Embed Size (px)
DESCRIPTION
Qashout Quick Start Guide
Citation preview

A NEW & EASY WAY TO ACCESS YOUR CASH!
QNET
QASHOUTQashout your Q Account commissions
to your own Bank Account
Quick Start Guide

2
QNET Qashout is an easy-to-use, secure and global ePayment system
exclusively for the global business needs of QNET IRs.
It’s a new and easy way to access your cash… anywhere in the world!
WHAT?
With QNET Qashout, you have your very own global pay portal that works
seamlessly with your Q Account to manage and access your commissions and
cash.
HOW?
You can quickly and easily transfer your Q Account commission payments
straight into your Bank Account via Qashout!
WANT TO KNOW MORE..?
Introducing… QNET QASHOUT

3
1. Create your QNET Qashout Account
2. Activate your QNET Qashout Account
3. Direct Load funds from your Q Account to Qashout
4. View your QNET Qashout Transactions
5. Login to your Qashout Account
6. Cashout to your Bank Account via Bank Deposit
7. Cashout to your Bank Account via Wire Deposit
8. Setting up more than one Bank Account
9. How to update Financial Institution
10. Forgot Password
11. How to change Password
12. Get the most out of QNET Qashout
Quick Start Guide

1
4
1. Go to www.qnet.netand click IR Login
2. Enter IR ID No. and
Password
3. Click Login button
Create your Account

4. In your Virtual Office, click Go to Q Account
5
1 Create your Account

5. If prompted of this page, Tick the box to agree on the terms and conditions
6. Click on Confirm button
6
1 Create your Account

7
7. In the top menu, click on My Qashout
8. Click on Create Account in the drop-down submenu
1 Create your Account

7. Verify your registration details –these are your
default IR registration details from the QNET database
8. Click on Registerbutton
9. If all the information is correct, click on OK button in the pop up message
8
1 Create your Account

CONGRATULATIONS! You have now
successfully created your QNET Qashout account!
You will now be directed to the Qashout pay portal to Activate your account
If Qashout pay portal does not show up, Click on the Link inside the Q Account site to Activate your Account
9
1 Create your Account

1. You are now in the Qashout pay portal
2. Provide your Date of Birth
3. Click on Continuebutton
NOTE: The 2-step verification:
Step 1: Provide your IR ID
number; and
Step 2: Provide your date of
birth
occurs when you activate your
account by by accessing the
Qashout site
STEP 1
10
2 Activate your Account

1. Create a unique Passwordjust for your Qashoutaccount
2. Fill in other required information
3. For your utmost security, your Security Questions and Answers here are unique to your Qashout account – they
are not connected to your pre-existing Q Account Security Questions and Answers. Note: You cannot have the same wording for Security Question and Answer.
4. Tick on checkboxes to accept the Terms of Use and
3rd Party Policy
5. Click on Submit button11
STEP 2
2 Activate your Account

CONGRATULATIONS! You have successfully activated your QNET Qashout account!
Now it’s time to load your account with funds from your Q Account.
12
2 Activate your Account

1. Return to yourQ Account
2. Click on the link to perform Direct Load
NOTE: For future Direct Load Transaction, login in to your Q Account. Click on My Qashout menu then select Direct Load
13
3 Direct Load from Q Account to Qashout Account

14
3. Enter the
Amount to Transfer
4. Click on Proceed button
(Note: a flat fee of USD 10 will be deducted from your Q Account per Direct Load transaction)
3 Direct Load from Q Account to Qashout Account

5. Direct Load Confirm page will be displayed
6. Check your information is correct
7. Click on Proceed button to confirm and complete the Direct Load process
3 Direct Load from Q Account to Qashout Account

8. You will be taken to the Qashout Authenticationpage
9. Type in your correct PIN
Code
10. If prompted for the ff:
Type in the answer to your Security Questionand Security Word
OR
Type in your Token Code
11. Click on Proceed button
NOTE: You will be given three (3)
chances to enter the
correct details, otherwise,
the system will log you out
and your Q Account might
be blocked. Contact GSC
for help.16
3 Direct Load from Q Account to Qashout Account

17
12. After Authentication, you will be shown your Direct Load
Transaction Details
It’s that easy! You have
securely loaded funds from your Q Account to your QNET Qashout account!
Every Tuesday andFriday, any Direct Loads
you have completed will be automatically transferred to your QNET Qashout account!
(Note: There is a weekly
Direct Load limit of USD 5,000)
3 Direct Load from Q Account to Qashout Account

18
1. In your Q Account, go to My Qashout
2. Click on Qashout
Summary
3. Your Direct Load transaction details will be displayed
4. You also have the option to Export to Excel (to view your transactions the details in spreadsheet format) or to Print your transactions.
4 Viewing your Transactions
Qashout Summary

19
1. In your Q Account, go to My Account
Summary
4 Viewing your Transactions
My Account Summary

20
2. Your Commission and Settlement Details are displayed
3. You also have the option to Print your transactions.
4 Viewing your Transactions
My Account Summary

21
1. In your Q Account, go to My Qashout
2. Click on Login to
Qashout Site
3. Enter your IR ID No.and Qashout password
4. Click on the Login button
5 Login to your Qashout Account

22
6 Cashout to your Bank Account via Bank Deposit
1. Under Wallet Tools, click Cashout
2. Select whether you would like to make a one-time Cashout or set up an Automated
Cashout
3. Click Continue

23
6 Cashout to your Bank Account via Bank Deposit
4. If it is the first time you
are transferring to your Bank Account via Qashout, enter the required bank account information

24
6
1. Please carefully verify that your banking information is correct
2. Any incorrect information may cause significant delays to your transfer
ONE-TIME
CASHOUT
Cashout to your Bank Account via Bank Deposit

25
6
1. The easiest way to manage your payments is to set up an Automated Cashout
2. Under Wallet Tools, click Cashout
3. Select Add Auto Cashouts under Option 2
AUTOMATED
CASHOUT
Cashout to your Bank Account via Bank Deposit

26
6
4. Automated Cashout lets you schedule transfers of a
percentage of your incoming funds to up to three saved destinations… automatically
5. You can also choose between a daily or a monthly frequency for your Automated Cashouts
AUTOMATED
CASHOUT
Cashout to your Bank Account via Bank Deposit

27
Cashout to your Bank Account via Wire Transfer
1. Under Wallet Tools, click on Cashout
7

28
2. In Option 1: One Time Cashout, toggle
Add new Cashoutaccount
3. Click Continue
7 Cashout to your Bank Account via Wire Transfer

29
4. Select Wire Transfer
5. Click Continue
7 Cashout to your Bank Account via Wire Transfer
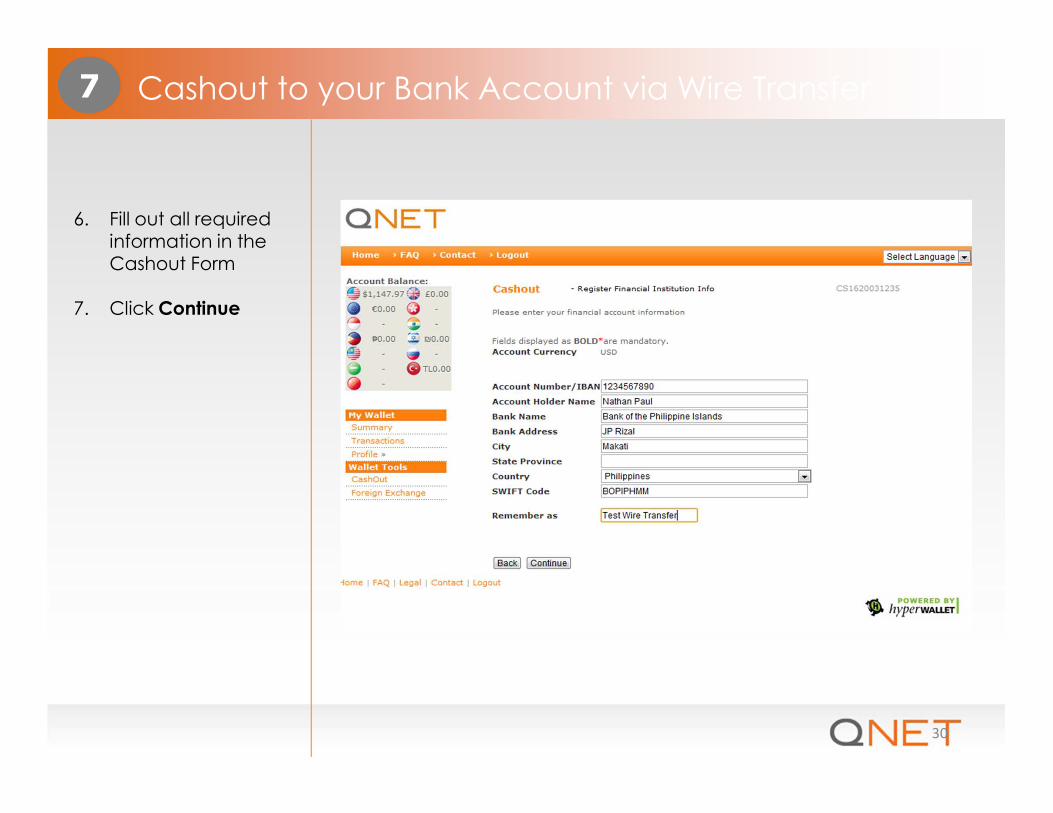
30
6. Fill out all required information in the Cashout Form
7. Click Continue
7 Cashout to your Bank Account via Wire Transfer

31
8. Select your Financial Institution from the dropdown box
9. Click Confirm
10. Check the details in Financial Institution Confirmation page
11. If all the details are correct, click
Confirm
7 Cashout to your Bank Account via Wire Transfer

32
12. Enter the amount to transfer
13. You may opt to add personal notes for this transaction
14. Click Continue
15. Check the transaction details
16. Click Confirm
7 Cashout to your Bank Account via Wire Transfer

33
Congratulations!You have now
successfully transferred money to your Financial Institution via Wire Transfer
7 Cashout to your Bank Account via Wire Transfer

34
Setting up more than one Bank Account
1. Under Wallet Tools, click Cashout
8

35
2. Under My Saved Cashout Account, click
Add new Cashout Account
Setting up more than one Bank Account8

36
3. Select your Financial
Institution
4. Click on Register New button
Setting up more than one Bank Account8

37
5. Fill-out required
information
6. Click on Confirmbutton
7. On the next page, check the Bank Account Profile.
8. Click on Confirmbutton
Setting up more than one Bank Account8

38
Newly registered Account is displayed under My Saved Cashout Accounts
To Add another Financial Institution:
8. Under My Wallet, click on Profile
Setting up more than one Bank Account8

39
9. Under Other Information, click on Update Financial Institution Information
Setting up more than one Bank Account8

40
You have an option to either Edit/Removeyour saved account or Add New Financial Institution.
To Add another Financial Institution, repeat steps # 3 to 7
Setting up more than one Bank Account8

41
How to update Financial Institution
1. Under My Wallet, click on Profile
2. Click on Updatebeside Financial
Institution Information
9

42
3. Select Edit beside a previously saved financial institution
4. Update the information
5. Click Confirm
How to update Financial Institution9

43
6. Check the updated information and click on Confirm button
Congratulations! You have now updated the information of your Financial Institution!
How to update Financial Institution9

44
Forgot Password
1. In Account Login page, click on Forgot Password? Link
NOTE:A notification will be sent to your email address
10

45
2. Click on the link in the email notification to proceed with two security questions
Forgot Password10

46
3. Enter Answer to Security Question #1
4. Click on “Continue” button
5. Enter Answer to Security Question #2
6. Click on “Continue” button
Forgot Password10

47
7. Enter your new
password
8. Re-enter new password
9. Click Continue button
NOTE: You will be directed to QNET Account Login
Forgot Password10

48
How to change your Password
1. Login to your online account
2. Under My Wallet, click on Profile
NOTE: You will be directed to QNET Account Login
11

49
3. Click Update Password
4. Enter your existing
password
5. Enter your new
password
6. Re-enter your new password in the Confirm field
7. Click on Confirm button
NOTE: Password must be 6-15 characters and is case sensitive. You may use any letter, number or symbol.
How to change your Password11

50
Congratulations!You have now successfully updated your password.
How to change your Password11

51
12 Get the most out of QNET Qashout
� A secure & convenient way to receive commission payments – electronically!
� Q Account to Qashout with a click!
� Manage your cash effortlessly with Auto Cashouts!
� Global access to your cash!
� Faster access to your earnings!
� Transfer earnings to any Bank Account in your country*!
� Instant electronic notifications of commission payments*!
� Review payment history & download into Microsoft Excel for customised management!
*If applicable, options may vary depends on countries.