Embed Size (px)
Citation preview
O f f i c e 2 0 1 0 Keyboard Shortcuts
GENERAL SHORTCUTS Lock Keyboard [W]+L Start Menu [W] My Computer [W]+E New Folder Ctrl+Shift+N Zoom In/Out [W]+(+/-) Projector Connect [W]+P Flip thru Windows [W]+Tab
MANAGING FILES/WINDOWS New Document Ctrl+N Close Document Ctrl+W Save As F12 Save a File Ctrl+S/Alt+1 Close Software Alt+F4 Spellcheck F7 Beginning of File Ctrl+Home End of File Ctrl+End Print File Ctrl+P MANAGING TEXT WITHIN A FILE Copy Selection Ctrl+C Paste Selection Ctrl+V Cut Selection Ctrl+X Undo Selection Ctrl+Z Repeat Action Ctrl+Y Bold Text Ctrl+B Italicize Text Ctrl+I Underline Text Ctrl+U Find Text Ctrl+F Find and Replace Ctrl+H Add Hyperlink Ctrl+K
ULTIMATE RIBBON SHORTCUT Access the tabs and the
commands within each Ribbon using the ALT key.
Press ALT to display the shortcut to activate a tab as well as the Quick Access Toolbar.
Press ALT again to display the shortcut for each command within the tab.
MICROSOFT® Office 2010® Q U I C K S T A R T R E F E R E N C E C A R D
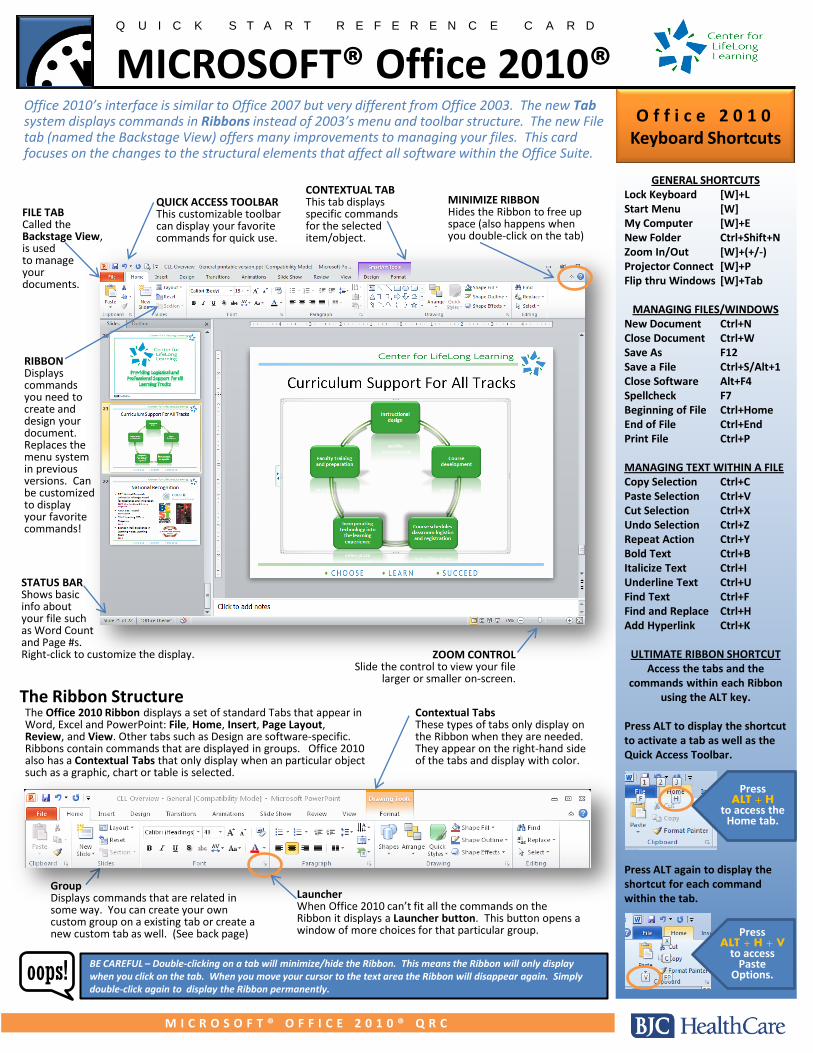
Office 2010’s interface is similar to Office 2007 but very different from Office 2003. The new Tab system displays commands in Ribbons instead of 2003’s menu and toolbar structure. The new File tab (named the Backstage View) offers many improvements to managing your files. This card focuses on the changes to the structural elements that affect all software within the Office Suite.
The Ribbon Structure
FILE TAB Called the Backstage View, is used to manage your documents.
QUICK ACCESS TOOLBAR This customizable toolbar can display your favorite commands for quick use.
CONTEXTUAL TAB This tab displays specific commands for the selected item/object.
MINIMIZE RIBBON Hides the Ribbon to free up space (also happens when you double-click on the tab)
RIBBON Displays commands you need to create and design your document. Replaces the menu system in previous versions. Can be customized to display your favorite commands!
STATUS BAR Shows basic info about your file such as Word Count and Page #s. Right-click to customize the display.
The Office 2010 Ribbon displays a set of standard Tabs that appear in Word, Excel and PowerPoint: File, Home, Insert, Page Layout, Review, and View. Other tabs such as Design are software-specific. Ribbons contain commands that are displayed in groups. Office 2010 also has a Contextual Tabs that only display when an particular object such as a graphic, chart or table is selected.
Group Displays commands that are related in some way. You can create your own custom group on a existing tab or create a new custom tab as well. (See back page)
Launcher When Office 2010 can’t fit all the commands on the Ribbon it displays a Launcher button. This button opens a window of more choices for that particular group.
ZOOM CONTROL Slide the control to view your file
larger or smaller on-screen.
BE CAREFUL – Double-clicking on a tab will minimize/hide the Ribbon. This means the Ribbon will only display when you click on the tab. When you move your cursor to the text area the Ribbon will disappear again. Simply double-click again to display the Ribbon permanently.
Contextual Tabs These types of tabs only display on the Ribbon when they are needed. They appear on the right-hand side of the tabs and display with color.
Press ALT + H
to access the Home tab.
Press ALT + H + V
to access Paste
Options. oops!
M I C R O S O F T ® O F F I C E 2 0 1 0 ® Q R C

What is the BACKSTAGE VIEW? The Backstage View is “everything that you do TO a file
that you don’t do IN a file.” This new feature offers a
variety of tools to manage the current file.
Software Controls Options: If you want to make specific changes to how your Office 2010 software behaves click the Options command. This command houses hundreds of choices organized by category. You can adjust how the software saves, proofs, and displays your files. Exit: This command closes the software program, not just Backstage View. You can also exit the program by double clicking on the 2010 icon in the top left hand corner of the window.
Backstage View Components The File tab or “Backstage View” replaces the Office button in Office 2007. It contains familiar tasks such as Open, Close, and Save, as well as document specific information. These items are displayed as TABS. When a tab is selected, the right side of the Backstage View displays the details of the tab.
Backstage Commands Offers four file management commands: Save, Save As, Open, and Close. These display at the top of the pane.
Backstage Tab Items When one of the six tabs is selected, the right side displays the tab details.
Opening/Closing the Backstage View The Backstage View can be accessed at any time. Use a single mouse click on the tab or use keyboard shortcuts to view it. The Backstage View always displays in full screen view. Therefore, you will need to close the view in order to view your file again.
Ways to Control the File Tab: 1. ALT + F or SINGLE click on the File tab to Open. 2. Press ESC or click on another tab to Close.
BACKSTAGE VIEW: Info tab This tab not only stores file property info but offers ways to protect the document, retrieve unsaved file versions, and check for file problems.
1. Within the File tab, click Info. 2. Under Properties,
click Add a Tag. 3. Type one or more keywords,
but make sure each is separated with a semicolon.
M I C R O S O F T ® O F F I C E 2 0 1 0 ® Q R C
Restoring an Unsaved Version: Great News! You can now recover versions of files that you closed without saving. Office 2010 stores unsaved versions in a system folder and retrieves it when you click on the Restore command. 1. Within the File tab, click Info. 2. Select a version listed
or click on Manage Versions to access a temp file.
3. Click Restore.
BE CAREFUL WHERE YOU DOUBLE-CLICK! Double-click on the File tab will not close the Backstage view. But double–clicking on another tab will minimize the Ribbon.
Adding a File Tag (keyword): You can add keywords called TAGS to search for related Office files. Use same tag name for related files and then use the Windows 7 search feature to find them easily.
Password Protecting a File: You can password protect your file so that only specific users can open and change the file.
1. Within the File tab, click Info. 2. Select Protect Document. 3. Select Encrypt with Password. 4. Type the new password and
click OK. Make sure you remember the password!
Marking a File as Final: You can mark your file as a final version to discourage editing. This is called Mark as Final. 1. Within the File tab, click Info. 2. Select Protect Document. 3. Select Mark As Final. 4. Click OK.
Note: File is READ-ONLY.
Inspecting and Deleting Unneeded Markups: The Inspect Document feature removes unneeded info such as hidden info, markups left from tracking changes, or personal info. Choose what type of info you what to inspect. When that info is found, you’ll have the option to delete it. 1. Within the File tab, click Info. 2. Click Check for Issues drop down list and
select Inspect Document. 3. Select Comments…
and click Inspect. 4. If comments are found
select Remove All. 5. Click Close.
Control how many Recent Files are displayed on the Recent tab. You will find this option within the File tab’s Options command, under the Advanced category.
NOTE!
oops!
Click once to open/close
BACKSTAGE VIEW: Recent tab Office 2010 expanded the Recent file list to hold up to 50 files and also display a list of recent places (folders).
Pinning a File or Folder: If you want to permanently keep a file or folder on the recent list simply click the Push Pin icon next to the file or folder you want to pin. Pinned items display at the top of the list. 1. Within the File tab,
click Recent. 2. Click the grey Push Pin
to the right of the file or folder name.
Adding a Recent File List to the Backstage View: Turn this feature on to see a list of Recent files displayed on the Backstage View main pane on the left. Choose how many files you want to view. This saves time accessing your most popular files. 1. Within the File tab, click Recent. 2. At the bottom of the display, select
Quickly Access this Number of Recent Presentations.
3. Adjust the number of files you want displayed.
BACKSTAGE VIEW: New tab The New tab in Office 2010’s Backstage View offers more templates choices. There are two kinds of templates; custom templates saved to your PC or downloadable templates from Office.com.
Add the NEW command to the Quick Access toolbar to open a blank document quickly.
NOTE!
Open a Blank File: 1. Within the File tab, click New. 2. Select Blank (Presentation, Document or Spreadsheet). 3. Click Create.
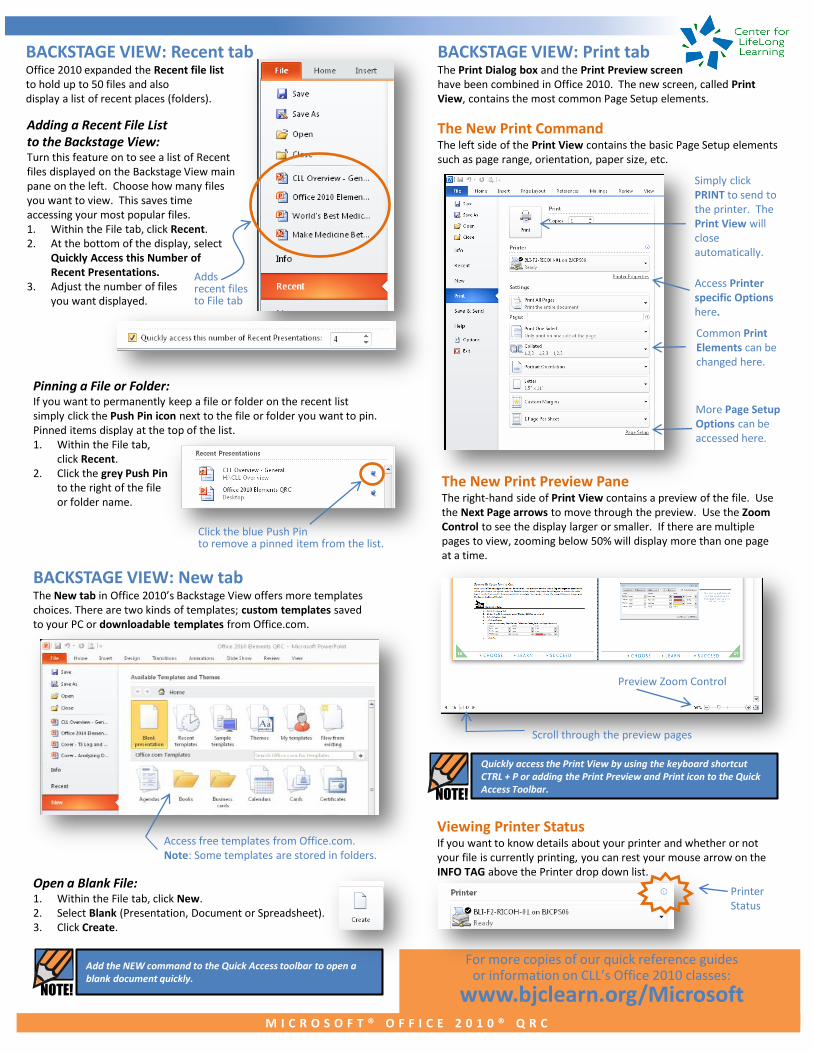
BACKSTAGE VIEW: Print tab The Print Dialog box and the Print Preview screen have been combined in Office 2010. The new screen, called Print View, contains the most common Page Setup elements.
The New Print Command The left side of the Print View contains the basic Page Setup elements such as page range, orientation, paper size, etc.
Access Printer specific Options here.
Common Print Elements can be changed here.
Simply click PRINT to send to the printer. The Print View will close automatically.
The New Print Preview Pane The right-hand side of Print View contains a preview of the file. Use the Next Page arrows to move through the preview. Use the Zoom Control to see the display larger or smaller. If there are multiple pages to view, zooming below 50% will display more than one page at a time.
More Page Setup Options can be accessed here.
Quickly access the Print View by using the keyboard shortcut CTRL + P or adding the Print Preview and Print icon to the Quick Access Toolbar.
NOTE!
Viewing Printer Status If you want to know details about your printer and whether or not your file is currently printing, you can rest your mouse arrow on the INFO TAG above the Printer drop down list.
Scroll through the preview pages
Preview Zoom Control
Printer Status
M I C R O S O F T ® O F F I C E 2 0 1 0 ® Q R C
For more copies of our quick reference guides or information on CLL’s Office 2010 classes:
www.bjclearn.org/Microsoft
Click the blue Push Pin to remove a pinned item from the list.
Access free templates from Office.com. Note: Some templates are stored in folders.
Adds recent files to File tab

Did you KNOW? Double-clicking the Office 2010 software icon located in the top left hand side of the window closes the software.
Customizing the Quick Access Toolbar At the top left corner of the Office 2010 window is a toolbar of commands that you use the most. This is called the Quick Access Toolbar. By default the toolbar only displays three icons but can be customized by adding any command.
You can also right-click on the selected word to display the Mini Toolbar.
NOTE!
BACKSTAGE VIEW: Save and Send tab The Save and Send tab offers more options for saving and sharing your file with others. Use this tab to save your file as a different type (PDF) or send your document via e-mail as a file attachment, a PDF, or a fax.
Sending a File via GroupWise: 1. Open the file in any Office 2010 software. 2. Select the File tab and click Save & Send. 3. Choose Send as an Attachment or as a PDF. 4. Finish the e-mail address, subject, and message and click Send.
Moving the Quick Access Toolbar: 1. Click the Quick Access Toolbar
drop-down arrow. 2. Select Show Below the Ribbon.
The Status Bar The Status Bar can now be customized to show more information about your file and software. Each software displays a different set of options that can be displayed on the Status Bar.
Customizing the Status Bar: 1. Right-click the Status
Bar at the bottom of the window.
2. Select the items you want to display on the Status Bar.
The Mini Toolbar The Mini Toolbar contains shortcuts for formatting text. It appears when text is selected.
Adding the E-mail command to your Quick Access Toolbar will open GroupWise and automatically attach the file for you!
NOTE!
Customizing the Ribbon Office 2010 offers more ways to organize the Ribbon display. Now you can add or delete commands within an existing group. You can also create new tabs, fill the new ribbon with commands you use most, and organize them into custom groups.
Setting Up New Tab and New Groups: 1. Select the File tab and click Options. 2. Select Customize Ribbon. 3. Click New Tab. 4. Click Rename. 5. Type a New Tab name and click OK. 6. Select the existing New Group or click
the New Group command. 7. Type a New Group and click OK.
Remove any unneeded Tabs by deselecting it with the Option command’s Customize Ribbon window.
NOTE!
Adding Commands to a New Tab: 1. Select the File tab and click
Options. 2. Select Customize Ribbon. 3. Under Customize Ribbon Main
Tabs display, select the Tab and/or Group you need commands added.
4. Under the Choose Commands From drop-down list, select a category of commands (All Commands displays more options).
5. Select the command you want to add to your new tab/group.
6. Click Add. 7. Click OK when finished.
Choose to send as an attachment or a PDF
Saves a file as a PDF
M I C R O S O F T ® O F F I C E 2 0 1 0 ® Q R C
Customizing the Quick Access Toolbar: 1. Click the Quick Access Toolbar drop-down arrow. 2. Select a command from the list
or choose More Commands to open a window that displays all available commands or right-click a command button and choose Add to the Quick Access Toolbar from the shortcut menu.
Word Status Bar
Move mouse to right-side of selected text to view the Mini toolbar clearly
New command added
Default icons


