Embed Size (px)
DESCRIPTION
mạng
Citation preview

To contribute content or make changes to the PWM Administrator Guide, please request access to the development work-in-progress document.
PWM Administrator’s Guide Updated for v1.7.0
http://code.google.com/p/pwm/
Table of Contents PWM Administrator's Guide
Overview and RequirementsFeaturesRequirements
InstallationServer SetupMaking a new WAR fileUpgrading
General Directory SetupSecure LDAP ConnectionSchema changesUsers, groups and permissions
Novell eDirectory IntegrationeDirectory SchemaeDirectory RightseDirectory Interaction
OpenLDAP IntegrationAccess control rulesSchema extensions
OpenDS / OpenDJ IntegrationConfiguration changeSchema ExtensionsAccess Rights
389 and Red Hat Directory Server IntegrationEnable MemberOf OverlaySchema ChangesUsers and GroupsAccess ControlOther Integration Notes
Active Directory IntegrationMicrosoft ADAM / AD LDSWeb Integration and Page Flow
Access GatewaysRequest ParametersCommand Servlet
CommandsInternationalization
Display Page ConfigurationAlternative translations
ThemesWordlists
Global Password HistoryLodalDB Database
PWM Command Line ToolsPolicies
Password PolicyChallenge Policy
LoggingCaptchasSMS Notifications
ConfigurationExample configurations
ClickatellVOIPbusterCustom SOAP service
Appendix A: TroubleshootingAppendix B: Error CodesGuide A: Integrating PWM with Java Security Manager
IntroductionGeneric debugging techniques for TomcatPWM 1.4.2 on Debian LennyPWM 1.5.3 / SVN revision 160 on Debian Squeeze
Guide B: PWM behind an Apache reverse proxyIntroductionConfiguring PWM serverConfiguring the webserver
Guide C: Integrating PWM with CASIntroductionclearPassEdit your CAS pom.xml to include the clearPass dependency.Interrupting a CAS session
Guide D: Integrating PWM with Novell Access ManagerIntroductionLink RedirectionReverse Proxy SettingsLogin Page Customizations

Overview and RequirementsWelcome to PWM Administrator’s Guide. PWM provides a feature rich, easy to manage, password self service web application for ldap directories.
Always check the PWM website for the latest version. The PWM website also has useful FAQs, support lists, and other helpful information as well as the most current version of this document.
PWM Website: http://code.google.com/p/pwm
This document describes the overall installation and setup of PWM. The PWM ConfigManager interface has detailed information about each of the many PWM configuration options.
PWM is distributed under the terms of the GNU General Public License (GPL). The full license text is available in the file pwm-license.txt included with the distribution.
Features
● Web based configuration manager with over 250 configurable settings○ Configurable display values for every user-facing text string
● Polished, intuitive end-user interface with as-you-type password rule enforcement
● Forgotten Password○ Internationalized/Localized challenge questions○ Use responses stored in local server, standard RDBMS database,
LDAP server or NetIQ eDirectory NMAS repositories○ Use Forgotten Password, Email/SMS Token/PIN, User attribute
values, or any combination for password recovery● Stand-alone, easy to deploy, java web application● User-facing screens are localized for:
○ Chinese (中文)○ Czech (ceština)○ Dutch (Nederlands)○ English○ Finnish (suomi)○ French (français)○ German (Deutsch)○ Hebrew (עברית)

○ Italian (italiano)
○ Japanese (日本語)
○ Korean (한국어)○ Norwegian (norsk)○ Norwegian Nynorsk (Norwegian Nynorsk)○ Polish (polski)○ Portuguese (português)○ Slovak (Slovenčina)○ Spanish (español),○ Thai (ไทย)
○ Turkish (Türkçe)● Helpdesk module,
○ Reset password with random and/or supplied passwords○ Clear intruder lockout○ Clear user challenge responses
● New User Registration / Account Creation○ Require agreement with configurable text○ Optional email address validation○ Verify ldap server replica synchronization○ Create account only after email address validation○ Optional auto-generated account entry name.
● Guest User Registration / Updating● PeopleSearch (white pages)● Account Activation / First time password assignment
○ Optional email address / sms token validation○ Require agreement with configurable text
● Administration modules including intruder-lockout manager, and online log viewer, daily stats viewer and user information debugging
● Easy to customize JSP HTML pages○ Theme-able interface with several example CSS themes
● Support for large dictionary wordlists to enforce strong passwords● Self-Health engine for displaying PWM and ldap directory health
○ Periodic test account validation○ Operations room health display screen○ Realtime feedback during configuration
● Shared password history to prevent passwords from being reused organizationally
● Automatic LDAP server fail-over to multiple ldap servers● Support for password replication checking ● Based on LdapChai API● Captcha support using reCaptcha● Support for minimal, restricted and mobile browsers with no cookies,
javascript or css

● Specialized skins for iPhone/Mobile devices● Designed for integration with existing portals and web security gateways● Integration with CAS
Requirements
PWM will work on any platform that meets the following minimum requirements:
● Java J2SE v1.6 or greater.● Java Application Server - Java Servlet Container v2.5 (Apache Tomcat v6x
or greater).● 64 MB of Java heap memory. Heavily utilized sites may require larger heap
sizes.● 1 GB of disk space for the LocalDB for default configurations.
In most cases, the full Java JDK is required to both run and compile PWM. The JRE does not have the neccessary libraries to compile JSP pages. Consult your java application server for more information.
PWM does not require a web server. Some administrators may chose to integrate Apache Tomcat with Apache Web Server, Microsoft IIS or other web server, but that is beyond the scope of this document. PWM is very lightweight and there will not be much performance difference with or without a web server.
PWM works with reverse proxy servers, even those that perform URL rewriting.
PWM has been known to work on JBoss and WebSphere. For Java Application Servers other than Apache Tomcat, PWM generally works best using an exploded archive directory. Alternatively, you can modify the web.xml to use a configuration file anywhere on the file system, and the configuration can in turn use a LocalDB directory that is anywhere on the file system.
Some operating systems come equipped with a pre-installed version of Apache Tomcat and Java. Some administrators prefer to use the operating system instance of tomcat while others prefer a standalone tomcat instance for PWM. Keep in mind that the default tomcat settings found on Apache Tomcat downloaded directly from Apache's website are used to test and develop PWM. Conversely, some operating system delivered tomcat configurations can cause problems for PWM.
InstallationInstallation of PWM follows standard Java Servlet guidelines.
Most of the difficulty administrators have installing PWM is usually not with PWM itself, but with Java, Tomcat, or an optional web server.
Server Setup
On your platform of choice, ensure that Java v6.0 or better is installed. You can do this by typing "java -version" at the operating systems command prompt. If the response is something other than the java version, visit http://www.oracle.com/technetwork/java/index.html and download the latest Java v1.6.x or better J2SE JDK. PWM works well the very latest Java versions and is developed with both 1.6 and 1.7. Often times the very latest JDK will have important security fixes that are well worth keeping up to date on. Make sure you have the JDK installed, the JRE does not contain enough libraries for tomcat to run applications such as PWM.
The next step is to install Apache Tomcat. Apache Tomcat can be found at http://jakarta.apache.org. Instructions for installing Tomcat vary from platform to platform, follow the documentation on apache's site. In order to proceed you should be able to access tomcat's welcome page from a web browser.
Finally, find tomcat's /webapps directory, usually located directly under the main tomcat directory. Copy the included pwm.war file into the /webapps directory. Some versions of tomcat may require a restart before the PWM application will deploy. Newer versions of tomcat provide web-based managers that allow servlet deployment from a browser and without restarts.
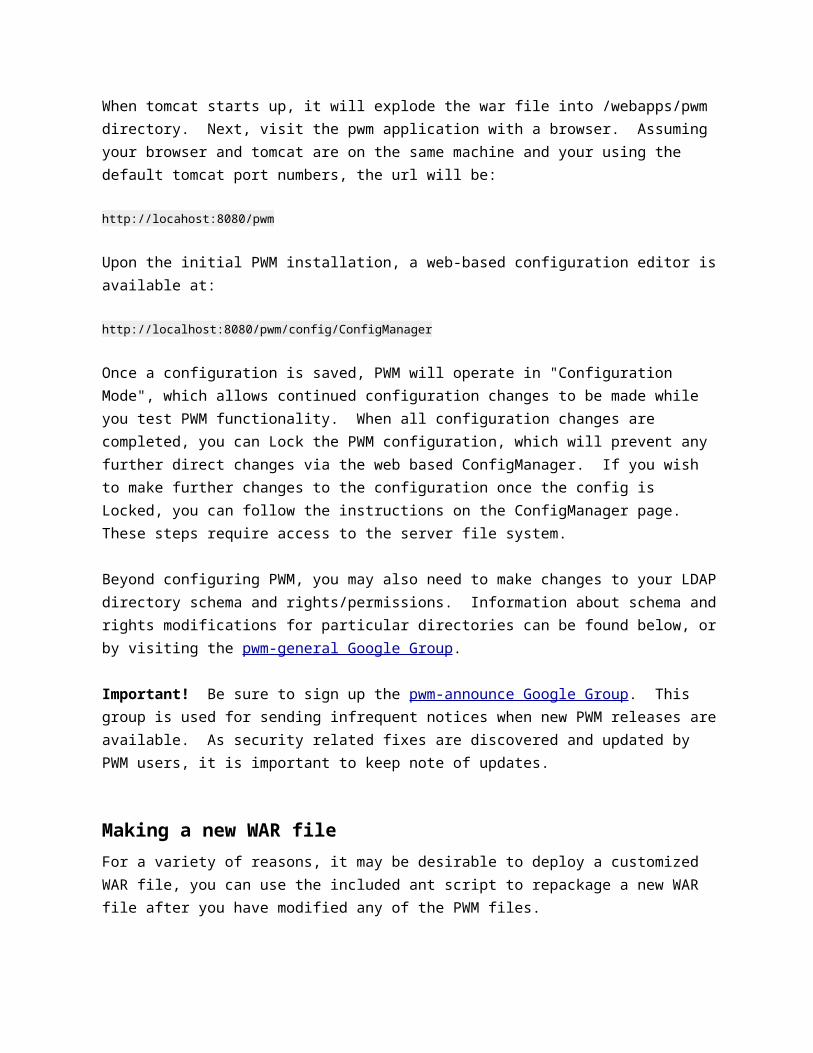
When tomcat starts up, it will explode the war file into /webapps/pwm directory. Next, visit the pwm application with a browser. Assuming your browser and tomcat are on the same machine and your using the default tomcat port numbers, the url will be:
http://locahost:8080/pwm
Upon the initial PWM installation, a web-based configuration editor is available at:
http://localhost:8080/pwm/config/ConfigManager
Once a configuration is saved, PWM will operate in "Configuration Mode", which allows continued configuration changes to be made while you test PWM functionality. When all configuration changes are completed, you can Lock the
PWM configuration, which will prevent any further direct changes via the web based ConfigManager. If you wish to make further changes to the configuration once the config is Locked, you can follow the instructions on the ConfigManager page. These steps require access to the server file system.
Beyond configuring PWM, you may also need to make changes to your LDAP directory schema and rights/permissions. Information about schema and rights modifications for particular directories can be found below, or by visiting the pwm-general Google Group.
Important! Be sure to sign up the pwm-announce Google Group. This group is used for sending infrequent notices when new PWM releases are available. As security related fixes are discovered and updated by PWM users, it is important to keep note of updates.
Making a new WAR file
For a variety of reasons, it may be desirable to deploy a customized WAR file, you can use the included ant script to repackage a new WAR file after you have modified any of the PWM files.
Even if you can modify the servlet files after they are deployed, it's still a good idea to modify the original source and build your own pwm.war. That way, it will be available as a backup.
With this process, you can have a pwm.war file that is completely customized for your environment. You do not need ant on your server, you can follow these steps on your workstation, and then deploy the resulting war file on your server. It is even okay if your workstation and server are different operating systems.
To build a new pwm.war file, follow the following steps:
1. Make sure you have Java v1.5 SDK or better installed.2. Set an environment variable for JDK_HOME to the JDK install directory.3. Download and install Apache Ant4. Make sure ant is in your path. Running "ant -version" should produce
results.5. Download PWM and unzip the pwm.zip directory6. Make any changes to PWM desired (jsp edits, configuration changes, etc)7. At the root of the pwm directory (where the build.xml file is located), run
the following commands:ant cleanant makeWAR
8. Deploy the resulting pwm.war file. On tomcat this means deleting the
webapps/pwm directory (if any) placing pwm.war file in the webaps directory, and restarting tomcat. (Newer versions of tomcat allow deploying war files through a web interface without restarting tomcat.
UpgradingTo upgrade PWM on Apache Tomcat, the following steps need to be performed:
1. Stop the PWM application or entire application server;2. Make a backup of the file WEB-INF/PwmConfiguration.xml.
3. Make a backup of the folder WEB-INF/localDB. (in older versions this may be named WEB-INF/pwmDB)
4. Undeploy the old war file by removing both the war file and the extracted directory.5. Deploy the new war file.6. Clean the work and temp directories of the Tomcat application server.
7. If the application server is stopped, start it to make sure it will expand the war file; if Tomcat is running it will automatically do so.
8. Restore WEB-INF/localDB
9. Restore WEB-INF/PwmConfiguration.xml.
Remark: it is possible to place the LocalDB directory outside of the web application. In that case restoration of the LocalDB can be skipped. A backup should nevertheless be made, in case a roll-Locback to the previous version is required, or something goes wrong.
General Directory SetupPWM generally requires some changes to your directory server in order to function correctly. First of all, a number of attributes are used for storing PWM’s information like password history, questions and answers needed for password reset, last password change date and optionally some information like (external) email addresses or mobile phone numbers for SMS notifications. This requires changes to the schema.Furthermore, a number of users and groups must be selected or setup to perform specific operations. Last but not least, the users need to get credentials and permissions in order to perform their tasks.
Secure LDAP ConnectionSome directories only allow encrypted operations or require encryption for certain operations, like changing passwords. In these cases you need to connect PWM to the SSL port. This usually is 636 or alternatively 1636. PWM allows you to use a promiscuous connection, which means it will accept any server certificate, whether it is valid or not. That is useful in development and testing environments, but often unwanted in production environments. In a production environment, you would want PWM, or in fact java, to trust the LDAP server’s certificate. There are three scenario’s:
● You use a certificate issued by a generally recognized commercial certificate authority. The certificate of this authority should already be in

the certificate database. If the server name in the LDAP URL is identical to the common name of the certificate, you’re done.
● You use a certificate issued by a private certificate authority, like from NetIQ iManager, Microsoft Active Directory or created using a tool like TinyCA. In this case the certificate(s) of that certificate authority need(s) to be imported into the java certificate database. See instructions below.
● You use a self signed certificate. In this case, the self signed certificate needs to be imported into the java certificate database. See instructions below.
In all cases you need to make sure that:● The certificate and the issuer certificates are still valid and have not
expired.● The name in the LDAP URL is identical to the name or any of the alternate
names of the certificate. For example connecting to ldaps://127.0.0.1:636 will probably fail, while connecting to ldaps://ldap.example.com:636 will succeed if the certificate name is ldap.example.com.
To import the CA certificate or self signed certificate into the certificate database, make sure you have it available in PEM format, also known as base64. Such a file looks like:
-----BEGIN CERTIFICATE-----MIICATCCAWoCCQDZ4jvO0d1ljzANBgkqhkiG9w0BAQUFADBFMQswCQYDVQQGEwJBVTETMBEGA1UECAwKU29tZS1TdGF0ZTEhMB8GA1UECgwYSW50ZXJuZXQgV2lkZ2l0cyBQdHkgTHRkMB4XDTExMTIxMzIwMjE1N1oXDTExMTIyMzIwMjE1N1owRTELMAkGA1UEBhMCQVUxEzARBgNVBAgMClNvbWUtU3RhdGUxITAfBgNVBAoMGEludGVybmV0IFdpZGdpdHMgUHR5IEx0ZDCBnzANBgkqhkiG9w0BAQEFAAOBjQAwgYkCgYEA0OfLxaoClmMttdEaa2Ig4htWL1AdCgOy8unDDc0qZvwlK3izXefc63jkbuJCyTU+CDHVH9he2x2UV1NXUArlfWBDvUanGMu12LH05S+HsFerKwpvqnVfKfGdzrfxUpd1lhTUcARtzJk5D3USXgqXZ7kwxyx6rr1KLmTG+96V9UECAwEAATANBgkqhkiG9w0BAQUFAAOBgQBQGUzS1knVn/snjq75enUo95e47UJVQkJjQbSrAz7ZqUA5uvooLkAYh7gGmqY9ECpXr8WM065+wFpyo97TEGr3W0uMCAaUQ9CloyKlOzrpBbdhqeuoh/Idq9EHUt7YDo9Oo+tLkebq9XuIsYJWiCSbHkPYpN5vBvVsLUUa50YsLA==-----END CERTIFICATE-----
Now locate the certificate database. It is located in $JAVA_HOME/lib/security/cacerts, where $JAVA_HOME is the directory where java is installed. Now use keytool to import the file:keytool -import -keystore $JAVA_HOME/lib/security/cacerts -file example.pem -alias ldap.example.comThe keytool will ask for a password, which is changeit by default.After importing the certificate, restart you application server.
Schema changesIn order to function correctly, PWM needs a number of attributes for application specific data storage. In theory, one could use existing, unused attributes of the right type, but to keep the directory clean and well organized, it is recommended to add new attributes to the directory schema.The table below shows the required attributes with the suggested (default) names and o bject identifiers.

Name OID Type Single
pwmEventLog 1.3.6.1.4.1.35015.1.2.1 OctetString N
pwmResponseSet 1.3.6.1.4.1.35015.1.2.2 OctetString N
pwmLastPwdUpdate 1.3.6.1.4.1.35015.1.2.3 Time Y
pwmGUID 1.3.6.1.4.1.35015.1.2.4 DirectoryString Y
Next, an auxiliary object class needs to be defined that allows the attributes.
Name OID Type
pwmUser 1.3.6.1.4.1.35015.1.1.1 Auxiliary
Of course, you are free to select different or existing attributes and object classes, but you need to update the PWM configuration.
Users, groups and permissionsPWM needs, apart from the “normal” users, a set of “special” users and groups to perform certain actions. The table below gives an overview of the types of users and/or groups that must an may be set up. Some user/group types are optional and only necessary if a certain module is enabled.
Function Description User / Group
Module
PWM Proxy User The proxy user performs most actions, especially when no user is authenticated within the session.
Actions that the proxy user performs are:
● Looking up users● Testing LDAP connections● Validation of attributes and
security questions during Password reset
● Reading user data● (Re)setting passwords● Creating new accounts (if
New User module is enabled)
The proxy user therefor needs access to the users in the user subtree and
U ALL

be able to read and write:
● objectClass● userPassword or equivalent
password attributes● pwmEventLog,
pwmLastPwdUpdate, pwmGUID (or other configured attributes)
Additionally, the proxy user needs to have read access to most other attributes of normal users.
PWM Administrators PWM administrators can be a single user or a group of users. An administrator needs read access to the user tree of the directory, but actually does nothing to modify them. A PWM administrator can access administrative functions withing PWM, but is not a directory administrator.
U/G ALL
Test User Periodically, PWM tries to connect to the directory server en perform standard actions. In order to do this, PWM uses a test user account. PWM tries to set the password, perform login, etc.The test user is a normal user account, that must be allowed to modify it’s own password and some attributes.
U ALL
Guest Administrators If the Guest Registration module is selected, a user or group must be allowed to perform these action. The user(s) must be granted directory permissions to:
● create users in a selected guest subtree
● read/set attributes and passwords for the guest accounts
U/G Guest Registration
Helpdesk Employees If the Helpdesk module is enabled, a special user or group is allowed to access this module. Helpdesk employees are allowed and should be
U/G Helpdesk

given directory permissions to view user account data, password modification and login data (not the password itself!), like last login, last password change, account status, etc., and to set a new password if necessary.
Depending on you organization and separation of duties, it is possible to create new users or groups for the guest administrator or helpdesk functions or share the permissions with the PWM administrators.
Normal users must be allowed to self-modify their own password, pwmResponseSet and other attributes that are configured for the module Update Profile, if enabled.
NetIQ (Novell) eDirectory Integration
PWM has robust support for Novell eDirectory. The following features are supported:
● Read Universal Password policies and traditional password settings● Correctly handle intruder lockout scenarios● Read Universal Password challenge set policies, including localized policies.● Write forgotten password responses to NMAS for compatibility with Novell
forgotten password clients● Read forgotten password responses from NMAS for use by forgotten
passwords
eDirectory Schema
PWM uses eDirectory attributes to store data about users, including last password change time, last time PWM sent email notices about password expiration, and secret question/answer.
PWM includes a "edirectory-schema.ldif" file in the schema directory that has the standard PWM schema extensions. The schema included uses an auxiliary class that is added to users as they use PWM, so the auxiliary class and attributes are removable from eDirectory in the future.
Using the ICE command line the schema file can be imported with a command

something like this:
ice -SLDIF -f edirectory-schema.ldif -DLDAP -s 192.168.1.1 -d cn=admin,o=o -w password
The ldif file can be imported using the ConsoleOne wizard, iManager, the ICE command line, and standard "ldapmodify" tools.
If you do not wish to use the standard PWM schema, all the attributes used by PWM can be changed in the PWM configuration to attributes that are already available in the directory.
eDirectory Rights
PWM requires permission to perform operations in eDirectory.PWM uses two different eDirectory logins, one is a generic proxy user that is used for certain operations, preAuthenticaton operations.Once the user is authenticated most operations will be performed with the user's connection and permissions.
The ldif file eDirectoryRights.ldif is included that offers a sample basic configuration of a proxy user and also sets ACL for users that are required by PWM.
For a default configuration, the following rights are required for the proxy user to the user container(s):
● Browse rights to [Entry Rights]● Read and Compare rights to pwmResponseSet and CN (or otherwise
configured naming attribute)● Read and Compare and Write rights to objectClass, passwordManagement,
pwmEventLog and pwmLastPwdUpdate● Read and Compare rights to any attribute used by ActivateUser servlet
For a default configuration, the following rights are required for each user to their own user entry:
● Browse rights to [Entry Rights]● Read and Compare and Write rights to pwmResponseSet● Read and Compare and Write rights to any attributes used in the
UpdateAttributes servlet
To assign rights to each user, it is best to use the [this] security entry. Assigning rights to a parent level container to modify pwmResponseSet will allow any user

in the container to modify the value of this attribute for any other user in the container, and thus allow a password reset by any user. See the eDirectoryRights.ldif file for an example of the [this] security entry.
Optionally, PWM should also have rights to read the password. This is configured as part of the eDirectory password policies. Normally, when a user uses PWM's Forgotten Password recovery feature, pwm will set the user's password to a randomly generated value during the recovery process. It does this so that when the user actually does type set a new password, the PWM can authenticate as the user using the random password, and then change the password using the user's credentials.
This process allows the directory to apply normal change password effects such as correctly setting the password expiration. However, if PWM is able to read the password of the user, it will not set an intermediate temporary password on the user.
PWM provides extensive logging to help troubleshoot installation and configuration issues. For best results during installation, set the log levels to "trace" in the log4jconfig.xml file, and monitor the output.
eDirectory Interaction
With the default configuration, PWM performs all operations against eDirectory using generic LDAP calls unless NMAS support is enabled.
Enabling NMAS allows for better error reporting and integration with eDirectory.
Many operations are preformed using the proxy user specified in the PWM Configuration. However, if the Always Use Proxy is set to true, then PWM will not bind as the user. Authentications will be handled using ldap compare.
If the option to store NMAS responses is enabled, then whenever a user saves their responses using PWM, they will also be stored in NMAS. This allows for Novell forgotten password clients to use the same responses. However, PWM itself can not directly use these responses for forgotten password.
OpenLDAP Integration
There are a few modifications that may be needed to the OpenLDAP configuration file, /etc/ldap/slapd.conf. Note that these modifications here are suggested as a template and may need to be customized to your own requirements.

For example, if pwm is configured to enable New User Registration and use the cn attribute to test for object name uniqueness, then the following configuration edit would allow PWM to perform the ldap equality check from PWM.
# Index cn to allow equality checks from the pwm webapp. This is# used by the new user registration module to check whether a given# username (cn) already exists in the LDAP directory.index cn eq
Access control rules
Configuring access control rules properly for pwm can be challenging. The following ruleset can be used as a reference. It has been tested to verify that users (or the PWM Admin) does not have any more privileges to the directory than absolutely required, but this configuration should be examined closely to ensure it does not allow any excess privileges in your environment.
# The userPassword by default can be changed# by the entry owning it if they are authenticated.# Others should not be able to see it, except the# admin entry below## NOTE: this is mostly standard OpenLDAP configuration.# The pwmadmin line can probably be omitted.access to attrs=userPassword,shadowLastChange by dn="cn=admin,dc=domain,dc=com" write by dn="cn=pwmadmin,dc=domain,dc=com" write by anonymous auth by self write by * none
# Grant access to subtree "ou=Accounts, dc=domain, dc=com"# which contains the accounts created by pwm. Change# this path to match your LDAP directory.## Note that here we have two "classes" of pwm users. The# dn="cn=pwmadmin,dc=domain,dc=com" user is used during# the initial phases of new user registration to create# the user into the directory. This is why the pwmadmin# account needs to have write access to this subtree.## Right after the user is created, pwm binds to OpenLDAP# as the newly created user, so "by anonymous auth" is# required. The user also needs to be able modify it's own# data, so "by self write" is also needed. If it's missing,# the user's password and/or personal information cannot be

# created/edited. This also prevents the new user# registration from working properly.access to dn.subtree="ou=Accounts,dc=domain,dc=com" by dn="cn=admin,dc=domain,dc=com" write by dn="cn=pwmadmin,dc=domain,dc=com" write by anonymous auth by self write by * none
# NOTE: this is standard OpenLDAP stuffaccess to dn.base="" by * read
# The admin dn has full write access, pwmadmin has full read access.# The pwmadmin entry may not be required. Feel free to experiment.access to * by dn="cn=admin,dc=domain,dc=com" write by dn="cn=pwmadmin,dc=domain,dc=com" read by * none
Schema extensions
Pwm contains a few schemas extensions which are distributed as LDIF files, however some of the settings are Novell eDirectory-specific, so these templates can instead be used on for OpenLDAP. The following are changes made to the /etc/ldap/schema file.
# /etc/ldap/schema/pwm.schema## We try to define OID's "correctly" as outlined here:## http://www.openldap.org/doc/admin23/schema.html## 1.3.6.1.4.1 base OID# 591242 organization idenfifier# 1 if an objectclass# 2 if an attribute# yyyy.mm.dd date of creation# n extra identifier#attributetype ( 1.3.6.1.4.1.591242.2.2010.04.16.1 NAME 'pwmEventLog' SYNTAX 1.3.6.1.4.1.1466.115.121.1.40 )
attributetype ( 1.3.6.1.4.1.591242.2.2010.04.16.2 NAME 'pwmResponseSet' SYNTAX 1.3.6.1.4.1.1466.115.121.1.40 )

attributetype ( 1.3.6.1.4.1.591242.2.2010.04.16.3 NAME 'pwmLastPwdUpdate' SYNTAX 1.3.6.1.4.1.1466.115.121.1.24 )
attributetype ( 1.3.6.1.4.1.591242.2.2010.04.16.4 NAME 'pwmGUID' SYNTAX 1.3.6.1.4.1.1466.115.121.1.15 )
objectclass ( 1.3.6.1.4.1.591242.1.2010.04.16.1 NAME 'pwmUser' AUXILIARY MAY ( pwmLastPwdUpdate $ pwmEventLog $ pwmResponseSet $
pwmGUID )
This allows pwm to track pwm-specific attributes for each user.
OpenDS / OpenDJ IntegrationOpenDS and fork project OpenDJ require a couple of schema extension and setting user rights for an administrator account, proxy user and test user.
Configuration change
By default clients are allowed to keep their connections open and reuse them for other operations. This can lead to problems under certain circumstances. To prevent this, clients must be forced to open a new connection for each operation. This can be done by setting ds-cfg-use-tcp-keep-alive=false for each of the connection handlers. Using an LDAP client (command line tool, LDAP browser or the Directory Console) look up the entry cn=LDAP Connection Handler, cn=Connection Handlers, cn=config and add the attribute ds-cfg-use-tcp-keep-alive with value false. Repeat this for cn=LDAPS Connection Handler, cn=Connection Handlers, cn=config.
Schema Extensions
The easiest way to extend the schema is using the OpenDS Control Panel (or OpenDJ Control Panel). Log in as “cn=Directory Manager” (default, otherwise your configured administrative account). Click Schema → Manage Schema. A new window opens, where new attributes and object classes can be configured.First add four attributes:
● Event Log: ○ Name: pwmEventLog○ Syntax: OctetString
● Response Set:

○ Name: pwmResponseSet○ Syntax: OctetString
● Last Password Update:○ Name: pwmLastPwdUpdate○ Syntax: GeneralizedTime
● PWM account GUID:○ Name: pwmGUID○ Syntax: DirectoryString
Then create a new objectClass:● Name: pwmUser● Parent: Top● Optional Attributes:
○ pwmEventLog○ pwmResponseSet○ pwmLastPwdUpdate○ pwmGUID
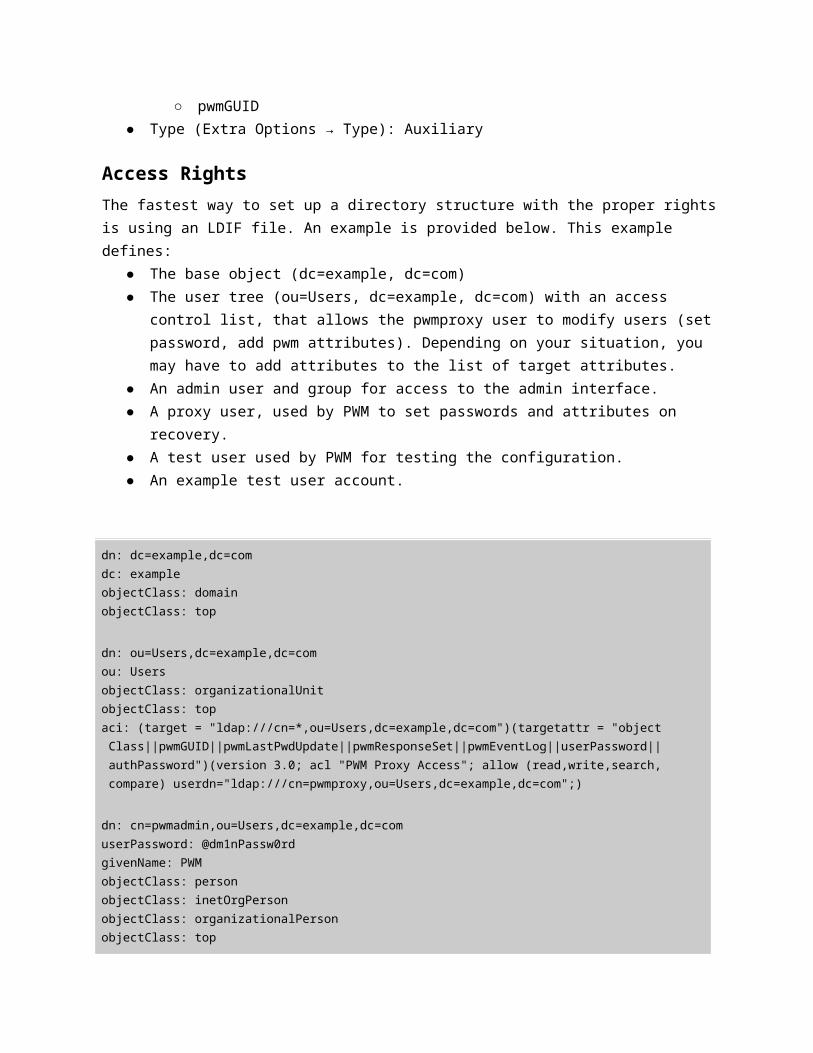
● Type (Extra Options → Type): Auxiliary
Access Rights
The fastest way to set up a directory structure with the proper rights is using an LDIF file. An example is provided below. This example defines:
● The base object (dc=example, dc=com)● The user tree (ou=Users, dc=example, dc=com) with an access control list,
that allows the pwmproxy user to modify users (set password, add pwm attributes). Depending on your situation, you may have to add attributes to the list of target attributes.
● An admin user and group for access to the admin interface.● A proxy user, used by PWM to set passwords and attributes on recovery.● A test user used by PWM for testing the configuration.● An example test user account.
dn: dc=example,dc=comdc: exampleobjectClass: domainobjectClass: top
dn: ou=Users,dc=example,dc=comou: UsersobjectClass: organizationalUnitobjectClass: topaci: (target = "ldap:///cn=*,ou=Users,dc=example,dc=com")(targetattr = "object Class||pwmGUID||pwmLastPwdUpdate||pwmResponseSet||pwmEventLog||userPassword|| authPassword")(version 3.0; acl "PWM Proxy Access"; allow (read,write,search,

compare) userdn="ldap:///cn=pwmproxy,ou=Users,dc=example,dc=com";)
dn: cn=pwmadmin,ou=Users,dc=example,dc=comuserPassword: @dm1nPassw0rdgivenName: PWMobjectClass: personobjectClass: inetOrgPersonobjectClass: organizationalPersonobjectClass: topuid: pwmadmincn: pwmadminsn: Admin
dn: cn=pwmproxy,ou=Users,dc=example,dc=comuserPassword: Pr0x4P@ssw0rdgivenName: PWMobjectClass: personobjectClass: inetOrgPersonobjectClass: organizationalPersonobjectClass: topuid: pwmproxycn: pwmproxysn: Proxyds-privilege-name: password-reset
dn: cn=pwmtest,ou=Users,dc=example,dc=comgivenName: PWMobjectClass: personobjectClass: inetOrgPersonobjectClass: organizationalPersonobjectClass: topuid: pwmtestcn: pwmtestsn: Test
dn: cn=test1,ou=Users,dc=example,dc=comobjectClass: personobjectClass: inetOrgPersonobjectClass: organizationalPersonobjectClass: topgivenName: Testmobile: 0612345678uid: test1cn: test1sn: User1userPassword: T3stP@ssw0rd
dn: cn=pwmAdminGroup,ou=Users,dc=pieters,dc=cxuniqueMember: cn=pwmadmin,ou=Users,dc=pieters,dc=cxcn: pwmAdminGroupobjectClass: groupOfUniqueNamesobjectClass: top

Additional permissions may be required for specific modules like the Helpdesk, New User and Guest Registration modules.
389 and Red Hat Directory Server IntegrationThe 389 Directory Server (formerly known as Fedora Directory Server) is the community version of the Red Hat Directory Server and is commonly used on Fedora and CentOS. The following instructions have been developed and tested on 389DS version 1.2.10 (CentOS 6.3) for use with Red Hat Directory Server version 9.0 on Red Hat Enterprise Linux version 6.3.
The 389-console (redhat-idm-console on Red Hat Directory Server) is the graphical admin console program name for the 389 Directory Server and can be used to graphically set the configurations in this section.
Before proceeding with the following integration steps you should first have Tomcat and the PWM application installed, as well as the basic PWM LDAP configurations in place using the Configuration Editor.
Enable MemberOf OverlayReference: Red Hat Directory Server 9.0 Administration Guide
Due to the way that PWM checks for group membership this plug-in must be enabled (it is disabled by default) in order to enable the Helpdesk and Admin modules. However this can also be useful when checking group membership of authenticated users in external applications.
The MemberOf plug-in requires that users include the inetUser object class, so be sure to add this class to your New User Registration module. Once populated the following can be used to check if a user belongs to the pwmadmins group:
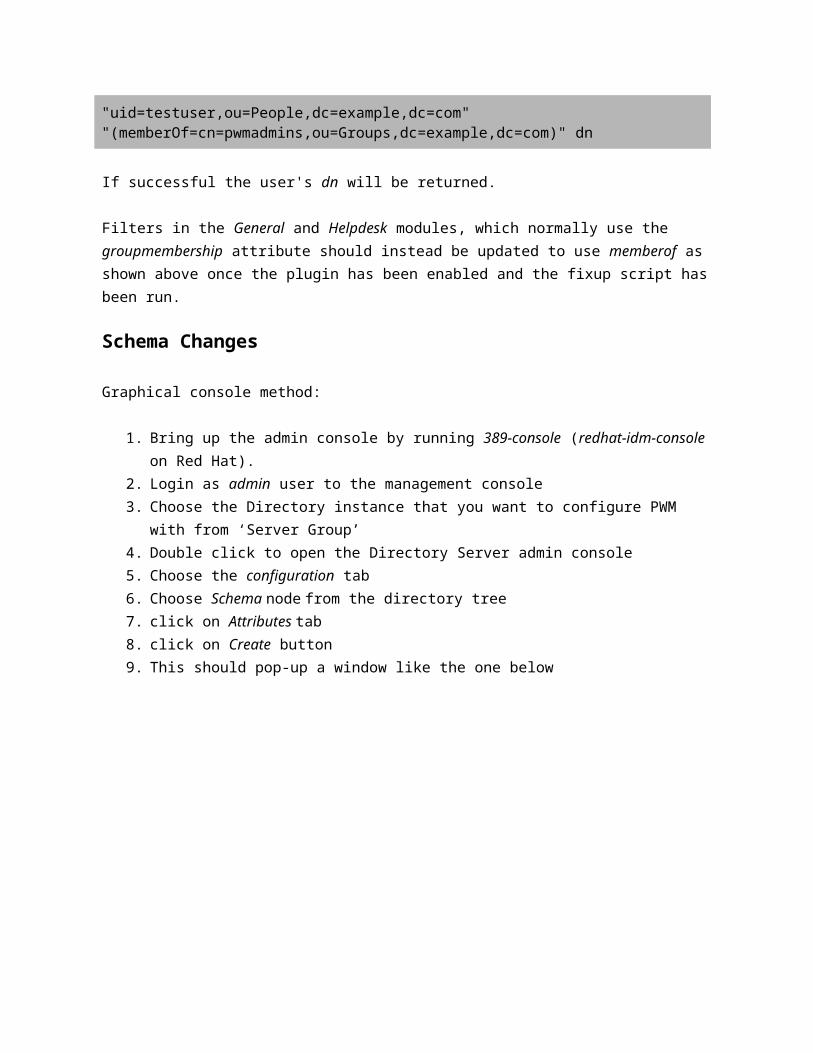
# ldapsearch -x -D "cn=Directory Manager" -W -b "uid=testuser,ou=People,dc=example,dc=com" "(memberOf=cn=pwmadmins,ou=Groups,dc=example,dc=com)" dn
If successful the user's dn will be returned.
Filters in the General and Helpdesk modules, which normally use the groupmembership attribute should instead be updated to use memberof as shown above once the plugin has been enabled and the fixup script has been run.
Schema Changes

Graphical console method:
1. Bring up the admin console by running 389-console (redhat-idm-console on Red Hat).
2. Login as admin user to the management console3. Choose the Directory instance that you want to configure PWM with from
‘Server Group’4. Double click to open the Directory Server admin console5. Choose the configuration tab6. Choose Schema node from the directory tree7. click on Attributes tab 8. click on Create button9. This should pop-up a window like the one below
10.For pwmEventLog a. Enter pwmEventLog as Attribute name.b. Enter 1.3.6.1.4.35015.1.2.1 as Attribute OID (optional)c. choose octetString for Syntax d. mark this as a ‘Multi-valued’ attribute and click OK
11.For pwmResponseSeta. Enter pwmResponseSet as Attribute name.b. Enter 1.3.6.1.4.35015.1.2.2 as Attribute OID (optional)c. choose octetString for Syntax d. mark this as a ‘Multi-valued’ attribute and click OK
12.For pwmLastPwdUpdatea. Enter pwmLastPwdUpdate as Attribute name.

b. Enter 1.3.6.1.4.35015.1.2.3 as Attribute OID (optional)c. choose GeneralizedTime for Syntax d. click OK
13.For pwmGUIDa. Enter pwmGUID as Attribute name.b. Enter 1.3.6.1.4.35015.1.2.4 as Attribute OID (optional)c. choose DirectoryString for Syntax d. click OK
14.Then to create a new objectclass pwmUser15.Click on schema node again from the directory tree16.Click on Object Classes tab17.Click on create button on the bottom of the console18.This should pop-up a create Object Class window like the one below
19.Provide the following and click OKa. enter pwmuser as Nameb. enter 1.3.6.1.4.35015.1.2.4 as OIDc. Choose pwmEventLog, pwmResponseSet, pwmLastPwdUpdate &
pwmGUID from the Available Attributes and click Add as Allowed Attributes. Make sure you click the Add button at the bottom.
Command line LDIF method:
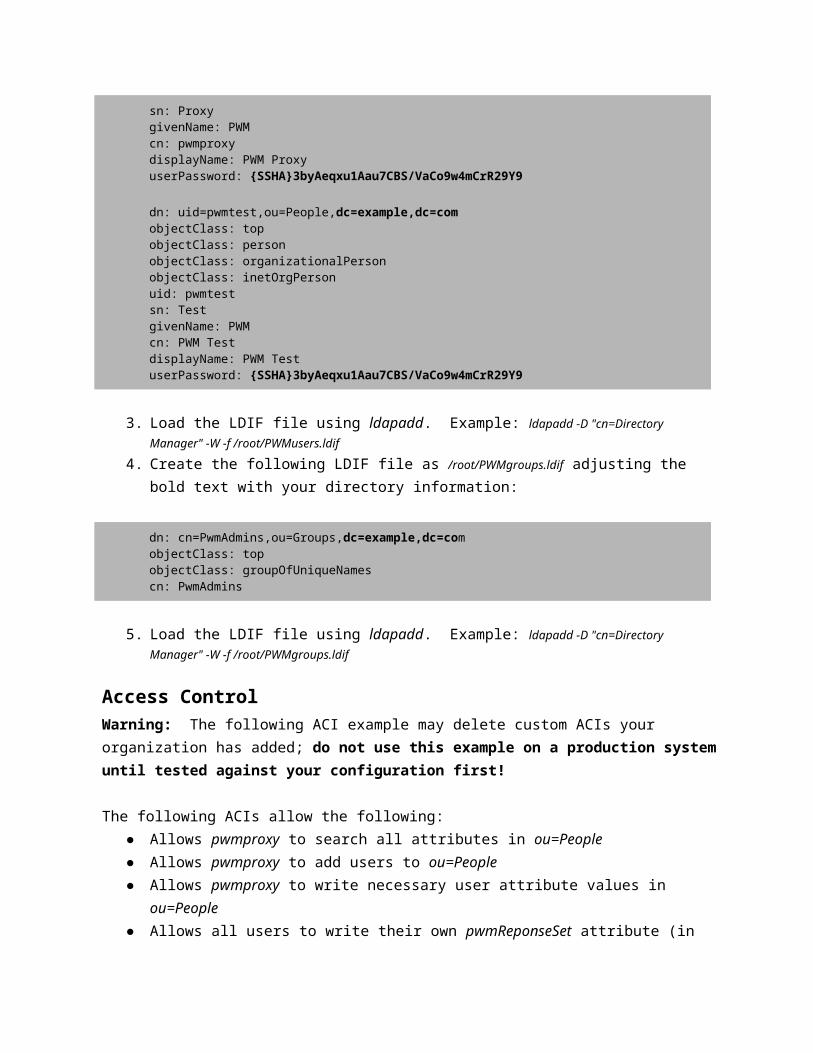
The easiest way to extend the schema of 389 Directory Server is to add a custom LDIF file named 99-PWMschema.ldif in /etc/dirsrv/slapd-<instance>/schema. Create it with following contents, adjusting the bold text with your LDAP information. Restart the directory server to make the changes take effect.
dn: cn=schemaobjectclass: topobjectclass: ldapSubentryobjectclass: subschemacn: schemaaci: (target="ldap:///cn=schema")(targetattr !="aci")(version 3.0;acl "anonymous, no acis"; allow (read, search, compare) userdn = "ldap:///anyone";)aci: (targetattr="*")(version 3.0; acl "Configuration Administrators Group"; allow (all) groupdn="ldap:///cn=Configuration Administrators,ou=Groups,ou=TopologyManagement,o=NetscapeRoot";)aci: (targetattr="*")(version 3.0; acl "Configuration Administrator"; allow (all) userdn="ldap:///uid=admin,ou=Administrators,ou=TopologyManagement,o=NetscapeRoot";)aci: (targetattr = "*")(version 3.0; acl "SIE Group"; allow (all) groupdn = "ldap:///cn=ldapserver,cn=389 Directory Server,cn=Server Group,cn=ldapserver.example.com,ou=ldapserver.example.com,o=NetscapeRoot";)attributetypes: ( 1.3.6.1.4.1.35015.1.2.1 NAME 'pwmEventLog' SYNTAX 1.3.6.1.4.1.1466.115.121.1.40 X-ORIGIN 'user defined' )attributetypes: ( 1.3.6.1.4.1.35015.1.2.2 NAME 'pwmResponseSet' SYNTAX 1.3.6.1.4.1.1466.115.121.1.40 X-ORIGIN 'user defined' )attributetypes: ( 1.3.6.1.4.1.35015.1.2.3 NAME 'pwmLastPwdUpdate' SYNTAX 1.3.6.1.4.1.1466.115.121.1.24 SINGLE-VALUE X-ORIGIN 'user defined' )attributetypes: ( 1.3.6.1.4.1.35015.1.2.4 NAME 'pwmGUID' SYNTAX 1.3.6.1.4.1.1466.115.121.1.7 SINGLE-VALUE X-ORIGIN 'user defined' )objectclasses: ( 1.3.6.1.4.1.35015.1.1.1 NAME 'pwmUser' DESC '' SUP top AUXILIARY MAY ( pwmEventLog $ pwmGUID $ pwmLastPwdUpdate $ pwmResponseSet ) X-ORIGIN 'user defined' )
Users and Groups
1. Create hashed passwords for the PWM users using the slappasswd command. These hashes will be used to more securely set the user passwords in the LDIF file. Example: slappasswd -u -h {SSHA}
2. Create the following LDIF file as /root/PWMusers.ldif adjusting the bold text with your directory information (do not use the hashes below, replace them with the hashes generated in step one above):
dn: uid=pwmproxy,ou=People,dc=example,dc=comobjectClass: topobjectClass: personobjectClass: organizationalPersonobjectClass: inetOrgPersonuid: pwmproxysn: ProxygivenName: PWMcn: pwmproxydisplayName: PWM Proxy

userPassword: {SSHA}3byAeqxu1Aau7CBS/VaCo9w4mCrR29Y9
dn: uid=pwmtest,ou=People,dc=example,dc=comobjectClass: topobjectClass: personobjectClass: organizationalPersonobjectClass: inetOrgPersonuid: pwmtestsn: TestgivenName: PWMcn: PWM TestdisplayName: PWM TestuserPassword: {SSHA}3byAeqxu1Aau7CBS/VaCo9w4mCrR29Y9
3. Load the LDIF file using ldapadd. Example: ldapadd -D "cn=Directory Manager" -W -f /root/PWMusers.ldif
4. Create the following LDIF file as /root/PWMgroups.ldif adjusting the bold text with your directory information:
dn: cn=PwmAdmins,ou=Groups,dc=example,dc=comobjectClass: topobjectClass: groupOfUniqueNamescn: PwmAdmins
5. Load the LDIF file using ldapadd. Example: ldapadd -D "cn=Directory Manager" -W -f /root/PWMgroups.ldif
Access ControlWarning: The following ACI example may delete custom ACIs your organization has added; do not use this example on a production system until tested against your configuration first!
The following ACIs allow the following:● Allows pwmproxy to search all attributes in ou=People● Allows pwmproxy to add users to ou=People● Allows pwmproxy to write necessary user attribute values in ou=People● Allows all users to write their own pwmReponseSet attribute (in addition to
the defaults)
1. Create the following LDIF file as /root/PWMacis.ldif adjusting the bold text with your directory information.
dn: ou=People,dc=example,dc=comchangetype: modifyreplace: aciaci: (targetattr = "*") (target = "ldap:///ou=People,dc=example,dc=com") (version 3.0; acl "PWM Proxy Search"; allow (read,search)(userdn = "ldap:///uid=pwmproxy,ou=People,dc=example,dc=com");)aci: (targetattr = "*") (target = "ldap:///ou=People,dc=example,dc=com")

(version 3.0; acl "PWM Proxy Add Users"; allow (add)(userdn = "ldap:///uid=pwmproxy,ou=People,dc=example,dc=com");)aci: (targetattr = "pwmGUID || pwmLastPwdUpdate || userPassword || objectClass || pwmEventLog") (target = "ldap:///ou=People,dc=example,dc=com") (version 3.0; acl "PWM Proxy Reset Password"; allow (write)(userdn = "ldap:///uid=pwmproxy,ou=People,dc=example,dc=com");)aci: (targetattr ="userpassword || telephonenumber || facsimiletelephonenumber || pwmResponseSet")(version 3.0;acl "Allow self entry modification";allow (write)(userdn = "ldap:///self");)
2. Load the LDIF file using ldapmodify. Example: ldapmodify -D "cn=Directory Manager" -W -f /root/PWMacis.ldif
Other Integration Notes
These additional considerations apply to 389 Directory Server.
1. Since 389 Directory Server uses uid as the default naming context rather than cn you must set the Username search filter (in LDAP Directory settings Advanced Settings) to (&(objectClass=person)(uid=%USERNAME%)).
2. You must change the PWM Admin Query String and Helpdesk Query Match settings (in LDAP Directory and Helpdesk configuration editor) to use the memberof attribute instead of groupmembership.
3. The default setting to merge the password PWM password policy with the directory password policy does not work at this time. Therefore it should be set to use PWM only (in Advanced Settings). The PWM Password Policies should then match or exceed the password policy you set on the directory server itself.
4. The New User Registration module should be updated to include the pwmUser and inetUser object classes in Default Object Classes. You may also want to add these object classes to pre-existing users. PWM probably will add these classes automatically when users log into PWM for the first time and create their response sets, but if you have issues make sure these object classes are added to the user.
5. For security purposes it is highly recommended that PWM is reverse proxied through Apache to hide the PWM configuration panel and other sensitive webapps. This also provides SELinux protection since Tomcat runs unconfined without extensive policy additions. The following example Apache proxy configuration can be used to proxy PWM through an SSL protected Apache installation with a proper iptables firewall configuration. Future access to the configuration editor will only be possible on the local system or local trusted network as defined by your firewall configuration.
ProxyPass /webapps/ROOT !ProxyPass /examples !ProxyPass /sample !ProxyPass /manager !
ProxyPass /host-manager !ProxyPass /pwm/private/admin !ProxyPass /pwm/config !
ProxyPass /pwm http://localhost:8080/pwmProxyPassReverse /pwm http://localhost:8080/pwm
6. If reverse proxying PWM through Apache then SELinux by default will prevent Apache from connecting to Tomcat. This can be easily rectified. While you can set the SELinux boolean httpd_can_network_connect to 1 a far more secure option is to simply add a new policy module such as the following:
module httpd-tomcat 1.0;
require {type httpd_t;type http_cache_port_t;class tcp_socket name_connect;
}
allow httpd_t http_cache_port_t:tcp_socket name_connect;
Active Directory Integration
PWM has support for standard change password functionality against active directory. Forgotten Password support also functions correctly with PWM. Because many AD sites find extending the AD schema to be impractical, the recommended approach for AD integration is to use an RDBMs database to store user’s challenge/response answers. This allows PWM to support forgotten password functionality with AD without extending the schema.
Microsoft ADAM / AD LDS
ADAM / AD LDS (Active Directory Lightweight Directory) will need a few tweaks depending of what pwm features that will be used.
Since ADAM/AD LDS cannot/does not store password policy, all user accounts will leverage either the local system password policy or the domain password policy if ADAM/AD LDS is a domain-joined host. As a result, your application may leverage a ADAM/AD LDS-specific user and you might think that there is no password expiry. This is not the case, so please consult your Active Directory and local password policies to check the password expiry settings. This will help to maintain service continuity for your application.

If a new user is created in ADAM/AD LDS and it doesnt comply with the password policy, it will be disabled by default. If the password policy cant be changed there is a workaround to add this value to each user: "msDS-UserAccountDisabled: FALSE"
These commands should be tested in a test environment before applying it on a production environment.
As default only members of 'Administrators' have the rights to change passwords.The example below modifies ADAM / AD LDS to allow everyone in OU=PWMUSERS to reset passwords:
dsacls \\localhost:389\OU=PWMUSERS,DC=PWMADAM,DC=net /I:S /G "SELF:CA;Reset Password"
A default PWM configuration will need all users to be members of (at least) 'Readers' + 'Users'. This can be a problem if you want to use the 'New User Registration' or the 'Register Guest User' features.
The example below modifies ADAM / AD LDS to give everyone 'Generic Read' in OU=PWMUSERS:
dsacls \\localhost:389\OU=PWMUSERS,DC=PWMADAM,DC=net /I:T /G everyone:GR
The feature 'User Activation' uses the attributeName vehicleInformation to store the value'pwmNewAccount' for accounts that can be activated, and 'pwmActivated' for accounts thathave been activated. This attribute is missing in ADAM / AD LDS and one way to fix thatis to replace 'vehicleInformation' with an unused attribute (for example 'carLicense').
Web Integration and Page Flow
PWM has been designed and tested to work well with portals and web access gateways.
PWM uses a very simple page flow model, with limited opportunity for configuration or changes. However, the settings that are available combined with some creative HTTP redirecting can allow for very customized scenarios.

It is helpful to not think of PWM as a standard web application with meaningful user navigation; instead the general intent is to place the user on a PWM page, complete a function, then redirect the user elsewhere. This keeps with the notion that password functions are typically not regarded as something the user desires to do, but rather an interruption or “security-wall” around the desired content.
PWM uses two configurable URLs, the logoutURL and forwardURL. These URLs are configured as part of PWM's general configuration. However, they can be overridden for any particular session by including the HTTP parameters forwardURL or continueURL on any request during the session.
After completing a function, the user will be redirected to the forwardURL, except if the password has been modified and the Logout After Password Change setting is set to true. In that case, the user will be redirected to the logoutURL instead.
There are two exceptions where a user is not immediately redirected to the forwardURL.
The first is when the Check Expiration During Authentication setting is set to true and the user's password has been determined to be expired. If this is the case, then the user is redirected to the change password screen (or possibly the password expiration warning page if the expiration is within the Expire Warn Time window. After the password change is completed, the user is then redirected back to the forwardURL/logoutURL except if:
The second exception is when Force Setup of Challenge Responses setting is set to true, the user matches Challenge Response Query Match and the user does not have valid pwm responses configured. In this case, the user is redirected to the setup responses module. Once compete, the user is then redirected back to the forwardURL/logoutURL.
PWM Page Flow

Access Gateways
PWM Supports HTTP-Basic authentication. If an http "Authorization" header is present, PWM will use the credentials in the header to authenticate the user. It is best practice to use the entire user DN as the username, but simple usernames will also be accepted and PWM will attempt to search the directory for the correct user.
Some parts of PWM need to be publicly accessible, such as forgotten password modules and new user registration. To support this, configure the following urls as public or restricted by your proxy or gateway configuration
Assuming PWM is setup so the user enters the following url to access PWM:
http://password.example.com/pwm
Add the following protected URLs:
URL Mode
password.example.com/* Public
/pwm/public/ChangePassword
Start
No
Yes
forwardURL
logoutURL
/pwm/public/ForgottenPassword
Password
Modified?
/pwm/public/ActivateUser
/pwm/private/UpdateProfile
Yes
No
/pwm/private/SetupResponses
Responses
Configured?
/pwm/public/NewUser
/pwm/private/ChangePassword
password.example.com/pwm/public/* Public
password.example.com/pwm/public/resources/* Public
password.example.com/pwm/private/* Restricted
password.example.com/pwm/private/admin/* Restricted
password.example.com/pwm/config/* Restricted
If your access gateway supports it, you should configure it to redirect to PWM if the password is expired.
For expired password URL use:
http://password.example.com/pwm/private/ChangePassword?passwordExpired=true
Optionally you can modify your login page to add links to the public NewUser page or Forgotten Password page.
Request Parameters
A variety of commands to PWM can be specified as parameters on URLs. Parameters are case sensitive. These request parameters can be placed on any link that will access PWM. An example follows:
http://password.example.com/pwm/private/ChangePassword?passwordExpired=true&forwardURL=http://www.example.com
Parameter Example Effect
passwordExpired passwordExpired=true Setting this parameter will make PWM override the state of the user's password expiration.
forwardURL forwardURL=http%3A%2F%2Fwww.example.com%2Fmain.html
Set the forwardURL to “http://www.example.com/main.html”. The value must be URL Encoded.
logoutURL logoutURL=%2Fpwm Sets the logoutURL to “/pwm”. The value must be URL Encoded.
pwmLocale pwmLocale=en Given a valid browser locale code, PWM will switch to the

given locale for display of all localized text
Command Servlet
The CommandServlet allows you to redirect a user to PWM and have it perform some specific command. Typically, you would use the CommandServlet functions during a user's login sequence to a portal or some other landing point.
Ideally, these functions work best when used with a proxy, access gateway, or some other device that will auto-authenticate the user. Otherwise, the user will have to authenticate to PWM during every login.
CommandServlet calls can be combined with any of the request parameters described above, such as the forwardURL parameter.
For example, the user login redirect sequence may proceed as follows:
URL Example Comment
http://portal.example.com Initial request from browser
http://portal.example.com/Login Access gateway redirects to login page
http://portal.example.com/ Access gateway redirects back to portal root
http://portal.example.com/index.html Web server redirects to index.html
http://password.example.com/pwm/private/CommandServlet?processAction=checkAll&forwardURL=http%3A%2F%2Fportal.example.com%2Fportalpage.html
index.html has meta redirect to PWM checkAll CommandServlet with a URLEncoded forwardURL value.
http://portal.example.com/portal/main.html PWM redirects back to the actual portal URL
The index.html described above would have the following content:
<html> <head> <meta http-equiv="REFRESH" content="0; URL=http://password.example.com/pwm/private/CommandServlet? processAction=checkAll&forwardURL=http%3A%2F%2Fportal.example.com

%2Fportalpage.html"/> </head> <body> <p>If your browser doesn't automatically load, click <a href="http://password.example.com/pwm/private/CommandServlet? processAction=checkAll&forwardURL=http%3A%2F%2Fportal.example.com%2Fportalpage.html">here</a>. </p> </body></html>
Commands
checkExpire http://password.example.com/pwm/private/CommandServlet?processAction=checkExpire
Checks the user's password expiration. If the expiration date is within the configured threshold, the user will be required to change password.
checkResponses http://password.example.com/pwm/private/CommandServlet?processAction=checkResponses
Checks the user's challenge responses. If no responses are configured, the user will be required to set them up.
checkProfile http://password.example.com/pwm/private/CommandServlet?processAction=checkProfile
Checks the user's profile. If the user's attributes do not meet the configured requirements, the user will be required to set their profile attributes.
checkAll http://password.example.com/pwm/private/CommandServlet?processAction=checkAll
Calls checkExpire, checkResponses and checkProfile consecutively.
InternationalizationPWM is fully internationalized, and comes with several localized languages. Only pages and configuration options that affect end users are internationalized. Most administrator screens are not localized or internationalized.

PWM uses the Java PropertyResourceBundle strategy for managing localized text. The locale of the user is determined by examining the first HTTP request sent by the browser. Any locale information in ldap is not evaluated. Thus, PWM responds in the configured locale of the browser.
Browser locale selection can be overridden by setting a “pwmLocale” parameter in any request. The value must be an ISO language code like “en”, “fr”, etc.
Additionally, a user can select a locale by clicking on the current locale displayed in the footer of most PWM pages.
Display Page Configuration
The default display strings can be overridden as part of the PWM configuration. Using the PWM Configuration Manager, select Display from the menu and edit the display, messages or error strings displayed to users.
Challenge Questions
PWM takes special consideration for Challenge/Response settings. Different challenges can be configured for each potential locale. Not only can the challenges be different, but the number of challenges, and number of random challenges can be different as well.
PWM will determine which set of challenges to use based on the locale of the browser during the SetupResponses process. Responses stored in ldap are tied to the locale of the challenge sets. Forever after, PWM will display and check the challenges of the user based on the locale they were entered in. For example, if a user sets up their responses in French, and then logs into pwm to recover their passwords from an English web browser, the challenges will display in French, and the user must enter the French responses.
If the user then sets up responses in a different language, the new language responses will overwrite the old responses.
Alternative translations
For some languages, multiple versions of the default localisation may be provided. Alternative versions could be provided because a language allows for both a formal and an informal form of communication, or a dialect is used for which no official locale is defined.

Only one version of a locale (language, region) can be used at a time. Therefore, alternative translations are available in the supplemental/i18n folder of the PWM distribution.
In order to use the alternative translation, there are two options:
● Copy the alternative version (e.g. supplemental/i18n/Display_nl-colloquial.properties and supplemental/i18n/Message_nl-colloquial.properties) over the standard version within the source distribution (to e.g. servlet/src/password/pwm/config/Display_nl.properties and servlet/src/password/pwm/config/Message_nl.properties). Then rebuild and deploy the WAR file.
● Copy the alternative version over the already deployed language files, found under /WEB-INF/classes/password/pwm/config. Then restart the PWM application.
ThemesPWM comes with a couple of standard themes. Each theme is an extension or modification of the (original) default theme. Themes are located under /resources/themes/. Each theme consists of a directory containing at least the files pwmStyle.css and pwmMobileStyle.css. These files override the standard /resources/pwmStyle.css and /resources/pwmMobileStyle.css, respectively. A simple theme, like the blue theme, changes a couple of colors, replaces the header background and adds a company logo to the page header:
#header {width: 100%;height: 70px;margin: 0;background-image: url('header-gradient.gif')
}
#header-company-logo {position: relative;float: left;background-image: url(logo.png);top: 10px;left: 10px;width: 50px;height: 50px;z-index: 1;
}
#centerbody {background-color: #eeeeee;padding: 10px 10px 40px 10px;border: solid 3px #000088;border-radius: 5px;
}
.message {background-color: #eeeeee;
}
.message-info {background-color: #b6ccdb;
}
.message-error {background-color: #ffcccc;
}
.message-success {background-color: #70c1f9;
}
Any file referred from the stylesheet, like includes and images, must be place in or under the same directory where the stylesheet itself resides. So the blue theme directory contains:
● pwmStyle.css● pwmMobileStyle.css● header-gradient.gif● logo.png● README.txt
More advanced examples with different layouts, round corners, layers, transparency and background images can be found in other themes like “Red”, “Tulips” and “Water”.
There is a special theme called “custom”, which is merely an example and meant to be customized. You can test changes by configuring the custom theme as the site theme and simply modifying the deployed custom theme. Reloading your page will effectuate your changes immediately. Be sure to keep a copy of your modifications to be included in your next release when upgrading.
Wordlists

PWM is capable of checking user entered passwords and dis-allowing those found in a predefined password dictionary wordlist. The dictionary in use is configured by settng the "password.WordlistFile" setting in pwmSetting.properties.
The wordlist is a ZIP file containing one or more plain text files with one word per line. To facilitate the speedy checking of the dictionary during password changes, PWM compiles the wordlist into a local embedded database (LocalDB). By default, PWM uses the BerkelyDB embedded database, and stores its files in the WEB-INF/localDB directory. With logging set to trace, PWM will output the status of the wordlist compile to the log. The compile process only needs to run once unless the wordlist ZIP file is modified.
The default distribution of PWM contains a wordlist that includes about 8 million words of common passwords found in many systems. Larger worldlists containing tens of millions of words with a variety of languages are available on the PWM website. PWM has been tested with wordlists over 50 million words, however the initial wordlist compile time can be lengthy.
Seedlists are used by PWM to generate random passwords for users. The seedlists are used as a basis for a new random password, but are sufficiently modified to guarantee randomness and also to meet the configured policy for the user.
Global Password History
A seperate wordlist dictionary is used to provide a global password wordlist history. This wordlist is not pre-populated by any file, instead it is populated with a user's old password during any password change.
This has the effect of preventing any two users from using the same password over time. For security reasons, only the user's old password is stored. Administrators should evalute this feature closely before enabling it. This setting is controlled with the Shared Password History Age setting in the PWM Configuration. PWM will periodically purge the global password history of any passwords older than this age. A value of several months or years is appropriate. The unit for the setting is in seconds.
LodalDB Database
To store wordlists, event logs and statistics, PWM uses an on-disk embedded database. Several different database implementations are available. The default is the BerekelyDB embedded database. The default settings are intended to be self-sufficient, and should not require any administrator interaction or maintenance. The LocalDB location and other settings are tunable in the ConfigurationManager.

PWM Command Line ToolsPWM offers a command line tool for various functionality. The command line tool is called from a script in PWM’s “WEB-INF” directory.
Script Description
Command.bat Windows BAT file script wrapper for calling PWM Command Line tools
Command.sh Linux/Unix shell script wrapper for calling PWM Command Line tools
Running the PwmCommand script wrapper will output a list of the various commands and options available. Before running the script you will need to set the JAVA_HOME environment variable.
You may need to grant the PwmCommand.sh execute permissions by running:
chmod a+x PwmCommand.sh
PoliciesPWM uses a matrix of configurations for determining the correct password and challenge/response policies for determining a policy for a given set. PWM gives detailed information about discovered policies during authentication time at the TRACE log level.
Password Policy
Each password policy setting is available in the PWM Configuration. These password policies represent "minimum" policies that will be applied to the user. If the setting the directory type is Novell eDirectory and the Configuration setting Read eDirectory Password Policy is set to true, then PWM will attempt to locate a Universal Password policy configured for the user. If one is found then the policy is merged with the settings in the policies set in the PWM Configuration. The most restrictive of any two settings are used.
When using eDirectory, PWM will attempt to read the legacy password policy settings directly from the user object in the case where the user does not have a Universal Password policy assigned.

For example, if the PWM Configuration contains a setting of Password Minimum Length set to 5 and the Universal Password policy has a setting of 4, then the minimum password length for the user will be 5.
Challenge Policy
For challenge questions, pwm can read both the PWM Configuration, as well as the configuration stored in eDirectory Universal Password policies. The behavior is disable in the eDirectory configuration settings.
Challenge policies can be localized for the the users language.
If localized policies are discovered in the ldap directory, PWM will honor them.
PWM can also be configured to require that all random password questions be required to be entered at setup time. In this case, the questions are presented randomly to the user when trying to reset a forgotten password. This is the standard behavior with eDirectory challenges.
Alternatively, PWM can allow the user to provide responses for only the minimum number of required random responses at setup time. Then, only those responses will be required when resetting a forgotten password. This behavior reflects more common forgotten password scenarios encountered on the Internet, but is less secure.
LoggingPWM uses Apache Log4j. Log4j is a common logging java engine for Java. Log4j allows logging to a variety of destinations such as files, syslog, nt event log, databases and others.
Logging levels available (in order of severity):
1. trace2. debug3. info4. error5. warn6. fatal
For normal operations, "info" level should be sufficient. "trace" level is recommended during initial configuration. Logging is controlled by editing the PWM Configuration. Alternatively, PWM can be configured to register a log4j xml

configuration file. A default sample configuration lof4jconfig.xml is included.
The default logging configuration logs info level to stdout. When used with tomcat, this will log to tomcat's logs/catalina.out file.
PWM also stores a temporary log of recent events in the LocalDBLo. This log is accessible in the administrator screens and is useful for checking recent pwm activity.
CaptchasPWM has integrated support for Captcha protection. The captcha makes it more difficult for a hacker to launch an automated attack against PWM. PWM uses the online reCaptcha service for captcha generation and validation. You will need to configure a reCaptcha account to use the service. reCaptcha accounts are free.
The online service approach insures that the captcha technology is continuously improved to make it difficult to be compromised. The reCaptcha account parameters are configured in the PWM Configuration.
SMS NotificationsAs of version 1.5.4 SMS notifications will be available in several parts of the application:
● Password recovery● New User account creation● New Guest account creation
For SMS notifications, you need to have access to an HTTP or HTTPS based SMS gateway service. Many paid services are available on the Internet.
Configuration
The configuration is set up to be usable for many different service providers. The following configuration options are available.
● User SMS Number Attribute: enter the LDAP attribute name for the mobile phone number to be used for SMS notifications. This number should be in full international format, i.e. a plus sign, country code, region code (without zero) and subscriber number: e.g. +31612345678. Some other formats can be recognized and reformatted into the international format, combined with the default country code (below). For example a Dutch mobile phone number starts with 06, the Dutch country code is 31. A

mobile phone number like 06-12345678 would be rewritten to +31612345678.
● Maximum SMS Queue Age: this setting determines the maximum life time in seconds of unsent SMS messages in the outgoing queue. If an SMS message can not be sent for a period longer than configured here, the message will be discarded. The default is 300 seconds (5 minutes).
● SMS Gateway: set the HTTP or HTTPS address for the SMS gateway. The address should include ‘http://’ or ‘https://’, the server name and full path, but no question mark or parameters. Parameters need to be configured at the SMS Request Data setting. Example: https://sms.example.com/gateway/.
● SMS Gateway User and SMS Gateway Password: these settings are used as the authentication credentials for the SMS gateway. The user name and password can be used for “basic authentication” (part of the HTTP protocol) or as parameters for the SMS request data (see below). If no authentication is required, because of IP address based access, fill in some dummy values.
● HTTP(S) Method: data can be sent as part of the request or as additional content. If the data is to be sent as parameters after the SMS Gateway URL, use the GET method. If the data is to be sent as form data, XML or SOAP, use the POST method.
● SMS Gateway Authentication Method: if the SMS gateway uses HTTP basic authentication, set this to basic, otherwise use request. In case of request, the username and password usually need to be part of the request data.
● SMS Request Data: this is the data sent to submit the SMS message. Possible formats are HTTP parameters for GET requests and POST form data, plain ASCII or XML and SOAP. The data can include several parameters that will be replaced before submission. All parameters are surrounded by percent signs. These parameters are available:
● %USER%: authentication user name● %PASS%: authentication password● %SENDERID%: sender identification● %TO%: recipient SMS number● %REQUESTID%: randomly generated request identifier● %MESSAGE%: the message to be sent
● SMS Data Content Type: set the MIME type for POST data. This setting will be ignored when using the GET request method. A MIME type is formatted as a main type name, a slash and a subtype name, for example:
○ text/plain: text documents○ text/xml: XML and SOAP documents○ application/x-www-form-urlencoded
● SMS Data Content Encoding: select the way to encode field replacement data. Often data contains characters that are considered special for specific content types. For example you cannot use < or > in XML data. These characters have to be replaced with < and >. PWM can use the Java

built in URLencoder and Apache Common’s String Escape Utils to encode text values, if required. The following encodings are supported:
○ NONE: no encoding, use at your own risk○ CSV: escape for comma separated values○ HTML: for HTML data○ JAVA: for Java String representations○ JAVASCRIPT: recommended for JSON formatted documents○ SQL: turn single-quotes (') into double single-quotes ('')○ URL: (default) recommended for GET requests and POST with form
data○ XML: for XML and/or SOAP services
● Maximum SMS Text Length: normally, an SMS message can contain up to 160 characters, that will use 140 bytes, because of special encoding. For UTF-8 messages, the number of characters is reduced to 70. On the other hand, some service providers allow sending longer messages that will be split up and put back together by the receiving mobile phone. 140 is a safe setting for most situations when using a latin alfabet and really short messages. Messages exceeding the maximum length will be split and sent as separate messages. Note that this may result in messages being received in a different order! Therefore it is recommended to use the largest possible size, that your service provider and mobile network operators support, if you expect to sent long messages. Please, contact your service provider for the maximum recommended message length.
● Response Regular Expressions: in order to recognize a successfully sent message, you can enter one or more regular expression1. If any of these messages matches the received response, the message is considered to be submitted successfully and will be removed from the queue. If no expression matches, the submission will be retried until the message expires.If no expressions are entered, any attempt to send the message will be considered successful, as long as the gateway service responds.Note that you have to match an entire line. You can use .* at the beginning and end of the expression to fill up the expression. For example use ^OK:\s.* to match any string starting with “OK:” a whitespace character (\s) and then any other characters. The expressions are case sensitive.
● SMS Sender ID: service providers often allow senders to specify a sender identification. This can be either a phone number or an alphanumeric string (e.g. ExampleCom). The service provider usually has to verify or accept the
1See http://download.oracle.com/javase/tutorial/essential/regex/ for more information. See http://www.exampledepot.com/egs/java.util.regex/pkg.html for advanced examples of modifier flags.

sender identification. Please contact your service provider for allowed values for the sender identification.
● SMS Phone Number Format: set the phone number format accepted by the SMS gateway, normally a variation of a full international format. The following variants are possible:
● plain: country code (e.g. 1 for USA) plus subscriber number (e.g. 12312345): 112312345
● plus: as plain, but with a plus sign as a prefix: +112312345● zeros: as plain, but prefixed with a double zero: 00112312345
● Default SMS Country Code: If the recipient SMS number is not in international format, the recipient number will be prefixed with the default country code.
● Request ID Characters: If a request allows or requires a unique request identifier, PWM can generate a random value. Specify the characters that can be used in the request id.
● Request ID Length: Specify the length of the request id.● Challenge Token SMS Text: Set the text to be sent for password
recovery. Use %TOKEN% as a placeholder for the password recovery token to be sent.
Another option under Modules → Forgotten Password determines the usage of SMS for token delivery:
● Token Send Method: this setting determines when SMS or email messages will be sent. There are four possibilities:
● both: try to send both SMS and email● emailfirst: try to send email; if no email address is available, try SMS● emailonly: try to send email; if no email address is available, do not
try SMS● smsfirst: try to send SMS; if no SMS number is available, try email● smsonly: try to send SMS; if no SMS number is available, do not try
Example configurations
Clickatell
For Clickatell, the easiest way is the HTTP(S) GET API2. To configure your service for this API, use the following settings:
● Set the gateway URL to: https://api.clickatell.com/http/sendmsg ● Enter your username and password● Select the GET method● Use request as the authentication method● Set the request data to: user=%USER%&password=%PASS%&api_id=XXXX&to=
2See http://www.clickatell.com/downloads/http/Clickatell_HTTP.pdf for full API documentation.

%TO%&text=%MESSAGE%Don’t forget to replace XXXX with the API id provided. Optionally, you can add “&concat=2” or “&concat=3” to allow longer messages (up to 406 characters).
● Set the request content data encoding to URL.
● Set the response regular expression to ^ID: [A-Za-z0-9]+
● Set the phone number format to plain.
● Specify the maximum message length as 140 for single length messages (no concat option, or concat=1), 273 for double length messages (concat=2) or 406 for tripple length messages (concat=3).
VOIPbuster
The VOIPbuster SMS service can be configured with a REST call:● Set the gateway URL :
https://www.voipbuster.com/myaccount/sendsms.php● Enter your username and password for the service● Select the GET method● Use request as the authentication method● Set the SMS Request Data (Advanced) to: username=%USER%&password=%PASS%&to=
%TO%&text=%MESSAGE%
● Set the request content data encoding to url.
Custom SOAP service
An example custom made SOAP service could accept a SOAP document like below:
<soapenv:Envelope xmlns:soapenv="http://schemas.xmlsoap.org/soap/envelope/" xmlns:ws="http://ws.sms.example.com/"> <soapenv:Header/> <soapenv:Body> <ws:sendTextMessage> <sender>ExampleCom</sender> <to>+155512345678</to> <text>Your token is M7Spe0Vt</text> </ws:sendTextMessage> </soapenv:Body></soapenv:Envelope>
You could use the following settings:● Set the gateway URL to your custom web service address.● Enter your username and password.● Select the POST method.● Use basic as the authentication method if your service requires HTTP
authentication, otherwise select request if the authentication parameters

are included in the request data or the access is IP address based.● Set the request data to the full SOAP message, with fields to be replaced.
For example:
<soapenv:Envelope xmlns:soapenv="http://schemas.xmlsoap.org/soap/envelope/" xmlns:ws="http://ws.sms.example.com/"> <soapenv:Header/> <soapenv:Body> <ws:sendTextMessage>
<sender>%SENDERID%</sender> <to>%TO%</to>
<text>%MESSAGE%</text> </ws:sendTextMessage> </soapenv:Body></soapenv:Envelope>
● Set the request data content type to text/xml and the request data encoding to XML.
● Set the response regular expression to something suitable that matches a success message, or leave empty to accept any response. Example:.*<status level=”response”.*
● Set the phone number format to the required format.● Specify the maximum message length.
Appendix A: TroubleshootingPWM is designed to be as easy to operate as possible. But sometimes, errors will occur, especially during the initial configuration. These steps may be helpful in self-diagnosing the problem.
1) Assuming PWM is starting okay, the first place to check for problems is the PWM health page. The health page can be accessed at the following url:
/pwm/public/health.jsp
This same health screen is shown when configuring PWM, and can alert you to configuration problems or unreachable services.
2) If PWM isn’t starting okay and you are using tomcat, the tomcat temporary/work directories may be corrupt or have outdated files. Stop tomcat, delete the tomcat/temp and tomcat/work directory contents, then start tomcat again. This problem is especially likely when changing tomcat or PWM

builds/versions.
3) Check out the PWM log. If using tomcat, the log data will typically be in the tomcat/logs/catalina.out file, although some tomcat installations may log to different files. By default, PWM is set to log at level “INFO” only, which is often not useful for debugging. Edit the PWM configuration logging settings and set the STDOUT Log Level setting to “TRACE”.
4) Check the log file (if possible) of your ldap directory. Many times problems with PWM aren’t problems with PWM at all but with the ldap directory.

Appendix B: Error Codes
Error Description
5001 An incorrect password was used.
5002 Incorrect response value (or attribute) was used.
5003 User is already authenticated.
5004 User is not authenticated, and authentication is required.
5006 Username is invalid or the user does not have any responses configured.
5007 The response answer contains a word that is in the wordlist.
5008 The response answer is too short.
5009 The response answer is too long.
5010 The response answer is a duplicate.
5011 The response question is a duplicate.
5012 A required response question is missing.
5013 A required HTTP parameter is missing on the request.
5014 A configuration field has an incorrect value.
5015 An unexpected error occured.
5016 The username cannot be matched to an LDAP distinguished name.
5017 The LDAP directory is not reachable.
5018 User did not supply correct values during activation.
5019 The requested services is not available or is disabled.
5020 The Basic-Authentication header has changed during the HTTP session.
5021 The user attempting activation is not permitted due to the LDAP query match.
5022 There is no challenge policy available for the user.
5023 Too many incorrect login attempts have been attempted by the user.
5024 The source address has had too many incorrect login attempts.
5025 The HTTP session has had to many incorrect login attempts.
5026 PWM was unable to set the temporary password for the user during recovery.
5027 The user is not authorized to perform the action
5028 PWM was unable to verify the user’s HTTP session.
5029 A required response value is missing.
5030 A random response value is missing.
5031 The captcha response is incorrect.
5032 There was a problem communicating with the remote captcha service.
5033 The PWM configuration file is invalid.
5034 The form nonce is incorrect.
5035 The form sequence number is incorrect (back button detection).
5036 Unable to send token due to missing address/number.
5037 The user supplied token is incorrect.
5038 The entered current password is incorrect.
5039 Error while shutting down a PWM service or database.
5040 The user GUID is unreadable or not able to be written.
5041 The user supplied token has expired.
5042 Multiple LDAP distinguished names found for the user supplied username.
5043 Only the original manager who created the user may update this user.
5044 Non secure HTTP requests are not permitted.
5045 Unable to write the response to the configured storage message.
5046 Unable to unlock the user account.
5047 Unable to update the users profile.
5048 Unable to activate the user.

5049 Unable to create the new user.
5050 Unable to activate the user
5051 The remote database is unavailable.
5052 The local LocalDB is unavailable.
5053 The application is unavailable.
5054 Unable to reach pwm-cloud web service.
5055 The security key is invalid or missing.
5056 Unable to clear stored user responses.
5057 A required remote service is unreachable.
5058 A response contains text from the challenge question.
5059 An error with the encryption certificates has been encountered.
5060 A problem has occured writing to the Syslog server.
5061 Too many threads are in use.
5062 The user’s password is required.
5063 A security restriction has been violated.
Guide A: Integrating PWM with Java Security Manager
Introduction
Configuring Tomcat's Java Security Manager (JSM) properly can be very painful and it seems most people just don't bother using it. However, Security Manager makes it very difficult for any potential security holes in PWM to be used for malicious purposes. For generic information about the JSM take a look at these pages:
● http://java.sun.com/developer/onlineTraining/Programming/JDCBook/ appA.html
● http://tomcat.apache.org/tomcat-5.5-doc/security-manager-howto.html ● http://java.sun.com/j2se/1.4.2/docs/guide/plugin/developer_guide/
debugger.html
As the JSM rulesets are highly dependent on both the underlying OS, web container and PWM versions, this article is split into generic and specific sections.
Generic debugging techniques for Tomcat
The biggest problem with JSM integration is that it's often not obvious what Security Manager rules you need to add to make things works. You almost certainly have to add JSM debugging to Tomcat command-line. On Debian this is done by editing /etc/default/tomcat*<version*>:
JAVA_OPTS="-Djava.awt.headless=true -Xmx128M -Djava.security.debug=access"
After Tomcat is restarted, it starts spitting out "access allowed/denied" messages to it's logs. On Debian Lenny this is _/var/log/syslog_, and on Debian Squeeze _/var/log/tomcat6/catalina.out_. You can weed out failures with something like this:
$ tail -n 15000 <logfile>|grep "access denied"|cut -d " " -f 7-|sort|uniq -u
Alternatively, you can activate real-time monitoring with
$ tail -n 0 -f <logfile> |grep "access denied"
before restarting Tomcat. In either case, you should get notices like this:
access: access denied (java.lang.management.ManagementPermission monitor)access: access denied (java.util.PropertyPermission org.apache.commons.logging.diagnostics.dest read)access: access denied (java.util.PropertyPermission org.apache.commons.logging.LogFactory.HashtableImpl read)access: access denied (java.util.PropertyPermission org.apache.commons.logging.LogFactory read)access: access denied (java.util.PropertyPermission org.apache.commons.logging.Log.allowFlawedContext read)access: access denied (java.util.PropertyPermission org.apache.commons.logging.Log.allowFlawedDiscovery read)access: access denied (java.util.PropertyPermission org.apache.commons.logging.Log.allowFlawedHierarchy read)access: access denied (java.util.PropertyPermission org.apache.commons.logging.Log read)access: access denied (java.util.PropertyPermission org.apache.commons.logging.log read)
After spotting these failures, convert them into matching security manager rules and restart Tomcat. Repeat this as many times as necessary. Note that this setup can easily create gigabytes worth of useless logs, so remember to switch off debugging before going to production.
On Debian and many other distributions Tomcat's JSM rules are stored in _/etc/tomcat*<version*>/policy.d_. These ruleset fragments are converted into the active ruleset stored in _/var/cache/tomcat*<version*>/catalina.policy_ or similar.It's probably a good idea to make sure the pwm-specific policy file loads after the default policy files, so name it something like "50user.policy". Also make sure the file has the same permissions as the existing policy files or it may not load properly.
PWM 1.4.2 on Debian Lenny
The additional ruleset below allows pwm to work properly under JSM under Debian Lenny + Tomcat 5.5.26 from Debian repos. It depends on the default Debian rules being loaded first.
Note that this ruleset has only been tested with pwm utilizing the following features:
● Create new user● Update attributes

● Change password● CAPTCHA
// ========== PWM-specific settings =====================================//// Put this into a separate file, e.g. /etc/tomcat5.5/policy.d/50user.policy//
grant {// With this everything works great, but it's terribly insecure//permission java.security.AllPermission;
// This gets us past the first errorpermission java.lang.RuntimePermission "createClassLoader";
// This gets us past pwm-db access issues. It seems we cannot use "<snip>/pwm/META-INF/pwm-db/-" without the whole
// Tomcat breaking. Apparently this happens because the pwm-db directory is created on the fly and Security Manager
// can't find it when it launches -> everything breaks badly.//// This set of FilePermissions seems to work and prevents the webapp from
_writing_ to META-INF/context.xml,// which contains security-related settings (e.g. host/subnet-based filtering
rules)permission java.io.FilePermission
"/var/lib/tomcat5.5/webapps/pwm/META-INF/*", "read, execute";permission java.io.FilePermission
"/var/lib/tomcat5.5/webapps/pwm/META-INF/pwm-db", "read, write, delete, execute";permission java.io.FilePermission
"/var/lib/tomcat5.5/webapps/pwm/META-INF/pwm-db/-", "read, write, delete, execute";permission java.io.FilePermission
"/var/lib/tomcat5.5/webapps/pwm/WEB-INF/classes/-", "read";
// Misc FilePermissionspermission java.io.FilePermission "/usr/share/javazi/ZoneInfoMappings",
"read";permission java.io.FilePermission
"/usr/share/tomcat5.5/server/classes/org/apache/jk/common/HandlerRequest.class", "read";
permission java.io.FilePermission "/usr/share/tomcat5.5/server/classes/org/apache/tomcat/util/buf/DateTool.class", "read";
permission java.io.FilePermission "/WEB-INF/classes/org/apache/log4j/-", "read";
// Misc RuntimePermissionspermission java.lang.RuntimePermission "defineClassInPackage.java.lang";permission java.lang.RuntimePermission
"defineClassInPackage.org.apache.jasper.runtime";permission java.lang.RuntimePermission

"accessClassInPackage.sun.util.logging.*";permission java.lang.RuntimePermission
"accessClassInPackage.org.apache.tomcat.*";
// Misc PropertyPermissionspermission java.util.PropertyPermission "elementAttributeLimit", "read";permission java.util.PropertyPermission "entityExpansionLimit", "read";permission java.util.PropertyPermission
"javax.xml.parsers.DocumentBuilderFactory", "read";permission java.util.PropertyPermission "maxOccurLimit", "read";permission java.util.PropertyPermission "user.timezone", "write";permission java.util.PropertyPermission "memAdmin", "read";permission java.util.PropertyPermission "memLock", "read";permission java.util.PropertyPermission "memTree", "read";permission java.util.PropertyPermission "memTxn", "read";permission java.util.PropertyPermission "memTreeAdmin", "read";permission java.util.PropertyPermission "sun.arch.data.model", "read";
// reCAPTCHA-specific PropertyPermissionspermission java.util.PropertyPermission "httpclient.*", "read";permission java.util.PropertyPermission "apache.commons.httpclient.*",
"read";permission java.util.PropertyPermission "java.class.path", "read";permission java.util.PropertyPermission "user.name", "read";
// reCAPTCHA-specific SocketPermissionspermission java.net.SocketPermission "*","connect,resolve";
// Misc SocketPermissionspermission java.net.SocketPermission "127.0.0.1:389", "connect, resolve";
// Log4j-specific propertiespermission java.util.PropertyPermission "log4j.*", "read";
// BerkeleyDB-specific propertiespermission java.util.PropertyPermission "je.*", "read";permission java.util.PropertyPermission "JEDiagnostics", "read";permission java.util.PropertyPermission "JEMonitor", "read";
// Misc permissionspermission java.util.logging.LoggingPermission "control";permission ng.reflect.ReflectPermission "suppressAccessChecks";
};
PWM 1.5.3 / SVN revision 160 on Debian Squeeze
A few modifications are needed to adapt Lenny's ruleset for Squeeze, Tomcat6

and pwm 1.5.3+. Note that this ruleset has only been tested with pwm utilizing the following features only:
● Create new user● Update attributes● Change password● Password reset with email token● CAPTCHA
// ========== PWM-specific settings =====================================
grant {
// This gets us past the first errorpermission java.lang.RuntimePermission "createClassLoader";// Added between 1.4.2 and 1.5.2permission java.lang.RuntimePermission "modifyThread";
// This gets us past pwm-db access issues. It seems we cannot use "<snip>/pwm/META-INF/pwm-db/-" without the whole
// Tomcat breaking. Apparently this happens because the pwm-db directory is created on the fly and Security Manager
// can't find it when it launches -> everything breaks badly.//// This set of FilePermissions seems to work and prevents the webapp from
_writing_ to META-INF/context.xml,// which contains security-related settings (e.g. host/subnet-based filtering
rules)permission java.io.FilePermission "/var/lib/tomcat6/webapps/pwm/META-INF/*",
"read, execute";// pwm-db moved from META-INF to WEB-INF between pwm 1.4.2 and 1.5.2; also
renamed from pwm-db to pwmDBpermission java.io.FilePermission
"/var/lib/tomcat6/webapps/pwm/WEB-INF/pwmDB", "read, write, delete, execute";permission java.io.FilePermission
"/var/lib/tomcat6/webapps/pwm/WEB-INF/pwmDB/-", "read, write, delete, execute";permission java.io.FilePermission
"/var/lib/tomcat6/webapps/pwm/WEB-INF/classes/-", "read";// permission java.io.FilePermission
"/var/lib/tomcat6/webapps/pwm/WEB-INF/lib/*", "read";
// Next two added between 1.4.2 and 1.5.2permission java.io.FilePermission "/usr/lib/jvm/java-6-openjdk/jre/lib/*",
"read";permission java.io.FilePermission "/var/lib/tomcat6/webapps/pwm/WEB-INF/-",
"write";
// Misc FilePermissionspermission java.io.FilePermission "/usr/share/javazi/ZoneInfoMappings",
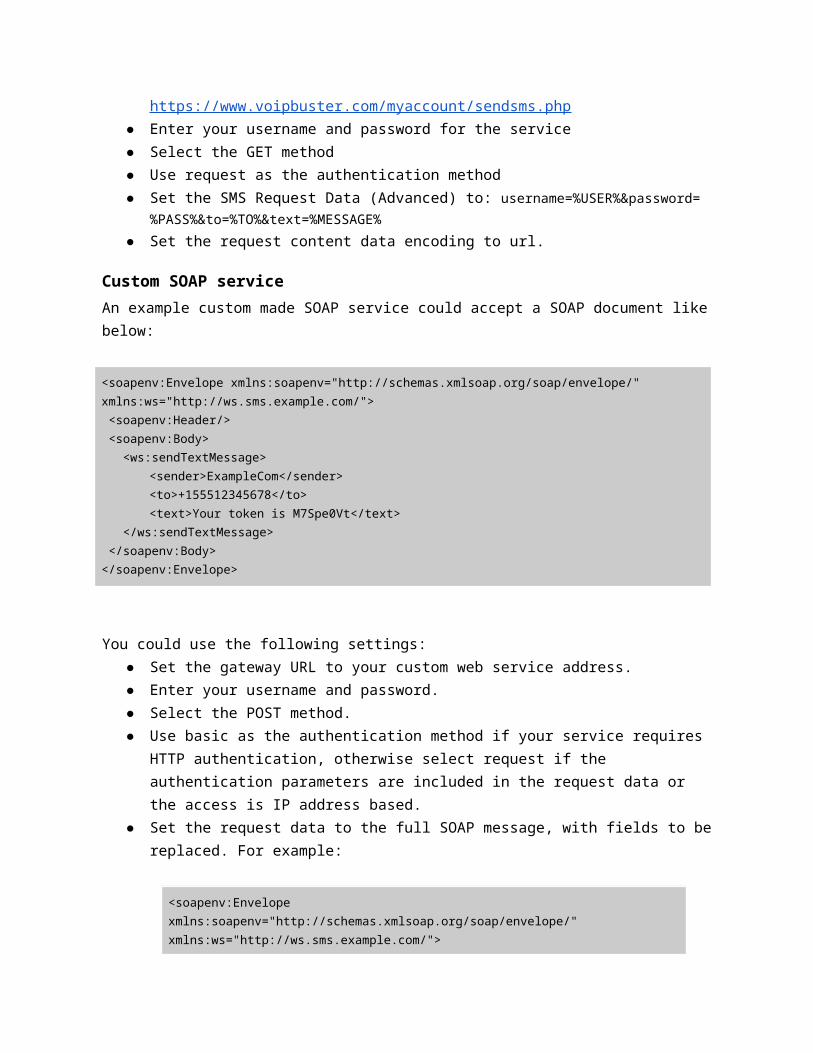
"read";// Next two missing//permission java.io.FilePermission
"/usr/share/tomcat6/server/classes/org/apache/jk/common/HandlerRequest.class", "read";
//permission java.io.FilePermission "/usr/share/tomcat6/server/classes/org/apache/tomcat/util/buf/DateTool.class", "read";
permission java.io.FilePermission "/usr/share/tomcat6/.mailcap", "read";permission java.io.FilePermission "/WEB-INF/classes/org/apache/log4j/-",
"read";
// Misc RuntimePermissionspermission java.lang.RuntimePermission "defineClassInPackage.java.lang";permission java.lang.RuntimePermission
"defineClassInPackage.org.apache.jasper.runtime";permission java.lang.RuntimePermission
"accessClassInPackage.sun.util.logging.*";permission java.lang.RuntimePermission
"accessClassInPackage.org.apache.tomcat.*";permission java.lang.RuntimePermission "getFileSystemAttributes";
// Misc PropertyPermissionspermission java.util.PropertyPermission "*", "read,write";//permission java.util.PropertyPermission "elementAttributeLimit", "read";//permission java.util.PropertyPermission "entityExpansionLimit", "read";//permission java.util.PropertyPermission
"javax.xml.parsers.DocumentBuilderFactory", "read";//permission java.util.PropertyPermission "maxOccurLimit", "read";//permission java.util.PropertyPermission "user.timezone", "write";//permission java.util.PropertyPermission "memAdmin", "read";//permission java.util.PropertyPermission "memLock", "read";//permission java.util.PropertyPermission "memTree", "read";//permission java.util.PropertyPermission "memTxn", "read";//permission java.util.PropertyPermission "memTreeAdmin", "read";//permission java.util.PropertyPermission "sun.arch.data.model", "read";// Next two added to pwm 1.4.2 rules for pwm 1.5.2//permission java.util.propertyPermission "org.apache.commons.logging",
"read";//permission java.util.PropertyPermission
"com.google.gson.annotation_cache_size_hint", "read";
// reCAPTCHA-specific PropertyPermissions//permission java.util.PropertyPermission "httpclient.*", "read";//permission java.util.PropertyPermission "apache.commons.httpclient.*",
"read";//permission java.util.PropertyPermission "java.class.path", "read";//permission java.util.PropertyPermission "user.name", "read";
// reCAPTCHA-specific SocketPermissionspermission java.net.SocketPermission "*","connect,resolve";
// Misc SocketPermissions

permission java.net.SocketPermission "127.0.0.1:389", "connect, resolve";
// Log4j-specific propertiespermission java.util.PropertyPermission "log4j.*", "read";
// BerkeleyDB-specific propertiespermission java.util.PropertyPermission "je.*", "read";permission java.util.PropertyPermission "JEDiagnostics", "read";permission java.util.PropertyPermission "JEMonitor", "read";
// Misc permissionspermission java.util.logging.LoggingPermission "control";// Obsolete in pwm 1.5.2?permission ng.reflect.ReflectPermission "suppressAccessChecks";// Next two added to pwm 1.4.2 rules for pwm 1.5.2permission java.lang.reflect.ReflectPermission "suppressAccessChecks";permission java.lang.management.ManagementPermission "monitor";
};

Guide B: PWM behind an Apache reverse proxy
Introduction
There are several good reasons to place PWM behind a reverse proxy:
● Blocking certains PWM functions for good (e.g. /admin, /config)● Masking PWM server's real DNS name, e.g. to avoid having to buy a
separate SSL certificate
PWM does not require Apache or any other reverse proxy, so this type of configuration is optional.
These instructions were written using Apache 2.2 running on Linux Debian Lenny, with PWM svn revision 160 running on Linux Debian Squeeze and Tomcat 6.
Configuring PWM server
On PWM, most configuration is related to security. You have three options:
● Let Apache contact PWM using insecure HTTP protocol (e.g. port 8080 or 8180). This setup will become slightly more secure if firewall (or Tomcat) is used to block access from IPs other than that of Apache.
● Allow Tomcat/PWM access only using HTTPS. This will require additional configuration at the Apache end. This can be made more secure by limiting access to the webserver's IP.
● Secure Apache <-- --> Tomcat/pwm connection using VPN such as OpenVPN
● Block all other access to PWM.
In the PWM configuration make sure to turn Enable Session Verification to false, or reverse proxying will not work properly.
Configuring the webserver

Adding reverse proxy support to Apache is relatively easy. Go to /etc/apache2/sites-available and place something like this to the appropriate section:
# Reverse proxying setup for other webservers running on localhost# or on remote servers. Configuration details available here:## http://httpd.apache.org/docs/2.2/mod/mod_proxy.html
# Reverse proxies don't need to allow proxy requestsProxyRequests Off
# Proxy access control - not very important in reverse proxies# as the target servers have been predefined by the sysadmin<Proxy *> Order deny,allow Allow from all</Proxy>
# No need to proxy SSL-enabled servers (yet)#SSLProxyEngine On
# This is required to connect to SSL-enabled servers not running# on port 443#AllowCONNECT 8443
# Block access to administrative functions, see## http://httpd.apache.org/docs/2.2/mod/mod_proxy.html#proxypassProxyPass /pwm/admin !ProxyPass /pwm/config !
# Map local server URL to a remote server URL. We're using HTTP through# secure VPN connection.ProxyPass /pwm http://<pwm-server-ip>:8080/pwm
# This rewrites HTTP headers etc. so that proxied server's# responses point the client back to this server, not the# proxied serverProxyPassReverse /pwm http://<pwm-server-ip>:8080/pwm
Note that using any other path than /pwm will not work, at least out of the box. For example, submitting the CAPTCHA form will fail with "Form submitted with incorrect pwmFormID value" error.

Guide C: Integrating PWM with CAS
Introduction
CAS, which in this context stands for Central Authentication Service, provides clients a single sign-on service facilitating a trusted way for an application to authenticate a user. More information about CAS can be found on the Jasig home page:
http://www.jasig.org/cas
While CAS is a great service allowing end users to sign in to multiple applications simply by signing in one time, as of version 3.4.11, there is no built in integration for password interrupt programs like PWM. Thankfully, CAS is fairly malleable while remaining completely secure, and will allow us to interrupt a session as long as we pass on the CAS service “ticket” to the service that was initially requested.
clearPass
In order to integrate PWM with CAS, or “casify” PWM, we have to employ the use of clearPass. Full documentation on this process can be found here.
https://wiki.jasig.org/display/CASUM/ClearPass
Edit your CAS pom.xml to include the clearPass dependency.
<dependency><groupId>org.jasig.cas3.extensions</groupId>
<artifactId>clearpass-webapp</artifactId> <version>1.0.7.GA</version> <scope>runtime</scope> <type>war</type></dependency>
Edit your CAS deployerConfigContext.xml to include the required authentication manager.
<property name="authenticationMetaDataPopulators"> <list> <bean class="org.jasig.cas3.extensions.clearpass.CacheCredentialsMetaDataPopulator"> <constructor-arg index="0" ref="credentialsCache" /> </bean>

</list></property>
Edit the CAS web.xml to include the proper clearPass servlet information.
<servlet-mapping> <servlet-name>cas</servlet-name>
<url-pattern>/clearPass</url-pattern></servlet-mapping>
Also include the appropriate filters in the CAS web.xml
<filter><filter-name>CAS Validation Filter</filter-name><filter-class>org.jasig.cas.client.validation.Cas20ProxyReceivingTicketValidationFilter</filter-class>
<init-param> <param-name>casServerUrlPrefix</param-name> <param-value>https://host:8443/cas</param-value> </init-param> <init-param> <param-name>serverName</param-name> <param-value>https://host:8443</param-value> </init-param> <init-param> <param-name>exceptionOnValidationFailure</param-name> <param-value>false</param-value> </init-param> <init-param> <param-name>allowedProxyChains</param-name> <param-value>https://pwm.example.com:8443/pwm/proxyCallback
</param-value> </init-param> <init-param> <param-name>useSession</param-name> <param-value>false</param-value> </init-param> <init-param> <param-name>redirectAfterValidation</param-name> <param-value>false</param-value> </init-param></filter>
<filter><filter-name>CAS HttpServletRequest Wrapper Filter</filter-name><filter-class>org.jasig.cas.client.util.HttpServletRequestWrapperFilter</

filter-class></filter><filter-mapping>
<filter-name>CAS Validation Filter</filter-name> <url-pattern>/clearPass</url-pattern></filter-mapping>
<filter-mapping> <filter-name>CAS HttpServletRequest Wrapper Filter</filter-name> <url-pattern>/clearPass</url-pattern></filter-mapping>
If you are building CAS using the Maven overlay then rebuild it and redeploy the WAR file to your application server.
Next, add the CAS clearPass url to the PWM configuration XML or use the ConfigManager editor. The result will be a configuration setting in the PWMConfiguration.xml as follows:
<setting key="cas.clearPassUrl" syntax="STRING"> <label>CAS ClearPass URL</label> <value><![CDATA[https://host:8443/cas/clearPass]]></value></setting>
In the PWM web.xml you will need to uncomment the CAS section and fit it to your environment. Note the text is already in the web.xml, it just needs the comments removed and the settings modified.
<filter> <filter-name>CAS Validation Filter</filter-name> <filter-class>org.jasig.cas.client.validation.Cas20ProxyReceivingTicketValidationFilter
</filter-class> <init-param> <param-name>casServerUrlPrefix</param-name> <param-value>https://host:8443/cas/</param-value> </init-param> <init-param> <param-name>serverName</param-name> <param-value>https://host:8443</param-value> </init-param> <init-param> <param-name>proxyCallbackUrl</param-name> <param-value>https://host:8443/pwm/proxyCallback</param-value> </init-param> <init-param> <param-name>proxyReceptorUrl</param-name> <param-value>/proxyCallback</param-value>

</init-param></filter>
<filter> <filter-name>CAS Authentication Filter</filter-name> <filter-class>org.jasig.cas.client.authentication.AuthenticationFilter</filter-class> <init-param> <param-name>casServerLoginUrl</param-name> <param-value>https://host:8443/cas/login</param-value> </init-param> <init-param> <param-name>serverName</param-name> <param-value>https://host:8443</param-value> </init-param> <init-param> <param-name>renew</param-name> <param-value>false</param-value> </init-param> <init-param> <param-name>gateway</param-name> <param-value>false</param-value> </init-param></filter>
<filter> <filter-name>CAS Single Sign Out Filter</filter-name> <filter-class>org.jasig.cas.client.session.SingleSignOutFilter</filter-class></filter>
<filter-mapping> <filter-name>CAS Single Sign Out Filter</filter-name> <url-pattern>/*</url-pattern></filter-mapping><listener> <listener-class>org.jasig.cas.client.session.SingleSignOutHttpSessionListener
</listener-class></listener><filter-mapping> <filter-name>CAS Validation Filter</filter-name> <url-pattern>/private/*</url-pattern></filter-mapping><filter-mapping> <filter-name>CAS Authentication Filter</filter-name> <url-pattern>/private/*</url-pattern></filter-mapping><filter-mapping> <filter-name>CAS Validation Filter</filter-name> <url-pattern>/proxyCallback</url-pattern></filter-mapping>
Also, be sure to use HTTPS for PWM. HTTPS is required for proper functionality. Save the
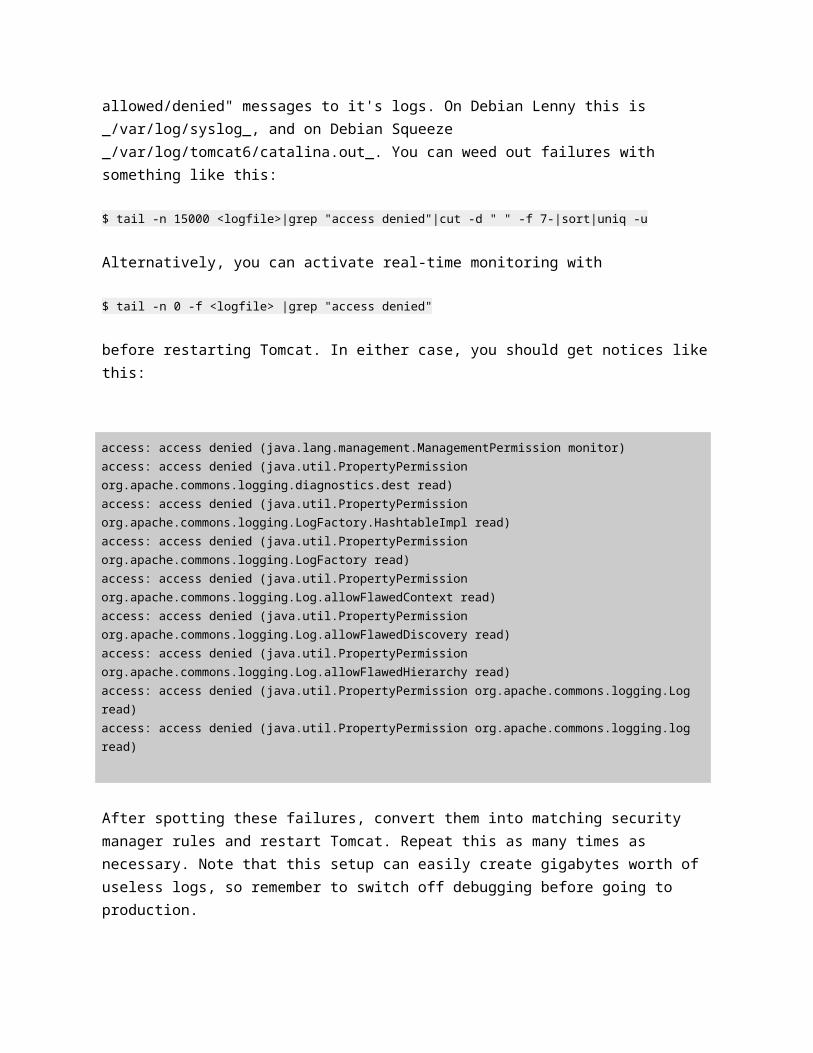
changes you have made and restart your application server. Now when you attempt to access PWM you will be redirected to your CAS instance. Upon authentication CAS will redirect you back to PWM.
Interrupting a CAS session
One way to interrupt a CAS login session is to edit your CAS login-webflow.xml. The main idea is to create a custom <action-state> that evaluates the service your user is attempting to access. In the webflow, after the user has been authenticated and granted a ticket, the session is then passed on to a custom page which redirects to the PWM command servlet with the service URL and ticket appended that the URL. While the configuration of such a setup is beyond the scope of PWM, I have provided a few snippets to illustrate the process.
login-webflow.xml
<action-state id="customInterrupt"><evaluate expression="flowScope.service.id"/>
<transition on="https://service.host.com/login/index.php"to="service1" />
<transition on="" to="warn" /></action-state><end-state id="service1" view="service1View" />
service1view.jsp
<%String redirectURL="https://service.host.com:8443/pwm/private/CommandServlet?
processAction=checkAll&forwardURL=https%3A%2F%2Fservice.host.com%2Flogin%2Findex.php?"+request.getParameter("ticket") ;
response.sendRedirect(redirectURL);%>
With these code snippets you should be on your way to creating an environment that allows PWM to properly interrupt a CAS login session.
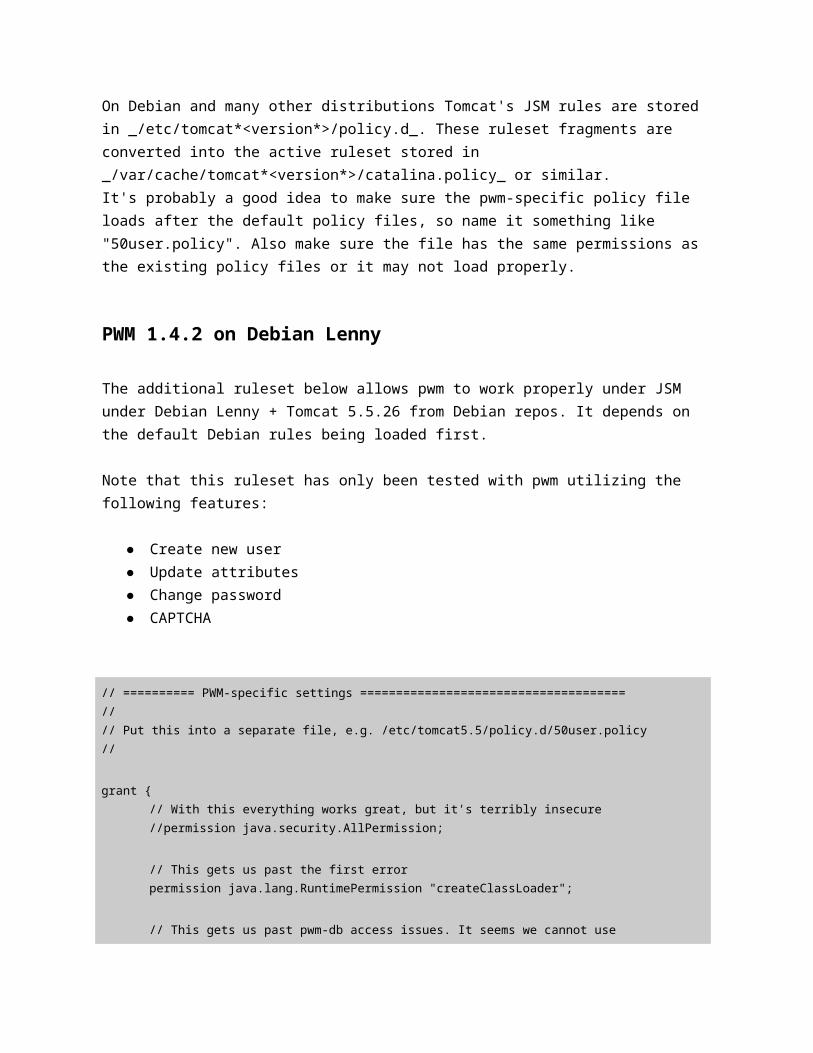
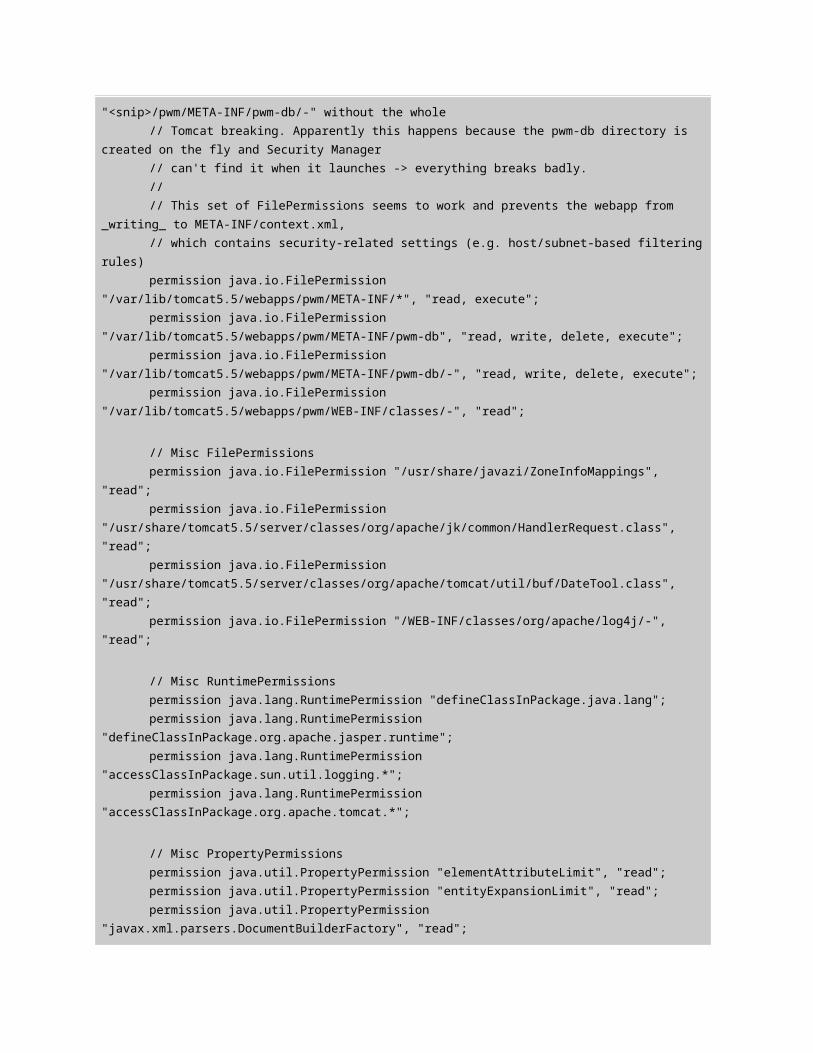
Guide D: Integrating PWM with Novell Access Manager
Introduction
This section provides an overview on integrating PWM with Novell’s Access Manager (NAM) solution, providing access to password management functionality both inside and outside of your company’s network.
NAM acts as a reverse proxy, much like the example of the Apache reverse proxy given in Guide A of this document. NAM additionally provides enhanced single sign-on functionality, allowing PWM to be placed on the internal network and not have to deal with minting SSL certificates for each PWM server that you build.
Since NAM controls authentication, you will not utilize the base PWM login screen, as authentication will be passed to PWM automatically.
Link RedirectionThe most important aspect of implementing an instance of PWM behind NAM is understanding which URL links to integrate into your NAM login page as well as the reverse proxy and single sign-on settings that need to be configured.
Because the PWM login screen itself is never directly displayed in a NAM setting, the links on that page must be transferred to the NAM login screen. These links are:
● https://wwww.example.com/pwm/public/ActivateUser ○ This link is used for the Activate User PWM module
● https://www.example.com/pwm/public/ForgottenPassword ○ This link is used to reset a forgotten password
● https://www.example.com/pwm/public/Help-Documents.html ○ This link should go to a web page that provides registration guides for your
environment. ● https://www.example.com/pwm/private/Shortcuts
○ This link should be the primary redirect link if you wish to use the Shortcuts page as a defacto landing page for NAM logins. You can include a link to the User Application here for access to RBPM and Workflow services.

Reverse Proxy SettingsYou should have a reverse proxy created for the PWM server(s).
The reverse proxy that is created for PWM must also have protected resources setup, so that the user will be able to access sections of PWM without having to provide authentication credentials. One of the protected resources should be called pwm-public and have the following url paths setup.
/pwm/public/ActivateUser/*
/pwm/public/ForgottenPassword/*
/pwm/resources/*
This will enable users who click on the link on the login screen to activate their account or reset a forgotten password to do so without having to provide any authentication credentials. The /pwm/resources path is included in order to facilitate the proper themes and other parts of the web page to display correctly through NAM.
Login Page CustomizationsThe login page can be customized to include links to public PWM services such as
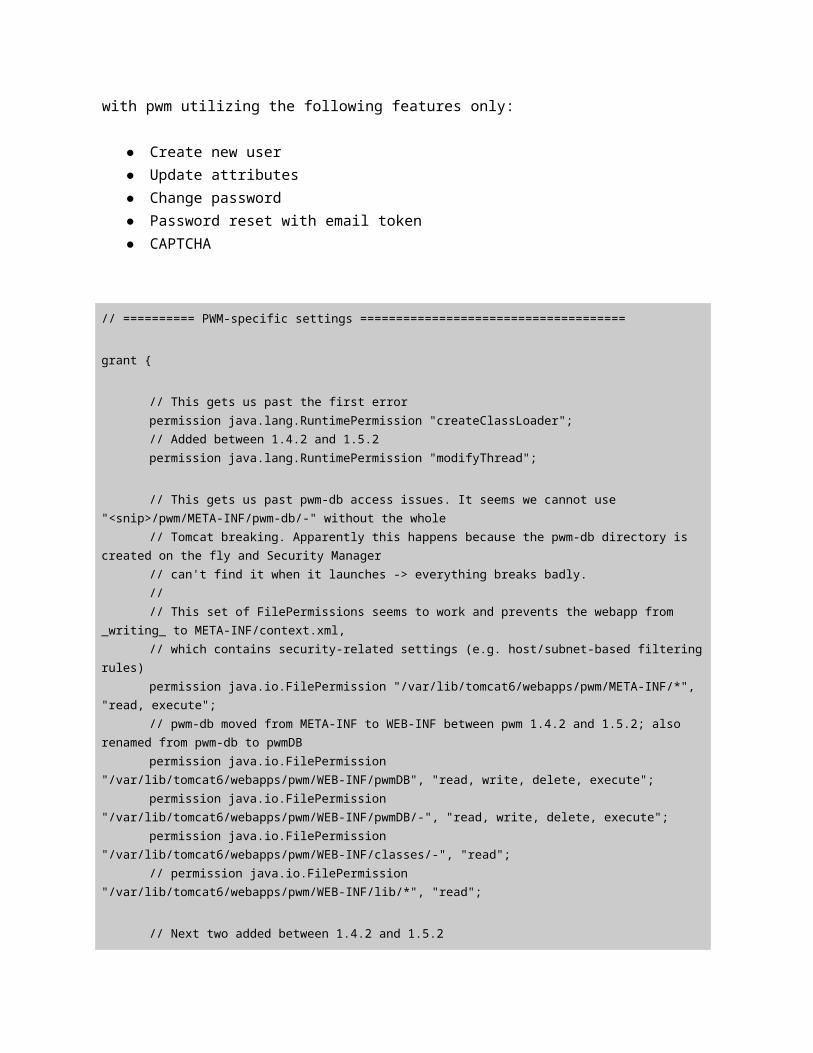
ForgottenPassword or NewUser modules. To do so modify the IDP server’s “login.jsp” file to include a link to the forgotten password page:
<a href=”https://www.example.com/pwm/public/ForgottenPassword”>Forgotten Password</a>
It is also possible to modify the login page so that all logins through NAM are processed by PWM. The use case for doing this is to force the user throught he several “check” processes that PWM can enforce such as the password pre-expiration, setup responses and profile.
This approach uses the IDP’s “ctarget” attribute to rewrite the user’s post-login destination to PWM, and then in turn pass PWM the user’s original requested URL so after the process checks in PWM are completed, the user is forwarded on to their original destination.
To implement this process, add the following to the login.jsp page:
<%// set these parameters as appropriate for your environmentfinal String pwmURL = "http://www.example.com/pwm/";final String pwmCommand = "checkAll"; // could be "checkExpire", "checkResponses", "checkProfile" or "checkAll" // see pwm documentationfinal boolean debugMode = true;String ctarget = null;
// do not modify the below code unless you know what you are doing.String currentTarget = (String)request.getAttribute("target");if (debugMode) { out.write("<p>Current target: " + currentTarget + "</p>"); out.write("<p>Current ctarget: " + request.getAttribute("ctarget") + "</p>");}if (currentTarget != null && !currentTarget.contains(pwmURL)) { final StringBuilder newURL = new StringBuilder(); newURL.append(pwmURL); newURL.append("/private/CommandServlet"); newURL.append("?processAction="); newURL.append(pwmCommand); newURL.append("&forwardURL="); newURL.append(java.net.URLEncoder.encode(currentTarget,"UTF-8")); //request.setAttribute("target",null); //session.setAttribute("target",); ctarget = newURL.toString(); if (debugMode) { out.write("<p>New target set to: " + newURL.toString() + "</p>"); }} else if (debugMode) { out.write("<p>Target already redirected to PWM, was not modified.</p>");}%><% if (ctarget != null) { %>
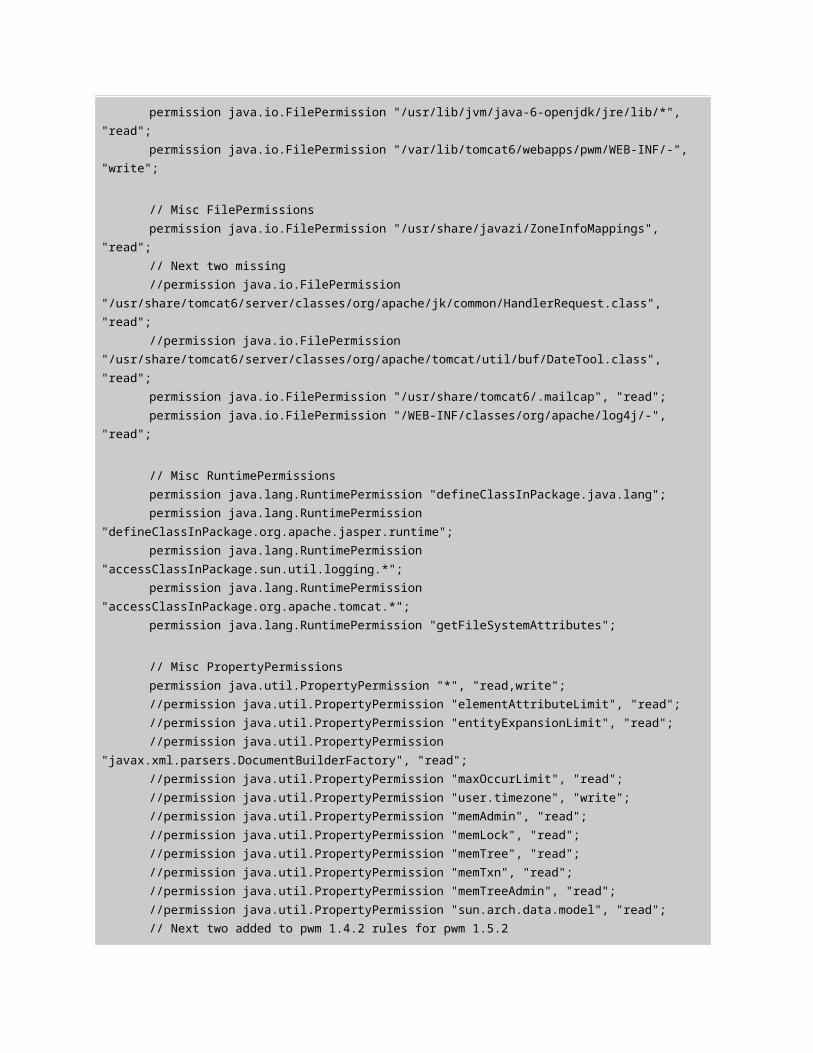
<input type="hidden" name="ctarget" value="<%=ctarget%>"><% } %>
The above text should be inserted somewhere between the existing <form> </form> tags on the login.jsp file.