Embed Size (px)
Citation preview
FOR VERSION 1.6
PSAlterUser
Manual
Page 2
Copyright © 1996, 2001 A. W. Inston and Quite Software
This document is the user manual for PSAlter, a software product. Both manual and software are supplied under the terms of a license, and may only be used or copied according to the terms of the license.
The name PostScript® is used in this document to mean the Post-Script language as defined by Adobe Systems Incorporated in various documents, unless otherwise stated. PostScript is also used as a prod-uct trademark for Adobe Systems’ Implementation of the PostScript language interpreter. While this document may from time to time refer to PostScript interpreters it makes no representations that PSAlter is in any sense the Adobe product defined above.
PostScript and Adobe Type Manager are registered trademarks and Adobe is a trademark of Adobe Systems Inc. Microsoft® is a regis-tered trademark and Windows is a trademark of Microsoft Corpora-tion. Macintosh and LaserWriter are trademarks of Apple Computer, Inc. CorelDRAW is a registered trademark of Corel Corporation. Mac-romedia and Freehand are registered trademarks of Macromedia, Inc. Helvetica, Palatino and Times are trademarks of Linotype AG and/or its subsidiaries. Times New Roman is a trademark of The Monotype Corporation plc.
Table of Contents
Page 3
Table of Contents
Table of Contents . . . . . . . . . . . . . . . . . . . . . . . . . . . . . . . . 3
Part 1: Getting started . . . . . . . . . . . . . . . . . . . . . . . . . . . . . . 9Installing PSAlter . . . . . . . . . . . . . . . . . . . . . . . . . . . . . . . 10
What you will need: system requirements . . . . . 10Running the installation . . . . . . . . . . . . . . . . . . . . 10Uninstalling (removing) PSAlter . . . . . . . . . . . . . 11Support . . . . . . . . . . . . . . . . . . . . . . . . . . . . . . . . . . 11Registration . . . . . . . . . . . . . . . . . . . . . . . . . . . . . . . 12
Introducing PostScript® and PSAlter . . . . . . . . . . . . . . 13What is PostScript? . . . . . . . . . . . . . . . . . . . . . . . . . 13
Level 1, level 2 and level 3 PostScript . . . . . . . . . 14What can PSAlter do? . . . . . . . . . . . . . . . . . . . . . . 15The four modes of operation . . . . . . . . . . . . . . . . 15Example — viewing a PostScript file . . . . . . . . . 16PostScript errors . . . . . . . . . . . . . . . . . . . . . . . . . . . 18Font substitution . . . . . . . . . . . . . . . . . . . . . . . . . . . 20Finding out more . . . . . . . . . . . . . . . . . . . . . . . . . . 20
Other books . . . . . . . . . . . . . . . . . . . . . . . . . . . . . . 21
Part 2: Using PostScript . . . . . . . . . . . . . . . . . . . . . . . . . . . 23Viewing PostScript documents with PSAlter . . . . . . . 24
Zooming options . . . . . . . . . . . . . . . . . . . . . . . . . . 25Handling multiple pages . . . . . . . . . . . . . . . . . . . . 28
Moving whole pages . . . . . . . . . . . . . . . . . . . . . . . 28Moving part of a page . . . . . . . . . . . . . . . . . . . . . . 29
Other options in view mode . . . . . . . . . . . . . . . . . 30Exporting and copying the image . . . . . . . . . . . . 30
Table of Contents
Page 4
Updating the image . . . . . . . . . . . . . . . . . . . . . . . . 31Searching for the picture . . . . . . . . . . . . . . . . . . . . 31
The status line in View Mode . . . . . . . . . . . . . . . . 32Translating PostScript to other formats . . . . . . . . . . . . 34
The formats PSAlter uses . . . . . . . . . . . . . . . . . . . 34Windows Bitmap . . . . . . . . . . . . . . . . . . . . . . . . . . 34TIFF . . . . . . . . . . . . . . . . . . . . . . . . . . . . . . . . . . . . . 34Encapsulated PostScript . . . . . . . . . . . . . . . . . . . . 34
Using Translate . . . . . . . . . . . . . . . . . . . . . . . . . . . . 35A simple translation session . . . . . . . . . . . . . . . . 35Multi-page documents . . . . . . . . . . . . . . . . . . . . . 37Options for cropping the picture . . . . . . . . . . . . . 37
Using translated files . . . . . . . . . . . . . . . . . . . . . . . 38Windows Paint . . . . . . . . . . . . . . . . . . . . . . . . . . . . 38Word for Windows . . . . . . . . . . . . . . . . . . . . . . . . 38CorelDRAW . . . . . . . . . . . . . . . . . . . . . . . . . . . . . . 38
Choosing setup options . . . . . . . . . . . . . . . . . . . . . 38Using the “Where Am I” Function . . . . . . . . . . . . . . . . . 40
Where - text information . . . . . . . . . . . . . . . . . . . . 42Where - path information . . . . . . . . . . . . . . . . . . . 43Where - bounding box . . . . . . . . . . . . . . . . . . . . . . 45Where - recent comments . . . . . . . . . . . . . . . . . . . 47
Setup options for PSAlter . . . . . . . . . . . . . . . . . . . . . . . . 49Imaging setup . . . . . . . . . . . . . . . . . . . . . . . . . . . . . 50
Imaging model . . . . . . . . . . . . . . . . . . . . . . . . . . . . 51Paper size . . . . . . . . . . . . . . . . . . . . . . . . . . . . . . . . 52Custom size option . . . . . . . . . . . . . . . . . . . . . . . . 53Orientation . . . . . . . . . . . . . . . . . . . . . . . . . . . . . . . 54Resolution . . . . . . . . . . . . . . . . . . . . . . . . . . . . . . . . 54Use bounding box for EPS option . . . . . . . . . . . . 55Typical memory sizes per page . . . . . . . . . . . . . . 56
Limits setup . . . . . . . . . . . . . . . . . . . . . . . . . . . . . . . 57Path length . . . . . . . . . . . . . . . . . . . . . . . . . . . . . . . 57Truncate large co-ordinates . . . . . . . . . . . . . . . . . 58
Emulation setup . . . . . . . . . . . . . . . . . . . . . . . . . . . 58Language version choice . . . . . . . . . . . . . . . . . . . 59Garbage collection option . . . . . . . . . . . . . . . . . . . 60
Table of Contents
Page 5
Stricter Checking option . . . . . . . . . . . . . . . . . . . . 60Colour images option . . . . . . . . . . . . . . . . . . . . . . 60Limited level 2 option . . . . . . . . . . . . . . . . . . . . . . 61Advertise level 2 option . . . . . . . . . . . . . . . . . . . . 61Serial/Parallel option (‘ASCII’) . . . . . . . . . . . . . . 61Binary option . . . . . . . . . . . . . . . . . . . . . . . . . . . . . 62BCP option . . . . . . . . . . . . . . . . . . . . . . . . . . . . . . . 62TBCP/PJL option . . . . . . . . . . . . . . . . . . . . . . . . . . 62
Encapsulated PostScript and PSAlter . . . . . . . . . . . . . . 63How an application uses EPS . . . . . . . . . . . . . . . . 63About EPS previews . . . . . . . . . . . . . . . . . . . . . . . 65
EPSI format . . . . . . . . . . . . . . . . . . . . . . . . . . . . . . . 65How PSAlter reads EPS . . . . . . . . . . . . . . . . . . . . . 66
If the page is blank . . . . . . . . . . . . . . . . . . . . . . . . . 66How PSAlter writes EPS . . . . . . . . . . . . . . . . . . . . 67
EPS export wrapper details . . . . . . . . . . . . . . . . . 67EPS export problems . . . . . . . . . . . . . . . . . . . . . . . 69EPS Export is not PostScript conversion . . . . . . 70
PSAlter and fonts . . . . . . . . . . . . . . . . . . . . . . . . . . . . . . . 71What is a font? . . . . . . . . . . . . . . . . . . . . . . . . . . . . 71PostScript fonts . . . . . . . . . . . . . . . . . . . . . . . . . . . . 71Fonts and Windows . . . . . . . . . . . . . . . . . . . . . . . . 72How PSAlter keeps the look of fonts . . . . . . . . . . 74Using Windows fonts to add extra fonts to PSAlter 74Handling missing fonts . . . . . . . . . . . . . . . . . . . . . 80Other font setup options . . . . . . . . . . . . . . . . . . . . 82
Working with user packages . . . . . . . . . . . . . . . . 82Using all ATM fonts . . . . . . . . . . . . . . . . . . . . . . . 82Using font directories . . . . . . . . . . . . . . . . . . . . . . 83Using font metrics . . . . . . . . . . . . . . . . . . . . . . . . . 84
Part 3: Programming PostScript . . . . . . . . . . . . . . . . . . . . 87Introducing the PSAlter Workbench . . . . . . . . . . . . . . . 88
Handling child windows . . . . . . . . . . . . . . . . . . . . 88Using the Workbench — a tutorial . . . . . . . . . . . 89
Table of Contents
Page 6
Starting up . . . . . . . . . . . . . . . . . . . . . . . . . . . . . . . 89Pausing, viewing the image . . . . . . . . . . . . . . . . . 90Watching the image build . . . . . . . . . . . . . . . . . . 91Walking through the program . . . . . . . . . . . . . . . 91Looking at some data . . . . . . . . . . . . . . . . . . . . . . 92Adding a ‘watch’ . . . . . . . . . . . . . . . . . . . . . . . . . . 92Setting a breakpoint . . . . . . . . . . . . . . . . . . . . . . . . 93Some help . . . . . . . . . . . . . . . . . . . . . . . . . . . . . . . . 93
Program and file viewers . . . . . . . . . . . . . . . . . . . . . . . . . 95The main program window . . . . . . . . . . . . . . . . . 95
The current position options . . . . . . . . . . . . . . . . 96The output log (%stdout) . . . . . . . . . . . . . . . . . . . 97Other file windows . . . . . . . . . . . . . . . . . . . . . . . . . 98Hints for large files . . . . . . . . . . . . . . . . . . . . . . . . . 99
Controlling execution . . . . . . . . . . . . . . . . . . . . . . . . . . . 101Running and walking . . . . . . . . . . . . . . . . . . . . . 101Single stepping . . . . . . . . . . . . . . . . . . . . . . . . . . . 103
Image viewers . . . . . . . . . . . . . . . . . . . . . . . . . . . . . . . . . 105Starting image viewers . . . . . . . . . . . . . . . . . . . . 105Overlay options . . . . . . . . . . . . . . . . . . . . . . . . . . 106Selecting a cutout box . . . . . . . . . . . . . . . . . . . . . 107
Data viewers . . . . . . . . . . . . . . . . . . . . . . . . . . . . . . . . . . 109Stack viewers . . . . . . . . . . . . . . . . . . . . . . . . . . . . . 109
Which way up? . . . . . . . . . . . . . . . . . . . . . . . . . . 110Expanding values . . . . . . . . . . . . . . . . . . . . . . . . 110Finding out more about an object . . . . . . . . . . . 111
Watch viewer . . . . . . . . . . . . . . . . . . . . . . . . . . . . 112Array and dictionary viewers . . . . . . . . . . . . . . . 114
Vanishing viewers . . . . . . . . . . . . . . . . . . . . . . . . 114String viewers . . . . . . . . . . . . . . . . . . . . . . . . . . . . 115Graphics state viewers . . . . . . . . . . . . . . . . . . . . . 115
Current font viewer . . . . . . . . . . . . . . . . . . . . . . . 115Path items . . . . . . . . . . . . . . . . . . . . . . . . . . . . . . . 116Graphics state stack . . . . . . . . . . . . . . . . . . . . . . . 116
Current path viewer . . . . . . . . . . . . . . . . . . . . . . . 116Current halftone viewer . . . . . . . . . . . . . . . . . . . 117Font name viewers . . . . . . . . . . . . . . . . . . . . . . . . 117
Table of Contents
Page 7
Operator count viewer . . . . . . . . . . . . . . . . . . . . . 118Memory info viewer . . . . . . . . . . . . . . . . . . . . . . 118Last error info . . . . . . . . . . . . . . . . . . . . . . . . . . . . 119
Breakpoints . . . . . . . . . . . . . . . . . . . . . . . . . . . . . . . . . . . 120The breakpoint control panel . . . . . . . . . . . . . . . 121Operator breakpoints . . . . . . . . . . . . . . . . . . . . . . 121Name breakpoints . . . . . . . . . . . . . . . . . . . . . . . . 123Source breakpoints . . . . . . . . . . . . . . . . . . . . . . . . 124Image breakpoints . . . . . . . . . . . . . . . . . . . . . . . . 125Editing breakpoint options . . . . . . . . . . . . . . . . . 126
Breakpoint actions . . . . . . . . . . . . . . . . . . . . . . . . 126Breakpoint skipping . . . . . . . . . . . . . . . . . . . . . . 127Breakpoint labels . . . . . . . . . . . . . . . . . . . . . . . . . 127
Using executive mode . . . . . . . . . . . . . . . . . . . . . . . . . . . 128Executive mode in a printer . . . . . . . . . . . . . . . . 128Executive mode in PSAlter workbench . . . . . . . 128Combining executive mode with a program window 129Additional notes . . . . . . . . . . . . . . . . . . . . . . . . . . 131
Entering executive mode . . . . . . . . . . . . . . . . . . 131Leaving executive mode . . . . . . . . . . . . . . . . . . . 131Controlling flow of executive commands . . . . 131Side effects . . . . . . . . . . . . . . . . . . . . . . . . . . . . . . 132Changing the command . . . . . . . . . . . . . . . . . . . 132
Restrictions . . . . . . . . . . . . . . . . . . . . . . . . . . . . . . 132Implementation notes for PostScript programmers . 134
Adding header files . . . . . . . . . . . . . . . . . . . . . . . 134Calling additional header files . . . . . . . . . . . . . . 134Error reporting in header files . . . . . . . . . . . . . . 135Additional notes and restrictions . . . . . . . . . . . 135
Device dependent operators . . . . . . . . . . . . . . . . 136The file operator . . . . . . . . . . . . . . . . . . . . . . . . . . 137Windows fonts . . . . . . . . . . . . . . . . . . . . . . . . . . . 137Error handling . . . . . . . . . . . . . . . . . . . . . . . . . . . . 139Execution stack . . . . . . . . . . . . . . . . . . . . . . . . . . . 140
Problems with restore . . . . . . . . . . . . . . . . . . . . . 140
Table of Contents
Page 8
Problems with recursion . . . . . . . . . . . . . . . . . . . 140A note on arithmetic accuracy . . . . . . . . . . . . . . 141Restrictions and limits . . . . . . . . . . . . . . . . . . . . . 141
Missing operators . . . . . . . . . . . . . . . . . . . . . . . . 141Limits . . . . . . . . . . . . . . . . . . . . . . . . . . . . . . . . . . . 142Emulations . . . . . . . . . . . . . . . . . . . . . . . . . . . . . . 142Failures . . . . . . . . . . . . . . . . . . . . . . . . . . . . . . . . . 143
Extensions . . . . . . . . . . . . . . . . . . . . . . . . . . . . . . . 143@popup operator . . . . . . . . . . . . . . . . . . . . . . . . . 143@yes? operator . . . . . . . . . . . . . . . . . . . . . . . . . . . 144Other new operators . . . . . . . . . . . . . . . . . . . . . . 144
Appendices . . . . . . . . . . . . . . . . . . . . . . . . . . . . . . . 145Appendix A: Built-in fonts . . . . . . . . . . . . . . . . . . . . . . 146Appendix B: Keyboard shortcuts . . . . . . . . . . . . . . . . . 149
Common shortcuts . . . . . . . . . . . . . . . . . . . . . . . . 149View mode / Workbench image windows . . . 150Workbench, other than image windows . . . . . . 151

Part 1: Getting started
Installing PSAlter
Page 10
Installing PSAlter
Please make sure you understand the license agreement supplied with PSAlter. In particular, this does not normally allow you to give the software to friends or colleagues to run on their computer, unless you are removing it from your system.
What you will need: system requirementsPSAlter is a program for IBM-compatible PCs running Microsoft Windows 95 or later, including Windows 98, Windows Me, Windows NT 4.0, and Windows 2000.
If you have not used Microsoft Windows, you should become familiar with it before trying to use PSAlter.
You will need a modest amount of hard disk space: about 4 megabytes to install. You will need a CDROM drive to install from CD.
16 megabytes of memory (RAM) is recommended - more will improve performance and allow larger or higher resolution files to be viewed.
To use Windows fonts, PSAlter must have access to the set of fonts which are supplied with Windows. If you have not changed anything, these will be available.
Running the installationNote: if you are not installing from CDROM, for instance if you are installing a download from our web site, please check whether different instructions apply.
You should be running Microsoft Windows (as noted above).
Installing PSAlter
Page 11
Insert the CDROM into the drive. The simplest way to start the installer is to open your My Computer icon, and right click on the icon for the CDROM drive. A menu will appear; simply select Install PSAlter from the menu.
If you can prefer, you can navigate to the folder English\Products\PSAlter on the CDROM, and double click on the setup.exe file.
The setup program will ask a number of questions, then will complete the installation. In some cases it will be necessary to reboot your computer. This only happens when you do not have a software component called the “Windows Installer” already on your system. This is standard with Windows 2000.
After set up is completed, you will see an icon on your desktop. Double click to start PSAlter for the first time. Now, you will be asked to enter your serial number, your name and organisation. Check what you type carefully as it can be difficult to correct later.
Uninstalling (removing) PSAlterYou can easily remove PSAlter from your system in the usual way. Use Settings > Control Panels and select the Add/Remove programs control panel. PSAlter should appear in the list of software you can remove
SupportAt Quite Software, we are proud of the quality of our products and want to help you get the best out of them. We do everything we can to make sure that they will work ‘out of the box’ and that you won’t have to waste any time contacting us for assistance. But things do go wrong, so there are a number of options for getting help.
• On the internet, check our web site for the latest support information. Your problem may already be described on:
http://www.quite.com/psalter/support.htm
Installing PSAlter
Page 12
• If a browser such as Netscape or Internet Explorer is installed on your system, you should be able to use Help | PSAlter home page to reach our pages.
• Send us e-mail to [email protected].
• You can fax us on +44 1631 574089 (in the UK: 01631 574089).
• Phone us on +44 20 8553 6574 (in UK: 020 8553 6574.) We can’t guarantee instant technical support over the phone, and we recommend you use one of the above methods if you can.
• Write to us at Support, Quite Software, Carraig Thura, Lochawe, Argyll, PA33 1AF, United Kingdom.
Try to include relevant details of your problem don’t assume that we will have seen it before. Do check the manual, and the release notes. But also, please don’t e-mail large supporting files except on request. Please include your PSAlter serial number with your message.
We regret that we can’t offer a training service for people learning PostScript. There are a number of excellent ‘teach yourself’ PostScript books available. On the internet, you may find the comp.lang.postscript usenet group a valuable resource; also visit our web site at http://www.quite.com/ps/ for hints, tips, and pointers to other useful sites.
RegistrationPlease register your copy of PSAlter for two key benefits:
• If you lose your serial number we will be able to help you.
• We will be able to e-mail you with news of new releases.
You can register on the web at http://www.quite.com/register.htm.
Introducing PostScript® and PSAlter
Page 13
Introducing PostScript® and PSAlter
What is PostScript?PostScript is a programming language which was specifically designed for use in computer printers. It provides a powerful way of describing what you want on the printed page. It is also portable: you should get identical results printing to a variety of PostScript compatible printers, including the high-end phototypesetters used in professional printing.
PostScript is a trademark of Adobe Systems Inc., who devised the language and continue to own it. However, they do not restrict other companies from using it. (There is one exception to this: only a printer with Adobe’s software should be called a ‘PostScript printer’. All others are ‘PostScript-compatible’.)
PostScript (and PostScript-compatible) printers would be no use unless there was PostScript to send to them. Fortunately, there is now a large body of applications which understand how to write PostScript, and which can therefore print to a PostScript printer. This includes almost all Microsoft Windows and Macintosh applications. If a PostScript program is put in a file rather than sent straight to a printer, it can be printed later, or given to others to print.
You can also look at the contents, and may be able to read some of it. It is usually difficult to understand: most applications write their PostScript for efficient printing, and make no allowance for the fact that someone may want to read it. PostScript can be simple though. The following is a piece of PostScript which could be sent to a printer.
%!72 72 scale % coordinates now in inches
Introducing PostScript® and PSAlter
Page 14
1 1 moveto2 1 lineto 2 2 lineto 1 2 lineto closepathfillshowpage
This will draw a 1 inch (2.5 cm) square black box, 1 inch across and 1 inch up from the bottom left of the page.
Writing PostScript has usually been difficult, mainly because if you make any sort of mistake, the printer doesn’t do anything very helpful. If you’re lucky, a cryptic error message will appear on a control panel for the printer, but that’s about it.
PSAlter makes writing PostScript easy. But you don’t have to write PostScript for PSAlter to be useful. You can put PSAlter to work whether you have a PostScript printer or not.
Level 1, level 2 and level 3 PostScriptLevel 1 PostScript is the PostScript language originally defined by Adobe Systems in 1985. In 1990, Adobe systems released level 2 PostScript, which added a great many new facilities to the language. And in 1999, Adobe released the documentation on level 3 PostScript.
PSAlter does not fully support level 3 PostScript, so you may be wondering how useful it will be.
Because of the huge body of existing PostScript printers, most of them level 1 or 2 and not capable of being upgraded, almost all programs which produce PostScript files can write level 1 PostScript files, or at least level 2. They either always do this, or have an option to do it. So you could almost always produce level 1 or 2 PostScript to work with.
Almost all PostScript level 1 files will work correctly on level 2 printers, since the language was designed to be upwards compatible.
Introducing PostScript® and PSAlter
Page 15
Similarly, most PostScript files made publicly available are level 1 PostScript. This is so they are compatible with existing printers.
There will always be exceptions to this; and some people may not realise they are producing level 3 PostScript which is unsuitable for many printers, if it works with their existing printers.
What can PSAlter do?PSAlter can read PostScript and turn it into pages of pictures, text, or whatever. It can do this because it contains a PostScript-compatible interpreter. This is similar to the software found in a PostScript printer.
Once PSAlter has a page, it can show it on the screen, or write it out to a file. It can write files in a number of formats which can be read by other programs. If a PostScript file consists of more than one page, you can move backwards and forwards to view them in any order.
PSAlter also has a Workbench mode of operation. In this you can view a PostScript program, and watch as it puts a page together. It can be paused at any time, and you can check up on all aspects of its environment — like the current values of variables.
The Workbench helps you write PostScript and get it right. You can also use it to look at other people’s PostScript to see how it works. All of section 3 of this manual, starting on page 87, is concerned with the Workbench.
The four modes of operationOnce PSAlter is started you will see a screen like this one:
You can choose between four modes: View, Translate, Report and Workbench.
View shows each page on the screen as soon as it is completed. You get the chance to zoom in or out (to magnify, or to see the
Introducing PostScript® and PSAlter
Page 16
whole of a large picture), and to ‘export’ in one of the formats used by Translate.
Translate will turn the PostScript into another graphics format, without showing it on the screen. If this is a multi-page document, you will get the chance to save each page.
Report will not show any pictures or PostScript code. Instead it generates a report on the file, including number of pages, fonts used, and any errors. The report may be viewed or copied to the clipboard. (Note that you can also use View | Report in the View or Workbench modes to view the same report).
Workbench lets you write PostScript programs, or open existing ones. You can run them full speed, or one instruction at a time, and can open extra windows to view data and other information. The workbench still allows you to view pages — even as they are being constructed. Using executive mode you can enter extra PostScript commands at any time.
You can also use Setup to change the behaviour of PSAlter. For instance, when PSAlter is first started all pictures will be viewed at 72 dpi (pixels per inch), since this uses less memory. Using Setup it is easy to switch to show more detail.
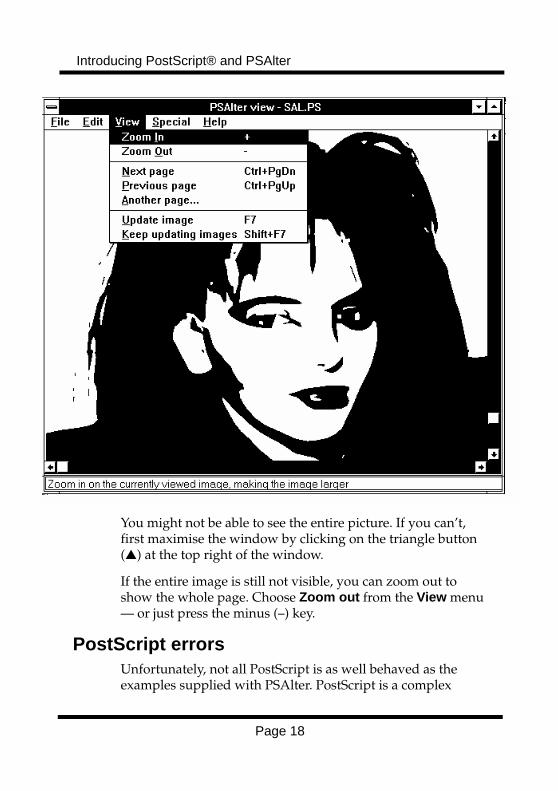
Example — viewing a PostScript filePSAlter includes a number of samples, and we will use one now. Start PSAlter and choose View from the initial screen (click on View, or press the V key).
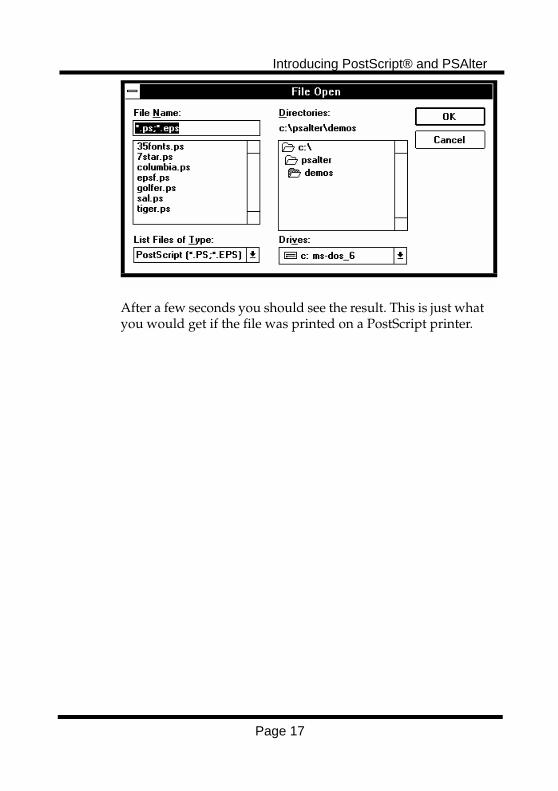
You will now get a File Open box. If you have just installed PSAlter, it will be in the directory c:\psalter\demos and you can just type the file name sal.ps and click OK.
Introducing PostScript® and PSAlter
Page 17
After a few seconds you should see the result. This is just what you would get if the file was printed on a PostScript printer.
Introducing PostScript® and PSAlter
Page 18
You might not be able to see the entire picture. If you can’t, first maximise the window by clicking on the triangle button (▲) at the top right of the window.
If the entire image is still not visible, you can zoom out to show the whole page. Choose Zoom out from the View menu — or just press the minus (–) key.
PostScript errorsUnfortunately, not all PostScript is as well behaved as the examples supplied with PSAlter. PostScript is a complex
Introducing PostScript® and PSAlter
Page 19
programming language, and errors can be made. PostScript differs subtly between different printers, so what works on one may not work on all the others. Also, PostScript can hit various limitations of the interpreters.
Diagnosing PostScript errors is usually a difficult job, partly because of the cryptic messages, and partly because it is very difficult to find exactly where in the program it has gone wrong. PSAlter is designed to help with both of these.
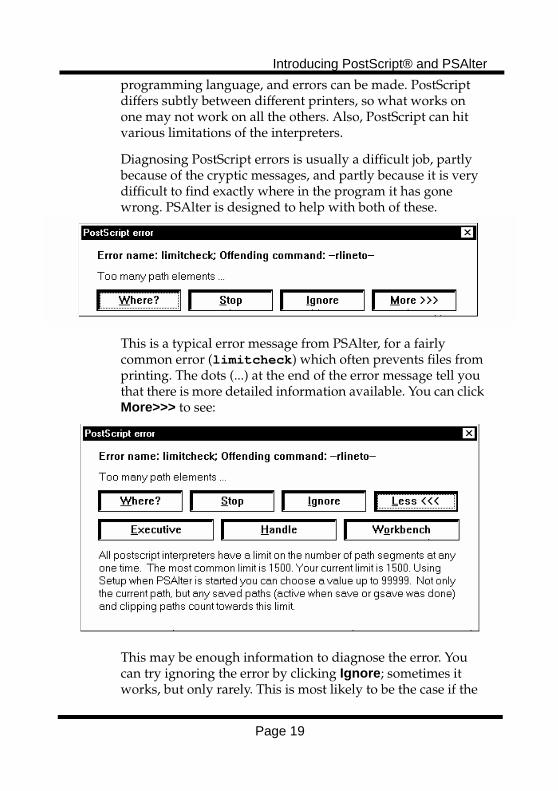
This is a typical error message from PSAlter, for a fairly common error (limitcheck) which often prevents files from printing. The dots (...) at the end of the error message tell you that there is more detailed information available. You can click More>>> to see:
This may be enough information to diagnose the error. You can try ignoring the error by clicking Ignore; sometimes it works, but only rarely. This is most likely to be the case if the

Introducing PostScript® and PSAlter
Page 20
program is using features specific to a printer — say setduplex to ask for printing on both sides of the paper.
More often, you have to click Stop. Handle the same as Stop in most cases — only PostScript programmers are likely to be concerned about the difference. Once you have stopped, you will also be able to see how much, if any, of the page has already been produced.
If you want to find more about the error, you can click Workbench, and you will be able to see exactly what is happening at the time of the error. Once in the workbench you can also enter Executive mode, which may allow you to type individual commands to ‘fix’ the error.
If you are not a PostScript programmer, the most useful function is likely to be the Where button. This aims to help you locate the error in terms which relate to the original document. For details of the Where Am I function, see Using the �Where Am I� Function on page 40.
Font substitutionFont substitution is another area where PSAlter can help you. Most printers will simply substitute the font Courier for any missing font, but with PSAlter you have full control over this process. For instance, you may get a PostScript file which uses the font ‘Stone Sans’. If you don’t have that font, you can tell PSAlter that ‘Arial’ is a good substitute for it. The document will not be perfect, but it will look better than it would if Courier was used. You can try different substitutions until you get an acceptable one. (There are many thousands of fonts, so it is not possible for PSAlter to make this decision for you.)
PSAlter can make use of your Windows fonts. By default, PSAlter uses the fonts already installed in your system to give you the appearance of the basic 35 fonts found in a typical PostScript printer.
Introducing PostScript® and PSAlter
Page 21
Finding out moreIf you want to know more about PSAlter, and its capabilities, you should start with the book currently in your hands! There is also no substitute for exploring PSAlter — look out for these:
• Hints will pop-up the first time you do something. They try to point out when something may not be immediately obvious. If you don’t like hints, just click the No Hints box the first time you see one.
• Read the status line at the bottom of the screen for information, especially when moving the mouse through a menu.
• In the PSAlter workbench, the right mouse button is very important — click it over different types of window, and you will see different pop-up menus.
• PSAlter also has an extensive online help, with more extensive descriptions of many parts of PSAlter.
• For PostScript programmers, and those hoping to find out more about PostScript, PSAlter has context-sensitive help on all level 1 PostScript operators. If you are in the workbench, click the mouse over an operator then press Ctrl+F1. A help window will appear with detailed information, including any notes specific to PSAlter’s implementation. If you are already reading PSAlter’s help, you will see an Operator button that can be used at any time.
PostScript is not a hard language to learn, but it is different from most other programming languages in its approach. It is also very hard to get right unless you have a tool like PSAlter to help you, because of the very limited or non-existent error messages from most printers.
Introducing PostScript® and PSAlter
Page 22
Other booksThe documentation with PSAlter is not intended to be a course or self-teaching guide to PostScript. There are many good books on PostScript available from larger book shops.
The serious programmer may well want the official reference to PostScript. This is in the book PostScript Language Reference Manual, now in its third edition. This 870 page book covers level 1 and level 2 PostScript in great detail, but it is not a good book to learn from (any more than the help in PSAlter is good to learn from). This book is published by Addison Wesley with ISBN 0-201-37922-8.
For working with PSAlter the second edition may be especially helpful. This defines the original level 2 language implemented by PSAlter, and has useful appendixes missing in the third edition. ISBN 0-201-18127-4.
But there are many other books available on PostScript, suitable for learning from. It is probably best to visit a large bookstore and see which book suits your style best.
Introducing PostScript® and PSAlter
Page 23
Part 2: Using PostScript

Viewing PostScript documents with PSAlter
Page 24
Viewing PostScript documents with PSAlter
The previous section, Introducing PostScript and PSAlter, included an example of using PSAlter’s view mode to preview a PostScript file. This section has more detail on using the view mode.
You will find many keyboard shortcuts described in this chapter. They may be difficult to remember, so they are summarised in a table at the end of this book, on page 150.
You can also view documents in Workbench mode, and do much more besides. View mode is designed to be simpler and easier to use than the Workbench, if you are only interested in the end results. You can switch from View mode to Workbench mode at any time by using File | Switch to Workbench mode.
When you select view mode from the PSAlter startup screen, you will be prompted for a file name. Once you have viewed this file, you can view another by using File | Open and Run.
You can also simply view files using ‘drag and drop’. In Windows 3.1 you can drag files from File Manager onto the PSAlter icon in Program Manager, or the window or icon for a running copy of PSAlter. In Windows 95 you can also drag files from the windows desktop.
When you have viewed the image, you might decide to change the setup options. You can do this with Special | Setup. For instance you can change the resolution to see more detail; you can change the orientation if the picture is not upright; or you can switch between colour and black-and-
Viewing PostScript documents with PSAlter
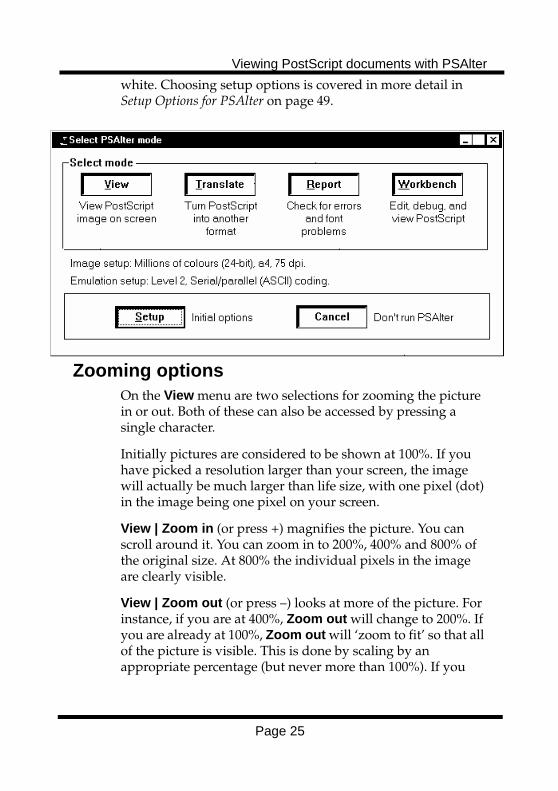
Page 25
white. Choosing setup options is covered in more detail in Setup Options for PSAlter on page 49.
Zooming optionsOn the View menu are two selections for zooming the picture in or out. Both of these can also be accessed by pressing a single character.
Initially pictures are considered to be shown at 100%. If you have picked a resolution larger than your screen, the image will actually be much larger than life size, with one pixel (dot) in the image being one pixel on your screen.
View | Zoom in (or press +) magnifies the picture. You can scroll around it. You can zoom in to 200%, 400% and 800% of the original size. At 800% the individual pixels in the image are clearly visible.
View | Zoom out (or press –) looks at more of the picture. For instance, if you are at 400%, Zoom out will change to 200%. If you are already at 100%, Zoom out will ‘zoom to fit’ so that all of the picture is visible. This is done by scaling by an appropriate percentage (but never more than 100%). If you
Viewing PostScript documents with PSAlter
Page 26
change the size of the PSAlter window, the picture is resized again.
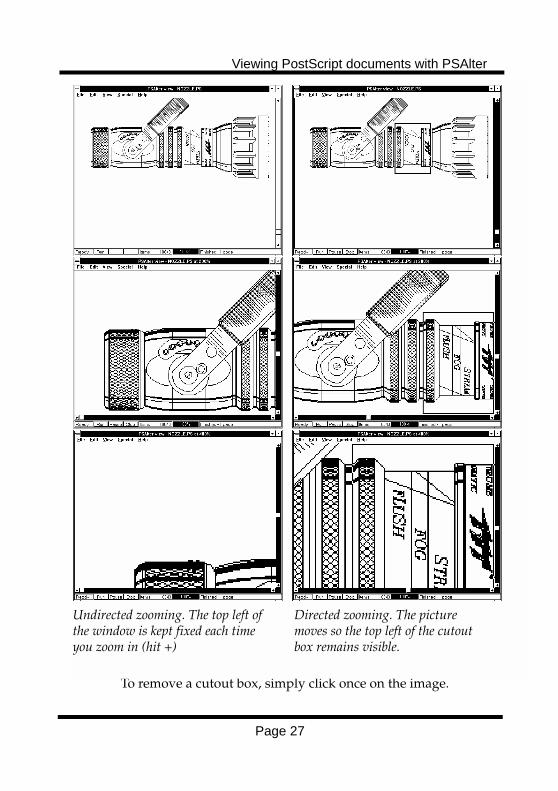
Normally, when you zoom, the top left point of the window stays fixed, and so the detail you wanted to see may not be visible. To get around this you can use directed zooming. Just drag the mouse over the part of the image you are interested in, and a cutout box will appear. Now, each time you zoom, PSAlter will try to keep the detail in the cutout box visible.
Viewing PostScript documents with PSAlter
Page 27
To remove a cutout box, simply click once on the image.
Undirected zooming. The top left of the window is kept fixed each time you zoom in (hit +)
Directed zooming. The picture moves so the top left of the cutout box remains visible.
Viewing PostScript documents with PSAlter
Page 28
When you zoom to fit, some detail may be obscured by areas of black or white, or stripes. This occurs when the image model is black and white (see Setup Options for PSAlter: Imaging Setup on page 50), and is unavoidable (except by running again with a different image model).
Handling multiple pagesMany PostScript files are multi-page documents, and PSAlter will handle these for you. What it will do by default is follow the latest complete page.
• The image will stay blank while the first page is being worked on.
• As soon as the first page is finished, PSAlter will display it for you.
• As each subsequent page is finished, PSAlter will show you that one.
• When the program is complete, PSAlter will show you the final page.
PSAlter will always work through the pages in the order that they would print, and keeps a copy of each page before moving to the next. You can look at any available page.
In other words, you can go back and forwards within the pages already processed, but you cannot go forwards beyond the page PSAlter is currently working on.
As soon as you change page you break the connection with latest complete page, and PSAlter won’t update automatically, though it continues to process pages and hold them for you to look at later. To get this link (with latest page) back, press Ctrl+End.
Moving whole pagesThe View menu includes a number of items for choosing the page to view.
Viewing PostScript documents with PSAlter
Page 29
View | Next page and View | Previous page move you forwards and back within the available pages. As soon as you move pages, PSAlter will no longer keep updating for you. For Next Page you can press Ctrl+PageDn. For Previous page you can press Ctrl+PgUp.
View | Another page allows you to pick any page in the document from a list. It also allows you to choose to zoom out to view the entire page (as if you had used View | Zoom out). A shortcut for this is to press the ‘@’ key (which may also require the Shift key).
When you use Another page you can also choose the special values Current or Latest. Latest connects you back to the latest complete page (same as pressing Ctrl+End).
Current lets you view the current page (rather than the latest complete page). This is not very useful by itself. It moves to the (possibly incomplete) current page, and keeps following whichever page is current. Used with the Keep updating images option (see Updating the images, below) Current is much more useful.
Moving part of a pageWhen you are reading a document containing text, you often won’t be able to see the whole of a page at once (except by zooming out, which may make the text too small to read).
The easiest way to step through a document like this is the PgDn (page down) and PgUp (page up) keys. PgDn shows you the next screen of data, from the same page, or moves to the next page if you are at the bottom of the current page. PgUp moves in the reverse direction.
Normally this skips the top and bottom margin on each page — see Searching for the Picture, on page 31, for more information.
You can also use the arrow keys to move within a page. They never change page. The four arrow keys scroll slowly across
Viewing PostScript documents with PSAlter
Page 30
the page, but by holding down the Ctrl key, they move one entire screen of data.
Other options in view modeExporting and copying the image
You can export images from View mode, as if you had used Translate mode. (Translate mode, and choices in exporting images, are described in more detail in Translating PostScript to other Formats on page 34.) You can either use File | Export this image when looking at a particular page, or use the File | Export image option and pick a page. These are equivalent when there is only one page. You can use this at any time, but you will be warned if you may be about to export a page that is not yet complete.
You can also copy images to the Windows clipboard. Make sure you are viewing the image you want to copy, then choose Edit | Copy (or use Ctrl+C). A preview of the image will appear (the copy dialog), just as when you are exporting. You can choose to copy the bounding box or the whole page, or to use the mouse to cutout part of the image. When you click OK the image is placed on the clipboard.
Memory requirements for copy. Note that when you copy to the clipboard two complete copies of the image are placed in memory, for other applications to paste. One of them uses the same image model as your screen. For example, if the image is monochrome but you have a 256-colour screen, one of the images will be eight times larger. The copy dialog will show you how much memory will be needed.
Some images will be too large to copy, so for these you should use export. Remember that after using Paste in another application the images are still on the clipboard, using memory. To empty it you can use the Clipboard Viewer application, or just Copy a small piece of text.
Viewing PostScript documents with PSAlter
Page 31
Updating the imageNormally, PSAlter will update an image only when it is complete. If a page seems to be taking a long time, you might like to use the View | Update Image menu item (or press F7). This will show you the page as it currently is (and has no effect unless the page is the current page — see Moving whole pages on page 28).
You can also use the View | Keep updating images selection (Shift+F7). Each time you select this it is switched on or off. When switched on, PSAlter repaints the image about once a second as the program is running. This will slow it down enormously, but can be interesting.
There are some complications to this that are only important when viewing multi-page documents.
When you select View | Keep updating images, PSAlter checks to see if you have chosen to view the latest complete page. If so, it switches to follow the current page instead. If it didn’t do this, you would never see the updates being made to the current page.
Similarly, if you switch off View | Keep updating images, and you are following the current page, then PSAlter switches back to following the latest complete page. To avoid a sudden jump, it waits until the current page is complete.
Searching for the picture When working with high resolutions, or zoomed in, it is possible to lose the picture completely. If this happens use Edit | Find picture (or press the Home key). This will first work out the rectangle containing the image, then move to the top left of the rectangle. With an irregular shape, it is possible that you still might not see anything.
You can also think of Find Picture as meaning ‘find first line’ if viewing a text file. There is no menu item for ‘find last line’ but you can press the End key to move to the left of the final line.
Viewing PostScript documents with PSAlter
Page 32
The menu item Edit | Always find picture is switched alternatively on and off each time you use it. If on, the equivalent of Find picture is done each time a page is shown for the first time.
When using PgUp and PgDn to navigate through a multi-page document (see page 29), the Always find picture option is important too; if switched on then PgUp and PgDn ignore the blank margin at the top and bottom of each page. They may also move to ignore the left margin, if that means more text will be visible.
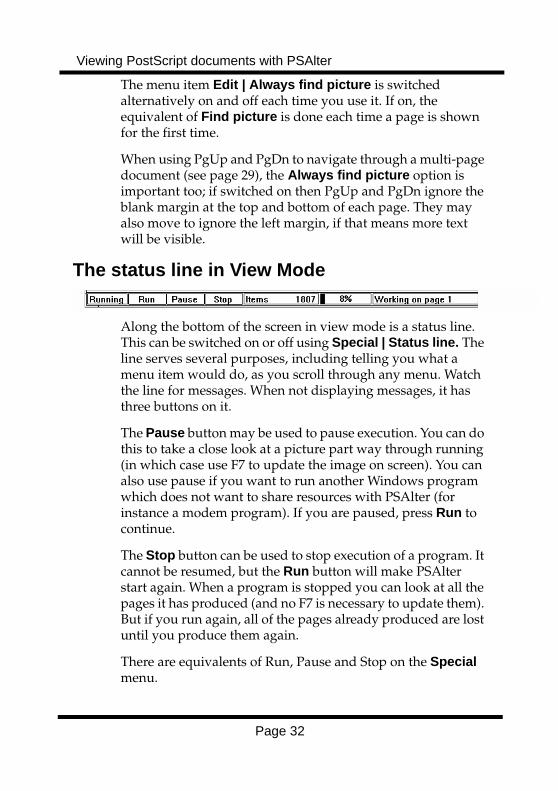
The status line in View Mode
Along the bottom of the screen in view mode is a status line. This can be switched on or off using Special | Status line. The line serves several purposes, including telling you what a menu item would do, as you scroll through any menu. Watch the line for messages. When not displaying messages, it has three buttons on it.
The Pause button may be used to pause execution. You can do this to take a close look at a picture part way through running (in which case use F7 to update the image on screen). You can also use pause if you want to run another Windows program which does not want to share resources with PSAlter (for instance a modem program). If you are paused, press Run to continue.
The Stop button can be used to stop execution of a program. It cannot be resumed, but the Run button will make PSAlter start again. When a program is stopped you can look at all the pages it has produced (and no F7 is necessary to update them). But if you run again, all of the pages already produced are lost until you produce them again.
There are equivalents of Run, Pause and Stop on the Special menu.
Viewing PostScript documents with PSAlter
Page 33
The status line also includes a percentage gauge. This shows how far you are into the PostScript program. Unlike most graphics formats, it is impossible to predict the rate at which PostScript will execute — in some cases it may reach 99% in seconds, then take minutes to complete. Still, the percentage gauge is a useful indication, especially if you are familiar with the type of file you are using.
The percentage gauge changes colour too, as a visual reminder of the program status. It is blue while running, green when finished, red for an error, and grey if paused.
The count of ‘items’ is another measure of how far PostScript has executed. It is how many items (or tokens) have been executed in the program, and should advance even when the percentage bar seems stuck.
Translating PostScript to other formats
Page 34
Translating PostScript to other for-mats
The formats PSAlter usesPSAlter can write files in three formats: Windows Bitmap (BMP), Tagged Image File Format (TIFF), and Encapsulated PostScript (EPS). Each of these has particular uses.
Windows Bitmap This is a simple format designed by Microsoft. It is the format used by Windows Paintbrush and is understood by a wide variety of Windows applications. Support is less common outside Windows.
A windows bitmap file contains a ‘bitmap’, which can be thought of as a rectangular grid divided up into small squares. Each square has a single colour. You can see this when you choose ‘Zoom In’ in Paintbrush.
TIFFTIFF is another bitmap format, though it is more complicated than Windows Bitmap. It is widely understood by graphics applications, both in and out of Windows, though not by Paintbrush.
A disadvantage of TIFF is that there are several allowed ‘varieties’ of TIFF, and not all applications can understand all varieties. PSAlter writes the simplest formats it can, to increase the chance it will be understood.
Encapsulated PostScript An EPS file is a special PostScript file for use primarily in desktop publishing applications (though some word processors can also use EPS). It is a less general format than
Translating PostScript to other formats
Page 35
the others, being aimed at users with PostScript printers, but can also be higher quality than the others. It contains three key things:
• A PostScript program, for printing. This will not normally be printed on a page by itself, but included as part of a larger program to make up a more complicated page.
• Information in the PostScript program telling the application the size and position of the image. It needs this to know how large a space to allow for the image on its page.
• An optional ‘preview’. This is what the application uses to show you the picture on the screen. The preview is good enough quality for the screen, but not for printing.
PSAlter can make EPS files from some, but not all, PostScript files. For instance, it can’t make an EPS file from a multi-page document.
The subject of EPS is covered in more detail in the section Encapsulated PostScript and PSAlter on page 63.
Using TranslateA simple translation session
Translating with PSAlter is quite simple. Just do the following steps:
1 Start PSAlter by double clicking on its icon
2 Click on the Translate button (or press T)
3 You will get a File Open box. Choose the file to be translated
Translating PostScript to other formats
Page 36
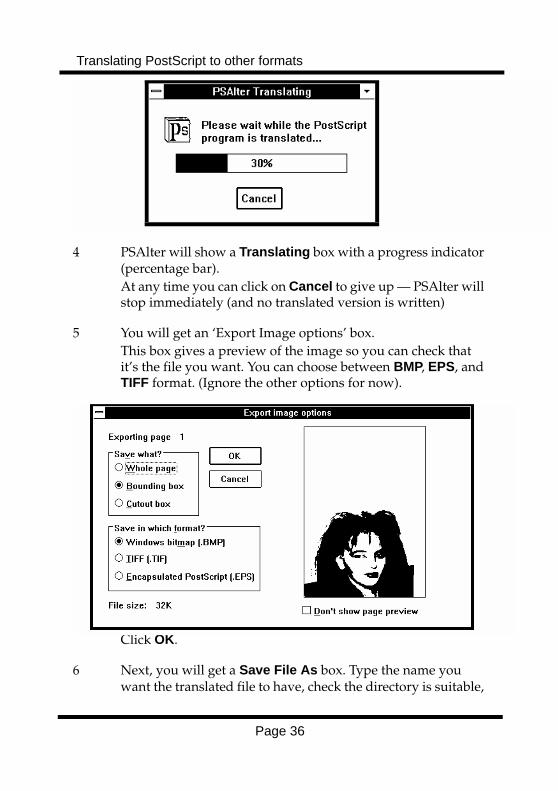
4 PSAlter will show a Translating box with a progress indicator (percentage bar). At any time you can click on Cancel to give up — PSAlter will stop immediately (and no translated version is written)
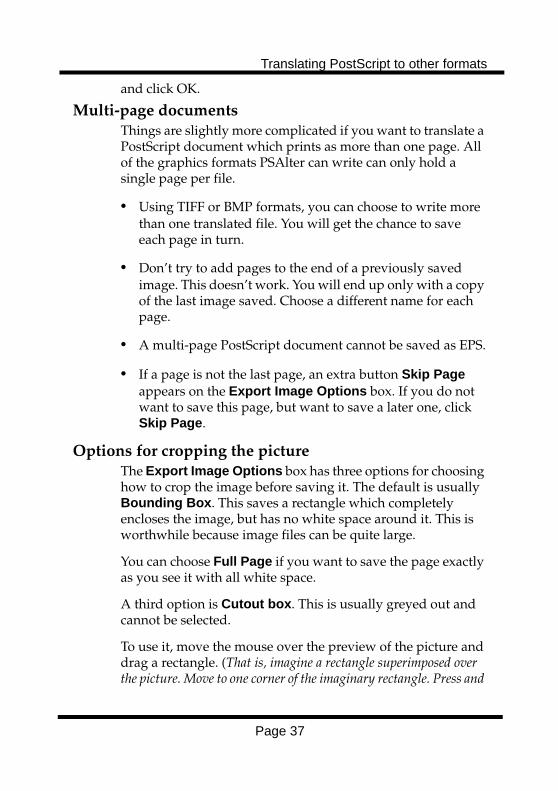
5 You will get an ‘Export Image options’ box. This box gives a preview of the image so you can check that it’s the file you want. You can choose between BMP, EPS, and TIFF format. (Ignore the other options for now).
Click OK.
6 Next, you will get a Save File As box. Type the name you want the translated file to have, check the directory is suitable,
Translating PostScript to other formats
Page 37
and click OK.
Multi-page documentsThings are slightly more complicated if you want to translate a PostScript document which prints as more than one page. All of the graphics formats PSAlter can write can only hold a single page per file.
• Using TIFF or BMP formats, you can choose to write more than one translated file. You will get the chance to save each page in turn.
• Don’t try to add pages to the end of a previously saved image. This doesn’t work. You will end up only with a copy of the last image saved. Choose a different name for each page.
• A multi-page PostScript document cannot be saved as EPS.
• If a page is not the last page, an extra button Skip Page appears on the Export Image Options box. If you do not want to save this page, but want to save a later one, click Skip Page.
Options for cropping the pictureThe Export Image Options box has three options for choosing how to crop the image before saving it. The default is usually Bounding Box. This saves a rectangle which completely encloses the image, but has no white space around it. This is worthwhile because image files can be quite large.
You can choose Full Page if you want to save the page exactly as you see it with all white space.
A third option is Cutout box. This is usually greyed out and cannot be selected.
To use it, move the mouse over the preview of the picture and drag a rectangle. (That is, imagine a rectangle superimposed over the picture. Move to one corner of the imaginary rectangle. Press and
Translating PostScript to other formats
Page 38
hold down the left mouse button, and move the mouse to the opposite corner of the imaginary rectangle. Release the mouse button and you will see the rectangle superimposed.) You can repeat the cutout operation until you are happy with the results.
Using translated filesOnce you have translated a file you can use it in various applications, such as painting programs, desktop publishing and (some) word processors.
There are too many of these to give detailed instructions, but here are some typical examples.
Windows PaintThis is provided with Microsoft Windows. It can read BMP files saved by PSAlter (File | Open). Once opened, you can modify the image with the Paintbrush tools, or print it.
Word for WindowsUse Insert | Picture. BMP, TIFF and EPS files can be placed in a Word document. Some releases of Word have problems with certain TIFF and EPS files. Use an EPS file only if you are printing to a PostScript printer or if you are creating a PDF file with Adobe Acrobat Distiller.
CorelDRAWCorelDRAW can insert bitmapped images in BMP or TIFF format using File | Import. Versions before CorelDRAW 5 cannot, in general, place EPS files. Figures can be scaled, rotated and cropped but not modified.
Choosing setup optionsWhen PSAlter is started, you will see there is a button marked Setup. The options you choose on the setup screen are very important to how PSAlter works.
For instance, you can choose between black and white, grey scale, or several colour options. You can also choose the
Translating PostScript to other formats
Page 39
resolution (dots per inch or dpi). This affects the size of the image and the amount of RAM and disk space needed. If the values chosen are too large, you may not be able to process the image at all.
Always check the ‘memory per page’ figure shown on the setup screen; as a rough guide make sure this is no more than 50% of the amount of RAM installed.
For more details see Setup Options for PSAlter, on page 49.
Using the “Where Am I” Function
Page 40
Using the “Where Am I” Function
One of the most common problems which affects users of PostScript is PostScript errors. The most common question asked once PSAlter has given a detailed explanation of an error is “where am I?”. In a complex document containing many graphics, it may be a struggle to identify the original document or file causing the error. Often, this identification is the most important factor. Once identified, that part of the job can be redone, solving or circumventing the problem.
When PSAlter displays a PostScript error, it now gives a new button Where?
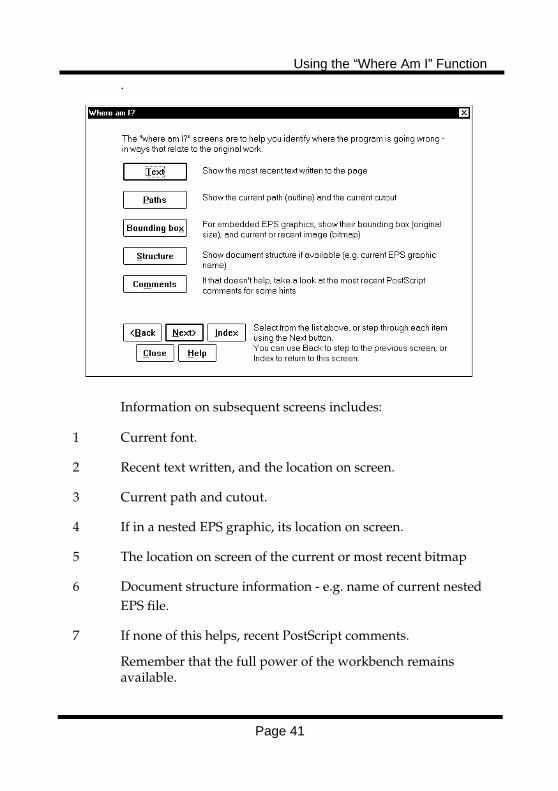
This button opens the first of a series of screens designed to help you identify the source of the error. You can also use View | Where am I? in the Workbench or View mode even if there is no error
Using the “Where Am I” Function
Page 41
.
Information on subsequent screens includes:
1 Current font.
2 Recent text written, and the location on screen.
3 Current path and cutout.
4 If in a nested EPS graphic, its location on screen.
5 The location on screen of the current or most recent bitmap
6 Document structure information - e.g. name of current nested EPS file.
7 If none of this helps, recent PostScript comments.
Remember that the full power of the workbench remains available.
Using the “Where Am I” Function
Page 42
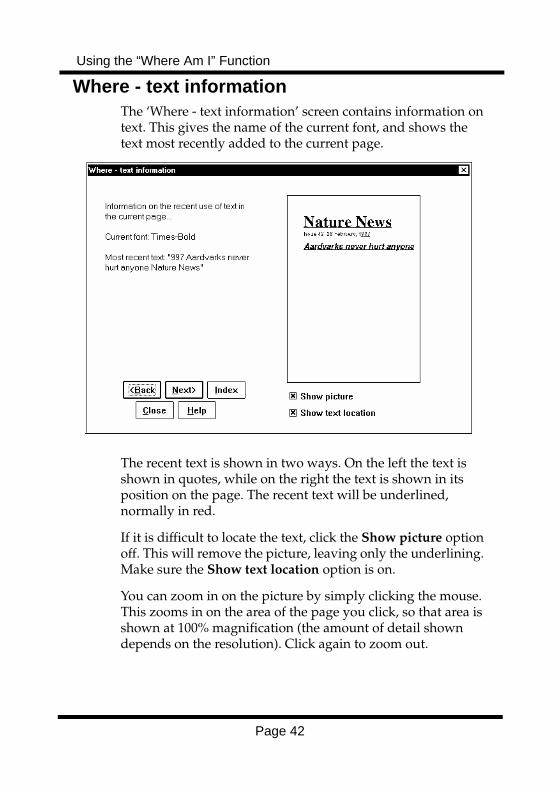
Where - text informationThe ‘Where - text information’ screen contains information on text. This gives the name of the current font, and shows the text most recently added to the current page.
The recent text is shown in two ways. On the left the text is shown in quotes, while on the right the text is shown in its position on the page. The recent text will be underlined, normally in red.
If it is difficult to locate the text, click the Show picture option off. This will remove the picture, leaving only the underlining. Make sure the Show text location option is on.
You can zoom in on the picture by simply clicking the mouse. This zooms in on the area of the page you click, so that area is shown at 100% magnification (the amount of detail shown depends on the resolution). Click again to zoom out.

Using the “Where Am I” Function
Page 43
Notes
1 If there is no text on the current page, this screen will not show anything useful, except possibly the current font.
2 Some programs identify their fonts with unhelpful names like F12.
3 The information shown on the left will only be accurate if the font follows a standard ordering. Some fonts might, for instance, have the letter ‘a’ in the slot we’d expect to find ‘z’.This may include TrueType fonts printed in Windows 95. In these cases, looking at the page should help.
4 As this example illustrates, text is not necessarily written from top to bottom, or even from left to right. In most cases the order makes sense, though.
5 The text shown on the left of the screen does not show any line breaks. Text which is very loosely placed may appear to have spaces in it.
6 The red underlines may appear above rather than below the text, because some applications place their text this way (with the ‘base line’ above).
7 For this (and similar) screens the colours shown can be affected by changing the settings in the Options | Colours menu in the workbench.
Where - path informationThe ‘Where - path information’ screen contains information on paths. As a PostScript file runs it constructs invisible paths which will then be filled in or outlined to make them visible. Paths can also be turned into cutouts, which are like a window

Using the “Where Am I” Function
Page 44
on the page: until the cutout is changed marks cannot be made outside the cutout.
The current path and cutout path are overlaid on a miniature version of the current page. The current path, if any, will usually be shown in red. The cutout path will usually be shown in blue. As with the text information screen, you can clear the Show Picture option to show only the paths. You can also click the mouse to zoom in.
The current path information is most useful in cases where you are getting a limitcheck error, which often means a path is too complicated. It is usually easy to work out which graphic is involved.
The cutout information is more often useful than you might think. Many applications set a cutout to the size of the current graphic before starting it, so this is a valuable way to find out which graphic is in use.
This is thecutout
This portion is the currentpath and can extend outside cutout
Using the “Where Am I” Function
Page 45
Notes
1 If you can’t see the current path (red), this is normal. Many activities, such as drawing text, do not require a path.
2 If you can’t see the cutout path even with the picture off, first look for it around the border of the page. If it is there then no special cutout has been set - each page starts out with a cutout the size of the page.
3 If you still can’t see the cutout path, switch off the Show path option. The path is sometimes directly on top of the cutout, and may obscure it.
4 If you still can’t see the cutout path there probably isn’t one! That is, no marks can currently be made on the page. This is unusual, but won’t cause an error in itself.
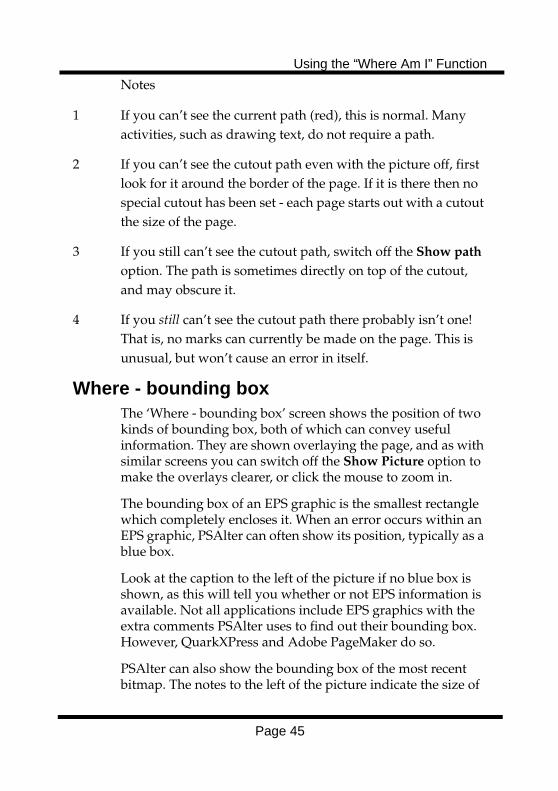
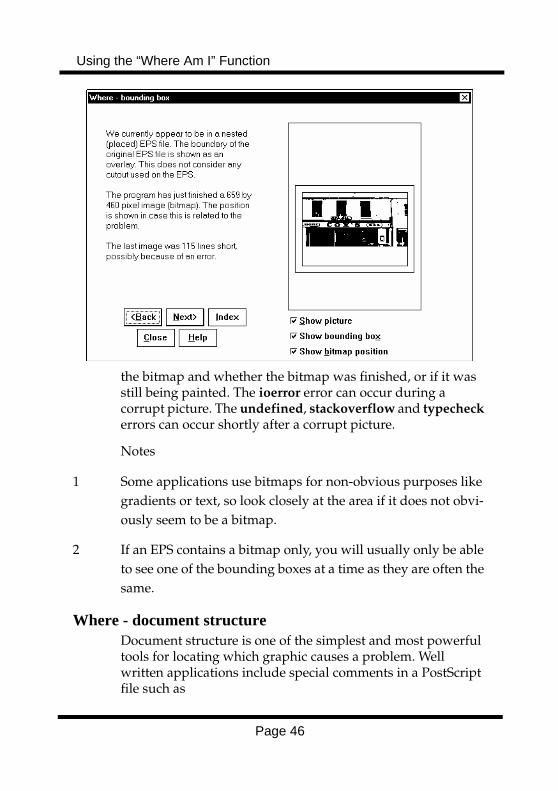
Where - bounding boxThe ‘Where - bounding box’ screen shows the position of two kinds of bounding box, both of which can convey useful information. They are shown overlaying the page, and as with similar screens you can switch off the Show Picture option to make the overlays clearer, or click the mouse to zoom in.
The bounding box of an EPS graphic is the smallest rectangle which completely encloses it. When an error occurs within an EPS graphic, PSAlter can often show its position, typically as a blue box.
Look at the caption to the left of the picture if no blue box is shown, as this will tell you whether or not EPS information is available. Not all applications include EPS graphics with the extra comments PSAlter uses to find out their bounding box. However, QuarkXPress and Adobe PageMaker do so.
PSAlter can also show the bounding box of the most recent bitmap. The notes to the left of the picture indicate the size of
Using the “Where Am I” Function
Page 46
the bitmap and whether the bitmap was finished, or if it was still being painted. The ioerror error can occur during a corrupt picture. The undefined, stackoverflow and typecheck errors can occur shortly after a corrupt picture.
Notes
1 Some applications use bitmaps for non-obvious purposes like gradients or text, so look closely at the area if it does not obvi-ously seem to be a bitmap.
2 If an EPS contains a bitmap only, you will usually only be able to see one of the bounding boxes at a time as they are often the same.
Where - document structureDocument structure is one of the simplest and most powerful tools for locating which graphic causes a problem. Well written applications include special comments in a PostScript file such as
Using the “Where Am I” Function
Page 47
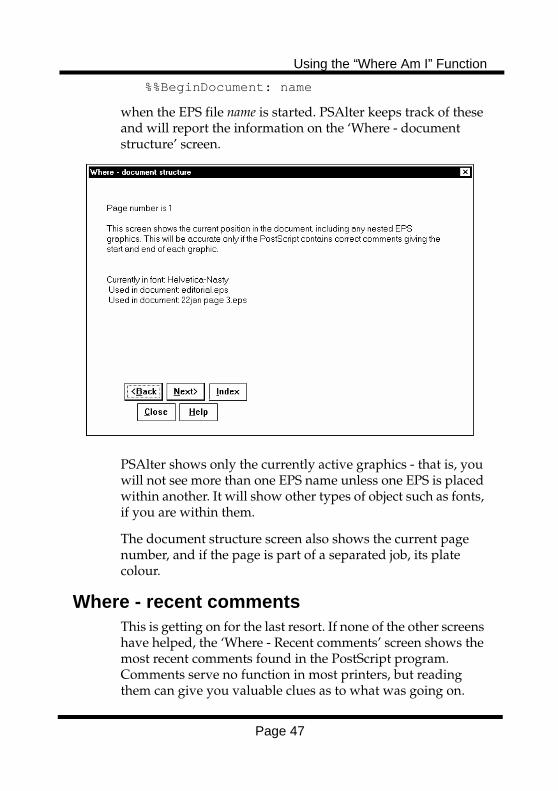
%%BeginDocument: name
when the EPS file name is started. PSAlter keeps track of these and will report the information on the ‘Where - document structure’ screen.
PSAlter shows only the currently active graphics - that is, you will not see more than one EPS name unless one EPS is placed within another. It will show other types of object such as fonts, if you are within them.
The document structure screen also shows the current page number, and if the page is part of a separated job, its plate colour.
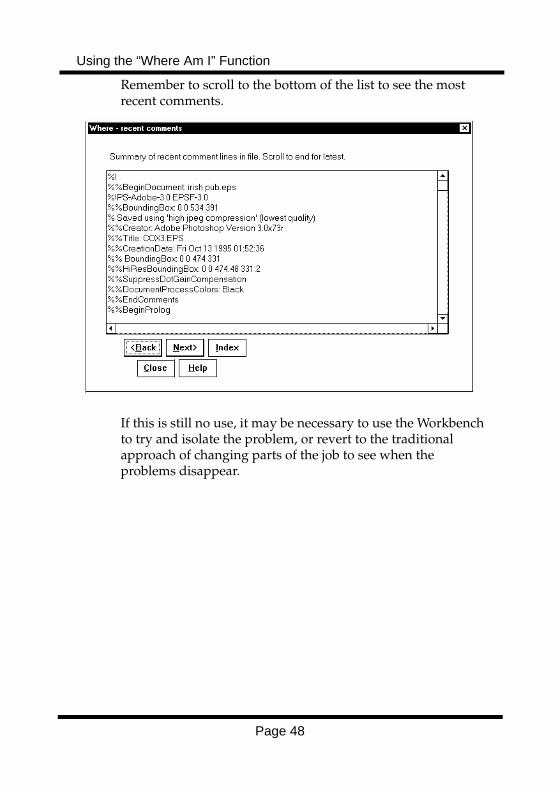
Where - recent commentsThis is getting on for the last resort. If none of the other screens have helped, the ‘Where - Recent comments’ screen shows the most recent comments found in the PostScript program. Comments serve no function in most printers, but reading them can give you valuable clues as to what was going on.
Using the “Where Am I” Function
Page 48
Remember to scroll to the bottom of the list to see the most recent comments.
If this is still no use, it may be necessary to use the Workbench to try and isolate the problem, or revert to the traditional approach of changing parts of the job to see when the problems disappear.
Setup options for PSAlter
Page 49
Setup options for PSAlter
There are a number of options available for setting up PSAlter. It is worth spending some time to understand them, since an inappropriate setting may mean that a PostScript file is not processed correctly, or that your system does not have enough resources to handle it.
The setup options are available when PSAlter is started, by clicking on the Setup button. In Workbench mode, they are also available from the Options menu, and in View mode from the Special menu. There are four setup screens, and you can switch between them by clicking the tabs (buttons) at the top of each screen. The four screens are:
• Imaging setup: defines how your image will look (is it colour?) and how large, among other things. This is the most important to understand.
• Limits setup: adjust limits which could affect whether the file will be processed.
• Emulation setup: various options relating to what kind of PostScript device PSAlter pretends to be (because there is no universal PostScript printer which will work in all cases).
• Fonts setup: this is covered in the separate section, PSAlter and Fonts, on page 71.
When experimenting with PSAlter, it may be convenient to reset the options to their initial values, rather than work out the details of what has been changed. For this reason, each setup screen has a Reset button to allow options to be set back to their initial values. You can reset all the options in a specific category (like imaging setup), or in all categories.
Setup options for PSAlter
Page 50
Imaging setup
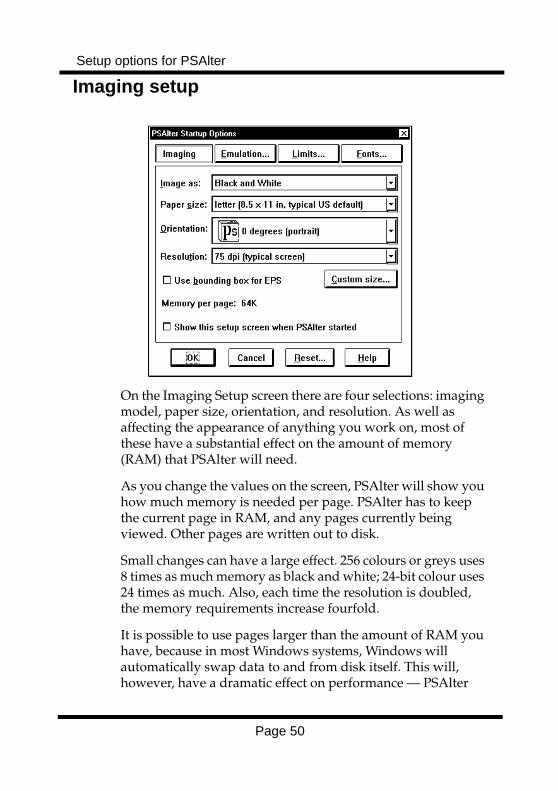
On the Imaging Setup screen there are four selections: imaging model, paper size, orientation, and resolution. As well as affecting the appearance of anything you work on, most of these have a substantial effect on the amount of memory (RAM) that PSAlter will need.
As you change the values on the screen, PSAlter will show you how much memory is needed per page. PSAlter has to keep the current page in RAM, and any pages currently being viewed. Other pages are written out to disk.
Small changes can have a large effect. 256 colours or greys uses 8 times as much memory as black and white; 24-bit colour uses 24 times as much. Also, each time the resolution is doubled, the memory requirements increase fourfold.
It is possible to use pages larger than the amount of RAM you have, because in most Windows systems, Windows will automatically swap data to and from disk itself. This will, however, have a dramatic effect on performance — PSAlter
Setup options for PSAlter
Page 51
may well appear to come to a halt (except that the hard disk will be active). As a very rough guide, any image larger than 50% of available RAM will cause poor performance. Completed pages are written to your TEMP directory (check what this is with the SET command in DOS). If this is on a disk with little free space (especially a RAM disk), PSAlter may fail. At the end of this section, on page 56, is a table of typical sizes, depending on the other settings.
Imaging modelThe imaging model lets you decide what sort of ‘device’ PSAlter is. A particular printer is normally only one thing. For instance, a typical laser printer can print black dots only: if you choose black and white, PSAlter will work like this. On the other hand, some devices can do full colour, and if you want to convert PostScript to graphics for use in other applications, you will probably want to choose colour.
This is what the main colour choices or imaging model are. They not only affect how the image appears on screen, but how it will be exported.
• Black and white uses only black and white for the picture. Areas of grey or colour are represented by more or less black dots. This is how almost all black and white printers work, but the detail can be less clear.
• 256 greys uses only shades of grey for the picture. Colours are turned into grey.
• 256 colours shows up to 256 colours, chosen from a fixed ‘palette’ covering a broad spectrum. This includes over 30 shades of grey, so is a good compromise for most types of work.
• ‘Millions of colours’ or 24-bit colour produces an accurate representation of the colours. If your screen can show 256 or less colours, the image is translated when it is shown, and this can be very slow.
Setup options for PSAlter
Page 52
Not only the appearance, but the memory requirements are dramatically affected by the image model. Most of the image models use one byte for each pixel. However, black and white puts eight pixels in each byte, so is 1/8 the size. And 24-bit colour uses three bytes for each pixel and is 3 times the size, or 24 times the size of black and white.
One other thing affected by the image model is what happens when you zoom out (that is, to view the whole picture, by shrinking it to fit the screen). With most image models, the effect is as you might expect. However, with black and white you will see that shades of grey are simulated by using black and white dots. If you zoom out on this it is possible that either all of the black, or all of the white dots in an area are lost, leading to a loss of detail: in some cases all the detail becomes completely obscured by a black area, or by stripes. This is unavoidable when working with black and white only.
Note that the image model has no effect on the PostScript accepted. In all cases, a colour drawing is accepted, and it will if necessary be turned to greys or black and white. Depending on the setting in the Emulation Setup screen (see page 58), colour images (typically photographs) may or may not be accepted; again the image model makes no difference.
Most modern PCs now have enough memory and processing speed, that starting with version 1.6 “millions of colours” is the default.
Paper sizePostScript was designed for use in printers, and will always work to a specific ‘paper size’. PSAlter allows you to choose between the common paper sizes. In the US, the most common paper size is ‘letter’ (8.5 x 11 inches). In the UK, it is ‘a4’ (210 x 297 mm).
If a program tries to make marks outside the area of the paper, this is ignored. It is not an error, and the only indication that something is wrong is that part (or all) of the image does not print.
Setup options for PSAlter
Page 53
Printers differ in how they handle paper. Some automatically detect what size paper has been loaded. Others assume or have to be told what size. Some printers have more than one paper tray, and can make a choice of sizes available.
To complicate matters still further, the PostScript itself often asks for a specific paper size. For instance, by including the operator ‘letter’ as part of the file, a PostScript file indicates it wants to print on letter sized paper. Again, printers will vary in how they handle this request. Some will simply refuse to print unless the correct sized paper is used.
If a program asks for a specific page size, PSAlter will honour the request, and ignore what you choose in the setup screen. Be aware that this can increase (or decrease) the amount of memory required for each page.
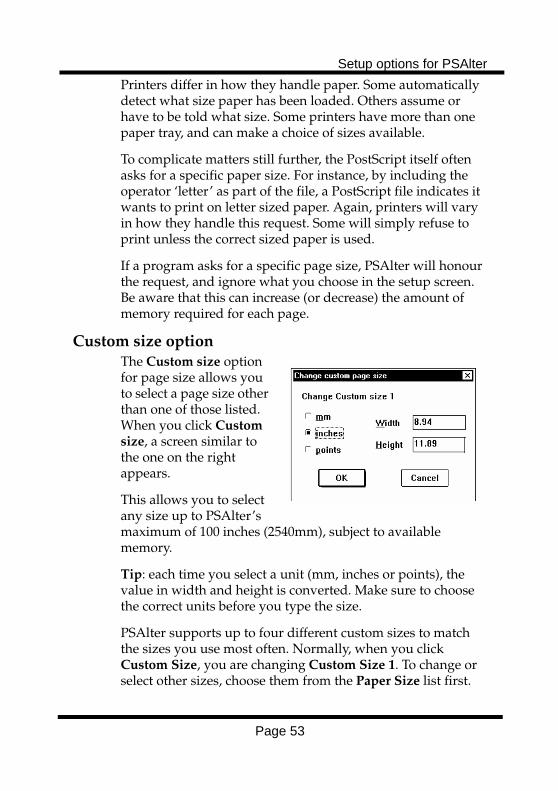
Custom size optionThe Custom size option for page size allows you to select a page size other than one of those listed. When you click Custom size, a screen similar to the one on the right appears.
This allows you to select any size up to PSAlter’s maximum of 100 inches (2540mm), subject to available memory.
Tip: each time you select a unit (mm, inches or points), the value in width and height is converted. Make sure to choose the correct units before you type the size.
PSAlter supports up to four different custom sizes to match the sizes you use most often. Normally, when you click Custom Size, you are changing Custom Size 1. To change or select other sizes, choose them from the Paper Size list first.
Setup options for PSAlter
Page 54
Remember that most PostScript files include page size requests, and PSAlter will always honour these requests. Custom page sizes only affect files with no page size request included, which includes all EPS files. However, custom sizes have no effect if the file is an EPS file and Use Bounding Box for EPS (see below) has been selected.
OrientationConventionally, programs offer two ways to use a piece of paper. The names (corresponding to museum art conventions) are portrait and landscape. Portraits are normally tall and landscapes are normally wide.
Most printers only have a single paper tray, though. When a program prints a ‘landscape’ page it usually does so by rotating the image and printing it sideways. The person picking up the paper will allow for this without a thought.
On screen, it is less easy for you to ignore the fact that an image is sideways. Because of this, PSAlter allows you to decide in advance that the image is to be rotated.
Unfortunately, there is no universal agreement on which way a landscape picture is rotated (clockwise or anticlockwise). So you can choose between rotating by 90 degrees and 270 degrees in Orientation setup. Of the two, 270 degrees seems more often correct.
You can also rotate by 180 degrees: this will turn the image upside-down.
ResolutionThe resolution of an image is how many dots (pixels) per inch it has. Dots per inch is abbreviated dpi. No matter what resolution you choose, PSAlter will usually display it so one pixel in the image matches one pixel on the screen. This means that as you increase the resolution, the image appears to become larger, and you may have to scroll around to find parts of it.
Setup options for PSAlter
Page 55
The resolution has an immediate effect on the amount of memory needed. For instance, using 256 colours, an a4 page at 75 dpi will require 533 kilobytes. But increase resolution to 300 dpi, and you will need 8.5 megabytes per page, too much for many systems to handle. The size of an exported image also depends on the resolution, though usually the white space trimmed from around the image means that the space on disk is reduced
If you are producing pictures for export and eventually printing, you might think you have to choose the resolution of the printer to get good results. If you have a colour printer the memory required can be enormous: for instance a single 24-bit colour page at 720 dpi would require almost 150 megabytes of RAM (and the same amount of disk space to export it). Fortunately this is almost never necessary. For pictures, a resolution of 100 dpi or less is adequate for almost all desktop colour or black and white printers. The only exception to this is text and line art, which benefits from higher resolutions. You should experiment to find the best results for you, and remember that the type of image you work on will make a lot of difference.
Use bounding box for EPS optionIf you select the Use bounding box for EPS option, special processing is performed for each EPS file that you use with PSAlter. All EPS files contain a ‘bounding box’, which gives its size if used as a graphic. When the option is on, the page size is automatically adjusted to contain the bounding box stated in the file.
If you work much with EPS files it is convenient to switch this on. An important disadvantage, however, is that if you intended to print the file directly by sending it to a printer, you will not necessarily see problems that may occur, such as if the image is off the visible page.
Note that PSAlter does not use the file name to decide if a file is EPS. Instead, it looks at the first line, which must contain
Setup options for PSAlter
Page 56
%!PS-Adobe-x.x EPSF-x.x
where x.x is the version number of the file format. If creating PostScript files yourself, make sure to only use this form on files intended for use as EPS graphics.
A small margin is added around the stated size of the EPS file to allow for any overrun. This may result in an unexpected white ‘frame’ around a picture.
Note: Even if this option is off, PSAlter will notice if you are trying to view an EPS file that is too large for the current page size, and give you a chance to increase the size for the current file.
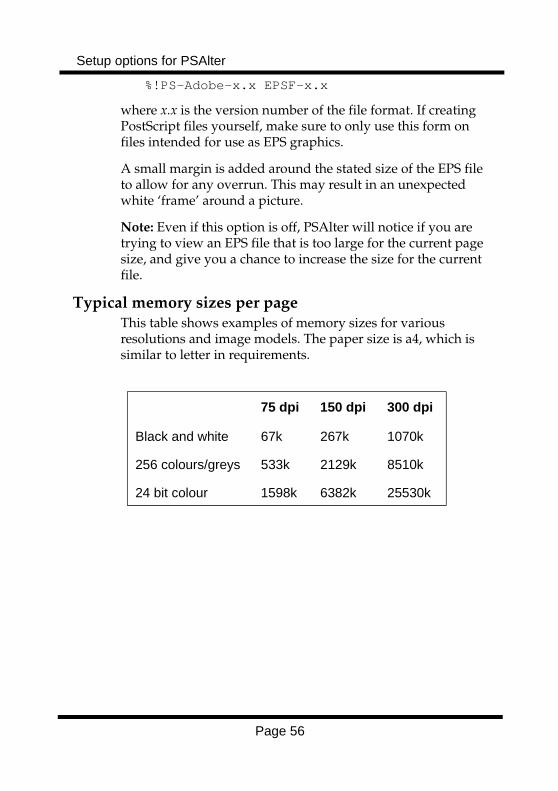
Typical memory sizes per pageThis table shows examples of memory sizes for various resolutions and image models. The paper size is a4, which is similar to letter in requirements.
75 dpi 150 dpi 300 dpi
Black and white 67k 267k 1070k
256 colours/greys 533k 2129k 8510k
24 bit colour 1598k 6382k 25530k
Setup options for PSAlter
Page 57
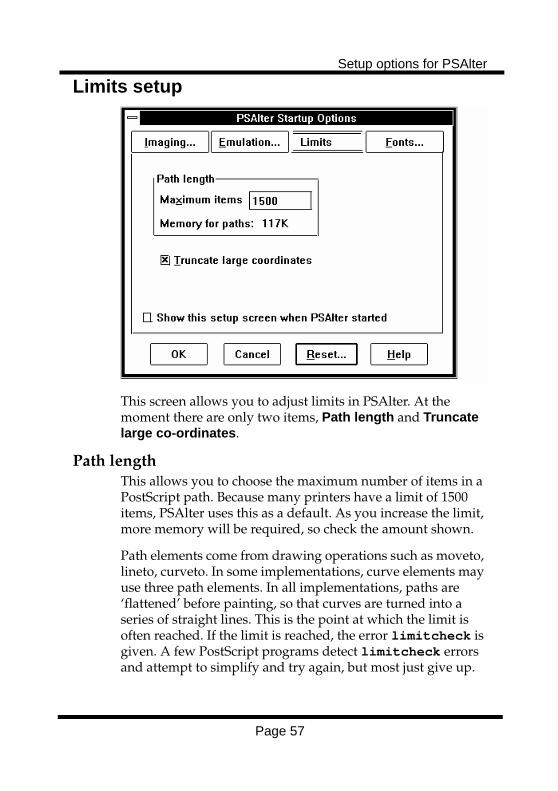
Limits setup
This screen allows you to adjust limits in PSAlter. At the moment there are only two items, Path length and Truncate large co-ordinates.
Path lengthThis allows you to choose the maximum number of items in a PostScript path. Because many printers have a limit of 1500 items, PSAlter uses this as a default. As you increase the limit, more memory will be required, so check the amount shown.
Path elements come from drawing operations such as moveto, lineto, curveto. In some implementations, curve elements may use three path elements. In all implementations, paths are ‘flattened’ before painting, so that curves are turned into a series of straight lines. This is the point at which the limit is often reached. If the limit is reached, the error limitcheck is given. A few PostScript programs detect limitcheck errors and attempt to simplify and try again, but most just give up.
Setup options for PSAlter
Page 58
Because the number of lines needed to approximate curves depends on resolution, on the value of the currentflat operator, and the particular implementation in use, the fact that PSAlter does, or does not, reach this limit cannot be taken as proof that a particular file will succeed, or fail, in printing. But it does give a rough idea.
Truncate large co-ordinatesA few PostScript programs use very large co-ordinates (a metre or so off the page!). PSAlter can only properly handle co-ordinates up to around 30,000 pixels, and this option allows you to decide what to do with larger ones. Truncation allows the program to proceed, and is the default. If truncation is off, an error message is reported, which can aid in diagnosing problems.
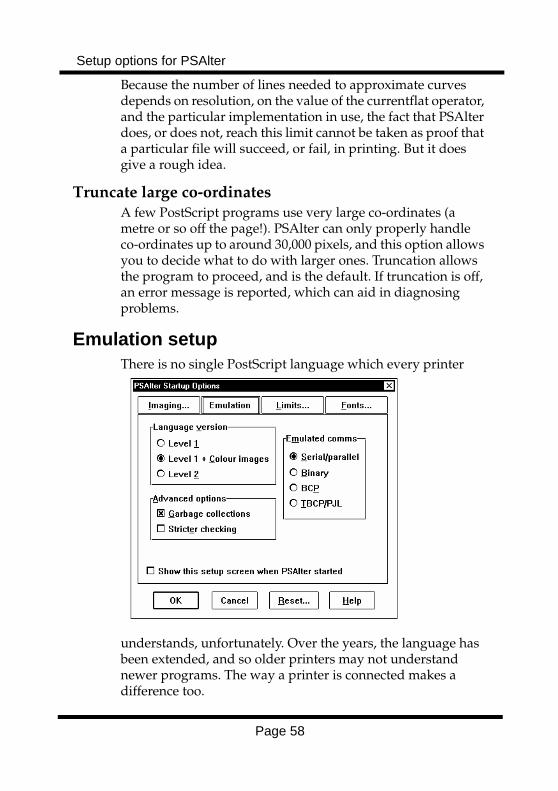
Emulation setupThere is no single PostScript language which every printer
understands, unfortunately. Over the years, the language has been extended, and so older printers may not understand newer programs. The way a printer is connected makes a difference too.
Setup options for PSAlter
Page 59
One set of options controls the PostScript language accepted by PSAlter (those under Language extensions).
The other set of options is less obvious — those under Emulated Comms. There are several different ways a printer can be connected to a computer. In some cases this means that not all characters can be sent to the printer. To get around this, several different ‘protocols’ have been invented. When you get a PostScript file, it may have been written with a particular protocol, and you may have to tell PSAlter which one. For instance, files created for a Hewlett-Packard laser printer may use the ‘TBCP’ protocol, and get errors in PSAlter if any other protocol is chosen.
Language version choicePSAlter supports three variants of the PostScript language, which correspond to commonly available printers.
• Level 1 is the original PostScript printer. A large number of black and white laser printers, including all those made before 1990, and many made since, are level 1. These printers accept requests for coloured text and drawings, but not coloured bitmaps (e.g. photographs). Choose this option if you want to ensure the file works on the widest possible range of printers.
• Level 1 + Colour images corresponds to the older colour printers, including all those produced before 1990. When this option is selected, PSAlter will accept coloured bitmaps. However, this option does not force PSAlter to display in colour; this is controlled by the Imaging Setup. PostScript programmers may wish to note that this option allows PSAlter to use the CMYK extension operators, including the colorimage operator.
• Level 2 was an enhancement to PostScript which Adobe first published in 1990. It includes all of level 1. Recent PostScript printers are level 2, though some manufacturers who do not use Adobe interpreters continue to supply level 1 printers. With this option selected, PSAlter will handle
Setup options for PSAlter
Page 60
the widest range of PostScript files.
Note: In 1997, Adobe announced PostScript 3, which can be thought of as level 3. PSAlter does not support PostScript 3. Just as PostScript level 1 printers are still supported by almost all applications, we believe it will be a long, long time before level 2 is obsolete.
Garbage collection optionGarbage collection enables a feature of level 2 PostScript that allows unused memory to be reclaimed. This reduces memory requirements and can allow a program to run faster. It is largely transparent to the PostScript program.
Because this option is so useful, it is on by default in PSAlter even for level 1, even though a level 1 printer would not do this. Only programmers who are monitoring the exact memory usage of their programs are likely to want to switch this option off.
Stricter Checking optionThere are a few errors which are made in PostScript files and fonts so often that PSAlter is best to ignore them. One example is fonts which are more than 2000 units wide (the widths of two 'M' characters). Such fonts are wrong by the definition of PostScript but they are not uncommon. However, programmers may want to discover these errors, as the file is more likely to fail on some of a wide range of printers.
If this option is set, PSAlter does extra checking, and is recommended for PostScript developers. Anyone just interested in results should leave Stricter Checking switched off. Programmers requiring full details can find them in the on-line help.
Colour images optionIf the colour images option is set, PSAlter will be able to accept and display coloured images (such as photographs).
Setup options for PSAlter
Page 61
They will be displayed in black and white if the imaging setup is not colour.
Not all printers allow this, so the option is off by default. All colour printers, and all level 2 printers allow it. This option does not affect most colour drawings, which all printers accept.
Programmer’s note: Strictly speaking this option allows PSAlter to use the CMYK Extension operators, including the colorimage operator.
Limited level 2 optionIf the limited level 2 option is set, a number of features of PostScript level 2 are allowed. This does not turn PSAlter into a full level 2 emulator, but it can be useful in many cases, as it can cope with the output of many common PostScript drivers. For details of what features are supported, see the PSAlter help file.
Advertise level 2 optionIf limited level 2 is switched on, a number of programs may produce a page containing the message ‘this job requires a level 2 printer’. If this happens, switch on the Advertise Level 2 option. The program will now believe that it has a level 2 printer. (Programmers should note that this causes the languagelevel operator to be set to 2).
The reason this is optional is that there may be programs that work out whether they are on a level 1 or level 2 printer, and work correctly in either case, but if they believe they are on a level 2 printer may cause PSAlter to fail (because its level 2 support is incomplete).
Serial/Parallel option (‘ASCII’)If the serial/parallel option is set, PSAlter behaves like most PostScript printers when connected to a serial or parallel port. Such printers use special characters to control communication — such as Ctrl+D (ASCII 004) for ‘reset’. This is often referred to as the ‘ASCII protocol’. It is not possible to send binary data
Setup options for PSAlter
Page 62
to such a printer. Because many PostScript drivers produce these control characters, this is the default option.
Binary optionIf the binary option is set, PSAlter behaves like a binary printer. Any character can be sent and there are no ‘special’ characters. Because many printer drivers include Ctrl+D at the beginning or end of a job, which will reset a printer on a serial/parallel port (but cause errors on a binary printer), this option is not the default.
Usually, PostScript printers on an Apple Macintosh network are binary. Binary printers are rarer in the IBM-compatible environment.
BCP optionBCP is short for ‘binary communications protocol’. It is similar to the ASCII protocol, but allows binary data to be sent as escaped characters — for instance Ctrl+A followed by D sends the Ctrl+D character, which would otherwise reset the printer.
TBCP/PJL optionTBCP is a more recent development of BCP, and is short for ‘tagged binary communications protocol’. It is similar to BCP, but must be switched on by the sequence Ctrl+A followed by M. If not switched on a printer-specific default is used — PSAlter assumes ASCII. If you see the sequence ‘escape’ followed by ‘%-12345X’, this is a sure sign that TBCP is in use, as this is a TBCP reset string.
In some printers, TBCP is combined with special instructions starting ‘@PJL’. This is a special language devised by Hewlett-Packard for printer control, and it is not PostScript. PSAlter does not understand PJL instructions, but in TBCP mode it will skip and ignore them.
Encapsulated PostScript and PSAlter
Page 63
Encapsulated PostScript and PSAlter
PSAlter can both read and write Encapsulated PostScript (EPS) files. As mentioned in the section on Translating PostScript to other formats on page 34, an EPS file is basically a PostScript file which satisfies several requirements:
• It is only a single page, and has no ‘side effects’ (see EPS Export Wrapper Details on page 67).
• It contains extra information so an application knows the size and position of the image.
• It might have an attached ‘preview’ showing what the PostScript will look like when printed.
The full specification of EPS files is in the PostScript Language Reference Manual, 2nd edition, but you do not need that to use EPS. (Note: it has been removed from the 3rd edition of that book. At the time of writing, you may find a copy among the “tech notes” on http://partners.adobe.com/.)
You should be aware that the term ‘EPS’ is often used freely — and incorrectly — for any PostScript file printed from an application. In practice few applications ‘print’ true EPS, though sometimes it is usable as such. When an application writes EPS it is usually through an Export or Save as EPS option. Provided a file is only one page, PostScript can often turn it into valid EPS — see How PSAlter Writes EPS, below.
How an application uses EPSIn Windows an EPS file is recognised by its .eps type.
Encapsulated PostScript and PSAlter
Page 64
EPS files are intended to be used as a high quality graphics format for users with PostScript printers. It is supported by DTP — Desk Top Publishing — applications and some others (such as some word processors). Most common graphics formats are based on bitmaps, so they are at a fixed resolution. Once this resolution is reached, the quality will not improve. EPS graphics, however, use PostScript instructions so should scale to any size. They are often smaller than a bitmap of the same quality.
Assuming the application is going to print to a PostScript printer, all it has to do when printing an EPS graphic is copy the PostScript out to the printer at the appropriate place in the job. It will include PostScript operators to scale the image and to place it at the required position in the page, but it does not need to understand the PostScript in the EPS file to do that.
Since most applications do not have the ability to interpret PostScript, so they don’t know what the PostScript will look like when printed. This is where the preview part of the file comes in.
EPS files do not have to have a preview. In this case most applications will show a box on the screen to indicate the position of the graphic, but no indication of what it looks like. Most people expect more than this!
The preview is an attached file giving a picture of the graphic. This can be at screen resolution, so the combined size of PostScript and preview can be less than a high resolution bitmap.
As an extra bonus, the preview gives the application a chance to print an EPS graphic to a non-PostScript printer. The quality may not be as good, because the bitmap is typically low resolution, but it is better than nothing.
Sometimes you may be able to print an EPS file directly, especially if it has no preview. But they are not intended for printing; the image may be blank or the wrong size, or nothing may print at all.
Encapsulated PostScript and PSAlter
Page 65
About EPS previewsWe have described previews as an optional file ‘attached’ to an EPS. There are several types of preview, and how they are attached depends on the system in use.
On the Macintosh, a preview is part of the ‘resource fork’ of the file. This means that the basic part of the file contains only PostScript, and the preview follows it around in the resource fork. Macintosh previews are in PICT format, a native Macintosh drawing format.
This is convenient, but only Macintosh files have a separate resource fork, so a different solution is needed for the DOS environment. So, in Windows, a typical EPS has both PostScript and preview combined in the same file. There is a special header which tells applications how to find the two parts of the file. This works fine, but it does mean that a DOS EPS file cannot be sent direct to a printer, since the preview will cause errors.
There are two allowed formats for the preview part of a DOS EPS file. The most commonly found format is a bitmap, TIFF. This is the only format PSAlter will write, at present. The other format is Windows Metafile (WMF). This is a set of drawing instructions which are understood by Windows and can be sent to the screen or printed.
EPSI formatEPSI stands for Encapsulated PostScript Interchange. This is another variant of EPS. It is less powerful than the other formats above (for instance, the image cannot be held in colour), but has the advantage that it is a single file containing only printable characters, which can therefore be transferred to many systems. It is the most common format in Unix systems.
EPSI holds the preview in the PostScript code as a series of comments. These would be ignored if printed, but can be understood by the application using the EPSI file.
Encapsulated PostScript and PSAlter
Page 66
PSAlter can read EPSI files, but it cannot generate them. It sees the preview as comments, just as a printer would.
How PSAlter reads EPSPSAlter can open EPS files to view or translate. It does not use the preview, however. PSAlter recognises a DOS EPS file and effectively removes the preview from the file it is reading.
That is, it becomes invisible; the file is not changed unless you save it. If you do save the file the preview part will be lost, which may not be desirable. There is a reason for this, though: if PSAlter did save the original preview, it might be wrong and misleading if you changed the PostScript code. (You can make a new preview: see the next section).
To avoid accidentally overwriting the preview in an EPS file, while working in the Workbench, PSAlter takes these precautions if you open an EPS with header:
• The File | Save option is disabled; you must use File | Save As to save with a new name (and without preview).
• The automatic prompt asking you if you want to save a modified file if you exit is disabled.
If the page is blankThere is one problem which is specific to reading EPS files. This is where an apparently correct graphic produces a completely blank page. This occurs when the image is painted outside the boundary of the page. As described below, an EPS file includes a %%BoundingBox line with four numbers on it. The bottom left of the image is at the position given by the first two figures. When used by an application, this is automatically adjusted so the image is visible, but when PSAlter reads it, it does not adjust the figures unless the Use Bounding Box For EPS option is in effect (see page 55.)
For instance, a file might have at the start:
%%BoundingBox: 2000 3000 2200 3300
Encapsulated PostScript and PSAlter
Page 67
This indicates a 200-unit square picture starting at (2000,3000). Since each unit is 1/72 inch, this is well outside the visible page.
Fortunately, this can be remedied in PSAlter by the Use Bounding Box For EPS option. Remember that such a fix will not be reflected if the PostScript file is sent directly to the printer.
Some applications habitually produce EPS files outside the visible page, including some releases of CorelDRAW.
How PSAlter writes EPSOnce PSAlter has interpreted a PostScript file, it can export it in a variety of formats, as described in an earlier section. This can be done using the Translate button from the PSAlter startup screen; from an image view by using the right button menu and Export this image, and from the Workbench File | Export menu item.
If you choose to export as EPS, PSAlter writes out the entire PostScript program and the current page image as a DOS EPS with a TIFF preview. The preview reflects the current image model and resolution; if you want a colour preview, for instance, you must choose a colour image model from PSAlter Setup.
The PostScript part of an EPS file must conform to certain requirements, and your original PostScript code may not. To get around this, PSAlter writes extra PostScript before and after the original program — this ‘wrapper’ tries to make sure it is valid EPS.
EPS export wrapper detailsThe wrapper will include a correct EPS PostScript header, looking like this:
%!PS-Adobe-3.0 EPSF-3.0%%BoundingBox: llx lly urx ury
Encapsulated PostScript and PSAlter
Page 68
The first line tells an application this is an EPS file, and what version it is. Some older applications may not understand the latest — version 3 — EPS format.
The second line tells the importing application the bounding box of the picture. The bounding box is the smallest rectangle to completely enclose the picture. (llx,lly) is the lower left of this rectangle and (urx,ury) is the upper right. All measurements are in points (1/72 inch) from the bottom left of the page.
The wrapper will also include a list of all of the fonts required by the page. This is the list of fonts shown in the Workbench by View | Info | Fonts Used.
The original PostScript is enclosed by %%BeginDocument and %%EndDocument lines, which makes sure any lines in the original file are ignored by any application using the EPS.
The wrapper may include extra code if you chose an orientation other than 0 degrees (upright portrait) from PSAlter Setup. The code rotates the PostScript so that it matches the preview.
The wrapper may also include extra code to disable page size operations. An EPS file must not include instructions to set page size — for instance the operator a4 to choose a4 page size. This is because it would override any page size selection made by the application using the EPS, as well as losing any marks placed on the page before the call to a4. However, a great number of PostScript files intended for printing do include page size requests, which would normally make them unsuitable for use as an EPS.
To get around this, PSAlter checks to see if a page size is requested. If it is, the request is processed normally and affects the size of the image which may be cut down for preview. But when the EPS file is exported, PSAlter adds extra lines to the wrapper which have the effect of disabling the page size request that follows. This means PSAlter can make EPS files from more PostScript files than it otherwise could.
Encapsulated PostScript and PSAlter
Page 69
EPS export problemsCreating an EPS file from a PostScript file can have some problems, though PSAlter does its best to minimise them.
Some PostScript files are simply unsuitable for use as EPS files, because they have side-effects on the rest of the page. For instance, they might use the erasepage operator, which would remove any marks made on the page before the EPS was included.
Adobe define a list of ‘forbidden’ and ‘dangerous’ operators for EPS files. PSAlter watches out for them, and will warn you when you export, if any were used. You have the option of exporting anyway, but this should alert you to possible problems later.
Unfortunately, some PostScript can be written to have side effects, without using any of the forbidden operators. In such cases, PSAlter cannot detect this but an EPS file may still not work properly.
Another potential problem is that some applications expect to find additional lines in the EPS header — for instance a list of the colours used in the file — and may not work completely otherwise.
One thing which should not be a problem is ‘Control D’ characters. These are shown as [Ctrl+D] in the Workbench editor and are present in most DOS PostScript files at the beginning and/or the end, to reset the printer. It would not be good if an EPS graphic reset the printer, so PSAlter discards any Ctrl+D characters as it exports. (Note: PSAlter does not discard Ctrl+D characters if the protocol is set to binary in the Emulation setup screen — see page 62).
It is quite possible to use PSAlter to read EPS files it has written, and re-export them, again and again. However, this is not recommended, since each time this is done, another wrapper will be put around the code. These use resources and
Encapsulated PostScript and PSAlter
Page 70
eventually the file may cause errors (such as dictstackoverflow) in PSAlter or in a printer.
EPS Export is not PostScript conversionIn the past few years, a number of programs have appeared or been improved so that they can “open” EPS files rather than (or as well as) place them.
This can lead to interesting problems, because almost all of these programs are limited in the PostScript files they can accept. It is common to accept only level 1 PostScript, for instance. Unfortunately, these programs often give the most minimal error messages too.
Some programs also interpret EPS files when they are placed.
Programs that have some ability to open EPS files include Adobe Illustrator, Adobe Photoshop, Adobe InDesign, CorelDraw, and Macromedia Freehand.
If you have a PostScript or EPS file that cannot be opened by a particular program, it may be tempting to try to use PSAlter to simplify it. In general this will not work, because the same PostScript is still there, in PSAlter’s wrapper.
However, if an application only places EPS files, but places a grey box only - this is where EPS export may be very useful.
PSAlter and fonts
Page 71
PSAlter and fonts
As it is supplied, PSAlter will produce reasonable results for each of the 35 fonts which are built into a PostScript printer. It uses the fonts already installed into your Windows system to do this, and you do not have to change anything.
PSAlter does give extensive control over fonts, to cope with a variety of situations.
What is a font?A ‘font’, as we use it here, is a collection of character shapes. These are used to produce the text which PSAlter shows as part of pages. Most PostScript documents contain text, so a proper handling of fonts is essential.
There are many different fonts. They are grouped into families. For instance, the Times family includes at least four variants: roman (the normal characters), italic, bold, and bold italic. Some systems synthesise italic by slanting characters, and bold by overprinting. PostScript does not do that: it has four sets of outlines for the Times family, with subtly different shapes and spacing.
PostScript fontsPostScript supports two main types of fonts: type 1 and type 3. To the user there is no difference, except that type 1 fonts are often better quality. Type 3 fonts are only rarely found these days.
PostScript fonts do not come in specific sizes. Instead, the outlines they describe are used to make characters at whatever size is required.
PSAlter and fonts
Page 72
All fonts used with PostScript have names. For instance, the Times family has four members, and their names are Times-Roman, Times-Italic, Times-Bold and Times-BoldItalic. A PostScript program must use the names exactly right (including all punctuation and upper/lower case).
The fonts which a PostScript program uses in a printer come from three places:
• The font can be built-in to the printer.
• The font can be ‘downloaded’ to the printer — that is previously sent to the printer and held in its memory until switched off. Some printers have hard disks which allow downloaded fonts to be kept permanently.
• The font can be included in the program. An included (‘embedded’) font can only be used by that program, as it is thrown away when the program finished.
If a program uses a font which cannot be found, a printer will usually substitute a different built-in one. Most often, this is Courier, which will often give a completely different look to a document. Missing fonts are an all-too common problem when PostScript is moved between printers.
PostScript printers most commonly have 35 fonts, listed in Appendix A on page 146. Almost all have a basic set of 13 fonts. These are the families Times, Helvetica and Courier (each in four variations), and the font Symbol, which contains mathematical and Greek symbols. As PSAlter is initially installed it provides the 35 fonts and no others. However, if a font is embedded, PSAlter will make use of it, in the same way a printer would.
Fonts and WindowsPSAlter will use the fonts in your Windows system in making up its pages. An understanding of Windows fonts is helpful in setting up PSAlter to use fonts properly. Windows supports several different types of fonts. Some of them (‘screen fonts’)
PSAlter and fonts
Page 73
are designed only for use on screen at a single size. PSAlter cannot use these on a page.
More useful are TrueType fonts, which were introduced with Windows 3.1. These are similar to PostScript fonts, in that they contain a set of outlines and can be scaled to any size.
Windows is supplied with three main families of TrueType fonts: Times New Roman (similar to the PostScript font family Times), Arial (similar to Helvetica) and Courier New (similar to Courier).
Although PostScript and TrueType fonts often appear the same, they rarely have the same names. This is a major complication in using Windows TrueType fonts to substitute for missing PostScript fonts.
Windows versions before Windows 2000 cannot use PostScript fonts directly. However, there is an add-in product called Adobe Type Manager (ATM). This can use PostScript type 1 fonts, provided they are prepared in a special way. The PostScript fonts can then be used like any other Windows font.
This is especially useful to Windows users with PostScript printers, as Windows will automatically include any of the fonts which are required into PostScript sent to a printer. (TrueType fonts are also included, but they normally have to be translated into a PostScript font as part of the printing process.)
PSAlter works with ATM, if it is present, to use PostScript fonts installed in your Windows system. PSAlter does not require ATM, however, as it can work entirely with TrueType fonts.
If ATM is present but you do not want PSAlter to use it, you can prevent this. Click Windows on the Font Setup screen to get the option to switch off the Use ATM Fonts option. On some windows systems, PSAlter will determine that it does not need to use ATM and this option may be disabled.
PSAlter and fonts
Page 74
How PSAlter keeps the look of fontsPSAlter can keep the appearance of a document, even though it may not have all of the fonts used in it. It does this using three techniques, which are automatic for the basic 35 fonts.
1 Choose a similar looking font. PostScript has built-in lists of what fonts to substitute if the requested font is not available. These include fonts available in several popular font packages, so if they are installed, PSAlter will be able to make use of them with no changes. You can build your own lists for fonts beyond the 35.
2 Adjust character spacing. The spacing of letters is potentially different for each font. If another font is substituted without adjusting the spacing, this will mean that the characters may not fit the gap left for them on the page. There may be extra spaces between letters, or letters may overlap. PSAlter has built-in tables of the sizes of each character in the basic 35 fonts. These ensure that characters fit the space available to them. You can add tables for other fonts.
3 Horizontal scaling. In some cases the substitute font is too wide or too narrow to be used effectively, even if the character spacing is adjusted. This is especially noticeable if the substi-tute characters are too wide, and overlap. To get over this, PSAlter can stretch or shrink characters horizontally. This is done for the entire font, not individual characters, but usually produces reasonable results. For instance, if the font Helvetica-Narrow is not available, PSAlter may use Arial at 82% of its width.
These techniques are acceptable in many cases. However, they will not look exactly the same as the original font, and for some applications close is not good enough.
The accompanying file addfonts.txt (described in Appendix A on page 146) lists the options which you have for providing fonts which are a perfect match. Appendix A also shows samples of the effect of substitution.
Using Windows fonts to add extra fonts to
PSAlter and fonts
Page 75
PSAlterIf you have a windows font which you know is a good match for a PostScript font used in a document you can add it. Once you have done this, PSAlter may no longer be a good tool for previewing before printing, unless the font is also in your printer, simply because it will not highlight missing fonts which will cause trouble when printed.
Use these steps to add a Windows font for PSAlter.
1 Install the font in Windows. For TrueType fonts, this is done with the Fonts Control Panel. For PostScript fonts, if ATM is installed, this is done with the ATM control panel. Note that Windows places an upper limit on the number of fonts which can be used; above that Windows may not work properly. This will be different for each person, but may be around 300–400 fonts. (Note: PSAlter can use PostScript fonts without install-ing them in Windows, but this will not produce such good results).
2 Enter the Font Setup dialog. This is done from the startup screen (Setup button), from the Options | Font Setup menu selection in the workbench, or from the Special menu in view mode.
For now, we are concerned with the buttons down the left side of the Font setup dialog (Font sources).
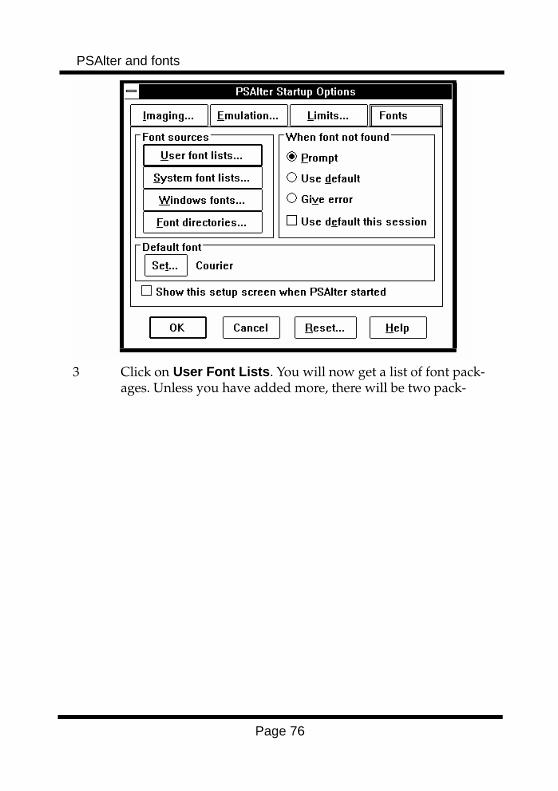
PSAlter and fonts
Page 76
3 Click on User Font Lists. You will now get a list of font pack-ages. Unless you have added more, there will be two pack-
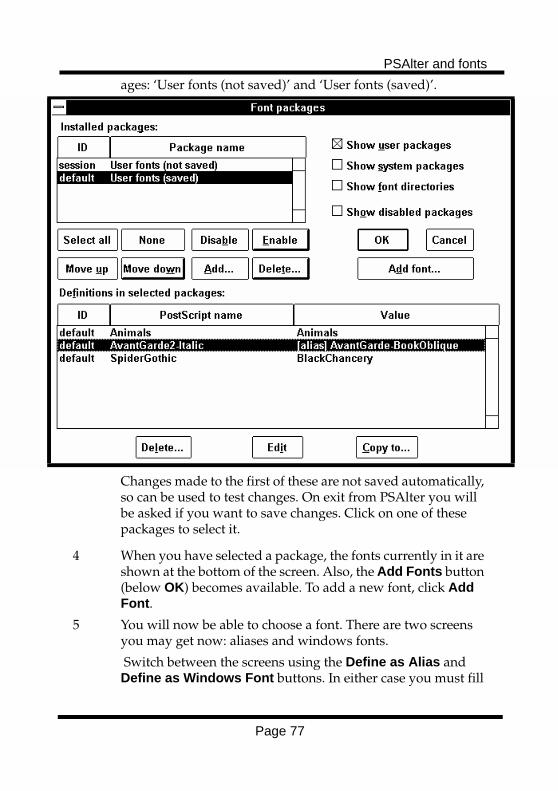
PSAlter and fonts
Page 77
ages: ‘User fonts (not saved)’ and ‘User fonts (saved)’.
Changes made to the first of these are not saved automatically, so can be used to test changes. On exit from PSAlter you will be asked if you want to save changes. Click on one of these packages to select it.
4 When you have selected a package, the fonts currently in it are shown at the bottom of the screen. Also, the Add Fonts button (below OK) becomes available. To add a new font, click Add Font.
5 You will now be able to choose a font. There are two screens you may get now: aliases and windows fonts.
Switch between the screens using the Define as Alias and Define as Windows Font buttons. In either case you must fill
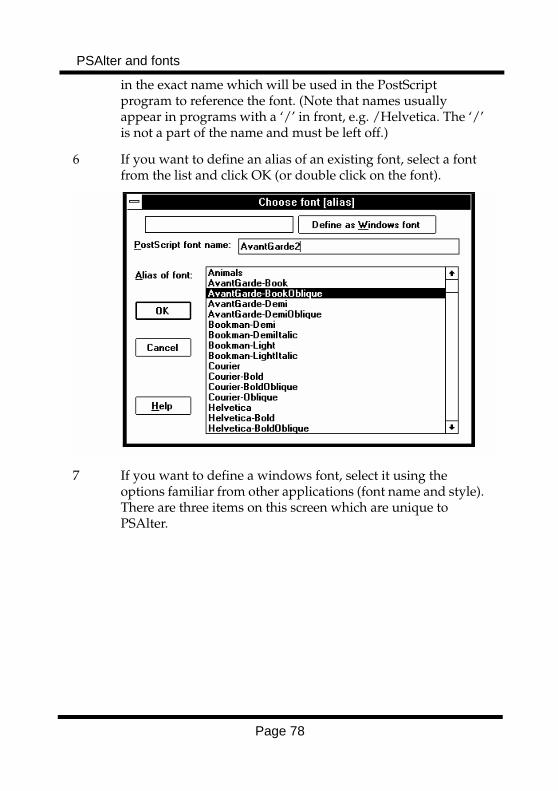
PSAlter and fonts
Page 78
in the exact name which will be used in the PostScript program to reference the font. (Note that names usually appear in programs with a ‘/’ in front, e.g. /Helvetica. The ‘/’ is not a part of the name and must be left off.)
6 If you want to define an alias of an existing font, select a font from the list and click OK (or double click on the font).
7 If you want to define a windows font, select it using the options familiar from other applications (font name and style). There are three items on this screen which are unique to PSAlter.
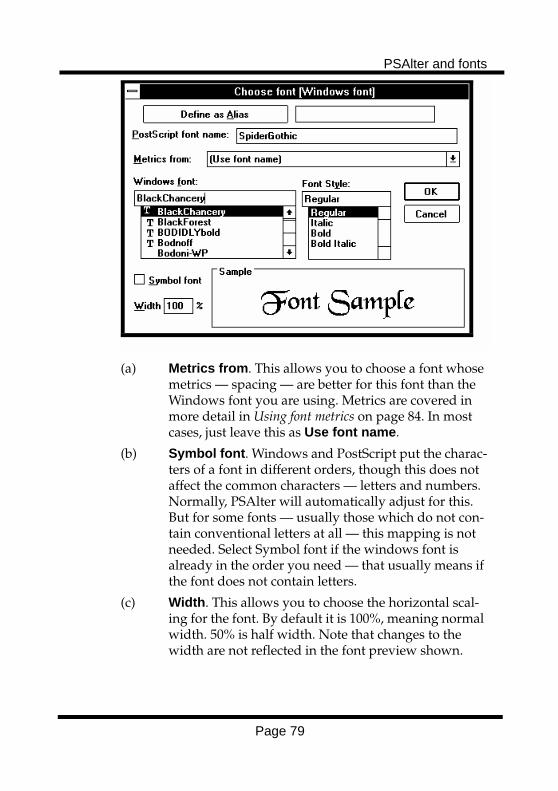
PSAlter and fonts
Page 79
(a) Metrics from. This allows you to choose a font whose metrics — spacing — are better for this font than the Windows font you are using. Metrics are covered in more detail in Using font metrics on page 84. In most cases, just leave this as Use font name.
(b) Symbol font. Windows and PostScript put the charac-ters of a font in different orders, though this does not affect the common characters — letters and numbers. Normally, PSAlter will automatically adjust for this. But for some fonts — usually those which do not con-tain conventional letters at all — this mapping is not needed. Select Symbol font if the windows font is already in the order you need — that usually means if the font does not contain letters.
(c) Width. This allows you to choose the horizontal scal-ing for the font. By default it is 100%, meaning normal width. 50% is half width. Note that changes to the width are not reflected in the font preview shown.
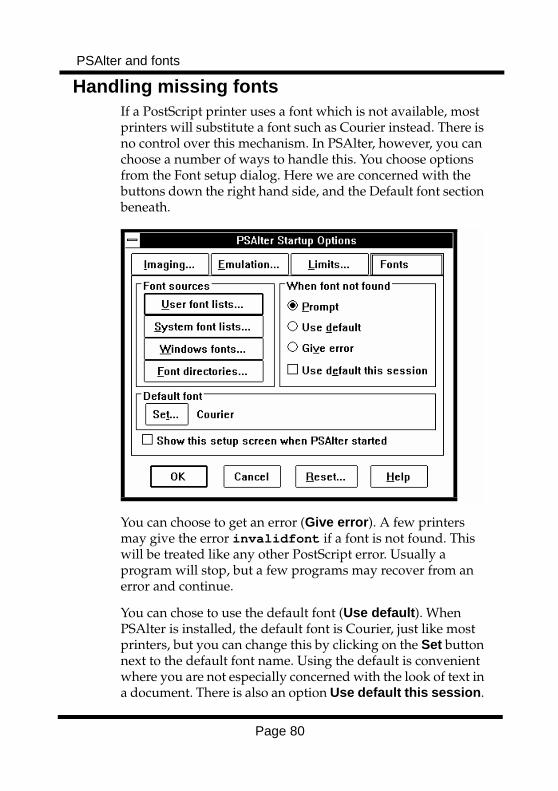
PSAlter and fonts
Page 80
Handling missing fontsIf a PostScript printer uses a font which is not available, most printers will substitute a font such as Courier instead. There is no control over this mechanism. In PSAlter, however, you can choose a number of ways to handle this. You choose options from the Font setup dialog. Here we are concerned with the buttons down the right hand side, and the Default font section beneath.
You can choose to get an error (Give error). A few printers may give the error invalidfont if a font is not found. This will be treated like any other PostScript error. Usually a program will stop, but a few programs may recover from an error and continue.
You can chose to use the default font (Use default). When PSAlter is installed, the default font is Courier, just like most printers, but you can change this by clicking on the Set button next to the default font name. Using the default is convenient where you are not especially concerned with the look of text in a document. There is also an option Use default this session.
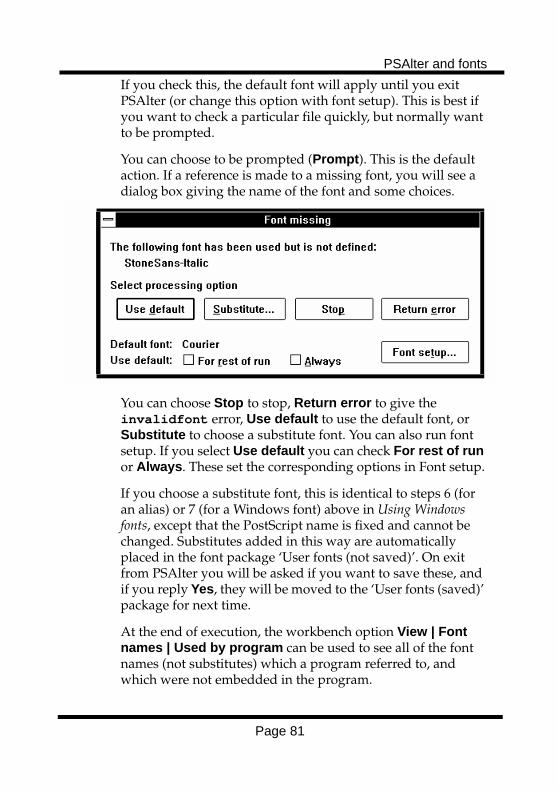
PSAlter and fonts
Page 81
If you check this, the default font will apply until you exit PSAlter (or change this option with font setup). This is best if you want to check a particular file quickly, but normally want to be prompted.
You can choose to be prompted (Prompt). This is the default action. If a reference is made to a missing font, you will see a dialog box giving the name of the font and some choices.
You can choose Stop to stop, Return error to give the invalidfont error, Use default to use the default font, or Substitute to choose a substitute font. You can also run font setup. If you select Use default you can check For rest of run or Always. These set the corresponding options in Font setup.
If you choose a substitute font, this is identical to steps 6 (for an alias) or 7 (for a Windows font) above in Using Windows fonts, except that the PostScript name is fixed and cannot be changed. Substitutes added in this way are automatically placed in the font package ‘User fonts (not saved)’. On exit from PSAlter you will be asked if you want to save these, and if you reply Yes, they will be moved to the ‘User fonts (saved)’ package for next time.
At the end of execution, the workbench option View | Font names | Used by program can be used to see all of the font names (not substitutes) which a program referred to, and which were not embedded in the program.
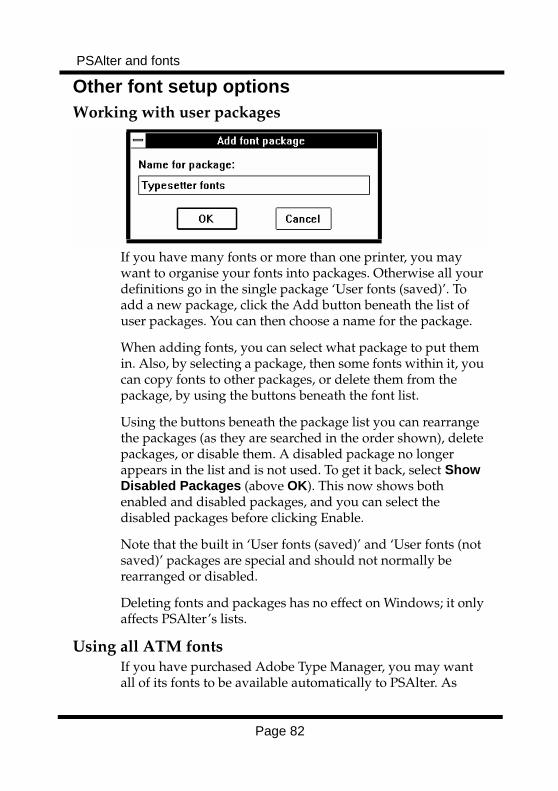
PSAlter and fonts
Page 82
Other font setup optionsWorking with user packages
If you have many fonts or more than one printer, you may want to organise your fonts into packages. Otherwise all your definitions go in the single package ‘User fonts (saved)’. To add a new package, click the Add button beneath the list of user packages. You can then choose a name for the package.
When adding fonts, you can select what package to put them in. Also, by selecting a package, then some fonts within it, you can copy fonts to other packages, or delete them from the package, by using the buttons beneath the font list.
Using the buttons beneath the package list you can rearrange the packages (as they are searched in the order shown), delete packages, or disable them. A disabled package no longer appears in the list and is not used. To get it back, select Show Disabled Packages (above OK). This now shows both enabled and disabled packages, and you can select the disabled packages before clicking Enable.
Note that the built in ‘User fonts (saved)’ and ‘User fonts (not saved)’ packages are special and should not normally be rearranged or disabled.
Deleting fonts and packages has no effect on Windows; it only affects PSAlter’s lists.
Using all ATM fontsIf you have purchased Adobe Type Manager, you may want all of its fonts to be available automatically to PSAlter. As
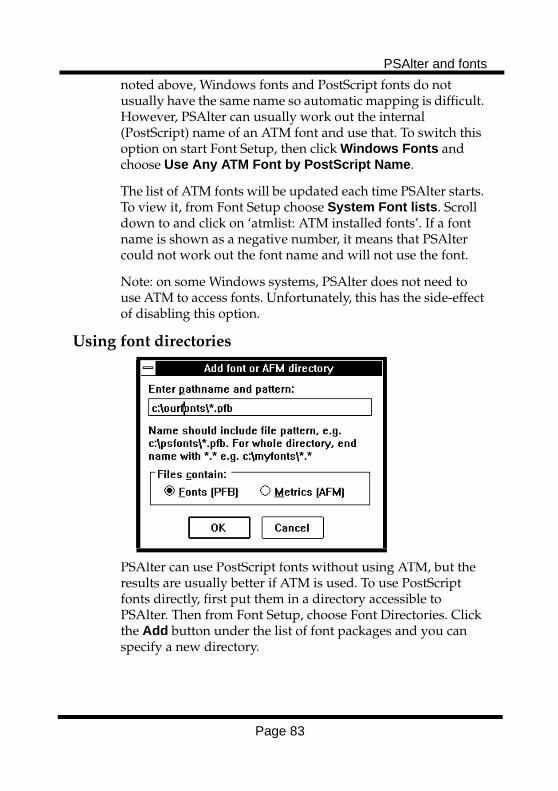
PSAlter and fonts
Page 83
noted above, Windows fonts and PostScript fonts do not usually have the same name so automatic mapping is difficult. However, PSAlter can usually work out the internal (PostScript) name of an ATM font and use that. To switch this option on start Font Setup, then click Windows Fonts and choose Use Any ATM Font by PostScript Name.
The list of ATM fonts will be updated each time PSAlter starts. To view it, from Font Setup choose System Font lists. Scroll down to and click on ‘atmlist: ATM installed fonts’. If a font name is shown as a negative number, it means that PSAlter could not work out the font name and will not use the font.
Note: on some Windows systems, PSAlter does not need to use ATM to access fonts. Unfortunately, this has the side-effect of disabling this option.
Using font directories
PSAlter can use PostScript fonts without using ATM, but the results are usually better if ATM is used. To use PostScript fonts directly, first put them in a directory accessible to PSAlter. Then from Font Setup, choose Font Directories. Click the Add button under the list of font packages and you can specify a new directory.
PSAlter and fonts
Page 84
Make sure you check Files contain: fonts (PFB). PFB is the qualifier ATM gives to PostScript fonts. Your fonts do not have to end PFB, and do not have to be in special ATM format.
What you specify is not actually a directory, it is a pattern. For instance, to use all of the files in directory c:\myfonts, you must type c:\myfonts\*.*. You can only use an asterisk (*) after the final backslash (\), not as part of the directory name.
You can have as many font directories as you like. If a directory is not found it is automatically disabled, but not deleted.
If PSAlter cannot recognise a font, its name will appear as a negative number. In some cases you can fix this by adding the line
%!FontType1-1.0: fontname
(using the appropriate value for fontname) at the start of the font. Keep a copy of the original font. You must not make this change if the font starts with 6 undisplayable characters: that is binary information used by ATM, and the file size must not change.
Using font metrics‘Metrics’ is a term for the size of each character in a font. PSAlter has built-in metrics for the base 35 fonts, and you can add metrics for other fonts. In general, if you have the font you do not need the metrics. But if you are using a lookalike font, having the metrics can help improve the appearance.
To add metrics you need to obtain the Adobe Font Metric (AFM) file for the font, from the font manufacturer. These are often available online, from Adobe’s FTP site.
Place the AFM files into a directory and go through the same procedure as for adding a font directory, above. Type a pattern for the files, e.g. c:\myfonts\*.afm, and select Files Contain: metrics (AFM).
PSAlter and fonts
Page 85
Note that the AFM files supplied with PSAlter are cut down to reduce space and may not be usable with other applications.
There is one case where an AFM file is useful even if you do have the correct font. That is where a font has an unusual encoding (arrangement of characters), and the PostScript program rearranges them. This is rare, however.

PSAlter and fonts
Page 86
PSAlter and fonts
Page 87
Part 3: Programming
PostScript
Introducing the PSAlter Workbench
Page 88
Introducing the PSAlter Workbench
The PSAlter Workbench provides a complete environment for developing, testing and debugging PostScript. You can also use it to view or translate PostScript, but most people will find it easier to use the View or Translate modes for that, since there are fewer choices to make.
Handling child windowsThe Workbench is basically a window with a number of child windows, which can each be moved and in most cases resized or iconized. Child windows are so called because they cannot be moved outside the boundary of their parent window — the Workbench.
There is one child containing the program you are running, one or more image viewers showing pages produced (see page 105), and possibly one or many data viewers (see page 109) showing information on the running program.
There are also special purpose windows, such as file viewers or windows for setting breakpoints.
It is easy to get a large number of child windows and lose track of them. To help you with this PSAlter offers various features:
• You can close or minimize (iconize) each of the most common classes of child window. See the Window | Close or Window | Minimize menus.
• The Window menu itself is extended to show the name of each active child, and can be used to select them, provided there are not too many.
Introducing the PSAlter Workbench
Page 89
• You can step through windows with Ctrl+Tab or Ctrl+F6.
• PSAlter will not usually start more than one identical window, so you can go through the motions of starting one you have ‘lost’ in order to find it. For instance, if you are viewing the operand stack but can’t see the window for it, choose View | Stack | Operand stack again.
Moving between Windows is not only important for when you lose them. Some menu items, or keyboard shortcuts, only work when an appropriate child window is active. For instance Edit | Copy may copy text from a file window or a picture from an image window; if neither type of window is active, it may do nothing.
Normally, the title bar of the active window will be a different colour from all the other (inactive) windows. There are other visual cues for which window is active — for instance a scroll bar disappears from most types of window when they are not active.
Using the Workbench — a tutorialThe only way to get to know the Workbench properly is to use it. Once you have an idea of what to do, you can read the fol-lowing sections to see the details. First, a whirlwind tour of some of the features.
So, start PSAlter and click on Workbench (or press W) to begin.
Starting upYou will see the PSAlter workbench, with status line at the bottom and a smaller ‘Untitled program’ child window. This will be blank.
Look at the status line along the bottom of the PSAlter window. This has various buttons (Run, Pause etc.) that we will be using, though if you have no mouse there are
Introducing the PSAlter Workbench
Page 90
equivalent entries on the Run menu at the top. If you don’t see a status line choose View | Status line.
Click on the Run button (or use Run | Start). PSAlter sees there is no program, so it gives you the chance to open a program and run it. Choose the file tiger.ps from the PSAlter demo files, typically in c:\psalter\demo. PSAlter will start to run the program, but first it will open up an image viewer which may partly obscure the program.
Pausing, viewing the imageWatch the percentage bar in the status line. When it is about 30% done click on the Pause button. The program will pause, and you can see what it is doing. If the program runs too fast and finishes, you can restart it with Run as often as you like.
(If you have a fast PC and everything is too fast, try the sample program allnight.ps instead. Since this was first created, PCs have become must faster and it no longer takes all night.)
Click the right mouse button over the image viewer (not on the title) and choose Update | Update images now (shortcut: F7) from the menu which appears. You can now see how far the drawing has gone. Scroll about the image or resize it if you want to see more.
Is the image in black and white? You can start again and have it in colour. Click Stop. Choose Options | Imaging setup and then choose Image As: 256 colours (not 256 greys). Check also that you set Resolution: 75 dpi. Now click OK, then Run again. Pause when 30% done as before.
Make sure you can see a reasonable amount of the picture. You can maximise the Workbench and the image viewer within it by clicking on their respective maximise buttons (triangle ▲ in the top right corner; in Windows 95 a button containing a square).
Introducing the PSAlter Workbench
Page 91
Watching the image buildFrom the right button menu for the image, choose Update | Keep updating images. This is a ‘switch’ option — when it is switched on, it will show a tick mark next to it. So if there is already a tick next to Keep updating images, this was already on. Unlike most PSAlter options, this option is not remembered and will always be off when PSAlter starts.
Now click Run again. The program will continue, but this time much more slowly. You should be able to see the parts of the picture being added. If you can’t see anything changing, scroll around the picture in search of some action.
While updating the picture, PSAlter might take a little while to respond to your instructions, like clicking on Pause, but it will process your requests in the end; there is no need to keep trying.
Now, while it is running, choose Overlay | Show current path (another switch option: you should be switching it on) from the image right button menu. This will show a red line for the current path. The path is the (normally) invisible construction lines used to put together the image, a piece at a time. There is not always a path to see; if you have any trouble finding it, click Stop then Run again — it is easier to see on a blank screen.
Walking through the programWe will now look at the program itself. But first, remember to switch off Overlay | Show current path and Update | Keep updating images, since they will slow everything else down.
If you switched to using allnight.ps, because your PC is too fast, now is the time to switch back to tiger.ps.
You can close down the image window or resize it so the program is visible. Never be tempted to close the program window so you can see more of the image, since that will stop everything! You can minimize (iconize) it though.
Introducing the PSAlter Workbench
Page 92
Click on Walk in the status line. The program will slow to a crawl, and you will be able to see each item as it is executed. Many of the items executed are constants, which are put on the operand stack so, while it is running choose View | Stack | Operand stack. This will show items being added, and then removed, by operators.
Looking at some dataAnother important stack is the dictionary stack, though it doesn’t change very much in this program. Choose View | Stack | Dictionary stack while in the middle of the tiger.ps program and you should see a list of three dictionaries. Stretch the dictionary viewer to make it wider so you can see the names.
The three items will probably be systemdict, userdict, and Adobe_Illustrator_1.2d1. Double click on the last of these and a dictionary viewer will open showing the contents of it. (Don’t worry if you see globaldict too - this is normal in PostScript Level 2.)
Press and hold the mouse over any item in the viewer and you will see the contents expanded in the status line. You can also double click on the dictionaries and arrays to open more viewers.
Adding a ‘watch’It is often convenient to be able to see the value of particular variables as a program runs. You can do this with a dictionary viewer, but this may have too many entries to fit on the screen all at once. You can use a Watch viewer instead, to keep watch on the variables of your choice, even if they are in different dictionaries.
Look at the program and click on a name somewhere in it. For instance, Adobe_Illustrator_1.2d1 near the top of the program. Now press Ctrl+W. A new ‘watch’ viewer will open, showing the specified name and its current value. If the value has not yet been defined, as at the start of the program, the word ‘undefined’ is used.

Introducing the PSAlter Workbench
Page 93
You can add as many watches as required using this technique or View | Object | Add watch or view.
Setting a breakpointBreakpoints are all about pausing a program automatically at important moments. Most programs will take far too long to run if you walk through every part of them.
We will set an operator breakpoint. Choose Window | Breakpoint control. On the window which opens, click Add Operator, then type ‘fill’ and press Enter.
Make sure you can see the program window, then click Run to go at full speed. Fairly soon, the program will pause, and you should see fill highlighted. Using this technique you can pause before or after any operator. You can also set breakpoints on a variety of other actions, but that’s almost all for this tutorial. You’re about ready to read the remaining sections of this manual.
Some helpBut first, let’s take a look at the online help. Click on Stop to stop the program. Go to the top of the program (scroll, or press Ctrl+Home). No scroll bar? Remember to click on the window first. Look for a PostScript operator such as exch, add or def. Click on the operator name, then use Help on PostScript operator from the program’s right button menu.
You should see help on the operator. Try again, first clicking on something which is not an operator — for instance anywhere on the first line. You should now see the index of operators, and you can click on any of them to see the help for that operator. (You can return to the index from any page in PSAlter help, with the special Operator button.)
Don’t forget that the help is not intended to teach PostScript from scratch, but as a reference for programmers who already have some knowledge of PostScript. Turn back to Finding out more on page 20 if you missed that.
Introducing the PSAlter Workbench
Page 94
PSAlter is designed to be just as useful to the beginner typing in a few lines of PostScript as to the professional trying to debug large programs.
If you are just starting, be warned — examining other PostScript programs, like the sample programs, may seem a good starting point. But most of them are generated for efficiency and are very hard to read. The sample program 7star.ps is intended as a fairly simple example to start with, though.
Program and file viewers
Page 95
Program and file viewers
PSAlter uses several file viewer windows. In at least one of these — the program window — you are likely to be doing editing. PSAlter’s file viewer windows (a program window and a file window are really different names for the same thing) are designed so as to be familiar to Windows users. The editing actions and keystrokes are the same as in typical Windows editors, like Notepad.
Unlike Notepad, PSAlter can handle very large files with ease. There are some hints on how to work effectively with large files later on.
How to edit text, copy and paste, and the various keyboard shortcuts for selecting text and moving around the file, are not described here because they should be familiar; however there are some details in the online help file.
The main program windowThe most important file viewer is that for the main program. You can open up a file with File | Open Program. Once it is open, if you can’t see it because of other windows, use Window | Main program (or Ctrl+G) to make sure it is visible.
Once you have opened a program, you can make changes to it until you choose to run it. From then, until the program ends, or is stopped, the program is locked and cannot be changed.
The program window cannot be closed while the program is running. You must use the Stop button if you do want to close it. But beware — if the program window is closed, you lose all the other information belonging to it. That includes all images and any data you are viewing. The same applies if you use
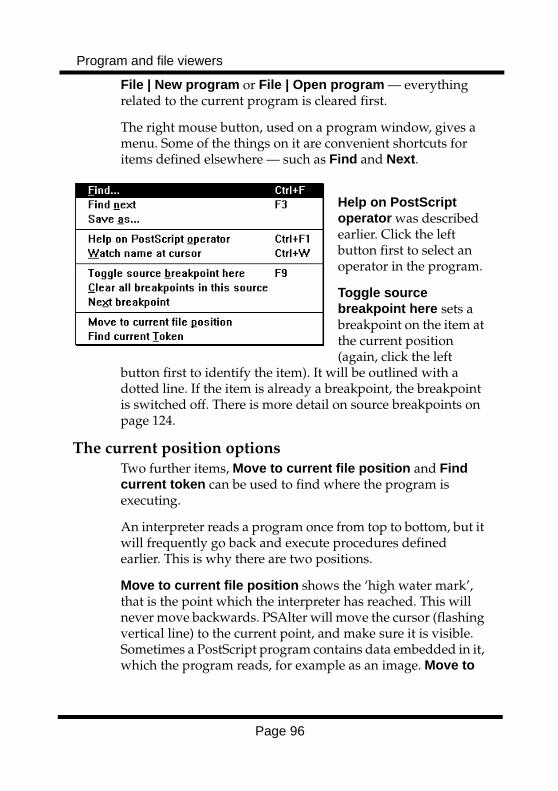
Program and file viewers
Page 96
File | New program or File | Open program — everything related to the current program is cleared first.
The right mouse button, used on a program window, gives a menu. Some of the things on it are convenient shortcuts for items defined elsewhere — such as Find and Next.
Help on PostScript operator was described earlier. Click the left button first to select an operator in the program.
Toggle source breakpoint here sets a breakpoint on the item at the current position (again, click the left
button first to identify the item). It will be outlined with a dotted line. If the item is already a breakpoint, the breakpoint is switched off. There is more detail on source breakpoints on page 124.
The current position optionsTwo further items, Move to current file position and Find current token can be used to find where the program is executing.
An interpreter reads a program once from top to bottom, but it will frequently go back and execute procedures defined earlier. This is why there are two positions.
Move to current file position shows the ‘high water mark’, that is the point which the interpreter has reached. This will never move backwards. PSAlter will move the cursor (flashing vertical line) to the current point, and make sure it is visible. Sometimes a PostScript program contains data embedded in it, which the program reads, for example as an image. Move to

Program and file viewers
Page 97
current file position will show you how far this process has gone.
Find current token shows the current token in the program. (A token is a single element in a PostScript program, such as a number, name, or string.) This may be at the current file position, but is more often in a procedure.
The token will be highlighted. This is also done automatically at various times: when walking through the program, following a single step, or when the program stops.
The output log (%stdout)All PostScript interpreters potentially write to an error log. In most cases though, it is thrown away by the printer with no opportunity to view it. The output log contains messages written by the interpreter, for instance when an error occurs. A PostScript program can also write to the log using the print operator, among others.
By connecting a printer on a serial port, and using a special communications program, it is possible to send information to the printer, and have the log sent back and displayed on the computer. This is one of the few debugging techniques available without PSAlter.
The output log is a named device in PostScript terms, and its name is %stdout. This term may be more familiar to PostScript programmers.
PSAlter always keeps an output log window in workbench mode. It can be minimized (iconized), but never closed. PSAlter automatically adds a few messages, such as a record of the time taken to execute a program. You can open the log window or bring it to the top with Window | Output log or by pressing Ctrl+L.
The output log window is a file viewer like any other. While the program is running text may be selected in it and copied to
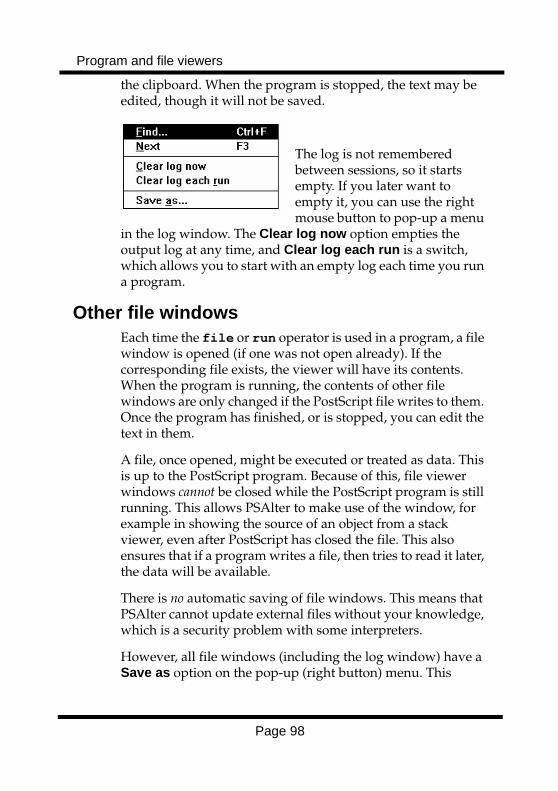
Program and file viewers
Page 98
the clipboard. When the program is stopped, the text may be edited, though it will not be saved.
The log is not remembered between sessions, so it starts empty. If you later want to empty it, you can use the right mouse button to pop-up a menu
in the log window. The Clear log now option empties the output log at any time, and Clear log each run is a switch, which allows you to start with an empty log each time you run a program.
Other file windowsEach time the file or run operator is used in a program, a file window is opened (if one was not open already). If the corresponding file exists, the viewer will have its contents. When the program is running, the contents of other file windows are only changed if the PostScript file writes to them. Once the program has finished, or is stopped, you can edit the text in them.
A file, once opened, might be executed or treated as data. This is up to the PostScript program. Because of this, file viewer windows cannot be closed while the PostScript program is still running. This allows PSAlter to make use of the window, for example in showing the source of an object from a stack viewer, even after PostScript has closed the file. This also ensures that if a program writes a file, then tries to read it later, the data will be available.
There is no automatic saving of file windows. This means that PSAlter cannot update external files without your knowledge, which is a security problem with some interpreters.
However, all file windows (including the log window) have a Save as option on the pop-up (right button) menu. This
Program and file viewers
Page 99
allows a copy to be saved at any time. Even following Save as, there is no automatic saving or prompting to save.
How the file operator interacts with file viewers is described further in Implementation notes: The file operator on page 137.
Hints for large filesPSAlter’s file viewers are designed to handle very large files (up to hundreds of megabytes) without imposing long delays on the user. This is because PostScript files can be very large, yet you may only be interested in the first few or last few lines.
No matter how large the file, it should open immediately. By dragging the scroll bar you can quickly position to any part of the document. Don’t click on the arrow buttons in the scroll bar, as that will move through the whole document. Ctrl+End will move directly to the end of the document. (If the screen is blank after Ctrl+End, use PgUp once - often files have blank lines at the end).
Saving a large file will inevitably take time. Remember that because PSAlter always saves the old file as a backup, twice the disk space is required. A search for text can also take a long time. Both saving and searching give an indication of their progress on the status line. The Esc key can be pressed to cancel either activity. (Note: if you cancel a save the original file is either unaltered or completely saved, never half saved).
As you change a file, modifications are written to a temporary file. This is in the TEMP directory (type SET in a DOS session to check this). Some systems are set up with a RAM drive for TEMP which is fast, but very limited in size. You may have to disable this feature (usually in c:\autoexec.bat) if working on very large files.
PSAlter is written in the expectation that there will be a disk cacheing utility such as SMARTDRV in effect, so that reads from the disk are reduced. (This will normally be installed along with Windows, unless it has been removed). If no such
Program and file viewers
Page 100
software, or equivalent hardware, is in use, screen display may be very slow.
PSAlter can handle very long lines as well. This can also cause slow display where there are lines many thousands of bytes long — for instance in the middle of binary data, where there are no lines but PSAlter is looking for them.
Controlling execution
Page 101
Controlling execution
There are plenty of options to control execution, but if you just want to run the program hit the Run button. You do not even have to open a program; if you haven’t chosen a program yet, Run will let you pick one.
Running and walkingWhen you hit the Run button, the program executes ‘full speed’. That does not mean you lose control. PSAlter checks for mouse and keyboard activity frequently, so you can use menus and buttons, and about once a second will update any data viewers which are open. Also, if you have selected Keep Updating Images, it updates any image viewers which are looking at an incomplete page. These updates slow down PSAlter, so you may want to close all data viewers if you are trying to execute as quickly as possible.
If you want to see what the program is doing, you use the Walk button. It then steps through each item in the program, following into each procedure called. It is as if you are single stepping through each item, as described below.
You can switch between Run and Walk as often as you like. There is no need to pause to do this. While walking, the {}+ button is useful for running at full speed until the end of a procedure you have seen before — see Single stepping, below.
If you want to pause, hit the Pause button. You can resume with either Run or Walk. Also, at any time you can use Stop. Once you have stopped, the program cannot be continued; Run or Walk will start again from the beginning, throwing away any pages so far produced. Breakpoints (see Breakpoints on page 120) will also result in pausing.
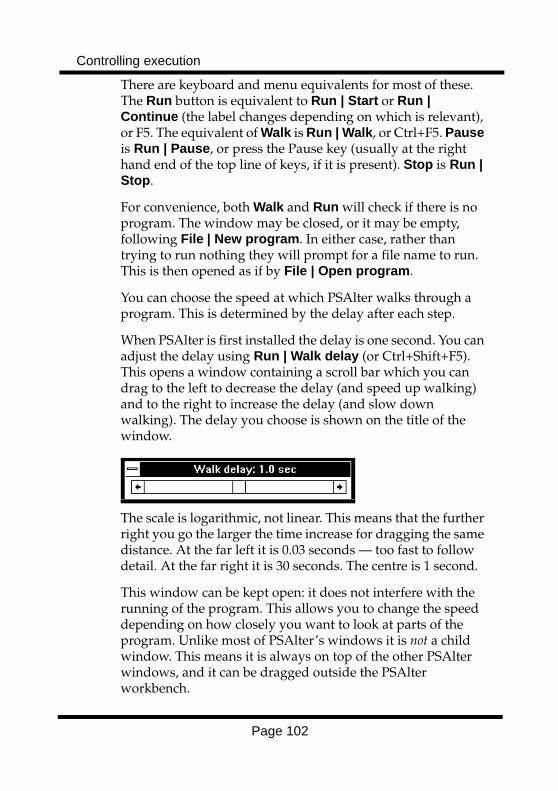
Controlling execution
Page 102
There are keyboard and menu equivalents for most of these. The Run button is equivalent to Run | Start or Run | Continue (the label changes depending on which is relevant), or F5. The equivalent of Walk is Run | Walk, or Ctrl+F5. Pause is Run | Pause, or press the Pause key (usually at the right hand end of the top line of keys, if it is present). Stop is Run | Stop.
For convenience, both Walk and Run will check if there is no program. The window may be closed, or it may be empty, following File | New program. In either case, rather than trying to run nothing they will prompt for a file name to run. This is then opened as if by File | Open program.
You can choose the speed at which PSAlter walks through a program. This is determined by the delay after each step.
When PSAlter is first installed the delay is one second. You can adjust the delay using Run | Walk delay (or Ctrl+Shift+F5). This opens a window containing a scroll bar which you can drag to the left to decrease the delay (and speed up walking) and to the right to increase the delay (and slow down walking). The delay you choose is shown on the title of the window.
The scale is logarithmic, not linear. This means that the further right you go the larger the time increase for dragging the same distance. At the far left it is 0.03 seconds — too fast to follow detail. At the far right it is 30 seconds. The centre is 1 second.
This window can be kept open: it does not interfere with the running of the program. This allows you to change the speed depending on how closely you want to look at parts of the program. Unlike most of PSAlter’s windows it is not a child window. This means it is always on top of the other PSAlter windows, and it can be dragged outside the PSAlter workbench.
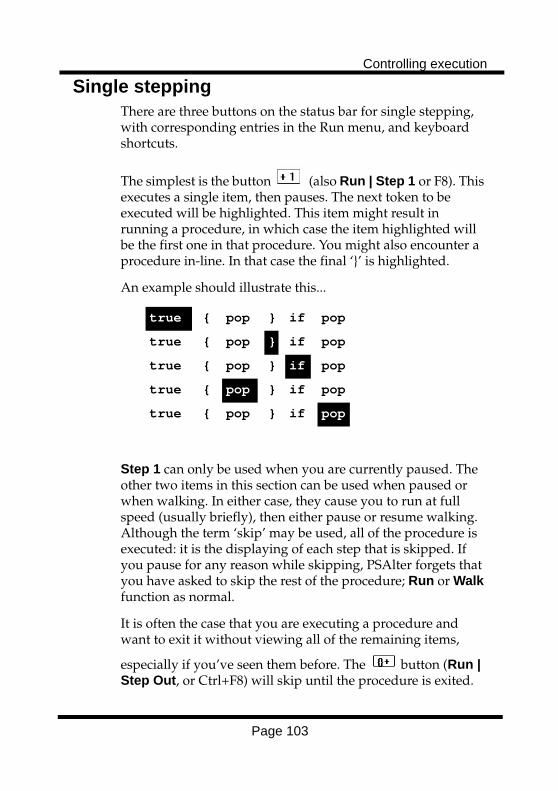
Controlling execution
Page 103
Single steppingThere are three buttons on the status bar for single stepping, with corresponding entries in the Run menu, and keyboard shortcuts.
The simplest is the button (also Run | Step 1 or F8). This executes a single item, then pauses. The next token to be executed will be highlighted. This item might result in running a procedure, in which case the item highlighted will be the first one in that procedure. You might also encounter a procedure in-line. In that case the final ‘}’ is highlighted.
An example should illustrate this...
Step 1 can only be used when you are currently paused. The other two items in this section can be used when paused or when walking. In either case, they cause you to run at full speed (usually briefly), then either pause or resume walking. Although the term ‘skip’ may be used, all of the procedure is executed: it is the displaying of each step that is skipped. If you pause for any reason while skipping, PSAlter forgets that you have asked to skip the rest of the procedure; Run or Walk function as normal.
It is often the case that you are executing a procedure and want to exit it without viewing all of the remaining items,
especially if you’ve seen them before. The button (Run | Step Out, or Ctrl+F8) will skip until the procedure is exited.
true { pop } if pop
true { pop } if pop
true { pop } if pop
true { pop } if pop
true { pop } if pop
Controlling execution
Page 104
If the currently highlighted item would result in a procedure being entered (either a procedure call, or an operator such as
if, repeat, exec), the button (Run | Step Over, or Shift+F8) will not display the contents of the procedure, although they are executed.
Image viewers
Page 105
Image viewers
You should read the section Viewing PostScript documents on page 24 before reading this one, as many of the concepts are the same. The main difference is that in the workbench you can have more than one image viewer, and each image viewer is a separate child window in the workbench.
Like other child windows in workbench mode, image viewers are controlled by a right button menu. Many of the options duplicate those found in the View menu in view mode and are not covered here.
You should make sure the image viewer is the current window before using keyboard shortcuts like + to zoom in, for example by clicking on the window first with the left button or another method described in Handling child windows on page 88. For background viewers (see below), click on the background.
Starting image viewersWhen you start to run a program, PSAlter checks to see if there is an image viewer open. If there is not, one is automatically opened. This is a ‘latest complete page’ viewer which will follow pages, though you can change that at any time.
You can close that or any other viewer without affecting the program. Similarly, you can start more viewers without affecting the program.
You start a new viewer with View | Image | New viewer. You will be given a list of all the pages produced so far by the program which is running (or completed). You also have the choice of current or latest complete page. When you start a viewer, you can check the Zoom to fit box if you want the initial view to be zoomed out so the whole page is visible.

Image viewers
Page 106
Another way to start a new viewer is View | Image | Image on background. This opens a viewer which fills the whole workbench viewer, but which is behind the other windows (including, possibly, other image viewers). Because there is no system menu for this background viewer, there is a special way to close it — use View | Image | Remove background image. When you switch from view mode to workbench mode, the viewer automatically becomes a background image, so the appearance is maintained (though the program window becomes visible on top of it).
PSAlter will not normally start more than one viewer per page. This is not enforced rigidly, however. The background image and another image can be of the same page. Also, by changing page to view, you can end up with several views on the same page. Using this you can view a ‘thumbnail’ of an entire zoomed out page in one window, while examining detail in another.
You can close all the image viewers quickly with Windows | Close | All image viewers, or minimize (iconize) them all with Windows | Minimize | All data viewers.
Overlay optionsThe Overlay item on the right button menu contains a number of items which allow you to overlay data on top of image viewers. Each overlay has a default colour, which can be changed from Options | Colours. (Only an approximation of the colour can be chosen.)
Overlay | Show current path allows you to see the current PostScript path, as constructed by lineto, curveto, and similar operators. These paths are normally invisible until filled in (at which point the actual path is no longer accessible). See also View | Graphics | Current path viewer on page 116, which gives a list of the co-ordinates of the path items. The default colour is red.
Overlay | Show clip path shows the clip path. All painting operations are ‘clipped’ so they lie within this path. Initially,
Image viewers
Page 107
the clip path follows the edge of the page, and may be hard to see. The default colour is blue.
The options to overlay paths are usually only useful if you are viewing an image before a program has completed, e.g. if using Update | Keep updating images.
Overlay | Show grid lines causes the whole page to be covered with crossed lines at 50-pixel intervals. These are the pixels in the PostScript device, so grid lines get farther apart as you zoom in. The default colour is yellow.
Overlay | Set image breakpoint, Overlay | Clear image breakpoint, and Search | Find image breakpoint are described in Image breakpoints on page 125.
Selecting a cutout boxYou can use the mouse to define a ‘cutout’ for the image. The cutout is
• used as the default area to export or copy when you use Export this image or Edit | Copy, and allows more accuracy than doing the same thing with the preview shown when exporting;
• used as the target when zooming in or out.
Just move the mouse to one corner of a rectangle, and drag the mouse to the other corner. To ‘drag’, keep the mouse button pressed while you move the mouse.
You can cutout when zoomed in or out. If you drag to the edge of the image, it will automatically scroll. To remove the cutout, click on the image without dragging the mouse.
Search | Cutout bounding box discovers the bounding box of the image (the smallest rectangle to enclose it) and superimposes that on the image as a cutout box.
While selecting, the position in device co-ordinates (pixels) is reported in the status line. This is also a convenient way of

Image viewers
Page 108
discovering the exact co-ordinates at a location. If, and only if, a resolution of 72 dpi is in use, these correspond to the default user co-ordinates of 1/72 inch.
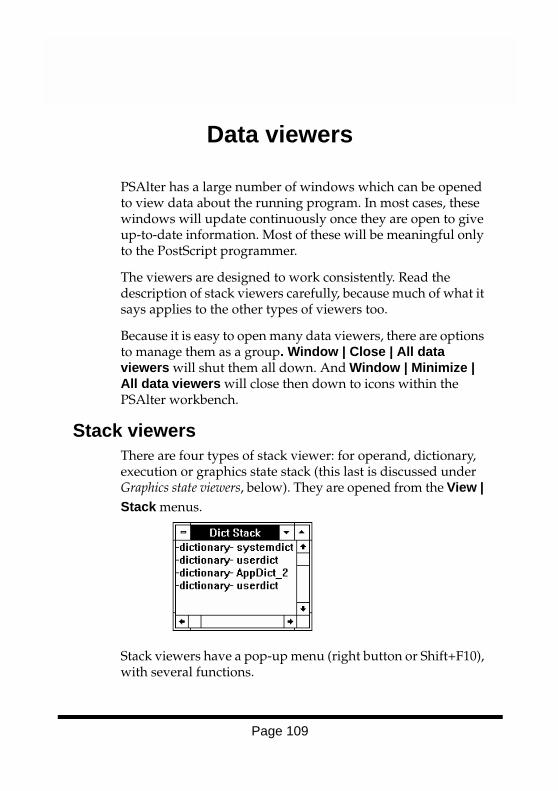
Data viewers
Page 109
Data viewers
PSAlter has a large number of windows which can be opened to view data about the running program. In most cases, these windows will update continuously once they are open to give up-to-date information. Most of these will be meaningful only to the PostScript programmer.
The viewers are designed to work consistently. Read the description of stack viewers carefully, because much of what it says applies to the other types of viewers too.
Because it is easy to open many data viewers, there are options to manage them as a group. Window | Close | All data viewers will shut them all down. And Window | Minimize | All data viewers will close then down to icons within the PSAlter workbench.
Stack viewersThere are four types of stack viewer: for operand, dictionary, execution or graphics state stack (this last is discussed under Graphics state viewers, below). They are opened from the View | Stack menus.
Stack viewers have a pop-up menu (right button or Shift+F10), with several functions.
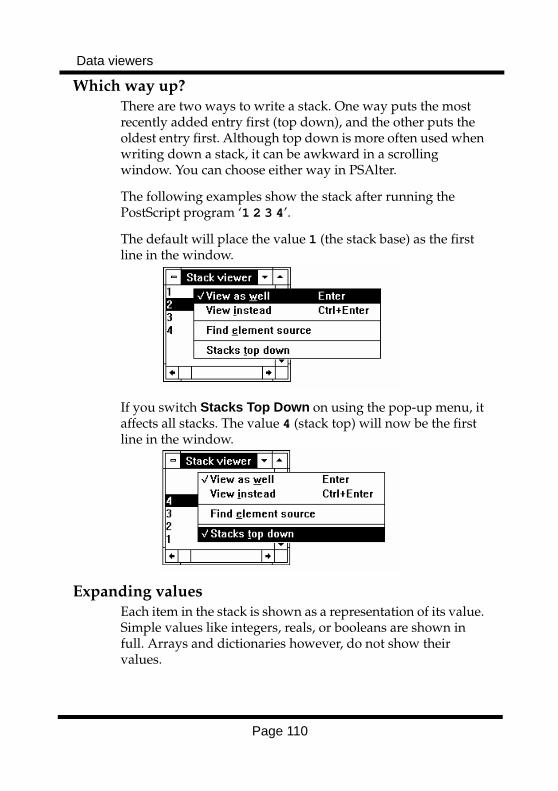
Data viewers
Page 110
Which way up?There are two ways to write a stack. One way puts the most recently added entry first (top down), and the other puts the oldest entry first. Although top down is more often used when writing down a stack, it can be awkward in a scrolling window. You can choose either way in PSAlter.
The following examples show the stack after running the PostScript program ‘1 2 3 4’.
The default will place the value 1 (the stack base) as the first line in the window.
If you switch Stacks Top Down on using the pop-up menu, it affects all stacks. The value 4 (stack top) will now be the first line in the window.
Expanding valuesEach item in the stack is shown as a representation of its value. Simple values like integers, reals, or booleans are shown in full. Arrays and dictionaries however, do not show their values.
Data viewers
Page 111
There are two ways to get more information on an array or dictionary. For brief information, press and hold the left mouse button over the item in the stack window. The status bar at the bottom of the screen will show an expanded view of the contents, which may be adequate for small items. If this is not adequate you can open a new viewer for the item as well as, or instead of, the stack viewer.
To open a new viewer, click on the item with the left mouse button to highlight it. Then, use the right mouse button over the item to get the pop-up menu. This menu includes View as well or View instead, both of which will open a new viewer if the object is of an appropriate type. In the case of View instead, the stack viewer will close. Because this is a frequent action, there are several shortcuts.
• Double clicking the left button is equivalent to View as well.
• You can scroll in the viewer with the arrow keys, and use the Enter key as another alternative for View as well.
• If you hold down the Ctrl key while double clicking or pressing Enter, this is equivalent to View instead.
New viewers may overlay the existing one, so you might have to rearrange windows to see everything
Finding out more about an objectPSAlter records information on objects and can often tell you more about them than a conventional interpreter. The information it records is name and position. The name recorded is the first name given to the object (if it is an array, dictionary or string). Often this is enough to identify an object when it is otherwise ‘lost’. The data viewers will give a name where available. For example, it is always easy to spot userdict and systemdict wherever they occur on the dictionary stack.
The position information records the current position in the program when an object was created; this applies to all types
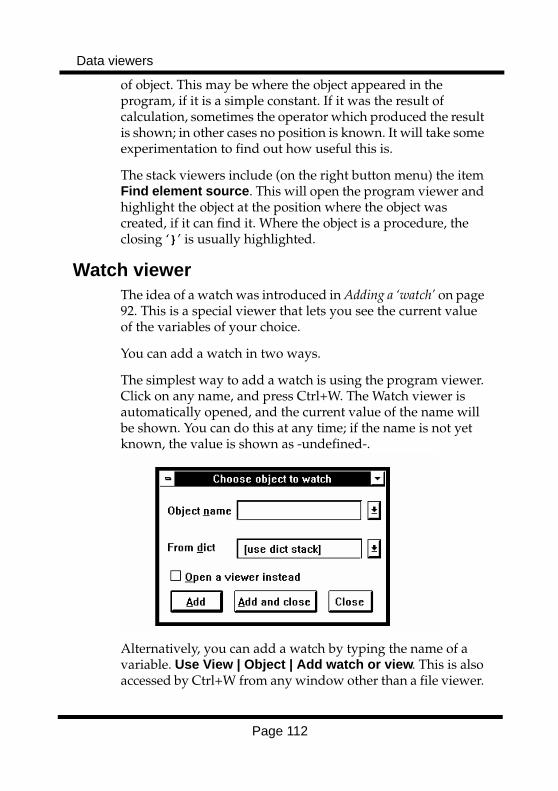
Data viewers
Page 112
of object. This may be where the object appeared in the program, if it is a simple constant. If it was the result of calculation, sometimes the operator which produced the result is shown; in other cases no position is known. It will take some experimentation to find out how useful this is.
The stack viewers include (on the right button menu) the item Find element source. This will open the program viewer and highlight the object at the position where the object was created, if it can find it. Where the object is a procedure, the closing ‘}’ is usually highlighted.
Watch viewerThe idea of a watch was introduced in Adding a ‘watch’ on page 92. This is a special viewer that lets you see the current value of the variables of your choice.
You can add a watch in two ways.
The simplest way to add a watch is using the program viewer. Click on any name, and press Ctrl+W. The Watch viewer is automatically opened, and the current value of the name will be shown. You can do this at any time; if the name is not yet known, the value is shown as -undefined-.
Alternatively, you can add a watch by typing the name of a variable. Use View | Object | Add watch or view. This is also accessed by Ctrl+W from any window other than a file viewer.
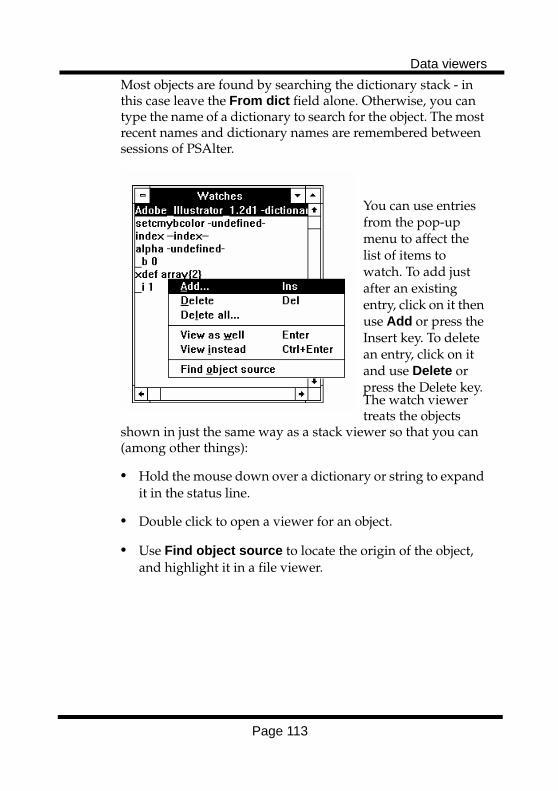
Data viewers
Page 113
Most objects are found by searching the dictionary stack - in this case leave the From dict field alone. Otherwise, you can type the name of a dictionary to search for the object. The most recent names and dictionary names are remembered between sessions of PSAlter.
You can use entries from the pop-up menu to affect the list of items to watch. To add just after an existing entry, click on it then use Add or press the Insert key. To delete an entry, click on it and use Delete or press the Delete key.The watch viewer treats the objects
shown in just the same way as a stack viewer so that you can (among other things):
• Hold the mouse down over a dictionary or string to expand it in the status line.
• Double click to open a viewer for an object.
• Use Find object source to locate the origin of the object, and highlight it in a file viewer.
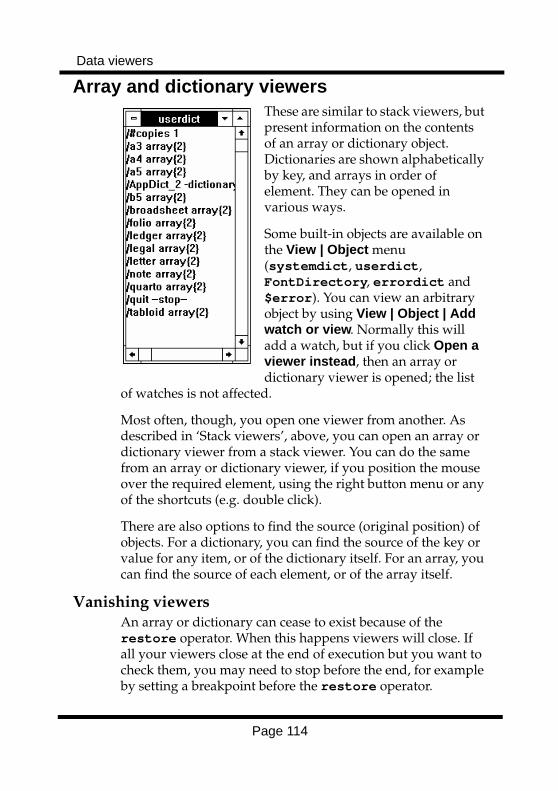
Data viewers
Page 114
Array and dictionary viewersThese are similar to stack viewers, but present information on the contents of an array or dictionary object. Dictionaries are shown alphabetically by key, and arrays in order of element. They can be opened in various ways.
Some built-in objects are available on the View | Object menu (systemdict, userdict, FontDirectory, errordict and $error). You can view an arbitrary object by using View | Object | Add watch or view. Normally this will add a watch, but if you click Open a viewer instead, then an array or dictionary viewer is opened; the list
of watches is not affected.
Most often, though, you open one viewer from another. As described in ‘Stack viewers’, above, you can open an array or dictionary viewer from a stack viewer. You can do the same from an array or dictionary viewer, if you position the mouse over the required element, using the right button menu or any of the shortcuts (e.g. double click).
There are also options to find the source (original position) of objects. For a dictionary, you can find the source of the key or value for any item, or of the dictionary itself. For an array, you can find the source of each element, or of the array itself.
Vanishing viewersAn array or dictionary can cease to exist because of the restore operator. When this happens viewers will close. If all your viewers close at the end of execution but you want to check them, you may need to stop before the end, for example by setting a breakpoint before the restore operator.
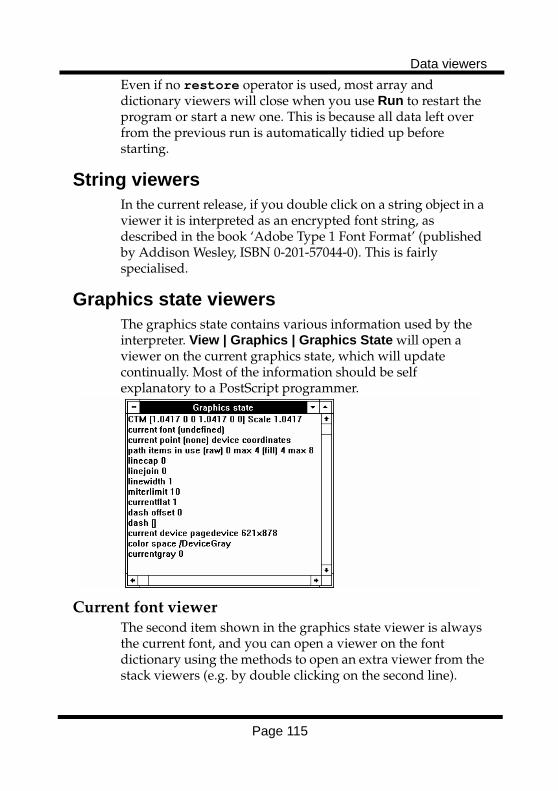
Data viewers
Page 115
Even if no restore operator is used, most array and dictionary viewers will close when you use Run to restart the program or start a new one. This is because all data left over from the previous run is automatically tidied up before starting.
String viewersIn the current release, if you double click on a string object in a viewer it is interpreted as an encrypted font string, as described in the book ‘Adobe Type 1 Font Format’ (published by Addison Wesley, ISBN 0-201-57044-0). This is fairly specialised.
Graphics state viewersThe graphics state contains various information used by the interpreter. View | Graphics | Graphics State will open a viewer on the current graphics state, which will update continually. Most of the information should be self explanatory to a PostScript programmer.
Current font viewerThe second item shown in the graphics state viewer is always the current font, and you can open a viewer on the font dictionary using the methods to open an extra viewer from the stack viewers (e.g. by double clicking on the second line).
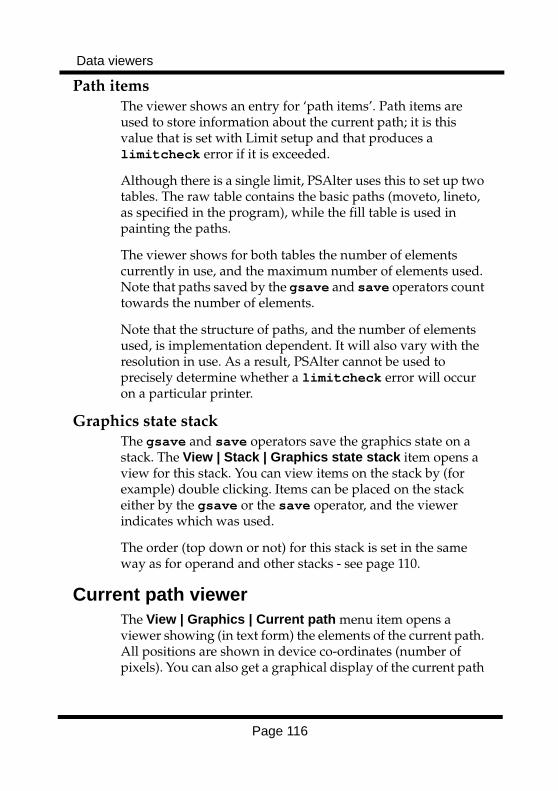
Data viewers
Page 116
Path itemsThe viewer shows an entry for ‘path items’. Path items are used to store information about the current path; it is this value that is set with Limit setup and that produces a limitcheck error if it is exceeded.
Although there is a single limit, PSAlter uses this to set up two tables. The raw table contains the basic paths (moveto, lineto, as specified in the program), while the fill table is used in painting the paths.
The viewer shows for both tables the number of elements currently in use, and the maximum number of elements used. Note that paths saved by the gsave and save operators count towards the number of elements.
Note that the structure of paths, and the number of elements used, is implementation dependent. It will also vary with the resolution in use. As a result, PSAlter cannot be used to precisely determine whether a limitcheck error will occur on a particular printer.
Graphics state stackThe gsave and save operators save the graphics state on a stack. The View | Stack | Graphics state stack item opens a view for this stack. You can view items on the stack by (for example) double clicking. Items can be placed on the stack either by the gsave or the save operator, and the viewer indicates which was used.
The order (top down or not) for this stack is set in the same way as for operand and other stacks - see page 110.
Current path viewerThe View | Graphics | Current path menu item opens a viewer showing (in text form) the elements of the current path. All positions are shown in device co-ordinates (number of pixels). You can also get a graphical display of the current path
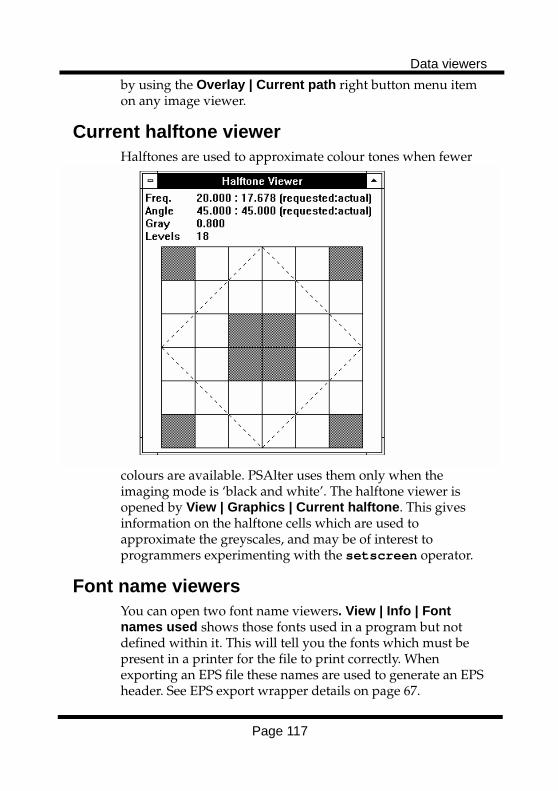
Data viewers
Page 117
by using the Overlay | Current path right button menu item on any image viewer.
Current halftone viewerHalftones are used to approximate colour tones when fewer
colours are available. PSAlter uses them only when the imaging mode is ‘black and white’. The halftone viewer is opened by View | Graphics | Current halftone. This gives information on the halftone cells which are used to approximate the greyscales, and may be of interest to programmers experimenting with the setscreen operator.
Font name viewersYou can open two font name viewers. View | Info | Font names used shows those fonts used in a program but not defined within it. This will tell you the fonts which must be present in a printer for the file to print correctly. When exporting an EPS file these names are used to generate an EPS header. See EPS export wrapper details on page 67.
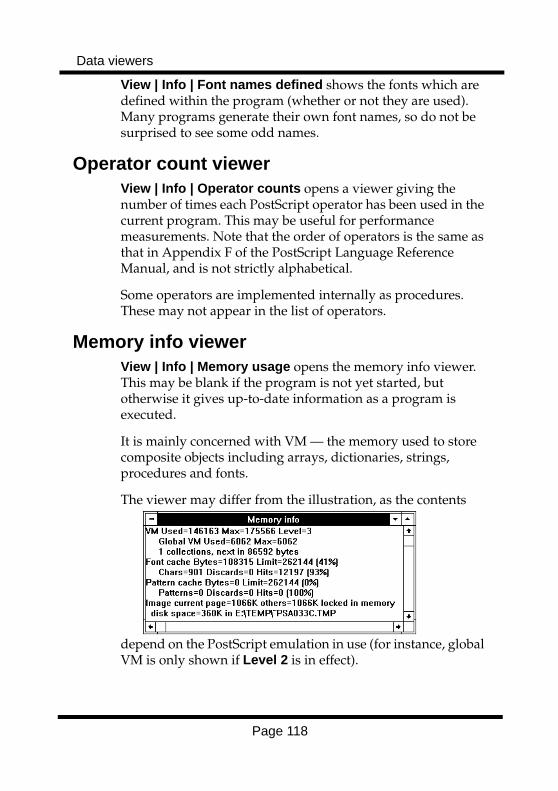
Data viewers
Page 118
View | Info | Font names defined shows the fonts which are defined within the program (whether or not they are used). Many programs generate their own font names, so do not be surprised to see some odd names.
Operator count viewerView | Info | Operator counts opens a viewer giving the number of times each PostScript operator has been used in the current program. This may be useful for performance measurements. Note that the order of operators is the same as that in Appendix F of the PostScript Language Reference Manual, and is not strictly alphabetical.
Some operators are implemented internally as procedures. These may not appear in the list of operators.
Memory info viewerView | Info | Memory usage opens the memory info viewer. This may be blank if the program is not yet started, but otherwise it gives up-to-date information as a program is executed.
It is mainly concerned with VM — the memory used to store composite objects including arrays, dictionaries, strings, procedures and fonts.
The viewer may differ from the illustration, as the contents
depend on the PostScript emulation in use (for instance, global VM is only shown if Level 2 is in effect).
Data viewers
Page 119
It shows the current amount of memory (VM) used, the maximum used so far and the number of save operators in effect. PSAlter does not use the same amount of memory as other interpreters; in some cases the amount of VM shown may be twice what would be used in a printer (because of the debugging and other information held).
Garbage collections reclaim VM, and occur automatically. Information on this is also shown.
Information is also given on the font cache and (in level 2 only) pattern cache; and how much memory is occupied by pages currently being worked on, or viewed. Pages not in use are written out to disk, and the file name and disk space required are also shown.
Last error infoThe selection View | Info | Show last error will pop-up a box containing information on the last PostScript error that occurred. All of the text from the original error message will be repeated. You must click OK to remove this box, as you cannot do anything else in PSAlter while it is displayed.
The last error info box also includes a Copy button. This allows the full text shown to be copied to the clipboard (since the Edit | Copy menu item is inaccessible).
Breakpoints
Page 120
Breakpoints
Breakpoints are a useful tool for discovering what is going on in a program. You can make PSAlter check for particular events, then pause when they occur. It is also possible to use the breakpoint system for profiling programs, e.g. counting how often a particular procedure is used.
PSAlter supports four kinds of breakpoint.
• Operator breakpoints are triggered when particular PostScript operators are executed. For instance, by setting a breakpoint before the fill operator, you could check the path before it is filled (and deleted).
• Name breakpoints are triggered when names are used. More precisely, you can set a breakpoint for when a particular name is used as a key to a dictionary, either for fetching or storing. This would allow you to discover when particular names are being set, or variables referenced.
• Source breakpoints are set using the program editor. You can highlight specific tokens in the program, and the breakpoint is triggered each time that token is executed.
• Image breakpoints are set using the mouse on an image viewer. You define a rectangle. Each time any operator makes a mark within that rectangle, the program will pause. You can use this to find out which part of a program was drawing part of a diagram, for example.
When a breakpoint is hit the program will normally pause, and an explanation is shown in the status line. You can view stacks, variables, etc. and then continue, with Run or Walk.

Breakpoints
Page 121
The breakpoint control panelDisplay the breakpoint control panel with Window | Breakpoints (Ctrl+B).
This allows you to inspect the breakpoints you have set (except the single image breakpoint), remove, and modify them, and add operator and name breakpoints. By clicking on Find, you can locate a source breakpoint in the original program.
Operator breakpointsWhen you click on Add Operator in the breakpoint control panel you can choose any operator by typing its name. You

Breakpoints
Page 122
can choose to pause before executing the operator, after executing it, or both.
If you want to add more than one breakpoint, click Add rather than Add and Close, then the window will remain open.
Notes. Some ‘operators’ in PostScript are not implemented as true operators. Instead, they are built-in procedures, even though they in some cases appear to the program as operators. Examples include sethsbcolor and pstack. Also some ‘operators’ are built-in constants, such as true and systemdict. Operator breakpoints cannot be set on these (but you could use name breakpoints). Also, because there are a number of built-in procedures, which themselves contain other operators, you may get unexpected pauses for breakpoints, especially on common operators like exch or add.
In the list of operators you will see a number of names starting ‘@’. These are for special purposes in PSAlter. You may be able to use them, but they are not documented and may change in future releases.
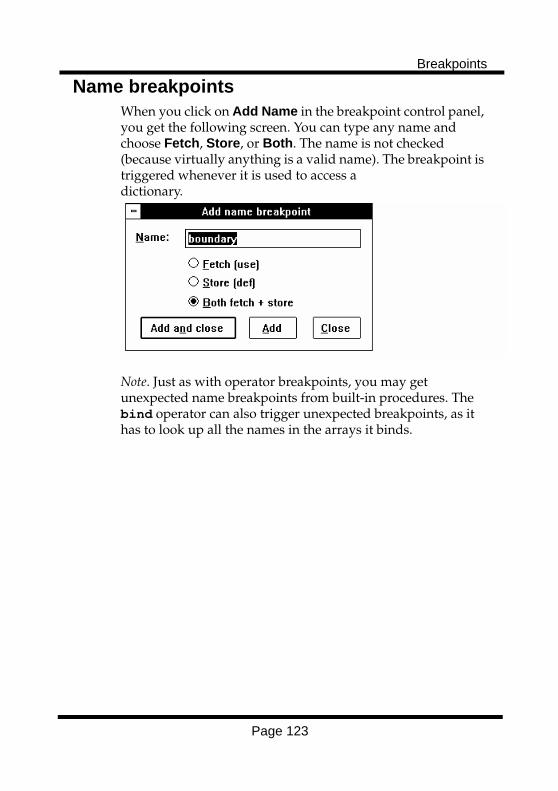
Breakpoints
Page 123
Name breakpointsWhen you click on Add Name in the breakpoint control panel, you get the following screen. You can type any name and choose Fetch, Store, or Both. The name is not checked (because virtually anything is a valid name). The breakpoint is triggered whenever it is used to access a dictionary.
Note. Just as with operator breakpoints, you may get unexpected name breakpoints from built-in procedures. The bind operator can also trigger unexpected breakpoints, as it has to look up all the names in the arrays it binds.
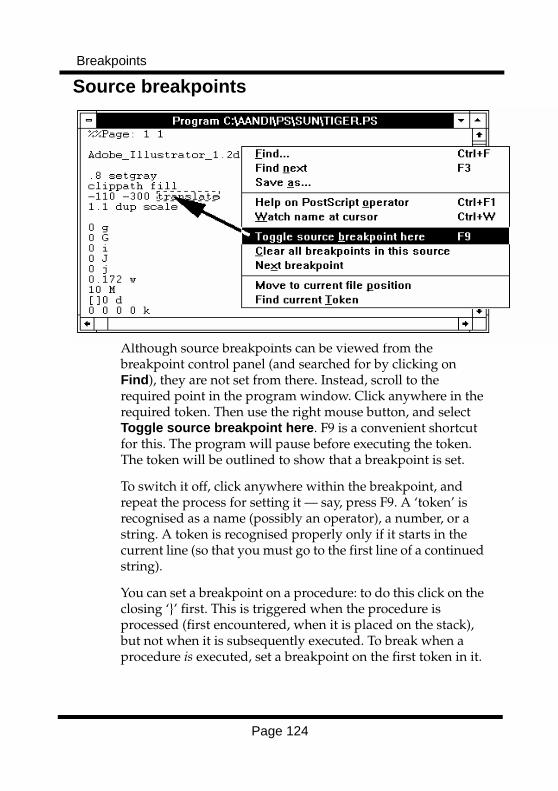
Breakpoints
Page 124
Source breakpoints
Although source breakpoints can be viewed from the breakpoint control panel (and searched for by clicking on Find), they are not set from there. Instead, scroll to the required point in the program window. Click anywhere in the required token. Then use the right mouse button, and select Toggle source breakpoint here. F9 is a convenient shortcut for this. The program will pause before executing the token. The token will be outlined to show that a breakpoint is set.
To switch it off, click anywhere within the breakpoint, and repeat the process for setting it — say, press F9. A ‘token’ is recognised as a name (possibly an operator), a number, or a string. A token is recognised properly only if it starts in the current line (so that you must go to the first line of a continued string).
You can set a breakpoint on a procedure: to do this click on the closing ‘}’ first. This is triggered when the procedure is processed (first encountered, when it is placed on the stack), but not when it is subsequently executed. To break when a procedure is executed, set a breakpoint on the first token in it.
Breakpoints
Page 125
There are several more options on the pop-up menu for the program window. You can search for source breakpoints, or you can clear all of them.
Image breakpointsYou can set exactly one image breakpoint. It applies to all pages: whenever a mark is made in the specified rectangle, the program will pause. The mark does not even have to be visible: for example white text on a white background will trigger it. However, if the marks are not visible because they are clipped, no breakpoint occurs.
To set the breakpoint use the right-button menu in any image viewer. It is often helpful to run the program once to establish the exact area required. Use Overlay | Select Image Breakpoint. Then move the mouse to one corner of the rectangle and drag it to the other corner. The rectangle will then be highlighted in green.
Image breakpoints are also cleared with the right button menu on any image viewer: use Overlay | Clear Image Breakpoint. Using Search | Find Image Breakpoint from the same menu will make the breakpoint visible, if the image is large and you have lost the breakpoint.
Whenever the image breakpoint is triggered, the current image is always refreshed. This is not the case for the other classes of breakpoint.
An image breakpoint is also triggered after a page is cleared by a page size request. For instance, the operator a4 will clear the page even if the page size is already a4. The grestore operator can also clear the page if there was a page size request since the gsave. PSAlter does not trigger an image breakpoint, though, if the page was completely blank (as it would be when a page size request appears at the start of a job, or when grestore follows showpage).
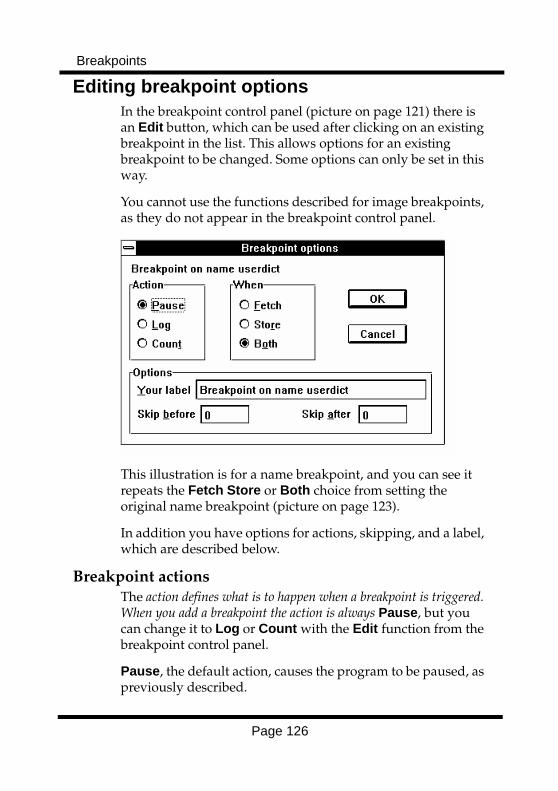
Breakpoints
Page 126
Editing breakpoint optionsIn the breakpoint control panel (picture on page 121) there is an Edit button, which can be used after clicking on an existing breakpoint in the list. This allows options for an existing breakpoint to be changed. Some options can only be set in this way.
You cannot use the functions described for image breakpoints, as they do not appear in the breakpoint control panel.
This illustration is for a name breakpoint, and you can see it repeats the Fetch Store or Both choice from setting the original name breakpoint (picture on page 123).
In addition you have options for actions, skipping, and a label, which are described below.
Breakpoint actionsThe action defines what is to happen when a breakpoint is triggered. When you add a breakpoint the action is always Pause, but you can change it to Log or Count with the Edit function from the breakpoint control panel.
Pause, the default action, causes the program to be paused, as previously described.
Breakpoints
Page 127
Log means that the program does not pause, but an entry is written to the output log (%stdout) each time the breakpoint is encountered. This may slow down a program substantially if the breakpoint is often hit.
Count simply adds to the counter which is displayed in the breakpoint control panel. This does not slow the program down much, and is a convenient way of profiling the actions of a program: answering questions like: how often do particular operators, names, or portions of the program get executed?
Breakpoint skippingSometimes, you do not want to trigger a breakpoint every time an event occurs. For instance, you may know from experience that the 60th time the fill operator is used is the interesting one.
Using the skip options allows you to handle this case efficiently. Click Edit in the breakpoint control panel to view or change the skip options.
Skip before is the number of times the breakpoint is ignored before it is finally triggered. This will always be 0 when a breakpoint is first created. Note that in the example above (60th fill operator) you would need to set Skip before to 59.
After a breakpoint is hit, the value from Skip after is copied to Skip before (but not itself altered). This value is initially 0, but if, for instance you set it to 10, the breakpoint is triggered every tenth time.
Breakpoint labelsWhen working with many breakpoints, especially in the program source, it may be hard to keep track of which is which. Using the Edit function from the breakpoint control panel, you can change the default label assigned by PSAlter to something more meaningful, and this is used in all contexts where the breakpoint is reported.
Using executive mode
Page 128
Using executive mode
Many PostScript printers allow an operator executive, which is useful for experimenting with PostScript. Although it is not necessary with PSAlter, it can occasionally be useful, so PSAlter supports something similar to the printer facility.
Executive mode in a printerYou would use executive mode in a printer like this:
• Connect to the printer on a two-way connection, for instance a serial cable using a communications program.
• Type the word executive and press return. The printer won’t echo this back, so you will be typing ‘blind’.
• The printer will put out a prompt such as
• PostScript printer version 47.0PostScript>
• You can now type PostScript commands and receive back whatever responses the printer sends to the standard output file. For instance, to find out what is on the stack, you could type pstack.
• When finished, type quit to return the printer to its normal state.
Executive mode in PSAlter workbenchThis describes the basics of using PSAlter’s executive mode.
At any time while in the workbench you can enter executive mode. Use the Run | Executive menu option or press its keyboard shortcut Ctrl+E. An enlarged status line will appear

Using executive mode
Page 129
at the bottom of the screen, including an extra line for typing commands (the ‘Executive line’).
You can type PostScript commands and press Return. The commands you have typed are now ‘locked’ and cannot be changed while they are running.
Once the commands have been run, PSAlter will return to the Executive line and allow you to type more commands. The previous command will still be in the line, but it will be selected (highlighted). To type a new command there is no need to delete the old one; it will replace it.
To leave executive mode press the Escape (Esc) key while the cursor is in the Executive line. Once you have left executive mode, any previously running program will resume.
The commands you type are logged in the output log, unless you type false echo.
Combining executive mode with a program window
You can start using executive at any time, whether or not a program is currently running. If a program is running it will be suspended as long as you are in executive mode. When you leave executive mode the program will resume.
Using executive mode
Page 130
There are several different possibilities for PSAlter interacting with the program window.
• If the program was actually running, it will resume. If it was walking, it will continue walking.
• If a program was paused (possibly at a breakpoint), on exit from executive mode the program will still be paused, and can be continued.
• If a program has finished (either because it reached the end, or because it was stopped), executive mode will be able to use the information left behind by the program (procedures, data etc.). Note that many programs will end with a restore operator and remove all the definitions they have set up; in this case you may need to put a breakpoint on restore if you want to work with those definitions. Once you leave executive mode, Run | Start (or the Run button) will start the program from the beginning as a new job.
• If a program is open but not yet started, you cannot use executive mode to set up data for the program, since when you use Run | Start, the program is started as a new job.
It is possible to run external programs from executive mode. For instance, you could type
(c:\\psalter\\demos\\tiger.ps) run
(Notice that PostScript requires backslashes \ to be doubled up \\). You can do this even when another program is running, though this may not do the first program any good. One of the features of the run operator is that it will not report any errors. To receive error reports normally, replace ‘run’ with (r) file cvx exec, for instance
(c:\\psalter\\demos\\tiger.ps) (r) file cvx exec
Using executive mode
Page 131
Additional notesEntering executive mode
You can enter executive mode using Run | Executive or Ctrl+E. You will also enter executive mode if the operator executive is included in a program.
This can be used to go ‘interactive’ at critical parts of a program you are debugging. By including it at the start of a program, you will have the opportunity to change the program’s environment before it gets started.
If you use Run | Executive or Ctrl+E when already in executive mode it will return the cursor to the executive line. This is especially useful if working without a mouse. If the previous line has not finished running, you will be given the chance to stop it and enter a new command.
Leaving executive modeThe easiest way to leave executive mode is to press the Escape key which the cursor is in the executive line. You may have to press Ctrl+E first if the cursor is not in this line.
You can also leave executive mode by typing quit, or by running quit as part of a procedure.
Finally, you can leave executive by Run | Quit executive.
Controlling flow of executive commandsMost commands typed in executive finish almost immediately. You can tell it has finished because while the command is running it is written in grey text and cannot be changed.
Sometimes, though, a command will run for some time. In this case you can use the full range of PSAlter’s control facilities. This includes pausing, breakpoints, and single stepping, and you can use Stop to end the command early. If you have a suspended program in a window it is not affected by any of these options.
Using executive mode
Page 132
Side effectsIf you use executive mode while a program is running, any changes made in executive mode are persistent — that is, they affect the program when it is resumed. This includes any changes to stacks, data, and graphics state, as well as any marks left on the page.
This is deliberate; it allows executive mode to be used to ‘fix up’ a program, to save modifying it and starting again. You should be aware, though, that you may stop the program from working if, for instance, you clear the operand stack.
Some operators have unexpected side effects too — for instance if you use ‘showpage’ you cannot rely on the program carrying on as before on a fresh page, since showpage may change the graphics state (such as scaling).
The only change which is completely undone on leaving executive mode is any change to the execution stack. The execution stack is also restored at the start of each new executive command.
Changing the commandIf you don’t change the command that has just executed, then use Run or press return again, PSAlter prompts you to confirm that you want to run the command again. This is to stop ‘accidents’ caused by running a command twice.
To avoid the prompt, while running the same command again, click on the command text once. If the highlighting is removed (which clicking will do), the prompt is not issued.
RestrictionsYou should be aware of these restrictions on executive mode.
• You can use cut, paste, copy and undo with the executive line. But you cannot paste in multi-line text; it is cut off at the first carriage return.
• You cannot re-enter executive mode when you are already
Using executive mode
Page 133
using it. Any attempt to use the executive operator when in executive mode will get an error. Some printers will allow this.
• You cannot type a command longer than 255 characters.
• You cannot define only the first part of a procedure, then finish it on a subsequent line — all { } brackets must match in the line you type.
• You cannot use commands which expect in-line data — such as (typically) image.
• You can use Run | Walk (the Walk button) as well as Run | Start (the Run button) to run an executive command. However, PSAlter will not walk through the command you type. It will, however, walk through any procedures you refer to in an active program. When you press Return in the executive line, it is equivalent to Run | Start.
Implementation notes for PostScript programmers
Page 134
Implementation notes for Post-Script programmers
Some of the details of PSAlter have subtle effects on the way PostScript programs run. This section has details on a few of them. You should be aware, however, that all of these details may change in future releases; don’t build complex applications which rely on the precise way PSAlter works.
Adding header filesWhen PSAlter starts, it reads a file called psalter.hdr. This is an essential part of the setup, and without it the implementation of PostScript would not be complete. Although psalter.hdr should not be changed, it can be convenient to have your own files read when PSAlter starts.
These are called header files, and can contain definitions of procedures, emulations of particular printer features, or other appropriate setup commands. If you create a file called user.ps in the same directory as the PSAlter program psalter.exe, it will automatically be run after psalter.hdr is finished.
Calling additional header filesIf you do not want to put everything in user.ps, you can run additional files from there. This can be done using the run or file operators. Although run is easier to use, this means that no error messages are reported, which can make problems hard to find.
The following examples give three calls to additional header files:
(test2.ps) run
Implementation notes for PostScript programmers
Page 135
This runs the file test2.ps, in the same directory as user.ps. No errors will be reported, it will just stop reading test2.ps on the first error, and continue with the next commands in the current file.
(C:\\utils\\h2.ps) (r) file cvx exec
This runs the file c:\utils\h2.ps. Errors will be reported. Notice that PostScript requires backslashes (\) to be doubled (\\).
{ (test2.ps) (r) file } stopped not { cvx exec } if
This runs test2.ps, and detects any errors in it. It does not, however, require that test2.ps exist, and will quietly ignore it if the file is missing.
Error reporting in header filesErrors in header files are treated in the same way as in normal files. Note, however, that the error pop-up has fewer choices - essentially only Stop and Ignore.
The error message box is also modified to include the name of the current file being read.
Additional notes and restrictions• If you redefine existing operators in a header file, it is easy
to make PSAlter interpret PostScript wrongly. Take care.
• Don’t use any operators that attempt to draw on the current device, or that try to set the device size. These may cause PSAlter to fail.
• The header files may be read after PSAlter has started, if certain setup options are changed (e.g. if switching from level 1 to level 2).
• Test header files using level 1, since they will be used whatever the emulation settings.
• You can use @yes?, a PSAlter extension to PostScript, to

Implementation notes for PostScript programmers
Page 136
do conditional setup in the header. This is described in Extensions on page 143.
• File viewer windows are never opened for files accessed via the file operator while reading headers (see next section).
Device dependent operatorsBecause the PostScript language originally did not include any way to directly influence the device (e.g. printer) it was running on — for instance to select a paper size — printers each have a selection of device dependent operators.
There is no single standard for these operators, and they are best avoided in any PostScript program intended to be portable. PSAlter does not implement most of the device dependent operators, so that it provides a better test for portability.
However, some device dependent operators have been used in so many printers, or are so useful, that they are in common use. PSAlter implements a basic set, so that most programs will work successfully.
Most of the operators in this class that PSAlter implements are concerned with selecting a paper size. These operators will override the page size selected in Imaging setup. The operators implemented for paper size include: 11x17 11x17tray a3 a3tray a4 a4tray a5 b5 b5tray folio ledger ledgertray legal legaltray letter lettertray note quarto, and the typesetter operators setpage and setpageparams. Very few printers would have all of these operators, so portability is not guaranteed.
There are a few other operators too, including setjobtimeout and resolution. For full details and a complete list, check the online help file.
Note that these operators are mostly found in statusdict and userdict, rather than the more usual systemdict.

Implementation notes for PostScript programmers
Page 137
The file operatorThe file operator is used to access external files from PostScript programs. Its behaviour is implementation dependent.
Except when reading header files (which are handled as described above) PSAlter implements the file operator using file viewer windows. Remember that any use of the file operator stops a PostScript file from being portable, and will probably stop it from printing altogether.
With the file operator, file names have two parts, a device and a file name. The device name always comes first, and is surrounded by ‘%’ signs. Either can be omitted. Examples of names — as PostScript strings — are (%os%c:\\psalter\\demo\\tiger.ps) (file1) (%stdout).
PSAlter currently ignores the device name. But if referring to an external file, the device %os% is recommended. Notice that, by the rules of PostScript, any backslash (\) appearing in the name must be doubled up.
When reading a file for the first time, PSAlter requires a valid file name, whatever the device. A window is opened viewing that file; if the file does not exist the undefinedfilename error is generated. When writing, the name can be anything; subsequent attempts to read from the same name will succeed.
Remember that PSAlter does not save the contents of file viewers. However, what is written into a named PostScript file can be read in subsequent runs within the same session of PSAlter, provided the file viewer is not closed.
Windows fontsWindows fonts can be used as substitutes for PostScript fonts. They are very similar to PostScript fonts, but have some differences.
Implementation notes for PostScript programmers
Page 138
Windows fonts look like Type 1 PostScript fonts, but only superficially. The Private dictionary is empty and the CharStrings dictionary contains special values. There are also extra keys in the dictionary which PSAlter requires for correct operation.
Windows fonts can be used for all operations a type 1 font could be used for, including all show variants and charpath.
Windows fonts can also be re-encoded by providing a new Encoding array. There are some limitations to this, though it will work for most conventional (alphabetic) fonts and for most symbol fonts if you check Symbol font when setting them up. The limitations are as follows:
• You can only access characters in the normal Windows character set. An attempt has been made to provide a character for every glyph in StandardEncoding and ISOLatin1Encoding. This includes the characters lslash and Lslash, and the ligatures fi and fl. These are simulated using existing characters.
• PSAlter normally assumes that the font follows the Windows character encoding, with the characters named according to the Adobe standard encoding. This means that the default character ordering of the PSAlter font is not the same as that of the Windows font.
• If you check Symbol font when setting up the substitution, the font is assumed to have the same character names as the font Symbol, and that all of the character positions are correct.
• If an AFM (font metric) file can be found when setting up the font, the information in it is used to build both the initial Encoding array and the reverse mapping used to find a windows character. All the basic 35 fonts have AFM files supplied.
Implementation notes for PostScript programmers
Page 139
Where a Windows font is used, the Metrics, Metrics2, CDevProc and WMode entries cannot be used to change character spacing. They will be ignored.
Also, when charpath is used, fonts are not ‘normalised’ so that they are defined with outer paths anticlockwise; some code may depend on fonts being defined in that order.
Error handlingPSAlter allows you to ignore PostScript errors. However, this is at odds with the conventional PostScript error handling.
In most implementations, each error has an error handler in errordict, which performs various functions then executes stop. When the interpreter stops after an error, it will then execute HandleError from errordict to produce any error messages.
A program can stop errors from being fatal in two ways. Most commonly, the stopped operator is used, so that if an error is found, and stop is executed, the program can continue. The second approach is to replace one or all of the error handlers in errordict, to take its own recovery procedures.
PSAlter will report an error and allow you to ignore it if
• no stopped (or run) operator is in effect, and
• the error handler has not been modified.
This leaves one case where an error may not be detected properly; where an error handler is replaced and still executes stop.
Note that the error handlers included with many print jobs do not use either of these techniques. Instead, they replace HandleError, so that once an error has occurred, and the program has stopped, they can report details of the error. PSAlter will use these only if Handle rather than Stop is chosen when an error is encountered. The default PSAlter error handler logs a special error message.
Implementation notes for PostScript programmers
Page 140
Execution stack(This is very specialised and should be ignored if you don’t understand it!)
The definition of the execution stack calls for a procedure to be removed before executing the last item. While this does allow unlimited recursion, such programs are rare. In fact far more common are programs which, due to an error, would loop forever. PSAlter does not remove items until after they are executed, so that the execution stack can always be used to trace back called procedures.
This potentially causes two problems.
Problems with restoreThe restore operator will give the invalidrestore error if any composite object on any stack is newer than the save object. Given that PSAlter does not remove a procedure before executing its last element, this code should fail:
save true { restore } if
However, this does not fail because of a special rule applied by PSAlter: invalidrestore will never be reported for an empty procedure. As the execution stack contains a procedure with only the items remaining to be executed (i.e., none, in this case), no error will occur.
Problems with recursionA very few programs might legitimately use this feature for recursion and would fail with the execstackoverflow error. To avoid this, PSAlter checks before giving execstackoverflow to see if the top element on the stack is an empty procedure. If it is, then a message is issued.
The message box gives a choice of tidying up the execution stack (Yes), or giving an error (No). If you choose Yes, all empty procedures are removed from the top of the stack. Furthermore, once you have chosen Yes, you will not be asked again for the current session of PSAlter.
Implementation notes for PostScript programmers
Page 141
To demonstrate this effect for a file which will loop forever if you reply Yes, try:
/zap { zap } def zap
A note on arithmetic accuracyPSAlter 1.5 and above may give different results from earlier versions, for work that includes complex arithmetic calculations. Both may give different results from any particular printer.
If you are performing calculation in PostScript you should be aware that the accuracy in most implementations is very limited, and rounding errors can quickly accumulate. It is best to avoid complex calculations in PostScript.
PSAlter uses a slightly more accurate maths library than most PostScript implementations. This means, of course, that it can give different results.
PSAlter 1.5 was compiled with a different maths library from earlier versions. This gives equally valid, but again possibly different results.
The main culprit when PostScript programs are giving radically different answers to calculations is the apparently innocent cvi operator, which always truncates towards zero rather than rounding, as many people expect.
Restrictions and limitsMissing operators
PSAlter implements all of the PostScript level 1 or level 2 operators which a printer must have.
It does, however, leave out a number of operators which might be found in a typical printer, but which are not appropriate to an interactive environment. These are device specific extensions, to change such things as baud rate, time-outs,
Implementation notes for PostScript programmers
Page 142
paper tray, or cover sheets. (The most common operators to set page size are supported, however).
Other extensions to PostScript, including level 3 and some operators which were added to some level 2 printers (e.g. those related to CID fonts) are not included.
If any existing operators have restrictions, these are noted in the online help for that operator.
LimitsThe limitations in PSAlter are those of a typical level 1 interpreter, with some exceptions. Most obviously, the path size can be increased using Limits setup.
If you select the Level 2 Emulation setup option, dictionaries can grow beyond their original size. In all cases userdict can grow, so you will not get the dictfull error for userdict. The dictionary and operand stacks will also be able to grow.
The amount of VM available to a program depends on the amount of memory available to Windows. No attempt is made to reserve VM, so other running programs, or other parts of PSAlter may reduce the maximum VM.
Device co-ordinates cannot exceed about 30000. This is far outside the printable area, but a few programs use very large co-ordinates. Using Limits Setup you can choose whether to truncate large co-ordinates (which works in most cases) or to get the limitcheck error. In a few cases, especially when working with Windows fonts, overflow may not be detected, and co-ordinates may wrap around with unwelcome consequences.
EmulationsIn ASCII, as opposed to binary, mode PSAlter should detect Ctrl+D characters in images. At the time of writing it does not, and so PSAlter may fail to complain about a file that would not print (since a printer may treat Ctrl+D as end-of-file).
Implementation notes for PostScript programmers
Page 143
FailuresIf an arithmetic overflow occurs on a real operation, PSAlter may fail or issue an error message. Some interpreters may return the rangecheck error when this occurs; others may produce a meaningless large number.
Like many other programs, PSAlter is sometimes unable to recover properly when running out of memory. It will usually have become unacceptably slow before this happens. Often it will manage to recover and give a VMerror message; if this happens you would be well advised to restart PSAlter, and possibly Windows itself, before trying to run anything else.
ExtensionsPSAlter has avoided adding any extensions to PostScript, as these make programs less portable. There are two extensions, however, that are particularly suited to running and testing programs in a Windows environment, and which have an effect that cannot be achieved in standard PostScript. They are the operators @popup and @yes? (notice that the latter name includes a question mark). Both are actually procedures, though they are described as operators.
In the examples given here, a test is made to ensure that the operator actually exists. This is good practice and ensures that the file can still be sent to a printer successfully.
@popup operatorThis operator takes a single string as operand. A message box pops up in the PSAlter window, containing the string. The user must click OK to continue.
@popup is useful for noting exceptional events while developing programs. For instance
currentlinewidth 0 eq { /@popup where { pop % excess results from where (Line width is zero!) @popup

Implementation notes for PostScript programmers
Page 144
} if} if
@yes? operatorThe @yes? operator can be used for simple interaction as a program runs. Like @popup, it takes a single string as operand. Unlike it, a boolean is returned. The message will be displayed in a box, and the user must click Yes or No to continue. If they click Yes, then @yes? will return true; otherwise false.
For example:
/@yes? where{ pop (Do you want to clear the path?) @yes? { newpath } if} if
Other new operatorsYou will discover other new operators if you explore PSAlter. Use them at your own risk; they will not be documented or supported, and may change.

Implementation notes for PostScript programmers
Page 145
Appendices
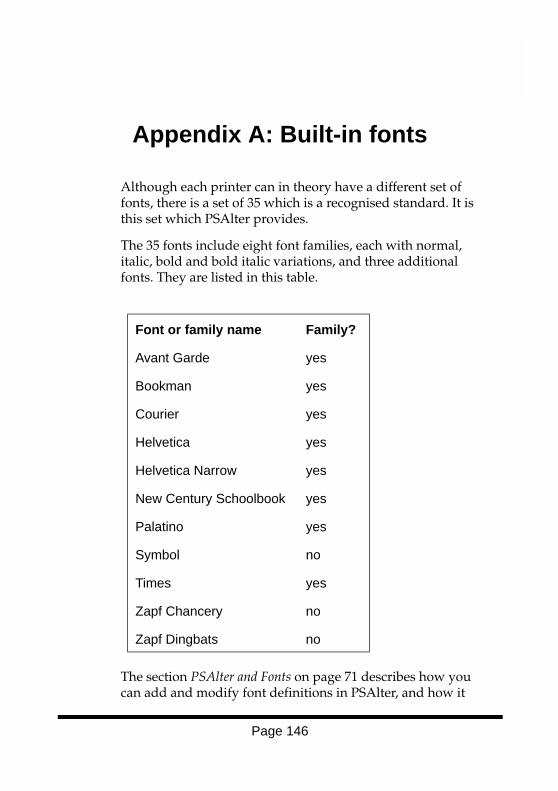
Appendix A: Built-in fonts
Page 146
Appendix A: Built-in fonts
Although each printer can in theory have a different set of fonts, there is a set of 35 which is a recognised standard. It is this set which PSAlter provides.
The 35 fonts include eight font families, each with normal, italic, bold and bold italic variations, and three additional fonts. They are listed in this table.
The section PSAlter and Fonts on page 71 describes how you can add and modify font definitions in PSAlter, and how it
Font or family name Family?
Avant Garde yes
Bookman yes
Courier yes
Helvetica yes
Helvetica Narrow yes
New Century Schoolbook yes
Palatino yes
Symbol no
Times yes
Zapf Chancery no
Zapf Dingbats no
Appendix A: Built-in fonts
Page 147
uses the fonts installed in Windows to maintain the appearance of a document.
When Windows is installed it only has three font families: Arial (similar to Helvetica); Times New Roman (similar to Times); and Courier New. It also has the single fonts Symbol and Wingdings.
On the next page are examples of fonts as produced by PSAlter. The first is using Adobe fonts (with Adobe Type Manager); the second uses only the built in Windows fonts. Although the appearance changes, you can see that the spacing remains the same, so that the basic appearance and readability of documents is preserved.
You can add more fonts to windows to make the fonts PSAlter uses closer to the ‘real thing’. PSAlter recognises the fonts from several popular font and graphics packages, and will automatically use them if they are there. If you don’t have one of these packages you can define your own lookalike fonts, but it is more laborious.
Because the information is subject to change, the options you have for installing third party fonts are described in a separate document addfonts.txt in the PSAlter install directory (typically c:\program files\quite\psalter.) At the time of writing, several Adobe and Microsoft font packages are covered, together with CorelDRAW versions 3, 4 and 5 (later versions of CorelDRAW include the same fonts, but it is important to be selective in installing them, as installing the full set of 1000+ fonts will make Windows unstable).
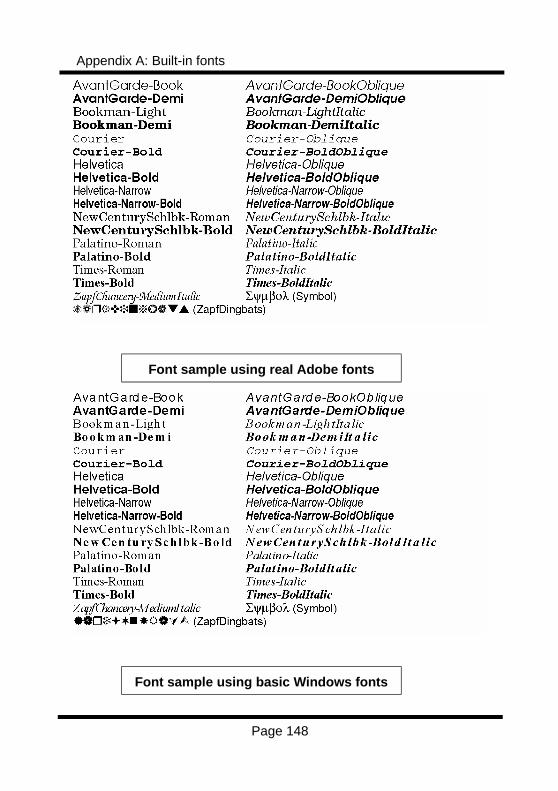
Appendix A: Built-in fonts
Page 148
Font sample using real Adobe fonts
Font sample using basic Windows fonts

Appendix B: Keyboard shortcuts
Page 149
Appendix B: Keyboard shortcuts
If you do not use a mouse or other pointing device, almost all of the functions in PSAlter are still available. The main exceptions are those functions which require dragging the mouse over an image viewer.
Even if you have a mouse, you may prefer to use the keyboard for the common activities.
Because a number of operations apply to the current child window in the workbench, you should make sure that the current child is appropriate before using any function. For instance Ctrl+C (copy) might apply to a program viewer or to an image. Other functions will have no effect if used with the wrong child active.
You can step between child windows using Ctrl+F6 or Ctrl+Tab; some windows have a special code such as Ctrl+G for the main program.
To access items from the main menu, click and release Alt or F10, then use arrow keys or the underlined letters to navigate. The right mouse menus are accessed by Shift+F10.
The next pages have a brief summary of keyboard shortcuts. There is more detail in the online Help.
Common shortcuts
Keystroke(s) Function
F1 Open Help
Alt+F4 Exit PSAlter
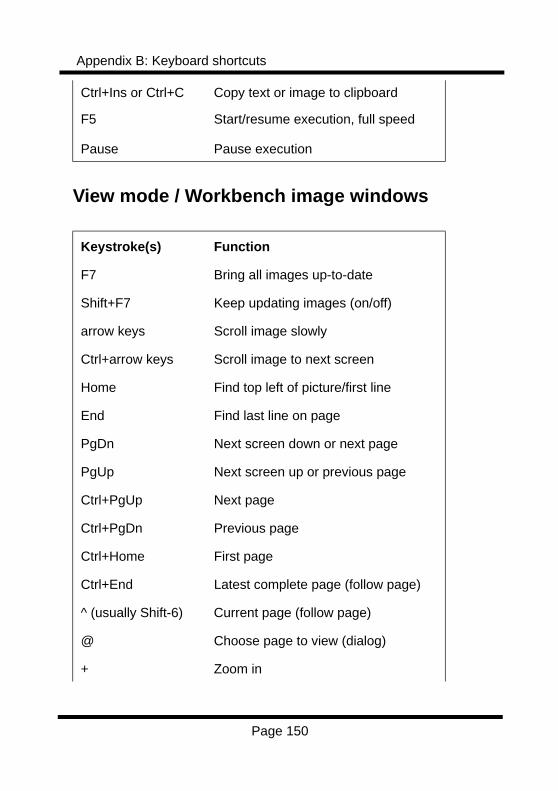
Appendix B: Keyboard shortcuts
Page 150
View mode / Workbench image windows
Ctrl+Ins or Ctrl+C Copy text or image to clipboard
F5 Start/resume execution, full speed
Pause Pause execution
Keystroke(s) Function
F7 Bring all images up-to-date
Shift+F7 Keep updating images (on/off)
arrow keys Scroll image slowly
Ctrl+arrow keys Scroll image to next screen
Home Find top left of picture/first line
End Find last line on page
PgDn Next screen down or next page
PgUp Next screen up or previous page
Ctrl+PgUp Next page
Ctrl+PgDn Previous page
Ctrl+Home First page
Ctrl+End Latest complete page (follow page)
^ (usually Shift-6) Current page (follow page)
@ Choose page to view (dialog)
+ Zoom in
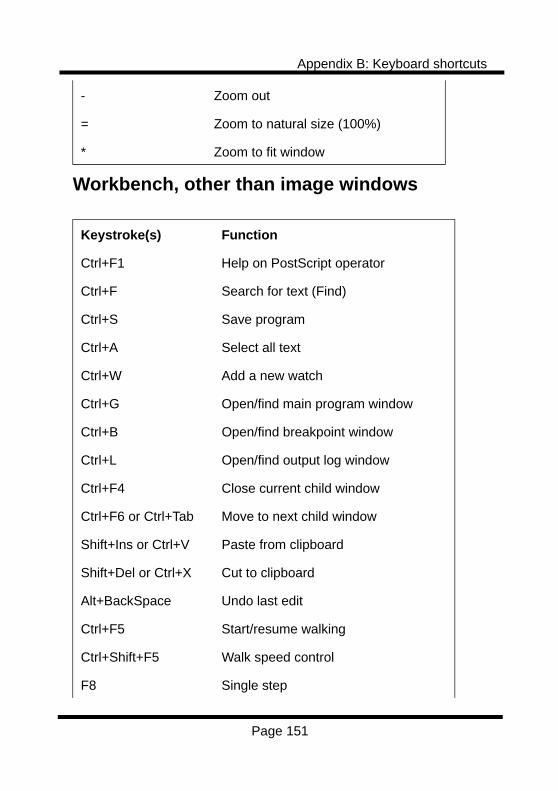
Appendix B: Keyboard shortcuts
Page 151
Workbench, other than image windows
- Zoom out
= Zoom to natural size (100%)
* Zoom to fit window
Keystroke(s) Function
Ctrl+F1 Help on PostScript operator
Ctrl+F Search for text (Find)
Ctrl+S Save program
Ctrl+A Select all text
Ctrl+W Add a new watch
Ctrl+G Open/find main program window
Ctrl+B Open/find breakpoint window
Ctrl+L Open/find output log window
Ctrl+F4 Close current child window
Ctrl+F6 or Ctrl+Tab Move to next child window
Shift+Ins or Ctrl+V Paste from clipboard
Shift+Del or Ctrl+X Cut to clipboard
Alt+BackSpace Undo last edit
Ctrl+F5 Start/resume walking
Ctrl+Shift+F5 Walk speed control
F8 Single step
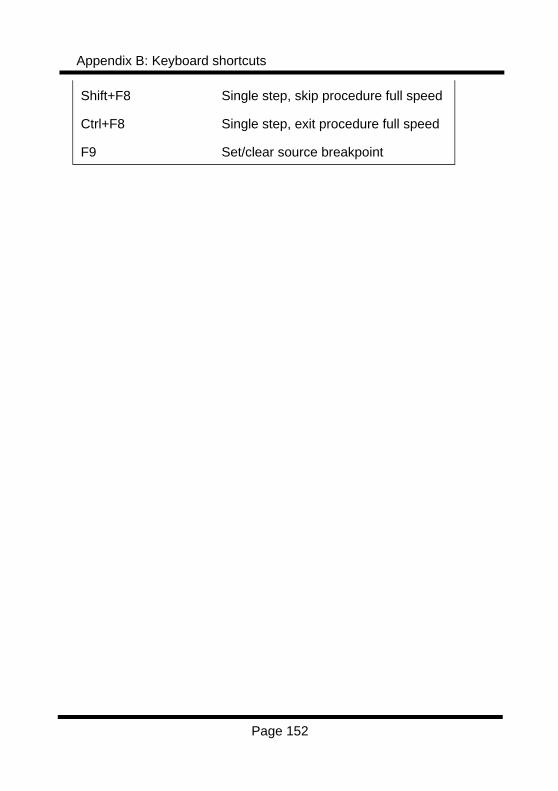
Appendix B: Keyboard shortcuts
Page 152
Shift+F8 Single step, skip procedure full speed
Ctrl+F8 Single step, exit procedure full speed
F9 Set/clear source breakpoint