Embed Size (px)
Citation preview

Projects Module Guide
April 2014 Department of Water Resources
Project Services Office

Page intentionally left blank.

Contents I. Projects Module Overview .......................................................................................................................... 1
II. Projects Module .......................................................................................................................................... 3
A. My Projects .............................................................................................................................................. 5
B. All Projects ............................................................................................................................................... 6
III. Navigating the Projects Workbook Tabs ..................................................................................................... 8
A. Project Overview Tab .............................................................................................................................. 8
B. Location Tab .......................................................................................................................................... 10
C. Budget Tab ............................................................................................................................................. 11
D. Milestone Tab ........................................................................................................................................ 13
E. Task Tab ................................................................................................................................................. 15
i. Task Level Tracking ............................................................................................................................ 15
ii. Before entering Tasks, consider how your grantee will Invoice ........................................................ 15
F. Benefit Tab ............................................................................................................................................ 17
i. Updating Project Benefits .................................................................................................................. 17
G. Project Team Tab ............................................................................................................................... 18
H. Communication Tab .............................................................................................................................. 24
I. Attachments Tab ................................................................................................................................... 27
J. Checklist (Deliverables) ......................................................................................................................... 28
K. Contract ................................................................................................................................................. 30
L. Return .................................................................................................................................................... 33
M. Frequently Asked Questions (FAQ) ................................................................................................... 34

Page intentionally left blank.

Projects Module Guide
Project Services Office Page 1
I. Projects Module Overview
The Projects module in GRANTS allows you to review and edit existing project information or add new projects. This module has two sub-modules: My Projects and All Projects.
The Projects module can be accessed using the red tab (the tab turns blue when you have selected a GRANTS module). The sub-modules are displayed as hyperlinks in the blue banner under the module tabs.
Each user role has different access permissions that will limit the user’s access within the Projects Module, see Table 1 below.
Table 1: User Access within the Projects Module
Module Sub-Module Workbook User
Staff PSP Staff Program Manager
GRanTS Admin
Projects My Projects
Project Overview Location Budget
Milestone Task
Benefit Project Team
Communication Attachment
Checklist Contract Return

Projects Module Guide
Project Services Office Page 2
Module Sub-Module Workbook User
Staff PSP Staff Program Manager
GRanTS Admin
All Projects
Project Overview Location Budget
Milestone Task
Benefit Project Team
Communication Attachment
Checklist Contract Return
The My Projects sub-module is available to everyone: however, the All Projects sub-module is only available to the PSP Staff, Program Manager, and GRANTS Admin. If you do not have this access level and have been asked by your Program Manager to create projects or update projects that are not assigned to you, please contact the GRANTS Admin Team at [email protected].
Projects Module Guide
Project Services Office Page 3
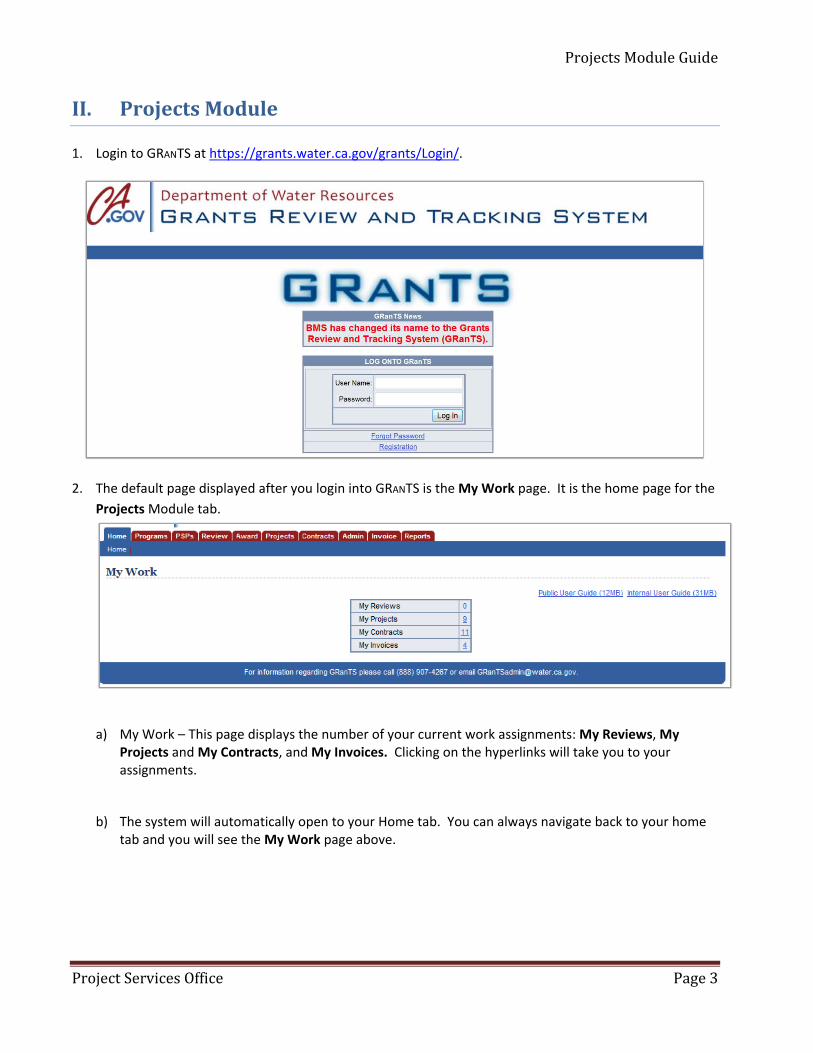
II. Projects Module 1. Login to GRANTS at https://grants.water.ca.gov/grants/Login/.
2. The default page displayed after you login into GRANTS is the My Work page. It is the home page for the
Projects Module tab.
a) My Work – This page displays the number of your current work assignments: My Reviews, My Projects and My Contracts, and My Invoices. Clicking on the hyperlinks will take you to your assignments.
b) The system will automatically open to your Home tab. You can always navigate back to your home tab and you will see the My Work page above.

Projects Module Guide
Project Services Office Page 4
Your home page has a list of red PRIMARY TABS across the top at all times. Use these tabs to navigate while in GRANTS. Don’t use your browser back button.
If you do not have assignments listed on My Work, contact your program manager to ask about assignments. Your username will need to be updated as the project manager in the system. You should make a list of your projects so that your program manager can verify which project should have your name associated to it. You can also contact [email protected] or call 888-907-4267 to verify your user status.

Projects Module Guide
Project Services Office Page 5
A. My Projects
My Projects is the first page displayed when you click on the Projects Tab in the red module tabs. This page will display a list of projects currently assigned to you.
On this screen, you can sort your projects alphabetically or by date by clicking on the column header. Since each page can display up to ten projects, you can use the dropdown menu or arrows at the bottom of the page to navigate to another page.
If you want to export the data into an excel spreadsheet for any purpose, you can click on the Export Data hyperlink located on top right of the screen.
You can switch to All Projects to look for a specific project that has not been assigned to your username if you have permissions to All Projects sub-module.

Projects Module Guide
Project Services Office Page 6
B. All Projects
This page lets you search for a specific project including projects that are not assigned to you. You can filter by Program, Project Name, Start Year, Project Manager, and/or End Year. If you are unable to find a specific project and know it exists within the system, try broadening your field of search and leave no selection in the fields.

Projects Module Guide
Project Services Office Page 7
When you click on a Project Name hyperlink, you will be automatically directed to the Project Overview workbook tab. The Project Overview tab (the grey tab) contains the Project Data, which displays general information about the project including the Project Name, Organization, Program, Dates and information about the scope of work and project objective.

Projects Module Guide
Project Services Office Page 8
III. Navigating the Projects Workbook Tabs The secondary row of grey tabs navigates you through the individual workbooks throughout GRANTS,. In the Projects Workbook, these tabs have detailed information about the project. The information is captured and updated by the DWR project manager and is viewable by the grantees/contractors. The data collected in the Project Workbook contains information that will be used in legislative and workload reports, as well as in Invoices, so it is very important to keep this information up-to-date and accurate.
The following sections provide a detailed description of each tab and how they can be used to collect project information.
A. Project Overview Tab
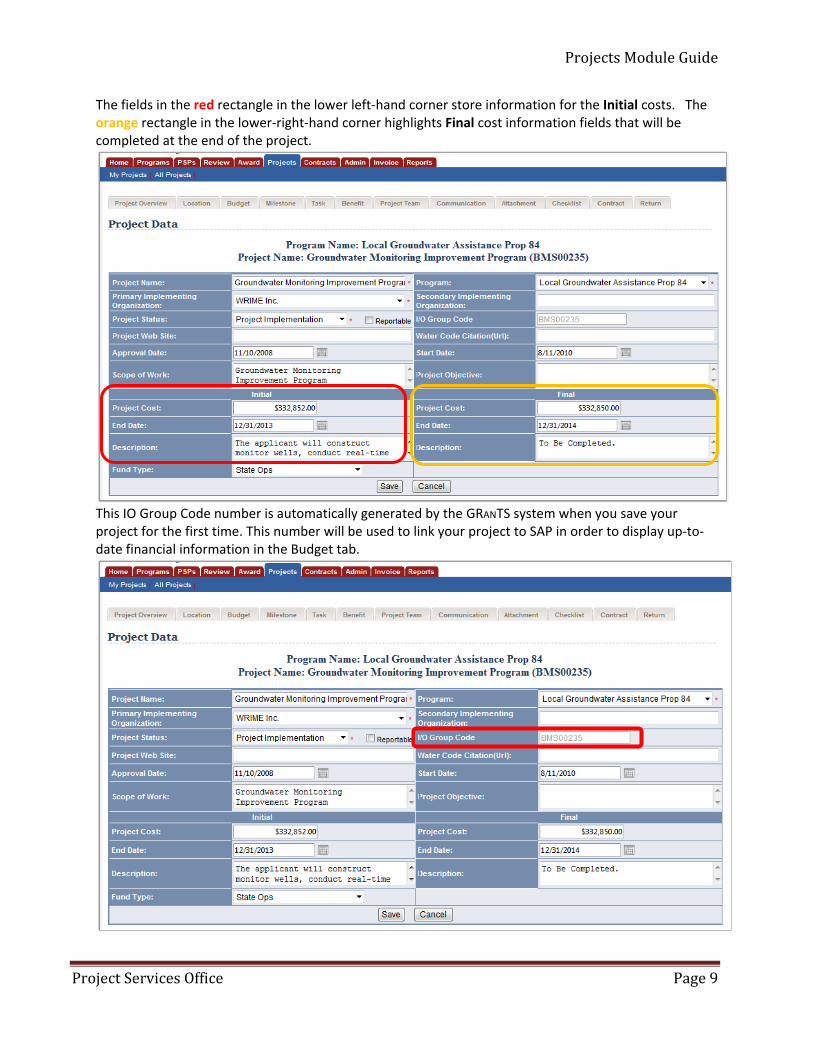
The Project Overview Tab contains general information about the project including the initial Project Cost, End Date, and Description. The list below shows what’s included in the Project Overview tab.
Project Name Program Primary Implementing Organization Secondary Implementing Organization Project Status Project Web Site Scope of Work Project Objective Start Date Water Code Citation Approval Date Final Description Initial Project Cost Final End Date Initial End Date Final Project Cost Initial Description Fund Type
IO Group Code
Projects Module Guide
Project Services Office Page 9
The fields in the red rectangle in the lower left-hand corner store information for the Initial costs. The orange rectangle in the lower-right-hand corner highlights Final cost information fields that will be completed at the end of the project.
This IO Group Code number is automatically generated by the GRANTS system when you save your project for the first time. This number will be used to link your project to SAP in order to display up-to-date financial information in the Budget tab.

Projects Module Guide
Project Services Office Page 10
B. Location Tab
The Location Tab collects data on project location.
The Location Data displays the Latitude, Longitude, Location Description, Location Label, Clarification (if needed), Physical Location, and Hydrologic Region Info which includes: Watershed, and Flags. The flags are there to denote if the Program is/is not Legal Delta, or a Disadvantaged Communities. The Shape File Exists will only be available to check upon the creation of a PSP.
The Location List displays the types of locations already entered into the Program. If you want to add a new Location, click on the Add New hyperlink to insert a new row in the table. Use the Location List to enter the following information.
Congressional District County Assembly District Senate District DWR Region Hydrological Region Ground Water Basin IRWM Region

Projects Module Guide
Project Services Office Page 11
Make your selections for Select Location Type, Location Code, and Description and click the Save hyperlink to save the location entry. Please note that you may enter more than one County or District if your project spans multiple locations.
C. Budget Tab
Budget Data in the Projects Module is different than the budget information displayed in the related contract. It is important to understand the relationship between Projects and Contracts at this stage. The Budget information on this screen relates specifically to the project level information of the contract.
The budget information is automatically transferred from the project information entered by the applicant when they submit the proposal during a PSP/award cycle. Otherwise, this information will be entered by the project manager.
Enter Federal Share, Local Share, In-Kind Amount, Private Amount, or other funds yet to be determined in order to track the total project cost.
Projects Module Guide
Project Services Office Page 12
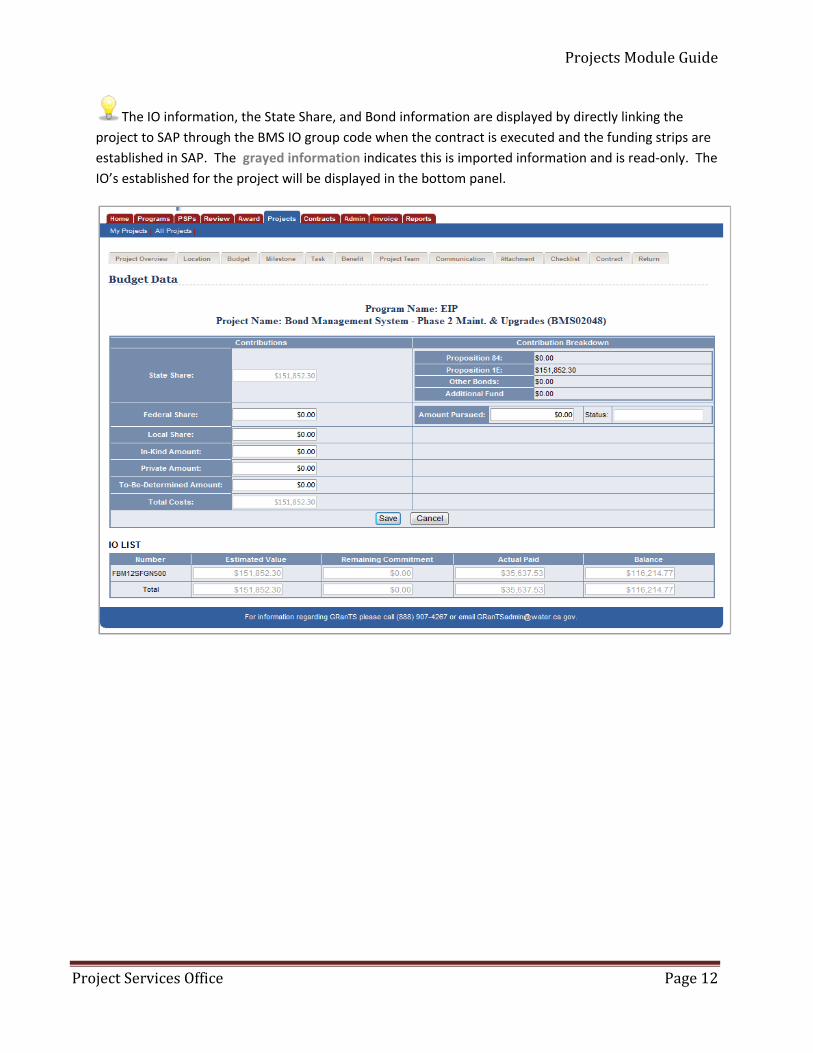
The IO information, the State Share, and Bond information are displayed by directly linking the project to SAP through the BMS IO group code when the contract is executed and the funding strips are established in SAP. The grayed information indicates this is imported information and is read-only. The IO’s established for the project will be displayed in the bottom panel.

Projects Module Guide
Project Services Office Page 13
D. Milestone Tab
The Milestone workbook tab contains a list of project milestones.
Click on the Add New hyperlink to add a new milestone.
Enter Milestones based on the major events in your project to help monitor your projects progress.
Milestones have descriptions and deadlines, as well as a budget and % complete information for tracking and reporting purposes. These fields are created to help the project manager track high level project work-in-progress and are entered manually.

Projects Module Guide
Project Services Office Page 14
Please examine the contract details to decide how the contractor will invoice and report on the contract and individual projects. If the Contract has several projects related to its completion, each project’s milestone and task information must be entered.
Some Milestones can be timeline related: 1st year’s accomplished work; 2nd year’s work and the associated tasks completed within that time. Other programs may use Milestones to designate reporting or billing cycles; Milestone 1 is at the completion of tasks 1-3, Milestone 2 is at the completion of tasks 4-6, etc.
One program example shows a contract exhibit and their schedule:
Conjunctive Water Management ProjectsTask 1. Direct Project Administration
Project Assessment and Evaluation PlanQuarterly ReportsProject Completion Report
Task 2. Land Purchase and EasementTask 3. Planning Design and Engineering
Environmental DocumentationProject DesignBidding and Award
Task 4. Construction ImplementationSystem Improvement Project
Task 1: Direct Project Admin.Task 2: Land Purchase/Easement

Projects Module Guide
Project Services Office Page 15
In the following example, the TASKS and roll-up MILESTONES might be as follows:
Each contract / project will be unique and require pre-planning before the program’s project manager can decide how to track tasks, milestones, and deliverables. The only requirement in GRANTS is:
All Projects must have associated Tasks for the Invoice Module to link the project work to the contract. So the next tab we’ll cover is the Task Tab.
E. Task Tab
i. Task Level Tracking Project level tracking is done in GRANTS at the TASK LEVEL. This enables the project to meet the Bond Accountability reporting requirements and track project expenditures. ii. Before entering Tasks, consider how your grantee will Invoice
Milestone 1: Conjunctive Water Management Project Associated Tasks: Task 1: Direct Project Admin Task 2: Land Purchase/Easement Task 3: Planning Design Engineering
Milestone 2: System Improvement Project Associated Tasks: Task 1: Direct Project Admin. Task 2: Land Purchase/Easement Etc.

Projects Module Guide
Project Services Office Page 16
Tasks link directly to the Invoice Module. Your grantees will invoice according to the tasks the DWR Project manager enters into GRANTS. These tasks should come from the executed contract which provides the details of the work to be done. Each task has high level entry fields that capture Task Number, Name, Start Date, End Date, Budget Amount, Balance and Percentage Completion. All fields will require manual tracking with the exception of task balance.
To edit a task, simply click on one of the Task Names hyperlink to be brought to the Edit Task screen.
The Balance Field will automatically decrease as the grantee enters expenditures against this amount.
These tasks keep the work in-line with the original intent of the award and ensure the work is completed according to the original contract. The information captured in GRANTS can be amended to reflect contract and task changes that the Program negotiates through the course of the project.
Tasks should match the work level that will be invoiced by the grantee. It is not necessary to capture detailed sub-task information in GRANTS. Detailed subtask information can continue to be collected according to your program’s existing policy.
A NOTE ABOUT INVOICES: Please refer to the INVOICE USER GUIDE, Section E, for detailed information on INVOICE and TASK LINKAGES.

Projects Module Guide
Project Services Office Page 17
F. Benefit Tab
i. Updating Project Benefits Unless your project was imported from a PSP, the Benefit List will most likely be blank.
The Benefit List page for the Project shows all the Benefits associated with the Project. The Benefits are grouped together under separate categories (e.g. Primary, Secondary, Tertiary, etc.). The Benefit List is displayed in a tabular format with the following columns:
• Category - Primary, Secondary, Tertiary • Benefit Type - The Projects benefit type • Benefit - The name of the Benefit Name • Unit - The measurement unit used for the benefit. This field may or may not be required
and if it is required, it will auto populate. • Proposed - The number of benefit units that the project proposed is to achieve • Actual - The actual number of benefit units that the project achieves • Description - The description of the benefit the project is to achieve • Action - Save or Cancel

Projects Module Guide
Project Services Office Page 18
An Add New hyperlink is displayed at the top of the Benefit List to facilitate addition of new Benefits under each category.
Complete all categories associated with the Benefit.
Column headings magnified:
Once all categories are complete, click on the Save hyperlink.
G. Project Team Tab
This is where the assignments are made for the staff and organizations’ day-to-day contacts for project management. The project manager should verify that the Project Team is correctly listed on this tab.

Projects Module Guide
Project Services Office Page 19
The Project Team can be edited, but cannot be deleted once created. This maintains a historical record of contacts associated with the project over the life of the contract. The Project Team should be the staff working most closely with the project data, grantee communications, files, etc. as well as identifying the contact information for the grantee. This step insures that the Project will be located on these individuals Home tab and My Projects pages. Click on the Project Team tab in the Project Workbook for a particular Project.

Projects Module Guide
Project Services Office Page 20
To change information on an already existing Contact, click on their hyperlinked name.
Modify the information and click on the Save button.
Projects Module Guide
Project Services Office Page 21
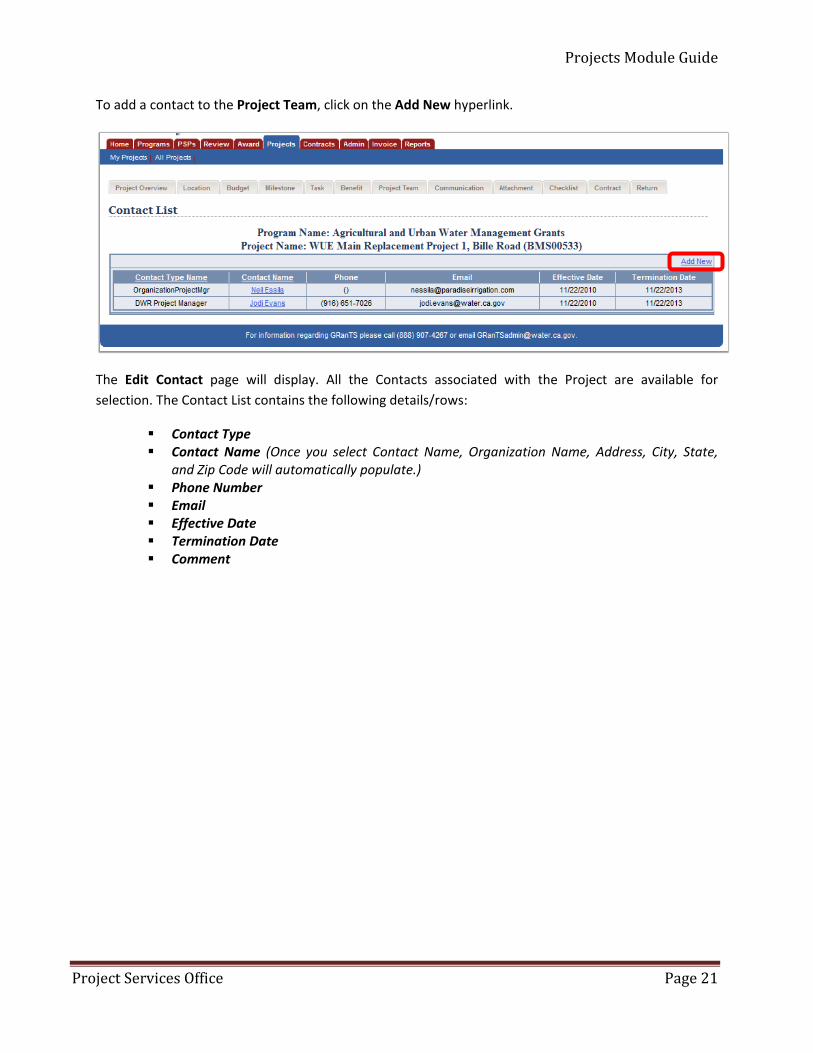
To add a contact to the Project Team, click on the Add New hyperlink.
The Edit Contact page will display. All the Contacts associated with the Project are available for selection. The Contact List contains the following details/rows:
Contact Type Contact Name (Once you select Contact Name, Organization Name, Address, City, State,
and Zip Code will automatically populate.) Phone Number Email Effective Date Termination Date Comment

Projects Module Guide
Project Services Office Page 22
When creating a new Contact the Effective Date and Termination Date are automatically set to the same day. If you do not extend the Termination Date into the future, the Project will not be available in your My Projects page.

Projects Module Guide
Project Services Office Page 23
Complete the contact information for the organization’s day-to-day contact information and any staff updates needed and click on the Save button.

Projects Module Guide
Project Services Office Page 24
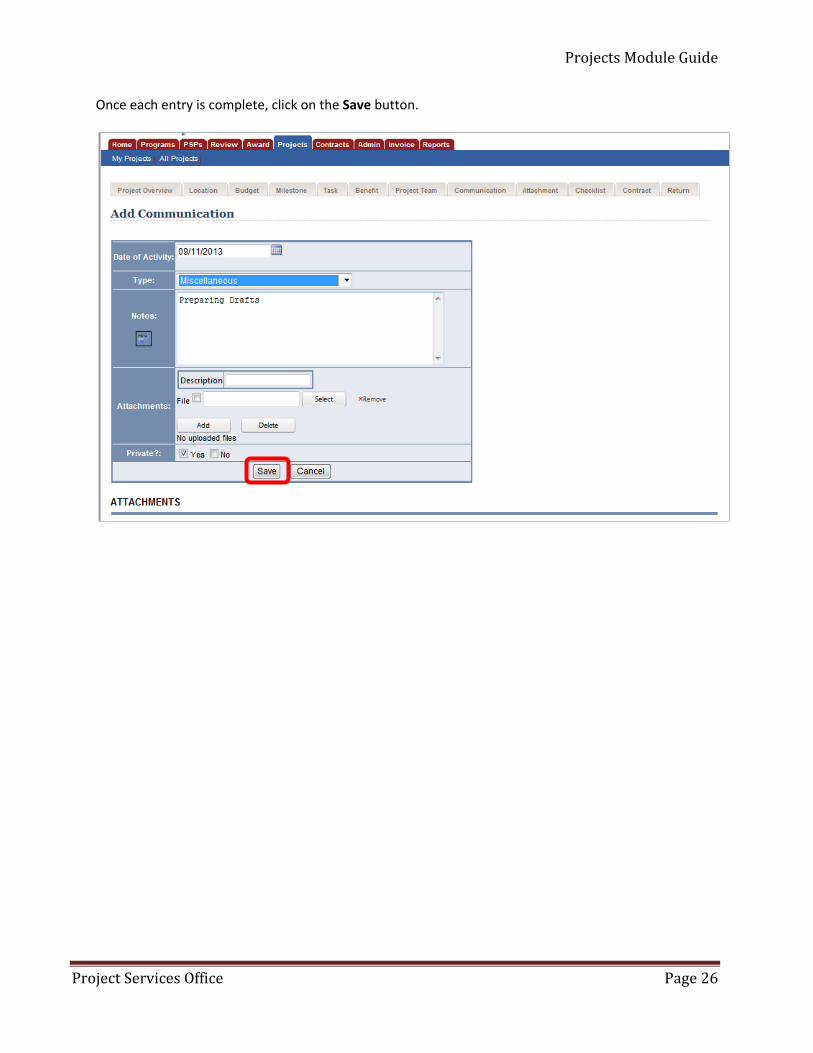
H. Communication Tab
The communication tab can be used to log emails, document conversations with the grantee, or record critical steps in the project. You can also attach documents to the communication.
a) Click on the Communication workbook tab.
b) Click on the Create Note hyperlink to add a communication entry.

Projects Module Guide
Project Services Office Page 25
Each entry on this page has the following details: • Date of activity • Type - Drop down list for Type of communication Aggreement Execution Date Communication with Grantee Grantee Submits Invoice Kick-off Meeting Miscellaneous POC Approves Invoice Progress Report Received Progress Report Received Review Completed Review Saved See Reviews for more info Site Visit
• Notes • Attachments and Description (specific to the communication) • Private? - Checking the box Yes will hide this communication from the outside grantee. No
will allow the grantee to see it also. Yes is always the default setting in GRANTS, meaning by default all communications are set to private unless you choose to share the communication with the outside grantee.
• List of Attachments uploaded
Projects Module Guide
Project Services Office Page 26
Once each entry is complete, click on the Save button.

Projects Module Guide
Project Services Office Page 27
I. Attachments Tab
The Attachment workbook tab should house project related items such as: Work plans, Designs, Permits and any other PROJECT related correspondence. These items should be uploaded by the grantee, contract analyst, or project manager as well as handled in the usual business practice of the program.
To add a new Attachment, click on the Add New hyperlink.
The Add Attachment section will appear below the Project Attachment List.
The Add Attachment section is displayed with the following details/fields: • Description • Content Type • Upload • Private?

Projects Module Guide
Project Services Office Page 28
When you are done filling out the required fields, click on the Save button.
J. Checklist (Deliverables)
Navigate to the Checklist page by clicking on the Checklist workbook tab.

Projects Module Guide
Project Services Office Page 29
Click on the Checklist Name hyperlink of an existing item displayed on the Checklist tab in the Project Workbook for a Project or click on the Add New hyperlink displayed on the Checklist tab in the Project Workbook for a Project.
The Edit Checklist page for the Checklist is displayed with the following details/fields –
• Checklist Number • Checklist Name • Description • Milestone • Due Date • Completion Date
Make changes to any values of an existing Checklist on the Checklist Edit page or type in all the required values to add a new Checklist. When you are done, click on the Save button to save your changes.

Projects Module Guide
Project Services Office Page 30
K. Contract
The Contract workbook tab will take you back to the Contract Screen which shows the Contract List associated with that project.
The Contract workbook tab also allows you to make assignments for the projects you are managing. If your project is not linked to a contract, click on the Add Assignment hyperlink and you can find the contract and link it to the project here.

Projects Module Guide
Project Services Office Page 31
Select the Program and Year from the drop down lists.
Select the Contract associated with the Program from the Available Contracts field and click on the right double arrow (>>) button to insert the Contract in the Selected Contracts field.

Projects Module Guide
Project Services Office Page 32
To remove a contract from the Selected Contracts, click on the contract and then click on the left double arrow (<<) button.
Once all contracts have been selected and inserted into the Selected Contracts field, click on the Save button.

Projects Module Guide
Project Services Office Page 33
L. Return
The Return workbook tab will take you back to the List of Projects.

Projects Module Guide
Project Services Office Page 34
M. Frequently Asked Questions (FAQ)
When entering information into the data cells, Save your data regularly. If a mandatory field is not completed or an error is detected in GRANTS, a message will appear in red and the information will not successfully save. Correct this information and click the Save button. If successfully saved, a message will appear in the upper right-hand corner: Project created successfully.