Embed Size (px)
Citation preview

Project – JBVNL CPF&GPF
End User Manual - FICO
Manual_CPF&GPF Accounting 1
1. FB50 – CPF&GPF Accounting
Input FB50 in Transaction box and press Enter key
1.1 Document Header Data Information
The following are the Input fields under the Document Header data
Document Date: Input the Invoice date in the Document date field
Posting Date: Input the transaction date in the Posting date field
Currency: Input the Currency INR in the Currency field
Document Header Text: Input the Text Information in text field

Project – JBVNL CPF&GPF
End User Manual - FICO
Manual_CPF&GPF Accounting 2
1.2 Document Line Item Data
The following are the Input fields under the Line Item data
GL Account: Place the Cursor on the field and press F4. Select the respective GL
Account and press Enter key
Debit/Credit: Select Debit/Credit option from drop down list
Text Field: Input the Text information
Profit Center: Place the cursor on the field and press F4. Select the respective Profit
Center and press Enter key
1.3 Simulate
Simulate: Click on Simulate option. System will display the line items (Debit and Credit
entry).
Project – JBVNL CPF&GPF
End User Manual - FICO
Manual_CPF&GPF Accounting 3
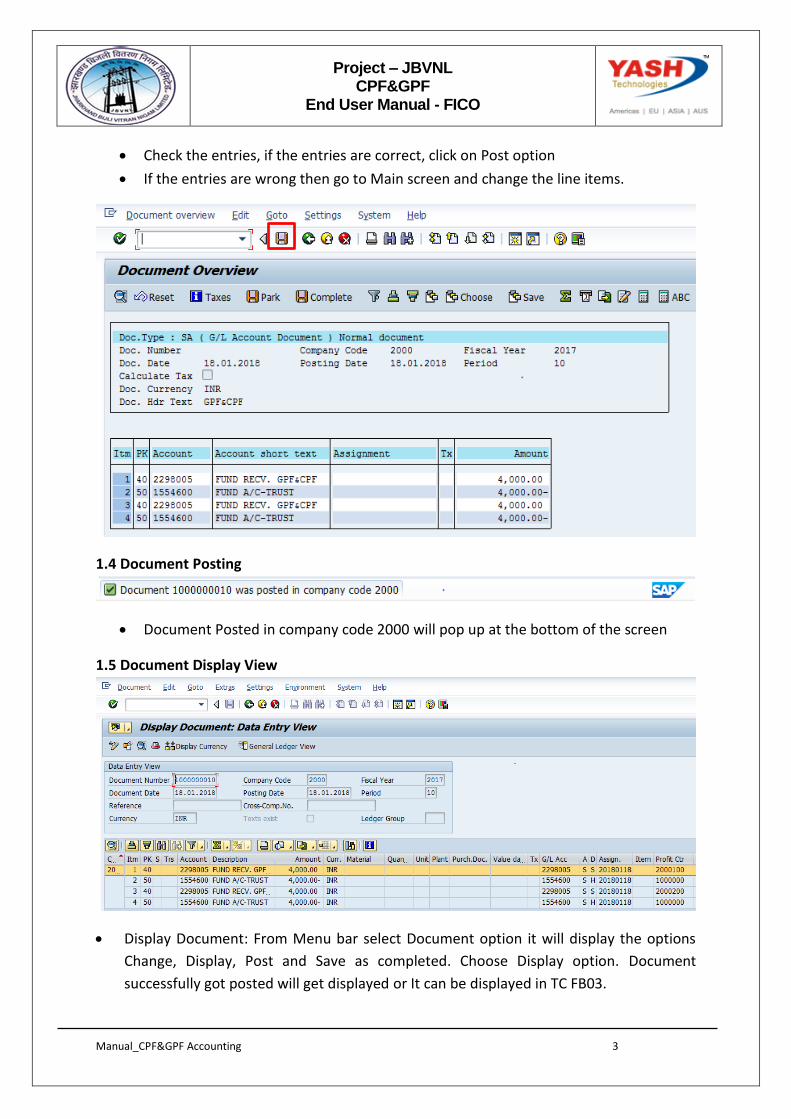
Check the entries, if the entries are correct, click on Post option
If the entries are wrong then go to Main screen and change the line items.
1.4 Document Posting
Document Posted in company code 2000 will pop up at the bottom of the screen
1.5 Document Display View
Display Document: From Menu bar select Document option it will display the options
Change, Display, Post and Save as completed. Choose Display option. Document
successfully got posted will get displayed or It can be displayed in TC FB03.

Project – JBVNL CPF&GPF
End User Manual - FICO
Manual_CPF&GPF Accounting 4
2. Payment to the Trust Company
2.1 Document Header Data Information
The following are the Input fields under the Document Header data
Document Date: Input the Invoice date in the Document date field
Posting Date: Input the transaction date in the Posting date field
Currency: Input the Currency INR in the Currency field
Document Header Text: Input the Text Information in text field
2.2 Document Line Item Data
The following are the Input fields under the Line Item data
Project – JBVNL CPF&GPF
End User Manual - FICO
Manual_CPF&GPF Accounting 5
GL Account: Place the Cursor on the field and press F4. Select the respective GL
Account and press Enter key
Debit/Credit: Select Debit/Credit option from drop down list
Text Field: Input the Text information Eg: Payment to Trust
Profit Center: Place the cursor on the field and press F4. Select the respective Profit
Center and press Enter key
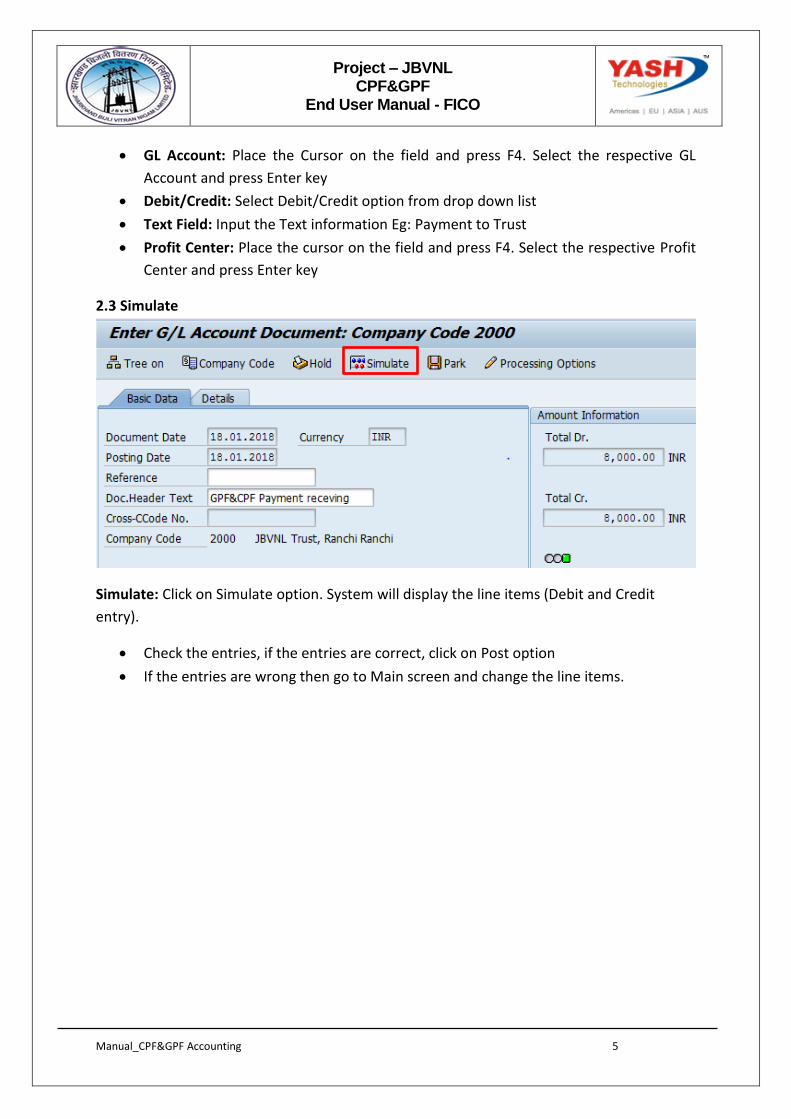
2.3 Simulate
Simulate: Click on Simulate option. System will display the line items (Debit and Credit
entry).
Check the entries, if the entries are correct, click on Post option
If the entries are wrong then go to Main screen and change the line items.

Project – JBVNL CPF&GPF
End User Manual - FICO
Manual_CPF&GPF Accounting 6
2.4 Document Posting
Document Posted in company code 1000 will pop up at the bottom of the screen
2.5 Document Display View
Display Document: From Menu bar select Document option it will display the options
Change, Display, Post and Save as completed. Choose Display option. Document
successfully got posted will get displayed or It can be displayed in TC FB03.

Project – JBVNL CPF&GPF
End User Manual - FICO
Manual_CPF&GPF Accounting 7
3.1 FB60 – Employee Vendor Invoice Booking
Input FB60 in Transaction box and press Enter key
1. Document Header Data Information
The following are the Input fields under the Document Header data of Vendor Invoice
Vendor: Input the Vendor Number in the Vendor field with help of press “F4” button
to search vendor number.
Invoice Date: Input the Invoice date in the field
Posting Date: Input the transaction date in the Posting date field
Currency: Input the Currency INR in the Currency field
Reference: Input the Reference field with Reference (invoice) number
Text: Input the Text Information in text field Eg: Vendor invoice posting with Tax

Project – JBVNL CPF&GPF
End User Manual - FICO
Manual_CPF&GPF Accounting 8
2. Document Line Item Data
The following are the Input fields under the Line Item data to be filled.
GL Account: Place the Cursor on the field and press F4. Select the respective GL
Account and press Enter key
Debit/Credit: Select Debit/Credit option from drop down list
Text Field: Input the Text information e. g.: Vendor Invoice posting with Tax
Profit Center: Profit Center will get automatically updated (through Cost Center
Profit Center will get updated) as configured.

Project – JBVNL CPF&GPF
End User Manual - FICO
Manual_CPF&GPF Accounting 9
3. Simulation of Transaction before posting:
Simulate: Click on Simulate option. System will display the line items (Debit and Credit
entry).
Check the entries, if the entries are correct, click to Post Button
If the entries are not okay, then go to main screen and take required action to
correct it.
Click on Save icon

Project – JBVNL CPF&GPF
End User Manual - FICO
Manual_CPF&GPF Accounting 10
4. Document Posting
Document is posted, An information will be populated at the bottom of the screen
5. Document Display View
We can view the transaction in two ways:
Display Document: From Menu bar select Document option it will display the options
Change, Display, Post and Save as completed. Choose Display option. Document
successfully got posted will get displayed
Input FB03 in Transaction box and system will take us to Document Display screen.
Input the Document number and Press Enter key. Document posted will get displayed.
4.1 F-53 : Employee Vendor Outgoing Payment
Input F-53 in Transaction box and press Enter key

Project – JBVNL CPF&GPF
End User Manual - FICO
Manual_CPF&GPF Accounting 11
4.2 Employee Vendor Outgoing Payment
The following are the Input fields under the Document Header data of Vendor Outgoing
Payment
Document Date: Input the Invoice date in the field
Posting Date: Input the transaction date in the Posting date field
Document Type: Input the Document type KZ for Vendor payment
Company Code: Input the Company code 1000 in this field
Currency: Input the Currency INR in the Currency field
Reference: Input the Reference field with Reference (invoice) number
Clearing Text: Input the text information in this field

Project – JBVNL CPF&GPF
End User Manual - FICO
Manual_CPF&GPF Accounting 12
Bank Data: Under this Section
Account: Place the cursor on the field and press F4. List of GL Accounts will appear,
select respective Bank outgoing GL Account and press Enter key
Amount: Input the amount
Profit Center: Input the respective Profit center by selecting from the drop down list
Text: Input the text information in this field
Open Item Selection: Under the section
Account: Input the Vendor Number in this field
Account Type: Input the Account type “K” (Vendors) from drop down list
Select All items Icon and select Deactivate items tab
Double Click on the line items(Debit and Credit) which will get activated(turns in to
Blue colour)
Select Document option in Menu, choose Simulate option.

Project – JBVNL CPF&GPF
End User Manual - FICO
Manual_CPF&GPF Accounting 13
5 Simulation of Transaction before posting:
Simulate: Click on Simulate option. System will display the line items (Debit and Credit
entry).
Check the entries, if the entries are correct, click to Post Button
If the entries are not okay, then go to Main screen and take required action to
correct it.
6 Document Posting
Document is posted, An information will be populated at the bottom of the screen

Project – JBVNL CPF&GPF
End User Manual - FICO
Manual_CPF&GPF Accounting 14
7 Document Display View
We can view the transaction in two ways:
Display Document: From Menu bar select Document option it will display the options
Change, Display, Post and Save as completed. Choose Display option. Document
successfully got posted will get displayed
Input FB03 in Transaction box and system will take us to Document Display screen.
Input the Document number and Press Enter key. Document posted will get displayed.
Manual End