Embed Size (px)
Citation preview

Callum Scott 1 27/03/2012
Project Diary
Theory and applications of 3D
Applications of 3D: e.g. environments, models, product design, animations, TV, film, web, games, education, architectural walk-through Displaying 3D polygon animations: application programming interface, e.g. Direct3D, OpenGL; graphics pipeline, e.g. modelling, lighting, viewing, projection, clipping, scan conversion, texturing and shading, display; rendering techniques (radiosity, ray tracing); rendering engines; distributed rendering techniques; lighting; textures; fogging; shadowing; vertex and pixel shaders; level of detail Geometric theory: vertices; lines; curves; edge; polygons; element; face; primitives; meshes, e.g. wireframe; coordinate geometry (two-dimensional, three-dimensional); surfaces Mesh construction: box modelling; extrusion modelling; using common primitives, e.g. cubes, pyramids, cylinders, spheres 3D development software: software, e.g. 3D Studio Max, Maya, Lightwave, AutoCAD, Cinema 4D, Softimage|XSI; file formats, e.g. 3ds, .mb, .lwo, .C4d, .dxf, .obj; plug-ins Constraints: polygon count; file size; rendering time
Research Character Animations:
Film: M-O From the film Wall-e
M-O (Microbe Obliterator) is a tiny, obsessive compulsive cleaning robot who likes to keep
everything spotless, and he has never gone off routine until he meets WALL-E. When M-O
first sees how filthy WALL-E is his flashing red light pops out of his head conveying that the
situation isn’t usual to him and becomes quite livid.
TV & Film: Gromit

Callum Scott 2 27/03/2012
Gromit is an intelligent and sophisticated character, he enjoys reading the newspaper and
making inventions with Wallace. Seeing as Gromit is a dog he doesn’t speak, however I find
that his communication using body language and facial expressions passives a comical
character.
TV & Film: Mr Bean
Mr Bean is an unconventional character; his eccentric actions bring various unusual schemes
and contrivances to everyday tasks, he can become quite childish and selfish when in a
social event. Although his trademark appearance of a tweed jacket, red tie and calculator
watch make him look normal.
He lives solitary life however has a teddy bear companion called “Teddy”, although Teddy is
inanimate, Mr Bean pretends he is alive.
Creating characterisation using the camera:

Callum Scott 3 27/03/2012
Devise a 3D animation Stimulus: e.g. client brief, own brief, from market research Ideas: brainstorming; sketches; pre-visualisation (concept drawings, storyboards) Legal and ethical considerations: legal, e.g. copyright; ethical, e.g. confidentiality, decency; representation, e.g. race, gender, religion, sexuality Specification: target audience; Storyboards; constraints, e.g. polygon count, image resolution, frame rate, output size and aspect ratio, file type, file size Own Brief Background: To create a short 3D animation sequence that is based on a household object
using 3Ds Max. The idea needs to show the use of an IK Chain or a Rig, which would give me
the opportunity to make the object move and act giving it a personality.
Tasks:
Create a project plan
Make a schedule showing my workflow
Structure work , renders, textures and files in folders
Initial ideas: do some brainstorming of objects I could animate in a household
Research animations which have good characterisations
Make a product diary and annotate the design process.
Aims:
Have a detailed storyboard
Document all process work in a product diary
Have a collection of renders
Completed 3Ds Max animation
To achieve a distinction in the unit: this means I have to achieve a distinction or
higher in all criteria’s
Deadlines:
Main 3D model completed 8/11/11
Rendered Animation 12/1/12
End Results:
Pending..

Callum Scott 4 27/03/2012
Inanimate objects in a household that could be made into animation:
Storyboards
A still coat stand centres in the dark scene
The viewer can slightly make out the coat stand with rough lighting glowing through the
door
A close up of the door as it opens
The light from the other side of the door lights up the small room
An arm appears around the door, holding a jacket/coat and drops it on the floor
The door closes again... the coat stand then comes to life
The coat stand is looks grumpy with its arms on its hips
Other: Lamp, chair, umbrella, hoover, candle holder, stapler, camera and tripod,
Living Room:
TV, foot stool, coffee table,
Kitchen:
Microwave, sissors, whisk, coffee machine, tooster, clock, washing machine
Bedroom:
Alarm clock, computer mouse, teddy bear, toy robot,
Bathroom:
Rubber duck, portable mirror, tweezers,

Callum Scott 5 27/03/2012
The coat stand pumps it fist in frustration as the person does not come back to pick up the
coat
The coat stand then walks over to the coat and picks it up
The coat stand has the coat on its arm and returns to being still.
Alterations from original plan
Coat maybe too difficult to animate so could change to a stiffer material object such as a
hat, so animation would be easier.
Specification of ‘Coat Stand’
The specification of the animation is..
Firstly, to show-off my skills in 3Ds Max 2011-2012, and my capabilities when utilizing the
software for example, my creating an animated walk-cycle with a biped (crash-test dummy),
my lighting and shadows effects, and material, texturing abilities.
Secondly, I believe the animation can be used as a learning instrument for young children. I
believe that it could teach that being impolite to others will not get you anywhere, but will
only affect someone else.
Finally, this
Legal and Ethical Considerations
There is no abusive language used in the animation to cause offence to the viewer, this
would imply that the animated sequence would be available to a vast audience. I believe
that if the animated sequence was to actually be published it would be certified by British
Board Film Classification (BBFC) as a ‘U’ (suitable for all ages).
The animation wouldn’t have any discrimination towards race, religion, sexuality seeing as it
doesn’t represent the any form of humanitarian harm.

Callum Scott 6 27/03/2012
The target audience of the animation would be intended for young children between the
ages of 5 and 12 years. Reason being the comedy values and the shortness of the animation
would appeal to this audience.
The main characters; ‘Coat Stand’ and ‘Crash-test Dummy’ are inanimate objects brought to
life with the anthropomorphisms of human characteristics.
Main Characters:
This animation may contain some copyright © backgrounds in some texturing.
Animation Trial
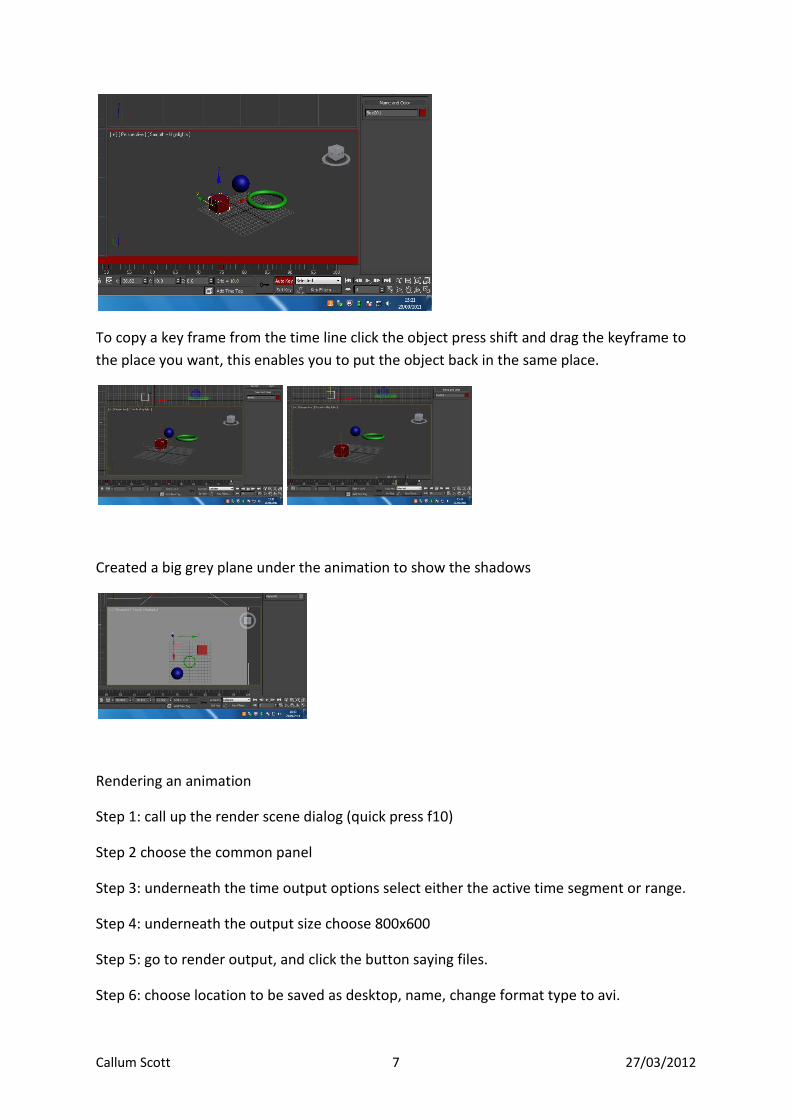
Repositioning the shapes co-ordinates:
Repositioning the shapes co-ordinates whilst the auto key is on and moving the timer slide.
Callum Scott 7 27/03/2012
To copy a key frame from the time line click the object press shift and drag the keyframe to
the place you want, this enables you to put the object back in the same place.
Created a big grey plane under the animation to show the shadows
Rendering an animation
Step 1: call up the render scene dialog (quick press f10)
Step 2 choose the common panel
Step 3: underneath the time output options select either the active time segment or range.
Step 4: underneath the output size choose 800x600
Step 5: go to render output, and click the button saying files.
Step 6: choose location to be saved as desktop, name, change format type to avi.

Callum Scott 8 27/03/2012
Step 7: compression setup window, choose cinepak by radius
Step 8: make sure that you have the right camera selected.
Modelling the coat stand
Start by making the middle pole using the cylinder object
Then using the line under the splines create a hook like shape to create a leg
Using lofting on the leg shape you get a thick leg
Then make three more duplicates of the leg by pressing shift and dragging the leg to the
new position
Then start creating the arms using the same process....
Now position the arms and legs in on the pole to create the look of a coat stand

Callum Scott 9 27/03/2012
Once you’ve done this, finalise the coat stand by making rings around the legs and a centre
piece on top. I have gone for a simple design.
Modelling additional items
Door
Select create tool, find doors on the drop down menu and I chose pivot door.
Adjust the parameters of the door to craft the appearance.

Callum Scott 10 27/03/2012
Table
Worktop
Make a rectangular cuboid with 1 unit depth.
Legs
Create a cylinder tube and position under a corner of the table. Duplicate and position the
legs to each corner.
Texturing/Materials
Find a wood texture and place on the table.
Assembling

Callum Scott 11 27/03/2012
Use proboolean to attach the separate legs and table top.
Lampshade
Cone
Create a cone object
Subtraction
Make a duplicate cone and scale down each parameter by 1 unit
Place the duplicate cone in the same position as the original but lower

Callum Scott 12 27/03/2012
Proboolean-subtract
Hanger
Materials
Light switch
Creating objects
Make two cube objects, one base object

Callum Scott 13 27/03/2012
Switch
Convert the smaller rectangle into an editable poly and lower one of the edges.
Materials
Table and accessories
Texturing

Callum Scott 14 27/03/2012
Sliding Window
Materials
Modelling a hat
Background Image
Press alt+b to get the background view setup, and select the view and image you want to
see.

Callum Scott 15 27/03/2012
Spline
Create a spline outline around the edge of the cap, and then go round again on the same
side so that you can lathe the spline and have thickness to the cap.
Lathe
1
2
Select modifier list and lathe, the result will look like 1, however if you select the axis and
pull outwards it will stretch to look like 2.
Sun Shade

Callum Scott 16 27/03/2012
Select the lower in and outside ring edge of the Bennie and pull down so that you have small
polygons on the bottom, then select the middle polygons and extrude outwards
Curvature
In wireframe view select the middle vertexes and pull upwards, then select the left and right
sided vertexes of the sun shade and pull them down. Complete this should a create a curved
shape.
Tessellate and Mesh Smooth

Callum Scott 17 27/03/2012
Select the tessellate function in the panel, this will in the polygon count, this will give the
mesh smooth a better effect and smooth out the lumpness of the cap.
Adjustable Gap
Create a gap by deleting the some of the polys on the middle back of the cap, and then fill
the black space between the polys by using the wielding vertex method.
Modelling Cap Process Complete

Callum Scott 18 27/03/2012
Texturing
Modelling the scene
Modelling Box Room
Create a box, convert it to an editable-poly and select the polygon on the left and right sides
of the box then right click selecting extrude and pull the new polys outwards to create the
side walls.
Modelling a hole for window to fit in
Find the area where the window will fit, then selecting the box vertex’s use the quick slice
tool to make edges in the positions the window will be. This will create polys where the
window will be, which when the area of the window is sliced you will delete for the window
to fit in. Now select the edges around the hole and holding down the shift key and pulling
outwards half way will create polys filling only half the gap, after that select the vertexes
and wield them together to fill the gaps.
Fitting the window in place

Callum Scott 19 27/03/2012
viewing the wireframe of the window and wall, make sure the window just overlaps the
lines of the wall so that there are no gaps for light to get through.
Modelling a hole for the door to fit
Either using the same procedure as the window or...
Selecting the edges around the door and right click on connect to create a new polygon to
delete leaving a hole for the door.
Then wield together the vertex’s to fill the gaps.
Now position the door into place, best to switch to wireframe and front view to make sure
it’s in place.
Modelling the floor
Problems occurred
Plane object:

Callum Scott 20 27/03/2012
Originally I had a plane covering the ground surface; however this caused a problem with
the lighting as strange lighting and shadows formed
Instead I decided to extrude the floor from window side towards the opposite side, and
attached the vertexes. And the same problem occurred.
Shadows:
The shadows that occurred due to lighting problems
I realised that the walls and floor made from planes meant light was able to break shadows
between tiny gaps, so I crafted the walls and floor with one cube object.

Callum Scott 21 27/03/2012
Position of lights:
Texturing the scene
I have used dark browns and reds to texture the scene, as this will emboss the lighting and
shadows in the animation. I used a wood panel texture for the floor which gives a warm and
physical effect to the room.
The effect of wooden flooring and lighting:

Callum Scott 22 27/03/2012
Materials used:
Glass – for the glasses and wine bottle
Concrete – for the outside ground texture
Red matte paint – to texture the surrounding walls
High Gloss wood (pine) – used for the table to reflect light and stand out
Matte Wood – Used for the door, this is a dull texture seeing as its centre viewpoint
in the animation I don’t want it to overwhelm the viewer.
Glossy Light wood (oak) – To texture the coat stand, it is simple and not and light
against the dark and strong background which makes it stand out.
Ginger Panel Wood – used for the floor, this warms the room and textures the
floorboard with wooden panels.
Outside texturing:

Callum Scott 23 27/03/2012
Model planes around the room, make sure areas where you can see outside like door and
window are covered.
Apply a concrete texture to the ground plane,
Apply a sky texture to the door and window planes.

Callum Scott 24 27/03/2012
Animation Process
Start: frames 1- 300
Story: The room is dark with only the light piercing through the window from an outside
street lamp, a shadow of standing in the middle of the room is looking rather sinister. The
door opens a burst of light comes through the door with a silhouette of a man standing at
its frame and the light switch is flicked on, the light is balanced with the warm room light.
Production Process: Press auto key to begin the animating process. Then select the room
lights and turn the intensity to zero, this turns the lights off and will begin the animation
with only the outside light on.
To animate the door, select and press set keys when it is closed at the beginning of the
timeline so that it begins closed, then go to where the test-dummy walks towards the door
and pushes it slightly, here you need to adjust the door to being partly open to do this click
the modify panel and increase the percentage of the door opened. As the crash-test dummy
is pushing the door open and walking into the room, adjust the door to being more and
more open. This may be different if the door is an editable poly then you will need to select
the door polygon leaving out the frame and edit the amount the door is opened by using the
rotate tool.
This procedure will be done whilst the auto-key
Camera View: Main camera: Shows the most of the scene, excluding the window and left
side wall
Frames: 300-500
Part 1 Story: A crash-test dummy walks into the room, turning on the light with the switch
with his left hand.
Camera View: close camera: Can see outside of the door and the light switch
Part 2 Story: whilst taking off his cap and attempting to put it on a nearby coat stand with
his right hand. However misses and does not seem fussed and walks off, whilst his cap falls
to the floor.
Camera View: Main camera: can see the crash-test dummy and the coat stand.
Production Process:
Whilst in footstep mode, create steps walking towards the door, then move the arm and
hand to towards the door pushing it open. Then create further footsteps by selecting the

Callum Scott 25 27/03/2012
biped footstep mode and in the right frame create new steps towards the light and move
hand
Frames: 500-600
Story: The cap laying upside-down on the floor sits there for a while, whilst the door closes it
gets blown slightly further into the room. The lights still left on. The suddenly a coat stand
comes to life and looks rather frustrated, and puts its arms on its hips... waiting for the
dummy to come back and pick up the cap. After a few seconds the
Camera view: main camera
Production Process:
Production Process of walk cycle: To animate a walk cycle for a biped, you need to first
select the core of the biped then select motion, footstep mode, and then select create
footstep. Place the footsteps where you want the character to walk, for instance mine stops
at the door to open it. Once done, click on create keys for inactive footsteps which will
active the cycle in the time line.
Camera Shots/Positions

Callum Scott 26 27/03/2012
Main Camera
Close Camera
Action Camera
Shoulder Camera

Callum Scott 27 27/03/2012
Table Camera
Rendering and Editing Process
Render 100 frames at a time to speed the rendering time, then edit together on Premiere.
Post-Production Process
Industry practice
Plan: asset management (file storage and retrieval, naming conventions); workflow (scheduling, efficient time management); deadlines (production milestones, deliverables, quality assurance) Software interface: files, e.g. loading, properties, merging, replacing, importing, saving, backup and autosaving; viewports, e.g. viewport configuration, viewport controls; workspace, eg command panels, floating palettes and toolbars, drawing aids; animation controls, e.g. time, trajectories, pivot points, forward kinematics, inverse kinematics, morphing, effects, key frames and playback Animation: layers; object naming conventions; tools, e.g. move, stretch, rotate pivot points, linking, kinematics, skeletons, deformations, skin, particle systems, real-world physics Animation techniques: time-based (animating with key frames); motion control; kinematics (inverse, forward); staging the animation, e.g. lights, cameras, supports, tripods; biped; deformations; paths/trajectories; effects, e.g. motion blur, glow, particle systems, real-world physics; object hierarchies;

Callum Scott 28 27/03/2012
parentchild inheritance and relationship Animation process: animating, e.g. objects, lights, cameras, textures, morphs and transformations Virtual camera: cameras, e.g. target, free, camera view; camera parameters, e.g. lens length, field of vision (FOV), focus, depth of field aperture; camera animation Edexcel BTEC Level 3 Nationals specification in Creative Media Lighting techniques: light types, e.g. ambient, distant, area, spot, point, linear, photometric, raytraced; lighting controls and effects, e.g. projector, attenuation, colour, shadows; atmospheric, e.g. clouds, smoke, fire; volumetric, e.g. fog, mist Texturing techniques: texturing process, e.g. creating, loading textures, applying textures; using materials, e.g. materials editor, mapping materials, material modifiers; material types, e.g. bitmap, procedural, using avi video files as textures Rendering: scene rendering, e.g. rendering controls, rendering options, output size and aspect ratio, safeframe, file type, file size; image resolution, e.g. TV, film, game, web Industry practice: reflect on finished product (compared with original intentions, fitness for purpose, technical qualities, aesthetic qualities); production skills (ideas generation, animation specification, workflow and time management, technical competence, teamwork)
Time management (Explained): Table Schedule
Start Date Tasks End Date
03/11/11 Start the project plan 03/11/11
04/11/11 To do a schedule 07/11/11
10/11/11 Initial ideas: Conceptualise and visualise your ideas, brainstorm your ideas. Note down all ideas, those you will later adopt and those you will not. Show how they have developed into your final product. Identify the stages involved.
11/11/11
17/11//11 Research: Carefully research character animations from TV adverts, Games and Film. Record all your research in your product diary.
24/11/11 Begin a Product Diary: Annotate all your work and keep it in your PD (Product Diary). In your Product Diary critically evaluate your final concept commenting on the reasons for the final concept comparing it with your other ideas. Why did you select this as the final concept?
1/12/11 Storyboard your animation sequence detailing motion of Characters, rough light and camera positions and any effects to be used.

Callum Scott 29 27/03/2012
If necessary use an additional mood board to illustrate the Look and Feel of your eventual 3D animation - Decide on how your 3D animation is going to look and feel. Consider: materials, lighting and lighting effects, geometry and sound.
22/12/11 Produce a written or verbal, audio or visual evaluation of your work. Provide feedback to your teachers and peers. Record Peer feedback Provide feedback on your own performance, the performance of your team and on the fitness of purpose of your completed project.
12/12/11 FINAL SUBMISSION FOR ALL WORK

Callum Scott 30 27/03/2012
XC.Scott
Creative Media Student