Embed Size (px)
Citation preview

Software Version: 9.50-9.55
Project and Portfolio Management Center
Project Management Configuration Guide
Go to HELP CENTER ONLINEhttp://admhelp.microfocus.com/ppm/
Document Release Date: November 2019 | Software Release Date: November 2019

Legal NoticesDisclaimer
Certain versions of software and/or documents (“Material”) accessible here may contain branding from
Hewlett-Packard Company (now HP Inc.) and Hewlett Packard Enterprise Company. As of September 1,
2017, the Material is now offered by Micro Focus, a separately owned and operated company. Any
reference to the HP and Hewlett Packard Enterprise/HPE marks is historical in nature, and the HP and
Hewlett Packard Enterprise/HPE marks are the property of their respective owners.
Warranty
The only warranties for products and services of Micro Focus and its affiliates and licensors (“Micro Focus”)
are set forth in the express warranty statements accompanying such products and services. Nothing herein
should be construed as constituting an additional warranty. Micro Focus shall not be liable for technical or
editorial errors or omissions contained herein. The information contained herein is subject to change without
notice.
Restricted Rights Legend
Contains Confidential Information. Except as specifically indicated otherwise, a valid license is required for
possession, use or copying. Consistent with FAR 12.211 and 12.212, Commercial Computer Software,
Computer Software Documentation, and Technical Data for Commercial Items are licensed to the U.S.
Government under vendor's standard commercial license.
Copyright Notice© Copyright 1997-2019 Micro Focus or one of its affiliates.
Project Management Configuration GuideProject and Portfolio Management Center
Project and Portfolio Management Center (9.50-9.55) Page 2 of 50

Contents
Project and Portfolio Management Center 1
Chapter 1: Getting Started with Project Management Configuration 5Introduction to Project Management Configuration 5
Chapter 2: Key Server Parameters and Scheduled Services 7Overview 7Work Plan Page Size Controls 7Enter Actuals Page Size 9Cost Calculation Settings 9Microsoft Project Integration Options 11
Enabling Microsoft Project Launch from a Work Plan 11Mapping Work Plans to Microsoft Project Files 12
Chapter 3: Configuring Project Details Tab Fields 13Overview of Configuring Project Details Tab Fields 13Project Details Tab Fields 13Configuring Project Details Tab Fields 15
Chapter 4: Configuring the Project Process 16Overview of Configuring the Project Process 16Project Process 16Configuring the Project Process 17
Chapter 5: Configuring Project Control Processes 19Overview of Configuring Project Control Processes 19Configuring Project Control Entities 19
Project Issue Request Type 19Risk Request Type 21Scope Change Request Type 21Configuring the Project Control Entities 23
Configuring Project Control Processes 23Project Issue Workflow 23Risk Workflow 24Scope Change Workflow 25Configuring the Project Control Workflows 26
Chapter 6: Configuring Task User Data 28
Project Management Configuration GuideProject and Portfolio Management Center
Project and Portfolio Management Center (9.50-9.55) Page 3 of 50

Configuring User Data 28
Chapter 6: Setting Idle Time for Project Details Page 29
Chapter 7: Enabling Service Portfolio for Tasks 30Enabling Service Settings for Project Types and Projects 30Configuring Service Settings for Project Types and Projects 31
Configure Service Settings for Project Types 31Configure Service Settings for Projects 31
Enabling and Editing Services for Tasks in Work Plan 32Service as a Non-Required Field 33Service as a Required Field 34Set Service to Required for an Existing Project 35(Optional) Specify a Default Service for a Project 35Setting Services for Tasks 35Service Inheritance Behavior 36
Chapter 8: Synchronizing Actuals from Time Management 38Overview 38Enabling Projects for Synchronization 43Running the Synchronization Script 43
Logging Messages 47
Appendix A: Typical Usage 48
Send Us Feedback 50
Project Management Configuration GuideProject and Portfolio Management Center
Project and Portfolio Management Center (9.50-9.55) Page 4 of 50

Chapter 1: Getting Started with Project Management ConfigurationIntroduction to Project Management ConfigurationProject Management enables organizations to streamline and standardize the management of project activities using a template-based, collaborative approach.
The Project Details tab of the Project Overview page contains fields delivered with the Best Practices installation (see Installation and Administration Guide for more information). These fields do not need to be set up or altered in any way before you start using Project Management, but if you want to change them, they can be customized to suit your business needs in the following ways:
l Individual field names and values can be changed. These fields and their workflow interactions are contained and defined by a request type that can be altered in the PPM Workbench. See "Configuring Project Details Tab Fields" on page 13, for more detailed information.
l Fields themselves can be configured to be hidden, visible, or read-only depending on what stage has been reached in the project process.
The project process, which is driven by the workflow discussed in "Configuring the Project Process" on page 16, can also be changed; for example, security on each workflow step can be configured to suit your business needs. Also see this section for details on configuring the underlying project process.
Project Management includes specialized project control items that can be submitted and resolved during project execution as Demand Management requests:
l Issues can be filed against a particular project to raise issues that require attention.
l Risks can be brought up to highlight risks that may endanger project execution. l Scope changes can be requested to adjust the scope of the project.
Project Management Configuration GuideChapter 1: Getting Started with Project Management Configuration
Project and Portfolio Management Center (9.50-9.55) Page 5 of 50

Once submitted, these requests follow their own workflows to resolution. Each request type and its workflow are delivered with the Best Practices installation, ready for you to use. But, if you want to change them, they can be customized to match your project control processes. (For more information about Best Practices installation, see Installation and Administration Guide.) The following project control request aspects can be changed to suit your business needs:
l Individual fields and possible values can be changed. l Fields themselves can be configured to be hidden, visible, or read-only
depending on what stage has been reached in the workflow. l The workflows can be changed, including workflow structure and security
settings for each step.For detailed discussion of these project control request types and workflow configuration, see "Configuring Project Control Processes" on page 19.
Work plans organize the specific tasks or deliverables for a project into a hierarchical structure. Project Management provides scalability for viewing work plans of different sizes by providing a mechanism for controlling the number of tasks displayed at any given time. In this way, larger work plans are divided into pages that display sets of tasks. Users can choose from a set of options in their profiles how large they want a work plan page to be. "Key Server Parameters and Scheduled Services" on page 7, explains how to configure the available options, as well as settings related to:
l Cost calculation roll-up l Microsoft® Project integrationProject Management also includes task user data, custom fields that can be associated with every task on a work plan. If you have no need of custom fields for tasks on your work plans, then you do not need to configure task user data. "Configuring Task User Data" on page 28, explains task user data configuration.
Specific features of Project Management relating to work plan page size, cost calculation roll-up, or Microsoft Project integration can be configured by modifying the server.conf file on the PPM Server. "Key Server Parameters and Scheduled Services" on page 7, contains details on these features and their controls.
Project Management Configuration GuideChapter 1: Getting Started with Project Management Configuration
Project and Portfolio Management Center (9.50-9.55) Page 6 of 50

Chapter 2: Key Server Parameters and Scheduled Services l "Overview" below l "Work Plan Page Size Controls" below l "Enter Actuals Page Size" on page 9 l "Cost Calculation Settings" on page 9 l "Microsoft Project Integration Options" on page 11
OverviewSeveral important features of Project Management are controlled by parameters in the server.conf file and scheduled services on the PPM Server. Changing the values of these parameters and services can alter the way these features work. This section explains the server.conf parameters and scheduled services for Project Management, along with their default values.
For more detailed information on configuring the server.conf file, see the Installation and Administration Guide.
Work Plan Page Size ControlsThe Work Plan page displays a set number of tasks at a time, referred to as a
"page." You can navigate between pages in a large work plan by using the
and buttons or by specifying a task number in Seq # and clicking Go.
Users can adjust the number of rows per work plan page in the Project Work Plan Preferences section of the Edit My Profile page, accessed by selecting Open > Administration > Edit My Profile from the menu bar.
Project Management Configuration GuideChapter 2: Key Server Parameters and Scheduled Services
Project and Portfolio Management Center (9.50-9.55) Page 7 of 50

Figure 2-1. Edit My Profile page
These options are controlled by the server.conf parameters described in "Table 2-1. server.conf parameters for work plan page size controls, continued" on the next page.
Parameter Description Default Value
LOW_PAGE_SIZE
The number of work plan lines to load per page when the user is using a slow connection, such as a WAN. This is presented to the user as a selection option.
Possible values: Any whole number
20
HIGH_PAGE_SIZE
The number of work plan lines to load per page when the user is using a fast connection, such as a LAN.
Possible values: Any whole number
100
Table 2-1. server.conf parameters for work plan page size controls
Project Management Configuration GuideChapter 2: Key Server Parameters and Scheduled Services
Project and Portfolio Management Center (9.50-9.55) Page 8 of 50

Parameter Description Default Value
DEFAULT_PAGE_SIZE_OPTION
This is the default setting for all new users, and indicates whether to use the fast setting or the slow setting (rather than indicating a specific size).
l Companies with mostly LAN users should set this to use the fast setting.
l Companies with mostly WAN/VPN users or highly mixed usage should set this to use the slower setting.
Possible values: LOW_PAGE_SIZE, HIGH_PAGE_SIZE, DEFAULT_PAGE_SIZE
LOW_PAGE_SIZE
MAX_PAGE_SIZE
The maximum number of work plan lines that can be loaded into the Work Plan page, at a given time. The user can set their own page size up to this value (higher values are ignored).
Possible values: Any whole number
500
DEFAULT_PAGE_SIZE
The default number of work plan lines supplied in the user-defined option.
Possible values: Any whole number
50
Table 2-1. server.conf parameters for work plan page size controls, continued
Enter Actuals Page SizeYou can modify the following server.conf parameter:
l PM_NUM_EDIT_ASGMTS. Default: 200. The maximum number of assignments that can be open on the Enter Actuals page. Specify any whole number greater than zero.
Cost Calculation SettingsCost data that involves roll-ups from other sources is recalculated system-wide on a periodic basis. These types of cost data can include the following possible scenarios:
l Work plan tasks roll up planned and actual cost data to summary tasks l Work plan actual cost data rolls up to the project financial summary l Project actual cost data rolls up to the program financial summary
Project Management Configuration GuideChapter 2: Key Server Parameters and Scheduled Services
Project and Portfolio Management Center (9.50-9.55) Page 9 of 50

Since these roll-up calculations are performed periodically, cost data for one entity may not match its dependent entity until the next calculation interval.
Periodic cost roll-up is performed system-wide and is governed by the server.conf parameter described in "Table 2-2. server.conf parameter for periodic cost calculations" below and scheduled services described in "Table 2-3. Scheduled services for periodic cost calculations" below.
Parameter Description Default Value
PM_CAN_ROLLUP_ACTUALS_ON_SAVE
Determines if a project manager has the option of forcing the system to calculate roll-ups upon saving entries to the Enter Actuals page, rather than waiting.
TRUE
Table 2-2. server.conf parameter for periodic cost calculations
Service Description Default Values
Cost Rollup Service Determines if periodic cost roll-up calculations are performed and the frequency with which the roll-up calculations are performed.
Status: Enabled
Schedule Type: Simple
Schedule: 1 hour
FX Rate Update Service
Determines if financial exchange rates are recalculated after updates are made to them and the frequency with which financial exchange rate rules are checked for updates and costs recalculated.
Status: Enabled
Schedule Type: Simple
Schedule: 2 hours
Cost Rate Rule Update Service
Determines if costs are recalculated after updates are made to cost rate rules and the frequency with which cost rate rules are checked for updates and costs recalculated.
Status: Enabled
Schedule Type: Simple
Schedule: 1 hour
Table 2-3. Scheduled services for periodic cost calculations
Periodic roll-up of other information is also performed system-wide:
l Roll-up of task information to summary tasks is deferred when resources enter task actuals through the My Tasks portlet or time sheets.
l Calculation of schedule exceptions and schedule health for work plans is deferred when resources enter task actuals, or when work plan schedule information is updated through Microsoft Project.
Project Management Configuration GuideChapter 2: Key Server Parameters and Scheduled Services
Project and Portfolio Management Center (9.50-9.55) Page 10 of 50

These calculations are governed by the scheduled services described in "Table 2-4. Scheduled services for work plan information" below.
Service Description Default Values
Task Actual Rollup Service
Determines if periodic task actual roll-up calculations are performed and the frequency with which the task actual roll-up calculations are performed.
Status: Enabled
Schedule Type: Simple
Schedule: 250 seconds
Exception Rule Service
Determines if task exceptions are recalculated and the frequency with which task exceptions are recalculated.
Status: Enabled
Schedule Type: Simple
Schedule: 1 hour
Task Scheduler Service
Determines if the work plan schedule health is recalculated and the frequency with which work plan schedule health is recalculated.
Status: Enabled
Schedule Type: Simple
Schedule: 1 minute
Table 2-4. Scheduled services for work plan information
Microsoft Project Integration OptionsThere are two server.conf parameters that are important for the following aspects of Microsoft Project integration:
l "Enabling Microsoft Project Launch from a Work Plan" below l "Mapping Work Plans to Microsoft Project Files" on the next page
Enabling Microsoft Project Launch from a Work PlanIn Project Management, when viewing or editing a work plan that has been integrated with Microsoft Project, you can click Actions in the Work Plan page and select Open Work Plan in Microsoft Project to launch Microsoft Project and open the associated Microsoft Project file.
If, for security reasons, you cannot enable this option, users can manually open the Microsoft Project file and all Microsoft Project integration features are available from the Microsoft Project menus. Users will not be able to open the associated Microsoft Project file from the Project Management work plan.
Project Management Configuration GuideChapter 2: Key Server Parameters and Scheduled Services
Project and Portfolio Management Center (9.50-9.55) Page 11 of 50

To enable Microsoft Project launch from an Project Management work plan, do the following:
1. Install a supported version of Microsoft Internet Explorer on the user's system (refer to the System Requirements and Compatibility Matrix for a list of supported versions of Microsoft Internet Explorer)
2. The server.conf parameter ENABLE_PROJECT_LAUNCH_FROM_ACTION_MENU must be set to True (this parameter controls the ability of users to launch Microsoft Project from an Project Management work plan)
Note: The Open Work Plan in Microsoft Project option will result in an error when opening projects that are Microsoft Project Server-based. If your business relies on the use of Microsoft Project Server, you may want to disable this menu option (by setting ENABLE_PROJECT_LAUNCH_FROM_ACTION_MENU to False.
Mapping Work Plans to Microsoft Project FilesAll projects in Project Management that are integrated with Microsoft Project must store a link to the project in the Microsoft Project file. This link must be contained in a custom field in Microsoft Project that remains consistent and untouched across all projects. The server.conf parameter MSP_PROJECT_CUSTOM_FIELD stores the Microsoft Project field where the project link information is kept. Its default value is Text30.
Note: This parameter is a system-level setting and must not be changed after you have begun work with projects that are integrated with Microsoft Project.
Project Management Configuration GuideChapter 2: Key Server Parameters and Scheduled Services
Project and Portfolio Management Center (9.50-9.55) Page 12 of 50

Chapter 3: Configuring Project Details Tab FieldsOverview of Configuring Project Details Tab FieldsThis section provides details on the fields in the Project Details tab of the Project Overview page, and how to modify them to suit your business needs, if desired.
Project Details Tab FieldsThe Details tab of the Project Overview page contains fields delivered ready to use for projects. These fields and their workflow interactions are contained and defined by a request type that can be altered in the PPM Workbench.
l If you have not installed Portfolio Management, the request type delivered by default is called Project Details and is specified in the default project type. Its fields are described in "Table 3-1. Default project fields, continued" on the next page.
l If you have installed Portfolio Management, another request type is provided called PFM - Project. Its fields are discussed in the Portfolio Management Configuration Guide.
Field Name Description
Summary section
Project No. A number that uniquely identifies the project. This field cannot be altered.
Project Name The name of the project. This field should be made visible and editable if you want users to be able to change the project name.
Project Manager The manager of the project.
This field can be made editable, but it is recommended that it be made display-only, and that project managers be defined using the project's Configure Participants page.
Planned Start Period
The planned start date for the project. This field should not be altered.
Table 3-1. Default project fields
Project Management Configuration GuideChapter 3: Configuring Project Details Tab Fields
Project and Portfolio Management Center (9.50-9.55) Page 13 of 50

Field Name Description
Planned Finish Period
The planned finish date for the project. This field should not be altered.
Project Status The status of the project. This field should not be altered.
Project Health The overall health of the project. This field should not be altered.
Description A brief description of the project.
Benefits Manager The manager of benefits of the project's financial summary.
PFM Project section
Business Unit The business unit from which this project originated.
Business Objective
The business objective with which the project is aligned.
Project Dependencies
Any dependencies the project has.
Staffing Profile The resource demand of the project. This field is read-only and should not be altered, as the staffing profile can be accessed from the Project Summary tab of the Project Overview page.
Net Present Value
If enabled, the NPV for the project. (For a definition, see the Portfolio Management Configuration Guide.)
Associated Programs
Name of the program(s) to which the project is associated. This field is a link to the program. The programs listed are only those programs to which you have the View Programs, Edit Programs, or Edit All Programs access grant.
The project can be associated to only one program that has Portfolio Management enabled. The project can be associated to one or more programs that do not have Portfolio Management enabled. To add or remove an association to a program, go to the program's overview page.
Financial Summary
Name of the financial summary for the project. This field is a link to the financial summary.
Table 3-1. Default project fields, continued
Project Management Configuration GuideChapter 3: Configuring Project Details Tab Fields
Project and Portfolio Management Center (9.50-9.55) Page 14 of 50

Configuring Project Details Tab FieldsThe fields on the Details tab do not need to be set up or altered in any way before you start using Project Management. But, if you want to change them, they can be customized to suit your business needs in the following ways:
l Viewing and editing security on certain fields can be altered. l Certain individual field names and values can be changed. l Fields themselves can be configured to be hidden, visible, or read-only
depending on what stage has been reached in the project process, which is driven by the workflow discussed in "Configuring the Project Process" on page 16.
l New fields can be added to capture any information not already covered.These fields and their workflow interactions are contained and defined by a request type that can be altered in the PPM Workbench.
l If you have not installed Portfolio Management, the request type delivered by default is called Project Details and is specified in the default project type.
l If you have installed Portfolio Management, another request type is provided called PFM - Project.
l If you choose to configure your own request type to define the Details tab, you must include the PFM Project field group in the request header type. For more details on field groups and request header types, see the Demand Management Configuration Guide.
If you want to add other lifecycle and planning information to the project, we recommend that you create a new section in the request type and add the new fields there.
For general recommendations on altering this request type in the context of Portfolio Management, see the Portfolio Management Configuration Guide.
User access to these request types should be carefully considered. The User Access tab of the Request Type window defines user access to the request type, which in turn defines the list of users who can participate in the project process. These project process participants can see all the projects whose Details tab is governed by that request type.
For more detailed information on creating and modifying request type fields, see the Demand Management Configuration Guide.
Project Management Configuration GuideChapter 3: Configuring Project Details Tab Fields
Project and Portfolio Management Center (9.50-9.55) Page 15 of 50

Chapter 4: Configuring the Project ProcessOverview of Configuring the Project ProcessThis section provides details on the workflow associated with the request type used to define the Project Details tab, which determines the project process, and how to modify this workflow to suit your business needs, if desired. The workflow provided by default models a very simple lifecycle.
Project ProcessThe project process is determined by a workflow in Project and Portfolio Management Center (PPM). The workflow is associated with the request type that defines the fields in the Project Details tab in the Project Overview page.
l The Project Process workflow is delivered by default, and presents the high-level stages of a project being implemented. Steps are updated manually, either by the project manager to signal the completion of a stage, or by approvers who verify that the stage is complete. The project workflow is shown in "Figure 4-1. Project process" on the next page.
l If you have installed Portfolio Management, a different workflow is used which also defines the process for projects in your portfolio. This workflow is discussed in the Portfolio Management Configuration Guide.
Project Management Configuration GuideChapter 4: Configuring the Project Process
Project and Portfolio Management Center (9.50-9.55) Page 16 of 50

Figure 4-1. Project process
The default workflow steps are described as follows:
1. In Planning. The project is being planned. 2. Active. The project is in its execution phase. 3. On Hold. The project is on hold. This step can be reached from the Active or In
Planning steps, but is not necessary. 4. Complete. The project is complete.
Configuring the Project ProcessThe project workflow is delivered with the Best Practices installation, ready for you to use in Project Management. But, if you want to change the workflow, it can be customized to match your general project execution process. For more information about Best Practices installation, see Installation and Administration Guide.
l If you have not installed Portfolio Management, the workflow is called Project Process.
l If you have installed Portfolio Management, the workflow is called PFM - Project.
Project Management Configuration GuideChapter 4: Configuring the Project Process
Project and Portfolio Management Center (9.50-9.55) Page 17 of 50

Steps in the workflow can also be configured to integrate with fields on the Project Details tab, determining whether they are visible or editable.
Consider the following when making changes to the project workflow:
l You might want to significantly change the project workflow to represent the major project phases at your company. You need to make sure the request statuses are updated to be consistent with any project workflow changes.
l You can also add steps, change step names, and modify notifications, although We recommend that the project stages be tracked at a high level, totaling under fifteen steps; they are not meant to emulate a detailed work plan.
l The automated workflow steps included in the Project Process workflow are used to control the internal status of the project, as well as the status of the staffing profile associated with the project. These automated steps should be included in your workflow to take full advantage of Project Management functionality.
l If you have installed Portfolio Management, the Complete Project and Create Asset steps should be retained in the final workflow to take full advantage of Portfolio Management functionality.
l Each step in the workflow is associated with a security group or groups. Users who are not part of the security group for a workflow step cannot act on it. Review the security for each workflow step to ensure that it is sufficient for your organization.
For general recommendations on altering this workflow in the context of Portfolio Management, see the Portfolio Management Configuration Guide.
For more detailed information on modifying workflows, see the Demand Management Configuration Guide.
Project Management Configuration GuideChapter 4: Configuring the Project Process
Project and Portfolio Management Center (9.50-9.55) Page 18 of 50

Chapter 5: Configuring Project Control Processes l "Overview of Configuring Project Control Processes" below l "Configuring Project Control Entities" below l "Configuring Project Control Processes" on page 23
Overview of Configuring Project Control ProcessesThis section provides details on:
l The following project control entities delivered with Project Management and how to modify their fields and their behavior to suit your business needs, if desired: l Project issues l Risks l Scope changes
l The processes associated with the project control entities, and how to modify them to suit your business needs, if desired.
Configuring Project Control EntitiesProject Management delivers pre-defined project control request types that can be used without additional configuration. If desired, these request types can be altered to suit your business needs. It is recommended that you review the security settings for these request types at a minimum, to ensure that they are sufficient for your organization.
Project Issue Request TypeProject Management delivers a preconfigured project issue request type called Project Issue that can be used without additional configuration to log project-level issues. If you have installed Program Management, a separate but similar Program Issue request type is delivered for use at the program level.
The project issue request type's fields are described in "Table 5-1. Project issue" on the next page.
Project Management Configuration GuideChapter 5: Configuring Project Control Processes
Project and Portfolio Management Center (9.50-9.55) Page 19 of 50

Field Name Description
Header Section: Summary
Issue Status The status of the issue.
Created By The user who created the issue.
Assigned To The user to whom the issue is assigned.
Project The project associated with the issue.
Priority The priority of the issue.
Values in this field are linked to the issue health of a project, configured in the Issue Health policy. See the "Configuring Project Types" section of the Project Management User Guide for more detailed information.
Escalation Level The escalation level of the issue. Possible values are Project or Program. If there are program(s) associated with the project, escalating to the Program level will make the issue visible at the program level. If you are not using programs, you may want to hide this field.
Description A brief description of the issue.
Details Section: Issue Details
Date Identified The date the issue was identified.
Due Date The date by which the issue should be resolved.
Issue Type The type of issue being raised.
Detailed Description
A detailed description of the issue.
Proposed Solution
The proposed solution for the issue.
Business Function
The business function that is affected by the issue.
Table 5-1. Project issue
Project Management Configuration GuideChapter 5: Configuring Project Control Processes
Project and Portfolio Management Center (9.50-9.55) Page 20 of 50

Risk Request TypeProject Management delivers a preconfigured risk request type called Project Risk that can be used without additional configuration to log project-level risks. If the project is associated with any programs, risks will be displayed at the program level based on the settings for that program.
The risk request type's fields are described in "Table 5-2. Risk fields" below.
Field Name Description
Header Section: Summary
Risk Status The status of the risk.
Created By The user who created the risk.
Assigned To The user to whom the risk is assigned.
Project The project associated with the risk.
Priority The priority of the risk.
Risk Impact Level The impact level of the risk.
Probability The probability of the risk occurring.
Description A brief description of the risk.
Details Section: Risk Details
Risk Type The type of risk being raised.
Date Identified The date the risk was identified.
Detailed Description A detailed description of the risk.
Closure Criteria The criteria for successfully closing the risk.
Action Plan The proposed plan of action for dealing with the risk.
Table 5-2. Risk fields
Scope Change Request TypeProject Management delivers a preconfigured scope change request type called Project Scope Change Request that can be used without additional configuration to request changes in project scope. If the project is associated with any programs,
Project Management Configuration GuideChapter 5: Configuring Project Control Processes
Project and Portfolio Management Center (9.50-9.55) Page 21 of 50

scope changes will be displayed at the program level based on the settings for that program.
The fields of a scope change request type are described in "Table 5-3. Scope change request fields, continued" on the next page.
Field Name Description
Header Section: Summary
Scope Change Status The status of the scope change.
Created By The user who created the scope change.
Assigned To The user to whom the scope change is assigned.
Project The project associated with the scope change.
Priority The priority of the scope change.
CR Level A ranking of the impact or importance of the scope change.
Business Impact Severity
The severity of the scope change's impact on the business.
Description A brief description of the scope change.
Details Section: Scope Change Details
Assigned Release The release to which the scope change is assigned.
Target Implementation Date
The date by which the scope change should be implemented.
Detailed Description A detailed description of the scope change.
Benefit of Proposed Change
The benefit the proposed scope change would have.
Alternatives Any alternatives to the scope change that exist.
List of Impacted Deliverables
A list of the deliverables impacted by the scope change.
Impact Summary A summary of the impact the scope change will have.
Table 5-3. Scope change request fields
Project Management Configuration GuideChapter 5: Configuring Project Control Processes
Project and Portfolio Management Center (9.50-9.55) Page 22 of 50

Field Name Description
Financial Impact The dollar amount of the scope change's impact.
Schedule Impact (in days)
The number of days by which the scope change affects the schedule.
Table 5-3. Scope change request fields, continued
Configuring the Project Control EntitiesThe project control entities do not need to be set up or altered in any way before you start using Project Management. However, if you want to change them, they can be customized to suit your business needs in the following ways:
l Viewing and editing security on certain fields can be altered. l Individual field names and values can be changed. l Fields themselves can be configured to be hidden, visible, or read-only
depending on what stage has been reached in each project control process, which are driven by the workflows discussed in "Configuring Project Control Processes" below.
l New fields can be added.If you choose to configure your own project control request types, you must include one of the following field groups in the request header type:
l Project Issue l Project Risk l Project Scope ChangeFor more details on field groups and request header types, see the Demand Management Configuration Guide.
For more detailed information on creating and modifying request type fields, see the Demand Management Configuration Guide.
Configuring Project Control ProcessesThe project control processes are defined by the workflows delivered by Project Management, which can be used without additional configuration. If desired, the workflows can be altered to suit your business needs.
Project Issue WorkflowThe project issue process is determined by the workflow called Issue Management Process in PPM. The workflow is associated with the project issue request type. If
Project Management Configuration GuideChapter 5: Configuring Project Control Processes
Project and Portfolio Management Center (9.50-9.55) Page 23 of 50

you have installed Program Management, the program issue request type also uses this workflow. The issue management workflow is shown in "Figure 5-1. Issue management workflow" below.
Figure 5-1. Issue management workflow
The default workflow steps are described as follows:
1. Review and Assign Issue. The issue is reviewed and assigned to the appropriate user.
2. Manage Issue. The issue is resolved.
3. Approve Resolution. The resolution to the issue is reviewed.
4. Close. The issue is closed.
Risk WorkflowThe risk process is determined by the workflow called Risk Management Process in PPM. The workflow is associated with the risk request type. The risk management workflow is shown in "Figure 5-2. Risk management workflow" below.
Figure 5-2. Risk management workflow
Project Management Configuration GuideChapter 5: Configuring Project Control Processes
Project and Portfolio Management Center (9.50-9.55) Page 24 of 50

The default workflow steps are described as follows:
1. Evaluate Risk Impact Level. The risk's impact is evaluated.
2. PMO Lead Review and Assign Risk. The risk is reviewed by the Program Management Office and assigned to the appropriate user.
3. Project Lead Review and Assign Risk. The risk is reviewed by the project lead and assigned to the appropriate user.
4. Manage Risk. The risk is resolved.
5. Approve Closure. The resolution to the risk is reviewed.
6. Close. The risk is closed.
Scope Change WorkflowThe scope change process is determined by the workflow called Scope Change Request Process in PPM. The workflow is associated with the scope change request type. The scope change request workflow is shown in "Figure 5-3. Scope change request workflow" below.
Figure 5-3. Scope change request workflow
Project Management Configuration GuideChapter 5: Configuring Project Control Processes
Project and Portfolio Management Center (9.50-9.55) Page 25 of 50

The default workflow steps are described as follows:
1. Identify and Document Change Request. The initiator builds a case for the change and sets the change request level.
2. Evaluate CR Level. The scope change's impact is evaluated. Depending on the level, the scope change is routed to a different branch of the workflow, each of which includes steps to create or update an impact analysis of the scope change. This ensures that decisions regarding the scope change are well-founded.
3. Create/Update Impact Analysis. Once the impact analysis has been created and updated, the scope change is analyzed and a recommendation issued. Often this will be the selection of a specific option or a recommendation not to pursue.
4. Submit Recommendation. The scope change is either submitted for approval or escalated for additional analysis.
5. Approve Request. The scope change may be rejected, deferred, or accepted. Usually a change control board issues the final approval.
6. Close. The scope change is closed.
Configuring the Project Control WorkflowsThe project control workflows are delivered with the Best Practices installation, ready for you to use in Project Management. But, if you want to change them, they can be customized to match your project control processes. (For more information about Best Practices installation, see the Installation and Administration Guide.) Steps in the workflow can also be configured to integrate with fields on the project control request types, determining whether they are visible or editable.
Project Management Configuration GuideChapter 5: Configuring Project Control Processes
Project and Portfolio Management Center (9.50-9.55) Page 26 of 50
Consider the following when making changes to the project control workflows:
l You need to make sure the request statuses are updated to be consistent with any project control workflow changes.
l Each step in the workflow is associated with a security group or groups. Users who are not part of the security group for a workflow step cannot act on it.
For more detailed information on modifying workflows, see the Demand Management Configuration Guide.
Project Management Configuration GuideChapter 5: Configuring Project Control Processes
Project and Portfolio Management Center (9.50-9.55) Page 27 of 50
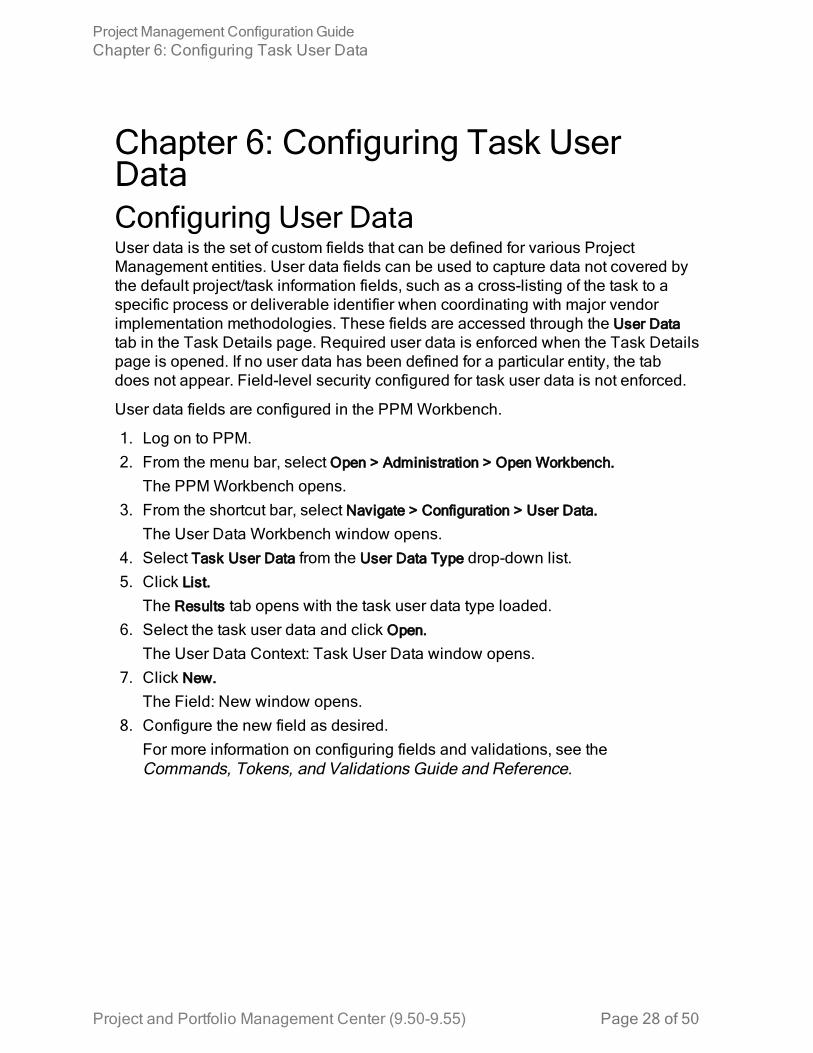
Chapter 6: Configuring Task User DataConfiguring User DataUser data is the set of custom fields that can be defined for various Project Management entities. User data fields can be used to capture data not covered by the default project/task information fields, such as a cross-listing of the task to a specific process or deliverable identifier when coordinating with major vendor implementation methodologies. These fields are accessed through the User Data tab in the Task Details page. Required user data is enforced when the Task Details page is opened. If no user data has been defined for a particular entity, the tab does not appear. Field-level security configured for task user data is not enforced.
User data fields are configured in the PPM Workbench.
1. Log on to PPM. 2. From the menu bar, select Open > Administration > Open Workbench.
The PPM Workbench opens. 3. From the shortcut bar, select Navigate > Configuration > User Data.
The User Data Workbench window opens. 4. Select Task User Data from the User Data Type drop-down list. 5. Click List.
The Results tab opens with the task user data type loaded. 6. Select the task user data and click Open.
The User Data Context: Task User Data window opens. 7. Click New.
The Field: New window opens. 8. Configure the new field as desired.
For more information on configuring fields and validations, see the Commands, Tokens, and Validations Guide and Reference.
Project Management Configuration GuideChapter 6: Configuring Task User Data
Project and Portfolio Management Center (9.50-9.55) Page 28 of 50

Chapter 6: Setting Idle Time for Project Details PageYou might spend long time entering data in the Project Details page. However, PPM would regard this as inactivity and then terminate your session. You can use the following parameter to set the duration you can stay idle in this page. This helps prevent data loss because of inactivity.
Parameter Description, Usage Values
REQUEST_AND_PROJECT_ KEEPALIVE_MAX_IDLE_TIME
You use this parameter to specify the duration (in minutes) that you can stay idle on the Request Details page and Project Details page before your session starts to time out.
Default value: 600
Valid value: positive integer
The KINTANA_SESSION_TIMEOUT parameter, which specifies the time to elapse before a user session times out, still takes effect when you use the above parameter. They work together in the following way:
l When the value of REQUEST_AND_PROJECT_KEEPALIVE_MAX_IDLE_TIME is greater than 0, you can stay idle Project Details page for the specified duration. After the duration ends, the session times out when the time specified by KINTANA_SESSION_TIMEOUT is up. In this case, as long as you are not idle in these pages performing actions like clicking the mouse and pressing keys, your session will not time out because PPM keeps the session alive.
l When the value of REQUEST_AND_PROJECT_KEEPALIVE_MAX_IDLE_TIME is 0, KINTANA_SESSION_ TIMEOUT works in the Project Details page as it does in other PPM pages: your session times out if no requests are sent from the browser to the server for a duration equal to or greater than the KINTANA_SESSION_TIMEOUT value.
Project Management Configuration GuideChapter 6: Setting Idle Time for Project Details Page
Project and Portfolio Management Center (9.50-9.55) Page 29 of 50

Chapter 7: Enabling Service Portfolio for TasksAs a project manager, you can enable a single service for each task when you plan your work plan.
After you enable the service settings with administrator privilege, the Service task field is displayed as an additional column in the Schedule view of work plan. Then, you will be able to specify which business service each task supports on the work plan for your project.
To enable specifying a service for a task, do the following:
1. "Enabling Service Settings for Project Types and Projects" below 2. "Configuring Service Settings for Project Types and Projects" on the next page 3. "Enabling and Editing Services for Tasks in Work Plan" on page 32
Enabling Service Settings for Project Types and ProjectsTo enable service settings for project types and projects:
1. In the PPM Workbench, create a new Request Header Type with PFM Project and Service field groups enabled. a. Open Request Header Type workbench window and create a new Request
Header Type, for example, MyProject_RHT. b. In the Field Groups window, select PFM Project and Service field groups,
and then click OK.For more information about enabling the service field group for request header types, see the Demand Management Configuration Guide.
2. In the PPM Workbench, create a new Request Type using the new request header type. a. Open Request Type workbench window and create a new Request Type,
for example, MyProject_RT. b. Select MyProject_RHT as the request header type. c. Complete other fields as necessary. Click OK.
Note: In order for services to be used on a project, make sure to associate the newly created request type with your project type. See "Configure Service Settings for Project Types " on the next page.
Project Management Configuration GuideChapter 7: Enabling Service Portfolio for Tasks
Project and Portfolio Management Center (9.50-9.55) Page 30 of 50

For more information about creating and configuring request types, see the Demand Management Configuration Guide.
Configuring Service Settings for Project Types and Projects
Configure Service Settings for Project Types In PPM, create a project type and configure service settings.
1. On the Create Project Type page of PPM (from the menu bar, select Create > Administration > Project Type), in the Project Type field, provide a project type name, for example, MyProjectType_n.
2. Click Request Types policy in the left pane.The Request Types page opens.
3. Click the selector icon for the Project Process Request Type field.In the request type window that opens, select the new request type, for example, MyProject_RT.
4. Click Project Fields policy in the left pane. The Project Fields page opens. The Service checkbox setting becomes available.
5. Under Additional Fields section, select the Service checkbox if you want to enable the Service field for the new request type.
6. The Is Required checkbox now becomes available. If you want the Service field to be required for projects created from the current project type, select the Is Required checkbox; otherwise, the Service field is optional.
7. Click Create.For more information about project types, see the Project Management User Guide.
Configure Service Settings for ProjectsCreate projects from the new project type, and configure the Service and Is Required settings.
Project Management Configuration GuideChapter 7: Enabling Service Portfolio for Tasks
Project and Portfolio Management Center (9.50-9.55) Page 31 of 50
The Service and Is Required settings are available for all projects you create from the new project type.
1. After you have created a project from the new project type (for example, MyProjectType_n), on the Project Overview page, click Settings. The Project Settings page opens.
2. Click Project Fields policy in the left pane. The Project Fields page opens.
You can configure Service and Is Required settings here for your project. See step 5 and step 6.
For more information about setting project policies, see the Project Management User Guide.
Enabling and Editing Services for Tasks in Work PlanIf you have selected the Service checkbox from the Project Fields policy of a project's Project Settings page, the Service field is enabled for the project. When you create a work plan for the project and add tasks to it, the Service field is displayed in the work plan as a column in its Schedule view.
Project Management Configuration GuideChapter 7: Enabling Service Portfolio for Tasks
Project and Portfolio Management Center (9.50-9.55) Page 32 of 50
Service as a Non-Required FieldIf you selected only the Service checkbox from the project policy for a project, the Service field is enabled but not required. It means that empty fields are allowed.
When you create a work plan for the project (by clicking Create blank work plan, Create work plan from a template... or Create work plan from another project... from the Project Summary tab of the Project Overview page), the Service field for the root task or Service fields for all task items inherit the default service setting if you already specified a default service in the project's Project Details page; otherwise the Service field(s) will be empty. See "(Optional) Specify a Default Service for a Project" on page 35.
Each new task item you add to the work plan follows certain service inheritance rules. See "Service Inheritance Behavior" on page 36. If there is no default service or parent service, the Service field for the new child task will be empty.
However, after you finish adding task items, you may edit the Service field value for each of the tasks or summary tasks individually. You can also specify different services for different task items on the same work plan. See "Setting Services for Tasks" on page 35.
Note: Based on your Project Policy settings, all Service fields for task items on a single work plan are either required or non-required. You cannot have both required and non-required fields on one work plan.
Project Management Configuration GuideChapter 7: Enabling Service Portfolio for Tasks
Project and Portfolio Management Center (9.50-9.55) Page 33 of 50

Service as a Required FieldIf you have selected both Service and Is Required checkboxes on the project policy page for a project, the Service field is enabled and required for the project, and empty fields are not allowed.
When you create a work plan for the project:
l If you already specified a default service in the project's Project Details tab, the Service field for the root task inherits the default service setting;
l If you have not specified a default service in the Project Details tab, you will be prompted to specify a default service. l When you click Create blank work plan from the Summary tab of the Project
Overview page, the Choose Default Service dialog opens.To specify a default service, click the selector icon, select a service from the list, then click Create to proceed.
l When you click Create work plan from a template, the Create Work Plan from Template dialog opens.In addition to specifying a work plan template, you also need to specify a default service for the work plan.
l When you click Create work plan from another project, the Create Work Plan from Another Project dialog opens.In addition to specifying a project, you need to specify a default service for the work plan.
Each new task item you add to the work plan follows certain service inheritance rules. See "Service Inheritance Behavior" on page 36.
After you finish adding task items, you may edit the Service field value for each of the tasks or summary tasks individually. You can also specify different services for different task items on the same work plan. See "Setting Services for Tasks" on the next page.
Project Management Configuration GuideChapter 7: Enabling Service Portfolio for Tasks
Project and Portfolio Management Center (9.50-9.55) Page 34 of 50

Set Service to Required for an Existing ProjectIf the work plan for an existing project contains blank Service fields, when you set service to required for the project by selecting the Is Required setting on the Project Settings page and click Save, the Action Required dialog opens:
You may click Auto Fill to fill all blank Service fields with the value from the parent project. Click Cancel to discard the changes you made.
(Optional) Specify a Default Service for a ProjectWhen you have enabled and configured service settings from the Project Fields policy of the Project Settings page, you can specify a default service for the project before creating the project's work plan.
To specify a default service,
1. On the project's Project Overview page, click Details. The Details tab opens.
2. Under the Service section, click the selector icon for the Service field.The service list window opens.
3. Select a service from the list as the default service, for example, Email service. 4. Click Save.
The default service is specified.
Setting Services for TasksYou can set values for the Service fields for tasks like setting any other editable fields on a work plan. You can also set the Service value for a specific task in the Task Details page.
To set Service fields on the work plan page:
1. In the Project Summary tab of the Project Overview page, click Edit Work Plan.The Work Plan page opens.
Project Management Configuration GuideChapter 7: Enabling Service Portfolio for Tasks
Project and Portfolio Management Center (9.50-9.55) Page 35 of 50

2. Select the task item that you want to edit the Service field for, click the selector icon for the Service field to select a different service setting, or simply delete the service value.
3. Click Save to save your changes. If the Service field is required, l When you remove the service value for a child task and then click Save, the
empty Service field for the child will be automatically filled with the parent task's service value.
l Removing the service value for the root task is not allowed. If you do so, you will be prompted with an error message.To resolve the error, simply go back to the Work Plan page and specify a service value for the root task before you click Save.
4. Click Done to exit the Work Plan page after you have finished editing the service value.
Service Inheritance BehaviorTasks, summary tasks, and root tasks can inherit their service settings from their parent projects, making it unnecessary to manually set the service for every task and summary task within a project.
Service inheritance follows certain rules:
l When a service is set on a project, the same service cascades down to all its children. These children will continue to inherit their parent's service setting. If one of these children is moved to a different parent with a different service setting, the child will acquire the new parent's service setting.
l When a child is specified with a different service setting than its parent, the service setting cascade stops and that child's service setting is preserved. This child's service setting will be preserved even if the child is indented, outdented, or cut-and-pasted under a different parent.
Note: When service is required, the child's service setting inherits its parent's only in the following scenario after the cascade relationship is broken:
The child is specified with a different service setting than its parent, the service setting cascade stops and that child's service setting remains preserved. Then, the parent's service setting is modified to another service setting, and the child service setting is deleted. When you click Save, the child will inherit the parent's new service setting as empty field is not allowed. This is designed to minimize your manual effort.
Project Management Configuration GuideChapter 7: Enabling Service Portfolio for Tasks
Project and Portfolio Management Center (9.50-9.55) Page 36 of 50

However, this does not mean that the service setting cascade relationship is resumed. Once the service setting cascade stops, it cannot be resumed. Even if you modify the parent's service setting to a different one at this time, the child's new service setting is preserved.
l In the case of a child with a different service setting, manually setting that child's service setting to that of its parent means that its service setting will no longer be preserved, and will become that of its current parent.
l Manually setting a child's service to an empty value will keep it empty, but it will not stay empty if the child is moved to a parent with a non-empty service setting.
l If a summary task's parent changes its service setting, the new service will be applied to the summary task and all its children as well, unless the summary task's service setting is different than its parent's, in which case the summary task and its children will remain untouched.
Additional rules regarding service inheritance behavior:
l In Project Management controlled mode, when services are synchronized, if a child's service is empty in PPM, it will remain empty in Microsoft Project.
l In Microsoft Project controlled mode and shared controlled mode, when services are synchronized, if a child's service is empty in Microsoft Project, that child's service will inherit its parent's service in PPM.
Project Management Configuration GuideChapter 7: Enabling Service Portfolio for Tasks
Project and Portfolio Management Center (9.50-9.55) Page 37 of 50

Chapter 8: Synchronizing Actuals from Time Management l "Overview" below l "Enabling Projects for Synchronization" on page 43 l "Running the Synchronization Script" on page 43
OverviewThis section details the procedures used to synchronize actuals from Time Management to Project Management for projects that have Time Management and Project Management integrated. Synchronization allows actuals specified using Time Management to be copied to Project Management work plan tasks. Actuals may need to be synchronized if the sum of actual efforts in Time Management do not match the total actual efforts in Project Management (for example, actuals may not match after an upgrade or if time sheet data is imported into Time Management from an external application).
The following actuals can be synchronized from Time Management to Project Management:
l Actual effort l Actual start date l Actual finish date l Percent completeUsing the kPMTMSync.sh script, you can synchronize actuals for projects that have been enabled for synchronization. You can either specify a single project to synchronize or synchronize all projects that have been enabled for synchronization. You can have multiple sessions running a single instance of the script, but each instance must be run for a different project. That is, do not simultaneously run more than one instance of the script for the same project.
Caution: Back up the database before running this script. Synchronization cannot be undone. Once you run the script, actuals that have been deleted can only be recovered from a database backup.
When kPMTMSync.sh is run, actuals with matching tasks and resources are copied from Time Management to Project Management.
If actuals are entered in Time Management and the project has Time Management enabled, for tasks/resources that match between the work plan and Time Management, actuals are synchronized from Time Management. If actuals have been entered directly from both the work plan and Time Management (for the same
Project Management Configuration GuideChapter 8: Synchronizing Actuals from Time Management
Project and Portfolio Management Center (9.50-9.55) Page 38 of 50

tasks/resources), the actuals in the work plan are replaced by the Time Management actuals.
In all other situations, if actuals have been entered directly in the work plan, they are retained; if no actuals have been entered directly in the work plan, nothing is synchronized. It is not possible to have actuals entered for a project from Time Management if the project does not have Time Management enabled. See "Table 8-1. Scenarios for actuals synchronization, continued" on page 42 for more details.
Project Management Configuration GuideChapter 8: Synchronizing Actuals from Time Management
Project and Portfolio Management Center (9.50-9.55) Page 39 of 50

Project Management-Entered Actuals
Project is Time Management-Enabled
Time Management-Entered Actuals
Tasks/Resources Match
Results after kPMTMSync.sh is Run
X X X X Actuals in the work plan are replaced by Time Management-entered actuals
Project Management-entered actuals are retained
X Project Management-entered actuals are retained
Project Management-entered actuals are retained
Table 8-1. Scenarios for actuals synchronization
Project Management Configuration GuideChapter 8: Synchronizing Actuals from Time Management
Project and Portfolio Management Center (9.50-9.55) Page 40 of 50

Project Management-Entered Actuals
Project is Time Management-Enabled
Time Management-Entered Actuals
Tasks/Resources Match
Results after kPMTMSync.sh is Run
X X Scenario is not possible
Scenario is not possible
X Project Management-entered actuals are retained
Project Management-entered actuals are retained
Table 8-1. Scenarios for actuals synchronization, continued
Project Management Configuration GuideChapter 8: Synchronizing Actuals from Time Management
Project and Portfolio Management Center (9.50-9.55) Page 41 of 50

Project Management-Entered Actuals
Project is Time Management-Enabled
Time Management-Entered Actuals
Tasks/Resources Match
Results after kPMTMSync.sh is Run
X X X Actuals in the work plan are copied from Time Management-entered actuals
Nothing is copied
X Nothing is copied
Nothing is copied
X X Scenario is not possible
Scenario is not possible
X Nothing is copied
Nothing is copied
Table 8-1. Scenarios for actuals synchronization, continued
If the includeDates option is specified, the actual start date and actual finish date in Project Management are updated from Time Management. If the includePC option is specified, percent complete is calculated using the actual effort. For more detailed information about these and other options, see "Running the Synchronization Script" on the next page.
After the script has run, actuals are updated according to the schedule for the Task Actual Rollup Service. Therefore, you may not see up-to-date actuals immediately after the script has completed.
Project Management Configuration GuideChapter 8: Synchronizing Actuals from Time Management
Project and Portfolio Management Center (9.50-9.55) Page 42 of 50
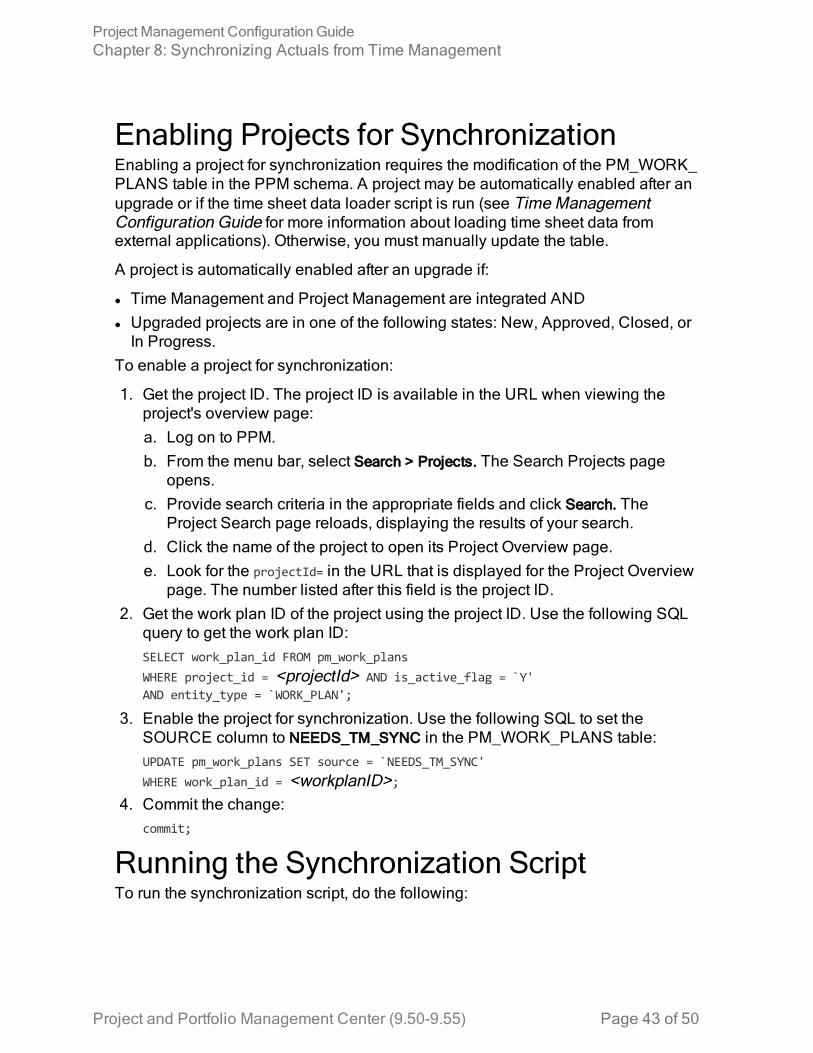
Enabling Projects for SynchronizationEnabling a project for synchronization requires the modification of the PM_WORK_PLANS table in the PPM schema. A project may be automatically enabled after an upgrade or if the time sheet data loader script is run (see Time Management Configuration Guide for more information about loading time sheet data from external applications). Otherwise, you must manually update the table.
A project is automatically enabled after an upgrade if:
l Time Management and Project Management are integrated AND l Upgraded projects are in one of the following states: New, Approved, Closed, or
In Progress.To enable a project for synchronization:
1. Get the project ID. The project ID is available in the URL when viewing the project's overview page: a. Log on to PPM. b. From the menu bar, select Search > Projects. The Search Projects page
opens. c. Provide search criteria in the appropriate fields and click Search. The
Project Search page reloads, displaying the results of your search. d. Click the name of the project to open its Project Overview page. e. Look for the projectId= in the URL that is displayed for the Project Overview
page. The number listed after this field is the project ID. 2. Get the work plan ID of the project using the project ID. Use the following SQL
query to get the work plan ID:SELECT work_plan_id FROM pm_work_plans WHERE project_id = <projectId> AND is_active_flag = `Y' AND entity_type = `WORK_PLAN';
3. Enable the project for synchronization. Use the following SQL to set the SOURCE column to NEEDS_TM_SYNC in the PM_WORK_PLANS table:UPDATE pm_work_plans SET source = `NEEDS_TM_SYNC' WHERE work_plan_id = <workplanID>;
4. Commit the change: commit;
Running the Synchronization ScriptTo run the synchronization script, do the following:
Project Management Configuration GuideChapter 8: Synchronizing Actuals from Time Management
Project and Portfolio Management Center (9.50-9.55) Page 43 of 50

1. Back up the database.
Caution: Synchronization cannot be undone. Once you run the script, actuals that have been deleted can only be recovered from a database backup.
2. From the PPM Server, change to the <PPM_Home>/bin directory. 3. Run the following command:
sh ./kPMTMSync.sh -username <username> -password <password> [-projectno <projectnumber>] [-projectname <projectname>] [-includeDates yes] [-includePC yes] [-removeEmpty yes]
Note: Messages from the script are sent as standard output to the screen. To log these messages, see "Logging Messages" on page 47.
Option (*Required) Description
*username Any existing PPM user who has the Edit All Projects access grant.
*password The password for the PPM user.
projectno The project number of the project to which the actuals are synchronized. The project number is available on the Search Projects page or in the Project Details tab of the project. If you also specify the projectname argument, the project name and project number must correspond to the same project. If neither the projectno nor the projectname argument is specified, all projects with synchronization enabled have their actuals synchronized.
projectname The project name of the project to which the actuals are synchronized. The project name is available on the Search Projects page or in the Project Details tab of the project. If you also specify the projectno argument, the project number and project name must correspond to the same project. If neither the projectno nor the projectname argument is specified, all projects with synchronization enabled have their actuals synchronized.
Project Management Configuration GuideChapter 8: Synchronizing Actuals from Time Management
Project and Portfolio Management Center (9.50-9.55) Page 44 of 50

Option (*Required) Description
includeDates If set to yes, the actual start date and actual finish date (if available) is copied from Time Management. The actual start date is the earliest date for which effort is provided on any time sheet for a task. The actual finish date is the latest date for which effort is provided on any time sheet for a task and is copied only if percent complete for the task is equal to 100 (the task has been completed). If the task has not been completed, the actual finish date from Project Management is used.If this option is not included, both the actual start date and actual finish date from Project Management are used.WARNING: For a completed project, if actuals for resources have been added from both Project Management and Time Management, using this option on this project ignores the actuals from Project Management. The status of all tasks that had actuals entered from Project Management are changed from Completed to In Progress and the actuals entered from Project Management are lost.
Project Management Configuration GuideChapter 8: Synchronizing Actuals from Time Management
Project and Portfolio Management Center (9.50-9.55) Page 45 of 50
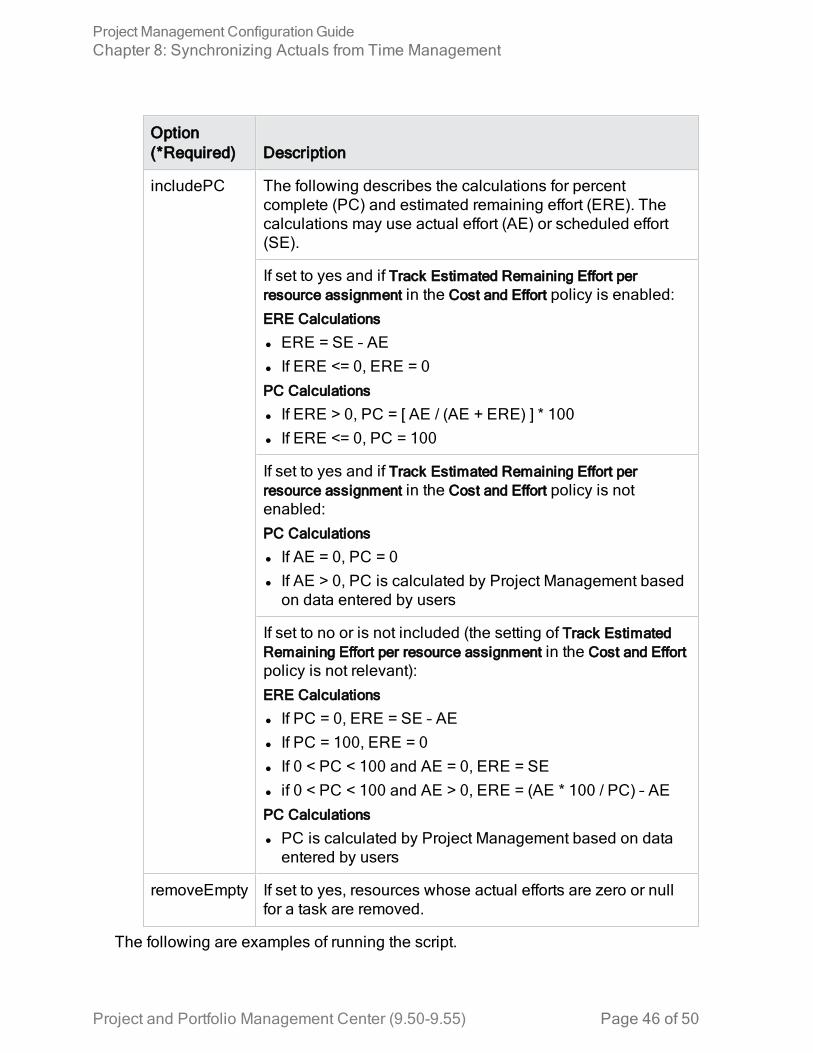
Option (*Required) Description
includePC The following describes the calculations for percent complete (PC) and estimated remaining effort (ERE). The calculations may use actual effort (AE) or scheduled effort (SE).
If set to yes and if Track Estimated Remaining Effort per resource assignment in the Cost and Effort policy is enabled:ERE Calculations
l ERE = SE – AE l If ERE <= 0, ERE = 0PC Calculations
l If ERE > 0, PC = [ AE / (AE + ERE) ] * 100 l If ERE <= 0, PC = 100
If set to yes and if Track Estimated Remaining Effort per resource assignment in the Cost and Effort policy is not enabled:PC Calculations
l If AE = 0, PC = 0 l If AE > 0, PC is calculated by Project Management based
on data entered by users
If set to no or is not included (the setting of Track Estimated Remaining Effort per resource assignment in the Cost and Effort policy is not relevant):ERE Calculations
l If PC = 0, ERE = SE – AE l If PC = 100, ERE = 0 l If 0 < PC < 100 and AE = 0, ERE = SE l if 0 < PC < 100 and AE > 0, ERE = (AE * 100 / PC) – AEPC Calculations
l PC is calculated by Project Management based on data entered by users
removeEmpty If set to yes, resources whose actual efforts are zero or null for a task are removed.
The following are examples of running the script.
Project Management Configuration GuideChapter 8: Synchronizing Actuals from Time Management
Project and Portfolio Management Center (9.50-9.55) Page 46 of 50

User1 wants to synchronize the actuals of all projects with synchronization enabled. User1 has the Edit All Projects access grant and runs the following command:
sh ./kPMTMSync.sh -username User1 -password User1_password
User2, who also has the Edit All Projects access grant, wants to synchronize the actuals for a project named Project1 whose project number is 311223. User2 can run one of the following commands:
sh ./kPMTMSync.sh -username User2 -password User2_password -projectno 311223
or
sh ./kPMTMSync.sh -username User2 -password User2_password -projectname Project1
or
sh ./kPMTMSync.sh -username User2 -password User2_password -projectno 311223 -projectname Project1
Logging MessagesBy default, messages from the script are sent as standard output to the screen. To log these messages, redirect standard output to a file: when you run the script, type > <filename> at the end of the command where <filename> is the name of the file where messages are logged.
For example, User2, who has the Edit All Projects access grant, wants to synchronize the actuals for a project named Project1 and redirect standard output to a file named SyncLog01.txt in the /tmp directory. User2 runs the following command:
sh ./kPMTMSync.sh -username User2 -password User2_password -projectname Project1 > /tmp/SyncLog01.txt
If the message The specified project does not require a TM-PM Sync. displays or is logged, the project is not enabled for synchronization. See "Enabling Projects for Synchronization" on page 43.
Project Management Configuration GuideChapter 8: Synchronizing Actuals from Time Management
Project and Portfolio Management Center (9.50-9.55) Page 47 of 50

Appendix A: Typical UsageThe following information is based on typical usage of PPM and Project Management. Micro Focus cannot warrant that you will have the same or similar experience.
"Table A-1. Project Management Typical Usage, continued" on the next page lists entities with an amount for its typical usage, comments about typical usage, amounts that are considered complex and might impact performance, where that performance impact might occur, and recommendations or comments about complex usage.
Typical Complex
Performance Impact
Recommendations/Comments
Number of Tasks
50–500 > 5,000 Load work plan, cost roll-ups
Do not create a task that represents a generic topic such as vacation or training. Shorten the project duration and simplify work breakdown.
Number of Levels in a Work Plan
< 5–7
Number of Resources Assigned to a Single Task
< 100a >= 50 Time sheet submission, cost roll-ups
Performance depends on the number of resources per project rather than the number of resources per task.
Number of Resources Assigned to an Entire Project
hundreds Make tasks more granular to optimize performance for resources entering time and for project managers and summary task owners.
Table A-1. Project Management Typical Usage
Project Management Configuration GuideAppendix A: Typical Usage
Project and Portfolio Management Center (9.50-9.55) Page 48 of 50
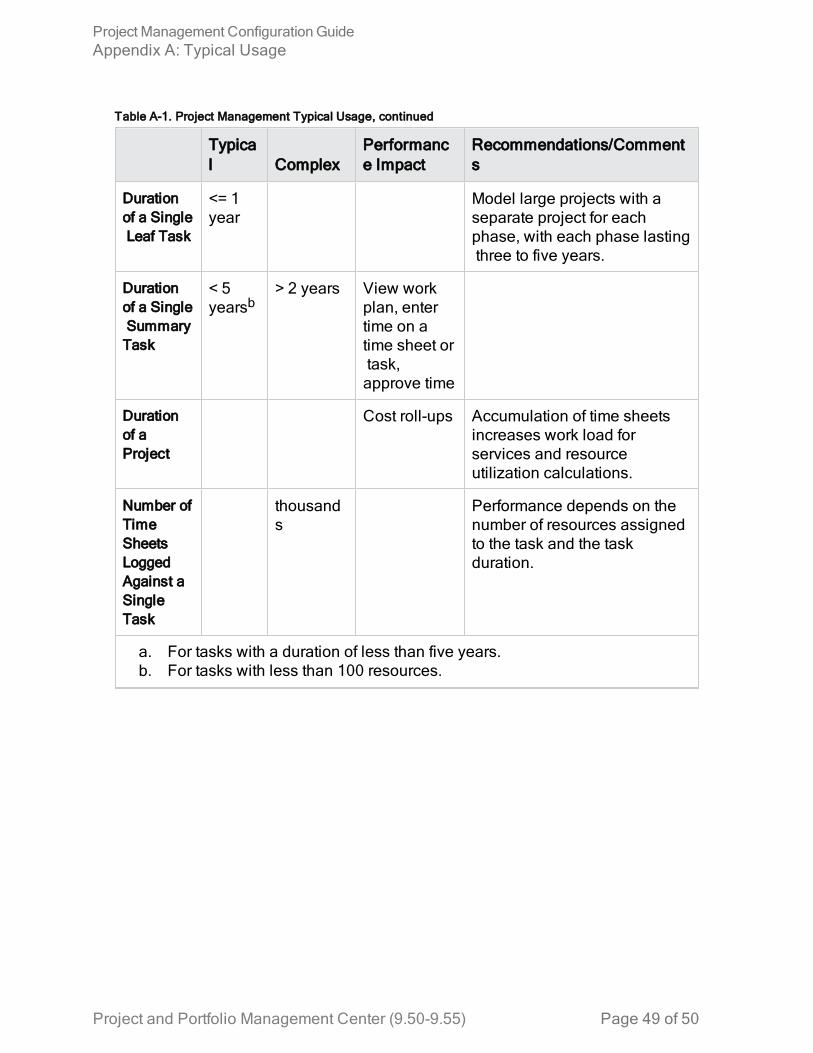
Typical Complex
Performance Impact
Recommendations/Comments
Duration of a Single Leaf Task
<= 1 year
Model large projects with a separate project for each phase, with each phase lasting three to five years.
Duration of a Single Summary Task
< 5 yearsb
> 2 years View work plan, enter time on a time sheet or task, approve time
Duration of a Project
Cost roll-ups Accumulation of time sheets increases work load for services and resource utilization calculations.
Number of Time Sheets Logged Against a Single Task
thousands
Performance depends on the number of resources assigned to the task and the task duration.
a. For tasks with a duration of less than five years. b. For tasks with less than 100 resources.
Table A-1. Project Management Typical Usage, continued
Project Management Configuration GuideAppendix A: Typical Usage
Project and Portfolio Management Center (9.50-9.55) Page 49 of 50

Send Us FeedbackLet us know how we can improve your experience with the Project Management Configuration Guide.Send your email to: [email protected]
Project and Portfolio Management Center (9.50-9.55) Page 50 of 50