Embed Size (px)
Citation preview

Programmer’s Guide
DataWindow .NET™
2.0

DOCUMENT ID: DC00044-01-0200-01
LAST REVISED: March 2006
Copyright © 2004-2006 by Sybase, Inc. All rights reserved.
This publication pertains to Sybase software and to any subsequent release until otherwise indicated in new editions or technical notes. Information in this document is subject to change without notice. The software described herein is furnished under a license agreement, and it may be used or copied only in accordance with the terms of that agreement.
To order additional documents, U.S. and Canadian customers should call Customer Fulfillment at (800) 685-8225, fax (617) 229-9845.
Customers in other countries with a U.S. license agreement may contact Customer Fulfillment via the above fax number. All other international customers should contact their Sybase subsidiary or local distributor. Upgrades are provided only at regularly scheduled software release dates. No part of this publication may be reproduced, transmitted, or translated in any form or by any means, electronic, mechanical, manual, optical, or otherwise, without the prior written permission of Sybase, Inc.
Sybase, the Sybase logo, ADA Workbench, Adaptable Windowing Environment, Adaptive Component Architecture, Adaptive Server, Adaptive Server Anywhere, Adaptive Server Enterprise, Adaptive Server Enterprise Monitor, Adaptive Server Enterprise Replication, Adaptive Server Everywhere, Adaptive Warehouse, Afaria, Answers Anywhere, Anywhere Studio, Application Manager, AppModeler, APT Workbench, APT-Build, APT-Edit, APT-Execute, APT-Translator, APT-Library, AvantGo Mobile Delivery, AvantGo Mobile Inspection, AvantGo Mobile Marketing Channel, AvantGo Mobile Pharma, AvantGo Mobile Sales, AvantGo Pylon, AvantGo Pylon Application Server, AvantGo Pylon Conduit, AvantGo Pylon PIM Server, AvantGo Pylon Pro, Backup Server, BizTracker, ClearConnect, Client-Library, Client Services, Convoy/DM, Copernicus, Data Pipeline, Data Workbench, DataArchitect, Database Analyzer, DataExpress, DataServer, DataWindow, DataWindow .NET, DB-Library, dbQueue, Developers Workbench, DirectConnect, DirectConnect Anywhere, Distribution Director, e-ADK, E-Anywhere, e-Biz Impact, e-Biz Integrator, E-Whatever, EC Gateway, ECMAP, ECRTP, eFulfillment Accelerator, Embedded SQL, EMS, Enterprise Application Studio, Enterprise Client/Server, Enterprise Connect, Enterprise Data Studio, Enterprise Manager, Enterprise SQL Server Manager, Enterprise Work Architecture, Enterprise Work Designer, Enterprise Work Modeler, eProcurement Accelerator, EWA, Financial Fusion, Financial Fusion Server, Gateway Manager, GlobalFIX, iAnywhere, iAnywhere Solutions, ImpactNow, Industry Warehouse Studio, InfoMaker, Information Anywhere, Information Everywhere, InformationConnect, InternetBuilder, iScript, Jaguar CTS, jConnect for JDBC, M2M Anywhere, Mach Desktop, Mail Anywhere Studio, Mainframe Connect, Maintenance Express, Manage Anywhere Studio, M-Business Anywhere, M-Business Channel, M-Business Network, M-Business Suite, MDI Access Server, MDI Database Gateway, media.splash, MetaWorks, mFolio, Mirror Activator, MySupport, Net-Gateway, Net-Library, New Era of Networks, ObjectConnect, ObjectCycle, OmniConnect, OmniSQL Access Module, OmniSQL Toolkit, Open Biz, Open Client, Open ClientConnect, Open Client/Server, Open Client/Server Interfaces, Open Gateway, Open Server, Open ServerConnect, Open Solutions, Optima++, PB-Gen, PC APT Execute, PC DB-Net, PC Net Library, Pharma Anywhere, PocketBuilder, Pocket PowerBuilder, Power++, power.stop, PowerAMC, PowerBuilder, PowerBuilder Foundation Class Library, PowerDesigner, PowerDimensions, PowerDynamo, PowerScript, PowerSite, PowerSocket, Powersoft, PowerStage, PowerStudio, PowerTips, Powersoft Portfolio, Powersoft Professional, PowerWare Desktop, PowerWare Enterprise, ProcessAnalyst, QAnywhere, Rapport, RemoteWare, RepConnector, Replication Agent, Replication Driver, Replication Server, Replication Server Manager, Replication Toolkit, Report-Execute, Report Workbench, Resource Manager, RFID Anywhere, RW-DisplayLib, RW-Library, Sales Anywhere, SDF, Search Anywhere, Secure SQL Server, Secure SQL Toolset, Security Guardian, SKILS, smart.partners, smart.parts, smart.script, SOA Anywhere, SQL Advantage, SQL Anywhere, SQL Anywhere Studio, SQL Code Checker, SQL Debug, SQL Edit, SQL Edit/TPU, SQL Everywhere, SQL Modeler, SQL Remote, SQL Server, SQL Server Manager, SQL SMART, SQL Toolset, SQL Server/CFT, SQL Server/DBM, SQL Server SNMP SubAgent, SQL Station, SQLJ, STEP, SupportNow, S.W.I.F.T. Message Format Libraries, Sybase Central, Sybase Client/Server Interfaces, Sybase Financial Server, Sybase Gateways, Sybase IQ, Sybase MPP, Sybase SQL Desktop, Sybase SQL Lifecycle, Sybase SQL Workgroup, Sybase User Workbench, SybaseWare, Syber Financial, SyberAssist, SybFlex, SyBooks, System 10, System 11, System XI (logo), SystemTools, Tabular Data Stream, TradeForce, Transact-SQL, Translation Toolkit, UltraLite, UltraLite.NET, UNIBOM, Unilib, Uninull, Unisep, Unistring, URK Runtime Kit for UniCode, VisualWriter, VQL, WarehouseArchitect, Warehouse Control Center, Warehouse Studio, Warehouse WORKS, Watcom, Watcom SQL, Watcom SQL Server, Web Deployment Kit, Web.PB, Web.SQL, WebSights, WebViewer, WorkGroup SQL Server, XA-Library, XA-Server, XcelleNet, and XP Server are trademarks of Sybase, Inc. 10/05
Unicode and the Unicode Logo are registered trademarks of Unicode, Inc.
All other company and product names used herein may be trademarks or registered trademarks of their respective companies.
Use, duplication, or disclosure by the government is subject to the restrictions set forth in subparagraph (c)(1)(ii) of DFARS 52.227-7013 for the DOD and as set forth in FAR 52.227-19(a)-(d) for civilian agencies.
Sybase, Inc., One Sybase Drive, Dublin, CA 94568.

Contents
Programmer’s Guide iii
About This Book ........................................................................................................................... ix
CHAPTER 1 Introduction to DataWindow .NET ................................................. 1About DataWindow objects, DataWindowControls,
WebDataWindowControls, and DataStores ....................... 1DataWindow .NET components ....................................................... 4DataWindow .NET class hierarchy................................................... 5Classes, structures, delegates, and enumerations in the
Sybase.DataWindow namespace....................................... 7Classes, structures, delegates, and enumerations in the
Sybase.DataWindow.Web namespace .............................. 9Installing DataWindow .NET........................................................... 10Getting context-sensitive help ........................................................ 12
CHAPTER 2 Tutorial ........................................................................................... 13About this tutorial ........................................................................... 14Creating a project and library ......................................................... 15Connecting to the EAS Demo database ........................................ 15Creating and saving a DataWindow object .................................... 16Modifying the appearance of the DataWindow object .................... 20Copying a DataWindow object into a library................................... 22Creating a second DataWindow object .......................................... 24
Using SQL Select to build a DataWindow object .................... 24Modifying the appearance of the second DataWindow object ....... 29Adding DataWindows to a form...................................................... 32Adding a DataWindowControl to a Windows form ......................... 33Associating a DataWindow object with the control......................... 34Adding a second DataWindowControl to the form ......................... 35Adding a Transaction object to the form ........................................ 36Connecting to the database ........................................................... 37Retrieving data ............................................................................... 38Updating data ................................................................................. 42Building a deployment library ......................................................... 44

Contents
iv DataWindow .NET
Adding a WebDataWindowControl to a Web form ......................... 45Associating a DataWindow object with the control......................... 46Adding a second DataWindowControl to the form ......................... 47Adding a Transaction object to the form ........................................ 48Connecting to the database ........................................................... 50Retrieving data into the detail DataWindow ................................... 53
CHAPTER 3 Working with DataWindow Controls............................................ 57About DataWindow controls ........................................................... 57
Using drag-and-drop ............................................................... 58Creating a control in code ....................................................... 59Editing the DataWindow object in the control.......................... 60Specifying the DataWindow object at runtime......................... 60
Accessing a database .................................................................... 62Retrieving and updating data .................................................. 62
Using a DataSet as the data source .............................................. 66The binding model................................................................... 68The retrieve and update model ............................................... 72
Importing data from an external source ......................................... 74Exporting data from a DataWindow object..................................... 74Manipulating data in a DataWindow control ................................... 74
How a DataWindowControl manages data ............................. 75Accessing and manipulating the text in the edit control .......... 76Coding the ItemChanged event............................................... 77Coding the ItemError event ..................................................... 77
Accessing the items in a DataWindow ........................................... 78Accessing data values using methods .................................... 78Accessing data values using DataWindow data
expressions ...................................................................... 80Using other DataWindow methods................................................. 84Accessing the properties of a DataWindow object ......................... 85Updating the database ................................................................... 86
How the DataWindow control updates the database .............. 86Changing row or column status programmatically .................. 88
Handling events ............................................................................. 90Handling DataWindow exceptions ................................................. 91
The DbErrorException class.................................................... 93Creating reports ............................................................................. 94
Planning and building the DataWindow object ........................ 94Printing the report.................................................................... 95
Using composite reports ................................................................ 95Using crosstabs.............................................................................. 97
Viewing the underlying data .................................................... 97Letting users redefine the crosstab ......................................... 97

Contents
Programmer’s Guide v
Using graphs .................................................................................. 98Types of graphs....................................................................... 98For more information ............................................................... 99
CHAPTER 4 Working with DataStores ........................................................... 101About DataStores......................................................................... 101Working with a DataStore ............................................................ 103Accessing and manipulating data in a DataStore ........................ 104Event handling ............................................................................. 106Sharing information ...................................................................... 106.NET remoting .............................................................................. 107
Typical usage scenario.......................................................... 110
CHAPTER 5 Working with Transaction and AdoTransaction Objects ........ 111About the Transaction and AdoTransaction classes.................... 111Using a Transaction object........................................................... 112
Creating a Transaction object using drag and drop .............. 113Creating a Transaction object in code................................... 113Setting Transaction object properties.................................... 114Connecting to the database .................................................. 117Associating the Transaction object with a DataWindow
control or DataStore ....................................................... 117Disconnecting from the database.......................................... 118Exception handling ................................................................ 118
Using an AdoTransaction object .................................................. 120Creating an ADO.NET Connection object ............................. 122Opening a connection ........................................................... 123Creating an AdoTransaction object ....................................... 123Associating the AdoTransaction object with a DataWindow
control or DataStore ....................................................... 124Starting a transaction and manipulating data ........................ 125
CHAPTER 6 Accessing DataWindow Object Properties in Code ................ 127About properties of the DataWindow object and its controls........ 127
What you can do with DataWindow object properties ........... 127How to specify property values in the DataWindow painter .. 129
Accessing DataWindow object property values in code............... 130Late binding........................................................................... 130Early binding.......................................................................... 131
Accessing properties directly ....................................................... 131GraphicObject classes .......................................................... 131Using DataWindow expressions as property values ............. 134

Contents
vi DataWindow .NET
PrintProperties class ............................................................. 136Edit style properties............................................................... 137
Using Modify and SetProperty ..................................................... 139Advantages and drawbacks of the Modify method................ 141Handling errors...................................................................... 143Nested strings and special characters for DataWindow
object properties ............................................................. 144
CHAPTER 7 Dynamically Changing DataWindow Objects ........................... 147About dynamic DataWindow processing...................................... 147Modifying a DataWindow object ................................................... 148Creating a DataWindow object..................................................... 149
Create and SetTransaction ................................................... 149Specifying the DataWindow object syntax ............................ 150
Providing query ability to users .................................................... 152How query mode works......................................................... 153Using query mode ................................................................. 154
Providing Help buttons ................................................................. 157
CHAPTER 8 Manipulating Graphs ................................................................... 159Using graphs ................................................................................ 159Modifying graph properties........................................................... 160
How parts of a graph are represented................................... 160Referencing parts of a graph................................................. 161
Accessing data properties............................................................ 162Getting and setting information about the data and its
display ............................................................................ 162Saving graph data ................................................................. 166Modifying colors, fill patterns, and other data........................ 167
CHAPTER 9 Using Web DataWindows............................................................ 171What the Web DataWindow is ..................................................... 171About ASP.NET ........................................................................... 172
ASP.NET application files ..................................................... 173Web server controls .............................................................. 173Web page processing............................................................ 174
The Web DataWindow server control and client control .............. 175Using the Web DataWindow ........................................................ 176
About XML, XSLT, CSS, and XHTML................................... 177How to use the Web DataWindow......................................... 178How the Web DataWindow works ......................................... 179How the XML Web DataWindow works................................. 181

Contents
Programmer’s Guide vii
XML, XHTML, and HTML formats ......................................... 184WebDataWindowControl properties............................................. 185
Controlling the size of generated code.................................. 189Generating JavaScript for common management tasks ....... 189Configuring XML.................................................................... 190Maintaining state ................................................................... 192Postbacks and callbacks ....................................................... 197Paging methods .................................................................... 198RowsPerPage and scroll bars ............................................... 200Page navigation bars............................................................. 200Rendering graphs.................................................................. 203Creating hyperlinks................................................................ 205
Printing Web DataWindows ......................................................... 207Server-side printing ............................................................... 207Saving as PDF ...................................................................... 210
Setting up database connections ................................................. 212
CHAPTER 10 Designing Web DataWindows.................................................... 213Working in DataWindow Designer ............................................... 213Designing DataWindow objects for the Web DataWindow .......... 214Web DataWindow properties ....................................................... 216
Setting Web generation properties for the Web DataWindow ................................................................... 219
Using JavaScript caching in DataWindow Designer .................... 223Using expressions........................................................................ 226Using Button and Picture controls................................................ 226Using a drop-down calendar ........................................................ 228Using a drop-down DataWindow.................................................. 229Previewing the DataWindow ........................................................ 230Rendering HTML for controls in an HTML Web DataWindow...... 231
CHAPTER 11 Working with XHTML Templates ............................................... 233The Export Template view for XHTML ......................................... 233What you can customize .............................................................. 234The default XHTML export template ............................................ 235Managing templates..................................................................... 236
Creating and saving templates.............................................. 237Selecting the template to use ................................................ 238
Template structure ....................................................................... 240Header section ...................................................................... 240Detail section......................................................................... 242

Contents
viii DataWindow .NET
Editing XHTML export templates ................................................. 242Element Context Menus ........................................................ 243Root element ......................................................................... 245DataWindow controls ............................................................ 246DataWindow painter expressions.......................................... 246Element attributes ................................................................. 247Style declarations .................................................................. 248JavaScript event handlers ..................................................... 249CDATA sections .................................................................... 249
Selecting XHTML export templates at runtime............................. 250Exporting DataWindow data in XML or in XHTML ....................... 250
CHAPTER 12 Writing Scripts for the Web DataWindow Client Control ......... 253About client-side programming .................................................... 253Implementing an event................................................................. 254Calling client methods .................................................................. 256Alphabetical list of events for the Web DataWindow client
control............................................................................. 259Alphabetical list of methods for the Web DataWindow client
control............................................................................. 266
CHAPTER 13 Deploying DataWindow .NET Applications ............................... 291Deploying applications ................................................................. 291Deploying Windows form applications ......................................... 292
Deployment techniques for Windows applications ................ 293Deploying ASP.NET applications................................................. 293
Deployment techniques for Web applications ....................... 294About deployment libraries........................................................... 296DataWindow .NET runtime files ................................................... 296Deploying .NET assemblies ......................................................... 297Using the Runtime Packager ....................................................... 298Using deployment dialog boxes ................................................... 300Saving data in PDF format ........................................................... 300
Index ........................................................................................................................................... 303

About This Book
Subject This book provides information about using Sybase® DataWindow® technology in development environments that conform to the Microsoft .NET Framework version 2.0, such as Visual Studio .NET 2005.
Audience This book is for anyone developing applications that use DataWindow .NET™ in the .NET Framework. It assumes that:
• You are familiar with the DataWindow painter. If not, see the DataWindow Designer User’s Guide.
• You are an experienced user of Visual Basic or C# and your development environment. If not, see the documentation for your development environment and your language of choice.
Related books The DataWindow .NET documentation set includes the following books that are available as printed books and in compiled HTML Help:
• This book, which provides information about creating and deploying applications that use DataWindow .NET and programming with DataWindow objects. It includes a brief tutorial.
• The DataWindow Designer User’s Guide tells you how to build the DataWindow objects that you use in DataWindow .NET.
• Connecting to Your Database describes the database interfaces you can use in DataWindow Designer and in your .NET application.
The documentation set also includes:
• The Connection Reference, which describes database parameters and preferences. This book is available in the online Help for DataWindow Designer.
• The DataWindow Object Reference, which describes DataWindow expressions and the functions you use with them, and properties of DataWindow objects. This book is available in compiled HTML Help and in the online Help for DataWindow Designer.
Programmer’s Guide ix

• The DataWindow Reference, which describes all the interfaces, classes, methods, and other members of the DataWindow .NET assembly. This book can be installed into Visual Studio .NET. It is also available as a compiled HTML Help file (dwref20.chm). It is not currently available on the Sybase Technical Library CD or the Product Manuals Web site.
• An Installation Guide and release bulletin.
Code samples You can find sample code on the Sybase CodeXchange Web site at http://datawindownet.codeXchange.sybase.com and in the Sybase\DataWindow .NET 2.0\Code Examples directory.
Other sources of information
Use the Sybase Getting Started CD, the SyBooks CD, and the Sybase Product Manuals Web site to learn more about your product:
• The Getting Started CD contains release bulletins and installation guides in PDF format, and may also contain other documents or updated information not included on the SyBooks CD. It is included with your software. To read or print documents on the Getting Started CD, you need Adobe Acrobat Reader, which you can download at no charge from the Adobe Web site using a link provided on the CD.
• The SyBooks CD contains product manuals and is included with your software. The Eclipse-based SyBooks browser allows you to access the manuals in an easy-to-use, HTML-based format.
Some documentation may be provided in PDF format, which you can access through the PDF directory on the SyBooks CD. To read or print the PDF files, you need Adobe Acrobat Reader.
Refer to the SyBooks Installation Guide on the Getting Started CD, or the README.txt file on the SyBooks CD for instructions on installing and starting SyBooks.
• The Sybase Product Manuals Web site is an online version of the SyBooks CD that you can access using a standard Web browser. In addition to product manuals, you will find links to EBFs/Maintenance, Technical Documents, Case Management, Solved Cases, newsgroups, and the Sybase Developer Network.
To access the Sybase Product Manuals Web site, go to Product Manuals at http://www.sybase.com/support/manuals/.
x DataWindow .NET

About This Book
If you need help Each Sybase installation that has purchased a support contract has one or more designated people who are authorized to contact Sybase Technical Support. If you cannot resolve a problem using the manuals or online help, please have the designated person contact Sybase Technical Support or the Sybase subsidiary in your area.
Programmer’s Guide xi

xii DataWindow .NET

Programmer’s Guide 1
C H A P T E R 1 Introduction to DataWindow .NET
About this chapter This chapter provides an overview of DataWindow technology, the DataWindow .NET architecture, and the DataWindow .NET class hierarchy.
Contents
About DataWindow objects, DataWindowControls, WebDataWindowControls, and DataStores
The patented Sybase DataWindow technology provides powerful data retrieval, manipulation, presentation, and update capabilities for client/server, multitier, and thin-client Web-based applications. DataWindow .NET lets you take advantage of the rich interface and ease-of-use of the DataWindow in the .NET environment.
DataWindow objects A DataWindow object is an object you use to retrieve, present, and manipulate data from a relational database or other data source (such as an Excel worksheet or a text file). A DataWindow object defines the source of the data and its display characteristics.
Topic Page
About DataWindow objects, DataWindowControls, WebDataWindowControls, and DataStores
1
DataWindow .NET components 4
DataWindow .NET class hierarchy 5
Classes, structures, delegates, and enumerations in the Sybase.DataWindow namespace
7
Classes, structures, delegates, and enumerations in the Sybase.DataWindow.Web namespace
9
Installing DataWindow .NET 10
Getting context-sensitive help 12

About DataWindow objects, DataWindowControls, WebDataWindowControls, and DataStores
2 DataWindow .NET
You design the DataWindow object in DataWindow Designer (or in the Sybase PowerBuilder or InfoMaker products), where you specify display formats, presentation styles, validation rules, and other data properties. You can also add nested reports, computed columns, pictures, buttons, and other enhancements to the DataWindow object.
The DataWindow Designer User’s Guide describes the predefined presentation styles you can use to create a DataWindow object, as well as all the ways you can enhance it so the data can be viewed and used in the most meaningful way.
The following illustration shows a .NET Windows form with a grid-style DataWindow object at the top, sharing data with three graph-style DataWindow objects at the bottom:
DataWindow controls and DataStores
DataWindowControls and WebDataWindowControls are visual containers for the DataWindow object, and a DataStore object is a nonvisual container. DataWindowControls are used in .NET Windows applications, and WebDataWindowControls are used in Web applications. You use drag-and-drop or write code to add a control or DataStore to your forms, then associate a DataWindow object with the container and code the methods and events of the container to manipulate the DataWindow object.

Chapter 1 Introduction to DataWindow .NET
Programmer’s Guide 3
Basic process Using a DataWindowControl, WebDataWindowControl, or DataStore in Visual Studio .NET 2005 involves these main steps:
1 In DataWindow Designer, create a project to hold your DataWindow objects, then use the DataWindow wizard to create a DataWindow object.
In the wizard, you define the data source, presentation style, and some display properties of the object.
2 Use the DataWindow painter to design the DataWindow object.
In the painter, you define other properties of the object, such as display formats, validation rules, and sorting and filtering criteria.
3 Save the DataWindow object in a library (PBL) file.
4 In a Visual Basic or C# Windows application project, drag the DataWindowControl or DataStore icon from the Toolbox to the form. In an ASP.NET Web Site project, drag the WebDataWindowControl or DataStore icon from the Toolbox to the form.The following illustration shows a DataWindowControl.
5 In the Properties window for the control or DataStore, specify the name of the DataWindow object and the library where it resides.
6 Add code to retrieve, modify, and update the data in the DataWindow object.
These steps are described in more detail in Chapter 2, “Tutorial.” The process is similar in other .NET development environments, where you need to use the appropriate mechanism for the environment to create an instance of the control or DataStore on a form.
The rest of this chapter provides an overview of DataWindow .NET.

DataWindow .NET components
4 DataWindow .NET
DataWindow .NET componentsThere are two major components in DataWindow .NET:
• The DataWindow .NET front end provides the interface between your .NET client application and the DataWindow server. It maps the methods, events, and properties of the DataWindowControl, WebDataWindowControl, DataStore, and other DataWindow .NET classes to the application. The front end also ensures that .NET applications interact directly only with pure .NET code. The front end is delivered in three .NET assemblies, DataWindow.dll, WebDataWindow.dll, and DataWindowInterop.dll.
• Behind the scenes, the DataWindow server (pbdwn105.dll) handles the loading and presentation of DataWindow objects, manages communication with databases, maintains data buffers, and handles functions such as sorting, filtering, and exporting data.
Figure 1-1: DataWindow .NET architecture
DataWindow .NET also includes native database interfaces that provide a direct connection to your data through vendor-specific database APIs, as well as standard ADO.NET, ODBC, and OLE DB interfaces.

Chapter 1 Introduction to DataWindow .NET
Programmer’s Guide 5
You use these database interfaces when you design your DataWindow objects in DataWindow Designer and in your application development tool. In your development tool, you can provide database connectivity using a Transaction class that is used only by the DataWindow, or an AdoTransaction class that lets you share an ADO.NET connection with other database constructs such as DataSets or Command objects.
For information about database connectivity in DataWindow Designer, see Connecting to Your Database. For information about connecting to a database using the DataWindow .NET Transaction or AdoTransaction classes, see Chapter 5, “Working with Transaction and AdoTransaction Objects.”
DataWindow .NET class hierarchyFigure 1-2 shows the relationships among the three main classes used in Windows form applications and the three main interfaces that make up DataWindow .NET. (The WebDataWindowControl class hierarchy is shown in Figure 1-3 on page 6.)
Figure 1-2: DataWindow .NET object model major components
DataWindowChild implements IDataWindowBase
The base interface, IDataWindowBase, defines methods such as Retrieve and UpdateData. The DataWindowChild class implements IDataWindowBase and extends the .NET System.Object class. A DataWindowChild object can be a DataWindow object that is nested inside another DataWindowControl or DataStore object. It can also be used as a drop-down DataWindow object in a column in another DataWindow object. A common use of a drop-down DataWindow object is a list of states, provinces, or countries.

DataWindow .NET class hierarchy
6 DataWindow .NET
DataStore implements IDataStore
The IDataStore interface extends IDataWindowBase and adds two properties, LibraryList and DataWindowObject, that let you associate a DataWindow object with a DataStore. It also adds methods, such as methods for getting and setting columns, and events that fire at various stages of retrieving, printing, and updating data.
The DataStore class implements IDataStore and extends the .NET System.ComponentModel.Component class.
DataWindowControl implements IDataWindow
The IDataWindow interface extends IDataStore and adds methods and events that relate to the visual display of data.
The DataWindowControl class implements IDataWindow and extends the .NET System.Windows.Form.Control class, from which it inherits properties, methods, and events.
WebDataWindowControl class hierarchy
The WebDataWindowControl class is defined in the Sybase.DataWindow.Web namespace and is delivered in the WebDataWindow.dll assembly.
The class extends the .NET System.Web.UI.WebControls.WebControl class. It implements the IPostBackEventHandler and IPostBackDataHandler interfaces to handle client-side postbacks, and the IDataStore interface to enable ShareData, RowsCopy, and RowsMove methods to be called between the WebDataWindowControl and DataStore.
Internally, the WebDataWindowControl uses an instance of the DataStore class to expose methods and properties and render the DataWindow in the selected rendering format.
Figure 1-3: WebDataWindowControl class hierarchy

Chapter 1 Introduction to DataWindow .NET
Programmer’s Guide 7
Classes, structures, delegates, and enumerations in the Sybase.DataWindow namespaceClasses In addition to the main classes and interfaces illustrated in Figure 1-2, there are
numerous other classes, including:
• Two classes, Transaction and AdoTransaction, that can be used for database connections. For more information, see Chapter 5, “Working with Transaction and AdoTransaction Objects.”
• Classes that inherit from the System.EventArgs class and are used to pass state information to event handlers. For more information, see “Handling events” on page 90.
• Classes that inherit from various System.Exception classes and are used in exception handling. See “Handling DataWindow exceptions” on page 91.
• A GraphicObject class that inherits from System.Object and is the ancestor of graphic object classes for objects that can display in a DataWindow, such as columns, buttons, and graphs. For more information, see “Accessing DataWindow object property values in code” on page 130.
• An EditControl class that represents editable controls on a DataWindow. For more information, see “Manipulating data in a DataWindow control” on page 74.
• An ExpressionBasedProperty class and descendent classes that allow you to set DataWindow object properties that are backed by expressions. For more information, see “Using DataWindow expressions as property values” on page 134.
• Classes that inherit from an EditStyleBase class and allow you to set edit style properties for columns, and a SpinProperties class that allows you to set an EditMask spin control’s increment and maximum and minimum values.
• A DataWindowSyntaxGenerator class that provides a method called DataWindowSyntaxFromSql that generates a DataWindow source definition from a valid SQL SELECT statement. You can use the DataWindow syntax with the Create method to create a new DataWindow object dynamically.
For more information, see “Using DataWindowSyntaxFromSql” on page 150.

Classes, structures, delegates, and enumerations in the Sybase.DataWindow namespace
8 DataWindow .NET
• A Utility class that holds methods that allow you to convert units of measurement in a DataWindow to and from pixels, and to get a list of the DataWindow objects in a library. See “Getting a list of DataWindow objects in a library” on page 61.
Structures There are four structures:
• CodeTableValue describes the data-display value pair for a column’s code table.
• DataWindowBand describes the band or layer in a DataWindow object. For more information about bands and layers, see the DataWindow Designer User’s Guide.
• GraphObjectAtPointer provides information about graph items under the mouse pointer.
• ObjectAtPointer defines the structure returned for the ObjectUnderMouse property.
Delegates Delegates handle each of the events that can occur in a DataWindow application, such as the BeginRetrieve event and the ButtonClicked event. For example, the delegate for the ButtonClicked event is ButtonClickedEventHandler.
Enumerations Enumerations are used to specify values such as the actions to be taken in specific events, the style to be used for borders, symbols, and lines, and the status of a row or a data item.
Quick reference To view or print a quick reference to all the classes, interfaces, structures, delegates, and enumerations in the Sybase.DataWindow namespace, go to the Sybase.DataWindow Namespace page in the DataWindow Reference help. For how to install this help, see “Getting context-sensitive help” on page 12.

Chapter 1 Introduction to DataWindow .NET
Programmer’s Guide 9
Classes, structures, delegates, and enumerations in the Sybase.DataWindow.Web namespace
The Sybase.DataWindow.Web namespace has additional specialized classes.
Classes In addition to the WebDataWindowControl class, there are several other classes, including:
• The DataObject class, which holds the DataWindow object’s data cache; the AutoDataCacheErrorEventArgs class, used when an error occurs in automatic data caching; and the AutoContextRestoreErrorEventArgs class, used when an error occurs in automatic context restoration. For more information, see “Maintaining state” on page 192.
• Two classes that inherit from the System.EventArgs class and are used to pass state information to event handlers that handle the AfterPerformAction and BeforePerformAction events. For more information, see “Handling events” on page 90.
• Classes that inherit from the System.UnauthorizedAccessException class and are used when the ASP.NET worker process does not have write access on the server. See “Handling DataWindow exceptions” on page 91 and “Configuring the .NET Framework” on page 207.
• A StreamImageContainer class used to display a Graph DataWindow as an image stream. For more information, see “Rendering graphs” on page 203.
• A GraphConfigurations class that wraps the deployment behavior for graph rendering. For more information, see “Rendering graphs” on page 203.
• A JavaScriptConfigurations class that wraps the deployment behavior for static JavaScript files. For more information, see “Generating JavaScript for common management tasks” on page 189.
• An XmlConfigurations class that wraps the deployment behavior for XHTML and XML Web DataWindow rendering. For more information, see “Configuring XML” on page 190.
• ObjectLink, ObjectLinkCollection, ObjectLinkConverter, LinkArgument, LinkArgumentCollection, and LinkArgumentConverter classes that are used to handle hyperlinks. For more information, see “Creating hyperlinks” on page 205.

Installing DataWindow .NET
10 DataWindow .NET
• PageNavigationBarSettings and related classes that are used to specify the style and properties of a page navigation bar. See “Paging methods” on page 198.
• A StateObject class that keeps track of changes to properties and saves changes to a control’s view state.
Delegates Delegates handle the AfterPerformAction, BeforePerformAction, AutoContextRestoreError, and AutoDataCacheError events.
Enumerations Enumerations are used to specify values such as the type of a link argument or postback action, how DataWindows and graphs are rendered, and how JavaScript functions are deployed.
Quick reference To view or print a quick reference to all the classes, delegates, and enumerations in the Sybase.DataWindow.Web namespace, go to the Sybase.DataWindow.Web Namespace page in the DataWindow Reference help. For how to install this help, see “Getting context-sensitive help” on page 12.
Installing DataWindow .NETThe DataWindow .NET common setup program also installs Adaptive Server Anywhere, DataWindow Designer, and context-sensitive help for the DataWindow assembly. For complete installation instructions, see the Installation Guide.
Adding controls to the Toolbox
When you install DataWindow .NET on a computer on which Visual Studio .NET 2005 has already been installed, the installer registers the DataWindow .NET controls so that they display in the Visual Studio toolbox.
In a Windows application, the DataWindowControl, DataStore, and Transaction icons display in the toolbox. In a Web application, the WebDataWindowControl and StreamImageContainer icons display when you select View>Designer from the Visual Studio menu. The DataStore and Transaction icons display when you select View>Component Designer from the menu.
If Visual Studio .NET 2005 is installed after DataWindow .NET, you can register the DataWindow .NET controls manually using the DWToolBoxReg utility. The utility is installed in the DataWindow .NET directory.

Chapter 1 Introduction to DataWindow .NET
Programmer’s Guide 11
To register the controls, change directory to the DataWindow .NET directory and type the following commands, where full_path is the full path to your DataWindow .NET 2.0 installation directory:
DWToolBoxReg -a "full_path\DataWindow.dll"DWToolBoxReg -a "full_path\WebDataWindow.dll"
These commands add a new tab to the Visual Studio .NET toolbox with the name Sybase DataWindow 2.0. You can use a different name for the tab by adding the -tab option to the command line. For example:
DWToolBoxReg -a "full_path\DataWindow.dll" -tab "DataWindow .NET 2.0"
Use the -r option to remove the tab from the toolbox.
Alternatively, you can create a new tab, right-click on the tab, select Choose Items, browse to your DataWindow .NET 2.0 installation directory, and select DataWindow.dll, and then WebDataWindow.dll.
The DWToolboxReg utility works only in Visual Studio .NET 2005. If you are using another development tool that has a toolbox or tool palette, use the mechanism described in the product’s documentation to add DataWindow .NET controls.
Adding DataWindow references to the solution
When you have created a new application in Visual Studio .NET, open the Solution Explorer, right-click References, and select Add References. In the Add Reference dialog box, click Browse and navigate to the DataWindow .NET 2.0 directory, select DataWindow.dll, DataWindowInterop.dll, and, for an ASP.NET application, WebDataWindow.dll, and click OK.
If you use drag-and-drop to add the controls to a form, the references are created automatically.

Getting context-sensitive help
12 DataWindow .NET
Getting context-sensitive help In Visual Studio .NET, the prototype of a method or property displays when you place the edit cursor on it in the code editor. In Visual C#, a brief summary also displays.
To get more detailed information when you press F1 with the edit cursor on a DataWindow member, you need to select the DataWindow Reference component in the DataWindow .NET setup program. This component adds a Help component in Microsoft Help 2 format to the Visual Studio .NET 2005 Help namespace. The Help component displays in the Help contents and filter list as Sybase DataWindow.
If you install the Sybase DataWindow help, you can also see help in the Visual Studio .NET Object Browser.
If you are not using Visual Studio, you can install the same help in Microsoft Help 1.2 format (compiled HTML Help). For more information, see the Installation Guide.

Programmer’s Guide 13
C H A P T E R 2 Tutorial
About this chapter This chapter walks you through the creation of simple Windows and ASP.NET Web applications in DataWindow Designer and Visual Studio .NET 2005.
Contents Topic Page
About this tutorial 14
Creating a project and library 15
Connecting to the EAS Demo database 15
Creating and saving a DataWindow object 16
Modifying the appearance of the DataWindow object 20
Copying a DataWindow object into a library 22
Creating a second DataWindow object 24
Modifying the appearance of the second DataWindow object 29
Adding DataWindows to a form 32
Adding a DataWindowControl to a Windows form 33
Associating a DataWindow object with the control 34
Adding a second DataWindowControl to the form 35
Adding a Transaction object to the form 36
Connecting to the database 37
Retrieving data 38
Updating data 42
Building a deployment library 44
Adding a WebDataWindowControl to a Web form 45
Associating a DataWindow object with the control 46
Adding a second DataWindowControl to the form 47
Adding a Transaction object to the form 48
Connecting to the database 50
Retrieving data into the detail DataWindow 53

About this tutorial
14 DataWindow .NET
Before you begin This chapter assumes that you have some basic experience with DataWindow Designer and with using Visual Basic or C# in Visual Studio .NET. For more information about the DataWindow Designer user interface, see the DataWindow Designer User’s Guide. For more information about using Visual Basic or C#, see the documentation for your development environment.
About this tutorialIn this tutorial, you start by setting up a project in DataWindow Designer and building two DataWindow objects.
The first object uses the Tabular presentation style and displays a list of customers. The data comes from the Customers table in the EAS Demo database, which is an Adaptive Server® Anywhere database supplied with DataWindow Designer. You must have ASA and the database installed on your system to complete the tutorial.
The second object uses the FreeForm presentation style and shows details for a single customer.
In Visual Studio .NET, you can create a new Windows Application or ASP.NET Web Application in the New Project dialog box.
In the Windows Application project, you use drag-and-drop to add two DataWindowControls and a Transaction object to a Windows form. Then you write code to set up a master-detail relationship between the two DataWindows, and add buttons to retrieve and update data.
In the ASP.NET Web Application project, you use drag-and-drop to add two WebDataWindowControls and a Transaction object to a Web form. Then you write code to set up a master-detail relationship between the two DataWindows and retrieve data.
The code in this tutorial is provided in Visual Basic and C#.
Chapter 2 Tutorial
Programmer’s Guide 15
Creating a project and libraryIn DataWindow Designer, you store your DataWindow objects in libraries, and you use a project to organize your libraries.
❖ To create a project and library in DataWindow Designer:
1 Click the New button in the DataWindow Designer tool bar (the PowerBar), select Project from the Project tab page, and click OK.
2 In the wizard, navigate to the Sybase\DataWindow Designer 2.0 folder, specify the name start for the project, and click Finish.
DataWindow Designer creates a project (a .DWP file) and a library (a .PBL file), both with the name start in the directory you specified.
Connecting to the EAS Demo databaseBefore you create your first DataWindow object, make sure that DataWindow Designer is connected to the EAS Demo database. This database contains tables that are used as examples in the DataWindow Designer User’s Guide. An ODBC data source and database profile, both named EAS Demo DB V105 DWD, are installed when you install DataWindow Designer.
If you do not have an ODBC data source or a DataWindow Designer database profile for this database, use the following procedures to create them. If you already have the data source and profile, look at step 2 in the second procedure to see a quick way to code the connection syntax in your .NET application.
❖ To create a data source for the EAS Demo database:
1 Click the Database Profile button on the PowerBar, expand the ODBC folder, expand Utilities, and double-click Create ODBC Data Source.
2 Select User Data Source and click Next.
3 Select Adaptive Server Anywhere 9.0 and click Next and then Finish.
4 On the ODBC page of the Connect to Adaptive Server Anywhere dialog box, type EAS Demo DB V105 DWD as the name of the data source.
5 On the Login page, enter dba as the User ID and sql as the Password.
6 On the Database page, click Browse and navigate to the DataWindow Designer 2.0 directory.

Creating and saving a DataWindow object
16 DataWindow .NET
7 Select easdemodb105.db, click Open, and then click OK.
This creates the EAS Demo DB V105 DWD DSN.
❖ To create a database profile for the EAS Demo database:
1 In the Database Profile dialog box, select ODBC ODB and click New.
2 In the Database Profile Setup dialog box, type EAS Demo DB V105 DWD as the name of the profile, select the EAS Demo DB DSN you just created, and click Apply.
That is all you need to do to create a profile, but while you have the dialog box open, click the Preview tab. The Database Connection Syntax box contains code you can copy and paste into your .NET application. You can change the name of the transaction object you use to connect to the database and your programming language.
3 Click OK.
❖ To connect to the EAS Demo database:
• In the Database Profile dialog box, expand the ODBC folder, select the EAS Demo DB V105 DWD database profile, click Connect, and then click OK.
Creating and saving a DataWindow objectCreating a DataWindow object
You create DataWindow objects using a wizard, and then enhance them in the DataWindow painter.
❖ To create a DataWindow object in DataWindow Designer:
1 In the New dialog box, click the DataWindow tab, select Tabular from the list of presentation styles, and click OK.
The Choose Data Source for Tabular DataWindow page of the DataWindow wizard displays.
2 Select Quick Select as the data source, select the Retrieve On Preview check box if it is not already selected, and click Next.
DataWindow Designer connects to the EAS Demo DB V105 DWD database, and the Quick Select dialog box displays.
3 Click the customer table in the Tables list box.

Chapter 2 Tutorial
Programmer’s Guide 17
This opens the table and lists its columns as shown in the illustration below. For this DataWindow, you will select four columns.
4 Click id, fname, and lname in the Columns list box in the order listed.Scroll down the list and click company_name.
DataWindow Designer displays the selected columns in a grid at the bottom of the Quick Select dialog box.
Selection order determines default display orderThe order in which you select the columns determines their default left-to-right display order in the DataWindow object. If you clicked a column by mistake, you can click it again to clear the selection. You can also rearrange columns later in the DataWindow painter.
You can use the grid area at the bottom of the dialog box to specify sort criteria (for the SQL ORDER BY clause) and selection criteria (for the SQL WHERE clause).
5 In the grid area of the Quick Select dialog box, click in the cell next to Sort and below Id.
A drop-down list box displays.

Creating and saving a DataWindow object
18 DataWindow .NET
6 Select Ascending from the drop-down list box.
This specifies that the id column is to be sorted in ascending order.
7 Click OK.
The DataWindow wizard asks you to select the colors and borders for the new DataWindow object. By default, there are no borders for text or for columns.
8 Click Next.
This accepts the border and color defaults. The DataWindow wizard summarizes your selections.
9 Click Finish.
DataWindow Designer creates the new DataWindow object and opens the DataWindow painter.
Understanding the DataWindow painter
The Design view in the DataWindow painter is divided into four areas called bands: header, detail, summary, and footer. You can modify the contents of these bands. For example, you can change their sizes, add objects (controls, text, lines, boxes, or ovals), and change colors and fonts.
In the Design view, DataWindow Designer displays a Heading band with default headings and a Detail band with the columns you selected:

Chapter 2 Tutorial
Programmer’s Guide 19
The Preview view displays the DataWindow as it appears at runtime. DataWindow Designer displays data for all customers. The data is sorted in ascending order by customer ID, as you specified in the wizard.
Displaying the Preview viewIf the Preview view is not displayed, select View>Preview from the menu bar. If Preview is grayed, it is already displayed and you cannot select it. You can open only one Preview view at a time.
Save the DataWindow object
Now you name the DataWindow object and save it in the start.pbl library.
❖ To save a DataWindow object:
1 Select File>Save from the menu bar.
The Save DataWindow dialog box displays with the insertion point in the DataWindows box.
2 Type d_custlist in the DataWindows box.
3 (Optional) Type the following comments in the Comments box:
This DataWindow object retrieves customer names and company associations.
4 Click OK.
DataWindow Designer saves the DataWindow object and closes the Save DataWindow dialog box.

Modifying the appearance of the DataWindow object
20 DataWindow .NET
Modifying the appearance of the DataWindow objectIn DataWindow Designer, you can make many different customizations to the DataWindow object’s appearance. This exercise demonstrates some of the techniques you can use to make cosmetic changes to the DataWindow. You can skip this exercise if you want to.
In the exercise you reposition the columns and column headings to make room for the hand pointer, which displays to the left of the currently selected row. You also move some of the columns to make them line up with their headings.
You make these changes in the Design view. You can keep the Preview view open at the same time to see how the changes you make affect the appearance of the DataWindow at runtime.
❖ To change the appearance of the DataWindow object:
1 Select Edit>Select>Select All from the menu bar or press Ctrl+A.
All of the controls in the DataWindow object are selected in the Design view.
2 Position the mouse pointer over one of the selected objects and drag the object to the right about one inch.
All of the selected objects move together.
3 Click in a blank area in the Design view to clear the selection.
4 Click the Customer ID header above the Header band, hold down the Ctrl key and click the id column above the Detail band, release the Ctrl key, and drag the id column to the left about one-half inch.
The column and its header move together.
5 Click the Center button in the StyleBar and click in a blank area in the Design view.
This centers the Customer ID column header text and the column data, and clears the object selection.
6 Click the First Name header, hold down the Ctrl key and click the Last Name and Company Name headers, then click the Left button in the StyleBar.

Chapter 2 Tutorial
Programmer’s Guide 21
This left-justifies the text in those three headers. When you have finished, the Design and Preview views should look something like this:
7 Select File>Close from the menu bar.
A message box asks if you want to save your changes.
8 Click Yes.
DataWindow Designer saves the DataWindow object and closes the DataWindow painter.
Previewing the DataWindow in HTML
You can use DataWindows in Windows and Web applications. To see what a DataWindow looks like in an HTML DataWindow in a Web browser, you can use HTML Preview. For more information, see “Previewing the DataWindow” on page 230. Make sure you set the recommended properties before previewing the DataWindow in a browser.
Property descriptionsTo access property descriptions for the DataWindow, select the DataWindow object by deselecting all controls, then right click in the Properties view and select Help from the pop-up menu. Most of the properties related to Web generation are described in the HTMLGen.property topic. There are also CSSGen.property, XHTMLGen.Browser, XMLGen.property, and XSLTGen.property topics.
DataWindow property descriptions are also available in the DataWindow Object Reference in the compiled HTML Help.

Copying a DataWindow object into a library
22 DataWindow .NET
Copying a DataWindow object into a libraryThe next DataWindow object you create will include the State column in the Customer table. This column uses a pre-defined DropDownDataWindow edit style called StateCode. A DropDownDataWindow edit style allows you to use another DataWindow object as the data source for a column. In this case, the DataWindow object has a list of states and their two-letter postal codes.
StateCode is an extended attribute associated with the State column in the EAS Demo database. Extended attributes are stored in system tables in the database and supply information about display formats, validation rules, edit styles, and fonts.
• For more information about edit styles and extended attributes, see the DataWindow Designer User’s Guide.
You can see the definition of StateCode in the Database painter.
❖ To view an edit style in the Database painter:
1 Click the Database icon in the PowerBar to open the Database painter.
2 In the Objects view, expand ODB ODBC>EAS Demo DB V105 DWD>Tables>customer>Columns, right-click the state column, and select Properties from the pop-up menu.
3 Select the Edit Style tab in the Column Properties view and note that the Style Name is StateCode.
4 In the Extended Attributes view, scroll down to StateCode and select Properties from its pop-up menu.

Chapter 2 Tutorial
Programmer’s Guide 23
The DataWindow option in the Edit Style dialog box shows that this edit style uses a DataWindow object called d_dddw_states.
5 Close the dialog box and the Database painter.
The d_dddw_states DataWindow object is available in the sample library installed with DataWindow Designer. To use it in your application, you need to copy it into your application’s library.
❖ To copy a DataWindow object from one library to another:
1 Click the Library icon in the PowerBar to open the Library painter.
2 In the Tree view, navigate to the Sybase\DataWindow Designer 2.0\Code Examples directory and expand dwdexample.pbl.
3 Right-click d_dddw_states and select Copy from its pop-up menu.
4 In the Select Library dialog box, navigate to the start.pbl you created for this tutorial and click Open.
The d_dddw_states DataWindow object displays in your library in the System Tree.

Creating a second DataWindow object
24 DataWindow .NET
Creating a second DataWindow objectWhen you built the first DataWindow object, you used Quick Select to specify the table and columns. This let you retrieve all the customers without having to use the Select painter.
To build the second DataWindow object, you use the Select painter. You need to define a retrieval argument and WHERE criteria so you can pass an argument to the DataWindow object at runtime to select a specific customer. In this case, you will pass the customer ID.
Using SQL Select to build a DataWindow objectIn this section, you:
• Select a data source and style
• Select the table and columns
• Define a retrieval argument
• Specify a WHERE clause
• View the DataWindow in the DataWindow painter
• Save the DataWindow object
Select a data source and style
First you select a data source and define how the data is to be presented.
❖ To select the data source and style:
1 Click the New button in the PowerBar, select FreeForm from the list of presentation styles, and click OK.
2 Select SQL Select as the data source and select Retrieve On Preview if it is not already selected.
Since the data source is SQL Select, you go to the Select painter, and the Select Tables dialog box displays.
Selecting the Retrieve On Preview check box allows you to view the data returned by a query in the development environment, but you need to provide initial values for any retrieval arguments that you specify.
3 Click Next.
Chapter 2 Tutorial
Programmer’s Guide 25
Select the table and columns
Now you select the table and the columns from that table to use in the DataWindow object.
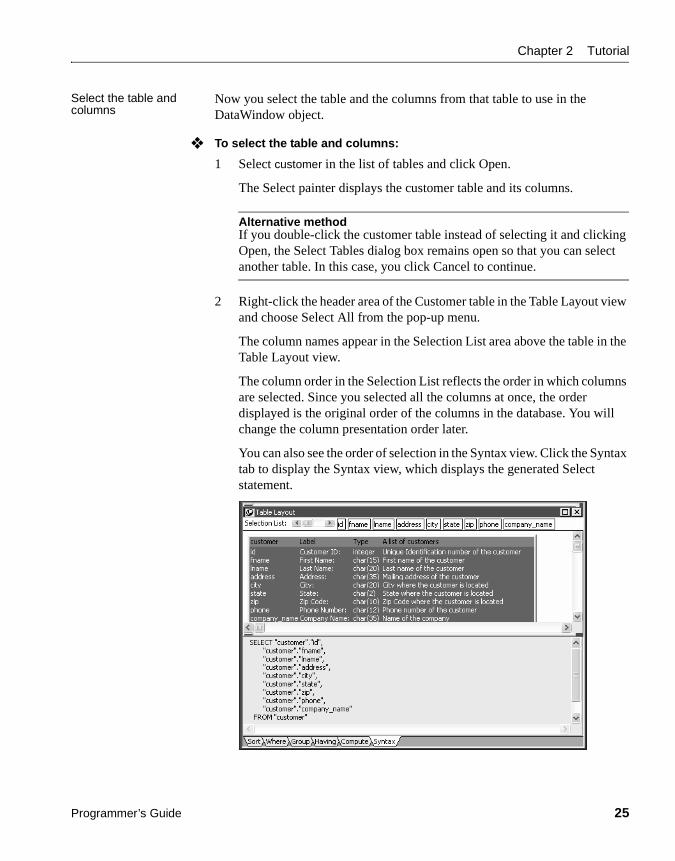
❖ To select the table and columns:
1 Select customer in the list of tables and click Open.
The Select painter displays the customer table and its columns.
Alternative methodIf you double-click the customer table instead of selecting it and clicking Open, the Select Tables dialog box remains open so that you can select another table. In this case, you click Cancel to continue.
2 Right-click the header area of the Customer table in the Table Layout view and choose Select All from the pop-up menu.
The column names appear in the Selection List area above the table in the Table Layout view.
The column order in the Selection List reflects the order in which columns are selected. Since you selected all the columns at once, the order displayed is the original order of the columns in the database. You will change the column presentation order later.
You can also see the order of selection in the Syntax view. Click the Syntax tab to display the Syntax view, which displays the generated Select statement.

Creating a second DataWindow object
26 DataWindow .NET
Define a retrieval argument
Now define a retrieval argument.
❖ To define a retrieval argument:
1 Select Design>Retrieval Arguments from the menu bar.
The Specify Retrieval Arguments dialog box displays.
2 Type cust_id in the Name box.
The default data type is Number, which is what this exercise requires.
About retrieval argument namesYou can choose any name you want for the retrieval argument; it is just a placeholder for the value you pass at runtime.
3 Click OK.
The retrieval argument is defined.
Specify a WHERE clause
You need to specify a WHERE clause using the retrieval argument to retrieve a specific customer.
❖ To specify a WHERE clause:
1 Click the Where tab at the bottom of the Select painter.
2 Click in the box below Column in the Where tab page.
A down arrow displays, and the box becomes a drop-down list box.
3 Click the down arrow and select "customer"."id".
Your selection displays immediately below the Column heading. An equal sign (=) appears in the Operator box. This is what you need for this tutorial, so do not change it.
4 Right-click in the box below the Value column header on the Where tab page.

Chapter 2 Tutorial
Programmer’s Guide 27
Select Arguments from the pop-up menu, select :cust_id, and click Paste.
5 Click the Syntax tab.
The Syntax tab page displays the modified SELECT statement.
6 Scroll down until you see the generated WHERE clause.
You have now created a complete SQL SELECT statement that retrieves data from several columns in the customer table where the id column is equal to an argument that will be supplied at runtime.
View the DataWindow in the DataWindow painter
You can view the DataWindow in the DataWindow painter using the Design and Preview views.
❖ To view the DataWindow in the DataWindow painter:
1 Click the Return button in the PainterBar or select File>Return To DataWindow Painter from the menu bar.
The DataWindow wizard asks you to select the borders and colors for the new DataWindow object.
2 Select Raised from the Border drop-down list box for columns.Click Next.
You have added raised borders to the columns, but not to the labels in the DataWindow object. The DataWindow wizard summarizes your selections.
3 Click Finish.
Because you selected the Retrieve On Preview check box and because the Preview view is part of the default layout scheme for the DataWindow painter, the Specify Retrieval Arguments dialog box appears.

Creating a second DataWindow object
28 DataWindow .NET
This dialog box prompts you for an argument value. When you put this DataWindow object into the tutorial application, you write code that passes the required argument to the DataWindow object automatically.
4 Type a customer ID (such as 101, 102, or 103) in the Value field.Click OK.
The DataWindow painter opens. The Design view displays the new DataWindow object, and the Preview view retrieves the requested customer data.
Retrieving other recordsIf you want to preview the record for another customer, you can right-click inside the DataWindow Preview view, select Retrieve from the pop-up menu, then specify a different customer ID in the Specify Retrieval Arguments dialog box.
Save the DataWindow object
Now name the DataWindow object and save it.
❖ To save the DataWindow object:
1 Select File>Save from the menu bar.
The Save DataWindow dialog box displays.

Chapter 2 Tutorial
Programmer’s Guide 29
2 Type d_customer in the DataWindows box.
Earlier you saved a DataWindow object as d_custlist.
3 (Optional) Type the following comments in the Comments box.
This DataWindow retrieves all columns for the Customer table. It is useful as a detail DataWindow.
4 Click OK.
You return to the DataWindow painter.
Modifying the appearance of the second DataWindow object
This exercise shows how you can modify the appearance of a free-form DataWindow object. You:
• Rearrange columns and labels
• Align columns and labels
• Display the arrow for a drop-down DataWindow edit style
Columns on freeform DataWindowsData fields on freeform DataWindow objects are still called columns, even though they are shown in a nontabular display.
Rearrange columns and labels
Rearrange the columns and labels in the new DataWindow object to customize its appearance. You can maximize the Design view for greater ease in manipulating the columns and their labels.
❖ To rearrange the columns and labels:
1 Click the Address: label in the Design view, press the Ctrl key, and click the address column.
The Address label and column are selected.

Modifying the appearance of the second DataWindow object
30 DataWindow .NET
2 Keep the Ctrl key pressed and click the following column labels and columns:
If necessary, scroll down until you can see all the columns in the DataWindow.
3 Release the Ctrl key, position the cursor on one of the selected objects, and drag it to the top right corner of the DataWindow object.
The objects move together.
4 Use the Ctrl+click technique to move the following label and column controls to the location indicated:
5 Drag the Detail band up below the last column label.
This removes any extra space in the detail area. Some of the fields might overlap others. You fix this in the next exercise.
Align columns and labels
Now align the columns and labels on the new DataWindow.
❖ To align the columns and labels:
1 Select the Zip Code: label in the Design view and move it as close as possible to the company_name column.
A narrow space should separate the left edge of the label box from the right edge of the column box.
2 While the Zip Code: label is still selected, use the Ctrl+click technique to select the Address:, City:, and State: labels.
3 Select Format>Align from the menu bar.
A cascading menu of align options displays.
4 Select the first option (Align left edges).
Label Column
City: city
State: state
Zip Code: zip
Label Move with column Move under
Company Name: company_name Last Name:
Phone Number: phone Company Name:

Chapter 2 Tutorial
Programmer’s Guide 31
DataWindow Designer aligns the left edges of the selected objects with the left edge of the first item you selected (the Zip Code: label).
Selecting an alignment tool from the PainterBarYou can access a drop-down list of alignment tools by clicking the Align button on PainterBar2.
5 Move the zip column so that it is next to the Zip Code: label, and align the address, city, and state columns with the zip column just as you aligned the column labels.
Display the arrow for a drop-down DataWindow edit style
In the previous screenshot, the column for the customer state of residence has a DropDownDataWindow edit style that uses the d_dddw_states drop-down DataWindow object you copied into your library in “Copying a DataWindow object into a library” on page 22.
You can make the state selection list visible at all times in your application, or you can display an arrow at all times to indicate that a selection list is available. Now you change the property for the state column to show the arrow at all times.
❖ To display the arrow for a DropDownDataWindow edit style:
1 Click the state column in the Design view and make sure the Properties view displays.
The Properties view displays properties of the column.
2 Click the Edit tab in the Properties view.
You may need to click the arrow keys near the top of the Properties view to display the Edit tab before you can click it. Notice that the Style Type selection is DropDownDW.
3 Select the Always Show Arrow check box.

Adding DataWindows to a form
32 DataWindow .NET
Make sure the state column in the Design view is wide enough to display two characters plus the arrow symbol. An arrow appears next to the state column in the Design and Preview views. While the column is selected in Design view, you can make the column wider by holding the cursor over the right edge of the column until the cursor symbol changes to a double-headed arrow, then dragging the edge toward the rightmost frame of the view.
The Preview view should look like this:
4 Click the Save button in PainterBar1 and click the Close button in PainterBar1.
Adding DataWindows to a formTo use the DataWindow object in a .NET application, you add a DataWindowControl or WebDataWindowControl to a form, then associate that control with the DataWindow object.
Names for DataWindow controls and DataWindow objects
There are two names to be aware of when you are working with a DataWindow:
• The name of the DataWindowControl or WebDataWindowControl
• The name of the DataWindow object associated with the control
When you place a control in a form, it gets the default name DataWindowControl1 or WebDataWindowControl1. You can change the name to be something meaningful for your application. In this case, you will add two controls and rename them dwCustList and dwCustomer. These controls will be associated with the DataWindow objects d_custlist and d_customer.

Chapter 2 Tutorial
Programmer’s Guide 33
To add DataWindow objects to a Windows application, go to “Adding a DataWindowControl to a Windows form” next. To add DataWindow objects to a Web application, go to “Adding a WebDataWindowControl to a Web form” on page 45.
Adding a DataWindowControl to a Windows form❖ To place a DataWindowControl on a form:
1 In Visual Studio .NET, create a new Visual Basic or C# Windows Application project named Start and open the form.
2 Select View>Toolbox if the Visual Studio Toolbox is not visible.
3 In the Toolbox, select Sybase DataWindow 2.0, click the down arrow to locate the DataWindowControl icon, and select it.
4 Click on the form where you want the top left corner of the DataWindow to display.
The control displays on the form.
5 Resize the DataWindowControl by selecting it and dragging one of its corners or sides.
Troubleshooting If the Sybase DataWindow 2.0 tab is not visible in the Toolbox or it does not contain the controls, see “Installing DataWindow .NET” on page 10 for how to add them manually.
If you encounter the DataWindowServerNotLoaded exception, make sure that the location of the PBDWN105.DLL file, which is in the DataWindow .NET 2.0 directory, is in your PATH environment variable, and that the PATH is not corrupted or too long. You should also make sure that the References Path in the project’s property pages includes the DataWindow .NET 2.0 directory.
You should always check the latest version of the release bulletinon on the Sybase Product Manuals Web site at http://sybooks.sybase.com for additional troubleshooting information.

Associating a DataWindow object with the control
34 DataWindow .NET
Associating a DataWindow object with the controlAfter placing the control, you associate a DataWindow object with the control.
❖ To associate a DataWindow object with the control:
1 Right-click the DataWindowControl and select Properties.
2 In the Properties window, locate the LibraryList property in the left panel, and click the Browse (...) button in the right panel to open the Library List dialog box.
3 Click the Add Library to Library List icon (circled in the following illustration), browse to select the start.pbl file, and click Open.
You can add multiple libraries to the list. When you specify a DataWindow object, the server searches the libraries for it in the order in which the libraries display in the list.

Chapter 2 Tutorial
Programmer’s Guide 35
4 Select DataWindowObject in the Properties window, click the browse button in the right pane to open the Select DataWindow dialog box, select the d_custlist DataWindow object, and click OK.
5 Change the Name property of the control to dwCustList.
6 Set the ScrollBars property to Vertical.
The Customers table in the database has more than 100 rows, so the control needs a scroll bar so that users can see them all.
7 Close the Properties window.
The column headers display in the control on the form.
Adding a second DataWindowControl to the formYou are building a master-detail form. You have already added the master DataWindowControl. Now repeat the same steps to add a second control to the form and associate it with a DataWindow object. This time rename the control dwCustomer and associate it with the d_customer DataWindow object. This control does not need a scroll bar.
After you resize the controls and the form to display all the fields in the DataWindow objects, the form should look something like this:

Adding a Transaction object to the form
36 DataWindow .NET
Adding a Transaction object to the formYou can use either a Transaction object or an AdoTransaction object to connect to a database. An AdoTransaction object lets you share a connection with other database constructs in an application. For this simple application, you will use a Transaction object, which is used exclusively for DataWindow .NET controls.
Drag-and-drop not available for AdoTransactionYou can add a Transaction object to a form using drag-and-drop, but an AdoTransaction object can only be added in code. For more information, see “Using an AdoTransaction object” on page 120.
❖ To add a Transaction object to a form:
1 Drag the Transaction item from the Sybase DataWindow tab of the Toolbox to the form.
Since the Transaction object is nonvisual, it displays below the form.
2 Right-click the Transaction object to display its Properties window.
3 Change the Name property to myTrans.
4 Type the following in the DbParameter field:
ConnectString='DSN=EAS Demo DB V105 DWD;UID=;PWD='
5 Make sure the EAS Demo database is running, then click the Test Connection link in the properties window.
You should see a message box indicating that the connection was successful.
Troubleshooting tipIf the connection was not successful, go back to DataWindow Designer and look at the Preview page of the Database Profile dialog box. Change the language to whatever language you are using, change the name of the Transaction object to myTrans, and make sure that the generated code in Visual Studio .NET matches the generated code in the Database Connection Syntax pane.

Chapter 2 Tutorial
Programmer’s Guide 37
Connecting to the databaseNow you add code so that the connection to the database is made when the form is loaded. You also want to establish the relationship between each DataWindowControl and the Transaction object at the same time, because the association only needs to be made once per session.
❖ To connect to the database and set up the transaction:
1 Double-click in an empty area of the form.
This creates an event handler for the form’s Load event and opens the code editor:
[Visual Basic]Private Sub Form1_Load(ByVal sender As System.Object, ByVal e As System.EventArgs) Handles MyBase.Load
End Sub
[C#]private void Form1_Load(object sender, System.EventArgs e)
{
}
2 Type the following in the Form1_Load event handler (add semicolons to the end of each line for C#):
myTrans.Connect()dwCustList.SetTransaction(myTrans)dwCustomer.SetTransaction(myTrans)
This code connects to the database and associates the connected Transaction object with each of the DataWindowControls.
Disconnecting from the database
When you drag a Transaction object to a form, it is added to the form’s components list, and is automatically disconnected and disposed of when the form is closed. If you do not use drag-and-drop, you need to disconnect from the database when the form is closed.
❖ To disconnect from the database in Visual Basic:
1 In the code editor, select Closing from the list of events in the drop-down list at the top right.
The Form1_Closing event handler displays.

Retrieving data
38 DataWindow .NET
2 Enter the following code to disconnect from the database and exit the application when the form is closed:
Private Sub Form1_Closing(ByVal sender As Object, ByVal e As System.ComponentModel.CancelEventArgs) Handles MyBase.Closing
myTrans.Disconnect()Application.Exit()
End Sub
❖ To disconnect from the database in C#:
• Enter the following code to disconnect from the database and exit the application when the form is closed:
private void Form1_Closing(object sender, System.ComponentModel.CancelEventArgs e){
myTrans.Disconnect();Application.Exit();
}
Retrieving dataYou need to retrieve data into both DataWindow objects. You will add a button to the form to populate the master DataWindow, then code its RowFocusChanged event handler to populate the detail DataWindow.
Retrieving data into the master DataWindow
First add a button to the form that will retrieve data into the master DataWindow.
❖ To retrieve data into the master DataWindow:
1 Make sure there is enough room at the bottom of the form to add buttons, then expand the All Windows Forms tab in the Visual Studio .NET Toolbox and drag the Button item to the form.
2 Right-click the button and select Properties, change the Name property to btnRetrieve and the Text property to Retrieve, and close the Properties window.
3 Double-click the button.
This creates an event handler for the button’s clicked event and opens the code editor.

Chapter 2 Tutorial
Programmer’s Guide 39
4 Type the following in the btnRetrieve_Click event handler (add a semicolon to the end of the line for C#):
dwCustList.Retrieve()
This line retrieves data into the master DataWindow, dwCustList. Select Debug>Start Debugging to run the program. When you click the Retrieve button, the first DataWindow displays a list of customers.
5 Close the application.
Retrieving data into the detail DataWindow
Since these DataWindow objects have a master-detail relationship, you want the details for the row that has focus in dwCustList to display in dwCustomer. To do that, you need to write code in the RowFocusChanged event handler for dwCustList.
The second DataWindow object, d_customer, has a WHERE clause that you set up in the SQL painter (see “Specify a WHERE clause” on page 26):
WHERE "customer"."id" = :cust_id
The Retrieve method can take a list of retrieval arguments as a parameter. In this case, you use the GetItemDouble method to return the value of the customer id column in dwCustList that has focus. That value is then passed to the Retrieve method for dwCustomer to be used within the WHERE clause.
In Visual Studio .NET, the techniques for adding an event handler are different in Visual Basic and C#.
❖ To retrieve data into the detail DataWindow in Visual Basic:
1 Right-click on dwCustList and select View Code.
2 From the drop-down list on the right in the Code Editor, select RowFocusChanged.
This generates the event handler method and places the edit cursor in the body of the method.
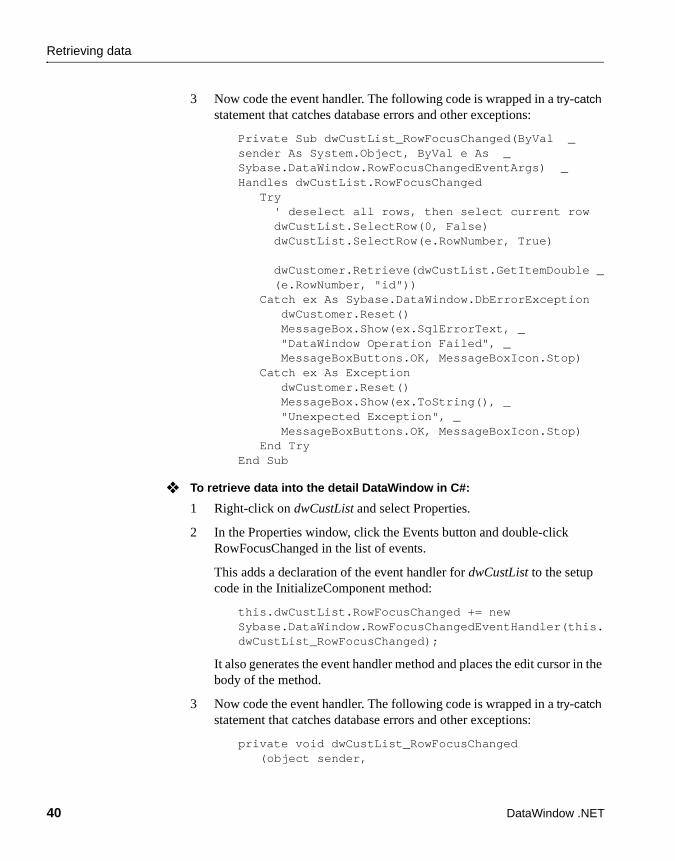
Retrieving data
40 DataWindow .NET
3 Now code the event handler. The following code is wrapped in a try-catch statement that catches database errors and other exceptions:
Private Sub dwCustList_RowFocusChanged(ByVal _sender As System.Object, ByVal e As _Sybase.DataWindow.RowFocusChangedEventArgs) _Handles dwCustList.RowFocusChanged
Try' deselect all rows, then select current rowdwCustList.SelectRow(0, False)dwCustList.SelectRow(e.RowNumber, True)
dwCustomer.Retrieve(dwCustList.GetItemDouble _(e.RowNumber, "id"))
Catch ex As Sybase.DataWindow.DbErrorExceptiondwCustomer.Reset()MessageBox.Show(ex.SqlErrorText, _"DataWindow Operation Failed", _MessageBoxButtons.OK, MessageBoxIcon.Stop)
Catch ex As ExceptiondwCustomer.Reset()MessageBox.Show(ex.ToString(), _"Unexpected Exception", _MessageBoxButtons.OK, MessageBoxIcon.Stop)
End TryEnd Sub
❖ To retrieve data into the detail DataWindow in C#:
1 Right-click on dwCustList and select Properties.
2 In the Properties window, click the Events button and double-click RowFocusChanged in the list of events.
This adds a declaration of the event handler for dwCustList to the setup code in the InitializeComponent method:
this.dwCustList.RowFocusChanged += new Sybase.DataWindow.RowFocusChangedEventHandler(this.dwCustList_RowFocusChanged);
It also generates the event handler method and places the edit cursor in the body of the method.
3 Now code the event handler. The following code is wrapped in a try-catch statement that catches database errors and other exceptions:
private void dwCustList_RowFocusChanged(object sender,

Chapter 2 Tutorial
Programmer’s Guide 41
Sybase.DataWindow.RowFocusChangedEventArgs e){try {// deselect all rows, then select current rowdwCustList.SelectRow(0, false);dwCustList.SelectRow(e.RowNumber,true);
dwCustomer.Retrieve(dwCustList.GetItemDouble((int) e.RowNumber, "id"));
}
// catch database error and reset dwCustListcatch (Sybase.DataWindow.DbErrorException ex) {dwCustomer.Reset();MessageBox.Show(ex.SqlErrorText, "DataWindow Operation Failed",MessageBoxButtons.OK, MessageBoxIcon.Stop);
}catch (Exception ex){dwCustomer.Reset();MessageBox.Show(ex.ToString(), "UnexpectedException", MessageBoxButtons.OK,MessageBoxIcon.Stop);
}}
Testing retrieve Now you can test whether selecting a different row in the master DataWindow changes the detail DataWindow.
❖ To test the interaction between the master and detail DataWindows:
1 Select Debug>Start Debugging to run the program, and click the Retrieve button.
The first DataWindow displays a list of customers and the second displays the data for the first customer in the list (because the first row has focus).
2 Select a different row in the master DataWindow.
The detail DataWindow displays the data for the new row.
3 Close the application.

Updating data
42 DataWindow .NET
Updating dataNow you will add another button to the form that updates any changes the user makes in the detail DataWindow to the database. You use the UpdateData method to update data in the database.
Use UpdateData, not UpdateThe DataWindowControl has both Update and UpdateData methods. Update is inherited from System.Windows.Forms.Control and causes the control to redraw invalidated regions in its client area. Use UpdateData to update data to the database.
UpdateData can be called with two boolean arguments. If the first argument is true, the data that the user last entered is automatically validated and stored in the control’s buffer. If the second argument is true, retained information about what data has been modified is automatically reset. In this case, you call UpdateData with the second argument set to false, and then use ResetUpdateStatus to clear the status flags manually.
The manual approach is preferred if you expect there might be data validation errors triggered at the DBMS level. If the update fails in that case, you might want to retain the status of the DataWindow before the update to allow the user to amend the data and retry.
If UpdateData throws an exception, the code that commits the transaction and clears the delete buffer is never reached.
❖ To update data in the database:
1 Add a button to the form as you did in “Retrieving data into the master DataWindow” on page 38.
2 In the button’s Properties window, change the Name property of the button to btnUpdate and the Text property to Update.
3 Double-click the button to add an event handler for its Click event.
4 In the code editor, complete the code for the event handler as follows:
[Visual Basic]Private Sub btnUpdate_Click(ByVal sender As _System.Object, ByVal e As System.EventArgs) _Handles btnUpdate.Click
TrydwCustomer.UpdateData(True, False)myTrans.Commit()

Chapter 2 Tutorial
Programmer’s Guide 43
dwCustomer.ResetUpdateStatus()Catch ex As Sybase.DataWindow.DbErrorExceptionMessageBox.Show(ex.SqlErrorText + vbcrlf _+ "No changes made to the database.", _"Database Error", MessageBoxButtons.OK, _MessageBoxIcon.Warning)
Catch ex As ExceptionMessageBox.Show(ex.ToString() + vbcrlf + _"No changes made to the database.", _"Unexpected Exception", _MessageBoxButtons.OK, MessageBoxIcon.Warning)
End TryEnd Sub
[C#]private void btnUpdate_Click(object sender,
System.EventArgs e){try {dwCustomer.UpdateData(true, false);myTrans.Commit();dwCustomer.ResetUpdateStatus();}catch (Sybase.DataWindow.DbErrorException ex){MessageBox.Show(ex.SqlErrorText + "\n\nNo changes made to the database.","Database Error", MessageBoxButtons.OK, MessageBoxIcon.Warning);
}catch (Exception ex){MessageBox.Show(ex.ToString() + "\n\nNo changes made to the database.", "Unexpected Exception", MessageBoxButtons.OK, MessageBoxIcon.Warning);
}}
5 Select Debug>Start Debugging to run the program, and click the Retrieve button.

Building a deployment library
44 DataWindow .NET
6 Change the first name of the customer displayed in the detail DataWindow, and click the Update button.
The name does not change in the master DataWindow.
7 Now click the Retrieve button again.
The data in the master DataWindow is refreshed, and your name change displays.
8 Close the application.
Building a deployment libraryIn a DataWindow .NET application, you can use a library (PBL) or deployment library (PBD) as the source of your DataWindow objects. If your users have DataWindow Designer, PowerBuilder, or InfoMaker, they can open PBL files and copy or modify the objects in them. They cannot copy or modify the objects in a PBD file. A PBD file is also smaller than a PBL file.
When you are ready to deploy your application, build a deployment library and change the LibraryList property of each DataWindowControl or DataStore to reference the PBD file instead of the PBL. Along with the executable file for your application, you need to deploy some additional files.
For a list of the files you need to deploy and some techniques for deploying applications, see Chapter 13, “Deploying DataWindow .NET Applications.”
For where to deploy files, see “Deploying Windows form applications” on page 292.
❖ To build a deployment library:
• Right-click on the project file in the System Tree and select Build Deployment from the pop-up menu.
The Windows form tutorial is complete
This is the last section in the Windows form tutorial. The next section tells you how to build an ASP.NET Web application.
You can continue to modify and enhance the Windows solution. For example, you could add code to make sure that all changes have been made correctly when you close the application, add a button that inserts a new row into the database, or modify the form to use an AdoTransaction object instead of a Transaction object.

Chapter 2 Tutorial
Programmer’s Guide 45
For more complete sample applications in Visual Basic and C#, see the Sybase CodeXchange Web site at http://datawindownet.codeXchange.sybase.com/ and the Code Examples subdirectory in your DataWindow .NET 2.0 directory.
Adding a WebDataWindowControl to a Web formTo use the DataWindow object in an ASP.NET application, you add a WebDataWindowControl to a Web form, then associate that control with the DataWindow object.
❖ To place a WebDataWindowControl on a form:
1 In Visual Studio .NET, create a new Visual Basic or C# ASP.NET Web Site, name it WebStart, and accept the default location.
Default.aspx opens in the Source editor.
2 Click Design to display the Web form.
3 Select View>Toolbox if the Visual Studio Toolbox is not visible.
4 In the Toolbox, expand Sybase DataWindow 2.0 and select the WebDataWindowControl icon.
If the WebDataWindowControl icon is not visible in the Toolbox, see “Installing DataWindow .NET” on page 10 for how to add it.
5 Click on the form where you want the top left corner of the Web DataWindow to display.

Associating a DataWindow object with the control
46 DataWindow .NET
Associating a DataWindow object with the controlAfter placing the control, you associate a DataWindow object with the control.
First you need to add the PBL that contains the DataWindow object to the solution.
❖ To associate a DataWindow object with the control:
1 In the Solution Explorer, right-click the name of the application and select Add>Add Existing Item.
2 In the Add Existing Item dialog box, select All Files in the Files of Type drop-down list, browse to the location of start.pbl and select it, then click Add.
3 Right-click the WebDataWindowControl on the form and select Properties.
4 In the Properties window, locate the LibraryList property in the left panel, and click the Browse (...) button in the right panel to open the Specify Library List dialog box.
5 Click the Add Library to Library List icon and click the browse button.
6 In the Select Library dialog box, select start.pbl in the Contents pane and click OK.
You can add multiple libraries to the list. When you specify a DataWindow object, the server searches the libraries for it in the order in which the libraries display in the list.

Chapter 2 Tutorial
Programmer’s Guide 47
7 Click OK to close the Specify Library List dialog box.
8 Select DataWindowObject in the Properties window, click the browse button in the right pane to open the Select DataWindow dialog box, select the d_custlist DataWindow object, and click OK.
The column headers display in the control on the form.
9 Change the (ID) property of the control to dwCustList.
10 Set the AutoSaveDataCacheAfterRetrieve and AutoRestoreDataCache properties to true.
The data will be saved to a cache after a retrieve and the data cache will be restored after a postback.
11 Set the Height property to 240 and make sure that the VerticalScrollBar property is set to Auto.
The Customers table in the database has more than 100 rows. By default, all of the rows display. Setting the Height property restricts the number of rows that display. Setting the VerticalScrollBar property to Auto adds a scroll bar if one is needed.
Adding a second DataWindowControl to the formYou are building a master-detail form. You have already added the master WebDataWindowControl. Now repeat the same steps to add a second control to the form and associate it with a DataWindow object. This time rename the control dwCustomer and associate it with the d_customer DataWindow object. Set the AutoRestoreDataCache and AutoRestoreDataCacheAfterRetrieve properties to true..
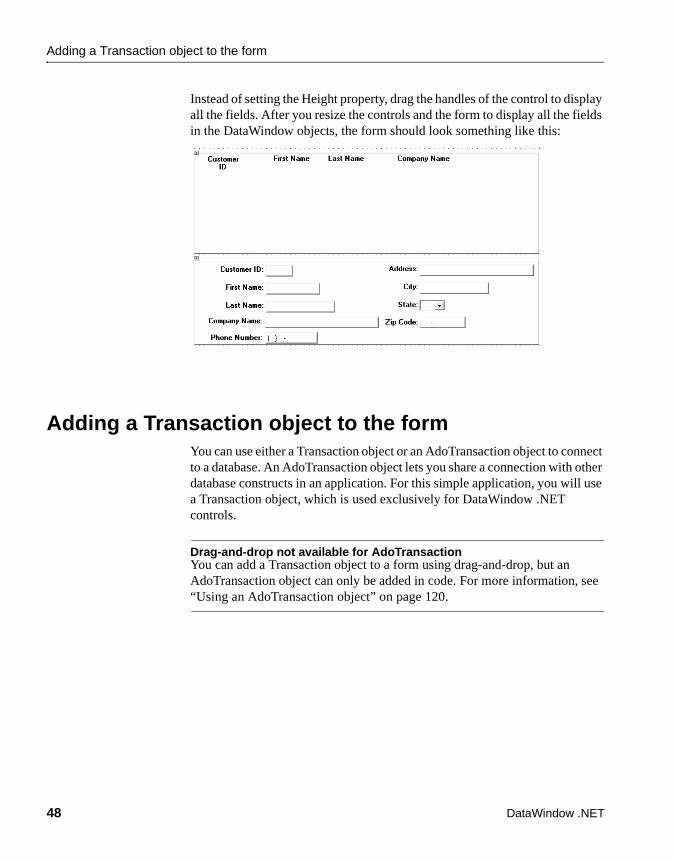
Adding a Transaction object to the form
48 DataWindow .NET
Instead of setting the Height property, drag the handles of the control to display all the fields. After you resize the controls and the form to display all the fields in the DataWindow objects, the form should look something like this:
Adding a Transaction object to the formYou can use either a Transaction object or an AdoTransaction object to connect to a database. An AdoTransaction object lets you share a connection with other database constructs in an application. For this simple application, you will use a Transaction object, which is used exclusively for DataWindow .NET controls.
Drag-and-drop not available for AdoTransactionYou can add a Transaction object to a form using drag-and-drop, but an AdoTransaction object can only be added in code. For more information, see “Using an AdoTransaction object” on page 120.

Chapter 2 Tutorial
Programmer’s Guide 49
❖ To add a Transaction object to a form:
1 Select View>Component Designer to view the Transaction item on the Sybase DataWindow 2.0 tab of the Toolbox.
2 Drag the Transaction item from the Toolbox to the Component Designer.
3 Right-click the Transaction object to display its Properties window.
4 Change the Name property to myTrans.
5 Type the following in the DbParameter field:
ConnectString='DSN=EAS Demo DB V105 DWD;UID=dba;PWD=sql',ConnectOption='SQL_DRIVER_CONNECT,SQL_DRIVER_NOPROMPT'
By default, if an ODBC database connection receives an error in a client-server application, a message box prompts the user for information. In an ASP.NET application, the message box cannot be displayed and the Web application appears to hang. Setting SQL_DRIVER_NOPROMPT as a value of the ConnectOption database parameter stops the server from attempting to display a message.
6 Make sure the EAS Demo database is running, then click the Test Connection link in the properties window.
You should see a message box indicating that the connection was successful.
Troubleshooting tipIf the connection was not successful, go back to DataWindow Designer, select SQL_DRIVER_NOPROMPT as the value for Connect Type on the Options page of the Database Profile dialog box, and look at the Preview page. Change the language to whatever language you are using, change the name of the Transaction object to myTrans, and make sure that the code in Visual Studio .NET matches the generated code in the Database Connection Syntax pane.

Connecting to the database
50 DataWindow .NET
Connecting to the databaseNow you add code so that the connection to the database is made and data is retrieved into the master DataWindow when the form is loaded. You need to establish the relationship between the WebDataWindowControl and the Transaction object at the same time. If any errors occur, they display in a text box.
❖ To connect to the database and set up the transaction:
1 Select View>Designer to open the default.aspx form.
2 Expand the Standard tab in the Visual Studio .NET Toolbox, drag a TextBox control onto the form below the dwCustomer DataWindow.
3 In the properties window, set its ID to errMsg, its TextMode to Multiline, and its Visible property to false.
The text box will only display if an error occurs.
4 Double-click in an empty area of the form.
This creates an event handler for the page’s Load event and opens the code editor:
[Visual Basic]Private Sub Page_Load(ByVal sender As System.Object, ByVal e As System.EventArgs) Handles MyBase.Load
End Sub
[C#]private void Page_Load(object sender, System.EventArgs e){}
5 Type the following in the Page_Load event handler:
[Visual Basic]If Not Me.IsPostBack Then
TryInitializeComponent()myTrans.Connect()dwCustList.SetTransaction(myTrans)dwCustList.Retrieve()
Catch Ex As ExceptionerrMsg.Text = ex.ToString()errMsg.Visible = true
Chapter 2 Tutorial
Programmer’s Guide 51
dwCustomer.Visible = falseEnd Try
End If
[C#]if (!this.IsPostBack){
try{
InitializeComponent();myTrans.Connect();dwCustList.SetTransaction(myTrans);dwCustList.Retrieve();
}catch(System.Exception ex){
errMsg.Text = ex.ToString();errMsg.Visible = true;dwCustomer.Visible = false;
}}
This code connects to the database, associates the connected Transaction object with the master DataWindow, and retrieves data into the master DataWindow. If any exception is thrown, the errMsg textbox displays with the text of the exception.
Disconnecting from the database
When you drag a Transaction object to a form, it is added to the form’s components list, and is automatically disconnected and disposed of when the form is closed. If you do not use drag-and-drop, you need to disconnect from the database when the form is unloaded.
❖ To disconnect from the database in Visual Basic:
1 In the code editor, select Unload from the list of events in the drop-down list at the top right.
The Page_Unload event handler displays.
2 Type myTrans.Disconnect()to disconnect from the database when the page is unloaded:
Private Sub Page_Unload(ByVal sender As Object, ByVal e As System.EventArgs) Handles MyBase.Unload
myTrans.Disconnect()End Sub

Connecting to the database
52 DataWindow .NET
❖ To disconnect from the database in C#:
1 Select View>Component Designer from the menu.
2 In the Properties window, select _Default from the drop-down list at the top of the window to display properties for the Web page.
3 Click the Events button to display a list of events for the control, type Page_Unload in the event name box for the Unload event, and press the Tab key:
This associates the Page_Unload event handler with the form’s Unload event. The code editor opens with the cursor in the body of the event handler.
4 To disconnect from the database when the page is unloaded, type myTrans.Disconnect(); in the event handler:
private void Page_Unload(object sender, System.EventArgs e){
myTrans.Disconnect();}
You can run the application at this point to check that the master DataWindow displays. Make sure the EAS Demo database is running before you start the application. The first time you run the application using Run>Start Debugging, Visual Studio displays a Debugging Not Enabled message box. Select OK to enable debugging.

Chapter 2 Tutorial
Programmer’s Guide 53
Retrieving data into the detail DataWindowSince these DataWindow objects have a master-detail relationship, you want the details for the row that is selected in dwCustList to display in dwCustomer.
Coding a client-side event
To do that, first you code a client-side Clicked event in the form’s .aspx file and store the selected row number in a hidden HTML input field, then submit the form. For more information about client events, see Chapter 12, “Writing Scripts for the Web DataWindow Client Control.”
❖ To code a client-side clicked event:
1 Open the Default.aspx Design page and drag an Input (Hidden) control from the HTML tab in the Toolbox onto the page.
This adds an INPUT tag to the page that will not display in the Browser.
2 In the Properties window for the Hidden control, type rownum in the id and name fields.
3 Right-click on dwCustList, select Properties, and make sure that both ClientEvents and ClientScriptable are set to true.
4 In the Properties window, click in the ClientEventClicked field and select Add New Event Handler from the drop-down list.
This generates a JavaScript function in the page’s .aspx file:
function objdwCustList_Clicked(sender, rowNumber, objectName) {
}
5 Now add code to the objdwCustList_Clicked function. The following code sets the value of the rownum INPUT tag to the number of the clicked row and submits the form:
document.Form1.rownum.value = rowNumber;document.Form1.submit();
Coding the Retrieve method for the detail DataWindow
The second DataWindow object, d_customer, has a WHERE clause that you set up in the SQL painter (see “Specify a WHERE clause” on page 26):
WHERE "customer"."id" = :cust_id
The id is the value assigned to the rownum hidden INPUT tag. The value is passed to the page in the Request property and then used as the argument in the SetRow method on the master DataWindow.

Retrieving data into the detail DataWindow
54 DataWindow .NET
The Retrieve method can take a list of retrieval arguments as a parameter. In this case, you use the GetItemDouble method to return the value of the customer id column in dwCustList that has focus. That value is then passed to the Retrieve method for dwCustomer to be used within the WHERE clause.
The code is added to an Else clause in the page’s Load event handler.
❖ To retrieve data into the detail DataWindow:
1 Open the code file for Default.aspx and locate the last line in the Load event handler.
2 Add code before the End If statement in Visual Basic or before the closing brace of the event handler in C#. The following code examples show the complete code for the Load event handler with the new code in italics:
[Visual Basic]If Not Me.IsPostBack Then
TryInitializeComponent()myTrans.Connect()dwCustList.SetTransaction(myTrans)dwCustList.Retrieve()
Catch Ex As ExceptionerrMsg.Text = ex.ToString()errMsg.Visible = truedwCustomer.Visible = false
End Try
’ Add the following codeElse
Dim selectedRow As Int32selectedRow = _System.Int32.Parse(Request.Params("rownum"))dwCustList.SetRow(selectedRow)
TryInitializeComponent()myTrans.Connect()dwCustomer.SetTransaction(myTrans)dwCustomer.Retrieve(System.Convert.ToInt32 _
(dwCustList.GetItemDouble(selectedRow, _"id")))
errMsg.Visible = FalsedwCustomer.Visible = True

Chapter 2 Tutorial
Programmer’s Guide 55
Catch ex As ExceptionerrMsg.Text = ex.ToString()errMsg.Visible = TruedwCustomer.Visible = False
End Try’End of new code
End If
[C#]if (!this.IsPostBack){
try{
InitializeComponent();myTrans.Connect();dwCustList.SetTransaction(myTrans);dwCustList.Retrieve();
}catch(System.Exception ex){
errMsg.Text = ex.ToString();errMsg.Visible = true;dwCustomer.Visible = false;
}}
// Add the following codeelse {
Int32 selectedRow = System.Int32.Parse(this.Request.Params["rownum"]);
dwCustList.SetRow(selectedRow);
try{
InitializeComponent();myTrans.Connect();dwCustomer.SetTransaction(myTrans);dwCustomer.Retrieve(System.Convert.ToInt32
(dwCustomers.GetItemDouble(selectedRow,"id")));
}catch(System.Exception ex){
errMsg.Text = ex.ToString();errMsg.Visible = true;

Retrieving data into the detail DataWindow
56 DataWindow .NET
dwCustomer.Visible = false;}
}// End of new code
Testing retrieve Now you can test whether selecting a different row in the master DataWindow changes the detail DataWindow.
❖ To test the interaction between the master and detail DataWindows:
1 Select Debug>Start Debugging to run the program, and click a row in the master DataWindow.
The detail DataWindow displays the data for the selected row.
2 Select a different row in the master DataWindow.
The detail DataWindow displays the data for the new row.
3 Close the browser.
Learning more about Web DataWindows
You have now completed the exercises in this brief tutorial.
For more complete sample applications in Visual Basic and C#, see the Sybase CodeXchange Web site at http://datawindownet.codeXchange.sybase.com/ and the Code Examples subdirectory in your DataWindow .NET 2.0 directory. For more information about programming with the Web DataWindow, see Chapter 9, “Using Web DataWindows.” For more information about deploying Web DataWindows, see “Deployment techniques for Web applications” on page 294.

Programmer’s Guide 57
C H A P T E R 3 Working with DataWindow Controls
About this chapter This chapter describes how to use DataWindow controls.
Contents
About DataWindow controlsThe DataWindowControl is a visual container for DataWindow objects in a Windows application. It provides properties, methods, and events for manipulating the data and appearance of the DataWindow object. The control is part of the user interface of your application.
Topic Page
About DataWindow controls 57
Accessing a database 62
Using a DataSet as the data source 66
Importing data from an external source 74
Exporting data from a DataWindow object 74
Manipulating data in a DataWindow control 74
Accessing the items in a DataWindow 78
Using other DataWindow methods 84
Accessing the properties of a DataWindow object 85
Updating the database 86
Handling events 90
Handling DataWindow exceptions 91
Creating reports 94
Using composite reports 95
Using crosstabs 97
Using graphs 98

About DataWindow controls
58 DataWindow .NET
You also use DataWindow objects in WebDataWindowControls, which are used in ASP.NET applications; in the nonvisual DataStore; and in child DataWindows, which are used in drop-down DataWindows and with the composite presentation style. Much of the information in this chapter applies to all of these object types.
For more information about DataStores, see Chapter 4, “Working with DataStores.” For more information about the WebDataWindowControl, see Chapter 9, “Using Web DataWindows.” For more information about drop-down DataWindows and composite DataWindows, see the DataWindow Designer User’s Guide.
The simplest way to use a DataWindow object in an application is to use drag-and-drop to add a DataWindow control to a form, then associate that control with the DataWindow object. You can also create a DataWindow control in your code using its constructor, either statically or dynamically. For more about dynamic DataWindows, see Chapter 7, “Dynamically Changing DataWindow Objects.”
Using drag-and-dropWhen you install DataWindow .NET in Visual Studio .NET 2005, a Sybase DataWindow 2.0 tab is added to the Visual Studio Toolbox. If the tab is not visible, see “Installing DataWindow .NET” on page 10 for how to add it manually.
To add a DataWindow control to a form, expand the Sybase DataWindow 2.0 tab and drag the icon for the control you need onto your form.
You create and design DataWindow objects in DataWindow Designer and save them in a library (.PBL) or deployment library (.PBD). You need to set two properties of the DataWindow control to associate it with a DataWindow object. The LibraryList property is set to the name of the PBL or PBD that contains the DataWindow object, and the DataWindowObject property is set to the name of the DataWindow.
Right-click the form to open its Properties window to set these properties, or set them directly in code. You can set all the properties for the control in the form’s Constructor event. The DataWindowControl is not fully created until the form’s Load event is fired,so you should not attempt to call any methods on the control in the Constructor event.
“Adding DataWindows to a form” on page 32 shows these steps in more detail.
Chapter 3 Working with DataWindow Controls
Programmer’s Guide 59
Creating a control in codeWhen you use drag-and-drop to add a DataWindow control to a form, the control is added to the form’s control collection and a handle is created for it automatically. When you create a DataWindow programmatically, you need to force a handle to be created for the control and any child controls before you can access the control. Calling the control’s constructor does not create the handle. You can use the CreateControl method to create a handle for the DataWindow control.
The following code creates an instance of a DataWindowControl called dwC, sets its library list and DataWindow object, creates a handle for dwC, sets the loction and size of the control, and add it to the form’s controls collection:
[Visual Basic]Dim dwC As Sybase.DataWindow.DataWindowControl' ...dwC = New Sybase.DataWindow.DataWindowControldwC.LibraryList = "C:\mypbls\employee.pbl"dwC.DataWindowObject = "d_emp"dwC.Location = New System.Drawing.Point(32, 24)dwC.Size = New System.Drawing.Size(272, 152)
dwC.CreateControl()me.Controls.Add(dwC)
[C#]private Sybase.DataWindow.DataWindowControl dwC;// ...dwC = New Sybase.DataWindow.DataWindowControl();dwC.LibraryList = "C:\\mypbls\\employee.pbl";dwC.DataWindowObject = "d_emp";dwC.Location = new System.Drawing.Point(32, 24);dwC.Size = new System.Drawing.Size(272, 152);
dwC.CreateControl()this.Controls.Add(dwC);;
DataWindow controls on tab pagesIn a TabControl, if a DataWindow control is on one of the tab pages that is hidden when the TabControl first displays, you need to set its Transaction object and retrieve data when the tab page displays. For more information, see “Retrieving data into DataWindow controls on tab pages” on page 63.

About DataWindow controls
60 DataWindow .NET
Editing the DataWindow object in the controlOnce you have associated a DataWindow object with a DataWindowControl or WebDataWindowControl on a form, you can go directly to DataWindow Designer to edit the associated DataWindow object. (You cannot do this with a DataStore.)
❖ To edit an associated DataWindow object:
• Select Edit DataWindowObject from the control's pop-up menu.
DataWindow .NET opens the associated DataWindow object in DataWindow Designer.
DataWindow Designer requires a project. If DataWindow Designer is not open when you select Edit DataWindowObject, it opens with a temporary project that is deleted when you close DataWindow Designer.
For more information about using DataWindow Designer, see the DataWindow Designer User’s Guide.
Specifying the DataWindow object at runtimeWhen you associate a DataWindow object with a control on a form, you are setting the initial value of the DataWindow control's DataWindowObject property. At runtime, this tells your application to create an instance of the DataWindow object specified in the control's DataWindowObject property and use it in the control.
Setting the DataWindowObject property in code
In addition to specifying the DataWindow object in the Properties window, you can switch the object that displays in the control at runtime by changing the value of the DataWindowObject property in code.
When you change the DataWindow object at runtime, you might need to call SetTransaction again. For more information about using these methods, see “Associating the Transaction object with a DataWindow control or DataStore” on page 117 and “Associating the AdoTransaction object with a DataWindow control or DataStore” on page 124.
For example: to display the DataWindow object d_EmpHist from the library C:\emp.pbl in the DataWindow control dwEmp, you can code:
dwEmp.LibraryList = "c:\emp.pbl"dwEmp.DataWindowObject = "d_EmpHist"

Chapter 3 Working with DataWindow Controls
Programmer’s Guide 61
Code examplesSimple code examples, where the only difference between Visual Basic and C# statements is the addition of a semicolon for C#, are shown in Visual Basic.
The DataWindow object d_EmpHist was created in DataWindow Designer and is stored in a library that is on the control’s library list so that you can see it in the control at design time.
How the DataWindow object is found at runtimeAt runtime, the DataWindow server strips the full path from each library and looks for the library in the system path. If you have more than one copy of a library, one in the path specified in the library list and one in the system path, you might see unexpected results when you run or debug the application if the DataWindow exists in only one version of the library or has been modified in only one version.
The control dwEmp is contained on the form and is saved as part of the form.
Getting a list of DataWindow objects in a library
The GetDataWindowObjectEntries method in the Utility class lists the DataWindow objects present in a given PBL or PBD. The method takes a library name as an argument and returns an array of DataWindowObjectEntry objects, each of which holds the name of a DataWindow object as well as its last-modified date and comments.
This C# code in the Page_Load event populates the dwList drop-down list box with a list of the DataWindow objects in the library list:
if (!IsPostBack){
Sybase.DataWindow.DataWindowObjectEntry[] dws;dws = Sybase.DataWindow.Utility.
GetDataWindowObjectEntries(Page.MapPath(wdw.LibraryList));
for (int i=0; i<dws.Length; i++)dwList.Items.Add(new ListItem(dws[i].Name,
dws[i].Name));}

Accessing a database
62 DataWindow .NET
Accessing a databaseBefore you can display data in a DataWindow control, you must get the data that is stored in the data source into that control. The most common way to get the data is to access a database.
You can use either a Transaction object or an AdoTransaction object to access a database. For more information, see Chapter 5, “Working with Transaction and AdoTransaction Objects.”
Retrieving and updating dataYou call the following two methods to access a database through a DataWindow control:
RetrieveUpdateData
Basic data retrieval
After you have set the transaction object for your DataWindow control, you can use the Retrieve method to retrieve data from the database and insert it into that control:
dwEmp.Retrieve( )
Using retrieval argumentsAbout retrieval arguments
Retrieval arguments qualify the SELECT statement associated with the DataWindow object, reducing the rows retrieved according to some criteria. For example, in the following SELECT statement, Salary is a retrieval argument defined in DataWindow Designer:
SELECT Name, emp.sal FROM Employee WHERE emp.sal > :Salary
When you call the Retrieve method, you supply a value for Salary. The code to retrieve the names and salaries of employees whose salary exceeds 50,000 looks like this in Visual Basic:
dwEmp.Retrieve(50000)

Chapter 3 Working with DataWindow Controls
Programmer’s Guide 63
When coding Retrieve with arguments, specify them in the order in which they are defined in the DataWindow object. Your Retrieve method can provide more arguments than a particular DataWindow object expects. Any extra arguments are ignored. This allows you to write a generic Retrieve that works with several different DataWindow objects. You can specify any number of retrieval arguments.
Omitting retrieval arguments
If your DataWindow object takes retrieval arguments but you do not pass them in the Retrieve method, the DataWindowControl prompts the user for them when Retrieve is called. In a Web application, you must provide your own mechanism for user-entered retrieval arguments.
Retrieving data into DataWindow controls on tab pages
Controls on a tab page are not created until the tab page displays, so you cannot set the Transaction object and retrieve data into a DataWindow control on a hidden tab page until the tab page displays. There are two ways to retrieve data into DataWindowControls on hidden tab pages:
• Using the SelectedIndexChanged event of the TabControl
• Using the DataWindowCreated event of the DataWindowControl
Using the SelectedIndexChanged event of the TabControl
The SelectedIndexChanged event of the TabControl is fired when the 0-based index of the currently-selected tab page changes. In the handler for this event, you can check whether the second and subsequent tab pages have been displayed, and, if they have not, set the Transacation object for the DataWindow control on that tab page and retrieve data.
The following C# example has three tab pages. Setting the value of the boolean variables _tab2FirstShown and _tab3FirstShown to true allows you to check whether the tab page is being displayed for the first time. No special handling is needed for the first tab page, because the controls are instantiated when the tab control first displays.
bool _tab2FirstShown = true;bool _tab3FirstShown = true; private void tabControl1_SelectedIndexChanged(object sender, EventArgs e)
{if (this.tabControl1.SelectedIndex == 1 &&
_tab2FirstShown){

Accessing a database
64 DataWindow .NET
_tab2FirstShown = false;dataWindowControl2.SetTransaction(transaction1);dataWindowControl2.Retrieve();
}
else if (this.tabControl1.SelectedIndex == 2 &&_tab3FirstShown)
{_tab3FirstShown = false;dataWindowControl3.SetTransaction(transaction1);dataWindowControl3.Retrieve();
}}
Using the DataWindowCreated event of the DataWindowControl
You can also set the Transactation object for the DataWindow control and retrieve data in the DataWindowCreated event for each DataWindowControl on a tab page that is hidden when the TabControl first displays:
private void dw_2Created(object sender, Sybase.DataWindow.DataWindowCreatedEventArgs e)
{dataWindowControl2.SetTransaction(transaction1);dataWindowControl2.Retrieve();
}
private void dw_3Created(object sender, Sybase.DataWindow.DataWindowCreatedEventArgs e)
{dataWindowControl3.SetTransaction(transaction1);dataWindowControl3.Retrieve();
}
Updating data
After users have made changes to data in a DataWindow control, you can use the UpdateData method to save those changes in the database.
The code looks like this in Visual Basic:
dwEmp.UpdateData()

Chapter 3 Working with DataWindow Controls
Programmer’s Guide 65
UpdateData sends to the database all inserts, changes, and deletions made in the DataWindow control since the last UpdateData method call. You can then commit (or roll back) those database updates with the Commit and Rollback methods of the Transaction object or of the AdoTransaction object’s Transaction property.
For more specifics on how a DataWindow control updates the database (that is, which SQL statements are sent in which situations), see “Updating the database” on page 86.
Examples The following example shows code that connects, retrieves, updates, commits or rolls back, and disconnects from the database.
Although the example shows all database operations in a single module, most applications separate these operations. For example, an application could connect to the database in the form’s Load event and retrieve and update data in one or more button clicked events.
The following C# statements retrieve and update data using the transaction object EmpSQL and the DataWindowControl dwEmp:
// Create an instance of the Transaction object// and set its parametersTransaction EmpSQL = new Transaction();EmpSQL.Dbms = DbmsType.Odbc;
EmpSQL.DbParameter = "ConnectString='DSN=EAS Demo DB V105;UID=dba;PWD=sql',DisableBind=1";EmpSQL.AutoCommit = false;
// Connect to the database specified in the// transaction object EmpSQLEmpSQL.Connect();
// Set EmpSQL as the transaction object for dwEmpdwEmp.SetTransaction(EmpSQL);
// Retrieve data from the database specified in// EmpSQL into dwcEmpdwEmp.Retrieve();
// Make changes to the data......
// Update the databasetry {

Using a DataSet as the data source
66 DataWindow .NET
dwEmp.UpdateData();EmpSQL.Commit();
}catch (Exception ex) {
EmpSQL.Rollback();}
finally {// Disconnect from the databaseEmpSQL.Disconnect();
}
Handling retrieval or update errors
A production application should include more robust error tests after each database operation. For more about checking for errors, see “Handling DataWindow exceptions” on page 91.
Using a DataSet as the data sourceIn DataWindow Designer, you can specify ADO DataSet as the data source for a DataWindow object. The DataWindow wizard prompts you to specify the name of the XSD file that contains the DataSet, then you can select the DataTable you want to use and design the presentation of the DataWindow in the DataWindow painter.
For more information and a list of datatype mappings from the DataSet to the DataWindow, see the chapter on defining DataWindow objects in the DataWindow Designer User’s Guide.
At runtime, there are two ways to use a DataWindow with a DataSet:
• The binding model is designed for .NET programmers who are used to binding data sources to controls like a DataGrid and using other mechanisms to manipulate data. The DataWindow is used as a presentation tool and its retrieve and update capabilities are disabled.
• The retrieve and update model uses the ability of the DataWindow to retrieve and update data as well as manage its presentation. You might want to use this model if you have a DataSet that you want to use as a DataWindow data source but you still want to use DataWindow methods to retrieve and update.

Chapter 3 Working with DataWindow Controls
Programmer’s Guide 67
The examples in this section use an XSD file that contains two DataAdapters: one for each of the department and employee tables from the EAS Demo DB (which are joined on the dept_id column). The columns used are the dept_id and dept_name columns from the department table, and the emp_id, emp_fname, emp_lname, salary, and dept_id columns from the employee table.
The following XSD file shows the typed DataSet generated from the DataAdapters for the department and employee tables:
<?xml version="1.0" standalone="yes"?><xs:schema id="DeptEmployee" targetNamespace="http://www.tempuri.org/DeptEmployee.xsd" xmlns:mstns="http://www.tempuri.org/DeptEmployee.xsd" xmlns="http://www.tempuri.org/DeptEmployee.xsd" xmlns:xs="http://www.w3.org/2001/XMLSchema" xmlns:msdata="urn:schemas-microsoft-com:xml-msdata" attributeFormDefault="qualified" elementFormDefault="qualified"> <xs:element name="DeptEmployee" msdata:IsDataSet="true"> <xs:complexType> <xs:choice maxOccurs="unbounded"> <xs:element name="department"> <xs:complexType> <xs:sequence> <xs:element name="dept_id" type="xs:int" /> <xs:element name="dept_name" type="xs:string" /> </xs:sequence> </xs:complexType> </xs:element> <xs:element name="employee"> <xs:complexType> <xs:sequence> <xs:element name="emp_id" type="xs:int" /> <xs:element name="emp_fname" type="xs:string" /> <xs:element name="emp_lname" type="xs:string" /> <xs:element name="dept_id" type="xs:int" /> <xs:element name="salary" type="xs:decimal" /> </xs:sequence> </xs:complexType> </xs:element> </xs:choice> </xs:complexType> <xs:unique name="Constraint1" msdata:PrimaryKey="true"> <xs:selector xpath=".//mstns:department" /> <xs:field xpath="mstns:dept_id" /> </xs:unique> <xs:unique name="employee_Constraint1" msdata:ConstraintName="Constraint1" msdata:PrimaryKey="true">

Using a DataSet as the data source
68 DataWindow .NET
<xs:selector xpath=".//mstns:employee" /> <xs:field xpath="mstns:emp_id" /> </xs:unique> </xs:element></xs:schema>
The binding modelThe binding model allows you to bind the data in a DataTable to a DataWindow in the same way you would bind the data to a DataGrid. When a DataWindow is bound to a DataTable or to a DataView, modifications to the data are applied immediately to the underlying object. Modifications to the underlying object (from other bound controls for example) are reflected immediately in the DataWindow. When a DataWindow is bound to a DataTable, it binds to the “default view” of the DataTable.
You cannot use DataWindow methods such as Retrieve and Update because they duplicate features of the underlying object. For example, the DataWindow does not populate the DataSet with data. To populate the DataSet, use the Fill method of a DataAdapter.
The following C# statements populate the DataSet described in “Using a DataSet as the data source” on page 66, creating two DataTables:
DepartmentAdapter.Fill ( DeptEmployee );EmployeeAdapter.Fill ( DeptEmployee );
These statements populate the DataWindow and a DataWindowChild, in this case a drop-down DataWindow, from the DataTables:
DataWindowChild DDDW = dw_1.GetChild( "dept_head_id" );DDDW.BindAdoDataTable ( DeptEmployee.employee );dw_1.BindAdoDataTable ( DeptEmployee.department );
DataView methods These statements delete a row from a DataView:
DataRowView DRV = DepartmentView[1];DRV.Delete ( );DRV.EndEdit( );
This statement inserts a blank row into the DataView:
newRow = DepartmentView.AddNew ( );
The row will not appear in the DataWindow until the EndEdit method has been called and has completed.

Chapter 3 Working with DataWindow Controls
Programmer’s Guide 69
These statements change a specific column's data value. You use them instead of the SetItem methods of the DataWindow control:
DataRowView DRV = DepartmentView [ 0 ];DRV [ 0 ] = "800";DRV.EndEdit();
In the preceding examples, the EndEdit method is required because we use the DataView ListChanged event to signal changes to the DataView. In most cases the data is not available for copy to the DataWindow until the EndEdit method is complete. For example, in the following example, three ListChanged events occur. These statements insert a row with values into a DataView:
newRow = DepartmentView.AddNew();newRow [ "dept_id" ] = "900";newRow [ "dept_name" ] = "AppleWare";newRow [ "dept_head_id" ] = "102";newRow.EndEdit( );
First an ItemAdded event occurs when the AddNew method is called. The row has null values and is added to the end of the DataView in a detached state.
When the EndEdit method is processed, another ItemAdded event occurs. The row now has values and is added to the DataView.
Finally an ItemMoved event occurs when the inserted row is moved to the correct ordinal position in the DataView.
DataWindow methods If the user needs to specify column values for a row, you need to insert an empty row. You can use a version of the DataWindow InsertRow method without a row number specification:
dw_1.InsertRow ( );
When the row is added to the DataWindow, it is added at the end of the DataWindow and the DataWindow scrolls to its location.
When you insert a row into a DataWindow, it is not propagated to the underlying DataTable or DataView immediately. Most DataTables and DataViews specify a unique key, and if that key is null, an exception is thrown. Since a row inserted into a DataWindow has no values at the time of insertion, it is not added to the DataTable until the RowFocusChanged event is fired.
When focus changes from the new row, the Binding Manager intercepts the RowFocusChanged event from the DataWindow, creates a new DataView row (DataRowView), populates it with the values from the DataWindow row, and performs an EndEdit. At this time the new row is accepted by the DataView (its RowStatus is “Added”) and it moves to the correct location in the DataView.

Using a DataSet as the data source
70 DataWindow .NET
Row number ignoredIf a row number is specified in the InsertRow method, it is ignored. The row is added to the end of the DataWindow.
Deleting a row from the DataWindow is typically done to remove a row added by InsertRow with incomplete data. This abandons the new row and its values before adding it to the DataView.
dw_1.DeleteRow ( Int32 rowNumber );
If the row being deleted is not new, DeleteRow deletes the corresponding DataRowView in the DataView. The Binding Manager is notified of the deletion by the ListChanged event of type ItemDeleted and the corresponding DataWindow row is deleted.
Restricted DataWindow methods
To conform to the data binding model, many built-in DataWindow features are restricted. Although the normal data buffers are in place and used internally, they cannot be accessed in code so that the principles of the “data access separate from data presentation” mode are preserved. Restricted methods include:
• Sort—this is done by the DataView
• Filter—also done by the DataView
• RowsMove, RowsCopy, and RowsDiscard
Updating values When a data value is changed in the user interface, the change is communicated to the DataView immediately. If the DataColumn values have changed since the BindAdoDataTable method was executed, an error is posted. If the change is to a sort key value in the DataView, the row moves to its correct position in the DataView and in the DataWindow.
You need to use a DataAdapter or another technique to propagate the changed DataSet, DataTables, and/or DataView back to their data sources using the built-in methods of those objects.
Example: Binding model
This example creates two OLE DB data adapters using SQL queries that are the same as the SQL statements for a DataWindow object and a drop-down DataWindow and uses them to fill two DataSets. Then it binds the DataTables from each of the DataSets to a DataWindowControl and a DataWindowChild.
[Visual Basic]Dim daDept as OleDbDataAdapterDim dsDept as New DataSetDim daDDDW as OleDbDataAdapterDim dsDDDW as New DataSet

Chapter 3 Working with DataWindow Controls
Programmer’s Guide 71
Dim sqlStmt as StringDim sqlDDDW as StringDim dwc as Sybase.DataWindow.DataWindowChild
'Specify a SQL query that is the same as the DataWindow object's SQL statementSqlStmt = "select dept_id, dept_name, dept_head_id from department"
'Specify a SQL query that is the same as the drop-down DataWindow's SQL statementSqlDDDW = "select emp_id from employee"
'Create two OLE DB data adapters using the SQL query stringsdaDept = New OleDbDataAdapter(sqlStmt,OleDbConn)daDDDW = New OleDbDataAdapter(sqlDDDW, OleDbConn)
'Fill two DataSetsdaDept.Fill(dsDept, "department")daDDDW.Fill(dsDDDW, "employee")
'Get the DDDW dwc = dw_1.GetChild("dept_head_id")
'Bind a DataTable to the DDDWdwc.BindAdoDataTable(dsDDDW.Tables("employee"))
'Bind a DataTable to the DataWindowControldw_1.BindAdoDataTable(dsDept.Tables("department"))
[C#]OleDbDataAdapter daDept;DataSet dsDept = new DataSet;OleDbDataAdapter daDDDW;DataSet dsDDDW = new DataSet;String sqlStmt,sqlDDDW;Sybase.DataWindow.DataWindowChild dwc;
// Specify a SQL query that is the same as the // DataWindow object's SQL statementSqlStmt = "select dept_id, dept_name, dept_head_id from
Using a DataSet as the data source
72 DataWindow .NET
department";
// Specify a SQL query that is the same as the // drop-down DataWindow's SQL statementSqlDDDW = "select emp_id from employee";
// Create the data adaptersdaDept = new OleDbDataAdapter(sqlStmt,OleDbConn);daDDDW = new OleDbDataAdapter(sqlDDDW, OleDbConn);
// Fill the DataSetsdaDept.Fill(dsDept, "department");daDDDW.Fill(dsDDDW, "employee");
// Get the DDDW dwc = dw_1.GetChild("dept_head_id");
// Bind a DataTable to the DDDWdwc.BindAdoDataTable(dsDDDW.Tables("employee"));
// Bind a DataTable to the DataWindowControldw_1.BindAdoDataTable(dsDept.Tables("department"));
The retrieve and update modelThe retrieve and update model allows the DataWindow to work in the traditional manner. Data is retrieved from the underlying DataTable and can be manipulated (sorted, filtered, updated) as is done with a SQL data source.
The DataSet and DataTable must still be populated outside the DataWindow using a DataAdapter and the Fill method. The Retrieve method has a new overloaded version that copies data into the DataWindow.
After the data is retrieved from the DataTable, the DataWindow is “disconnected” from the DataTable and modifications are not applied to the table until the DataWindow UpdateData method is called. The same type of optimistic concurrency as is used with SQL data sources is used when modifications are applied to the DataTable.
Inserting, deleting, sorting, filtering, copying, moving, and the use of ShareData are all supported.

Chapter 3 Working with DataWindow Controls
Programmer’s Guide 73
Example: Retrieve/Update model
This example creates two OLE DB data adapters using SQL queries that are the same as the SQL statements for a DataWindow object and a drop-down DataWindow and uses them to fill two DataSets. Then it retrieves data from the DataTables into a DataWindowControl and a DataWindowChild.
[C#]OleDbDataAdapter daDept;DataSet dsDept = new DataSet;OleDbDataAdapter daDDDW;DataSet dsDDDW = new DataSet;String sqlStmt,sqlDDDW;Sybase.DataWindow.DataWindowChild dwc;
// Specify a SQL query that is the same as the // DataWindow object's SQL statementSqlStmt = "select dept_id, dept_name, dept_head_id from department";
// Specify a SQL query that is the same as the // drop-down DataWindow's SQL statementSqlDDDW = "select emp_id from employee";
// Create the data adaptersdaDept = new OleDbDataAdapter(sqlStmt,OleDbConn);daDDDW = new OleDbDataAdapter(sqlDDDW, OleDbConn);
// Fill the DataSetsdaDept.Fill(dsDept, "department");daDDDW.Fill(dsDDDW, "employee");
// Get the DDDW dwc = dw_1.GetChild("dept_head_id");
// Retrieve data into the DDDWdwc.Retrieve(dsDDDW.Tables("employee"));
// Retrieve data into the DataWindowControldw_1.Retrieve(dsDept.Tables("department"));

Importing data from an external source
74 DataWindow .NET
Importing data from an external sourceIf the data for a DataWindow does not come from a database (for example, the data source was defined as External in the DataWindow wizard), you can use these methods to import data into the DataWindow control:
ImportClipboard (not supported for the WebDataWindowControl)ImportFileImportString
The data format can be XML, comma-separated values, or text. You can also get data into the DataWindow by using one of the SetItem methods or by using a DataWindow expression.
For more information on the SetItem methods and DataWindow expressions, see “Accessing data values using methods” on page 78.
Exporting data from a DataWindow objectYou can use the following methods to export data from a DataWindow object:
SaveAsSaveAsFormattedText
SaveAs lets you save data in several different formats, including PDF, HTML, XML, and text. For more information about exporting data, see the DataWindow Designer User’s Guide.
SaveAsFormattedText saves the DataWindow’s content, including headers and computed fields, into a text file with customized formatting.
Manipulating data in a DataWindow controlTo handle user requests to add, modify, and delete data in a DataWindow, you can write code to process that data, but first you need to understand how a DataWindow control manages data. This section describes the way the DataWindowControl used in Windows applications manages data. The DataStore and the WebDataWindowControl, which uses a DataStore internally, also use buffers to store data, but the event processing described in this section does not apply to them.

Chapter 3 Working with DataWindow Controls
Programmer’s Guide 75
How a DataWindowControl manages dataAs users add or change data, the data is first handled as text in an edit control. If the data is accepted, it is then stored as an item in a buffer.
About the DataWindow buffers
A DataWindow uses three buffers to store data:
Table 3-1: DataWindow buffers
About the edit control As the user moves around the DataWindowControl, the DataWindow places a temporary edit control over the current cell (row and column). The edit control displays as a dotted rectangle.
The edit control is treated by Windows as a separate control that floats on the DataWindowControl. As a result, MouseEnter and MouseLeave events are fired as the cursor moves over each cell. The contents of the edit control are text data that has not yet been accepted by the DataWindowControl. Data entered in the edit control is not in a DataWindow buffer yet; it is simply text in the edit control.
About items When the user changes the contents of the edit control and presses Enter or leaves the cell (by tabbing or pressing Up arrow or Down arrow from the keyboard), the DataWindow processes the data and either accepts or rejects it, depending on whether it meets the requirements specified for the column.
If the data is accepted, the text is moved to the current row and column in the DataWindow Primary buffer. The data in the Primary buffer for a particular column is referred to as an item.
Events for changing text and items
When data is changed in the edit control, several events occur.
Table 3-2: Events triggered by changing text and items
Buffer Contents
Primary Data that has not been deleted or filtered out (that is, the rows that are viewable)
Filter Data that was filtered out
Delete Data that was deleted by the user or through code
Event Description
DataWindowKeyDown Occurs when a key is pressed in the edit control
EditChanged Occurs for each keystroke the user types in the edit control
ItemChanged Occurs when a cell has been modified and loses focus

Manipulating data in a DataWindow control
76 DataWindow .NET
How text is processed in the edit control
When the data in a column in a DataWindow has been changed and the column loses focus (for example, because the user tabs to the next column), the following sequence of events occurs:
1 The DataWindowControl converts the text into the correct datatype for the column. For example, if the cursor is in a numeric column, the DataWindowControl converts the string that was entered into a number. If the data cannot be converted, the ItemError event is triggered.
2 If the data converts successfully to the correct datatype, the DataWindowControl applies any validation rule used by the column. If the data fails validation, the ItemError event is triggered.
3 If the data passes validation, the ItemChanged event is triggered.
4 If the ItemChanged event accepts the data, the ItemFocusChanged event is triggered and the data is stored as an item in the Primary buffer.
Accessing and manipulating the text in the edit controlUsing methods The following methods allow you to access the text in the edit control:
• GetText – obtains the text in the edit control.
• SetText – sets the text in the edit control.
In event code In addition to these methods, the following events provide access to the text in the edit control:
EditChangedItemChangedItemError
Use the Data parameter, which is passed into the event, to access the text of the edit control. In your code for these events, you can test the text value and perform special processing depending on that value.
For an example, see “Coding the ItemChanged event” next.
ItemError Occurs when new data fails the validation rules for the column
ItemFocusChanged Occurs when the current item in the DataWindowControl changes
Event Description
Chapter 3 Working with DataWindow Controls
Programmer’s Guide 77
Manipulating the text When you want to further manipulate the contents of the edit control within your DataWindowControl, you can use any of these methods that are defined for the EditControl class:
ClearCopyCutReplaceSelectText
The edit control that is current for a given DataWindowControl is accessible using the CurrentEdit property. Note that you should check the Empty property first, because a DataWindowControl does not always have an edit control on it. For example, read-only DataWindows do not have edit controls.
For more information about these methods, see the online Help.
Coding the ItemChanged eventIf data passes conversion and validation, the ItemChanged event is triggered. By default, the ItemChanged event accepts the data value and allows focus to change. You can write code for the ItemChanged event to do some additional processing. For example, you could perform some tests, reject the data, and have the column regain focus. The action after ItemChanged is determined by the value assigned to the Action property of the ItemChangedEventArgs class passed into the event-handling code.
Coding the ItemError eventThe ItemError event is triggered if there is a problem with the data. By default, it rejects the data value and displays a message box. You can write code for the ItemError event to do some other processing. For example, you can accept the data value, or reject the data value but allow focus to change:
e.Action = ItemErrorAction.RejectAndAllowFocusChange
For more information about coding events, see “Handling events” on page 90.

Accessing the items in a DataWindow
78 DataWindow .NET
Accessing the items in a DataWindowYou can access data values in a DataWindow by using methods or DataWindow data expressions. Both methods allow you to access data in any buffer and to get original or current values.
The method you use depends on how much data you are accessing and whether you know the names of the DataWindow columns when the code is compiled.
Accessing data values using methodsYou can access data values in a DataWindow using GetItem and SetItem methods.
You call GetItem methods to obtain the data that has been accepted into a specific row and column. You can also use them to check the data in a specific buffer before you update the database. You call SetItem methods to set the value of a specific row or column. You must use the method appropriate for the column’s datatype.
GetItem methods that return primitive types
These methods obtain the data in a specified row and column in a specified buffer and return a primitive datatype: GetItemDate, GetItemDateTime, GetItemDecimal, GetItemDouble, GetItemString, GetItemTime. All these methods are overloaded. You can specify either the number or the name of the column, and you can optionally specify whether to obtain the original data in the column or the current data, and which DataWindow buffer to get the data from.
For example, the following statement assigns the value from the empname column of the first row to the variable strName in the Primary buffer:
strName = dw1.GetItemString (1, "empname")
GetItem methods that return SqlTypes datatypes
GetItemSqlDateTime, GetItemSqlDecimal, GetItemSqlDouble, and GetItemSqlString work in the same way, but return a SqlTypes datatype.
The methods that return primitive types have the advantage that you do not need to cast the return value to another type, as you do if you use both SqlTypes and primitive types in your code.
However, some primitive datatypes cannot handle null values, so your code must either test whether a value is null before processing it, or include a try-catch block to handle the exception that is thrown if the value is null. You can call a method that returns a SqlTypes datatype and then test whether the return value is null.

Chapter 3 Working with DataWindow Controls
Programmer’s Guide 79
Testing for null Two methods, IsItemNull and SetItemNull, test whether an item is null and set an item to null. This example uses IsItemNull to test whether a column’s value is null before processing it using GetItemDouble:
If dw.IsItemNull(1,1) then// handle null value
ElseDim val as Integerval = CInt(dw.GetItemDouble(1,1))// do non-null processing
End If
This example catches the exception that is thrown if the column’s value is null:
Dim val as IntegerTry
val = CInt(dw.GetItemDouble(1,1))// do non-null processing
Catch ex As Exception// handle null data
End try
This example uses a method that returns a SqlTypes datatype, so the test for null can be performed after the method call:
Dim val as new System.Data.SqlTypes.SqlDoubleval = dw.GetItemSqlDouble(1,1)If val.IsNull Then
// handle null valueElse
// do non-null processingDim valInteger as IntegervalInteger = CInt(val.Value)
End if
SetItem methods These methods set the data in a specified row and column using primitive datatypes: SetItemDate, SetItemDateTime, SetItemDecimal, SetItemDouble, SetItemString, SetItemTime.
These methods use SqlTypes datatypes: SetItemSqlDateTime, SetItemSqlDecimal, SetItemSqlDouble, SetItemSqlString.
For example, the following statement sets the value of the empname column in the first row to the string “Waters”:
dw1.SetItemString(1, "empname", "Waters")

Accessing the items in a DataWindow
80 DataWindow .NET
Accessing data values using DataWindow data expressionsDataWindow data expressions use the Data, SelectedData, and DataWindowRow classes.
The Data class represents the data rows and columns in a DataWindow data buffer and allows you to access data using C# indexers. There is a Data object for each of the DataWindow buffers: PrimaryData, FilteredData, and DeletedData. The SelectedData class represents the highlighted rows in a DataWindowControl. The DataWindowRow class represents a row in a data buffer.
Not available for Web DataWindowsThe PrimaryData, FilteredData, and DeletedData fields are not available on the WebDataWindowControl.
Data values for single items are returned as a System.Object. Data values for multiple items are returned as an array of objects. Data values for multiple rows are returned as an array of Object arrays.
To set data values, use an Object for a single value, an array of objects for multiple values, or an array of Object arrays for multiple values in multiple rows. The Data class has a Rows property to access all current data values in all rows and an OriginalValues property to access all original data values in all rows.
The Data.Item property
You use the Item property of the data buffer objects to access data values. The basic syntax for indexer access to DataWindow data in data buffers is:
Object Obj = dwcontrol.Buffername [args...]
For a complete list of syntaxes, see the Data.Item property in the online Help in Visual Studio .NET. Here are some Visual Basic samples:
• To access a single row and column current data value in the PrimaryData buffer:
Dim Obj as ObjectObj = dw1.PrimaryData [ 1, 2 ]
• To access current data values in a single row in the Filter buffer:
Obj = dw_1.FilteredData [ 1 ]
• To access a block of current data values using startrow, startcol, endrow, and endcol arguments:
Obj = dw_1.FilteredData [ 1, 2, 4, 3 ]

Chapter 3 Working with DataWindow Controls
Programmer’s Guide 81
• To set a block of data values using startrow, startcol, endrow, and endcol arguments:
dw_2.PrimaryData [ 1, 2, 4, 3 ] = Obj
• To access the original data value for a single row and column:
Obj = dw_1.PrimaryData [ 1, 2, true ]
• To set a range of rows data values using startRow and endRow, where rows is an array of Object arrays:
dw_2.PrimaryData [ 1, rows.Length ] = rows
Rows property The Data and SelectedData classes both have a Rows property. The Rows property for Data allows you to access and set the current data values of all rows in a buffer. The Rows property for SelectedData lets you access the current data values in selected rows. For example, this statement gets the data in selected rows:
Dim rows as Object rows = dw_1.SelectedData.Rows
OriginalValues property
The Data and SelectedData classes both have an OriginalValues property. The OriginalValues property for Data allows you to access the original data values of all rows in a buffer. The OriginalValues property for SelectedData lets you access the original data values in selected rows. For example, this statement gets the primary buffer's original data values:
Dim O as Object O = dw_1.PrimaryData.OriginalValues
Accessing data: examples
You can use the PrimaryData, FilteredData, and DeletedData objects to access and set data values for a single column, an entire row, or a range of rows. Most of the examples in this section use the primary buffer, but could also be used for the filtered and delete buffers. If an invalid datatype is submitted to the DataWindow by an indexer an exception is thrown.
Single column To set a value for a single column, the value must be cast to Object. A returned value can be cast to its actual datatype. You must know the column datatype in advance.
// get a column valueObject O = dw_1.PrimaryData [ 1, (short) 3 ];
// get original data value with third argument "true"Object O = dw_1.PrimaryData [ 1, (short) 3, true ];

Accessing the items in a DataWindow
82 DataWindow .NET
// use a column name Object O = dw_1.PrimaryData [ 1, "emp_lname" ];
// get original data valueObject O = dw_1.PrimaryData [ 1, "emp_lname", true];
// set a column valuedw_1.PrimaryData [ 1, (short) 3 ] = (Object) O;
// use the column namedw_1.PrimaryData [ 1, "emp_lname" ] = (Object) O;
Entire row To set data values for an entire row, you need to provide an array of objects and each object in the array must be of the correct datatype. Objects in a returned array can be cast to their real datatype. Again, you must know the column datatypes in advance.
// return an array of objects for row 5Object [ ] O = dw_1.PrimaryData[ 5 ];
// get original data values in row 5Object [ ] O = dw_1.PrimaryData[ 5, true ];
// set data values in row 5 from an array of objectsdw_1.PrimaryData [ 5 ] = O;
Range of rows When you access data values for a range of rows, an array of object arrays is returned. Each object array is the same as the single row described in “Entire row,” and accessing and setting values follow the same rules for datatypes.
// get data values in rows 1 to 5Object [ ] O = dw_1.PrimaryData [ 1, 5 ];
// get original data in rows 1 to 5Object [ ] O = dw_1.PrimaryData [ 1, 5, true ];
// set data values in rows 1 to 5dw_1.PrimaryData [ 1, 5 ] = O;
Subset of columns in a range of rows
You can access or set a subset of column values in a range of rows using startrow, startcol, endrow, and endcol arguments:
// get data values in columns 3 to 6 in rows 1 to 5Object [ ] O = dw_1.PrimaryData [ 1, 3, 5, 6 ];
// get original data valuesObject [ ] O = dw_1.PrimaryData [ 1, 3, 5, 6, true ];

Chapter 3 Working with DataWindow Controls
Programmer’s Guide 83
// set data values in columns 3 to 6 in rows 1 to 5dw_1.PrimaryData [ 1, 3, 5, 6 ] = O;
Entire data buffer You can access an entire data buffer using the Rows and OriginalValues properties:
Object [ ] O = dw_1.PrimaryData.Rows;Object [ ] O = dw_1.PrimaryData.OriginalValues;dw_1.PrimaryData.Rows = O;
C# example This C# example is for a DataWindow based on the department table in the EAS Demo database. The DataWindow contains three columns (dept_id, dept_name, and dept_head_id).
// Get a single row Object[] obj = dw_1.PrimaryData[1];MessageBox.Show("dept id :"+obj[0].ToString());MessageBox.Show("dept name :"+obj[1].ToString());MessageBox.Show("dept head id :"+obj[2].ToString());
// Get a range of rows from row 1 to // row 3 for all columnsObject[] obj = dw_1.PrimaryData[1,3];For (int i=0;i<3;i++){
Object[] rowobj = (Object[])obj[i];MessageBox.Show("dept id:"+rowobj[0].ToString());MessageBox.Show("dept name:"+rowobj[1].ToString());MessageBox.Show("dept head id:"
+rowobj[2].ToString());}
// Set data values in a single rowint deptid = 600;String deptname = "Human Resources";int managerid = 102;int li_row;Object[] obj = new Object[3];obj[0] = deptid;obj[1] = deptname;obj[2] = managerid;li_row = dw_1.InsertRow(0);dw_1.PrimaryData[li_row] = obj;

Using other DataWindow methods
84 DataWindow .NET
Visual Basic example The following Visual Basic examples use the department and employee tables in the EAS Demo database and are included in the samples available in the Code Examples directory. These statements set the data value of the start_date column in row 1 to December 25, 2005:
Dim D As System.DateTimeD = New DateTime(2005, 12, 25, 1, 25, 0, 0)dwPrimary.PrimaryData(1, "start_date") = D
These statements filter data from a primary DataWindow and display it in a secondary DataWindow:
'Clear any data from the secondary DataWindowdwSecondary.Reset()'Apply a filter to the primary DataWindowdwPrimary.SetFilter("dept_id = 100")dwPrimary.Filter()
'Take the filtered rows and set them into 'the Secondary DataWindowDim dwData As ObjectdwData = dwPrimary.FilteredData.RowsdwSecondary.PrimaryData.Rows = dwData
Using other DataWindow methodsThere are many more methods you can use to perform activities in DataWindow controls. The more common ones are listed in Table 3-3. These methods are all available on the DataWindowControl. The Client and Server columns indicate whether each method is available on the Web DataWindow client or the WebDataWindowControl server control.
Table 3-3: Common methods in DataWindow controls
Method Purpose Client Server
AcceptText Applies the contents of the edit control to the current item in the DataWindow control
Yes No
DeleteRow Removes the specified row from the DataWindow control, placing it in the Delete buffer; does not delete the row from the database
Yes Yes
Filter Displays rows in the DataWindow control based on the current filter
No Yes

Chapter 3 Working with DataWindow Controls
Programmer’s Guide 85
The Web DataWindow client and server controls both support ScrollFirstPage, ScrollLastPage, ScrollPriorPage, and ScrollNextPage methods. You can see a complete list of DataWindowControl and WebDataWindowControl methods in the Object Browser or the online Help in Visual Studio .NET. For a list of Web DataWindow client methods, see “Calling client methods” on page 256.
Accessing the properties of a DataWindow objectDataWindow object properties store the information that controls the behavior of a DataWindow object. They are not properties of the DataWindowControl, WebDataWindowControl, or DataStore, but of the DataWindow object displayed in the control. The DataWindow object is itself made up of individual controls—column, text, graph, and drawing controls—that have DataWindow object properties.
You establish initial values for DataWindow object properties in DataWindow Designer. You can also get and set property values at runtime in your code. You can access the properties of a DataWindow object using the Describe and Modify methods or GetProperty and SetProperty methods, GraphicObject classes containing properties and methods specific to a given control on the DataWindow, or dot notation.
GetRowFromRowId, GetRowIdFromRow
Returns a row number from its identifier, or a row’s identifier from its row number
No Yes
InsertRow Inserts a new row Yes Yes
Reset Clears all rows in the DataWindow control No Yes
Retrieve Retrieves rows from the database Yes Yes
RowsCopy, RowsMove Copies or moves rows from one DataWindow control to another or from one buffer to another within a DataWindow control
No Yes
RowsDiscard Discards a range of rows in a DataWindow control No Yes
Scroll Scrolls according to a specified scroll type or to a specified row No No
SelectRow Highlights a specified row Yes Yes
ShareData Shares data among different DataWindow controls No Yes
Sort Sorts the rows in a DataWindow control using the DataWindow's current sort criteria
Yes Yes
UpdateData (Update on client control)
Sends to the database all inserts, changes, and deletions that have been made in the DataWindow control
Yes Yes
Method Purpose Client Server

Updating the database
86 DataWindow .NET
For more information, see Chapter 6, “Accessing DataWindow Object Properties in Code.” For lists and descriptions of DataWindow object properties, see the DataWindow Object Reference.
Updating the databaseAfter users have made changes to data in a DataWindow control, you can use the UpdateData method to save the changes in the database. UpdateData sends to the database all inserts, changes, and deletions made in the DataWindow since the last UpdateData or Retrieve method was executed.
How the DataWindow control updates the databaseFor database updates, the DataWindow control determines what type of SQL statements to generate by looking at the status of each of the rows and columns in the DataWindow buffers.
For rows, the RowStatus enumeration has four values. For columns, the ItemStatus enumeration has two values.
Table 3-4: RowStatus enumeration
Table 3-5: ItemStatus enumeration
Value Meaning
New The row is new but no values have been specified for its columns.
NewAndModified The row is new, and values have been assigned to its columns. In addition to changes caused by user entry or one of the SetItem methods, a new row gets the status NewModified when one of its columns has a default value.
NotModified The information in the row has not changed.
Modified The information in one or more of the columns in the row has changed.
Value Meaning
NotModified The information in the column has not changed.
Modified The information in the column has changed.

Chapter 3 Working with DataWindow Controls
Programmer’s Guide 87
How statuses are set When data is retrieved When data is retrieved into a DataWindow, all rows and columns initially have a status of NotModified.
After data has changed in a column in a particular row, either because the user changed the data or the data was changed programmatically, such as through one of the SetItem methods, the ItemStatus for that column changes to Modified. Once the status for any column in a retrieved row changes to Modified, the RowStatus also changes to Modified.
When rows are inserted When a row is inserted into a DataWindow, it initially has a RowStatus of New, and all columns in that row initially have an ItemStatus of NotModified. After data has changed in a column in the row, either because the user changed the data or the data was changed programmatically, the ItemStatus changes to Modified. Once the ItemStatus for any column in the inserted row changes to Modified, the RowStatus changes to NewAndModified.
When a DataWindow column has a default value, the column’s status does not change to Modified until the user makes at least one actual change to a column in that row.
When UpdateData is called
For rows in the Primary and Filter buffers When the UpdateData method is called, the DataWindow control generates SQL INSERT and UPDATE statements for rows in the Primary and/or Filter buffers based upon the row statuses in Table 3-6.
Table 3-6: RowStatus and SQL statement generated
A column is included in an UPDATE statement only if the following two conditions are met:
• The column is on the updatable column list maintained by the DataWindow object
For more information about setting the update characteristics of the DataWindow object, see the DataWindow Designer User's Guide.
• The column has an ItemStatus of Modified
Row status SQL statement generated
NewAndModified INSERT
Modified UPDATE (or DELETE/INSERT if a primary key is changed and the update properties of the DataWindow object are set to generate that sequence)

Updating the database
88 DataWindow .NET
The DataWindow control includes all columns in INSERT statements it generates. If a column has no value, the DataWindow attempts to insert a null. This causes a database error if the database does not allow null values in that column.
For rows in the Delete buffer The DataWindow control generates SQL DELETE statements for any rows that were moved into the Delete buffer using the DeleteRow method. However, if a row has a RowStatus of New or NewAndModified before DeleteRow is called, no DELETE statement is issued for that row.
Changing row or column status programmaticallyYou might need to change the status of a row or column programmatically. Typically, you do this to prevent the default behavior from taking place. For example, you might copy a row from one DataWindow to another; and after the user modifies the row, you might want to issue an UPDATE statement instead of an INSERT statement.
You use the SetRowStatus method to programmatically change a DataWindow's row status information. Use the GetRowStatus method to determine the status of a specific row.
You use the SetItemStatus method to programmatically change a DataWindow's column status information. Use the GetItemStatus method to determine the status of a specific column.
Changing column status
You use SetItemStatus to change the column status from Modified to NotModified, or vice versa.
Change column status when you change row statusChanging the row status changes the status of all columns in that row to NotModified, so if the UpdateData method is called, no SQL update is produced. You must change the status of columns to be updated after you change the row status.

Chapter 3 Working with DataWindow Controls
Programmer’s Guide 89
Changing row status Changing row status is a little more complicated. The following table illustrates the effect of changing from one row status to another.
Table 3-7: Effects of changing from one row status to another
In the preceding table, the word Expected in the Result column means that the row status is changed to the specified status. For example, issuing SetRowStatus to change the status to Modified or NewAndModified always succeeds.
No change means that the change is not valid and the status is not changed. For example, issuing SetRowStatus on a row that has the status New to change the status to NotModified does not change the status.
Different means that the resulting status is different from both the original and the specified status. For example, issuing SetRowStatus on a row that has the status Modified to change the status to New changes the status to NewAndModified.
Changing a row's status to NotModified or New causes all columns in that row to be assigned an ItemStatus of NotModified. Change the column’s status to Modified to ensure that an update results in a SQL Update.
Changing status indirectlyWhen you cannot change to the desired status directly, you can usually do it indirectly. For example, change New to Modified to NotModified.
Specified Status Original Status Resulting Status Result
Modified New Modified Expected
Modified NewAndModified Modified Expected
Modified NotModified Modified Expected
NewAndModified New NewAndModified Expected
NewAndModified Modified NewAndModified Expected
NewAndModified NotModified NewAndModified Expected
New NewAndModified NewAndModified No change
New Modified NewAndModified Different
New NotModified New Expected
NotModified Modified NotModified Expected
NotModified New New No change
NotModified NewAndModified New Different
Handling events
90 DataWindow .NET
Handling eventsDataWindow .NET follows the delegate event-handling model used in the .NET Framework.
Senders and delegates
An event can be triggered when a user clicks a button or moves a mouse, or when your code triggers the event explicitly. The object that triggers the event is called the event sender. The event sender has no knowledge of the object that captures the event (the event receiver), and the role of the delegate is to act as an intermediary between the sender and receiver.
The delegate is a special class that takes information about the sender of the event and the data associated with the event and communicates it to the method that actually handles the event.
An “On” method triggers an event
An event is triggered by a protected method that has the name of the event with the prefix On. For example, the RowFocusChanging event for the DataWindowControl is triggered by the OnRowFocusChanging method.
The method that triggers the event has one argument that inherits from the System.EventArgs class and contains data associated with the event. The argument for OnRowFocusChanging is RowFocusChangingEventArgs.
Delegate naming and arguments
The delegate for an event has the same name as the event with the suffix EventHandler. For example, the delegate for RowFocusChanging is RowFocusChangingEventHandler. A delegate has two arguments: a reference to the System.Object that triggered the event (the sender) and the descendant of the System.EventArgs class specifically associated with the event. The second argument can also be a specialized descendant of System.EventArgs called CancelEventArgs—this argument can be used when the event can be cancelled.
EventArgs argument The descendant of EventArgs associated with an event has properties specific to the event. For example, RowFocusChangingEventArgs has three properties:
• Cancel can be set to true to disallow the focus change to the new row number
• CurrentRowNumber is the number of the row that currently has focus
• NewRowNumber is the number of the row that will get focus
For an example of coding an event handler, see “Retrieving data” on page 38.

Chapter 3 Working with DataWindow Controls
Programmer’s Guide 91
Event scripts for user-defined buttons
In DataWindow Designer, you can add buttons to a DataWindow with either a predefined action, such as Update or Retrieve, or a user-defined action. If you use a predefined action, the code to perform the action is provided for you. If you select User-Defined (the default) from the Action list in the DataWindow painter, you need to code a ButtonClicked event for the button.
Suppose you add two buttons named b_button1 and b_button2 to a DataWindow object in the DataWindow painter. You can add a ButtonClicked event to the DataWindow control in .NET to perform a different action depending on which button was clicked:
Private Sub dwGrid_ButtonClicked(ByVal sender As Object, ByVal e As Sybase.DataWindow.ButtonClickedEventArgs) Handles dwGrid.ButtonClicked
Dim buttonClicked As StringbuttonClicked = _
dwGrid.ObjectUnderMouse.Gob.Name.ToString()If buttonClicked = "b_button1" Then
MsgBox("Button 1 was Clicked!")ElseIf buttonClicked = "b_button2" Then
MsgBox("Button 2 was clicked!")End If
End Sub
Events in Web applications
Events that take place in the client browser in an ASP.NET Web application can be handled in client events. Client-side methods or built-in buttons that cause a page round trip trigger the BeforePerformAction and AfterPerformAction server-side events. For more information, see “About client-side programming” on page 253.
Handling DataWindow exceptionsThere are several types of errors that can occur during DataWindow processing. For example:
• Data items that are invalid (discussed in “Manipulating data in a DataWindow control” on page 74)
• Failures when retrieving or updating data
• Attempts to access invalid or nonexistent properties or data

Handling DataWindow exceptions
92 DataWindow .NET
The DataWindow server throws the exceptions listed in Table 3-8. Your code should use try-catch blocks to trap these exceptions. See the online Help for each method to see which exceptions it can throw.
Table 3-8: DataWindow .NET exceptions
Exception When thrown
ChildNotFoundException If the requested child DataWindow was not found
DataWindowLoadFailedException If the specified DataWindow object cannot be loaded
DataWindowNotCreatedException If a method is called before creation of the DataWindow is completed
DataWindowServerLoadFailedException If the DataWindow server cannot be loaded
DbErrorException When a database error occurs
InvalidColumnException When a method specifies an invalid column number or name
InvalidExpressionException When an invalid expression is detected
InvalidRowNumberException When a method specifies an invalid row number
MethodFailureException Thrown for an otherwise undocumented failure of a method
NoPermissionCreateFileException Thrown in a Web application when the ASP.NET process does not have permission to create a file
NoPermissionCreateFolderException Thrown in a Web application when the ASP.NET process does not have permission to create a folder
System.ArgumentException When a method specifies an invalid parameter
System.ArgumentNullException When an argument is null
System.ArgumentOutOfRangeException If an argument is not in range (not applicable to rows and columns – see IndexOutOfRangeException)
System.IndexOutOfRangeException If an index is not in range (applies to code table methods)
System.InvalidOperationException When an operation that is usually legal cannot be carried out because of the current state of the object
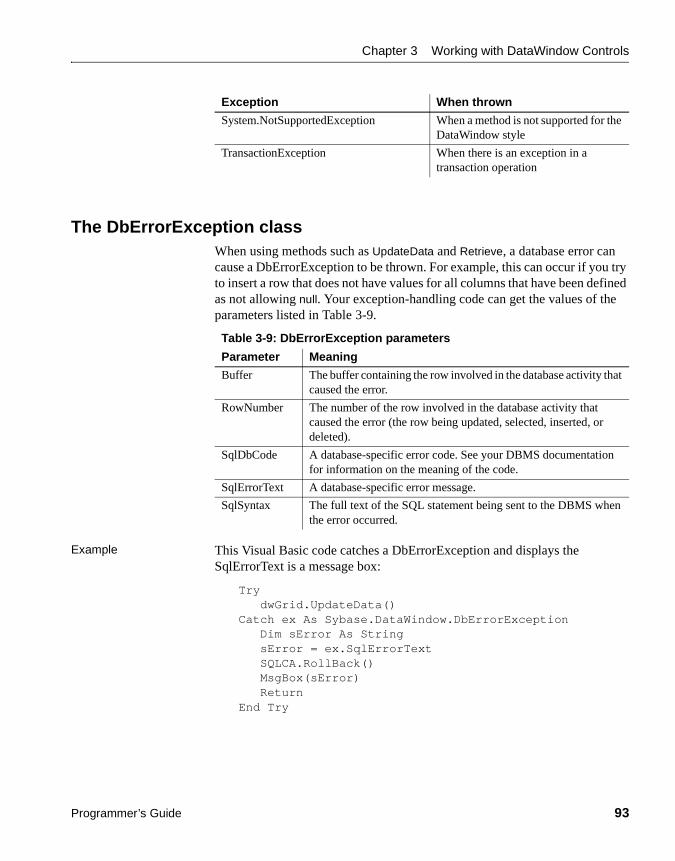
Chapter 3 Working with DataWindow Controls
Programmer’s Guide 93
The DbErrorException classWhen using methods such as UpdateData and Retrieve, a database error can cause a DbErrorException to be thrown. For example, this can occur if you try to insert a row that does not have values for all columns that have been defined as not allowing null. Your exception-handling code can get the values of the parameters listed in Table 3-9.
Table 3-9: DbErrorException parameters
Example This Visual Basic code catches a DbErrorException and displays the SqlErrorText is a message box:
TrydwGrid.UpdateData()
Catch ex As Sybase.DataWindow.DbErrorExceptionDim sError As StringsError = ex.SqlErrorTextSQLCA.RollBack()MsgBox(sError)Return
End Try
System.NotSupportedException When a method is not supported for the DataWindow style
TransactionException When there is an exception in a transaction operation
Exception When thrown
Parameter Meaning
Buffer The buffer containing the row involved in the database activity that caused the error.
RowNumber The number of the row involved in the database activity that caused the error (the row being updated, selected, inserted, or deleted).
SqlDbCode A database-specific error code. See your DBMS documentation for information on the meaning of the code.
SqlErrorText A database-specific error message.
SqlSyntax The full text of the SQL statement being sent to the DBMS when the error occurred.

Creating reports
94 DataWindow .NET
This C# code displays a message box that uses the value of SqlDbCode:
// Database error -195 means that some of the// required values are missingIf Ex.SqlDbCode = -195 {
string message = "You have not supplied values forall the required fields.";
string caption = "Missing Information";MessageBox.Show(message, caption);
}
Creating reportsYou can use DataWindow objects to create standard business reports such as financial statements, sales order reports, employee lists, or inventory reports.
To create a production report, you:
• Determine the type of report you want to produce
• Build a DataWindow object to display data for the report
• Place the DataWindow object in a DataWindow control on a form
• Write code to perform the processing required to populate the DataWindow control and print the contents as a report
Planning and building the DataWindow objectTo design the report, you create a DataWindow object. You select the data source and presentation style and then:
• Sort the data
• Create groups in the DataWindow object to organize the data in the report and force page breaks when the group values change
• Enhance the DataWindow object to look like a report (for example, you might want to add a title, column headers, and a computed field to number the pages)
For information about designing DataWindow objects for use in Web applications, see “Designing DataWindow objects for the Web DataWindow” on page 214.

Chapter 3 Working with DataWindow Controls
Programmer’s Guide 95
Using fontsPrinter fonts are usually shorter and fatter than screen fonts, so text might not print in the report exactly as it displays in DataWindow Designer. You can pad the text fields to compensate for this discrepancy.
You should test the report format with a small amount of data before you print a large report.
Printing the reportAfter you build the DataWindow object and fill in print specifications, you can place it in a DataWindowControl on a form, as described in “Using drag-and-drop” on page 58.
To allow users to print the report, your application needs code that performs the printing logic. For example, you can place a button on the form, then write code that is run when the user clicks the button.
To print the contents of a single DataWindow control or DataStore, call the Print method. For example, this Visual Basic statement prints the report in the DataWindowControl dwSales:
dwSales.Print()
For information about the Print method, see the online Help. For information about using composite reports to print multiple DataWindows, see “Using composite reports” next. For information about printing Web DataWindows, see “Printing Web DataWindows” on page 207.
Using composite reportsWhen designing a DataWindow object for a report, you can choose to combine other reports (which are also DataWindow objects) within it. The basic steps for using composite reports in an application are the same ones you follow for the other report types. There are, however, some additional topics concerning these reports that you should know about.
To learn about designing composite reports, see the DataWindow Designer User's Guide.

Using composite reports
96 DataWindow .NET
Printing multiple updatable DataWindows on a page
An advantage of composite reports is that you can print multiple reports on a page. A limitation of composite reports is that they are not updatable, so you cannot directly print several updatable DataWindows on one page. However, there is an indirect way to do that, as follows.
You can use the GetChild method on a report embedded in a composite report to get a reference to that report. After getting the reference to the nested report, you can address it at runtime like other DataWindows.
Using this technique, you can call the ShareData method to share data between multiple updatable DataWindow controls and the nested reports in your composite report. This allows you to print multiple updatable DataWindows on a page through the composite report.
❖ To print multiple DataWindows on a page using a composite DataWindow:
1 Build a form that contains DataWindowControls with the updatable DataWindow objects.
2 Define a composite report that has reports corresponding to each of the DataWindows in the window or form that you want to print. Be sure to name each of the nested reports in the composite report.
3 Add the composite report to the form (it can be hidden).
4 In your application, do the following:
a Retrieve data into the updatable DataWindow controls.
b Use GetChild to get a reference to the nested reports in the composite report.
c Use ShareData to share data between the updatable DataWindow objects and the nested reports.
d When appropriate, print the composite report.
The report contains the information from the updatable DataWindow objects.
Re-retrieving dataEach time you retrieve data into the composite report, all references (handles) to nested reports become invalid, and data sharing with the nested reports is terminated. Therefore, be sure to call GetChild and ShareData each time after retrieving data.
For a list of properties of nested reports, see the DataWindow Object Reference.
Chapter 3 Working with DataWindow Controls
Programmer’s Guide 97
Using crosstabsTo perform certain kinds of data analysis, you might want to design DataWindow objects in the Crosstab presentation style. The basic steps for using crosstabs in an application are the same ones you follow for the other DataWindow types, but there are some additional topics concerning crosstabs that you should know about.
To learn about designing crosstabs, see the DataWindow Designer User's Guide.
Viewing the underlying dataIf you want users to be able to see the raw data as well as the cross-tabulated data, you can do one of two things:
• Place two DataWindow controls on the form: one that is associated with the crosstab and one that is associated with a DataWindow object that displays the retrieved rows.
• Create a composite DataWindow object that contains two reports: one that shows the raw data and one that shows the crosstab.
Do not share data between the two DataWindow objects or reportsThey have the same SQL SELECT data definition, but they have different result sets.
For more about composite DataWindows, see the DataWindow Designer User's Guide.
Letting users redefine the crosstabWith the CrosstabDialog method for the DataWindowControl, you can allow users to redefine which columns in the retrieved data are associated with the crosstab's columns, rows, and values at runtime. This method is not available on DataStores or WebDataWindowControls.

Using graphs
98 DataWindow .NET
The CrosstabDialog method displays the Crosstab Definition dialog box to allow the user to define the data for the crosstab's columns, rows, and values (using the same techniques as in DataWindow Designer). When the user clicks OK in the dialog box, the DataWindowControl rebuilds the crosstab with the new specifications.
As with other DataWindow objects, you can modify the properties of a crosstab at runtime using the Modify or SetProperty methods. For more information, see “Modifying a crosstab's properties at runtime” on page 151.
Using graphsGraphs in DataWindow objects are tied directly to the data that is in the DataWindow object. As the data changes, the graph is automatically updated to reflect the new values.
You can use graphs in DataWindow objects in two ways:
• By including a graph as a control in a DataWindow object to enhance the display of information.
• By using the Graph presentation style—the entire DataWindow object is a graph. In this case the underlying data is not visible.
Types of graphsDataWindow Designer provides many types of graphs for you to choose from. You choose the type on the Define Graph Style page in the DataWindow wizard or in the General page in the Properties view for the graph.
Area, bar, column, and line graphs
Area, bar, column, and line graphs are conceptually very similar. They differ only in how they physically represent the data values—whether they use areas, bars, columns, or lines to represent the values. All other properties are the same. Typically you use area and line graphs to display continuous data and use bar and column graphs to display noncontinuous data.
Pie graphs Pie graphs typically show one series of data points with each data point shown as a percentage of a whole. You can have pie graphs with more than one series if you want; the series are shown in concentric circles. Multi series pie graphs can be useful in comparing series of data.
Chapter 3 Working with DataWindow Controls
Programmer’s Guide 99
Scatter graphs Scatter graphs show xy data points. Typically you use scatter graphs to show the relationship between two sets of numeric values. Non-numeric values, such as string and DateTime datatypes, do not display correctly. Scatter graphs do not use categories. Instead, numeric values are plotted along both axes—as opposed to other graphs, which have values along one axis and categories along the other axis. You can have multiple series of data in a scatter graph. For example, you might want to plot mileage versus speed for several makes of cars in the same graph.
Three-dimensional graphs
You can also create 3-dimensional (3D) graphs of area, bar, column, line, and pie graphs. In 3D graphs (except for 3D pie graphs), series are plotted along a third axis (the Series axis) instead of along the Category axis. You can specify the perspective to use to show the third dimension.
Stacked graphs In bar and column graphs, you can choose to stack the bars and columns. In stacked graphs, each category is represented as one bar or column instead of as separate bars or columns for each series.
For more informationFor more information about working with graphs in DataWindow Designer, see the DataWindow Designer User’s Guide.
For information about using graphs in a Web DataWindow, see “Rendering graphs” on page 203.
For information about working with graphs at runtime, see Chapter 8, “Manipulating Graphs.”

Using graphs
100 DataWindow .NET
Programmer’s Guide 101
C H A P T E R 4 Working with DataStores
About this chapter This chapter describes how to use DataStore objects in an application.
Contents
Before you begin This chapter assumes you know how to build DataWindow objects in the DataWindow painter, as described in the DataWindow Designer User’s Guide.
About DataStoresA DataStore is a nonvisual DataWindow control. DataStores act just like DataWindow controls except that they do not have many of the visual characteristics associated with DataWindow controls. Like a DataWindow control, a DataStore has a DataWindow object associated with it. DataStores can be used in Windows and Web applications.
When to use a DataStore DataStores are useful when you need to access data but do not need the visual presentation of a DataWindow control. DataStores allow you to:
• Perform background processing against the database without having to hide DataWindow controls in a window
Topic Page
About DataStores 101
Working with a DataStore 103
Accessing and manipulating data in a DataStore 104
Event handling 106
Sharing information 106
.NET remoting 107

About DataStores
102 DataWindow .NET
Suppose that the DataWindow object displayed in a DataWindow control is suitable for online display but not for printing. In this case, you could define a second DataWindow object for printing that has the same result set description and assign this object to a DataStore. You could then share data between the DataStore and the DataWindow control. Whenever the user asked to print the data on a form, you could print the contents of the DataStore.
• Hold data used to show multiple views of the same information. When a window shows multiple views of the same information, you can use a DataStore to hold the result set. By sharing data between a DataStore and one or more DataWindow controls, you can provide different views of the same information without retrieving the data more than once.
DataStore methods Many of the methods and events available for DataWindowControls are also available for DataStores. However, some of the methods that handle online interaction with the user are not available for either DataStores or WebDataWindowControls, which use a DataStore internally. For example, DataStores support the Retrieve, UpdateData, InsertRow, and DeleteRow methods, but not FindNextSelectedRow and SetRowFocusIndicator.
Prompting for information
When you are working with DataStores, you cannot use functionality that causes a dialog box to display to prompt the user for more information. Here are some examples of when this can occur:
Prompt for Criteria You can define your DataWindow objects so that the user is prompted for retrieval criteria before the DataWindow retrieves data. This feature works with DataWindowControls only. It is not supported with DataStores.
Prompt for Printing For DataWindowControls, you can specify that a print setup dialog box display at runtime, either by checking the Prompt Before Printing check box on the DataWindow object’s Print Specifications property page, or by setting the DataWindow object’s Print.Prompt property in code. This is not supported with DataStores.
Retrieval arguments If you call the Retrieve method for a DataWindowControl that has a DataWindow object that expects an argument, but do not specify the argument in the method call, the DataWindow prompts the user for a retrieval argument. This behavior is not supported with DataStores.
DataStores require no visual overhead
Unlike DataWindowControls, DataStores do not require any visual overhead in a form. Using a DataStore is therefore more efficient than hiding a DataWindowControl in a form.

Chapter 4 Working with DataStores
Programmer’s Guide 103
Working with a DataStore To use a DataStore, you first need to create an instance of the DataStore object and assign the DataWindow object to the DataStore. You can do this using drag-and-drop, as described for DataWindowControls in “Adding DataWindows to a form” on page 32, or in code.
Because it is a nonvisual object, when you drag a DataStore onto a form, its icon displays below the form. Also because it is nonvisual, it has only a few properties you need to set, including the LibraryList and DataWindowObject.
Then, if the DataStore is intended to retrieve data, you need to set the transaction object for the DataStore and connect to the database, if there is no existing connection. Once these setup steps have been performed, you can retrieve data into the DataStore, share data with another DataStore or DataWindow control, or perform other processing.
Examples The following code shows the code generated when you drag a DataStore onto a Windows form in a C# project and set its LibraryList and DataWindowObject properties.
Notice that a BeginInit method was generated. The Visual Studio .NET design environment uses this method to start the initialization of a component that is used on a form or used by another component. The EndInit method ends the initialization. Using the BeginInit and EndInit methods prevents the control from being used before it is fully initialized:
[C#]// In the declaration block for Form1private Sybase.DataWindow.DataStore dsDept;...// In private void InitializeComponent()this.dsDept = new
Sybase.DataWindow.DataStore(this.components);((System.ComponentModel.ISupportInitialize)
(this.dsDept)).BeginInit();...//this.dsDept.LibraryList = "C:\\dwbexam.pbl";this.dsDept.DataWindowObject = "printer_sales";

Accessing and manipulating data in a DataStore
104 DataWindow .NET
Accessing and manipulating data in a DataStore To access data using a DataStore, you need to read the data from the data source into the DataStore.
If the data source is a database
If the data for the DataStore is coming from a database (that is, the data source was defined as anything but External in the DataWindow painter), you need to communicate with the database to get the data. The steps you perform to communicate with the database are the same steps you use for a DataWindow control.
For more information about communicating with the database, see “Accessing a database” on page 62.
If the data source is not a database
If the data for the DataWindow object is not coming from a database (that is, the data source was defined as External in the DataWindow painter), you can use the following methods to import data into the DataStore:
ImportClipboard (in Windows applications only)ImportFileImportString
You can also get data into the DataStore by using a DataWindow data expression or by using one of the SetItem methods.
For more information about the SetItem methods, see “Accessing data values using methods” on page 78.
About the DataStore buffers
Like a DataWindow control, a DataStore uses three buffers to manage data:
Table 4-1: DataStore buffers
Programming with DataStores
There are many methods for manipulating DataStore objects. These are some of the more commonly used:
Table 4-2: Common methods in DataStore objects
Buffer Contents
Primary Data that has not been deleted or filtered out (that is, the rows would be visible in a visual presentation)
Filter Data that was filtered out
Delete Data that was deleted by the user or in a script
Method Purpose
DeleteRow Deletes the specified row from the DataStore.
Filter Filters rows in the DataStore based on the current filter criteria.
InsertRow Inserts a new row.
Print Sends the contents of the DataStore to the current printer.

Chapter 4 Working with DataStores
Programmer’s Guide 105
For information about DataStore methods, see the online Help in Visual Studio .NET.
Dynamic DataWindow objects The methods in the table above manipulate data in the DataStore but do not change the definition of the underlying DataWindow object. In addition, you can use the Describe and Modify (or GetProperty and SetProperty) methods to access and manipulate the definition of a DataWindow object. Using these methods, you can change the DataWindow object at runtime. For example, you can change the appearance of a DataWindow or allow your user to create ad hoc reports.
For more information, see Chapter 7, “Dynamically Changing DataWindow Objects.”
Using DataStore properties and events This chapter mentions only a few of the properties and events that you can use to manipulate DataStores. For more information about DataStore properties and events, see the online Help.
Reset Clears all rows in the DataStore.
Retrieve Retrieves rows from the database.
RowsCopy Copies rows from one DataStore to another DataStore or DataWindow control.
RowsMove Moves rows from one DataStore to another DataStore or DataWindow control.
ShareData Shares data among different DataStores or DataWindow controls. See “Sharing information” on page 106.
Sort Sorts the rows of the DataStore based on the current sort criteria.
UpdateData Sends to the database all inserts, changes, and deletions that have been made since the last UpdateData.
Method Purpose

Event handling
106 DataWindow .NET
Event handlingFor an overview of event handling in DataWindow .NET, see “Handling events” on page 90.
Most events are passed data in an argument structure specialized for a set of events. For example, the BeginRetrieve, RowRetrieved, and EndRetrieve events are passed row count and row number data in argument classes that extend the RowEventArgs class, and BeginPrint, PagePrinting, and EndPrint events are passed page count information in argument structures that extend the PrintEventArgs class.
Sharing information The ShareData method allows you to share a result set between two different DataStores or DataWindow controls. When you share information, you remove the need to retrieve the same data multiple times.
The ShareData method shares data retrieved by one DataWindow control or DataStore (called the primary DataWindow) with another DataWindow control or DataStore (the secondary DataWindow).
Result set descriptions must match
When you share data, the result set descriptions for the DataWindow objects must be the same. However, the SELECT statements can be different. For example, you could use the ShareData method to share data between DataWindow objects that have the following SELECT statements (because the result set descriptions are the same):
SELECT dept_id from deptSELECT dept_id from dept where dept_id = 200SELECT dept_id from employee
You can also share data between two DataWindow objects where the source of one is a database and the source of the other is external. As long as the lists of columns and their datatypes match, you can share the data.
What is shared? When you use the ShareData method, the following information is shared:
Primary bufferDelete bufferFilter bufferSort order

Chapter 4 Working with DataStores
Programmer’s Guide 107
ShareData does not share the formatting characteristics of the DataWindow objects. That means you can use ShareData to apply different presentations to the same result set.
When you alter the result set
If you perform an operation that affects the result set on either the primary or the secondary DataWindow, the change affects both of the objects sharing the data because the result set is shared. For example, if you call the UpdateData method for the secondary DataWindow, the update operation is applied to the primary DataWindow also.
Turning off sharing data
To turn off the sharing of data, you use the ShareDataOff method. When you call ShareDataOff for a primary DataWindow, any secondary DataWindows are disassociated and no longer contain data. When you call ShareDataOff for a secondary DataWindow, that DataWindow no longer contains data, but the primary DataWindow and other secondary DataWindows are not affected.
In most cases you do not need to turn off sharing, because the sharing of data is turned off automatically when a window is closed and any DataWindow controls (or DataStores) associated with the window are destroyed.
Crosstabs You cannot share data with a DataWindow object that has the Crosstab presentation style.
.NET remotingDataWindow synchronization
In a conventional client/server application, where database updates are initiated by a single application running on a client machine, the DataWindow server can manage DataWindow state information for you automatically. In an application that uses .NET remoting, the situation is somewhat different. Because application components are partitioned between the client and the server, you need to write logic to ensure that the data buffers and status flags for the DataWindow control on the client are synchronized with those for the DataStore on the server.
DataWindow .NET provides four methods that support .NET remoting for DataWindow controls and DataStores:
GetFullStateSetFullStateGetChangesSetChanges

.NET remoting
108 DataWindow .NET
Although these methods are most useful in distributed applications, they can also be used in nondistributed applications where multiple DataWindow controls or DataStores must be synchronized.
Moving DataWindow buffers and status flags
To synchronize a DataWindow control on the client with a DataStore on the server, move the DataWindow data buffers and status flags back and forth between the client and the server whenever changes occur. The procedures for doing this are essentially the same whether the source of the changes resides on the client or the server.
To apply complete state information from one DataWindow control or DataStore to another, you need to:
1 Invoke the GetFullState method to capture the current state of the source DataWindow or DataStore.
2 Invoke the SetFullState method to apply the state of the source DataWindow or DataStore to the target.
To apply changes from one DataWindow control or DataStore to another, you need to:
1 Invoke the GetChanges method to capture changes from the source DataWindow or DataStore.
2 Invoke the SetChanges method to apply changes from the source DataWindow or DataStore to the target.
SetChanges can be applied to an empty DataWindow control or DataStoreYou can call SetChanges to apply changes to an empty DataWindow control or DataStore. The target DataWindow control does not need to contain a result set from a previous retrieval operation. However, the DataWindow control must have access to the DataWindow definition. This means that you need to assign the DataWindow object to the target DataWindow control before calling SetChanges.
DataWindow state is stored in blobs
When you call GetFullState, the DataWindow server returns DataWindow state information in a DataWindowFullState object that inherits from the DataWindow Blob class. When you call GetChanges, state information is returned in a DataWindowChanges object that inherits from Blob. These objects support the ISerializable interface for use in .NET remoting applications.

Chapter 4 Working with DataStores
Programmer’s Guide 109
This function in a client console application calls GetFullState, stores the state of the DataWindow object in a DataWindowFullState object, and writes progress to the console:
public DataWindowFullState GetDwData(){
Console.WriteLine("GetDwData() called");ds_1.DataWindowObject = "d_dept_grid";ds_1.SetTransaction(sqlca);
DataWindowFullState FullState = null;try{
ds_1.Retrieve();FullState = ds_1.GetFullState();
Console.WriteLine("Retrieve Succeeded ");}catch (Sybase.DataWindow.DbErrorException ex){
Console.WriteLine("DbErrorException on Retrieve"+ ex.SqlErrorText );
}return FullState;
}
The DataWindowFullState object returned from GetFullState provides everything required to recreate the DataWindow, including the data buffers, status flags, and complete DataWindow specification. The DataWindowChanges object returned from GetChanges provides data buffers and status flags for changed and deleted rows only.
DataWindowFullState and DataWindowChanges do not support Web servicesDataWindowFullState and DataWindowChanges cannot be used in a Web service because some of their members are internal or protected and therefore cannot be serialized using XML serialization.
Synchronizing after UpdateData
When called without arguments, the UpdateData method resets the update flags after a successful update. Therefore, when you call the UpdateData method on the server, the status flags are automatically reset for the server DataStore. However, the update flags for the corresponding client DataWindow control are not reset. Therefore, if the UpdateData method on the server DataStore succeeds, call ResetUpdateStatus on the client DataWindow to reset the flags.

.NET remoting
110 DataWindow .NET
One source, one target
You can synchronize a single source DataWindow control or DataStore with a single target DataWindow control or DataStore. Do not try to synchronize a single source with multiple targets, or vice versa.
Typical usage scenarioSuppose the server application uses a DataStore called ds_1. This DataStore is the source of data for a target DataWindow control called dw_1 on the client. The server application connects to the database, creates a DataStore, and assigns the DataWindow object to the DataStore.
In one of its functions, the server application issues a Retrieve method for ds_1, calls GetFullState on ds_1, and then passes the resulting DataWindowFullState object to the client.
Once the client has the FullState object, it calls SetFullState to apply the state information from FullState to dw_1.
At this point, the user can insert new rows in dw_1 and change or delete some of the existing rows. When the user makes an update request, the client calls GetChanges and invokes another function that passes the resulting DataWindowChanges object back to the server. The server application function then calls SetChanges to apply the changes from dw_1 to ds_1.
After synchronizing ds_1 with dw_1, the server application updates the database. If the update was successful, the client calls ResetUpdateStatus to reset the status flags on the client DataWindow.

Programmer’s Guide 111
C H A P T E R 5 Working with Transaction and AdoTransaction Objects
About this chapter This chapter describes the Transaction and AdoTransaction classes.
Contents
About the Transaction and AdoTransaction classesDataWindow .NET provides two classes that support the connection between a DataWindow object and a database.
Transaction class The Transaction class provides control of the transaction using Connect, Disconnect, Commit, and Rollback methods, and properties for specific parameters including the DBMS, database, user ID, and password.
AdoTransaction class The Transaction class does not export a public interface and can be used only with DataWindow objects. If you want to share a connection with other database constructs in your application, such as DataSet or Command objects, you can use an instance of the AdoTransaction class.
Like classes that inherit from the System.Data.IDbCommand interface, such as OdbcCommand and OleDbCommand, the AdoTransaction class has public properties that hold an ADO.NET connection and transaction. The Connection class represents a unique session with a data source.
Figure 5-1 shows the public properties and methods defined for the Transaction and AdoTransaction classes. The Transaction class inherits additional properties and methods from the System.ComponentModel.Component class, and it uses the DbmsType enumeration to provide the value for the DBMS used.
Topic Page
About the Transaction and AdoTransaction classes 111
Using a Transaction object 112
Using an AdoTransaction object 120

Using a Transaction object
112 DataWindow .NET
Figure 5-1: Transaction and AdoTransaction classes
Using a Transaction objectIn a DataWindow database connection, a Transaction object is a nonvisual object that functions as the communications area between the DataWindow and the database. The Transaction object specifies the parameters that the DataWindow server uses to connect to a database. You must establish the Transaction object before you can access the database from your application.
Communicating with the database
If you are using a Transaction object, you take the following general steps:
1 Create a Transaction object.
2 Set its properties.
Chapter 5 Working with Transaction and AdoTransaction Objects
Programmer’s Guide 113
3 Connect to the database.
4 Assign the Transaction object to a DataWindowControl, WebDataWindowControl, or DataStore and perform database processing.
5 Disconnect from the database.
Exception handlingThe sample code in the following sections is simplified for brevity. You would usually wrap your code with try-catch statements to ensure that attempts to modify the database succeeded before committing the transaction. For more information, see “Exception handling” on page 118.
Creating a Transaction object using drag and dropIn Visual Studio .NET, you can create a Transaction object by dragging the Transaction item from the Sybase DataWindow 2.0 tab in the Toolbox to a form. Because it is a nonvisual object, its icon displays in the area below the form in a Windows application. In a Web site application, you need to open the Code Designer view to see the Transaction icon in the Toolbox and drag it to the view. You can right-click on the icon and display the Properties window to set properties, or you can set them in code.
If you use drag-and-drop to add the Transaction object to a form, the Transaction object is added to the form's components list. Objects on the components list are disposed automatically when the form is disposed, so you do not need to explicitly disconnect the transaction. However, if you declare the Transaction object in code, as described next, you must call the Disconnect method explicitly. The connection that the Transaction object represents is not closed automatically when the Transaction object goes out of scope.
Creating a Transaction object in codeTo create a Transaction object in code, declare it in the form, then create a new instance of it. To simplify the code, the examples in this chapter assume that the Sybase.DataWindow namespace has been referenced in the code:
[Visual Basic]Imports Sybase.DataWindow...Friend WithEvents TR1 As Transaction

Using a Transaction object
114 DataWindow .NET
...Me.TR1 = New Transaction()
[C#]using Sybase.DataWindow;...private Transaction TR1;...this.TR1 = new Transaction();
Setting Transaction object propertiesTable 5-1 describes the properties of the Transaction object. You can set most of these properties in code or in the Properties window for a Transaction object in your .NET development environment. When you are designing a DataWindow object, you can set these properties in the Database profile dialog box in DataWindow Designer. The table lists the equivalent field in the Database Profile Setup dialog box that you complete to create a database profile in DataWindow Designer. A few of the properties cannot be set—you use them to get information about the transaction.
Properties for DataWindow .NET database interfacesFor information about the values you should supply for each connection property, see the section for the database interface you are using in the Connection Reference in the online Help for DataWindow Designer.
Table 5-1: Transaction object properties
Property Datatype DescriptionIn a database profile
Dbms Enumeration The DBMS identifier for your connection. For a complete list of the identifiers for the supported database interfaces, see the online Help.
DBMS
Database String The name of the database to which you are connecting. Database Name
UserID String The name or ID of the user who will log in to the database server.
User ID
Password String The password used to log in to the database server. Password

Chapter 5 Working with Transaction and AdoTransaction Objects
Programmer’s Guide 115
Using the Preview tab to connect in DataWindow Designer
The Preview tab page in the Database Profile Setup dialog box makes it easy to generate accurate connection syntax in DataWindow Designer for use in your .NET code.
As you complete the Database Profile Setup dialog box, the correct connection syntax for each selected option is generated on the Preview tab. DataWindow Designer assigns the corresponding database parameter or property name to each option and inserts quotation marks, commas, semicolons, and other characters where needed. You can copy the syntax you want from the Preview tab directly into your script.
Lock String For those DBMSs that support the use of lock values and isolation levels, the isolation level to use when you connect to the database. For information about the lock values you can set for your DBMS, see the descriptions of the Isolation and Lock database parameters in the online Help for DataWindow Designer.
Isolation or Isolation Level
ServerName String The name of the server on which the database resides. Server Name
AutoCommit Boolean For those DBMSs that support it, specifies whether database operations are issued outside of the scope of a transaction, and therefore take immediate and permanent effect.
AutoCommit Mode
DbParameter String Contains DBMS-specific connection parameters that support particular DBMS features. For a description of each parameter that the DataWindow server supports, see the chapter on setting additional connection parameters in Connecting to Your Database.
Various fields
SqlReturnData String Contains DBMS-specific information. Cannot be set
RowsAffected Int32 The number of rows affected by the most recent SQL operation. The database vendor supplies this number, so the meaning may be different for each DBMS.
Cannot be set
DbHandle String The handle for your DBMS, which can be used to directly involve native methods in the database client API.
Cannot be set
IsConnected Boolean Whether the transaction object is connected to the database. Values are true (connected) and false (not connected).
Cannot be set
Property Datatype DescriptionIn a database profile

Using a Transaction object
116 DataWindow .NET
❖ To use the Preview tab to connect in a .NET application:
1 In the Database Profile Setup dialog box for your connection, supply values for basic options on the Connection page and additional parameters and properties on the other tabbed pages as required by your database interface.
For information about connection parameters for your interface and the values you should supply, click the Help button in the dialog box.
2 Click Apply to save your settings without closing the Database Profile Setup dialog box.
3 Click the Preview tab.
The correct connection syntax for each selected option displays in the Database Connection Syntax box using SQLCA as the name of the Transaction object and VB.NET as the language.
4 If necessary, change the name in the Transaction Object box and select a different language from the Language Option list.
5 Select one or more lines of text in the Database Connection Syntax box and click Copy.
DataWindow Designer copies the selected text to the clipboard. You can then paste this syntax into your code.
6 Click OK.
Example The following statements assign values to the properties of a Transaction object named TR1 so that it can connect to the EAS Demo database using an ODBC connection:
[Visual Basic]TR1.Dbms = DbmsType.OdbcTR1.AutoCommit = TrueTR1.DbParameter = "ConnectString='DSN=EAS Demo DB V105 DWD;UID=dba;PWD=sql',RPCReBind=1,DisableBind=1,PBUseProcOwner='Yes'"
[C#]TR1.Dbms = DbmsType.Odbc;TR1.AutoCommit = true;TR1.DbParameter = "ConnectString='DSN=EAS Demo DB V105 DWD;UID=dba;PWD=sql',RPCReBind=1,DisableBind=1,PBUseProcOwner='Yes'";

Chapter 5 Working with Transaction and AdoTransaction Objects
Programmer’s Guide 117
Connecting to the databaseOnce you establish the connection parameters by assigning values to the Transaction object properties, you can connect to the database using the Transaction object’s Connect method:
[Visual Basic]InitializeComponent()TR1.Connect()
[C#]InitializeComponent();TR1.Connect();
Associating the Transaction object with a DataWindow control or DataStore
You use the SetTransaction method to associate the Transaction object with a DataWindowControl, WebDataWindowControl, or DataStore. After calling SetTransaction, you can perform database activities:
[Visual Basic]// In form’s load methoddwCustomer.SetTransaction(TR1)dwCustomer.Retrieve()...// In an Update buttondwCustomer.UpdateData()TR1.Commit()dwCustomer.ResetUpdateStatus()
[C#]// In form’s load methoddwCustomer.SetTransaction(TR1);dwCustomer.Retrieve();...// In an Update buttondwCustomer.UpdateData();TR1.Commit();dwCustomer.ResetUpdateStatus();

Using a Transaction object
118 DataWindow .NET
Disconnecting from the databaseWhen your database processing is completed, you disconnect from the database using the Disconnect method (you do not need to disconnect explicitly if you used drag-and-drop from the Toolbox to add the Transaction object to the form):
[Visual Basic]TR1.Disconnect()
[C#]TR1.Disconnect();
Exception handlingMost methods of the Transaction object throw System.InvalidOperationException if the Transaction is already connected, or Sybase.DataWindow.TransactionException for other failures. You can wrap the Connect, Commit, and Rollback methods in try-catch statements that catch these exceptions.
The TransactionException object has two properties that you can use to help determine the cause of the failure, SqlDbCode and SqlErrorText.
Table 5-2: TransactionException object properties
Using SqlErrorText and SqlDbCode
The string SqlErrorText in the Transaction object contains the database vendor-supplied error message. The integer named SqlDbCode in the Transaction object contains the database vendor-supplied status code. You can reference these variables in your code.
Example The following try-catch clause handles the exceptions that might be thrown when a Windows application connects to a database, associates a transaction with a DataWindowControl, and retrieves data from the database. Notice that DataWindow operations such as Retrieve might throw a DbErrorException, which also has SqlErrorText and SqlDbCode properties:
[Visual Basic]Try
sqlca.Connect()dwDept.SetTransaction(sqlca)
Property Datatype Description
SqlDbCode Int32 Database error code
SqlErrorText String The text of the database vendor’s error message corresponding to the error code

Chapter 5 Working with Transaction and AdoTransaction Objects
Programmer’s Guide 119
dwDept.Retrieve()Dim msg As String
Catch Ex As System.InvalidOperationExceptionmsg = "The transaction is already connected" _+ "The application cannot continue"MsgBox(msg)Application.Exit()
Catch Ex As TransactionExceptionmsg = Ex.SqlErrorText + _"\n\nThe application cannot continue." + _"Database Connection Failed"Application.Exit()
Catch Ex As DbErrorExceptionmsg = Ex.SqlErrorText + _"\n\nThe application cannot continue." + _"DataWindow Operation Failed"Application.Exit()
Catch Ex As System.Exceptionmsg = Ex.ToString() + _"\n\nThe application cannot continue." + _"Unexpected Exception"Application.Exit()
End Try
[C#]try
{sqlca.Connect();dwDept.SetTransaction(sqlca);dwDept.Retrieve();
} catch (System.InvalidOperationException ex) {
MessageBox.Show("The application cannotcontinue.", "The transaction is alreadyconnected", MessageBoxButtons.OK,MessageBoxIcon.Stop);Application.Exit();
}catch (TransactionException ex) {
MessageBox.Show(ex.SqlErrorText + "\n\nThe application cannot continue.", "Database Connection Failed",MessageBoxButtons.OK, MessageBoxIcon.Stop);Application.Exit();
}

Using an AdoTransaction object
120 DataWindow .NET
catch (DbErrorException ex) {
MessageBox.Show(ex.SqlErrorText + "\n\nThe application cannot continue.","DataWindow Operation Failed",MessageBoxButtons.OK, MessageBoxIcon.Stop);Application.Exit();
}catch (System.Exception ex){
MessageBox.Show(ex.ToString() + "\n\nThe application cannot continue.","Unexpected Exception", MessageBoxButtons.OK,MessageBoxIcon.Stop);Application.Exit();
}
Using an AdoTransaction objectYou can use an AdoTransaction object to share an ADO.NET connection with other database constructs in your application, such as Command objects, DataSets, DataTables, and DataViews.
Drag-and-drop not availableIn Visual Studio .NET, you can create a Transaction object by dragging the Transaction item from the Sybase DataWindow tab in the Toolbox to a form. You cannot create an AdoTransaction object using drag-and-drop—you must create it in code.
The ADO.NET database interface provided with DataWindow .NET comprises a server in a private .NET assembly (Sybase.PowerBuilder.Db.dll or Sybase.PowerBuilder.DbExt.dll for Oracle 10g or Adaptive Server® Enterprise 15 or later) and an unmanaged driver library (PBADO105.DLL). When you deploy an application that uses an AdoTransaction object, you must deploy these DLLs as well as PBSHR105.DLL. For more information about deploying applications, see Chapter 13, “Deploying DataWindow .NET Applications.”

Chapter 5 Working with Transaction and AdoTransaction Objects
Programmer’s Guide 121
PBSHR105.DLL contains utility routines that constitute a database interface layer between the DataWindow server and DataWindow .NET database interfaces for OLEDB, ODBC, and specific DBMSs, as well as ADO.NET. You must deploy this file with all DataWindow .NET applications, whatever database connectivity options they use.
For more information about the ADO.NET database interface, see Connecting to Your Database.
When you connect to a database in ADO.NET, you use one of the data providers supplied with the .NET Framework. Each data provider has four primary objects:
• The Connection object establishes a connection to a data source
• The Command object executes a command against the data source
• The DataReader reads a stream of data from the data source
• The DataAdapter populates a DataSet object with the data
In DataWindow .NET, you interact with the Connection object to open a connection to a database. In this release, you do not work directly with the other objects—the DataWindow handles database operations.
The AdoTransaction object has some similarities to the data provider’s Command object. Both have properties that get and set the connection and transaction that they use to perform database operations, and the AdoTransaction object creates a Command object internally and passes connection and transaction information to it.
Data provider supportIn this release, the .NET Framework data providers for OLE DB and SQL Server are supported.
Overview of steps If you are using an AdoTransaction object to connect to a database, you take the following general steps:
1 Create a new instance of an ADO.NET Connection object and set its properties.
2 Open an existing connection or create a new one.
3 Create an AdoTransaction object that uses the Connection object and bind it to the internal database interaction layer.

Using an AdoTransaction object
122 DataWindow .NET
4 Assign the AdoTransaction object to a DataWindowControl, WebDataWindowControl, or DataStore.
5 Start a transaction and perform database processing.
6 Disconnect from the database.
Generating code in the Database Profile dialog boxYou can use the Database Profile dialog box for ADO.NET in DataWindow Designer to generate the code you need to perform the first three of these steps. See “Using the Preview tab to connect in DataWindow Designer” on page 115.
Creating an ADO.NET Connection objectBefore you establish a connection, create an instance of a .NET data provider’s Connection object and set its properties. The example shown here uses the .NET Framework Data Provider for OLE DB:
[Visual Basic]Dim connString As New String _("User ID=dba;Password=sql;Data Source=EAS Demo DB V105 DWD;Provider=ASAProv.90")Dim oleDbConn As New OleDbConnection(connString)
[C#]OleDb.OleDbConnection oleDbConn = new OleDb.OleDbConnection();oleDbConn.ConnectionString = "User ID=dba;Password=sql;Data Source=EAS Demo DB V105 DWD;Provider=ASAProv.90";
When an instance of a connection has been created, it can be used again. Note that the ConnectionString property cannot be updated after the connection has been opened.

Chapter 5 Working with Transaction and AdoTransaction Objects
Programmer’s Guide 123
Opening a connectionThe Open method on a Connection object takes an open connection from a pool if a connection is available or opens a new connection:
[Visual Basic]oleDbConn.Open()
[C#]oleDbConn.Open();
Creating an AdoTransaction objectAn AdoTransaction object has four properties: Connection, DbParameter, IsBound, and Transaction. They are described in Table 5-3.
Table 5-3: AdoTransaction object properties
When you create a new AdoTransaction object, you can pass the name of the Connection object as a parameter of the constructor or call the constructor with no parameters and specify the Connection object using the Connection property.
You can also optionally supply database parameters to be passed on to the database interface layer. An easy way to determine the correct syntax for setting these parameters is to set them in the DataBase Profile dialog box for ADO.NET and copy them from the Preview page. See “Using the Preview tab to connect in DataWindow Designer” on page 115.
Property Datatype Description
Connection System.Data.IDbConnection The ADO.NET connection that the AdoTransaction object binds to the database interface layer. DataWindows that use the AdoTransaction object use this connection to perform database operations such as retrieve and update.
DbParameter String Database parameters to be passed to the database interface layer for processing. For a description of each parameter that the database interface supports, see the chapter on setting additional connection parameters in Connecting to Your Database.
IsBound Boolean Read-only property that indicates whether the ADO.NET connection associated with this AdoTransaction object has been bound to the database interface layer.
Transaction System.Data.IDbTransaction The ADO.NET transaction that is started within the AdoTransaction's Connection property.

Using an AdoTransaction object
124 DataWindow .NET
In the following example, an OleDbConnection object is passed in the constructor (no database parameters are passed), then the connection is bound to the database interface layer:
[Visual Basic]Imports Sybase.DataWindow...Friend WithEvents adoTrans As AdoTransaction...Me.adoTrans = New AdoTransaction(oleDbConn)adoTrans.BindConnection()
[C#]using Sybase.DataWindow;...private AdoTransaction adoTrans;...this.adoTrans = new AdoTransaction(oleDbConn);adoTrans.BindConnection();
The BindConnection method binds the connection object passed in the constructor to the database interface layer and sets the IsBound property to true. If you need to change the Connection object associated with the AdoTransaction, or change or add any database parameters, you must call the UnbindConnection method first.
Associating the AdoTransaction object with a DataWindow control or DataStore
You use the SetTransaction method to associate the AdoTransaction object with a DataWindowControl, WebDataWindowControl, or DataStore. The following code creates a DataStore, supplying the name of the DataWindow object and the library where it is stored as arguments in the constructor, and uses the SetTransaction method to associate the DataStore and the AdoTransaction:
[Visual Basic]Dim ds As New DataStore("mylib.pbd", "d_dept")ds.SetTransaction(adoTrans)
[C#]DataStore ds = new DataStore("mylib.pbd", "d_dept");ds.SetTransaction(adoTrans);

Chapter 5 Working with Transaction and AdoTransaction Objects
Programmer’s Guide 125
Starting a transaction and manipulating dataYou use the BeginTransaction method of the AdoTransaction object’s Connection property to start a transaction. The Connection property inherits its methods from the IDbConnection interface. Similarly, you use the Commit and Rollback methods of the AdoTransaction object’s Transaction property. The Transaction property inherits its methods from the IDbTransaction interface.
In the following example, data is retrieved into the DataStore before the transaction is started within a try-catch statement. Within the same try clause, changes in the data are updated to the database and committed and the status flags are reset. If the update fails, a DbErrorException is caught and the transaction is rolled back.
[Visual Basic]// In form's load methodds.Retrieve()...// In an Update buttonTry
adoTrans.Transaction = _adoTrans.Connection.BeginTransaction()
ds.UpdateData(true, false)adoTrans.Transaction.Commit()ds.ResetUpdateStatus()
Catch ex As DbErrorExceptionMessageBox.Show(ex.SqlErrorText + _"\n\nNo changes have been made to the database.", _"Database error", MessageBoxButtons.OK, _MessageBoxIcon.Stop);adoTrans.Transaction.Rollback();
Catch ex As ExceptionMessageBox.Show(ex.ToString() + _"\n\nNo changes have been made to the database.", _"Unexpected Exception", MessageBoxButtons.OK, _MessageBoxIcon.Stop);
End Try
[C#]// In form’s load methodds.Retrieve();...// In an Update buttontry

Using an AdoTransaction object
126 DataWindow .NET
{adoTrans.Transaction =
adoTrans.Connection.BeginTransaction();ds.UpdateData(true, false);adoTrans.Transaction.Commit();ds.ResetUpdateStatus();
}catch (DbErrorException ex) {
MessageBox.Show(ex.SqlErrorText + "\n\nNo changes have been made to the database.","Database error", MessageBoxButtons.OK,MessageBoxIcon.Stop);adoTrans.Transaction.Rollback();
}catch (Exception ex){
MessageBox.Show(ex.ToString() + "\n\nNo changes have been made to the database.","Unexpected Exception", MessageBoxButtons.OK,MessageBoxIcon.Stop);
}

Programmer’s Guide 127
C H A P T E R 6 Accessing DataWindow Object Properties in Code
About this chapter This chapter explains methods for accessing properties of controls within a DataWindow.
Contents
About properties of the DataWindow object and its controls
This section describes:
• What you can do with DataWindow object properties
• How to specify property values in the DataWindow painter
What you can do with DataWindow object propertiesThe DataWindow object defines the way data is displayed in a DataWindow control. (Here DataWindow control is used to mean a DataWindowControl, WebDataWindowControl, or DataStore). It contains controls that represent the columns, text labels, computed fields, and images.
The properties of the DataWindow object and its controls store the information that specifies the behavior of the DataWindow object. They are not properties of the DataWindow control, but of the DataWindow object displayed in the control.
Topic Page
About properties of the DataWindow object and its controls 127
Accessing DataWindow object property values in code 130
Accessing properties directly 131
Using Modify and SetProperty 139
About properties of the DataWindow object and its controls
128 DataWindow .NET
TerminologyWhen you are programming for DataWindows, there are several types of expressions involved.
A DataWindow expression is an expression assigned as a value to a DataWindow property and is evaluated by the DataWindow engine. The expression can refer to column data and can have a different value for each row in the DataWindow object.
A DataWindow property expression is an expression in your code that gets or sets the value of a DataWindow object property. Its effects are equivalent to what the Describe and Modify methods do.
Types of values Property values can be constants or they can be DataWindow expressions. DataWindow expressions allow the property value to be based on other conditions in the DataWindow, including data values. Conditional expressions based on data can give the property a different value for each row.
Getting and setting values
You establish initial values for properties in the DataWindow painter. You can also get and set property values at runtime in code in both an early-binding and a late-binding fashion. For more information, see “Accessing DataWindow object property values in code” on page 130.
There are several techniques for accessing property values. A particular property might be accessible by a subset of those techniques. For example, some properties are read-only at runtime, some can be set only at runtime, and some accept only constants (not DataWindow expressions) as values.
For a complete list of properties and the ways you can access each one, see the DataWindow Object Reference.
Examples: ways of setting the Border property
This table lists the ways you can access a property, using the Border property as an example:
Table 6-1: Ways to access and change DataWindow object properties
What you can do with properties
How to do it, using the Border property as an example What happens
Set the initial value of the property in the workspace
Property page, General tab, Border box
The Border property takes on the value you set unconditionally. In the Preview view and at runtime, the control has the border you indicated in the workspace unless you set the Border property again in some way.

Chapter 6 Accessing DataWindow Object Properties in Code
Programmer’s Guide 129
You can also set the initial value of the property at runtime in code for a DataWindow being created using the DataWindowSyntaxFromSql method. When DataWindowSyntaxFromSql executes, the border value of all columns is set in the generated syntax.
How to specify property values in the DataWindow painter When you specify values in the Properties view of the DataWindow painter, you are setting properties of the DataWindow object and its controls.
Properties for each control
Each control in the DataWindow (columns, text, drawing controls) has its own property pages, because there are different sets of properties for each control. To access individual property pages, display the Properties view and then select a control.
If several controls have the same property and you want them all to have the same value, you can select all the controls so that the property page shows the properties that they have in common. When you change the property value, it is applied to all selected controls.
Specify the value of the property at runtime based on an expression defined for the control in the workspace
Property page, General tab, Border box, Expression button
In Preview and at runtime, the border changes as specified in the expression, which overrides the setting on the property page.
For example, an expression can give the Salary column value a ShadowBox border when the salary exceeds $70,000.
To see the effect in the Preview view, you might need to close Preview and reopen it.
Get the value of the property at runtime in code
Describe or GetProperty method, or GraphicObjectColumn BorderStyle.Value and BorderStyle.Expression properties
Returns the value of the Border property for the specified control.
Change the value of the property at runtime in code
Modify or SetProperty method, or GraphicObjectColumn BorderStyle.Value and BorderStyle.Expression properties
At runtime, the value of the property changes when the code executes. For example, you could code Modify in the Clicked event and change the border of the control the user clicked.
What you can do with properties
How to do it, using the Border property as an example What happens

Accessing DataWindow object property values in code
130 DataWindow .NET
DataWindow expressions for properties
For many properties, you can specify a DataWindow expression in the Properties view by clicking the Expression button beside the property. At runtime, the expression is evaluated for each row. When the expression includes row-dependent information in the calculation (such as data), each row can have a different value for the property. In the painter, you can see the results in the Preview view. You might need to close Preview and reopen it if you are not seeing the settings you have made.
For information about the components of expressions, see the DataWindow Designer User’s Guide. For examples of expressions, see “Using DataWindow expressions as property values” on page 134. For information about setting values for properties that use expressions, see “Using DataWindow expressions as property values” on page 134.
Accessing DataWindow object property values in codeWhen an object is assigned to an object variable, the object is bound to the variable. Late binding occurs when the type of the variable to which the object is bound is not specified at compile time. Early binding occurs when the variable to which the object is bound is of a specific type. It lets the compiler allocate memory and perform other optimizations at compile time.
DataWindow .NET supports both late and early binding.
Late bindingDataWindow .NET provides two sets of methods that let you access property values in a DataWindow object using late binding.
Describe and Modify The Describe and Modify methods use strings to specify the property names. This is a simple example:
DW1.Describe("empname.Border")DW1.Modify("empname.Border=1")
Both methods can get and set the values of multiple properties. Describe can take a string that contains the name of multiple properties separated by spaces. Modify can take a string that contains the names and values of multiple properties.

Chapter 6 Accessing DataWindow Object Properties in Code
Programmer’s Guide 131
GetProperty and SetProperty
The GetProperty and SetProperty methods use strings as well. GetProperty is identical to Describe. SetProperty can set only one value at a time. Unlike Modify, which combines property names and values in a single string argument, SetProperty has two arguments, one for the property name, and one for the value to be set:
DW1.GetProperty("empname.Border")DW1.SetProperty("empname.Border", "1")
Early bindingAlthough all available DataWindow object properties can be accessed with the four methods described in “Late binding,” the fact that properties and values are provided as string arguments at runtime requires defensive programming techniques to handle the exceptions that are thrown when invalid property names or values with invalid datatypes are supplied.
DataWindow .NET provides an object-oriented presentation of the properties of a DataWindow object through which many of the controls on the DataWindow object can be treated as class instances with their own sets of properties and methods. Using these classes allows the .NET programmer to access some properties in an early-binding fashion, resulting in more maintainable code.
The classes that support this “dot notation” approach are the GraphicObject classes, ExpressionBasedProperty classes, EditStyle classes, and the PrintProperties class.
Accessing properties directlyYou can access properties of many classes directly using dot notation.
GraphicObject classesFigure 6-1 shows the hierarchy of the GraphicObject classes.

Accessing properties directly
132 DataWindow .NET
Figure 6-1: GraphicObject class hierarchy
Table 6-2 describes each of the GraphicObject classes.
Table 6-2: GraphicObject classes
Class Description
GraphicObject The ancestor of all classes representing DataWindow controls. This class includes property expressions for the sizing, positioning, and visibility of the control on the DataWindow. The three methods defined for this class (SendToBack, BringToFront, SetBand) allow controls to be moved dynamically between bands on the DataWindow and to be positioned in front of or behind other objects (z-ordering).
GraphicObjectText Represents a text object on a DataWindow control and includes properties for setting the foreground and background colors as well as the text itself.
GraphicObjectButton Represents a button on a DataWindow control and includes properties for setting the foreground and background colors as well as the text itself.
GraphicObjectReport Used with a composite DataWindow or a DataWindow containing a nested report. The only property currently exposed is DataWindowObject, which specifies the name of the DataWindow displayed in that nested report.

Chapter 6 Accessing DataWindow Object Properties in Code
Programmer’s Guide 133
Obtaining a class instance
There are several ways to obtain the class instance that is associated with a given control on a DataWindow:
• Each control on a DataWindow has a name that is provided by (and can be modified in) DataWindow Designer when the control is placed on the DataWindow object. You can provide that name to the GetObjectByName method to return a value of type GraphicObject.
GraphicObjectPicture Represents a picture control placed on the DataWindow and provides a FileName property pointing to the GIF, JPEG, or BitMap file that is displayed in the control.
GraphicObjectGraph Represents a graph control within a DataWindow, including graph-style DataWindows and graphs inserted into other DataWindows. This is the most complex of the GraphicObject classes. It offers several properties relating to categories and series within the graph and many methods allowing displays and values in the graph to be manipulated. A GraphObjectUnderMouse property grants access to the specific graph element that an end user has clicked on or is hovering over.
GraphicObjectColumn An abstract class that is an ancestor of DataWindow columns that contain OLE data, simple columns mapping to a back-end database, and computed columns. Each of these types of columns has a BorderStyle and a DataType property, both of which are defined on this class.
GraphicObjectBlobColumn Represents OLE Blob columns on the DataWindow, which contain data to be interpreted by an OLE server application, such as Microsoft Word or RealPlayer. This class is the ancestor of GraphicObjectInkPicture and provides a read-only ColumnNumber property.
GraphicObjectInkPicture Represents an InkPicture control on the DataWindow and provides properties that set or get ink collection modes and attributes of the ink collected.
GraphicObjectSimpleColumn An abstract class that defines properties common to columns representing database data of standard types such as string, integer, and decimal, as well as to columns whose values are computed at runtime based on other columns or DataWindow expressions. You can set format expressions as well as background and foreground colors for these types of objects.
GraphicObjectEditableColumn Represents column objects on a DataWindow that map to DataWindow buffers and, with the exception of external DataWindows, to data in the back-end data source. Each column includes a column number and a tab order property. For columns with an edit style that uses a code table, this class provides three methods to manipulate a code table.
GraphicObjectComputedColumn Exposes the expression that defines the value displayed in a computed column as a property. A computed column displays values of standard datatypes, but its value is based on a potentially complex expression that can include other column and computed column objects as well as many DataWindow expressions.
Class Description

Accessing properties directly
134 DataWindow .NET
• For column objects, which are numbered, you can invoke the GetColumnObjectByNumber method to obtain a value of type GraphicObjectColumn.
• The Gob property of the DataWindowControl's ObjectUnderMouse property contains the GraphicObject class associated with the control currently under the mouse pointer. The Gob property always contains a valid instance. If there is no control under the mouse, its Empty property is set to true.
When you use any of these three techniques, you will probably need to cast the GraphicObject (or GraphicObjectColumn) instance to one of the final classes that precisely represents the specific DataWindow control of interest.
In a Visual Basic program, for example, you might use the following code to determine the actual text displayed in a label on the DataWindow control:
Dim label As Sybase.DataWindow.GraphicObjectTextlabel = CType(dw1.GetObjectByName("t2"),
Sybase.DataWindow.GraphicObjectText)MsgBox("The label selected is: " + label.Text)
Some DataWindow controls are not supported in this hierarchy, specifically drawing controls and the group box, nor are all properties directly available. In future releases of DataWindow .NET, more of the DataWindow control properties will be exposed in the GraphicObject hierarchy.
Using DataWindow expressions as property valuesMany DataWindow object properties are backed by a DataWindow expression. When a DataWindow object property’s value can be an expression, you can make the control’s appearance or other properties depend on other information in the DataWindow. For example, the text color property of a GraphicObjectEditableColumn can be controlled by an expression such as:
if ( salary>50000, RGB(255,0,0), RGB(0,0,0) )
This expression changes the text color to red if the salary is greater than 50,000.
A DataWindow expression can include:
• Operators
• The names of controls within the DataWindow, especially column and computed field names

Chapter 6 Accessing DataWindow Object Properties in Code
Programmer’s Guide 135
• DataWindow expression functions. Some functions, such as IsRowNew, refer to characteristics of an individual row
Assigning an expression
To assign an expression in the painter, click the icon next to the property you want to set and specify the expression in the Modify Expression dialog box.
To assign an expression in code, you can use the Modify and SetProperty methods, or you can use a descendant of the ExpressionBasedProperty class.
The ExpressionBasedProperty class has descendants for each of the datatypes used in expressions, including AlignmentProperty, BooleanProperty, BorderStyleProperty, ColorProperty, Int16Property, Int32Property, FileNameProperty, and StringProperty.
The following figure shows the hierarchy of the ExpressionBasedProperty classes.
Figure 6-2: ExpressionBasedProperty class hierarchy
Each of these property classes has two properties: Expression and Value. The Expression property is a String. The Value property is of the datatype required in the expression. For example, this is a ColorProperty expression property:
if ( salary>50000, RGB(255,0,0), RGB(0,0,0) )
The ColorProperty object’s Value property is a System.Drawing.Color datatype.

Accessing properties directly
136 DataWindow .NET
The following Visual Basic code sets the BackgroundColor.Value property of the last name column to Silver. It also sets the TextColor.Expression property to a string that sets the text color to red if the state is New York and green otherwise:
Dim colLName As _Sybase.DataWindow.GraphicObjectEditableColumn
colLName = CType(dwSort.GetObjectByName("lname"), _Sybase.DataWindow.GraphicObjectEditableColumn
colLName.BackgroundColor.Value = _System.Drawing.Color.Silver
colLName.TextColor.Expression = _"If(state ='NY', rgb(255, 0, 0), rgb(0, 255, 0) )"
Obtaining property values
You can use the Describe and GetProperty methods to get the value of expressions, or you can use dot notation with the ExpressionBasedProperty classes. The ValueInRow method for most of the descendent classes returns the value of a property for a column in a particular row.
The following C# code accesses the TextColor property and uses the ValueInRow method to return the color value in a specific row:
GraphicObjectEditableColumn gobColumn;Int32 someRow;System.Drawing.Color C1, C2;String expr;
C1 = gobColumn.TextColor.Value;expr = gobColumn.TextColor.Expression;C2 = gobColumn.TextColor.ValueInRow ( someRow );
Properties with subproperties
For properties that use multiple “dots,” new property objects are instantiated when they are needed.
PrintProperties classThe PrintProperties class encapsulates DataWindow and DataStore print properties, and the corresponding PrintProperties property returns the properties. For example, the following code sets the Collate print property to true:
dwEmp.PrintProperties.Collate = true;

Chapter 6 Accessing DataWindow Object Properties in Code
Programmer’s Guide 137
Edit style propertiesThe EditStyle property of a GraphicObjectEditableColumn returns an instance of an EditStyle class. These classes derive from the EditStyleBase class, which holds common methods. The following figure shows the hierarchy of the EditStyle classes.
Figure 6-3: EditStyle class hierarchy
The ScrollableEdit class holds common properties for EditStyle types that contain text and can have scroll bars. The classes in Table 6-3 encapsulate the edit style properties of the GraphicObjectEditableColumnObject.
Table 6-3: Properties for edit styles
Class name Edit style
CheckBox CheckBox
DDDW DropDownDW
DDLB DropDownListBox
EditMask EditMask
InkEdit InkEdit
RadioButton RadioButtons
SimpleEdit Edit

Accessing properties directly
138 DataWindow .NET
For example, the following C# code sets the value of the InkMode and Factoid properties for the column phone, whose edit style is InkEdit:
GraphicObjectEditableColumn phoneCol =(GraphicObjectEditableColumn)dwCust.GetObjectByName("phone");
if (phoneCol.EditStyle is InkEdit){
((InkEdit)phoneCol.EditStyle).InkMode =InkMode.CollectInk;
((InkEdit)phoneCol.EditStyle).Factoid = "TELEPHONE";}
SpinProperties class The EditMask edit style can use a spin control. Spin properties are defined in the SpinProperties class. The following example sets and gets an EditMask column’s Minimum, Maximum, and Increment spin properties:
[Visual Basic]Dim col As GraphicObjectEditableColumnDim Min, Max As StringDim Inc As Short
col = dw1.GetObjectByName("quantity")CType(col.EditStyle, EditMask).Spin.Minimum = "2"CType(col.EditStyle, EditMask).Spin.Maximum = "20"CType(col.EditStyle, EditMask).Spin.Increment = 2Min = CType(col.EditStyle, EditMask).Spin.MinimumMax = CType(col.EditStyle, EditMask).Spin.MaximumInc = CType(col.EditStyle, EditMask).Spin.Increment[C#]GraphicObjectEditableColumn col =
(GraphicObjectEditableColumn)dw1.GetObjectByName("quantity");
String Min, Max;short Inc;((EditMask)col.EditStyle).Spin.Minimum = "2";((EditMask)col.EditStyle).Spin.Maximum = "20";((EditMask)col.EditStyle).Spin.Increment = 2;Min=((EditMask)col.EditStyle).Spin.Minimum;Max=((EditMask)col.EditStyle).Spin.Maximum;Inc=((EditMask)col.EditStyle).Spin.Increment;

Chapter 6 Accessing DataWindow Object Properties in Code
Programmer’s Guide 139
Using Modify and SetPropertyProperties can also be modified using the Modify or SetProperty methods, but the syntax is more difficult to construct and prone to error.
The expression assigned to the TextColor property includes a default value. Nested quotes complicate the syntax, as in this C# example for Modify:
DW1.Modify("lname.TextColor = \"16777215 ~t If(bene_day_care = 'Y', 15790320, 16777215)\"");
This call to SetProperty achieves the same result:
DW1.SetProperty("emp_lname.Background.Color", "16777215 ~t If(bene_day_care = 'Y', 15790320, 16777215)");
This Visual Basic code achieves the same result using GraphicObject classes:
Dim colLastName As _Sybase.DataWindow.GraphicObjectEditableColumn
colLastName = _CType(DW1.GetObjectByName("emp_lname"), _GraphicObjectEditableColumn)
colLastName.BackgroundColor.Expression = _"if(bene_day_care = 'Y', 15790320, 16777215)"
You can use both single and double quotes, but when you need to nest additional pairs of quotes, you use an escape character to identify inner nested pairs. For more information, see “Nested strings and special characters for DataWindow object properties” on page 144.
More examples in the DataWindow painter and in code
These examples illustrate the difference between the format for a DataWindow expression specified in the DataWindow painter as opposed to Visual Basic code. The examples use a combination of Modify, SetProperty, and explicit access to GraphicObject properties.
Border property The expression applied to the Border property of the salary column displays a border around salaries over $60,000:
If(salary > 60000, 1, 0)
This statement changes the expression in code using Modify:
DW1.Modify("salary.Border='0 ~t If(salary > 60000, 1, 0)'")

Using Modify and SetProperty
140 DataWindow .NET
In this statement, salaryColumn is defined as a GraphicObjectColumn variable (or one of its descendants). You can get salaryColumn using a call to GetObjectByName or GetColumnObjectByNumber, or from the Gob element of the DataWindowControl’s ObjectUnderMouse structure:
salaryColumn.BorderStyle.Expression = "If (salary > 60000, 1, 0)"
Font.Weight property for a column To make out-of-state (not in Massachusetts) names and numbers bold in a phone list, apply this expression to the name and phone_number columns. The state column must be part of the data source, but it does not have to be displayed:
If(state = 'MA', 400, 700)
This statement changes the appearance of the name column in code:
DW1.SetProperty("name.Font.Weight", "700 ~t If(state = 'MA', 400, 700)")
Brush.Color property for a rectangle This expression, applied to a rectangle drawn around all the columns in a tabular report, causes alternate rows to be shaded (a graybar effect). Make sure the columns and computed fields have a transparent background. The expression Mod(GetRow( ), 2) = 1 distinguishes odd rows from even rows:
If(Mod(GetRow(), 2) = 1, 16777215, 15790320)
This statement changes the expression in code:
DW1.SetProperty("rectangle_1.Brush.Color", "0 ~t If(Mod(GetRow(), 2) = 1, 16777215, 15790320)")
Brush.Color and Brush.Hatch properties for a rectangle To highlight employees whose review date is approaching, draw a rectangle behind the row. This expression for the rectangle’s Brush.Color property makes the rectangle light gray for employees for whom the month of the start date matches the current month or the next month:
If(month(start_date) = month(today())or month(start_date) = month(today()) + 1or (month(today()) = 12 and month(start_date) = 1),12632256, 16777215)
A similar expression for the Brush.Hatch property makes the fill pattern of the rectangle Bdiagonal (1) for review dates that are approaching. Otherwise, the rectangle is transparent (7) so that it does not show:
If(month(start_date) = month(today())or month(start_date) = month(today()) + 1

Chapter 6 Accessing DataWindow Object Properties in Code
Programmer’s Guide 141
or (month(today()) = 12 and month(start_date) = 1),1, 7)
You can also set the Pen.Color and Pen.Style properties to affect the outline of the rectangle.
To set the Brush.Color property in code:
DW1.SetProperty("rect1.Brush.Color", "'16777215 \t " +"If(month(start_date) = month(today()) " +"or month(start_date) = month(today()) + 1 " +"or (month(today()) = 12 " + "and month(start_date) = 1), 12632256, 16777215)'")
Font.Height property for a rectangle This expression applied to the Font.Height property of a text control makes the text control in the first row of a DataWindow larger than in other rows. Make sure the borders of the text control are large enough to accommodate the increased size:
If(GetRow() = 1, 500, 200)
This statement changes the expression for the text control t_desc in code:
DW1.Modify("t_desc.Font.Height = '200 ~t If(GetRow() = 1, 500, 200)'")
For more information about DataWindow expressions, see the DataWindow Object Reference in the online help for DataWindow Designer.
Advantages and drawbacks of the Modify methodUsing the Modify method to access property values of a DataWindow object has advantages and drawbacks.
Advantages You can set several properties in a single call to Modify, resulting in less code than multiple invocations of SetProperty or multiple assignments to a GraphicObject class instance.

Using Modify and SetProperty
142 DataWindow .NET
For example, this code, which sets three properties to constant values, is not too complex:
rtn = DW1.Modify("emp_id.Font.Italic=0oval_1.Background.Mode=0oval_1.Background.Color=255");
In some cases, setting multiple properties at once is desirable from a performance standpoint. Dynamic crosstab manipulation is a specific case of this, since the crosstab might be destroyed and recreated when certain properties are adjusted. Supplying all properties in one Modify call ensures that the reconstruction of the crosstab occurs only once.
In comparison with setting GraphicObject properties, a Modify (or SetProperty) call might be the only recourse if the specific DataWindow control property has not been exposed as a property on a GraphicObject class.
Drawbacks Modify can require complex quoted strings. When you specify an expression for a property value, it is difficult to specify nested quotes correctly—the code is hard to understand and prone to error.
For example, this string assigns a DataWindow expression to the Color property:
DW1.Modify("emp_id.Color=\"16777215 \tIf(emp_status=~\"A~\",255,16777215)\"");
Compare that to the following code, which uses an explicit property of the GraphicObjectColumn class:
Dim colEmpID As Sybase.DataWindow.GraphicObjectEditableColumn
colEmpID = CType(DW1.GetObjectByName("emp_id"), GraphicObjectEditableColumn)
colEmpID.TextColor.Expression = "if(emp_status = 'A', 255, 16777215)"
If you want to use the Modify method to change multiple properties, one technique you can use is to test your code using separate calls to SetProperty, change them from SetProperty to Modify calls when each property is being set correctly, then concatenate the strings in the Modify calls to make a single Modify call.
For more information about quoted strings, see “Nested strings and special characters for DataWindow object properties” on page 144.

Chapter 6 Accessing DataWindow Object Properties in Code
Programmer’s Guide 143
Handling errorsDescribe, Modify, GetProperty, and SetProperty each throw exceptions if an invalid property value is supplied as an argument. Describe and GetProperty throw a System.ArgumentException if the string does not represent a valid property. Modify and SetProperty throw a MethodFailureException whose Message property contains the location of the error in the property value string. For example, consider the following code, where you want to change the color of the id column:
TryDim ModString As StringModString = "id.color='255~tif (getrow() < 10,"ModString += "RGB(255,0,0, RGB(0, 255,0))'"dw1.Modify(ModString)
Catch ex As Sybase.DataWindow.MethodFailureExceptionMsgBox("Syntax Error: " + ex.Message)
End Try
The closing parenthesis of the first RGB expression is missing. This generates an exception and displays a message box with the following text:
Syntax error: Modify did not complete successfully; the error message is: Line 1 Column 63: incorrect syntax
Column 63 is actually the end of the supplied string value, which is where the omission of the parenthesis is first detected. If the id column specified in the string is not valid, the incorrect syntax message shows column 9, because the incorrect syntax is detected after the equals sign: id.color=.
When you set an expression using the property values of the GraphicObject classes and assign an invalid property value, the DataWindow server throws a Sybase.DataWindow.InvalidExpressionException, not a MethodFailureException. For example, this code contains the same error as the previous example:
Trylabel = CType(dw1.GetObjectByName("id"),
Sybase.DataWindow.GraphicObjectText)label.TextColorExpression = "if (getrow() < 10,
RGB(255,0,0, RGB(0, 255,0))"Catch ex As
Sybase.DataWindow.InvalidExpressionExceptionMsgBox("Syntax Error: " + ex.Message,
MsgBoxStyle.Critical, "Property Assignment Error")End Try

Using Modify and SetProperty
144 DataWindow .NET
This produces a message box with the following error text:
Syntax Error: COLOR had an invalid expression. Expression is: if (getrow() < 10, RGB(255,0,0, RGB(0,255,0))
Since the default properties on GraphicObject classes are strongly typed—for instance, the TextColor property is a System.Drawing.Color value—most, if not all, errors in setting these values are detected by the compiler at build time.
Nested strings and special characters for DataWindow object properties
DataWindow property values often involve specifying strings within strings. Embedded quotation marks need special treatment so that the strings are parsed correctly.
Different processing by language and DataWindow
Most languages use different characters from those used within the DataWindow to delimit strings and identify special characters. Strings are delimited by double quotes and the escape character in strings is the backslash (\). The escape character allows you to include double quotes and special characters within a string. The DataWindow can use either double or single quotes to delimit strings and uses tilde (~) as an escape character.
Because some parts of the string are parsed by the language and some by the DataWindow, strings passed to the DataWindow often use both types of escape characters. The one to use depends on whether the DataWindow or the external language will evaluate the character. The external language deals with the outer string and converts escape sequences to the corresponding special characters. Nested strings are dealt with by the DataWindow parser.
Guidelines Observe these guidelines for each type of character:
• Special characters use the language escape character. Tabs, newlines, and carriage returns are \t, \n, \r.
• Nested double quotes require the language escape character (\) so they are not interpreted as the closure of the opening double quote. Depending on the level of nesting, they might also require the DataWindow escape character (~).
• Single quotes for nested strings do not need the language escape character, but depending on the level of nesting, they might need the DataWindow escape character.

Chapter 6 Accessing DataWindow Object Properties in Code
Programmer’s Guide 145
• Tildes are specified in odd-numbered groups. They do not interact with the language escape character in counting the number of escape characters used.
Examples Both of these C# examples are valid ways of nesting a string:
DW1.Modify("DataWindow.Crosstab.Values=\"empname\"");
DW1.Modify("DataWindow.Crosstab.Values='empname'");
The following three statements specify the same string. They show a string with three levels of nesting using different combinations of escape characters and quote types. In the first example, note the escaping of the inner quote with a tilde for the DataWindow and a backslash for the language:
DW1.Modify("emp_id.Color=\"16777215 \t If (emp_status=~\"A~\",255,16777215)\"");
DW1.Modify("emp_id.Color=\"16777215 \t If (emp_status='A',255,16777215)\"");
DW1.Modify("emp_id.Color='16777215 \t If (emp_status=\"A\",255,16777215)'");
Special use of tilde A special case of specifying tildes involves the EditMask.SpinRange property, whose value is two numbers separated by a tilde (not an escape character, simply a tilde). In code, the value is in a nested string and needs a tilde escape character. The two tildes are interpreted as a single tilde when parsed by the DataWindow:
DW1.Modify("benefits.EditMask.SpinRange='0~~10'");

Using Modify and SetProperty
146 DataWindow .NET

Programmer’s Guide 147
C H A P T E R 7 Dynamically Changing DataWindow Objects
About this chapter This chapter describes how to modify and create DataWindow objects at runtime.
Contents
About dynamic DataWindow processing Basics DataWindow objects and all entities in them (such as columns, text,
graphs, and pictures) each have a set of properties. You can look at and change the values of these properties at runtime using DataWindow methods and property expressions. You can also create DataWindow objects at runtime.
A DataWindow object that is modified or created at runtime is called a dynamic DataWindow object.
What you can do Using this dynamic capability, you can allow users to change the appearance of the DataWindow object (for example, change the color and font of the text) or create ad hoc queries by redefining the data source. After you create a dynamic DataWindow object and the user is satisfied with the way it looks and the data that is displayed, the user can print the contents as a report.
See Chapter 8, “Manipulating Graphs,” for information about changing graphs in DataWindow controls at runtime.
Topic Page
About dynamic DataWindow processing 147
Modifying a DataWindow object 148
Creating a DataWindow object 149
Providing query ability to users 152
Providing Help buttons 157

Modifying a DataWindow object
148 DataWindow .NET
Modifying a DataWindow object At runtime, you can modify the appearance and behavior of a DataWindow object in a DataWindowControl by doing one of the following:
• Changing the values of its properties
• Adding or deleting controls from the DataWindow object
Changing property values
You can use the Modify or SetProperty methods to set property values. This lets you change settings that you ordinarily specify during development in the DataWindow painter.
Before changing a property, you might want to get the current value and save it in a variable, so you can restore the original value later. To obtain information about the current properties of a DataWindow object or a control in a DataWindow object, use the Describe or GetProperty method.
Some properties are available using GraphicObject classes. For example, you can use the GraphicObjectButton’s Text property to get or set the text on a button control in a DataWindow object.
Using expressions in property values
With some DataWindow properties, you can assign a value through an expression that the DataWindow evaluates at runtime, instead of having to assign a value directly. For example, the following statement displays a salary in red if it is less than $12,000, and in black otherwise:
dw1.Modify("salary.Color = '0 ~t if(salary <12000,255,0)' ")
For more information The syntax is different for expressions in code versus expressions specified in the DataWindow painter. For the correct syntax and information about which properties can be assigned expressions, see Chapter 6, “Accessing DataWindow Object Properties in Code.”
Adding and deleting controls within the DataWindow object
You can also use the Modify method to:
• Create new objects in a DataWindow object
This lets you add DataWindowControls (such as text, bitmaps, and graphic controls) dynamically to the DataWindow object.
To get a good idea of the correct Create syntax, see “Specifying the DataWindow object syntax” on page 150.
• Destroy controls in a DataWindow object
This lets you dynamically remove controls you no longer need.
Chapter 7 Dynamically Changing DataWindow Objects
Programmer’s Guide 149
Tool for easier coding of DataWindow syntax
From the Tool page in the New dialog box in DataWindow Designer, you can launch DWSyntax, a tool that makes it easy to build the correct syntax for Describe, Modify, and DataWindowSyntaxFromSql statements. You click buttons to specify which properties of a DataWindow you want to use, and DWSyntax automatically builds the appropriate syntax, which you can copy and paste into your application code.
Creating a DataWindow object This section describes how to create a DataWindow object by calling the Create method of a DataWindowControl or DataStore in an application.
You should use the techniques described here for creating a DataWindow from syntax only if you cannot accomplish what you need to in the DataWindow painter. The usual way of creating DataWindow objects is to use the DataWindow painter.
To learn about creating DataWindow objects in the DataWindow painter, see the DataWindow Designer User's Guide.
Create and SetTransactionYou use the Create method to create a DataWindow object dynamically at runtime. Create generates a DataWindow object using source code that you specify. It replaces the DataWindow object currently in the specified DataWindowControl or DataStore with the new DataWindow object.
The Create method destroys the association between the DataWindowControl or DataStore and the transaction object. As a result, you need to reset the control's transaction object by calling the SetTransaction method after you call Create.
To learn how to associate a DataWindowControl with a transaction object, see Chapter 5, “Working with Transaction and AdoTransaction Objects.”

Creating a DataWindow object
150 DataWindow .NET
Specifying the DataWindow object syntaxThere are two ways to specify or generate the syntax required for the Create method:
• Use the DataWindowSyntaxFromSql method
• Create the syntax yourself
Using DataWindowSyntaxFromSql
You are likely to use DataWindowSyntaxFromSql to create the syntax for most dynamic DataWindow objects. If you use DataWindowSyntaxFromSql, all you have to do is provide the SELECT statement and the presentation style.
DataWindowSyntaxFromSql is a method of the DataWindowSyntaxGenerator object and takes a Transaction or AdoTransaction object as a parameter. The transaction object must be connected when you call the method.
DatWindowSyntaxFromSql is overloaded. It has two required arguments:
• A connected Transaction or AdoTransaction object
• A string containing the SELECT statement for the DataWindow object
If you do not specify a third argument or the third argument is null, DataWindowSyntaxFromSql creates a DataWindow object with the Tabular presentation style. You can specify one of two third arguments:
• A string identifying the presentation style and other settings. You can use the DWSyntax tool to generate this string—see “Tool for easier coding of DataWindow syntax” on page 149.
• A value of the DataWindowStyle enumeration.
DataWindowSyntaxFromSql returns the complete syntax for a DataWindow object that is built using the specified SELECT statement.
If your DBMS is Adaptive Server and you call DataWindowSyntaxFromSql, the DataWindow server must determine whether the tables are updatable through a unique index. This is possible only if you set AutoCommit to true before calling DataWindowSyntaxFromSql, as shown here for a Transaction object called myTrans:
myTrans.AutoCommit=trueDWSyntaxGenerator.DataWindowSyntaxFromSql (myTrans,
sqlstmt, stylestr)myTrans.AutoCommit=false

Chapter 7 Dynamically Changing DataWindow Objects
Programmer’s Guide 151
Creating the syntax yourself
You need to create the syntax yourself to use some of the advanced dynamic DataWindow features, such as creating a group break.
The DataWindow source code syntax that you need to supply to the Create method can be very complex. To see examples of DataWindow object syntax, go to the Library painter in DataWindow Designer, select a DataWindow object, and use the Entry>Export menu item to export the DataWindow object syntax to a text file. You can then view the file in a text editor.
Creating and destroying composite reports at runtime
You can create and destroy composite reports in a DataWindow object dynamically at runtime using the same technique you use to create and destroy other controls in a DataWindow object.
Creating composite reports To create a composite report, use the New keyword with the Modify method. Supply the appropriate values for the composite report's properties.
When creating a composite report, you need to re-retrieve data to see the report. In a composite report, you can either retrieve data for the whole report or use GetChild to get a reference to the new nested report and retrieve its data directly. For reports nested in other reports, you need to retrieve data for the base report.
Modifying a crosstab's properties at runtime
As with other DataWindow objects, you can modify the properties of a crosstab at runtime using the Modify or SetProperty methods. Some changes require the DataWindowControl to dynamically rebuild the crosstab; others do not. (If the original crosstab was static, it becomes a dynamic crosstab when it is rebuilt.)
Changes that do not force a rebuild
You can change the following properties without forcing the DataWindowControl to rebuild the crosstab:
Table 7-1: Properties you can change on a crosstab DataWindow without forcing a rebuild
Properties Objects
Alignment Column, Compute, Text
Background Column, Compute, Line, Oval, Rectangle, RoundRectangle, Text
Border Column, Compute, Text
Brush Line, Oval, Rectangle, RoundRectangle
Color Column, Compute, Text

Providing query ability to users
152 DataWindow .NET
Changes that force a rebuild
If you change any other properties, the DataWindowControl rebuilds the structure of the crosstab when Modify is called. You should combine all needed expressions into one Modify call so that the DataWindowControl has to rebuild the crosstab only once.
Default values for properties
For computations derived from existing columns, the DataWindowControl by default uses the properties from the existing columns. For completely new columns, properties (such as font, color, and so on) default to the first column of the preexisting crosstab. Properties for text in headers default to the properties of the first text control in the preexisting crosstab's first header line.
For details on the DataWindow object properties, see the DataWindow Object Reference in the online help.
Providing query ability to users When you call the Retrieve method for a DataWindowControl, the rows specified in the DataWindow object's SELECT statement are retrieved. You can give users the ability to further specify which rows are retrieved at runtime by putting the DataWindow into query mode. To do that, you use the Modify method with a property expression.
LimitationsYou cannot use query mode in a DataStore or WebDataWindowControl, or in a DataWindow object that contains the UNION keyword or nested SELECT statements.
Edit styles (dddw, ddlb, checkbox, edit, editmask, radiobutton)
Column
Font Column, Compute, Text
Format Column, Compute
Pen Line, Oval, Rectangle, RoundRectangle
Pointer Column, Compute, Line, Oval, Rectangle, RoundRectangle, Text
Properties Objects

Chapter 7 Dynamically Changing DataWindow Objects
Programmer’s Guide 153
How query mode worksOnce the DataWindow is in query mode, users can specify selection criteria using query by example—just as you do when you use Quick Select to define a data source. When criteria have been defined, they are added to the WHERE clause of the SELECT statement the next time data is retrieved.
The following three figures show what happens when query mode is used.
First, data is retrieved into the DataWindow. There are 36 rows:
Next, query mode is turned on. The retrieved data disappears and users are presented with empty rows where they can specify selection criteria. Here the user wants to retrieve rows where Quarter = Q2 and Units > 10:

Providing query ability to users
154 DataWindow .NET
Next, query mode is turned off and Retrieve is called. The DataWindowControl adds the criteria to the SELECT statement, retrieves the seven rows that meet the criteria, and displays them to the user:
You can turn query mode back on, allow the user to revise the selection criteria, and retrieve again.
Using query mode
❖ To provide query mode to users at runtime:
1 Turn query mode on by coding.
[Visual Basic]dwc1.Modify("datawindow.querymode=yes")
[C#]dwc1.Modify("datawindow.querymode=yes");
All data displayed in the DataWindow is blanked out, though it is still in the DataWindowControl's Primary buffer, and the user can enter selection criteria where the data had been.
2 The user specifies selection criteria in the DataWindow, just as you do when using Quick Select to define a DataWindow object's data source.
Criteria entered in one row are ANDed together; criteria in different rows are ORed. Valid operators are =, <>, <, >, <=, >=, LIKE, IN, AND, and OR.
For more information about Quick Select, see the User's Guide.
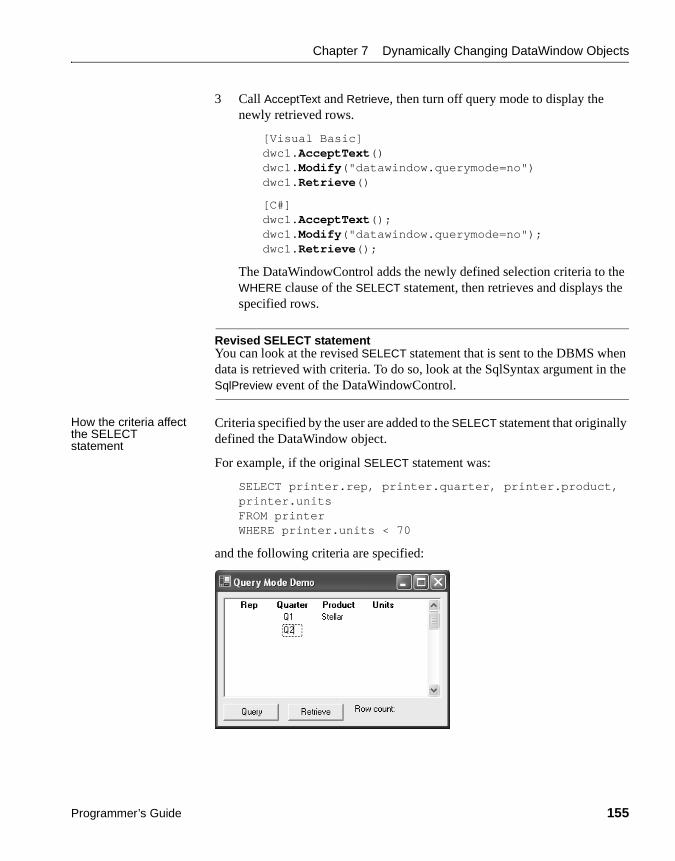
Chapter 7 Dynamically Changing DataWindow Objects
Programmer’s Guide 155
3 Call AcceptText and Retrieve, then turn off query mode to display the newly retrieved rows.
[Visual Basic]dwc1.AcceptText()dwc1.Modify("datawindow.querymode=no")dwc1.Retrieve()
[C#]dwc1.AcceptText();dwc1.Modify("datawindow.querymode=no");dwc1.Retrieve();
The DataWindowControl adds the newly defined selection criteria to the WHERE clause of the SELECT statement, then retrieves and displays the specified rows.
Revised SELECT statementYou can look at the revised SELECT statement that is sent to the DBMS when data is retrieved with criteria. To do so, look at the SqlSyntax argument in the SqlPreview event of the DataWindowControl.
How the criteria affect the SELECT statement
Criteria specified by the user are added to the SELECT statement that originally defined the DataWindow object.
For example, if the original SELECT statement was:
SELECT printer.rep, printer.quarter, printer.product, printer.unitsFROM printerWHERE printer.units < 70
and the following criteria are specified:

Providing query ability to users
156 DataWindow .NET
the new SELECT statement is:
SELECT printer.rep, printer.quarter, printer.product, printer.unitsFROM printerWHERE printer.units < 70AND (printer.quarter = 'Q1'AND printer.product = 'Stellar'OR printer.quarter = 'Q2')
Clearing selection criteria
To clear the selection criteria, Use the QueryClear property.
[Visual Basic]dwc1.Modify("datawindow.queryclear=yes")
[C#]dwc1.Modify("datawindow.queryclear=yes");
Sorting in query mode You can allow users to sort rows in a DataWindow while specifying criteria in query mode using the QuerySort property. The following statement dedicates the first row in the DataWindow to sort criteria (just as in Quick Select in the DataWindow wizard).
[Visual Basic]dwc1.Modify("datawindow.querysort=yes")
[C#]dwc1.Modify("datawindow.querysort=yes");
Overriding column properties during query mode
By default, query mode uses edit styles and other definitions of the column (such as the number of allowable characters). If you want to override these properties during query mode and provide a standard edit control for the column, use the Criteria.Override_Edit property for each column.
[Visual Basic]dwc1.Modify("mycolumn.criteria.override_edit=yes")
[C#]dwc1.Modify("mycolumn.criteria.override_edit=yes");
You can also specify this in the DataWindow painter by checking Override Edit on the General property page for the column. With properties overridden for criteria, users can specify any number of characters in a cell. They are not constrained by the number of characters allowed in the column in the database.

Chapter 7 Dynamically Changing DataWindow Objects
Programmer’s Guide 157
Forcing users to specify criteria for a column
You can force users to specify criteria for a column during query mode by coding the following:
[Visual Basic]dwc1.Modify("mycolumn.criteria.required=yes")
[C#]dwc1.Modify("mycolumn.criteria.required=yes");
You can also specify this in the DataWindow painter by checking Equality Required on the General property page for the column. Doing this ensures that the user specifies criteria for the column and that the criteria for the column use = rather than other operators, such as < or >=.
Providing Help buttons A DataWindow object has properties related to online Help. By initializing the DataWindow.Help.File property to the name of a Help file, you can display Help command buttons on dialog boxes that display for a DataWindowControl at runtime.
For complete information on the Help-related DataWindow object properties, see the DataWindow Object Reference in the online help.

Providing Help buttons
158 DataWindow .NET

Programmer’s Guide 159
C H A P T E R 8 Manipulating Graphs
About this chapter This chapter describes how to write code that allows you to access and change a graph in a Windows form application at runtime.
Contents
Using graphsIt is common for developers to design DataWindow objects that include one or more graphs. When users need to quickly understand and analyze data, a bar, line, or pie graph can often be the most effective format to display.
To learn about designing graphs, see the DataWindow Designer User’s Guide.
This chapter applies to graphs in DataWindowControls. In a WebDataWindowControl, graphs can be displayed in a stand-alone image file or in an image stream embedded into the Web page. For more information, see “Rendering graphs” on page 203.
Working with graphs in your code
The following sections describe how you can access (and optionally modify) a graph in a DataWindowControl by addressing its properties in code at runtime. There are two kinds of graph properties:
• Properties of the graph definition itself These properties are initially set in the DataWindow painter when you create a graph. They include a graph’s type, title, axis labels, whether axes have major divisions, and so on.
Topic Page
Using graphs 159
Modifying graph properties 160
Accessing data properties 162
Modifying graph properties
160 DataWindow .NET
• Properties of the data These properties are relevant only at runtime, when data has been loaded into the graph. They include the number of series in a graph (series are created at runtime), colors of bars or columns for a series, whether the series is an overlay, text that identifies the categories (categories are created at runtime), and so on.
Modifying graph propertiesWhen you define a graph in the DataWindow painter, you specify its behavior and appearance. For example, you might define a graph as a column graph with a certain title, divide its Value axis into four major divisions, and so on. Each of these entries corresponds to a property of a graph. For example, all graphs have a property GraphType, which specifies the type of graph.
When dynamically changing the graph typeIf you change the graph type, be sure also to change the other properties as needed to properly define the new graph.
You can change these graph properties at runtime by assigning values to the graph’s properties in code using the Modify or SetProperty methods.
For example, to change the title of graph gr_emp in DataWindowControl dwEmpInfo, you could write this code in Visual Basic:
dwEmpInfo.Modify("gr_emp.Title='New Title'")
How parts of a graph are representedGraphs consist of parts: a title, a legend, and axes. Each of these parts has a set of display properties. These display properties are themselves stored as properties in a subobject (structure) of Graph called grDispAttr.
For example, graphs have a Title property, which specifies the text for the title. Graphs also have a property TitleDispAttr, of type grDispAttr, which itself contains properties that specify all the characteristics of the title text, such as the font, size, whether the text is italicized, and so on.

Chapter 8 Manipulating Graphs
Programmer’s Guide 161
Similarly, graphs have axes, each of which also has a set of properties. These properties are stored in a subobject (structure) of Graph called grAxis. For example, graphs have a property Value, of type grAxis, which specifies the properties of the Value axis, such as whether to use auto scaling of values, the number of major and minor divisions, the axis label, and so on.
Here is a representation of the properties of a graph:
Graphint Heightint Depthboolean Borderstring Title...
grDispAttr TitleDispAttr, LegendDispAttr, PieDispAttrstring FaceNameint TextSizeboolean Italic...
grAxis Values, Category, Seriesboolean AutoScaleint MajorDivisionsint MinorDivisionsstring Label...
Referencing parts of a graphYou use the Describe and Modify methods to reference the display properties of the various parts of a graph. For example, one of the properties of a graph’s title is whether the text is italicized or not. That information is stored in the boolean Italic property in the TitleDispAttr property of the graph.
This example changes the label text for the Value axis of graph gr_emp in the DataWindowControl dwEmpinfo:
dwEmpinfo.Modify("gr_emp.Values.Label='New label'")
For a complete list of graph properties, see the DataWindow Object Reference in the online help.
Some properties can also be referenced using the GraphObjectUnderMouse property. For more information, see “Using point and click” on page 163.

Accessing data properties
162 DataWindow .NET
Accessing data propertiesTo access properties related to a graph’s data at runtime, you use methods of the GraphicObjectGraph object. There are two categories of methods related to graph data:
• Methods that provide and set information about a graph’s data
• Methods that change the color, fill patterns, and other visual properties of data
You call the data-access methods after a graph has been created and populated with data. Some graphs, such as graphs that display data for a page or group of data, are destroyed and re-created internally as the user pages through the data. Any changes you made to the display of a graph, such as changing the color of a series, are lost when the graph is re-created.
Property for graph creation
To be assured that data-access methods are called after a graph has been created and populated with data, you can test the value of the GraphicObjectGraph Created property, or call the methods in the GraphCreated event.
The GraphCreated event occurs after the graph has been created and populated with data, but before the graph displays. By accessing the data in the graph in this event, you are assured that you are accessing the current data and that the data displays the way you want it to.
Getting and setting information about the data and its displayThere are several methods for getting and setting information about data in a graph in a DataWindowControl at runtime.
The methods listed in Table 8-1 get and set information about the data.
Table 8-1: Get and set methods for data in graphs
Method Information provided or set
GetCategoryName The name of a category, given its number
GetCategoryNumber The number of a category, given its name
GetDataDateTime The value of a data point, given its series and position
GetDataDouble The value of a data point, given its series and position
GetDataStyle The color, fill pattern, and other visual properties of a specified data point
GetSeriesDataCount The number of data points in a series
GetSeriesName The name of a series, given its number
GetSeriesNumber The number of a series, given its name

Chapter 8 Manipulating Graphs
Programmer’s Guide 163
You can also use properties to get information about the graph.
Table 8-2: Common properties for graphs in DataWindows
Using point and click The GraphObjectUnderMouse property uses the GraphObjectAtPointer structure to hold information about the part of the graph under the mouse. GraphObjectAtPointer has three fields:
• The ObjectType field holds the type of object under the mouse pointer
The object is identified as a GraphObjectType enumerated value. For example, if the user hovers over or clicks on a data point, GraphObjectUnderMouse.objectType returns Data. If the user clicks on the graph’s title, GraphObjectUnderMouse.objectjType returns Title.
For a list of GraphObjectType values, see the DataWindow Reference Help.
• The SeriesName field holds the name of the series under the mouse pointer
• The DataPoint field holds the index number of the data point under the mouse pointer, or 0 if there is no datapoint under the pointer
Example This example uses the GraphObjectUnderMouse property to display a tooltip showing the part of the graph that is under the mouse as it hovers over the graph.
When you create a DataWindow object using the Graph presentation style, the graph is given the name gr_1. If you insert a graph into a DataWindow of a different style, the default name for the graph is also gr_1.
GetSeriesStyle The color, fill pattern, and other visual properties of a specified series
SetDataStyle The color, fill pattern, and other visual properties for a specific data point
SetSeriesStyle The color, fill pattern, and other visual properties for a series
Property Information provided
CategoryCount The number of categories in a graph
Created Whether the graph has been created (drawn)
GraphObjectUnderMouse The part of the graph that is under the mouse pointer
SeriesCount The number of series in a graph
Type The type of graph, using the GraphType enumeration
Method Information provided or set

Accessing data properties
164 DataWindow .NET
The example declares an instance of the GraphicObjectGraph object named gobGraph. Then it uses the DataWindowControl’s GetObjectByName method to get the type of gr_1 and convert it to a GraphicObjectGraph object assigned to gobGraph.
If the type of the graph object under the mouse is Category, the string displayed by the tooltip is “Category: ” followed by the category name for the current datapoint. If the type is a Series, the string displayed by the tooltip is “Series” followed by a colon and the name of the series. All graphs have at least one implicit series. When you create a graph with no explicit series, a series is created with an empty string as the series name.
If the type is Data, scatter graphs need to be handled differently, because they have no Category, and the X and Y coordinates are specified as X and Y values of the GraphAxis enumerated type. Other graph types always have a category.
The code is in the MouseMove event for a DataWindowControl.
[Visual Basic]Private Sub dw1_MouseMove(ByVal sender As Object, ByVal e As System.Windows.Forms.MouseEventArgs) Handles dw1.MouseMove
Dim gobGraph As Sybase.DataWindow.GraphicObjectGraphDim s As StringDim xData As StringDim yData As StringDim seriesName As StringDim dataPoint As Integer
TrygobGraph = CType(dw1.GetObjectByName("gr_1"), _
Sybase.DataWindow.GraphicObjectGraph)seriesName = _
gobGraph.GraphObjectUnderMouse.SeriesNamedataPoint = gobGraph.GraphObjectUnderMouse.DataPoint
s = _gobGraph.GraphObjectUnderMouse.ObjectType.ToString
Select Case sCase "Category"s = s + ": " + gobGraph.GetCategoryName(dataPoint)
Case "Series"' Check for explicit seriesIf Trim(seriesName).Length > 0 Then

Chapter 8 Manipulating Graphs
Programmer’s Guide 165
s = s + ": " + seriesNameEnd If
Case "Data"' scatter graphs have x, y and no categoryIf gobGraph.Type = _
Sybase.DataWindow.GraphType.Scatter ThenTryxData = gobGraph.GetDataDouble(seriesName, _dataPoint, Sybase.DataWindow.GraphAxis.X)yData = gobGraph.GetDataDouble(seriesName, _dataPoint, Sybase.DataWindow.GraphAxis.Y)If Trim(seriesName).Length > 0 Thens = "Series: " + seriesName
End Ifs = s + " Value: (" + xData.ToString + "," _+ yData.ToString + ")"
Catchs = s + " Value: <unavailable>"
End TryElse
' every other graph type has a category at leasts = "Category: " + _gobGraph.GetCategoryName(dataPoint)
' Check for explicit seriesIf Trim(seriesName).Length > 0 Thens = " Series: " + seriesName
End If
' Axis values are either DateTime or Double.' No method to determine datatype, so test for' DateTime first. If not DateTime, throw an' exception and handle as Double.Trys = s + " Value: " + _CStr(gobGraph.GetDataDateTime(seriesName, _dataPoint, Sybase.DataWindow.GraphAxis.Y))
Catch ex As ExceptionTrys = s + " Value: " + _CStr(gobGraph.GetDataDouble(seriesName, &dataPoint, Sybase.DataWindow.GraphAxis.Y))
Catch ex2 As Exceptions = s + " Value: <unavailable>"
End Try

Accessing data properties
166 DataWindow .NET
End TryEnd If
End Select
' turn off tool tip if not on interesting part of graphIf s = "Graph" ThentipGraph.Active = False
ElsetipGraph.Active = TruetipGraph.SetToolTip(dw1, s)
End IfCatch ex As Exception' ignore tooltip if there is an exception ' (like no DataWindow object)End Try
End Sub
Saving graph dataYou can copy a bitmap image of the graph to the system clipboard and paste it into an application such as Microsoft Paint, Visio, or Jasc Paint Shop Pro, using the GraphicObjectGraph Copy method:
Private Sub btncopy_Click(ByVal sender As System.Object, ByVal e As System.EventArgs) Handles btnCopy.Click
Dim gobGraph As Sybase.DataWindow.GraphicObjectGraph
gobGraph = CType(dw1.GetObjectByName("gr_1"), _Sybase.DataWindow.GraphicObjectGraph)
gobGraph.Copy()End Sub
Chapter 8 Manipulating Graphs
Programmer’s Guide 167
Modifying colors, fill patterns, and other dataThe following methods allow you to modify the appearance of data in a graph and get information about current settings:
Table 8-3: Get and set methods for the display of data in graphs
These Get methods return an instance of either the GraphDataStyle or GraphSeriesStyle class. The Set methods take a GraphDataStyle or GraphSeriesStyle object as an argument. Typically you use the Get method to obtain an instance of the class, specify new values for the properties you want to change, and then use the Set method to set the display properties.
Turn redrawing offTo eliminate flicker that can occur because of interrelationships among properties, call SetRedrawOff before calling the SetDataStyle and SetSeriesStyle methods, then call SetRedrawOn to turn redrawing back on and Refresh to display any pending visual changes. For example:
dw1.SetRedrawOff()gobGraph.SetDataStyle(pointStyle)dw1.SetRedrawOn()dw1.Refresh()
The GraphSeriesStyle class has properties for background and foreground color, fill style and shade color, line color, style, and width, symbol style, and whether the data is an overlay. The GraphDataStyle class inherits from the GraphSeriesStyle class and adds a property, PieExplosionPercentage, that reports or sets the percentage that an exploded pie slice in a pie graph is moved away from the center of the pie in order to draw attention to the data.
Method Information provided or set
GetDataStyle The color, fill pattern, and other visual properties of a specified data point
GetSeriesStyle The color, fill pattern, and other visual properties of a specified series
SetDataStyle The color, fill pattern, and other visual properties for a specific data point
SetSeriesStyle The color, fill pattern, and other visual properties for a series
Accessing data properties
168 DataWindow .NET
Example The following example lets a user change a display property of a graph by double-clicking the property in a list view, which opens a dialog box in which the user can set properties.
Private Sub lvDataPoint_DoubleClick(ByVal sender As Object, ByVal e As System.EventArgs) Handles lvDataPoint.DoubleClick
Dim lvi As ListViewItemDim dialog As frmChooseStyleDim pointStyle As Sybase.DataWindow.GraphDataStyleDim gobGraph As Sybase.DataWindow.GraphicObjectGraph
' data point values are not editableIf lvDataPoint.FocusedItem.Text.IndexOf("Value") _
=-1 Then
' clone the item with focus and send it off' to dialog for processinglvi = lvDataPoint.FocusedItem.Clone()dialog = New frmChooseStyle(lvi)
' upon return update the real ListViewItem ' with the change If dialog.ShowDialog() = DialogResult.OK Then
lvDataPoint.FocusedItem.SubItems.Item(1) = _lvi.SubItems.Item(1)
' get the current data point stylegobGraph = _
CType(dw1.GetObjectByName("gr_1"), _Sybase.DataWindow.GraphicObjectGraph)
pointStyle = _gobGraph.GetDataStyle(cbSeries.Text, _nupDataPoint.Value)
' update data style depending on option ' that changedSelect Case lvDataPoint.FocusedItem.TextCase "Foreground Color" pointStyle.ForegroundColor = _System.Drawing.Color.FromArgb(Val("&H" + _lvi.SubItems.Item(1).Text))
Case "Background Color"pointStyle.BackgroundColor = _System.Drawing.Color.FromArgb(Val("&H" + _lvi.SubItems.Item(1).Text))

Chapter 8 Manipulating Graphs
Programmer’s Guide 169
Case "Shade Color" pointStyle.ShadeColor = _System.Drawing.Color.FromArgb(Val("&H" + _lvi.SubItems.Item(1).Text))
Case "Line Color"pointStyle.LineColor = _System.Drawing.Color.FromArgb(Val("&H" + _lvi.SubItems.Item(1).Text))
Case "Symbol Style" pointStyle.SymbolStyle = _System.Enum.Parse(GetType _(Sybase.DataWindow.SymbolStyle), _lvi.SubItems.Item(1).Text, False)
Case "Line Style"pointStyle.LineStyle = _System.Enum.Parse(GetType _(Sybase.DataWindow.LineStyle), _lvi.SubItems.Item(1).Text, False)
Case "Fill Pattern" pointStyle.FillStyle = _System.Enum.Parse(GetType _(Sybase.DataWindow.FillStyle), _lvi.SubItems.Item(1).Text, False)
Case "Line Width" pointStyle.LineWidth = _Convert.ToInt32(lvi.SubItems.Item(1).Text)
End Select
' apply the data style changegobGraph.SetDataStyle(pointStyle)
End IfEnd If
End Sub

Accessing data properties
170 DataWindow .NET

Programmer’s Guide 171
C H A P T E R 9 Using Web DataWindows
About this chapter This chapter describes how to use Web DataWindows in data-based ASP.NET applications.
Contents
What the Web DataWindow isThe Sybase Web DataWindow is a DataWindow that is generated dynamically for use in Web applications. The Web DataWindow offers a thin-client solution that provides most of the data manipulation, presentation, and coding capabilities of the DataWindow without requiring any DLLs on the Web client. The DataWindow that displays in the Web browser looks very much like the DataWindow you designed in DataWindow Designer.
Using a Web DataWindow In DataWindow .NET, you work with the Web DataWindow using a custom server component called a WebDataWindowControl. You use a WebDataWindowControl in a Web forms page in an ASP.NET Web application in much the same way that you use a DataWindowControl in a form in a .NET Windows application. The WebDataWindowControl renders a DataWindow object and its data as a Web DataWindow and displays it in an ASP.NET (.aspx) page in a browser.
For more information about using the WebDataWindowControl, see “How to use the Web DataWindow” on page 178.
Topic Page
What the Web DataWindow is 171
About ASP.NET 172
The Web DataWindow server control and client control 175
Using the Web DataWindow 176
WebDataWindowControl properties 185
Printing Web DataWindows 207
Setting up database connections 212

About ASP.NET
172 DataWindow .NET
Web DataWindow rendering formats
The Web DataWindow can be rendered in three formats:
• XML Separate XML (content), XSLT (layout), and CSS (style) with a subsequent transformation to XHTML
• XHTML XHTML content only
• HTML HTML content only
You select the format you want to use by setting the WebDataWindowControl’s RenderFormat property. The XML RenderFormat provides the greatest control of the presentation of the DataWindow. For more information about the files generated when you use the XML RenderFormat, see “About XML, XSLT, CSS, and XHTML” on page 177. For what to consider when choosing a RenderFormat, see “XML, XHTML, and HTML formats” on page 184.
This chapter describes the Web DataWindow and how you use it in ASP.NET Web forms applications. For an overview of ASP.NET Web forms applications, see “About ASP.NET” next.
About ASP.NETASP.NET is a server-based programming framework that runs on Microsoft Internet Information Services (IIS) and dynamically generates and manages Web forms pages.
To use the Web DataWindow in an ASP.NET application, you must have ASP.NET 2.0 installed on your computer, and you must be familiar with the principles, architecture, and coding techniques used in ASP.NET. To get started, go to the Microsoft ASP.NET Developer Center at http://msdn.microsoft.com/asp.net/default.aspx. The rest of this section provides a brief orientation.

Chapter 9 Using Web DataWindows
Programmer’s Guide 173
ASP.NET application filesAn ASP.NET Web forms application uses a virtual directory in IIS to hold the files that make up the application and control access to those files. This directory is called the application root. You must have access to a computer running IIS to build and test ASP.NET applications. Each ASP.NET Web form application includes:
• One or more Web forms pages (.aspx files) that contain static text and controls you want to display
• A code file (an .aspx.cs or .aspx.vb file) for each page that contains the programming logic
• A Web.config file that holds configuration settings
When you create a new Web application project using Visual Studio .NET, these files are created for you in a physical directory under the <Driveletter>:\Inetpub\wwwroot directory.
When you build a project, the code files are compiled into a single project .dll file. The .aspx file is generated into a .NET class file that inherits from the code class and is compiled into a second .dll file when the page is first used.
To access a Web forms page, a user opens the .aspx page on the server where it is running. For example, if your application is called MyWebApp, the default page is called MyWebForm.aspx, and the server is called dover, use this URL:
http://dover/MyWebApp/MyWebForm.aspx
Web server controlsYou can use several types of server controls in an ASP.NET Web form:
• HTML server controls are HTML elements that expose an object model to the server so that they can be programmed.
• Web server controls might be buttons, labels, text boxes, or specialized controls such as calendars. They expose an object model that might not reflect HTML syntax.
• Validation controls can be attached to input controls to test the validity of user-entered data.

About ASP.NET
174 DataWindow .NET
• Web user controls are like Web Forms pages in that they have a user-interface page (with the extension .ascx) and a code file, but they do not have <html>, <body>, or <form> elements. They are embedded in a Web forms page to provide reusable elements such as custom toolbars.
Custom Web server controls
You can also use or build custom Web server controls. These are compiled, reusable components that can be a combination of two or more existing components, custom versions of existing components, or new components derived from a base control class.
The System.Web.UI.Control class defines properties, methods, and events common to all server controls, including ViewState management and the control’s execution lifecycle. The System.Web.UI.WebControls.WebControl class derives from System.Web.UI.Control and adds user interface properties and methods. The WebDataWindowControl is a custom server control that inherits from System.Web.UI.WebControls.WebControl.
Web page processingWhen you design a Web page, you need to code specific processing in events that are fired when the page is processed.
Page initialization When a page is rendered, its Page_Init event is triggered. The ASP.NET framework restores the ViewState of the page and its controls and restores data that has been posted back.
Page loading In the Page_Load event, you can perform initial data binding if the Page.IsPostBack property is false, or, if it is true, you can read and restore values and update control properties.
Validation and event handling
After these events have fired, the Validate method of validator Web server controls, if any are associated with the page, is invoked before application-specific events are handled. If any control events have been cached, as specified by the AutoPostBack property, they are processed before the event that caused the page to be posted. Your application-specific events should check the IsValid property for page and validation controls, save the state of page variables that you are maintaining, and save the state of controls that have been added to the page dynamically.
Page unloading When the page has finished rendering and is ready to be discarded, the Page_Unload event fires. You should perform final cleanup work in this event, such as closing database connections and discarding objects.
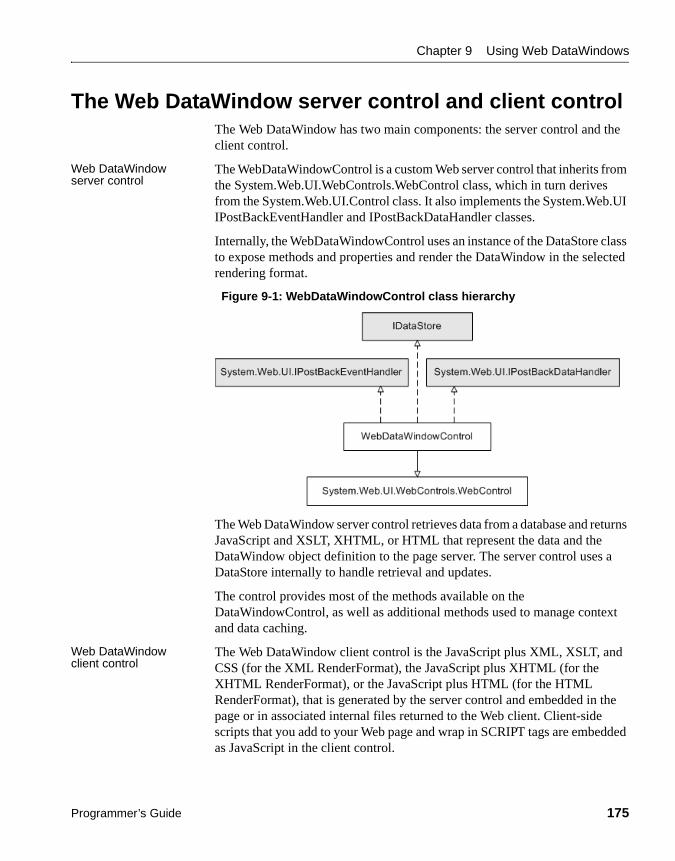
Chapter 9 Using Web DataWindows
Programmer’s Guide 175
The Web DataWindow server control and client controlThe Web DataWindow has two main components: the server control and the client control.
Web DataWindow server control
The WebDataWindowControl is a custom Web server control that inherits from the System.Web.UI.WebControls.WebControl class, which in turn derives from the System.Web.UI.Control class. It also implements the System.Web.UI IPostBackEventHandler and IPostBackDataHandler classes.
Internally, the WebDataWindowControl uses an instance of the DataStore class to expose methods and properties and render the DataWindow in the selected rendering format.
Figure 9-1: WebDataWindowControl class hierarchy
The Web DataWindow server control retrieves data from a database and returns JavaScript and XSLT, XHTML, or HTML that represent the data and the DataWindow object definition to the page server. The server control uses a DataStore internally to handle retrieval and updates.
The control provides most of the methods available on the DataWindowControl, as well as additional methods used to manage context and data caching.
Web DataWindow client control
The Web DataWindow client control is the JavaScript plus XML, XSLT, and CSS (for the XML RenderFormat), the JavaScript plus XHTML (for the XHTML RenderFormat), or the JavaScript plus HTML (for the HTML RenderFormat), that is generated by the server control and embedded in the page or in associated internal files returned to the Web client. Client-side scripts that you add to your Web page and wrap in SCRIPT tags are embedded as JavaScript in the client control.

Using the Web DataWindow
176 DataWindow .NET
JavaScript caching Some features available on the client control are optional: events, methods, data update and validation, and display formatting for newly entered data. The size of the generated JavaScript increases as you add more client-side functionality. You can cache client-side methods in JavaScript files on your Web server to reduce the size of the markup generated for Web DataWindow pages and, if the browser is configured to use cached files, improve the performance on the client machine.
For information about enabling JavaScript caching, which you can set up in either the Properties window in Visual Studio .NET or DataWindow Designer, see “Generating JavaScript for common management tasks” on page 189 and “Using JavaScript caching in DataWindow Designer” on page 223. You can find additional information about client-side caching and other generation properties in the DataWindow Object Reference.
Using client-side events and methods Events that are triggered on the client control do not require the server control to reload the page, so processing on the client is typically much faster than processing on the server.
For more information about enabling features on the client, see “WebDataWindowControl properties” on page 185 and “Web DataWindow properties” on page 216. For more about writing scripts and lists of client-side events and methods, see Chapter 12, “Writing Scripts for the Web DataWindow Client Control.”
For more information about the events and methods available on the server control and the properties used to implement the events available on the client control, see the online Sybase DataWindow Help in Visual Studio .NET or the dwref20.chm compiled HTML Help file.
Using the Web DataWindowThis section first provides you with a brief introduction to XML, XSLT, CSS, and XHTML and then describes how to use the Web DataWindow in Web forms applications.
Before a Web DataWindow can be generated for use in a Web application, you must create the DataWindow object you want to use in DataWindow Designer. For information about designing DataWindow objects for any type of Web DataWindow, see “Designing DataWindow objects for the Web DataWindow” on page 214.
Chapter 9 Using Web DataWindows
Programmer’s Guide 177
About XML, XSLT, CSS, and XHTMLHTML is the most popular markup language in the world. The focus, though, of most HTML markup is appearance; the HTML tags do not provide you with any information. For example, if you see an HTML document with an element that has content as simple as <td>12345</td>, you do not know what the content represents. The content could be the zip code of a particular town, or it might be the population of the town.
XML documents An XML document:
• Contains information marked up with tags that describe all the pieces of information
• Models the relationships between all the pieces of information
• Is contained in a single element called the root element which becomes the root of a tree structure that contains other elements that represent the information
An XML document might include the element <zipcode>12345</zipcode>, and you know from the zipcode tag that 12345 is a zip code.
XSLT transformations XML documents separate the content from the presentation, and they can be transformed (using XSLT, the Extensible Stylesheet Language for Transformations) into a variety of presentation types such as:
• An HTML page that includes <td>12345</td>
• A PDF file that includes zip code information
• A display of zip code information in wireless phones or pagers
With XSLT, you can transform XML documents into other documents, which are often XML documents themselves. For example, Web pages created in XHTML (an XML-compliant version of HTML) are XML documents, and you can use XSLT to transform any XML document into a styled XHTML Web page for display in a browser.
CSS style sheets A cascading style sheet (CSS) allows you to add style rules to the elements of a document that define how the content of the elements should be rendered. Using a CSS enables you to separate the contents of an HTML, XHTML, or XML document from its visual presentation. However, XSLT moves you beyond CSS because XSLT offers you complete flexibility to change the layout of content. XSLT also allows you to define rules that not only alter the design, but also add, change, or remove elements of the content if appropriate.

Using the Web DataWindow
178 DataWindow .NET
• For an overview of XML, see the first section of the chapter on exporting and importing XML in the DataWindow Designer User’s Guide. For detailed information about XML and XSLT, see the O’Reilly and Associates, Inc. Learning XML and Learning XSLT books.
How to use the Web DataWindowThe easiest way to use the Web DataWindow in your Web applications is to do the following:
1 Create a new DataWindow object or select an existing DataWindow object that you want to display in a Web browser.
For information, see “Designing DataWindow objects for the Web DataWindow” on page 214.
2 Create a new ASP.NET application in Visual Studio .NET (or another development tool that uses the .NET Framework version 2.0 and supports Web forms applications).
3 Drag a WebDataWindowControl from the Toolbox to a Web form page.
Using drag-and-drop adds references to the .NET components required by the WebDataWindowControl automatically. If you do not use drag-and-drop, open the Visual Studio Solution Explorer and add references to the DataWindow.dll, DataWindowInterop.dll, and WebDataWindow.dll files in the DataWindow .NET 2.0 directory to your project.
4 In the Properties window for the WebDataWindowControl, specify the LibraryList, DataWindowObject, and RenderFormat properties.
See “XML, XHTML, and HTML formats” on page 184 for features supported with each rendering format.
5 (Optional) Specify additional properties for the WebDataWindowControl.
See “WebDataWindowControl properties” next for a list of properties.
6 Add a transaction object to the form, specify connection properties, and connect to a database.
7 Associate the transaction with the WebDataWindowControl and use the Retrieve method to retrieve data into the control.
For a simple example, see “Adding a WebDataWindowControl to a Web form” on page 45.

Chapter 9 Using Web DataWindows
Programmer’s Guide 179
How the Web DataWindow worksThe first time a page that contains a WebDataWindowControl is requested, the following sequence of steps occurs:
1 The page sends an HTTP Get request to the server.
2 The DataWindow engine creates an internal instance of a DataStore and performs the following tasks:
a Sets the working DataWindow object based on LibraryList and DataWindowObject properties.
b Populates the Web DataWindow’s properties from the properties defined on the object in DataWindow Designer or the properties defined for the WebDataWindowControl in the Properties window (see “WebDataWindowControl properties” on page 185).
c Registers client JavaScript, including hidden context and action fields and postback script, using the Page class method.
d Sets the database transaction and calls the DataStore's Retrieve method to retrieve data.
e If requested, saves data to a cache.
f Renders the XML/HTML/XHTML in the control’s Render method.
g Outputs the resulting XHTML or HTML into the Page.
3 The HTTP response returns the Page to the client-side browser.
4 The user interacts with the page, usually triggering a postback to the server.
Figure 9-2 illustrates the sequence of events after a first request.

Using the Web DataWindow
180 DataWindow .NET
Figure 9-2: WebDataWindowControl first request
When user interaction triggers a postback, the following sequence of steps occurs:
1 The page sends an HTTP Post request to the server.
2 The DataWindow engine creates an internal instance of a DataStore and performs the following tasks:
a Sets the working DataWindow object based on LibraryList and DataWindowObject properties.
b Populates the Web DataWindow’s properties from the properties defined on the object in DataWindow Designer or the properties defined for the WebDataWindowControl in the Properties window (see “WebDataWindowControl properties” on page 185).
c Registers client JavaScript, including hidden context and action fields and postback script, using the Page class method.
d Sets the database transaction and calls the DataStore's Retrieve method to retrieve data, or restores cached data.
e Retrieves postback data stored in the context and action hidden field and applies the context and action to the DataStore.
f If the action is a client method or integrated button, triggers the BeforePerformAction and AfterPerformAction server-side events, enabling you to trap errors.

Chapter 9 Using Web DataWindows
Programmer’s Guide 181
g Renders the XML/HTML/XHTML in the control’s Render method.
h Outputs the resulting XHTML or HTML into the Page.
3 The HTTP response returns the Page to the client-side browser.
4 The user interacts with the page, usually triggering a postback to the server.
Figure 9-3 illustrates the sequence of events after a postback.
Figure 9-3: WebDataWindowControl postback
How the XML Web DataWindow worksThe overall sequence of steps described in “How the Web DataWindow works” on page 179 applies to all Web DataWindows. There are additional steps for the XML Web DataWindow, which generates DataWindow content, layout, and style separately at runtime and renders a fully functional DataWindow in XHTML.

Using the Web DataWindow
182 DataWindow .NET
Figure 9-4: XML Web DataWindow rendering
You can customize each of these XML Web DataWindow components at design time using a custom XHTML export template in the Export Template view for XHTML. For information, see Chapter 11, “Working with XHTML Templates.” You can also use these templates with the XHTML RenderFormat.
Server-side and client-side activity
When you have configured the pieces the XML Web DataWindow needs, here is what happens when a user requests the URL for a page containing the DataWindow.
Server-side activity Server-side code is used to invoke the Web DataWindow generator. During the generation process:
1 Using the default XHTML export template or a custom template you created, an XHTML rendering of the DataWindow is generated in a DOM tree.
2 A CSS style sheet is generated in a DOM tree with the style information for the DataWindow elements.
Generating as many of the style rules in CSS as possible (including all absolute positions) increases page download speed because the stylesheet is downloaded only once and cached.
3 Client-side JavaScript files are generated for instantiating the control object and the array of row elements.
You can improve performance by generating most of this client-side JavaScript in static files. For information about how you create and deploy the static JavaScript files, see “Generating JavaScript for common management tasks” on page 189.

Chapter 9 Using Web DataWindows
Programmer’s Guide 183
4 A reverse transformation of the XHTML DOM tree to XML (DataWindow content) and XSLT (DataWindow layout) occurs.
XSLT also creates the structural layout of the page, saving bandwidth. Server processing is also reduced by offloading work to the client.
5 A small amount of JavaScript is generated to perform explicit transformation on the client side to render in the browser a fully functional DataWindow in XHTML.
XHTML and HTML DataWindowsThe XHTML Web DataWindow generates separate CSS and JavaScript files, but it does not generate the XML content and XSLT structure in separate files. It renders an XHTML page in the browser. The HTML Web DataWindow renders an HTML page.
Client-side activity When a user accesses a Web page containing the XML Web DataWindow, the client browser:
1 Downloads the source XML file (DataWindow content for the page) and the XSLT stylesheet, which is cached locally.
2 Performs the transformation using the XSLT processor built in to the client browser.
3 Outputs the XHTML result into a <div> section on the page.
4 Downloads, caches, and applies the CSS stylesheet for display in the browser.
5 Downloads and caches JavaScript files.
6 When there is a subsequent action by the user (HTTP Post/HTTP response), regenerates and downloads the XML file and JavaScript row objects file for the updated DataWindow page.
Browser requirements for the XML Web DataWindow
The XML Web DataWindow requires browsers that support the latest client-side technologies—XML, XSLT, XHTML, CSS, and JavaScript. You can select the browser to use for the XML Web DataWindow (XHTML format) in the Web Generation page in the DataWindow object property view:
Browser XML parser/XSLT processor XSLT version
Internet Explorer 5, 5.5 MSXML 2.0, 2.5 (update required) XSL-WD
Internet Explorer 6.0 MSXML 3.0 XSLT 1.0
Netscape 6+ TransforMiiX XSLT 1.0
Mozilla 1.0 TransforMiiX XSLT 1.0

Using the Web DataWindow
184 DataWindow .NET
MSXML 2.6 or higher is required with Internet ExplorerThe XML Web DataWindow requires MSXML 2.6 or higher with Internet Explorer. Internet Explorer 5 or 5.5 includes MSXML 2.0 or 2.5, so you must either update MSXML to 2.6 or higher or use Internet Explorer 6.0. For information about MSXML versions, refer to “Version list for the Microsoft XML parser” on the Microsoft Help and Support Web site at http://support.microsoft.com/default.aspx?scid=kb;en-us;269238.
XML, XHTML, and HTML formatsThere are many Web sites that provide information about the advantages of different markup languages, such as HTML and XHTML Frequently Answered Questions at http://www.w3.org/MarkUp/2004/xhtml-faq#advantages. Both XML and XHTML Web DataWindow rendering formats render the page in XHTML. XHTML Web pages are processed and rendered more quickly in the browser than HTML pages because extensive browser code is not needed to handle the more complex rules and variations that would be required with HTML.
Web users benefit from faster download of XHTML DataWindow pages because the XSLT (for the XML render format) and CSS stylesheets are downloaded only once and cached, resulting in bandwidth savings. Enterprises also benefit from the greater efficiency, scalability, extensibility, and accessibility gained by using standard W3C technologies.
Use only one format for a DataWindow in a sessionBecause the XHTML and XML formats were designed to exploit the automatic services of the browser cache for better bandwidth efficiency, you cannot use both of these formats for the same DataWindow in a single session. If you do, you might see formatting anomalies in the second DataWindow.
Which format to use Table 9-1 compares features supported in each rendering format.
Table 9-1: Features of Web DataWindow rendering formats
Feature XML XHTML HTML
Web pages conform to industry standards
Yes Yes No
Pages can be customized using an XHTML export template
Yes Yes No
XSLT stylesheets are cached Yes No No
CSS stylesheets are cached Yes Yes No

Chapter 9 Using Web DataWindows
Programmer’s Guide 185
The XML RenderFormat does not support accessibility software. Some aspects of the HTML generated using the HTML RenderFormat do not support accessibility software.
WebDataWindowControl propertiesThis section lists the properties for the WebDataWindowControl that are specific to the control (some properties are inherited from the System.Web.UI.WebControls.WebControl class). Table 9-2 lists the properties you can set in the Properties view. Table 9-3 lists the properties you can use in code to get information about the DataWindow object or control.
For more detailed information about each property, see the Sybase DataWindow online Help in the development environment or the DataWindow Reference compiled Help file (dwref20.chm).
Server permissions must be configured (see “Configuring XML” on page 190)
Yes Yes No
Common JavaScript files can be cached
Yes Yes Yes
Most efficient handling of large amounts of paged data
Yes No No
Postback and callback mechanisms for paging and other client actions
Yes Yes Yes
Client-side mechanism for paging and other client actions
Yes No No
A Grid DataWindow page can be sorted on the client without a postback
Yes No No
Composite and nested DataWindows are supported
No Yes No
Absolute positioning is supported in Grid DataWindows
Yes Yes No
Greatest compatibility with accessibility software (Section 508)
No Yes No
Feature XML XHTML HTML

WebDataWindowControl properties
186 DataWindow .NET
Understanding how properties interact
Some properties that you can set in the Properties window in Visual Studio .NET can also be set for the DataWindow object in DataWindow Designer. If a property is set in DataWindow Designer, it is respected in DataWindow .NET. However, the properties you set in the painter are not reflected in the Properties view, which displays default values for most properties.
See Table 10-5 on page 221 for a comparison of properties set in the two environments.
If you have set a property in DataWindow Designer, change the default for its equivalent in the Properties window only if you want to override the value set in the painter. If default values are changed in the Properties view, they override the values set in the painter. If default values are not changed, properties set in DataWindow Designer are used. For example:
• ClientEvents is true by default in both the painter and the WebDataWindowControl. If you set it to false in the painter, client events will be disabled even though the control property is set to true.
• If you set the XmlConfigurations.UrlPath property in the WebDataWindowControl, any ResourceBase and PublishPath properties set in the painter are not used.
Table 9-2: Properties that can be set for the WebDataWindowControl
Property Description
AutoRestoreContext, AutoRestoreDataCache, AutoSaveDataCacheAfterRetrieve, EnableDataState
Properties used to customize context management and data caching. See “Maintaining state” on page 192.
ClientEventButtonClicked, ClientEventButtonClicking, ClientEventClicked, ClientEventItemChanged, ClientEventItemError, ClientEventItemFocusChanged, ClientEventRowFocusChanged, ClientEventRowFocusChanging
Properties used to specify event handlers for events on the Web DataWindow client control. See Chapter 12, “Writing Scripts for the Web DataWindow Client Control.”
ClientEvents Specifies whether client events can be fired. You can reduce the size of the generated Web DataWindow control by setting the ClientEvents, ClientFormatting, ClientScriptable, and ClientValidation properties to false. See “Controlling the size of generated code” on page 189.
ClientFormatting Specifies whether display formatting should be performed on the client in the browser.

Chapter 9 Using Web DataWindows
Programmer’s Guide 187
ClientScriptable Specifies whether client-side JavaScript can interact with the control.
ClientValidation Specifies whether validation is performed on the client in the browser.
DataWindowObject Specifies the name of the DataWindow object to load in the control (set the LibraryList property before setting DataWindowObject).
DisplayOnly Specifies that the DataWindow object cannot be used for data entry.
GenerateDDDWFrames Specifies whether drop-down DataWindows are generated using IFrames or HTML SELECT elements. See “Using a drop-down DataWindow” on page 229.
GraphConfigurations Specifies how graphs are rendered in a WebDataWindowControl. See “Rendering graphs” on page 203.
HorizontalScrollBar, VerticalScrollBar
Specifies whether scroll bars display on the WebDataWindowControl. For more information, see “RowsPerPage and scroll bars” on page 200.
JavaScriptConfigurations Specifies whether JavaScript for common tasks is embedded in the rendered DataWindow or associated internal files, or deployed in separate static files. See “Generating JavaScript for common management tasks” on page 189.
LibraryList Specifies the list of libraries in which the control searches for DataWindow objects.
ObjectLinks Specifies generated hyperlinks for objects in the DataWindow object. See “Creating hyperlinks” on page 205.
PageNavigationBarSettings Specifies the type of navigation bar to display (with next and previous buttons, numbered pages, or an edit box or drop-down list) and other properties of the page navigation bar. See “Page navigation bars” on page 200.
PagingMethod Specifies how paging is handled. See “Paging methods” on page 198.
RenderFormat Specifies the format—XML, XHTML, or HTML—in which the DataWindow object is rendered. For which format to use, see “XML, XHTML, and HTML formats” on page 184.
Property Description

WebDataWindowControl properties
188 DataWindow .NET
Table 9-3: Properties that return information about the WebDataWindowControl
RowsPerPage Specifies how many rows display on each page. For more information, see “RowsPerPage and scroll bars” on page 200.
XmlConfigurations Specifies the XHTML template to use for XML and XHTML Web DataWindows, the path where automatically generated files are saved, and optional SessionSpecific and SecurelyInline properties. For more information, see “Configuring XML” on page 190.
Property Description
ClientObjectName Read-only property that specifies the name of the client-side Web DataWindow control.
ColumnCount Returns the number of columns in the DataWindow object, excluding computed columns.
CurrentPage Returns the number of the current page in the DataWindow object.
CurrentRow Returns the number of the current row in the DataWindow object.
DataSourceType Returns the type of the data source of the DataWindow object (SQL SELECT, stored procedure, external, or unbound).
DataWindowStyle Returns the presentation style of the DataWindow object.
DeletedCount Returns the number of rows that have been marked for deletion in the DataWindow object.
FilteredCount Returns the number of rows not included in the primary buffer because of the application of filter criteria.
ModifiedCount Returns the number of rows that have been modified in the DataWindow object.
PageCount Returns the total number of pages in the DataWindow object.
PrintProperties Returns an instance of the PrintProperties class that describes properties associated with printing the DataWindow object.
RowCount Returns the number of rows in the DataWindow object.
Syntax Returns the syntax that describes the DataWindow object.
Property Description

Chapter 9 Using Web DataWindows
Programmer’s Guide 189
Controlling the size of generated codeSome supported features increase the size of the generated code. If you do not use a feature such as display formatting, validation rules, or client-side scripting, you can enhance performance by preventing the server control from generating code for the unused feature. You can turn these features on or off in the Properties window for the WebDataWindowControl in your development environment, or on the Web Generation property page for the DataWindow object in DataWindow Designer.
You can also cache client-side methods in JavaScript files to reduce the size of the generated code and increase performance on both the server and the client. Without JavaScript caching, each time a Web DataWindow is rendered in a client browser, JavaScript code for DataWindow methods is generated on the server and downloaded to the client.
When you set DataWindow object or WebDataWindowControl properties to reference cached JavaScript files, the methods defined in the files are not generated with the HTML or XHTML in any Web DataWindow pages that are sent to the client browser.
For more information, see “Generating JavaScript for common management tasks” next and “Using JavaScript caching in DataWindow Designer” on page 223.
Generating JavaScript for common management tasksYou can generate JavaScript files that contain the JavaScript required to manage common DataWindow operations, and operations with DateTime, number, and string datatypes. You can distribute these files in one of three ways by selecting one of the following values for JavaScriptOption in the JavaScriptConfigurations section in the Properties window for the WebDataWindowControl:
• EmbeddedinPageAtRendering The JavaScript is embedded in each Web page when it is rendered (for the HTML rendering format) or in internal JavaScript files that are generated when the page is rendered (for the XML and XHTML rendering formats). This simplifies deployment, because you do not need to specify the names and locations of external files, but it reduces performance because the JavaScript needs to be regenerated for each DataWindow.

WebDataWindowControl properties
190 DataWindow .NET
• External The JavaScript functions are deployed to the browser once per session in standalone files that are cached in the browser, improving performance and reducing network bandwidth. If you select this option, you need to generate the JavaScript files, add them to your application as resouce content, and specify the names of the files and their URL path. You must regenerate the files every time you update to a new version of DataWindow .NET to ensure that any enhancements added in the new version are incorporated in the generated JavaScript files.
• WebResourceFile The JavaScript functions are deployed in files that are embedded in the WebDataWindow.dll assembly as a Web resource. With this option, JavaScript functions are deployed to the browser once per session, as with the External option, gaining the same performance advantages and the additional advantage that you do not need to generate and deploy the files.
If you select External, you need to generate the JavaScript files. To generate the JavaScript files in Visual Studio .NET, select Generate Client Management JavaScript from the pop-up menu for the WebDataWindowControl or from its Properties window and complete the dialog box. The files are saved to the URL path you specify or to the root directory for your application if no URL path is specified.
You can also generate JavaScript files for the HTML Web DataWindow in DataWindow Designer. For more information, see “Using JavaScript caching in DataWindow Designer” on page 223.
Configuring XMLIf you use the XML or XHTML Web DataWindow, you can use the properties of the XmlConfigurations class to fine-tune the way the XML and XHTML are generated.
XHTML export templates
The XSLT stylesheet that transforms the DataWindow content to XHTML can be customized by applying a custom XHTML export template to the default generation. The CSS stylesheet can be customized by applying custom style attributes in a custom XHTML export template. Using stylesheets to target the presentation enables the DataWindow to be rendered on virtually every device. The TemplateName property specifies this template. If any templates have been defined, they display in a drop-down list in the Properties window. For more information, see Chapter 11, “Working with XHTML Templates.”

Chapter 9 Using Web DataWindows
Programmer’s Guide 191
URL for dynamically created files
The XmlConfigurations.UrlPath property specifies the physical directory where dynamically created files are saved. This includes .css, .js, .xml, and .xslt files. If you specify a value for XmlConfigurations.UrlPath, it overrides the values for PublishPath and ResourceBase set in DataWindow Designer.
If you want to specify different paths for each of the different file types or if you want to specify a full path, set the properties in DataWindow Designer and leave the XmlConfigurations.UrlPath property empty in Visual Studio .NET. For more information about the properties you can set in DataWindow Designer, see “XML Web DataWindow generation properties” on page 217.
Write permission for directories for generated filesWhen you specify a path for dynamically generated files, make sure that the ASP.NET account (or, for Windows 2003 server, the IIS_WPG user group) has write permission to the directories. For more information, see the Microsoft documentation.
You must delete files manuallyIf you do not set these properties in DataWindow Designer or in DataWindow .NET, the files are saved in the current Web application’s root directory.
You must set up a mechanism for deleting dynamically generated files, whether or not they are saved to a specified path. Saving them in a directory makes it easier to delete them.
Generating files for specific clients
If you use dynamic DataWindow objects customized for specific clients, you can force the generation of the names of these files to be specific to each client. You do this by setting the SessionSpecific property to true. This eliminates the possibility of server-side contention for presentation formats when the DataWindow generation is specific to the client. The default value is false.
Generating XML inline for security
The XML published on the Internet in your XML Web DataWindow could contain sensitive data, and this data might be exposed to Internet users when published to a separate document. For increased security, if the SecurelyInline property to set to true, the XML is generated “inline” to the XSLT transformation script in the page that renders the control. If only authenticated users have access to this script, the security of the XML is ensured. Setting this property should have no adverse side effects on the caching efficiency of the control. The default value is false.

WebDataWindowControl properties
192 DataWindow .NET
Maintaining stateASP.NET pages are inherently stateless—they are executed, rendered, and destroyed on every round trip to the server. You can use several techniques to maintain state, such as posting a page back to itself or storing state on the server in Session state. DataWindow .NET provides two different techniques to manage data:
• A context management system to maintain and manage a DataWindow’s client- and server-side data changes and state during a page round trip.
• Integrated data cache management as an easy way to cache retrieved data into Session or Application state and restore it into the DataWindow during a postback.
The context management system is similar to ASP.NET ViewState management.
About ASP.NET ViewState management
ASP.NET automatically restores values into form fields on postback using the HTTP header. It uses a concept called ViewState to keep track of server control state values that are not posted back as part of the form, such as the text of a Label control or settings for scroll bar properties. The WebDataWindowControl uses ViewState to maintain the state of various properties, such as the LibraryList and DataWindowObject, but it does not use ViewState to maintain the data.
ViewState is a hidden form field managed by the .NET page framework. When an ASP.NET page is executed, all the values that make up the page’s ViewState are encoded into a single string and assigned to the value of the hidden form field. This value is stored on the client’s browser in the page sent to the client, and posted back to the server if the page is posted back to the server.
When the page is posted back, ASP.NET parses the encoded string and uses the individual values to repopulate property values of the page and its controls.
ViewState is available on all pages with the server-side form tag, <form runat="server">.
ViewState is enabled by default. To reduce page size, you can turn it off for a control or a page when it is not needed, such as when the control has no dynamic values or when the page does not post back to itself. Otherwise, EnableViewState should always be set to true.

Chapter 9 Using Web DataWindows
Programmer’s Guide 193
DataWindow .NET context management
The context management system used by DataWindow .NET is similar to ASP.NET’s ViewState management; however, it uses a context model to maintain and manage changes in data on both the client and server and to manage the state of its data on a page round trip. The context includes changes in data on the server, including data modification, rows inserted, and rows deleted, as well as changes in data on the client and additional state information. It does not contain all the data in the DataWindow—only the changes made to data.
To use the Web DataWindow context management system, you must set EnableDataState to true.
Context management process
Context is managed as follows:
1 When the initial page request is made, the DataWindow retrieves data. A user can then perform any operation on the DataWindow.
2 When the control is rendered, the DataWindow engine generates an encoded context string that contains changes to data, such as the modification of existing data and rows inserted and deleted. This context string is stored in a hidden field and sent to the client with the rendered DataWindow.
3 When the DataWindow displays in the browser, the user can make changes in the form on the page and then submit the page. Before the page is posted back to the server, the Web DataWindow client control collects the changes made in the browser and appends them to the original context string. The context string is passed back to the server.
4 When the page is posted back, the server control gets the context from the hidden field as a server variable. After the DataWindow retrieves data, the context is restored to the DataWindow, either manually or automatically depending on the AutoRestoreContext property setting.
5 When the user performs another operation on the DataWindow, the process is repeated.
Update resets the contextChanges in data on the server are cleared when the data is updated to the database, and the context string is reset.

WebDataWindowControl properties
194 DataWindow .NET
Restoring context You can set the AutoRestoreContext property to true (the default) to have the context restored to the DataWindow in the browser automatically before the user can make any changes to the DataWindow. Setting AutoRestoreContext to true calls the RestoreContext method implicitly.
Context should not be restored until the DataWindow has dataContext should only be restored after the DataWindow has obtained its data. This can be done using a retrieve, an import, a data cache restore, or another method.
If AutoRestoreContext is true and AutoRestoreDataCache is false, you should populate the DataWindow's data before the WebDataWindowControl's OnLoad event. In this case, the best place to populate the DataWindow with data is in the OnLoad event for the page. For example, you can call Retrieve in the page's OnLoad event and set AutoRestoreContext to true to let the DataWindow automatically restore its context. If you do not want to conform to this limitation, you can set AutoRestoreContext to false and then call the RestoreContext method manually after your data retrieve is done.
If you need to restore context manually, use the RestoreContext method explicitly. If context is not restored correctly when the AutoRestoreContext property is set, an AutoRestoreContextError event is triggered. A failure in the RestoreContext method throws an exception.
Data state There are times when it is appropriate to disable the data state, particularly to improve application performance. For example, if you import a large amount of data into a WebDataWindowControl, the state of data changes becomes large because all the rows imported are treated as newly inserted rows. (In a retrieve, only new rows are added to the data state of changes.)
If the EnableDataState property is set to true, importing a large amount of data sends a large context to the client. When the page is posted back, there is no need to import the data again since the context containing the state of data changes is restored to the WebDataWindowControl. If you want to improve performance, you can avoid sending a large context to the client by setting EnableDataState to false. However, since with this setting the imported data is not included in the context, you must import the data again when the page is posted back.

Chapter 9 Using Web DataWindows
Programmer’s Guide 195
Integrated data cache management
Integrated data cache management lets you cache retrieved data into session state and then restore it to the DataWindow during a postback so that you do not need to connect to the database and retrieve the data again.
The saved data cache contains all the data in the DataWindow, including the contents of the primary, filter, and delete buffers and any child DataWindows, and the status flags. The data cache does not contain the presentation (the LibraryList, DataWindowObject, and other display characteristics) of the DataWindow object. The presentation is saved in ViewState.
Session-based caching
Integrated cache management is based on the session, not the application. It uses the ASP.NET Page.Session property to save the data, which is in turn based on the SessionState property. To fully understand the implications of this, see your Microsoft ASP.NET documentation. For example, session data might be released if the browser does not revisit the application within a specified timeout period. If you expect this to affect your application, you can use the GetDataObject and SetDataObject methods to save the data cache into an application-level state object. (See “Managing the data cache without integrated management” on page 196).
Automatic or explicit save and restore
You can use the SaveDataCache method to explicitly save the data cache into session state after retrieving data, or you can set the AutoSaveDataCacheAfterRetrieve property to true to specify that the DataWindow will automatically save the data as a data cache after a retrieve completes successfully.
If the DataWindow uses an external data source, you must use SaveDataCache to save the data cache explicitly:
dwExt.SaveDataCache()
During page postback, you can use the RestoreDataCache method to explicitly restore the data from session state into the DataWindow, or set the AutoRestoreDataCache property to true to restore the data cache if it exists in session state. You do not need to call RestoreDataCache explicitly for external DataWindows if the AutoRestoreDataCache property is set to true.
Use AutoSaveDataCacheAfterRetrieve together with AutoRestoreDataCache and AutoRestoreContext to simplify your coding tasks.
If saving or restoring the data cache fails when the automatic caching properties are set to true, the AutoDataCacheError event is triggered. SaveDataCache and RestoreDataCache throw an exception on failure.

WebDataWindowControl properties
196 DataWindow .NET
Data cache and dynamic DataWindows
When the data cache of a static DataWindow is restored, the DataWindow can be recreated because the data cache restores the data and ViewState restores the DataWindow object’s design. The data cache is not saved for dynamically created DataWindow objects because ViewState does not contain the information about the DataWindow’s design required to recreate the DataWindow.
Because the DataWindow object was created dynamically, there is no LibraryList or DataWindowObject associated with it. For a DataWindow dynamically constructed using DataWindowSyntaxFromSql, the DataWindow’s syntax is not saved when SaveViewState is called and therefore not restored when LoadViewState is called because saving the syntax would make the ViewState too large.
Setting AutoRestoreDataCache to true when you are using a dynamically created DataWindow results in an exception instead of triggering the AutoDataCacheError event, because there is no DataWindow object associated with the control.
If you are using a DataWindow created from syntax, you need to call the Create method to recreate the dynamic DataWindow in every request. Calling Create clears the DataWindowObject property setting.
Modifying DataWindow syntax on the server
If you use the Modify method on the server to modify the syntax of a DataWindow object at runtime, your changes are not restored when the DataWindow is recreated. To save these changes, use a mechanism such as saving them to Session state.
Managing the data cache without integrated management
The GetDataObject and SetDataObject methods allow you to manage the DataWindow’s data cache object yourself. You can get the data cache object with GetDataObject and save it into the application-level Page.Cache. When the page is posted back, you can retrieve the data cache object from the page cache and set it back into the DataWindow using SetDataObject.
The ClearDataCache, RestoreDataCache, and SaveDataCache methods also allow you to manage the data in session state manually.
Avoiding property conflicts
SaveDataCache and GetDataObject should be used to save only unmodified data if EnableDataState is set to true to enable data change context management during a page round trip. The WebDataWindowControl’s context management keeps track of data changes and restores the context (by setting AutoRestoreContext to true or calling RestoreContext directly) during the page round trip.

Chapter 9 Using Web DataWindows
Programmer’s Guide 197
If SaveDataCache and GetDataObject save the data with changes, then RestoreContext might reapply the changes and cause anomalies.
Life cycle
Table 9-4 describes what action the WebDataWindowControl takes at each stage of its life cycle.
Table 9-4: WebDataWindowControl life cycle
Postbacks and callbacksThe life cycle of a Web forms page begins when the browser presents a form to the user and the user interacts with the form. In previous versions of ASP.NET, any action that required processing that interacted with server components had to post the form back to the server, where the processing occured before the form was returned to the browser. This is called a round trip.
Phase What happens Event or method
Initialize Initializes settings for the incoming Web request. Init event (OnInit method)
Load view state Populates the ViewState property, including settings for LibraryList, DataWindowObject, and other WebDataWindowControl properties.
LoadViewState method
Process postback data Restores the data cache if AutoRestoreDataCache is true.
Restores the context if AutoRestoreContext is true and the control is already loaded.
LoadPostData method
Load Restores the context if AutoRestoreContext is true and context was not restored in the LoadPostData method.
Load event (OnLoad method}
Handle postback events Performs client actions. RaisePostBackEvent method
Prerender Registers client scripts and button context and actions.
PreRender event (OnPreRender method)
Save state Saves settings for LibraryList, DataWindowObject, and other WebDataWindowControl properties and saves the client context if necessary.
SaveViewState method
Render Renders the Web DataWindow. Render method
Dispose Disposes of internal DataStore and other objects. Dispose event
WebDataWindowControl properties
198 DataWindow .NET
To improve performance, round trips to the server should be avoided when possible. Performing tasks such as user input validation or sorting in JavaScript, VBScript, or another scripting language on the client can help minimize round trips, as can restricting the use of code that causes a round trip to events that require a definite user action, such as a mouse click.
A major feature introduced in ASP.NET 2.0 is the script callback mechanism. This provides a way to execute server-side code without posting and refreshing the current page. A rendered page can make a background callback to the server, send input data to the relevant page, and receive a response. The response string can then be processed by the client appropriately, often manipulating the rendered page content through the Dynamic HTML (DHTML) object model and a callback JavaScript function embedded in the page.
Paging methodsThe PagingMethod property enables you to specify how paging requests are handled. The default setting is PostBack, which posts each page request back to the server.
Callback paging CallBack paging uses the ASP.NET script callback feature to provide page navigation without posting the whole page back to the server. The XML data for the next requested page is downloaded as an XML string returned to the callback. A JavaScript function on the client collects the data and invokes the client-side XSLT processor to transform the data using the XSLT stylesheet that was downloaded and cached on the first request. The next page of data is displayed on demand. If you set the PagingMethod property to CallBack, you do not need to write server-side code and client-side JavaScript to take advantage of the script callback feature.
The PagingMethod property affects all paging actions, including DataWindow button actions that cause paging, client paging script methods, and integrated page navigationbar paging actions, but also all other DataWindow button actions and client methods such as Sort and Retrieve. When PagingMethod is set to Callback, all these actions are executed using script callbacks.
For the XML RenderFormat, if the DataWindow layout is inconsistent from page to page, or it does not contain a complete first page of data, the generated XSLT stylesheet is not reusable, and therefore cannot be cached by the browser. When this occurs, the Callback PagingMethod defers to PostBack until a stylesheet that can be reused and therefore cached in the browser can be generated.

Chapter 9 Using Web DataWindows
Programmer’s Guide 199
Client-side paging Client-side paging uses an XML document stored in the browser’s memory as a client-side data cache of all the DataWindow’s rows. It retrieves the entire XML result set and uses XSLT re-transformation of the cached stylesheet to perform paging on the client. This allows other DataWindow actions to be performed entirely on the client. When PagingMethod is set to XmlClientSide, the InsertRow, AppendRow, and DeleteRow actions execute entirely on the client with no postback or callback to the server.
Computed fields not refreshedNo computed fields dependent on the RowCount method get refreshed as the user is changing the current row count as a result of the InsertRow, AppendRow, and DeleteRow actions. This is because the underlying expressions are evaluated and generated on the server as static values. They are reevaluated only when an action is performed that does involve a postback, such as an update.
An ASP.NET page hosting a WebDataWindowControl configured for postback paging (or even callback paging) places more load on the Web server and can only page as quickly as the connection between client and server allows. A similar ASP.NET page hosting a WebDataWindowControl configured for client-side paging by contrast takes slightly longer to load on first request due to the fact that it is pulling down all of the XML records rather than just one page worth. But once loaded, subsequent paging requests take place entirely on the client and paging is not dependent on the connection speed.
Crosstab, Group, and Label DataWindows cannot be rendered correctly using the client-side paging method because their data presentation is not consistent from page to page. The client-cached XSLT style sheet cannot be reused. For the same reason, client-side paging cannot handle a DataWindow with a summary band on the last page.
Client-side paging is available only for the Xml RenderFormat and in button actions and client JavaScript paging methods of the Web DataWindow client control. It is not supported with the integrated page navigation bar.
Call SetTransaction if you change the DataWindowObject propertyWith the XmlClientSide PagingMethod, if you change the DataWindowObject property of the WebDataWindowControl from its original value during a server lifecycle, without calling Retrieve, you must at least call SetTransaction during that same server lifecycle.
WebDataWindowControl properties
200 DataWindow .NET
RowsPerPage and scroll barsThe default behavior for a Web DataWindow is to display all the rows retrieved in a single page. If you want to limit the number of rows that display, set the RowsPerPage property to the number of rows you want. Displaying a limited number of rows requires less time to refresh the display in the browser. When you set RowsPerPage to a non-zero value, the value of the Height property is ignored and the control is sized to fit the number of rows.
If you set the RowsPerPage property, you can add ScrollFirstPage, ScrollLastPage, ScrollPriorPage, and ScrollNextPage buttons to the DataWindow object, typically in the footer band, to navigate to the rest of the data. For more information, see “Using Button and Picture controls” on page 226. You can also use an integrated navigation bar, as described in “Page navigation bars” next.
Note that the RowsPerPage option sets not only the number of rows visible in the browser, but also the number of rows currently loaded into the control. Typically you do not want to display a vertical scroll bar in a DataWindow when you have set the RowsPerPage property, because users will use the navigation buttons to move through the data.
The default value for both HorizontalScrollBar and VerticalScrollBar is Auto, which means that the size of the control is respected and a scroll bar displays automatically if the number of columns or rows exceeds the size of the control. Specify None if you do not want scroll bars and you want the control to expand to accommodate the size of its contents. Specify NoneAndClip if you do not want scroll bars and you want the control to remain the same size and clip the data. Specify Fixed if you always want scroll bars even if the data does not exceed the size of the control.
Separate values for horizontal and vertical scroll bar display are not supported on Netscape browsers. If you expect your application to run on Internet Explorer and Netscape Browsers, the values for HorizontalScrollBar and VerticalScrollBar should be set to the same value to ensure consistent display.
Page navigation barsAs an alternative to setting the RowsPerPage property and creating your own user interface for navigating between pages, you can use an integrated page navigation bar. The page navigation bar can be added to the top or bottom of the DataWindow and can use several different styles.

Chapter 9 Using Web DataWindows
Programmer’s Guide 201
The PageNavigationBarSettings property, which is an instance of the PageNavigationBarSettings class, lets you control the visibility, style, page navigation mode, and other properties of the page navigation bar. You set these options in the PageNavigationBarSettings section in the Properties window for the WebDataWindowControl or in code.
To display the page navigation bar, set its Visible property to true and the WebDataWindowControl’s RowsPerPage property to a number greater than 0.
The default page navigator is the NextPrev style. This sample uses the default text-based arrow keys. You can use images or text instead:
There are two other basic styles: Numeric and QuickGo. You can combine the QuickGo style with either the NextPrev or Numeric styles. This sample uses Numeric with QuickGo:
Table 9-5 lists the properties of PageNavigationBarSettings.
Table 9-5: PageNavigationBarSettings properties
Property Description
BarStyle Represents the style of the page navigation bar. PageNavigationBarStyle is a class inherited from the standard System.Web.UI.WebControls.Style, which has all the behaviors and properties of standard System.Web.UI.WebControls.Style.
Use the BarStyle property to control the appearance of the page navigation bar, such as the background color and border style. This property is read-only, however, you can set the properties of the PageNavigationBarStyle object it returns.
NavigatorType Specifies the navigator type:
• NextPrev – Previous, next, first, and last page images or text.
• Numeric – Numbered and first and last page links.
• QuickGo – A page number input edit box or page number selection drop-down list.
• NextPrevWithQuickGo – Combined type.
• NumericWithQuickGo – Combined type.
The default is NextPrev.

WebDataWindowControl properties
202 DataWindow .NET
For a description of the properties for the NavigatorTypes, BarStyle, and PageStatusInfo, see the online Help in Visual Studio .NET or the dwref20.chm compiled HTML Help file. Most of these properties are self-explanatory, but a few are described here.
URLs for images Each of the navigator types has at least one property you can use to specify an image for a button. For example, the following statement in a code-behind file specifies an image for the Next button in a NextPrev style navigator:
dw_1.PageNavigationBarSettings.NextPrevNavigator.NextPageImageUrl = "PageNext.gif"
PageCountPerGroup For the Numeric type, the PageCountPerGroup property is an integer that indicates the number of numeric buttons to display concurrently in the page navigator. If there are more pages in the WebDataWindowControl than specified in this property, Next or Previous Group Page buttons or both are displayed. For example, if there are 10 pages in the DataWindow and this property is set to three, when the page first displays, the numbers 1, 2, and 3 and the NextGroup button displays. When you click the Next Group button, the
NextPrevNavigator Sets properties of the NextPrev type, such as the URL for the image or the text to use for each of the links and tooltip text for each link.
NumericNavigator Sets properties of the Numeric type, such as the URL for the image or the text to use for each of the links, tooltip text for each link, and the format for the page number.
PageStatusInfo Sets the visibility and appearance of current page status information, such as Page 3 of 10, in the page navigation bar.
Position Indicates the position of the page navigation bar in the WebDataWindowControl: Top, Bottom, or TopAndBottom. The default is Bottom.
QuickGoNavigator Sets properties of the QuickGo type, such as the URL for the image or the text for the GoTo button, tooltip text, and the format for the page number.
Visible A boolean value indicating whether the page navigation bar is displayed in the WebDataWindowControl. If the RowsPerPage property of WebDataWindowControl is less than or equal to 0, the page navigation bar does not display when Visible is set to true because there is no paging. The default value is false.
Property Description

Chapter 9 Using Web DataWindows
Programmer’s Guide 203
PageNumberDisplayFormat
The PageNumberDisplayFormat property for the Numeric and QuickGo types is a string value containing the format used to generate the numeric page number button text. For QuickGo, this property takes effect when the QuickGoPageNavigatorSettings.Type is set to DropDownList and the Mode property is set to PagerMode.NumericPages.
In the page number display format, {P} is the keyword for generating numeric page number button text. For example, if the PageNumberDisplayFormat is #{P}, then the numeric page number button text will be shown as #1, #2. When PageNumberDisplayFormat is an empty string, which is the default value, the format [{P}] is used.
TextFormat The TextFormat property for PageStatus is a string value used to generate page status text information displayed in the page navigation bar. It uses the following keywords:
For example, if the TextFormat is Page {C} of {T} (the default), the WebDataWindowControl has 10 pages, and the current page number is 3, the page status information text is generated as Page 3 of 10.
Rendering graphsGraphs can be displayed in a DataWindow in a standalone image file or in an image stream embedded into the Web page. You specify how you want the graph to be rendered by setting the RenderOption property in the GraphConfigurations section in the WebDataWindowControl’s Properties window or in code. You can use the graph presentation style to display a graph in a Web DataWindow, or a supported presentation style such as tablular or freeform. Graphs do not display in Web DataWindows with the grid presentation style.
Keyword Generates
{C} Current page number{T} Page count{R} Row count{F} First row of current page{L} Last row of current page{S} Starting page of current numeric group{E} Ending page of current numeric group

WebDataWindowControl properties
204 DataWindow .NET
Using an image file If you set the RenderOption property to ImageFile, the rendering of the graph object is saved into a temporary file on the Web server and an image URL is generated to reference the temporary image file. The physical directory in which the temporary image file is stored and the URL path are specified in the GraphDynamicImageFileUrlPath property. This property must specify a URL path in your Web application virtual directory, and it must be a path that can be mapped to a writable physical directory in your Web application's physical directory.
Using an image stream
If you set the RenderOption property to ImageStream, the rendering of the graph object is saved into a memory stream in the session cache in a StreamImageContainer and the stream is output to a page whose content type is “image/imageformat”, where imageformat is gif, jpeg, or png. The URL reference to the image, set in the StreamImageContainerPage property, points to this page instead of to an image file.
Image file formats You can choose to render the graph in GIF, JPEG, or PNG formats. You select the image format you want by setting the ImageFormat property of the GraphConfigurations class to a value of the GraphImageFormat enumerated variable. The default image format is PNG. which provides superior rendering and a smaller footprint than JPEG.. Choose GIF is you want to reduce the footprint to a minimum at the cost of some loss of rendering quality.
Write permission for directories for generated files
When you specify a path for dynamically generated files, make sure that the ASP.NET account (or, for Windows 2003 server, the IIS_WPG user group) has write permission to the directories. For more information, see the Microsoft documentation.
Example This Visual Basic code sets the RenderOption and other properties based on a user’s choice in a radio button:
If rb_format.SelectedIndex = 0 Thendw1.GraphConfigurations.RenderOption = _Sybase.DataWindow.Web.GraphRenderOption.ImageStream
dw1.GraphConfigurations.StreamImageContainerPage = _"StreamImageContainerPage.aspx"
Elsedw1.GraphConfigurations.RenderOption = _Sybase.DataWindow.Web.GraphRenderOption.ImageFiledw1.GraphConfigurations. _GraphDynamicImageFileUrlPath = "image/"
End If
dw1.Retrieve()

Chapter 9 Using Web DataWindows
Programmer’s Guide 205
Creating hyperlinksYou can add a link to a column, computed field, bitmap, or text control in a WebDataWindowControl in the control's Properties window:
1 In the Properties window for a WebDataWindowControl, click the ellipsis button in the ObjectLinks field.
2 In the ObjectLink Collection Editor, click Add to add a new object link.
3 Specify values for the ObjectName and LinkUrl properties, and optionally the LinkTarget and LinkArguments properties.
4 To set the LinkArguments property, with the new object link selected, click the ellipsis button in the LinkArguments field to open the LinkArgument Collection editor.
Click Add to add a new link argument and specify a name, type, and value. If you select DataWindowColumn as the type, clicking the ellipsis button in the Value field displays a list of columns in the DataWindow. If you select DataWindowExpression, the Edit DataWindow Expression dialog box displays.
5 Click OK to return to the ObjectLink Collection Editor.
The ObjectLink object generates an HTML hyperlink for the selected control. If the control is a column, the HTML is generated only if the column is readonly (its tab order in DataWindow Designer is 0).
The ObjectLink class encapsulates the HTML.Link, HTML.LinkArgs, and HTML.LinkTarget properties of the DataWindow object's column, computed field, bitmap, or text controls, using the ObjectName property to identify the control.
You can specify values for the DataWindow object properties on the HTML page in the Properties view for the control in DataWindow Designer. Values you specify in the ObjectLink Collection Editor override values set in the painter.
If you set link values in the painter, you need to set them in the Properties window only if you want to override the properties set in the painter. For information about setting these properties in DataWindow Designer, see the description of the properties in the DataWindow Object Reference.
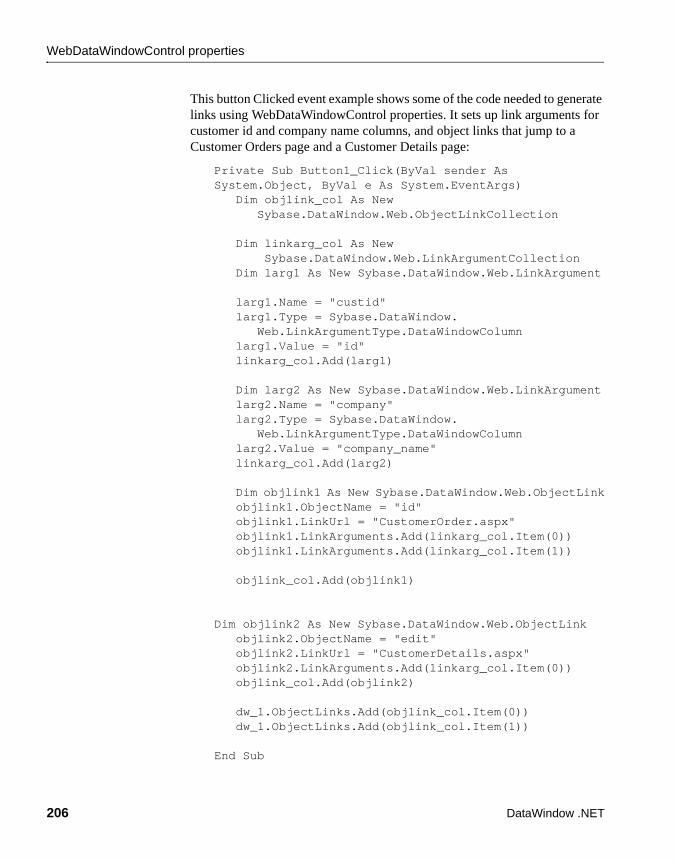
WebDataWindowControl properties
206 DataWindow .NET
This button Clicked event example shows some of the code needed to generate links using WebDataWindowControl properties. It sets up link arguments for customer id and company name columns, and object links that jump to a Customer Orders page and a Customer Details page:
Private Sub Button1_Click(ByVal sender As System.Object, ByVal e As System.EventArgs)
Dim objlink_col As NewSybase.DataWindow.Web.ObjectLinkCollection
Dim linkarg_col As NewSybase.DataWindow.Web.LinkArgumentCollection
Dim larg1 As New Sybase.DataWindow.Web.LinkArgument
larg1.Name = "custid"larg1.Type = Sybase.DataWindow.
Web.LinkArgumentType.DataWindowColumnlarg1.Value = "id"linkarg_col.Add(larg1)
Dim larg2 As New Sybase.DataWindow.Web.LinkArgumentlarg2.Name = "company"larg2.Type = Sybase.DataWindow.
Web.LinkArgumentType.DataWindowColumnlarg2.Value = "company_name"linkarg_col.Add(larg2)
Dim objlink1 As New Sybase.DataWindow.Web.ObjectLinkobjlink1.ObjectName = "id"objlink1.LinkUrl = "CustomerOrder.aspx"objlink1.LinkArguments.Add(linkarg_col.Item(0))objlink1.LinkArguments.Add(linkarg_col.Item(1))
objlink_col.Add(objlink1)
Dim objlink2 As New Sybase.DataWindow.Web.ObjectLinkobjlink2.ObjectName = "edit"objlink2.LinkUrl = "CustomerDetails.aspx"objlink2.LinkArguments.Add(linkarg_col.Item(0))objlink_col.Add(objlink2)
dw_1.ObjectLinks.Add(objlink_col.Item(0))dw_1.ObjectLinks.Add(objlink_col.Item(1))
End Sub

Chapter 9 Using Web DataWindows
Programmer’s Guide 207
Here is the ObjectLinks tag in the Customer Orders .aspx page:
<ObjectLinks><dw:ObjectLink ObjectName="sales_order_id"
LinkUrl="CustomerOrder.aspx"><LinkArguments>
<dw:LinkArgument Type="DataWindowColumn"Name="orderid"Value="sales_order_id"></dw:LinkArgument>
</LinkArguments></dw:ObjectLink>
</ObjectLinks>
Printing Web DataWindowsYou can use the browser’s Print button to print a Web DataWindow, but that prints only what you have in the window. This means that a scrolling DataWindow would not be completely printed.You can print a DataWindow displayed in a Web form to a printer on the Web server using the Print method. This might be a useful technique if the Web server is accessed over a local Intranet. You can also use the SaveAs method to export the DataWindow to a PDF file on the server and then stream the result to the browser.
Before you can use either of these techniques, you must perform some configuration on the Web server.
Server-side printingWhen you call the Print method, the DataWindow is printed to a printer that is installed on the Web server. The DataWindow can reside in either a WebDataWindowControl or a DataStore.
The Web server must be configured so that the ASP.NET worker process has access to system settings and the SYSTEM account has access to printers. Implementing server-side printing requires changing the default permissions on the server.
Configuring the .NET Framework
By default, the .NET Framework runs with the permissions of the local “machine” account. In order to print using IIS, the .NET Framework must run with the permissions of the local “SYSTEM” account. The procedures for configuring the .NET Framework for IIS 5.x and 6.x are different.

Printing Web DataWindows
208 DataWindow .NET
On Windows 2000 or Windows XP with IIS 5.x, you need to edit the machine.config file on the Web server to ensure that the process under which ASP.NET is running has sufficient permissions to access printers installed on the network.
On Windows Server 2003 and on Windows 2000 or Windows XP with IIS 6.x, you use the IIS Manager (the inetmgr utility) to configure the application pool identity.
❖ To configure the .NET Framework to run with local SYSTEM settings with IIS 5.x:
1 In your C:\WINDOWS or C:\WINNT directory, navigate to the Microsoft.NET\Framework\VersionNum\CONFIG directory, where VersionNum is the version of the .NET Framework, for example v1.1.4322.
2 Open the machine.config file with a text or XML editor and locate the processModel element.
You need to change the value of the userName setting in this element. The default settings for userName and passWord are:
userName="machine" passWord="AutoGenerate"
3 Change the value of userName to “SYSTEM”:
userName="SYSTEM" passWord="AutoGenerate"
4 Save the machine.config file.
❖ To configure the .NET Framework to run with local SYSTEM settings with IIS 6.x:
1 In the Windows Start>Run box, type InetMgr.
2 In the IIS Manager, expand local computer and select Application Pools.
3 Right-click Application Pools and select Properties.
4 Click the Identity tab, select Local System from the Predefined list box, and click OK.
5 Click Yes in the pop-up warning message window that displays.
6 Right-click local computer and select All Tasks>Restart IIS to restart IIS.
Chapter 9 Using Web DataWindows
Programmer’s Guide 209
Exposing printer settings to the SYSTEM account
When a printer is installed on a computer, its settings are stored in the HKEY_CURRENT_USER registry key. IIS runs under the context of the local SYSTEM account. It has access to the HKEY_USERS registry key, but not to the HKEY_CURRENT_USERS subkey, which is only available to a user logged on to the computer.
By default, no printers are defined in the HKEY_USERS key. You can add them by exporting three keys from the HKEY_CURRENT_USERS key and importing them to the HKEY_USERS key.
CautionIncorrectly editing the registry might severely damage your system. Make sure you back up valued data before making changes to the registry.
❖ To make printer settings available to the SYSTEM account:
1 Check that the current user on the Web server has the required printer(s) installed.
2 To launch the Registry Editor, type regedit in the Start>Run dialog box and click OK.
3 Select the HKEY_USERS\.DEFAULT\Software\Microsoft\Windows NT\CurrentVersion key and export the registry key from the File or Registry menu.
4 Specify a name and location in the Export Registry File dialog box and click Save.
This file provides a backup if you need to restore the registry.
5 In the HKEY_CURRENT_USER\Software\Microsoft\Windows NT\CurrentVersion key, select the Devices subkey and export the registry key.
6 Specify the name devices.reg and a temporary location in the Export Registry File dialog box and click Save.
7 Repeat steps 5 and 6 for the PrinterPorts and Windows subkeys, naming the files printerports.reg and windows.reg.
8 Open devices.reg in Notepad (do not use TextPad or another editor), replace the string HKEY_CURRENT_USER with the string HKEY_USERS\.DEFAULT (note that there is a dot before DEFAULT), and save the file.
9 Repeat step 8 for printerports.reg and windows.reg.

Printing Web DataWindows
210 DataWindow .NET
10 Double-click each of the edited files to import them into the registry.
11 Restart IIS so that the configuration changes take effect.
❖ To restart IIS:
1 In the Windows Start>Run box, type InetMgr.
2 In the IIS Manager, right-click the local computer and select All Tasks>Restart IIS.
3 In the Start/Stop/Reboot dialog box, select Restart Internet Services on ComputerName, where ComputerName is the local computer.
After restarting IIS, you need to restart the Web site.
Where the DataWindow is printed
When you use the Print method, the DataWindow is printed to the printer specified in the DataWindow object’s PrinterName property, or to the default printer as specified in the Devices registry key.
This Visual Basic code gets the name of the printer and writes it to a log file before printing the DataWindow:
Dim printerName As StringprinterName = dwGrid.PrintProperties.PrinterNamesMsg = "Printer name: " + printerNamewritelog(sMsg)dwGrid.Print()
Saving as PDFIf you want your application to save a DataWindow object in PDF format, the Web server (not the client) must satisfy the requirements for Ghostscript and PostScript drivers described in “Saving data in PDF format” on page 300.
You must also:
• Configure the .NET Framework to run under the SYSTEM account and expose printer settings to the SYSTEM account as described in “Server-side printing” on page 207.
• Make sure that the Sybase DataWindow PS profile is exposed to the SYSTEM account as described next.

Chapter 9 Using Web DataWindows
Programmer’s Guide 211
• On Windows 2003 Server, configure the server so that the PostScript printer driver can be installed. See “Installing a printer on Windows 2003 Server” on page 211.
• Create a folder on the server in which to save the PDF files and set its permissions so that the ASP.NET application process has write access to it.
Exposing the Sybase DataWindow PS profile to the SYSTEM account
Saving as PDF requires a PostScript printer profile called Sybase DataWindow PS. This profile is added to your development computer automatically when you save a DataWindow’s rows to a PDF file in the DataWindow painter.
You can also add the profile manually using the Windows Add Printer wizard. In the wizard, click the Have Disk button and browse to the Adist5.inf file installed in the DataWindow .NET 2.0\drivers directory, or to another PostScript driver file. You can download PostScript driver files from several locations, including the Adobe Web site.
The Sybase DataWindow PS profile must be exposed to the SYSTEM account as described in “Exposing printer settings to the SYSTEM account” on page 209. If this profile does not display in the Devices, PrinterPorts, and Windows subkeys in HKEY_USERS\.DEFAULT\Software\Microsoft\Windows NT\CurrentVersion, copy the string values from the HKEY_CURRENT_USER\Software\Microsoft\Windows NT\CurrentVersion key.
Installing a printer on Windows 2003 Server
On Windows 2003 Server, a default Group Policy disallows installation of printers that use kernel-mode drivers, and as a result the driver used by the Sybase DataWindow PS profile is not installed. Kernel-mode drivers have access to system-wide memory, and poorly written drivers can cause system failures. To allow installation of kernel-mode drivers, follow these steps:
1 Select Run from the Windows Start menu.
2 In the Open box, type gpedit.msc and click OK.
3 In the Group Policy console, expand Computer Configuration, Administrative Templates, and Printers.
4 Disable “Disallow Installation of Printers Using Kernel-Mode Drivers.”
Example If you have completed these configuration steps, you can use code like the following to generate the PDF from the current DataWindow on the page and open the PDF file on the client computer.

Setting up database connections
212 DataWindow .NET
Put the following C# code behind a LinkButton with a label such as “Printer-friendly version.” The code generates a unique file name in a subdirectory called pdfs of the Web application. The unique name is used as the filename argument of the SaveAs method.
String pdfFileName;String pdfUrl;String uniqueName;
uniqueName = System.Guid.NewGuid().ToString() + ".pdf";pdfUrl = "pdfs/" + uniqueName;pdfFileName = Page.MapPath("") + "\\pdfs\\" + > uniqueName;
dw.SaveAs(pdfFileName,Sybase.DataWindow.FileSaveAsType.Pdf);
HtmlGenericControl body;body = FindControl("body") as HtmlGenericControl;body.Attributes.Clear();
body.Attributes.Add("onLoad", "pdfWindow=window.open('" + HttpUtility.UrlEncode(pdfUrl) + "', 'pdf', 'dependent');pdfWindow.focus();");
body.Attributes.AddAttributes(newHtmlTextWriter(Response.Output));
You can find a sample application that uses a different technique on the Sybase CodeXchange Web site at http://datawindownet.codeXchange.sybase.com.
Setting up database connectionsWhen you use the Web DataWindow, it is the Web DataWindow server control that interacts with the database, so you need to set up database connections on the server where the control is running. For information about connecting to a database, see Chapter 5, “Working with Transaction and AdoTransaction Objects.”

Programmer’s Guide 213
C H A P T E R 1 0 Designing Web DataWindows
About this chapter This chapter describes how to design DataWindow objects in DataWindow Designer for use in ASP.NET applications.
Contents
Working in DataWindow DesignerIf you have already designed the DataWindow objects you need in DataWindow Designer, then the .NET Framework development environment is where you will do most of the work required to build ASP.NET applications that use DataWindows. There are three areas that might require you to work in DataWindow Designer:
• Designing new DataWindow objects or tuning existing DataWindow objects to avoid the use of unsupported features
• Setting DataWindow object properties that control the XML, XHTML, or HTML that is generated for your DataWindow objects
• Designing XHTML templates to customize the XHTML generated by the XML and XHTML Web DataWindows
Topic Page
Working in DataWindow Designer 213
Designing DataWindow objects for the Web DataWindow 214
Web DataWindow properties 216
Using JavaScript caching in DataWindow Designer 223
Using expressions 226
Using Button and Picture controls 226
Using a drop-down calendar 228
Using a drop-down DataWindow 228
Previewing the DataWindow 230
Rendering HTML for controls in an HTML Web DataWindow 231

Designing DataWindow objects for the Web DataWindow
214 DataWindow .NET
This chapter covers the first two of these areas. For information about customizing export templates, see Chapter 11, “Working with XHTML Templates.”
Designing DataWindow objects for the Web DataWindow
The Web DataWindow supports most DataWindow functionality. This section describes what features to use to take full advantage of the Web DataWindow, and what features to avoid.
Using existing DataWindow objects
Many existing DataWindow objects work in the Web DataWindow. If a DataWindow object uses features that the Web DataWindow does not support, then the features are ignored. You can still use the DataWindow object if the remaining functionality is acceptable for your application. Table 10-1 lists supported and unsupported features.
Table 10-1: Web DataWindow supported and unsupported features
DataWindow feature Supported and unsupported features
Presentation styles All presentation styles except TreeView are supported. Unsupported presentation styles retrieve data but display nothing. The Grid presentation style is rendered as an HTML table if you use the HTML RenderFormat, and as a result absolute positioning is not supported and the display characteristics differ from those of XML and XHTML Web DataWindows.
Graphs Graphs can be displayed in a DataWindow in a standalone image file or in an image stream embedded into the Web page. Graph controls inserted into DataWindow objects that use the Grid presentation style do not display. See “Rendering graphs” on page 203.
Nested and composite reports
Supported for the XHTML rendering format only.
Supported controls Supported controls: Column, Computed Field, Graph, Text, Picture, Button, GroupBox, Rectangle.
These controls are ignored: OLE Object, OLE Database Blob, RoundRectangle, Oval, InkPicture.
For information on:
• Expressions for computed fields, see “Using expressions” on page 226.
• Images for Picture controls, see “Using Picture controls” on page 228.
• Button controls and supported actions, see “Using Button controls” on page 226.
Report controls Report controls are supported in XHTML Web DataWindows only.

Chapter 10 Designing Web DataWindows
Programmer’s Guide 215
GroupBox controls GroupBoxes cannot be rendered in Crosstab and Grid style DataWindows.
The following GroupBox properties are not supported: moveable, pointer, resizeable, slideleft, slideup, font.charset, font.width.
Line controls Only horizontal Line controls are supported. The line’s color property is always rendered, and the width property is rendered if the line is solid. Other line styles are displayed as solid lines with the default width. Vertical and slanted lines are ignored.
Rectangle controls Rectangles cannot be rendered in a Label DataWindow with any rendering format when the layer of the Rectangle is foreground, unless the height of the DataWindow control is set to a fixed value.
The following Rectangle properties are not supported: moveable, pointer, resizeable, slideleft, slideup, brush.hatch, pen.style
Retrieving data Filtering and sorting are supported by setting properties or calling methods on the server control. Sorting can also be specified by using a client control method. See Chapter 12, “Writing Scripts for the Web DataWindow Client Control.”
User-specified queries using the QueryMode property are not supported.
Updating data Same as the DataWindowControl. The DataWindow object must contain editable columns.
Edit styles All edit styles are supported except InkEdit and EditMask, with the exception of the DDCalendar EditMask. If the DataWindow uses the EditMask edit style, the styles specified are treated as though they were specified as a display format.
DDCalendar EditMask property
The DDCalendar EditMask property option allows for separate selections of the calendar month, year, and date. This option can be set in a check box on the Edit tab of the DataWindow painter Properties view when a Date or DateTime column with the EditMask edit style is selected. It can also be set in code, as in this example for the birth_date column:
dwEmp.Modify("birth_date.EditMask.DDCalendar='Yes'")
For more information, see “Using a drop-down calendar” on page 228.
DropDownDataWindows A drop-down DataWindow must be in the same PBL as the DataWindow in which it is used. Data for drop-down DataWindows is retrieved on the server. See “Using a drop-down DataWindow” on page 229. The dddw.lines property is not supported in Web pages because the browser controls how the DropDownDataWindow displays.
Display formats Supported, including the use of color.
Validation rules The expression might be evaluated on the client or the server, depending on the expression.
For information, see “Using expressions” on page 226.
Property expressions Evaluated on the server.
Layout Properties that specify autosizing of height and width or allow the user to resize or move controls, such as SlideLeft and SlideRight, are ignored.
DataWindow feature Supported and unsupported features

Web DataWindow properties
216 DataWindow .NET
Web DataWindow propertiesThis section describes the XML, XHTML, and HTML DataWindow object properties for the Web DataWindow that you can set in DataWindow Designer or in code, using the Modify or SetProperty methods.
Some properties that you can set for the DataWindow object in DataWindow Designer can also be set in the Properties window in Visual Studio .NET. If a property is set in DataWindow Designer, it is respected in DataWindow .NET. However, the properties you set in the painter are not reflected in the Properties view, which displays default values for most properties. For more information, see “Understanding how properties interact” on page 186.
For more detailed information about each property, see the DataWindow Object Reference or the online Help for the property name in DataWindow Designer. For information about how to set properties in DataWindow Designer, including shared HTML and XHTML properties, see “Setting Web generation properties for the Web DataWindow” on page 219.
XML and XHTML data properties
Table 10-2 shows row data properties for the XML and XHTML Web DataWindow.
Table 10-2: Row properties for the XML and XHTML Web DataWindow
Properties The following properties are not supported:
• EditMask.Spin DataWindow object property
• Sparse (Suppress Repeating Values) DataWindow object property
• RightToLeft DataWindow control property
The Limit property is not supported in multiline edit columns in a Web DataWindow. In JavaScript, the multiline edit column maps to a textarea object, and the limit property maps to a maxlength attribute, which the textarea object does not support.
Tab order Supported in HTML 4 and later browsers.
DataWindow feature Supported and unsupported features
Property User interface fields Description
Data.XHTML Read only, so no user interface field A string containing the row data content of the DataWindow object in XHTML format
Data.XMLWeb Read only, so no user interface field A string containing browser-specific JavaScript that performs the XSLT transformation on the browser

Chapter 10 Designing Web DataWindows
Programmer’s Guide 217
XML Web DataWindow generation properties
Table 10-3 lists properties supporting XML Web DataWindow generation. If you set the XmlConfigurations.UrlPath property in the properties window in Visual Studio .NET, the JSGen, XMLGen, and XSLTGen ResourceBase and PublishPath properties are ignored.
Table 10-3: Properties supporting XML Web DataWindow generation
Property User interface fields Allows you to
CSSGen.property Web Generation property page with CSS selected as the format to configure: resource base, publish path, and session-specific file names
Specify the physical path to which a generated CSS style sheet is published and the URL indicating the location of the style sheet where the property variable is PublishPath or ResourceBase, as well as whether generated CSS, XSLT, and JavaScript file names are specific to a session
JSGen.property JavaScript Generation property page with XHTML selected as the format to configure: resource base and publish path
Specify the physical path to which generated JavaScript (that is included in the final XHTML page) is published and the URL indicating the location of the generated JavaScript where the property variable is PublishPath or ResourceBase
XMLGen.property Web Generation property page with XML selected as the format to configure: resource base, publish path, and secure inline XML generation
Specify the physical path to which XML is published and the URL referenced by the JavaScript that transforms the XML to XHTML where the property variable is PublishPath or ResourceBase, as well as whether XML is generated in the XSLT transformation script for security
XSLTGen.property Web Generation property page with XSLT selected as the format to configure: resource base and publish path
Specify the physical path to which the generated XSLT style sheet is published and the URL referenced by the JavaScript that transforms the XML to XHTML (using the generated XSLT stylesheet) where the property variable is PublishPath or ResourceBase
XHTMLGen.Browser Web Generation property page with XHTML selected as the format to configure: browser
Identify the browser in which XHTML generated within an XSLT style sheet is displayed

Web DataWindow properties
218 DataWindow .NET
About PublishPath and ResourceBasePublishPath is a string that specifies the physical path of the Web site folder to which DataWindow .NET publishes generated CSS, JavaScript, XML, or XSLT. ResourceBase is a string that specifies the URL of the generated file. For example, you might set CSSGen.ResourceBase to /MyWebApp/cssfiles and CSSGen.PublishPath to C:\Inetpub\wwwroot\MyWebApp\cssfiles, and set similar paths for the JSGen, XMLGen, and XSLTGen properties.
HTML properties There are four types of HTML properties you can set in DataWindow Designer. The first three apply to the DataWindow object itself. The last applies to bitmap, column, computed field, and text controls in the DataWindow object. Many of these properties can be overridden in the Properties window in the development environment.
Table 10-4: HTML properties you can set in DataWindow Designer
Property User interface fields Allows you to
HTMLDW(shared by all Web DataWindow formats)
Web DataWindow check box on the General page of the DataWindow object Property view. Selecting this check box sets this property to Yes.
View the HTML in a browser using Design>HTML Preview.
HTMLTable.property(HTML only)
All fields on the HTML Table page of the DataWindow object Property view.
Change the display characteristics of HTML tables, including border style and cell width and padding.
HTMLGen.property (shared by all Web DataWindow formats)
All fields on the Web Generation page and the JavaScript Generation page of the DataWindow object Property view. (You can also start the JavaScript Generation wizard using the Generate File button on the JavaScript Generation page).
Control the number of rows displayed on the page, generate HTML for a specific browser or HTML version, choose client-side features to incorporate into the page, select how to display drop-down DataWindows, select a paging method, and set up JavaScript caching to enhance performance.
HTML.property (shared by all Web DataWindow formats)
All fields on the HTML page of the Property view for a Column, Computed Field, Text, or Picture control in a DataWindow object.
Set up hyperlinks and retrieval arguments typically used to create master/detail Web pages, specify whether the content of a control should be rendered as HTML, and specify any HTML to be appended to a control.

Chapter 10 Designing Web DataWindows
Programmer’s Guide 219
Setting Web generation properties for the Web DataWindowEach of the Web formats that contribute to the generation of a Web DataWindow require configuration:
HTMLXHTMLCSSXMLXSLTJavaScript
The rest of this section describes configuration of HTML, XHTML, CSS, XML, XSLT, and JavaScript in DataWindow Designer. For information about JavaScript caching, see “Using JavaScript caching in DataWindow Designer” on page 223. You need only configure the properties used by your RenderFormat choice in Visual Studio .NET.
To configure a particular Web format, you use the Web Generation page in the DataWindow object property view. The Web Generation page is controlled by the Format to configure drop-down list box at the top of the view that displays the Web formats for the Web DataWindow:

Web DataWindow properties
220 DataWindow .NET
The properties that are shared by HTML and XHTML display in the view by default. When you set shared properties, both formats are configured at the same time:
Which properties you can set depends on the format you select.
Table 10-5 shows which properties you can set with each selected format. The last column lists equivalent properties you can set in the .NET development environment. For more information about setting properties in the .NET development environment, see “WebDataWindowControl properties” on page 185.
For descriptions of properties, see the DataWindow Object Reference in the online compiled HTML Help. Use Table 10-3 on page 217 and Table 10-4 on page 218 to find out which Help topic describes each property.

Chapter 10 Designing Web DataWindows
Programmer’s Guide 221
Table 10-5: Web generation properties in DataWindow Designer and in the .NET development environment
Format to configure Applies to
Properties in DataWindow Designer
Properties in the .NET development environment
XHTML/HTML All Web DataWindow formats
Rows per page (sets the PageSize property
RowsPerPage
Generate JavaScript JavaScriptConfigurations.JavaScriptOption
Client events ClientEvents
Client validation ClientValidation
Client computed fields No equivalent
Client formatting ClientFormatting
Client scriptable ClientScriptable
Generate DDDW Frames GenerateDDDWFrames
Object name ClientObjectName
TabIndex base TabIndex
Self link No equivalent
Self link arguments No equivalent
Encode self link arguments No equivalent
Paging Method PagingMethod
HTML HTML Web DataWindows
Browser Overridden by the browser handling the current request
HTML version Overridden by the browser handling the current request
XHTML XHTML and XML Web DataWindows
Browser Overridden by the browser handling the current request
CSS XML Web DataWindows (for generated CSS files)
Resource base XMLConfigurations.UrlPath
Publish path XMLConfigurations.UrlPath
Session-specific file names XMLConfigurations.SessionSpecific
XML XML Web DataWindows (for generated XML files)
Resource base XMLConfigurations.UrlPath
Publish path XMLConfigurations.UrlPath
Generate securely inline XMLConfigurations.SecurelyInline
XSLT XML Web DataWindows (for generated XSLT files)
Resource base XMLConfigurations.UrlPath
Publish path XMLConfigurations.UrlPath

Web DataWindow properties
222 DataWindow .NET
Typically you share style (CSS), layout (XSLT), and control definitions (JS) for use by all clients; however, if you use dynamic DataWindows customized for specific clients, you can force generation of the DataWindow presentation-related document names to be specific to each client. You do this by selecting the Session Specific CSS, XSLT, and JS Filenames check box or by setting the CSSGen.SessionSpecific property to “yes”. This eliminates the possibility of server-side contention for presentation formats when the DataWindow generation is specific to the client.
You should avoid using the same name for different DataWindows (in different PBLs) in the same application. If you must use duplicate names, you can eliminate the possibility of server-side contention for presentation formats and data content by entering a fully qualified file name (rather than a path) for the publish path properties of those DataWindows. If you do use a file name for a publish path property, the file extension must correspond to the type of format you are configuring. For example, if you are adding a file name to the publish path of the XML format, the file extension must be XML.
Setting ResourceBase and PublishPath for JavaScript files
You configure JavaScript generation properties for the XML Web DataWindow and XHTML Web DataWindow on the JavaScript Configuration tab. Select XHTML in the Format to Configure box and provide paths for the resource base and the publish path.
The other choice for format to configure on the JavaScript generation page is XHTML/HTML. The options that display are used for JavaScript caching. For more information, see “Using JavaScript caching in DataWindow Designer” next.

Chapter 10 Designing Web DataWindows
Programmer’s Guide 223
Using JavaScript caching in DataWindow DesignerIn DataWindow Designer, you can use the Web DataWindow JavaScript Generator wizard to create JavaScript files (at design time) that contain the JavaScript client-side methods. You can start the Web DataWindow JavaScript Generator wizard by clicking the Generate File button in the JavaScript Generation property page of the DataWindow property view or from the Tool tab of the New dialog box.
You can also generate JavaScript files for the WebDataWindowControl in the Properties window in your development environment. In Visual Studio .NET, you can also choose to use JavaScript files that are embedded in the WebDataWindow.dll assembly as a resource. See “Generating JavaScript for common management tasks” on page 189.
Shared JavaScript generation properties
These JavaScript files (HTML/XHTML) are shared by all Web formats of the Web DataWindow—XML, XHTML, and HTML.
Each pass of the wizard generates only one file, which allows you to combine or separate classes of functions. Once you have generated one or more JavaScript files, you can attach them to a DataWindow object using the Filename drop-down lists (for Common Class, Date Time Management, Number Format, String Format, and User Class) in the JavaScript Generation property page.
Generating and associating JavaScript files with a DataWindow object enables the JavaScript functions to be cached and then reused each time the page containing the DataWindow object displays in the browser.

Using JavaScript caching in DataWindow Designer
224 DataWindow .NET
Server-side and client-side performance
When you set DataWindow properties to reference included JavaScript files, the methods defined in the referenced files are not generated with the HTML in any Web DataWindow pages that are sent to the page server and client browser. Using JavaScript files also reduces the size of the HTML page rendered in the browser.
With JavaScript caching, you improve performance on the client machine as long as the client browser is configured to use cached files. With caching enabled, the browser loads the JavaScript files from the Web server into its cache, and these become available for all the Web DataWindow pages in your application. There is no client-side performance gain if the browser does not find the JavaScript files in its cache since, in this case, it reloads the files from the Web server.
Web DataWindow JavaScript Generator wizard
With the Web DataWindow JavaScript Generator wizard, you can generate only one JavaScript file at a time. The wizard gives you the option of including all Web DataWindow methods in a single file, but you can also restrict the types of methods to include in each JavaScript file it generates every time you use the wizard. The different method types correspond to the following DataWindow HTML properties:
Table 10-6: Methods generated by JavaScript Generator wizard in cached files
All of these properties are optional. You can set each of the properties from the JavaScript Generation page of the DataWindow property view, selecting the files you generate with the wizard as values. The wizard registers each file it generates, making it available for selection from the drop-down lists in the DataWindow property view.
When you update to a new version of DataWindow .NET, you must always regenerate the JavaScript files to ensure that any changes or enhancements in the new version are incorporated in the files.
HTMLGen.property Contents of cached file
CommonJSFile Methods used by all DataWindows.
DateJSFile Methods used by DataWindows with date and time formatting.
NumberJSFile Methods used by DataWindows with number formatting.
StringJSFile Methods used by DataWindows with string formatting.
UserJSFile User-defined client-side JavaScript methods—these cannot be generated by the Web DataWindow JavaScript Generator wizard. (See “User-defined JavaScript methods” on page 225.)

Chapter 10 Designing Web DataWindows
Programmer’s Guide 225
Using the ResourceBase property
You must deploy all cached files for your Web application to your Web server. You can use relative URLs or path names for cached JavaScript files if you specify their location in the HTMLGen.ResourceBase property.
You set these on the JavaScript Generation page of the DataWindow property view in DataWindow Designer. The ResourceBase property is also used to specify the location of image files.
If you do not set the HTMLGen.ResourceBase property, you must include the complete URL in the values of any of the HTMLGen properties that you set. In either case, the URLs are rendered as SRC attributes inside SCRIPT tags in the pages generated by the Web DataWindow component and sent to the client browser.
User-defined JavaScript methods
You can also reference a file where you store your own client-side JavaScript methods. To use this feature, you must assign the name of the file to the DataWindow HTMLGen.UserJSFile property and make sure the file is available to your Web server. As for the wizard-generated JavaScript files, you can use the HTMLGen.ResourceBase property to set the location for the file, or you can include the complete path to the file in the property value assignment.
You can make this assignment in DataWindow Designer or in code. The following code sets the user-defined JavaScript file to MyMethods.JS:
wdwEmp.Modify _ ("DataWindow.HTMLGen.UserJSFile=" + _ "'http://my_server.com/JavaScripts/MyMethods.JS'")
This example will be rendered in the generated HTML page as:
<SCRIPT LANGUAGE="JavaScript" SRC="http://my_server.com/JavaScripts/MyMethods.JS"></SCRIPT>
You can then call client-side methods stored in the MyMethods.JS file from the HTML syntax rendered for (or appended to) controls in a DataWindow object. For information on generating or appending HTML syntax to controls, see “Rendering HTML for controls in an HTML Web DataWindow” on page 231.

Using expressions
226 DataWindow .NET
Using expressionsIn general, expressions for validation rules and computed fields are translated into JavaScript and evaluated in the client browser. For validation of data entry, the user gets immediate feedback on the new data.
Some expressions have to be evaluated on the server. This might be because the evaluation involves all the rows, rather than data on the current page only, or because the expression does not translate into JavaScript.
If an expression includes these functions, it will be evaluated on the server:
• Aggregation functions, like Sum, Max, Average, First
• Case function
If you use an aggregation function in a computed field, the value is computed on the server and displayed on the client. If the user edits data, the value is not updated. If an action occurs that reloads the page, the value is computed again based on the changed data.
ProfileInt and ProfileString return default valuesThe ProfileInt and ProfileString DataWindow expression functions do not examine a user’s INI files if you use them in an expression evaluated on the client. Doing so would be a security violation. They always return the default value.
Using Button and Picture controlsUsing Button controls When a DataWindow object includes a Button control, the button becomes an
HTML or XHTML button element in the Form element for the Web DataWindow client control. The button action becomes JavaScript code for the button's Clicked event. You do not need to write any code yourself unless you specify a user-defined action.
You can use Button controls for:
• Navigation Buttons with the PageFirst, PageLast, PageNext, and PagePrior actions let the user scroll to other rows in the result set when you have set the RowsPerPage property.

Chapter 10 Designing Web DataWindows
Programmer’s Guide 227
• Getting and editing data Buttons with Retrieve, Update, InsertRow, DeleteRow, and AppendRow actions let the user maintain data. There must be updatable columns in the DataWindow object.
These button actions are not supported and are ignored:
All button actions that reload the page perform an AcceptText before sending data back to the server. If the AcceptText fails (the button action returns -1), this means that pending data changes were not accepted and nothing was sent back to the server. Put code in the server-side AfterPerformAction event to detect and handle the failure appropriately. For more information, see “Handling method failures” on page 258.
User-defined actions If you specify a user-defined action for the button in the DataWindow painter, the ButtonClicked event is triggered when a user clicks the button. You can add a ButtonClicked event handler to the Web DataWindow client control in .NET to perform a different action depending on which button was clicked. For an example, see ButtonClicked on page 259.
GIF and JPEG images for buttons
The picture on a button in a DataWindow object can be rendered in the Web browser as a JPEG, GIF, or BMP image. Use a JPEG or GIF image to ensure that the image will display on all browsers.
DataWindow .NET provides GIF images for commonly used buttons such as Retrieve, Update, PageNext, and so on. These pictures are included in the DWACTION.JAR file in the DataWindow Designer 2.0 directory.
To make the images available to the Web page in the Web browser, you must uncompress the JAR file, deploy the image files to the server, and set the HTMLGen.ResourceBase property to the directory where the files are located.
Alternative to buttons: use methods of the client control
If you want to use an existing DataWindow object that does not have Button controls, you can edit the DataWindow object and save a new version with Button controls. However, if you are sharing DataWindow objects with an existing application and it is not practical to edit them, your Web page can include HTML or XHTML buttons that call methods of the Web DataWindow client control.
Cancel QueryClear
Filter QueryMode
Preview QuerySort
PreviewWithRulers SaveRowsAs
Print Sort
Using a drop-down calendar
228 DataWindow .NET
There are methods of the client control that correspond to each of the supported button actions. For information, see “About client-side programming” on page 253.
Using Picture controls You can use any image types the browser supports, most commonly JPEG or GIF. Use relative paths for ease of deployment.
To make sure the images are available to the Web page in the browser, place the image files in a directory on the Web server and then set the HTMLGen.ResourceBase property to that directory. You can do this in DataWindow Designer on the JavaScript Generation page of the DataWindow property view, or in code:
dwMine.Modify("DataWindow.HTMLGen.ResourceBase='C:\InetPub\wwwroot\Images'")
The ResourceBase property also specifies the location of JavaScript include files. See “Using JavaScript caching in DataWindow Designer” on page 223.
Using a drop-down calendarThe drop-down calendar DataWindow option is available for use on any DataWindow column with an EditMask, and a Date, DateTime, or TimeStamp datatype. The DDCalendar EditMask property option allows for separate selections of the calendar month, year, and date. This option can be set in a check box on the Edit tab of the DataWindow painter Properties view when a column with the EditMask edit style is selected. It can also be set in code, as in this example for the birth_date column:
dw_1.Modify("birth_date.EditMask.DDCalendar='Yes'")
To make sure that dates selected with the drop-down calendar option are displayed with the desired edit mask for Web DataWindows, you should specify that the Client Formatting option be included with the static JavaScript generated and deployed for the DataWindow. To conserve bandwidth, JavaScript for client formatting is not included by default. To include this script, you can select the Client Formatting check box on the Web Generation page of the DataWindow Properties view or the ClientFormatting property in the Properties window in Visual Studio .NET. If you do not include script for client formatting, the drop-down calendar will use a default edit mask to display the column data based on the client machine's default localization settings.

Chapter 10 Designing Web DataWindows
Programmer’s Guide 229
Using a drop-down DataWindowIn an HTML Web DataWindow in Internet Explorer, when you tab to a column that uses the drop-down DataWindow edit style, you can use the arrow keys on the keyboard to change its value. If you click the column, the drop-down DataWindow displays so that you can scroll to a different value and click to select it.
You set the display properties for the column on the Edit page in the Properties view in the DataWindow painter. The Width of DropDown property sets the width of the drop-down display to a size that is a percentage of the width of the column. For example, 300 sets the display width to three times the column width.
The default behavior uses inline frames (iFrames), which might increase the volume of markup generated. For DataWindow objects that make heavy use of drop-down DataWindows, you might save bandwidth by generating the drop-down DataWindows in HTML select elements. To do so, clear the Generate DDDW Frames check box on the Web Generation page with the Format to Configure option set to HTML/XHTML. You can view the generated source from each technique and save it to a file, then compare file sizes to determine which is best for your DataWindow objects.
You can also set the WebDataWindowControl’s generateDDDWFrames property in code.

Previewing the DataWindow
230 DataWindow .NET
Previewing the DataWindow To see what the DataWindow will look like in an HTML Web DataWindow application, you can use HTML Preview.
❖ To get an HTML preview of a Web DataWindow:
1 On the General property page of the DataWindow property sheet, check Web DataWindow.
If you do not check Web DataWindow, the preview displays the data as an HTML table without buttons, validation rules, or other scripts. At runtime, this property is always true.
2 On the Web Generation page, select HTML/XHTML from the Format to Configure list and specify a value for Rows per Page.
This sets the PageSize property for the DataWindow object. To display only one row of data, specify 1.
3 Select HTML from the Format to Configure list and specify a value for Browser and one for Version if you want to preview the DataWindow for a specific client configuration.
Typically you will want to set the Browser property to the value that is compatible with the latest version of Internet Explorer.
4 Select Design>HTML Preview from the menu bar.
If the menu item is disabled, open the Preview view to enable it.
5 Enter data and see whether validation rules behave as expected.
6 Use your buttons to navigate to other pages.

Chapter 10 Designing Web DataWindows
Programmer’s Guide 231
Rendering HTML for controls in an HTML Web DataWindow
This section applies to the HTML Web DataWindow only. You can use XHTML templates to customize the display of the XML Web DataWindow and XHTML Web DataWindow. For more information, see Chapter 11, “Working with XHTML Templates.”
No validationThe HTML Generator does not validate the HTML you include in controls in DataWindow objects. If the HTML is not valid, the DataWindow might not display correctly.
Including HTML in a control
You can include valid HTML in some controls in a DataWindow object, including a text control, column, or computed field. To render the contents of the control as HTML when the HTML for the DataWindow is generated, set the control’s ValueIsHTML property to true. For example, suppose a text control’s text property is <I>Name</I>. The following table shows how the text is rendered in the generated HTML and displayed in a browser.
Table 10-7: Effect of ValueIsHTML property on rendered text
When you embed HTML in a control, you can cause ASP to detect a security risk. To avoid this, add validateRequest='false' in the page directive of your ASP page.
Appending HTML to a control
The AppendedHTML property enables you to append your own HTML to the HTML generated by the HTML Generator component. You can use this feature to specify attributes and event actions. The HTML you specify for the AppendedHTML property value is appended to generated syntax for the rendering of a DataWindow control before the closing bracket of the HTML element for that control.
ValueIsHTML Generated HTML source Output in browser
TRUE <I>Name</I> Name
FALSE <I>Name</I> <I>Name</I>

Rendering HTML for controls in an HTML Web DataWindow
232 DataWindow .NET
You must also make sure not to use an event handler name that is already generated for a DataWindow control as a client-side event handler. These include the names listed in Table 10-8.
Table 10-8: Generated event handler names
DataWindow control Generated event handler names
Edit, EditMask, DropDownListBox, or DropDownDataWindow
onFocus, onClick, onChange, and onBlur
CheckBox or RadioButton onFocus, onClick, and onBlur
TextBox, Picture with link, or Button onClick
Programmer’s Guide 233
C H A P T E R 1 1 Working with XHTML Templates
About this chapter This chapter describes how to customize the XHTML generated by the XML and XHTML Web DataWindows by defining export templates.
Contents
The Export Template view for XHTMLYou can customize the XHTML that is generated at runtime by the XML Web DataWindow and the XHTML Web DataWindow using an XHTML export template in the DataWindow painter’s Export Template view for XHTML.
Each DataWindow object that you create has a default XHTML export template associated with it. You can see the default template in the DataWindow painter’s Export Template view for XHTML.
Displaying the XHTML export templateThe Export Template view for XHTML coexists with the Export Template view for XML, each on its own tab page with XML on the top by default. To display the view for XHTML, click the XHTML tab. If you have any problems displaying the view, select View>Export/Import Template>XHTML from the menu bar or select View>Layouts>Default and then click the XHTML tab.
Topic Page
The Export Template view for XHTML 233
What you can customize 234
The default XHTML export template 235
Managing templates 236
Template structure 240
Editing XHTML export templates 242
Selecting XHTML export templates at runtime 250
Exporting DataWindow data in XML or in XHTML 250
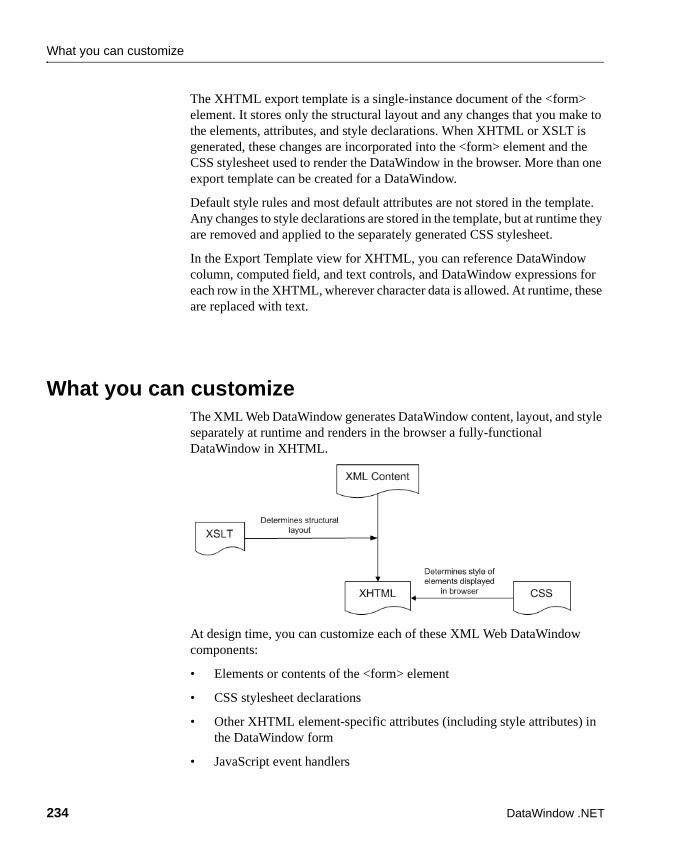
What you can customize
234 DataWindow .NET
The XHTML export template is a single-instance document of the <form> element. It stores only the structural layout and any changes that you make to the elements, attributes, and style declarations. When XHTML or XSLT is generated, these changes are incorporated into the <form> element and the CSS stylesheet used to render the DataWindow in the browser. More than one export template can be created for a DataWindow.
Default style rules and most default attributes are not stored in the template. Any changes to style declarations are stored in the template, but at runtime they are removed and applied to the separately generated CSS stylesheet.
In the Export Template view for XHTML, you can reference DataWindow column, computed field, and text controls, and DataWindow expressions for each row in the XHTML, wherever character data is allowed. At runtime, these are replaced with text.
What you can customizeThe XML Web DataWindow generates DataWindow content, layout, and style separately at runtime and renders in the browser a fully-functional DataWindow in XHTML.
At design time, you can customize each of these XML Web DataWindow components:
• Elements or contents of the <form> element
• CSS stylesheet declarations
• Other XHTML element-specific attributes (including style attributes) in the DataWindow form
• JavaScript event handlers

Chapter 11 Working with XHTML Templates
Programmer’s Guide 235
Examples of customization
Your customizations can include these types of modifications:
The default XHTML export templateIn the default XHTML export template, export XHTML entities (markup and character data) are displayed as single tree view items that denote the type of entity. The default template has one element for each column in the DataWindow object.
You can create multiple templates and save them by name with the DataWindow object. Each template is uniquely associated with the DataWindow object open in the painter. For information, see “Managing templates” on page 236.
Customization Example
Structural layout Add or remove elements and content (input fields of the XHTML <form> element) from the header, detail, summary, and footer bands
Style rules of data input field elements in the <form> element
Modify the default CSS stylesheet property values and add or remove CSS stylesheet declarations
Other attributes of elements of the DataWindow
Override attribute values and remove or add attributes specific to these elements
JavaScript event handlers Override, redirect, add, or remove JavaScript event handlers

Managing templates
236 DataWindow .NET
How tree view items are represented
Each item in the XHTML export template displays as a single tree view item with an image and font color that denotes its type. Elements are represented by a yellow icon that resembles a luggage tag. The end tags of elements and the markup delimiters (angle brackets) used in an XHTML document do not display.
The following table shows the icons used in the Export Template view for XHTML.
Table 11-1: Icons used in the Export Template view for XHTML
Managing templatesFrom the pop-up menu for the default XHTML export template (with no items selected), you can create multiple templates and save them by name with the DataWindow object open in the painter. You can also open and edit existing templates that are associated with the current DataWindow object and, when more than one template is associated with the DataWindow, delete the current template.
Icon Description
Root or child element
Group header element
DataWindow column reference
Static text control reference
Computed field or DataWindow painter expression reference
Literal text
CDATA section
Nested report

Chapter 11 Working with XHTML Templates
Programmer’s Guide 237
The pop-up menu has these options for managing templates:
Creating and saving templatesCreating a new default template
To create a new default XHTML export template, select New Default from the pop-up menu in the Export Template view for XHTML.
A new default XHTML export template has the following elements:
Menu item Description
New Default Define a new default XHTML export template based on the current DataWindow layout
Open Open a saved template
Save Save the current template; if the template has no name, name it
Save As Save the current template with a new name
Delete Delete the current template (enabled only if more than one template exists for the current DataWindow object)
Elements Name defaults to
Root <form> DataWindow name_dataForm
Header <div> DataWindow name_band_0
Detail <div> DataWindow name_detail_0
Summary <div> DataWindow name_band_n

Managing templates
238 DataWindow .NET
Saving the template To save a new default template, select Save from the pop-up menu in the Export Template view for XHTML, name the template, and provide a comment that identifies its use.
The template is stored inside the DataWindow object in the PBL. After saving a template with a DataWindow object, you can see its definition in the Source editor for the DataWindow object. For example, this is part of the source for a DataWindow that has two templates. The templates have required elements only:
export.xhtml(usetemplate = "t_phone"template = (name = "t_address"
comment = "Employee Address Book" xhtml = "<…>")template = (name = "t_phone"
comment = "Employee Phone Book" xhtml = "<…>") )
Defining multiple templatesYou can define multiple templates for a single DataWindow object. One reason you might do this is to vary the edit styles generated for the same DataWindow edit control.
Selecting the template to useUsing the Export.XHTML.UseTemplate property
The Data Export page in the Properties view lets you set properties for exporting data in XHTML. The names of all templates that you create and save for the current DataWindow object display in the Use Template drop-down list.
In addition to the properties that you can set on this page, you can use the Export.XHTML.TemplateCount and Export.XHTML.Template[ ].Name properties to let the user of an application select an export template at runtime. See “Selecting XHTML export templates at runtime” on page 250.
Footer <div> DataWindow name_band_n
Child elements of the Header, Detail, Summary, and Footer elements
Name of each DataWindow control.
Elements Name defaults to

Chapter 11 Working with XHTML Templates
Programmer’s Guide 239
You can specify the template you want to apply to the default XML Web DataWindow or XHTML Web DataWindow generation at runtime by setting the Export.XHTML.UseTemplate property. You set the property using the Data Export tab in the DataWindow painter’s Properties view by selecting XHTML as the format and then selecting the XHTML export template’s name from the Use Template drop-down list box.
You can also set the Export.XHTML.UseTemplate DataWindow property in code. For information, see “Selecting XHTML export templates at runtime” on page 250.
Incorrect setting of the UseTemplate propertyIf you set the Export.XHTML.UseTemplate property at runtime to the name of a template that does not exist, the built-in default Template is used on an export.
Properties related to XHTML export templates
Table 11-2 shows properties related to XHTML export templates.
Table 11-2: Properties for XHTML export templates
For detailed information about DataWindow properties, see the DataWindow Object Reference.
Property User interface fields Description
Export.XHTML.TemplateCount
Read only, so no user interface field.
The number of XHTML export templates associated with a DataWindow object
Export.XHTML.Template[num].Name
Read only, so no user interface field.
The name of an XHTML export template associated with a DataWindow object returned by an index value that ranges from 1 to the value of the Export.XHTML. TemplateCount property
Export.XHTML.UseTemplate
Select a template from the Use Template drop-down list box in the Data Export tab in the DataWindow painter’s Properties view.
The name of an XHTML export template (previously saved in the DataWindow painter) that optionally controls the logical structure of the XHTML generated by a DataWindow object

Template structure
240 DataWindow .NET
Template structureAn XHTML export template has a Header section and a Detail section separated graphically by a line across the tree view. Other DataWindow bands are incorporated into these sections.
The Detail Start element
A line across the Export/Import Template view separates the Header section from the Detail section. The first element after this line, d_dept_list_row in the previous screen shot, is called the Detail Start element.
There can be only one Detail Start element, and it must be inside the document’s root element. Each band of the DataWindow is wrapped by a <div> element. When the DataWindow is exported to XHTML, this element and all children and/or siblings after it are generated iteratively for each row.
Header sectionThe Header section can contain the items listed in Table 11-3. Only the root XHTML <form> element is required.
Table 11-3: Items permitted in the Header section of an XHTML document
Item Details
Root <form> element (start tag)
The XHTML <form> element is the root element of the XHTML template. See “Root element” on page 245.
XHTML elements Additional elements below the root element.
DataWindow control references
Text. See “DataWindow controls” on page 246.

Chapter 11 Working with XHTML Templates
Programmer’s Guide 241
Detail section in root elementThe root element displays in the Header section, but the entire content of the Detail section is contained in the root element.
The items in the Header section are generated only once at runtime (when the DataWindow is exported to XHTML), unless the DataWindow is a group DataWindow. For group DataWindows, the corresponding XHTML fragment in the Header section is repeated so that it iteratively heads each group detail—the group of XHTML rows corresponding to the group specified in the DataWindow.
The Header section contains the rendering of the DataWindow header band and any group header bands. Bands are generated within <div> elements. The controls rendered in the Header section (such as computed titles and text control column headings) are typically also generated within <div> elements, with referenced content.
These entities are generated only once and are not iterated for each row. However, for DataWindows with group headers, the corresponding XHTML fragment in the Header section is repeated, iteratively heading each group of XHTML rows corresponding to the group specified in the DataWindow.
DataWindow expressions
Text. See “DataWindow painter expressions” on page 246.
Literal text Text that does not correspond to a DW control.
Attributes Can be assigned to all elements. See “Element attributes” on page 247.
CDATA sections See “CDATA sections” on page 249.
Child elements Child elements in the Header section cannot be iterative except in the case of group DataWindows.
Item Details
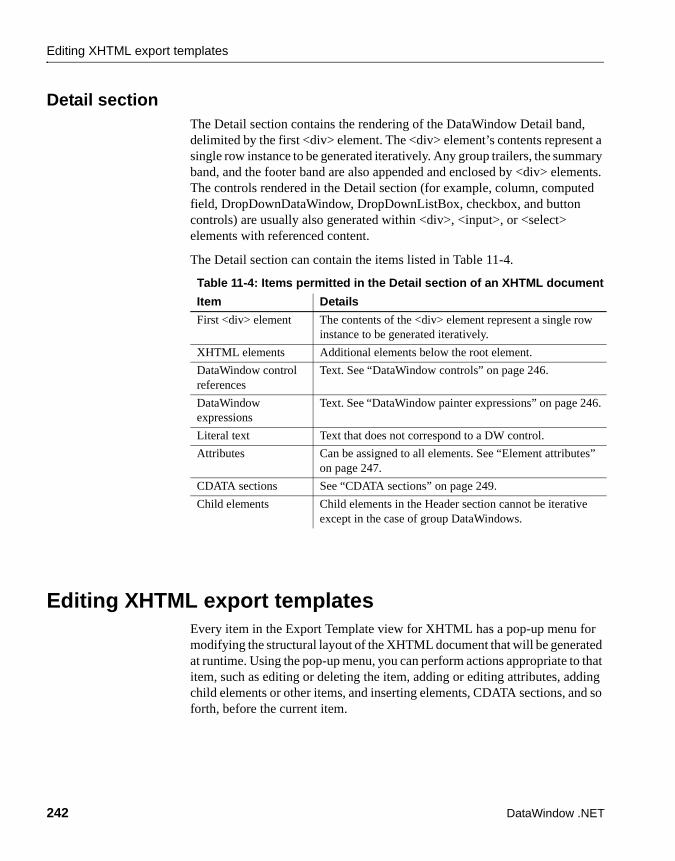
Editing XHTML export templates
242 DataWindow .NET
Detail sectionThe Detail section contains the rendering of the DataWindow Detail band, delimited by the first <div> element. The <div> element’s contents represent a single row instance to be generated iteratively. Any group trailers, the summary band, and the footer band are also appended and enclosed by <div> elements. The controls rendered in the Detail section (for example, column, computed field, DropDownDataWindow, DropDownListBox, checkbox, and button controls) are usually also generated within <div>, <input>, or <select> elements with referenced content.
The Detail section can contain the items listed in Table 11-4.
Table 11-4: Items permitted in the Detail section of an XHTML document
Editing XHTML export templatesEvery item in the Export Template view for XHTML has a pop-up menu for modifying the structural layout of the XHTML document that will be generated at runtime. Using the pop-up menu, you can perform actions appropriate to that item, such as editing or deleting the item, adding or editing attributes, adding child elements or other items, and inserting elements, CDATA sections, and so forth, before the current item.
Item Details
First <div> element The contents of the <div> element represent a single row instance to be generated iteratively.
XHTML elements Additional elements below the root element.
DataWindow control references
Text. See “DataWindow controls” on page 246.
DataWindow expressions
Text. See “DataWindow painter expressions” on page 246.
Literal text Text that does not correspond to a DW control.
Attributes Can be assigned to all elements. See “Element attributes” on page 247.
CDATA sections See “CDATA sections” on page 249.
Child elements Child elements in the Header section cannot be iterative except in the case of group DataWindows.

Chapter 11 Working with XHTML Templates
Programmer’s Guide 243
If an element has no attributes, you can edit its tag in the Export Template view for XHTML by selecting it and left-clicking the tag or pressing F2. Literal text nodes can be edited in the same way. You can delete items (and their children) by pressing the Delete key.
Element Context MenusThe tree view in the Export Template view for XHTML represents a real-time DOM tree. Each XHTML element of the tree in the Header and Detail sections has a pop-up menu. The pop-up menu items perform DOM-based actions for modifying the structural layout of the XHTML document that will be generated. The menu options include:
DOM-based actions The Edit menu item allows you to change the label of the tree view item representing the XHTML element name. All element items that display no attributes, as well as literal text nodes selected in the tree view, can also be edited with a single mouse-click or with the shortcut key F2.
Add Child allows you to append an entity as a last child.
Menu item DOM-based action
Edit DOMNode::SetNodeName
Add Child DOMNode::AppendChild
Insert Before DOMNode::InsertBefore
Delete DOMNode::RemoveChild
Editing XHTML export templates
244 DataWindow .NET
The submenu option DataWindow Control Reference invokes a dialog box in which you can select from a filtered list box of Column, Computed Field, and Text controls. You can also add control references to empty attribute values or element contents using drag-and-drop from the Control List View.
The submenu option DataWindow Expression opens the Modify Expression dialog box so that you can compose an expression. DataWindow column references (in the form of expressions) can also be added using drag-and-drop from the Column Specification View.
All tree view items except the <form> element can be deleted using the Delete menu item or the Delete key.
Presentation and function
The remaining context menu items invoke dialog boxes that allow you to override presentational and functional specifications of each element. These include:
• Element attributes
• Style declarations
• JavaScript event handlers
The dialog boxes first display these specifications as they would be generated at runtime by default. The painter gets these from the XML Web Generator in real time and displays them on the left side of the dialog box. You can use the input fields on the right side of the dialog box to override these specifications at the atomic declaration or attribute level. This applies to resetting included declarations and attributes, setting declarations and attributes that were not included, or removing declarations and attributes. These changes persist in the XHTML export template and they are applied to the default presentation generated by the XML Web Generator at runtime.

Chapter 11 Working with XHTML Templates
Programmer’s Guide 245
Root elementThe root element of the XHTML export template is the XHTML <form> element. You can change the name of the root element and add attributes and children.
Changing the name of the root element changes the name of its start and end tags. You can change the name using the Edit Attributes menu item to display the Element Attributes dialog box. For information about editing attributes, see “Element attributes” on page 247.
You can add the following kinds of children to the root element:
• Elements
• Text
• DataWindow control references
• DataWindow painter expressions (including column references)
• CDATA sections
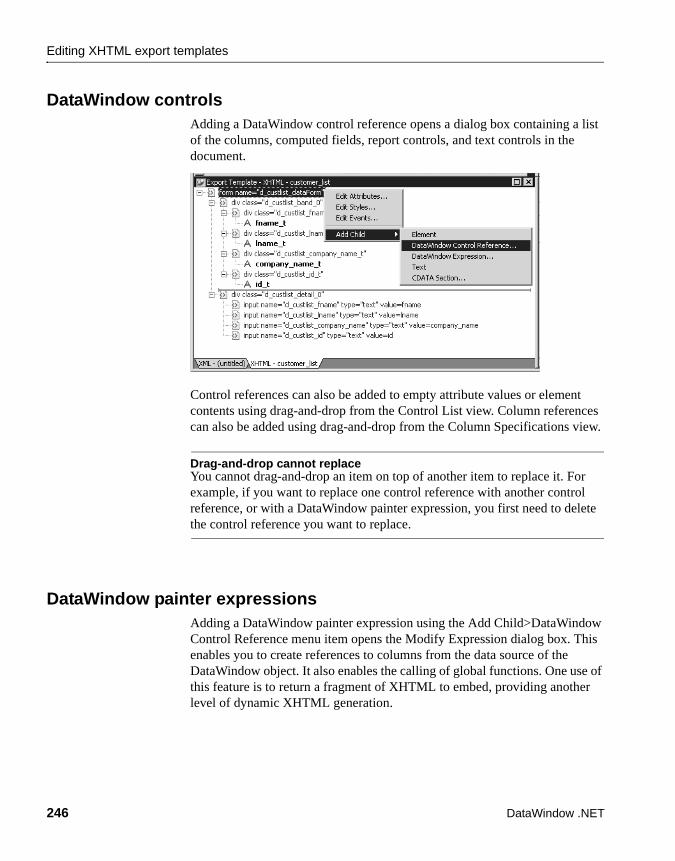
Editing XHTML export templates
246 DataWindow .NET
DataWindow controlsAdding a DataWindow control reference opens a dialog box containing a list of the columns, computed fields, report controls, and text controls in the document.
Control references can also be added to empty attribute values or element contents using drag-and-drop from the Control List view. Column references can also be added using drag-and-drop from the Column Specifications view.
Drag-and-drop cannot replaceYou cannot drag-and-drop an item on top of another item to replace it. For example, if you want to replace one control reference with another control reference, or with a DataWindow painter expression, you first need to delete the control reference you want to replace.
DataWindow painter expressionsAdding a DataWindow painter expression using the Add Child>DataWindow Control Reference menu item opens the Modify Expression dialog box. This enables you to create references to columns from the data source of the DataWindow object. It also enables the calling of global functions. One use of this feature is to return a fragment of XHTML to embed, providing another level of dynamic XHTML generation.

Chapter 11 Working with XHTML Templates
Programmer’s Guide 247
Using Date and DateTime with strings
If you use a control reference or a DataWindow painter expression that does not include a string to represent Date and DateTime columns in a template, the XHTML output conforms to ISO 8601 date and time formats. For example, consider a date that displays as 12/27/2004 in the DataWindow, using the display format mm/dd/yyyy. If the export template does not use an expression that includes a string, the date is exported to XHTML as 2004-12-27.
However, if the export template uses an expression that combines a column with a Date or DateTime datatype with a string, the entire expression is exported as a string and the regional settings in the Windows registry are used to format the date and time.
Using the previous example, if the short date format in the registry is mm/dd/yy, and the DataWindow painter expression is: "Start Date is " + start_date, the XHTML output is Start Date is 12/27/04.
Element attributesSelect Edit Attributes from the pop-up menu for elements to edit an existing attribute or add a new one. The attributes that display include all the default attributes for the elements with any template changes applied. The name attribute (and in some cases the class attribute) used to identify the element is omitted and cannot be changed.
You can change or delete the default attribute values or add new ones. Controls or expressions can also be referenced for element attribute values.
For each attribute specified, you can select a control reference from the drop-down list or enter a literal text value. A literal text value takes precedence over a control reference. You can also use the expression button to the right of the Text box to enter an expression.

Editing XHTML export templates
248 DataWindow .NET
The expression button and entry operates similarly to DataWindow object properties in the Properties view. The button shows a green equals sign if an expression has been entered, and a red not-equals sign if not. A control reference or text value specified in addition to the expression is treated as a default value. In the template, this combination is stored with the control reference or text value, followed by a tab, preceding the expression. For example:
attribute_name=~"text_val~~tdw_expression~"
When you finish modifying element attributes and you click OK, only changes are stored in the template. Default attributes that are deleted are added in the template and marked with an empty value.
Style declarationsIf you right-click an element and select Edit Styles from the pop-up menu, the Style Declarations dialog box displays the read-only set of default style declarations for the element on the left:
For clarity, style declarations are omitted from the XHTML export template. You can add new style declarations or override the existing ones by declaring them on the right side, or remove them by adding them with an empty value.

Chapter 11 Working with XHTML Templates
Programmer’s Guide 249
JavaScript event handlersIf you right-click an element and select Edit Events from the pop-up menu, the JavaScript Event Handlers dialog box displays a read-only set of event handlers for the element on the left:
This dialog box displays the current JavaScript event handlers, if any. You can add new event handlers or override the existing ones by declaring them on the right side, or remove them by adding them with an empty value.
CDATA sectionsEverything inside a CDATA section is ignored by the parser. If text contains characters such as less than or greater than signs (< or >) or ampersands (&) that are significant to the parser, it should be defined as a CDATA section. A CDATA section starts with <![CDATA[ and ends with ]]>. CDATA sections cannot be nested, and there can be no white space characters inside the ]]> delimiter; for example, you cannot put a space between the two square brackets.
Example <![CDATA[do not parse me
]]>

Selecting XHTML export templates at runtime
250 DataWindow .NET
Selecting XHTML export templates at runtimeTwo DataWindow properties, Export.XHTML.TemplateCount and Export.XHTML.Template[ ].Name, enable you to provide a list of templates from which the user of the application can select at runtime.
The TemplateCount property gets the number of templates associated with a DataWindow object. You can use this number as the upper limit in a FOR loop that populates a drop-down list with the template names. The FOR loop uses the Template[ ].Name property.
Dim count As StringDim templateName As StringDim i As Long
count=wdw.Describe("DataWindow.Export.XHTML.TemplateCount")
for i=1 to CLng(count)templateName = wdw.Describe _
("DataWindow.Export.XHTML.Template[" + Cstr(i) _+ "].Name")
DDL1.Items.Add(New ListItem(templateName))next
Before generating the XHTML, set the export template using the value in the drop-down list box:
wdw.SetProperty _("DataWindow.Export.XHTML.UseTemplate", _DDL1.SelectedValue())
Exporting DataWindow data in XML or in XHTMLYou can export the data in a Web DataWindow in XML or XHTML to a string using the Describe or GetProperty method and the Data.XML or Data.XHTML properties:
xmlstring = wdw.Describe("DataWindow.Data.XML")xmlstring = wdw.GetProperty("DataWindow.Data.XML")xmlstring = wdw.Describe("DataWindow.Data.XHTML")xmlstring = wdw.GetProperty("DataWindow.Data.XHTML")

Chapter 11 Working with XHTML Templates
Programmer’s Guide 251
The Data.XHTML property also contains a form element, XHTML input elements, state information, and XHTML and JavaScript for navigation. When you export data, DataWindow .NET uses an export template to specify the content of the generated XHTML and CSS style sheet. You can also export the JavaScript that performs the XSLT transformation on the browser using the Data.XMLWeb property. For more information see the property descriptions in the DataWindow Object Reference.
Default export formatIf you have not created or assigned an export template, DataWindow .NET uses the default export format. This is the same format used when you create a new default export template. See “Creating and saving templates” on page 237.

Exporting DataWindow data in XML or in XHTML
252 DataWindow .NET

Programmer’s Guide 253
C H A P T E R 1 2 Writing Scripts for the Web DataWindow Client Control
About this chapter This chapter describes how to write client-side scripts for the Web DataWindow.
Contents
About client-side programmingIf you want to provide additional processing of newly entered data or have more control over user interactions with the data, you can choose to enable events and scripting in the Web DataWindow client control. The use of some client-side events and methods does not require a round trip to the server, so it can improve performance. However, since ASP.NET is designed to take full advantage of server-side programming and state management, the use of server-side DataWindow events and methods is recommended.
The name of the client control is the string obj followed by the name of the DataWindow object in the control. In the Properties window, this read-only property displays as the ClientObjectName property. You use this name when defining functions that handle client-side events and use client-side methods.
Topic Page
About client-side programming 253
Implementing an event 254
Calling client methods 256
Alphabetical list of events for the Web DataWindow client control 259
Alphabetical list of methods for the Web DataWindow client control 266

Implementing an event
254 DataWindow .NET
Implementing an eventThe ClientEvents property in the Properties window must be set to true (the default). The client control supports the events listed in Table 12-1. For a description of each event, see “Alphabetical list of events for the Web DataWindow client control” on page 259.
Table 12-1: Client-side events for the Web DataWindow
About return values for DataWindow events
In client events, you can use a return statement as the last statement in the event script. The datatype of the value is number.
Event Arguments Return Codes
ButtonClicked sender, rowNumber, buttonName
0 – Continue processing
ButtonClicking sender, rowNumber, buttonName
0 – Execute action assigned to button, then trigger ButtonClicked
1 – Do not execute action or trigger ButtonClicked
Clicked sender, rowNumber, objectName
0 – Continue processing
1 – Prevent focus change
ItemChanged sender, rowNumber, columnName, newValue
0 – Accept data value
1 – Reject data value and prevent focus change
2 – Reject data value but allow focus change
ItemError sender, rowNumber, columnName, newValue
0 – Reject data value and show error message
1 – Reject data value with no error message
2 – Accept data value
3 – Reject data value but allow focus change
ItemFocusChanged sender, rowNumber, columnName
0 – Continue processing
RowFocusChanged sender, newRowNumber
0 – Continue processing
RowFocusChanging sender, currentRowNumber, newRowNumber
0 – Continue processing
1 – Prevent focus change

Chapter 12 Writing Scripts for the Web DataWindow Client Control
Programmer’s Guide 255
For example, in the ItemChanged event, set the return code to 2 to reject an empty string as a data value:
if (newValue = "") {return 2;
}
ClientEvent properties Events are implemented using ClientEvent properties that display in the Properties window for the WebDataWindowControl. To write a script for an event of the client control, find the property for the event in the left pane of the Properties window, for example ClientEventRowFocusChanging. Then select Add a New Event Handler from the drop-down list in the right pane. A JavaScript function prototype for the event handler is added to the HTML for the .aspx page.
The default name for the function is the ClientObjectName plus an underscore and then the event name:
objWDWName_eventname ( arguments )
The script is enclosed in SCRIPT tags, which are written to the HTML the first time you add an event handler. You can include client methods in the script if client scripting is enabled.
Using VBScript with JavaScriptClient event scripts are inserted in JavaScript. If the page also contains some VBScript and the default page language is VBScript, you will get a Page error when you run or preview the page. You can have both JavaScript and VBScript on the page as long as the default page language is not set to VBScript.
Example This example prevents focus from changing if the user tries to go back to an earlier row. In this case the name of the DataWindow control is dwCustomer:
<SCRIPT Language="javascript">function objdwCustomer_RowFocusChanging(sender,
currentRowNumber, newRowNumber){if (newRowNumber < currentRowNumber)
{ return 1; }}
</SCRIPT>
Calling client methods
256 DataWindow .NET
This example displays a message box informing the user which column and row number was clicked:
function objdwCustomer_Clicked(sender, rowNumber, objectName){alert ("You clicked the " + objectName +
" column in row " + rowNumber)}
For more information about when these events occur, look up the name of the associated WebDataWindowControl ClientEvent property in the Sybase DataWindow online Help in Visual Studio .NET.
Calling client methods
Set ClientScriptable to trueTo write scripts that call methods of the client control, the ClientScriptable property in the Properties window or in DataWindow Designer must be set to true—the default is false. If this property is not set, you receive the error: Object doesn't support this property or method.
Several client methods accomplish the same tasks as actions of Button controls. If your DataWindow object uses Button controls to implement scrolling and updating, you might not need to do any client scripting.
You can use the methods in the first column in Table 12-2 on the client in client-side events or functions. Methods marked with an asterisk force the Web page to be reloaded. The second column lists the properties and methods that perform the same function in a DataWindowControl or the server WebDataWindowControl.
For a description of each client method, see “Alphabetical list of methods for the Web DataWindow client control” on page 266. For a description of the properties and methods in the second column, see the Sybase DataWindow help in Visual Studio .NET.

Chapter 12 Writing Scripts for the Web DataWindow Client Control
Programmer’s Guide 257
Table 12-2: Methods for the Web DataWindow client control
GetNextModifiedThe GetNextModified method finds modified rows in the current page only.
Client control method DataWindow control equivalent
AcceptText AcceptText method
DeletedCount DeletedCount property
DeleteRow * DeleteRow method
GetClickedColumn ObjectUnderMouse.GOB property
GetClickedRow ObjectUnderMouse.RowNumber property
GetColumn GetColumn method
GetItem GetItem* methods
GetItemStatus GetItemStatus and GetRowStatus methods
GetNextModified FindNextModifiedRow method
GetRow CurrentRow property
InsertRow * InsertRow method
IsRowSelected IsSelected method
ModifiedCount ModifiedCount property
Retrieve * Retrieve method
RowCount RowCount property
ScrollFirstPage * ScrollFirstPage method (on WebDataWindowControl)
ScrollLastPage * ScrollLastPage method (on WebDataWindowControl)
ScrollNextPage * ScrollNextPage method (on WebDataWindowControl)
ScrollPriorPage * ScrollPriorPage method (on WebDataWindowControl)
SelectRow SelectRow method
SetColumn SetColumn method
SetItem SetItem methods
SetRow SetRow method
SetScroll ScrollNextPage and ScrollPriorPage methods (on WebDataWindowControl) and ScrollToRow method on DataWindowControl
SetSort SetSort method
Sort * Sort method
Update * UpdateData method

Calling client methods
258 DataWindow .NET
This function in the script area of a Web form’s .aspx page updates data:
function btnUpdate_onclick() {objdwCustomer.Update();
}
The button is defined in the form:
<form id = "Form1" method="post" runat="server"><INPUT language="javascript" id="btnUpdate"
type="button" value="Update" onClick="return btnUpdate_onclick">
...</form>
Note that you can get the same functionality with the Update action for a Button control in the DataWindow object. For more information, see “Using Button and Picture controls” on page 226.
Handling method failures
The methods marked with an asterisk in Table 12-2 cause an action to be posted back to the server. Whenever an action is posted back to the server, the server-side BeforePerformAction event is fired before the action is performed, enabling the user to cancel the action, and the AfterPerformAction event is fired after the action is performed.
These methods always return 1 unless the AcceptText method that is called implicitly after each method is called fails. Use the AfterPerformAction event to test whether the action was performed successfully. The AfterPerformAction event handler has two arguments. The Action argument indicates the type of the postback action, for example ScrollNextPage, InsertRow, or Retrieve. These actions can be posted from buttons in the DataWindow object as well as from client script. The ActionResult argument indicates whether the action succeeded.
The following example in the code file for a form writes the result of an action to a text box called txtMsg:
[Visual Basic]Private Sub dw_1_AfterPerformAction(ByVal sender As _
Object, ByVal e As _Sybase.DataWindow.Web.AfterPerformActionEventArgs)_Handles dw_1.AfterPerformAction
txtMsg.Text = "AfterPerformAction: " + _e.Action.ToString + " " + e.ActionResult.ToString
End Sub

Chapter 12 Writing Scripts for the Web DataWindow Client Control
Programmer’s Guide 259
[C#]private void wdw_afteraction(object sender, Sybase.DataWindow.Web.AfterPerformActionEventArgs e){
this.txtMsg.Text = this.txtMsg.Text +"AfterPerformAction: " + e.Action.ToString() + " " + e.ActionResult.ToString();
}
Note that client-side methods do not throw DbErrorExceptions, so you might choose to use server-side methods to obtain better information about database errors.
Alphabetical list of events for the Web DataWindow client control
The list of Web DataWindow client control events follows in alphabetical order.
ButtonClickedDescription Occurs when the user clicks a button inside a DataWindow object.
Applies to Web DataWindow client control
Return codes There are no special outcomes for this event. The only code is:
0 Continue processing
Usage In DataWindow Designer, you can add buttons to a DataWindow with either a predefined action, such as Update or Retrieve, or a user-defined action. If you use a predefined action, the code to perform the action is provided for you. If you select User-Defined (the default) from the Action list in the DataWindow painter, you need to code a ButtonClicked event for the button.
Argument Description
sender Object. The source of the event.
row Number. The number of the row the user clicked.
objectName String. The name of the control within the DataWindow under the pointer when the user clicked.

Alphabetical list of events for the Web DataWindow client control
260 DataWindow .NET
ButtonClicked fires only for buttons with the UserDefined action. Other buttons cause the page to be reloaded from the server.
The ButtonClicked event executes code after the action assigned to the button has occurred.
This event is fired only if you have not selected Suppress Event Processing for the button.
If Suppress Event Processing is on, only the Clicked event and the action assigned to the button are executed when the button is clicked.
If Suppress Event Processing is off, the Clicked event and the ButtonClicked event are fired. If the return code of the ButtonClicking event is 0, the action assigned to the button is executed and the ButtonClicked event is fired. If the return code of the ButtonClicking event is 1, neither the action nor the ButtonClicked event are executed.
Examples Suppose you add two buttons named b_button1 and b_button2 to a DataWindow object in the DataWindow painter. You can add a ButtonClicked event handler to the Web DataWindow client control in .NET to perform a different action depending on which button was clicked. In the Properties window for the WebDataWindow control, click on the ClientEventButtonClicked property, select Add a New Event Handler, and add some code:
if (buttonName=="b_button1"){alert("Button 1 Clicked!");
}
if (buttonName=="b_button2"){alert("Button 2 Clicked!");
}
See also ButtonClicking

Chapter 12 Writing Scripts for the Web DataWindow Client Control
Programmer’s Guide 261
ButtonClickingDescription Occurs when the user clicks a button. This event occurs before the
ButtonClicked event.
Applies to Web DataWindow client control
Return codes Set the return code to affect the outcome of the event:
0 Execute the action assigned to the button, then trigger the ButtonClicked event1 Prevent the action assigned to the button from executing and the ButtonClicked event from firing
Usage Use the ButtonClicking event to execute code before the action assigned to the button occurs. If the return code is 0, the action assigned to the button is then executed and the ButtonClicked event is fired. If the return code is 1, the action and the ButtonClicked event are inhibited.
This event is fired only if you have not selected Suppress Event Processing for the button.
The Clicked event is fired before the ButtonClicking event.
See also ButtonClicked
ClickedDescription Occurs when the user clicks anywhere in a Web DataWindow client control.
Applies to Web DataWindow client control
Argument Description
sender Object. The source of the event.
row Number. The number of the row the user clicked.
objectName String. The name of the control within the DataWindow under the pointer when the user clicked.
Argument Description
sender Object. The source of the event.
row Number. The number of the row the user clicked.
objectName String. The name of the control within the DataWindow under the pointer when the user clicked.

ButtonClicking
262 DataWindow .NET
Return codes Set the return code to affect the outcome of the event:
0 Continue processing1 Prevent the focus from changing
Usage When the user clicks on a DataWindow button, the Clicked event occurs before the ButtonClicking event. When the user clicks anywhere else, the Clicked event occurs when the mouse button is released.
Examples This script in a .aspx file submits the value of the selected row in the DataWindow to the server:
function objdwCustomers_Clicked(sender, rowNumber, objectName) {
document.Form1.rownum.value = rowNumber;document.Form1.submit();
}
The clicked event is defined in the element for the Web DataWindow client control in the form:
<dw:webdatawindowcontrol id="dwCustomers" runat="server" DataWindowObject="d_customer" LibraryList="masterdetail.pbl" ClientEventClicked="objdwCustomers_Clicked" ...></dw:webdatawindowcontrol>
See also ButtonClickedButtonClickingItemFocusChangedRowFocusChangedRowFocusChanging
ItemChangedDescription Occurs when a field in a DataWindow control has been modified and loses
focus (for example, the user presses Enter, the Tab key, or an arrow key or clicks the mouse on another field within the DataWindow). It occurs before the change is applied to the item. ItemChanged can also occur when the AcceptText or Update function is called.

Chapter 12 Writing Scripts for the Web DataWindow Client Control
Programmer’s Guide 263
Applies to Web DataWindow client control
Return codes Set the return code to affect the outcome of the event:
0 (Default) Accept the data value1 Reject the data value and do not allow focus to change2 Reject the data value but allow the focus to change
Usage The ItemChanged event does not occur when the Web DataWindow client control itself loses focus. If the user clicks on an Update button, you will need to write a script that calls AcceptText to see if a changed value should be accepted before the button’s action occurs. For information on the right way to do this, see the description of AcceptText in the online Sybase DataWindow Help in Visual Studio .NET.
See also ItemError
ItemErrorDescription Occurs when a field has been modified, the field loses focus (for example, the
user presses Enter, Tab, or an arrow key or clicks the mouse on another field in the DataWindow), and the data in the field does not pass the validation rules for its column.
Applies to Web DataWindow client control
Argument Description
sender Object. The source of the event.
row Number. The number of the row containing the item whose value is being changed.
columnName String. The name of the column containing the item.
newValue String. The new data the user has specified for the item.
Argument Description
sender Object. The source of the event.
row Number. The number of the row containing the item whose new value has failed validation.
columnName String. The name of the column containing the item.
newValue String. The new data the user has specified for the item.

ItemFocusChanged
264 DataWindow .NET
Return codes Set the return code to affect the outcome of the event:
0 (Default) Reject the data value and show an error message box1 Reject the data value with no message box2 Accept the data value3 Reject the data value but allow focus to change
Usage If the Return code is 0 or 1 (rejecting the data), the field with the incorrect data regains the focus.
The ItemError event occurs instead of the ItemChanged event when the new data value fails a validation rule. You can force the ItemError event to occur by rejecting the value in the ItemChanged event.
Examples This script in the .aspx file displays an alert message:
function objwdw_ItemError(sender, rowNumber, columnName, newValue) {
alert("ItemError: " + rowNumber + columnName + newValue);
}
See also ItemChanged
ItemFocusChangedDescription Occurs when the current item in the control changes.
Applies to Web DataWindow client control
Return codes There are no special outcomes for this event. The only code is:
0 Continue processing
Usage ItemFocusChanged occurs when focus is set to another column in the DataWindow, including when the DataWindow is first displayed.
The row and column together uniquely identify an item in the DataWindow.
See also RowFocusChangedRowFocusChanging
Argument Description
sender Object. The source of the event.
row Number. The number of the row containing the item that has just gained focus.
columnName String. The name of the column containing the item.

Chapter 12 Writing Scripts for the Web DataWindow Client Control
Programmer’s Guide 265
RowFocusChangedDescription Occurs when the current row changes in the DataWindow.
Applies to Web DataWindow client control
Return codes There are no special outcomes for this event. The only code is:
0 Continue processing
Usage The SetRow function, as well as user actions, can trigger the RowFocusChanged and ItemFocusChanged events.
Examples This script in the .aspx file displays an alert message when the row focus changes:
function objdw_RowFocusChanged(sender, newRowNumber) {alert("Focus changed to row” " + newRowNumber);
}
See also ItemFocusChangedRowFocusChanging
RowFocusChangingDescription Occurs when the current row is about to change in the DataWindow. (The
current row of the DataWindow is not necessarily the same as the current row in the database.)
The RowFocusChanging event occurs just before the RowFocusChanged event.
Argument Description
sender Object. The source of the event.
newRow Number. The number of the row that has just become current.
Argument Description
sender Object. The source of the event.
currentRow Number. The number of the row that is current (before the row is deleted or its number changes). If the DataWindow object is empty, currentrow is 0 to indicate there is no current row.
newRow Number. The number of the row that is about to become current. If the new row is going to be an inserted row, newrow is 0 to indicate that it does not yet exist.

Alphabetical list of methods for the Web DataWindow client control
266 DataWindow .NET
Applies to Web DataWindow client control
Return codes Set the return code to affect the outcome of the event:
0 Continue processing (setting the current row)1 Prevent the current row from changing
Usage Typically the RowFocusChanging event is coded to respond to a mouse click or keyboard action that would change the current row in the DataWindow object.
See also ItemFocusChangedRowFocusChanged
Alphabetical list of methods for the Web DataWindow client control
The list of Web DataWindow client control methods follows in alphabetical order.
AcceptTextDescription Applies the contents of the DataWindow’s edit control to the current item in the
buffer of a Web DataWindow client control. The data in the edit control must pass the validation rule for the column before it can be stored in the item.
Applies to Web DataWindow client control
Syntax number objdwcontrol.AcceptText ( )
Return value Returns 1 if it succeeds and -1 if it fails (for example, the data did not pass validation).
Usage When a user moves from item to item in a Web DataWindow client control, the control validates and accepts data the user has edited.
Argument Description
objdwcontrol A reference to a Web DataWindow client control

Chapter 12 Writing Scripts for the Web DataWindow Client Control
Programmer’s Guide 267
When a user modifies a DataWindow item then immediately changes focus to another control in the window, the Web DataWindow client control does not accept the modified data—the data remains in the edit control. Use the AcceptText method in this situation to ensure that the DataWindow object contains the data the user edited.
AcceptText in the ItemChanged eventCalling AcceptText in the ItemChanged event has no effect.
DeletedCountDescription Reports the number of rows that have been marked for deletion in the database.
Applies to Web DataWindow client control
Syntax number objdwcontrol.DeletedCount ( )
Return value Returns the number of rows that have been deleted from objdwcontrol but not updated in the associated database table.
Returns 0 if no rows have been deleted or if all the deleted rows have been updated in the database table. DeletedCount returns -1 if it fails.
Usage An updatable WebDataWindowControl has several buffers. The primary buffer stores the rows currently being displayed. The delete buffer stores rows that the application has marked for deletion by calling the DeleteRow method. These rows are saved until the database is updated. You can use DeletedCount to find out if there are any rows in the delete buffer.
If a DataWindow is not updatable, rows that are deleted are discarded—they are not stored in the delete buffer. Therefore, DeletedCount returns 0 for a nonupdatable DataWindow unless a method, such as RowsCopy or RowsMove, has been used to populate the delete buffer.
Argument Description
objdwcontrol A reference to a Web DataWindow client control

AcceptText
268 DataWindow .NET
DeleteRowDescription Deletes a row from a DataWindow.
Applies to Web DataWindow client control
Syntax number objdwcontrol.DeleteRow ( number row )
Return value Returns -1 if AcceptText fails and 1 otherwise. AcceptText is called for all methods that reload the page before sending data to the server.
Usage DeleteRow deletes the row from the DataWindow’s primary buffer.
Calling DeleteRow causes the new status of the data to be sent back to the server where data is retrieved again minus the deleted row. Then the page is reloaded. But you must still call the Update method to update the database and the data on the server.
All methods that reload the page perform an AcceptText before sending data back to the server. If the method fails (returns -1), this means that pending data changes were not accepted and nothing was sent back to the server. Use the server-side AfterPerformAction event to detect and handle the failure appropriately.
The AfterPerformAction event handler receives an argument of type AfterPerformActionEventArgs that contains an Action property that indicates the client DataWindow postback action, and an ActionResult property that contains the value 1 for success or -1 for failure.
Examples This function in a .aspx file displays the number of the row deleted in an alert message:
function btnDeleteRow_onclick() {alert("DeleteRow returned: " +objwdw.DeleteRow(Form1.rownum.value));
}
Argument Description
objdwcontrol A reference to a Web DataWindow client control.
row A value identifying the row you want to delete. To delete the current row, specify 0 for row.

Chapter 12 Writing Scripts for the Web DataWindow Client Control
Programmer’s Guide 269
GetClickedColumnDescription Obtains the number of the column the user clicked or double-clicked in a Web
DataWindow client control.
Applies to Web DataWindow client control
Syntax number objdwcontrol.GetClickedColumn ( )
Return value Returns the number of the column that the user clicked or double-clicked in objdwcontrol. Returns 0 if the user did not click or double-click a column (for example, the user double-clicked outside the data area, in text or spaces between columns, or in the header, summary, or footer area).
Usage Call GetClickedColumn in the Clicked event for a Web DataWindow client control.
When the user clicks on the column, that column becomes the current column after the Clicked event is finished. During this event, GetColumn and GetClickedColumn can return different values.
If the user arrived at a column by another means, such as tabbing, GetClickedColumn cannot identify that column. Use GetColumn instead to identify the current column.
GetClickedRowDescription Obtains the number of the row the user clicked or double-clicked in a Web
DataWindow client control object.
Applies to Web DataWindow client control
Syntax number objdwcontrol.GetClickedRow ( )
Return value Returns the number of the row that the user clicked or double-clicked in objdwcontrol. Returns 0 if the user did not click or double-click a row (for example, the user double-clicked outside the data area, in text or spaces between rows, or in the header, summary, or footer area).
Argument Description
objdwcontrol A reference to a Web DataWindow client control
Argument Description
objdwcontrol A reference to a Web DataWindow client control

AcceptText
270 DataWindow .NET
Usage Call GetClickedRow in the Clicked event for a Web DataWindow client control.
When the user clicks on the row, that row becomes the current row after the Clicked event is finished. During this event, GetRow and GetClickedRow can return different values.
If the user arrived at a row by another means, such as tabbing, GetClickedRow cannot identify that row. Use GetRow instead to identify the current row.
GetColumnDescription Obtains the number of the current column. The current column is the column
that has focus.
Applies to Web DataWindow client control
Syntax number objdwcontrol.GetColumn ( )
Return value Returns the number of the current column in objdwcontrol. Returns 0 if no column is current (because all the columns have a tab value of 0, making all of them uneditable), and -1 if an error occurs.
Usage GetColumn and GetClickedColumn, when called in the Clicked event, can return different values. The column the user clicked does not become current until after the event.
The current columnA column becomes the current column after the user tabs to it or clicks it or if a script calls the SetColumn method. A column cannot be current if it cannot be edited (if it has a tab value of 0).
A DataWindow always has a current column, even when the control is not active, as long as there is at least one editable column.
Argument Description
objdwcontrol A reference to a Web DataWindow client control

Chapter 12 Writing Scripts for the Web DataWindow Client Control
Programmer’s Guide 271
GetItemDescription Gets the value of an item for the specified row and column. GetItem returns the
value available in the data available to the client. This is equivalent to the primary buffer in other environments.
Applies to Web DataWindow client control
Syntax returnvalue objdwcontrol.GetItem (number row, number column )
returnvalue objdwcontrol.GetItem (number row, string column )
Return value Returns the value in the specified row and column. The datatype of the returned data corresponds to the datatype of the column. Returns the empty string ("") if an error occurs.
Usage Use GetItem to get data that has been accepted by the DataWindow. In a script for the ItemChanged or ItemError event, you can use the newValue argument to find out what the user entered before the data is accepted.
Examples This statement sets LName to the value for row 3 of the emp_name column in the DataWindow dwEmployee:
var LName = objdwEmployee.GetItem(3, "emp_name");
See also SetItem
GetItemStatusDescription Reports the modification status of a row or a column within a row. The
modification status determines the type of SQL statement the Update client method or UpdateData server will generate for the row or column.
Applies to Web DataWindow client control
Argument Description
objdwcontrol A reference to a Web DataWindow client control.
row A value identifying the row location of the data.
column The column location of the data. Column can be a column number or a column name. The column number is the number of the column as it is listed in the Column Specification view of the DataWindow painter—not necessarily the number of the column in the Design view.
To get the contents of a computed field, specify the name of the computed field for column. Computed fields do not have numbers.

AcceptText
272 DataWindow .NET
Syntax number objdwcontrol.GetItemStatus (number row, number columnNumber )
number objdwcontrol.GetItemStatus ( number row, string columnName )
Return value A number that identifies the status of the item at row, column of objdwcontrol:
If column is 0, GetItemStatus returns the status of row.
Usage Use GetItemStatus to understand what SQL statements will be generated for new and changed information when you update the database.
Update generates an INSERT statement for rows with status 3. It generates an UPDATE statement for rows with status 1 and references the columns that have been affected.
Argument Description
objdwcontrol A reference to a Web DataWindow client control.
row A value identifying the row for which you want the status.
column The column for which you want the status. Column can be a column number or a column name. The column number is the number of the column as it is listed in the Column Specification view of the DataWindow painter—not necessarily the number of the column in the Design view.
Specify 0 to get the status of the whole row.
Status Meaning
0 The information in the row or column is unchanged.
1 The information in the column or one of the columns in the row has changed.
2 The row is new but no values have been specified for its columns. (Applies to rows only, not to individual columns.)
3 The row is new, and values have been assigned to its columns. In addition to changes caused by user entry or the SetItem method, a new row gets this status when one of its columns has a default value. (Apples to rows only, not to individual columns.)

Chapter 12 Writing Scripts for the Web DataWindow Client Control
Programmer’s Guide 273
GetNextModifiedDescription Reports the next row that has been modified in the specified buffer.
Applies to Web DataWindow client control
Syntax number objdwcontrol.GetNextModified (number row, number dwbuffer )
Return value Returns the number of the first row that was modified after row in objdwcontrol. Returns 0 if there are no modified rows after the specified row.
Usage For more information on the status of rows and columns, see GetItemStatus.
GetNextModified finds changed rows only on the current page. The result set for the DataWindow can include rows that are on the server but not displayed in the browser. GetNextModified cannot find changed rows that are on the server but not on the client’s current page.
GetRowDescription Reports the number of the current row in a Web DataWindow client control.
Applies to Web DataWindow client control
Syntax number objdwcontrol.GetRow ( )
Return value Returns the number of the current row in objdwcontrol. Returns 0 if no row is current and -1 if an error occurs.
Current row not always displayedThe current row is not always a row displayed on the screen. For example, if the cursor is on row 7 column 2 and the user uses the scroll bar to scroll to row 50, the current row remains row 7 unless the user clicks row 50.
Argument Description
objdwcontrol A reference to a Web DataWindow client control in which you want to locate the modified row.
row A value identifying the row location after which you want to locate the modified row. To search from the beginning, specify 0.
dwbuffer Ignored for the Web DataWindow client control.
Argument Description
objdwcontrol A reference to a Web DataWindow client control

AcceptText
274 DataWindow .NET
InsertRowDescription Inserts a row in a Web DataWindow client control. If any columns have default
values, the row is initialized with these values before it is displayed.
Applies to Web DataWindow client control
Syntax number objdwcontrol.InsertRow ( number row )
Return value Returns -1 if AcceptText fails and otherwise returns the number of the row that was added. AcceptText is called for all methods that reload the page before sending data to the server.
Usage Calling InsertRow causes the new status of the data to be sent back to the server where the data is retrieved again and the row is inserted. Then the page is reloaded.
All methods that reload the page perform an AcceptText before sending data back to the server. If the method fails (returns -1), this means that pending data changes were not accepted and nothing was sent back to the server. Use the server-side AfterPerformAction event to detect and handle the failure appropriately.
The AfterPerformAction event handler receives an argument of type AfterPerformActionEventArgs that contains an Action property that indicates the client DataWindow postback action, and an ActionResult property that contains the value 1 for success or -1 for failure.
Examples This function in a .aspx file displays the number of the row inserted in an alert message:
function btnInsertRow_onclick() {alert("InsertRow returned: " +objwdw.InsertRow(Form1.rownum.value));
}
Argument Description
objdwcontrol A reference to a Web DataWindow client control.
row A value identifying the row before which you want to insert a row. To insert a row at the end, specify 0.

Chapter 12 Writing Scripts for the Web DataWindow Client Control
Programmer’s Guide 275
IsRowSelectedDescription Determines whether a row is selected in a DataWindow. A selected row is
highlighted using reverse video.
Applies to Web DataWindow client control
Syntax boolean dwcontrol.IsSelected ( number row )
Return value Returns true if row in dwcontrol is selected and false if it is not selected. If row is greater than the number of rows in dwcontrol or is 0 or negative, IsRowSelected also returns false.
Usage You can call IsRowSelected in a script for the Clicked event to determine whether the row the user clicked was selected. With IsRowSelected and SelectRow, you can highlight a row on the client without causing a postback.
Examples This code calls IsRowSelected to test whether the clicked row is selected. If the row is selected, SelectRow deselects it; if it is not selected, SelectRow selects it:
function objdw_1_Clicked (sender, rowNumber, objectName) {
if (rowNumber > 0){
if (sender.IsRowSelected(rowNumber))sender.SelectRow(rowNumber, false);
elsesender.SelectRow(rowNumber, true);
}
See also SelectRow
Argument Description
dwcontrol A reference to a DataWindow control, DataStore, or child DataWindow
row A value identifying the row you want to test to see if it is selected

AcceptText
276 DataWindow .NET
ModifiedCountDescription Reports the number of rows that have been modified but not updated in a
DataWindow or DataStore.
Applies to Web DataWindow client control
Syntax number objdwcontrol.ModifiedCount ( )
Return value Returns the number of rows that have been modified in the primary buffer. Returns 0 if no rows have been modified or if all modified rows have been updated in the database table. Returns -1 if an error occurs.
Usage ModifiedCount reports the number of rows that are scheduled to be added or updated in the database table associated with a DataWindow.
RetrieveDescription Retrieves rows from the database for a Web DataWindow client control. If
arguments are included, the argument values are used for the retrieval arguments in the SQL SELECT statement for the DataWindow object.
Applies to Web DataWindow client control
Syntax number objdwcontrol.Retrieve ( )
Return value Returns -1 if AcceptText fails and otherwise returns the number of rows displayed. AcceptText is called for all methods that reload the page before sending data to the server.
Usage After rows are retrieved, the DataWindow object’s filter is applied. Therefore, any retrieved rows that do not meet the filter criteria are immediately moved to the filter buffer and are not included in the return count.
Before you can retrieve rows for a Web DataWindow client control, you must specify a transaction object with SetTransaction and establish a database connection.
Calling Retrieve causes data to be retrieved on the server and the page to be reloaded.
Argument Description
objdwcontrol A reference to a Web DataWindow client control
Argument Description
objdwcontrol A reference to a Web DataWindow client control.
Chapter 12 Writing Scripts for the Web DataWindow Client Control
Programmer’s Guide 277
All methods that reload the page perform an AcceptText before sending data back to the server. If the method fails (returns -1), this means that pending data changes were not accepted and nothing was sent back to the server. Use the server-side AfterPerformAction event to detect and handle the failure appropriately.
The AfterPerformAction event handler receives an argument of type AfterPerformActionEventArgs that contains an Action property that indicates the client DataWindow postback action, and an ActionResult property that contains the value 1 for success or -1 for failure.
Examples This function in a .aspx file displays the number of rows retrieved and displayed in an alert message:
function btnRetrieve_onclick() {alert("Retrieve returned: " +objwdw.Retrieve(Form1.deptid.value));
}
RowCountDescription Obtains the number of rows that are currently available in a Web DataWindow
client control. To determine the number of rows available, the RowCount method checks the primary buffer.
Applies to Web DataWindow client control
Syntax number objdwcontrol.RowCount ( )
Return value Returns the number of rows that are currently available in objdwcontrol, 0 if no rows are currently available, and -1 if an error occurs.
Usage The primary buffer for a Web DataWindow client control contains the rows that are currently available for display or printing. These are the rows counted by RowCount. The number of currently available rows equals the total number of rows retrieved minus any deleted or filtered rows plus any inserted rows. The deleted and filtered rows are stored in the DataWindow’s delete and filter buffers.
Argument Description
objdwcontrol A reference to a Web DataWindow client control

AcceptText
278 DataWindow .NET
ScrollFirstPageDescription Scrolls a Web DataWindow client control to the first page, displaying the result
set’s first group of rows in the Web page. (A page is the number of rows that are displayed in the Web DataWindow client control at one time.) ScrollFirstPage changes the current row, but not the current column.
Applies to Web DataWindow client control
Syntax number objdwcontrol.ScrollFirstPage ( )
Return value Returns -1 if AcceptText fails and 1 otherwise. AcceptText is called for all methods that reload the page before sending data to the server.
Usage Calling ScrollFirstPage causes the page to be reloaded with another set of rows from the result set.
All methods that reload the page perform an AcceptText before sending data back to the server. If the method fails (returns -1), this means that pending data changes were not accepted and nothing was sent back to the server. Use the server-side AfterPerformAction event to detect and handle the failure appropriately.
The AfterPerformAction event handler receives an argument of type AfterPerformActionEventArgs that contains an Action property that indicates the client DataWindow postback action, and an ActionResult property that contains the value 1 for success or -1 for failure.
Examples This statement scrolls dwEmployee to the first page:
objdwEmployee.ScrollFirstPage();
See also ScrollLastPageScrollNextPageScrollNextPageSetScroll
Argument Description
objdwcontrol A reference to a Web DataWindow client control

Chapter 12 Writing Scripts for the Web DataWindow Client Control
Programmer’s Guide 279
ScrollLastPageDescription Scrolls a Web DataWindow client controll to the last page, displaying the result
set’s last group of rows in the Web page. (A page is the number of rows that are displayed in the DataWindow control at one time.) ScrollLastPage changes the current row, but not the current column.
Applies to Web DataWindow client control
Syntax number objdwcontrol.ScrollLastPage ( )
Return value Returns -1 if AcceptText fails and 1 otherwise. AcceptText is called for all methods that reload the page before sending data to the server.
Usage Calling ScrollLastPage causes the page to be reloaded with another set of rows from the result set.
All methods that reload the page perform an AcceptText before sending data back to the server. If the method fails (returns -1), this means that pending data changes were not accepted and nothing was sent back to the server. Use the server-side AfterPerformAction event to detect and handle the failure appropriately.
The AfterPerformAction event handler receives an argument of type AfterPerformActionEventArgs that contains an Action property that indicates the client DataWindow postback action, and an ActionResult property that contains the value 1 for success or -1 for failure.
Examples This statement scrolls dwEmployee to the last page:
objdwEmployee.ScrollLastPage();
See also ScrollFirstPageScrollNextPageScrollNextPageSetScroll
Argument Description
objdwcontrol A reference to a DataWindow control
AcceptText
280 DataWindow .NET
ScrollNextPageDescription Scrolls a DataWindow control forward one page, displaying the next group of
rows in the DataWindow’s display area. (A page is the number of rows that can be displayed in the DataWindow control at one time.) ScrollNextPage changes the current row, but not the current column.
Applies to Web DataWindow client control
Syntax number objdwcontrol.ScrollNextPage ( )
Return value Returns -1 if AcceptText fails and otherwise returns the number of the row displayed at the top of the DataWindow control when the scroll finishes or tries to scroll past the last row. ScrollNextPage returns 1 with nested or composite reports since, in these cases, the current row cannot be changed. AcceptText is called for all methods that reload the page before sending data to the server.
Usage Calling ScrollNextPage causes the page to be reloaded with another set of rows from the result set.
All methods that reload the page perform an AcceptText before sending data back to the server. If the method fails (returns -1), this means that pending data changes were not accepted and nothing was sent back to the server. Use the server-side AfterPerformAction event to detect and handle the failure appropriately.
The AfterPerformAction event handler receives an argument of type AfterPerformActionEventArgs that contains an Action property that indicates the client DataWindow postback action, and an ActionResult property that contains the value 1 for success or -1 for failure.
ScrollPriorPageDescription Scrolls a DataWindow control backward one page, displaying another group of
rows in the DataWindow’s display area. (A page is the number of rows that can be displayed in the DataWindow control at one time.) ScrollPriorPage changes the current row but not the current column.
Applies to Web DataWindow client control
Argument Description
objdwcontrol A reference to a DataWindow control or child DataWindow

Chapter 12 Writing Scripts for the Web DataWindow Client Control
Programmer’s Guide 281
Syntax number objdwcontrol.ScrollPriorPage ( )
Return value Returns -1 if AcceptText fails and otherwise returns the number of the row displayed at the top of the DataWindow control when the scroll finishes or tries to scroll past the first row. AcceptText is called for all methods that reload the page before sending data to the server.
Usage Calling ScrollNextPage causes the page to be reloaded with another set of rows from the result set.
All methods that reload the page perform an AcceptText before sending data back to the server. If the method fails (returns -1), this means that pending data changes were not accepted and nothing was sent back to the server. Use the server-side AfterPerformAction event to detect and handle the failure appropriately.
The AfterPerformAction event handler receives an argument of type AfterPerformActionEventArgs that contains an Action property that indicates the client DataWindow postback action, and an ActionResult property that contains the value 1 for success or -1 for failure.
SelectRowDescription Highlights or removes highlights from rows in a DataWindow control or
DataStore. You can select all rows or a single row. SelectRow does not affect which row is current. It does not select rows in the database.
Applies to Web DataWindow client control
Syntax void dwcontrol.SelectRow ( number row, boolean select )
Argument Description
objdwcontrol The name of the DataWindow control or child DataWindow you want to page (scroll) to the prior page
Argument Description
dwcontrol A reference to a Web DataWindow client control.
row A value identifying the row you want to select or deselect. Specify 0 to select or deselect all rows.
select A boolean value that determines whether the row is selected or not selected:
• True – Select the row(s) so that they are highlighted.
• False – Deselect the row(s) so that they are not highlighted.

AcceptText
282 DataWindow .NET
Return value Returns 1 if it succeeds and -1 if an error occurs. If there is no DataWindow object assigned to the Web DataWindow client control, the method returns 1.
Usage If a row is already selected and you specify that it be selected (boolean is true), it remains selected. If a row is not selected and you specify that it not be selected (boolean is false), it remains unselected. With IsRowSelected and SelectRow, you can highlight a row on the client without causing a postback.
Examples This statement selects the fifteenth row in dw_employee:
dw_employee.SelectRow(15, true)
See also IsRowSelected
SetColumnDescription Sets the current column in a Web DataWindow client control.
Applies to Web DataWindow client control
Syntax number objdwcontrol.SetColumn ( string column )
number objdwcontrol.SetColumn ( number column )
Return value Returns 1 if it succeeds and -1 if an error occurs. If column is less than 1 or greater than the number of columns, SetColumn fails.
Usage SetColumn moves the cursor to the current column but does not scroll the DataWindow control.
Only an editable column can be current. (A column is editable when its tab order value is greater than 0.) Do not try to set a noneditable column as the current column.
Avoiding infinite loopsNever call SetColumn in the ItemChanged, ItemError, or ItemFocusChanged event. Because SetColumn can trigger these events, such a recursive call can cause a stack fault.
Argument Description
objdwcontrol A reference to a Web DataWindow client control.
column The column you want to make current. Column can be a column number or a column name.

Chapter 12 Writing Scripts for the Web DataWindow Client Control
Programmer’s Guide 283
SetItemDescription Sets the value of a row and column in a Web DataWindow client control to the
specified value.
Applies to Web DataWindow client control
Syntax number objdwcontrol.SetItem ( number row, number column, variant value )
number objdwcontrol.SetItem ( number row, string column, variant value )
Return value Returns 1 if it succeeds and -1 if an error occurs.
Usage SetItem sets a value in the Primary buffer. It does not affect the value currently in the edit control over the current row and column, which is the data the user has changed or might change. The value in the edit control does not become the value of the DataWindow item until it is validated and accepted (see AcceptText).
You can use SetItem to set the value of an item when the data the user entered is not valid. When you use a return code that rejects the data the user entered but allows the focus to change (return code of 2 in the script of the ItemChanged event or return code of 3 in the ItemError event), you can call SetItem to put valid data in the row and column.
Using SetItem to correct user inputIf the DataWindow engine cannot properly convert the string the user entered, you must include statements in the script for the ItemChanged or ItemError event to convert the data and use SetItem with the converted data. For example, if the user enters a number with commas and a dollar sign (for example, $1,000), the DataWindow engine is unable to convert the string to a number and you must convert it in the script.
Argument Description
objdwcontrol The name of the Web DataWindow client control in which you want to set a specific row and column to a value.
row The row location of the data.
column The column location of the data. Column can be a column number or a column name. The column number is the number of the column as it is listed in the Column Specification view of the DataWindow painter—not necessarily the number of the column in the Design view.
value The value to which you want to set the data at the row and column location. The datatype of the value must be the same datatype as the column.

AcceptText
284 DataWindow .NET
If you use SetItem to set a row and column to a value other than the value the user entered, you can use SetText to assign the new value to the edit control so that the user sees the current value.
Examples This script fragment checks whether a valid item has been selected before setting the item’s value:
itemValue = objdwProd.GetItem(rowNumber, colName);if (itemValue == 0) {
objdwProd.SetItem(rowNumber, colName, 1);thePage.submit();
} else if (itemValue == 1) {alert(objdwCust.GetItem(1, "custfname") +
", item already selected.");} else {alert("Error, item not available.");}
See also GetItem
SetRowDescription Sets the current row in a Web DataWindow client control.
Applies to Web DataWindow client control
Syntax number objdwcontrol.SetRow ( number row )
Return value Returns 1 if it succeeds and -1 if an error occurs. If row is less than 1 or greater than the number of rows, SetRow fails.
Usage SetRow moves the cursor to the current row but does not scroll the Web DataWindow client control.
Avoiding infinite loopsNever call SetRow in the ItemChanged event or any of the other events that it might trigger. Such a recursive call can cause a stack fault.
Argument Description
objdwcontrol A reference to a Web DataWindow client control in which you want to set the current row
row The row you want to make current

Chapter 12 Writing Scripts for the Web DataWindow Client Control
Programmer’s Guide 285
SetScrollDescription Scrolls a Web DataWindow control to a specified row or to the prior or next
page in the result set.
Applies to Web DataWindow client control
Syntax number dwcontrol.SetScroll ( scrollAction, data)
Return value Returns 1 if it succeeds and -1 if an error occurs.
If dwcontrol is null, the method returns null.
Usage The SetScroll method lets users scroll backwards and forwards through the result set one page at a time without causing a postback to the server. Calling ScrollPriorPage and ScrollNextPage causes the page to be reloaded with another set of rows from the result set.
If scrollAction is 1, SetScroll does not highlight the row. Use SelectRow to let the user know what row is current.
Events SetScroll may trigger these events:
ItemChangedItemErrorItemFocusChangedRowFocusChangedRowFocusChanging
Examples This statement scrolls dw_employee to the prior page:
dw_employee.SetScroll(2, 0);
This statement scrolls dw_employee to row 120:
dw_employee.SetScroll(1, 120);
Argument Description
dwcontrol A reference to a Web DataWindow client control.
scrollAction An integer that indicates the scroll action to be taken. Values are:
• 1 – Scroll to the row number indicated by data.
• 2 – Scroll to the page indicated by data.
data If scrollAction is 1, an integer that specifies the row number to scroll to.
If scrollAction is 2, an integer that specifies the page to scroll to. Values are:
• 0 – Scroll to prior page.
• 1 – Scroll to next page.

AcceptText
286 DataWindow .NET
See also ScrollNextPageScrollPriorPageSelectRow
SetSortDescription Specifies sort criteria for a Web DataWindow client control.
Applies to Web DataWindow client control
Syntax number objdwcontrol.SetSort ( string format )
Return value Returns 1 if it succeeds and -1 if an error occurs.
Usage A DataWindow object can have sort criteria specified as part of its definition. SetSort overrides the definition, providing new sort criteria for the DataWindow. However, it does not actually sort the rows. Call the Sort method to perform the actual sorting.
The sort criteria for a column have one of the forms shown in the following table, depending on whether you specify the column by name or number.
Table 12-3: Examples for specifying sort order
The following table shows the recognized values for order. These values are case insensitive. For example, as, s, AS, or S all specify a case-sensitive sort in ascending order.
Argument Description
objdwcontrol A reference to a Web DataWindow client control.
format A string whose value is valid sort criteria for the DataWindow (see Usage). The expression includes column names or numbers.
A column number must be preceded by a pound sign (#).
Syntax for sort order Examples
columnname order "emp_lname A"
"emp_lname asc, dept_id desc"
# columnnumber order "#3 A"

Chapter 12 Writing Scripts for the Web DataWindow Client Control
Programmer’s Guide 287
Table 12-4: Recognized values for sort order
If you omit order or specify an unrecognized string, the sort is performed in ascending order and is case insensitive. You can specify secondary sorting by specifying criteria for additional columns in the format string. Separate each column specification with a comma.
Examples This function on a client-side button sets the sort criteria for objdwSort so that dwSort is sorted in ascending order by the values in the column selected by the user. Since ascending order is the default, the + "A" in the call to SetSort could be omitted:
function btn_ClientSort_onclick() {if (!columnSelected) {
alert("Select a column on which to sort!");return;
}objdwSort.SetSort(Form1.sle_colname.value + "A");objdwSort.Sort();
}
The button is defined in the JavaScript for the form:
<INPUT language="javascript" id="btn_ClientSort" style="Z-INDEX: 101; LEFT: 40px; WIDTH: 96px; POSITION: absolute; TOP: 312px; HEIGHT: 24px"onclick="return btn_ClientSort_onclick()" type="button" value="Sort from Client">
SortDescription Sorts the rows in a Web DataWindow client control using the DataWindow’s
current sort criteria.
Applies to Web DataWindow client control
Syntax number objdwcontrol.Sort ( )
Order value Resulting sort order
a, asc, ascending, ai, i Case-insensitive ascending
d, desc, descending, di Case-insensitive descending
as, s Case-sensitive ascending
ds Case-sensitive descending
Argument Description
objdwcontrol A reference to a Web DataWindow client control

AcceptText
288 DataWindow .NET
Return value Returns 1 if it succeeds and -1 if an error occurs.
Usage Sort uses the current sort criteria for the DataWindow. To change the sort criteria, use the SetSort method. The SetSort method is equivalent to using the Sort command on the Rows menu of the DataWindow painter. If you do not call SetSort to set the sort criteria before you call Sort, Sort uses the sort criteria specified in the DataWindow object definition.
Calling Sort causes the page to be reloaded.
All methods that reload the page perform an AcceptText before sending data back to the server. If the method fails (returns -1), this means that pending data changes were not accepted and nothing was sent back to the server. In this situation the ItemError event occurs.
Built-in client-side sorting In Web DataWindows that use the Grid presentation style and the XML rendering format, a client-side sort can be performed with no coding. The order of numeric or text-based data values in a DataWindow column changes when the user clicks the column header. When the user moves the mouse over a column header, the cursor changes automatically to the Hand style to provide a cue to the user that sorting can be performed on that column.
This sorting functionality is based on client-side XSLT processing. For text-based sorting, the rules for sorting are language dependent, and are therefore controlled by the local language of the client computer running the XSLT processor. A white paper describing implementation details of language-dependent, text-based sorting is available on the Unicode Consortium Web site.
Because the sorting functionality is based on client-side XSLT processing, changing the order of items in a column does not force a page refresh. The sort functionality is not available with HTML or XHTML DataWindows, or with XML DataWindows that have non-grid presentation styles.
UpdateDescription Updates the database with the changes made in a Web DataWindow client
control. Update can also call AcceptText for the current row and column before it updates the database.
Applies to Web DataWindow client control

Chapter 12 Writing Scripts for the Web DataWindow Client Control
Programmer’s Guide 289
Syntax number objdwcontrol.Update ( )
Return value Returns -1 if AcceptText fails and 1 otherwise. AcceptText is called for all methods that reload the page before sending data to the server.
Usage Calling Update in the client control causes changed data to be passed to the server and updated there. Data is retrieved again and the page is reloaded. Data is not committed or rolled back automatically after the client-side Update action is performed.
The Transaction and AdoTransaction objects are programmable, and you should perform transaction management yourself in the AfterPerformAction server-side event or elsewhere.
All methods that reload the page perform an AcceptText before sending data back to the server. If the method fails (returns -1), this means that pending data changes were not accepted and nothing was sent back to the server. Use the server-side AfterPerformAction event to detect and handle the failure appropriately.
The AfterPerformAction event handler receives an argument of type AfterPerformActionEventArgs that contains an Action property that indicates the client DataWindow postback action, and an ActionResult property that contains the value 1 for success or -1 for failure.
Frequent updating improves performance The Web DataWindow client maintains the state of the server component in string form and the information is sent to the server and back again with every request. If the user has not modified the data, the amount of client-side state information is small. The amount of client-side state information grows proportionally to the number of outstanding changes that have not been updated to the database. When the client control calls Update or server-side code calls the UpdateData method, the state information returns to the minimum amount, so calling Update or UpdateData frequently can reduce the amount of information transferred back and forth.
Examples function btnUpdate_onclick() {alert("Update returned: " + objwdw.Update());
}
Argument Description
objdwcontrol A reference to a Web DataWindow client control.

AcceptText
290 DataWindow .NET

Programmer’s Guide 291
C H A P T E R 1 3 Deploying DataWindow .NET Applications
About this chapter This chapter lists the files you need to deploy to the client with DataWindow .NET Windows form applications and to the production Web server for ASP.NET Web form applications.
Contents
Deploying applicationsWhether you are deploying a Windows application to a user’s computer or a Web application to a server, you need to deploy all the files your application needs. You may also need to perform some configuration tasks. This chapter summarizes deployment requirements for Windows and Web form applications and describes deployment tools provided with DataWindow .NET.
Requirements for PDF If your application uses the ability to save as PDF, additional files and some configuration are required on the Windows application user’s system or on the production Web server. For more information, see “Saving data in PDF format” on page 300.
Topic Page
Deploying applications 291
Deploying Windows form applications 292
Deploying ASP.NET applications 293
About deployment libraries 296
DataWindow .NET runtime files 296
Deploying .NET assemblies 297
Using the Runtime Packager 298
Using deployment dialog boxes 300
Saving data in PDF format 300

Deploying Windows form applications
292 DataWindow .NET
Deploying Windows form applicationsYou need to deploy several types of files with a Windows application:
• Application-specific files
• Deployment libraries
• DataWindow .NET runtime files
Application-specific files
After you build a Windows form .NET application, you need to deploy the executable file and any DLLs that were compiled and saved in the Release\bin directory on the development computer. The files should be installed in the application’s directory on the target computer.
Deployment libraries The deployment library (PBD) or PBL file or files that contain the DataWindow objects used in your application need to be distributed with your application in a directory on the system path. At runtime, the DataWindow server strips the full path from each library and looks for the library in the system path. If you have more than one copy of a library, one in the path specified in the library list and one in the system path, you might see unexpected results when you run or debug the application if the DataWindow exists in only one version of the library or has been modified in only one version.
For information about PBDs, see “About deployment libraries” on page 296.
DataWindow .NET runtime files
You must deploy a set of core DataWindow .NET runtime files with a DataWindow .NET application, as well as files that are required if your application uses specific features. The application looks for the files in the directories in the same directory as the executable file or in the system PATH environment variable. For a complete list of files, see “DataWindow .NET runtime files” on page 296.
Some of the files you need to deploy, DataWindow.dll, DataWindowInterop.dll, Sybase.PowerBuilder.Db.dll, and Sybase.PowerBuilder.DbExt.dll, are strong-named assemblies. A strong name includes the assembly’s identity as well as a public key and a digital signature. The way you deploy these files can limit your choice of deployment techniques. For more information, see “Deploying .NET assemblies” on page 297.
Chapter 13 Deploying DataWindow .NET Applications
Programmer’s Guide 293
Deployment techniques for Windows applicationsDataWindow .NET provides ways to simplify deployment of DataWindow .NET runtime files using a Microsoft Windows Installer file. You can also copy all the files you need to a release directory using dialog boxes built into the DataWindowControl. See “Using the Runtime Packager” on page 298 and “Using deployment dialog boxes” on page 300. For more information about deploying .NET applications, see your Microsoft documentation.
Deploying ASP.NET applicationsYou need to deploy several types of files to the production server for an ASP.NET Web application:
• Application files
• Deployment libraries
• DataWindow .NET runtime files
Application files When you build an ASP.NET application, the code class file (.aspx.vb, or .aspx.cs), but not the .aspx file, is compiled into a project DLL file along with all other class files included in your project. You need to deploy this DLL and the .aspx file to the server.
Application-specific files should be copied to the bin directory for your application in a path on the default Web share root directory (wwwroot).
Deployment libraries The deployment library (PBD) or PBL file or files that contain the DataWindow objects used in your application must be available on the Web server. The WebDataWindowControl’s LibraryList property contains URLs of the PBLs or PBDs that the Web DataWindow uses to load the DataWindow object. You deploy the PBLs or PBDs as content resources as you would image resources.
At runtime, the URL of a PBL or PBD is mapped internally into a physical directory and file from which the DataWindow object is loaded. If the URL is not an absolute physical file path, it should be part of your Web application’s virtual path.
For example, suppose your Web application’s URL is http://localhost/mydemo and it maps to C:\Inetpub\wwwroot\MyDemo, and that there is a subdirectory called pbls in C:\Inetpub\wwwroot\MyDemo. If the pbls directory contains dwobjects.pbl, the URL for this PBL should be /mydemo/pbls/dwobjects.pbl.
Deploying ASP.NET applications
294 DataWindow .NET
At runtime, the Page.MapPath method maps /mydemo/pbls/dwobjects.pbl to C:\Inetpub\wwwroot\MyDemo\pbls\dwobjects.pbl.
You can also use an absolute file path URL in the LibraryList property, such as:
file:///C:\Inetpub\wwwroot\MyDemo\pbls\dwobjects.pbl
For more information about PBD files, see “About deployment libraries” on page 296.
DataWindow .NET runtime files
You must deploy a set of core DataWindow .NET runtime files with a DataWindow .NET application, as well as files that are required if your application uses specific features. For a complete list of files, see “DataWindow .NET runtime files” on page 296.
Some of these files are unmanaged DLLs. The Web application looks for these files in a directory specified in an environment variable named DWDOTNET20. If you use the packaging tool provided with DataWindow .NET, this environment variable is created for you. For more information, see “Finding files in a Web application” on page 299.
Four of the files you need to deploy, DataWindow.dll, DataWindowInterop.dll, WebDataWindow.dll, and Sybase.PowerBuilder.Db.dll are strong-named assemblies. A strong name includes the assembly’s identity as well as a public key and a digital signature. The way you deploy these files can limit your choice of deployment techniques. For more information, see “Deploying .NET assemblies” on page 297.
Deployment techniques for Web applicationsIf your ASP.NET application does not require changes to IIS settings or registration of COM objects, and if it does not use assemblies in the GAC, you can copy the files your application needs to the production server using a simple copy technique such as the xcopy command-line tool or FTP.
If your application needs IIS configuration or uses COM objects that must be registered, or if it uses shared assemblies that are stored in the server’s global assembly cache (GAC), you might need to use another technique. For more information about deploying ASP.NET applications, see your Microsoft documentation.
DataWindow .NET provides a way to simplify deployment of DataWindow .NET runtime files using a Microsoft Windows Installer file. See “Using the Runtime Packager” on page 298.

Chapter 13 Deploying DataWindow .NET Applications
Programmer’s Guide 295
Write permission for directories for generated files
If your DataWindow .NET application specifies a path for dynamically generated files, make sure that the ASP.NET account (or, for Windows 2003 server, the IIS_WPG user group) has write permission to the directories. You need to do this if your application uses graphs in Web DataWindows or saves the JavaScript, XML, XSLT, and CSS files generated for XML or XHTML Web DataWindows into separate directories.
For more information about setting permissions for ASP.NET applications, see the Microsoft documentation.
Configuring the server for DataWindow printing
If your application uses the Print method or the SaveAs method with the argument Pdf to print Web DataWindows, you need to take the same configuration steps on the production server that were required on the development server. For more information, see “Printing Web DataWindows” on page 207.
Configuring the server for DBCS characters
If you plan to use DBCS characters, such as Chinese, Korean, or Japanese, with the Web DataWindow, you need to configure the server to handle them. This configuration is required if you want to save a DataWindow object that contains DBCS characters to text, CSV, or Excel files that use ANSI encoding, or import text or CVS files containing DBCS characters into a DataWindow object using ANSI encoding.
The regional settings you set in the Windows control panel on the server apply to the current user, not to the ASP.NET account under which the Web application is running. The regional settings used by IIS are the settings that were in effect when IIS was installed. Changing the locale on an English Windows operating system does not resolve the problem. There are three ways to resolve this issue:
1 Run IIS on a Native Language Windows operating system.
2 Set the regional settings you need before installing IIS.
3 Change the user account that starts running IIS from the default ASP.NET user account to a user account with the regional setting you want. To do this, you need to edit the <processModel> section in the server’s machine.config file or the impersonate setting in the web.config file. Windows Server 2003 requires a different technique.
For more information, see your Microsoft ASP.NET documentation.

About deployment libraries
296 DataWindow .NET
About deployment librariesWhen you are ready to deploy your application, consider building a deployment library (a PBD) for each of your PBLs and changing the LibraryList property of each DataWindowControl or DataStore to reference the PBD file instead of the PBL. PBD files cannot be opened by users and take less disk space.
• If your application uses images, you can build them into the executable or PBD files. For more information, see the section on creating a deployment library in the DataWindow Designer User’s Guide.
DataWindow .NET runtime filesThis section lists the files that you need to deploy to a client with DataWindow .NET Windows applications. The same files are required on the production server for Web applications (they are not required on Web clients).
The DataWindow .NET initialization files and DLLs listed in this section are all installed in the Sybase\DataWindow .NET 2.0 directory and are freely redistributable.
Required files The files listed in Table 13-1 must be distributed with all applications that use DataWindow .NET if they are not already installed on the target system.
Table 13-1: DataWindow .NET required runtime files
The pbshr105.dll has dependencies on the Microsoft C++ runtime files msvcr71.dll and msvcp71.dll and the Microsoft GDI+ module gdiplus.dll. If you use Ink controls, the Microsoft .NET Active Template Library (ATL) module, atl71.dll, is also required.
File Description
DataWindow.dll Front end, interacts with the .NET runtime
WebDataWindow.dll Web DataWindow front end; required on production server for Web applications
DataWindowInterop.dll Interop layer, communicates between front end and DataWindow server
pbdwn105.dll DataWindow server
pbshr105.dll Required utilities

Chapter 13 Deploying DataWindow .NET Applications
Programmer’s Guide 297
Optional files The files listed in Table 13-2 need only be deployed if your application requires them. Typically you will deploy the Xerces files and at least one database interface.
Table 13-2: DataWindow .NET optional runtime files
Deploying .NET assembliesDataWindow.dll, DataWindowInterop.dll, WebDataWindow.dll, Sybase.PowerBuilder.Db.dll and Sybase.PowerBuilder.DbExt.dll are .NET assemblies. The WebDataWindow.dll is required only for Web applications. You can use one of three techniques to deploy these files:
• Deploy .NET assemblies in the same directory as the executable file for a Windows application or into your Web application’s bin directory.
• Use a .NET application configuration file to assign the path of the .NET assembly. The file contains configuration settings that the common language runtime (CLR) reads as well as settings that the application reads. For an executable file, the configuration file has the same name as the executable file with the extension .config.
File Required for
pblab105.ini DataWindows that use the Label presentation style
PBXerces105.dll, xerces-c_2_6.dll, xerces-depdom_2_6.dll
XML or XHTML RenderFormat or DataWindow export to or import from XML
pbado105.dll, Sybase.PowerBuilder.Db.dll, Sybase.PowerBuilder.DbExt.dll
ADO.NET database connections
pbdir105.dll Sybase DirectConnect database connections
pbin9105.dll Informix 9 database connections
pbo84105.dll Oracle8i database connections
pbo90105.dll Oracle9i database connections
pbo10105.dll Oracle 10g database connections
pbodb105.dll ODBC database connections
pbodb105.ini ODBC database connections
pbole105.dll OLE DB database connections
pbsyc105.dll Sybase Adaptive Server Enterprise database connections

Using the Runtime Packager
298 DataWindow .NET
For more information about configuration files, see the .Microsoft .NET Framework documentation.
• Add the assembly to the Global Assembly Cache (GAC). Use this technique only when the assembly must be shared by several applications. You can no longer install an application using xcopy if one of the assemblies it uses is in the GAC.
For more information about the GAC, see the .Microsoft .NET Framework documentation.
Using the Runtime PackagerThe DataWindow .NET Runtime Packager is a tool that packages most of the files a DataWindow .NET application needs at runtime into a Microsoft Windows Installer (MSI) file. Windows installer is an installation and configuration service that is installed with most Microsoft operating systems.
❖ To build an MSI file for a DataWindow .NET application:
1 Launch the dwpack20 executable file in your Sybase\DataWindow .NET 2.0 directory.

Chapter 13 Deploying DataWindow .NET Applications
Programmer’s Guide 299
2 Select WinForm deployment for a Windows form application or WebForm deployment for an ASP.NET Web application.
3 Clear the check boxes for the database interfaces not required for your application.
4 If your application does not use the ability to import or export the data in a DataWindowControl in XML format, clear the XML Support check box.
5 (Optional) Specify a different name and/or location for the DataWindow .NET runtime package.
6 Click Create.
The Runtime Packager creates an MSI file and adds to it the base components listed in Table 13-1 on page 296, the pblab105.ini file, and the files you selected. It does not add any executable, DLL, PBD, or PBL files to the package. You can add these files to the MSI file or copy them to the destination directory manually. Running the MSI file on the target computer copies all the files in the package into the directory specified.
For information about working with MSI files, see the Windows Installer section in the Microsoft documentation.
Finding files in a Web application
When the MSI file generated for a Web application is run on the Web server, it creates an environment variable called DWDOTNET20 and sets its value to the path where the DataWindow DLLs were installed. When the Web application runs, the DataWindow server loads the unmanaged DataWindow .NET DLLs based on the directory specified in the DWDOTNET20 environment variable.
If you choose not to use the Runtime Packager, you can create a DWDOTNET20 environment variable and copy the unmanaged DLLs to the directory it specifies manually.
The .NET assemblies, DataWindow.dll, DataWindowInterop.dll, WebDataWindow.dll, Sybase.PowerBuilder.Db.dll, and Sybase.PowerBuilder.DbExt.dll are also installed in the specified directory. You should move these files to your application’s bin directory, or use another technique for deploying them, as described in “Deploying .NET assemblies” on page 297.

Using deployment dialog boxes
300 DataWindow .NET
Using deployment dialog boxesYou can deploy a Windows application by simply copying the contents of your project’s bin\Release directory to the user’s computer. To make sure that all the files you need are in the bin directory, right-click on a DataWindowControl and select Prepare for Deployment from the pop-up menu. You can also open the Prepare for Deployment dialog box by clicking the link at the bottom of the Properties window for a DataWindowControl.
❖ To prepare an application for deployment by copying files:
1 In the Prepare for Deployment dialog box, select the database interface your application uses.
2 Click OK.
The Copy for Deployment dialog box opens, listing the PBD file that holds your DataWindow objects, the required DLLs, and the DLLs for the database interface you selected.
3 If the list includes files that you do not want to copy, clear the check box next to them.
4 Click the browse (...) button next to the Target Directory box, browse to the bin\Release directory for your project, and click OK.
The files you selected are copied to the target directory. You can copy the contents of this directory, which also contains the executable file and any application-specific files, to a user’s computer, or add the contents of this directory to a package or ZIP file to be distributed to users.
Saving data in PDF formatIn order for users of Windows forms applications to use the SaveAs method to save data as PDF, they must first download and install GNU Ghostscript on their computers as described in the procedure that follows. If you are setting up a Web server for a Web forms application, follow the same procedure to install Ghostscript on the server. Ghostscript is not required on the client for Web applications.
The use of GNU Ghostscript is subject to the terms and conditions of the GNU General Public License (GPL). Users should be asked to read the GPL before installing GNU Ghostscript on their computers. A copy of the GPL is available on the GNU Project Web server at http://www.gnu.org/license.

Chapter 13 Deploying DataWindow .NET Applications
Programmer’s Guide 301
❖ To install GNU Ghostscript:
1 Into a temporary directory on your computer, download the self-extracting executable file for the version of Ghostscript you want from one of the sites listed on the Ghostscript Web site at http://www.ghostscript.com/doc/GPL.
2 Run the executable file to install Ghostscript on your system.
The default installation directory is C:\gs. You can select a different directory and/or choose to install shortcuts to the Ghostscript console and readme file.
Location of files When you save a DataWindow object as PDF, the DataWindow server searches in the following locations for an installation of GNU Ghostscript:
• The Windows registry
• The relative path of the pbdwn105.dll file
• The system PATH environment variable
If GNU Ghostscript is installed using the Ghostscript executable file, the path is added to the Windows registry.
If the Ghostscript files are in the relative path of the pbdwn105.dll file, they must be installed in this directory structure:
dirname\pbdwn105.dlldirname\gs\gsN.NNdirname\gs\fonts
where dirname is the directory that contains the runtime DLLs and N.NN represents the release version number for Ghostscript.
You might not need to distribute all the fonts provided in the distribution. For information about fonts, see Fonts and font facilities supplied with Ghostscript at http://www.ghostscript.com/doc/gnu/7.05/Fonts.htm.
You must also deploy the default PostScript printer driver and related files that are installed in Sybase\DataWindow.NET 2.0\drivers. These files can be copied to or installed on the target computers. They must be located in this directory structure:
dirname\pbdwn105.dlldirname\drivers

Saving data in PDF format
302 DataWindow .NET
PostScript printer profile
Each user’s computer (or the Web server for Web applications) must have a PostScript printer profile called Sybase DataWindow PS. This profile is added to your development computer automatically when you save a DataWindow’s rows to a PDF file in the DataWindow painter.
Users can add the profile manually using the Windows Add Printer wizard. In the wizard, click the Have Disk button and browse to the Adist5.inf file installed in the DataWindow .NET 2.0\drivers directory, or to another PostScript driver file.

Programmer’s Guide 303
AAcceptText method
about 266calling from Update 288
ADO.NET Connection objectcreating 122Open method 123
AdoTransaction class 111AdoTransaction methods, summary 111AdoTransaction object
associating with a DataWindow control or DataStore 124
BeginTransaction method 125BindConnection method 124Commit method 125properties 123Rollback method 125SetTransaction method 124using 120
aggregation functions, Web DataWindow 226aligning columns in DataWindow objects 30applications, using DataWindow objects in 13, 57architecture, DataWindow .NET 4area graphs 98arguments, retrieval 276ASP.NET
about 172account access 204postbacks 197ViewState 192Web server controls 173
AutoCommit Transaction property 115AutoRestoreContext property 194AutoRestoreDataCache property 195AutoSaveDataCacheAfterRetrieve property 195
Bbar graphs 98BeginInit method 103BeginTransaction method 125BindConnection method 124bitmaps, dynamically adding and removing 148blobs
DataWindow synchronization 109DataWindowChanges 108DataWindowFullState 108
Border property (DataWindow object), examples of setting 128
buffersDataStore 104DataWindow 75, 86retrieving data 271returning modified rows 273setting values of rows and columns 283
Button controls, Web DataWindow 226ButtonClicked event 259ButtonClicking event 261
CCase function, Web DataWindow 226class hierarchy
DataWindow .NET 5Edit styles 137ExpressionBasedProperty 135GraphicObject 131WebDataWindowControl 6
class instances, obtaining 133Clear method 77ClearDataCache method 196Clicked event 261, 269, 270, 275client control methods
AcceptText 266DeletedCount 267
Index

Index
304 DataWindow .NET
DeleteRow 268GetClickedColumn 269GetClickedRow 269GetColumn 270GetItem 271GetItemStatus 271GetNextModified 273GetRow 273InsertRow 274IsRowSelected 275ModifiedCount 276Retrieve 276RowCount 277ScrollFirstPage 278ScrollLastPage 279ScrollNextPage 280ScrollPriorPage 280SelectRow 281SetColumn 282SetItem 283SetRow 284SetSort 286Sort 287Update 288
client control, Web DataWindow 175ClientObjectName property for WebDataWindow control
253CodeTableValue structure 8column graphs 98column status
changing 88in DataWindow controls 86
columnsaligning 30clicked 269current 270, 282graphing data in 98in DataWindow expressions 134initializing 274modification status of 271rearranging 29retrieving from buffer 271updating 288values of 283
comments, DataWindow 19, 29Commit method 65, 125
communication with databases 62computed fields in DataWindow expressions 134Connect method 117connecting, and Transaction object 117Connection AdoTransaction property 123connection code, generated on Preview tab 115context management, Web DataWindow 193context, restoring 194context-sensitive help 12continuous data 98controls, supported in Web DataWindow 214Copy method 77copy method, for saving graphs 166count of rows marked for deletion 267create capability for Modify 148Create method 7, 149criteria, sort 286, 287CrosstabDialog method 97crosstabs
modifying during execution 151users redefining during execution 97using in applications 97viewing underlying data 97
CSS 177current
column 282row 273, 281, 284row before inserting 274
cursor and current row 284Cut method 77
Ddata
retrieving and updating 62retrieving from buffers 271retrieving, example 38sharing 105updating 64updating, example 42Web DataWindow 215
data cache, Web DataWindow 195data modified status flags 86

Index
Programmer’s Guide 305
data sourceexternal 74, 104Quick Select 16
database connections, about 62database errors 93Database Transaction object property 114Database Transaction property 114databases
communicating with 62connecting to 37, 50, 117deleted rows 267disconnecting from 118profiles, connection properties in 114retrieving data 271, 276retrieving, presenting, and manipulating data 62updating 64, 288
DataModified item status 273DataObject property of DataWindow controls 60DataPoint field 163DataStore
about 2inheritance 5working with 101
DataStore methodscommon 104GetChanges 107GetFullState 107ResetUpdateStatus 109SetChanges 107SetFullState 107ShareData 106ShareDataOff 107UpdateData, synchronizing data after calling 109
DataStore objectsaccessing data 104buffers 104importing data from external sources 104methods 104sharing data 105
DataWindowserver 4synchronization 107technology 1
DataWindow .NETarchitecture 4class hierarchy 5
classes 7, 9controls, registering 10DataWindow server 4delegates 7, 9enumerations 7, 9front end 4structures 7, 9
DataWindow controlsabout 57accessing the current text 76assigning transaction objects to 149associating with objects during execution 60buffers 75, 86column status 86creating reports with 94data management in 75DataObject property 60handling errors 93importing data from external sources 74ItemChanged event 77ItemError event 77methods 84names 32placing in windows 32, 45, 58processing entries 76row status 86rows available for display 277updating, use of row/column status when 86using crosstabs 97using graph methods 162
DataWindow Designer project, creating 15DataWindow Designer, about 2DataWindow expression functions 135DataWindow expressions
as values for properties 128defined 128format in painter versus code 135
DataWindow methodsBeginInit 103Clear 77context-sensitive help on 12Copy 77Create 149CrossTabDialog 97Cut 77DataWindowSyntaxFromSql 7, 150

Index
306 DataWindow .NET
defined on interfaces 5DeleteRow 88Describe 130, 148Describe, exceptions thrown by 143EndInit 103exceptions thrown by 92for handling events 90GetChanges 107GetChild 96GetColumnObjectByNumber 133GetFullState 107GetItem 78GetItemDate 78GetItemDateTime 78GetItemDecimal 78GetItemDouble 78GetItemSqlDateTime 78GetItemSqlDecimal 78GetItemSqlDouble 78GetItemSqlString 78GetItemStatus 88GetItemString 78GetItemTime 78GetObjectByName 133GetObjectByName, using with graphs 164GetProperty 131, 148GetProperty, exceptions thrown by 143GetRowStatus 88GetStateStatus 107GetText 76ImportClipboard 74, 104ImportFile 74, 104ImportString 74, 104IsItemNull 79list of common 84Modify 130, 148Modify, advantages and drawbacks 141Modify, changing crosstab report with 151Modify, changing graph properties at runtime 160Modify, creating composite report with 151Modify, exceptions thrown by 143Print 95Refresh 167Replace 77Retrieve 62, 86Retrieve, example 39, 54
Retrieve, exceptions thrown by 93Retrieve, providing query ability with 152Retrieve, with DataStore 102SaveAs 74SaveAs, software required for PDF 300SaveAsFormattedText 74SelectRow 281SelectText 77SetChanges 107SetFullState 107SetItem 78SetItem, modifying status 87SetItemDate 78, 79SetItemDateTime 79SetItemDouble 79SetItemNull 79SetItemSqlDateTime 79SetItemSqlDecimal 79SetItemSqlDouble 79SetItemSqlString 79SetItemStatus 88SetItemString 79SetItemTime 79SetProperty 131, 148SetProperty, changing crosstab report with 151SetProperty, changing graph properties at runtime
160SetProperty, exceptions thrown by 143SetRedrawOff 167SetRedrawOn 167SetRowStatus 88SetText 76SetTransaction, calling after Create 149ShareData 96supported by DataStores 102UpdateData 62, 86UpdateData, example 42UpdateData, exceptions thrown by 93UpdateData, when called 87where described x
DataWindow objectsabout 1aligning columns 30and graphs in 98associating with controls 34, 46, 60basic use of 13, 57

Index
Programmer’s Guide 307
creating 16, 24creating dynamically 149creating reports with 94data source 16designing for Web DataWindow 214display order 17displaying data 62dynamic use of 147editing 60enhancing 29generating HTML from 74graphs in 159HTML preview 230listing 61names 32presentation style 16presentation styles 2printing multiple on a page 96properties of 85, 127rearranging columns 29retrieval arguments 26saving 19selecting columns with Quick Select 17WHERE clause 26
DataWindow painteraligning columns and labels 30bands 18editing DataWindow object 60modifying objects 20modifying objects in 29retrieval argument 26views 18WHERE clause 26
DataWindow property expressions 128DataWindow.dll 4DataWindowBand structure 8DataWindowChanges object 108DataWindowChild class 5DataWindowControl
about 2adding to a form 32, 35, 45, 47inheritance 6
DataWindowFullState object 108DataWindowInterop.dll 4DataWindowSyntaxFromSql method 7, 150
and data cache 196
setting initial property values 129DataWindowSyntaxGenerator class 7DbHandle Transaction property 115Dbms Transaction object property 114Dbms Transaction property 114DbParameter AdoTransaction property 123DbParameter Transaction object property 114DbParameter Transaction property 115default values 274delegate classes 8, 10, 90Delete buffer
DataStore 104DataWindow 75returning modified rows 273
DeletedCount method 267DeleteRow method 88, 268deploying your application 296deployment DLLs 296deployment library, building 44Describe method 148, 150
error handling 143getting property values 130
destroy capability for Modify 148detail band in DataWindow objects 18directory structure, required for save as PDF 301Disconnect method 118disconnecting from databases 118display formats in Web DataWindow 215distributed applications, performing database updates in
107distributing your application 296DLLs, required for deployment 296DropDownDataWindow edit style 31dwItemStatus enumerated data type 271DWP, creating 15DWPack utility 298DWToolBoxReg utility 10dynamic DataWindow objects
about 147adding elements 148creating 149modifying 148providing query mode 152specifying create syntax 150
Index
308 DataWindow .NET
Eearly binding, accessing properties 131EAS Demo database 14
connecting to 15creating a profile 16
edit controls 75, 76, 77applying contents of 266
edit stylesdrop-down DataWindow 31overriding in query mode 156Web DataWindow 215
EditChanged event 76EditControl class 7, 9, 75EnableDataState property 194EndInit method 103enumerations 8, 10errors, following database retrieval or update 93events
handling 90ItemChanged 77ItemError 77Web DataWindow client control 254
exception handlingDataWindow processing 91Describe and Modify methods 143Transaction object 118
executionaccessing graphs 160associating DataWindow objects with controls 60modifying DataWindow objects 148
Export/Import Template view icons 236expressions
assigning DataWindow property values 148examples 139for DataWindow object properties 134
extended attributes 31External data source, importing data 74, 104
Ffilter buffer 75, 104
returning modified rows 273filters, applying 276focus, column 270fonts, using in reports 95
footer band in DataWindow objects 18formats, sort criteria 286forms, adding DataWindowControls to 58Freeform presentation style, columns 29
GGetChanges method 107, 108GetChild method 96GetClickedColumn method 269GetClickedRow method 269GetColumn method 270GetColumnObjectByNumber method 134GetDataObject method 196GetDataStyle method 167GetDataWindowObjectEntries utility 61GetFullState method 107, 108GetItem method 271GetItemDate method 78GetItemDateTime method 78GetItemDecimal method 78GetItemDouble method 78GetItemSqlDateTime method 78GetItemSqlDecimal method 78GetItemSqlDouble method 78GetItemSqlString method 78GetItemStatus method 88, 271GetItemString method 78GetItemTime method 78GetNextModified method 273GetObjectByName method 133GetRow method 273GetRowStatus method 88GetSeriesStyle method 167GetText method 76Ghostscript, downloading 300GNU Ghostscript, downloading 300Gob property 134graph methods
for data display 167for getting information 162
GraphConfigurations property 203GraphDataStyle class 167
Index
Programmer’s Guide 309
GraphicObject classesabout 7, 9hierarchy 131, 135, 137list of 132
GraphicObjectUnderMouse property 163graphics, adding to DataWindow objects 148GraphObjectAtPointer structure 7, 8GraphObjectType enumerated value 163GraphObjectUnderMouse property 163graphs
about 159data properties 162getting information about 162in DataWindow objects 98in Web DataWindow 203internal representation 160making three-dimensional 99modifying display of data 167modifying during execution 160properties of 160types of 98
GraphSeriesStyle class 167grAxis subobject of graphs 161grDispAttr subobject of graphs 160
Hhandling errors 143handling events 90header band in DataWindow objects 18header section in XML template 240help, providing in dynamic DataWindow objects 157highlighting rows 275, 281HTML
appending to a control 231including in a control 231saving DataWindow data as 74
HTML Preview 230
IIDataStore interface 6IDataWindow interface 6IDataWindowBase interface 5
IIS, configuring for printing 207image file formats for graphs 204ImportClipboard method 74, 104ImportFile method 74, 104ImportString method 74, 104InsertRow method 274installation 10integrated data cache management 195IsBound AdoTransaction property 123IsConnected Transaction property 115IsItemNull method 79IsRowSelected function 275ItemChanged event 76, 77, 262ItemError event 76, 77ItemFocusChanged event 264items in DataWindow controls 75ItemStatus, changing 88
JJavaScript caching
in DataWindow Designer 223in Visual Studio .NET 190
JavaScriptConfigurations property 189
Llate binding, accessing properties 130library, creating 15line graphs 98links, in ObjectLink Collection Editor 205Lock Transaction property 115loops, avoiding infinite 282, 284
Mmaster-detail DataWindows, example 38methods
DataStore 104DataWindow 84graph 162JavaScript caching 223Web DataWindow client control 256

Index
310 DataWindow .NET
Modified status 89ModifiedCount method 276Modify method
basic usage 148error handling 143using query mode 152with crosstabs 151
Nnames of DataWindow controls and DataWindow
objects 32nested reports
creating during execution 151using in applications 95
nested strings 145.NET remoting, support for 107New status 86, 89NewAndModified status 89NewModified item status, returning next row with 273NewModified status 86NotModified status 86, 89null values, testing for 79
OObjectAtPointer structure 8ObjectType field 163ObjectUnderMouse property 134On methods for events 90online help 12Open method, Connection object 123
PPage_Init event 174Page_Load event 174Page_Unload event 174Password Transaction object property 114Password Transaction property 114PBDs, required for deployment 296pbdwn105.dll 4
not loaded 33
PBL, creating 15PDF
saving as 210software required for 300
Picture button in Web DataWindow 227Picture controls in Web DataWindow 228pie graphs 98postbacks 197presentation styles
DataWindow object 16supported in Web DataWindow 214Tabular 16
presentation styles for DataWindows 2Preview tab in Database Profile painter 115Preview tab, generating syntax 115Primary buffer 75, 104
retrieving data from 271returning modified rows 273row count 277
Print method 95printing
multiple DataWindow objects on a page 96reports 95Web DataWindows 207
profiles, database 114programs, using DataWindow objects in 13, 57properties
about 127conditional values using expressions 130DataWindow expressions as property values 128DataWindow object 85examples of setting 128retrieving current values of 148, 150special characters for accessing 144Transaction object 114values in code 128, 130values in painter 128, 129
property expressions, when to use 131
Qquery mode
clearing 156forcing equality 157
Index
Programmer’s Guide 311
providing to users 152sorting in 156
quick reference 8, 10Quick Select 16
sort criteria 18using 16
quotes in sort criteria 286
Rrecursive call 282Refresh method 167remoting, support for .NET 107Replace method 77reports
creating with DataWindow objects 94nested 95printing 95
ResetUpdateStatus method 109RestoreContext method 194RestoreDataCache method 195retrieval arguments
creating 26defining 26using 62WHERE clause 26
Retrieve method 86, 276accessing a database 62and retrieval arguments 39, 54, 62example 39, 54exceptions thrown by 93handling errors 93using 62
RetrieveStart event 276return count 276Rollback method 65, 125row status, changing 89RowCount method 277RowFocusChanged event 265RowFocusChanging event 265rows
clicked 269deleting 267, 268getting current 273in primary buffer 277
inserting 274modification status 271, 273, 276providing user-specified retrieval 152retrieving data from 271retrieving from database 276selecting 275, 281setting current 284setting value of 283sorting 287status in DataWindow controls 86updating 288
RowsAffected Transaction property 115RowsPerPage property 200RowStatus, changing 89runtime DLLs 296Runtime Packager 298
SSaveAs method 74
software required for PDF 300SaveAsFormattedText method 74SaveDataCache method 195saving graphs 166scatter graphs 99scatter graphs, having no category axis 164scripts, modifying graphs in 160scroll bars in Web DataWindows 200ScrollFirstPage method 278ScrollLastPage method 279ScrollNextPage method 280ScrollPriorPage method 280Select painter
about 25tab area 25
SELECT statement 25SELECT statements, modifying at execution time 155selection criteria for query mode 152selection, of rows 275SelectRow method 281SelectText method 77separator line in XML template 240series, implicit in all graphs 164SeriesName field 163

Index
312 DataWindow .NET
server component methodsSetColumn 282SetRow 284SetSort 286
ServerName Transaction object property 114ServerName Transaction property 115SetChanges method 107, 108SetColumn method 282SetDataObject method 196SetDataStyle method 167SetFullState method 107, 108SetItem method 283SetItem methods, changing status with 87SetItemDate method 79SetItemDateTime method 79SetItemDecimal method 79SetItemDouble method 79SetItemNull method 79SetItemSqlDateTime method 79SetItemSqlDecimal method 79SetItemSqlDouble method 79SetItemSqlString method 79SetItemStatus method 88SetItemString method 79SetItemTime method 79SetProperty method 148
changing crosstab report with 151changing graph properties at runtime 160exceptions thrown by 143
SetRedrawOff method 167SetRedrawOn method 167SetRow method 284SetRowStatus method 88SetSeriesStyle method 167SetSort method 286SetText method 76SetTransaction method 117, 124ShareData method 96, 106ShareDataOff method 107Sort method 287sort order, specifying criteria 286sorting in query mode 156SQL Select 24SQL statements
and modification status 271CONNECT 276
specifying retrieval arguments 276SQL statements, SELECT 25SQL syntax, in Select painter 25SqlDbCode TransactionException property 118SqlErrText TransactionException property 118SqlReturnData Transaction object property 114SqlReturnData Transaction property 115stack faults, avoiding 282stacked graphs 99status of rows and columns 271status of rows or columns 86strings, retrieving from buffers 271structures 8summary band in DataWindow objects 18SyntaxFromSQL 150SyntaxFromSql 7, 150SYSTEM account, configuring 209System.EventArgs class 7, 9System.Exception class 7, 9
TTabular presentation style 16text controls in DataWindow objects 148text in DataWindow edit control 75three-dimensional graphs, about 99tilde character, SpinRange property 145Transaction AdoTransaction property 123Transaction class
description 111using 112
Transaction methodsCommit 111Connect 117Disconnect 111, 118exceptions thrown 118Rollback 111SetTransaction 117, 124summary 111
Transaction objectadding to a form 36, 48associating with a DataWindow control or DataStore
117, 124exception handling 118properties 114

Index
Programmer’s Guide 313
reassociating DataWindow controls with 149specifying before row retrieval 276
TransactionException object 118tutorial 14
UUnbindConnection method 124Update method 288update status
and Update method 271in distributed applications 107
UpdateData method 86accessing a database 62example 42exceptions thrown by 93handling errors 93resetting status flags 109saving changes 64using 64when called 87
updating data 64example 42
UserID Transaction property 114Utility class 8
GetDataWindowObjectEntries method 61
Vvalidation rules in Web DataWindow 215view, types of
Design (DataWindow painter) 18HTML Preview (DataWindow painter) 19Preview (DataWindow painter) 19Syntax (Select painter) 25Table Layout (Select painter) 25
ViewState, in ASP.NET 192
WWeb applications and DataWindow technology 171Web DataWindow
about 171aggregation functions 226client-side scripts 254context management 193controls 175data cache management 195data manipulation 226DataWindow objects 214events for client control 254expressions 226graphs 203JavaScript caching 223JavaScript Generator wizard 223maintaining state 192methods for client control 256navigation 226picture button 227printing 207process 179render formats 184scroll bars 200server component and client control 175types 172using 176
Web DataWindow client control functionsIsRowSelected 275
Web DataWindow methodsSetScroll 285
Web page processing 174Web server controls 173WebDataWindowControl
about 175properties 185
WHERE clausebuilding 24specifying 26
wizardsDataWindow 16Web DataWindow JavaScript Generator 223

Index
314 DataWindow .NET
XXHTML export template
creating and saving 236Detail Start element 240editing 242exporting 251saving 238
XML 177XML Web DataWindow
benefits 184how it works 181how to use 178using 176
XmlConfigurations property 190XSLT 177