Embed Size (px)
Citation preview

Driver Instructions
Procision™ Dual-ClutchAutomatic TransmissionTRDR0990 EN-USMarch 2018


Warnings and Cautions
!
!
!
i
Warnings and Cautions
Definitions
DANGER: Indicates you will be severely injured or killed if you do not follow the indicated procedure.
WARNING: Indicates an immediate hazard, which could result in severe per-sonal injury or death if you do not follow the indicated procedure.
CAUTION: Indicates vehicle or property damage could occur if you do not fol-low the indicated procedure.
Note: Indicates additional detail that will aid in the diagnosis or repair of a component or system.
Read the entire driver instructions before operating this transmission.
If the engine cranks in any mode other than Park or Neutral, service your vehicle immediately.
Before working on the vehicle, parking the vehicle, or leaving the cab of the vehicle with the engine running:
1. Safely come to a complete stop.
2. Continue to depress and hold service brake and:
• Select Park if equipped with Shift Lever and slowly release ser-vice brake to engage park pawl.
• Select Neutral if equipped with Push Button.
3. Apply vehicle parking brake and chock wheels.
For safety reasons and transmission operation requirements, depress and hold the service brake prior to selecting a mode from Park or Neutral.

Warnings and Cautions
For vehicles equipped with an air brake system, do not release the vehicle parking brake or attempt to select a gear until the vehicle air pressure is at the correct level.
Before starting the engine, ensure the vehicle parking brake is applied and:
• Select Park if equipped with Shift Lever.
Before operating the PTO, see “Features” on page 14.
Battery (+) and (-) must be disconnected prior to any type of welding on any Procision 7-Speed Dual Clutch Transmission equipped vehicle.
Protect the transmission and electronic components from excessive heat and sparks.
ii

iii
Table of Contents
Warnings and Cautions . . . . . . . . . . . . . . . . . . . . . . . . . . . . . . . i
OperationDriver Interface Devices . . . . . . . . . . . . . . . . . . . . . . . . . . . . . 1Start Up . . . . . . . . . . . . . . . . . . . . . . . . . . . . . . . . . . . . . . . . . 3 Power Down . . . . . . . . . . . . . . . . . . . . . . . . . . . . . . . . . . . . . . 3Park . . . . . . . . . . . . . . . . . . . . . . . . . . . . . . . . . . . . . . . . . . . . . 4Reverse Mode . . . . . . . . . . . . . . . . . . . . . . . . . . . . . . . . . . . . 5Neutral Mode. . . . . . . . . . . . . . . . . . . . . . . . . . . . . . . . . . . . . . 5Drive Mode . . . . . . . . . . . . . . . . . . . . . . . . . . . . . . . . . . . . . . . 6Manual Mode . . . . . . . . . . . . . . . . . . . . . . . . . . . . . . . . . . . . . 7Hold Mode. . . . . . . . . . . . . . . . . . . . . . . . . . . . . . . . . . . . . . . . 8Low Mode . . . . . . . . . . . . . . . . . . . . . . . . . . . . . . . . . . . . . . . 9Display Messages . . . . . . . . . . . . . . . . . . . . . . . . . . . . . . . . . . 10Features . . . . . . . . . . . . . . . . . . . . . . . . . . . . . . . . . . . . . . . . . 14
Service & MaintenanceGeneral Model Information . . . . . . . . . . . . . . . . . . . . . . . . . . . 18
Oil Information . . . . . . . . . . . . . . . . . . . . . . . . . . . . . . . . . . . . . 20Vehicle Towing . . . . . . . . . . . . . . . . . . . . . . . . . . . . . . . . . . . . 23Eaton Customer Support . . . . . . . . . . . . . . . . . . . . . . . . . . . . . 24

iv

Operation
Driver Interface Devices
The vehicle may be equipped with either an OEM Shift Lever or an Eaton Push Button Controller.
Note: Driver instructions may vary depending on the driver interface device installed.
OEM Shift Lever
Note: Avoid manually holding Shift Lever between mode positions. Allow the shift lever detents to properly hold selected mode position.
P Selects Park (see page 4 for more details)
R Selects Reverse (see page 4 for more details)
N Selects Neutral (see page 4 for more details)
D Selects Drive (see page 6 for more details)
H Hold current gear (see page 8 for more details)
L Downshifts at earliest opportunity (see page 9 for more details)
Park
HoldDrive
NeutralReverse
Low
1

Operation
Eaton Push Button Controller
R Selects Reverse (see page 4 for more details)
N Selects Neutral (see page 4 for more details)
D Selects Drive (see page 6 for more details)
MANUAL Selects MANUAL (see page 7 for more details)
LOW Selects LOW (see page 9 for more details)
Service Alerts driver of potential transmission problems
Used in “D” or “MANUAL” mode to request upshifts and down-shifts
R - Reverse
N - Neutral
D - Drive
MANUAL
LOW
- Upshift
- Downshift
SERVICE
SHIFT
MANUAL
EATON FULLERTRANSMISSIONS
LOW
D
N
R
Button not used
Service Indicator
- Upshift
- Downshift
2

3
Operation
Start Up and Power Down Procedures
Start Up1. Confirm vehicle parking brake is applied and:
• Select Park if equipped with Shift Lever.
2. Turn ignition key “On” and allow transmission to power up.
• Transmission is powered up when display indicates “P” or “N”.
3. Start engine.
• Shift Lever – if engine does not crank, confirm Park is selected, depress and hold service brake and re-try to crank engine.
• Push Button – if engine does not crank, depress and hold ser-vice brake and re-try to crank engine.
• If the engine cranks but will not start, refer to OEM.
4. Depress and hold service brake.
5. Select desired mode with driver interface device.
6. Confirm transmission is in the desired mode indicated by a solid start gear in display: “R” (Reverse), “D” (Drive) or “1” (Drive).
• Before selecting a mode from Park or Neutral, depress and hold service brake.
7. Release vehicle parking brake.
Transmission is ready for operation.
Power Down1. Safely come to a complete stop.
2. Continue to depress and hold service brake and:
• Select Park if equipped with Shift Lever and slowly release service brake to engage park pawl.
• Select Neutral if equipped with Push Button.
3. Apply vehicle parking brake.
Note: Select Park or Neutral before engine is shut off.
4. Turn ignition key to “Off”, transmission will power down.

Operation
!
Transmission Modes
Park Mode – Shift Lever Only
• Selects Park.
• Engages the transmission's internal park pawl mechanism.
CAUTION: Safely come to a complete stop prior to selecting Park.
Note: When attempting to start the engine and the engine does not crank, confirm Park is selected, vehicle parking brake is applied and service brake is depressed.
When shifting into Park on a grade:1. Safely come to a complete stop.
2. Continue to depress and hold service brake.
3. Select Park with Shift Lever.
4. Slowly release service brake to engage park pawl.
5. Apply vehicle parking brake.
When shifting out of Park on a grade (Engine Idling): 1. Depress and hold service brake.
2. Select desired mode with Shift Lever.
Note: Some noise from the transmission and driveline may occur when shifting out of Park.
3. Confirm transmission is in the desired mode.4. Release vehicle parking brake.
Transmission is ready for operation.
4

Operation
!
!
Reverse Mode
• Selects Reverse.
CAUTION: When launching on a grade, confirm the transmission is in the desired mode indicated by a solid “R” in the display before releasing the ser-vice brake.
Neutral Mode
• Selects Neutral.
• Initial gear position after Start Up with a Push Button.
CAUTION: When Neutral is selected and vehicle is at a complete stop, con-tinue to depress and hold service brake and apply vehicle parking brake.
Note: When attempting to start the engine and the engine does not crank, confirm Park or Neutral is selected, vehicle parking brake is applied and service brake is depressed.
5

6
Operation
Drive Mode
• Selects 1st gear.
• All upshifts and downshifts are performed automatically based on vehicle and transmission conditions.
• 1st gear is the only available start gear when launching from a stop.
CAUTION: When launching on a grade, confirm the transmission is in the desired mode indicated by a “D” or “1” in the display before releasing the service brake.
Note: If using Push Button Upshift and Downshift buttons, the transmission may deny a shift request to prevent over-speed or under-speed of the engine.
!

7
Operation
MANUAL - Manual Mode – Push Button OnlyManual Mode maintains current gear or allows the driver to advance a shift while driving instead of letting the transmission upshift or downshift automat-ically. Manual Mode is typically used during slow-speed parking lot and load-ing dock maneuvering, over railroad tracks and on grades.
• If Manual Mode is selected at a stop, 1st gear is maintained and no automatic shifts are performed until the driver depresses Upshift button to shift transmission. 1st gear is the only available start gear when launching from a stop.
• If Manual Mode is selected while driving, current gear is maintained and no automatic shifts are performed until the driver requests a shift by depressing the Upshift or Downshift buttons or Manual Mode Override is activated.
Manual Mode Override: Transmission automatically initiates or inhibits shifts to prevent over-speed or under-speed of the engine while in Manual Mode.
• If vehicle is being back-driven and engine RPM is approaching a higher than normal level, transmission may override driver's Manual Mode request and perform an upshift.
• If vehicle load and grade of terrain causes engine torque and RPM to fall below an acceptable range, transmission may override driver's Manual Mode request and perform a downshift.
Note: For optimum efficiency and performance during normal driving, it is recommended to operate the transmission in Drive Mode.
8
Operation
H - Hold Mode – Shift Lever OnlyHold Mode maintains current gear instead of letting the transmission upshift or downshift automatically. Hold Mode is typically used during slow-speed parking lot and load dock maneuvering, over railroad tracks and on grades.
• If Hold Mode is selected at a stop, 1st gear is maintained and no automatic shifts are performed.
• If Hold Mode is selected while driving, current gear is maintained and no automatic shifts are performed until Drive Mode is selected or Hold Mode Override is activated.
Hold Mode Override: Transmission automatically initiates shifts to prevent over-speed or under-speed of engine while in Hold Mode.
• If vehicle is being back-driven and engine RPM is approaching a higher than normal level, transmission may override driver's Hold Mode request and perform an upshift.
• If vehicle load and grade of terrain causes engine torque and RPM to fall below an acceptable range, transmission may override driver's Hold Mode request and perform a downshift.

9
Operation
L or LOW - Low Mode
Shift Lever – LPush Button – LOW
Low Mode initiates downshifts at the earliest opportunity to maximize engine braking and minimize the use of the service brake, for example, when driving down long grades or when coming to a stop.
• If Low Mode is selected at a stop, 1st gear is maintained and no automatic shifts are performed.
• If Low Mode is selected while driving, downshifts are performed at higher RPMs than normal to enhance engine braking.
Low Mode Override: Transmission automatically initiates upshifts to prevent over-speed of engine while in Low Mode.
• If vehicle is being back driven and engine RPM is approaching a higher than normal level, transmission may override driver's Low Mode request and perform an upshift.

Operation
!
Display Messages
Transmission Oil Warm-up CycleTransmission Oil Warm-up Cycle activates when the engine is running to increase the transmission oil temperature and allow transmission operation during cold ambient temperatures. The Transmission Control Module (TCM) activates the Transmission Oil Warm-up Cycle when the transmission oil tem-perature is below -13° F (-25° C). When the Transmission Oil Warm-up Cycle is active the TCM does not allow a mode requests from Park or Neutral and display indicates “Range Inhibit” and/or “WAIT FOR TRANS WARM UP”. When the transmission oil temperature reaches approximately -13° F (-25° C), the display indicates “P” or “N” and the transmission is ready for operation.
WARNING: The engine is required to be running at low idle RPM during theTransmission Oil Warm-up Cycle. Apply the vehicle parking brake and:
• Select Park if equipped with Shift Lever.
Engine Shut Off With Transmission In GearIf the engine was shut off with the transmission in gear (Reverse or a Drive mode), at the next key on, a flashing “P” or “N” may be indicated in the display and the engine may not crank. Confirm Park or Neutral is selected, vehicle parking brake is applied and service brake is depressed when attempting to start engine.
10

Operation
!
!
Clutch Abuse
This transmission uses an electronically controlled, hydraulically actuated clutch; however, the clutch can overheat with improper use. To protect the clutch, the display indicates “CA” and/or “CLUTCH ABUSE” alerting the driver that a clutch abuse event is active.
• If “CA” and/or “CLUTCH ABUSE” is active in the display, immediately discontinue the operation that is being performed which is causing the clutch to overheat. “CA” and/or “CLUTCH ABUSE” turns off once the clutch abuse event no longer exists.
CAUTION: If “CA” and/or “Clutch Abuse” continues, the display indicates “F”, a warning tone sounds and clutch opens. Apply vehicle parking brake, select Park or Neutral and allow the engine to idle.
• Idling the engine allows the transmission to circulate oil and cool the clutch.
• Transmission operation returns after the clutch cools indicated by “P” or “N” in the display and/or no warning tone.
CAUTION: Do not use the accelerator pedal to hold or stop vehicle roll on a grade. Apply the service brake to properly hold the vehicle prior to launching from a stop.
11
Operation
!
Transmission FaultThis transmission is equipped with On-Board Diagnostics incorporated into the Transmission Control Module (TCM). On-Board Diagnostics monitor TCM functions to verify the transmission is operating as designed. If On-Board Diagnostics identifies an issue in the system, the display indicates a flashing “F” and may activate a fallback mode. During a fallback mode, a driver may experience operational changes in gear engagement, launch, upshift and downshift strategies.
CAUTION: If a transmission fault occurs indicated by an Amber or Red service lamp on the instrument panel and/or “F”/Message in the instrument panel dis-play and/or Service lamp on Push Button Control, service is required. To maintain proper transmission operation and performance, service the trans-mission at an Eaton authorized service facility as soon as possible.
If “F” is indicated and driver does not experience operational changes:
• Vehicle may continue to be driven. Service the transmission at an Eaton authorized service facility as soon as possible.
If “F” is indicated and driver experiences operational changes or fallback modes:
• Drive to a safe location and perform Power Down and Start Up Pro-cedures (see pages 4 and 3, respectively, for more details) in an attempt to clear condition.
- If condition continues to exist, vehicle may continue to be driven with fallback mode active. Service the transmission at an Eaton authorized service facility as soon as possible.
If transmission will not engage a gear, launch from a stop or upshift with or without an “F” indicated:
• Perform Power Down and Start Up Procedures (see pages 4 and 3, respectively, for more details) in an attempt to clear condition.
Note: Ensure service brake is depressed before selecting a mode from Park or Neutral.
- If condition continues to exist, service the transmission at an Eaton authorized service facility as soon as possible.
12

Operation
Range InhibitIf the driver selects a mode that is not appropriate for the conditions, the transmission controls may activate Range Inhibit to protect the transmission. If Range Inhibit is active, the transmission denies the driver's mode request and the display flashes the desired mode and/or indicates “Range Inhibit”. Range Inhibit activates during:
• Transmission Oil Warm-up Cycle.
• Shuttle shifting between Reverse or a Drive mode while the vehicle is rolling.
Note: To help prevent Range inhibit, confirm the vehicle is stationary and the service brake is depressed when selecting a mode from Park or Neutral and shifting between Reverse or a Drive mode.
13

Operation
!
!
!
FeaturesNote: Features for this transmission are optional and configured at the OEM
and/or body builder.
Urge to Move and Creep ModeUrge to Move is available in Reverse or a Drive mode when the vehicle is sta-tionary and the service brake is depressed. Urge to Move aids in the transition to Creep Mode when the service brake is released. Creep Mode allows the vehicle to move at slow speeds, at engine idle without having to apply the accelerator pedal. Creep Mode is useful during slow speed parking lot and loading dock maneuvering, driving in stop-and-go traffic and on minimal grades. Creep Mode is available in Reverse or a Drive mode, during a launch from a stop or after decelerating from a coast.
CAUTION: Urge to Move and Creep Mode functionality varies depending on grade, vehicle load, axle ratio and tire size.
Hill HelperHill Helper assists in launching the vehicle on a grade. Hill Helper may momentarily aid in maintaining the vehicle position while the driver transitions from the service brake to accelerator pedal. Hill Helper is available in Reverse or a Drive mode.
CAUTION: Hill Helper functionality varies depending on grade, vehicle load, axle ratio and tire size.
CAUTION: Do not use the accelerator pedal to hold vehicle or stop vehicle roll on a grade. Apply the service brake to properly hold the vehicle prior to launching from a stop.
Eaton Dynamic Shifting (EDS)EDS automatically determines the best transmission shift strategy while in Drive Mode, based on load, grade and other inputs to allow the engine to operate at optimum performance and efficiency.
14
Operation
!
Tap Down Shifting (TDS)TDS initiates downshifts at the earliest opportunity, with a momentary “tap” of the service brake, to maximize engine braking, for example, when driving down long grades or when coming to a stop. If available, the transmission downshifts to the next lowest gear ratio allowing engine braking to assist in slowing the vehicle. The transmission only allows one downshift per “tap”.
Note: TDS functionality varies depending on grade, road speed, engine RPM and load.
Note: Transmission automatically initiates upshifts to prevent over-speed of engine.
CAUTION: The vehicle's service brake is required to properly control and com-plete the slowing and stopping of the vehicle.
Transmission Power Take Off (PTO)Stationary PTO Operation:
1. Confirm vehicle parking brake is applied and:
• Shift Lever – Park is selected.
• Push Button – Neutral is selected.
2. Confirm engine is running at idle RPM.
3. Depress and hold service brake.
4. Select transmission PTO switch.
5. Increase engine RPM to a minimum of 950 RPM to operate PTO.
Note: PTO is engaged when PTO indicator lamp illuminates.
Stationary PTO Operation is available.
Note: If PTO indicator lamp does not illuminate, momentarily raise engine speed by 200–300 RPM. If the PTO still does not engage, turn off the PTO switch and confirm vehicle parking brake is applied, service brake is depressed and Park or Neutral is selected. Momentarily raise engine RPM by 200–300 RPM, return engine to idle RPM and repeat steps 3-5.
PTO Quick Disengage - Stationary PTO Operation automatically disengages if Reverse or a Drive mode is selected.
15
Operation
!
Mobile PTO Operation:
1. Confirm vehicle parking brake is applied and:
• Shift Lever – Park is selected.
• Push Button – Neutral is selected.
2. Confirm engine is running at idle RPM.
3. Depress and hold service brake.
4. Select desired mode.
5. Confirm transmission is in the desired mode.
6. Select transmission PTO switch.
Note: PTO is engaged when PTO indicator lamp illuminates.
7. Release vehicle parking brake.
Mobile PTO Operation is available.
Note: Mobile PTO Operation automatically disengages if vehicle speed and/or engine RPM exceeds 9 MPH (14 KPH) or 2700 RPM
Note: If PTO indicator lamp does not illuminate, turn off the PTO switch and confirm vehicle parking brake is applied, service brake is depressed and Park or Neutral is selected. Momentarily raise engine RPM by 200–300 RPM, return engine to idle RPM and repeat steps 3-7.
Note: Stationary PTO is available when configured for Mobile PTO Operation. Follow Stationary PTO Operation instructions. Stationary PTO does not automatically disengage if Reverse or a Drive mode is selected.
CAUTION: Follow PTO manufacturer instructions for proper use and operation.
16
Operation
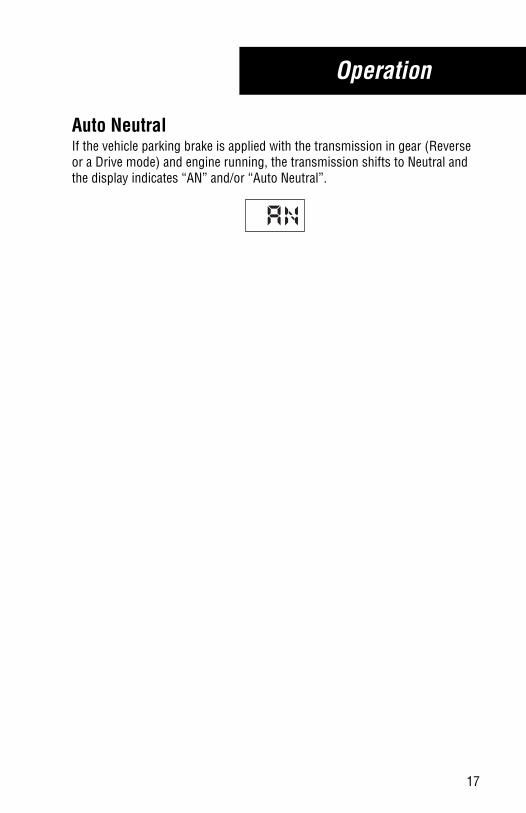
Auto NeutralIf the vehicle parking brake is applied with the transmission in gear (Reverse or a Drive mode) and engine running, the transmission shifts to Neutral and the display indicates “AN” and/or “Auto Neutral”.
17

Service & Maintenance
General Model Information
Transmission IdentificationThe transmission is identified by the model and serial number. This informa-tion is stamped on the transmission identification tag and affixed to the right side of the clutch housing.
Note: Do not remove or destroy the transmission identification tag.
The blank spaces provided below are for recording transmission identification data. Have these reference numbers available when ordering replacement parts or requesting service information.
Transmission Model _____________________________________
Transmission Serial Number _______________________________
Eaton® TransmissionsFuller® Transmissions
Model
Serial Assembled In
Eaton CorporationKalamazoo, MI USA
18
Service & Maintenance
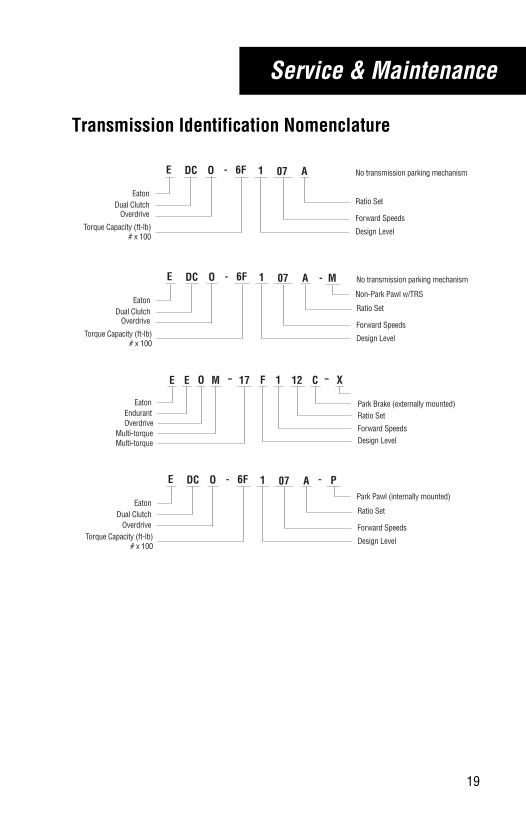
Transmission Identification Nomenclature
E
EatonDual Clutch
Torque Capacity (ft-lb)# x 100
Forward Speeds
Design Level
DC O
Overdrive
6F 1 07
Ratio Set
- A - M
E
EatonDual Clutch
Torque Capacity (ft-lb)# x 100
Forward Speeds
Design Level
DC O
Overdrive
6F 1 07
Ratio Set
- APark Pawl (internally mounted)
P -
No transmission parking mechanism
E
EatonEndurant
Multi-torque Forward SpeedsDesign Level
17 F 1
Ratio Set
M 12
Park Brake (externally mounted)
C
E
EatonDual Clutch
Torque Capacity (ft-lb)# x 100
Forward Speeds
Design Level
DC O
Overdrive
6F 1 07
Ratio Set
- A No transmission parking mechanism
Non-Park Pawl w/TRS
E O -
Overdrive
- X
Multi-torque
19

Service & Maintenance
!
!
Transmission Oil InformationProper transmission oil maintenance and service are key to an effective pre-ventative maintenance program.
This transmission is designed so the internal parts operate by hydraulic actua-tion in a forced lubrication system. To ensure proper transmission operation and lubrication, follow these procedures:
1. Maintain oil level and inspect regularly.
2. Follow maintenance interval chart.
3. Use the correct grade and type of transmission oil.
4. Use only Eaton Roadranger approved transmission oil.
CAUTION: Use only Procision Dual Clutch Transmission Oil - PS-278 specifi-cation.
For product support, go to www.eaton.com/roadranger:
• Eaton Approved Lubricant Suppliers Manual, TCMT0020.
• Roadranger Lubricant Products Manual, TCMT0021
or contact Eaton at 800-826-4357.
CAUTION: Mixing lubricants or introducing additives to the Procision Trans-mission may breakdown the lubricant properties and cause component dam-age and loss of performance. Automatic transmission, automated transmission, manual transmission, gear and engine oils are not compatible with this transmission.
20

Service & Maintenance
Transmission Oil Level Inspection and MaintenanceIntervalTransmission oil level inspection and maintenance intervals are necessary to maintain optimized transmission performance. Refer to the Transmission Oil Level Inspection and Maintenance Interval table below.
Note: Extended drain intervals are not recommended.
Transmission Oil Operating TemperatureOn vehicles equipped with a transmission oil temperature gauge, the normal operating range is approximately 140 - 212° F (60 - 100° C).
Transmission Oil Level Inspection & Maintenance Interval
Transmission Oil Level Inspection
Daily Perform:• Transmission Oil LevelInspection Procedure.
• Inspect transmission, coolerlines and connections for leaks.
Maintenance Interval
Every 150,000 miles (240,000 kilometers)
Drain and fill transmission oil and change lubrication filter.
21

Service & Maintenance
!
Transmission Oil Level Inspection Procedure
1. Park vehicle in a safe area on level ground and:
• Select Park if equipped with Shift Lever and slowly release ser-vice brake to engage park pawl.
• Select Neutral if equipped with Push Button.
2. Set vehicle parking brake and chock wheels.
3. Confirm engine is running at low idle RPM.
4. Locate the transmission oil level dipstick and tube in the engine com-partment and clean any dirt or debris from dipstick and tube prior to removal.
5. Remove the transmission oil level dipstick.
6. Completely wipe transmission oil from dipstick and re-install dipstick completely into tube.
7. Remove the transmission oil level dipstick and inspect oil level.
8. Repeat Steps 6 and 7 to confirm level.
9. Add or drain transmission oil if level is not within the Transmission Oil Level Operating Range based on transmission oil temperature.
10. Re-install the transmission oil level dipstick.
CAUTION: When adding fluid, use only Eaton approved transmission oil. Fill through the transmission oil dipstick tube located in the engine compartment. Do not overfill transmission oil.
22
Service & Maintenance
!
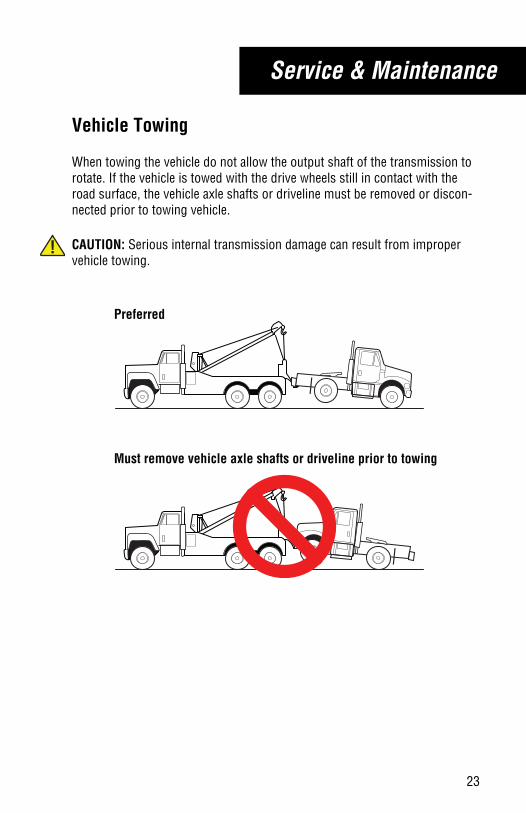
Vehicle Towing
When towing the vehicle do not allow the output shaft of the transmission to rotate. If the vehicle is towed with the drive wheels still in contact with the road surface, the vehicle axle shafts or driveline must be removed or discon-nected prior to towing vehicle.
CAUTION: Serious internal transmission damage can result from improper vehicle towing.
Preferred
Must remove vehicle axle shafts or driveline prior to towing
23
Service & Maintenance
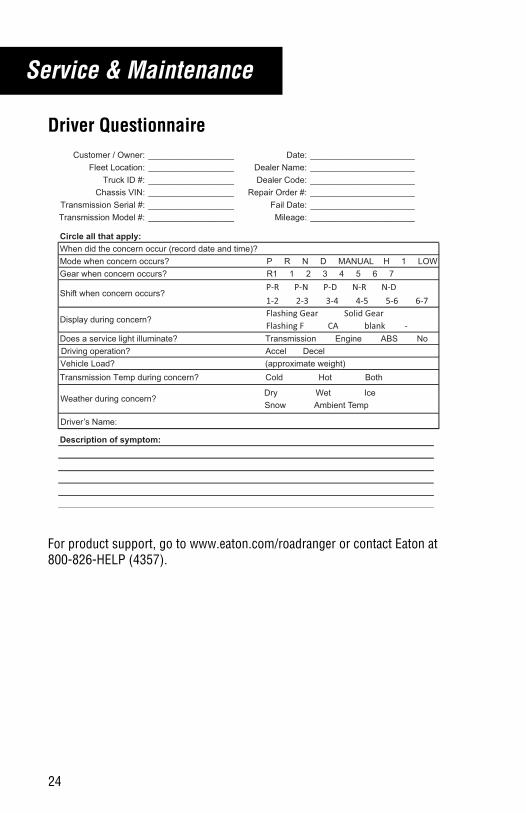
Driver Questionnaire
For product support, go to www.eaton.com/roadranger or contact Eaton at 800-826-HELP (4357).
Customer / Owner: ___________________ Date: ______________________Fleet Location: ___________________ Dealer Name: ______________________
Truck ID #: ___________________ Dealer Code: ______________________Chassis VIN: ___________________ Repair Order #: ______________________
Transmission Serial #: ___________________ Fail Date: ______________________Transmission Model #: ___________________ Mileage: ______________________
Description of symptom:
1-2 2-3 3-4 4-5 5-6 6-7
Display during concern? Flashing Gear Solid Gear
Flashing F CA blank - Does a service light illuminate? Transmission Engine ABS NoDriving operation? Accel Decel
Transmission Temp during concern? Cold Hot Both
Circle all that apply:When did the concern occur (record date and time)? Mode when concern occurs? P R N D MANUAL H 1 LOW Gear when concern occurs? R1 1 2 3 4 5 6 7
Shift when concern occurs? P-R P-N P-D N-R N-D
Vehicle Load? (approximate weight)
Dry Wet Ice Snow Ambient TempWeather during concern?
Driver’s Name:
24


Copyright Eaton Cummins Automated Transmission Technologies, 2018.Eaton Cummins Automated Transmission Technologies hereby grant their customers,vendors, or distributors permissionto freely copy, reproduce and/ordistribute this document in printedformat. It may be copied only inits entirety without any changes or modifications. THIS INFORMATIONIS NOT INTENDED FOR SALE ORRESALE, AND THIS NOTICE MUSTREMAIN ON ALL COPIES.
Note: Features and specificationslisted in this document are subject tochange without notice and representthe maximum capabilities of thesoftware and products with all options installed. Although every attempt hasbeen made to ensure the accuracy of information contained within, Eatonmakes no representation about the completeness, correctness or accuracyand assumes no responsibility forany errors or omissions. Features and functionality may vary depending onselected options.
For spec’ing or service assistance, call 1-800-826-HELP (4357) or visit www.eaton.com/roadranger.In Mexico, call 001-800-826-4357.
Roadranger: Eaton and trusted partners providing the best products and services in the industry, ensuring more time on the road.
Eaton Cummins Automated Transmission TechnologiesP.O. Box 4013Kalamazoo, MI 49003 USA800-826-HELP (4357)www.eaton.com/roadranger
Printed in USA


