Embed Size (px)
Citation preview

Procedures for BARNI

Website Home PageFeatures• BARNI is password protected.
• BARNI assigns a due date and generates a confirmation email with this information.
• Counselors can track the progress and completion of information requests (IR).
• Within the SBDCNet, BARNI allows IRs to be visible online and tracks each step of the work process.
• Researchers can checkout and complete applicable statistics online.
• IRs can still be printed if desired.
• The email review, delivery and archival systems remain unaffected by this new process.

Registering with Barni
Getting Started• Go to SBDCNet home page,
http://sbdcnet.org .
• Register with the ‘Register’ link using your first initial and last name as your user name.
• Confirmation of registration will be sent to your email.
• Use your username and password to login.
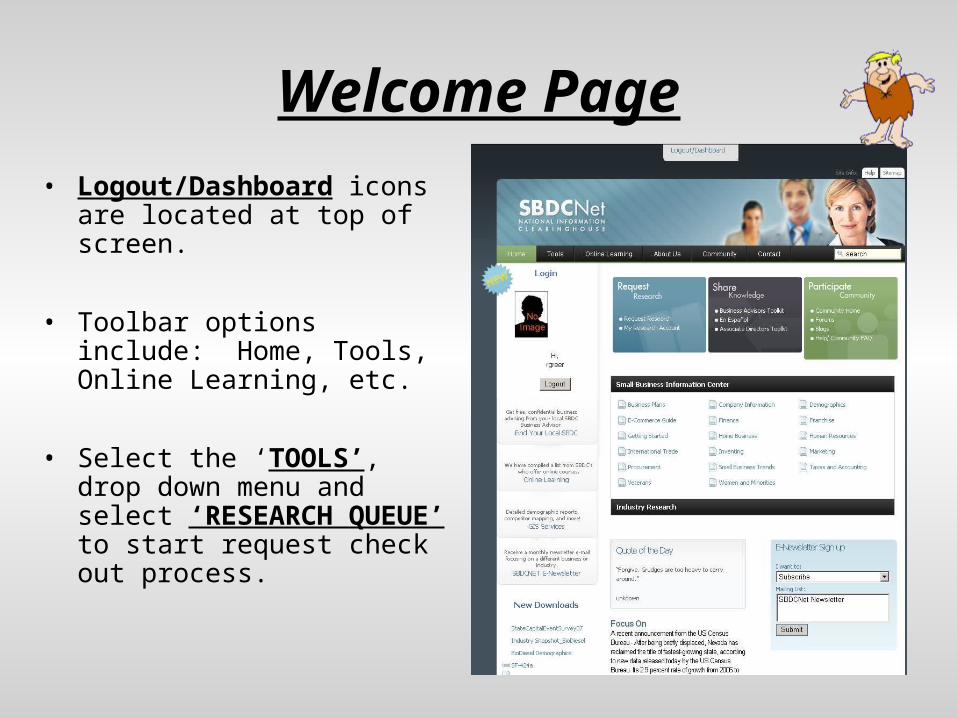
Welcome Page
• Logout/Dashboard icons are located at top of screen.
• Toolbar options include: Home, Tools, Online Learning, etc.
• Select the ‘TOOLS’, drop down menu and select ‘RESEARCH QUEUE’ to start request check out process.

Status Fields and Color Coding
• Access ‘requests’ from the Navigation bar on left.
• Click on ‘REQUESTS’ button to refresh the queue and see all pending IRs. IRs are automatically sorted in FIFO order.
• Status color coding is employed:– RED indicates that IRs are due or
overdue to the requesting business advisor
– YELLOW indicates that IRs are NEARLY DUE
– BLUE indicates that IRs have been received within the past 5 days.
• The ‘SELECT STATUS’ field lists options available.
• Researchers will be concerned with requests marked “PRE-GISed”.

Requests Page – Column Titles • All columns have titles • A symbol in the ASAP column indicates ASAP status has been requested by counselor.• A symbol in the GIS column indicates a GIS component is required.• Request # - the number assigned by the system and reported to the counselor.• Counselor - the requesting counselor’s last name appears. • Checkout – a link to assign and/or access an IR. Researcher’s first initial and last name will appear if
it is already checked out• Status – Current work process for IR. An IR should only be checked out if “Pre-GISed” appears
in the status column.• Received – Date the IR was received• Due – Date the IR is due to counselor. If IR has been assigned ASAP status, the accompanying date
will reflect the ASAP date.

• The ‘STATUS’ indicates the last completed stage of the IR. The process ordered stages are:
– Received– Pre-Filtered– Pre-GISed– Researched– GISed– Completed
• Only IRs with a “Pre-GISed” status are available and ready to be checked out for research.
• To ensure accuracy of IRs ready for research, select “APPLY FILTER” first.
• Click ‘REQUESTS’ to refresh the queue.
• Select the first available IR.
Queue – Applying the filter

Request Worksheet• When an IR is selected, it automatically
becomes checked out to the requesting researcher and his/her name will appear next to it in the queue.
• Upon “CHECKOUT’ the worksheet will immediately appear.
• This contains all pertinent information from the requesting counselor about the respective client.
• This page also maintains a log of all researchers who have worked on this IR at anytime.
• The units requested for research are found under “QUESTION/INFORMATION NEEDED”
• Information that the counselor has provided about the client and respective business can be found under “ABOUT THE BUSINESS”
• This page is READ ONLY and cannot be edited.
• If a printout of the IR is preferred, click ‘PRINT’
• When research is complete, select ‘STATS’
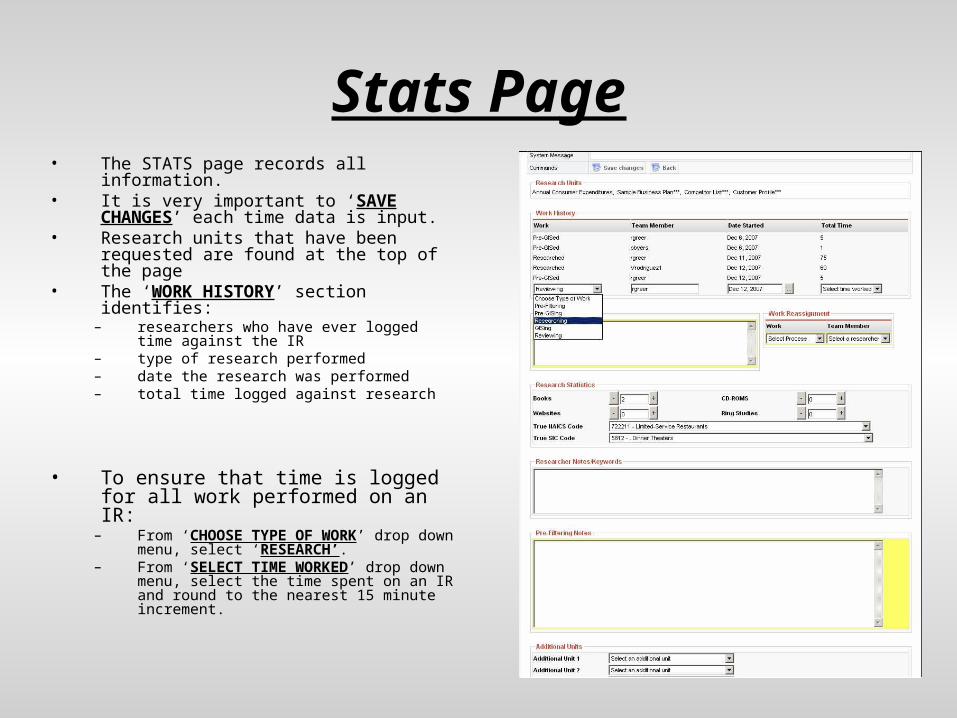
Stats Page• The STATS page records all information.• It is very important to ‘SAVE CHANGES’
each time data is input.• Research units that have been requested
are found at the top of the page• The ‘WORK HISTORY’ section identifies:
– researchers who have ever logged time against the IR
– type of research performed– date the research was performed– total time logged against research
• To ensure that time is logged for all work performed on an IR:
– From ‘CHOOSE TYPE OF WORK’ drop down menu, select ‘RESEARCH’.
– From ‘SELECT TIME WORKED’ drop down menu, select the time spent on an IR and round to the nearest 15 minute increment.
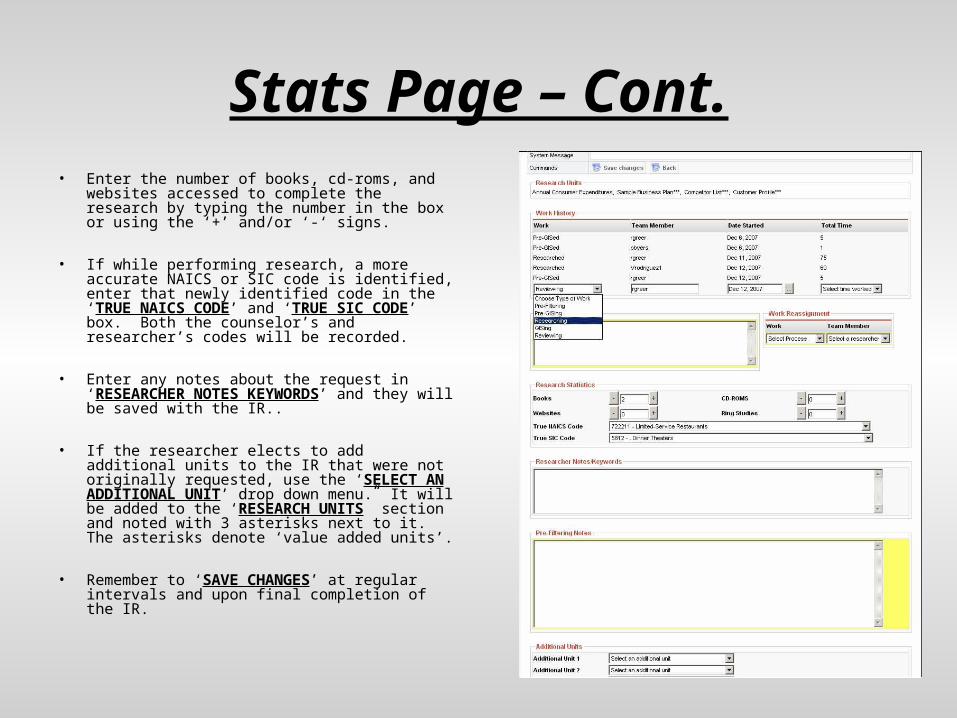
Stats Page – Cont.• Enter the number of books, cd-roms, and
websites accessed to complete the research by typing the number in the box or using the ‘+’ and/or ‘-‘ signs.
• If while performing research, a more accurate NAICS or SIC code is identified, enter that newly identified code in the ‘TRUE NAICS CODE’ and ‘TRUE SIC CODE’ box. Both the counselor’s and researcher’s codes will be recorded.
• Enter any notes about the request in ‘RESEARCHER NOTES KEYWORDS’ and they will be saved with the IR..
• If the researcher elects to add additional units to the IR that were not originally requested, use the ‘SELECT AN ADDITIONAL UNIT’ drop down menu. It will be added to the ‘RESEARCH UNITS” section and noted with 3 asterisks next to it. The asterisks denote ‘value added units’.
• Remember to ‘SAVE CHANGES’ at regular intervals and upon final completion of the IR.

IR Completion
• When research on an IR is complete and time has been is logged, the project status automatically advances to the next step and the researcher’s name will no longer appear beside the request. It is now ready and available for review.
• If it is necessary to hold an IR for any length of time (e.g. overnight, etc.) do not save time against it. (It remains checked out by an individual researcher until time is logged against it.)
• Once time is saved against an IR and the research has been emailed to the SBDCNet Inbox, the process is complete.
• To begin research on another IR:– assess the ‘PRE-GISed’ status filter– refresh the queue using the
‘REQUESTS’ button, and– checkout the next available request.