Embed Size (px)
Citation preview

Copyright 2015 Alfano, S.A. Tous droits réservés. 1
PRO III EVO
Manual (EN)
Firmware V4.2.5
Serial
Be preserved
0 6 0 0
Copyright 2015 Alfano, S.A. Tous droits réservés. 2
PROIII EVO
Introduction 4
The front of the PRO III EVO 4
The rear of the PRO III EVO 4
Modules compatible with PROIII-EVO 5
Features PROIII-EVO, GPS2 & GPS4 6
PRO III EVO 6
PRO III EVO with module GPS2 7
PRO III EVO with module GPS4 7
Installation 8
Power supply 9
Batteries 9
Power on, backlight on and off the ALFANO 10
Window "HOME" 11
The symbols most used 11
Shortcuts 12
Beginning of a timing session and use the ALFANO running 13
Setup
Power off 14
Bluetooth 14
Circuit 14
Date/hour 15
Driver 15
Temperatures 15
Speed 16
RPM 17
Gear 17-18
G-Force 19
Led 19
Display : contrast, LED lighting, time off, backlight 19
Peak 20
GPS check 20
Activation / deactivation GPS 20
Counters engine 21
Frequency of sampling 21
Graphic settings 21
Unit 21
Language 22
Parameters by default 22
Update 22

Copyright 2015 Alfano, S.A. Tous droits réservés. 3
Circuit
Select a circuit 23
Management Circuits 23-24
Information 24
A) Create a Track Magnetic/Infrared 25
B) Create a Track GPS 26-27
C Create a Track Mag/IR + GPS 28-29-30-31
Import track from another ALFANO, via Bluetooth 32
DATA (Menu)
Best lap, « Absolute '&' last session» 33
DATA (recorded data) 33
Circuits used 33
Data Erasing 33
DATA (data)
Best lap 34
Teoric lap 34
Session 35-36
Connection/download 37-38
Counters engine 38
The windows of race (Layouts) 39-40-41
Power supply, accessories + consumption table 42-43
Memory 43
VisualData2 44
Update Firmware 44
GPS
Signal GPS 45
Number of satellites 45
Date & hour 45
Warranty conditions 46
Product modifications 46
Damages e responsabilities 46
Disposal 46

Copyright 2015 Alfano, S.A. Tous droits réservés. 4
Introduction
The front of the PROIII-EVO
It consists of 11 LEDs, 4 buttons, the external dimensions are 133.5x90x76mm.
The rear of the PROIII-EVO
Input RED
1 NTC temperature
or temperature K, or
2 with the hub
A2190
Input BLACK
USB cable or cable
Module GPS2/GPS4
Input GREEN
Magnetic sensor or
infrared (time)
allows you to
connect a speed
sensor with the hub
A2191-A2192
RPM
RPM high tension
Batteries 2xAA
The PROIII EVO is supplied with a magnetic sensor ref. A1302, a RPM cable ref. A1600, two AA batteries.
Screen77x45mm
Pixels : 160x94
Backlighting

Copyright 2015 Alfano, S.A. Tous droits réservés. 5
Modules compatible with the PROIII-EVO
• The module GPS2
Input BLACK
BUS : Connection with the
PROIII-EVO
Input GREY
Connection USB
• The module GPS4
Input BLACK
BUS : Connection with the
PROIII-EVO
Input GREY
Connection USB
Input BLUE
Connection speed sensor
With a cable hub 'A2191'
ability to connect 2 speed
sensors
Input RED
With a cable hub "A2190", the
possibility of connecting two
temperature sensors (NTC + K)
or a temperature sensor (NTC)
+ a lambda sensor or valve

Copyright 2015 Alfano, S.A. Tous droits réservés. 6
CHARATERISTICS PROIII EVO, GPS2 & GPS4
PRO III EVO
- Timing to the hundredth of a second
- 1 input for taking the time magnetic or infrared
- 1 connection to the engine speed (RPM)
- 1 Temperature input
- 1 second temperature supplementary entry (with the article A2190)
- 1 input speed sensor (with the article A2192 or A2193)
- Data storage up to 10Hz
- 5 meters of the engines "driving time"
- 11 possible screens of data views in the running to be chosen
- Full menu of integrated analysis in PROIII EVO (maximum, minimum, graphic, best time, best
partial, etc ...)
- Complete configuration menu (Peak, three pilots, alarms, various settings, etc ...)
- Backlight
- 6 languages available integrated
- 9 LED : RPM / temperature / (or Lambda with Form GPS4)
- 2 LED alarm temperatures
- 1 input for connecting USB (Article A4220) to download data, the management of the circuits or
update PROIII EVO
- Possible developments through system upgrades (new screens of data in the running, the
connection to the future GSM 3G, etc ...)
- Hermetic to water projections (IP56)
- Screen (mm / pixel) : 75x45 / 160x94
- Dimensions 133.5 x 90 x 28 mm
- Weight 434gr.
- 3 power options : 2 AA batteries (included) or POWER A4004, A4005
Possible configuration :

Copyright 2015 Alfano, S.A. Tous droits réservés. 7
PRO III EVO with the module GPS2
- The module allows GPS2 more :
- - Speed with GPS
- - Trajectory with GPS
- - Ability to create circuits with magnetic fields, or infrared and additional partial with GPS
- - Ability to create circuits entirely with GPS
- - Bluetooth connection to download the data, manage your circuits, update the PROIII EVO
- - Bluetooth connection to share (send or receive) circuits to other drivers
- - 1 input for the USB connection (Article A4220) to download data, manage tracks or update
PROIII EVO
- - Possible evolution of the product thanks to updates (Application Smartphone / Tablet
compatible to download data, connection with the future GSM 3G, etc ...)
PRO III EVO with the module GPS4
- The module allows GPS4 more :
- - Speed with GPS
- - Trajectory with GPS
- - Ability to create circuits with magnetic fields, or infrared and additional partial with GPS
- - Ability to create circuits entirely with GPS
- - Bluetooth connection to download the data, manage your circuits, update the PROIII EVO
- - Bluetooth connection to share (send or receive) circuits to other drivers
- - 1 input for the speed sensor
- - 1 second entrance to the speed sensor (A2191) (allows the analysis of understeer, oversteer,
slittammento)
- - Gforce / 3-axis accelerometer integrated in the module GPS4
- - 1 input temperature
- - 1 second entrance additional temperature (with Article A2190)
- You can have a total of 4 temperatures (2 on PROIII EVO and 2 on the module GPS4)
- - 1 input for the USB connection (Article A4220) to download data, manage tracks or update
PROIII EVO
- - Possible evolution of the product thanks to updates (Application Smartphone / Tablet
compatible to download data, connection with the future GSM 3G, etc ...
Configuration possible with the module GPS4 :

Copyright 2015 Alfano, S.A. Tous droits réservés. 8
Installation
Installation of the display
1) Fix the PROIII to the steering wheel by
respecting the order of slices : red, black
and that in metal..
2) Tighten the set with the autoblocking M8
metal nut.
Installation of the connectors CORRECT NOT CORRECT
Introduce completely the male connector into its
housing, the black rubber joint has to be against
the female connector before tightening the nut.
This would pull a penetration of water and a bad
electric contact, because during the tightening of
the nut, the black joint dislodges of its location.
Use an anti-interferences hood
Internationally recognized to reduce the
electromagnetic pollution
Some systems of ignition are very aggressive. Use
then a hood of candle equipped with a resistance
of 5kOhm for an optimal functioning of the system,
while maintaining the performances of your
engine.
Strongly recommended PRECAUTION : it prevents
a dysfunction, the extinction or the blocking of
your ALFANO.
The screwdriver
Use a screwdriver of type Torx X20 to fix the batteries cover.
3
4
3

Copyright 2015 Alfano, S.A. Tous droits réservés. 9
Alimentation
Il PROIII EVO is supplied with 2 batteries type AA 1,5V. On the welcome page, you can check the
batteries’ life. When the power becomes too weak, a message appears :
When this message displays, PROIII goes
automatically off after 10 seconds.
Note : The intensity of the backlight and LED
intensity decreases considerably the autonomy of
the batteries.
Note :
- Remember to check the energy meter before starting a race. Consumption and the volume of
the battery depends on the quality and type of batteries, which is why it is recommended to
change the batteries when you see the message.
- Two other types of power supplies are available for PRO-EVO II (see power system and
accessories)
Batteries The technology applied to our new systems requires larger battery consumption; battery quality is
crucial ! There are 3 major types of AA batteries on the market.
Salines : Salines are rarely used, they only have about a third of the energy of Alkaline batteries.
Alcalines : Alkaline batteries are the best option.
Ricaricabili : Very good option, but the difference of quality from a brand to another is important. A
bad brand loses its energy even with no use at about 1% a day. Furthermore, these batteries have a
memory effect, if you recharge a battery which is half full while in use, you will not be able to use more
than half of the stored energy, and the other half will be lost.
There are good that if you do not use rechargeable batteries lose less than 12% for a year and have no
memory effect. Examples of brands Recommended: SANYO XX Eneloop and Uniross Hydro, they are
used by professional photographers.
IMPORTANT NOTICE Always use batteries and brand quality.
Never leave batteries in the device when not in use
within 2-3 weeks to avoid the dissolution of the batteries on the electronics causing irreparable damage
You lose the warranty in case of leakage of battery acid.
Copyright 2015 Alfano, S.A. Tous droits réservés. 10
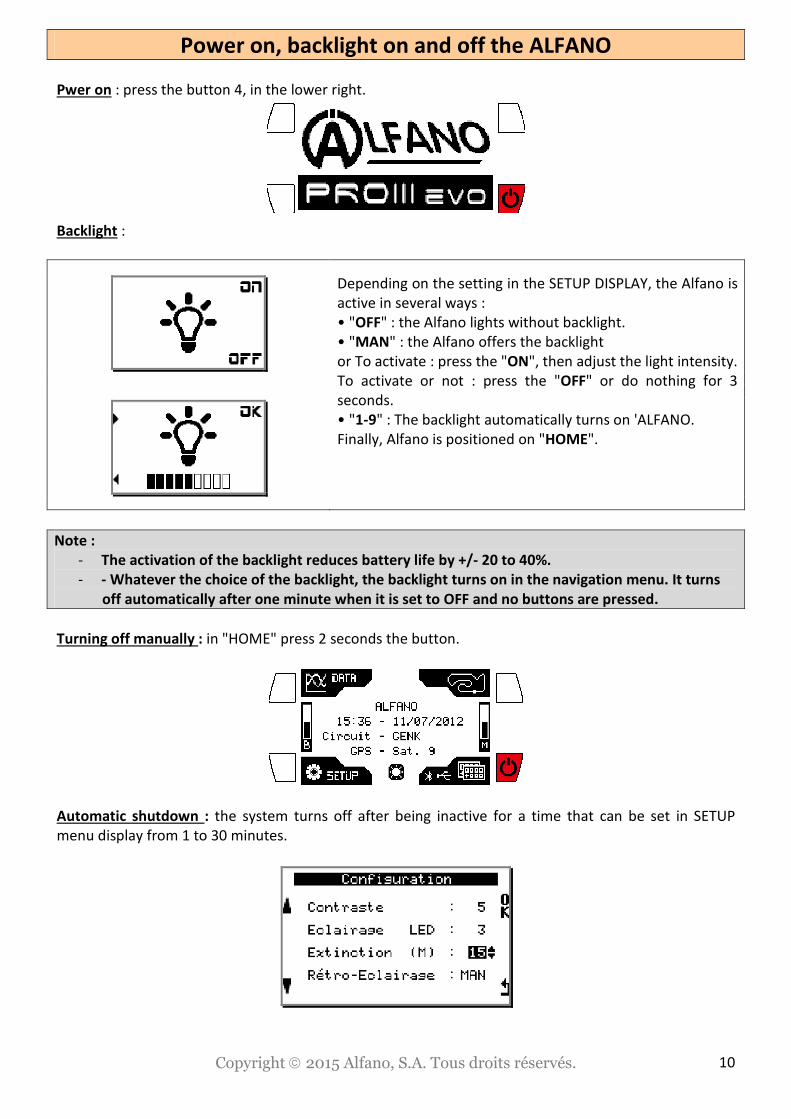
Power on, backlight on and off the ALFANO
Pwer on : press the button 4, in the lower right.
Backlight :
Depending on the setting in the SETUP DISPLAY, the Alfano is
active in several ways :
• "OFF" : the Alfano lights without backlight.
• "MAN" : the Alfano offers the backlight
or To activate : press the "ON", then adjust the light intensity.
To activate or not : press the "OFF" or do nothing for 3
seconds.
• "1-9" : The backlight automatically turns on 'ALFANO.
Finally, Alfano is positioned on "HOME".
Note :
- The activation of the backlight reduces battery life by +/- 20 to 40%.
- - Whatever the choice of the backlight, the backlight turns on in the navigation menu. It turns
off automatically after one minute when it is set to OFF and no buttons are pressed.
Turning off manually : in "HOME" press 2 seconds the button.
Automatic shutdown : the system turns off after being inactive for a time that can be set in SETUP
menu display from 1 to 30 minutes.
Copyright 2015 Alfano, S.A. Tous droits réservés. 11
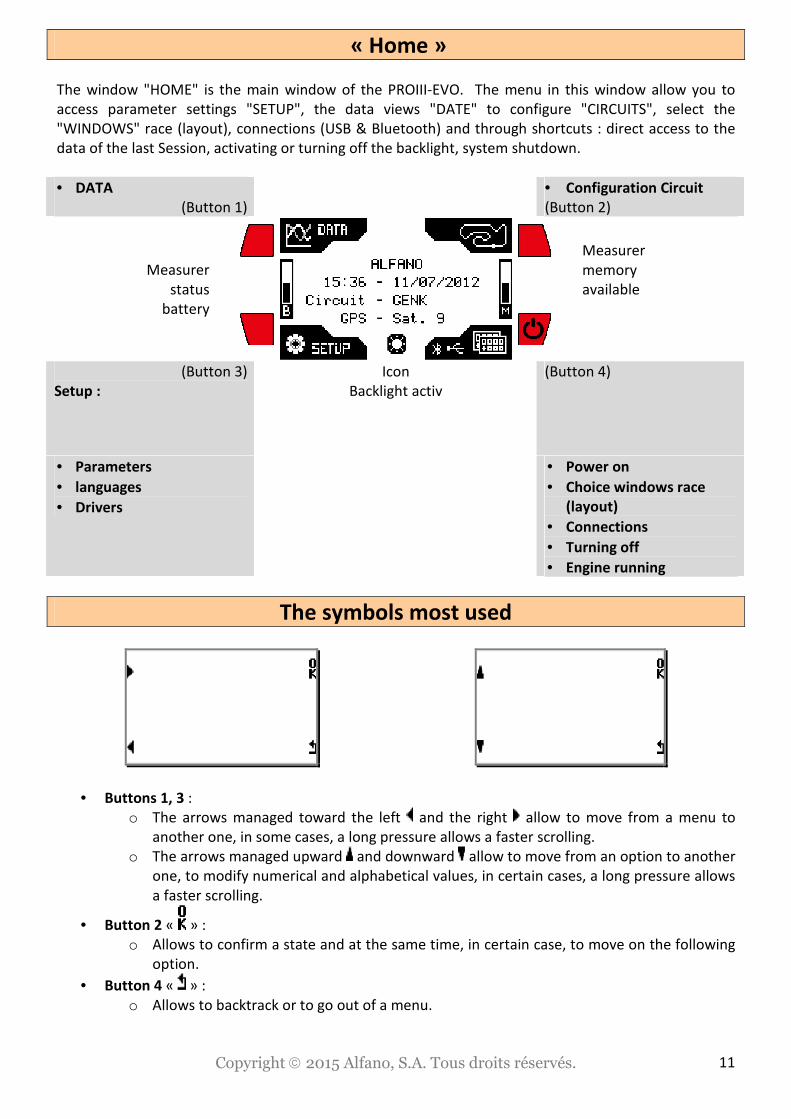
« Home »
The window "HOME" is the main window of the PROIII-EVO. The menu in this window allow you to
access parameter settings "SETUP", the data views "DATE" to configure "CIRCUITS", select the
"WINDOWS" race (layout), connections (USB & Bluetooth) and through shortcuts : direct access to the
data of the last Session, activating or turning off the backlight, system shutdown.
• DATA • Configuration Circuit
(Button 1) (Button 2)
Measurer
status
battery
Measurer
memory
available
(Button 3)
Setup :
Icon
Backlight activ
(Button 4)
• Parameters
• languages
• Drivers
• Power on
• Choice windows race
(layout)
• Connections
• Turning off
• Engine running
The symbols most used
• Buttons 1, 3 :
o The arrows managed toward the left and the right allow to move from a menu to
another one, in some cases, a long pressure allows a faster scrolling.
o The arrows managed upward and downward allow to move from an option to another
one, to modify numerical and alphabetical values, in certain cases, a long pressure allows
a faster scrolling.
• Button 2 « » :
o Allows to confirm a state and at the same time, in certain case, to move on the following
option.
• Button 4 « » :
o Allows to backtrack or to go out of a menu.

Copyright 2015 Alfano, S.A. Tous droits réservés. 12
The shortcuts
Tasti di scelta rapida consentono di passare più velocemente per andare direttamente a l'opzione
desiderata.
In « HOME » :
- 1 second pressure on button 1 = direct access to the data of the last SESSION.
1 second
- 1 second pressure on button 3 = activate or deactivate the backlight.
1 second
- 2 second pressure on button 4 = extinction of the system.
2 seconds

Copyright 2015 Alfano, S.A. Tous droits réservés. 13
Starting on, during the race and switching off the ALFANO
The ALFANO has to be on « HOME ».
Start the engine and run. In presence of RPM, the
windows of racing « Layout » replace the «HOME»
page,
From the detection of the magnetic strip, the
window of the race « Layout » replaces the
window « HOME», l’ALFANO starts timing and
saves the data from these sensors.
With the button at the top right, you can change
the window running « Layout ».
With the button on the top left, turn on or off the
backlight.
Once you turn off the engine, the message STOP
with the lap time :
- Recording stops automatically after 5
seconds or by pressing either button down
to stop timing and return on « HOME ».
Copyright 2015 Alfano, S.A. Tous droits réservés. 14
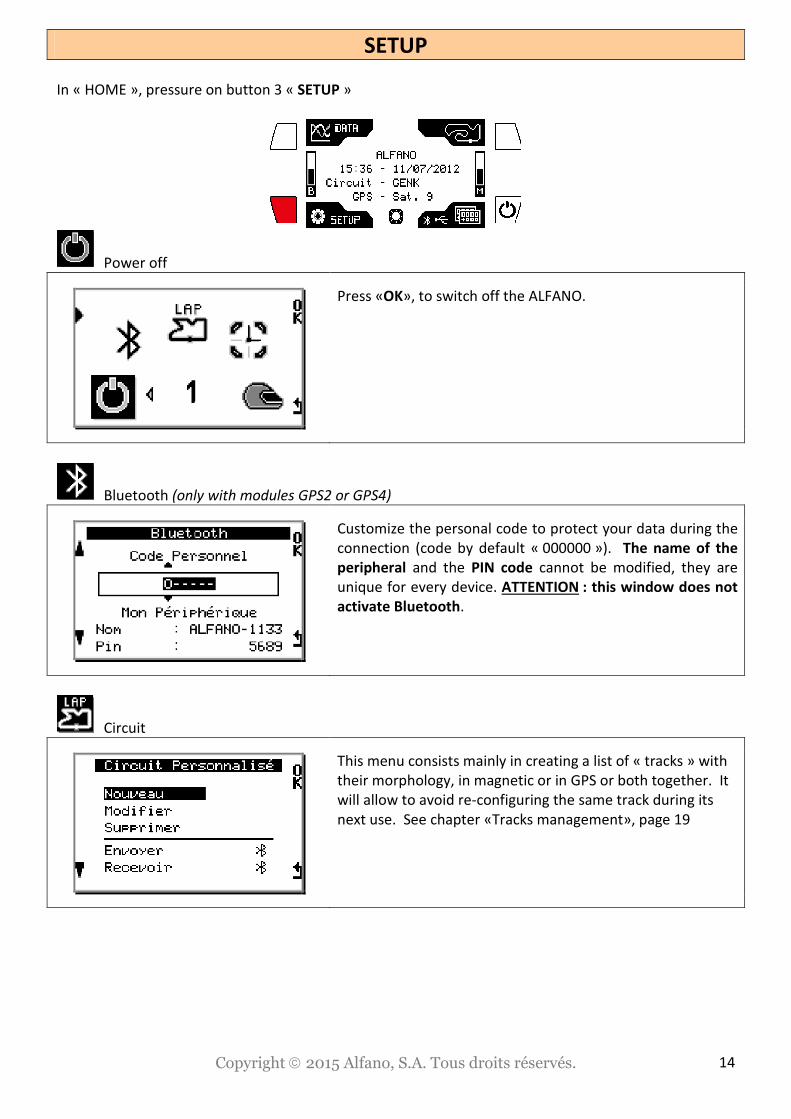
SETUP
In « HOME », pressure on button 3 « SETUP »
Power off
Press «OK», to switch off the ALFANO.
Bluetooth (only with modules GPS2 or GPS4)
Customize the personal code to protect your data during the
connection (code by default « 000000 »). The name of the
peripheral and the PIN code cannot be modified, they are
unique for every device. ATTENTION : this window does not
activate Bluetooth.
Circuit
This menu consists mainly in creating a list of « tracks » with
their morphology, in magnetic or in GPS or both together. It
will allow to avoid re-configuring the same track during its
next use. See chapter «Tracks management», page 19

Copyright 2015 Alfano, S.A. Tous droits réservés. 15
Date/hour (only with modules GPS2 or GPS4)
Setting :
• • "the date format and time zone for the date and
time are obtained from satellites GMT.
Driver
Possibility of editing up to 3 drivers' names. The chosen
driver will be associated with the SESSION of timing.
To choose a driver : select him with left arrows, then press on
«OK».
To modify the name of the driver : 3 seconds pressure on
«OK» on the name to be modified.
Temperatures
Select the control of the temperature
T1 and T2 for the PROIII EVO
T3 and T4 (only with module GPS4)
Viewing the two temperatures of module GPS4 and input
select K, Lambda button 3.

Copyright 2015 Alfano, S.A. Tous droits réservés. 16
Speed
Without the module GPS4, the PROIII EVO offers only a speed
input.
If you connect the module GPS4, entrance on PROIII-EVO is
automatically disabled, the splitter from the possibility to
connect 2 speed sensors on the module GPS4.
Before you set this menu, you need to connect a speed
sensor « A2201 » and a magnetic ring to install sull'assele
rear of the karting or small magnets to be fixed on the shaft
of the transmission for cars or a magnetic special for
Motorcycles. Finally, press «OK» to finish the configuration.
Note : the use of a ring magnets 4 is recommended
to increase the accuracy of the data and the speed of
display of the gear engaged.
Adjustment :
• "Pulse Wheel", the number of magnets mounted on
the circumference of the ring : 1/2/3/4, then, press
«OK» to adjust the following parameter.
• "Wheel Circumference", the circumference of the
wheel. (rear wheel of karting) then press «OK» to
finish the configuration.
• Test : The speed can be read in real time.

Copyright 2015 Alfano, S.A. Tous droits réservés. 17
RPM
Viewing and adjusting RPM High Voltage
Press «OK» to change the multiplication coefficient RPM,
depends on the type of engine :
• /4
• /2
• X1
• X2
• X4
Finally press again «OK» to confirm.
Test : starting the engine RPMs are readable
Gear
This menu allows to configure the gear engaged to be able to see it on real time during the movement of
the vehicle. ATTENTION : It is essential before setting the gear box, to configure correctly the SPEED
and the RPM because the method used to obtain the gear engaged bases itself on coefficients of
multiplication between the data of the SPEED and the RPM.
• Press on left arrows to select the number of gear the
vehicle contains, then, press on « OK » to go on with
configuration.
• Engage the first gear and run. (for the karting, this
configuration can be made on the trolley). As soon as
the ALFANO detects speed and RPM, this window is
going to be replaced by the following one. See
picture below.

Copyright 2015 Alfano, S.A. Tous droits réservés. 18
• 1) The green LED flash during 5 seconds before setting
the gear 1. Then,
• 2) The white LED replace the green ones. At this
moment, the system calculates the coefficient of
multiplication and memorizes this report in a few
seconds. Then,
• 3) The red LED replace the white ones. At this
moment, the ALFANO asks you to engage the next
gear that will be gear 2. Then,
• 4) This cycle begins again until the configuration of
the last gear. Then,
• 5) « OK » displays during 3 seconds. Finally,
• 6) The ALFANO shows the racing display (Layout).

Copyright 2015 Alfano, S.A. Tous droits réservés. 19
Forza-G (only with the module GPS4)
The module GPS4 is equipped with a sensor G-Force 3 Axis
integrated. Important to properly install the module GPS4 to
get the correct data of G-Force.
Led
Settle thresholds :
• of the 9 leds (by group of 3), over the display for the
RPM / T1 / T2 / LAMBDA,
• of the 2 leds (level Low and level High ), on left and
on right of the display for T1 / T2 / T3/ T4
Note : they will shut down when the moderate
temperature will be between these two levels.
Lambda, T3, T4 are only available with the module
GPS4 connected
Display
Setting :
• Screen contrast,
• LEDS brightness
• time to turn off automatically,
• Backlight :
o « OFF » : backlight off on ALFANO.
o « MAN » : backlight manual on ALFANO.
o « 1-9 » : Automatic backlight on ALFANO. (Set the
intensity from 1 to 9).
Copyright 2015 Alfano, S.A. Tous droits réservés. 20
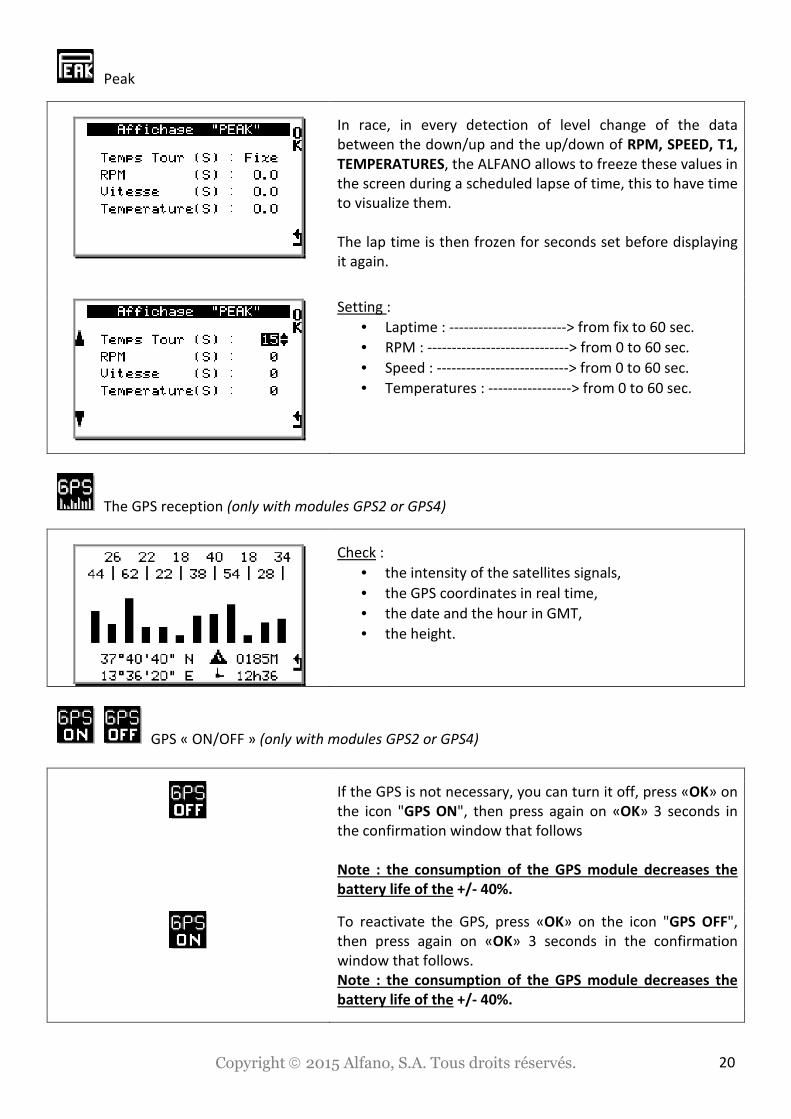
Peak
In race, in every detection of level change of the data
between the down/up and the up/down of RPM, SPEED, T1,
TEMPERATURES, the ALFANO allows to freeze these values in
the screen during a scheduled lapse of time, this to have time
to visualize them.
The lap time is then frozen for seconds set before displaying
it again.
Setting :
• Laptime : ------------------------> from fix to 60 sec.
• RPM : -----------------------------> from 0 to 60 sec.
• Speed : ---------------------------> from 0 to 60 sec.
• Temperatures : -----------------> from 0 to 60 sec.
The GPS reception (only with modules GPS2 or GPS4)
Check :
• the intensity of the satellites signals,
• the GPS coordinates in real time,
• the date and the hour in GMT,
• the height.
GPS « ON/OFF » (only with modules GPS2 or GPS4)
If the GPS is not necessary, you can turn it off, press «OK» on
the icon "GPS ON", then press again on «OK» 3 seconds in
the confirmation window that follows
Note : the consumption of the GPS module decreases the
battery life of the +/- 40%.
To reactivate the GPS, press «OK» on the icon "GPS OFF",
then press again on «OK» 3 seconds in the confirmation
window that follows.
Note : the consumption of the GPS module decreases the
battery life of the +/- 40%.
Copyright 2015 Alfano, S.A. Tous droits réservés. 21
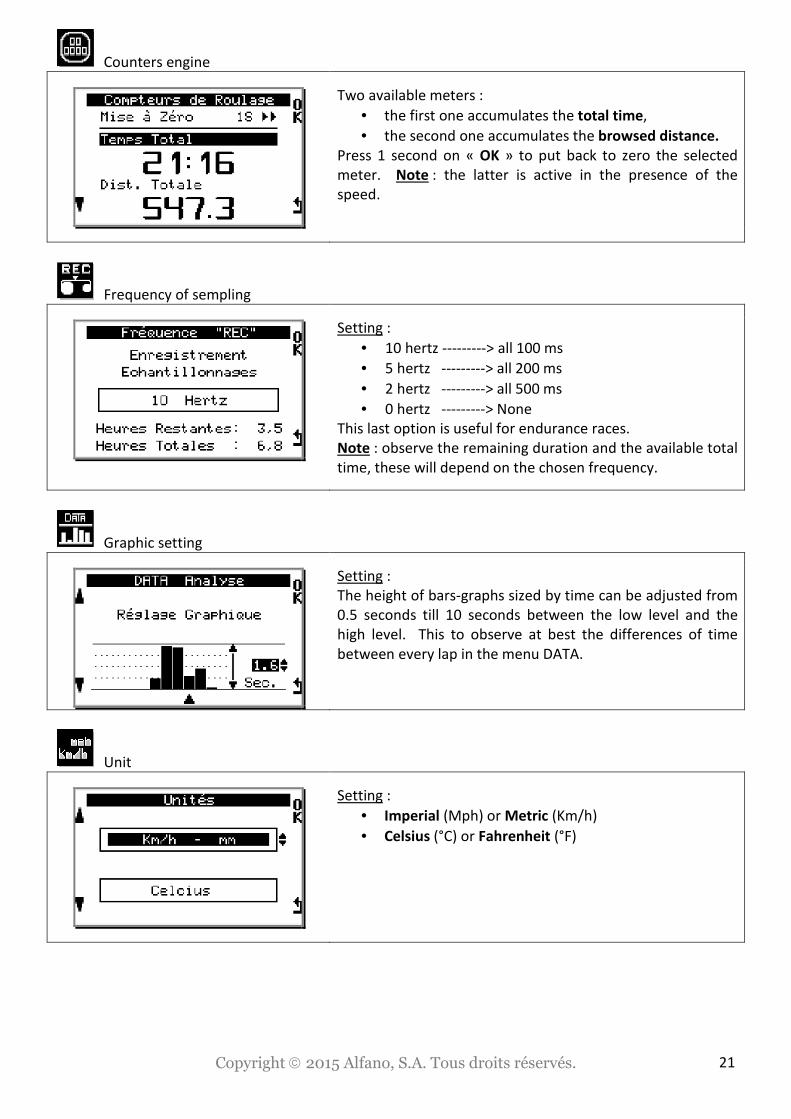
Counters engine
Two available meters :
• the first one accumulates the total time,
• the second one accumulates the browsed distance.
Press 1 second on « OK » to put back to zero the selected
meter. Note : the latter is active in the presence of the
speed.
Frequency of sempling
Setting :
• 10 hertz ---------> all 100 ms
• 5 hertz ---------> all 200 ms
• 2 hertz ---------> all 500 ms
• 0 hertz ---------> None
This last option is useful for endurance races.
Note : observe the remaining duration and the available total
time, these will depend on the chosen frequency.
Graphic setting
Setting :
The height of bars-graphs sized by time can be adjusted from
0.5 seconds till 10 seconds between the low level and the
high level. This to observe at best the differences of time
between every lap in the menu DATA.
Unit
Setting :
• Imperial (Mph) or Metric (Km/h)
• Celsius (°C) or Fahrenheit (°F)
Copyright 2015 Alfano, S.A. Tous droits réservés. 22
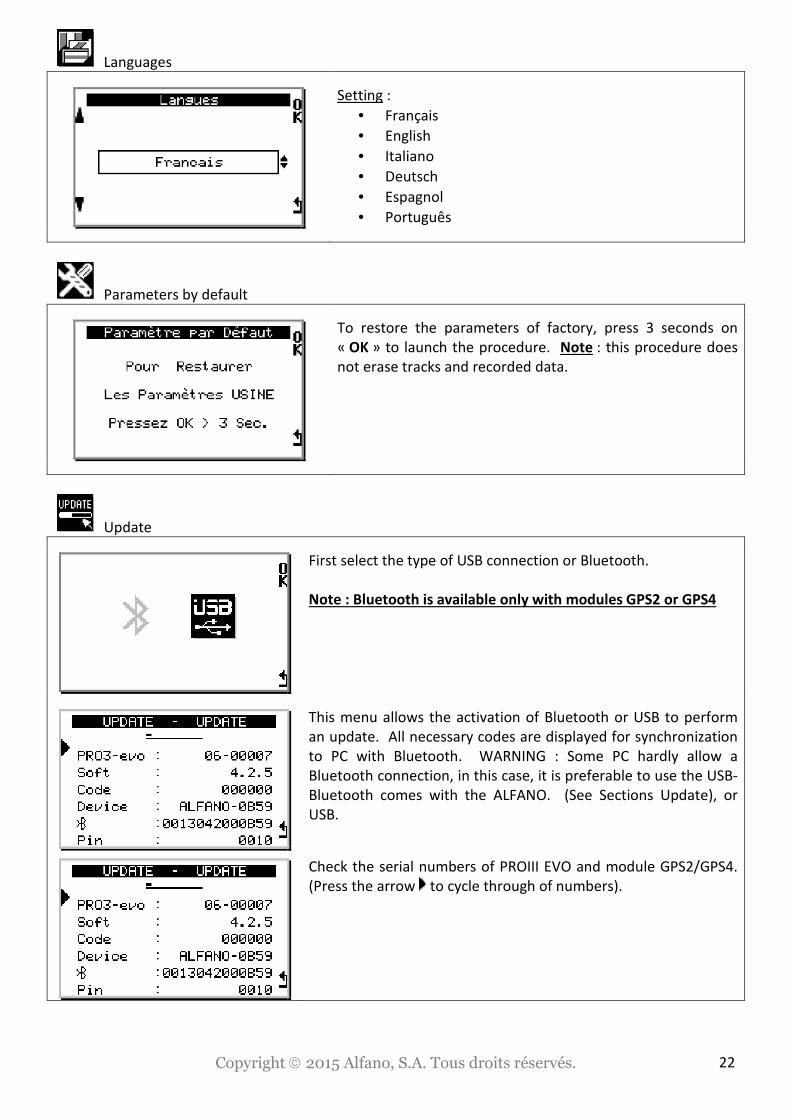
Languages
Setting :
• Français
• English
• Italiano
• Deutsch
• Espagnol
• Português
Parameters by default
To restore the parameters of factory, press 3 seconds on
« OK » to launch the procedure. Note : this procedure does
not erase tracks and recorded data.
Update
First select the type of USB connection or Bluetooth.
Note : Bluetooth is available only with modules GPS2 or GPS4
This menu allows the activation of Bluetooth or USB to perform
an update. All necessary codes are displayed for synchronization
to PC with Bluetooth. WARNING : Some PC hardly allow a
Bluetooth connection, in this case, it is preferable to use the USB-
Bluetooth comes with the ALFANO. (See Sections Update), or
USB.
Check the serial numbers of PROIII EVO and module GPS2/GPS4.
(Press the arrow to cycle through of numbers).
Copyright 2015 Alfano, S.A. Tous droits réservés. 23
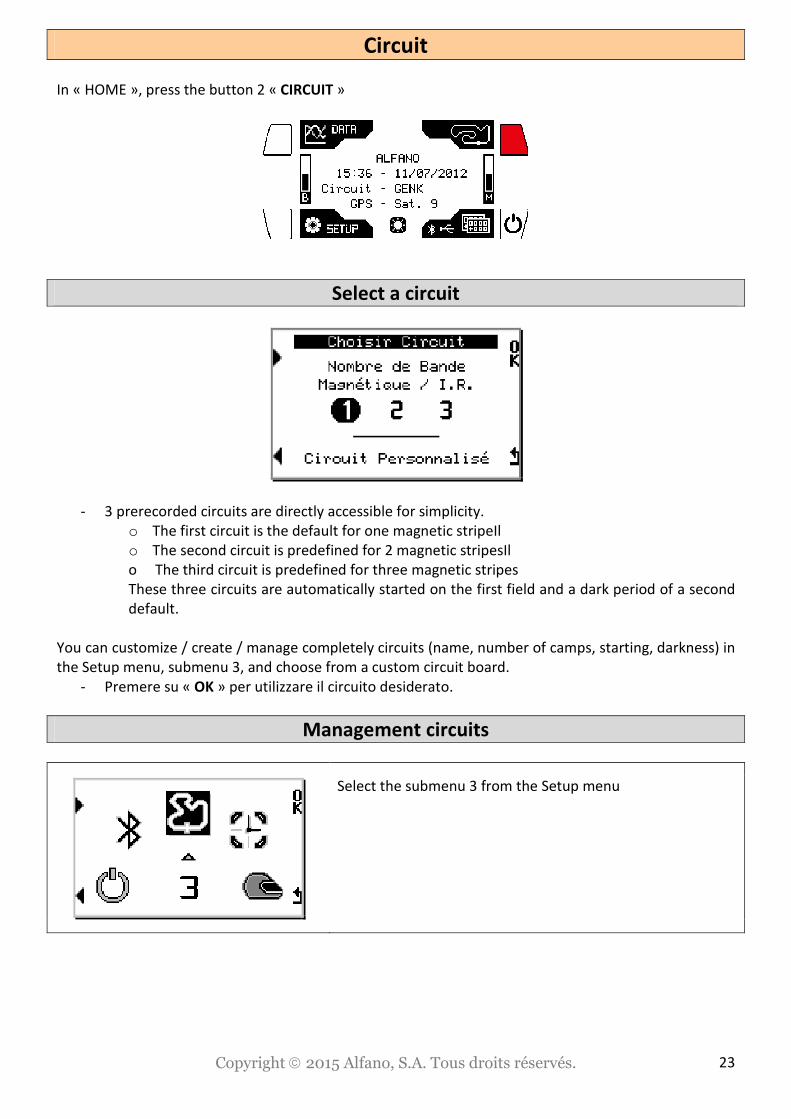
Circuit
In « HOME », press the button 2 « CIRCUIT »
Select a circuit
- 3 prerecorded circuits are directly accessible for simplicity.
o The first circuit is the default for one magnetic stripeIl
o The second circuit is predefined for 2 magnetic stripesIl
o The third circuit is predefined for three magnetic stripes
These three circuits are automatically started on the first field and a dark period of a second
default.
You can customize / create / manage completely circuits (name, number of camps, starting, darkness) in
the Setup menu, submenu 3, and choose from a custom circuit board.
- Premere su « OK » per utilizzare il circuito desiderato.
Management circuits
Select the submenu 3 from the Setup menu

Copyright 2015 Alfano, S.A. Tous droits réservés. 24
« New »
Create a new track.
« Modify »
Modify the name and the time of “obsucurity” of an existing
track.
« Delete »
Delete an existing track.
« Send » (only with modules GPS2 or GPS4 connected)
Send an existing track via Bluetooth towards another System
ALFANO.
« Receive » (only with modules GPS2 or GPS4 connected)
Receive via Bluetooth, a circuit from another system ALFANO.
Information
For the visualization and the logical recording of the data, it is necessary, before using the ALFANO in
race, to configure the morphology of the track. This menu consists in creating tracks (80 maximum)
and saving them.
The different technologies of timing
The tracks in Magnetic This is the most precise solution. The magnetic energy to activate the ALFANO is supplied by magnetic
strips specially created by ALFANO company, this system is patented (E.P.0632350), most of the tracks
throughout the world are equipped from 1 to 3 strips.
The tracks in Infrared The system in Infrared to activate the ALFANO is constituted by an IR transmitter (ref. A4100) and an IR
receiver (ref. A140*) with codified frequency, developed by ALFANO company. The transmitter settles
down at the edge of the track and the receiver links with the ALFANO instead of the magnetic sensor.
Note : Several transmitters can settle down at the edge of the track to obtain lap’s partial times.
The tracks in GPS The timing data are supplied by the GPS.
The tracks in Magnetic or Infrared + GPS It is possible to combine two technologies to obtain additional partial times. Note : in this case, the
magnetic strip or the infrared transmitter is the only reference for the departure and consequently, for
the laps timing.
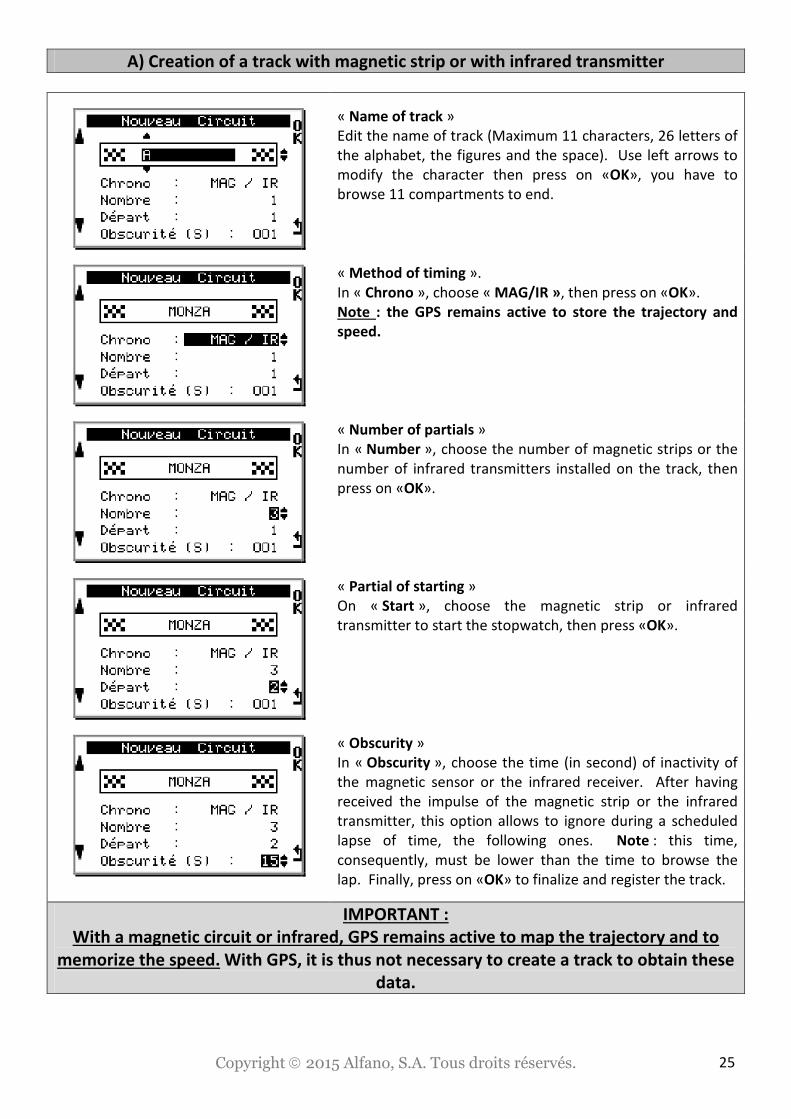
Copyright 2015 Alfano, S.A. Tous droits réservés. 25
A) Creation of a track with magnetic strip or with infrared transmitter
« Name of track »
Edit the name of track (Maximum 11 characters, 26 letters of
the alphabet, the figures and the space). Use left arrows to
modify the character then press on «OK», you have to
browse 11 compartments to end.
« Method of timing ».
In « Chrono », choose « MAG/IR », then press on «OK».
Note : the GPS remains active to store the trajectory and
speed.
« Number of partials »
In « Number », choose the number of magnetic strips or the
number of infrared transmitters installed on the track, then
press on «OK».
« Partial of starting »
On « Start », choose the magnetic strip or infrared
transmitter to start the stopwatch, then press «OK».
« Obscurity »
In « Obscurity », choose the time (in second) of inactivity of
the magnetic sensor or the infrared receiver. After having
received the impulse of the magnetic strip or the infrared
transmitter, this option allows to ignore during a scheduled
lapse of time, the following ones. Note : this time,
consequently, must be lower than the time to browse the
lap. Finally, press on «OK» to finalize and register the track.
IMPORTANT :
With a magnetic circuit or infrared, GPS remains active to map the trajectory and to
memorize the speed. With GPS, it is thus not necessary to create a track to obtain these
data.
Copyright 2015 Alfano, S.A. Tous droits réservés. 26
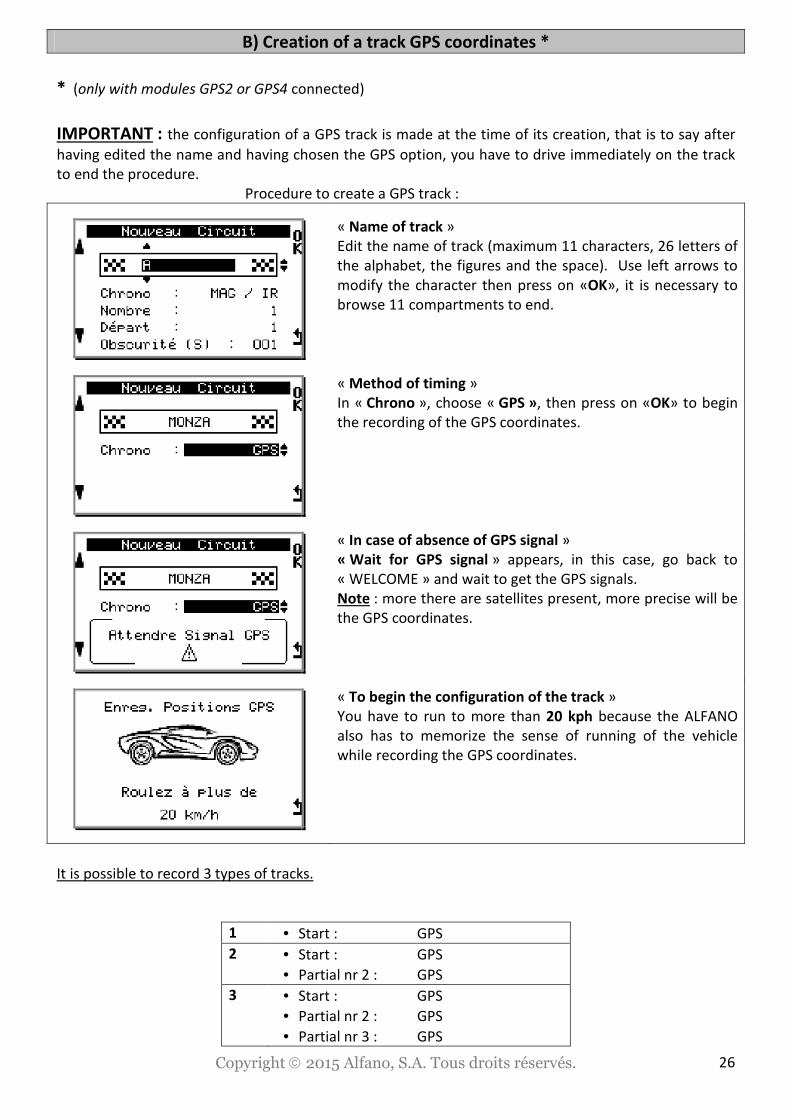
B) Creation of a track GPS coordinates *
* (only with modules GPS2 or GPS4 connected)
IMPORTANT : the configuration of a GPS track is made at the time of its creation, that is to say after
having edited the name and having chosen the GPS option, you have to drive immediately on the track
to end the procedure.
Procedure to create a GPS track :
« Name of track »
Edit the name of track (maximum 11 characters, 26 letters of
the alphabet, the figures and the space). Use left arrows to
modify the character then press on «OK», it is necessary to
browse 11 compartments to end.
« Method of timing »
In « Chrono », choose « GPS », then press on «OK» to begin
the recording of the GPS coordinates.
« In case of absence of GPS signal »
« Wait for GPS signal » appears, in this case, go back to
« WELCOME » and wait to get the GPS signals.
Note : more there are satellites present, more precise will be
the GPS coordinates.
« To begin the configuration of the track »
You have to run to more than 20 kph because the ALFANO
also has to memorize the sense of running of the vehicle
while recording the GPS coordinates.
It is possible to record 3 types of tracks.
1 • Start : GPS
2 • Start : GPS
• Partial nr 2 : GPS
3 • Start : GPS
• Partial nr 2 : GPS
• Partial nr 3 : GPS

Copyright 2015 Alfano, S.A. Tous droits réservés. 27
On the following example : simulation of the 3rd method
This window appears as soon as the vehicle exceeds 20 kph.
START
Press on «GPS» at the moment wished on the track to
memorize the GPS starting point.
PARTIALS
Press on «GPS» at the moment wished on the track to
memorize the GPS point of partial nr 2.
PARTIALS
Press on «GPS» at the moment wished on the track to
memorize the GPS point of partial nr 3.
ARRIVAL
Go back on the « GPS » starting point to end the
programming of the track and immediately the system starts
a session.
ATTENTION :
The captures of GPS partials have to be done before going back on the GPS starting
point.
Copyright 2015 Alfano, S.A. Tous droits réservés. 28
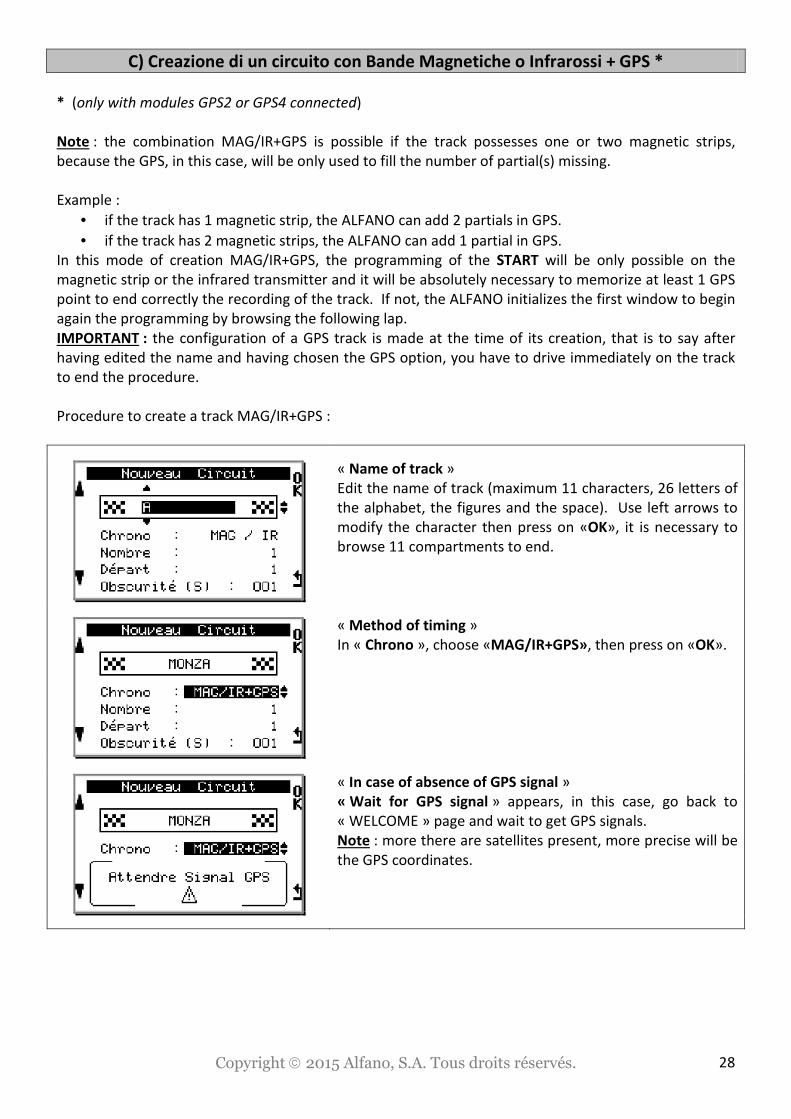
C) Creazione di un circuito con Bande Magnetiche o Infrarossi + GPS *
* (only with modules GPS2 or GPS4 connected)
Note : the combination MAG/IR+GPS is possible if the track possesses one or two magnetic strips,
because the GPS, in this case, will be only used to fill the number of partial(s) missing.
Example :
• if the track has 1 magnetic strip, the ALFANO can add 2 partials in GPS.
• if the track has 2 magnetic strips, the ALFANO can add 1 partial in GPS.
In this mode of creation MAG/IR+GPS, the programming of the START will be only possible on the
magnetic strip or the infrared transmitter and it will be absolutely necessary to memorize at least 1 GPS
point to end correctly the recording of the track. If not, the ALFANO initializes the first window to begin
again the programming by browsing the following lap.
IMPORTANT : the configuration of a GPS track is made at the time of its creation, that is to say after
having edited the name and having chosen the GPS option, you have to drive immediately on the track
to end the procedure.
Procedure to create a track MAG/IR+GPS :
« Name of track »
Edit the name of track (maximum 11 characters, 26 letters of
the alphabet, the figures and the space). Use left arrows to
modify the character then press on «OK», it is necessary to
browse 11 compartments to end.
« Method of timing »
In « Chrono », choose «MAG/IR+GPS», then press on «OK».
« In case of absence of GPS signal »
« Wait for GPS signal » appears, in this case, go back to
« WELCOME » page and wait to get GPS signals.
Note : more there are satellites present, more precise will be
the GPS coordinates.

Copyright 2015 Alfano, S.A. Tous droits réservés. 29
« Number of partial »
In « Number », choose the number of magnetic strips or of
infrared transmitters installed on the track, then press on
«OK».
« Partial of start »
In « Start », choose the magnetic strip or the infrared
transmitter wished for the timing starting, then press on
«OK».
« Obscurity »
In « Obscurity », choose the time (in second) of inactivity of
the magnetic sensor or the infrared receiver. After having
received the impulse of the magnetic strip or the infrared
transmitter, this option allows to ignore during a scheduled
lapse of time, the following ones.
Note : this time, consequently, must be lower than the time
to browse the lap. Finally, press on «OK» to finalize and
register the track.
« To begin the configuration of the track »
You have to run to more than 20 kph because the ALFANO
also has to memorize the sense of running of the vehicle
while recording the GPS coordinates.
It is possible to record 4 types of tracks :
1 • Start : Mag/IR (indispensable)
• Partial nr 2 : GPS
2 • Start : Mag/IR (indispensable)
• Partial nr 2 : GPS
• Partial nr 3 : GPS
3 • Start : Mag/IR (indispensable)
• Partial nr 2 : Mag/IR
• Partial nr 3 : GPS
4 • Start : Mag/IR (indispensable)
• Partial nr 2 : GPS
• Partial nr 3 : Mag/IR
Copyright 2015 Alfano, S.A. Tous droits réservés. 30
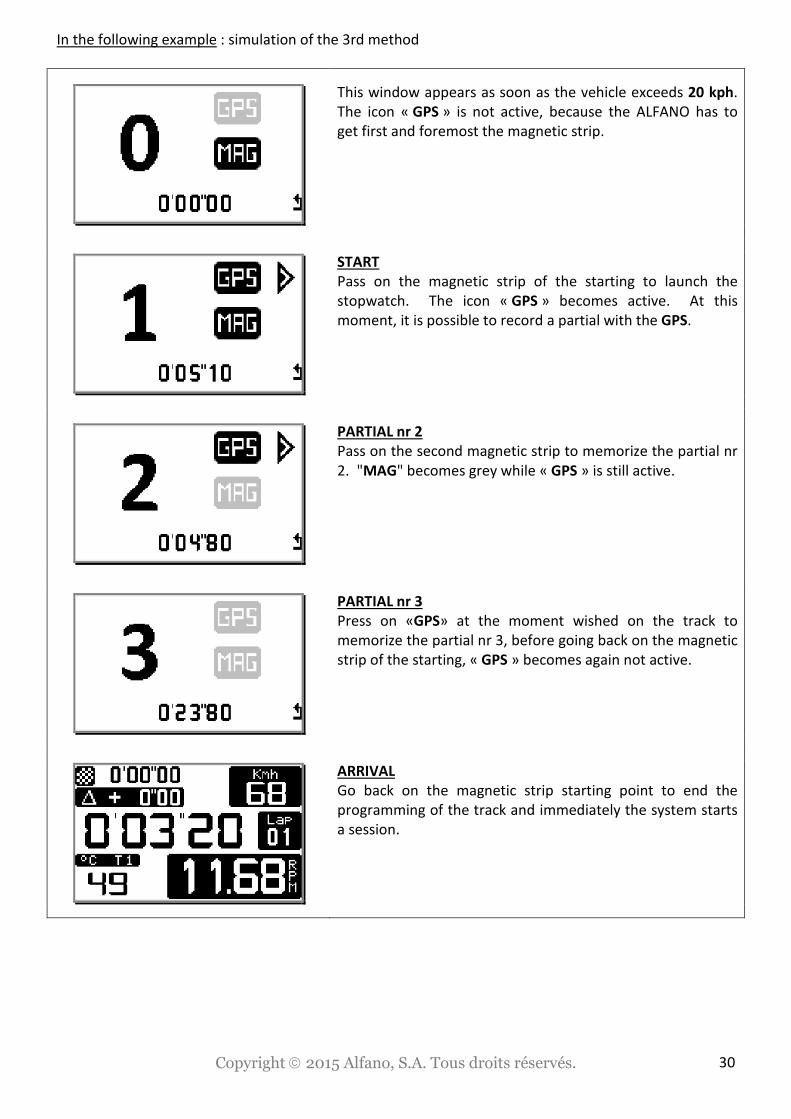
In the following example : simulation of the 3rd method
This window appears as soon as the vehicle exceeds 20 kph.
The icon « GPS » is not active, because the ALFANO has to
get first and foremost the magnetic strip.
START
Pass on the magnetic strip of the starting to launch the
stopwatch. The icon « GPS » becomes active. At this
moment, it is possible to record a partial with the GPS.
PARTIAL nr 2
Pass on the second magnetic strip to memorize the partial nr
2. "MAG" becomes grey while « GPS » is still active.
PARTIAL nr 3
Press on «GPS» at the moment wished on the track to
memorize the partial nr 3, before going back on the magnetic
strip of the starting, « GPS » becomes again not active.
ARRIVAL
Go back on the magnetic strip starting point to end the
programming of the track and immediately the system starts
a session.

Copyright 2015 Alfano, S.A. Tous droits réservés. 31
On the following example : simulation of the 4th method
This window appears as soon as the vehicle exceeds 20 kph.
The icon « GPS » is not active, because the ALFANO has to
get first and foremost the magnetic strip.
START
Pass on the magnetic strip of starting to launch the
stopwatch. « GPS » becomes active, at this moment, it is
possible to record a partial with the GPS.
PARTIAL nr 2
Press on «GPS» at the moment wished on the track to
memorize the point of GPS of the partial nr 2, before passing
on the second magnetic strip. « GPS » becomes non active
again.
PARTIAL nr 3
Pass on the second magnetic strip to memorize the partial nr
3.
ARRIVAL
Go back on the magnetic strip starting point to end the
programming of the track and immediately the system starts
a session.
Copyright 2015 Alfano, S.A. Tous droits réservés. 32
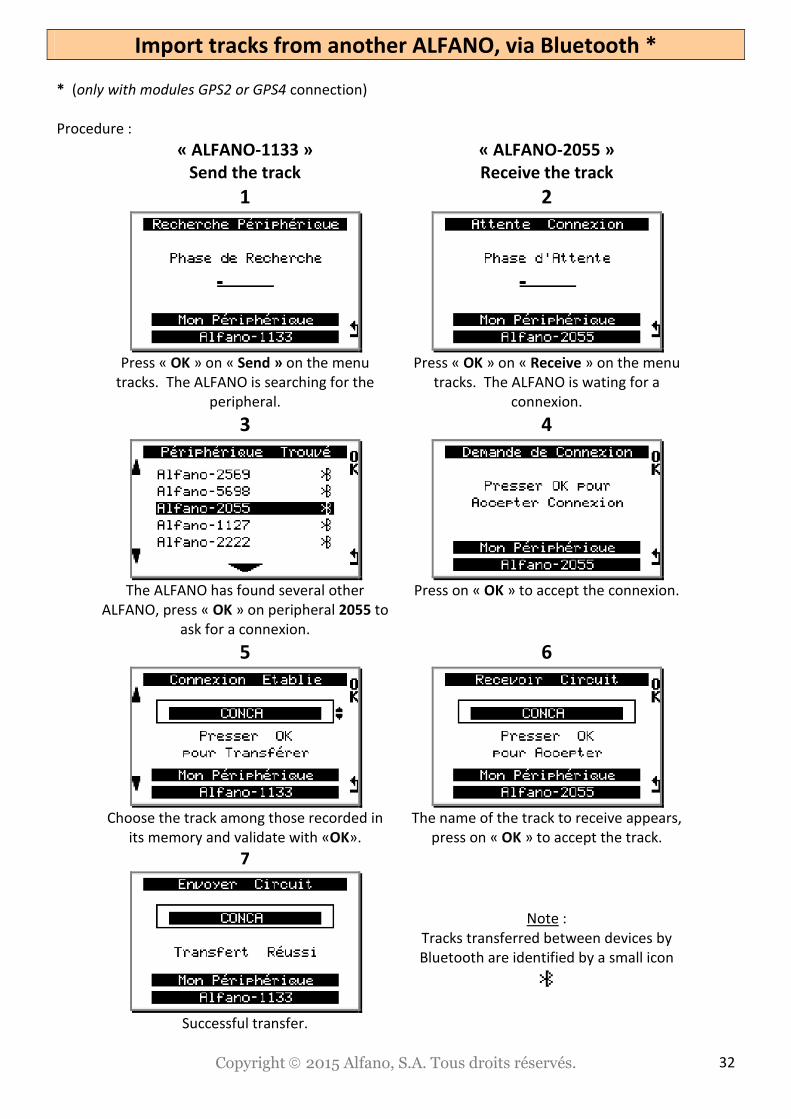
Import tracks from another ALFANO, via Bluetooth *
* (only with modules GPS2 or GPS4 connection)
Procedure :
« ALFANO-1133 »
Send the track
« ALFANO-2055 »
Receive the track
1 2
Press « OK » on « Send » on the menu
tracks. The ALFANO is searching for the
peripheral.
Press « OK » on « Receive » on the menu
tracks. The ALFANO is wating for a
connexion.
3 4
The ALFANO has found several other
ALFANO, press « OK » on peripheral 2055 to
ask for a connexion.
Press on « OK » to accept the connexion.
5 6
Choose the track among those recorded in
its memory and validate with «OK».
The name of the track to receive appears,
press on « OK » to accept the track.
7
Successful transfer.
Note :
Tracks transferred between devices by
Bluetooth are identified by a small icon
Copyright 2015 Alfano, S.A. Tous droits réservés. 33
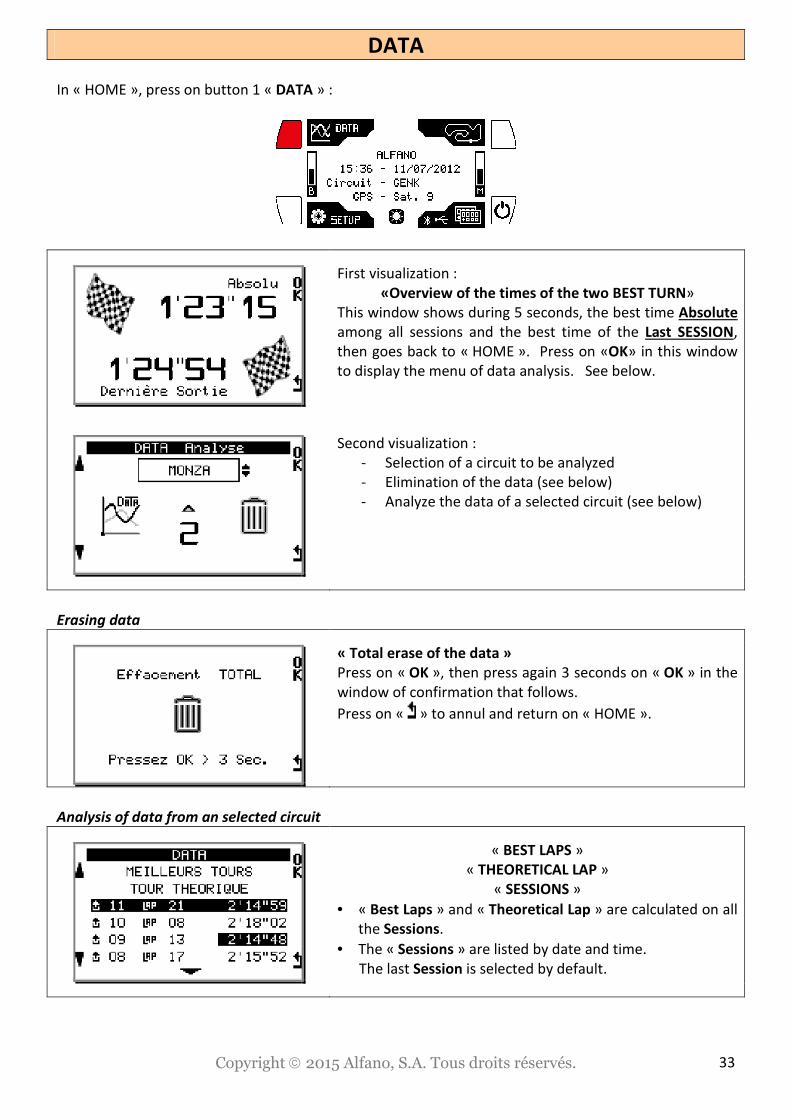
DATA
In « HOME », press on button 1 « DATA » :
First visualization :
«Overview of the times of the two BEST TURN»
This window shows during 5 seconds, the best time Absolute
among all sessions and the best time of the Last SESSION,
then goes back to « HOME ». Press on «OK» in this window
to display the menu of data analysis. See below.
Second visualization :
- Selection of a circuit to be analyzed
- Elimination of the data (see below)
- Analyze the data of a selected circuit (see below)
Erasing data
« Total erase of the data »
Press on « OK », then press again 3 seconds on « OK » in the
window of confirmation that follows.
Press on « » to annul and return on « HOME ».
Analysis of data from an selected circuit
« BEST LAPS »
« THEORETICAL LAP »
« SESSIONS »
• « Best Laps » and « Theoretical Lap » are calculated on all
the Sessions.
• The « Sessions » are listed by date and time.
The last Session is selected by default.

Copyright 2015 Alfano, S.A. Tous droits réservés. 34
BEST LAPS (on all the sessions)
Press « OK » on « BEST LAPS », this menu consists in confronting the data of diverse sensors on the LAST
SESSION best lap and the best lap of the ABSOLUTE, press on the double arrow to vary the data of these
two laps.
Press the arrow to show next window, RPM ranges. This option allows to analyze the behavior of the
engine through RPM ranges, that is to say the time + the conversion in percentage of this time for all the
RPM ranges of 1.000 rotations/min accumulated in this lap. Press on « » to show the next RPM ranges.
Press on double arrow to vary and so compare the data of these two laps. Press on « » to go back on
menu DATA.
THEORETICAL LAP (on all the sessions)
Press « OK » on « THEORETICAL LAP »,
This window takes back the best partials made on all the
sessions, and calculates then the theoretical time. Press on
« OK » on partial wished to reach the lap belonging to it.
LAST SESSION ABSOLUTE
Copyright 2015 Alfano, S.A. Tous droits réservés. 35
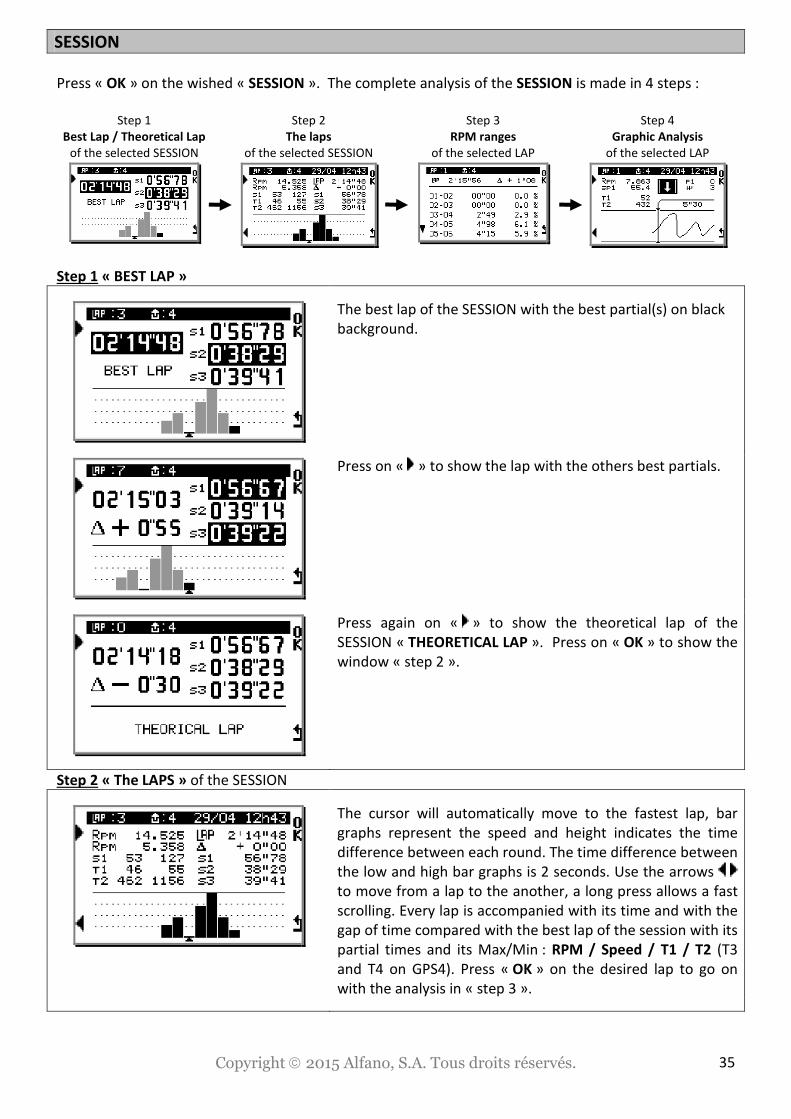
SESSION
Press « OK » on the wished « SESSION ». The complete analysis of the SESSION is made in 4 steps :
Step 1 Step 2 Step 3 Step 4
Best Lap / Theoretical Lap The laps RPM ranges Graphic Analysis
of the selected SESSION of the selected SESSION of the selected LAP of the selected LAP
Step 1 « BEST LAP »
The best lap of the SESSION with the best partial(s) on black
background.
Press on « » to show the lap with the others best partials.
Press again on « » to show the theoretical lap of the
SESSION « THEORETICAL LAP ». Press on « OK » to show the
window « step 2 ».
Step 2 « The LAPS » of the SESSION
The cursor will automatically move to the fastest lap, bar
graphs represent the speed and height indicates the time
difference between each round. The time difference between
the low and high bar graphs is 2 seconds. Use the arrows
to move from a lap to the another, a long press allows a fast
scrolling. Every lap is accompanied with its time and with the
gap of time compared with the best lap of the session with its
partial times and its Max/Min : RPM / Speed / T1 / T2 (T3
and T4 on GPS4). Press « OK » on the desired lap to go on
with the analysis in « step 3 ».

Copyright 2015 Alfano, S.A. Tous droits réservés. 36
Step 3 « RPM ranges »
This option allows for the lap chosen on step 3 to analyze the
behavior of the engine through RPM ranges, that is to say the
time + the conversion in percentage of this time for all the
RPM ranges of 1.000 rotations/min accumulated in this lap.
Press on « » to show the next RPM ranges, press on « OK »
to show the window « step 5 »
Step 4 « Graphic Analysis »
For an accurate analysis, this option allows to view the
chosen lap on (step 2), step by step, according to the
recording frequency chosen on « SETUP »: RPM (+graphic),
T°1, T°2, T°3, T°4, Speed, Gear, etc… Use the arrows to
browse the lap, a long pressure allows a fast scrolling.
Press on « » and return on « HOME ».
Copyright 2015 Alfano, S.A. Tous droits réservés. 37
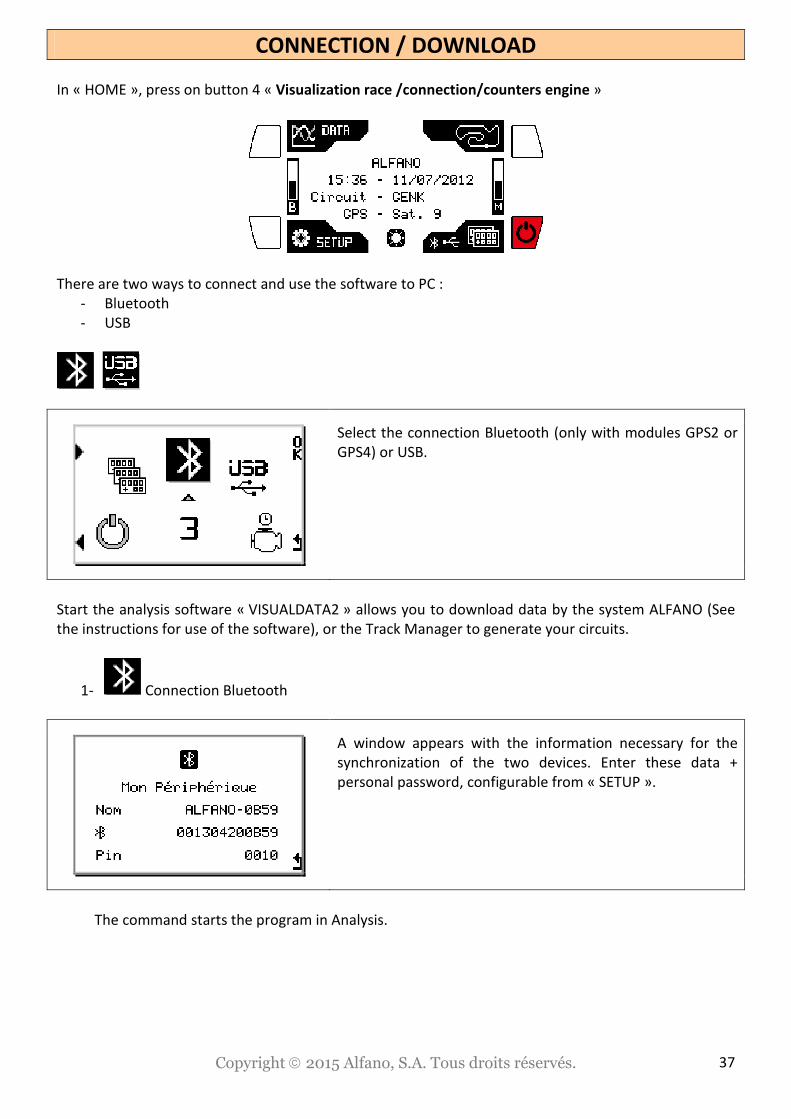
CONNECTION / DOWNLOAD
In « HOME », press on button 4 « Visualization race /connection/counters engine »
There are two ways to connect and use the software to PC :
- Bluetooth
- USB
Select the connection Bluetooth (only with modules GPS2 or
GPS4) or USB.
Start the analysis software « VISUALDATA2 » allows you to download data by the system ALFANO (See
the instructions for use of the software), or the Track Manager to generate your circuits.
1- Connection Bluetooth
A window appears with the information necessary for the
synchronization of the two devices. Enter these data +
personal password, configurable from « SETUP ».
The command starts the program in Analysis.

Copyright 2015 Alfano, S.A. Tous droits réservés. 38
This window confirms the connection with your PC.
2- Connection USB
No need for data connection with the USB
Note : Use the interface transfer A4220.
Counters engine
In « HOME », press on button 4 « SETUP »
Select the menu counters engine (on the menu 5)
This menu shows the meters of running time of 5 engines:
• A single engine can be active. The chosen engine will
be visible on « HOME »
• Press on « OK » on the engine selected to activate it.
• Press 1 second on « OK » on the engine selected for
the putting with zero.

Copyright 2015 Alfano, S.A. Tous droits réservés. 39
The windows of racing « Layouts »
In « HOME », press on button 4 :
Select the menu windows racing (on the menu 2)
Each « Layout » has a number to make your choice easier.
That number with the word « Confirm » appears only a few
seconds, then press on button « Confirm » to choose it, even
if the word is not displayed anymore.
The windows racing
Race « 1 » • Best time / Lap time / Gap
• Nr of the lap
• Temperature T1
• RPM
• Speed
• Gear engaged
Race « 2 » • Best time / Lap time / Gap
• Nr of the lap
• Temperature T1 / T2
• RPM
• Speed
• Gear engaged
Copyright 2015 Alfano, S.A. Tous droits réservés. 40
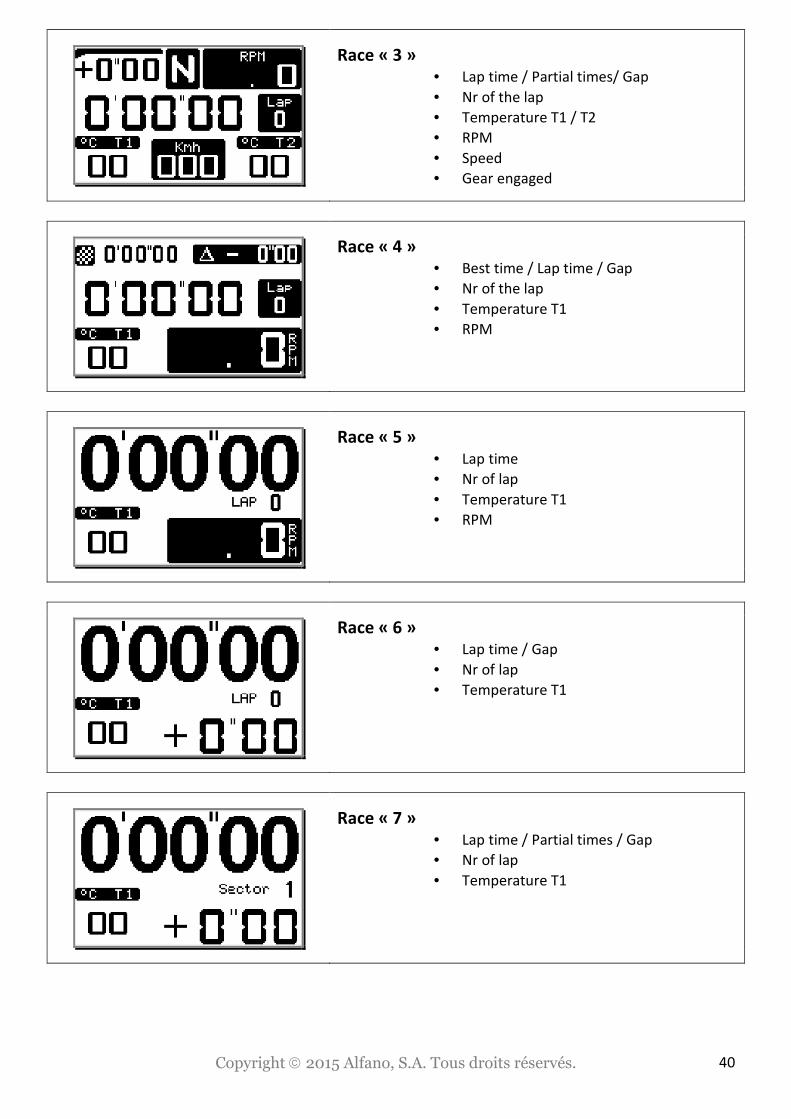
Race « 3 » • Lap time / Partial times/ Gap
• Nr of the lap
• Temperature T1 / T2
• RPM
• Speed
• Gear engaged
Race « 4 » • Best time / Lap time / Gap
• Nr of the lap
• Temperature T1
• RPM
Race « 5 » • Lap time
• Nr of lap
• Temperature T1
• RPM
Race « 6 » • Lap time / Gap
• Nr of lap
• Temperature T1
Race « 7 » • Lap time / Partial times / Gap
• Nr of lap
• Temperature T1
Copyright 2015 Alfano, S.A. Tous droits réservés. 41
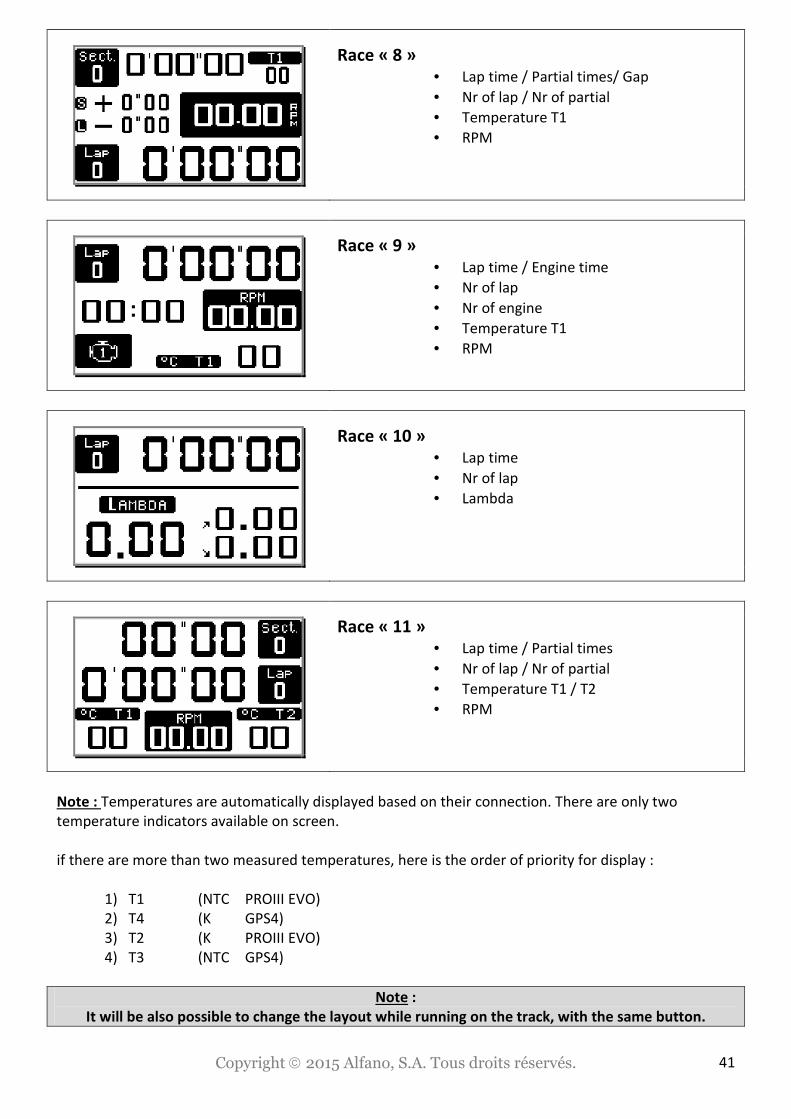
Race « 8 » • Lap time / Partial times/ Gap
• Nr of lap / Nr of partial
• Temperature T1
• RPM
Race « 9 » • Lap time / Engine time
• Nr of lap
• Nr of engine
• Temperature T1
• RPM
Race « 10 » • Lap time
• Nr of lap
• Lambda
Race « 11 » • Lap time / Partial times
• Nr of lap / Nr of partial
• Temperature T1 / T2
• RPM
Note : Temperatures are automatically displayed based on their connection. There are only two
temperature indicators available on screen.
if there are more than two measured temperatures, here is the order of priority for display :
1) T1 (NTC PROIII EVO) 2) T4 (K GPS4) 3) T2 (K PROIII EVO) 4) T3 (NTC GPS4)
Note :
It will be also possible to change the layout while running on the track, with the same button.

Copyright 2015 Alfano, S.A. Tous droits réservés. 42
Power Supply : options and accessories
Batteries
A4019 Alkaline PROCELL 1.5V model « AA/R6 »
A4018 A4016 Rechargeable UNIROSS, 2050 mAh Hybrio 1.2V UNIROSS charger from 100 to 240V 50/60Hz
! Senza effetto memoria!
A4017 ALFANO Rechargeable Pack 8.800 mAh Li Ion 3.7V (Waterproof) 75x40x40mm
Delivered with a 100 to 240V 50/60Hz charger and a case.
Power supply A4005 (A4013 + A4017)

Copyright 2015 Alfano, S.A. Tous droits réservés. 43
A4004 (A4012 + A4001) (optional: cigarette lighter connector) A4011
Table of Consumption
Alkaline UNIROSS Pack ALFANO
Li Ion 3.7V
PROIII-evo * xxx xxx xxx
PROIII-evo xxx xxx xxxx
(*)With backlight (Power 5) Table purposes only
Memory
Also think of checking the available memory with memory space in the « HOME » page or the time
remaining on the setup menu --- > REC. not to saturate the memory when you run.
You can record a maximum of 99 sessions by track.
You can record a maximum of 327 sessions on all the tracks.
You can record a maximum of 99 laps by closed track session, if you run more laps, a new session will
start automatically.
The maximum time is 15 minutes round.
Important note :
- When the memory indicator in the main menu is filled, the memory is almost full, goes into
automatic mode of endurance, so records only part-time with the minimum and maximum, but
not the champions.
- When the memory on the main menu is filled and flashes, the memory is full, it is impossible to
start a new session until the data have been deleted.

Copyright 2015 Alfano, S.A. Tous droits réservés. 44
VisualData2
Download our software VISUALDATA2 (Windows) available on www.alfano.com
Start the “executable” from your computer and follow the instructions of the VISUALDATA2 manual of
installation also available on our website www.alfano.com
Update FIRMWARE
The menu update allows you to upgrade your ALFANO. The updates allow you to correct any problems
but also to improve functionality of the product. Use a PC with a Bluetooth device integrated or USB
cable.
Enter the menu Update via the menu Setup.
Download the excutable UPDATER and
then the different files *.fwr available on
our website www.alfano.com
New updates will be continuous available.
Start the “executable” from your computer and follow the instructions of the FIRMWARE installation
manual also available on our site www.alfano.com
ATTENTION : During the update, do not remove the batteries

Copyright 2015 Alfano, S.A. Tous droits réservés. 45
GPS*
* (only with modules or GPS2 GPS4 connected)
Signal GPS
When you turn on the PROIII EVO with its module, wait for the GPS signal. The wait at the time of
reception depends on several parameters :
The environment in which the GPS module is located (building, wood, clear sky, etc.…)
The cold start or warm start: The GPS receiver acquires the signal faster when used regularly, in fact, the
more the GPS is off, the longer the time waiting to receive the signal at the next start, this is due to
downloads GPS (ephemeris etc.) when it is off for several days. This waiting time can vary from a few
seconds to several minutes.
Number of Satellites
The GPS acquires the actual position from 3 satellites. With more satellites in view, there will be more
accurate GPS coordinates and then a more precise timing. We recommend starting with the timing of 8
satellites received or the accuracy of the timing can not be guaranteed.
Date e hour
As indicated in the Setup menu, the satellite gives us the date and GMT time, so you need to set the
time zone based on the position of the GPS module in the Setup menu / setting the time and date.

Copyright 2015 Alfano, S.A. Tous droits réservés. 46
Warranty conditions
All our devices have been subject to in-depth factory tests and are covered by a 24-month warranty
against manufacturing defects. The warranty comes into action from the date of purchase. The date of
purchase is the date stated on the invoice/receipt given by the seller at the time of sale. The
manufacturer undertakes to repair and replace free of charge any parts which have a manufacturing
defect during the warranty period. Any defects which cannot be clearly attributed to the material or the
manufacturer will be examined at one of our approved after-sales service centers and invoiced
depending on the results. The warranty does not apply in cases of device opening, accidental damage,
negligence or misuse, inappropriate or incorrect installation or failure to perform the installation in
accordance with the instructions contained in the attention note and in events not associated with the
rules of operation and use of the device. The warranty will become null and void in cases of repair or
handling carried out by unauthorized third parties. Intervention under warranty does not entitle to the
device replacement or warranty extension. Intervention under warranty is carried out at one of our
approved after-sales service centers or at our head office. In the latter case, the item must reach our
establishment postage paid, that is, transport costs shall be paid by the user. The manufacturer
undertakes no responsibility for any damage to persons or goods caused by poor installation or
incorrect use of the device.
Product modifications
Alfano applies a method of continuous development. Alfano reserves the right to make changes and
improvements to any product described in this document without prior notice. No modifications or
changes to the product should be done without ALFANO approval.
Damages and responsabilities
The products are used under the customer’s sole discretion and risk and therefore damages suffered or
caused by the products shall be the customer’s responsibility. ALFANO cannot be held responsible for
the direct or indirect consequences of wrong use.
Disposal
The device must be disposed with respect for the environment. The chronometer and its accessories
contain many plastic parts. When the chronometer or one of its accessories no longer functions, they
must be dealt in accordance to the laws of the Country where it is located. Used batteries must be
disposed in accordance with the Country’s environmental regulations.

Copyright 2015 Alfano, S.A. Tous droits réservés. 47
IMPORTANT NOTICE
Always use batteries and brand quality.
Never leave batteries in the device when not in use
within 2-3 weeks to avoid the dissolution of the batteries on
the electronics causing irreparable damage.
You lose the warranty in case of leakage of battery acid.
Rue de l’Industrie, 3b – 1400 NIVELLES (BELGIUM)
www.alfano.com