Embed Size (px)
Citation preview
MFD User Guide
Ver 1
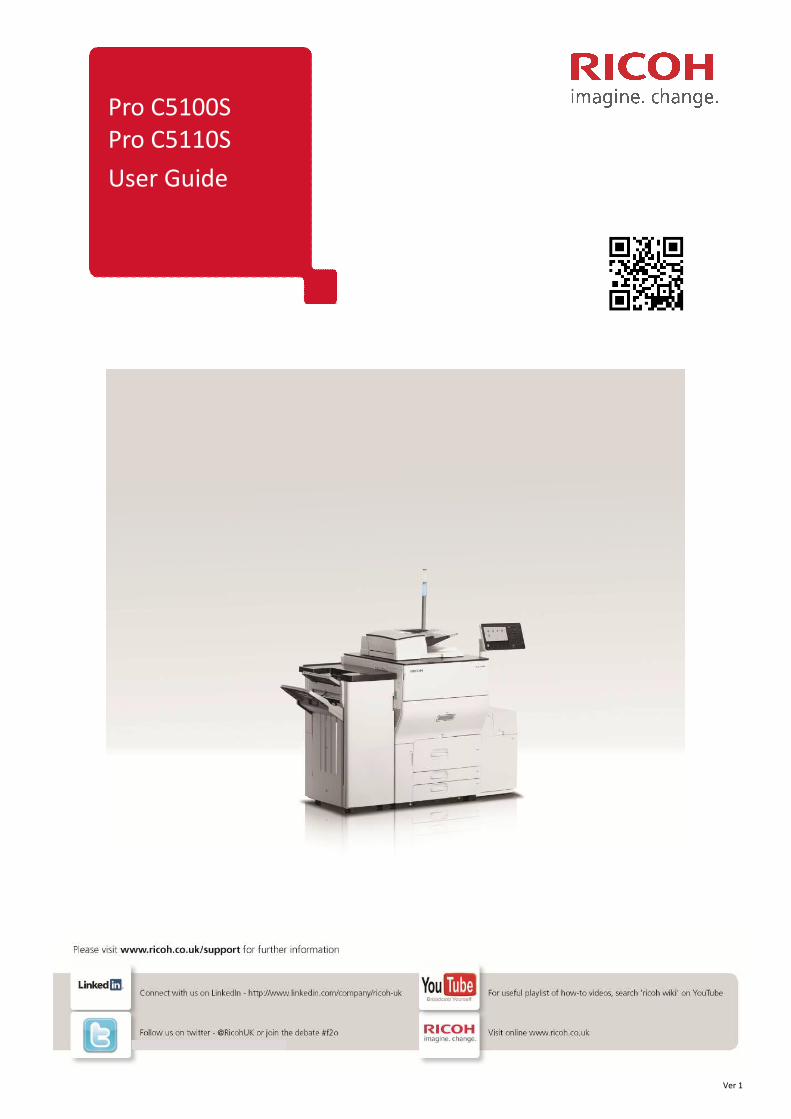
Pro C5100SPro C5110SUser Guide

CONTENTS
CONTROL PANEL Page 3
An overview of the function buttons.
MFD BASICS Page 6
Explains some of the most commonly used buttons.
LOADING PAPER IN TRAY 1 Page 8
How to load tray 1 correctly. Tray 1 is a high capacity, dual tray only capable
of holding A4.. (Unless you have specified the A3 version of this tray).
COPIER
Double-sided Page 9
Make 2-sided copies from single and double sided originals.
Sorting Page 10
Collate documents into sets.
Reducing & Enlarging Page 11
Reduce and enlarge different sized documents.
Storing a document Page 12
Save documents onto the MFD hard drive.
DOCUMENT SERVER
Retrieving documents Page 14
Print documents that have been saved onto the MFD hard drive.
PRINTER
Locked Print Page 15
Locked Print is particularly useful for confidential / secure printing.
Jobs will not be printed out until the user enters a user code at the MFD to release it.
Creating One-Click Presets Page 18
One-click presets allow you to customise your print settings,
saving time and effort by creating easy icons for the settings used most.
SCANNER
Scan to Email Page 21
Scan a document and email it to a designated email address.
Saving Email Shortcuts Page 22
Set up shortcut buttons for commonly used email addresses.
Scan to Folder Page 25
Scan a document to a shared folder on the server.
Naming a file Page 26
Rename the scan file at the MFD.

CONTROL PANEL
1. Display panel
Displays keys for each function, operation status, or messages.
2. [Reset] key
Press to clear the current settings.
3. [Program] key (Copier, Document Server, Scanner mode)
Press to register frequently used settings, or to recall registered settings. Also press to program
defaults for the initial display when modes are cleared or reset, or immediately after the main power
switch is turned on.
4. [Interrupt] key
Press to pause an ongoing copy job and start a new copy job. Deselect to continue previous job.
CONTROL PANEL
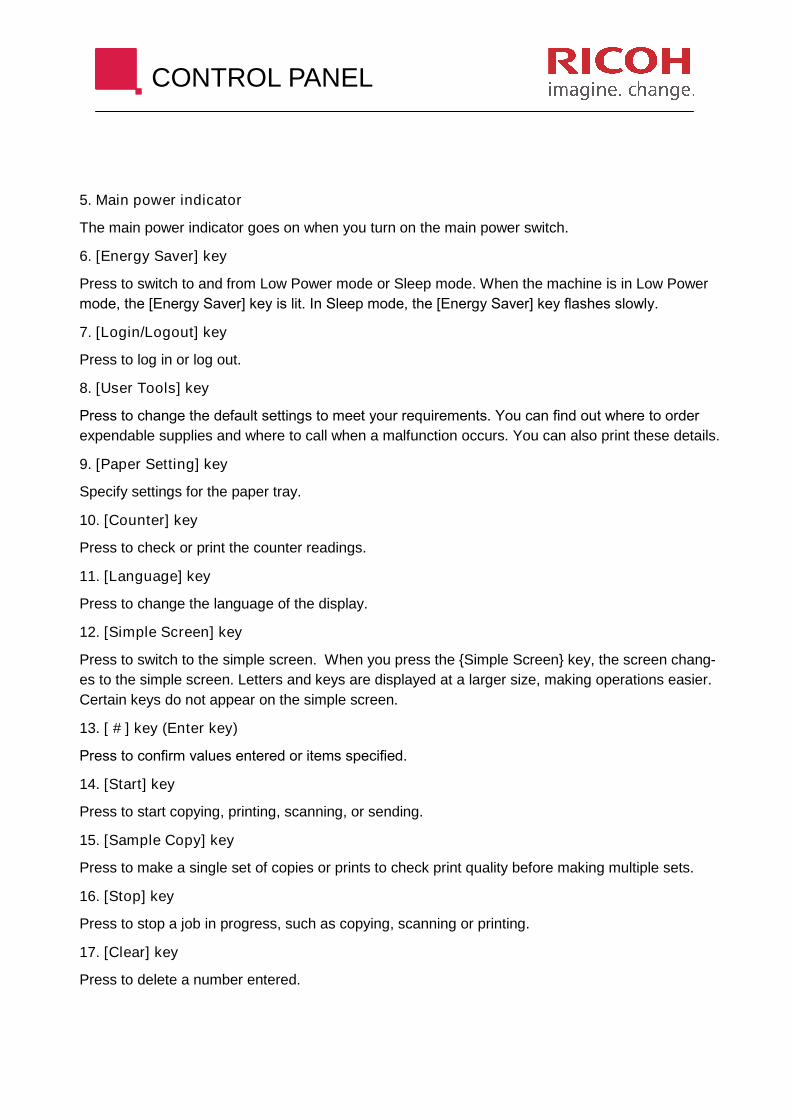
5. Main power indicator
The main power indicator goes on when you turn on the main power switch.
6. [Energy Saver] key
Press to switch to and from Low Power mode or Sleep mode. When the machine is in Low Power
mode, the [Energy Saver] key is lit. In Sleep mode, the [Energy Saver] key flashes slowly.
7. [Login/Logout] key
Press to log in or log out.
8. [User Tools] key
Press to change the default settings to meet your requirements. You can find out where to order
expendable supplies and where to call when a malfunction occurs. You can also print these details.
9. [Paper Setting] key
Specify settings for the paper tray.
10. [Counter] key
Press to check or print the counter readings.
11. [Language] key
Press to change the language of the display.
12. [Simple Screen] key
Press to switch to the simple screen. When you press the {Simple Screen} key, the screen chang-
es to the simple screen. Letters and keys are displayed at a larger size, making operations easier.
Certain keys do not appear on the simple screen.
13. [ # ] key (Enter key)
Press to confirm values entered or items specified.
14. [Start] key
Press to start copying, printing, scanning, or sending.
15. [Sample Copy] key
Press to make a single set of copies or prints to check print quality before making multiple sets.
16. [Stop] key
Press to stop a job in progress, such as copying, scanning or printing.
17. [Clear] key
Press to delete a number entered.
CONTROL PANEL
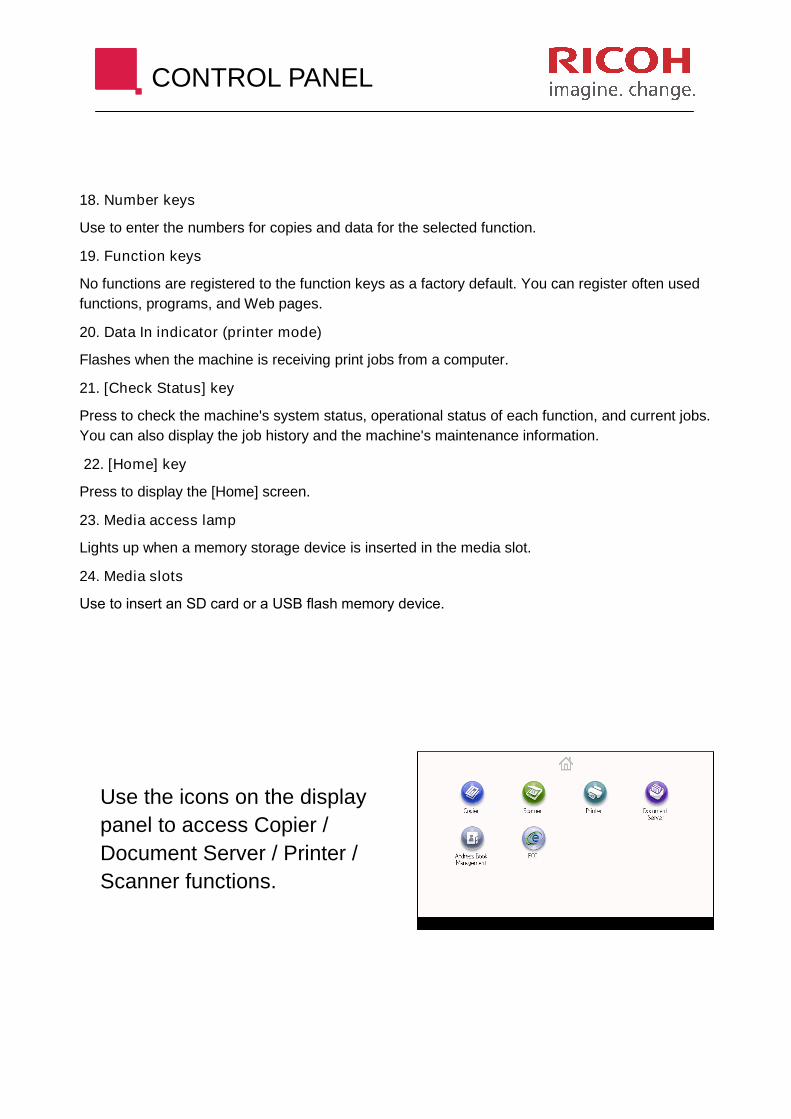
18. Number keys
Use to enter the numbers for copies and data for the selected function.
19. Function keys
No functions are registered to the function keys as a factory default. You can register often used
functions, programs, and Web pages.
20. Data In indicator (printer mode)
Flashes when the machine is receiving print jobs from a computer.
21. [Check Status] key
Press to check the machine's system status, operational status of each function, and current jobs.
You can also display the job history and the machine's maintenance information.
22. [Home] key
Press to display the [Home] screen.
23. Media access lamp
Lights up when a memory storage device is inserted in the media slot.
24. Media slots
Use to insert an SD card or a USB flash memory device.
Use the icons on the display
panel to access Copier /
Document Server / Printer /
Scanner functions.

MFD BASICS
Load your documents
FACE UP in the Auto-
matic Document feeder.
(Remove any staples or
paper clips!)
Place your documents
FACE DOWN on the
glass, aligned with the
top left-hand corner.
Use the number keys to
enter user codes,
passwords or quantities.
The ‘Home’ button will
return the device to the
Home screen.
❶
❷
❸
❹

MFD BASICS
Press the
‘Energy Saver’ button
to turn the machine
on from standby.
Press ‘Sample Copy’
to produce a proof
(single) set.
To stop a job,
press ‘Stop’.
Press the ‘Start’ button
to begin copying/
scanning.
❺
❻
❼
❽

LOADING PAPER INTO TRAY 1
Tray 1 can hold A4 paper only.
(Unless you have specified the A3
only version of this tray.) When
paper loaded in the right side of Tray
ϭ�ƌƵŶƐ�ŽƵƚ ͕ �ƉĂƉĞƌ�ŽŶ�ƚŚĞ�ůĞŌ�ŝƐ�
ĂƵƚŽŵĂƟĐĂůůLJ�ƐŚŝŌĞĚ�ƚŽ�ƚŚĞ�ƌŝŐŚƚ͘ �Do
not pull out Tray 1 while the tray is
moving paper ͖ �ǁ Ăŝƚ�ƵŶƟů�ƐŽƵŶĚƐ�ƐƚŽƉ�
coming from the tray.
dŚĞ�ůĞŌ�ŚĂŶĚ�ƚƌĂLJ�ĐĂŶ�ĐŽŵĞ�ŽƵƚ�ŽŶ�
it’s own and be loaded whilst paper
ŝƐ�ƐƟůů�ďĞŝŶŐ�ƚĂŬĞŶ�ĨƌŽŵ�ƚŚĞ�ƌŝŐŚƚ�
hand tray. Do not overfill the tray.
Providing the right hand tray is not
being used, both trays can be loaded
Ăƚ�ƚŚĞ�ƐĂŵĞ�ƟŵĞ͘ �̂ ŝŵƉůLJ�ƉƵůů�ŽƵƚ�ƚŚĞ�
right hand tray by the handle. For the
right stack, align the right edge of the
paper with the right edge of the tray.
&Žƌ�ƚŚĞ�ůĞŌ�ƐƚĂĐŬ͕�ĂůŝŐŶ�ƚŚĞ�ůĞŌ�ĞĚŐĞ�
ŽĨ�ƚŚĞ�ƉĂƉĞƌ�ƚŽ�ƚŚĞ�ůĞŌ�ĞĚŐĞ�ŽĨ�ƚŚĞ�
tray. Close the right hand tray first,
ĂŶĚ�ƚŚĞŶ�ƚŚĞ�ůĞŌ�ŚĂŶĚ�ƚƌĂLJ͘
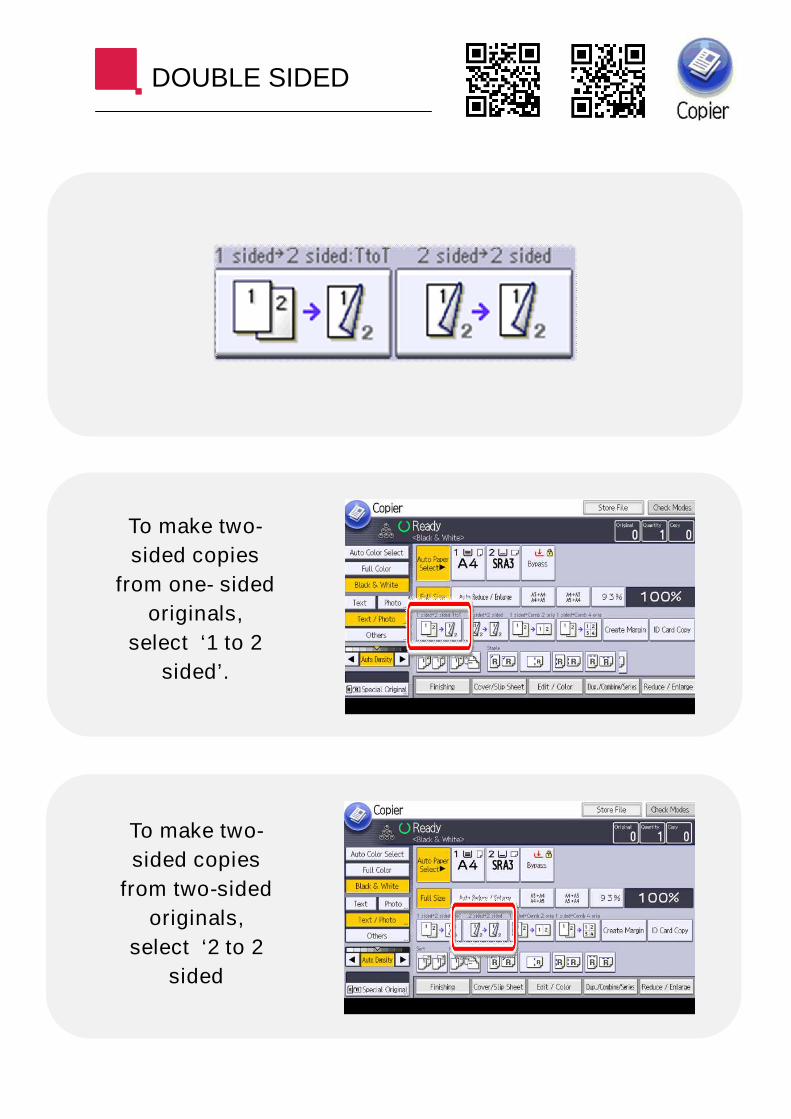
DOUBLE SIDED
To make two-
sided copies
from one- sided
originals,
select ‘1 to 2
sided’.
To make two-
sided copies
from two-sided
originals,
select ‘2 to 2
sided

SORT & STAPLE
To collate
documents in-
to sets, select
‘Sort’.
To staple
your docu-
ments choose
from one of
the staple
options.
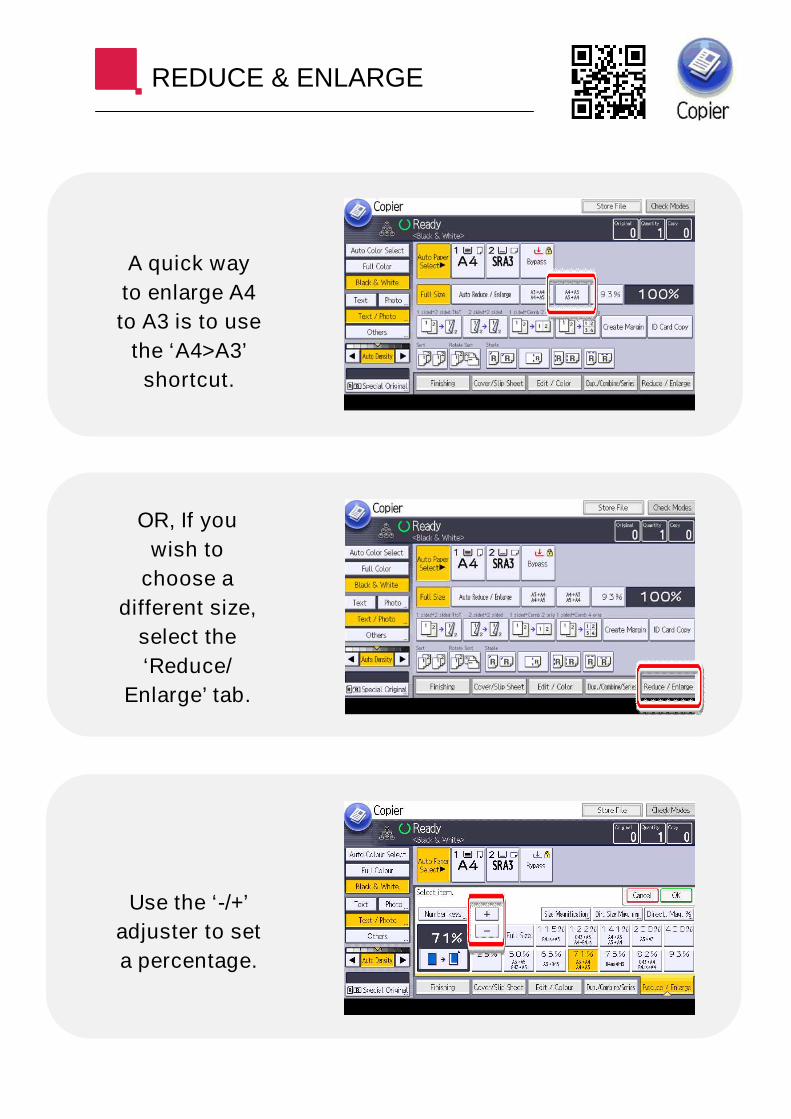
REDUCE & ENLARGE
A quick way
to enlarge A4
to A3 is to use
the ‘A4>A3’
shortcut.
OR, If you
wish to
choose a
different size,
select the
‘Reduce/
Enlarge’ tab.
Use the ‘-/+’
adjuster to set
a percentage.

STORING A DOCUMENT
Choose any
settings (sort,
staple, etc).
Then select
‘Store File’
Select ‘File
Name’
Select ‘Delete
All’
❶
❷
❸
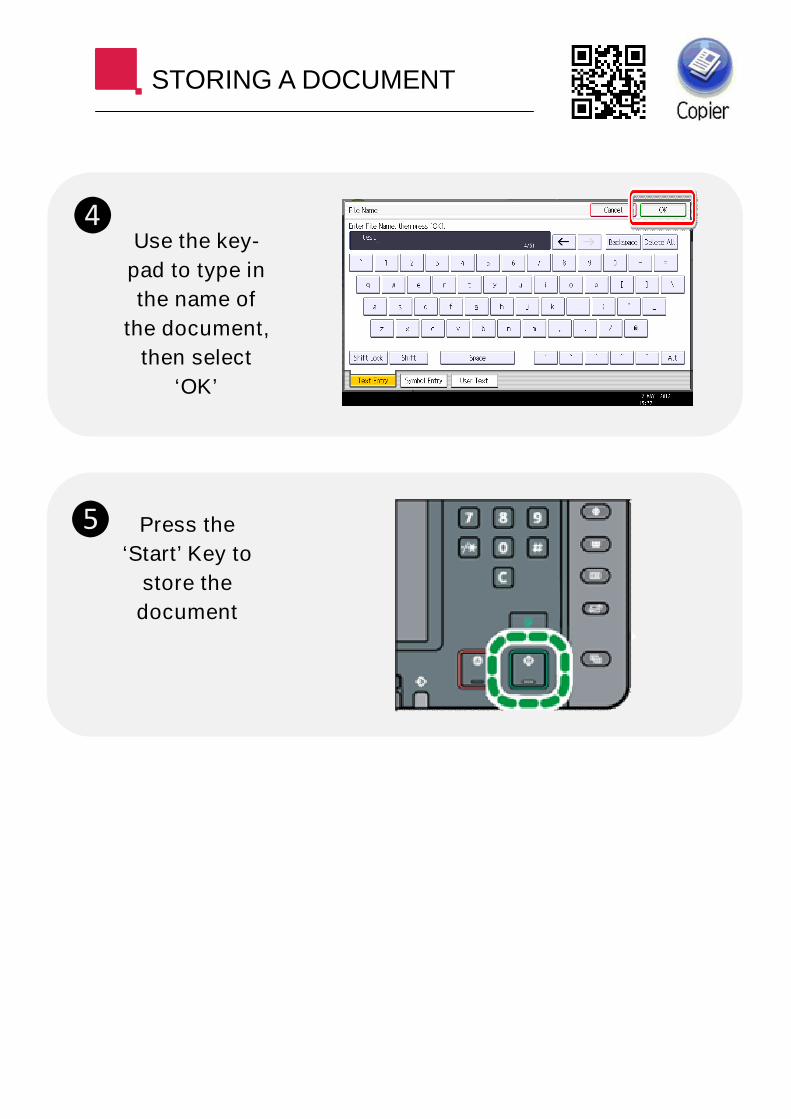
STORING A DOCUMENT
Use the key-
pad to type in
the name of
the document,
then select
‘OK’
Press the
‘Start’ Key to
store the
document
❹
❺

RETRIEVING DOCUMENTS
Select the
Shared Folder
(or the Folder
you saved
your
document to)
Select the
file you wish
to print
Use the number
keys to change
quantity. (Prints
one copy by de-
fault). Press the
‘Start’ button to
❶
❷
❸

LOCKED PRINT
At the PC
select File,
Print and
Properties
Under Job
Type select
‘Locked Print’
from the drop
down box, and
then
Create your own
‘User ID’. (e.g.
JSmith)
Create your own
‘Password’
(4-8 digits, e.g.
1234)
❶
❷
❸

LOCKED PRINT
At the MFD,
select
‘Printer’ and
‘Print Jobs’
Select your
User ID (in
this example
‘Nick’
Select the job
(s) you wish
to print and
then select
‘Print’.
❹
❺
❻

LOCKED PRINT
Use the
number keys
to enter your
‘Password’
Select ‘OK’
(Use number
keys to change
quantity)
Select ‘Print’ to
print your job(s)
❼
❽
❾

CREATING ONE-CLICK PRESETS
At your PC
select ‘File’, ‘Print’
and then ‘Printer
Properties’.
All available print
functions can be
found here.
The ‘One Click
Preset List’ comes
pre-filled with five
options, but it is
useful to create
your own.
The following ex-
ample shows how
to create a black
& white, single
sided one click
preset. Select the
‘1 Sided’ preset
❶
❷
❸

CREATING ONE-CLICK PRESETS
Select ‘Black
and White’ from
the drop down
menu
To save this
option, select
‘Register Current
Settings’
Type in a Name for
the Preset and any
comments required
to describe the
options you have
selected. Select OK
to save.
❹
❺
❻

CREATING ONE-CLICK PRESETS
Your preset has
now been
added to the
screen
You can also
change the order
of your presets by
selecting ‘Manage
Preset List’
Select your preset
and select the ‘Up’
or ‘Down’ option
to change
position in the list
❼
❽
❾

SCAN TO EMAIL
Select your
destination
box
If no other
settings are
required,
press ‘Start’
❶
❷

SAVING EMAIL SHORTCUTS
To save an
email address
as a shortcut,
select ‘Manual
Entry’
Use the key-
board to type
in the email
address, then
select ‘OK’
Select
‘Prog Dest’
❶
❷
❸
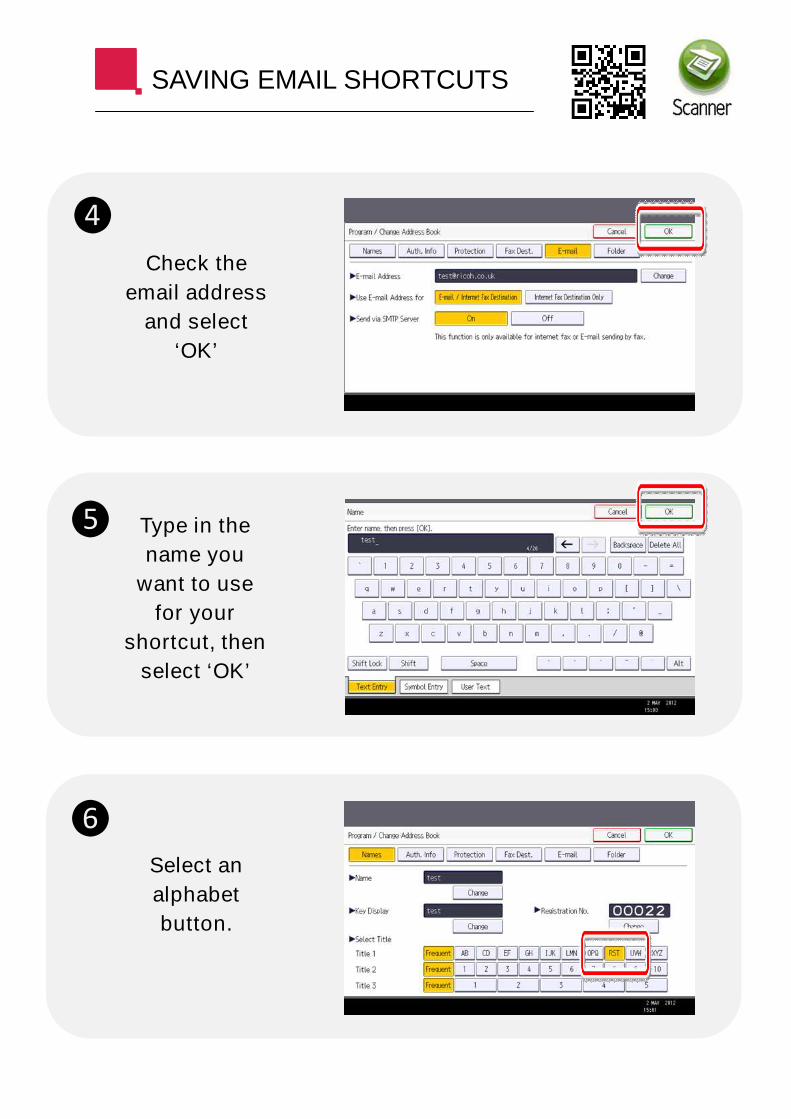
SAVING EMAIL SHORTCUTS
Check the
email address
and select
‘OK’
Type in the
name you
want to use
for your
shortcut, then
select ‘OK’
Select an
alphabet
button.
❹
❺
❻

SAVING EMAIL SHORTCUTS
Select ‘OK’
The shortcut
is now saved
and ready to
use.
Destinations
can also be
accessed by
using the al-
phabet title
❼
❽
SCAN TO FOLDER
Select the
‘Folder’ tab
Select the
Folder
destination
you require
If no other
settings are
required,
press ‘Start’
❶
❷
❸

NAMING A FILE
If you want to
name your
file, select
‘Send File
Type/Name’
Select ‘File
Name’
Type in the
name of your
document and
select ‘OK’
❶
❷
❸