Embed Size (px)
Citation preview
Version 3.2 Release —§—
Prime-Cache / Pro-Cache / Power-Cache
LTO Archive Appliance
User Manual
Cache-A Corp. Archive Appliance Manual – January 2013 pg. ii
Cache-A Archive Appliance Manual CA-D0011, January 2013. Cache-A Corporation provides this publication “as is” without warranty of any kind, either express or implied, including but not limited to the implied warranties of merchantability or fitness for a particular purpose. Cache-A Corporation may revise this publication from time to time without notice. COPYRIGHT STATEMENT Copyright 2009-13 by Cache-A Corporation. All rights reserved. Your right to copy this manual is limited by copyright law. Making copies or adaptations without prior written authorization of Cache-A Corporation is prohibited by law and constitutes a punishable violation of the law. TRADEMARK STATEMENT Cache-A, Prime-Cache, Pro-Cache, and Power-Cache are trademarks of Cache-A Corporation, A-Series is licensed by Cache-A from Quantum Corporation. Windows and Vista are trademarks of Microsoft Corp., Mac and Mac OS are trademarks of Apple Inc., registered in the U.S. and other countries. Other trademarks may be mentioned herein which belong to other companies.
Cache-A Corp. Archive Appliance Manual – January 2013 pg. iii
Cache-A Corporation Limited Warranty Statement
Cache-A’s warranty obligations for this product are limited to the terms set forth below:
Cache-A, as defined below, warrants this product against defects in materials and workmanship under normal use for a period of ONE (1) YEAR from the date of purchase by the original end-user purchaser (“Warranty Period”).
If a defect arises and a valid claim is received by Cache-A within the Warranty Period, at its option and to the extent permitted by law, Cache-A will either (1) repair the product at no charge, using new parts or refurbished parts, (2) exchange the product with a product that is new or refurbished and is at least functionally equivalent to the original product, or (3) refund the purchase price of the product.
EXCLUSIONS AND LIMITATIONS This Limited Warranty applies only to the product manufactured by or for Cache-A that can be identified by the “Cache-A” trademark, trade name, or logo annexed to it. The Limited Warranty does not apply to any non-Cache-A product or any software, even if packaged or sold with the Cache-A product. Manufacturers, suppliers, or publishers, other than Cache-A, may provide their own warranties to the end user purchaser.
Cache-A does not warrant that the operation of the product will be uninterrupted or error-free. Cache-A is not responsible for damage arising from failure to follow instructions relating to the product’s use. This warranty does not apply: (a) to cosmetic damage, including but not limited to scratches, dents, and broken plastic; (b) to damage caused by use with non-Cache-A products; (c) to damage caused by accident, abuse, misuse, flood, fire, earthquake or other external causes; (d) to damage caused by operating the product outside the permitted or intended uses described by Cache-A; (e) to damage caused by service (including upgrades and expansions) performed by anyone who is not a representative of Cache-A; (f) to a product or part that has been modified to alter functionality or capability without the written permission of Cache-A; or (g) if any Cache-A serial number has been removed or defaced. Installation of any software programs not authorized by Cache-A will void this warranty.
Important: Do not open the product. Opening the product may cause damage that is not covered by this warranty. Only Cache-A or an authorized service provider should perform service on this product.
TO THE EXTENT PERMITTED BY LAW, THIS WARRANTY AND THE REMEDIES SET FORTH ABOVE ARE EXCLUSIVE AND IN LIEU OF ALL OTHER WARRANTIES, REMEDIES AND CONDITIONS, WHETHER ORAL OR WRITTEN, STATUTORY, EXPRESS OR IMPLIED. AS PERMITTED BY APPLICABLE LAW, CACHE-A SPECIFICALLY DISCLAIMS ANY AND ALL STATUTORY OR IMPLIED WARRANTIES, INCLUDING, WITHOUT LIMITATION, WARRANTIES OF MERCHANTABILITY AND FITNESS FOR A PARTICULAR PURPOSE AND WARRANTIES AGAINST HIDDEN OR LATENT DEFECTS. IF CACHE-A CANNOT LAWFULLY DISCLAIM STATUTORY OR IMPLIED WARRANTIES THEN TO THE EXTENT PERMITTED BY LAW, ALL SUCH WARRANTIES SHALL BE LIMITED IN DURATION TO THE DURATION OF THE EXPRESS WARRANTY AND TO THE REPAIR OR REPLACEMENT SERVICE AS DETERMINED BY CACHE-A IN ITS SOLE
Cache-A Corp. Archive Appliance Manual – January 2013 pg. iv
DISCRETION. No Cache-A reseller, agent, or employee is authorized to make any modification, extension, or addition to this warranty. If any term is held to be illegal or unenforceable, the legality or enforceability of the remaining terms shall not be affected or impaired.
EXCEPT AS PROVIDED IN THIS WARRANTY AND TO THE MAXIMUM EXTENT PERMITTED BY LAW, CACHE-A IS NOT RESPONSIBLE FOR DIRECT, SPECIAL, INCIDENTAL OR CONSEQUENTIAL DAMAGES RESULTING FROM ANY BREACH OF WARRANTY OR CONDITION, OR UNDER ANY OTHER LEGAL THEORY, INCLUDING BUT NOT LIMITED TO LOSS OF USE; LOSS OF REVENUE; LOSS OF ACTUAL OR ANTICIPATED PROFITS (INCLUDING LOSS OF PROFITS ON CONTRACTS); LOSS OF THE USE OF MONEY; LOSS OF ANTICIPATED SAVINGS; LOSS OF BUSINESS; LOSS OF OPPORTUNITY; LOSS OF GOODWILL; LOSS OF REPUTATION; LOSS OF, DAMAGE TO OR CORRUPTION OF DATA;OR ANY INDIRECT OR CONSEQUENTIAL LOSS OR DAMAGE HOWSOEVER CAUSED INCLUDING THE REPLACEMENT OF EQUIPMENT AND PROPERTY, ANY COSTS OF RECOVERING, PROGRAMMING OR REPRODUCING ANY PROGRAM OR DATA STORED IN OR USED WITH THE CACHE-A PRODUCT, AND ANY FAILURE TO MAINTAIN THECONFIDENTIALITY OF DATA STORED ON THE PRODUCT. THE FOREGOING LIMITATION SHALL NOT APPLY TO DEATH OR PERSONAL INJURY CLAIMS, OR ANY STATUTORY LIABILITY FOR INTENTIONAL AND GROSS NEGLIGENT ACTS AND/OR OMISSIONS. CACHE-A DISCLAIMS ANY REPRESENTATION THAT IT WILL BE ABLE TO REPAIR ANY PRODUCT UNDER THIS WARRANTY OR MAKE A PRODUCT EXCHANGE WITHOUT RISK TO OR LOSS OF PROGRAMS OR DATA.
OBTAINING WARRANTY SERVICE Please access and review the online help resources referred to in the documentation accompanying this product before seeking warranty service. If the product is still not functioning properly after making use of these resources, contact your authorized Cache-A reseller or access the online website: www.cache-a.com/support for instructions on how to obtain warranty service. You must follow Cache-A’s warranty processes. You must retain the original system packaging material to enable you to ship the product to Cache-A’s repair service location for service; failure to do so will make any damages to the product incurred in shipping void the warrantee (you may order replacement packaging material for a fee). During the first 90 days of the warrantee period, Cache-A will cover ground shipping both ways and return shipping for the full year; customers wanting expedited shipping must cover all associated costs.
At Cache-A’s discretion we may send you new or refurbished replacement product, or customer-installable replacement parts to enable you to service or exchange your own product (“Self Service”). Upon receipt of the replacement product or part, the original product or part becomes the property of Cache-A and you agree to follow instructions, including, if required, arranging the return of original product or part to Cache-A in a timely manner. When providing Self Service requiring the return of the original product or part, or in order to secure advance shipment of replacement systems, Cache-A may require a credit card authorization as security for the retail price of the replacement product or part and applicable shipping costs. If you follow instructions, Cache-A will cancel the credit card authorization, so you will not be charged for the product or part and any related shipping costs. If you fail to return the replaced product or part as instructed, Cache-A will charge the credit card for the authorized amount.
Service options, parts availability and response times may vary according to the country in which service is requested. Service options are subject to change at any time. You may be responsible for shipping and

Cache-A Corp. Archive Appliance Manual – January 2013 pg. v
handling charges if the product cannot be serviced in the country in which service is requested. If you seek service in a country that is not the country of purchase, you will comply with all applicable export laws and regulations and be responsible for all custom duties, V.A.T. and other associated taxes and charges. For international service, Cache-A may repair or exchange defective products and parts with comparable products and parts that comply with local standards. In accordance with applicable law, Cache-A may require that you furnish proof of purchase details and/or comply with registration requirements before receiving warranty service.
Before you deliver your product for warranty service it is your responsibility to keep a separate backup copy of the contents, and disable any security passwords. IT IS POSSIBLE THAT THE CONTENTS OF YOUR HARD DRIVE WILL BE LOST OR REFORMATTED IN THE COURSE OF WARRANTY SERVICE, AND CACHE-A AND ITS AGENTS ARE NOT RESPONSIBLE FOR ANY DAMAGE TO OR LOSS OF PROGRAMS, DATA OR OTHER INFORMATION CONTAINED ON THE MEDIA OR ANY PART OF THE PRODUCT SERVICED. We will attempt to maintain your configuration and system data, however, your product may be returned to you configured as originally purchased, subject to applicable updates. You may be responsible for reconfiguring, reloading databases, reinstalling software options and resetting user names and passwords. Recovery and reinstallation of software and user data are not covered under this Limited Warranty.
Cache-A Corp. Archive Appliance Manual – January 2013 pg. vi
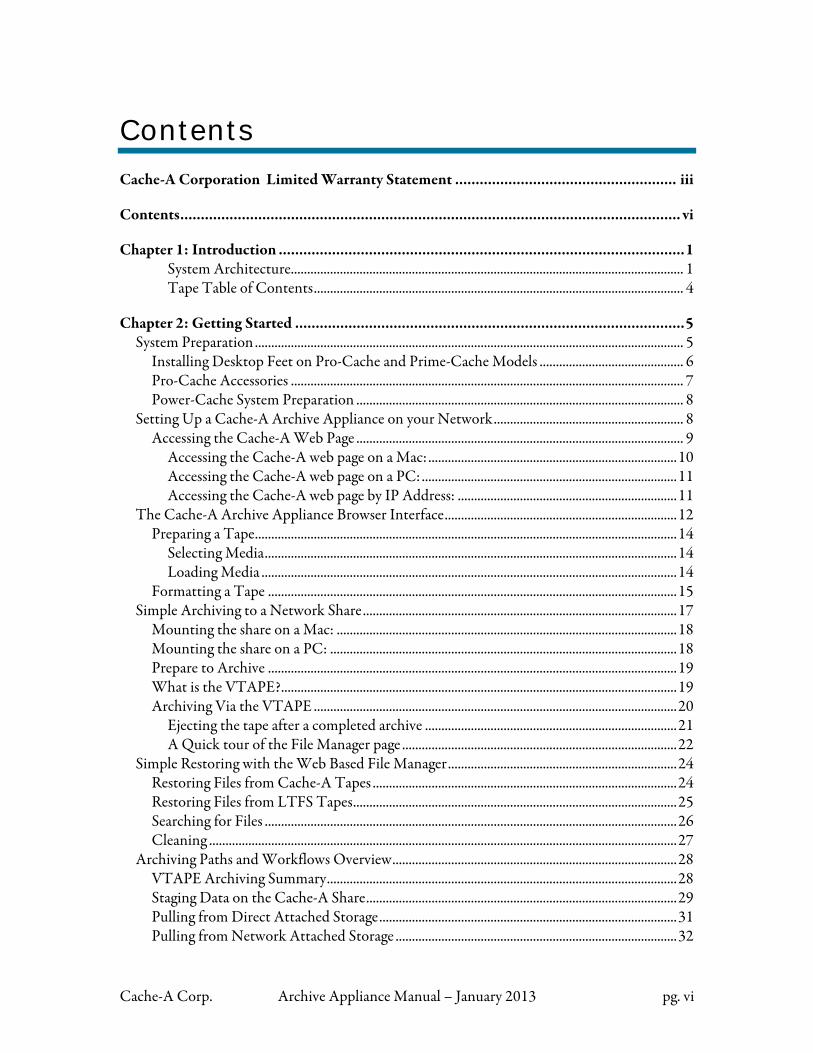
Contents
Cache-A Corporation Limited Warranty Statement ...................................................... iii
Contents.......................................................................................................................... vi
Chapter 1: Introduction ...................................................................................................1System Architecture........................................................................................................................ 1Tape Table of Contents................................................................................................................. 4
Chapter 2: Getting Started ...............................................................................................5System Preparation................................................................................................................................... 5
Installing Desktop Feet on Pro-Cache and Prime-Cache Models ............................................ 6Pro-Cache Accessories ........................................................................................................................ 7Power-Cache System Preparation .................................................................................................... 8
Setting Up a Cache-A Archive Appliance on your Network.......................................................... 8Accessing the Cache-A Web Page .................................................................................................... 9
Accessing the Cache-A web page on a Mac: ............................................................................10Accessing the Cache-A web page on a PC: ..............................................................................11Accessing the Cache-A web page by IP Address: ...................................................................11
The Cache-A Archive Appliance Browser Interface.......................................................................12Preparing a Tape.................................................................................................................................14
Selecting Media..............................................................................................................................14Loading Media ...............................................................................................................................14
Formatting a Tape .............................................................................................................................15Simple Archiving to a Network Share................................................................................................17
Mounting the share on a Mac: ........................................................................................................18Mounting the share on a PC: ..........................................................................................................18Prepare to Archive .............................................................................................................................19What is the VTAPE?.........................................................................................................................19Archiving Via the VTAPE ...............................................................................................................20
Ejecting the tape after a completed archive .............................................................................21A Quick tour of the File Manager page ....................................................................................22
Simple Restoring with the Web Based File Manager......................................................................24Restoring Files from Cache-A Tapes .............................................................................................24Restoring Files from LTFS Tapes...................................................................................................25Searching for Files ..............................................................................................................................26Cleaning ...............................................................................................................................................27
Archiving Paths and Workflows Overview.......................................................................................28VTAPE Archiving Summary...........................................................................................................28Staging Data on the Cache-A Share...............................................................................................29Pulling from Direct Attached Storage...........................................................................................31Pulling from Network Attached Storage ......................................................................................32
Cache-A Corp. Archive Appliance Manual – January 2013 pg. vii
Queuing Archive and Restore Jobs ................................................................................................33System Shutdown....................................................................................................................................35
Chapter 3: Understanding Cache-A Appliance Technologies.........................................37The Cache-A VTAPE............................................................................................................................37
Managing Your Content ..................................................................................................................41Organizing Techniques ....................................................................................................................42
Staging your data ...........................................................................................................................42Disconnecting the VTAPE .........................................................................................................43Versioned Archiving.....................................................................................................................44VTAPE Contents may vary ........................................................................................................45
Managing VTAPE and Physical Tape Capacity ..............................................................................45The Cache-A Table of Contents and Catalog..................................................................................48
Managing the Catalog .......................................................................................................................50
Chapter 4: Browser Interface Reference .........................................................................52Header and Main Menu ........................................................................................................................52
Header ..................................................................................................................................................52Main Menu..........................................................................................................................................53
File Manager.............................................................................................................................................54File Manager Operations..................................................................................................................55
The Source Directory View Dropdown Menu.......................................................................56Direct Attached Storage Mounting and Unmounting.........................................................57The Tape Directory View Dropdown Menu..........................................................................58
File and Folder Selection and Movement .....................................................................................59Restoring LTFS Tapes .................................................................................................................60Cache-A Share Bypass and File Movement Control.............................................................60Subdirectory Display ....................................................................................................................65
The Search Button.............................................................................................................................66Restore from Search Results .......................................................................................................66Power Search Examples................................................................................................................68
The Menu Button..............................................................................................................................70Rename – Rename Tape Volume ..............................................................................................70Delete – Delete Item in Catalog ................................................................................................71Get Info ...........................................................................................................................................71File Information Window...........................................................................................................72Erase .................................................................................................................................................74Eject..................................................................................................................................................75Recover All......................................................................................................................................76Location...........................................................................................................................................77
The Transfer Summary.....................................................................................................................79View All Transfer Link ................................................................................................................79Transfer Activity Indicator .........................................................................................................80Cancel Button................................................................................................................................81Drive Status ....................................................................................................................................82

Cache-A Corp. Archive Appliance Manual – January 2013 pg. viii
Transfer Status Bar .......................................................................................................................82The Transfer List ..........................................................................................................................83The Pending Transfer Bar...........................................................................................................86
Queue Manager .......................................................................................................................................87Library Manager ......................................................................................................................................89Tape Information ...................................................................................................................................90
Tape Summary...............................................................................................................................91File Summary .................................................................................................................................91Media Information .......................................................................................................................92
System Status ...........................................................................................................................................93Health Status..................................................................................................................................93Network Status ..............................................................................................................................94
Versions.....................................................................................................................................................95Diagnostic Logs .......................................................................................................................................97Mount Manager ......................................................................................................................................98
AFP Mounting..................................................................................................................................100Backup Schedules..................................................................................................................................103Network Settings ..................................................................................................................................104
Network Settings Tab .....................................................................................................................104Network Services Tab .....................................................................................................................106
User Management.................................................................................................................................108Date & Time ..........................................................................................................................................109System Tools ..........................................................................................................................................110
Support Connect Tab .....................................................................................................................110Software Update Tab ......................................................................................................................111Backup Catalog Tab ........................................................................................................................112Settings Tab.......................................................................................................................................113
Multiple Volumes........................................................................................................................115Write Verify..................................................................................................................................117Direct Attached Storage Link...................................................................................................117VTAPE Link ................................................................................................................................119Library IP Address ......................................................................................................................120MD5 Checksum..........................................................................................................................120Automatic Software Update.....................................................................................................121Send Email Upon Session End .................................................................................................121
Utilities Tab ......................................................................................................................................123Disconnect VTAPE....................................................................................................................124Clear the Cache-A Share ...........................................................................................................124Rescan Devices .............................................................................................................................125Restart Tape Manager ................................................................................................................125
Catalog Sharing Tab........................................................................................................................125Initiating Catalog Sharing.........................................................................................................127Taking a Client Off-line ............................................................................................................128Using Catalog Sharing for Periodic Syncing .........................................................................128
Cache-A Corp. Archive Appliance Manual – January 2013 pg. ix
RAID Settings Tab ..........................................................................................................................128
Chapter 5: Cache-A LTFS ............................................................................................129Formatting a Tape with LTFS ......................................................................................................130The Cache-A Catalog and LTFS Tapes......................................................................................132File Manager and LTFS Tapes ......................................................................................................133LTFS File System Checking ..........................................................................................................134
Cache-A TOC Errors on LTFS tapes ....................................................................................134LTFS Archiving with Cache-A Appliances ....................................................................................135
Using LTFS with Client Shared or Direct Mounted Volumes .............................................135Using LTFS with the Cache-A Network Shared Volume......................................................135
Tape Spanning .............................................................................................................................137Tape Duplication ........................................................................................................................137
Known issues with LTFS: ...................................................................................................................138LTFS Latency Issues........................................................................................................................138Conditions that can prevent unmounting the LTFS Volume...............................................139Macintosh issues with the LTFS Volume:..................................................................................140
File Naming Issues ......................................................................................................................140
Chapter 6: Pro-Cache & Power-Cache Library Operations ..........................................141Installing the Cache-A Library Option............................................................................................141
Physical Mounting ...........................................................................................................................141Electrical Connections....................................................................................................................142
Preparing Cache-A Systems for Library Operations.....................................................................143Loading the Library with Tapes....................................................................................................144
Selecting and Preparing Tape Media ......................................................................................144Tape Bar Codes ...........................................................................................................................145Using Library Magazines ...........................................................................................................146Cleaning Library Drives.............................................................................................................148
Cache-A Library and Multi-Drive User Interface.........................................................................149Multi-Drive VTAPE Changes ......................................................................................................149
Two Tape Drive Systems...........................................................................................................149Power-Cache Models with up to Four Drives ......................................................................150
Web User Interface Header...........................................................................................................151Library File Manager Operations .................................................................................................152
The Source Directory View Dropdown Menu.....................................................................152The Tape Directory View Dropdown Menu........................................................................152Archiving and Restoring............................................................................................................153LIBRARY VTAPE Bypass and File Movement Control...................................................154Restore from Search Results .....................................................................................................154
The Menu Button............................................................................................................................154Load Tape .....................................................................................................................................155Dup Tape (a.k.a. Dubbing) .......................................................................................................155Eject................................................................................................................................................156
Library Manager ...............................................................................................................................157
Cache-A Corp. Archive Appliance Manual – January 2013 pg. x
Multiple-Volume Tape Usage ..................................................................................................158Diagnostic Logs ................................................................................................................................159Backup Schedules .............................................................................................................................159
Chapter 7: Hardware Reference....................................................................................160Prime-Cache...........................................................................................................................................160
Front Panel ........................................................................................................................................160Rear Panel ..........................................................................................................................................163
Pro-Cache ...............................................................................................................................................165Front Panel ........................................................................................................................................165Rear Panel ..........................................................................................................................................168Pro-Cache Direct Attached Storage Interfaces .........................................................................170
Power-Cache..........................................................................................................................................173Front Panel ........................................................................................................................................173Rear Panel ..........................................................................................................................................176
Maintenance Terminal ........................................................................................................................178Maintenance Options .....................................................................................................................179
Appendix A: Cache-A Archiving Best Practices ........................................................182
Appendix B: Regular Expressions .................................................................................187
Appendix C: RAID Management .................................................................................188Pro-Cache & Prime-Cache RAID 0 / RAID 1 Configuration ..................................................188
Logging in from the Maintenance Terminal .............................................................................189Logging in from a Terminal Session ............................................................................................190Reconfiguring the Pro-Cache RAID ...........................................................................................190
Power-Cache RAID 0 / RAID 5.......................................................................................................193Changing Power-Cache’s RAID Configuration.......................................................................194Monitoring and Managing RAID Volumes...............................................................................194Repairing a Failed Disk in a RAID 5 Volume............................................................................197
Cache-A Corp. Archive Appliance Manual – January 2013 pg. 1
Chapter 1: Introduction
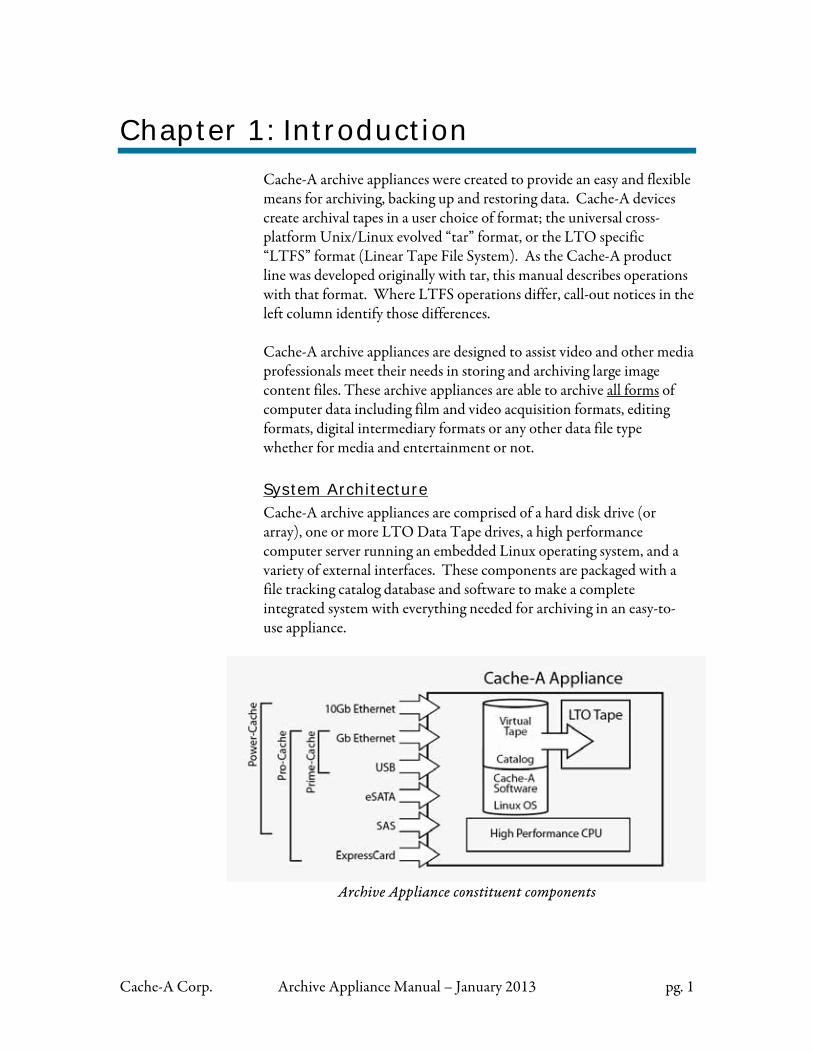
Cache-A archive appliances were created to provide an easy and flexible means for archiving, backing up and restoring data. Cache-A devices create archival tapes in a user choice of format; the universal cross-platform Unix/Linux evolved “tar” format, or the LTO specific “LTFS” format (Linear Tape File System). As the Cache-A product line was developed originally with tar, this manual describes operations with that format. Where LTFS operations differ, call-out notices in the left column identify those differences. Cache-A archive appliances are designed to assist video and other media professionals meet their needs in storing and archiving large image content files. These archive appliances are able to archive all forms of computer data including film and video acquisition formats, editing formats, digital intermediary formats or any other data file type whether for media and entertainment or not. System Architecture
Cache-A archive appliances are comprised of a hard disk drive (or array), one or more LTO Data Tape drives, a high performance computer server running an embedded Linux operating system, and a variety of external interfaces. These components are packaged with a file tracking catalog database and software to make a complete integrated system with everything needed for archiving in an easy-to-use appliance.
Archive Appliance constituent components
Cache-A Corp. Archive Appliance Manual – January 2013 pg. 2
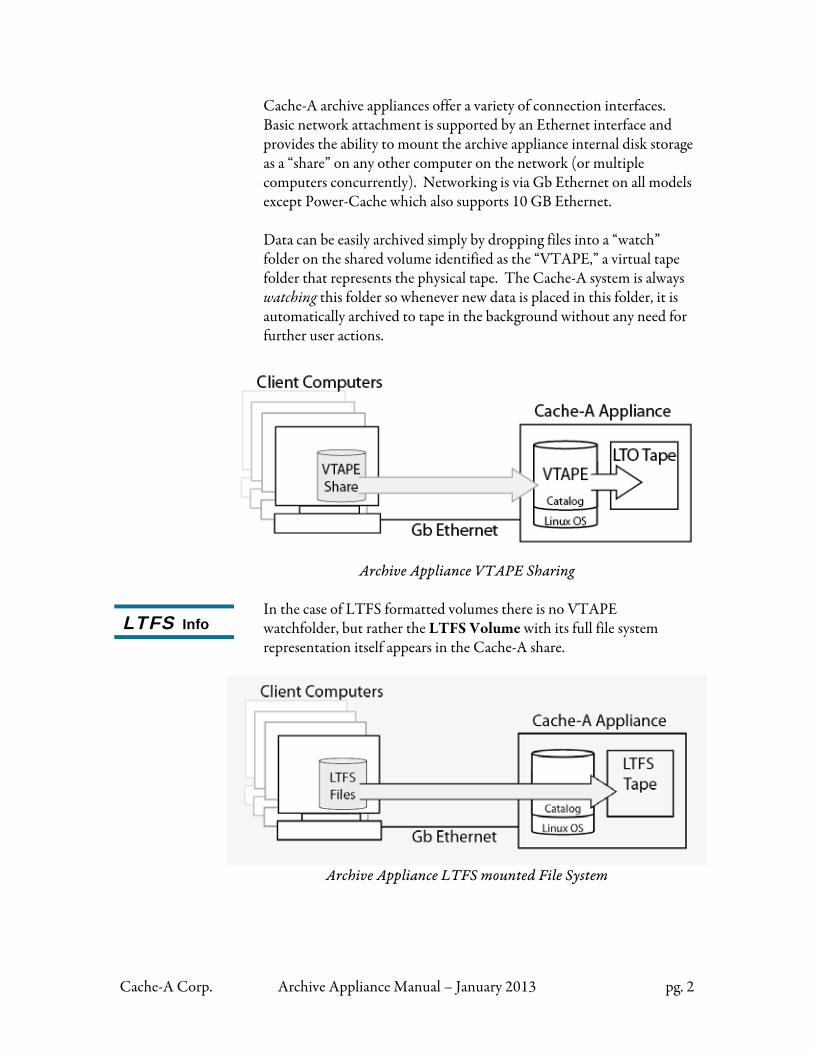
Cache-A archive appliances offer a variety of connection interfaces. Basic network attachment is supported by an Ethernet interface and provides the ability to mount the archive appliance internal disk storage as a “share” on any other computer on the network (or multiple computers concurrently). Networking is via Gb Ethernet on all models except Power-Cache which also supports 10 GB Ethernet. Data can be easily archived simply by dropping files into a “watch” folder on the shared volume identified as the “VTAPE,” a virtual tape folder that represents the physical tape. The Cache-A system is always watching this folder so whenever new data is placed in this folder, it is automatically archived to tape in the background without any need for further user actions.
Archive Appliance VTAPE Sharing
In the case of LTFS formatted volumes there is no VTAPE watchfolder, but rather the LTFS Volume with its full file system representation itself appears in the Cache-A share.
Archive Appliance LTFS mounted File System
LTFS Info
Cache-A Corp. Archive Appliance Manual – January 2013 pg. 3
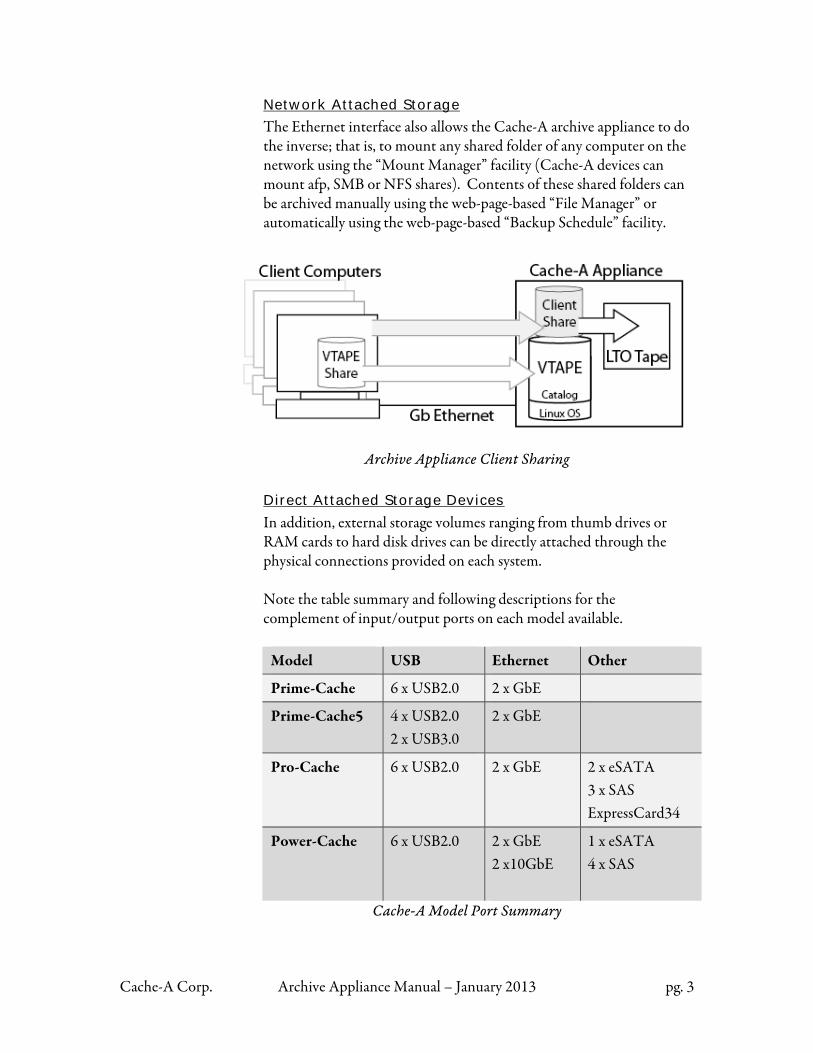
Network Attached Storage
The Ethernet interface also allows the Cache-A archive appliance to do the inverse; that is, to mount any shared folder of any computer on the network using the “Mount Manager” facility (Cache-A devices can mount afp, SMB or NFS shares). Contents of these shared folders can be archived manually using the web-page-based “File Manager” or automatically using the web-page-based “Backup Schedule” facility.
Archive Appliance Client Sharing
Direct Attached Storage Devices
In addition, external storage volumes ranging from thumb drives or RAM cards to hard disk drives can be directly attached through the physical connections provided on each system. Note the table summary and following descriptions for the complement of input/output ports on each model available.
Model USB Ethernet Other
Prime-Cache 6 x USB2.0 2 x GbE
Prime-Cache5 4 x USB2.0 2 x USB3.0
2 x GbE
Pro-Cache 6 x USB2.0 2 x GbE
2 x eSATA 3 x SAS ExpressCard34
Power-Cache 6 x USB2.0 2 x GbE 2 x10GbE
1 x eSATA 4 x SAS
Cache-A Model Port Summary
Cache-A Corp. Archive Appliance Manual – January 2013 pg. 4
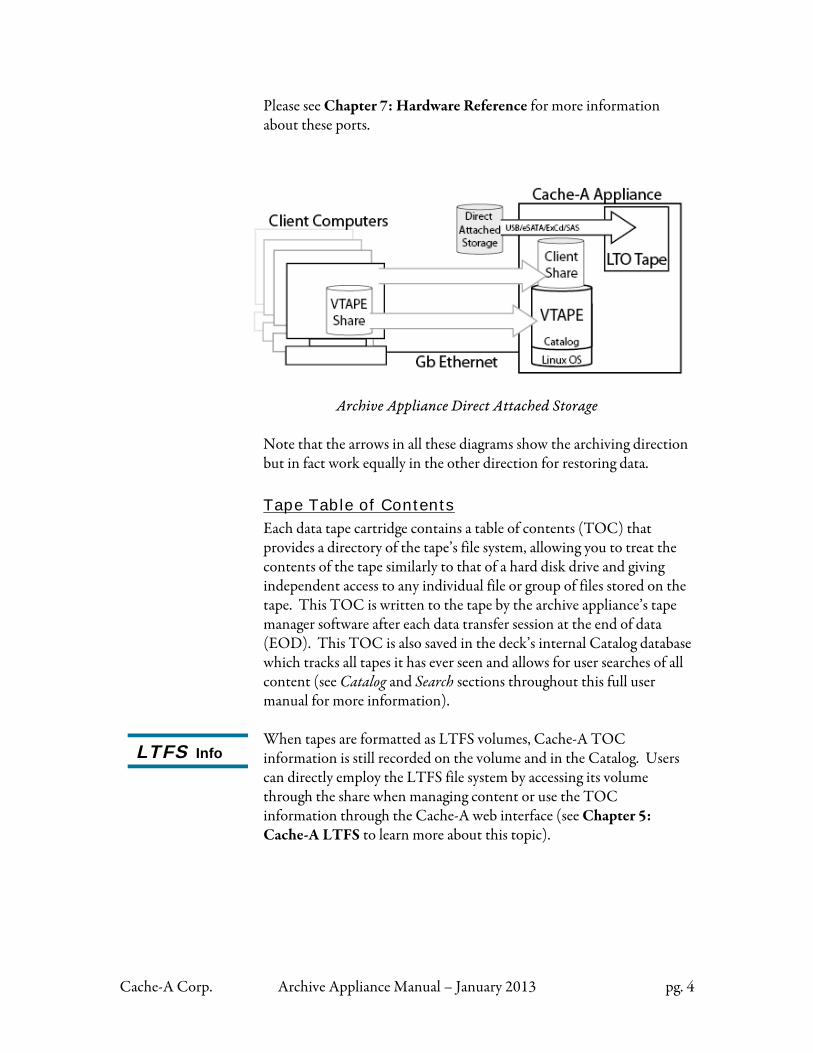
Please see Chapter 7: Hardware Reference for more information about these ports.
Archive Appliance Direct Attached Storage
Note that the arrows in all these diagrams show the archiving direction but in fact work equally in the other direction for restoring data. Tape Table of Contents
Each data tape cartridge contains a table of contents (TOC) that provides a directory of the tape’s file system, allowing you to treat the contents of the tape similarly to that of a hard disk drive and giving independent access to any individual file or group of files stored on the tape. This TOC is written to the tape by the archive appliance’s tape manager software after each data transfer session at the end of data (EOD). This TOC is also saved in the deck’s internal Catalog database which tracks all tapes it has ever seen and allows for user searches of all content (see Catalog and Search sections throughout this full user manual for more information). When tapes are formatted as LTFS volumes, Cache-A TOC information is still recorded on the volume and in the Catalog. Users can directly employ the LTFS file system by accessing its volume through the share when managing content or use the TOC information through the Cache-A web interface (see Chapter 5: Cache-A LTFS to learn more about this topic).
LTFS Info
Cache-A Corp. Archive Appliance Manual – January 2013 pg. 5
Chapter 2: Getting Started
This chapter describes how to set up your Cache-A archive appliance and shows the basic approaches for archiving files.
System Preparation
Setting up a Cache-A archive appliance on your network
The Cache-A Archive Appliance Browser User Interface
Simple Archiving to a Network Share
Simple Restoring with the Web Based File Manager
Archiving Paths and Workflows Overview
System Shutdown
This section will get you started, however, you are encouraged to read both Chapter 1: Introduction and Chapter 3: Cache-A Technologies to understand the power of your archive appliance.
System Preparation
Cache-A archive appliances are designed to be used in a wide variety of environments but users should attempt to keep the system in a reasonably cool, low humidity and clean area. There is wide latitude for this within the systems specifications, but the life of tapes and the tape drive will depend to some extent on these parameters. Keeping the tapes and drive clean is the most important environmental factor; see Appendix A: Cache-A Archiving Best Practices for more information about this. Prime-Cache is intended for tabletop operation and can be used standing up vertically or lying on its side with the drive toward the top (drive door opens up). Pro-Cache is intended either for tabletop or rack-mount applications used with our rack mounting kit or on a rack tray. Power-Cache is intended for rack-mount use only.
Cache-A Corp. Archive Appliance Manual – January 2013 pg. 6
Warning
Regardless of how your Cache-A system is mounted and used it is important to always keep all vent holes clear of obstructions to assure adequate system cooling.
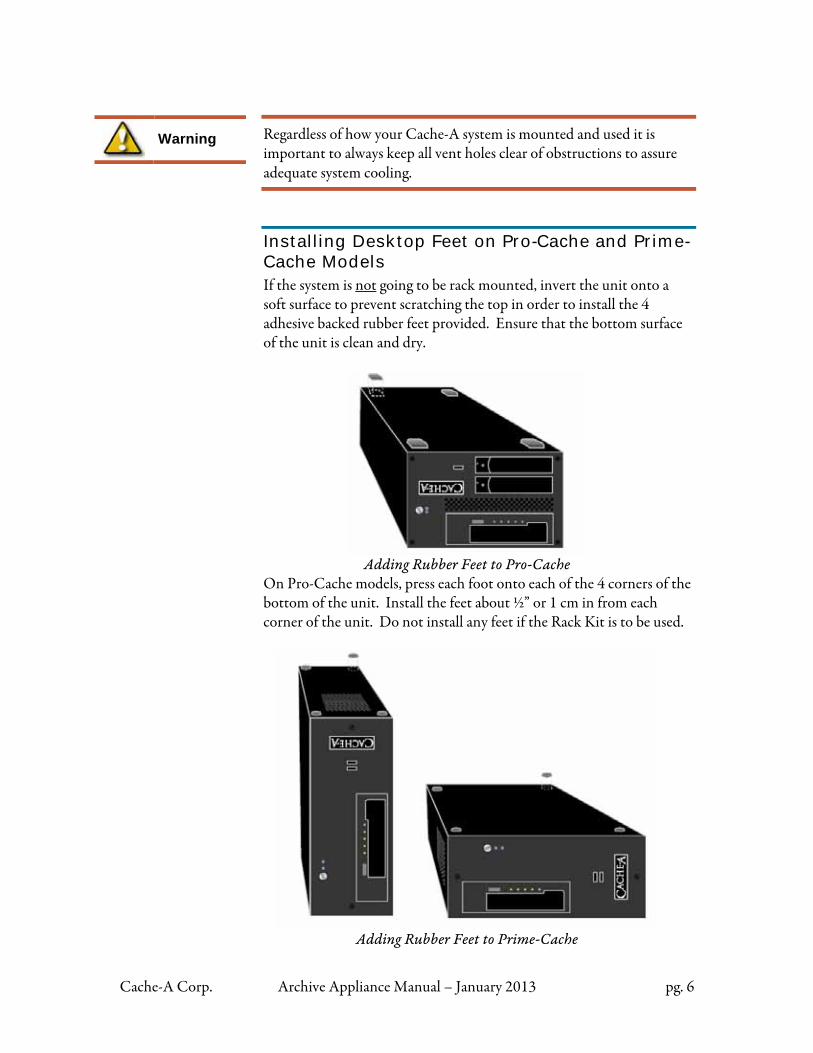
Installing Desktop Feet on Pro-Cache and Prime-Cache Models If the system is not going to be rack mounted, invert the unit onto a soft surface to prevent scratching the top in order to install the 4 adhesive backed rubber feet provided. Ensure that the bottom surface of the unit is clean and dry.
Adding Rubber Feet to Pro-Cache
On Pro-Cache models, press each foot onto each of the 4 corners of the bottom of the unit. Install the feet about ½” or 1 cm in from each corner of the unit. Do not install any feet if the Rack Kit is to be used.
Adding Rubber Feet to Prime-Cache
Cache-A Corp. Archive Appliance Manual – January 2013 pg. 7
Prime-Cache models are not rack mountable and are intended for desktop use (although they can be placed in a suitable rack tray). Prime-Cache models can be operated in either a horizontal or vertical desktop orientation, as you prefer. When positioning rubber feet for vertical orientation, place them as near to the corners as practical to maximize the stability of the unit.
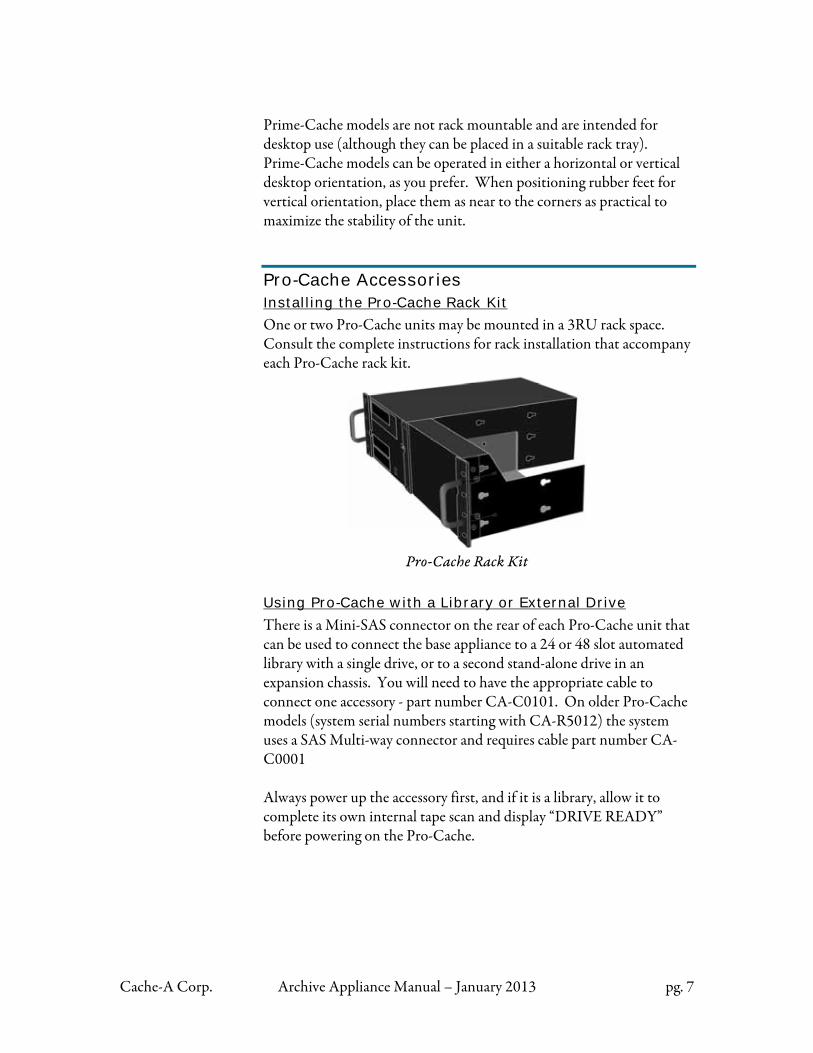
Pro-Cache Accessories Installing the Pro-Cache Rack Kit
One or two Pro-Cache units may be mounted in a 3RU rack space. Consult the complete instructions for rack installation that accompany each Pro-Cache rack kit.
Pro-Cache Rack Kit
Using Pro-Cache with a Library or External Drive
There is a Mini-SAS connector on the rear of each Pro-Cache unit that can be used to connect the base appliance to a 24 or 48 slot automated library with a single drive, or to a second stand-alone drive in an expansion chassis. You will need to have the appropriate cable to connect one accessory - part number CA-C0101. On older Pro-Cache models (system serial numbers starting with CA-R5012) the system uses a SAS Multi-way connector and requires cable part number CA-C0001 Always power up the accessory first, and if it is a library, allow it to complete its own internal tape scan and display “DRIVE READY” before powering on the Pro-Cache.

Cache-A Corp. Archive Appliance Manual – January 2013 pg. 8
Power-Cache System Preparation Please refer to our separate Power-Cache System Installation Guide for details on getting your Power-Cache ready to use. A copy should have been included with your system and is also available from the user manuals link on our web site. As Power-Cache tape drives are all external to the base unit, it is extremely important to connect the system as outlined and to observe the correct power up sequence in order to see and control all drives and libraries.
Setting Up a Cache-A Archive Appliance on your Network
By default, Cache-A archive appliances must be connected to an Ethernet network with DHCP and will obtain a connection via an assigned IP address. This means your network needs to include at least a client computer, the Cache-A deck and a router. You can use any one of the Ethernet connections available on the back panel of your Cache-A archive appliance. Most models have 2 each GbE ports, Power-Cache provides also 2 each 10GbE ports – refer to the Power-Cache installation and setup guide for additional networking guidelines.
Only attach one Ethernet connection per network. Connecting more than one port to the same network will cause networking problems.
Archive Appliance Network Connection
Warning
Cache-A Corp. Archive Appliance Manual – January 2013 pg. 9
This may take a few minutes
Warning
Once the system’s Ethernet is connected to a DHCP network, connect power and turn on the system by pressing the power button on the front panel. Upon powering up, the system will obtain an IP address from the router and then advertise itself on the network using both Apple Bonjour and Windows name services. Note that DHCP assignment and Windows/Bonjour name advertisement may take some time on some network/system combinations. Normally Cache-A systems will appear within a minute, but can take as long as a half hour to show up, especially in some Windows environments. Static IP Addressing
If you want to employ a user defined static IP address you can do so from the Network Settings page of the Cache-A appliance web page (see Network Setting section in Chapter 4: Browser Interface Reference for more details). This can be done from the browser which is normally reached through the DHCP setup referenced above – or – you can connect a monitor, keyboard and mouse directly to the back panel of the unit (see Maintenance Terminal section in Chapter 7: Hardware Reference for more details).
Making any network changes may make your system unreachable on the network if you forget its IP address or if you connect to the wrong Ethernet port. Proceed with caution – lost networking situations can frequently only be corrected via the Maintenance Terminal.
Accessing the Cache-A Web Page In order to get started using your Cache-A Archive appliance, you will first need to access it from a browser and confirm initializing a tape as described below. You will need to know the Host Name or Bonjour Name of your Cache-A device to proceed. The default hostname of any Cache-A Archive appliance is:
archiveXX where XX is the last two digits of your serial number. For example serial number CA-P4001-30010 would be archive10. Host Names can
Cache-A Corp. Archive Appliance Manual – January 2013 pg. 10
be changed in Network Settings but we recommend you only do so after fully understanding Cache-A operations. Accessing the Cache-A web page on a Mac:
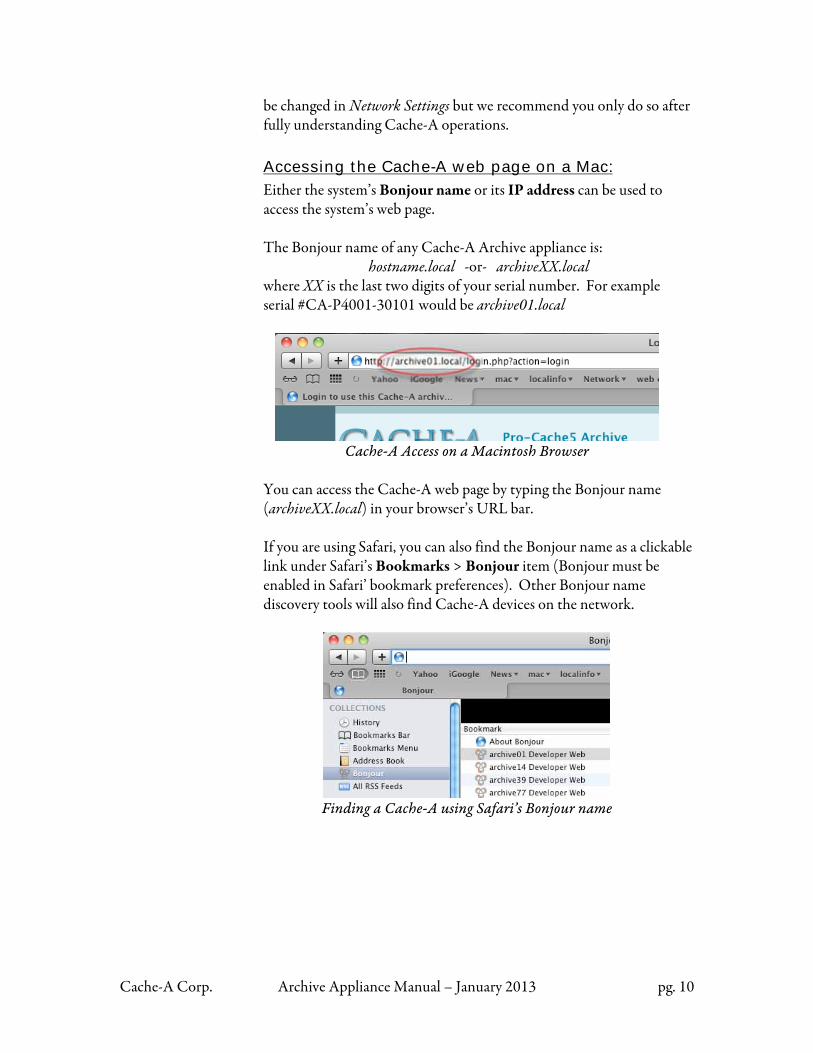
Either the system’s Bonjour name or its IP address can be used to access the system’s web page. The Bonjour name of any Cache-A Archive appliance is:
hostname.local -or- archiveXX.local where XX is the last two digits of your serial number. For example serial #CA-P4001-30101 would be archive01.local
Cache-A Access on a Macintosh Browser
You can access the Cache-A web page by typing the Bonjour name (archiveXX.local) in your browser’s URL bar. If you are using Safari, you can also find the Bonjour name as a clickable link under Safari’s Bookmarks > Bonjour item (Bonjour must be enabled in Safari’ bookmark preferences). Other Bonjour name discovery tools will also find Cache-A devices on the network.
Finding a Cache-A using Safari’s Bonjour name
Cache-A Corp. Archive Appliance Manual – January 2013 pg. 11
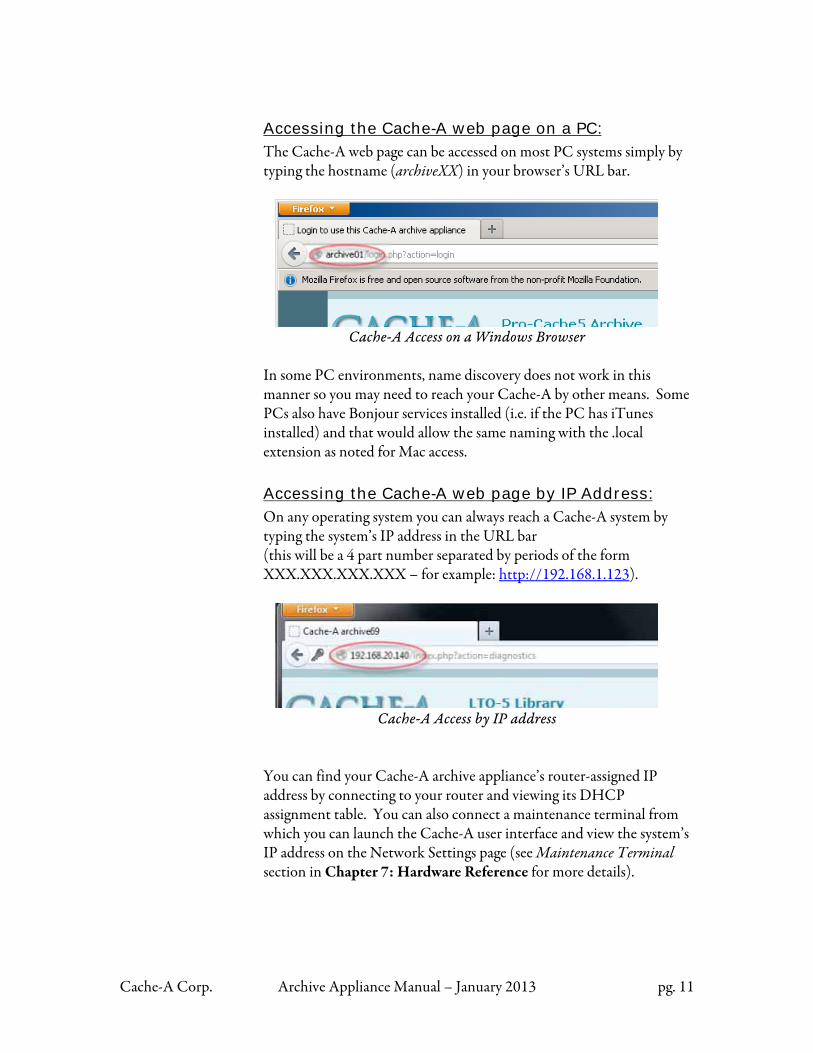
Accessing the Cache-A web page on a PC:
The Cache-A web page can be accessed on most PC systems simply by typing the hostname (archiveXX) in your browser’s URL bar.
Cache-A Access on a Windows Browser
In some PC environments, name discovery does not work in this manner so you may need to reach your Cache-A by other means. Some PCs also have Bonjour services installed (i.e. if the PC has iTunes installed) and that would allow the same naming with the .local extension as noted for Mac access. Accessing the Cache-A web page by IP Address:
On any operating system you can always reach a Cache-A system by typing the system’s IP address in the URL bar (this will be a 4 part number separated by periods of the form XXX.XXX.XXX.XXX – for example: http://192.168.1.123).
Cache-A Access by IP address
You can find your Cache-A archive appliance’s router-assigned IP address by connecting to your router and viewing its DHCP assignment table. You can also connect a maintenance terminal from which you can launch the Cache-A user interface and view the system’s IP address on the Network Settings page (see Maintenance Terminal section in Chapter 7: Hardware Reference for more details).

Cache-A Corp. Archive Appliance Manual – January 2013 pg. 12
The Cache-A Archive Appliance Browser Interface
The first step towards using a Cache-A Archive appliance is to bring up its web page so you can control and monitor the system’s activity. This will also allow you to initialize your first tape.
NOTE: Cache-A systems have been tested with Firefox, Chrome and Safari web browsers – this user interface does not work properly with Windows Internet Explorer.
When you have connected to your Cache-A system as outlined above, you will see the Login Page:
The Cache-A Archive Appliance Login Page
Type in the User Name and Password in the spaces provided:
The default login user name is cache
The associated default password is cache123
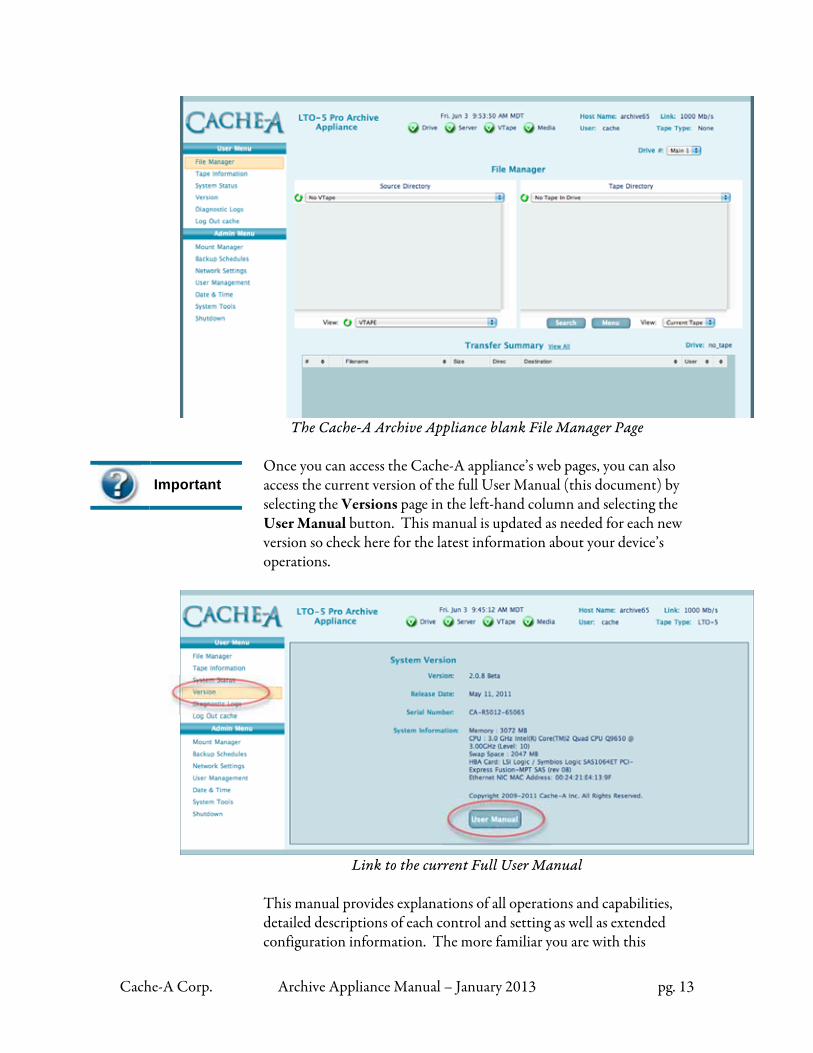
While it is possible to change this login, we recommend you keep this user and password to ensure support has a way into your system, however users can be added and this password can be changed later if desired (see User Management in Chapter 4: Browser Interface Reference for more information about this). When you have successfully logged in, you will see the File Manager page:
Warning
Cache-A Corp. Archive Appliance Manual – January 2013 pg. 13
Important
The Cache-A Archive Appliance blank File Manager Page
Once you can access the Cache-A appliance’s web pages, you can also access the current version of the full User Manual (this document) by selecting the Versions page in the left-hand column and selecting the User Manual button. This manual is updated as needed for each new version so check here for the latest information about your device’s operations.
Link to the current Full User Manual
This manual provides explanations of all operations and capabilities, detailed descriptions of each control and setting as well as extended configuration information. The more familiar you are with this
Cache-A Corp. Archive Appliance Manual – January 2013 pg. 14
document, the more you will get out of your Cache-A archive appliance. NOTE: this User Manual button links you to a pdf of the manual – you can cause your browser to download this to your computer as a file by right clicking and selecting the appropriate option.
Preparing a Tape Selecting Media Your Cache-A system comes with one sample tape. Note that LTO systems can read and write back 1 generation and read back 2 generations, thus for example, you can use LTO-4 and LTO-5 tapes in an LTO-5 system and read-only LTO-3 tapes. LTO Tape is manufactured under license from and strict control by the LTO consortium. Manufacturers include Fuji Film, Maxell, TDK, and Sony. LTO tapes are also private labeled by others including HP and IBM. All these vendors provide quality media that will work well in your Cache-A system. Note that some counterfeit media does exist out in the market, so purchase tape from a vendor you can trust. Loading Media
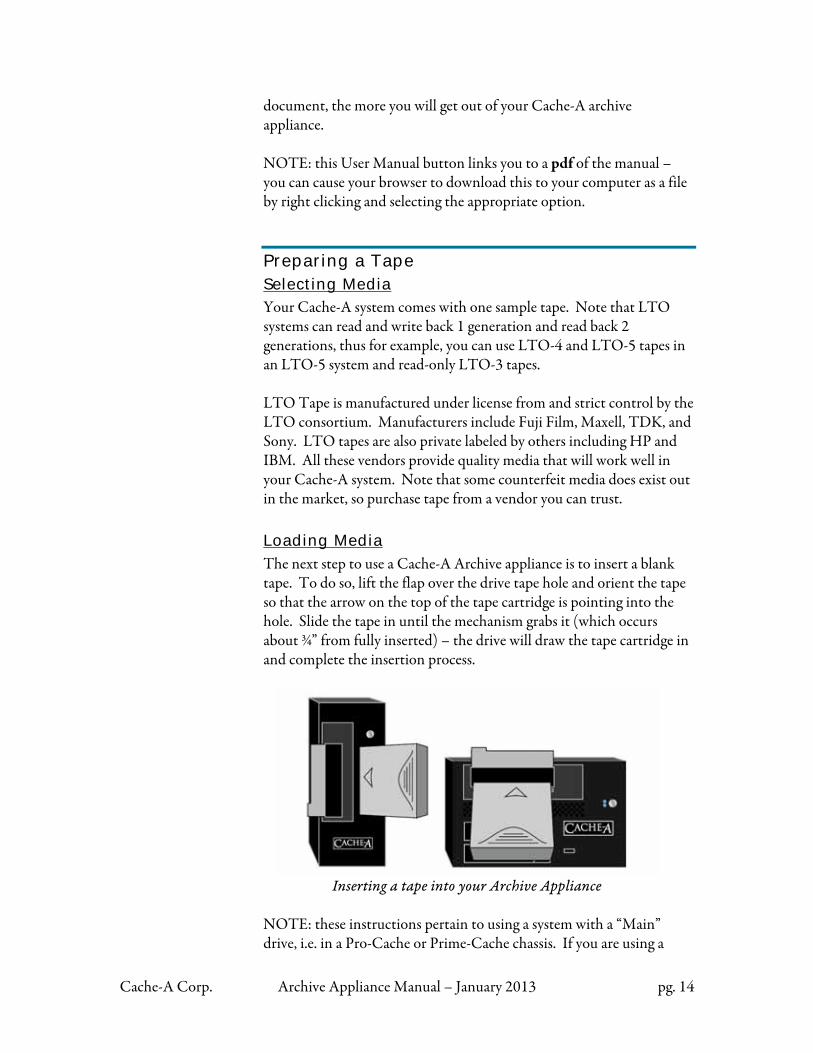
The next step to use a Cache-A Archive appliance is to insert a blank tape. To do so, lift the flap over the drive tape hole and orient the tape so that the arrow on the top of the tape cartridge is pointing into the hole. Slide the tape in until the mechanism grabs it (which occurs about ¾” from fully inserted) – the drive will draw the tape cartridge in and complete the insertion process.
Inserting a tape into your Archive Appliance
NOTE: these instructions pertain to using a system with a “Main” drive, i.e. in a Pro-Cache or Prime-Cache chassis. If you are using a

Cache-A Corp. Archive Appliance Manual – January 2013 pg. 15
This may take a few moments
Power-Cache, employ the stand-alone drive in the expansion chassis; if one does not exist, refer to instructions in Chapter 6: Pro-Cache & Power-Cache Library Operations to cause the robotics to insert the tape for you. Once the system has threaded the tape into the drive and read the solid-state memory in the tape, it will recognize that you have inserted a new tape cartridge and present you with the following dialog:
Archive Appliance Initialize Tape Dialog
Formatting a Tape When a new tape is inserted (or when you select Erase from the Menu dropdown) you will be presented with the Erase/Initialize Tape dialog. If this is an LTO-5 or later tape, you will also have the option to select the tape Format. LTFS does not work on LTO-4 and previous generation tapes. Selecting tar Format (Cache-A) causes the system to write in Unix/Linux standard “tar” format and appends a table of contents (TOC) at the end of data. Selecting LTFS Format writes in the new open standard that keeps a separate “index” partition that tracks a true file system on the tape (note that Cache-A’s TOC file is also written to LTFS formatted tapes in order to improve performance on our systems). Select Erase or Initialize as appropriate in this dialog and wait for the File Manager web page to update as described below. We recommend you always select tar format (Cache-A) unless you anticipate the need to interchange content with others who do not have Cache-A devices. LTFS formatted tapes take longer to mount, format and eject, have less total space, and require some cautions as noted throughout this manual.
LTFS Info
TIP
Cache-A Corp. Archive Appliance Manual – January 2013 pg. 16
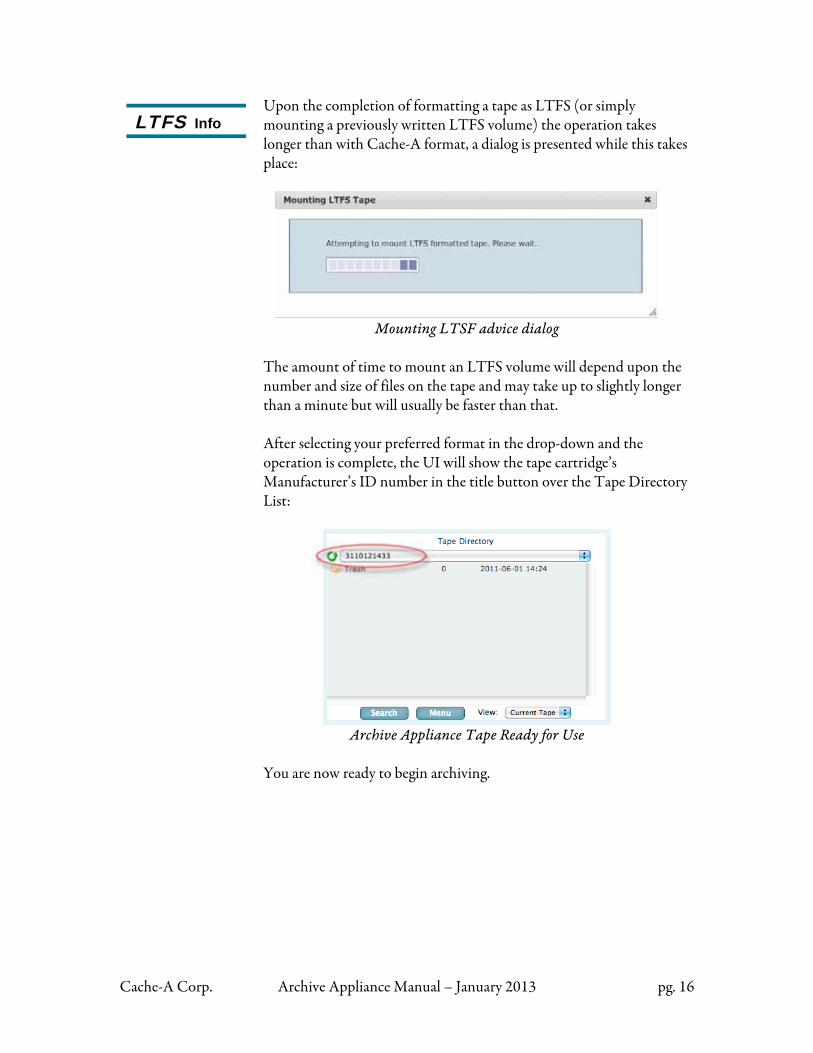
Upon the completion of formatting a tape as LTFS (or simply mounting a previously written LTFS volume) the operation takes longer than with Cache-A format, a dialog is presented while this takes place:
Mounting LTSF advice dialog
The amount of time to mount an LTFS volume will depend upon the number and size of files on the tape and may take up to slightly longer than a minute but will usually be faster than that. After selecting your preferred format in the drop-down and the operation is complete, the UI will show the tape cartridge’s Manufacturer’s ID number in the title button over the Tape Directory List:
Archive Appliance Tape Ready for Use
You are now ready to begin archiving.
LTFS Info
Cache-A Corp. Archive Appliance Manual – January 2013 pg. 17
Simple Archiving to a Network Share
Cache-A Archive Appliances offer many methods to archive content. These various methods are based on accessing user data from one of the following sources:
Via the network shared volume offered by the appliance where you drop content to be archived (covered below – for more detail see the Network Share Guidelines section in Chapter 4: Browser Interface Reference).
Via a client shared volume where the appliance mounts a folder from one or more of the computers on your network (see the Mount Manager section in Chapter 4: Browser Interface Reference for more information).
Via a direct mounted volume that is physically connected to the appliance’s USB, SATA, SAS, or ExpressCard slot (see The Source Directory View Dropdown Menu section in Chapter 4: Browser Interface Reference for more information).
The most common archive method and the easiest way to get started archiving is to use the Network Share method. Within the Network Share method, there are a variety of strategies for getting content onto tape and two methods are described in the following pages:
Via the VTAPE where everything you drop automatically goes to tape – this method is easy and straightforward but has some drawbacks discussed at the end of the section below.
Via a Staged Folder where you organize content on the share and commit it to tape as a data set – this method is recommended to ensure large archives are efficiently moved to tape in the best archival fashion.
The internal disk of each Cache-A device contains a user area for data. This acts like a small “NAS” or Network Attached Storage device. It is provided as a common location across your network where you can place data to be archived. In order to use the Network Share archiving technique, you must mount the Cache-A archive appliance on your client computer. The following descriptions discuss how to achieve this on Macs and PCs.
Cache-A Corp. Archive Appliance Manual – January 2013 pg. 18
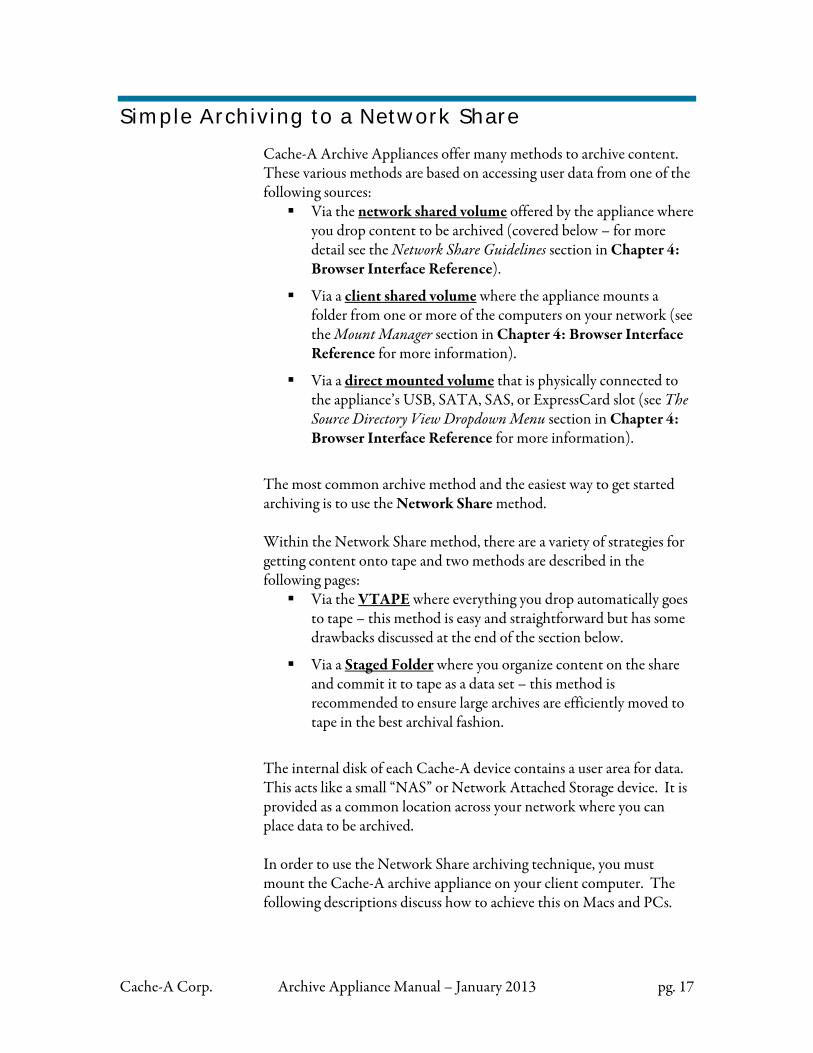
Mounting the share on a Mac: Each connected Cache-A system will appear in the Finder by its Host name in the SHARED Item of the left column. Mount the Cache-A network share by highlighting that item and clicking on the Connect As button and providing your Cache-A user name and password (default: cache, cache123):
Mounting the Archive Appliance on a Mac
Cache-A shares can appear twice under the “SHARED” column as OS X systems will see both the normal Macintosh (afp) and Windows (SMB) share offered by each system. Note: you can alternatively archive using the Windows share however, this is not recommended because afp allows much faster file transfers with Mac clients.
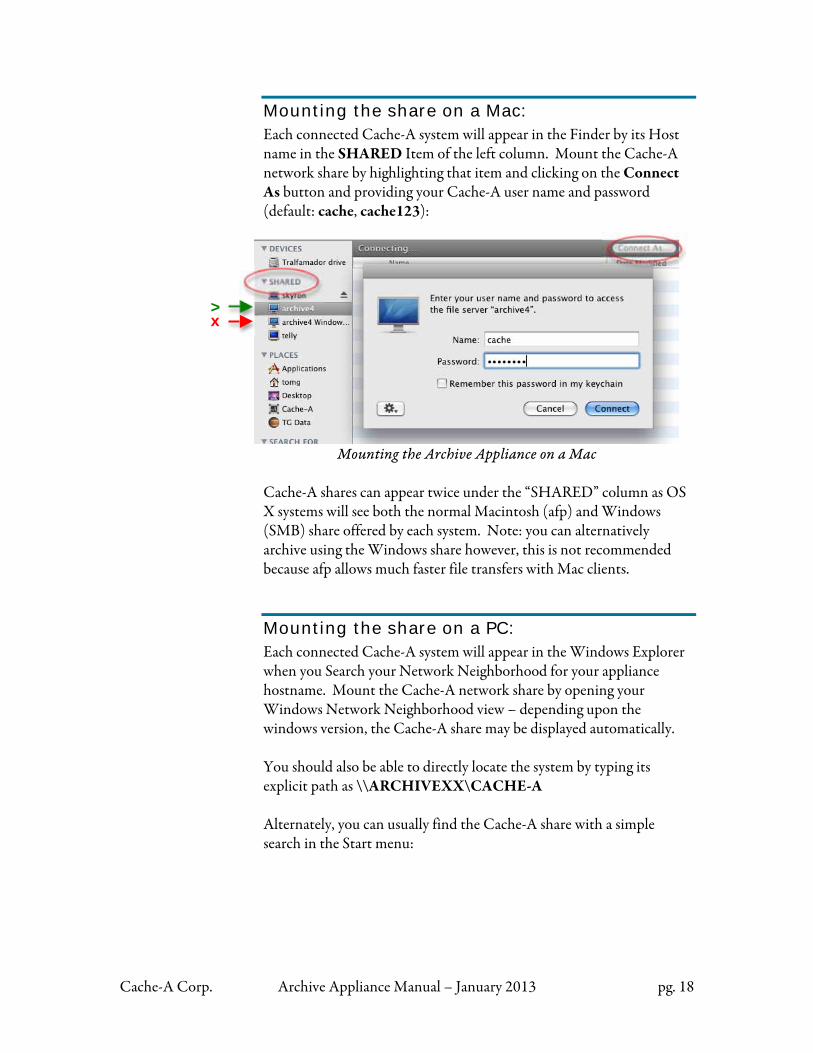
Mounting the share on a PC: Each connected Cache-A system will appear in the Windows Explorer when you Search your Network Neighborhood for your appliance hostname. Mount the Cache-A network share by opening your Windows Network Neighborhood view – depending upon the windows version, the Cache-A share may be displayed automatically. You should also be able to directly locate the system by typing its explicit path as \\ARCHIVEXX\CACHE-A Alternately, you can usually find the Cache-A share with a simple search in the Start menu:
x >
Cache-A Corp. Archive Appliance Manual – January 2013 pg. 19
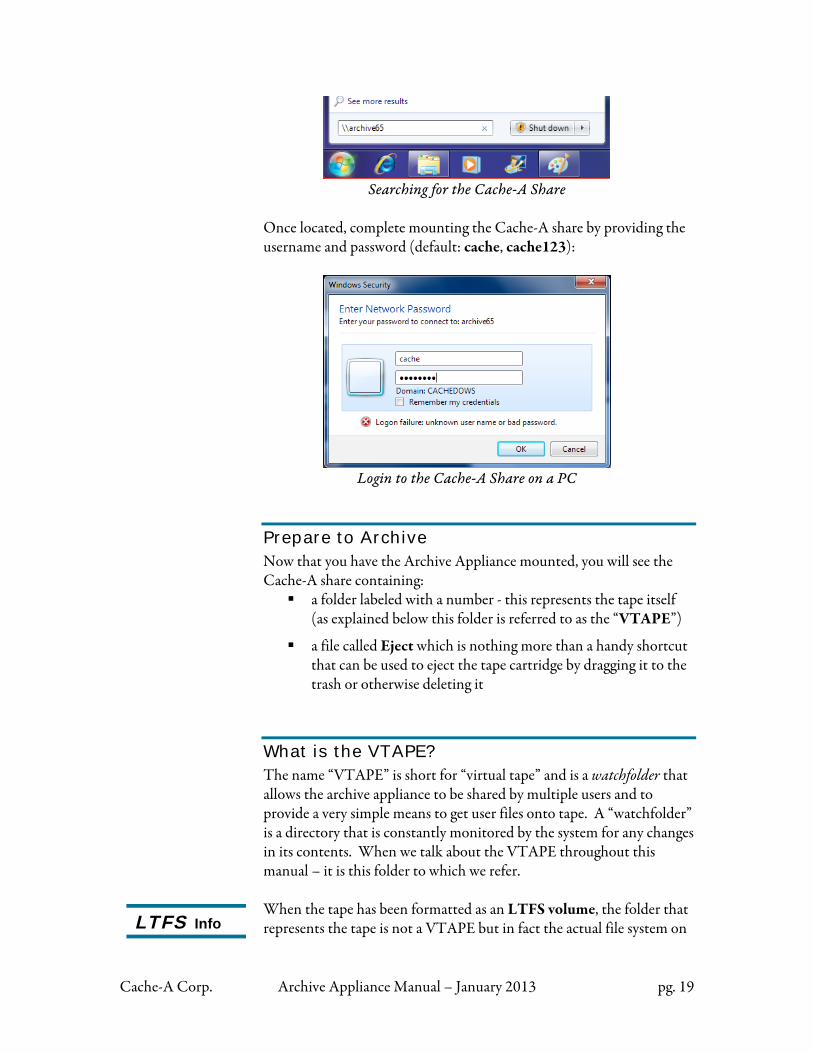
Searching for the Cache-A Share
Once located, complete mounting the Cache-A share by providing the username and password (default: cache, cache123):
Login to the Cache-A Share on a PC
Prepare to Archive Now that you have the Archive Appliance mounted, you will see the Cache-A share containing:
a folder labeled with a number - this represents the tape itself (as explained below this folder is referred to as the “VTAPE”)
a file called Eject which is nothing more than a handy shortcut that can be used to eject the tape cartridge by dragging it to the trash or otherwise deleting it
What is the VTAPE? The name “VTAPE” is short for “virtual tape” and is a watchfolder that allows the archive appliance to be shared by multiple users and to provide a very simple means to get user files onto tape. A “watchfolder” is a directory that is constantly monitored by the system for any changes in its contents. When we talk about the VTAPE throughout this manual – it is this folder to which we refer. When the tape has been formatted as an LTFS volume, the folder that represents the tape is not a VTAPE but in fact the actual file system on LTFS Info
Cache-A Corp. Archive Appliance Manual – January 2013 pg. 20
Warning
the tape, however, it appears in the same location and still represents the tape but behaves differently as clearly noted throughout. The VTAPE and LTFS Volume “Name”
The numerical identification that initially appears on this folder is the hard coded manufacturer’s unique tape cartridge ID – the appliance uses this for the tape name by default. You can rename the tape cartridge from the File Manager > Menu button at any time and this folder will inherit whatever new name you assign. This is also known as the “Volume Name” of the tape.
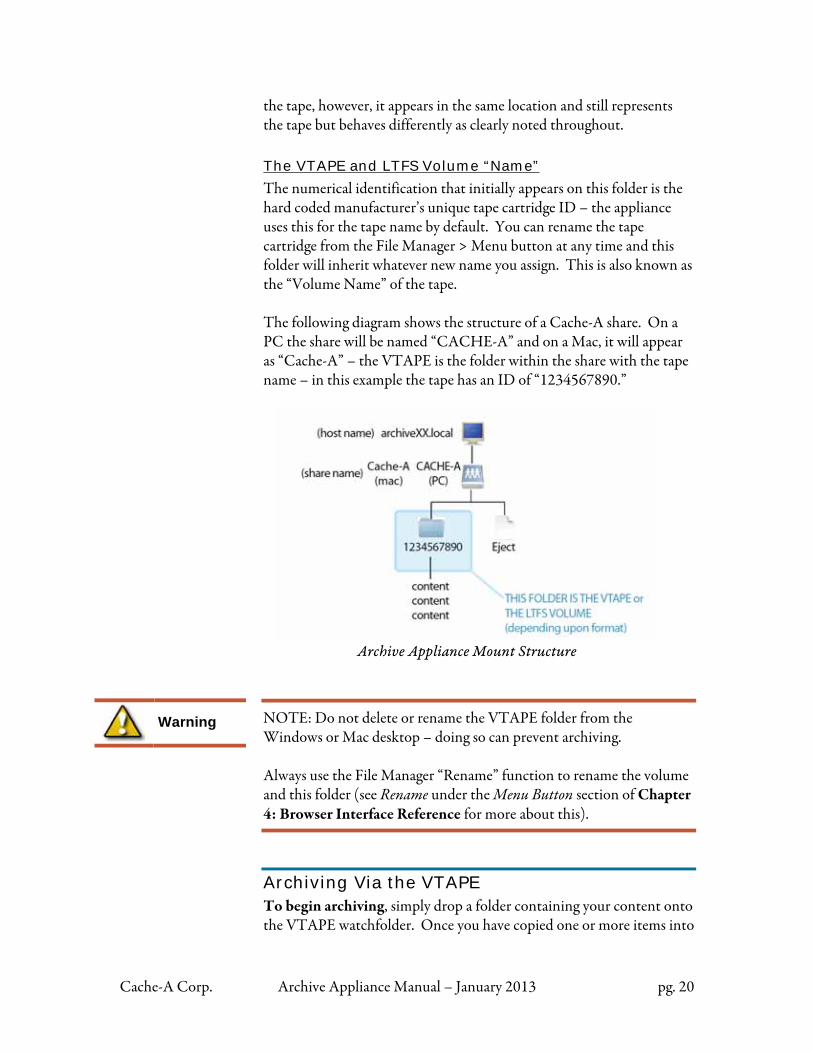
The following diagram shows the structure of a Cache-A share. On a PC the share will be named “CACHE-A” and on a Mac, it will appear as “Cache-A” – the VTAPE is the folder within the share with the tape name – in this example the tape has an ID of “1234567890.”
Archive Appliance Mount Structure
NOTE: Do not delete or rename the VTAPE folder from the Windows or Mac desktop – doing so can prevent archiving. Always use the File Manager “Rename” function to rename the volume and this folder (see Rename under the Menu Button section of Chapter 4: Browser Interface Reference for more about this).
Archiving Via the VTAPE To begin archiving, simply drop a folder containing your content onto the VTAPE watchfolder. Once you have copied one or more items into
Cache-A Corp. Archive Appliance Manual – January 2013 pg. 21
the VTAPE you will also see a Transfer log and, if any problems occurred, an Error log. Ejecting the tape after a completed archive
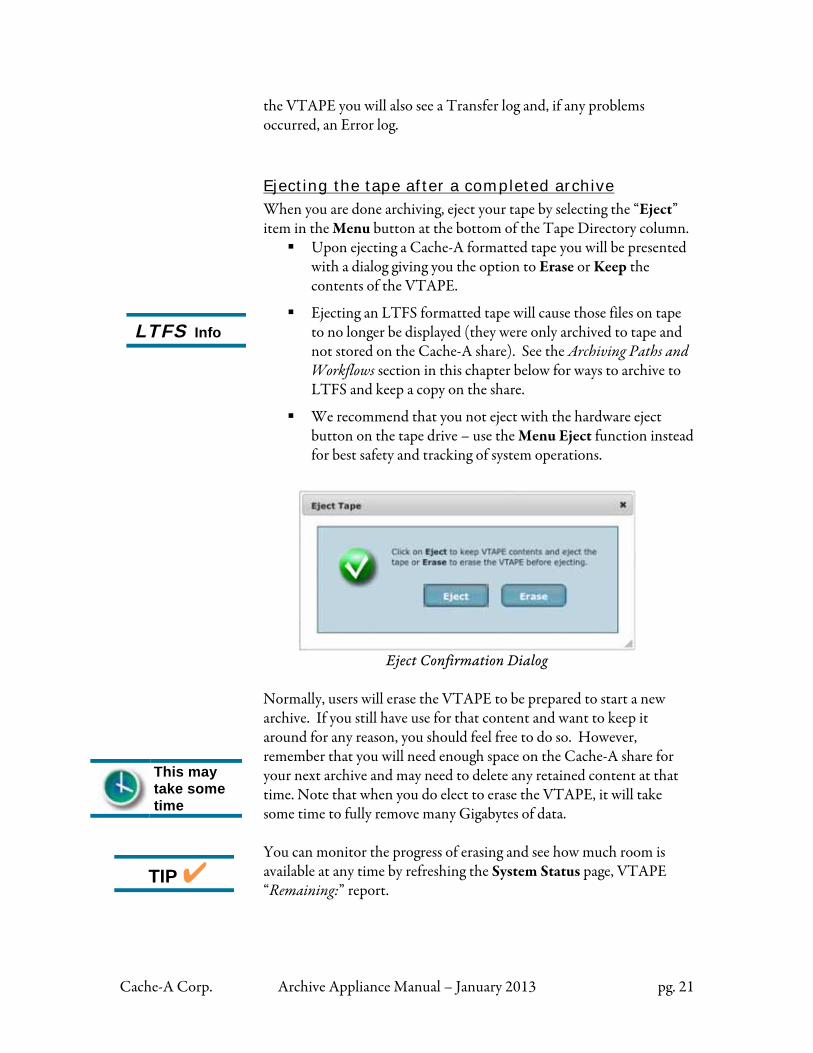
When you are done archiving, eject your tape by selecting the “Eject” item in the Menu button at the bottom of the Tape Directory column.
Upon ejecting a Cache-A formatted tape you will be presented with a dialog giving you the option to Erase or Keep the contents of the VTAPE.
Ejecting an LTFS formatted tape will cause those files on tape to no longer be displayed (they were only archived to tape and not stored on the Cache-A share). See the Archiving Paths and Workflows section in this chapter below for ways to archive to LTFS and keep a copy on the share.
We recommend that you not eject with the hardware eject button on the tape drive – use the Menu Eject function instead for best safety and tracking of system operations.
Eject Confirmation Dialog
Normally, users will erase the VTAPE to be prepared to start a new archive. If you still have use for that content and want to keep it around for any reason, you should feel free to do so. However, remember that you will need enough space on the Cache-A share for your next archive and may need to delete any retained content at that time. Note that when you do elect to erase the VTAPE, it will take some time to fully remove many Gigabytes of data. You can monitor the progress of erasing and see how much room is available at any time by refreshing the System Status page, VTAPE “Remaining:” report.
LTFS Info
TIP
This may take some time
Cache-A Corp. Archive Appliance Manual – January 2013 pg. 22
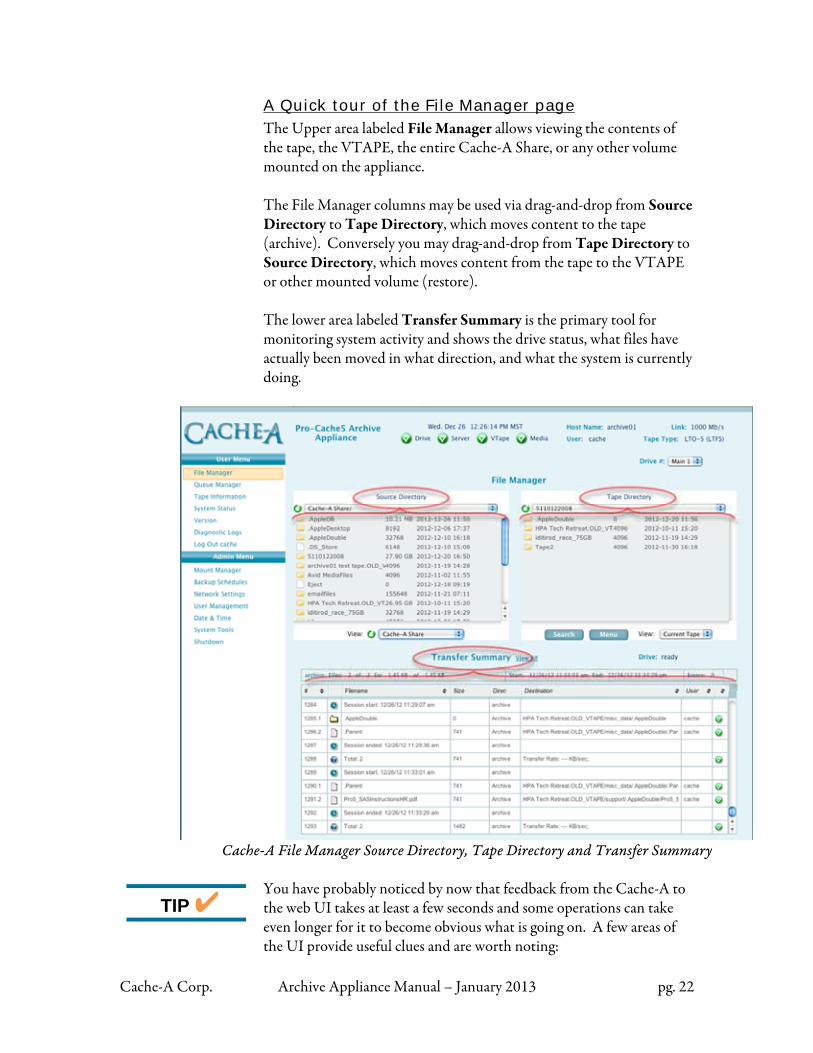
A Quick tour of the File Manager page The Upper area labeled File Manager allows viewing the contents of the tape, the VTAPE, the entire Cache-A Share, or any other volume mounted on the appliance. The File Manager columns may be used via drag-and-drop from Source Directory to Tape Directory, which moves content to the tape (archive). Conversely you may drag-and-drop from Tape Directory to Source Directory, which moves content from the tape to the VTAPE or other mounted volume (restore). The lower area labeled Transfer Summary is the primary tool for monitoring system activity and shows the drive status, what files have actually been moved in what direction, and what the system is currently doing.
Cache-A File Manager Source Directory, Tape Directory and Transfer Summary
You have probably noticed by now that feedback from the Cache-A to the web UI takes at least a few seconds and some operations can take even longer for it to become obvious what is going on. A few areas of the UI provide useful clues and are worth noting:
TIP
Cache-A Corp. Archive Appliance Manual – January 2013 pg. 23
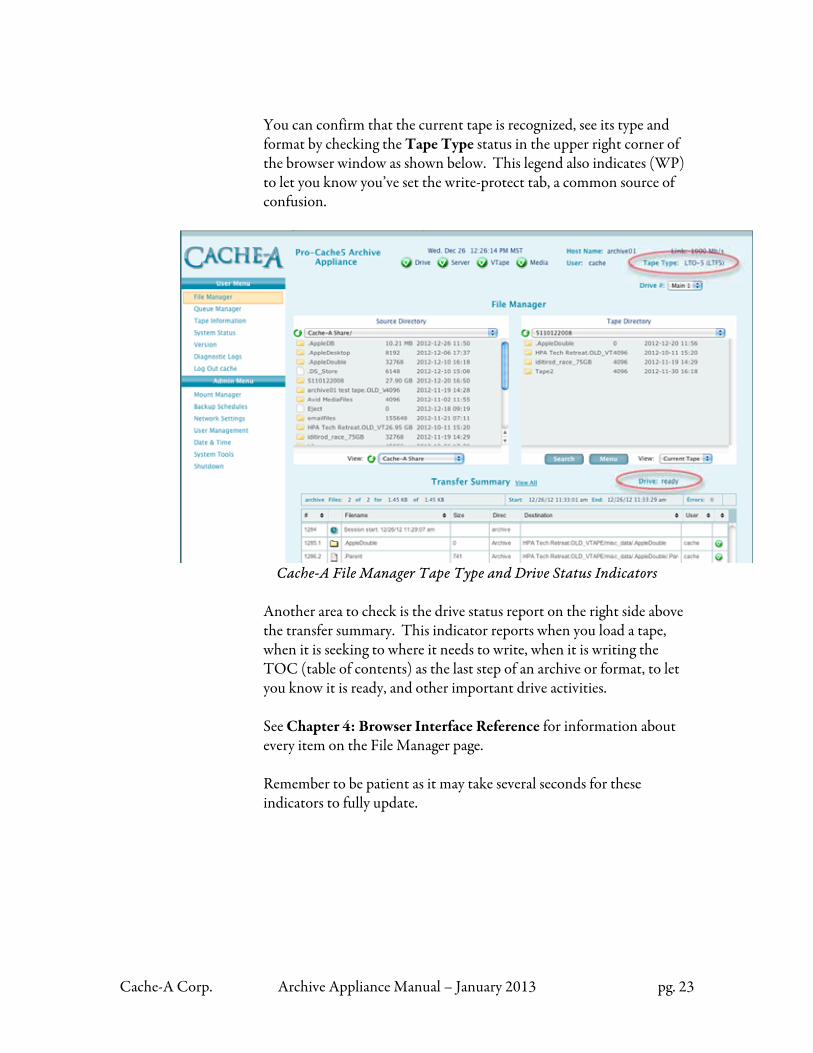
You can confirm that the current tape is recognized, see its type and format by checking the Tape Type status in the upper right corner of the browser window as shown below. This legend also indicates (WP) to let you know you’ve set the write-protect tab, a common source of confusion.
Cache-A File Manager Tape Type and Drive Status Indicators
Another area to check is the drive status report on the right side above the transfer summary. This indicator reports when you load a tape, when it is seeking to where it needs to write, when it is writing the TOC (table of contents) as the last step of an archive or format, to let you know it is ready, and other important drive activities. See Chapter 4: Browser Interface Reference for information about every item on the File Manager page. Remember to be patient as it may take several seconds for these indicators to fully update.
Cache-A Corp. Archive Appliance Manual – January 2013 pg. 24
Simple Restoring with the Web Based File Manager
The Cache-A Archive Appliance File Manager web page provides the tools for recovering data from your catalog of tape cartridges.
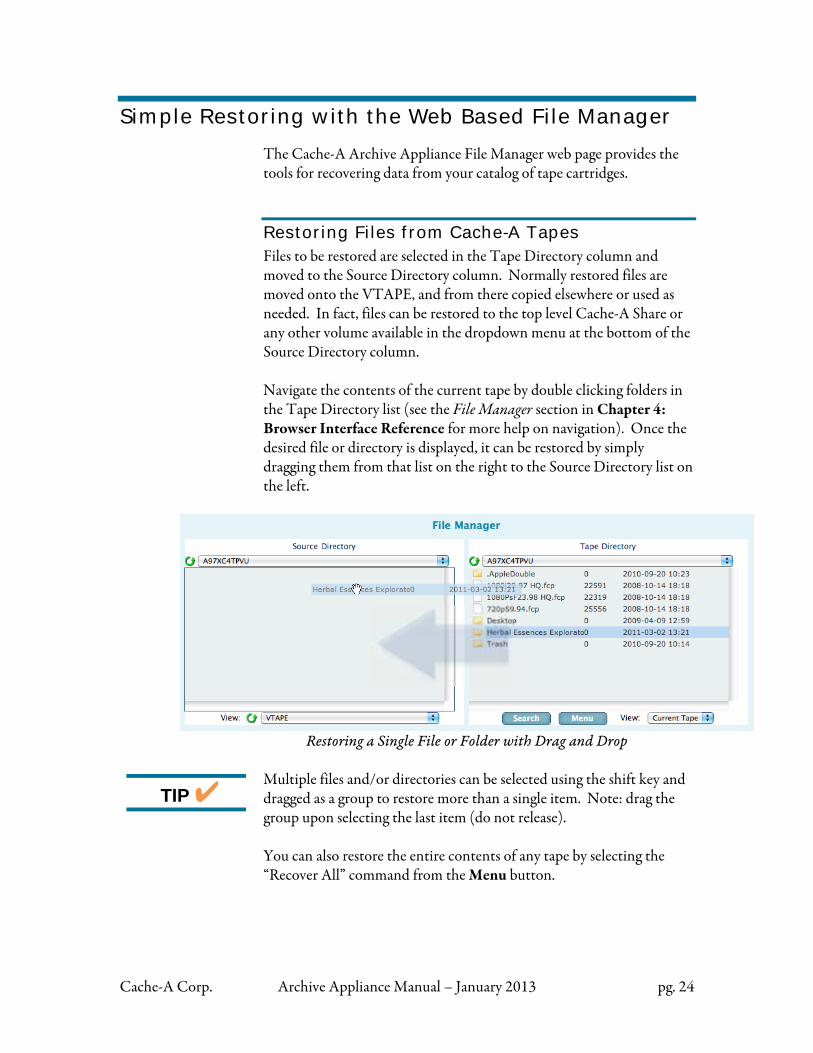
Restoring Files from Cache-A Tapes Files to be restored are selected in the Tape Directory column and moved to the Source Directory column. Normally restored files are moved onto the VTAPE, and from there copied elsewhere or used as needed. In fact, files can be restored to the top level Cache-A Share or any other volume available in the dropdown menu at the bottom of the Source Directory column. Navigate the contents of the current tape by double clicking folders in the Tape Directory list (see the File Manager section in Chapter 4: Browser Interface Reference for more help on navigation). Once the desired file or directory is displayed, it can be restored by simply dragging them from that list on the right to the Source Directory list on the left.
Restoring a Single File or Folder with Drag and Drop
Multiple files and/or directories can be selected using the shift key and dragged as a group to restore more than a single item. Note: drag the group upon selecting the last item (do not release). You can also restore the entire contents of any tape by selecting the “Recover All” command from the Menu button.
TIP
Cache-A Corp. Archive Appliance Manual – January 2013 pg. 25
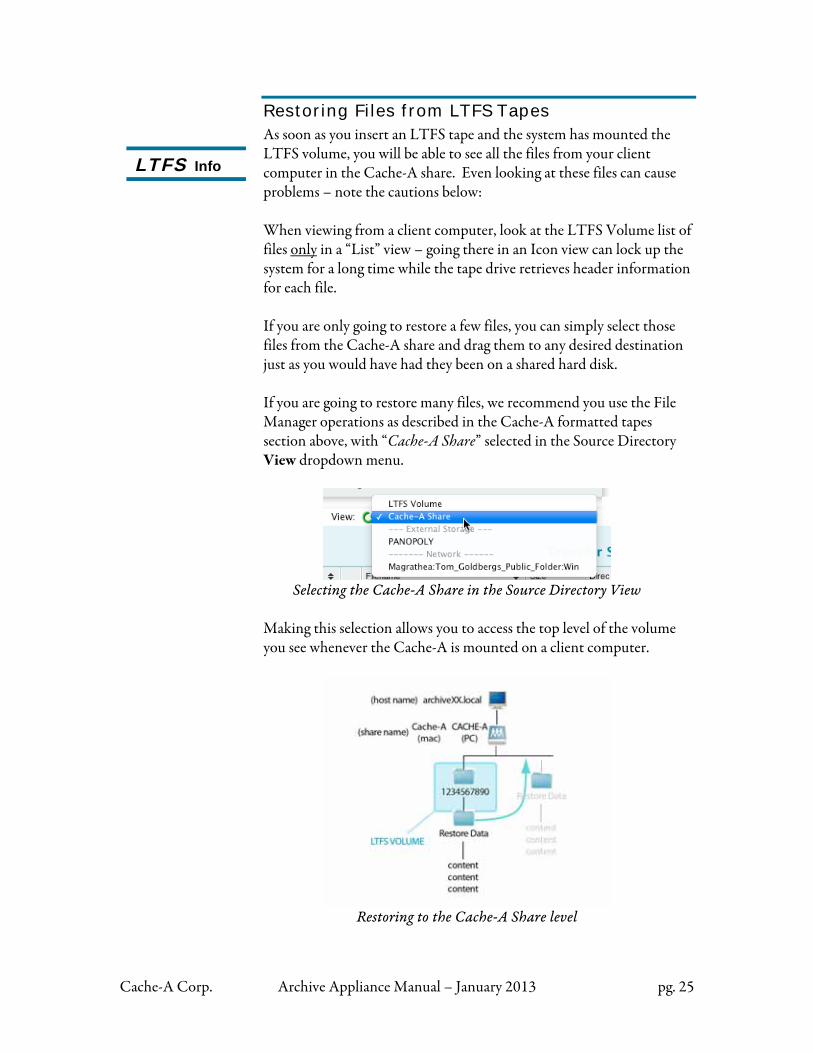
Restoring Files from LTFS Tapes As soon as you insert an LTFS tape and the system has mounted the LTFS volume, you will be able to see all the files from your client computer in the Cache-A share. Even looking at these files can cause problems – note the cautions below: When viewing from a client computer, look at the LTFS Volume list of files only in a “List” view – going there in an Icon view can lock up the system for a long time while the tape drive retrieves header information for each file. If you are only going to restore a few files, you can simply select those files from the Cache-A share and drag them to any desired destination just as you would have had they been on a shared hard disk. If you are going to restore many files, we recommend you use the File Manager operations as described in the Cache-A formatted tapes section above, with “Cache-A Share” selected in the Source Directory View dropdown menu.
Selecting the Cache-A Share in the Source Directory View
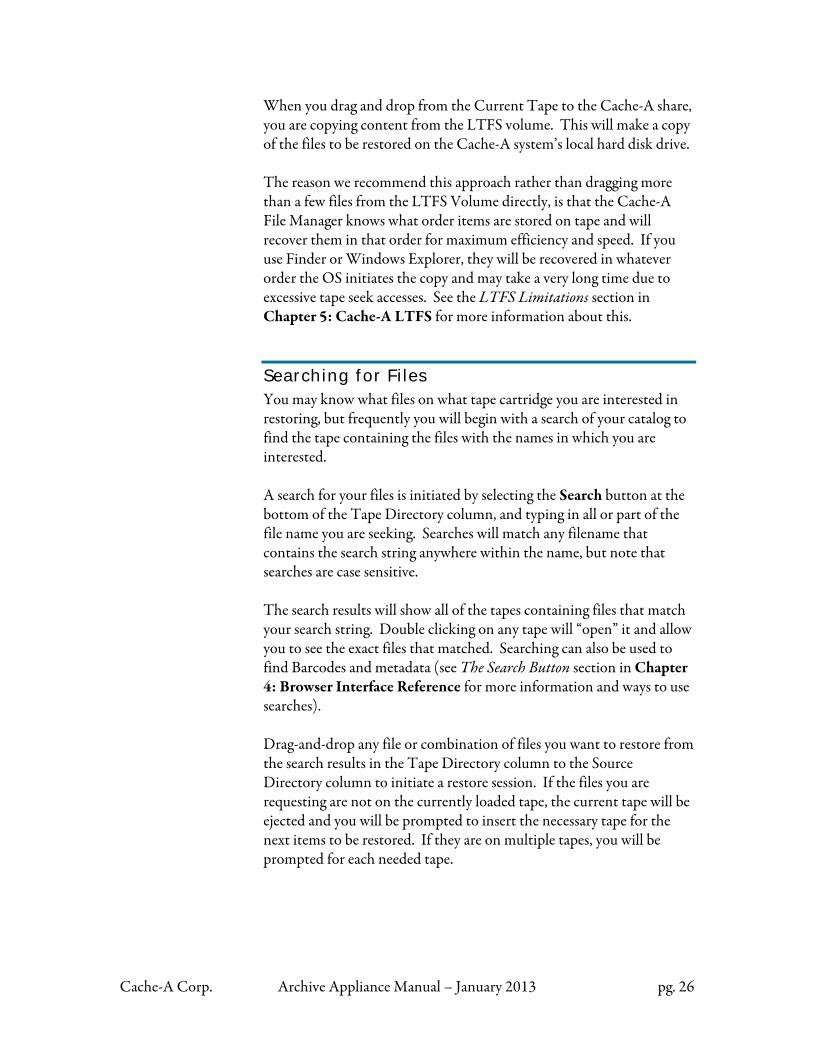
Making this selection allows you to access the top level of the volume you see whenever the Cache-A is mounted on a client computer.
Restoring to the Cache-A Share level
LTFS Info
Cache-A Corp. Archive Appliance Manual – January 2013 pg. 26
When you drag and drop from the Current Tape to the Cache-A share, you are copying content from the LTFS volume. This will make a copy of the files to be restored on the Cache-A system’s local hard disk drive. The reason we recommend this approach rather than dragging more than a few files from the LTFS Volume directly, is that the Cache-A File Manager knows what order items are stored on tape and will recover them in that order for maximum efficiency and speed. If you use Finder or Windows Explorer, they will be recovered in whatever order the OS initiates the copy and may take a very long time due to excessive tape seek accesses. See the LTFS Limitations section in Chapter 5: Cache-A LTFS for more information about this.
Searching for Files You may know what files on what tape cartridge you are interested in restoring, but frequently you will begin with a search of your catalog to find the tape containing the files with the names in which you are interested. A search for your files is initiated by selecting the Search button at the bottom of the Tape Directory column, and typing in all or part of the file name you are seeking. Searches will match any filename that contains the search string anywhere within the name, but note that searches are case sensitive. The search results will show all of the tapes containing files that match your search string. Double clicking on any tape will “open” it and allow you to see the exact files that matched. Searching can also be used to find Barcodes and metadata (see The Search Button section in Chapter 4: Browser Interface Reference for more information and ways to use searches). Drag-and-drop any file or combination of files you want to restore from the search results in the Tape Directory column to the Source Directory column to initiate a restore session. If the files you are requesting are not on the currently loaded tape, the current tape will be ejected and you will be prompted to insert the necessary tape for the next items to be restored. If they are on multiple tapes, you will be prompted for each needed tape.
Cache-A Corp. Archive Appliance Manual – January 2013 pg. 27
Cleaning A brief mention about cleaning the tape drive should be noted. LTO tape drives need cleaning from time to time, normally after a hundred or more tapes. This will vary depending upon the temperature and humidity as well as tape brand and batch. The drive or Library will tell you when it needs cleaning by illuminating the cleaning LED. We suggest you only insert a cleaning tape when the drive indicates it is needed or when instructed by Cache-A support. The drive will automatically detect cleaning cartridges and automatically run a cleaning cycle with it and then eject the cleaning tape when complete (this may take up to 5 minutes). Keep an Ultrium cleaning tape on hand for this eventuality – once the tape drive mechanism identifies that it needs cleaning, it will not work again until this has been done. Note: all LTO cleaning tapes should be compatible with your Cache-A drive – they are not differentiated by LTO generation (i.e. LTO-4).
TIP
Cache-A Corp. Archive Appliance Manual – January 2013 pg. 28
Archiving Paths and Workflows Overview
Archiving by dropping files and folders into the VTAPE is the easiest way to get content onto tape, but it is not always the best way. This section discusses the benefits and tradeoffs of a variety of archiving strategies. For a full explanation of the various paths and how the Cache-A system is organized, we recommend you read Chapter 3: Understanding Cache-A Technologies.
VTAPE Archiving Summary As described in “Simple Archiving to Network Share” section above, this solution is straightforward and easy to understand. You many not always want to use this method; the reasons for choosing it or not are as follows. Why not always use the VTAPE:
Content will not arrive on the share as fast as the Tape Drive can archive it, especially on networks with much traffic – this causes excess tape activity (stopping, starting and reversing – also called “shoeshining”) – the penalty for this is less efficient use of tape space and more wear and tear on your tape drive
Users naturally drop bits and pieces of their archive content as they are encountered – this is not a “best practice” for archival policies – we recommend data be “curated” into logical groups where they can both be efficiently written and efficiently restored as data sets when needed
When multiple users are dropping into the VTAPE, content goes onto tape in approximately the order it landed on the VTAPE and thus different projects can be intermixed on tape which also causes inefficiencies in later restores
Most Important: If one or more archive or restore sessions have been started from the File Manager page of the user interface, the VTAPE is not monitored during those sessions and dropped files will not get archived
When you should use the VTAPE:
When learning to use the Cache-A, using the VTAPE provides the simplest workflow for beginners
Cache-A Corp. Archive Appliance Manual – January 2013 pg. 29
In single user environments where there is no possibility of multiple user access and network traffic is lighter, VTAPE operations are OK
When a few files need to be added to an existing tape archive, VTAPE operations work well for convenience (and content can not be well-organized on tape under these circumstances anyway)
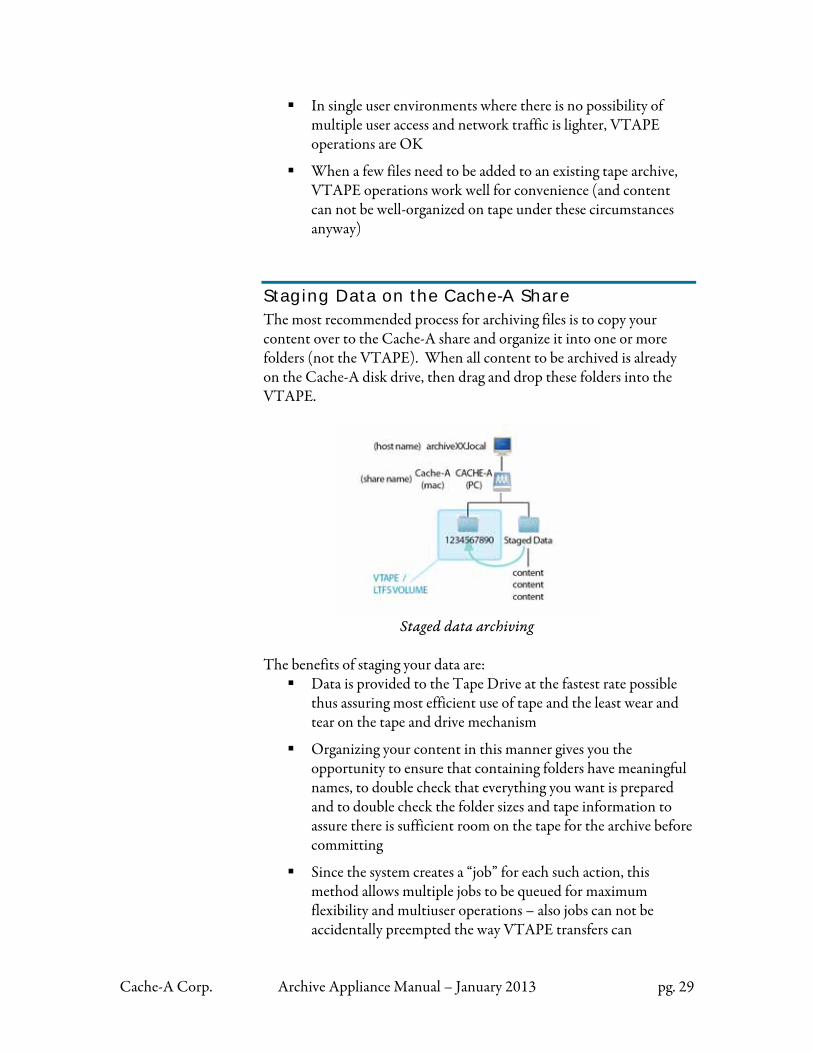
Staging Data on the Cache-A Share The most recommended process for archiving files is to copy your content over to the Cache-A share and organize it into one or more folders (not the VTAPE). When all content to be archived is already on the Cache-A disk drive, then drag and drop these folders into the VTAPE.
Staged data archiving
The benefits of staging your data are:
Data is provided to the Tape Drive at the fastest rate possible thus assuring most efficient use of tape and the least wear and tear on the tape and drive mechanism
Organizing your content in this manner gives you the opportunity to ensure that containing folders have meaningful names, to double check that everything you want is prepared and to double check the folder sizes and tape information to assure there is sufficient room on the tape for the archive before committing
Since the system creates a “job” for each such action, this method allows multiple jobs to be queued for maximum flexibility and multiuser operations – also jobs can not be accidentally preempted the way VTAPE transfers can
Cache-A Corp. Archive Appliance Manual – January 2013 pg. 30
The downsides of staging your content are: A second user action is required after all content has been
placed on the Cache-A drive (that of moving it to the VTAPE)
Overall archiving duration (from initial staging to session completed) may take longer than just dropping on the VTAPE
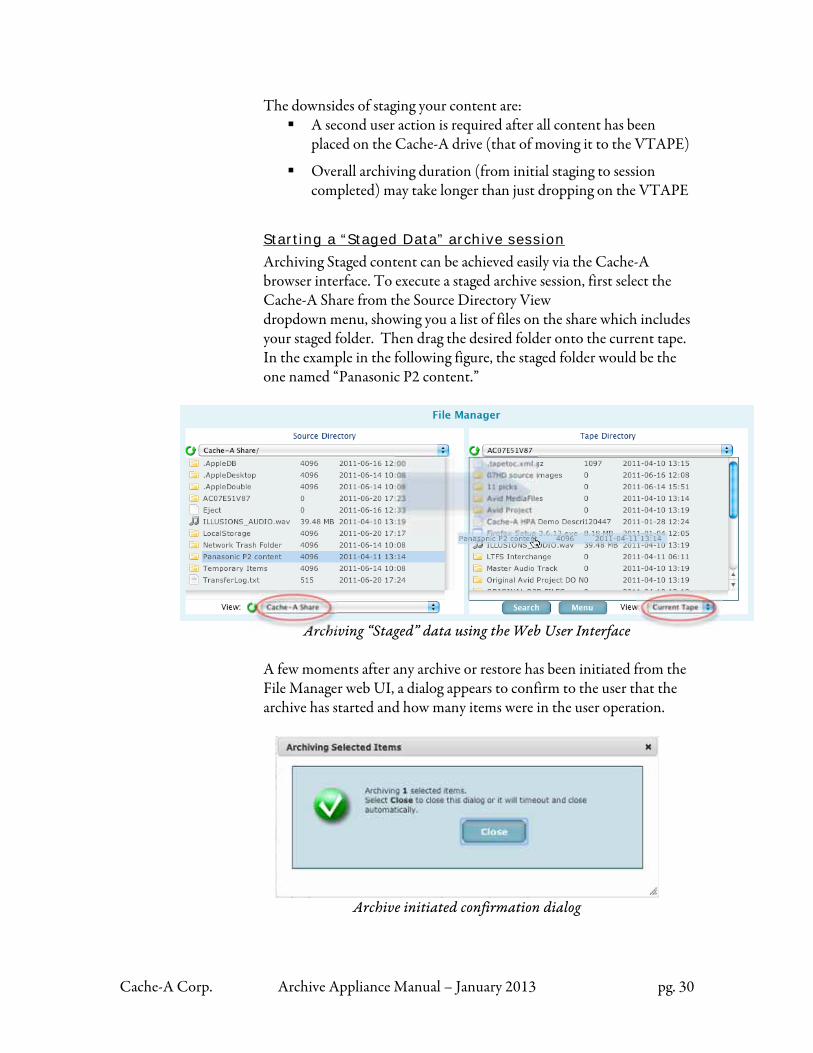
Starting a “Staged Data” archive session
Archiving Staged content can be achieved easily via the Cache-A browser interface. To execute a staged archive session, first select the Cache-A Share from the Source Directory View dropdown menu, showing you a list of files on the share which includes your staged folder. Then drag the desired folder onto the current tape. In the example in the following figure, the staged folder would be the one named “Panasonic P2 content.”
Archiving “Staged” data using the Web User Interface
A few moments after any archive or restore has been initiated from the File Manager web UI, a dialog appears to confirm to the user that the archive has started and how many items were in the user operation.
Archive initiated confirmation dialog
Cache-A Corp. Archive Appliance Manual – January 2013 pg. 31
When this dialog appears, you can click on Close or simply leave it alone and it will disappear.
The wrong way to start a staged archive: It is possible to archive staged content via the client computer by drag and dropping the desired folders onto the VTAPE or LTFS Volume from a Finder or Explorer window. We recommend you avoid this as it really is equivalent to the VTAPE method. Use the File Manager to initiate staged content archiving.
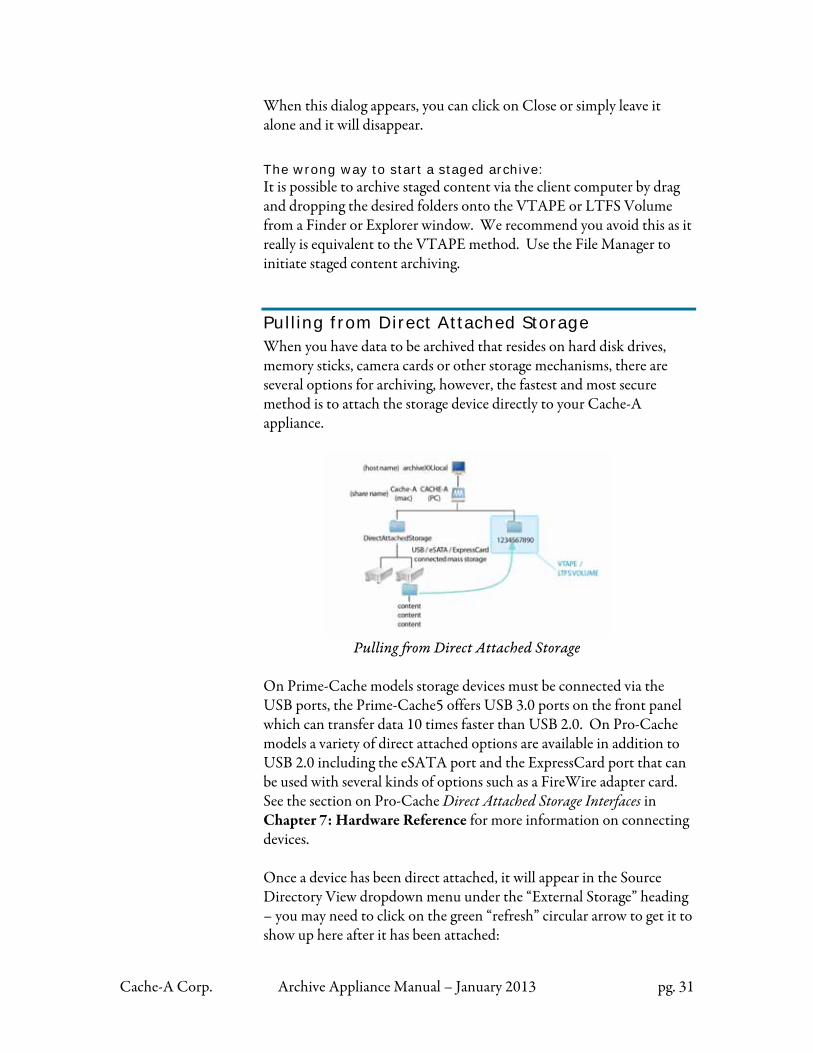
Pulling from Direct Attached Storage When you have data to be archived that resides on hard disk drives, memory sticks, camera cards or other storage mechanisms, there are several options for archiving, however, the fastest and most secure method is to attach the storage device directly to your Cache-A appliance.
Pulling from Direct Attached Storage
On Prime-Cache models storage devices must be connected via the USB ports, the Prime-Cache5 offers USB 3.0 ports on the front panel which can transfer data 10 times faster than USB 2.0. On Pro-Cache models a variety of direct attached options are available in addition to USB 2.0 including the eSATA port and the ExpressCard port that can be used with several kinds of options such as a FireWire adapter card. See the section on Pro-Cache Direct Attached Storage Interfaces in Chapter 7: Hardware Reference for more information on connecting devices. Once a device has been direct attached, it will appear in the Source Directory View dropdown menu under the “External Storage” heading – you may need to click on the green “refresh” circular arrow to get it to show up here after it has been attached:
Cache-A Corp. Archive Appliance Manual – January 2013 pg. 32
Selecting Direct Attached Storage in the Source Directory View
Once that item is selected in the dropdown and the device’s file list is displayed, you can select as many items as desired (shift click, drag upon last click) and drop them onto the Tape Directory Column, Current Tape view to start archiving. DO NOT initiate archives from Direct Attached Storage from a client computer that has mounted the Cache-A Share. Initiate such archives only from the File Manager page as described here.
Archiving from a Direct Attached source
Note that the reverse direction is equally possible – you can restore anything from the current tape onto a direct attached device by dragging from the Tape Directory column to the Source Directory.
Pulling from Network Attached Storage When you have data to be archived on a NAS (Network Attached Storage) or any client computer with a shared folder, the fastest network archive performance will usually be to mount the volume directly to your Cache-A appliance. To set this up, you will need to use the Mount Manager page (see that manual section in Chapter 4: Browser Interface Reference for more information.
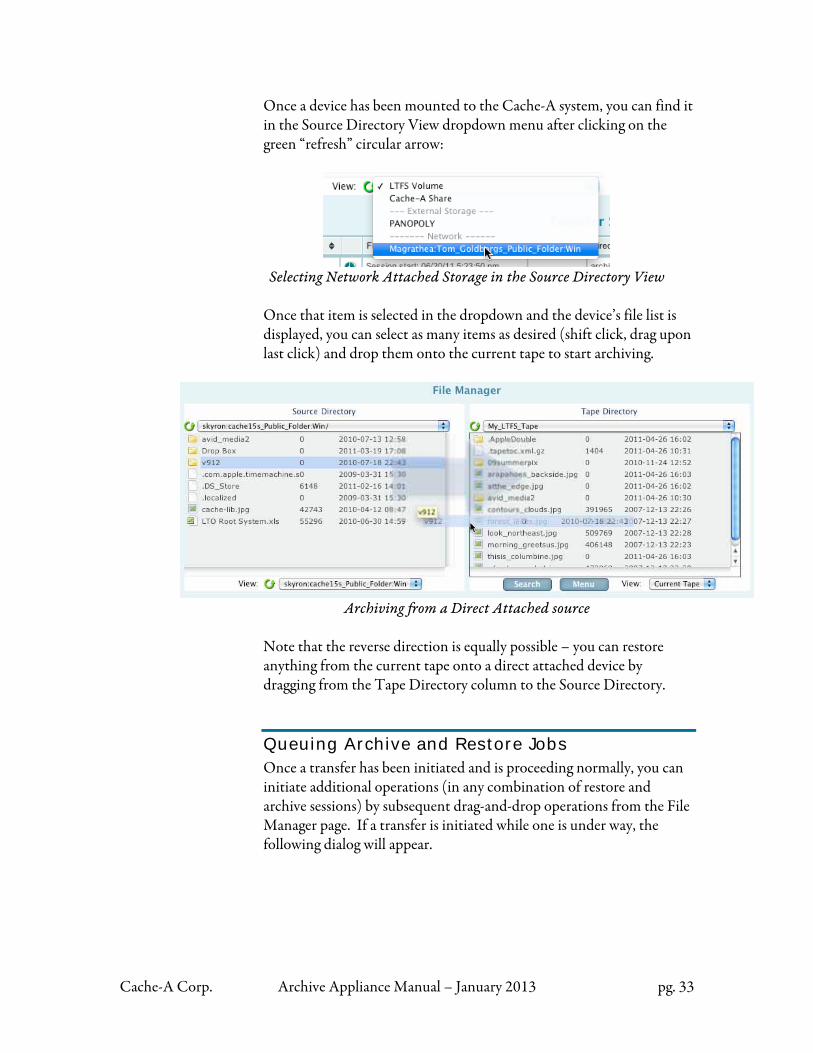
Cache-A Corp. Archive Appliance Manual – January 2013 pg. 33
Once a device has been mounted to the Cache-A system, you can find it in the Source Directory View dropdown menu after clicking on the green “refresh” circular arrow:
Selecting Network Attached Storage in the Source Directory View
Once that item is selected in the dropdown and the device’s file list is displayed, you can select as many items as desired (shift click, drag upon last click) and drop them onto the current tape to start archiving.
Archiving from a Direct Attached source
Note that the reverse direction is equally possible – you can restore anything from the current tape onto a direct attached device by dragging from the Tape Directory column to the Source Directory.
Queuing Archive and Restore Jobs Once a transfer has been initiated and is proceeding normally, you can initiate additional operations (in any combination of restore and archive sessions) by subsequent drag-and-drop operations from the File Manager page. If a transfer is initiated while one is under way, the following dialog will appear.
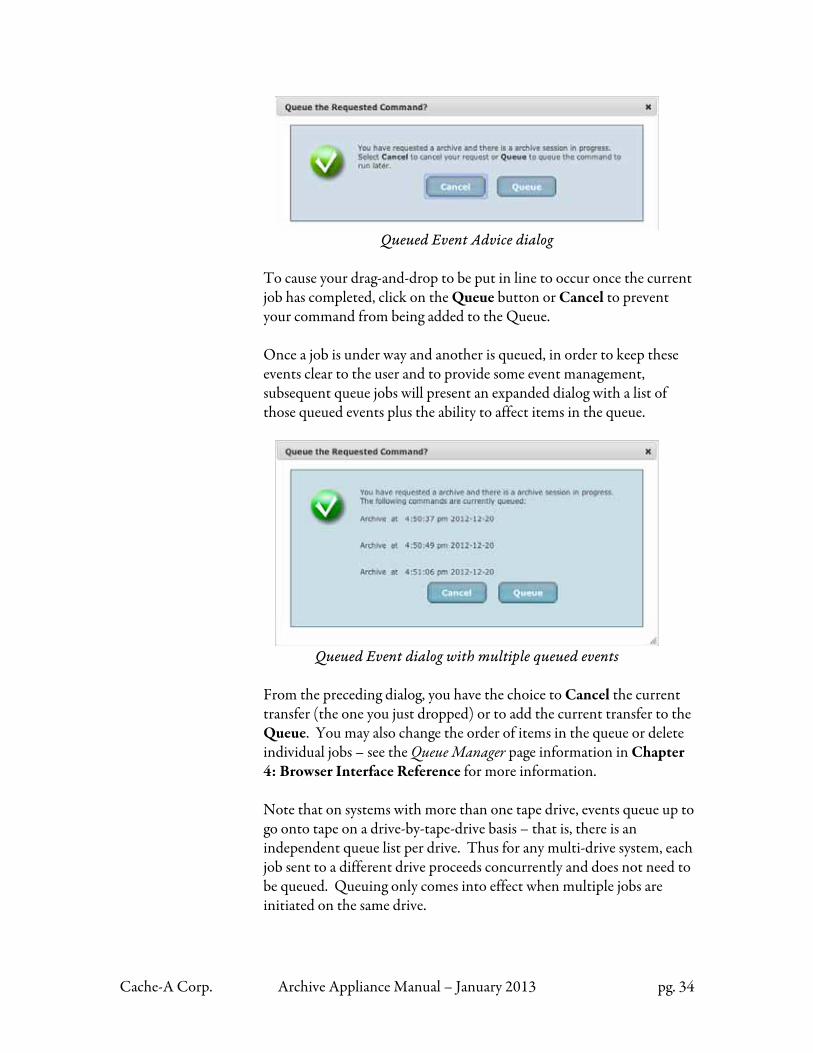
Cache-A Corp. Archive Appliance Manual – January 2013 pg. 34
Queued Event Advice dialog
To cause your drag-and-drop to be put in line to occur once the current job has completed, click on the Queue button or Cancel to prevent your command from being added to the Queue. Once a job is under way and another is queued, in order to keep these events clear to the user and to provide some event management, subsequent queue jobs will present an expanded dialog with a list of those queued events plus the ability to affect items in the queue.
Queued Event dialog with multiple queued events
From the preceding dialog, you have the choice to Cancel the current transfer (the one you just dropped) or to add the current transfer to the Queue. You may also change the order of items in the queue or delete individual jobs – see the Queue Manager page information in Chapter 4: Browser Interface Reference for more information. Note that on systems with more than one tape drive, events queue up to go onto tape on a drive-by-tape-drive basis – that is, there is an independent queue list per drive. Thus for any multi-drive system, each job sent to a different drive proceeds concurrently and does not need to be queued. Queuing only comes into effect when multiple jobs are initiated on the same drive.
Cache-A Corp. Archive Appliance Manual – January 2013 pg. 35
Queuing is only fully functional as described here as of version 3.1.x and later. Do not attempt to queue jobs if your system is not updated to this version or greater – your subsequent sessions will be ignored.
System Shutdown
Cache-A recommends that a Shutdown always be done from the Shutdown page of the web user interface – this gives users the most control over what happens to jobs and tapes. If this is not convenient, it is also OK to shutdown by briefly pressing the power button on the unit. A shutdown command will cause the system to eject the current tape(s) if present. This can take time for either a rewind then eject for tar formatted, and for LTFS, an unmount - which causes an index update, then a rewind and eject. The Unmounting step is probably the longest process in the shutdown sequence. Shutdowns will proceed more quickly and have less potential for problems if you manually eject any tapes first, preferably from the File Manager Menu button dropdown. Note that the system may appear to not be doing anything when it is actually busy – look for evidence of this before taking further action:
Check the “Drive” status indicator in the File Manager > Transfer List upper right corner, if it is not “ready” the system will not shut down
Refresh the browser window to make sure your page is loading and updated with the current state of the machine
Check that the Internal Disk Storage Activity indicator (amber or blue front panel light) is not mostly on – if it is still flickering heavily, the system is busy and a forced shutdown will likely adversely affect an archive and/or the internal disks.
Note that there are 2 ways to force a shutdown: • Press and hold the power button (bad) • Disconnect power (worse)
This may take some time
Warning
TIP
Cache-A Corp. Archive Appliance Manual – January 2013 pg. 36
Shutdown by either of these methods will likely leave the internal disk system in a state where it will need a “file system check” (fsck) on power up – this can be a lengthy process, sometimes 30 minutes or more depending upon model, amount of data, and number of issues discovered, so be patient.
• Some file system checking is done automatically and system booting may take a long time after an improper shutdown
• If your Disk Activity lights are busy, DO NOT interrupt this process, you can cause severe file system damage If your system does not boot properly after a power event and after waiting for the Disk Activity lights to stop flashing, contact Cache-A support.
Cache-A Corp. Archive Appliance Manual – January 2013 pg. 37
Chapter 3: Understanding Cache-A Appliance Technologies
The Getting Started section above touches on some of the unique technologies used in Cache-A archive appliances. This chapter is devoted to explaining in more detail how these technologies are implemented, the concepts behind them and how to make the most of them. As these products contain many powerful capabilities that are different from most archive tools on the market, this section of the manual will be important to any user who wants to fully explore the uses of their archive appliance.
The Cache-A VTAPE
Cache-A’s VTAPE is similar to the idea of a “watchfolder” found in many backup software solutions, with the significant difference being that data is never removed once archived. When used in its basic form (drop your files and forget them) archiving operations are incredibly simple. As soon as you want to do something different however, there are many implications that should be understood and are covered in this chapter. As noted in the previous chapter, data can be easily archived simply by dropping files onto the shared folder, or “VTAPE” that represents the tape. This “Virtual Tape” is confusing to many users but is really quite simple once you understand it. The explanation in this section should make things clear. If we look inside the Cache-A share when there is no tape present, because the VTAPE is a virtual representation of the tape, it will not be there either – thus the Cache-A share will contain only files you put there:
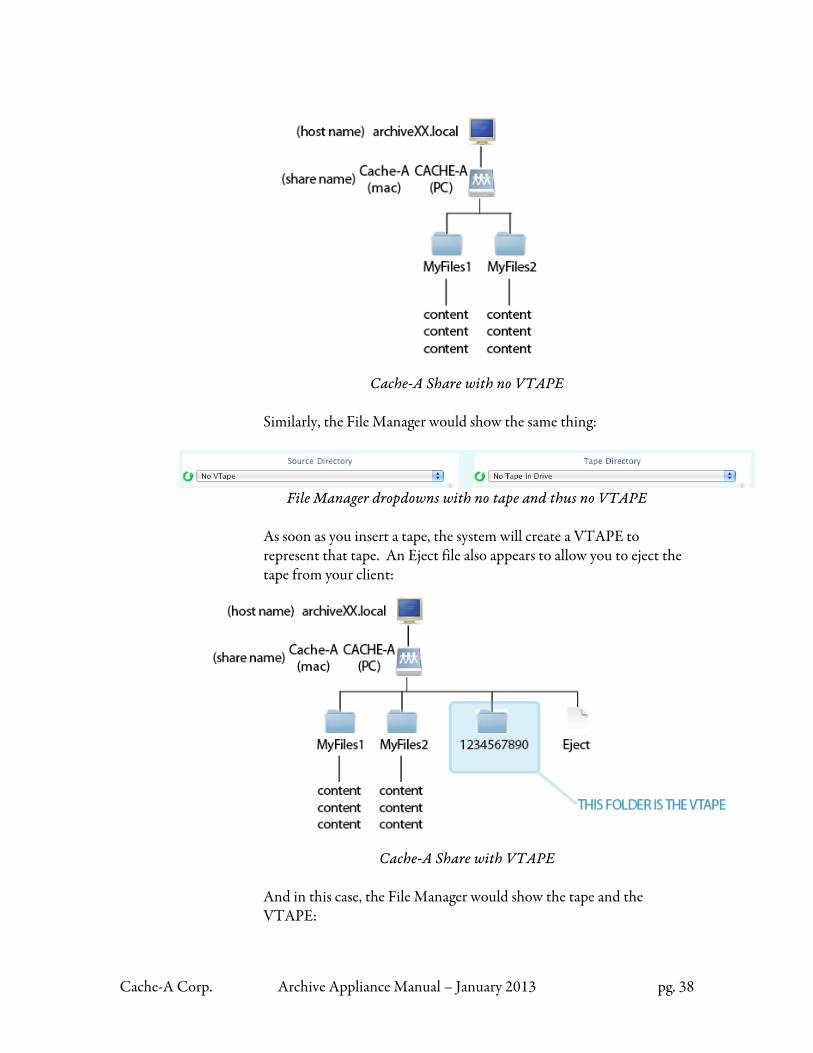
Cache-A Corp. Archive Appliance Manual – January 2013 pg. 38
Cache-A Share with no VTAPE
Similarly, the File Manager would show the same thing:
File Manager dropdowns with no tape and thus no VTAPE
As soon as you insert a tape, the system will create a VTAPE to represent that tape. An Eject file also appears to allow you to eject the tape from your client:
Cache-A Share with VTAPE
And in this case, the File Manager would show the tape and the VTAPE:
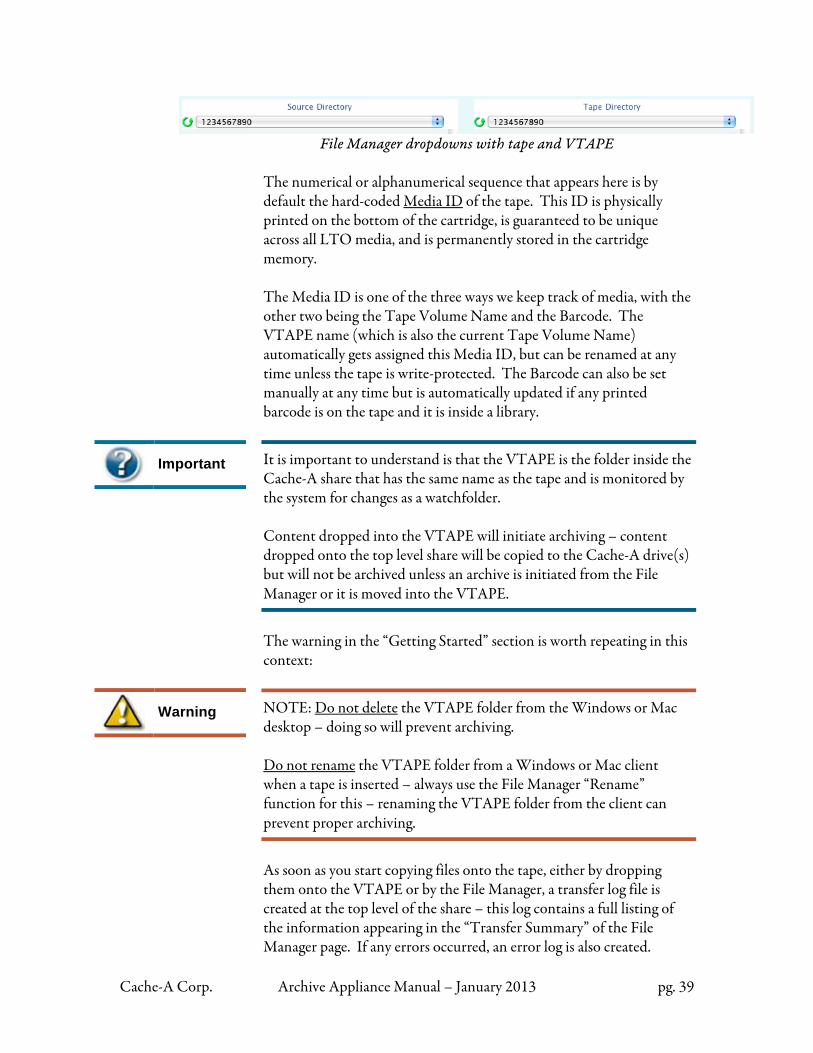
Cache-A Corp. Archive Appliance Manual – January 2013 pg. 39
File Manager dropdowns with tape and VTAPE
The numerical or alphanumerical sequence that appears here is by default the hard-coded Media ID of the tape. This ID is physically printed on the bottom of the cartridge, is guaranteed to be unique across all LTO media, and is permanently stored in the cartridge memory. The Media ID is one of the three ways we keep track of media, with the other two being the Tape Volume Name and the Barcode. The VTAPE name (which is also the current Tape Volume Name) automatically gets assigned this Media ID, but can be renamed at any time unless the tape is write-protected. The Barcode can also be set manually at any time but is automatically updated if any printed barcode is on the tape and it is inside a library.
It is important to understand is that the VTAPE is the folder inside the Cache-A share that has the same name as the tape and is monitored by the system for changes as a watchfolder. Content dropped into the VTAPE will initiate archiving – content dropped onto the top level share will be copied to the Cache-A drive(s) but will not be archived unless an archive is initiated from the File Manager or it is moved into the VTAPE.
The warning in the “Getting Started” section is worth repeating in this context:
NOTE: Do not delete the VTAPE folder from the Windows or Mac desktop – doing so will prevent archiving. Do not rename the VTAPE folder from a Windows or Mac client when a tape is inserted – always use the File Manager “Rename” function for this – renaming the VTAPE folder from the client can prevent proper archiving.
As soon as you start copying files onto the tape, either by dropping them onto the VTAPE or by the File Manager, a transfer log file is created at the top level of the share – this log contains a full listing of the information appearing in the “Transfer Summary” of the File Manager page. If any errors occurred, an error log is also created.
Important
Warning

Cache-A Corp. Archive Appliance Manual – January 2013 pg. 40
Cache-A Share with VTAPE and logs after some files have been copied
Additional items in the Cache-A Share
The Cache-A Share may contain two additional system-created items if so configured: a link to the “VTAPE” and a link to a folder called “LocalStorage” representing any additional Direct Attached Storage devices you may have connected to your Cache-A archive appliance:
Cache-A Share with VTAPE link and Direct Attached Links enabled
The VTAPE link provides an easy way to find this folder as it always appears with that exact name regardless of what the tape is called. The LocalStorage link provides client side access to the content of any
Cache-A Corp. Archive Appliance Manual – January 2013 pg. 41
devices plugged directly into the Cache-A system if you have a need to access the files on them or to add more data to any such device. These additional items are discussed further in the Browser Reference section under the System Tools page > Settings tab section where they can be enabled. Be sure to review the information there before using these features.
Managing Your Content In order to keep your content organized, you should make a practice of archiving your data already contained in folders or of creating folders on the Cache-A Share into which you drop files before you begin archiving. There are many good reasons for doing so:
Thousands of loose files at the top level of a tape will be difficult to manage
It is much easier and more accurate to drag-and-drop folders than many files
Folders make for better organization of your files and allow more meaningful identification and make for better searches for finding content later
Note the following important restrictions:
You can not delete from archives:
• Cache-A Archive Appliance Tapes do not allow the user to reorganize or rename files on the tape cartridge
• Once content is archived, it will remain on the tape as archived until that tape is erased
You can not move content in archives:
• The Archive Appliance will archive files with the names and hierarchy they have when they are moved to the VTAPE
• If you move or change file names in the VTAPE folder on the mounted Cache-A share, you are not changing what is on the tape, but you may be causing those items to be archived again
Cache-A Corp. Archive Appliance Manual – January 2013 pg. 42
Warning
Important
• LTFS formatted tapes do allow you to move files (not folders) around after content has been archived to tape – this can be done on the client computer to the mounted LTFS Volume but NOT from the Cache-A web user interface
• LTFS formatted tapes also allow you to appear to delete files from tape but the files actually remain on tape – this can be done on the client computer to the mounted LTFS Volume but NOT from the Cache-A web user interface
• Any such actions are bad practice – content to be archived should be fully organized prior to being committed to tape as explained in detail in the following section
If you attempt to change the name of files in the VTAPE before or while they are being copied to tape, you may cause serious archiving errors.
Note that you CAN add content to any given tape any time the tape is loaded as long as there is space left on it. The Managing VTAPE and Physical Tape Capacity section below discusses this in more detail.
Organizing Techniques Staging your data
The previous Getting Started chapter describes the basic “staging” concept; additional information about staging is covered here. You can store content anywhere on the Archive Appliance share volume – only content placed into the VTAPE folder will be archived to tape.
Placing your data at the top level of the shared volume will allow you to reorganize and rename your data prior to archiving. Once you have manipulated your files to your satisfaction, you can use the File Manager to drag from the top level onto the VTAPE to initiate the archive-to-tape process
LTFS Info
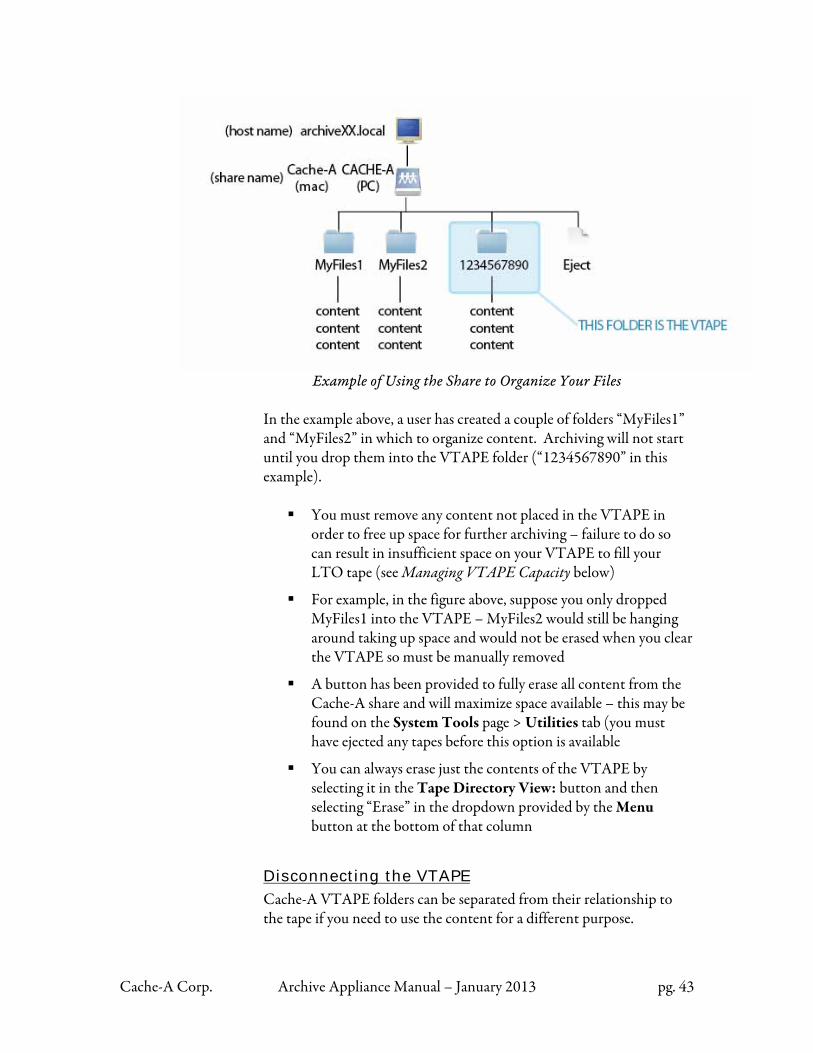
Cache-A Corp. Archive Appliance Manual – January 2013 pg. 43
Example of Using the Share to Organize Your Files
In the example above, a user has created a couple of folders “MyFiles1” and “MyFiles2” in which to organize content. Archiving will not start until you drop them into the VTAPE folder (“1234567890” in this example).
You must remove any content not placed in the VTAPE in order to free up space for further archiving – failure to do so can result in insufficient space on your VTAPE to fill your LTO tape (see Managing VTAPE Capacity below)
For example, in the figure above, suppose you only dropped MyFiles1 into the VTAPE – MyFiles2 would still be hanging around taking up space and would not be erased when you clear the VTAPE so must be manually removed
A button has been provided to fully erase all content from the Cache-A share and will maximize space available – this may be found on the System Tools page > Utilities tab (you must have ejected any tapes before this option is available
You can always erase just the contents of the VTAPE by selecting it in the Tape Directory View: button and then selecting “Erase” in the dropdown provided by the Menu button at the bottom of that column
Disconnecting the VTAPE
Cache-A VTAPE folders can be separated from their relationship to the tape if you need to use the content for a different purpose.
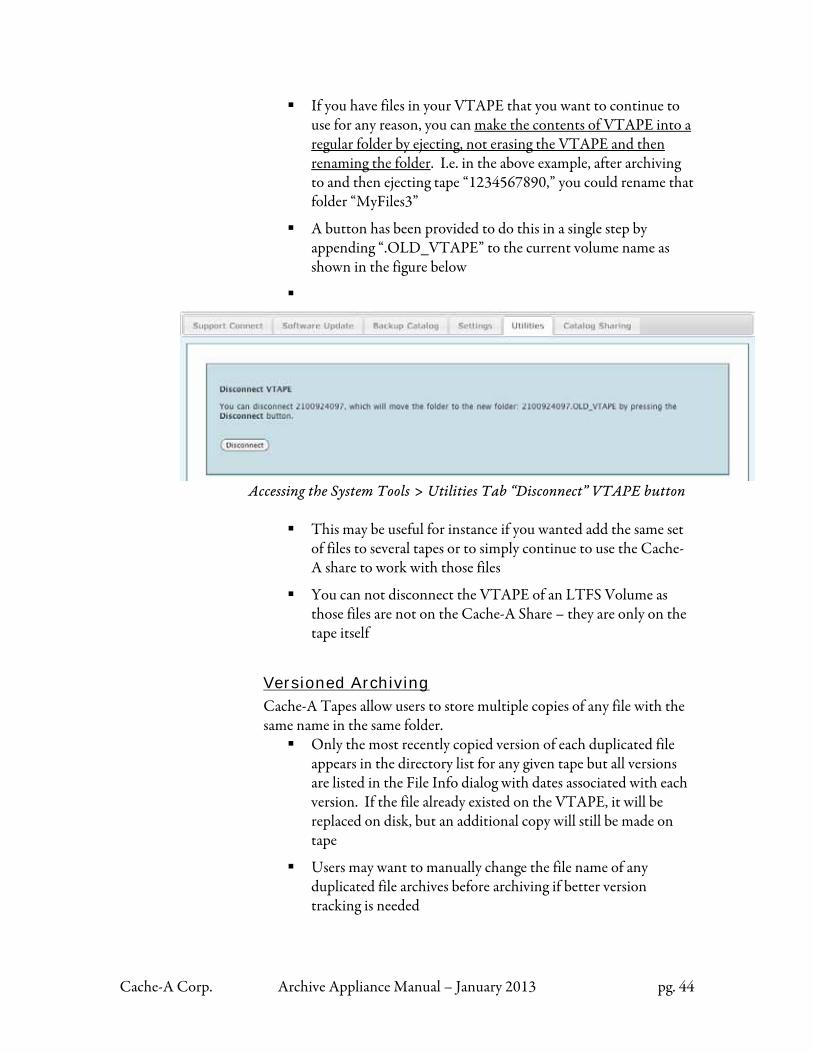
Cache-A Corp. Archive Appliance Manual – January 2013 pg. 44
If you have files in your VTAPE that you want to continue to use for any reason, you can make the contents of VTAPE into a regular folder by ejecting, not erasing the VTAPE and then renaming the folder. I.e. in the above example, after archiving to and then ejecting tape “1234567890,” you could rename that folder “MyFiles3”
A button has been provided to do this in a single step by appending “.OLD_VTAPE” to the current volume name as shown in the figure below
Accessing the System Tools > Utilities Tab “Disconnect” VTAPE button
This may be useful for instance if you wanted add the same set
of files to several tapes or to simply continue to use the Cache-A share to work with those files
You can not disconnect the VTAPE of an LTFS Volume as those files are not on the Cache-A Share – they are only on the tape itself
Versioned Archiving
Cache-A Tapes allow users to store multiple copies of any file with the same name in the same folder.
Only the most recently copied version of each duplicated file appears in the directory list for any given tape but all versions are listed in the File Info dialog with dates associated with each version. If the file already existed on the VTAPE, it will be replaced on disk, but an additional copy will still be made on tape
Users may want to manually change the file name of any duplicated file archives before archiving if better version tracking is needed
Cache-A Corp. Archive Appliance Manual – January 2013 pg. 45
A search for any given file will return a list of all versions allowing you to access whichever version you desire for a restore (See The Search Button in Chapter 4: Browser Interface Reference for more information about this capability)
VTAPE Contents may vary
The contents of the VTAPE folder may or may not contain the same data as the tape cartridge that it represents.
The VTAPE will in fact always contain the same data as the tape if you fill each tape cartridge, then erase the VTAPE and start fresh with the next tape
When you eject a tape, you will be asked if you want to erase the VTAPE – unless you have a good reason not to erase the VTAPE, you should always select Erase
One good reason to keep the contents of the VTAPE is if you want to make a second copy of the data you just archived. In this case, simply insert a new tape, and then select the Copy button in the New Tape Inserted dialog
As you use the system, you may have partially filled tapes, want to eject them and add different content to other tapes, etc. Under these circumstances you also may want to preserve the items in your VTAPE – please read each dialog carefully when choosing how you will manage this data
Managing VTAPE and Physical Tape Capacity
Cache-A archive appliances take advantage of the fact that LTO tape drives have built-in hardware to losslessly compress data on the fly without impacting transfer rates or data quality. Some data will not compress at all, and some may compress to 2:1 or more. Content such as mpeg or H.264 files make very efficient use of bits and will not compress at all. Content such as blue-screen tiff sequences contain a lot of redundant data and will compress quite a bit. Because of this, either of two scenarios can cause problems: a) the VTAPE can contain more data than will fit on a tape cartridge or b) the tape cartridge can contain more data than will fit on the VTAPE. Video professionals should never be concerned about any quality impact of this compression – it is guaranteed to have bit for bit accuracy when restoring files.
Cache-A Corp. Archive Appliance Manual – January 2013 pg. 46
Important
Tape and VTAPE disk capacities must be manually managed by the user when archiving files. The Multiple Volumes (Tape Spanning mode) capability allows you to ignore Tape capacity as long as you have additional tapes to insert upon filling the Current Tape. Cache-A recommends you use Multiple Volumes only when necessary – keeping individual tapes with their own individual directories is safer for a number of reasons. Multiple Volumes and Remove Files capabilities are discussed under the System Tools page > Settings tab section of Chapter 4: Browser Interface Reference. When these capabilities are not enabled, you should observe the following cautions:
The VTAPE can accommodate anywhere from 900 GB to over 7 TB depending upon the Cache-A model and RAID configuration. Consult the System Status page, Total Size figure to see what your system capacity is
The Cache-A Share is big enough to fill an LTO tape cartridge with no compression. If your data compresses well, the VTAPE may not be big enough for that all in one go, so you may have to erase it to add more data
To see how much data is on any loaded tape, select the Tape Info item in the left column menu to invoke a dialog with all the important information about that tape
The Tape Info window may display a negative number for Space Lost – this indicates that your data did compress somewhat. This number is actually a combined report of how much data compressed less actual losses from read-write start-stops, bad blocks, etc.
When the VTAPE is full, it won't let you put any more on it. Thus if the tape is not full because of lossless compression, you will have to erase it or remove some data from the VTAPE in order to copy more onto the tape.
Note that the Catalog, which is a collection of all the tape TOCs (tables of contents), is stored on the same Cache-A share along with VTAPE contents and other data you’ve placed on the share. Overfilling this share can cause Catalog problems.

Cache-A Corp. Archive Appliance Manual – January 2013 pg. 47
Warning
Warning
Too Much Data on the VTAPE Partition
If you put too much data on your VTAPE, the system may not have enough room left for the revised Catalog after archiving – always watch out for this warning.
It is possible that when archiving and the tape becomes full, if
there is more data on the VTAPE than will fit, the system will stop archiving files at that point.
If you try to restore all of a tape that contains more uncompressed data than the VTAPE will hold, the restore will stop when the VTAPE file system is full.
The system will not be able to write the TOC if there isn’t enough room left. To prevent this problem, it is a bad idea to try to cram every possible bit onto your tapes.
Do not overfill tapes – maximum recommended capacities (unless using the Multiple Volumes feature) are: LTO-4 — 740 GB LTO-5 — 1425 GB LTO-6 — 2250 GB
You can always recover all data written to overfilled tapes, but you may not know exactly what made it to tape and what did not. Also, the TOC will exist in your catalog, but will not be present on tape and thus can not be relearned in another Cache-A system or in the event of a Catalog crash.
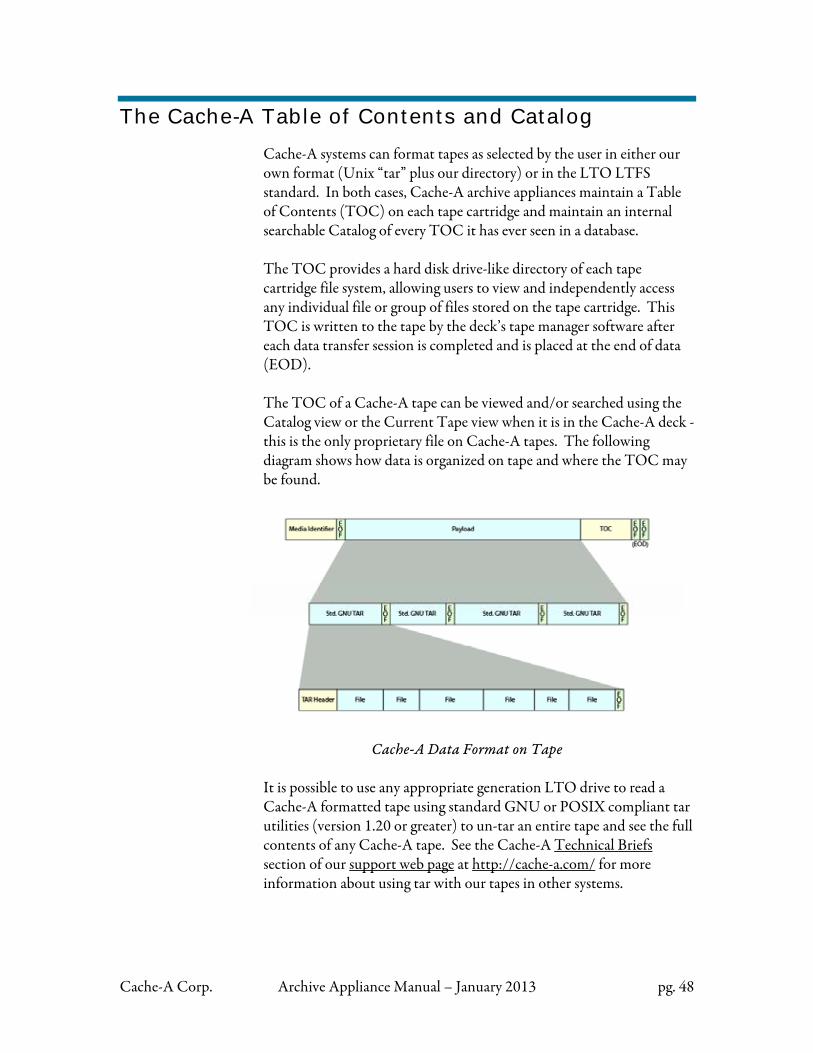
Cache-A Corp. Archive Appliance Manual – January 2013 pg. 48
The Cache-A Table of Contents and Catalog
Cache-A systems can format tapes as selected by the user in either our own format (Unix “tar” plus our directory) or in the LTO LTFS standard. In both cases, Cache-A archive appliances maintain a Table of Contents (TOC) on each tape cartridge and maintain an internal searchable Catalog of every TOC it has ever seen in a database. The TOC provides a hard disk drive-like directory of each tape cartridge file system, allowing users to view and independently access any individual file or group of files stored on the tape cartridge. This TOC is written to the tape by the deck’s tape manager software after each data transfer session is completed and is placed at the end of data (EOD). The TOC of a Cache-A tape can be viewed and/or searched using the Catalog view or the Current Tape view when it is in the Cache-A deck - this is the only proprietary file on Cache-A tapes. The following diagram shows how data is organized on tape and where the TOC may be found.
Cache-A Data Format on Tape
It is possible to use any appropriate generation LTO drive to read a Cache-A formatted tape using standard GNU or POSIX compliant tar utilities (version 1.20 or greater) to un-tar an entire tape and see the full contents of any Cache-A tape. See the Cache-A Technical Briefs section of our support web page at http://cache-a.com/ for more information about using tar with our tapes in other systems.
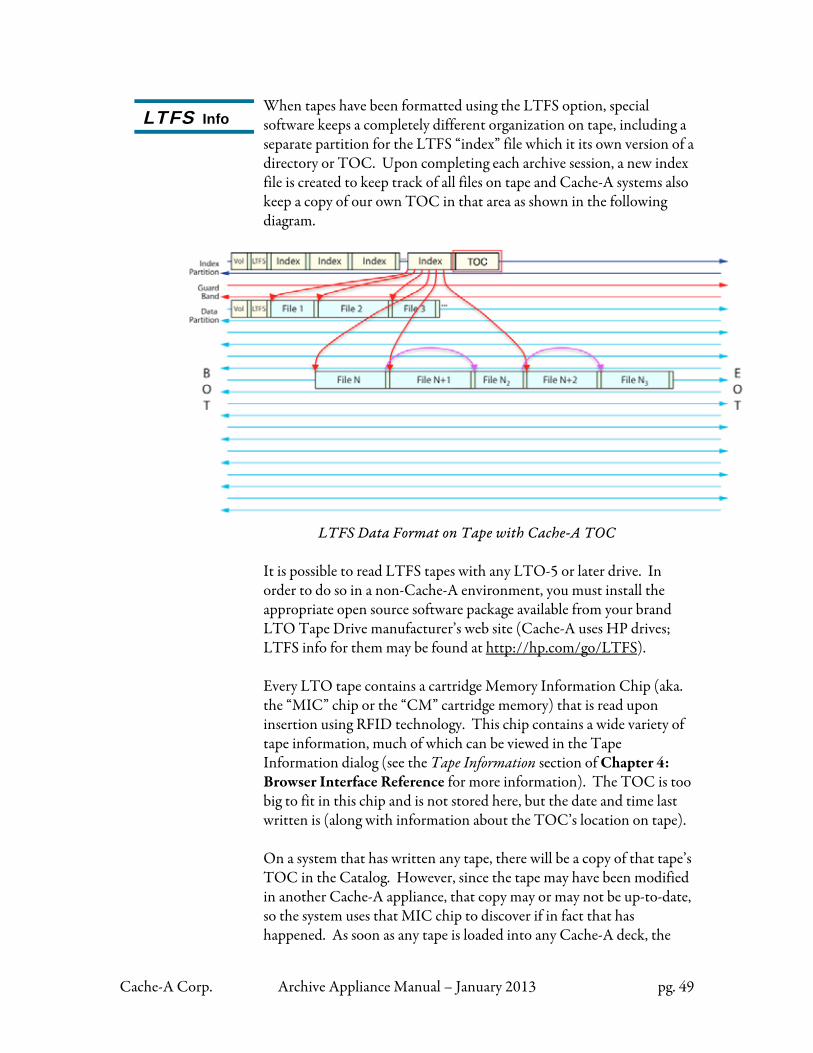
Cache-A Corp. Archive Appliance Manual – January 2013 pg. 49
When tapes have been formatted using the LTFS option, special software keeps a completely different organization on tape, including a separate partition for the LTFS “index” file which it its own version of a directory or TOC. Upon completing each archive session, a new index file is created to keep track of all files on tape and Cache-A systems also keep a copy of our own TOC in that area as shown in the following diagram.
LTFS Data Format on Tape with Cache-A TOC
It is possible to read LTFS tapes with any LTO-5 or later drive. In order to do so in a non-Cache-A environment, you must install the appropriate open source software package available from your brand LTO Tape Drive manufacturer’s web site (Cache-A uses HP drives; LTFS info for them may be found at http://hp.com/go/LTFS). Every LTO tape contains a cartridge Memory Information Chip (aka. the “MIC” chip or the “CM” cartridge memory) that is read upon insertion using RFID technology. This chip contains a wide variety of tape information, much of which can be viewed in the Tape Information dialog (see the Tape Information section of Chapter 4: Browser Interface Reference for more information). The TOC is too big to fit in this chip and is not stored here, but the date and time last written is (along with information about the TOC’s location on tape). On a system that has written any tape, there will be a copy of that tape’s TOC in the Catalog. However, since the tape may have been modified in another Cache-A appliance, that copy may or may not be up-to-date, so the system uses that MIC chip to discover if in fact that has happened. As soon as any tape is loaded into any Cache-A deck, the
LTFS Info
Cache-A Corp. Archive Appliance Manual – January 2013 pg. 50
tape ID and last written date/time is pulled from the tape's memory chip and compared to the Catalog. If it is a match, the system instantly displays the internal copy of the TOC. If that information is either not in the catalog or it is newer than the catalog, the TOC is read from tape and the Catalog is updated. Reading the TOC from the tape may be very quick or can take quite a bit of time depending upon where on the tape it is stored (tape seek time alone can be up to 2 minutes) and how big it is (a single TOC can contain a directory of hundreds of thousands or even millions of small files). The system will display a wait dialog when importing a TOC – do not interrupt this process or you will end up with a partial representation of the tape’s contents in the catalog.
Managing the Catalog Normally, the Catalog is self-maintaining and requires no user intervention. Any change you make to any tape, including erasing it, is immediately updated in the catalog. As noted above, any time you insert any tape into a deck, that TOC is added to the Catalog. If you did not want to add a tape to your Catalog, or if you have removed a tape from your shelves, you can remove it from the Catalog by selecting it in the Catalog List and selecting Delete from the Menu Button (see the that section in Chapter 4: Browser Interface Reference for more information). The internal Catalog is stored on the local hard disk and is very unlikely ever have problems. However, in the event of a catastrophic hard disk crash, this database could be lost. There is a user-initiated Catalog backup utility to allow you to backup the Catalog onto the VTAPE and thus onto the Current tape if loaded - this also allows you to copy it to other media such as a USB drive or any other volume. This function may be found under the Catalog Backup tab of the System Tools page (see the that section in Chapter 4: Browser Interface Reference for more information). In the rare event of a lost Catalog, restoring your backup Catalog will require a call to Cache-A technical support to allow our service technician to restore the database. There will be user facilities to handle this in future versions.
This may take a few minutes
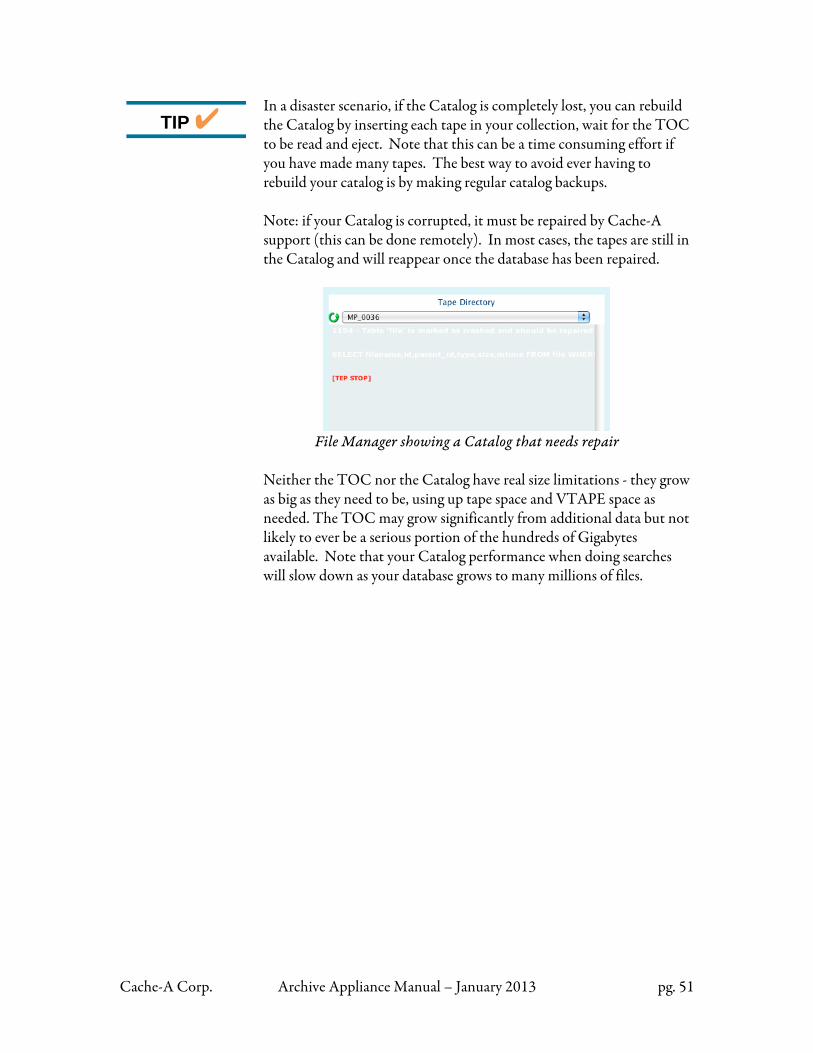
Cache-A Corp. Archive Appliance Manual – January 2013 pg. 51
In a disaster scenario, if the Catalog is completely lost, you can rebuild the Catalog by inserting each tape in your collection, wait for the TOC to be read and eject. Note that this can be a time consuming effort if you have made many tapes. The best way to avoid ever having to rebuild your catalog is by making regular catalog backups. Note: if your Catalog is corrupted, it must be repaired by Cache-A support (this can be done remotely). In most cases, the tapes are still in the Catalog and will reappear once the database has been repaired.
File Manager showing a Catalog that needs repair
Neither the TOC nor the Catalog have real size limitations - they grow as big as they need to be, using up tape space and VTAPE space as needed. The TOC may grow significantly from additional data but not likely to ever be a serious portion of the hundreds of Gigabytes available. Note that your Catalog performance when doing searches will slow down as your database grows to many millions of files.
TIP
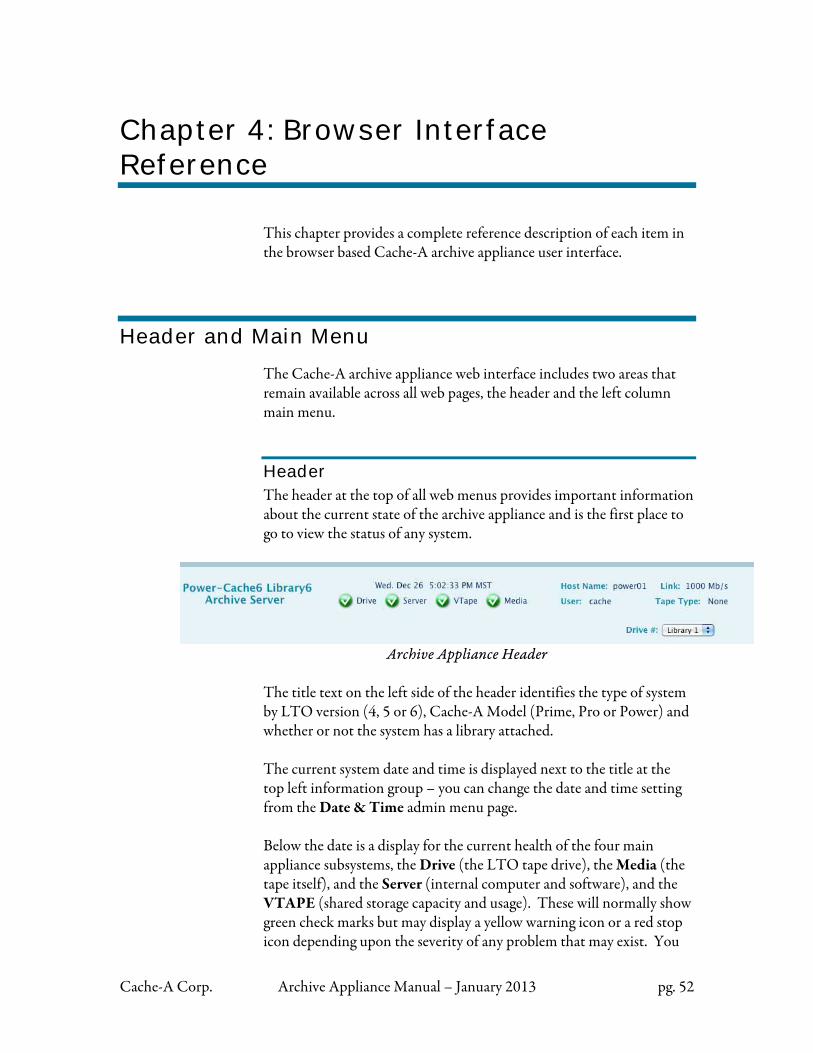
Cache-A Corp. Archive Appliance Manual – January 2013 pg. 52
Chapter 4: Browser Interface Reference
This chapter provides a complete reference description of each item in the browser based Cache-A archive appliance user interface.
Header and Main Menu
The Cache-A archive appliance web interface includes two areas that remain available across all web pages, the header and the left column main menu.
Header The header at the top of all web menus provides important information about the current state of the archive appliance and is the first place to go to view the status of any system.
Archive Appliance Header
The title text on the left side of the header identifies the type of system by LTO version (4, 5 or 6), Cache-A Model (Prime, Pro or Power) and whether or not the system has a library attached. The current system date and time is displayed next to the title at the top left information group – you can change the date and time setting from the Date & Time admin menu page. Below the date is a display for the current health of the four main appliance subsystems, the Drive (the LTO tape drive), the Media (the tape itself), and the Server (internal computer and software), and the VTAPE (shared storage capacity and usage). These will normally show green check marks but may display a yellow warning icon or a red stop icon depending upon the severity of any problem that may exist. You
Cache-A Corp. Archive Appliance Manual – January 2013 pg. 53
may click on any of these icons to take you immediately to the System Status page where additional status information is displayed. The Host Name item displays the configured hostname for this system. By default this is archiveXX where XX is the last two digits of your serial number. For example serial #CA-P4001-30010 would be archive10. The hostname can by changed in the Network Settings page. The User item displays the name of the currently logged-in user. User names, passwords and privilege level adding and removing users can be administered in the User Management page. The Link item shows the Ethernet connection speed detected by the system. For optimum performance this display should show 1000 Mb/s for Gigabit Ethernet connection speed. This will display 10000 Mb/s for Power-Cache systems when 10 Gb E is connected. The Tape Type item shows what kind of tape the system has detected is present, or No Tape if no tape is detected. The system may display and will work with any appropriate tapes (LTO-3, 4, 5 or 6 – LTO can read tapes from the previous 2 generations and write to the current and previous). The Tape Type item will also indicate if the current tape is LTFS formatted.
Main Menu The main menu system down the left side of the web display allows access to all major subsections of the system operations. Not all menu items are available to all users. Two user privilege levels are available, user and admin when setting up new users on the system – all users not given admin level privileges will not see the items in the lower Admin Menu section.
LTFS Info
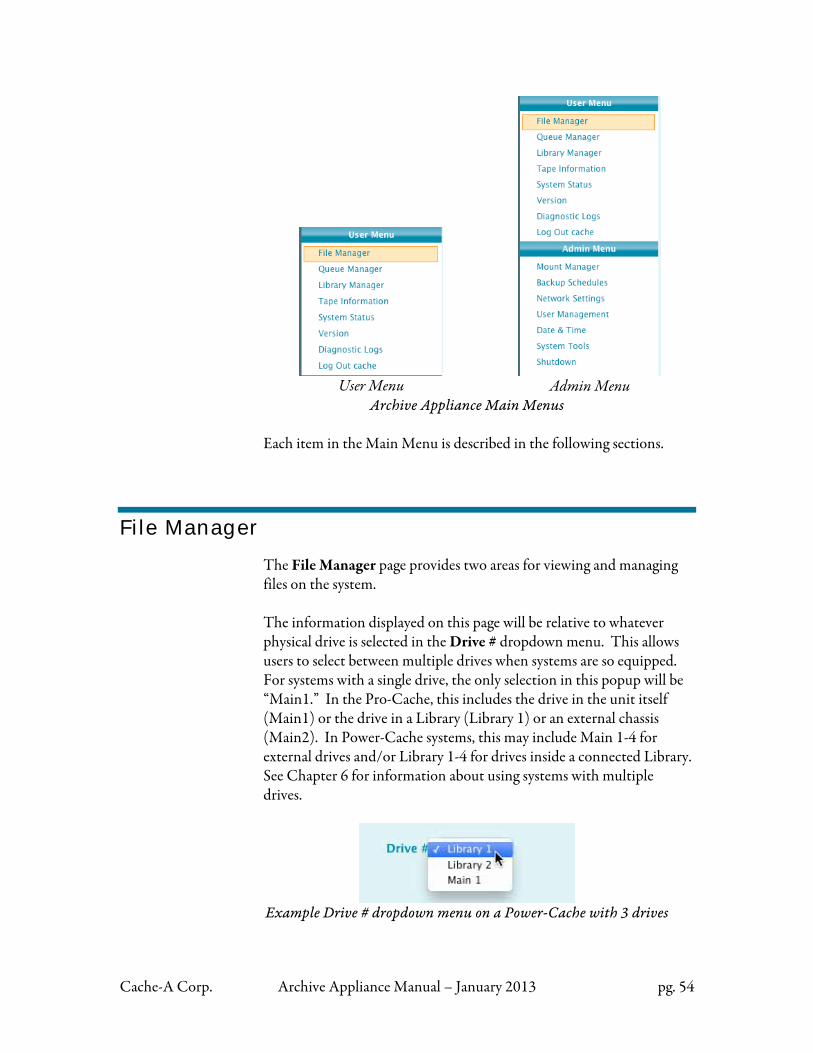
Cache-A Corp. Archive Appliance Manual – January 2013 pg. 54
User Menu
Admin Menu
Archive Appliance Main Menus Each item in the Main Menu is described in the following sections.
File Manager
The File Manager page provides two areas for viewing and managing files on the system. The information displayed on this page will be relative to whatever physical drive is selected in the Drive # dropdown menu. This allows users to select between multiple drives when systems are so equipped. For systems with a single drive, the only selection in this popup will be “Main1.” In the Pro-Cache, this includes the drive in the unit itself (Main1) or the drive in a Library (Library 1) or an external chassis (Main2). In Power-Cache systems, this may include Main 1-4 for external drives and/or Library 1-4 for drives inside a connected Library. See Chapter 6 for information about using systems with multiple drives.
Example Drive # dropdown menu on a Power-Cache with 3 drives

Cache-A Corp. Archive Appliance Manual – January 2013 pg. 55
The Upper area labeled File Manager allows viewing the contents of the tape, the VTAPE, the entire Cache-A Share, or any other volume mounted on the appliance. The File Manager columns may also be used via drag-and-drop to move content to the tape (archive) or to move content from the tape to the VTAPE or other mounted volume (restore). The lower area labeled Transfer Summary is the primary tool for monitoring system activity and shows the drive status, what files have actually been moved in what direction, and what the system is currently doing.
Archive Appliance File Manager Page
File Manager Operations Each of the two lists in the file manager display all the files on whatever volume is selected in the View dropdown menu under each column. The Source Directory column is nominally where files are coming from when archiving (the file source). When restoring, this column
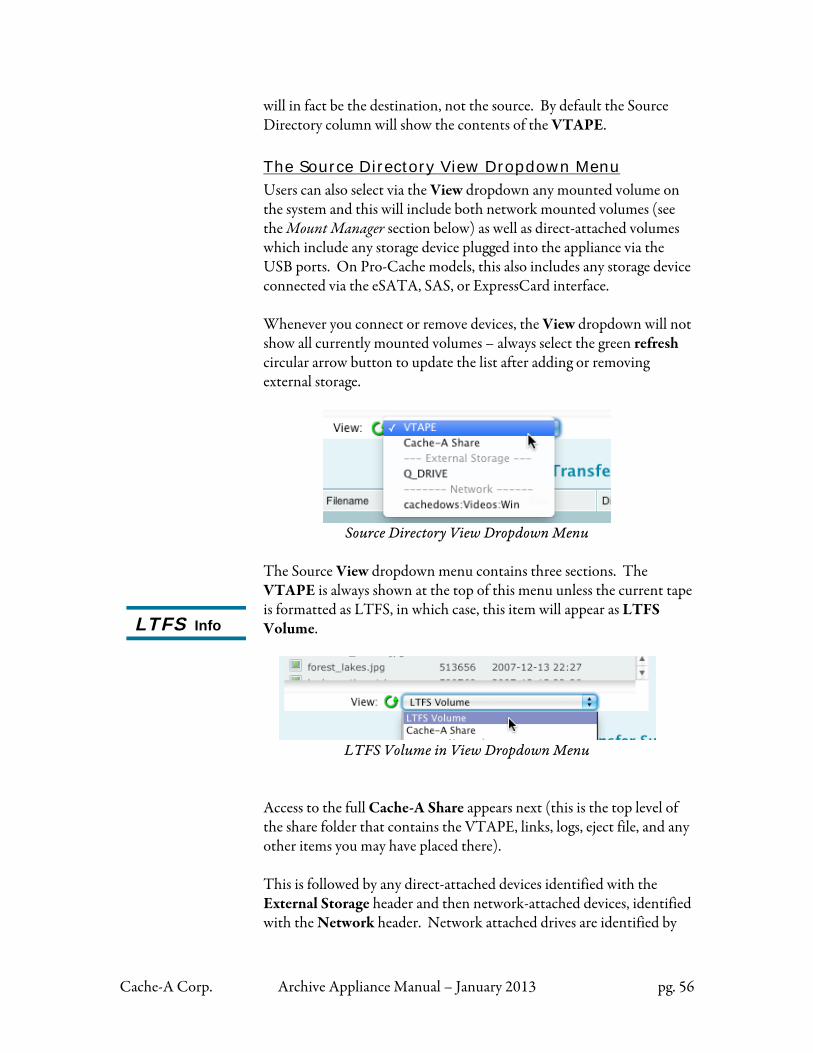
Cache-A Corp. Archive Appliance Manual – January 2013 pg. 56
will in fact be the destination, not the source. By default the Source Directory column will show the contents of the VTAPE. The Source Directory View Dropdown Menu
Users can also select via the View dropdown any mounted volume on the system and this will include both network mounted volumes (see the Mount Manager section below) as well as direct-attached volumes which include any storage device plugged into the appliance via the USB ports. On Pro-Cache models, this also includes any storage device connected via the eSATA, SAS, or ExpressCard interface. Whenever you connect or remove devices, the View dropdown will not show all currently mounted volumes – always select the green refresh circular arrow button to update the list after adding or removing external storage.
Source Directory View Dropdown Menu
The Source View dropdown menu contains three sections. The VTAPE is always shown at the top of this menu unless the current tape is formatted as LTFS, in which case, this item will appear as LTFS Volume.
LTFS Volume in View Dropdown Menu
Access to the full Cache-A Share appears next (this is the top level of the share folder that contains the VTAPE, links, logs, eject file, and any other items you may have placed there). This is followed by any direct-attached devices identified with the External Storage header and then network-attached devices, identified with the Network header. Network attached drives are identified by
LTFS Info

Cache-A Corp. Archive Appliance Manual – January 2013 pg. 57
the hostname:volumename:type where type is Win (Samba/CIFS sharing), NFS (Network File System) or AFS (Apple File System). There may also be occasions when the entire Source Directory list does not show all the files/folders you expect to see therein and an additional refresh button is provided at the top of each column to update the file lists. The files on mounted network shares will appear blank if the mount has failed.
Note: if you have refreshed the Source Directory display and do not see files/folders you know are there, DO NOT PROCEED using this as a destination as it may be incorrectly mounted. Disconnect and reconnect the device to resolve this issue.
Direct Attached Storage Mounting and Unmounting
USB Devices support "hot plugging" and can be plugged in and removed at any time. The list of drives in both the Source Directory listing of the File Manager page (and in the DirectAttachStorage folder on the Share if enabled) is updated by clicking on the refresh arrow at the bottom of the Source Directory window. eSATA Devices do not support hot plugging, so although you can plug in an eSATA device with power on, a reboot is always required before it will appear. For more information about Direct Attached Storage options and harware support see the section on Direct Attached Storage Interfaces for your model system in Chapter 7: Hardware Reference. Removing Direct Attached Storage Links
To get rid of links in the Soure Directory View drop-down menu (and the DirectAttachStorage folder), you must unplug the device, and then click refresh arrow at the bottom of the Source Directory in File Manager for it to refresh and remove old links. In the case of eSATA, a reboot after removal may also be required. If the system is shut down and the device is then removed, old links may persist - to remove them either replug the device and follow the above procedure or remove them via Linux shell commands.
Warning
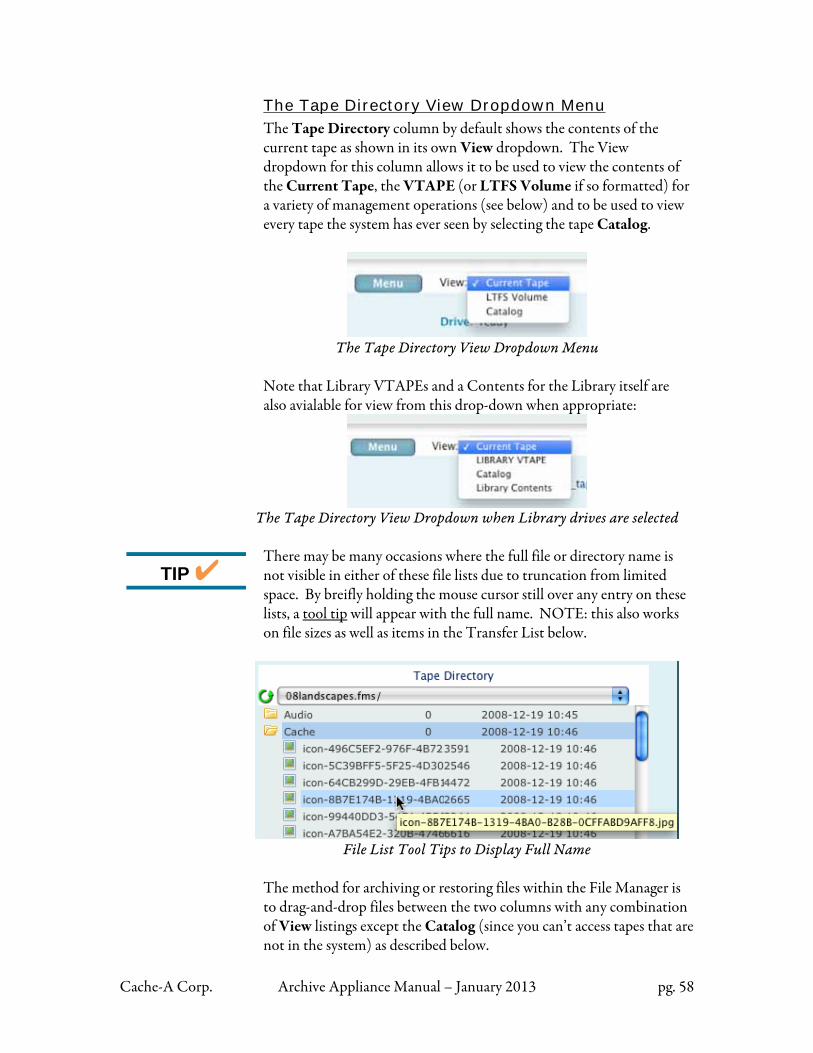
Cache-A Corp. Archive Appliance Manual – January 2013 pg. 58
The Tape Directory View Dropdown Menu The Tape Directory column by default shows the contents of the current tape as shown in its own View dropdown. The View dropdown for this column allows it to be used to view the contents of the Current Tape, the VTAPE (or LTFS Volume if so formatted) for a variety of management operations (see below) and to be used to view every tape the system has ever seen by selecting the tape Catalog.
The Tape Directory View Dropdown Menu
Note that Library VTAPEs and a Contents for the Library itself are also avialable for view from this drop-down when appropriate:
The Tape Directory View Dropdown when Library drives are selected
There may be many occasions where the full file or directory name is not visible in either of these file lists due to truncation from limited space. By breifly holding the mouse cursor still over any entry on these lists, a tool tip will appear with the full name. NOTE: this also works on file sizes as well as items in the Transfer List below.
File List Tool Tips to Display Full Name
The method for archiving or restoring files within the File Manager is to drag-and-drop files between the two columns with any combination of View listings except the Catalog (since you can’t access tapes that are not in the system) as described below.
TIP
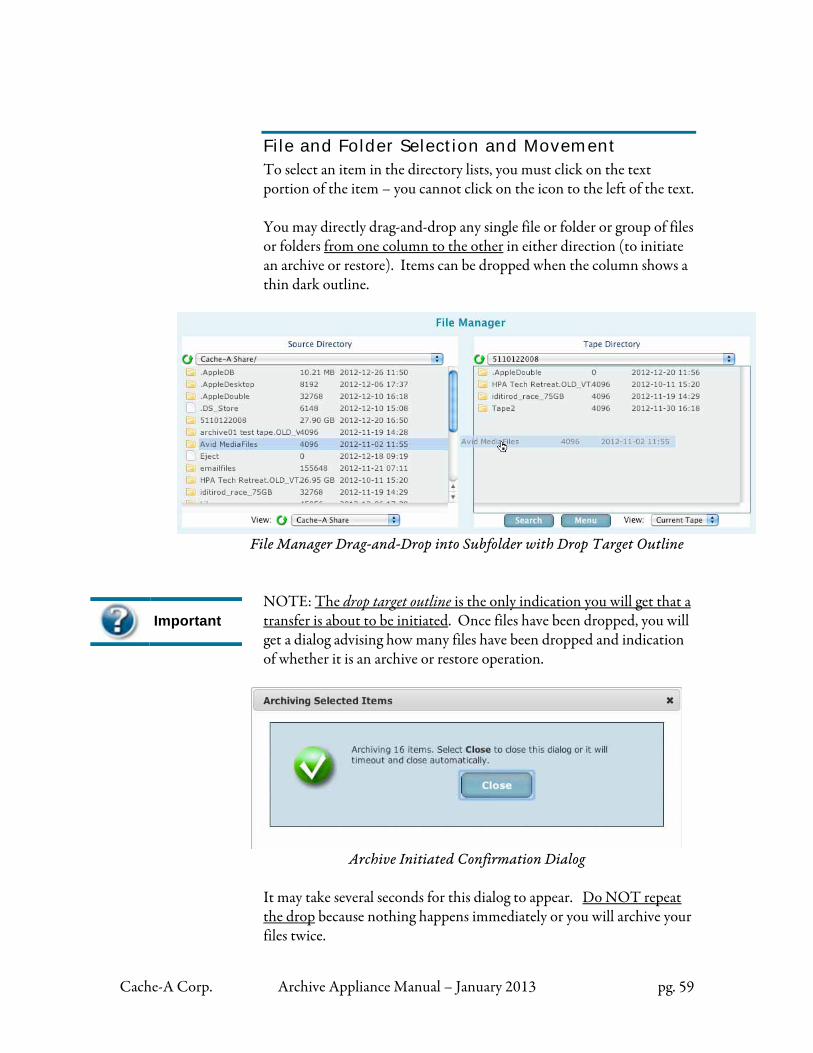
Cache-A Corp. Archive Appliance Manual – January 2013 pg. 59
Important
File and Folder Selection and Movement To select an item in the directory lists, you must click on the text portion of the item – you cannot click on the icon to the left of the text. You may directly drag-and-drop any single file or folder or group of files or folders from one column to the other in either direction (to initiate an archive or restore). Items can be dropped when the column shows a thin dark outline.
File Manager Drag-and-Drop into Subfolder with Drop Target Outline
NOTE: The drop target outline is the only indication you will get that a transfer is about to be initiated. Once files have been dropped, you will get a dialog advising how many files have been dropped and indication of whether it is an archive or restore operation.
Archive Initiated Confirmation Dialog
It may take several seconds for this dialog to appear. Do NOT repeat the drop because nothing happens immediately or you will archive your files twice.
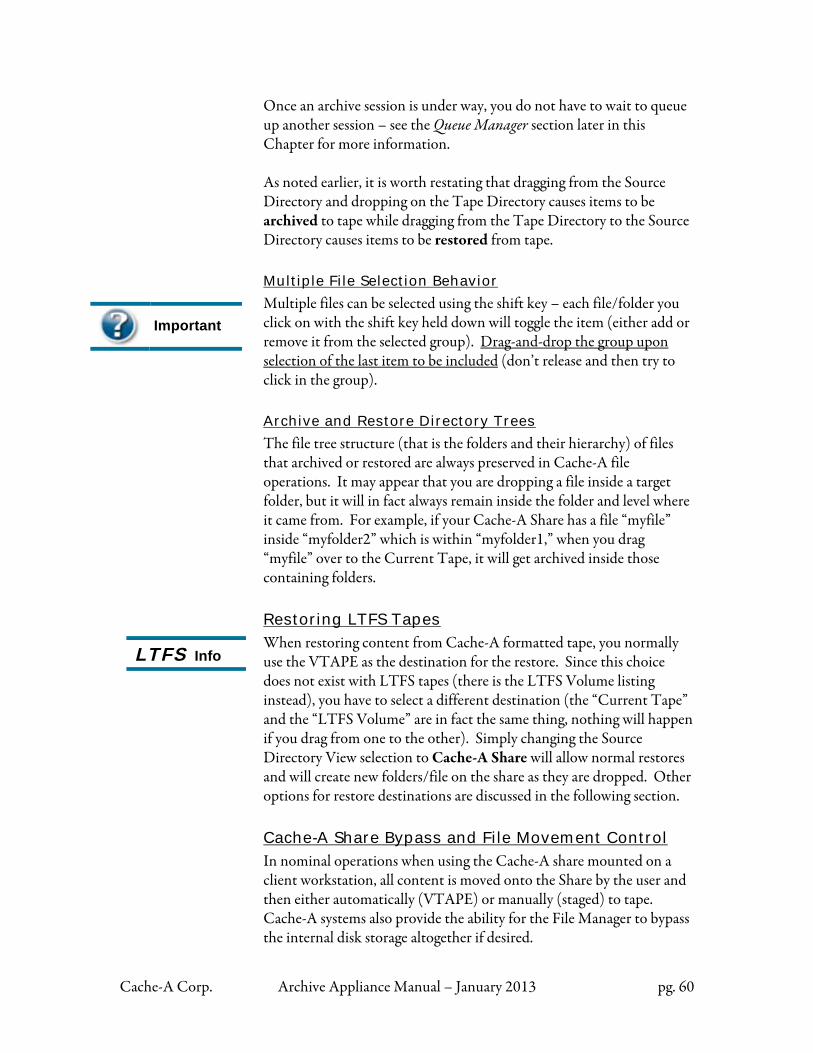
Cache-A Corp. Archive Appliance Manual – January 2013 pg. 60
Important
Once an archive session is under way, you do not have to wait to queue up another session – see the Queue Manager section later in this Chapter for more information. As noted earlier, it is worth restating that dragging from the Source Directory and dropping on the Tape Directory causes items to be archived to tape while dragging from the Tape Directory to the Source Directory causes items to be restored from tape. Multiple File Selection Behavior
Multiple files can be selected using the shift key – each file/folder you click on with the shift key held down will toggle the item (either add or remove it from the selected group). Drag-and-drop the group upon selection of the last item to be included (don’t release and then try to click in the group). Archive and Restore Directory Trees
The file tree structure (that is the folders and their hierarchy) of files that archived or restored are always preserved in Cache-A file operations. It may appear that you are dropping a file inside a target folder, but it will in fact always remain inside the folder and level where it came from. For example, if your Cache-A Share has a file “myfile” inside “myfolder2” which is within “myfolder1,” when you drag “myfile” over to the Current Tape, it will get archived inside those containing folders. Restoring LTFS Tapes
When restoring content from Cache-A formatted tape, you normally use the VTAPE as the destination for the restore. Since this choice does not exist with LTFS tapes (there is the LTFS Volume listing instead), you have to select a different destination (the “Current Tape” and the “LTFS Volume” are in fact the same thing, nothing will happen if you drag from one to the other). Simply changing the Source Directory View selection to Cache-A Share will allow normal restores and will create new folders/file on the share as they are dropped. Other options for restore destinations are discussed in the following section. Cache-A Share Bypass and File Movement Control
In nominal operations when using the Cache-A share mounted on a client workstation, all content is moved onto the Share by the user and then either automatically (VTAPE) or manually (staged) to tape. Cache-A systems also provide the ability for the File Manager to bypass the internal disk storage altogether if desired.
LTFS Info
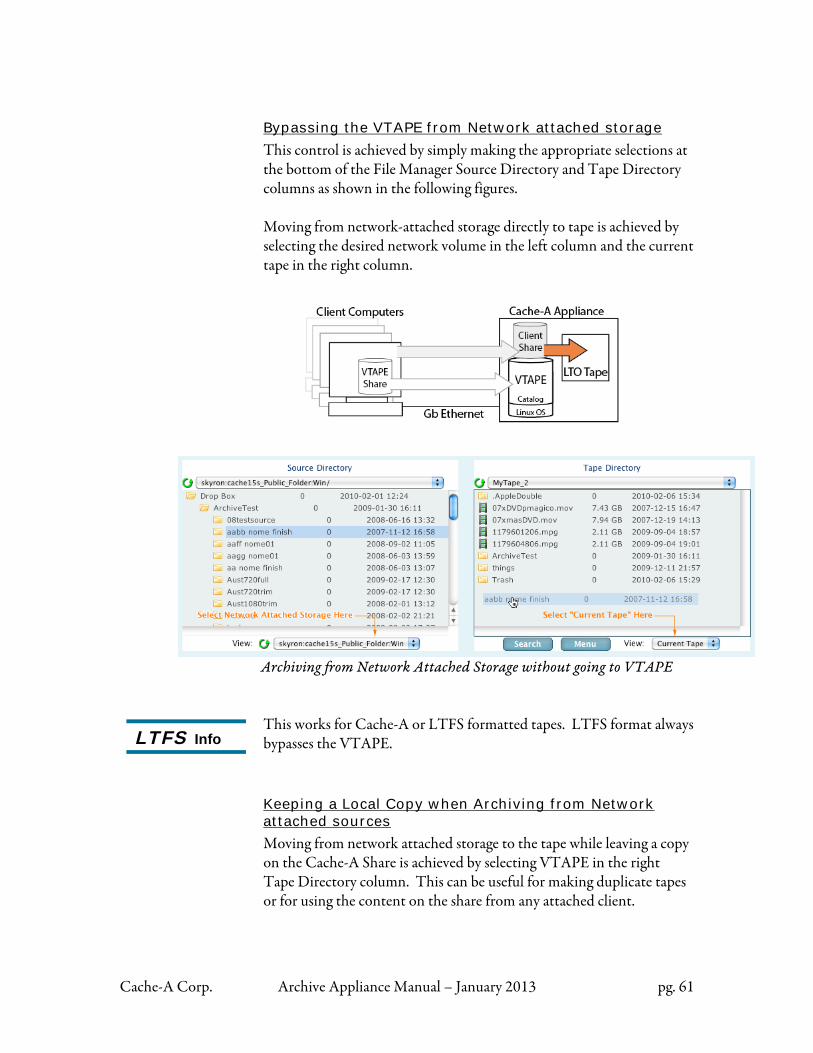
Cache-A Corp. Archive Appliance Manual – January 2013 pg. 61
Bypassing the VTAPE from Network attached storage
This control is achieved by simply making the appropriate selections at the bottom of the File Manager Source Directory and Tape Directory columns as shown in the following figures. Moving from network-attached storage directly to tape is achieved by selecting the desired network volume in the left column and the current tape in the right column.
Archiving from Network Attached Storage without going to VTAPE This works for Cache-A or LTFS formatted tapes. LTFS format always bypasses the VTAPE. Keeping a Local Copy when Archiving from Network attached sources
Moving from network attached storage to the tape while leaving a copy on the Cache-A Share is achieved by selecting VTAPE in the right Tape Directory column. This can be useful for making duplicate tapes or for using the content on the share from any attached client.
LTFS Info
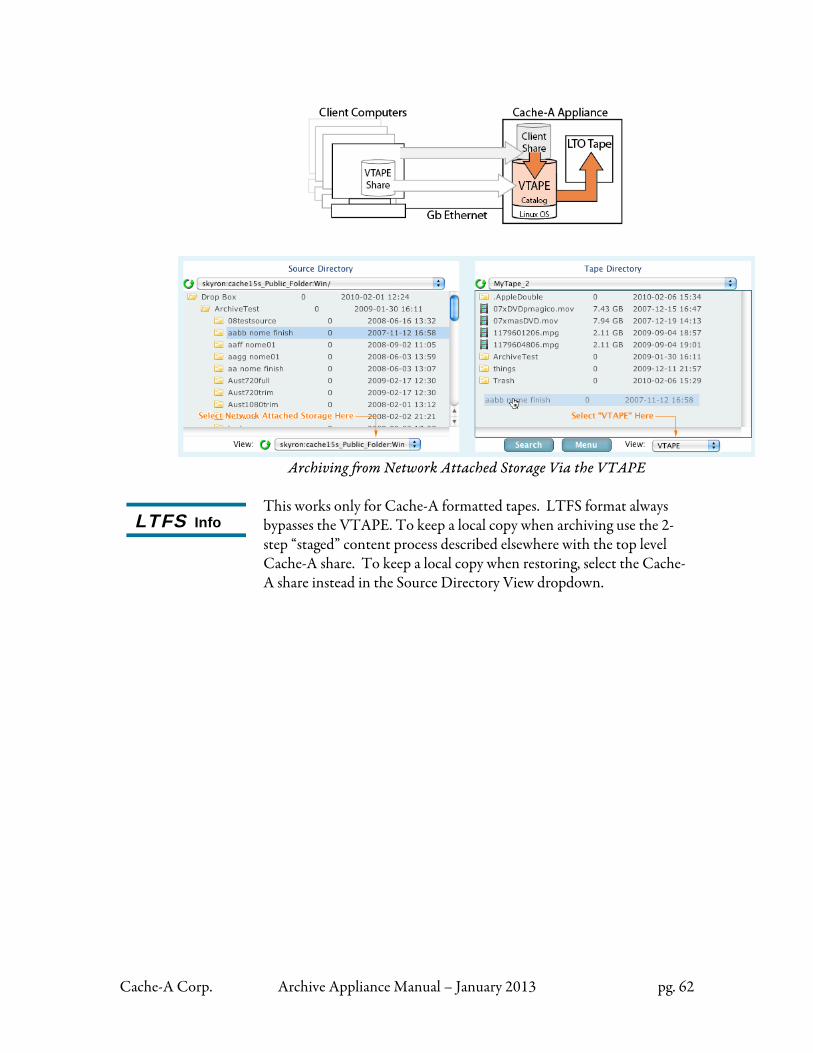
Cache-A Corp. Archive Appliance Manual – January 2013 pg. 62
Archiving from Network Attached Storage Via the VTAPE
This works only for Cache-A formatted tapes. LTFS format always bypasses the VTAPE. To keep a local copy when archiving use the 2-step “staged” content process described elsewhere with the top level Cache-A share. To keep a local copy when restoring, select the Cache-A share instead in the Source Directory View dropdown.
LTFS Info
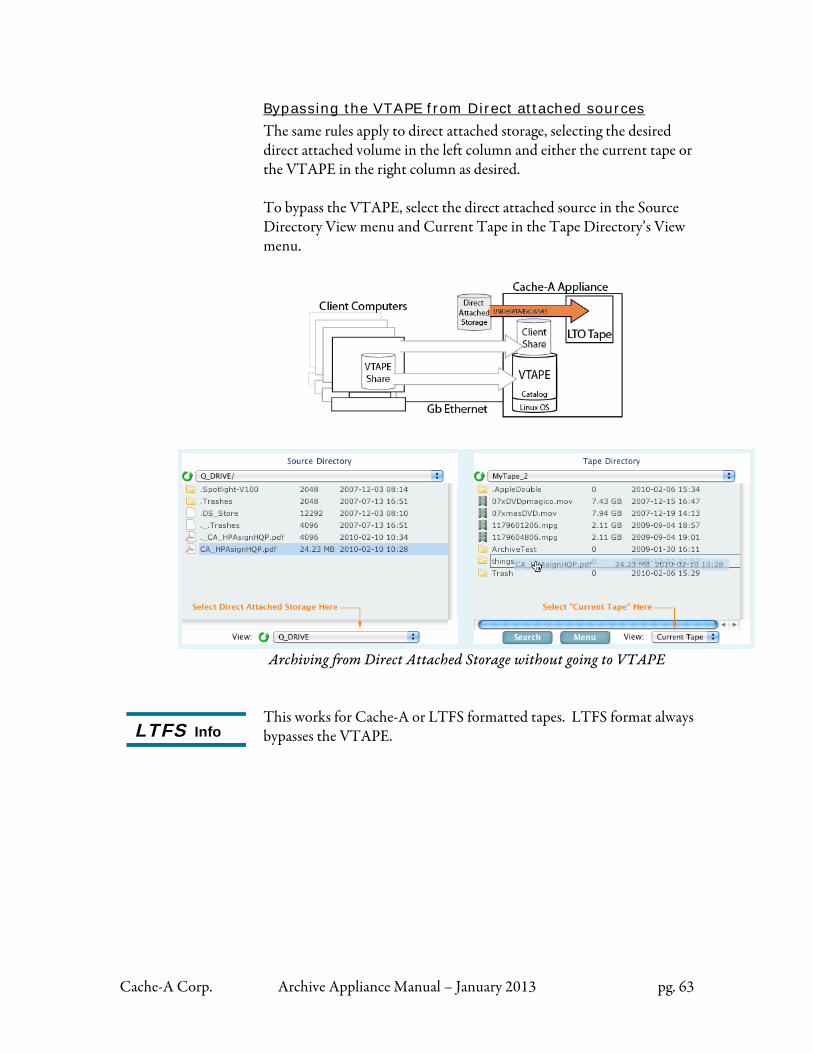
Cache-A Corp. Archive Appliance Manual – January 2013 pg. 63
Bypassing the VTAPE from Direct attached sources
The same rules apply to direct attached storage, selecting the desired direct attached volume in the left column and either the current tape or the VTAPE in the right column as desired. To bypass the VTAPE, select the direct attached source in the Source Directory View menu and Current Tape in the Tape Directory’s View menu.
Archiving from Direct Attached Storage without going to VTAPE
This works for Cache-A or LTFS formatted tapes. LTFS format always bypasses the VTAPE.
LTFS Info
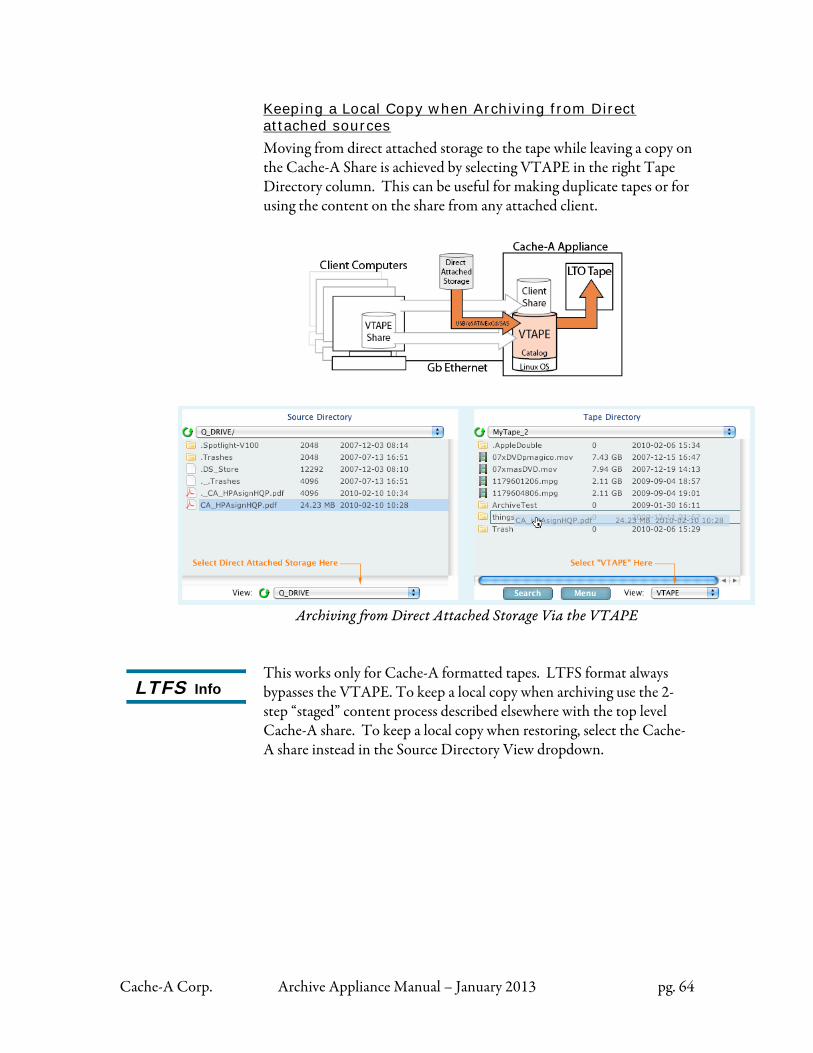
Cache-A Corp. Archive Appliance Manual – January 2013 pg. 64
Keeping a Local Copy when Archiving from Direct attached sources
Moving from direct attached storage to the tape while leaving a copy on the Cache-A Share is achieved by selecting VTAPE in the right Tape Directory column. This can be useful for making duplicate tapes or for using the content on the share from any attached client.
Archiving from Direct Attached Storage Via the VTAPE
This works only for Cache-A formatted tapes. LTFS format always bypasses the VTAPE. To keep a local copy when archiving use the 2-step “staged” content process described elsewhere with the top level Cache-A share. To keep a local copy when restoring, select the Cache-A share instead in the Source Directory View dropdown.
LTFS Info LTFS Info
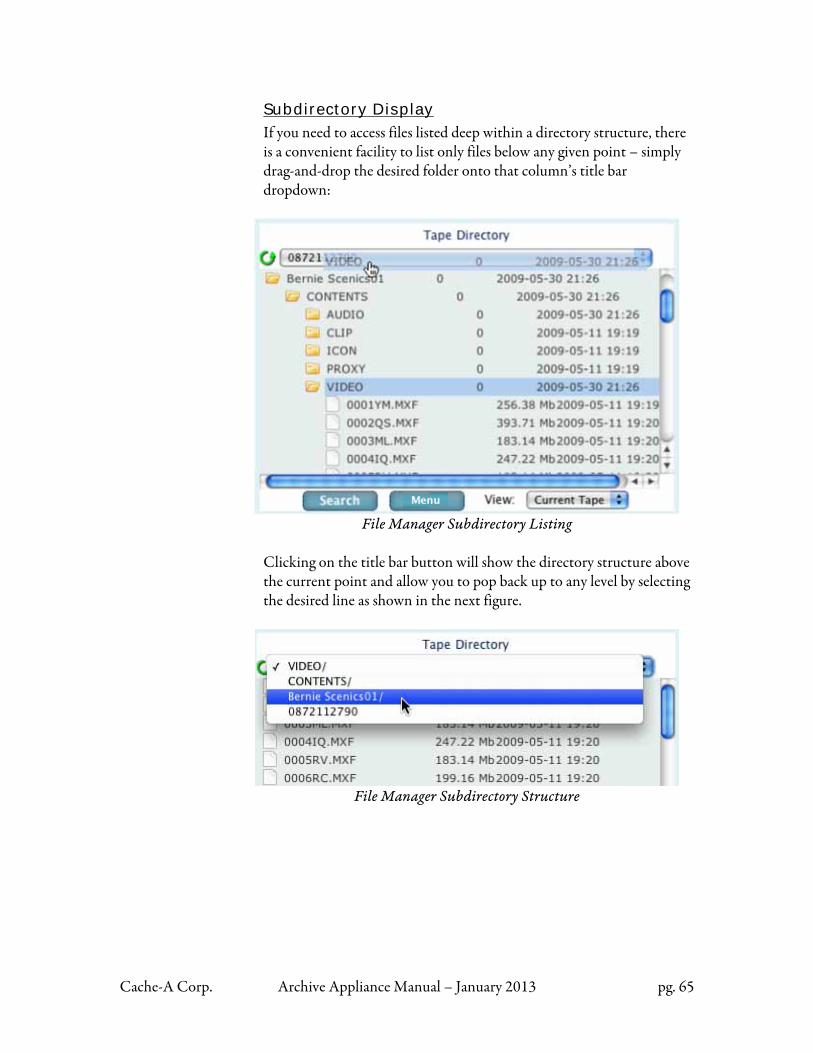
Cache-A Corp. Archive Appliance Manual – January 2013 pg. 65
Subdirectory Display
If you need to access files listed deep within a directory structure, there is a convenient facility to list only files below any given point – simply drag-and-drop the desired folder onto that column’s title bar dropdown:
File Manager Subdirectory Listing
Clicking on the title bar button will show the directory structure above the current point and allow you to pop back up to any level by selecting the desired line as shown in the next figure.
File Manager Subdirectory Structure
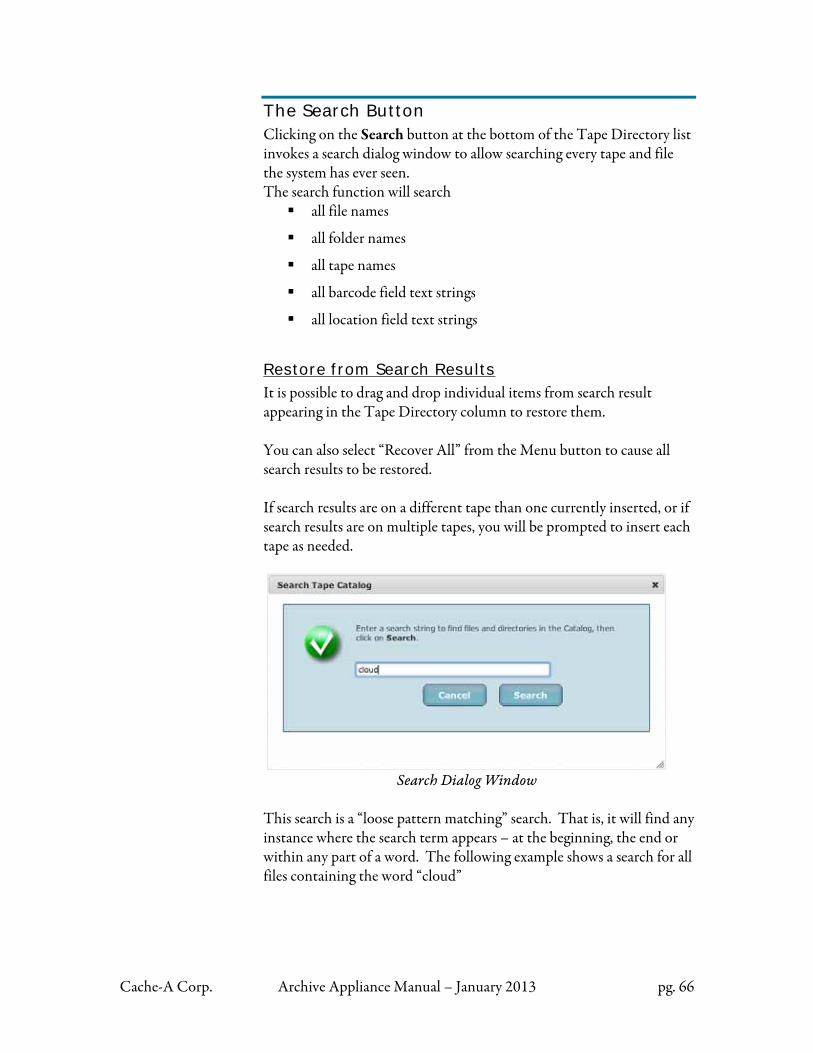
Cache-A Corp. Archive Appliance Manual – January 2013 pg. 66
The Search Button Clicking on the Search button at the bottom of the Tape Directory list invokes a search dialog window to allow searching every tape and file the system has ever seen. The search function will search
all file names
all folder names
all tape names
all barcode field text strings
all location field text strings
Restore from Search Results
It is possible to drag and drop individual items from search result appearing in the Tape Directory column to restore them. You can also select “Recover All” from the Menu button to cause all search results to be restored. If search results are on a different tape than one currently inserted, or if search results are on multiple tapes, you will be prompted to insert each tape as needed.
Search Dialog Window
This search is a “loose pattern matching” search. That is, it will find any instance where the search term appears – at the beginning, the end or within any part of a word. The following example shows a search for all files containing the word “cloud”
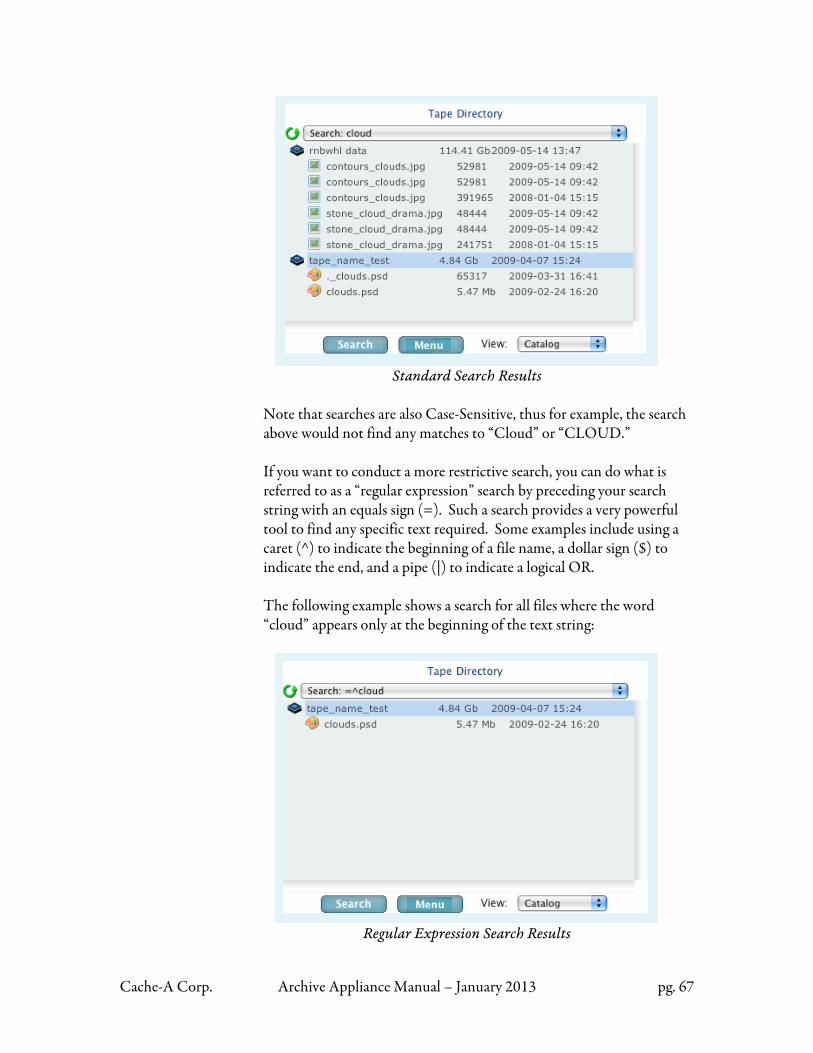
Cache-A Corp. Archive Appliance Manual – January 2013 pg. 67
Standard Search Results
Note that searches are also Case-Sensitive, thus for example, the search above would not find any matches to “Cloud” or “CLOUD.” If you want to conduct a more restrictive search, you can do what is referred to as a “regular expression” search by preceding your search string with an equals sign (=). Such a search provides a very powerful tool to find any specific text required. Some examples include using a caret (^) to indicate the beginning of a file name, a dollar sign ($) to indicate the end, and a pipe (|) to indicate a logical OR. The following example shows a search for all files where the word “cloud” appears only at the beginning of the text string:
Regular Expression Search Results
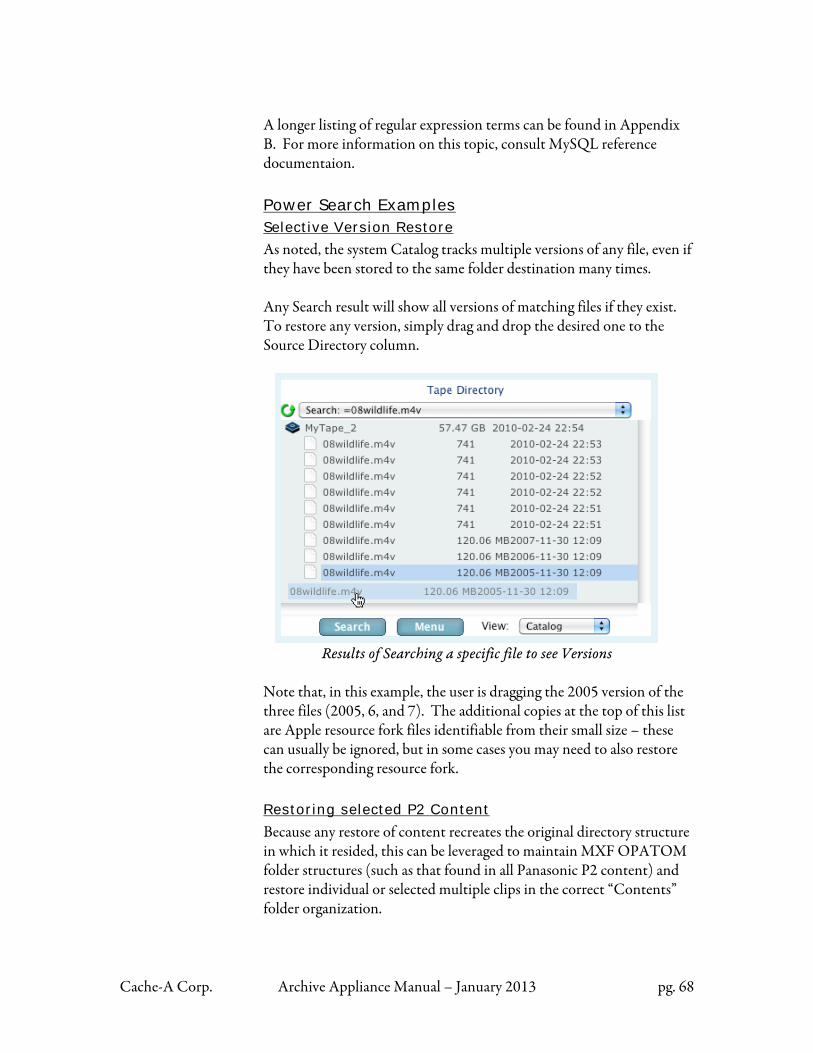
Cache-A Corp. Archive Appliance Manual – January 2013 pg. 68
A longer listing of regular expression terms can be found in Appendix B. For more information on this topic, consult MySQL reference documentaion. Power Search Examples Selective Version Restore
As noted, the system Catalog tracks multiple versions of any file, even if they have been stored to the same folder destination many times. Any Search result will show all versions of matching files if they exist. To restore any version, simply drag and drop the desired one to the Source Directory column.
Results of Searching a specific file to see Versions
Note that, in this example, the user is dragging the 2005 version of the three files (2005, 6, and 7). The additional copies at the top of this list are Apple resource fork files identifiable from their small size – these can usually be ignored, but in some cases you may need to also restore the corresponding resource fork. Restoring selected P2 Content
Because any restore of content recreates the original directory structure in which it resided, this can be leveraged to maintain MXF OPATOM folder structures (such as that found in all Panasonic P2 content) and restore individual or selected multiple clips in the correct “Contents” folder organization.
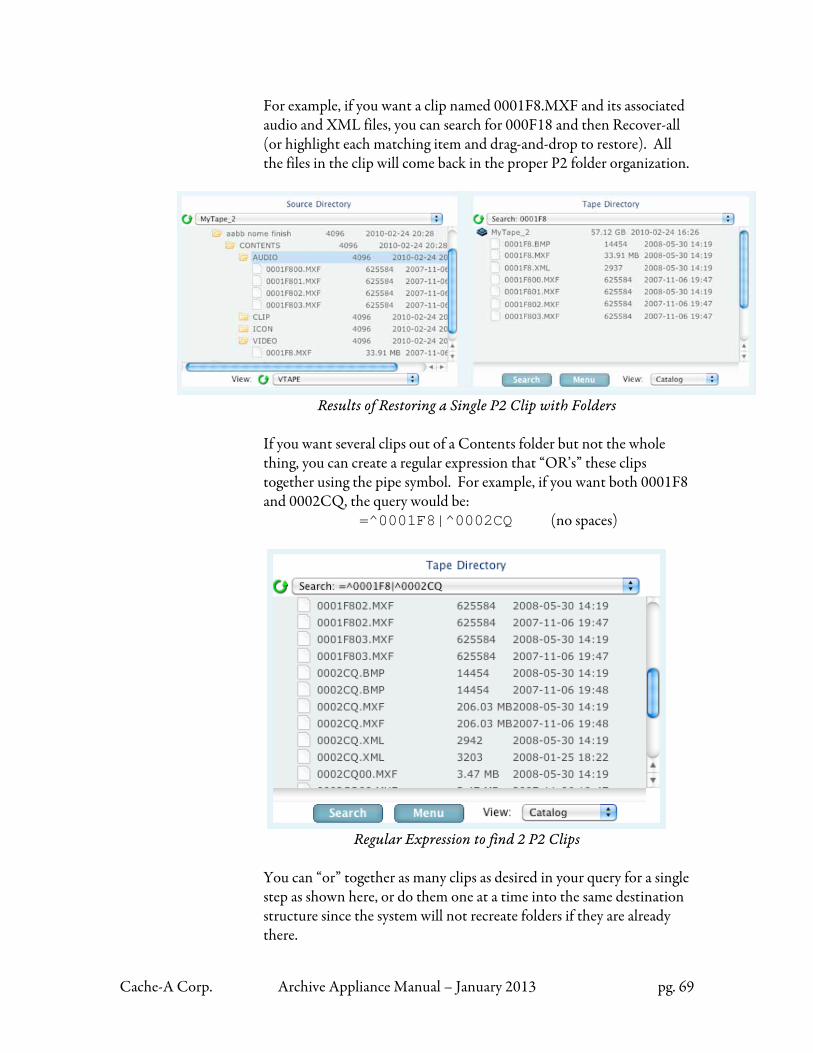
Cache-A Corp. Archive Appliance Manual – January 2013 pg. 69
For example, if you want a clip named 0001F8.MXF and its associated audio and XML files, you can search for 000F18 and then Recover-all (or highlight each matching item and drag-and-drop to restore). All the files in the clip will come back in the proper P2 folder organization.
Results of Restoring a Single P2 Clip with Folders
If you want several clips out of a Contents folder but not the whole thing, you can create a regular expression that “OR’s” these clips together using the pipe symbol. For example, if you want both 0001F8 and 0002CQ, the query would be: =^0001F8|^0002CQ (no spaces)
Regular Expression to find 2 P2 Clips
You can “or” together as many clips as desired in your query for a single step as shown here, or do them one at a time into the same destination structure since the system will not recreate folders if they are already there.
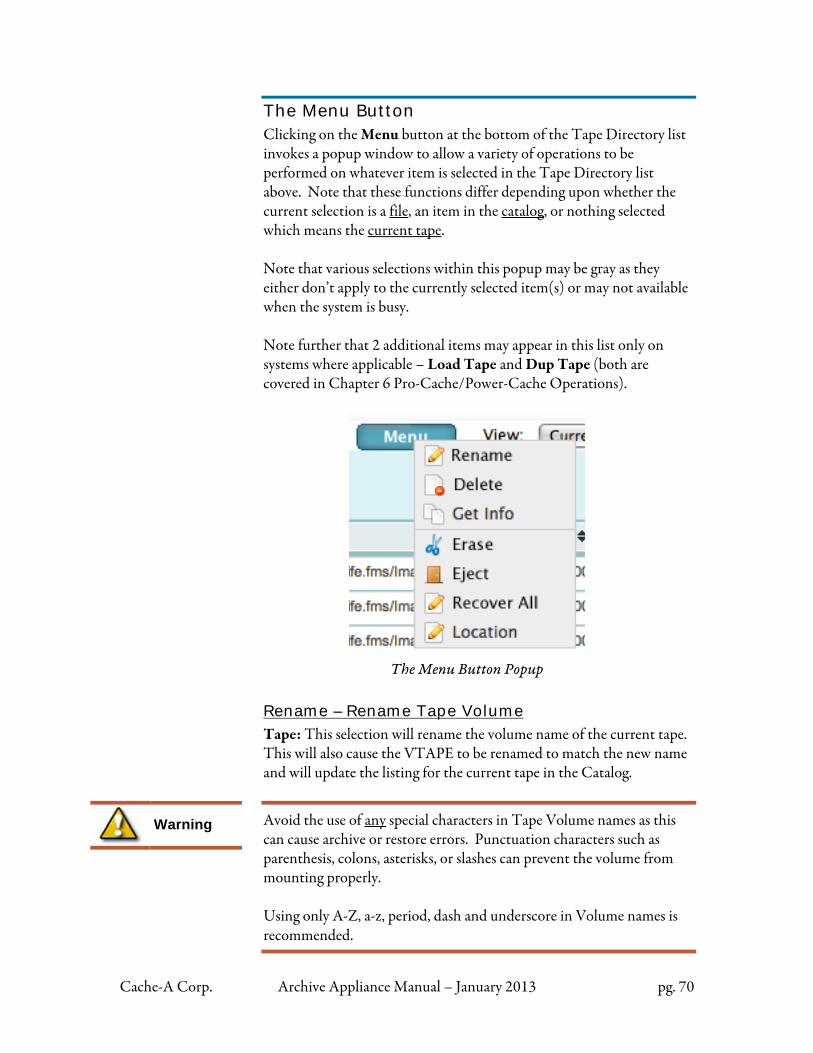
Cache-A Corp. Archive Appliance Manual – January 2013 pg. 70
The Menu Button Clicking on the Menu button at the bottom of the Tape Directory list invokes a popup window to allow a variety of operations to be performed on whatever item is selected in the Tape Directory list above. Note that these functions differ depending upon whether the current selection is a file, an item in the catalog, or nothing selected which means the current tape. Note that various selections within this popup may be gray as they either don’t apply to the currently selected item(s) or may not available when the system is busy. Note further that 2 additional items may appear in this list only on systems where applicable – Load Tape and Dup Tape (both are covered in Chapter 6 Pro-Cache/Power-Cache Operations).
The Menu Button Popup
Rename – Rename Tape Volume
Tape: This selection will rename the volume name of the current tape. This will also cause the VTAPE to be renamed to match the new name and will update the listing for the current tape in the Catalog.
Avoid the use of any special characters in Tape Volume names as this can cause archive or restore errors. Punctuation characters such as parenthesis, colons, asterisks, or slashes can prevent the volume from mounting properly. Using only A-Z, a-z, period, dash and underscore in Volume names is recommended.
Warning
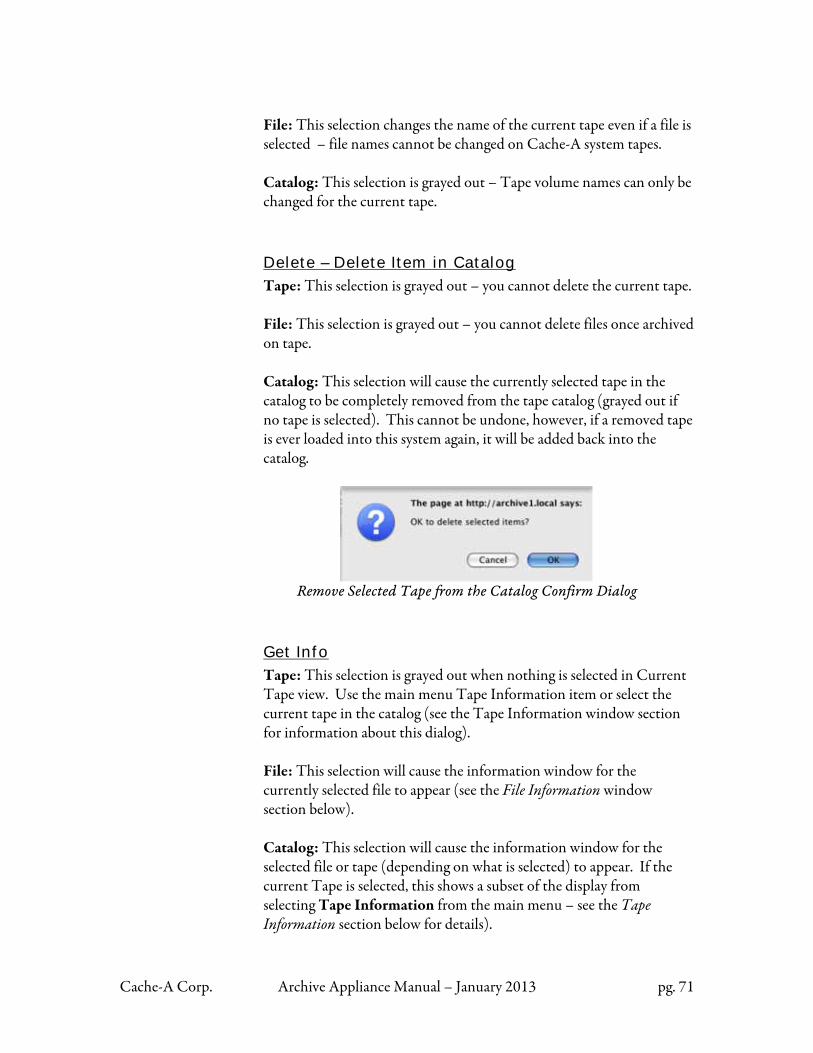
Cache-A Corp. Archive Appliance Manual – January 2013 pg. 71
File: This selection changes the name of the current tape even if a file is selected – file names cannot be changed on Cache-A system tapes. Catalog: This selection is grayed out – Tape volume names can only be changed for the current tape. Delete – Delete Item in Catalog
Tape: This selection is grayed out – you cannot delete the current tape. File: This selection is grayed out – you cannot delete files once archived on tape. Catalog: This selection will cause the currently selected tape in the catalog to be completely removed from the tape catalog (grayed out if no tape is selected). This cannot be undone, however, if a removed tape is ever loaded into this system again, it will be added back into the catalog.
Remove Selected Tape from the Catalog Confirm Dialog
Get Info
Tape: This selection is grayed out when nothing is selected in Current Tape view. Use the main menu Tape Information item or select the current tape in the catalog (see the Tape Information window section for information about this dialog). File: This selection will cause the information window for the currently selected file to appear (see the File Information window section below). Catalog: This selection will cause the information window for the selected file or tape (depending on what is selected) to appear. If the current Tape is selected, this shows a subset of the display from selecting Tape Information from the main menu – see the Tape Information section below for details).
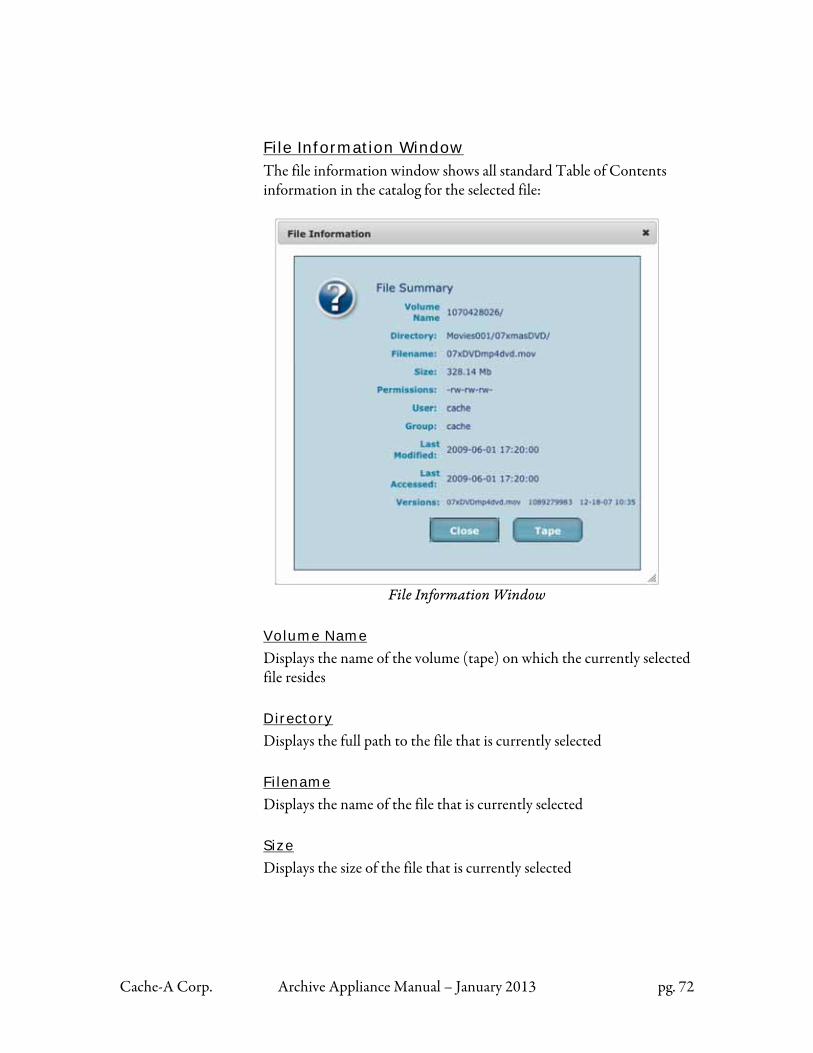
Cache-A Corp. Archive Appliance Manual – January 2013 pg. 72
File Information Window
The file information window shows all standard Table of Contents information in the catalog for the selected file:
File Information Window
Volume Name
Displays the name of the volume (tape) on which the currently selected file resides Directory
Displays the full path to the file that is currently selected Filename
Displays the name of the file that is currently selected Size
Displays the size of the file that is currently selected
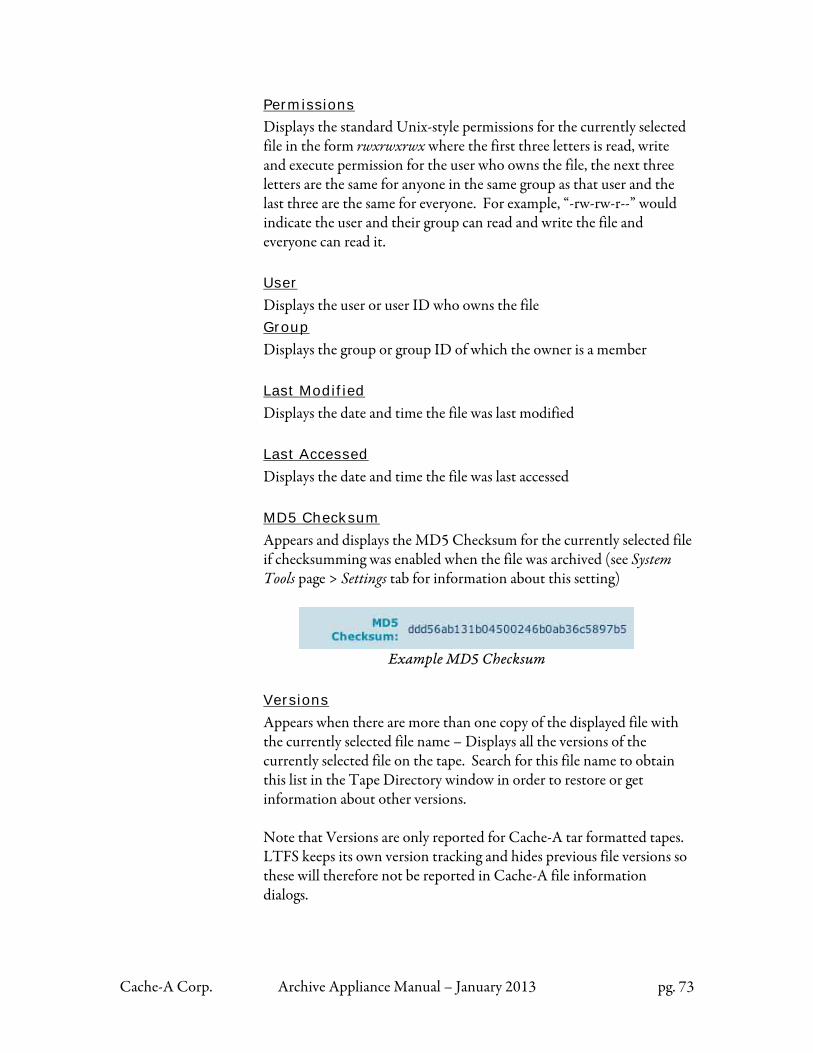
Cache-A Corp. Archive Appliance Manual – January 2013 pg. 73
Permissions
Displays the standard Unix-style permissions for the currently selected file in the form rwxrwxrwx where the first three letters is read, write and execute permission for the user who owns the file, the next three letters are the same for anyone in the same group as that user and the last three are the same for everyone. For example, “-rw-rw-r--” would indicate the user and their group can read and write the file and everyone can read it. User
Displays the user or user ID who owns the file Group
Displays the group or group ID of which the owner is a member Last Modified
Displays the date and time the file was last modified Last Accessed
Displays the date and time the file was last accessed MD5 Checksum
Appears and displays the MD5 Checksum for the currently selected file if checksumming was enabled when the file was archived (see System Tools page > Settings tab for information about this setting)
Example MD5 Checksum
Versions
Appears when there are more than one copy of the displayed file with the currently selected file name – Displays all the versions of the currently selected file on the tape. Search for this file name to obtain this list in the Tape Directory window in order to restore or get information about other versions. Note that Versions are only reported for Cache-A tar formatted tapes. LTFS keeps its own version tracking and hides previous file versions so these will therefore not be reported in Cache-A file information dialogs.
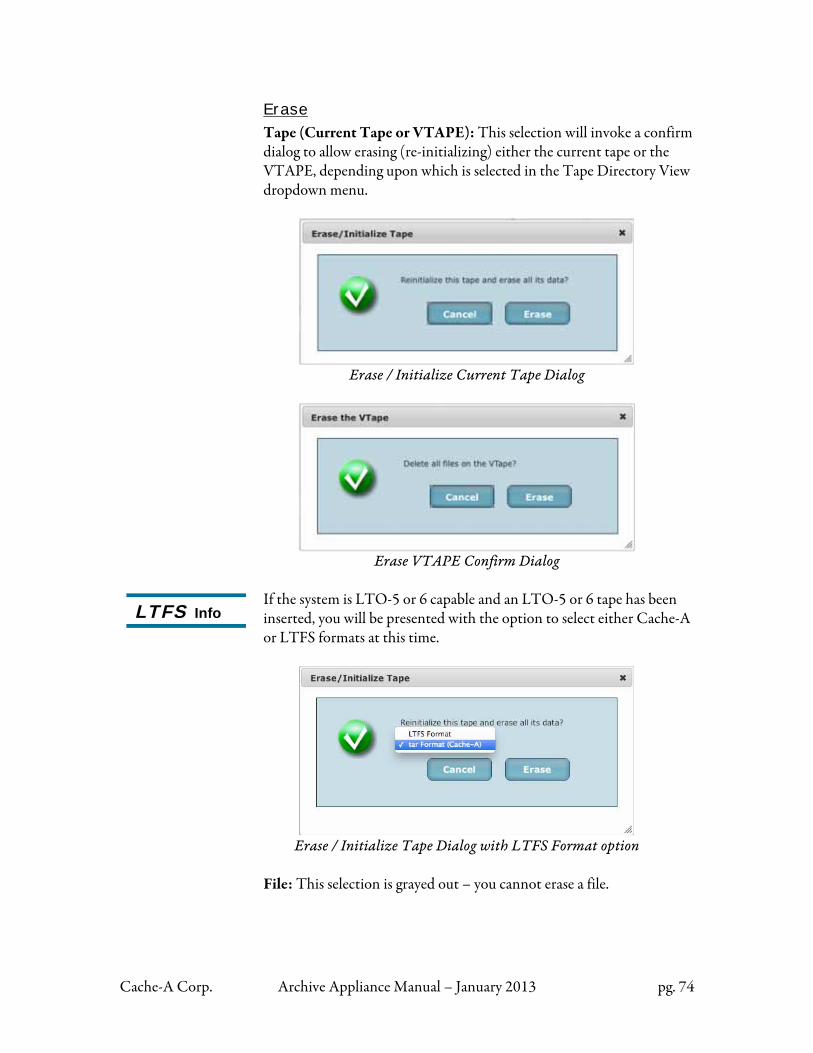
Cache-A Corp. Archive Appliance Manual – January 2013 pg. 74
Erase
Tape (Current Tape or VTAPE): This selection will invoke a confirm dialog to allow erasing (re-initializing) either the current tape or the VTAPE, depending upon which is selected in the Tape Directory View dropdown menu.
Erase / Initialize Current Tape Dialog
Erase VTAPE Confirm Dialog
If the system is LTO-5 or 6 capable and an LTO-5 or 6 tape has been inserted, you will be presented with the option to select either Cache-A or LTFS formats at this time.
Erase / Initialize Tape Dialog with LTFS Format option
File: This selection is grayed out – you cannot erase a file.
LTFS Info
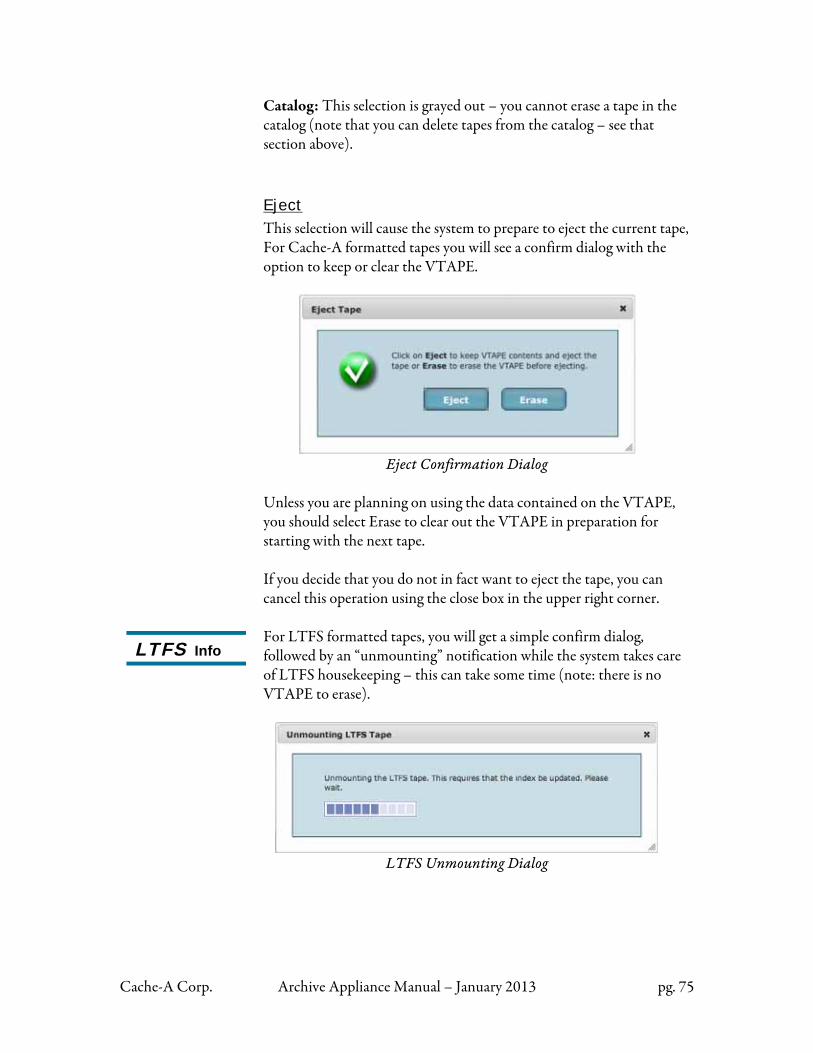
Cache-A Corp. Archive Appliance Manual – January 2013 pg. 75
Catalog: This selection is grayed out – you cannot erase a tape in the catalog (note that you can delete tapes from the catalog – see that section above). Eject
This selection will cause the system to prepare to eject the current tape, For Cache-A formatted tapes you will see a confirm dialog with the option to keep or clear the VTAPE.
Eject Confirmation Dialog
Unless you are planning on using the data contained on the VTAPE, you should select Erase to clear out the VTAPE in preparation for starting with the next tape. If you decide that you do not in fact want to eject the tape, you can cancel this operation using the close box in the upper right corner. For LTFS formatted tapes, you will get a simple confirm dialog, followed by an “unmounting” notification while the system takes care of LTFS housekeeping – this can take some time (note: there is no VTAPE to erase).
LTFS Unmounting Dialog
LTFS Info
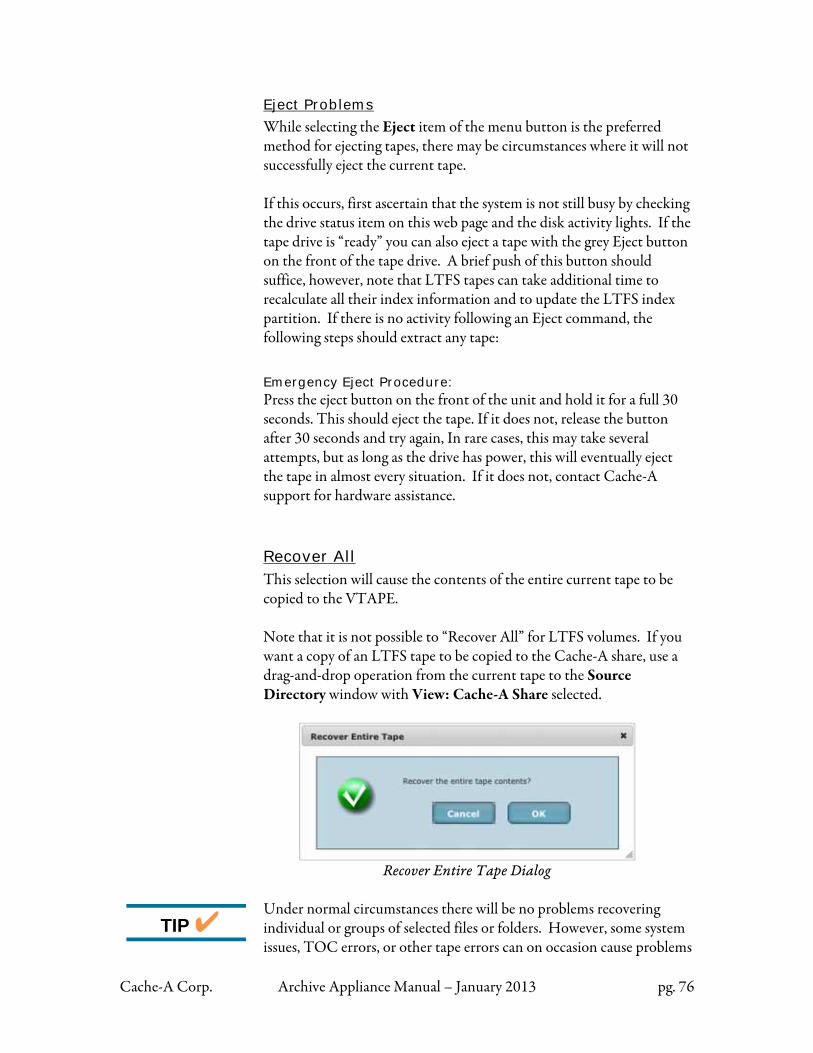
Cache-A Corp. Archive Appliance Manual – January 2013 pg. 76
Eject Problems
While selecting the Eject item of the menu button is the preferred method for ejecting tapes, there may be circumstances where it will not successfully eject the current tape. If this occurs, first ascertain that the system is not still busy by checking the drive status item on this web page and the disk activity lights. If the tape drive is “ready” you can also eject a tape with the grey Eject button on the front of the tape drive. A brief push of this button should suffice, however, note that LTFS tapes can take additional time to recalculate all their index information and to update the LTFS index partition. If there is no activity following an Eject command, the following steps should extract any tape:
Emergency Eject Procedure: Press the eject button on the front of the unit and hold it for a full 30 seconds. This should eject the tape. If it does not, release the button after 30 seconds and try again, In rare cases, this may take several attempts, but as long as the drive has power, this will eventually eject the tape in almost every situation. If it does not, contact Cache-A support for hardware assistance. Recover All This selection will cause the contents of the entire current tape to be copied to the VTAPE. Note that it is not possible to “Recover All” for LTFS volumes. If you want a copy of an LTFS tape to be copied to the Cache-A share, use a drag-and-drop operation from the current tape to the Source Directory window with View: Cache-A Share selected.
Recover Entire Tape Dialog
Under normal circumstances there will be no problems recovering individual or groups of selected files or folders. However, some system issues, TOC errors, or other tape errors can on occasion cause problems
TIP

Cache-A Corp. Archive Appliance Manual – January 2013 pg. 77
restoring some content. If you are having issues recovering any individual file or folder on a tar tape, this Recover-All process will be the best way to get those files back. If you are having issues recovering any file or folder with the File Manager on an LTFS volume, see the instructions under Cache-A TOC Errors on LTFS tapes in Chapter 5: Cache-A LTFS. Location
File: This selection will invoke a dialog to allow adding metadata to the current file – a provision is made to record any Keywords associated with the file and to identify a Location where the file was recorded. These are free text fields up to 232 characters long (they will accommodate a very large amount of text).
File Location Dialog
Catalog (Tape): This selection will invoke a dialog to allow adding metadata to the selected tape – a provision is made to record any Barcode used on the tape and to identify a Location where the tape is to be stored. These are also free text fields that can accommodate up to 232 characters long.

Cache-A Corp. Archive Appliance Manual – January 2013 pg. 78
Important
Tape Location Dialog
Note: you may use any of these fields to store any text-based metadata you want to associate with a file or tape – these category names are only provided as field identifiers and do not impose restrictions on the use of these fields. Changing metadata for any tape other than the current tape will cause differences between the tape’s own data and the catalog: the tape’s own copy of this metadata will be updated the next time that tape is loaded and modified. Note that you can also change Location information for any files on any tape whether loaded for not, this too will be updated upon the next load and update to the tape containing those files.
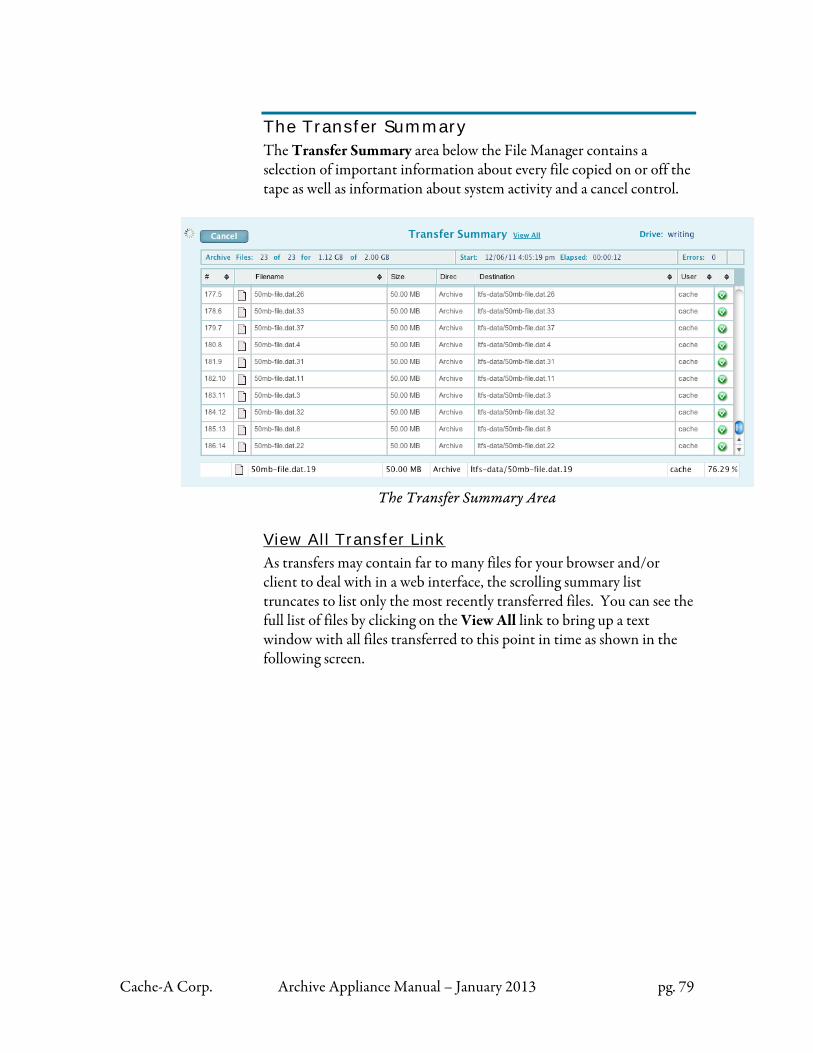
Cache-A Corp. Archive Appliance Manual – January 2013 pg. 79
The Transfer Summary The Transfer Summary area below the File Manager contains a selection of important information about every file copied on or off the tape as well as information about system activity and a cancel control.
The Transfer Summary Area
View All Transfer Link
As transfers may contain far to many files for your browser and/or client to deal with in a web interface, the scrolling summary list truncates to list only the most recently transferred files. You can see the full list of files by clicking on the View All link to bring up a text window with all files transferred to this point in time as shown in the following screen.
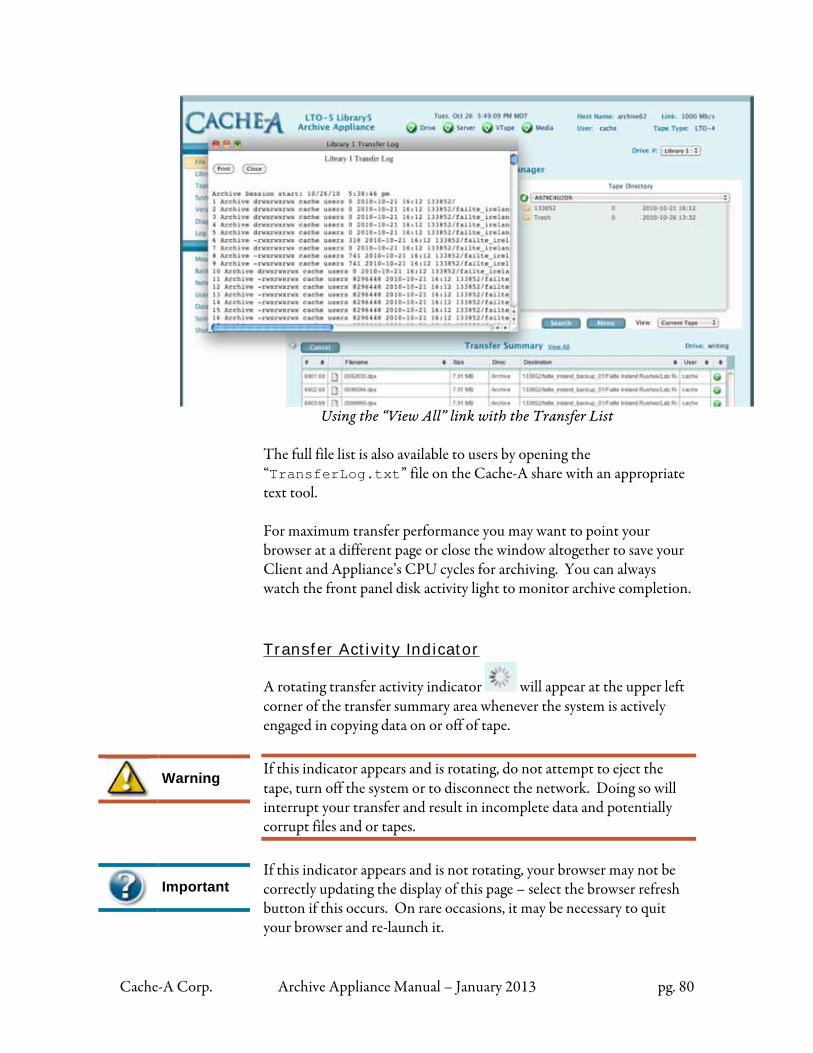
Cache-A Corp. Archive Appliance Manual – January 2013 pg. 80
Warning
Important
Using the “View All” link with the Transfer List
The full file list is also available to users by opening the “TransferLog.txt” file on the Cache-A share with an appropriate text tool. For maximum transfer performance you may want to point your browser at a different page or close the window altogether to save your Client and Appliance’s CPU cycles for archiving. You can always watch the front panel disk activity light to monitor archive completion. Transfer Activity Indicator
A rotating transfer activity indicator will appear at the upper left corner of the transfer summary area whenever the system is actively engaged in copying data on or off of tape. If this indicator appears and is rotating, do not attempt to eject the tape, turn off the system or to disconnect the network. Doing so will interrupt your transfer and result in incomplete data and potentially corrupt files and or tapes. If this indicator appears and is not rotating, your browser may not be correctly updating the display of this page – select the browser refresh button if this occurs. On rare occasions, it may be necessary to quit your browser and re-launch it.
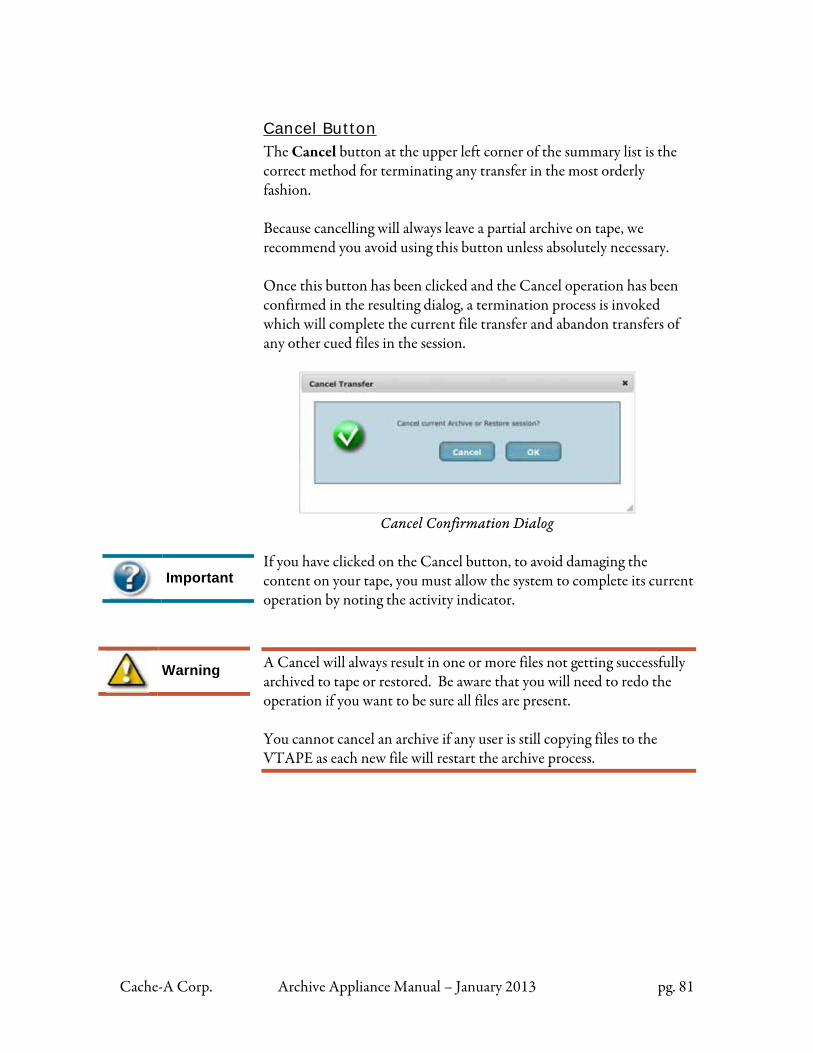
Cache-A Corp. Archive Appliance Manual – January 2013 pg. 81
Important
Warning
Cancel Button
The Cancel button at the upper left corner of the summary list is the correct method for terminating any transfer in the most orderly fashion. Because cancelling will always leave a partial archive on tape, we recommend you avoid using this button unless absolutely necessary. Once this button has been clicked and the Cancel operation has been confirmed in the resulting dialog, a termination process is invoked which will complete the current file transfer and abandon transfers of any other cued files in the session.
Cancel Confirmation Dialog
If you have clicked on the Cancel button, to avoid damaging the content on your tape, you must allow the system to complete its current operation by noting the activity indicator.
A Cancel will always result in one or more files not getting successfully archived to tape or restored. Be aware that you will need to redo the operation if you want to be sure all files are present. You cannot cancel an archive if any user is still copying files to the VTAPE as each new file will restart the archive process.
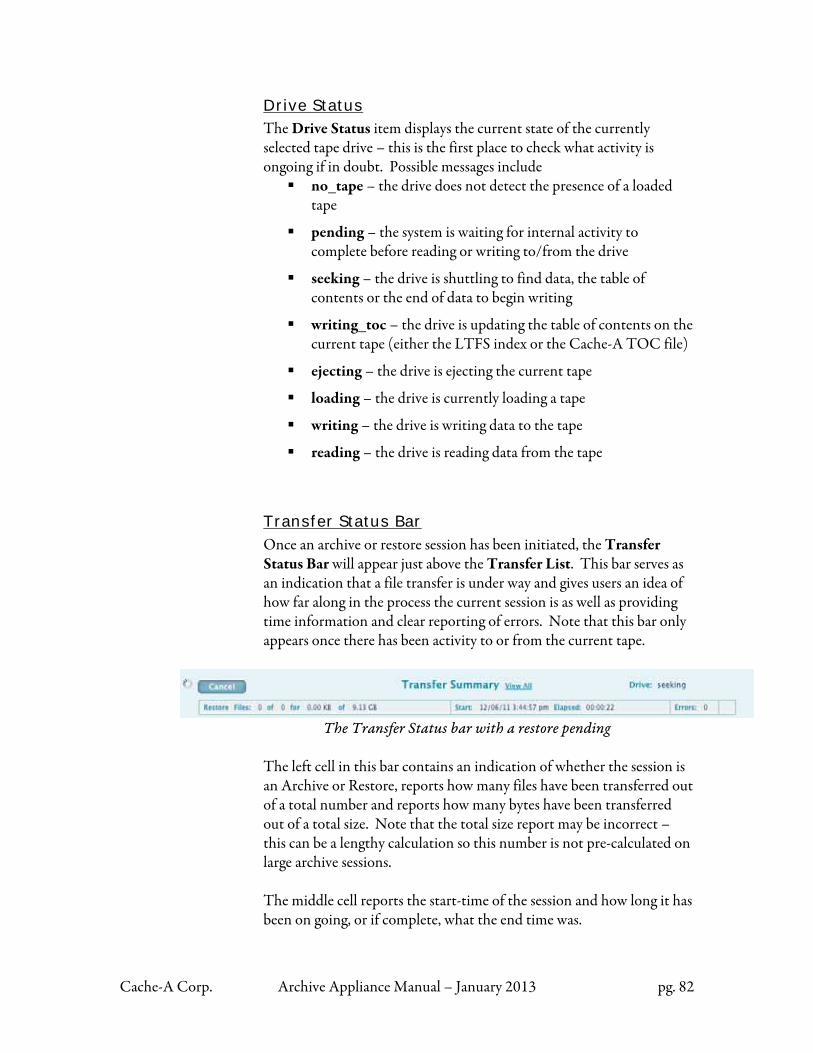
Cache-A Corp. Archive Appliance Manual – January 2013 pg. 82
Drive Status The Drive Status item displays the current state of the currently selected tape drive – this is the first place to check what activity is ongoing if in doubt. Possible messages include
no_tape – the drive does not detect the presence of a loaded tape
pending – the system is waiting for internal activity to complete before reading or writing to/from the drive
seeking – the drive is shuttling to find data, the table of contents or the end of data to begin writing
writing_toc – the drive is updating the table of contents on the current tape (either the LTFS index or the Cache-A TOC file)
ejecting – the drive is ejecting the current tape
loading – the drive is currently loading a tape
writing – the drive is writing data to the tape
reading – the drive is reading data from the tape
Transfer Status Bar
Once an archive or restore session has been initiated, the Transfer Status Bar will appear just above the Transfer List. This bar serves as an indication that a file transfer is under way and gives users an idea of how far along in the process the current session is as well as providing time information and clear reporting of errors. Note that this bar only appears once there has been activity to or from the current tape.
The Transfer Status bar with a restore pending
The left cell in this bar contains an indication of whether the session is an Archive or Restore, reports how many files have been transferred out of a total number and reports how many bytes have been transferred out of a total size. Note that the total size report may be incorrect – this can be a lengthy calculation so this number is not pre-calculated on large archive sessions. The middle cell reports the start-time of the session and how long it has been on going, or if complete, what the end time was.
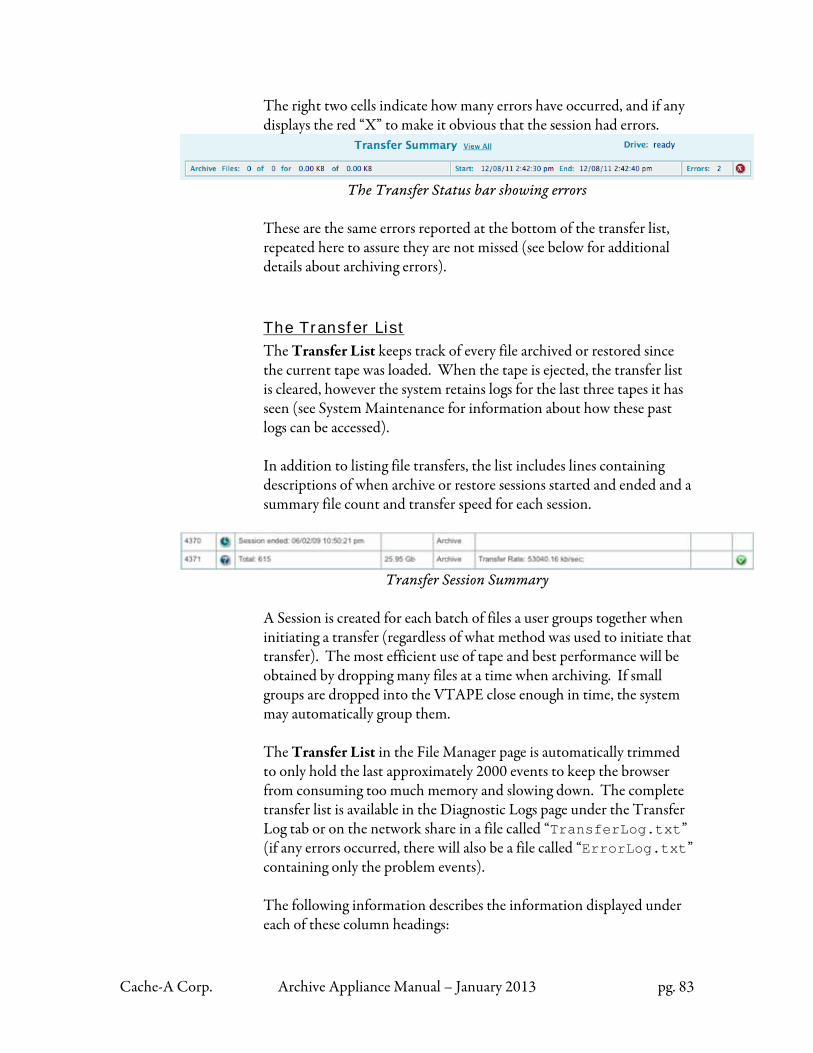
Cache-A Corp. Archive Appliance Manual – January 2013 pg. 83
The right two cells indicate how many errors have occurred, and if any displays the red “X” to make it obvious that the session had errors.
The Transfer Status bar showing errors
These are the same errors reported at the bottom of the transfer list, repeated here to assure they are not missed (see below for additional details about archiving errors). The Transfer List
The Transfer List keeps track of every file archived or restored since the current tape was loaded. When the tape is ejected, the transfer list is cleared, however the system retains logs for the last three tapes it has seen (see System Maintenance for information about how these past logs can be accessed). In addition to listing file transfers, the list includes lines containing descriptions of when archive or restore sessions started and ended and a summary file count and transfer speed for each session.
Transfer Session Summary
A Session is created for each batch of files a user groups together when initiating a transfer (regardless of what method was used to initiate that transfer). The most efficient use of tape and best performance will be obtained by dropping many files at a time when archiving. If small groups are dropped into the VTAPE close enough in time, the system may automatically group them. The Transfer List in the File Manager page is automatically trimmed to only hold the last approximately 2000 events to keep the browser from consuming too much memory and slowing down. The complete transfer list is available in the Diagnostic Logs page under the Transfer Log tab or on the network share in a file called “TransferLog.txt” (if any errors occurred, there will also be a file called “ErrorLog.txt” containing only the problem events). The following information describes the information displayed under each of these column headings:
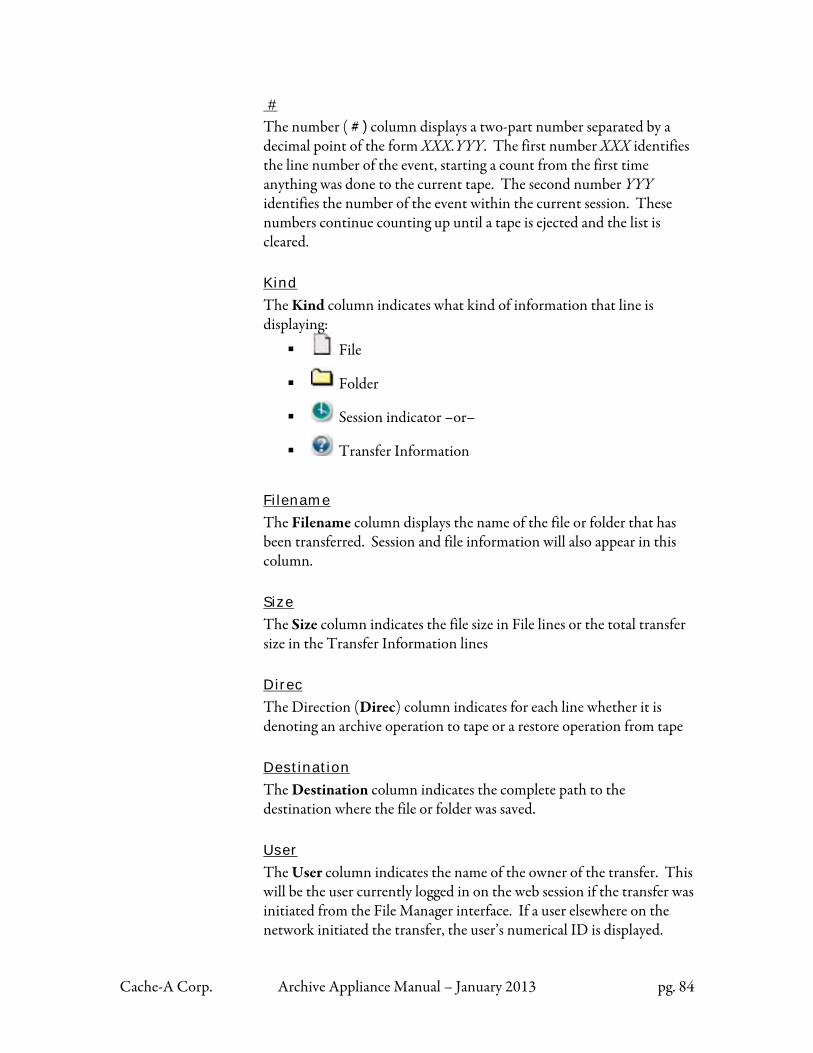
Cache-A Corp. Archive Appliance Manual – January 2013 pg. 84
#
The number ( # ) column displays a two-part number separated by a decimal point of the form XXX.YYY. The first number XXX identifies the line number of the event, starting a count from the first time anything was done to the current tape. The second number YYY identifies the number of the event within the current session. These numbers continue counting up until a tape is ejected and the list is cleared. Kind
The Kind column indicates what kind of information that line is displaying:
File
Folder
Session indicator –or–
Transfer Information
Filename
The Filename column displays the name of the file or folder that has been transferred. Session and file information will also appear in this column. Size
The Size column indicates the file size in File lines or the total transfer size in the Transfer Information lines Direc
The Direction (Direc) column indicates for each line whether it is denoting an archive operation to tape or a restore operation from tape Destination
The Destination column indicates the complete path to the destination where the file or folder was saved. User
The User column indicates the name of the owner of the transfer. This will be the user currently logged in on the web session if the transfer was initiated from the File Manager interface. If a user elsewhere on the network initiated the transfer, the user’s numerical ID is displayed.
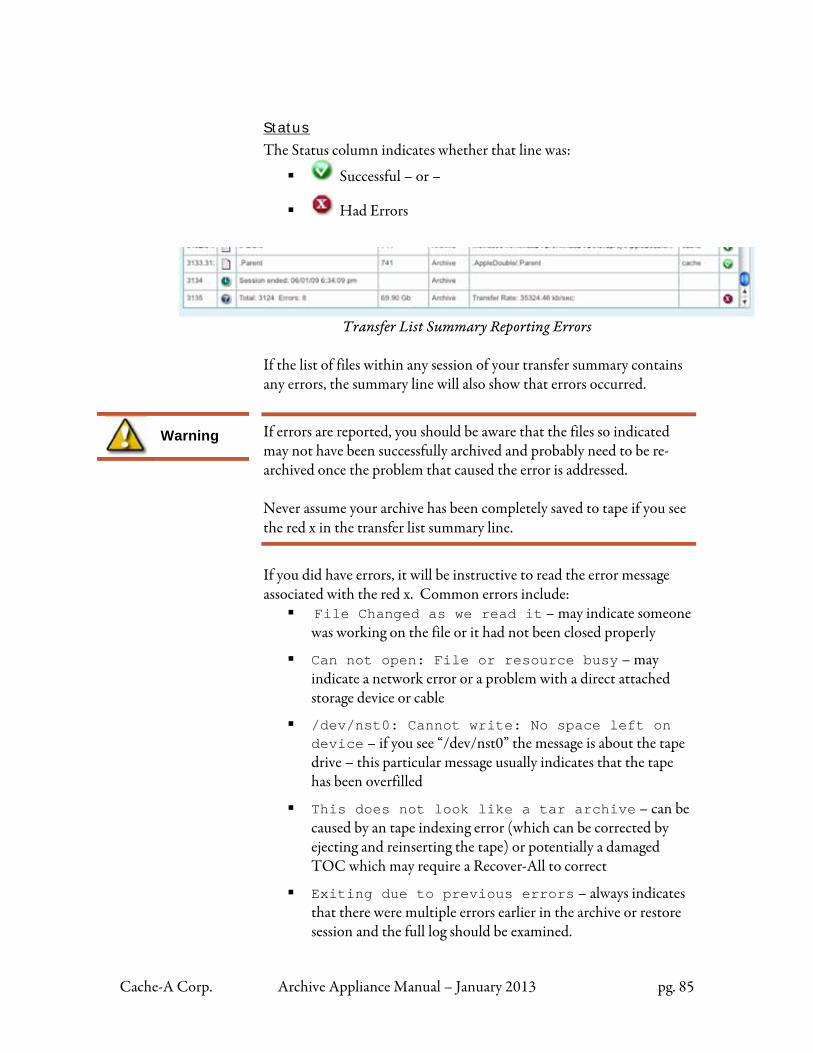
Cache-A Corp. Archive Appliance Manual – January 2013 pg. 85
Warning
Status
The Status column indicates whether that line was:
Successful – or –
Had Errors
Transfer List Summary Reporting Errors
If the list of files within any session of your transfer summary contains any errors, the summary line will also show that errors occurred.
If errors are reported, you should be aware that the files so indicated may not have been successfully archived and probably need to be re-archived once the problem that caused the error is addressed. Never assume your archive has been completely saved to tape if you see the red x in the transfer list summary line.
If you did have errors, it will be instructive to read the error message associated with the red x. Common errors include:
File Changed as we read it – may indicate someone was working on the file or it had not been closed properly
Can not open: File or resource busy – may indicate a network error or a problem with a direct attached storage device or cable
/dev/nst0: Cannot write: No space left on device – if you see “/dev/nst0” the message is about the tape drive – this particular message usually indicates that the tape has been overfilled
This does not look like a tar archive – can be caused by an tape indexing error (which can be corrected by ejecting and reinserting the tape) or potentially a damaged TOC which may require a Recover-All to correct
Exiting due to previous errors – always indicates that there were multiple errors earlier in the archive or restore session and the full log should be examined.
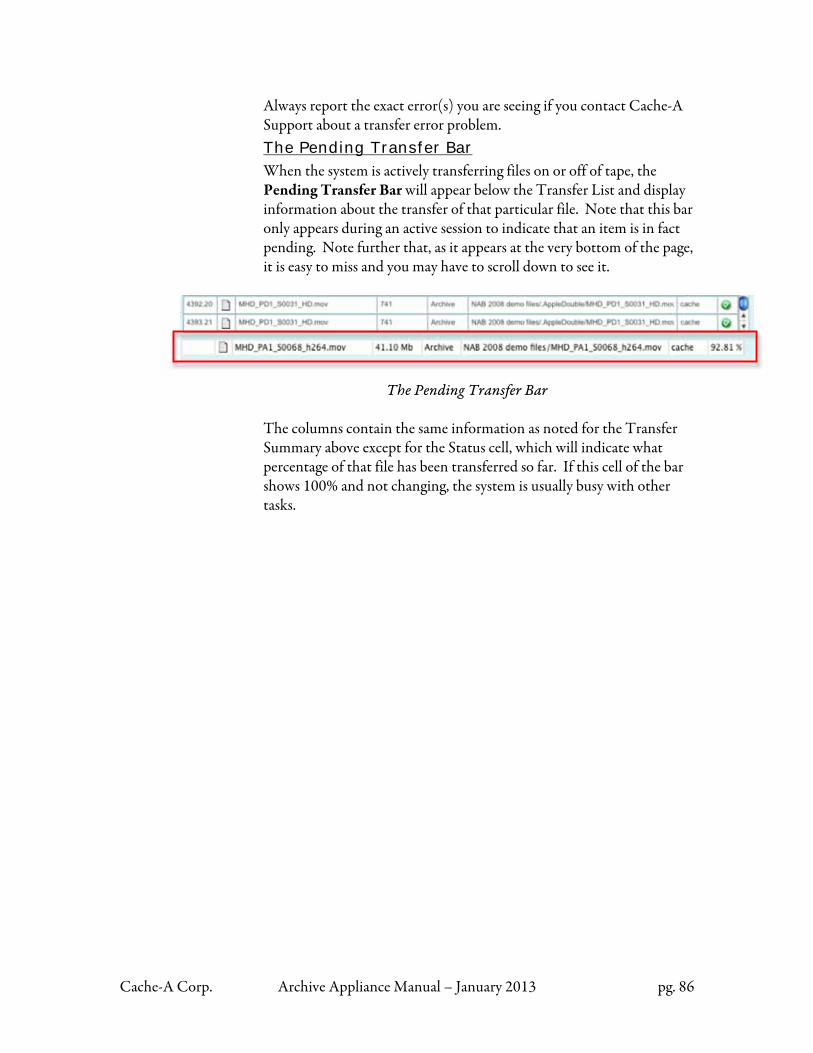
Cache-A Corp. Archive Appliance Manual – January 2013 pg. 86
Always report the exact error(s) you are seeing if you contact Cache-A Support about a transfer error problem. The Pending Transfer Bar
When the system is actively transferring files on or off of tape, the Pending Transfer Bar will appear below the Transfer List and display information about the transfer of that particular file. Note that this bar only appears during an active session to indicate that an item is in fact pending. Note further that, as it appears at the very bottom of the page, it is easy to miss and you may have to scroll down to see it.
The Pending Transfer Bar The columns contain the same information as noted for the Transfer Summary above except for the Status cell, which will indicate what percentage of that file has been transferred so far. If this cell of the bar shows 100% and not changing, the system is usually busy with other tasks.

Cache-A Corp. Archive Appliance Manual – January 2013 pg. 87
Queue Manager
New as of version 3.1.x, Cache-A systems now include the ability to queue sessions. This means that you can stack up as many archive and/or restore sessions to be executed as you desire. You can also view the list of queued items and reorder them as desired from this Queue Manager page. When the system is idle or working on a single archive or restore session, the queue will be empty and the queue manager will have no items listed:
The Queue Manager with no queued items
As you initiate archive or restore sessions while one is ongoing, a Queue advice dialog appears showing what is in the list and asking if you want your new action (we call each user action a Job) to be added:
Queue Requested Command Dialog with 2 items already in the queue
When this dialog appears, you can select the Queue button to cause your selection to get added to the end of the queue or the Cancel button to prevent the action from creating a queued session. The system will allow you to continue to add as many Jobs as you like to the queue.
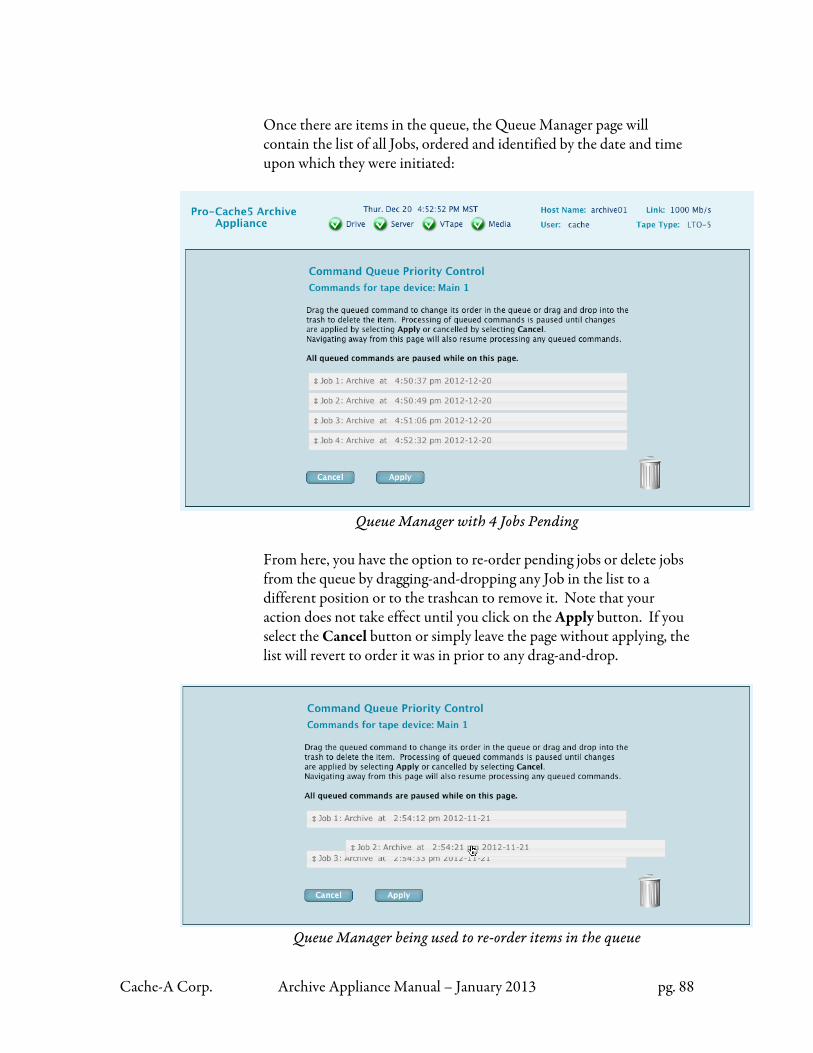
Cache-A Corp. Archive Appliance Manual – January 2013 pg. 88
Once there are items in the queue, the Queue Manager page will contain the list of all Jobs, ordered and identified by the date and time upon which they were initiated:
Queue Manager with 4 Jobs Pending
From here, you have the option to re-order pending jobs or delete jobs from the queue by dragging-and-dropping any Job in the list to a different position or to the trashcan to remove it. Note that your action does not take effect until you click on the Apply button. If you select the Cancel button or simply leave the page without applying, the list will revert to order it was in prior to any drag-and-drop.
Queue Manager being used to re-order items in the queue
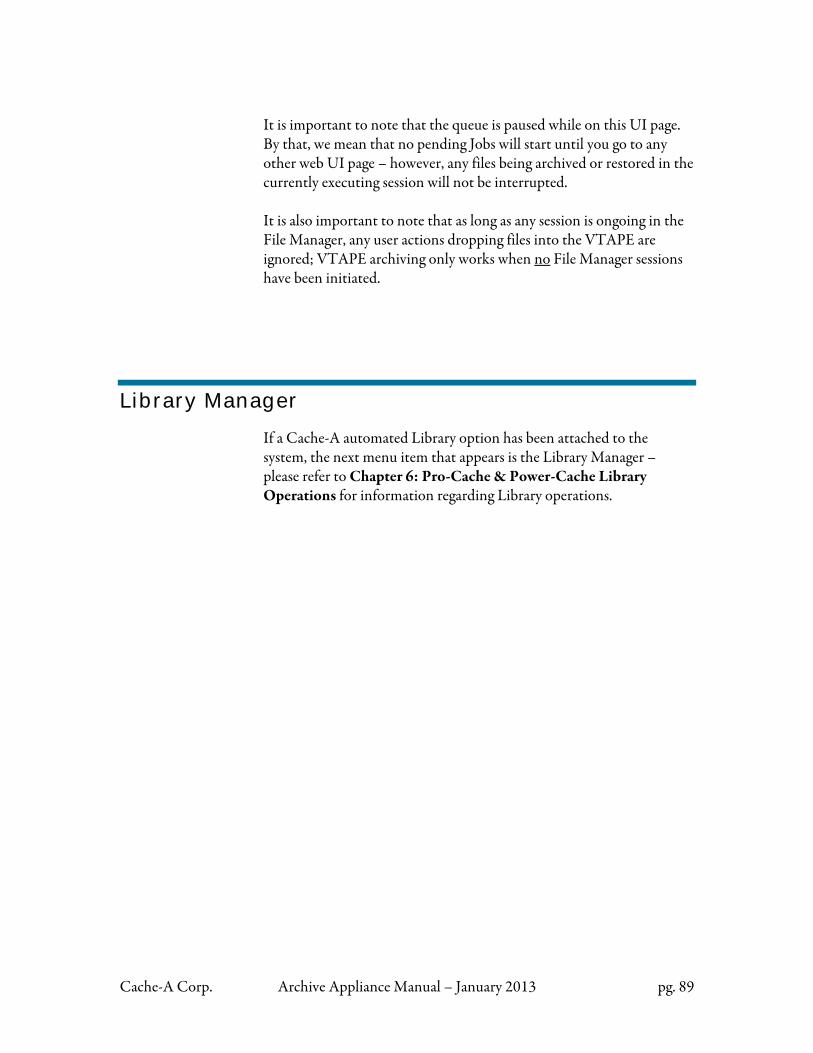
Cache-A Corp. Archive Appliance Manual – January 2013 pg. 89
It is important to note that the queue is paused while on this UI page. By that, we mean that no pending Jobs will start until you go to any other web UI page – however, any files being archived or restored in the currently executing session will not be interrupted. It is also important to note that as long as any session is ongoing in the File Manager, any user actions dropping files into the VTAPE are ignored; VTAPE archiving only works when no File Manager sessions have been initiated.
Library Manager
If a Cache-A automated Library option has been attached to the system, the next menu item that appears is the Library Manager – please refer to Chapter 6: Pro-Cache & Power-Cache Library Operations for information regarding Library operations.
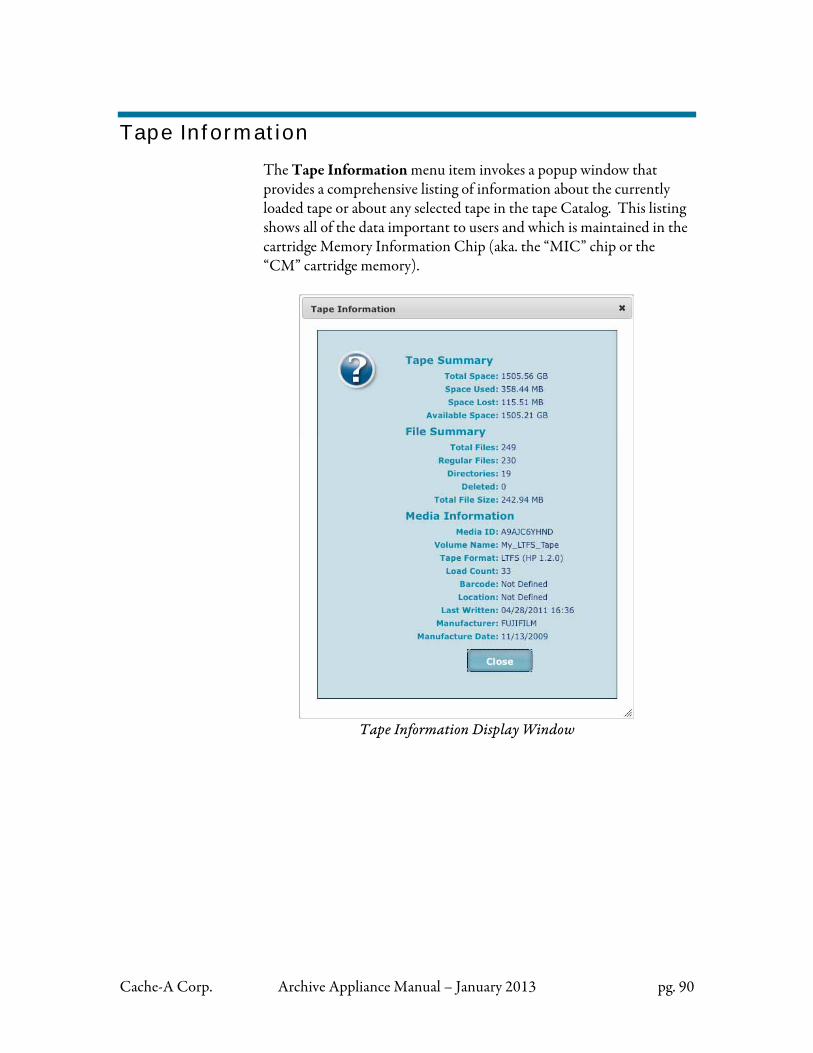
Cache-A Corp. Archive Appliance Manual – January 2013 pg. 90
Tape Information
The Tape Information menu item invokes a popup window that provides a comprehensive listing of information about the currently loaded tape or about any selected tape in the tape Catalog. This listing shows all of the data important to users and which is maintained in the cartridge Memory Information Chip (aka. the “MIC” chip or the “CM” cartridge memory).
Tape Information Display Window
Cache-A Corp. Archive Appliance Manual – January 2013 pg. 91
Tape Summary Total Space
Displays the total capacity of the tape in Gigabytes. Space Used
Displays the total number of Gigabytes consumed on the tape with files, folders, TOCs (table of contents), and lost space. Space Lost
Displays how much space is lost or gained (negative number). This value is the numerical difference of Space Used minus Total File Size. Space on tapes is lost if bad blocks have been identified and marked and wherever writing had to stop and restart. Space is gained whenever data losslessly compresses (see Lossless Compression section in Appendix A: Cache-A Archiving Best Practices for more information). Available Space
Displays the numerical difference of Total Space minus Space Used. File Summary Total Files
Displays the total number of directory entries (files and folders) on tape. Regular Files
Displays the number of files on tape. Directories
Displays the number of directories on tape. Deleted
Displays the number of files and folders that have been moved to the trash. This will always show zero as of this software revision as trash is not used. Total File Size
Displays the total size of all files on tape not taking into consideration any lossless compression.
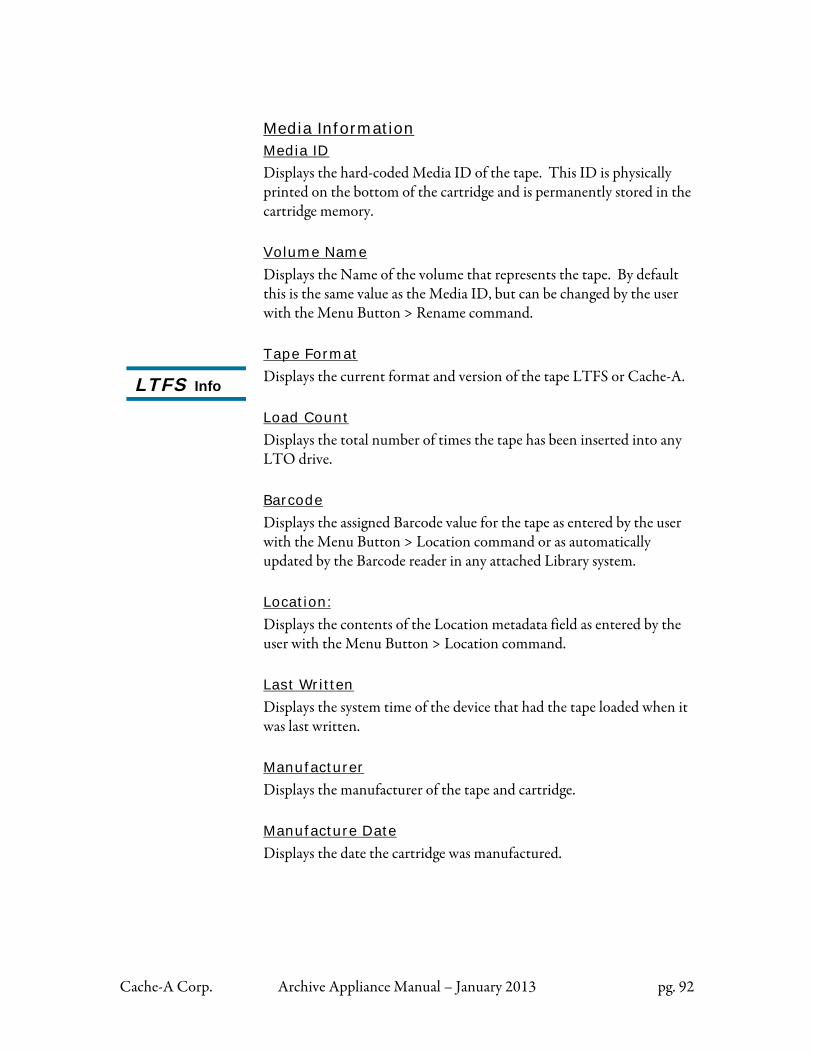
Cache-A Corp. Archive Appliance Manual – January 2013 pg. 92
Media Information Media ID
Displays the hard-coded Media ID of the tape. This ID is physically printed on the bottom of the cartridge and is permanently stored in the cartridge memory. Volume Name
Displays the Name of the volume that represents the tape. By default this is the same value as the Media ID, but can be changed by the user with the Menu Button > Rename command. Tape Format
Displays the current format and version of the tape LTFS or Cache-A. Load Count
Displays the total number of times the tape has been inserted into any LTO drive. Barcode
Displays the assigned Barcode value for the tape as entered by the user with the Menu Button > Location command or as automatically updated by the Barcode reader in any attached Library system. Location:
Displays the contents of the Location metadata field as entered by the user with the Menu Button > Location command. Last Written
Displays the system time of the device that had the tape loaded when it was last written. Manufacturer
Displays the manufacturer of the tape and cartridge. Manufacture Date
Displays the date the cartridge was manufactured.
LTFS Info
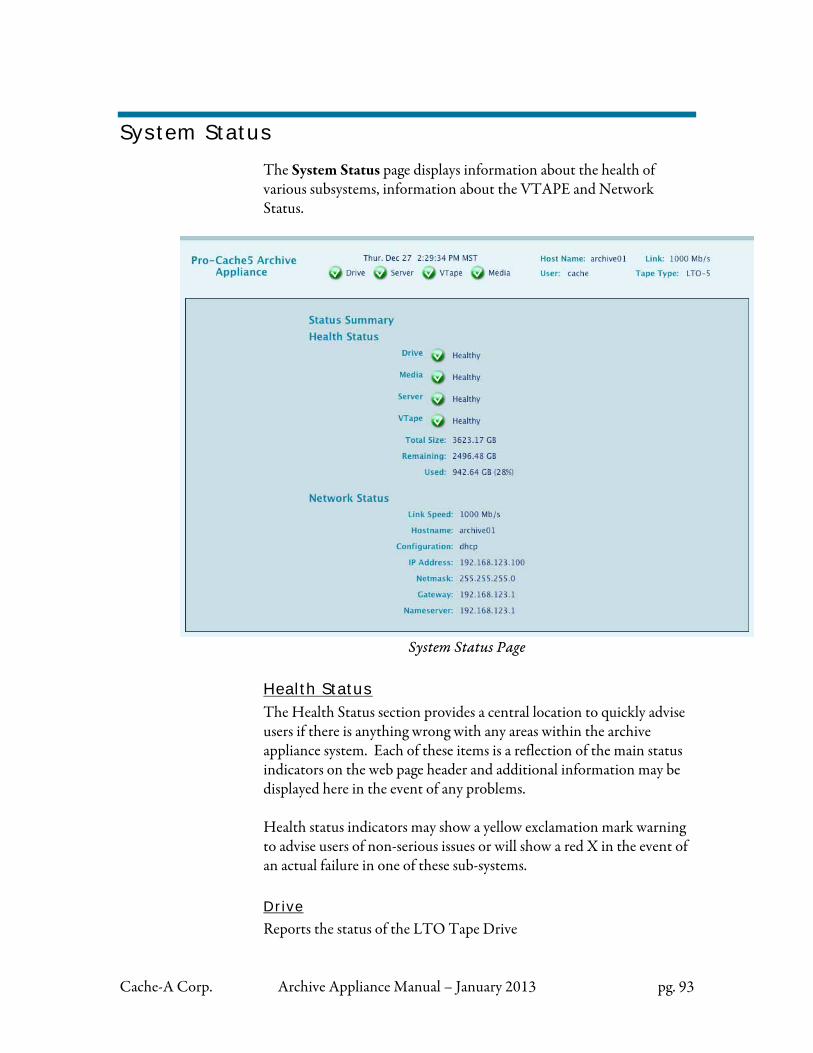
Cache-A Corp. Archive Appliance Manual – January 2013 pg. 93
System Status
The System Status page displays information about the health of various subsystems, information about the VTAPE and Network Status.
System Status Page
Health Status
The Health Status section provides a central location to quickly advise users if there is anything wrong with any areas within the archive appliance system. Each of these items is a reflection of the main status indicators on the web page header and additional information may be displayed here in the event of any problems. Health status indicators may show a yellow exclamation mark warning to advise users of non-serious issues or will show a red X in the event of an actual failure in one of these sub-systems. Drive
Reports the status of the LTO Tape Drive
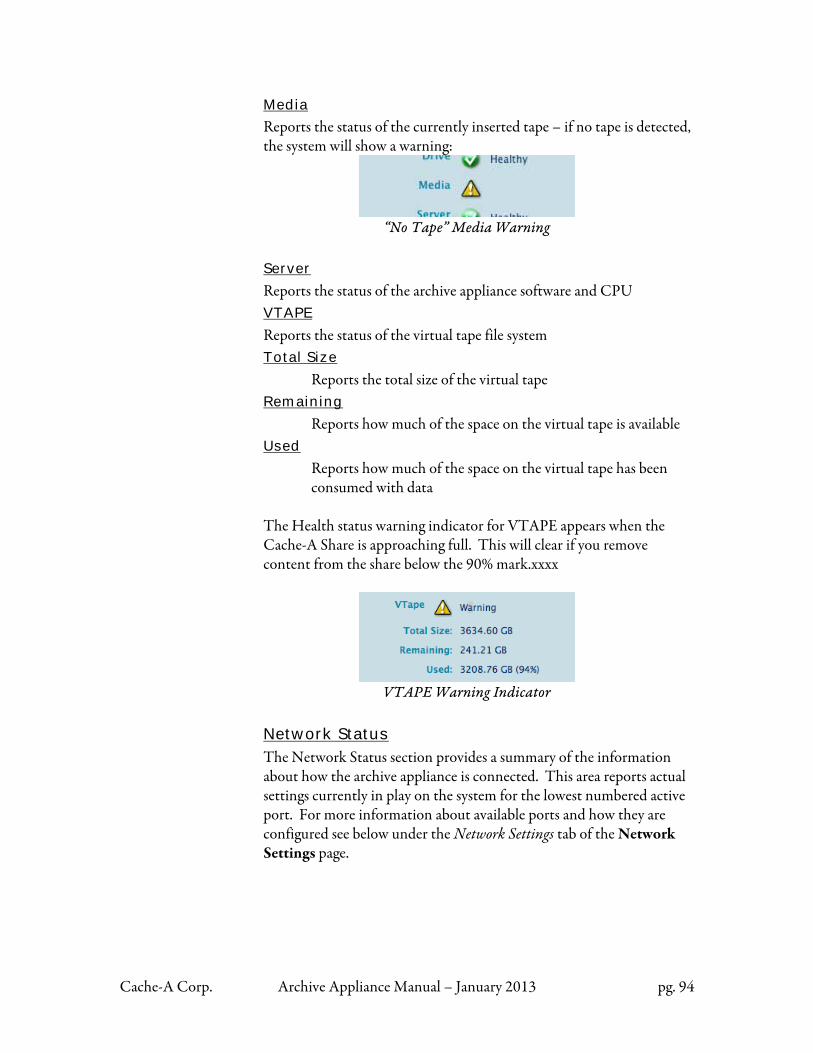
Cache-A Corp. Archive Appliance Manual – January 2013 pg. 94
Media
Reports the status of the currently inserted tape – if no tape is detected, the system will show a warning:
“No Tape” Media Warning
Server
Reports the status of the archive appliance software and CPU VTAPE
Reports the status of the virtual tape file system Total Size
Reports the total size of the virtual tape Remaining
Reports how much of the space on the virtual tape is available Used
Reports how much of the space on the virtual tape has been consumed with data
The Health status warning indicator for VTAPE appears when the Cache-A Share is approaching full. This will clear if you remove content from the share below the 90% mark.xxxx
VTAPE Warning Indicator
Network Status
The Network Status section provides a summary of the information about how the archive appliance is connected. This area reports actual settings currently in play on the system for the lowest numbered active port. For more information about available ports and how they are configured see below under the Network Settings tab of the Network Settings page.
Cache-A Corp. Archive Appliance Manual – January 2013 pg. 95
Link Speed
Reports the Ethernet connection speed detected by the system. For optimum performance this display should show 1000 Mb/s for Gigabit Ethernet connection speed.
Hostname
Reports the configured hostname for this system. Configuration
Reports whether the system is obtaining its IP address from a server or router (DHCP) or if the IP address is Manually assigned
IP Address
Reports the IP address used to communicate with this archive appliance
Netmask
Reports the Network mask used with this archive appliance Gateway
Reports the Gateway used with this archive appliance Nameserver
Reports the Nameserver used with this archive appliance
Versions
The Versions page shows a variety of critical information about the software and hardware in the archive appliance serving this web page. When contacting technical support, please refer to the information on this page.
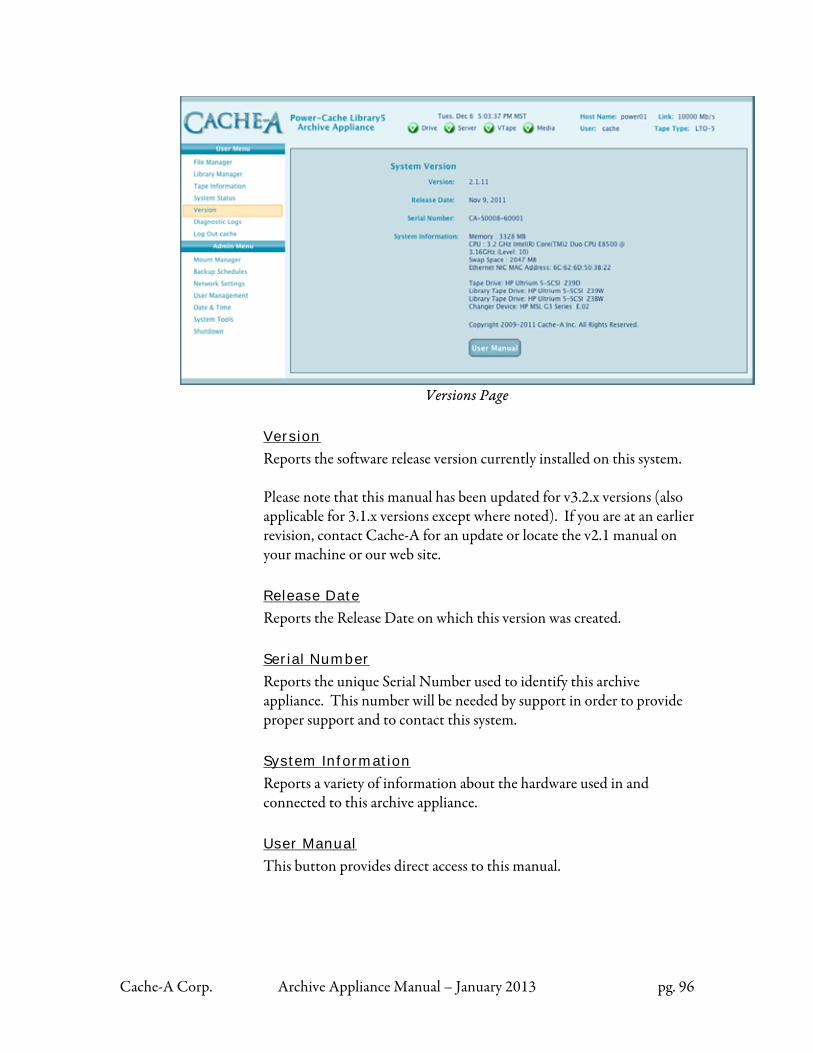
Cache-A Corp. Archive Appliance Manual – January 2013 pg. 96
Versions Page
Version
Reports the software release version currently installed on this system. Please note that this manual has been updated for v3.2.x versions (also applicable for 3.1.x versions except where noted). If you are at an earlier revision, contact Cache-A for an update or locate the v2.1 manual on your machine or our web site. Release Date
Reports the Release Date on which this version was created. Serial Number
Reports the unique Serial Number used to identify this archive appliance. This number will be needed by support in order to provide proper support and to contact this system. System Information
Reports a variety of information about the hardware used in and connected to this archive appliance. User Manual
This button provides direct access to this manual.
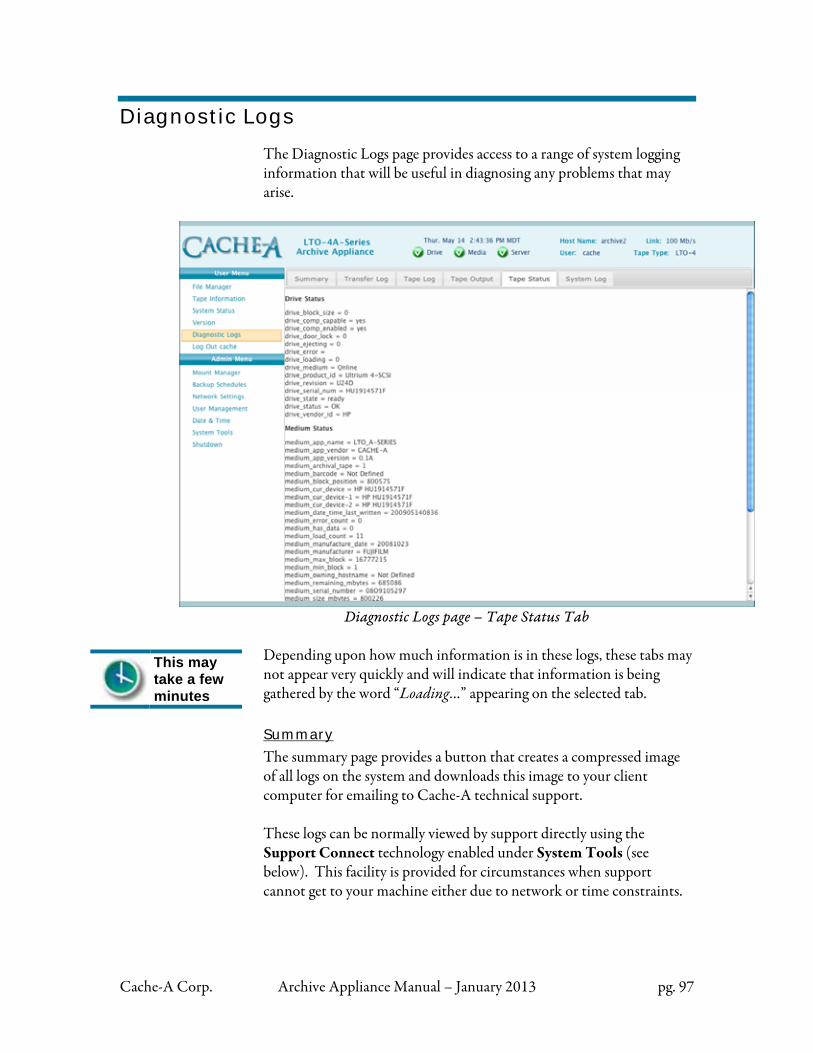
Cache-A Corp. Archive Appliance Manual – January 2013 pg. 97
This may take a few minutes
Diagnostic Logs
The Diagnostic Logs page provides access to a range of system logging information that will be useful in diagnosing any problems that may arise.
Diagnostic Logs page – Tape Status Tab
Depending upon how much information is in these logs, these tabs may not appear very quickly and will indicate that information is being gathered by the word “Loading…” appearing on the selected tab. Summary
The summary page provides a button that creates a compressed image of all logs on the system and downloads this image to your client computer for emailing to Cache-A technical support. These logs can be normally viewed by support directly using the Support Connect technology enabled under System Tools (see below). This facility is provided for circumstances when support cannot get to your machine either due to network or time constraints.
Cache-A Corp. Archive Appliance Manual – January 2013 pg. 98
Transfer Log
Reports a log of all transfers since the current tape was loaded. This list contains the same information as the File Manager > Transfer List, however is not truncated and may include hundreds of thousands of entries. In the event this is a long list, it may take some time to load. Tape Log
Reports a log of Tape information Tape Output
Reports a log of Tape output Tape Status
Reports a log of Tape status System Log
Reports a log of system functions and status
Mount Manager
The Mount Manager provides a tool to enable the archive appliance to mount shares that are available on your network. Mounting network shares allows you to archive or restore data using the File Manager page; shared volumes are available in the dropdown menu at the bottom of the Source Directory list, making any files therein available for drag-and-drop operations. Mounting network shares also allows you to schedule backups of these shares using the Backup Manager described below. When you open this page by clicking on the Mount Manager item in the Main Menu, the Available Network Volumes list automatically rescans to locate all publically browseable shares.

Cache-A Corp. Archive Appliance Manual – January 2013 pg. 99
This may take a few minutes
The Mount Manager Screen
Note shares shown include Unix/Linux NFS systems running zeroconf and advertised windows SMB shares. Apple file protocol servers will also appear in this list, their shares will only appear after providing credentials (see AFP mounting below). If shares have been added to the network, you can cause this list to
refresh manually by clicking on the refresh button in the upper left corner. Because Windows share scans can take a long time, especially on networks with a large number of PCs, there is a separate refresh button to allow you to cause the system to scan for Windows XP shares. Note that Window shares will appear only if your Windows client is configured such that shared folders are “publically browseable.” Once the Available Network Volumes list has completely updated, to actually mount any volume, click on the desired line to select that volume for mounting and then click on the Mount button. Successfully mounted volumes will disappear from the Available Network Volumes list and show as a list item in the Mounted Volumes list. Volumes appearing in this list are now available for manual operations as noted above in the dropdown menu at the
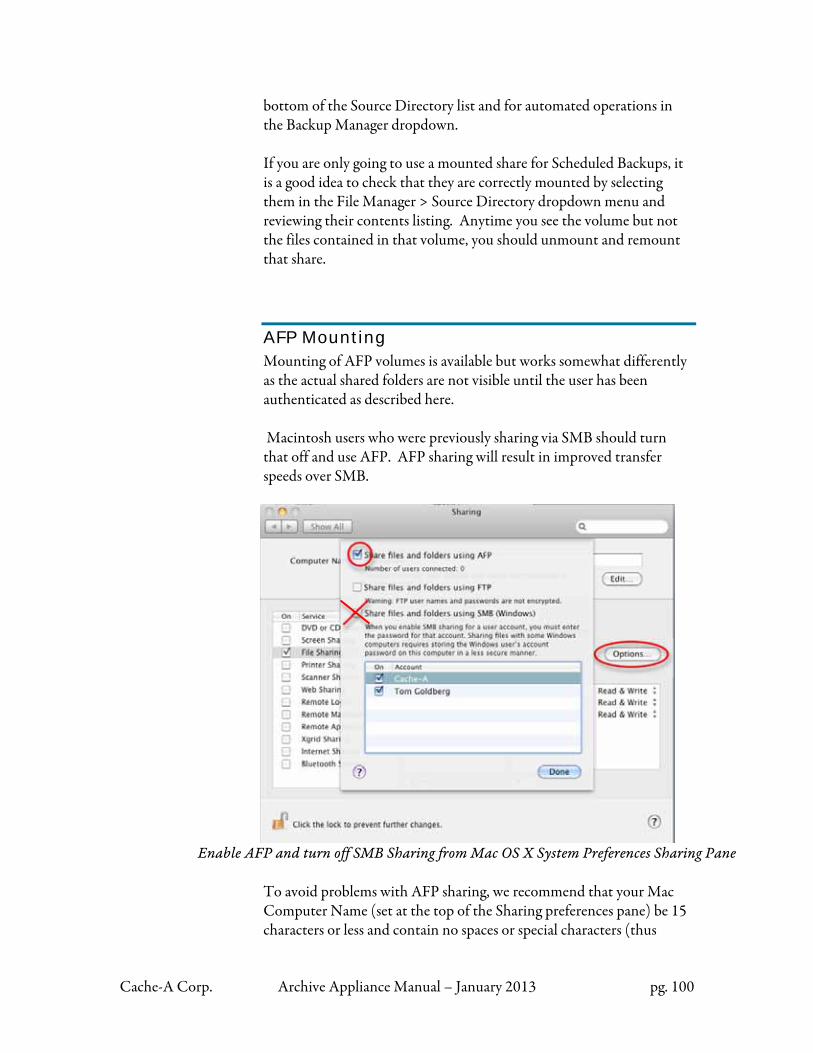
Cache-A Corp. Archive Appliance Manual – January 2013 pg. 100
bottom of the Source Directory list and for automated operations in the Backup Manager dropdown. If you are only going to use a mounted share for Scheduled Backups, it is a good idea to check that they are correctly mounted by selecting them in the File Manager > Source Directory dropdown menu and reviewing their contents listing. Anytime you see the volume but not the files contained in that volume, you should unmount and remount that share.
AFP Mounting Mounting of AFP volumes is available but works somewhat differently as the actual shared folders are not visible until the user has been authenticated as described here. Macintosh users who were previously sharing via SMB should turn that off and use AFP. AFP sharing will result in improved transfer speeds over SMB.
Enable AFP and turn off SMB Sharing from Mac OS X System Preferences Sharing Pane
To avoid problems with AFP sharing, we recommend that your Mac Computer Name (set at the top of the Sharing preferences pane) be 15 characters or less and contain no spaces or special characters (thus
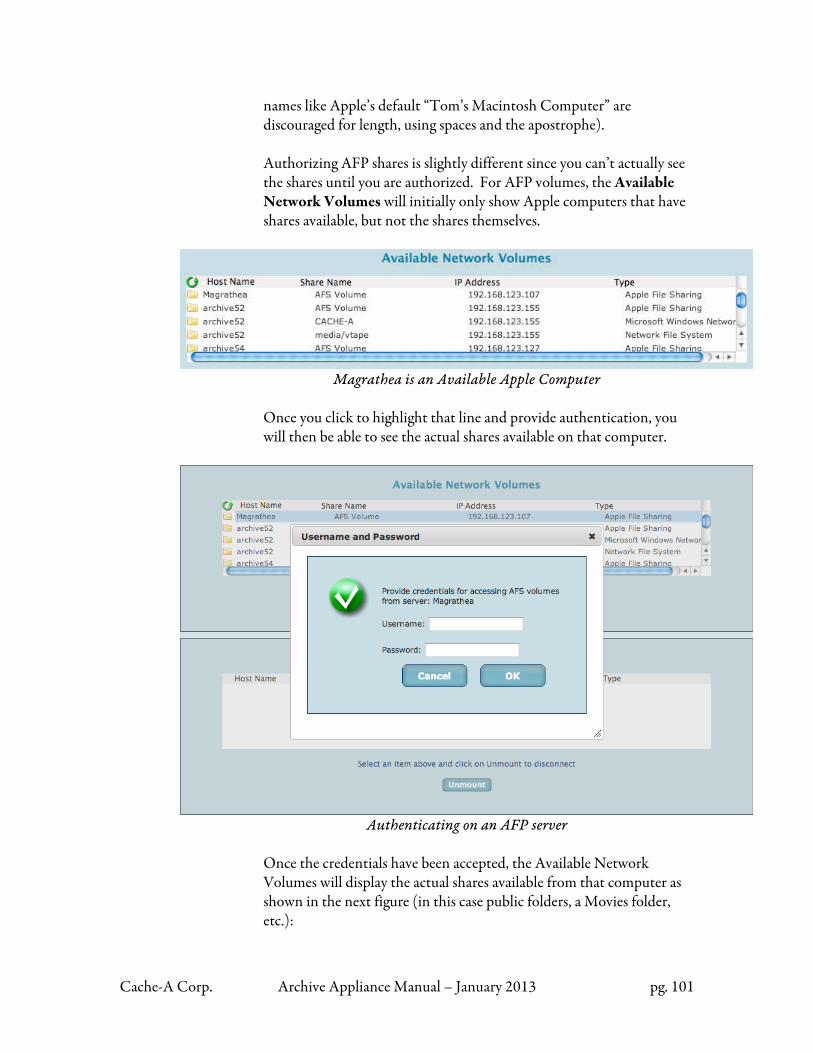
Cache-A Corp. Archive Appliance Manual – January 2013 pg. 101
names like Apple’s default “Tom’s Macintosh Computer” are discouraged for length, using spaces and the apostrophe). Authorizing AFP shares is slightly different since you can’t actually see the shares until you are authorized. For AFP volumes, the Available Network Volumes will initially only show Apple computers that have shares available, but not the shares themselves.
Magrathea is an Available Apple Computer
Once you click to highlight that line and provide authentication, you will then be able to see the actual shares available on that computer.
Authenticating on an AFP server
Once the credentials have been accepted, the Available Network Volumes will display the actual shares available from that computer as shown in the next figure (in this case public folders, a Movies folder, etc.):
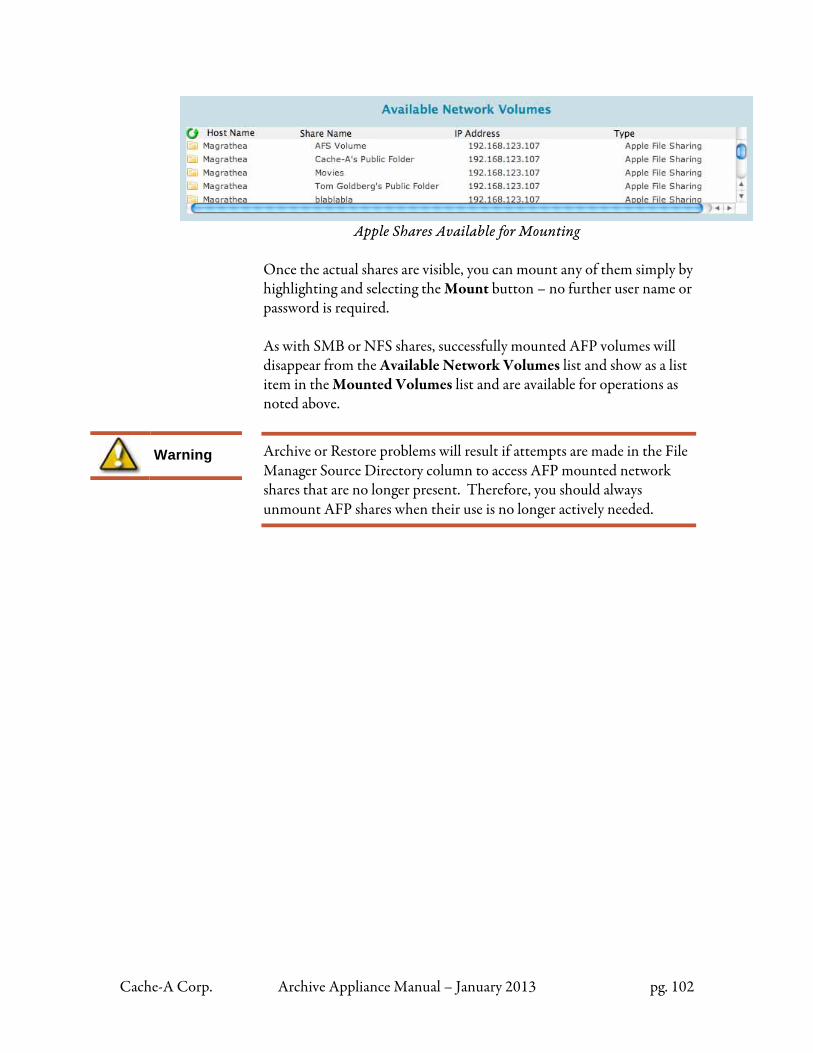
Cache-A Corp. Archive Appliance Manual – January 2013 pg. 102
Apple Shares Available for Mounting
Once the actual shares are visible, you can mount any of them simply by highlighting and selecting the Mount button – no further user name or password is required. As with SMB or NFS shares, successfully mounted AFP volumes will disappear from the Available Network Volumes list and show as a list item in the Mounted Volumes list and are available for operations as noted above.
Archive or Restore problems will result if attempts are made in the File Manager Source Directory column to access AFP mounted network shares that are no longer present. Therefore, you should always unmount AFP shares when their use is no longer actively needed.
Warning
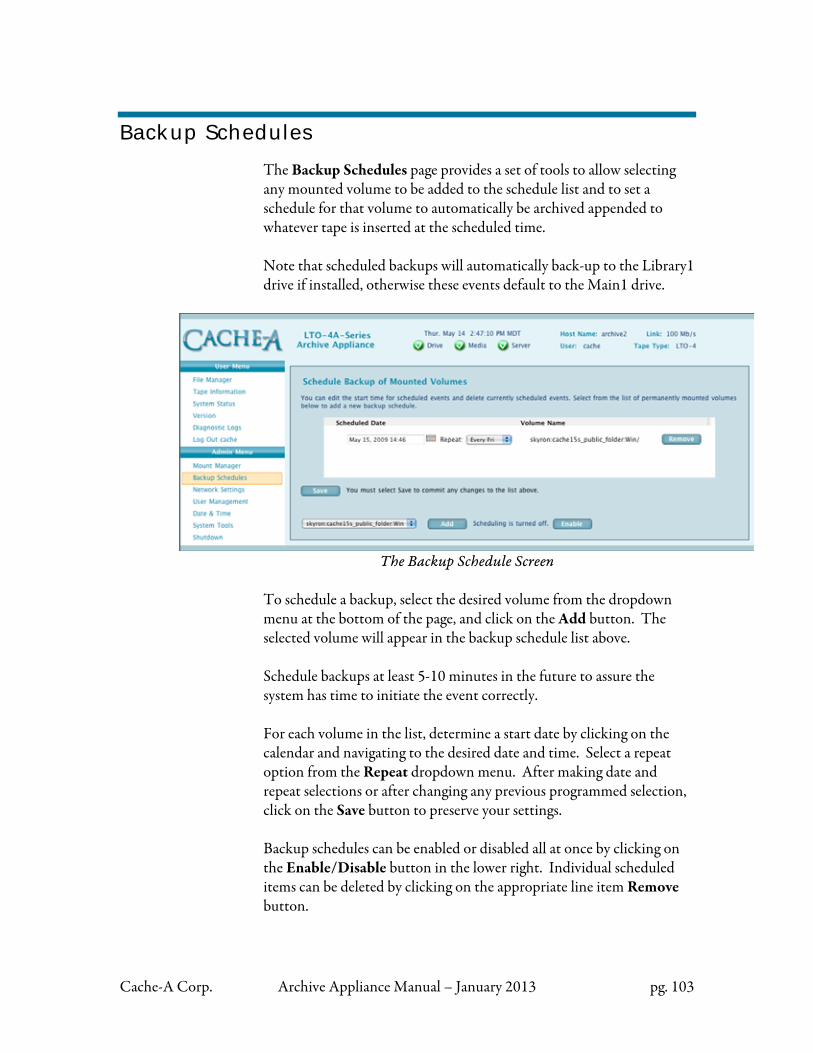
Cache-A Corp. Archive Appliance Manual – January 2013 pg. 103
Backup Schedules
The Backup Schedules page provides a set of tools to allow selecting any mounted volume to be added to the schedule list and to set a schedule for that volume to automatically be archived appended to whatever tape is inserted at the scheduled time. Note that scheduled backups will automatically back-up to the Library1 drive if installed, otherwise these events default to the Main1 drive.
The Backup Schedule Screen
To schedule a backup, select the desired volume from the dropdown menu at the bottom of the page, and click on the Add button. The selected volume will appear in the backup schedule list above. Schedule backups at least 5-10 minutes in the future to assure the system has time to initiate the event correctly. For each volume in the list, determine a start date by clicking on the calendar and navigating to the desired date and time. Select a repeat option from the Repeat dropdown menu. After making date and repeat selections or after changing any previous programmed selection, click on the Save button to preserve your settings. Backup schedules can be enabled or disabled all at once by clicking on the Enable/Disable button in the lower right. Individual scheduled items can be deleted by clicking on the appropriate line item Remove button.
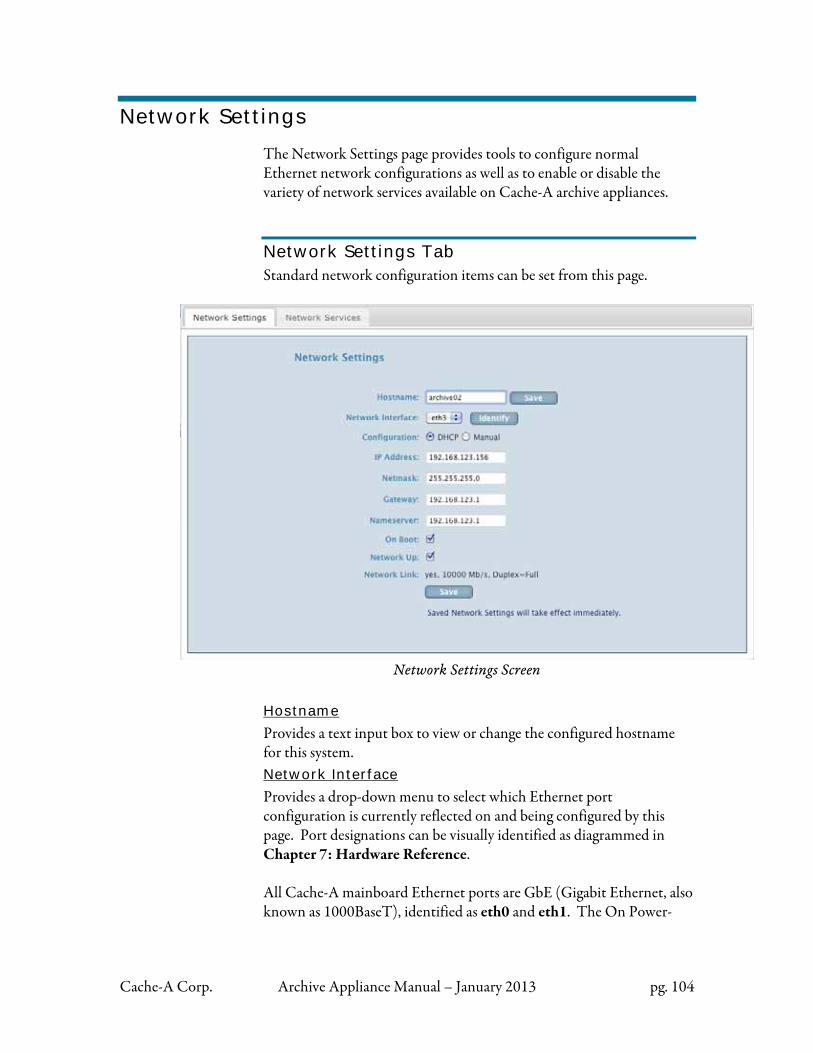
Cache-A Corp. Archive Appliance Manual – January 2013 pg. 104
Network Settings
The Network Settings page provides tools to configure normal Ethernet network configurations as well as to enable or disable the variety of network services available on Cache-A archive appliances.
Network Settings Tab Standard network configuration items can be set from this page.
Network Settings Screen
Hostname
Provides a text input box to view or change the configured hostname for this system. Network Interface
Provides a drop-down menu to select which Ethernet port configuration is currently reflected on and being configured by this page. Port designations can be visually identified as diagrammed in Chapter 7: Hardware Reference. All Cache-A mainboard Ethernet ports are GbE (Gigabit Ethernet, also known as 1000BaseT), identified as eth0 and eth1. The On Power-
Cache-A Corp. Archive Appliance Manual – January 2013 pg. 105
Cache systems, a separate 10GbE board provides SFP+ Ethernet ports eth2 and eth3 on the left and right respectively. The Identify button is not functional as of this release.
Only attach one Ethernet connection per network. Connecting more than one port to the same network will cause networking problems.
Configuration
Provides a pair of radio buttons to view or change the system IP address setting from DHCP (obtain from a server or router) or Manual (to allow the IP address to be user assigned) IP Address
Provides a text input box to view or change the IP address used to communicate with this archive appliance Netmask
Provides a text input box to view or change the Network mask used with this archive appliance Gateway
Provides a text input box to view or change the Gateway used with this archive appliance Nameserver
Provides a text input box to view or change the Nameserver used with this archive appliance On Boot
Provides a check box to cause the currently selected port to be activated at boot-up time. This box should only be checked for ports that have active Ethernet connections at boot time. Network Up
Provides a check box to cause the currently selected port to be activated upon selection of the Save button. This box should only be checked for ports that currently have active Ethernet connections. Network Link
Provides information about the current link status of the currently selected Ethernet port. Indication is yes or no for link present or not, a report of link speed and duplex status.
Warning
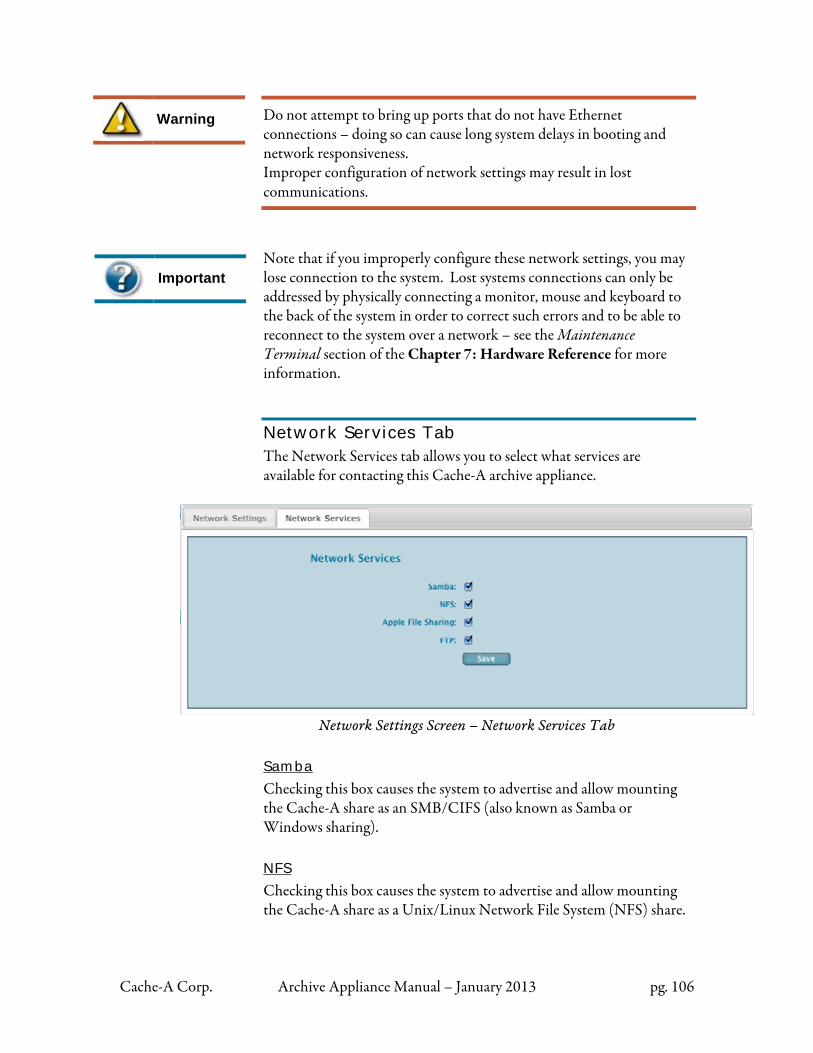
Cache-A Corp. Archive Appliance Manual – January 2013 pg. 106
Warning Do not attempt to bring up ports that do not have Ethernet
connections – doing so can cause long system delays in booting and network responsiveness. Improper configuration of network settings may result in lost communications.
Note that if you improperly configure these network settings, you may lose connection to the system. Lost systems connections can only be addressed by physically connecting a monitor, mouse and keyboard to the back of the system in order to correct such errors and to be able to reconnect to the system over a network – see the Maintenance Terminal section of the Chapter 7: Hardware Reference for more information.
Network Services Tab The Network Services tab allows you to select what services are available for contacting this Cache-A archive appliance.
Network Settings Screen – Network Services Tab
Samba
Checking this box causes the system to advertise and allow mounting the Cache-A share as an SMB/CIFS (also known as Samba or Windows sharing). NFS
Checking this box causes the system to advertise and allow mounting the Cache-A share as a Unix/Linux Network File System (NFS) share.
Important
Cache-A Corp. Archive Appliance Manual – January 2013 pg. 107
Apple File Sharing
Checking this box causes the system to advertise and allow mounting the Cache-A share as an Apple File Protocol (afp) share. FTP
Checking this box turns on the internal vsftp server and allowing users to copy content to the Cache-A share with any FTP client. The default setting for all network services is on or enabled. If you never intend to use any of these services, you should uncheck those and Save. For instance, doing so will reduce the redundant appearance of Cache-A listings under “Shared” devices on a Mac Finder window. Note that these settings control how the Cache-A share is made available to clients on the network. This does not affect how the Cache-A system can mount client shares available on the network; all available shares will appear in the mount manager regardless of these settings.
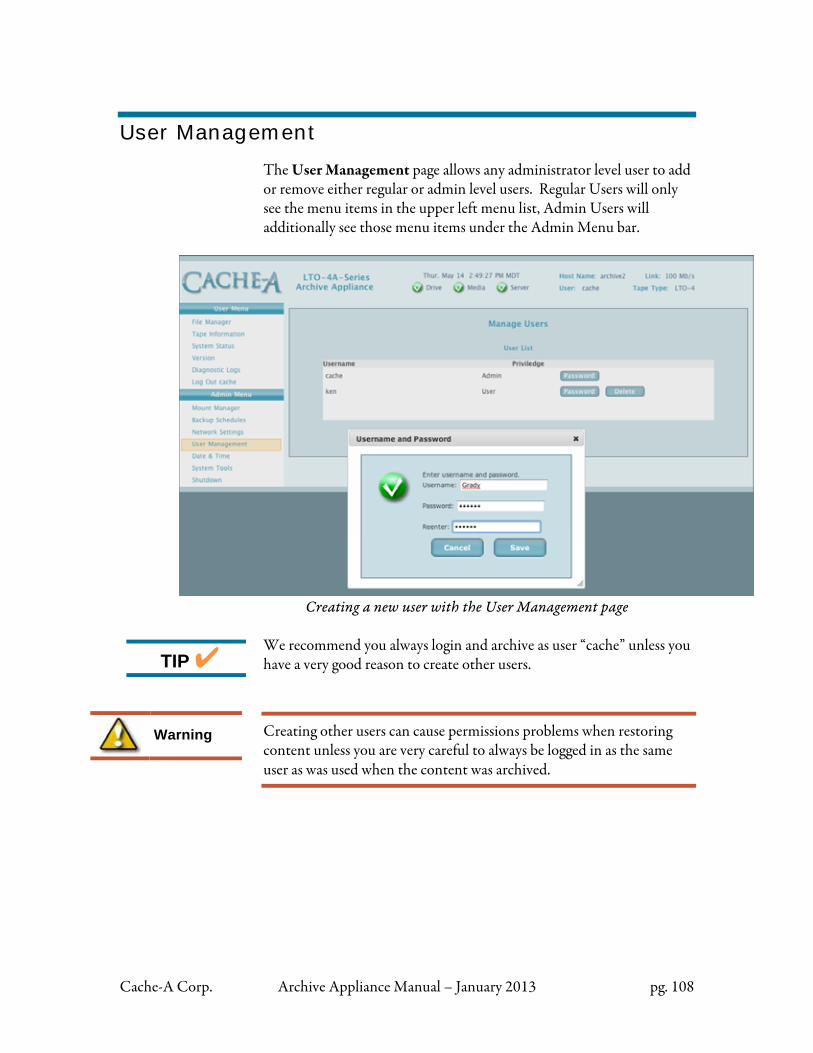
Cache-A Corp. Archive Appliance Manual – January 2013 pg. 108
User Management
The User Management page allows any administrator level user to add or remove either regular or admin level users. Regular Users will only see the menu items in the upper left menu list, Admin Users will additionally see those menu items under the Admin Menu bar.
Creating a new user with the User Management page
We recommend you always login and archive as user “cache” unless you have a very good reason to create other users.
Creating other users can cause permissions problems when restoring content unless you are very careful to always be logged in as the same user as was used when the content was archived.
Warning
TIP
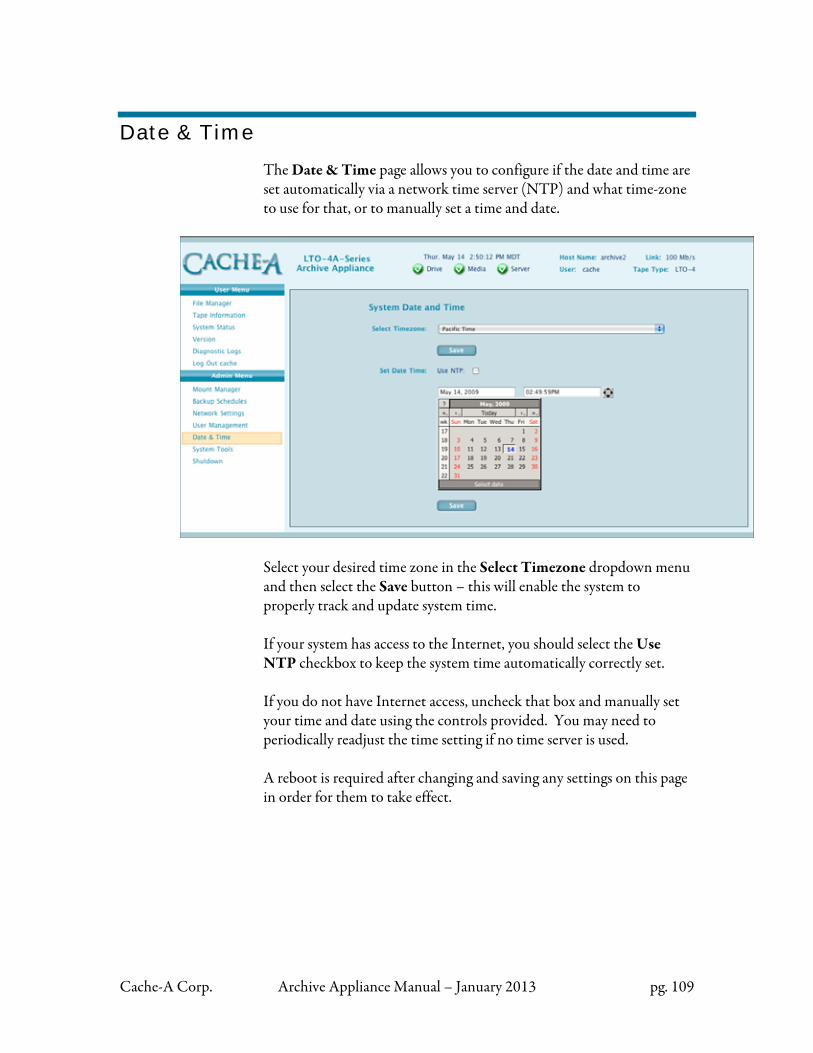
Cache-A Corp. Archive Appliance Manual – January 2013 pg. 109
Date & Time
The Date & Time page allows you to configure if the date and time are set automatically via a network time server (NTP) and what time-zone to use for that, or to manually set a time and date.
Select your desired time zone in the Select Timezone dropdown menu and then select the Save button – this will enable the system to properly track and update system time. If your system has access to the Internet, you should select the Use NTP checkbox to keep the system time automatically correctly set. If you do not have Internet access, uncheck that box and manually set your time and date using the controls provided. You may need to periodically readjust the time setting if no time server is used. A reboot is required after changing and saving any settings on this page in order for them to take effect.
Cache-A Corp. Archive Appliance Manual – January 2013 pg. 110
System Tools
The System Tools page provides access to a variety of support and system options for Cache-A archive appliances. These functions are grouped under a number of tabs as follows:
• Support Connect • Software Update • Backup Catalog • Settings • Utilities • Catalog Sharing • RAID Settings
Each tab is discussed in detail in the following subsections.
Support Connect Tab This tab allows you to make the appliance visible to Cache-A support. As long as your network is attached to the Internet, enabling this feature permits this archive appliance to create a secure VPN (Virtual Private Network) back to Cache-A’s support server and permits only qualified Cache-A support technicians to provide a variety of services including:
Checking current system status and activity
Making logs available for review and diagnosis
Updating software on your system
Enabling options and or features
Restoring damaged tapes
Restoring Catalog backups

Cache-A Corp. Archive Appliance Manual – January 2013 pg. 111
System Tools > Support Connect Tab
To enable Support Connect, select the Connect to Cache-A Support radio button and click on the OK button. Note: the next time your system is rebooted, Support Connect is automatically disabled. Cache-A technicians will usually reboot for you when they complete their activities.
Software Update Tab From time to time, Cache-A may have updates available. To find out about the latest release version, to see the release notes and to arrange to get your system updated, you can visit the Cache-A web site support page at http://cache-a.com and click on the Support button - to schedule an update please fill out the Software Update form. When a software update has been scheduled for your system, you have to simply visit this tab of the System Tools page to view any scheduled update and to enable a download at any time.
System Tools > Software Update Tab
Cache-A Corp. Archive Appliance Manual – January 2013 pg. 112
To download a software update, select the Download radio button and click on the OK button. A wait bar indicator will appear while a software update is in progress. A status message is also displayed indicating what is going on in the software update. Once the software update is complete, the system will return to the screen that indicates no Software Update is available for the unit.
Assure that the Download has completed and that the system is no longer working on an update before proceeding. Turning off a unit prematurely could leave it in a compromised state.
Backup Catalog Tab This tab provides a tool for you to backup your Catalog of tape TOCs. This protects the system record of every tape currently in the Catalog and all the metadata associated with every file and tape. When this function is initiated, the entire Catalog is written to a file on the VTAPE. If a tape is inserted, that file will also be written to that tape – you should note which tape contains the most current backup of your Catalog. Note that you can also or alternatively take the copy of the Catalog on VTAPE and back it up anywhere else on your network or direct attached storage (i.e. a USB drive) if you prefer to do so. Simply use the same means described elsewhere in this manual for moving VTAPE data to a network share, to your client computer or to direct attached storage.
Warning
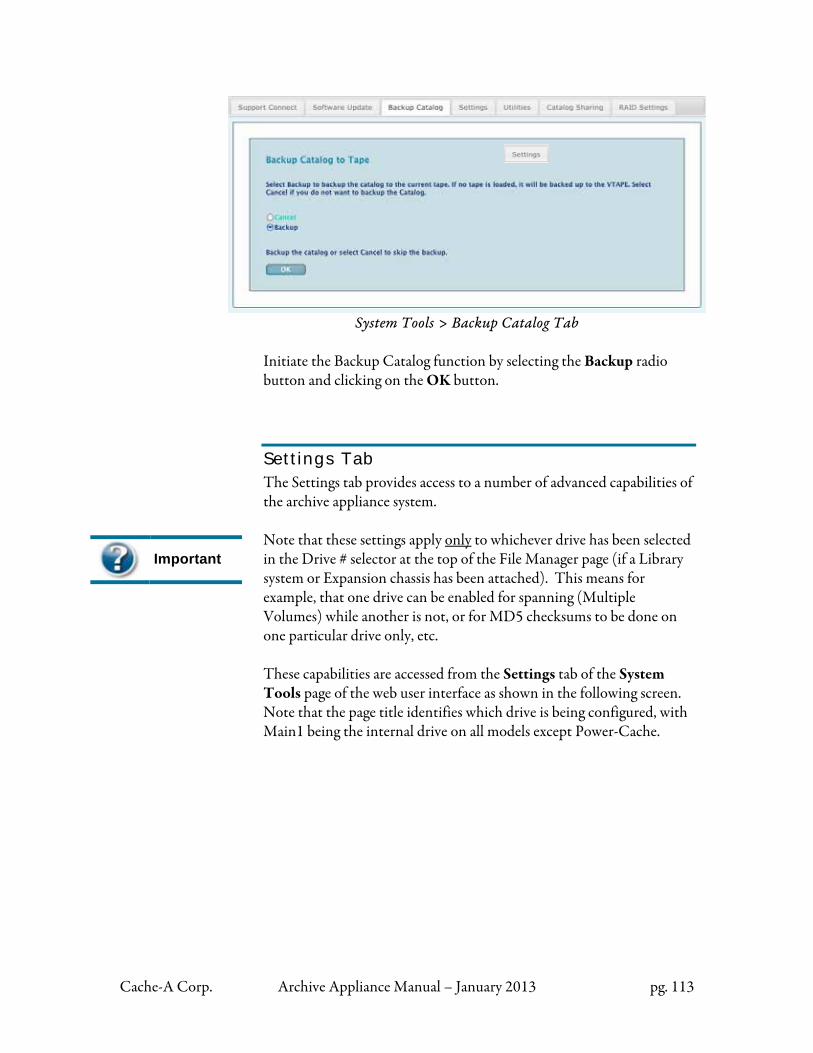
Cache-A Corp. Archive Appliance Manual – January 2013 pg. 113
System Tools > Backup Catalog Tab
Initiate the Backup Catalog function by selecting the Backup radio button and clicking on the OK button.
Settings Tab The Settings tab provides access to a number of advanced capabilities of the archive appliance system. Note that these settings apply only to whichever drive has been selected in the Drive # selector at the top of the File Manager page (if a Library system or Expansion chassis has been attached). This means for example, that one drive can be enabled for spanning (Multiple Volumes) while another is not, or for MD5 checksums to be done on one particular drive only, etc. These capabilities are accessed from the Settings tab of the System Tools page of the web user interface as shown in the following screen. Note that the page title identifies which drive is being configured, with Main1 being the internal drive on all models except Power-Cache.
Important
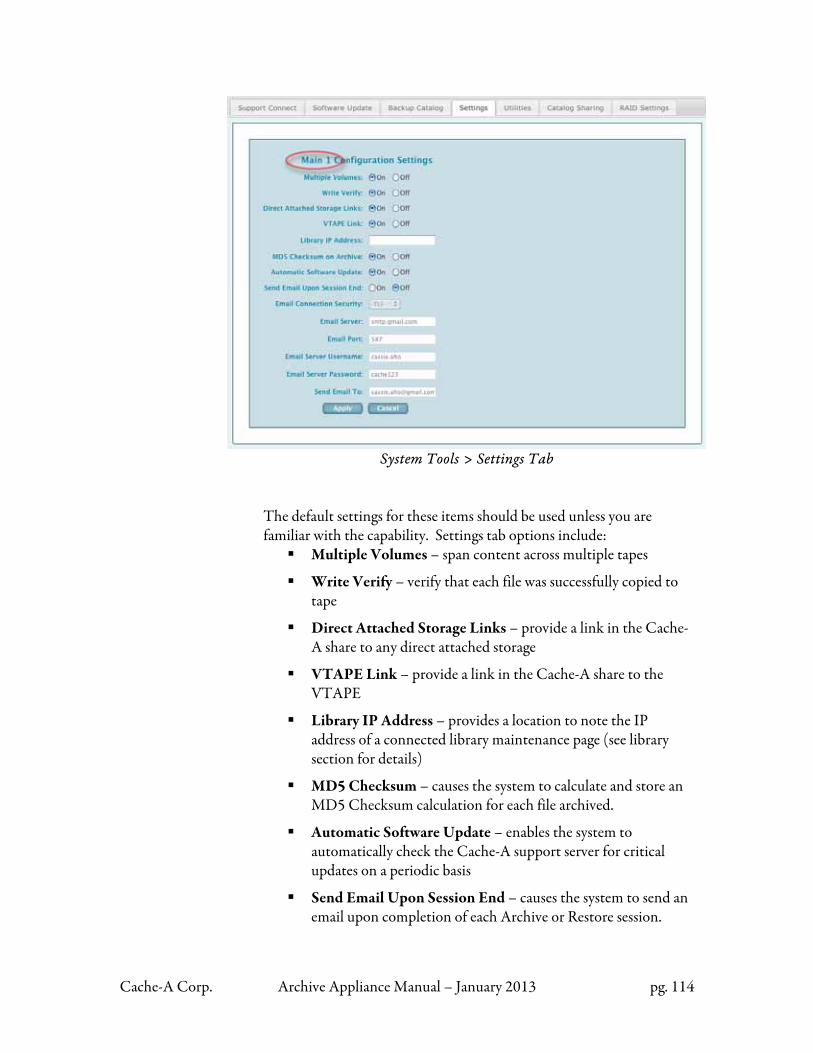
Cache-A Corp. Archive Appliance Manual – January 2013 pg. 114
System Tools > Settings Tab
The default settings for these items should be used unless you are familiar with the capability. Settings tab options include:
Multiple Volumes – span content across multiple tapes
Write Verify – verify that each file was successfully copied to tape
Direct Attached Storage Links – provide a link in the Cache-A share to any direct attached storage
VTAPE Link – provide a link in the Cache-A share to the VTAPE
Library IP Address – provides a location to note the IP address of a connected library maintenance page (see library section for details)
MD5 Checksum – causes the system to calculate and store an MD5 Checksum calculation for each file archived.
Automatic Software Update – enables the system to automatically check the Cache-A support server for critical updates on a periodic basis
Send Email Upon Session End – causes the system to send an email upon completion of each Archive or Restore session.
Cache-A Corp. Archive Appliance Manual – January 2013 pg. 115
Multiple Volumes “Multiple Volumes” is the ability to span data sets larger than the capacity of the current tape (800GB for LTO-4, 1.5TB for LTO-5, or 2.5TB for LTO-6) across two or more tapes that comprise a “multiple volume” set. We refer to this capability as tape spanning and access it through the “Multiple Volumes” selection. LTFS Tape spanning has been enabled as of 3.1.x Cache-A software, but does not work with LTFS format prior to that version. Tape spanning is easy to use but requires the user to keep the multiple volumes of a spanned archive (referred to as a “tape set”) together and organized by number within the set. This feature is turned off by default because tape spanning is a less safe way to archive than single tapes as explained below. Note that the fact that there is only a single TOC stored on the last tape for a multi-tape set makes tape spanning somewhat less secure than breaking up your archives into individual tapes. As spanned tape sets grow, it becomes increasingly risky for many physical volumes to be relying upon a single TOC and, it becomes increasingly likely that the TOC can get damaged. Therefore we recommend you try to keep spanned sets to no more than just a few tapes whenever possible. In the event that you have a damaged TOC for a spanned set, you will only be able to do a “Recover-All” to get your data back. When “Multiple Volumes” is turned Off, users must manually keep track of how much data is on tape using the Tape Info dialog and assure that each archive session will fit within the remaining available space. When “Multiple Volumes” is turned On the system will continue any archive session across as many tapes as needed. Once the current tape has been filled, the system ejects the current tape and the user is prompted to insert a new one:
Important
LTFS Info

Cache-A Corp. Archive Appliance Manual – January 2013 pg. 116
User prompt to insert a new tape
Archiving continues until all queued files have been written to tape, no matter how many tapes this takes. Note that the Table of Contents (TOC) is still written only at the End of Data so is only on the last tape in the set. Tape Sets are identified by the volume name of the first tape in the set and can not be renamed once spanned. Each tape in the set gets that volume name appended with an underscore and the number of that tape within the set. For example, if the first tape’s name was 1234567890 then the 3rd tape within that set will get the volume name 1234567890_3. Important points to note about spanning tapes include:
If you are going to use a custom volume name with tape sets, you must assign that name before spanning to the next tape to assure tape set naming consistency.
Tapes that were created with Multiple Volumes On but are not full are no different than tapes created with this feature Off. Multiple Volumes archiving only comes into play when the capacity of the first tape is exceeded.
Tapes that were not created with Multiple Volumes On, but are not full, can become part of a tape set by enabling this feature and then adding content as desired.
Tapes within tape sets that have been filled up are automatically write-protected (regardless of the physical protect tab setting) and it is only possible to restore from them or erase them.
The system catalog will show the contents of each individual tape in the set by its underscore-numbered name. If you are no longer using a tape set, you must individually delete every tape from the set in the catalog – you should not keep a subset of a spanned set and expect the system to be able to restore from them.
Cache-A Corp. Archive Appliance Manual – January 2013 pg. 117
Individual files on tar formatted tape sets can span across tape boundaries and thus those files will appear in the catalog entry associated with the tape on which it starts, but the following tape would also be needed to restore that file. On such a restore, the user would be prompted to insert the next tape in the set when needed. Files can not span across tapes in LTFS spanning, and thus you may have wasted space on LTFS spanned sets if the files are large.
If you are doing a restore and are prompted for a tape, insert the requested volume – if you insert the wrong one, the system will reject it and request the tape it needs again. If you fail to insert the correct tape 3 times, the restore will abort.
If you need to have a Cache-A appliance learn a tape set that it has not seen before, you only need to insert the last tape in the set. If you insert any other tape from a tape set that has not been seen, you will be prompted to insert the last tape so that the system can access the tape set’s TOC. Write Verify
“Write Verify” is an automatic process conducted at the completion of writing each archive session. By default, this capability is set to On and causes the system to traverse the entire list of files archived within each session comparing that list to the source list, and to report any discrepancies. Users may turn Write Verify Off to save time at the end of archiving sessions, however as optimized in the recent releases, the time penalty for this check is small given the benefit. We recommend that this setting remain On. Direct Attached Storage Link
“Direct Attached Storage Link” (also known as the LocalStorage link) provides an option to users to allow viewing and manipulation of data residing on any storage device connected directly to a Cache-A system. When this option is set to On, a folder called “LocalStorage” will appear in the Cache-A Share advertising any mass storage devices you have directly connected to the Cache-A.
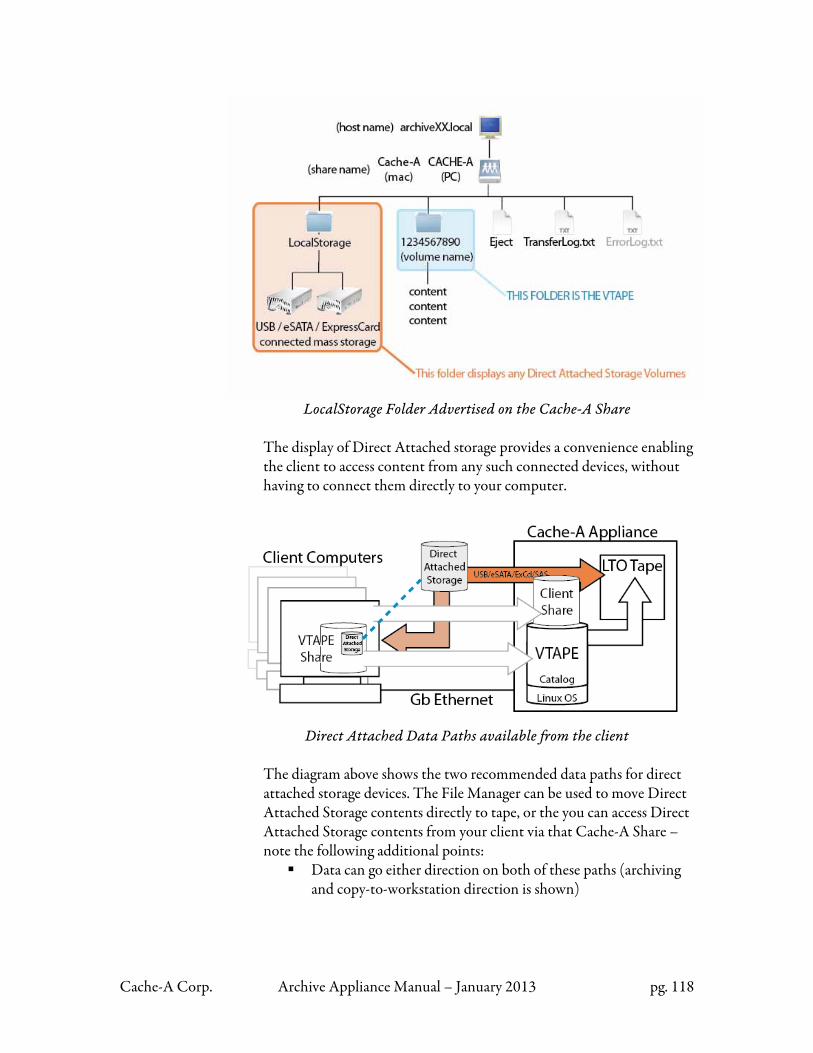
Cache-A Corp. Archive Appliance Manual – January 2013 pg. 118
LocalStorage Folder Advertised on the Cache-A Share
The display of Direct Attached storage provides a convenience enabling the client to access content from any such connected devices, without having to connect them directly to your computer.
Direct Attached Data Paths available from the client
The diagram above shows the two recommended data paths for direct attached storage devices. The File Manager can be used to move Direct Attached Storage contents directly to tape, or the you can access Direct Attached Storage contents from your client via that Cache-A Share – note the following additional points:
Data can go either direction on both of these paths (archiving and copy-to-workstation direction is shown)
Cache-A Corp. Archive Appliance Manual – January 2013 pg. 119
Important
While you can select content in such Direct Attached Storage devices and drop it into the VTAPE to start an archive, this is not recommended as it will slow down archiving and has no benefit
The Cache-A Linux system can only write to Mac Volumes configured as “Extended, Case Sensitive” (HSF+ case sensitive) file systems. By default Macintosh OS systems configure volumes as “Extended, Journaled” – turn off journaling and enable Case-Sensitive using an appropriate tool such as the Mac Disk Utility if you need to write to these volumes
If you don’t want to use this capability or find the appearance of this folder confusing, set this option to Off and the LocalStorage folder will not appear. VTAPE Link
“VTAPE Link” provides a consistent and persistent symbolic link to the VTAPE volume. When the VTAPE Link selection is set to On, a symbolic link named “VTAPE” is created. There are two reasons Cache-A systems provide this capability:
To permit users to easily find the VTAPE without knowing the volume name in Cache-A shares that may have a lot of content
To permit third party applications to always go to the Cache-A share folder and archive by putting content into the VTAPE folder
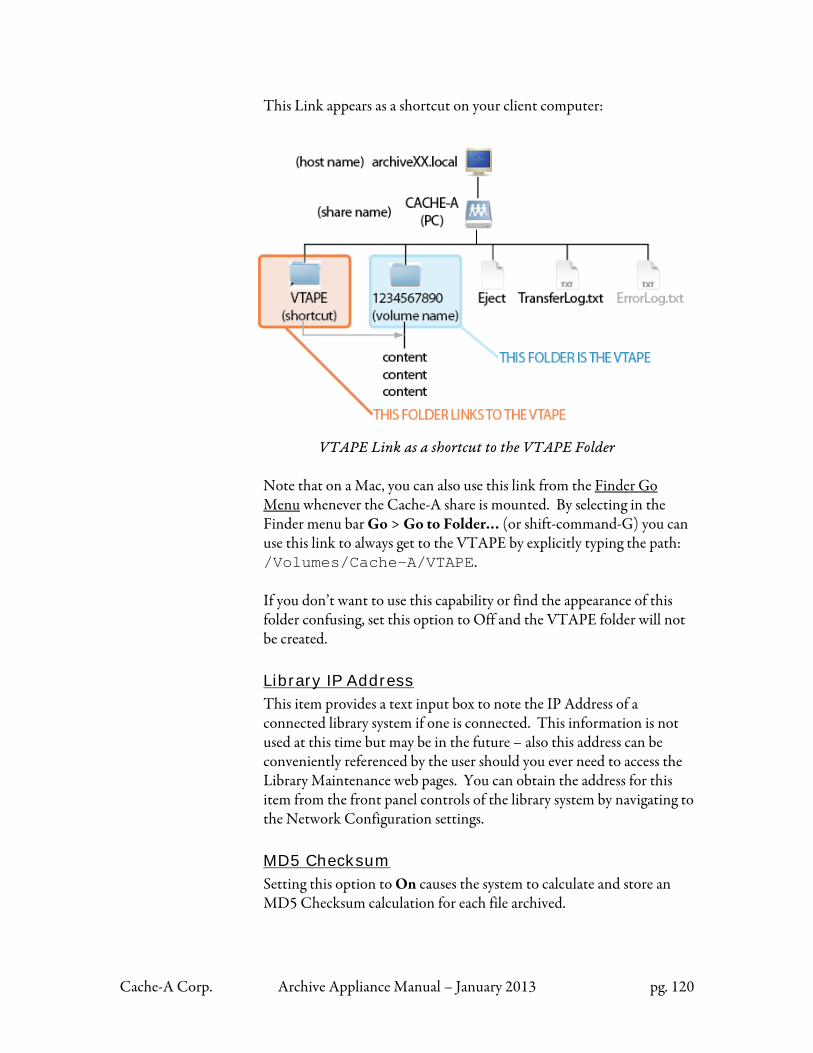
Cache-A Corp. Archive Appliance Manual – January 2013 pg. 120
This Link appears as a shortcut on your client computer:
VTAPE Link as a shortcut to the VTAPE Folder
Note that on a Mac, you can also use this link from the Finder Go Menu whenever the Cache-A share is mounted. By selecting in the Finder menu bar Go > Go to Folder… (or shift-command-G) you can use this link to always get to the VTAPE by explicitly typing the path: /Volumes/Cache-A/VTAPE. If you don’t want to use this capability or find the appearance of this folder confusing, set this option to Off and the VTAPE folder will not be created. Library IP Address
This item provides a text input box to note the IP Address of a connected library system if one is connected. This information is not used at this time but may be in the future – also this address can be conveniently referenced by the user should you ever need to access the Library Maintenance web pages. You can obtain the address for this item from the front panel controls of the library system by navigating to the Network Configuration settings. MD5 Checksum
Setting this option to On causes the system to calculate and store an MD5 Checksum calculation for each file archived.
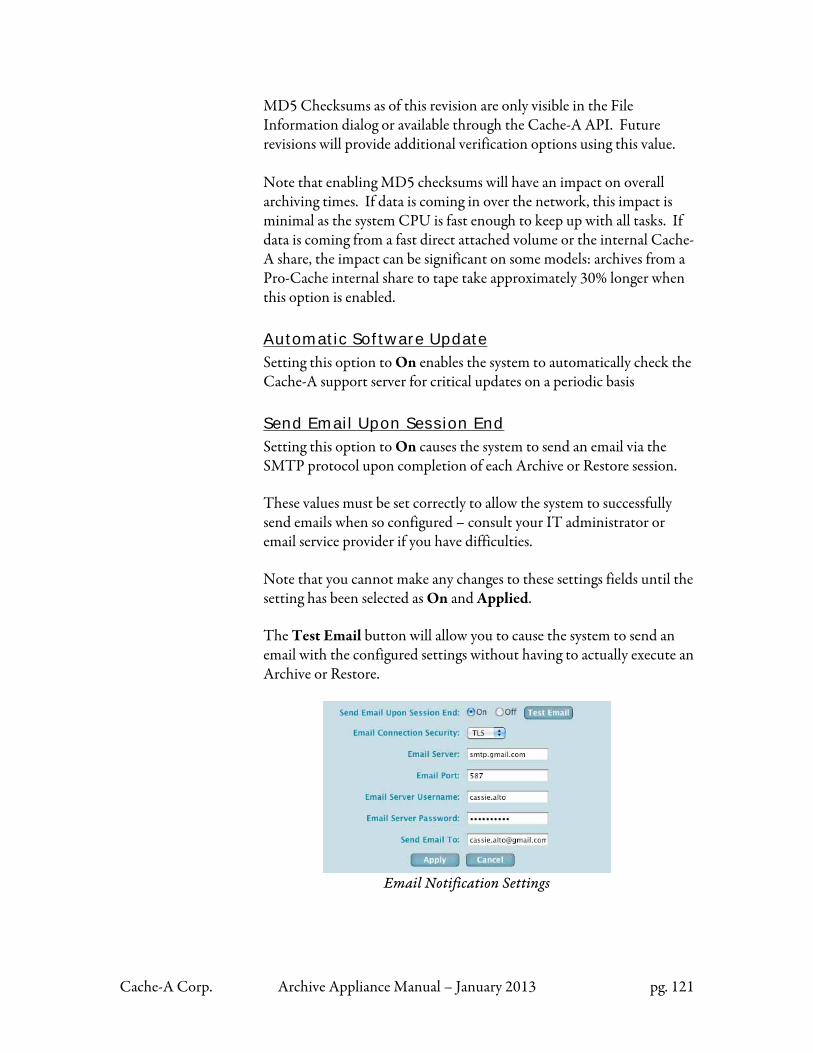
Cache-A Corp. Archive Appliance Manual – January 2013 pg. 121
MD5 Checksums as of this revision are only visible in the File Information dialog or available through the Cache-A API. Future revisions will provide additional verification options using this value. Note that enabling MD5 checksums will have an impact on overall archiving times. If data is coming in over the network, this impact is minimal as the system CPU is fast enough to keep up with all tasks. If data is coming from a fast direct attached volume or the internal Cache-A share, the impact can be significant on some models: archives from a Pro-Cache internal share to tape take approximately 30% longer when this option is enabled. Automatic Software Update
Setting this option to On enables the system to automatically check the Cache-A support server for critical updates on a periodic basis Send Email Upon Session End
Setting this option to On causes the system to send an email via the SMTP protocol upon completion of each Archive or Restore session. These values must be set correctly to allow the system to successfully send emails when so configured – consult your IT administrator or email service provider if you have difficulties. Note that you cannot make any changes to these settings fields until the setting has been selected as On and Applied. The Test Email button will allow you to cause the system to send an email with the configured settings without having to actually execute an Archive or Restore.
Email Notification Settings
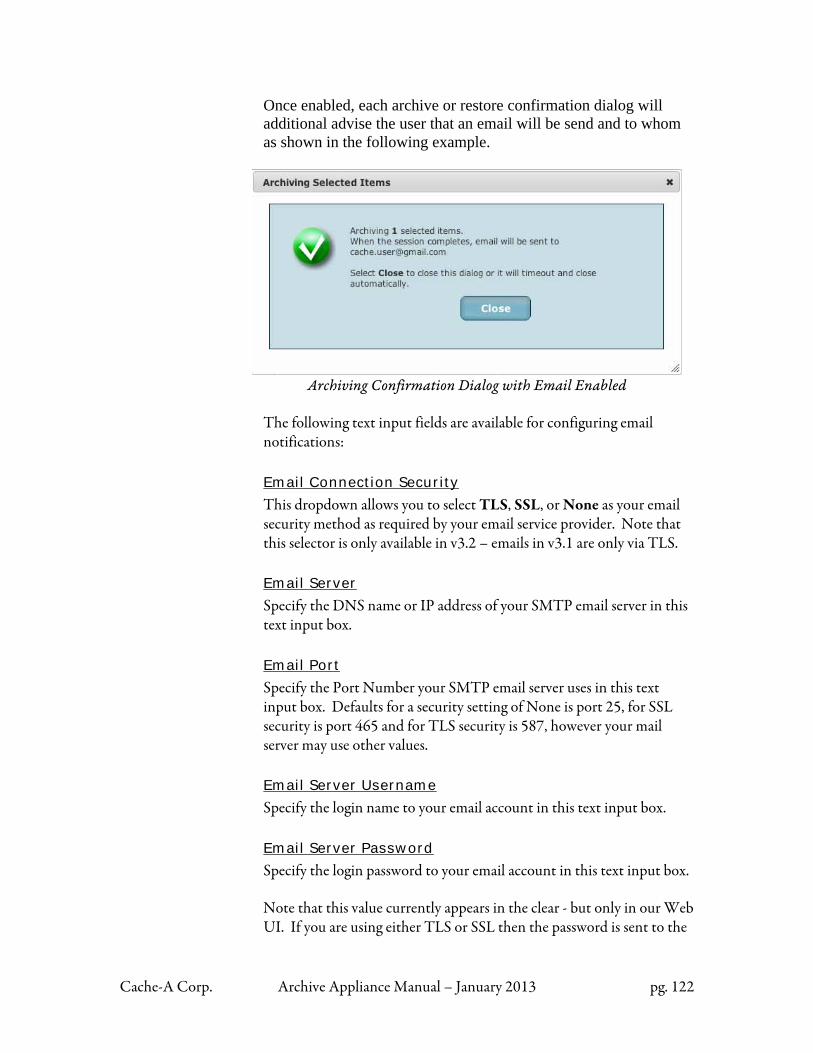
Cache-A Corp. Archive Appliance Manual – January 2013 pg. 122
Once enabled, each archive or restore confirmation dialog will additional advise the user that an email will be send and to whom as shown in the following example.
Archiving Confirmation Dialog with Email Enabled
The following text input fields are available for configuring email notifications: Email Connection Security
This dropdown allows you to select TLS, SSL, or None as your email security method as required by your email service provider. Note that this selector is only available in v3.2 – emails in v3.1 are only via TLS. Email Server
Specify the DNS name or IP address of your SMTP email server in this text input box. Email Port
Specify the Port Number your SMTP email server uses in this text input box. Defaults for a security setting of None is port 25, for SSL security is port 465 and for TLS security is 587, however your mail server may use other values. Email Server Username
Specify the login name to your email account in this text input box.
Email Server Password
Specify the login password to your email account in this text input box. Note that this value currently appears in the clear - but only in our Web UI. If you are using either TLS or SSL then the password is sent to the
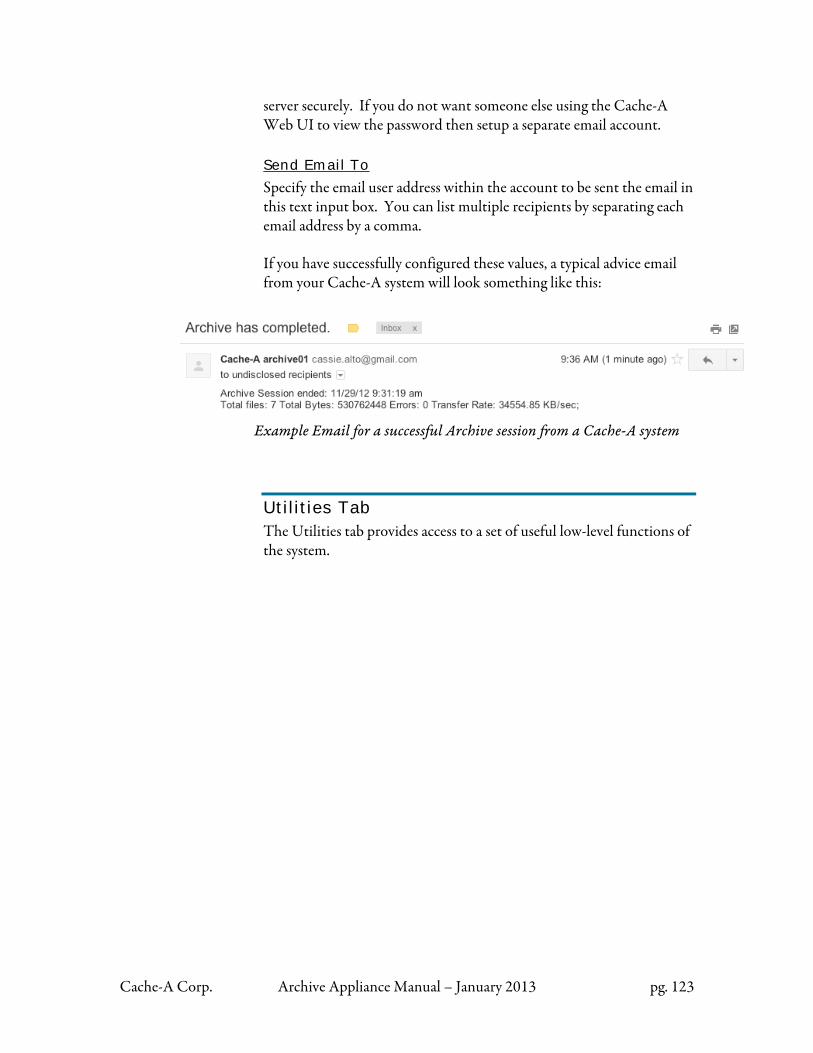
Cache-A Corp. Archive Appliance Manual – January 2013 pg. 123
server securely. If you do not want someone else using the Cache-A Web UI to view the password then setup a separate email account. Send Email To
Specify the email user address within the account to be sent the email in this text input box. You can list multiple recipients by separating each email address by a comma. If you have successfully configured these values, a typical advice email from your Cache-A system will look something like this:
Example Email for a successful Archive session from a Cache-A system
Utilities Tab The Utilities tab provides access to a set of useful low-level functions of the system.
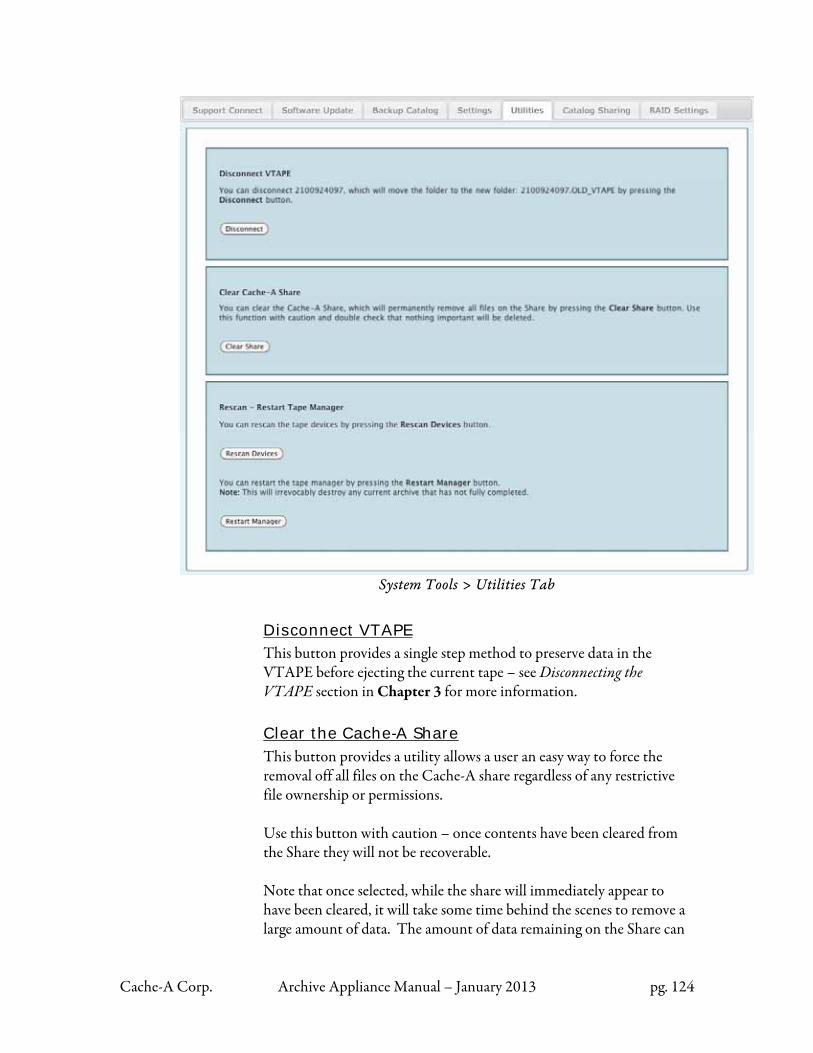
Cache-A Corp. Archive Appliance Manual – January 2013 pg. 124
System Tools > Utilities Tab
Disconnect VTAPE This button provides a single step method to preserve data in the VTAPE before ejecting the current tape – see Disconnecting the VTAPE section in Chapter 3 for more information. Clear the Cache-A Share
This button provides a utility allows a user an easy way to force the removal off all files on the Cache-A share regardless of any restrictive file ownership or permissions. Use this button with caution – once contents have been cleared from the Share they will not be recoverable. Note that once selected, while the share will immediately appear to have been cleared, it will take some time behind the scenes to remove a large amount of data. The amount of data remaining on the Share can
Cache-A Corp. Archive Appliance Manual – January 2013 pg. 125
be viewed by going to the System Status page – you will have to refresh to see the latest status if you are sitting on that page. Rescan Devices
If your system has additional tape drives connected and they are not appearing in the web UI drive selector dropdown menu, they were not seen by the system at boot time. This button can be used to correct such situations. Before selecting Rescan Devices, ensure that all cables are correctly routed, securely plugged in, all devices are powered up, and in the case of Libraries, that they have completed their internal scan and advise Drive Ready on their front panel. Restart Tape Manager
This button provides a utility for restarting the management software that controls all tape drive operations. This button should be used only when the system has been verified to be in a “hung” or non-responsive state. Follow all normal procedures to assure that your system isn’t really still busy doing valid tasks before resorting to this function.
As stated in the screen informational text, do not select the Restart Tape Manager button unless so instructed – interrupting the tape manager indiscriminately can result in loss of data and/or corruption of the system catalog.
Catalog Sharing Tab The Catalog Sharing tab provides access to facilities for sharing the contents of the Catalogs of two or more systems on a local area network.
Warning
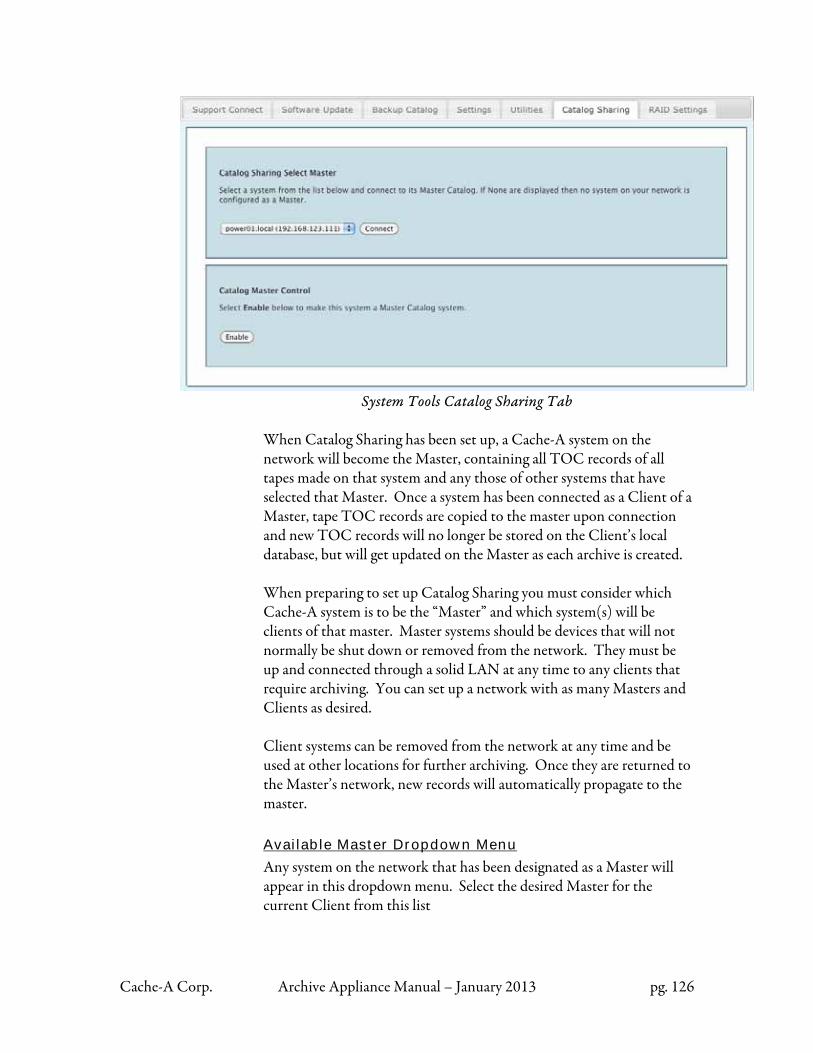
Cache-A Corp. Archive Appliance Manual – January 2013 pg. 126
System Tools Catalog Sharing Tab
When Catalog Sharing has been set up, a Cache-A system on the network will become the Master, containing all TOC records of all tapes made on that system and any those of other systems that have selected that Master. Once a system has been connected as a Client of a Master, tape TOC records are copied to the master upon connection and new TOC records will no longer be stored on the Client’s local database, but will get updated on the Master as each archive is created. When preparing to set up Catalog Sharing you must consider which Cache-A system is to be the “Master” and which system(s) will be clients of that master. Master systems should be devices that will not normally be shut down or removed from the network. They must be up and connected through a solid LAN at any time to any clients that require archiving. You can set up a network with as many Masters and Clients as desired. Client systems can be removed from the network at any time and be used at other locations for further archiving. Once they are returned to the Master’s network, new records will automatically propagate to the master. Available Master Dropdown Menu
Any system on the network that has been designated as a Master will appear in this dropdown menu. Select the desired Master for the current Client from this list
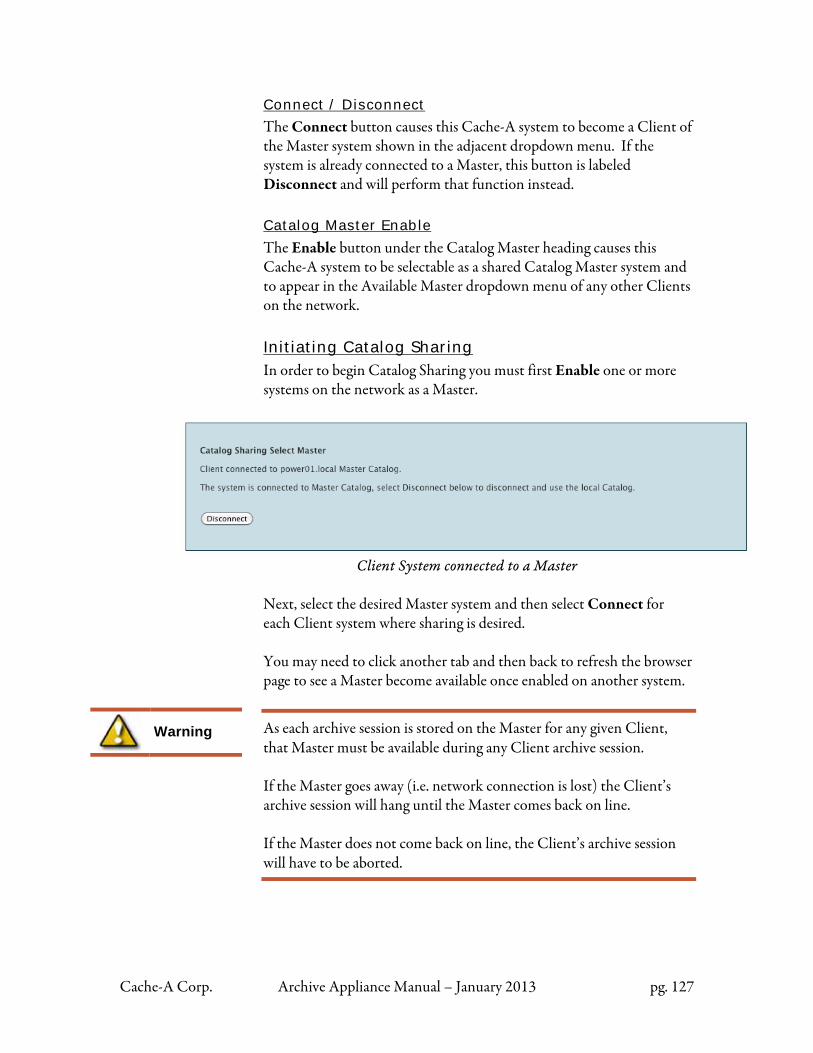
Cache-A Corp. Archive Appliance Manual – January 2013 pg. 127
Connect / Disconnect
The Connect button causes this Cache-A system to become a Client of the Master system shown in the adjacent dropdown menu. If the system is already connected to a Master, this button is labeled Disconnect and will perform that function instead. Catalog Master Enable
The Enable button under the Catalog Master heading causes this Cache-A system to be selectable as a shared Catalog Master system and to appear in the Available Master dropdown menu of any other Clients on the network. Initiating Catalog Sharing
In order to begin Catalog Sharing you must first Enable one or more systems on the network as a Master.
Client System connected to a Master
Next, select the desired Master system and then select Connect for each Client system where sharing is desired. You may need to click another tab and then back to refresh the browser page to see a Master become available once enabled on another system.
As each archive session is stored on the Master for any given Client, that Master must be available during any Client archive session. If the Master goes away (i.e. network connection is lost) the Client’s archive session will hang until the Master comes back on line. If the Master does not come back on line, the Client’s archive session will have to be aborted.
Warning
Cache-A Corp. Archive Appliance Manual – January 2013 pg. 128
Taking a Client Off-line When a client is to be removed from the network and taken somewhere else, the proper process is for the user to select Disconnect from the Master first and then relocate the unit and use as desired. Upon returning the unit to the LAN with the Master, the Client should be reconnected using this page’s Connect button. Upon reconnecting, all new records or updates will be propagated to the Master. If the user does not follow this series of steps, the client will not propagate any new records until a disconnect and then reconnect occurs. (NOTE: this is due to the Client not being able to distinguish between a Master disappearing and moving to another network). Using Catalog Sharing for Periodic Syncing
Because archiving on a client in a shared catalog environment has the risks noted in the warning above, some users elect to deploy catalog sharing only on a periodic basis, connecting allowing the Master to learn the new tapes on the Client’s catalog, and then disconnecting. Doing this allows the Master to be updated but still leaves the Client as an independent archiving system most of the time. It is also possible to do two-way syncing using this technique so that 2 (or more) systems all contain Catalogs with all tapes. To achieve this, simply set one system to be a Master, and connect the second to be its Client and allow the Catalog to update. Then disconnect and reverse the relationship, making the second system the Master and connecting the first as a Client.
RAID Settings Tab The RAID Settings tab only applies to Pro-Cache and Power-Cache systems and is described in detail in the Appendix C: RAID Management.
Cache-A Corp. Archive Appliance Manual – January 2013 pg. 129
Chapter 5: Cache-A LTFS
Cache-A archive appliance operations for making LTFS tapes are described throughout this manual. This chapter collects many of those descriptions and includes overall guidelines and warnings when working with LTFS that may not be covered elsewhere in this manual. This chapter assumes that your system is set up and connected to a network appropriately and that you are familiar with normal Cache-A operations. Note that LTFS will only work with LTO-5 and LTO-6 tapes in LTO-5 and LTO-6 drives (and subsequent generations when available). The choice to use LTFS or standard Cache-A format can be made on a tape-by-tape basis by the user upon initial tape format or erasure. The main reason we suggest the use of LTFS is for content interchange. If you know you will be sharing a tape with someone who does not have a Cache-A, this is a good choice. Note that LTFS formatted tapes take longer to mount, format and unmount upon eject. Note further that LTFS sets aside a portion of the tape for the index partition and another for the partition guard band and thus has less space available than a tar tape. We recommend you use tar format (Cache-A) for content that will remain on your shelves and that will be read back within your facility. This is because they are written with the venerable “tar” program that has millions of users over decades on many operating systems and is very well understood, tested and stable. Cache-A formatted tapes are also faster at formatting, mounting and ejecting, and use tape more efficiently. Note that Cache-A tapes are also interchangeable with most LTO environments, but generally must be fully restored at non-Cache-A destinations and the table of contents can only be viewed on Cache-A systems.
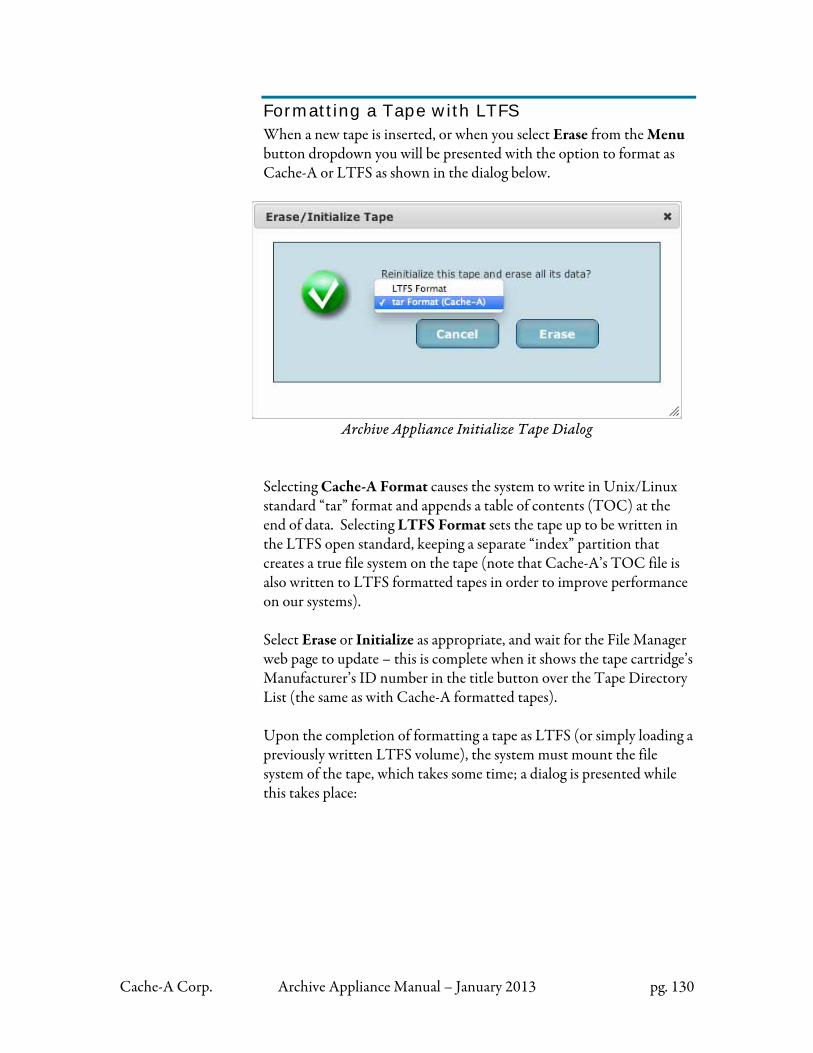
Cache-A Corp. Archive Appliance Manual – January 2013 pg. 130
Formatting a Tape with LTFS When a new tape is inserted, or when you select Erase from the Menu button dropdown you will be presented with the option to format as Cache-A or LTFS as shown in the dialog below.
Archive Appliance Initialize Tape Dialog
Selecting Cache-A Format causes the system to write in Unix/Linux standard “tar” format and appends a table of contents (TOC) at the end of data. Selecting LTFS Format sets the tape up to be written in the LTFS open standard, keeping a separate “index” partition that creates a true file system on the tape (note that Cache-A’s TOC file is also written to LTFS formatted tapes in order to improve performance on our systems). Select Erase or Initialize as appropriate, and wait for the File Manager web page to update – this is complete when it shows the tape cartridge’s Manufacturer’s ID number in the title button over the Tape Directory List (the same as with Cache-A formatted tapes). Upon the completion of formatting a tape as LTFS (or simply loading a previously written LTFS volume), the system must mount the file system of the tape, which takes some time; a dialog is presented while this takes place:
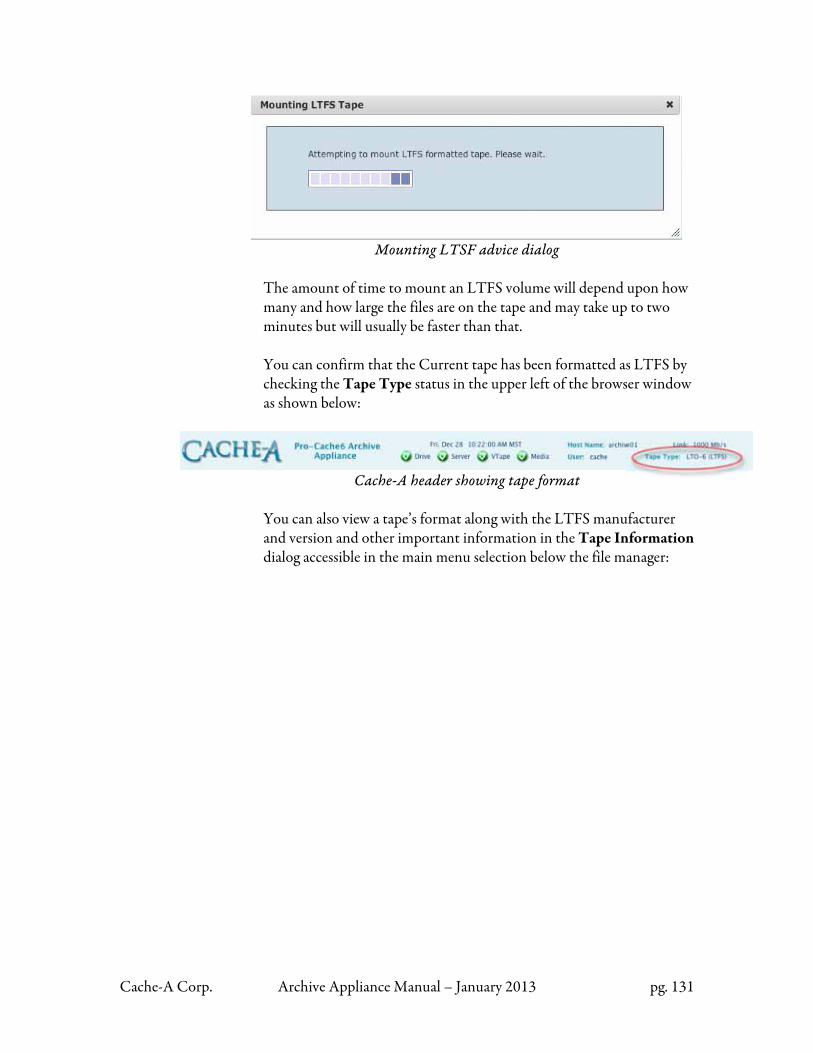
Cache-A Corp. Archive Appliance Manual – January 2013 pg. 131
Mounting LTSF advice dialog
The amount of time to mount an LTFS volume will depend upon how many and how large the files are on the tape and may take up to two minutes but will usually be faster than that. You can confirm that the Current tape has been formatted as LTFS by checking the Tape Type status in the upper left of the browser window as shown below:
Cache-A header showing tape format
You can also view a tape’s format along with the LTFS manufacturer and version and other important information in the Tape Information dialog accessible in the main menu selection below the file manager:
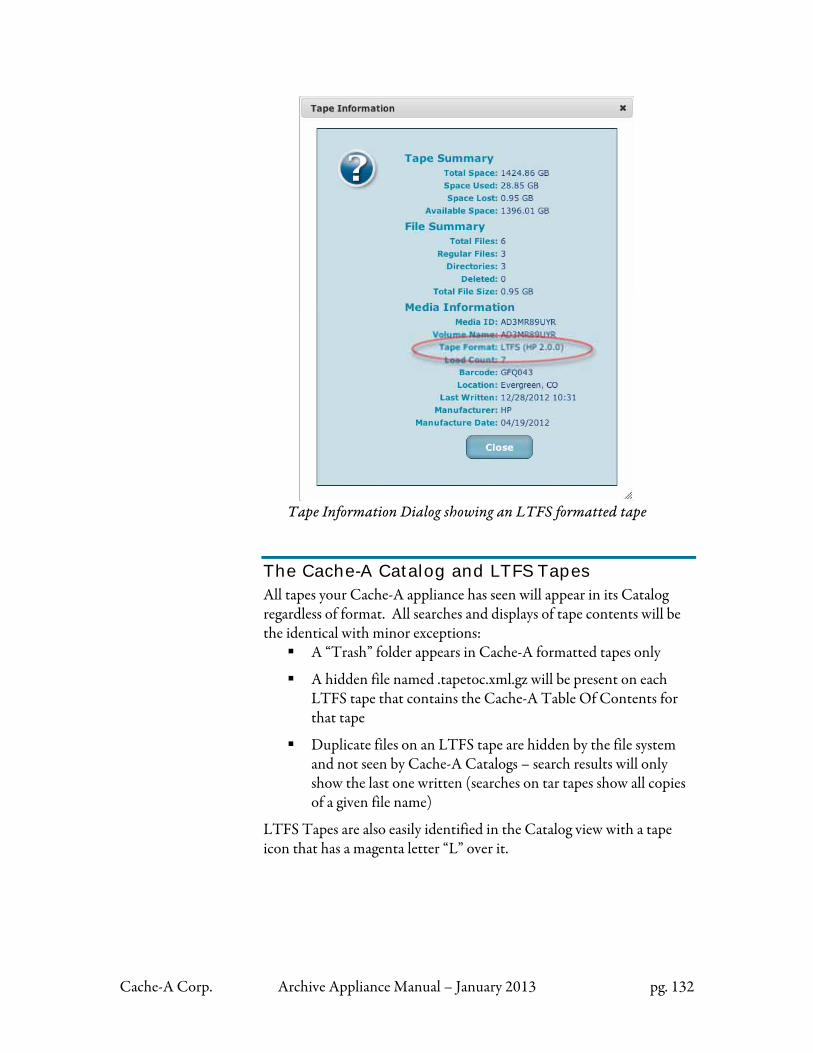
Cache-A Corp. Archive Appliance Manual – January 2013 pg. 132
Tape Information Dialog showing an LTFS formatted tape
The Cache-A Catalog and LTFS Tapes All tapes your Cache-A appliance has seen will appear in its Catalog regardless of format. All searches and displays of tape contents will be the identical with minor exceptions:
A “Trash” folder appears in Cache-A formatted tapes only
A hidden file named .tapetoc.xml.gz will be present on each LTFS tape that contains the Cache-A Table Of Contents for that tape
Duplicate files on an LTFS tape are hidden by the file system and not seen by Cache-A Catalogs – search results will only show the last one written (searches on tar tapes show all copies of a given file name)
LTFS Tapes are also easily identified in the Catalog view with a tape icon that has a magenta letter “L” over it.
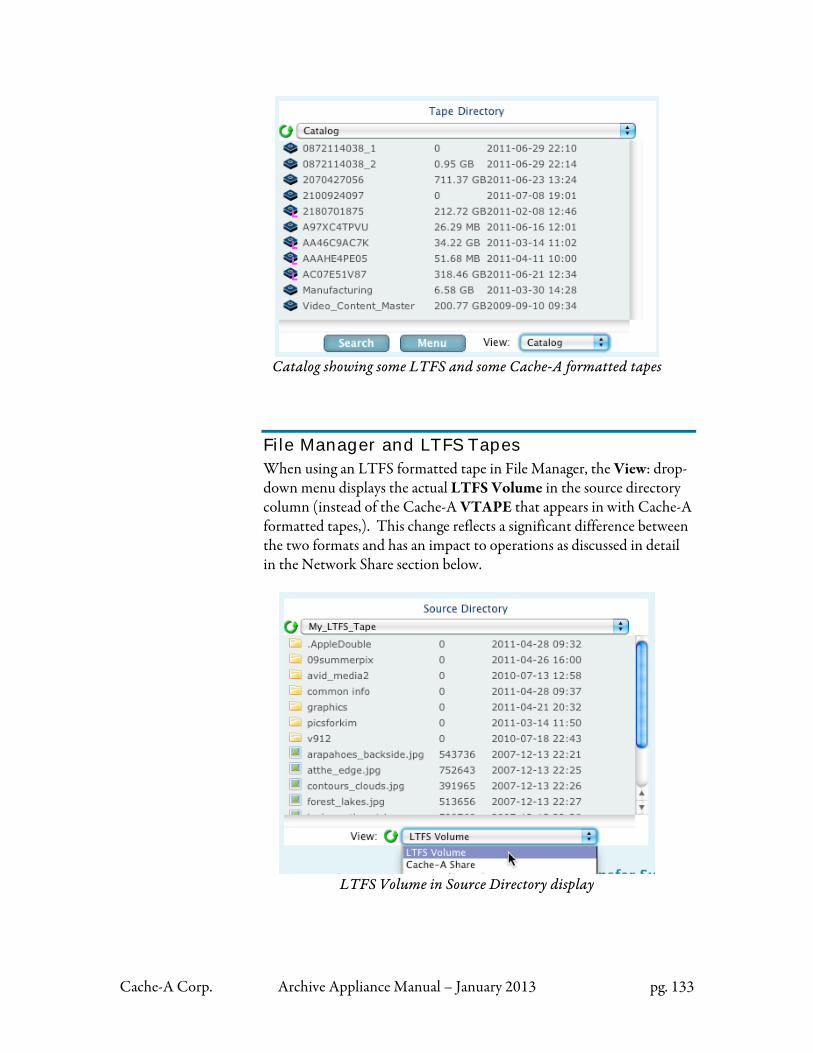
Cache-A Corp. Archive Appliance Manual – January 2013 pg. 133
Catalog showing some LTFS and some Cache-A formatted tapes
File Manager and LTFS Tapes When using an LTFS formatted tape in File Manager, the View: drop-down menu displays the actual LTFS Volume in the source directory column (instead of the Cache-A VTAPE that appears in with Cache-A formatted tapes,). This change reflects a significant difference between the two formats and has an impact to operations as discussed in detail in the Network Share section below.
LTFS Volume in Source Directory display
Cache-A Corp. Archive Appliance Manual – January 2013 pg. 134
LTFS File System Checking As LTFS tapes get more content added to them in a series of archiving sessions, they build up a history of what got added and where everything is on tape (in a similar manner to what happens with hard disk drives). As with hard disk drives, the contents of the tape and the index that keeps track of it can develop errors. For this reason, LTFS includes an automatic “File System ChecK” or “fsck” function – or in this case, referred to as LTFSCK. Occasionally the LTFS software will determine that a file system check is needed and this will cause the loading of that tape to take longer. At such times, you will be prompted to execute this check or eject the tape:
LTFSCK needed for the current tape
Note that depending upon the number of files on the tape, the fsck process can take considerable time (up to ½ hr). You will see the following dialog while this occurs:
LTFS File System Check in progress
Cache-A TOC Errors on LTFS tapes
In the event of some kinds of LTFS errors, it is possible for the Cache-A TOC and thus the Catalog to not match the LTFS file system. If this happens, you will need to remove the Cache-A TOC file from the tape – this will cause the system to rebuild the TOC file and correct any such errors.
Cache-A Corp. Archive Appliance Manual – January 2013 pg. 135
To make this repair, use a client that can see hidden files (those that start with a period) or a terminal session. Remove the “.tapetoc.xml.gz” file from the LTFS Volume, eject, delete the entry from the Catalog, and reinsert the tape – the TOC will be rebuilt. See the section on The “rm” Command in the Cache-A Tech Brief Command Line Access to Cache-A Appliances for more information about how to remove this file from a terminal session.
LTFS Archiving with Cache-A Appliances
As with standard Cache-A formatted tapes, the same methods to archive content are available. These various methods are based on accessing user data from one of the following sources:
Via the network shared volume offered by the appliance where you drop content and allow it to be automatically backed up (covered below – for more detail see the Network Share Guidelines section).
Via a client shared volume where the appliance mounts a folder on one or more of the computers on your network (see the Mount Manager section for more information).
Via a direct mounted volume that is physically connected to the appliance’s USB, SATA, SAS, or ExpressCard slot (see the Direct Mount section for more information).
Using LTFS with Client Shared or Direct Mounted Volumes When archiving via the client shared volume or the direct mounted volume method, operations are identical regardless of the tape format. Since Client Shared and Direct Mounted operations work the same regardless of tape format, we recommend using these methods when working with LTFS tapes.
Using LTFS with the Cache-A Network Shared Volume When archiving via the network shared volume method, operations are significantly different because of the fact that the Cache-A share point contains the actual LTFS file system in place of the VTAPE folder.
Cache-A Corp. Archive Appliance Manual – January 2013 pg. 136
Regardless of how the tape is formatted, the folder that represents the tape will appear in the Cache-A share with the name of the current tape. However, this folder has a significantly different operation and underlying model depending upon format.
While a VTAPE folder will only contain those items you placed in it, and those items may not even be on the current tape (depending on what Eject and Keep options you selected), the LTFS Volume folder will always show exactly what is on the current tape only. This is because the LTFS Volume is in fact the file system on the tape. Accessing this folder is exactly like accessing another share disk drive except:
Dropping files directly on the LTFS Volume can be a lot faster than archiving via the VTAPE as data does not go through the appliance’s internal disk, but rather from the client workstation’s source drive directly onto tape
Having the LTFS Volume open on your client workstation can cause problems for several reasons:
• On Macintosh systems as clients often write small hidden files that can initiate undesired time-consuming archive sessions
• The LTFS Volume can be a lot slower when displaying the contents of the directory if you are in a graphical view on your client computer (i.e. Icon or Cover Flow view) as the client OS has to make requests to the tape to display this information that will require it to read at least the header of every file in the directory so displayed
• We recommend that you access the LTFS Volume from the Cache-A Share level where it resides to drop items into it but not to open and view it
• We recommend that if you must view the LTFS Volume on your client, you always view in a list-view format
Important
Cache-A Corp. Archive Appliance Manual – January 2013 pg. 137
Dropping content onto the LTFS Volume to archive it works very well. Dragging content out of the LTFS Volume to restore it works well only if you restore single files. The more files you restore, the worse performance is likely to be as your client computer cannot cause them to be restored in the order they reside on tape – thus such restores will cause more and more unnecessary tape shuttling the more files you restore. For this reason we recommend you always restore from LTFS tapes using the Cache-A File Manager facilities.
LTFS does support removing and renaming files from a directory listing, but the file is not actually removed, only the index (directory) is changed - any deleted file remains on tape (note LTFS does not support moving files or directories). These actions can be accomplished when accessing the LTFS Volume in the Cache-A share from Windows Explorer or Mac Finder. Cache-A does not support these remove and rename operations from the File Manager because we consider tapes to be Archival. Any changes of this type should be made to the source file system before committing to tape. If a tape has room, you can always create additional folders and/or archive newer versions/named files to update archives - this way you have both old and new versions available and keep an archive intact.
Consult the Getting Started chapter and the File Manager section of the Browser Interface reference section for operational workflows with LTFS Volumes. Tape Spanning
As of v3.1 and later, Cache-A LTFS does support tape spanning. This can be used in the exact same way as with tar formatted tapes, but does have one difference. With LTFS spanning, files that exceed the remaining capacity of the current tape are not split but rather fully written to the next tape. See the Multiple Volumes section of Chapter 4: Browser Interface Reference for more information about spanning. Tape Duplication
LTFS tape duplication is implemented as of v3.1 as well. This function works identically to tar duplication. See the Dup Tape (a.k.a. Dubbing)
Cache-A Corp. Archive Appliance Manual – January 2013 pg. 138
This may take some time
section of Chapter 6: Pro-Cache & Power-Cache Library Operations for more information.
Known issues with LTFS:
The following items are inherent to using the LTFS format itself and not related to the Cache-A appliance itself.
LTFS Latency Issues There are a number of situations where the behavior of LTFS Volumes is slow and can impact operations, especially on client computers.
Displaying the LTFS Volume within the Cache-A Share in Icon or other graphical views from Mac OS or from Windows Explorer can cause the tape drive to read every file in the directory and take considerable time. You may end up causing Finder or Windows Explorer to be hung until all the files in the selected directory have been read.
Because of this property of the LTFS Volume, we recommend you always view it in your client’s “list” view or simply drop content onto the closed folder. Note that even displaying LTFS Volumes in list views can impose delays, especially with Mac OS clients. These issues can be avoided entirely by always using the Cache-A File Manager web user interface for listing, archiving and restoring and not relying on Finder or Windows Explorer to list the contents of the LTFS Volume. One last latency issue worth noting is that, while you can see the LTFS Volume just like any disk drive, if you open a file on that volume with an application (i.e. opening a Word .doc with MS Word), you will experience seriously annoying delays while the tape drive fetches the file. Further, as soon as you save the file (or worse experience an autosave), the application will be hung while the tape drive goes off to find a new spot on tape to save changes. Furthermore, this can cause the file to become fragmented on tape that will further impact subsequent restore performance for this and potentially other files.
TIP
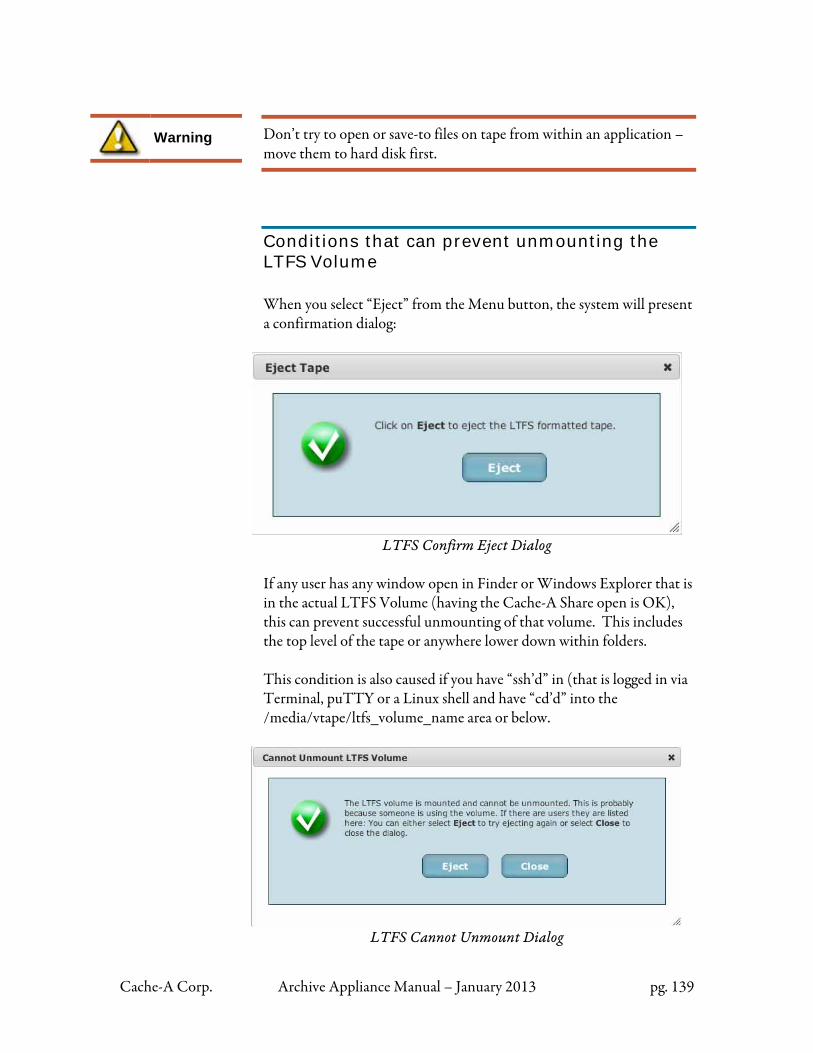
Cache-A Corp. Archive Appliance Manual – January 2013 pg. 139
Warning
Don’t try to open or save-to files on tape from within an application – move them to hard disk first.
Conditions that can prevent unmounting the LTFS Volume When you select “Eject” from the Menu button, the system will present a confirmation dialog:
LTFS Confirm Eject Dialog
If any user has any window open in Finder or Windows Explorer that is in the actual LTFS Volume (having the Cache-A Share open is OK), this can prevent successful unmounting of that volume. This includes the top level of the tape or anywhere lower down within folders. This condition is also caused if you have “ssh’d” in (that is logged in via Terminal, puTTY or a Linux shell and have “cd’d” into the /media/vtape/ltfs_volume_name area or below.
LTFS Cannot Unmount Dialog
Cache-A Corp. Archive Appliance Manual – January 2013 pg. 140
Macintosh issues with the LTFS Volume: Mac OS versions may have issues with what they refer to as “named streams” when dropping folders onto the LTFS Volume and cause the Mac Finder to report an “Error -50” upon dropping content onto the LTFS Volume. If you see this error, you can eliminate it by following the steps in the Apple Knowledge Base report covering this topic:
To disable named streams as a default for all Mac OS X client user accounts on a Mac
Log in to Mac OS X with an admin user account if you aren't already logged in as an admin, then execute these two commands in Terminal:
echo "[default]" | sudo tee -a /etc/nsmb.conf echo "streams=no" | sudo tee -a /etc/nsmb.conf
Note that if it was mounted, you will have to unmount and remount the Cache-A share after applying these terminal commands. For more information about this issue and other options for dealing with it, please refer to the information posted at http://support.apple.com/kb/HT4017 on the Apple web site. This issue can also be avoided by mounting a Macintosh share on the Cache-A appliance with the Mount Manager facility, and using the File Manager in the web user interface for your operations. File Naming Issues
LTFS does not support the use of a colon or forward slash in file names. Do not use these characters in file names to be archived to LTFS formatted tapes. As noted throughout this document, we recommend avoiding all special characters and punctuation in file names except for underscores, dashes and periods.
Important
Cache-A Corp. Archive Appliance Manual – January 2013 pg. 141
Chapter 6: Pro-Cache & Power-Cache Library Operations
In addition to stand-alone operations as described in the preceding chapters, Pro-Cache and Power-Cache models can be used to control an automated tape library and/or additional stand-alone drives. Pro-Cache systems can control up to a total of 2 tape drives selectable from the top of the File Manager page, the one inside the chassis (identified as Main1) and an additional drive in either a Library option (identified as Library1) or in an external drive chassis (identified as Main2). Power-Cache systems can control any combination of up to 4 tape drives, this may include Main 1-4 for external drives and/or Library 1-4 for drives inside a connected Library or any combination thereof. Operations for multiple drives on both Pro- and Power-Cache systems are the same, however the Cache-A share and VTAPE watchfolder does vary depending upon what is installed, as described in the operation section of this chapter.
Installing the Cache-A Library Option
Please refer to the Getting Started Guide and Read-Me-First documentation when installing a Cache-A Library with a Pro-Cache. Please refer to the Installation and Setup Guide when installing a Cache-A Library with a Power-Cache. Important portions of these documents are summarized in the this section for convenience preceding the operations section.
Physical Mounting The Library option must be rack mounted utilizing the provided rack rails within 1 meter of the Pro-Cache using the provided SAS interconnect cable. Remove the Library unit from its packaging and remove and store the shipping lock in slot provided in the back of the library. Please retain
Cache-A Corp. Archive Appliance Manual – January 2013 pg. 142
Warning
the packing materials in case the system ever needs to be shipped for repair.
The shipping lock must be removed for the robotics to work properly. Retain this lock as shown in the guide in case the unit ever needs to be shipped for repair – units returned without this lock in place in the original packing materials may not be covered by our warranty.
NOTE: Do not rest any objects on top of the library chassis. Any weight on the library top panel can cause it to deflect enough to interfere with the robotics movement and cause errors.
Electrical Connections Pro-Cache
Connect the Cache-A option SAS cable from the Pro-Cache SAS connecter in the upper right corner, to the Library SAS or Expansion Chassis SAS connector as shown in the Library Getting Started guide. Connect a Gb Ethernet cable from one of the Ethernet ports on the Pro-Cache to an appropriately configured network. For more information about connecting this system to a network, please refer to the Setting Up a Cache-A Archive Appliance on your Network section in Chapter 2: Getting Started. Power-Cache
Connect the Cache-A 4 lane SAS cable from the Power-Cache SAS connector to the available Library and external drives in the order specified in the Power-Cache Installation and Setup Guide. Connect either a Gb Ethernet RJ-45 cable or a 10 Gb SFP+ cable from the ports on the Power-Cache to an appropriately configured network. Also consult Chapter 2 Setting Up a Cache-A Archive Appliance on your Network for more information. Library
Optionally connect a Gb Ethernet cable to the Library Ethernet port. Note that this connection is not required for Cache-A operations, but
Important
Cache-A Corp. Archive Appliance Manual – January 2013 pg. 143
Important
may be useful to access the library’s internal controls and diagnostics using its Remote Management Interface (RMI) as described in the introduction of the getting started guide. The Library is shipped configured by default to network using a router assigned IP address (DHCP). To find that address or to manually set a different IP address, follow the instructions in section 9 of the getting started guide using the buttons on the front panel or Operator Control Panel (OCP) – there is a text box in the System Tools page > Settings tab for recording this value as a convenience. Power
Connect AC power to both the Library and Cache-A systems. Once all the above connections are completed, power on the Library using the front panel power button. Observe the front panel display and power on the Pro-Cache or Power-Cache after the Library display indicates “Drive RDY.”
Preparing Cache-A Systems for Library Operations
The connected Cache-A system must be authorized in order to work with a Cache-A Library Option. If Cache-A had all your order information before shipping, this may already be completed, but going through the following process will ensure both authorization and that your system is running the latest version of software. Starting Support Connect
To obtain authorization, you must have your system connected as described above, powered up, and connected to a network with Internet access.
Cache-A systems cannot be authorized for Library or additional drive operation without an Internet connection. This connection is only required to enable Cache-A to authorize the Cache-A system to work with a Library and/or more than 1 drive. Once authorized, the Internet is no longer needed.
To obtain authorization follow these steps:
Cache-A Corp. Archive Appliance Manual – January 2013 pg. 144
Invoke a browser on a client computer on the network and access the Cache-A web page and log-in as explained in the Getting Started Guide or the “Getting Started” section of the Users Manual
Determine your system serial number, either from the label on the rear of the unit or by referring to the Versions page of the web interface
Prepare your system for any software updates that may be available by going to the System Tools page, the Support Connect tab will be selected, and click on “Connect to Cache-A Support” radio button and the OK button below.
Contact Cache-A support (contact information is on the Support page of our web site at http://cache-a.com/support.php) and advise us that your system needs authorization.
Many facilities have private networks that do not provide any access to the Internet. If your Cache-A system is to be installed in such a facility, you must set it up at least temporarily in a location that does have Internet for this authorization process. Once this is authorized, this should never be required again.
Loading the Library with Tapes Selecting and Preparing Tape Media
When selecting tapes to load into your library, note the following information:
LTO systems can read and write back 1 generation and read back 2 generations, thus for example, you use LTO-4 and LTO-5 tapes in an LTO-5 Library and read-only LTO-3 tapes.
You can use any mix of compatible tapes in your Library.
Your library will be able to read and write to any appropriate version tape written in any Cache-A system.
You can also read and write to new tapes.
If you insert tapes written with non-Cache-A systems, you will have the option to re-initialize them from the Cache-A web interface but will not be able to use those tapes until you have done so unless
• a) they are written as LTFS volumes - or -
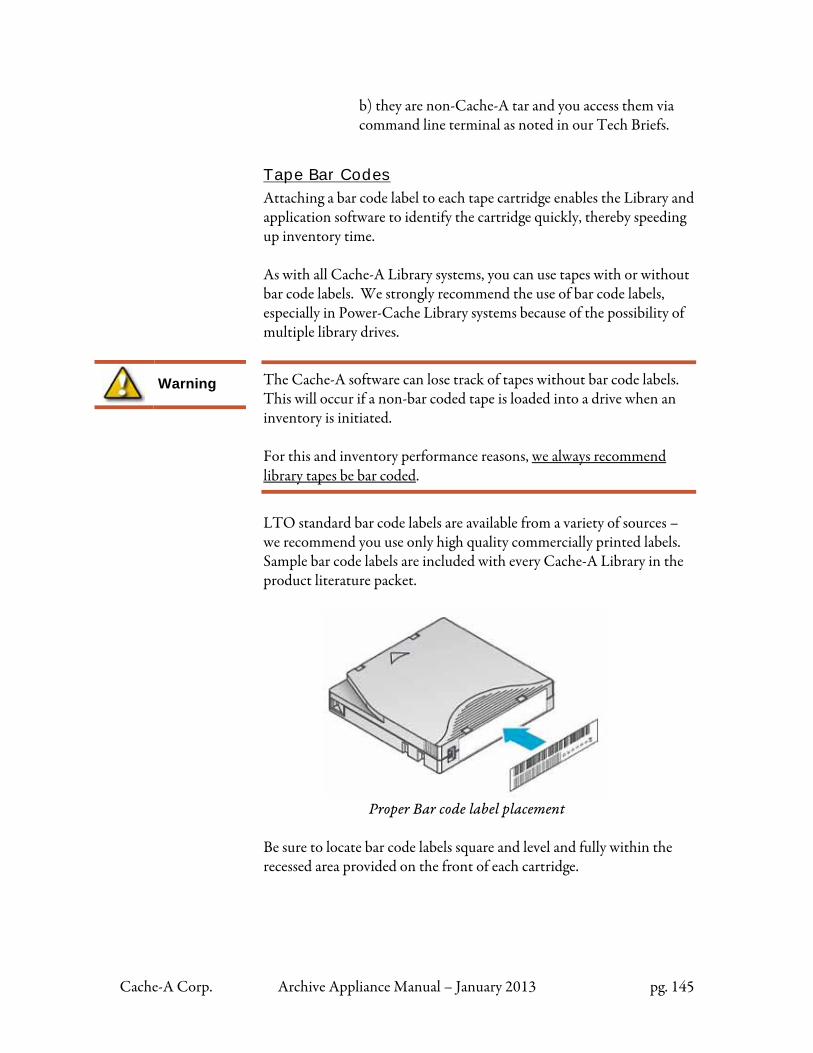
Cache-A Corp. Archive Appliance Manual – January 2013 pg. 145
Warning
• b) they are non-Cache-A tar and you access them via command line terminal as noted in our Tech Briefs.
Tape Bar Codes
Attaching a bar code label to each tape cartridge enables the Library and application software to identify the cartridge quickly, thereby speeding up inventory time. As with all Cache-A Library systems, you can use tapes with or without bar code labels. We strongly recommend the use of bar code labels, especially in Power-Cache Library systems because of the possibility of multiple library drives.
The Cache-A software can lose track of tapes without bar code labels. This will occur if a non-bar coded tape is loaded into a drive when an inventory is initiated. For this and inventory performance reasons, we always recommend library tapes be bar coded.
LTO standard bar code labels are available from a variety of sources – we recommend you use only high quality commercially printed labels. Sample bar code labels are included with every Cache-A Library in the product literature packet.
Proper Bar code label placement
Be sure to locate bar code labels square and level and fully within the recessed area provided on the front of each cartridge.
Cache-A Corp. Archive Appliance Manual – January 2013 pg. 146
Using Library Magazines Tapes may be loaded into the magazines in the Library during any time the robotic tape handling system is not currently moving tapes. Reinserting a magazine into a Library will cause a new inventory to be initiated which can be time consuming, so it is advisable to fill them up whenever possible to minimize downtime. Normal operating procedure is to release the magazines from the Operator Control Panel (OCP) on the front panel of the library. The front panel sequence to release a magazine on a Library24 is as follows:
Select the Left or Right Arrow button until the display reads “Operations”
Select the Enter button
If a password is required use the Arrow and Enter buttons to load the password (default is all zeros – just keep hitting Enter)
Select the Left or Right Arrow button until the display reads “Unlock Left Magazine” or “Unlock Right Magazine” as desired
Select Enter
The front panel sequence to release the magazines from the OCP on a Library48 is as follows:
Select the Left or Right Arrow button until the dropdown “Operations” Menu appears
Select the Down Arrow button until the display reads “Unlock Left Magazines” or “Unlock Right Magazines” as desired
Select the OK button
If a password is required use the Up/Down Arrow keys to increment/decrement each digit and Left/Right Arrow keys to advance to the next digit (default is all ones)
Select the OK button on the last password digit and then again to advance to the “<OK>” at the bottom of the display and select the OK button to accept the password
If you must remove the magazines when the Library is not powered on: 1) insert a straightened paper clip or small pin about 1.5 cm (0.6 inch) into the magazine release hole on the rear of the library unit, while 2) another person pulls out the magazine from that side.
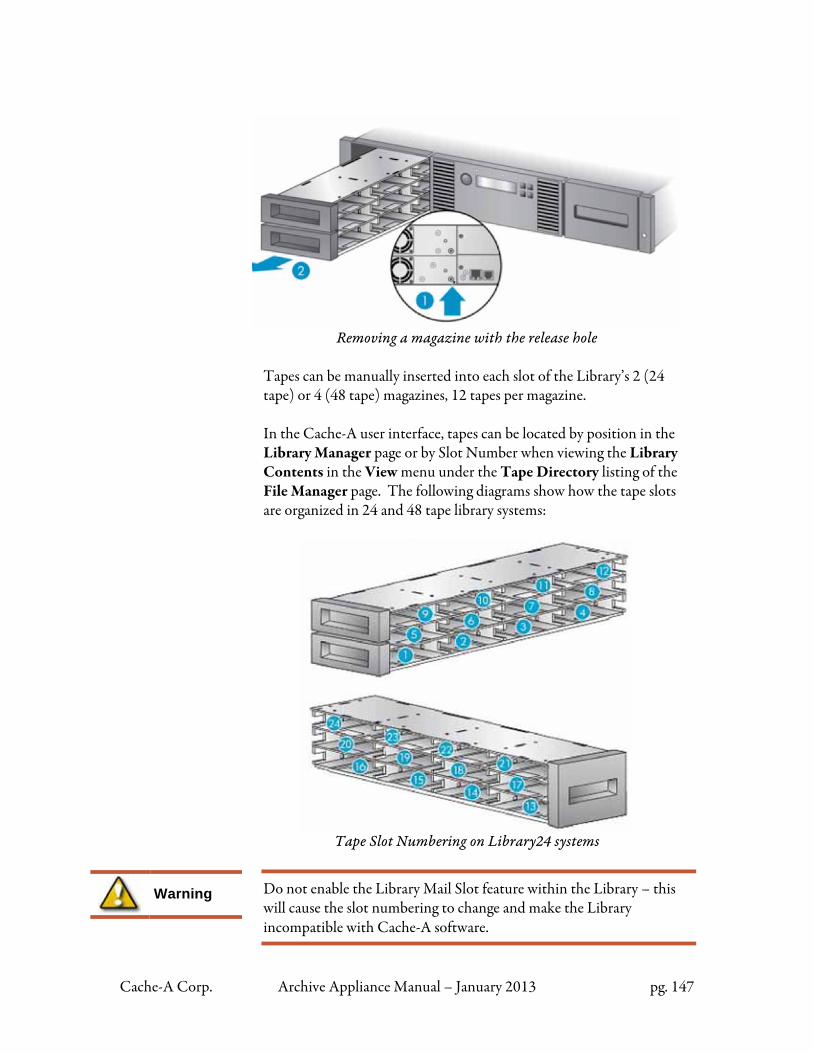
Cache-A Corp. Archive Appliance Manual – January 2013 pg. 147
Removing a magazine with the release hole
Tapes can be manually inserted into each slot of the Library’s 2 (24 tape) or 4 (48 tape) magazines, 12 tapes per magazine. In the Cache-A user interface, tapes can be located by position in the Library Manager page or by Slot Number when viewing the Library Contents in the View menu under the Tape Directory listing of the File Manager page. The following diagrams show how the tape slots are organized in 24 and 48 tape library systems:
Tape Slot Numbering on Library24 systems
Do not enable the Library Mail Slot feature within the Library – this will cause the slot numbering to change and make the Library incompatible with Cache-A software.
Warning
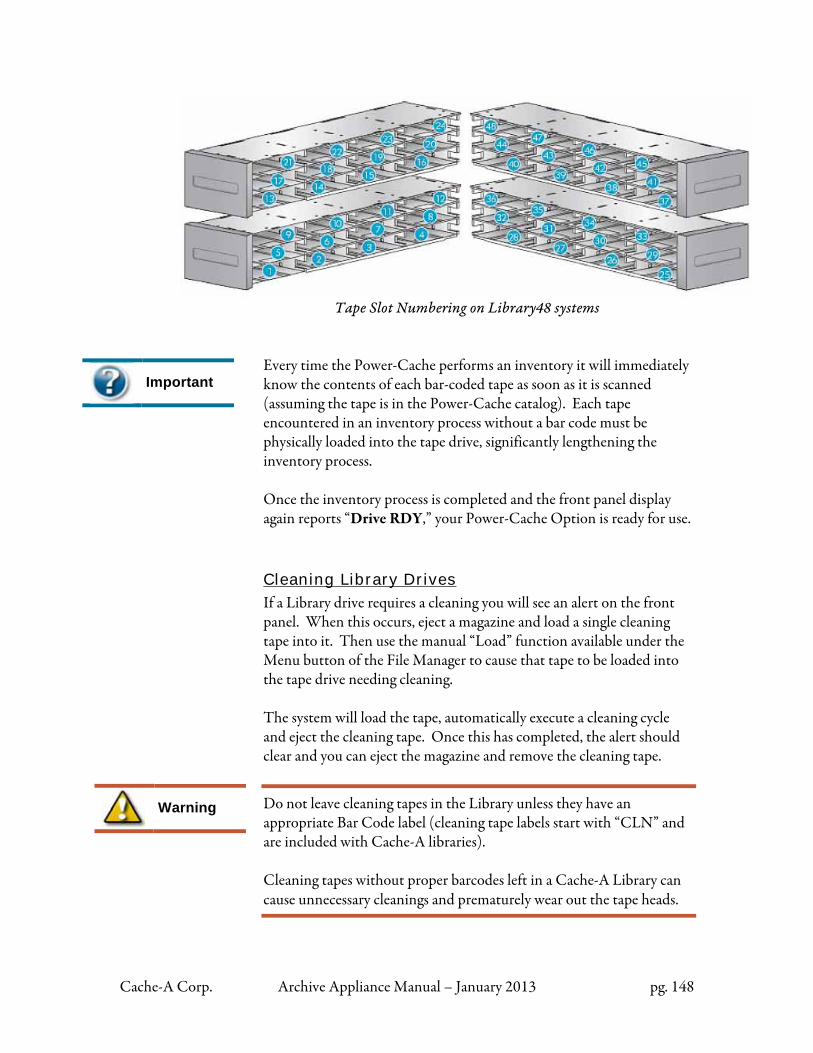
Cache-A Corp. Archive Appliance Manual – January 2013 pg. 148
Important
Warning
Tape Slot Numbering on Library48 systems
Every time the Power-Cache performs an inventory it will immediately know the contents of each bar-coded tape as soon as it is scanned (assuming the tape is in the Power-Cache catalog). Each tape encountered in an inventory process without a bar code must be physically loaded into the tape drive, significantly lengthening the inventory process. Once the inventory process is completed and the front panel display again reports “Drive RDY,” your Power-Cache Option is ready for use. Cleaning Library Drives
If a Library drive requires a cleaning you will see an alert on the front panel. When this occurs, eject a magazine and load a single cleaning tape into it. Then use the manual “Load” function available under the Menu button of the File Manager to cause that tape to be loaded into the tape drive needing cleaning. The system will load the tape, automatically execute a cleaning cycle and eject the cleaning tape. Once this has completed, the alert should clear and you can eject the magazine and remove the cleaning tape.
Do not leave cleaning tapes in the Library unless they have an appropriate Bar Code label (cleaning tape labels start with “CLN” and are included with Cache-A libraries). Cleaning tapes without proper barcodes left in a Cache-A Library can cause unnecessary cleanings and prematurely wear out the tape heads.
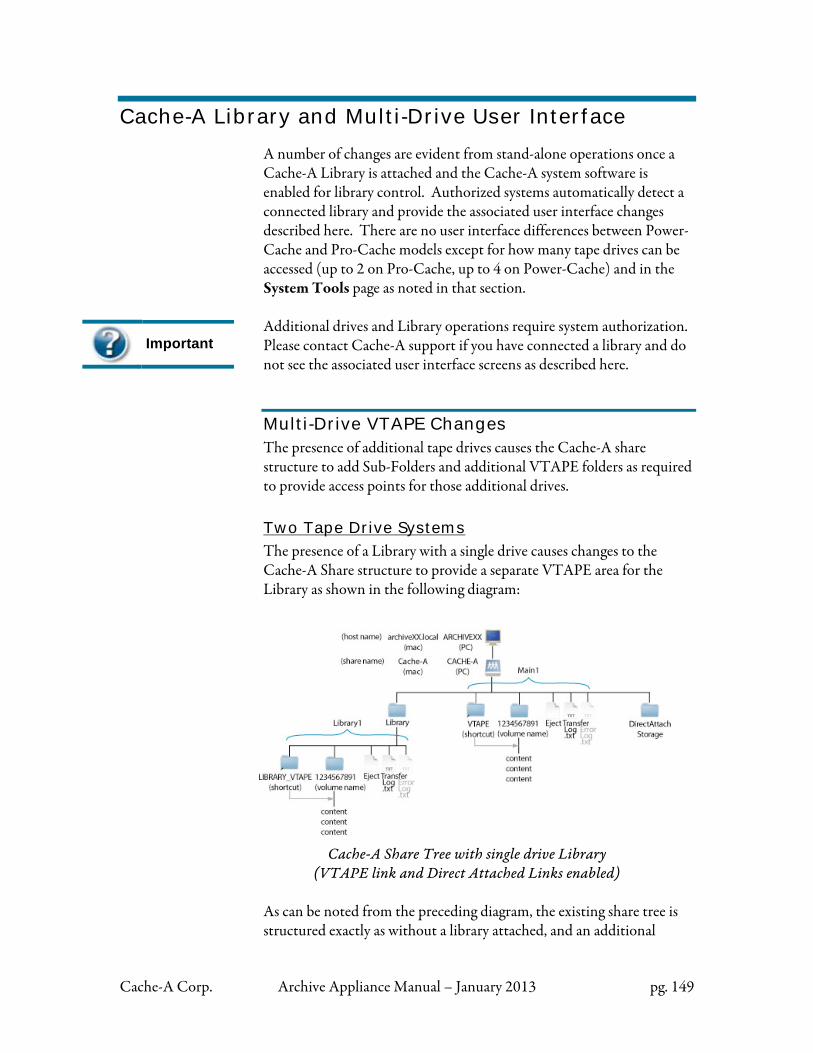
Cache-A Corp. Archive Appliance Manual – January 2013 pg. 149
Important
Cache-A Library and Multi-Drive User Interface
A number of changes are evident from stand-alone operations once a Cache-A Library is attached and the Cache-A system software is enabled for library control. Authorized systems automatically detect a connected library and provide the associated user interface changes described here. There are no user interface differences between Power-Cache and Pro-Cache models except for how many tape drives can be accessed (up to 2 on Pro-Cache, up to 4 on Power-Cache) and in the System Tools page as noted in that section. Additional drives and Library operations require system authorization. Please contact Cache-A support if you have connected a library and do not see the associated user interface screens as described here.
Multi-Drive VTAPE Changes The presence of additional tape drives causes the Cache-A share structure to add Sub-Folders and additional VTAPE folders as required to provide access points for those additional drives. Two Tape Drive Systems
The presence of a Library with a single drive causes changes to the Cache-A Share structure to provide a separate VTAPE area for the Library as shown in the following diagram:
Cache-A Share Tree with single drive Library
(VTAPE link and Direct Attached Links enabled)
As can be noted from the preceding diagram, the existing share tree is structured exactly as without a library attached, and an additional
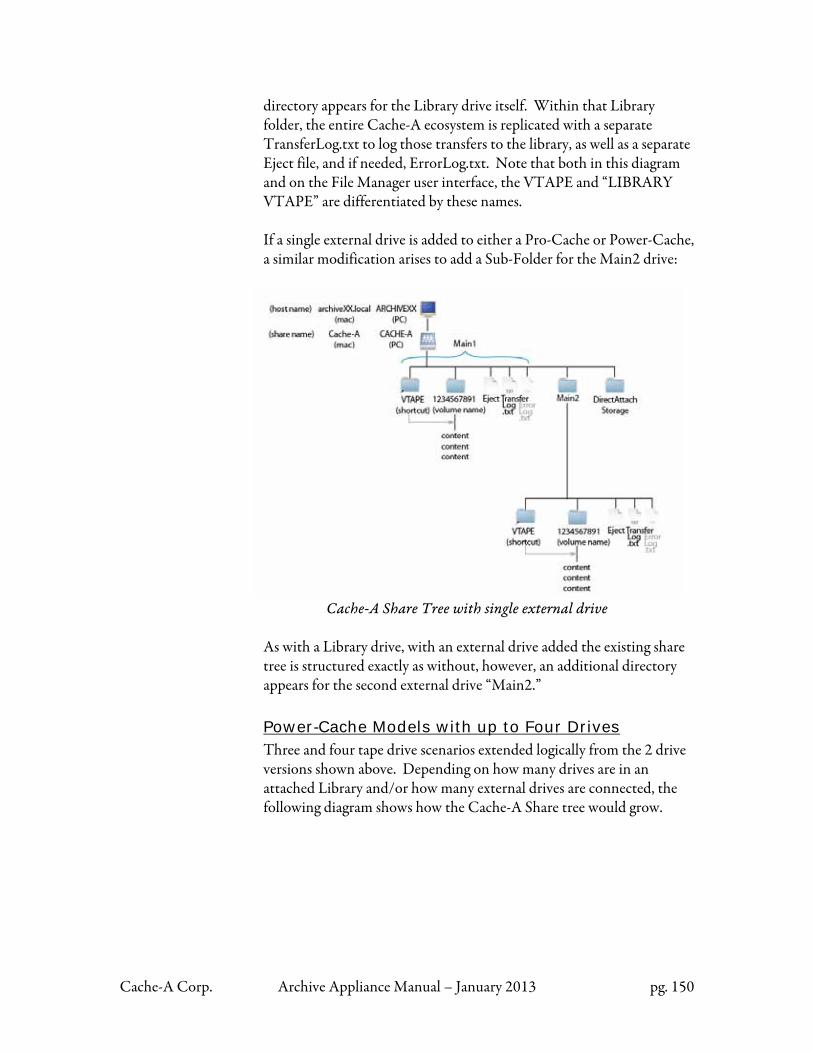
Cache-A Corp. Archive Appliance Manual – January 2013 pg. 150
directory appears for the Library drive itself. Within that Library folder, the entire Cache-A ecosystem is replicated with a separate TransferLog.txt to log those transfers to the library, as well as a separate Eject file, and if needed, ErrorLog.txt. Note that both in this diagram and on the File Manager user interface, the VTAPE and “LIBRARY VTAPE” are differentiated by these names. If a single external drive is added to either a Pro-Cache or Power-Cache, a similar modification arises to add a Sub-Folder for the Main2 drive:
Cache-A Share Tree with single external drive
As with a Library drive, with an external drive added the existing share tree is structured exactly as without, however, an additional directory appears for the second external drive “Main2.” Power-Cache Models with up to Four Drives Three and four tape drive scenarios extended logically from the 2 drive versions shown above. Depending on how many drives are in an attached Library and/or how many external drives are connected, the following diagram shows how the Cache-A Share tree would grow.
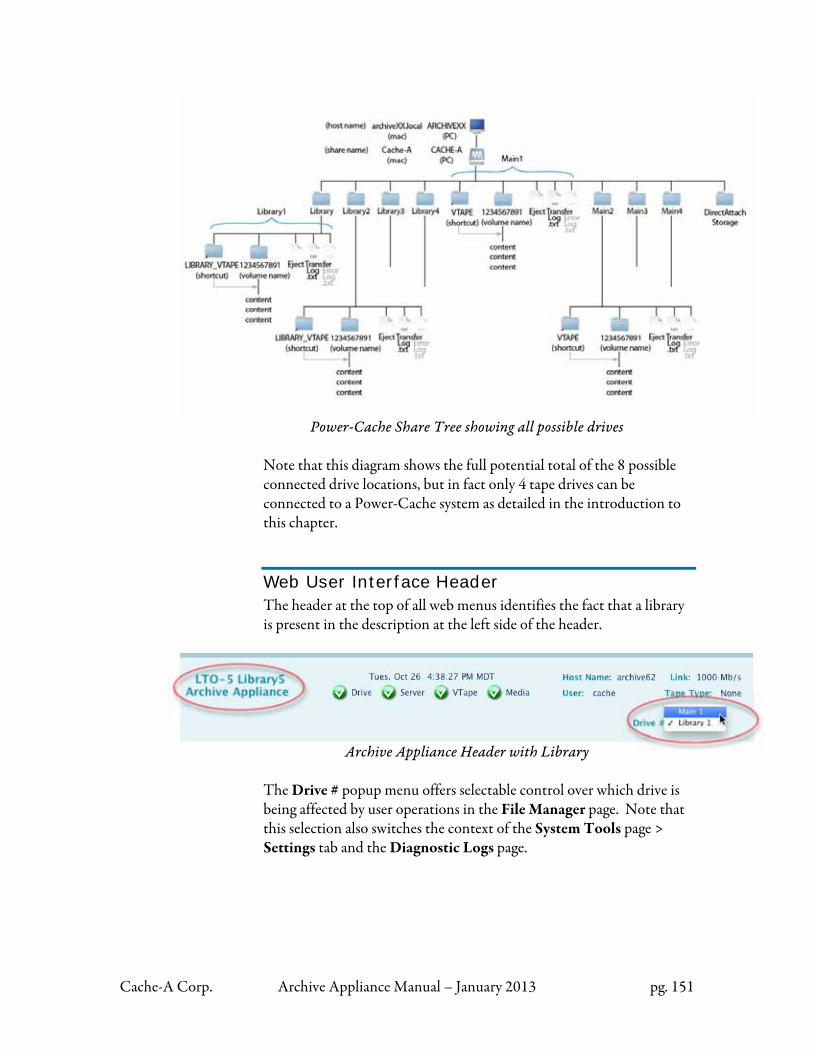
Cache-A Corp. Archive Appliance Manual – January 2013 pg. 151
Power-Cache Share Tree showing all possible drives
Note that this diagram shows the full potential total of the 8 possible connected drive locations, but in fact only 4 tape drives can be connected to a Power-Cache system as detailed in the introduction to this chapter.
Web User Interface Header The header at the top of all web menus identifies the fact that a library is present in the description at the left side of the header.
Archive Appliance Header with Library
The Drive # popup menu offers selectable control over which drive is being affected by user operations in the File Manager page. Note that this selection also switches the context of the System Tools page > Settings tab and the Diagnostic Logs page.
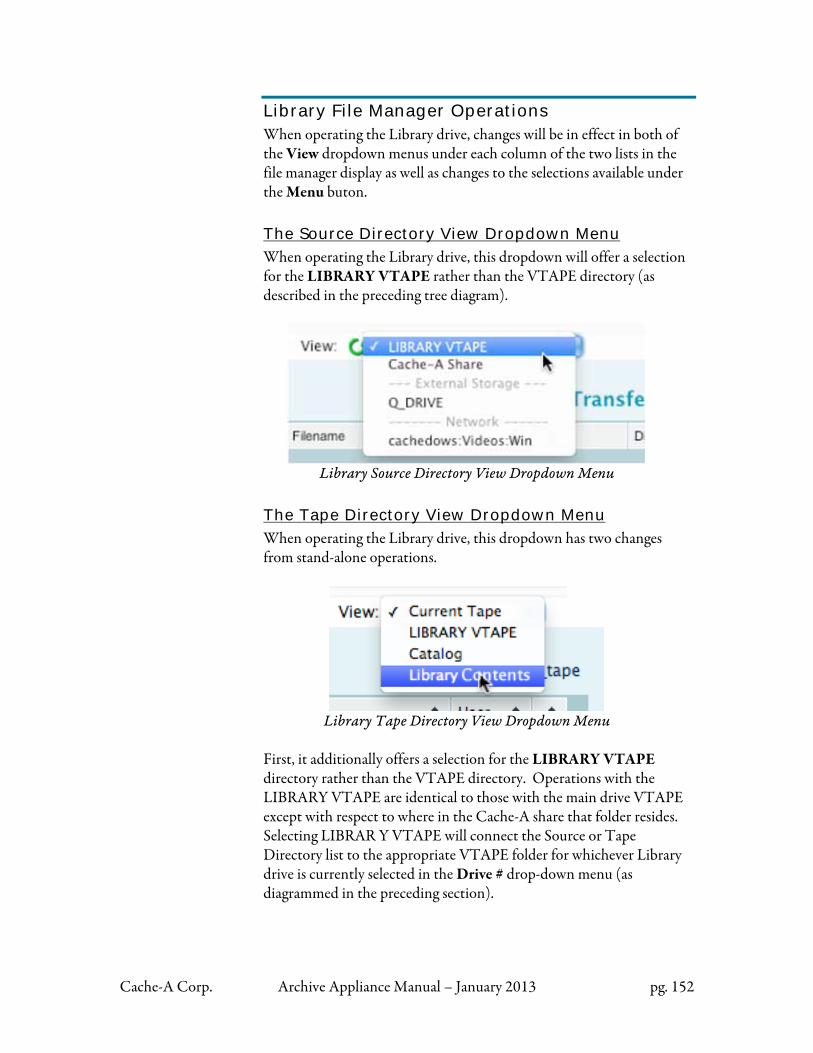
Cache-A Corp. Archive Appliance Manual – January 2013 pg. 152
Library File Manager Operations When operating the Library drive, changes will be in effect in both of the View dropdown menus under each column of the two lists in the file manager display as well as changes to the selections available under the Menu buton. The Source Directory View Dropdown Menu
When operating the Library drive, this dropdown will offer a selection for the LIBRARY VTAPE rather than the VTAPE directory (as described in the preceding tree diagram).
Library Source Directory View Dropdown Menu
The Tape Directory View Dropdown Menu
When operating the Library drive, this dropdown has two changes from stand-alone operations.
Library Tape Directory View Dropdown Menu
First, it additionally offers a selection for the LIBRARY VTAPE directory rather than the VTAPE directory. Operations with the LIBRARY VTAPE are identical to those with the main drive VTAPE except with respect to where in the Cache-A share that folder resides. Selecting LIBRAR Y VTAPE will connect the Source or Tape Directory list to the appropriate VTAPE folder for whichever Library drive is currently selected in the Drive # drop-down menu (as diagrammed in the preceding section).
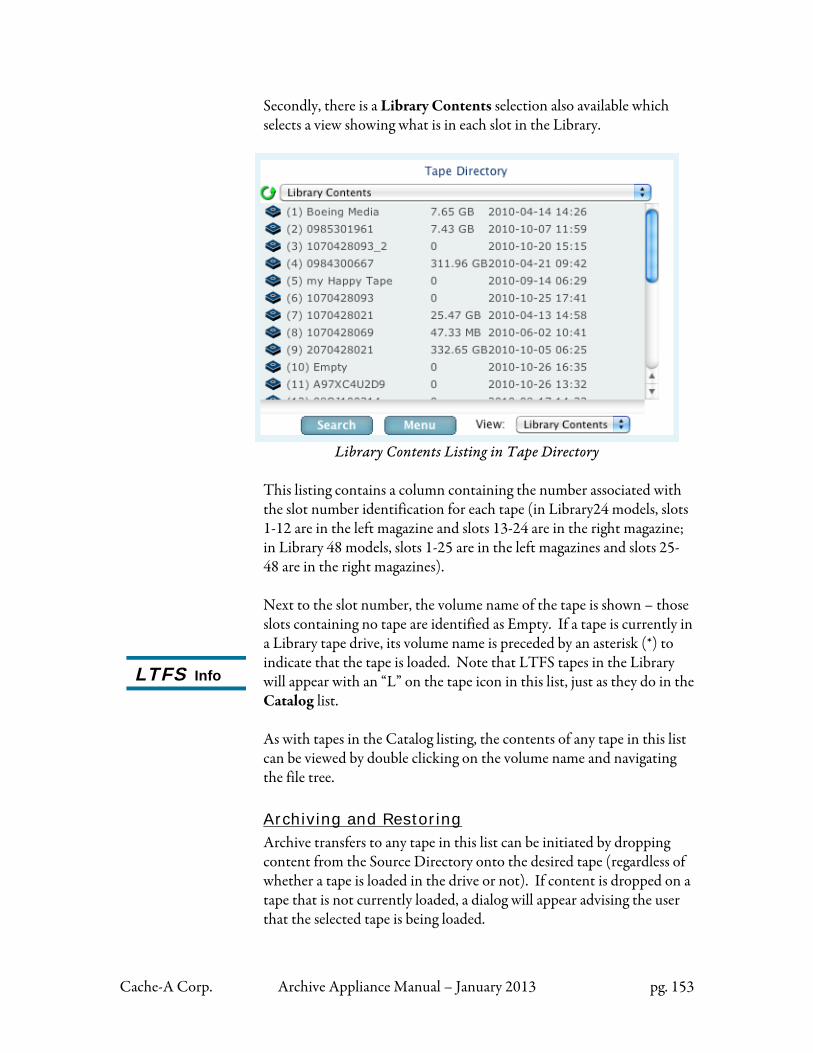
Cache-A Corp. Archive Appliance Manual – January 2013 pg. 153
Secondly, there is a Library Contents selection also available which selects a view showing what is in each slot in the Library.
Library Contents Listing in Tape Directory
This listing contains a column containing the number associated with the slot number identification for each tape (in Library24 models, slots 1-12 are in the left magazine and slots 13-24 are in the right magazine; in Library 48 models, slots 1-25 are in the left magazines and slots 25-48 are in the right magazines). Next to the slot number, the volume name of the tape is shown – those slots containing no tape are identified as Empty. If a tape is currently in a Library tape drive, its volume name is preceded by an asterisk (*) to indicate that the tape is loaded. Note that LTFS tapes in the Library will appear with an “L” on the tape icon in this list, just as they do in the Catalog list. As with tapes in the Catalog listing, the contents of any tape in this list can be viewed by double clicking on the volume name and navigating the file tree. Archiving and Restoring
Archive transfers to any tape in this list can be initiated by dropping content from the Source Directory onto the desired tape (regardless of whether a tape is loaded in the drive or not). If content is dropped on a tape that is not currently loaded, a dialog will appear advising the user that the selected tape is being loaded.
LTFS Info
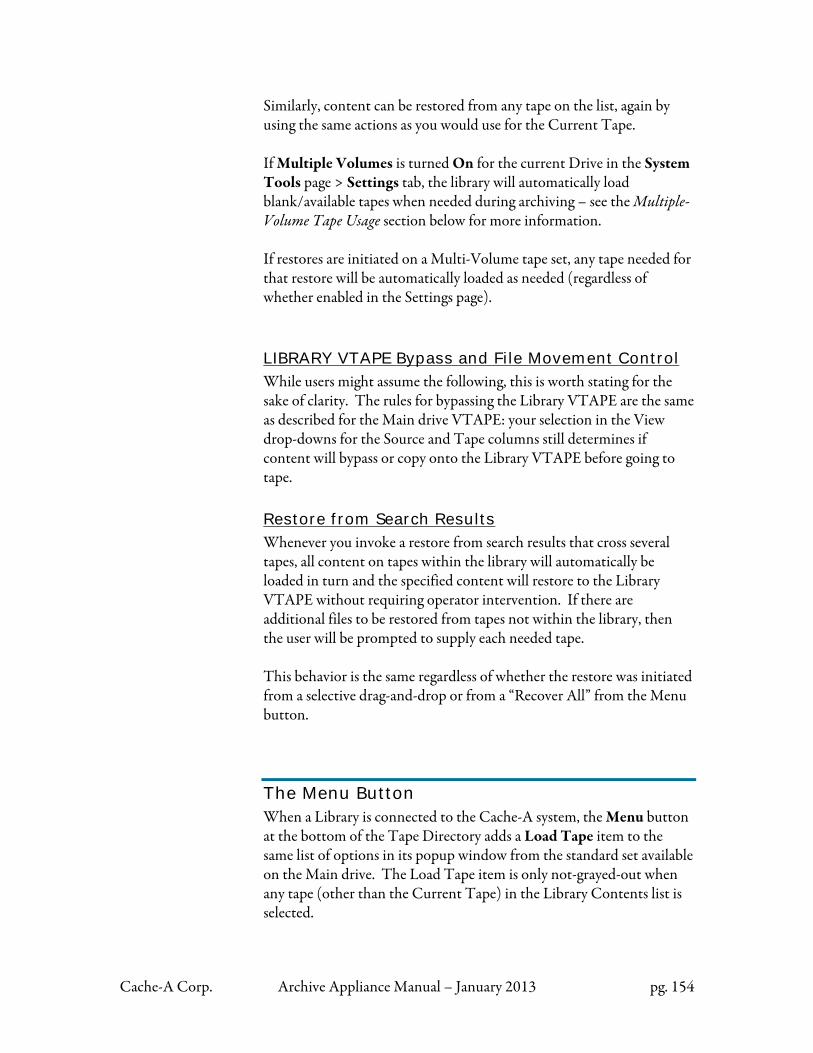
Cache-A Corp. Archive Appliance Manual – January 2013 pg. 154
Similarly, content can be restored from any tape on the list, again by using the same actions as you would use for the Current Tape. If Multiple Volumes is turned On for the current Drive in the System Tools page > Settings tab, the library will automatically load blank/available tapes when needed during archiving – see the Multiple-Volume Tape Usage section below for more information. If restores are initiated on a Multi-Volume tape set, any tape needed for that restore will be automatically loaded as needed (regardless of whether enabled in the Settings page). LIBRARY VTAPE Bypass and File Movement Control
While users might assume the following, this is worth stating for the sake of clarity. The rules for bypassing the Library VTAPE are the same as described for the Main drive VTAPE: your selection in the View drop-downs for the Source and Tape columns still determines if content will bypass or copy onto the Library VTAPE before going to tape. Restore from Search Results
Whenever you invoke a restore from search results that cross several tapes, all content on tapes within the library will automatically be loaded in turn and the specified content will restore to the Library VTAPE without requiring operator intervention. If there are additional files to be restored from tapes not within the library, then the user will be prompted to supply each needed tape. This behavior is the same regardless of whether the restore was initiated from a selective drag-and-drop or from a “Recover All” from the Menu button.
The Menu Button When a Library is connected to the Cache-A system, the Menu button at the bottom of the Tape Directory adds a Load Tape item to the same list of options in its popup window from the standard set available on the Main drive. The Load Tape item is only not-grayed-out when any tape (other than the Current Tape) in the Library Contents list is selected.
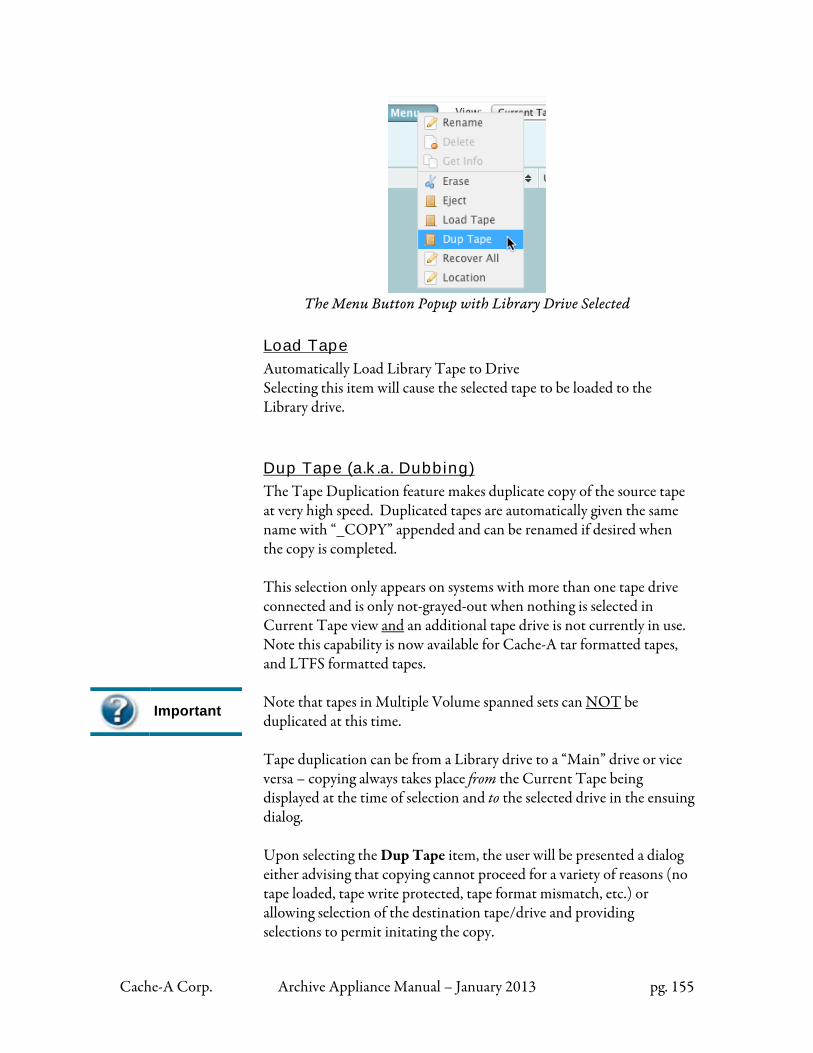
Cache-A Corp. Archive Appliance Manual – January 2013 pg. 155
The Menu Button Popup with Library Drive Selected
Load Tape
Automatically Load Library Tape to Drive Selecting this item will cause the selected tape to be loaded to the Library drive. Dup Tape (a.k.a. Dubbing)
The Tape Duplication feature makes duplicate copy of the source tape at very high speed. Duplicated tapes are automatically given the same name with “_COPY” appended and can be renamed if desired when the copy is completed. This selection only appears on systems with more than one tape drive connected and is only not-grayed-out when nothing is selected in Current Tape view and an additional tape drive is not currently in use. Note this capability is now available for Cache-A tar formatted tapes, and LTFS formatted tapes. Note that tapes in Multiple Volume spanned sets can NOT be duplicated at this time. Tape duplication can be from a Library drive to a “Main” drive or vice versa – copying always takes place from the Current Tape being displayed at the time of selection and to the selected drive in the ensuing dialog. Upon selecting the Dup Tape item, the user will be presented a dialog either advising that copying cannot proceed for a variety of reasons (no tape loaded, tape write protected, tape format mismatch, etc.) or allowing selection of the destination tape/drive and providing selections to permit initating the copy.
Important
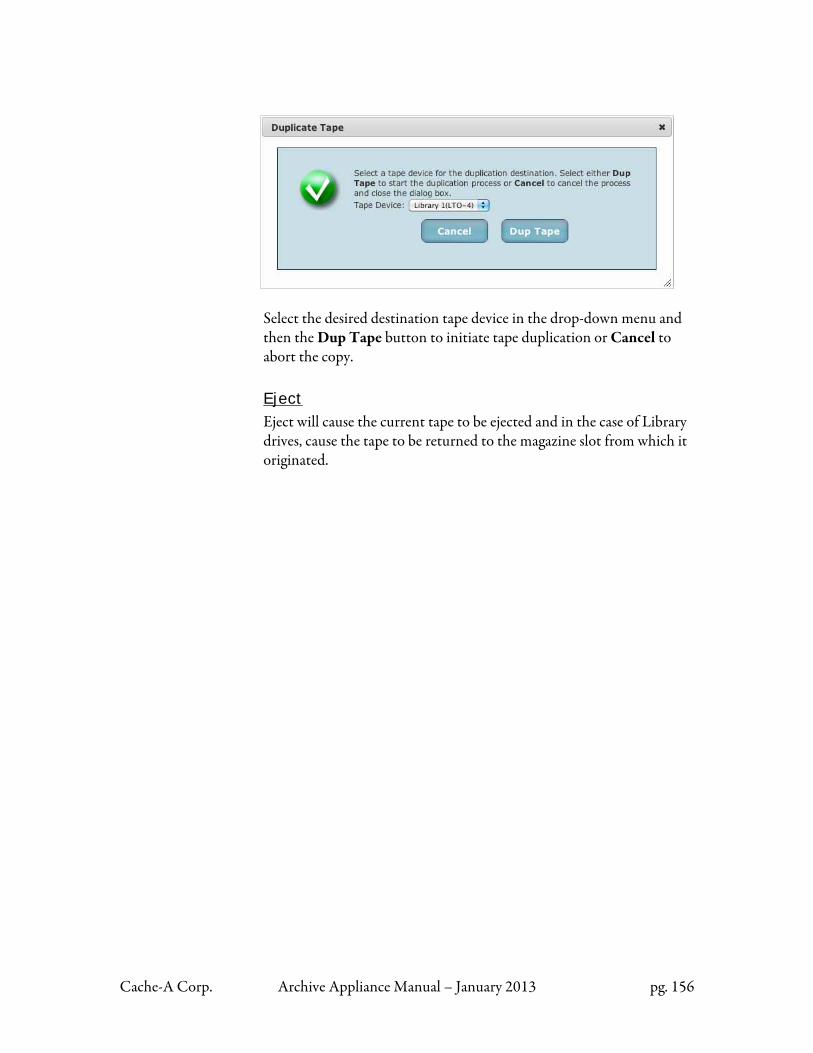
Cache-A Corp. Archive Appliance Manual – January 2013 pg. 156
Select the desired destination tape device in the drop-down menu and then the Dup Tape button to initiate tape duplication or Cancel to abort the copy. Eject
Eject will cause the current tape to be ejected and in the case of Library drives, cause the tape to be returned to the magazine slot from which it originated.
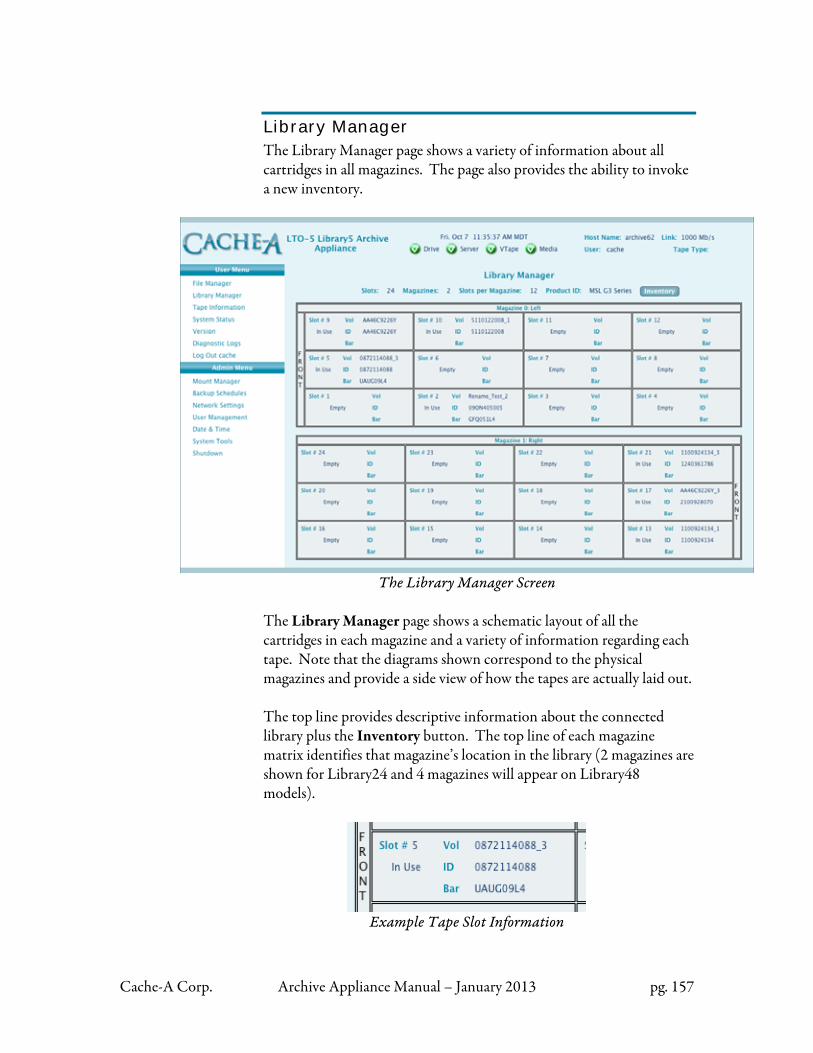
Cache-A Corp. Archive Appliance Manual – January 2013 pg. 157
Library Manager The Library Manager page shows a variety of information about all cartridges in all magazines. The page also provides the ability to invoke a new inventory.
The Library Manager Screen
The Library Manager page shows a schematic layout of all the cartridges in each magazine and a variety of information regarding each tape. Note that the diagrams shown correspond to the physical magazines and provide a side view of how the tapes are actually laid out. The top line provides descriptive information about the connected library plus the Inventory button. The top line of each magazine matrix identifies that magazine’s location in the library (2 magazines are shown for Library24 and 4 magazines will appear on Library48 models).
Example Tape Slot Information
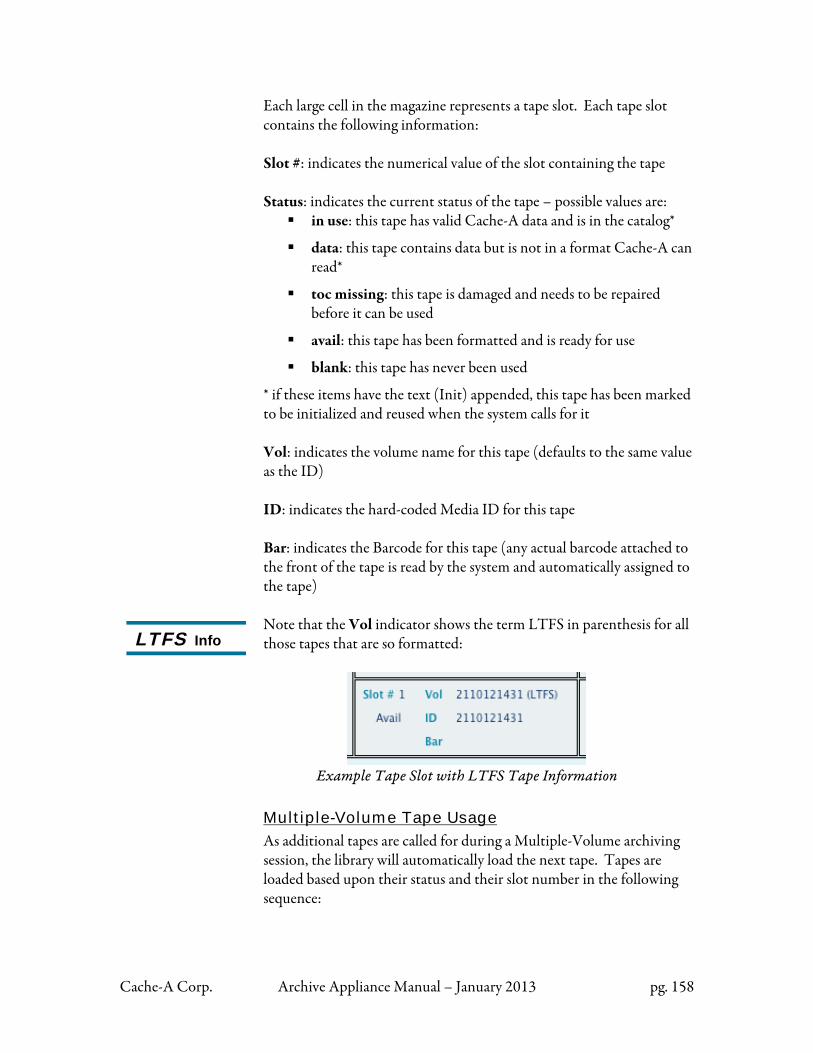
Cache-A Corp. Archive Appliance Manual – January 2013 pg. 158
Each large cell in the magazine represents a tape slot. Each tape slot contains the following information: Slot #: indicates the numerical value of the slot containing the tape Status: indicates the current status of the tape – possible values are:
in use: this tape has valid Cache-A data and is in the catalog*
data: this tape contains data but is not in a format Cache-A can read*
toc missing: this tape is damaged and needs to be repaired before it can be used
avail: this tape has been formatted and is ready for use
blank: this tape has never been used
* if these items have the text (Init) appended, this tape has been marked to be initialized and reused when the system calls for it Vol: indicates the volume name for this tape (defaults to the same value as the ID) ID: indicates the hard-coded Media ID for this tape Bar: indicates the Barcode for this tape (any actual barcode attached to the front of the tape is read by the system and automatically assigned to the tape) Note that the Vol indicator shows the term LTFS in parenthesis for all those tapes that are so formatted:
Example Tape Slot with LTFS Tape Information
Multiple-Volume Tape Usage
As additional tapes are called for during a Multiple-Volume archiving session, the library will automatically load the next tape. Tapes are loaded based upon their status and their slot number in the following sequence:
LTFS Info
Cache-A Corp. Archive Appliance Manual – January 2013 pg. 159
Warning
All Blank tapes are used first, by lowest slot number. Once there are no more blank tapes the pool of tapes, those marked as avail are used, again by lowest slot number.
Note: Ensure that you have a sufficient quantity of tapes loaded in your Library for all data in an archive session If you do not have enough blank/init/available tapes in the system to complete the archive session, the user interface will prompt the user to load another tape – this process involves removing a magazine and potentially tapes from the system to continue – we recommend you avoid this situation.
Diagnostic Logs When the Library drive is selected on the File Manager page, the logs in the Diagnostic Logs page reflect activity for the Library. Logs for the Main drive are maintained separately. Select from the Drive selector in the File Manager before going to the Diagnostic Logs page to obtain logs for the drive of interest.
Backup Schedules All events appearing in the Backup Schedule list will apply to the Library Drive regardless of which drive is selected in the File Manager Drive selector. Scheduled backups will archive to the Current Tape in the Library Drive. If the system is configured for Multiple Volumes operation, and if there is more data than will fit on the Current Tape, the system will automatically load the next available tape, initialize it if needed, rename the volume per normal Multi-Volume rules and continue archiving until complete. If no tape is present in the Library when a scheduled event occurs, the event will be skipped.
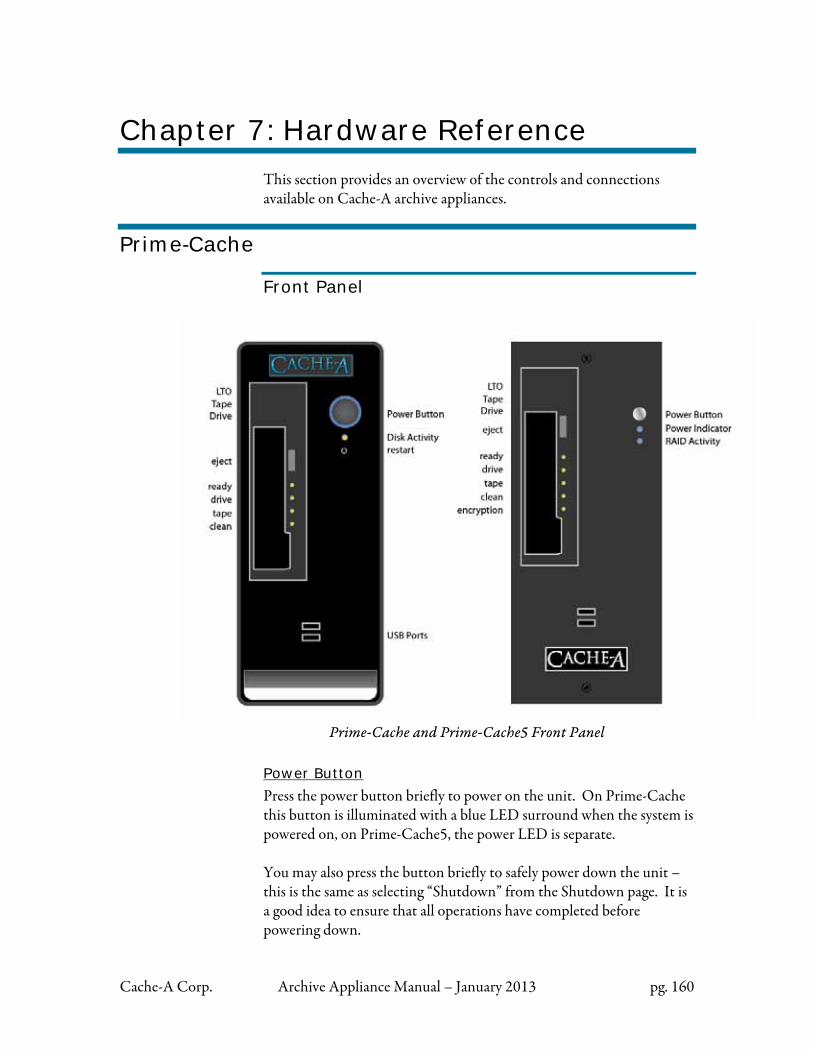
Cache-A Corp. Archive Appliance Manual – January 2013 pg. 160
Chapter 7: Hardware Reference
This section provides an overview of the controls and connections available on Cache-A archive appliances.
Prime-Cache
Front Panel
Prime-Cache and Prime-Cache5 Front Panel
Power Button
Press the power button briefly to power on the unit. On Prime-Cache this button is illuminated with a blue LED surround when the system is powered on, on Prime-Cache5, the power LED is separate. You may also press the button briefly to safely power down the unit – this is the same as selecting “Shutdown” from the Shutdown page. It is a good idea to ensure that all operations have completed before powering down.
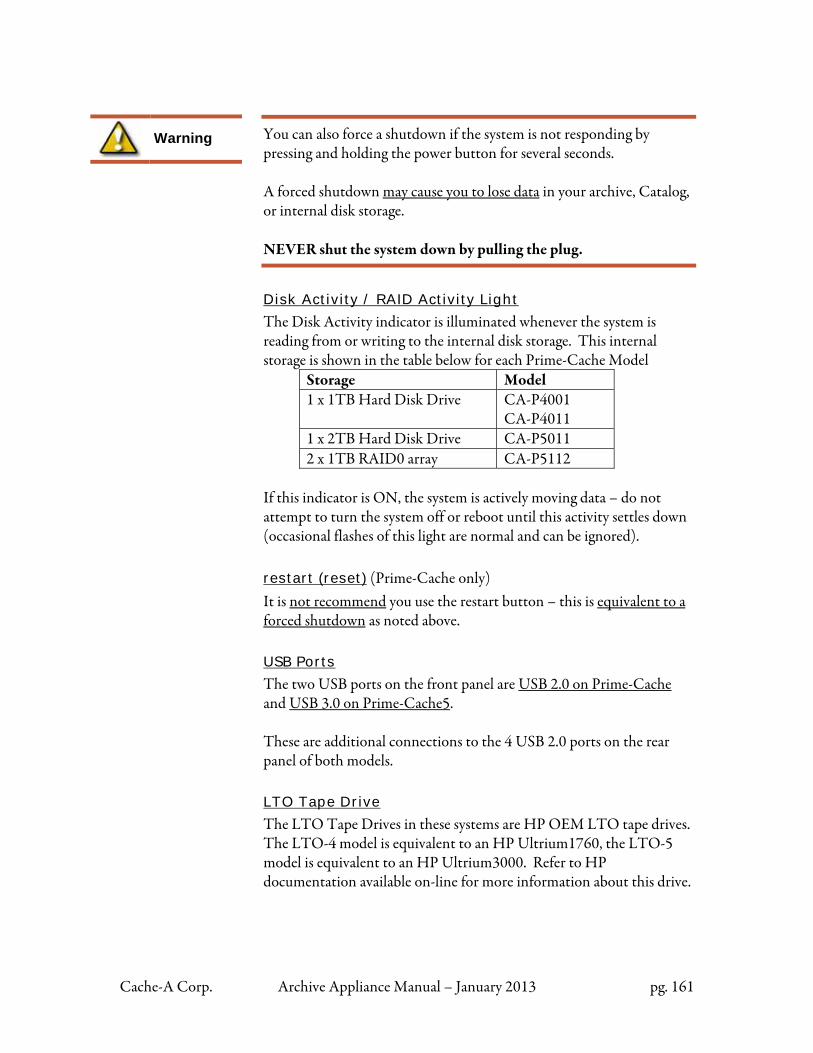
Cache-A Corp. Archive Appliance Manual – January 2013 pg. 161
Warning
You can also force a shutdown if the system is not responding by pressing and holding the power button for several seconds. A forced shutdown may cause you to lose data in your archive, Catalog, or internal disk storage. NEVER shut the system down by pulling the plug.
Disk Activity / RAID Activity Light
The Disk Activity indicator is illuminated whenever the system is reading from or writing to the internal disk storage. This internal storage is shown in the table below for each Prime-Cache Model
Storage Model 1 x 1TB Hard Disk Drive CA-P4001
CA-P4011 1 x 2TB Hard Disk Drive CA-P5011 2 x 1TB RAID0 array CA-P5112
If this indicator is ON, the system is actively moving data – do not attempt to turn the system off or reboot until this activity settles down (occasional flashes of this light are normal and can be ignored). restart (reset) (Prime-Cache only) It is not recommend you use the restart button – this is equivalent to a forced shutdown as noted above. USB Ports
The two USB ports on the front panel are USB 2.0 on Prime-Cache and USB 3.0 on Prime-Cache5. These are additional connections to the 4 USB 2.0 ports on the rear panel of both models. LTO Tape Drive
The LTO Tape Drives in these systems are HP OEM LTO tape drives. The LTO-4 model is equivalent to an HP Ultrium1760, the LTO-5 model is equivalent to an HP Ultrium3000. Refer to HP documentation available on-line for more information about this drive.
Cache-A Corp. Archive Appliance Manual – January 2013 pg. 162
eject
The eject button will force the tape drive to rewind and eject the tape unless it is actively writing. Unless you are sure no other users are using the drive and there are no pending tasks, you should not use this button to eject. Also, note that ejecting with this button does not give you the opportunity to automatically erase the VTAPE (VTAPE contents are preserved). ready
Green - Indicates power and activity: Off - Power off or self-test failure
On - Powered on and ready for use, but no activity
Flashing - Engaged in activity, such as responding to Read, Write or Space commands or performing a self-test
drive: Drive Error
Orange - Indicates drive problems: Off - No fault
Flashing - Unrecoverable hardware failure. A power cycle or successful tape load will turn the LED off, but the LED will start flashing again if the same operation is performed and the hardware fault is still present
tape: Tape Error
Orange - Indicates tape problems: Off - No fault
Flashing - Current tape is faulty, such as unreadable cartridge memory or unsupported type. Do not use the cartridge; replace it. The LED will go out when a tape load begins.
clean
Orange - Indicates whether the drive needs cleaning: Off - Cleaning not required
On - Cleaning cartridge being used. The Ready LED flashes.
Flashing - Cleaning needed. The LED continues to flash if the drive is power cycled, and will only go out after a supported cleaning tape has been used.
encryption (Prime-Cache5 only)
Not used – encryption is not available in Cache-A appliances
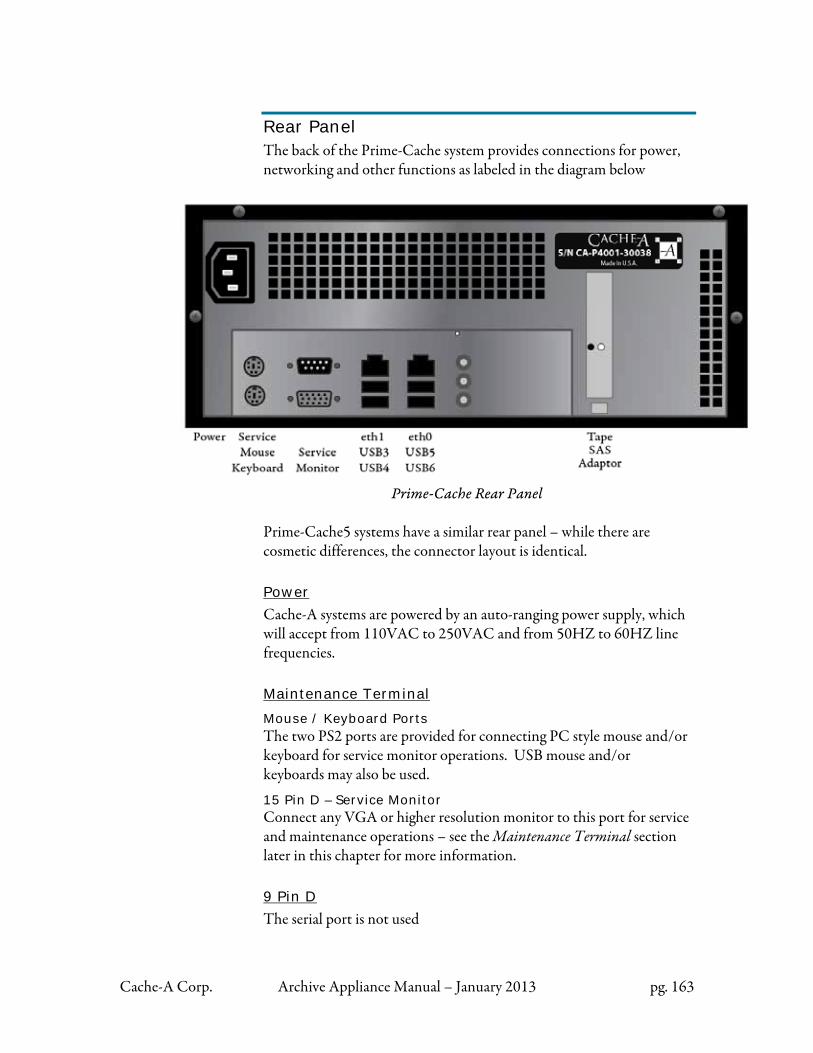
Cache-A Corp. Archive Appliance Manual – January 2013 pg. 163
Rear Panel The back of the Prime-Cache system provides connections for power, networking and other functions as labeled in the diagram below
Prime-Cache Rear Panel
Prime-Cache5 systems have a similar rear panel – while there are cosmetic differences, the connector layout is identical. Power
Cache-A systems are powered by an auto-ranging power supply, which will accept from 110VAC to 250VAC and from 50HZ to 60HZ line frequencies. Maintenance Terminal
Mouse / Keyboard Ports The two PS2 ports are provided for connecting PC style mouse and/or keyboard for service monitor operations. USB mouse and/or keyboards may also be used.
15 Pin D – Service Monitor Connect any VGA or higher resolution monitor to this port for service and maintenance operations – see the Maintenance Terminal section later in this chapter for more information. 9 Pin D
The serial port is not used
Cache-A Corp. Archive Appliance Manual – January 2013 pg. 164
eth1 / eth 0
Two Gigabit (1000BaseT) Ethernet ports are provided for network connections.
Ethernet Port LED Indicators LED indicators on each Ethernet port confers the following information: Left LED: Yellow Off - LAN Link not established On - LAN Link established Blinking - Communication ongoing Right LED: Green/Orange Off - 10 Mb/s Green - 100 Mb/s Orange - 1000 Mb/s USB
Any of the 6 USB (4 rear + 2 front) connections can be used for mass storage device connection and / or mouse / keyboard connection.
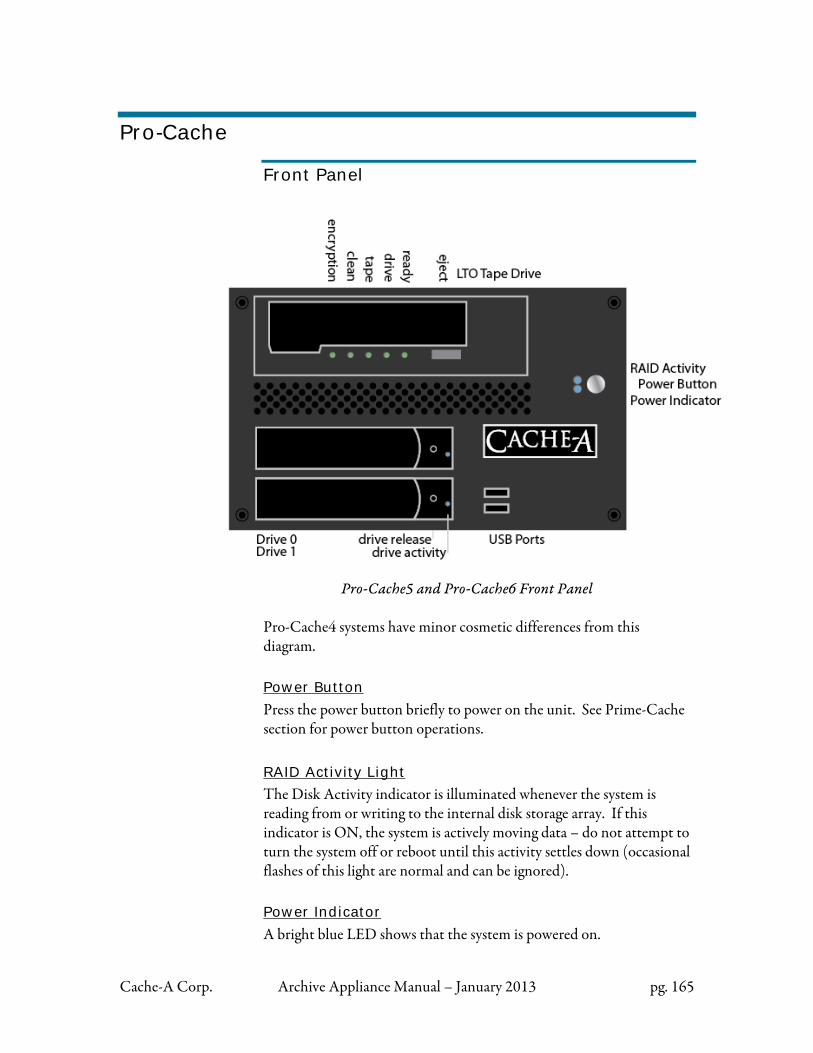
Cache-A Corp. Archive Appliance Manual – January 2013 pg. 165
Pro-Cache
Front Panel
Pro-Cache5 and Pro-Cache6 Front Panel
Pro-Cache4 systems have minor cosmetic differences from this diagram. Power Button
Press the power button briefly to power on the unit. See Prime-Cache section for power button operations.
RAID Activity Light
The Disk Activity indicator is illuminated whenever the system is reading from or writing to the internal disk storage array. If this indicator is ON, the system is actively moving data – do not attempt to turn the system off or reboot until this activity settles down (occasional flashes of this light are normal and can be ignored). Power Indicator
A bright blue LED shows that the system is powered on.
Cache-A Corp. Archive Appliance Manual – January 2013 pg. 166
Warning
USB Ports
The two USB ports on the front panel are additional connections to the 4 in back and provided for convenience. drive release
Each drive tray can be released from the drive cage by inserting a un-bent paperclip or equivalent into this hole – the front eject lever will spring up; pull on the lever to eject the drive. Use this ONLY in the event of a drive failure.
Removing a drive during operations can result in loss of data. Pro-Cache drives are removeable only for the purposes of easy replacement in the event of a drive failure. Pro-Cache drives can not be read in other computer systems.
drive activity
A small blue LED at the right edge of the drive tray will illuminate when each individual drive is reading or writing. LTO Tape Drive
The LTO Tape Drives in these systems are HP OEM LTO tape drives. The LTO-4 model is equivalent to an HP Ultrium 1760, the LTO-5 model is equivalent to an HP Ultrium 3000, the LTO -6 model is equivalent to the HP Ultrium 6250. Refer to HP documentation available on-line for more information about this drive. eject
The eject button will force the tape drive to rewind and eject the tape unless it is actively writing. Unless you are sure no other users are using the drive and there are no pending tasks, you should not use this button to eject. Also, note that ejecting with this button does not give you the opportunity to automatically erase the VTAPE (VTAPE contents are preserved).
Cache-A Corp. Archive Appliance Manual – January 2013 pg. 167
ready
Green - Indicates power and activity: Off - Power off or self-test failure
On - Powered on and ready for use, but no activity
Flashing - Engaged in activity, such as responding to Read, Write or Space commands or performing a self-test
drive: Drive Error
Orange - Indicates drive problems: Off - No fault
Flashing - Unrecoverable hardware failure. A power cycle or successful tape load will turn the LED off, but the LED will start flashing again if the same operation is performed and the hardware fault is still present
tape: Tape Error
Orange - Indicates tape problems: Off - No fault
Flashing - Current tape is faulty, such as unreadable cartridge memory or unsupported type. Do not use the cartridge; replace it. The LED will go out when a tape load begins.
clean
Orange - Indicates whether the drive needs cleaning: Off - Cleaning not required
On - Cleaning cartridge being used. The Ready LED flashes.
Flashing - Cleaning needed. The LED continues to flash if the drive is power cycled, and will only go out after a supported cleaning tape has been used.
encryption
Not used – encryption is not available in Cache-A appliances – LTO-4 drives do not have this LED.
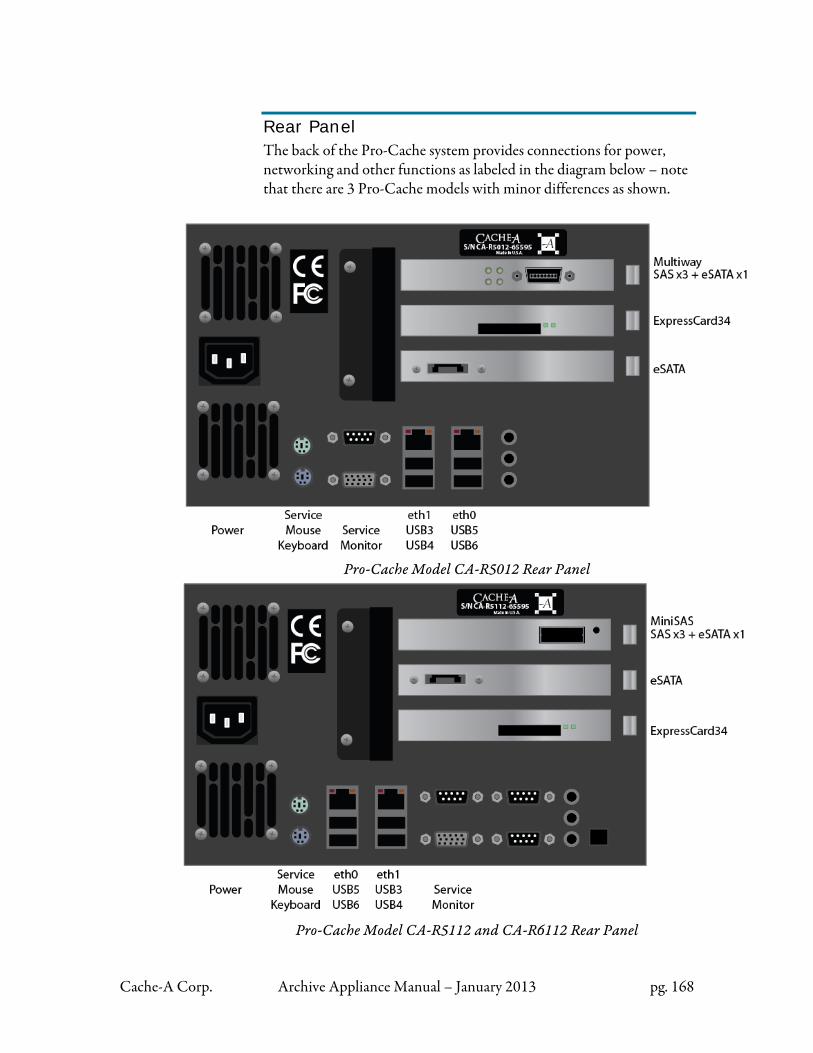
Cache-A Corp. Archive Appliance Manual – January 2013 pg. 168
Rear Panel The back of the Pro-Cache system provides connections for power, networking and other functions as labeled in the diagram below – note that there are 3 Pro-Cache models with minor differences as shown.
Pro-Cache Model CA-R5012 Rear Panel
Pro-Cache Model CA-R5112 and CA-R6112 Rear Panel
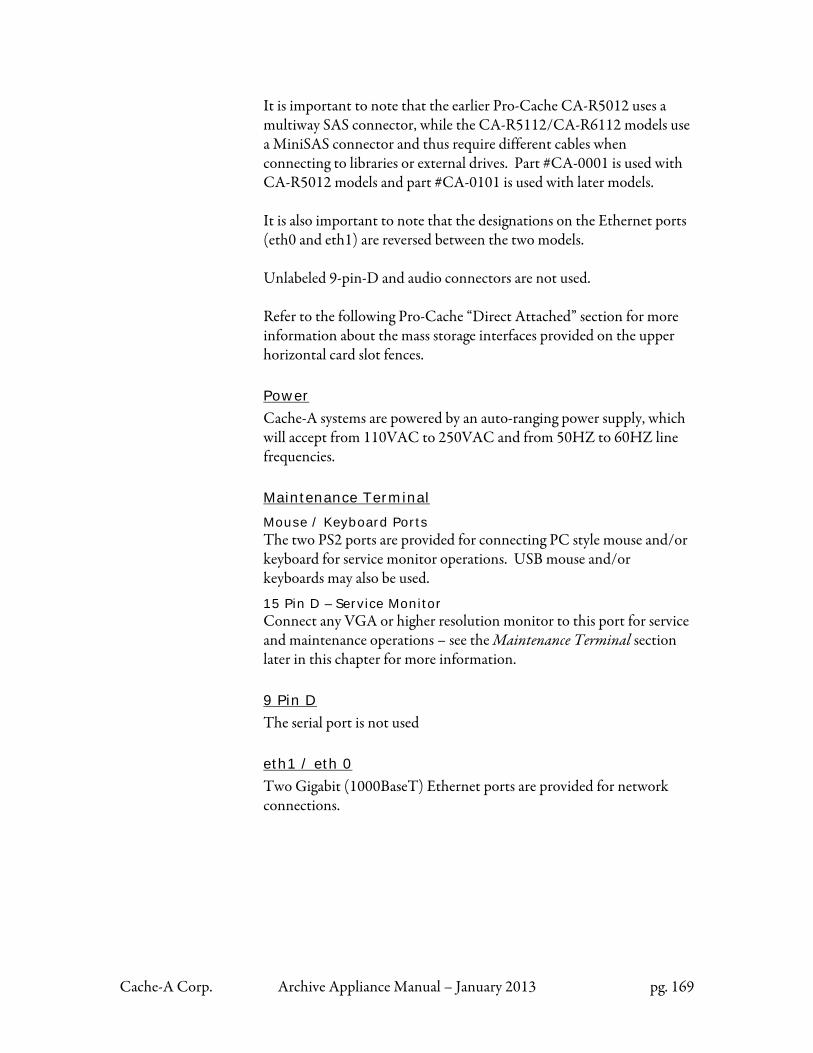
Cache-A Corp. Archive Appliance Manual – January 2013 pg. 169
It is important to note that the earlier Pro-Cache CA-R5012 uses a multiway SAS connector, while the CA-R5112/CA-R6112 models use a MiniSAS connector and thus require different cables when connecting to libraries or external drives. Part #CA-0001 is used with CA-R5012 models and part #CA-0101 is used with later models. It is also important to note that the designations on the Ethernet ports (eth0 and eth1) are reversed between the two models. Unlabeled 9-pin-D and audio connectors are not used. Refer to the following Pro-Cache “Direct Attached” section for more information about the mass storage interfaces provided on the upper horizontal card slot fences. Power
Cache-A systems are powered by an auto-ranging power supply, which will accept from 110VAC to 250VAC and from 50HZ to 60HZ line frequencies. Maintenance Terminal
Mouse / Keyboard Ports The two PS2 ports are provided for connecting PC style mouse and/or keyboard for service monitor operations. USB mouse and/or keyboards may also be used.
15 Pin D – Service Monitor Connect any VGA or higher resolution monitor to this port for service and maintenance operations – see the Maintenance Terminal section later in this chapter for more information. 9 Pin D
The serial port is not used eth1 / eth 0
Two Gigabit (1000BaseT) Ethernet ports are provided for network connections.
Cache-A Corp. Archive Appliance Manual – January 2013 pg. 170
Ethernet Port LED Indicators LED indicators on each Ethernet port confers the following information: Left LED: Yellow Off - LAN Link not established On - LAN Link established Blinking - Communication ongoing Right LED: Green/Orange Off - 10 Mb/s Green - 100 Mb/s Orange - 1000 Mb/s USB
Any of the 6 USB (4 rear + 2 front) connections can be used for mass storage device connection and / or mouse / keyboard connection.
Pro-Cache Direct Attached Storage Interfaces Pro-Cache expands the capability to direct-attach mass storage devices with the addition of ExpressCard, eSATA and SAS interfaces. These interface physical locations are shown in the following Hardware Reference section. Nominally, any mass storage device connected to any of these interfaces will be seen by the system software and made available for archiving operations. There are restrictions to this as follows: eSATA Interface
The eSATA interface (or external serial ATA computer bus) is intended for connecting to mass storage devices such as hard disk drives. This interface will support up to 3Gb/s bus speeds and is compatible with first and second-generation eSATA devices. By definition, eSATA interfaces are NOT hot-pluggable. In order to have eSATA drives appear correctly
Connect the eSATA device, then power it up and assure it is fully running
Then power-on or restart from the web page your Cache-A system.
This applies only to eSATA devices - ExpressCard connected and USB connected devices can be plugged in at any time, and disconnected at any time you are not reading from or writing to them.
Cache-A Corp. Archive Appliance Manual – January 2013 pg. 171
ExpressCard Interface
The ExpressCard interface is also intended for connecting to mass storage devices via ExpressCard adapters. This interface will support up to 2.5Gb/s bus speeds and is also hot-pluggable. New Cache-A hardware running Intel i-series processors are only compatible with v2.0 ExpressCards – older v1.1 ExpressCards will not work. The Pro-Cache ExpressCard adapter does not work with any of the available cards that serve non-storage purposes (i.e. wireless connection cards) and should not be used in the Pro-Cache slot. The following interfaces are supported:
Firewire 800 Adapter Card: Any mass storage device with a Firewire 800 (IEEE 1394b) interface. Firewire 400 (IEEE 1394a) may work as well, however the USB 2.0 interface may be faster. Cache-A has tested as functional Sonnet and SIIG ExpressCard34 Firewire800 adapter cards.
eSATA Adapter Card: Additional eSATA devices may be connected using an eSATA to ExpressCard adapter. All such adapters tested worked in Cache-A systems. Relative performance of this connection versus the native eSATA port also provided has not been evaluated.
USB 3.0 Adapter Card: High speed USB 3.0 devices may be connected using a USB 3.0 to ExpressCard adapter. Adapters from SIIG have been tested to work in Cache-A systems. For Pro-Cache systems at v2.1 or earlier, a driver patch is required to enable USB 3.0 – this has been addressed in v3.0 and later Cache-A releases. NOTE: as of this release, these are the only Express interfaces that have been tested. Once any ExpressCard device has been connected and powered up, after a few moments, it will be visible in the File Manager > Source Directory > View: popup menu after clicking on the green refresh button. A restart may be required depending upon the model of card.
Cache-A Corp. Archive Appliance Manual – January 2013 pg. 172
SAS Interface
The SAS interface (Serial Attached SCSI) is a very high performance data-transfer technology employed for data and control of attached Library automation options and additional external LTO tape drives. Cache-A offers single drive 24 and 48 slot Library LTO-5 and LTO-6 models as well as stand-alone LTO-5 and 6 drives in external chassis. Pro-Cache models can be authorized to control any one additional tape drive device in addition to the internal tape drive. The “SAS” connector on this connector plate has 3 lanes of SAS and the fourth allocated to an extra eSATA interface. Contact Cache-A support for more information about this connector and its wiring.
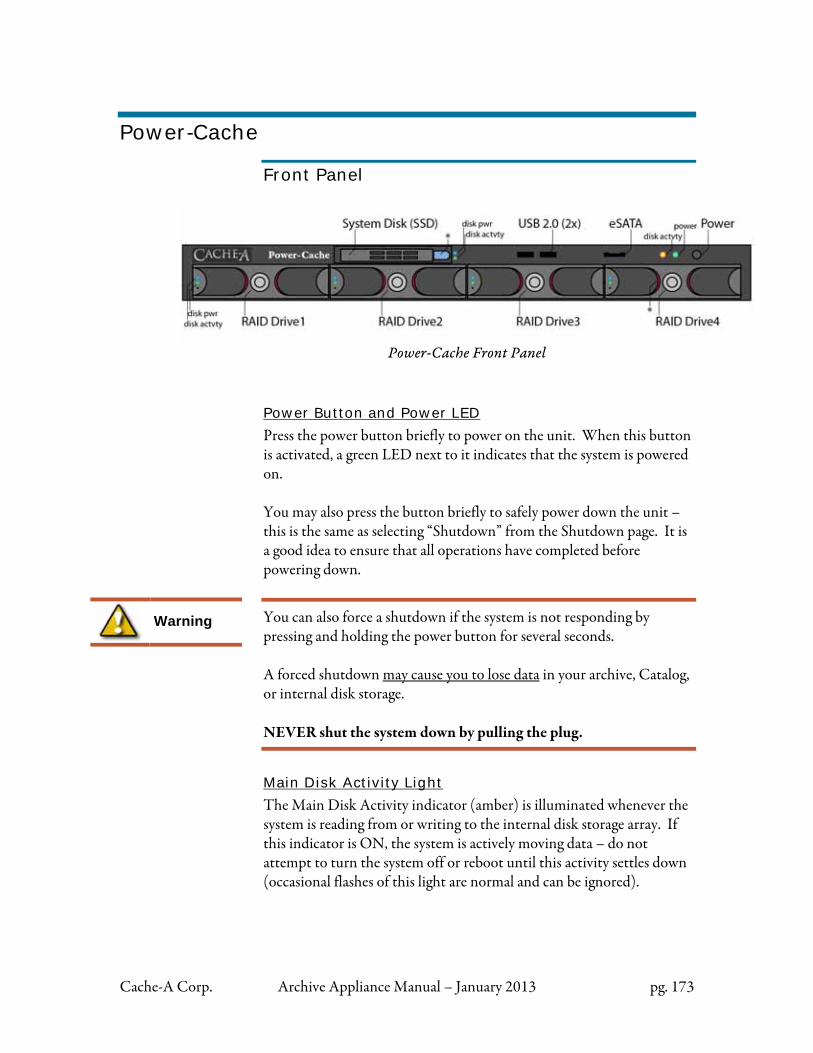
Cache-A Corp. Archive Appliance Manual – January 2013 pg. 173
Warning
Power-Cache
Front Panel
Power-Cache Front Panel
Power Button and Power LED
Press the power button briefly to power on the unit. When this button is activated, a green LED next to it indicates that the system is powered on. You may also press the button briefly to safely power down the unit – this is the same as selecting “Shutdown” from the Shutdown page. It is a good idea to ensure that all operations have completed before powering down.
You can also force a shutdown if the system is not responding by pressing and holding the power button for several seconds. A forced shutdown may cause you to lose data in your archive, Catalog, or internal disk storage. NEVER shut the system down by pulling the plug.
Main Disk Activity Light
The Main Disk Activity indicator (amber) is illuminated whenever the system is reading from or writing to the internal disk storage array. If this indicator is ON, the system is actively moving data – do not attempt to turn the system off or reboot until this activity settles down (occasional flashes of this light are normal and can be ignored).
Cache-A Corp. Archive Appliance Manual – January 2013 pg. 174
Disk Power Indicators
5 blue LEDs show that the each disk in the RAID and the system disk is powered on. Disk Activity Indicators
5 green LEDs provide visual feedback for accesses to each disk in the RAID and the system disk individually. USB Ports
The two USB ports on the front panel are additional connections to the 4 in back and provided for convenience. eSATA Interface
The eSATA interface (or external serial ATA computer bus) is intended for connecting to mass storage devices such as hard disk drives. This interface will support up to 3Gb/s bus speeds and is compatible with first and second-generation eSATA devices. By definition, eSATA interfaces are NOT hot-pluggable. In order to have eSATA drives appear correctly
Connect the eSATA device, then power it up and assure it is fully running
Then power-on or restart from the web page your Cache-A system.
* drive release
Each drive tray in the RAID can be released from the drive cage by squeezing the two red finger catches together. These drive trays may be locked using the key provided in the system packaging to prevent inadvertent removal. Consult the RAID manager and associated instructions before removing any RAID drive. The system disk can be released by pressing the blue button to the right of the drive - the front eject lever will spring out; pull on the lever to eject the drive. Only eject the system drive in the event of a drive failure or as instructed by Cache-A support.
Cache-A Corp. Archive Appliance Manual – January 2013 pg. 175
Warning Removing a drive during operations can result in loss of data – consult
the section on Power-Cache RAID management for correct drive removal procedures. Power-Cache drives are removeable only for the purposes of easy replacement in the event of a drive failure and not for data transfer. Power-Cache drives can not be read in other computer systems.

Cache-A Corp. Archive Appliance Manual – January 2013 pg. 176
Rear Panel The back of the Power-Cache system provides connections for power, networking and other functions as labeled in the diagram below:
Power-Cache Model CA-S0008 Rear Panel
Power-Cache Model CA-S0108 and CA-S0112 Rear Panel
Power
Cache-A systems are powered by an auto-ranging power supply which will accept from 110VAC to 250VAC and from 50HZ to 60HZ line frequencies. Maintenance Terminal
Mouse / Keyboard Ports The two PS2 ports are provided for connecting PC style mouse and/or keyboard for service monitor operations. USB mouse and/or keyboards may also be used.
15 Pin D – Service Monitor Connect any VGA or higher resolution monitor to this port for service and maintenance operations – see the Maintenance Terminal section for more information. 9 Pin D
The audio and serial port(s) are not used
Cache-A Corp. Archive Appliance Manual – January 2013 pg. 177
USB
Any of the 6 USB connections can be used for mass storage device connection and / or mouse / keyboard connection. eth1 / eth 0
Two Gigabit (1000BaseT) Ethernet ports are provided for network connections.
Ethernet Port LED Indicators LED indicators on each Ethernet port confers the following information: Left LED: Yellow Off - LAN Link not established On - LAN Link established Blinking - Communication ongoing Right LED: Green/Orange Off - 10 Mb/s Green - 100 Mb/s Orange - 1000 Mb/s Eth2 / eth 3
Two 10 Gigabit (SPF+) Ethernet ports are provided for 10x faster speed network connections. These are suitable for either optical or copper adapters conforming to SPF+ requirements. 4 Lane SAS
A 4 lane Mini-SAS port is provided to connect to up to 4 tape drives in external chassis and/or in Library options. You must use the supplied Mini-SAS 4 lead cable and follow the connection directions provided in the Power-Cache Installation and Setup document.
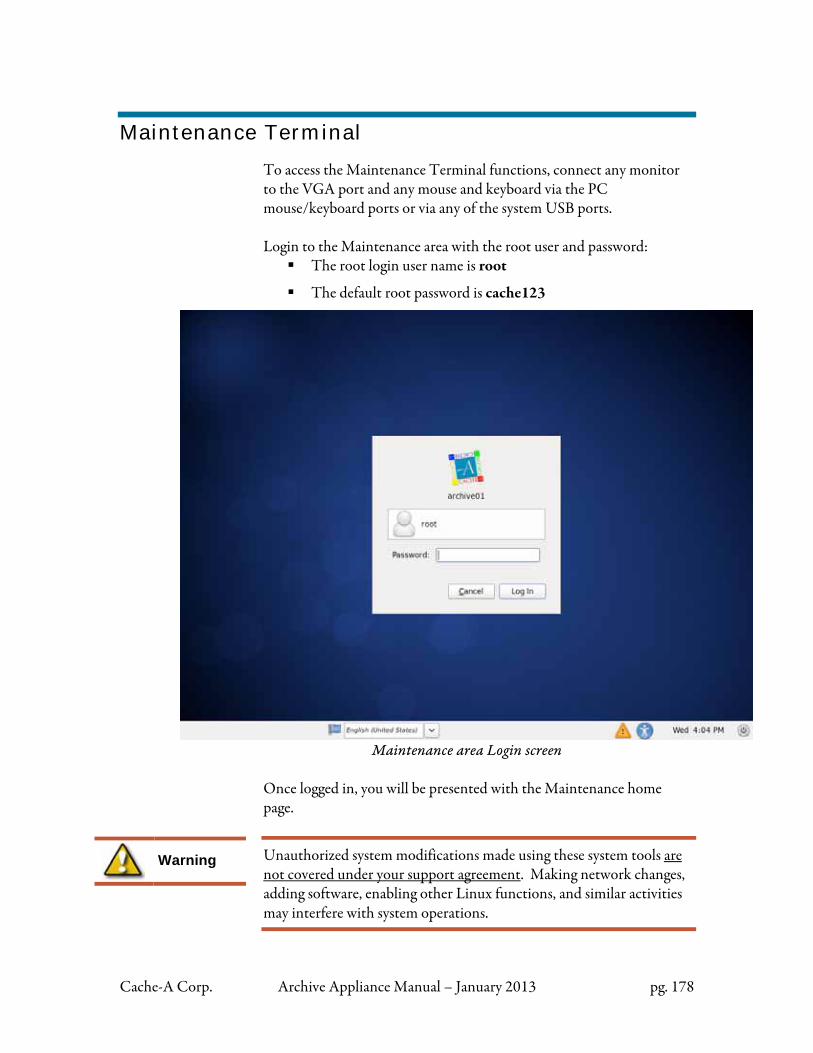
Cache-A Corp. Archive Appliance Manual – January 2013 pg. 178
Warning
Maintenance Terminal
To access the Maintenance Terminal functions, connect any monitor to the VGA port and any mouse and keyboard via the PC mouse/keyboard ports or via any of the system USB ports. Login to the Maintenance area with the root user and password:
The root login user name is root
The default root password is cache123
Maintenance area Login screen
Once logged in, you will be presented with the Maintenance home page.
Unauthorized system modifications made using these system tools are not covered under your support agreement. Making network changes, adding software, enabling other Linux functions, and similar activities may interfere with system operations.
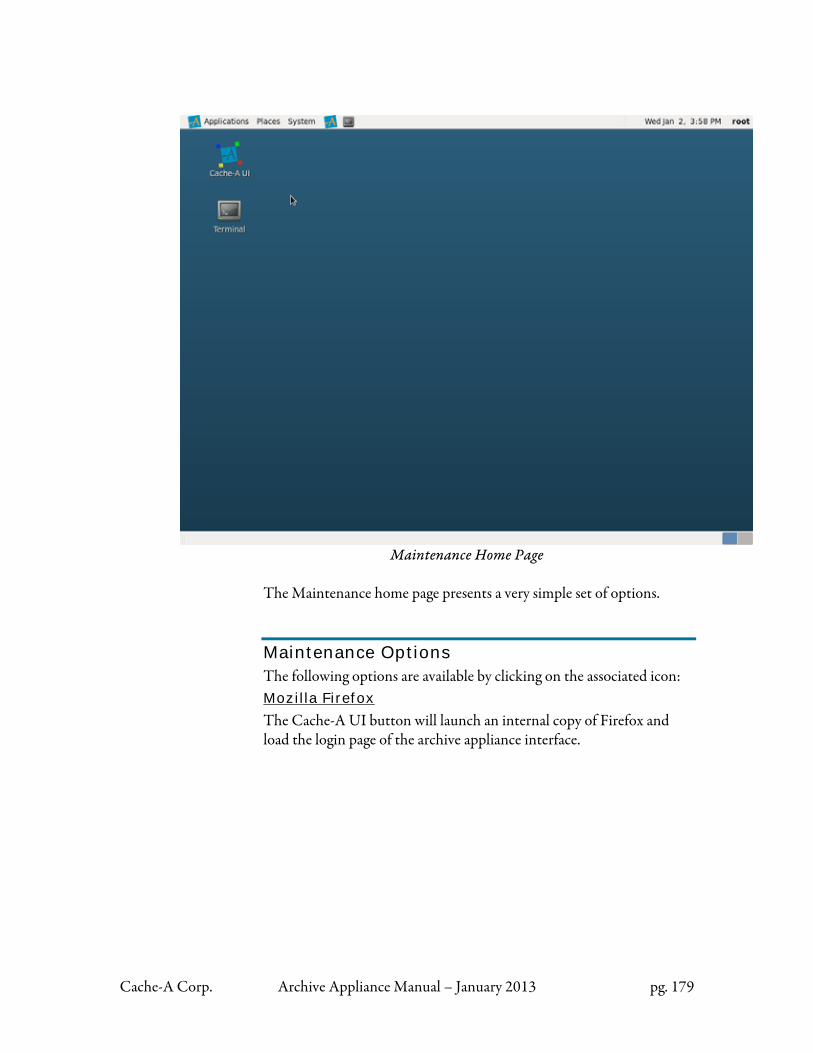
Cache-A Corp. Archive Appliance Manual – January 2013 pg. 179
Maintenance Home Page
The Maintenance home page presents a very simple set of options.
Maintenance Options The following options are available by clicking on the associated icon: Mozilla Firefox
The Cache-A UI button will launch an internal copy of Firefox and load the login page of the archive appliance interface.
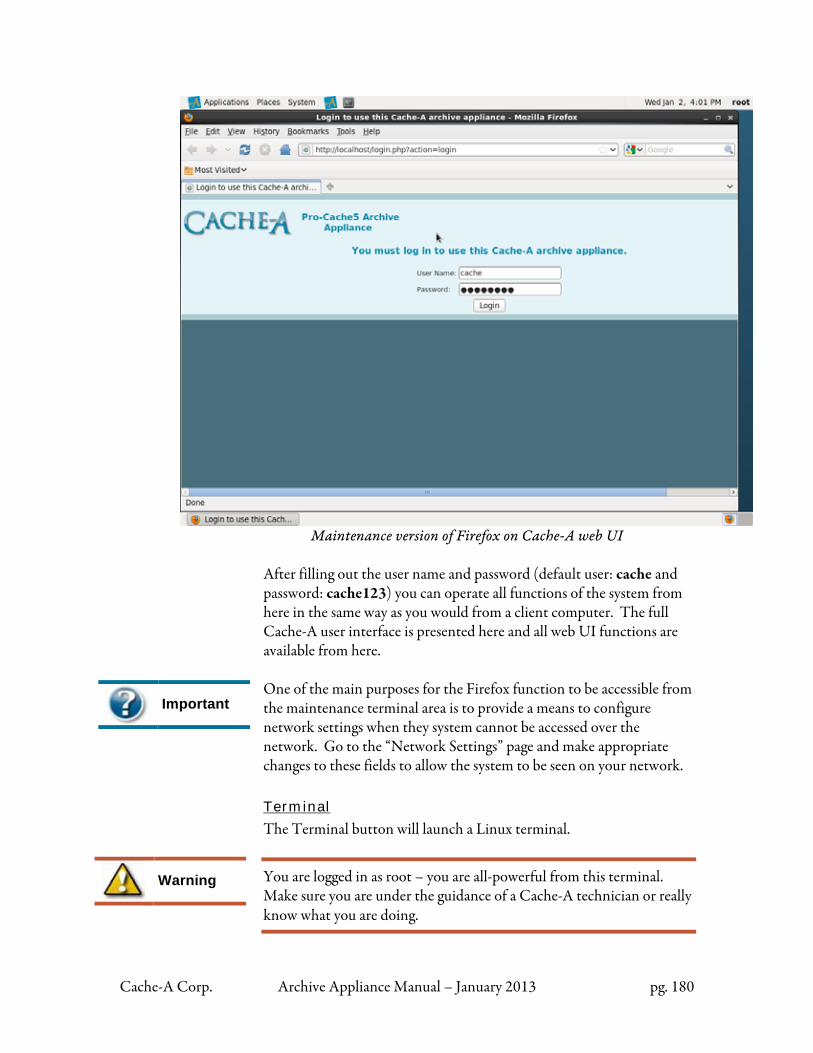
Cache-A Corp. Archive Appliance Manual – January 2013 pg. 180
Warning
Important
Maintenance version of Firefox on Cache-A web UI
After filling out the user name and password (default user: cache and password: cache123) you can operate all functions of the system from here in the same way as you would from a client computer. The full Cache-A user interface is presented here and all web UI functions are available from here. One of the main purposes for the Firefox function to be accessible from the maintenance terminal area is to provide a means to configure network settings when they system cannot be accessed over the network. Go to the “Network Settings” page and make appropriate changes to these fields to allow the system to be seen on your network. Terminal
The Terminal button will launch a Linux terminal.
You are logged in as root – you are all-powerful from this terminal. Make sure you are under the guidance of a Cache-A technician or really know what you are doing.
Cache-A Corp. Archive Appliance Manual – January 2013 pg. 181
Shutdown
The Shutdown button will cause the system to do an orderly power down.
Cache-A Corp. Archive Appliance Manual – January 2013 pg. 182
Appendix A: Cache-A Archiving Best Practices
This section covers some lessons learned and cautions which should be observed to help our customers have the best possible experience. If you really want to guarantee that everything you archive is fully protected, you really should make at least 2 copies of every tape and store them in separate locations. If you really want to guarantee that your content is completely protected on an LTO tape, you should restore it and check that every file is the same as the original source material. If an archive made on a Cache-A system completes with no errors, all your content should be on tape within the accuracy of LTO tape drives and current high quality computer hardware. This makes the probability of errors small but still statistically possible with increasing likelihood the more data you archive. In fact the probability of data errors written to LTO tape is between 100 and 1000 times smaller than that of hard disk drives, but not perfect. This is why productions such as high-value movie shoots do make dual tapes and have workflows that fully check their contents. Most of our customers archive to tape, and if there were no errors, put them on the shelf and are well protected. But if you have content that absolutely must be fully protected, you should use the same steps movie studios do. The one part of your system that has the potential of being lost is the internal catalog of tapes. While you can always re-create a lost Catalog by inserting every tape again, this is a time-consuming process. It makes sense to regularly back up this catalog as described in the System Tools page > Backup Catalog Tab section. It doesn’t matter if you backup on to tape or other media, but doing this about once every 10 tapes is recommended. Note that this backup is less of an issue on Cache-A models configured for RAID 1 or RAID 5 protection as the catalog is then protected
Backup Your Catalog
Archiving 101

Cache-A Corp. Archive Appliance Manual – January 2013 pg. 183
against a single drive failure, although you may still want do so in order to keep a copy off-site. Most Cache-A archive appliances connect over Gigabit Ethernet (GbE), and that networking technology officially requires CAT6 or better quality cabling. Many users find that older CAT5e or even plain CAT5 wiring works fine over short runs as long as all 8 wires are employed (some older Ethernet cables only have 4 wires connected and these will not work at all). If you are experiencing network issues, cabling quality and length of runs are one of the first places to begin troubleshooting. Old Ethernet cables can become intermittent, even new ones can have improperly secured connectors, they are inexpensive and easily replaced as the first step in finding a problem. Gigabit Ethernet is backwards compatible so you can connect a Cache-A system to 100Base or even 10Base networks although your transfer speed will be much slower. Power-Cache systems also offer 10 GbE with ten times faster network transfers. Deploying a 10 GbE network requires more expertise and is more expensive but well worth the investment if you are transferring a lot of data over the network. One word of caution is in order – do not attempt to archive or restore data over wireless networks (WiFi). Such networks are neither fast enough nor reliable enough to trust your content to. Always archive over hard-wired Ethernet networks. It is important for users to understand that the directory (also known as the TOC or Table of Contents) is updated at the end of each “Session” as identified in the Transfer Summary listing. A Session is usually the set of files a user has grouped to initiate a transfer but these are sometimes broken up into several sets or sometimes collected with other files into a larger set based on the appliance’s algorithms for efficiency. If power is interrupted before the current session is completed, all files written in that will never be recorded in the TOC and the archived data has no record of being written and is at that point lost. The tape’s current TOC is also lost, but there are two backups for this: a) the internal system catalog is constantly updated and will contain the latest valid information for the tape and will be automatically written back to
Networking Considerations
When Directory Updates Occur
Cache-A Corp. Archive Appliance Manual – January 2013 pg. 184
the tape during recovery, or b) in the event that the internal catalog is also lost, the TOC can be recovered from rereading the tape itself (this can take several hours). For this reason we strongly recommend that all Cache-A appliances be on an uninterruptible power supply (UPS). When transferring files either via mounted volumes or from Cache-A’s share, Cache-A Archive appliances should handle all filenames of any length compatible with Windows, MacOS, and Unix/Linux operating systems. Note that when considering file names, there will be still be issues when users attempt to restore such files cross platform. If for instance, a Mac file has characters illegal on a Windows machine, when you attempt to restore it to a Windows machine, the file name will be converted to something acceptable to the target OS. In general, it is best practice to limit your filenames to be absolutely safe and adhere to the Windows filename restrictions:
No control characters. Carriage return (CR), NULL, and Linefeed (LF) are control characters
Don’t use < > : “ / \ | ? * %
Don’t use a space or period as the first or last character and ideally, don’t use spaces at all and only use underscores and dashes to separate words in filenames
It is possible with Cache-A devices to use FTP file transfers to archive to the appliance. Cache-A devices do not support FXP transfers (direct server to server). Third party FTP Clients typically do not handle many unusual characters such as quotation marks or slashes, and some can’t handle even minor infractions such as extra spaces or periods. You should be aware of the limitations of your FTP tools when using this technique to transfer files. Third party FTP Clients typically do not support Apple file resource forks as described in the following section.
File Naming Considerations
Third Party FTP Clients
Cache-A Corp. Archive Appliance Manual – January 2013 pg. 185
Apple computers before Mac OSX used something called “resource forks” to keep track of what application created each file rather than the Windows convention of a three letter dot suffix to keep track of the association (i.e. a “.doc” file is a Microsoft Word file or a “.jpg” is a JPEG image). Resource forks could also keep track of additional information including file types and custom icons. Resource forks are “deprecated” in the Mac OSX, which is to say that they are supported but applications are not supposed to use them anymore. They have in fact been replaced by what Apple calls “extended file attributes.” Neither resource forks nor these extended attributes fit well into cross platform file systems such as those used by Cache-A. Each of these resource forks and extended file attributes create a hidden file when using a cross platform technology and this information gets stored in an AppleDouble folder on the archive tape. These files will automatically appear on the appliance when MacOS files are copied to it to preserve full Apple compatibility. Several other “hidden” files come over when copying Mac folders and all these files may be safely ignored. You may well find you can get more onto a tape than the 800GB LTO-4 or 1.5TB LTO-5 or 2.5TB LTO-6 stated native capacitys. All LTO drives have hardware lossless data compression built in and running transparently in the background. Normally video data does not compress much further with this and whenever no savings are seen, the data is stored exactly as it comes in to the appliance. With other types of data (especially files like documents and spreadsheets) this compression can typically save up to 2:1. Never worry about this changing your data in any way – every bit stored is guaranteed to restore bit-for-bit as it came in, which is why it is called “lossless.” A complete accounting of how much data is fitting on any tape is displayed in the tape information dialog available from the Main Menu. It is becoming increasingly popular to take LTO drives out into the field to make backups of the increasing range of cameras that record to RAM and Hard Disk.
Apple Resource Forks and Cache-A
Lossless Data Compression
Taking Cache-A Systems on the Road
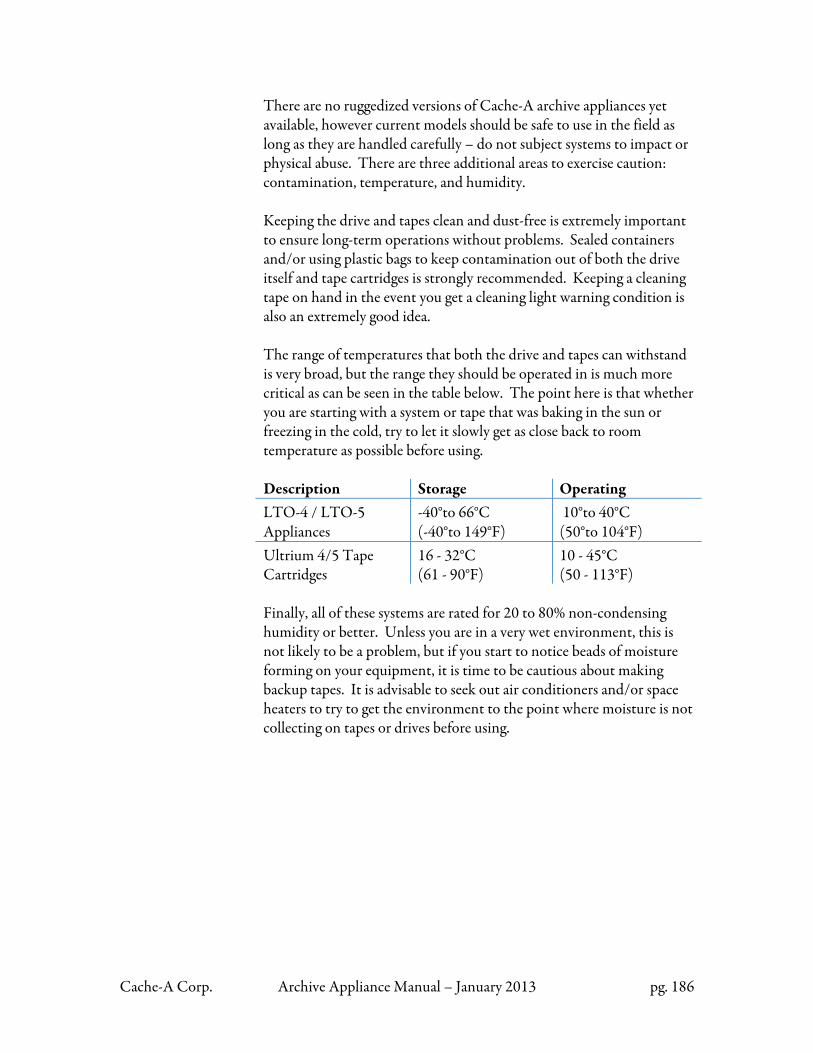
Cache-A Corp. Archive Appliance Manual – January 2013 pg. 186
There are no ruggedized versions of Cache-A archive appliances yet available, however current models should be safe to use in the field as long as they are handled carefully – do not subject systems to impact or physical abuse. There are three additional areas to exercise caution: contamination, temperature, and humidity. Keeping the drive and tapes clean and dust-free is extremely important to ensure long-term operations without problems. Sealed containers and/or using plastic bags to keep contamination out of both the drive itself and tape cartridges is strongly recommended. Keeping a cleaning tape on hand in the event you get a cleaning light warning condition is also an extremely good idea. The range of temperatures that both the drive and tapes can withstand is very broad, but the range they should be operated in is much more critical as can be seen in the table below. The point here is that whether you are starting with a system or tape that was baking in the sun or freezing in the cold, try to let it slowly get as close back to room temperature as possible before using. Description Storage Operating LTO-4 / LTO-5 Appliances
-40°to 66°C (-40°to 149°F)
10°to 40°C (50°to 104°F)
Ultrium 4/5 Tape Cartridges
16 - 32°C (61 - 90°F)
10 - 45°C (50 - 113°F)
Finally, all of these systems are rated for 20 to 80% non-condensing humidity or better. Unless you are in a very wet environment, this is not likely to be a problem, but if you start to notice beads of moisture forming on your equipment, it is time to be cautious about making backup tapes. It is advisable to seek out air conditioners and/or space heaters to try to get the environment to the point where moisture is not collecting on tapes or drives before using.
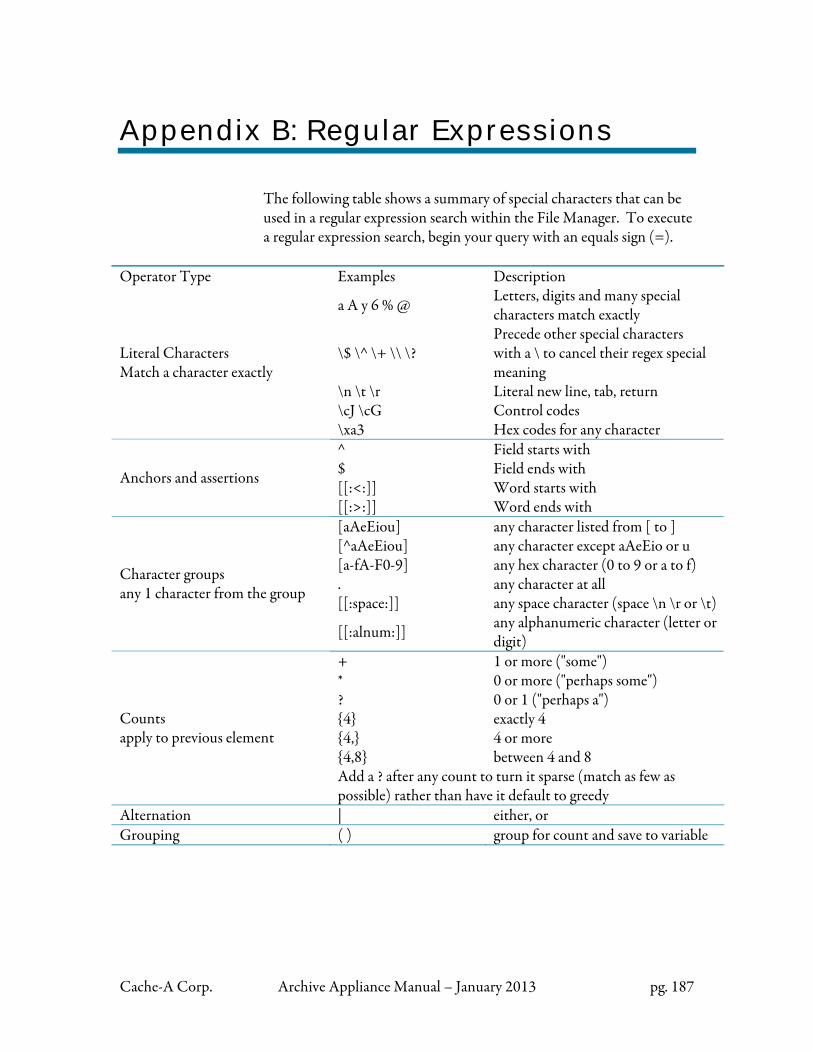
Cache-A Corp. Archive Appliance Manual – January 2013 pg. 187
Appendix B: Regular Expressions
The following table shows a summary of special characters that can be used in a regular expression search within the File Manager. To execute a regular expression search, begin your query with an equals sign (=).
Operator Type Examples Description
a A y 6 % @ Letters, digits and many special characters match exactly
\$ \^ \+ \\ \? Precede other special characters with a \ to cancel their regex special meaning
\n \t \r Literal new line, tab, return \cJ \cG Control codes
Literal Characters Match a character exactly
\xa3 Hex codes for any character ^ Field starts with $ Field ends with [[:<:]] Word starts with Anchors and assertions
[[:>:]] Word ends with [aAeEiou] any character listed from [ to ] [^aAeEiou] any character except aAeEio or u [a-fA-F0-9] any hex character (0 to 9 or a to f) . any character at all [[:space:]] any space character (space \n \r or \t)
Character groups any 1 character from the group
[[:alnum:]] any alphanumeric character (letter or digit)
+ 1 or more ("some") * 0 or more ("perhaps some") ? 0 or 1 ("perhaps a") {4} exactly 4 {4,} 4 or more {4,8} between 4 and 8
Counts apply to previous element
Add a ? after any count to turn it sparse (match as few as possible) rather than have it default to greedy
Alternation | either, or Grouping ( ) group for count and save to variable
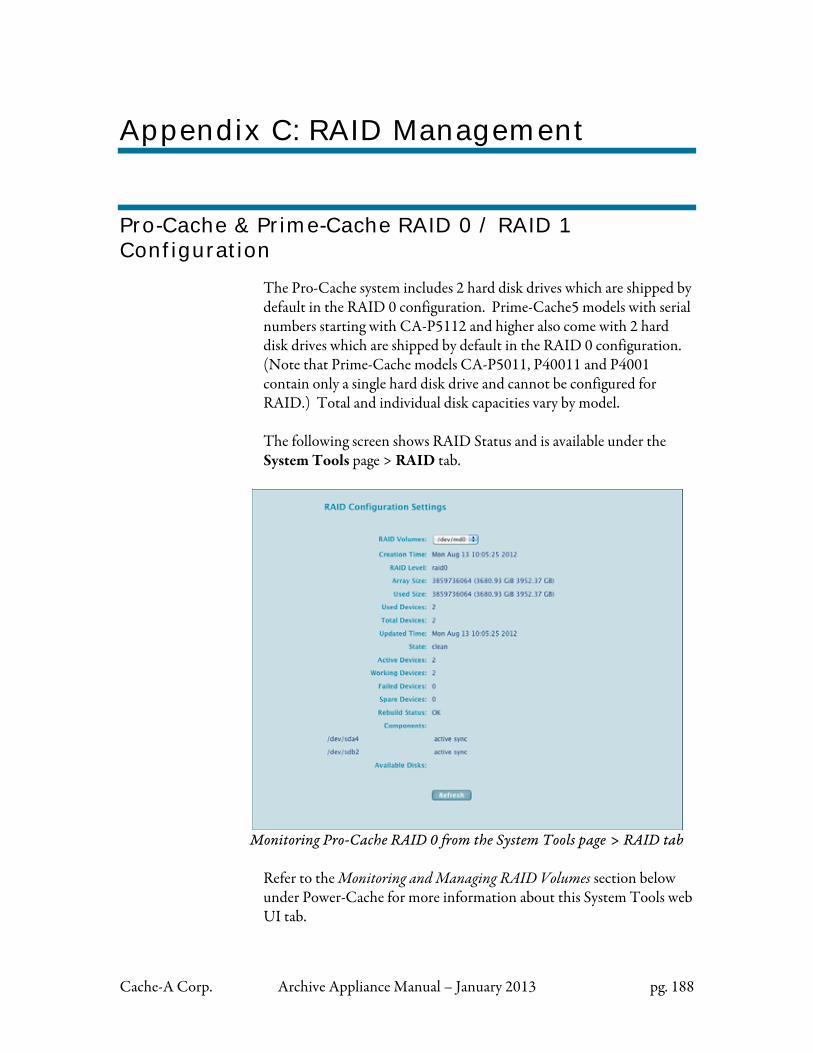
Cache-A Corp. Archive Appliance Manual – January 2013 pg. 188
Appendix C: RAID Management
Pro-Cache & Prime-Cache RAID 0 / RAID 1 Configuration
The Pro-Cache system includes 2 hard disk drives which are shipped by default in the RAID 0 configuration. Prime-Cache5 models with serial numbers starting with CA-P5112 and higher also come with 2 hard disk drives which are shipped by default in the RAID 0 configuration. (Note that Prime-Cache models CA-P5011, P40011 and P4001 contain only a single hard disk drive and cannot be configured for RAID.) Total and individual disk capacities vary by model. The following screen shows RAID Status and is available under the System Tools page > RAID tab.
Monitoring Pro-Cache RAID 0 from the System Tools page > RAID tab
Refer to the Monitoring and Managing RAID Volumes section below under Power-Cache for more information about this System Tools web UI tab.

Cache-A Corp. Archive Appliance Manual – January 2013 pg. 189
Warning Users may change RAID configuration at any time, however any
content on the shared portion of the disk will be lost. Users should also be aware that if power is interrupted or the RAID reconfiguration process is interfered with in any way, the system may become completely inoperable and require a factory rebuild.
RAID 0 provides speed and capacity but data will be lost if a drive fails. RAID 0 is a technique whereby data is stored across hard disks drives in the array – this is referred to as “Striping.” The capacity of a RAID 0 array is the total of the drives. Performance is much faster than with a single drive or with a RAID 1 array.
Example System Status report for a RAID 0 setting
RAID 1 provides complete data protection against a single drive failure. RAID 1 is a technique whereby data is stored identically on hard disks drives in the array – this is referred to as “Mirroring.” The capacity of a RAID 1 array is that of only one of the drives. Performance is roughly equivalent to that of a single drive.
Example System Status report for a RAID 1 setting
In order to change the RAID setting, you must log into a command shell on the system as the root user and type the command for this change as covered in the following sections.
Logging in from the Maintenance Terminal To access the Maintenance Terminal functions, connect any monitor to the VGA port and any mouse and keyboard via the PS2 mouse/keyboard ports or via any of the system USB ports. Note: The
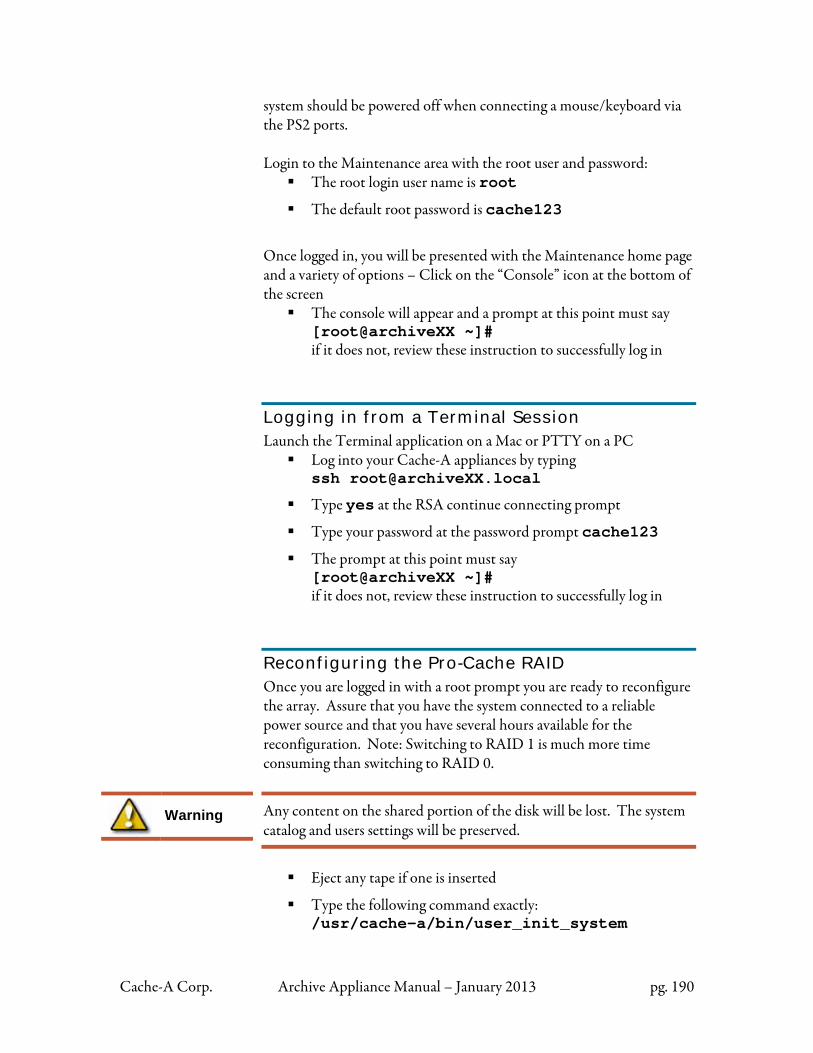
Cache-A Corp. Archive Appliance Manual – January 2013 pg. 190
Warning
system should be powered off when connecting a mouse/keyboard via the PS2 ports. Login to the Maintenance area with the root user and password:
The root login user name is root
The default root password is cache123
Once logged in, you will be presented with the Maintenance home page and a variety of options – Click on the “Console” icon at the bottom of the screen
The console will appear and a prompt at this point must say [root@archiveXX ~]# if it does not, review these instruction to successfully log in
Logging in from a Terminal Session Launch the Terminal application on a Mac or PTTY on a PC
Log into your Cache-A appliances by typing ssh [email protected]
Type yes at the RSA continue connecting prompt
Type your password at the password prompt cache123
The prompt at this point must say [root@archiveXX ~]# if it does not, review these instruction to successfully log in
Reconfiguring the Pro-Cache RAID Once you are logged in with a root prompt you are ready to reconfigure the array. Assure that you have the system connected to a reliable power source and that you have several hours available for the reconfiguration. Note: Switching to RAID 1 is much more time consuming than switching to RAID 0.
Any content on the shared portion of the disk will be lost. The system catalog and users settings will be preserved.
Eject any tape if one is inserted
Type the following command exactly: /usr/cache-a/bin/user_init_system
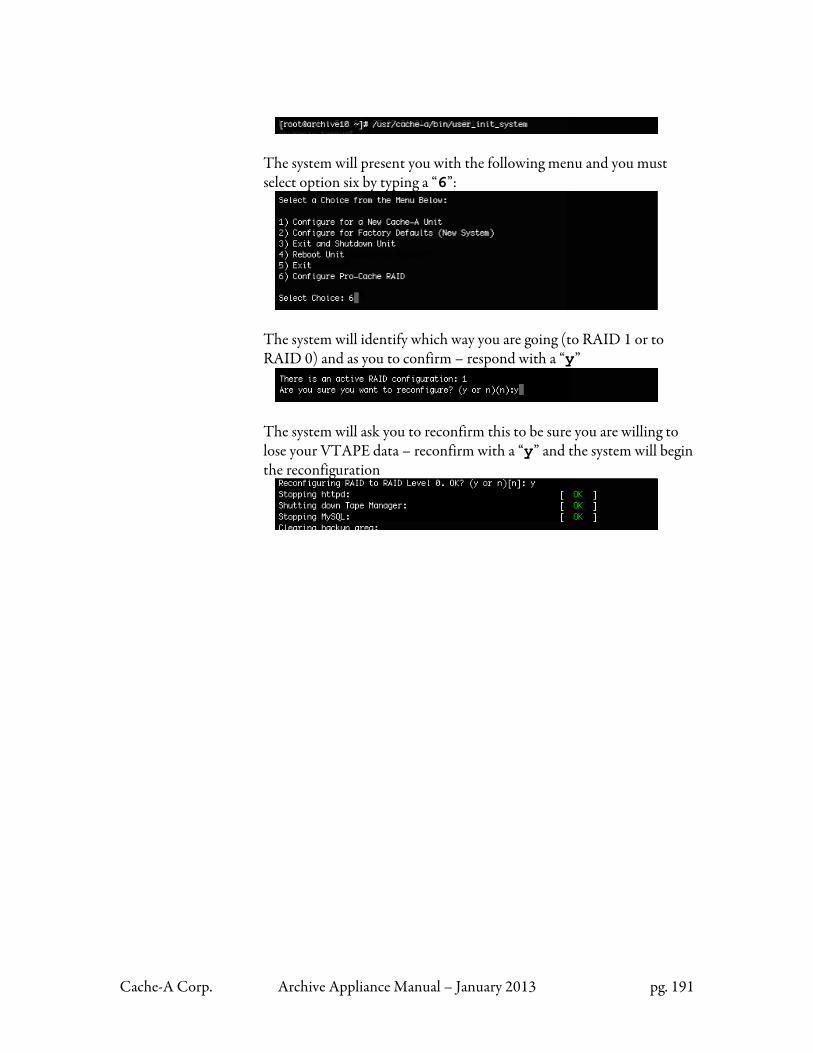
Cache-A Corp. Archive Appliance Manual – January 2013 pg. 191
The system will present you with the following menu and you must select option six by typing a “6”:
The system will identify which way you are going (to RAID 1 or to RAID 0) and as you to confirm – respond with a “y”
The system will ask you to reconfirm this to be sure you are willing to lose your VTAPE data – reconfirm with a “y” and the system will begin the reconfiguration
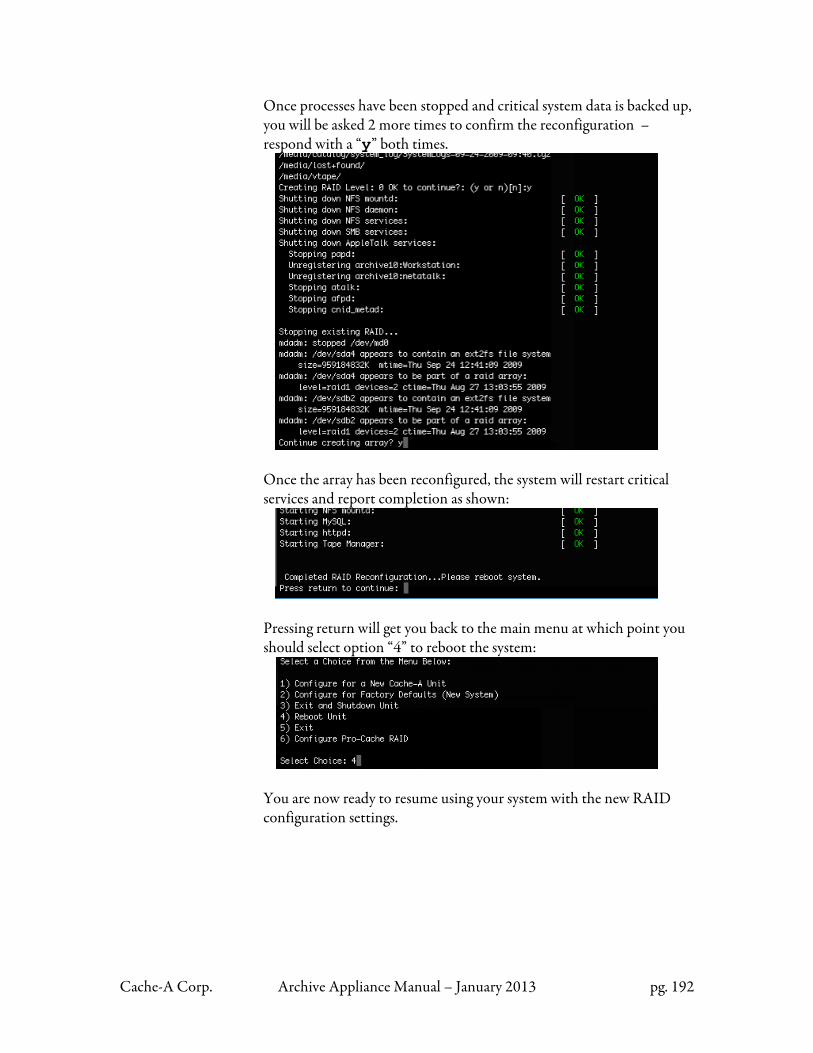
Cache-A Corp. Archive Appliance Manual – January 2013 pg. 192
Once processes have been stopped and critical system data is backed up, you will be asked 2 more times to confirm the reconfiguration – respond with a “y” both times.
Once the array has been reconfigured, the system will restart critical services and report completion as shown:
Pressing return will get you back to the main menu at which point you should select option “4” to reboot the system:
You are now ready to resume using your system with the new RAID configuration settings.
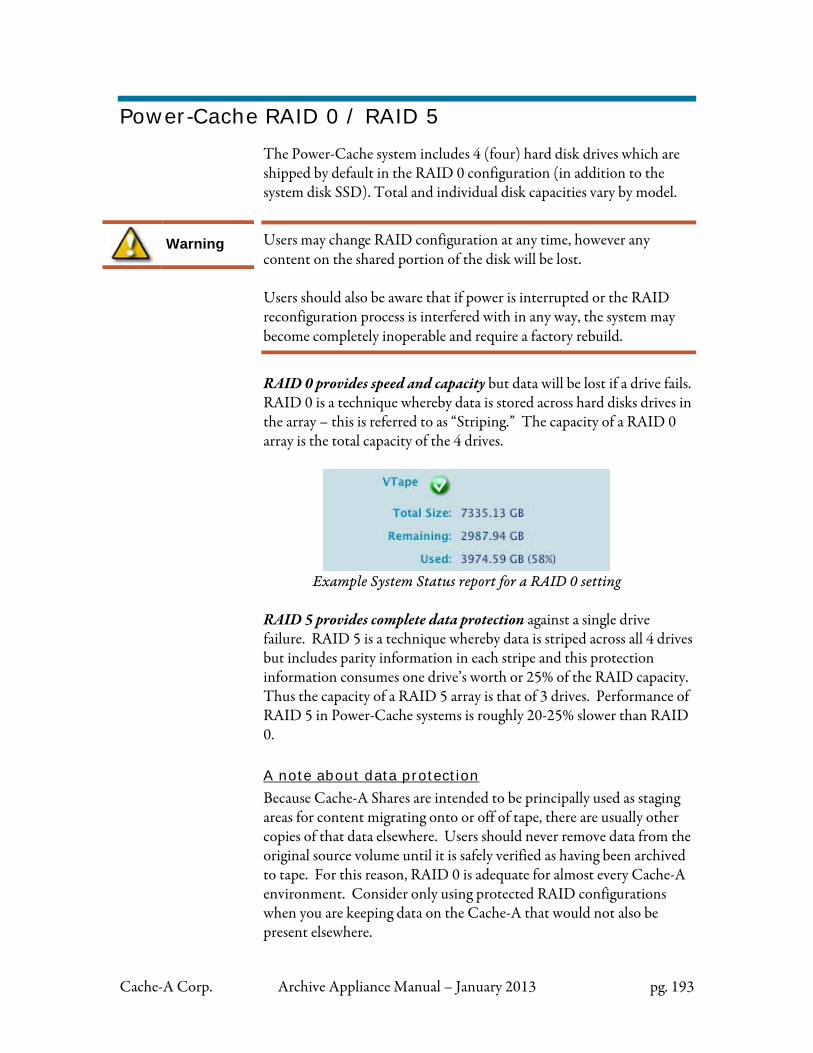
Cache-A Corp. Archive Appliance Manual – January 2013 pg. 193
Warning
Power-Cache RAID 0 / RAID 5
The Power-Cache system includes 4 (four) hard disk drives which are shipped by default in the RAID 0 configuration (in addition to the system disk SSD). Total and individual disk capacities vary by model.
Users may change RAID configuration at any time, however any content on the shared portion of the disk will be lost. Users should also be aware that if power is interrupted or the RAID reconfiguration process is interfered with in any way, the system may become completely inoperable and require a factory rebuild.
RAID 0 provides speed and capacity but data will be lost if a drive fails. RAID 0 is a technique whereby data is stored across hard disks drives in the array – this is referred to as “Striping.” The capacity of a RAID 0 array is the total capacity of the 4 drives.
Example System Status report for a RAID 0 setting
RAID 5 provides complete data protection against a single drive failure. RAID 5 is a technique whereby data is striped across all 4 drives but includes parity information in each stripe and this protection information consumes one drive’s worth or 25% of the RAID capacity. Thus the capacity of a RAID 5 array is that of 3 drives. Performance of RAID 5 in Power-Cache systems is roughly 20-25% slower than RAID 0. A note about data protection
Because Cache-A Shares are intended to be principally used as staging areas for content migrating onto or off of tape, there are usually other copies of that data elsewhere. Users should never remove data from the original source volume until it is safely verified as having been archived to tape. For this reason, RAID 0 is adequate for almost every Cache-A environment. Consider only using protected RAID configurations when you are keeping data on the Cache-A that would not also be present elsewhere.
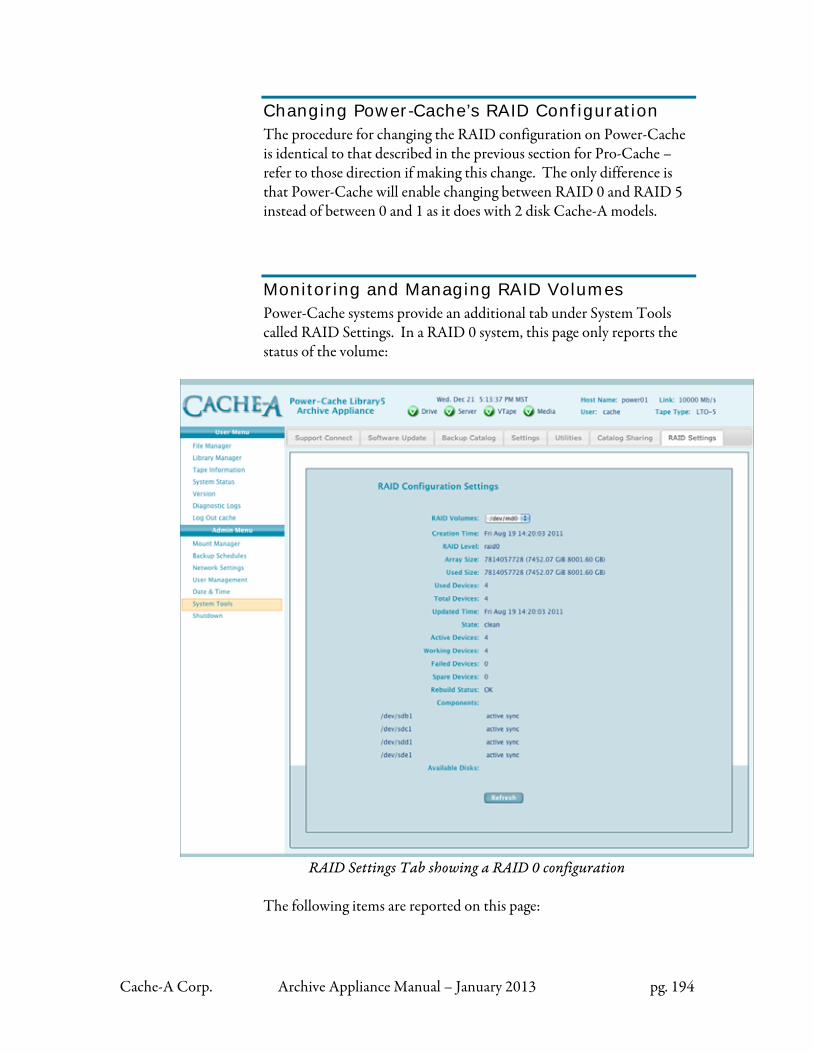
Cache-A Corp. Archive Appliance Manual – January 2013 pg. 194
Changing Power-Cache’s RAID Configuration The procedure for changing the RAID configuration on Power-Cache is identical to that described in the previous section for Pro-Cache – refer to those direction if making this change. The only difference is that Power-Cache will enable changing between RAID 0 and RAID 5 instead of between 0 and 1 as it does with 2 disk Cache-A models.
Monitoring and Managing RAID Volumes Power-Cache systems provide an additional tab under System Tools called RAID Settings. In a RAID 0 system, this page only reports the status of the volume:
RAID Settings Tab showing a RAID 0 configuration
The following items are reported on this page:
Cache-A Corp. Archive Appliance Manual – January 2013 pg. 195
RAID Volumes
Provides a selector to choose between different RAID volumes – currently, for Power-Cache systems, the only choice is the main system volume identified as /dev/md0 Creation Time
Indicates the date and time the volume was created RAID Level
Identifies the RAID mode for this volume – only “raid0” or “raid5” volumes are currently supported Array Size
Reports the total size of the volume in GB (10243) and GiB (10003) Used Size
Reports the total used size of the volume (normally the same as the Array Size Used Devices
Reports the number of devices (disk drives) employed by the volume (Power-Cache volumes currently have 4) Total Devices
Reports the number of devices (disk drives) connected to the RAID volume (Power-Cache volumes currently have 4) Updated Time
Reports the date and time this volume was last modified State
Reports the state of the volume – if everything is working properly this will report “clean” Active Devices
Reports the number of devices (disk drives) currently active in the volume (Power-Cache RAID 5 volumes nominally have 4 devices unless one has failed leaving just 3 active) Failed Devices
Reports the number of devices (disk drives) that have failed in the volume Spare Devices
Reports new or replacement disk devices actively being incorporated into the volume Rebuild Status
If the system is configured for RAID 5 and has failed and a replacement drive has been added, this line item reports the percent complete status of the rebuild – otherwise it reports OK
Cache-A Corp. Archive Appliance Manual – January 2013 pg. 196
Components
Lists the specific devices (disk drives) currently employed by the volume – if RAID 5, provides a button to Fail that device in order to remove it from the RAID – if a drive has been marked as Failed, a Remove button is provided Available Disks
Lists any disk drives that are available to be added back into the RAID set and provides a button to do so if appropriate Refresh
This button causes this page to update its reporting to the current status of the RAID
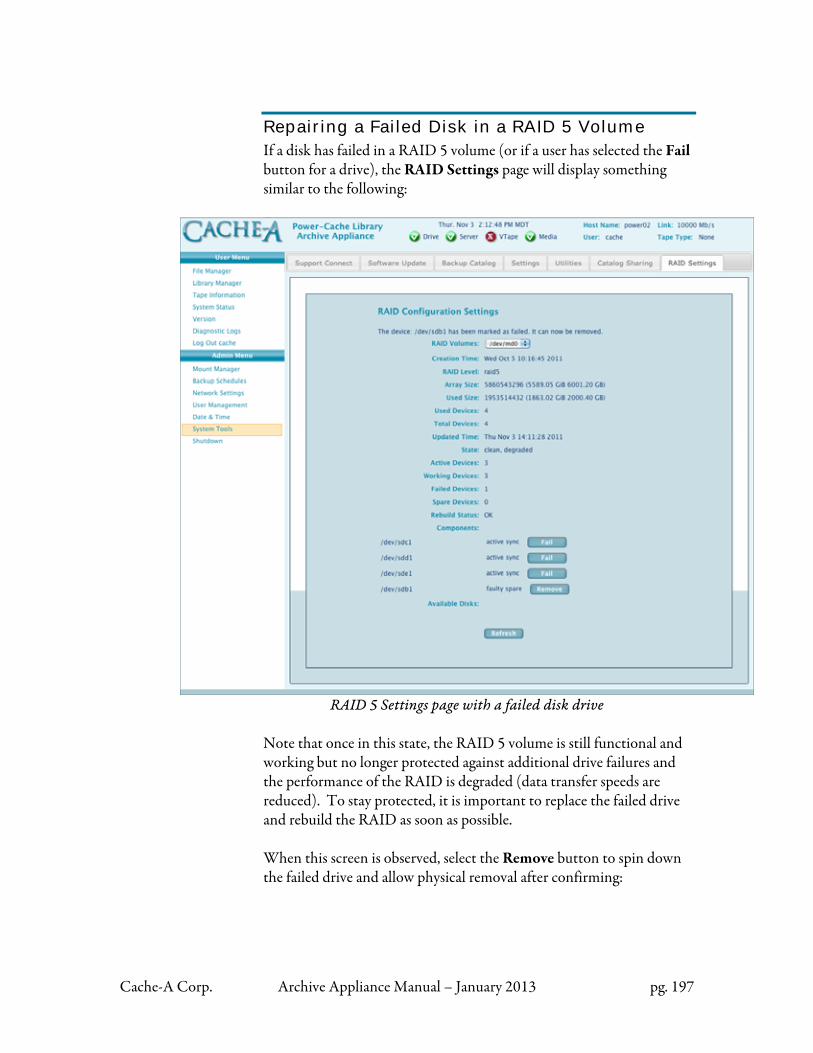
Cache-A Corp. Archive Appliance Manual – January 2013 pg. 197
Repairing a Failed Disk in a RAID 5 Volume If a disk has failed in a RAID 5 volume (or if a user has selected the Fail button for a drive), the RAID Settings page will display something similar to the following:
RAID 5 Settings page with a failed disk drive
Note that once in this state, the RAID 5 volume is still functional and working but no longer protected against additional drive failures and the performance of the RAID is degraded (data transfer speeds are reduced). To stay protected, it is important to replace the failed drive and rebuild the RAID as soon as possible. When this screen is observed, select the Remove button to spin down the failed drive and allow physical removal after confirming:
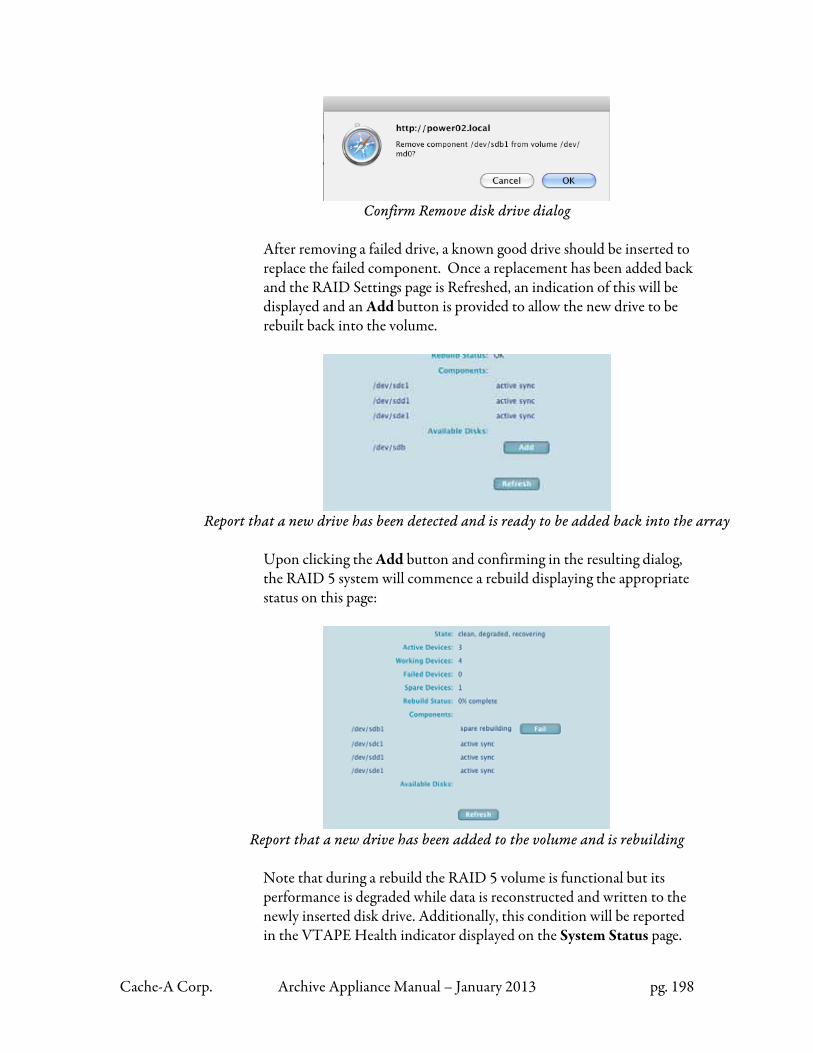
Cache-A Corp. Archive Appliance Manual – January 2013 pg. 198
Confirm Remove disk drive dialog
After removing a failed drive, a known good drive should be inserted to replace the failed component. Once a replacement has been added back and the RAID Settings page is Refreshed, an indication of this will be displayed and an Add button is provided to allow the new drive to be rebuilt back into the volume.
Report that a new drive has been detected and is ready to be added back into the array
Upon clicking the Add button and confirming in the resulting dialog, the RAID 5 system will commence a rebuild displaying the appropriate status on this page:
Report that a new drive has been added to the volume and is rebuilding
Note that during a rebuild the RAID 5 volume is functional but its performance is degraded while data is reconstructed and written to the newly inserted disk drive. Additionally, this condition will be reported in the VTAPE Health indicator displayed on the System Status page.
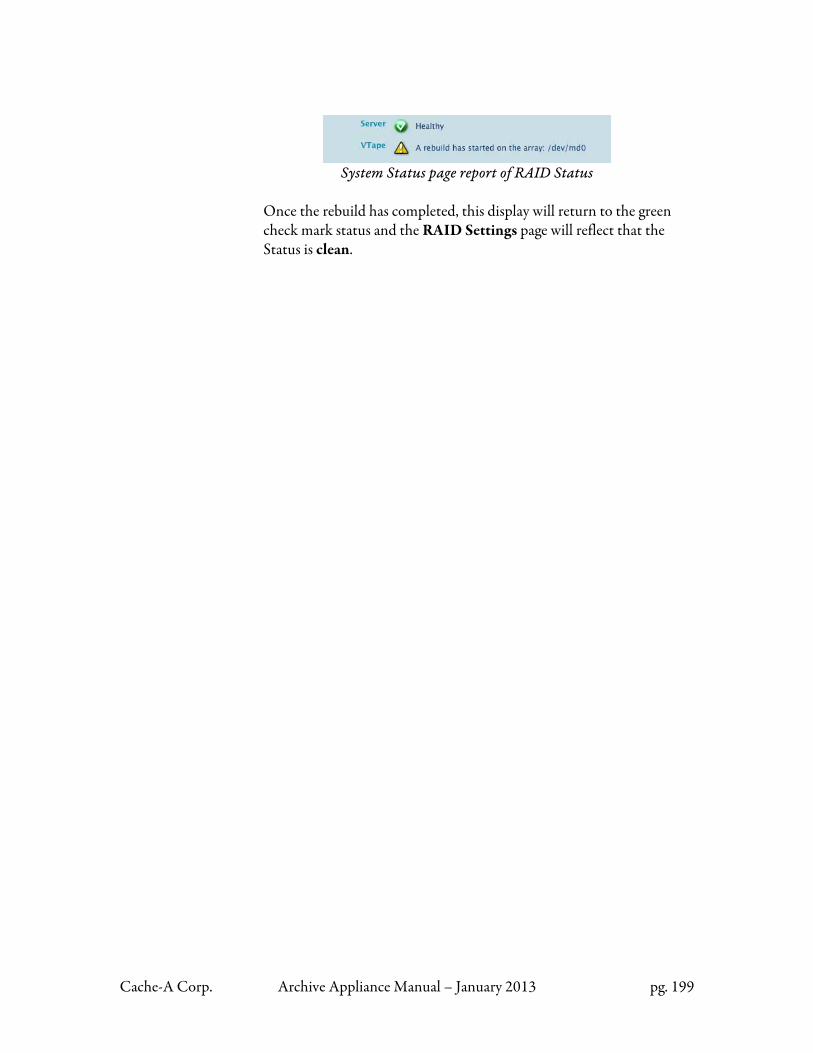
Cache-A Corp. Archive Appliance Manual – January 2013 pg. 199
System Status page report of RAID Status
Once the rebuild has completed, this display will return to the green check mark status and the RAID Settings page will reflect that the Status is clean.