Embed Size (px)
Citation preview

1
PRIMARY SCIENCE CURRICULUM GUIDE
GRADE 5
Unit 1: Human Body - Parts of the body and their roles for healthy living.
Topic Objectives Content Method/Strategies Materials Evaluation Integration
Knowledge Skills Attitude
Effects of
exercise
Observe and
discuss the
effects of
exercise on
breathing
rate
Predict
the
effects of
exercise
on
breathing
rate
Demon-
strate the
effects of
exercise
on
breathing
rate
Record
and inter-
prêt
results of
experi-
ment-
Develop an
awareness
of the need
for regular
exercise
Our breathing rate
increases when we
exercise. This is
because the cells of
our muscles need
extra food and
oxygen when we
exercise. Our lungs
will therefore work
faster to supply
more oxygen and go
back to normal when
we stop exercising.
1. Pupils predict the effects of
exercise on breathing rate.
2. Pupils plan their experiment
to test their predictions.
3. Following class discussion
with teacher on proposed
testing, pupils agree on
procedure.
4. Pupils either exercise for
different lengths of time or vary
the type of exercise e.g.
walking, running, as follows:
(a) If they change the length of
time, they should keep the type
of exercise the same each time.
(b) If they change the type of
exercise, they should keep the
length of time they exercise for
the same each time.
5. Pupils measure their
breathing rate by holding their
hands on their rib cage and
counting how many breaths
they make in a minute. They
should also take the breathing
rate at rest (normal) for
comparison. 6. Results can be
recorded in the form of a table
eg. Exer-cise Exer-cise time
(min) Breath-ing rate (breaths
per minute)
Clock, stop
watch
Were
pupils’
predictions
realistic?
Were
pupils
plans for
their
experi-
ments
approp-
riate? How
did the
results
compare
with the
pupils’
predic-
tions?
Do the
graphs
reflect a
meaningful
compari-
son?
Health and
Family -
Life
Education -
Keeping
healthy and
physically
fit. Mathe-
matics -
Graphs
2
PRIMARY SCIENCE CURRICULUM GUIDE
GRADE 5
Unit 1: Human Body - Parts of the body and their roles for healthy living
Topic Objectives Content Method/Strategies Materials Evaluation Integration
Knowledge Skills Attitude
Effects of
exercise
on heart
beat rate
Discuss the
effects of
exercise on
heart beat
rate.
Predict
the
effects of
exercise
on heart
beat rate.
Demonst
rate the
effects of
exercise
on heart
beat rate.
Record
and
interpret
results of
experi-
ment
Develop
positive or
healthy
attitude to
exercising.
In children the heart
beats about 100 to
120 times a minute.
In grown people it
beats about 70 to 90
times a minute.
When we exercise
the heart beats hard
and fast. The cells
of our muscles need
extra food and
oxygen when we
exercise. So the
heart must beat
faster and work
harder to take more
blood to the
muscles.
7. Results can be represented as
line graphs. One graph for each
type of exercise. Breathing
Rate (breaths per min)
Exercise time (min)
8. Results are interpreted during
class discussion.
1. Recap – Main parts of the
circulatory system.
Heart as the pump and blood
vessels namely arteries, veins
and capillaries. Simply state
functions of arteries, veins and
capillaries.
2. Pupils predict the effects of
exercise on the heart beat rate.
3. Pupils plan their experiment
to test their predictions. 3.
Following class discussion with
teacher on proposed testing,
pupils agree on procedure.
4. Pupils could perform the
following experiment. Take the
resting pulse rate for one
minute and record it. (a pulse
can be taken by placing the
first two fingers of one hand
on the inner side of the wrist
of the other hand). (b) Pupils
run in place or jump on the
spot for one minute.
Clock, stop
watch
Were
pupils’
predictions
realistic?
Were
pupils’
plans for
their
experiment
appropriate?
Did pupils
have
difficulty in
taking their
pulse?
Health and
Family Life
Education _
Keeping
healthy and
physically
fit.
3
PRIMARY SCIENCE CURRICULUM GUIDE
GRADE 5
Unit 1: Human Body - Parts of the body and their roles for healthy living
Topic Objectives Content Method/Strategies Materials Evaluation Integration
Knowledge Skills Attitude
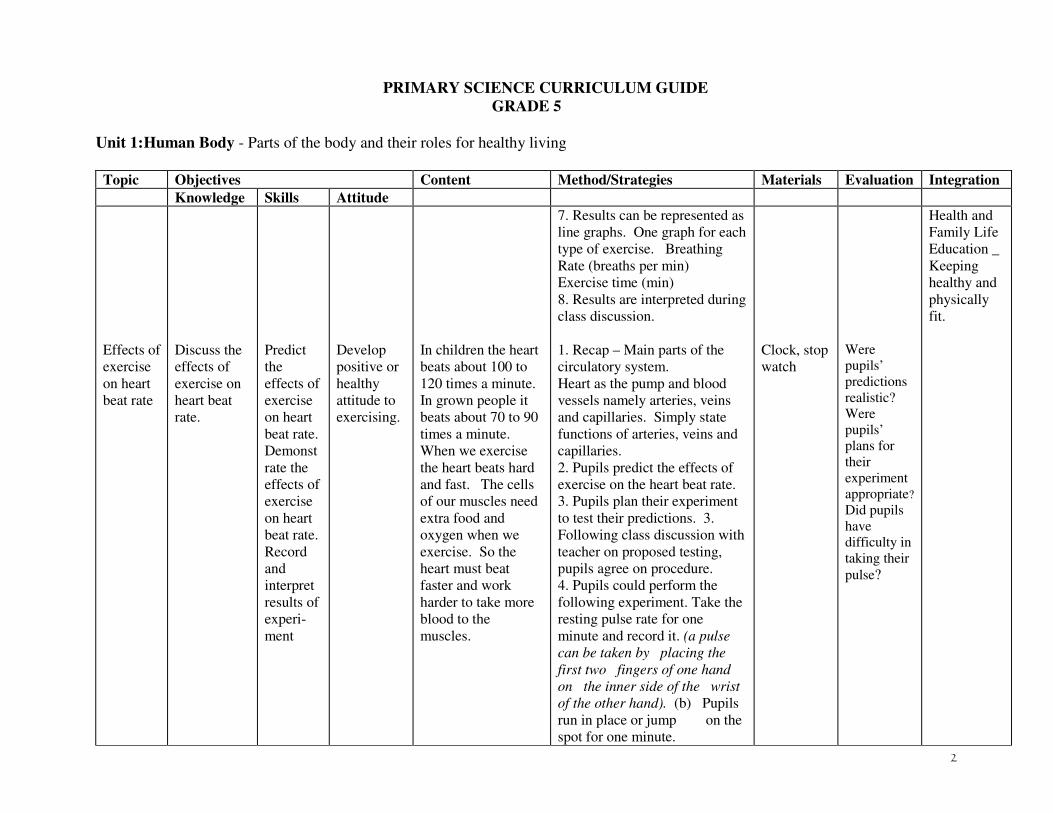
c) Pulse rate is then taken
and recorded. (d) Pulse rate is
then taken every two minutes
over the next ten minutes and
rate recorded. (e) Pupils
compare pulse rate before
exercise, immediately
after exercise and ten
minutes after exercise.
5. Class discusses results and
makes conclusions.
How did
the results
compare
with the
pupils’
predic-
tions?

4
PRIMARY SCIENCE CURRICULUM GUIDE
GRADE 5
Unit 1: Human Body - Parts of the body and their roles for healthy living
Topic Objectives Content Method/Strategies Materials Evaluation Integration
Knowledge Skills Attitude
Effects of
high- fat
diets
Discuss the
effects of
high-fat
diets on the
heart.
Interpret
obser-
vations
Develop an
awareness
of the
dangers of
high-fat
diets and
thereby
avoiding
such diets.
The blood travels
around our body in
blood vessels called
arteries, veins and
capillaries. Too
much fat in our diets
causes these vessels
to become blocked.
This leads to
hypertension (high
blood pressure) and
can result in heart
attacks.
1. Pupils suggest effects of diets
high in fats. 2. During class
discussion teacher gives simple,
but not detailed explanation, of
these effects. 3. Pupils observe
(a) samples of foods rich in fats
(b) picture of foods/diets high
in fats (c) boxes, wrappers and
labels of foodstuffs showing
content or composition. 4.
Class summarises guidelines for
providing low-fat diets. 5.
Pupils share guidelines with
family members and encourage
their adoption.
Samples of
foods rich
in fats.
Pictures of
foods/diets
high in
fats. Boxes,
wrappers
or labels of
foodstuffs.
Did pupils
suggest
effects of
high-fat
diets?
Were
pupils
willing to
share
guidelines
with family
members?
Health and
Family Life
Education -
Guidelines
for healthy
living.

5
PRIMARY SCIENCE CURRICULUM GUIDE
GRADE 5
Unit 1: Human Body - Parts of the body and their roles for healthy living
Topic Objectives Content Method/Strategies Materials Evaluation Integration
Knowledge Skills Attitude
Wastes
of the
body
Identify
wastes of
the body.
Observe and
identify
ways in
which the
body gets
rid of these
wastes.
Record
obser-
vations in
the form
of a table
Willingnes
s to
observe
good
hygiene
practices in
keeping the
body clean
especially
with regard
to urine
and sweat.
Our body produces
waste products
which must be given
off. The giving off
or removal of wastes
is called excretion.
These waste
products include
carbon dioxide,
urine and sweat.
Carbon dioxide is
given off through
the nose when we
breathe out or
exhale. Waste
products from the
blood are collected
by the kidneys and
sent to the bladder
as urine and then
excreted. Sweat is
given off by the skin
through perspiration.
1.Pupils identify waste products
and by which organ each is
excreted. 2. Pupils briefly
explain how each product is
excreted. 3. After class
discussion with teacher,
information is summarized in
the form of a table thus: Waste
Product-Organ-How Excreted ----- ------- ------- ------ ------- --
----- ------ ------ ------
4.Teacher explains that faeces
removal is the end process of
digestion called egestion.
Model of
internal
organs of
human
body
Pictures/
charts
showing
internal
organs of
the human
body
Were
pupils able
to name the
waste
products
and related
organs?
Were
pupils able
to say how
the body
gets rid of
the wastes?
Can pupils
explain
what is
egestion?
Health and
Family Life
Education -
Keeping
healthy

6
PRIMARY SCIENCE CURRICULUM GUIDE
GRADE 5
Unit 1: Human Body - Parts of the body and their roles for healthy living
Topic Objectives Content Method/Strategies Materials Evaluation Integration
Knowledge Skills Attitude
Effects of
smoking
Discuss the
effects of
smoking on
the body.
Demon-
strate the
effects of
smoking
on the
body.
Observe
and inter-
prêt
results
from
demon-
stration
Develop an
awareness
of the
dangers of
smoking
and thus
avoid the
bad and
unhealthy
habit.
The nicotine in
tobacco tends to
make the heart beat
faster. Tobacco
smoke in a smoker’s
lungs cuts down on
the amount of
oxygen available to
the heart and
bloodstream.
Smoking raises
blood pressure by
narrowing the blood
vessels and making
the heart beat faster.
Smoking is a main
cause of cancer. It
results in stained
teeth and lips,
offensive breath and
can ruin
relationships.
Smoking is an
expensive habit.
This demonstration can be
done by someone who smokes,
teacher, school employee or
parent. Smoker inhales from a
lighted cigarette, holding the
smoke in the mouth without
allowing it to go into the lungs.
Place a white handkerchief over
the mouth stretched as firmly as
possible. 3 Blow the smoke
back through the handkerchief;
a dark stain will be left.
Cigarette
Matches
Hand-
kerchief
Were
pupils
familiar
with the
effects of
tobacco
smoke?
Were
pupils
surprised at
the stains
or the
amount of
tar in
inhaled and
exhaled
cigarette
smoke?
Health and
Family Life
Education -
Dangers/
Effects of
smoking.

7
PRIMARY SCIENCE CURRICULUM GUIDE
GRADE 5
Unit 1: Human Body - Parts of the body and their roles for healthy living
Topic Objectives Content Method/Strategies Materials Evaluation Integration
Knowledge Skills Attitude
6. Note the difference between
the two stains.
7. Pupils also state some
harmful effects on health and
social relationships.
8. Class discusses these effects.
9. Working in small groups,
pupils make posters showing
the harmful effects of smoking.
Pupils display posters in class
and school.

8
PRIMARY SCIENCE CURRICULUM GUIDE
GRADE 5
Unit 1: Human Body - Parts of the body and their roles for healthy living
Topic Objectives Content Method/Strategies Materials Evaluation Integration
Knowledge Skills Attitude
Effects of
drugs
Discuss the
effects of
drugs on the
body.
Identify
useful and
harmful
drugs
Classify
drugs as
useful or
harmful.
Develop an
awareness
of the
effects of
useful and
harmful
drugs.
Develop
the healthy
attitude of
using only
useful
drugs.
We use drugs to
treat diseases and
relieve pain. If the
drugs are not used
properly some can
cause severe health
problems and even
death. Patent
medicines, over the
counter (OTC) and
prescribed drugs or
medicines usually
have beneficial
effects. Harmful or
dangerous drugs
include alcohol,
nicotine from
tobacco, caffeine
from coffee and tea,
marijuana (ganga)
and cocaine (coke).
1. Pupils name some common
drugs, both useful and harmful.
2. Class is divided into small
groups and discusses the effects
of the drugs. 3. Pupils look at
pictures of persons using drugs
and their effects on them.
4. Teacher and pupils provide
labels, wrappers and packets
that have information on the
effect of the drugs e.g. patent
medicines and cigarette as on
cigarette packet/box. .
5. Pupils share information
during class discussion. 6.
Teacher and class place drugs
into two groups, useful and
harmful (illicit) drugs.
Pictures of
persons
using drugs
and the
effects of
such drugs.
Labels,
empty
wrappers
and
packets.
Resources
for
research
and
present-
ation of
projects
e.g. books,
magazines,
newspapers
writing
paper,
cardboard,
markers.
Were
pupils able
to name
some
patent and
illicit
drugs?
Was
information
on labels,
wrappers
and packets
useful?
Did pupils
identify the
effects of
both types
of drugs?
Health and
Family Life
Education
and Social
Studies -
Effects of
Useful and
Harmful
Drugs.

9
PRIMARY SCIENCE CURRICULUM GUIDE
GRADE 5
Unit 2: Animal Kingdom - The Variety, features and life processes of animals
Topic Objectives Content Method/Strategies Materials Evaluation Integration
Knowledge Skills Attitude
External
features
of
inverte-
brates
Identify
external
features of
in-
vertebrates
Observe
inverte-
brates to
identify
external
features.
Display
respect for
life by
handling
organisms
with care.
Display
safety /
precautions
to avoid
harm to
organisms
and injury
to
themselves.
Invertebrates, that is,
animals without
backbones have
different external
features. Their body
covering varies from
soft as in worms to a
hard shell as in
crabs. Some
invertebrates have
no legs, others have
six, eight, ten and
even many more
legs. Also, some
have no wings,
while some have one
and two pairs of
wings.
1. Teacher and pupils provide a
wide variety of invertebrates
such as earthworm, millipede,
insects (e.g. ants, flies,
butterfly, beetle) spider, snail,
crab, shrimp. Both living and
preserved specimens would be
useful.
2. Pupils work in small groups.
They examine and observe the
external features of the
organisms. Teacher gives class
safety precautions e.g. not
putting fingers in their mouth
after touching organisms.
3. Pictures of invertebrates can
be used in observing and
identifying their external
features.
Wide
variety of
in-
vertebrates
– live or
preserved
specimens
e.g.
earthworm,
millipede,
ant, fly,
beetle,
snail, crab,
shrimp.
Pictures of
in-
vertebrates.
Were
pupils
familiar
with
external
features of
in-verte-
brates?
Were
pupils able
to use the
external
dis-
tinguishing
features?
En-
vironmental
Education
and school
yard
ecology –
Variety of
in-
vertebrates.

10
PRIMARY SCIENCE CURRICULUM GUIDE
GRADE 5
Unit 2: Animal Kingdom - The Variety, features and life processes of animals
Topic Objectives Content Method/Strategies Materials Evaluation Integration
Knowledge Skills Attitude
Groups
of
inverte-
brates
Group
inverte-
brates using
identified
external
features.
Observe
inverte-
brates to
identify
external
features.
Classify
inverte-
brates
accord-
ing to
their
features.
Appreciate
that there is
a wide
variety of
inverte-
brates.
The observable
external features of
invertebrates can be
used to put them
into different
groups. While most
have an external
skeleton, a major
difference is in their
body appendages, of
wings and legs.
Worms have no
wings or legs
Insects have six
legs, one or two
pairs or no wings.
Arachnids e.g.
spiders have eight
legs.
Crustaceans e.g.
crabs, shrimp and
lobster, have ten to
twenty legs and no
wings. They have a
hard shell.
Myriapods e.g.milipedes and
centipedes have
more than twenty
legs. Molluscs e.g.
snails protect their
bodies by a hard
shell.
4. Pupils report their findings
during class discussion.
5. Teacher and class summarise
external features. Pupils will
work in small groups.
1. Using organisms from
previous lessons and the
features observed, pupils
arrange the organisms
(invertebrates) into groups with
respect to number of legs (no
legs, 6, 8, 10 or more than 10
legs), wings and type of
exoskeleton.
2. Pictures of invertebrates can
be used.
3. Class summarises
information as follows: Group
Main features Exam-ples ------ -
------ ----- ------ ------- ----- ----
-- ------- ----- 4. Pupils
collect and paste on cardboard
pictures of at least one
invertebrate from each group..
Wide
variety of
inverte-
brates as
used in
previous
lesson
Pictures of
inverte-
brates
cardboard
paste
Were
pupils
familiar
with
external
features of
inverte-
brates?
Were
pupils able
to use the
external
distinguish-
ing
features?
Did pupils
handle
organisms
with care?
Did pupils
display
safety
precau-
tions?
Environ-
mental
Education
and School
Yard
Ecology -
groups of
inverte-
brates

11
PRIMARY SCIENCE CURRICULUM GUIDE
GRADE 5
Unit 2: Animal Kingdom - The Variety, features and life processes of animals
Topic Objectives Content Method/Strategies Materials Evaluation Integration
Knowledge Skills Attitude
Life
cycle of
insects
Identify the
stages in the
life cycle of
an insect
showing
complete or
gradual
metamor-
phosis and
another
showing
incomplete
or direct
metamor-
phosis.
Observe
stages in
both
complete
(gradual)
and
incomple
te (direct)
metamor-
phosis.
Record
observ-
ations in
a table.
Make
infer-
ences
from
observ-
ations.
Display
respect for
life by
handling
organisms
with care.
Display
safety pre-
cautions
to avoid
injury or
harm by
organisms
Many young insects
do not look like the
adult. Insects develop
in stages. The
sequence of stages is
called metamorphosis
(many changes of
form). For example,
the butterfly passes
through four stages of
egg, larva
(caterpillar) egg,
larva, (caterpillar),
pupa and imago
(adult).
This is called
complete or gradual
metamorphosis.
This lesson should be spread over a few weeks. 1. Teacher
and pupils look in flower or
kitchen garden for eggs laid by
butterfly or moth on leaves,
usually the lower surface. 2. If
eggs are not found, teacher and
pupils should look for larva or
caterpillar. 3. Eggs or larva are
placed in a box or bottle and
covered with a net or guaze-like
material to allow gases to enter
and leave. 4. The caterpillar is
fed with leaves from the tree on
which it was found.
Egg, larva
(caterpillar)
pupa, adult
butterfly or
moth. Egg,
nymph and
adult
cockroach
or grass-
hopper
Honey bee
or wasp
(mara-
bunta) nest
Pictures of
stages in
life cycle
of insects
Were
pupils
familiar
with
insects?
Were
pupils able
to observe
the
different
stages in
the
metamor-
phoses and
their main
distin-
guishing
features?
Agricultural
Science and
School Yard
Ecology -
Life cycle of
insects.

12
PRIMARY SCIENCE CURRICULUM GUIDE
GRADE 5
Unit 2: Animal Kingdom - The Variety, features and life processes of animals
Topic Objectives Content Method/Strategies Materials Evaluation Integration
Knowledge Skills Attitude
Draw the
stages of
metamor-
phosis of
chosen
inverte-
brates.
The cockroach
passes through three
stages of egg,
nymph and imago
(adult). This is
called incomplete or
direct metamorphosis.
Other insects that
show complete
(gradual)
metamorphosis are
the housefly,
mosquito, honey
5. Pupils observe specimen
daily and note changes in the
form of a table. DAY
OBSERVATION ………..
…………. ………..
………….. 6. As a
substitute or to support changes,
part of a honey bee or wasp
(marabunta) nest could be used,
opened and observed over four
days. Note: Caution is
necessary when handling and
transporting nests. Do not ask
pupils to collect nests. Care
taken to avoid being stung by
insects. 7. Teacher and pupils
look for and examine the eggs
of cockroach or grasshopper.
Can pupils
distinguish
between
complete
(gradual)
and
incomplete
(direct)
meta-
orphosis?

13
PRIMARY SCIENCE CURRICULUM GUIDE
GRADE 5
Unit 2: Animal Kingdom - The Variety, features and life processes of animals
Topic Objectives Content Method/Strategies Materials Evaluation Integration
Knowledge Skills Attitude
Life
cycle of
frog or
toad
Identify
stages in the
life cycle of
a frog or
toad.
Observe
stages in
the life
cycle of a
frog or
toad.
Display
respect for
life by
handling
organisms
with care.
Bee, wasp and
moths. Incomplete
or direct
metamorphosis also
occurs in the
grasshopper.
Frog and toads are
amphibians and can
live in water and on
land. Most frogs or
toads begin their
life-cycle in water as
the eggs can develop
only under moist or
wet conditions.
8. Pupils observe specimen
daily for two weeks, observe
changes and record same in the
form of a table as before. 9.
Class discusses and summarises
observation,. 10. Pupils make
simple drawings of stages in
both types of metamorphoses.
This lesson will take a few
weeks 1. Teacher and pupils
collect some pond/stream water
with frog/toad eggs and place
same in a transparent container.
Pond/
stream
water with
frog/toad
eggs
Tadpoles
Were
pupils
familiar
with
amphibian
eggs or
tadpoles?
Did pupils
observe
changes?
School Yard
Ecology -
Life cycle of
amphibians

14
PRIMARY SCIENCE CURRICULUM GUIDE
GRADE 5
Unit 2: Animal Kingdom - The Variety, features and life processes of animals
Topic Objectives Content Method/Strategies Materials Evaluation Integration
Knowledge Skills Attitude
Record
observ-
ations on
stages of
the life-
cycle of
amphib-
ians.
The eggs hatch into
a larval stage called
tadpole. The tadpole
lives in water and
develop into young
frogs, as shown
below. Egg
tadpole Frog/
young toad
frog/toad
2. To the sample of water,
pupils add some plant materials.
3. Pupils observe specimen over
a period of time noting changes
and recording observations in
the form of a table DAY
OBSERVATIONS …………
……………………
…………………… 4.
Observations are compared
with those of complete
(gradual) metamorphosis in
insects. 5.Class discusses
observations and make
conclusions.
Did pupils
compare
metamor-
phosis with
that in
insects?

15
PRIMARY SCIENCE CURRICULUM GUIDE
GRADE 5
Unit 3: Plant Kingdom - The variety, features and life processes of plants
Topic Objectives Content Method/Strategies Materials Evaluation Integration
Knowledge Skills Attitude
Func-
tions of
leaves
State that
leaves make
food for
plants.
Test
leaves for
the
presence
of starch.
To display
care and
safety in
using
equipment,
chemicals
and heat.
The leaves of a plant
make its food. The
green colouring
matter of the leaf
called chlorophyll
traps sunlight and
combines it with
water from the soil,
and carbon dioxide
from the air to make
carbohydrates and
produce oxygen gas
as a by-product.
This process is
called
photosynthesis (photo-light and
synthesis- building
up).
To show photosynthesis, leaves
can be tested for the presence of
starch. This experiment
involves the use of heat and
should be done as a
demonstration by the teacher.
1. Pupils detach (pick) two
small leaves from two plants
that have been in sunlight for a
few hours. A totally green leaf
and a variegated (of different
colours) leaf, say from the
hibiscus, would be useful. 2.
Teacher places leaves in boiling
water in a beaker or any
suitable container to kill them.
3. Teacher then places the dead
leaves in alcohol or methylated
spirits in a test tube, smaller
beaker or any other suitable
container to extract the
chlorophyll or the green
colouring matter.
Green leaf,
variegated
leaf, 2
beakers
(small and
smaller) or
suitable
containers
1 test tube
(small)
water,
alcohol or
methylated
spirits,
iodine
solution,
potato, heat
source.
Did pupils
follow
steps in
demon-
stration
done by
teacher?
Did pupils
understand
why
alcohol or
methylated
spirits was
not heated
directly or
why a
water bath
was used?
Did pupils
understand
the need to
carry out
the starch
test?
Agricultural
Science -
Food from
plants.

16
PRIMARY SCIENCE CURRICULUM GUIDE
GRADE 5
Unit 3: Plant Kingdom - The variety, features and life processes plants
Topic Objectives Content Method/Strategies Materials Evaluation Integration
Knowledge Skills Attitude
Note: Alcohol and methylated
spirits are flammable and
should not be heated directly
but rather in a water bath, that
is, in a container of heated
water. 4. Place the brittle
leaves in the hot water to soften
them. 5. Dry the leaves, place
them on a clean flat surface,
add a few drops of iodine
solution to them and observe.
Note: The Starch Test Iodine
solution added to a known
starchy surface e.g. potato,
turns bluish black or purple.
Was it
useful to
use a
variegated
leaf?

17
PRIMARY SCIENCE CURRICULUM GUIDE
GRADE 5
Unit 3: Plant Kingdom - The variety, features and life processes of plants
Topic Objectives Content Method/Strategies Materials Evaluation Integration
Knowledge Skills Attitude
State that
leaves give
off excess
water in the
form of
vapour.
Set up
simple
apparatus
to show
loss of
excess
water by
leaves.
Display
care and
accuracy in
setting up
apparatus
for experi-
ment.
Water that the plant
does not use in the
form of vapour is
given off by any
exposed part of a
plant mainly the
leaves. This process
is called
transpiration. In
the leaves, this is
done by tiny
openings called
stomata (singular
stoma) found
mainly on the under
surface of the leaf
Leaves breathe for
the plant. That is,
they take in and give
off oxygen and
carbon dioxide.
Pupils should use well-watered
plants. Over one branch of a
potted plant, pupils will tie or
secure a clear cellophane or
plastic bag on the stem. For
another branch of the same
plant, pupils will remove all the
leaves and tie or secure another
clear cellophane or plastic bag
on the stem. Pupils will leave
the plant in the sunlight for a
few hours and then observe the
cellophane or plastic bags. As
an alternative, pupils may use
two different potted plants or
plants growing in the ground.
Potted
plants,
plants
growing in
the earth,
cellophane
or plastic
bags.
Twine/
String,
anhydrous
copper
sulphate,
cobalt
chloride
paper
Did pupils
tie or
secure
cellophane
or plastic
bags
properly?
What was
observed in
the
cellophane
or plastic
bags? Was
it possible
to verify or
test the
vapours
collected?

18
PRIMARY SCIENCE CURRICULUM GUIDE
GRADE 5
Unit 3: Plant Kingdom - The variety, features and life processes of plants
Topic Objectives Content Method/Strategies Materials Evaluation Integration
Knowledge Skills Attitude
Mono-
cotyle-
dons and
dicoty-
ledons
State the
features of
monocoty-
ledonous
and dicoty-
ledonous
plants.
Observe
features
of
monoco-
tyledons
and
dicoty-
ledons.
Display
care in
handling
plants.
Flowering
plants that have one
cotyledon (or seed
leaf) in their seeds are
called
monocotyledons.
Those plants that
have two cotyledons
(two seed leaves) in
their seeds are called
dicotyledons.
Note: It is better or
‘experimentally correct’ to test
the vapour in the cellophane or
plastic bags to show whether it
is water or not. This can be
done by using either (a)
anhydrous (white powdered)
copper sulphate which turns
blue with the addition of water,
or (b) cobalt chloride paper
(blue) turns pink with the
addition of water. 1. Teacher
and pupils provide a wide range
of seeds e.g. corn, paddy,
awara, black-eye, bora, mango,
coconut, peanut, pigeon peas,
carilla. 2.Pupils examine the
seeds provided to determine if
the cotyledon or inner food
store is in one or two pieces.
Variety of
seeds such
as corn,
paddy,
awara,
blackeye,
bora,
mango,
coconut,
peanut.
Was the
range of
seeds
adequate
and useful?
Were
pupils able
to identify
the
cotyledons
of seeds?
School Yard
Ecology -
Features of
monocoty-
ledons and
dicotyledons

19
PRIMARY SCIENCE CURRICULUM GUIDE
GRADE 5
Unit 3: Plant Kingdom - The Variety, features and life processes of plants
Topic Objectives Content Method/Strategies Materials Evaluation Integration
Knowledge Skills Attitude
Record
obser-
vations in
a table.
Classify
plants as
monoco-
tyledons
or dicoty-
ledons
using
observ-
able
features.
Monocotyledons
also have parallel-
veined leaves and
fibrous roots. Some
examples are corn,
coconut, rice and
awara.
Dicotyledons also
have net-veined
leaves and tap roots.
Some examples are
black-eye, bora,
peanut and mango.
Pupils may need to open up
some seeds to see the
cotyledon. Pupils place seeds
into two groups; those with one
cotyledon and those with two
cotyledons. 3. Pupils visit
school yard and school garden
and observe plants, especially
those of the seeds provided, and
examine the type of leaves and
roots. 4..Pupils may also
examine plants at home and
other areas in their
environment.
pigeon
peas,
carilla.
Were
pupils able
to
summarise
the main
features of
monocoty-
ledons and
dicoty-
ledons?
Can pupils
say if a
plant is a
monocoty-
ledon or a
dicoty-
ledon from
the type of
leaf or root
it has?
School Yard
Ecology -
Features of
monocoty-
ledons and
dicotyledons

20
PRIMARY SCIENCE CURRICULUM GUIDE
GRADE 5
Unit 3: Plant Kingdom - The Variety, features and life processes of plants
Topic Objectives Content Method/Strategies Materials Evaluation Integration
Knowledge Skills Attitude
5. Pupils will summarise their
findings in the form of a table as
follows: Plant /Type of Leaf/ Root Sys-tem
Coty ledon Plant / Group Bora Net-veined/
Tap 2 Dicoty-ledon …… …… …...
….. ….. ….. …… ….. ….. ….
See Science Around Us
Book 5, Page 56 Pupils then
discuss the main features of
monocotyledons and
dicotyledons.

21
PRIMARY SCIENCE CURRICULUM GUIDE
GRADE 5
Unit 4: Environment - Components of the environment and their interrelations
Topic Objectives Content Method/Strategies Materials Evaluation Integration
Knowledge Skills Attitude
The
decay of
plant and
animal
materials
State which
materials are
biodegrad-
able, and
which are
non-
biodegrad-
able.
Investi-
gate how
organic
(plant
and
animal)
materials
decay.
Predict
which
materials
decay
faster.
Make
inference
Display
proper
sanitation
in handling
dead and
decaying
materials.
Materials from
plants and animals
are called organic.
These materials
include leaves,
flowers, fruits, stems
and roots of plants.
Animal materials
include their flesh,
faeces, skin, hair,
fur. Most of these
organic materials rot
or decay over a
period of time.
Similarly, when
plants and animals
die their bodies rot
or decay over a
longer period of
time.
This topic may be covered in two
lessons. Observations however,
will be made over a period of two
weeks. 1. Pupils will work in
small groups. 2. They will use
small transparent, plastic
containers such as jars and
cellophane bags into which they
will place a small sample of
different materials. 3. Materials
to be used can include bread,
fruits, vegetables and their
peelings, leaves, grass, small
pieces of plastic, glass and metal.
Small
trans-
parent,
plastic
contain-
ers small,
clear,
cello-
phane
bags,
bread,
fruits,
vege-
tables,
leaves,
grass,
plastic
objects,
glass,
metals,
water,
soil.
Did pupils
use a
comparable
range of
materials?
Were
pupils able
to verify
their
predic-
tions?
What is the
effect of
water and
soil in the
decay or
decomposit
ion of
materials?
School Yard
Ecology and
Environ-
mental
Education -
Decay of
plant and
animal
materials.

22
PRIMARY SCIENCE CURRICULUM GUIDE
GRADE 5
Unit 4: Environment - Components of the environment and their interrelations
Topic Objectives Content Method/Strategies Materials Evaluation Integration
Knowledge Skills Attitude
This process of
decay or
decomposition
causes substances
that make up plants
and animals to go
back into the earth
and the world.
Materials such as
fruits, paper,
cardboard and
cotton that decay
within a short period
of time are said to be
biodegradable.
Materials such as
plastic, glass and
metals which will
not decay are said to
be non-bio
degradable.
4. For each material used, three
samples should be used as
follows: a) by itself b) moistened
with water c) covered with soil
and moistened with water 5.
Water is added periodically as
necessary. 6. Pupils will predict
which materials will rot or decay
first, which will decay later and
which will never decay.
Can pupils
say what is
the benefit
of using
biode-
gradable
materials?

23
PRIMARY SCIENCE CURRICULUM GUIDE
GRADE 5
Unit 4: Environment - Components of the environment and their interrelations
Topic Objectives Content Method/Strategies Materials Evaluation Integration
Knowledge Skills Attitude
7. Pupils observe each sample of
material daily for two weeks and
record observations in the form of
a table as follows: Day/Sample In Air /
Moistened In Soil 8. Pupils
compare their predictions with
their observations. 9. During
class discussion pupils should be
able to say if water (moisture) and
the soil help in the decay of
materials and why.

24
PRIMARY SCIENCE CURRICULUM GUIDE
GRADE 5
Unit 4: Environment - Components of the environment and their interrelations
Topic Objectives Content Method/Strategies Materials Evaluation Integration
Knowledge Skills Attitude
Wastes
and their
disposal
State some
common
wastes and
methods of
their
disposal.
Classify
the
different
types of
wastes
and their
method
of
disposal.
Adopt and
encourage
proper and
sanitary
disposal
of wastes.
Man’s activities
produce many
wastes. Garbage and
litter from the home
make up domestic
wastes. The wastes
given off by factories
include smoke,
fumes, heat and
poisonous chemicals.
These are called
industrial wastes.
Agricultural wastes
include manure, trash
and plastic. Urine and
faeces are called
biological wastes.
Proper and safe
methods of waste
disposal are
necessary to prevent
pollution of the soil,
water and air.
1. Pupils work in small groups. 2.
They make a brief visit to school
yard and observe litter, garbage
and rubbish heap. They make a
list of wastes produced in the
home, farm, factory, etc. , and
group them as follows: Home /
Farm / Factory Others …… …….
……. ……. …… …… …….
…… 3. Pupils consider ways
by which each set of wastes can
be best disposed of.
Pictures
of
different
types of
wastes
and their
methods
of
disposal.
Was there
litter,
garbage or
rubbish in
school
yard?
Were
pupils able
to identify
different
types of
wastes?
Were
pupils
familiar
with the
methods of
waste
disposal?
Environ-
mental
Education,
School Yard
Ecology,
Agricultural
Science,
Social
Studies -
Wastes and
their
disposal.
Art and
Craft -
Making
posters

25
PRIMARY SCIENCE CURRICULUM GUIDE
GRADE 5
Unit 4: Environment - Components of the environment and their interrelations
Topic Objectives Content Method/Strategies Materials Evaluation Integration
Knowledge Skills Attitude
These methods
include (a) Proper
collection and storage
of wastes. (b)
Recycling wastes that
are reused in the
manufacture of new
materials and goods.
Biodegradable wastes
eg. grass and faeces,
can be recycled to
produce compost and
biogas. Non-
biodegradable wastes
eg. glass and plastic
can also be recycled.
(c) Burning
combustible material
(d) Proper disposal of
faeces and urine
4. Following class discussion,
pupils summarise information in
the form of a table Source / Waste
/ Means of Dis-posal …….
…….. ……. …….. …….. …….
Ref: Science Around Us, Book 6,
Page 32. 5. Each group would
make a poster showing the proper
disposal of a different type of
waste.
26
PRIMARY SCIENCE CURRICULUM GUIDE
GRADE 5
Unit 4: Environment - Components of the environment and their interrelations
Topic Objectives Content Method/Strategies Materials Evaluation Integration
Knowledge Skills Attitude
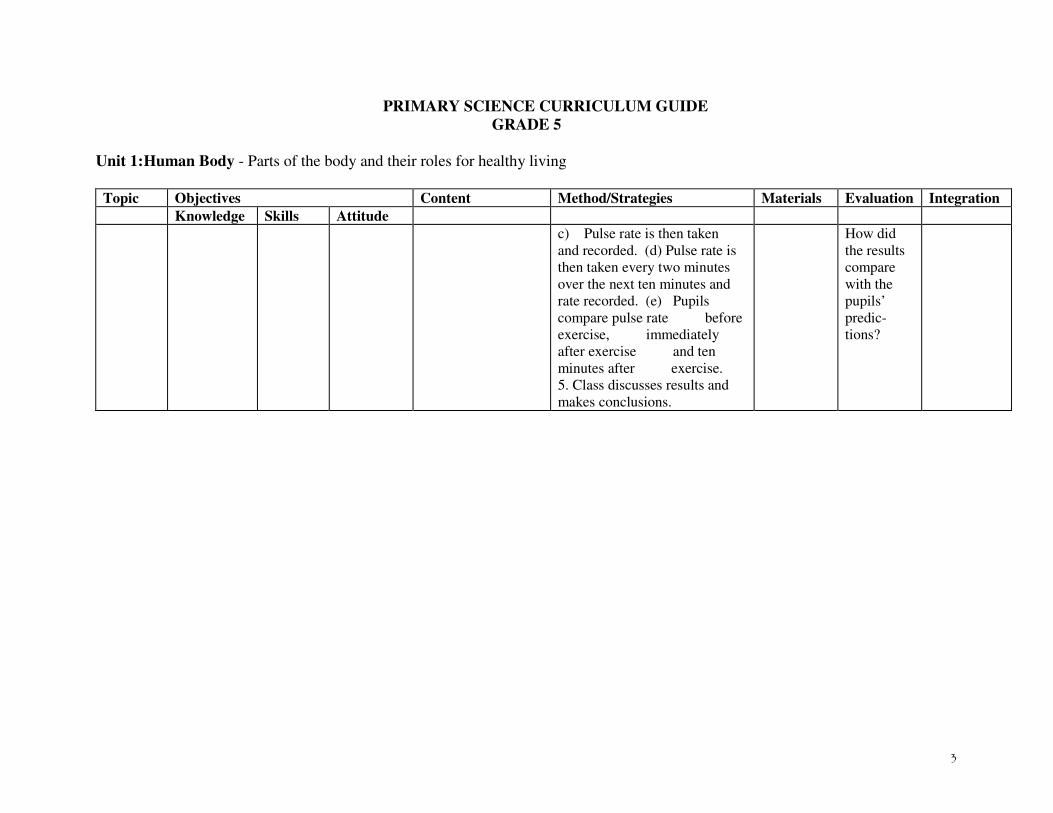
(e) Filling up land,
and useless ponds
and trenches with
wastes. (f) Proper
management of sites
with dumped wastes
(‘garbage dumps’).
See Appendix 50 Ways to Reduce
Your Waste by the Environmental
Protection Agency (EPA),
Guyana Note: After the next
lesson, class should make a
compost pit.

27
PRIMARY SCIENCE CURRICULUM GUIDE
GRADE 5
Unit 4: Environment - Components of the environment and their interrelations
Topic Objectives Content Method/Strategies Materials Evaluation Integration
Knowledge Skills Attitude
Conser-
vation of
materials
Discuss
ways by
which
materials
including
resources
can be
conserved.
Observe
both
accept-
able and
unaccep-
table
effects of
using
materials
or
resources
Instill
habit of
conserv-
ing
materials/
resources.
Materials that we use
in the home, school
and at the workplace
must be used
properly and wisely
so as to preserve
them and prevent
wastage. These
materials include
foodstuff, clothing,
stationery, furniture,
medicines and
agricultural inputs.
Other materials such
as the soil, water and
minerals are called
natural resources.
1. Pupils work in small groups.
They discuss ways by which
materials including resources can
be used wisely or conserved.
They may use books and
magazines and also view posters
and pictures as provided by
bodies such as the Environmental
Protection Agency (EPA). 2.
Teacher conducts class discussion
as groups report, then summarises
some common methods of
conservation. 3. As a follow-up,
each group is assigned the task to
prepare, within two weeks, a
poster to illustrate a different
method of conservation.
Books,
magaz-
ines,
posters,
pictures
Were the
resource
materials
useful?
Did pupils
discuss
practical
methods of
conserva-
tion? Were
the posters
meaning-
ful?
Technology
Education/
Environ-
mental
Education/
Social
Studies -
Use of
materials
including
resources.
Art and
Craft -
Making
posters

28
PRIMARY SCIENCE CURRICULUM GUIDE
GRADE 5
Unit 4: Environment - Components of the environment and their interrelations
Topic Objectives Content Method/Strategies Materials Evaluation Integration
Knowledge Skills Attitude
The wise use of
materials and their
preservation is called
conservation. Some
methods of
conservation include:
(a) using only the
amount of materials
needed. (b) storing
properly all unused
materials. (c)
recycling materials
eg. paper, glass,
plastic, aluminium
cans, as discussed in
previous lesson. (d)
avoiding the pollution
of land, water and
other resources in the
environment. (e)
making alternative
uses of some
materials, containers,
etc.

29
PRIMARY SCIENCE CURRICULUM GUIDE
GRADE 5
Unit 4: Environment - Components of the environment and their interrelations
Topic Objectives Content Method/Strategies Materials Evaluation Integration
Knowledge Skills Attitude
The
causes,
effects
and
preven-
tion of
the
pollution
of land,
water and
air
Discuss the
causes,
effects and
prevention
of pollution
of land,
water and
air.
Use
research
skills in
project
work.
Reinforce
the
practice of
reducing
or even
preventing
pollution..
The improper use of
materials which
results in harm to the
environment leads to
pollution. Pollution
is often caused by
man and affects land,
water and air. Land
pollution often results
from the improper
disposal of wastes
from human activities
and from animals.
This includes
dumping of litter and
use of agricultural
chemicals. Water is
also polluted by litter,
garbage and
chemicals from
factories and by oil
spills.
1. Review lesson on methods of
waste disposal. 2. Teacher
conducts visit to school yard or
near-by environment for class to
observe any signs of pollution. 3.
Pupils give the main causes and
effects of pollution during a brief
class discussion. 4. Teacher
divides class into small groups, at
least three or six groups,
depending on class size. Each
group will do a project on the
causes, effects and prevention of
pollution of land, water or air. (If
there are three groups ,one would
deal with land, another with
water and the other air. If there
are six groups, two would deal
with land, water and air
respectively.)
Books
magazines,
posters,
pictures
cardboard,
markers,
paste
Were
pupils
familiar
with the
main
causes and
effects of
pollution?
Did each
pupil
contribute
to the
group
project?
What is the
quality of
the group
reports?
Are there
evidences
of simple
research?
Environ-
mental
Education/
School
Yard
Ecology/
Social
Studies -
Causes,
effects and
prevention
of
pollution.

30
PRIMARY SCIENCE CURRICULUM GUIDE
GRADE 5
Unit 4: Environment - Components of the environment and their interrelations
Topic Objectives Content Method/Strategies Materials Evaluation Integration
Knowledge Skills Attitude
Smoke from fires and
vehicles and also
toxic fumes from the
burning of plastic and
rubber pollute the air.
Pollution of land
results in foul smell,
spread of diseases
and reduction in soil
fertility.
Contaminated water
spreads diseases such
as gastro-enteritis,
typhoid, diarrhoea
and cholera. Polluted
air results in smogs
and affects
breathing by both
plants and animals .
5. Pupils will seek information
from as many different sources as
possible. They will summarise
their work under the headings of
causes, effects and prevention .
Submission should be on regular-
sized card-board. Pictures,
photographs, etc. may be
submitted. 6. Project may take
about two weeks to complete. 7.
Group report will be posted up in
classroom followed by
presentation and discussion. 8.
Corrected group submissions can
be used in a school exhibition.

31
PRIMARY SCIENCE CURRICULUM GUIDE
GRADE 5
Unit 4: Environment - Components of the environment and their interrelations
Topic Objectives Content Method/Strategies Materials Evaluation Integration
Knowledge Skills Attitude
Noise
Pollution
Define noise
pollution
and state its
effects.
Use
research
skills in
project
work.
Develop
an
awareness
of noise
pollution
and how it
affects
others.
Damage to the protective
filtering layer of the
atmosphere, that is, the o-
zone layer, results in skin
and other diseases.
Pollution can be
prevented by 1.proper
disposal of wastes.
2.restricting use
of agricultural chemicals
3.keeping water ways
clear of grass and weeds
4.reduce or stop the
burning of plastics and
rubber 5 use treated
petrol (f)
6. reduce the use of
aerosol sprays.
Loud unpleasant and
unwanted sounds are
called noise pollution.
Such sounds can make us
ill.
Noise can cause deafness
as well as heart attack,
hypertension and stomach
ulcers. There are laws to
help reduce noise at work
and during leisure time.
1. Pupils list examples of
noise pollution.
2. They research
(a) noise pollution at work
(b) what can be done to
reduce noise pollution
3. Teacher and pupils
discuss the effects on
general health and hearing.
Texts,
magazines,
newspapers,
with
information
on Noise
Pollution.
Did pupils
find out
about noise
pollution at
work and
what
regulations/
measures
are in place
to reduce
such?
Social
Studies –
Give re-
sponsibilities

32
PRIMARY SCIENCE CURRICULUM GUIDE
GRADE 5
Unit 5: Weather - Types, features and effects of the weather
Topic Objectives Method/Strategies Materials Evaluation Integration
Knowledge Skills Content
Effects of
the
weather
Discuss the
effects of
the weather
on humans
and the
environment
Observe
the
effects of
the
weather
on
humans
and the
environ-
ment
Apprec-
iate that
the
weather
has both
useful and
harmful
effects on
humans
and the
environ-
ment
The weather which
includes the sun, rain
and wind, affects
humans, other
animals, plants and
the environment. The
sun which provides
heat and light helps
plants and animals
make food to grow
and develop. Rain
provides water for
drinking and other
domestic purposes. It
also helps plants and
animals to grow. Too
much rain can result
in floods which can
ruin homes and crops.
Very high tides have
a similar effect.
1. Pupils will work in small
groups.
2. They will visit the school yard
and immediate environment to
observe effects of the weather.
3. On return to classroom, pupils
will further observe and discuss
the effects of the weather. They
will use books, magazines,
posters, pictures, weather reports
from newspapers, etc., to get
more information.
4. Pupils summarise effects and
present same during class
discussion.
Books,
magazines,
posters,
pictures,
weather
reports
from
newspapers
During out
door
classroom
visits, did
pupils
observe
any effects
of the
weather?
Did pupils
state both
useful and
harmful
effects of
the
weather?
Environ-
mental
Education,
School -
Yard
Ecology,
Social
Studies -
Effects of the
Weather

33
PRIMARY SCIENCE CURRICULUM GUIDE
GRADE 5
Unit 5: Weather – Types, features and effects of the weather
Topic Objectives Content Method/Strategies Materials Evaluation Integration
Knowledge Skills Attitude
Too little water
results in drought
which reduces the
growth of crops and
animals. The wind
keeps us cool. It
helps birds and some
animals to fly.
Strong winds can
cause damage to life
and property. Very
strong winds like
hurricanes result in
damage to buildings,
crops, animals and
humans.

34
PRIMARY SCIENCE CURRICULUM GUIDE
GRADE 5
Unit 5: Weather - Types, features and effects of the weather
Topic Objectives Content Method/Strategies Materials Evaluation Integration
Knowledge Skills Attitude
Effects of
the sun,
water and
wind on
rocks.
Discuss the
effects of
the sun,
water and
wind on
rocks.
Observe
the
effects of
the sun,
water and
wind on
rocks.
Record
and
report
obser-
vations
The sun, water and
wind cause rocks to
break up into smaller
pieces. This process
is called weathering.
Heat from the sun
causes rocks to
expand during the
day. At nights the
rocks cool down and
get smaller. When
this expansion and
contraction occur
over a period of time
the rocks crack and
break up. Rain and
water falling on rocks
over a long period of
time cause some parts
to wear away slowly.
This can lead to the
formation of cracks.
The wind can break
off small pieces of
rocks from larger
ones. It can also pick
up small stones and
sand and hit them
against larger pieces
of rocks thereby
breaking them into
smaller pieces.
1. Pupils will work in small
groups. 2. They will visit the
school yard and immediate
environment to observe any signs
of weathering. They may look for
the effects of water from a pipe or
gutter falling on a piece of rock or
a concrete surface. 3. On return to
classroom, teacher demonstrates
the effect of water falling on ice
for a few minutes. This can be
compared to water falling on
rocks. 4. Pupils will discuss
further the effects of weathering.
5. Pupils summarise the effects of
weathering and present same
during class discussion.
Ice, water During out
door
classroom
visit, did
pupils
observe
any signs
of weather-
ing? Was
the demon-
stration of
water
falling on
ice
meaning-
ful?
Environ-
mental
Education
and Social
Studies -
Weathering
of rocks.

35
PRIMARY SCIENCE CURRICULUM GUIDE
GRADE 5
Unit 6: Materials - Properties and changes in the states of matter
Topic Objectives Content Method/Strategies Materials Evaluation Integration
Knowledge Skills Attitude
Solutes,
solvents
and
solution
Explain
what is a
solute,
solvent and
solution.
Identify
solutes and
solvents in
solutions.
Find out
which
materials
are
soluble in
some
common
liquids.
Record
infor-
mation in
the form
of a table
Sugar added to water
seems to disappear.
However, sugar
added to oil does not
change. The sugar is
said to dissolve in the
water but not in the
oil. Materials that
dissolve in another
are said to be soluble.
For example, sugar
and salt are soluble in
water. Materials that
do not dissolve are
said to be insoluble.
For example, sand is
insoluble in water.
1. Pupils work in small groups or
preferably in pairs. 2. They will
test some common house - hold
materials for solubility in some
common liquids. These materials
could include sugar, salt, flour,
fruit juice, sand, water, oil, etc.
(see list of materials). a) They
may use water or drink bottle cap
into which they will pour a little
of the liquids such as water and
oil. b) Using a small plastic or
sanitary spoon, they will then put
a small quantity of sugar in each
cap of liquid. They will leave for
a while and then observe what
happens. c) They will repeat and
test each of the other house-hold
materials.
Water/
drink bottle
caps, sugar,
salt, flour,
fruit juice,
sand,
plastic,
milk
powder,
soap
powder,
water, oil,
oil paint,
tar,
kerosene
Did pupils
observe
which
materials
were
soluble in
which
liquids?
Were
pupils able
to identify
the solutes
and
solvents in
the
solutions?
Food and
Nutrition -
Making
beverages.

36
PRIMARY SCIENCE CURRICULUM GUIDE
GRADE 5
Unit 6: Materials - Properties and changes in the states of matter
Topic Objectives Content Method/Strategies Materials Evaluation Integration
Knowledge Skills Attitude
When a substance
dissolves in another,
a solution is formed.
The substance that
dissolves is called the
solute while that
which does the
dissolving is called
the solvent. solute +
solvent=solution Solutes are usually
solids while solvents
are usually liquids.
Oil paint and tar are
soluble in kerosene
but not in water .
While milk and fruit
juice are soluble in
water but not in oil.
(d) They will record their results
and observations in the form of a
table as follows: Material Water
Oil Sugar soluble insoluble Salt
--------- -------- Flour etc. ---------
------- 3.Teacher demonstrates
to class the mixing of oil paint
with kerosene and then tar with
kerosene. 4. Class interprets
results of investigations. 5.
Teacher introduces the terms
dissolve, soluble, insoluble,
solute, solvent, solution.. 6. As a
follow-up, pupils may at home
test other materials for solubility.

37
PRIMARY SCIENCE CURRICULUM GUIDE
GRADE 5
Unit 6: Materials - Properties and changes in the states of matter
Topic Objectives Content Method/Strategies Materials Evaluation Integration
Knowledge Skills Attitude
The rate
at which
materials
dissolve
State what
speeds up
the
dissolving
of materials
Predict
what
speeds up
the
dissolv-
ing of
materials.
Mani-
pulate
Equip-
ment to
test
predic-
tions
using
simple
apparatus
and
materials.
Measure
volume
Display
care and
safety
when
using
heated
materials.
The rate at which
some materials
(solutes) dissolve in
other materials
(solvents) can be
increased by stirring
and raising the
temperature of the
solvent. These
processes are
common in the
making of beverages,
tea, coffee and in
some other cooking
procedures.
Pupils will work in small groups.
1. They suggest what speeds up
dissolving. (They may say stirring
and increase in temperature).
They will decide how they will
carry out their investigations. 2.
They should use sugar, water and
small sanitary cups. 3. To
investigate the effects of stirring
they should pour the same
volume of water, about 20 ml, in
each of three sanitary cups A, B
and C. To each cup they will add
the same amount of sugar, about
1 tablespoon, and treat as follows:
A= no stirring B = slow stirring C
= fast stirring They will note the
observations and results.
Sugar
water-cold,
normal,
warm
sanitary
cups.
measuring
cylinder or
dropping/
medicine
pipette,
table
spoon,
plastic
spoon
Did pupils
make
realistic
predic-
tions?
Were
pupils able
to verify
their
predic-
tions?
Were
pupils able
to compare
predictions
to everyday
practices in
the home
e.g. making
beverages,
tea, coffee,
etc. and
cooking?
Food and
Nutrition -
Making
beverages
and cooking
Mathematics-
Measuring
volume

38
PRIMARY SCIENCE CURRICULUM GUIDE
GRADE 5
Unit 6: Materials - Properties and changes in the states of matter
Topic Objectives Content Method/Strategies Materials Evaluation Integration
Knowledge Skills Attitude
Separa-
ting
mixtures
Explain how
substances
in mixtures
can be
separated.
Demon-
strate the
processes
of
sieving
and
filtering
Draw
simple
diagrams
Mixtures of
substances can be
separated by different
methods.
4. To investigate the effect of
temperature, pupils will repeat
step 3 above using instead cold,
normal and warm water in cups
A, B and C respectively.
However, they will NOT stir the
materials. They will then note
their observations and results. 5.
Pupils should repeat step 4 above
and stir the contents of each cup.
They will also note their
observations and results. Pupils
will work in small groups. 1.
They will be presented with
simple mixtures e.g. pebbles and
bottle caps, buttons and seeds to
be separated.
Peas, rice,
sand, salt
water,
sanitary
cups,
funnel,
table
tissue/
paper
towel, filter
paper.
Did pupils
suggest
possible
methods of
separation?
Technology
Education -
Separating
mixtures
39
PRIMARY SCIENCE CURRICULUM GUIDE
GRADE 5
Unit 6: Materials - Properties and changes in the states of matter
Topic Objectives Content Method/Strategies Materials Evaluation Integration
Knowledge Skills Attitude
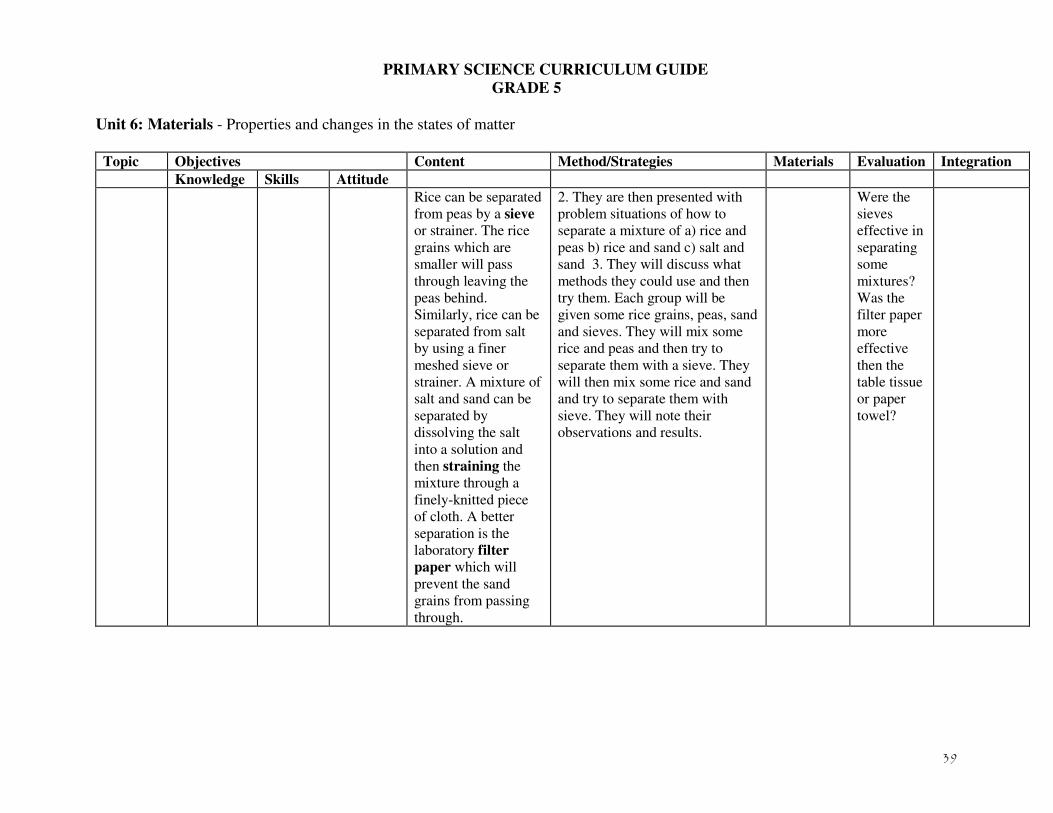
Rice can be separated
from peas by a sieve
or strainer. The rice
grains which are
smaller will pass
through leaving the
peas behind.
Similarly, rice can be
separated from salt
by using a finer
meshed sieve or
strainer. A mixture of
salt and sand can be
separated by
dissolving the salt
into a solution and
then straining the
mixture through a
finely-knitted piece
of cloth. A better
separation is the
laboratory filter
paper which will
prevent the sand
grains from passing
through.
2. They are then presented with
problem situations of how to
separate a mixture of a) rice and
peas b) rice and sand c) salt and
sand 3. They will discuss what
methods they could use and then
try them. Each group will be
given some rice grains, peas, sand
and sieves. They will mix some
rice and peas and then try to
separate them with a sieve. They
will then mix some rice and sand
and try to separate them with
sieve. They will note their
observations and results.
Were the
sieves
effective in
separating
some
mixtures?
Was the
filter paper
more
effective
then the
table tissue
or paper
towel?

40
PRIMARY SCIENCE CURRICULUM GUIDE
GRADE 5
Unit 6: Materials - Properties and changes in the states of matter
Topic Objectives Content Method/Strategies Materials Evaluation Integration
Knowledge Skills Attitude
4. Pupils will then try to separate
a mixture of salt and sand.
Each group
will be
provided
with at
least two
sanitary
cups, some
water, a
funnel, two
table
tissues or a
piece of
paper
towel.
They will
add some
water to
the mixture
to dissolve
the salt in
one of the
sanitary
cups.
They will
line the
inside of
the funnel
with a table
tissue or
pieces of
paper
towel and
place the
funnel
inside the
other
sanitary
cup.

41
PRIMARY SCIENCE CURRICULUM GUIDE
GRADE 5
Unit 6: Materials - Properties and changes in the states of matter
Topic Objectives Content Method/Strategies Materials Evaluation Integration
Knowledge Skills Attitude
They will then gently pour the
mixture of salt solution and sand
through the funnel. They will note
the observations and results.
If
laboratory
filter paper
is
available,
pupils will
repeat 4 (b)
above
using the
filter paper
instead of
the tissue.
They will
compare
the
observation
s and
results. 5.
Pupils will
make a
simple
diagram of
the filtering
apparatus.
6. Teacher
will heat
the filtrate
or salt
solution to
separate
the salt
from the
water.

42
PRIMARY SCIENCE CURRICULUM GUIDE
GRADE 5
Unit 7: Earth and Space - Components of the solar system and their inter-relations
Topic Objectives Content Method/Strategies Materials Evaluation Integration
Knowledge Skills Attitude
Phases of
the moon
Explain how
the main
phases of
the moon
come about.
Recognise
the main
phases of
the moon.
Observe
and
record
the
shapes of
the moon
as it
travels
around
the Earth.
The largest and
brightest object in the
night sky is usually
the moon. The moon
travels around the
Earth in an anti-
clockwise direction.
It makes a complete
orbit in about 28 days
(a lunar month). The
moon does not
produce light of its
own. We see it
because it reflects
light from the sun.
At different times of
the month different
parts of the moon are
lit up by the sun.
NOTE: Observation for this
lesson will spread over a month.
1. Show how the phrases of the
moon come about pupils will
need a torch light, a beach ball or
similar ball and a darkened room.
Since a darkened room may not
be easily possible, teacher will
demonstrate how the activity can
be done.
The ball
(representi
ng the
moon) is
suspended
or hung in
the room.
Someone
shines the
light
represent-
ing the sun
on the ball
from
different
position.
Look at the
ball and see
how it
appears as
different
parts are lit
up like the
phases of the
moon. Pupils
should do
activity at
home.

43
PRIMARY SCIENCE CURRICULUM GUIDE
GRADE 5
Unit 7: Earth and Space - Components of the solar system and their inter-relations
Topic Objectives Content Method/Strategies Materials Evaluation Integration
Knowledge Skills Attitude
As such, the moon
appears to have
different shapes
during the month and
these are called the
phases of the moon.
The moon phases
begin with the new
moon which we
cannot see in the
night sky. The next
phase is the crescent
when only a small
part of the moon is
visible. The half-
moon appears next.
As the moon is
getting fuller, the
phase is called
gibbous. When the
whole moon is seen it
is called full moon.
2. To observe and record the
shape of the moon or its phases,
pupils should do the following:
_0 Divide a page in their note
book into 15 large rectangles. Do
the same for another page to get a
total of 30 rectangles.
1 Observe the moon every
evening at about the same time
for 30 days and draw its shape for
each day in a rectangle. Write the
date at the bottom of the drawing
in the rectangle.
2 If the evening is cloudy, or the
moon cannot be seen, then leave a
blank and make the next drawing
in the next rectangle.
Did pupils
have any
difficulty
in
observing
and
recording
the shapes
of the
moon for
the 30
days?

44
PRIMARY SCIENCE CURRICULUM GUIDE
GRADE 5
Unit 7: Earth and Space - Components of the solar system and their inter-relations
Topic Objectives Content Method/Strategies Materials Evaluation Integration
Knowledge Skills Attitude
The phases that
follow show the
moon beginning to
get smaller and so
goes through the
gibbous, half-moon
and crescent stages
again until the new
moon phase is
entered once more.
(d) When drawings are
completed, pupils will try to
identify the main phases of the
moon and compare them with
representations shown on
calendars, weather/climate
reports.

45
PRIMARY SCIENCE CURRICULUM GUIDE
GRADE 5
Unit 8: Energy: Forms of energy, their sources and effects
Topic Objectives Content Method/Strategies Materials Evaluation Integration
Knowledge Skills Attitude
How
sounds
are
produced
Explain how
sounds are
produced.
Demonst
rate how
sounds
are
produced
Sounds are made or
produced as things
move back and forth
or vibrate. We can
sometimes see and
feel these vibrations.
Knocking, plucking
and blowing make
things vibrate. For
example, knocking
drums, plucking
guitar strings and
blowing flutes
produce different
sounds. The
vibrations make the
air vibrate to cause
sounds which we can
hear.
Pupils will work singly or in pairs
and carry out the following
activities and observe what
happens. 1. (a) Hold firmly near
the edge of a desk about 10 cm of
a 30 cm ruler. Pull down and
release the other end of the ruler.
b)Gently hit a bottle with the
ruler. 2 Shake some seeds or
pebbles inside a bottle. 3 Stretch
a rubber band around the thumb
and first finger. Pluck the band
with a finger of the other hand. e)
Blow across the top of an empty
bottle then across the bottle with
some water.
30 cm
ruler, bottle
seeds/
pebbles,
rubber
band,
straw, sheet
of paper
empty tin
can, thread/
string
scissors,
rice/sand
Did pupils
observe the
production
of sounds
in carrying
out the
activities?
Did pupils
suggest
other
simple
ways of
producing
sounds?
Health and
Family Life
Education -
Speaking

46
PRIMARY SCIENCE CURRICULUM GUIDE
GRADE 5
Unit 8: Energy: Forms of energy, their sources and effects
Topic Objectives Content Method/Strategies Materials Evaluation Integration
Knowledge Skills Attitude
Blow across the end of a straw.
Flap a piece of paper in the air.
Each of the above activities
produces a sound.
2. Pupils may suggest other single
ways of producing sounds.
3. To better illustrate the
vibrations, pupils will do the
following. (a) Work in small
groups. (i) Tie firmly a piece of
paper over the open end of a tin
can. ii) Place some grains of rice
or sand onto the paper of the
drum. Hit the drum gently with
the fingers. What do you hear, see
or feel?
Was the
improvised
drum
effective in
illustrating
vibrations?
Were
pupils able
to identify
their voice
box and
feel it
vibrating?
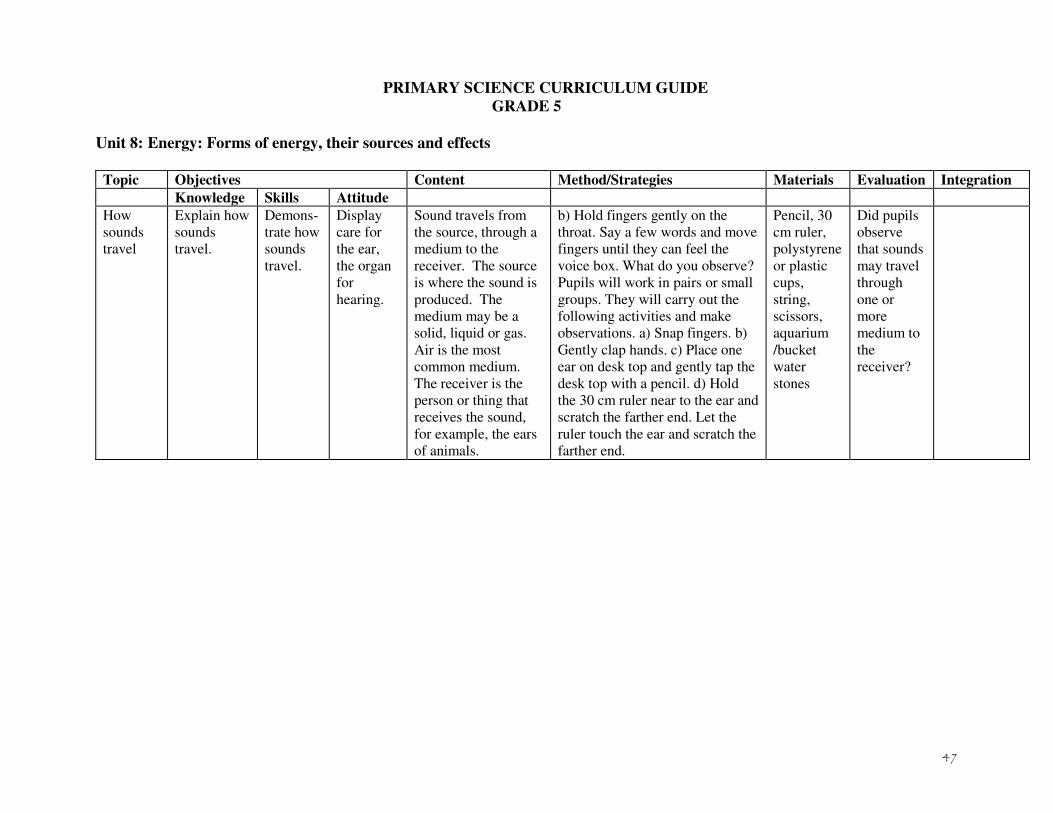
47
PRIMARY SCIENCE CURRICULUM GUIDE
GRADE 5
Unit 8: Energy: Forms of energy, their sources and effects
Topic Objectives Content Method/Strategies Materials Evaluation Integration
Knowledge Skills Attitude
How
sounds
travel
Explain how
sounds
travel.
Demons-
trate how
sounds
travel.
Display
care for
the ear,
the organ
for
hearing.
Sound travels from
the source, through a
medium to the
receiver. The source
is where the sound is
produced. The
medium may be a
solid, liquid or gas.
Air is the most
common medium.
The receiver is the
person or thing that
receives the sound,
for example, the ears
of animals.
b) Hold fingers gently on the
throat. Say a few words and move
fingers until they can feel the
voice box. What do you observe?
Pupils will work in pairs or small
groups. They will carry out the
following activities and make
observations. a) Snap fingers. b)
Gently clap hands. c) Place one
ear on desk top and gently tap the
desk top with a pencil. d) Hold
the 30 cm ruler near to the ear and
scratch the farther end. Let the
ruler touch the ear and scratch the
farther end.
Pencil, 30
cm ruler,
polystyrene
or plastic
cups,
string,
scissors,
aquarium
/bucket
water
stones
Did pupils
observe
that sounds
may travel
through
one or
more
medium to
the
receiver?

48
PRIMARY SCIENCE CURRICULUM GUIDE
GRADE 5
Unit 8: Energy: Forms of energy, their sources and effects
Topic Objectives Content Method/Strategies Materials Evaluation Integration
Knowledge Skills Attitude
Sound travels in all
directions; out to the
side, down and up.
Sound travels better
and faster through
solids and liquids
than through the air.
(e) Make a string telephone using
2 polystyrene or plastic cups and
about 30 m of string as follows:
Make a hole in the bottom of each
cup. Push the ends of the string
through the holes and make knots.
Speak into one cup and let
another pupil listen through the
other cup.
(f) Use an aquarium if available
or a bucket. Hit 2 small stones in
the empty aquarium or bucket.
Let another pupil put ears against
the aquarium or bucket and listen.
Is the sound louder than before?
What has the sound passed
through? In all of the above
activities, pupils will observe that
the sounds travel through one or
more medium to the receiver.

49
PRIMARY SCIENCE CURRICULUM GUIDE
GRADE 5
Unit 8: Energy: Forms of energy, their sources and effects
Topic Objectives Content Method/Strategies Materials Evaluation Integration
Knowledge Skills Attitude
How we
hear
Briefly and
simply
explain how
the ear
works for us
to hear.
Observe
from a
model
and or
charts/
diagrams
the main
parts of
the ear.
Demons-
trate
simply
(no
details)
how the
ear
works.
We hear sounds with
our ears. Sound
vibrations are
collected by our ear-
flaps and pass along
the ear canal. These
vibrations make the
thin skin-like ear
drum vibrate. The
vibrations pass
through the rest of the
ear, that is, the
middle ear to the
inner ear, and
messages are sent by
nerves to the brain.
The brain interprets
the vibrations as
sounds. All this
happens very, very
quickly.
1. Teacher provides models,
charts or diagrams of the structure
of the ear.
2. Pupils observe model, charts or
diagrams of the ear.
3. Teacher demonstrates and
explains briefly how the ear
works. (It would be better if the
demonstration is done for each
group of pupils).
Model of
the ear,
charts/
diagrams
of the ear.
Were
pupils able
to
recognize
the location
and
appearance
of the
delicate ear
drum?
Could
pupils
briefly
explain
how the ear
works?
Health and
Family Life
Education -
How the ear
works.

50
PRIMARY SCIENCE CURRICULUM GUIDE
GRADE 5
Unit 8: Energy: Forms of energy, their sources and effects
Topic Objectives Content Method/Strategies Materials Evaluation Integration
Knowledge Skills Attitude
Care of
the ears
Explain
briefly why
we should
care our
ears.
Foster the
habit of
using our
ears
properly
and with
care.
The ear and its parts
are important. They
can be cared for as
follows: - Never push
things in our ears as
this can damage the
ear drum and lead to
deafness. - Hairs in
the ear keep out dirt.
The outer end of the
ear canal can be
cleaned by an oiled
cotton swab or ‘q-
tip’. - Wax is
produced in the ear
canal to clean and
moisten it. Excess
wax can cause partial
deafness or ‘buzzing’
in the ear and should
be removed by a
doctor or nurse.
Avoid too loud sound
as they can damage
the ear drum and lead
to deafness.
Pupils will work in small groups
1. They will discuss how they
should care their ears. 2. Groups
share their ideas during class
discussion. 3. Teacher guides
class in summarizing the main
ways to care the ears. These
could be placed on a poster and
displayed in the class.
Model of
the ear,
charts/
diagrams
of the ear
Did pupils
suggest
simple and
practical
ways to
care their
ears?
Health and
Family Life
Education -
Care of the
ears. Art and
Craft-
Making
posters

51
PRIMARY SCIENCE CURRICULUM GUIDE
GRADE 5
Unit 8: Energy: Forms of energy, their sources and effects
Topic Objectives Content Method/Strategies Materials Evaluation Integration
Knowledge Skills Attitude
How
we see
Briefly
and simply
explain how
the eye
works for us
to see.
Observe
from a
model
and or
charts/
diagrams
the main
parts of
the eye.
Demonst
rate
simply
(no
details)
how the
eye
works.
The eye is shaped
like a ball. Light
comes into the eye
from an object.
Without light we
cannot see. The light
passes through the
part of the eye called
the pupil. The light is
focused by the lens
onto the back of the
eye to form an image.
This image is sent
along a nerve to the
brain where it is
interpreted and we
see the object we are
looking at.
1. Teacher provides models,
charts or diagrams of the structure
of the eye.
2. Pupils observe model, charts or
diagrams of the eye.
3. Teacher demonstrates and
explains briefly how the eye
works. (It would be better if the
demonstration is done for each
group of pupils.)
Model
of the eye,
charts/
diagrams
of the eye.
Were
pupils able
to
recognize
the main
parts of the
eye?
Could
pupils
briefly
explain
how the
eye works?
Health
and Family
Life -
education
How the eye
works.

52
PRIMARY SCIENCE CURRICULUM GUIDE
GRADE 5
Unit 8: Energy: Forms of energy, their sources and effects
Topic Objectives Content Method/Strategies Materials Evaluation Integration
Knowledge Skills Attitude
Care of
the eyes
Explain
briefly why
we should
care our
eyes. State
some simple
ways to care
the eyes.
Foster the
habit of
using our
eyes
properly
and with
care.
Our eyes are very
important. In caring
them we should do
the following - Never
push things into the
eye. - Never rub eyes
with hands. - In very
bright light, protect
eyes with sunglasses.
- wash eyes with
clean water. - If you
cannot see things
clearly, have your
eyes tested. - If you
need to wear
spectacles, then wear
them. .
Pupils will work in small groups.
1. They will discuss how they
should care their eyes.
2. Groups share their ideas during
class discussion.
3. Teacher guides class in
summarizing the main ways to
care the eyes. These could be
placed on a poster and displayed
in the class.
Model of
the eye,
charts /
diagrams
of the eye
Did pupils
suggest
simple and
practical
ways to
care their
eyes?
Health and
Family Life
Education -
Care of the
eyes.

53
PRIMARY SCIENCE CURRICULUM GUIDE
GRADE 5
Unit 8: Energy
Topic Objectives Content Method/Strategies Materials Evaluation Integration
Knowledge Skills Attitude
Light
travels
faster
than
sound
State
situations
where light
travels faster
than sound.
Demons-
trate that
light
travels
faster
than
sound.
- If eyes are red and
itchy, go to the clinic
or doctor. - Do not
strain eyes by
working in dim light.
-Do not look at
welding flashes or the
sun. Light travels
faster than sound. For
example, we would
see the light of an
approaching vehicle
before we hear the
sound of its engine.
Also, we would see
lightning before we
hear the thunder
1. Pupils suggest situations
where they would see the light
before they hear the sound.
2. As a follow-up, class uses the
playing field to show light travels
faster than sound as follows: a)
Activity should be done in school
yard.
Whistle,
kerchief
Were pupil
able to say
which they
observe
first, light
or sound?
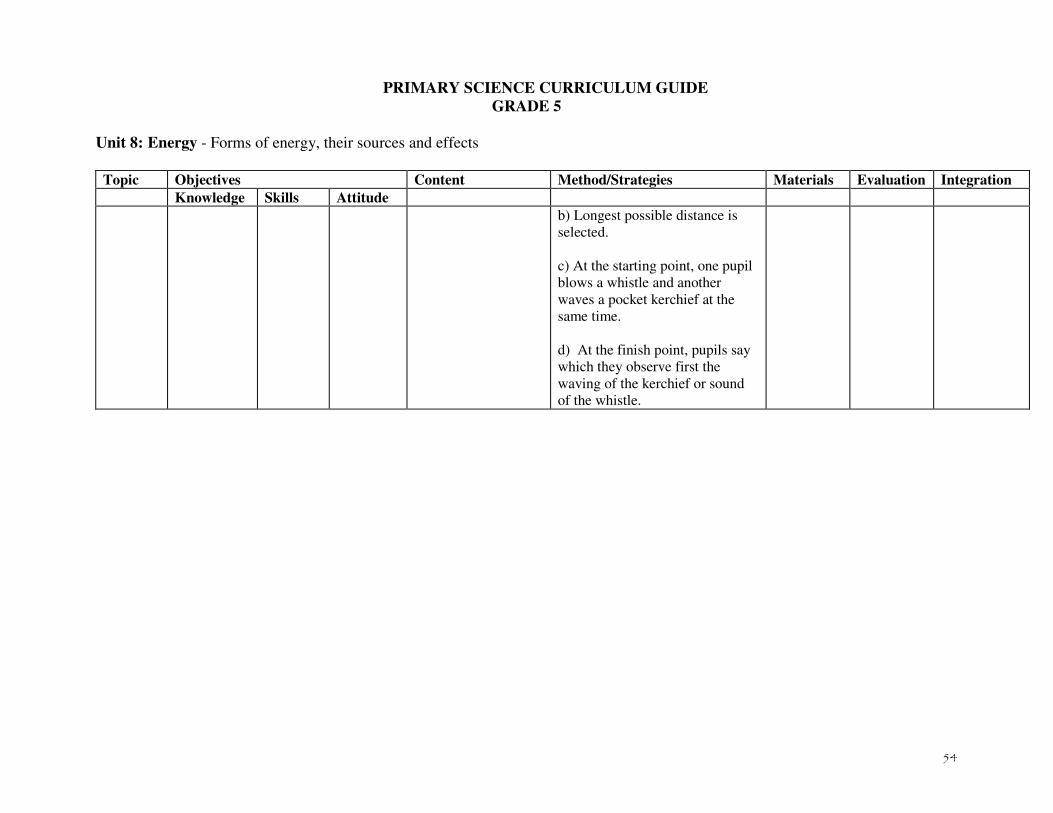
54
PRIMARY SCIENCE CURRICULUM GUIDE
GRADE 5
Unit 8: Energy - Forms of energy, their sources and effects
Topic Objectives Content Method/Strategies Materials Evaluation Integration
Knowledge Skills Attitude
b) Longest possible distance is
selected.
c) At the starting point, one pupil
blows a whistle and another
waves a pocket kerchief at the
same time.
d) At the finish point, pupils say
which they observe first the
waving of the kerchief or sound
of the whistle.

55
PRIMARY SCIENCE CURRICULUM GUIDE
GRADE 5
Unit 9: Forces - Types of forces and their effects
Topic Objectives Content Method/Strategies Materials Evaluation Integration
Knowledge Skills Attitude
Measur-
ing
forces
Convert
mass to
force
(weight)
Measure
the size
of a force
using a
force
measurer
or spring
balance.
Measure
mass of
an object
or body
using a
spring
balance.
Forces are measured
by force measurers or
spring balances and
are expressed in
newtons (N).
However, it is more
common to have
scales and balances
that measure mass.
The measured mass
can then be converted
to force (weight). A
mass of 1 kilogram
(kg) exerts a force of
10 newtons (N). Thus
1 kg = 10 N.
Pupils will work in pairs or small
groups.
1. Use a force measurer to
measure the push or pull that is
exerted on a body e.g. pull on a
door knob, a book, or any other
object.
2. Use scales or balances to
measure the mass of different
objects.
3. Convert mass into force
(weight) by multiplying the mass
in kg by10 N.
Force
measurer,
scale,
balance,
assortment
of common
objects e.g.
book, ball,
rock.
Were
pupils able
to use the
force
measurer
and read
the
measure-
ments?
Were
pupils able
to convert
the
measured
masses into
forces
(weights)?
Mathematics-
Using
measuring
devices.

56
PRIMARY SCIENCE CURRICULUM GUIDE
GRADE 5
Unit 9: Forces - Types of forces and their effects
Topic Objectives Content Method/Strategies Materials Evaluation Integration
Knowledge Skills Attitude
Effects of
increase-
ing and
decreas-
ing
forces
The
effects of
friction.
Explain
briefly the
effects of
increasing
and
decreasing
forces.
Discuss the
effects of
friction.
Predict
the
effects of
increase-
ing and
decreas-
ing
forces.
Demons-
trate the
effects of
increas-
ing and
decreas-
ing
forces.
Invest-
gate the
effects of
friction.
Display
care in
moving on
smooth
surfaces
Forces (pushes, pulls,
twists and turns)
make things go. An
increase in forces can
cause an increase in
motion. Similarly, a
decrease in forces
would result in
reduced motion and
the body may even
stop or come to a rest. Whenever one object
moves over another,
friction tries to stop
the movement.
Pupils will work in small groups.
1. They will recap the effects of
applying forces on objects such as
pushing or pulling a book or box.
2. They can set up a see-saw
using a 30 cm ruler and a pencil
as a pivot.
3. They may use coins or similar
objects and try to balance them on
the see-saw. They could vary the
quantity and position of the coins
and observe the effects.
4. Class is divided into groups
and get involved in tug-o-wars.
Pupils will work individually, in
pairs or in small groups. 1. To
illustrate friction at work, they
will do the following :
Book, box,
30 cm
ruler,
pencil,
coins.
Book,
plastic,
pieces of
wood –
polished,
unpolished,
sandpaper,
ball marble
Did pupils
make
meaningful
predictions
of the
effects of
increasing
and
decreasing
forces?
Was the
use of the
simple
improvised
see-saw
effective?
Were
pupils
familiar
with
friction?
Physical
Education -
Use of the
see-saw, tug-
o war.
Technology
Education -
The effects of
friction.

57
PRIMARY SCIENCE CURRICULUM GUIDE
GRADE 5
Unit 9: Forces - Types of forces and their effects
Topic Objectives Content Method/Strategies Materials Evaluation Integration
Knowledge Skills Attitude
Record
obser
vations
and
results
On a polished floor
there is very little
friction and so an
object will move
quickly along it and
take longer before it
stops. Friction will
increase or decrease
according to the
roughness or
smoothness of the
objects. On a gravel
road there is a lot of
friction and an object
will move along it
slowly and stop more
quickly due to
friction. Friction can
be reduced by
polishing the
surfaces, oiling or
greasing and using
rollers or ball
bearings.
(a) Push a book on the surface of
the desk. (b) Push the same book
on a piece of plastic. (c) Rub
together two pieces of unpolished
board. (d) Rub together two
pieces of smooth, polished board.
(e) Rub together two pieces of
sand paper. 2. Pupils note their
observations and results and
report same for class discussion.
3. Pupils carry out the following
activities to illustrate some effects
of friction a) Rub the palms of
their hands together and note the
effects.

58
PRIMARY SCIENCE CURRICULUM GUIDE
GRADE 5
Unit 9: Forces - Types of forces and their effects
Topic Objectives Content Method/Strategies Materials Evaluation Integration
Knowledge Skills Attitude
Friction is a very
common force and it
also helps in
movement, for
example, in the
friction of tyres on
the road, the friction
of brakes on a wheel
and of our footwear
on the road or floor.
(b) Choose two surfaces, a
smooth one such as a shiny book
or piece of plastic and a rough
one such as bumpy wood or piece
of sand paper. Start a ball or
marble moving gently on the
smooth surface. How did it go
and did it keep going?
(c) Repeat b) ii above using the
rough surface. Compare the
observations and the results.
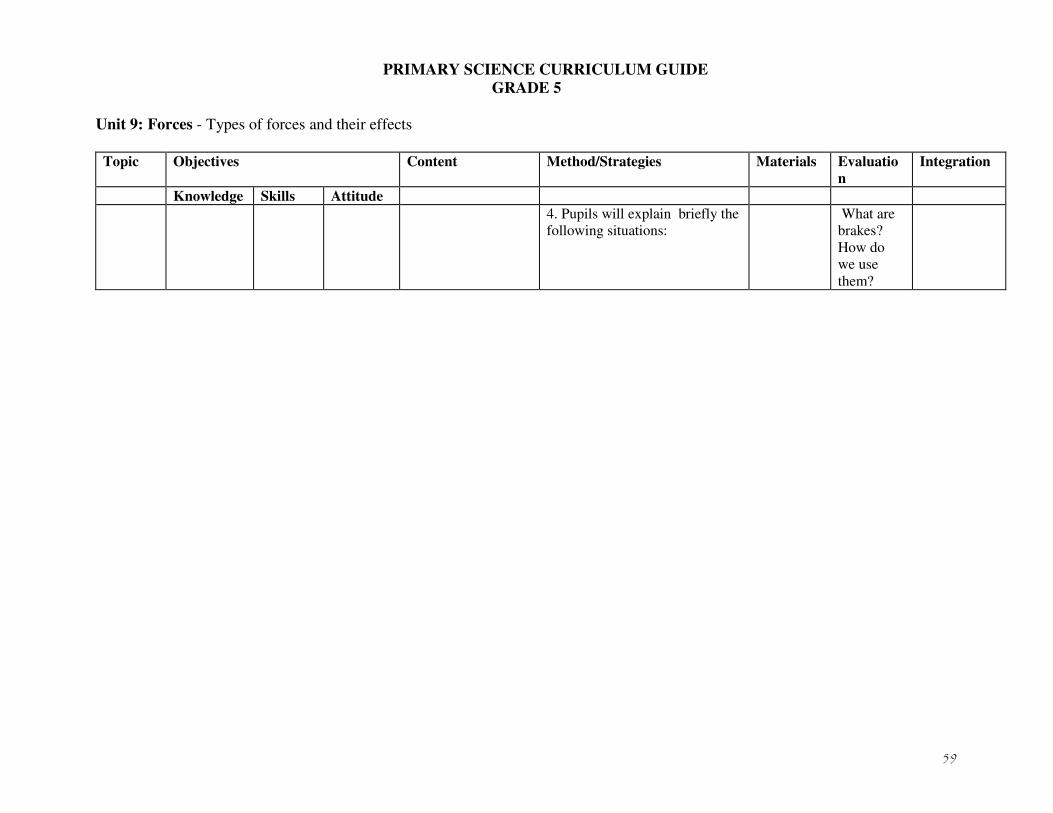
59
PRIMARY SCIENCE CURRICULUM GUIDE
GRADE 5
Unit 9: Forces - Types of forces and their effects
Topic Objectives Content Method/Strategies Materials Evaluatio
n
Integration
Knowledge Skills Attitude
4. Pupils will explain briefly the
following situations:
What are
brakes?
How do
we use
them?