Embed Size (px)
Citation preview

Preface
The last of three volumes,
this eBook provides
information on the proper
use of test instruments for
verifying the quality of the
application of protective
coatings after the
installation process is
complete. It is applicable
to new pipe in the shop,
field splices (girth weld
areas), existing pipe in the
field, and painted steel in
general. Verifying the
quality of surface
preparation is the subject
of Volume 1 and verifying
the quality during
application is the subject
of Volume 2.
Successful corrosion
prevention using
protective coating
systems is based in part
on the quality of the
surface preparation and
coating system
installation. To verify
quality, we rely heavily on
data generated by
coatings inspection
instruments and on visual
inspection of the
prepared surfaces. We
rely on this same
information to determine
contractual compliance
with the project
specification.
This eBook was prepared
with both the novice and
the experienced coatings
professional in mind.
While it does not include
every inspection
instrument from every
manufacturer, it does
contain a cross-section of
common instruments,
with references to

industry standards
throughout. Both
traditional methods and
novel techniques for
verifying quality are
explored.
Instrument use, however,
is only part of the coatings
inspection equation. It
must be combined with
thorough knowledge of
cleaning and painting, the
project specification, and
field constructability.
Formal training in coatings
inspection techniques
remains a critical
component of the
process. This publication
is not intended to replace
formal training, but rather
to supplement the
learning process before,
during and after training.
Introduction
Common quality control
checkpoints associated
with post-coating
application inspection
include:
• Holiday Detection
• Hardness Testing
• Adhesion Testing
Holiday Detection
Project specifications for
the application of coatings
to liquid and gas pipelines
frequently require a
continuous coating
system. Rather than
relying on a visual
inspection, special
detectors are used to
determine the number
and location of skips,
misses, and pinholes, so
that they can be repaired
prior to placing the
pipeline into service. The
pipeline industry

frequently refers to this
procedure as “jeep” testing (Figure 1). If
holiday, pinhole or “jeep” testing is not performed,
and there are undetected
voids in the coating
system, the performance
of the cathodic protection
system could be affected
(if the voids are
extensive), and the
exposed substrate could
corrode, with the
potential for pitting
corrosion, section loss,
and in a worse case,
perforation of the
substrate. Holiday testing
is governed by three
industry standards: ASTM
D5162, Standard Practice
for Discontinuity (Holiday)
Testing of Nonconductive
Protective Coating on
Metallic Substrates, ASTM
G62, Standard Test
Methods for Holiday
Detection in Pipeline
Coatings, and NACE
SP0188, Discontinuity
(Holiday) Testing of New
Protective Coatings on
Conductive Substrates.
Pinhole or holiday
detection is usually
conducted after the final
coat has been applied, but
before it has achieved
complete cure in the
event repair of the
coating film is required.
The terms “pinhole” and “holiday” are often used
Figure 1 – Courtesy of Pipeline
Inspection Company

interchangeably.
However, they represent
two different types of
“breaches” in the coating system. Pinholes are tiny
voids in the coating that
penetrate through a layer
or layers of the system,
potentially to the
substrate. These voids
allow the service
environment to have
direct or nearly direct
access to the metal
substrate via tiny
“pathways.” Holidays are
considered “skips” or “misses” in the coating/lining system (just
like holidays are skips in
the work calendar). These
uncoated areas also
permit easy access to the
unprotected substrate.
Pinholes can be caused by
poor wetting of the
coating on the surface
during application, or out-
gassing (displacement) of
air without subsequent
flow-out of the coating.
Holidays are areas that
are missed by the
applicator. They may be
caused by the
configuration of the
structure being coated
(i.e., difficult to access
with the application
equipment), or lack of
attention to detail by the
applicator. Most holidays
and pinholes are found on
areas that are difficult to
protect or access, such as
edges and corners, welds,
bolts, nuts and threads,
behind angles and clips,
inside holes, between
back-to-back angles, etc.
Large, flat surfaces that
are easier to access and

coat usually contain fewer
pinholes and holidays.
There are two different
types of holiday
detectors, low voltage
and high voltage;
selection of the specific
type is based on the total
thickness of the
coating/lining system.
Low voltage or “wet sponge” holiday detectors are used on
coatings/linings that are
less than 20 mils (508 µm)
thick. High voltage holiday
detectors or “spark testers” are typically used
on coatings greater than
20 mils thick. Independent
of coating thickness, both
detectors will only work
on non-conductive
coatings applied to a
conductive substrate. For
example, epoxy coatings
applied to steel can be
tested for holidays, while
a zinc-rich coating applied
to the same steel cannot
(zinc is a conductive metal
in the coating).
Low Voltage (wet sponge)
Holiday Detection
There are several
manufacturers of low
voltage holiday detectors;
all operate on a similar
principle, and most
operate on 67.5 volts DC
using battery power
(Figure 2). A sponge is
Figure 2

clamped to the end of a
wand and is wetted with
tap water containing a
low-sudsing wetting agent
(about 0.5 oz./gallon [15
mL/3.8 L]) supplied by
most low voltage holiday
detector
manufacturers/suppliers.
Kodak Photo-Flo
photographic
development wetting
agent can also be used.
The wetting agent
reduces natural water
surface tension, and is
particularly important to
use when coatings are in
the 10-20 mil (254-508
µm) range. The detector
unit is grounded to an
uncoated area of steel
using a ground wire clip.
Both the wand and the
ground wire are
connected to the
detector. The wet sponge
is scanned across the
coated surface (Figure 3)
at a rate not to exceed
one linear foot per
second. If a pinhole or
holiday is present, the
water from the sponge
will contact the steel,
complete the circuit (since
the detector is grounded
to the bare metal) and
cause the detector to
signal using a visible
and/or an audible alarm.
Figure 3 – Courtesy of
DeFelsko Corporation
Calibration and
Verification of Continuity
Calibration of any coating
inspection instrument is
paramount to the
reliability of the data it
produces. Annual
calibration by the
manufacturer or an
authorized service center
is recommended by most
instrument
manufacturers. A
certificate of calibration is
provided.
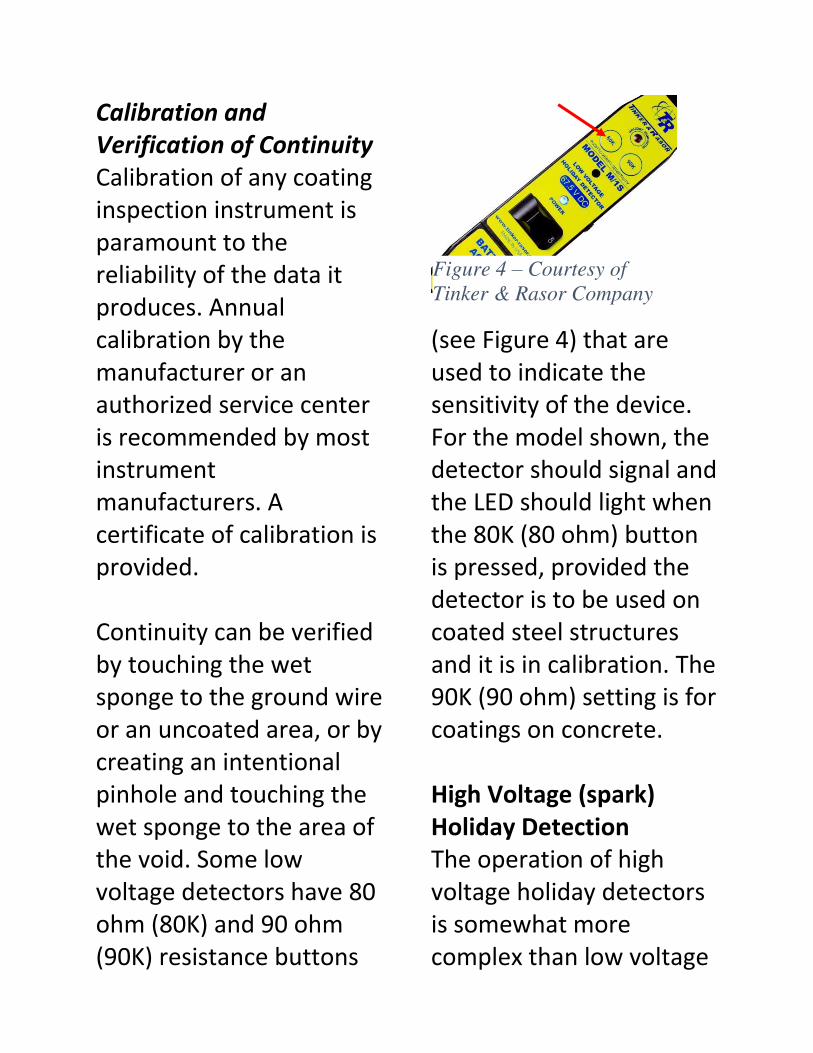
Continuity can be verified
by touching the wet
sponge to the ground wire
or an uncoated area, or by
creating an intentional
pinhole and touching the
wet sponge to the area of
the void. Some low
voltage detectors have 80
ohm (80K) and 90 ohm
(90K) resistance buttons
(see Figure 4) that are
used to indicate the
sensitivity of the device.
For the model shown, the
detector should signal and
the LED should light when
the 80K (80 ohm) button
is pressed, provided the
detector is to be used on
coated steel structures
and it is in calibration. The
90K (90 ohm) setting is for
coatings on concrete.
High Voltage (spark)
Holiday Detection
The operation of high
voltage holiday detectors
is somewhat more
complex than low voltage
Figure 4 – Courtesy of
Tinker & Rasor Company

detectors, since the test
voltage is variable and
selection of the voltage is
based on the thickness of
the coating to be tested
and to some degree the
conductivity of the
surrounding air. While
both NACE International
and ASTM International
have tables in their
respective standards
listing coating thickness
ranges and corresponding
test voltage ranges, it is
best to contact the
coating manufacturer to
obtain their
recommended voltage
setting or calculate the
required test voltage
(discussed on Page 11),
since the ranges listed in
the tables are quite broad
and only “suggested.” To
prevent potential damage
to a coating film when
using high voltage test
instrumentation, total film
thickness and dielectric
strength of the coating is
considered in selecting
the appropriate voltage
for detection of
discontinuities.
Atmospheric conditions
are also considered since
the voltage required for
the spark to “bridge” a
given distance in air varies
with the conductivity of
the air at the time the test
Figure 5 -Courtesy of Tinker
& Rasor Company
is conducted.
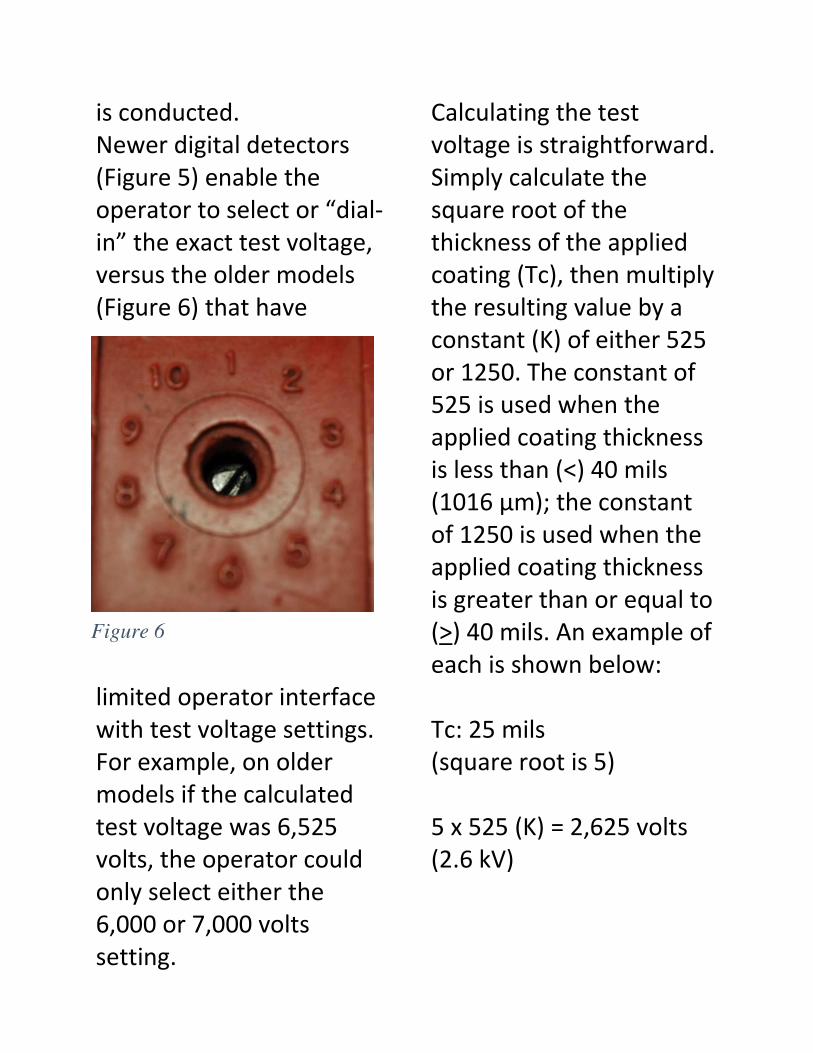
Newer digital detectors
(Figure 5) enable the
operator to select or “dial-in” the exact test voltage,
versus the older models
(Figure 6) that have
limited operator interface
with test voltage settings.
For example, on older
models if the calculated
test voltage was 6,525
volts, the operator could
only select either the
6,000 or 7,000 volts
setting.
Calculating the test
voltage is straightforward.
Simply calculate the
square root of the
thickness of the applied
coating (Tc), then multiply
the resulting value by a
constant (K) of either 525
or 1250. The constant of
525 is used when the
applied coating thickness
is less than (<) 40 mils
(1016 µm); the constant
of 1250 is used when the
applied coating thickness
is greater than or equal to
(>) 40 mils. An example of
each is shown below:
Tc: 25 mils
(square root is 5)
5 x 525 (K) = 2,625 volts
(2.6 kV)
Figure 6

Tc: 50 mils
(square root is 7.1)
7.1 x 1250 (K) = 8,875
volts (8.9 kV)
Once the test voltage is
established, the ground
cable is attached to the
uncoated substrate (or
the ground cable is
dragged along the ground,
provided the pipe is
grounded to earth and the
ground cable maintains
contact with the earth).
The exploring electrode
that will be run across the
coating is then selected.
Choices of electrodes
include flat conductive
Neoprene rubber, brass or
stainless-steel brush, and
half-coil or full coil
springs. The electrode is
coupled to the wand, the
unit is powered-on and
the voltage is set. The
electrode is scanned
across the coated surface
(Figure 7) at a rate not to
exceed one linear foot per
second. If a pinhole or
holiday is present, a spark
is generated at the precise
location of the flaw and
the detector signals with a
visible and/or an audible
alarm.
Figure 7 – Courtesy of Pipeline
Inspection Company

While it is acceptable to
retest any repairs made to
the coating, it is
recommended that
retesting be limited to the
areas of repair, rather
than the entire coated
surface. Also, holiday
detection should never be
conducted on a wet
surface, and misleading
results or damage could
occur when testing a
coating or lining system
that has been in service.
ASTM D5162 specifically
states, “This practice is
intended for use with new
coatings applied to metal
substrates. Its use on a
coating previously
exposed to an immersion
condition has often
resulted in damage to the
coating and has produced
erroneous detection of
discontinuities due to
permeation or moisture
absorption of the coating.
Deposits may also be
present on the surface
causing telegraphing
(current traveling through
a moisture path to a
discontinuity, giving an
erroneous indication) or
current leakage across the
surface of the coating due
to contamination. The use
of a high voltage tester on
previously exposed
coatings has to be
carefully considered
because of possible spark-
through, which will
damage an otherwise
sound coating. Although a
low voltage tester can be
used without damaging
the coating, it may also
produce erroneous
results.”

Calibration and
Verification of Continuity
Similar to the low voltage
detectors, annual
calibration by the
manufacturer or an
authorized service center
is recommended by most
instrument
manufacturers. A
certificate of calibration is
provided.
Continuity can be verified
by touching the electrode
to the ground wire or an
uncoated area, or by
creating an intentional
pinhole and touching the
electrode to the area of
the void. The actual
voltage output (compared
to the set point) can be
verified using a Peak
Reading Voltmeter (Figure
8a/8b).
To address the concerns
over prevailing
conductivity of the air
(e.g., pressure, humidity)
interfering with the test
and the potential to
exceed the dielectric
strength of the coating Figure 8a – Courtesy of Tinker &
Rasor Company
Figure 8b – Courtesy of
Tinker and Rasor Company

itself, a plastic sheet
comparable in thickness
to the applied coating can
be placed on a section of
uncoated steel and an
intentional pinhole
created in the plastic. The
voltage setting on the
detector can be adjusted
(as necessary) to the point
where it alarms. However,
if the coating has slight
conductivity (e.g., carbon
in vinyl ester linings) this
procedure may not be
viable, since the use of a
lower inspection voltage
may be necessary.
Hardness Testing
The hardness of a coating
material is an indication of
its degree of cure and its
inherent performance
characteristics. Hardness
testing of newly coated
cut-backs at splices is
often performed prior to
burying the pipe, to
reduce the opportunity
for coating damage during
the backfill process.
The hardness of thick film
coatings is typically
measured using an
indentor-type tester,
which measures the
resistance to indentation
under a specific spring
force load. The project
specification should
indicate the minimum
acceptable hardness value
prior to placing the
coating system into
service. The minimum
acceptable hardness value
is often established by the
manufacturer of the
coating.

Measuring Durometer
Hardness
Durometer hardness
testing is performed
according to the
procedure described in
ASTM D2240, Standard
Test Method for Rubber
Property – Durometer
Hardness. The standard
includes several types of
measurement devices
(Types A, B, C, D, DO, O,
OO, OOO, OOO-S and R),
each used for different
types and hardness of
materials. We will focus
on the use of a Shore D
Durometer, since many of
the thick film, chemically
resistant coatings used in
the pipeline industry fall
into the hardness range
that a Shore D durometer
can accurately measure.
For softer, thick film
coating materials, a Shore
A durometer may be
more useful since it has a
lower spring force.
According to the ASTM
standard, hardness values
obtained using
durometers that are less
than 20 and greater than
90 are not considered
reliable and it suggests
not recording them. In
fact, the digital durometer
described later
automatically discards
readings less than 20 and
greater than 90. It should
be noted that ASTM
D2240 is written primarily
for laboratory
applications; however,
Durometers can be used
in the field.

A Shore D Durometer is a
small hand-held analog
device (Figure 9), or an
electronic device (Figure
10) with a remote probe
that is used to measure
the indention hardness of
various materials like hard
rubber, plastics, soft
metals, and epoxy
coatings. A small cone-
shaped indentor
protrudes from the
pressor foot (the base of
the tester or probe). The
durometer contains a
calibrated spring that is
used to apply
perpendicular force to the
indentor. A cured,
hardened coating will
provide great resistance
to the indentor under the
force of the applied load,
compared to an uncured,
softer coating. This
resistance to indention is
displayed on the gage dial
Figure 9
Figure 10 – Courtesy of
DeFelsko Corporation

or digital display as a
hardness value.
Verifying the Accuracy of
the Durometer
Durometers should be
calibrated annually by the
manufacturer or their
authorized service center.
Some will even provide a
10-point calibration
certification traceable to a
National Metrology
Institution like the
National Institute of
Standards and Technology
(NIST). The operator
cannot calibrate a
durometer, but should
verify proper operation
prior to each period of
use.
Test blocks are used to
verify proper operation
(accuracy). The set shown
(Figure 11) represents
hardness values of 25, 46
and 75 on the D scale. A
measurement is taken on
each test block and
compared to the hardness
value displayed on the
durometer. If the value
displayed by the
durometer does not
conform to the tolerance
of the test block value (for
example 25 +/- 5, which
means that the displayed
hardness value obtained
on the test block can
range from 20-30), the
durometer should not be
used to measure the
hardness of a coating and
Figure 11 – Courtesy of DeFelsko
Corporation

should be returned to the
manufacturer or service
center for repair and
calibration.
The surface of the coating
to be tested should be
clean and smooth. Any
inherent surface
roughness can produce
erroneous hardness
values. Since temperature
and humidity can
influence the hardness
value, the surface
temperature of the
coated surface and the
relative humidity of the
surrounding air should be
measured and recorded
prior to testing. While the
temperature and humidity
data is required to be
reported by the ASTM
standard, there is no
correction of the hardness
values based on the
prevailing ambient
conditions.
Measuring Coating
Hardness (Analog
Durometer)
After verifying accuracy
using the test blocks and
returning the red ancillary
pointer to zero, the
durometer is cupped in
the operator’s hand and
vertical pressure is
Figure 12

applied using even, steady
hand/thumb pressure
(Figure 12) until the base
of the instrument seats
evenly on the coated
surface. The maximum
force will be maintained
by the red ancillary
pointer, even though the
black pointer will return
to zero once the
downward pressure is
released. A minimum of
five measurements is
obtained (spaced at least
¼ inch apart), the average
indention hardness is
calculated, and the results
are compared to the
requirements of the
project specification or
coating manufacturer. The
analog-type durometers
may be difficult to seat
correctly on small
diameter pipe. The
durometer should always
be positioned so that
measurements are
obtained along the length
of the pipe and not across
it.
Measuring Coating
Hardness (Digital
Durometer)
After verifying accuracy
using the test blocks, the
remote probe is pressed
into the coating until the
presser foot is in full, flat
contact with the surface,
and held in place (Figure
Figure 13 – Courtesy of DeFelsko
Corporation

13). After the durometer
emits a single audible
signal, it will display a
symbol indicating a
reading is in the process
of being obtained. The
test timer will begin
counting down. When the
timer reaches zero, the
durometer will emit a
double audible signal and
display the measurement
value. The probe is
removed from the
surface. Because of the
relative small diameter of
the test foot, its use is
more amenable to curved
surfaces; however, the full
measuring surface of the
probe must sit flush on
the surface without
rocking to obtain a
reliable reading.
Adhesion Testing
There are multiple
methods that can be used
to measure the adhesion
of coating systems,
including knife (ASTM
D6677, Standard Test
Method for Evaluating
Adhesion by Knife), knife
and tape (ASTM D3359,
Standard Test Methods
for Measuring Adhesion
by Tape Test), and tensile
or pull-off (ASTM D4541,
Standard Test Method for
Pull-Off Strength of
Coatings Using Portable
Adhesion Testers for
coatings on metal
surfaces and ASTM
D7234, Standard Test
Method for Pull-Off
Strength of Coatings on
Concrete Using Portable
Adhesion Testers). The
information that follows
focuses on ASTM D4541

(specifically, the 2017
version), and ASTM
D6677. The knife and tape
test (ASTM D3359) is not
described since it is not
commonly used to test
thick-film pipe coatings.
Tensile (pull-off)
Adhesion Testing
When performing a
tensile or pull-off
adhesion test, the
strength of a coating bond
is being assessed at
several different “planes,” including the adhesion of
the coating system to the
substrate, and the
adhesion of the coating
layers to each other if
there is more than one
layer of coating on the
surface. In both cases, the
adhesive strength of a
coating, or the bond of
the layers to one another
and to the substrate is
being assessed. The inner-
strength of each coating
layer is also being
assessed, which is known
as the cohesive strength
of a coating, or the ability
of each layer to hold itself
together or maintain its
“inner-strength.”
The adhesion of a coating
system to a surface is
highly variable, and can
be influenced by a
multitude of factors too
numerous to list here.
That is likely why there is
no industry-wide standard
that says that a certain
type of coating must have
a minimum adhesive or
cohesive strength.
However, project
specifications may require
a minimum adhesion
value as a contract

requirement, and coating
manufacturers will often
report an adhesion value
on their product data
sheets that may be
adopted into a project
specification.
Test Protocols
There are two protocols
that are applicable to
tensile (pull-off) adhesion
testing of coatings:
Protocol 1 - Test to
Fracture and Protocol 2 -
Pass/Fail test.
Protocol 1 - Test to
Fracture: Protocol 1 is
typically used when the
minimum
adhesion/cohesion
properties of the coating
system are unspecified. In
this case, the load is
applied to the fixture until
detachment occurs, or the
maximum capacity of the
test instrument is
reached. High levels of
applied force may result
in glue breaks prior to
coating breaks (an epoxy
glue is typically used to
attach the test fixtures to
the coated surface).
According to the 2017
version of ASTM D4541,
unless otherwise agreed
upon by the contracting
parties, test results are
discarded for all tests
where the glue break is in
excess of ¼ of the loading
area (test fixture area).
Protocol 2 – Pass/Fail
Test: Protocol 2 is
typically used when the
minimum
adhesion/cohesion
properties of the coating
system are specified. In
this case, the load is

applied to the fixture until
the specified value is
attained or detachment
occurs, whichever
happens first. High levels
of applied force may again
result in glue breaks prior
to coating breaks.
According to the 2017
version of ASTM D4541, if
a visibly detectable glue
break occurs (defined as
5% or more of the loading
area) and the specified
minimum value is not
attained, additional
loading fixtures may need
to be attached and pulled.
If the specified value is
achieved and the test
fixture remains attached,
the pressure is released
and the adhesion tester
removed. The test fixture
is either left in place, or
removed by tapping the
side with a hammer to
break the bond.
There are a variety of test
instruments that can be
used to assess the tensile
or pull-off strength of a
coating or coating system;
however, all of them
require that a loading
fixture (a.k.a. pull stub or
dolly) be attached to the
surface of the coating
using an adhesive (Figure
14 a and b). Once the
adhesive (glue) cures, a
vertical load is applied to
the loading fixture,
Figure 14a
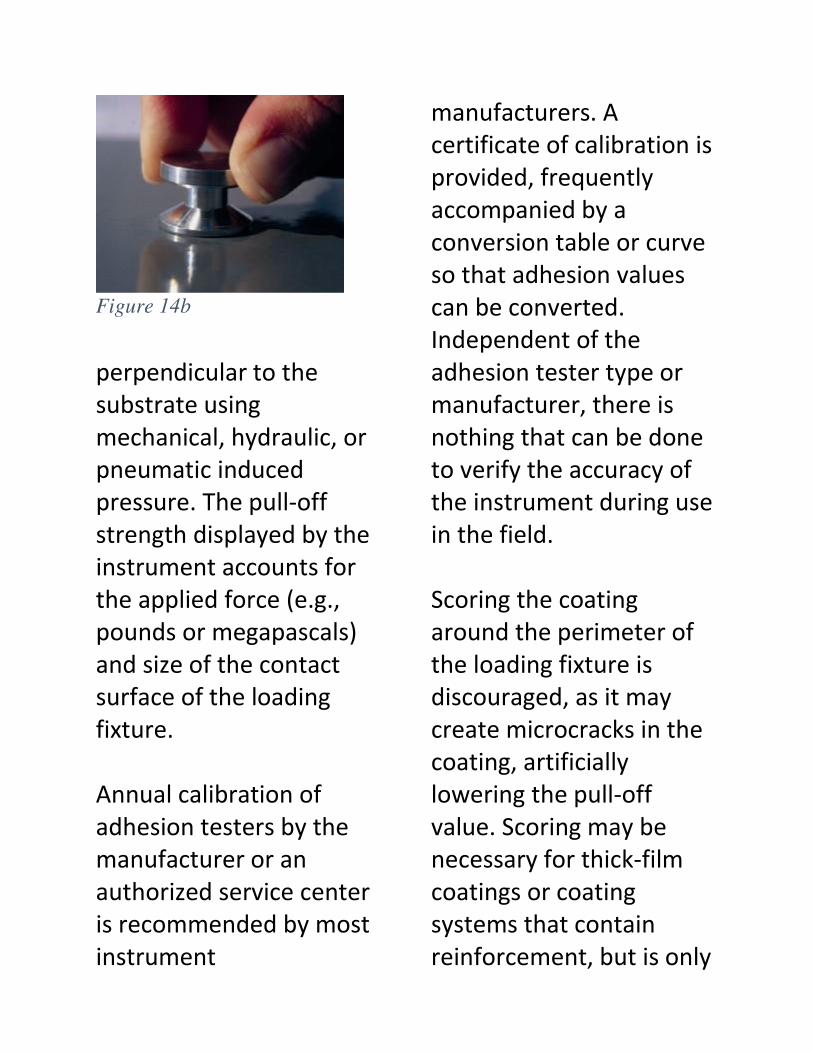
perpendicular to the
substrate using
mechanical, hydraulic, or
pneumatic induced
pressure. The pull-off
strength displayed by the
instrument accounts for
the applied force (e.g.,
pounds or megapascals)
and size of the contact
surface of the loading
fixture.
Annual calibration of
adhesion testers by the
manufacturer or an
authorized service center
is recommended by most
instrument
manufacturers. A
certificate of calibration is
provided, frequently
accompanied by a
conversion table or curve
so that adhesion values
can be converted.
Independent of the
adhesion tester type or
manufacturer, there is
nothing that can be done
to verify the accuracy of
the instrument during use
in the field.
Scoring the coating
around the perimeter of
the loading fixture is
discouraged, as it may
create microcracks in the
coating, artificially
lowering the pull-off
value. Scoring may be
necessary for thick-film
coatings or coating
systems that contain
reinforcement, but is only
Figure 14b

performed if agreeable to
all parties.
The ASTM standard
includes five annexes that
form a mandatory part of
the standard (the
appendices are non-
mandatory). Each annex
describes the proper use
of a different apparatus.
Fixed Alignment
Adhesion Testers (Annex
A1)
A fixed alignment
adhesion tester (Figure
15) consists of three basic
components: A hand
wheel or hexagon-shaped
nut at the top; a black
column housing a spring
or series of Belleville
washers, and containing a
dragging indicator pin and
scale in the middle; and a
Figure 15
Figure 16

base containing three legs
and a pulling “jaw” at the
bottom, designed to fit
the head of the loading
fixture. The “jaw” of the
instrument is lowered and
inserted under the head
of the loading fixture
(Figure 16). The load is
applied by rotating the
handwheel (or nut, using
a ratchet) clockwise. The
tension on the spring or
washers applies a
perpendicular, upward
force on the loading
fixture. The tension is
increased smoothly and
evenly using a moderate
speed not to exceed 150
psi/second (1
MPa/second). The test
should be completed in
100 seconds or less. The
pull-off value is read from
the scale on the black
column (Figure 17). The
mechanical adhesion
testers are fixed and
cannot align with any
slight mis-attachment of
the loading fixture, so the
force may not be applied
truly perpendicular to the
surface. If this happens,
shear forces are applied
to the loading fixture (and
the coating system)
instead of, or in addition
to, tensile forces. In
addition, the pulling
forces are not applied at a
constant rate since the
operator cannot turn the
handwheel or nut
continuously. Frequently
Figure 17

pull-off values at the point
of detachment are
roughly 50% of those
obtained with self-aligning
adhesion testers.
Self-Aligning Adhesion
Testers
Self-aligning adhesion
testers are hydraulically
or pneumatically
operated; each type is
described herein.
Self-Aligning Adhesion
Testers – Hydraulic
(Annex A2, A4, A5)
There are three
manufacturers of self-
aligning hydraulic
adhesion testers. In each
case a loading fixture is
attached to the coated
surface (as described
earlier) and a self-aligning
quick connect (Figure 18
and 20), or actuator
(Figure 19) is coupled to
Figure 18
Figure 19

the head of the loading
fixture and hydraulic
pressure is
applied. The adhesion
tester shown in Figure 21
applies a continuous load
at a predetermined rate
(not to exceed 150
psi/second) until the
loading fixture becomes
detached. The rate (and
continuity of the rate) for
the other two hydraulic
adhesion testers (Figure
22 and 23) are controlled
by the operator. The
instruments automatically
convert the force to psi or
MPa based on the size of
the contact surface of the
loading fixture used.
Figure 21 – Courtesy of
DeFelsko Corporation
Figure 20

Figure 22
Self-Aligning Adhesion
Testers – Pneumatic
(Annex A3)
Pneumatic adhesion
testers use an air-
operated piston threaded
onto the shaft of a
specially-designed loading
fixture to apply
perpendicular, tensile
Figure 24
Figure 25
Figure 23
Figure 24 – Courtesy of M.E
Taylor Engineering, Inc.
/SEMicro Division

force (Figure 24). There
are several piston sizes;
each with a corresponding
range (i.e., an F-2 piston is
0-1000 psi, an F-4 piston is
0-2000 psi and an F8
piston is 0-4000 psi). Air
pressure is generated
using small CO2 cartridges,
which produce pressured
air that travels through a
small diameter hose into
the piston. The pneumatic
adhesion tester shown in
Figure 25 applies a
continuous pressure load
at a rate pre-established
by the operator (not to
exceed 150 psi/second)
until the loading fixture
becomes detached. A
chart corresponding to
each piston size is used to
convert the burst pressure
to psi or MPa.
Loading Fixtures
Type:
The manufacturers of the
various test instruments
(mechanical, hydraulic,
pneumatic) also
manufacturer the
corresponding loading
fixtures (Figure 26). There
is no “universal” fixture. Loading fixtures are
typically manufactured
from aluminum, steel or
stainless steel. Most
operators consider the
aluminum loading fixtures
to be disposable, as the
cost associated with
Figure 26

cleaning them often
exceeds the cost of new
fixtures. However steel
and stainless-steel loading
fixtures are reusable.
Coating/glue can be
removed from the base of
loading fixtures using
chemical paint strippers,
heat or abrasive blast
cleaning. If cleaned by
abrasive blast cleaning,
care must be taken to
avoid beveling or
changing the shape of the
contact surface of the
fixture.
Diameter: Twenty-
millimeter (20 mm)
loading fixtures are
common for coatings on
metal, although smaller
diameter fixtures (e.g., 10
and 14 mm) are available
from some of the
instrument
manufacturers. Fifty-
millimeter (50 mm)
loading fixtures are
required for testing the
tensile strength of
coatings applied to
concrete (per ASTM
D7234).
Shape: Many of the
adhesion test instrument
manufacturers can
produce loading fixtures
with concave and convex
bases. The loading fixtures
with a concave base are
used on the exterior of
pipe, while the loading
fixtures with a convex
base are used on the
interior of pipe. However,
since there is no universal
curvature (pipe diameters
vary widely), it is
important to tell the
equipment supplier the
diameter of the pipe

section being tested.
Concave/convex loading
fixtures are specially-
manufactured and need
to be ordered well in
advance of the intended
test date. Note:
Determining the need to
use curved loading
fixtures is based on the
diameter of the coated
pipe to be tested and the
diameter of the loading
fixture. Concave/convex-
shaped fixtures may not
be required for testing the
adhesion of coatings on
larger diameter pipe. To
determine whether curved
loading fixtures are
required, a fixture (of the
desired diameter) with a
flat surface can be placed
onto the pipe surface and
checked to see whether it
can be rocked back and
forth or whether it seats
level on the surface. If
rocking is evident, the use
of curved fixtures is
recommended.
Frequency of Testing
ASTM D4541 states, “At
least three replications
are usually required in
order to statistically
characterize the test area
(i.e., location);” however
it does not indicate how
many test locations to
select in order to
characterize the adhesion
properties of the coating
system on the entire
structure. Therefore, it is
important to establish a
test frequency upfront.
Considerations may
include the number of
heterogeneous areas on a
given structure, variations
in coating thickness, etc.

A statistically significant sampling may or may not
be feasible, given that these tests are destructive to the
coating film and each area of test may need to be
repaired. Other considerations include whether adhesion
testing is part of a quality assessment (where destructive
testing should be minimized), or if it is being employed to
help diagnose the cause of a coating failure, where
additional destructive tests have little negative impact,
but can provide value in examining a problem.
Reporting the Type and Amount of Break
The type of break and amount of each type of break
arguably provides as much information as the pull-off
value itself. The types of break include adhesive,
cohesive or glue, and all three may be present on a single
pull test. An adhesive break is a clean break between the
substrate and the first coating layer (Figure 27), or a
clean break between layers (Figure 28) when there are
multiple coating layers in the system. A cohesive break is
a split within a given coating layer (Figure 29). A glue
break (Figure 30) is the failure of the glue itself that was
used to attach the loading fixture to the coated surface
(may or may not require a retest, as described earlier).

The approximate percentage of each type of break that
occurred should also be reported (e.g., 80% adhesive
[primer/topcoat]; 20% cohesive (within topcoat layer).
The total should add up to 100% of the loading area.
Knife Adhesion Testing
The adhesion of a
coating system can also
be evaluated using
ASTM D6677,
“Evaluating Adhesion by Knife,” which is a quick and easy way to
assess adhesion in the
field. Once a test area
is selected, a straight
edge is used in conjunction with a knife blade to make a
1.5" long cut through the coating system (down to the
substrate) followed by a second cut across the first cut to
Figure 31

form an “X.” The legs at the top and bottom of the “X” should be approximately 1" apart, and the intersection of
the “X” should be close to a 30-45° angle.
Starting at the intersection of the
“X,” the tip of the knife blade is used to attempt to lift the coating
from the substrate or the
underlying coating layers (Figure
32).
The adhesion is rated on a scale of
10 to 0 (Figure 33).
Figure 32
Figure 33

Conclusion
Proper surface preparation/inspection (the foundation
for the coating system), proper application/inspection of
the coating system and post-installation inspection are
critical to the protection of the substrate, and to prevent
premature coating failure and preserve pipeline integrity.
This approach to quality is illustrated in the Venn
Diagram below.
Post-installation inspection includes veryfying that the
coating system is continuous, properly cured prior to
service, and well adhered. Common post-installation
quality check points include those described in this
Volume 3 of the eBook series - Surface Preparation and

Coating Application Inspection Instruments for the
Pipeline Industry. Instruments used during surface
preparation are presented in Volume 1; instruments used
during the coating application process are presented in
Volume 2.