Embed Size (px)
Citation preview

Precious Plants and Animals
Environmental Sculpture Resource Kit
Stages 2 and 3
Developed in support of the 2012 Woollahra Environmental Schools Sculpture Prize

The ‘Precious Plants & Animals’ Environmental Sculpture Resource Kit has been produced by Woollahra Council, with funding from the New South Wales Government through its Environmental Trust, as a learning resource for teachers and students participating in the 2012 Woollahra Environmental Schools Sculpture Prize.
Project Manager and Supporting Author: Melissa Sellen
BBus, MEnvEd
Principal Author:Cara MacLeod
BFA, MTeach
Woollahra Council Editorial Team:Laura Beattie, Events & Communications Officer
Chris Munro, Team Leader Environment & Sustainability
Melissa Sellen, Environmental Education Officer
Publishing:
Melissa Sellen, Woollahra Municipal Council
Illustrations:
All illustrations are © Cara MacLeod 2012 unless otherwise specified
Published by:
Woollahra Council, Sydney, Australia 2012
Printed on 100% recycled paper stock
‘Precious Plants & Animals’ Environmental Sculpture Resource Kit
Copyright © Woollahra Municipal Council 2012
Woollahra Council welcomes the use of these resources within the restraints imposed by the Copyright Act 1968 (Cth). Provided acknowledgement is made of the source, Australian Government and Non-Government school staff are permitted to copy this material freely for the purpose of teaching students in schools or communicating with parents and others in the community. Detailed requests for use not specifically permitted by the Copyright Act 1968 (Cth) should be submitted to Woollahra
Council via: [email protected]
This project has been assisted by the New South Wales Government through its Environmental Trust

3
Precious Plants and Animals
IntroductionThis resource is designed to help students get the most out of the 2012 Woollahra Environmental Schools Sculpture Prize, and to empower and excite them to express their environmental passion through art.
Woollahra Council established the Environmental Schools Sculpture Prize in 2007, due to an increasing demand for a local schools category in the already successful Woollahra Small Sculpture Prize. The Woollahra Small Sculpture Prize was established in 2001 to support, promote and celebrate artistic excellence as well as to promote local community engagement. These combined exhibitions attract significant media interest, and receive approximately 3000 community visitors.
The Environmental Schools Sculpture Prize is open to all students in primary and high school in the Woollahra local government area and seeks to engage students with a passion for art and the environment, by creating a sculpture that expresses an environmental message to the community.
Finalist sculptures are displayed in tandem with the Woollahra Small Sculpture Prize finalist entries and will be exhibited at Council for two weeks from 29 October - 9 November 2012.
The 2012 theme is biodiversity which encourages students to submit an entry that represents some aspect of biodiversity – whether it be drawing attention to the problems our plants and animals face, highlighting the beauty and complexity of our plants and animals, or providing hope and imagination in the way we could support and enhance the biodiversity and ecosystems around us.
Why we have created this resourceWhile the Woollahra Environmental Schools Sculpture Prize has experienced increasing success since its inception in 2007, local teachers expressed their desire for Council to provide resources to support them in further applying the educational aspect of the competition and enabling students to build their confidence as they submit their works.
With funding from the NSW Government through its Environmental Trust, this resource has been developed to expand the support provided to students in the production of their submission.
About the resourceThe Precious Plants & Animals Environmental Sculpture Resource Kit is a six-part, teaching and learning resource that provides support to teachers. The kit offers lesson ideas that are integrated with the Board of Studies stage 2 and 3 Creative Arts syllabus Visual Arts outcomes, while providing additional cross-curriculum links. It has been designed to support schools in combining visual arts with sustainability education, in the lead up to the 2012 Woollahra Environmental Schools Sculpture Prize, specifically on the theme of biodiversity.
Biodiversity can be described as the “variety of plants and animals (species) and the places they live (ecosystems)” (NSW National Parks and Wildlife Service). Biodiversity conservation is “the need to conserve terrestrial and aquatic biodiversity, protect ecosystem health and maintain critical ecosystem services (NSW Council on Environmental Education). These elements will form critcal parts of the students exploration through these lessons.
In the Precious Plants & Animals lessons, students explore the theme of plants and animals, in the context of local, national and global environments, though a series of visual arts activities. There is also a strong emphasis on waste reduction in art making.
During each lesson, students are exposed to a range of contemporary artists and artworks exploring plants and animals in their work, as well as considering local problems and environments for their inspiration in practical tasks.

Precious Plants and Animals
4
How to use this resourceEach lesson has been designed to provide flexibility to suit class needs. The aim is to encourage creative, individual responses, rather than producing the same finished ‘craft’ activity.
This resource has been designed to fit naturally into the educational requirements of the NSW Board of Studies Creative Arts syllabus for stages 2 and 3, while providing additional cross-curriculum links. Each activity can be mixed and matched as suitable for each individual class however ideally, activities will be worked through in order.
Where relevant, suggestions of adaptation ideas for younger or older students are provided, or extension activities are suggested if further development of the unit is desired. A series of ‘did you know?’ fact boxes have also been included to provide additional sustainability education information to enhance the underlying environmental message of each lesson. Each lesson also contains a list of related key vocabulary, definitions of which can be found in the Glossary at the end of the resource.
Teachers are also encouraged to incorporate the sustainable use of resources and the reduction of waste wherever possible during lessons. Brushes can be cleaned in a small bucket of water rather than under a running tap. Left over clay can be softened and used again and students are encouraged to use recycled or discarded materials wherever possible throughout the lessons. In this way, students learn, both in theory and practice, how their artwork can communicate an environmental message while also having a minimal impact in its production.
About the AuthorsCara MacLeod is an artist educator based in Sydney. Since completing her Bachelor of Fine Arts and Master of Teaching, she taught Visual Arts at Ascham School for several years and travelled and worked as an artist in residence in Europe and Canada.
She has experience working with Local Government to develop environmental art projects and workshops for children and young adults, and recently ran an environmental sculpture program at Glenmore Road Public School.
Cara is currently working as an artist educator at the Museum of Contemporary Art Australia, presenting a range of innovative workshops and exhibition based experiences for diverse audiences in the MCA galleries and the National Centre for Creative Learning.
Melissa Sellen is an environmental educator with significant experience working with children and adults. Since completing her Master of Environmental Education, she has worked for well known environmental not-for-profit organisations, Planet Ark and the Nature Conservation Council of NSW, developing school resources and community programs to engage everyday Australians in caring for our planet and incorporating sustainable practices into their daily lives.
Melissa has experience working for State and Local Government and is currently the Environmental Education Officer at Woollahra Municipal Council.

5
Precious Plants and Animals
Unit One: Web of LifeSubject Matter: Places & Spaces, Other Living Things
Unit Duration: 1 lesson
Forms: Sculpture, Fibre
Lesson OverviewStudents discuss the meaning of biodiversity and view images of some different ecosystems in Australia.
They then weave individual God’s Eye webs to show the diversity of these places using a range of reused and recycled materials.
When complete, individual weavings are hung in a group to show the diversity and interconnectedness of the different parts of our environment.
Lesson OutcomesThe environmental objectives of this lesson are to:
• Develop a basic understanding of biodiversity in Australia;
• Identify different ecosystem types in Australia; and
• Understand that biodiversity is about interconnectedness and diversity.
At the end of this lesson, students will be able to:
• Reuse collected materials to create sustainable artworks (VAS2.1, VAS3.2);
• Experiment with the texture and colour of different fibres to suggest the characteristics of different environments and the diversity of life on earth (VAS2.2, VAS3.1); and
• Discuss biodiversity and appreciate how different qualities and characteristics can be represented in weavings (VAS3.4).
You Will Need • Interactive whiteboard or projector and screen;
• Images of different biodiverse ecosystems in Australia (e.g. Great Barrier Reef, Daintree Rainforest, Simpson Desert, Styx River, National Parks, etc - sourced from Google images);
• Smooth sticks (at least 20cm long) collected from green waste, recycled cane blind or a coil of thin round cane cut into sticks, or bamboo skewers (enough for two or four sticks per student);
• Wool, twine, raffia, natural fibres, and reused fabric cut into strips (raincoats, umbrellas, t-shirts);
• Scissors;
• Pin board or display area such as a wall, window or hanging lines from ceiling;
• Pins, bulldog clips, tape, wool or fishing wire for display.
Precious Plants and Animals
6
Vocabulary • ecosystem
• fibre
• reuse
• recycle
• texture
• three-dimensional
• weaving
• biodiversity
• environment
• food chain
• food web
• sculpture
Activities 1. Introduction:
Show the definition of biodiversity on the interactive whiteboard. Explain that ‘biodiversity’ stands for biological diversity - meaning the variety of all living things on earth.
Ask questions to start students thinking about earth’s biodiversity:
- How many different species do you think there are on earth? (Answer: very roughly 8.7 million!)
- What are some of the different environments or ecosystems these species live in? (Show pictures of different Australian ecosystems including coral reefs, rainforests, national parks, rivers and deserts as students provide suggestions).
- Which interesting environments like these have you visited?
- Which animals and plants did you see there?
- What do you think would happen if there were only a few different species in the world, or if all the environment looked the same (e.g. one big city, one big ocean, one big rainforest).
Help the class to organise their ideas by highlighting key ideas and grouping words, e.g. names of animals and plants, lists of different ecosystems etc. Wrap up the discussion by explaining that all life on earth is interconnected and relies on each other to live.
2. Art Making:
Students respond to the rich biodiversity on earth by making mixed media ‘God’s Eye’ weavings to represent different Australian ecosystems.
Allocate each student an ecosystem (e.g. rainforest, bush, desert, ocean, river, coast etc.) as the basis for their weaving. They will work individually on their weaving but can share suitable materials and develop their ideas in small groups with those who share their ecosystem.
Encourage your students to choose appropriate materials. Ensure there is a wide range of materials with various colours and textures for them to choose from that will help them represent their ecosystem e.g. blue plastic bags, sparkly blue wool and old blue umbrellas cut into strips could represent the beauty of the ocean; a rainforest weaving might include green wool mixed with natural twine or raffia to give the rough texture of vines.
Did you know? • Biodiversity is the variety of all living things; the different plants, animals and micro organisms, the genetic information they contain and the ecosystems they form.
• It is estimated there are 8.7 million species of plants, animals and micro-organisms on earth. Australia has about one million of these, which represents more than 7% of the world’s total.
• More than 80 per cent of Australia’s flowering plants, mammals, reptiles and frogs are unique to Australia, along with most of it’s freshwater fish and almost half of its birds.
• Australia’s marine environment is home to 4000 fish species, 1700 coral species, 50 types of marine mammal and a wide range of seabirds.
• According to the World Resources Institute, the biggest cause of extinction is loss of habitat.
• Scientists estimate that between 150 and 200 species become extinct every 24 hours.

7
Precious Plants and Animals
Also encourage them to mix different colours and tones - contrasts such as placing bright colours next to pastels can add interest. For example, if they have chosen mostly greens, they could try adding light yellow and dark brown or add a splash of pink or red, to represent flowers, branches and so on. If they have chosen mainly light, earthy colours to represent the desert, rows of bright yellow for the sun and sky blue around the outside might be effective.
Making an Ojo de Dios (God’s Eye) weaving:
Students take two sticks (to make a cross); a 60cm length of wool and a pair of scissors. You may wish to prepare the cross frames in advance. If not, students construct as follows:
First, tie a knot at the mid-point of one of the sticks. Place the center of the second stick over the center of the first stick, at a right angle. Secure the two together by criss crossing the wool around both sticks 2 or 3 times in each direction. You should now have a secure cross frame.
Start the weaving by bringing the wool up over the front of the vertical stick. Wind it all the way around the stick and then bring it back up over the front.
Take the yarn over to the horizontal stick on your left, wrapping it over the top, around the back of the stick, and then back over the top. Moving counter-clockwise, continue the process until you have made the trip around all four sticks twice.
Now you’ve finished the centre, continue in the same direction, but show your students how to wrap the wool around the stick twice before they take it over to the next stick and so on. Keep the wool wrapped tightly around each stick and pulled in close to the centre. This double wrap is the key to a successful Ojo de Dios. It not only creates even spacing between the wool, but it also secures the wool in place and prevents it from warping and stretching out of shape.
When your students are ready to change to a new color, they should count the number of wool rows in that section of their Ojo de Dios to make sure they are the same (e.g. they might change to a new colour after 4 rows). They then cut the wool they have been working with to a length of about 10cm. They can join the new wool to the old with a knot at the back of the stick. Then trim the ends of yarn after tying the knot.
Students begin wrapping the wool just as before with their new color. They continue wrapping, changing colours when they wish. Stop wrapping about 2cm from the end of the stick, and tie a knot at the back to secure the end of the yarn. Make loops for each weaving and tie them to the back so they can be hung up and displayed.
3. Display
Hang or arrange individual weavings together to show the diversity and interconnectedness of all of these places and living things. Use a clear space on a pinboard or wall to pin them up or tie them with fishing line or wool in hanging lines from the classroom ceiling.
Encourage students to talk about what qualities they represented in their artworks.
ExtensionStudents could hang collected objects from the corners of their weavings, e.g. seed pods, leaves, shells, cocoons or feathers, to further enhance the display. They could also add small drawings, photos and key words to their weavings, tucking them into the wool like a pin board.
Students who have made these weavings before, or are skilled at this weaving technique, can try joining two squares together to make a more complex God’s Eye. See www.etsy.com/blog/en/2011/how-tuesday-weaving-a-complex-ojo-de-dios/ for more advanced techniques.
Additional ReferencesNSW Ecosystems - www.curriculumsupport.education.nsw.gov.au/env _ ed/centres/ecosystems

Precious Plants and Animals
8
Unit Two: Wildlife WalkSubject Matter: Other Living Things, Places and Spaces
Unit Duration: 1 lesson
Forms: Drawing, Collage
Lesson OverviewStudents explore the school grounds on a wildlife walk and learn more about the biodiversity by observing and interacting with the natural environment.
Students draw the living things they find and describe their sensory experiences, including sounds, smells and textures. Students view artworks by John Wolseley and discover new ways to represent the environment using their senses and a range of drawing techniques.
Lesson OutcomesThe environmental objectives of this lesson are to:
• Explore and record biodiversity and habitat diversity in the school grounds; and
• Understand that biodiversity issues are all around them, including local places like their home or school.
At the end of this lesson, students will be able to:
• Make observational sketches of objects and use photos of plants and animals to create an artistic representation of the biodiversity of their school grounds (VAS2.1, VAS3.2); and
• Appreciate how they can use various approaches and techniques and express their responses to their immediate environment (VAS2.3, VAS2.4, VAS3.4).
You Will Need • A range of graphite pencils (2B and 4B are good for shading) and wax crayons;
• Sharpeners, erasers, scissors and glue;
• A4 sheets of cartridge paper, brown paper and other types of sketching/drawing paper;
• Magnifying glasses;
• Images of Mandarin Duck and Insectivores and Nectarists with Bottle-brush by John Wolseley (available at www.roslynoxley9.com.au/artists/);
• Optional: White, black and brown pastels;
• Optional: Colour printer;
• Optional: Digital cameras.

9
Precious Plants and Animals
Vocabulary • audience
• technique
• mixed media
• modelling
• stippling
• represent
• frottage
• subject matter
• habitat
• vegetation
• species
• sensory
Activities1. Introduction:
Review the definition of biodiversity and explain that students will learn more about appreciating biodiversity in their school by going on a wildlife walk during the lesson.
2. Artist Case Study:
Look at John Wolseley’s drawings Mandarin Duck (2010) and Insectivores and Nectarists (2009) to see how he makes artworks based on an exploration of a natural place.
Identify different drawing techniques used. Explain stippling (using lots of dots instead of lines), hatching (repeated lines in the same direction) and shading to show volume.
On his work, the artist says:
“My practice often springs directly from the land or environment in which I find myself. Usually I do masses of looking, investigating, and listening to what is special about that place. I continue my interest in the nature of marks made by rubbing paper against burnt trees and shrubs.”
Read this quote to the class and discuss how they could take on these practices as they are walking through the school grounds. Ideas could include close up sketches, making notes about how an environment looked or sounded, listening, looking under leaves and exploring textures and colours in their own drawings.
3. Demonstration
Demonstrate different drawing and recording techniques:
i) Observation sketch using lines - look closely at a leaf and lightly sketch the shape, then draw all the fine lines you can see in the direction they go in. Add darker lines or try hatching to show darker areas.
ii) Observation sketch using shading - sketch an insect in pencil onto brown paper and add white pastel highlights or shading with a 2B or 4B pencil.
iii) Make a frottage of a texture - such as a thick leaf with veins, by rubbing the flat side of a large wax crayon or graphite pencil on paper pressed onto the object.
iv) Writing descriptive words - e.g. cool, shady, mossy, to show how words can be integrated into the picture.
Did you know? • There are thought to be approximately 220,000 different species of insects in Australia.
• In Australia, it is estimated that insects make up almost 70% of our biodiversity.
• To keep warm in the cooler months ladybirds huddle together in large groups and hibernate.
• A ladybird in flight beats its wings up to 85 times per second.
• Many species come out only at night (they are nocturnal) so cannot be observed during the day.
• Some scientists identify which animals are present in an environment by studying their scats (the poo they leave behind!)
• Other clues you can find to identify which animals are present include fur, feathers, eggs, teeth, bones and footprints.
• Some species are threatened and are therefore protected under NSW law. The NSW Threatened Species Conservation Act (1995) contains a list of threatened plants and animals in NSW.

Precious Plants and Animals
10
4. Wildlife Walk
Identify an area such as garden or bush area in your school grounds to explore. Remind students that they need to take care not to damage the environment as they walk.
Find a place to sit quietly, observe and listen as a group for the first couple of minutes. Discuss what sounds they hear or things they see that might tell them something about the plants and animals that live there.
Explain where students can go on their wildlife walk to complete their observational sketches.
Students take clipboards with white and brown paper, a pencil and a wax crayon. They then make observational sketches of plants, objects and insects within the garden boundaries. Students can also explore the area to collect interesting textures, and listen carefully to record any sounds such as bird calls, the wind, rustling leaves etc. They could also use a camera or magnifying glasses if available.
Monitor your class and ensure they are both sketching and recording words and sounds. You could discuss ways to build up their pictures by filling in spaces, adding detail or trying a different pencil, crayon or piece of paper.
5. Wrapping Up
After 20 minutes, return to the classroom and collect and display their work.
Review the different plants and animals that have been drawn and the sounds and observations recorded.
Discuss the walk with the class. What did they find interesting or beautiful on their wildlife walk? What were some of the challenges? (e.g. drawing a bird that flew away). Did anyone find other traces of biodiversity such as a nest, feathers, or footprints?
ExtensionDrawing and Collage: Give students more time to carefully rub out smudges, add notes, collage other pieces and work into their drawings with pencil or pen to achieve greater detail. If you used a camera to document the wildlife walk, print photos taken in the school grounds and add them to the sketched works on display.
Group Collage: Look again at the work of artist John Wolseley e.g. Tracing the Wallace Line; wing leaf and land (1999), and consider how different views, textures, botanical drawings and notes can be put together to create an artwork about a particular place.
Give students another lesson to put their various drawings and notes together to create a finished group artwork about the biodiversity they found in the school grounds.
On large sheets of cardboard or brown paper from a roll that is long enough for your class or a smaller group to fit around, students sketch a horizon line, and add trees, ground cover, shrubs and rocks in pencil, white and brown pastels and charcoal.
They then add notes, dotted lines showing where they walked, and collage on the detailed sketches of things they saw and textures they found along the way. Students cut or carefully tear out their own sketches and glue them onto the group collage to create a larger mixed media landscape.
Additional ReferencesTo conduct a more detailed and scientific wildlife survey of your school, check out Unit 2 of the ‘BioWhat?’ educational resource available at www.backyards4wildlife.com.au/uploads/BioWhat.pdf

11
Precious Plants and Animals
Unit Three: A Special HomeSubject Matter: Other Living Things, Places and Spaces
Unit Duration: 2 lessons
Forms: Collage, Sculpture
Lesson OverviewStudents learn about different habitats and make their own miniature diorama of an Australian habitat.
They experiment with a range of natural and recycled sculpture materials to represent the characteristics of the habitat, including the plants and animals which live there.
Lesson OutcomesThe environmental objectives of this lesson are to:
• Build understanding of the parts of an ecosystem that create habitat for biodiversity; and
• Understand that a variety of ecosystems and habitats are important for biodiversity.
At the end of this lesson, students will be able to:
• Show relationships between different species in their natural habitat (VAS2.1);
• Arrange objects to reflect their knowledge of Australian ecosystems (VAS2.2, VAS3.1, VAS3.2); and
• Appreciate how Australian ecosystems have been represented in their own and others’ artworks (VAS2.4, VAS3.4).
You Will Need • Pencils, textas;
• Collection of recycled materials for dioramas - assorted coloured and textured materials such as fabric offcuts, bottle lids, corks, plasticine, pipe cleaners, plasticine, sheets of foam, wooden sticks, buttons, plastic lids, small bottles, cane skewers, wool, twine, fishing line, corks etc;
• Sand or sandpaper, foam and collected rocks for ground covers;
• Bark, string, or seagrass for vines;
• Cellophane, tissue paper, crepe paper, coloured paper, nature magazines;
• Collection of shoe boxes or small recycled boxes (one per student);
• Scissors, PVA glue and glue sticks, sticky tape, pliers, masking tape;
• Optional: Paint and large brushes, gaffa tape, staple gun;
• Optional: Where the Forest Meets the Sea by Jeanie Baker (ISBN-Hardback: 0-688-06363-2)

Precious Plants and Animals
12
Vocabulary • artist’s statement
• artist’s intention
• audience
• diorama
• ecosystem
• elements
• habitat
• native species
• vegetation
• resource
• technique
• pollution
Activities1. Introduction:
View drawings and photos of the school gardens or bush area explored during the wildlife walk. Explain to students that each ecosystem, or environment where plants and animals interact, is precious and provides a home (habitat) for many species (including some we can’t even see in the soil and air).
One way you can represent a habitat in art is through a diorama. Dioramas are small scale copies of real life.
What are some of the habitats (places where animals live) in your school? This could include trees, nests, hollows, ponds, hives, soil, cocoons or flowers. Explain that in this lesson, students will be creating a diorama that shows a native habitat.
2. Art Making:
Remind students that in this activity, the class is following the principles of avoid, reduce, reuse and recycle to save precious resources and protect our environment.
Invite each student to choose a habitat type (as listed above or one of their own) to form the theme of their diorama. They may wish to revisit the habitat in the school grounds and take pictures or write notes before starting their diorama.
Set up a resource area on a desk or the floor, with a large collection of recycled materials from the school or home.
Explore how different materials can show the colours and textures of the different habitats - is it a bright or dark place? Is there dense vegetation? Give students a chance to look at the materials and plan how they could be used creatively. When students have a plan, hand out boxes for dioramas. Students must write their names on the back.
Inside their box, students draw a background for their diorama. They should include any tree layers/ stories, flowering shrubs and ground cover and include an example of their habitat.
Students then create a collage over their drawing on the inside walls and bottom of their box to build up the background in three dimensions. They should choose a variety of materials which show characteristics and features of the environment (e.g. tissue paper is soft and colourful (flowers, sky), torn brown paper or sand paper is rough (rocks, gravel)).
Did you know? • Woollahra is rich in biodiversity with approximately 30 hectares of bushland and over 300 plant species.
• Animals found in Woollahra include brush-tailed and ring-tailed possums, larger reptiles like the blue-tongue lizard and eastern water dragon, and species of frog including the leaf-green tree frog, brown-striped marsh frog and the eastern froglet.
• Habitat loss is one of the biggest threats to our plants and animals in Australia.
• Introduced species have a big impact on the habitat of native animals. For example, the Indian Myna bird is known to overtake the tree hollows and nests of native species.
• A ‘habitat’ can be any area where a species makes it’s home - this could be in the air, in the soil, or on other plants or animals.
• The more habitat types there are in one area, the more biodiversity there will be.

13
Precious Plants and Animals
Encourage them to show biodiversity within the habitat by adding different colours, textures, and shapes of the various plants, animals and insects that live there.
Students should also make a few elements that stand up, pop out or hang inside the diorama to make it three-dimensional. Students could model forms in plasticine, or make plants, animals and habitats out of pipe cleaners, foam and fabric.
One way to create a three-dimensional effect is to print photos, or draw or collect small pictures, glue them on stiff cardboard and cut them out. By adding a tab at the bottom, students can fold it back to make them pop up or stand by taping or gluing it to the bottom of the box.
Another idea is to fold two strips of paper to make a jack-in-the-box type spring to join on the back of birds and insects. Why not tie some fishing line from holes in the top of the diorama so they appear to fly?
Allow students up to two lessons to complete their habitat dioramas.
3. Wrapping Up
Evaluate the completed dioramas as a class. Discuss which habitats have been shown and which plants and animals have been included. What might be missing? Which techniques have been used to effectively show qualities and characteristics of the habitat?
Discuss or sketch ideas for how to display your dioramas. Consider the audience for your work. How could you use your artworks to let people know about the importance of protecting these habitats? Where would be a good place for a public diorama display? The library and the office attract many visitors.
Students write a brief artist’s statement of their diorama, including information about the artist’s name, title, date, materials and techniques used and subject matter represented. Students could type up their artist statements, insert an image of the habitat they represented, then print and mount it on cardboard to present their work to their audience.
To give a neat look to your diorama display, try painting the outsides a solid colour in acrylic paint. You could staple gun them to a pin board in a grid, or stack them in a display area and join the back of your display with gaffa tape.
ExtensionRead Where the Forest Meets the Sea by Jeanie Baker and discuss the history, biodiversity and human impact on the Daintree Rainforest in Queensland.
Show students the artist’s detailed and naturalistic use of paper collage to represent the beautiful, unspoilt rainforest, and discuss how she has layered images to reveal dinosaurs, indigenous people and later an urban development. Discuss how we can have a negative effect on local habitats and ecosystems when we use too many resources or create too much waste.
Additional ReferencesVisit Reverse Garbage (www.reversegarbage.org.au) at Marrickville or Taylor Square for materials.
Precious Plants and Animals
14
Unit Four: Indigenous PerspectivesSubject Matter: Places and Spaces, People
Unit Duration: 2-4 lessons
Forms: Drawing, Sculpture
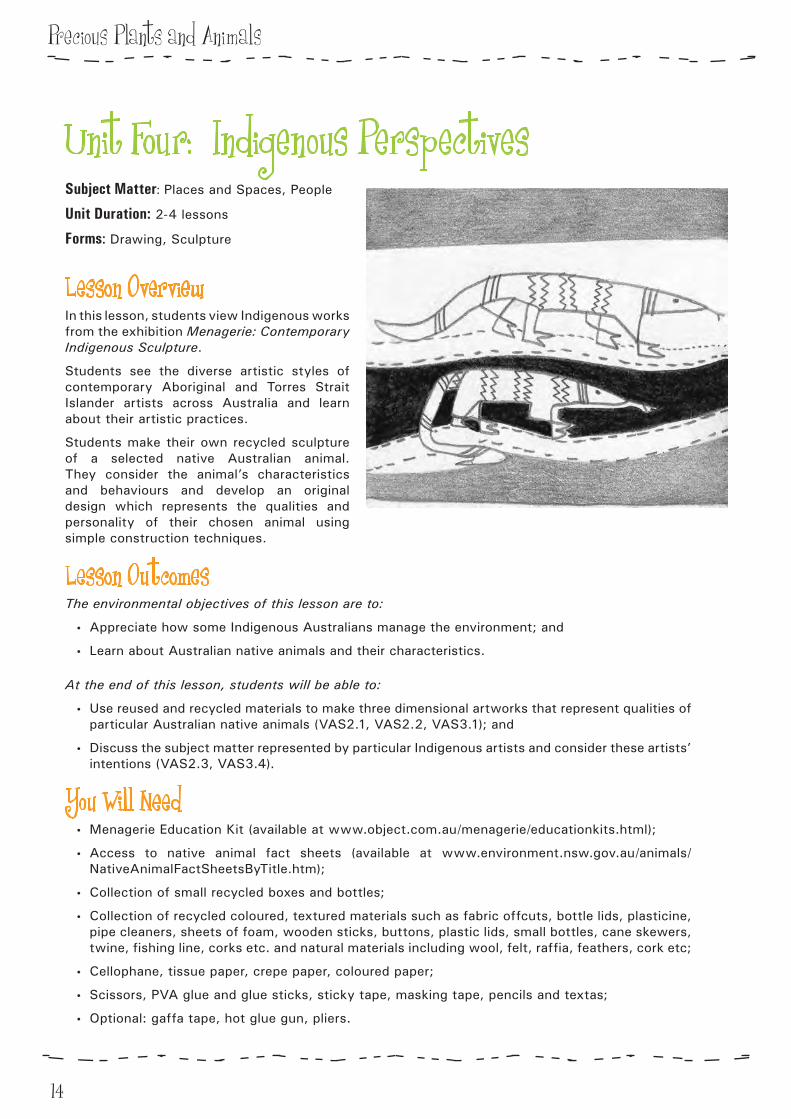
Lesson OverviewIn this lesson, students view Indigenous works from the exhibition Menagerie: Contemporary Indigenous Sculpture.
Students see the diverse artistic styles of contemporary Aboriginal and Torres Strait Islander artists across Australia and learn about their artistic practices.
Students make their own recycled sculpture of a selected native Australian animal. They consider the animal’s characteristics and behaviours and develop an original design which represents the qualities and personality of their chosen animal using simple construction techniques.
Lesson OutcomesThe environmental objectives of this lesson are to:
• Appreciate how some Indigenous Australians manage the environment; and
• Learn about Australian native animals and their characteristics.
At the end of this lesson, students will be able to:
• Use reused and recycled materials to make three dimensional artworks that represent qualities of particular Australian native animals (VAS2.1, VAS2.2, VAS3.1); and
• Discuss the subject matter represented by particular Indigenous artists and consider these artists’ intentions (VAS2.3, VAS3.4).
You Will Need • Menagerie Education Kit (available at www.object.com.au/menagerie/educationkits.html);
• Access to native animal fact sheets (available at www.environment.nsw.gov.au/animals/NativeAnimalFactSheetsByTitle.htm);
• Collection of small recycled boxes and bottles;
• Collection of recycled coloured, textured materials such as fabric offcuts, bottle lids, plasticine, pipe cleaners, sheets of foam, wooden sticks, buttons, plastic lids, small bottles, cane skewers, twine, fishing line, corks etc. and natural materials including wool, felt, raffia, feathers, cork etc;
• Cellophane, tissue paper, crepe paper, coloured paper;
• Scissors, PVA glue and glue sticks, sticky tape, masking tape, pencils and textas;
• Optional: gaffa tape, hot glue gun, pliers.

15
Precious Plants and Animals
Vocabulary • observe
• artist’s intention
• sculpture
• contemporary
• diversity
• indigenous
• curator
• menagerie
Activities 1. Introduction:
Explain to the class that Indigenous Australian art comes from many different parts of the country. By looking at it, we can understand some of how the original owners of Australia, who lived here for thousands of years before many of our ancestors did, view the environment and manage plants and animals.
2. Artist Case Studies:
Bring up images of the Menagerie exhibition on screen. Explain that these artworks were chosen by a curator to be part of the exhibition because they show great skill and highlight the importance of caring for each other, animals and the land in their art.
The exhibition featured 33 established and emerging Aboriginal and Torres Strait Islander artists from every Australian state and territory who each produced a sculpture of an Australian animal using different materials.
- What different Australian animals can students see in the exhibition artworks? (kangaroo, echidna, hammerhead shark, owls, fish, goannas, spiders, sting rays, Tasmanian devil)
- Which artwork is their favourite? Why?
Read the section ‘Sand Goanna and Tjukurrpa’ on page 11 of the Education Kit and also artist Niningka Lewis’ quote (and show it on screen).
After reading the description of Tjurkurpa, or Aboriginal Law, brainstorm with the class some rules they might make for caring for people, animals, plants and the land. What things are important to do in your local environment to keep it healthy?
3. Student Research:
Ask each student to choose an Australian native animal that they would like to make a sculpture of.
Each student should visit www.environment.nsw.gov.au/animals/NativeAnimalFactSheetsByTitle.htm and research their chosen animal. What does it look like? Where does it live? What does it eat? What are it’s main threats?
Students should then decide what materials they could use to create their animal sculpture. Starting with a sketch of their proposed idea is a great way to help solidify their plan.
Did you know? • Australia has more than 140 species of marsupials, including kangaroos, wallabies, koalas, wombats and the Tasmanian Devil, which is now found only in Tasmania.
• Indigenous Australians successfully managed their land for at least 40,000 years, gaining all the resources they needed for clothing, shelter and food while allowing the environment to renew and not become exhausted or overused.
• By eating a large variety of foods in a systematic and sustainable manner Aboriginal food gathering techniques ensure that no one food source is over-exploited.
• Aboriginal land management practices rely on an excellent knowledge of the area including the complex diversity of plants and animals found there.

Precious Plants and Animals
16
4. Art Making:
Once students have chosen, researched and sketched their native animal, they can begin constructing their animal out of recycled materials.
You may want to keep images of the Menagerie exhibition on screen to inspire students however remind them that it is not culturally appropriate to directly copy Aboriginal art.
Instead, encourage them think about the colour, texture or feeling and unique features of their native animal (grey, furry, big eyes, pink ears etc.) and use offcuts of fabric, plastic bottles painted on the inside and filled with sand, buttons, pipe cleaners etc. to create a sculpture of their own.
This activity would be difficult to achieve in one lesson as it is preferred that students use their own creativity to build an original piece of art.
5. Wrapping Up:
Once students have completed their sculptures, ask them to make a short presentation to the class explaining the techniques and materials they have used, as well as provide some information about their chosen animal and the threats it faces.
ExtensionStudents could build a habitat, shelter or home for their animal. For example, they could place a bird on a perch made out of a branch and join on some leaves and insects around to show its habitat.
Students could also look at the Menagerie Education Kit in pairs and choose an artwork that they like. Students read the information and look at the pictures and discuss with their partner what the artist has shown about the particular animal, as well as their habitat, and the artist’s relationship to the animal in their sculpture.
Additional ReferencesView a select gallery of the Menagerie works on your Interactive White Board at http://museumvictoria.com.au/melbournemuseum/whatson/exhibition-archive/menagerie/
Educational resource on the Djalkiri exhibition in Arnhem Land including artists such as John Wolseley, Fiona Hall, Judy Watson and Yonlgu artists. This resource contains activities related to artists’ work as well as information on Aboriginal art, culture and Arnhem Land (available at www.24hrart.org.au/download/Djalkiri _ school _ activities.pdf).

17
Precious Plants and Animals
Unit Five: Fly ButterflySubject Matter: Places & Spaces, Objects
Unit Duration: 2 lessons
Forms: Drawing, Sculpture
Lesson OverviewStudents learn why butterflies are important in the environment and what attracts them to a habitat.
Students consider and appreciate Butterfly Garden by environmental artist Reiko Goto, then make their own cardboard sculptures of a butterfly. These are joined onto a long strip of cane to be displayed as a flight of butterflies.
Lesson OutcomesThe environmental objectives of this lesson are to:
• Understand the importance of butterflies in the environment; and
• Appreciate that creating a garden can be a work of art.
At the end of this lesson, students will be able to:
• Create a symmetrical artwork by folding and cutting a shape and adding decorative patterns (VAS2.1, VAS2.2, VAS3.1); and
• Appreciate the artwork of Reiko Goto and understand how meaning can be conveyed through art (VAS2.3, VAS3.3).
You Will Need • Images of common butterflies found in Australia (available at hhtp://australianmuseum.net.au/Australian-insects);
• Images of Butterfly Garden (1992) by Reiko Goto (available at www.yerbabuenagardens.com/features/gardens.html#6 and http://nmr.collinsandgoto.com/people/reiko/butterfly/index.html);
• Sheets of A3 coloured cardboard (1 per student) plus black cardboard for decorating butterfly wings. If you wish to choose a particular butterfly species to make, you could select royal blue for Dunk Island butterflies or orange for Monarch butterflies;
• Pencils, glue, scissors, tape;
• Long strips of cane - you can often find decorative bunches 1-2 metres long, dyed in bright colours, in bargain stores selling homewares.

Precious Plants and Animals
18
Vocabulary • symmetry
• pattern
• public art
• balance
• camouflage
• habitat
• metamorphosis
Activities 1. Introduction:
Explain to students that artists can make art which draws attention to environmental issues - sometimes by making artworks about environmental issues, such as paintings or sculptures.
Sometimes artists respond by actually making artworks in the environment - with, and for, other living things (such as building a garden). One artist in San Francisco in the United States created a Butterfly Garden as an artwork.
Show images of some different butterflies (or the specific one you are going to make if you are prescribing for your students):
- What shapes, colours and patterns can they see?
- What job do butterflies do in nature? (Help pollinate flowers).
- Did they know that butterfly wings are symmetrical (each is a mirror image of the other)?
2. Artist Case Study:
Consider the work Butterfly Garden by Reiko Goto. Looking at photos of the artwork, ask students to imagine they are a butterfly who was born in San Francisco and stumbled across this beautiful garden in the middle of the city.
- What’s interesting about this habitat?
- What makes it attractive to butterflies? (Plants for all stages of their lifecycle, water source, sheltered from wind, edges next to a sunny lawn).
- Does it surprise them that a garden to attract butterflies could be considered a work of art? Why or why not?
3. Art Making:
Students each take a piece of coloured A3 cardboard and a pencil to draw their butterfly shape.
Fold a landscape piece of A3 coloured cardboard in half so it creates an A4 portrait card with a fold down the left side.
Keeping the card folded, and starting from the left side, students draw the outline of one half of a butterfly. Encourage them to fill the page, with the widest point of the forewing, and tips of the lower wing, going all the way out to the edge of the page and the antennae touching the top of the page.
Did you know? • There are about 115,000 species of moths and butterflies in the world and about 400 species of butterfly in Australia.
• The color of a butterfly is important in many ways. It functions as camouflage, to absorb heat, aids in finding a mate, and serves as warning to predators.
• A butterfly’s wings can have as many as 125,000 scales in one square inch.
• Most butterflies will only live for about 7-14 days.
• Butterflies and moths are a group of insects known as lepidopterans, which means ‘scaly wings’.
• The female Queen Victoria’s Birdwing is the largest butterfly in the world. It can grow up to 10 inches from the the tip of one wing to the other.
• Butterflies can see red, green, and yellow.
• Butterflies cannot fly if their body temperature is less than 28 degrees.
• Butterflies taste with their feet.
• Butterflies love sunshine, garden flowers and puddles of water.

19
Precious Plants and Animals
You may wish to show students a stencil outline of a butterfly on screen (available through Google images) to help them replicate the butterfly outline.
Remind them to draw a shape they can cut out, and make sure the body is big enough so their butterfly can stay in one piece when they cut out their outline.
Once their outline is drawn, and keeping the cardboard folded, students cut around their half-butterfly outline (without cutting up the fold itself). They should be careful to cut so that the outline stays in one piece. If a student cuts their butterfly in half, join the pieces with sticky tape or add an extra piece of cardboard where it has been cut for support. When unfolded, they should have full symmetrical butterfly shape.
Students take a second colour piece of cardboard by swapping with someone else, or using other small pieces of scrap cardboard for decoration. If they are all making similar butterflies such as a Monarch or a Dunk Island butterfly they should take black cardboard for their decoration.
To make the shapes to decorate each wing, students should fold their second piece of cardboard in half, then draw each spot, line or shape needed on one side so when they cut through the folded card, they end up with two, identical shapes. This ensures the wings remain symmetrical in their decoration.
Students arrange the shapes in a symmetrical position on the butterfly and collage them. Students continue arranging shapes and patterns on their sculptures until they have achieved a design showing some of the observed features of butterflies.
4. Wrapping Up:
Attach the finished collaged sculptures to long strips of cane. Tape the cane along the fold in the middle of the butterfly body.
Finished sculptures can be held up high to look like they’re flying or your class might like to see how their sculptures look outdoors, and go for a walk to the garden. They could plant their sculptures in a garden containing lawn, trees or flowers and take some photos of their sculptures in the school grounds.
Additional ReferencesExtensive teaching resources and information about butterflies from the Florida Museum of Natural History (available at www.flmnh.ufl.edu/education/guides/butterfly-guide.pdf)

Precious Plants and Animals
20
Unit Six: Our PlaceSubject Matter: Objects, Places & Spaces, People
Unit Duration: 2 lessons
Forms: Drawing, Painting, Digital Forms
Lesson OverviewStudents look at the book My Place, learning how a local suburb has changed over time.
As a class, students discuss different ways they could improve biodiversity and sustainability in their own school grounds and choose a project to implement.
Note: real projects can take time and resources. Links are provided to show how your class could realise a project and where grant funding may be available.
Lesson OutcomesThe environmental objectives of this lesson are to:
• Engage students in the creation of a biodiversity enhancement project for their school; and
• Help students understand there are a variety of ways to support biodiversity in our environment.
At the end of this lesson, students will be able to:
• Experiment with sustainable and natural materials in artmaking (VAS2.1, VAS3.2);
• Contribute to a design which will improve biodiversity in their school grounds (VAS3.1); and
• Recognise how artists, including themselves, can interpret the world in particular ways in their artmaking (VAS2.3).
You Will Need • Copy of My Place by Nadia Wheatley and Donna Rawlins (ISBN 0-85924-575-6);
• Graphite and coloured pencils;
• Cartridge paper;
• Watercolour paints and small round paint brushes (sizes, 4, 6 and 8);
• Resources to embark on your chosen biodiversity project (see Additional References section for links to how to undertake various biodiversity enhancement projects).

21
Precious Plants and Animals
Vocabulary • aerial perspective
• sustainability
• biodiversity
• installation
• nest box
• pond
Activities1. Discussion:
Students read and look at the drawings in My Place by Nadia Wheatley and Donna Rawlins.
- What changes took place in the book? What changes can students identify in their own local environment?
- Have the changes to their local area affected any of the natural bush or environment? How?
- Have any gardens or native areas been installed or planted (e.g. for Schools Tree Day or similar) in their local area?
Discuss with students what things might threaten natural environments, plants and animals (such as pollution, cutting down trees, litter, overusing resources etc.)
Ask students a series of ‘what if’ questions to illicit how the actions we take can have a positive influence on the environment e.g. what if all our waste was recycled, what if our ancient forests were protected, what if plastic bags were no longer given out in supermarkets etc.
2. Planning your project:
Ask your class to think about the school and playground. What could be made or planted to help provide habitat or support for our precious plants and animals?
Hand out sheets of scrap paper and graphite pencils and give each student time to draw or design a garden or feature that could be installed at the school to support biodiversity (this could include a pond, bird bath, nest box, butterfly or bird attracting garden, worm farm, native garden etc).
When they have finished sketching, students use watercolours to complete the design of their idea for the school grounds.
Discuss the different ideas that students have developed, and display them in the classroom.
3. Project creation:
Students then consider the available space in the school and choose one project to be undertaken by the class.
See the weblinks in the Additional Resources section for information on how to make your project happen.
Contact the Environmental Education Officer at Woollahra Council if you need help designing your project or obtaining grants or resources.
Did you know? • A nestbox is a box built especially for animals to nest in. Nest boxes are usually built for particular species of birds, but some mammals such as possums may also use them.
• There is much potential to restore some of our lost biodiversity. Woollahra Council has an active bush regeneration program comprising of council staff as well as volunteers.
• Australia has 216 frog species, and many of these are endemic - that is, they are found nowhere else in the world.
• In the Sydney region, the two most common frogs are the Striped Marsh Frog, and the Eastern Toadlet.
• Pets such as dogs and cats have a big impact on local biodiversity as they can attack native species. Encourage neighbours around your school to keep cats inside at night and keep dogs on a leash to protect the biodiversity in your school.
• Woollahra Council provides grants of up to $1000 to local schools to help them complete environmental projects.
Precious Plants and Animals
22
ExtensionOnce your project is underway, your class could make a series of posters to educate the rest of the school about the benefits of the project. This might include raising awareness about the environmental project you are embarking on, advertising fund raising activities, and encouraging your school community to get involved in a working bee or another event.
Consider attending an upcoming Eastern Suburbs Sustainable Schools Network (ESSSN) meeting to meet with other schools and learn about sustainability projects they are undertaking (visit http://reduceyourfootprint.com.au/projects/esssn for more information).
Additional ReferencesGeneral:
www.backyards4wildlife.com.au/uploads/BFW _ Booklet _ Web.pdf
Grants Available:
www.woollahra.nsw.gov.au/community/building _ your _ community/community _ grants
www.sustainableschools.nsw.edu.au/Default.aspx?tabid=688
Nest Boxes:
www.backyardbuddies.net.au/PDFs/nestbox.pdf
www.environment.nsw.gov.au/animals/GuideToMakingAPossumHouse.htm
www.backyards4wildlife.com.au/uploads/BFW%20FS%20-%20Nesting%20Boxes.pdf
Ponds:
www.fnpw.org.au/PDFS/Resources/Pond.pdf
www.fnpw.org.au/resources/habitats-for-australian-animals/native-frog-ponds
www.backyards4wildlife.com.au/uploads/BFW%20FS%20-%20Frog%20Friendly.pdf
Butterfly Boxes and Gardens:
www.fnpw.org.au/PDFS/Resources/butterflyBox.pdf
www.backyards4wildlife.com.au/uploads/BFW%20FS%20-%20Butterflies.pdf
http://permaculture.org.au/2012/03/06/getting-kids-into-gardening-part-i-creating-a-butterfly-garden/
Ladybirds and Lizards:
www.fnpw.org.au/PDFS/Resources/ladybirdHouse.pdf
www.backyards4wildlife.com.au/uploads/BFW%20FS%20-%20Lizards.pdf
Native Gardens:
www.camden.nsw.gov.au/files/environment/native _ gardenlr.pdf
www.backyards4wildlife.com.au/uploads/BFW%20FS%20-%20Native%20Garden.pdf
Bird Attracting Gardens:
www.cboc.org.au/birdscaping.html
http://floraforfauna.com.au/planner/

23
Precious Plants and Animals
Glossaryaerial perspective how an object or scene looks from above
artist’s intention the aim or purpose of the person making the artwork
artist’s statement a description of an artwork including the artist’s name, title, date, what they have represented, how it was made and why
audience the viewers of an artwork or exhibition
balance the ways in which the elements (lines, shapes, colors, textures, etc.) of an artwork are arranged
biodiversity the variety of all living things on earth
camouflage the act of concealing the identity or presence of something by modifying its appearance
contemporary art produced at this present point in time
curator a person who selects and often interprets works of art
diorama a model representing a scene with three-dimensional figures, either in miniature or as a large scale museum exhibit
diversity consisting of a variety or range of different characteristics or species
ecosystem a complex set of relationships among the living resources, habitats, and residents of an area
elements parts that make up a whole
environment the combination of all the conditions that influence the life of an individual or population: the natural environment; the built environment; and, the social-cultural environment
fibre a slender, elongated, threadlike object such as cotton or nylon
food chain a ‘chain’ of organisms which depend on each other in their feeding habits
food web a series of interrelated food chains
frottage drawing technique where a drawing media such as crayon is rubbed onto paper over a surface to create an impression of the surface texture
habitat the place where a plant or animal naturally lives or grows
indigenous originating and living, or occurring naturally, in an area or environment
installation an arrangement of sculptures and other elements in a gallery or other space
menagerie a collection of wild or strange animals, especially for exhibition; a place where they are kept or exhibited
metamorphosis the process of transformation from an immature form to an adult form in two or more distinct stages
mixed media different materials or forms combined in an artwork
modelling a sculpture technique; joining pieces of a soft material such as clay and shaping them with your hands, fingers or tools
native species a local, naturally occuring species that has not been introduced
nest box a man-made box provided for animals to nest or live in
observe watch (someone or something) carefully and attentively

Precious Plants and Animals
24
Glossarypattern a repeated decorative design
pollution poor state of the natural environment when contaminated with harmful substances as a consequence of human activities
pond a man-made body of water, usually found in gardens and parks, for the habitat of plants, animals and insects
public art the installation of permanent, site-specific works of art into buildings, natural places, public spaces and structures through a community design process that includes citizens, artists, architects and urban planners
recycle to put or pass through a cycle again, for further treatment or new use
represent to show something as it is seen
resource something that can be used, something useful
reuse to use again, especially after salvaging or special treatment or processing
scale the relative size
sculpture the art of making forms in the round or in relief by carving wood or stone, modelling clay, casting metal or combining other resources
sensory of or relating to sensation or the five physical senses; transmitted or perceived by the senses
species a group of living organisms consisting of similar individuals capable of exchanging genes or interbreeding
stippling drawing technique using many dots to create an image
subject matter a matter or theme to be represented in an artwork
sustainability meeting the needs of the present without compromising the ability of future generations to meet their needs
symmetry the identical reflection of two sides
technique the systematic procedure by which a complex or scientific task is accomplished
texture the feel or appearance of a surface; representation of structure and detail
three-dimensional having length, breadth and depth, in the round
vegetation plants considered collectively, especially those found in a particular area or habitat
weaving the process of creating cloth or fabric by interlacing or interweaving strips or strands of material

Precious Plants & Animals Evaluation
2012 Woollahra Environmental Schools Sculpture Prize
In order to continually improve our support of schools, please provide some feedback on
your experience using this resource kit.
Once completed, please return this form via fax on 9391 7044, by post to Woollahra Council, PO Box 61,
Double Bay NSW 1360 or via email to [email protected].
Teacher Name: ____________________________________________________________________________________
School Name: _____________________________________________________________________________________
Grade Taught: _____________________________________________________________________________________
Please remark on the following statements using the scale provided:
Statement Strongly
Disagree Disagree Neutral Agree
Strongly
Agree
I feel the units were effective in teaching their stated
aims 1 2 3 4 5
I feel the class was engaged by the unit content 1 2 3 4 5
I feel the units were appropriate for their age and level
of understanding 1 2 3 4 5
I found this resource useful for incorporating
environmental education into my Visual Arts lessons 1 2 3 4 5
I believe this resource enabled me to effectively engage
my class in creative thinking and learning for
sustainability
1 2 3 4 5
I feel this resource built the capacity of my class to
combine artistic skill development with environmental
sustainability
1 2 3 4 5
I feel this resource has provided a helpful support to my
class in preparation for the Woollahra Environmental
Sculpture Prize
1 2 3 4 5
Which unit(s) did you find were the most effective? __________________________________________________
___________________________________________________________________________________________________
___________________________________________________________________________________________________
Which unit(s), if any, did you find ineffective or inappropriate? ________________________________________
___________________________________________________________________________________________________
___________________________________________________________________________________________________
How would you like to see this resource changed or improved in the future? ____________________________
___________________________________________________________________________________________________
___________________________________________________________________________________________________
Do you have any additional comments? ______________________________________________________________
___________________________________________________________________________________________________
___________________________________________________________________________________________________
Thank you for your valuable feedback.

Woollahra Municipal Council
Website address:www.woollahra.nsw.gov.au
This project has been assisted by the New South Wales Government through its Environmental Trust