Embed Size (px)
Citation preview
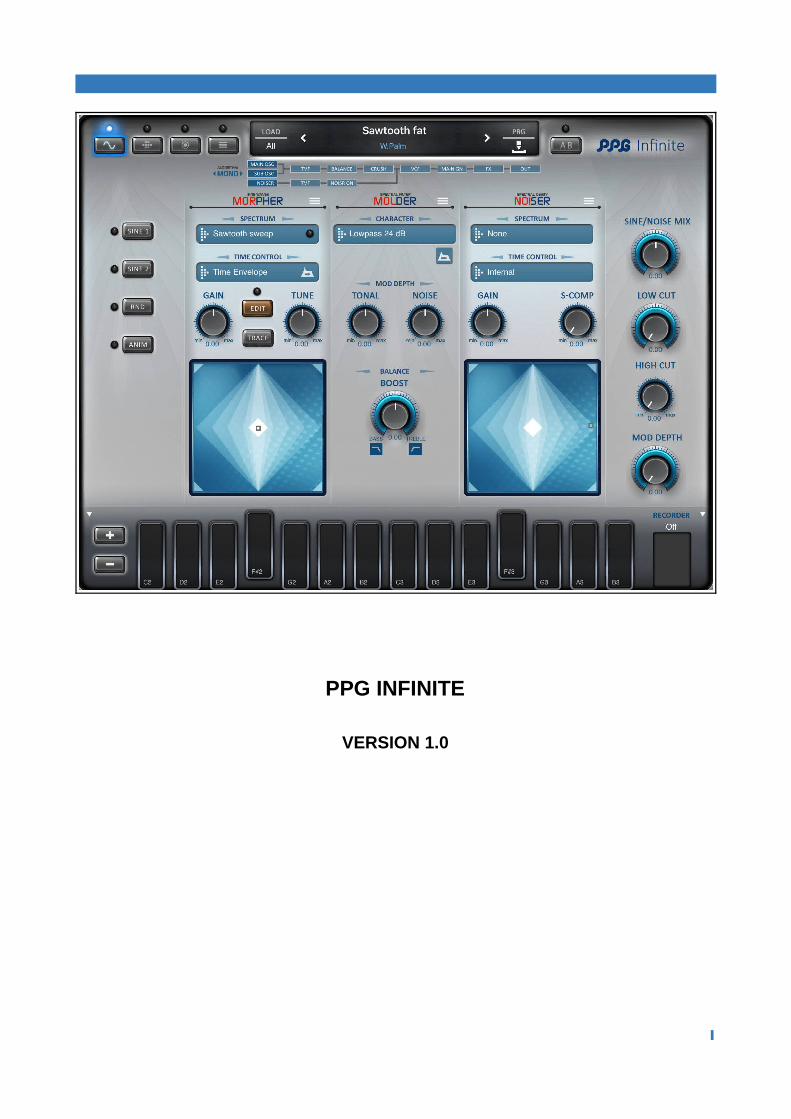
PPG INFINITE
VERSION 1.0
1

Introduction
Thank you for purchasing PPG Infinite.
At the end of the 1970s, Wolfgang Palm developed wavetable synthesis.
This was very successful and was consequently used by many synthesizer companies in the 80s and 90s.
But this technology does have its limitations.This is mainly due to the fact that the sounds used are harmonic. Whereas in nature this really doesn't happen very often.
Many sounds, like a piano string, have small offsets from the harmonic frequencies. This offset is even greater in sounds like bells or percussion.
Infinite overcomes this limitation.
The sounds it produces can have total freedom with the frequencies of its overtones. And to take things further, it is also possible to have independent movement of these overtones during the course of a note.
Another important part of most natural sounds is noise.
Be it a flute or when a drumstick hits the drumhead - all this can be reproduced in Infinite.
Furthermore, the noise source can be used to modulate the tonal part which results in very powerful effects.
Alongside these new digital features, we still have the typical 24db Lowpass filter, 2 VCA with stereo out and effects.
All this is controlled by 10 envelopes, 4 LFOs and a modulation matrix.
2

Key Features
• New system which can synthesize harmonic and inharmonic sounds• Morpher - X/Y controller which morphs 5 user selectable sine resources• Noiser - X/Y controller morphing 3 noise resources and performing
modulations on the tonal part• Molder - acts as a digital filter with any imaginable filter sweeps• Two detailed editor pages for the Sine resources, featuring a 3D display• Import WTS and TCS files from the iPad WaveGenerator and
WaveMapper• Import Phonem utterances and use them in the Infinite Molder• Versatile matrix system - allowing 16 sources to control 40 parameters• 10 Envelopes, for control of filter sweeps, waveform, noise and many
modulations• 4 LFOs which can be freely routed via the matrix• Delay/Reverb effect• Overdrive/Distortion • A/B compare your edited sounds• AU extension - run multiple Infinite instances in AU hosts• IAA - inter-app audio support• Audiobus 2 with state saving• Export audio to AudioShare• Preset browser with new listing filters• Directly accessible context help for each module• Freely configurable schematic keypads, with extremely expressive
modulation options• 4 Keypad play modes: Poly, Mono, Legato and Multi-trigger• 4 MIDI modes: Omni, Poly, Mono and Voice-Per-Channel
3

Table of ContentsIntroduction..................................................................................................2
Key Features.................................................................................................3
The Basics......................................................................................................6The Top Bar.................................................................................................................... 6The Loading Filter............................................................................................................ 7The Keypad..................................................................................................................... 8The Recorder.................................................................................................................. 9Exporting audio................................................................................................................9
The Pages ...................................................................................................10The Morphing Page........................................................................................................ 11The Resources...............................................................................................................11The Morpher................................................................................................................. 13Import from WaveGenerator......................................................................................... 14Import from WaveMapper..............................................................................................14The Noiser....................................................................................................................15The Molder................................................................................................................... 16Importing from Phonem................................................................................................. 17Confgurations............................................................................................................... 18The 3D Display..............................................................................................................19The Sine Resource......................................................................................................... 21The Edit Mode............................................................................................................... 22The Sine Structure......................................................................................................... 23The Random Panel......................................................................................................... 26The Animation Panel...................................................................................................... 26
Parameter Page.........................................................................................27The Main Parameter.......................................................................................................27The Envelope Controller................................................................................................ 28The LFO controller........................................................................................................29The X/Y controllers....................................................................................................... 29The Matrix.................................................................................................................... 30The Envelopes............................................................................................................... 32The envelope types........................................................................................................ 32The control points......................................................................................................... 32The key balance............................................................................................................. 33Time continuation..........................................................................................................33
The Settings And Effects Page................................................................34The Effects Panel............................................................................................................34The Reverb....................................................................................................................35The Delay......................................................................................................................35
4

The Settings Section.......................................................................................................36The Keys And Pads Panel............................................................................................... 36The Global Module........................................................................................................ 37Using Infnite with Audiobus........................................................................................... 38Using Infnite with Inter-App Audio (IAA)........................................................................38Recording MIDI..............................................................................................................39The MIDI Setup Module................................................................................................. 40MIDI input..................................................................................................................... 40MIDI mode.................................................................................................................... 40MIDI receive channel......................................................................................................40MIDI output ..................................................................................................................41
The Browser page......................................................................................44The Program Browser....................................................................................................44Applying Filters.............................................................................................................. 45Sorting the list............................................................................................................... 45The Program Manager.................................................................................................... 46The Target List.............................................................................................................. 47Import And Export Of Bundles....................................................................................... 48Converting external resources........................................................................................48 ....................................................................................................................................48
5
The Basics
All sounds in Infinite are synthesized from sine components and noise signals.
The sine waves are free in frequency and gain, thus it can produce a huge range of sounds from bells to violins.
PPG has analysed many instrument sounds, but also generated typical synthetic spectra. You can edit these to make modifications or even create new ones from scratch.
It is also the possible to import your own sounds from the other PPG apps.
Infinite is based on resources, partially analysed, partially synthetically generated, or manually edited.
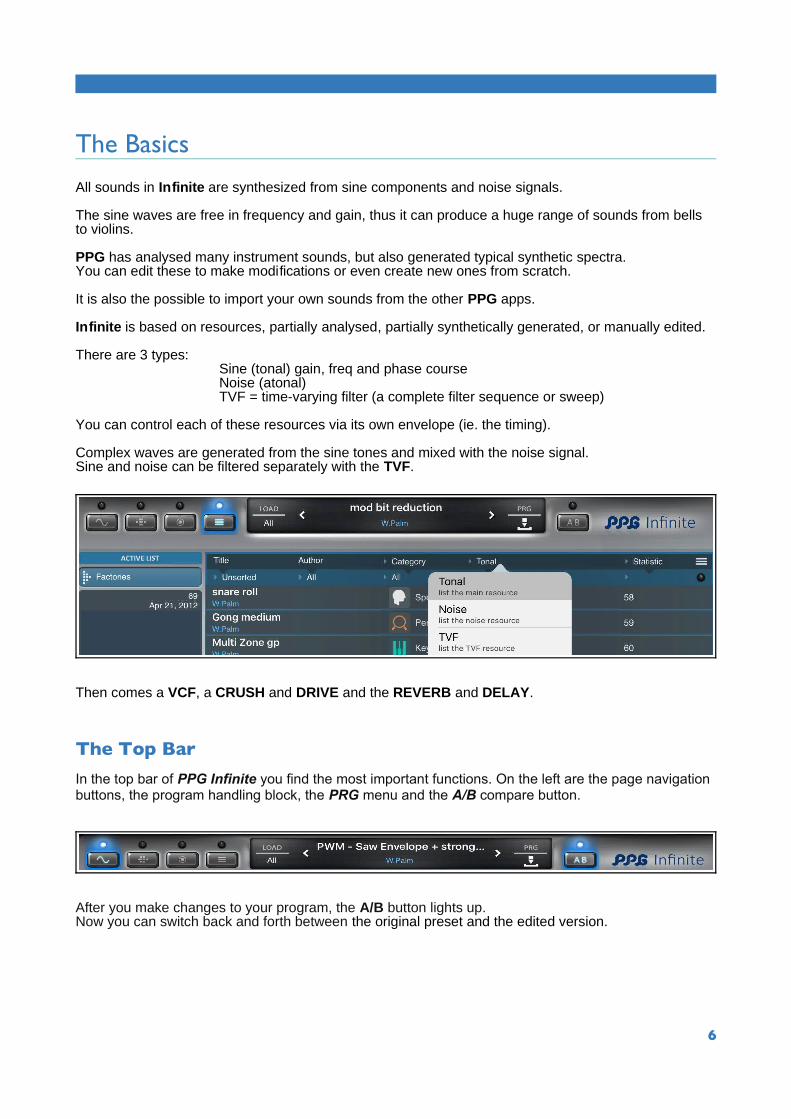
There are 3 types:Sine (tonal) gain, freq and phase courseNoise (atonal)TVF = time-varying filter (a complete filter sequence or sweep)
You can control each of these resources via its own envelope (ie. the timing).
Complex waves are generated from the sine tones and mixed with the noise signal.Sine and noise can be filtered separately with the TVF.
Then comes a VCF, a CRUSH and DRIVE and the REVERB and DELAY.
The Top Bar
In the top bar of PPG Infinite you find the most important functions. On the left are the page navigation buttons, the program handling block, the PRG menu and the A/B compare button.
After you make changes to your program, the A/B button lights up. Now you can switch back and forth between the original preset and the edited version.
6
Before you switch to another program, you should save your changes using the Save or SaveAs function. To learn more about the data structure and the resources handling, see the help text on the Browser page.
Please note that the original PPG presets are write protected. If you want to save one as your own, you will be asked to enter a new name for the preset.
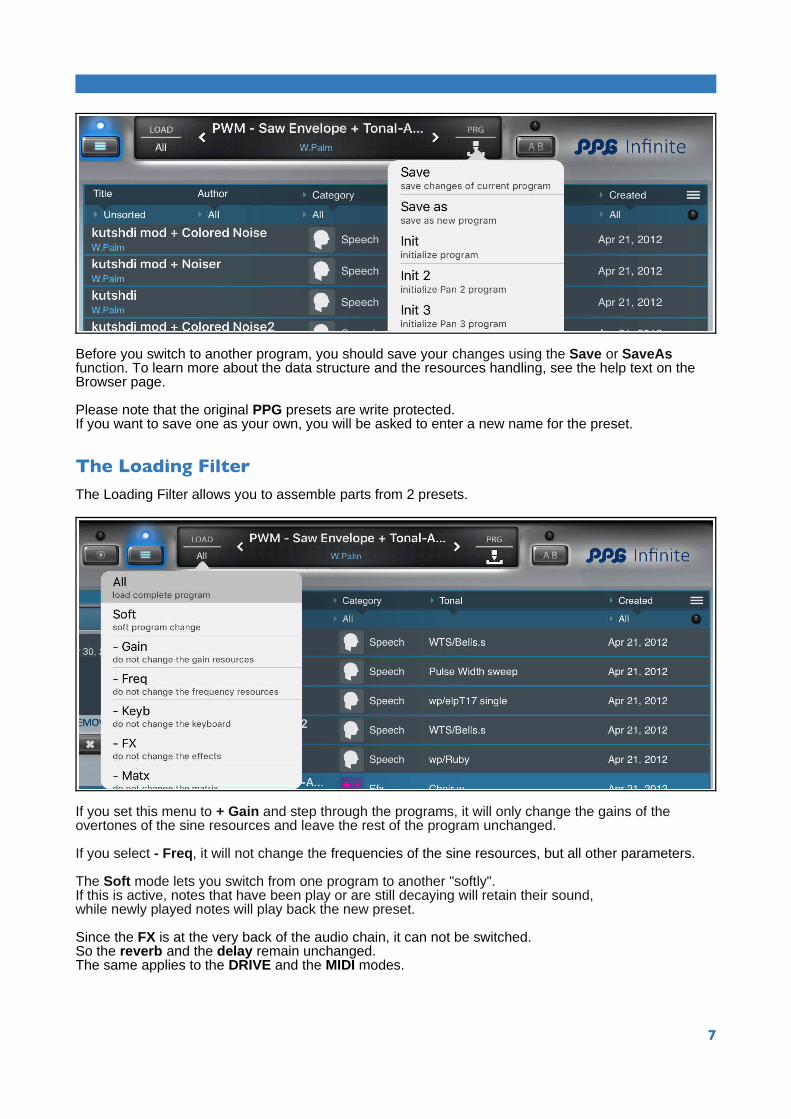
The Loading FilterThe Loading Filter allows you to assemble parts from 2 presets.
If you set this menu to + Gain and step through the programs, it will only change the gains of the overtones of the sine resources and leave the rest of the program unchanged. If you select - Freq, it will not change the frequencies of the sine resources, but all other parameters.
The Soft mode lets you switch from one program to another "softly". If this is active, notes that have been play or are still decaying will retain their sound, while newly played notes will play back the new preset.
Since the FX is at the very back of the audio chain, it can not be switched. So the reverb and the delay remain unchanged. The same applies to the DRIVE and the MIDI modes.
7
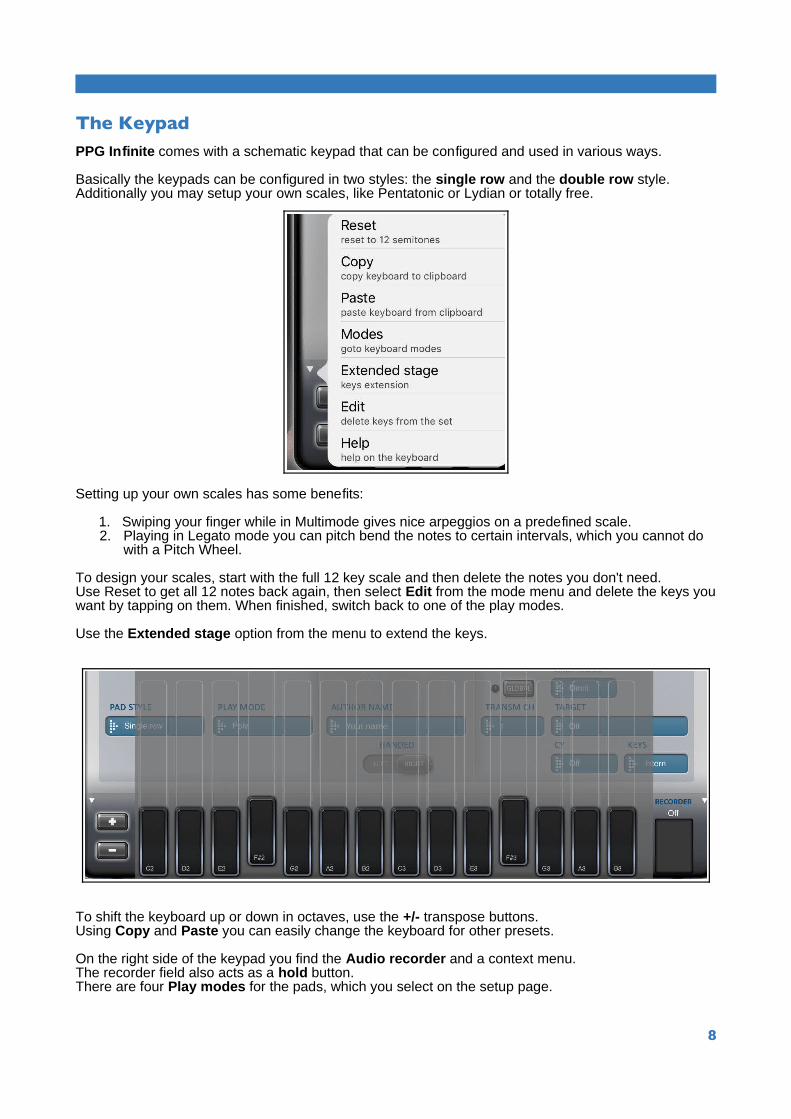
The KeypadPPG Infinite comes with a schematic keypad that can be configured and used in various ways.
Basically the keypads can be configured in two styles: the single row and the double row style. Additionally you may setup your own scales, like Pentatonic or Lydian or totally free.
Setting up your own scales has some benefits:
1. Swiping your finger while in Multimode gives nice arpeggios on a predefined scale.2. Playing in Legato mode you can pitch bend the notes to certain intervals, which you cannot do
with a Pitch Wheel.
To design your scales, start with the full 12 key scale and then delete the notes you don't need. Use Reset to get all 12 notes back again, then select Edit from the mode menu and delete the keys youwant by tapping on them. When finished, switch back to one of the play modes.
Use the Extended stage option from the menu to extend the keys.
To shift the keyboard up or down in octaves, use the +/- transpose buttons.Using Copy and Paste you can easily change the keyboard for other presets.
On the right side of the keypad you find the Audio recorder and a context menu. The recorder field also acts as a hold button. There are four Play modes for the pads, which you select on the setup page.
8

The RecorderIn order to record and export audio, Infinite has a built in audio recorder.A tap above the recorder display opens the record panel.
Tap the record button and play some notes. When you tap that button again the recording stops and you may enter play mode. The mini display shows the recorded material.
Please note that the area of the Recorder display is also used as the Hold function.
Exporting audioThere are three ways to export audio. If you own the AudioShare app, maybe Export to Audio Share is the easiest way.
Besides that you can do it via the iOS Pasteboard or via file-sharing in iTunes. In the context menu, you find the Copy function, which moves the audio into the iPad's Clipboard, and you can Paste it into another app.
You may record up to 30 minutes stereo audio at 44.1 kHz.
Please note that copying a long recording to the clipboard may take a short while.
To use file-sharing, do the following steps:
• Save your recording to a temporary file, using the Save command.• Open iTunes on your computer.• Under Devices, click on the iPad• Go to the Apps tab• Scroll down until you see File Sharing.• Select Infinite from the list and you see temprec.wav• You can Save the file to your computer from here
9

The Pages
The Morphing page
This is where you arrange the resources you want to use and control the morphing. This page has four subpages for detailed editing of the Sine Resources.
The Parameter page
Here you control the various parameters and modulations of the synthesizer. A very powerful matrix lets you modulate all important values by LFOs, envelopes and external signals.
The Effects and Setup page
This is the page where you control the Effects, MIDI settings and global values.
The Browser page
This is the management page where you arrange, sort, filter and organize your programs in lists.
You find help texts for every module and page in the context menus, which open when you tap on these symbols:
10
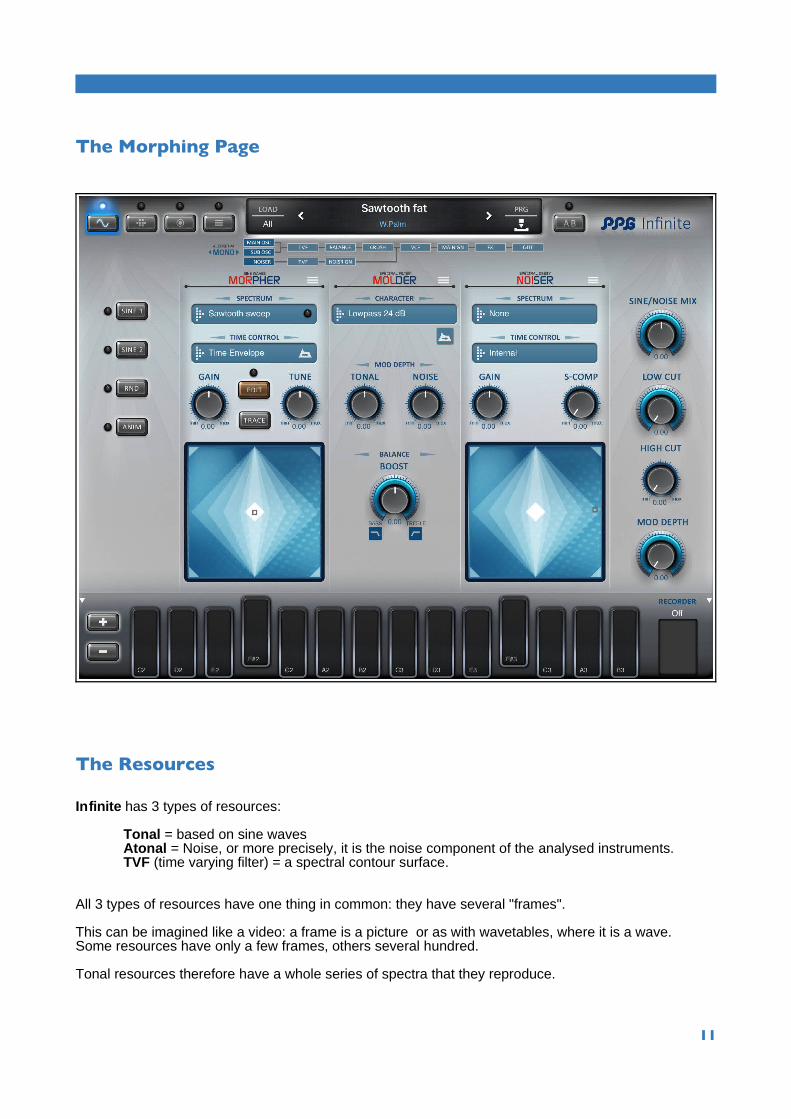
The Morphing Page
The Resources
Infinite has 3 types of resources:
Tonal = based on sine wavesAtonal = Noise, or more precisely, it is the noise component of the analysed instruments.TVF (time varying filter) = a spectral contour surface.
All 3 types of resources have one thing in common: they have several "frames".
This can be imagined like a video: a frame is a picture or as with wavetables, where it is a wave.Some resources have only a few frames, others several hundred.
Tonal resources therefore have a whole series of spectra that they reproduce.
11

For the analyzing sounds these frames run from the beginning to the end of the sound.
For synthetic resources, the differences from frame to frame can be drastic.E.g. the "Pulse Width sweep" resource has 200 spectra that correspond to the flow of a PWM.
The time sequence is also controlled here (as with wavetable synth) via an envelope. If you only want to have a fixed wave, you have to adjust the envelope with the sustain to the desired value.
On the first page you have access to the resources:
Left - the tonal resources (sines) in the MORPHER panel.
Middle - the TVF (time varying filter) resources in the MOLDER.
Right - the Atonal resources (noise) in the NOISER.
12

The Morpher
In the left X/Y controller, you can morph several tonal components.
There are 5 target points: centre, left, right, top and bottom. If you activate EDIT, you can see the current selection of resources.
If you tap on one of the 5 buttons, the current resource is displayed at the top in the SPECTRUM selector, together with an envelope that controls the timing and the two dials GAIN and TUNE.
In the X direction, the gains of the sinusoidal components are morphed. In the Y direction, the frequencies are morphed.
In other words: • The frequencies are controlled from the middle, top or bottom. • The gains of the partials are controlled from the centre, left or right.
Take for instance the preset Sawtooth, from the Tutorials list.
In the centre is a Sawtooth - Triangle sweep.The process is controlled by TIME envelope (Which you can adjust on the second page).
If the morph point is in the centre, only this sweep runs off. If you go to the right, the process is morphed with a piano sound. Left into a R-Piano.Moving towards the top, the frequencies are taken from the FMo 2 resource. This is a synthetic resource with different frequency movements of the sine tones. Moving downwards, the frequencies of the partial tones of a bell are taken.
This is the basic principle of the morphing page.
13

Import from WaveGeneratorIn WaveGenerator, the Infinite export function (from version 2.1.3 on) is located on the wave page in the context menu.
It sends the current wavetable to Infinite and is converted into a sine resource which is then loaded intothe centre field.
Import from WaveMapperIn WaveMapper, the Infinite export function (from version 2.1.2 on) is located on the oscillators page in the context menu.
It sends the current wavetable or TCS resource to Infinite and is converted into a sine resource which isthen loaded into the centre field.
Please note that this conversion is a complex process which can have artifacts depending on thecomplexity of the audio material.
14

The Noiser
On the right you have the Noiser. This is a second X/Y controller which, on one hand, fades 3 noise sources, but also allows noise modulation of the sinusoidal components.
There are 3 fields: middle, top and bottom, where you can load 3 noise sources.
These fields are activated again with the EDIT button. If the point is moved in the vertical direction, these resources are mixed.
Moving to the right, the noise modulation of the sine components is activated. It is also possible to limit a frequency range with the two dials LOW CUT and HIGH CUT.
If the LOW dial is moved to the left and the HIGH dial to the far right, the complete frequency range (ie. all active harmonics) are modulated. If the LOW value is increased further, the deep overtones are excluded from the modulation. This parameter can also be controlled via the matrix.
Moving on the left side of the X/Y field, the sine components are modulated with the noise resource. On the left hand side it is a solid white noise signal, which results in a slightly different effect.
All noise effects are controlled with the MIX control dial, which basically fades between the noise and the tonal signals.
15

The MolderIn the centre is the Molder.
In principle, it acts as a filter which deforms the tonal and noise signals spectrally.
At the top, you select a resource, and then use the TONAL and NOISE controls to adjust how strongly the spectra are deformed. This is a Time-Varying Filter (TVF). It is therefore a complete filter sweep which is used here.
The timing can be controlled via the TVF Time envelope (on the second page).
You can go directly to the relevant envelope by tapping on any of these envelope-jump symbols:
If the TONAL or NOISE control dial is in the positive range, the filter contour is modulated positively. Taking for example, the lowpass resource, allows typical lowpass effects to be achieved.
16
If the controller is set to negative ranges, the filter contour is modulated negatively. One can imagine this as an anti-filter or inverse filter.
Filter sequences can also be imported from PPG Phonem.
The BALANCE dial controls an additional treble or bass boost. This value can also be modulated via the matrix and is an interesting addition to the TVF.
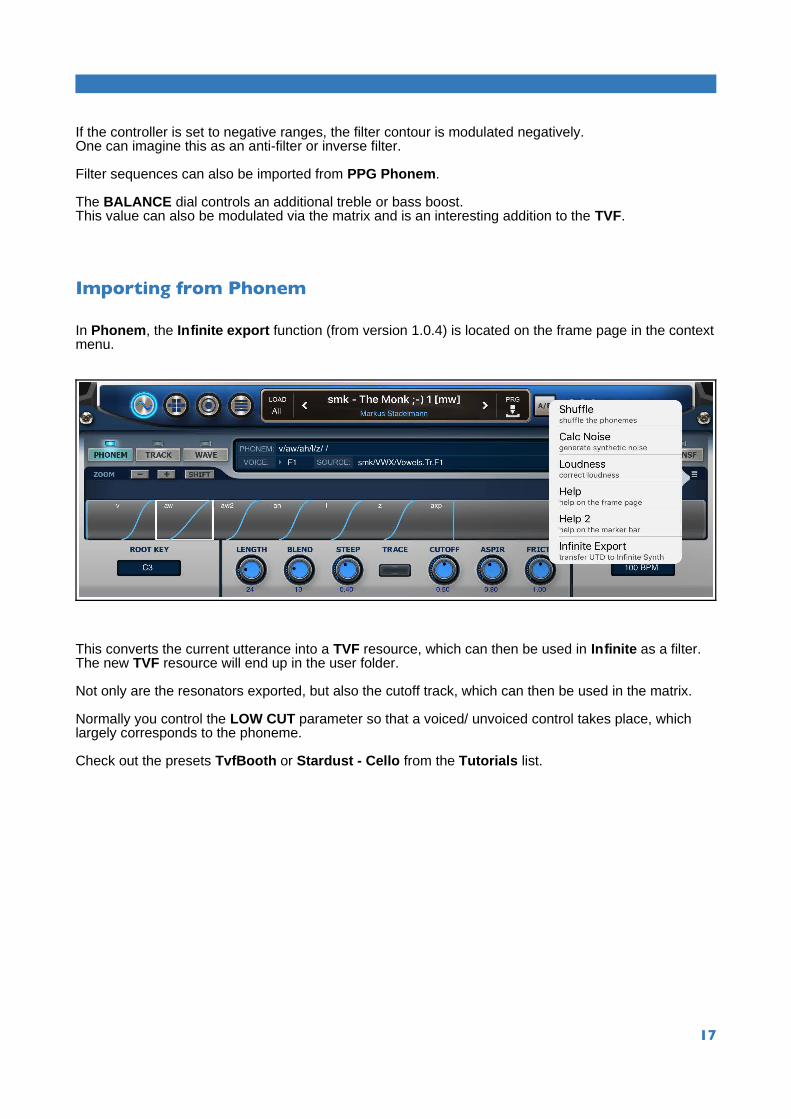
Importing from Phonem
In Phonem, the Infinite export function (from version 1.0.4) is located on the frame page in the contextmenu.
This converts the current utterance into a TVF resource, which can then be used in Infinite as a filter. The new TVF resource will end up in the user folder.
Not only are the resonators exported, but also the cutoff track, which can then be used in the matrix.
Normally you control the LOW CUT parameter so that a voiced/ unvoiced control takes place, which largely corresponds to the phoneme.
Check out the presets TvfBooth or Stardust - Cello from the Tutorials list.
17

ConfgurationsInfinite has 4 audio/ oscillator configurations that are designed to allow interesting stereo effects, without adding much CPU load.
Tap on the ALGORITHM heading to access the menu.
MONO:Oscillators and noise signal are mixed and then sent through the Crusher,VCF and VCA and effects. The SubOsc has the same sound as the MainOsc, but its own pitch.
PAN1:OSC1 -> crusher, VCF, MainGainOSC2 -> directly to SubGain, own tuning, otherwise everything from OSC1NOIS -> directly in NoiseGain, own panning (matrix)
PAN2:OSC1 -> TVF -> crusher, VCF, MainGainOSC2 -> directly on SubGain, own sound control
PAN3:OSC1 -> TVF - MainGainOSC2 -> crusher, VCF, SubGainNOIS -> directly in NoiseGain, own panning (matrix)
In PAN2 and PAN3, the SubOsc can play a different resource than the MainOsc. The SubOsc always uses the centre resource and the MainOsc does the morphing. Both use their own gain envelopes.The MainOsc controls the pitch from the Y axis, as well as the morphing mentioned above.The SubOsc only uses the centre resource, and therefore also the pitch of the centre resource.
If you want to have different pitches, you have to set the merger point on the top or bottom, and load a corresponding resource. If you want to have completely separate sounds, you have to put the point into a corner and occupy the two resources with the same sound.
If you want to have separate TIME envelopes (because of loop or time continue mode), you have to place an EXT envelope on the centre point.
See the examples: Two Pitches, Two Sounds, Two Synths and Two Synths Pan3.
18

The 3D DisplayIf you click on one of the editor buttons in the left panel (ie. SINE 1, SINE 2, RND and ANIM), a part editor and the 3D display will open.
The 3D display below shows the sine tracks stacked horizontally.
The first harmonic is at the front and higher partial tones are arranged further backwards. The z axis is thus the frequency plotted and the time in the x direction. The y-axis shows the amplitude.
With the slider in the lower part of the display, you can select a track (marked in white). This is then the track to which the 6 parameters (rotary dials) act.
If you activate the TRACE dial and play a sound, a cursor shows the current position of the sound.
You can also select the active overtone using the +/- buttons.
19

There are 2 modes, which are switched with the SIGNIF (significant) button.
If this is not active, each of the 200 overtones are displayed. In this case, overtones in which the gain parameter is set to 0 are not effective. This is often the case with the resources analysed.
If you only want to see the really active harmonics, activate the SIGNF button. Then the cursor jumps to the next relevant harmonic each time.
It is also possible to activate non-active partials by raising the GAIN.
20

The Sine ResourceYou can create and edit Infinite Sine resources yourself.For each overtone, there is a track that determines the timing. Each track defines the amplitudes, frequencies, and optionally the phase sequence from beginning to end.
PPG has analysed many sounds and extracted them into these parameters. A sound can contain several thousand data points. You can change any point in Infinite, and there are some parameters that make sense.
On the SINE 1 page, each overtone has 6 parameters for setting a track:
• Freq - the basic frequency of the Partial• Gain - the gain of the Partial• Decay - the decay time• Mod Int - the gain of a low frequency sine modulation• Mod Frq - die frequency of this modulation• Phase - the start phase of this modulation
If you select a sine track in the 3D display and change one of these parameters, the change is immediately visible in the display (and also audible).
21

The Edit Mode
This mode determines which sine tracks are edited.
• Single - the dials only change one partial wave at a time• All Others - all other overtones are edited• All - all overtones are edited• Solo - only one partial tone is edited and the rest is greatly reduced
In Solo mode only one partial tone is edited and the rest is greatly reduced. The solo mode is particularly interesting to investigate the resource and to change its structure.
Please note that in this mode, no gain change is possible since the gains are always preset because of the display.
The other parameters such as Decay, Modulation and Frequency can be set.
22

The Sine Structure
On the SINE 2 page, the structure of the amplitudes of each sine track can be edited.
In the upper section there is a bar editor where each data point can be changed.
For some resources, there are only a few points (such as the FMo 2 resource), in others several hundred.
23
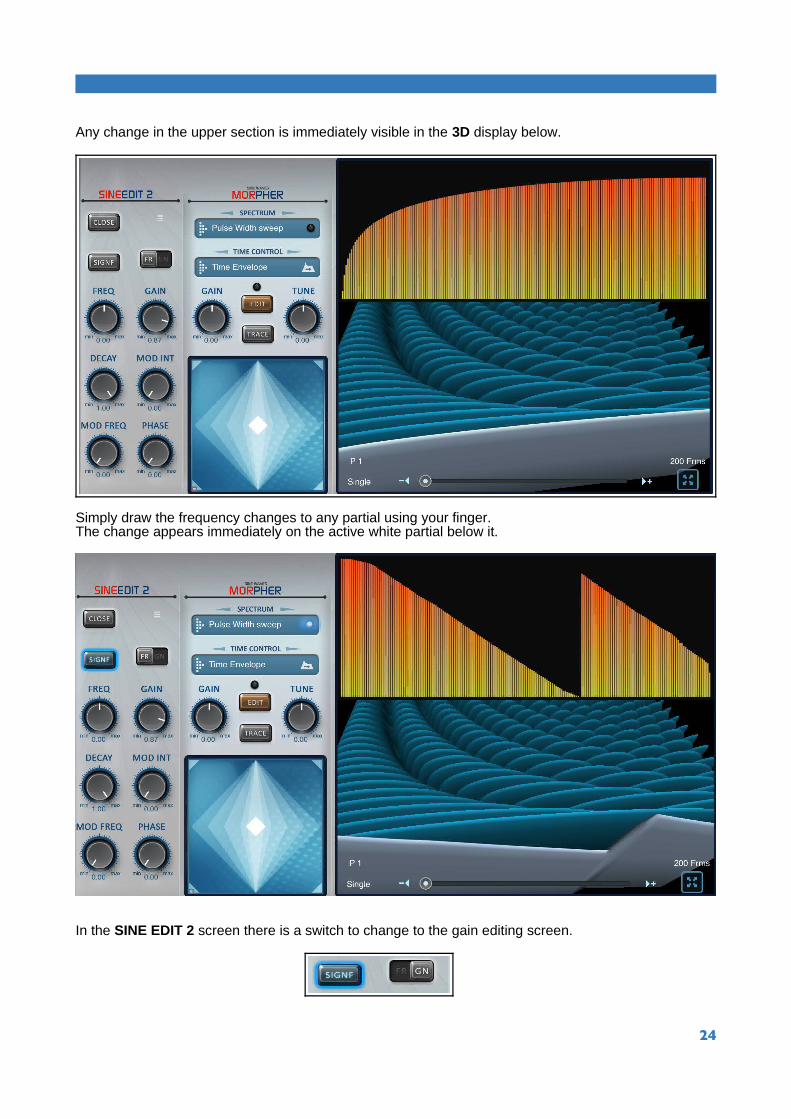
Any change in the upper section is immediately visible in the 3D display below.
Simply draw the frequency changes to any partial using your finger.The change appears immediately on the active white partial below it.
In the SINE EDIT 2 screen there is a switch to change to the gain editing screen.
24
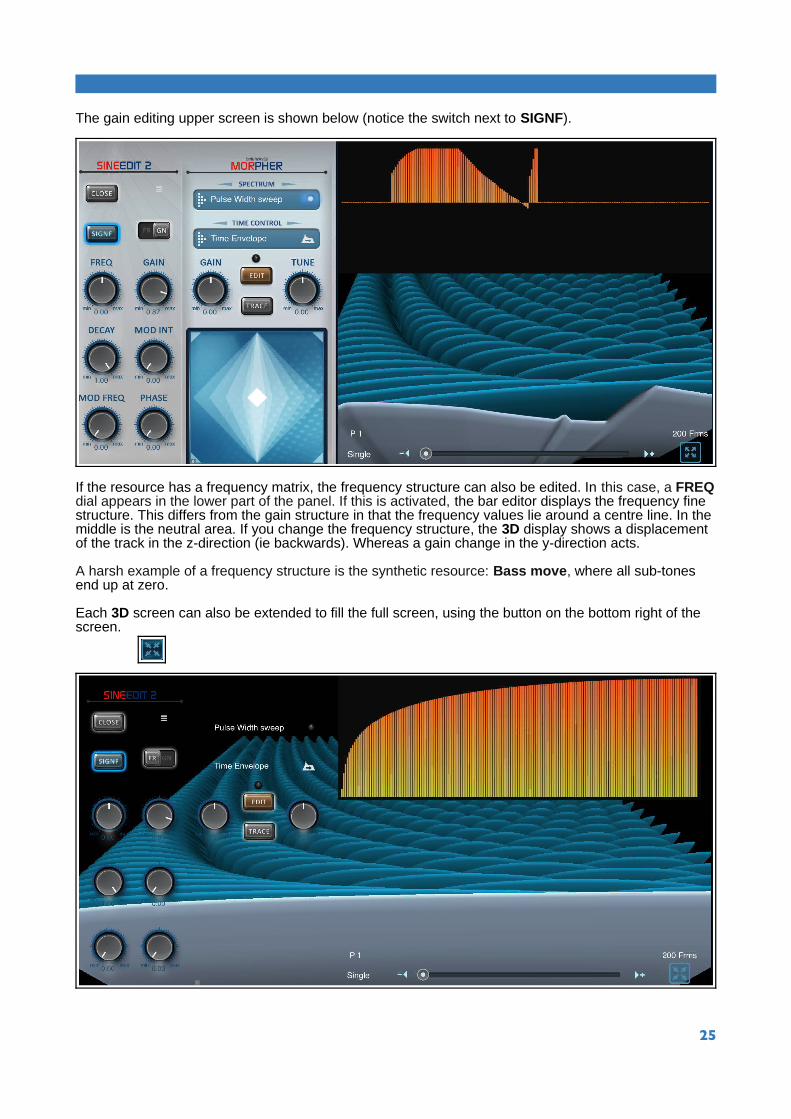
The gain editing upper screen is shown below (notice the switch next to SIGNF).
If the resource has a frequency matrix, the frequency structure can also be edited. In this case, a FREQdial appears in the lower part of the panel. If this is activated, the bar editor displays the frequency fine structure. This differs from the gain structure in that the frequency values lie around a centre line. In the middle is the neutral area. If you change the frequency structure, the 3D display shows a displacement of the track in the z-direction (ie backwards). Whereas a gain change in the y-direction acts.
A harsh example of a frequency structure is the synthetic resource: Bass move, where all sub-tones end up at zero.
Each 3D screen can also be extended to fill the full screen, using the button on the bottom right of the screen.
25

The Random PanelWith the RND button you enter this page. Here sinusoids can be changed with several random generators.
The strength of the change can be preset for each of the 6 parameters. For example, if you set the GAIN knob to 0.5 and then press the GO button, the levels of the overtones are adjusted with this intensity. With each GO, another variation is achieved. Please do not forget to save the changes using Save or SaveAs.
The Animation Panel
Here you can animate the 3D screen, using the Roll X, Roll Y and Frequency dials for control.
26
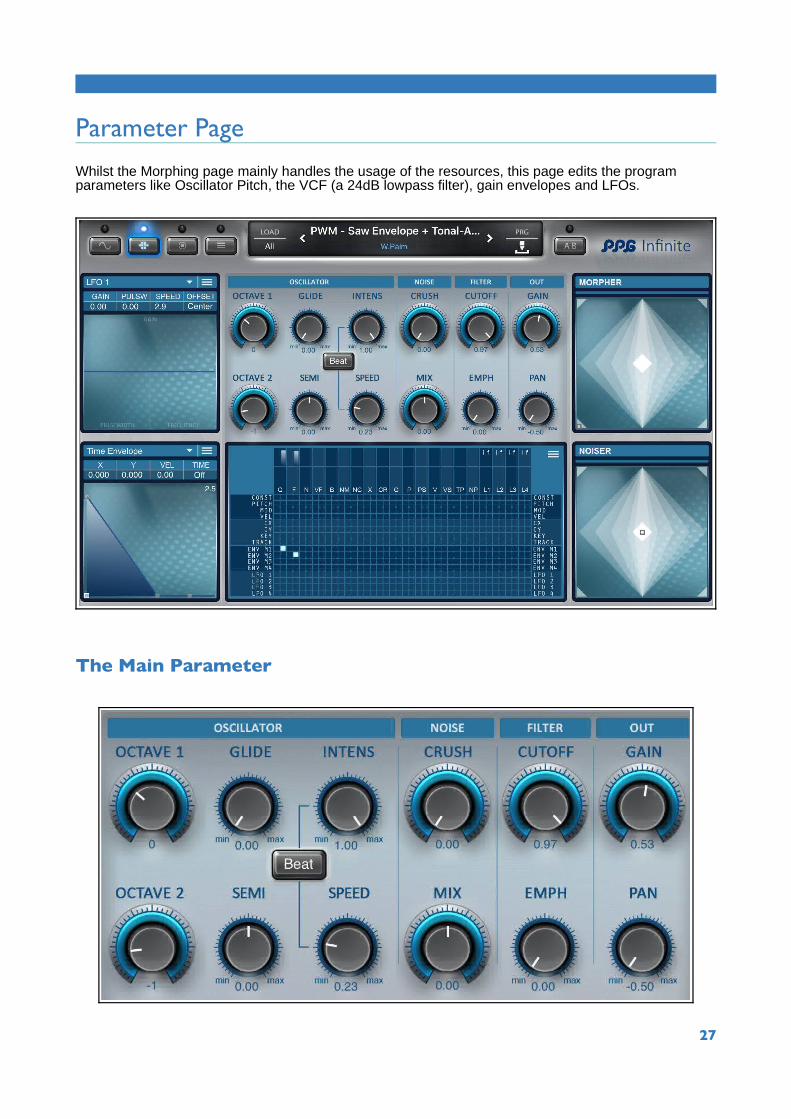
Parameter Page
Whilst the Morphing page mainly handles the usage of the resources, this page edits the program parameters like Oscillator Pitch, the VCF (a 24dB lowpass filter), gain envelopes and LFOs.
The Main Parameter
27
Here you find the most important parameters grouped in modules:
• OCTAVE 1 - MainOscillator octave switch• OCTAVE 2 - SubOscillator octave switch• SEMI - Fine tune of the SubOscillator• GLIDE - glide or portamento time• INTENS - intensity of a overtones modulation• SPEED - the speed of the modulation• MODE - mode of the overtones modulation• CRUSH - the intensity of the crusher• MIX - balance between noise and tonal volume• CUTOFF - the cutoff frequency of the 24db lowpass filter• EMPH - the emphasis of that filter• VOLUME - total volume of the synthesizer• PAN - the output panning
It should be noted that all parameters react finer on the vertical finger movement, when you move the finger more to the right. The opposite is also true, when you move to the left. A double-tap resets the parameter to its neutral position.
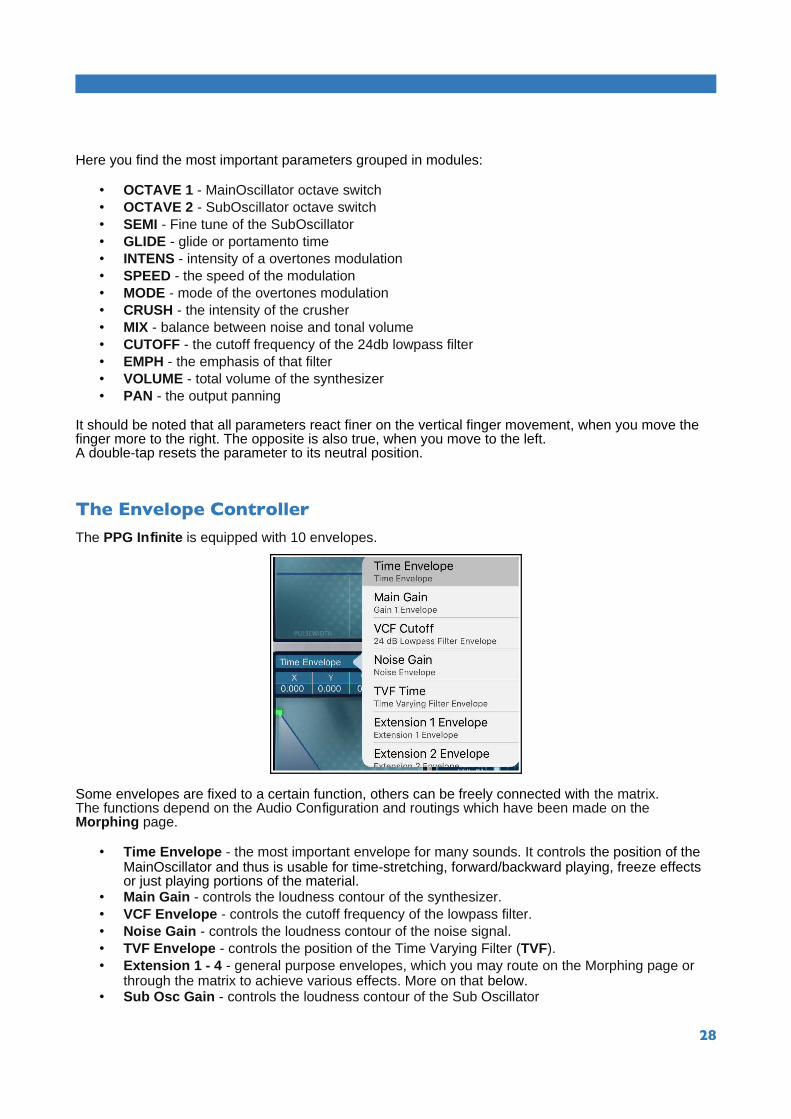
The Envelope ControllerThe PPG Infinite is equipped with 10 envelopes.
Some envelopes are fixed to a certain function, others can be freely connected with the matrix. The functions depend on the Audio Configuration and routings which have been made on the Morphing page.
• Time Envelope - the most important envelope for many sounds. It controls the position of the MainOscillator and thus is usable for time-stretching, forward/backward playing, freeze effects or just playing portions of the material.
• Main Gain - controls the loudness contour of the synthesizer.• VCF Envelope - controls the cutoff frequency of the lowpass filter.• Noise Gain - controls the loudness contour of the noise signal.• TVF Envelope - controls the position of the Time Varying Filter (TVF).• Extension 1 - 4 - general purpose envelopes, which you may route on the Morphing page or
through the matrix to achieve various effects. More on that below.• Sub Osc Gain - controls the loudness contour of the Sub Oscillator
28

(if the audio config is set accordingly)
The LFO controllerPPG Infinite has 4 LFOs (low frequency oscillators).There is an extra help page on this, which you reach through the context menu.
The X/Y controllersThese two controllers are the same as on the Morphing page.
The resource labels are shown when the EDIT mode on the Morphing page is active.
29

The trace point is shown when the TRACE mode on the Morphing page is active. A double-tap resets this controller.
The MatrixThe Matrix is the main routing device in PPG Infinite.
You can modulate all important parameters of the synth-engine by all possible controllers. On the left side you have the matrix inputs on the top are the outputs with a gain slider for each output.
Moving your finger horizontally inside the matrix field selects a column and shows a tooltip with the full name of the control.
Moving your finger vertically inside the labels selects a row and sets the connection.To erase a connection, move all the way down or up.
Moving inside the slider area sets that slider value.
A double-tap in this area resets it to the neutral position.
Description of the matrix inputs (which are the control sources)
• CONST - This uses a constant value as source.• PITCH - The Pitch Wheel of your MIDI controller.• MOD - The Modulation Wheel of your MIDI controller.• VEL - The keypads or MIDI key velocity.• CX - X-Sensor of the schematic keypads + MIDI Aftertouch.• CY - Y-Sensor of the schematic keypads + Velocity + MIDI-Breath.• KEY - The MIDI key. This allows you to balance the desired effect over the keyboard.• TRACK - The cutoff track of TVF resources imported from PPG Phonem.
• ENV M1: The Extension1 envelope.• ENV M2: The Extension2 envelope.• ENV M3: The Extension3 envelope.• ENV M4: The Extension4 envelope.
• LFO1: The LFO 1 signal.
30

• LFO2: The LFO 2 signal.• LFO3: The LFO 3 signal.• LFO4: The LFO 4 signal.
Description of the matrix outputs (which are the control inputs of the synthesizer engine)
Most of them have two faders, so you can use two signals to modulate them. Some modulations can bemonitored with a corona effect in the rotary knobs. In the following description this is marked with a * (asterisk). Others which modulate the control point in the XY controllers, are marked with **.
• G = Gains Merge: This adds to the Morpher X direction **• F = Frequency Merge: This adds to the Morpher Y direction **• N = Noise Merge: This adds to the Noiser Y direction **• VF = TVF (time varying filter): This adds to the TVF TIME envelope• B = Balance Filter: This adds to the Balance position *• NM = Noise Mod: This adds to the Noiser X position **• NC = Noise Low Cut: This adds to the LOW CUT parameter *• X = Mix: Modulates the MIX parameter *• CR = Crush: Modulates the CRUSH parameter *• C = VCF Cutoff: Adds to the CUTOFF parameter *• P = Pitch: Adds to the pitch of the Main Oscillator• PS = Pitch Sub: Adds to the pitch of the Sub Oscillator• V = Volume: Adds to the Main volume *• VS = Volume Sub: Adds to the Sub Oscillator volume• TP = Tonal Pan: Adds to the PAN parameter *• NP = Noise Pan: Modulates the Noise panning• L1 = LFO1: i=intensity, f=frequency• L2 = LFO2: i=intensity, f=frequency• L3 = LFO3: i=intensity, f=frequency• L4 = LFO4: i=intensity, f=frequency
The best way to check out the various effects of the control parameters is to set all columns to CONST and play with the faders. You find a macro in the tools menu called Set Const.
31

The EnvelopesIn Infinite you may use up to 10 independent Envelopes. In the drop-down lists you will find short descriptions on how each envelope is used as default.
The envelope typesThe envelopes can be configured as normal ADSR type envelopes or as an endless looping type. In the loop mode, the envelope goes into decay and then rises again to a second peak level, where it decays again and so on. However not all envelopes have this feature. e.g. the gain envelope must always decay to zero after some time, so it doesn't have the loop mode. For the time controls, a loop can be very useful, as it creates a lively sustain sound, like a sampler doeswhen it loops. You can activate the loop via the context menu, in the envelope module.
The control pointsThe envelope has 3 to 5 control points, dependent on its mode.
If you select the Gain envelope, you see only the normal three control points needed for an ADSR envelope. With the peak you control the Attack time. The second point controls the Sustain and the decay time. The third point controls the release time.
If you look at the Time controller envelope, you have 4 points, as long as it has no loop. Additional to the normal ADSR, you have a point at time zero. This point shifts the base level of the envelope up and down, which is very important for the time control because you don't have an extra base parameter there. You may even move this point higher than the peak, which then inverts the envelope. The 4th point behaves differently to the usual ADSR. You may move this point up and down, but it acts somewhat different to the usual zero point.
Now if you are in loop mode, you have 5 points. The 4th point controls the width of the loop and the 5th point offers a random component to the loop. If you move point 5 up, the random effect increases. Move it down and you get more regular periods. Just try it out.
Notice the active point is always highlighted. If points are very close to each other, you may jump to the neighbour by double tapping.
In addition to the control points in the envelope graph, numerical value inputs for high-precision setup ofthe parameters are available. These controls are connected to the current active point in the envelope display.The curves of each segment can be bend when you activate the Curve mode in the context menu.
32

The envelope time scale automatically changes according to the release endpoint. The end time of the scale is shown in the top right corner.Each envelope has its own velocity attenuator, which you may adjust in the frame of the envelope display. The velocity is controlled either by external MIDI keyboard or by the vertical position where you tap the key.
The key balanceInfinite comes with a new feature which we call Key Balance, which offers the possibility to change theenvelope setting with the played key.
Two Envelope settings are used for this. One for the LOW key (MIDI # 36) and one for the HI key (MIDI # 96).This way you have two complete sets of parameters which are then morphed according to the key.
You enable this mode with the Balance option. Then you can edit the HI and the LOW note settings by selecting them in the menu. The current status is shown in the top left corner of the envelope display.You can see the whole thing in action when you activate the Trace mode and play different keys.Note that no editing is possible in this mode.In the tutorials bank you will find some examples, e.g. Sawtooth with loop balance.
Time continuationThis new feature makes it possible to continue the time control of the sinusoidal resources beyond the normal end of the envelope curve. This is particularly interesting with percussive sounds, where the sound control is passed on by the parameters of the Sine resource, even beyond the audio length of the analyzed sound. This mode is activated via the TIME switch.
Examples can be found in the resources bank, e.g. Rhodes or Concert Guitar.
33
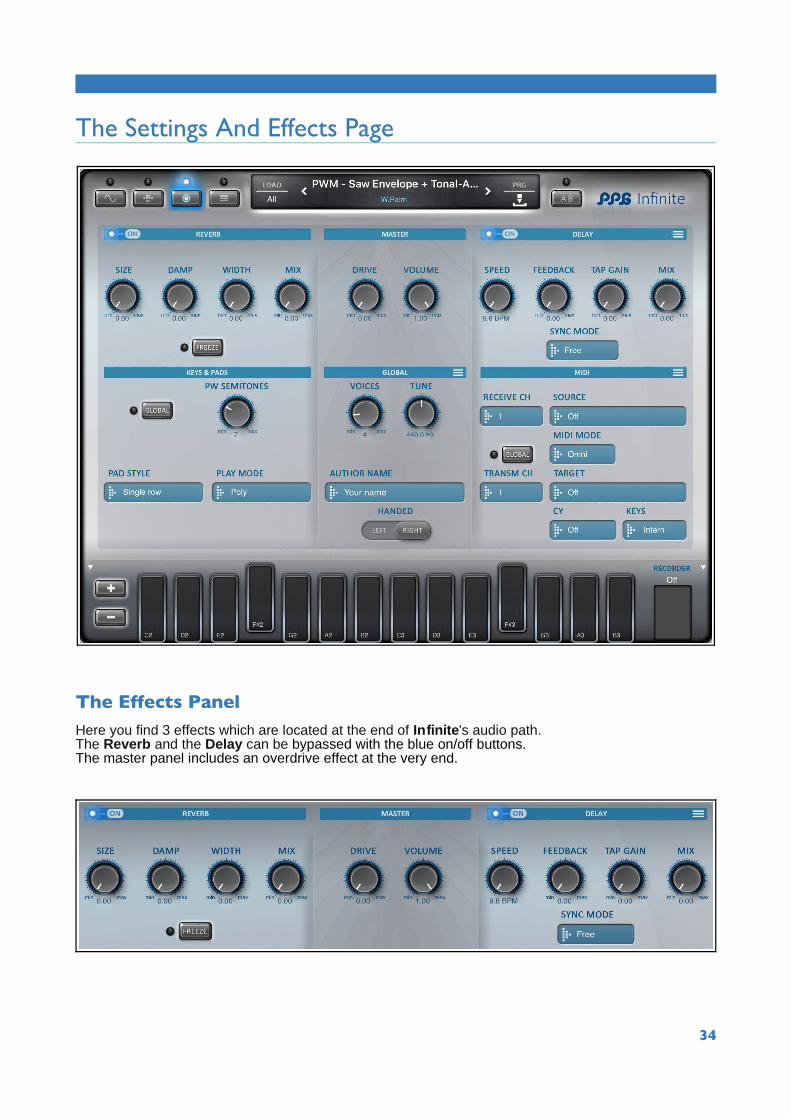
The Settings And Effects Page
The Effects PanelHere you find 3 effects which are located at the end of Infinite's audio path. The Reverb and the Delay can be bypassed with the blue on/off buttons. The master panel includes an overdrive effect at the very end.
34

The ReverbYou setup the characteristics of the reverb with the SIZE DAMP and WIDTH parameters.
The MIX dial controls the ratio between original signal and reverb.
The DelayThe Delay is very useful when you sync Infinite to your host.
To do so, select a quarter-bar ratio from the SYNC MODE drop down list.
35

The Settings Section
The Keys And Pads Panel
Here you find the Pitch Wheel Interval (PWI) and the keypads settings.
The PLAY MODE defines how the synthesizer reacts to the keypad touches.
36

There are four play modes:
• Poly - all voices can be played polyphonically. MIDI ModWheel (CC1) is routed to all CY modulations and BreathController (CC2) to the CX mods.
• Mono - works in a monophonic mode, like on vintage synths which had only one voice. This gives interesting effects when you setup your oscillators with PORTAMENTO. In this case only one voice is used. MIDI CCs work the same way as in Poly.
• Legato - the played notes can be individually bend to other notes by moving in X-direction.
• Multi - here all voices are triggered while you swipe over the Pads.
• VPC - this stands for Voice per Channel, and is quite special but very versatile. In this mode each voice may use a different MIDI channel and reacts only on this channel after the trigger. Some hardware controllers use this mode.
•
The Global Module
This module lets you setup your basic system parameters, like total tuning and number of voices. You should enter your personal signature, which will be shown in the sound programs you create.
VOICESThe maximum number of voices you can play is limited by the system power. If you experience dropouts or clicks in the audio signal, please lower this value. We also recommend to use audio buffer sizes not less than 512 samples.
AUTHOR NAMEHere you enter your name, which is then assigned to your presets.
HANDEDYou can change the behaviour of some controllers with this mode. It also sets the keyboard orientation. The octave buttons move to the other side of the keyboard, when you change the handed mode.
37

In the context menu you find a Warnings switch, which lets you enable or disable the warning messages when an unsaved program needs to be saved. After installation this mode is set to display the warning. When you get familiar with this you may prefer to get rid of this message.
The Trace switch enables the Trace points on the knobs. On 32-bit devices it might be useful to switch this feature off because it saves some CPU power.
Using Infnite with AudiobusInfinite supports Audiobus 2 with StateSaving, but there are some things to note. We found that performance is drastically reduced when using Audiobus, especially with 32-bit devices. This results in a smaller number of voices you may play with Infinite. You can improve this a bit by setting the Latency Control to 512 samples.
Using Infnite with Inter-App Audio (IAA)
PPG Infinite supports Inter-app audio (IAA). When you use Infinite in a Host app that features IAA, connect the Host with Infinite. Now you can play Infinite from inside the Host. You also can control the sequencer from inside Infinite.
See also the Help in the recorder section for IAA control.
For example, in GarageBand you choose the external instrument (see below).
38
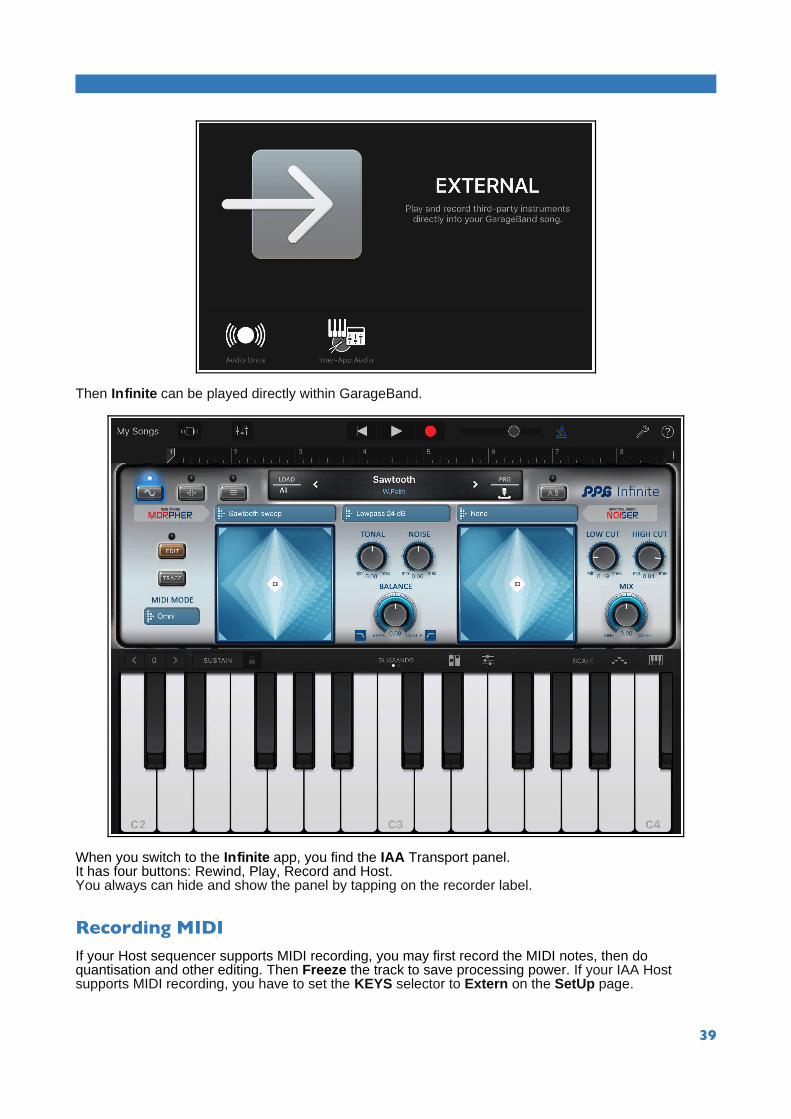
Then Infinite can be played directly within GarageBand.
When you switch to the Infinite app, you find the IAA Transport panel. It has four buttons: Rewind, Play, Record and Host.You always can hide and show the panel by tapping on the recorder label.
Recording MIDIIf your Host sequencer supports MIDI recording, you may first record the MIDI notes, then do quantisation and other editing. Then Freeze the track to save processing power. If your IAA Host supports MIDI recording, you have to set the KEYS selector to Extern on the SetUp page.
39

The MIDI Setup Module
MIDI inputPPG Infinite has two MIDI inputs. One is exposed to other apps, while the other is active only if you select a MIDI source with the SOURCE selector. It depends on the other app you use, which method is best and possible.Some sequencer apps show a list of MIDI inputs and you can select which one should play the sequence. Other apps just expose their MIDI out and you must select that one in Infinite's SOURCE selector.
MIDI modeHere you find 4 modes: Omni, Mono, Poly and VPC.
Omni - this is the simplest one. It reacts on any channel and uses all available voices.Mono - uses only one voice on one channel, and works like an analog monophonic keyboard does. It only has a gate (no multi trigger). This means that if you play legato, you don't get a new trigger for the note. This gives some nice possibilities, especially when combined with sounds that use portamento.Poly - uses all voices, but only on one channel. Use the Channel control for that. Note that 0 means off.VPC - this stands for Voice per Channel, and is quite special but very versatile. In this mode each voice may use a different channel, and reacts only on this channel after the trigger. This can be very interesting in sequence where you could setup tracks with different channels and use the pitch wheel and CC1 and CC2 controllers to individually form the sounds. There are also some hardware controllers supporting this, and some iPad apps.
The MIDI mode is contained in Infinite's programs. For users with hardware controllers it may be more convenient to have the MODE fixed for a session. Inthat case you may activate the GLOBAL switch. Then the MODE stays as it is, independent of the preset.
MIDI receive channelUse this setting to filter incoming MIDI events. This works only in Mono and Poly modes. When in Omni or VPC mode, all channels work on all voices.MIDI Mod-wheel is routed to the CY control and channel aftertouch to CX.If you use MIDI via the Network, ensure that the iPad is connected (settings -> bluetooth), not forgettingyour host as well.
40

MIDI output PPG Infinite features 2 MIDI outputs. One is virtual and may be connected by another app. The other one can directly be connected through the TARGET selector. The SEND CHANNEL defines the channel on which Infinite will send out MIDI data.The KEYS switch determines the keyboard and controller action.
Intern - the keyboard controls only the internal synthesizer. No MIDI is sent out in this case.Extern - the keyboard and the controllers are sent through MIDI, there is no internal connection to the synth.Both - the keyboard controls the internal synthesizer and also sends out MIDI.
The CY selector defines what will be sent out on the CY sensor.Please note that MIDI is only send when the Keys switch is set to Extern or Both.MIDI control values (CC = continuous controllers) are sent when the KEYS selector is set to Extern or Both on the Settings page. They will be received always.
Due to the limit of 127 and the many predefined CCs, only a small set of Infinite parameters could be routed to CCs.
When the MIDI mode is set to VpC, there are some special routings, which are very useful for controlling Infinite from the Linnstrument or the Seaboard.
You have the following connections:• CC #1 -> CY• CC #74 -> CY• Aftertouch -> CX
Please note that CC's will change the current program parameters.
Performance Controllers
CC# DESTINATION
001 CY controller
002 CX controller
003 -
004 -
005 -
006 -
007 Master Volume
008 -
009 -
010 Panning
011 Expression
012 -
013 -
014 Reverb Mix
015 Delay Mix
016 Morph Gain
017 Morph Freq
018 Noise Mod
019 Morph Noise
41

Main Parameters
CC# DESTINATION
020 Glide
021 Octave 1
022 Octave 2
023 Semitone
024 OSC Mod Speed
025 OSC Mod Intensity
026 Noise / Tonal Mix
027 VCF Cutoff
028 VCF Emphasis
029 Overdrive
030 Reverb Freeze
Modifiers
CC# DESTINATION
070 Crusher
071 Tonal TVF
072 Noise TVF
073 Tonal Balance
Noiser
CC# DESTINATION
074 Noise Mod Cut Low
075 Noise Mod Cut Hi
076 Noise Mod Depth
LFO 1 Parameters
CC# DESTINATION
085 Intensity
086 Shape
087 Speed
42
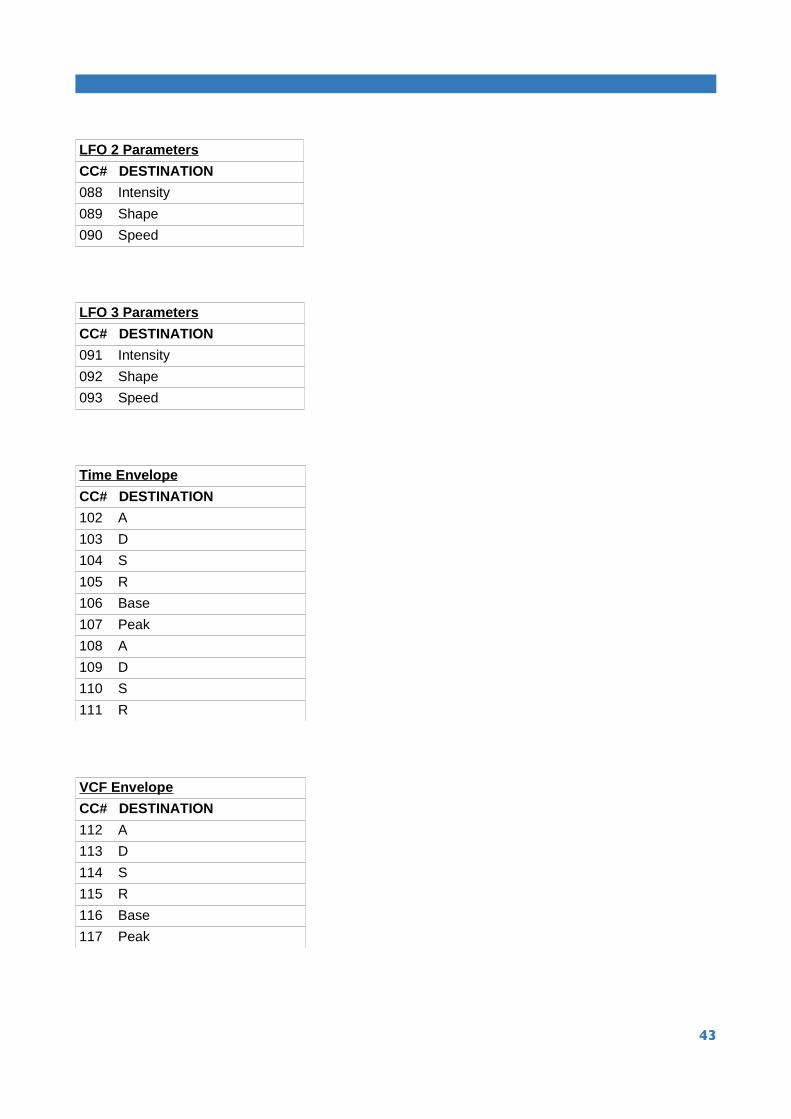
LFO 2 Parameters
CC# DESTINATION
088 Intensity
089 Shape
090 Speed
LFO 3 Parameters
CC# DESTINATION
091 Intensity
092 Shape
093 Speed
Time Envelope
CC# DESTINATION
102 A
103 D
104 S
105 R
106 Base
107 Peak
108 A
109 D
110 S
111 R
VCF Envelope
CC# DESTINATION
112 A
113 D
114 S
115 R
116 Base
117 Peak
43

The Browser pageThe browser page offers a number of easy ways to manage your programs.
The page is divided into three parts: The Program browser, the Program manager and the List manager.
The Program BrowserIn PPG Infinite all your programs are located in one pool.
To group a selection of programs in a browser list, you have several filters and modes available.
44

You can create a new list and then copy single entries from the browser list into the target list.
If you create a new program or use the SaveAs command from the main menu, then that program is added to the pool and also added to the current browser list.
The LED on the top right corner always shows if a list is changed. When finished working on the list, you should save it. If you have started with a PPG list, you will be asked for a new name because the PPG lists are protected.
Applying FiltersIf you have a big list, like Factories, it might be helpful to show selected parts of it.You can, for example, use the a Category as filter.
The default setting is All, which means that all programs are displayed as they are ordered inside the list.
When you select a category as filter, the browser only displays programs from that category. You can change the category for a preset by tapping on the icon and swiping sideways.
Please note that the browser always shows the last saved state of the programs.
Sorting the listBesides filtering, there are several ways to sort the list. On the top left you can sort the programs for titles in alphabetic order.
45

Another way is to sort the programs for Created or Updated dates.You do this with the selector on the right side.
Please note that you only can sort the list with one criterium. For example, you cannot sort for alphabetic and date at the same time.
There also is the possibility to freely order your presets in your list without the filters. You achieve this by setting the last selector on the right side to Statistic. The last column then shows a running number for the presets. Tap a number and move it to the left or right to a desired position. When you lift the finger, the preset will be moved to that place.
Don't forget to save the newly ordered list.
The Program ManagerThe top-left module contains tools to manage the programs inside the active list and a target list. You may select these lists from the popup menus, which open if you tap on the small triangles.
This menu has three zones: System, PPG and User. The two System entries are temporary generated lists and are based on all the programs in the pool. List new programs sets a time limit, so you have an easy way to list your latest created presets.
The PPG lists are the ones from our sound designers, and are write protected. Your own lists will be displayed in the User zone.
46

The REMOVE button deletes the active program from the Browser list. You will be asked if you just want to remove the preset from the list or if you want to delete it from the pool as well. Be careful when doing this because the program might be used in another list.
The TO TARGET button appends the program to the destination list. That is the list you have selected below as TARGET LIST. The text input field in the active list allows you to write a comment for your list.
The Target ListHere you administer your lists. To create a new list, click NEW. Then you have an empty list as destination. Now you may copy programs from your active list into the new one.
SAVE AS makes a copy with a new name.DELETE removes the list from the file system.Please note that the comment field here is only for display, not editing.
47
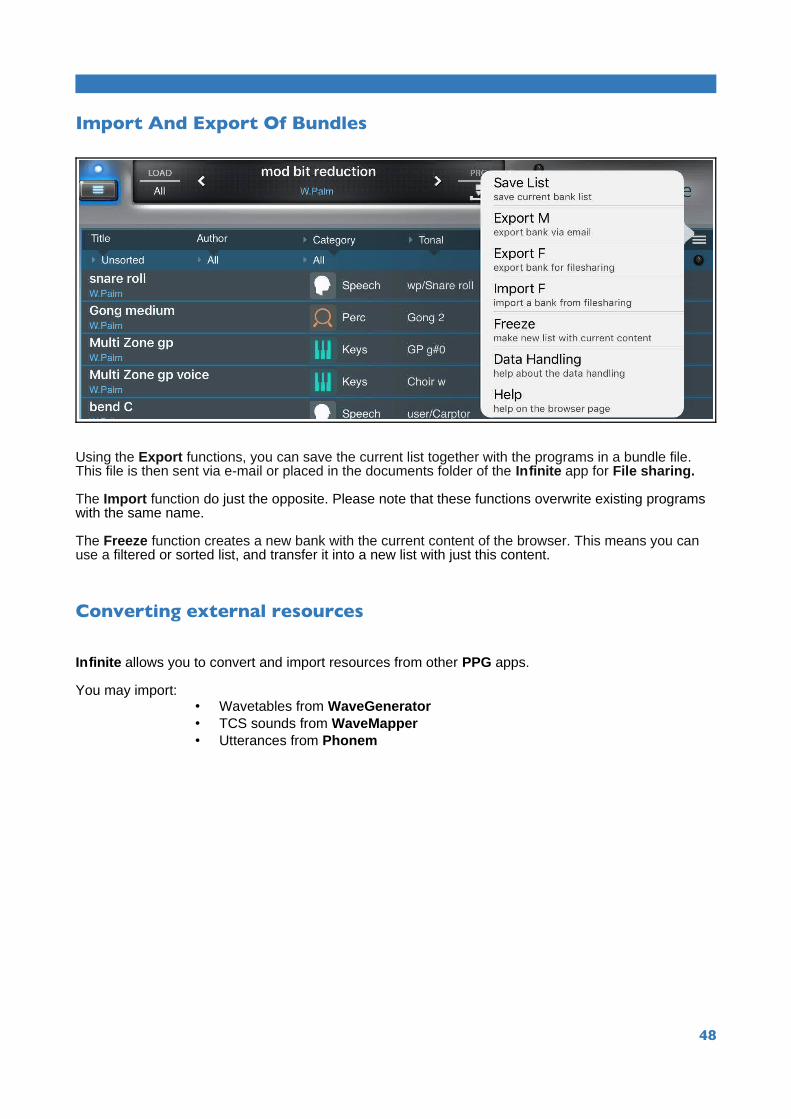
Import And Export Of Bundles
Using the Export functions, you can save the current list together with the programs in a bundle file. This file is then sent via e-mail or placed in the documents folder of the Infinite app for File sharing.
The Import function do just the opposite. Please note that these functions overwrite existing programs with the same name.
The Freeze function creates a new bank with the current content of the browser. This means you can use a filtered or sorted list, and transfer it into a new list with just this content.
Converting external resources
Infinite allows you to convert and import resources from other PPG apps.
You may import:• Wavetables from WaveGenerator• TCS sounds from WaveMapper• Utterances from Phonem
48

Manual by Nick Trass
© 2017 PPG, Wolfgang Palm, Hamburg, Germany
PPG on Facebook: http://www.facebook.com/PPGWavegenerator
Wolfgang Palm website: http://www.wolfgangpalm.com
49