Embed Size (px)
Citation preview
Poser Character Alterations Zephyr11, 08-Dec-2014, i 01
Character Optimization,Stump Creation
Introduction
The aim of this document is to give some tricks to Poser & DAZStudio users so that they will be able to :– Optimize the file size of their Poser scenes– Create stumps, amputations and body modifications
1/12

Poser Character Alterations Zephyr11, 08-Dec-2014, i 01
Character Optimization
This chapter is not mandatory to create stumps, amputations or body modifications, but it provides the means to manipulate lighter files and to freeze body morphs.
In this document, examples are given for Daz3d Victoria 4.2 (aka V42) but they can applied to all kind of characters, clothes, hairs, ....
Have you never noticed that Poser scenes (.pzz files) are enormous and slow to load?
If you load V42 and some morphs to create your own realistic character your scene grows quickly over 8MB.
Why?It is due to the morphs data. Each time you load a full body morph, Poser loads thousand lines of coordinates that are kept in the file (even if those coordinates are identical for each character of your scene)
After this optimization process, you will get an easy-to-use file between 1MB and 2MB !
Required tools :– Poser7 (or above)– Eposer (refer to the software list) at the end of this document)
The main lines of the process :1) Create your own character with its characteristics.2) Save it3) Start Eposer and load your original character4) Unfold the tree of the file and click right on the Figure of your character5) Select 'Optimize OBJ' in the menu6) In the optimization dialog
1. Activate 'Create new OBJ'2. Give a name to the final geometry of the character3. Select the channels to be optimized4. [Optional] : Save the channel list (just to be ale to reuse or control it)5.
7) Save As the optimized file8) Start Poser (or DAZStudio) and open your optimized character.
Step by Step Optimization
Start Poser and model your character as desired andsave it (her) in a scene file (.pzz or .pz3)
2/12

Poser Character Alterations Zephyr11, 08-Dec-2014, i 01
Start Eposer and load your scene
Eposer provides you the means to explore the structure of the scene file.
Select the figure that represents your character.
You can notice that this character is based on the geometry file 'blMilWom_4b.obj' aka Victoria 4.2
Click on the right button and select the 'Optimize OBJ' menu entry
A dialog box opens
This dialog box provides you the means to select thechannels that will be included in a new geometry file.
Select « Create new OBJ » to signal to Eposer to create a new geometry file.This new file will be derivated from the initial one by adding the channels' displacements to each vertex (3D points).
So that I will not be necessary anymore to keep the morphs values in the scene file.
It is a very interesting feature, but a little bit dangerous.I suggest to include only 'FBM' and 'PBM' to avoid to remove expressions morphs. If you select all channels your character will not be able to smile or to close her eyes !
Before applying the morphs, you must select a destination file (instead you will alter your original Daz3D file!!)
I usually create a directory for each character and I create give an understandable name to the final geometry.
Here, the directory is 'V42Carmel' localized in '..\Poser7\Runtime\Geometries\Zephyr11' and the destination file name is 'blv4b_carmel.obj' to keep trace of the original geometry one.
3/12

Poser Character Alterations Zephyr11, 08-Dec-2014, i 01
Click on «Optimize» button, Eposer loads the geometry file, detects the limbs, applies the morphs, create the new geometry, remove applied morph from the loaded scene and replace the reference to the original geometry by the reference to the newly created one.
After that, you just have to save your scene with a new name : 'Carmel-light.pz3' for example.
Finally, I suggest to the optimized scene with Poser to check if everything works fine.
If your character is Voluptuous or quite big, you may have to modify the joints connections at elbow or shoulder level.
Just add few percent on the scales of the InnerSphere and it will be fine.
Save it, this file will be your base character.
PS : You can do the same kind of optimization on clothes of hairs.
In this case, the Carmel.pzz original file is over 7MB when the optimized one is just 1,7MB !
4/12

Poser Character Alterations Zephyr11, 08-Dec-2014, i 01
Stump CreationTo create a new stump or any other kind of limb modifications, I will suppose that you have created your own character and eventually optimized it !
Required tools :– Poser7 (or above)– Eposer (refer to the software list) at the end of this document)– Wings3D or any Mesh modeler that import and export wavefront files (.obj)
The main steps of stump creation are the following :1) Start Eposer and export the limb(s) you want to modify (or stump or cut or ...)2) Load your base character 3) Select the figure that represents your character4) Click on « Extract OBJ »
1. Select a destination directory (Eposer will create one file per part or limb)2. Unselect all channels3. Load a channel list (already saved during the optimization process)4. Click on 'Extract'5. Close Eposer
5) Start your preferred 3D Modeler (wings3D for example)6) Import the parts that have been saved with the Wavefront format (.obj)7) Modify the part to create what you need : stump, tail, ..., droids mechanical part, ...8) Export the part from Wings3D (at this step you may use Eposer for its hole filling function, this will be
described later)9) Start Eposer (again) to replace the original limb by the modified one10) Load your base character 11) Select the limb to be replaced12) Click on « Stump » in the context menu13) Select the new geometry of the limb and click on « OK »14) Remove the useless limb parts. I never remove the limb part that follows the cut one to avoid strange
effects 15) Save the result scene16) Start Poser and load your scene
Start Eposer and export the limb(s) you want to modify (or stump or cut or ...)Load your base character Select the figure that represents your character
5/12

Poser Character Alterations Zephyr11, 08-Dec-2014, i 01
Click on « Extract OBJ »
Select a destination directory (Eposer will create onefile per part or limb)
Unselect all channels
Load a channel list (already saved during the optimization process) or select the channels you want to include in the extracted wavefront files.
Click on 'Extract'
In few seconds, Eposer will extract all geometries attached the BODY actor.
abdomenextracted.obj eyeBrowextracted.obj rEyeextracted.obj rFootextracted.obj rForeArmextracted.obj lCollarextracted.obj headextracted.obj hipextracted.obj lEyeextracted.obj rHandextracted.obj lFootextracted.obj rIndex1extracted.obj lForeArmextracted.obj rIndex2extracted.obj rIndex3extracted.obj rMid1extracted.obj rMid2extracted.obj lHandextracted.obj rMid3extracted.obj lIndex1extracted.obj rPinky1extracted.obj lIndex2extracted.obj rPinky2extracted.obj lIndex3extracted.obj rPinky3extracted.obj lMid1extracted.obj rRing1extracted.obj lMid2extracted.obj rRing2extracted.obj lMid3extracted.obj rRing3extracted.obj lowerJawextracted.obj rShinextracted.obj rShldrextracted.obj rThighextracted.obj lPinky1extracted.obj rThumb1extracted.obj lPinky2extracted.obj rThumb2extracted.obj lPinky3extracted.obj rThumb3extracted.obj lRing1extracted.obj rToeextracted.obj lRing2extracted.obj lRing3extracted.obj lShinextracted.obj chestextracted.obj lShldrextracted.obj lThighextracted.obj tongue01extracted.obj lThumb1extracted.obj tongue02extracted.obj lThumb2extracted.obj tongue03extracted.obj lThumb3extracted.obj tongue04extracted.obj lToeextracted.obj tongue05extracted.obj neckextracted.obj rCollarextracted.obj
Close Eposer
6/12

Poser Character Alterations Zephyr11, 08-Dec-2014, i 01
Start your prefered 3D Modeler (wings3D for example)Import the parts that have been saved with the Wavefront format (.obj)
Modify the part to create what you need : stump, tail, ..., droids mechanical part, ...
The following steps will show you how to create stumps with Wing3d.
I suppose, that you have imported all body parts you need and saved them in Wings3d format.
Now, Select both Shins and duplicate them without any displacement !
Rename the copies and hide the original pieces.
We will first reduce the length of the shins : Select some lowest faces of the shins.
Delete the selected faces. Wings destroys all faces except 2 isolated one.Select them and mark them as Hole.
Now, we will reshape the lower part of the shins.
Select the big faces and increase the selection of two levels
7/12

Poser Character Alterations Zephyr11, 08-Dec-2014, i 01
Use the radial scale applied on the selected region the resize the shins
I usually begin with 96 % or 97 %, but it's a matter of taste.
Click on '-' to reduce the selected sets
Redo a region radial scale (about 94%)
Reduce again the sets, you only should have 2 facesand redo a region radial scale (about 85 % to 88%)
If you want to use the filling algorithm of EPOSER : Select the lowest faces and give them a specific material. 'H' in my example.It will be used by EPOSER to localize the area to be filled.
8/12
Poser Character Alterations Zephyr11, 08-Dec-2014, i 01
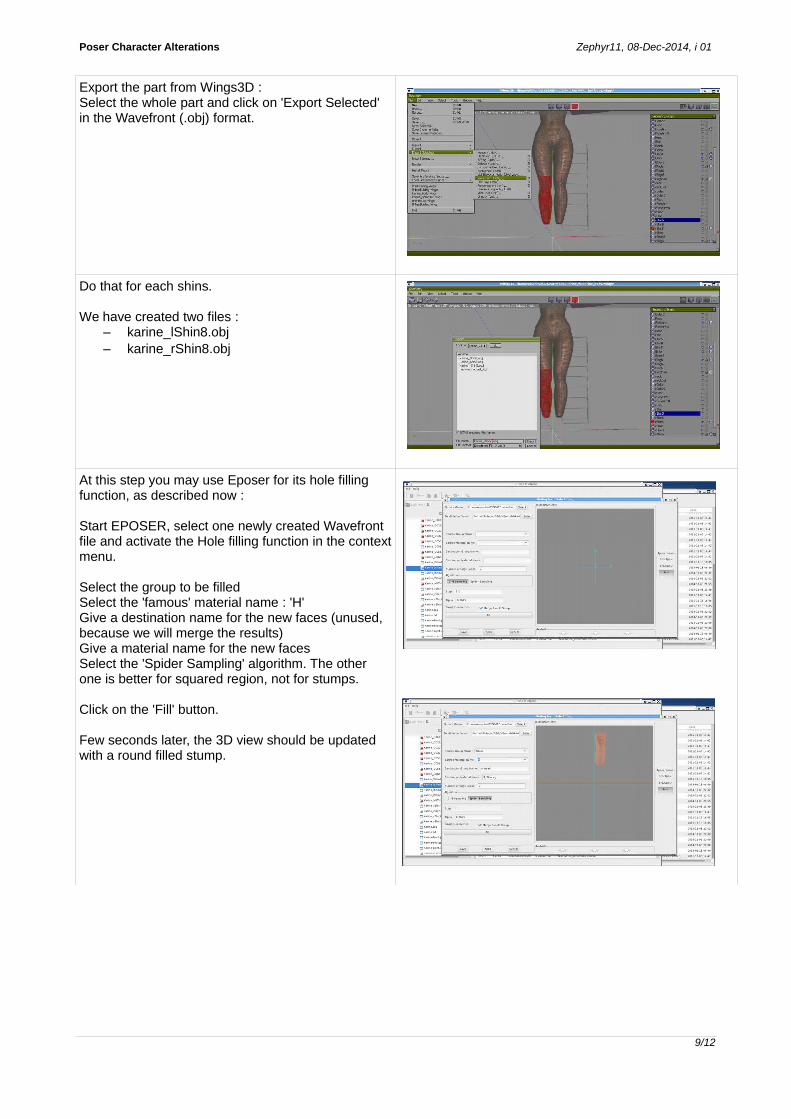
Export the part from Wings3D :Select the whole part and click on 'Export Selected' in the Wavefront (.obj) format.
Do that for each shins.
We have created two files :– karine_lShin8.obj– karine_rShin8.obj
At this step you may use Eposer for its hole filling function, as described now :
Start EPOSER, select one newly created Wavefront file and activate the Hole filling function in the contextmenu.
Select the group to be filledSelect the 'famous' material name : 'H'Give a destination name for the new faces (unused, because we will merge the results)Give a material name for the new facesSelect the 'Spider Sampling' algorithm. The other one is better for squared region, not for stumps.
Click on the 'Fill' button.
Few seconds later, the 3D view should be updated with a round filled stump.
9/12

Poser Character Alterations Zephyr11, 08-Dec-2014, i 01
Click and save to overwrite the initial geometry and quit EPOSER.
Restart Wing3d and import the filled geometry.
From time to time, you will have to reapply the materials, when Wings3D considers that the imported material is not identical to the previously known one.
If you want you can polish the job.
Export the finalized polished parts from Wings3D ()
Start Eposer (again) to replace the original limb by the modified oneLoad your base character
10/12

Poser Character Alterations Zephyr11, 08-Dec-2014, i 01
Select the limb to be replacedClick on « Stump » in the context menu. The geometry replacement dialog box open.
Select the new geometry of the limb and click on « OK »
The OBJ filename field is filled with the selected path.Click on “OK” to do the action :
Remove the useless limb parts.
I never remove the limb part that immediately followsthe cut one to avoid strange effects.
Finally, save the result scene
11/12

Poser Character Alterations Zephyr11, 08-Dec-2014, i 01
Start Poser and load your scene and play ;)
Software ToolsPoser
Poser can be bought here: http://poser.smithmicro.com/poser.html
DAZ StudioDazStudio is here http://www.daz3d.com
EPOSER :EPOSER is an opensource software, the source code can be found here (http://pojamas.sourceforge.net )The compiled versions for Windows and Linux (64bits and 32bits) have just been posted :You can get the :
Linux 64bits version here: http://dl.free.fr/kIOdGG0cY Windows 32bits is here http://dl.free.fr/vloxFTDHU Windows 64bits is here http://dl.free.fr/f9Ng3oPmP
Mesh ModelerWings3D is a light and powerful opensource software www.wings3d.com It works on Windows & Linux.
A text editor may be useful :I suggest the opensource Vim www.vim.org or NotePad++
12/12