Embed Size (px)
Citation preview
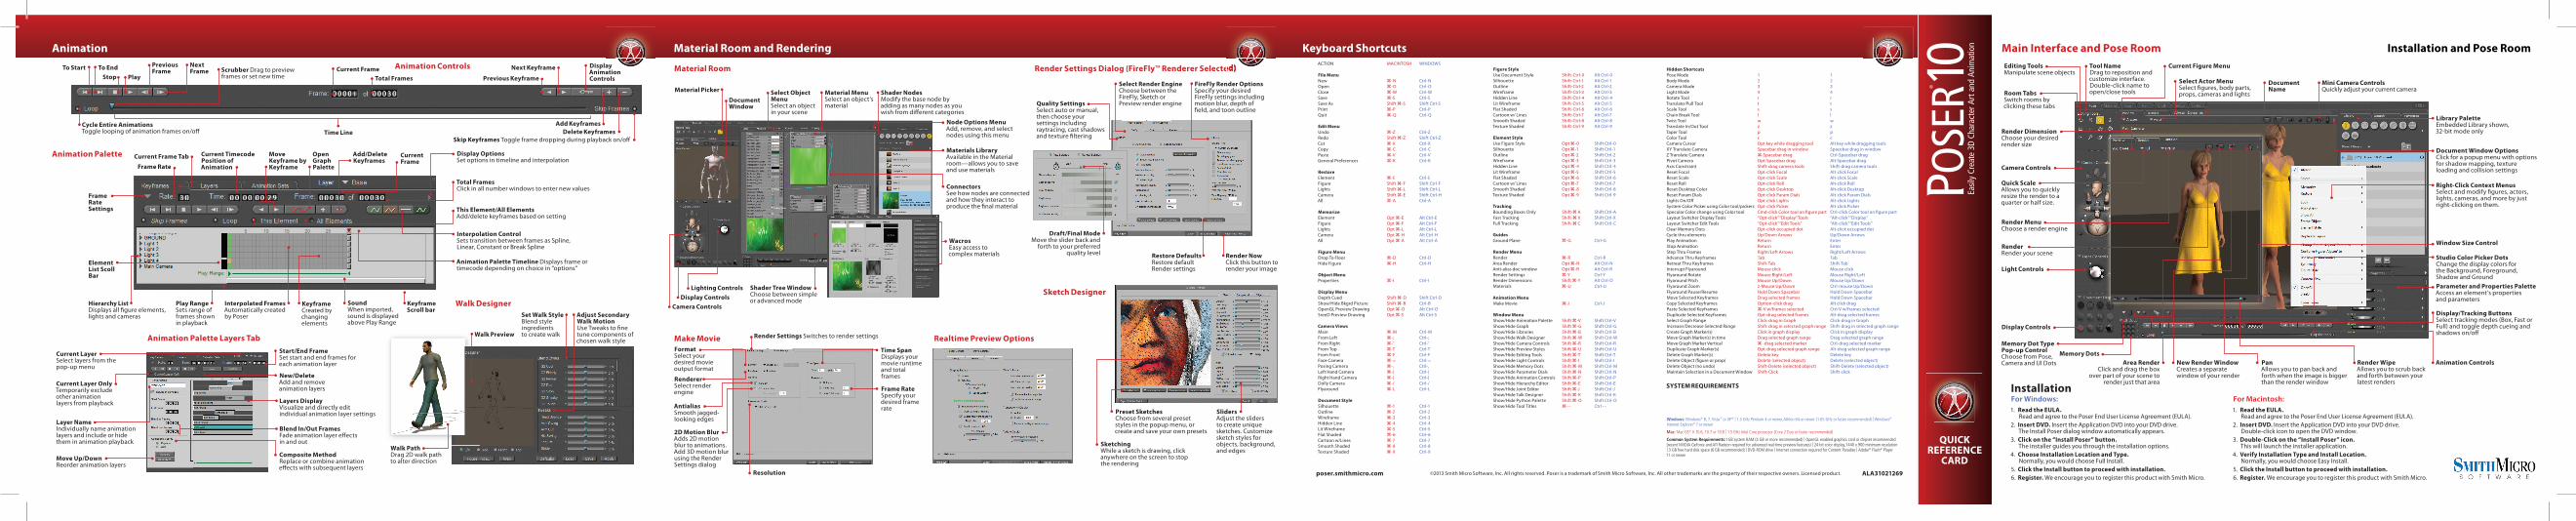
QUICKREFERENCE
CARD
Animation Material Room and Rendering Keyboard Shortcuts Main Interface and Pose Room Installation and Pose Room
To Start
Current Frame Tab Current TimecodePosition ofAnimation
FrameRateSettings
ElementList ScollBar
MoveKeyframe byKeyframe
OpenGraphPalette
Add/DeleteKeyframes
DocumentWindow
Material Picker
Lighting Controls
Display Controls
Camera Controls
Resolution
Select ObjectMenuSelect an objectin your scene
FormatSelect yourdesired movieoutput format
Render Settings Switches to render settings
Time SpanDisplays your movie run time and totalframes
Draft/Final ModeMove the slider back and
forth to your preferredquality level
Preset SketchesChoose from several preset styles in the popup menu, or create and save your own presets
SlidersAdjust the slidersto create uniquesketches. Customizesketch styles forobjects, background, and edges
Tool NameDrag to reposition and customize interface. Double-click name to open/close tools
Editing ToolsManipulate scene objects
Light Controls
Camera Controls
Memory Dot TypePop-up ControlChoose from Pose, Camera and UI Dots
Memory Dots
Display Controls
Render DimensionChoose your desired render size
Quick ScaleAllows you to quickly resize the render to a quarter or half size.
Render MenuChoose a render engine
Windows: Windows® 8, 7, Vista™ or XP® | 1.3 GHz Pentium 4 or newer, Athlon 64 or newer (1.65 GHz or faster recommended) | Windows® Internet Explorer® 7 or newer
Mac: Mac OS® X 10.6, 10.7 or 10.8 | 1.5 GHz Intel Core processor (Core 2 Duo or faster recommended)
Common System Requirements:1 GB system RAM (4 GB or more recommended) | OpenGL enabled graphics card or chipset recommended (recent NVIDIA GeForce and ATI Radeon required for advanced real-time preview features) | 24-bit color display, 1440 x 900 minimum resolution | 3 GB free hard disk space (6 GB recommended) | DVD-ROM drive | Internet connection required for Content Paradise | Adobe® Flash® Player 11 or newer
SYSTEM REQUIREMENTS
RenderRender your scene
Current Figure Menu
Select Actor MenuSelect fi gures, body parts, props, cameras and lightsRoom Tabs
Switch rooms by clicking these tabs
Library PaletteEmbedded Library shown, 32-bit mode only
Parameter and Properties PaletteAccess an element’s properties and parameters
Document Window OptionsClick for a popup menu with options for shadow mapping, texture loading and collision settings
Mini Camera ControlsQuickly adjust your current camera
Window Size Control
Right-Click Context Menus Select and modify fi gures, actors,lights, cameras, and more by justright-clicking on them.
Display/Tracking ButtonsSelect tracking modes (Box, Fast or Full) and toggle depth cueing and shadows on/off
Render Wipe Allows you to scrub back and forth between your latest renders
Animation ControlsPanAllows you to pan back and forth when the image is bigger than the render window
New Render WindowCreates a separate window of your render
Area RenderClick and drag the box
over part of your scene to render just that area
Studio Color Picker DotsChange the display colors for the Background, Foreground, Shadow and Ground
Document Name
poser.smithmicro.com ALA31021269©2013 Smith Micro Software, Inc. All rights reserved. Poser is a trademark of Smith Micro Software, Inc. All other trademarks are the property of their respective owners. Licensed product.
SketchingWhile a sketch is drawing, click anywhere on the screen to stopthe rendering
Restore DefaultsRestore defaultRender settings
Render NowClick this button to render your image
Frame RateSpecify your desired frame rate
RendererSelect renderengine
AntialiasSmooth jagged-looking edges
2D Motion BlurAdds 2D motionblur to animations.Add 3D motion blur using the Render Settings dialog
Material MenuSelect an object’smaterial
Shader Tree WindowChoose between simpleor advanced mode
Node Options MenuAdd, remove, and select nodes using this menu
Materials LibraryAvailable in the Material room—allows you to save and use materials
ConnectorsSee how nodes are connectedand how they interact toproduce the fi nal material
WacrosEasy access to complex materials
Quality SettingsSelect auto or manual,then choose yoursettings includingraytracing, cast shadowsand texture fi ltering
Select Render EngineChoose between theFireFly, Sketch orPreview render engine
FireFly Render OptionsSpecify your desired FireFly settings including motion blur, depth of fi eld, and toon outline
Shader NodesModify the base node byadding as many nodes as youwish from diff erent categories
CurrentFrame
Frame Rate
To End PreviousFrame
NextFrame Scrubber Drag to preview
frames or set new timeCurrent Frame Next KeyframeAnimation Controls Material Room
Make Movie Realtime Preview Options
Sketch Designer
Render Settings Dialog (FireFly™ Renderer Selected)
Animation Palette
Animation Palette Layers Tab
Walk Designer
Stop Play Total Frames Previous Keyframe
Display Animation Controls
Cycle Entire Animations Toggle looping of animation frames on/off
Display Options Set options in timeline and interpolation
Total Frames Click in all number windows to enter new values
This Element/All Elements Add/delete keyframes based on setting
Interpolation Control Sets transition between frames as Spline, Linear, Constant or Break Spline
Animation Palette Timeline Displays frame or timecode depending on choice in “options”
Hierarchy ListDisplays all fi gure elements,lights and cameras
Current LayerSelect layers from the pop-up menu
Start/End FrameSet start and end frames for each animation layer
Current Layer OnlyTemporarily exclude other animation layers from playback
New/DeleteAdd and remove animation layers
Layer NameIndividually name animation layers and include or hide them in animation playback
Layers DisplayVisualize and directly edit individual animation layer settings
Blend In/Out FramesFade animation layer eff ects in and out
Move Up/DownReorder animation layers
Composite MethodReplace or combine animation eff ects with subsequent layers
Play RangeSets range offrames shown in playback
Interpolated FramesAutomatically createdby Poser
KeyframeCreated by changingelements
SoundWhen imported,sound is displayed above Play Range
Set Walk StyleBlend styleingredientsto create walk
Walk PathDrag 2D walk pathto alter direction
Walk Preview
Adjust SecondaryWalk MotionUse Tweaks to fi netune components ofchosen walk style
KeyframeScroll bar
Time LineAdd Keyframes
Delete KeyframesSkip Keyframes Toggle frame dropping during playback on/off
ACTION MACINTOSH WINDOWS
File MenuNew z-N Ctrl-NOpen z-O Ctrl-OClose z-W Ctrl-WSave z-S Ctrl-SSave As Shift z-S Shift Ctrl-SPrint z-P Ctrl-PQuit z-Q Ctrl-Q
Edit MenuUndo z-Z Ctrl-ZRedo Shift z-Z Shift Ctrl-ZCut z-X Ctrl-XCopy z-C Ctrl-CPaste z-V Ctrl-VGeneral Preferences z-K Ctrl-K
RestoreElement z-E Ctrl-EFigure Shift z-F Shift Ctrl-FLights Shift z-L Shift Ctrl-LCamera Shift z-E Shift Ctrl-HAll z-A Ctrl-A
MemorizeElement Opt z-E Alt Ctrl-EFigure Opt z-F Alt Ctrl-FLights Opt z-L Alt Ctrl-LCamera Opt z-H Alt Ctrl-HAll Opt z-A Alt Ctrl-A
Figure MenuDrop To Floor z-D Ctrl-DHide Figure z-H Ctrl-H
Object MenuProperties z-I Ctrl-I
Display MenuDepth Cued Shift z-D Shift Ctrl-DShow/Hide Bkgrd Picture Shift z-B Ctrl-BOpenGL Preview Drawing Opt z-O Alt Ctrl-OSreeD Preview Drawing Opt z-S Alt Ctrl-S
Camera ViewsMain z-M Ctrl-MFrom Left z-; Ctrl-;From Right z-’ Ctrl-’From Top z-T Ctrl-TFrom Front z-F Ctrl-FFace Camera z-= Ctrl-=Posing Camera z-, Ctrl-,Left Hand Camera z-[ Ctrl-[Right Hand Camera z-] Ctrl-]Dolly Camera z-/ Ctrl-/Flyaround z-L Ctrl-L
Document StyleSilhouette z-1 Ctrl-1Outline z-2 Ctrl-2Wireframe z-3 Ctrl-3Hidden Line z-4 Ctrl-4Lit Wireframe z-5 Ctrl-5Flat Shaded z-6 Ctrl-6Cartoon w/Lines z-7 Ctrl-7Smooth Shaded z-8 Ctrl-8Texture Shaded z-9 Ctrl-9
Figure StyleUse Document Style Shift-Ctrl-0 Alt Ctrl-0Silhouette Shift-Ctrl-1 Alt Ctrl-1Outline Shift-Ctrl-2 Alt Ctrl-2Wireframe Shift-Ctrl-3 Alt Ctrl-3Hidden Line Shift-Ctrl-4 Alt Ctrl-4Lit Wireframe Shift-Ctrl-5 Alt Ctrl-5Flat Shaded Shift-Ctrl-6 Alt Ctrl-6Cartoon w/ Lines Shift-Ctrl-7 Alt Ctrl-7Smooth Shaded Shift-Ctrl-8 Alt Ctrl-8Texture Shaded Shift-Ctrl-9 Alt Ctrl-9
Element StyleUse Figure Style Opt z-0 Shift Ctrl-0Silhouette Opt z-1 Shift Ctrl-1Outline Opt z-2 Shift Ctrl-2Wireframe Opt z-3 Shift Ctrl-3Hidden Line Opt z-4 Shift Ctrl-4Lit Wireframe Opt z-5 Shift Ctrl-5Flat Shaded Opt z-6 Shift Ctrl-6Cartoon w/ Lines Opt z-7 Shift Ctrl-7Smooth Shaded Opt z-8 Shift Ctrl-8Texture Shaded Opt z-9 Shift Ctrl-9
TrackingBounding Boxes Only Shift-z A Shift Ctrl-A Fast Tracking Shift-z X Shift Ctrl-X Full Tracking Shift-z C Shift Ctrl-C
GuidesGround Plane z-G Ctrl-G
Render MenuRender z-R Ctrl-RArea Render Opt z-N Alt Ctrl-NAnti-alias doc window Opt z-R Alt Ctrl-RRender Settings z-Y Ctrl-YRender Dimensions Shift z-Y Alt Ctrl-DMaterials z-U Ctrl-U
Animation MenuMake Movie z-J Ctrl-J
Window MenuShow/Hide Animation Palette Shift z-V Shift Ctrl-VShow/Hide Graph Shift z-G Shift Ctrl-GShow/Hide Libraries Shift z-B Shift Ctrl-BShow/Hide Walk Designer Shift z-W Shift Ctrl-WShow/Hide Camera Controls Shift z-R Shift Ctrl-RShow/Hide Preview Styles Shift z-U Shift Ctrl-UShow/Hide Editing Tools Shift z-T Shift Ctrl-TShow/Hide Light Controls Shift z-I Shift Ctrl-IShow/Hide Memory Dots Shift z-M Shift Ctrl-MShow/Hide Parameter Dials Shift z-N Shift Ctrl-NShow/Hide Animation Controls Shift z-P Shift Ctrl-PShow/Hide Hierarchy Editor Shift z-E Shift Ctrl-EShow/Hide Joint Editor Shift z-J Shift Ctrl-JShow/Hide Talk Designer Shift z-K Shift Ctrl-KShow/Hide Python Palette Shift z-O Shift Ctrl-OShow/Hide Tool Titles z- - Ctrl - -
Hidden ShortcutsPose Mode 1 1Body Mode 2 2Camera Mode 3 3Light Mode 4 4Rotate Tool r rTranslate/Pull Tool t tScale Tool s sChain Break Tool l lTwist Tool w wTranslate In/Out Tool z zTaper Tool p pColor Tool c cCamera Cursor Opt key while dragging tool Alt key while dragging toolsXY Translate Camera Spacebar drag in window Spacebar drag in windowZ Translate Camera z-Spacebar drag Ctrl-Spacebar dragPivot Camera Opt-Spacebar drag Alt-Spacebar dragAxis Constraint Shift-drag camera tools Shift-drag camera toolsReset Focal Opt-click Focal Alt-click FocalReset Scale Opt-click Scale Alt-click ScaleReset Roll Opt-click Roll Alt-click RollReset Desktop Color Opt-click Desktop Alt-click DesktopReset Param Dials Opt-click Param Dials Alt-click Param DialsLights On/Off Opt-click Lights Alt-click LightsSystem Color Picker using Color tool/pickers Opt-click Picker Alt-click PickerSpecular Color change using Color tool Cmd-click Color tool on fi gure part Ctrl-click Color tool on fi gure partLayout Switcher Display Tools “Opt-click”“Display”Tools “Alt-click”“Display”Layout Switcher Edit Tools “Opt-click”“Edit Tools” “Alt-click”“Edit Tools”Clear Memory Dots Opt-click occupied dot Alt-click occupied dotCycle thru elements Up/Down Arrows Up/Down ArrowsPlay Animation Return EnterStop Animation Return EnterStep Thru Frames Right/Left Arrows Right/Left ArrowsAdvance Thru Keyframes Tab TabRetreat Thru Keyframes Shift-Tab Shift-TabInterrupt Flyaround Mouse click Mouse clickFlyaround Rotate Mouse Right/Left Mouse Right/LeftFlyaround Pitch Mouse Up/Down Mouse Up/DownFlyaround Zoom z-Mouse Up/Down Ctrl-mouse Up/DownFlyaround Pause/Resume Hold Down Spacebar Hold Down SpacebarMove Selected Keyframes Drag selected frames Hold Down SpacebarCopy Selected Keyframes Option-click drag Alt click dragPaste Selected Keyframes z-V w/frames selected Ctrl-V w/frames selectedDuplicate Selected Keyframes Opt-drag selected frames Alt-drag selected framesSelect Graph Range Click-drag in Graph Click-drag in GraphIncrease/Decrease Selected Range Shift-drag in selected graph range Shift-drag in selected graph rangeCreate Graph Marker(s) Click in graph display Click in graph displayMove Graph Marker(s) in time Drag selected graph range Drag selected graph rangeMove Graph Marker Vertical z -drag selected marker Ctrl-drag selected markerDuplicate Graph Marker(s) Opt-drag selected graph range Alt-drag selected graph rangeDelete Graph Marker(s) Delete key Delete keyDelete Object (fi gure or prop) Delete (selected object) Delete (selected object)Delete Object (no undo) Shift-Delete (selected object) Shift-Delete (selected object)Maintain Selection in a Document Window Shift-Click Shift-click
1. Read the EULA.Read and agree to the Poser End User License Agreement (EULA).
2. Insert DVD. Insert the Application DVD into your DVD drive. Double-click icon to open the DVD window.
3. Double-Click on the “Install Poser” icon. This will launch the installer application.
4. Verify Installation Type and Install Location.Normally, you would choose Easy Install.
5. Click the Install button to proceed with installation.6. Register. We encourage you to register this product with Smith Micro.
For Macintosh:InstallationFor Windows:1. Read the EULA.
Read and agree to the Poser End User License Agreement (EULA).2. Insert DVD. Insert the Application DVD into your DVD drive.
The Install Poser dialog window automatically appears.3. Click on the “Install Poser” button.
The installer guides you through the installation options.4. Choose Installation Location and Type.
Normally, you would choose Full Install.5. Click the Install button to proceed with installation.6. Register. We encourage you to register this product with Smith Micro.
Renderer Selected)

RemoveRemove Polygons/Vertices from group
Create orDeleteGroups
EditSelectedPolygons/Vertices
AdvancedGroupFunction
ChooseDisplayOptions
Create Propfrom Selection
Setup SmoothingGroup
Select Groups
Palettes and Controls Palettes and Controls Cloth Room and Setup Room Hair Room and Face Room
Talk Designer Camera Palette Light Controls
Library Palette
Group Editor
Hierarchy Editor
Input FilesSpecify a sound fi le and add optional transcript text
SelectCamera MenuChoose cameraor view
Face CameraZooms to face
Light Options MenuSelect light options
Light PositionDrag to set lightposition in studio
Add Light
Delete Light
Right-ClickTo select new light typeLight Intensity
Drag to reduceor increase light intensity
Light PropertiesControls light name, visibility, shadow behavior, color, parent, and infi nite/spotlight characteristic
Light ColorClick to setlight color
Current Runtime Pop-up menu Breadcrumbs
Dock/UndockUndocking transforms library drawer into fl oating palette
Start TeachingClick to start/stop recording of value changes
Hierarchical Pop-up Menu Quickly access library palette categories and subcategories
Add Additional Runtimes
Switch to Category ButtonsDisplays top-levellibrary buttons
PreviewSelect the preview to view detail. Double-click or click-drag to apply the setting onto scene
Add to LibraryAdds new content item to current category from scene selection
Extended Details
Add to Favorites
Item List Panel
Delete from LibraryRemoves selected content item from library
Library PreferencesClick to open and set preferences
Create New FigureAdds an additional fi gure to your scene
Change FigureReplaces the current fi gurewith one from the library
CreateNew Folder
Tree View
Current CameraIcon indicates camera inuse. Click and drag on icon to select other cameras
Move X and YMoves cameraup/down, side to side
Move X and ZMoves cameraIn/Out, Side to Side
RollRolls camera leftor right
RotationTrackballRotates camera
Left Hand CameraZooms to left hand
Fly Around View
Right HandCameraZooms to right hand
Animation On/Off Toggles ability toanimate currentcamera on/off
Move Y and ZMoves cameraUp/Down andIn/Out
Focal LengthAdjusts focal lengthof camera
X=Side/SideY=Up/DownZ=In/Out
ScaleZooms In/Out view
Viseme Map FileMaps speech sounds to facial expressions
Start/End FrameSpecify a Start and End frame for your lipsync animation
Create Keyframes InSelect a new or existing animation layer for your lipsync animation keyframes
Head MotionsAdd realistic eye and head movements
Emotional TweaksCustomize your animation by adjusting emotion morph targets
Display OptionsCheck items to display or hide on the Hierarchy list
Docking options
Docking Controls Click to open and select Docking options Use the Group Editor to create and edit
polygon or vertex groups. Some features (e.g. Dynamic Hair, Cloth) require the Group Editor tool
PropertiesDouble-click an item to open its properties
Visibility IconToggles visibility ofthe item in thedocument window
Figure CreationUse these options tocreate fi gures or set up IK chains
Collapse IconClick to collapseall child itemsbelow this item
Expand IconClick to expand all child itemsbelow this item
Enunciation Amplify or reduce energy infl uence
FigureSelect a fi gure to animate
Edit Palette
Dependant ParametersParameters
Morphing Tool
Display Controls
Twist ToolTwists elementaround its center
Rotate ToolRotates element
Master Parameter Name
Value Slider Click /drag or enter numerical values for Master Parameter
Selected Dependent Parm Select to edit values
Dependent Parameter List Parameters to be driven by Master Parameter
Graph Editor Edit selected dependent parm value by click/drag in graph
Current Actor MenuSelect an element inyour scene
Parameters/Properties TabsSwitch back and forth between the Parameters and Properties palettes
Parameters MenuAdd, remove, andcontrol dial groups
Driven parameterDouble stacks of values indicate driven parameter. Top number is controlled by master. Bottom number is editable.
Master ParameterIcon indicates a master parameter, click to open editor
Parameter Options Pop-Up
Parameter Change IndicatorIndicates when parameter changes from default setting
Grouped DialsExpand and collapsedial groups and move dials between groups
Parameter DialClick and drag toincrease or decreasevalue, double-click to bring up dialog box
Numeric ValueClicking this value lets you directly enter new values
Wireframe
SilhouetteOutline Flat lined Cartoon
LinedSmoothLined
LitWireframe
HiddenLine
FlatShaded
Cartoon SmoothShaded
TextureShaded
Choose to apply display styles to your Document, (current) Figure, or (current) Element (such as a body part or prop). Figure and Element modes allow you to apply a higher category display style to your current selection.
Translate/PullRepositionselement
ScaleIncrease/Decreaseelement sizeuniformly
Chain BreakBreaks chain ofparts aff ected bytranslation tools
GroupingSelects andgroups specifi cpolygons/vertices
Morphing ToolVisually sculpt morph targets by clicking and dragging
Translate In/OutMoves elementIn/Out
TaperScale one end of element
ColorPicks colorfrom selectedelement
View Magnifi erZooms in-out ofscene withoutaff ecting camera
Direct ManipulationVisually translate,rotate, and/or scaleelements
Action ButtonsSelect the action you wish to use to modify vertices
Tool OptionsDisplays options for the current brush
Brush StyleSelect a brush style
Radius and MagnitudeCustomize the way in which your changes will aff ect the mesh
Morphing Tool Create OptionsConfi gure the degree and range of mesh modifi cations
Display OptionsSelect options to help you visualize your modifi cations
MirrorMirror changes across various axes on the mesh
Zero MorphReset the mesh to its neutral state
Save Copy AsSave your modifi cations as a new morph target
Lock/Unlock AllDisable or enable modifi cations on all morph targets
Morph TargetsControl which morphs are aff ected by the Morphing Tool
Exaggeration ControlsAdjust Morphing Tool sensitivity
Clear PinsRemoves all pins
Add PinPin vertices in place to prevent further modifi cation
Clear MorphsClick this button to erase your changes and start over
Morphing ToolDirectly manipulate vertices using the Morphing Tool
Memory DotsClick on an empty dot tosave a pose, UI or camerasetting. ALT-Click (Option-Click on Mac) an occupieddot to clear its setting.
Setup Room
Content Room
Clothify
Cloth Collision Objects
Cloth Simulation Settings
Cloth Room
Cloth SimulationControlsCreate and set upcloth simulations
Cloth ControlsConvert props to/fromdynamic cloth objects and set up cloth collisiondetection
Cloth GroupsDivide cloth objects intodiff erent groups to control behavior during animation
Dynamic Group ControlsDynamic cloth groupsbehave according todynamic settings
Choreographed GroupPosition and animategroup using keyframes
Constrained GroupMap/Animate with theirassociated surface
Soft Decorated GroupGroup deforms as it moveswith dynamic cloth
Rigid Decorated GroupGroup moves with surrounding dynamic cloth
ResetRestore default DynamicControls settings
The Clothify dialog is where you convert props to dynamic cloth objects. Select the element to clothify using the pull-down menu.
The Cloth Collisions Objects dialog allows you to select objects for the cloth to collide against, and cloth collision settings.
Bone ToolThe Bone tool lets you add and remove bones
The Setup room allowsyou to create and modify Poser fi gures. Bones
Bones control how your fi gures move. When manipulating the position of bone ends, the cursor changes to a bulls eye as shown.
Additional content available at:contentparadise.com
The Simulation Settings dialog appears when you create a new dynamic cloth simulation. Name your new simulation and specifyits name, range, collision, and draping options.
The Poser Content room accesses Content Paradise, which is your gateway to free and for-sale Poser content. Need a Poser fi gure, prop, texture, or something else? Content Paradise has you covered.
Poser’s Download Manager will auto-install most downloaded content and add it to the Library palette. No more manually placing fi les in folders!
Select Simulation MenuEach Poser scene canhave multiple clothsimulations
Dynamic ControlsCloth dynamics controlhow dynamic clothbehaves during animationEditing Tools
DocumentWindow
Hair Style Tool
Hair Room
Face Room
Face Shaping ToolCurrent Group MenuSelect the hair group you wish to work on
Growth ControlsControl hair length and orientation
Styling ControlsCreate custom eff ects such as curls and control the number of hairs in the current hair group
Dynamics ControlsHair dynamics controlhow hair behaves during animations
Hair Growth Group Tools Create, name, edit, and delete hair groups
Hair Styling ToolThis editing tool appears in the Hair Room and opens the Hair Style Tool palette when selected
DocumentWindow
Editing Tools
Camera Controls
Display Controls
Morphing ToolDirectly manipulatefacial expressionsusing Morphing tool
Add PinPin vertices in place toprevent further modifi cation
Clear PinsRemoves pins
Caricature DialCreate wackyfaces for yourfi gures
Symmetric/AsymmetricMorphsChoose subset of morph targets towork with inFace Sculpting
Facial MorphsControl whichmorphs areaff ected by theMorphing tool
Face Texture ToolAdd ethnic, age, and gender features to head textures
Clear MorphsClick this buttonto erase yourchanges andstart over
ExaggerationControlsAdjust FaceMorphing Toolsensitivity
Face Shaping Tool WindowInteractively sculpt facial expressions with Morphing Tool Technology
Reset Face RoomRestore Face Room defaults
Random FaceOne click creates a totally random face and texture!
Texture PreviewSee the current texture map
Photo Lineup AreaCreate 3D heads using two photos (front and side)
Hair Editing ToolsThese tools function similarly to the normal Editing Tools, except they only aff ect guide hairs
Remove Guide HairsRemoves guide hairsfrom your selection
Add Guide HairsAdds guide hairs toyour selection
Constrain LengthEnabling this optionkeeps hairs fromgrowing/shrinking
Clear SelectionDeselect all selectedguide hairs
Falloff Defi nes the portion of guidehairs aff ected by the tools
LengthenGrow or shrink the selected guide hairs
Apply ShapeApply the custom shape to the head
Photo/GeometryToolsAlign photos and geometry for best fi t and highest realism
Texture VariationsAdd ethnic, age, and gender features to head textures
Face Sculpting WindowClick and drag vertices to visually sculpt facial features using the Morphing tool
Frame SelectedFits camera aroundcurrently selectedactor
Orbit SelectedRotates camera around currentactor
AddAdd Polygons/vertices to group