Embed Size (px)
Citation preview

POS Terminal Download Procedures
Verifone VX 520 Terminal 1/23/2019

08/22/2018 2 | P a g e
Keypad Display Reference
ALPHA key
* key BACK key
ENTER key
CANCEL key
01/23/2019 3 | P a g e
Note: If you make a mistake at any time during this procedure, unplug the power cord, plug it back in and restart at Step 1.
Broadband - Group 1 *MA Download ** Please Note ** If the terminal is Displaying GO FILE NOT FOUND, repeat these steps.
1. On initial screen (reboot screen) hold ENTER and 7 together until you get “TERMINAL MGR ENTRY” Screen. You may have to try it more than one time.
2. On the screen above, when VERIX TERMINAL MGR appears, Enter the password:
1 ALPHA ALPHA 6 6 8 3 1 and press ENTER
3. From the screen below, Select: 2) Download

01/23/2019 4 | P a g e
01/23/2019 5 | P a g e
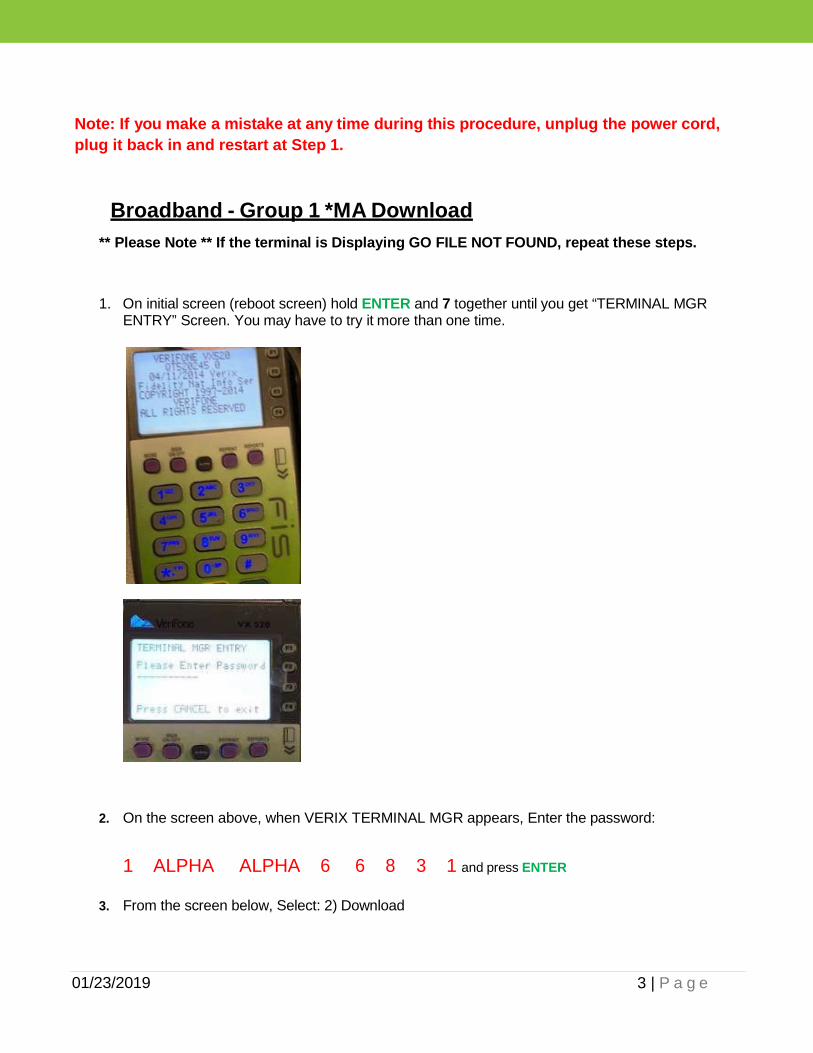
4. On the screen below, when Group ID: _1 appears: Press ENTER
5. When VERIX TERMINAL MGR appears: Enter the password:
1 ALPHA ALPHA 6 6 8 3 1 and press ENTER
6. On the screen below, Select: 2) Multi-app

01/23/2019 6 | P a g e
01/23/2019 7 | P a g e
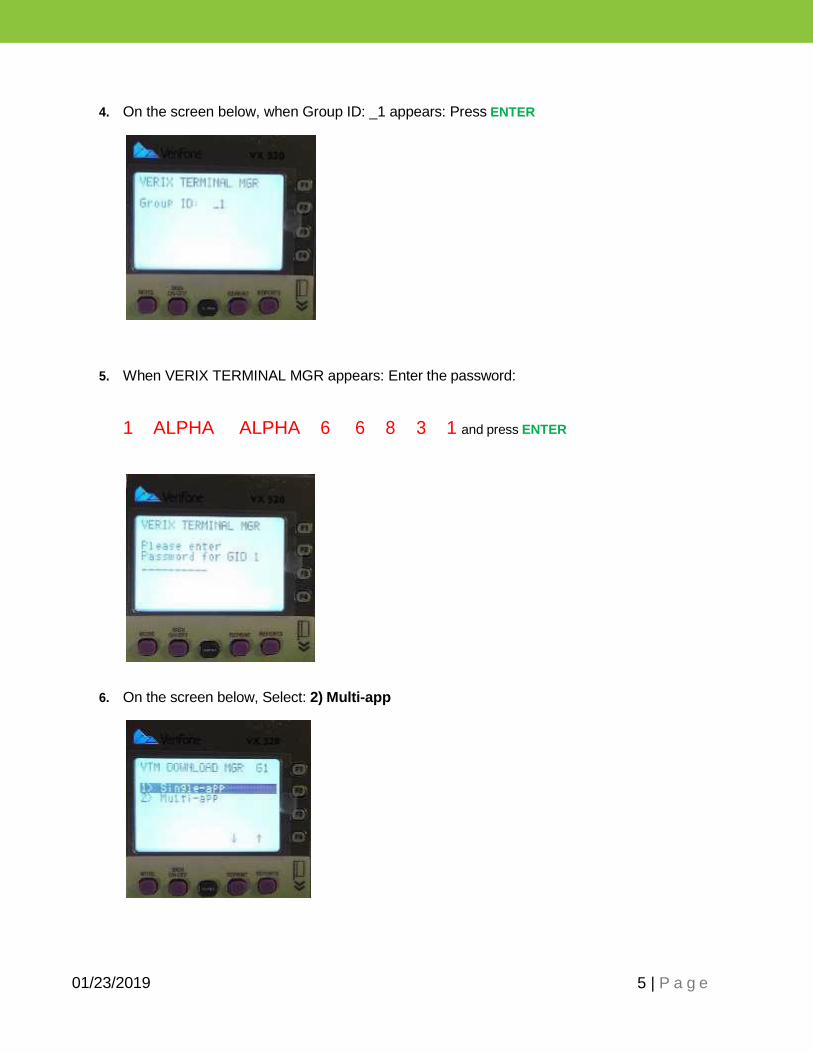
7. On the screen below, Select: 1) Full dnld
8. On the screen below, Select: 2) Continue
9. On the screen below, Select: 1) Yes

01/23/2019 8 | P a g e
10. Select 1 for Yes to confirm deletion
11. On the screen below asking if you want to clear the application, Select: 1) Yes
12. On the screen below, asking for deletion confirmation, Select: 1) Yes
13. On the screen below, following deletion confirmation, the Screen will display “DELETING FILES”

01/23/2019 9 | P a g e
14. Press the first purple button- from left to right- that says More.
15. On the screen below, Select: 3) TCPIP
16. On the screen below, Press ENTER for Download
01/23/2019 10 | P a g e
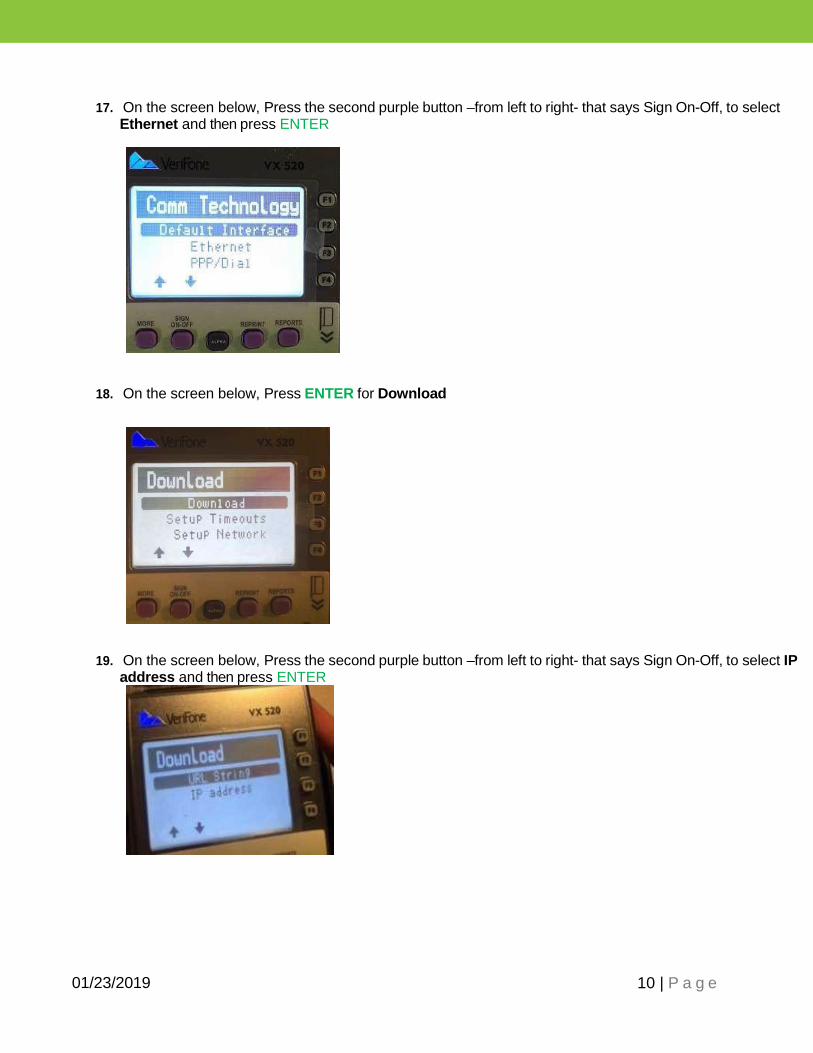
17. On the screen below, Press the second purple button –from left to right- that says Sign On-Off, to select Ethernet and then press ENTER
18. On the screen below, Press ENTER for Download
19. On the screen below, Press the second purple button –from left to right- that says Sign On-Off, to select IP address and then press ENTER

01/23/2019 11 | P a g e
20. On the screen below, Enter the IP address, using the ‘#’ Key to add periods: 67.23.53.172 • Use the ‘Reports’ key to edit the value
21. On the screen above, once the IP address has been correctly entered on the screen, Press ENTER
22. On the screen below, If the port displays (empty), press the fourth Purple button from left to right that says Reports, this will allow you to Edit the port number. (This step may be skipped if port 8013 is already present)
23. On the screen below, type the Port Number 8013
24. On the screen below, once you have typed in the Port Number, Press ENTER

01/23/2019 12 | P a g e
25. On the screen below, Press ENTER for Download
26. On the screen below, Press ENTER for Download
27. On the screen below, Press ENTER for Download

01/23/2019 13 | P a g e
28. On the screen below, If the Terminal ID displays (empty), press the fourth Purple button from left to right that says Reports, this will allow you to Edit the Terminal ID
29. On the screen below,Type in the terminal ID that starts with one of the letters A, B, C, D, or E.
I f y o u r t e r m i n a l s u p p o r t s b o t h E B T a n d W I C t r a n s a c t i o n s , m a k e s u r e
t h i s s c r e e n s h o w s t h e W I C T e r m i n a l I D . S e e t h e d e t a i l s i n t h e p i c t u r e s
a t t h e e n d o f t h i s s t e p t o f i n d y o u r W I C T e r m i n a l I D. I f t h e t e r m i n a l I D
i s e m p t y o r d i f f e r s f r o m t h e W I C t e r m i n a l I D , p r e s s t h e f o u r t h p u r p l e k e y
( u n d e r R e p o r t s ) t o e d i t t h e T e r m i n a l I D .
I f y o u r t e r m i n a l s u p p o r t s o n l y E B T o r o n l y W I C , t h e v a l u e d i s p l a y e d
f o r t h e T e r m i n a l I D w i l l b e c o r r e c t . I f t h e T e r m i n a l I D i s e m p t y, p r e s s
t h e f o u r t h p u r p l e k e y ( u n d e r R e p o r t s ) t o e d i t t h e T e r m i n a l I D .
For example, to enter E154615001 for the Terminal ID, enter the following:
3 ALPHA ALPHA, 154615001

01/23/2019 14 | P a g e
You can find terminal Information located on your terminal, same number should be located on your receipt. On your receipts, you would use the MERCHANT TERM ID
30. On the screen below, Press ENTER for Download

01/23/2019 15 | P a g e
31. On the screen below, Press ENTER for Download
32. On the screen below, Press ENTER when Settings Summary appears on the screen
33. On the screen below, Press ENTER when Settings Summary appears on the screen

01/23/2019 16 | P a g e
34. Press Enter on Settings Summary Screen
35. On the screen below, Press ENTER when Settings Summary appears on the screen
36. On the screen below, Download will appear when the terminal begins downloading

01/23/2019 17 | P a g e
37. The terminal will automatically restart after the download completes.
38. After Successful Download, select a menu choice (e.g., FIS EBT, FIS WIC). When the next menu is displayed, a communications test can be performed to verify the terminal is able to communicate successfully.
39. Steps for performing a communication test: • Press the green ENTER key. • The terminal displays FUNCTION? • Press the ‘8’ key. • The terminal displays Send Data, Receiving, and prints a COMM TEST
ACCEPTED receipt. If the terminal stays on Receiving for a long period of time, please contact our Help Desk.
• Repeat the above steps if your terminal supports multiple FIS applications.