Embed Size (px)
Citation preview

Spring 2018
Portal User GuideFor All ACT Aspire Assessments

1February 7, 2018 1
© 2018 by ACT, Inc. All rights reserved. ACT® Aspire® is a registered trademark of ACT, Inc.
Contact Information and ResourcesContact InformationACT® Aspire® Customer Care• Phone: 855.730.0400, 6:00 a.m.–7:30 p.m., central time, Monday through Friday• Email: www.act.org/contact-actaspire
Resources This manual references various websites and systems. Use this list to locate the url to that website or system.
Website URL
ACT Aspire Data Use Policy https://www.discoveractaspire.org/legal/data-usage-policy/
ACT Aspire Landing Page http://actaspire.pearson.com/
ACT Aspire Portal https://www.actaspire.org/
Avocet http://actaspire.avocet.pearson.com
TestNav™ Support Site https://support.assessment.pearson.com/display/TN/TestNav+8+Online+Support
Training Management System (TMS) https://actaspire.tms.pearson.com/
Accessibility and Accommodations The Avocet website also includes accommodations and accessibility resources. Some examples include:
• Spanish Pre-Recorded Audio Test Directions
• Braille Notes (for the room supervisor)
• ACT-Approved Bilingual Word-to-Word Dictionaries
Prepare Your Students There are two resources available for students who wish to prepare for testing:
• Student Sandbox
• Exemplar Test Question Booklets
For more information, see the Exemplar Items section of the ACT Aspire Landing Page.

2February 7, 2018 2
Introduction 4
Objective of the Portal User Guide 4
How to Use this Guide 4
User Role Descriptions 5
See Appendix D the User Role Matrix for full list of User Roles 5
Test Coordinator User Role 5
Room Supervisor User Role 5Technology Coordinator User Role 5
Tenant Role Descriptions 6
General Portal Functionality 8
System Requirements for Using the Portal 8
Accessing the Portal 9
The Portal Dashboard 9
Managing Your Portal Password 9
Preference Settings in the User Profile 11
Viewing Messages and Notifications 11
Creating Messages 11
Locating Help Resources for Using the Portal 13
Chat Functionality 13
Adding Organizations to the Portal 14
Viewing Organization Members 15
Managing Member Permissions 15
Editing or Deleting Organizations 16
Locating and Managing Student Information 16
Deleting Multiple Students from an Organization 17
Student Extracts Summary Page 18
Managing Test Session Administration in the Portal 19
Additional Order Process 21
Adding Students to Test Sessions 24
Creating Multiple Test Sessions & Copying Test Sessions 26
Step-by-Step Work Instructions 28
Test Administration Process Flowcharts 29
Computer-Based Testing High-Level Workflow 29
Paper-Based Testing High-Level Workflow 30
Step 01. Organizational File (CBT & PBT) 31
New Customers: Organizational File 31
Selecting and Switching Organizations in the Portal 31
Organization Extract 32
Step 02. Delegating Tasks & Inviting Users (CBT & PBT) 34
Tenant Roles and Test Session Roles 34
Accepting Invitations to the Portal 35
Switching Tenants in the Portal 36
Step 03. Student Data File (CBT & PBT) 38
Student Data Upload (SDU) File Layout 38
Uploading Student Data Files 43
Accessing Rollover Student Data Files 43
Student Data Upload Error Resolutions 44
Adding Students Manually 45
Deleting Students from the Portal 46
Reverse Student Data Upload (SDU) File 47
Retaining Lead-in Zeros 47
Transferring Students within a Tenant 47
Transfer Students Between Tenants 51
Reinstating Students 52
Invalidating Students 54
Editing Student ID Details 55
Additional Actions from Test Info Tab on the Student 56
Add or Remove Multiple Students Associated to a User 57
Step 04. Accessibility & Accommodations (CBT & PBT) 59
Updating a Personal Needs Profile (PNP) 59
PNP Hover Functionality 61
Step 05. Create Groups (CBT & PBT) 62
Creating Student Groups in the Portal 62
Copying Groups 63
Step 06. Technology Set-Up and Configuration (CBT Only) 64
Step 07. Test Session Set-Up (CBT Only) 65
ACT Aspire Test Session Setup Process 65
Assigning User Roles to Test Sessions 70
Adding and Removing Students from Test Sessions 72
Adding Students to Sessions Using Groups Created 73
Step 08: PreCache Content (CBT Only) 75
Step 09. Print Authorization Tickets (CBT Only) 76
Printing Authorization Tickets for Computer-Based Testing 76
Printing Personal Needs Profile (PNP) Information 77
Step 10. Start All Test Sessions (CBT Only) 79
Activating a Test Session in the Portal 79
View and Edit Your Test Sessions 79
Step 11. Administer the Test (CBT Only) 80
Contents

3February 7, 2018 3
Test Session Monitoring Dashboard 80
Portal Dashboard Lights 84
Manually Logging Out of TestNav 85
Resuming an Exited Student 86
Submitting Final Answers 87
Submitting Final Answers – Elapsed Time 87
Enabling Unplanned Extended Time 88
Recording Unplanned Extra Time in the Portal 90
Managing Test Sessions 91
Starting a Test Session 92
Viewing Student Progress 92
Closing a Test Session 92
Close Multiple Test Sessions at Once 93
View Activity History 93
Registered/Returned Status Report 94Register Students from Registered/Returned Status Report Interface 96
Export Registered/Returned Report Data via CSV File 97
Step 12. Post-Test Clean-Up (CBT Only) 98
Room Supervisor Responsibilities at the end of a Test Session 98
Reporting Irregularities 100
Reporting an Irregularity in the Portal 101
Step 06. Test Session Set-Up (PBT Only) 103
Test Session Setup Process 103
Assigning User Roles to Test Sessions 107
Adding and Removing Students from Test Sessions 107
Step 07. Receiving & Organizing Test Materials (PBT Only) 109
Receipt & Security of Test Materials 109Summative Only: Shipment Tracking Functionality is Now Available to Track Paper Material Shipments 109
Answer Document Manual Gridding Instructions 109Mass Assign a Portal ID to Manual Grid Test Session Assignments 110
Step 08. Start All Test Sessions (PBT Only) 111
How to Start a Test Session in the Portal 111
Step 09. Administer the Test (PBT Only) 112
Administering the ACT Aspire Paper-Based Assessments 112
Step 10. Post-Test Clean-Up (PBT Only) 113
Clean-Up & Reporting Irregularities 113
Reporting Irregularities 113
Step 11. Returning Testing Materials (PBT Only) 116
Returning Answer Documents & Test Books 116
Accessing Reports (CBT & PBT) 117
Accessing Summative Reports 117
Accessing Periodic Interim Reports 120
Accessing Periodic Classroom Reports 123
Accessing Tessera Reports 124
Appendix A: Glossary & Acronyms 126
Appendix B: Privacy & Policies 128
Privacy Statement for Customers 128
Website Privacy Policy 129
Appendix C: List of Irregularities 133
Appendix D: User Roles Matrix 135Customer Service Center Contact Information 142
Change Table 143
4February 7, 2018
INTRODUCTION General Information
IntroductionObjective of the Portal User Guide
The Portal User Guide is a one-stop guide for anything related to the Portal. This guide’s purpose is to give a detailed overview of the Portal functionality and then walk through the step-by-step instructions for preparing for, administering, and completing a computer or paper testing administration.
How to Use this Guide
This guide is separated into three major parts:
• Portal system requirements, functionality, and walkthrough.
• Step-by-step instructions for computer-based and paper-based testing administrations.
• Appendices with an acronym list, glossary, and privacy policy information.
Each of the step-by-step instructions will have a color and user role associated with it in the top right hand corner. These colors are different for the six test administration categories they represent:
• Blue: General Information
• Orange: Assessment Preparation
• Green: Assessment Administration
• Aqua: Post-Test Steps
• Purple: Reporting & Data Usage
Each of these steps will also include the following introductions:
• Explains the purpose of the following step and how it fits into the testing administration.
• Some steps have additional documentation you may reference to learn more about the given step.

5February 7, 2018
USER ROLE DESCRIPTIONS General Information
User Role Descriptions See Appendix D the User Role Matrix for full list of User Roles.
Test Coordinator User Role
The Test Coordinator user role is the main ACT Aspire contact at his or her organization. This role requires a broad understanding of how to use the Portal, how to assign organization members to appropriate test administration roles and tasks, and knowledge of the test administration from start to finish. Please see the Test Coordinator details below for a high-level overview of expectations for the Test Coordinator user role.
Who should be a Test Coordinator?
The role of Test Coordinator should be assigned to the person in charge of overseeing assessments for a school or district. This person will act as the primary contact for his or her organization, and will receive any ACT Aspire communications that detail test administration updates.
Room Supervisor User Role
The Room Supervisor is responsible for the secure administration of the assessment in a designated room. This role requires an understanding of testing procedures and instructions to properly administer the assessment in a standard manner. Please see the Room Supervisor details below for a high-level overview of expectations.
Who should be a Room Supervisor?
The role of Room Supervisor should be assigned to a person who can securely administer the ACT Aspire assessment on the test day.
Technology Coordinator User Role
The Technology Coordinator acts as the main technology contact for his or her organization. This role requires a broad understanding of the technology needs for the ACT Aspire assessment. Please see the Technology Coordinator details below for a comprehensive overview of expectations for the Technology Coordinator user role.
Who should be a Technology Coordinator?
The role of Technology Coordinator should be assigned to a person who can provide technology set-up and implementation for a successful ACT Aspire testing administration.

General Information
6February 7, 2018
TENANT ROLE DESCRIPTIONS
Tenant Role DescriptionsSee Appendix D for User Role Matrix.
Tenant: An organization’s (school/district) data container. Any information related to that organization is stored, manipulated, and modified in the tenant.
Administrator: The highest level of organization permissions. Ability to manage users assigned to the various organizations in your tenant. You can invite new members, control their access to the organizations within the tenant, or delete them from the tenant completely.
Administrators have access to the below items in the Portal:
• Student Information: The Administrator user role has access to all student information including the ability to import, add or delete students and edit confidential student data. Complete access to adding, removing or editing student accommodations.
• Groups: Groups can consist of up to 200 students and organized by teacher, grade, subject, or other chosen criteria. Groups are intended to facilitate easier test session setups and to give a greater degree of control when generating dynamic reports in the Portal. The Administrator role has full access to creating, editing, deleting and viewing groups as well as adding or deleting students from groups.
• Test Sessions: Ability to manage all aspects of the test session: creation, copying, editing, printing student login tickets, assigning room supervisors and starting a test.
• Student Transfers & Test Reinstatement: The Administrator role is the only level with the ability to transfer students between schools and approve or reject test reinstatements (allowing students to retest). Please note that the user who requests a transfer or reinstatement cannot also approve that transfer or reinstatement.
• Monitoring Testing: Only the Administrator role has access to Monitoring Dashboard information.
■ Student Test Assignment bar graph allows you to determine how many of your students have been assigned to a paper or online test session, by subject.
■ Test Session Status pie chart provides a visual representation of all of the test sessions in the platform.
■ Student PNP Supports Distribution bar graph displays the count of students that have accommodations.
■ Student Session Status displays the number of students in each status as a pie chart visualization.
• Reporting: Complete access to all reports
■ Current Progress Report - Prior & current year average scale scores, average composite scores, predicted future performance
■ Supplemental Scores Report- National percentile ranks, ELA, progress with test complexity, STEM, & progress toward career readiness
■ Subject Proficiency by Demographic - ACT readiness level distribution by subject & demographic for each grade

General Information
7February 7, 2018
TENANT ROLE DESCRIPTIONS
■ Subject Proficiency by Grade - ACT readiness level distributions by subject & grade
■ Subject Proficiency by Student-Summary of achieved ACT readiness levels by grade & student
■ Skill Proficiency by Subject-Scale & skill score summary by grade & subject
■ Skill Proficiency by Demographic-ACT readiness level distributions by demographic
■ Skill Proficiency by Group-Summary of achieved ACT readiness levels by group
■ Skill Proficiency by District-Scale & skill score summary by grade & subject
■ Skill Proficiency by School-Scale & skill score summary by grade & subject
■ Individual Student Report - combination of Current Progress and Skill Proficiency; available as a one-page or two-page report
■ Subject Proficiency by School Report - (available to Administrator at District Level) - ACT readiness level distributions by grade, subject & school
■ Subject Proficiency by District - (available to Administrator at State Level) - ACT readiness level distributions by grade, subject & district
■ Student Performance File - (available to Administrator at State Level) - complete listing of student scale scores
■ New Class Roster Report: Informs educators about their incoming class’s previous test scores allowing for targeted instruction.
• Access to view individual organization data - Users can invite new members, control their access to the organizations within the tenant, or delete them from the tenant completely.
Test Coordinators have access to the below items in the Portal:
• Student Information - The Test Coordinator role has access to all student information including the ability to import, add, or delete students and edit confidential student data. Complete access to adding, removing, or editing student accommodations.
• Groups - Groups can consist of up to 200 students and organized by teacher, grade, subject, or other chosen criteria. Groups are intended to facilitate easier test session setups and to give a greater degree of control when generating dynamic reports in the Portal. The Test Coordinator role has full access to creating, editing, deleting, and viewing groups as well as adding or deleting students from groups.
• Test Sessions - Ability to manage all aspects of the test session the individual is assigned to: creation, copying, editing, printing student login tickets, assigning room supervisors, and starting a test.
• Student Transfers & Test Reinstatement/Invalidations - Limited access, only allowed to view or cancel student transfer/reinstatement/invalidation requests.

8February 7, 2018
GENERAL PORTAL FUNCTIONALITY General Information
General Portal Functionality
The Portal is the administrative hub for authorized test administration personnel to view and manage vital information for smooth and successful testing. This guide provides an overview of essential Portal tools and features.
System Requirements for Using the Portal
The machine(s) from which you will access the Portal must meet the following requirements:
PC/Windows Mac
Processor 1.6 GHz x86-compatible Intel Core Duo 1.83 GHz
Only Intel-based Macs are supported
RAM 512 MB RAM 1 GB RAM
Web Browser • IE 10 and IE 11
• Firefox (current stable version)
• Chrome (current stable version)
• Safari 4.0, 5.0 & 6.0
• Firefox (current stable
version)
• Chrome (current stable
version)
Minimum Screen Resolution
1024 x 768 1024 x 768
Network Speed High speed internet (DSL, etc.) High speed internet (DSL, etc.)
Setting Filtering, Firewalls, and Proxy Servers to permit access to the Portal and TestNav8To access the Portal, you must set firewalls, proxy servers, or other internet content filters to permit www.actaspire.org. For browser-based Computer-Based Testing, you will also need to allow the Firefox ESR 52 browser to access tn.actaspire.org, the URL for the TestNav testing platform. For both of these URLs, ports 80 and 443 must be opened in firewalls, proxy servers, and content filters.
In addition to the URLs for your test, the following must be open in any firewalls, proxy servers, or other software that is used for internet content filtering:
• *.tn.actaspire.org:80
• *.tn.actaspire.org:443
• *.pearsontestcontent.com
• *.thawte.com
• *.highcharts.com
• google-analytics.com (optional)

General Information
9February 7, 2018
GENERAL PORTAL FUNCTIONALITY
• *jquery.com
• *cloudflare.com
• *.usertrust.com
• *comodoca.com
• *cdn.datatables.net
• s3.amazonws.com
• vjs.zencdn.net
Accessing the Portal
To begin setting up your ACT Aspire test administration:
• Open https://www.actaspire.org/ in your internet browser
• Enter your email address and password in the provided fields
• Click the Sign In button at the upper right of the Welcome screen
• If you are accessing the Portal for the first time, you will be asked to enter your first and last name, create a password, accept ACT Aspire’s Terms and Conditions and Privacy Policy, and verify the on-screen security code.
The Portal Dashboard
The Portal Dashboard is your organization’s Welcome screen for authorized Portal users. It serves as a hub for viewing and accessing information about your ACT Aspire test administration. From the Dashboard you can access:
• A link to the Profile Details screen, where users can view and edit personal information and, for users associated with multiple tenants, switch tenants while remaining logged in to the Portal
• Messages sent by other organization members
• Blue switch organization button and Search Organization functions for users associated with multiple organizations
• The Dashboard Menu Ribbon, which provides comprehensive access to the Portal’s test administration tools:
• A list of recently active test sessions and their administrative status, as well as quick links for viewing all of an organization’s tests, and for creating new test sessions
Managing Your Portal Password
If you would like to change your password to the Portal, please follow the steps below:
• From the Profile Icon drop down menu click “Change Password”.

10February 7, 2018
GENERAL PORTAL FUNCTIONALITY General Information
• Complete the Change Password form by entering your current password and your desired new password, and confirming your new password.
• Click Submit.
If you have forgotten your password, follow these steps:
• Open the ACT Aspire Sign In page.
• Click the “Forgot Your Password?” link below the sign in fields.
• On the Forgot Password screen, enter your email address in the provided field, and click “Submit”.
• ACT Aspire will email a password reset link to the address provided; click the link to proceed. (Please check spam folders for reset links if they do not immediately appear in your inbox.)

11February 7, 2018
PREFERENCE SETTINGS IN THE USER PROFILE General Information
Preference Settings in the User Profile
Users can change settings in the Portal to match usability preferences for the following areas:
• Test Type (Summative, Interim, Classroom, or Tessera)• Request Queue (Transfers, Reinstatements, Invalidations, and Tenant to Tenant Transfers)
• Request History (Transfers, Reinstatements, Invalidations, and Tenant to Tenant Transfers)
To change these user preference settings please follow these steps:
1. Click on the user icon in the top right of the Portal.
2. Select your name from the dropdown menu.
3. On the Profile Details page, scroll down to the “User Preferences” section.
4. You may change any of the three preference types by clicking the blue switch link and selecting the preferred option from the dropdown menu:
Viewing Messages and Notifications
To view messages sent to you by other organization members, click the envelope icon in the upper-right corner of the Portal screen. New messages will be indicated by a red box affixed to the envelope icon.
Creating MessagesThe Portal includes messaging functionality which can be used to communicate to members across your organization. (Only users with “Administrator” permissions may access this messaging functionality.)
1. Hover over “Organizations” on the Portal dashboard ribbon and select “Message Management” from the dropdown menu.
2. You will be taken to the “System Messages History” page which contains a list of your organization’s messaging history.• Status: A message can be in either an “Active” (currently displayed in the Portal to other
members), “Draft” (currently unpublished, but partially written), “Expired” (the message’s end date has passed), or “Scheduled” (the message’s start date is upcoming) status.
• Edit and delete icons: These icons can be used to edit or delete the messages listed in the table.
3. Click “Create a System Message” to begin the message creation process. You will then be taken to the Create a System Message screen. There are several fields and dropdowns that can be selected when creating a system message:

12February 7, 2018
GENERAL PORTAL FUNCTIONALITY General Information
• Preview: Select this button to preview your message in its current state.• Save as Draft: Select this button to save your message in a draft status. Messages saved as a
draft are not visible to users in the portal, and can be edited and published at a later date.• Organizations: The Organizations dropdown menu will display your organization’s
hierarchy with checkboxes next to each district and school. Select the district(s)/school(s) for which you would like the message to be visible to. ■ Please note: Selecting a district in the dropdown menu will not select the schools nested
under that district.
• User Roles: This dropdown displays a list of user roles. Select which user roles you would like the message to be visible to.
• Subject: Enter the message’s subject.• Message: Enter the content of your message into the “Message” field. Users may add
different headings to the message’s content; bold, Italic, or underlined text; formatting options such as bulleting, numbering, and indentation; and hyperlinks.
• Start Date: The date that the message will begin to appear in the Portal. Messages with a start date in the future will appear in the Portal on that date.
• End Date: The date that the message will no longer appear in the Portal.4. After completing the required fields, select “Publish” to publish the message. Your message will
then appear on the “System Messages History” page.5. Your messages (when published) will appear on the Portal Dashboard page’s “Messages” box,
and under the “Messages” screen after clicking on the envelope symbol on the menu ribbon.

General Information
13February 7, 2018
GENERAL PORTAL FUNCTIONALITY
Locating Help Resources for Using the Portal
The Help function in the Portal allows users to access several important resources directly in the Portal:
1. In the Portal, hover over “Help” on the dashboard menu ribbon.2. A dropdown menu will appear:
3. You may select any of the four links available from the dropdown menu to be taken directly to the available resource:• Avocet Resources: Repository of ACT Aspire and ACT Tessera documentation and resources.• Training Videos: A hub for viewing training videos about ACT Aspire Summative and
Periodic testing and ACT Tessera.• Landing Page: Includes resources and links that will help you learn about, prepare for, and
deliver the ACT Aspire and ACT Tessera assessments.• Discover ACT Aspire: Describes ACT Aspire product details, news, and ordering
information.
Chat FunctionalityUsers may use an instant messaging service to chat with ACT Aspire agents after logging into the Portal. Please follow the steps below to access chat:
1. Login to the Portal. (Please note: Users must have Portal access to chat with agents.)2. Click the chat icon in the upper right:
3. A window will appear with a set of fields. Please complete the listed fields and click “Submit”. An agent will respond to your message shortly after submitting:

14February 7, 2018
GENERAL PORTAL FUNCTIONALITY General Information
Please note: The instant messaging chat service follows the same customer service hours that the call center follows. (Monday through Friday, 6:00am to 7:30pm CST.)
Adding Organizations to the Portal
Administrative entities participating in ACT Aspire Testing are known in the Portal as Organizations. An Organization is a hierarchical structure headed by either a State- or District-level organization, and one or more sub-organizations. Organizations with a State-level parent organization will contain at least two district-level sub-organizations. Districts, whether they are the parent organization or a sub-organization within a State tenant, can contain one or more school sub-organizations. An organization with a State-level parent might look like this:
• Stateo District 1
■ School 1A ■ School 1B
o District 2 ■ School 2A
o District 3 ■ School 3A ■ School 3B
15February 7, 2018
GENERAL PORTAL FUNCTIONALITY General Information
■ School 3CAn organization with a District-level parent might look like this:
• Districto School Ao School B
Please note that schools that are not associated with a state, school district, or other parent organization (such as a private school) will still be structured on the District/School model in the Portal:
• Districto School
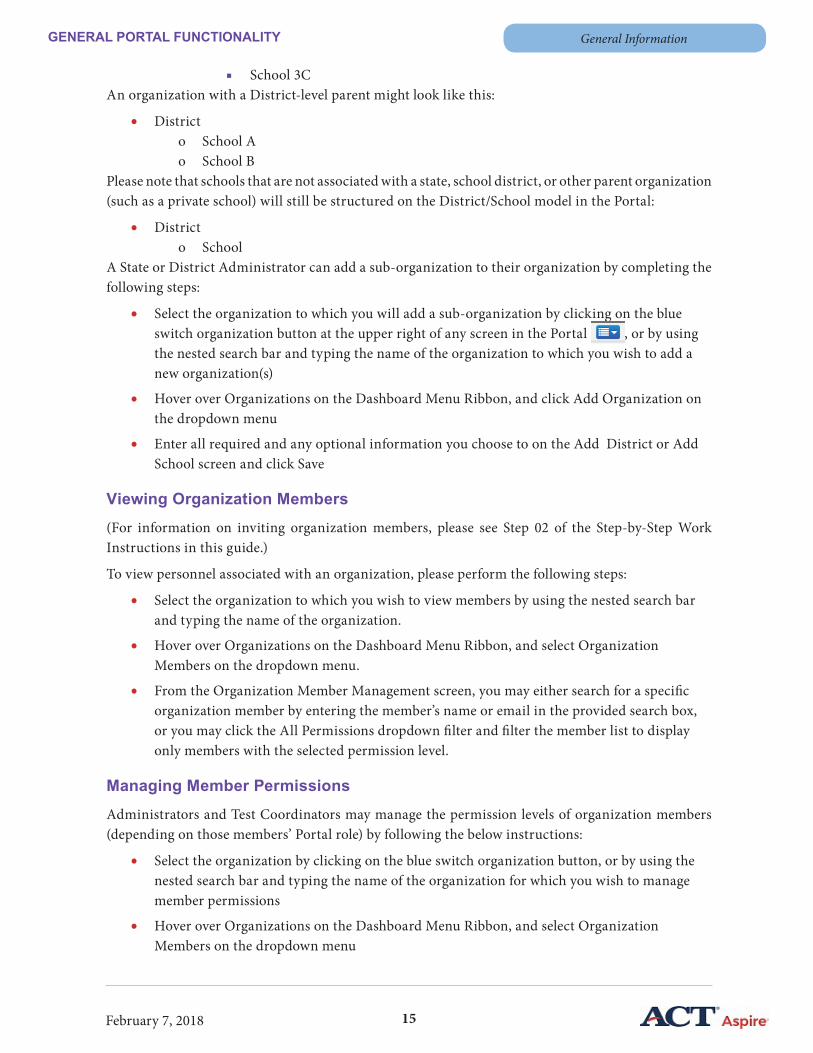
A State or District Administrator can add a sub-organization to their organization by completing the following steps:
• Select the organization to which you will add a sub-organization by clicking on the blue switch organization button at the upper right of any screen in the Portal , or by using the nested search bar and typing the name of the organization to which you wish to add a new organization(s)
• Hover over Organizations on the Dashboard Menu Ribbon, and click Add Organization on the dropdown menu
• Enter all required and any optional information you choose to on the Add District or Add School screen and click Save
Viewing Organization Members
(For information on inviting organization members, please see Step 02 of the Step-by-Step Work Instructions in this guide.)
To view personnel associated with an organization, please perform the following steps:
• Select the organization to which you wish to view members by using the nested search bar and typing the name of the organization.
• Hover over Organizations on the Dashboard Menu Ribbon, and select Organization Members on the dropdown menu.
• From the Organization Member Management screen, you may either search for a specific organization member by entering the member’s name or email in the provided search box, or you may click the All Permissions dropdown filter and filter the member list to display only members with the selected permission level.
Managing Member Permissions
Administrators and Test Coordinators may manage the permission levels of organization members (depending on those members’ Portal role) by following the below instructions:
• Select the organization by clicking on the blue switch organization button, or by using the nested search bar and typing the name of the organization for which you wish to manage member permissions
• Hover over Organizations on the Dashboard Menu Ribbon, and select Organization Members on the dropdown menu
16February 7, 2018
GENERAL PORTAL FUNCTIONALITY General Information
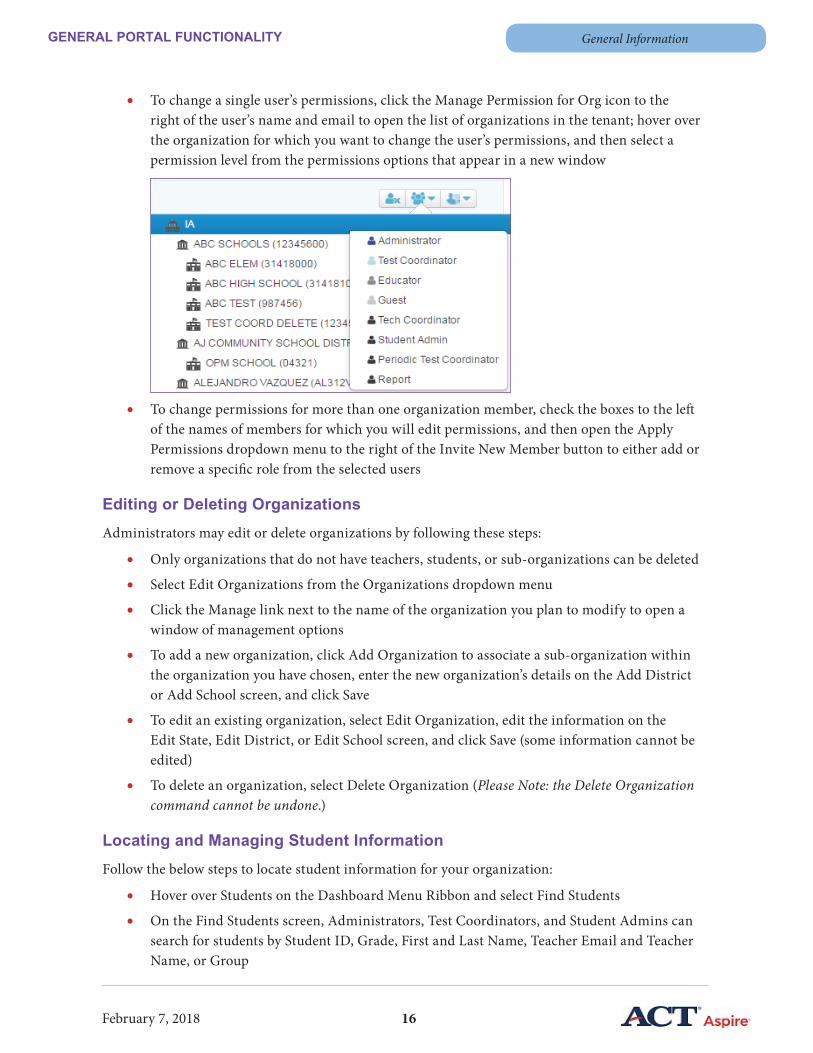
• To change a single user’s permissions, click the Manage Permission for Org icon to the right of the user’s name and email to open the list of organizations in the tenant; hover over the organization for which you want to change the user’s permissions, and then select a permission level from the permissions options that appear in a new window
• To change permissions for more than one organization member, check the boxes to the left of the names of members for which you will edit permissions, and then open the Apply Permissions dropdown menu to the right of the Invite New Member button to either add or remove a specific role from the selected users
Editing or Deleting Organizations
Administrators may edit or delete organizations by following these steps:
• Only organizations that do not have teachers, students, or sub-organizations can be deleted
• Select Edit Organizations from the Organizations dropdown menu
• Click the Manage link next to the name of the organization you plan to modify to open a window of management options
• To add a new organization, click Add Organization to associate a sub-organization within the organization you have chosen, enter the new organization’s details on the Add District or Add School screen, and click Save
• To edit an existing organization, select Edit Organization, edit the information on the Edit State, Edit District, or Edit School screen, and click Save (some information cannot be edited)
• To delete an organization, select Delete Organization (Please Note: the Delete Organization command cannot be undone.)
Locating and Managing Student Information
Follow the below steps to locate student information for your organization:
• Hover over Students on the Dashboard Menu Ribbon and select Find Students
• On the Find Students screen, Administrators, Test Coordinators, and Student Admins can search for students by Student ID, Grade, First and Last Name, Teacher Email and Teacher Name, or Group

17February 7, 2018
GENERAL PORTAL FUNCTIONALITY General Information
• Click the blue Search button after entering search parameters
• Clicking a student’s ID number on the “Students Found” page will take you to their individual student profile
To edit information in different categories, please follow the appropriate steps below:
• To manage an individual student’s information, locate the student by conducting a search on the Find Students screen and then clicking the desired student’s ID Number from the student list produced by the search. The Student Profile screen provides a student’s Test Info, Personal Needs, Demographics, Groups, Teachers, Grades, and Testing Accountability information.
• To edit a student’s Basic Information, click the blue Edit button to the upper right of the Student Profile screen, and modify the information you wish to update. Click Save to finalize your changes. (Local IDs and State Student IDs may be changed; Student IDs and Schools cannot be modified on this screen.)
• To view a list of Test Sessions in which a student is enrolled, click the Test Info tab below the student’s basic information. This will open a list all test sessions in which a student has or will participate in, along with Test Name, Additional Information, Tested Grade, Subject, Academic Year, Student Test Session Status, and Scale Score. You may navigate to a specific test session by clicking on the test name.
• To edit a student’s Personal Needs Profile or Demographics, select the appropriate tab below the student’s basic information, click the blue Edit button, modify information as is necessary, and click Save. Please note: Most accessibilities affect test forms and can only be edited prior to adding a student to a test session.
• To edit Groups or Teachers, select the desired tab below the student’s basic information, and locate the group or teacher to which the student will be associated by clicking inside the provided Add to Group/Teacher box, which will open a list from which to choose a group or teacher.
• To edit a student’s testing grade for a specific subject, select the Grades tab below the student’s basic information and click the blue Edit button. This will reveal a dropdown menu for each ACT Aspire test subject, from which you can select the student’s testing grade level.
• To edit a student’s Testing Accountability, select the desired tab below the student’s basic information. Select a Will Not Test reason for the desired subjects.
Deleting Multiple Students from an Organization
To delete students from an organization, please follow the steps below:
1. After using the Find Students screen’s search function to generate a list of students, select the boxes to the left of the Student IDs for those students you wish to delete from the organization
2. Click the Action button to open the Delete option
3. By clicking Delete, a window then asks “Are you sure you want to delete the student(s)?” will appear. Please note that clicking OK finalizes the deletion of students from the Portal. Students who have taken tests or having a pending transfer request cannot be deleted.

18February 7, 2018
GENERAL PORTAL FUNCTIONALITY General Information
Student Extracts Summary Page
Student extracts are consolidated on one page. Follow these steps to access the Student Extracts page:
1. In the Portal, hover over “Students” on the dashboard menu ribbon.2. Select “Student Extracts” from the dropdown menu.3. You will be taken to the Student Extracts page. Users may generate a new extract at the
organization level they are currently pinned to (either State (if applicable), District, or School). Users may also view previous extracts at any available organization tab. Select the extract name for the extract you would like to view or generate:
4. The following student extracts are available:• Student Profiles: Includes all students in the selected organization(s) and identifies all
student profile data, including groups, teachers and PNP supports.• Reverse Personal Needs Profiles (PNP): Includes all students in the selected organization(s)
and identifies the PNP supports for each student. Can be modified and used to update existing student PNP supports.
• Reverse Student Data Upload (SDU): Includes all students in the selected organizations(s). Can be modified and used to update existing student profiles.
• Testing Accountability: Includes students in the selected organization(s) who are assigned a ‘Will Not Test’ reason code in one or more subjects.
• Invalidations: Includes students in the selected organization(s) who have pending or

19February 7, 2018
GENERAL PORTAL FUNCTIONALITY General Information
completed invalidation requests.• Reinstates: Includes students in the selected organization(s) who have pending or
completed reinstatement requests.• Transfers: Includes students in the selected organization(s) who have pending or completed
transfer requests.• Summative Comments: Includes students in the selected organization(s) who have
comments in summative test sessions.• Interim Comments: Includes students in the selected organization(s) who have comments
in interim test sessions.• Classroom Comments: Includes students in the selected organization(s) who have
comments in classroom test sessions.• Students with Longitudinal Data: Includes all students in the selected organization(s) with
longitudinal data and allows a comparison between the students’ profile data and the linked longitudinal data.
• Students with no Longitudinal Data: Includes all students in the selected organization(s) that have no longitudinal data.
• Longitudinal Data Not Linked to a Student: (State-level only) Includes all longitudinal data in the tenant that is not matched to a student.
5. Click the blue “Generate Extract” icon to begin the extract. You may click the refresh icon in the “Action” column to refresh the status of the download.
6. Once the extract is completed a download link will display in the “Action” column. Click this icon to download and view the extract.
Managing Test Session Administration in the Portal
Authorized test session users can monitor running test sessions from the Test Session Details screen by viewing the Status and Answered/Total fields next to the names of students in the test session. Consult the following chart for explanations of student test session statuses.
Category on Dashboard Screen
Test Session Status from the Test Session Details Screen Student Statuses and Definitions
Not Started• Scheduled
• Ready
• Scheduled:
o (CBT) The session has not been started and the student cannot log into TestNav.
o (PBT) The student has not yet been processed for personalized answer documents.
• Ready: Current date is within the test session date window. Test session has not been started.

20February 7, 2018
GENERAL PORTAL FUNCTIONALITY General Information
In Progress • In Progress
• Ready:
o (CBT) The session has been started and the student can now log into TestNav.
o (PBT) The student’s pre-ID has been processed and the student will receive personalized documents.
• Active (CBT): Student has logged in to TestNav
• Exited (CBT): Student has exited TestNav
• Resumed (CBT): Test has been resumed and the student can log in to TestNav
• Submitted (CBT): Student has finished and submitted the test. The student cannot log back in to the test after submitting.
• Force Closed (CBT): The test has been closed for the student, and their answers have been submitted 0. The student cannot log back in to the test after submitting.
• Did Not Test (CBT): Student registration record is no longer recognized by TestNav 8. The student is no longer able to test using those credentials.
Completed • Closed
• Test sessions can be closed if the students are in any status.
• Closing the test session will produce a confirmation warning. By selecting “yes”, any student not yet submitted will be put into Force Close status.

General Information
21February 7, 2018
ADDITIONAL ORDER PROCESS
Additional Order Process
If test sessions were not created by the Spring 2018 Summative Paper-Based Testing Schedule deadline, an additional order will need to be placed. Note: You may need to order additional shipping and color labels in order to return your additional materials.
1. Click on the Cart icon on the dashboard or hover over the Organizations heading on the menu ribbon and Click on Manage Additional Orders.

22February 7, 2018
Test Coordinator - Assessment PreparationADDITIONAL ORDER PROCESS
2. Click on the Create New Order button.
3. The Materials Order-Add Item screen will appear. Select the item you want to order along with the grade, subject, and quantity. Then click Add to Cart button.
4. After an item is added to the cart you will be taken back to the same screen as above to enter in another item if needed. Keep adding items until your order is complete. Note: Test books and Answer Documents are separate items and need to be ordered individually.

23February 7, 2018
Test Coordinator - Assessment PreparationADDITIONAL ORDER PROCESS
5. Once all items have been entered. Click on View Cart button.
6. The Additional Materials Order-View Cart screen will appear. Each item entered will be listed. You have the option to edit the quantity or remove the item. If your order is complete click on Continue to Checkout button. (Note: If you need to add more items click on the Add More Items button.) .
24February 7, 2018
Test Coordinator - Assessment PreparationADDITIONAL ORDER PROCESSADDITIONAL ORDER PROCESS
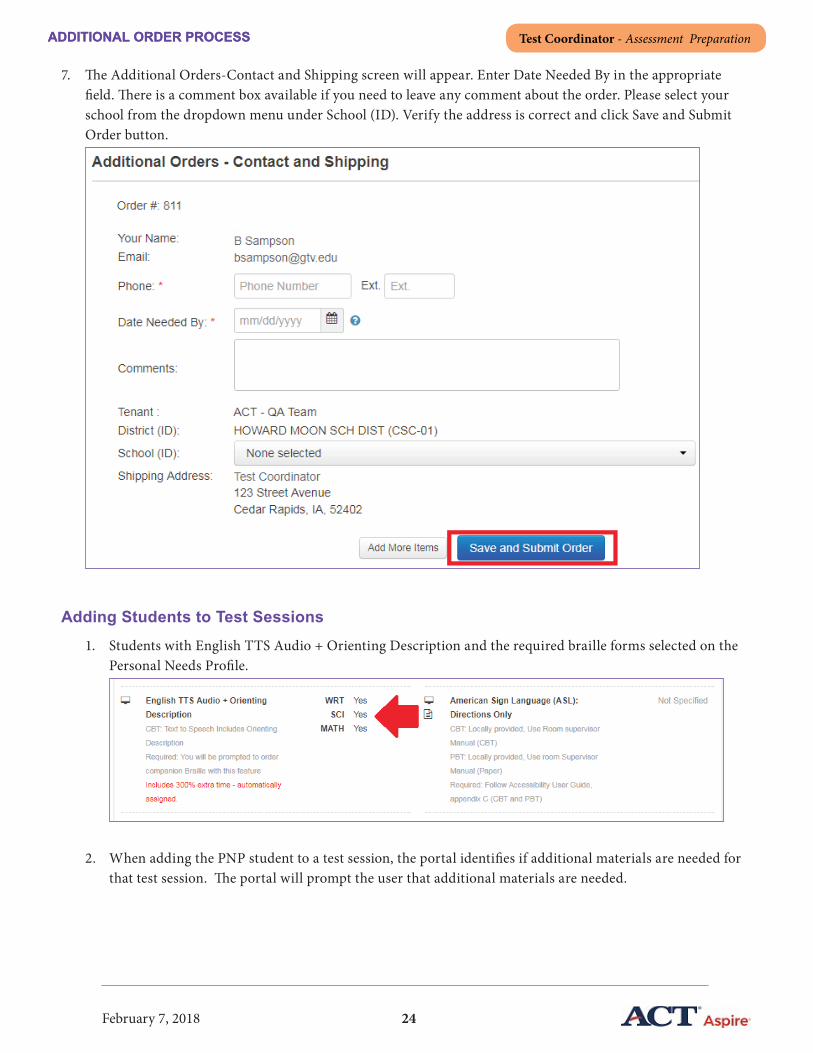
7. The Additional Orders-Contact and Shipping screen will appear. Enter Date Needed By in the appropriate field. There is a comment box available if you need to leave any comment about the order. Please select your school from the dropdown menu under School (ID). Verify the address is correct and click Save and Submit Order button.
Adding Students to Test Sessions
1. Students with English TTS Audio + Orienting Description and the required braille forms selected on the Personal Needs Profile.
2. When adding the PNP student to a test session, the portal identifies if additional materials are needed for that test session. The portal will prompt the user that additional materials are needed.

25February 7, 2018
ADDITIONAL ORDER PROCESS General Information
3. The pop up window shows all additional materials information and options for the PNP, based on the test type (and grade/subject of test session).
4. You must enter a value in at least one box on the pop up. If no materials are needed, enter 0.
5. Users may populate multiple boxes if needed.
6. Selecting the ‘Cancel’ button closes the popup window and user remains on the ‘Add Students’ page. After cancelling, students can be removed from the test session, if desired.
26February 7, 2018
Test Coordinator - Assessment PreparationADDITIONAL ORDER PROCESS
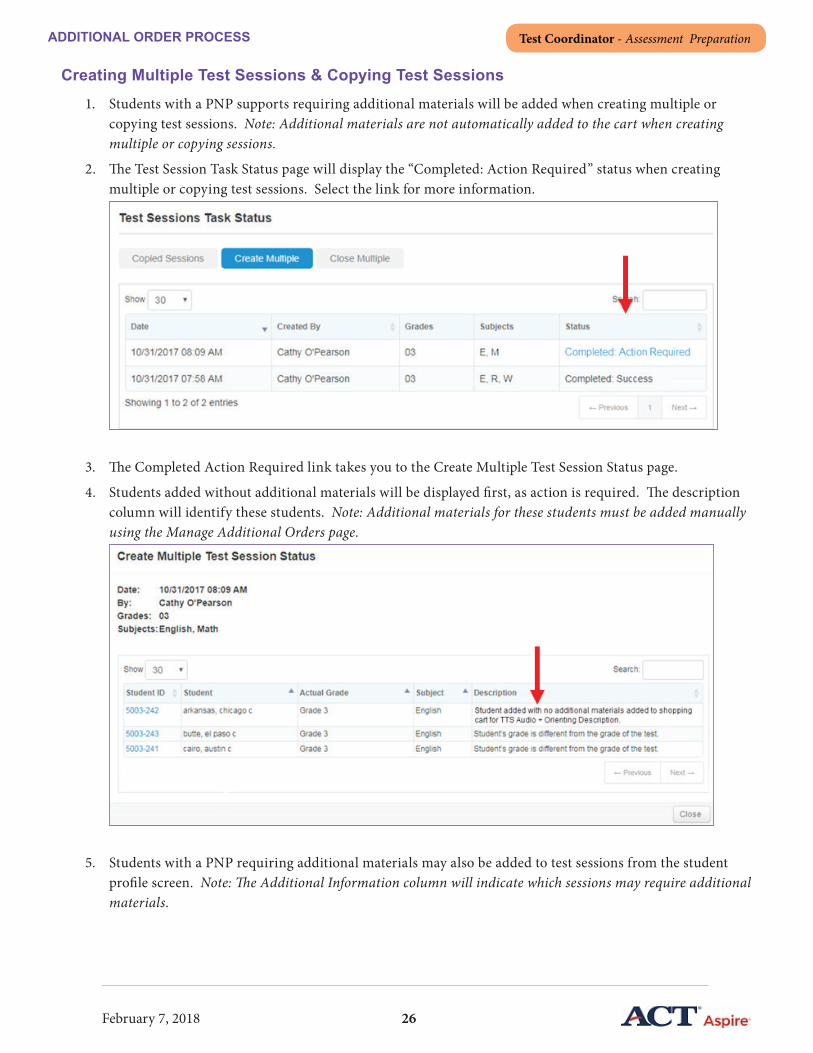
Creating Multiple Test Sessions & Copying Test Sessions
1. Students with a PNP supports requiring additional materials will be added when creating multiple or copying test sessions. Note: Additional materials are not automatically added to the cart when creating multiple or copying sessions.
2. The Test Session Task Status page will display the “Completed: Action Required” status when creating multiple or copying test sessions. Select the link for more information.
3. The Completed Action Required link takes you to the Create Multiple Test Session Status page.
4. Students added without additional materials will be displayed first, as action is required. The description column will identify these students. Note: Additional materials for these students must be added manually using the Manage Additional Orders page.
5. Students with a PNP requiring additional materials may also be added to test sessions from the student profile screen. Note: The Additional Information column will indicate which sessions may require additional materials.

27February 7, 2018
Test Coordinator - Assessment PreparationADDITIONAL ORDER PROCESS
6. A warning on the ‘Add Student to Existing Test Sessions’ status identifies that no materials were added to the shopping cart. Note: Additional materials for these students must be added manually using the Manage Additional Orders page.

28February 7, 2018
Test Coordinator - Assessment PreparationSTEP-BY-STEP WORK INSTRUCTIONS
Step-by-Step Work Instructions
The objective of the following chapters is to provide work instructions in a step-by-step format that will lead users through the ACT Aspire Computer- and Paper-Based Testing administrations.
Please note: The first five steps of the step-by-step work instructions are the same for both computer- and paper-based testing. After these first five steps, the following seven steps will be for computer-based testers. If you are using paper-based tests or have paper-based accommodations for some students please continue to page 103 to follow the remaining paper-based testing steps.
29February 7, 2018
Test Coordinator - Assessment PreparationTEST ADMINISTRATION PROCESS FLOWCHARTS
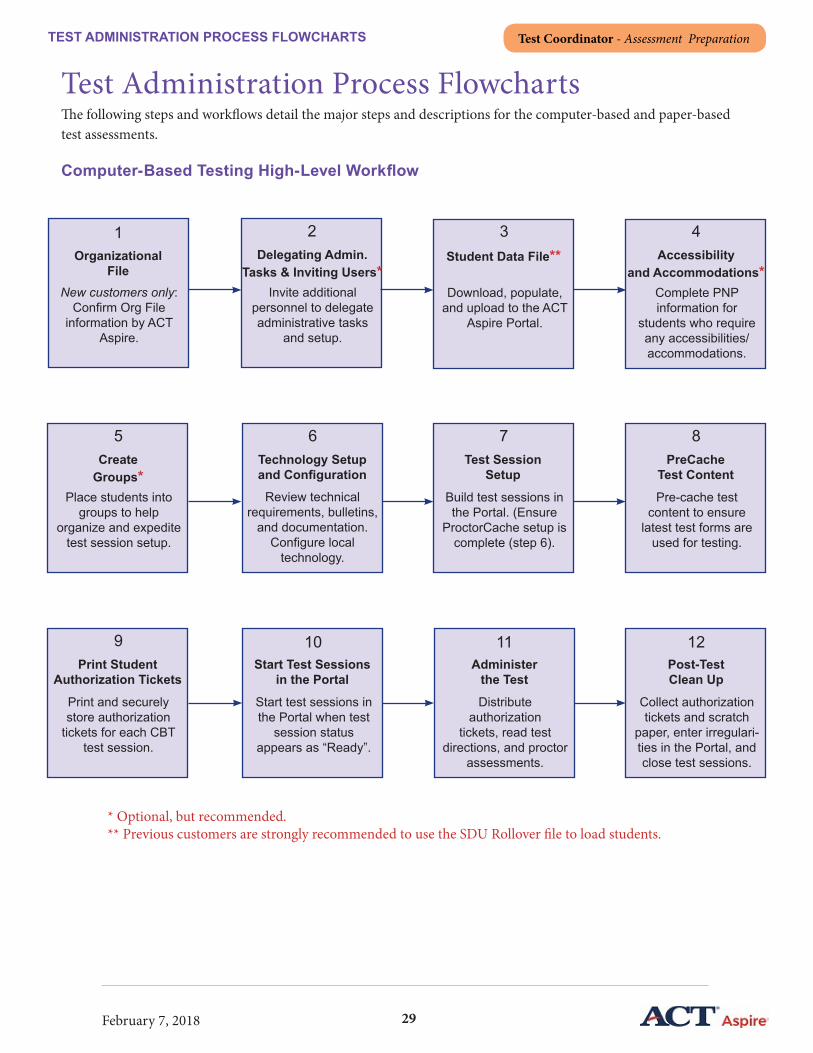
Test Administration Process FlowchartsThe following steps and workflows detail the major steps and descriptions for the computer-based and paper-based test assessments.
Computer-Based Testing High-Level Workflow
Organizational File
1
New customers only: Confirm Org File
information by ACT Aspire.
Delegating Admin. Tasks & Inviting Users*
2
Invite additional personnel to delegate administrative tasks
and setup.
Student Data File**3
Download, populate, and upload to the ACT
Aspire Portal.
Accessibilityand Accommodations*
4
Complete PNP information for
students who require any accessibilities/accommodations.
Create Groups*
5
Place students into groups to help
organize and expedite test session setup.
Technology Setupand Configuration
6
Review technical requirements, bulletins,
and documentation. Configure local
technology.
Test SessionSetup
7
Build test sessions in the Portal. (Ensure
ProctorCache setup is complete (step 6).
PreCacheTest Content
8
Pre-cache test content to ensure
latest test forms are used for testing.
Print StudentAuthorization Tickets
9
Print and securely store authorization
tickets for each CBT test session.
Start Test Sessionsin the Portal
10
Start test sessions in the Portal when test
session status appears as “Ready”.
Administerthe Test
11
Distribute authorization
tickets, read test directions, and proctor
assessments.
Post-TestClean Up
12
Collect authorization tickets and scratch
paper, enter irregulari-ties in the Portal, and close test sessions.
* Optional, but recommended. ** Previous customers are strongly recommended to use the SDU Rollover file to load students.
30February 7, 2018
Assessment PreparationTEST ADMINISTRATION PROCESS FLOWCHARTS
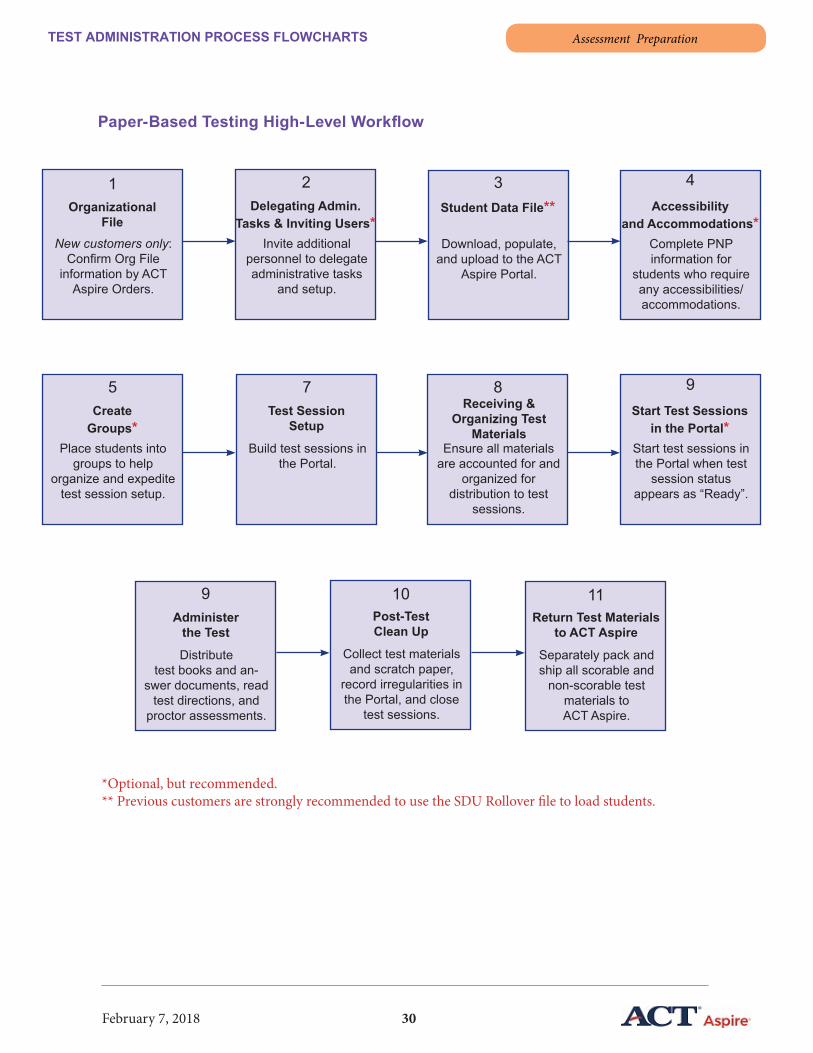
Paper-Based Testing High-Level Workflow
Organizational File
1
New customers only: Confirm Org File
information by ACT Aspire Orders.
Delegating Admin. Tasks & Inviting Users*
2
Invite additional personnel to delegate administrative tasks
and setup.
Student Data File**3
Download, populate, and upload to the ACT
Aspire Portal.
Accessibilityand Accommodations*
4
Complete PNP information for
students who require any accessibilities/accommodations.
Create Groups*
5
Place students into groups to help
organize and expedite test session setup.
Test SessionSetup
7
Build test sessions in the Portal.
Receiving & Organizing Test
Materials
8
Ensure all materials are accounted for and
organized for distribution to test
sessions.
Start Test Sessionsin the Portal*
9
Start test sessions in the Portal when test
session status appears as “Ready”.
Administerthe Test
9
Distribute test books and an-
swer documents, read test directions, and
proctor assessments.
Post-TestClean Up
10
Collect test materials and scratch paper,
record irregularities in the Portal, and close
test sessions.
Return Test Materialsto ACT Aspire
11
Separately pack and ship all scorable and
non-scorable test materials to ACT Aspire.
*Optional, but recommended. ** Previous customers are strongly recommended to use the SDU Rollover file to load students.
31February 7, 2018
STEP 01. ORGANIZATIONAL FILE (CBT & PBT) Assessment Preparation
Step 01. Organizational File (CBT & PBT)New Customers: Organizational File
After placing an order, the ACT Aspire team will contact you and gather information to upload an organizational file so you may access the Portal.
After ACT Aspire has confirmed the file, an invitation to the Portal will be sent to individuals listed in the file.
Please note: If you have already submitted an organizational file for a previous administration or currently have access to the Portal, you do not need to resubmit a new organizational file.
Selecting and Switching Organizations in the Portal
The Portal blue switch organization button and Search Organization functionality allows authorized users to easily access organizations with which they are associated. Smooth navigation between organizations is especially important for streamlining data management for large organizations with many associated users. Depending on your user role in the Portal, you might be affiliated with multiple Organizations.
To perform some of the tasks in the Portal, you will need to work either at the district level or choose a specific school, even if your district is comprised only of one school. Knowing how to navigate from one organization to another is a crucial first step in successfully updating student data, creating test sessions, accessing score reports, and executing other Portal tasks.
The first time you log in to the Portal, you will automatically arrive at the organization appropriate to your designated user role. If you have access to multiple organizations, you may switch between them from within the Portal.
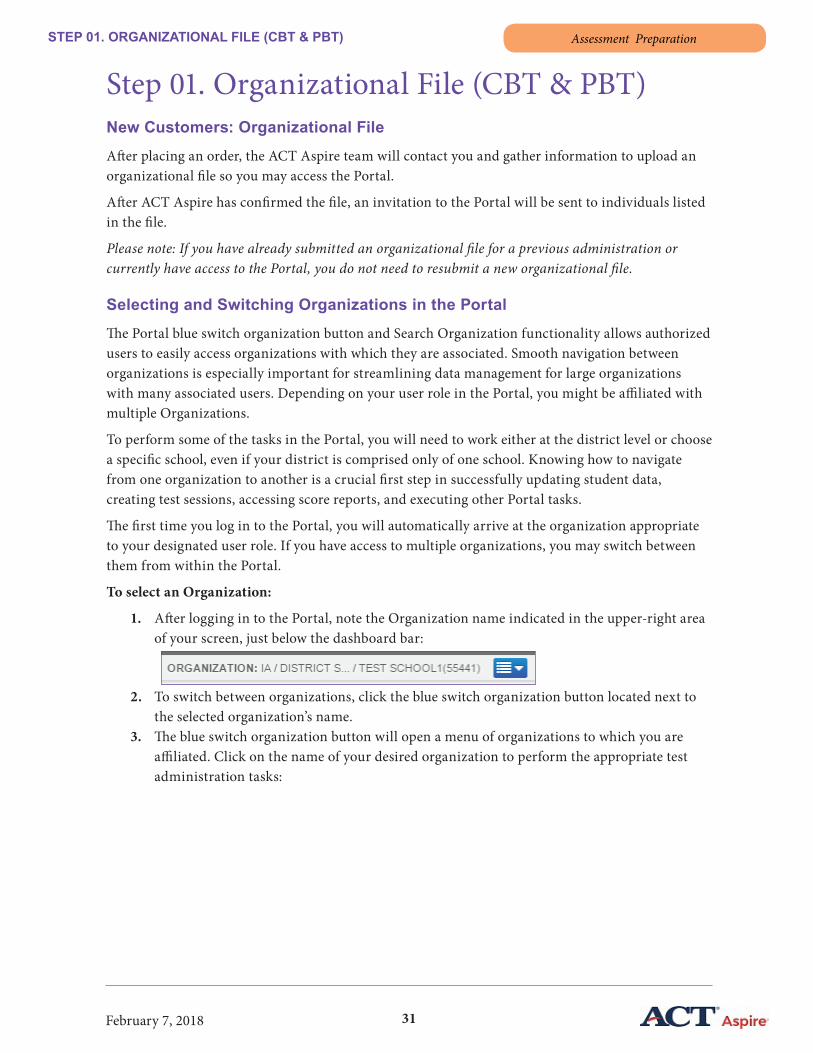
To select an Organization:
1. After logging in to the Portal, note the Organization name indicated in the upper-right area of your screen, just below the dashboard bar:
2. To switch between organizations, click the blue switch organization button located next to the selected organization’s name.
3. The blue switch organization button will open a menu of organizations to which you are affiliated. Click on the name of your desired organization to perform the appropriate test administration tasks:
32February 7, 2018
STEP 01. ORGANIZATIONAL FILE (CBT & PBT) Assessment Preparation
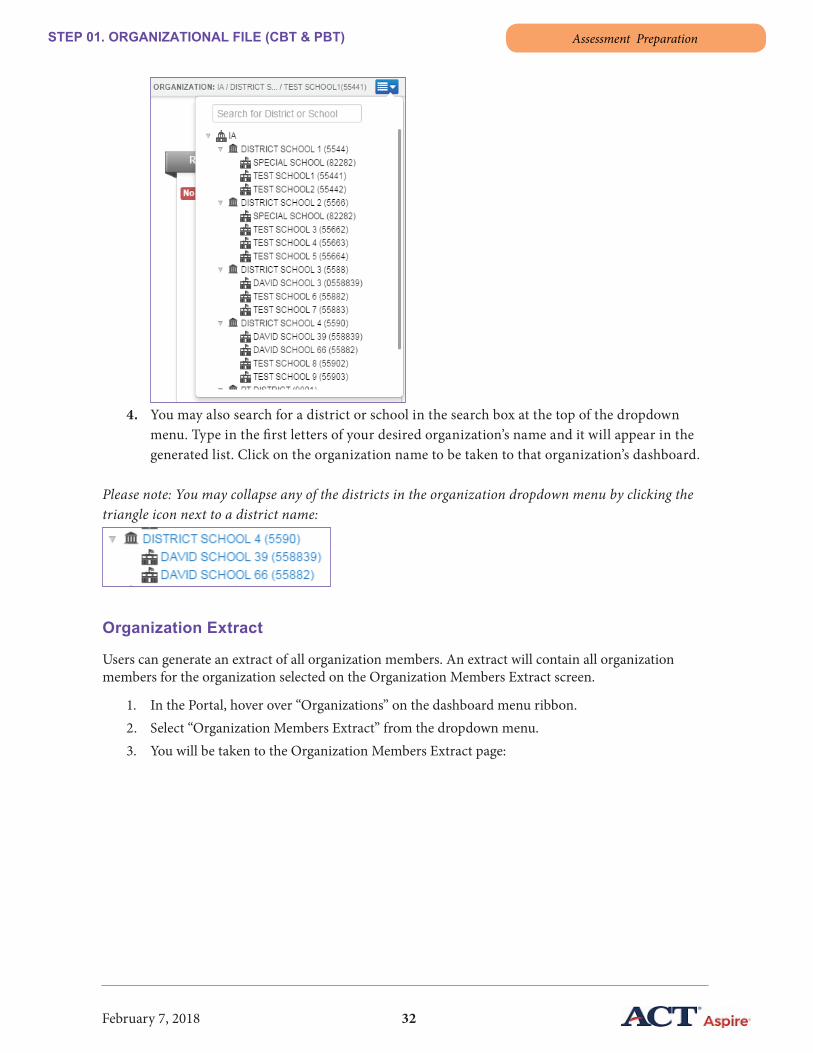
4. You may also search for a district or school in the search box at the top of the dropdown menu. Type in the first letters of your desired organization’s name and it will appear in the generated list. Click on the organization name to be taken to that organization’s dashboard.
Please note: You may collapse any of the districts in the organization dropdown menu by clicking the triangle icon next to a district name:
Organization Extract
Users can generate an extract of all organization members. An extract will contain all organization members for the organization selected on the Organization Members Extract screen.
1. In the Portal, hover over “Organizations” on the dashboard menu ribbon.2. Select “Organization Members Extract” from the dropdown menu.3. You will be taken to the Organization Members Extract page:

33February 7, 2018
STEP 01. ORGANIZATIONAL FILE (CBT & PBT) Assessment Preparation
4. Users may generate a new extract at the organization level they are currently pinned to (either State (if applicable), District, or School). User generated extracts will remain available until the next portal rollover.
5. Click the blue “Generate Extract” icon to begin the extract. You may click the refresh icon in the “Action” column to refresh the status of the download.
6. Once the extract is completed a download link will display in the “Action” column. Click this icon to download and view the extract.
Please note: At this time there is no functionality to import a file to update an organization’s information.

34February 7, 2018
STEP 02. DELEGATING TASKS & INVITING USERS (CBT & PBT) Assessment Preparation
Step 02. Delegating Tasks & Inviting Users (CBT & PBT)The Invite New Member capability gives Organization Administrators and Test Coordinators the ability to invite and manage roles for educators and staff personnel who they have selected to participate in their ACT Aspire Test Administration.
To invite new members to the Portal, please follow the steps listed below:
1. Select the organization (state, district, or school) to which you wish to add Portal users by clicking the blue switch organization button near the top-right of the screen.
Please note: The organization level you select determines what organizations the users you add will be able to access. If you invite a user while working at the district level of an organization, the new user will be able to access all schools within the district, whereas a member added at the school level will only be able to access that school.
2. Once you have chosen the desired organization, select Organization Members from the Organizations dropdown menu.
3. Click the blue Invite New Member button on the Organization Member Management screen.
4. Enter a list of email addresses for the invitees and select the appropriate role for the list of users.
5. Click Submit to send invitation emails. If multiple addresses were entered, you will be able to select which users are assigned which permissions after clicking Submit.
Please note: The Portal is a secure system. The Portal invitation will become inactive after 7 days and if an invitation link is opened and a user navigates away from the registration process before completion.
Tenant Roles and Test Session Roles
Access to certain areas and functionality of the Portal is determined by a user’s assigned role. Use the information below to determine what permissions are associated with which user roles. Please see Appendix D for a complete list of user roles.
There are 2 sets of roles in the Portal: Tenant Roles and Test Session Roles.
Tenant roles determine what a user can do within the organization:
• Uploading Org and SDU data
• View Members
• Manage User permissions
• Invite/delete users
• Associate users to organization
• Publish messages to the entire tenant/state
• Create test sessions
• View reports

35February 7, 2018
STEP 02. DELEGATING TASKS & INVITING USERS (CBT & PBT) Assessment Preparation
Test Session roles determine what a user can do within a Test Session:
• Add/remove users
• Add/Edit Test Session roles for users
• Add/remove students
• Change test session dates or times
• Change test session title
• Print student authorizations
• Proctor the test session
• Close a test session
Tenant Roles are:
1. Administrator
2. Test Coordinator
3. Periodic Test Coordinator
4. Tech Coordinator
5. Student Admin
6. Report
7. Educator
8. Guest
Test Session Roles are:
1. Test Supervisor
2. Room Supervisor
3. Guest
Tenant roles and Test Session roles are separate and not related. (E.g., a user with a Tenant Role of Test Coordinator could have the user role of a Guest for a specific test session.)
Users may have different roles for each test session. (E.g. a user can be a Room Supervisor in Test Session 1, but a Test Supervisor in Test Session 2.)
Accepting Invitations to the Portal
The Portal Invitation is intended to expedite setup of your ACT Aspire test administration while also maintaining data security.
Administrators and Test Coordinators listed on the Organizational File will receive invitations once the file is uploaded to the Portal. Once they accept their initial invitations, Administrators and Test Coordinators can send secure invitations to other organization members. When you receive your Portal invitation, please follow these steps to accept the invitation and access your account.

36February 7, 2018
STEP 02. DELEGATING TASKS & INVITING USERS (CBT & PBT) Assessment Preparation
1. Upon Organizational File upload or an Administrator/Test Coordinator-initiated invitation, an invitation email from [email protected] will arrive in the appropriate email inbox:
2. Open the email and click the registration link.
3. The registration link will take you to the User Profile details page. Please enter your information in the provided fields and click “Join Now.” (Note that the “Grades” and “Subjects” fields are optional.)
4. The second step asks you to verify an on-screen security code and to review and accept ACT Aspire’s Terms and Conditions.
5. After you have completed these requirements, click “Join Now” to access your Portal homepage.
Switching Tenants in the Portal
The Switch Tenants functionality enables Portal users who are registered with multiple State- and District-level organizations to access them from a single account.
The Portal uses tenants to organize data at the highest level of an organization. Most users will belong to a single tenant, but users associated with multiple tenants in the Portal must switch tenants in order to view and manage organization-specific data.
For example, if you belong to Tenant A and Tenant B, you will need to switch from Tenant A to Tenant B when you need to perform administrative tasks for Tenant B.
To Switch Tenants1. Log in to the Portal.
2. Click on the profile icon in the upper right corner of the Portal to open the Profile Menu:
3. Click Edit Profile to access the Profile Details page.
4. Click Switch Tenant in the Current Tenant area.

37February 7, 2018
STEP 02. DELEGATING TASKS & INVITING USERS (CBT & PBT) Assessment Preparation
5. Select a tenant from the dropdown list, or type the name of the tenant with which you want to work:
6. Click Apply.
7. Verify that you have entered the correct tenant by looking for the name of the tenant in the upper right side of the tenant’s Welcome screen. The tenant name will be preceded by a house icon. (Please note: You will arrive on the Welcome screen of the tenant you visited most recently upon each login to the Portal.)

38February 7, 2018
STEP 03. STUDENT DATA FILE (CBT & PBT) Assessment PreparationSTEP 03. STUDENT DATA FILE (CBT & PBT)
Step 03. Student Data File (CBT & PBT)Student Data Upload (SDU) File LayoutThe following table will guide you through the fields, requirements, and restrictions of the Stu-dent Data Upload (SDU) file.
Related Resources: Student Data Upload template found on Avocet.
Previous customers are strongly recommended to use the SDU Rollover file to load students.
Please note: If a leading zero needs to be included for a State District Code, State School Code, or a Student ID, please use an apostrophe at the beginning of the data field(‘) to keep the zero intact. (For example, ‘012345.) Please see the end of this section for directions on retaining lead-in zeros.
Column Field Name Description Length Required? Valid Values Edit Comments/Questions
A Update indicator
Update Indicator 1 No Blank, U, D, N Blank: New student record, U: Update record, D: Delete record, N: No change
B State State postal abbreviation
2 Yes AL, AK, AZ, AR, CA, CO, CT, DE, FL, GA, HI, ID, IL, IN, IA, KS, KY, LA, ME, MD, MA, MI, MN, MS, MO, MT, NE, NV, NH, NJ, NM, NY, NC, ND, OH, OK, OR, PA, RI, SC, SD, TN, TX, UT, VT, VA, WA, WV, WI, WY, AS, DC, FM, GU, MH, MP, PW, PR, VI
2 character state or US territory abbreviation. Uppercase letters only. Example: Iowa = IA, Texas = TX
C State District Code
District CDS Code
20 Yes 0-9, A-Z, a-z, - (dash)
Remove leading, trailing spaces and normalize all embedded blanks to one blank.
NCES Link: http://nces.ed.gov /globallocator/
This code must match the corresponding fields on the Org File. Use of spaces will prevent student uploads!

39February 7, 2018
STEP 03. STUDENT DATA FILE (CBT & PBT) Assessment Preparation
D State School Code
School CDS Code
20 Yes 0-9, A-Z, a-z, - (dash)
Remove leading, trailing spaces and normalize all embedded blanks to one blank.
NCES Link: http://nces.ed.gov /globallocator/
This code must match the corresponding fields on the Org File. Use of spaces will prevent student uploads!
E ACT High School Code
The ACT or College Board CEEB Code
10 No 0-9 Leave blank for grades 3-8
F State Student ID
State ID 20 Yes (see comments)
A-Z, a-z, 0-9, - (dash)
Either State Student ID or Local ID must be populated.DO NOT USE Social Security Number!
G Local ID Local ID 20 Yes (see comments)
A-Z, a-z, 0-9, - (dash)
Either State Student ID or Local ID must be populated.DO NOT USE Social Security Number!
H First Name Student’s first name
35 Yes A-Z, a-z, - (dash), ‘ (apostrophe), (, ), and space.
Normalize spaces (remove leading, trailing and consecutive spaces).
I Last Name Student’s last name
35 Yes A-Z, a-z, - (dash), ‘ (apostrophe), (, ), and space.
Normalize spaces (remove leading, trailing and consecutive spaces).
J Middle Initial Student’s middle initial
1 No A-Z, a-z First letter of middle name only. The file upload will fail if anything other than the first letter of a student’s middle name is used!
K DOB Date of Birth 10 Yes mm/dd/yyyy, m/d/yyyy or mm/d/yyyy or m/dd/yyyy
L Gender Student’s gender
1 Yes F, M F: Female M: Male
M Actual Grade Actual grade student is currently enrolled
2 Yes 0-12
N English Testing Grade
English Testing Grade
2 No 0-10, blank Use if student is testing at grade other than their actual enrolled level
O Reading Testing Grade
Reading Testing Grade
2 No 0-10, blank Use if student is testing at grade other than their actual enrolled level
P Math Testing Grade
Math Testing Grade
2 No 0-10, blank Use if student is testing at grade other than their actual enrolled level
Q Science Testing Grade
Science Testing Grade
2 No 0-10, blank Use if student is testing at grade other than their actual enrolled level

40February 7, 2018
STEP 03. STUDENT DATA FILE (CBT & PBT) Assessment Preparation
R Writing Testing Grade
Writing Testing Grade
2 No 0-12, blank Use if student is testing at grade other than their actual enrolled level
S Class or Group 1
Enables grouping of students in any way that the user desires. By teacher, class, level, etc.
50 No A-Z, a-z, 0-9, special characters . (period), - (dash), ‘ (apostrophe) and space
Normalize spaces (remove leading, trailing and consecutive spaces).
T Class or Group 2
Enables grouping of students in any way that the user desires. By teacher, class, level, etc.
50 No A-Z, a-z, 0-9, special characters . (period), - (dash), ‘ (apostrophe) and space
Normalize spaces (remove leading, trailing and consecutive spaces).
U Class or Group 3
Enables grouping of students in any way that the user desires. By teacher, class, level, etc.
50 No A-Z, a-z, 0-9, special characters . (period), - (dash), ‘ (apostrophe) and space
Normalize spaces (remove leading, trailing and consecutive spaces).
V Class or Group 4
Enables grouping of students in any way that the user desires. By teacher, class, level, etc.
50 No A-Z, a-z, 0-9, special characters . (period), - (dash), ‘ (apostrophe) and space
Normalize spaces (remove leading, trailing and consecutive spaces).
W Class or Group 5
Enables grouping of students in any way that the user desires. By teacher, class, level, etc.
50 No A-Z, a-z, 0-9, special characters . (period), - (dash), ‘ (apostrophe) and space
Normalize spaces (remove leading, trailing and consecutive spaces).
X Class or Group 6
Enables grouping of students in any way that the user desires. By teacher, class, level, etc.
50 No A-Z, a-z, 0-9, special characters . (period), - (dash), ‘ (apostrophe) and space
Normalize spaces (remove leading, trailing and consecutive spaces).
Y Class or Group 7
Enables grouping of students in any way that the user desires. By teacher, class, level, etc.
50 No A-Z, a-z, 0-9, special characters . (period), - (dash), ‘ (apostrophe) and space
Normalize spaces (remove leading, trailing and consecutive spaces).
Z Class or Group 8
Enables grouping of students in any way that the user desires. By teacher, class, level, etc.
50 No A-Z, a-z, 0-9, special characters . (period), - (dash), ‘ (apostrophe) and space
Normalize spaces (remove leading, trailing and consecutive spaces).

41February 7, 2018
STEP 03. STUDENT DATA FILE (CBT & PBT) Assessment Preparation
AA Class or Group 9
Enables grouping of students in any way that the user desires. By teacher, class, level, etc.
50 No A-Z, a-z, 0-9, special characters . (period), - (dash), ‘ (apostrophe) and space
Normalize spaces (remove leading, trailing and consecutive spaces).
AB Class or Group 10
Enables grouping of students in any way that the user desires. By teacher, class, level, etc.
50 No A-Z, a-z, 0-9, special characters . (period), - (dash), ‘ (apostrophe) and space
Normalize spaces (remove leading, trailing and consecutive spaces).
AC Hispanic or Latino
Hispanic or Latino
1 No Y, N, blank Y=Yes, N=No, X=Prefer not to respond, blank=not provided
AD American Indian / Alaska Native
American Indian / Alaska Native
1 No Y, N, blank Y=Yes, N=No, X=Prefer not to respond, blank=not provided
AE Asian Asian 1 No Y, N, blank Y=Yes, N=No, X=Prefer not to respond, blank=not provided
AF Black/African American
Black/African American
1 No Y, N, blank Y=Yes, N=No, X=Prefer not to respond, blank=not provided
AG Native Hawaiian / Other Pacific Islander
Native Hawaiian / Other Pacific Islander
1 No Y, N, blank Y=Yes, N=No, X=Prefer not to respond, blank=not provided
AH White White 1 No Y, N, blank Y=Yes, N=No, X=Prefer not to respond, blank=not provided
AI Migrant Migrant 1 No Y, blank Y=Yes, blank=Prefer not to respond
AJ Economically Disadvantaged
Economically Disadvantaged
1 No Y, blank Y=Yes, blank=Prefer not to respond
AK IEP IEP 1 No Y, blank Y=Yes, blank=Prefer not to respond
AL ELL ELL 1 No Y, blank Y=Yes, blank=Prefer not to respond
AM Section 504 Section 504 1 No Y, blank Y=Yes, blank=Prefer not to respond
AN Other Accoms Plan
Other Accoms Plan
1 No Y, blank Y=Yes, blank=Prefer not to respond
AO Gifted Gifted and Talented
1 No Y, blank Y=Yes, blank=unknown or prefer not to respond
AP Homeless Homeless 1 No Y, blank Y=Yes, blank=unknown or prefer not to respond
AQ Parent in Military
Parent in Military
1 No Y, blank Y=Yes, blank=unknown or prefer not to respond
AR In Foster Care In Foster Care 1 No Y, blank Y=Yes, blank=unknown or prefer not to respond
AS Teacher Email 1
Email address of teacher
60 No [email protected] format, allowed characters A-Z, a-z, - (dash), .(period), 0-9, _(underscore), @
Associates teacher with student, adds user with Educator portal permissions if not registered in portal. Admin must send invitation from portal to enable access.

42February 7, 2018
STEP 03. STUDENT DATA FILE (CBT & PBT) Assessment Preparation
AT Teacher Email 2
Email address of teacher
60 No [email protected] format, allowed characters A-Z, a-z, - (dash), .(period), 0-9, _(underscore), @
Associates teacher with student, adds user with Educator portal permissions if not registered in portal. Admin must send invitation from portal to enable access.
AU Teacher Email 3
Email address of teacher
60 No [email protected] format, allowed characters A-Z, a-z, - (dash), .(period), 0-9, _(underscore), @
Associates teacher with student, adds user with Educator portal permissions if not registered in portal. Admin must send invitation from portal to enable access.
AV Teacher Email 4
Email address of teacher
60 No [email protected] format, allowed characters A-Z, a-z, - (dash), .(period), 0-9, _(underscore), @
Associates teacher with student, adds user with Educator portal permissions if not registered in portal. Admin must send invitation from portal to enable access.
AW Teacher Email 5
Email address of teacher
60 No [email protected] format, allowed characters A-Z, a-z, - (dash), .(period), 0-9, _(underscore), @
Associates teacher with student, adds user with Educator portal permissions if not registered in portal. Admin must send invitation from portal to enable access.
AX Teacher Email 6
Email address of teacher
60 No [email protected] format, allowed characters A-Z, a-z, - (dash), .(period), 0-9, _(underscore), @
Associates teacher with student, adds user with Educator portal permissions if not registered in portal. Admin must send invitation from portal to enable access.
AY Teacher Email 7
Email address of teacher
60 No [email protected] format, allowed characters A-Z, a-z, - (dash), .(period), 0-9, _(underscore), @
Associates teacher with student, adds user with Educator portal permissions if not registered in portal. Admin must send invitation from portal to enable access.
AZ Teacher Email 8
Email address of teacher
60 No [email protected] format, allowed characters A-Z, a-z, - (dash), .(period), 0-9, _(underscore), @
Associates teacher with student, adds user with Educator portal permissions if not registered in portal. Admin must send invitation from portal to enable access.
BA Teacher Email 9
Email address of teacher
60 No [email protected] format, allowed characters A-Z, a-z, - (dash), .(period), 0-9, _(underscore), @
Associates teacher with student, adds user with Educator portal permissions if not registered in portal. Admin must send invitation from portal to enable access.
BB Teacher Email 10
Email address of teacher
60 No [email protected] format, allowed characters A-Z, a-z, - (dash), .(period), 0-9, _(underscore), @
Associates teacher with student, adds user with Educator portal permissions if not registered in portal. Admin must send invitation from portal to enable access.
BC Pearson Student Code
Pearson Student Number
10 No System generated. Leave blank for initial load.

43February 7, 2018
STEP 03. STUDENT DATA FILE (CBT & PBT) Assessment Preparation
Uploading Student Data Files
Successfully importing your Student Data Upload (SDU) file is the first step in managing student data for the purpose of updating Personal Needs Profiles (PNPs), creating Test Sessions, ensuring the timely delivery of materials for paper testing, and receiving the most complete possible Individual and Group Reports.
To upload Student Data Files to the Portal, please follow the step-by-step instructions listed below:
1. Follow the Selecting and Switching Organizations instructions to choose the organization to which you wish to upload associated students.
2. Hover over “Students” on the menu ribbon and select “Import Student Data”.3. On the Student Profile Imports screen, click the blue Import Students button, locate the
SDU file you wish to upload (the file may be either a .xlx, .xlsx, or .csv file), and select Open. The selected file will then be uploaded, validated, and saved in the Portal.
4. Refresh the Student Profile Imports page to view processing results. Please note that the file format must meet the SDU template requirements in order to successfully upload your Student Data. (The SDU template may be found on Avocet.)
Accessing Rollover Student Data Files
If a tenant has tested in the 2016-2017 school year, the tenant will be rolled over. It is recommended that you use the rollover student data file to import your students. This file is only available at the highest organization level in the tenant
1. Select “Students” from the menu ribbon.2. Select “Student Extracts” from the dropdown menu.
3. Choose “Reverse SDU” extract.
4. The Reverse SDU extract will appear in the list of extracts and can be identified by “Rollover System Admin” in the submitted column. Select the download icon to download the extract.
5. Make any edits needed (including advancing student grade levels and removing the “N” from the Update Indicator Column) to the file and upload using the steps under “Uploading Student Data Files” above.

44February 7, 2018
STEP 03. STUDENT DATA FILE (CBT & PBT) Assessment Preparation
Student Data Upload Error Resolutions
The steps below instruct users through the resolution process if the Student Data Upload fails or is complete with errors when attempting to upload the file to the Portal.
1. Download the results file by clicking on the blue download icon under the Action header in the Portal. Note: If your file has leading zeros you will need to open the file to retain the leading zeros. Please see steps below on how to retain leading zeros.
2. Open this file after it has downloaded. Once in Excel, click Sort and Filter toward the top right of the worksheet. (You will need to enable editing to do this.)Sort by Error Message (Column A) alphabetically. This will bring the errors to the top of the worksheet:
3. The Error Message column will list the conflict for each row that failed to upload. Rows with already valid data will read “Success” in this field.
4. Correct the invalid data in each row according to this message. (I.e., Invalid First Name, Invalid State Code, etc.)
5. After the corrections have been made, delete the entire Error Message column.6. Save this file locally.7. Re-upload the file into the Portal.8. If all the corrections have been made and no conflict remains, the SDU should clear as
“Complete” on the Portal site.See the table below for a list of possible SDU Error Messages and their resolutions. If the solution is not immediately obvious, this should help you identify and fix the problem.
Message Meaning Resolution
Invalid TemplateThe file’s data fields do not match the expected layout or header row is missing.
Check the header on the spreadsheet to make sure it matches the layout for the type of data being loaded.
Success Student loaded successfully No further action required.
A student with same Student Id available in the given Tenant
The student ID is already in use by a student that has been loaded
Verify the student ID and cor-rect if necessary or remove duplicate entry.
Invalid State District Code The district code does not match that provided in the Org file
Remove any special characters other than - (dash), make sure the code matches that provided in the Org file
Invalid First Name The student’s first name contains invalid characters or is too long
Remove any special characters other than – (dash); ’ (apostrophe); , (comma); or space. Make sure the name is 35 charac-ters or fewer.

45February 7, 2018
STEP 03. STUDENT DATA FILE (CBT & PBT) Assessment Preparation
Invalid Last Name The student’s first name contains invalid characters or is too long
Remove any special characters other than – (dash); ’ (apostrophe); , (comma); or space. Make sure the name is 35 charac-ters or fewer.
Invalid ACT High School CodeThe code contains invalid characters or is too long
Remove any special characters, leave blank for grades 3-8.
School Code is a Required Field State School code is missingInsert the school code that was provided in the Org file. (Also located next to the organization/district name in the Portal.)
Actual Grade is a Required Field Student’s grade is missing Enter the student’s grade level.First Name is a Required Field Student’s first name is missing Enter the student’s first name.Last Name is a Required Field Missing student’s last name Enter the student’s last name.The student record found under different organization with District (xxxxx) - School (xxxx)
The student’s record is showing at a different school.
Use the transfer feature to move the student record to the new school.
The Update Indicator Column
This column determines how the system will treat the data in the rest of the row. If the Update Indicator Column is empty the system will add the data in that row to the system, assuming there are no errors. This can only be done once per student, after the student is in the system leaving the Update Indicator Column empty will return a “Student ID already exists in the tenant”. Further changes to this student’s record should use a “U” in the Update Indicator Column.
Other Possible Update Indicators:
• N means “No Change”. This informs the system to make no changes to this row in the file. The system will ignore this row when validating and no changes will be made in the system.
• U means “Update”. This informs the system to apply an update to the student’s information. This would be used when changes have been made to a student entry that has already been uploaded into the system.
• D means “Delete”. This informs the system to delete the student. A student can be deleted if he or she has not taken or is not in the process of taking a test.
Once a user corrects all errors and adds the correct Update Indicator flag, the Error Message column must be deleted; then the file must be saved and re-uploaded.
Adding Students Manually
Follow these steps to manually upload students individually using the built-in Portal functionality for loading a single student. Note: You must be pinned at the school level.
1. Hover over “Students” on the menu ribbon.
2. Select “Add Student” from the dropdown menu.
3. Complete the required entries marked with a red asterisk (*):
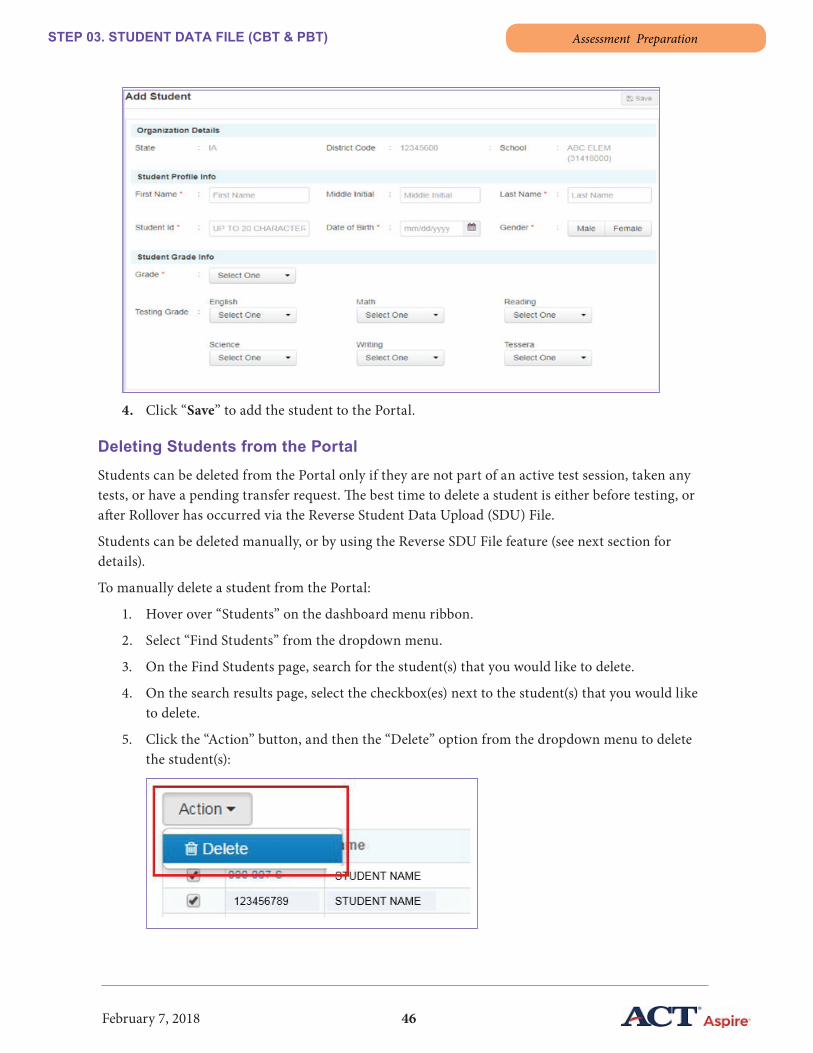
46February 7, 2018
STEP 03. STUDENT DATA FILE (CBT & PBT) Assessment Preparation
4. Click “Save” to add the student to the Portal.
Deleting Students from the Portal
Students can be deleted from the Portal only if they are not part of an active test session, taken any tests, or have a pending transfer request. The best time to delete a student is either before testing, or after Rollover has occurred via the Reverse Student Data Upload (SDU) File.
Students can be deleted manually, or by using the Reverse SDU File feature (see next section for details).
To manually delete a student from the Portal:
1. Hover over “Students” on the dashboard menu ribbon.
2. Select “Find Students” from the dropdown menu.
3. On the Find Students page, search for the student(s) that you would like to delete.
4. On the search results page, select the checkbox(es) next to the student(s) that you would like to delete.
5. Click the “Action” button, and then the “Delete” option from the dropdown menu to delete the student(s):
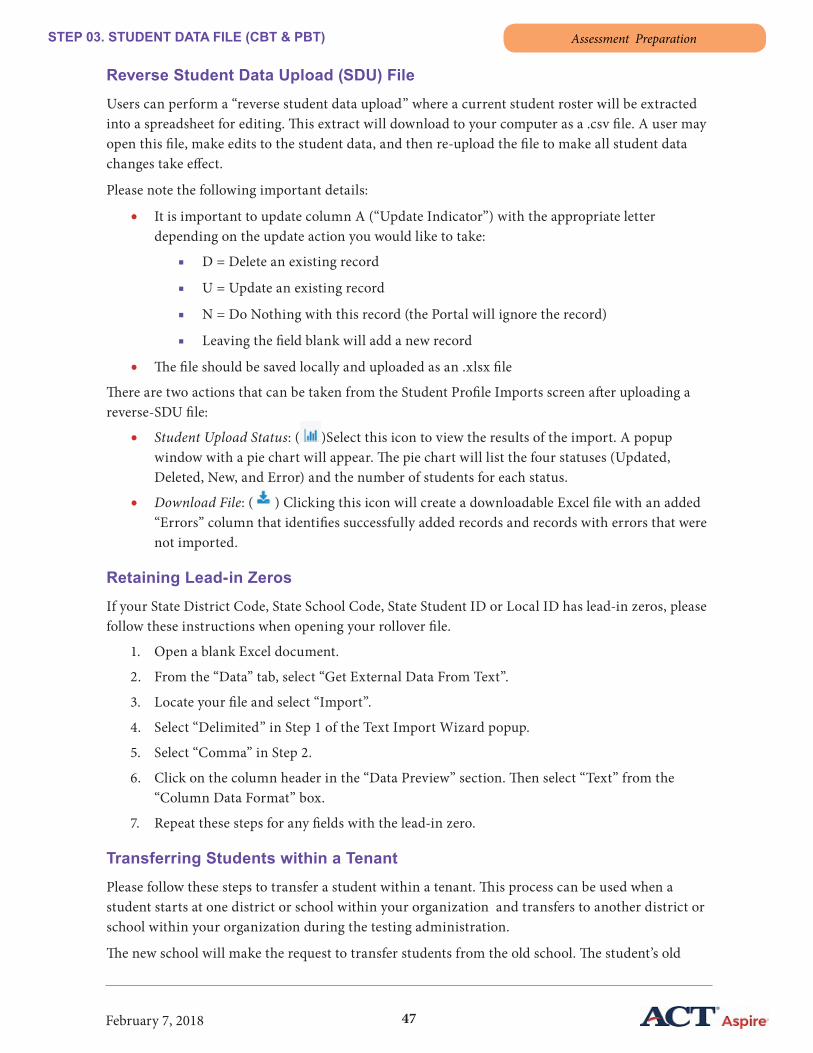
47February 7, 2018
STEP 03. STUDENT DATA FILE (CBT & PBT) Assessment Preparation
Reverse Student Data Upload (SDU) File
Users can perform a “reverse student data upload” where a current student roster will be extracted into a spreadsheet for editing. This extract will download to your computer as a .csv file. A user may open this file, make edits to the student data, and then re-upload the file to make all student data changes take effect.
Please note the following important details:
• It is important to update column A (“Update Indicator”) with the appropriate letter depending on the update action you would like to take:
■ D = Delete an existing record
■ U = Update an existing record
■ N = Do Nothing with this record (the Portal will ignore the record)
■ Leaving the field blank will add a new record
• The file should be saved locally and uploaded as an .xlsx file
There are two actions that can be taken from the Student Profile Imports screen after uploading a reverse-SDU file:
• Student Upload Status: ( )Select this icon to view the results of the import. A popup window with a pie chart will appear. The pie chart will list the four statuses (Updated, Deleted, New, and Error) and the number of students for each status.
• Download File: ( ) Clicking this icon will create a downloadable Excel file with an added “Errors” column that identifies successfully added records and records with errors that were not imported.
Retaining Lead-in Zeros
If your State District Code, State School Code, State Student ID or Local ID has lead-in zeros, please follow these instructions when opening your rollover file.
1. Open a blank Excel document.
2. From the “Data” tab, select “Get External Data From Text”.
3. Locate your file and select “Import”.
4. Select “Delimited” in Step 1 of the Text Import Wizard popup.
5. Select “Comma” in Step 2.
6. Click on the column header in the “Data Preview” section. Then select “Text” from the “Column Data Format” box.
7. Repeat these steps for any fields with the lead-in zero.
Transferring Students within a Tenant
Please follow these steps to transfer a student within a tenant. This process can be used when a student starts at one district or school within your organization and transfers to another district or school within your organization during the testing administration.
The new school will make the request to transfer students from the old school. The student’s old
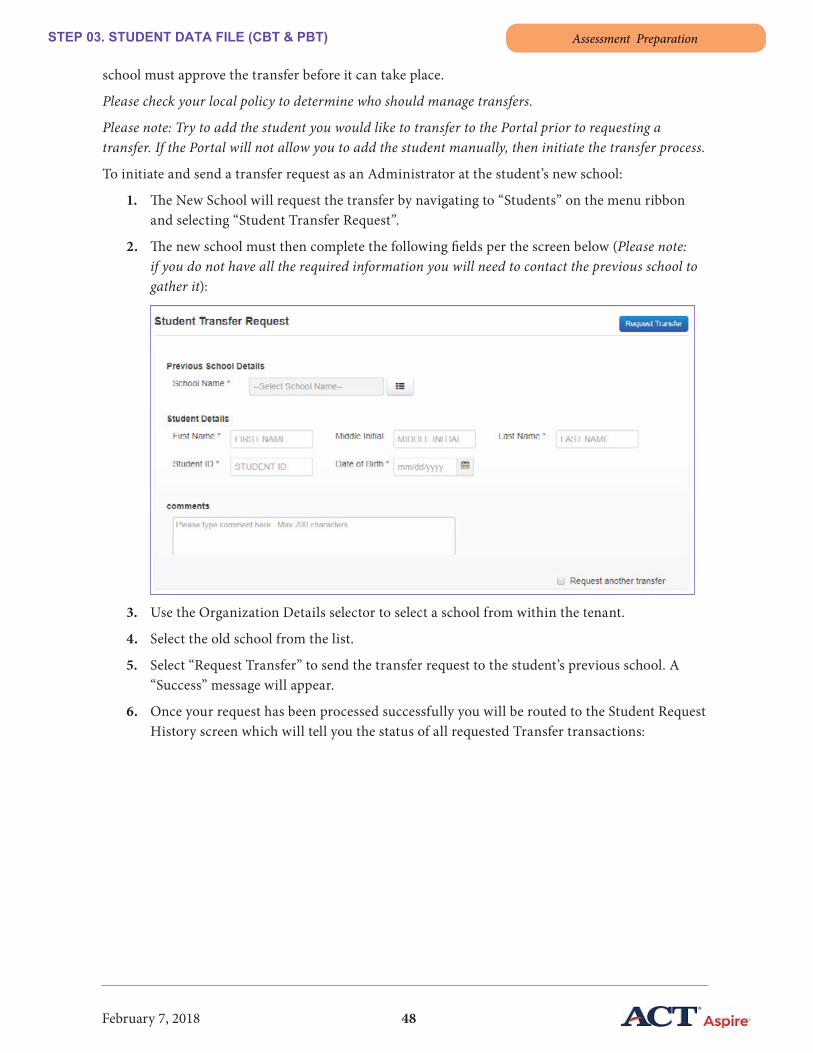
48February 7, 2018
STEP 03. STUDENT DATA FILE (CBT & PBT) Assessment Preparation
school must approve the transfer before it can take place.
Please check your local policy to determine who should manage transfers.
Please note: Try to add the student you would like to transfer to the Portal prior to requesting a transfer. If the Portal will not allow you to add the student manually, then initiate the transfer process.
To initiate and send a transfer request as an Administrator at the student’s new school:
1. The New School will request the transfer by navigating to “Students” on the menu ribbon and selecting “Student Transfer Request”.
2. The new school must then complete the following fields per the screen below (Please note: if you do not have all the required information you will need to contact the previous school to gather it):
3. Use the Organization Details selector to select a school from within the tenant.
4. Select the old school from the list.
5. Select “Request Transfer” to send the transfer request to the student’s previous school. A “Success” message will appear.
6. Once your request has been processed successfully you will be routed to the Student Request History screen which will tell you the status of all requested Transfer transactions:
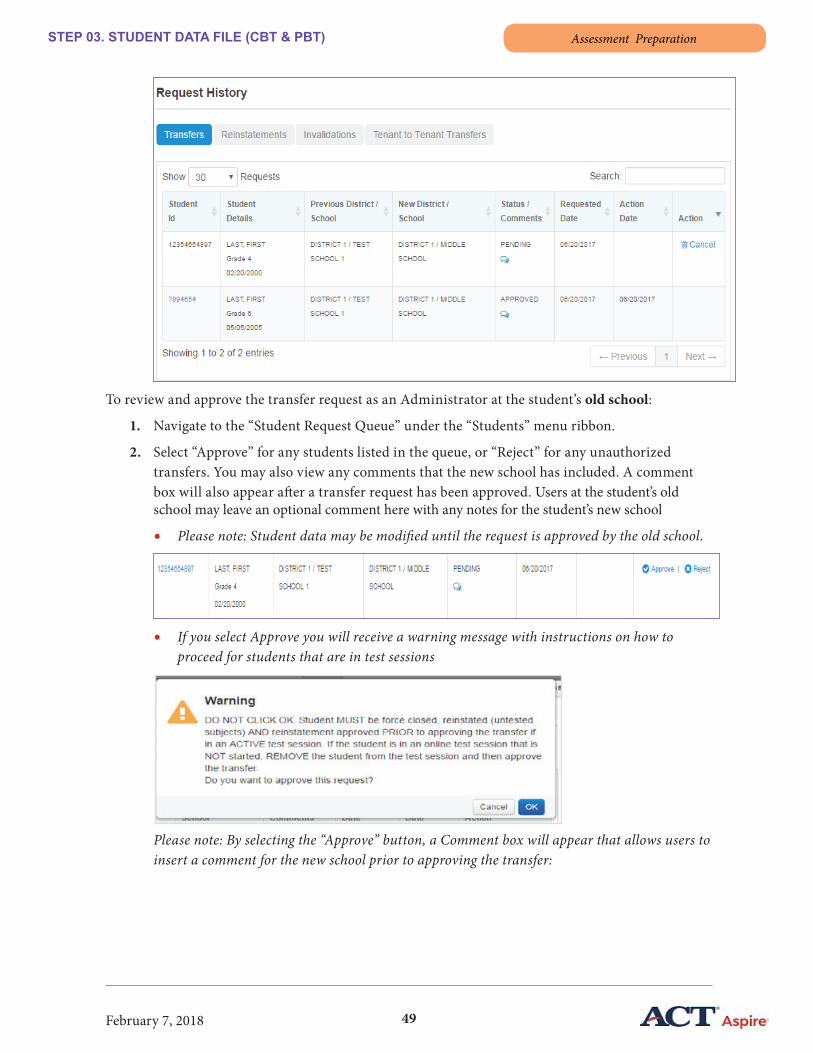
49February 7, 2018
STEP 03. STUDENT DATA FILE (CBT & PBT) Assessment Preparation
To review and approve the transfer request as an Administrator at the student’s old school:
1. Navigate to the “Student Request Queue” under the “Students” menu ribbon.
2. Select “Approve” for any students listed in the queue, or “Reject” for any unauthorized transfers. You may also view any comments that the new school has included. A comment box will also appear after a transfer request has been approved. Users at the student’s old school may leave an optional comment here with any notes for the student’s new school
• Please note: Student data may be modified until the request is approved by the old school.
• If you select Approve you will receive a warning message with instructions on how to proceed for students that are in test sessions
Please note: By selecting the “Approve” button, a Comment box will appear that allows users to insert a comment for the new school prior to approving the transfer:

50February 7, 2018
STEP 03. STUDENT DATA FILE (CBT & PBT) Assessment Preparation
3. Once the request has been approved the student data will be transferred.
4. If you choose to Reject a transfer request, a Warning message will appear asking you to confirm the rejection. Click “OK” and you will be asked to enter a comment for why you are rejecting the Transfer request. At this point additional contact and communication may be required between the old and new school.
5. The new school’s Student Request History will now show the status of each request in the Status column:
The following data will be transferred:
a) Student Profile Data, Student Test Session Status, and Test Scores.
b) Longitudinal data will move with student. Please note: a student’s Personal Needs Profile is not longitudinal data, so there is no way to identify what PNPs a student had for a previous test. The system can only identify what the current PNP data is for the student, thus only PNP data as it currently exists in the system will be transferred.
Please note the following important details:
• A new session will not be automatically created for students transferred to a new school. You must place them into test sessions at the new school.
• If a student is in an online test session that has been started or a paper test session that has been sent for processing they cannot be removed from the session. The student will need to

51February 7, 2018
STEP 03. STUDENT DATA FILE (CBT & PBT) Assessment Preparation
be reinstated before being added to test sessions at the new school. The reinstatement may take place at the old school before the transfer is approved or at the new school after the transfer has been approved. (please see page 52 for more information regarding reinstating students)
• Certain users may view the Transfer Request Queue for your school by selecting “Student Request Queue”:
Please note: To open a list of a student’s test sessions to remove or close them prior to transfer, you may go to the student’s profile and choose the Test Info tab. Clicking on the test session name will take you to the session and the student may be removed from the session if the session has not been started, or force closed from within the session window. (These actions may be performed from the Student Profile screen by checking the session for which you would like to remove or force close the student from and selecting the appropriate action from the dropdown menu.)
Transfer Students Between Tenants
What is a tenant?A tenant is an organization’s (school/district) data container. Any information related to that organization is stored, manipulated, and modified in the tenant. When you log into the Portal, you are logging into your organization’s tenant.
The tenant-to-tenant transfer process:
1. The student’s new school/district should contact Customer Service to request a tenant-to-tenant transfer.
• Contact by phone: (855) 730-0400

52February 7, 2018
STEP 03. STUDENT DATA FILE (CBT & PBT) Test Coordinator - Assessment Preparation
2. A Customer Service Agent will then reach out to confirm student information and initiate the transfer process within 48 hours.
3. The student’s old school/district from a different tenant will then see a pending tenant-to-tenant transfer request in the Portal:
4. A user with Administrator permissions at the student’s old school/district may approve the transfer request. Requests should be approved within 48 hours.
Student information transferred after approval:
• Student’s name• Date of birth• Actual grade• All existing longitudinal data• State and local IDs
Reinstating Students
District- and School-level Administrators may request reinstatements for students who, at the District Administrators discretion, will be allowed a new test attempt. Students must be force closed in a test session before they can be reinstated. This must also be done for transfer students who were in active test sessions at the previous school. Note: Reinstatements can only be requested for Summative tests.
To request a Reinstatement:
1. In the Portal, navigate to the active test session containing the force closed student you wish to reinstate.
2. On the Test Session Details screen, locate the name of the student you wish to reinstate.3. Under the “Status” column, select the “Force Close” dropdown menu. The “Reinstate” option
will appear:

53February 7, 2018
STEP 03. STUDENT DATA FILE (CBT & PBT) Assessment Preparation
4. Select “Reinstate”. A popup warning will appear to confirm the reinstatment request for a student. Click “OK” to continue.
5. In the Reinstate window, enter a comment, and select “Save”. A “Success” popup will appear; click “OK” to continue.
6. Reinstatement requests will then be reviewed by the District-Level Administrator for approval. (Please note: If an Administrator requests a reinstatement, they will not be able to approve that reinstatement. It must be approved by another user with Administrator permissions at the organization.)
7. After the reinstatement has been approved, students will have a “DNR” (“Do Not Report”) label next to their name and Reinstatement APPROVED after the Student ID, in the test session they were force closed from and on their student profile page.
Example label on the Test Session Details page:
Please note: School-Level Administrators are not authorized to approve or reject reinstatements.
To Request a Reinstatement from the Student Profile PageUsers may also request a student reinstatement directly from a student’s Student Profile page.
1. From a student’s profile page, select the “Test Info” tab.2. Check the box next to the Summative test session in which you would like to reinstate the
student’s test assignment.3. Click the “Action” dropdown and select “Request Reinstatement” from the dropdown menu:
4. Enter any comments into the “Comments” field and click “Submit Request”.
Important Details Regarding Reinstatements:
A reinstatement:• Does not count as a test attempt; it allows students to have another test attempt for the
grade/subject.• Only the new test attempt will display on the Individual Student Report and Student
Performance File.

54February 7, 2018
STEP 03. STUDENT DATA FILE (CBT & PBT) Assessment Preparation
Invalidating Students
Administrators may request invalidations for students who have been force closed or have a submitted test in a test session. The purpose of an Invalidation is to mark a student’s test attempt so the score will not be reported on reports and files such as Individual Student Reports and Student Performance Files.
Please note: Invalidated test attempts will show a “INV” in place of a score on reports and on the student profile.
To request an Invalidation:
1. In the Portal, navigate to the active test session containing the force closed or submitted student you wish to submit an invalidation request for.
2. On the Test Session Details screen, locate the name of the student you wish to invalidate.
3. Under the “Status” column, select the “Force Close” or “Submitted” dropdown menu. The “Invalidate” option will appear:
4. Select “Invalidate”. A warning message will appear; click “OK” to proceed.
5. In the Invalidate window, enter a comment, and select “Save”. A “Success” popup will appear; click “OK” to proceed.
6. The request will then be reviewed by the Administrator at the highest level of your organization.
To Request an Invalidation from the Student Profile PageUsers may also request a student invalidation directly from a student’s Student Profile page.
1. From a student’s profile page, select the “Test Info” tab.2. Check the box next to the Summative test session in which you would like to invalidate the
student’s test assignment.3. Click the “Action” dropdown and select “Request Invalidation” from the dropdown menu:

55February 7, 2018
STEP 03. STUDENT DATA FILE (CBT & PBT) Assessment Preparation
4. Enter any comments into the “Comments” field and click “Submit Request”.
Important Details Regarding Invalidations:
An invalidation:
• Counts as a test attempt; student cannot take same grade/subject again.• The invalidated test attempt will display on the ISR file. An “Invalidate” message will be
shown in lieu of score.• The invalidated test attempt will display in SPF data files as “INV”.• Invalidations are not relevant to Periodic assessments.
Editing Student ID Details
A student’s ID information is what directly links a student to his or her longitudinal data in the Portal. Please follow the steps below to edit this information.
To edit Student ID details:1. Navigate to a specific student’s Student Profile page. This can be done by:
a. Searching for a student using the Portal’s Student Search feature, orb. Clicking on a student’s name in a test session.
2. In the upper right of the Student Profile page, click the “Edit” button.
3. Click on the Student Local ID or State Student ID fields to begin editing.
4. Click “Save” to save any edits. The Student Local ID, State Student ID, or the Student ID fields will be updated with the entered information. (In the below example, “SAMPLE99” was entered into the State Student ID field.)
Please note the following details:

56February 7, 2018
STEP 03. STUDENT DATA FILE (CBT & PBT) Assessment Preparation
• The Student ID field’s valid values include 0-9, A-Z, a-z, and dashes ( - ).
• All longitudinal data will be linked to a student’s Student ID. Editing the State Student ID field will update the Student ID with the edited information.
• If an error is discovered with a Student ID it should be corrected as soon as possible, preferably before testing begins. If an error is discovered after reporting, the Student ID may still be corrected, but it will not change on the student’s reports.
Additionally, the following rules apply to what is considered a “Student ID” depending on the information entered:
• If only the State Student ID is provided, Student ID = State Student ID
• If only the Local ID is provided, Student ID = Local ID
• If both State Student ID and Local ID are provided, Student ID = State Student ID
To delete a student from a student’s profile:
1. Navigate to a student’s Student Profile.
2. Click the Edit button in the Basic Information section.
3. Click the Delete button to delete the student from the Portal:
Please note: A student can be deleted only if the student does not have any current academic year test data. Any longitudinal data associated to a deleted student will remain in the tenant.
Additional Actions from Test Info Tab on the Student
Users may perform several actions directly from the Test Info tab on the student profile. To perform these actions, please follow the steps below:
1. On a student’s Student Profile page scroll down to the Test Info tab.
2. Select the test session(s) for which you would like to perform an action.
3. Click the Action icon to display a dropdown menu:
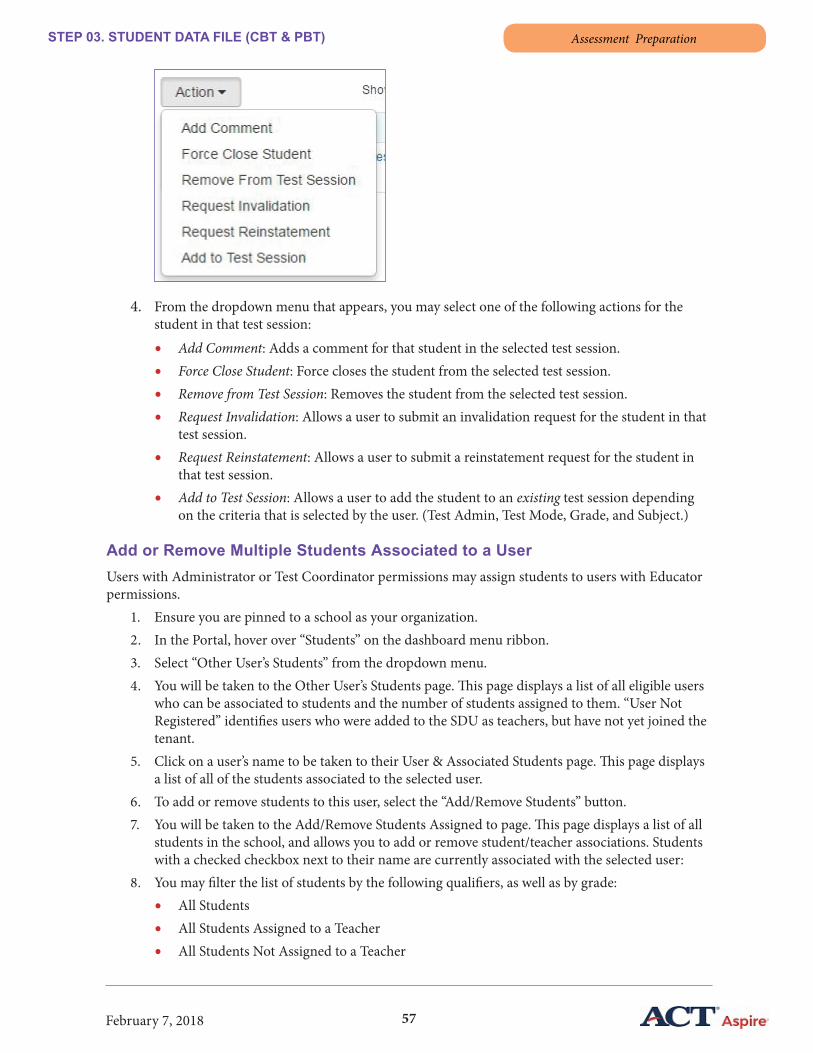
57February 7, 2018
STEP 03. STUDENT DATA FILE (CBT & PBT) Assessment Preparation
4. From the dropdown menu that appears, you may select one of the following actions for the student in that test session:
• Add Comment: Adds a comment for that student in the selected test session.• Force Close Student: Force closes the student from the selected test session.• Remove from Test Session: Removes the student from the selected test session.• Request Invalidation: Allows a user to submit an invalidation request for the student in that
test session.• Request Reinstatement: Allows a user to submit a reinstatement request for the student in
that test session.• Add to Test Session: Allows a user to add the student to an existing test session depending
on the criteria that is selected by the user. (Test Admin, Test Mode, Grade, and Subject.)
Add or Remove Multiple Students Associated to a UserUsers with Administrator or Test Coordinator permissions may assign students to users with Educator permissions.
1. Ensure you are pinned to a school as your organization.2. In the Portal, hover over “Students” on the dashboard menu ribbon.3. Select “Other User’s Students” from the dropdown menu.4. You will be taken to the Other User’s Students page. This page displays a list of all eligible users
who can be associated to students and the number of students assigned to them. “User Not Registered” identifies users who were added to the SDU as teachers, but have not yet joined the tenant.
5. Click on a user’s name to be taken to their User & Associated Students page. This page displays a list of all of the students associated to the selected user.
6. To add or remove students to this user, select the “Add/Remove Students” button.7. You will be taken to the Add/Remove Students Assigned to page. This page displays a list of all
students in the school, and allows you to add or remove student/teacher associations. Students with a checked checkbox next to their name are currently associated with the selected user:
8. You may filter the list of students by the following qualifiers, as well as by grade:• All Students• All Students Assigned to a Teacher• All Students Not Assigned to a Teacher
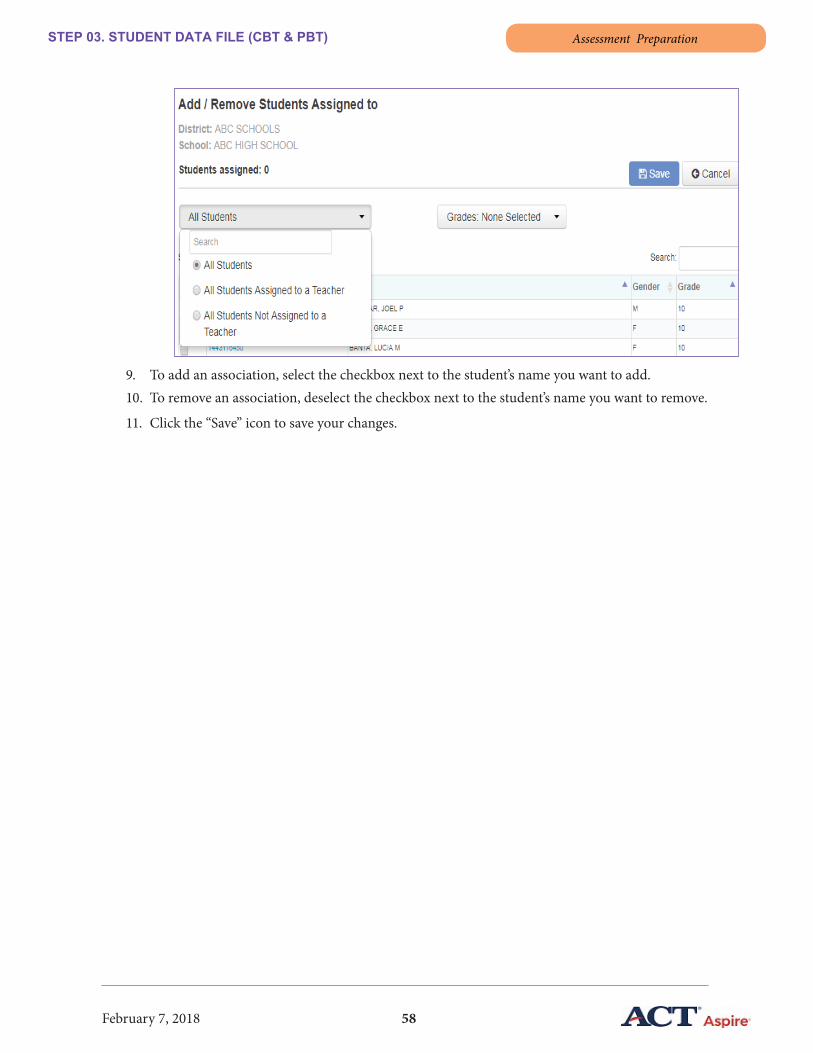
58February 7, 2018
STEP 03. STUDENT DATA FILE (CBT & PBT) Assessment Preparation
9. To add an association, select the checkbox next to the student’s name you want to add.10. To remove an association, deselect the checkbox next to the student’s name you want to remove.
11. Click the “Save” icon to save your changes.

59February 7, 2018
STEP 04. ACCESSIBILITY & ACCOMMODATIONS (CBT & PBT) Assessment Preparation
Step 04. Accessibility & Accommodations (CBT & PBT)Updating a Personal Needs Profile (PNP)
A student’s Personal Needs Profile ensures that approved students will receive the Open Access and/or Accommodation supports they require for a smooth and fair ACT Aspire testing experience. Entering and updating a student’s PNP will ensure that either TestNav or the student’s ACT Aspire paper testing materials will be configured according to their accessibility needs.
Please note: Please reference the Accessibility User’s Guide: Summative Testing Form on Avocet before completing any PNP information.
Related Resources:
• Accessibility User’s Guide: Summative Testing on Avocet
As PNP information is not included in the Student Data Upload (SDU), a student’s PNP must be updated after the initial SDU upload, but before the student is placed into any test sessions. To update a student’s PNP please follow the step-by-step instructions listed below:
1. From the Students menu, select Find Students.
2. On the Find Students screen, search for the student you wish to update. Students can be searched by Student ID, Grade, Name, Teacher, and Groups.
3. Click on the Student’s ID number to navigate to the chosen Student Profile screen, select Personal Needs tab and then Edit to adjust the student’s supports.
4. To add a support, click the checkbox next to the support’s name. Some supports are subject-specific and others apply to all subjects.
5. Click Save to finalize the student’s PNP.
Please note: A Personal Needs Profile cannot be edited if the student is enrolled in one or more Not Started or In Progress tests. To update a Personal Needs Profile the student must first be removed from the test session, or must wait until all her or his test sessions are closed before an Administrator or Test Coordinator can update that student’s PNP.
To ensure that paper testing materials arrive in a timely manner, please enter and update a student’s Personal Needs Profile and add them to test sessions at least five weeks in advance of the test administration window.
Please Note: For more information regarding ordering braille materials for English TTS Audio + Orienting Description students, see page 24.
To Generate a Reverse PNP Extract
A user may generate and download a reverse PNP extract which lists all students for an organization and their associated accommodations, if applicable.
1. To generate a reverse PNP extract, hover over “Students” on the dashboard ribbon and select “Student Extracts” from the dropdown menu.
2. Select “Reverse PNP” on the Student Extracts page.

60February 7, 2018
STEP 04. ACCESSIBILITY & ACCOMMODATIONS (CBT & PBT) Assessment Preparation
3. Click the blue “Generate Extract” button to begin the extract download.
4. Once the extract generation is complete, select the download link in the “Action” column to download the extract as a CSV file.
5. Accommodation selections for a student will be listed as “Y” in the accommodation’s column.
To Modify PNP Data for Multiple Students
1. Generate and download a Reverse PNP Extract. (Please see steps above.)
2. Modify any student PNP support data in the downloaded file:
• Please see the Personal Needs Profile Data Upload Layout available on avocet for more information.
• To update a student’s PNP selection with a support he or she needs, enter a “Y” into the associated accommodation column. Note: If updating extra time support enter 150, 200, 250, 300, 400 numbers as the percentage of extra time.
• To remove a support for a student, simply delete the “Y” that is currently in the associated accommodation column.
• Do not update the State District Code, State School Code, State Student ID, Local ID, First Name, Last Name, and Date of Birth (DOB) columns. (Columns A-G.)
3. Save this spreadsheet to your local drive.
4. Hover over “Students” on the dashboard menu ribbon.
5. Select “Import Student Data” from the dropdown menu.
6. Select the “PNP-DU Imports” tab to switch to the PNP upload screen.
7. Select the blue “Import PNP Updates” button.
8. Locate the spreadsheet with the reverse PNP information on your local drive.
9. The selected file will then be uploaded, validated, and student records will be updated.
Please note the following details:
• Select the graph icon in the Action column to view the status of your import. (Please note that the Status field may remain “In Progress” until the page is manually refreshed.)
• Select the download icon in the Action column to download an Excel file with an added “Errors” column that identifies successfully updated records and records with errors that were not updated.
ο By correcting the errors on the downloaded file, you may re-upload the file to update the PNP data. Please be sure to delete the “Errors” column before attempting to re-upload.

61February 7, 2018
STEP 04. ACCESSIBILITY & ACCOMMODATIONS (CBT & PBT) Assessment Preparation
PNP Hover Functionality
Users may quickly see which accommodations are assigned to which student by hovering over the personal needs profile (PNP) icon in the Portal.
1. On the Test Session Details page for a student with accommodations, scroll down to the student’s name in the list of students in the session.
2. Next to the student name will be a PNP icon. Hover over this icon to display a popup window that lists the specific accommodations for that student in this test session:

62February 7, 2018
STEP 05. CREATE GROUPS (CBT & PBT) Assessment Preparation
Step 05. Create Groups (CBT & PBT)Creating Student Groups in the Portal
Organizing students by Groups in the Portal is intended to facilitate easier test session setups, and to give Administrators and Test Coordinators a greater degree of control when generating Online Reports in the Portal.
Please note that Groups are different from Test Sessions:
• The Groups function allows Administrators and Test Coordinators to organize students by teacher, home room, placement, or other subsets of an organization’s student population.
• Test Sessions designate the date and time when a selection of students is scheduled to take a specific ACT Aspire test together. The group function is just one means by which test session creators can populate sessions. (For instructions on creating test sessions, see the “Session Set-Up” topic on Avocet.)
Test session creators can select a group they have created to easily populate multiple sessions according to desired criteria without having to perform a student-by-student search within the organization’s entire student population. A single student can also belong to more than one group. For example, a student can be placed in groups with their respective English and Science classmates and added to sessions accordingly. Administrators and Test Coordinators can edit groups at any time.
To create a group in the Portal via Student Data Upload, please enter the name of the group to which you would like to assign a student in Columns S through AB of the SDU file. When the SDU is uploaded to the Portal, the groups will automatically be created and populated with the students indicated in the SDU. (Please review the Student Data Upload (SDU) File Layout for further instructions.)
To Create a Group in the Portal:
1. From the blue switch Organization menu dropdown button at the upper-right of the dashboard screen, select the name of the school in which you want to create a group.
2. Once you have selected your school, hover over “Students” on the menu ribbon and select “Create Group” from the dropdown menu.
3. On the Create Group screen, you will be required to enter a name for your new group. If you would like to add a short description for the group, you may add one here as well.
4. Click “Save” to create the group.
5. To add and/or remove students from Groups, click “Find Groups” on the Students dropdown menu, and then click the link to your group on the Groups Found screen.
6. Click the Add/Remove Students button on the chosen group’s management screen. (Please note that, depending on the size of an organization’s student list, it may take time for your student list to load.)
7. When the list of students appears, select the students you wish to add by clicking the box next to their name on the left. (To select all the students on the current page, you may click the box at the far-left corner of the Student list.)

63February 7, 2018
STEP 05. CREATE GROUPS (CBT & PBT) Assessment Preparation
8. To remove students from the group, you may deselect them by clicking on an already checked box:
9. To finish editing the Group, click Save.
To Delete a Group:
1. To Delete a Group go to the “Students” menu on the dashboard and select “Find Groups” from the dropdown menu and you will be taken to the Groups Found screen.
2. Select the box next to the group you want to delete.
3. Open the Actions dropdown and then click Delete. (Please Note: This cannot be undone.)
4. Click OK to confirm the Delete action.
Copying Groups
Users may also duplicate pre-existing groups.
1. Ensure you are pinned to a school as your organization.2. In the Portal, hover over “Students” on the dashboard menu ribbon.3. Select “Find Groups” from the dropdown menu.4. Click on the name of a group from the list of available groups that appears.5. On the group’s details page, select the “Copy” icon to copy the group:
6. Enter a name for the copied group and a description, if desired.
7. Click “Copy” to copy the group.

64February 7, 2018
STEP 06. TECHNOLOGY SET-UP AND CONFIGURATION (CBT ONLY) Assessment Preparation
Step 06. Technology Set-Up and Configuration (CBT Only)Please note: The following seven steps apply to computer-based tests only. Please see page 103 for the remaining steps that apply to paper-based tests only.
App Check and Proctor Caching provide technological supports to optimize the TestNav platform for Computer-Based Testing.
• App Check confirms that the device or computer is running a supported operating system (OS) and OS version. After it checks the OS, App Check confirms that the device or computer is configured to launch TestNav in kiosk mode. You must run App Check on every device in your testing environment.
• Proctor Caching software allows you to pre-cache test content to your local network and locally store an encrypted copy of all pre-cached tests.
Users are highly advised to consult the Technical Readiness Manual for more setup and configuration information.
For the most current information regarding technology requirements and setup please visit the link below:
• https://support.assessment.pearson.com/display/TN/TestNav+8+Online+Support

65February 7, 2018
STEP 07. TEST SESSION SET-UP (CBT ONLY) Assessment Preparation
Step 07. Test Session Set-Up (CBT Only)Please note: This step applies to computer-based testers. Please see page 103 for the remaining steps that apply to paper-based testers.
ACT Aspire Test Session Setup Process
Creating and managing test sessions in the Portal establishes the Portal as a centralized hub for planning, organizing, and monitoring your ACT Aspire test administration. Test Session setup provides tools for easy scheduling and session-level proctor caching.
To setup test sessions for the ACT Aspire test, please follow the step-by-step instructions listed below.
To Setup a Single Test Session in the Portal
1. Navigate to the blue switch Organization dropdown located in the upper-right corner of the dashboard screen to select the school for which you would like to create test sessions.
2. On the menu ribbon, hover over the test type that you would like to create, and click the “Create a Test Session” option from the dropdown menu.
3. On the New Test Details screen, the blue “Create Single” icon will be activated. Click the bullet-list button located next to the Test field under Step 1, Test Selection to open the Select a Test window. To select the test and mode you wish to administer, click the blue link at the right end of the desired Test Name:
4. After selecting the test session subject, grade, and mode, click the calendar icons next to Start Date and End Date under Step 2, Testing Schedule. This establishes the overall time frame during which you desire to administer an ACT Aspire test session. After selecting your start date an end date will auto populate with the date two weeks from the start date. If you wish to change the end date you can override the date by selecting a new date within the administration window. If your location participates in Daylight Savings Time, please check the “Enable Daylight Savings Time” box to the right of the time zone dropdown menu.

66February 7, 2018
STEP 07. TEST SESSION SET-UP (CBT ONLY) Assessment Preparation
Please note: For CBT testing, it is imperative that you test within the determined test schedule and Daily Test Window.
5. For Step 3, Testing Details, enter a name for your test session.
Please note: For paper-based sessions (paper accommodations such as Large Print, Braille, ASL) the first 6 characters in the Test Session Title field will appear on a paper Pre-ID. Because of this, we suggest the following naming convention:
• Test Session ID (The first six characters; auto-assigned by the Portal);Test Session Title (The remaining characters) Teacher’s Initials, Grade, Subject.
• For example, for Jane Doe’s Grade 4 English class, the ID would be “JDG4E” – Teacher: Jane Doe, Grade 4, English.
6. If your school has performed Proctor Caching, under Step 4, Proctor Caching Details, you will see the Primary Host IP Address and the Primary Host Port. These details ensure that the system is ready for the test. (See below section for Proctor Cache details.) Please note: Proctor Caching is highly recommended!
7. Click Create Test Session to finalize test session details. You may edit open test sessions at any time. Once a test session is closed, it can no longer be edited.
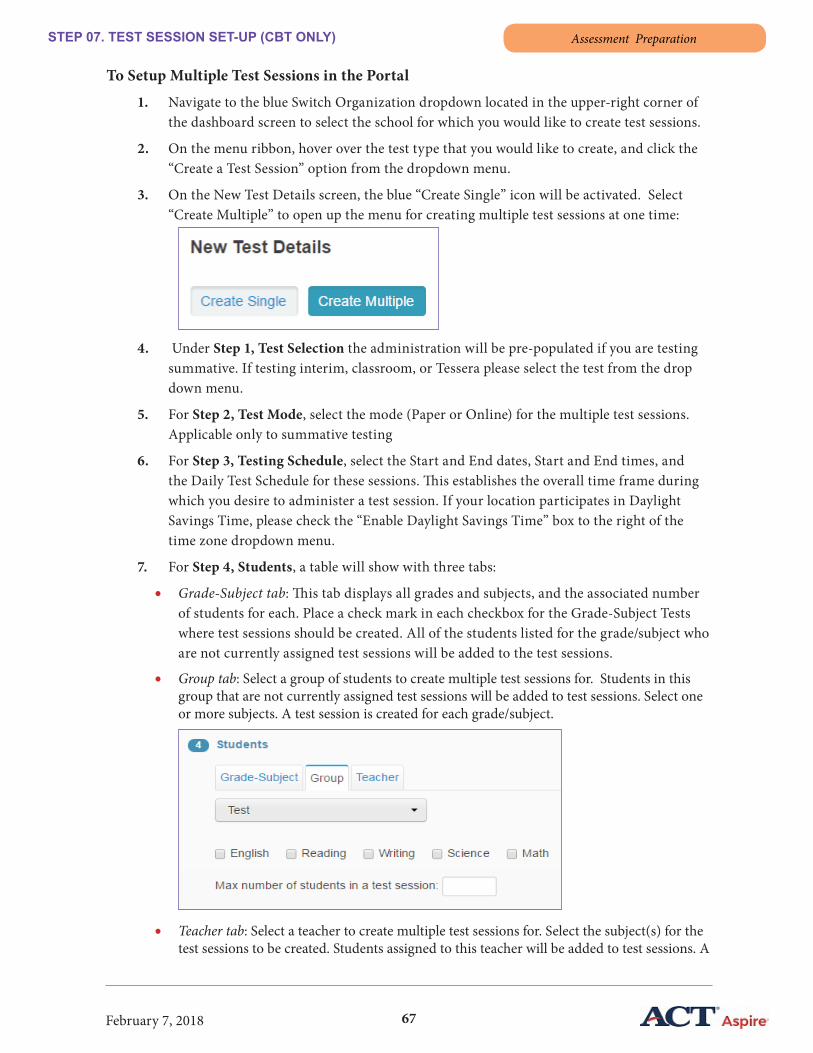
67February 7, 2018
STEP 07. TEST SESSION SET-UP (CBT ONLY) Assessment Preparation
To Setup Multiple Test Sessions in the Portal
1. Navigate to the blue Switch Organization dropdown located in the upper-right corner of the dashboard screen to select the school for which you would like to create test sessions.
2. On the menu ribbon, hover over the test type that you would like to create, and click the “Create a Test Session” option from the dropdown menu.
3. On the New Test Details screen, the blue “Create Single” icon will be activated. Select “Create Multiple” to open up the menu for creating multiple test sessions at one time:
4. Under Step 1, Test Selection the administration will be pre-populated if you are testing summative. If testing interim, classroom, or Tessera please select the test from the drop down menu.
5. For Step 2, Test Mode, select the mode (Paper or Online) for the multiple test sessions. Applicable only to summative testing
6. For Step 3, Testing Schedule, select the Start and End dates, Start and End times, and the Daily Test Schedule for these sessions. This establishes the overall time frame during which you desire to administer a test session. If your location participates in Daylight Savings Time, please check the “Enable Daylight Savings Time” box to the right of the time zone dropdown menu.
7. For Step 4, Students, a table will show with three tabs:
• Grade-Subject tab: This tab displays all grades and subjects, and the associated number of students for each. Place a check mark in each checkbox for the Grade-Subject Tests where test sessions should be created. All of the students listed for the grade/subject who are not currently assigned test sessions will be added to the test sessions.
• Group tab: Select a group of students to create multiple test sessions for. Students in this group that are not currently assigned test sessions will be added to test sessions. Select one or more subjects. A test session is created for each grade/subject.
• Teacher tab: Select a teacher to create multiple test sessions for. Select the subject(s) for the test sessions to be created. Students assigned to this teacher will be added to test sessions. A

68February 7, 2018
STEP 07. TEST SESSION SET-UP (CBT ONLY) Assessment Preparation
test session is created for each grade/subject. Use the checkbox to indicate the teacher will be added to the test session as a Room Supervisor.
Please note: Users may change the maximum number of student in a test session, as needed. Online test sessions maximum is 200. Recommended paper test session size is 400.Please note: The system uses the student’s Actual Grade to place them in a test session. To schedule a student for Off-Grade testing, do this manually after the test session is created.
8. If your school has performed Proctor Caching, under Step 5 Proctor Caching Details, you will see the Primary Host IP Address and the Primary Host Port. These details ensure that the system is ready for the test. (See below section for Proctor Cache details.) Please note: Proctor Caching is highly recommended.
9. Click Create Test Sessions to begin creating all appropriate test sessions. This may take up to a couple of hours depending on the number of test sessions and number of students.
Please note: You may check the test session creation status by hovering over the test type on the dashboard menu and selecting “Test Session Jobs Status”. This page will show test sessions with varying statuses. Any session with a “Warning” status can be clicked to view the description of the issue. Click on a student’s Student ID to view the student’s profile.
If the Proctor Cache Details Are Not Visible (For Single and Multiple Sessions):
• If you do not see this information, navigate to the Organizations menu and select Proctor Cache Settings.
• You will find the Primary Host IP Address by following the appropriate steps below:
o For PCs:
☐ Go to the Start menu on the proctor caching computer.
☐ Search for cmd.exe in the Search field.

69February 7, 2018
STEP 07. TEST SESSION SET-UP (CBT ONLY) Assessment Preparation
☐ Type “ipconfig” into the command prompt.
☐ The IP Address is listed in the IPv4 Address row.
☐ Enter this information in the Primary Host IP Address.
o For Macs:
☐ Go to the Apple menu on the proctor caching computer.
☐ Select System Settings.
☐ Select Network.
☐ Click on the Active Network Interface (probably Ethernet).
☐ Your IP Address will be in the window
• In the Port field enter “4480”.
• Hit Save. Proctor Caching is now complete.
To Copy a Test Session to a New Subject:Please note:
• To use this functionality you must have Administrator or Test Session Supervisor-level permissions in the Portal.
• Any users in the original session will be copied to the duplicated sessions.
• The default Proctor Cache setting will be used for duplicated sessions.
1. Navigate to a test session that you would like to copy to create a new test session for a different subject.
a. For example: You currently have a Math test session with 30 students in it. Those same students also need to be placed into a Reading test session. Please navigate to the Math test session to begin the copying process.
2. On the Test Session Details screen, select the “Copy” button.
3. A list of available subjects will appear. Choose the subject and modes you wish to create the new test sessions for.
4. After making a selection, the option to change the name of the test session will appear. Updating this field is optional.
Please note: For paper-based sessions (paper accommodations such as Large Print, Braille, ASL) the first 6 characters in the Test Session Title field will appear on a paper Pre-ID. Because of this, we suggest the following naming convention:
o Teacher’s Initials, Grade, Subject. For example, for Jane Doe’s Grade 4 English class, the ID would be “JDG4E” – Teacher: Jane Doe, Grade 4, English
5. Select the test start and end dates.

70February 7, 2018
STEP 07. TEST SESSION SET-UP (CBT ONLY) Assessment Preparation
6. Select “Copy” to complete this process. A message will appear inviting you to view the progress of your test session copy request. Click “OK” to proceed.
7. You will be directed to the Test Session Jobs Status page, which will display a status report for any test sessions created using the copy fun ctionality:
8. Please review the “Status” column for any warnings that occurred during test sessions creation.
The following list provides possible warnings:
• Could not create test session
• Student(s) not added
o Student is already in a test session
o Student’s actual grade is not allowed for the destination test session
• Student’s actual grade is different than the tested grade (off-grade)
• Students from two different grades added to the test session
• The current test does not have an accommodated form necessary for a student’s PNP
9. After reviewing these copied sessions you may navigate to any of them to edit any test session information. Please note: a warning message does not automatically mean that the session cannot be created as originally configured.
Assigning User Roles to Test Sessions
Assigning Authorized Users to test sessions distributes test administration responsibilities to select district and school personnel. Test Supervisors can set and change user permission levels to ensure optimal administrative support and maintain test security.

71February 7, 2018
STEP 07. TEST SESSION SET-UP (CBT ONLY) Assessment Preparation
• Please note: Administrators and Test Coordinators are given Test Supervisor test session roles automatically and will not need to be assigned to test sessions.
To Assign a Test Session Role to an authorized Portal user:
1. From the My Test Sessions screen, locate and select the test session to which you wish to add authorized users.
2. From the Test Session Details page, select the Authorized Users dropdown on the right side of the screen just under the Quick Guide to display the list of authorized users.
3. Click the Add/Edit link to open the Add & Remove Users/Change User Permissions window.
4. In the Add & Remove Users/Change User Permissions window, locate the individual to whom you want to assign a test session role, and click the Not Assigned link next to the user’s name. This will open a separate box from which you can assign a user the role of Test Supervisor, Room Supervisor, or Guest. (See the Appendix D: User Roles Matrix for information on user roles.)
5. If you wish to add a user who is not yet registered in the Portal, you can send an invitation from the test session by selecting the “Invite” link and placing the desired email address in the “Invite Room Supervisor to Test” popup. The user will receive an email invitation and will automatically be added as a Room Supervisor to the desired test session.
To Invite a New User to a Test Session
1. On the “My Test Sessions” page, locate and click the “Action” dropdown button:
2. Select the “Add User to Test Sessions” option from the dropdown menu:
• Please note: The functionality to start and close multiple test sessions is also found from this Action dropdown menu.
3. The list of test sessions will reload with empty checkboxes next to each test session name. Select the test sessions for which you would like to invite a room supervisor to and click “Submit”.
72February 7, 2018
STEP 07. TEST SESSION SET-UP (CBT ONLY) Assessment Preparation
4. A popup window will display showing the test session permission role that each user has for all of the selected test sessions. Users with a warning icon do not have the same permission role in all of the selected test sessions or may not be an authorized user in all of the selected test sessions.
5. Select the checkbox next to a user’s name and select the “Assign Permissions” dropdown to assign a “Not Assigned” user with a Test Supervisor, Room Supervisor, or Guest permission.
• Please note: Permissions can’t be changed for users identified as “Creators”. Users changed from a permission role to “Not Assigned” will be removed from all selected test sessions.
6. Click “Save” when finished to save your changes. A “Success” message will appear; click “OK” to proceed.
Adding and Removing Students from Test Sessions
The Add and Remove Students functionality gives Test Supervisors a user-friendly tool for managing test session rosters in the Portal. This allows users to adjust to changes in a school’s student enrollment or easily place students into new test sessions as necessary.
Please note: Users may add up to 200 students to computer-based test sessions.
Adding Students
1. From the My Test Sessions screen, select the test session to which you will add students. This action will open the Test Session Details screen.
2. Click the Add button. Please note that, if you wish to re-test a student on a subject after they have already tested in another session, they must be in Force Closed or Submitted status in the test session, reinstated to test in the appropriate subject, and then added to the new test session.
3. Select the boxes next to the names of students you wish to add, and then click Done.
Removing Students
1. From the My Test Sessions screen, select the test session from which the student(s) will be removed. This action will open the Test Session Details screen.
2. Select the boxes next to the names of students you wish to remove.
3. Click the Remove button. Please note that the test session must be in Scheduled or Ready status. Once a student’s test session has been Started, the student cannot be removed from the session.
Moving Students to a New Session
1. From the My Test Sessions screen, select the test session from which the student(s) will be removed. This action will open the Test Session Details screen.
2. Select the boxes next to the names of students you wish to remove.
3. Click the Remove button.
4. Return to the My Test Sessions screen and select the test session to which you will add student(s). This action will open the Test Session Details screen.
5. Click the Add button.
6. Select the box next to the name of the student(s) you wish to add, then click Done.
73February 7, 2018
STEP 07. TEST SESSION SET-UP (CBT ONLY) Assessment Preparation
Adding Students to Sessions Using Groups Created
The Portal gives test session creators the ability to build sessions by loading students according to Groups that have been created either in the Student Data Upload process or in the Portal. Using Groups to set up test sessions may facilitate a smoother test administration, and grants Administrators and Test Coordinators the ability to create Online Reports according to specific criteria.
Please note: A group must already be created and populated with students before attempting to add a group to a test session. See Creating Student Groups in the Portal.
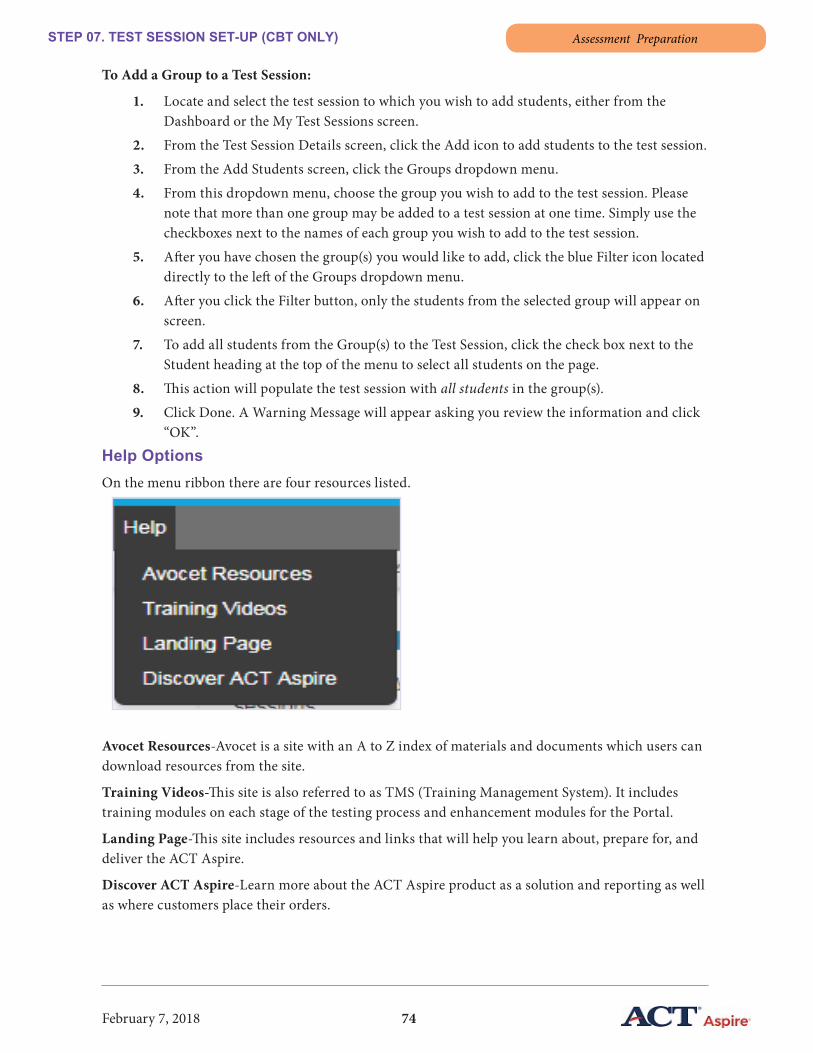
74February 7, 2018
STEP 07. TEST SESSION SET-UP (CBT ONLY) Assessment Preparation
To Add a Group to a Test Session:
1. Locate and select the test session to which you wish to add students, either from the Dashboard or the My Test Sessions screen.
2. From the Test Session Details screen, click the Add icon to add students to the test session.
3. From the Add Students screen, click the Groups dropdown menu.
4. From this dropdown menu, choose the group you wish to add to the test session. Please note that more than one group may be added to a test session at one time. Simply use the checkboxes next to the names of each group you wish to add to the test session.
5. After you have chosen the group(s) you would like to add, click the blue Filter icon located directly to the left of the Groups dropdown menu.
6. After you click the Filter button, only the students from the selected group will appear on screen.
7. To add all students from the Group(s) to the Test Session, click the check box next to the Student heading at the top of the menu to select all students on the page.
8. This action will populate the test session with all students in the group(s).
9. Click Done. A Warning Message will appear asking you review the information and click “OK”.
Help OptionsOn the menu ribbon there are four resources listed.
Avocet Resources-Avocet is a site with an A to Z index of materials and documents which users can download resources from the site.
Training Videos-This site is also referred to as TMS (Training Management System). It includes training modules on each stage of the testing process and enhancement modules for the Portal.
Landing Page-This site includes resources and links that will help you learn about, prepare for, and deliver the ACT Aspire.
Discover ACT Aspire-Learn more about the ACT Aspire product as a solution and reporting as well as where customers place their orders.

75February 7, 2018
STEP 08: PRECACHE CONTENT (CBT ONLY) Assessment Preparation
Step 08: PreCache Content (CBT Only)Please note: This step applies to computer-based testers. Please see page 103 for the remaining steps that apply to paper-based testers.
Pre-caching test content is highly recommended for Spring 2018 testing. Caching test content locally will help alleviate the strain of testing information passing back and forth to and from the TestNav servers.
Please see the Technical Readiness Manual on Avocet for more information regarding how to setup and use ProctorCache.
76February 7, 2018
STEP 09. PRINT AUTHORIZATION TICKETS (CBT ONLY) Assessment Preparation
Step 09. Print Authorization Tickets (CBT Only)Please note: This step applies to computer-based testers. Please see page 103 for the remaining steps that apply to paper-based testers.
Printing Authorization Tickets for Computer-Based Testing
Student Authorization Tickets provide students with secure TestNav login credentials, giving Room Supervisors a fast and efficient way of managing the start of a test session. Printing Authorization Tickets from the Portal streamlines the TestNav sign in process and facilitates easy testing-day management.
Test Supervisors and Room Supervisors are able to print 1, 2, 4, or 10 Authorization Tickets per page, either by school or by test session. Authorization tickets will include the student’s name in the following format: First name MI. Last name. (Example: John J. Smith’s name would appear as “John J. Smith”.)
Printing Authorization Tickets by School
1. Navigate to the blue Switch Organization dropdown located in the upper-right corner of the dashboard screen to select the school for which you would like to print Authorization Tickets.
2. Navigate to the Summative, Interim, Classroom, or Tessera Tests menu, and then click Test Session Print.
3. On the My Test Sessions screen, click Print and then select Authorization Tickets from the dropdown menu.
4. Select your desired sorting preference and number of tickets per page, and then click Print. Please be sure to set your printer settings to single-sided printing so that you can distribute Authorization Tickets to students.
• Select the number of Ticket(s) per page you with to print
• Selecting Sort by Student Name will create a printable PDF of Authorization Tickets for all students placed in test sessions, sorted alphabetically by last name.
• Selecting Sort by Session will create a printable PDF of Authorization Tickets for all students placed in test sessions, sorted alphabetically by test session name. For each test session, student authorization tickets are then sorted alphabetically by student last name.
Printing Authorization Tickets by Test Session
1. Navigate to the blue Switch Organization dropdown located in the upper-right corner of the dashboard screen to select the school for which you would like to print Authorization Tickets.
2. Navigate to the Summative, Interim, Classroom, or Tessera Tests menu, and then click Find My Test Sessions.
3. On the My Test Sessions screen, locate and select the name of an individual session to enter the Test Session Details screen.

77February 7, 2018
STEP 09. PRINT AUTHORIZATION TICKETS (CBT ONLY) Assessment Preparation
4. On the Test Session Details screen, click Authorization, and then select For All Students from the dropdown menu. You may also opt to print For Selected Students in the event that a student will not participate in their designated test session. From the Authorization dropdown menu, click on Print Settings to modify the number of Authorization Tickets per page you would like to print. The Portal’s default setting is 1 ticket per page.
5. By selecting a printing mode, the Portal will generate a printable PDF of Authorization Tickets for all selected students in the test session, sorted alphabetically by last name.
Downloading a CSV file of selected students containing their authorization information:
1. Click Authorization and select For All Students on the dropdown menu.
2. A message will appear titled Print Authorization Settings that will give the options to download the authorization tickets as a CSV, or to view the authorization tickets as PDFs.
3. Select the Download as CSV option, and click “Submit”.
4. Open the file after it has downloaded to view the list of students in the test session and their respective log-in information.
5. The file will include the following information:
• Test Name
• Test Session Name
• Student Name
• Student ID
• User Name
• Password
• TestNav URL
• App - TestNav Desktop app instructions (Launch your TestNav app to login.)
Printing Personal Needs Profile (PNP) Information
The Personal Needs Profile Printing functionality provides a comprehensive record of all students in a test session who require Accommodation or Open Access supports during ACT Aspire testing. This improves the ability of Room Supervisors to manage TestNav onboarding, account for extra time, and make other adjustments to test session procedures.
You can easily locate sessions that have students with Personal Needs Profiles (PNPs) by looking for the PNP icon immediately beneath a test session’s name on the My Test Sessions screen:
The PNP icon will also appear on the Test Session Details screen, next to the name of any student to whom PNP supports are assigned.
To print PNP Information for a Test Session
1. From the Dashboard or My Test Sessions screen, locate and click on a test session that contains students with a PNP.
2. Click on the blue Print icon at the upper-left portion of the Test Session Details screen, and

78February 7, 2018
STEP 09. PRINT AUTHORIZATION TICKETS (CBT ONLY) Assessment Preparation
then select Personal Needs from the dropdown menu.
3. This will generate a printable PDF that lists each student in the test session with a Personal Needs Profile, along with the supports associated with their PNP, by Name, Presentation Supports, Interaction & Navigation Supports, Response Supports, and General Test Conditions. (Please note that this option is not available if there are no students with a PNP in the test session.)
4. Confirm the information and print the PNP roster information.
Steps for Printing PNP at the Organization Level
Users can print a list of all students in an organization who have a Personal Needs Profile by following these steps:
1. Hover over Summative, Interim, Classroom, Tessera Tests on the dashboard menu ribbon and select Test Session Print. This will take you to a My Test Sessions screen that lists all test sessions at the selected organization. (Please note: Users may switch between the three test session statuses to display test sessions.)
2. Click Print, and then select Personal Needs from the dropdown menu.
3. This will generate a printable PDF that lists each student in the organization who has a Personal Needs Profile, along with the supports selected for their PNP, by Name, Presentation Supports, Interaction & Navigation Supports, Response Supports, and General Test Conditions.
Please note the following items:
• If a student does not have any supports selected in their PNP, their name will not appear on the PNP Information printout.
• Only the supports selected on a student’s PNP will appear on the PNP Information printout.

79February 7, 2018
STEP 10. START ALL TEST SESSIONS (CBT ONLY) Assessment Preparation
Step 10. Start All Test Sessions (CBT Only)Please note: This step applies to computer-based testers. Please see page 103 for the remaining steps that apply to paper-based testers.
Activating a Test Session in the Portal
After your test sessions have been completely built and populated, test sessions must be started in the Portal in order to begin Computer-Based testing. Use the following information as a guide through the test session activation process.
Starting Test Sessions
Follow the steps below to start a test session.
1. Select “Find My Test Sessions” from the test type (Summative, Interim, Classroom, Tessera) dropdown menu. (Not started test sessions will be found under the “Not Started” filter.)
2. Click on the name of the test session that you would like to view.
Please note: Any Not Started test sessions will have the date that the test is scheduled to begin in the “Scheduled Start Date” column.
3. From the Test Session Details screen, click Ready, and select Start Test from the dropdown menu.
Please Note: The Test Session Status button will read Scheduled if the current date and time are before the date and time set during test session setup.
4. Once the test session has been started, the Test Session Status button will change to In Progress.
View and Edit Your Test Sessions1. On the Portal dashboard page, select “View All Tests” in the lower right corner of the
dashboard screen.
2. From the My Test Sessions screen, select the title of the test session you want to view or edit. Use the filter buttons above the list to search tests by subject and grade.
3. On the Test Session Details screen, select Edit.
4. On the Edit Test Details screen, modify information as needed and select Done to save.
5. Repeat for all users you wish to assign or reassign or remove. Select Save.
6. A “Success” message will appear; click “OK” to proceed.

80February 7, 2018
STEP 11. ADMINISTER THE TEST (CBT ONLY) Assessment Preparation
Step 11. Administer the Test (CBT Only)Please note: This step applies to computer-based testers. Please see page 103 for the remaining steps that apply to paper-based testers.
Related Resources:
• Calculator Policy: http://actaspire.avocet.pearson.com/actaspire/home#15317
Test Session Monitoring Dashboard
The Monitoring Dashboard supplies Administrators with four widgets for tracking student testing progress:
• Student-Test Assignment
• Test Session Status
• Student PNP Supports Distribution
• Student Session Status
The Monitoring Dashboard may be found by hovering over “Summative, Interim, or Classroom” on the dashboard menu ribbon and selecting “Monitoring Dashboard” from the dropdown menu.
The interactive Student Status Reports widgets also help users search for test sessions according to specific criteria. You may close or minimize any of the four widgets by selecting the “-” or “x” in the upper right hand corner of the widget box. To redisplay a report that you have closed, select the Monitoring Dashboard option from the menu.
The Student-Test Assignment Widget allows Administrators to determine if all students have been assigned to an online or paper test session for each ACT Aspire subject. Users can also drill down to the School and Grade level to identify students who have not been assigned to a test session in a particular subject by clicking on the corresponding number in the Student-Test Assignment chart:

81February 7, 2018
STEP 11. ADMINISTER THE TEST (CBT ONLY) Assessment Administration
Notes on the Student Test Assignment Widget:
• The total number of students displayed on the Student Test Assignment Widget should match the student count for the entire organization.
• By clicking on bar-graph links on the Student Test Assignment Widget, users will be taken to the appropriate My Test Sessions screen, rather than to a list of students.
The Test Session Status Widget provides a visual representation of an organization’s test sessions in the Portal. Users can access additional detail about session counts by clicking on the desired section of the pie chart, which will redirect them to the My Test Sessions screen, according to test session status. (For example, if you click the Ready section of the pie chart, you will arrive on a list of Not Started test sessions on the My Test Sessions screen.)
The Test Session Status Widget displays data that reflects five possible test session statuses:
• Scheduled: Test sessions that have been scheduled prior to the beginning of the Testing Schedule. Test sessions will remain in Scheduled status until the first day of the testing schedule, as determined by the test session creator, after which the test session will enter Ready status.
• Ready: Test sessions that have not been Started in the Portal, but can be as per the determined Testing Schedule.
• In Progress: Test sessions that have been started in the Portal. Please note that a test session can still be in an In Progress state even after the close of the testing schedule.
• Closed: Test sessions that have been Closed in the Portal. Please note that a test session cannot be reopened once it has been closed.
• Auto Closed: Test sessions that have been auto closed 24 hours after the end of their testing window.
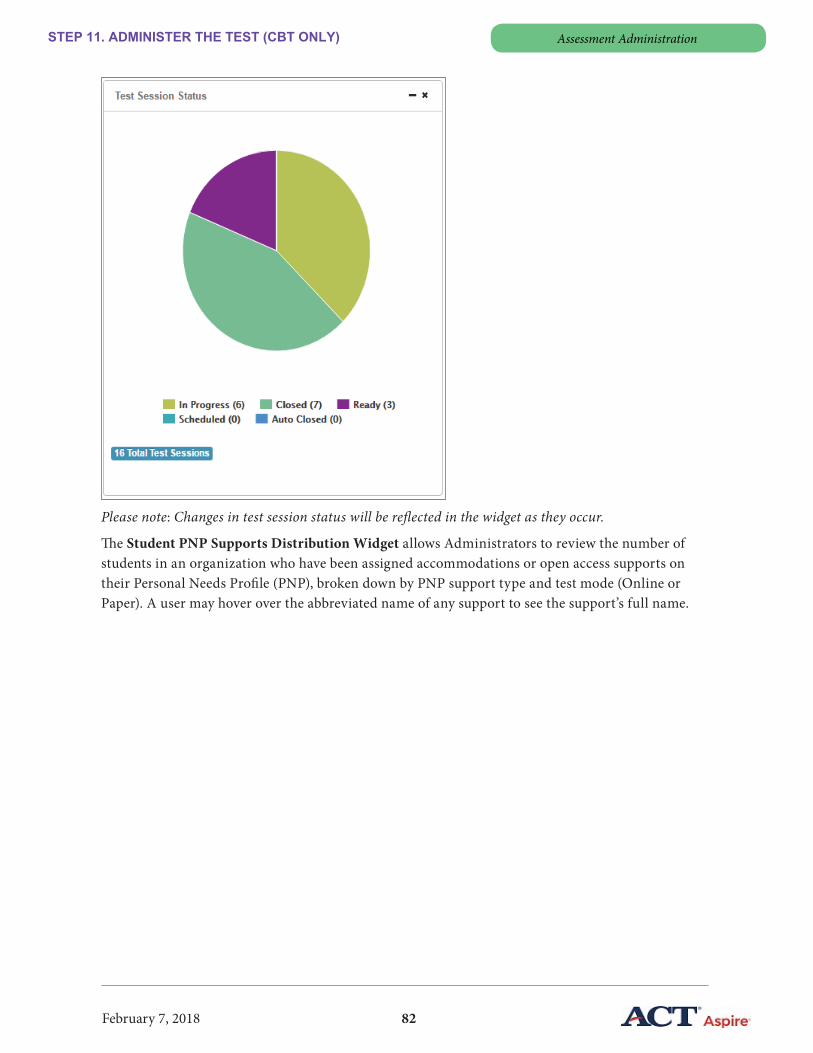
82February 7, 2018
STEP 11. ADMINISTER THE TEST (CBT ONLY) Assessment Administration
Please note: Changes in test session status will be reflected in the widget as they occur.
The Student PNP Supports Distribution Widget allows Administrators to review the number of students in an organization who have been assigned accommodations or open access supports on their Personal Needs Profile (PNP), broken down by PNP support type and test mode (Online or Paper). A user may hover over the abbreviated name of any support to see the support’s full name.

83February 7, 2018
STEP 11. ADMINISTER THE TEST (CBT ONLY) Assessment Administration
The Student Session Status Widget provides an overview of student statuses across all test sessions in the Portal and allows users to track testing progress at the student level. This widget displays the nine statuses a student can be in depending on the status of his or her test session:
• Scheduled: Number of students whose test sessions are in “Scheduled” status
• Ready: Number of students whose test sessions are in “Ready” status
• Active: Number of students whose test sessions are in “Active” status
• Exited: Number of students whose test sessions are in “Exited” status
• Resumed: Number of students who have a “Resumed” status
• Submitted: Number of students who have completed their test are in a “Submitted” status
• Force Close: Number of students who have been closed from a test session and have a “Force Close” status
• Did Not Test: Number of students who did not test. (Students who were in Unregistered, Scheduled, or Ready statuses when their test sessions was closed.)
• Unregistered: Number of students that weren’t able to successfully register in TestNav due to a technical error

84February 7, 2018
STEP 11. ADMINISTER THE TEST (CBT ONLY) Assessment Administration
Portal Dashboard Lights
The Dashboard Lights that accompany Test Session information on the Portal’s Dashboard screen provides an at-a-glance test session status updates. This allows your organization’s users to manage administrative workflows and track the progress of individual test sessions, as well as the organization’s overall test administration.
Please Note: Portal Dashboard Lights will only show the five most recently created test sessions. Also Auth/Roster Printed will not change to green if printed by school rather than by session.
On the Dashboard page, you will find five Dashboard Light columns that correspond to established test sessions in the Portal. These status lights track the progress of a test session through the following administrative steps:

85February 7, 2018
STEP 11. ADMINISTER THE TEST (CBT ONLY) Assessment Administration
• Students Added: Indicates if students have been added to a test session.
• Auth/Roster Printed: Indicates if Authorization Tickets or a Student Roster have been printed for the test session. (Only if the roster was printed at the organization level.)
• PNP Printed: Indicates if a Personal Needs Profile roster has been printed, when applicable.
• Started: Indicates if the test session has been Started in the Portal.
• Closed: Indicates if the test session has been Closed in the Portal.
The lights will either be gray, green, or red, depending on an administrative step’s status:
• Gray: Not applicable in current state
• Green: Action completed
• Red: Necessary steps have not been completed
Please note that the Auth/Roster Printed and PNP Printed columns do not need to be in a green “Action Completed” state in order to administer a test. These indicators signify only that these steps were taken for a given test session.
Manually Logging Out of TestNav
Students have the option to sign out of TestNav while they are participating in the test. When students attempt to sign out, they will be given the option to return to the test to finish it later. Students will perform the actions listed below to sign out of TestNav.
Please note the following important details for the information below:
• The room supervisor must resume each test that is in an “Exited” status in order for each student to continue testing.
• Please do not force close a student’s test if the student is in “Exited” status.
• Please do not close a test session until all students have completed testing.
Students should perform the following steps to sign out of TestNav:
1. Click on the person icon in the upper right-hand side of the TestNav window.
2. Select “Sign out of TestNav” from the menu.
3. Click “Save and Return Later” from the pop-up window:

86February 7, 2018
STEP 11. ADMINISTER THE TEST (CBT ONLY) Assessment Administration
4. After the student performs these actions, he or she will be logged out of TestNav and the student’s status in the Portal will change to “Exited”.
Resuming an Exited Student
Once students have exited TestNav they will need to be resumed in order to log back into the exited test. If an exited student attempts to log into TestNav without being resumed, a warning message will display in TestNav:
To Resume a Single Exited Student:
1. Locate the exited student in the Test Session Details screen. The student’s status in the Status column will display as “Exited”.
2. Click the word “Exited”, and select “Resume Test”:
3. The student’s status will change to “Resumed” and he or she will be able to login to TestNav using the same credentials initially used to enter the test for this test session.
To Resume Multiple Exited Students at Once:
1. Locate the exited students in the Test Sessions Details screen.
2. Click the checkbox to the left of the students’ names (You may also click the checkbox on the column header to select all students):

87February 7, 2018
STEP 11. ADMINISTER THE TEST (CBT ONLY) Assessment Administration
3. Select the “Resume” icon from the bar of available actions:
4. You will receive a message that states the action was successful.
Please note: Any students in a “Force Close” status will not be resumed.
Submitting Final Answers
When students reach the last question, they will also have the ability to review their responses before submitting them.
To do this either select the Review dropdown at the top of the page, or click the orange “Not Answered” icon. A student may also review any questions they have bookmarked by clicking the blue “Bookmarks” icon.
Clicking Submit Final Answers will submit the student’s final answers and the student will be automatically logged out of TestNav. In the Portal, the status for this test session will change to Submitted.
Submitting Final Answers – Elapsed Time
While students are participating in the test, a timer will appear in the upper right side of the screen, showing the student how much time remains in the test. Once this timer has elapsed, students will

88February 7, 2018
STEP 11. ADMINISTER THE TEST (CBT ONLY) Assessment Administration
be asked to submit their final answers.
1. Once students have logged into TestNav, a timer will appear in the upper right side of the TestNav window, beside the student’s name.
2. When the student has five minutes of time remaining, a warning message will appear in the upper right corner of the TestNav window.
3. Once time has fully elapsed, the timer will display Submit Your Test and a window will appear asking students to submit their final answers. Students will click Submit Final Answers to submit their test and be logged out of TestNav.
Enabling Unplanned Extended Time
In some scenarios, students may be allowed to extend their time beyond the allotted time for the test. Additionally, the room supervisor will enter a special comment in the Portal for the student who received the extra time. It is important to note that this time extension is likely something that is predetermined, and possibly a recorded support for the student. Extra time is not enabled for students simply because they want more time to test.
1. If a student runs out of time during a test the following warning will appear:

89February 7, 2018
STEP 11. ADMINISTER THE TEST (CBT ONLY) Assessment Administration
2. Click on the Proctor Only link and enter the Proctor Password. The Proctor Password can be found on the Test Sessions Details screen. Click on the Proctor Password dropdown to display the password.
3. After entering the password, click Continue.

90February 7, 2018
STEP 11. ADMINISTER THE TEST (CBT ONLY) Assessment Administration
4. A final screen will appear where you can select Untimed or Enter time. Choose an option and click Continue.
Recording Unplanned Extra Time in the Portal
If any students receive extra time, a warning message will appear when the test session is closed. This warning message alerts the room supervisor that one or more students in the session being closed have received extra time, and a comment must be entered to record the reason for the extra time.
1. Click the clock icon directly to the right of the comment icon in the Comment column. This comment icon will appear as an outline of a clock if a comment has not yet been entered, and a darker ‘filed in’ icon will appear if a comment has been saved. This allows you to easily scan for students who need comments entered in the case that you have multiple comments to enter.
2. A dialog box will appear, allowing the room supervisor to select the reason and enter a comment for the extended time.

91February 7, 2018
STEP 11. ADMINISTER THE TEST (CBT ONLY) Assessment Administration
Managing Test Sessions
The Portal includes an array of tools to aid test session management and ensure a smooth and efficient test administration. These Portal tools provide authorized users with accessible means to find, edit, start, monitor, and close test sessions.
Finding Test Sessions
The My Test Sessions screen equips users with multiple tools for sorting and locating specific test sessions:
To access the My Test Sessions screen, hover over Summative, Interim, Classroom, or Tessera Tests, and click Find My Test Sessions on the dropdown menu.
From the My Test Sessions screen, users can filter test sessions according to:
• Test Mode – All, Paper, or Online
• Subject
• Grade
• Status – Not Started, In Progress, or Completed
• Search – Locate a test session by keyword
Editing Test Sessions
1. On the My Test Sessions screen, locate and select the name of the test session you wish to edit.
2. On the Test Session Details screen click Edit on the menu at the upper-left of the screen. This will open the Edit Test Details screen.
3. On this screen, authorized users can update the Testing Schedule information, Testing Details (Test Title and Instructions), and Proctor Caching enabling details.
4. After you have made the desired edits, click Done to save your changes.

92February 7, 2018
STEP 11. ADMINISTER THE TEST (CBT ONLY) Assessment Administration
Starting a Test Session
Once a test session enters Ready status, Administrators, Test Supervisors, and Room Supervisors can start a test. To do so, click on the blue Ready button at the center of the Test Session Details screen and select Start Test. Once a test session has been started, the status button will change to green and read In Progress. Once a session has been started, students can then log in during the days and times specified in the test session details. Users can also change the testing status of individual students by clicking on the status dropdown next to the student’s name.
Administrators and Test Coordinators may start multiple test sessions at once by completing the following steps:
1. Select a school from the organization dropdown menu.
2. Click “View All Tests”.
3. On the “My Test Sessions” page, locate and click the “Action” dropdown button:
4. Select “Start Test Sessions”.5. You may then select the check boxes next to the listed test sessions. Each test session will be
in a “Ready” status. You may also select all test sessions by selecting the check box next to the “Test Session Name” header name.
6. The started tests will move from “Not Started” to the “In Progress” status at the top of the table:
Viewing Student Progress
To track a student’s progress within a computer-based test session, click the name of the desired test session from the list on the My Test Sessions screen to display a list of names for all students in the test session. The Answered/Total column, located in the center of the session header will display the number of questions the student has viewed versus the total number of questions on the exam. (For example, “36/45” indicates that student has viewed 36 of 45 questions.)
Closing a Test Session
Once a test is complete, the test session must be Closed. To close a test session, navigate to the Test Status icon at the center of the Test Session Details screen and click Close Test. After a test session has been Closed it cannot be reopened.
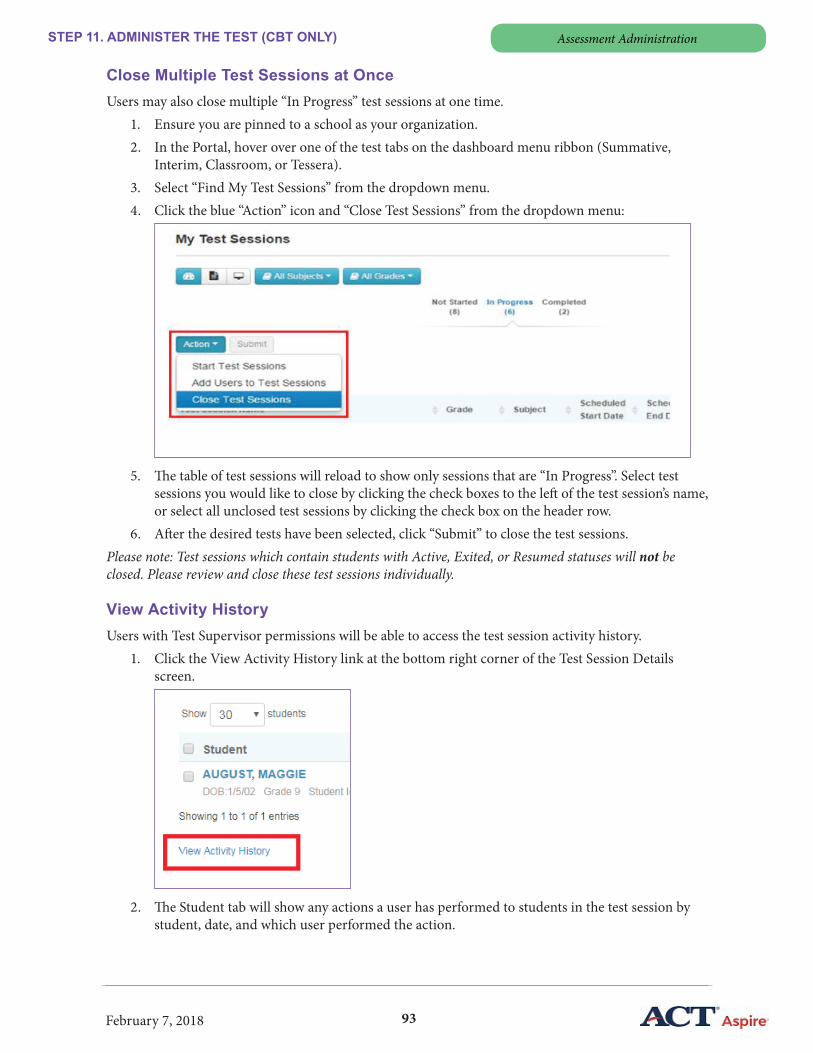
93February 7, 2018
STEP 11. ADMINISTER THE TEST (CBT ONLY) Assessment Administration
Close Multiple Test Sessions at OnceUsers may also close multiple “In Progress” test sessions at one time.
1. Ensure you are pinned to a school as your organization.2. In the Portal, hover over one of the test tabs on the dashboard menu ribbon (Summative,
Interim, Classroom, or Tessera).3. Select “Find My Test Sessions” from the dropdown menu.4. Click the blue “Action” icon and “Close Test Sessions” from the dropdown menu:
5. The table of test sessions will reload to show only sessions that are “In Progress”. Select test sessions you would like to close by clicking the check boxes to the left of the test session’s name, or select all unclosed test sessions by clicking the check box on the header row.
6. After the desired tests have been selected, click “Submit” to close the test sessions.Please note: Test sessions which contain students with Active, Exited, or Resumed statuses will not be closed. Please review and close these test sessions individually.
View Activity HistoryUsers with Test Supervisor permissions will be able to access the test session activity history.
1. Click the View Activity History link at the bottom right corner of the Test Session Details screen.
2. The Student tab will show any actions a user has performed to students in the test session by student, date, and which user performed the action.

94February 7, 2018
STEP 11. ADMINISTER THE TEST (CBT ONLY) Assessment Administration
3. The Test Session tab will show any actions done to change the test session status and which user performed the actions.
4. The Authorized Users tab will show which users have been added or removed as authorized users in a test session.
Registered/Returned Status ReportThe Registered/Returned Status report is a report that identifies the numbers and percentages of students in different phases of the testing process for a state, district, or school. This report can be found by hovering over “Summative Tests” on the dashboard menu ribbon, and selecting “Registered/Returned Status” from the dropdown menu.
Each row identifies the number of students in two statuses for each subject:
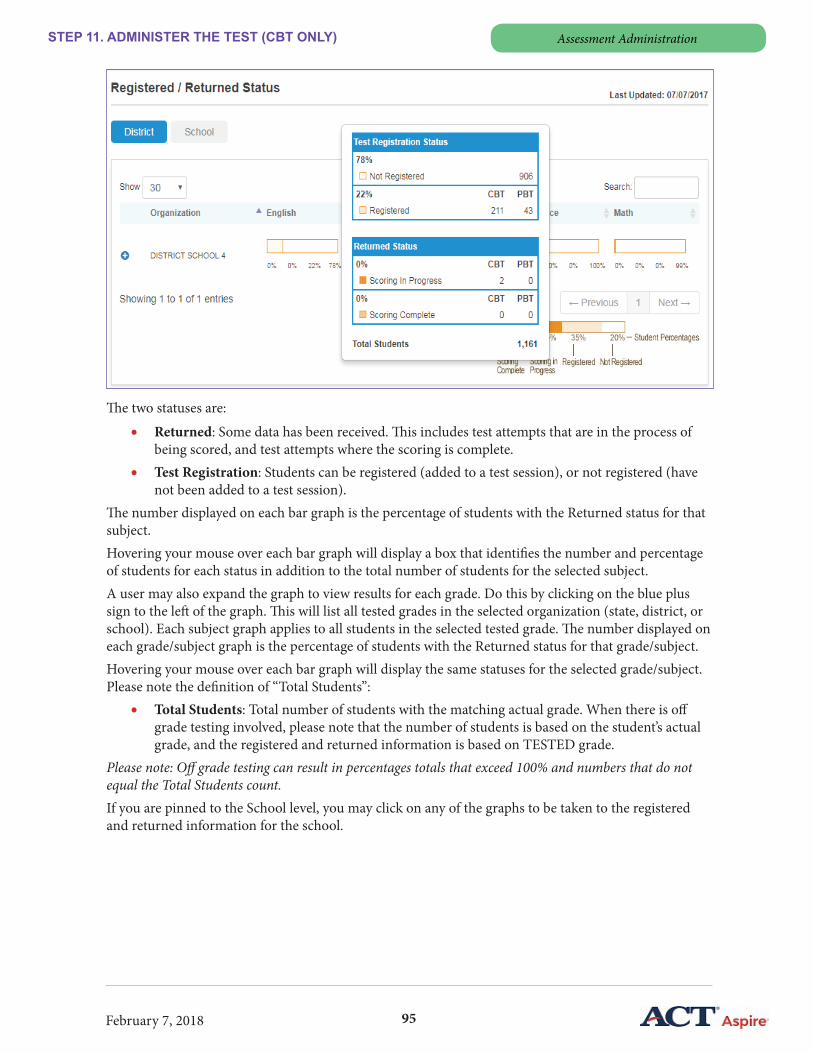
95February 7, 2018
STEP 11. ADMINISTER THE TEST (CBT ONLY) Assessment Administration
The two statuses are:
• Returned: Some data has been received. This includes test attempts that are in the process of being scored, and test attempts where the scoring is complete.
• Test Registration: Students can be registered (added to a test session), or not registered (have not been added to a test session).
The number displayed on each bar graph is the percentage of students with the Returned status for that subject.Hovering your mouse over each bar graph will display a box that identifies the number and percentage of students for each status in addition to the total number of students for the selected subject.A user may also expand the graph to view results for each grade. Do this by clicking on the blue plus sign to the left of the graph. This will list all tested grades in the selected organization (state, district, or school). Each subject graph applies to all students in the selected tested grade. The number displayed on each grade/subject graph is the percentage of students with the Returned status for that grade/subject.Hovering your mouse over each bar graph will display the same statuses for the selected grade/subject. Please note the definition of “Total Students”:
• Total Students: Total number of students with the matching actual grade. When there is off grade testing involved, please note that the number of students is based on the student’s actual grade, and the registered and returned information is based on TESTED grade.
Please note: Off grade testing can result in percentages totals that exceed 100% and numbers that do not equal the Total Students count.If you are pinned to the School level, you may click on any of the graphs to be taken to the registered and returned information for the school.

96February 7, 2018
STEP 11. ADMINISTER THE TEST (CBT ONLY) Post-Test Steps
This page identifies a more detailed, student level view of the graph that was selected on the school tab.Filtering ResultsThe default view is All Students. You may filter the displayed student results by selecting the All Students, Registered, Not Registered, Scoring in Progress, or Scoring Complete boxes. You may also click on a student’s name in the Student column to be linked directly to their student profile.Changing Search ResultsYou may view student level results of other search criteria by selecting 1 or more grades and/or selecting a different subject.
Register Students from Registered/Returned Status Report InterfaceUsers can also register students directly from the new Registered/Returned Status report.
1. Ensure you are pinned to a school as your organization.2. Navigate to the Registered/Returned Status report by hovering over “Summative Tests” on the
Portal dashboard menu ribbon and selecting “Registered/Returned Status” from the dropdown menu.
3. Select the blue plus sign next to a school’s name to expand the available grades.4. Click the status bar for a grade to be taken to that grade’s details screen.5. On the details screen, click the “Not Registered” box to display only students in the “Not
Registered” status:

97February 7, 2018
STEP 11. ADMINISTER THE TEST (CBT ONLY) Post-Test Steps
6. Click the blue “Register” link in the status column to register any unregistered students directly to a relevant test session.
Export Registered/Returned Report Data via CSV FileUsers may generate an extract that lists students for selected grades and subject and their associated statuses from the Registered/Returned Report screen.
1. On the Student Registered/Returned Status report screen (follow the steps above to access), select the “Extract” button:
2. A CSV file will download to your computer. Open this file to view the students for the selected test grades and subject and their associated current statuses.

98February 7, 2018
STEP 12. POST-TEST CLEAN-UP (CBT ONLY) Post-Test Steps
Step 12. Post-Test Clean-Up (CBT Only)Please note: This step applies to computer-based testers. Please see page 103 for the remaining steps that apply to paper-based testers.
Room Supervisor Responsibilities at the end of a Test Session
As students complete their tests it is important for Room Supervisors to follow the steps associated with closing test sessions, reporting irregularities, and allowing for any extra time a student may require.
1. Please have students select the “Submit Final Answers” button in TestNav to transmit final student responses after testing is complete.
2. Collect and count all scratch paper and authorization tickets before any students leave the testing room.
3. Ensure that all computers used for testing are logged out of TestNav.
4. Check each student’s test status in the Portal and submit a test on behalf of any student who needs assistance with submitting their test by clicking the triangle next to their name under the status column and selecting “Force Close.”
5. Finish recording any testing irregularities (session and student level) in the Portal.
6. Return all authorization tickets, scratch paper, and administration manuals to the Test Coordinator. Please remember that these materials must be either kept and stored at the local level or securely destroyed.
To extend a student’s time:
In some scenarios, students may be allowed extended test time beyond the allotted time for the test. The Room Supervisor will enter an overtime comment in the Portal for the student who received the extra time. It is important to note that this time extension is likely something that is predetermined, and possibly a recorded support for the student. Extra time is not to be enabled for students simply because the student wants more time to test.
1. Once the student’s timer has elapsed, a dialog box will appear on the screen.
2. On the Test Session Details screen in the Portal, the Room Supervisor will select the “Proctor Password” dropdown to display the password, which will be the same for all students in the test session:
3. Room Supervisors will click the Proctor Only button on the student’s computer and enter the Proctor Password, and click Continue.
4. The student will be allowed to return to the test.

99February 7, 2018
STEP 12. POST-TEST CLEAN-UP (CBT ONLY) Post-Test Steps
5. Time will either continue on indefinitely or continue for the amount of time entered. The student will be able to interact with the test as normal and submit final answers.
The student may review their answers before submitting their tests using the “Review” dropdown menu.
Clicking Review Answers will allow students to review test items. Bookmarked questions will be identified in the Bookmarked column. Students can click on the bookmarked question to navigate to the bookmarked test question.
Clicking Submit Final Answers will submit the student’s final answers and the student will be automatically logged out of TestNav. In the Portal, the status for this test session will change to Submitted.
If any students receive extra time, a warning message will appear when the test session is closed. This warning message alerts the room supervisor that one or more students in the session being closed have received extra time, and a comment must be entered to record the reason for the extra time.
To record the extra time comment and close the test session:
1. Select the clock icon directly to the right of the comment icon in the Comment column. This comment icon will appear as an outline of a clock if a comment has not yet been entered, and a darker ‘filled in’ icon will appear if a comment has been saved. This allows you to easily scan for students who need comments entered in the case that you have multiple comments to enter:
2. A dialog box will appear, allowing the room supervisor to select the reason and enter a comment for the extended time:

100February 7, 2018
STEP 12. POST-TEST CLEAN-UP (CBT ONLY) Assessment Preparation
Reporting Irregularities
Reporting irregularities allows school personnel to document any circumstance that might affect student scores. Irregularities should first be recorded by Room Supervisors with subsequent notification provided to the Test Coordinator.
Please Note: Recording an irregularity for a student is not the same as invalidating their test and dismissing them for prohibited behavior.
Room supervisors should document any of the following occurrences during administration of the tests:
• A student engages in any instance of prohibited behavior.
• A student becomes ill or leaves the room during testing.
• A student fails to follow instructions (responds to questions randomly, obviously does not read questions prior to responding, or refuses to respond to questions).
• A general disturbance or distraction occurs which could affect one or more students’ results.
• A student questions the accuracy or validity of an item.
• A student has a technical issue that interrupts testing.
Please note: Bathroom breaks do not require an irregularity to be entered!
For any instances where students can resume testing after illness, a technical issue, or a general disturbance, follow the instructions about how to resume a test session in the “Resume a Test” section of the Avocet website.
There are two types of irregularities: Student Irregularities (irregularities that only affect a single student), and Test Session Irregularities (irregularities that affect an entire test session). See the Appendix C section of this manual for the list of irregularity categories and codes used in the Portal.
• The Examinee category of irregularities includes student behaviors that may affect their performance or the performance of other students. These include the exhibition of prohibited behaviors described previously, student complaints about testing conditions or

101February 7, 2018
STEP 12. POST-TEST CLEAN-UP (CBT ONLY) Assessment Preparation
challenges of test items, and arriving late for testing or not showing up.
• The irregularities in the Environment/Materials category include external factors that may affect student testing. These include things like outside noises or hot/cold room temperatures, damaged, missing or stolen test materials, and occurrences like power outages, severe weather, or emergency evacuations.
• The Technical category pertains to the performance of online testing and includes system failure, slowness, or freezing, difficulties launching the test or with students using the testing platform, and other system issues like problems with using a keyboard, mouse, monitor or other related hardware.
• The Staff category includes actions testing staff may engage in that affect testing. These include failure to follow testing procedures like mistiming a test or not reading the verbal instructions from the Room Supervisor Manual, arriving late for testing or not showing up, or other inappropriate behavior like engaging in personal communication via other staff, telephone, or text during testing.
When choosing an irregularity category and code, keep in mind that certain irregularity reporting will determine whether a student can resume online testing or whether the student will need to switch to paper and pencil testing. In addition, notify your Test Coordinator of any irregularities after testing.
Reporting an Irregularity in the Portal
Irregularity comments will lock after they are submitted in a test session. These comments can not be edited or deleted and will remain until Rollover occurs for the user’s organization.
Test Session Irregularities
Example: Fire alarm – a situation that affects the administration of the entire test session.
1. Navigate to the Summative, Interim, Classroom, or Tessera Tests tab and click on Find My Test Sessions.
2. Select the test session to which you want to add a comment.
3. On the Test Session Details page, open the Comment menu next to the Print button, and click Add Comment to open the Group Comment window:
4. In this window, choose an irregularity from the available reason categories. In the event of a fire alarm, a commenter would choose “Disturbance/interruption/comfort” from the Environment/Materials category. Enter additional information in the provided Comment box. To submit the irregularity, click Save.

102February 7, 2018
STEP 12. POST-TEST CLEAN-UP (CBT ONLY) Assessment Preparation
Student Irregularities
Example: Student illness – a situation that affects an individual student.
1. Navigate to the Summative, Interim, Classroom, or Tessera Tests tab and click on Find My Test Sessions.
2. Select test session, then navigate to the Test Session Details page.
3. Click on the comment bubble specific to the student for whom an irregularity will be entered.
4. Document irregularity details under Available Reasons. Since an illness during the test is an examinee’s irregularity, look under the Examinee tab for “Illness during test”.
5. Check the box that matches the irregularity.
6. In the comment box on the right, please enter a short description of the event. Click Save to submit the irregularity:
Please see Appendix C: List of Irregularities for a complete list of available irregularities.

103February 7, 2018
STEP 06. TEST SESSION SET-UP (PBT ONLY) Assessment Preparation
Step 06. Test Session Set-Up (PBT Only)Please note: The following steps apply to paper-based tests only.
Test Session Setup Process
Creating and managing test sessions in the Portal establishes the Portal as a centralized hub for planning, organizing, and monitoring your ACT Aspire test administration.
To set up test sessions, please follow the step-by-step instructions listed below.
Please note: A student should not be removed from a test session after that student’s personalized materials have shipped.
To Setup a Single Test Session in the Portal
1. Navigate to the blue Organization dropdown located in the upper-right corner of the dashboard screen to select the school for which you would like to create test sessions.
2. On the menu ribbon, hover over the test type that you would like to create, and click the “Create a Test Session” option from the dropdown menu.
3. On the New Test Details screen, the blue “Create Single” icon will be activated. Click the bullet-list button located next to the Test field under Step 1, Test Selection to open the Select a Test window. To select the test and mode you wish to administer, click the blue paper link at the right end of the desired Test Name:
4. After selecting the test session subject, grade, and mode, click the calendar icons next to Start Date and End Date under Step 2, Testing Schedule. This establishes the overall time frame during which you desire to administer an ACT Aspire test session. Generation of paper materials will be based on the Start Date entered here.
5. For Step 3, Testing Details, enter a name for your test session.
Please note: For paper-based sessions the first 6 characters in the Test Session Title

104February 7, 2018
STEP 06. TEST SESSION SET-UP (PBT ONLY) Assessment Preparation
field will appear on a paper Pre-ID. Because of this, we suggest the following naming convention:
• Test Session ID (the first six characters; auto-assigned by the Portal) - Test Session Title (the remaining characters) Teacher’s Initials, Grade, Subject.
• For example, for Jane Doe’s Grade 4 English class, the ID would be “JDG4E” – Teacher: Jane Doe, Grade 4, English.
6. Click Create Test Session to finalize test session details.
To Setup Multiple Test Sessions in the Portal
Setting up multiple test sessions in the Portal at one time is a fast way to add students to test sessions.
1. Navigate to the blue Organization dropdown located in the upper-right corner of the dashboard screen to select the school for which you would like to create test sessions.
2. On the menu ribbon, hover over the test type you would like to create and click the “Create a Test Session” option from the dropdown menu.
3. On the New Test Details screen, the blue “Create Single” icon will be activated. Select “Create Multiple” to open up the menu for creating multiple test sessions at one time:
4. Click the dropdown menu under Step 1, Test Selection and select the administration for which you would like to create multiple sessions.
5. For Step 2, Test Mode, select the mode (Paper) for the multiple test sessions.
6. For Step 3, Testing Schedule, select the Start and End dates. This establishes the overall time frame during which you desire to administer an ACT Aspire test session. Generation of paper materials will be based on the Start Date entered here.
7. For Step 4, Students, a table will show with three tabs:
• Grade-Subject tab: This tab displays all grades and subjects, and the associated number of students for each. Place a check mark in each checkbox for the Grade-Subject Tests where test sessions should be created. All of the students listed for the grade/subject will be added to the test sessions.
• Group tab: Select a group of students to create multiple test sessions for. Students in this group will added to test sessions. And select one or more subjects. A test session is created for each grade/subject.

105February 7, 2018
STEP 06. TEST SESSION SET-UP (PBT ONLY) Assessment Preparation
• Teacher tab: Select a teacher to create multiple test sessions for. Select a subject to create multiple test sessions for. Students assigned to this teacher will be added to test sessions. A test session is created for each grade/subject. Use the checkbox to indicate the teacher will be added to the test session as a Room Supervisor.
• Please note: Users may change the maximum number of student in a test session, as needed. The recommended paper test session size is 400.
Please note: The system uses the student’s Actual Grade to place them in a test session. To schedule a student for Off-Grade testing, do this manually after the test session is created.
8. Click Create Test Session to begin creating all appropriate test sessions. This may take up to a couple of hours depending on the number of test sessions and number of students. View the My Test Sessions screen to see the test sessions after they are created.
Please note: You may check the test session creation status by hovering over “Summative Tests” on the dashboard menu and selecting “Test Session Jobs Status”. This page will show test sessions with varying statuses. Any session with a “Warning” status can be clicked to view the description of the issue. Click on a student’s Student ID to view the student’s profile.
To Copy a Test Session to a New Subject:Please note:
• To use this functionality you must have Administrator or Test Session Supervisor-level permissions in the Portal.
• Any users in the original session will be copied to the duplicated sessions.
1. Navigate to a test session that you would like to copy to create a new test session for a different subject.
a. For example: You currently have a Math test session with 30 students in it. Those

106February 7, 2018
STEP 06. TEST SESSION SET-UP (PBT ONLY) Assessment Preparation
same students also need to be placed into a Reading test session. Please navigate to the Math test session to begin the copying process.
2. On the Test Session Details screen, select the “Copy” button.
3. A list of available subjects will appear. Choose the subject and modes you wish to create the new test sessions for.
4. After making a selection, the option to change the name of the test session will appear. Updating this field is optional.
Please note: For paper-based sessions (paper accommodations such as Large Print, Braille, ASL) the first 6 characters in the Test Session Title field will appear on a paper Pre-ID. Because of this, we suggest the following naming convention:
o Teacher’s Initials, Grade, Subject. For example, for Jane Doe’s Grade 4 English class, the ID would be “JDG4E” – Teacher: Jane Doe, Grade 4, English
5. Select the test start and end dates.
6. Select “Copy” to complete this process. A message will appear inviting you to view the progress of your test session copy request.
7. You will be directed to the Test Session Jobs Status page, which will display a status report for any test sessions created using the copy functionality:
8. Please review the “Status” column for any warnings that occurred during test sessions creation.
The following list provides possible warnings:
• Could not create test session
• Student(s) not added
o Student is already in a test session

107February 7, 2018
STEP 06. TEST SESSION SET-UP (PBT ONLY) Assessment Preparation
o Student’s actual grade is not allowed for the destination test session
• Student’s actual grade is different than the tested grade (off-grade)
• Students from two different grades added to the test session
• The current test does not have an accommodated form necessary for a student’s PNP
9. After reviewing these copied sessions you may navigate to any of them to edit any test session information. Please note: a warning message does not automatically mean that the session cannot be created as originally configured.
Assigning User Roles to Test Sessions
Assigning Authorized Users to test sessions distributes test-administration responsibilities to select district and school personnel. Test Supervisors can set and change user permission levels to ensure optimal administrative support and maintain test security.
• Please note: Administrators and Test Coordinators are given Test Supervisor test session roles automatically and will not need to be assigned to test sessions
To Assign a Test Session Role to an authorized Portal user:
1. From the Find My Test Sessions screen, locate and select the test session to which you wish to add authorized users.
2. From the Test Session Details page, select the Authorized Users dropdown on the right side of the screen just under the Quick Guide to display the list of authorized users.
3. Click the Add/Edit link to open the Add & Remove Users/Change User Permissions window.
4. In the Add & Remove Users/Change User Permissions window, locate the individual to whom you want to assign a test session role, and click the Not Assigned link next to the user’s name. This will open a separate box from which you can assign a user the role of Test Supervisor, Room Supervisor, or Guest. (See the ACT Aspire User Roles Overview for information on test-session user roles.)
5. If you wish to add a user who is not yet registered in the Portal, you will need to send an invitation from the Portal, and the invitee must accept the Portal invitation before they can be associated with a test session.
To Invite a New User to a Test Session
1. Please follow steps 1 and 2 above.
2. Click the Invite link to open the Invite Room Supervisor to Test window.
3. Type the e-mail address(es) of the user(s) you wish to invite and click Submit. The new user will be e-mailed an invitation to join the test session at the permission level of Room Supervisor.
4. Once the new user has accepted the invitation, you may edit their user role by following the Assign a Test Session Role steps listed above.
Adding and Removing Students from Test Sessions
The Add and Remove Students functionality gives Test Supervisors a user-friendly tool for managing

108February 7, 2018
STEP 06. TEST SESSION SET-UP (PBT ONLY) Assessment Preparation
test session rosters in the Portal. This allows users to adjust to changes in a school’s student enrollment or easily place students into new test sessions as necessary.
Please note: Users may add up to 400 students to paper-based test sessions.
Adding Students
1. From the My Test Sessions screen, select the test session to which you will add students. This action will open the Test Session Details screen.
2. Click the Add button. Please note that, if you wish to re-test a student on a subject after they have already tested in another session, they must be Force Closed in the test session, reinstated to test in the appropriate subject, and then added to the new test session.
3. Select the boxes next to the names of students you wish to add, and then click Done.
Removing Students
1. From the My Test Sessions screen, select the test session from which the student(s) will be removed. This action will open the Test Session Details screen.
2. Select the boxes next to the names of students you wish to remove.
3. Click the Remove button. Please note that test session must be in Scheduled or Ready status. Once a student’s test session has been Started, the student cannot be removed from the session.
Moving Students to a New Session
1. From the My Test Sessions screen, select the test session from which the student(s) will be removed. This action will open the Test Session Details screen.
2. Select the boxes next to the names of students you wish to remove.
3. Click the Remove button.
4. Return to the My Test Sessions screen and select the test session to which you will add student(s). This action will open the Test Session Details screen.
5. Click the Add button.
6. Select the box next to the name of the student(s) you wish to add, then click Done.

109February 7, 2018
STEP 07. RECEIVING & ORGANIZING TEST MATERIALS (PBT ONLY) Assessment Preparation
Step 07. Receiving & Organizing Test Materials (PBT Only)Receipt & Security of Test Materials
It is important to securely store and manage test materials for the testing administration. The Test Coordinator Manual will walk you through the steps for receiving and securely storing test materials.
Summative Only: Shipment Tracking Functionality is Now Available to Track Paper Material Shipments
Users may now view shipment tracking information for paper test material for their organization.
1. Hover over “Organizations” on the dashboard menu ribbon.
2. Select “View Shipment Data” from the dropdown menu.
3. On the View Shipment Data page you may select shipments going either direction: to the district/school or to Pearson by selecting between the available swatches:
Please note: If multiple organizations are displayed, you may use the search box to view results for a specific organization. To get more detailed tracking information, copy the tracking number displayed and enter it on the identified carrier’s website. For UPS carrier click the tracking number hyperlink.
Answer Document Manual Gridding Instructions
Use the following instructions when gridding a blank answer document for a student’s ACT Aspire testing. Please note: it is vital that blank answer documents are gridded accurately and completely in order to ensure efficient processing and timely score reporting.
Related Resources:
• “Answer Documents” topic on Avocet
1. To obtain the Portal ID Number for Box F follow the directions below.
a. This is NOT the State Student ID and is unique for each subject.
i. Login to the Portal at www.actaspire.org.
ii. Once in the Portal, you will need to locate the corresponding paper test session to which the student has been loaded, and generate a Portal ID number for each
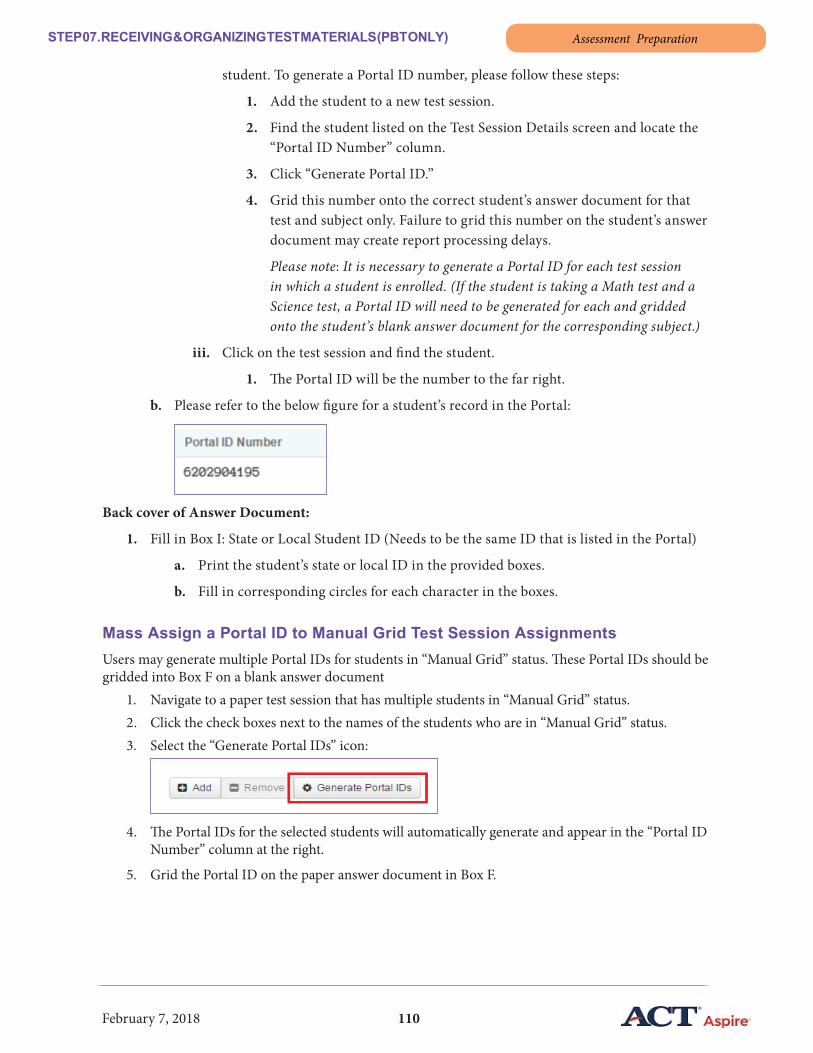
110February 7, 2018
STEP 07. RECEIVING & ORGANIZING TEST MATERIALS (PBT ONLY) Assessment Preparation
student. To generate a Portal ID number, please follow these steps:
1. Add the student to a new test session.
2. Find the student listed on the Test Session Details screen and locate the “Portal ID Number” column.
3. Click “Generate Portal ID.”
4. Grid this number onto the correct student’s answer document for that test and subject only. Failure to grid this number on the student’s answer document may create report processing delays.
Please note: It is necessary to generate a Portal ID for each test session in which a student is enrolled. (If the student is taking a Math test and a Science test, a Portal ID will need to be generated for each and gridded onto the student’s blank answer document for the corresponding subject.)
iii. Click on the test session and find the student.
1. The Portal ID will be the number to the far right.
b. Please refer to the below figure for a student’s record in the Portal:
Back cover of Answer Document:
1. Fill in Box I: State or Local Student ID (Needs to be the same ID that is listed in the Portal)
a. Print the student’s state or local ID in the provided boxes.
b. Fill in corresponding circles for each character in the boxes.
Mass Assign a Portal ID to Manual Grid Test Session AssignmentsUsers may generate multiple Portal IDs for students in “Manual Grid” status. These Portal IDs should be gridded into Box F on a blank answer document
1. Navigate to a paper test session that has multiple students in “Manual Grid” status.2. Click the check boxes next to the names of the students who are in “Manual Grid” status.3. Select the “Generate Portal IDs” icon:
4. The Portal IDs for the selected students will automatically generate and appear in the “Portal ID Number” column at the right.
5. Grid the Portal ID on the paper answer document in Box F.

111February 7, 2018
STEP 08. START ALL TEST SESSIONS (PBT ONLY) Assessment Administration
Step 08. Start All Test Sessions (PBT Only)How to Start a Test Session in the Portal
It is best practice for paper-based testers to start and close test sessions in the Portal . The following steps will walk you through this process from start to finish. This step is optional, but recommended. Failing to start and close test sessions will not prevent your organization from administering the test, nor will it delay receipt of reports.
Starting Test Sessions
Follow the steps below to start a test session.
1. Select Find My Test Sessions from the Summative dropdown menu.
2. Click on the name of the test session that you would like to view.
3. From the Test Session Details screen, click Ready, and select Start Test.
Please Note: The Test Session Status button will read Scheduled if the current date and time are before the date and time set during test session setup.
4. Once the test session has been started, the Test Session Status button will change to In Progress.
Administrators and Test Coordinators may also start multiple test sessions at once (must be pinned to school) by completing the following steps:
1. Hover over “Summative Tests” on the dashboard menu ribbon.2. Select “Find My Test Sessions” from the dropdown menu.3. Click the “Action” button and select “Start Test Sessions” from the dropdown menu.4. Select which tests to start by either selecting the checkbox next to each test session you
would like to start, or by selecting the checkbox at the header column to select all tests:
5. Select “Submit” to begin the selected tests.6. The started tests will move from “Not Started” to the “In Progress” status at the top of the
table:
112February 7, 2018
STEP 09. ADMINISTER THE TEST (PBT ONLY) Post-Test Steps
Step 09. Administer the Test (PBT Only)Administering the ACT Aspire Paper-Based Assessments
The Room Supervisor Manual (PBT) contains detailed information for administering the ACT Aspire assessments including testing conditions, administration procedures, and verbal instructions.
Please refer to the Room Supervisor Manual (PBT) on Avocet for Test Administration Procedures. It also contains detailed information related to Verbal Instructions.
113February 7, 2018
STEP 10. POST-TEST CLEAN-UP (PBT ONLY) Post-Test Steps
Step 10. Post-Test Clean-Up (PBT Only)Clean-Up & Reporting Irregularities
After all testing has been completed, you may follow the steps in the Room Supervisor Manual (PBT) to report irregularities, collect all testing materials, and store materials securely.
Please refer to the Room Supervisor Manual (PBT) on Avocet for After All Testing instructions for more details.
Reporting Irregularities
Reporting irregularities allows school personnel to document any circumstance that might affect student scores. Irregularities should first be recorded by Room Supervisors with subsequent notification provided to the Test Coordinator. Paper-based testers may record irregularities using the paper irregularities form, but then must enter the irregularities into the Portal. An example of this can be found in the Room Supervisor Manual (PBT) on Avocet.
Please Note: Recording an irregularity for a student is not the same as invalidating their test and dismissing them for prohibited behavior. Instructions for using this tool can be found in the “Irregularities” section of the Avocet website. Testing personnel should use the tool to report any of the irregularities occurring within the room.
Room supervisors should document any of the following occurrences during administration of the tests:
• A student engages in any instance of prohibited behavior.
• A student becomes ill or leaves the room during testing.
• A student fails to follow instructions (responds to questions randomly, obviously does not read questions prior to responding, or refuses to respond to questions).
• A general disturbance or distraction occurs which could affect one or more students’ results.
• A student questions the accuracy or validity of an item.
• A student has a technical issue that interrupts testing.
Please note: Bathroom breaks do not require an irregularity to be entered!
There are two types of irregularities: Student Irregularities (irregularities that only affect a single student), and Test Session Irregularities (irregularities that affect an entire test session). See the Appendix C for the latest update of irregularity categories and codes used in the Portal.
• The Examinee category of irregularities includes student behaviors that may affect their performance or the performance of other students. These include the exhibition of prohibited behaviors described previously, student complaints about testing conditions or challenges of test items, and arriving late for testing or not showing up.
• The Environment/Materials category of irregularities include external factors that may affect student testing. These include things like outside noises or hot/cold room temperatures, damaged, missing or stolen test materials, and occurrences like power outages, severe weather, or emergency evacuations.
• The Staff category includes actions testing staff may engage in that affect testing. These

114February 7, 2018
STEP 10. POST-TEST CLEAN-UP (PBT ONLY) Post-Test Steps
include failure to follow testing procedures like mistiming a test or not reading the verbal instructions from the Room Supervisor Manual, arriving late for testing or not showing up, or other inappropriate behavior like engaging in personal communication via other staff, telephone, or text during testing.
• The Technical category pertains to the performance of online testing.
In addition, notify your Test Coordinator of any irregularities after testing.
To report an irregularity in the Portal:
Test Session Irregularities
Example: Fire alarm – a situation that affects the administration of the entire test session.
1. Navigate to the Summative tab and click on Find My Test Sessions.
2. Select the test to which you want to add a comment.
3. On the Test Session Details page, open the Comment menu next to the Print button, and click Add Comment to open the Group Comment window:
4. In this window, choose an irregularity from the available reason categories. In the event of a fire alarm, a commenter would choose “Disturbance/interruption/comfort” from the Environment/Materials category. Enter additional information in the provided Comment box. To submit the irregularity, click Save.
Student Irregularities
Example: Student illness – a situation that affects an individual student.
1. Navigate to the Summative tests tab and click on Find My Test Sessions.
2. Select test, then navigate to the Test Session Details page.
3. Click on the Comments button specific to the student for whom an irregularity will be entered.
4. Document irregularity details under Available Reasons. Since an illness during the test is an examinee’s irregularity, look under the Examinee tab for “Illness during test”.
5. Check the box that matches the irregularity.
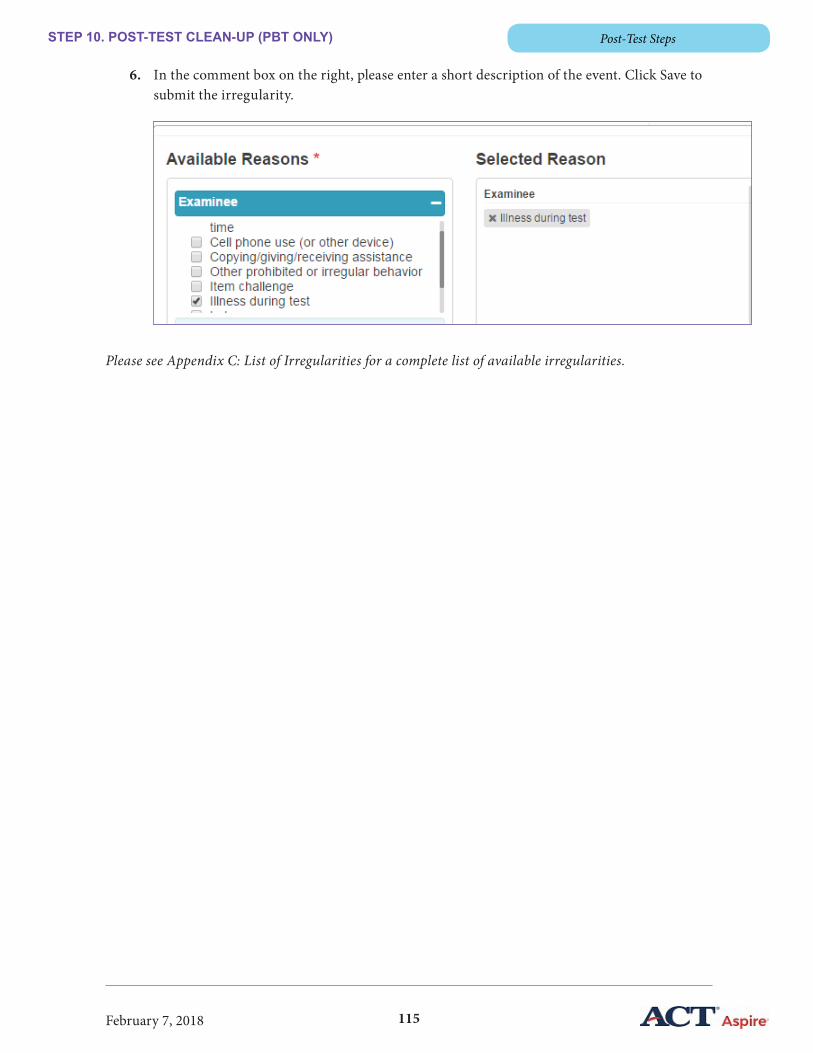
115February 7, 2018
STEP 10. POST-TEST CLEAN-UP (PBT ONLY) Post-Test Steps
6. In the comment box on the right, please enter a short description of the event. Click Save to submit the irregularity.
Please see Appendix C: List of Irregularities for a complete list of available irregularities.

116February 7, 2018
STEP 11. RETURNING TESTING MATERIALS (PBT ONLY) Reporting & Data Usage
Step 11. Returning Testing Materials (PBT Only)Returning Answer Documents & Test Books
Follow the steps in the Test Coordinator Manual on how to properly return materials.

117February 7, 2018
ACCESSING REPORTS (CBT & PBT) Reporting & Data Usage
Accessing Reports (CBT & PBT)Accessing Summative Reports
Users with the Administrator, Test Coordinator, Educator, and Report roles are able to access Summative reports. These reports are posted to the Portal per the reporting schedule. These reports include the Individual Student Report (ISR), Student Performance File (SPF), and Subject and Skill Proficiency reports. Dynamic teacher/group reports are also available for subsets of students. Below are step-by-step instructions for accessing Summative Reports.
Please note: Educator/Group reports may be printed using the Portal’s print functionality.
Users with the Educator user role may only see student data for students with whom they are associated. (see the Add or Remove Multiple Students Associated to a User section on page 55 for more information)
Related Resources:
• Student Performance File (found in the Portal)
• Summative Reports samples on Avocet
To access posted reports:
1. In the Portal, select the appropriate organization: district or school.
2. Hover over Summative Tests on the menu ribbon and select View Summative Reports.
3. To download the posted report, click the Download icon ( ) in the Action column for the appropriate report. Users may also filter the list by administration and report type by using the filters above the reports table. (Please note: A user may switch between State (if applicable), District, and School from this screen by selecting the appropriate button in the top left under “Summative Reports”.)
4. Select Save to begin the download process:

118February 7, 2018
ACCESSING REPORTS (CBT & PBT) Reporting & Data Usage
To access Educator Reports by Grade:
1. Ensure you are pinned at your tenant’s school level.
2. Hover over “Summative Tests” on the dashboard menu ribbon.
3. Select “View Summative Reports” from the dropdown menu.
4. You will then be taken to the Summative Reports screen. Click the gray “Educator” tab. It will change to blue and the Dynamic Summative Reports selection screen will appear:
5. Select the desired report. (See below for report descriptions.)

119February 7, 2018
ACCESSING REPORTS (CBT & PBT) Reporting & Data Usage
6. Select a Tested Grade.
7. Select a Subject or Group if the selected report requires it.
8. Select the “Find Students” button to display a list of available students.
9. Filter students by 10, 30, 50, 100, or All. The default view is 30.
10. Select the students you would like to include in the report by checking the box next to their name(s).
11. Click “Generate Report”. A new window will appear in your browser with the generated report.
Available Summative Dynamic Reports for Educators
• Subject Proficiency by Student: Displays the group’s average score, number correct, and percentage correct by skill; students are also listed individually with score, points correct, and percentage correct by skill
• Current Progress: Provides educators with an overall view of their classroom’s performance and their students’ predicted path in all assesed subjects.
• Supplemental Scores: Aggregates the classroom/group additional measures of performance, including National Percentile Ranks, ELA, STEM, Progress with Text Complexity, and Progress toward Career Readiness.
• Proficiency Summary: Details a classroom’s performance in a given subject.
• Skill Proficiency: Assists educators in quickly identifying students in need of extra support in a particular subject as well as students who might benefit from additional rigor. Includes students’ scale score performance, categorizes students into the ACT Readiness Levels, and highlights students who are falling below the ACT Readiness Range in particular skills areas.
• Skill Proficiency by Group: Identifies groups in need of intervention for a particular subject. Pinpoints skill areas where curriculum adjustments or professional development might be needed.
• New Class Roster Report: Informs educators about their incoming class’s previous test scores allowing for targeted instruction. Please note the following:
■ Users with Educator permissions that do not have students assigned to them will not see the option for the New Class Roster report.
■ Rollover and the subsequent SDU upload have to occur for a tenant to have access to the New Class Roster report.
To generate a Two-Page or One Page Individual Student Report (ISR):
Before selecting “Generate Report” in step 10 above, a user may click the download icon in the Two-Page ISR or One Page ISR columns in the student table to download the student’s respective report. The Two-Page ISR report will display the student’s current and predicted path towards College and Career Readiness in each subject, along with the percentage of points achieved in subject skills. The One Page ISR displays similar information, but in a reduced format.

120February 7, 2018
ACCESSING REPORTS (CBT & PBT) Reporting & Data Usage
Accessing Periodic Interim Reports
Interim reports are created as soon as students submit their final answers to TestNav. Users with an Administrator, Test Coordinator, Periodic Test Coordinator, Report, or Educator user role can generate these dynamic reports, which are usually available within one hour but can take up to 24 hours after submission. Below is the step-by-step process to generate these reports.
1. In the Portal, select the organization for which you will generate reports.
2. Hover over Interim Tests on the menu ribbon.
3. Click “View Interim Reports” from the dropdown menu.
4. You will then be taken to the Interim Reports page.
5. You may select the level (district, school) and select the report to be generated.
6. Click on blue “Generate Reports” button.
7. The report will generate and show in the View Reports section. You may view the report by clicking the blue “Download” text. Note: When reports are generated a second time, the original report will be overwritten by the newly generated report.
To generate Interim Student Performance Files (SPFs):
1. Hover over Interim Tests on the menu ribbon.
2. Click “View Interim Reports” from the dropdown menu.
3. You will then be taken to the Interim Reports page.
4. Select “SPF – Scores” or “SPF Reporting Categories” and click the Generate Reports button.
5. You may download the SPF reports in the View Reports section by clicking the “Download” text.

121February 7, 2018
ACCESSING REPORTS (CBT & PBT) Reporting & Data Usage
Please note: Depending on your permissions level in the Portal, you may switch between District, School, and Educator to gain access to corresponding reports.
Available Periodic Interim Reports for Districts and Schools (Generated with the same process as the Interim SPF files):
1. Subject Proficiency by Grade (District): Displays the district’s average by subject and grade
2. Subject Proficiency by School (District): Displays the district’s average by subject and school
3. Subject Proficiency by Demographic (District): Displays the district’s average by demographic
4. Subject Proficiency by Grade (School): Displays the school’s average by subject and grade
5. Subject Proficiency by Demographic (School): Displays the school’s average by demographic
Generating Educator Score Reports
1. Ensure you are pinned to the School level.
2. Hover over “Interim Tests” on the menu ribbon.
3. Click “View Interim Reports”.
4. You will be taken to the Interim Reports page.
5. Select the “Educator” button to switch to the dashboard for selecting Educator reports
6. Choose the report you would like to generate, and then select the criteria for that report. (Please note: The criteria for each report will change depending on the report selected.)
7. Select “Find Students”.
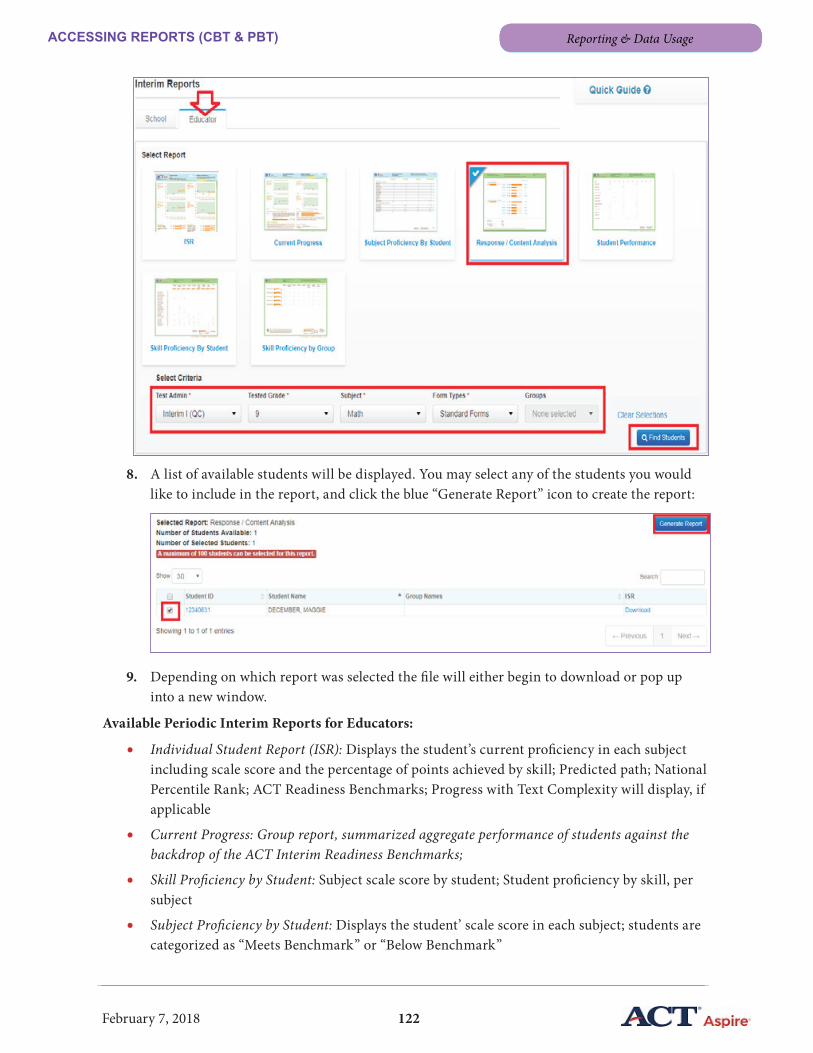
122February 7, 2018
ACCESSING REPORTS (CBT & PBT) Reporting & Data Usage
8. A list of available students will be displayed. You may select any of the students you would like to include in the report, and click the blue “Generate Report” icon to create the report:
9. Depending on which report was selected the file will either begin to download or pop up into a new window.
Available Periodic Interim Reports for Educators:
• Individual Student Report (ISR): Displays the student’s current proficiency in each subject including scale score and the percentage of points achieved by skill; Predicted path; National Percentile Rank; ACT Readiness Benchmarks; Progress with Text Complexity will display, if applicable
• Current Progress: Group report, summarized aggregate performance of students against the backdrop of the ACT Interim Readiness Benchmarks;
• Skill Proficiency by Student: Subject scale score by student; Student proficiency by skill, per subject
• Subject Proficiency by Student: Displays the student’ scale score in each subject; students are categorized as “Meets Benchmark” or “Below Benchmark”

123February 7, 2018
ACCESSING REPORTS (CBT & PBT) Reporting & Data Usage
• Student Performance: Displays the students scale score and ACT Readiness Benchmark by month
• Skill Proficiency by Group: Displays the group’s average ACT Readiness Benchmark, and percentage correct by skill
• Response/Content Analysis: Displays the group’s average score by skill; also includes item response distribution and item standards; ability to view questions with item response distribution and student responses; Math includes an OpenEd Link which allows educators to access additional tools for instruction; a user may print or save this report electronically
Accessing Periodic Classroom Reports
Users with Administrator, Test Coordinator, Periodic Test Coordinator, Report, and Educator user roles are able to generate Classroom reports. Reports are generally available within an hour but can take up to 24 hours after the student submits their final answers to TestNav. Districts and schools may administer Classroom tests as many times as they want, as each Classroom form addresses different standards.
1. In the Portal, select the school for which you will generate reports.
2. Hover over “Classroom Tests” on the menu ribbon.
3. Click “View Classroom Reports” from the dropdown menu.
4. You will then be taken to the Classroom Reports page, click “Create Report” icon.
6. You will then be taken to a page that allows you to generate and view online reports.
7. Select the report type from the three dropdown menus one of three report types from the dropdown menus:
• Student Classroom Report: Displays the overall score and summary of question responses.
• Student Performance Report: Displays the average score and student performance by subject.
• Response and Content Analysis Report: Displays the response analysis data, test questions, and standards. Math includes an OpenEd Link which allows educators to access additional tools for instruction.
8. Complete the required data selections for the desired report.
9. After selecting the required data for your report, click the blue “Get Students” icon.
10. A list of students that satisfy your selections will be displayed. Select the students you would like to create your report for.
11. Click the blue “Generate Report” button and the report name from the dropdown menu.
12. The report will begin downloading and a status bar will visualize time remaining. After the report has successfully downloaded, select the blue “Download” icon to complete the process.
• Please note: The Response and Content Analysis and Student performance reports will generate in your browser as an HTML report. This report cannot be downloaded as a PDF but can be printed.
13. The generated Student Classroom Report will download and may be opened as a PDF.
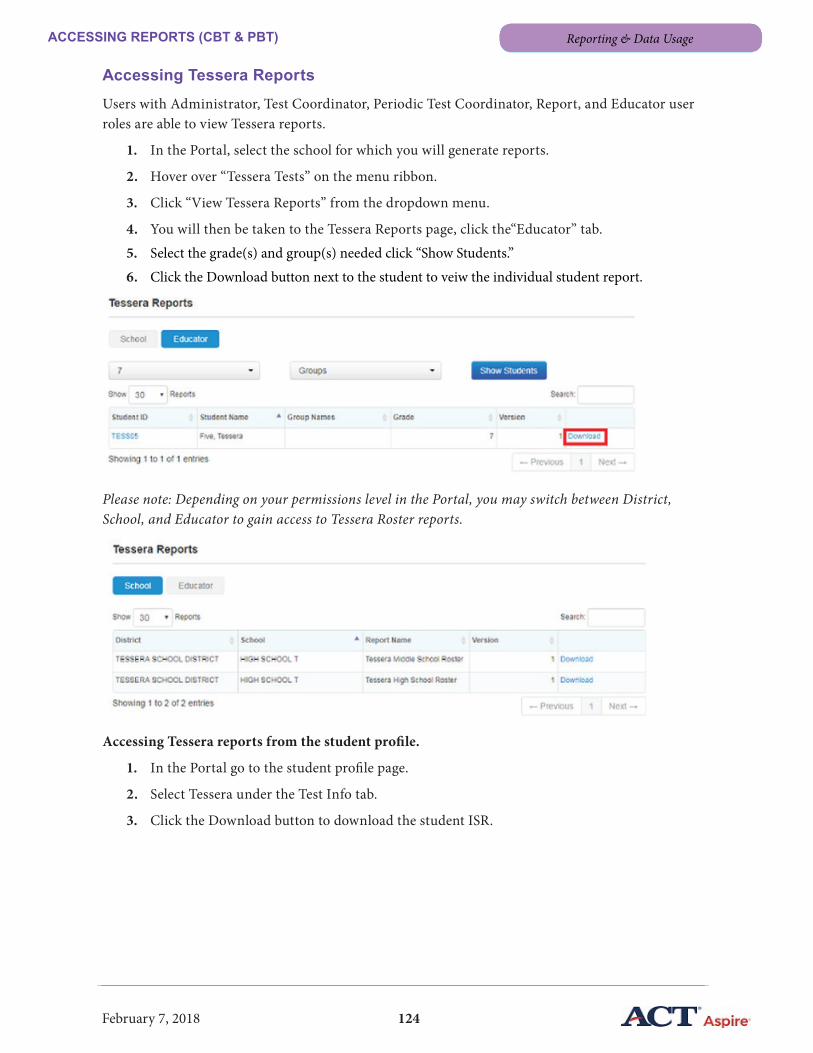
124February 7, 2018
ACCESSING REPORTS (CBT & PBT) Reporting & Data Usage
Accessing Tessera Reports
Users with Administrator, Test Coordinator, Periodic Test Coordinator, Report, and Educator user roles are able to view Tessera reports.
1. In the Portal, select the school for which you will generate reports.
2. Hover over “Tessera Tests” on the menu ribbon.
3. Click “View Tessera Reports” from the dropdown menu.
4. You will then be taken to the Tessera Reports page, click the“Educator” tab.
5. Select the grade(s) and group(s) needed click “Show Students.”
6. Click the Download button next to the student to veiw the individual student report.
Please note: Depending on your permissions level in the Portal, you may switch between District, School, and Educator to gain access to Tessera Roster reports.
Accessing Tessera reports from the student profile.
1. In the Portal go to the student profile page.
2. Select Tessera under the Test Info tab.
3. Click the Download button to download the student ISR.

125February 7, 2018
ACCESSING REPORTS (CBT & PBT) Reporting & Data Usage
126February 7, 2018
APPENDIX A: GLOSSARY & ACRONYMS General Information
Appendix A: Glossary & AcronymsGlossary
• Avocet: Encyclopedia-styled website that houses all ACT Aspire Implementation support documents. http://actaspire.avocet.pearson.com/actaspire/Home
• Classroom Assessments: Brief assessments based on clear learning targets, identify students’ strengths and areas of need so that teachers can adjust their instruction and students can adjust their learning strategies.
• Dashboard Lights: Appear on the Portal dashboard and display at-a-glance information about the status of actions within test sessions. For example, a red light in the Students Added column communicates that students have not been added to that test session.
• Dashboard Widgets: Small applications on the reporting dashboard of the Portal that provide visual, and at times interactive, information about students in the Portal.
• Interim Assessments: These are administered periodically throughout the course of an academic year and supply educators with timely and instructionally valuable data that summative assessments are not designed to provide.
• Irregularities: Events or circumstances that affect or interrupt testing for individual students or entire test sessions. These occurrences must be recorded as irregularities in the testing Portal.
• Training Management System (TMS): Online Portal of How-To videos covering a wide variety of program functionality and administrative procedures.
• Periodic Assessments: Short assessments that are given to students over the course of the school year to track student progress. The two types of periodic assessments are Interim and Classroom.
• Proctor Cache: A Pearson-supplied software designed to reduce bandwidth requirements and accelerate the delivery of test content to students.
• Summative Assessments: Assessments given typically once per year to see if students are mastering key concepts
• Tenant: Subdivision of the Portal that contains an organization’s information.• Tenant User Roles: Permission designations that determine what information and Portal
functionality tenant users can access . (A complete list of user role permissions can be found in Appendix D.)
• Tessera: A non-cognitive assessment that measures six non-cognitive skills and character strengths sets to analyze learning and life success. It is available for grades 6-8 and 9-12.
• TestNav: The secure test delivery platform that students use to participate in the computer based assessment.
Acronyms
• CBT: Computer-Based Testing• EHS: Early High School (9th &10th grade)• ELA: English-Language Arts• ISR: Individual Student Report• ORG: Organization• PBT: Paper-Based Testing
127February 7, 2018
APPENDIX A: GLOSSARY & ACRONYMS General Information
• PNP: Personal Need Profile (Accommodation plan for students)• SDU: Student Data Upload• SPF: Student Performance File• STA: Spanish Text Audio• TMS: Training Management System

128February 7, 2018
APPENDIX B: PRIVACY & POLICIES General Information
Appendix B: Privacy & PoliciesPrivacy Statement for Customers
Personally identifiable information is information that identifies a specific person, such as name or home address. ACT Aspire, LLC’s general policy on the release of personally identifiable information (PII) that is collected as part of the ACT Aspire™ program is that it will not provide such information to a third party without the consent of the individual (or, in the case of an individual under age 18, the consent of a parent or legal guardian). However, ACT Aspire may share PII as follows, as allowed by applicable laws:
• ACT Aspire will share PII with its member companies, NCS Pearson, Inc., and ACT, Inc.
• Both member companies provide services to ACT Aspire that are essential for ACT Aspire to provide testing services, and both members will use PII only in the same ways ACT Aspire can in accordance with this policy. In the event of dissolution of ACT Aspire, LLC, its members will assume ownership of its assets, including routine business records that may include PII.
• ACT Aspire may provide PII to a state agency, school district, or school, where that party has paid the fee for the individual to take the assessment. This PII may include linking information relating to ACT Aspire™ assessments with information relating to ACT programs such as the ACT assessment.
• If the individual is under 18 years of age, ACT Aspire may provide PII to the individual’s parent or guardian, who may direct us to release the information to third parties. If the individual is 18 years of age or older, ACT Aspire may provide PII to the individual, who may direct us to release the information to third parties.
• At the request of a school or other organization qualified to receive data as disclosed above, and in the discretion of ACT Aspire and its member companies, ACT Aspire may choose to release data including PII to third parties providing certain data analysis, research, or administrative or educational support services to such school or organization. In such cases, the third party must provide a written description of the services it provides to the school or organization and sign a confidentiality agreement.
• ACT Aspire may enter into contracts with third parties to perform functions on its behalf, which may include assisting it in processing PII. These parties are contractually required to maintain the confidentiality of the information and are restricted from using the information for any purposes other than performance of those functions.
• ACT Aspire may disclose PII to facilitate the testing process, for example, to room supervisor.
• ACT Aspire may provide PII as required or allowed by operation of law, or to protect the health and safety of its customers or others.
ACT Aspire may authorize its members and other subcontractors to use de-identified and aggregate data for other purposes, such as research. PII will not be included in any de-identified or aggregate data sets.
129February 7, 2018
APPENDIX B: PRIVACY & POLICIES General Information
Consent
One of the benefits of choosing the ACT Aspire™ testing program is that it measures progress longitudinally and aligns with programs and services of one of our member companies, ACT, including the ACT® assessment. When an individual participates in these ACT programs or services, they (or, in the case of an individual under the age of 18, their parent) may be asked if they want to share their ACT Aspire information with ACT in order to track their academic progress over time. If an individual (or their parent) consents to this sharing, this information will be shared with ACT on a personally identifiable basis and will be subject to ACT’s privacy policy.
Website Privacy Policy
YOU ARE REQUIRED TO READ THESE TERMS AND CONDITIONS OF USE CAREFULLY BEFORE USING THIS SITE.
Before using this Site, please read this Privacy Policy and the Terms of Use for this Site carefully. By using this Site and its services, you acknowledge that you understand, accept and agree to the terms of this Privacy Policy and the Terms of Use for this Site. If you have any questions concerning this Privacy Policy or the Terms of Use for this Site, please contact Pearson at [email protected].
This site is operated by NCS Pearson, Inc. (“Pearson”). Pearson is under contract with certain state education agencies and educational assessment providers, including ACT, Inc., (“Education Customer”) to provide services for the educational assessment programs, including the ACT Aspire™ (“Assessment Programs”). Each Education Customer contracts with Pearson to provide this site pursuant to specifications that are developed for the Education Customer. Some features of this site may not be accessible to all users. This Privacy Policy explains Pearson’s privacy policy with respect to the personal information collected through this site.
Purpose of this Site
This Site is an education data Portal and online testing system with various features designed for use by a variety of education stakeholders, including state education Administrators, educators and students. Some features of this website are designed for and available only to Education Customers and School District and School authorized staff (“Educators”). Other features of this website are designed to administer assessments to students.
The purpose the Site features for Administrators and Educators is to facilitate: (a) enrollment of students for assessments; (b) ordering of assessment-related materials; (c) administration of online educational assessments; and (d) assessment record keeping and reporting
Pearson collects and uses personal data through this Site in accordance with, and for the purpose of fulfilling, its Assessment Program contract with the Education Customer for which such personal data is collected.
Access
Access to this Site related to each Assessment Program is restricted by password to users authorized by the Education Customer sponsoring such Assessment Program. Education Customers or State Education Agencies are responsible for authorizing Educator access to this Site, or providing Pearson with such authorized user information. Educators are responsible for protecting their log-in
130February 7, 2018
APPENDIX B: PRIVACY & POLICIES General Information
credentials from unauthorized use by a third party. Pursuant to the Terms of Use, all users must refrain from providing unauthorized third parties with access to the materials found on this Site, or for using the Site for a purpose that is not authorized by Pearson or the Education Customer.
Information Collection
Education Customer and School District Personnel: To create an Assessment Program record for a student and register students for an assessment in that Assessment Program, the following information may be collected from Educators through this Site, as specified by the Education Customer sponsoring the Assessment Program: student’s name, birth date, gender, statewide identifier, student’s first language, ethnicity, grade level, participation in an Individualized Education Program (IEP). Other demographic information may also be collected if so specified by the Education Customer for the Assessment Program. To order materials related to an Assessment Program, the following personal information may be collected: name, school district, address, phone number, and quantity. If Pearson receives inquiries or emails about or through this Site from Educators, Pearson may keep a record of the email, correspondence and comments, including the individual’s name, school district or organization name and email address in order to reply to the communication, perform Site support and issue resolution and maintain business records concerning this Site.
Students and Children under Age 13: Pearson does not seek to collect personal information from parents or students through this website. Students under the age of 13 are specifically requested to not provide any personal information through this website.
If Pearson receives an inquiry from a student through this Site, Pearson may collect, use and retain personal information included in that inquiry to respond on a one time basis to the student and to refer the student and the inquiry to the applicable Education Customer or the student’s School or School District. After responding to a student inquiry, Pearson will remove from its system any personal information of the student included in the inquiry. If Pearson receives an inquiry from a parent through this Site, Pearson may collect, use and retain personal information included in that inquiry to respond to the parent, to refer the parent and inquiry to the applicable Education Customer, School or School District, perform Site support and issue resolution and maintain business records concerning this Site.
Information Access and Correction
Only an authorized Educator may enter data on a student’s record through this Site. An authorized Educator may review the student record on this Site, make student record changes, review available assessment reports and otherwise track data for that student. An Educator may contact Pearson at [email protected] if the Educator believes there may be an issue with a student record, an assessment report or encounters any issues in accessing or correcting information through this Site.
Information Use or Disclosure
Pearson will use the data provided by Educators through this Site to fulfill orders for assessments, create reports and records concerning students, and perform other contractual obligations for the Education Customer sponsoring the Assessment Program.
Except for the limited exceptions set forth below, Pearson will not share with, or disclose to, third parties, the names of users, students or other personally identifiable information collected through

131February 7, 2018
APPENDIX B: PRIVACY & POLICIES General Information
or in connection with this Site. Pearson may, however, use or disclose personally identifiable information:
• As requested or required by the Education Customer for the Assessment Program or the user’s or student’s School or School District;
• In response to subpoenas, court orders or legal process, to the extent permitted or required by law;
• To protect student or user security, or the security of other persons, consistent with applicable laws;
• As required by law;
• In connection with the sale, joint venture or transfer of some or all of the assets of NCS Pearson, Inc., subject to written approval from the Education Customer; and/or
• To affiliated companies and contractors providing services for the Assessment Program who are obligated to take appropriate commercially reasonable steps to maintain the confidentiality of such information and use it solely for the purposes specified in this Privacy Policy.
Non-personally identifiable aggregated information collected through this website may be used for quality assurance and for research and development and may be disclosed to third parties in non- personally identifiable form upon receipt of written approval from the Education Customer.
Security and Confidentiality
Subject to the other provisions of this Privacy Policy and contractual obligations, Pearson will take commercially reasonable steps to maintain the confidentiality of all personal information and student records collected and managed through this Site. For example, this Site currently uses industry-standard SSL-encryption to protect user account and password information and uses a secure connection to Pearson servers, which are protected by firewalls to prevent unauthorized break-ins. The administrative system and authentication mechanisms are protected through the use of SSL encryption of data transmitted via HTTP. As other security methodologies become commercially available, Pearson may change its current security systems processes or substitute these systems with other security systems or processes. UNFORTUNATELY, NO DATA TRANSMISSION OVER THE INTERNET IS GUARANTEED COMPLETELY SECURE. GIVEN THE INHERENT OPERATION AND STRUCTURE OF THE INTERNET, ALL TRANSMISSIONS ARE DONE AT YOUR OWN RISK.
Precautions to be taken by Users
User Information and access to this Site is password protected for the privacy and protection of student personal and student assessment data. Educators and all other users are urged to keep confidential all login credentials, user information and passwords. If storage of this information is required, it is recommended that it be encrypted, and kept in a secure location. To protect data, users should always logoff when exiting this Site and not divulge or share user identification or passwords with anyone.
Cookies
The use of cookies is a common practice for Internet facing web applications. Cookies are small text files that a website transfers to your computer’s browser. Cookies will provide the website with

132February 7, 2018
APPENDIX B: PRIVACY & POLICIES General Information
non- personally identifiable information, but does identify your computer, browser and Internet specifications. This Site uses cookies to measure traffic patterns, personalize content and control security.
IP Addresses
An IP address is a number automatically assigned to your computer by your Internet service provider. This Site may collect IP addresses, the associated URLs, domain types, the browser type used to access the Site, the country, state and telephone area code where the users’ Internet service provider’s servers are located, the pages of this Site that users viewed during their visit and any search terms entered on the Site. Collection of IP addresses is generally for system administration purposes, to monitor the level of activity on the Site and for security reasons.
Links to Other Sites
This Site may contain links to other websites related to the Assessment Program on the Internet, which may include Education Customer sites, or other Pearson websites. The information practices of those websites are not covered by this Privacy Statement or any other policies or terms applicable to this Site. You should read the terms and policies of those other websites before supplying information to that site or otherwise using the site.
Site and Content Ownership
The Site is owned and operated by Pearson. The content thereof is protected by copyrights owned by the Education Customer, Pearson and/or its licensors.
Changes to the Privacy Policy
This Privacy Policy and the Terms of Use for this Site may be revised from time to time through an updated posting. You should, therefore, check both this Privacy Policy and the Terms of Use periodically. Revisions are effective upon posting and your continued use of this site following the posting of such revisions will indicate your acceptance of such revisions.
Contact Information
If you have questions or concerns about this Privacy Policy, please contact us at 855-730-0400.

133February 7, 2018
APPENDIX C: LIST OF IRREGULARITIES General Information
Appendix C: List of Irregularities The following list details all irregularities that can be recorded in the Portal. Please refer to this list before selecting an irregularity code.
• Category Level is the menu level for each category when opening the comment box
• Sub-Category Level is the level of each specific irregularity nested within the category
Category Category Level
Sub-Category Level Irregularity Text
Student CommentsExaminee 1 1 Working ahead or marking ovals after timeExaminee 1 2 Cell phone use (or other device)Examinee 1 3 Copying/giving/receiving assistanceExaminee 1 4 Other prohibited or irregular behaviorExaminee 1 5 Item challengeExaminee 1 6 Illness during testExaminee 1 7 LateExaminee 1 8 Did not testExaminee 1 9 Student took Paper TestExaminee 1 10 Student took Online TestExaminee 1 11 Parent Opt-outEnvironment/Materials 2 1 Disturbance/interruption/comfortEnvironment/Materials 2 2 Defective or damaged test booklet or answer documentEnvironment/Materials 2 3 Missing or stolen test materialsEnvironment/Materials 2 4 Power outageEnvironment/Materials 2 5 WeatherEnvironment/Materials 2 6 Emergency evacuationTechnical 3 1 Launching test and login issuesTechnical 3 2 Problems during the exam - slow, freezingTechnical 3 3 Kicked out of testTechnical 3 4 Other system issuesStaff 4 1 Test proceduresStaff 4 2 Irregular staff behavior
Test Session CommentsExaminee 1 1 Working ahead or marking ovals after timeExaminee 1 2 Cell phone use (or other device)Examinee 1 3 Copying/giving/receiving assistanceExaminee 1 4 Other prohibited or irregular behaviorExaminee 1 5 Item challengeExaminee 1 6 Illness during testExaminee 1 7 LateExaminee 1 8 Did not testExaminee 1 9 Student took Paper Test

134February 7, 2018
APPENDIX C: LIST OF IRREGULARITIES General Information
Examinee 1 10 Student took Online TestEnvironment/Materials 2 1 Disturbance/interruption/comfortEnvironment/Materials 2 2 Defective or damaged test booklet or answer documentEnvironment/Materials 2 3 Missing or stolen test materialsEnvironment/Materials 2 4 Power outageEnvironment/Materials 2 5 WeatherEnvironment/Materials 2 6 Emergency evacuationTechnical 3 1 Launching test and login issuesTechnical 3 2 Problems during the exam - slow, freezingTechnical 3 3 Kicked out of testTechnical 3 4 Other system issuesStaff 4 1 Test proceduresStaff 4 2 Irregular staff behavior
TestNav Overtime CommentsExaminee 1 1 Working ahead or marking ovals after timeExaminee 1 2 Cell phone use (or other device)Examinee 1 3 Copying/giving/receiving assistanceExaminee 1 4 Other prohibited or irregular behaviorExaminee 1 5 Item challengeExaminee 1 6 Illness during testExaminee 1 7 LateExaminee 1 8 Did not testExaminee 1 9 Student took Paper TestExaminee 1 10 Student took Online TestExaminee 1 11 Student took Paper TestExaminee 1 12 Student took Online TestEnvironment/Materials 2 1 Disturbance/interruption/comfortEnvironment/Materials 2 2 Defective or damaged test booklet or answer documentEnvironment/Materials 2 3 Missing or stolen test materialsEnvironment/Materials 2 4 Power outageEnvironment/Materials 2 5 WeatherEnvironment/Materials 2 6 Emergency evacuationTechnical 3 1 Launching test and login issuesTechnical 3 2 Problems during the exam - slow, freezingTechnical 3 3 Kicked out of testTechnical 3 4 Other system issuesStaff 4 1 Test proceduresStaff 4 2 Irregular staff behavior
Reinstate CommentsRestricted 5 1 Reinstate (Student must be re-registered!)
Invalidate a Test Attempt CommentsInvalidate 6 1 INV request from userInvalidate 6 1 INV request from paper answer document

135February 7, 2018
APPENDIX C: LIST OF IRREGULARITIES General Information
Actions
Adm
inis
trat
or
Stud
ent A
dmin
Test
C
oord
inat
or
Peri
odic
Tes
t C
oord
inat
or
Tech
nolo
gy
Coo
rdin
ator
Educ
ator
Rep
ort
Gue
st
Test
Sup
ervi
sor
Roo
m
Supe
rvis
or
Organizational DataView org data upload history
View an individual org and its
information
Add/Edit/Delete an individual org
View all org data
Student Data
Add/Edit/Delete student data file
(SDU) into the system.
View SDU import results
Add student PNP supports via PNP
data upload file (PNP-DU)
Find Students (Search for students)
View an individual student profile
Add/Edit/Delete an individual student
profile via UI
View Student Transfer Request page Submit a Student Transfer Request Cancel a Student Transfer Request View Student Transfer Request
History
View Student Transfer Queue Approve/Reject Student Transfer
Requests
Submit a Student Reinstate Request
View Student Reinstate Request
History
Cancel a Student Reinstate Request
View Student Reinstate Queue Approve/Reject a Student Reinstate
Request
Submit a Student Invalidation
Request
Submit 1 or more student invalidation
requests via Student Profile
View Student Invalidation Request
History
APPENDIX D: USER ROLES MATRIX

136February 7, 2018
APPENDIX C: LIST OF IRREGULARITIES General Information
Actions
Adm
inis
trat
or
Stud
ent A
dmin
Test
C
oord
inat
or
Peri
odic
Tes
t C
oord
inat
or
Tech
nolo
gy
Coo
rdin
ator
Educ
ator
Rep
ort
Gue
st
Test
Sup
ervi
sor
Roo
m
Supe
rvis
or
Cancel a Student Invalidation
Request
View Student Invalidation Queue View student/teacher associations of
all users
Add/delete multiple students to the
user themself
Add/delete multiple students to a
teacher
Can have students associated to
them
Can have students associated to
them
Groups
View a list of groups
Edit individual group meta data
Delete a group
View a list of students associated with
groups
Add/Delete students from groups
Create/Copy an individual group
Tenant Members
Invite tenant members
Resend invitation email to
unregistered users
View tenant members
Delete tenant member
Change own password
Unlock own user account
Edit own profile
View/Edit Notification Settings on
own profile
View/Edit Preference Settings on own
profile
Tenant Permissions
View a tenant member’s tenant
permission role
APPENDIX D: USER ROLES MATRIX

137February 7, 2018
APPENDIX C: LIST OF IRREGULARITIES General Information
Actions
Adm
inis
trat
or
Stud
ent A
dmin
Test
C
oord
inat
or
Peri
odic
Tes
t C
oord
inat
or
Tech
nolo
gy
Coo
rdin
ator
Educ
ator
Rep
ort
Gue
st
Test
Sup
ervi
sor
Roo
m
Supe
rvis
or
Add additional tenant user permission
role(s) to a tenant member’s profile
Remove tenant permission role(s)
from a tenant member’s profile
Set user as an org owner
Remove user as an org owner
Test Sessions
View All Test Sessions
View Test Session (Sessions User is
Associated With)
Find My Test Sessions
Edit Test Session Name
Edit Test Session Date/Time
Start/Close a Test Session
Delete a Test Session
View Proctor Password
Copy Test Sessions
View Activity History
Generate Authorization Tickets
Reset Student Login Passwords
Generate 1 or more Portal ID
Edit Student Session Statuses
Submit a Student Reinstatement/
Invalidation Request
Generate PNP report
Generate roster report
View paper material tracking
View List of Materials Orders
Add items to the Materials Order
Shopping Cart
View Materials Order Shopping Cart
Checkout/ Order Materials Orders
Create a Summative test session
Create multiple Summative test
sessions
Start multiple Summative Test
Sessions at the same time.
APPENDIX D: USER ROLES MATRIX

138February 7, 2018
APPENDIX C: LIST OF IRREGULARITIES General Information
Actions
Adm
inis
trat
or
Stud
ent A
dmin
Test
C
oord
inat
or
Peri
odic
Tes
t C
oord
inat
or
Tech
nolo
gy
Coo
rdin
ator
Educ
ator
Rep
ort
Gue
st
Test
Sup
ervi
sor
Roo
m
Supe
rvis
or
View multiple test session creation
(Summative or Periodic)
View multiple test session copied/
closed logs for all test types
(Summative or Periodic)
Add/edit/remove users to multiple
Test Sessions at the same time
(Summative or Periodic)
Create an Interim or Classroom test
session
Create multiple interim or classroom
test sessions at the same time
Start multiple test sessions at the
same time (Summative or Periodic)
Close Multiple Test Sessions at the
same time (Summative or Periodic)
Add/Remove Students to Test
Session
Delete a student from 1 or more test
sessions from the Student Profile
(Summative or Periodic)
Force close a student from 1 or more
test sessions from the Student Profile
(Summative or Periodic)
Add/View Test Comments
View/Remove Student Comments
Add comments for a student in 1 or
more test sessions from the Student
Profile (Summative or Periodic)
Add students to existing test sessions
from the Student Profile (Summative
or Periodic)
Test session permission role when
added to a test session
Test
Supervisor
Test
Supervisor
Test
Supervisor
Test or
Room
Supervisor
Test or
Room
Supervisor
APPENDIX D: USER ROLES MATRIX

139February 7, 2018
APPENDIX C: LIST OF IRREGULARITIES General Information
Actions
Adm
inis
trat
or
Stud
ent A
dmin
Test
C
oord
inat
or
Peri
odic
Tes
t C
oord
inat
or
Tech
nolo
gy
Coo
rdin
ator
Educ
ator
Rep
ort
Gue
st
Test
Sup
ervi
sor
Roo
m
Supe
rvis
or
View Registered/Returned Status
Report
Register or add a student from the
Registered/Returned report
Print Comments (Student Test
Session Extract)
Download Student Roster Extract
Download PNP Report
Messages/Notifications
View Messages
View Message History
Create/Edit/Delete a Message
Preview/Publish a Message
Save a Message as a Draft
View Summative Monitoring
Dashboard
View Interim or Classroom Monitoring
Dashboard
Summative Reports
Download Summative ISR PDFs/One
page ISR PDFs
Search/View Summative ISR PDFs/
One page ISR PDFs for individual
students
Search/Generate Summative
Teacher/Group Online (HTML)
Reports
View Summative Teacher/Group
Online (HTML) Reports
Download Auto Generated
Summative School PDF Reports
Download Auto Generated
Summative District PDF Reports
Download Auto Generated
Summative State PDF Reports
View Auto Generated Student
Performance File (SPF)
APPENDIX D: USER ROLES MATRIX
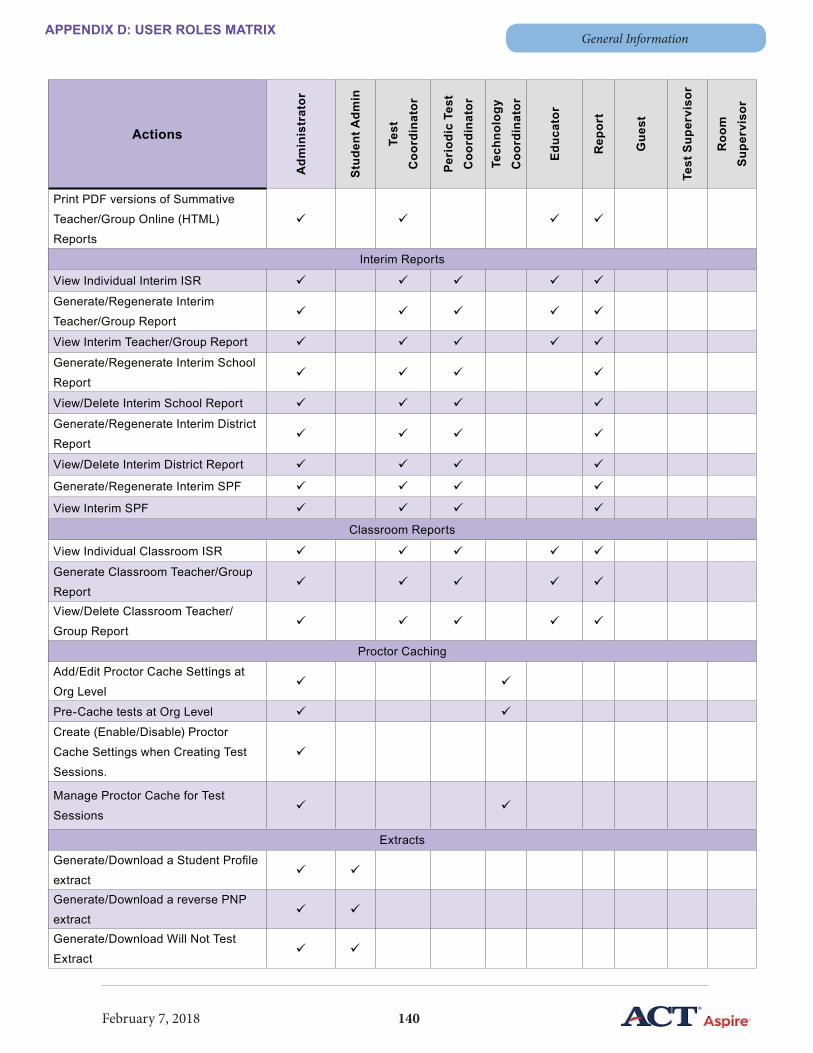
140February 7, 2018
APPENDIX C: LIST OF IRREGULARITIES General Information
Actions
Adm
inis
trat
or
Stud
ent A
dmin
Test
C
oord
inat
or
Peri
odic
Tes
t C
oord
inat
or
Tech
nolo
gy
Coo
rdin
ator
Educ
ator
Rep
ort
Gue
st
Test
Sup
ervi
sor
Roo
m
Supe
rvis
or
Print PDF versions of Summative
Teacher/Group Online (HTML)
Reports
Interim Reports
View Individual Interim ISR
Generate/Regenerate Interim
Teacher/Group Report
View Interim Teacher/Group Report
Generate/Regenerate Interim School
Report
View/Delete Interim School Report
Generate/Regenerate Interim District
Report
View/Delete Interim District Report
Generate/Regenerate Interim SPF
View Interim SPF
Classroom Reports
View Individual Classroom ISR
Generate Classroom Teacher/Group
Report
View/Delete Classroom Teacher/
Group Report
Proctor Caching
Add/Edit Proctor Cache Settings at
Org Level
Pre-Cache tests at Org Level
Create (Enable/Disable) Proctor
Cache Settings when Creating Test
Sessions.
Manage Proctor Cache for Test
Sessions
Extracts
Generate/Download a Student Profile
extract
Generate/Download a reverse PNP
extract
Generate/Download Will Not Test
Extract
APPENDIX D: USER ROLES MATRIX
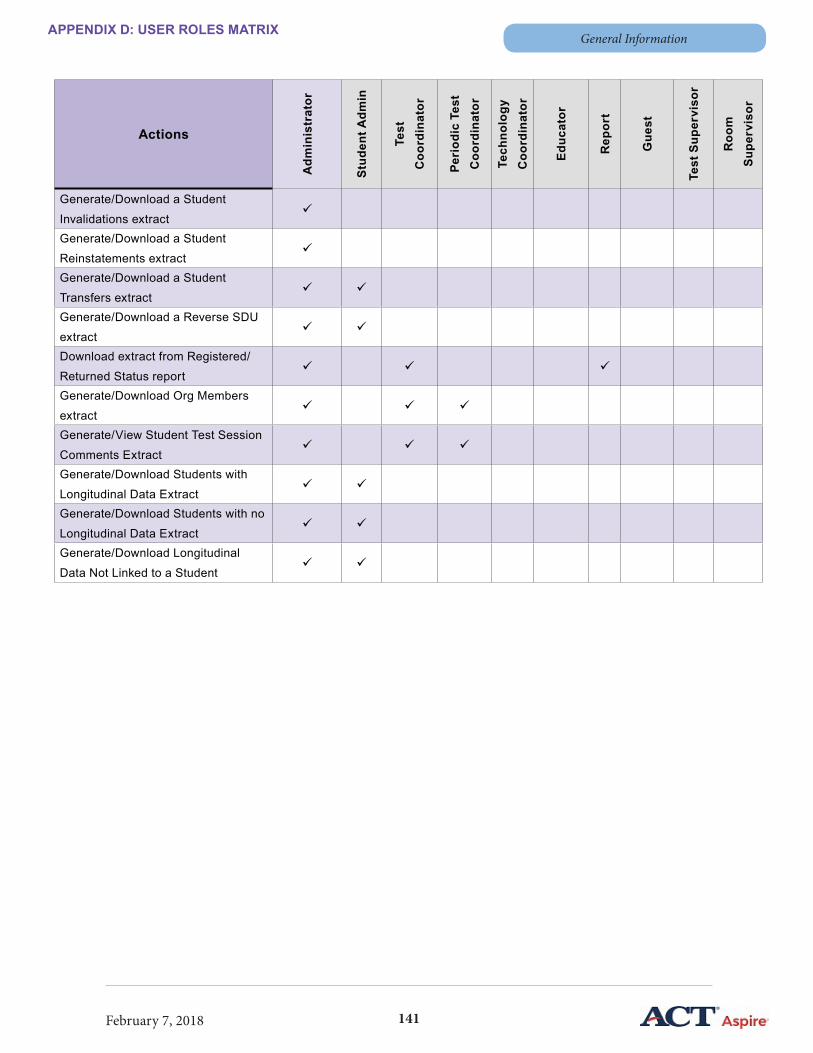
141February 7, 2018
APPENDIX C: LIST OF IRREGULARITIES General Information
Actions
Adm
inis
trat
or
Stud
ent A
dmin
Test
C
oord
inat
or
Peri
odic
Tes
t C
oord
inat
or
Tech
nolo
gy
Coo
rdin
ator
Educ
ator
Rep
ort
Gue
st
Test
Sup
ervi
sor
Roo
m
Supe
rvis
or
Generate/Download a Student
Invalidations extract
Generate/Download a Student
Reinstatements extract
Generate/Download a Student
Transfers extract
Generate/Download a Reverse SDU
extract
Download extract from Registered/
Returned Status report
Generate/Download Org Members
extract
Generate/View Student Test Session
Comments Extract
Generate/Download Students with
Longitudinal Data Extract
Generate/Download Students with no
Longitudinal Data Extract
Generate/Download Longitudinal
Data Not Linked to a Student
APPENDIX D: USER ROLES MATRIX

142February 7, 2018
CUSTOMER SERVICE CENTER CONTACT INFORMATION General Information
Customer Service Center Contact Information
1-855-730-0400
Available Monday - Friday between 6:00am – 7:30pm Central time
Call options:• For questions about ACT Tessera, press 1• For assistance with the ACT Aspire Portal, including student data uploads and test
session creation, press 2, then• Press 1 for Password• Press 2 for Arkansas• Press 3 for Wisconsin• Press 4 for all other customers
• For general questions about ACT Aspire, including ordering or reporting, press 3• For assistance with billing or payment questions, press 4
• To learn more about purchasing ACT Aspire, press 5

143February 7, 2018
CHANGE TABLE General Information
Change TableThe below table outlines any changes made between file versions. Complete change tables for other manuals can be found under “Manuals” on the ACT Aspire Landing Page: http://actaspire.pearson.com/allresources.html
Current version is 1.0.
Version Date of Update(s) Section(s) Updated Update(s) Made
1.0 2/7/18 • Throughout document• Updated document with Spring 2018 administration-
specific information.


