Embed Size (px)
Citation preview

4.2.0 | December 2014 | 3725-04289-002/AUser Guide
Polycom® RealPresence Immersive Studio™

2
Copyright© 2014, Polycom, Inc. All rights reserved. No part of this document may be reproduced, translated into another language or format, or transmitted in any form or by any means, electronic or mechanical, for any purpose, without the express written permission of Polycom, Inc.
6001 America Center DriveSan Jose, CA 95002USA
Trademarks Polycom®, the Polycom logo and the names and marks associated with Polycom products are trademarks and/or service marks of Polycom, Inc. and are registered and/or common law marks in the United States and various other countries.
All other trademarks are property of their respective owners. No portion hereof may be reproduced or transmitted in any form or by any means, for any purpose other than the recipient's personal use, without the express written permission of Polycom.
Disclaimer While Polycom uses reasonable efforts to include accurate and up-to-date information in this document, Polycom makes no warranties or representations as to its accuracy. Polycom assumes no liability or responsibility for any typographical or other errors or omissions in the content of this document.
Limitation of Liability Polycom and/or its respective suppliers make no representations about the suitability of the information contained in this document for any purpose. Information is provided "as is" without warranty of any kind and is subject to change without notice. The entire risk arising out of its use remains with the recipient. In no event shall Polycom and/or its respective suppliers be liable for any direct, consequential, incidental, special, punitive or other damages whatsoever (including without limitation, damages for loss of business profits, business interruption, or loss of business information), even if Polycom has been advised of the possibility of such damages.
End User License Agreement By installing, copying, or otherwise using this product, you acknowledge that you have read, understand and agree to be bound by the terms and conditions of the End User License Agreement for this product. The EULA for this product is available on the Polycom Support page for the product.
Patent Information The accompanying product may be protected by one or more U.S. and foreign patents and/or pending patent applications held by Polycom, Inc.
Open Source Software Used in this Product This product may contain open source software. You may receive the open source software from Polycom up to three (3) years after the distribution date of the applicable product or software at a charge not greater than the cost to Polycom of shipping or distributing the software to you. To receive software information, as well as the open source software code used in this product, contact Polycom by email at [email protected].
Customer Feedback We are striving to improve our documentation quality and we appreciate your feedback. Email your opinions and comments to [email protected].
Polycom Support Visit the Polycom Support Center for End User License Agreements, software downloads, product documents, product licenses, troubleshooting tips, service requests, and more.

Polycom, Inc. 3
Contents
Before You Begin . . . . . . . . . . . . . . . . . . . . . . . . . . . . . . . . . . . . . . . . . . . . . . . . . . . 4Get Help . . . . . . . . . . . . . . . . . . . . . . . . . . . . . . . . . . . . . . . . . . . . . . . . . . . . . . . . . . . . . . . . . . 4
The Polycom Community . . . . . . . . . . . . . . . . . . . . . . . . . . . . . . . . . . . . . . . . . . . . . . . . . . 4
Get Started . . . . . . . . . . . . . . . . . . . . . . . . . . . . . . . . . . . . . . . . . . . . . . . . . . . . . . . . . 5Overview . . . . . . . . . . . . . . . . . . . . . . . . . . . . . . . . . . . . . . . . . . . . . . . . . . . . . . . . . . . . . . . . . . 5
Interact with the System . . . . . . . . . . . . . . . . . . . . . . . . . . . . . . . . . . . . . . . . . . . . . . . . . . . . . . 6
View the Home Screen . . . . . . . . . . . . . . . . . . . . . . . . . . . . . . . . . . . . . . . . . . . . . . . . . . . . . . . 7
Place and Answer Calls . . . . . . . . . . . . . . . . . . . . . . . . . . . . . . . . . . . . . . . . . . . . . . 9Place a Call . . . . . . . . . . . . . . . . . . . . . . . . . . . . . . . . . . . . . . . . . . . . . . . . . . . . . . . . . . . . . . . . 9
Check the Call Duration Time . . . . . . . . . . . . . . . . . . . . . . . . . . . . . . . . . . . . . . . . . . . . . . 11
Dial Passwords or Extensions . . . . . . . . . . . . . . . . . . . . . . . . . . . . . . . . . . . . . . . . . . . . . . 11
Add Participants to a Call . . . . . . . . . . . . . . . . . . . . . . . . . . . . . . . . . . . . . . . . . . . . . . . . . 11
In-Call Toolbar . . . . . . . . . . . . . . . . . . . . . . . . . . . . . . . . . . . . . . . . . . . . . . . . . . . . . . 12
Answer a Call . . . . . . . . . . . . . . . . . . . . . . . . . . . . . . . . . . . . . . . . . . . . . . . . . . . . . . . . . . . . . 12
Ignore a Call . . . . . . . . . . . . . . . . . . . . . . . . . . . . . . . . . . . . . . . . . . . . . . . . . . . . . . . . . . . . . . 12
End a Call . . . . . . . . . . . . . . . . . . . . . . . . . . . . . . . . . . . . . . . . . . . . . . . . . . . . . . . . . . . . . . . . 12
Cancel a Speed Dial . . . . . . . . . . . . . . . . . . . . . . . . . . . . . . . . . . . . . . . . . . . . . . . . . . . . . . . . 13
Use Call Hold and Resume . . . . . . . . . . . . . . . . . . . . . . . . . . . . . . . . . . . . . . . . . . . . . . . . . . . 13
Use Microsoft Outlook Calendaring . . . . . . . . . . . . . . . . . . . . . . . . . . . . . . . . . . . 14Join Scheduled Meetings . . . . . . . . . . . . . . . . . . . . . . . . . . . . . . . . . . . . . . . . . . . . . . . . . . . . 14
Show Content . . . . . . . . . . . . . . . . . . . . . . . . . . . . . . . . . . . . . . . . . . . . . . . . . . . . . 15Work with Content . . . . . . . . . . . . . . . . . . . . . . . . . . . . . . . . . . . . . . . . . . . . . . . . . . . . . . . . . . 16
Hold Effective Meetings . . . . . . . . . . . . . . . . . . . . . . . . . . . . . . . . . . . . . . . . . . . . . 17
System Maintenance . . . . . . . . . . . . . . . . . . . . . . . . . . . . . . . . . . . . . . . . . . . . . . . 18
Regulatory Information . . . . . . . . . . . . . . . . . . . . . . . . . . . . . . . . . . . . . . . . . . . . . 20Important Safeguards . . . . . . . . . . . . . . . . . . . . . . . . . . . . . . . . . . . . . . . . . . . . . . . . . . . . . . . 20
System Rating . . . . . . . . . . . . . . . . . . . . . . . . . . . . . . . . . . . . . . . . . . . . . . . . . . . . . . . . . . . . . 20

Polycom, Inc. 4
Before You Begin
Welcome to immersive collaboration with the Polycom® RealPresence Immersive Studio™ system. The RealPresence Immersive Studio system includes the following features:
● High-quality, 1080p60 video with consistent picture characteristics through all viewing angles
● Polycom 3D Voice audio that delivers immersive sound, eliminating perceptible differences between the sound from remote and in-room participants
● 1080p content resolution that you can show on the content or participant displays
This guide explains how to use your touch device to operate your RealPresence Immersive Studio 9-seat or 21-seat immersive telepresence (ITP) room system.
This guide also describes what you can expect to see on the displays during meetings in the ITP room, and provides general guidelines for conducting successful meetings.
Additional documentation is available at the Polycom Video Documentation web site.
Get HelpFor more information about installing, configuring, and administering Polycom products, refer to Documents and Downloads at Polycom Support.
The Polycom CommunityThe Polycom Community gives you access to the latest developer and support information. Participate in discussion forums to share ideas and solve problems with your colleagues. To register with the Polycom Community, simply create a Polycom online account. When logged in, you can access Polycom support personnel and participate in developer and support forums to find the latest information on hardware, software, and partner solutions topics.
Caution: Read the regulatory information.
Read carefully the Regulatory Information in this guide before using the RealPresence Immersive Studio system.

Polycom, Inc. 5
Get Started
OverviewThe Polycom® RealPresence Immersive Studio™ system is a state-of-the-art visual collaboration tool. With crisp, clean video and crystal-clear sound, Polycom RealPresence Immersive Studio systems provide natural video conferencing using the most robust video communications technology.
The RealPresence Immersive Studio system contains a media wall with a free-standing credenza, three large people displays, and one large content display. The RealPresence Immersive Studio 9-seat system contains a specialized table to fit nine chairs and optional components: back wall, ceiling acoustic treatment, and nine chairs.
RealPresence Immersive Studio 9-seat system

Interact with the System
Polycom, Inc. 6
The RealPresence Immersive Studio 21-seat system contains all of the components in the RealPresence Immersive Studio 9-seat system with an additional back table to accommodate an additional 12 participants.
RealPresence Immersive Studio 21-seat system
Interact with the SystemIf you have chosen the optional ceiling cloud and lighting system, the sensor in the ceiling turns the lights and displays on when you enter the room.
Your touch device enables you to join meetings, place audio and video calls, search the directory, adjust volume, show content, and select options. Familiar gestures for mobile devices—such as tapping, swiping, and dragging—make operating the system easy and intuitive. If the RealPresence Immersive Studio system is in sleep mode, touch the tablet to wake up the system.

View the Home Screen
Polycom, Inc. 7
View the Home ScreenThe RealPresence Immersive Studio Home screen is shown next.
The following table describes information that the Home screen provides.
Home Screen
Icon and Description
Pairing information. Indicates whether a device is paired with the system, the system name, and IP address.
To display a list of paired guest devices, tap the system name.
System date and time. If Microsoft Outlook Calendaring is enabled, you can display a reminder for the next meeting by tapping the time or date.

View the Home Screen
Polycom, Inc. 8
Outlook meeting calendar. The Outlook meeting calendar is available only if your system is connected to the Microsoft Exchange Server.
To display more information about a meeting or to join a meeting, tap the meeting notice.
For more information about connecting to the Microsoft Exchange Server and using Outlook calendaring, refer to the Polycom RealPresence Immersive Studio Administrator Guide at support.polycom.com.
Tap to display options for placing a call.
Tap to display options for showing content.
Tap to display the view of the local room.
Tap to mute the microphone in the local room.
Tap to display a slider to adjust the volume in the local room.
Home Screen
Icon and Description
Polycom, Inc. 9
Place and Answer Calls
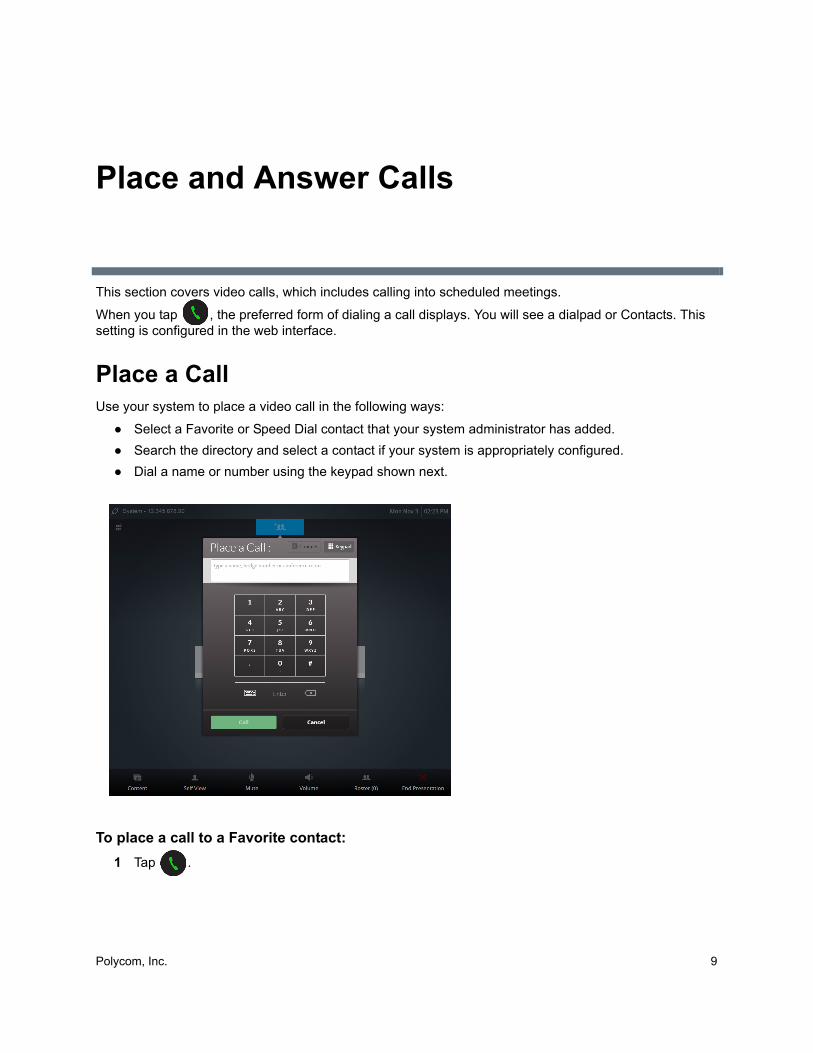
This section covers video calls, which includes calling into scheduled meetings.
When you tap , the preferred form of dialing a call displays. You will see a dialpad or Contacts. This setting is configured in the web interface.
Place a Call Use your system to place a video call in the following ways:
● Select a Favorite or Speed Dial contact that your system administrator has added.
● Search the directory and select a contact if your system is appropriately configured.
● Dial a name or number using the keypad shown next.
To place a call to a Favorite contact:
1 Tap .

Place a Call
Polycom, Inc. 10
2 From the Favorites list, tap one or more contacts. Tap if the Favorites list does not display.
If no favorites are listed, check with your system administrator to determine whether favorites are configured in your system.
3 Tap .
To place a call to a Speed Dial contact:
» On the Home screen, tap the name of the contact. You can swipe left and right to scroll between the calendar and speed dials when the calendar service is enabled.
Only speed dials are available on the Home screen if calendar service is not enabled.
To place a call to a directory contact:
1 Tap .
2 Tap the blank dialing area or tap to display the virtual keyboard.
3 Type the directory entry name that you want to call.
4 Tap .
To place a call by entering a name or number:
1 Tap .
2 Choose one of the following:
Tap the blank dialing area or tap to display the keypad.
Tap to display the dialpad.
3 Enter the number or name of the contact you want to call.
Depending on the capabilities of your system and the system you are calling, the dialing information could look like one of the following examples.
4 Tap .
Note: You might see a different display
Your administrator can configure which screen is displayed next. The following instructions apply to the default setup; however, you might see a different display.
Dialing Examples
Format Description
123.45.67.89 IPv4 address
2555 E.164 extension for H.323 and SIP
stereo.polycom.com Host name
[email protected] SIP user name

Place a Call
Polycom, Inc. 11
Check the Call Duration Time
To check the call duration time:
» Touch the System Date on the Home screen to display the Meeting Duration.
Dial Passwords or Extensions
To display the dialpad and enter DTMF tones (dial tones) for VMR (bridge) passwords and extensions:
1 Tap on the main screen.
2 Input VMR number 7020000.
3 Tap .
4 Tap .
5 Input the conference password followed by #.
Add Participants to a Call
To call additional participants:
» Tap on the main screen or the roster to display the dialpad.

Answer a Call
Polycom, Inc. 12
In-Call Toolbar
When the call connects, the touch device displays the In-Call toolbar, which includes the additional options shown in the following table:
Answer a Call The RealPresence Immersive Studio system displays the name of the caller or system.
To answer a call manually:
» Tap .
Ignore a Call The RealPresence Immersive Studio system displays the name of the caller or system.
To ignore a call:
» Tap .
End a Call
To hang up a call:
» Tap .
Displays a list of participants in the call.
Disconnects from the call.

Cancel a Speed Dial
Polycom, Inc. 13
Cancel a Speed Dial
To cancel a speed dial:
» Tap .
Use Call Hold and Resume The RealPresence Immersive Studio system supports call hold and resume in Microsoft Lync 2013 and H.323 calls. Putting a call on hold pauses audio and video between RealPresence Immersive Studio systems and:
● Other RealPresence Immersive Studio systems
● Remote Lync clients
● Lync A/V MCUs
● Lync 2013 Soft Client
● Lync 2013 AVMCU
● Lync 2010 Soft Client
● Lync 2010 AVMCU
To use Call Hold and Resume:
1 Press to put the call on hold.
2 Press to resume the call.

Polycom, Inc. 14
Use Microsoft Outlook Calendaring
If your system is configured to connect to the Microsoft Exchange Server, you can view information about scheduled meetings on the Home screen calendar. If you have completed configuration steps, you can also call from meetings on the Home screen calendar. Meeting reminders are displayed on your touch device five minutes before a meeting.
Join Scheduled Meetings If no meetings appear on the RealPresence Immersive Studio Home screen, your system is not connected to the Microsoft Exchange Server.
To join a scheduled meeting:
1 Tap the meeting notice.
2 If the time slot is overbooked, tap the meeting that you want to join.
3 If the contact number is not shown, enter it manually.
4 Tap .

Polycom, Inc. 15
Show Content
You can show content from a computer that is connected to your RealPresence Immersive Studio system. Connect the computer by using the HDMI or VGA cables located in the table. The cables extend out of the pocket as you gently pull them. Recoil the cables gently using the recoil button.
For best video quality, use refresh rates of 60 Hz or less. Set the resolution and refresh rates according to your computer’s instructions.
Before you show content, test the PC you are using and check that the computer video output is configured to use one of the supported resolutions and refresh rates shown in the following table.
Supported Resolutions and Refresh Rates
To show content:
1 Choose one of the following:
Out of a call, tap .
Note: RealPresence Immersive Studio 21-Seat system connections
For the RealPresence Immersive Studio 21-Seat system, connections are located in the front table only.
Resolution Refresh Rates (Hz)
800 x 600 56, 60, 72, 75, 85
1024 x 768 60, 70, 75, 85
1280 x 720 50, 60
1280 x 768 60
1280 x 1024 60, 75, 85
1600 x 1200 60
1680 x 1050 60
1920 x 1080 60
1920 x 1200 60

Work with Content
Polycom, Inc. 16
In a call, tap .
2 Drag the Laptop icon to a Monitor icon or the Content Source icon .
To show VisualBoard content:
Drag the VisualBoard icon to a Monitor icon or the Content Source icon .
To show PPCIP content:
Drag the PPCIP icon to a Monitor icon or the Content Source icon .
To stop content:
» Choose one of the following:
Tap the Content Source icon.
Tap .
Work with ContentThe RealPresence Immersive Studio system provides quick-swap buttons that enable you to move the content display among monitors.
To show content on each monitor and then all four monitors in succession, drag and hold the content source on the bottom monitors.
Quick Swap Buttons for Showing Content
Label Description
Show content on only the top monitor (default).
Show content on only the three bottom monitors.
Show content on all four monitors.
Polycom, Inc. 17
Hold Effective Meetings
Conducting a successful meeting in a RealPresence Immersive Studio room is easy. Because you don’t have to manage cameras, microphones, speakers, remote controls, and other equipment, you can concentrate on sharing important information.
In a telepresence conference, all movements, expressions, and gestures are visible to everyone. As in any meeting, avoid repetitive motions that may distract other participants, such as tapping your pen or fingers on the tabletop.
The microphones are extremely sensitive. They can pick up all sound in the room—even gentle noises and whispers—and even if you are not in camera range. Refrain from sidebar conversations that can be distracting to participants in multipoint meetings.
When speaking, you do not have to direct your speech to a certain location or speak louder than normal. Speak in your normal tone and conversational volume.
If you plan to share content, connect and test your source before the meeting to ensure that the sound, graphics, video, and presentations are working properly.

Polycom, Inc. 18
System Maintenance
Clean your system regularly to ensure proper functionality. Use the following table for detailed cleaning information.
Recommended Cleaning Procedures
Component Recommended Cleaning Procedure
Front wall panels and table top surfaces
To remove general soiling and water stains on the laminate surface of the front and back table tops, use a damp cloth. If needed, use a hard-surface, all purpose cleaner such as Formula 409®, Fantastik®, Top Job, Mr. Clean, etc., and follow the manufacturer’s instructions. To prevent staining, ink should be removed as soon as possible. Do not use paint thinners, naphtha, or solvent-based fluids. Always rinse and wipe the laminate surfaces dry after cleaning.
Camera cluster Do not clean the camera cluster, which is centrally located in front of the media wall within a camera housing.
Camera cluster enclosure and shield
Using a soft sponge, a wool cloth, or chamois, wipe the polycarbonate shield with lukewarm water containing a neutral detergent, such as Formula 409, Windex, or Joy®. Be very careful not to scratch the polycarbonate shield. Do not leave cleaners on for a long period, or apply cleaners in direct sunlight or at elevated temperatures. Be sure to rinse off cleaners with lukewarm water. Never use razor blades, scrapers, squeegees, or brushes.
Carpet For carpeting, vacuum daily using a vacuum cleaner with a cylinder brush. Treat spots and spills as soon as they occur. Always try to remove the spot with water before using a spotting solution.
When vacuuming, be careful not to bump into the media wall. Doing so may mis-align the camera, resulting in compromised video.
Ceiling Micro- phone Arrays
Gently dust with a feather duster as needed.

Work with Content
Polycom, Inc. 19
Chairs For Steelcase-Amia chairs, vacuum or dust the leather frequently with a clean, dry cloth. If the leather is soiled, wipe it with a damp, soft cloth and a lather of any mild soap and a minimum amount of lukewarm water. Do not spot clean leather; clean the entire surface. Wipe it clean with a damp cloth and dry it with a clean, soft cloth.
For spots and spills, wipe the excess liquid immediately with a clean cloth or sponge, and let the leather air dry. If further cleaning is necessary, sponge the entire leather surface with clean, lukewarm water. Let the leather air dry; never use a hair dryer or other heat source to dry leather.
For stubborn spots on the leather, apply a mild, nonabrasive soap solution with a clean, wet sponge. Rinse well and let it air dry. For butter, oil, or grease, wipe the leather with a clean, dry cloth and let the remainder of the oil dissipate into the leather. Do not apply water or try to wash a grease spot.
Chairs Do not use saddle soap, cleaning solvents, oils, furniture polishes, varnishes, abrasive cleaners, detergents, or ammonia on leather; they will ruin the finish, causing it to become sticky and cracked.
For regular cleaning of the polished aluminum chair components, apply a pre-softened paste wax to the polished aluminum following the manufacturer’s instructions. In humid atmospheres near salt water, apply the wax once a month. In other areas, apply the wax every three months to maintain the appearance of the aluminum.
Power Pockets Dust with a feather duster and keep free of debris. If a spill occurs in or around Power Pockets, wipe it up immediately. If you notice data collaboration problems after a spill, contact your organization’s IT department.
Displays (large display screens at the front of the room)
Gently wipe the screens with a very soft, lint-free cloth (microfiber is recommended) and a liquid cleaning solution that contains water, vinegar and water, or isopropyl alcohol, such as Monster screen cleaner. Spray the liquid cleaning solution directly on the cloth and clean in a circular motion. Do not use cleaners that contain acetone, ethyl alcohol, ethyl acid, ammonia, or methyl chloride.
Light fixtures Turn off the power and then wipe the fixtures with a soft, lint-free cloth. Clean the lenses with a dry cloth only.
Tablet Keep the touch device free of dirt and dust. For best cleaning results, refer to the cleaning instructions that came with the tablet.
Back wall acoustic panels
If the acoustic panel fabric becomes soiled, gently rub the affected areas with a clean, lint-free cloth and warm soapy water. Test all cleaning procedures on a small inconspicuous area. Do not immerse the panels in water. Do not rub web ink as this may cause smudging.
Component Recommended Cleaning Procedure

Polycom, Inc. 20
Regulatory Information
Regulatory notices describe safety and legal considerations for using the RealPresence Immersive Studio system.
Important SafeguardsSAVE THESE INSTRUCTIONS
Read and understand the following instructions before using the system:
● Always disconnect the system from power before cleaning.
● Do not spray liquids directly onto the system when cleaning. Always apply the liquid first to a static-free cloth.
● Do not place any liquids on the system.
● Do not disassemble this system. To reduce the risk of shock and to maintain the warranty on the system, a qualified technician must perform service or repair work.
● Avoid using this system during an electrical storm. There may be a remote risk of electric shock from lightning.
System Rating120/220-240 V~,15/8 A, 50/60 Hz
The main system consists of three independent electronics rack units which are considered “pluggable equipment.” The room lighting system is considered to be “permanently connected equipment.”
In order for the pluggable equipment to be disconnected from the supply, the socket outlets shall be installed near the equipment and shall be easily accessible.
● For each electronics rack, the electrical outlet is within 1 foot (30 cm) of the equipment.
● For each electronics rack, access to each power cord is easily accessible behind wooden panels. To remove the wooden panels, lift up and towards you. The panels are located under each main display (left, center, and right). No tools are required for the removal of the wooden panels.
To disconnect the room lighting from the AC mains supply, turn off the switch labeled (lighting disconnect).
Caution: Disconnect racks and lighting controller before servicing
This equipment uses multiple disconnects. See the instructions below for quick disconnect of the racks and lighting controller. Please disconnect all before servicing.

System Rating
Polycom, Inc. 21
Instructions for installer: A readily accessible disconnect device shall be incorporated external to the equipment. Electrician needs to install a single throw double pole switch within a one meter area of the Lighting Controller. Service to the single throw double pole switch should not be greater than 20 amps. The warning label must be placed on the switch that says “VIDEOCONFERENCE ROOM LIGHTING DISCONNECT.”
A disconnect device shall have a contact separation of at least 3mm. Vertically mounted disconnect switches and circuit breakers shall be mounted so that the UP position of the handle is the “on” position.
The main electronics are stationary pluggable equipment Type A with simultaneous multiple connections to the AC mains supply.
● The building installation must provide a means for connection to protective earth.
● The equipment must be connected to that means.
● A service person must verify that all socket outlets from which the equipment is to be powered provides a connection to the building protective earth.
To verify, use a suitable long test/wander lead with an ohm meter/multimeter. Connect one end to a known protective earthing point of the building electrical installation and ensure that there is a reading of less than one ohm to each earthing contact of all socket outlets to be connected, as shown next.
Socket outlets earthing contact points
If lack of protective earth is discovered at any of the socket outlets, this must first be rectified by installing a suitable protective earthing conductor in accordance with local wiring code and regulations. This installation must be carried out by a registered, competent electrician.
WARNING: HIGH LEAKAGE CURRENT. EARTH CONNECTION ESSENTIAL BEFORE CONNECTING SUPPLY.


![Realpresence Solutions[1]](https://img.dokumen.tips/doc/110x75/577cd6511a28ab9e789c146a/realpresence-solutions1.jpg)
