Embed Size (px)
Citation preview

Journal of Pollination Ecology, 13(21), 2014, pp 203-217
203
POLLEN ANALYSES FOR POLLINATION RESEARCH, ACETOLYSIS
Gretchen D. Jones*
USDA-ARS, APMRU, 2771 F&B Rd, College Station, TX 77802, U.S.A., retired
Abstract— Analysis of the pollen associated with pollinators can reveal their role in pollination, the habitats and plants they visit, from where they migrated, what they eat, and dispersal patterns in and around cropping systems. However, finding pollen on and or in a pollinator depends on the technique used to recover the pollen. Acetolysis can be used to recover pollen from internal insect tissues (gut, alimentary canal, crop, etc.), external tissues (proboscis, legs, eyes, etc.) or both. Acetolysis is the best technique for recovering pollen because any tissue is dissolved and lipids and debris are removed from the sample and the pollen grains. This makes the diagnostic characteristics of the pollen grains more visible so that accurate pollen identification can be made. By using the proper technique, better pollen recovery can be made and thus better data can be obtained.
Keywords: Acetolysis, palynology, pollen recovery, pollinators, pollination biology
INTRODUCTION
Flowers and pollinators have for the most part evolved together. The role of the pollinator in pollinating flowers is commonplace. However, it was not until the middle 1600's that anyone really connected the stamens with the production of seeds. Today, pollination biology examines the functions of flowers and their relationships with their pollinators. It is realized that both nectar and pollen are important food sources for pollinators.
Flowering plants are adapted to enhance successful pollination and fertilization under widely varying conditions (Jarzen and Nichols 1996). Numerous and often bizarre methods have developed to ensure that pollination occurs. Some pollination methods use pollinators such as insects (entomophily), bats (chiropterophily), birds (ornithopily), reptiles (saurophily) and small non-flying mammals (therophily) to transfer pollen from the male to the female parts of the plant.
Typical flowers pollinated by beetles are large, single, dull in texture, greenish or off-white in colour, and heavily scented (Proctor and Yeo 1972). Flowers visited by flies, on the other hand, are simple with very little depth, light in colour with nectar guides (Proctor and Yeo 1972). Butterfly (Lepidoptera) flowers are open during the day and closed at night, have a weak agreeable odour, are vividly coloured including pure red, and have simple nectar guides with nectarines hidden in narrow tubes or spurs (Faegri and van der Pijl, 1979).
Hummingbird flowers are red, orange, or pink and many taxa have narrow tubes. Hummingbirds often land on the petals of the claret cup cactus (Echinocereus coccineus G. Engelmann). While holding on tightly to the petals, they will dip their entire body into the flower and sip from the
nectaries at the base of the stigma. As they are doing so, they get dusted on the forehead with pollen by the anthers.
A species of Banksia (Proteaceae) is pollinated by native rats (Carpenter 1978). A lizard has been observed visiting and drinking the nectar of Aloë (Elvers 1977) indicating the importance of reptilian pollinators in the past for pollinating seed-bearing plants. Reptile coprolites (fossilized feces) recovered from Jurassic sediments indicate that these animals browsed on the pollen-bearing plant structures (Harris 1945, 1956). It has been suggested that reptiles, not beetles, were the original pollinators of angiosperms (Hughes 1976). The most sophisticated pollination mechanisms have been evolved in the orchid family (Orchidaceae). Some bee orchids are pollinated by male wasps because the orchid flowers evolved to mimic female wasps.
Regardless of the type of pollinator, they become dusted with pollen when actively feeding on the nectar and/or pollen of a flower. Pollinators that do not actively feed on nectar, pollen or plant exudates also become “dusted” with pollen by walking around or in the flowers in search of food, mates, prey, shelter, etc. Thus, pollen is a natural marker on and or in any pollinator.
The literature is full of articles and books that state “methods” used to recover pollen from pollinators. Unfortunately, many if not most of the steps are omitted. Nothing is more frustrating than following a technique only to have it not work. This is a waste of time, effort, and money. Furthermore, there are many steps in a technique when the pollen can accidently be lost. Too often the scientist may not even know if any pollen was lost. How could a scientist tell if a pollinator just did not have any pollen or if the pollen was lost due to flawed steps in the technique? If the scientist never properly learned the steps, the technique and ultimately the research are doomed.
Jones (2012a) described pollen recovery techniques from pollinators without using acetolysis. Regrettably, finding pollen and its identification were difficult with these techniques because the pollen grains were obscured by the
Received 28 June 2013, accepted 9 January 2014
*Corresponding author; email: [email protected]
204 JONES J Poll Ecol 13(21)
FIGURE 1. Cotton pollen (Gossypium hirsutum C. Linnaeus) (P) trapped within a boll weevil (Anthonomus grandis Boheman) gut. Bar = 100 micrometers.
pollinator’s tissue, lipids on the grains and/or debris (Fig. 1). Jones (2012b) described pollen recovery techniques from insects using acetolysis. However, Jones (2012b) was written for palynologists who know and understand all the steps for recovering pollen. As such, most of those steps and how they are accurately executed were excluded. Many of those steps, are not detailed in the literature but are taught from one palynologist to another.
Acetolysis takes longer than examining pollen directly from a pollinator. However, when acetolysis is used, pollen grain numbers and diversity increase. More accurate pollen identification can be made when using acetolysis because the pollen grain’s diagnostic characteristics are easily seen and photographed. Additionally, the pollen grains can be positioned so that both the equatorial and polar views can be seen. This increases the possibility that the pollen grain can be identified.
The purpose of this manuscript is twofold. First, is to provide a detailed, step by step acetolysis technique that will recover pollen from any pollinator. Second, the manuscript is written so that anyone can learn and follow the proper processing steps of acetolysis. This manuscript is meant to be a “stand alone” manuscript. As such, some of the topics presented in Jones (2012a & b) will be briefly repeated.
Acetolysis
Acetolysis is the same regardless of the type of pollinator processed. Any differences among the different pollinators occur in the preparation of the pollinator and the steps prior to acetolysis. Acetolysis dissolves most of the tissue and organic debris, and removes the proteins, lipids, and carbohydrates from the surface of the pollen grains (Erdtman 1960; Low et al. 1989). This makes the pollen grains easier to stain, photograph, and identify. Without
acetolysis, pollen from Salix (willow) and Brassica (rapeseed) can be virtually identical and impossible to differentiate (Low et al. 1989). However, when acetolysis is used on the pollen of the two taxa, the differences between pollen from the two taxa are easily seen (Low et al. 1989).
Acetolysis must be conducted under a fume hood and the person conducting the acetolysis must be wearing protective gear (gloves, a face shield, lab coat, etc.). The acetolysis solution is a mixture of concentrated sulfuric acid and acetic anhydride. This mixture is not only corrosive, but reacts violently with water. Thus, all water, ethyl alcohol (ETOH), and bases (except sodium bicarbonate) must be removed from the hood prior to making up the acetolysis mixture. Care should be taken when handling and disposing of the acetolysis mixture. Furthermore, the samples must be free of all water and moisture prior to adding the acetolysis solution.
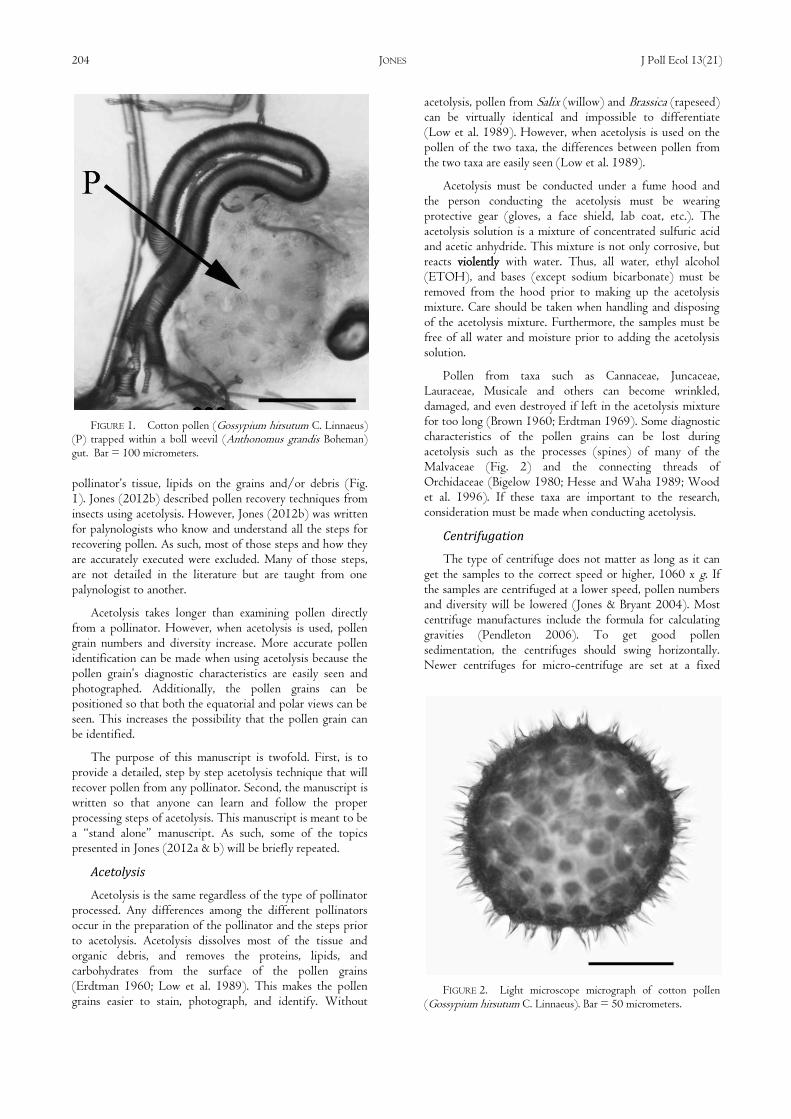
Pollen from taxa such as Cannaceae, Juncaceae, Lauraceae, Musicale and others can become wrinkled, damaged, and even destroyed if left in the acetolysis mixture for too long (Brown 1960; Erdtman 1969). Some diagnostic characteristics of the pollen grains can be lost during acetolysis such as the processes (spines) of many of the Malvaceae (Fig. 2) and the connecting threads of Orchidaceae (Bigelow 1980; Hesse and Waha 1989; Wood et al. 1996). If these taxa are important to the research, consideration must be made when conducting acetolysis.
Centrifugation
The type of centrifuge does not matter as long as it can get the samples to the correct speed or higher, 1060 x g. If the samples are centrifuged at a lower speed, pollen numbers and diversity will be lowered (Jones & Bryant 2004). Most centrifuge manufactures include the formula for calculating gravities (Pendleton 2006). To get good pollen sedimentation, the centrifuges should swing horizontally. Newer centrifuges for micro-centrifuge are set at a fixed
FIGURE 2. Light microscope micrograph of cotton pollen (Gossypium hirsutum C. Linnaeus). Bar = 50 micrometers.

August 2014 POLLEN ANALYSES, ACETOLYSIS 205
FIGURE 3. A glass, 12 ml centrifuge tube (C), and two micro-centrifuge tubes (M) used for acetolysis.
angle. These centrifuges are compact and obtain speeds far greater than 1060 x g. Centrifugation with a fixed angle centrifuge makes decanting the supernatant more difficult because the pollen pellet is slanted and easily becomes dislodged. Research needs to be conducted with these centrifuges to see if fragile pollen grains like cotton (Gossypium hirsutum C. Linnaeus) break during centrifugation. Regardless of the centrifuge used, never stop the centrifuge using the brake (unless there is an emergency). When the brake is used, pollen from the bottom of the tube will be mixed back with the supernatant. Then, when the supernatant is decanted, the pollen will go with it and be lost. Before putting the centrifuge tubes into the centrifuge, clean them off with a paper towel. This will help keep the centrifuge clean.
Centrifuge Tubes
Centrifuge tubes come in a variety of sizes and shapes (Fig. 3). They can be made of glass or plastic. Plastic centrifuges scratch more easily than the glass tubes. If the inside becomes scratched, the tube retains unwanted pollen and becomes a source of pollen contamination to other samples. Regardless, they must withstand caustic chemicals and 100+° C for 15 or more minutes.
Centrifuge tubes must have a conical bottom. The narrow, conical bottom helps make a pollen pellet or plug at the bottom of the tube when centrifuging. Some palynologists use a slightly more rounded bottom centrifuge tube. However, they understand the challenges of these types of tubes during the decanting stage. The conical bottom
tubes are more “fool proof”. Pollen is less likely to be lost when using the conical bottom centrifuge tubes especially for the non-palynologist.
The type of pollinator or its tissue determines the type and size of the centrifuge tube. Whole pollinators such as hard bodied insects (unless soft bodied and small), large body parts (heads, thorax, etc.), lumped tissues and samples, pollen pellets or pollen removed from bees, etc. need 12-15 ml centrifuge tubes. The 12-15 ml tubes are easy to handle and most centrifuges have shields to fit them. For small pollinators, tissues (crop, gut, alimentary canal, etc.), or body parts (legs, proboscis, etc.) etc., micro-centrifuge tubes (1.5 – 2 mm) work well. When micro-centrifuge tubes are used for large pollinators, the tissue will not be dissolved nor will the pollen in/on the pollinator be released from the tissue and cleared. Micro-centrifuge tubes use fewer chemicals and the pollen residue is not transferred to another vial for archiving. Micro-centrifuge tubes can be difficult to handle and adding/removing chemicals can be a problem.
Chemicals
All chemicals can be purchased in various grades and concentrations. To ensure that chemicals are pure and are free of pollen and additional chemicals, use reagent grade chemicals. These cost more but hold up better over time. The chemicals used in acetolysis are glacial acetic acid, acetic anhydride, sulfuric acid, 95% ETOH, and glycerin. All chemicals must be disposed of properly. Prior to performing acetolysis, know how to dispose of chemicals and how to clean up any spills.
Decanting the Supernatant
Decanting the supernatant correctly is of the utmost importance. (Fig. 4). It is easy to decant the supernatant improperly and lose pollen or even the entire pollen pellet. Be sure to watch the bottom of the centrifuge tube while decanting to make sure that the pollen pellet does not become dislodged. If it starts to move, stop decanting. Proper decanting takes practice. So practice prior to processing the real samples. If decanting is too slow, the supernatant will run down the tube (Fig. 5). When the supernatant is the acetolysis mixture or acid, it will run on the tube, drip on the counter and even worse run on hands, lab coats, etc. If decanting is too fast, not only can the supernatant be spilled but also there is the possibility of losing the pollen plug at the bottom of the tube.
1. hold the centrifuge tube just under the beaded top with the index finger and thumb
2. make sure that your fingers and hand do not touch the label on the centrifuge tube
3. in one continuous, smooth motion tip the centrifuge tube down allowing the supernatant to flow out of the tube (Fig. 4)
4. if the tipping is too slow, the liquid will curl over the lip of the centrifuge tube (Fig. 5)
5. if the tipping is too fast, the liquid and plug will come out too fast
6. do not bring the tube back up and then down again 7. do not thrust the tube downwards

206 JONES J Poll Ecol 13(21)
FIGURE 4. Properly decanting the pollen residue through a 450 micrometer screen.
FIGURE 5. Decanting the supernatant too slowly causing the supernatant to drip back onto the centrifuge tube.
8. if the pollen pellet starts to move, pull the tube back up. Do not try to pour any more supernatant out of the tube. The sample will need to be re-centrifuged so that a pollen plug will form.
Finding and Documenting Pollen
(See Jones 2012a, b for more details)
Use a 20-40X objective lens to scan the slide for pollen. While looking through the microscope, slowly move the slide to the right. Photograph, identify and/or count any pollen grain by focusing up and down through the slide (through focusing). Continue moving the slide to the right until the next corner comes into view. Move the slide down one field of view. Now, move the slide to the left documenting any pollen grains until the other side comes
into view. Move the slide down one field of view and go back to the right. Repeat this process until the entire slide has been examined.
It is important to document each different pollen type by photographing it. Each pollen type should have its own name or number so that it can be separated from similar looking grains. The notebook of the printed pollen micrographs becomes a photo representation of all the pollen types seen within the project. The micrographs in this notebook can be compared with pollen grains within the project, from other projects, and with pollen grains found in atlases, on line, or in various pollen reference collections.
Pollinator Preparation
The easiest way to get a pollinator ready for acetolysis is to put it (them) into a glass vial, micro-centrifuge tube, petri dish, etc. and freeze them for 72+ hours. Freezing stops the digestive processes and prevents most pollinators from thrashing around. Freezing is also good for storing dissected tissues and body parts. For dissected tissue, place the tissue into a micro-centrifuge tube or vial and add a little water. Make sure they are labelled properly.
Acetolysis can also be used on the pollen removed from body parts or live pollinators. Pollen can either be removed manually and dropped onto waxed paper or removed by using filter paper. If the pollen is put on waxed paper, “pour” the pollen into a micro-centrifuge tube or fold the waxed paper and store in a dry place until ready to use.
To examine pollen from the proboscis of live hawkmoths, Haber (1989) passed the tongue through a folded strip of filter paper. Adding 95% ETOH to the filter paper just prior to its use, will remove more pollen than dry filter paper. The best filter to use is 100% cellulose acetate filters with a 0.45 µm pore size and 45 mm in diameter. This type of filter will almost completely dissolve in the acetolysis mixture. Filters that are not 100% cellulose acetate will not completely dissolve in the acetolysis mixture (Lutier & Vaissiére 1993). Unfortunately, after acetolysis there is often filter parts remaining in the pollen residue (Jones & Bryant 1998). These can be moved around when examining the sample with light microscopy (LM) but not with scanning electron microscopy (SEM) (Jones & Bryant 1998).
Use a different filter for each pollinator and/or each part of the pollinator. If necessary, the filters can be cut in half. Be sure to wear gloves to prevent accidental pollen contamination. Hold the filter with a pair of forceps or hemostats. Squirt a little 95% ETOH onto the filter. Gently rub the head, legs, abdomen, etc. of the pollinator with the filter. When wiping live pollinators, make sure that they dry before releasing them. Fold the filter four times making a small cone. Place the folded filter into a labelled micro-centrifuge tube, vial, or centrifuge tube and freeze.
For some pollinators such as bats, it is easiest to remove pollen from their fur with cellophane tape. Cut the amount of tape that is needed to fit around your middle finger or two or three fingers. The tape should go completely around the finger or fingers, sticky side out. Attach it to the other side. Have someone that is wearing heavy gloves hold the

August 2014 POLLEN ANALYSES, ACETOLYSIS 207
FIGURE 6. Lycopodium clavatum C. Linnaeus spore in polar view. Bar = 20 micrometers.
bat’s wings open. Gently tap the underside of the wings, feet, and face around its mouth being careful not to harm the bat or get bitten by the bat. If desired, use a different tape for different areas. Place the tape into labelled 2-dram vials.
Marker Spores
Marker spores, Lycopodium clavatum L. (Stockmarr 1971) (Fig. 6) are used as a control to ensure that nothing went wrong during processing and for calculating concentration values. They work best for calculating pollen concentration values, when the pollen to spore ratio is as close to 1:1 as possible. That way the addition of a single pollen grain or spore to the pollen and spore count will not drastically affect the calculations of the pollen concentration values (Bryant & Jones 2001; Maher 1981). The amount of pollen recovered on/in most insects (except the Hymenoptera) is so small that the number of Lycopodium spores from a single tablet will overwhelm the number of recovered pollen. On occasion a single insect or other pollinator will have over 1,000 pollen grains in/on them (Jones et al. 2007). In this case calculating the pollen concentration value would be beneficial. However, it can be impossible to make an “a priori” decision as to which sample should have the marker spores added and which should not. Only with bee pellets, honey, storage honey, etc. is there a possibility of recovering enough pollen that the use of Lycopodium tablets is feasible. If Lycopodium spore tablets are used, it is important that they be well dissolved prior to adding them to the sample. Lycopodium tablets cannot be dissolved in a micro-centrifuge tube because they effervesce over the top of the tube. The best way to dissolve the tablets is to place them into a small (50 ml) beaker. Add a small amount (about 1 ml) of concentrated hydrochloric acid (HCL). The tablet will begin to effervesce. Swirl the beaker around, add another ml of HCL and swirl again. Continue adding one (1) ml of HCL until the tablet (s) stops effervescing and the tablet is dissolved. The amount of HCL depends entirely on the number of tablets being dissolved.
Mixing
Periodically throughout the acetolysis technique, usually after decanting the supernatant, the samples and the pollen residue need to be mixed. Mixing can be accomplished by a variety of ways, wooden applicator sticks, a vortex stirrer,
motorized pedestal, etc. Glass rods are not recommended because they are usually too wide to get into the bottom of the centrifuge tube to stir the pollen residue. It really does not matter what is used to mix the sample as long as the pollen residue becomes thoroughly mixed. The easiest and quickest way is to use a type of vortex stirrer where the centrifuge tubes can be held onto it for an allotted amount of time. When holding the sample make sure that the tubes are not held in such a way that the label or number will come off. If the pollen residue cannot be dislodged and mixed, a clean pollen free probe can be used to dislodge the pellet and then it can be mixed.
Screening
If large or many body parts or scales remain after acetolysis, the samples need to be strained/screened. The screen must be large enough to allow large pollen grains like cotton (about 150 µm in diameter) to pass through but small enough to trap the body parts. Screens have a square mesh and the squares are measured diagonally. Stainless steel screens hold up to any acids that are not completely removed from the sample. The most commonly used screens are 250, 400 and 420 µm. Always use a larger screen if there is any possibility of having large pollen grains in the pollen residue.
Slides and Cover Slips
The materials and thickness of slides and cover slips varies greatly (Jones 2012a, b). However, the best to use for light microscopy (LM) are a 15 X 75 mm glass slide or larger, with a thickness of 0.93 - 1.05 mm. This is thick enough to not easily break and yet thin enough for good resolution for LM (Moore et al. 1991). An 18 mm square cover slip easily fits onto a 15 X 75 mm glass slide. Cover slips should be a number 1 or 1.5 and have a thickness of 0.13 - 0.19 mm (Jones 2012a, b). Glass slides and cover slips are the best for light microscopy because they have a better refractive index than plastic. Even “pre-cleaned” slides and coverslips need to be cleaned prior to usage. The easiest way is to clean them with 95 -100% ETOH.
Sonication
Sonication is commonly used in palynology (Vaissiére 1991; Dafni 1992; Kannely 2003, 2005). Vaissiére (1991) and Dafni (1992) suggest soaking the pollen in acetone for 30 minutes prior to sonication. Kannely (2003, 2005) found that pollen was released from lily anthers when the anthers were placed in distilled water and sonicated at 20 um amplitude for 12-15 s. Sonication is often used to separate clumps of debris and/or pollen (Bryant and Holloway 2009, Bryant et al. 2012). Bryant et al. (2012) suggested sonicating archeological samples for no longer than 10 s in a Delta 5 Sonicator. Langgut et al. (2013) successfully sonicated their archeological samples at 20KHz for two min. How easily pollen is removed from a pollinator’s body when sonicated is the subject of future research. If sonication is to be used, make sure that it does not destroy any pollen
Staining
Pollen is stained to increase its contrast for microphotography and identification. There are many stains

208 JONES J Poll Ecol 13(21)
available including methyl-green, fuchsin, and others (Wodehouse 1959; Moore et al. 1991; Kearns and Inouye 1993). Safranin O (Green 1991) is the “preferred” stain for most palynological uses (Wood et al. 1996). Safranin O comes in a crystal form and easily dissolves in water and ETOH (Green 1991). It stains the pollen grains pink to red depending on the amount of stain. The pink/red colour is pleasing to the eye, stands out, and has good contrast for microphotography. Most optical systems are corrected for green light and it is thought that the definition is best with a reddish-orange colour (Traverse 1988).
A stock solution of Safranin O should be made ahead of time. To make up the stock solution, add 1 g of Safranin O crystals to 100 ml of 50% ETOH. To make a lighter stain, add 1 g of Safranin O crystals to 100 ml of 100% ETOH and 50 ml of water. Mix well and let it sit for 2-5 minutes. Additional stain can always be added if the pollen grains are too light.
Pollen grains with an ornate exine (outside layer) (cotton) stain rapidly. However those with a smooth exine (grasses, sedges, etc.) do not stain well. Start off with staining the samples with three drops of stock stain. Examine a few samples after they have been stained and determine if the pollen is stained well enough. If not add more stain to the samples.
There are several things that can be done to lighten too darkly stained pollen. First, rinse the pollen residue three or more times with water and then with 95% ETOH. If that does not work, bleach can be used. However, bleach destroys pollen and is tricky to use. The bleaching process is explained under Acetolysis step 8, Staining.
Vials
Similar to the centrifuge tubes, vials come in a variety of sizes and materials. Glass vials hold up well over time. The 1 or 2-dram glass vials work well for pollinators with a small amount of pollen residue and for honeybee pellets and honey with a large amount of pollen residue. A plastic centrifuge tube can be modified so that the vials can be placed in them for centrifugation. Two easy ways to modify plastic centrifuge tubes are to use string or a dowel. Cut the sting and pack it into the centrifuge tube until it reaches the top. Centrifuge the tubes with the string for 5 minutes at high speed. Now add more string and repeat until the string is tightly packed into the tube. make sure to leave about 4-5 cm (ca. 1.5 in) at the top of the tube for the vial. Now weigh the tubes. Add more string so that all tubes have about the same weight. Add the vial to the top and make sure that the vial does not sink too far into the tube during centrifugation nor does it hit the centrifuge’s rotor. Another way to modify a plastic centrifuge tube to fit the vial is to cut a small wooden dowel so that it fits in the centrifuge tube to about 10 mm from the top of the centrifuge tube (Fig. 7). The dowel will prevent the vial from moving down to the bottom of the centrifuge tube when centrifuged.
Water
Normal tap water is not suitable for pollen techniques because tap water often has pollen in it. For all pollen work,
FIGURE 7. Plastic conical bottom centrifuge tubes modified to hold a 1-dram vial. The tube on the left is packed with string (S). The tube on the right has a wooden dowel (D) that fits into it and prevents the vial from sinking inside the tube.
use distilled or reverse osmosis (RO) water. Be sure to double check the distilled/RO water from time to time making sure that it is pollen free. Water needs to be in a squirt bottle so that it can be squirted into the samples.
THE ACETOLYSIS PROCEDURE
Weeks prior to starting acetolysis
Prior to starting acetolysis, check with a safety officer (if there is one) about the disposal of caustic acids (sulfuric and acetic anhydride) and glacial acetic acid. Also find out what to do and how to clean up acid spills. Obtain any spill kits needed prior to starting acetolysis. Check that the hood, centrifuge, mixers, etc. are in working condition and that all the supplies needed (centrifuge tubes, applicator sticks, pipettes, etc.) are ready to use.
1-2 hours prior to acetolysis
1. Double check that all equipment is working, that the needed chemicals and proper waste disposal containers are ready to be used.
2. Turn the hot block on and set at 100° C. It may take several hours to reach 100° C. If boiling water is used, set it up and have the water almost boiling before preparing the acetolysis mixture.

August 2014 POLLEN ANALYSES, ACETOLYSIS 209
3. Make a supersaturated solution of sodium bicarbonate for minor spills. Place hot water into a 2-liter or greater jug or beaker. Add sodium bicarbonate and stir. Continue adding sodium bicarbonate until a precipitate forms. Transfer some of the supersaturated sodium bicarbonate into a squirt bottle and shake well. Have this squirt bottle ready to be used if necessary.
4. Pour some of the supersaturated sodium bicarbonate solution into a labelled beaker. This will be used to neutralize the acid on applicator sticks.
5. Label the sodium bicarbonate beaker, squirt bottle, and stock container.
6. Get a face shield, lab coat, and gloves ready to be worn. Make sure that the shield is clean and that it fits.
7. Double check that all glassware (beakers, graduated cylinder, centrifuge tubes, etc.) are clean and DRY.
8. Label all beakers, centrifuge tubes, and vials with a “wax” pencil or sharpie a. the number or label is the only way to identify one
tube/beaker from another b. put the number or label near the top of the
centrifuge tube or beaker but not where it can be rubbed off when held with one’s hand.
c. label a beaker for the acetic anhydride and another one for sulfuric acid
d. check the numbers or labels periodically to make sure that they are legible.
e. with a diamond scribe, additionally label the bottom of the vials
9. Pour some glacial acetic acid into a squirt bottle and label it.
10. Place the centrifuge into the hood if it is not already there
11. Turn the hood on and test the draft to ensure that the hood is working properly
Acetolysis: for 12-15 ml centrifuge tubes
The following is for 8 samples in 12- 15 ml glass centrifuge tubes. It is important that the sample is well covered with the acetolysis mixture. If the samples are small, only add three (3) mls of acetolysis mixture per sample. If they are large use five (5) mls of acetolysis mixture. Often the soft tissue adheres to the applicator stick or glass rod when crushing. If this occurs, remove it from the stick with a clean probe and place it back.
A 9:1 ratio of acetic anhydride to sulfuric acid will be needed. If 8 samples in 12-15 ml glass centrifuge tubes are being processed, a total of 40 mls of acetolysis mixture (5 mls per sample) will be needed. If 16 samples in 12-15 mls tubes are being processed, a total of 80 mls of acetolysis mixture will be needed.
Calculations: 8 samples, each need 5 mls of acetolysis mixture. 8 X 5 = 40. So 40 mls of acetolysis mixture will be needed for 8 samples. The ratio of the two chemicals is 9:1. Therefore, 36 mls of acetic anhydride and 4 mls of sulfuric acid will be needed.
Have the sodium bicarbonate beaker in a squirt bottle close enough to grab if necessary. Put on a lab coat and gloves.
TABLE I. Generalized steps to recover pollen from pollinators that are dry, frozen, fresh, in various liquids and from which filters were used to remove the pollen.
Filter Dry
Filter Frozen
Dry Frozen Water or ETOH
Glacial Acetic Acid
Other liquids
Cellophane tape
Thaw X X Dissolve tape X Remove liquid X X X Crush X X X X X X X Pre-Acetolysis, Glacial Acetic Acid
X X X X X X
Acetolysis X X X X X X X X Post-Acetolysis, Glacial Acetic Acid
X X X X X X X X
Water Rinses X X X X X X X X Straining, if necessary X X X X X X X X ETOH Rinse X X X X X X X X SEM Preparation X X X X X X X X Staining X X X X X X X X Transfer to vials* X X X X X X X X Glycerin X X X X X X X X Remove ETOH X X X X X X X X Preparing Slides for LM X X X X X X X X Identify and Photograph pollen grains
X X X X X X X X
*If the sample is in micro-centrifuge tubes they do not need to be transferred into vials.

210 JONES J Poll Ecol 13(21)
Step 1 – Sample Preparation (Table 1)
a. Sample in ETOH, or another liquid (other than water or glacial acetic acid)
1) pour the contents into a 12-15 ml centrifuge tube a) rinse the original container with distilled water
pouring the rinse water into the centrifuge tube b) repeat rinsing the original container several times c) fill the tube with distilled water to about 2.5 cm (1
inch) from the top 2) centrifuge for 3 min at 1060 X g, 3) decant the supernatant 4) mix the centrifuge tube for 15 s with a stick, vortex
stirrer, etc. 5) rinse the original container with distilled water,
pouring the water into the centrifuge tube 6) centrifuge, decant, and mix 7) add 8 mls of distilled water to the centrifuge tube,
centrifuge, decant, and mix 8) repeat #7 above two more times ending with decanting 9) crush the sample with a wooden stick, glass stirring
rod, or motorized pestle10) go to step 2, Pre-acetolysis, glacial acetic acid
b. Samples in water 1) pour the contents into a 12-15 ml centrifuge tube
a) rinse the original container with distilled water pouring the rinse water into the centrifuge tube
b) repeat rinsing the original container several times c) add enough distilled water so that the liquid reaches
to about 1 cm from the top of the centrifuge tube 2) centrifuge for 3 min at 1060 X g, 3) decant the supernatant 4) mix the centrifuge tube for 15 s with a stick, vortex
stirrer, etc. 5) rinse the original container with distilled water,
pouring the water into the centrifuge tube 6) centrifuge, decant, and mix 7) add 8 mls of distilled water to the centrifuge tube,
centrifuge, decant, and mix 8) repeat #7 above two more times ending with
decanting 9) crush the sample with a wooden stick, glass stirring
rod or motorized pestle 10) go to step 2, Pre-acetolysis, glacial acetic acid
c. Samples in glacial acetic acid 1) pour the contents into a 12-15 ml centrifuge tube
a) rinse the original container with glacial acetic acid pouring the rinse into the centrifuge tube
b) repeat rinsing the original container with glacial acetic acid several times
2) centrifuge for 3 min at 1060 X g, 3) decant the supernatant 4) mix the centrifuge tube for 15 s with a stick, vortex
stirrer, etc. 5) rinse the original container again with glacial acetic
acid, pouring the rinse into the centrifuge tube 6) centrifuge, decant, and mix 7) crush the sample with a wooden stick, glass stirring rod
or motorized pestle8) go to step 3, Acetolysis d. Samples that are frozen or fresh
1) thaw for about 15 minutes if frozen
2) if the samples are fresh or very wet after being thawed a) crush the sample with a wooden stick, glass stirring
rod or motorized pestle b) go to step 2, Pre-acetolysis, glacial acetic acid.
3) if the samples are relatively dry after thawing a) crush the sample with a wooden stick, glass stirring
rod or motorized pestle b) go to step 3, Acetolysis.
e. Samples that are dry 1) crush the sample with a wooden stick, glass stirring rod
or motorized pestle 2) go to step 3, Acetolysis
f. For bee pellets or other types of pellets 1) crush the sample with a wooden stick, glass stirring rod
or motorized pestle 2) go to step 2, Pre-acetolysis, glacial acetic acid
g. Frozen 100% cellulose acetate filters 1) place the filter into a 12-15 ml centrifuge tube
a) micro-centrifuge tubes are not suitable for the acetolysis of the filters because of the size of the filter
b) if the filters are in a micro-centrifuge tube for storage, they need to be removed and put into a 12-15 ml centrifuge tube
2) thaw the filter for 25 min 3) using an applicator stick, break up the filter paper as
much as possible 4) go to step 3, Acetolysis
h. Cellophane stick tape 1) add enough 95% ETOH to the vial containing the
cellophane tape so that the tape is covered by the ETOH.
2) allow the sticky part of the tape to dissolve, about 10 minutes
3) use a pair of clean forceps to remove the plastic part of the tape from the vial.
4) pour the ETOH into a clean labelled 12-15 ml centrifuge tube
5) add enough distilled water to fill the tube to about 2 cm from the top
6) centrifuge, decant the supernatant, and mix for 15 s 7) using a squirt bottle, add water to about 2 cm from the
top 8) centrifuge, decant the supernatant, and mix for 15 s 9) repeat steps 7 and 8 10) go to step 2, Pre-Acetolysis, Glacial Acetic Acid
NOTE: Sonicate the samples after they are crushed prior to preceding to any other step. Add marker spores at this point if used.
Step 2 – Pre-Acetolysis, Glacial Acetic Acid
a. mix the centrifuge tube for 15 s with a stick, vortex stirrer, etc.
b. add 5 mls of glacial acetic acid (glacial) from the squirt bottle
1) stir with a wooden applicator stick as the glacial is being added.
2) use a different applicator stick for each sample
August 2014 POLLEN ANALYSES, ACETOLYSIS 211
3) while stirring, slowly remove the applicator stick rinsing it with glacial acetic acid as it is lifted from the liquid
4) place the applicator stick into the sodium bicarbonate waste beaker
c. centrifuge samples for 3 minutes at 1060 X g d. decant the supernatant into an acid waste collector or
follow your safety officer’s directions for acid waste disposal
Step 3 – Acetolysis (must be conducted in a fume hood)
a. put on the face shield b. mix the samples well for 15-20 s with a stick, vortex
stirrer, etc. c. Make the acetolysis mixture (9:1 ratio of acetic
anhydride to sulfuric acid). 1) From a stock bottle, pour about 38 mls of acetic
anhydride into a clean labelled beaker. If this beaker is very clean, the excess can be poured back into the stock bottle.
2) Add 36 mls of the acetic anhydride from the beaker into a 50 ml clean, dry graduated cylinder.
3) add 5 mls of concentrated sulfuric acid into its labelled beaker
4) slowly add 4 mls of the sulfuric acid from the beaker into the graduated cylinder that has the acetic anhydride in it.
5) let the sulfuric acid run along the inside of the graduated cylinder as it is poured in.
6) the graduated cylinder will become hot to the touch, and often turns yellow. If the mixture turns very dark, the chemicals could be bad (usually the sulfuric), the amount of sulfuric acid is too high and the acetolysis mixture is considered “hot”, or the chemicals are contaminated with another chemical. In those cases, discard and start over with new chemicals.
d. slowly pour about 1 ml of the acetolysis mixture into the sample
1) gently stir the sample with a wooden applicator stick as the acetolysis mixture is added
2) if there is no reaction, add a little more acetolysis mixture, stirring while adding.
3) add a total of 3 mls to the sample, then go to the next sample
4) add more acetolysis mixture until all samples have 3 ml of acetolysis mixture
a) for small pollinators (insects, spiders, etc.) and pollinator tissues don’t add any more
b) 3 mls will reach the top of the curve of a glass conical bottom centrifuge tube
5) for large pollinators, whole insects, and multiple samples as one sample, and filter paper, add 2 more ml of acetolysis mixture to each sample
a) stirring as it is added b) 5 ml of acetolysis mixture will reach to the middle of
a 12-15 ml glass conical bottom centrifuge tube. 6) place the wooden applicators sticks into the sodium
bicarbonate beaker e. place the samples into the pre-heated hot block
1) if boiling water is used, the water needs to be boiling before making the acetolysis mixture.
2) the centrifuge tubes should not be able to fall into the water
3) The level of the boiling water should not bubble up and over into the samples
f. cook the samples for 5-25 min, depending on sample 1) for large, whole squashed pollinators, cook for 15-20
min 2) for small, squashed pollinators or its tissue, cook for
10 min 3) for pollen pellets, cook for 5 min 4) for whole, squashed moths or butterflies, cook for 15-
25 min. The scales that don’t dissolve will have to be strained out after acetolysis.
5) for filter paper, cook for 20 min g. every three minutes, stir each sample with the clean
wooden applicator stick 1) use a different applicator stick for each sample 2) do not leave the wooden applicator sticks in the
centrifuge tubes because the acetolysis mixture will dissolve them.
3) continue to stir as the applicator stick is lifted up out of the acetolysis mixture
4) place each applicator stick into the beaker that contains the sodium bicarbonate.
5) the filter paper may adhere to the sticks during stirring. If this happens
a) use a clean probe to remove the filter paper from the stick
b) place the filter back into the acetolysis solution h. after the allotted amount of time, remove the samples
from the hot block
Step 4 – Post-Acetolysis, Glacial Acetic Acid
a. add 5 mls of glacial acetic acid to each sample 1) stir the samples with an applicator stick as the glacial
acetic acid is added 2) make sure that the pollen residue plug becomes
dislodged and mixed 3) while stirring, rinse the applicator stick with the glacial
acetic acid as it is lifted out of the sample 4) place the applicator stick into the waste sodium
bicarbonate beaker b. centrifuge the samples for 3 min c. decant the supernatant into a waste beaker d. mix the samples very well, at least 15s
Step 5 – Water Rinses
a. the face shield can be removed, but keep the lab coat and gloves on
b. using a squirt bottle, fill the tube with distilled water to about 2.5 cm (1 inch) from the top
1) In one motion, aim the tip of the squirt bottle to the center bottom of the centrifuge tube and squirt water into the sample HARD
2) once the initial hard pressure is used, back off of the pressure but don’t stop squirting
3) when you start squirting water in to the sample, don’t stop until the tube is full

212 JONES J Poll Ecol 13(21)
4) turn the centrifuge tube as you squirt the water down the inside of the tube so that the sides are rinsed
5) make the water level even in the tubes 6) don’t place the tip of the squirt bottle into the
centrifuge tube. This will contaminate the squirt bottle. c. centrifuge the samples for 3 min at 1060 X g d. decant the supernatant into the waste beaker e. mix well for 15 s f. repeat the water rinse steps at least two more times
1) continue water rinses until the liquid is clear and no longer smells like glacial acetic acid.
2) this may take more than three water rinses 3) after the third water rinse, the supernatant can be
decanted into the hood’s sink
Step 6 – Straining the Samples
a. skip this step if there are no visible large body parts remaining.
b. bend the screen slightly so that it has a depression or well in the center and will rest on the top of a 100 ml plastic or glass beaker (Fig. 4).
1) use a separate beaker and screen for each sample 2) make sure that each beaker is labelled with the sample
number c. mix the pollen residue for 15s d. pour the pollen residue onto the screen, allowing the
liquid to go into the beaker e. holding the centrifuge tube at an angle, squirt a small
amount of water into the centrifuge tube and allow it to run out onto the screen and into the beaker
f. repeat the above (e) several times, or until all the pollen residue and large body parts are on the screen.
g. squirt water on the sides of the test tube and allow it to run out onto the screen and into the beaker
h. squash the body parts with a clean spatula then rinse the screen and body residue several times with distilled water
i. tap the screen several times on the top of beaker to dislodge any pollen grains stuck to the bottom side of the screen
j. pour the contents of the beaker back into its original centrifuge tube
k. centrifuge, decant, and mix l. if there is more water and pollen residue in the beaker,
pour it into the centrifuge tube m. add enough water so that the liquid is about 2 cm (1
inch) from the top of the centrifuge tube n. centrifuge, decant, and mix o. when all the water and residue are back in the centrifuge
tube 1) rinse the beaker several times with distilled water
allowing the water rinse to go into the centrifuge tube 2) be sure to rinse the sides of the beaker
Step 7 – ETOH Rinse
a. mix the samples for 15s b. add 5 ml of 95% ETOH to each sample c. centrifuge for 3 min at 1060 X g d. decant the supernatant
NOTE: If SEM is to be used, pipette a small amount of pollen residue to the SEM stubs at this point (Jones et al. 1995).
Step 8 – Staining
a. pipette 2-5 drops of Safranin O stock-stain or some other type of stain into the pollen residue after it was decanted (step 7d).
b. mix well for 10-15 s. c. examine the pollen to see if they are stained
1) pipette 1drop of sample on to a glass slide and cover with a cover slip
2) examine the sample 3) if the pollen grains are too light, add another drop of
stain 4) if the pollen grains are too dark, rinse 3-4 times with
water, centrifuging, decanting, and mixing 5) if the pollen grain are still too dark after rinsing 4
times with water, bleach the grains a) pipette 1 drop of household bleach into the sample b) with your finger, gently tap the test tube several times
to mix the sample and the bleach c) as soon as a colour change is seen, fill the test tube
with water d) centrifuge, decant, and mix e) add water 2 more times, centrifuging, decanting and
mixing each time f) examine the sample by pipetting 1 drop onto a glass
slide and covering the drop with a cover slip g) if the sample is too tight, add a drop of stain h) if the sample is too dark, repeat the bleaching process i) rinse the sample 2 more times with water to remove
any bleach d. add 5 ml of 95% ETOH. e. centrifuge for 3 minutes at 1060 X g f. decant the supernatant g. mix for 15 s.
Step 9 – Transferring to vials
a. make sure that the 1 or 2-dram glass vials are marked with the appropriate number on the sides and bottom of the vial
b. add a little 95% ETOH to the pollen residue in the centrifuge tube
c. pour the pollen residue into the vial d. squirt 95% ETOH into the bottom of the centrifuge
tube, allowing the ETOH it to run into the vial e. repeat the above (b-d) until the entire pollen residue is
transferred to the vial f. centrifuge the vials for 3 min at 1060 X g g. decant the supernatant
1) carefully watch the bottom of the vial because it is easy to remove pollen at this point
2) it is better to have half the vial with ETOH than lose pollen
Step 10 – Glycerin
a. add 3-5 drops of glycerin to each vial 1) glycerin can either be pipetted into the sample or put
into a squirt bottle and “dripped” into the sample. See
August 2014 POLLEN ANALYSES, ACETOLYSIS 213
acetolysis for micro-centrifuge tubes for pipette instructions.
2) for samples with very little pollen residue, add 3 drops of glycerin
3) for pollen pellets, and pollen removed from bees, add 10 or more drops or more of glycerin
b. stir the pollen residue well with a wooden applicator stick or flat toothpick
c. leave the toothpick or application stick in the vial.
Step 11 – Removing the ETOH
a. place samples onto a warm hot block or hot plate (20-25º C) overnight.
1) the ETOH will evaporate leaving the pollen residue in glycerin.
2) if too little glycerin was added, the samples will dry out before morning and pollen will be lost
3) if too much glycerin is added, the pollen residue will be diluted and more slides will have to be made to examine the pollen.
b. stir the samples several times with a new, clean toothpick/stick before leaving the samples overnight
c. leave the sticks in the vials over night 1) the sticks/toothpicks help the ETOH evaporate 2) the sticks/toothpicks will be used to make glass slides
for LM the next day d. for samples with little glycerin, leave on the warm hot
block for several hours, then turn the hot block off and leave them over night.
Step 12 – Preparing Slides for Light Microscopy
(See Jones 2012a for more detail)
a. if the vials still have an ETOH odour, the sample is not ready to make glass slides so keep them on the warm hot block until there is no ETOH odour
b. more than one slide of the pollen residue may be needed to obtain a good representation of the pollen diversity.
c. clean glass slides and cover slips with 95% ETOH d. allow slides and cover slips to dry e. Stir each vial for 15s with the toothpick or applicator
stick left in the vial f. remove 1 - 2 drops of the pollen residue g. place the drop (s) onto a cleaned glass slide h. allow the drop (s) to spread slightly i. place a cover slip over the drop (s) j. seal the cover slip to the slide
1) if VALAP (McGee-Russel and Allen 1971) is used as a sealant, follow their directions.
2) add 1 drop of fingernail polish to each corner of the coverslip
a) nail polish can be any colour and any type b) some brands work better than others c) clear top coat nail polish allows pollen grains that
move to the edge of the coverslip to be seen, identified and photographed.
3) paint the peripheral edge of the cover slip with fingernail polish
4) allow the nail polish to dry 5) add another layer of fingernail polish over the first one
k. label slides and vials
ACETOLYSIS: MICRO-CENTRIFUGE TUBES
Everything is basically the same when using micro-centrifuge tubes, except the amount of chemicals and glycerin used, how the chemicals are added/removed, and the lack of transferring the pollen residue to vials. Sometimes chemicals and liquids, like water, are difficult to decant from the micro-centrifuge tube. Spraying a small amount of 95% ETOH onto the top of liquid helps the liquid pour out of the micro-centrifuge tube. An “old fashioned glass pipette” about 14 cm (5.7 in) long makes adding and removing chemicals easy. To add chemicals with a pipette, put a pipette bulb at the wider end of the pipette. Squeeze the bulb and place the pipette tip into the chemical. Gently relax fingers and withdraw the chemical to about half the length of the pipette tube. Hold the pipette over the ET and gently squeeze the pipette bulb to release the chemical drop by drop. To remove any chemicals, water, etc. squeeze the pipette bulb. Put the tip of the pipette into the liquid so that the tip is about 3-5 mm above the pollen residue. Slowly open the bulb by slightly relaxing your fingers, and withdraw the liquid.
Less acetolysis mixture will be made up when using micro-centrifuge tubes. For 8 micro-centrifuge tubes, make 10 mls of the acetolysis mixture. Add 9 mls of acetic anhydride to a graduated cylinder, then add 1 ml of sulfuric acid. Add 1 ml of acetolysis solution to each sample. Discard the remaining acetolysis mixture. After cooking for the appropriate amount of time, add 0.5 ml of glacial acetic acid. Follow all the steps but step 9, transferring to vials. If the samples need to be strained return the pollen residue to the appropriate micro-centrifuge tube. The evaporation of the ETOH can take as little as a couple of hours when using micro-centrifuge tubes, so they need to be watched more carefully.
DISCUSSION AND CONCLUSIONS
Pollen found on/in a pollinator is useful in many areas. First, the yield of many crops (apples, almonds, peaches, melons, etc.) depends on and is improved by the pollinators that visit the crop’s flowers. Pollen from those taxa found on any pollinator indicates that they help in increasing the yield of the crop. Second, many pollinators feed on non-crop flowers. Knowing which plants are foraged and having those plants surround the fields/orchards helps keep the pollinators close to the cropping system. Third, the habit, habitat and life cycles of many pollinators are poorly known. Pollen on/in those pollinators can answer a multitude of questions. Which plant species were visited? How often are the flowers visited? How do genetically modified plants (GMO) affect the pollinators? How far do they disperse GMO pollen? Finally, pollen found on/in pollinators can be used to determine their migratory activities, source zones, and the habitats where they occurred (i.e., Cate and Skinner 1978; Benedict et al., 1991; Berkhousen and Shapiro 1994; Boukary et al., 1997; DelSocorro & Gregg 2001; Gregg 1993, Gregg et al. 1993; Hagerup, 1950, 1951; Hendrix et al. 1987, Hendrix and Showers 1992; Lingren et al. 1993, 1994; Loublier et al. 1994; Kim et al., 2010).

214 JONES J Poll Ecol 13(21)
Pollen can be recovered from a pollinator’s digestive tract (gut, alimentary canal, crop, etc.) (internal) or from their body parts (legs, eyes, mouth parts, etc.) (external). Determination of the analyses of the internal or external pollen or both depends on the pollinator’s mode of feeding and the questions being asked. Historically, pollinators like adult moths and butterflies are examined for pollen by looking at external pollen (proboscis, eyes, and legs). Jones and Lopez (2001) found different taxa between the internal and external pollen in/on adult corn earworm moths (Helicoverpa zea Broddie). Similarly, the internal tissues of boll weevils (Anthonomus grandis Boheman) are examined for pollen (Cate & Skinner 1978; Benedict et al., 1991; Gregg et al. 1993; Hardee et al. 1999). Jones and Coppedge (1998, 1999, 2000) found a different pollen assemblage on the exoskeleton of boll weevils than previously found internally. Thus, pollen taxa are missed when examining only the external or internal parts of the pollinator. For a full assemblage of pollen taxa, both internal and external pollen must be examined.
Regrettably, finding pollen in/on any pollinator is essentially a “hit or miss” situation, and depends on a variety of factors (Jones & Jones 2001, Jones & Greenberg 2009). These factors can be put into four broad categories; the pollinator, the flower, the pollen, and the techniques. Pollinator factors include but are not limited to the mode of feeding, the feeding apparatus, where the pollen is located, and possible mechanical loss due to flight, digestion, etc. (Jones & Greenberg 2009). Todd and Vansell (1942) found that the number of pollen grains decreased the longer nectar remained in a bee’s stomach. Lycopodium clavatum C. Linnaeus spores remained in the crop of corn earworm moths for three days (Westbrook et al. 1998). Asteraceae pollen was the most common taxa found on corn earworm adults (Lingren et al. 1993; 1994), however pollen grains with processes (e.g. Asteraceae) were found less often on hawkmoths (Kislev et al. 1972). Colias eurytheme (Boisduval), alfalfa caterpillar, lost up to 51% of Phlox spp. pollen grains simply through the coiling and uncoiling its proboscis (Levin & Berube, 1972).
Flower factors include not only the amount of pollen produced per flower and per inflorescence, but also the flower’s physical attributes (size, shape, longevity, time of flowering, anther size and shape, etc.). The amount of pollen produced by different taxa varies greatly. Red clover (Trifolium pretense C. Linnaeus), produce about 220 pollen grain per anther (Erdtman 1969), whereas apple (Malus sp.) produces between 1400-6200+ pollen grains per anther (Erdtman 1969). Smartweed on the other hand (Polygonum sp.) produces about 6,000 pollen grains per anther or almost three million per inflorescence (Traverse, 1988). A single birch (Betula sp.) catkin can produce as many as five million pollen grains (Proctor & Yeo 1973). Traverse (1988) estimated that a ten-year-old branch system of a pine (Pinus) produced 350 million pollen grains.
Pollen factors include the type, size, aperturation and ornamentation of the pollen grain, the amount of lipids on its surface, and the strength of the pollen wall. For example, pollen of the Malvaceae (mallow family), like cotton, is very
large (125+ µm in diameter) with long processes (Jones & McCurry 2012). Malvaceae pollen easily breaks. This makes it more difficult to find than grains that remain whole. Cotton pollen fragments could be found in the gut of boll weevils for as long as 120 h (Jones & Greenberg 2009). Whole almond pollen grains were found in boll weevil guts for 96 h (Jones et al. 2007).
The final category is the technique used to recover pollen from pollinators. More than anything, finding pollen depends on the technique used to obtain the pollen (Bryant et al. 1991). Good techniques recover a large number and high diversity of pollen grains and taxa while faulty techniques lead to poor pollen recovery with a low number of pollen grains and taxa diversity. The number of pollen grains recovered from honeybees and other hymenoptera can be in the hundreds of thousands to millions. Pollen grain numbers from insects such as tarnished plant bugs (Lygus linerolaris (Palisot de Beauvois)) or Agathirsia wasps are usually less than 10 pollen grains per insect (Pucci & Jones 2010; Jones & Allen 2012, 2013). The loss of several thousand pollen grains from a honeybee pellet may or may not severely affect the results. However, the loss of even ten pollen grains from pollinators like tarnished plant bugs will severely affect the results and any management strategies.
Acetolysis is by far the best way to recover pollen from pollinators regardless of the size and type of pollinator, or if the pollen is external or internal. Acetolysis does have its drawbacks. The chemicals are caustic and have to be disposed of properly. Acetolysis has to be conducted under a fume hood. Specialized equipment is needed for acetolysis. Finally, acetolysis takes longer than other methods to recover pollen from pollinators.
However, the positives for using acetolysis to recover pollen from pollinators outweigh the negatives. Just the fact that after using acetolysis, the pollen grains and their diagnostic characteristics are more visible is of utmost importance. Identification of pollen depends on being able to see those diagnostic characteristics. How many apertures does the grain have? Are the apertures pores or colpi? What do they look like? What is the grain’s ornamentation? Is the ornamentation uniform across the pollen grain? Without being able to see these things and more, pollen identification is impossible. These characteristics separate pollen into the family, genus and species rankings. To say that a pollen grain is an Asteraceae does not give the researcher much information. The Asteraceae are common, occur world-wide, and often bloom year round in many regions. For example, Asteraceae is the largest plant family in Texas and is represented by 196 genera and 682 species (Jones et al. 1997). Identifying a pollen grain to the species rank because the diagnostic characteristics can be seen not only identifies the plant species, but also the habitat and often the location. For example, identifying a pollen grain as Harvardia pallens (G. Bentham) N. Britton & J. Rose (pale ebony, SY = Pithecellobium pallens) tells the researcher that the pollen not only came from a particular species of Fabaceae (legume plant family) but also that pale ebony only occurs in the drier habitats of the southern tip of Texas and northern Mexico. This information gives the researcher more

August 2014 POLLEN ANALYSES, ACETOLYSIS 215
information from which to determine food sources, habitats, source zones, migration routes, dispersal, etc.
When push comes to shove, acetolysis is always the best technique to use to recover pollen from any pollinator. Acetolysis not only removes most to all of the sample’s tissue but also removes the lipids and debris on and around the pollen grains, making their diagnostic characteristics more visible. It is from these characteristics that accurate pollen identification can be made. The purposes of this manuscript are to provide a detailed, step by step acetolysis technique that recovers pollen from any pollinator and to describe the acetolysis technique in such a way that anyone can follow it. Scientists have been asking questions about pollinators, their food sources, habitats, source zones, and migration routes for centuries. Many of these questions can be answered through the identification of the pollen on/in the pollinator. However, without the proper technique and accurate pollen identification the data are erroneous. Only by using the best techniques can the questions be correctly answered.
ACKNOWLEDGEMENTS
I am truly indebted to Ester F. Wilson (USDA-ARS, APMRU, retired) and Chris Parker (USDA-ARS, APMRU) for all their hard work and to Dr. Cynthia Sheffield (USDA-ARS, FFSRU) for her review of the manuscript. Mention of trade names or commercial products in this article is solely for the purpose of providing specific information and does not imply recommendation or endorsement by the U.S. Department of Agriculture.
REFERENCES
Benedict JH, Wolfenbarger DA, Bryant VM, Jr, George D M (1991) Pollen ingested by boll weevils (Coleoptera; Curculionidae) in southern Texas and northeastern Mexico. Journal of Economic Entomology 84: 126-131.
Berkhousen AE Shapiro AM (1994) Persistent pollen as a tracer for hibernating butterflies: the case of Hesperia juba (Lepidoptera: Hesperiidae). Great Basin Naturalist 54: 71-78.
Bigelow JH (1980) Improved palynolographic technique. Micropaleontology 26: 193-195.
Boukary IB, Finfras J, Tourneur J–C (1997) Feeding habits of Forficula senegalensis (Derm.: Forficulidae) on millet in the Sudanese-Sahelian zone of Niger: crop content analysis. Entomophaga 42: 537-542.
Brown CA. 1960. Palynological Techniques. Clair A. Brown, Baton Rouge, LA.
Bryant VM, Jr, Holloway RG (2009) Reducing charcoal abundance in archaeological pollen samples. Palynology 33: 63-72.
Bryant VM, Jr, Jones GD (2001) The R-values of honey: pollen coefficients. Palynology 25: 11-28.
Bryant VM, Jr, Kampbell S, Hall JL (2012) Tobacco pollen: archaeological and forensic applications. Palynology 36: 208-223.
Bryant VM, Jr, Pendleton M, Murray RE, Lingren PD, Raulston JR (1991) Techniques for studying pollen adhering to nectar-feeding corn earworm (Lepidoptera: Noctuidae) moths using scanning electron microscopy. Journal of Economic Entomology 84: 237-240.
Carpenter FL (1978) Hooks for mammal pollination? Oecologia 35: 123-132.
Cate J., Skinner JL (1978) Fate and identification of pollen in the alimentary canal of the boll weevil, Anthonomus grandis. Southwestern Entomologist, 3: 263-452.
Dafni A (1992) Pollination ecology: a practical approach. Oxford University Press, New York.
Del Socorro AP, Gregg PC (2001) Sunflower (Helianthus annuus L.) pollen as a marker for studies of local movement in Helicoverpa armigera (Hübner) (Lepidoptera: Noctuidae). Australian Journal of Entomology 40: 257-263.
Elvers I (1977) Flowering-visiting lizards on Madeira. Botanisk Notiser 130: 231-234.
Erdtman G (1960) The acetolysis method. Svensk Botanisk Tidskrift 54: 561-564.
Erdtman G (1969) Handbook of Palynology, An introduction to the study of pollen grains and spores. Hafner Publishing Co., New York.
Fægri K van der Pijl L (1979) The principles of pollination ecology. 3rd. Edition. Pergamon Press, New York.
Green FJ (1991) The Sigma-Aldrich handbook of stains, dyes, and indicators. Aldrich Chemical Co., Inc. Milwaukee, WI.
Gregg PC (1993) Pollen as a marker for migration of Helicoverpa armigera and H. punctigera (Lepidoptera: Noctuidae) from western Queensland. Australian Journal of Ecology 18: 209-219.
Gregg PC Fitt GP Zalucki MP Murray DAH McDonald G (1993) Winter breeding and spring migration of Helicoverpa spp. in inland Australia, 1989-1991. In: S. A. Corey, D. J. Dall, and WM. Milne editors. Pest Control and Sustainable Agriculture. CSIRO, Melbourne.
Haber WA (1984) Pollination by deceit in a mass-flowering tropical tree Plumeria rubra L. Apocynaceae). Biotropica 16: 269-275.
Haber WA, Frankie GW (1989) A tropical hawkmoth community: Costa Rican dry forest Sphingidae. Biotropica 21: 155-172.
Hagerup O (1950) Thrips pollination in Calluna. Biologiske Meddelelser Kongelige Danske Videnskabernes Selskab 18: 1-16.
Hagerup O (1951) Pollination in the Faroes-in spite of rain and poverty of insects. Biologiske Meddelelser Kongelige Danske Videnskabernes Selskab 18: 1-48.
Hardee DD, Jones GD, Adams LC (1999) Emergence, movement, and host plants of boll weevils (Coleoptera: Curculionidae) in the Delta of Mississippi. Journal of Economic Entomology 92:130-139.
Harris TM (1945) On a coprolite of Caytonia pollen. Annals and Magazine of Natural History (Series 11) 12: 357-378.
Harris TM (1956) The investigation of a fossil plant. Proceedings of the Royal Institution of Great Britain 36: 456-466.
Hendrix WH, Mueller TF, Phillips JR, Davis OK (1987) Pollen as an indicator of long-distance movement of Heliothis zea (Lepidoptera: Noctuidae). Environmental Entomology 16: 1148-1151.
Hendrix W, Showers WB (1992) Tracing black cutworm and armyworm (Lepidoptera: Noctuidae) northward migration using Pithecellobium and Calliandra pollen. Population Ecology 21: 1092-1096.
Hesse, M Waha M (1989) A new look at the acetolysis method. Plant Systematics and Evolution 163: 147-152.
Hughes, NF (1976) Paleobiology of angiosperm origins; problems of Mesozoic seed-plant evolution. Cambridge University Press, Cambridge.
Jarzen, DM Nichols DJ (1996) Pollen. In: Jansonius J and McGregor DC (eds.) Palynology: principles and applications.

216 JONES J Poll Ecol 13(21)
American Association of Stratigraphic Palynologists Foundation, Dallas, TX, pp. 261-291.
Jones GD (2012a) Pollen analyses for pollination research, unacetolyzed pollen. Journal of Pollination Ecology 9: 96-107.
Jones GD (2012b) Pollen recovery from insects. Palynology 36: 86-109.
Jones GD Allen KC (2012) Using Amaranthus palmeri pollen to mark captured tarnished plant bugs. Palynology 36: 153-161.
Jones GD Allen KC (2013) Pollen analyses of tarnished plant bugs. Palynology 37: 170-176.
Jones GD Bryant VM, Jr (1998) Pollen recovery from honey. In: Bryant VM Wrenn JH (eds.). New Developments in Palynomorph Sampling, Extraction and Analysis. American Association of Stratigraphic Palynologists Foundation, Dallas, TX, pp. 107-114.
Jones GD Bryant VM, Jr (2004) The use of ETOH for the dilution of honey. Grana 43:
174-182.
Jones GD Bryant VM, Jr Lieux MH Jones SD Lingren PD (1995) Pollen of the southeastern United States: with emphasis on melissopalynology and entomopalynology. American Association of Stratigraphic Palynology Contribution Series Number 30. American Association of Stratigraphic Palynology Foundation, Dallas, TX.
Jones GD, Coppedge JR (1998) Pollen analyses of the boll weevil exoskeleton. In: Bryant VM, Jr, Wrenn JH (eds.) New developments in palynomorph sampling, extraction, and analysis. American Association of Stratigraphic Palynologists Foundation, Contribution Series No. 33. American Association of Stratigraphic Palynologists Foundation, Dallas, TX, pp 121-126.
Jones GD, Coppedge JR (1999) Foraging resources of boll weevils (Coleoptera: Curculionidae). Journal of Economic Entomology 92: 860-869.
Jones GD, Coppedge JR (2000) Foraging resources of adult Mexican corn rootworm (Coleoptera: Chrysomelidae) in Bell County, Texas. Journal of Economic Entomology 93: 636-643.
Jones GD, Greenberg SM (2009) Cotton pollen retention in boll weevils: a laboratory experiment. Palynology 31: 157-165.
Jones GD, Greenberg SM, Eischen FA (2007) Almond, melon, and pigweed pollen retention in the boll weevil (Coleoptera: Curculionidae). Palynology 31: 81-93.
Jones, GD Jones SD (2001) The uses of pollen and its implication for entomology. Neotropical Entomology 30:341-350.
Jones GD, Lopez JD, Jr (2001) Pollen analysis of the crop of corn earworm adults. Proceedings of the 9th International Palynological Congress. American Association of Stratigraphic Palynology Foundation. Dallas, TX, pp 505-510.
Jones GD McCurry H (2012) Differentiating pollen from four species of Gossypium. Palynology 36: 80-85.
Jones S D Wipff JK Montgomery PM (1997) Vascular plants of Texas. University of Texas Press, Austin, TX.
Kannely A (2003) Pollen output in the first and second flower of the geophytic lily Calochortus. M. S. thesis. California State University, Chico, CA.
annely A ( ) reparation and quantification of entomophilous pollen using sonication and an area-counting
technique. adron o 52: 267-269.
Kearns CA., Inouye DW (1993) Techniques for pollination biologists. University of Colorado Press, Niwot, CO.
Kim KS Jones GD Westbrook JK Sappington TW (2010) Multidisciplinary fingerprints: forensic reconstruction of an insect reinvasion. Journal of the Royal Society Interface 7: 677-686.
Kislev ME, Kravz A, Lorch J (1972) A study of hawkmoth pollination by a palynological analysis of the proboscis. Israel Journal of Botany 21: 57-75.
Langgut D Gadot Y Porat N Lipschits, O (2013) Fossil pollen reveals the secrets of the Royal Persian Garden at Ramat Rahel, Jerusalem. Palynology, DOI:10.1080/01916122.2012.736418.
Levin DA, Berube DE (1972) Phlox and Colias: the efficiency of a pollination system. Evolution 26: 242-250.
Lingren PD, Bryant VM, Jr, Raulston JR, Pendleton M, Westbrook J, Jones GD (1993) Adult feeding host range and migratory activities of corn earworm, cabbage looper and celery looper (Lepidoptera: Noctuidae) moths as evidenced by attached pollen. Journal of Economic Entomology 86: 1429-1439.
Lingren PD, Westbrook JK, Bryant VM, Jr, Raulston JR, Esquivel JF, Jones GD (1994) Origin of corn earworm (Lepidoptera: Noctuidae) migrants as determined by Citrus pollen markers and synoptic weather systems. Environmental Entomology 23: 562-570.
Loublier Y, Douault P, Causse R, Barthes J, Bues R, Poitout S (1994) Utilisation des spectres polliniques recueillis sur Agrotis (Scotia) ipsilon Hufnagel (Noctuidae) comme indicateur des migrations. Grana 33: 276-281.
Low NH Schweger C Sporns P (1989) Precautions in the use of melissopalynology. Journal of Apicultural Research 28: 50 54.
Lutier PM Vaissiére BE (1993) An improved method for pollen analysis of honey. Review of Palaeobotany and Palynology 78: 129-144.
Maher L (1981) Statistics for microfossil concentration measurements employing samples spiked with marker grains. Review of Paleobotany and Palynology 32: 153-191.
McGee-Russel S, Allen RD (1971) Reversible stabilization of labile microtubules in the reticulopodial network of Allogromia. Advances in Cell and Molecular Biology 1: 153-184.
Moore PD, Webb JA, Collinson ME (1991) Pollen Analysis. 2nd ed. Blackwell Scientific Publications, London.
Pendleton MW (2006) Descriptions of melissopalynological methods involving centrifugation should include data for calculating Relative Centrifugal Force (RCF) or should express data in units of RCF or gravities (g). Grana 45: 71-72.
Proctor M, Yeo P (1972) The pollination of flowers. Taplinger Publishing Co., New York.
Pucci TM, Jones GD (2010) Interspecific mouthpart length variation and floral visitation in the parasitic wasp genus Agathirsia (Braconidae: Agathidinae). Annals of the Entomological Society of America 103: 566-573.
Stockmarr J (1971) Tablets with spores used in absolute pollen analysis. Pollen et Spores 13: 615-621.
Todd FE, Vansell GJ (1942) Pollen grains in nectar and honey. Journal of Economic Entomology 35: 728 - 731.
Traverse A (1988) Paleopalynology. Unwin Hyman, London, England.
Vaissiére BE (1991) Honey bees, Apis mellifera L. (Hymenoptera: Apidae), as pollinators of upland cotton, Gossypium hirstutm L. (Malvaceae), for hybrid seed production. Ph.D. thesis. Texas A&M University, College Station, TX.
Westbrook JK, Esquivel JF, Lopez JD, Jr, Jones GD, Wolf WW, Raulston JR (1998) Validation of bollworm migration across south-central Texas in 1994-1996. Southwestern Entomologist 23: 209-219.

August 2014 POLLEN ANALYSES, ACETOLYSIS 217
Wodehouse R P (1959) Pollen grains: their structure, identification and significance in science and medicine. Hafner Publishing Co., New York.
Wood GD, Gabriel AM, Lawson JC (1996) Palynological Techniques-processing and microscopy. In: Jansonius J,
McGregor DC (eds) Palynology: principles and applications. Vol. 1. American Association of Stratigraphic Palynologists Foundation, pp 29-520.


![Untitled-1 []flowers for compatible pollination and with pollen from white flowers for incompatible pollination. After 48 h the compatible pol- ... studies or dehydrated in acetone](https://img.dokumen.tips/doc/110x75/5e50ad2528aa6d1f42158a02/untitled-1-flowers-for-compatible-pollination-and-with-pollen-from-white-flowers.jpg)