Embed Size (px)
Citation preview

Point-to-Point Encryption (P2PE) Implementation Manual
Mobile / Mini / Flex
Version 1.0

P2PE Implementation Manual for PCI P2PE v2.0 Clover Network, Inc. November 2017
© 2017 All Rights Reserved PIM Page 2
1. P2PE Solution Information and Solution Provider Contact Details
1.1 P2PE Solution Information
Solution name: Clover Mobile / Mini / Flex
Solution reference number per PCI SSC
website:
2017-00893.001
1.2 Solution Provider Contact Information
Company name: Clover Network, Inc.
Company address: 415 N. Mathilda Ave., Sunnyvale, CA 94085
Company URL: www.clover.com
Contact name: Customer Support
Contact phone number: (855) 853-8340
Contact e-mail address: [email protected]
P2PE and PCI DSS
Merchants using this P2PE Solution may be required to validate PCI DSS compliance and
should be aware of their applicable PCI DSS requirements. Merchants should contact their
acquirer or payment brands to determine their PCI DSS validation requirements.
2. Approved POI Devices, Applications/Software, and the Merchant Inventory
2.1 POI Device Details
The following information lists the details of the PCI-approved POI devices approved for use in
this P2PE solution.
Note all POI device information can be verified by visiting: https://www.pcisecuritystandards.org/approved_companies_providers/approved_pin_transaction_security.php
POI device vendor: Clover Network, Inc.
POI device model name and number: Clover Mobile, Clover Mini, Clover Flex
Hardware version #(s): 1.0, 1.0, 1.XX
Firmware version #(s): 1.0, 1.1, 01.XX.XXXX
PCI PTS Approval #(s): 4-40156, 4-40158, 4-40209
2.2 POI Software/application Details
The following information lists the details of all software/applications (both P2PE applications
and P2PE non-payment software) on POI devices used in this P2PE solution.

P2PE Implementation Manual for PCI P2PE v2.0 Clover Network, Inc. November 2017
© 2017 Clover Network, Inc. All Rights Reserved PIM Page 3
Note that all applications with access to clear-text account data must be reviewed according to
Domain 2 and are included in the P2PE solution listing. These applications may also be
optionally included in the PCI P2PE list of Validated P2PE Applications list at vendor or
solution provider discretion.
Application
vendor, name
and version #
POI device
vendor
POI device model
name(s) and
number:
POI Device
Hardware &
Firmware Version
#
Is application
PCI listed?
(Y/N)
Does application
have access to
clear-text account
data (Y/N)
N/A N/A N/A N/A N/A N/A
All Clover devices are out of scope for Domain 2 since all cardholder data is encrypted at swipe, dip, or tap (SRED). No payment card data is ever stored in any application and is only
processed by the firmware of the device. 2.3 POI Inventory & Monitoring
▪ All POI devices must be documented via inventory control and monitoring procedures,
including device status (deployed, awaiting deployment, undergoing repair or otherwise not
in use, or in transit).
▪ This inventory must be performed annually, at a minimum.
▪ Any variances in inventory, including missing or substituted POI devices, must be reported
to Clover Network, Inc. via the contact information in Section 1.2 above.
▪ Sample inventory table below is for illustrative purposes only. The actual inventory should
be captured and maintained by the merchant in an external document.
Merchants can keep track of all devices using the Clover Web Management Dashboard.
Using the Dashboard, all registered Clover devices will appear in their Devices tab in their
Dashboard. From here, they can regularly manage their inventory and keep track of them.

P2PE Implementation Manual for PCI P2PE v2.0 Clover Network, Inc. November 2017
© 2017 Clover Network, Inc. All Rights Reserved PIM Page 4
Merchants may also use an Inventory tracking spreadsheet to keep track of all their devices
similar to this sample below:
Sample Inventory Table
Device vendor
Device model name(s)
and number: Device Location Device Status
Serial Number or other
Unique Identifier
3. POI Device Installation Instructions
Do not connect non-approved cardholder data capture devices.
The P2PE solution is approved to include specific PCI-approved POI devices. Only these devices denoted above in table
2.1 are allowed for cardholder data capture.
If a merchant’s PCI-approved POI device is connected to a data capture mechanism that is not PCI approved, (for
example, if a PCI-approved SCR was connected to a keypad that was not PCI-approved):
▪ The use of such mechanisms to collect PCI payment-card data could mean that more PCI DSS requirements are
now applicable for the merchant.
▪ Only P2PE approved capture mechanisms as designated on PCI’s list of Validated P2PE Solutions and in the PIM
can be used.
Do not change or attempt to change device configurations or settings.
Changing or attempting to change device configurations or settings will invalidate the PCI-
approved P2PE solution in its entirety. Examples include, but are not limited to:
▪ Attempting to enable any device interfaces or data-capture mechanisms that were disabled
on the P2PE solution POI device
▪ Attempting to alter security configurations or authentication controls
▪ Physically opening the device
▪ Attempting to install applications onto the device

P2PE Implementation Manual for PCI P2PE v2.0 Clover Network, Inc. November 2017
© 2017 Clover Network, Inc. All Rights Reserved PIM Page 5
3.1 Installation and connection instructions
Activate & Connect your Clover Device (Mobile shown below):
Set up the Hardware
Plug in the cables for your Clover Device
1. Plug in Clover Mobile’s USB outlet to a nearby wall outlet 2. Plug in Clover Mobile’s microUSB connector to the Clover Mobile port 3. Press and hold the Power button to turn on Clover Mobile. You will know Clover Mobile
is on when the Clover logo appears on the front screen.

P2PE Implementation Manual for PCI P2PE v2.0 Clover Network, Inc. November 2017
© 2017 Clover Network, Inc. All Rights Reserved PIM Page 6
Connect Clover Mobile to a Network
Activate Device via 3G
1. Once your Clover Mobile has started, select your primary language that you would like Clover to be set up in.
2. You will then be taken to the Network connection screen. Please wait about a minute for the SIM card to wake up and for the SIM card to verify that it’s connected to the 3G network
3. Tap Next.
P2PE Implementation Manual for PCI P2PE v2.0 Clover Network, Inc. November 2017
© 2017 Clover Network, Inc. All Rights Reserved PIM Page 7
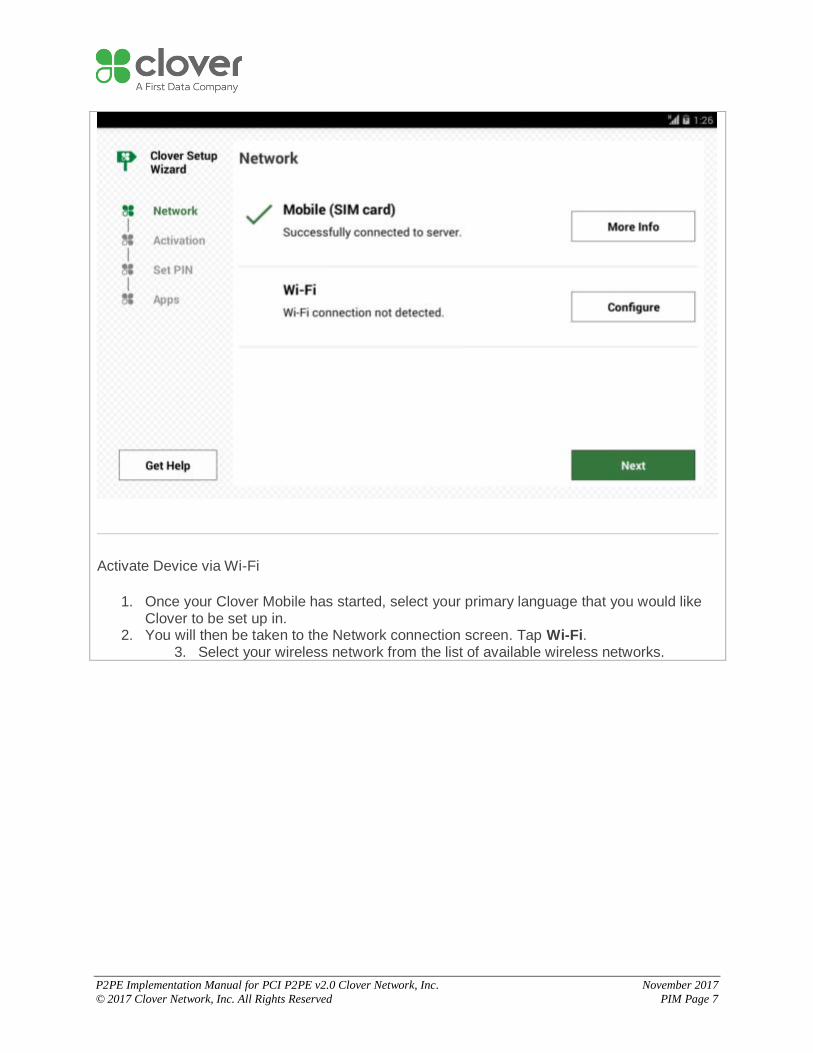
Activate Device via Wi-Fi
1. Once your Clover Mobile has started, select your primary language that you would like Clover to be set up in.
2. You will then be taken to the Network connection screen. Tap Wi-Fi. 3. Select your wireless network from the list of available wireless networks.

P2PE Implementation Manual for PCI P2PE v2.0 Clover Network, Inc. November 2017
© 2017 Clover Network, Inc. All Rights Reserved PIM Page 8
4. Enter in your wireless network password.
NOTE
If you do not see your Wi-Fi network name, you may have a WEP or open access network. Please connect your Clover Mobile to a WPA or WPA2 network for PIC compliance reasons.

P2PE Implementation Manual for PCI P2PE v2.0 Clover Network, Inc. November 2017
© 2017 Clover Network, Inc. All Rights Reserved PIM Page 9
Updating Clover Software during device setup
After Clover Mobile connects to the network for the first time, it will need to download and install the latest version of Clover. Your Clover Mobile will then automatically reboot. Depending on the device, you may need to install a second download.
Activate your Clover Mobile
Locate & enter your activation code
Install the Apps in the App Market
Install apps and access the App Market
1. After entering your activation code, Clover Mini may prompt you with a few questions about your business. Please answer them the most accurately, so Mini can be automatically set up with settings that are best for your business needs.
2. After answering these questions, your apps should begin installing. Please wait until the install process is complete.
Pair with Mobile Printer

P2PE Implementation Manual for PCI P2PE v2.0 Clover Network, Inc. November 2017
© 2017 Clover Network, Inc. All Rights Reserved PIM Page 10
Optionally pair with Clover Mobile Printer
After you complete initial setup, you have the option to pair your Clover Mobile printer and customize your device.
If you have a Clover Mobile Printer on hand, let’s pair it now:
1. Tap Next to begin 2. Load paper in your Clover Mobile printer by opening the Clover Mobile Printer and
inserting the included paper roll.
NOTE
At this stage, you can also make a note of the last 4 digits of the Clover Mobile Printer’s Serial Number.
3. Turn your Clover Mobile Printer on by pressing and holding the power button on its underside
4. After the Clover Mobile device detects nearby Clover Mobile Printers, tap Pair under Clover Mobile printer that you would like to pair with (the last 4 digits of the Clover Mobile Printer’s Serial Number should display on the screen). The Clover Mobile should print out a pairing code.

P2PE Implementation Manual for PCI P2PE v2.0 Clover Network, Inc. November 2017
© 2017 Clover Network, Inc. All Rights Reserved PIM Page 11
5. Use your Clover Mobile device to scan the pairing code that is printed out from the
Mobile Printer to complete the pairing process. You should see that your Mobile Printer was paired successfully.
NOTE
To scan, press and hold down on Clover Mobile’s trigger.

P2PE Implementation Manual for PCI P2PE v2.0 Clover Network, Inc. November 2017
© 2017 Clover Network, Inc. All Rights Reserved PIM Page 12
6. (Optional) You can Test the printer by tapping Test Printer to ensure that the Clover Mobile Printer can receive print requests from your Clover Mobile device
7. Tap Done
NOTE

P2PE Implementation Manual for PCI P2PE v2.0 Clover Network, Inc. November 2017
© 2017 Clover Network, Inc. All Rights Reserved PIM Page 13
If you would not like to pair your Clover Mobile with your Clover Mobile Printer at this time, tap Skip instead
Customize Your Device
Customize your device
We will be customizing your device for the first time. Remember, you can always make changes
to these settings in the Setup app.
Customize your device with the following questions:
1. Do you want to require a PIN to unlock your device? • Yes, require a PIN – We recommend for you to require a PIN to unlock your
device for added security and reporting benefits. Every employee should have a PIN
• No, don’t require a PIN – For terminal parity, we created an option for you not to require a PIN upon entry. However, we recommend for you to require your employees to PIN into your Clover Mobile
2. Where do you want to take tips and signatures? • On tablet screen – If you are tip enabled, you can choose to have your
customers sign on screen as necessary for transactions • On printed receipt – If you are tip enabled, you can choose to have your
customers sign on the printed receipt as necessary for transactions 3. Tap Continue to complete customization

P2PE Implementation Manual for PCI P2PE v2.0 Clover Network, Inc. November 2017
© 2017 Clover Network, Inc. All Rights Reserved PIM Page 14
Activate & Connect your Clover Device (Mini shown below):

P2PE Implementation Manual for PCI P2PE v2.0 Clover Network, Inc. November 2017
© 2017 Clover Network, Inc. All Rights Reserved PIM Page 15

P2PE Implementation Manual for PCI P2PE v2.0 Clover Network, Inc. November 2017
© 2017 Clover Network, Inc. All Rights Reserved PIM Page 16

P2PE Implementation Manual for PCI P2PE v2.0 Clover Network, Inc. November 2017
© 2017 Clover Network, Inc. All Rights Reserved PIM Page 17

P2PE Implementation Manual for PCI P2PE v2.0 Clover Network, Inc. November 2017
© 2017 Clover Network, Inc. All Rights Reserved PIM Page 18

P2PE Implementation Manual for PCI P2PE v2.0 Clover Network, Inc. November 2017
© 2017 Clover Network, Inc. All Rights Reserved PIM Page 19

P2PE Implementation Manual for PCI P2PE v2.0 Clover Network, Inc. November 2017
© 2017 Clover Network, Inc. All Rights Reserved PIM Page 20

P2PE Implementation Manual for PCI P2PE v2.0 Clover Network, Inc. November 2017
© 2017 Clover Network, Inc. All Rights Reserved PIM Page 21
Activate & Connect your Clover Device (Flex shown below):

P2PE Implementation Manual for PCI P2PE v2.0 Clover Network, Inc. November 2017
© 2017 Clover Network, Inc. All Rights Reserved PIM Page 22

P2PE Implementation Manual for PCI P2PE v2.0 Clover Network, Inc. November 2017
© 2017 Clover Network, Inc. All Rights Reserved PIM Page 23

P2PE Implementation Manual for PCI P2PE v2.0 Clover Network, Inc. November 2017
© 2017 Clover Network, Inc. All Rights Reserved PIM Page 24

P2PE Implementation Manual for PCI P2PE v2.0 Clover Network, Inc. November 2017
© 2017 Clover Network, Inc. All Rights Reserved PIM Page 25

P2PE Implementation Manual for PCI P2PE v2.0 Clover Network, Inc. November 2017
© 2017 Clover Network, Inc. All Rights Reserved PIM Page 26

P2PE Implementation Manual for PCI P2PE v2.0 Clover Network, Inc. November 2017
© 2017 Clover Network, Inc. All Rights Reserved PIM Page 27

P2PE Implementation Manual for PCI P2PE v2.0 Clover Network, Inc. November 2017
© 2017 Clover Network, Inc. All Rights Reserved PIM Page 28
Note: Only PCI-approved POI devices listed in the PIM are allowed for use in the P2PE solution for account data capture.
Physically secure POI devices in your possession, including devices:
▪ Awaiting deployment
▪ Undergoing repair or otherwise not in use
▪ Waiting transport between sites/locations.
3.2 Guidance for selecting appropriate locations for deployed devices
Device Management
NOTE
The Devices section in the Setup app can only be viewed by the account owner. You must be logged into the Web Dashboard with the email assigned to the owner of this account.
Add or change your device name
You can use the Setup app to give your Clover device a name, or edit an existing name. This is helpful if you have multiple Clover devices and use them for different purposes.
The names will show up in the Reporting app , making it easier to track down orders and
payments by device.
For example, a fast food restaurant might name their devices “Counter” and “Drive-Thru.”
NOTE
You can only access Setup app > Devices on Web Dashboard if you are the account owner. You must log into Web Dashboard using the email assigned to the account owner.
To change your device name:

P2PE Implementation Manual for PCI P2PE v2.0 Clover Network, Inc. November 2017
© 2017 Clover Network, Inc. All Rights Reserved PIM Page 29
1. Open Setup app 2. Tap Devices 3. Tap the device you want to edit 4. Enter your desired name in the Name field 5. Tap Save to finalize your changes
Set an order title prefix to easily distinguish orders from different devices
AVAILABLE ONLY ON REGISTER PLAN
This feature is only available on Register Plan. Learn about our Service Plans.
Use the Setup app to assign custom order title prefixes to your Clover devices. The custom prefix assigned to your devices help to distinguish which order came from which device.
For example, a fast food restaurant with two Clover devices for order-taking might use the prefix “L” for the device on the left side of the counter, and R for the right side; the order numbers will be R25 and L25. Or, a restaurant with a Clover device at their Bar and a second in their Patio might use prefixes “B” for Bar and “P” for Patio.
NOTE
You can only access Setup app > Devices on Web Dashboard if you are the account owner. You must log into Web Dashboard using the email assigned to the account owner.
You must have order numbers set to automatic for custom prefixes to work.
To set an order title prefix:
1. Open Setup app 2. Tap Devices 3. Select the device you want to edit 4. Enter a prefix in the Order title prefix field

P2PE Implementation Manual for PCI P2PE v2.0 Clover Network, Inc. November 2017
© 2017 Clover Network, Inc. All Rights Reserved PIM Page 30
5. Tap Save
3.3 Guidance for physically securing deployed devices to prevent unauthorized removal or substitution
Merchants can view all their deployed Clover devices to ensure they have kept track of their inventory through the Clover Web Dashboard. Once they log in, they can see all deployed devices. Clover devices such as the Mobile and Flex are handheld devices, however, they can be physically secured to a table or desk with the use of the optional Clover Dock.

P2PE Implementation Manual for PCI P2PE v2.0 Clover Network, Inc. November 2017
© 2017 Clover Network, Inc. All Rights Reserved PIM Page 31
In the event a Clover device is lost or stolen, they can remotely activate a factory reset.
For lost or stolen devices:
How do I report a stolen device?
You can report a device as stolen by calling Clover Customer Support. You can find the Clover Customer Support number by logging into your merchant dashboard. It is displayed at the top right corner of the screen. You can also send an email to [email protected]. (For more information, see: How do I contact Clover Customer Support.)

P2PE Implementation Manual for PCI P2PE v2.0 Clover Network, Inc. November 2017
© 2017 Clover Network, Inc. All Rights Reserved PIM Page 32
How can I order a replacement device?
When you report a device stolen by calling Clover Customer Support, the Customer Support agent will help order a replacement device.
How soon will I get a new device?
This may vary based on specific contract plans/resellers, but replacement devices are usually received within 24-48 hours after Customer Support initiates a replacement.
Can someone else use my stolen device?
Once your device is marked as stolen in Clover’s system, no one else will be able to use your device. However, if your device is not Password protected, or someone is able to log into your device before you report your device stolen or before the device becomes marked as stolen, they could use your device.
NOTE
It is recommended that a unique Passcode be set for each employee, manager and owner to access your device(s). This also enables tracking of employee activity if needed. (see how to Create / Edit Employee Information)
Can I disable my stolen device on my own?
Unfortunately, there is no way for you to disable your stolen device on your own. When you call Customer Support, Clover will disable your stolen device.
Is my information safe?
Unique employee, owner, and manager Passcodes will help keep your information from being accessed without your permission. Once a device is marked as stolen, all information associated with the merchant account (i.e., orders, payments, reporting, settings, etc.) will be wiped from the device. Account information remains intact.
What if an employee Passcode was not required? What information will be open to the thief?
Any information or actions that the employees or the employee role has permission to view and do would be available to the thief until the device is reported stolen.
Factory reset a Clover device
There are two different ways to factory reset your Clover device:

P2PE Implementation Manual for PCI P2PE v2.0 Clover Network, Inc. November 2017
© 2017 Clover Network, Inc. All Rights Reserved PIM Page 33
• Use the Setup app
• Use Settings app
IMPORTANT
Do NOT factory reset a Clover device unless you are instructed to do so by Clover Customer Support. When you factory reset a Clover device, you won’t be able to use it until you get a new activation code from Clover. Your original activation code will not work.
If you factory reset your Clover device, any transactions stored on it while offline will be deleted and the associated payments will not be processed.
To factory reset a Clover device using the Setup app:
NOTE
You can only access Setup app > Devices on Web Dashboard if you are the account owner. You must log into Web Dashboard using the email assigned to the account owner.
1. Open Setup app 2. Tap Devices 3. Select the device you want to factory reset 4. Tap Factory Reset
To factory reset a Clover device using Settings:
1. Open Settings • Alternatively, you can swipe downwards from the top right part of your Clover
device screen to select Settings

P2PE Implementation Manual for PCI P2PE v2.0 Clover Network, Inc. November 2017
© 2017 Clover Network, Inc. All Rights Reserved PIM Page 34
2. Tap Backup & reset 3. Tap Factory data reset 4. Tap Reset tablet to confirm factory reset

P2PE Implementation Manual for PCI P2PE v2.0 Clover Network, Inc. November 2017
© 2017 Clover Network, Inc. All Rights Reserved PIM Page 35
4. POI Device Transit
4.1 Instructions for securing POI devices intended for, and during, transit
Integrity Protections of Devices in Transit
• In addition to anti-tamper seal tape, there are additional protections while in transit.
• To ensure devices are not tampered from the manufacturer to the distribution facility (e.g. TASQ or Quanta), we can perform the following operation as a "tamper-evident seal".
• Before the device leaves the assembly line, it is to be put in "Manufacturing Transit Mode". The device is issued a X509 certificate and the private key is stored in SP secure memory. If the device is tampered, the private key is erased.
• At the secure room (e.g. TASQ or Quanta) in the provisioning step, we verify the manufacturing certificate and issues certificates to both the Application Processor and Secure Processor.
4.2 Instructions for ensuring POI devices originate from, and are only shipped to, trusted sites/locations
Clover is sold by our trusted partners including Clover Connect, Ignite Payments, Restaurant Depot, and Sam’s Club. You’ll also find Clover at leading US Banks, such as Bank of America, BBVA, Citi, PNC, Sun Trust and Wells Fargo. More than 3,000 other First Data partners also sell Clover solutions in the US.
Do not purchase any Clover devices online or from an untrusted source or website. Only trusted partners and ISVs can properly activate Clover device for merchants. In order to request a return (RMA), please contact Clover support at: (855) 853-8340.
5. POI Device Tamper Monitoring and Skimming Prevention
5.1 Instructions for physically inspecting POI devices and preventing skimming, including instructions and contact details for reporting any suspicious activity
Additional guidance for skimming prevention on POI terminals can be found in the document entitled Skimming Prevention: Best Practices for Merchants, available at www.pcisecuritystandards.org.
• Visual inspection o Before using the device, the user must conduct a regular inspection to check for
evidence of tampering. The following is a partial list of procedures. Check the PCI website for the latest best practices.
▪ Exterior should show no evidence of cutting or disassembly. ▪ No evidence of unusual wires or overlays connected inside the ICC slot
nor on or near the PIN entry area. ▪ No changes to the resistance when inserting or removing a card from

P2PE Implementation Manual for PCI P2PE v2.0 Clover Network, Inc. November 2017
© 2017 Clover Network, Inc. All Rights Reserved PIM Page 36
the ICC slot.
5.2 Instructions for responding to evidence of POI device tampering
There are three potential screens that you may see if your Clover Mobile, Mini, or Flex device detects a tamper:
• In the Setup Wizard, you may be automatically directed to the Get Help screen with the error “Device tampered, return to manufacturer”
• In the Setup Wizard, in a rare case you may also see a “Tamper Detected” screen

P2PE Implementation Manual for PCI P2PE v2.0 Clover Network, Inc. November 2017
© 2017 Clover Network, Inc. All Rights Reserved PIM Page 37
• If the device detects a tamper after you have activated your device, it will display the
following error in the Sale , Refund , Voice Auth , Phone Sale
, Authorization , etc. apps: “TRANSACTION FAILED: DEVICE NOT INITIALIZED, RETURN TO MANUFACTURER”
What does it mean if my device has been tampered?
PCI dictates that PIN-entry devices like Clover Mobile, Mini, and Flex need to detect if they

P2PE Implementation Manual for PCI P2PE v2.0 Clover Network, Inc. November 2017
© 2017 Clover Network, Inc. All Rights Reserved PIM Page 38
have been tampered, and if so, lock the ability to take transactions. This can happen for a number of reasons, such as a credit card skimmer is applied to the device or someone has attempted to break the device open. This can also happen if the device is dropped hard enough during shipment or by the merchant or a customer. Mobile, Mini, and Flex will automatically detect if they have been tampered and if so, will no longer accept payments.
This is for your protection.
What should I do if my device has been tampered?
If any of these screens appear on your Clover Mobile, Mini or Flex, it is very important to replace the device as soon as possible. The device should be considered with limited functionality.
You may still be able to take the following payments:
• Credit swipe payment • EMV chip-insert with signature payment
You will NOT be able to take the following payments:
• Debit swipe payment • EMV chip-insert with PIN entry payment
NOTE
You should receive an email immediately on Clover detecting the tamper that you have new units being shipped to you. If you did not receive an email, please contact Customer Support immediately in order to return the affected device and receive a replacement device as soon as possible.

P2PE Implementation Manual for PCI P2PE v2.0 Clover Network, Inc. November 2017
© 2017 Clover Network, Inc. All Rights Reserved PIM Page 39
5.3 Instructions for confirming device and packaging were not tampered with, and for establishing secure, confirmed communications with the solution provider
Merchants should inspect their Clover Mini / Mobile / Flex to ensure the package has not been opened or tampered with. The box should be sealed and all contents should include the following:
For Clover Mini:
For Clover Mobile:

P2PE Implementation Manual for PCI P2PE v2.0 Clover Network, Inc. November 2017
© 2017 Clover Network, Inc. All Rights Reserved PIM Page 40
For Clover Flex:

P2PE Implementation Manual for PCI P2PE v2.0 Clover Network, Inc. November 2017
© 2017 Clover Network, Inc. All Rights Reserved PIM Page 41
How do I contact Clover Customer Support? IMPORTANT
Your Clover Customer Support phone number is based on your merchant account. You can easily find your Clover Support number on your Clover device or by logging onto your Web Dashboard.
You can also send an email to [email protected]. You can also contact support at (855) 853-8340.

P2PE Implementation Manual for PCI P2PE v2.0 Clover Network, Inc. November 2017
© 2017 Clover Network, Inc. All Rights Reserved PIM Page 42
On Clover Mobile, Mini, and Flex, you will find your Clover Customer Support toll-free phone number in the top right corner. Your Merchant ID (MID) is also there for easy reference.
1. Tap the icon in the upper left to open the Menu drawer 2. Tap Help and Support 3. Tap About; the phone number will be under Contact Help and Support

P2PE Implementation Manual for PCI P2PE v2.0 Clover Network, Inc. November 2017
© 2017 Clover Network, Inc. All Rights Reserved PIM Page 43
On Web Dashboard, you will find the support contact information in the Support box in the upper right corner of the screen. This includes your Merchant ID (MID) for easy reference.

P2PE Implementation Manual for PCI P2PE v2.0 Clover Network, Inc. November 2017
© 2017 Clover Network, Inc. All Rights Reserved PIM Page 44
5.4 Instructions to confirm the business need for, and identities of, any third-party personnel claiming to be support or repair personnel, prior to granting those personnel access to POI devices
Clover does not contract with any third-party personnel to install, troubleshoot, or repair any Clover devices. Only Clover Customer Support is authorized to assist merchants with their Clover devices through the phone, email, and the web. If there are any problems with your Clover device, please contact Clover Customer Support.
Your Clover Customer Support phone number is based on your merchant account. You can easily find your Clover Support number on your Clover device or by logging onto your Web Dashboard.
You can also send an email to [email protected]. You can also contact support at (855) 853-8340.
P2PE Implementation Manual for PCI P2PE v2.0 Clover Network, Inc. November 2017
© 2017 Clover Network, Inc. All Rights Reserved PIM Page 45
6. Device Encryption Issues
6.1 Instructions for responding to POI device encryption failures
In the unlikely event encryption and decryption fails, transactions will not be processed. The merchant will be unable to process the transaction and will be prompted to re-enter the transaction. The merchant should contact Support through their device, the support email at [email protected] or contact support at (855) 853-8340.
6.2 Instructions for formally requesting of the P2PE solution provider that P2PE encryption of account data be stopped
Merchants do not have the ability to turn off encryption on Clover devices. All transactions require TransArmor encryption and decryption in order to be processed. Therefore, there are no instructions for formally requesting that P2PE encryption of account data be stopped.
7. POI Device Troubleshooting
7.1 Instructions for troubleshooting a POI device
PCI dictates that PIN-entry devices need to detect if they have been tampered, and if so, lock the ability to take PIN-entry transactions. This can happen for a number of reasons, such as having a credit card skimmer applied to the device or someone attempting to break the device open. This can also happen if the device is dropped hard enough.
What error message will I see if my device has been tampered?
There are three potential screens that you may see if your Clover Mobile or Clover Mini device detects a tamper:
1. In the Setup Wizard, you may be automatically directed to the Get Help screen with the error “Device tampered, return to manufacturer”
2. In the Setup Wizard, in a rare case you may also see a “Tamper Detected” screen 3. If the device detects a tamper after you have activated your device, it will display the
following error in the Sale, Refund, Voice Auth., Phone Sale, Authorizations, and other apps: “TRANSACTION FAILED: DEVICE TAMPER DETECTED PLEASE RETURN THIS UNIT”
What does it mean if my device has been tampered?
Clover devices come with sensors that are used to detect tampering, misuse, or harm of your device. Our Clover devices will disable PIN entry acceptance for your and your customers’ security when our devices detect a tamper. You will still be able to accept transactions that do not require PIN entry and use your device for everything else you currently use to run your business.

P2PE Implementation Manual for PCI P2PE v2.0 Clover Network, Inc. November 2017
© 2017 Clover Network, Inc. All Rights Reserved PIM Page 46
NOTE
In unlikely cases, shaking and dropping may cause the sensors to detect a tamper.
How do I get a replacement device?
If a tamper message is displayed, you will receive an email from Clover that a tamper has been detected. If you would like to accept PIN transactions, including EBT, we will be happy to send you a replacement device. To request a new replacement device, have an admin or manager go to Setup > Payments > PIN Entry on your current device or call Customer Support. If the device is still in the warranty period, then the replacement device is free of charge. Shipping and handling fees may apply.
When your new device ships, you’ll receive a notification email from Clover Support ([email protected]) that will contain your activation code as well as the tracking information for your shipment. Please activate your new device as soon as it arrives and return the original in the box in which you received the replacement device. A mailing label for the return will be included in the box.
Can I turn off the tampered message?
No. The only way to remove the tampered message is to return the device for a new one.
If my device is tampered, can I still take transactions?
Yes, once a device is tampered, any transactions requiring PIN entry are locked. You can still accept transactions that do not require a PIN.
Why is it safe to take payments when my device has been tampered?
The device is still secure and payments can be made even after a tamper occurs. The same protection mechanisms such as encryption and anti-tampers are still working to protect cardholder data when processing payments. However, the most sensitive type of transactions involving PIN-entry payments are disabled.
Can I keep my device until I receive the new device?
Yes. You can still accept transactions that do not require a PIN. You can also use your device for everything else to run your business, such as taking orders, report generation, or syncing with your other Clover devices.
How do I recognize and prevent tamper?
Inspect your Clover Device. You should also check the PCI website for best practices, but here is a partial list of things to look for:
• The exterior of the device shows evidence of cutting, disassembly, broken seals, broken ports
• There are unusual wires or overlays connected inside the chip card slot, on or near the

P2PE Implementation Manual for PCI P2PE v2.0 Clover Network, Inc. November 2017
© 2017 Clover Network, Inc. All Rights Reserved PIM Page 47
PIN-entry area • Wires are loose or connector broken • The number of connections to the device are different • The cables are a different color • There are apparent changes to the resistance when inserting or removing a card from
the chip card slot (Clover Mobile/Mini only). • Your device is in a different location • Your device has scratches especially around the seams of the terminal window display • Clover labels not present or show signs of peeling
If you have any questions or suspect your device has been tampered, call Clover Support and request a replacement.
For more Troubleshooting topics, visit Clover Help: https://help.clover.com/troubleshoot/
8. Additional Solution Provider Information
What should I do if I do not find the answer to my question or want to leave feedback? Go to: https://help.clover.com/faq/what-should-i-do-if-i-do-not-find-the-answer-to-my-question-or-want-to-leave-feedback/
If you do not find a specific answer to your question by:
1. Looking at the Learn app and topic guides 2. Looking through the Troubleshooting section 3. Using the Search bar on the top of this website to search for your question
Or if you would like to submit feedback to us, please click on the “Feedback” on the bottom of this page or any other webpage that you see on this website. From there, let us know about your specific questions and suggestions.