Embed Size (px)
Citation preview

PODIUMBring the Visual Beauty of the Universe to Larger Screens and Audiences
®
Pedro Braganca
Foreword by David H. Bradstreet, Ph.D
Professor of Astronomy & PhysicsObservatory/Planetarium DirectorEastern University, St. Davids, PA USA
Podium_Guts 5/28/09 10:43 PM Page 1

www.simulationcurriculum.comwww.starrynighteducation.com
© 2009 Simulation Curriculum Corp. All rights reserved. Starry Night and Simulation Curriculum are trademarks of SimulationCurriculum Corp.
Microsoft and Windows are trademarks of Microsoft Corporation. Apple, Macintosh, Mac, and QuickTime are registered trademarks of Apple Computer, Inc. OpenGL® is a registered trademark owned by Silicon Graphics, Inc.
Podium_Guts 5/28/09 10:43 PM Page 2

STARRY NIGHT® EDUCATIONAL INSTITUTION LICENSE AGREEMENT
LEGAL AGREEMENT
THIS IS A LEGAL AGREEMENT BETWEEN YOU (EITHER AN INDIVIDUAL OR AN ENTITY) AND SIMULATION CURRICULUM CORP. (SIMULATION CURRICULUM). THIS AGREEMENT IS GOVERNED BY THE INTERNAL SUBSTANTIVE LAWS OF THE STATE OF MINNESOTA (AND NOT BY THE 1960UNITED STATES CONVENTION ON CONTRACTS FOR THE INTERNATIONAL SALE OF GOODS, AS AMENDED). BY OPENING THIS PRODUCT AND/ORBY INSTALLING OR USING THIS PRODUCT YOU AGREE TO BE BOUND BY THE TERMS OF THIS AGREEMENT. IF YOU DO NOT WISH TO AGREETO THE TERMS OF THIS AGREEMENT, PROMPTLY AFTER PURCHASE RETURN THE PACKAGE (INCLUDING ALL PRODUCT COMPONENTS, SOFTWARE AND/OR PRINTED MATERIALS) WITH PROOF OF PURCHASE TO THE PLACE WHERE YOU PURCHASED IT FOR A REFUND OF THEPURCHASE PRICE, REMOVE THE PRODUCT FROM YOUR HARD DRIVE AND PERMANENTLY ERASE ALL COPIES OF THE PRODUCT.
SIMULATION CURRICULUM PRODUCT LICENSE
GRANT OF LICENSE. This License Agreement permits you to use Simulation Curriculum’s software, which may include electronic and/or printed documentation (the “Product”), concurrently on the number of computers set forth in the table below entitled “Authorized Use” for the configurationindicated on the sales invoice or on the sticker placed on the packaging for the Product, as applicable. The Product is “in use” on a computer when it isloaded into the temporary memory (i.e., RAM or cache) or installed into permanent memory (e.g., hard disk, CD-ROM or DVD drive, or other storagedevice) of that computer. You may not use the Product on or over a network or any other transfer device without each concurrent user having beenauthorized to use the Product and any documentation in that manner under the License Agreement. Use of the Product concurrently on more than thenumber of computers permitted by this Agreement constitutes copyright infringement and may be punishable by civil fines, criminal penalties, or both.
COPYRIGHT. All intellectual property and proprietary rights in the Product (including all animations, audio, images, maps, music, photographs, video, andtext incorporated into the Product) are owned by Simulation Curriculum and its affiliates, suppliers and licensers, and are protected by the United Statescopyright laws and international treaty provisions. The Product is licensed, not sold. Simulation Curriculum and it affiliates, suppliers and licensers retainall rights not expressly granted herein. You must treat the Product like any other copyrighted material, except that you may make one copy of the Productsolely for backup or archival purposes. You may not rent or lease the Product, but schools and libraries may lend the Product to third parties for stand-alone use solely for the purpose of evaluation and otherwise subject to the terms of this Agreement. You may transfer your rights under this Agreementon a permanent basis provided you transfer the license granted by this Agreement, the Product and all associated printed materials, and retain no copies,and the recipient agrees to the terms of this Agreement. You may not export or re-export the Product or any underlying information or technology. Youmay not add any other notices or markings to the Product or obscure or alter any markings or legends on the Product. You may not reverse engineer,decompile or disassemble the Product, except to the extent that this restriction is expressly prohibited by applicable law. You may make an unlimitednumber of paper copies of the electronic and/or printed teacher and instructional materials accompanying the Product so long as such materials are onlyused in conjunction with the use of the Product. The restrictions contained herein apply equally to hybrid DVD-ROMs or CD-ROMs which may containmultiple versions of the Product for use on different operating systems.
LIMITED WARRANTY. Simulation Curriculum and its affiliates, suppliers and licensers warrant that the electronic media, if any, on which the Product isdistributed is free from defects in materials and workmanship for a period of ninety (90) days from the time of receipt. ANY AND ALL OTHER IMPLIEDWARRANTIES, STATUTORY OR OTHERWISE, WITH RESPECT TO THE PRODUCT AND THE ACCOMPANYING WRITTEN MATERIALS, INCLUDINGBUT NOT LIMITED TO IMPLIED WARRANTIES OF MERCHANTABILITY, NON-INFRINGEMENT AND FITNESS FOR A PARTICULAR PURPOSE, AREHEREBY EXPRESSLY DISCLAIMED. Simulation Curriculum will provide online technical support for the Product for two years from date of purchase, butis under no obligation to provide updates, patches, or upgrades.
REMEDIES. Your exclusive remedies shall be, at Simulation Curriculum’s sole option, (a) the refund of the amount you paid for the Product (not includ-ing any applicable shipping and handling costs) or (b) repair or replacement of the Product (if determined to be defective by Simulation Curriculum and/oran authorized dealer in their sole discretion) provided that the defective Product is returned to Simulation Curriculum or an authorized dealer within nine-ty (90) days from the date of purchase. This Limited Warranty is void if failure of the Product has resulted from accident, abuse or misapplication. Anyreplacement product will be warranted for the remainder of the original warranty period or ninety (90) days, whichever is longer.
LIMITATION OF LIABILITIES. IN NO EVENT WILL SIMULATION CURRICULUM OR ITS AFFILIATES, SUPPLIERS AND LICENSORS BE LIABLE FORANY INDIRECT, SPECIAL, INCIDENTAL, ECONOMIC, COVER, PUNITIVE, INCREASED OR CONSEQUENTIAL DAMAGES ARISING OUT OF THE USEOF OR INABILITY TO USE THE PRODUCT, USER DOCUMENTATION OR RELATED TECHNICAL SUPPORT INCLUDING, WITHOUT LIMITATION, DAMAGES OR COSTS RELATING TO THE LOSS OF PROFITS, BUSINESS, GOODWILL, DATA OR COMPUTER PROGRAMS, EVEN IF ADVISED OF THEPOSSIBILITY OF SUCH DAMAGES. IN NO EVENT WILL SIMULATION CURRICULUM OR ITS AFFILIATES, SUPPLIERS OR LICENSORS LIABILITYEXCEED THE AMOUNT PAID BY YOU FOR THE PRODUCT. THE FOREGOING LIMITATIONS, EXCLUSIONS AND DISCLAIMERS SHALL APPLY TO THEMAXIMUM EXTENT PERMITTED BY APPLICABLE LAW, EVEN IF ANY REMEDY FAILS ITS ESSENTIAL PURPOSE. BECAUSE SOME JURISDICTIONSDO NOT ALLOW THE EXCLUSION OR LIMITATION OF LIABILITY FOR CONSEQUENTIAL OR INCIDENTAL DAMAGES, THE ABOVE LIMITATION MAYNOT APPLY TO YOU.
GOVERNING LAW. This Agreement shall be governed by and construed in accordance with the domestic laws of the State of Minnesota without giving effect to any choice or conflict of law provision or rule that would cause the application of the laws of any jurisdiction other than the State ofMinnesota. To the extent enforceable under applicable law, any action in any way relating to this Agreement or any other dispute relating to the Productmust be filed and heard only in a federal or state court sitting in the State of Minnesota, and you agree to submit to, and not to contest or challengevenue in, any such courts.
U.S. GOVERNMENT RESTRICTED RIGHTS. The Product and user documentation is provided with RESTRICTED RIGHTS AND LIMITED RIGHTS. Use,duplication or disclosure by the Government is subject to restrictions as set forth in subparagraph (c)(l)(ii) of the Rights in Technical Data and ComputerSoftware clause at DFARS 252.227-7013 or subparagraphs (c)(l) and (2) of the Commercial Computer Software-Restricted Rights at 48 CFR 52.227-19as applicable. Simulation Curriculum Corp., 5666 Lincoln Drive, Suite 260, Edina, MN 55436 USA.
Simulation Curriculum may cancel, change, modify, discontinue, terminate or charge a fee at any time for any online services available in conjunction withthis Product.
IN THE EVENT THAT AN END USER LICENSE AGREEMENT IS INCLUDED WITHIN THE PRODUCT THAT CONTAINS TERMS THAT CONFLICT WITHTHIS AGREEMENT, THE TERMS OF THIS AGREEMENT SHALL GOVERN.
Starry Night Education 6.0 License ref 20090301
Podium_Guts 5/28/09 10:43 PM Page 3

Licence Reference
For your reference, please record the user name and license key for Starry Night Podiumhere. Check that both the user name and license key match the user name and licensekey sent to you (the license key is uniquely tied to the user name, and will not work withanother user name). The user name and license key are case sensitive.
Username:
License Key: gu6 – – – –
Podium_Guts 5/28/09 10:43 PM Page 4

INSTALLING AND RUNNINGSTARRY NIGHT
Podium_Guts 5/28/09 10:43 PM Page 5

Starry Night Podium
www.starrynighteducation.com
Podium_Guts 5/28/09 10:43 PM Page 6

Bring the visual beauty of the universe to larger screens and audiences
iwww.starrynighteducation.com
Installing Starry Night
The Starry Night Podium software comes on a single DVD-ROM. You will need a DVD-ROM drive to install the program. The DVD-ROM includes both the Windows andMacintosh versions.
Note: To run Starry Night through a projector, you need to run two programs: StarryNight Podium and Starry Night Projector. Starry Night Podium is the operator interface.You can use Starry Night Podium on its own, without projecting it to an audience. Touse a video projector or external monitor, both Starry Night Podium and Starry NightProjector need to be running.
To install Starry Night Podium and Starry Night Projector, follow the installation instructionsbelow.
Windows
To install Starry Night for Windows, follow these steps.
1. Insert the Starry Night disc in the DVD-ROM drive.
2. A window will pop up onscreen with instructions for installing Starry Night. Followthe instructions that appear.
Note: A pre-requisites installer will launch first and install all the required 3rd party software your computer will need to run Starry Night.
The Starry Night installer will launch after the pre-requisites installation is completed.
Podium_Guts 5/28/09 10:43 PM Page i
Starry Night Podium
ii www.starrynighteducation.com
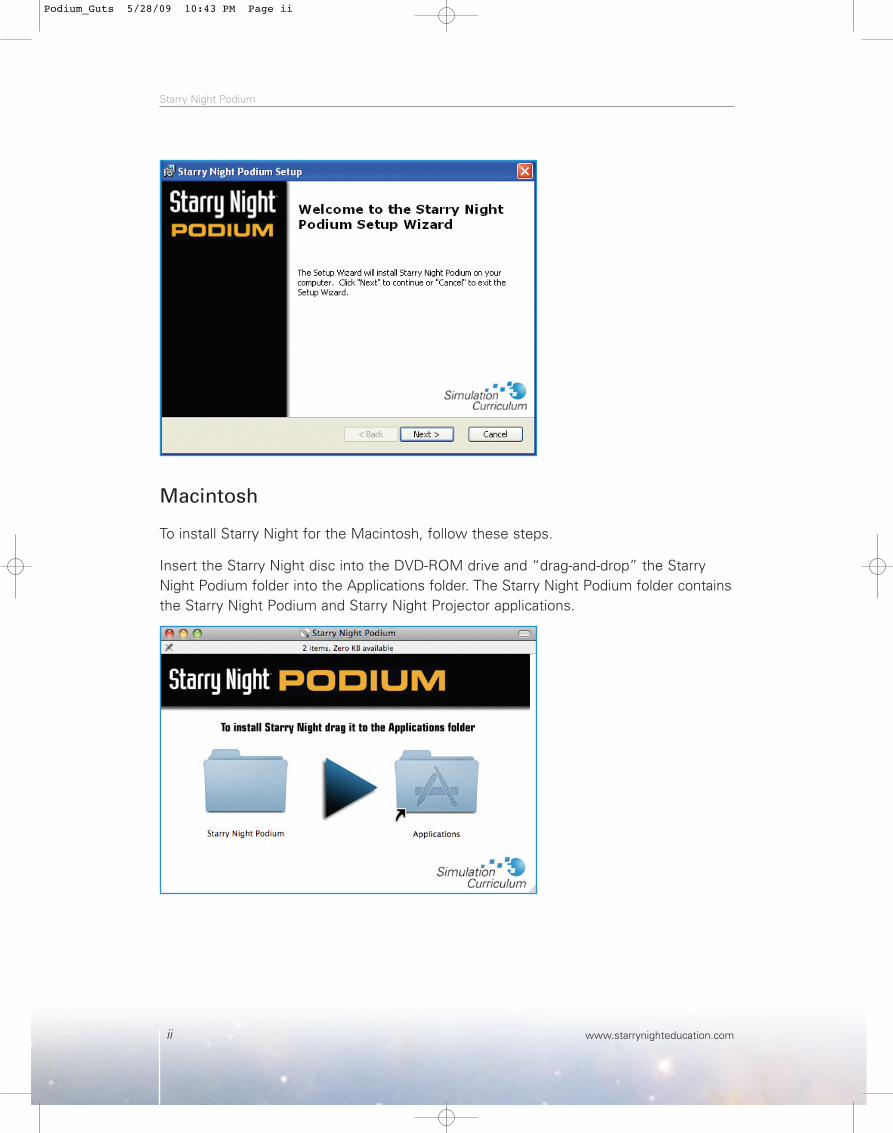
Macintosh
To install Starry Night for the Macintosh, follow these steps.
Insert the Starry Night disc into the DVD-ROM drive and “drag-and-drop” the StarryNight Podium folder into the Applications folder. The Starry Night Podium folder containsthe Starry Night Podium and Starry Night Projector applications.
Podium_Guts 5/28/09 10:43 PM Page ii

Bring the visual beauty of the universe to larger screens and audiences
iiiwww.starrynighteducation.com
Running Starry Night
Once you have installed Starry Night Podium, you can run the program as follows:
Windows: Double-click the Start Starry Night Podium icon on your desktop, or selectit from your start menu. This will launch Starry Night Podium and Starry Night Projector.
Macintosh: Double-click the Starry Night Podium and Starry Night Projector iconsin the Applications/Starry Night Podium folder.
Important: When using a projector, click on the Starry Night Projector icon found inthe same location as Starry Night Podium. This will launch the projector component ofStarry Night. The two applications will automatically connect so that any action youperform in Starry Night Podium will be mirrored in Starry Night Projector.
Podium_Guts 5/28/09 10:43 PM Page iii
Starry Night Podium
iv www.starrynighteducation.com
Connecting to a Digital Projector
Follow these general guidelines when using a digital projector with Starry Night.Connecting a digital projector to a computer should be plug-and-play in most cases. Referto your projector’s manual for additional information on specific operating instructions.
Note: A digital projector with a minimum native resolution of 1024 x 768 pixels is required.
1. Connect the appropriate video cable by plugging one end of the cable on the projector’sComputer In port and the other in to the computer’s Video port. If supported byyour computer and projector, a HDMI or DVI connection is recommended for thebest quality connection.
2. To use an external speaker, connect the audio cables from the speakers into thecomputer’s audio port. Audio is only required if you want to incorporate movies withaudio tracks or use the ambient sounds and pronunciation guide in Starry Night.
3. Turn on the projector by pressing the Power/On button.
4. Turn on your computer. When your computer turns on, it should detect the digitalprojector and an image should be projected.
Tip: For Windows computers: if the image appears only on the computer screen or only on the projection screen, hold down the Fn key and press the F8 key (somecomputers require a different F key) to toggle between modes until your image displays on both the computer monitor and projection screen.
5. Your computer can mirror the monitor display onto the projection screen or extendthe desktop onto the projection screen. To use Starry Night for projection, you willneed to set your display settings to extend your desktop, not mirror.
Podium_Guts 5/28/09 10:43 PM Page iv

Bring the visual beauty of the universe to larger screens and audiences
vwww.starrynighteducation.com
Follow these general steps to extend the desktop onto the projection screen.
PC Computers
Windows XP: Start Menu > Control Panel > Display > Settings
a. Click on the monitor icon that reads“2” (this is the projection output).
b. Then check the box that reads“Extend my Windows desktop onto this monitor”.
Windows Vista: Start Menu > Control Panel > Personalization > Display Settings
a. Click on the monitor icon that reads“2” (this is the projection output).
b. Then check the box that reads“Extend the desktop onto this monitor”.
Podium_Guts 5/28/09 10:43 PM Page v

Starry Night Podium
vi www.starrynighteducation.com
Mac Computers: Apple Menu > System Preferences > Displays
Click on the Arrangement tab. Make sure the “Mirror Displays” box is unchecked.
Tip: If you have a Mac laptop, press the F7 key to toggle between mirror and extended displays.
6. You are now ready to launch Starry Night. Starry Night Podium and Starry NightProjector can be found under:
Windows:
Double-click the Start Starry Night Podium icon on your desktop, or select it from yourstart menu. This will launch Starry Night Podium and Starry Night Projector.
Macintosh:
Double-click the Starry Night Podium and Starry Night Projector icons in theApplications/Starry Night Podium folder.
Note: When both Starry Night Podium and Starry Night Projector are running, they willautomatically connect to each other so that any action performed in Starry Night Podiumis reflected in Starry Night Projector (that is, the projection screen). If the connection isactive, the Sync button will change its status to Live. The Sync button is located onthe far left of the Toolbar.
(Sync button: “Live” indicates an active connection, “Off” indicates there is no connection.)
Podium_Guts 5/28/09 10:43 PM Page vi

Bring the visual beauty of the universe to larger screens and audiences
viiwww.starrynighteducation.com
Foreword
Welcome and congratulations for joining a vast community of Starry Night users. Overthe years, I have found Starry Night to be the finest piece of educational astronomicalsoftware available. Its precision, ease of use, incredible graphics and flexibility make itone of the most useful teaching tools in my arsenal. I can quickly set up almost anykind of astronomical scenario, over an incredible range of dates, and present it to mystudents to wonderfully illustrate the workings of the skies. I have seen my studentsnod and make assenting “noises” time and time again when I demonstrate such thingsas lunar phases, eclipses and shadow cones, seasons, proper motion, precession, spin-orbit lock, planetary motion, analemmas on different planets and moons, coordinatesystems or spatial distributions of various celestial objects like globular clusters. I lovethe ability to save all of my scenarios as Favorite files and then simply load them andyou’re ready to go! No need to reinvent the wheel each time.
Students also love to work with the program themselves. Its comfortable and easy tolearn interface is a snap to computer literate young people. Starry Night Podium makesit even easier by integrating over 260 pre-made simulations, 100 movies and dozens ofconcept diagrams into the program and making them accessible via a point-and-clickinterface that takes minutes to learn.
In addition to tremendous software, the developers behind Starry Night are profoundlycommitted to excellence in education in general and astronomy education in particular.Many times in the past several years I have made suggestions for improvements andadditions to Starry Night, and lo and behold almost all of those have made it into thecurrent version. It’s extremely satisfying to know that the folks that work on StarryNight share my own lifelong dedication to astronomy education at all levels. I loveworking with the program and the people behind it, and I have no doubts whatsoeverthat you will as well.
Starry Night has revolutionized my astronomy teaching and energized my students. It hasgiven them a strong foundation in understanding how the universe works. I am certainthat you will enjoy using and discovering new things with Starry Night and I know thatyour students will appreciate putting their hands on the universe.
David H. Bradstreet, Ph.D.Eastern University, St. Davids, PA USAMarch 10, 2009
Podium_Guts 5/28/09 10:43 PM Page vii

Starry Night Podium
viii www.starrynighteducation.com
Podium_Guts 5/28/09 10:43 PM Page viii

ixwww.starrynighteducation.com
Installing and Running Starry Night
Foreword . . . . . . . . . . . . . . . . . . . . . . . . . . . . . . . . . . . . . . . . . . . . . . . . . . . . . . . . . . . . vii
Section 1: Welcome to Starry Night Podium
Welcome . . . . . . . . . . . . . . . . . . . . . . . . . . . . . . . . . . . . . . . . . . . . . . . . . . . . . . . . . 1About This Guide . . . . . . . . . . . . . . . . . . . . . . . . . . . . . . . . . . . . . . . . . . . . . . . . . . 2
Teaching With Starry Night . . . . . . . . . . . . . . . . . . . . . . . . . . . . . . . . . . . . . . . 3The Favourites Side Pane . . . . . . . . . . . . . . . . . . . . . . . . . . . . . . . . . . . . . . . . 4The Data Library . . . . . . . . . . . . . . . . . . . . . . . . . . . . . . . . . . . . . . . . . . . . . . . 5Additional Resources . . . . . . . . . . . . . . . . . . . . . . . . . . . . . . . . . . . . . . . . . . . 5The Appendices . . . . . . . . . . . . . . . . . . . . . . . . . . . . . . . . . . . . . . . . . . . . . . . 6Starry Night Feedback Form . . . . . . . . . . . . . . . . . . . . . . . . . . . . . . . . . . . . . . 7
Section 2: Structuring a Presentation in Starry Night
Starry Night Favourite Files . . . . . . . . . . . . . . . . . . . . . . . . . . . . . . . . . . . . . . . . . 11What is a Favourite File? . . . . . . . . . . . . . . . . . . . . . . . . . . . . . . . . . . . . . . . 11The Favourites Side Pane . . . . . . . . . . . . . . . . . . . . . . . . . . . . . . . . . . . . . . . 12Viewing a pre-made Starry Night File - An Example . . . . . . . . . . . . . . . . . . . 12
Projecting Movies and Images . . . . . . . . . . . . . . . . . . . . . . . . . . . . . . . . . . . . . . . 14Player Controls . . . . . . . . . . . . . . . . . . . . . . . . . . . . . . . . . . . . . . . . . . . . . . . 14Display Options . . . . . . . . . . . . . . . . . . . . . . . . . . . . . . . . . . . . . . . . . . . . . . . 15Viewing a Movie or Image - An Example . . . . . . . . . . . . . . . . . . . . . . . . . . . 15
Adding Favourite Files . . . . . . . . . . . . . . . . . . . . . . . . . . . . . . . . . . . . . . . . . . . . . 16Creating and Saving . . . . . . . . . . . . . . . . . . . . . . . . . . . . . . . . . . . . . . . . . . . 16 Creating and Saving a Favourite File - An Example . . . . . . . . . . . . . . . . . . . 17Adding Document Notes . . . . . . . . . . . . . . . . . . . . . . . . . . . . . . . . . . . . . . . 17Organizing . . . . . . . . . . . . . . . . . . . . . . . . . . . . . . . . . . . . . . . . . . . . . . . . . . . 18Exporting and Sharing . . . . . . . . . . . . . . . . . . . . . . . . . . . . . . . . . . . . . . . . . . 18Deleting . . . . . . . . . . . . . . . . . . . . . . . . . . . . . . . . . . . . . . . . . . . . . . . . . . . . . 18
Adding Media Favourites (Movies and Images) . . . . . . . . . . . . . . . . . . . . . . . . . . 19Supported Formats and Types . . . . . . . . . . . . . . . . . . . . . . . . . . . . . . . . . . . 19Importing . . . . . . . . . . . . . . . . . . . . . . . . . . . . . . . . . . . . . . . . . . . . . . . . . . . . 19Organizing . . . . . . . . . . . . . . . . . . . . . . . . . . . . . . . . . . . . . . . . . . . . . . . . . . . 19Deleting . . . . . . . . . . . . . . . . . . . . . . . . . . . . . . . . . . . . . . . . . . . . . . . . . . . . . 19
Projecting LiveSky Content . . . . . . . . . . . . . . . . . . . . . . . . . . . . . . . . . . . . . . . . . . 20LiveSky Side Pane . . . . . . . . . . . . . . . . . . . . . . . . . . . . . . . . . . . . . . . . . . . . 20Accessing Images . . . . . . . . . . . . . . . . . . . . . . . . . . . . . . . . . . . . . . . . . . . . . 21Types of Images . . . . . . . . . . . . . . . . . . . . . . . . . . . . . . . . . . . . . . . . . . . . . . 21
Section 3: Appendices
Appendix A: Quick Start Guide . . . . . . . . . . . . . . . . . . . . . . . . . . . . . . . . . . . . . . . 25Appendix B: Exporting Data - Star Charts, Movies, Images . . . . . . . . . . . . . . . . . 29Appendix C: Tips & Tricks . . . . . . . . . . . . . . . . . . . . . . . . . . . . . . . . . . . . . . . . . . . 33
TABLE OF CONTENTS
Podium_Guts 5/28/09 10:43 PM Page ix

Starry Night Podium
x www.starrynighteducation.com
Podium_Guts 5/28/09 10:43 PM Page x
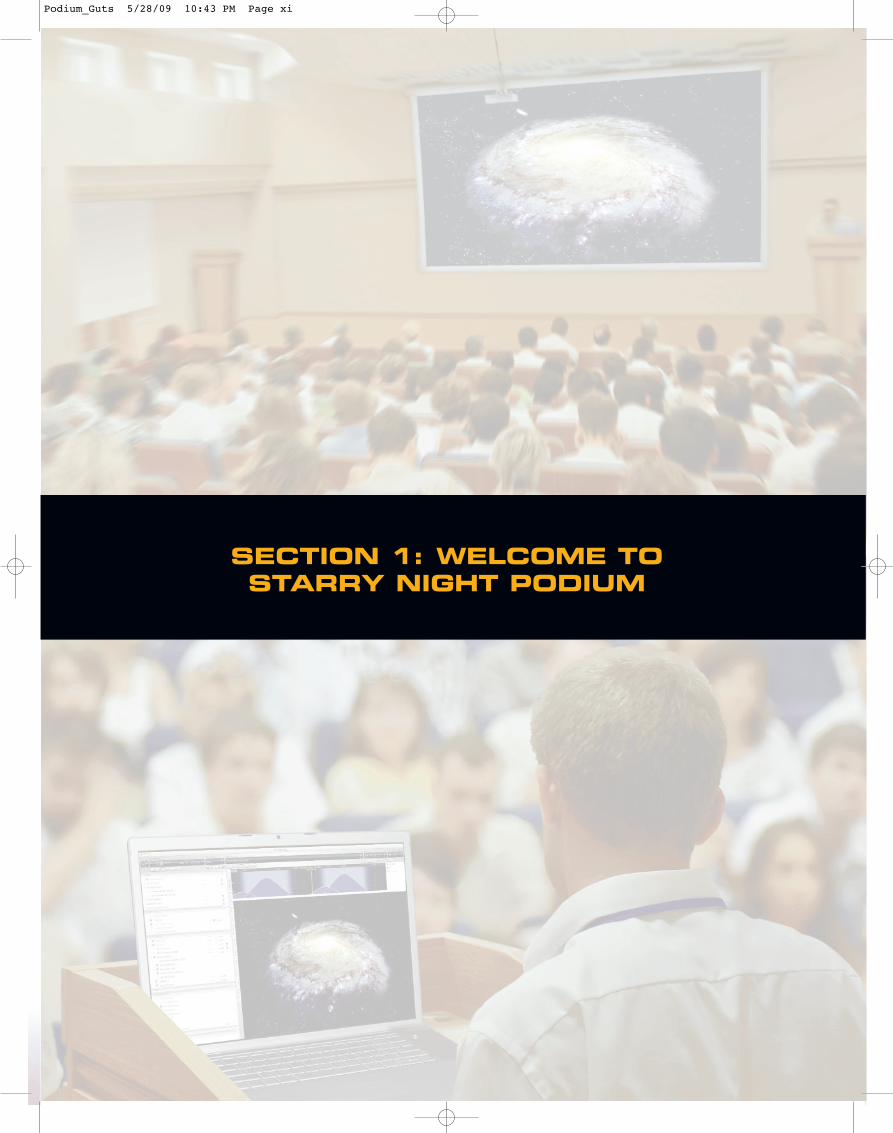
SECTION 1: WELCOME TOSTARRY NIGHT PODIUM
Podium_Guts 5/28/09 10:43 PM Page xi
Starry Night Podium
xii www.starrynighteducation.com
Podium_Guts 5/28/09 10:43 PM Page xii
Bring the visual beauty of the universe to larger screens and audiences
1www.starrynighteducation.com
“The most incomprehensible thing about the universe is that it is comprehensible.”– Albert Einstein (1879-1955) German-born theoretical physicist
Welcome
The invention of desktop astronomy software has been the most exciting new development in astronomy education in years, perhaps since that night four centuriesago when Galileo pointed the newly invented telescope at the heavens for the firsttime! Starry Night is the premier astronomy software package on the market, puttingmore power and knowledge in your hands than even the world’s pre-eminentastronomers had just a few years ago.
You can see how the sky will look tonight, tomorrow, or far into the past or future. Youcan view the stars as they appear from your own backyard, from a country on the otherside of the world, or from another planet. You can witness a total eclipse from theMoon, watch the Sun set from the surface of Mars, ride a comet or even venture outinto the realm of galaxies. You are limited only by your curiosity.
To share the view with a larger audience, digital projectors are widely used in schoolsand other educational settings to project Starry Night on a larger screen. The resultingview is pleasing, but the projected image is not optimized. Some of the disadvantagesinclude:
• The audience can view the contents of your desktop, including private documentsand other programs.
• The Starry Night program interface and controls are visible. This takes up valuableprojection real estate, clutters the view and provides a visual distraction to the expe-rience.
• The audience can view the mouse cursor and how you interact with the program.This can be distracting, especially when you access various controls to manipulatethe sky.
We knew we could provide a better solution that allowed you to display just the sky,without the clutter or distractions. Enter Starry Night Podium.
Optimized for projection, Starry Night Podium provides an intuitively designed interfaceon the operator’s computer screen and projects an impressive, uncluttered view of thesky that brings the visual beauty and accuracy of Starry Night to larger screens andaudiences.
Podium_Guts 5/28/09 10:43 PM Page 1

Starry Night Podium
2 www.starrynighteducation.com
Starry Night Podium also allows you to fade, zoom and position digital movies and stillimages anywhere on the screen during Starry Night presentations, without having tolaunch a separate program. You can even project live images from robotic telescopessuch as SOHO (internet connection required).
Starry Night Podium makes it easy to build custom presentations. To help you get started,Starry Night Podium includes a library of pre-made interactive simulations, educationalmovie clips and concept diagrams to help you create memorable presentations. Youcan add your own simulations, movies and images to this library to create your owncustomized, professional looking, fully integrated astronomy lectures.
Starry Night Podium provides an immersive experience ideally suited for today’s classrooms, lecture halls and science centers.
About This Guide
“The art of teaching is knowing how to stimulate students to feelthe joy of learning. And we have an absolutely delicious subject to teach!”
– Robert F. Garrison, PhDProfessor Emeritus of Astronomy and AstrophysicsUniversity of Toronto, Canada.
This guide is designed to help you harness the full power of Starry Night Podium. It willshow you how an advanced software application optimized for projection can enhanceyour astronomy teaching or outreach and how you can create memorable presentationswith the build in data library or from your own creative ideas, movies and images.
Starry Night Podium makes it easy and, dare we say, fun. There are hundreds of “point-and-click” pre-made simulations that you can use to start building a custompresentation. The pre-made simulations have been created by professional educatorsand astronomers using Starry Night and each demonstrate a particular astronomicalconcept. Many of the pre-made simulations contain a text description explaining andexpanding upon the concept being illustrated. Use them as a starting point or to drawideas from. You can also create and save your own simulation files.
Starry Night Podium also offers you a library of movies and concept diagrams. There areover a hundred movies of dramatic and realistic visualizations of astronomical phenomena.The movies touch on a variety of topics, from constellations to the big bang. A set of 25concept diagrams round out the data library in Starry Night Podium. The diagramsshowcase abstract concepts and phenomena.
Starry Night Podium makes it easy for you to organize the simulations, movies andimages into a custom presentation. You can mix and match simulations, movies and
Podium_Guts 5/28/09 10:43 PM Page 2

Bring the visual beauty of the universe to larger screens and audiences
3www.starrynighteducation.com
images, organize them in folders and arrange them in sequence. During your presentation,you can quickly move from file to file and deliver an immersive, multimedia experiencethat brings your presentation topic to life.
We invite you to explore Starry Night Podium yourself to see what it can do. Experimentwith the software outside the framework of the pre-made simulations. The possibilitiesand learning potential are almost limitless.
A look at the table of contents will give you a good idea of how this guide is organized,with introductory information, guidance on creating presentations, and helpful appendices.There is a feedback form so you can tell us how we’re doing. We appreciate your commentsand will use them to improve future editions.
Learn more about the Starry Night family of astronomy and space exploration multimediaproducts and subscribe to our newsletter at www.starrynighteducation.com.
Teaching with Starry Night
Astronomy brings special challenges to an educator. Among them are:
• The three-dimensional nature of processes like seasons and moon phases,
• Frame-of-reference problems in understanding these processes,
• Many complex and abstract topics, and
• The existence of deep-rooted misconceptions.
In many instances, you are introducing an individual to one of the few science lecturesthey’ll attend. Some astronomical concepts can be difficult if someone has no backgroundor familiarity with the subject. Starry Night Podium can help your audience develop anunderstanding of the universe around them by engaging them in interactive simulations,movies and images.
In astronomy everything is relative. We see the universe from a tilted, moving platform.We do not feel ourselves moving. We are rooted on Earth’s surface. To us on theground, Earth’s daily rotation on its axis and yearly revolution about the Sun make itlook as though the sky is moving. Some of the motions we see are real while othersare merely reflections of Earth’s motions.
Visualization through computer simulations can help reconcile what are often conflictingideas by enabling the viewer to gain otherwise impossible perspectives of celestial systemsin motion.
This is the frame-of-reference problem. How something looks depends on the frame ofreference within which it is viewed. In astronomy, the ability to change one’s frame of
Podium_Guts 5/28/09 10:43 PM Page 3

Starry Night Podium
4 www.starrynighteducation.com
reference is crucial to understanding some common astronomical concepts. This StarryNight package, with its computer models, allows you to easily switch between differentframes of reference to gain a fuller understanding of our place in the solar system, thegalaxy, and the universe. It will help your audience sort out what is real motion and whatis apparent motion.
The Favourites Side Pane
The included data library of pre-made simulations, movies and images resides in theFavourites side pane. The files in this pane are collectively known as Favourites. Youcan open any of the Favourites files by opening the Favourites side pane and clickingon a file of interest. If the Favourites file is a movie or image, a set of media player controls will appear.
Tip: You can open the Favourites side paneby clicking on the Favourites side tab or bychoosing Favourites > Show FavouritesPanel from the main menu. To close theFavourites side pane, choose Favourites >Hide Favourites Panel from the main menu or click on the highlighted Favourites
side tab.
You can create new folders (and subfolders)in the Favourites side pane, add new files,place files in folders and organize them inany order. The Favourites side pane is arepository of all pre-made simulations,movies and images.
The Favourites side pane makes it easy tobuild a presentation by allowing you to dragfiles and organize them in folders. For example,if you were planning on doing a presentationon Moon Phases, you would first create afolder named “Moon Phases”. Inside thisfolder, you would place your simulations,movies and images and arrange them in theorder you wanted to show them. During yourpresentation, you simply open the “MoonPhases” folder in the Favourites side paneand scroll through the files.
Podium_Guts 5/28/09 10:43 PM Page 4

Bring the visual beauty of the universe to larger screens and audiences
5www.starrynighteducation.com
We encourage you to browse the Favourites side pane and familiarize yourself with theincredibly diverse data library included in Starry Night Podium.
Section 2 of this guide explains in detail how to effectively use the Favourites sidepane to create custom presentations from the available content or from your own files.
The Data Library
Starry Night Podium includes an extensive data library of pre-made simulations, moviesand images that are ready to be used in your presentation. This valuable resource canbe browsed in the Favourites side pane and includes:
• Starry Night Files (.SNF): a library of over 260 pre-made simulations organized bybig topic areas. To access these files, open the Favourites side pane and expand theSimulations folder.
• Movie Media: 100 mini-documentaries and movie clips documenting our under-standing of the universe. To access these files, open the Favourites side pane andexpand the Movies folder.
• Image Media: 25 concept diagrams illustrating astronomical phenomena. To accessthese files, open the Favourites side pane and expand the Images folder.
Additional Resources
Rounding out this Starry Night package are these additional resources:
• Starry Night User’s Guide: a comprehensive 210-page manual. Starry Night hasbeen designed to be intuitive and easy to learn. Before reading this guide we encourage you to plunge in and give it a try. The manual is in PDF format and isaccessible via the Help menu in Starry Night Podium.
• Starry Night Companion Book: a 192-page introduction to astronomy by well-known astronomy educator John Mosley. The book is in PDF format and isaccessible via the Help menu in Starry Night Podium. You may find it helpful tobrowse through this first if you are new to astronomy or are teaching it for the first time.
• Starry Night’s Education Website: here you will find more information on our educational products, software updates, and more astronomy resources. Log on to our website at: www.starrynighteducation.com
Podium_Guts 5/28/09 10:43 PM Page 5

Starry Night Podium
6 www.starrynighteducation.com
The Appendices
Wrapping up this guide are the appendices. Here you will find information on how toget started using Starry Night. Starry Night is a comprehensive astronomy program butits controls are intuitive. You will be an expert in no time.
There is also information on how to export data from Starry Night (star charts, moviesand images), how to add your own custom data into the program such as photorealistichorizons and a section on tips and tricks for Starry Night Podium.
Everything you need to do a satisfying presentation that gives your audience a realinsight into the universe using Starry Night Podium is right here, at your fingertips.
Podium_Guts 5/28/09 10:43 PM Page 6

Bring the visual beauty of the universe to larger screens and audiences
7www.starrynighteducation.com
StronglyAgree
Agree Neutral Disagree StronglyDisagree
Yes No
Starry Night is easily integrated into my existingcourse or lecture content.
This is a useful resource that meets my needs in this subject.
I will be able to apply what I learned from thisguide.
The simulations, movies and images are well integrated and helpful in my presentations.
The pre-made simulations effectively demonstrateconcepts and are appropriate to my audience.
The movies and graphics included are adequate to explain astronomical phenomena.
The instructions in this guide have enough information and are easy to understand.
I would recommend this product to a colleague.
Starry Night Feedback Form
Starry Night Podium: We’d like to hear from you!
You get the last word! After you have used this product for a while, Starry Night wouldappreciate you taking a few minutes to fill out this evaluation form. Your feedback isimportant for the future improvement and development of our educational resources.Please return this form with your responses to:
Mail:
Simulation Curriculum Corp.Att: Education, 5666 Lincoln Drive, Suite 260, Edina, MN 55436 USA
Fax: 1-952-935-4050 E-mail: [email protected]: www.starrynighteducation.com
Where do you use Starry Night Podium (i.e. classroom, college lecture hall, science center)?
What is the average size of your audience?
Please check the appropriate box
Podium_Guts 5/28/09 10:43 PM Page 7

Starry Night Podium
8 www.starrynighteducation.com
What features of this guide did you find most helpful?
How can we make this guide more effective for you?
Additional comments.
Podium_Guts 5/28/09 10:43 PM Page 8
SECTION 2: STRUCTURING APRESENTATION IN STARRY NIGHT
Podium_Guts 5/28/09 10:43 PM Page 9

Starry Night Podium
10 www.starrynighteducation.com
Podium_Guts 5/28/09 10:43 PM Page 10

Bring the visual beauty of the universe to larger screens and audiences
11www.starrynighteducation.com
In this section you will learn about the different types of files you can project with StarryNight Podium and how you can use them to create a custom presentation. We’ll lookat several types of files:
Starry Night files: Dynamic files that you open with Starry Night to recreate a particularview or celestial event.
Movie files: Animation sequences showing an astronomical event such as an eclipse.
Image files: Static color images of a particular view.
Starry Night Favourite Files
What is a Starry Night File?
A Starry Night file allows you to recreate all the conditions and settings which you usedin the program to see a particular celestial event.
When you open a Starry Night file again, it will restore you to the same time, viewinglocation and viewing direction as when you saved the file. It will also restore the timemode you were using when you saved the file. For example, if you had time playingcontinuously forward in discrete time steps of one day when you saved the file, timewill again move forward one day at a time when you reopen it. Finally, all of your label,guide and sky settings will be restored.
Note: Starry Night files are saved with the file extension “.snf” at the end of their name.
Some events for which you may wish to make a Starry Night file include an eclipse, aplanetary alignment, or a closeup of a galaxy or star cluster. Pre-made files are also veryuseful for teaching situations. The Favourites side pane contains hundreds of pre-madefiles that you can browse through.
What is a Starry Night file not? It is not a pre-made animation sequence which showsyou blasting off from Earth, for example. All a Starry Night file does is establish the initial screen conditions from then on you have complete control over how the screenview will evolve. If you want to make replayable animation sequences, Starry NightPodium allows you to make movies. For more information, read the section on“Making Movies” in Appendix B.
Podium_Guts 5/28/09 10:43 PM Page 11
Starry Night Podium
12 www.starrynighteducation.com
The Favourites Side Pane
The Favourites side pane provides a nice sample of what can be done with Starry Nightfiles. The Favourites side pane is subdivided into layers based on big topic areas suchas “The Stars” or “The Planets”.
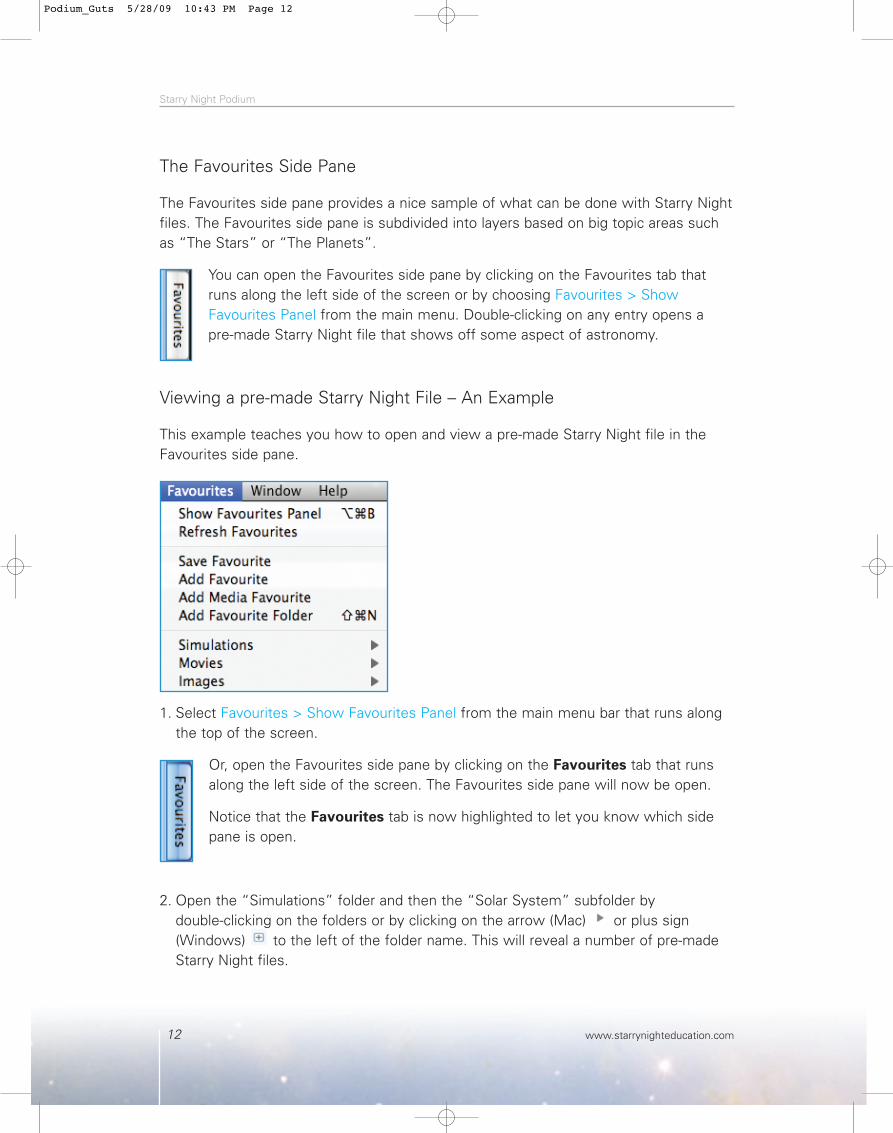
You can open the Favourites side pane by clicking on the Favourites tab thatruns along the left side of the screen or by choosing Favourites > ShowFavourites Panel from the main menu. Double-clicking on any entry opens a pre-made Starry Night file that shows off some aspect of astronomy.
Viewing a pre-made Starry Night File – An Example
This example teaches you how to open and view a pre-made Starry Night file in theFavourites side pane.
1. Select Favourites > Show Favourites Panel from the main menu bar that runs alongthe top of the screen.
Or, open the Favourites side pane by clicking on the Favourites tab that runsalong the left side of the screen. The Favourites side pane will now be open.
Notice that the Favourites tab is now highlighted to let you know which sidepane is open.
2. Open the “Simulations” folder and then the “Solar System” subfolder by double-clicking on the folders or by clicking on the arrow (Mac) or plus sign(Windows) to the left of the folder name. This will reveal a number of pre-madeStarry Night files.
Podium_Guts 5/28/09 10:43 PM Page 12

Bring the visual beauty of the universe to larger screens and audiences
13www.starrynighteducation.com
3. Click on the “Geocentric View” file. This will load the “Geocentric View” file in thesky window.
4. Sometimes a small info icon will appear to the right of the file name in theFavourites pane. Click this icon to read a text note that describes this file. The notefor the “Geocentric View” file should read “Use the ‘Run time forward’ button toview the motion of the Sun, Venus and Mars as seen from a stationary Earth.”
5. As suggested in the note, press the Run Time Forward button located in the StarryNight Toolbar above the sky window.
The Starry Night file will now play and you can see the motion of the Sun and planets.
Tip: Take some time to look at the entries in the Favourites side pane. Remember thatthe entries are not static images, they are regular Starry Night files which you can thenmodify using any of Starry Night’s controls.
Podium_Guts 5/28/09 10:43 PM Page 13

Starry Night Podium
14 www.starrynighteducation.com
Projecting Movies and Images
A unique feature of Starry Night Podium is the ability to show movies and images onthe projection screen. A library of a 100 movies and 25 concept diagrams is includedand located in the Favourites side pane. Starry Night Podium also allows you to importyour own movies and images. See “Adding Media Favourites (Movies and Images)” onpage 19.
To browse the movies and images open the Favourites side pane. The images can befound in the “Images” folder and the movies can be found in the “Movies” folder.
Player Controls
To view a movie or image, click on a file you are interested in. This will highlight the filename and activate a set of media player controls.
If you select a movie file, three buttons will appear that allow you torewind, stop and play. If you selectan image file, two buttons will appearthat allow you to stop and play.
Press the play button to viewmovies and images. The stop buttonwill stop the movie or image andremove it from the screen. The rewindbutton, available only for movie files,rewinds the movie to the beginning.
Tip: A a small info icon mightappear to the right of a movie orimage name in the Favourites sidepane. Click this icon to read a textnote that tells you more about themovie or image.
Podium_Guts 5/28/09 10:43 PM Page 14
Bring the visual beauty of the universe to larger screens and audiences
15www.starrynighteducation.com
Display Options
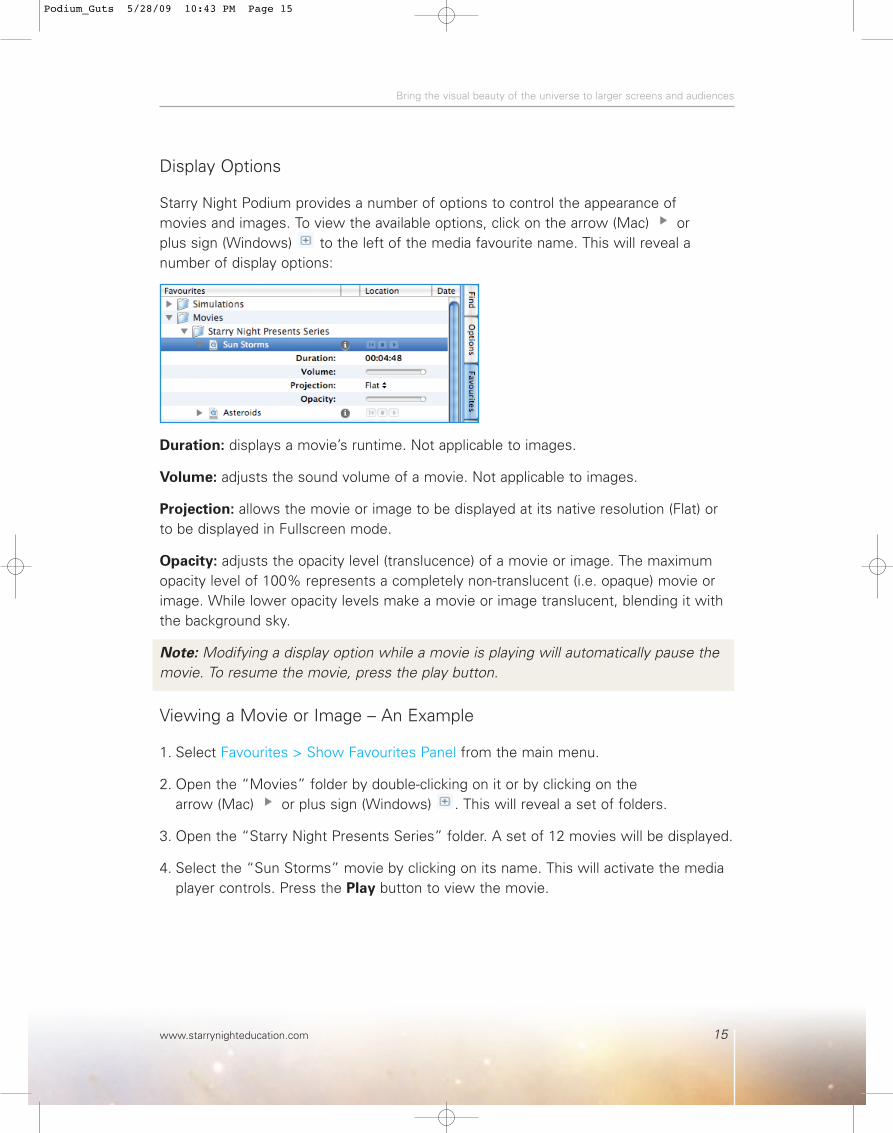
Starry Night Podium provides a number of options to control the appearance of movies and images. To view the available options, click on the arrow (Mac) or plus sign (Windows) to the left of the media favourite name. This will reveal a number of display options:
Duration: displays a movie’s runtime. Not applicable to images.
Volume: adjusts the sound volume of a movie. Not applicable to images.
Projection: allows the movie or image to be displayed at its native resolution (Flat) orto be displayed in Fullscreen mode.
Opacity: adjusts the opacity level (translucence) of a movie or image. The maximumopacity level of 100% represents a completely non-translucent (i.e. opaque) movie orimage. While lower opacity levels make a movie or image translucent, blending it withthe background sky.
Note: Modifying a display option while a movie is playing will automatically pause themovie. To resume the movie, press the play button.
Viewing a Movie or Image – An Example
1. Select Favourites > Show Favourites Panel from the main menu.
2. Open the “Movies” folder by double-clicking on it or by clicking on the arrow (Mac) or plus sign (Windows) . This will reveal a set of folders.
3. Open the “Starry Night Presents Series” folder. A set of 12 movies will be displayed.
4. Select the “Sun Storms” movie by clicking on its name. This will activate the mediaplayer controls. Press the Play button to view the movie.
Podium_Guts 5/28/09 10:43 PM Page 15

Starry Night Podium
16 www.starrynighteducation.com
Adding Favourite Files
The options at the top of the Favourites menu allow you to add your own files. This canbe particularly effective if you are giving a lecture or presentation and need to open alot of files in a short period of time.
Creating and Saving
You can use Starry Night Podium to create a simulation of a particular celestial eventand then save it as a file so that when you go back to it later and reopen the file, all ofyour settings will be restored.
To save a file, select Add Favourite from the Favourites menu. Your file will beaddded to the Favourites pane. By default, your file will be named “untitled”. Clickingon the file name allows you to rename the file.
Tip: You can modify any of the files listed in the Favourites menu or side pane. To modify a file, first open the file from the Favourites menu, or the Favourites side pane.Next, modify the file in any fashion using the Starry Night controls. Finally, chooseFavourites > Save Favourite from the main menu. A dialog box will appear, asking youif you wish to overwrite the existing file. Choose Replace Favourite to overwrite theexisting file.
Podium_Guts 5/28/09 10:43 PM Page 16

Bring the visual beauty of the universe to larger screens and audiences
17www.starrynighteducation.com
Creating and Saving a Favourite File – An Example
This example teaches you how to use the Favourites menu to add a new Favourite.You will create a simple file that shows the constellations from your location tonight.
1. Restore Starry Night’s default settings by pressing the Home button located in theToolbar above the sky window.
2. Set the time to 10:00:00 PM in the Toolbar.
3. Press the k key on your keyboard to toggle on the constellation stick figures andnames.
4. To save your work, select Favourites > Add Favourite. Name the file “ConstellationsTonight”.
5. Press the Home button in the Toolbar. Notice the default settings were restored.
6. In the Favourites side pane, locate the file named “Constellations Tonight” and clickon it. The scene should change to 10:00:00 PM and the constellation stick figuresand labels should appear.
Adding Document Notes
You can add personal text notes to any file in the Favourites side pane. Open theFavourite file you want to add a note to and select File > Edit Document Notes.
Use the text box to enter any additional information about the file. Then click the OK
button. To attach and save your note to the file, you must resave the file from theFavourites > Save Favourite menu.
A small info icon will then appear to the left of the file name in the Favourites pane. Click this icon to read your notes. If you wish to edit the note you added, select File > Edit Document Notes and resave the file to make the changes permanent.
Podium_Guts 5/28/09 10:43 PM Page 17

Starry Night Podium
18 www.starrynighteducation.com
Organizing
The pre-made simulation files in the Favourites side pane are organized in folders andsubfolders. You can also add folders to help organize your favourite files. For example,if you are presenting a lecture on Moon phases, you might want to create a foldernamed “Moon Phases” and place all your related Moon Favourite files inside. Files andfolders in the Favourites side pane are “drag and drop”, so it is easy to move themaround and arrange them in the order you prefer.
By organizing your files, you will be able to go through them quickly and in sequenceduring your presentation. It also makes it easier to share your work with others.
To add a new folder, select Add Favourite Folder from the Favourites menu. Bydefault, the folder will be named “untitled folder”. As with Favourite files, you can clickon the folder name to rename it.
Exporting and Sharing
You can backup your Favourite files or share them with others. Right-clicking or Crtl-
click (Mac) on a file or folder will display a contextual menu. Select Show File orShow Folder to open a dialog box with the folder where that file is stored.
Deleting
Right-click or Crtl-click (Mac) on a file or folder and select Delete File or Delete
Folder to remove a file or folder.
Podium_Guts 5/28/09 10:43 PM Page 18

Bring the visual beauty of the universe to larger screens and audiences
19www.starrynighteducation.com
Adding Media Favourites (Movies and Images)
In addition to Starry Night files, Starry Night Podium allows you to import and projectmovie and image files. For example, you can add video clips from NASA or customgraphics you created for a presentation. You can even convert your powerpoint presen-tation to image files and use Starry Night Podium to display them in any sequence.Starry Night files, movies and images can be combined to create memorable andengaging presentations.
Tip: To save a view from Starry Night as an image, use Starry Night to setup the viewand select File > Export as Image. You can also create movies by selecting File >MakeMovie. For more information on exporting images and movies see Appendix B.
Supported Formats and Types
Images:
You can choose from .jpg, .png, .bmp, .gif, .tiff and many other popular formats.
Movies:
You can choose from .mov, .avi, .mp4, .m4v, mpeg and other supported formats.
A complete list of supported video formats and file types is available from:
http://www.apple.com/quicktime/player/specs.html .
Importing
To add a media favourite select Favourites > Add Media Favourite. A window will openthat will allow you to select the movie or image file you’d like to add to the Favouritesside pane.
Organizing
As with Favourite files, media favourites in the Favourites side pane are “drag anddrop”. You can move them around and arrange them in the order you prefer. You canmix Starry Night Favourite files and Media Favourites in the same folder and arrangethem in the sequence you’d like to show them during a presentation.
Deleting
Right-click or Crtl-click (Mac) on a image or movie favourite and select Delete MediaFile to remove an image or movie.
Podium_Guts 5/28/09 10:43 PM Page 19

Starry Night Podium
20 www.starrynighteducation.com
Projecting LiveSky Content
Although Starry Night has a wealth of built-in astronomical information, much moreinformation exists on the Internet. LiveSky is a gateway to the rich resources of theInternet. You can use LiveSky to access live images of celestial phenomena and projectthem on a large screen.
LiveSky Side Pane
Open the Livesky side pane to access live images.
At the top of the open LiveSky pane will be an image. Beneath the image isinformation about the image, such as itssource and date. Beneath the imageinformation are three buttons.
Clicking this button opens theimage and displays it.
Clicking this button causes Starry Night
to begin downloading an up-to-date image from the Internet.
Clicking this button will remove the image
from the screen.
Podium_Guts 5/28/09 10:43 PM Page 20

Bring the visual beauty of the universe to larger screens and audiences
21www.starrynighteducation.com
Accessing Images
You choose which image will be displayed in the LiveSky pane by expanding one of thelayers listed beneath the image, and then clicking on an image name.
Clicking on an image name will display themost recently downloaded version of thisimage. It will not attempt to download anup-to-date version of the image – you needto press the Refresh button to do this.
Clicking the information icon to theright of an image name will display a briefdescription of the image.
Types of Images
LiveSky can provide you with up-to-date images of many different celestial phenomena:images of the Sun as seen through different filters and at different wavelengths, plotsof the sun’s electromagnetic activity, images of auroral activity (northern and southernlights) in Earth’s atmosphere, and satellite imagery of Earth. As more types of live plan-etary images become available online, links to these images will be added to LiveSky.
Podium_Guts 5/28/09 10:43 PM Page 21

Starry Night Podium
22 www.starrynighteducation.com
Podium_Guts 5/28/09 10:43 PM Page 22

APPENDICES
Podium_Guts 5/28/09 10:43 PM Page 23

Starry Night Podium
24 www.starrynighteducation.com
Podium_Guts 5/28/09 10:43 PM Page 24

Bring the visual beauty of the universe to larger screens and audiences
25www.starrynighteducation.com
Appendix A: Quick Start Guide
1
2 3 64 5
78 9 10 11
12
13
14 15
Running Starry Night Podium
Once you have installed Starry Night Podium, you can run the program asfollows:
Windows: Double-click the Starry Night icon on your desktop, or select it from yourstart menu.
Macintosh: Double-click the Starry Night icon in the Applications/Starry Night Podiumfolder.
Important: To use a projector, click on the Starry Night Projector icon found in the samelocation as Starry Night Podium. This will launch the projector component of Starry Night.The two applications will automatically connect so that any action you perform in StarryNight Podium will be mirrored in Starry Night Projector.
Podium_Guts 5/28/09 10:44 PM Page 25
Starry Night Podium
26 www.starrynighteducation.com
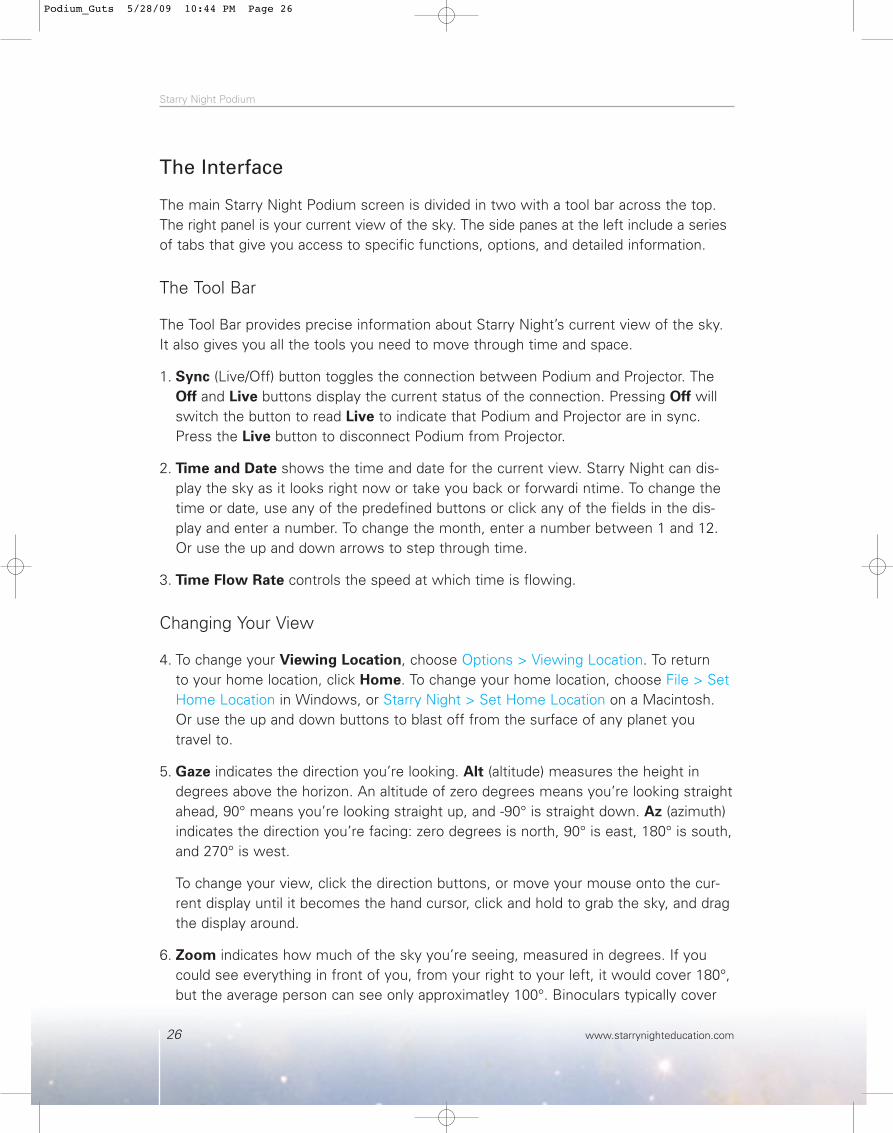
The Interface
The main Starry Night Podium screen is divided in two with a tool bar across the top.The right panel is your current view of the sky. The side panes at the left include a seriesof tabs that give you access to specific functions, options, and detailed information.
The Tool Bar
The Tool Bar provides precise information about Starry Night’s current view of the sky.It also gives you all the tools you need to move through time and space.
1. Sync (Live/Off) button toggles the connection between Podium and Projector. TheOff and Live buttons display the current status of the connection. Pressing Off willswitch the button to read Live to indicate that Podium and Projector are in sync.Press the Live button to disconnect Podium from Projector.
2. Time and Date shows the time and date for the current view. Starry Night can dis-play the sky as it looks right now or take you back or forwardi ntime. To change thetime or date, use any of the predefined buttons or click any of the fields in the dis-play and enter a number. To change the month, enter a number between 1 and 12.Or use the up and down arrows to step through time.
3. Time Flow Rate controls the speed at which time is flowing.
Changing Your View
4. To change your Viewing Location, choose Options > Viewing Location. To return to your home location, click Home. To change your home location, choose File > SetHome Location in Windows, or Starry Night > Set Home Location on a Macintosh.Or use the up and down buttons to blast off from the surface of any planet you travel to.
5. Gaze indicates the direction you’re looking. Alt (altitude) measures the height indegrees above the horizon. An altitude of zero degrees means you’re looking straightahead, 90° means you’re looking straight up, and -90° is straight down. Az (azimuth)indicates the direction you’re facing: zero degrees is north, 90° is east, 180° is south,and 270° is west.
To change your view, click the direction buttons, or move your mouse onto the cur-rent display until it becomes the hand cursor, click and hold to grab the sky, and dragthe display around.
6. Zoom indicates how much of the sky you’re seeing, measured in degrees. If youcould see everything in front of you, from your right to your left, it would cover 180°,but the average person can see only approximatley 100°. Binoculars typically cover
Podium_Guts 5/28/09 10:44 PM Page 26

Bring the visual beauty of the universe to larger screens and audiences
27www.starrynighteducation.com
5° to 7°, and telescopes even less. Use the buttons below – or the scroll wheel on your mouse – to zoom in for a closer look at any object that catches your eye.
The Side Panes
7. These side panes give you access to Starry Night functions, display options, anddetailed astronomical information.
Find allows you to search through Starry Night’s databases and select specificobjects in the sky.
Options allows you to modify the appearance of your sky display, including suchthings as guides and gridlines, local conditions, and the objects you want to see.
Favorites include a menu of Starry Night files that demonstrate the application’s features and key astronomical concepts. You can also store your own favorites here.
Status provides a handy summary of your current sky view.
Info provides comprehensive information on the currently selected object, includinglinks to even more online information.
SkyGuide is where you will find a collection of interactive guided tours through thecosmos. It also includes step-by-step instructions on how to use the most commonStarry Night functions.
Events is a search engine that finds and lists current and future visible astronomicalevents like moon phases, eclipses, meteor showers and more.
LiveSky is Starry Night’s gateway to the rich resources of the Internet. This panelgathers together the most current astronomical images and data available online.
FOV allows you to display an outline onscreen that shows the shape and typical fieldof view (FOV) of any of your astronomical instruments.
SkyGuide
Click the SkyGuide tab to access Starry Night’s collection of interactive guided tours ofthe cosmos. SkyGuide functions a lot like your Web browser: there are buttons to helpyou navigate through the pages and lots of links to explore.
8. The Back button takes you to the page you last visited. Click it again to move backthrough the pages you’ve seen. Click Forward to go forward again through the samepages.
9. Click Home to take you to the main SkyGuide page.
Podium_Guts 5/28/09 10:44 PM Page 27

Starry Night Podium
28 www.starrynighteducation.com
10. Click Refresh to restart the Starry Night display.
11. Text Increase and Text Decrease change the size of the text in the SkyGuide window. (Macintosh version only.)
12. Each page in SkyGuide includes a Path that shows where you are and the wayback to the main page, and each section in SkyGuide begins with a Menu of Topics
to be covered. Click these links to navigate through SkyGuide.
13. At the bottom of each page, you’ll find a link to the Next Page. If you want to readSkyGuide from beginning to end, keep clicking here. Or use the menus to explore.
14. Click Table of Contents to display a list of all the topics and tours SkyGuide offers.
15. Click Page Forward to move to the next page in SkyGuide. Click Page Back tomove to the previous page.
Podium_Guts 5/28/09 10:44 PM Page 28
Bring the visual beauty of the universe to larger screens and audiences
29www.starrynighteducation.com
Appendix B: Exporting Data – Star Charts, Movies, Images
Exporting Data: Star Charts
Starry Night has a special set of print settings that make printing informative, legiblecharts easy. The charts can be taken outside to help locate and identify objects in the sky.
Starry Night can create finder charts in a variety of layouts. From naked eye charts thathelp you become familiar with the pattern of the constellations to finder charts thataccurately simulate what you can see through a telescope, finder scope or binoculars.
First, center on the area of sky you are interested in and use the Field of View buttonsin the Zoom control of the Toolbar to set the correct field of view for your printed chart.For example, if you want a chart that shows the northern part of the sky, press the N
button in the Toolbar to face north and set your field of view to 100 degrees. Rememberthat the appearance of the sky is time-sensitive; make sure to set the time in StarryNight to the time you plan to use the star chart.
Once the time, viewing direction and field of view have been set, select File > Print fromthe menu. Alternatively, if you wish to print a chart centered on a specific object, right-click (Ctrl click on the Mac) on the object and select Print Chart from the contextual menu.
Print Settings
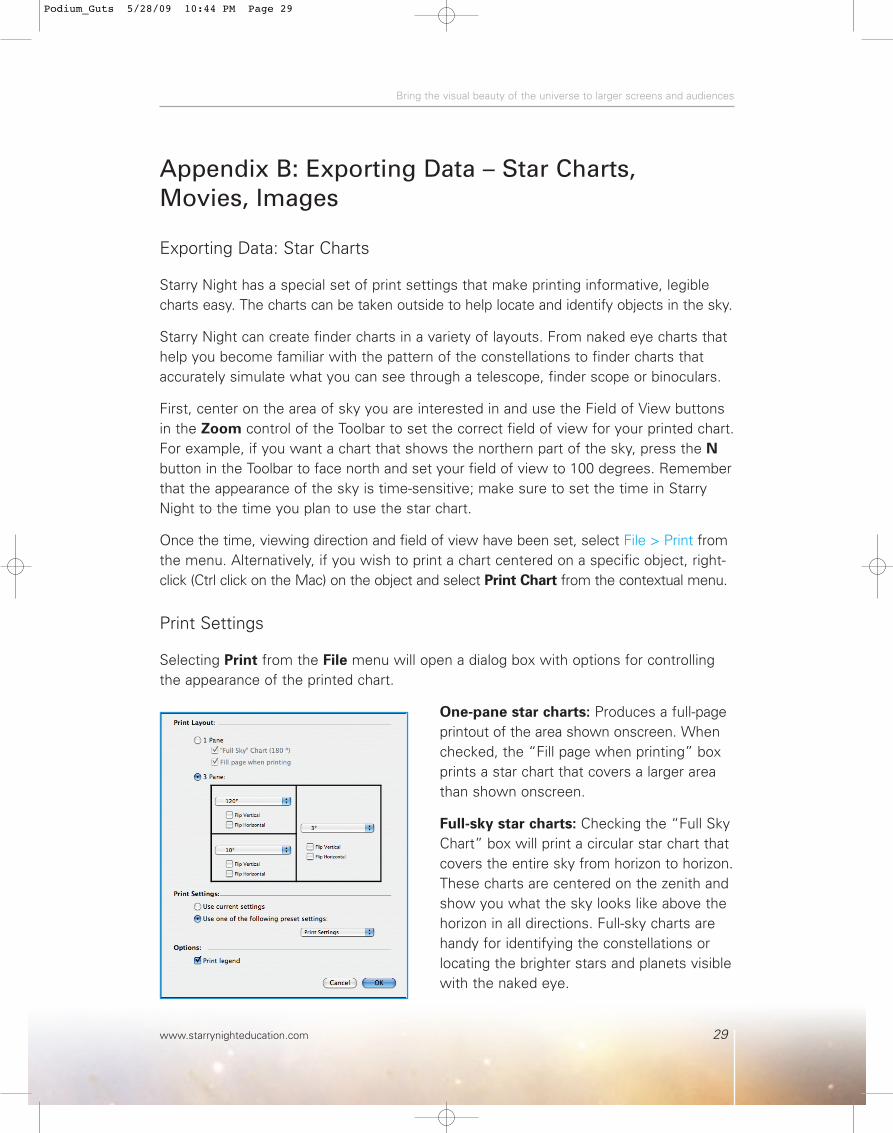
Selecting Print from the File menu will open a dialog box with options for controllingthe appearance of the printed chart.
One-pane star charts: Produces a full-pageprintout of the area shown onscreen. Whenchecked, the “Fill page when printing” boxprints a star chart that covers a larger areathan shown onscreen.
Full-sky star charts: Checking the “Full SkyChart” box will print a circular star chart thatcovers the entire sky from horizon to horizon.These charts are centered on the zenith andshow you what the sky looks like above thehorizon in all directions. Full-sky charts arehandy for identifying the constellations orlocating the brighter stars and planets visiblewith the naked eye.
Podium_Guts 5/28/09 10:44 PM Page 29
Starry Night Podium
30 www.starrynighteducation.com
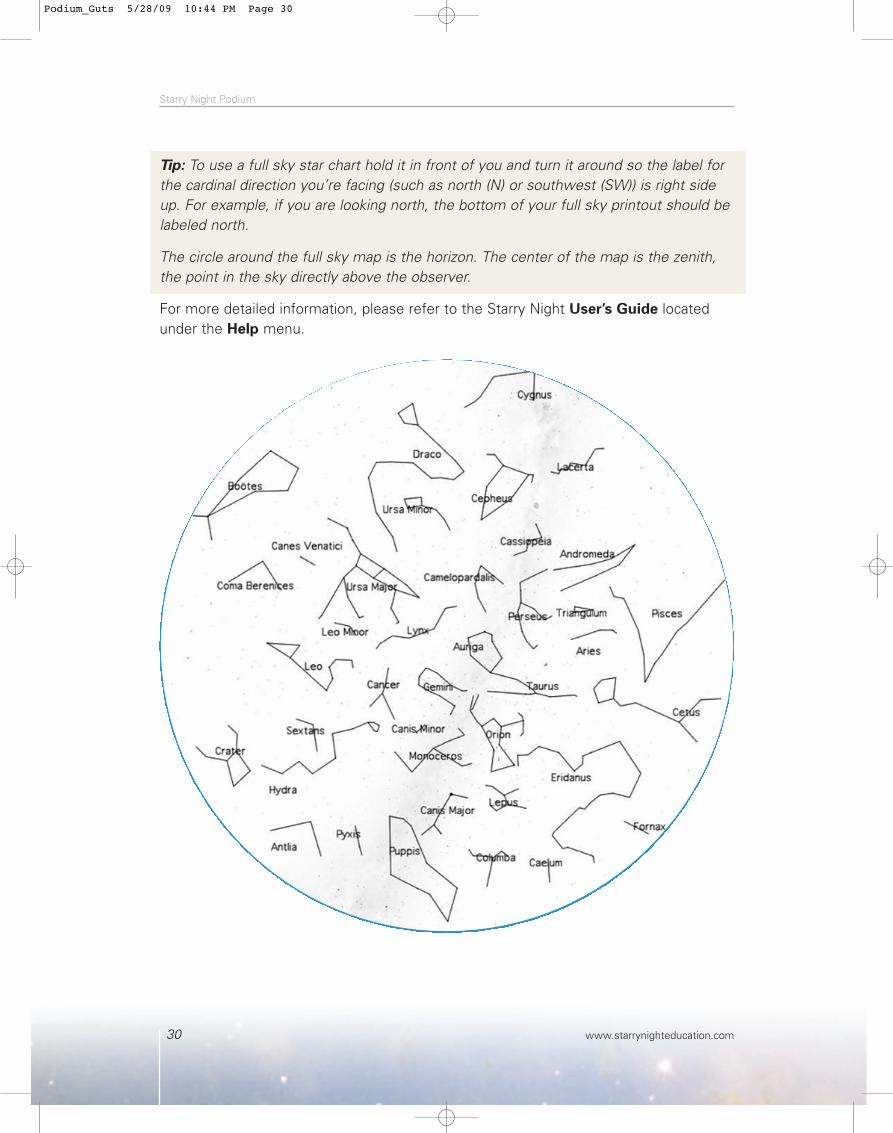
Tip: To use a full sky star chart hold it in front of you and turn it around so the label forthe cardinal direction you’re facing (such as north (N) or southwest (SW)) is right sideup. For example, if you are looking north, the bottom of your full sky printout should belabeled north.
The circle around the full sky map is the horizon. The center of the map is the zenith,the point in the sky directly above the observer.
For more detailed information, please refer to the Starry Night User’s Guide locatedunder the Help menu.
Podium_Guts 5/28/09 10:44 PM Page 30

Bring the visual beauty of the universe to larger screens and audiences
31www.starrynighteducation.com
Exporting Data: Movies
You can make spectacular movies using Starry Night. You can record a graphically inten-sive event (such as a planet flyby) and play it back as a smooth animated sequence.Movies are played back using the QuickTime viewer, so you can send them to studentsand colleagues. They need not have Starry Night to view the movies.
To make a movie, choose File > Make Movie. A dialog box will open that allows you toname your movie file and choose where to save it. The first time that you make amovie, the Compression Settings dialog box will also open. See “Movie CompressionSettings” in the Starry Night User’s Guide to learn more about the compression optionsavailable.
After you have named your file, a rectangle appears on the center of thescreen, which we call the Movie Box.
You can change the size of the movie box(height or width) by choosing Preferences
from the File menu (Windows) or theStarry Night menu (Macintosh). Andselecting QuickTime from the dropbox on the upper left of the Preferences dialog box.
Podium_Guts 5/28/09 10:44 PM Page 31

Starry Night Podium
32 www.starrynighteducation.com
There are three Movie controls: the Pause button, the Stop button, and the Record button. The Movie window will automatically be in Record mode when it opens.
• The Pause button pauses the recording of the movie. This enables you to adjust your view “off screen” between frames.
• The Stop button completes the recording process, and closes the QuickTime window.
• The Record button resumes the recording of a movie after it has been paused.
The number of frames in your movie and the total running time are shown in the bot-tom right corner. A new frame is added to the movie every time the screen is redrawn.Most changes you make in Starry Night cause the screen to be redrawn. Switchingdaylight on or off, changing the labels, and zooming in or out are just a few changeswhich will cause a new frame to be recorded.
It is often best to stop time flow before you make a movie. Once your view is set upproperly, you can turn the flow of time back on. When you are finished recording yourmovie, hit the Stop button along the bottom of the movie window.
Note: The Movie Box doesn’t record cursors, so you don’t have to worry about gettinga “hand” in the shot.
For more detailed information, please refer to the Starry Night User’s Guide locatedunder the Help menu.
Podium_Guts 5/28/09 10:44 PM Page 32

Bring the visual beauty of the universe to larger screens and audiences
33www.starrynighteducation.com
Appendix C: Tips & Tricks
Online Updates and Support
Registering Starry Night
When you run Starry Night the first time,you need to enter your name and regis-tration number before you can use all thefeatures of the program.
To get your unique registration number,click Get Registration Number. For thisto work, you must have an active Internetconnection. If you do not have an Internet connection, you can still click OK and the program will operate normally—but you will not be able to download the periodic dataupdates, such as new comets and tours.
After you have typed in your name and registration number, click OK to begin usingStarry Night.
A registered user is entitled to free technical support and reduced prices on otherastronomy software programs. You can update your registration information at any time by visiting the following site:
http://www.starrynight.com/register
You can retrieve your registration number at any time by choosing Help > Registration(on a Windows computer) or Starry Night > Registration (on a Macintosh).
Note: You can record your username and registration number in the front of this guide.
Updating your data files
After you enter your registration information, Starry Night asks if you want to update your data files.
If you click Update Files, StarryNight will attempt to download thelatest data files from our servers.
Downloading these files ensures that any new comets, asteroids, satellites, or SkyGuideinformation is added to the program.
Podium_Guts 5/28/09 10:44 PM Page 33

Starry Night Podium
34 www.starrynighteducation.com
You can update these files at any time by choosing LiveSky > Update Data Files from theapplication menu. You can customize how often to check for data update by choosingLiveSky > Preferences for Auto Updates from the application menu. New Starry Nightdata is available each day.
Note: Updating the data files is not the same as updating the program itself. To ensureyou are running the latest version of Starry Night, see the Program Updates section. Ifyou do not register your copy of Starry Night, the application will not be able to retrieveautomatic data updates.
From here you can click Cancel File Update to continue using the program or Open
Registration Dialog to obtain you registration number.
Technical Support and Discussion List
A list of frequently asked questions is available online by choosing Help > Online Help.You can also submit a question to our technical-support staff.
The Starry Night discussion list is a mailing list where you can ask questions and sharetips with other owners of Starry Night. The list has more than 9,000 members, so it isan excellent resource. You can sign up on the following page:
http://tech.groups.yahoo.com/group/StarryNight/
Projection Tips
A few tips when using Starry Night for projection:
Screen savers – it is a good idea to turn off screen savers prior to running Starry Night.This will avoid the possibility of a screen saver starting during your presentation.
Energy saver – disable the energy saver in your computer settings to prevent the computer from dimming the display, entering into sleep mode or shutting down duringa presentation.
Arrive early – and test all the connections and Starry Night prior to your presentation.
Room lighting – for the best image on the projection screen, darken the room asmuch as possible.
Projector adjustments – prior to your presentation, adjust the digital projector’s contrast, brightness and gamma settings. You should have Starry Night running whileadjusting these settings.
Starry Night Projector adjustments – there are a number of adjustments available inStarry Night itself to optimize the projected image:
Podium_Guts 5/28/09 10:44 PM Page 34

Bring the visual beauty of the universe to larger screens and audiences
35www.starrynighteducation.com
1. Star brightness, contrast & color: There are options to change the size of the stars or even the color of the star display. To access these options select Projector
Preferences… from the File menu in Starry Night Podium (Windows) or selectProjector Preferences… from the Starry Night Podium menu in Starry NightPodium (Macintosh). To learn more about these options select User’s Guide fromthe Help menu and read page 44.
2. Line thickness – you can adjust the line thickness of the various coordinate systemsin Starry Night. For example, to change the grid line thickness of the ecliptic guides,open the Options side pane, expand the Guides layer and click on Ecliptic Guides.In the window that appears onscreen, adjust the line thickness using theThinner/Thicker slider.
The constellation stick figure lines can also be adjusted. Open the Options sidepane, expand the Constellations layer and click on Stick Figures.
3. Horizon dimming at night – depending on your projector settings, the horizon may appear too dark at night. You can brighten the horizon by using the Dim at
night slider found in the Options pane. To view the slider, expand the Local View
layer and click on Local Horizon.
Tip: After your presentation is done, allow the projector to cool down before unplugging the power cord. This will protect the lens from cracking.
Starry Night Usability Tips
What if the monitor image and the projected image lose sync while using Starry Night?
First, check the status of the Sync button in the Toolbar. The button should read Live
when the connection is active.
If the button reads Live but the image on your monitor and the image on the projectedscreen don’t match, click the Sync button (changes the status from Live to Off) andthen click the Sync button again (changes the status from Off to Live) to re-establish theconnection. Your views should now be the same on the monitor and projection screen.
Starry Night Podium and Starry Night Projector Preferences
Starry Night Podium (what you see on your computer monitor) and Starry NightProjector (what is displayed in the projection screen) are two separate programs andeach has its own set of preferences.
Podium_Guts 5/28/09 10:44 PM Page 35

Starry Night Podium
36 www.starrynighteducation.com
The preferences for Starry Night Podium only affect the scene shown in your computermonitor. The preferences for Starry Night Projector are specific to the scene that is displayed on the projection screen.
Accessing the preferences
Starry Night Podium: (Windows) Select Preferences from the File menu in StarryNight Podium. (Macintosh) Select Preferences from the Starry Night Podium menu inStarry Night Podium.
Starry Night Projector: (Windows) Select Projector Preferences… from the File
menu in Starry Night Podium. (Macintosh) Select Projector Preferences… from theStarry Night Podium menu in Starry Night Podium.
Podium_Guts 5/28/09 10:44 PM Page 36

Bring the visual beauty of the universe to larger screens and audiences
37www.starrynighteducation.com
Heads-Up Display (HUD) Options
The Heads-Up Display (HUD) Options are of particular interest. Pointing the cursor at an object onscreen causes Starry Night to display the object’s name, constellation anddistance. This feature is known as the Heads-Up Display (HUD).
You can change the look of the HUD and also change the information fields that it displays, by choosing Preferences from the File menu (Windows) or the Starry Night
Podium menu (Macintosh) and selecting Cursor Tracking (HUD) from the dropbox inthe top left corner of the Preferences dialog box.
A long list of information fieldsgives you control over which objectinformation is displayed, includingname, magnitude, distance, and soon. You can also choose the color inwhich you want to display theseinformation fields.
Finally, you can choose the font,style, and size of the text in whichthe HUD information is displayed.
Tip: Press the i key on your keyboard to toggle the HUD on and off.
Displaying the HUD in the projection screen
If you want your audience to view where you are pointing your cursor, check the “Alsoshow HUD on projector” box and the HUD will be displayed in the projection screen.This is a handy feature when you want to direct the attention of your audience to a particular object.
Tip: Consult the User’s Guide found under the Help menu for a complete description of all available preferences.
Podium_Guts 5/28/09 10:44 PM Page 37

Starry Night Podium
38 www.starrynighteducation.com
The Sync (Live/Off) button
Every action you perform in Starry Night Podium is mirrored in Starry Night Projector(that is, the projection screen) after you let go of the mouse button. What is being shownon your monitor will always be in sync with the projected image. When you launch bothStarry Night Podium and Starry Night Projector, the two programs automatically connectto each other and the Sync button in the Toolbar will toggle to Live to indicate the current status of the connection.
It might be useful at times, to disconnect Starry Night Podium from Starry NightProjector by clicking the Sync button on the Toolbar. When the Sync button’s status is Live and you click on it, the connection between what you see in your monitor andwhat is being projected will no longer be in sync when you perform a new action inStarry Night Podium. To reflect the new connection status, the Sync button will toggleits status from Live to Off.
This allows you to setup a scene in Starry Night Podium without having the audienceview all the actions you had to perform to setup the scene.
For example, if someone asked you to show them the Pathfinder landing site on Mars,you would click on the Sync button to change it status from Live to Off and proceed tosetup your scene. When you had the scene you were asked to show, you would click theSync button, thereby changing the connection status from Off to Live. This re-establish-es the connection and what you see in your monitor will appear on the projectionscreen. The effect is similar from scrolling between pre-made simulation files and pro-vides a smooth transition between concepts you want to illustrate or for those timeswhen you need extra time to setup a scene.
Keyboard Shortcuts
I – Toggles the HUD on/off
K – Toggles the constellation stick figures and labels
L – Turns on the labels for stars and brighter deepsky objects.
Ctrl-D (Windows); Cmd-D (Macintosh) – Toggles Daylight on/off
Ctrl-E (Windows); Cmd-E (Macintosh) – Toggles the Horizon on/off for Pro users.
Shift Key – turns on the location scroller when pressed down. Use the location scrollerwhen exploring 3D space.
Spacebar – if you hit the space bar during a pan, the program immediately takes youdirectly to the object.
There are many more shortcuts to explore in Starry Night. A complete list of keyboardshortcuts can be found at the back of your User’s Guide – accessible via the Help
menu in Starry Night.
Podium_Guts 5/28/09 10:44 PM Page 38
Bring the visual beauty of the universe to larger screens and audiences
39www.starrynighteducation.com
Hidden Gems: Features you might not know about
What follows is a list of Starry Night features that will help you create great lookingStarry Night Favourite files. For additional features, refer to the User’s Guide under theHelp menu and subscribe to our monthly newsletter at www.starrynighteducation.com.
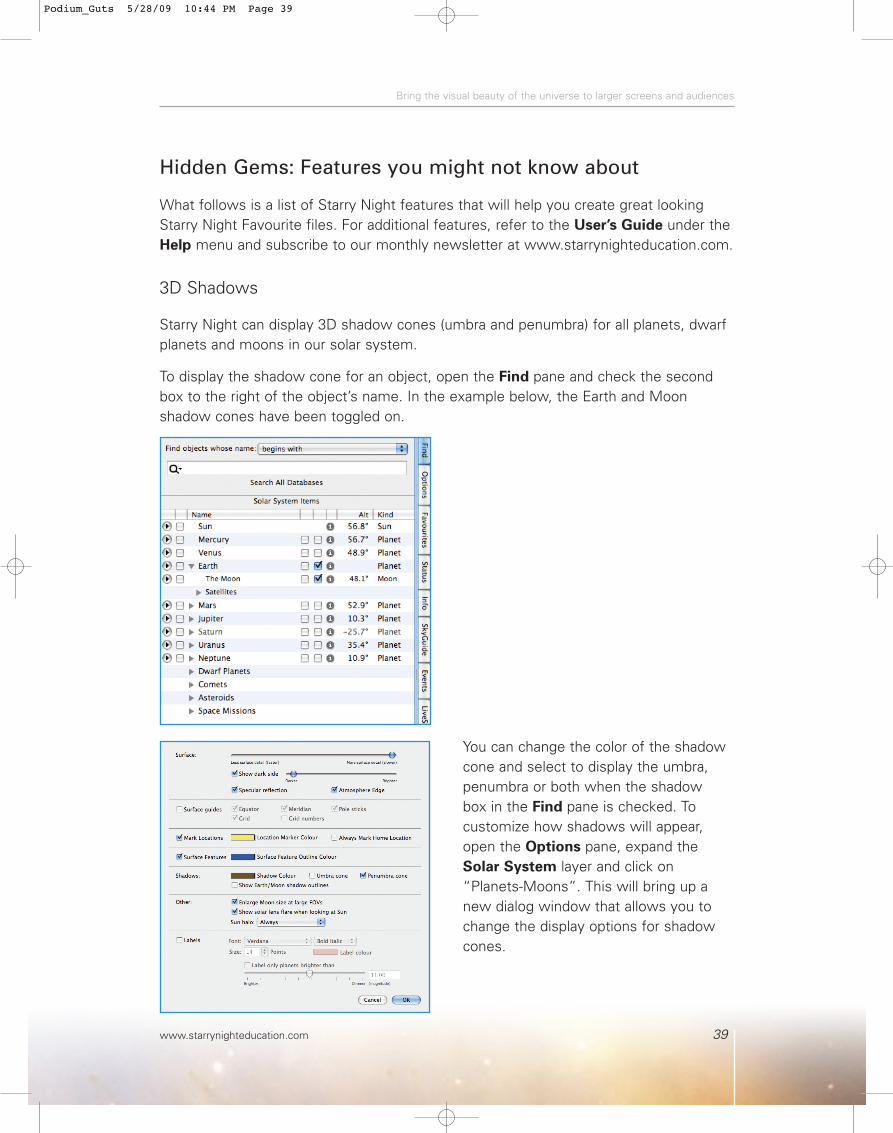
3D Shadows
Starry Night can display 3D shadow cones (umbra and penumbra) for all planets, dwarfplanets and moons in our solar system.
To display the shadow cone for an object, open the Find pane and check the secondbox to the right of the object’s name. In the example below, the Earth and Moon shadow cones have been toggled on.
You can change the color of the shadowcone and select to display the umbra,penumbra or both when the shadow box in the Find pane is checked. To customize how shadows will appear,open the Options pane, expand theSolar System layer and click on“Planets-Moons”. This will bring up anew dialog window that allows you tochange the display options for shadowcones.
Podium_Guts 5/28/09 10:44 PM Page 39

Starry Night Podium
40 www.starrynighteducation.com
Tip: An example of a 3D shadow cone to illustrate a lunar eclipse can be found in theFavourites side pane under Simulations > Earth, Moon and Sun > Eclipses > LunarEclipse > Lunar Eclipse zoomed in.
Distance Spheres
Distance Spheres allows you to display translucent spheres at custom distance milestones from a selected object.
Tip: An example of a distance sphere to show the boundaries of our solar system canbe found in the Favourites side pane under Simulations > Other > Distance Spheres >Sun distance spheres. Use the Increase Elevation button in the Toolbar to view the distance spheres. Hold down the SHIFT key and click-drag your mouse cursor around a distance sphere to change your perspective.
To add a new distance sphere, right-click or ctrl-click on a solar system object andselect Distance Spheres… from the contextual menu that pops up. Alternatively, youcan open the Find pane and click on an objects contextual menu button (first buttonlocated on the left of the object’s name) to view the contextual menu.
Podium_Guts 5/28/09 10:44 PM Page 40
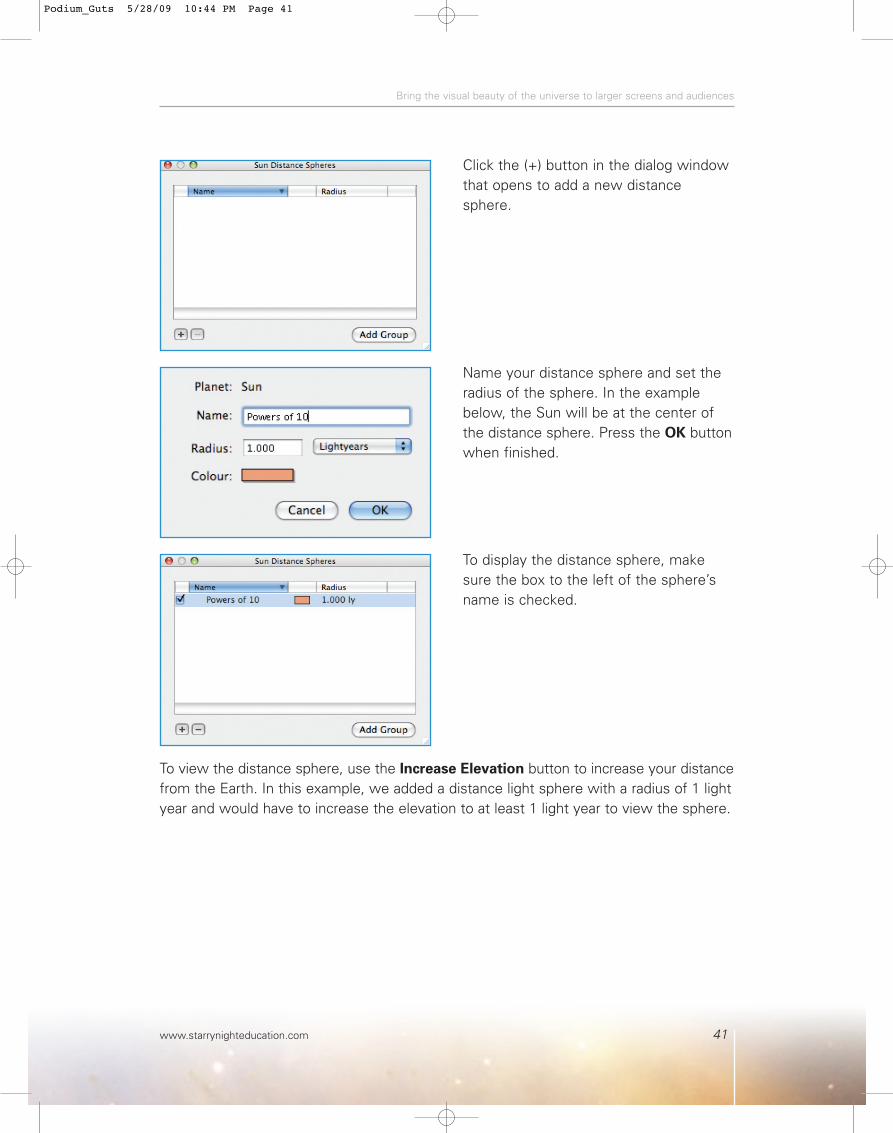
Bring the visual beauty of the universe to larger screens and audiences
41www.starrynighteducation.com
Name your distance sphere and set theradius of the sphere. In the examplebelow, the Sun will be at the center ofthe distance sphere. Press the OK buttonwhen finished.
To display the distance sphere, makesure the box to the left of the sphere’sname is checked.
To view the distance sphere, use the Increase Elevation button to increase your distancefrom the Earth. In this example, we added a distance light sphere with a radius of 1 lightyear and would have to increase the elevation to at least 1 light year to view the sphere.
Click the (+) button in the dialog windowthat opens to add a new distancesphere.
Podium_Guts 5/28/09 10:44 PM Page 41
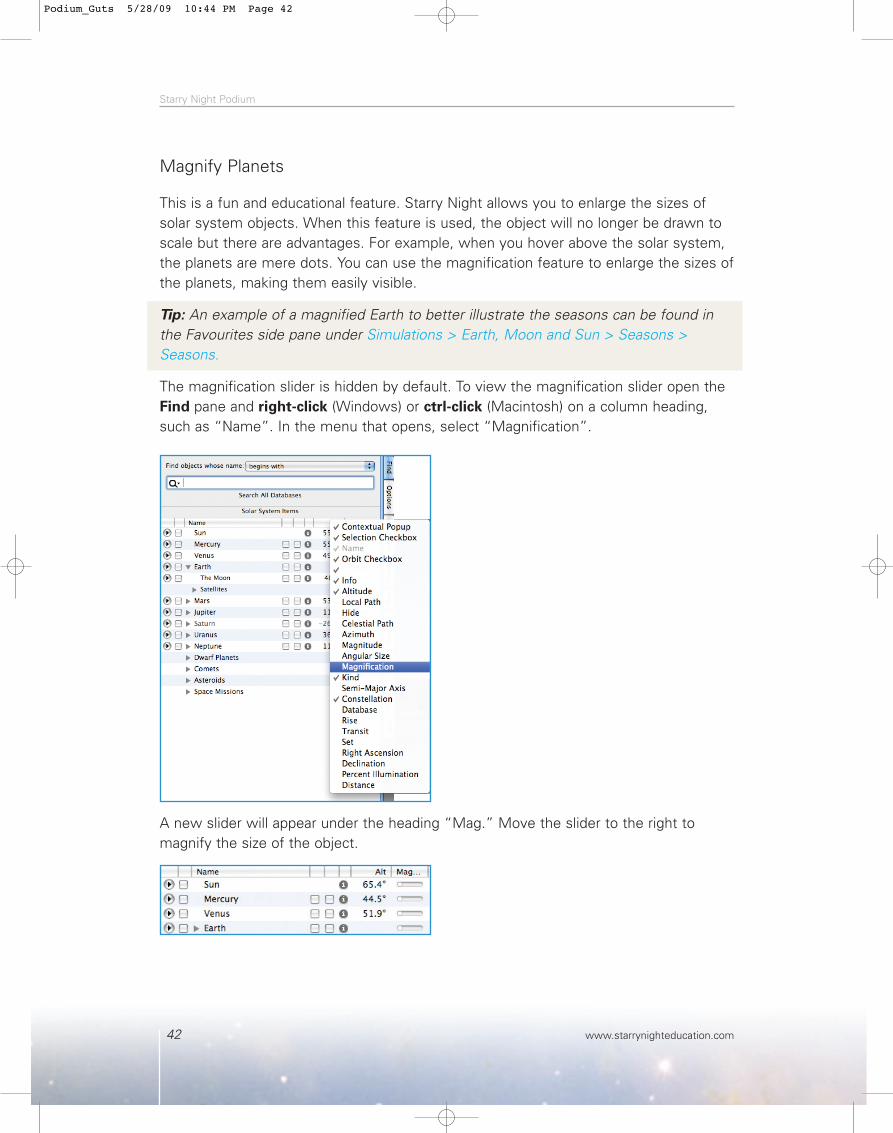
Starry Night Podium
42 www.starrynighteducation.com
Magnify Planets
This is a fun and educational feature. Starry Night allows you to enlarge the sizes ofsolar system objects. When this feature is used, the object will no longer be drawn toscale but there are advantages. For example, when you hover above the solar system,the planets are mere dots. You can use the magnification feature to enlarge the sizes ofthe planets, making them easily visible.
Tip: An example of a magnified Earth to better illustrate the seasons can be found inthe Favourites side pane under Simulations > Earth, Moon and Sun > Seasons >Seasons.
The magnification slider is hidden by default. To view the magnification slider open theFind pane and right-click (Windows) or ctrl-click (Macintosh) on a column heading,such as “Name”. In the menu that opens, select “Magnification”.
A new slider will appear under the heading “Mag.” Move the slider to the right to magnify the size of the object.
Podium_Guts 5/28/09 10:44 PM Page 42

Bring the visual beauty of the universe to larger screens and audiences
43www.starrynighteducation.com
Hide Planets
The hide feature will hide a solar system object from view. For example, if you wereshowing the orbit of the Earth, you could hide all of the other planets and avoid beingdistracted by the motion of the other planets.
Like the magnification feature, the hide feature is hidden by default. To view the hidecheckbox column open the Find pane and right-click (Windows) or ctrl-click (Macintosh)on a column heading, such as “Name”. In the menu that opens, select “Hide”.
A new checkbox will appear to the right of the Alt. column. Click on the box to hide theobject. In this example, Venus has been hidden from view.
Podium_Guts 5/28/09 10:44 PM Page 43

Starry Night Podium
44 www.starrynighteducation.com
Precession Dials
Precession Dial shows a ring in the northern and southern sky marked in 1000 yearincrements depicting the rotational axis “wobble” of the Earth over its 26,000 yearcycle.
To display the precession dials, open the Options pane, expand the Guides layer andthen the Celestial Guides (Poles) sub-layer. Under Celestial Guides (Poles) check the“Pole Precession Circles” box.
Tip: A pre-made simulation file showingthe precession dials can be found in theFavourites side pane under Simulations > Earth, Moon and Sun > Precession andNutation > Precession
Podium_Guts 5/28/09 10:44 PM Page 44
Bring the visual beauty of the universe to larger screens and audiences
45www.starrynighteducation.com
More Tips & Tricks online
Please visit us online at www.starrynighteducation.com for more tips and tricks fromus and other users of Starry Night.
Podium_Guts 5/28/09 10:44 PM Page 45
Starry Night Podium
46 www.starrynighteducation.com
Podium_Guts 5/28/09 10:44 PM Page 46