Embed Size (px)
Citation preview

Pluggy McPlugface The gigatron PS/2 adapter
and ROMv3 with TinyBASIC
ASSEMBLY MANUAL / USER MANUAL
!1

Pluggy McPlugface assembly and user manual version 20181114
© Reproduction of (parts of) this manual without prior written permission of Marcel van Kervinck and Walter Belgers is not allowed.
!2

Pluggy McPlugface
Introduction ‘Pluggy McPlugface’ is the name given to our PS/2 adapter, that plugs into the back of the
gigatron TTL computer. It makes it possible to connect a PS/2 keyboard. It also contains Tiny BASIC, which can be loaded into the gigatron so you can write your own BASIC programs. You can even save a Tiny BASIC program to the memory in the plug.
From mid September 2018, this adapter and ROM version 3 are part of the Gigatron kit. Existing users can order Pluggy McPlugface as well, which will also come with a pre-programmed EPROM with ROMv3.
Assembly The PS/2 adapter is a small PCB with a connector that plugs into the game controller port. It has another connector to connect your PS/2 keyboard (not included). The ‘brains’ is an ATtiny85. This tiny 8-bit RISC-based microcontroller can translate the signals coming from the PS/2 keyboard to signals the gigatron can understand. The microcontroller contains 8kB of flash memory, that we have pre-programmed with the translation software. The adapter also contains an image of Tiny BASIC v2, exactly the same BASIC that is already pre-programmed in ROM v3. Tiny BASIC can be loaded into the
gigatron using the Loader application as well, so it can be used on older ROM versions. The space that is left can store your own BASIC program, but saving programs will only work with ROMv3 or newer.
Here is an overview of the components you will need:
Picture Type Description Amount Mark ☑ if present
PCB Circuit board 1 ☐
IC socket 8-pin socket 1 ☐
ATtiny85 8-bit microcontroller 1 ☐
PS/2 Keyboard connector 1 ☐
9-pin sub-D female Gamepad connector 1 ☐
!3
The ATtiny85 is already programmed and inserted into the IC socket.
Since you already have experience in soldering the gigatron, this keyboard adapter should be easy. An important difference with the gigatron itself is that on this adapter, components are soldered on both sides of the PCB.
1. First, solder on the socket, either with or without the ATtiny85 microprocessor still inserted. It should be inserted on the side that says “ATtiny85 8 MHz”. Make sure the half moon cutout in the IC socket matches the half moon drawn on the circuit board. The ATtiny85 is more delicate than the components used in the gigatron. If you insert it the wrong way around and power it on, you will destroy it. Also, if your soldering skills are not great, you might want to solder in the empty socket and let it cool before inserting the ATtiny85. Be careful: if you hold the socket with your fingers while soldering, you might burn them!
2. Next, solder on the PS/2 connector. It goes on the same side of the board, next to the ATtiny85. The connector has 6 small pins and 3 large ones, that keep the plug in place. We have had cases where we needed to carefully jiggle the plug to get the pins into the holes.
3. The last part to solder is the DB9 plug, which goes on the other side of the PCB, that says “PS/2 keyboard adapter for Gigatron”. The 9 small pins need to be soldered. The plug might or might not have big pins that go in the big holes. If that is the case, you will probably need some force to insert the plug. These pins can be soldered, but you will require a soldering iron that generates enough heat to be able to solder them. Not soldering them is fine too, the construction is already sturdy enough without it.
4. If you ordered the upgrade, you will find that the package also contains a new EPROM containing ROMv3. Simply take out the old EPROM and insert the new one. Make sure the orientation is correct (the notch should be on the left). The old EPROM can be kept or wiped and reprogrammed (tools to do so are not included).
Usage You can either connect the game controller or the PS/2 adapter, they cannot be connected both at the same time. We have programmed the ATtiny85 in such a way that the keyboard can be used to provide the game controller outputs, so with just a PS/2 keyboard attached, you have access to all of the functionality. In other words: the PS/2 keyboard replaces the controller and gives you more functionality.
Push the DB9 plug of the PS/2 adapter into the game controller port and connect a PS/2 keyboard to the PS/2 connector. The PS/2 adapter fits nicely on the back of the
gigatron.
!4
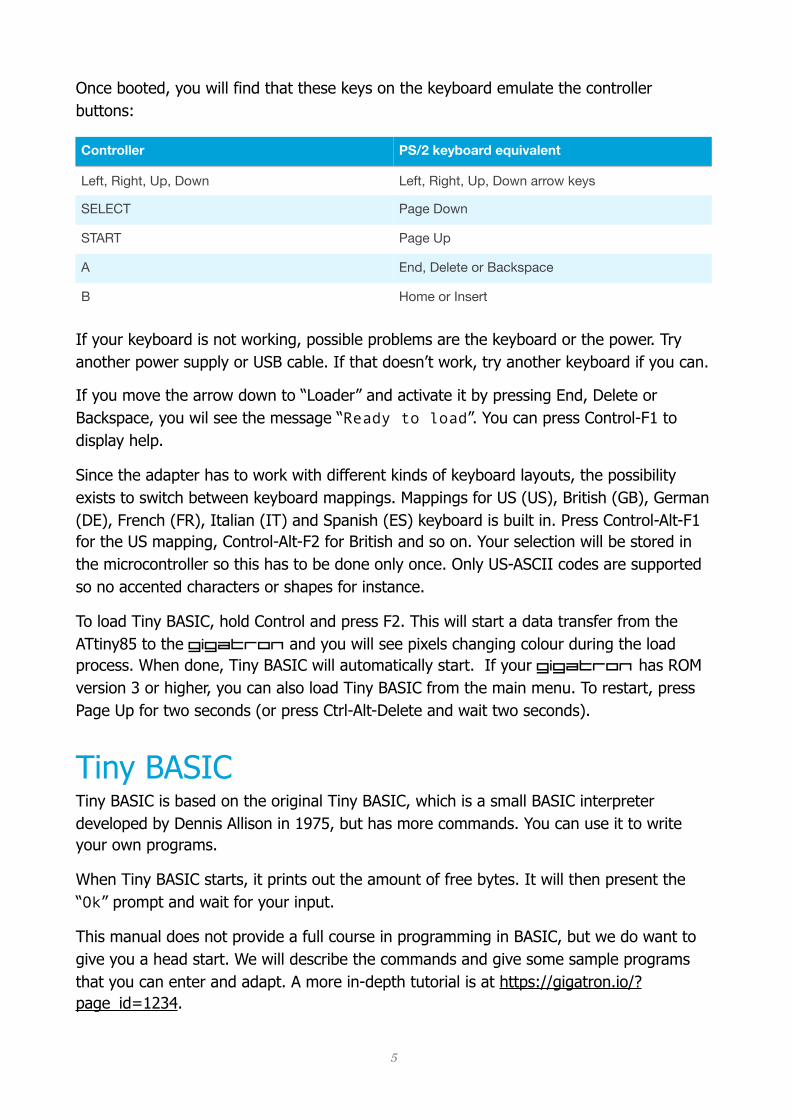
Once booted, you will find that these keys on the keyboard emulate the controller buttons:
If your keyboard is not working, possible problems are the keyboard or the power. Try another power supply or USB cable. If that doesn’t work, try another keyboard if you can.
If you move the arrow down to “Loader” and activate it by pressing End, Delete or Backspace, you wil see the message “Ready to load”. You can press Control-F1 to display help.
Since the adapter has to work with different kinds of keyboard layouts, the possibility exists to switch between keyboard mappings. Mappings for US (US), British (GB), German (DE), French (FR), Italian (IT) and Spanish (ES) keyboard is built in. Press Control-Alt-F1 for the US mapping, Control-Alt-F2 for British and so on. Your selection will be stored in the microcontroller so this has to be done only once. Only US-ASCII codes are supported so no accented characters or shapes for instance.
To load Tiny BASIC, hold Control and press F2. This will start a data transfer from the ATtiny85 to the gigatron and you will see pixels changing colour during the load process. When done, Tiny BASIC will automatically start. If your gigatron has ROM version 3 or higher, you can also load Tiny BASIC from the main menu. To restart, press Page Up for two seconds (or press Ctrl-Alt-Delete and wait two seconds).
Tiny BASIC Tiny BASIC is based on the original Tiny BASIC, which is a small BASIC interpreter developed by Dennis Allison in 1975, but has more commands. You can use it to write your own programs.
When Tiny BASIC starts, it prints out the amount of free bytes. It will then present the “Ok” prompt and wait for your input.
This manual does not provide a full course in programming in BASIC, but we do want to give you a head start. We will describe the commands and give some sample programs that you can enter and adapt. A more in-depth tutorial is at https://gigatron.io/?page_id=1234.
Controller PS/2 keyboard equivalent
Left, Right, Up, Down Left, Right, Up, Down arrow keys
SELECT Page Down
START Page Up
A End, Delete or Backspace
B Home or Insert
!5
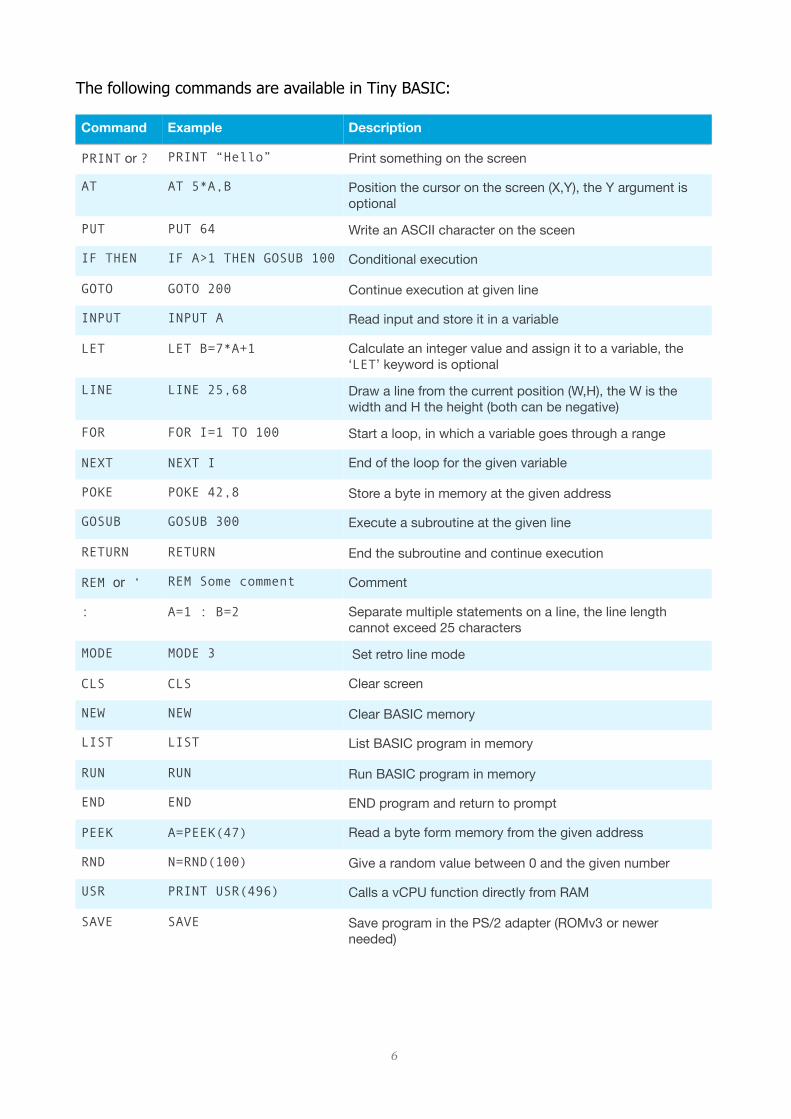
The following commands are available in Tiny BASIC:
Command Example Description
PRINT or ? PRINT “Hello” Print something on the screen
AT AT 5*A,B Position the cursor on the screen (X,Y), the Y argument is optional
PUT PUT 64 Write an ASCII character on the sceen
IF THEN IF A>1 THEN GOSUB 100 Conditional execution
GOTO GOTO 200 Continue execution at given line
INPUT INPUT A Read input and store it in a variable
LET LET B=7*A+1 Calculate an integer value and assign it to a variable, the ‘LET’ keyword is optional
LINE LINE 25,68 Draw a line from the current position (W,H), the W is the width and H the height (both can be negative)
FOR FOR I=1 TO 100 Start a loop, in which a variable goes through a range
NEXT NEXT I End of the loop for the given variable
POKE POKE 42,8 Store a byte in memory at the given address
GOSUB GOSUB 300 Execute a subroutine at the given line
RETURN RETURN End the subroutine and continue execution
REM or ‘ REM Some comment Comment
: A=1 : B=2 Separate multiple statements on a line, the line length cannot exceed 25 characters
MODE MODE 3 Set retro line mode
CLS CLS Clear screen
NEW NEW Clear BASIC memory
LIST LIST List BASIC program in memory
RUN RUN Run BASIC program in memory
END END END program and return to prompt
PEEK A=PEEK(47) Read a byte form memory from the given address
RND N=RND(100) Give a random value between 0 and the given number
USR PRINT USR(496) Calls a vCPU function directly from RAM
SAVE SAVE Save program in the PS/2 adapter (ROMv3 or newer needed)
!6
Lines are numbered and will be executed in order. Spaces can be omitted, but this will make your program less readable. The program is stored exactly as you type it, so the line 10 ?”Hello”:goSub20 will be stored as is and not as 10 PRINT “Hello” : GOSUB 20.
Lines can only be as long as the width of the screen (25 characters). If you go beyond that, a backslash will be displayed and the line will not be saved.
You do not have to type the lines of your program in order. They will automatically be ordered by line number. It is wise to not use consecutive line numbers but leave a gap between them, e.g. number them 10, 20, 30, etc. This way, you can insert extra lines between the existing lines using numbers that lie between them.
To replace a line, just enter a new line with the same line number. This will replace the existing line.
Let’s take a look at a sample program:
10 FOR I=0 TO 19 20 X=4+8*I : Y=3+6*I 30 POKE 43,PEEK(43)+7 40 AT X,119 : LINE 159-X,-Y 50 NEXT I 60 GOTO 10
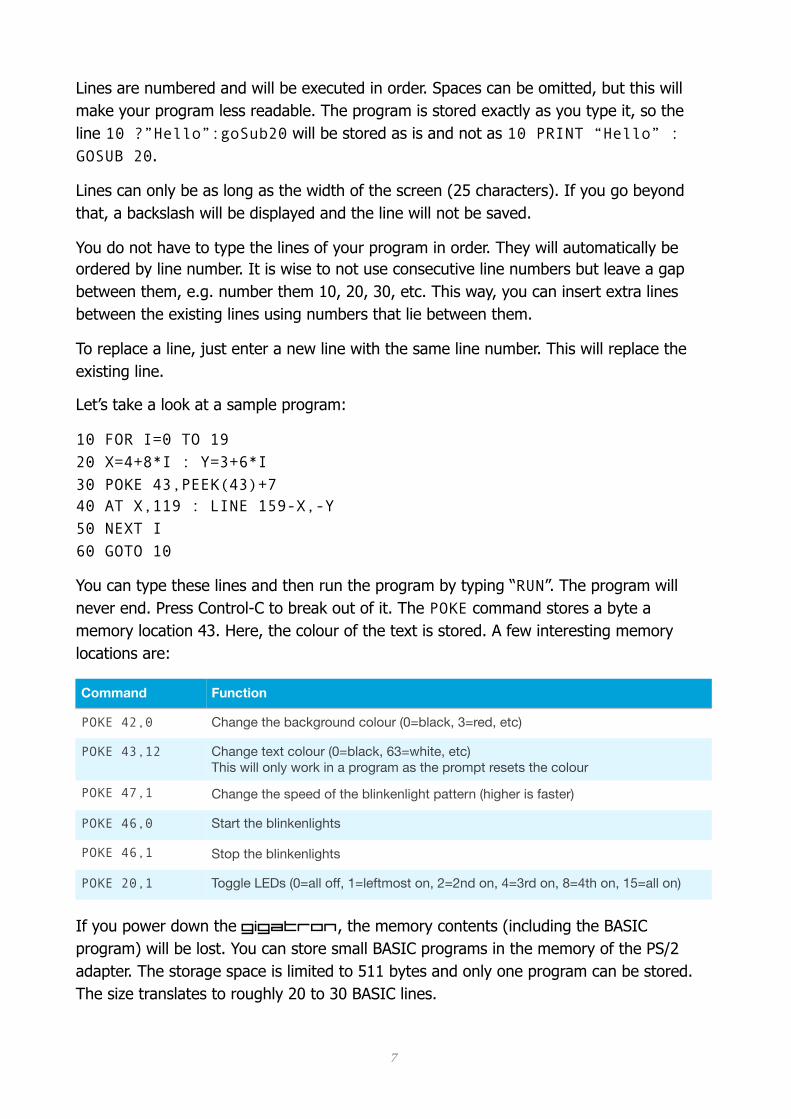
You can type these lines and then run the program by typing “RUN”. The program will never end. Press Control-C to break out of it. The POKE command stores a byte a memory location 43. Here, the colour of the text is stored. A few interesting memory locations are:
If you power down the gigatron, the memory contents (including the BASIC program) will be lost. You can store small BASIC programs in the memory of the PS/2 adapter. The storage space is limited to 511 bytes and only one program can be stored. The size translates to roughly 20 to 30 BASIC lines.
Command Function
POKE 42,0 Change the background colour (0=black, 3=red, etc)
POKE 43,12 Change text colour (0=black, 63=white, etc)This will only work in a program as the prompt resets the colour
POKE 47,1 Change the speed of the blinkenlight pattern (higher is faster)
POKE 46,0 Start the blinkenlights
POKE 46,1 Stop the blinkenlights
POKE 20,1 Toggle LEDs (0=all off, 1=leftmost on, 2=2nd on, 4=3rd on, 8=4th on, 15=all on)
!7

Saving is done by typing “SAVE”. During the process, the monitor may flash, this is normal. If you get a “Break error”, the program is too large to fit (or the process was interrupted). After saving, you can turn of the system.
If you want to restore the program later, start Tiny BASIC and then press Control-F3. The program will be now loaded as if you were typing it (really fast).
References Tiny BASIC tutorial: https://gigatron.io/?page_id=1234
gigatron forum: https://forum.gigatron.io/
Sample BASIC programs: https://github.com/kervinck/gigatron-rom/tree/master/BASIC
Source code for the PS/2 adapter: https://github.com/kervinck/gigatron-rom/tree/master/Utils/BabelFish
!8

ROMv3 ROM version 3 (‘ROMv3’) contains some software that is not present in versions 1 and 2. The assembly manual that came with these versions thus does not describe this new software.
The programs Snake, Racer, Mandelbrot, Pictures, Credits and Loader are described in the assembly manual/user manual that came with the gigatron.
In ROMv3, you will find that the menu now lists the following additional items:
- Tetronis
- Bricks
- TicTacToe
- BASIC
- WozMon
We will describe these new programs. Be sure to also check the forum at https://forum.gigatron.io/ for more information.
Tetronis Blocks are falling down. You can move them left or right within the box, using the left and right arrows. Using the up arrow, you can rotate the falling block. The down key will increase the speed the block is falling with. Your objective is to stack the blocks tightly. When the blocks create a full horizontal line, it will disappear and earn you points, shown at the bottom. When there is no space left for the block to fall, the game ends. In the top right corner, you can already see the shape of the next block that will fall.
Thanks to at67 for this contribution!
Bricks The objective of the game is to prevent the ball from falling out of the bottom of the screen. You have a bat that you can move left and right, to bounce the ball back up. On the top, there are coloured blocks that disappear when hit by the ball. Each block taken away will earn you a point. The score can be seen in the top right. On the top left, the amount of lives left is shown.
Thanks to xbx for this contribution!
!9

TicTacToe This starts BASIC with a pre-installed program, Tic-Tac-Toe. This program was listed in the January 1977 newsletter from the famous Homebrew Computer Club. It was written by Tom Pittman and it runs as-is on the gigatron.
BASIC Tiny BASIC is described in the previous chapter and on https://gigatron.io/?page_id=1234.
WozMon WozMon (the Woz Monitor) is a recreation of the WozMon ROM monitor program that was present in the Apple-1 computer, written by Steve Wozniak.
The program starts with the message “*** WozMon”, but there is no prompt. You can read memory, write memory and jump to a memory location.
To read memory, enter one or more hexadecimal addresses and press enter. The input is case insensitive. You can also specify ranges using the notation “address.address”. Examples are “2a”, “0000.00FF” and “1 2a 40.4f”. WozMon remembers the last used location and this can then be omitted in a subsequent range definition. For example, if you would give the command “10” to read one byte, and after that “.20”, that second command would show the memory in locations 11 to 20.
Writing data can be done by adding “:value” to an address. The command “2a:22” will display the current value of memory location 2A and will then write 22 in it. This will turn the background purple. The command “2f:04” will make the blinkenlights run faster. You can write multiple values in consecutive memory locations by using the form “address:value1 value2 value3 ..”
You can start execution at a certain memory location by using the command “address R”. This needs to be a capital R. For instance, the WozMon program itself is at location 200 (in hexadecimal), so the command “200 R” will restart WozMon.
!10