Embed Size (px)
Citation preview
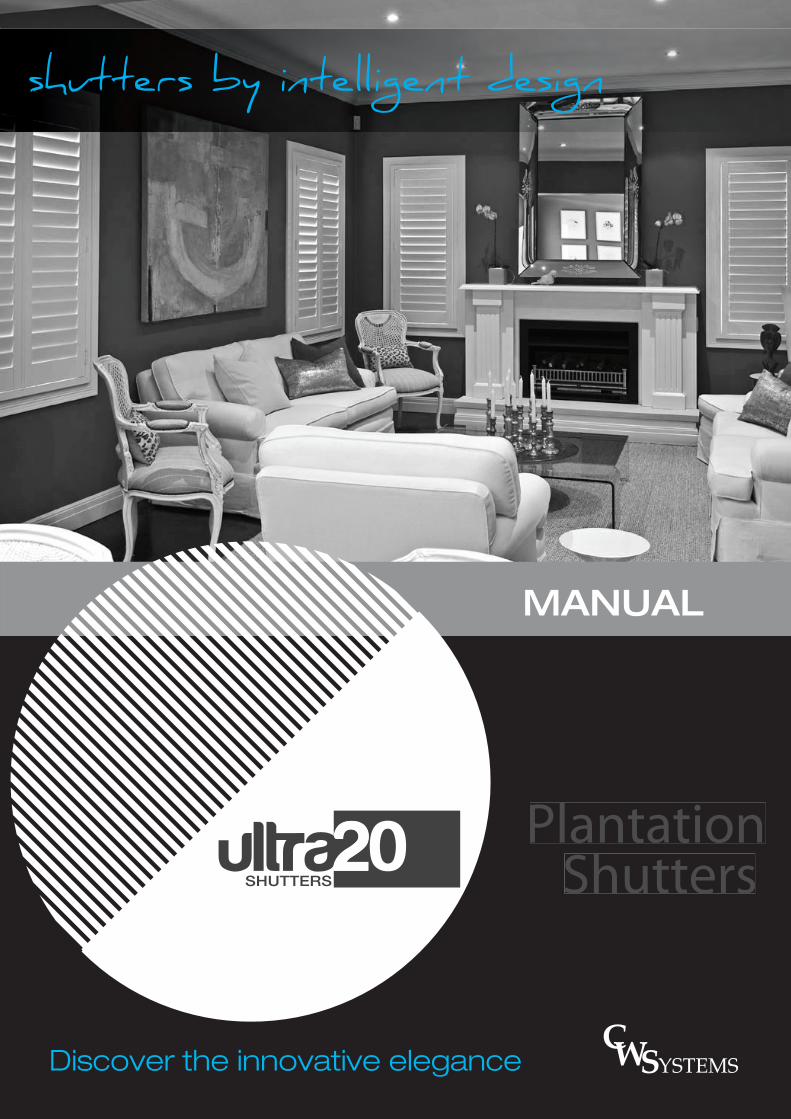
Plantation Shutters
Discover the innovative elegance
MANUAL

ContentsShutter Terminology ................................................................................................................... 1
Technical Horizontal Shutters .................................................................................................... 3
Blade (Louvre) Sizes ................................................................................................................. 4
Frames ...................................................................................................................................... 5
Stile Options .............................................................................................................................. 6
Hinge Options ............................................................................................................................ 7
Rail and Divider Options ............................................................................................................ 8
T-Post Locations ........................................................................................................................ 9
Horizontal/Transom Beams ....................................................................................................... 10
Divider Rails/Mid Rails ............................................................................................................... 10
Specialty Shutters – Bypass Track ............................................................................................ 11
Panel Confi gurations ................................................................................................................. 11
Specialty Shutters – Rake – Contoured .................................................................................... 12
Shutter Marking – Frames ......................................................................................................... 13
Shutter Marking – Panels .......................................................................................................... 13
Measuring Advice ...................................................................................................................... 14
Measuring Information – General .............................................................................................. 16
Measuring Information – Finished & Opening Window Size ..................................................... 17
Squareness ............................................................................................................................... 18
Warranty and Repair ................................................................................................................. 19
Claiming Under Warranty .......................................................................................................... 20
Warranty Certifi cate ................................................................................................................... 21
Care and Maintenance of Ultra20 .............................................................................................. 22
Cleaning .................................................................................................................................... 22

SYSTEMS PTYLTD
www.cwsystems.com.au1
Shutter TerminologyA Top/Bottom Rail H Stile CapB Rabbeted Stile I Magnet & CatchC Standard Stile J TenonD Louvre K MortiseE Frame (Z shown) L Tension ScrewF Hinge M Tension SpringG Tilt Bar N Mid Rail
Clearview Option
TOP RAIL
FRAME
STILE
MID RAILCLEARVIEWPUSH RODSLATS
BOTTOM RAIL
CLEARVIEWROD SYSTEM

SYSTEMS PTYLTD
www.cwsystems.com.au2
Beading .....................................................Decorative moulding or routing performed most often on stiles and framingmaterials.
Clearance ..................................................The amount of space needed to allow the blade to move freely behind the back of the panel. Usually, the distance from the back of a panel to the glass or moulding.
Mid (Divider) Rail ......................................Mid rail will be inserted to strengthen panel or divide panel into sections for combinations.
Framed Shutters .......................................A shutter system installed inside special custom mouldings.
Hanging Strips ..........................................A piece of wood which is mounted in or onto a window or door onto which the shutters are mounted. It adjusts for out-of-square windows and provides for lightcontrol.
Hinge ..........................................................The metal mechanism that attaches to the shutter stile and connects the panel to the frame, hanging strip or another panel and allows for shutter operation. Various types and fi nishes are offered to suit each individual installation.
Light Block ................................................Small strip of wood or part of shutter against which panels or blades close to prevent light penetration.
Blade (Louvre) ..........................................Shaped, fi nished strips of wood mounted horizontally in a panel to control light,view and privacy. The blades are usually movable and are available in various widths.
Blade Pin ...................................................Small part that connects blade to the panel and enables the blade to rotate.
Panel ..........................................................One complete shutter unit consisting of stiles, top and bottom rail and blades.
D-Mould .....................................................Piece of wood vertically attached on the stile, to block light from between the panels, improve the appearance of the fi nished product and to hide the inconsistencies of an out-of-square window.
Top & Bottom Rail ....................................The horizontal pieces of a panel that attach to the stiles at the top, bottom and sometimes the centre. These pieces are primarily for structural stability.
Stile ............................................................The vertical side pieces of a shutter panel that attach to the rails to enclose theblades. Hinges are attached to the outside of the stile to join the panel to themounting surface or to other panels.
T-Post .........................................................Framing piece rebated on each side for hinging purposes that allow large openings to be divided into smaller sections that fall within shutter system mounting specifi cations.
Tension Adjustment Screws ....................Standard on the side of the stiles. Screws used in place of springs for allhorizontal plantation shutters, these screws provide suffi cient tension to hold the blades in a preset position.
Centre Tilt Rod ..........................................Small, cylindrical wooden piece that is stapled to all the blades in a panel (or panel section), vertically on the horizontal blades allowing them to be moved up or down in unison.
Clearview Tilt Rod ....................................Small and light aluminium piece that is screwed to all the blades in a panel (or panel section), vertically on horizontal blades allowing them to be moved up or down in unison.

SYSTEMS PTYLTD
www.cwsystems.com.au3
ULTRA20 SHUTTER CHARACTERISTICS
Application Internal Application Only
Louvre Shape Elliptical
Louvre Type (width) mm 64mm 89 mm 114 mm
Louvre Thickness mm 10.5 mm
Stile Width (mm) and Profi le 51 mm beaded
Stile Thickness mm 27.5 mm
Rail Thickness mm 22 mm
Tilt Rod Clearview/Centre/Offset
Max Length Clearview Tilt Rod 1500 mm
Max Panel Height mm 2700 mm
Mid Rail required if panel is greater than 1520 mm
2 Mid Rails required if panel is greater than 3048 mm height
Max Hinged Panel Width mm including frame
750 mmIncluding frame
950 mmIncluding frame
950 mmIncluding frame
Max Hinged Bi-Fold Width mm 508 mm
Max Track Bi-Fold Width mm 600 mm
Special Shapes Available (include extracharge) Oval/Hexagon/Octagon/Triangle/Square/Round
Frame Styles available L Frame/Elegant Z Frame T-Post/Pack out L Frame 74 mm
Standard Joinery 17 mm x 17 mm/25 mm x 25 mm
Top and Bottom Rail 89 mm/114 mm/152 mm
Mid Rail 80 mm
Pelmet Fascia Sizes 150 mm x 22 mm
Non Standard Colour Not Available
Minimal Width 250 mm
Colours Available White/Bright White/Pearl
Hinges Available (extra for StainlessSteel) Non Mortise/Inside/Outside Pivots
Optional ExtrasTrack Sliding/Track Bi-Fold/Pelmets/Side Boards and Bottom Boards for Sliding and Bi-Fold Bay Windows/Corner Windows/Fixed Panels/Solid
Panels
Ultra20 Plantation Shutters have an Aluminium Insert for higher strength and increased stiffness. Ultra20 provides therich look of timber shutters and performs in areas that timber cannot. ULTRA20 ADDS STYLE AND VALUE TO ANY
HOME, SUITABLE FOR ALL WET AREAS AND EASILY CLEANED
Technical Horizontal Shutters

SYSTEMS PTYLTD
www.cwsystems.com.au4
Blade (Louvre) SizesAll Blades are reinforced with aluminium
0.7920 mm
0.9724.7 mm
0.9724.7 mm
0.4611.68 mm
0.4611.68 mm
0.4611.68 mm
AL252 1/2
63.5 mm
AL353 1/2
88.9 mm
AL454 1/2
114.3 mm

SYSTEMS PTYLTD
www.cwsystems.com.au5
Frames
125.4 mm
1 7/847.63 mm
1 1/238.10 mm
1 3/1630.48 mm
1 11/1617.15 mm
1/212.7 mm
BZ17 BULLNOSE 43.4 mm WIDE
SL 101 1/2ꞌꞌ x 1 7/8ꞌꞌ (38.10 mm x 47.63 mm)
ELEGANT Z FRAMEFRENCH DOOR L FRAME
FLF 88 7/8ꞌꞌ WIDE (22.23 mm)
STOP LIGHT STRIPSS 58 11/16ꞌꞌ WIDE (17.14 mm)
SSS 373/8ꞌꞌ x 2 5/8ꞌꞌ (9.53 mm x 66.68 mm)

SYSTEMS PTYLTD
www.cwsystems.com.au6
Stile OptionsSTANDARD SOLID STILE
SS 20 2ꞌꞌ WIDE (50.8 mm)STANDARD STILE WITH ALUMINIUM
AS 20 2ꞌꞌ WIDE (50.8 mm)
RABBETED SOLID STILESSR 21 2 1/8ꞌꞌ WIDE (53.98 mm)
RABBETED STILE WITH ALUMINIUMASR 21 2 1/8ꞌꞌ WIDE (53.98 mm)
SOLID D-MOULD STILE SA20 D-MOULD STILE WITH ALUMINIUMAA20 50.8 mm
T-POSTST 10 2ꞌꞌ WIDE (50.80 mm)
HANGING STRIPHS 107 1 1/16ꞌꞌ WIDE (27.20 mm)

SYSTEMS PTYLTD
www.cwsystems.com.au7
Hinge OptionsNon Mortise Hinges

SYSTEMS PTYLTD
www.cwsystems.com.au8
Rail and Divider Options
114 mm
80.3 mm
13/16''20.57 mm
3/8''9.65 mm
13/32''10.42 mm
3/8''9.65 mm
162.05 mm6 13/32''
Thickness13/16''
21.2 mm13/32''10.42 mm
3/8''9.65 mm
6''152.4 mm
Thickness13/16''
21.2 mm
123.95 mm4 7/8''
13/32''10.42 mm
3/8''9.65 mm
4 1/2''114.3 mm
3 1/2''88.9 mm3/8''
9.65 mm
13/32''10.42 mm
Thickness13/16''
20.57 mm
98.55 mm3 7/8''
SR 35 3 1/2ꞌꞌ WIDE (88.9 mm)
SR 45 4 1/2ꞌꞌ WIDE (114.3 mm)1/2ꞌꞌ WIDE (
SR 60 6ꞌꞌ WIDE 152.4 mm)WIDE (152.4 mm
SD 24 2 2/5ꞌꞌ WIDE (80.3 mm)

SYSTEMS PTYLTD
www.cwsystems.com.au9
T-Post Locations T-Posts divide a window vertically into sections.
T-Posts can be used to match the design of a window that has a natural break to accommodate panel confi gurations that require more than two panels, or just for aesthetic purposes. These can beused with any of our frame styles.
Custom T-Post locations are available in any of our shutters.
For window opening size shutters measure from the left side of the window to the centre of the 1st T-Post location for Position 1 (as shown below). For more than one T-Post, always measure from the far left of the window to the centre of the T-Post as shown below for Position 2.
For Make Size with Frame, measure from the left edge of the frame to the centre of the T-Post.

SYSTEMS PTYLTD
www.cwsystems.com.au10
Clearview
Horizontal/Transom Beams Horizontal T-Posts are required when multiple shutters are needed to cover large window heights.
Horizontal T-Post locations are measured from the bottom window edge to the centre of the T-Post for Position 1 (as shown below).
For more than one T-Post measure from the bottom of the window to the centre of the T-Post for Position 2 (as shown below).
Divider Rails/Mid Rails Shutter measurements that exceed the maximum dimensions 1800 mm require a Divider Rail.
A Divider Rail can be placed in any specifi ed location on panels.
A Divider Rail for an Outside Mount with the frame shutter is measured up from the bottom of the shutter to the middle of the Divider Rail.
A Divider Rail for a window reveal fi t size shutter is measured up from the bottom of the window to the middle of the Divider Rail.
If the Divider Rail is specifi ed at the centre, the Divider Rail may vary half a blade in height or drop.
Critical Mid Rail
If you require your Mid Rail to be exact please note top and bottom rails will vary.

SYSTEMS PTYLTD
www.cwsystems.com.au11
Specialty Shutters – Bypass Track Bypass tracking is an excellent way to cover large windows such as sliding glass door window
openings.
Utilizes an overhead track system attached to the panels so that the panels can slide horizontallyacross the window opening.
Can be ordered with the track only, with a frame attached to the track, or 3 sided to close in the panels, or with a plain or decorative valance/box out to help conceal the track system from the front.
Panel Confi gurations

SYSTEMS PTYLTD
www.cwsystems.com.au12
Specialty Shutters – Rake – ContouredRaked top shutters, are shutters that have a straight angled top. The shutters are manufactured with an angled top rail to conform to the opening. We provide a full frame on all rake shutters.
Rake shutters require the same dimensions as an arched shutter.
Please provide the width, height, and height of both the left and right sides.
Contoured shutters are another way to cover an arched opening. The shutter panels are manufactured with acurved top rail to conform to the desired opening. They are available as a full circle or an eyebrow. We providea full frame on all contoured shutters.
Half Circle Sunburst Half Circle Elongated Eyebrow Eyebrow
Circle Circle 2 panel Oval Quarterburst
Octagon Half Rake Full Rake
French Door
Sunburst Shutters Arch Shutters Elongated Eyebrow Shutters

SYSTEMS PTYLTD
www.cwsystems.com.au13
Shutter Marking – Frames Frames to be marked on the mitres or on ends of each end of the frame piece.
PIC# – Line# – Window # – Corner# is to be marked in ink.
Starting with Corner 1 in the bottom right-hand corner of the frames increasing the number going clockwise around the shutter.
Window and Line number increase just like the panels do.
Example:
486-1-1- 3486-1-1- 4
486-1-1- 1486-1-1- 2
486-1-1- 3
486-1-1- 2486-1-1- 1
486-1-1- 4
Shutter Marking – Panels Panels to be stamped in blue ink on the bottom of the bottom rail towards the hinge side.
PIC & LWP markings to be stamped onto the panel as shown below.
A LWP# of 1 1 1 means Line 1, Window 1, Panel 1.
If you had two 1 panel shutters on 2 lines, then the LWP numbers would be 1 1 1 for the fi rst one and2 1 1 for the second one.
If you had a 1 panel shutter with a quantity of 2 on one line, then the LWP would be 1 1 1 for the fi rst one and 1 2 1 for the second.
If you had a 2 panel shutter on 1 line their panels would be 1 1 1 and 1 1 2.
Example:
PIC - L - W - P
PIC# - Line# - Window# - Panel#
486-1-1-1
(Views of bottom of panel)

SYSTEMS PTYLTD
www.cwsystems.com.au14
Measuring AdviceGeneralMeasuring is the starting point in the production of a custom made shutter and one of the most critical phases of any installation. Too often not enough time is taken to get accurate measurements. Proper measurements can help to avoid mistakes, excessive work, call backs, and dissatisfi ed customers. To prepare for all of these possibilities you must get as much information as possible. Your approach to measuring a customer’s windows is important. If the customer sees that you are very thorough in your measuring techniques, they will beconfi dent in your ability to install the product.
Common ConsiderationsThere are some common considerations you should look for and note when you are measuring a window or room of windows:
Floor and ceiling are not the same distance apart or parallel.
Walls are not level, or have waves in them.
Windows are not square with the fl oor or ceiling.
Proper clearance between window and rear of shutter blades.
Obstructions such as:
a. Window sills
b. Window frames
c. Window cranks and locks
d. Windows which open into the room
e. Electrical switches
f. Air conditioners
g. Heating outlets and Cold air returns
h. Baseboard heating units
i. Door knobs
j. Doors that open into the room
k. Sensors for alarm systems
l. Light fi xtures and pictures
Mounting SurfacesYou must also record the type of surface you will be mounting your frame into and the type of fasteners youwill need such as:
Timber/Gyprock – Drill bits to pre-drill hole to prevent splitting.
Aluminium – Self drilling/Tek screws.
Steel – High speed steel drill bits, self-drilling or heavy duty screws.
Brick – Masonry drill bits, plastic wall plugs & screws.
Concrete – Masonry drill bits, plastic wall plugs and heavy duty screws/Dynabolts.

SYSTEMS PTYLTD
www.cwsystems.com.au15
Inside MeasureIS – Inside Measure
‘L’ and ‘Z’ Frames, Colonial Frame, Pivot Hinge Inside Mount and Non Mortise Hinges without framing options.
Measure opening width from left to right in three places (top, centre and bottom) and record the smallest.
Measure opening height from left to right in three places (left, centre and right) and record the smallest.
Using a level, place on window sill (bottom and side) and determine if window is level and square.
Measure the opening depth to ensure blades have adequate clearance to rotate freely.
Outside MeasureOS – Outside Measure
Measure total length and width of the area to be covered in three places (same as inside measure).
Depth measurements are especially important to ensure that the blades do not make contact with the window trim or frame.
Note: Build outs or hanging strips may be required for outside mounted shutters to provide adequate blade clearance.

SYSTEMS PTYLTD
www.cwsystems.com.au16
Measuring Information – GeneralTips
Always use a steel measuring tape for your measurements.
Measure each opening separately, even if they appear to be the same size.
Inside Mount: If no frame is required, a Hanging Strip Frame is recommended to reduce all lightgaps. We strongly recommend using a Z or L Frame.
Outside Mount: Recommended for window casings that are not perfectly square. Please use a BZ17Frame or Elegant Z Frame.
Shutter frames must be mounted securely into timber reveals and should be drilled and plugged intobrick openings.
Inside MountShutter is mounted inside the
window opening
Outside MountShutter is mounted outside of the
window opening

SYSTEMS PTYLTD
www.cwsystems.com.au17
Measuring Information – Finished &Opening Window SizeMeasuring by FINISHED SIZE (Outside Mount)
When ordering a shutter with OM dimensions the factory will build the shutter unit (panels and frames) to your exact width and height specifi cations to the outside edge of the frame. No deductions taken off for your sizes.
Window View
Measure in three places
Mea
sure
in th
ree
plac
es
Window View
Measure in three places
Mea
sure
in th
ree
plac
es
Measuring by Window Opening Size reveal fi t or Inside Mount
Measure the window width and the window height in three different places.
Inside Mount: Take the smallest of the three measurements to determine the width and the height.
Outside Mount: Select the largest of the three measurements to determine the fi nal dimensions of the shutter.

SYSTEMS PTYLTD
www.cwsystems.com.au18
SquarenessMeasuring for Window Squareness
To determine the squareness of the window, measure diagonally. If measurements are not equal, consider specifying greater deduction than the one usually taken or recommended. If the two diagonal measurementsvary more than 12 mm (1/2′′) you should consider an inside mount with one of our Z Frames or an outsidemount application.
Direct Mount Squareness
For direct mount, measure diagonally between corners to determine the squareness of the window. If thedifference between the two measurements is larger than 6 mm (1/4′′) then an outside mount is needed unless you are willing to fi ll the gaps with elastomeric sealant such as Selleys “No More Gaps”.
Window View
Measure in three places
Mea
sure
in th
ree
plac
es

SYSTEMS PTYLTD
www.cwsystems.com.au19
Warranty and RepairWarranty and Repair Policy covers the repair or replacement of its Ultra20 shutters for 20 years from the dateof purchase, if found to be defective in materials or workmanship. This warranty is in addition to any other statutory obligations required in the State or Territory of the premises, and supersedes all other warranties,both expressed and implied.
We warrant this product is free from defects within the following Acceptable Standard Guidelines:
If a defect is visible with the naked eye in natural daylight at a distance of 1.5 metres, it is not acceptable.If a defect is not visible with the naked eye in natural daylight at a distance of 1.5 metres, it is acceptable.
What is CW Systems’ Responsibility?
CW Systems guarantees that we will repair or replace at our sole discretion any parts or items deemed to be suffering from a defect. CW Systems, where possible, will repair or replace any product using identical components. If CW Systems designs and/or styles have been altered or upgraded, CW Systems will replace any components suffering from a defect with a part or product of comparable quality and value.
Product Use
The warranty is ex-factory and restricted to supply only. This warranty is only valid for the original purchaser or fi rst end user, and is at the sole discretion of CW Systems Shutters’ management. The warranty excludesany shipping, labour or other associated costs with the installation or removal of shutters and all liability for consequential or incidental damages from any cause whatsoever, and does not include:
Normal wear and tear
Installation or the manner of application or fi xing
Installation damage to the window(s) or premises
Misuse or abuse
Use of the product outside the CW Systems specifi cation guidelines
Use of components not supplied by CW Systems
Any alterations made to the original shutter panels as supplied
Incorrect or insuffi cient care, cleaning and maintenance
Use of silicon-based sprays or abrasive cleaning agents on product
Fire, fl ood or natural disasters; or Acts of God
Defects due to any contamination or pollution due to surface dirt or staining
Any unreasonable or unusual use or a failure to carry out normal maintenance and cleaning
The warranties are not transferable and are only available to the customer to whom the invoice is addressed
NOTE: The warranty only applies when the shutters are installed internally in accordance with the distributor’s instructions and are used for the intended purpose for which the shutters have beenmanufactured.

SYSTEMS PTYLTD
www.cwsystems.com.au20
Claiming Under WarrantyWhen claiming under this Warranty to CW Systems, you must submit a completed Repair Request formp q throughyour original retailer, AND you must substantiate your claim with proofp of the error or defect.f
The customer must submit the form within a period of one calendar month of fi rst detecting the defect.
A photographp g p is worth a thousand words and is the quickest and easiest way of providing proof of your claim. Please ensure you have a photograph of the entire window/shutter and also a r close up/detailedp photograph of the problem, suffi cient to identify the problem. If the problem exists on more than one panel, you must supply a photograph for each shutter panelp g p p .
A Repairp is considered to be any order that relates to a previous order, whether making a warranty claim, re-rordering or just requiring a shutter part or panel for the same job.
The Repair Request formp q will be assessed by CW Systems and if accepted as a defect of material or labour, will be processed and sent on to the factory of manufacture for re-supply.
Your repair cannot be accepted if:
The Repair Request form is not fi lled out correctly or in its entirety, including measurements, detailsof the cause and effect and the original order information.
You are making a claim and have not supplied the relevant photographs.
The job had not been paid for in full in accordance with the purchase order.
The repaired shutters will be supplied to the original retailer for the purchaser’s use.
The Warranty Certifi cate has not been previously submitted within the stated time.

SYSTEMS PTYLTD
www.cwsystems.com.au21
Warranty Certifi cateTo: CW Systems P/L
PO Box 294
PENDLE HILL NSW 2145
This is to certify that the person named on this certifi cate has installed, at the property named on this certifi cate,the CW Systems P/L product known as Ultra20, on the date specifi ed in this certifi cate. The product was coated/not coated as specifi ed on this certifi cate by CW Systems P/L at the time of installation.
Name and address of customer:
............................................................................................................................................................
............................................................................................................................................................
............................................................................................................................................................
Place of installation/property:
............................................................................................................................................................
............................................................................................................................................................
Date of installation:
............................................................................................................................................................
Was the product coated by CW Systems P/L at the time of installation?
Yes .................................................... No ....................................................
Name of installer: ................................................................................................................................................
Signature of installer: ..........................................................................................................................................
Dated: ................................................................................................................................................................

SYSTEMS PTYLTD
www.cwsystems.com.au22
Care and Maintenance of Ultra20Shutters are like any window furnishing, the better maintained, the greater the longevity.
Rotate blades daily.
Bi-Fold and Sliders: remember to close the blades before opening or sliding to prevent damage.
Keep tracks free of dirt and grit weekly. Use a silicon spray lubricant.
If any of the blades come loose, use the tension screw to tighten again (located at the side of the shutter panel).
Do not force shutters to close, gentle operation only.
Do not slam shutters closed as this will cause damage to both the shutter and the framework.
Do not put your hands through the blades to gain access to window openings as this will put a strain on the blades and will not be covered under warranty.
Ultra20 have a glide on the shutter panels. Customers should note that there may be a slight movement in the hinges and joints. This is compensated by the glide and the magnetic catch that stops the panel from sagging and keeps in square within the frame. Therefore when opening and closing, the panels will fl ex when sliding on the glide and should be assisted by slightly lifting the panel against the magnetic stop.
Please note if you need to access the window you must open the panel and not put your hand through the blades as they will be damaged and this damage will not be covered under warranty.
CleaningUltra20 Shutters are easily cleaned without harsh chemicals.
The shutter surfaces will collect a layer of dust over a period of time. Regular cleaning with a damp cloth will remove the dust.
If more thorough cleaning is required, then use mild dishwashing liquid diluted in water and wipe using a soft cloth.
If this is not suffi cient, then use a mild base household cleaner for more diffi cult dirt and stains.
External shutters should be hosed down regularly and washed with a mild soap solution to remove salt and air pollutants.
Caution: NEVER USE silicon-based sprays, chlorine-based cleaners or abrasive cleaners on Ultra20 shuttersas they may affect the surface appearance and durability.