Embed Size (px)
Citation preview

IBM Cognos Planning Contributor Web Client
Version 10.1.0
User Guide

Product InformationThis document applies to IBM Cognos Planning Version 10.1.0 and may also apply to subsequent releases. To check for newer versions of thisdocument, visit the IBM Cognos Information Centers (http://publib.boulder.ibm.com/infocenter/cogic/v1r0m0/index.jsp).
CopyrightLicensed Materials - Property of IBM© Copyright IBM Corp. 1999, 2010.US Government Users Restricted Rights – Use, duplication or disclosure restricted by GSA ADP Schedule Contract with IBM Corp.IBM, the IBM logo, ibm.com, and Cognos are trademarks or registered trademarks of International Business Machines Corp., in many jurisdictionsworldwide. Other product and service names might be trademarks of IBM or other companies. A current list of IBM trademarks is available onthe Web at www.ibm.com/legal/copytrade.shtml.Microsoft, Windows, Windows NT, and the Windows logo are trademarks of Microsoft Corporation in the United States, other countries, or both.Java and all Java-based trademarks and logos are trademarks of Sun Microsystems, Inc. in the United States, other countries, or both.Microsoft product screen shot(s) used with permission from Microsoft.

Table of Contents
Introduction 5
Chapter 1: Getting Started with Contributor Web Client 7Open Contributor 7Workflow 8
The Tree 8The Table 9
Submit Data 9Review Data 9
Chapter 2: Working with Data 11Parts of the Workspace 11
Tabs 11Dimensions 11
Copying and Pasting Data 13Quick Copy Commands 13
Quick Data Entry Commands 14View a Sum Quickly 16Calculated Cells, Breakbacks, and Holds 16Apply a Data Hold 17Adding Commentary 18
Enter Commentary 18View Commentary 20
Update Data 21Validate Data 21Print Data 22
Chapter 3: Importing Data 23Import from a Text File 23Quick Load from Microsoft Excel 23Get Data 23
Creating a Local Link 24Use Local Links with Contributor Add-in for Microsoft Excel 28Run a Local Link 29System Links 29
Chapter 4: Managing Changes to the Grid 31Working with Tabs 31
Try It Yourself - Tear Off a Tab 31Try It Yourself - Maximize a Tab 32
Freezing a Pane 32Hiding Rows and Columns 33Sort Dimensions 33Stacking Dimensions 34
Try It Yourself - Stack a Dimension 34
Licensed Materials – Property of IBM3© Copyright IBM Corp. 1999, 2010.

Replacing Dimensions 35Try It Yourself - Replace Dimensions 35
Chapter 5: Exporting Data 37Quick Export to Microsoft Excel 37Export to a Text File 37Export to Microsoft Excel Wizard 37
Saved Selections 37Reports 38
Chapter 6: Work Offline 39Take Work Offline 39Open the Offline Browser 39Take Work Back Online 40
Chapter 7: Troubleshooting 41Get Data Troubleshooting 41
Cannot Access an Item in the Target Dimension 41Cannot Access a Dimension Item In the Target Cube 41Extra Source Dimension in a Contributor-To-Contributor Load 41Item Removed from the Target Dimension 41An Extra Target Dimension Exists 42Missing Source Dimension in a Contributor-To-Contributor Load 42Additional Source Dimension Exists in a Contributor-To-Contributor Load 42Target Cube is Read-Only 42
Export for Microsoft Excel Troubleshooting 42
Glossary 43
Index 45
4 IBM Cognos Planning Contributor Web Client
Table of Contents
Introduction
Use this document with the IBM® Cognos® Planning Contributor Web Client. This guide describes
how you can use Contributor to see the current state of your plan, and explains how to add and
review data.
IBM® Cognos® Planning provides the ability to plan, budget, and forecast in a collaborative, secure
manner. The major components are Analyst and Contributor.
IBM Cognos Planning Analyst
IBM® Cognos® Planning Analyst is a flexible tool used by financial specialists to define their business
models. These models include the drivers and content required for planning, budgeting, and fore-
casting. The models can then be distributed to managers using the Web-based architecture of IBM
Cognos Planning Contributor.
IBM Cognos Planning Contributor
IBM® Cognos® Planning Contributor streamlines data collection and workflow management. It
eliminates the problems of errors, version control, and timeliness that are characteristic of a planning
system solely based on spreadsheets. Users have the option to submit information simultaneously
through a simple Web or Microsoft® Excel interface. Using an intranet or secure Internet connection,
users review only what they need to review and add data where they are authorized.
For more information about using this product, visit the IBM Cognos Customer Center (www.ibm.
com/software/data/support/cognos_crc.html).
IBM Cognos Innovation Center
The IBM® Cognos® Innovation Center for Performance Management provides a forum and Perfor-
mance Blueprints that you can use to discover new ideas and solutions for finance and performance
management issues. Blueprints are pre-defined data, process, and policy models that incorporate
best practice knowledge from customers and the Cognos Innovation Center. These Blueprints are
free of charge to existing customers or Platinum and Gold partners. For more information about
the Cognos Innovation Center or the Performance Blueprints, visit www.ibm.com/software/data/
cognos/innovation-center/
Audience
To use this guide, you should have an understanding of IBM Cognos Planning Contributor and
IBM Cognos Planning Analyst.
Finding information
To find IBM® Cognos® product documentation on the web, including all translated documentation,
access one of the IBM Cognos Information Centers at http://publib.boulder.ibm.com/infocenter/
cogic/v1r0m0/index.jsp. Updates to Release Notes are published directly to Information Centers.
Licensed Materials – Property of IBM5© Copyright IBM Corp. 1999, 2010.

You can also read PDF versions of the product release notes and installation guides directly from
IBM Cognos product disks.
Accessibility features
To accommodate the largest number of users, we focus our accessibility support on plan contributors.
IBM® Cognos® Planning provides accessible capabilities through the use of the Contributor Add-
in for Microsoft® Excel component. While using Contributor Add-in for Microsoft Excel, plan
users work in an Excel environment and can use the accessibility capabilities of Microsoft Excel.
For details about accessibility in Microsoft Excel, go to the Microsoft Web site and search for
"Voluntary Product Accessibility Template for Excel."
Forward-looking statements
This documentation describes the current functionality of the product. References to items that are
not currently available may be included. No implication of any future availability should be inferred.
Any such references are not a commitment, promise, or legal obligation to deliver any material,
code, or functionality. The development, release, and timing of features or functionality remain at
the sole discretion of IBM.
Samples disclaimer
The Great Outdoors Company, GO Sales, any variation of the Great Outdoors name, and Planning
Sample depict fictitious business operations with sample data used to develop sample applications
for IBM and IBM customers. These fictitious records include sample data for sales transactions,
product distribution, finance, and human resources. Any resemblance to actual names, addresses,
contact numbers, or transaction values is coincidental. Other sample files may contain fictional
data manually or machine generated, factual data compiled from academic or public sources, or
data used with permission of the copyright holder, for use as sample data to develop sample appli-
cations. Product names referenced may be the trademarks of their respective owners. Unauthorized
duplication is prohibited.
6 IBM Cognos Planning Contributor Web Client
Introduction

Chapter 1: Getting Started with Contributor WebClient
IBM® Cognos® Planning Contributor Web Client streamlines data collection and workflow man-
agement. It eliminates problems with errors, version control, and timeliness that characterize
decentralized planning processes. Organizations can easily engage thousands of people in the
planning process, collecting data from managers and staff across divisions and across geographies
as well as from sales, suppliers, and customers worldwide. Many users can work simultaneously
because Contributor is optimized for end-user performance.
You can contribute to plans contained in packages. A package defines a subset of data that is relevant
to an intended group of users. For example, one planning package may be intended for sales managers
to forecast sales in upcoming quarters.
Contributor Sample
IBM Cognos Planning includes sample applications that you can use for testing and training.
Throughout this document you will see the Sales plan from the go_expenses_contributor sample
used to demonstrate Contributor functions. An administrator must set up the go_expenses_contrib-
utor sample for you to use. For more information, see the IBM Cognos Planning Installation and
Configuration Guide.
Open ContributorTo start reviewing or adding data, you must have an intranet or secure Internet connection.
Steps
1. Open a Web browser. Type the Web address supplied by your administrator in the address
bar, typically http://servername/ibmcognos10.
2. Type your user ID and password and click OK.
3. In IBM® Cognos® Connection, in the upper-right corner, click Launch, Contributor. If you
have access to more than one package, click the package that you require.
On the workflow page, you see a graphical overview of all the areas you are responsible for,
and the status of the data.
4. To start using IBM® Cognos® Planning Contributor, in the tree on the left side of the screen,
click an item. The table displays the e.List items for which you are a contributor or reviewer.
To see the details panel for more information about an item, click the blue down arrow.
5. To send email, click the name of the person in the Ownership or Reviewer cells or in the details
panel.
Licensed Materials – Property of IBM7© Copyright IBM Corp. 1999, 2010.

6. To start working, click the e.List item in the table, it opens in a grid where you can view and
enter data.
WorkflowThe Workflow screen displays when you log on. It consists of a tree, a table, and approval hierarchy.
The tree on the left side of the screen shows, in a hierarchical form, the areas that you are responsible
for contributing to (Contributions) and reviewing (Reviews). Depending on your rights, you may
see Contributions, Reviews, or both. When you click an item in the tree, a table with the details
for the item displays on the right side of the screen.
An item in the tree or table is known as an e.List item. Typical examples are Sales Division, Mar-
keting Division, Development Division, and Cost Center. The e.List item names depend on the
design of your application.
The TreeEach item in the tree has an icon that indicates the current state of the data.
State and descriptionIcon
Not started
No changes have been saved to the data, although the contribution may have been
opened for editing.
Work in progress
The data was saved but not submitted. You can change and submit data in this state.
Locked
The data was submitted and the item was locked. Data in this state is read-only. If an
item is rejected, its state returns to work in progress.
Incomplete
At least one item belonging to this item is Not started, and at least one other item is in
a state of Work in progress, Locked, or Ready. Data in this state was aggregated. The
Incomplete state applies only to review items.
Ready
All items belonging to the reviewer are locked. The data is ready to be submitted to the
next level in the hierarchy.
Currently being edited or annotated
The item was opened for editing or annotating. Users end an edit session by closing the
grid or by submitting the item.
8 IBM Cognos Planning Contributor Web Client
Chapter 1: Getting Started with Contributor Web Client
State and descriptionIcon
Out of date
Data must be updated to reflect changes in the application, or system data must be
imported.
Currently being edited or annotated and is out of date
The TableThe table on the right side of the screen gives information such as the workflow state of the item,
the current owner, the reviewer, and when the item last changed.
If a document is attached to an e.List item, an icon appears next to that item.
If IBM® Cognos® Contributor Add-in for Microsoft® Excel is installed and configured, you can
click the Microsoft Excel button to open the e.List item using Contributor Add-in for Microsoft
Excel.
If you are a reviewer, you can reject a submitted item from this screen by clicking the reject button
.
Submit DataYou submit an e.List item to the next reviewer in the planning model hierarchy when you are happy
with the data it contains. After you submit the e.List item, it is locked and you can make no further
changes to the data. The reviewer can either accept or reject the changes you made to the e.List
item.
If you added a value into a cell that has a validation rule defined, and that value is outside the
bounds of the specified validation rule, an explanatory or warning message is shown when you
attempt to submit the plan. You must correct the data before you can submit an e.List item to the
next reviewer.
To submit data, you must have submit rights.
Steps
1. From the Workflow Actions menu, click Submit, or click the Submit icon .
If errors are identified during the validation process, they are summarized in the Validation
Error dialog box. You must fix validation errors before submitting data for review.
2. From the File menu, click Close.
Review DataYou are responsible for reviewing the e.List items that are grouped under Reviews on the workflow
page.
User Guide 9
Chapter 1: Getting Started with Contributor Web Client

When you have appropriate rights to e.List items, you can view them in any state. You can view
more than one e.List item at a time. E.List items open in separate windows. When an e.List item
has been submitted for review, it becomes Locked .
If you are not happy with the contents of an e.List item, and you have appropriate rights, you can
reject it, either from the workflow screen, or from the grid by clicking the Reject button . The
state of a rejected e.List item changes from Locked to Work in progress .
You may be prompted to send an email to the owners of the contribution explaining the changes
that they must make before it can be accepted. You can also annotate the contribution, and if you
have appropriate rights, you can edit the contribution. You must Take Ownership first.
When you have submitted all contribution e.List items in a review, it has a ready state . If you
are happy with all the contents, submit the e.List item .
10 IBM Cognos Planning Contributor Web Client
Chapter 1: Getting Started with Contributor Web Client

Chapter 2: Working with Data
Adding or editing data in the web client allows you to submit information to your datastore. To
modify data, your system administrator must grant you access. Data that you can edit has a white
background. Read-only data has a gray background. If you are not the current owner, the data
opens in a read-only view. To start adding or editing data, click Take Ownership .
You can edit data only if it has a workflow state of Not started or Work in progress . The
icons indicate the workflow state.
Parts of the WorkspaceThe workspace is comprised of the following parts:
● Tabs - a separate tab represents each cube in the application
● Dimension Bar - shows the dimensions that are in the rows, columns, and context
● Dimensions - groups of related data, such as products or dates
● Grid - the area where you add or edit data
● Grab Handles - points where you can grab a dimension or tab to move it within the grid
Dimension Bar Tab Dimension
Grab Handle
Grid
TabsA tab is a collection of dimensions and that represents a cube. Each tab typically contains a specific
dimension that is not common to other tabs. Usually, this dimension defines the function of the
tab. For example, using the go_expenses_contributor sample, the Travel Costs dimension is specific
to the Travel Costs tab. However, tabs also share common dimensions, such as months, budget
versions, and divisions that are often used to filter the grid.
DimensionsDimensions define the grid of the tab, forming the rows, columns, and context. A dimension is a
list of related items that often include calculations. Dimensions can include lists of departments,
products, customers, months, and profit and loss or balance sheet line items.
Licensed Materials – Property of IBM11© Copyright IBM Corp. 1999, 2010.

All dimensions within a tab determine the information shown in the grid. While dimensions in rows
or columns display all of the items in their lists, context dimensions filter the grid to display only
information for the active item.
Row and Column Dimensions
The row and column dimensions are shown on the Dimension Bar. Placing a dimension into a row
or column displays each of its list items as a heading, and a cell is created for every intersecting row
and column. To have any cells in the grid you must have at least one row and one column dimension.
Basic Layout
The basic layout has one row and one column dimension on the dimension bar.
Nested Layout
Nesting dimensions on the rows or columns increases the amount of data visible on the grid, lets
you view more specific information. For example, the following grid has two dimensions nested on
the rows.
Note: Each parent dimension item of a nested row or column contains repeated child dimension
items. Each dimension added to a row or column multiplies the number of rows or columns by the
number of items in the nested dimension.
Context Dimensions
Context dimensions do not appear on the rows or columns but filter the context of the grid. While
row and column dimensions display all of their list items in the grid, context dimensions limit the
12 IBM Cognos Planning Contributor Web Client
Chapter 2: Working with Data

items in the grid by displaying only information related to the active item in the dimension. Multiple
context dimensions may exist, and each context dimension filters the information in the grid
cumulatively. You can change the context of the grid by changing the context dimensions on the
Dimension Bar.
Using rows and columns alone to find specific data may decrease readability. Using context
dimensions alone to view general data may also limit readability. By nesting dimensions and filtering
context you can make data entry and grid navigation easier.
Copying and Pasting DataYou can copy and paste data from one cell into a single cell or into multiple cells. You cannot paste
data from text, date, or D-List formatted item cells into numeric cells. Also, you cannot paste data
from text cells into date cells. For example, if you copy data from a text cell and try to paste it into
a numeric cell, no data appears in the numeric cell.
You can create a URL to a cell or tab by clicking Copy URL from the Edit menu. You can then
paste the URL into an email or other location for users to access.
Tip: You can autosize the rows and columns in the visible range by clicking Autosize Visible Range
from the View menu.
Quick Copy CommandsCopy commands copy a value or operation to the left, right, above, or below rows and columns
on a single tab. Copy commands perform an action on cells of the same type as the one they were
entered in and only apply to the current grid. These commands apply to breakback cells, but do
not apply to nested, hidden, or collapsed dimensions.
You can combine copy and data entry commands, although you should not use them with the Grow
command.
The following table lists the quick copy commands.
ActionDescriptionCommand
Example: 5>Copies right>
Copies the number 5 to the right
Example: inc6>
Increases the row by 6% for each value to the
right
Example: add15<Copies left<
Adds 15 to each value in the row to the left
User Guide 13
Chapter 2: Working with Data

ActionDescriptionCommand
Example: 3|Copies down|
Copies 3 down the column
Example: reset|
Resets the cells down the column to the last
saved value
Example: hold^Copies up^
Holds the cell values up the column
Example: 2>^
Copies 2 to the right and up the column
Used in conjunction with a copy command to
stop copying beyond the cell
Copy stopper:
Quick Data Entry CommandsTyping a data entry command in a cell performs an action on the cell value. Data entry commands
are processed when you press Enter and only apply to the current grid.
These commands are not case sensitive.
You can use commands across two dimensions, but not across pages.
The following table lists the quick data entry commands.
ActionDescriptionCommand
Example: 5KEnters the value in thousands.K
Enters 5,000
Example: 10MEnters the value in millions.M
Enters 10,000,000
Adds a number to the cell value.Add, +
Example: sub8Subtracts a number from the cell value.Subtract, Sub
Subtracts 8 from the cell valueImportant: A minus sign (-) is not per-
mitted for subtract because this indi-
cates a negative number.
14 IBM Cognos Planning Contributor Web Client
Chapter 2: Working with Data

ActionDescriptionCommand
Example: mul3Multiplies the cell value by a number.Multiply, Mul, *
Multiplies the cell value by 3
Example: per5Multiplies the cell value by a number
added as a percentage.
Percent, per, %
Gives 5% of the original cell
value
Increases the cell value by a number added as a percentage.Increase, Inc
Example: decrease6Decreases the cell value by a number
added as a percentage.
Decrease, Dec
Decreases the cell value by 6%
Example: Pow10Takes the cell value to the number
added as an exponent.
Power, Pow
Raises the value to the power of
10
Example: G10LGrows cells by a percentage. Only valid
in time dimensions, where each period
increases either linearly, or as a com-
pound value.
Grow Compound,
Grow Linear, Gro-
Com, GroLin, GC,
GL
Increases the value by 10 percent
of the original value each period.
Important: Insert the numeric value
between the Grow and
Linear/Compound command, such as
Gro10Com, G40L.
Example: Div1.1Divides the cell value by the number
added.
Divide, Div, /
Divides cell value by 1.1
Resets selected cell values to the last saved version.Reset, Res
Makes the cell value a zero.Zero, Zer
Example: Round100Rounds cells to the appropriate level
based on input.
Round, Rou
Rounds all cells to the nearest
100, where 5,475 becomes 5,500
Holds the cell value from breakback calculations.Hold, Hol
Releases held cells.Release, Rel
User Guide 15
Chapter 2: Working with Data

View a Sum QuicklyYou can quickly view the sum of numeric values contained in cells.
You can only view the sum of numeric values. You cannot select cells containing other types of
data, such as text. The cells must all be on the same tab.
Step
● Select the cells that you want to sum.
The sum of the values in those cells appears in the status bar at the bottom of the window.
Calculated Cells, Breakbacks, and HoldsIf you type data into a calculated cell and press Enter, data in other cells that are part of the calcu-
lation are automatically recalculated. If a cell contains calculations, the numbers appear bold.
Typically, totals are split according to the original values contained in the cells that make up the
calculation. For example, if you type an amount into the Total cell for Jan through Dec and press
Enter, the amount is automatically divided over the 12 months. This is called breakback.
When you apply breakback to a row containing a mixture of zeros and values, the zeros remain at
zero, and the remaining cells are allocated in proportion to their original value. If you cut or delete
a value from a cell, that cell is treated as a zero cell and is not updated when you apply breakback.
Calculated cells may have associated business logic or validation rules. If you enter a value in a
calculated cell that is outside the bounds of the rule, a warning message is shown when you attempt
to submit or save the plan. You must correct the data before you can submit an e.List item to the
next reviewer or save the plan to the server.
Note: If you use breakback on calculated cells, the results will be propagated to all cells involved
in the calculation including cells in the current grid and across the model.
TotalDecNovOctSepAugJulJunMayAprMarFebJan
24000200020002000200020002000200020002000200020002000
In the above example, if you change the total to 30,000 and press Enter, each month total changes
to 2,500, as shown below.
TotalDecNovOctSepAugJulJunMayAprMarFebJan
30000250025002500250025002500250025002500250025002500
If you change June to 3,000 and press Enter, and then change the total annual cell to 40,000 and
press Enter, the June total changes to 3,934 and the other months change to 3,279. The month
totals changed proportionally according to the values contained in the cells.
16 IBM Cognos Planning Contributor Web Client
Chapter 2: Working with Data

TotalDecNovOctSepAugJulJunMayAprMarFebJan
40000327932793279327932793279393432793279327932793279
However, if you change the June total to 3,000 without pressing Enter and then change the total
annual cell to 40,000 and press Enter, the June total is held at 3,000, and the other months change
to 3,364.
TotalDecNovOctSepAugJulJunMayAprMarFebJan
40000336433643364336433643364300033643364336433643364
Apply a Data HoldYou can apply a data hold to a cell or range of cells in the grid. When a hold is applied the data
will not change as a result of a breakback or calculations. Cells that are held appear light blue.
Data holds are helpful for investigating different budget scenarios before finalizing the forecast.
Holds control how the data is calculated in a breakback by forcing certain values to remain constant
so you can see what you can change within the plan, and determine the impact of the forecast.
To reset unsaved changes to data and revert to the last saved version, select Reset Data from the
File menu.
Steps
1. Right-click the cell you want to hold and click Hold. The cell appears light blue.
To hold a selection of cells, select multiple continuous or separate cells, right-click any of the
selected cells, and click Hold.
2. To remove a hold on a single cell or group of cells, right-click the held cell and click Release.
To remove all holds, right-click any held cell and click Release All.
Cells are also released if you change context selection or if you change to a different tab.
User Guide 17
Chapter 2: Working with Data

Adding CommentaryUser annotations and attached documents that are linked to a plan are grouped together to form
commentary. You can copy commentary between cubes and applications using administration,
system, and local links. You can only copy commentary using links that contain data.
You can attach many types of files to a cell, tab, or model to help support your planning process.
The administrator in IBM® Cognos® Planning Administrator configures the file types and sizes that
you can attach. The attachments are stored in a Planning Application database.
The following default file types are allowed:
● Microsoft® Word (.doc, .docx)
● Microsoft Excel (.xls, .xlsx, .xlsm, .xlsb)
● Microsoft PowerPoint (.ppt, .pptx)
● ZIP Files (.zip)
● RAR Files (.rar)
● Microsoft Project (.mpp)
● Web Documents (.htm, .html)
● Text Files (.txt)
● PDF Files (.pdf)
● Microsoft Visio (.vsd)
The administrator can add or remove any file types from the defaults provided. Executable files
(.exe) are not included in the default list for security reasons, but can be added by the administrator.
Enter CommentaryYou may want to add notes to your plan. You can do this by commenting on a cell, a tab, or the
whole model while you enter data or after you submit.
Annotation Behaviors
When more than one person is creating an annotation on the same object, ownership and precedence
are the factors that dictate who has the priority to create the annotation.
When bouncing is enabled, an editing data owner can only be bounced by another user taking
ownership.
When bouncing is enabled, an editing user who is not data owner can be bounced by another user
starting an editing session regardless of whether that is to edit data or add an annotation.
The following scenarios explain the behavior that you can expect while adding annotations.
18 IBM Cognos Planning Contributor Web Client
Chapter 2: Working with Data

Scenario 1
If you try to add an annotation while another user is adding an annotating to the object, you will
receive a warning message that another user is creating an annotation and that, if you proceed, they
will not be able to save their changes.
If you proceed and save your changes, when the other user tries to save their changes, they will
receive a message telling them that another user is already editing and that they cannot save.
Scenario 2
Two users have the same grid open, neither have taken ownership and both are adding annotations
to the same object. One user saves their annotation. When the second user tries to save their
annotation, they will see a message that tells them that the annotations on the server are more recent
than what are displayed.
Scenario 3
If you take ownership of an object and another user tries to add an annotation without taking
ownership, they will receive an error message. The message tells them that the object is already
being edited and by whom.
Scenario 4
If you are adding an annotation to a grid that you do not own and took offline and another user
opens the same grid and tries to add an annotation they will receive an error message. The message
tells them that another user has been adding annotations offline and that, if they proceed, the other
user will not be able to save their changes.
Scenario 5
If you are adding an annotation to a grid that you own and took offline and another user opens
the same grid and tries to add an annotation they will not be allowed to add their annotation.
You can add commentary only if you have permissions to edit or review the e.List item. If you only
have view rights to an e.List item, you cannot add commentary.
Important: After you save or submit a session, you cannot edit commentary. But the person who
created the comment can delete it.
Steps
1. Right-click the cell or tab that you want to annotate.
2. Click Add Commentary and type your note.
3. If you wan to attach a document, click the Source file browse button.
4. If you want to add a link, do one of the following:
● To add a link to a web page, in the Commentary - Add dialog box, type a valid URL.
● To add a link to an email address, type the HTML link command as follows:
mailto://email_address
User Guide 19
Chapter 2: Working with Data

Clicking this link opens a new mail message window in your default email application, and
puts the email address in the To: field.
● To add a link to a file, type the HTML link command as in the following example:
file:\\unc_drive_name\docs\expenses.xls
Before you link to a file, ensure that the file is in a shared network location. Also, use the
universal naming convention instead of a fixed drive letter.
5. To view cell or tab commentary, move your pointer over the red triangle in the top right corner
of the cell or, for tabs, over the commentary icon on the tab.
6. If you want to add a comment to the model, click Edit, Add Commentary, Model, type your
note and optionally attach a document.
View CommentaryYou can view all types of model, tab, and cell comments and attached documents in the Commentary
Browser.
Your administrator may have configured your application so that actions you take, such as typing
data, importing files, and copying and pasting data, are recorded as audit annotations. If enabled,
you can view audit annotations for any cells for which you have at least view access.
For example, a conference justification document was added to the number of nights for September.
The reviewer can now see why more nights were requested for this budget.
Steps
1. To view comments and attached documents, click View, Browse Commentary and Documents.
2. If you want to filter the commentary, select User Annotation, Audit, or Attached Document.
20 IBM Cognos Planning Contributor Web Client
Chapter 2: Working with Data

3. If you want to filter the commentary view, select Current page or All pages.
Tip: You can link to the cell with the commentary by selecting an entry in the commentary
browser and clicking the cell location.
Update DataYou may need to update data if you receive a message that the data on the server is more recent
than the displayed data.
You may be unable to save your changes until you have updated the data.
Step
● Click Workflow Actions, and then click Update.
Validate DataData validation ensures that data entered in an IBM® Cognos® Planning Contributor application
is in the right format and conforms to existing business rules. These rules, which the administrator
defines in IBM® Cognos® Planning Administrator, represent a single data entry requirement imposed
on a range of cells in a single cube of a model.
Validation rules range from the basic checks, such as data type (integer or string) and format (dates),
to rules that use sophisticated business logic to verify if submitted data is valid. Validation rules
are also associated with actions that ensure conformance to the required input, output, and target
requirements, and that only valid data is accepted. Actions associated with a specific rule can present
a warning message, prevent you from saving the plan, or prevent you from submitting it to the next
e.List reviewer.
Because business requirements may change, we recommend that you validate your data regularly.
The benefit of validating data on the client is that it allows you to validate input data before
transmitting it to the server.
Steps
1. Click the tab that contains the target cell range for validation.
2. To verify that the data entries or changes conform to existing business rules and data-format
restrictions, from the File menu, click Validate Data or, on the toolbar, click the Validate Data
button .
3. If errors are detected, in the Validation Error dialog box, click the error to view its location in
the grid. The pointer appears in the first offending cell of the first failed rule in the rule set. For
example, the following error occurred because the hotel cost exceeded the allowable limit of
$250 per night.
User Guide 21
Chapter 2: Working with Data
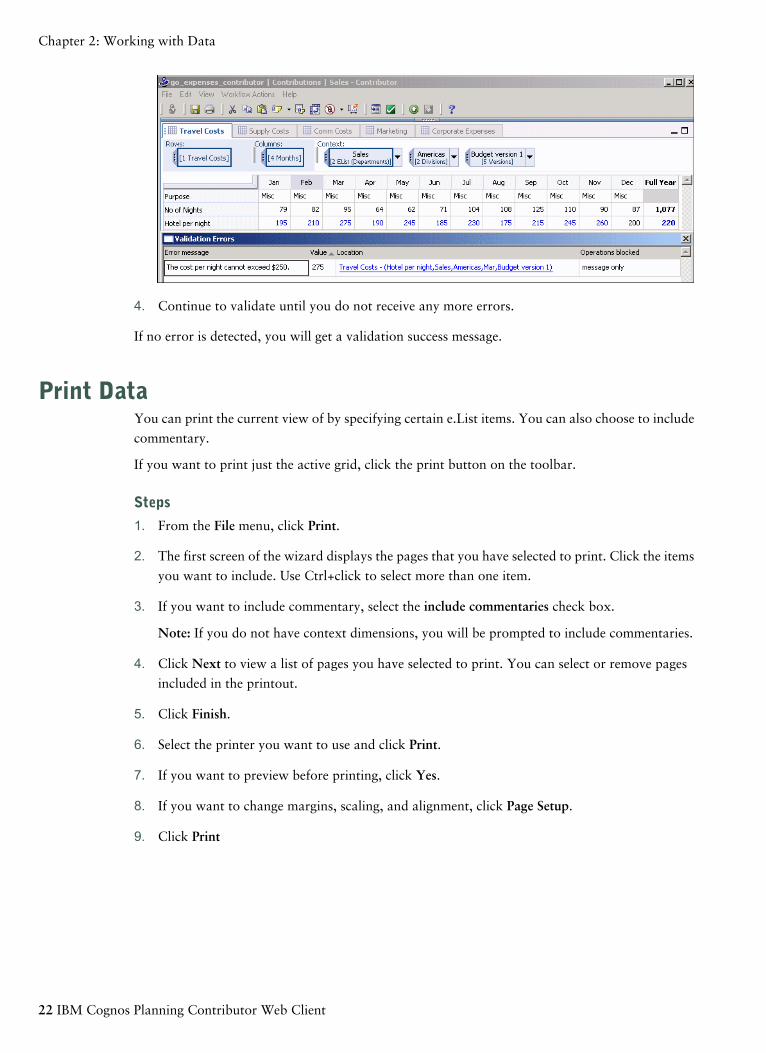
4. Continue to validate until you do not receive any more errors.
If no error is detected, you will get a validation success message.
Print DataYou can print the current view of by specifying certain e.List items. You can also choose to include
commentary.
If you want to print just the active grid, click the print button on the toolbar.
Steps
1. From the File menu, click Print.
2. The first screen of the wizard displays the pages that you have selected to print. Click the items
you want to include. Use Ctrl+click to select more than one item.
3. If you want to include commentary, select the include commentaries check box.
Note: If you do not have context dimensions, you will be prompted to include commentaries.
4. Click Next to view a list of pages you have selected to print. You can select or remove pages
included in the printout.
5. Click Finish.
6. Select the printer you want to use and click Print.
7. If you want to preview before printing, click Yes.
8. If you want to change margins, scaling, and alignment, click Page Setup.
9. Click Print
22 IBM Cognos Planning Contributor Web Client
Chapter 2: Working with Data

Chapter 3: Importing Data
You can import data using local and system links in the IBM® Cognos® Planning Contributor grid
using the Get Data wizard. You can also use quick import for text files.
Local links are created directly in the Get Data wizard. They load data into Contributor from var-
ious sources, including other Contributor tabs.
The Contributor administrator creates System links and deploys them to designated users, groups,
or roles. System links are defined in the IBM Cognos Planning Administrator and web users cannot
edit or share them. System links can use source data from other Contributor applications in the
same Planning environment.
Import from a Text FileYou can load data from a tab delimited text file into IBM® Cognos® Planning Contributor, however
you cannot import aggregated or calculated values.
Step
● Select File, Import, From Text File.
The data in the grid is written over with the imported data.
Tip: You can also right-click in the grid and select Import from Text File from the context menu.
Quick Load from Microsoft ExcelIf you exported data to Microsoft® Excel using Quick Export, see "Quick Export to Microsoft
Excel" (p. 37), you can use quick load to import the data back into the grid. You cannot import
aggregated or calculated values into the grid using quick load.
Steps
1. From the File menu, click Get Data.
2. On the Local Links tab, click Quick Load and select the Microsoft Excel file and worksheet
you would like to import.
Get DataYou can import data into a model from a tab within the same model or from an external file. For
example, you may want to copy one forecast scenario from one tab to another tab as a starting
point for a new analysis.
The import definitions are saved as a local link in the Get Data wizard. You can copy or delete
existing links. You can also view the run history of links.
Licensed Materials – Property of IBM23© Copyright IBM Corp. 1999, 2010.

Link States
The Get Data dialog box, from the File menu, lists all available links (Local or System) and the
status of those links.
Links can exist in two states: Ready or Incomplete.
A Ready status icon appears when the link definition is correctly and completely defined. You
must map at least one source dimension to a target dimension. You can run a link only if it is in a
ready state.
An Incomplete status icon appears when the link definition is not defined correctly or when it
is incomplete. You cannot run a link if the load definition is incomplete. The link definition may
not be complete because
● the source or target tabs are not selected
● columns or rows are not marked as description
● extra source or target dimensions exist
Creating a Local LinkA local link is a mapping between a set of data that you want to either import into your e.List item
from an external source or move data already in the grid to a different location in the open e.List
item. A local link is defined by its source type, target tab, and source and mapping definitions.
You can create link definitions using external data sources or tabs in the active grid. You can
modify and distribute link definitions after creation. You can store link definitions as an XML file.
After you run a link that includes commentary, annotation, or attached documents, the target will
have the same value and commentary as the source. This means that commentary in the target is
removed if there is no commentary in the source. If you target a cell with more than one source
cell, it will contain the aggregated value and the commentary from all the source cells. If you select
only one type of commentary in the link, then the other type of commentary is not affected by
running the link. You will not have multiple copies of commentary in target cells if you rerun the
link.
You can also add previously created XML and .cld link definitions by clicking Add.
From the File menu, select Get Data and click New to create a new local link. You can load data
from the following types of sources:
● Contributor Tab
You create a Contributor-to-Contributor link when you want to move data in the active IBM®
Cognos® Planning Contributor grid. You can move data inside a single tab or from one tab to
another.
● ASCII
You create ASCII links when you want to load data from text files.
● Microsoft® Excel
24 IBM Cognos Planning Contributor Web Client
Chapter 3: Importing Data

You create Microsoft Excel links when you want to load data from a single worksheet in a
Microsoft Excel workbook. You can also use an .xls file that was created using Export for
Microsoft Excel.
Important: When using a Microsoft Excel file as the source, you may get unpredictable results
if you use breakback on an item in Microsoft Excel that is calculated in Contributor. For more
information about breakback, see "Calculated Cells, Breakbacks, and Holds" (p. 16).
With the breakback functionality, cell data takes precedence over the breakback. If you import
a Microsoft Excel file with blank cells, they will be treated as zeros. When you perform a
breakback, you will receive unexpected results.
Defining the Source
When creating a local link using an ASCII or Microsoft® Excel file you must define the source by
renaming the rows and columns and by identifying which rows and columns are dimensions, or
data values, and what should be ignored during the import.
For example, using the go_expenses_contributor sample data, the ASCII file travel.txt is imported
using Get Data. The columns of the tab delimited file are renamed using the target dimensions and
the dimension columns are marked.
Marking Dimensions and Values
The data you are importing must map to dimensions in the target. Mark the rows and columns as
a dimension to map to the target dimension or as a value. You can also select rows and columns
to ignore during the import.
Any row or column not marked as a dimension or value will appear as DATA in the source
dimensions.
Renaming Rows or Columns
When you preview your Microsoft® Excel or ASCII source files, the columns are automatically
renamed to C1, C2, C3 and rows are renamed to R1, R2, R3.
User Guide 25
Chapter 3: Importing Data

You can rename your columns and rows by clicking Rename and typing a custom name or by
selecting a name from the target dimensions. Renaming rows and columns with the same name as
target dimensions helps to identify which source and target dimensions match. You can then use
the Map All feature.
You can also rename your columns by specifying the row that contains the column headers. If the
first row contains the names, start your import from the second row.
Splitting a Column
You can split a column whose information must be mapped to two or more separate target
dimensions. For example, you have a source dimension that lists dates in the format Jan-03, and
two target dimensions, one for month and one for year. You must split the source dimension into
two sub-dimensions to correctly load the data.
Note: You cannot split a dimension already marked as a Description.
Merging Dimensions
You can merge two or more source dimensions to map them to one target dimension. For example,
you want to merge a source dimension for years (03) and a source dimension for months (Jan) into
one dimension (Jan 03) and map it to the target dimension of months and years (Jan 03).
You can undo a split by merging the new dimensions.
Note: You cannot merge two dimensions when either is already marked as Description.
Mapping Dimensions
Mapping creates relationships between one or more source dimensions and a target dimension.
When all source and target dimensions are mapped, the load definition is ready.
When the source and target dimensions do not match, you have to manually map the dimensions.
When the source and target dimensions have the same names, you can automatically map the
dimensions.
Select the source and target dimensions and click Map All to automatically map all dimensions that
have the same name. Select a source and target dimension and click Map to map the dimensions
manually.
26 IBM Cognos Planning Contributor Web Client
Chapter 3: Importing Data

Automatically Mapping Dimensions
You can quickly map your source and target dimensions if the names of each already match. The
Map All button is available only if you have at least one set of matching dimensions.
Manually Mapping Dimensions
If the items in the source and target dimensions do not match, a manual map is required. For
example, you will have to create a manual map if the source item is Jan-08 and the target item is
1-08. If the items in a source or target of the manually mapped load are added, you must manually
update the load.
You can select an item in the source and target dimension and click Add. If there are multiple
matching items, click Match.
User Guide 27
Chapter 3: Importing Data

Filter Dimension Items by Characters
You can filter dimension items that appear in the Dimension Items list based on the first character
or on more than one character in the item name.
Note: This filter only applies to items that appear in the list. It does not affect what gets loaded
into the target.
Step
● In the Map Items dialog box, in the Filter box, enter the character or characters you want to
filter on.
Only the items that begin with the character or character you entered in the filter box appear
in the Dimension Items list.
Tip: To remove the filter, delete the characters in the Filter box .
Filter Dimension Items by Substrings
You can filter dimension items using a substring filter based on the character position. For example,
you can filter items to just the third, fourth, and fifth characters of each item.
When you use a substring, all the items that match the substring are rolled up into one item. For
example, if you have dimension items named Budget 1, Budget 2, and Budget 3 and if you applied
the substring BUD to the first three characters, all three items are rolled into one dimension item
to be loaded into the target dimension.
Unlike filtering by characters, using a substring applies to what is included in the load as well as
what is viewed in the Dimension Items list.
Steps
1. In the Map Items dialog box, click Substring.
The Select substring dialog box displays with the longest item name in the dimension list.
2. Clear the check boxes below the characters that you do not want to appear in the dimension
list.
Tip: Drag the pointer to clear more than one check box at a time.
3. Click OK.
The dimension items are now filtered by the characters in the positions you selected.
Unmapped Dimensions
You must address all source dimensions, either by mapping to a target dimension or by selecting
for inclusion on the Unmapped source dimensions dialog box. Otherwise the load will not be
marked as complete and cannot be executed.
Use Local Links with Contributor Add-in for Microsoft ExcelYou can import local links from or into IBM® Cognos® Planning Contributor Add-in for Microsoft®
Excel or export links into it. Local links that you want to import and export between the Contrib-
28 IBM Cognos Planning Contributor Web Client
Chapter 3: Importing Data

utor Add-in for Microsoft Excel and the Contributor Web Client must be saved as link definition
files (*.cld). You can save the link as XML if you are importing and exporting links using the
Contributor Web Client.
Steps
1. To export a link, in the Get Data Wizard, click Save As.
2. Select a location and name for the link. Select the Link definition files (*.cld) file type.
3. Open the application in the tool in which you want to run the link, in the Get Data Wizard,
click Add, and select the link you want to import.
Run a Local LinkTo load data into a target tab, you must have edit or submit rights for that tab. You cannot load
data into tabs that are read-only.
Steps
1. In the Local Links list, select the local link that you want to run.
Tip: You can control the order in which the local links run by adding them to the Local Linkslist in the desired order.
2. Click Run.
3. Click OK when the link is finished running.
System LinksYou can run system links if the IBM® Cognos® Planning Contributor administrator grants you
access to them. You cannot create a system link.
Steps
1. In the System Links list, select the system link that you want to run.
2. Click Run.
If errors exist, you are prompted to view or ignore them.
User Guide 29
Chapter 3: Importing Data

30 IBM Cognos Planning Contributor Web Client
Chapter 3: Importing Data

Chapter 4: Managing Changes to the Grid
You have the flexibility to arrange the grid and data organization to suit your needs. You can work
with many tabs at one time, or freeze columns or rows for easier scrolling in a particular tab. You
can also modify tab placement, data sorting, and zero suppression. The next time you open any
e.List in the same application, your settings are retained.
Note: If the e.List you are working in changes on the server while you have it open, the cube order
you are using will return to the default, as set by the administrator, after the update is complete.
If you want to revert back to the default grid or tab views, select Reset Tabs only, Reset Grid only,
or Reset both Tabs and Grid from the View menu, Reset Views.
Tip: You can zoom in and out of the grid by clicking Ctrl + = to zoom in and Ctrl + - to zoom out.
Working with TabsYou can move and reorder tabs. If you have more tabs than can be displayed in the window, the
hidden tabs appear in the hidden tab control area. This area is indicated by a chevron , and and
displays the number of hidden tabs. When you click on the chevron you can select a tab to view.
Tip: You can also use Ctrl + Page Up and Ctrl + Page Down to switch between tabs.
If you have multiple tabs torn off that have the same context dimensions, you can only view shared
members of that dimension. Unique members of the context dimensions cannot be shown until the
tabs are returned.
The active tab is blue while the inactive tabs appear gray.
Try It Yourself - Tear Off a TabYou want to see the impact of a planned business trip on the overall corporate expenses.
To accomplish this, you will have to tear off the Corporate Expenses tab, also known as the
reporting cube, to see the Travel Cost and Corporate Expenses tabs together.
To follow this example, you must have the go_expenses_contributor sample installed. For more
information, see "Contributor Sample" (p. 7).
Steps
1. Grab the Corporate Expenses tab and drag it to the bottom of the grid, the curser will change
to multiple folders, keep dragging the tab until you see the drop area highlighted and an arrow
indicating the placement of the tab.
Now the tabs are displayed vertically.
2. Click on the Travel Cost tab to make it active.
3. Add data and press Enter to commit data in the Travel Cost tab. You will see the data updated
in the Corporate Expenses tab.
Licensed Materials – Property of IBM31© Copyright IBM Corp. 1999, 2010.

4. To replace the torn tab, drag the tab to the center of the other tab area. The source tab returns
to the tab area. You can also revert the view by selecting Reset Tabs only from the View menu,
Reset Views.
Try It Yourself - Maximize a TabYou want to maximize a tab that has been torn-off to view the details.
You have the Travel Cost tab torn-off so that you can see the Corporate Expenses tab and the
Travel Cost tab displayed vertically. You want to look at the whole Travel Cost tab without having
to dock the tab back on the tab bar. You also want to easily minimize the tab so that the two tabs
appear vertically again.
To follow this example, you must have the go_expenses_contributor sample installed. For more
information, see "Contributor Sample" (p. 7).
Steps
1. On the Travel Cost tab, double-click on tab name.
The Travel Cost tab will maximize to take up the grid window.
2. To restore the display, double-click the tab name again.
Tip: If you minimize a torn-off tab it will stay in place, you can restore the tab by clicking the
restore button .
Freezing a PaneYou can customize your grid to make it easier for you to view and add data without having to
scroll or navigate through the pane.
32 IBM Cognos Planning Contributor Web Client
Chapter 4: Managing Changes to the Grid

To create a frozen section, select Freeze Panes from the View menu. You can fix cells on a row and
column with vertical and horizontal scrolling. Crosshair lines appear to indicate the fixed area.
To remove the freezing, select Freeze Panes from the View menu, the crosshair lines are removed.
You can also remove freezing by changing any of the following:
● numerical or dimensional sorting
● the order of dimensions
● collapsing or expanding dimensions
● zero suppression
● axis layout
● resetting views
● change context
Hiding Rows and ColumnsYou can hide individual or sequential selections of rows or columns or non-sequential selections.
To select a group of non-sequential rows or columns, click the desired row or column and then
Ctrl+click the additional rows or columns. Right-click the header of any selected row or column,
click Hide Selected. The selected rows no longer appear in the grid.
To show hidden rows and column, right-click on any header and click Show all hidden. You cannot
reveal specific rows or columns. You can also show hidden rows and columns by selecting Reset
Grid only or Reset both Tabs and Grid from the View menu, Reset Views.
Sort DimensionsThe dimension bar shows the order of dimensions on the axes of the grid. To create a logical order
of members in single dimension, you can sort alphabetically ascending or descending by row or
column. You can also change the layout of hierarchical dimensions to view the dimension as a list
or hierarchy. Timescale dimensions cannot be displayed as a hierarchy.
If you have more dimension than can be displayed on the dimension bar, the hidden dimensions
appear in the hidden dimension control area indicated by a chevron , and the number of hidden
dimensions. Click on the chevron to select the dimension you would like to view.
Steps
1. On the grab handle for a dimension in a row or column on the grid, right-click and select Sort
and then Sort Ascending or Sort Descending.
The hierarchical members of the dimension are also sorted. If you are viewing a hierarchical
dimension as a list, all members will be listed alphabetically without hierarchy. To change the
layout of a dimension right-click on the grab handle for the dimension and select Layout and
then select either Hierarchical or List.
User Guide 33
Chapter 4: Managing Changes to the Grid

2. To remove sorting, right-click on the grab handle and select No Sort from the Sort menu.
Stacking DimensionsYou can stack and reorganize dimensions to change how dimensions are displayed. You can reset
all dimensions using Reset Grid only from Reset Views in the View menu. You can drag and drop
dimensions from the dimension bar into other areas of the dimension bar or onto the grid, and
organize them on the rows or columns to create the desired grid layout.
Try It Yourself - Stack a DimensionYou want to see the differences in budget versions for the cost of supplies and compare the budgets
to costs for prior years. You will do this by stacking the versions dimension with the supply cost
dimension on the rows.
To follow this example, you must have the go_expenses_contributor sample installed. For more
information, see "Contributor Sample" (p. 7).
Steps
1. On the Supply Costs tab, click and drag the 5 Versions dimension from the context section of
the dimension bar to the right edge of the row axis. When you see the row axis become outlined
to indicate the drop zone, release the mouse button and the dimension is stacked on the rows.
You can now see each supply type with the forecasts for budget version 1 and 2, and the actuals
for the prior 2 years.
2. You can move dimensions on the rows or columns back to the dimension bar by selecting the
dimension on the grab handle and dragging it onto the bar.
34 IBM Cognos Planning Contributor Web Client
Chapter 4: Managing Changes to the Grid

Replacing DimensionsYou can replace dimensions on an axis by dragging and dropping an alternate dimension on top
of another dimension. For example, you can drag a dimension from the column by clicking the
grab handle of the dimension and moving it on top of a dimension on the row. When you see the
replace drop zone, release the dimension.
Tip: You can swap the rows and columns to view your data differently. For example, if the
months are on the rows, and marketing campaigns on the columns, you can swap the rows and
columns to make it easier to view campaign costs over time.
Try It Yourself - Replace DimensionsYou would like to see the individual types of marketing for each campaign. To do this, you can
swap the Marketing dimension with the Campaigns dimension on the rows.
To follow this example, you must have the go_expenses_contributor sample installed. For more
information, see "Contributor Sample" (p. 7).
Steps
1. On the Marketing tab, select the grab handle of the Campaign 1 dimension from the context.
2. Drag the dimension on top of the 1 Marketing dimension on the rows. When you see the rows
outlined, release the Campaign 1 dimension. The source dimension now replaces the target
dimension in the rows.
User Guide 35
Chapter 4: Managing Changes to the Grid

36 IBM Cognos Planning Contributor Web Client
Chapter 4: Managing Changes to the Grid

Chapter 5: Exporting Data
You can export data to Microsoft® Excel to create reports and charts, and to manipulate data. You
can also export data into a text file.
Quick Export to Microsoft ExcelYou can quickly export the data in the active tab to Microsoft® Excel. To access the quick export,
select Export, then Quick Export from the File menu or right-click in the grid and select Quick
Export from the context menu. Microsoft Excel opens with the data from the current tab, the file
is stored in the temporary directory. You can import this data back into IBM® Cognos® Planning
Contributor using Quick Load in Get Data.
Export to a Text FileYou can export data from the active tab to a text file. To export to a text file, select File, Export,
then To Text File, or right-click in the grid and select Export to Text File from the context menu.
You can import data back into the grid.
Export to Microsoft Excel WizardYou can export data to Microsoft® Excel to take advantage of Microsoft Excel functionality to
manipulate your IBM® Cognos® Planning Contributor data.
Saved SelectionsSelections are sets of data from an application grouped together to create specific reports. These
selections can be made up of data from one or more tabs within your application.
Once selections are created and saved, they are called Saved Selections and are stored on the server.
Choose which selection option you want to use:
● New Selection - creates a new selection of data. You can choose to Include Annotations, Merge
Cells to merge adjacent cells with the same value into a single cell, or Run when Finished to
run the saved selection immediately when the export wizard is complete.
To reduce the number of pages in your report, use the Merge Cells option to stack two or more
dimensions into one axis (row or column). You can stack dimensions to reduce the number of
pages in your report by moving page dimensions to either rows or columns.
● Edit Selection - changes the structure of an existing selection.
● Run Selection - uses a previously saved selection without changing the structure. If the structure
of a previously saved selection has changed significantly (because of a model change), that
selection may not be compatible and would need to be recreated.
Licensed Materials – Property of IBM37© Copyright IBM Corp. 1999, 2010.

ReportsReports are saved selections that have already been run.
You can import a new report, edit an existing report, or delete a report. Deleting a report does not
remove it from the system it was saved on.
Choose which report option you want to use when running the report:
● Prompt to Resolve Layout Issues compares the data from the existing report with the current
data. If there are layout differences such as added or deleted rows, columns, pages, or headers,
you are prompted.
● Ignore Layout Issues ignores any layout issues between the existing report and the newly created
report.
● Generate Layout Issue Report generates a report describing each structural difference between
the model and the report.
● Update Captions updates row, column, and sheet caption strings from the model data.
38 IBM Cognos Planning Contributor Web Client
Chapter 5: Exporting Data

Chapter 6: Work Offline
If you need to work in the Web Client, but you are temporarily unable to connect to a network,
you can work offline if you have sufficient rights. For example, you can view and edit your plan
while travelling.
Working offline should not be the standard working practice because reviewers cannot view the
current data and planners cannot receive updates when new data is imported. Ideally, you should
bring offline data online as soon as possible to keep the data changes visible.
If you take an e.List item offline, you can continue working online on other e.List items.
Take Work OfflineYou can take an e.List offline while you are connected to a network, or if you have already opened
an e.List then you can take it offline when you are not connected to a network. If you take an e.List
offline while you are not connected to a network, it will automatically reconcile when you bring
that item online.
Steps
1. Open the e.List item in the Web Client.
2. If you want to edit or annotate offline and you are not the current editor, click Take Ownership.
3. From the File menu, click Work Offline. This disconnects the server from this session while
leaving the session open. You can now work with the e.List item offline. If you close the
application while the e.List item is offline, and you restart it later, you will be asked if you want
to take it online or continue working offline.
In the offline browser, when you click Save, it saves to the offline store and does not connect
to the server. Any annotations become read-only and data changes color to indicate that it was
saved. Also, attached documents are not available when working offline.
Open the Offline BrowserIf the offline browser is closed, you can open it from the Start menu.
Steps
1. From the Start menu, click Programs, IBM Cognos Planning, and then Contributor Offline.
2. In the Offline Working - Cognos Planning Contributor dialog box, click the name of the
application, then select the e.List item and click OK. You can now edit information offline.
When you bring an e.List item view back online, annotations can be edited.
Licensed Materials – Property of IBM39© Copyright IBM Corp. 1999, 2010.

Take Work Back OnlineChanges made while offline are not saved to the server until you save or submit while online. When
you bring an e.List item view back online, annotations can be edited and you can attached documents
(if available).
If you are working with an e.List offline and then go back online, you do not have to bring it online
in order to work with other e.Lists that are online. But it is recommended that you bring any e.Lists
that you have worked with offline back online as soon as possible to ensure accurate data readings.
Steps
1. In the Web Client, click File, Work Online.
2. Click Yes.
The view you took offline opens with the current offline data. The data color reflects the changes
between the current data and the data stored on the server.
3. To save or submit your changes to the server, do one of the following:
● To save the changes you made while offline to the server, click File, and then click Save.
● To submit the changes you made while offline to the server, click File, and then click Submit.
40 IBM Cognos Planning Contributor Web Client
Chapter 6: Work Offline

Chapter 7: Troubleshooting
This section identifies issues that may require troubleshooting and suggests solutions.
Get Data TroubleshootingYou can use the following solutions to troubleshoot problems you may encounter when using Get
Data. For more information, see "Importing Data" (p. 23).
If you select to log errors during import, a reject file, with the name rejects<time>.txt, is created in
c:\Documents and Settings\<user>\Application Data\CognosRCP\temp\contributor_<release>. This
file is only created when using ASCII and Microsoft® Excel files as the source.
Cannot Access an Item in the Target DimensionIf a source dimension is manually mapped to a targeted dimension and you cannot access an item
in the targeted dimension, it may be because the target item is either deleted from the model or
hidden using access tables.
To correct this problem, map the source dimension item to another target dimension item or remove
the manual map entry. Verify your access to the source and target dimensions.
Cannot Access a Dimension Item In the Target CubeIf an error message indicates that Get Data cannot access a dimension item in the cube, it may be
because the target dimension was removed from the model or hidden using access tables.
To correct this problem, edit the load definition to manage the source dimension as an extra
dimension or map the source dimension to another target dimension. Also, confirm your access to
the target dimension.
Extra Source Dimension in a Contributor-To-Contributor LoadIf an error message indicates that an extra source dimension exists in a Contributor-to-Contributor
load, it may be because the load includes a source dimension item that was deleted from the model
or hidden using access tables.
To correct this problem, edit the load definition to manage the extra source dimension by including
at least one of its items.
Item Removed from the Target DimensionIf an error message indicates that an item was removed from the target dimension, it may be because
an item was deleted from the model or hidden using access tables.
To correct this problem, edit the load definition to manage the extra target dimension by including
at least one of the remaining items.
Licensed Materials – Property of IBM41© Copyright IBM Corp. 1999, 2010.

An Extra Target Dimension ExistsIf an error message indicates that an extra target dimension exists, it may be because a new
dimension was added to the target cube after a load definition was successfully completed. The
load is then considered out of date or incomplete.
To correct this problem, edit the load definition to manage the newly added dimension as an extra
target dimension and include at least one of its items.
Missing Source Dimension in a Contributor-To-Contributor LoadIf an error message indicates that there is a missing source dimension in your Contributor-to-Con-
tributor load, it may be because a source dimension was removed from the model or was hidden
using access tables.
To correct this problem, edit the load definition to manage the target dimension that was mapped
to the source dimension. Map it to another source dimension or treat it as an extra target dimension
and include at least one of its items.
Additional Source Dimension Exists in a Contributor-To-Contributor LoadIf an error message indicates that an additional source dimension exists in your Contributor-to-
Contributor load, it may be because a dimension was added to the source after a load definition
was successfully completed.
To correct this problem, edit the load definition to manage the new source dimension either by
mapping it to an existing target dimension or treating it as an extra source dimension.
Target Cube is Read-OnlyIf an error message indicates that the target cube is read-only, it may be because the user has not
taken ownership yet.
If a reviewer e.List item is open, the user may not have reviewer edit rights, or all cubes are specified
as read-only using access tables.
Export for Microsoft Excel TroubleshootingStructural differences are discrepancies between the existing Microsoft® Excel report and the current
model data within IBM® Cognos® Planning Contributor that will be used to refresh the report. If
the two structures are different, a message will appear notifying you of the difference and ask you
whether you want to resolve the difference.
If you choose
● Yes, a missing item is inserted into the worksheet or an unknown item is removed from the
worksheet.
● No, the difference is maintained in the worksheet.
● Cancel, the refresh operation is aborted.
42 IBM Cognos Planning Contributor Web Client
Chapter 7: Troubleshooting

Glossary
breakback
A function that changes the value of variables to make a formula equal to a specified value.
commentary
In Cognos Planning, any additional information attached to Contributor cells, tabs, or e.List items,
including both user annotations and attached files.
contribution
In Cognos Planning, data that is entered into an e.List in the Contributor application.
cube
A multidimensional representation of data needed for online analytical processing, multidimensional
reporting, or multidimensional planning applications.
current owner
In Contributor, the person who is editing or last opened an e.List item for edit.
dimension
In Cognos Planning, a list of related items such as Profit and Loss items, months, products, customers,
and cost centers, including calculations. The rows, columns, and pages of a cube are created from
dimensions.
In Cognos BI, TM1, and Express, a broad grouping of descriptive data about a major aspect of a
business, such as products, dates, or locations. Each dimension includes different levels of members
in one or more hierarchies and an optional set of calculated members or special categories.
D-link
In Analyst, a link that copies information in and out of cubes, and sometimes to and from text or
ASCII files.
e.List
A hierarchical dimension which typically reflects the structure of the organization (for example,
cost centers and profit centers). The e.List is the basis for the structure of a Contributor application.
hold
In Cognos Planning, a function that protects a cell against breakback.
lock
In IBM Cognos Planning, a function that prevents data being entered into cells whether by typing
or via a D-Link.
Licensed Materials – Property of IBM43© Copyright IBM Corp. 1999, 2010.

offline grid
In Cognos Planning, the application that is used to access a section of an offline Contributor
application. The purpose is to enable users to enter or view data while there is no network connec-
tion.
planner
In Cognos Planning, a person who enters data in the Contributor application in the web client.
Planning Administrator
A tool that enables administrators to publish an Analyst business model to the web, manage access
settings and model distribution, and configure the user's view of the model.
publish
In Cognos BI, to expose all or part of a Framework Manager model or Transformer PowerCube,
through a package, to the Cognos server, so that the data can be used to create reports and other
content.
In Cognos Planning, to copy the data from Contributor or Analyst to a data store, typically so that
the data can be used for reporting purposes.
reviewer
In Cognos Planning, a person who reviews the submissions of reviewers or planners.
44 IBM Cognos Planning Contributor Web Client
Glossary

Index
AAdd command, 14
adding
links to annotations, 18
adding data, 11
calculated cells, 16
copy commands, 13
validating, 21
annotating
cells, 18
data, 18
models, 18
tabs, 18
annotations
adding links, 18
audit, 20
browse, 18
user, 18
viewing, 18
attach documents, 18
attached documents, 18
attaching, 18
attaching a document, 18
audit annotations, 20
Bbasic layout, 12
breakback, 16
definition, 43
browse annotations, 18
Ccalculated cells, 16
entering data, 16
cells
annotating, 18
validating, 21
commentary
definition, 43
contributions, 8
definition, 43
Contributor, 7
workflow screen, 8
copy commands, 13
cubes
definition, 43
current owners
definition, 43
Ddata
annotating, 18
editing, 9
rejecting, 9
reviewing, 9
submitting, 9
submitting for review, 9
validating, 21
viewing, 11
data entry commands, 14, 18
data integrity
enforcing, 21
Decrease command, 14
dimensions
definition, 43
sort, 33
Divide command, 14
D-Links
definition, 43
Ee.List items, 8
rejecting, 9
reviewing, 9
e.Lists
definition, 43
editing
data, 9
entering data
data entry commands, 14
Licensed Materials – Property of IBM45© Copyright IBM Corp. 1999, 2010.

export links, 28
GGrow commands, 14
Hhold
definition, 43
holds, 16
IIBM Cognos Planning Contributor, 7
workflow screen, 8
IBM Cognos Planning Contributor Add-in for Microsoft
Excel, 28
import links, 28
incomplete, 8
Increase command, 14
KK command, 14
Llayout
basic, 12
layouts
nested, 12
links
adding to annotations, 18
local links
import and export, 28
lock
definition, 43
locked, 8
log on, 7
MM command, 14
models
annotating, 18
modifying views, 11
multi-e.List item views, 8
Multiply command, 14
Nnested layout, 12
not started, 8
Ooffline grids
definition, 43
offline working, 39
online working, 40
PPercent command, 14
planners
definition, 44
Planning Administrator
definition, 44
Power command, 14
publishing
definition, 44
Qquick commands
copy commands, 13
data entry commands, 14
Rready, 8
refresh, 37
reject, 8
rejecting
data, 9
e.List items, 9
Reset command, 14
reviewers
definition, 44
reviewing e.List items, 9
editing, 9
rejecting, 9
Ssorting dimensions, 33
submitting
data, 9
data for review, 9
Subtract command, 14
sums
viewing, 16
46 IBM Cognos Planning Contributor Web Client
Index

Ttable
workflow screen, 8
tabs
annotating, 18
take ownership, 11
tree
workflow screen, 8
Troubleshooting
additional source dimension exists in a Contributor-
To-Contributor load, 42
an extra target dimension exists, 42
cannot access a dimension item in the target cube, 41
cannot access an item in the target dimension, 41
extra source dimension in a Contributor-To-Contrib-
utor load, 41
item removed from the target dimension, 41
missing source dimension in a Contributor-To-
Contributor load, 42
target cube is read-only, 42
UUpdate command, 21
users
annotations, 18
VValidate Data command, 21
validation of data, 21
viewing
annotation links, 18
annotations, 18
data, 11
sums, 16
viewing data
modifying views, 11
views
modifying, 11
Wworkflow screen, 8
Contributions, 8
e.List items, 8
multi-e.List item views, 8
reviews, 8
table, 8
tree, 8
working
offline, 39
online, 40
work in progress, 8
ZZero command, 14
User Guide 47
Index