Embed Size (px)
Citation preview

Produced by © Flinders University – Centre for Educational ICT
PivotTables Excel 2010

Flinders University – Centre for Educational ICT Updated 13/07/2010
CONTENTS Layout ................................................................................................................................................................ 1 The Ribbon Bar .................................................................................................................................................. 2
Minimising the Ribbon Bar ............................................................................................................................. 2 The File Tab ....................................................................................................................................................... 3
What the Commands and Buttons do ............................................................................................................ 3 The Quick Access Toolbar................................................................................................................................. 4
Customising the Quick Access Toolbar ......................................................................................................... 4 PivotTables: Analysing data interactively .......................................................................................................... 6 PivotTable Ribbon Bar ....................................................................................................................................... 6 PivotTable layout ............................................................................................................................................... 7 Creating a PivotTable from an Excel list ............................................................................................................ 8
Adding fields to the PivotTable ...................................................................................................................... 8 Changing the Field settings ........................................................................................................................... 8
Controlling what appears in a PivotTable .......................................................................................................... 9 Filtering a PivotTable ..................................................................................................................................... 9 Display or hide data (detail) ........................................................................................................................... 9 Display or hide items ...................................................................................................................................... 9 Using Value filter ............................................................................................................................................ 9 Preventing access to PivotTable detail ........................................................................................................ 10
Totals ............................................................................................................................................................... 10 Grouping data .................................................................................................................................................. 10
Group numeric items .................................................................................................................................... 10 Group dates or times .................................................................................................................................... 10 Group selected items ................................................................................................................................... 10
Changing the data source to include additional fields ..................................................................................... 11 Creating a chart from a PivotTable .................................................................................................................. 12 Names in PivotTables ...................................................................................................................................... 12
Renaming a PivotTable field or item ............................................................................................................ 12

Flinders University – Centre for Educational ICT 1
LAYOUT Once you know your way around Excel you’ll find it much easier to use. Excel is made up of a number of different elements. Some of these elements, like the File Tab, Ribbon Bar and Quick Access tab may not be familiar to you if you have used another version of Office. If not, don’t worry, they soon will be.
1. The File Tab is used to access file management functions such as saving, opening, closing, printing, etc. Options is also available here so that you can set your working preferences for the application (this replaces Tools > Options in 2003).
2. The Ribbon bar is the tabbed band that appears across the top of the window. It is the control centre of all office 2010 applications. Instead of menus, you can now use the tabs on the Ribbon to access commands which have been categorised into groups. The commands include galleries of formatting options that you can select from, such as the Styles gallery shown here.
3. The Quick Access Bar also known as the QAT is a small toolbar that appears at the top left-hand corner of the window. It is designed to provide access to the tools you use most frequently and includes by default the Save, Undo and Redo buttons. You can add buttons to the Quick Access Toolbar to make finding your favourite commands easier.
4. The Status Bar appears across the bottom of the window and displays application information, eg. sheets, cell count, auto sum amount, and so on. It can also be customised to have more functions showing by right-clicking on the bar and choosing the options. The View buttons and the Zoom Slider are used to change the view or to increase/decrease the zoom ratio for your document.
1
2
3
4

Flinders University – Centre for Educational ICT 2
THE RIBBON BAR The Ribbon is the new command centre for Office. It provides a series of commands organised into groups and placed on relevant tabs. Tabs are activated by clicking on their name to display the command groups. Commands are activated by clicking on a button, tool or gallery option. The Ribbon is intended to make document design more intuitive.
Minimising the Ribbon Bar The wide band and use of icons makes it very quick and easy to find and apply commands and settings. However, if you are working on a large document with lots of text, it may suit you to hide the ribbon, either temporarily or permanently, while you are working. To hide the Ribbon bar click on a tab then double click the same tab. This will hide the bar. To access it just single click on a tab then select your function. The bar will then disappear again. To reactivate it, double click on one of the tabs again. Or click on the arrow on the right to open and close the ribbon bar.
Flinders University – Centre for Educational ICT 3
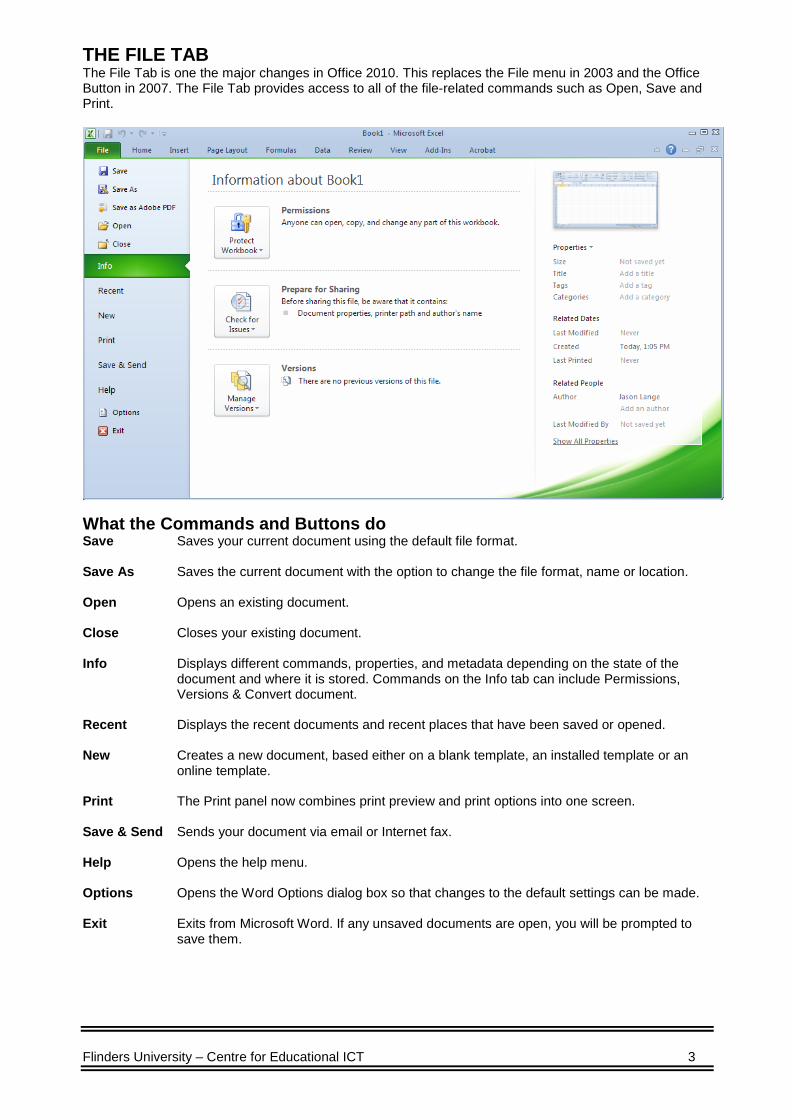
THE FILE TAB The File Tab is one the major changes in Office 2010. This replaces the File menu in 2003 and the Office Button in 2007. The File Tab provides access to all of the file-related commands such as Open, Save and Print.
What the Commands and Buttons do Save Saves your current document using the default file format. Save As Saves the current document with the option to change the file format, name or location. Open Opens an existing document. Close Closes your existing document. Info Displays different commands, properties, and metadata depending on the state of the
document and where it is stored. Commands on the Info tab can include Permissions, Versions & Convert document.
Recent Displays the recent documents and recent places that have been saved or opened. New Creates a new document, based either on a blank template, an installed template or an
online template. Print The Print panel now combines print preview and print options into one screen. Save & Send Sends your document via email or Internet fax. Help Opens the help menu. Options Opens the Word Options dialog box so that changes to the default settings can be made. Exit Exits from Microsoft Word. If any unsaved documents are open, you will be prompted to
save them.
Flinders University – Centre for Educational ICT 4
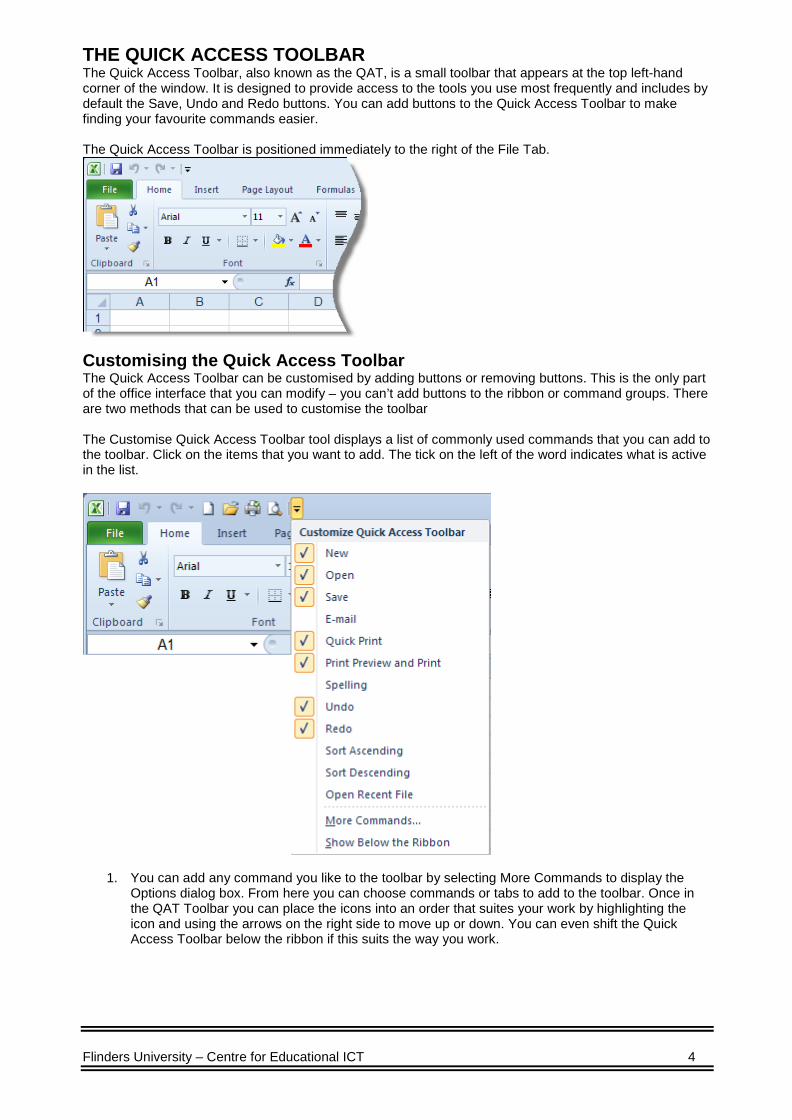
THE QUICK ACCESS TOOLBAR The Quick Access Toolbar, also known as the QAT, is a small toolbar that appears at the top left-hand corner of the window. It is designed to provide access to the tools you use most frequently and includes by default the Save, Undo and Redo buttons. You can add buttons to the Quick Access Toolbar to make finding your favourite commands easier. The Quick Access Toolbar is positioned immediately to the right of the File Tab.
Customising the Quick Access Toolbar The Quick Access Toolbar can be customised by adding buttons or removing buttons. This is the only part of the office interface that you can modify – you can’t add buttons to the ribbon or command groups. There are two methods that can be used to customise the toolbar The Customise Quick Access Toolbar tool displays a list of commonly used commands that you can add to the toolbar. Click on the items that you want to add. The tick on the left of the word indicates what is active in the list.
1. You can add any command you like to the toolbar by selecting More Commands to display the Options dialog box. From here you can choose commands or tabs to add to the toolbar. Once in the QAT Toolbar you can place the icons into an order that suites your work by highlighting the icon and using the arrows on the right side to move up or down. You can even shift the Quick Access Toolbar below the ribbon if this suits the way you work.

Flinders University – Centre for Educational ICT 5
2. By right clicking on a function (eg Autosum) you can add it to the Quick access bar.

Flinders University – Centre for Educational ICT 6
PIVOTTABLES: ANALYSING DATA INTERACTIVELY A PivotTable is an interactive table that quickly summarises large amounts of data. A PivotTable contains fields, each of which summarises multiple rows of information from the source data. It summarises data by using a summary function that you specify, such as Sum, Average, or Count. You can include subtotals and grand totals automatically, or use your own formulas by adding calculated fields and items. You can view your data in different ways. For example, you can view the names of cars either down rows or across columns. You can swap or move its rows and columns by dragging a field button to another part of the PivotTable to see different summaries of the source data. You can also display the details of areas in which you are interested, or filter the data by displaying different pages. You can create a PivotTable from an Excel list or database, an external database, multiple Excel worksheets, or another PivotTable. From this snippet of an Excel list
To this sorted list with built in filter to more define the list.
PIVOTTABLE RIBBON BAR

Flinders University – Centre for Educational ICT 7
PIVOTTABLE LAYOUT
1. PivotTable Field List – this section in the top right displays the fields in your spreadsheet. You may check a field or drag it to a quadrant in the lower portion.
2. The lower right quadrants - this area defines “where” and “how” the data shows on your pivot table. You can have a field show in either a column or row. You may also indicate if the information should be counted, summed, averaged, filtered and so on.
3. The area to the left is the result of your selections from (1) and (2). • Report Filter is a field that restricts what is shown in the body of the pivot table. In the
example, Department is filtered to only show the Sales department. • Row Labels are fields that are assigned a row orientation in a PivotTable. In the example, Car
Make and Car Model are row fields. • Column Labels is a field assigned a column orientation in a PivotTable. In the example,
Gender is a column field with two items, F and M. These allow more information to be show based on the Row labels
• Values is a field that contains data. In the example, Count of Car Model is a data field that summarises the entries from the Car Model column in the source data. A data field usually summarises numeric data, such as statistics or sales amounts, but the underlying data can also be text. By default, text data are summarised in a PivotTable with the Count summary function, and numeric data are summarised with Sum.
• Data area is the part of a PivotTable that contains summary data. The cells of the data area show summarised data for the items in the row and column fields. Values in each cell of the data area represent a summary of data from the source records or rows. In the example, the value in cell B8 is a summary of how many Holden cars are driven by Females.
1
2
3

Flinders University – Centre for Educational ICT 8
CREATING A PIVOTTABLE FROM AN EXCEL LIST 1. Open your Excel database with the information you want to make into a
PivotTable and click a cell in the data. 2. Select the Insert tab and click PivotTable 3. The Create PivotTable window will open.
• Select a Table or Range: this will automatically select the data. If it doesn’t select correctly enter in the sheet and area the data is.
• Select New Worksheet 4. Click OK 5. A new sheet will be created with the PivotTable
shell and PivotTable List pane. In the List pane all the column headings from your data will be automatically added.
6. To start building your PivotTable you need to drag fields into the required List fields.
Adding fields to the PivotTable 1. Move the mouse pointer onto a field in the top of the Field pane. The
pointer will change to 4 arrows. Click and hold then drag the field button to one of the 4 areas in the bottom of the Field pane.
2. Repeat to all required fields to get the PivotTable layout you require. 3. To change the order of fields in the different areas, click on the field and drag it up or down. 4. To remove a field from a PivotTable, drag the field button out of the bottom area into the top area.
Note: In some instances, you cannot drag certain fields.
Changing the Field settings 1. Click on a data field label in the Field pane 2. Select Field Settings... 3. Choose the required function from the
Subtotals & Filters tab, then click OK

Flinders University – Centre for Educational ICT 9
CONTROLLING WHAT APPEARS IN A PIVOTTABLE
Filtering a PivotTable Unless you specify otherwise all of the data in a list will be analysed when you create or modify a PivotTable. You can make your PivotTable work only with specific data by applying a filter to the PivotTable. This can be done by dragging an additional variable (field) to the Report Filter area in the PivotTable pane.
1. Drag the filter field to the Report Filter area 2. Click on the filter drop arrow in the PivotTable 3. Click on the filter criteria and click on OK
To clear the filter 1. Click on the filter button at the right of the filter field in
the PivotTable 2. Click on All, then OK
Note: There are also filter drop arrows for Column Labels and Row Labels.
Display or hide data (detail) 1. Select the outer item for which you want to show or hide inner row or column detail 2. On the PivotTable – Option ribbon bar, click Show Detail or Hide Detail
or click the + or – sign next to the row.
Display or hide items 1. Select the field for which you want to hide or show items 2. Click the drop-down arrow at the right of the field button 3. Deselect the items you want to hide, or select items you want to show,
and choose OK Note: When you hide or show an item, Excel automatically adjusts totals and subtotals in the PivotTable. When you hide the data in the PivotTable, the source data are not affected.
Using Value filter 1. Select the row or column field for which you want filter and click on the
drop-down arrow at the right of the field. 2. Select Value Filters and then choose the type of
filter you want. 3. Enter in the criteria and click OK
Note: When you refresh the PivotTable, change its layout, or display a different page field item, Excel recalculates and displays the appropriate filter order.

Flinders University – Centre for Educational ICT 10
Preventing access to PivotTable detail When you double-click a cell in the data area of a PivotTable, Excel displays a list of the source data summarised by that cell. You can use this procedure if you need to turn off access to this source detail.
1. Right Click on the PivotTable 2. Select PivotTable Options 3. In the Data tab, clear the Enable show details
check box 4. Click OK
TOTALS Using totals and subtotals in a PivotTable You can include grand totals for data in PivotTable rows and columns; and these are calculated using the same default summary function as the data fields you are totalling. Excel automatically displays subtotals for the outermost row or column field when you create two or more row or column fields in a PivotTable. You can add or remove inner row or column field subtotals if you need them. You can specify the summary function to use for subtotals.
Adding or removing subtotals in a PivotTable 1. Click in the PivotTable to activate the PivotTable Tools ribbon bar. 2. Select the Design tab. 3. Click the Subtotals icon and select the way you want to display the totals
or remove them.
Showing or hiding grand totals in a PivotTable 1. Click the PivotTable Tools ribbon bar. 2. Select the Design tab. 3. Click the grand Totals icon and select the way you want to display the totals or
turn them off.
GROUPING DATA Note: To group in a PivotChart report, work in the associated PivotTable report.
Group numeric items 1. Right-click the field with the numeric items, and select Group 2. The data range will be placed in the Starting at: box and the Ending at: box automatically. You can
change these manually if you want. 3. Type the number of items that you want in each group in the By box
Group dates or times 4. Right-click the field with the dates or times, and select Group 5. The data range will be placed in the Starting at: box and the Ending at:
box automatically. You can change these manually if you want. 6. In the By box, click one or more time periods for the groups
• To group items by weeks, click Days (make sure Days is the only one selected) and then select 7 in the Number of days box; you can then click additional time periods to group by if you want
Group selected items 1. Select the items to group, either by clicking and dragging, OR by holding down Ctrl or Shift while
you click

Flinders University – Centre for Educational ICT 11
2. Right-click the selected items, and select Group. It will now be called Group 1. Repeat for other groupings.
Note: For fields organized in levels, you can only group items that all have the same next-level item. For example, if the field has levels Country and City, you can't group cities from different countries.
Ungroup items 1. Right-click the group, and select Un-Group
Notes: Grouping numeric items, dates, and times is unavailable for some types of source data. When you group or ungroup items in a PivotChart report or its associated PivotTable report, some chart formatting may be lost.
CHANGING THE DATA SOURCE TO INCLUDE ADDITIONAL FIELDS 1. Click a cell in the PivotTable 2. Go to PivotTable Tools – Options and click on Change Data Source 3. Select the new source data range that includes additional/fewer rows or
columns 4. Click OK 5. When you change the data range and you want to
incorporate the changed information into the active PivotTable, click Refresh on the PivotTable tools – Option bar.
6. You can also use the Refresh Data command to update a PivotTable that is based on external data with new data that meet the criterion or criteria in the underlying query. If the PivotTable is based on external data, review the query in Microsoft Query to make sure it is retrieving the data you want (see below).

Flinders University – Centre for Educational ICT 12
CREATING A CHART FROM A PIVOTTABLE 1. Click the PivotTable report.
This displays the PivotTable Tools, adding the Options and Design tab. 2. On the Options tab, in the Tools group, click PivotChart. 3. In the Insert Chart dialog box, click the chart type and chart subtype that you want.
You can use any chart type except an xy (scatter), bubble, or stock chart. 4. Click OK.
The PivotChart report that appears has PivotChart report filters that you can use to change the data that is displayed in the chart.
Notes: A chart created from a PivotTable changes when you hide items, show details, or rearrange fields in the source PivotTable. If your PivotTable has page fields, the chart changes when you display different pages. When you display each item in the list for the page field, Excel updates the chart to display the current data. Advanced tip: If the underlying PivotTable is based on external data and you use Microsoft Query to add or delete fields from the external data, make sure that you also refresh the PivotTable; otherwise, Excel does not update the chart.
NAMES IN PIVOTTABLES
Renaming a PivotTable field or item 1. Select the field or item you want to rename 2. Type a new name and press Enter OR edit the name in the Formula bar and Enter it
Notes: When you change PivotTable field and item names, the source data are not affected. If you rename a numeric item, the item is formatted as text. Even if you restore to the original name for the item, it remains formatted as text and does not sort or group as a numeric item. To restore number formatting, select the item, and then click Field Settings on the PivotTable toolbar. Choose Number..., and then select a number format in the Category: box.