Embed Size (px)
Citation preview

Pivot Frame Mounting Instructions
Description QTYA. Pivot Frame 1B. Upper Catch Bracket 1C. Lower Catch Bracket 1D. Wall Anchors 12E. Screws, Mounting 12F. Spring Clips* *G. Wall Template 1H. Bracket Template 1I. Spirit Level 1J. Blue Tape 1 Instruction Sheet 1
What Is In The Box
A
B
C
E
G
D J
F
I
H* Some Pivot Frames include
Extra Spring Clips for Mat
if spring clips are lost or
to flatten mat in frame.

Pivot Frame Mounting Instructions
Description A. Drill B. 7/32” Drill Bit C. Pencil D. Phillips Screwdriver
Required Tools
Snap Spirit Level (I) into holes
on Wall Template (G).
Use these holes to mount frame with
hinges across top so frame opens by
lifting.Use these holes to mount frame with
hinges vertical so frame opens like a
book.
A
B
C
D
1
1
1

Pivot Frame Mounting Instructions
Once Wall Template is level and at the desired
heightUse Blue Tape to secure template to wall.
Use plenty of Blue Tape. Secure Wall Template
all along its outside edges.
Verify Wall Template is level and at the desired
height
Place Wall template against wall at desired height.
and orientation.
Adjust Wall Template level by raising/lowering
one end of template until bubble in Spirit Level
is centered between two lines on capsule.
2
2
3
Pivot Frame Mounting Instructions
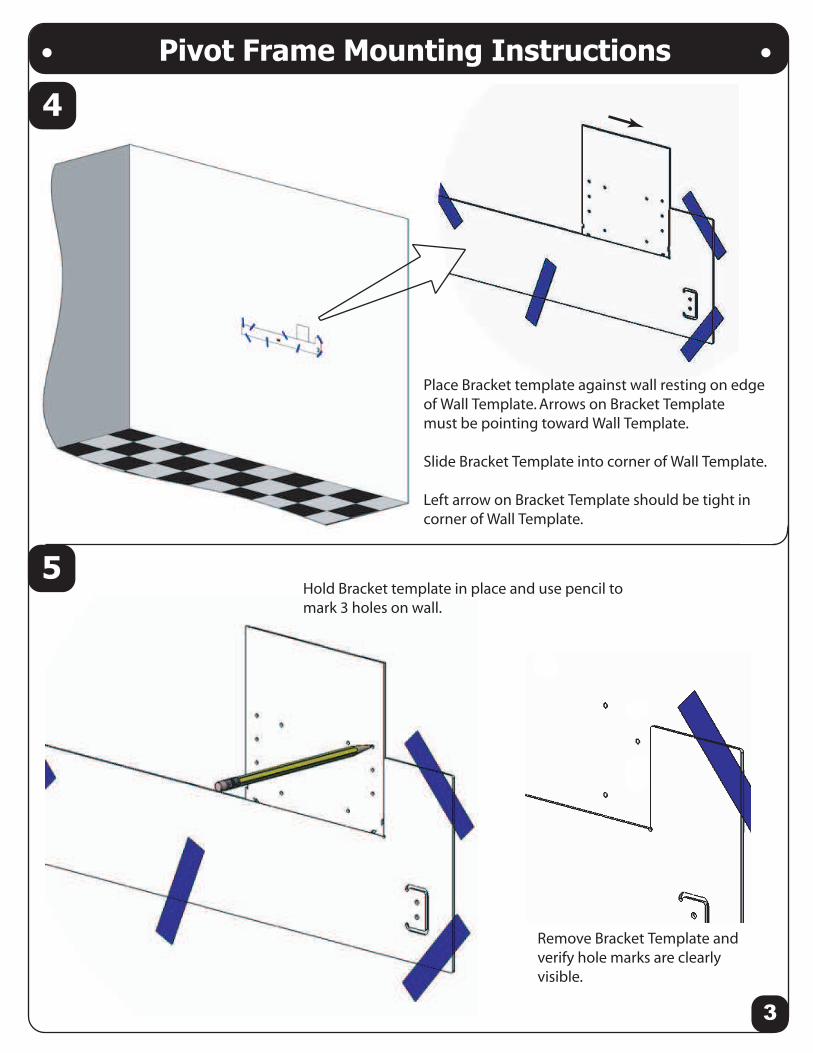
Place Bracket template against wall resting on edge
of Wall Template. Arrows on Bracket Template
must be pointing toward Wall Template.
Slide Bracket Template into corner of Wall Template.
Left arrow on Bracket Template should be tight in
corner of Wall Template.
3
4
Hold Bracket template in place and use pencil to
mark 3 holes on wall.
Remove Bracket Template and
verify hole marks are clearly
visible.
5

Pivot Frame Mounting Instructions
4
6
Insert one Wall Anchor into each drilled hole.
Use drill with 7/32” diameter drill bit to create
holes centered at each mark. Drill through wall
to allow placement of wall anchors.
Take Lower Catch Bracket and align
to drilled holes.
Make sure there are no wires, pipes or other
obstructions inside walls at drilling locations.!
7
Pivot Frame Mounting Instructions
5
8
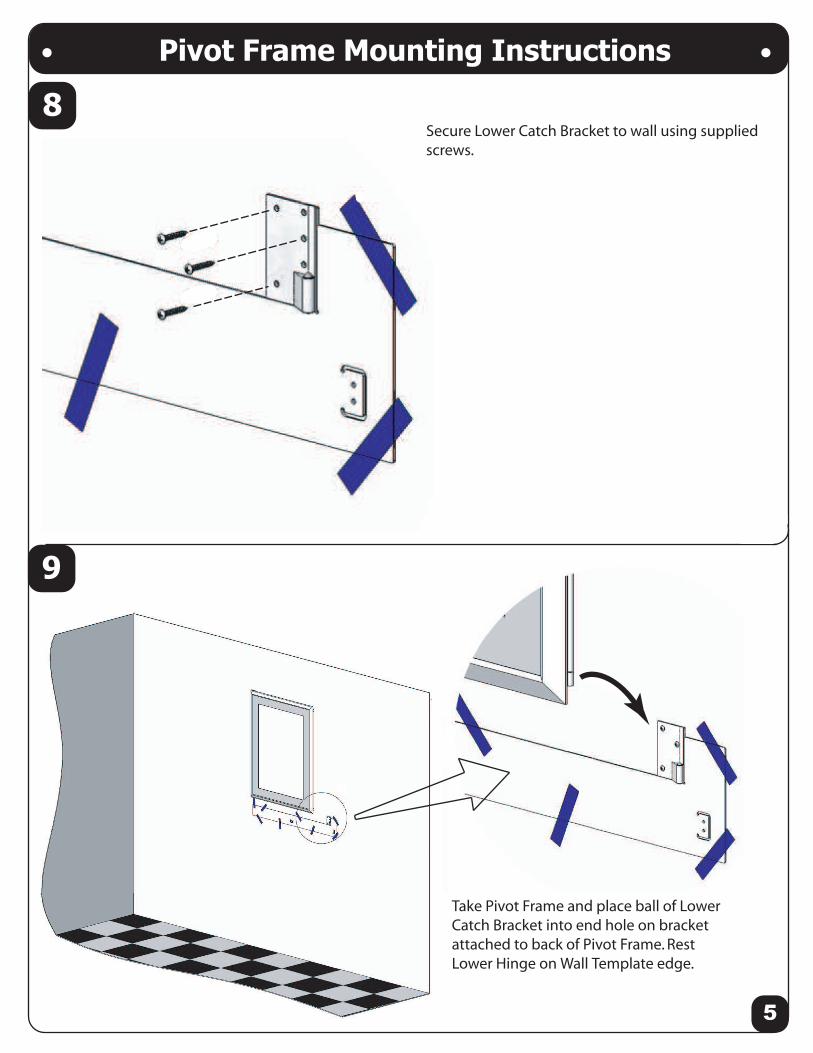
Take Pivot Frame and place ball of Lower
Catch Bracket into end hole on bracket
attached to back of Pivot Frame. Rest
Lower Hinge on Wall Template edge.
Secure Lower Catch Bracket to wall using supplied
screws.
9

Pivot Frame Mounting Instructions
6
10
Hinge rests on Wall Template as shown.
Rest Frame on ball of Lower Catch Bracket..
With ball of catch in place, use pencil to draw a line
against lower hinge edge.
Keep Frame in place for next step.
11
Pivot Frame Mounting Instructions
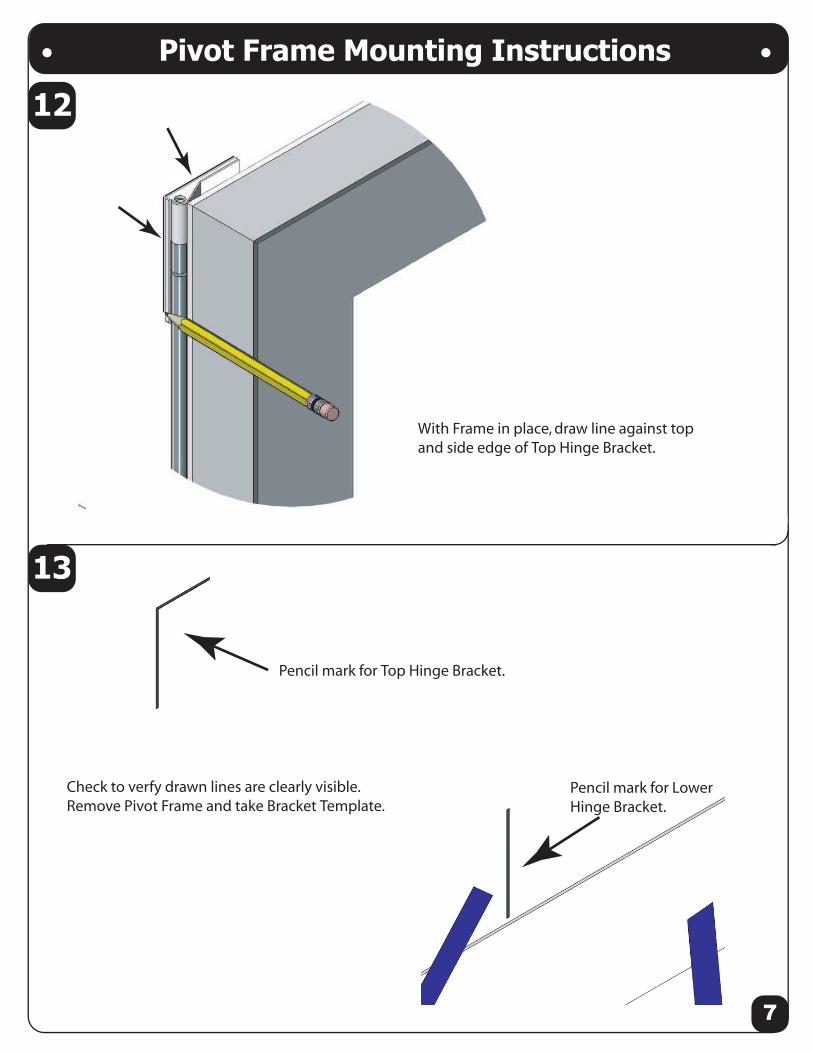
13
7
12
Pencil mark for Top Hinge Bracket.
With Frame in place, draw line against top
and side edge of Top Hinge Bracket.
Check to verfy drawn lines are clearly visible.
Remove Pivot Frame and take Bracket Template.Pencil mark for Lower
Hinge Bracket.

Arrow pointing down
Pivot Frame Mounting Instructions
15
8
14 Place Bracket Template on Wall Template.
Arrows must be pointing toward Wall
Template.
Hold Bracket Template in place and mark 3 holes
for drilling.
Slide Bracket Template to align right edge
of Bracket Template to drawn line.
Arrow pointing UP
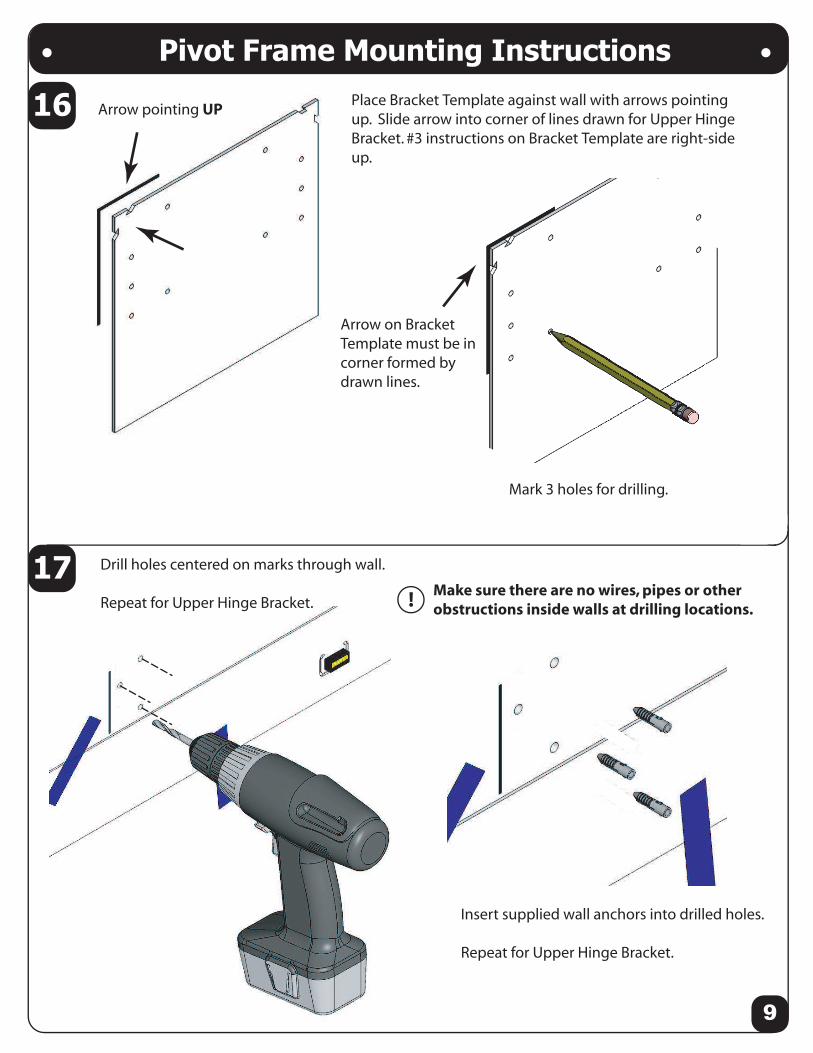
Pivot Frame Mounting Instructions
17
9
16 Place Bracket Template against wall with arrows pointing
up. Slide arrow into corner of lines drawn for Upper Hinge
Bracket. #3 instructions on Bracket Template are right-side
up.
Make sure there are no wires, pipes or other
obstructions inside walls at drilling locations.!
Arrow on Bracket
Template must be in
corner formed by
drawn lines.
Mark 3 holes for drilling.
Drill holes centered on marks through wall.
Repeat for Upper Hinge Bracket.
Insert supplied wall anchors into drilled holes.
Repeat for Upper Hinge Bracket.

Pivot Frame Mounting Instructions
10
18 Place Pivot Frame against wall and align holes in hinge brackets
to wall anchors.
Using supplied screws, secure Upper and Lower Hinge
Brackets to wall.

Pivot Frame Mounting Instructions
20
11
19Swing Pivot Frame closed against wall. Lower Catch should snap
in place.
Use pencil to draw line against Upper Catch Bracket
along top and side edges.
Place Upper Catch Bracket against wall and slide
behind Pivot Frame. Push down lightly to press ball
into catch on back of Pivot Frame. Hold bracket in
place.
Verify lines drawn are clearly visible. Open Pivot
Frame and remove Upper Catch Bracket.
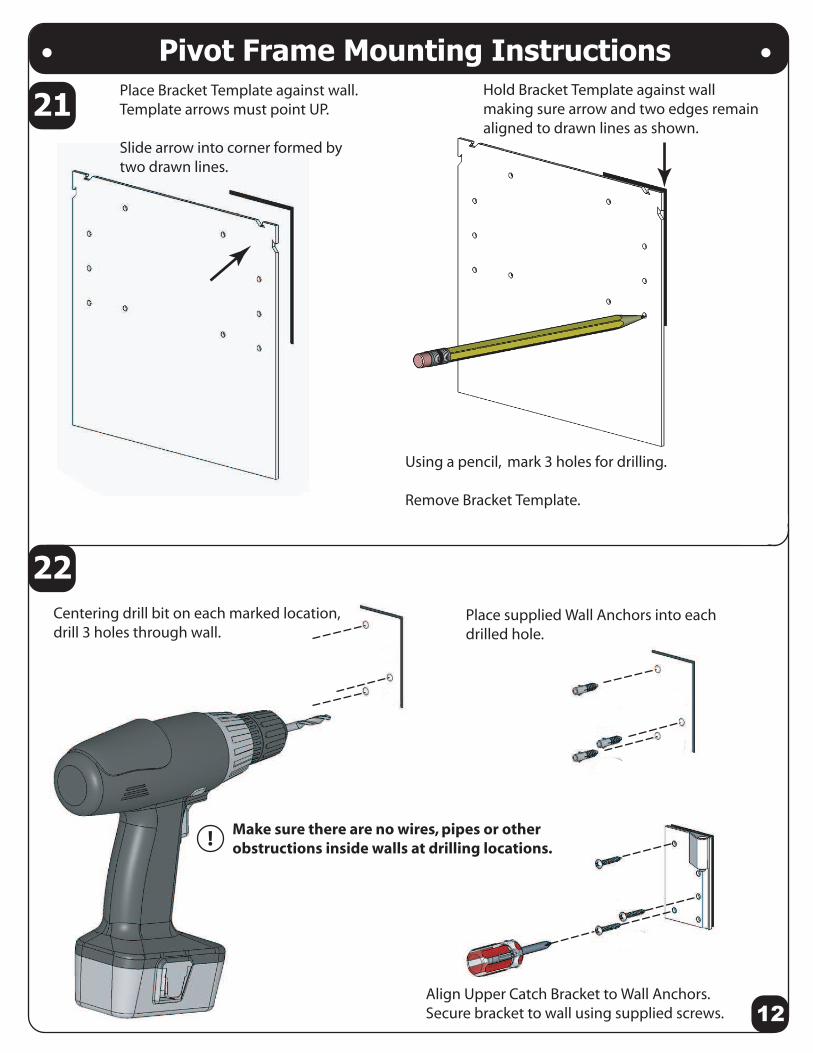
Pivot Frame Mounting Instructions
22
12
21Place Bracket Template against wall.
Template arrows must point UP.
Slide arrow into corner formed by
two drawn lines.
Centering drill bit on each marked location,
drill 3 holes through wall.
Using a pencil, mark 3 holes for drilling.
Remove Bracket Template.
Place supplied Wall Anchors into each
drilled hole.
Hold Bracket Template against wall
making sure arrow and two edges remain
aligned to drawn lines as shown.
Align Upper Catch Bracket to Wall Anchors.
Secure bracket to wall using supplied screws.
Make sure there are no wires, pipes or other
obstructions inside walls at drilling locations.!
Pivot Frame Mounting Instructions
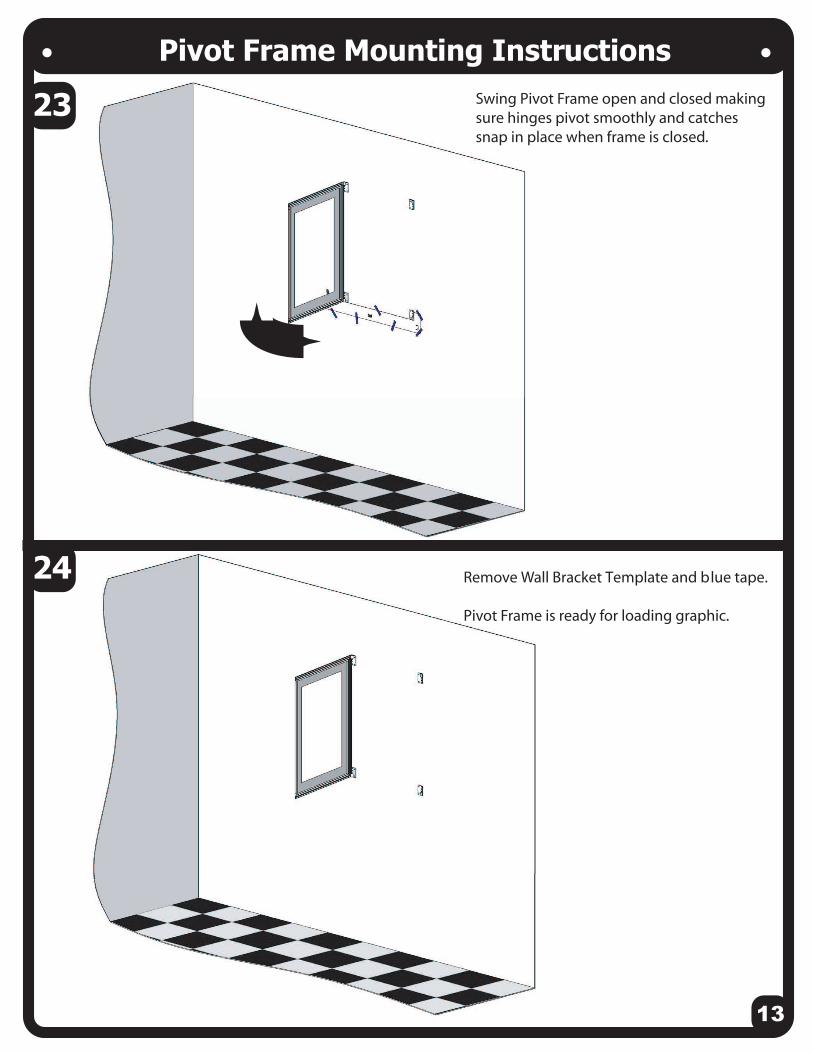
24
13
23 Swing Pivot Frame open and closed makingsure hinges pivot smoothly and catchessnap in place when frame is closed.
Remove Wall Bracket Template and blue tape.
Pivot Frame is ready for loading graphic.

Pivot Frame Loading Graphics
Peel protective liner from all tape segments.
Swing open frame.
On the back of the mat there are a number of
segments of tape. This tape has a protective liner
that must be removed.
Removing the protective liner exposes the adhesive
for mounting a poster. This exposed face is low-tack.
The low-tack tape allows for a number of repositioning
or replacing of posters without having to replace the tape.
Have remainder of blue tape available for securing graphic.
14
2
1
Blue Tape

Pivot Frame Loading Graphics
With poster in desired location, swing frame closed.
Pivot frame closed when catches snap in place.
15
4
With all tape segments peeled, mount poster
centered over and graphic facing window.
Tape is low-tack allowing the poster to be
removed from the tape without tearing if
repositioning of the poster is required.
If poster is not large enough to span tape,
poster has a heavy curl or tape is losing tack,
use supplied blue tape to finish securing
graphic to mat.
Blue Tape
3
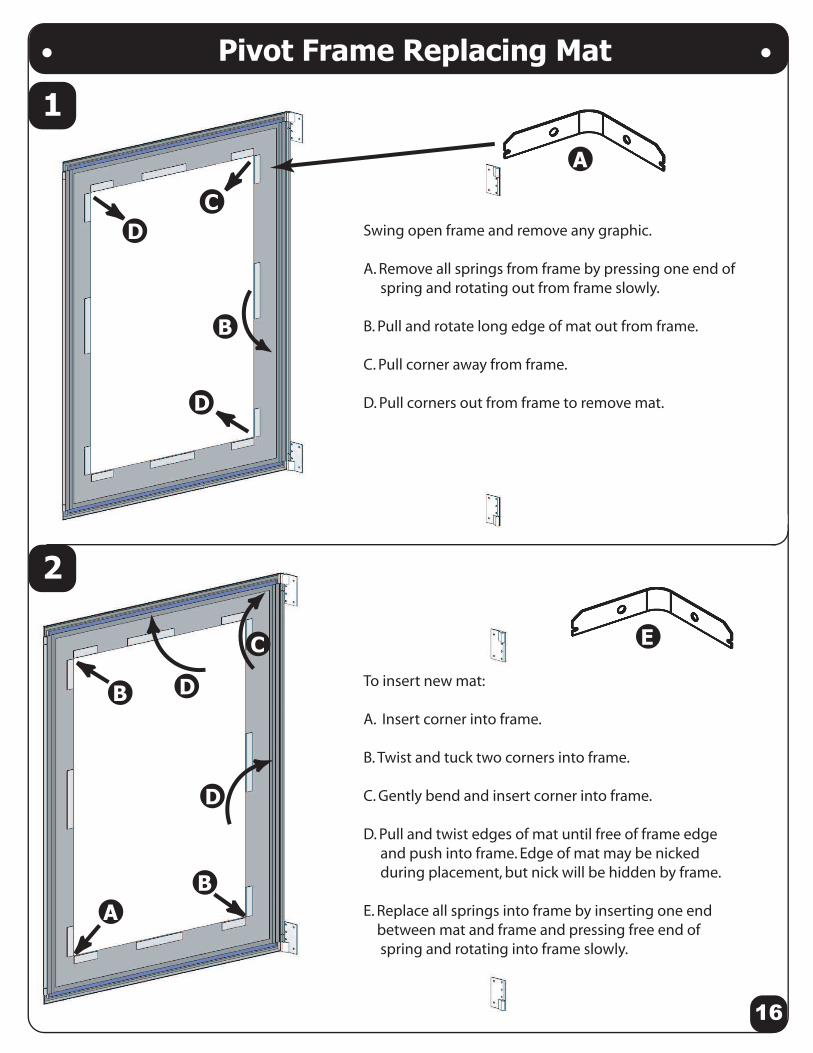
Pivot Frame Replacing Mat
Swing open frame and remove any graphic.
A. Remove all springs from frame by pressing one end of
spring and rotating out from frame slowly.
B. Pull and rotate long edge of mat out from frame.
C. Pull corner away from frame.
D. Pull corners out from frame to remove mat.
16
A
To insert new mat:
A. Insert corner into frame.
B. Twist and tuck two corners into frame.
C. Gently bend and insert corner into frame.
D. Pull and twist edges of mat until free of frame edge
and push into frame. Edge of mat may be nicked
during placement, but nick will be hidden by frame.
E. Replace all springs into frame by inserting one end
between mat and frame and pressing free end of
spring and rotating into frame slowly.
A
B D
D
E
B
C
D
D
B
C
2
1