Embed Size (px)
Citation preview
1.
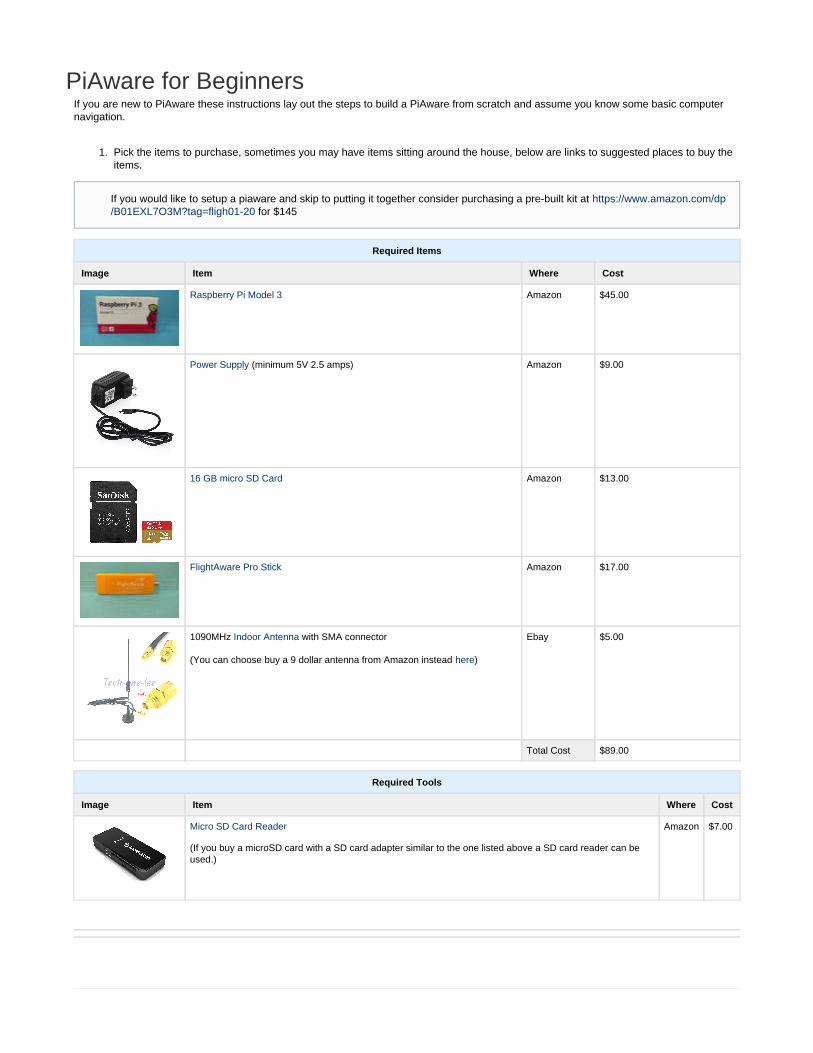
PiAware for BeginnersIf you are new to PiAware these instructions lay out the steps to build a PiAware from scratch and assume you know some basic computernavigation.
Pick the items to purchase, sometimes you may have items sitting around the house, below are links to suggested places to buy theitems.
Required Items
Image Item Where Cost
Raspberry Pi Model 3 Amazon $45.00
Power Supply (minimum 5V 2.5 amps) Amazon $9.00
16 GB micro SD Card
Amazon $13.00
FlightAware Pro Stick Amazon $17.00
1090MHz with SMA connectorIndoor Antenna
(You can choose buy a 9 dollar antenna from Amazon instead ) here
Ebay $5.00
Total Cost $89.00
Required Tools
Image Item Where Cost
Micro SD Card Reader
(If you buy a microSD card with a SD card adapter similar to the one listed above a SD card reader can beused.)
Amazon $7.00
If you would like to setup a piaware and skip to putting it together consider purchasing a pre-built kit at https://www.amazon.com/dp for $145/B01EXL7O3M?tag=fligh01-20

1. a.
2.
3.
4.
1.
2.
3.
Optional Items
Image Item Why Where Cost
Micro SD Card pre-loaded withPiAware
Skip the Programming Step Amazon $16.00
Raspberry Pi Case Protects the Pi Amazon $6.00
Ethernet Cable If you are not using WiFi Amazon $3.00
Filter If you live in an Urban environment this will allow you to seemore flights
Amazon $20.00
Programming the SD card on Windows 7
Download (632MB)PiAware on Raspbian Linux 3.5.0 ZIPClick on the link and it will automatically downloadin the download folder.
Select (Left click) on the downloaded piaware-sd-card-3.1. file, then right click to open up the menu and0.img.zip
select to unzip the compressed file.Extract All...
Choose a destination folder, I left mine in downloads
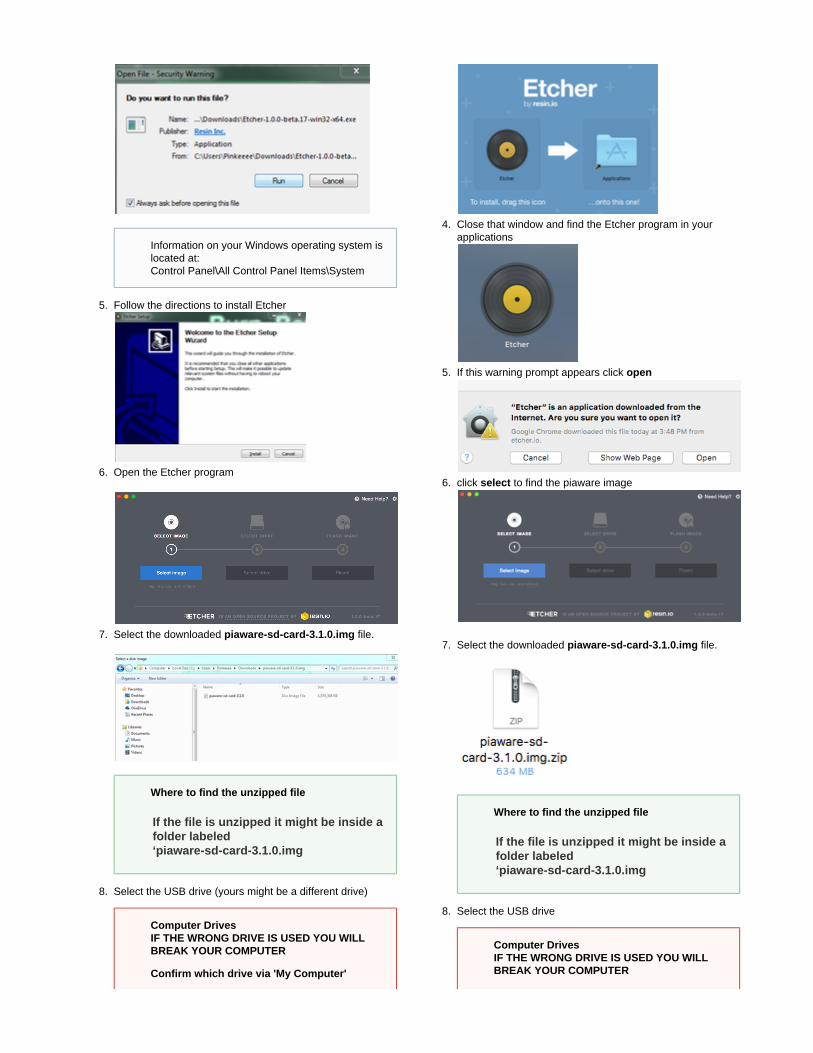
Down load Etcher from https://etcher.io/
Programming the SD card on a MAC
Download PiAware on Raspbian Linux 3.5.0 ZIP(632MB) and save the file on your computer.
Download the program Etcher at https://etcher.io/
Open the Etcher download and follow the instructions toinstall
If you plan to use a Raspberry Pi 2 and want to use WiFi please also purchase a WiFi dongleA list of compatible WiFi dongles can be found here https://flightaware.com/adsb/faq#wifidongles
Leave the file in the Downloads folderBy default the computer will place the file inDownloads you can leave the file in that folder.
4.
5.
6.
7.
8.
3.
4.
5.
6.
7.
8.
Follow the directions to install Etcher
Open the Etcher program
Select the downloaded file.piaware-sd-card-3.1.0.img
Select the USB drive (yours might be a different drive)
Close that window and find the Etcher program in yourapplications
If this warning prompt appears click open
click to find the piaware imageselect
Select the downloaded file.piaware-sd-card-3.1.0.img
Select the USB drive
Information on your Windows operating system islocated at: Control Panel\All Control Panel Items\System
Where to find the unzipped file
If the file is unzipped it might be inside afolder labeled‘piaware-sd-card-3.1.0.img
Computer DrivesIF THE WRONG DRIVE IS USED YOU WILLBREAK YOUR COMPUTER
Confirm which drive via 'My Computer'
Where to find the unzipped file
If the file is unzipped it might be inside afolder labeled‘piaware-sd-card-3.1.0.img
Computer DrivesIF THE WRONG DRIVE IS USED YOU WILLBREAK YOUR COMPUTER
8.
9.
10.
11.
12.
8.
9.
10.
11.
1.
2.
1. 2.
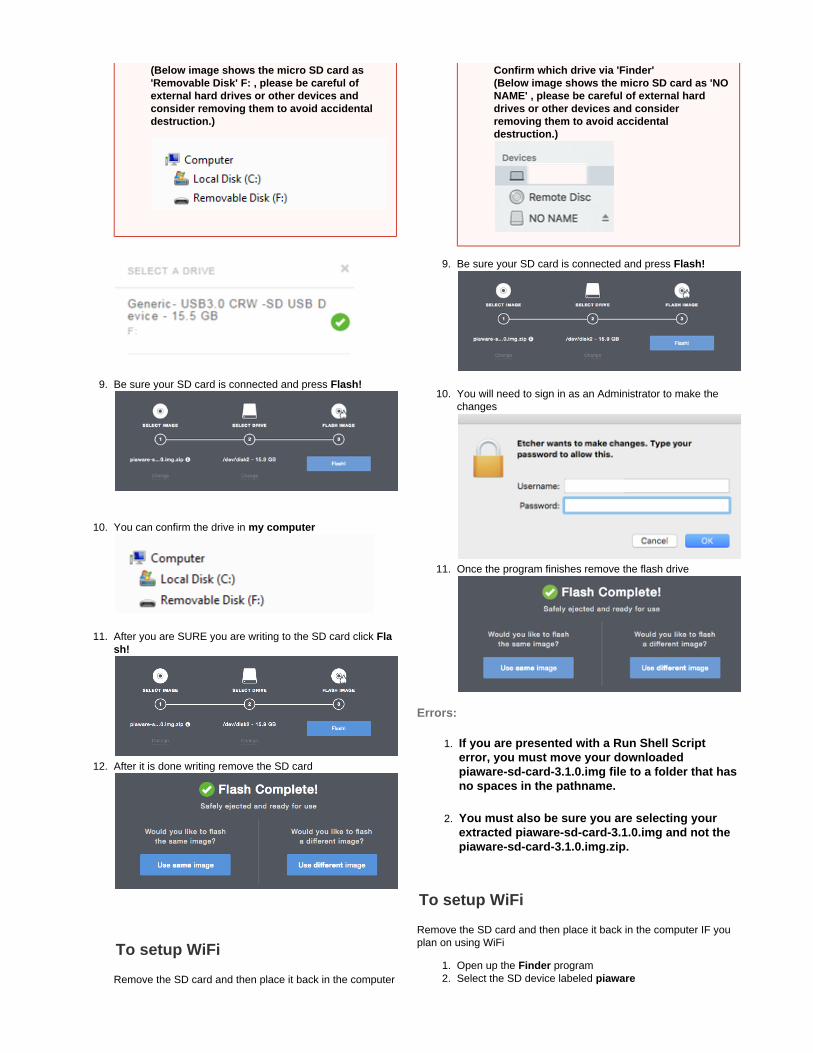
Be sure your SD card is connected and press Flash!
You can confirm the drive in my computer
After you are SURE you are writing to the SD card click Flash!
After it is done writing remove the SD card
To setup WiFi
Remove the SD card and then place it back in the computer
Be sure your SD card is connected and press Flash!
You will need to sign in as an Administrator to make thechanges
Once the program finishes remove the flash drive
Errors:
If you are presented with a Run Shell Scripterror, you must move your downloadedpiaware-sd-card-3.1.0.img file to a folder that hasno spaces in the pathname.
You must also be sure you are selecting yourextracted and not the piaware-sd-card-3.1.0.img
.piaware-sd-card-3.1.0.img.zip
To setup WiFi
Remove the SD card and then place it back in the computer IF youplan on using WiFi
Open up the programFinderSelect the SD device labeled piaware
(Below image shows the micro SD card as'Removable Disk' F: , please be careful ofexternal hard drives or other devices andconsider removing them to avoid accidentaldestruction.)
Confirm which drive via 'Finder'(Below image shows the micro SD card as 'NONAME' , please be careful of external harddrives or other devices and considerremoving them to avoid accidentaldestruction.)
12.
a. b.
c.
d. e.
2.
3.
4. 5.
IF you plan on using WiFiOpen up the programExplorerSelect the SD card device labeled piaware
Open the file labeled piaware-config.txt
The file will open in Notepad.Please see the next section on what to change
Open the file labeled piaware-config.txt
The file will open in TextEdit.Please see the next section on what to change
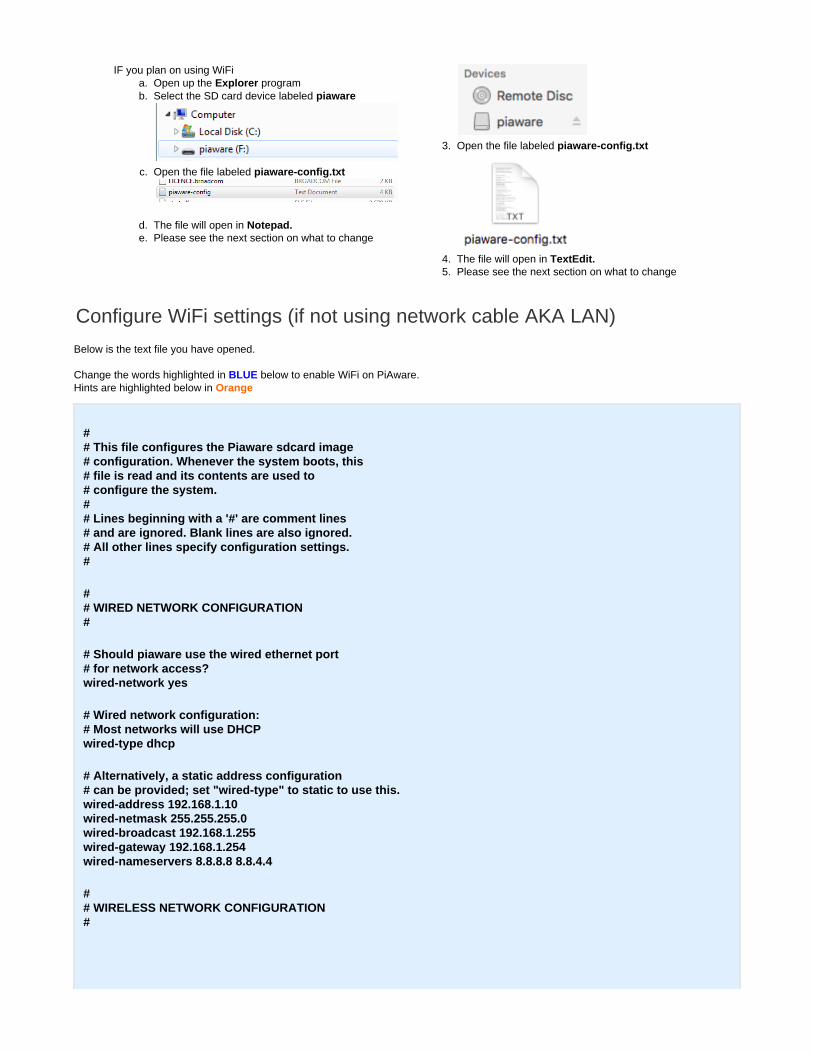
Configure WiFi settings (if not using network cable AKA LAN)
Below is the text file you have opened.
Change the words highlighted in below to enable WiFi on PiAware.BLUEHints are highlighted below in Orange
## This file configures the Piaware sdcard image# configuration. Whenever the system boots, this# file is read and its contents are used to# configure the system.## Lines beginning with a '#' are comment lines# and are ignored. Blank lines are also ignored.# All other lines specify configuration settings.#
## WIRED NETWORK CONFIGURATION#
# Should piaware use the wired ethernet port# for network access?wired-network yes
# Wired network configuration:# Most networks will use DHCPwired-type dhcp
# Alternatively, a static address configuration# can be provided; set "wired-type" to static to use this.wired-address 192.168.1.10wired-netmask 255.255.255.0wired-broadcast 192.168.1.255wired-gateway 192.168.1.254wired-nameservers 8.8.8.8 8.8.4.4
## WIRELESS NETWORK CONFIGURATION#

1.
# Should piaware use a wifi adaptor# for network access? You will need to attach# a supported USB wifi adaptor for this to work.
# change this to "yes" to enable wifiwireless-network no <----Change this to "yes"
# Wifi SSID and password.# This should be changed to match your wireless# network SSID and, for networks that require# a passphrase, the passphrase.
wireless-ssid MyWifiNetwork <-----replace with the name of your WiFi (aka the SSID of your localMyWifiNetworknetwork)
wireless-password s3cr3t <-----replace with the password to your WiFis3cr3t
# Wifi network configuration:# Most networks will use DHCPwireless-type dhcp
# Alternatively, a static address configuration# can be provided; set "wireless-type" to static to use this.wireless-address 192.168.1.10wireless-netmask 255.255.255.0wireless-broadcast 192.168.1.255wireless-gateway 192.168.1.254wireless-nameservers 8.8.8.8 8.8.4.4
Hit "Save" and then close the program.
Please eject the SD card BEFORE removing from your computer
Windows:
MAC:
In Finder press the 'eject' symbol beside drive name (piaware)
Put the Feeder together
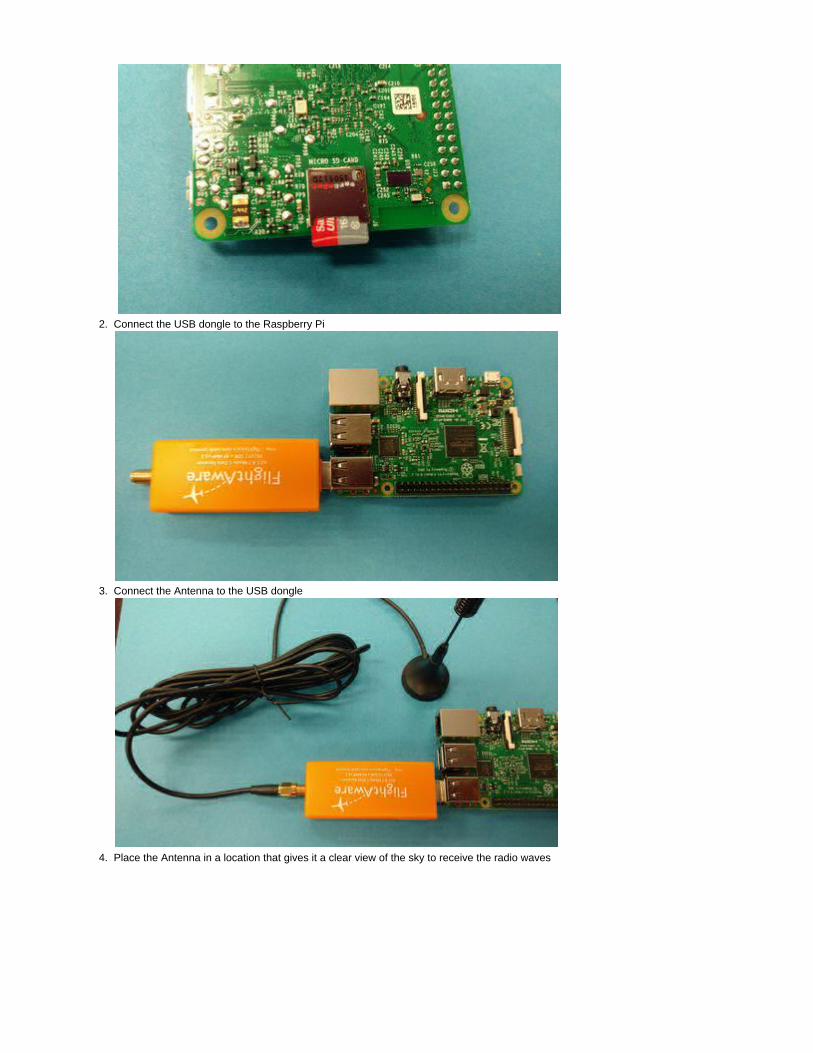
Put the micro SD card into the Raspberry Pi slot
1.
2.
3.
4.
Connect the USB dongle to the Raspberry Pi
Connect the Antenna to the USB dongle
Place the Antenna in a location that gives it a clear view of the sky to receive the radio waves

4.
5.
Connect the power supply
Claim your piaware
1. Go to this link: https://flightaware.com/adsb/piaware/claim2. If this appears: " wait 5Unfortunately, FlightAware hasn't found a new, unclaimed PiAware connection yet from your IP " minutes, IF nothing has happened pull the power and then plug it back in (to reboot in the future please use the control panel on yourpersonal stats page)
3. After it is claimed you will see:
If not using WiFiIf you are not using wifi don't forget to connect the ethernet (AKA network) cable.
You should observe a solid red LED and a blinking green LED on the Raspberry Pi as well as yellow and green LEDs nextto the Ethernet jack.
After 10 minutes if it hasn't appeared pull out the SD card and verify you typed your settings in correctly. If that doesn't fix ityou can try to reprogram the SD card. Lastly contact support at [email protected]

5.
(Sometimes the screen will continue to refresh after claiming but it will be listed under the linked PiAware Receivers so you will knowit functioned)
4. Under section 1 of the page there is a link to your page, follow it.View you ADS-B statistics5. Check you the Control Panel please customize it to your preference
6. Set your location
7. Then view your live map (The map might be centered over Europe and you will need to drag the map to view your location.)
8. Enjoy!