Embed Size (px)
Citation preview
1. Piano Technique by Paul White
( MA (Cantab) ARCM LGSM (MT) MTC )
First published 2007
Revised edition 2018
Introduction
This guide aims to be clear, concise and practical. It draws on a number of well-known sources (see
Bibliography on page 48), but, above all, it is the result of several decades of observation and experiment.
Standard aspects of technique are discussed, but special emphasis is given to areas, where, it is hoped, some
new light is shed upon either the technique itself or the way of explaining it. A small selection of exercises
mentioned in the text can be found at the end of the guide. A much larger range can be found online via this
link: http://www.scoreexchange.com/profiles/paulwhite743
Teachers often tell people what effect to aim for, but not how to achieve it or why we would do it in that way.
This book attempts to fill in those gaps. Neverthless, in studying the technical principles, we should never lose
sight of the artistic aim, as this is the whole point of the exercise. Above all, unless the music demands
otherwise, we should always aim to achieve a singing tone in our playing. This will help us intuitively to
combine the various aspects of technique and guide them towards the creation of a truly beautiful performance.
The greatest physique in the world is of no use without a brain attached to it. A fundamental aspect of playing
which is often overlooked is that we always hear the music in our head before we play it. Even in sight-reading,
we see the score, hear the music in our “inner ear” and translate what we hear into finger movements at the
keyboard. Developing the inner ear is therefore an indispensable element in piano technique. This can be
achieved through aural training, musical dictation and “mental practice” (see p. 42).
Many hours are wasted at the piano by adopting an attitude of blind faith and mindless drudgery. We should
instead take an analytical and diagnostic approach, identifying and focusing on core issues rather than taking
every technical problem in isolation. To take just one example, many problems of evenness are caused by
weakness in the outer fingers. Honing in further, a particular weakness is the alternation of fingers 4 and 2
together with 5 and 3 together. Still closer investigation reveals that the alternation is more difficult from 4/2 to
5/3 than the other way round. Other difficult moves include from 3 to 4 and from 4 to 5, where we are moving
from a stronger, longer finger to a shorter, weaker one. These moves can be practised as grace notes or using
Exercises 9 and 10E at the end of this guide.
A word about injuries Compared with some “relaxation methods”, the approach recommended here is quite a vigorous one. It
should be used in a sensible and moderate way, especially to begin with. It is a dangerous mistake to
suppose that a method which yields good results will yield even better ones when taken to extremes. I
personally have been playing the piano for fifty-six years and have never suffered an injury, nor, to the
best of my knowledge, have I ever caused anyone else to have one. Even so, one cannot be too careful!
Excessively strenuous practice may cause some people to experience difficulty in bending their fingers
when they first wake in the morning. In this case, do not use force to bend the fingers, but gently coax
them into a rounded position using the other hand. At the same time reduce the arm weight and finger
action in practising until the problem disappears. There is an element of compromise between achieving
the best musical result and being kind to the hands. A musician of integrity will always place the artistic
aim first. Further details are given on page 37.
Copyright © 2007 by Paul White

2. Contents
POSTURE 3
FINGER ACTION 4
The relationship between finger action, arm weight and arm movement 4
Finger action diagrams 5
The extending finger action 6
The hanging hand 6
The relationship between touch and speed 6
Hand shape 6
THE COMBINED ACTION OF FINGERS AND ARM 9
HELD EXERCISES 9
FREE EXERCISES 9
NON LEGATO AND LEGATO 10
THE ROLE OF ARM WEIGHT 11
Arm weight diagrams 12
RESTING ARM WEIGHT ON THE KEY BED 12
Arm weight and volume, arm weight and speed diagrams 16
PRACTISING RAPID PASSAGEWORK 17
ARM WEIGHT TRANSFER TOUCH 18
VARIETIES OF TOUCH AND DYNAMICS 19
VARYING THE STRENGTH OF FINGER ACTION 20
ACCENTS 21
EMPHASISING MELODIC LINES 21
CONTRAPUNTAL MUSIC 22
TONE COLOUR 22
STACCATO 23
Staccato with wing action 23
Staccato with wing action diagrams 24
Prepared staccato notes and chords with wing action diagrams 25
Finger staccato 26
Wrist staccato 27
TOUCH CHANGES RELATED TO SPEED 28
TECHNIQUE AND EXPRESSION 28
WING ACTION FOR CHORDS AND OCTAVES 28
Wing action diagrams 30
WRIST MOVEMENT IN PHRASING 31
3. SOME SPECIAL TECHNIQUES WITH OCTAVES AND CHORDS 32
Preparing hand shape in chords and melodies 32
Octaves 33
Gliding chords 33
Rapid pairs of chords 33
Weighing the notes of a chord 34
ACTION OF THE BACK 34
THE MECHANICS OF TONE PRODUCTION 34
Controlling articulation 37
THERAPEUTIC EXERCISES 37
Stretching exercises diagram 38
UNINTENTIONAL COMPLIMENTARY ARM MOVEMENTS 39
Forearm rotation 40
Other unintentional arm movements 40
PRACTICE METHODS 41
General points 41
Starting slowly and speeding up 41
Memorization and mental practice 42
Musical Attention 43
Special techniques for difficult sections 43
FINGERING: SOME GENERAL POINTS 45
THE SUSTAINING PEDAL 46
ANALYSIS 46
CULTIVATING A NATURAL TECHNIQUE 47
BIBLIOGRAPHY 48
EXERCISES AND STUDIES 48
EXAMPLES OF TECHNICAL EXERCISES 49
Posture
Freedom of movement is our aim, not restriction and rigidity. This applies firstly to the process of
breathing, which can sometimes inadvertently come to a halt when we are intent upon a demanding task.
Of equal importance is the way we sit, which should be tall but not stiff, with the shoulders relaxed and
down, yet with a certain feeling of buoyancy. Some slow, gentle rocking back, forth and sideways from
the hips keeps the joints of the arm mobile. Posture and seating position affect the way in which arm
weight operates. If we sit too close to the piano or lean forward, as sometimes happens when sight-
reading, the arms will push the hands forwards, jamming the wrists and forcing the fingers to play from
an awkward angle. Moving back a little and returning the trunk to a vertical position will cause the arms
to pull the hands gently backwards, restoring them to a healthy playing position. If we imagine arm
weight to be operating vertically on the keys, this will in fact cause the arms to straighten and push
forwards, creating the same problems as mentioned above. We should think of the elbows as wanting to
bend and pull backwards, the wrists as being drawn downwards and the fingers as pulling at the keys.

4.
Finger Action
The relationship between finger action, arm weight and arm movement Music is brought to life by means of contrast and variety. Just as the owner of a powerful sports car is
able (though not necessarily willing) to drive both slowly and fast, so the pianist with a strong technique
can play both quiet and loud, slow and fast music. A weak pianist will only be able to play slow, quiet
music, leading to a dull, monochrome effect. Therefore in our practice we aim to build strength. To this
end, given that the body gradually adapts to demands placed upon it, the way to build strong fingers is by
requiring them to transmit the maximum of kinetic energy to the keys (see p. 37). The initial paragraphs
which follow refer to practising finger work in technical exercises, scales and passagework, not to the
performance of quiet passages, and not to the playing of chords and octaves.
The greatest piano teacher ever was Sir Isaac Newton, although he did not know it. The observations
which follow are all based on simple Newtonian mechanics. They may sound very complicated compared
with the facile solutions offered by many traditional schools, but provide the only valid description of
what really happens when we play.
The force needed to move an object (in this case a piano key) is kinetic energy, which is a combination of
weight and speed, as stated in the equation KE (kinetic energy) = ½ mv2 (where m = mass and v =
velocity).The weight is provided by resting some of the arm’s weight on the keys. When the fingertip
strikes the key, the knuckle pushes upwards with equal force and reacts against the arm weight resting on
the previous key. This causes the arm weight to react back downwards upon the finger with an impulse of
kinetic energy which will depend on the amount of weight which was resting and the speed of the finger
stroke. It does not imply any downward movement by the arm. It is like saying, “When we push against a
wall, the wall pushes us the other way.” All the above processes happen simultaneously.
In other words, the finger stroke lifts the arm’s weight off the previous key and brings it to bear on the
next key at a certain speed. At the same time, the previous finger retracts, “giving” the weight to the new
finger, which again reacts against the weight at the knuckle and delivers it to the key at a particular speed.
It will be seen from the equation that the speed is even more significant than the weight. By doubling the
weight we also double the kinetic energy, but by doubling the speed we quadruple the kinetic energy. In
order to accelerate to a high speed, an object needs a certain distance over which to travel. This applies to
the finger approaching a piano key. It must be lifted high and brought down as fast as possible, just as a
builder lifts the hammer high before bringing it down upon the nail. The cricketer, tennis player or golfer
swings their bat/racquet/club well back before driving it rapidly towards the ball. The speed and
suddenness of the finger stroke, even in slow tempo, are even more important than the height.
Put simply, the implication of these points is that we need to rest arm weight on the keys and use a high,
rapid, sudden finger stroke, even in slow practice. This should be done very vigorously without being
taken to extremes. The piano mechanism presents only a moderate level of inertia, therefore using a
disproportionate amount of force is both mechanically inefficient and artistically inappropriate, as well as
being very tiring and potentially injurious. Even so, we should not practise in an inhibited or lukewarm
way. In performance, however, both the weight and finger action are often reduced (See p.17).
Traditional piano methods often tried to isolate the finger movement, with the wrist and arm being in
some way frozen or paralysed. The hand was artificially held in a horizontal position by the muscles on
the upper side of the forearm. This is conducive to poor tone and can cause stiffness and injury. Further
confusion was caused by Matthay (see p. 48), who suggested that the arm should be “poised”, i.e.
supporting its own weight. If instead we rest some arm weight on each key and allow the arm to be
passively moved up and down by the finger strokes, there will be no stiffness. There will also be no
danger in lifting the fingers to a comfortable height, and using swift, decisive finger strokes. Indeed, these
are indispensable prerequisites of clear and well articulated playing, particularly at high speed. It is

5.
perfectly natural to lift the fingers when playing, as can be seen by watching any child at the piano.
Nevertheless, we should not force the fingers to painful levels of lift, or hold them up rigidly when they
are not playing, as this reduces the power of the downward finger strokes and causes discomfort. Unused
fingers should be held at a comfortable height. The fingers should be gently but not excessively curved.
Although the arm does not take an active part in the production of individual notes, it is in no sense a
“dead weight” dragged around by the fingers. On the contrary, arm movements from the shoulders, via
the elbows and wrists, are used to guide the fingers as they navigate laterally around the keyboard in
phases and longer sections of passagework. The arm movements complement those of the fingers like a
dancing partner. For this reason it is essential to consider the arm as “semi-poised”, with a certain amount
of weight in it, but also with buoyancy and freedom of movement. The wrist may move laterally,
vertically, in circles or with a rocking “rotary” motion. To induce such freedom, play a one octave
arpeggio up and down repeatedly. The right wrist will move in an anticlockwise ellipse, wide but not tall,
whereas the left hand will move clockwise. The hand in this case remains horizontal, without rotary
movement. Extend the exercise to wider-ranging broken chords and arpeggios. In arpeggios, the wrists
and elbows move to the right on the note after the thumb and left on the thumb note when ascending. The
opposite takes place when descending. Anticipating the contours of the music with arm movements
greatly facilitates playing passagework. However, it should not be done in an exaggerated or theatrical
way. As with arm weight, it is used in partnership with finger work, not as a substitute for it.
An entirely distinct form of arm action (p.28) is used for playing chords, octaves and melodies which are
emphatic and declamatory. Nevertheless, in playing octaves, an element of finger action adds firmness to
the touch. Much real music combines melodic phrases, chords, octaves and other elements in a complex
texture, and here the finger and arm actions are continually alternating, sometimes occurring together, for
example when the right hand plays passagework accompanied by staccato chords in the left hand.
Finger Action The finger is curved and
raised above the key. The left hand
portion of the picture represents the knuckle end of the hand.
The finger straightens as it descends,
and begins to bend as or just before
the tone sounds and the key touches its bed.
The finger rebounds and slips back
a fraction, bending slightly as it does so, and allowing the key to raise
slightly, but not sufficiently to cut
off the tone. It then settles back on the
key with a moderate “resting weight”
The finger releases the key and
returns to the original raised position,
bending slightly more as it does so.
Overall shape described by the finger end.
It is helpful to imagine the fingers walking
(legato) or running (non legato) on the keys.

6.
The extending finger action The finger movement is shown in the diagrams above. The finger action is a like a wave movement or
“wing action” (see p.28), with the knuckle bending first, while the other joints are still straightening. The
fingertip and middle phalanx begin to bend on or fractionally before the sounding of the tone and
continue to bend as the knuckle joint straightens, lifting the finger from the key. This is similar to the way
in which guitar strings are plucked. It is important to note that the extension applies to the approach to
the key, not to the sounding or holding of the tone. These weight-bearing parts of the cycle should be
done by the flexors, not the extensors, otherwise we will experience a jarring similar to that felt in the
knees when running downhill. In other words, we are pulling the key, not pushing or stabbing it. It is the
pulling sensation which we feel in performance, the extension being largely unconscious. The pulling of
the key is not particularly visible, but is experienced as a tugging sensation in the fingertip. In slow
practice, we can think of aiming slightly further forward than the vertical, then pulling back a little.
The extending fingers land on the key almost vertically, giving maximum transmission of energy. If the
approach is made with a rigid or, still worse, bending finger, we will strike the key at an oblique angle,
with considerable energy loss. One centimetre of vertical finger travel causes the same amount of key
movement. A centimetre of oblique motion moves the key only a fraction of the distance, so that the key
travels more slowly and the tone is weaker. The action in the first, second and fourth pictures is sudden
and rapid, even in slow music. The fingers are propelled by sudden impulses of energy not unlike the
explosions which drive an internal combustion engine. As we aim to exercise the fingers and build
strength, we should take them through their full range of movement with swift, energetic strokes. The
tone begins in the second picture and is held until the third. During this time the fingertip starts to pull in,
rebounding from the key then falling back on to it and resting on the key bed with moderate weight. The
rebound and falling back are on a very small scale. Whilst holding the tone we feel the fingertip gently
pulling the key down and backwards. At the same time, the knuckle end of the finger continually pushes
up and forward, maintaining a gentle tension in the arched hand which serves to balance the backward
and downward pull of the arm weight. This tension and arching should not be taken to excess, as it will
lead to fatigue.
The hanging hand The knuckles, followed by the wrist and arm, are driven up and forward when each note sounded in slow
practice, although this becomes imperceptible at high speed. The arm movement is not deliberate but is
the result of the finger stroke. The finger then partially supports the weight of the arm in loud playing, the
rest being supported by the upper arm muscles. When the arm is fully poised, i.e. consciously held up, for
example during a rest or in quiet or leggiero playing (p. 17), the hand should not be deliberately held up
in a horizontal position. Doing so causes stiffness in the wrist and tires the muscles on the upper side of
the forearm unnecessarily. Instead it is allowed to hang loosely, giving an appearance of a high wrist
position. The only exception would be if we wish to achieve a crisp, dry staccato it quiet, rapid
passagework, in which case we lift the hand and keep the wrist low.
The relationship between touch and speed Notes produced by means of arm movements can only be played up to medium pace. More rapid notes
are played purely by finger work, supported by varying amounts of arm weight. This is because a given
muscle will only repeat its action up to a certain speed. The fingers, however, are sharing the work
between five team members, so that no one finger is obliged to repeat immediately. For this reason, when
we practise a passage slowly and gradually speed it up, there will be passive arm movements at low
speeds, but these will decrease as the speed increases, finally disappearing altogether. There will also be a
change from legato, where the arm weight is always supported by at least one finger, to non legato, where
the weight is “bounced” from finger to finger, with a short airborne phase, creating a silence, in between.
This is analogous to a person walking faster and faster and eventually “breaking” in to a run.
Hand shape The human hand is highly adaptable, changing its shape according to the multitude of different jobs
7.
which it has to do. We should allow this to happen, rather than forcing it into a predetermined mould. The “arching” of the hand is often taught as a commandment, without explanation. In fact it is the result of the
fingers pushing the knuckles up and forward as they sound and hold the tone (p. 6). This creates a gentle
and desirable tension in the hand which counteracts the backward and downward pull of arm weight.
The fingers are more strongly curved, particularly at the knuckle joint, when playing on white keys. This
is because flat fingers would be caught between the black keys. If we were to move the hand further
towards us, the thumbs would not reach the keys. However, neither of these misfortunes occurs when
playing on black keys, so we can release the fingers into a more gently curved position, although the
difference is small. Furthermore, the black keys are raised above the white, so that playing on them with a
strongly curved position would require the fingers to be raised uncomfortably high. They are also set back
from the white keys, so that the less curved fingers can reach forward for them. We tend to avoid using
the thumbs on black keys, but when we have to do so, the other fingers become more strongly curved
than in the normal black keys position, otherwise they would scrape on the lid of the keyboard. In slow
practice we prepare the position of the fingers (vertically above the key) and their shape (gently or
strongly curved for black or white keys respectively) well in advance, preferably several notes earlier
(See page 32). The changes in shape are quite subtle, and should not be exaggerated.
Straighter fingers can span wider intervals than curved ones, and are better for certain chords and
arpeggios, except where they come between black keys. Occasionally, when a white key is easily
accessible to a straight finger (usually B, C, E or F), and when curving the finger would render the stretch
uncomfortable, we can straighten the finger somewhat. An example would be a double sixth from Ab to F
in the right hand played by the thumb and fourth finger, as found in Chopin’s Study Op. 25 no. 8.
A rounded finger shape, with the finger tips consciously pulled in, is necessary for supporting the arm
weight when playing firmly. The straight finger forms a longer lever than the curved one. Playing with
straighter fingers is like driving in higher gear, particularly in the case of people who have long fingers.
For a given rotation of the knuckle joint (not to be confused with forearm rotation), the fingertip will
travel further and faster, but will be at a disadvantage in terms of torque when acting as an interface
between arm weight and the upthrust of the keys, or, for that matter, when resting arm weight on the key
bed. To compound this, the key’s resistance is greater at its inner end than near the tip, so that by bending
the fingers we will often be able to avoid striking the key in that hard place. For the less mechanically-
minded, this paragraph means that straighter fingers are better for playing with a light, “leggiero” touch.
In “leggiero” playing, the fingers can be more flexible, in three ways: Firstly, a less rounded shape can be
used, allowing for greater articulation, as the fingertips can be lifted higher. Secondly, a greater
differentiation in shape is possible between the black and white keys. Thirdly, the “cyclic” finger action
can be used more liberally, with the finger beginning to bend slightly earlier in the cycle, about two thirds
of the way down the stroke. In this way we acquire greater agility at the expense of volume. The selection
of touch therefore depends on the expressive requirements of the music. Rapid passagework is practised
firmly but often performed with a leggiero touch.
Longer fingers, especially the third, are more strongly curved than shorter ones. The little finger is curved
in the up position and virtually straight in the down position. The hand should not “sag” towards the fifth
finger, which should form an almost vertical pillar when playing on the white keys. Otherwise, the fifth
finger would be striking the key and supporting weight from a very disadvantageous slanting angle. The
finger nails should be very short, as we often, although by no means always, find ourselves playing on the
finger tips. People with very small hands often have to play with straighter fingers, in order to span wide
intervals. Those with very large hands may need to bend the fingers more on white keys in order to
navigate around the black keys.
Even when playing on white keys, a slightly gentler curve is more efficient than a strongly curved, claw-
like position. This can easily be seen by playing five white keys up and down rapidly several times, first

8.
with strongly curved fingers then with a gentler curve. In the second case the volume and articulation are
clearly enhanced. This is because the effective length of the lever is greater, so that for a given amount of
movement from the knuckle, the fingertips rise higher and descend on the keys more rapidly. They can
also span wider lateral stretches. There will be a reduction of surface noise caused by the fingernails, but
an increase in surface noise caused by the finger landing rapidly in the key and “patting” it. Lower noise
will be less, as the key will have a “braking” effect on the finger due to the reduced torque (see p.22).
The natural resting position of the fingers is a gentle curve, so that playing with a stronger curve requires
continuous effort by the small muscles on the underside of the fingers and hand, creating tension and
wasting energy. However, when bearing arm weight, the gently curved position places a greater load on
these small muscles, due to the increased torque acting upon them by the longer lever and less vertical
angle of the finger. This is nevertheless justified by the improvements described above. By practising
slowly, resting some arm weight on the keys, we can accustom the small muscles to the extra load.
Having said all this, it is also helpful to do some practising, particularly of held exercises, in a strongly
curved position. As in any form of physical training, it is beneficial to use the muscles in ways which are
beyond their normal comfort zone. There is even an extreme form of this method in which the fingers are
contracted as far as possible, and the keys are played not with the fingertip but with the joint between the
fingertip and the middle phalanx.
The difference between the strongly and gently curved positions is quite small. Any further straightening
of the fingers would cause problems in navigating between and around the black keys, and would result in
unevenness of tone and articulation between the straight and curved fingers.
Care should be taken not to allow the fingertips to “collapse” into a concave shape. This can be avoided
by pulling them in slightly when sounding and whilst holding the note, as though “grasping” the key and
trying to pull the piano towards us with the tip of the finger. This causes a sensation of focussing energy
into the fingertips, which have a feeling of “firmness” as a result. In doing this we are activating the
fingertip as a vital link in the chain of transmission whereby arm weight reaches the key. Normally the
piano does not move, but instead the arm is drawn towards the keyboard. This counteracts the backward
pull of arm weight (p.11). There is a sensation of the arm hanging like a rope bridge, suspended between
the fingertip and the shoulder so that its weight can be felt both in the fingertip and in the shoulder joint.
The finger’s action is like that of a pickaxe when it bites into the rock and simultaneously tugs at it. The
commonly-used expression “firm fingertips” does not particularly refer to the texture of the fingertips, but
means that they are being drawn in by the flexor muscles below the fingers, so as to avoid collapsing in
the other direction. The middle phalanx will be simultaneously drawn in, which is perfectly in order, but
we should nevertheless focus solely on drawing in the fingertip, which clings like a gecko to its key. This
avoids the very undesirable situation where the middle phalanx is drawn in but the fingertip is allowed to
collapse. These two joints, however, normally work in tandem. For wide stretches, it is helpful to flatten
the knuckle joint somewhat, whilst still pulling in the middle and end joints.
The drawing of the fingertip towards the player whilst playing and holding a note in slow practice
translates at high speed into a delightful sensation of gliding across the keys. However, if exaggerated, it
reduces efficiency and causes fatigue, partly due to friction occurring when the fingertip is pulled across
the key. It can also lead to an oblique stroke, causing a fuzzy tone. Like all changes in finger shape, it
should be on a small scale, particularly when playing in a close position. (See also p.17)
The thumb behaves differently from the other fingers. It is not raised, but remains close to the keys, in
order to avoid “banging”. Exercises for lateral thumb movements should be practised (see ex.3). There
are easier thumb exercises available commercially (see p.48). Most unevenness in playing is due either to
poor thumb work or to weakness in the outer fingers (4 and 5). The last joint (the tip) of the thumb should
never be bent, as it would then be too wide to fit on the keys. In order to achieve a feeling of uniformity
with the action of the other fingers, we can pull back the thumb knuckle slightly on sounding the tone.

9.
Keeping this joint gently pulled back also brings the thumb into better alignment with the keys.
In playing ascending scales and arpeggios with the right hand or descending ones with the left, the thumb
should be brought under as soon as the second finger plays, and should then wait above its key while any
remaining fingers play. In scales and passages, the thumb should be played more quietly than the other
fingers, again to counteract “banging.”
The combined action of fingers and arm
The finger functions in part like a hook drawing the key towards us, in part like a hammer descending
upon the key, in part like a see-saw with the tip descending and the knuckle rising, and in part as an
extending unit similar to a jack hammer. All these functions occur simultaneously, with the result that the
fingertip strikes downwards and backwards, and the knuckle drives upwards and forwards against the
weight of the arm, which is thereby transmitted to the key by reacting against the finger stroke (see left
hand diagram on p.12). The sequence of the combined action at slow and medium tempo is as follows:
The previous note is held with a certain amount of arm weight resting on the key bed (see p.12). The arm
is supported by the fingers at one end and the upper arm muscles at the other. About a quarter of the full
available weight of the arm rests on the fingertip. In legato playing this “resting weight” remains there
until it is lifted off by the next finger. In non legato playing, the weight is dropped by the finger so that it
falls on to the next finger.
The arm is driven up and forward again by the stroke of the next finger.
The finger momentarily bounces off the key bed, then falls back on to it before the dampers can engage.
This takes place at a microscopic level, which is why it is often overlooked.
The constant support for the remaining three quarters of the arm’s weight by the upper arm muscles is
still present, so that the amount of arm weight resting on the key remains at the same level as on the
previous note.
Held exercises
Correct hand position, which changes for every group of notes or chord (see p.6), should be practised by
means of held exercises. Place the five fingers on the adjacent keys CDEFG with the hand gently arched.
Play each finger alone four times, then in alternating pairs (CDCD etc.).The unused fingers hold down
their keys. Here, the extension of fingers (p.5) is imperceptible, as the hand is so close to the keys. The
playing fingers (except the thumb) are lifted high before striking their keys. The exercise should be
played firmly in a legato or non legato touch, and should be repeated, holding down a variety of different
chords. (See exercise 1). The Leschetizky Method contains many valuable held exercises (see page 48).
As already stated, the finger stroke drives the arm upwards. In legato it falls back down immediately as
the finger rebounds from the key bed. In non legato it remains up, with a moderate amount of weight
resting on the finger which has just played, then bobs down just before the ensuing note, releasing the
weight, which is dropped on to the next finger. The silent held notes take as little weight as possible. This
adds more power to the tone, and avoids stiffness in the wrist. Practising legato demands more work from
the fingers, as no power is derived from dropping arm weight, and because in non legato the hand can
shift slightly during the silences. For this reason, the legato practice is even more beneficial.
Free exercises A common fallacy is to state that “The fingers are all different, but the arm weight is always the same,”
with the implication that we can attain evenness in our playing by using arm weight alone, without
bothering to exercise the fingers. However, as explained on page 4, volume of tone depends on kinetic
energy, which requires a combination of arm weight and finger speed, the latter being achieved by raising
the fingers high and bringing them down smartly. In order to attain an even touch we need to exercise the
weaker outer fingers preferentially, particularly the 4th and 5th fingers, but also the 3rd, due to its

10.
dependency on the 4th, as they share a common tendon. Weakness in these fingers can lead not only to
poorer tone but also to uneven rhythm and uneven articulation, if the fingers are slow to lift off after
playing their notes. Numerous exercises are available for this purpose, an example being Exercise 7 at the
end of this guide. The hand should not sag to this side, but remain arched at the knuckle so as to
counterbalance the arm weight. Sadly, the only technique which many younger pupils ever see is in the
form of scales, which, although valuable from a theoretical standpoint, actually exacerbate the problem of
finger inequality by giving most of the work to the stronger fingers.
The word “free” is not used here in a libertarian sense. It simply means that the unused fingers do not
hold down their keys. They remain comfortably high and gently curved, except for the thumb, which lies
on top of its key. Repeat exercise 1, without holding the keys down, then try exercise 2. These are played
firmly with a legato or non legato touch, using the finger action described on p.4. Begin at mm. = 66 and
gradually speed up with the metronome. At roughly 280 notes per minute, the legato touch will “lift off”
into a non legato. When starting slowly with a non legato, this will lift off into a mezzo staccato, which
will in turn merge back into a non legato at very high speed. The touch can be maintained as a non legato
by applying more arm weight (see below), to counteract the “lifting off”. The held and free exercises
based on particular chords lead to the corresponding scales or arpeggios.
Free exercises yield their maximum benefit when played fast and loud. They should be speeded up to a
point where they become difficult, then gradually increased beyond that. Unless we push the limits, we
are not moving forward. Nevertheless we should also play exercises for a prolonged period at a fast but
comfortable speed, in order to build strength and endurance. This is analogous to the singer, who can
increase her range of high notes, not by constantly singing at high pitch, but by spending many hours
working on notes in the medium range. We practise exercises with alternate hands at each speed, so as to
rest one hand while the other plays. Many exercises do not need to be played with the hands together.
As Neuhaus says, in The Art of Piano Playing, the fingers are our soldiers at the front line, whilst arm
movements and arm weight are the back-up team. The latter are of no value unless the “soldiers” are
properly trained, in this case with finger exercises. Sources of these can be found on page 48.
Non Legato and Legato
There is some confusion of terminology here. The term non legato is associated with a detached or
articulated style typical of the raised finger school. However, it is also sometimes (although not in this
guide) used to refer to the Russian “whole arm” method, whereby the arm is dropped on to the keys at the
beginning of a phrase (see p. 31). Legato (literally “bound” or “joined” notes) means, of course that the
notes are connected seamlessly in a smooth progression. This is the “default” touch of the arm weight
school. In my view, a balanced technique should include both of these touches, with legato predominating
at lower speeds and non legato being the natural touch for faster passages.
The term non legato implies a very brief silence between each note. It is analogous to tonguing on a wind
instrument or playing with separate bows on a stringed instrument. It comes about as a natural result of
lifting the fingers high, unlike staccato, where the notes are deliberately shortened. Passages played non
legato will sound clear and highly articulated at speed. There are many grades of non legato, ranging from
a hair’s breadth of silence to something approaching a mezzo staccato.
In legato playing, each note is immediately followed by the next, with no silence in between. This is
similar to the singing voice, or to slurred playing on a wind or stringed instrument, and is suitable for
playing melodies. It is not suitable for rapid passagework as it lacks articulation. However, it is perfectly
viable, indeed preferable, to practise passagework slowly in a legato touch, using arm weight and a strong
raised finger action, afterwards speeding it up with a metronome. As stated above the touch will “lift off”
at high speed into a non legato. Slow practice in a legato gives the fingers even more exercise than non
legato, where the fingers are assisted by the dropping of the arm during the silence between the notes. In
addition, a non legato played slowly has an awkward, lurching feeling, like trying to run very slowly.
The physical mechanisms for playing legato and non legato are fundamentally different. In legato playing

11.
the sounding of the tone is accompanied by a brief bobbing up and down of the arm, after which the note
is held in a low position, shown by the broken pink line in the first diagram on page 12. In non legato, the
tone is sounded by a swift upward movement and then held in the high position, shown by the solid
blue line. The arm then bobs briefly down and up during the silence between the notes.
The most natural touch for rapid piano playing is non legato. This can easily be established by seizing any
uneducated member of the general public and obliging them to play a few quick notes. When the fingers
are lifted high, their natural alternation results in a brief silence between the notes. There is no point in
forcing oneself to play rapid passages in a legato, as it merely reduces clarity and articulation. Many
concert pianists play non legato most of the time, sustaining the notes where necessary with the damper
pedal, and playing legato only in passages where pedalling is impossible, for example when one hand has
a smooth melody against a staccato accompaniment in the other hand.
In fairly rapid performance a heavy legato touch can be cumbersome, as the fingers feel “tied down” to
the keys. When playing with a light non legato, the fingers feel as though they are dancing upon the keys,
as opposed to crawling along them in the case of legato. In passages with wide intervals between the
notes, arpeggios for example, non legato is more agile, as the hand can skip to an extent across the gaps
during the silences between the notes, instead of stretching from key to key. In this way, the hand can be
much more relaxed. However, for lyrical pieces at a slower tempo, the legato can achieve a more
penetrating tone and greater power of expression.
In practising both touches, we lift the fingers high. This allows them sufficient distance in which to
accelerate, giving greater power, and at speed enhances articulation by creating a short silence between
the notes. It also helps the unused fingers to avoid becoming entangled amongst the black keys. On the
other hand, when taken to excess, it reduces power by forcing the descending fingers to fight against the
upward stretch of the unused fingers, as though in a tug of war. It also causes tension and discomfort,
which distract the player from the fundamental task of interpreting the music.
The role of arm weight
The natural action of arm weight is to pull the hand not only downwards but also backwards, towards the
player, as the upper arms try to fall back to a vertical position. The wrist is drawn down so that the hand
rolls back, resting on the fleshy part of the finger end, rather than the very tip. To counteract this rolling
and the backward pull, the fingertip contracts, pulling the key as though trying to “walk” forwards. This
creates a dynamic equilibrium or stalemate, just as when a dog walks forwards whilst its owner restrains
it by pulling at the leash. The finger drags rather than stabs the key. We can imagine ourselves hanging
from the edge of a skyscraper whilst clinging to the roof with the fingertips. Avoid introducing arm
weight by straightening the elbows and pushing forward into the keys.
The finger pushes the arm upwards and forwards at the knuckle, again to counteract the downward and
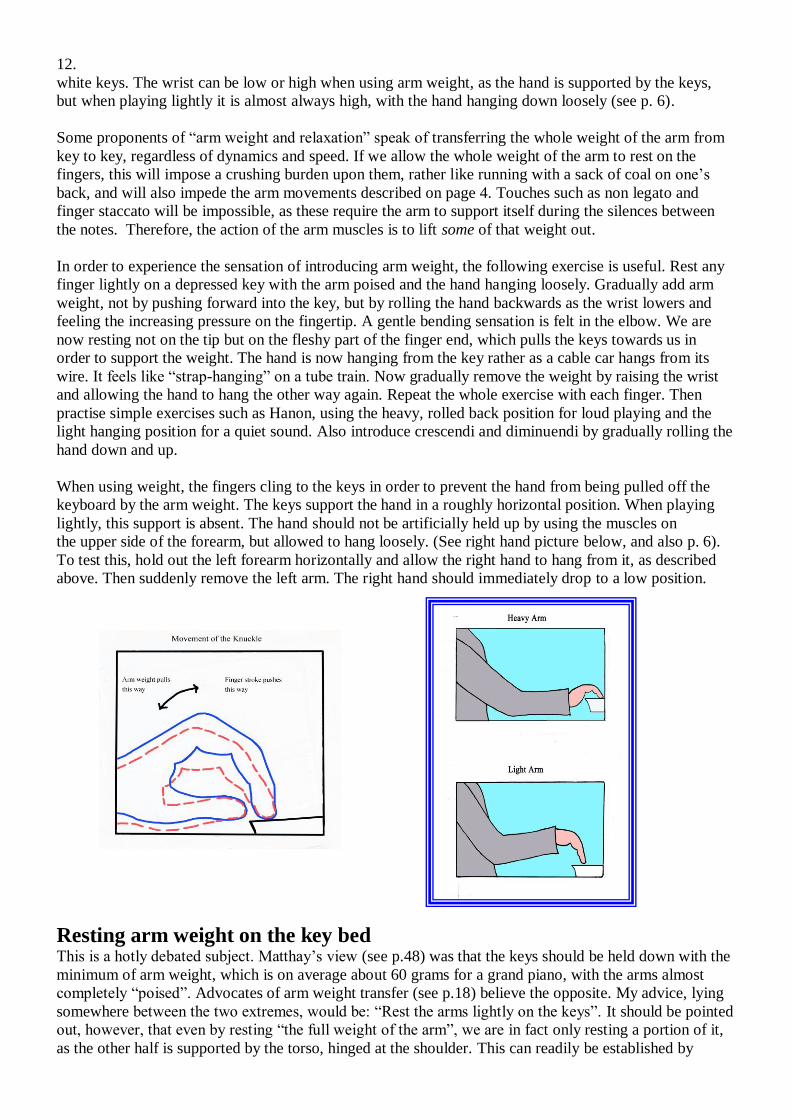
backward roll of the hand. The knuckle moves in an arc, pivoted at the fingertip (see diagram 1, p.12).
The wrist obediently follows in the same direction, but we should think of the action as occurring at the
knuckle, as this is where we execute individual finger movements, as opposed to whole hand movements
from the wrist. Hand movements undermine the independence of the fingers, as all the fingers are moved
at the same time. Nevertheless the wrist must follow the upward trend, so that the forearm and hand are
kept in a relatively straight alignment, supporting the weight of the arm but without arching the wrist.
In order to avoid arching, we relax the wrist down, so that the muscles which would raise it are not used.
It is not held down in an exaggerated or rigid way, and not when playing lightly (see below). However,
we must avoid the amateurish practice of sounding the notes with a downward arm and wrist movement.
The latter should only be used for the very first note of a phrase (see p. 31). We can also move the wrist
up and down in a flexible way whilst retaining a constant level of arm weight. This does not take place on
each individual note, but over a period of several notes, and is completely independent of the finger
action. This flexibility makes it easier to navigate around the keyboard when playing groups of black and
12.
white keys. The wrist can be low or high when using arm weight, as the hand is supported by the keys,
but when playing lightly it is almost always high, with the hand hanging down loosely (see p. 6).
Some proponents of “arm weight and relaxation” speak of transferring the whole weight of the arm from
key to key, regardless of dynamics and speed. If we allow the whole weight of the arm to rest on the
fingers, this will impose a crushing burden upon them, rather like running with a sack of coal on one’s
back, and will also impede the arm movements described on page 4. Touches such as non legato and
finger staccato will be impossible, as these require the arm to support itself during the silences between
the notes. Therefore, the action of the arm muscles is to lift some of that weight out.
In order to experience the sensation of introducing arm weight, the following exercise is useful. Rest any
finger lightly on a depressed key with the arm poised and the hand hanging loosely. Gradually add arm
weight, not by pushing forward into the key, but by rolling the hand backwards as the wrist lowers and
feeling the increasing pressure on the fingertip. A gentle bending sensation is felt in the elbow. We are
now resting not on the tip but on the fleshy part of the finger end, which pulls the keys towards us in
order to support the weight. The hand is now hanging from the key rather as a cable car hangs from its
wire. It feels like “strap-hanging” on a tube train. Now gradually remove the weight by raising the wrist
and allowing the hand to hang the other way again. Repeat the whole exercise with each finger. Then
practise simple exercises such as Hanon, using the heavy, rolled back position for loud playing and the
light hanging position for a quiet sound. Also introduce crescendi and diminuendi by gradually rolling the
hand down and up.
When using weight, the fingers cling to the keys in order to prevent the hand from being pulled off the
keyboard by the arm weight. The keys support the hand in a roughly horizontal position. When playing
lightly, this support is absent. The hand should not be artificially held up by using the muscles on
the upper side of the forearm, but allowed to hang loosely. (See right hand picture below, and also p. 6).
To test this, hold out the left forearm horizontally and allow the right hand to hang from it, as described
above. Then suddenly remove the left arm. The right hand should immediately drop to a low position.
Resting arm weight on the key bed This is a hotly debated subject. Matthay’s view (see p.48) was that the keys should be held down with the
minimum of arm weight, which is on average about 60 grams for a grand piano, with the arms almost
completely “poised”. Advocates of arm weight transfer (see p.18) believe the opposite. My advice, lying
somewhere between the two extremes, would be: “Rest the arms lightly on the keys”. It should be pointed
out, however, that even by resting “the full weight of the arm”, we are in fact only resting a portion of it,
as the other half is supported by the torso, hinged at the shoulder. This can readily be established by

13.
sawing off a human arm and placing it on a weighing scale. It weighs exactly 3.216 Kg. (depending on
whose arm is used.) A less painful method would be to weigh a brick in its entirety, then re-weigh it, placing one end on the edge of another brick, and the other end on the scale. The new reading will be
much lower than the previous one. A problem in the teaching of arm weight is that it is impossible to see
how much weight someone is using. This can be solved by “playing” on the top of a simple kitchen
weighing scale. This may seem a quaint solution, but it is far better than saying “Never use weight” or
“Use the whole weight of your arm.” That would be as good as a recipe which said “Don’t add any sugar”
or “Add as much sugar as possible!”
If we place the palm of our hand on the scale and allow the “whole weight” of the arm to rest on it, the
weight will be roughly 2.5 Kg. If we place one finger on the scale and roll back the hand so as to engage
arm weight, the maximum weight which the finger can comfortably bear will be about 600 grams, i.e.
roughly a quarter of the available weight. The optimum amount of resting weight to use when practising
would be about 300-400 grams. The louder and/or faster the music, the greater the amount of resting
weight. It is significantly more than the minimal weight specified by Matthay, for the following reasons:
Firstly, most of the tone is produced by the finger stroke reacting against the weight of the arm, producing
a sudden “spike” of weight (see p. 16). Therefore the weight needs to be there in the first place, and the
most convenient place where it can be is resting on the previous key. It is true that the finger can also
react against a completely poised arm, by lifting it above the poised level, but this does not provide
much power, particularly at higher speeds, although it is used in leggiero playing.
It may be asked “How can the resting weight act on the new finger if it is already supported by the
previous one?” Again, the answer lies in the physical position of the arm. The new finger lifts it to a
higher level than the one where it is resting. In addition, the previous finger releases the weight.
Secondly, a heavier arm (but not too heavy) bounces better off the key bed, (see below), just as a pebble
bounces better than a feather. This assumes a strong, rapid finger stroke.
Lastly, in non legato playing, we drop (rather than transfer) the weight on to the next note, so, as stated
above, the weight needs to be there in the first place.
If, instead of rolling the hand back, we were to roll it forwards so as to “stand” upon the fingers like
pillars, each finger could bear rather more resting weight. However, in this position the ability of the
fingers to move freely and to react against the weight is greatly reduced, so that we would be using more
weight to less effect. Therefore it is better to hang back rather than press forward. This can be proved by
playing five adjacent notes rapidly up and down in each of the two positions. In the rolled back position
with a low wrist, the volume and articulation are greatly enhanced.
Although we are only using at most a quarter of the available weight, it feels like quite a firm pressure on
the fingertips, due to the fact that it is applied to such a small surface area. Experienced players and those
with naturally strong fingers will be able to support more weight. It should be stressed that using a
great deal of arm weight in conjunction with a very strong finger action is high impact work, which
should be approached carefully. A moderate amount of weight with a comfortably high finger
action is sufficient. It should be added that, as seen in paragraph 4 on page 4, increasing the speed of the
finger stroke is a more effective way of achieving a strong tone than using excessive weight.
We should think of the fingers as the only active members, with the hand and wrist free and flexible but
not actively participating. As stated earlier, movements of the whole hand from the wrist undermine
finger independence, and should be avoided. If we imagine that the finger, from its tip all the way to the
wrist, is a train, then the fingertip is the engine, pulling the train over a hill. We can also think of the
knuckle and finger joints as supporting the resting arm weight. This shifts the attention forwards, away
from the wrist. Above all, we should be aware of the amount of pressure on the fingertip itself.

14.
After the initial exertion of sounding the note, the finger immediately rebounds from the key bed. In
response to this, the finger muscles, knuckles and wrist automatically relax from their exertion and the
arm drops back down. After this the fingertip falls back from its rebound and rests on the keys with the
“resting weight” specified above. This falling back prevents the keys from rising to the point where the
dampers would cut in. As already stated, the rebound and falling back occur on a microscopic scale.
During all these events the upper arm muscles are constantly supporting the other three-quarters of the
arm’s weight, so that the resting weight which falls back on to the new note will be exactly the same as on
the previous note. This is an automatic factor which can be completely ignored. A good way of thinking
about slow practice is to consider that some of the arm’s weight has already been withheld by the arm
muscles and can be forgotten about, whilst the remaining weight is resting on the fingertip. In legato
playing it is then picked up by the next finger, or in non legato dropped on to it during the brief silence
between the notes.
Matthay’s idea that the weight should be deliberately lifted out immediately after the tone has sounded
has left people perplexed as to how to do it. In fact, this happens automatically, for the following reasons:
Firstly, most of the weight is delivered by the finger stroke which reacts against the mass of the arm and
transmits it to the key. Once the finger has completed its stroke the pressure is released.
Secondly, like any object thrown at a surface, the finger and key bounce off immediately. This event
triggers the release of muscular action by the finger and wrist, as explained above.
In other words, the whole process of immediate cessation of pressure and re - absorbtion of weight by the
arm is something we should allow to happen rather than inducing deliberately. Nevertheless, we should
not stifle these processes by holding the arm stiffly. The following exercise aims to avoid this problem:
Place a finger lightly on a depressed key, and add a moderate amount of arm weight by rolling the wrist
back slightly. Strike a key firmly with the next finger. Allow the finger to bounce off the key, then fall
back on, reinstating the resting weight, which remains constant. This will cause the note to be sounded
twice in quick succession.
Repeat the “double hits” with each finger in turn, playing 5 notes up and down, very slowly.
Gradually increase the speed. At about 200 notes per minute, the notes will not be repeated, as the next
finger will begin its stroke before the first one has time to fall back on to the key. The result will be a
passage of mezzo-staccato notes, bouncing from one key to the next.
One misapplication of Matthay’s theory is the idea of trying to “put the brakes on the finger action” in
order to avoid pressing into the key after the tone has sounded. If we allow the finger stroke to follow
through naturally, like that of a tennis player, it will bounce better, so our work will be done
automatically.
When resting weight on the key, the hand does not hang from the wrist. Rather, it hangs from the
fingertip, i.e. in the other direction, with the wrist relaxed and low. The arm is suspended between the
fingertip and the shoulder joint. However, as soon as the arm is lifted from the keys, the hand should hang
loosely down from the wrist again. It should not be held up artificially by the muscles on the upper side of
the forearm, as this causes stiffness.
In non legato playing, the finger begins to lift before the next finger reaches its key, so that the arm is
unsupported for a moment. In response to this, the arm and wrist drop still further, only to be borne up
again by the next finger. This dropping gives added force to the finger stroke. It feels like an aircraft
passing through an air pocket, when the support of the air is suddenly absent, but is then immediately
reinstated. We can also think of wheeling a trolley across a tiled floor. The wheels bob down briefly into

15.
the joins between the tiles. This can first be practised by playing repeated notes with one finger, dropping
the arm between each note. The dropping and picking up is very sudden, like the click of a camera
shutter. The greater the resting weight, the more sudden the transition, as the heavy arm drops faster,
requiring a more rapid pick - up. The dropping should be done only just before the next note, just as,
when jumping, we bob down immediately before the jump, not a long time before.
The dropping is absent in legato playing. Here, the arm is supported by the finger and is then driven
upwards by the stroke of the next finger. It immediately falls back on the rebound, and remains in the
resting position. In this sense it is closer to a “pure” finger touch. As stated on page 10, in slow legato
practice, the “default” position of the knuckle and wrist is “low”. They bob up and down momentarily as
the key is struck. The default position in a slow non legato is “high”. They bob down and up briefly
during the silence between the notes. Nevertheless, in both cases the tone is sounded by a swift upward
and forward movement of the knuckle, and in both cases the arm always pulls down and backwards. The
difference between “low” and “high” is on very small scale, and should not be exaggerated!
In the graphs on p.16, the horizontal lines represent the resting weight, whilst the spikes show the weight
added by the finger stroke. This additional “weight” is really kinetic energy or pressure. The small dip
before the spike is the moment when the arm is dropped just before the note in non legato playing (absent
in legato). The other small dip, after the spike, is the moment when the finger has bounced off the key,
and before the resting weight is reinstated. In the second diagram, the weight acting upon the key just
before and just after the note in all three graphs is zero. At the moment of impact the weight is the same in
each case so the volume will be identical. What differs is the amount of resting weight between the notes,
less in slow playing, higher in fast passages.
By resting some weight on the key we allow the upper arm and back to relax. On the other hand, it places
more strain on the finger muscles, situated below the forearm. This means that, in slow playing, one
finger has to bear a heavy weight for a prolonged period, resulting in fatigue and discomfort. This is why
we lift out the weight when playing very long notes. The muscles of the shoulder and upper arm are
working whilst those of the lower forearm and hand are relaxed, and vice versa, as the upper arm takes
turns with the fingers and hand in supporting the arm weight. This alternation can be practised by rolling
the hand back and forth whilst resting one or more fingertips on the key bed or on any firm surface such
as a table top. It is also interesting to place a finger on the top of a weighing scale, and observe a regular
alternation from almost zero up to half a kilogram.
The arm can work in two different ways. It can be actively involved in sounding each note by adding and
removing weight (wing action, p.28), when playing chords, octaves or accented notes, or it can simply
rest part of its weight on the key beds, when playing passagework. Often however, the two occur together,
as most music consists of a complex mixture of all the above features.
When gradually speeding up a passage we usually begin in a legato touch at roughly 66 notes per minute,
resting weight on the key beds. However, from about 280 notes per minute, the arm no longer rests on the
key beds, but begins to bounce off, just as when someone walking increases their pace and finally breaks
into a run. This causes the touch to change to a non legato. At around 400 notes per minute the bouncing
merges back into a feeling continuous arm weight. The sensation of separate impulses of energy merges,
just as the separate frames of a film merge into a continuous moving picture. This is simply because our
brain is unable to perceive separate events occurring in very rapid succession. In the same way, the finger
stroke pushes the knuckle up and forwards in slow playing, but at high speed the separate knuckle
movements merge into a sensation of continuous gentle arching of the hand. This implies a mild tension
in the hand which is perfectly acceptable, and serves to counterbalance the downward and backward pull
of arm weight. It is not a “Pre-set” tension, but a response to the arm weight, and must be maintained,
especially at the outer side of the hand (4th and 5th fingers) in order to assure an even tone. The transitions
between these different touches are not sudden, as there is a considerable area of overlap where the touch
can be made more or less sustained by adding or reducing weight.

16. Arm Weight and Volume
Arm Weight and Speed
17.
The bounce of the arm is a soft one, cushioned by the elasticity of the whole muscular apparatus, much as
the leg muscles and soft shoes cushion the landing of our feet when running. As when running, part of the
time is spent resting weight (on the key) and part is “airborne”. The whole weight is not suddenly rested,
but is gradually added and then taken away, which accounts for the rounded profile of the third graph of
arm weight and speed.
When playing a melody, there are two alternatives. Normally we use a legato finger touch with resting
weight, literally “hanging off” the long notes. This gives a good deal of “lower noise” caused by the key
hitting the key bed forcibly. The latter consists of a wooden beam with thick felt washers beneath each
key. Alternatively, we can use an arm action (“wing action”, p.28) with little finger movement, lifting the
weight out immediately after the tone by tugging back the arm at the sounding point of the note, when the
hammer leaves the escapement, and before the key reaches its base. In this way a powerful tone can be
achieved with less lower noise and less jarring upon the fingers. It is helpful to think of “lifting the sound
out of the keys”. In more rapid playing, the arm action tends to highlight each individual note, giving a
more forceful, vehement, declamatory effect. The words “pesante” and “leggiero” aptly characterize the
touches with and without resting weight, both from a physical and expressive standpoint.
When the finger reacts against a heavy arm, it transmits more force to the key, hence the amount of
resting weight depends on the dynamic as shown in the first graph. The figures are very approximate, as
any instance of p, mf or f is different. It will be noticed that the amount of resting weight is very small
(the highest being 500 grams) in comparison with the additional weight delivered by the finger stroke (up
to 1 ½ Kg.). Not only the resting weight but also the strength of the finger stroke increases at a higher
volume. The finger stroke and arm weigh balance each other. A light weight can be delivered by
a relatively small stroke, whereas a heavy weight can only be supported and transmitted by a powerful
stroke. In the same way, a very large electrical impulse can only be transmitted by a powerful fuse wire.
The proportions of finger strength and arm weight also vary according to the articulation required. The
stronger the finger action and the lighter the arm weight, the more detached the notes will be. Increasing
the speed also makes the touch more detached. This is why, if we play rapidly using a very light arm, we
can achieve a non legato touch even without energetically lifting the fingers. (See next chapter).
When playing a melody with groups of quicker notes interspersed with long notes, we can introduce
weight by means of a downward wrist movement at the beginning of the quicker phrase, and lift it out
again by using an upward wrist movement at the beginning of the longer note. If the note is not very long,
for example a quaver among semiquavers, it is better to “hang” the weight off the long note, so it is then
available for playing the next note. In the music of J.S. Bach, we can come off the last semiquaver with
an accented staccato and play the remaining quavers with either a finger staccato (p.26) or a “wing action
arm staccato” (p. 23). We then introduce weight at the beginning of the next group of semiquavers and
play these with a finger action, legato in slow speed, non legato at higher speed. The finger staccato
combines easily with the legato or non legato. The arm action is more difficult but merrier and more
vigorous. In general terms, the semiquavers are played with a low wrist, the quavers with a high wrist.
Practising rapid passagework Extended sections of rapid passagework, found in Chopin or Czerny studies, for example, should be
practised with a strong finger action and moderately high resting weight, as described on page 4, but
performed with either a reduced finger action or reduced weight, or both, in order to minimize fatigue. An
important general principle in physical training is that the body should become accustomed to working
beyond the level required in performance, so that the technical demands will then seem so effortless that
we can focus entirely upon the musical message. The lifting muscles tire first, giving a burning sensation
on the upper side of the forearms, which is acceptable in practice but not very desirable in performance.
Playing with a reduced finger action may prove difficult to people who have only ever practised with
strongly raised fingers. Therefore, in the later stages of learning a piece, we can speed up the passage in
the following way: A significant amount of arm weight is still used, as well as a sudden, rapid, decisive

18.
finger action and firm tone. A rounded hand position is still maintained, with no sagging towards the little
finger. However, instead of lifting the fingers high, we start from the surface of the keys, “preparing” the
notes which are about to be played by placing the fingertips on their surface. We aim to generate as fast,
powerful and incisive a finger stroke as possible within this limited distance. Play with a legato touch,
making sure that each note is clear and that a constant thread of tone is maintained as the speed increases,
but without deliberately lifting the fingers high. A good deal of continuous arm weight will be required at
higher speeds. This makes life difficult for the fingers, which are supporting a heavy weight without the
advantage of lift. This process only needs to be done with whichever hand is playing the rapid notes, and
not to excess. Like its opposite, it takes us beyond the requirements of performance. We can now return to
a comfortable middle position, with moderate weight and moderate lift. In doing this form of practice we
are sacrificing something in terms of articulation, volume and incisiveness of touch, but gaining in terms
of speed. Lifting the fingers very high slows us down, as they have to travel further, which of course takes
longer and requires more effort. The notes will be less detached, but this is not very important in Chopin
or Ravel, as the articulation is in any case lost through continuous pedalling. It becomes an issue in the
case of Bach or Mozart, however. Fortunately, their music does not normally require extremes of speed or
endurance, so we can continue lifting the fingers high in performance.
A completely different, almost opposite approach is to keep the lifted finger action but take away almost
all the arm weight, playing with a leggiero touch, using a hanging hand. As the fingers are no longer
supporting weight, they can be released into a less strongly curved shape, which renders them more agile.
The touch is more articulated (detached) as the fingertips can be lifted higher above the keys. Double note
passages require more weight to balance the upthrust of two keys. Also, two fingers can bear more weight
than one. To establish the leggiero touch in slow practice, play five adjacent keys up and down repeatedly
with minimal weight, then gradually roll back the hand slightly, allowing weight to sink in to the point
where the touch is just beginning to feel firm. In this very light environment the fingers strive to make an
impact, biting into the keys like small axes. We should also practise the passagework using the leggiero
touch from the lowest speed, using a non legato with a strong finger action but minimal weight, and a
hanging hand. A greater strain will be felt in the upper arms and back, particularly at low speed, as the
keys are no longer supporting the weight. At a higher speed the “cyclic” finger action as shown in the last
diagram on p. 5 can become more pronounced, with the fingers beginning to bend about two thirds of the
way down, stroking the keys backwards and continuing to bend as they retract. Using the small muscles
in this way can take some of the strain off the larger muscles which move the fingers from the knuckle.
Mixing the close finger touch and the leggiero touch within one piece will add variety to the performance.
The close position gives a smooth, rounded tone whereas the leggiero touch creates a light, feathery
effect. An even more relaxed option is to use minimal finger lift and minimal weight, just enough to
sound the notes clearly. The hand is partially hanging, partially supported by the keys. The fingertips
gently stroke the keys towards the player. There is not a lot of point in doing this very slowly. Begin at
about 4 x 60 in a legato touch, playing quietly but making sure all the notes sound. The touch begins to
lift off into a non legato at roughly 8 x 76. Gradually increase to maximum speed, then play the whole
piece rapidly many times in order to build stamina. (See exercise 2c). With high speed and a light arm, a
clear non legato can be achieved without expending energy on lifting the fingers very high.
Arm weight transfer touch This concept, associated with the “arm weight school”, envisages weight being passed gently from finger
to finger, with the fingers being passive recipients of the weight. “Gravity” is said to be doing the work
instead of the fingers, rather than in partnership with them, so that finger action is minimised. It is
contrary to the central theme of this guide, namely, that the finger stroke produces the tone, by reacting
against the arm’s weight, which is resting upon the previous key (see p.4). Gravity does not make life
easier for the fingers. On the contrary, the more weight we use, the stronger the fingers must be to balance
it. Each finger lifts the arm off the previous finger, thereby bringing its weight to bear on the next key.
This is not a seamless process, as there is a momentary bobbing up and down of the arm coupled with a
rebound of the key (see p.11-17). Nevertheless, it is often helpful to think in terms of “feeling sensations”,
19.
which may be different from the real physical events. The transitions just described are so brief and on
such a small scale that they are scarcely noticeable, so that, in slow legato practice as well as in very rapid
playing, we feel that the arm is being continuously supported by the fingers. From an expressive
standpoint, whilst we are actually playing a series of separate notes, it is better to think instead of a
continuous unbroken melodic line, or “thread of tone,” just as singers do. This will be easier if we
experience a continuous thread of arm weight being passed between the fingers. Similarly, when
walking, we can focus on smooth forward motion rather than on individual footsteps, although this does
not mean that we do not need to lift our feet up.
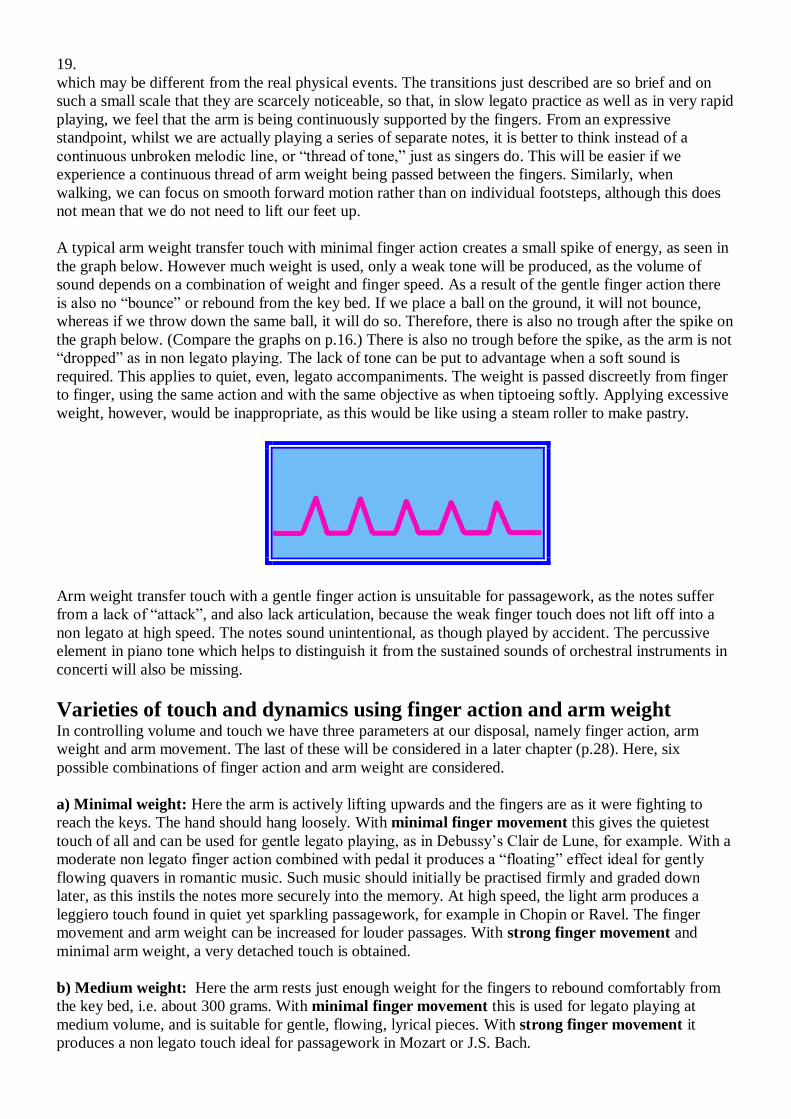
A typical arm weight transfer touch with minimal finger action creates a small spike of energy, as seen in
the graph below. However much weight is used, only a weak tone will be produced, as the volume of
sound depends on a combination of weight and finger speed. As a result of the gentle finger action there
is also no “bounce” or rebound from the key bed. If we place a ball on the ground, it will not bounce,
whereas if we throw down the same ball, it will do so. Therefore, there is also no trough after the spike on
the graph below. (Compare the graphs on p.16.) There is also no trough before the spike, as the arm is not
“dropped” as in non legato playing. The lack of tone can be put to advantage when a soft sound is
required. This applies to quiet, even, legato accompaniments. The weight is passed discreetly from finger
to finger, using the same action and with the same objective as when tiptoeing softly. Applying excessive
weight, however, would be inappropriate, as this would be like using a steam roller to make pastry.
Arm weight transfer touch with a gentle finger action is unsuitable for passagework, as the notes suffer
from a lack of “attack”, and also lack articulation, because the weak finger touch does not lift off into a
non legato at high speed. The notes sound unintentional, as though played by accident. The percussive
element in piano tone which helps to distinguish it from the sustained sounds of orchestral instruments in
concerti will also be missing.
Varieties of touch and dynamics using finger action and arm weight In controlling volume and touch we have three parameters at our disposal, namely finger action, arm
weight and arm movement. The last of these will be considered in a later chapter (p.28). Here, six
possible combinations of finger action and arm weight are considered.
a) Minimal weight: Here the arm is actively lifting upwards and the fingers are as it were fighting to
reach the keys. The hand should hang loosely. With minimal finger movement this gives the quietest
touch of all and can be used for gentle legato playing, as in Debussy’s Clair de Lune, for example. With a
moderate non legato finger action combined with pedal it produces a “floating” effect ideal for gently
flowing quavers in romantic music. Such music should initially be practised firmly and graded down
later, as this instils the notes more securely into the memory. At high speed, the light arm produces a
leggiero touch found in quiet yet sparkling passagework, for example in Chopin or Ravel. The finger
movement and arm weight can be increased for louder passages. With strong finger movement and
minimal arm weight, a very detached touch is obtained.
b) Medium weight: Here the arm rests just enough weight for the fingers to rebound comfortably from
the key bed, i.e. about 300 grams. With minimal finger movement this is used for legato playing at
medium volume, and is suitable for gentle, flowing, lyrical pieces. With strong finger movement it
produces a non legato touch ideal for passagework in Mozart or J.S. Bach.

20.
c) Heavier weight: Resting weight of about 400 grams combined with a strong, decisive finger action is
the normal touch for practising all passagework. As the speed is increased, it forms a continuous
“blanket” of weight which is needed in order to counteract the upthrust of the keys in rapid playing. At
high speed it serves to maintain a firm non legato, as the touch would otherwise lift off into a feathery
mezzo staccato. Josef Gat in “The Technique of Piano Playing” (see p. 48) explains this phenomenon in
terms of the number of keys played per second. If we imagine that each key has a nominal weight of 60
grams, in slow tempo we may only play say two notes during a four second period, with an upthrust of
120 grams. In rapid tempo, we may play fifty notes during the same time frame, and our fingers find
comfort beneath their “blanket” of arm weight as they grapple with a daunting upthrust of 3 Kilograms.
One could say that the many little springs of upthrust form a “mattress of resistance” against the weight of
the flexible blanket. This may sound fanciful, but it is the best way I can find to describe the sense of
equilibrium which we aim to achieve. At very high speeds, the fingers need to maintain firm contact with
the keys in order to ensure a secure performance. Like a speeding vehicle, we need “enhanced road
holding capability”, and the weight provides this. When used with minimal finger movement at high
speed, the 400 gram resting weight creates a warm legato. With strong finger movement it gives a
powerful and brilliant non legato touch used in virtuoso passagework. Playing in this way can easily lead
to fatigue, especially in prolonged periods of continuous passagework such as we find in Czerny studies.
In this case, we can divide the music into shorter phrases, beginning each phrase by dropping arm weight
on to the first note with a downward wrist movement, and ending the phrase by lifting out the weight and
allowing the hand to hang. The phrases can be gradually lengthened, until we are only taking a short
break at the end of each page or musical paragraph. We can also use “adding notes”, where we begin a
passage with just one note, then the first two notes, then three, four notes and so on, so the phrase
becomes longer each time. Each addition is played in the same way as in the method described above.
When playing continuous passagework, as in some Baroque music, expressive crescendi and diminuendi
can be introduced by increasing or decreasing the amount of arm weight by rocking the hand backwards
or forwards. The three levels of arm weight described above can be practised by playing simple patterns
such as CDEFGFEDC many times, or using Hanon studies (see p. 48), varying the weight each time. For
example, a phrase could be played twice with position (c), twice with (a), alternating, the quiet repeat
being like an echo. Then, twice with (a), twice with (b), twice with (c) and back again.
Varying the strength of finger action Finger action can be modified according to the expressive needs of the music. For extremely loud
passages, or for a very detached, articulated sound, the finger action is emphasised. This produces an
effect of vehement intensity in loud music, and of timidity in quiet passages. For cantabile melodies, arm
movements (“wing action”, see p.28) can be used, together with relaxed fingers which remain quite close
to the keys. A powerful tone can be attained in this way without energetic finger work. A somewhat
restrained finger action is used when performing passages requiring a great deal of endurance (but not
when practising them), as it leaves some strength in reserve (p.17). Extremely gentle broken chord
patterns used in accompaniments, or, for example, in Beethoven’s so-called “Moonlight” Sonata, can be
played in the following way: the fingers hardly move, remaining in contact with the keys. The wrist
moves in circles, which tend to be anticlockwise for the right hand or clockwise for the left hand,
irrespective of the direction of the melody. However, the hand remains horizontal in a lateral plane, and
does not rock from side to side. Even in such an extreme case, the music should first be practised firmly,
with raised fingers, as this instils the notes securely into the memory. In very quiet, furtive playing, we
use minimal arm weight with a hanging hand. The fingers are still lifted high, but the down stroke is
restrained. The “restraint” does not denote an abandonment of hand position or a relaxation of the fingers.
They are raised high, but come down in a careful manner, as though “tiptoeing” on the keys.
Dynamics depend upon contrast. Your loud is as loud as your quiet is quiet. Practising at maximum
volume is of great value from a technical standpoint, in building strong fingers and acquiring a sure
knowledge of the notes, and should certainly be done, but it is also vehemently anti-musical. Audiences
will be beguiled and entranced by soft tones, yet merely repelled by a show of force. People who have
21.
only practised loudly will find that, when they are obliged to play quietly, their touch will be uneven,
sometimes missing notes, as their fingers have become desensitised. They should then devote a
significant amount of time to practising quietly, preferably on a “loud” instrument, developing a feeling
for the minimum effort needed to sound the tones. Playing at medium volume is easy, so we should
devote ourselves to working on the extremes. Above all, we should avoid following the example of
egotistical pianists whose sole aim is to play as loud and fast as possible. Nevertheless, quiet playing
should come from discretion and restraint rather than from weakness.
Accents For an accent to stand out, the surrounding notes need to be much quieter, therefore we use a moderately
light arm, but with a level hand, as a hanging hand would not be able to deliver the accented notes. If we
are playing a passage of even semiquavers, and wish to accent, say, the first of every four notes, we use a
strong downward finger stroke on the accented note. This drives the knuckles upwards, reacting against
the weight of the semi-poised arm. In slow practice this may cause a “double bounce”, which can be
allowed to happen. The other notes are played with the same moderately light arm but with a much
weaker finger action which fails to engage the weight. For a very strong accent we can add an upward
wrist movement on the accented note, although this runs the risk of disturbing the rhythm as the note after
the accent will be delayed until the wrist has fallen back down. For a particularly strident accent, even on
a single note in passagework, it is possible to use a whole arm movement (wing action, p.28), again
playing the unaccented notes with fingers only.
If we are sustaining the accented note and playing the other notes below or above it with the same hand,
as an accompaniment, the sustained note is accented as above then held with a good deal of resting
weight. Doing this “deprives” the other notes of weight, as it is resting on the sustained note, so that they
are played purely with a finger touch. These technique can be practised using exercise 4, or Dohnanyi
exercise 12 or Joseffy exercise 1 (see p.48).
The accent can be further enhanced by playing only the accented notes, and “shadowing” the other notes,
playing them on the tops of the keys, without sounding. Scales and passagework can be practised with
accents every 3 or 4 beats, in order to obtain an even tone. All work with accents should be started very
slowly and speeded up gradually with a metronome. It will be noticed that the fourth and fifth finger need
more practice in bearing the force of an accent than do the other fingers. Some exercises are designed
specifically to train these fingers (see exercise 7). Accenting of single notes in passagework is not very
common in real music. One example would be the Rondoletto from Stravinsky’s Serenade En La. A
much more important use of accents is in emphasising melodic lines (see next section). For accents on
isolated notes or chords, see page 32.
Emphasising melodic lines
This is perhaps the most vital aspect of piano playing, as it makes all the difference between a dead
performance and one infused with life and beauty. It is achieved by applying a stronger finger stroke and
more resting weight to each note of the melody, whilst executing the accompaniment with reduced action.
Alternatively, arm movements may be used to emphasise the melody notes, especially if they form the
upper notes of chords, or for very long notes, where resting weight would be uncomfortable. Where there
are very big lateral stretches, requiring a straighter finger position, the arm action is also preferable. This
is because the straighter fingers are unable to support a great deal of arm weight.
It is often the case that both melody and accompaniment notes occur in the same hand (usually the right),
with the melody notes most commonly assigned to the third, fourth and fifth fingers. Special exercises
should be used to develop these fingers (Ex. 7). In Exercise 4, the crotchets are played with a strong
finger action and resting weight, whilst the other fingers “shy away” from the accompaniment notes,
using less finger action and very little resting weight. By resting the arm’s weight on the melody notes we
can lift it away from the accompaniment notes by shifting the “centre of gravity” away from them, just as
one can stand on one leg in order to take weight off the other. Each finger playing a melody note reacts

22.
against the arm weight resting on the previous melody note, with the accompaniment fingers being, as it
were, “bystanders” to the whole process. This can be practised by playing the melody notes legato, f, and
the accompaniment notes staccato, pp. The staccato notes are not bearing weight as they are not resting on
the keys, so the full weight is borne by the melody notes. The same technique can occasionally be used in
performance, as follows: Just as a quiet accompaniment sets off a relatively loud melodic line, so a
detached accompaniment (non legato or staccato) sets off a smooth melody by contrast. Such an
accompaniment resembles a cat padding across a soft carpet. It could also be likened to pizzicato strings.
We can also use the technique of “shadowing”, where we play the melody notes strongly but “pretend”
the accompaniment notes by playing them silently on the surface of the keys. In doing so we are, of
course, using zero resting weight for these notes. In addition, double note exercises should be practised,
accenting either the upper or lower voice and playing the other voice quietly. In particular, it is advisable
to emphasize the “outer” voice, played by the 3rd, 4th and 5th fingers. See exercise 5a.
The inward rotary movement which is part of the “wing action” (p.28) is at first difficult to apply to the
fourth and fifth fingers, and should be practised using exercise 7. In cases where a singing melodic line is
supported by an arpeggiated accompaniment , also in the right hand, as in Schubert’s Impromptu
Op. 90 no. 3, the melody notes are approached with a sudden outward rotary movement, which turns
inward just as the note is sounded. The wrist moves diagonally upwards and right, glancing off in an
arc to the left as the note is sounded. This is much easier than using resting weight on these long notes.
Where a melodic line is played in octaves or chords, it is often desirable to emphasize the top notes of the
octaves or chords above the rest of the notes. In such cases, a stronger singing tone can be achieved with
less effort by using an arm action (“wing action”, p.28) than by finger work. This will normally create a
non legato effect, which can then be sustained by means of the pedal.
Contrapuntal music Here, the same method outlined above is used to highlight a particular voice in a contrapuntal texture,
with two or more voices occurring in one hand. A fundamental rule of counterpoint is rhythmic
independence, so that one voice moves while another sustains a note. This gives rise to two possibilities:
Firstly, a loud note may be held whilst quicker notes are played quietly by the same hand. Doing this is
relatively easy. We simply accent the sustained note and then “hang” the arm from it, which takes the
weight off the other fingers.
The second possibility is more challenging, and should be given special attention. Here, a quiet note is
held whilst quicker notes are played loud in the same hand. The sustained note is held with minimal
weight so that all the weight is available for accenting the quick notes. It is very important that when
playing the quicker notes we do not “dig” into the sustained note. This would substantially reduce the
impact of the quicker finger strokes. The quiet note is played with an upward wrist movement and
hanging hand coupled with a weak finger stroke. For the loud notes we introduce arm weight by
“dropping” the arm on to the first one and playing the others with arm weight and a strong finger action.
This is identical to the way in which we play phrases (p.31) Practising exercises designed in this way is
one of the best means of achieving true finger independence. (Exercise 4 reverse option and exercise 6).
In some fugues, even the “quicker notes” are very slow! Here, it is preferable to use arm action rather
than resting weight in order to emphasise the fugue subject, as it is uncomfortable and inefficient to rest
weight on a finger for a long period of time.
Tone colour The tone colour of a performance is of great importance in determining its appeal to the listener. Much
that is said about the tone colour of particular pianists is probably spurious, as it depends to a large extent
upon the instrument itself, the acoustics of the auditorium and also upon recording techniques. As far as
the musical component of the tone is concerned, the only relevant factor is the speed of key descent at the

23.
moment when the escapement action releases, which is about two thirds of the way down. This
determines the volume of tone, which also affects the timbre. Quiet playing gives a more mellow sound
whereas loud playing creates a brighter tone with more upper partials.
However, the noise component is more within our control. This constitutes a surprisingly large proportion
of the overall sound, as anyone can discover by removing the action from their piano and using it as a
“Dummy keyboard”, or by playing on an electric keyboard which is switched off. Normally the noise is
masked by the musical sound, but when the latter is absent it becomes clearly audible. It can be divided
into high-pitched “upper noise” caused by the fingers (and sometimes the nails) striking the key surface,
and lower-pitched “lower noise” (a dull thud) which happens when the keys land on the felt pads beneath
them. The lower noise is considerably amplified by the body of the instrument. Given that the force acting
on the keys is a combination of weight and speed (p. 4), we can achieve the same amount of key speed,
therefore volume of sound, either by using a rapid, high finger action with little weight, or a slower finger
action close to the keys with a good deal of weight. The former will hit the keys surface hard, producing
upper noise, and will then experience a braking action from the key, finally landing quite softly on the
key bed (see p.17 paragraph 2). The latter will have zero speed at the key surface, and will accelerate
through the key’s descent, landing hard on the key bed and producing lower noise. In other words, a light
arm with raised finger action gives a bright tone, whereas arm weight with a close finger action gives a
more mellow sound. This makes sense in musical terms, as we use raised fingers for sparkling
passagework and arm weight for gentle melodies. The noise lacks the sustaining power of the string tone,
and is mainly confined to the “Starting transient” of the note. However, lower noise can be captured by
the pedal, leading in fast playing to a continuous “Roar” of background sound. Some people with find it
unromantic to describe tone colour in terms of “noise”, but it seems to be the only rational explanation.
Chords hit from above have a harsh sound due to the preponderance of upper noise. As regards other
types of passage, the listener’s perception is influenced, both in terms of tone colour and expression, by
subtle gradations and fluctuations of dynamics, both in a linear (melodic) sense and vertically, within a
texture. These are best achieved intuitively, by imagining the effect which we wish to achieve. One way
to do this is to mentally “orchestrate” the texture, ascribing one phrase to the ‘celli, another to woodwind
and so on. In this context, a hammered touch with raised fingers is suggestive of percussion instruments,
whereas a legato with fingers close to the keys is akin to slurred playing on wind or stringed instruments.
Here, the musical concept leads and the technique falls automatically into line. As often happens in
artistic matters, a coalition of instinct and intellect achieves the best result.
Staccato Staccato with wing action. Like sustained notes, staccato notes can be driven from the shoulder using the “wing action” (p.28), or
from the fingers or hand. To state the obvious, there is no resting weight, as the tone ends immediately.
Staccato represents the simplest form of the wing action, since the initial backward movement is omitted.
It consists of just two movements, forwards and back. These are shown in the diagrams on page 24. For
this reason, it is advisable to become familiar with playing staccato before learning the full wing action
with sustained notes. No distinction is made here between staccato for single notes and that used for
octaves and chords. The action is exactly the same, except that with single notes there is an additional
element of finger movement.
At a slow or medium pace, we “prepare” the note or chord by placing the fingers on the surface of the
keys to be played. In this case, we may not begin with the forward thrust as in the normal staccato, as the
fingertips would simply dig in to the keys. Therefore we must first “reverse out” as in the first prepared
staccato diagram (p.25), in the same way as a car reverses out of its parking place before proceeding
forward. The prepared staccato action is very similar to the wing action for sustained notes except that,
having played the note, the finger, instead of holding the key lightly, leaves it immediately and moves to
the surface of the next key to be played. At a slightly higher speed the preparation feels like playing an

24. Staccato with Wing Action
Starting position. The arm is
back and the wrist high, with
the hand hanging loosely, but
in position above the keys to
be played.
The arm straightens at the elbow,
so that the forearm is pushed
forwards, throwing the hand
upwards. The hand is not
deliberately raised, but is thrown
by the arm.
The elbow bends and the
forearm is pulled back, causing
the hand to descend rapidly,
striking the key, after which it is
snatched away immediately,
resuming its hanging position.
There is no deliberate movement of the hand or fingers. They are thrown.
The forearm moves forward and backward rather than up and down.
The forward and backward movements follow in immediate succession.
The elbows also move slightly outwards as the note is sounded.
Even in slow tempo, the action is very sudden.
There is a feeling of plucking the notes from the keyboard.

25.
Prepared Staccato Notes and Chords with Wing Action
The fingertips prepare the note or
chord by touching the surface of
the keys to be played. The wrist is
held at a moderate height, with the
hand as relaxed as the stretch permits.
The elbow pulls back suddenly,
lifting the wrist higher, with the
hand hanging loosely, but still
forming the shape of the chord.
The movement sequence is the
same as the wing action.
The forearm pushes forwards and
the wrist falls, throwing the hand
upwards. The hand is not lifted
deliberately. It is thrown by the arm.
The elbow pulls back again, and
The elbow pulls back again and
the wrist rises, causing the hand
to descend rapidly, sounding the
chord. The wrist continues to rise,
releasing the key, and moving as
fast as possible to prepare the next
chord, as in the first picture. 26.

26.
interim note on the surface of the keys, half - way between the real notes, so that there is a sensation of
“double tempo”. At about 180 beats per minute the preparation becomes impossible, and we revert to the
normal staccato. However, we still “prepare” the fingers in the air, vertically above the notes to be played.
In the case of chords, we form the shape of the chord in the air with our hand. At high speed the hand
flutters close to the keys, and the touch feels very relaxed. Rapid octave passages are always practised
with a wrist staccato (p. 27). However, at a slower tempo, sustained chords and octaves can also be
played very effectively using the wing action.
Finger staccato The wing action staccato is the most suitable for slow and medium speeds, but cannot be used at a high
speed. Here, finger or wrist staccato is used. A leggiero non legato touch with very little weight and a
strong finger action approaches a mezzo-staccato effect. For a true staccato, we need to focus our
attention on the retraction of the finger, which is very rapid and takes place immediately after the
sounding of the tone. It is carried out using exactly the same finger action as in the diagrams on page 5,
except that the finger immediately rebounds into the air instead of lingering on its key. Whilst in
sustained playing the hand is supported in a horizontal position by resting its weight on the key bed, in
staccato playing it is allowed to hang limply from the poised arm. For a very crisp dry staccato, however,
we need to lift the hand and keep the wrist low, although this is not a comfortable playing position.
For a stronger tone, arm weight can be added by lowering the arms slightly so that the finger engages the
weight of the poised arm by pushing up the knuckles and wrist momentarily upwards as the tone is
sounded. Again, the impetus is felt to come from the finger rather than from the wrist muscles.
Immediately after playing the note, and whilst the wrist is still rising, the finger retracts sharply, lifting at
the knuckle. It may bend slightly as it rises, but do not flick it backwards. Here again, the arm supports its
own weight during the silences between the notes and the hand hangs loosely. As the speed increases, the
arm is simply “bounced” from note to note by the strong finger strokes. As stated earlier, the hand should
not be artificially held up during the silences, as this can lead to stiffness. This problem can be avoided in
two ways. Firstly, at a low speed, we “prepare” the next note by placing the fingertip on the surface of the
key to be played, as in the wing action staccato above. The upthrust of the key at surface level is
sufficient to support most of the hand’s weight, taking the strain off the upper forearm muscles. The rest
is supported by partially “hanging” the hand. During the preparation, keep the knuckles fairly low and
allow even the other fingers to rest close to their keys instead of lifting them high. In this way we can
develop the rapid reflex of action and retraction without risk of stiffening the arm. The prepared finger
staccato follows exactly the same arc of movement as the legato finger action, but the fingers rest on the
key surface instead of the key bed, and the unused fingers are not lifted high (See exercise 10).
Secondly, we can introduce an element of the wing action, yet without any impetus from the shoulder. At
the moment of sounding the tone, there is a sharp bending of the wrist (upwards) and the elbow, as
though “snatching” the tone from the keys. The hand leaves the keyboard not vertically but somewhat
angled towards the player. Afterwards, the elbow is immediately relaxed again as the hand falls back on
to the keys. The sudden finger stroke causes the hand to be rocketed into the air, wrist uppermost. The
hand then rises, catching up with the wrist, and both fall in a more or less straight alignment, so that the
next finger lands softly on the surface of the next key. This method can only be used when employing an
extending finger action, as shown in the finger action diagrams.
The “preparation” can only be done up to a speed of about 180 beats per minute, after which the hand and
arm begin to bounce off the keys. This is a similar speed to the cut - off point when using preparation
with the wing action. The wrist movement gradually decreases as the speed is raised, and becomes
imperceptible at around 4 x 100, being replaced once again by a continuous transfer of arm weight. At
this point, the touch can no longer be regarded as staccato, having merged into a non legato. This is a
good touch for practising brilliant passagework, as it combines strength, elasticity and a highly articulated
sound. It can also be used for practising fingered octave passages and double note exercises. For greater
power, we can increase the element of wing action at low speed as follows: Instead of sounding the note
directly from the surface position, we can prepare then lift off as in the diagrams on page 25.

27.
The finger staccato can also be applied at full speed using adding notes and groups (see p.43). It is applied
only to the last note of each group, which is sharply accented and flies off into the air with the wrist
strongly raised. It may be necessary to lengthen the silence between groups owing to the high “orbit” of
the hand. Finger staccato can be practised on a springy surface such as the top of the piano stool (p.38).
Wrist staccato
Whereas the wing action staccato is driven from the upper arms, with the hand and wrist entirely passive,
the wrist staccato is the other way round. For crisp, dry staccato octaves, the arms are kept still and
poised, and the hand moves swiftly down from the wrist and immediately up again. It is held in a high
position until the next note. In the initial stages of practice, the forearm can be supported and held still by
resting it on the upturned palm of the other hand, near the wrist. This way of playing staccato uses the
muscles situated below and above the forearm, which move the hand down and up respectively. The
upper muscles, which are working against gravity, tire quite quickly. Therefore, if the staccato does not
need to be particularly crisp, we can use a more relaxed method, which does not involve these muscles.
Here, the only active movement is a downward hand movement from the wrist, driven by the lower
muscles. The arms hang loose and passive, with a certain amount of arm weight which is bounced from
the keys. The upward hand movement is entirely involuntary and is the natural consequence of the hand
bouncing from the key whilst the arm drops.
The following technique can be practised first with five fingers on the adjacent keys CDEFG, then on a
three note chord, and finally on two notes a sixth apart, followed by an octave apart. Using five keys
facilitates the “bounce” of the hand, due to the increase upthrust of numerous keys.
Place the fingertips on the surface of the keys with the wrist a little high and the hand sloping gently
toward the keys. Play the notes staccato with a rapid downward hand movement (upward wrist
movement). Leap straight to the surface of the next keys to be played (which may be the same keys or
different ones), and wait there, “preparing” the notes. During the ascending part of the leap the wrist is
arched upwards, but then falls back of its own accord during the descent, so as to land on the next key
in the original alignment once more. The fingertips remain close to the keys during the leap. Repeat the
whole process for every note. This action resembles a frog jumping among the water-lilies. Gradually
speed up the passage using a metronome. At about 2 x 80 notes per minute it will become impossible to
prepare the notes, and instead the fingers will “bounce” from key to key. A natural “cruising speed”
where the hand bounces readily occurs at around 4 x 80 notes per minute.
We play on the fingertips, but the fingers are not particularly tense. In octave playing, the second, third
and fourth fingers are completely relaxed and lie flat on the surface of the keys. The 5th finger (or 4th on
black keys) and thumb are firmer but not excessively tense. The wrists are slightly high. The arms have a
“hanging” feel, loose and relaxed. When using five fingers together as above, the bounce can be felt
through the whole body including the trunk and head, and particularly in the back of the neck.
The hand is not lifted high off the keys, indeed these barely rise to surface level. As already started, there
is no conscious lifting of the hands, the only voluntary movement being the downward one. The still,
poised arm of the first method (paragraph 1) would not allow the hand to bounce from the keys, as there
would be no weight available to bounce. The second method uses moderate weight and a flexible arm.
Octaves can be practised first on a single pair of keys repeated many times, then as a scale. I like to use
the fourth finger for black keys, although people with small hands may find that the stretch creates
tension, in which case they should use the fifth all the time. The fifth has some disadvantages on black
keys, however. It is thin and can miss the key. Also, it is necessary to move the hand forward every time a
black key is played, whereas the longer fourth finger can reach the key without moving forward.
Wrist octaves can be played quickly, but may be tiring when used for extended passages. We should use
the wing action for long stretches of repeated chords or octaves at moderate speed. The wing action is

28.
also better for heavy, thundering octaves. In order to reduce fatigue, passages or scales using wrist
staccato can first be practised in groups of two or three notes separated by rests, then the groups can be
increased in length. A little rocking back and forwards from the hips will help to keep the arms loose.
As the fingers remain very close to the keys, the lateral moves from note to note need to be very tidy. We
can approach this problem gradually either through slow practice or by playing three hits on each note
(without rests), then scaling back to two hits and finally one. In this way we are practising the wrist action
rapidly but have more time to think about the lateral moves.
Touch changes related to speed
It will be noticed that in many of the above examples, the characteristics of touch change as the speed
increases, rather like the gear changes of an accelerating vehicle. A basic principle in practising any
music is to start slowly and gradually increase the pace. Therefore, we should select an appropriate type
of touch for each speed change. For example, passagework may be practised slowly in a legato touch with
resting weight, then at medium speed with a “bounced” non legato touch, and at high speed with
continuous transfer of arm weight, also in a non legato. In this case, we should emulate the horse, which
passes through four distinct movement species as it accelerates: it walks, trots, canters and gallops. All the
different touches should be mastered by practising exercises, so that they can be drawn upon as and when
required. Having done this, we should not regard them as stock formulae to be applied in a mechanical
way, but should adapt them imaginatively to the needs of the music, rather as artists draw upon the
colours in their palette.
As a general principle, the amount of visible movement decreases as the speed increases, just as a ball left
to bounce freely will gradually bounce more and more frequently but less and less high. The height of the
initial bounce sets a certain speed of travel, and as each bounce gets lower it is able to complete the
distance in less and less time. In the same way, we need to increase the distance travelled by the fingers or
wrist in slow practice in order to attain the necessary speed of movement for velocity playing. This means
using a high and sudden finger stroke in slow practice.
The larger the body mass involved in playing a note, the slower will be the speed at which it can operate.
For the playing of very slow, powerful chords, pianists sometimes use their whole body including the
torso. At a slightly higher speed, for example when playing strong repeated chords, we may feel ourselves
rocked backward and forward on the seat, so that the knees can be seen to move. As the speed increases
further the arms but not the torso will be seen to move. At a still higher speed, only the fingers and hands
are active, and, at maximum speed, only finger movement is apparent.
Technique and expression Sometimes students are criticized for a lack of expression in their playing. This may be due, not to some
personality defect, but because their technical method is preventing them from achieving variety of touch
and dynamics. For example, using the whole weight of the arm the whole time will result in a dull and
leaden effect. On the other hand, pianists who always use an absolute minimum of arm weight will sound
silly and effete. Whilst lifting the fingers high is important when practising passagework, there are those
who carry this feature into the performance of smooth, gentle music, giving an impression of aggressivity.
People who never lift up their fingers, however, will lack the strength needed to realize the passionate and
furious climaxes of Romantic music or the glittering brilliance of Mozartian passagework. Many of these
problems are due to teachers who take some aspect of technique which is perfectly valid within a limited
context, but misapply it across the whole spectrum of piano playing, or who fail in their teaching to
distinguish between practice methods and the art of performance.
Wing action for chords and octaves There are two main types of action in piano playing, namely a finger action for passagework, described
above, and an arm action for chords, octaves and accented notes, which I have named “Wing Action”

29.
due to its similarity with the wings of a bird in flight. There are some fundamental differences between
the two techniques. Most importantly, in slow practice of the finger action, the arm is moved passively
and as a unit, hanging between the knuckles and the shoulder. In the wing action, it moves actively, in a
sequential wave motion.
The wing action is illustrated in the diagrams on page 30. Here the arm supports most of its own weight,
poised in a state of dynamic equilibrium between the uplift of its muscles and the downward pull of
gravity, ready to give either downwards or upwards according to need. The wrists, elbows and shoulders
are loose and free. The movement of the arms is a flexible one, with the upper arm descending first,
followed by the forearm, the hand, and finally the three joints of the finger, one after another. Likewise,
on the upstroke, the upper arm rises first, followed by the forearm and then the hand and fingers, in a
continual smooth cycle of motion. This can be practised in the air, away from the piano, then as staccato
chords up and down the keyboard. The notes are sounded at the lower end of the cycle, at the point where
the wrist begins to rise but the hand is still falling. Due to the delayed action, by the time the downward
movement reaches the fingers, and the tone is sounded, the wrist and forearm are already rising.
However, it is more helpful to think of the forearm as moving forwards and backwards, rather than down
and up. As shown in the diagrams, the forearm moves forward and slightly downward as the hand rises,
and backward as the hand falls. The wrist and elbow bend at the same time, and it is at this time that the
note is sounded. In staccato playing there is a simple forward / backward movement. In playing sustained
tones there is also an initial anticipatory backward movement (second picture), as the hand is removed
from the key in a hanging position. This initial stage does not always need to be executed deliberately, as
it will tend to happen automatically. The pushing forward (third picture) gives rise to a feeling of the arm
“digging under” the hand. The pull-back is like a “scooping out”.
There is also a slight rotary movement of the arm. During the very brief push forward there is an equally
brief turning outwards of the arms (right arm clockwise, left arm anticlockwise). This is immediately
followed by a turning inwards as the arm pulls back and the note is sounded. The two opposite rotations
are felt as a single rapid flick. The elbow moves outwards slightly as the tone is sounded. In other words,
the upper arm lifts sideways. The action can be practised on one’s lap, first standing then seated. The
upper arm bobs down just before the note and rises on sounding it. The upward and downward hand
movements are not deliberate. It is thrown up and down by the arm movements. This means that, even in
slow tempo, the wing action can only be executed as a sudden, rapid movement. In slow motion, there is
insufficient “G force” to throw the hand, and it would have to be deliberately lifted by the forearm
muscles. These muscles are not used in the wing action, which uses only the muscles of the upper arms,
chest and back, in the same way as when sawing wood or rowing a boat.
The idea of using three separate movements in playing a single note may seem overcomplicated and
unnatural. Yet it is almost identical to the simple act of throwing a ball. Examples of a forward thrust
followed so closely by a backward tug that the two are two are fused into a single act include such
civilized pursuits as snatching and punching.
Most of the time, the wing action is extremely miniaturised both in space and time, being but a
momentary twitch of the arm. It is the visible manifestation of a wave of kinetic energy travelling very
rapidly down the arm towards the keys, creating a momentary impact, after which the weight is
immediately lifted out. A similar type of chain reaction can be found in the movement of a whip.
From the observer’s point of view, the elbow moves noticeably backward in stage 2 (see diagram above)
and forward in stage 3. In stage 4 (the sounding of the tone), the elbow remains in roughly the same place,
but bends so as to lift the forearm. From the player’s perspective, however, there is a strong sense of
pulling back in stage 4. This serves as a braking action to the forward thrust in stage 3. This sounds
bewildering, but it is quite simple when you try it!

30. Wing Action
The finger sustains the previous note
lightly. The wrist is held moderately
high.
The elbow pulls suddenly back and the
wrist is lifted higher, with the hand
hanging loosely.
The forearm pushes forwards and the
wrist falls, throwing the hand upwards.
The hand is not deliberately lifted. It
is thrown by the arm.
The elbow pulls back again and the
wrist rises, causing the hand to descend
rapidly, striking the key. The wrist
continues to rise slightly more,
releasing the weight from the key,
which is held lightly as in position 1.
The whole sequence takes place within a split second, even in slow tempo. It is usually greatly
miniaturised, consisting of a barely visible twitch of the arm. Stage 2 applies only in slow playing.
An arm action is not suitable for practising passagework, as it is impossible to use it a high speeds. The
finger action (p.4 onwards) is used for this purpose. However, when rapid notes are divided into phrases,
the wing action comes into play, following the shape of the phrase rather than the individual notes.

31.
What is happening and what we see are different, just as when an aircraft, upon landing, applies reverse
thrust to its engines. Although these are working backwards, the aircraft is still moving forwards, finally
coming to a halt. In the same way, the dog owner tugs desperately at the lead whilst the dog continues
relentlessly moving forward. This needs to be borne in mind by the teacher, who will see only two
movements of the upper arms; backwards then forwards. Furthermore, the pupil will also see only these
two actions when the teacher is demonstrating.
The wing action should first be practised with staccato notes, chords or octaves (see p.23). These omit
the preparatory pull-back (diagram 2, p.30). Initially it could be practised with only the middle finger, or
with thirds played by the second and fourth fingers (see Exercise 8). In this way the arm action can be
perfected without adding the further complication of changing fingers.
When playing a melody, the wave motion is channelled down one finger by partially withholding the
others. It can be performed with relatively passive, relaxed fingers, moving only sufficiently to guide the
hand towards the required notes. This is suitable for cantabile melodies, and also for controlled, quiet
playing. Here, the hand - lift is very small, sometimes barely reaching the surface level of the keys. The
large muscles of the upper arms and torso allow much greater control of dynamics than do the small
finger muscles.
Phrases begin at the point in the cycle where the wrist is falling, and end at the point where the wrist rises
and leaves the hand “hanging” (see p.31, below).
Whilst arm movements cannot be carried into very fast playing, they can still be used in fast pieces. They
move with the slower notes, but not the quick ones. This also applies when one hand is playing slower
notes and the other executes rapid passagework. A good introduction to this idea is to practise the 2-part
inventions or other 2-part pieces of J.S. Bach, playing the semiquavers (1/16 notes) non legato with a
finger action and the quavers (1/8 notes) staccato with the wing action. In the case of a melody with a
quiet accompaniment, the arm will move with each melody note. In strongly rhythmical music with a
driving beat, a Baroque Gigue for example, the strong beats may be emphasised with an arm movement.
The natural touch resulting from the wing action is non legato (p.10). This will seem strange to followers
of “arm weight and relaxation”, for whom the natural touch is legato. A modified wing action can be used
to achieve legato. Here, the fingers remain in contact with the keys, but the wrist bobs down just before
playing each note, then up again as the note is sounded. In this case, there is no lifting of the hand from
the keys, as this would inevitably cause a brief silence.
Wrist movement in phrasing Phrasing brings life and shape to a melody, and can be enhanced by the simple technique of dropping the
wrist at the beginning of a phrase, and raising it at the end. This motion can first be practised with single
triads then single notes, then with phrases of 2, 3 and more notes. We can annotate the score with down
bow and up bow signs to indicate the position of the wrist as down or up. At the beginning of the phrase,
the forearm moves down, leaving the hand behind in the air. This causes the wrist to drop, shown by a
down bow sign. The back rounds slightly (see p.34). At the end of the phrase the forearm rises, again
leaving the hand behind, in a hanging position. The back straightens. At this point the wrist is high, as
indicated by an up bow sign.
The phrase may be unaccented, or the accent may be placed on the first note (down wrist) or the last note
(up wrist). As many phrases begin on weak beats, accenting the first note lends an expressive syncopation
to the music. It is particularly effective in the strongly contoured music of the Classical period, especially
in Mozart. We drop the weight of the arm on to the first note in such a way that the wrist falls but is met
by the resistance of the finger. An alternative in slow playing is to “prepare” the first note on the surface
of the key, then play it with a normal finger action, causing the arm to bob up and immediately back
down (p.9). The ensuing notes are played with a normal combination of finger action and arm weight.

32.
Accenting the last note (up wrist) gives a much stronger effect, particularly if it is played staccato. Placing
accents depends of course on the musical context. Within a phrase, the gradual falling and then rising of
the wrist gives a crescendo and diminuendo which is a typical musical feature of many phrases. This is
because weight is gradually introduced then withdrawn. The hand and forearm always move in opposite
directions, and this constant wave motion brings freedom of movement and avoids stiffness.
In playing a single note or chord, the note is sounded at the beginning of the up-stroke (see next chapter).
This coincides with the “tip” of the “wing action” described on page 28. The note may be unaccented or
accented. We should never use an individual downward stroke of the arm for single notes within a
passage or phrase, except for the first note. This is a common failing among children, who sometimes
play notes with a rigid arm action. In rapid passages, individual notes are produced by the fingers, whilst
the arm movement is completely independent, and follows the shape of the phrase (down at the
beginning, up at the end).
For long phrases where arm weight is used, the wrist may also move during the phrase, following the
natural movement of the hand as it navigates around the keyboard. In general, it will tend to rise when
playing groups of black keys and sink for the white keys. The wrist movements should be determined
intuitively by experiment, and again these can be noted in the score by means of down bow and up bow
signs. The arm weight must remain constant, otherwise the tone will reduce as the wrist is raised. Lateral
wrist movements are used to place the hand in the optimum position for playing different groups of keys,
and can be annotated with left or right arrows.
When a rest follows the end of a phrase, the hand is lifted off altogether, leaving the hand hanging in the
air. When the last note of the phrase is sustained, we hang arm weight down from the key, clinging with
the fingertip. If the sustained note is particularly long, we lift out the weight and let the hand hang in the
opposite way, from the wrist, holding the key down very lightly, again with the fingertip.
The wrist action in phrasing is not usually evident in very slow playing. In passages of medium speed, we
may encounter a compound arm movement, in which the small up-down arm movement associated with
individual notes, as explained on page 4, occurs within a larger overall down-up wrist movement for the
phrase. At high speed, the wrist action in phrasing can also be combined with a sense of even transfer of
arm weight, or, once again, can be done without arm weight depending on the volume required.
The down - up pattern can also be applied to phrases consisting of octaves or chords. Here again, there is
an up - down wrist movement for each octave, within the overall down - up movement for the phrase.
This technique is especially useful when playing small, rapid groups of two or three chords or octaves. In
this case, the last octave of the group is played with a strongly accented staccato, using a sharp upward
wrist movement (see next chapter).
Some special techniques with octaves and chords Preparing hand shape in chords and melodies Every chord has its own unique hand shape, due to the fact that those fingers playing on black keys are
less curved than those playing on white keys. The shape for each chord can easily be determined by
experiment, the main criterion being what feels most comfortable. We should always prepare the hand
shape of a chord in advance of playing it, either on the surface of the keys or in the air above the keys.
It is helpful to practise alternating between different chords, changing the hand shape each time. Even
when playing entirely on white keys, there is no fixed hand position. For example, when playing adjacent
white keys as in scales, the knuckle joint is strongly bent, whilst the fingers are only gently curved. When
the white keys are spaced apart, as in arpeggios, the knuckle will be flat or even bent downwards slightly,
giving an appearance of a high wrist, whilst the second joint of the fingers will be strongly curved. When
practising arpeggios, the hand shape for the corresponding chord should be retained throughout the
arpeggio, even when it involves a mixture of straight and bent fingers.

33.
Chords and octaves are normally played using the wing action or a finger or wrist action, as seen in the
section on staccato (p.23). Sustained chords are generally played using the wing action. When playing a
single, imposing, sustained, isolated chord, octave or note, we may use the same technique, but instead of
holding the tone in high position, we allow the wrist to drop to a comfortable low position for the
remainder of the chord. In other words, there are two up-down movements, the first large and slow (the
anticipation), the second small and rapid (the sounding of the chord). There may also be a third, even
smaller “aftershock”. The chord is sounded at the beginning of the second up - stroke. Examples would
be the first chord or Beethoven’s Pathetique Sonata, or the first note of Chopin’s first Ballade. Before
beginning these pieces, the fingers should rest for a while on the surface of the keys. This may all sound
very fussy when we are talking about just one note, but the alternative may well be a clumsy, awkward,
embarrassing moment at a critical point in the music.
Powerful chords, even though they may not be staccato, can be played using a prepared wrist staccato and
held with the pedal. In other words, we prepare the chord on the key surface, play it staccato by means of
a sudden upward wrist movement, and move immediately to the surface of the keys in the next chord. An
example would be the climax of Rachmaninov’s Prelude in C# Minor. The staccato is easier than trying
to hold down the chord, and gives more time to prepare the next chord.
Octaves Staccato octaves are played either using the wing action (p.28) or a wrist staccato (p.27). Melodic legato
octaves can be played with a finger action on the upper notes, using fingers 3, 4 and 5, whilst quietly
gliding the thumb across the lower keys. Emphasizing the upper notes gives an expressive singing tone to
legato octaves. As volume depends on a combination of weight and speed (p.4) we need to rest most of
the weight on the upper fingers, and also to lift them high and bring them down rapidly (See Ex. 7b).
People with small hands can begin by practising octaves over the interval of a 6th. Those with larger
hands may also practise over a 9th, after which the octaves will feel easier.
The 5th finger should be used on white keys, and the 4th on black, when playing octaves. This is because
the narrow 5th finger can easily slip off a black key. The pianist should prepare the changed hand shape
for white or black keys in advance. Sticking to this fingering will aid memorization.
Special ways for practising wrist octaves include playing the 5th (or 4th) finger alone whilst “shadowing”
the thumb silently, or vice-versa, and also playing the octaves with an automatic “double - bounce”.
Gliding chords For repeated chords used in accompaniment, we use a slow, smooth version of the wing action, beginning
with the back and shoulders, but without lifting the hand at all. The fingertips remain in contact with the
keys. The fingers extend (straighten) and the wrist rises, pressing the key down. The fingers curve as they
release the key, with a “stroking” motion. The whole pattern should follow in a continuous cycle, giving a
feeling of smoothly gliding from chord to chord. Where octaves or chords form part of a smooth melodic
line, they should be fingered like any other two (or more) part texture rather than treated separately. Here,
octaves can be played with the third finger as well as the fourth and fifth. Accenting the top note of each
chord produces a very expressive effect. This can be done by using a stronger finger stroke and more
“resting weight” (p.12) for the top notes.
A useful exercise is to repeat a note or chord fairly slowly and quietly, leaving an absolute minimum of
silence between the repetitions. The keys will remain partially depressed all the time, never fully rising to
the surface.
Rapid pairs of chords Where a chord is played twice rapidly, or two different chords follow each other in rapid succession, the
first should be executed with a down wrist movement, the second with an up wrist movement. It is
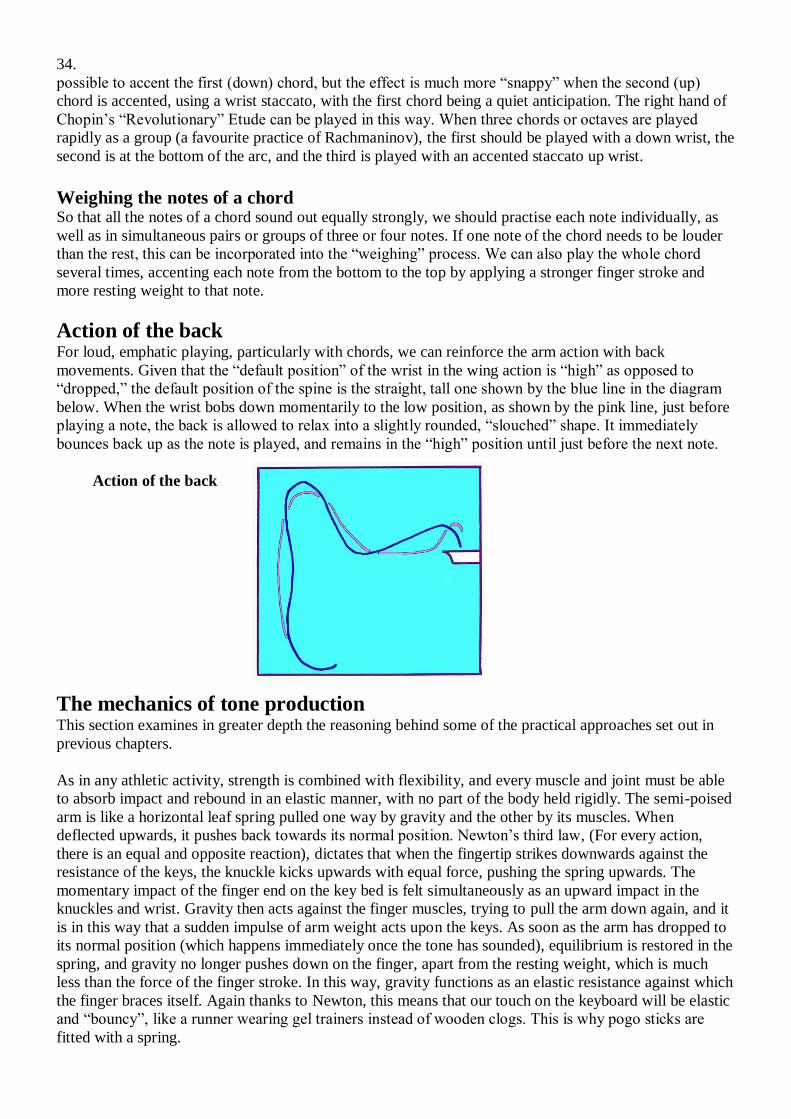
34.
possible to accent the first (down) chord, but the effect is much more “snappy” when the second (up)
chord is accented, using a wrist staccato, with the first chord being a quiet anticipation. The right hand of
Chopin’s “Revolutionary” Etude can be played in this way. When three chords or octaves are played
rapidly as a group (a favourite practice of Rachmaninov), the first should be played with a down wrist, the
second is at the bottom of the arc, and the third is played with an accented staccato up wrist.
Weighing the notes of a chord So that all the notes of a chord sound out equally strongly, we should practise each note individually, as
well as in simultaneous pairs or groups of three or four notes. If one note of the chord needs to be louder
than the rest, this can be incorporated into the “weighing” process. We can also play the whole chord
several times, accenting each note from the bottom to the top by applying a stronger finger stroke and
more resting weight to that note.
Action of the back
For loud, emphatic playing, particularly with chords, we can reinforce the arm action with back
movements. Given that the “default position” of the wrist in the wing action is “high” as opposed to
“dropped,” the default position of the spine is the straight, tall one shown by the blue line in the diagram
below. When the wrist bobs down momentarily to the low position, as shown by the pink line, just before
playing a note, the back is allowed to relax into a slightly rounded, “slouched” shape. It immediately
bounces back up as the note is played, and remains in the “high” position until just before the next note.
Action of the back
The mechanics of tone production This section examines in greater depth the reasoning behind some of the practical approaches set out in
previous chapters.
As in any athletic activity, strength is combined with flexibility, and every muscle and joint must be able
to absorb impact and rebound in an elastic manner, with no part of the body held rigidly. The semi-poised
arm is like a horizontal leaf spring pulled one way by gravity and the other by its muscles. When
deflected upwards, it pushes back towards its normal position. Newton’s third law, (For every action,
there is an equal and opposite reaction), dictates that when the fingertip strikes downwards against the
resistance of the keys, the knuckle kicks upwards with equal force, pushing the spring upwards. The
momentary impact of the finger end on the key bed is felt simultaneously as an upward impact in the
knuckles and wrist. Gravity then acts against the finger muscles, trying to pull the arm down again, and it
is in this way that a sudden impulse of arm weight acts upon the keys. As soon as the arm has dropped to
its normal position (which happens immediately once the tone has sounded), equilibrium is restored in the
spring, and gravity no longer pushes down on the finger, apart from the resting weight, which is much
less than the force of the finger stroke. In this way, gravity functions as an elastic resistance against which
the finger braces itself. Again thanks to Newton, this means that our touch on the keyboard will be elastic
and “bouncy”, like a runner wearing gel trainers instead of wooden clogs. This is why pogo sticks are
fitted with a spring.
35.
When trying to explain this to students who are weak in physics, we could use the following analogy:
When the jet stream from an aircraft pushes the air backwards, the air’s resistance pushes the aircraft
forwards. In the same way, the bottom of a car tyre pushes backwards against the road, causing the car to
move forwards. Likewise, when the knuckle end of the finger kicks upwards against the arm’s weight, the
arm’s resistance kicks the fingertip back down against the keys.
In the unthinkable circumstance of having to push my car down the drive, my own weight will be
insufficient to achieve this aim. If, however, I brace myself with my back to the garage door, the much
greater mass of the garage will enable me to move the car effortlessly. In the same way, the mass of the
arm braces the hand and fingers against the upthrust of the keys. In other words, when an irresistible force
meets an immovable object, then the entity generating the irresistible force will be obliged to move
backwards, unless it can find another immovable object facing the other way.
If a diver tries to drive a post into the sea bed, this will fail as the diver will be constantly pushed
upwards. If, however, the diver braces him/herself against the greater mass of a whale which happens to
be floating (poised) just above, the post will be easily pushed in. The whale itself is not resting its weight
on the sea bed. The diver encounters its weight by lifting it above the level at which it is poised. This
situation is analogous to leggiero or staccato playing, when the arm is fully poised.
A weight is only useful when converted into movement by being either lifted or dropped. The piano
mechanism does not “understand” weight. It only understands “speed of key descent”, which it converts
into “volume of sound”. This can be established by lowering a very heavy object very slowly on to the
keyboard from a crane. The resultant sound will be faint. A boy sitting on a see-saw may counterbalance
his friend at the other end by gently leaning backwards. However, if he climbs on to a tree branch and
drops on to the see-saw from a height, his friend will be sent flying into the air. This is why using a lot of
arm weight combined with a weak finger stroke will not achieve a strong tone, and nor will weight which
is gently “transferred” from finger to finger. A chain is as good as its weakest link, and no amount of arm
weight will produce a strong tone via a weak, flabby, slow-moving finger. It is all a matter of
transmission of energy.
I would distinguish here between momentum, which is the “unstoppability” of an object, and kinetic
energy, which is the amount of “zap” or “impact” which it has on things that are hit by it. The heavy,
slow-moving object above has a lot of momentum, as it would be difficult to stop, but not much kinetic
energy, due to its lack of speed. Thus, while our finger strokes are endowed with both momentum and
kinetic energy, the latter correlates better with the volume of tone produced (see p.4).
The immense power of mains electricity will not bring warmth to the home if it must first run through a
one amp fuse. Similarly, the boxer may put his full body weight behind the punch, but if he has very
weak arms, he will injure himself rather than the opponent. A mighty giant wielding an axe made of jelly
will be unable to crush even the smallest flea. On the other hand, a very lightweight object fired rapidly at
the key would also have little effect. The force of a moving object (kinetic energy) is a combination of
weight (mass) and speed, as anyone who has been hit by a meteorite will tell you, even without the help
of Newton and Einstein. Piano teaching has tended to be polarized between proponents of a strong, rapid
finger action and believers in arm weight, whereas in fact we need both.
The fingers need to be trained not only as moving units but also as transmitters of impulses of arm
weight, which implies practising at high volume and with resting weight. Practising without arm weight
will never build strong fingers. Operating in a weightless environment causes the body to lose strength, as
can be seen in the case of returning astronauts, who are often too weak to walk. The bones and muscles
build strength in response to the load put upon them. Having said this, however, we often perform with a
much lighter touch than the one used in practising.
The “dropping” mentioned above is a little difficult to see in the case of the arm, as it does not drop

36.
vertically. Because the keyboard is in front of the player, and the arm is, on average, sloping towards it
diagonally (with a bend in the middle), the weight pushes down and backwards, eventually converting to
a downward hand stroke as the forearm rises on sounding the tone. The net direction of the weight is
downwards, just as the direction of mains water is downwards from the reservoir, even though it may be
travelling upwards in the pipe system of your house. It is very important to steer pupils away from the
habit of producing notes by directly dropping the arm as a unit on every note. This is only done for the
first note of a phrase, in order to instate resting weight on the first key. The remaining notes are produced,
as already stated, by means of the fingers pushing the arm upwards.
In summary, we have an expanding unit (the finger and hand) kicking simultaneously upwards and
downwards. In legato, it kicks upwards against the stationary mass of the arm. In non legato, the mass is
not stationary but is itself endowed with a downward momentum, thus impacting the key with redoubled
force. In its “raw” state this produces a hard, crude tone which we must then refine to serve our artistic
purposes. We do this by applying it in varying degrees of strength to each note so as to create, in musical
terms, a balanced vertical texture and a meaningful horizontal progression.
Matthay (p.48) argued that we should never use arm weight for holding down a tone after it has been
sounded, (a) because only a minimal weight is needed to hold the key down, and (b) because it puts an
unnecessary load upon the finger muscles and on those muscles which keep the wrist up. This can be seen
by resting the whole weight of the arm on the keys whilst holding down, say, a triad. If we were to relax
the finger and wrist muscles, the hand would be dragged from the keyboard by gravity. Therefore these
muscles are working very hard just to keep the hand on the keyboard and hold a key down, with no
musical goal, as the note has already been sounded. I agree that we should not rest large amounts of
weight on a finger for long periods of time, for example, when playing at slow tempo, or with long notes
(e.g. minims and semibreves) at a quicker tempo. However, a moderate amount of resting weight is
necessary for passagework, even at a slow pace, (a) Because the weight would otherwise have to be
supplied by means of an arm movement, which would render the music “choppy”, (b) because the tone is
produced by the finger stroke reacting against the arm’s weight, therefore the weight must be there in the
first place, (c) because it translates directly into what will happen as we speed up the music (d) because a
heavier arm rebounds better from the key bed. Therefore arm weight resting on the key is like a security
guard on duty, who is being paid to do nothing most of the time. It is using energy and performing no
useful function, but is “on hand” ready to react against the next finger stroke. Matthay’s idea of taking out
all the weight has proved to be something of a red herring, as has his concept of a contracting finger
action. Even so, the resting weight should not be excessive, as it would then become a burden on the
fingers. Some teachers of “arm weight and relaxation” overlook this. One of the main reasons why some
people sometimes use too much resting weight when holding a tone, is the desire to create a feeling of
continuity in melodic lines. When singers, wind or string players wish to produce an unbroken stream of
sound, they do so by means of continuous expenditure of energy in tone production. However, in the case
of pianist, the “continuity” is an illusion created by a series of brief impulses of energy at the beginning of
each note, then sustained with significantly less energy. Its appearance belies the means of production,
just as the smooth gliding of the swan belies the frantic paddling going on beneath the surface.
In slow practice of passagework, we experience each note as a separate impulse of energy. As we
accelerate to the point where the touch turns into a “bounced” non legato, we can feel the arm resting on
an “air cushion”, held up by the rapidly repeated thrusts of the fingers. Gat poetically compared this with
the action of a road drill, no doubt fitting imagery to a Hungarian writer of the Soviet era. Each jab of the
drill propels it upwards, and before it has time to fall to the ground the next jab sends it up once again.
If we play an accented staccato note, driving the arm into the air, then let the finger fall back on to the key
without attempting to hold the arm up, the second note will be sounded at a speed of about 184 beats per
minute. This is therefore the lowest possible speed for bouncing unsupported arm weight. Between the
speeds of 184 and 368 (4 x 92), we have a choice between sustaining notes, or using bounced arm weight.

37.
In quiet playing with a hanging hand, we are not consciously using weight, but the “horizontal leaf
spring” (p.34) of the poised arm is still present, passively reinforcing the finger stokes against the upthrust
of the keys, and providing a stable platform to which the fingers are anchored at the knuckle joint. If the
fingers were not attached to the arm in this way, they would be too light to make any impression upon the
keys, however agile they may be. They would be like a featherweight boxer who takes on a heavyweight,
and finds that his own punches simply drive him backwards, without even being noticed by the opponent.
Controlling Articulation At a slow tempo, it is possible to control articulation by exactly timing the retraction of each finger.
However, at a medium or fast pace, it is determined by the strength of the finger strokes and the amount
of arm weight. Given that the kinetic energy which drives the keys is obtained by multiplying arm weight
with the square of the finger speed then dividing by two (see p.4) it follows that we can obtain the same
volume of tone using a light arm and fast finger stroke or a heavy arm and slow finger stroke. The
difference will be in the articulation. For a given finger stroke, a lighter arm will be propelled higher, and
will fall back more slowly, increasing the length of the silence between the notes. A faster finger stoke
will propel the arm still higher. In other words, the stronger the finger action and the lighter the arm, the
more detached the notes will be. It should be added, however, that higher levels of dynamics require a
good deal of both arm weight and finger action. The other aspect affected by varying the proportion of
arm weight and finger action is the noise element in the tone. Finger lift favours higher-pitched upper
noise whereas arm weight favours lower noise (see p. 22).
Therapeutic exercises The following anatomical point is laughably obvious, yet it is often overlooked in piano teaching. As
mentioned elsewhere in the guide, the rationale behind any programme of physical training is that the
body gradually adapts to demands which are consistently placed upon it over a significant period of time.
Muscles are designed to deliver kinetic energy (i.e. the power to move things), therefore in order to make
them as strong as possible, we must ask them to deliver a large amount of energy on a regular basis,
although not to the extent of causing injury.
When a muscle is exerted, it contracts, pulling the joint in question in one direction. The antagonistic
muscle situated on the other side pulls the joint the opposite way. When subjected to strenuous exertion
over a long period, either of these muscles will tend to foreshorten, becoming less able to stretch, so that
the muscle pulling the other way will encounter a resistance, and the joint will become less flexible.
Therefore in addition to the muscle-building process resulting from normal practising, we also need to
perform stretching exercises, a few of which are given in point (h) below.
A strong finger action combined with a large amount of resting weight (p.4) makes excellent “high
impact” work, developing strength and endurance in the fingers. However, when taken to excess it can
cause pain or even injury, particularly in the 4th and 5th fingers. The following remedies may be helpful.
Practise with a leggiero touch, i.e. a non - legato with a strong finger action but with the arms as light as
possible, pulling away from the keys, and with the hands hanging loosely.
Working against a continuous, even resistance is a wonderful way of creating suppleness, as swimming
and aqua aerobics prove. Practising exercises with the hands immersed in a basin of mud serves this
purpose. I use clay dissolved in hot water. City dwellers could consider treacle as a tasty alternative.
Because the fingers have a very small surface area, water alone does not provide sufficient resistance.
See also the section on using physiotherapy balls at the end of this chapter.
With the hands in hot water, gently alternate between making a fist and stretching the fingers out.
With the arms hanging loosely by the sides, shake the hands rapidly by rotating the forearms from side to
side. This can be combined with swinging the arms backwards and forwards.

38.
Some “relaxation methods” claim that practising exercises, especially with raised fingers, causes injury.
This is like the attitude of over-protective parents who do not allow their children to participate in sport.
They will end up weaker and more vulnerable in the long term. The old idea of “No pain, no gain” has
some validity. Nevertheless, we should minimise the risk by bearing certain points in mind:
a) Do not adopt a fixed, strongly curved finger shape.
b) Do not hold the unused fingers rigidly at maximum height.
c) Use arm weight and strong finger work but do not take either to excess for prolonged periods.
d) The hands should be supported by the fingers which rest on the keys, not by the forearm muscles.
e) The wrist should not be held excessively high or low or twisted too far to the sides.
f) When speeding up a passage, do not use arm movements when playing at high speed. About 4 x 92
would be a maximum. Above this speed, we must make a deliberate gear-change to a pure finger action
with varying amounts of continuous arm weight.
g) Avoid working too long and hard at high impact endurance studies, especially exercises for the fourth
and fifth fingers, played loud and fast. These provide great benefits in terms of technique, but can easily
lead to injury. It is better to do them in relatively short bursts, interspersed with low impact work, for
example memorization. This is a similar concept to “interval training” for runners, where short sprints
are alternated with period of running at a steady pace. Alternating mental and physical work gives both
the mind and body a chance to recover. Another good strategy is, when speeding up a page from a new
piece with the metronome, add on one playing through a section from exercise 7 as a “supplement”, at
the same metronome speed as the page just played. Do this for each speed level.
h) A common objection to the raised finger method is that it puts a strain on the upper muscles and
tendons which raise the fingers. This is partly because they are working against a lack of flexibility in
the antagonistic lower muscles, which are trying to pull the fingers back down. The exercises in the left
hand diagrams below stretch the lower muscles without putting a strain on the upper ones. Moisten the
hands slightly. Use a plastic or leather covered duet stool with a firm cushion in the centre, as in the
upper picture. Place the hands in the corners with fingers and thumbs outstretched. Gradually lean
forwards so a stretch is felt along the muscles on the underside of the forearm. Hold for several
minutes. Leaning away diagonally from each hand in turn increases the stretch. Come out of the stretch
very gradually. Do not attempt to bend the fingers for at least a minute afterwards. If a duet stool is
unavailable, the exercise can be done in a standing position using a normal stool. Alternatively, in a
kneeling position, bed the fingertips into a rug in a claw-like manner, as in the lower picture, and
gradually lean forward. The last of these poses can also be practised with an additional strip of foam
beneath the fourth fingertip. This finger has difficulty in lifting, and often delivers a weak tone, as it
does not have sufficient distance over which to accelerate.

39.
To stretch the upper muscles of the hand and forearm, bend the fingers to make a very gentle fist, then
encircle this with the other hand, so that the thumb is pressing the second and third fingertips into the
palm (See illustration above right). Pull the hand inwards until a stretch is felt, and hold for several
seconds. Repeat with the third and fourth fingers. The “inner” hand should be completely relaxed. In
all of the stretching exercises, go into and out of the pose very slowly and carefully, and do not go
immediately into the opposite pose.
Gymnastic exercises
Again using the piano stool, remove the cushion. Kneeling beside the stool, practise the following
staccato touches, using the soft surface to cushion the fingertips. The stool functions as a trampoline.
After doing the exercises, return to the stretching exercise.
Wing action: Using the piano stool, apply the wing action to the whole hand first of all, then each finger
in turn, many times. Here, the hand and fingers are passive, the impulse coming from the shoulders and
upper arms. Work at a natural cruising speed (probably around 200 strokes per minute).
Bounced arm weight: This is the opposite of the previous exercise, with the shoulders and upper arms
completely relaxed, and the work being done by the finger muscles. This will produce a stronger attack
than the wing action. This can be alternated with the wing action in order to give rest periods to each set
of muscles. Also practise with one hand using wing action, the other using bounced arm weight. We can
also practise wrist staccato, moving the whole hand downwards from the wrist (p. 27).
Combined wing action and bounced arm weight: This produces a much stronger attack than either
action alone. Again, try this first with the whole hand, then with each finger in turn.
Using physiotherapy balls and similar objects: In order to build strength we need to work against a
resistance, yet the piano action does not provide very much of this. If weight lifters simply moved their
arms up and down without carrying any weights, they would not develop great strength. Nature designed
our fingers as squeezing or gripping tools, not as hammers. They can be strengthened by squeezing a
physiotherapy ball, or better still an egg-shaped or cylindrical object. The latter can be made at home by
rolling a strip of foam rubber, by using foam insulation for pipes, or a partially inflated balloon or wide
bicycle inner tube. The last of these can be adjusted as to pressure and diameter to suit one’s hand. They
are not used in the normal manner, by squeezing all the fingers at once in opposition to the thumb, as this
would undermine the independence of both fingers and thumb. Rather, the thumb is left out to the side,
and the ball is squeezed against the palm by each individual finger in turn, whilst the other fingers pull
back, still in rounded form. Also use 2 and 4 together, and more importantly, 3 and 5 together. Stand with
the arms hanging loosely by the sides, keeping the wrists in a straight alignment. In triple time, squeeze
and hold for the first 2 beats, and release on the third. Repeat 4 times with each finger. Repeat the whole
sequence until tired. Then perform rapidly repeated squeezes, keeping the other fingers retracted. The
thumb can also be used to squeeze the ball against the opposite side of the palm, but without involving the
other fingers. These exercises also strengthen the small muscles of the fingers, which are important in
velocity playing (p.8). When no equipment is to hand, we can press each fingertip into the palm of the
hand, again using a squeezing action, and retracting the other fingers. After doing these exercises, relax
the muscles using the stretching exercises shown on page 38.
Practising on a weighted keyboard is a good way of strengthening the fingers. The increased upthrust of
the keys demands more arm weight, so that the muscles have to work against both of these opposing
forces. Conversely, people who normally practise on a lightweight keyboard will find themselves at a
disadvantage if they are required to perform on a typical modern grand piano with a heavy action.
Unintentional complementary arm movements
In the case of many physical actions, the deliberate movement of one part of the body may be
accompanied by unintentional, complementary movements in other parts. For example, many people may

40.
imperceptibly wiggle their hips when walking, but would never do so deliberately, unless they wished to
be dangerously provocative.
We should be clear about which actions are done deliberately, which are simply allowed to happen, and
which are deliberately prohibited. Arm movements are done deliberately when playing octaves and
chords, when emphasising a melodic line, and when a vehement effect is intended, each note being
accented. Deliberate arm movements are also used to navigate the musical contours in passagework (p.4).
These include lateral, vertical, circular or rotary movements of the wrist which bring the hands into the
optimum alignment for playing each group of notes. When playing individual notes in passagework,
small-scale vertical arm movements are allowed to happen, especially in slow practice, although the
conscious intention is directed towards the fingers. If we deliberately inhibit these movements, a stiff,
awkward style of performance will result.
Similarly, the “release of arm weight” after the initial impulse of the finger stroke occurs naturally as a
result of the key bouncing off its bed. If we deliberately induce it by applying a “braking action” or by
withdrawing the arm, and awkward, “choppy” touch will result.
As we speed up a passage, the unconscious arm movement continues into medium speed but disappears
in fast playing. In performing double note passages, the movement is more noticeable, and serves to
counteract the increased upthrust of two keys played at once.
True, teachers faced with a child who plays each note with a downward arm movement instead of using
the fingers would be well-advised to prohibit arm movements as a temporary measure. We should add
that the upward arm movement is so slight as to be virtually invisible from the audience’s perspective,
which is probably why it has often been overlooked.
Forearm rotation Another unintentional complementary movement is the “rotation” of the forearm in playing tremolo
octaves, broken chords, trills, and in accenting the 5th finger when it performs a “stabbing” staccato
action. The hand tilts to the right for the higher note, and to the left for the lower one. Such passages
should be practised slowly with a strong finger action, without rotation. Only when high speed is reached,
should the wobble be allowed, but not forced, to happen. It serves to relax the arm, and enhances the
musical effect. It can be practised, at high speed, using exercise 7 section 1, with every pair of fingers
except the thumb. This is not the same rotation as in the wing action, where the arm flicks out then in for
each single note, as opposed to a pair of notes.
There are a number of “relaxation methods” in which forearm rotation and similar movements are used as
a substitute for finger work. Whilst such methods may have some benefits for people with injuries, they
can never be considered as a means of achieving a clear, precise and effective playing style.
Other unintentional arm movements When a pianist’s arms fly into the air after playing a loud chord, this may look like a gesture of empty
display, but is in fact a natural “follow-through” to the upward thrust of the wrist, just as when a tennis
player or golfer follows through with their stroke, rather than stopping it abruptly after hitting the ball.
Rocking from the hips allows the shoulders, elbows and wrists to move without changing the hand
position, and serves to release tension. Holding the body in one position is always more tiring than
moving it, just as standing is more tiring than walking. This is because when holding a static position, a
certain set of muscles is being used in a particular way for a prolonged period of time.
In summary, whilst superfluous or theatrical mannerisms are certainly to be avoided, a variety of
unconscious movements can be helpful both from a technical and expressive standpoint. Pianists who
hold their arms and bodies absolutely still sound timid, lifeless and mechanical.

41.
Practice methods General points The ideas in this section are well - known, but are included as so many people lack any methodical
approach to practice, and simply use the time for playing pieces at full speed. The methods suggested are
unashamedly rigorous, since, in the world of piano study, there is sometimes a tendency towards vague
instructions where too much is left to chance, particularly as regards fingering.
It is true that talented people can reach a certain standard by simply playing through pieces in the manner
of a performance. However, at some point they will “Hit a wall”, whereby their playing is unable to
advance to a higher level. The most difficult passages will always elude them, and even more modest
sections will be untidy and approximate, with a great deal of fine detail missing. It is at this point that
they will have to make the painful decision to go back to square one, adopting a slow, methodical
approach.
Concentration and alertness are all important. For this reason, the morning is by far the best time to
practise, where circumstances permit. Demanding mental tasks, including memorization and fingering,
should be done at this time. The late afternoon and evening are second best, and the early afternoon is
worst, when the mind is clouded.
If concentration begins to fade, it is advisable to take a short break and do something completely
different, or to change to a different mode of practice, for example slow practice of pieces, technical
exercises, memorization, sight reading or improvisation.
Keep a written record of what you are currently practising, including sections covered, speeds reached
and other details. I use a sheet of A5 paper with a soft pencil, and continually rub out and update items.
Begin your practice session with technical exercises, scales, arpeggios and studies, then move on to
pieces. I always begin with stretching exercises (p.38), followed by very slow held exercises from
Leschetizky (p.47), which warm up and stretch the fingers, then move on to more rapid work.
Writing fingering on the score is the foundation of good practice, and should be applied to every note
except perhaps where a phrase is immediately repeated. A soft pencil is ideal for this purpose. The student
should work ahead and have the fingering checked by the teacher before practising it. Some guidelines for
fingering are given in the next section (see p.45).
Initially, you may wish to go through a bar or phrase at a time, with each hand separately then together,
working out the notes. Fluent sight-readers may skip this stage.
For pieces, take roughly a page a day for slow practice. Try to make it coincide with a musical section in
the piece. Practise slowly and firmly, with a finger touch or the wing action, as appropriate.
Starting slowly and speeding up The metronome enables us to speed up pieces very gradually. Begin at the following metronome speeds
for the shortest time-value occurring regularly in the piece (usually a semiquaver or quaver):
66 80 96 112 2 x 66 2 x 80 2 x 96 2 x 112 4 x 66 etc.
It is of course much more difficult to play with hands together than separately. Therefore any practice
regime which gives as much time to working with hands separately as with hands together is inefficient.
The above speeds could be used with hands separately then together, but some of the intervening speeds
(69, 72, 76, etc.) can be used with hands together only. Having reached a certain speed on one day, it is
advisable to backtrack to a somewhat lower speed the next day, and, using hands together only, work up
to the speed in question, before proceeding further in the normal way.
42.
When practising difficult, rapid pieces, it can be advantageous to work gradually up to a speed faster than
the real tempo of the music. In this way the reactions are sharpened to a point where performing at the
normal speed will be relaxed and effortless. As full speed is approached, the increments should be
decreased, sometimes reaching as little as one notch on the metronome. For slow, complex pieces, start at
a very low speed and increase by very small increments. The metronome can be left ticking the whole
time, or, alternatively, it can be used to set the speed initially, and to check it periodically, but otherwise
switched off. This encourages the player to develop a steady sense of pulse, and allows the notes to be
heard more clearly. Practice should never be a matter of mechanically putting fingers down without
listening to the sound produced.
Memorization and mental practice All other technical matters pale into insignificance compared with the fundamental task of learning the
music! The best way to do this is by memorizing it.
In difficult pieces, it may be impossible to reach the higher speeds without first memorizing the music, or
at least the most difficult sections. In general, though, the speeding up should precede the memorization,
otherwise mistakes will be memorized.
Once the piece has been brought to full speed and memorized, several further speed - ups with hands
together, starting at about half - speed, are to be recommended. These can be played from memory, and
also sometimes with eyes closed. It is also helpful to play one hand whilst “shadowing” the other on the
surface of the keys, and vice versa, always from memory. This can be combined with the speeding up
process, with the hands alternating for each increase in speed. A stage beyond shadowing is to play one
hand whilst simply imagining the other hand.
Memorize everything. It focuses the attention and stops the mind wandering. “Mental practice” (i.e. going
through the music in your mind paying attention to every note, including its fingering, but without
playing it) is even better. This should also be done with each hand separately then together. When we
play, we first “imagine” the music in our “inner ear” and then transmit this to our fingers via the
neuromuscular system. Even in sight-reading, we “inwardly hear” the music which we see on the page,
and then play what we are inwardly hearing! In the same way, a composer hears music inwardly and can
translate this either into playing or into a written score. There is an intimate link between the written
symbol, the inner ear and the fingers on the keys. This can be developed by mental practice and also by
aural training and musical dictation.
Use the following scheme to memorize a piece:
Go through the whole piece in 4 bar sections (or equivalent phrases), then go back to the beginning and
do it in 8 bar sections, then 16 bars, 32 bars etc. Mark the sections in the score with a pencil. For each of
section, do the right hand in the following way:
play it twice with the music
once by “mental practice”
once from memory
once again with the music to check
once again from memory
Repeat the above steps with the left hand. Then do the right hand and left hand once more from music and
once from memory, then repeat all the above steps with the hands together.
During all these repetitions of phrases and sections, do not play in a mechanical way, but pay attention to
phrasing, dynamics, touch and expression. It may also be possible to increase the speed during the
repetitions. Anyone who has memorized a piece in this way will realize how sketchy and superficial
43.
their knowledge of it was beforehand.
This process is most effective when done intensively, i.e. by practising long hours over relatively few
days, preferably not too long before the first performance. Whilst one hopes not to have a memory “like a
sieve”, nevertheless even a good memory is like a bucket with a small hole in it. By filling it quickly, we
can hope to have a full bucket before too much leaks away. On the other hand, one should not continue
practising until the point where the mind is overloaded and nothing is retained. It is advisable to alternate
memorization with technical practice so as to rest the mind now and then.
A rapid read through each hand of a short section, without playing, is valuable. Here, we are capturing
data rather than music, for example, the appearance of the notes on the stave, fingering and similar
“peripheral” matters. Visual memory of the score goes hand in hand with auditory memory.
Musical attention When playing, our attention is focused in many ways, partly on individual notes, partly on phrases and
partly looking ahead to the phrase that we are about to play. We are conscious of the sound, of physical
sensations in the fingers and arms, of spatial awareness and of our visual memory of the score. At the
same time we may also be doing a number of things automatically, like motorists who suddenly realize
that they have arrived home, even though they were entirely unaware of the journey, as their mind was
“somewhere else”. Just as with visual focus, we may speak of a “centre of attention” and of “peripheral
attention”. As our knowledge of a piece matures, the centre of attention will move towards the musical
message, with such matters as notes and fingering increasingly consigned to the peripheral area, or to the
“automatic” function. Most importantly, in practice and performance, we should eliminate superfluous
elements form our consciousness. These would include extraneous issues which may be on our mind, fear
of the audience and above all, personal vanity and egotistical display.
Special techniques for difficult sections Memorize the difficult sections before the rest of the piece, and run through them several times from
memory every day thereafter. Run through them by “mental practice” whilst waiting for trains. Closely
allied to Yoga, this habit is both productive and very soothing.
Having memorized the whole piece, play it many times from memory with hands separately and together,
taking special care to retain the left hand in the memory. Sections which are still causing problems should
be listed and practised separately. Run through them all at the beginning of each practice session. Work
on the difficult sections using some of the following special techniques:
First, go over the difficult section again very slowly and speed it up with the metronome.
Re - memorize it if necessary. Then, try to diagnose what the technical problem is, and use some of the
ideas explained earlier in this guide to remedy it. For passagework, the following are standard techniques:
Practise in different rhythms, for example, dotted quaver / semiquaver, and the reverse. For the long
notes, the arm bobs briefly up and down at the beginning of the note then “hangs” from the key. To
achieve the “reverse” rhythm, simply play the first rhythm, starting a note later. At a slow tempo it is even
more effective to use a double dotted rhythm, similar to a French Overture.
Divide it into groups of two, three or four notes. Play these as phrases, dropping arm weight on to the first
note with a down wrist and lifting it out on the last note with an up wrist. The phrases can be unaccented
or accented on the last note. When using a group of a certain length (e.g. 3 notes), initially begin the first
group on the first note of the passage. Next time, begin on the second note, and finally on the third.
Divide into groups of two rapid slurred notes, the second being played staccato and accented (See ex. 10).

44.
Passages requiring endurance, particularly rapid octaves, can be practised first in groups of three,
separated by rests, during which the muscles can recover, then gradually increasing the length of the
groups to 4, 6, 8, 12 and 16 notes. Rapid practice of an octave scale can be alternated with rapid practice
of fingered passagework, so as to give one set of muscles a rest while another is working.
Use “adding notes”: i.e. play the first note, then the first two, the first three, and continue adding a note at
a time, but always starting at the beginning of the passage. As with phrases, weight is introduced by
dropping on to the first note with a down wrist. The groups can be done unaccented, or accenting the last
note reached each time.
Play the passage normally, but accenting every second or third note (see p. 21).
Practise the passage with a double hit on each note. This may be unaccented, or with an accented staccato
on the second note, or with the first note accented and the second note sustained.
Where the same note is played twice rapidly, play the first note staccato. Use a different finger for the
second note. Play unaccented, or with an accent on the second note.
Where there is a difficult leap across the keyboard, practise alternating between the notes on either side of
the leap. Repeat the process with your eyes closed. Where there is a leap, or indeed any change of
position, after a rest, the hand should move immediately into position before the rest, and wait there. For
rapid leaps, play the note before the leap staccato, as this allows more time to negotiate the leap.
It should be pointed out that when applying the above special techniques, we should select those which
are appropriate to the problem in question, rather than going through the whole list of techniques. To do
so would be like a doctor who gives the patient every medicine on the market, in the hope that one will be
effective. For example, when trilling between the fourth and fifth fingers, the notes played by the fourth
will tend to be too long. Therefore we should practise the trill in a dotted rhythm, with the fifth playing
the longer (dotted) note. We should not reverse the rhythm, as this would simply exacerbate the problem.
(See Exercise 9). Unevenness occurs when the transition between two notes in a passage is difficult. This
transition will take longer than the rest, so that the first of the two notes will appear long. We can
remedy the problem by practising a short section of the passage including the transition in a rhythm in
which the excessively long note is now shorter than the others. Also practise the transition as a grace note.
Where one note is quieter than the rest (often that played by the fourth finger), again practise a short
group including the surrounding notes, this time accenting the weak note. Repeat the short phrase many
times without stopping.
If you frequently mis-hit or “fluff” a particular note, check whether you are catching the one above or
below it, and adjust your aim accordingly. It may be that the thumb is not being passed far enough under
the palm in an arpeggio, for example.
Whilst slow practice is of great importance, we should also spend a significant amount of time practising
quickly. As already mentioned, the rationale behind practising is that the body and mind gradually adapt
to demands which are consistently made upon them over a long period of time. Therefore, if we wish to
play quickly, we must also practise quickly! Given that a passage played slowly takes up much more time
than the same passage played fast, it can easily happen that nearly all our practice time is taken up with
playing slowly. In this case, we should reduce the number of repetitions at a slow pace and increase those
at high speed. For velocity playing we require not only strong muscles but also ability to “imagine” the
music flowing rapidly in our “inner ear” and to transmit this instantly to the fingers via the neuromuscular
system. Again, these processes can only be developed through rapid practice and also by mental practice,
which can be gradually speeded up in the same way as our physical playing. Whilst it is quite easy to
imagine the notes flowing swiftly, it is more difficult to picture which finger is playing each note, so we
should speed up the complete mental picture including fingering.

45.
Fingering: Some general points
As already mentioned, the importance of writing in fingering cannot be overstated. For any given phrase,
several fingerings are possible, and if the fingering is not written in, the pianist may use a different
fingering every time, and will end up with confusion instead of a clear sequence of action. Relying on the
editor’s fingering is to miss out on an important stage in the learning process. In order to establish the
fingering, play through each phrase several times with each hand separately, trying several fingerings, and
deciding on the best. This will often be a compromise between a number of factors, listed below.
Fingerings which work well at a slow tempo may prove to be impracticable at speed. Therefore try to play
the phrases at something like a realistic speed when determining the fingering.
Sometimes, a fingering which may not be quite the most comfortable for one hand, is nevertheless easier
for the co-ordination of the two hands. Therefore, fingerings should be tested with hands together as well
as separately. An example is the following passage from bar 54 of Fugue no. 3 from book 1 of Bach’s
“48”. Option A is good for each hand in isolation, but makes co-ordination very difficult. B is good for
co-ordination, but requires an awkward thumb crossing in the left hand. C is probably the best option, as
is good for co-ordination, with a symmetrical fingering in both hands for the first six notes, and has no
very difficult thumb crossings. When playing it, think of groups of 3, 3 and 2 semiquavers.
Fingering A follows pianistic conventions rather than common sense. For example, when learning scales
for examinations, we often avoid playing the two thumbs together, except on the tonic, as this would
create a “bump” on the note in question. However, in real music, a very small bump is greatly preferable
to having one’s performance ruined by being constantly tripped up due to an awkward fingering. When
the thumbs are placed on an unaccented note, as above, they may even create a pleasing syncopated
effect, to which Bach might well have had no objection. A further convention is to avoid using the thumb
on black keys. This has some truth, as doing so forces the hand into an uncomfortable forward position.
However, other considerations, as in the present example, will often override this rule. Be on the lookout
for passages like the above, as it only takes one of them to spoil an otherwise straightforward piece.
When fingering repeats, use the same fingering. Where possible, also use the same fingering for phrases
repeated at a different pitch, as in sequences, development sections and recapitulations. This makes
memorization simpler. However, if the change of pitch results in an awkward or clumsy fingering, this
will have to be changed.
It is sometimes conceptually helpful to divide a continuous passage into smaller groups of notes (usually
3, 4 or 6), each group having the same fingering. However, this may result in some awkward hand
positions, usually due to the thumb falling on a black key. The advantages and disadvantages of this
approach need to be weighed in each case.
Sometimes, a fingering which is less smooth or efficient mechanically is more suited to the expression.

46.
For example, when a dramatic “bump” is required, it may be better to repeat the same finger. The start of
a new phrase may also benefit from a less smooth fingering. Pianists who aim at a perfectly seamless
texture will produce music which is amorphous and lacking in expression. Also, a fingering which is the
most efficient mechanically may be so intricate and convoluted as to lead one to trip up in performance,
and should be replaced by a simpler fingering.
For octaves, use 5 on white keys and 4 on black, unless there is a very good reason to do otherwise. This
greatly simplifies memorization, as we know in advance which finger to use. The slim fifth finger can
easily miss or slip off a narrow black key. People with small hands may have to use the fifth throughout.
Changing fingers whilst holding one note is an undesirable and messy practice, but is occasionally
unavoidable. When it occurs, it is better to get the change over with as early as possible. This normally
involves the 4th and 5th fingers, and can sometimes be avoided by “walking” the 5th finger behind the 4th.
We memorize fingering together with the notes, so making numerous revisions to fingering can be
confusing. However, if we have a “brainwave” about the fingering of a certain passage, the new fingering
should be written in and the section in question thoroughly re - memorized. The “brainwave” will often
consist of taking certain notes with the other hand, so always be on the lookout for this opportunity.
Pianists with weak 4th and 5th fingers will sometimes resort to complex fingerings with numerous thumb
crossings and changes of position in order to avoid using these fingers. Those with strong, independent
fingers will be able to avail themselves of conceptually simpler fingerings.
Editors are by no means infallible. They have been given the task of writing fingerings for a large
quantity of music within a limited time frame, and may well have only a superficial knowledge of some
of the pieces. The best fingerings can only be found by in-depth study, and sometimes only emerge after
playing a piece for many years. Beware also of those editors who, as though in an effort to justify their
own existence, dream up all manner of wonderfully intricate and convoluted fingerings which are entirely
unnecessary and guaranteed to trip people up under the stress of performance.
The sustaining pedal
Almost all practice should be done without the pedal. It is added only in the final stages. Covering
unevenness or discontinuity resulting from poor fingering or lack of practice by means of the pedal is
definitely a sin. On the other hand, a well - played non legato with pedal added to give a “quasi legato”
effect is perfectly legitimate, and is in fact what most concert pianists do most of the time. There are also
occasions for playing staccato with pedal (see page 25). Half pedalling is of great value. We press the
pedal roughly half-way down then move it intuitively just as one uses the accelerator pedal of a car. It is
helpful to write in pedal marks, but not to excess, as it is a very subtle and intuitive art, and also varies
with different pianos and the acoustics of the room.
Analysis We analyse the music in order to understand the composer’s intentions. Piano practice entails a great deal
of patient and repetitive work, which can cause people to “Switch off” mentally. Instead, we should
always be on the lookout for features of musical interest and for patterns which will facilitate
memorization, annotating the score where necessary. Sections which are repeated with small changes, for
example in recapitulations, are especially difficult to memorize. Practise the changed phrases side by side,
making a mental note of the differences.
Imagine someone reciting a speech in a foreign language with no idea of its meaning! Needless to say, it
would also be very difficult to memorize a string of meaningless syllables in this way. Yet there are
pianists who feel that if they have delivered the correct notes at the right time, their work has been done!
Further discussion of analysis is beyond the scope of this document.

47.
Cultivating a natural technique When using the term “Natural”, we should not allow ourselves to wallow in sent imental, animistic,
Disney-like fantasies. Whilst only hardened Philistines would describe the instrument as “a wooden box
with sticks for brains”, this is perhaps no more misleading than the effusions of soft-hearted romantics
who treat the piano as though it were their pet poodle, or those prim and proper pianists who can convert
even the most dark, violent and wicked piece of music into something resembling a Sunday school picnic.
To all the kind and gentle teachers who say “Never hit the piano!” I would point out that, regardless of
what we do with the keys, whether it be hitting, pressing, stroking or caressing, the sound will be
produced in exactly the same way, namely by means of a hammer hitting a string. Nevertheless, the
manner in which we address the keys may serve to reinforce the artistic concept, both in our own minds
and that of the audience.
We aim to cultivate nature, rather than fight it. The third “finger action” diagram (p.5) represents a slight
departure from orthodox practice. It conforms with the physical nature of the piano as a percussion
instrument with rebounding hammers, and with the natural rhythm of work. We strike the key then allow
it to rebound slightly, rather than holding it to its base. This allows the finger and wrist muscles to relax
before the next moment of exertion, by holding the key with a considerably reduced amount of pressure
compared with that of the finger stroke. In a similar way, the drummer does not press his drumstick into
the drum after striking, nor does the builder press her hammer on to the nail, but allows it to rebound,
ready for the next strike. In the same way, the vibraphone player creates a continuous melody by
bouncing the mallet off the metal bar and allowing it to ring on.
The “cyclic” finger action also follows a natural motion sequence, similar to that of the legs in walking or
running. Imagine trying to run with our knees and ankles held rigidly in a fixed position, moving only
from the hips! Yet this is what many pianists do with their fingers. For this reason, one could ask pupils to
“take a walk” along the top of the piano with two of their fingers. The “extending” finger touch can also
be observed in any untrained person typing at the computer. Designed by nature and refined by evolution
into highly intelligent operators, capable of performing a multitude of delicate and intricate tasks, the
fingers are able to negotiate their way around the labyrinth of black and white keys with deftness and
agility. By holding them in a rigidly bent position, we place them in a straightjacket, hampering their
movements and stifling their natural intelligence.
The “wing action” exemplifies the adaptation of nature to the needs of keyboard playing. It will be
noticed that nothing has been said about “economy of movement”. What matters is not restricting
movement, but moving in the right way at the right time. Economy can easily turn into a straightjacket,
and when we restrict movement, we restrict expression. Examples of harmful forms of economy include
methods which exclude hand and arm participation, prescribe a fixed finger shape or insist that the fingers
be kept close to the keys. Such methods lead the pianist into an inhibited and unadventurous frame of
mind. Having said this, however, it is obviously better to exclude actions which serve no musical end, and
whose sole purpose is visual display. In addition, there are some leading soloists whose apparently
contrived facial expressions seem designed to draw attention to themselves rather than to the piece which
they are playing. This is extremely counter-productive, as the aim of performers should be to efface
themselves both from their own consciousness and that of the audience. We should follow the example of
the famous pop star who said that his job was to avoid getting in the way of the music. It is good to practise in a way which is more difficult than the real performance, just as the famous orator
Demosthenes used to rehearse his speeches with a mouth full of stones. Thus, we may practise with our
eyes closed, using a higher finger action and more arm weight than necessary. We could also use strongly
curved fingers which oblige us to stretch more at the knuckles. However, we must remember to relax into
a more natural style in the performance itself, otherwise this will simply become an exhibition of tortures.
In music as in real life there is a natural alternation of exertion and relaxation. The gentler, quieter
moments are not only vital from an artistic standpoint, but also of great technical value, as they allow our

48.
muscles to relax, so that they can give all the more in the fierce, impassioned climaxes. This natural ebb
and flow of dynamics, even within individual phrases, brings music to life. Despite this, one often hears
people “hammering through” a piece as though the sole objective were to reach the end! These pianists
have made such a virtue of their vigorous practice method that they have carried it over into performance.
This guide is devoid of anatomical illustrations. The human brain thinks in terms of actions, not muscle
groups. We think “I will push this forwards”, not “I will contract my triceps”. It is also helpful the think
in terms of feeling sensations, in a sensory rather than an emotional context, just a singing teachers do,
when they are describing various physical acts within the body which cannot be seen. For example, we
can speak of feeling a lifting sensation in the forearm, or a feeling of pressure on the fingertips.
Technique is meaningless until it is applied to playing real music. When starting a new piece, first play
through each phrase without thought, allowing the hands and arms to do what they intuitively find most
expedient. The second stage is to observe and rationalise what is happening, so as to understand the
technical processes being used. This is much more appropriate than applying a set of stereotyped a-priori
rules. As Neuhaus pointed out, there are as many techniques as there are musical utterances.
Specialists can become blinded by their own science, to the point where they see technique as an end
rather than a means. Even among professional concert pianists there are those who play in a thorough and
business-like way, as though doing their duty with due diligence, but nothing more. This is perhaps
because, in the meaningless merry-go-round of modern life, it is often difficult to connect with that magic
realm, beyond the world of everyday trivia, which is the natural habitat of artistic inspiration.
Bibliography The Leschetizky Method by Malwine Bree (1902). A good guide to the raised finger action and hand position, but lacking in
detail about how to use the arms.
The Act of Touch in All Its Diversity by Tobias Matthay (1903). Very influential, especially in Britain, but not particularly
recommended, as it has given rise to a good deal of confusion and bad practice.
Famous Pianists and their Technique by Reginald Gerig (1974). A long and interesting survey, particularly for the chapter on
Ortmann and Schultz, who developed the “extending finger action”, although they did not invent it.
The Technique of Piano Playing by Josef Gat (1958). Meticulously researched but too long and detailed for most people. It
contains some good ideas and some questionable ones. Gat understood the function of kinetic energy in producing tone (op.
cit. p.27) but did not understand the role of arm weight in creating the kinetic energy.
The Art of Piano Playing by Heinrich Neuhaus (1973). Full of wisdom and a pleasant read. Anecdotal rather than systematic.
Exercises and studies School of Advanced Piano Playing by Raphael Joseffy (G. Schirmer). An outstanding book. Probably the most extensive and
comprehensive selection of exercises available.
Essential Finger Exercises by Erno Dohnanyi (Editio Musica Budapest). This book contains many excellent exercises,
although some pages are devoted to things which can be found in a normal scale book.
The Virtuoso Pianist by Hanon (G. Schirmer). Simple sequential patterns, useful for practising different touches. Easily
playable by people who find difficulty in reading music.
The Art of Finger Dexterity by Carl Czerny (G. Schirmer). The studies are quite musical, and, by virtue of their length, help to
develop stamina. A good preparation for Chopin’s Etudes.
Technical exercises by Paul White. Available via the following link: www.scoreexchange.com/profiles/paulwhite743 A short
selection of representative exercises follows.


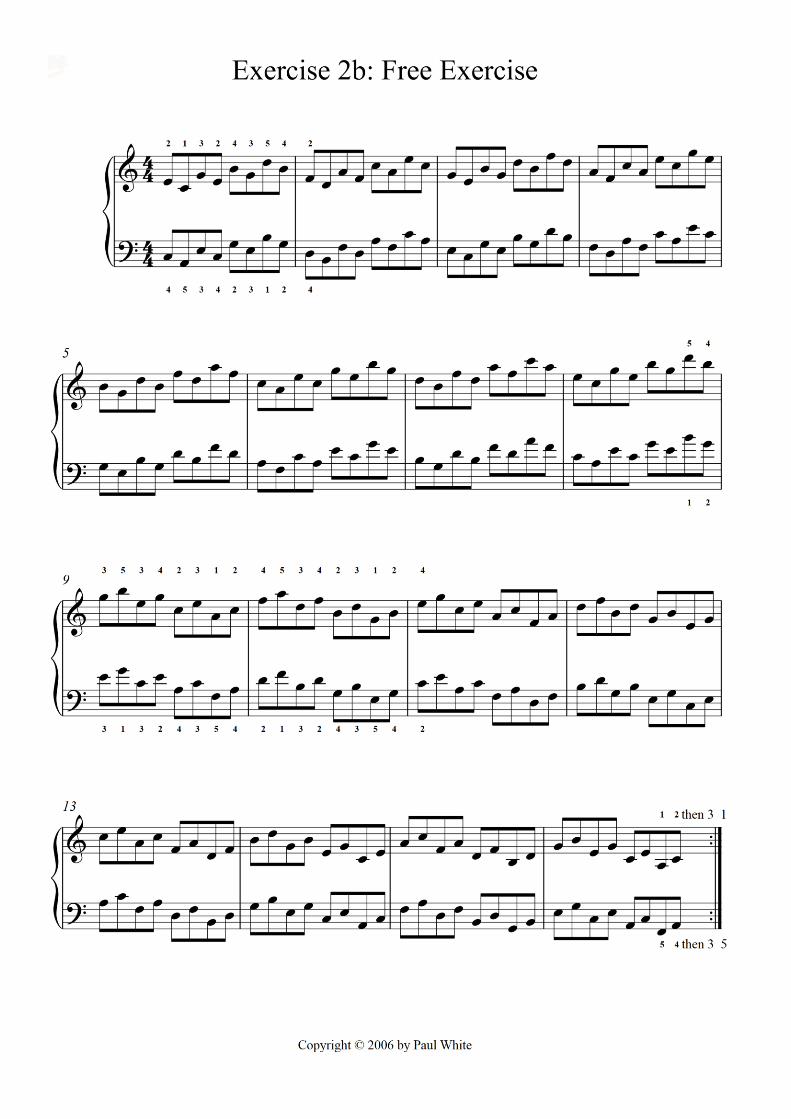


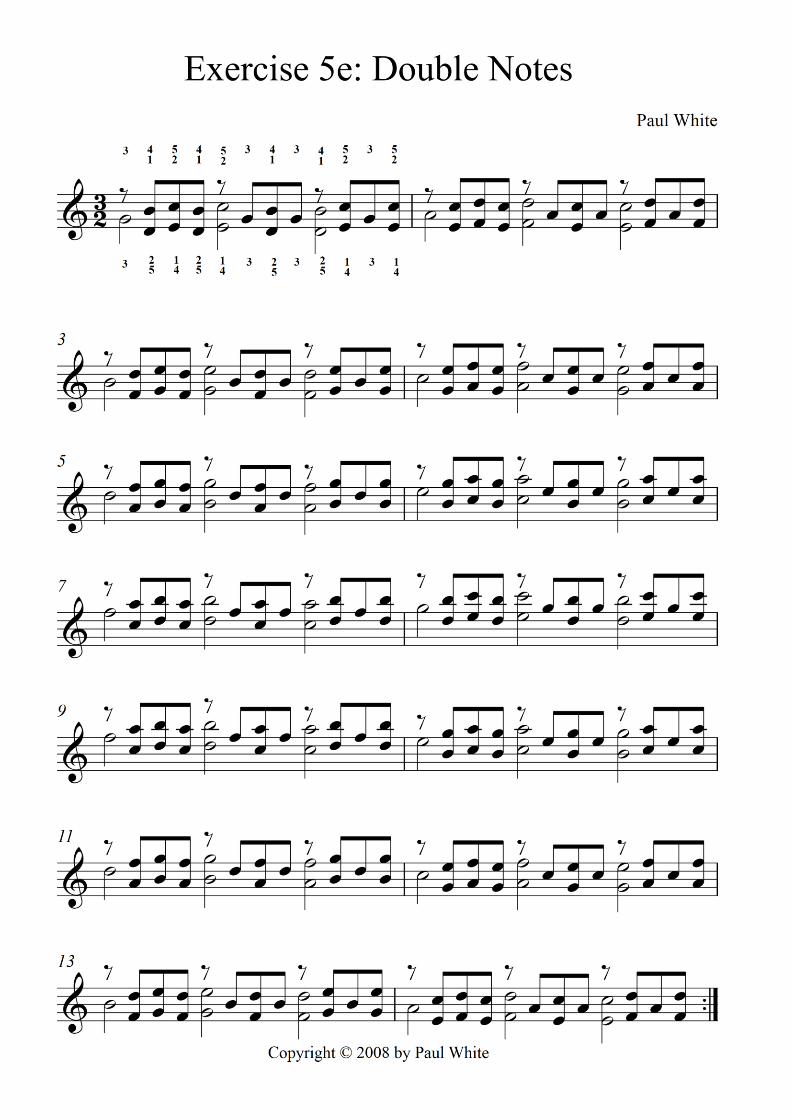
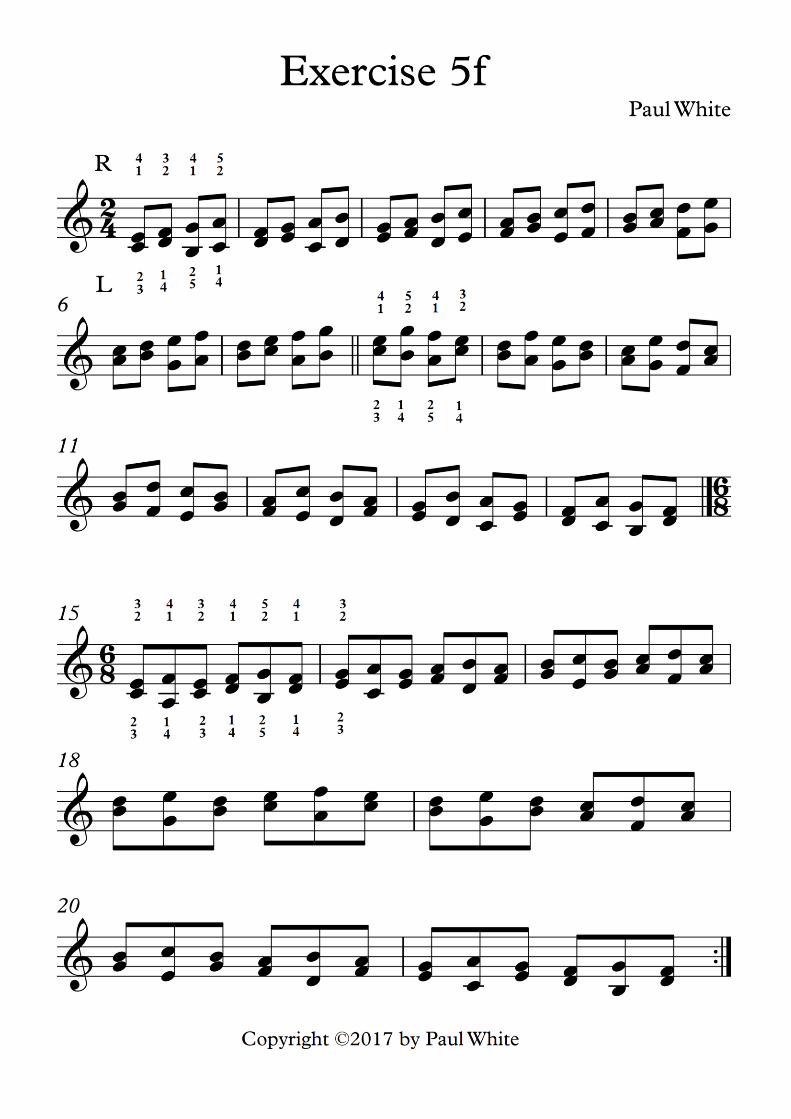


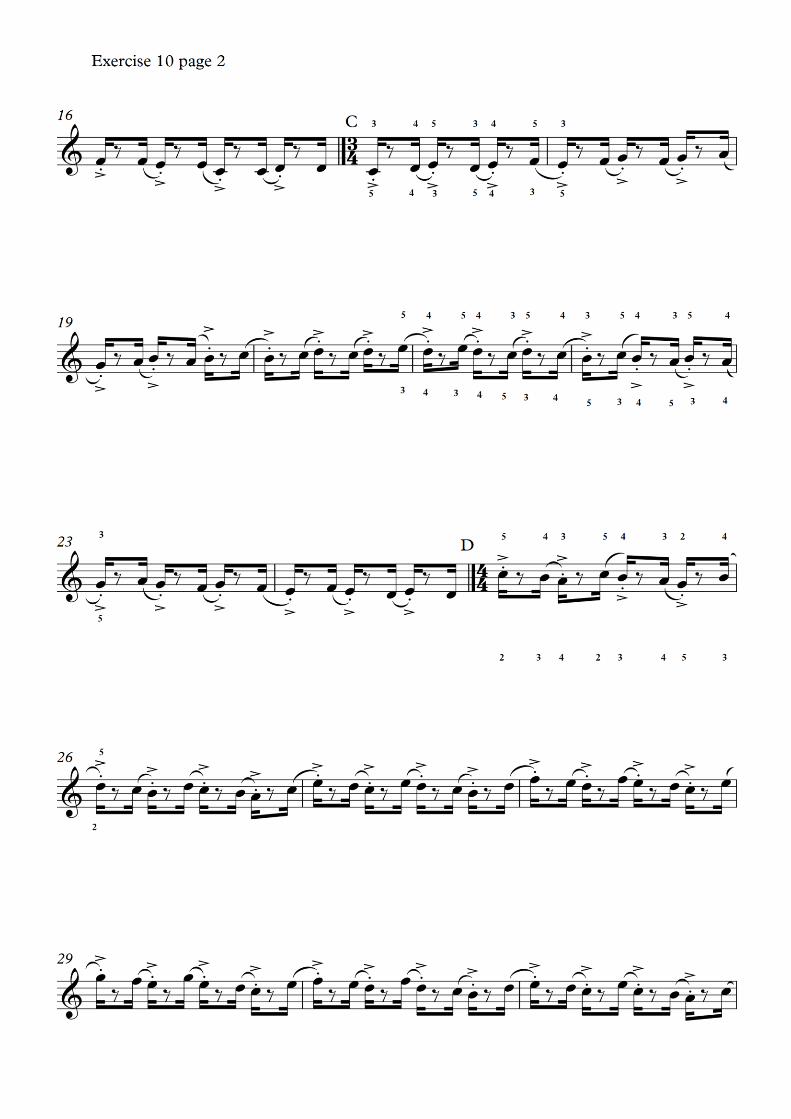


![Latin Jazz Piano Technique[1]](https://img.dokumen.tips/doc/110x75/563db7d9550346aa9a8e87aa/latin-jazz-piano-technique1.jpg)