Embed Size (px)
DESCRIPTION
By Paint the Moon Photoshop Actions. Photoshop Elements actions guide to installation, troubleshooting, layer masks and much more - Mac version. http://paintthemoon.net/blog/
Citation preview

© p a i n t t h e m o o n p h o t o s h o p a c t i o n sa l l r i g h t s r e s e r v e d • p a i n t t h e m o o n . n e t
Defin�ve
paint the moonp hotoshop™ act ions and textures
Action Installation and Troubleshooting Guidep h o t o s h o p e l e m e n t s f o r m a c
the
© p a i n t t h e m o o n p h o t o s h o p a c t i o n sa l l r i g h t s r e s e r v e d • p a i n t t h e m o o n . n e t
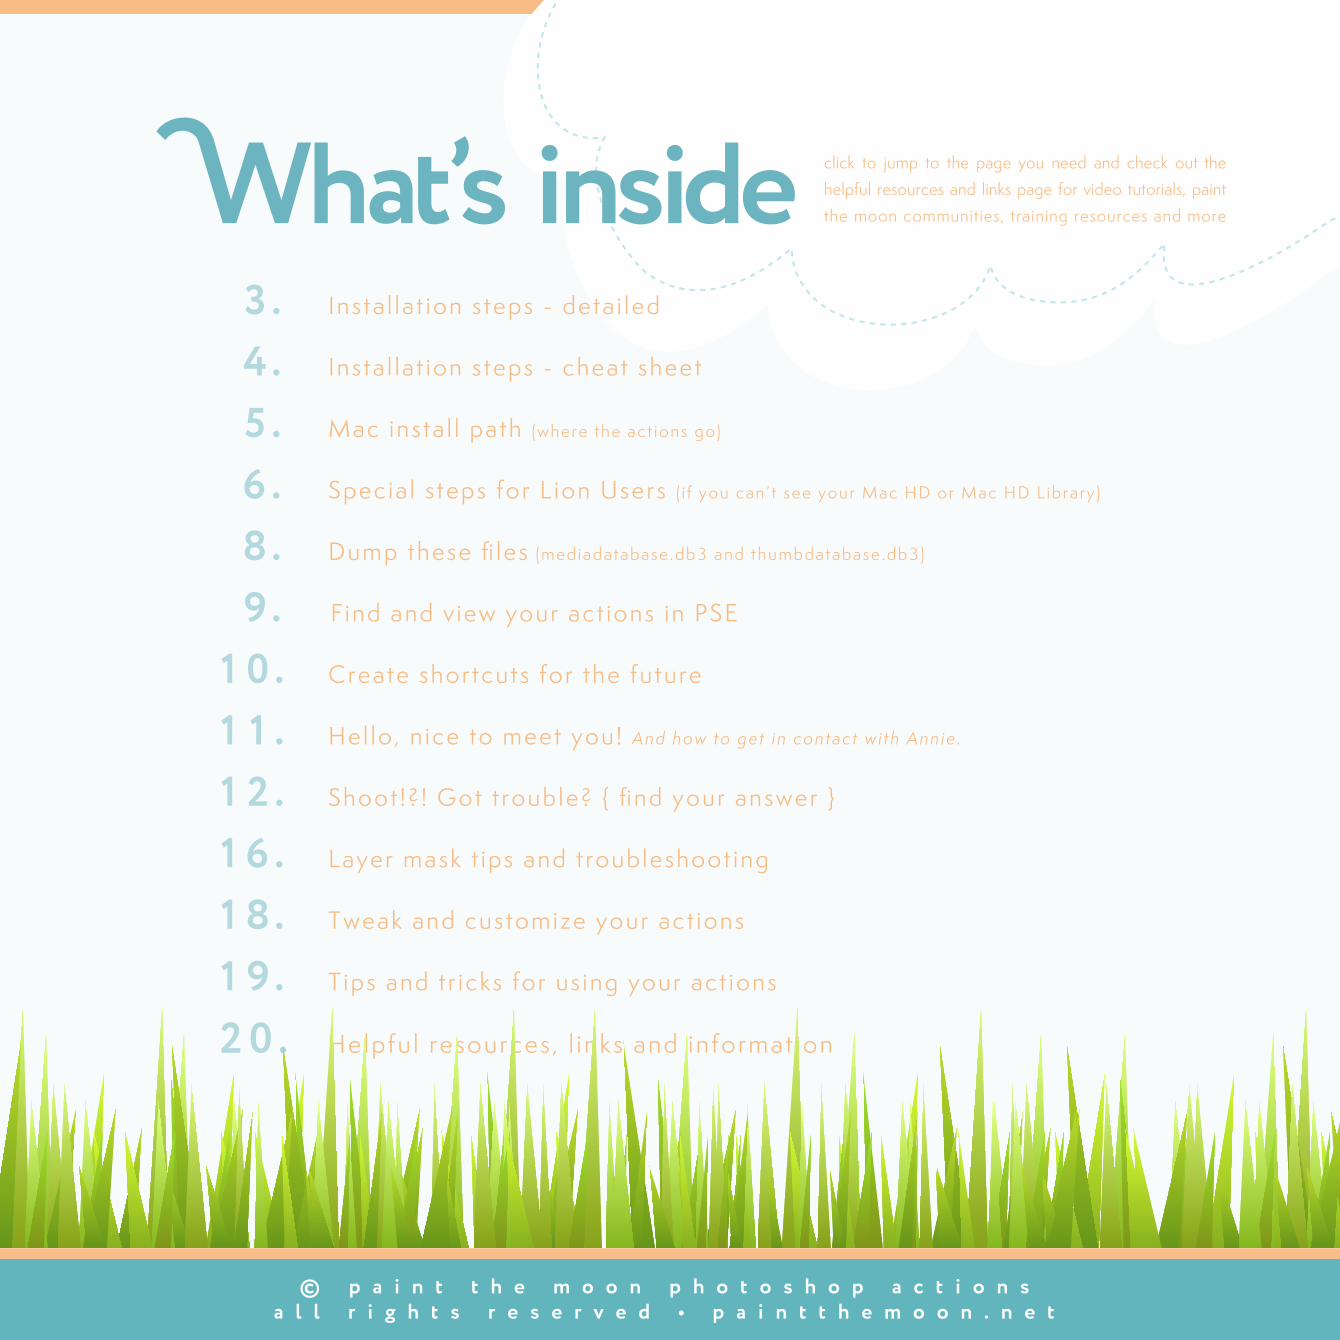
What’s inside 3 . Insta l lat ion steps - detai led
4 . Insta l lat ion steps - cheat sheet
5 . Mac instal l path (where the act ions go)
6 . Special s teps for L ion Users ( i f you can’t see your Mac HD or Mac HD Library)
8 . Dump these files (mediadatabase.db3 and thumbdatabase.db3)
9 . F ind and v iew your act ions in PSE
10. Create shortcuts for the future
. Hel lo, n ice to meet you! And how to get in contact with Annie.
12. Shoot!? ! Got t rouble? { find your answer }
16. Layer mask t ips and troubleshoot ing
18. Tweak and customize your act ions
. T ips and tr icks for us ing your act ions
. Helpful resources, l inks and informat ion
click to jump to the page you need and check out the helpful resources and links page for video tutorials, paint the moon communities, training resources and more

© p a i n t t h e m o o n p h o t o s h o p a c t i o n sa l l r i g h t s r e s e r v e d • p a i n t t h e m o o n . n e t
Detailed, in depth version ... this list covers every step in great detail. This covers everything from downloading to finding your installed actions in PSE. Be sure to see screen shot pages too!
Download your actions. You will be directed to a page where you can click on the words "Click here" to immediately download your products a er the payment goes through. You will also receive an e-mail at your payment address with the link in it.
Locate the downloaded file and open the folder. If it is not unzipped (if it still has the .zip extension at the end), unzip it. Most Macs have pre- installed so ware that allows you to double click it to unzip. If you find do not have unzipping so ware, you can download free so ware to do this online. A popular, highly rated FREE one are for the Mac is YemuZip.
Select all the action files (they are in their own folder - they all have the extensions .atn, .png and .xml ... each action has one of each of these types of files). Do a "copy" just like you would with copying text (command+ c). Do not copy any textures, PDF files, templates, etc. ... only the .atn, .xml and .png files - if you copy other files it will mess up your Effects palette and we'll need to fix things (see Shoot! Got trouble?!). The files also need to be placed loose into the Photo Effects folder, not within a folder.
Locate the Photo Effects folder. Your installation path is on page 5 under Mac path (which is a fancy way of saying the folders you need to open to get to the one you need). Note the most common problem when unable to find the Photo Effects folder on a Mac is not selecting your Macintosh HD (your main drive - the gray hard drive icon). Do NOT select your User Library (the little house icon with your user name). Lion users, please see pages 6 and 7 for information on un-hiding the Mac HD and Mac HD Library if you can’t see them.
Once inside the Photo Effects folder do a "paste" (like you are pasting text again, command + v). This is copying all the files to the Photo Effects folder where they need to be. NOTHING else is supposed to be copied into the Photo Effects folder - only png, atn and (if included) xml files.
Go back to your Installation Path , locate the version number folder (9.0, etc.), open it. Next open the Locale folder. Inside the Locale folder, open the en_US folder. Inside you will find the file called mediadatabase.db3. Select it and change the name to anything you want, add the word OLD to it or whatever you like. Go back to the version number folder (9.0, etc.) and find the Thumbdatabase.db3 file and do the same thing. See page 8 - Dump Those Files!
Restart PSE and leave it alone while it rebuilds the databases (it will give a message saying it's doing this). Leave it alone a good long time and don't interrupt it even if it looks like it’s become unresponsive If it’s interrupted, it will appear as if you have NO actions and you’ll need to repeat step six above.
A er it's all finished, go to your Effects palette and click on the Layer Styles button first (this resets the palette). Then click on the Photo Effects button, which is the third button over with sparkles around it. In the drop down menu to the right you will see the name of the action set you just installed. If your set did not come with xml files you will need to choose Show All to see your new actions in the palette all together (some older sets do not have them, but you will be getting a free update from Paint the Moon soon when we send out newly created XML files to all our customers for every PSE set in the shop). See page 9 - Find and View Those Actions.
1 .
2 .
3.
4.
5.
6.
7 .
8.
Installation Steps
page 3

© p a i n t t h e m o o n p h o t o s h o p a c t i o n sa l l r i g h t s r e s e r v e d • p a i n t t h e m o o n . n e t
Install cheat sheet the condensed version ... for experienced users and smarty pants
Download actions.
Unzip and open folder.
Select action files (png, atn and xml files) and “copy.”
Locate the Photo Effects folder (see your installation path for your system) and “paste” files.
Delete or rename mediadatabase.db3 and thumbdatabase.db3 files (see page 8,“Dump these files”).
Restart PSE and leave it alone while it rebuilds the databases. It could take up to 20-30 minutes,although usually only a few. Do not interrupt it, even if it seems to be unresponsive
Find actions in Effects palette within Elements.
Have lots of fun creating while saving time!
1 .
2 .
3.
4.
5.
6.
7 .
8.
page 4
First time action user?c l i c k H E R E f o r t i p s , t r i c k s a n d a s h o r t v i d e o w i t h e d i t i n g b a s i c s
c l i c k H E R E t o s e e t h e M a c i n s t a l l v i d e o f o r E l e m e n t s

© p a i n t t h e m o o n p h o t o s h o p a c t i o n sa l l r i g h t s r e s e r v e d • p a i n t t h e m o o n . n e t
Mac install path Installation path is a fancy way of saying the folders you need to open to get to the one you need to place your action files in
• Macintosh HD
• Library (your main hard drive Library - the gray drive icon, do not select your User Library which is the house icon)
• Application Support
• Adobe
• Photoshop Elements
• 10.0 (or your version number)
• Photo Creations
• Photo Effects (This is the folder where you will copy your action files to.)
page 5
EndHere
StartHere

© p a i n t t h e m o o n p h o t o s h o p a c t i o n sa l l r i g h t s r e s e r v e d • p a i n t t h e m o o n . n e t
Un-hide filesFor Lion users only
The actual installation instructions for actions for users running Lion are the same, however, finding the Macintosh HD and the Library are made a little more difficult because Apple
has made these hidden by default.
Making your Macintosh HD visible.The first thing you may notice when beginning to install your actions is that the Macintosh HD is not on your desktop or in your sidebar. This is where you want to start each time you
install your new actions (because you need the Macintosh HD Library NOT the User Library). You can make it visible in these areas again by doing the following steps.
My preferred method is having the hard drive appear in the Sidebar, so I can see it with any open window in Finder. I'd rather not have my desktop cluttered up with the hard drive
icon. To get it to appear in your Sidebar, open any window in Finder and right click on the sidebar in an empty area. The following window will pop up, where you'll want to check
Hard Disks. That's it. Now you can access your Macintosh HD starting from your Sidebar with no problems.
The other method is having the Macintosh HD show up on your desktop. To do this launch Finder from your Dock, then from your menu bar select Finder and choose Preferences.
Select the General tab and make sure there is a check mark next to Hard disks to be displayed on the desktop. Your Macintosh HD will immediately become visible on your desktop.
To hide it again, simply go back to this window and deselect the check box next to Hard Disks.
page 6
There it is!
Right clickon sidebar
CheckHard disks
to see yourMac HD in
the Sidebar

© p a i n t t h e m o o n p h o t o s h o p a c t i o n sa l l r i g h t s r e s e r v e d • p a i n t t h e m o o n . n e t
Un-hide filesFor Lion users only
Making your Macintosh HD Library visible.
Another hiccup you may run into is with the addition of Apple hiding some once visible files, Lion users no longer see the Macintosh HD Library visible as a default. There are several ways
to make hidden files visible again - my preferred method is number two or three, but these both require third party so�ware.
1. Using Terminal
• Open the Terminal application (Applications > Utilities > Terminal.app)
• Type in the following:
defaults write com.apple.Finder AppleShowAllFiles TRUE
• Hit the Return key
• Restart the Finder by holding down the option key while clicking on the Finder icon. Then click Relaunch.
• If you decide you'd like to re-hide the files after installing your actions type the following into Terminal:
defaults write com.apple.Finder AppleShowAllFiles FALSE
Then restart the Finder again.
2. Using DesktopUtility:
• Download and install the application DesktopUtility
• Launch the app and find the icon in your menu bar
• Click the option “Show Invisible files”
3. Using Tinkertool:
• Download and install the application Tinkertool
• Launch the app and in the Finder tab, check the box that says “Show hidden and system files”
• Click “Relaunch Finder” at the bottom right
Also, a friendly reminder that if you've purchased Elements from the Mac App store they have removed functionality from this
application and actions cannot be used with this version.App Store Note:
page 7
Tinkertools Application
© p a i n t t h e m o o n p h o t o s h o p a c t i o n sa l l r i g h t s r e s e r v e d • p a i n t t h e m o o n . n e t
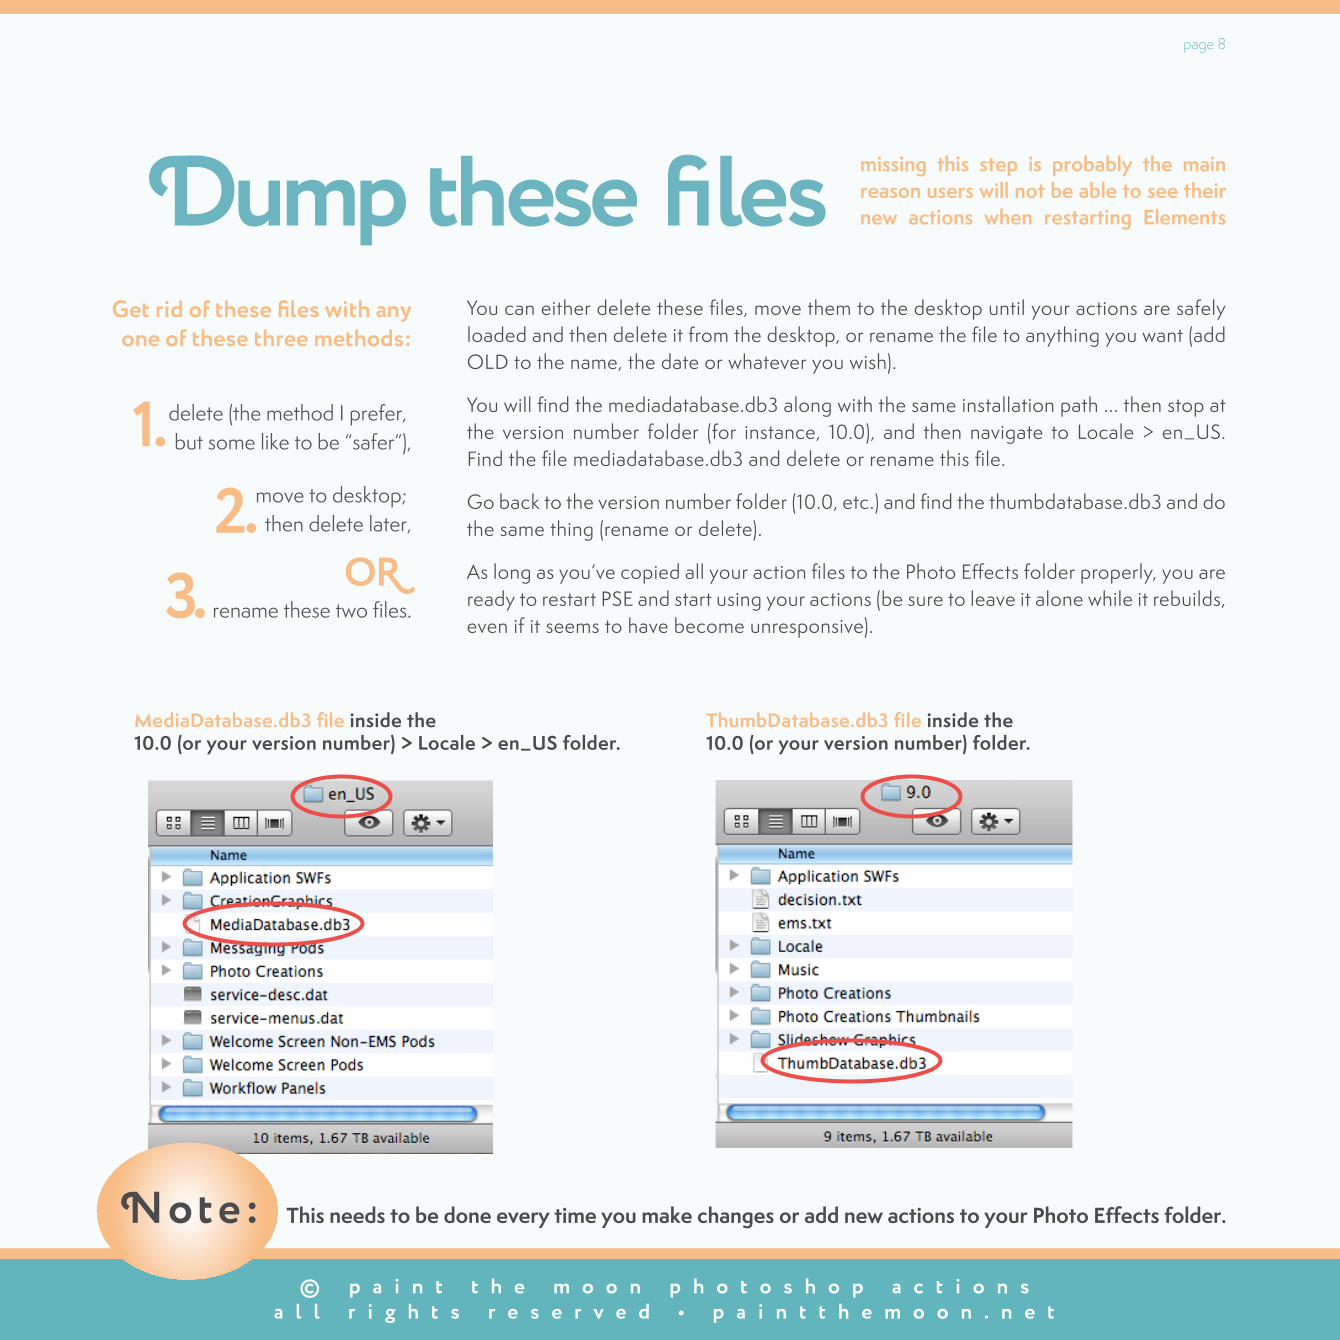
Get rid of these files with anyone of these three methods:
delete (the method I prefer, but some like to be “safer”),
move to desktop; then delete later,
rename these two files.
You can either delete these files, move them to the desktop until your actions are safely loaded and then delete it from the desktop, or rename the file to anything you want (add OLD to the name, the date or whatever you wish).
You will find the mediadatabase.db3 along with the same installation path ... then stop at the version number folder (for instance, 10.0), and then navigate to Locale > en_US. Find the file mediadatabase.db3 and delete or rename this file.
Go back to the version number folder (10.0, etc.) and find the thumbdatabase.db3 and do the same thing (rename or delete).
As long as you’ve copied all your action files to the Photo Effects folder properly, you are ready to restart PSE and start using your actions (be sure to leave it alone while it rebuilds, even if it seems to have become unresponsive).
1.2.
3. O�
Note: This needs to be done every time you make changes or add new actions to your Photo Effects folder.
MediaDatabase.db3 file inside the 10.0 (or your version number) > Locale > en_US folder.
ThumbDatabase.db3 file inside the 10.0 (or your version number) folder.
missing this step is probably the main reason users will not be able to see their new actions when restarting ElementsDump these files
page 8

© p a i n t t h e m o o n p h o t o s h o p a c t i o n sa l l r i g h t s r e s e r v e d • p a i n t t h e m o o n . n e t
Find your actions
View your actionsClick on the little arrow and three lines in the upper right corner to
change the view ... you can view different thumbnail sizes, as well as see the names of actions below the thumbnails in the palette
(you can also just hover over the icon with your mouse to view the title in the palette). If you’d like to group your most used actions into an easily accessible Favorites tab, see our YouTube video tutorial on
Organizing Elements Actions.
1. LayerStyles
(to reset)
2. Photo Effects
3. Select Action Set orShow All
Change the view
Follow these steps to find your actions once Elements is finished rebuilding contents and effects. Leave it alone during this process, this may take
a *long* time - up to 20-30 minutes in extreme cases (most of the timeit will take only a few). Interrupting it can cause problems and it will
appear that you have NO actions if it doesn’t finish.
1. Click on the 2nd button over (Layer Styles) to reset your Effects palette.
2. Click the third button over with sparkles around it (Photo Effects).
3. Then select your action set in the drop down menu or Show All to see all your actions (if your action set did not come with XML files,
you will need to Show All to see that set).
page 9

© p a i n t t h e m o o n p h o t o s h o p a c t i o n sa l l r i g h t s r e s e r v e d • p a i n t t h e m o o n . n e t
I highly recommend making aliases or shortcuts for the folders needed to install actions to make adding new actions in the future easier and faster. Go to each folder you will need to access for adding actions:
Photo Effects (to copy your action files to)
en_US (to delete/rename mediadatabase.db3)
Your version number (9.0, etc. to delete or rename thumbdatabase.db3)
When you get to each folder you need, just select it and then drag the folder to your sidebar as shown below (you can also right click and choose “Make Alias” and then drag the alias to your desktop or where ever you’d like it). Now you won’t need to hunt for them every time you make changes to your actions!
Adding shortcuts for your PSE folders make adding new actions a breeze!
make it easier to add actions in the future with shortcuts to the PSE folders needed for changes to your action collectionShortcuts for the future
page 10

© p a i n t t h e m o o n p h o t o s h o p a c t i o n sa l l r i g h t s r e s e r v e d • p a i n t t h e m o o n . n e t
Hi. I’m Annie.
So nice to meet you!I want to thank you for your support and bus iness . I t ru ly hope you are thr i l led wi th your Paint the Moon products . Your sat is fact ion is my number one pr ior i ty , and I take pr ide in provid ing excel lent customer serv ice. I f you find, a�er looking over the insta l la t ion guide, t roubleshoot ing guide and tutor ia l v ideos avai lable , that you are s t i l l in need of ass is tance, p lease feel f ree to e-mai l me at annabel le@paint themoon.net and I ’m more than happy to help.
I wi l l need to have the fol lowing informat ion in order to get you taken care of as quick as poss ib le :
• Paint the Moon product you are us ing
• Your computer ’s operat ing system
• Your vers ion of E lements
• What exact ly your i ssue is , or where in the insta l la t ion process you are running into a h iccup. The more detai led informat ion I get up f ront , the better and faster I can get you taken care of and star ted us ing and enjoying your new act ions.
Thank you!
page 11

© p a i n t t h e m o o n p h o t o s h o p a c t i o n sa l l r i g h t s r e s e r v e d • p a i n t t h e m o o n . n e t
@!#?@#! ?@#!!?@!#!?@?@#!#Shoot! Got trouble?t r o u b l e s h o o t i n g : p s e
First make sure you are running Photoshop Elements versions 6 or up.
I can't find where to copy my action files to!
This usually because the user has selected the User library instead of the Macintosh HD library. Please start your installation path by selecting your hard drive (the little gray hard drive icon, that usually is named Macintosh HD unless you've renamed it). Do NOT select the library that is found within your User name (the little house icon that is titled whatever your user name is).
I'm not seeing my new actions a�er copying them to the correct Photo Effects folder!
Usually this is because the user has not renamed or deleted the database files (mediadatabase.db3 and thumbdatabase.db3). Please see page eight for screen shots and directions on doing this.
I've done everything right and a�er restarting PSE ALL my actions are GONE!
This usually happens when PSE has been interrupted while rebuilding the contents and effects files. It can take a very long time for this to happen (it's usually just a few minutes, but can be up to around 20-30 minutes in rare instances), and many times it will look like it's finished or unresponsive, when it's actually still working in the background. Interrupting it by messing around in PSE in anyway will stop the process and it will appear as if you have no actions at all in your Effects palette. You'll need to rename/delete those database files once again and restart PSE (see page eight) ... this time you’ll want to be sure to leave it alone while it does it's thing. If you have PSE open with the Effects palette visible before shutting down, then you can keep an eye on the palette while it's rebuilding upon restarting PSE ... once you see all the effects pop back up there then you'll know it's close to being finished.
page 12

© p a i n t t h e m o o n p h o t o s h o p a c t i o n sa l l r i g h t s r e s e r v e d • p a i n t t h e m o o n . n e t
@!#?@#! ?@#!!?@!#!?@?@#!#
t r o u b l e s h o o t i n g : p s e
I only have one atn file included in my download - now what?
This means you have accidentally ordered the Photoshop (not Elements/PSE) version of the set. Please contact Annie and we'll take care of you.
The action was running, a message popped up and I hit stop ... everything reverted to the way it was before the action started.
Never hit Stop on a message within Elements unless you want to completely undo the action's effects and start over.
I ran the action and it doesn't appear that anything has changed?
Most likely you are using an action that has a layer mask that requires you to paint where you want the effects visible. Please see Layer Mask Basics for help (page 16), as well as the video tutorial on Layer Masks to understand how they work better. You'll need to use your white brush with the layer mask selected (the black box on the right of the layer) - paint where you want the effect to appear.
I've installed my new actions and now every time I open Elements it crashes on me!
Try resetting your preferences. To reset your preferences see the instructions on the next page under the “wonky” question.
The effect is too strong for my image or it’s too bright!
Adjust the layer opacity on the action’s layers, turn lightening and brightening or darkening layers on or off ... tweak the action until you get the right look for your image.
page 13

© p a i n t t h e m o o n p h o t o s h o p a c t i o n sa l l r i g h t s r e s e r v e d • p a i n t t h e m o o n . n e t
@!#?@#! ?@#!!?@!#!?@?@#!#
t r o u b l e s h o o t i n g : p s e
Everything is acting all wonky on me!
I frequently get emails from customers who tell me that Photoshop/Elements seems to be acting up and giving them strange errors or just doing oddball things. Sometimes this will look like an action isn’t working properly. The random things that can go wrong and errors that pop up with a corrupt preferences file are extensive but include freezes and crashes, tools acting weird or missing from toolbox, menu commands all of a sudden not available, unusual errors or results while running actions, crashing upon start up and more. I have found that almost 95% of the time when customers are running actions and experience strange problems or error messages, the issue is easily fixed by deleting the preferences file. It’s super easy and usually clears up the problem immediately. Be sure not to let go of the keys until you see the message about deleting the settings or preference file – click yes and then you may let go of the keys. Here is how to do it:
To dump your corrupt preferences file and give it a fresh start:
For a Mac, when you restart Elements make sure you hit the Command, Option and Shi� keys at the same time. When it asks if you want to delete the settings file, click yes. It will go ahead and delete the settings and then automatically restart. Getting the timing right can be a bit sensitive, so be sure to hold down those keys immediately a�er launching the Editor, but before the program actually opens completely.
Then restart PSE. Try again and hopefully Elements will begin to play nice. :)
Note: If it doesn’t work the first try, hold the keys this way … Hold down the Command and Option keys, then restart PS, and immediately press the Shi� key. In that order.
page 14

© p a i n t t h e m o o n p h o t o s h o p a c t i o n sa l l r i g h t s r e s e r v e d • p a i n t t h e m o o n . n e t
@!#?@#! ?@#!!?@!#!?@?@#!#
t r o u b l e s h o o t i n g : p s e
When I click on my actions I get messages like "Could not complete your request because the file is not compatible with this version of Photoshop." and "Could not complete your request because there is not enough memory (RAM)."
This happens if you have copied over a file that does not belong in your Photo Effects folder. The ONLY files you should be copying to your Photo Effects folder are the files that end in ATN, PNG and XML (if included). There will also be files ending in thumbnail.jpg (these are created by PSE, not something you copy in there). Anything else should be removed and then delete/rename your two database files and restart PSE again. Also, you should have no folders within the Photo Effects folder ... you will want to copy ONLY the loose atn, png and xml files over - not the folder they are in. These messages can also happen when your atn file and your png file have different names (see below under the black boxes question for the solution, if this is the case).
There are blank, black boxes inside my Photo Effects palette.
This happens for several different reasons. These only apply to actions created by designers other than Paint the Moon - these reasons being the action was meant to be installed in the Action Player (all Paint the Moon actions are recommended to be installed via the Photo Effects method only), or the action designer didn't create the matching PNG file thumbnail for the action (in which case it should still run okay, but will just not have a thumbnail icon. It also happens if your atn and png files do not have exactly the same name - in which case you can make changes to one of the files so they match EXACTLY (even a space can wreak havoc if the titles don't match).
I keep getting a message saying "The object "layer "Background" is not available."
Flatten your image prior to running actions, so that you only see the "Background" layer. If you need to do this, just right click on one of your layers and select "Flatten Image."
page 15

© p a i n t t h e m o o n p h o t o s h o p a c t i o n sa l l r i g h t s r e s e r v e d • p a i n t t h e m o o n . n e t
@!#?@#! ?@#!!?@!#!?@?@#!#
t r o u b l e s h o o t i n g : l a y e r m a s k s i n p s e
I'm painting on my layer mask but nothing is changing!
See next page for things to look for when your layer masks don’t appear to be working correctly.
Layer masks are a perfect way to achieve targeted results when running actions. They allow you to have the action’s effect appear on part
of the photo, but not the entire image. Using them is also essential for most of the actions in the Miracle Makeover action set ... such as
the Sparkle Eyes actions, which requires you to paint on the layer masks to make the effect appear where you need it. Here I will teach
you the very basics on layer masking.
First you need to know that white reveals and black conceals. This is your layer mask - the black or white box next to your layer thumbnails:
If the eyeball to the le is on, it means this layer is visible. If the layer mask is
white (as it is here), it means the layer effects are visible. To mask (or hide) any
specific areas of this layer or group, simply paint on the layer mask (make
sure it is selected as it is here) with a black brush. The opposite is also true. If
you have a black layer mask, it means everything on that layer is masked (or
hidden) and to reveal anything you need to paint with a white brush. This is
important to remember when using actions such as the Makeover series -
because when the action finishes running you won’t see any difference until
you start painting (i.e., revealing) on your layer masks.
You can always switch back and forth between a black and white brush if you
paint too much and need to correct it. You can also use a lower opacity or
harder/so er brush to really control the effect to the greatest possibility.
However, most of the time you’ll want to use a so airbrush at 0% hardness
for best results (unless purposely needing a hard edge for detail work).
REMEMBER . . . Black Conceals - White Reveals
page 16
C L I C Kfor layer mask video

© p a i n t t h e m o o n p h o t o s h o p a c t i o n sa l l r i g h t s r e s e r v e d • p a i n t t h e m o o n . n e t
@!#?@#! ?@#!!?@!#!?@?@#!#
t r o u b l e s h o o t i n g : l a y e r m a s k s i n p s e
The top color is your brush color. Black conceals, white reveals.To quickly switch colors, hit “X”
Click small boxes for default black and white colors, click the little arrows to swap fore-ground and background. To quickly go back to default black & white hit “D”
Make sure you have selected the default brush on top
Select your top brush tool
Painting basics for layer masks.
Make sure you have the layer mask selected before painting:
Layer mask selected and ready to paint on.
Layer mask not selected - NOT ready to paint on.
If you can’t see your anything happening when painting, check these settings:
Is, if your effects aren’t appearing when painting on layer masks, and you’ve checked all the above settings, there are two more rare things to check for. Number one would be your brush "flow" (how much is "flowing" from your brush). Setting the brush flow is an available option in full Photoshop, but isn't shown in the options bar for Elements users. However, the function is still present and be called up with shortcut keys (the brush tool + alt (or opt) + number key). If you somehow clicked this shortcut on accident it will set your brush flow to that number and stay that way as a default for all brushes as a preference unless you reset it. To reset it select the brush tool then press and hold the alt key (opt if on mac). While you have the alt (opt) key held down, press the 0 (zero) key. Your brush flow should now be re-set to 100% flow. :) The second thing to try would be resetting your preferences ... see page 14 for instructions.
I’ve checked all the above and everything is set correctly!
page 17
Blend mode:Normal
Opacity:100%
© p a i n t t h e m o o n p h o t o s h o p a c t i o n sa l l r i g h t s r e s e r v e d • p a i n t t h e m o o n . n e t
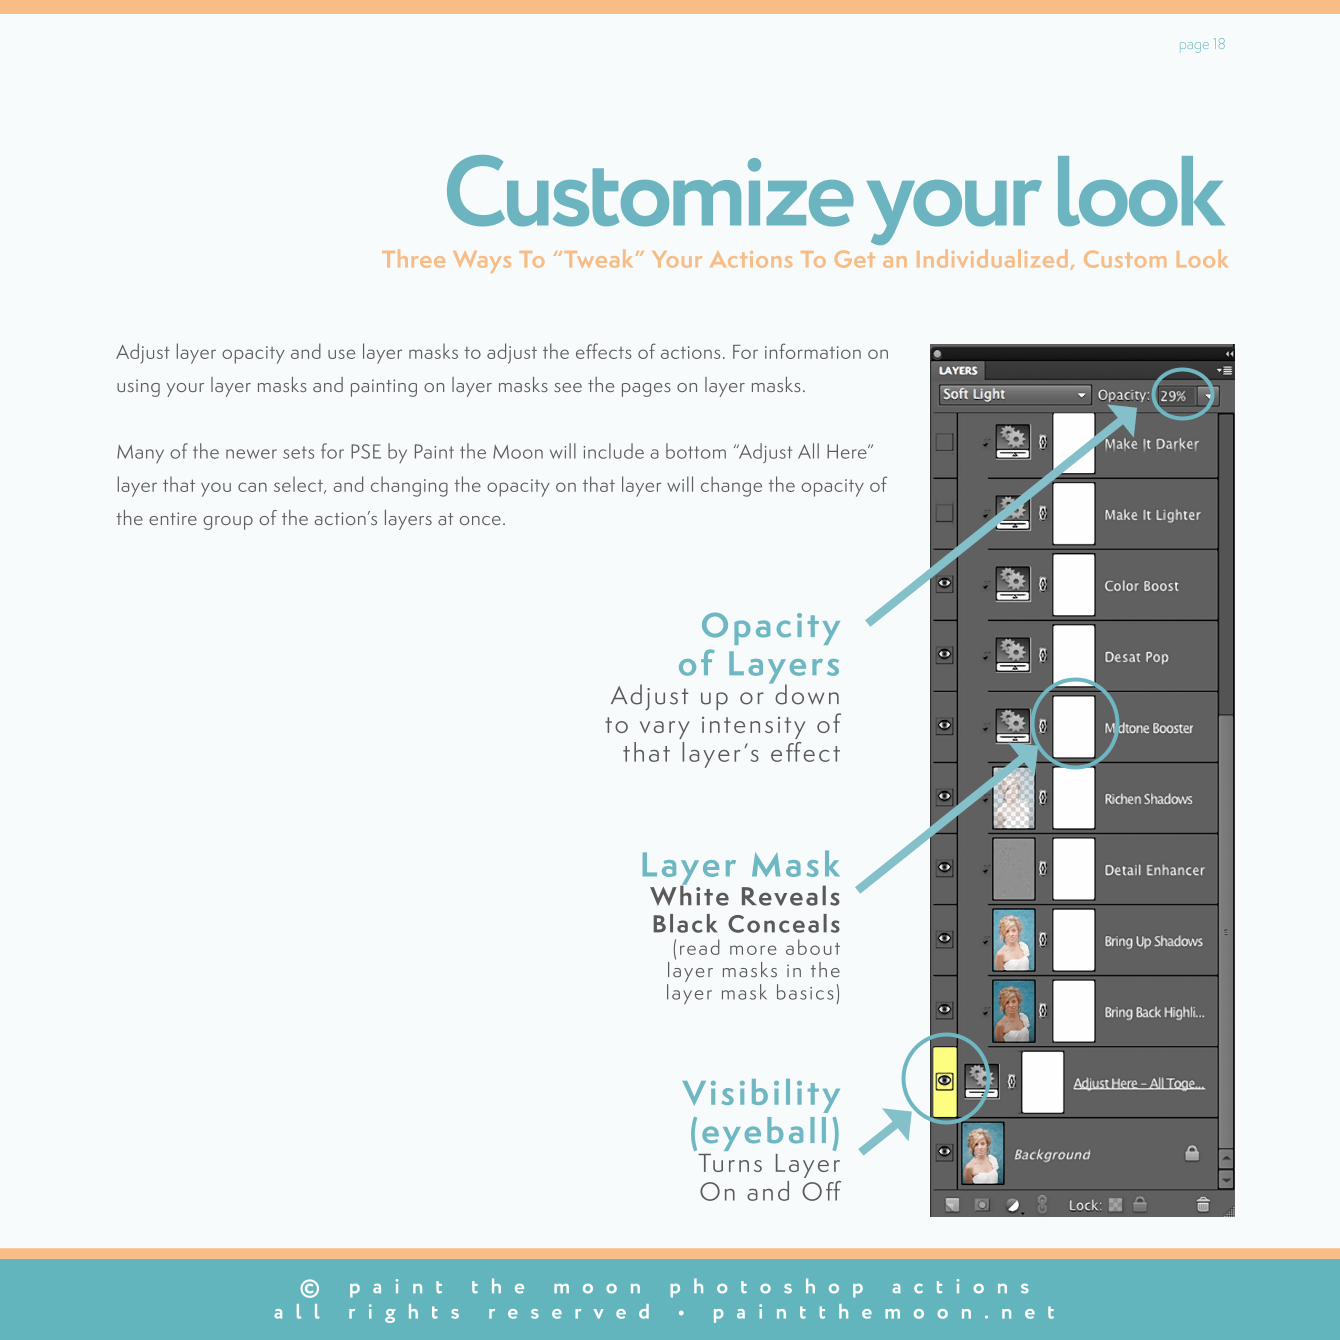
Adjust layer opacity and use layer masks to adjust the effects of actions. For information on
using your layer masks and painting on layer masks see the pages on layer masks.
Many of the newer sets for PSE by Paint the Moon will include a bottom “Adjust All Here”
layer that you can select, and changing the opacity on that layer will change the opacity of
the entire group of the action’s layers at once.
Customize your look
Opacity of Layers
Adjust up or down to vary intensi ty of
that layer ’s effect
Layer MaskWhite RevealsBlack Conceals
(read more aboutlayer masks in thelayer mask basics)
Visibi l ity(eyebal l )Turns LayerOn and Off
page 18
Three Ways To “Tweak” Your Actions To Get an Individualized, Custom Look

© p a i n t t h e m o o n p h o t o s h o p a c t i o n sa l l r i g h t s r e s e r v e d • p a i n t t h e m o o n . n e t
Fix color casts and exposure issues first.Always get your color right using the color correcting actions first (Picture Perfect and Miracle Makeover), then fix exposure issues (too
dark or light) next ... leaving room for a little more lightening depending on which action you will be running. If you are using one of the all
in one workflow actions, there will be lightening and darkening layers to work with, as well as basic warming and cooling layers and other
adjustments al built in. If you run a skin smoothing or artistic action on an image with obvious color issues (too cyan, red, magenta, green,
yellow or blue), it will tend to exaggerate the color problems. So, fix color and exposure problems first, then move on to the rest of your
edits. Remember that the artistic actions play with the color in each individual image, shi ing the colors and these actions may look differ-
ent on different images depending on what colors are prominent in your photo.
Make sure you understand your layer masks.Also remember when working with layer masks that white reveals what is underneath a mask on the layer and black conceals the effects. If
there is a black box on a layer, you will need to paint on that layer mask to make the effect visible where you want it. See the layer mask
basics in the Install Guides for more help, as well as our video tutorials on layers and layer masks. You can also adjust the opacity and the
so ness or hardness of your brush while painting on layer masks - this can help achieve a more natural look as you paint and build up the
effect gradually (I especially recommend doing this on skin smoothing and darkening/lightening layers.
Play with layer opacity.Don’t forget to adjust your opacity on your layers - either by selecting the “Adjust All” layer or by selecting individual layers as desired if
your set does not have the Adjust All bottom layers. This is a must to get the best results much of the time since every image is unique.
When an action is first finished running, many times the opacity of the action layers or group will be at 100% opacity ... and you may think,
"Whoa - not what I was going for," at first glance. However, I most likely it will need just to a 5 second tweak to the action (see page 18) to
get just the right look depending on the photo.
Things you should know.
page 19
Tips and tricks to get the most out of your actions.

© p a i n t t h e m o o n p h o t o s h o p a c t i o n sa l l r i g h t s r e s e r v e d • p a i n t t h e m o o n . n e t
© p a i n t t h e m o o n p h o t o s h o p a c t i o n sa l l r i g h t s r e s e r v e d • p a i n t t h e m o o n . n e t© p a i n t t h e m o o n • a l l r i g h t s r e s e r v e d • p a i n t t h e m o o n . n e t
Paint the Moon Storeshop hundreds of actions, textures, and templates to save you time and make your images look their very best ... love editing again - love your photos - come on, get happy!
Paint the Moon Facebook Communityshare, be inspired, ask questions, learn! our very active Facebook wall is a wonderful place to visit! come share yourimages edited with your Paint the Moon products, get feedback and find the latest updates on new releases, free product samples, giveaways, tutorials and so much more!
Paint the Moon Blogtutorials on processing, using actions and photography - plus step by step recipes and many more free resources
Paint the Moon YouTube Channela wellspring of resources at your fingertips ... video tutorials covering installation methods, action basics, getting the most from your actions, general Photoshop/Elements tips and editing, texture use and much more!
Paint the Moon Flickr Groupshare your images processed with Paint the Moon productsand browse through the albums to be inspired by others’ work
Paint the Moon Flickr Let‘s Do 52 Groupjoin at any time ... take a photo a week, follow the theme orgo out on your own - grow, learn and be inspired!
Paint the Moon on Twitterfor those who Tweet ... so do we!
Installation for Mac - Video Tutorial
© p a i n t t h e m o o n p h o t o s h o p a c t i o n sa l l r i g h t s r e s e r v e d • p a i n t t h e m o o n . n e t
Finding what you need s h a r e • l e a r n • g r o w
Thank you for your support!
page 20