Embed Size (px)
DESCRIPTION
Photo shop
Citation preview

Photoshop Lecture notes B.K.Mathan Nagan MCA., (Ph.D)
1 CAUSSANEL COLLEGE OF ARTS AND SCIENCE
Photoshop
Digital Graphics
Overview
Before you learn to manipulate a digital image in Photoshop, it's important to know what
exactly how monitors display images and what images are made up of. Colour space,
resolution, colour depth, and file types are all fundamental aspects of a digital graphic.
Here is a summary of the topics in this module:
(1) Computer Monitors
Learn how pixels are displayed on computer monitors and how that affects the
display of images.
(2) Bitmap Graphics
There are two graphic formats that can be used on the Web: bitmap and vector.
Both are described and illustrated in this lecture.
(3) Image Resolution
The resolution of a bitmap image is an important consideration, regardless of
whether it is destined for the Web or for print. This lecture defines resolution and
explains how it affects the display of bitmaps.
(4) Dimensions
A bitmap's dimensions directly affect the file size of the image.
(5) Colour Space
Learn what a colour space is and the role it plays in understanding digital graphics.
The RGB colour space is defined.
(6) Bit Depth and Colour Depth
This lecture discusses colour depth and its dependency on bit depth.
(7) GIF Format
GIF is a lossless bitmap image format commonly used on the Web. It has various
options such as transparency, dithering, and animation.
(8) JPEG Format
The JPEG format is also widely used on the Web. It permits the display of a full
range of colours and you can control the amount of compression applied.
(9) PNG Format
The PNG format is a newcomer to the WWW. It combines some of the features of
GIF and JPEG.
(A) Vector Graphics

Photoshop Lecture notes B.K.Mathan Nagan MCA., (Ph.D)
2 CAUSSANEL COLLEGE OF ARTS AND SCIENCE
Vector graphics are based on mathematical descriptions and their properties can be
edited with no loss in image quality.
Bitmap Graphics
Computers display two different types of digital images: bitmap (also called raster) and
vector. Understanding the differences between the two will enable you to optimize the
performance of your Web pages. [Note: Use of the term bitmap shouldn't be confused with
the .BMP (bitmap) Windows image format, which is not a Web standard. We'll use 'bitmap'
as a generic term that includes all file types that format images using pixels. In this and
the next few lectures, we'll be talking a lot about bitmaps because this is the digital image
format used by Photoshop.
bitmap image detail magnified 800% showing pixels
Image Pixels
Like monitors, bitmap images are composed of pixels. In a digital image pixels are tiny
squares of colour arranged in rows and columns as though on a grid. Image pixels are
shown in the picture at the right, above. Each pixel contains a single colour. In the previous
lecture we said that one image pixel needs one monitor pixel to display it. Because of this,
bitmaps are referred to as 'resolution-dependent'.
Bitmap File Formats
Bitmap images are the most common type of file. The main benefit of bitmap images is
that photographic colour, tone, and textures are accurately reproduced. Examples of
bitmap image formats include GIF, JPEG, PNG, PSD (Photoshop), TIFF, and BMP. Bitmap
formats that are acceptable for use on the Web are JPEG, GIF, and PNG. The two that you
will use for your Web pages will usually be GIF or .JPEG. We will describe each in more
detail later.
Bitmap Graphics Summary
Photoshop Lecture notes B.K.Mathan Nagan MCA., (Ph.D)
3 CAUSSANEL COLLEGE OF ARTS AND SCIENCE
There are two different digital image types: bitmap (or raster) and vector.
Bitmap graphics are composed of pixels which are tiny squares of colour.
Bitmap graphics are resolution-dependent.
Bitmap file types used on the Web are usually JPEG or GIF.
Bitmap images are the most common image type on the Web right now.
Image Resolution
Resolution in an image determines how many pixels per square inch that image contains.
This is expressed as PPI (pixels per inch). PPI is also referred to as pixel density.
For example, an image resolution of 72 ppi means that there are 72 pixels in a one-inch
row and 72 pixels in each one-inch column of an image. Therefore, theoretically there are
5,184 pixels in one square inch (72x72=5,184). The necessary resolution will differ based
on the desired output for the image. An image for a Web site can be between 72-96 ppi but
the industry standard for the resolution of Web images is 72 ppi.
PPI and Monitors Explained
When referring to a computer monitor, this concept of PPI can be confusing to understand.
PPI is actually a very relative term when talking about monitor resolution. 72 ppi is really
more of an industry standard than an actual measurement.
Different Monitor Sizes
There are many different sizes of monitors available. Most CRT monitors come in sizes such
as 15", 17", 19", 21", and even 22". Modern LCD monitors come in all kinds of shapes and
sizes, with "wide screen" monitors becoming very popular. (Monitor dimensions like those
just listed are always measured diagonally, not across the width of the monitor.) Some of
these monitors come in sizes of 20", 24", 27" and even 30" or higher.
What Does This Mean in Terms of PPI?
Imagine that you have 2 monitors on your desk. One monitor is a 21 inch display, while the
other is a 19 inch display. Both have their resolutions set to 1024 x 768. Since one monitor
is obviously larger than the other, the actual PPI would be different between the 2. They
are displaying the same number of pixels, but the 21" is displaying them over a larger
area. Therefore, since there are more inches, there would be fewer per inch. For example:
The 21 inch monitor is actually displaying around 61 ppi, while the 19 inch monitor is
actually displaying about 71 ppi. The more pixels you have over a smaller area, the more
PPI you have. If you are running a much higher resolution such as 1600 x 1200 (which is
Photoshop Lecture notes B.K.Mathan Nagan MCA., (Ph.D)
4 CAUSSANEL COLLEGE OF ARTS AND SCIENCE
favoured by many designers) you could be running a PPI closer to 100, but again,
depending on your monitor size. As you can see, the actual PPI for a computer monitor
varies quite a bit, depending on the actual monitor size and the screen resolution.
Mac VS PC
If you go looking for information on this very subject, you may find a lot of things like
"Macs display at 72 ppi, and PCs display at 96 ppi". This is only partially correct. As
mentioned above, PPI for monitors is a very relative measurement. However, the
operating system needs to have some kind of idea what PPI it is using. Therefore, it can be
said that the Mac assumes it is at 72 ppi, and the PC assumes it is at 96 ppi. These settings
really only affect the operating system's handling of things like fonts and its owngraphic
elements. (The reasons for the difference between operating systems are too great to go
into here.)
This discrepancy between Mac and PC has no effect on Web graphics however. If you're
using Photoshop with your monitor set at 1600 x 1200 pixels, and you create a graphic that
is 400 pixels wide, it would take up exactly 1/4 of your screen width whether you were
using a Mac or a PC. In other words,400 pixels is 400 pixels, no matter where it's being
shown.
Pixels are The Most Important Thing
If you are creating graphics meant to be shown on a computer monitor (such as Web
graphics), youonly need to concern yourself with pixels. As mentioned above, actual
PPI is a hard thing to pin down. Luckily for most of us, there's the previously mentioned
standard that programs like Photoshop use: 72 ppi. Keep all your graphics at 72 ppi
unless you are going to print them.
Resolution and Pixels
As already mentioned, pixels are the most important thing. You could set the PPI of an
image to anything you like (more on how to do this later), but if they both contain the
same number of pixels, the file size and display size won't change. In fact, most Web
browsers are incapable of displaying anything other than at 72 ppi. Therefore, only pixels
are considered when displaying a graphic on a Web page. If your image is 400 pixels
wide, it will still be shown as 400 pixels wide, no matter what the PPI of the image is set to.
Since pixels are so important, it must also be mentioned that too many can be a bad
thing. For example, let's say you are working with a 300 ppi image at 3000 by 1800
pixels. Photoshop might report this image as 10 inches by 6 inches. If you printed it, it

Photoshop Lecture notes B.K.Mathan Nagan MCA., (Ph.D)
5 CAUSSANEL COLLEGE OF ARTS AND SCIENCE
would fit nicely onto a page at that size (see Resolution and Print below). However, if you
tried to place it into a Web page, the browser displaying such a page would not show the
image at its intended size. It would essentially ignore the 300 ppi part. It would only look
at the pixels, and assume 72 ppi was being used. Therefore, your image would expand to
the full 3000 pixels wide, which would be much, much larger that your entire monitor's
display. This is why sometimes when you email a picture from a digital camera, the
recipient sees a huge picture. (Most email clients work a lot like Web browsers.)
If your original graphic came from something like a digital camera, it will most likely be
much too large for the Web, and you will need to bring it down to the correct size: 72 ppi,
and probably a smaller amount of pixels (more on how to do this later).
The Photoshop Save for Web and Devices feature (more on this later) works hand in
hand with the Web browser. It will take any image you save and automatically change it to
72 ppi, without adding or removing any pixels. However, keep in mind that like the Web
browser, it will spread all the pixels out until they are at 72 ppi.
File Size
Since the file size of an image is only dependant on the number of pixels it contains (as
well as its compression, but more on this later), changing the PPI of an image without
changing the number of pixels it contains will not change the file size.
Consider the two images below.
Resolutions Compared
200x200px - 300 ppi, 60 kb 200x200px - 72 ppi, 60 kb
Both have pixels dimensions of 200 x 200. One is at 300 ppi and the other at 72 ppi. There
is no noticeable difference in quality and the file size of the images is identical.
Photoshop Lecture notes B.K.Mathan Nagan MCA., (Ph.D)
6 CAUSSANEL COLLEGE OF ARTS AND SCIENCE
Therefore, PPI is really not that important for graphics meant for a computer monitor. Keep
the PPI at 72 and everything will work just fine.
Resolution and Print
It is in the domain of print that image resolution makes a critical difference. Different
printers have different resolutions. Printer resolution is measured in dpi (dots per inch).
Printed material is literally composed of dots of ink. The size and density of these dots
determine the quality of the output. An image to be printed in a newspaper will be around
170 ppi. If you've ever held a magnifying glass over a newspaper, you could see the
individual ink dots. Magazines are output at 266-300 dpi. High quality books are output at
even higher resolutions. So image resolution is important when you're creating images for
print but irrelevant as far as Web images are concerned. Photoshop's default image
resolution for print is 300 dpi.
Since this course is about producing images for the Web, we won't delve into the
considerations for print too much. However, there are a couple of things to keep in mind.
PPI versus DPI
Technically, dpi applies to printer resolution but you will see it used interchangeably
with ppi in different software and resource materials. For consistency, we'll stick to
ppi in this course to describe monitor and digital image resolution.
Print Size
While image resolution has no effect on the size of an image displayed in a browser,
it has a direct effect on the size of printed images. We'll touch on this more later
when we discuss the resizing of images.
Printing Web Graphics
Since standard print resolution is so much higher than standard Web resolution (72
ppi), most Web graphics will not print very well on even a home printer. Printing
uses a much higher resolution than monitor (Web) graphics, so the pixels are quite
noticeable when printed. This is why Web graphics tend to look "blocky" when printed.
Therefore, it's easy to understand why Web graphics are not very suitable for high quality
printing.
Image Resolution Summary
Digital image resolution is measured in pixels per inch (ppi).
PPI is also called pixel density.
Photoshop Lecture notes B.K.Mathan Nagan MCA., (Ph.D)
7 CAUSSANEL COLLEGE OF ARTS AND SCIENCE
The industry standard resolution for Web images 72 ppi.
PPI can vary from monitor to monitor, depending on the monitor resolution.
When creating graphics for a monitor, only the pixel size is important.
Even though Macs and PCs report different PPI's, this has no bearing on how your
Web graphics will display.
The resolution of an image has no effect on its file size.
Printer resolution is measured in dots per inch (dpi) which reflects the number of
dots of ink printed on a one-inch line.
Print graphics can range from 170-300 ppi or higher.
Image resolution affects the print size of an image.
Web graphics don't print very well, because 72 dpi is far too low of a resolution for
print.
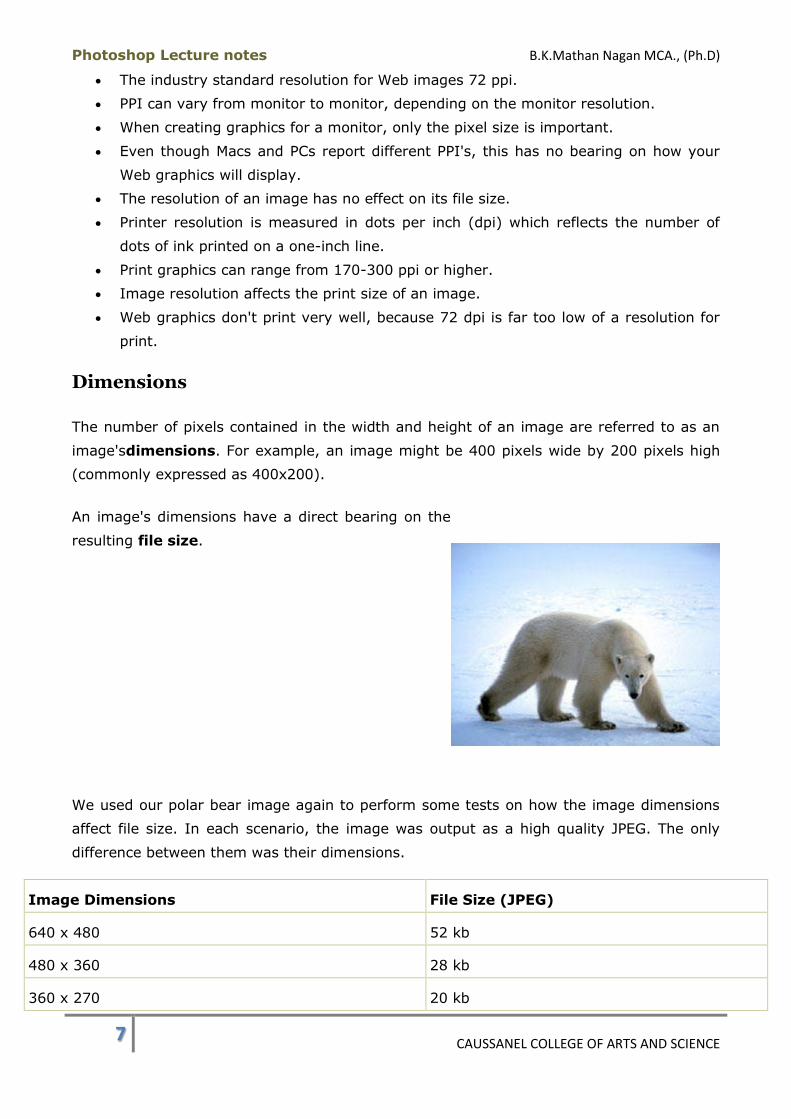
Dimensions
The number of pixels contained in the width and height of an image are referred to as an
image'sdimensions. For example, an image might be 400 pixels wide by 200 pixels high
(commonly expressed as 400x200).
An image's dimensions have a direct bearing on the
resulting file size.
We used our polar bear image again to perform some tests on how the image dimensions
affect file size. In each scenario, the image was output as a high quality JPEG. The only
difference between them was their dimensions.
Image Dimensions File Size (JPEG)
640 x 480 52 kb
480 x 360 28 kb
360 x 270 20 kb

Photoshop Lecture notes B.K.Mathan Nagan MCA., (Ph.D)
8 CAUSSANEL COLLEGE OF ARTS AND SCIENCE
270 x 203 12 kb
As you can see, there is a dramatic effect on the file size of the images. This is something
to keep in mind as you're making decisions on your image dimensions.
Dimensions Summary
The area an image takes up on screen is called its dimensions.
The dimensions are usually measured in pixels (width x height).
The dimensions of an image and its resulting file size are interrelated. Larger images
will take longer to download on the Web.
Colour Space
A colour space is a model for representing intensity values in colour. In other words, a
colour space defines a colour model with a specific range of colour (also known as gamut *)
that can be expressed in different ways, depending on how the colour is to be used. For
example, the RGB * colour space is used for monitors, while the CMYK * colour space is
used for printing. You can have the exact same colour of green for a monitor and for a
printing press, but they will be described in different ways.
Within a colour model, there can be differently defined colour spaces. The RGB colour
model, for example, can have several different colour spaces within it: Apple RGB, Adobe
RGB, or sRGB. They all describe colour by the same method (Red, Green, and Blue axis),
but they each have a different range (gamut) of colour that they can describe, depending
on what they are being used with or for.
Distinctive colour spaces will have different methods of representing the same colour,
providing inconsistent visual results. That is why it is very important to identify and
distinguish the colour space that applies to digital graphics on the Web. For the purposes of
digital graphics for the Web, we will concentrate on how Photoshop uses the RGB colour
space.
The RGB Colour Space
The RGB (Red, Green, Blue) space is a three-dimensional colour space whose components
are the red, green and blue intensities that make up a given colour. RGB-based colour
spaces are the most commonly used colour spaces in digital graphics, because the majority
of colour displays directly support them. The colours produced by an RGB colour space vary
from device to device. They are referred to as device-dependent colour spaces.
Photoshop Lecture notes B.K.Mathan Nagan MCA., (Ph.D)
9 CAUSSANEL COLLEGE OF ARTS AND SCIENCE
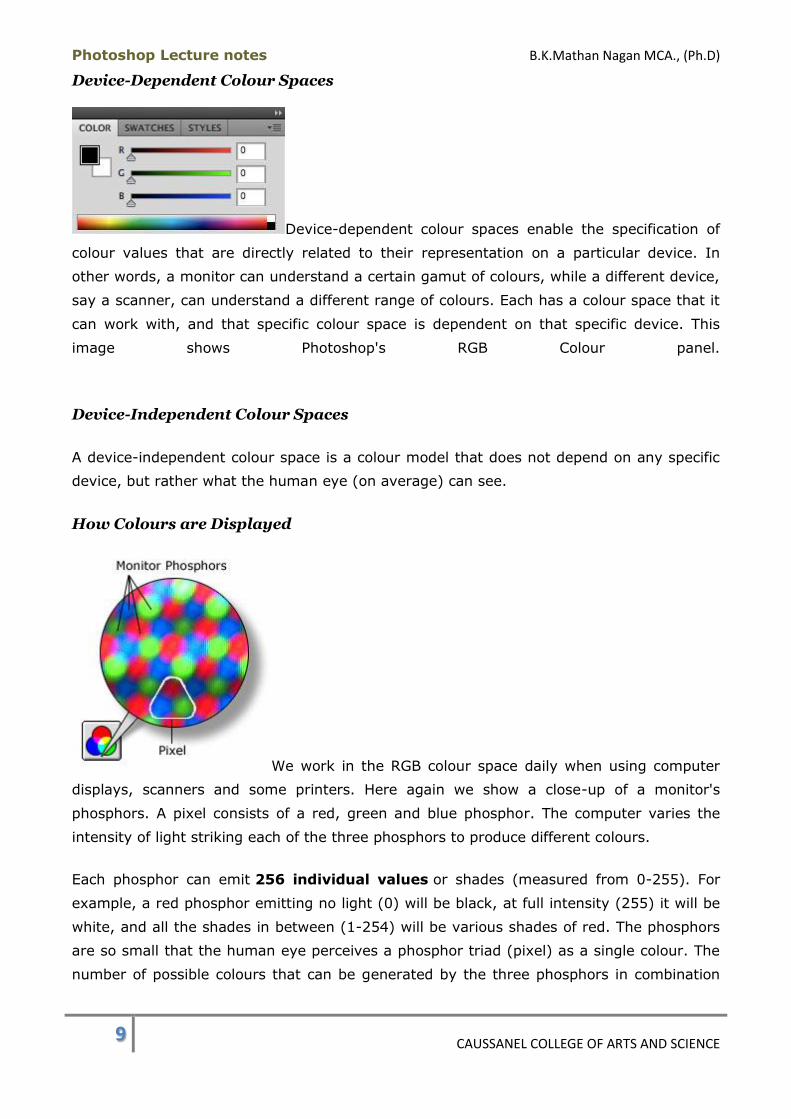
Device-Dependent Colour Spaces
Device-dependent colour spaces enable the specification of
colour values that are directly related to their representation on a particular device. In
other words, a monitor can understand a certain gamut of colours, while a different device,
say a scanner, can understand a different range of colours. Each has a colour space that it
can work with, and that specific colour space is dependent on that specific device. This
image shows Photoshop's RGB Colour panel.
Device-Independent Colour Spaces
A device-independent colour space is a colour model that does not depend on any specific
device, but rather what the human eye (on average) can see.
How Colours are Displayed
We work in the RGB colour space daily when using computer
displays, scanners and some printers. Here again we show a close-up of a monitor's
phosphors. A pixel consists of a red, green and blue phosphor. The computer varies the
intensity of light striking each of the three phosphors to produce different colours.
Each phosphor can emit 256 individual values or shades (measured from 0-255). For
example, a red phosphor emitting no light (0) will be black, at full intensity (255) it will be
white, and all the shades in between (1-254) will be various shades of red. The phosphors
are so small that the human eye perceives a phosphor triad (pixel) as a single colour. The
number of possible colours that can be generated by the three phosphors in combination
Photoshop Lecture notes B.K.Mathan Nagan MCA., (Ph.D)
10 CAUSSANEL COLLEGE OF ARTS AND SCIENCE
can be calculated as follows: 256 x 256 x 256 = 16, 777,216.
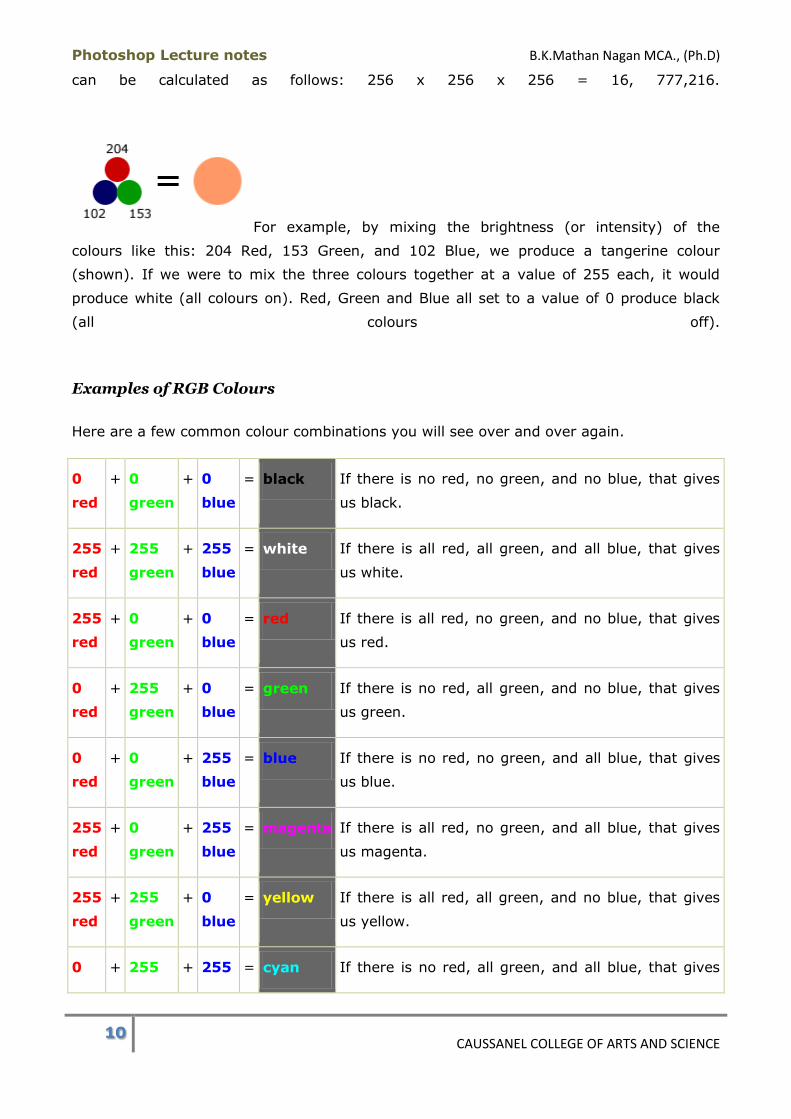
For example, by mixing the brightness (or intensity) of the
colours like this: 204 Red, 153 Green, and 102 Blue, we produce a tangerine colour
(shown). If we were to mix the three colours together at a value of 255 each, it would
produce white (all colours on). Red, Green and Blue all set to a value of 0 produce black
(all colours off).
Examples of RGB Colours
Here are a few common colour combinations you will see over and over again.
0
red
+ 0
green
+ 0
blue
= black If there is no red, no green, and no blue, that gives
us black.
255
red
+ 255
green
+ 255
blue
= white If there is all red, all green, and all blue, that gives
us white.
255
red
+ 0
green
+ 0
blue
= red If there is all red, no green, and no blue, that gives
us red.
0
red
+ 255
green
+ 0
blue
= green If there is no red, all green, and no blue, that gives
us green.
0
red
+ 0
green
+ 255
blue
= blue If there is no red, no green, and all blue, that gives
us blue.
255
red
+ 0
green
+ 255
blue
= magenta If there is all red, no green, and all blue, that gives
us magenta.
255
red
+ 255
green
+ 0
blue
= yellow If there is all red, all green, and no blue, that gives
us yellow.
0 + 255 + 255 = cyan If there is no red, all green, and all blue, that gives
Photoshop Lecture notes B.K.Mathan Nagan MCA., (Ph.D)
11 CAUSSANEL COLLEGE OF ARTS AND SCIENCE
red green blue us cyan.
Colour Space Summary
A colour model is a way of describing how to define colour. Examples of colour
models are RGB and CMYK.
A colour space defines how a range of colours are defined for a specific device within
a colour model.
Within the RGB colour model, there can exist many different colour spaces; each of
which describes colour in the same fashion, but is limited in gamut (range) to a
specific device.
The RGB colour space defines the amount of red, green, and blue that will be used
to create a colour. The RGB colour space is used for describing colour for monitors.
This is what you will be working with in Photoshop.
The range of colours that can be reproduced in a specific RGB colour space depends
on what device it will be displayed on. This means that the colour space is device-
dependent.
A computer monitor is a grid of tiny points of light called phosphors. Each triad of a
red, green and blue phosphor makes up a pixel. By varying the intensity of light
emitted by the red, green and blue phosphors, millions of colours can be produced.
Bit Depth and Colour Depth
Colour depth describes the maximum number of colours an image can contain. This is
dependent on the bit depth of its pixels. The higher the bit depth value, the more colour
information each pixel can display and the greater the number of colours the image can
contain.
Bit Depth
Bit depth is a value that describes the number of colours that an individual pixel can
display. A bit can either be on or off. Therefore, a 1-bit pixel can display two colours: black
and white. An 8-bit pixel displays 256 colours. Each bit can be on or off (2 states). When
combined in eight different ways (2x2x2x2x2x2x2x2 or 28) it can display up to 256 colours.
Pixels are usually one of five standard bit-depths. Rarely is anything above 8 bits
necessary.
Bit Depth No. Colours Calculation
Photoshop Lecture notes B.K.Mathan Nagan MCA., (Ph.D)
12 CAUSSANEL COLLEGE OF ARTS AND SCIENCE
1 2 21
8 256 28
16 65,536 216
24 16,777,216 224
32 16,777,216
plus 8-bit alpha channel
24 + 8 bits
Colour Depth
Sometimes the terms bit depth and colour depth are used interchangeably. We're going to
use the term colour depth to describe the overall ability of an image to display colours. The
distinction lies in the fact that some colour modes use more than one colour 'channel'. For
example, The RGB colour mode contains 8 bits in each of its three colour channels (red,
green, blue) giving an RGB image a colour depth of 24 bits (8 bits per channel x 3
channels). Below are examples of an image displayed in various colour modes to
demonstrate how image quality and file size are affected.
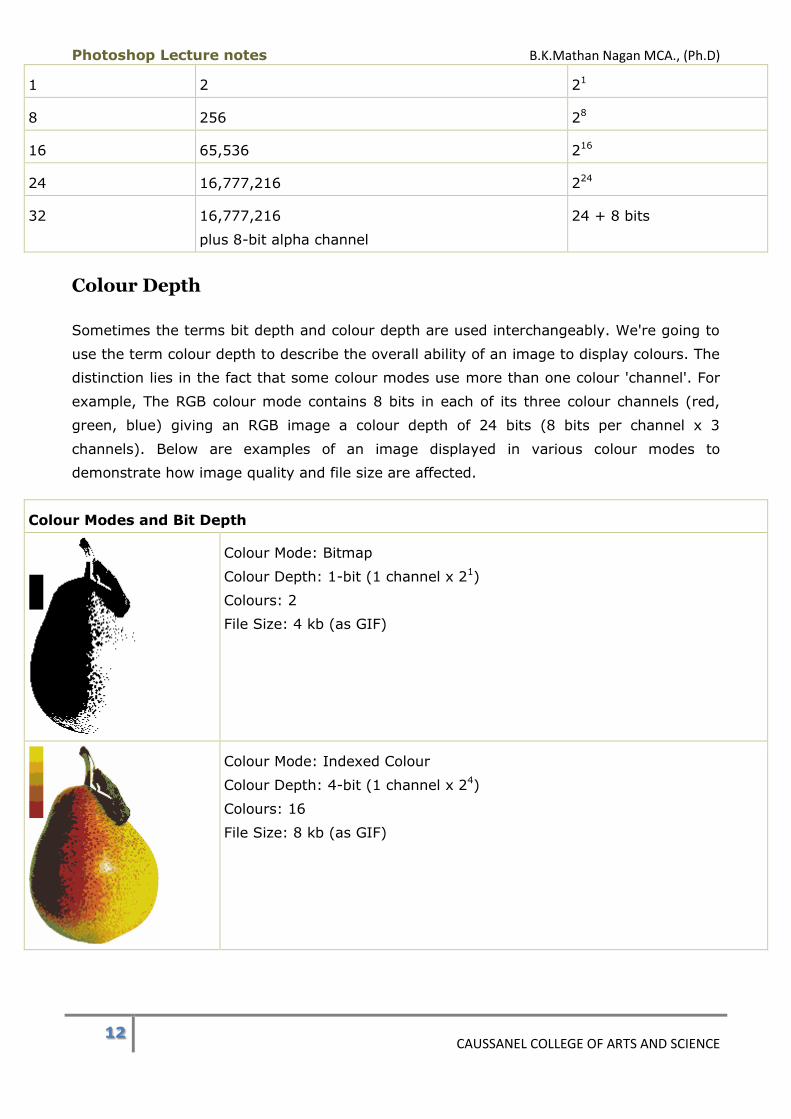
Colour Modes and Bit Depth
Colour Mode: Bitmap
Colour Depth: 1-bit (1 channel x 21)
Colours: 2
File Size: 4 kb (as GIF)
Colour Mode: Indexed Colour
Colour Depth: 4-bit (1 channel x 24)
Colours: 16
File Size: 8 kb (as GIF)
Photoshop Lecture notes B.K.Mathan Nagan MCA., (Ph.D)
13 CAUSSANEL COLLEGE OF ARTS AND SCIENCE
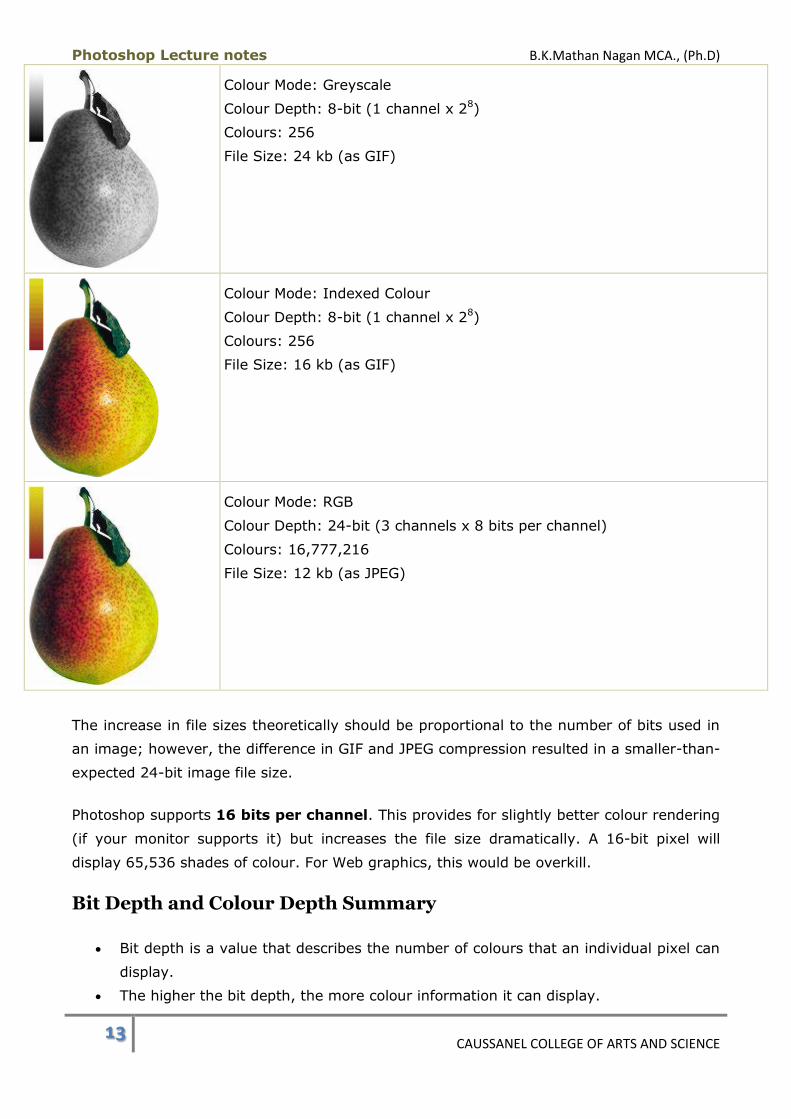
Colour Mode: Greyscale
Colour Depth: 8-bit (1 channel x 28)
Colours: 256
File Size: 24 kb (as GIF)
Colour Mode: Indexed Colour
Colour Depth: 8-bit (1 channel x 28)
Colours: 256
File Size: 16 kb (as GIF)
Colour Mode: RGB
Colour Depth: 24-bit (3 channels x 8 bits per channel)
Colours: 16,777,216
File Size: 12 kb (as JPEG)
The increase in file sizes theoretically should be proportional to the number of bits used in
an image; however, the difference in GIF and JPEG compression resulted in a smaller-than-
expected 24-bit image file size.
Photoshop supports 16 bits per channel. This provides for slightly better colour rendering
(if your monitor supports it) but increases the file size dramatically. A 16-bit pixel will
display 65,536 shades of colour. For Web graphics, this would be overkill.
Bit Depth and Colour Depth Summary
Bit depth is a value that describes the number of colours that an individual pixel can
display.
The higher the bit depth, the more colour information it can display.
Photoshop Lecture notes B.K.Mathan Nagan MCA., (Ph.D)
14 CAUSSANEL COLLEGE OF ARTS AND SCIENCE
Colour depth describes the maximum number of colours an image can display.
An image's colour depth is dependent on the bit depth of the image's pixels and the
number of channels it contains.
The file size of an image is proportional to its colour depth.
GIF Format
File types have been developed to designate pre-defined information and compression
methods about an image. File types can be described as bitmap or vector based. The file
type can usually be identified by the filename extension at the end of the name, as in
'banner.gif' or 'photo.jpeg'.
Most Web browsers currently support three image file types: GIF, JPEG and PNG.
GIF Format Defined
Graphic Interchange Format (GIF) uses a maximum of 256 colours (8-bit colour) and
uses combinations of these to simulate colours beyond that range (this is called dithering).
This format is best for displaying images such as logos, icons, buttons and other images
with uniform colours and tones as well as limited detail. The GIF format is supported by all
browsers.
There are two versions of the GIF format: GIF87 and GIF89a. GIF87 is an older version.
New features were introduced with GIF89a such as interlacing and animation.
GIF images have some extra functionality that JPEG and other file types do not. You can
save GIF images with the following features:
Indexed Colours
GIF is an indexed colour system. That means the colours on your system may not be the
exact colours that are on the other user's system. It should be close, but there is no
guarantee that it will be exact. You can choose between different colour palettes for your
images when you create them. For example, you can choose colours that are native to
Windows, Macintosh, or Web-safe (we will discuss Web-safe colours in more detail later).
In addition to the different colour palettes you can create, you can also control the bit-
depth. If you are using a black and white image, you can save it as a 1-bit image. This
may seem easy (and it is), but other image formats cannot always do this. JPEG, for
example, always stores and transmits a 24-bit, 16.8 million colour palette, even if the
image is black and white. This, of course, affects download times.
Photoshop Lecture notes B.K.Mathan Nagan MCA., (Ph.D)
15 CAUSSANEL COLLEGE OF ARTS AND SCIENCE
This is yet another example of why it is important to understand file formats. The
optimizing of your images depends on it.
GIF has been causing quite a stir for legal licencing issues over the last few years; this has
caused many people to move away from the GIF format. PNG was created to replace GIF.
We will cover PNG in a bit.
Dithering
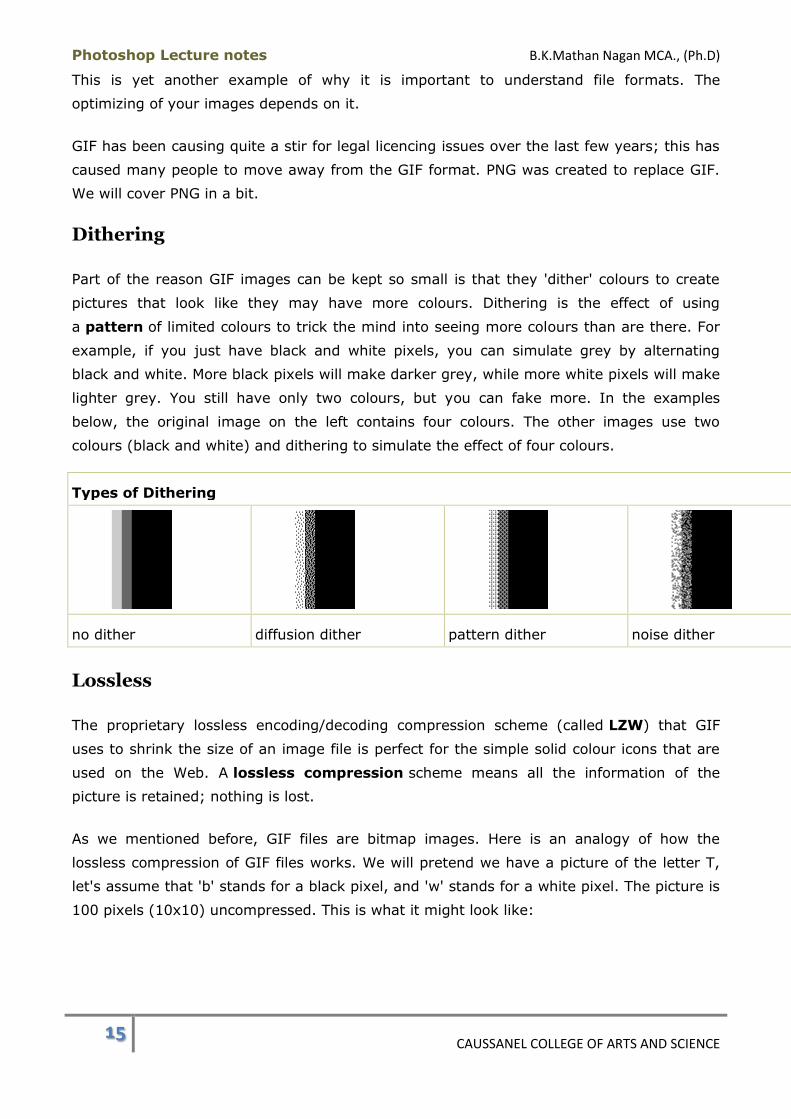
Part of the reason GIF images can be kept so small is that they 'dither' colours to create
pictures that look like they may have more colours. Dithering is the effect of using
a pattern of limited colours to trick the mind into seeing more colours than are there. For
example, if you just have black and white pixels, you can simulate grey by alternating
black and white. More black pixels will make darker grey, while more white pixels will make
lighter grey. You still have only two colours, but you can fake more. In the examples
below, the original image on the left contains four colours. The other images use two
colours (black and white) and dithering to simulate the effect of four colours.
Types of Dithering
no dither diffusion dither pattern dither noise dither
Lossless
The proprietary lossless encoding/decoding compression scheme (called LZW) that GIF
uses to shrink the size of an image file is perfect for the simple solid colour icons that are
used on the Web. A lossless compression scheme means all the information of the
picture is retained; nothing is lost.
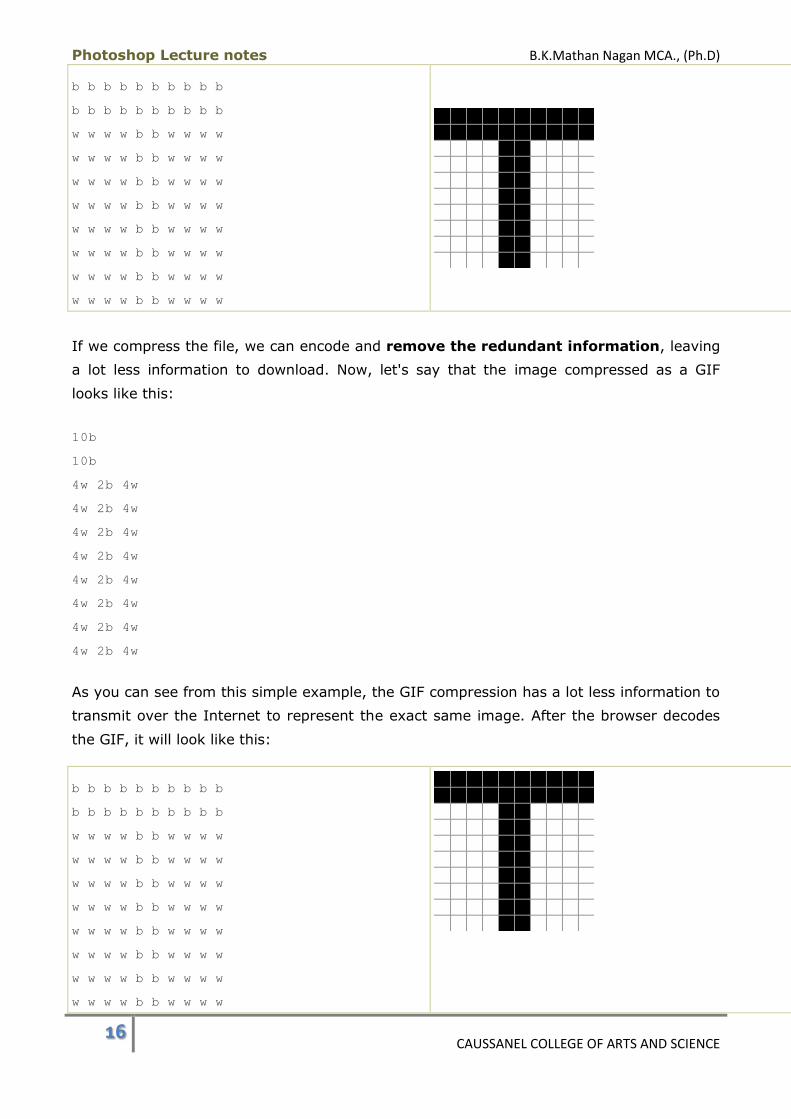
As we mentioned before, GIF files are bitmap images. Here is an analogy of how the
lossless compression of GIF files works. We will pretend we have a picture of the letter T,
let's assume that 'b' stands for a black pixel, and 'w' stands for a white pixel. The picture is
100 pixels (10x10) uncompressed. This is what it might look like:
Photoshop Lecture notes B.K.Mathan Nagan MCA., (Ph.D)
16 CAUSSANEL COLLEGE OF ARTS AND SCIENCE
b b b b b b b b b b
b b b b b b b b b b
w w w w b b w w w w
w w w w b b w w w w
w w w w b b w w w w
w w w w b b w w w w
w w w w b b w w w w
w w w w b b w w w w
w w w w b b w w w w
w w w w b b w w w w
If we compress the file, we can encode and remove the redundant information, leaving
a lot less information to download. Now, let's say that the image compressed as a GIF
looks like this:
10b
10b
4w 2b 4w
4w 2b 4w
4w 2b 4w
4w 2b 4w
4w 2b 4w
4w 2b 4w
4w 2b 4w
4w 2b 4w
As you can see from this simple example, the GIF compression has a lot less information to
transmit over the Internet to represent the exact same image. After the browser decodes
the GIF, it will look like this:
b b b b b b b b b b
b b b b b b b b b b
w w w w b b w w w w
w w w w b b w w w w
w w w w b b w w w w
w w w w b b w w w w
w w w w b b w w w w
w w w w b b w w w w
w w w w b b w w w w
w w w w b b w w w w
Photoshop Lecture notes B.K.Mathan Nagan MCA., (Ph.D)
17 CAUSSANEL COLLEGE OF ARTS AND SCIENCE
Exactly what we had before (lossless), but it took much less time to send. Sounds too
good to be true, right? Well, there are trade-offs. If the image is complex like a
photograph, the overhead of the compression may actually make the compressed image
larger than the original! The amount of data needed to describe a detailed photograph is
why they aren't suited to the GIF format.
Now that you have seen this example, which image would you be able to compress into a
smaller file: a white box that was 100x100, or a checkerboard pattern of black and white
that was 100x100? Why did you choose that answer?
Compression Ratio
You cannot change the amount of compression that occurs when you save an image as
GIF. Thealgorithm* is fixed, unlike some other compression formats. JPEG, for example,
employs a variable compression scheme that allows the user to trade quality for size. We
will explore this concept more shortly.
Interlacing
If you save a GIF image as interlaced (GIF89a), the browser is able to display the image
as it loads, gradually getting crisper and clearer until it has loaded. The image tends to
appear in waves. This allows the user to get an idea of what the image is long before it is
fully loaded. This was very important when surfing over a modem. These have slightly
larger file sizes than non-interlaced GIFs, so you have to decide whether the extra
download time is worth it or not. When GIFs are not interlaced, they load one line at a time
from top to bottom.
Transparency
You can set a single colour to be transparent; that is, it will allow the background colour
or image to show through it. This is used most commonly to make a solid coloured
background of an image transparent. Since all images are rectangles, you can make the
background transparent to make it look like it is round or curvy.
Animated GIFs
GIF images can also be animated. By linking several images together and having them
replace each other like a simple flip-book, the GIF89a format allows you to create simple
animations. These are used a lot in banner ads. They have uses, but they can also get
annoying. Netscape and Internet Explorer both display animated GIFs but some older
browsers cannot and may be only display the first image in the sequence.
Photoshop Lecture notes B.K.Mathan Nagan MCA., (Ph.D)
18 CAUSSANEL COLLEGE OF ARTS AND SCIENCE
Here is an example of an animated GIF file. These files can have a higher file
size and take longer to download.
These animations are being replaced by vector-based graphics like Flash, SVG, and others
with much faster download times.
Photoshop Lecture notes B.K.Mathan Nagan MCA., (Ph.D)
19 CAUSSANEL COLLEGE OF ARTS AND SCIENCE
GIF Format Summary
Images are compressed in different file formats. Each file format has advantages
and disadvantages.
GIF and JPEG are two very common bitmap file formats on the Web.
Graphic Interchange Format (GIF) uses a maximum of 256 colours but can simulate
more by dithering.
GIF is great for cartoons, logos, icons, buttons, and similar images that have limited
colour and detail.
GIF is a lossless file compression format. The information and detail of the original is
preserved.
You can interlace GIF89a images to allow users to get an idea of what an image
looks like before it is fully loaded.
You can choose a colour to be transparent in GIF89a images. This allows you to
make rectangular images appear as if they had irregular shapes.
Several frames or images can be linked together to create an animated GIF89a file.
These files allow you to control the time between frames.
Animated GIFs can be quite large and can take a long time to download if not
optimized.
GIF uses an indexed colour system that lets you choose a colour palette and bit-
depth to reduce download file sizes.
GIF uses a proprietary compression scheme that software vendors are supposed to
pay royalties on. The legal issues have encouraged the development of the PNG file
format.
JPEG Format
Joint Photographic Expert Group (JPEG) is the best format for photographs because they
contain 24-bit colour. That means it can support millions of colours (16.8 million, actually).
The JPEG format does not support transparency. All current browsers support JPEG (also
expressed as JPG) images.
Photoshop Lecture notes B.K.Mathan Nagan MCA., (Ph.D)
20 CAUSSANEL COLLEGE OF ARTS AND SCIENCE
Progressive
The Progressive option for JPEG images works the same way as interlacing does for GIFs.
Instead of loading each row of the image pixels from top to bottom, a blurry version of the
image displays initially and then it sharpens as the rest of the image downloads.
Lossy Compression
Lossy compression means that, depending on the amount of compression you apply to an
image, some of the original detail will be lost. The advantage is that you can reproduce a
high quality photograph over the Web with as much as a 100:1 difference in file size! GIF
cannot compress photographs anywhere close to this.
Photoshop allows you to specify the degree of file compression so you can create a
balance between image quality and file size. If picture quality is more important, choose a
higher quality setting when you compress the file. It will not be as small as it could be, but
it will be smaller than the original and look quite good. If you need smaller file sizes,
increase the compression. The file will be dramatically smaller than the original, but it won't
look as good.
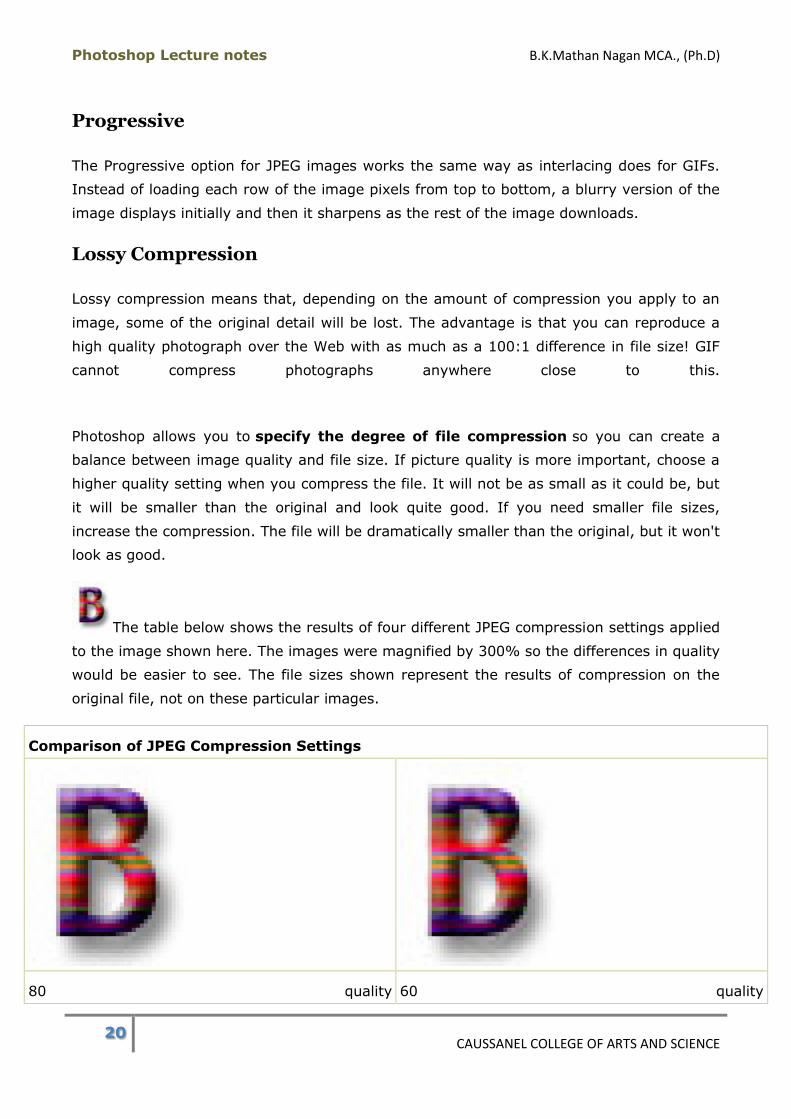
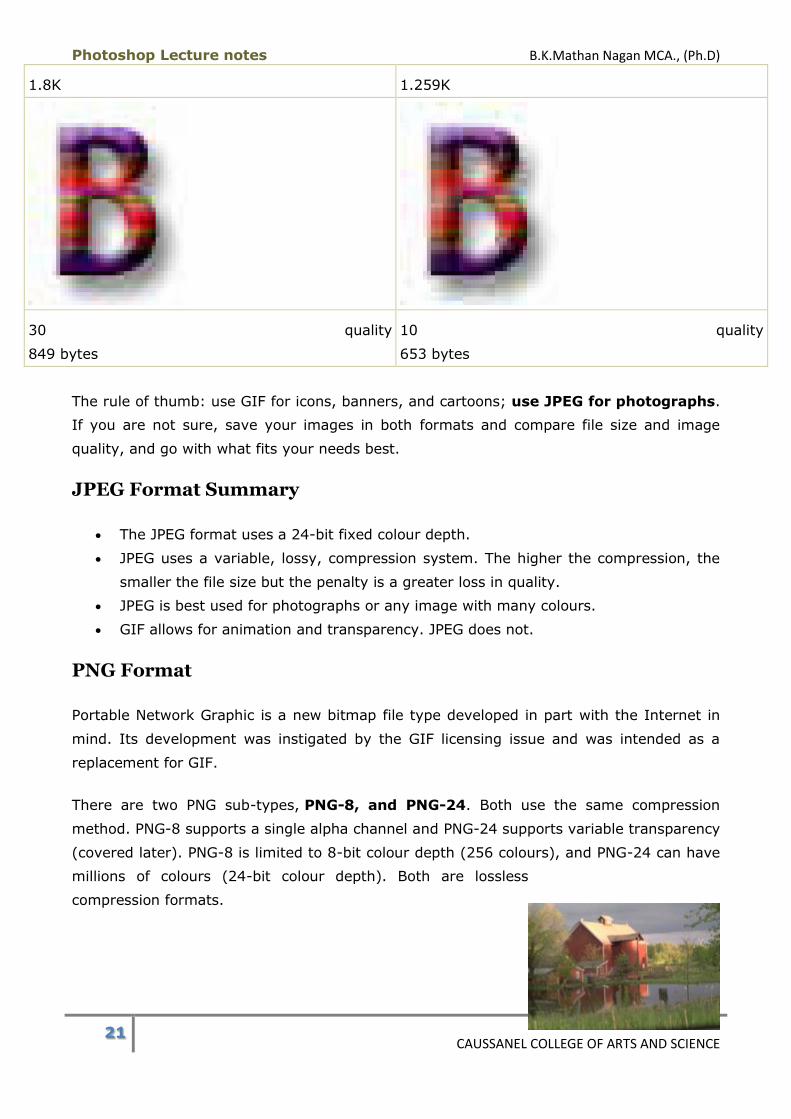
The table below shows the results of four different JPEG compression settings applied
to the image shown here. The images were magnified by 300% so the differences in quality
would be easier to see. The file sizes shown represent the results of compression on the
original file, not on these particular images.
Comparison of JPEG Compression Settings
80 quality 60 quality
Photoshop Lecture notes B.K.Mathan Nagan MCA., (Ph.D)
21 CAUSSANEL COLLEGE OF ARTS AND SCIENCE
1.8K 1.259K
30 quality
849 bytes
10 quality
653 bytes
The rule of thumb: use GIF for icons, banners, and cartoons; use JPEG for photographs.
If you are not sure, save your images in both formats and compare file size and image
quality, and go with what fits your needs best.
JPEG Format Summary
The JPEG format uses a 24-bit fixed colour depth.
JPEG uses a variable, lossy, compression system. The higher the compression, the
smaller the file size but the penalty is a greater loss in quality.
JPEG is best used for photographs or any image with many colours.
GIF allows for animation and transparency. JPEG does not.
PNG Format
Portable Network Graphic is a new bitmap file type developed in part with the Internet in
mind. Its development was instigated by the GIF licensing issue and was intended as a
replacement for GIF.
There are two PNG sub-types, PNG-8, and PNG-24. Both use the same compression
method. PNG-8 supports a single alpha channel and PNG-24 supports variable transparency
(covered later). PNG-8 is limited to 8-bit colour depth (256 colours), and PNG-24 can have
millions of colours (24-bit colour depth). Both are lossless
compression formats.
Photoshop Lecture notes B.K.Mathan Nagan MCA., (Ph.D)
22 CAUSSANEL COLLEGE OF ARTS AND SCIENCE
Historically, PNG has proved to be problematic for use on the Web, because it was not well
supported in all major browsers. While many browsers fully supported PNG, browsers like
Internet Explorer 6 had only partial support.
PNG has great possibilities for use on the Web. Many interesting effects can be achieved
with PNG-24's variable transparency. For example, you could create real drop shadows for
images that show the background (or even text) more and more towards the edge of the
shadow, just like a real drop shadow would. Another example of a great PNG-24 effect
might be creating a semi-transparent object on a page that allows some of the background
to show through. Using these techniques can make a Web page appear more three
dimensional.
All major browsers support PNG to some extent. The problem is that at least one popular
browser, Internet Explorer 6, doesn't support PNG-24's variable transparency properly. IE6
will display the PNG just fine, but if there is transparency, it will show all transparent areas,
regardless of the level of transparency, as the colour gray. As you can imagine, this can
have detrimental results for the visual appeal of your page. Internet Explorer 7 on the
other hand, supports PNG-24's variable transparency fully.
If you do choose to use PNG-24 in this manner, you need to be aware of the problems
stated above. There are a couple of ways around the problem. First, if you are using a
neutral, grayish group of colours in your design, the gray that IE6 will use instead of
transparency might not look too bad. Second, if you really must have variable transparency
in IE6, there are CSS (Cascading Style Sheets) "hacks" can sometimes force IE6 to show
the transparency properly. These "hacks" can have varying degrees of success though, and
can add a lot of extra work to your Web project.
PNG Format Summary
The Portable Network Graphic format was designed to replace GIF.
PNG-8 supports 256 colours and a single alpha channel.
PNG-24 supports 16.8 million colours and variable transparency.
Browser support is still not reliable.
Vector Graphics
Object oriented or vector graphics refers to images based on mathematical
calculations that are represented by paths. Vector graphics are typically more versatile
Photoshop Lecture notes B.K.Mathan Nagan MCA., (Ph.D)
23 CAUSSANEL COLLEGE OF ARTS AND SCIENCE
than bitmap or resolution-dependent graphics because they are scalable and generate
smaller file sizes.
Vector graphics are referred to as resolution-independent because they do not plot
images on a pixel-by-pixel basis and so are not tied into a monitor's resolution. Vector
images describe images in terms of shapes, lines, curves, points, colours, length, etc.
These images rely only on the resolution of an output device (like a printer for example) to
determine their final resolution. Some common vector-based applications are Macromedia
Freehand, Adobe Illustrator, and Macromedia Flash. Examples of images suitable for vector
graphics are logos and type.
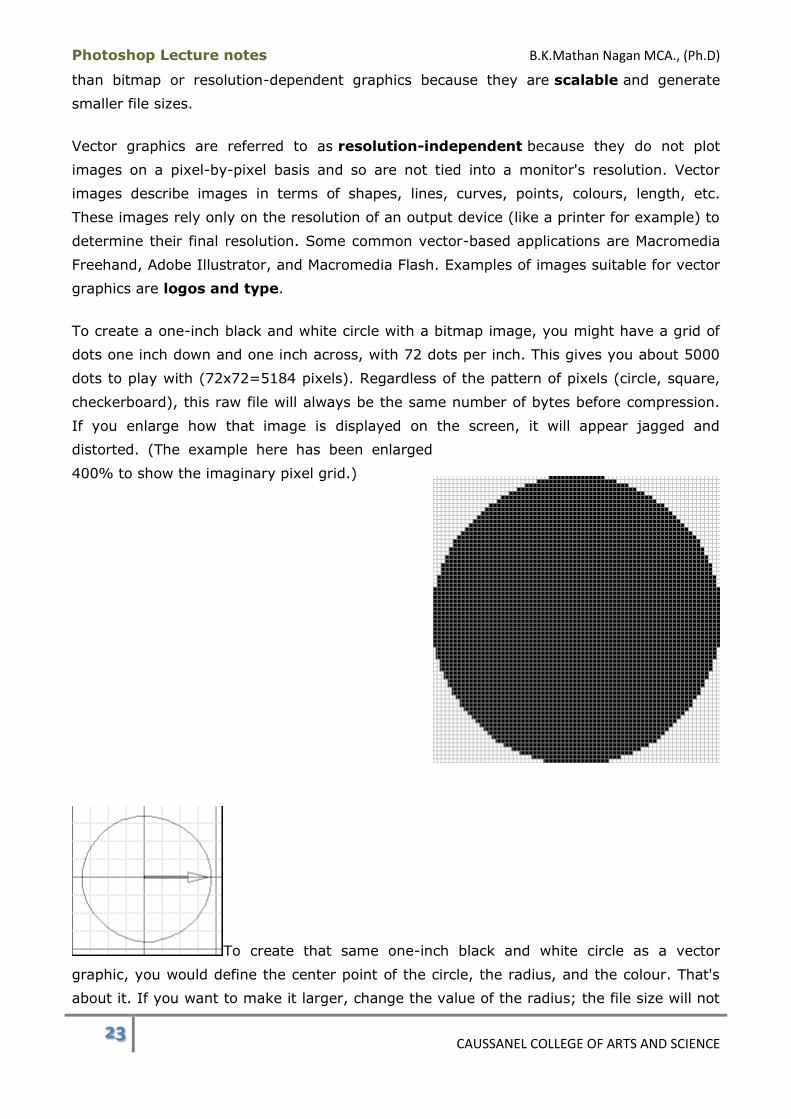
To create a one-inch black and white circle with a bitmap image, you might have a grid of
dots one inch down and one inch across, with 72 dots per inch. This gives you about 5000
dots to play with (72x72=5184 pixels). Regardless of the pattern of pixels (circle, square,
checkerboard), this raw file will always be the same number of bytes before compression.
If you enlarge how that image is displayed on the screen, it will appear jagged and
distorted. (The example here has been enlarged
400% to show the imaginary pixel grid.)
To create that same one-inch black and white circle as a vector
graphic, you would define the center point of the circle, the radius, and the colour. That's
about it. If you want to make it larger, change the value of the radius; the file size will not

Photoshop Lecture notes B.K.Mathan Nagan MCA., (Ph.D)
24 CAUSSANEL COLLEGE OF ARTS AND SCIENCE
get larger and the image will not distort. This is an advantage of vector graphics. However,
they are not useful for complex images such as photographs. The advantage there goes
to bitmaps.
While Photoshop primarily outputs bitmap images, it also has the ability to create vector
shapes that you can modify and scale while editing your images with no loss of quality.
You can view an example of a Flash vector file vs. a bitmap file here.
Vector Graphics Summary
There are two main types of digital graphic files: bitmap and vector.
Vector files are resolution-independent.
Vector graphics use mathematical formulae to create the image, not pixels on a grid
like bitmap images.
Simple vector images can be quite small compared to bitmap; complex images like
photographs are difficult and inefficient with vectors.
Bitmap is still more common than vector.
Vector images can scale without loss of detail or a change in file size.
Interface
Workspace Overview
Before we get started, let's reset all the Photoshop settings to return it to its default state.
If Photoshop is open, please close it. Then perform the following steps:
1. Hold down the Alt+Ctrl+Shift (Cmd+Option+Shift) keys.
2. While holding those down, launch the Photoshop application.
3. You will receive a prompt message, "Delete the Photoshop Settings File?"
4. Click the Yes button.
When you first open Photoshop, the workspace consists of a set of default or
standard menus, panels, and tools. Photoshop's menus appear at the top of your screen,
the Applications bar is below the menus, the Tool Options bar below that, the panels are
placed on the right side of your screen (but can be moved), and the tools are located in a
toolbox on the left (which can also be moved).
Photoshop Lecture notes B.K.Mathan Nagan MCA., (Ph.D)
25 CAUSSANEL COLLEGE OF ARTS AND SCIENCE
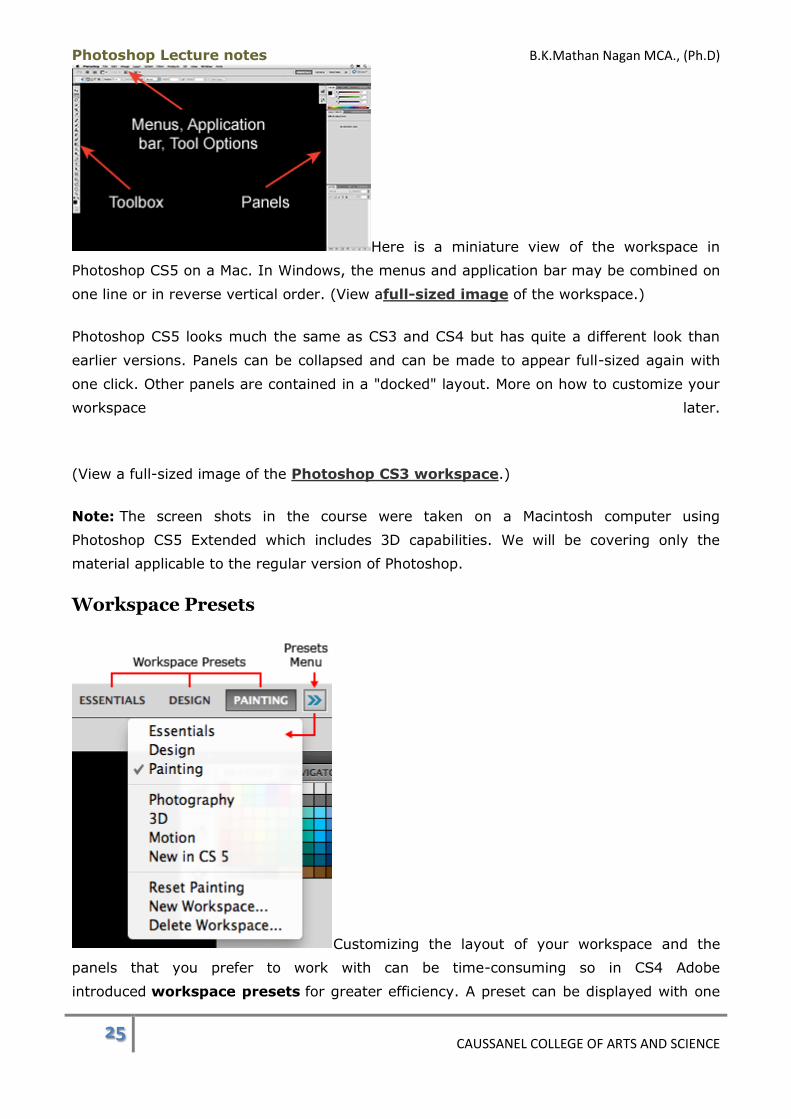
Here is a miniature view of the workspace in
Photoshop CS5 on a Mac. In Windows, the menus and application bar may be combined on
one line or in reverse vertical order. (View afull-sized image of the workspace.)
Photoshop CS5 looks much the same as CS3 and CS4 but has quite a different look than
earlier versions. Panels can be collapsed and can be made to appear full-sized again with
one click. Other panels are contained in a "docked" layout. More on how to customize your
workspace later.
(View a full-sized image of the Photoshop CS3 workspace.)
Note: The screen shots in the course were taken on a Macintosh computer using
Photoshop CS5 Extended which includes 3D capabilities. We will be covering only the
material applicable to the regular version of Photoshop.
Workspace Presets
Customizing the layout of your workspace and the
panels that you prefer to work with can be time-consuming so in CS4 Adobe
introduced workspace presets for greater efficiency. A preset can be displayed with one
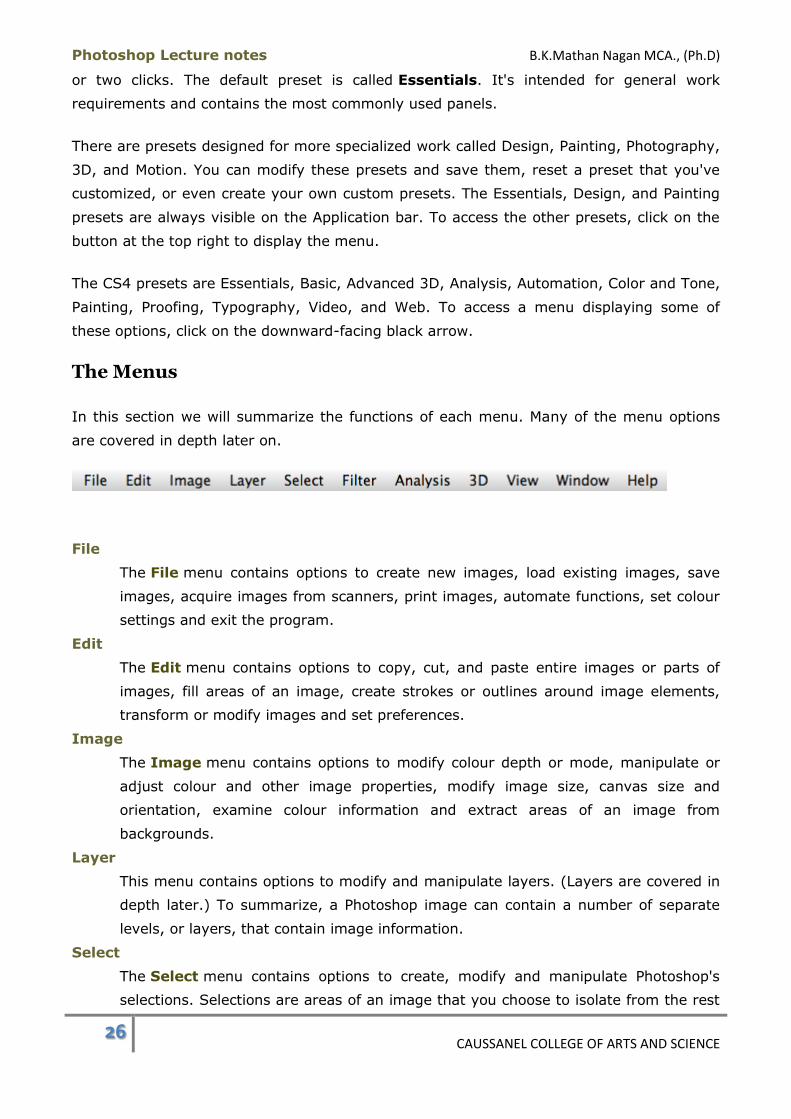
Photoshop Lecture notes B.K.Mathan Nagan MCA., (Ph.D)
26 CAUSSANEL COLLEGE OF ARTS AND SCIENCE
or two clicks. The default preset is called Essentials. It's intended for general work
requirements and contains the most commonly used panels.
There are presets designed for more specialized work called Design, Painting, Photography,
3D, and Motion. You can modify these presets and save them, reset a preset that you've
customized, or even create your own custom presets. The Essentials, Design, and Painting
presets are always visible on the Application bar. To access the other presets, click on the
button at the top right to display the menu.
The CS4 presets are Essentials, Basic, Advanced 3D, Analysis, Automation, Color and Tone,
Painting, Proofing, Typography, Video, and Web. To access a menu displaying some of
these options, click on the downward-facing black arrow.
The Menus
In this section we will summarize the functions of each menu. Many of the menu options
are covered in depth later on.
File
The File menu contains options to create new images, load existing images, save
images, acquire images from scanners, print images, automate functions, set colour
settings and exit the program.
Edit
The Edit menu contains options to copy, cut, and paste entire images or parts of
images, fill areas of an image, create strokes or outlines around image elements,
transform or modify images and set preferences.
Image
The Image menu contains options to modify colour depth or mode, manipulate or
adjust colour and other image properties, modify image size, canvas size and
orientation, examine colour information and extract areas of an image from
backgrounds.
Layer
This menu contains options to modify and manipulate layers. (Layers are covered in
depth later.) To summarize, a Photoshop image can contain a number of separate
levels, or layers, that contain image information.
Select
The Select menu contains options to create, modify and manipulate Photoshop's
selections. Selections are areas of an image that you choose to isolate from the rest

Photoshop Lecture notes B.K.Mathan Nagan MCA., (Ph.D)
27 CAUSSANEL COLLEGE OF ARTS AND SCIENCE
of the image. For example, you might want to isolate a person's eyes to change the
colour without affecting the rest of the image.
Filter
Filters, or special effects, are contained in this menu. Applying a filter to an image
will modify the image based on the filter's predefined instructions. Examples of some
filter effects: blurring, sharpening, distorting, and applying brush strokes or textures
to an image.
Analysis
This menu provides options for measuring, counting objects, and placing markers in
your image document.
3D (Photoshop Extended version only)
This menu contains tools for creating and manipulating 3D objects but won't be
covered in this course.
View
The View menu contains options to change your view of an image; e.g., zooming in
and out or displaying how the image might look when printed or viewed on another
computer. This menu also houses the ability to show/hide rulers and guides, which
will aid in editing your images.
Window
Window contains options to show/hide the Toolbox and panels, as well as options
to organize images within Photoshop's workspace.
Help
Online help, information about plug-ins and information about the version of
Photoshop you're using are located in this menu. Use Help Topics for reference or to
find out how to accomplish objectives you might be having problems with.
Workspace Overview Summary
Photoshop's workspace is comprised of three areas: menus, panels, and the toolbox.
The panels and toolbox can be moved.
You can choose from preset workspaces, edit them, or create your own.
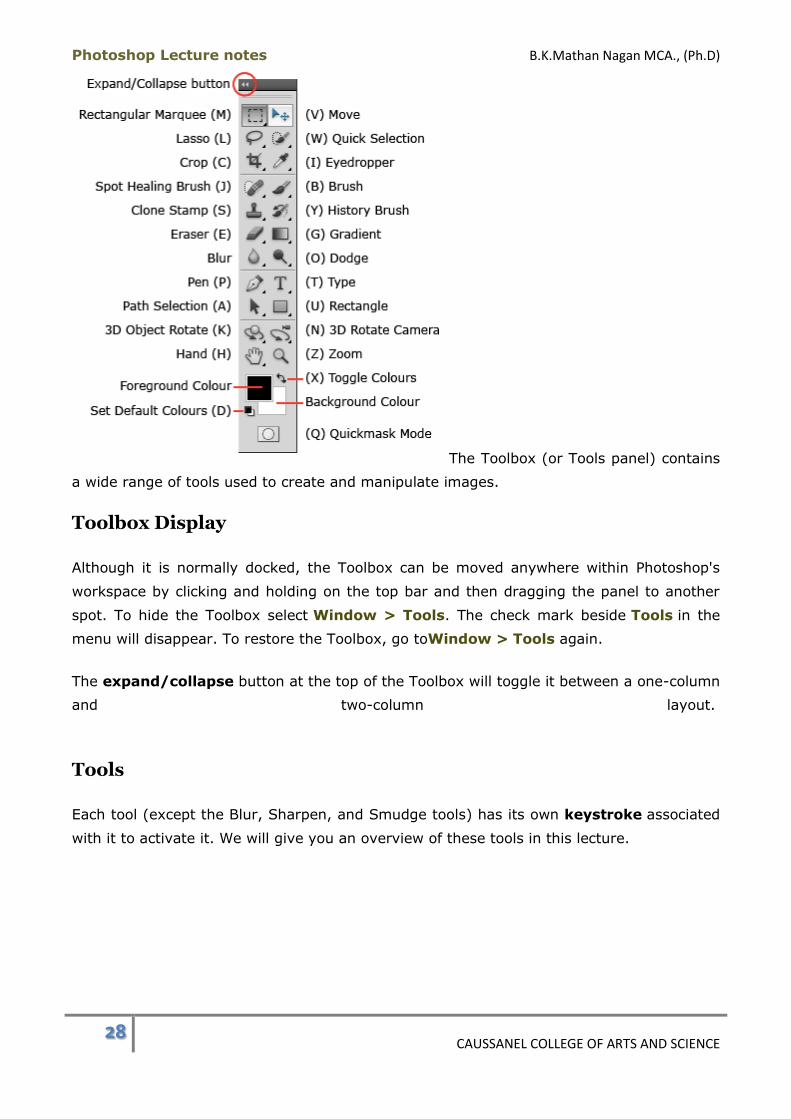
The Toolbox
Photoshop Lecture notes B.K.Mathan Nagan MCA., (Ph.D)
28 CAUSSANEL COLLEGE OF ARTS AND SCIENCE
The Toolbox (or Tools panel) contains
a wide range of tools used to create and manipulate images.
Toolbox Display
Although it is normally docked, the Toolbox can be moved anywhere within Photoshop's
workspace by clicking and holding on the top bar and then dragging the panel to another
spot. To hide the Toolbox select Window > Tools. The check mark beside Tools in the
menu will disappear. To restore the Toolbox, go toWindow > Tools again.
The expand/collapse button at the top of the Toolbox will toggle it between a one-column
and two-column layout.
Tools
Each tool (except the Blur, Sharpen, and Smudge tools) has its own keystroke associated
with it to activate it. We will give you an overview of these tools in this lecture.
Photoshop Lecture notes B.K.Mathan Nagan MCA., (Ph.D)
29 CAUSSANEL COLLEGE OF ARTS AND SCIENCE
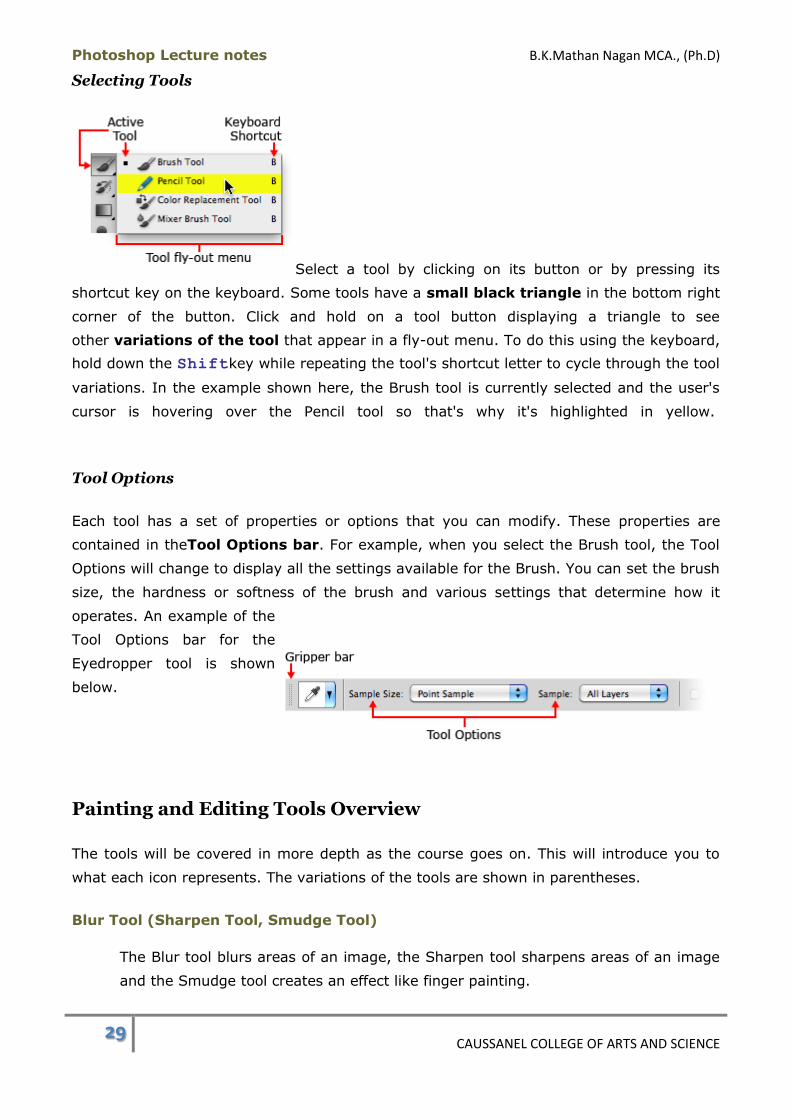
Selecting Tools
Select a tool by clicking on its button or by pressing its
shortcut key on the keyboard. Some tools have a small black triangle in the bottom right
corner of the button. Click and hold on a tool button displaying a triangle to see
other variations of the tool that appear in a fly-out menu. To do this using the keyboard,
hold down the Shiftkey while repeating the tool's shortcut letter to cycle through the tool
variations. In the example shown here, the Brush tool is currently selected and the user's
cursor is hovering over the Pencil tool so that's why it's highlighted in yellow.
Tool Options
Each tool has a set of properties or options that you can modify. These properties are
contained in theTool Options bar. For example, when you select the Brush tool, the Tool
Options will change to display all the settings available for the Brush. You can set the brush
size, the hardness or softness of the brush and various settings that determine how it
operates. An example of the
Tool Options bar for the
Eyedropper tool is shown
below.
Painting and Editing Tools Overview
The tools will be covered in more depth as the course goes on. This will introduce you to
what each icon represents. The variations of the tools are shown in parentheses.
Blur Tool (Sharpen Tool, Smudge Tool)
The Blur tool blurs areas of an image, the Sharpen tool sharpens areas of an image
and the Smudge tool creates an effect like finger painting.

Photoshop Lecture notes B.K.Mathan Nagan MCA., (Ph.D)
30 CAUSSANEL COLLEGE OF ARTS AND SCIENCE
Brush Tool (Pencil Tool, Colour Replacement Tool, Mixer Brush Tool)
The Brush tool is used to paint freehand hard- or soft-edged lines depending on the
Brush type selected in the Brushes panel. The Pencil tool performs a similar action
as the Brush with the difference being that the pencil tool only draws hard-edged
lines. The Mixer Brush tool emulates real-life painting by allowing colours to be
combined on a brush and various wetness settings to be applied.
Clone Stamp Tool (Pattern Stamp Tool)
The Clone Stamp tool is used to copy a portion of an image and paint it onto another
portion of the image. The Pattern Stamp tool paints a pre-defined pattern on an
image.
Crop Tool (Slice Tool, Slice Select Tool)
The Crop tool is used to define a portion of an image and then delete or hide
everything outside the defined area. The Slice tool allows you to slice up an image
like a puzzle to accommodate HTML tables and other Web applications that require
an image to be cut into pieces and placed together in a browser. The Slice Select
tool allows you to select a slice of an image and apply information to it. (These tools
are beyond the scope of this course so will not be covered.)
Dodge Tool (Burn Tool, Sponge Tool)
The Dodge tool lightens areas of an image, the Burn tool darkens areas of an image,
and the Sponge tool is used for changing the colour saturation in areas of an image.
Eraser Tool (Background Eraser Tool, Magic Eraser Tool)
This tool can be used to change pixel colour to be transparent, to the background
colour, or to a saved version of the image. The Background Eraser tool will erase
only sampled parts of an image while leaving others. The Magic Eraser tool will erase
one colour completely from the image.
Eyedropper Tool (Colour Sampler Tool, Ruler Tool, Note Tool, Count Tool)
The Eyedropper tool previews or selects colour from an image. The Colour Sampler
tool lets you set reference points in an image and compare the colour values of one
with another. The Ruler tool is used to measure distances and angles. The Notes tool
places a text notation in Photoshop documents. The Count tool lets you count items
in an image. Each time you click in the image, a number appears, starting with "1"
and incrementing by one with each click.
Gradient Tool (Paint Bucket Tool)

Photoshop Lecture notes B.K.Mathan Nagan MCA., (Ph.D)
31 CAUSSANEL COLLEGE OF ARTS AND SCIENCE
The Gradient tool is used to create gradient fills. Gradients are gradual shifts from
one colour to another or one colour to transparency. The effect is similar to the way
the sky shifts from dark blue to a lighter blue as you look toward the horizon. The
Paint Bucket tool effectively pours a solid colour of your choice into a designated
area of an image.
Hand Tool
The Hand tool will pull the images around the screen, allowing you to view different
parts of the image.
History Brush Tool (Art History Brush Tool)
The History Brush tool paints with an earlier version of an image. The Art History
Brush tool does the same but paints with stylized strokes that simulate the look of
different paint styles.
Horizontal Type Tool (Vertical Type Tool, Horizontal Type Mask Tool, Vertical Type
Mask Tool)
The Horizontal Type tool is used to create and modify text flowing horizontally. As
you would expect, the Vertical Type Tool arranged the letters vertically. The Mask
versions of these tools are produced as selections.
Lasso Tool (Polygonal Lasso Tool Magnetic Lasso Tool)
The Lasso tool is used to create irregular-shaped selections by allowing you to draw
freehand around a portion of an image. The Polygonal Lasso tool allows for
irregularly shaped selections in straight line segments only. The Magnetic Lasso tool
will automatically snap (or hold the selection) to defined parts of the image.
Move Tool
The Move tool is used to reposition elements within an image, including layers,
selections or text. It's also used to align or distribute image elements to help you in
laying out your content.
Path Component Selection Tool (Direct Selection Tool)
These tools are used to select and manipulate paths and vector shapes.
Pen Tool (Freeform Pen Tool, Add Anchor Point Tool, Delete Anchor Point Tool,
Convert Point Tool)
Photoshop Lecture notes B.K.Mathan Nagan MCA., (Ph.D)
32 CAUSSANEL COLLEGE OF ARTS AND SCIENCE
This tool set is used to create and manipulate paths and vector shapes. A vector
shape is made from a path which consists of lines or curves between anchor points.
Paths can also be converted into selections.
Quick Selection Tool (Magic Wand Tool)
The Quick Selection tool is a popular new tool that has more sophisticated
capabilities tan the Magic Wand tool. The Magic Wand tool is used to create
selections in images based on the colour of pixels.
Rectangular Marquee Tool (Elliptical Marquee Tool, Single Row Marquee Tool,
Single Column Marquee Tool)
The Marquee tools are used to select a portion of an image for manipulation
purposes.
Shape Tools (Rectangle Tool, Rounded Rectangle Tool, Ellipse Tool, Polygon Tool,
Line Tool, Custom Shape Tool)
These tools draw vector shapes that can be scaled and edited with no loss in quality.
Spot Healing Brush Tool (Healing Brush Tool, Patch Tool, Red Eye Tool)
The Spot Healing Brush tool works just like the Healing Brush Tool, except that you
don't need to sample an area. The Healing Brush tool operates similar to the Clone
Stamp tool. It includes the additional capability of matching the texture and lighting
of the cloned area to the underlying area. It automatically uses the surrounding
pixels to fix a spot the you click on. The Patch tool will also match the texture and
lighting of the clone to the targeted area but rather than painting on the cloned
area, a selection of the cloned area is dragged to the targeted area. The Red Eye
tool helps to remove the "red eye" effect from photographs.
Zoom Tool
The Zoom tool shrinks or magnifies your view of the image.
3D Object Rotate Tool (3D Object Roll Tool, 3D Object Pan Tool, 3D Object Slide
Tool, 3D Object Scale Tool)
(Not covered in this course.)
3D Rotate Camera Tool (3D Roll Camera Tool, 3D Pan Camera Tool, 3D Walk
Camera Tool, 3D Zoom Camera Tool)
(Not covered in this course.)
Photoshop Lecture notes B.K.Mathan Nagan MCA., (Ph.D)
33 CAUSSANEL COLLEGE OF ARTS AND SCIENCE
Other Tools
Foreground/Background Colours
The current foreground colour, or the colour you are currently painting with, is
displayed in the foreground colour box. By default, this is black. The current
background colour is displayed in the background colour box. The default is white.
Click the Default Colours icon to restore these colours to default. To switch the
foreground and background colours, click the swap arrow.
Edit Mode
Photoshop works in Standard mode and Quick Mask mode. This button toggles
between the two modes. Editing modes are covered in detail in later sections.
Keyboard Shortcuts
As you use Photoshop more and more, you will want to start learning the keyboard
shortcuts applicable to your operating system. By using a combination of mouse and
keyboard, you can get much more done in the same amount of time. The letter that
activates each Toolbox item is displayed next to the icon in the Toolbox when clicked on or
rolled over.
The Toolbox Summary
The Toolbox can be moved anywhere on the screen by clicking and dragging it by its
top bar.
Tools are used to manipulate images or create new image elements.
Select a tool by either clicking on the tool button or by using the one-letter
keystroke if a shortcut is available.
The keyboard shortcuts are displayed when you roll over the tool button with the
mouse pointer or display the fly-out menu for a tool.
A small black triangle on the lower-right corner of a tool button indicates that there
are other variations of the tool available.
Each tool has features or properties that can be modified in the Tool Options bar.
The Toolbox Keyboard Shortcuts:
Move tool: V
Marquee tool: M
Lasso tool: L
Quick Selection tool: W
Photoshop Lecture notes B.K.Mathan Nagan MCA., (Ph.D)
34 CAUSSANEL COLLEGE OF ARTS AND SCIENCE
Crop tool: C
Eyedropper tool: I
Healing Brush tool: J
Brush tool: B
Clone Stamp tool: S
History Brush tool: Y
Eraser tool: E
Gradient tool: G
Blur tool: (no shortcut key)
Dodge tool: O
Pen tool: P
Type tool: T
Path Component Selection tool: A
Shape tool: U
Hand tool: H
Zoom tool: Z
Toggle Colours: X
Set Default Colours: D
Cycle through tool variations: Shift-<letter>
Panel Basics
Photoshop stores many of the settings or options for tools and image manipulation in
rectangular-shaped panels, formerly called palettes. Essentially even the Toolbox is a
panel. In this lecture you'll learn about the display options for panels and we'll give you an
overview of the functions of each panel displayed in the Essentials workspace.
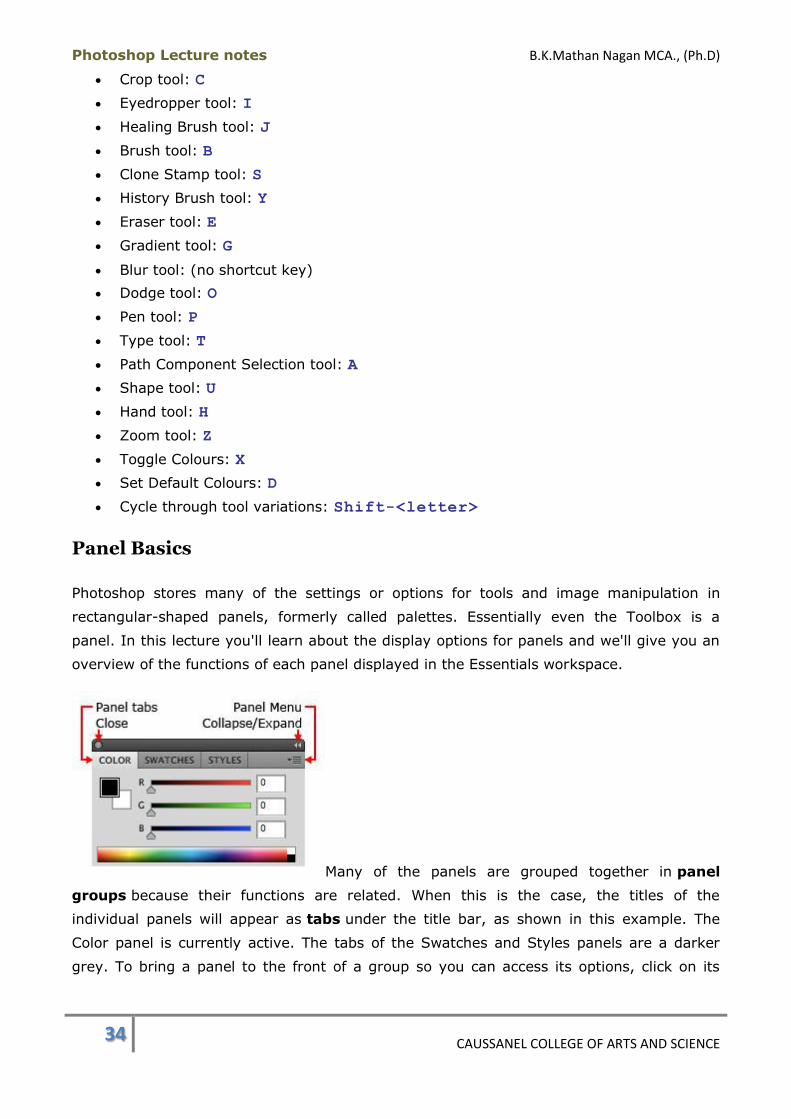
Many of the panels are grouped together in panel
groups because their functions are related. When this is the case, the titles of the
individual panels will appear as tabs under the title bar, as shown in this example. The
Color panel is currently active. The tabs of the Swatches and Styles panels are a darker
grey. To bring a panel to the front of a group so you can access its options, click on its
Photoshop Lecture notes B.K.Mathan Nagan MCA., (Ph.D)
35 CAUSSANEL COLLEGE OF ARTS AND SCIENCE
tab.
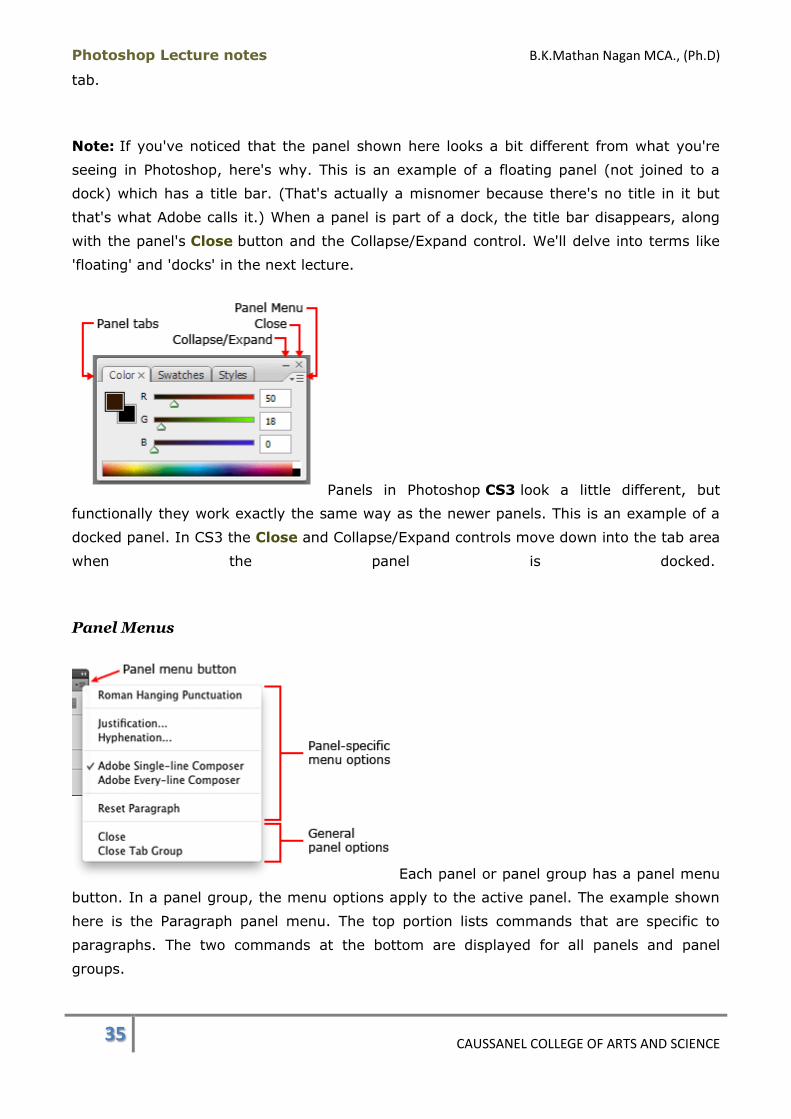
Note: If you've noticed that the panel shown here looks a bit different from what you're
seeing in Photoshop, here's why. This is an example of a floating panel (not joined to a
dock) which has a title bar. (That's actually a misnomer because there's no title in it but
that's what Adobe calls it.) When a panel is part of a dock, the title bar disappears, along
with the panel's Close button and the Collapse/Expand control. We'll delve into terms like
'floating' and 'docks' in the next lecture.
Panels in Photoshop CS3 look a little different, but
functionally they work exactly the same way as the newer panels. This is an example of a
docked panel. In CS3 the Close and Collapse/Expand controls move down into the tab area
when the panel is docked.
Panel Menus
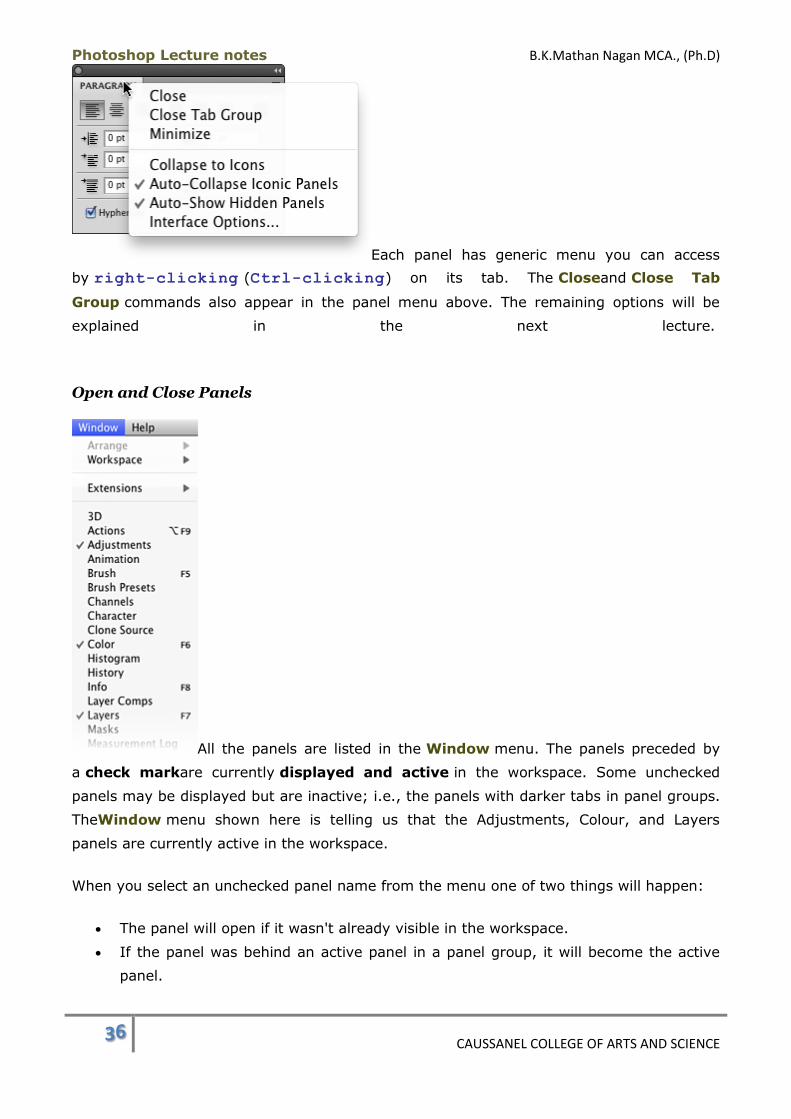
Each panel or panel group has a panel menu
button. In a panel group, the menu options apply to the active panel. The example shown
here is the Paragraph panel menu. The top portion lists commands that are specific to
paragraphs. The two commands at the bottom are displayed for all panels and panel
groups.
Photoshop Lecture notes B.K.Mathan Nagan MCA., (Ph.D)
36 CAUSSANEL COLLEGE OF ARTS AND SCIENCE
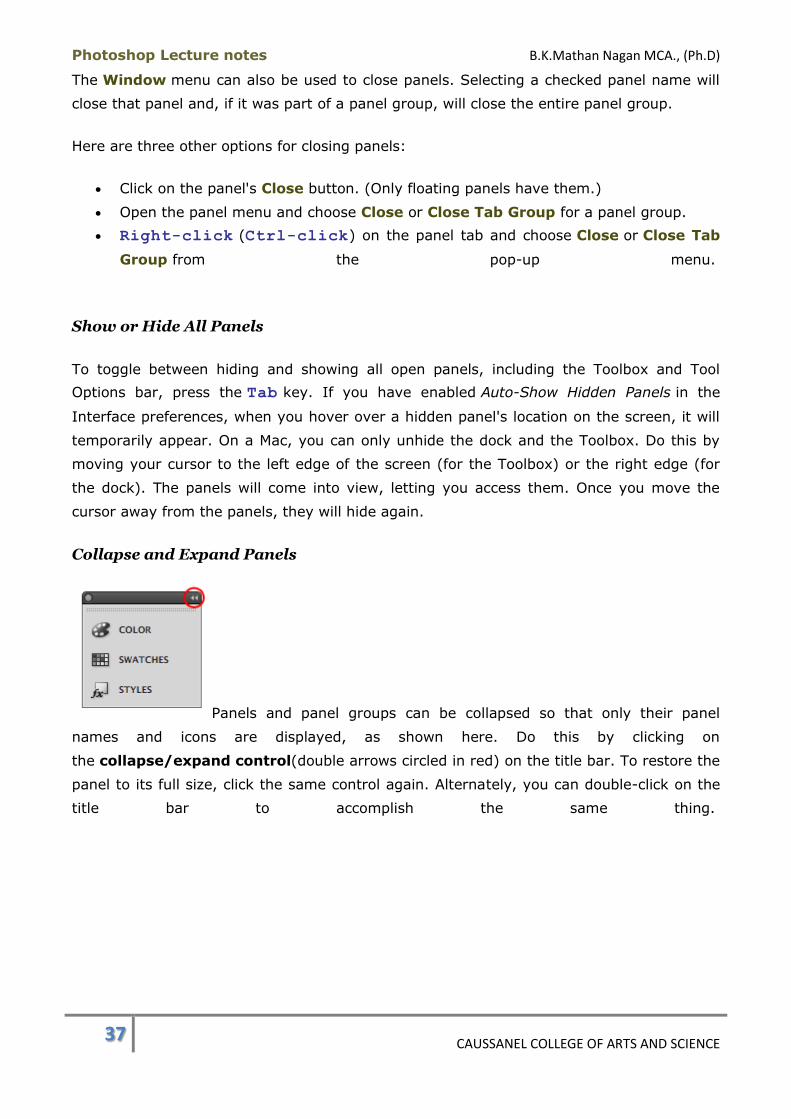
Each panel has generic menu you can access
by right-clicking (Ctrl-clicking) on its tab. The Closeand Close Tab
Group commands also appear in the panel menu above. The remaining options will be
explained in the next lecture.
Open and Close Panels
All the panels are listed in the Window menu. The panels preceded by
a check markare currently displayed and active in the workspace. Some unchecked
panels may be displayed but are inactive; i.e., the panels with darker tabs in panel groups.
TheWindow menu shown here is telling us that the Adjustments, Colour, and Layers
panels are currently active in the workspace.
When you select an unchecked panel name from the menu one of two things will happen:
The panel will open if it wasn't already visible in the workspace.
If the panel was behind an active panel in a panel group, it will become the active
panel.
Photoshop Lecture notes B.K.Mathan Nagan MCA., (Ph.D)
37 CAUSSANEL COLLEGE OF ARTS AND SCIENCE
The Window menu can also be used to close panels. Selecting a checked panel name will
close that panel and, if it was part of a panel group, will close the entire panel group.
Here are three other options for closing panels:
Click on the panel's Close button. (Only floating panels have them.)
Open the panel menu and choose Close or Close Tab Group for a panel group.
Right-click (Ctrl-click) on the panel tab and choose Close or Close Tab
Group from the pop-up menu.
Show or Hide All Panels
To toggle between hiding and showing all open panels, including the Toolbox and Tool
Options bar, press the Tab key. If you have enabled Auto-Show Hidden Panels in the
Interface preferences, when you hover over a hidden panel's location on the screen, it will
temporarily appear. On a Mac, you can only unhide the dock and the Toolbox. Do this by
moving your cursor to the left edge of the screen (for the Toolbox) or the right edge (for
the dock). The panels will come into view, letting you access them. Once you move the
cursor away from the panels, they will hide again.
Collapse and Expand Panels
Panels and panel groups can be collapsed so that only their panel
names and icons are displayed, as shown here. Do this by clicking on
the collapse/expand control(double arrows circled in red) on the title bar. To restore the
panel to its full size, click the same control again. Alternately, you can double-click on the
title bar to accomplish the same thing.
Photoshop Lecture notes B.K.Mathan Nagan MCA., (Ph.D)
38 CAUSSANEL COLLEGE OF ARTS AND SCIENCE
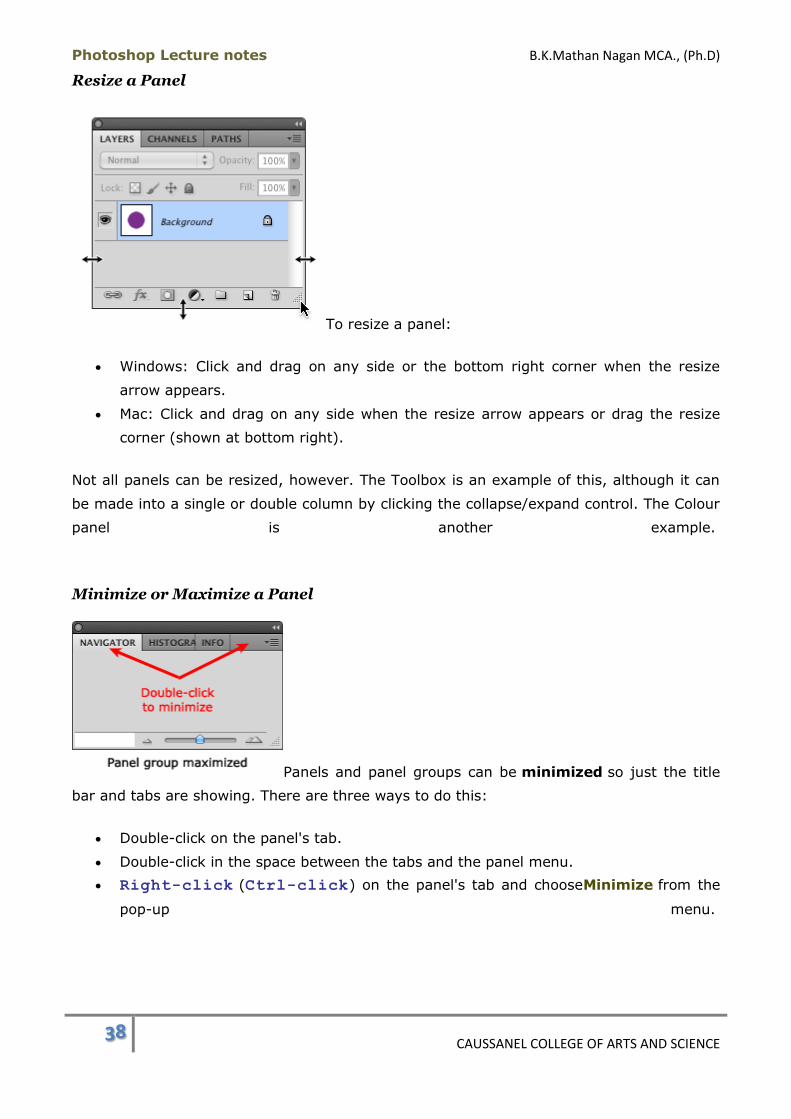
Resize a Panel
To resize a panel:
Windows: Click and drag on any side or the bottom right corner when the resize
arrow appears.
Mac: Click and drag on any side when the resize arrow appears or drag the resize
corner (shown at bottom right).
Not all panels can be resized, however. The Toolbox is an example of this, although it can
be made into a single or double column by clicking the collapse/expand control. The Colour
panel is another example.
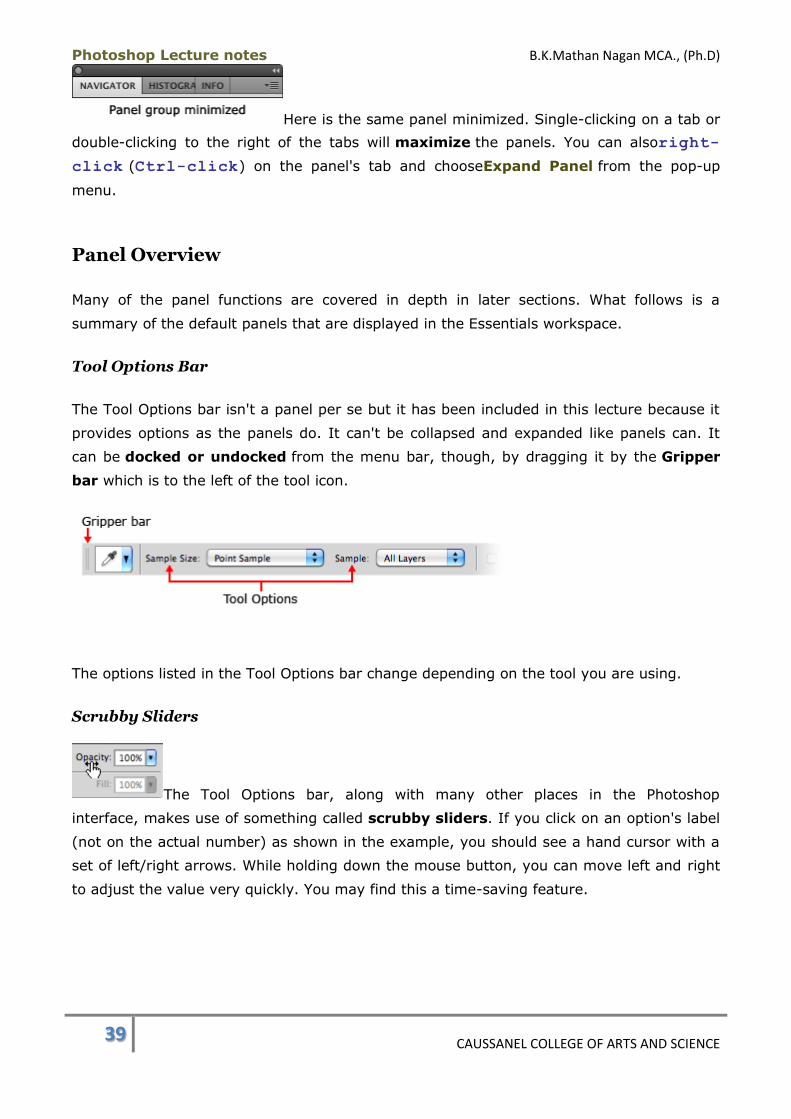
Minimize or Maximize a Panel
Panels and panel groups can be minimized so just the title
bar and tabs are showing. There are three ways to do this:
Double-click on the panel's tab.
Double-click in the space between the tabs and the panel menu.
Right-click (Ctrl-click) on the panel's tab and chooseMinimize from the
pop-up menu.
Photoshop Lecture notes B.K.Mathan Nagan MCA., (Ph.D)
39 CAUSSANEL COLLEGE OF ARTS AND SCIENCE
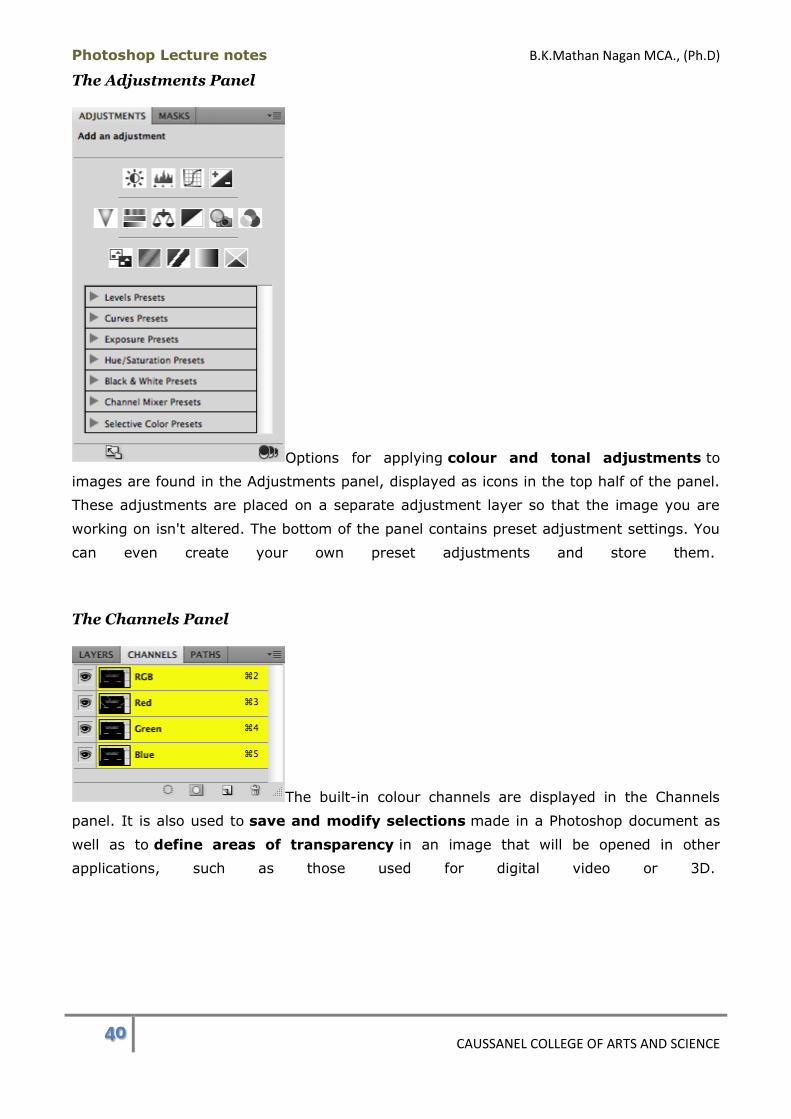
Here is the same panel minimized. Single-clicking on a tab or
double-clicking to the right of the tabs will maximize the panels. You can alsoright-
click (Ctrl-click) on the panel's tab and chooseExpand Panel from the pop-up
menu.
Panel Overview
Many of the panel functions are covered in depth in later sections. What follows is a
summary of the default panels that are displayed in the Essentials workspace.
Tool Options Bar
The Tool Options bar isn't a panel per se but it has been included in this lecture because it
provides options as the panels do. It can't be collapsed and expanded like panels can. It
can be docked or undocked from the menu bar, though, by dragging it by the Gripper
bar which is to the left of the tool icon.
The options listed in the Tool Options bar change depending on the tool you are using.
Scrubby Sliders
The Tool Options bar, along with many other places in the Photoshop
interface, makes use of something called scrubby sliders. If you click on an option's label
(not on the actual number) as shown in the example, you should see a hand cursor with a
set of left/right arrows. While holding down the mouse button, you can move left and right
to adjust the value very quickly. You may find this a time-saving feature.
Photoshop Lecture notes B.K.Mathan Nagan MCA., (Ph.D)
40 CAUSSANEL COLLEGE OF ARTS AND SCIENCE
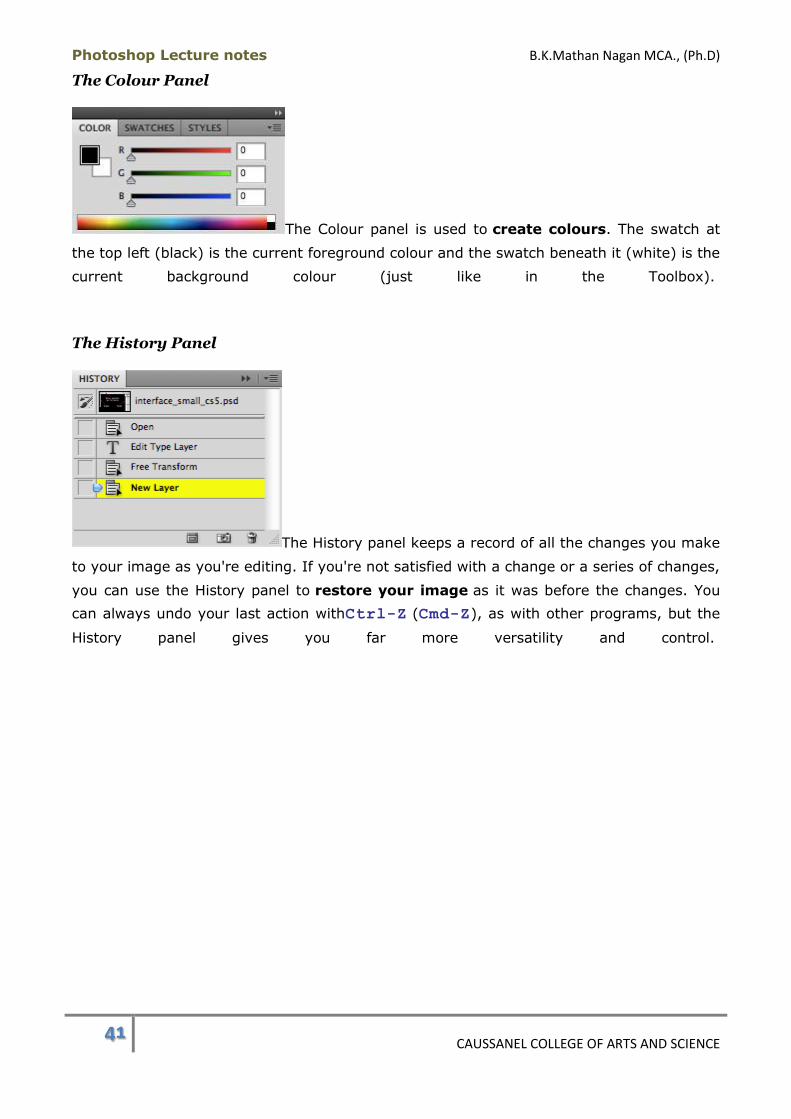
The Adjustments Panel
Options for applying colour and tonal adjustments to
images are found in the Adjustments panel, displayed as icons in the top half of the panel.
These adjustments are placed on a separate adjustment layer so that the image you are
working on isn't altered. The bottom of the panel contains preset adjustment settings. You
can even create your own preset adjustments and store them.
The Channels Panel
The built-in colour channels are displayed in the Channels
panel. It is also used to save and modify selections made in a Photoshop document as
well as to define areas of transparency in an image that will be opened in other
applications, such as those used for digital video or 3D.
Photoshop Lecture notes B.K.Mathan Nagan MCA., (Ph.D)
41 CAUSSANEL COLLEGE OF ARTS AND SCIENCE
The Colour Panel
The Colour panel is used to create colours. The swatch at
the top left (black) is the current foreground colour and the swatch beneath it (white) is the
current background colour (just like in the Toolbox).
The History Panel
The History panel keeps a record of all the changes you make
to your image as you're editing. If you're not satisfied with a change or a series of changes,
you can use the History panel to restore your image as it was before the changes. You
can always undo your last action withCtrl-Z (Cmd-Z), as with other programs, but the
History panel gives you far more versatility and control.
Photoshop Lecture notes B.K.Mathan Nagan MCA., (Ph.D)
42 CAUSSANEL COLLEGE OF ARTS AND SCIENCE
The Layers Panel
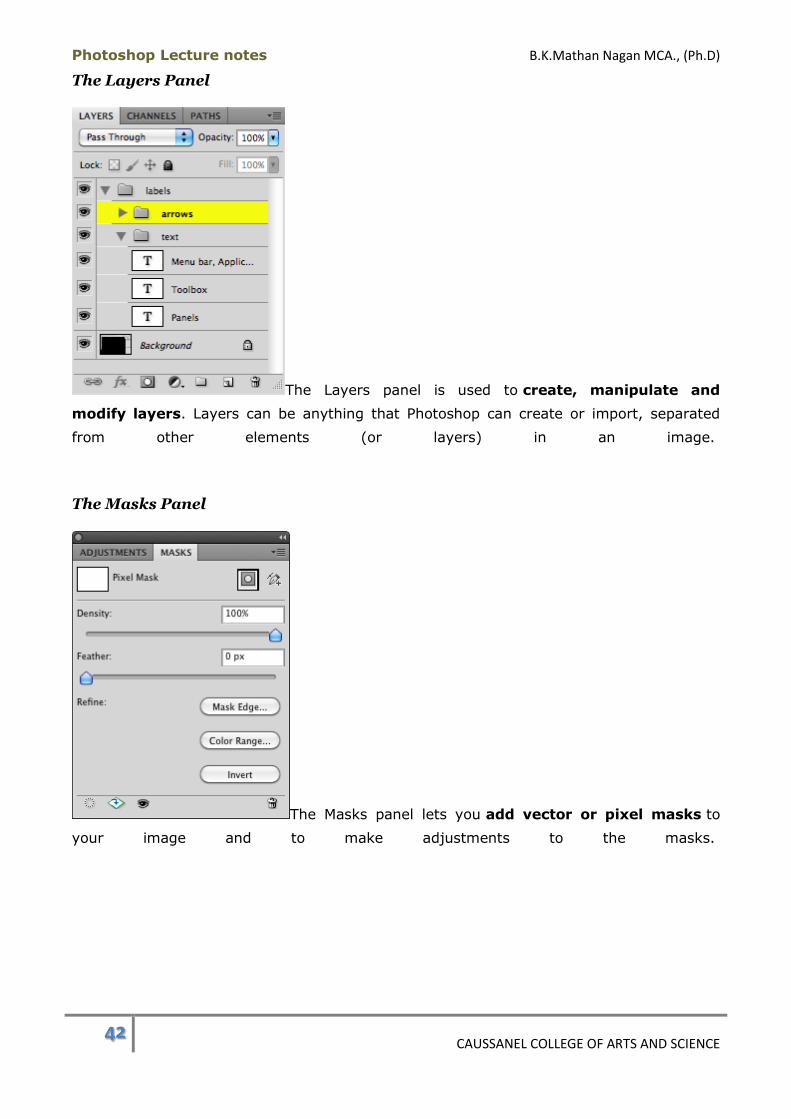
The Layers panel is used to create, manipulate and
modify layers. Layers can be anything that Photoshop can create or import, separated
from other elements (or layers) in an image.
The Masks Panel
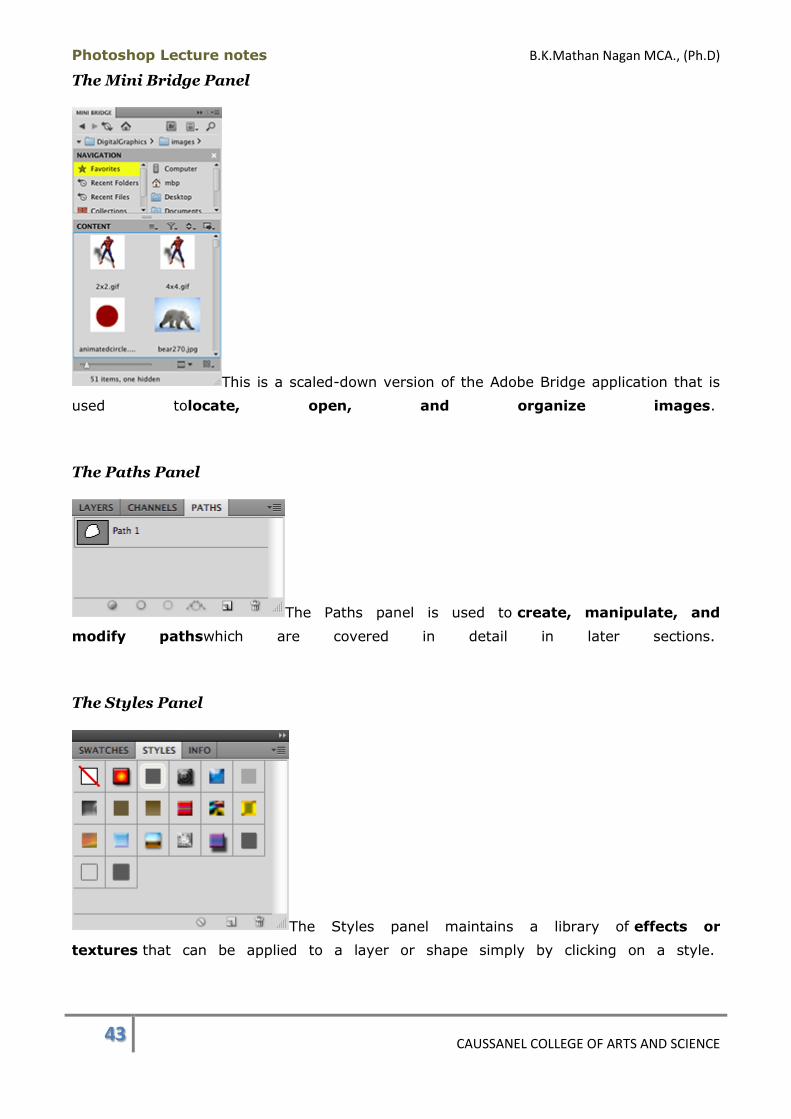
The Masks panel lets you add vector or pixel masks to
your image and to make adjustments to the masks.
Photoshop Lecture notes B.K.Mathan Nagan MCA., (Ph.D)
43 CAUSSANEL COLLEGE OF ARTS AND SCIENCE
The Mini Bridge Panel
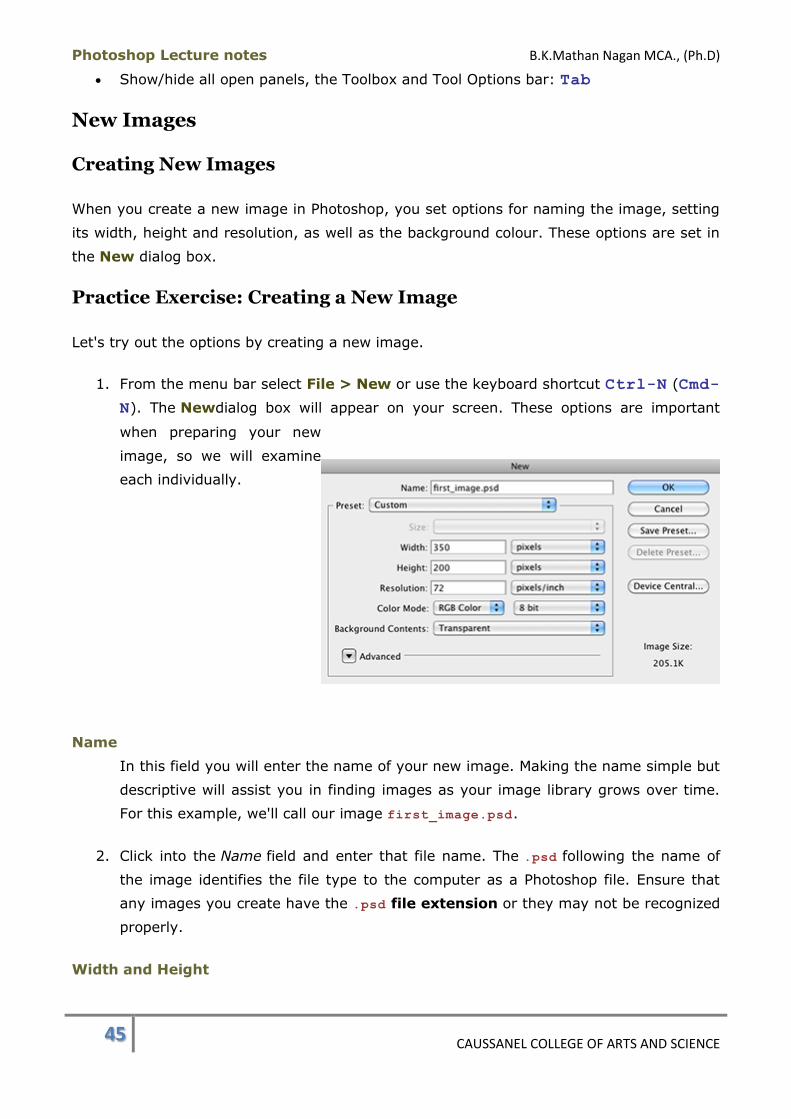
This is a scaled-down version of the Adobe Bridge application that is
used tolocate, open, and organize images.
The Paths Panel
The Paths panel is used to create, manipulate, and
modify pathswhich are covered in detail in later sections.
The Styles Panel
The Styles panel maintains a library of effects or
textures that can be applied to a layer or shape simply by clicking on a style.

Photoshop Lecture notes B.K.Mathan Nagan MCA., (Ph.D)
44 CAUSSANEL COLLEGE OF ARTS AND SCIENCE
The Swatches Panel
The Swatches panel contains a number of pre-selected
colours to choose from. You can create your own swatches as well as load other colour
sets. Photoshop includes a colour set of Web-safe swatches, which is a collection of colours
that are supported across browsers.
Panel Basics Summary
Panels are a collection of commonly used options and functions.
Most panels are arranged in groups.
Panels can be open or closed, hidden or displayed, collapsed or expanded,
minimized or maximized, and some can be resized.
The Tool Options bar is context-sensitive, meaning that the options it displays will
depend on the tool you have selected. It is used to set tool options.
Scrubby sliders allow you to quickly change values for many options without moving
a slider bar or typing a number.
The Adjustments panel lets you apply colour and tonal adjustments to an image.
Channels are used to save and modify selections made in a Photoshop document as
well as to determine areas of transparency.
The Colour panel is used to create new colours.
The History panel records all the changes you make to your image as you're editing.
The Layers panel is used to create, manipulate and modify image layers.
The Masks panel lets you add and adjust masks.
The Mini Bridge panel is used to locate, open and organize files.
The Paths panel lets you create, manipulate, and modify paths.
The Styles panel maintains a library of effects or textures that can be applied to
layers or shapes.
The Swatches panel contains a number of pre-selected colours to choose from.
Panel Basics Keyboard Shortcuts:
Undo: Ctrl-Z (Cmd-Z)
Photoshop Lecture notes B.K.Mathan Nagan MCA., (Ph.D)
45 CAUSSANEL COLLEGE OF ARTS AND SCIENCE
Show/hide all open panels, the Toolbox and Tool Options bar: Tab
New Images
Creating New Images
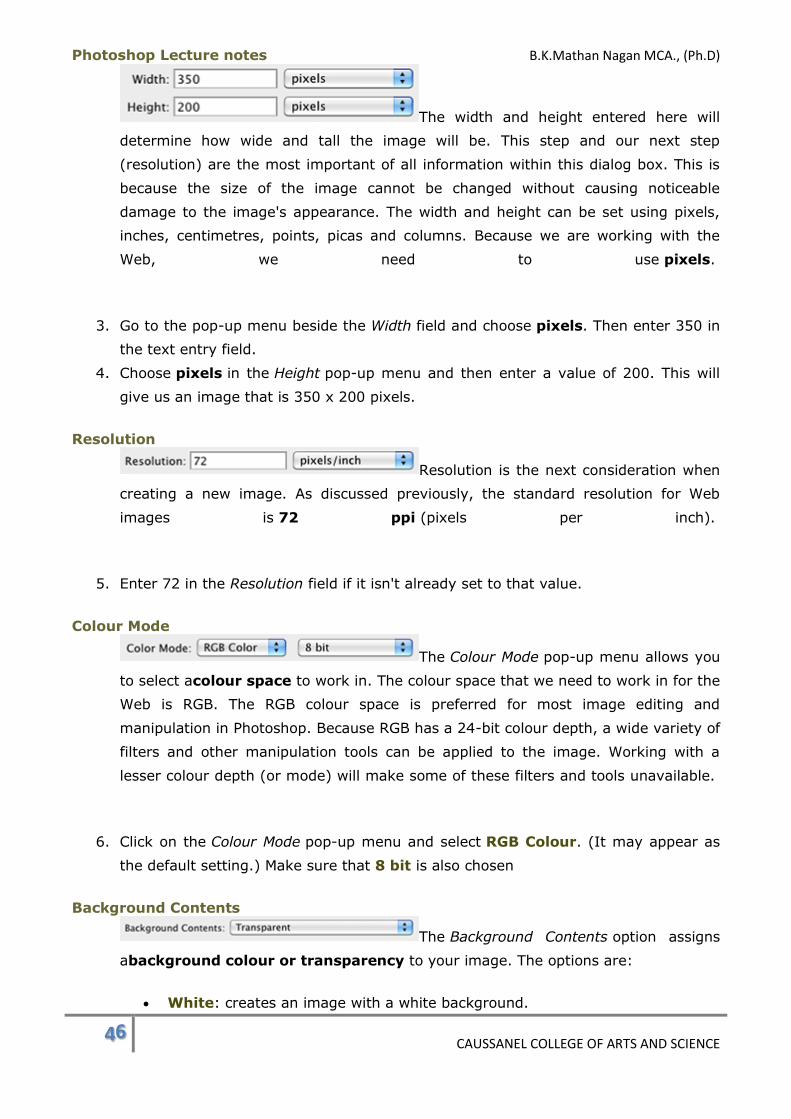
When you create a new image in Photoshop, you set options for naming the image, setting
its width, height and resolution, as well as the background colour. These options are set in
the New dialog box.
Practice Exercise: Creating a New Image
Let's try out the options by creating a new image.
1. From the menu bar select File > New or use the keyboard shortcut Ctrl-N (Cmd-
N). The Newdialog box will appear on your screen. These options are important
when preparing your new
image, so we will examine
each individually.
Name
In this field you will enter the name of your new image. Making the name simple but
descriptive will assist you in finding images as your image library grows over time.
For this example, we'll call our image first_image.psd.
2. Click into the Name field and enter that file name. The .psd following the name of
the image identifies the file type to the computer as a Photoshop file. Ensure that
any images you create have the .psd file extension or they may not be recognized
properly.
Width and Height
Photoshop Lecture notes B.K.Mathan Nagan MCA., (Ph.D)
46 CAUSSANEL COLLEGE OF ARTS AND SCIENCE
The width and height entered here will
determine how wide and tall the image will be. This step and our next step
(resolution) are the most important of all information within this dialog box. This is
because the size of the image cannot be changed without causing noticeable
damage to the image's appearance. The width and height can be set using pixels,
inches, centimetres, points, picas and columns. Because we are working with the
Web, we need to use pixels.
3. Go to the pop-up menu beside the Width field and choose pixels. Then enter 350 in
the text entry field.
4. Choose pixels in the Height pop-up menu and then enter a value of 200. This will
give us an image that is 350 x 200 pixels.
Resolution
Resolution is the next consideration when
creating a new image. As discussed previously, the standard resolution for Web
images is 72 ppi (pixels per inch).
5. Enter 72 in the Resolution field if it isn't already set to that value.
Colour Mode
The Colour Mode pop-up menu allows you
to select acolour space to work in. The colour space that we need to work in for the
Web is RGB. The RGB colour space is preferred for most image editing and
manipulation in Photoshop. Because RGB has a 24-bit colour depth, a wide variety of
filters and other manipulation tools can be applied to the image. Working with a
lesser colour depth (or mode) will make some of these filters and tools unavailable.
6. Click on the Colour Mode pop-up menu and select RGB Colour. (It may appear as
the default setting.) Make sure that 8 bit is also chosen
Background Contents
The Background Contents option assigns
abackground colour or transparency to your image. The options are:
White: creates an image with a white background.
Photoshop Lecture notes B.K.Mathan Nagan MCA., (Ph.D)
47 CAUSSANEL COLLEGE OF ARTS AND SCIENCE
Background Colour: creates an image using the background colour
displayed in the Toolbox. The background colour is the one on the right of the
two colour swatches.
Transparent: creates an image without any colour. Transparency is
displayed with a grey and white check pattern by default.
7. Select the Transparent option and click OK to create your first new image. Leave
the image open for the next lecture.
Preset
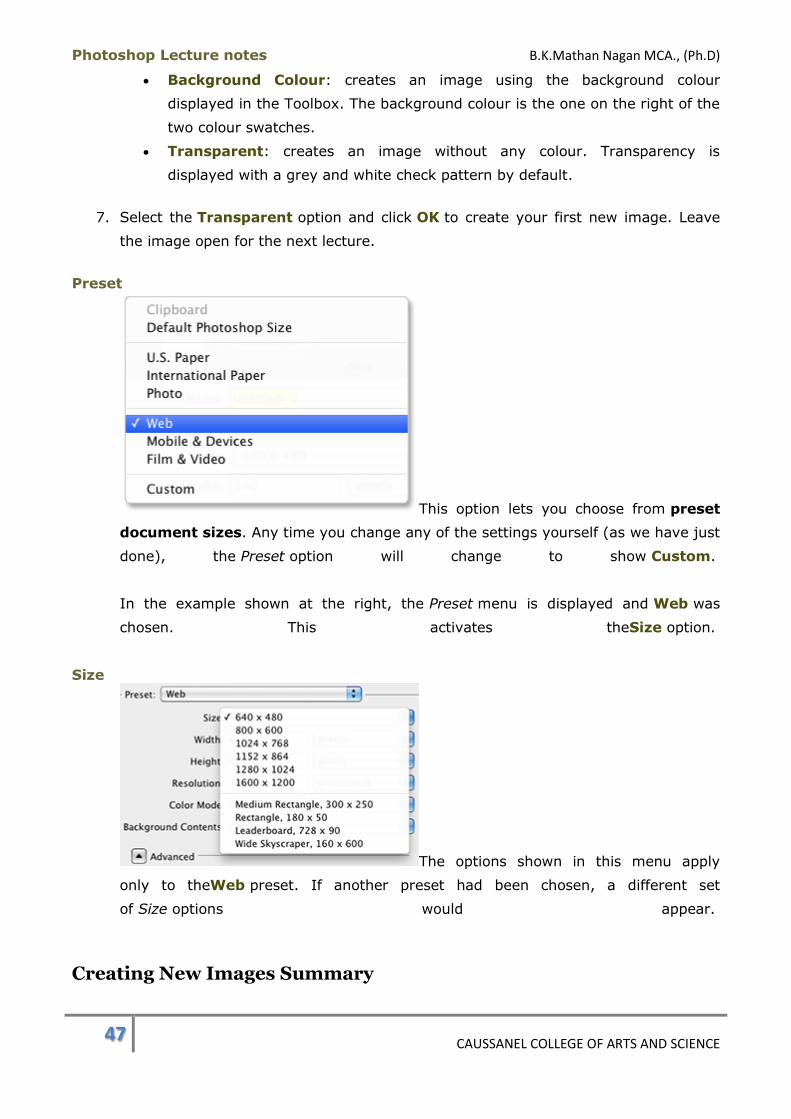
This option lets you choose from preset
document sizes. Any time you change any of the settings yourself (as we have just
done), the Preset option will change to show Custom.
In the example shown at the right, the Preset menu is displayed and Web was
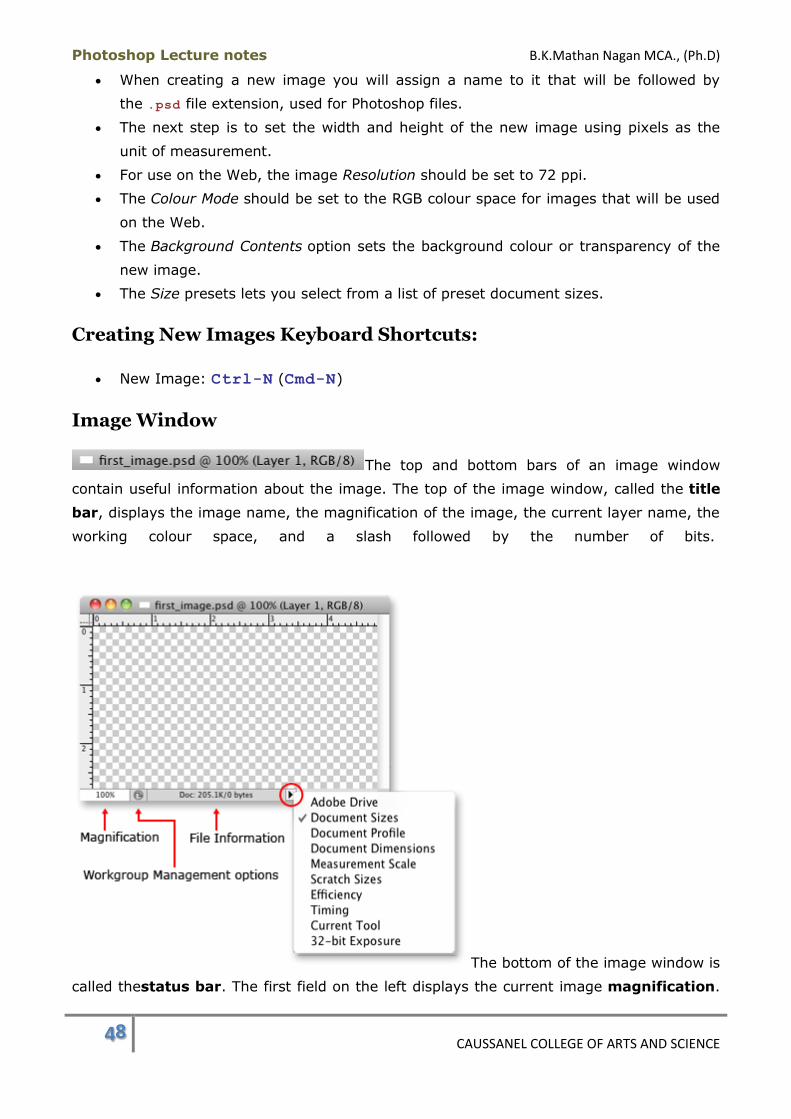
chosen. This activates theSize option.
Size
The options shown in this menu apply
only to theWeb preset. If another preset had been chosen, a different set
of Size options would appear.
Creating New Images Summary
Photoshop Lecture notes B.K.Mathan Nagan MCA., (Ph.D)
48 CAUSSANEL COLLEGE OF ARTS AND SCIENCE
When creating a new image you will assign a name to it that will be followed by
the .psd file extension, used for Photoshop files.
The next step is to set the width and height of the new image using pixels as the
unit of measurement.
For use on the Web, the image Resolution should be set to 72 ppi.
The Colour Mode should be set to the RGB colour space for images that will be used
on the Web.
The Background Contents option sets the background colour or transparency of the
new image.
The Size presets lets you select from a list of preset document sizes.
Creating New Images Keyboard Shortcuts:
New Image: Ctrl-N (Cmd-N)
Image Window
The top and bottom bars of an image window
contain useful information about the image. The top of the image window, called the title
bar, displays the image name, the magnification of the image, the current layer name, the
working colour space, and a slash followed by the number of bits.
The bottom of the image window is
called thestatus bar. The first field on the left displays the current image magnification.
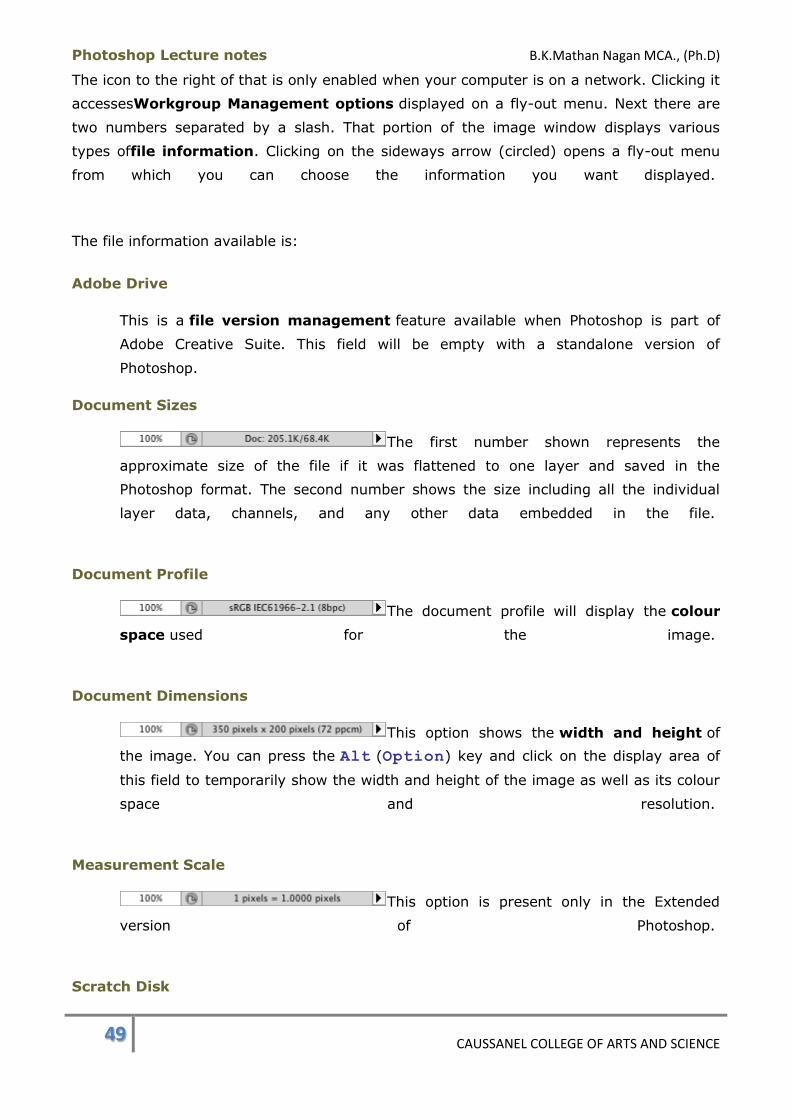
Photoshop Lecture notes B.K.Mathan Nagan MCA., (Ph.D)
49 CAUSSANEL COLLEGE OF ARTS AND SCIENCE
The icon to the right of that is only enabled when your computer is on a network. Clicking it
accessesWorkgroup Management options displayed on a fly-out menu. Next there are
two numbers separated by a slash. That portion of the image window displays various
types offile information. Clicking on the sideways arrow (circled) opens a fly-out menu
from which you can choose the information you want displayed.
The file information available is:
Adobe Drive
This is a file version management feature available when Photoshop is part of
Adobe Creative Suite. This field will be empty with a standalone version of
Photoshop.
Document Sizes
The first number shown represents the
approximate size of the file if it was flattened to one layer and saved in the
Photoshop format. The second number shows the size including all the individual
layer data, channels, and any other data embedded in the file.
Document Profile
The document profile will display the colour
space used for the image.
Document Dimensions
This option shows the width and height of
the image. You can press the Alt (Option) key and click on the display area of
this field to temporarily show the width and height of the image as well as its colour
space and resolution.
Measurement Scale
This option is present only in the Extended
version of Photoshop.
Scratch Disk

Photoshop Lecture notes B.K.Mathan Nagan MCA., (Ph.D)
50 CAUSSANEL COLLEGE OF ARTS AND SCIENCE
The scratch disk option will display the amount
of RAM and scratch disk space needed to work with the image. The number on
the left shows the amount of memory that Photoshop is currently using to display all
open images. The number on the right represents the amount of memory available
to process images.
Efficiency
This setting will show the percentage that
Photoshop is relying on the scratch disk to assist in processing the image. If the
number is below 100%, Photoshop is not running as fast as it could be.
Timing
This displays the time it took to perform the
last operation in Photoshop.
Current Tool
This shows the tool from the Toolbox that is
currently selected.
32-bit Exposure
This option lets you adjust the display of a 32-
bit HDR image. The option isn't available unless the image is an HDR image. (HDR
stands for high dynamic range. This is a photography technique that merges
multiple versions of the same image to create an image with a greater range of
tonal variations.)
Close New_Image.psd without saving it by going to File > Close or using the keyboard
shortcut Ctrl-W (Cmd-W).
Arranging Image Windows
There are a number of ways that you can display multiple image documents in the
workspace. They can be grouped together, floating, or a combination of both.

Photoshop Lecture notes B.K.Mathan Nagan MCA., (Ph.D)
51 CAUSSANEL COLLEGE OF ARTS AND SCIENCE
Grouped Image Windows
When you have multiple image documents
open in Photoshop, by default they are grouped in a single tabbed window. File
information about the active window is displayed in the window's title bar. Each tab
contains most of the same information, space permitting.
In this example, Cat.psd and CDROM.tif are tabbed images. The active image's tab is
a lighter grey. Clicking on the tab for CDROM.tif will make it the active image. Notice
that each tab has its own close button.
If you want to switch the order in which the tabs are arranged, click and drag a tab to
another spot in the tab area.
Sometimes tabs can be hidden or partially hidden
depending on the width of the window and the number of tabs it has. When this happens,
an icon will appear on the right edge of the tab area. Clicking on it will open the image
selection menu. The currently active image has a check mark beside it. You can choose
the name of another file from the menu to make it the active image.
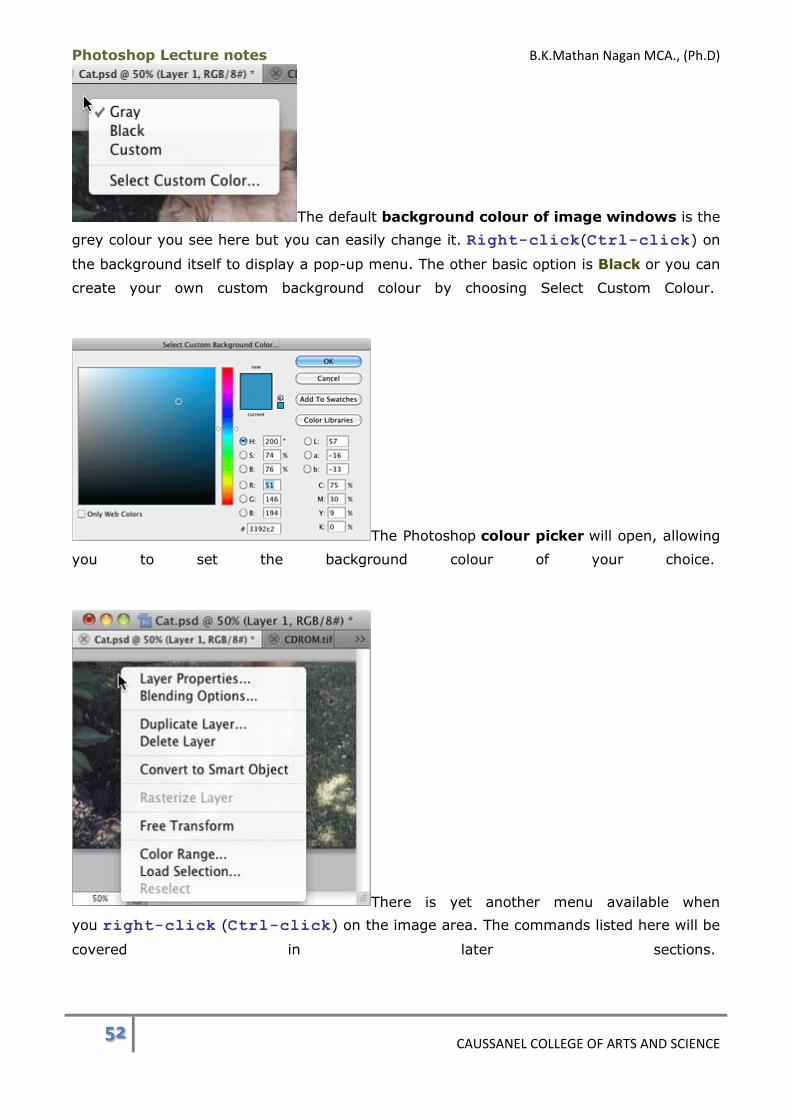
Photoshop Lecture notes B.K.Mathan Nagan MCA., (Ph.D)
52 CAUSSANEL COLLEGE OF ARTS AND SCIENCE
The default background colour of image windows is the
grey colour you see here but you can easily change it. Right-click(Ctrl-click) on
the background itself to display a pop-up menu. The other basic option is Black or you can
create your own custom background colour by choosing Select Custom Colour.
The Photoshop colour picker will open, allowing
you to set the background colour of your choice.
There is yet another menu available when
you right-click (Ctrl-click) on the image area. The commands listed here will be
covered in later sections.
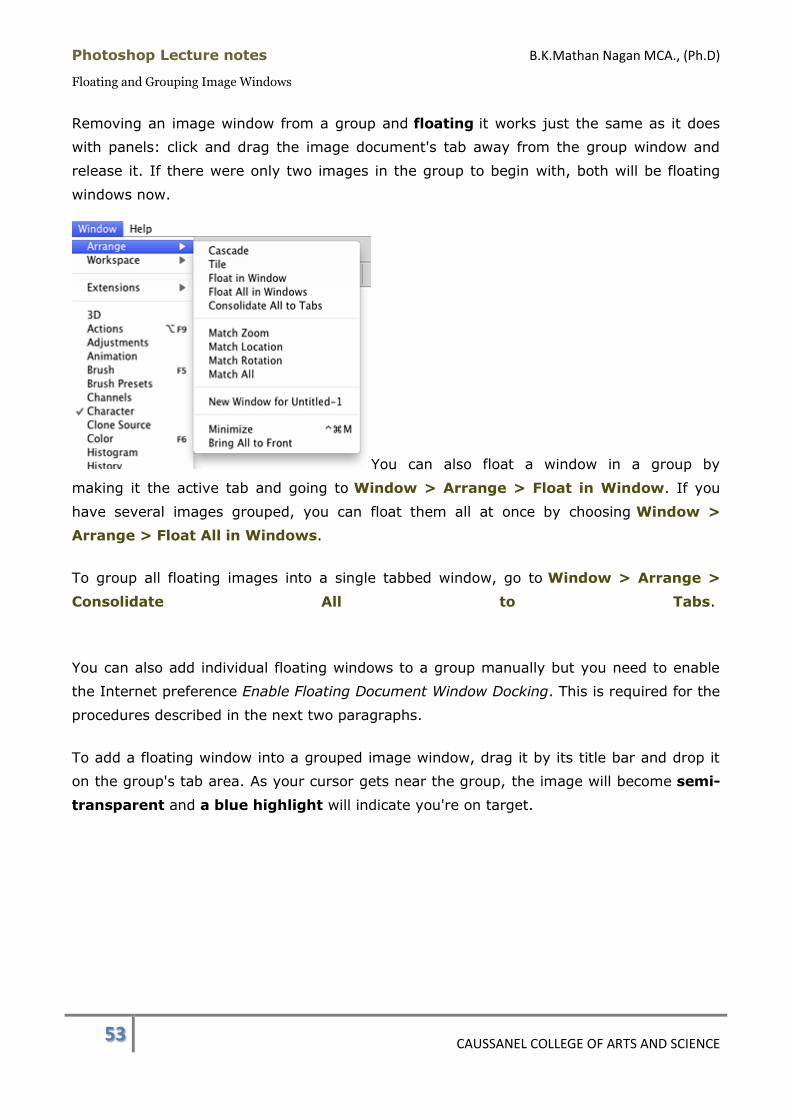
Photoshop Lecture notes B.K.Mathan Nagan MCA., (Ph.D)
53 CAUSSANEL COLLEGE OF ARTS AND SCIENCE
Floating and Grouping Image Windows
Removing an image window from a group and floating it works just the same as it does
with panels: click and drag the image document's tab away from the group window and
release it. If there were only two images in the group to begin with, both will be floating
windows now.
You can also float a window in a group by
making it the active tab and going to Window > Arrange > Float in Window. If you
have several images grouped, you can float them all at once by choosing Window >
Arrange > Float All in Windows.
To group all floating images into a single tabbed window, go to Window > Arrange >
Consolidate All to Tabs.
You can also add individual floating windows to a group manually but you need to enable
the Internet preference Enable Floating Document Window Docking. This is required for the
procedures described in the next two paragraphs.
To add a floating window into a grouped image window, drag it by its title bar and drop it
on the group's tab area. As your cursor gets near the group, the image will become semi-
transparent and a blue highlight will indicate you're on target.
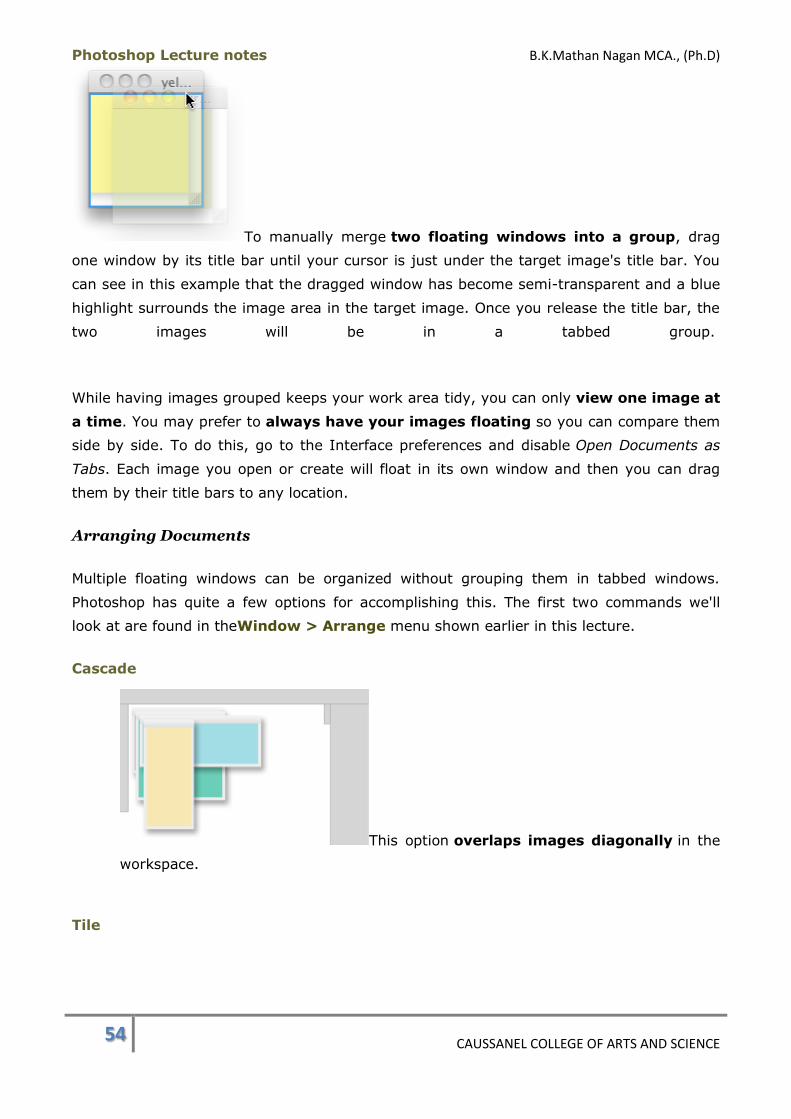
Photoshop Lecture notes B.K.Mathan Nagan MCA., (Ph.D)
54 CAUSSANEL COLLEGE OF ARTS AND SCIENCE
To manually merge two floating windows into a group, drag
one window by its title bar until your cursor is just under the target image's title bar. You
can see in this example that the dragged window has become semi-transparent and a blue
highlight surrounds the image area in the target image. Once you release the title bar, the
two images will be in a tabbed group.
While having images grouped keeps your work area tidy, you can only view one image at
a time. You may prefer to always have your images floating so you can compare them
side by side. To do this, go to the Interface preferences and disable Open Documents as
Tabs. Each image you open or create will float in its own window and then you can drag
them by their title bars to any location.
Arranging Documents
Multiple floating windows can be organized without grouping them in tabbed windows.
Photoshop has quite a few options for accomplishing this. The first two commands we'll
look at are found in theWindow > Arrange menu shown earlier in this lecture.
Cascade
This option overlaps images diagonally in the
workspace.
Tile
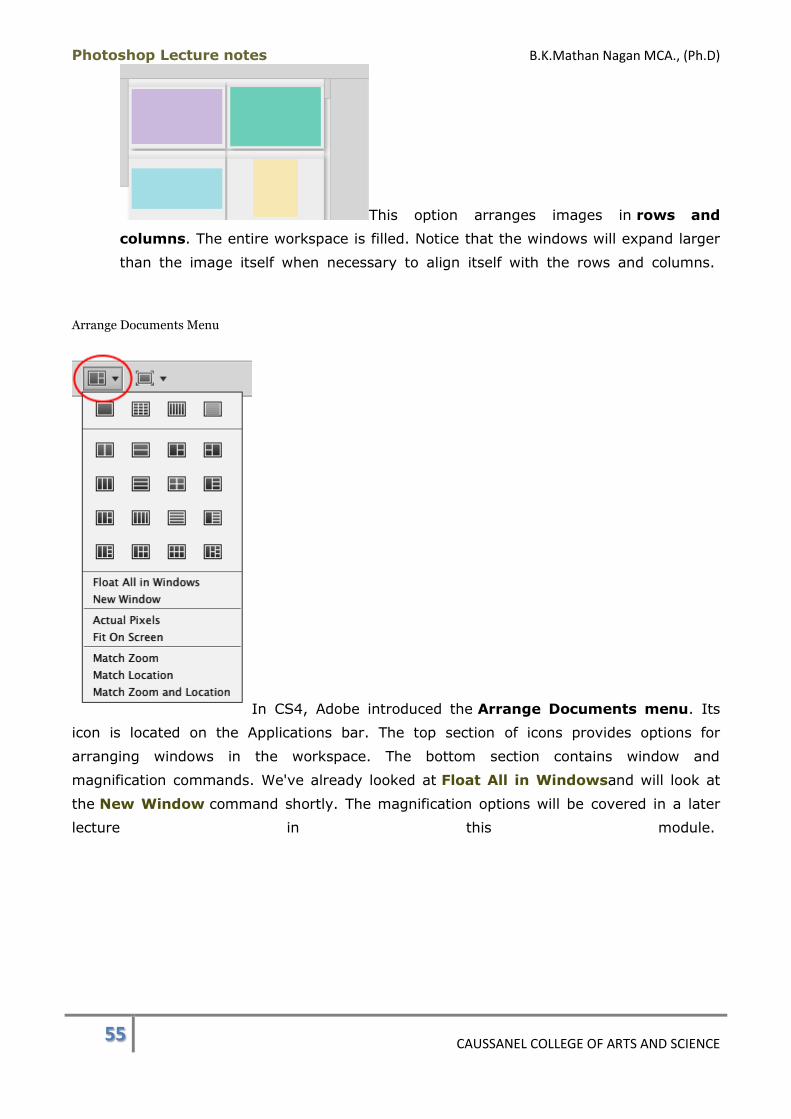
Photoshop Lecture notes B.K.Mathan Nagan MCA., (Ph.D)
55 CAUSSANEL COLLEGE OF ARTS AND SCIENCE
This option arranges images in rows and
columns. The entire workspace is filled. Notice that the windows will expand larger
than the image itself when necessary to align itself with the rows and columns.
Arrange Documents Menu
In CS4, Adobe introduced the Arrange Documents menu. Its
icon is located on the Applications bar. The top section of icons provides options for
arranging windows in the workspace. The bottom section contains window and
magnification commands. We've already looked at Float All in Windowsand will look at
the New Window command shortly. The magnification options will be covered in a later
lecture in this module.
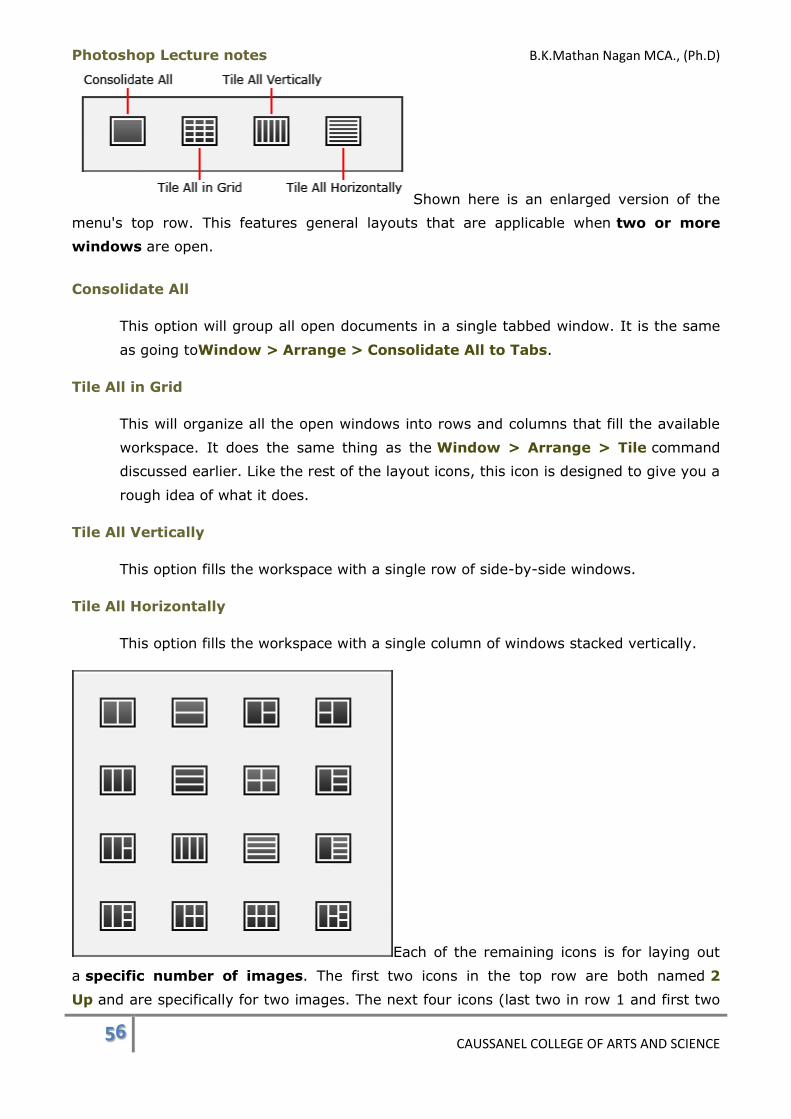
Photoshop Lecture notes B.K.Mathan Nagan MCA., (Ph.D)
56 CAUSSANEL COLLEGE OF ARTS AND SCIENCE
Shown here is an enlarged version of the
menu's top row. This features general layouts that are applicable when two or more
windows are open.
Consolidate All
This option will group all open documents in a single tabbed window. It is the same
as going toWindow > Arrange > Consolidate All to Tabs.
Tile All in Grid
This will organize all the open windows into rows and columns that fill the available
workspace. It does the same thing as the Window > Arrange > Tile command
discussed earlier. Like the rest of the layout icons, this icon is designed to give you a
rough idea of what it does.
Tile All Vertically
This option fills the workspace with a single row of side-by-side windows.
Tile All Horizontally
This option fills the workspace with a single column of windows stacked vertically.
Each of the remaining icons is for laying out
a specific number of images. The first two icons in the top row are both named 2
Up and are specifically for two images. The next four icons (last two in row 1 and first two
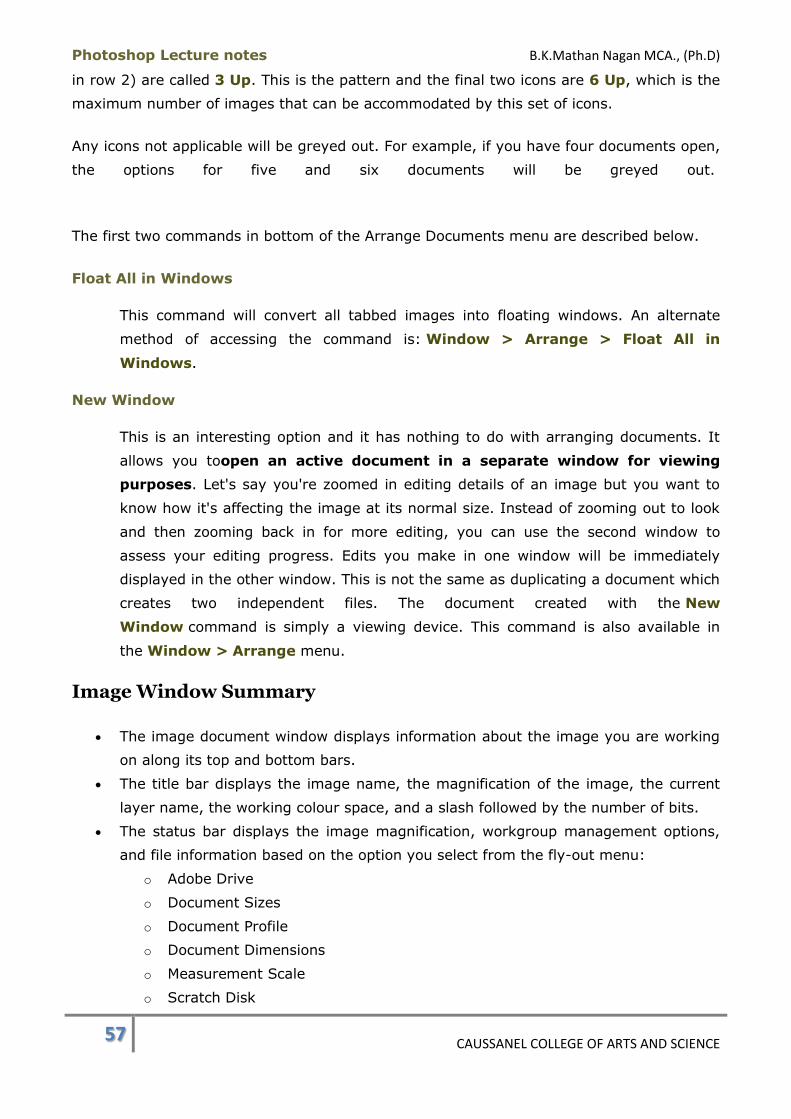
Photoshop Lecture notes B.K.Mathan Nagan MCA., (Ph.D)
57 CAUSSANEL COLLEGE OF ARTS AND SCIENCE
in row 2) are called 3 Up. This is the pattern and the final two icons are 6 Up, which is the
maximum number of images that can be accommodated by this set of icons.
Any icons not applicable will be greyed out. For example, if you have four documents open,
the options for five and six documents will be greyed out.
The first two commands in bottom of the Arrange Documents menu are described below.
Float All in Windows
This command will convert all tabbed images into floating windows. An alternate
method of accessing the command is: Window > Arrange > Float All in
Windows.
New Window
This is an interesting option and it has nothing to do with arranging documents. It
allows you toopen an active document in a separate window for viewing
purposes. Let's say you're zoomed in editing details of an image but you want to
know how it's affecting the image at its normal size. Instead of zooming out to look
and then zooming back in for more editing, you can use the second window to
assess your editing progress. Edits you make in one window will be immediately
displayed in the other window. This is not the same as duplicating a document which
creates two independent files. The document created with the New
Window command is simply a viewing device. This command is also available in
the Window > Arrange menu.
Image Window Summary
The image document window displays information about the image you are working
on along its top and bottom bars.
The title bar displays the image name, the magnification of the image, the current
layer name, the working colour space, and a slash followed by the number of bits.
The status bar displays the image magnification, workgroup management options,
and file information based on the option you select from the fly-out menu:
o Adobe Drive
o Document Sizes
o Document Profile
o Document Dimensions
o Measurement Scale
o Scratch Disk
Photoshop Lecture notes B.K.Mathan Nagan MCA., (Ph.D)
58 CAUSSANEL COLLEGE OF ARTS AND SCIENCE
o Efficiency
o Timing
o Current Tool
o 32-bit Exposure
Image documents can be grouped in a tabbed interface or floating.
Windows can be arranged using the Cascade or Tile commands in the Window >
Arrange menu. Cascading arranges them in a diagonal formation while tiling
arranges them in a grid formation.
The Arrange Documents menu in the Application bar provides many other options for
arranging image windows.
o Consolidate All will group all open documents into a tabbed interface.
o Tile All in Grid is the same as using the Window > Arrange >
Tile command.
o Tile All Vertically arranges the windows in a single row of side by side
images.
o Tile All Horizontally arranges the windows in a single column of images.
o The Arrange Documents menu also includes layouts for a specific number of
multiple windows.
o Float All in Windows will ungroup all images and float them.
o The New Window command will open a special view-only window that you
can use to monitor the progress of your edits in the actual document.
Image Window Keyboard Shortcuts:
Temporarily display width, height, colour space, and resolution: Hold down
the Alt (Option) key while clicking on the file information area of the image
window.
Close: Ctrl-W (Cmd-W)
Opening Images
The Open command is used to import or open a pre-existing file that you want to work on.
Various image file types can be opened with this command. If you're opening a vector file
type (e.g. EPS), there is an extra step involved. You'll get to practice opening a .psd and
an .eps file in an exercise.
For this lecture and those following in this module, you will need to
download NewImages.zip (2.6 MB). Once the file has finished downloading to your
computer, extract the files from the zip file using a decompression utility program like

Photoshop Lecture notes B.K.Mathan Nagan MCA., (Ph.D)
59 CAUSSANEL COLLEGE OF ARTS AND SCIENCE
WinZip (PC) or Stuffit Expander (Macintosh). You should now have a folder on your hard
drive called NewImages containing files named:
Cat_extract.psd
Cat.psd
CDROM.tif
pencil.eps
pink_rose.jpg
poppies.jpg
shapes.psd
Practice Exercise: Opening Files
1. Go to File > Open or use the keyboard shortcut Ctrl-O (Cmd-O).
Open Dialog Box
The Open dialog box contains
opening options to navigate to particular locations, to view a preview of the image before
opening it, or to search for a file on your computer.
View a full-sized version of the Open dialog box or the CS3 version.
2. Navigate to the NewImages folder that you downloaded.
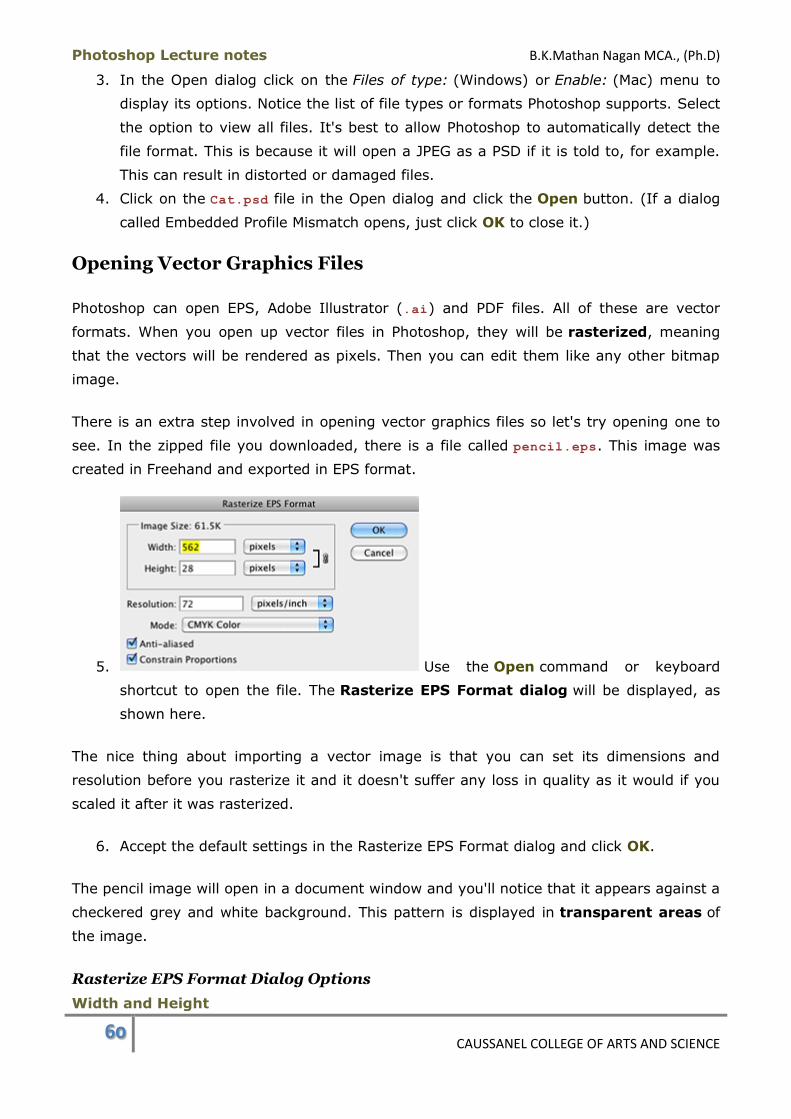
Photoshop Lecture notes B.K.Mathan Nagan MCA., (Ph.D)
60 CAUSSANEL COLLEGE OF ARTS AND SCIENCE
3. In the Open dialog click on the Files of type: (Windows) or Enable: (Mac) menu to
display its options. Notice the list of file types or formats Photoshop supports. Select
the option to view all files. It's best to allow Photoshop to automatically detect the
file format. This is because it will open a JPEG as a PSD if it is told to, for example.
This can result in distorted or damaged files.
4. Click on the Cat.psd file in the Open dialog and click the Open button. (If a dialog
called Embedded Profile Mismatch opens, just click OK to close it.)
Opening Vector Graphics Files
Photoshop can open EPS, Adobe Illustrator (.ai) and PDF files. All of these are vector
formats. When you open up vector files in Photoshop, they will be rasterized, meaning
that the vectors will be rendered as pixels. Then you can edit them like any other bitmap
image.
There is an extra step involved in opening vector graphics files so let's try opening one to
see. In the zipped file you downloaded, there is a file called pencil.eps. This image was
created in Freehand and exported in EPS format.
5. Use the Open command or keyboard
shortcut to open the file. The Rasterize EPS Format dialog will be displayed, as
shown here.
The nice thing about importing a vector image is that you can set its dimensions and
resolution before you rasterize it and it doesn't suffer any loss in quality as it would if you
scaled it after it was rasterized.
6. Accept the default settings in the Rasterize EPS Format dialog and click OK.
The pencil image will open in a document window and you'll notice that it appears against a
checkered grey and white background. This pattern is displayed in transparent areas of
the image.
Rasterize EPS Format Dialog Options
Width and Height

Photoshop Lecture notes B.K.Mathan Nagan MCA., (Ph.D)
61 CAUSSANEL COLLEGE OF ARTS AND SCIENCE
The original dimensions of the image file are initially displayed in the dialog. You can
enter different values to scale the image prior to rasterizing it. Clicking on
the Width and Height pop-up menus will allow you to select other units of
measurement.
Resolution
The image resolution set in your Preferences will determine the default value that
appears here. You can change it.
Mode
The Mode pop-up menu lets you select the colour space you want to work in.
Anti-aliased
When enabled, the edges of the graphic will
be smoothedout by filling the edges with semi-transparent pixels of colour and the
places where two colours meet will be slightly blended. If this check box is disabled,
the edges will have a jagged appearance. The image to the right places both
versions of the pencil together for comparison purposes (magnified by 300%). Both
the outside edges of the illustration as well as the areas where different colours
meet are affected by anti-aliasing. Usually, you'll want your images anti-aliased.
Constrain Proportions
When this check box is enabled, a link icon connects the Width and Height fields. If
you enter a different value in one of those fields, the value in the other field will be
automatically calculated toretain the original proportions of the image at its new
size. Disabling the check box will remove the link icon and let you set the width and
height independently.
7. Close both the cat and pencil images by going to File > Close All or use the
keyboard shortcutShift-Ctrl-W (Shift-Cmd-W). You will be prompted to
confirm closing without saving the EPS file. Choose Don't Save.

Photoshop Lecture notes B.K.Mathan Nagan MCA., (Ph.D)
62 CAUSSANEL COLLEGE OF ARTS AND SCIENCE
Open Recent List
A handy alternative to the Open command is the Open Recent command, also in
the File menu. This will display the names of documents recently opened in Photoshop. The
number of files listed is determined in the File Handling preferences.
8. Access this menu to re-open Cat.psd.
9. Close Cat.psd.
Opening Images Summary
The Open dialog box will allow you to browse through all available files that
Photoshop can open.
The dialog box lets you find files on your computer and select specific image formats
to look for.
When opening vector image files, you have the option of setting different dimensions
and image resolution without any loss in quality. Then Photoshop will rasterize the
image, meaning that it converts the vector data to pixels.
The Open Recent command is a quick way to find and open recently viewed
documents.
Opening Images Keyboard Shortcuts:
Open: Ctrl-O (Cmd-O)
Close All: Shift-Ctrl-W (Shift-Cmd-W)
Magnification/Navigation Controls
As you're creating and modifying images you will find you need to change the magnification
and navigate around your view of the image. You can do this with the Navigator panel, the
Zoom tool, the Hand tool, and the Screen Modes and Zoom Levels menus found in the
Application bar.
Screen Modes (Application Bar)
In the Interface module, we mentioned the
Application bar that is displayed either above or below the menu bar, depending on
whether you're on a Mac or a PC. The icon on the far right of the Application bar is for
Screen Modes.
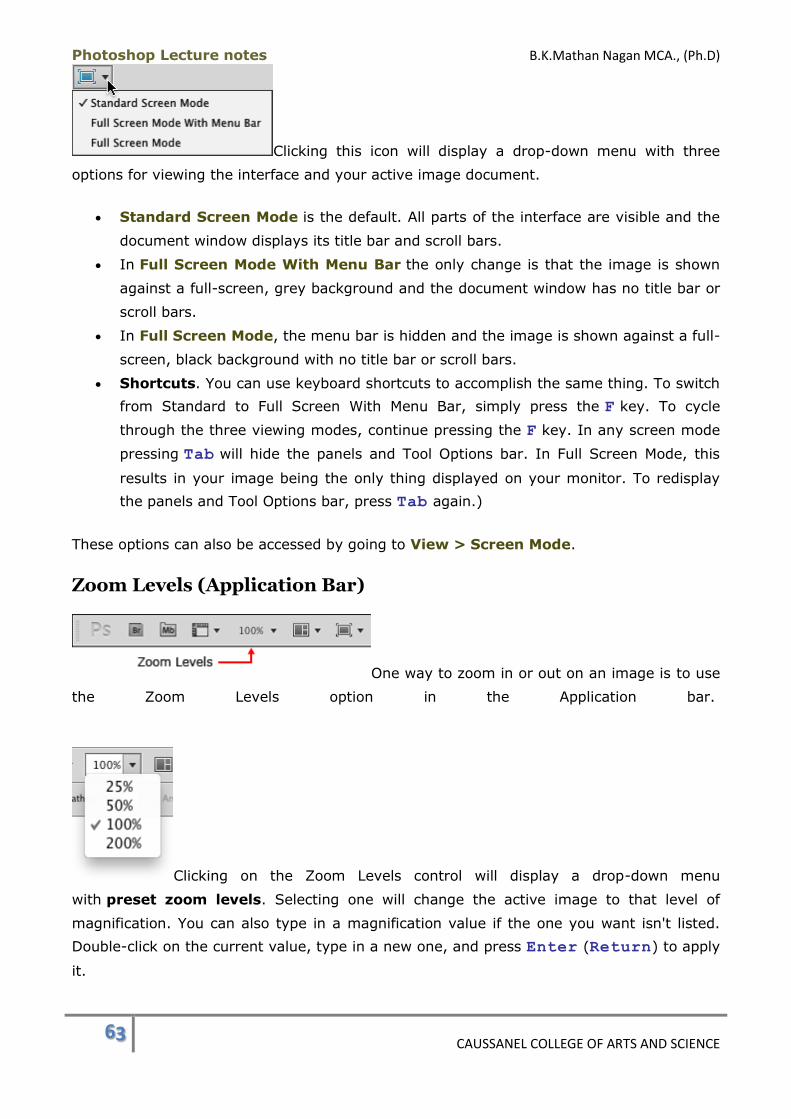
Photoshop Lecture notes B.K.Mathan Nagan MCA., (Ph.D)
63 CAUSSANEL COLLEGE OF ARTS AND SCIENCE
Clicking this icon will display a drop-down menu with three
options for viewing the interface and your active image document.
Standard Screen Mode is the default. All parts of the interface are visible and the
document window displays its title bar and scroll bars.
In Full Screen Mode With Menu Bar the only change is that the image is shown
against a full-screen, grey background and the document window has no title bar or
scroll bars.
In Full Screen Mode, the menu bar is hidden and the image is shown against a full-
screen, black background with no title bar or scroll bars.
Shortcuts. You can use keyboard shortcuts to accomplish the same thing. To switch
from Standard to Full Screen With Menu Bar, simply press the F key. To cycle
through the three viewing modes, continue pressing the F key. In any screen mode
pressing Tab will hide the panels and Tool Options bar. In Full Screen Mode, this
results in your image being the only thing displayed on your monitor. To redisplay
the panels and Tool Options bar, press Tab again.)
These options can also be accessed by going to View > Screen Mode.
Zoom Levels (Application Bar)
One way to zoom in or out on an image is to use
the Zoom Levels option in the Application bar.
Clicking on the Zoom Levels control will display a drop-down menu
with preset zoom levels. Selecting one will change the active image to that level of
magnification. You can also type in a magnification value if the one you want isn't listed.
Double-click on the current value, type in a new one, and press Enter (Return) to apply
it.
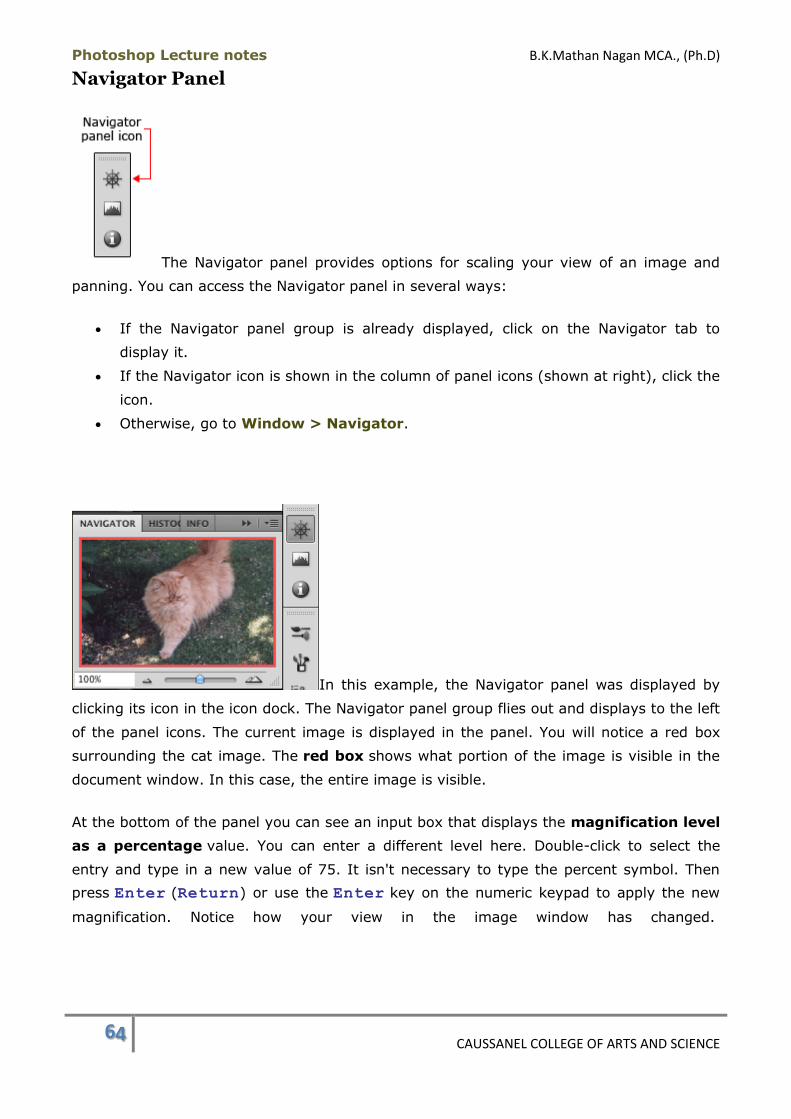
Photoshop Lecture notes B.K.Mathan Nagan MCA., (Ph.D)
64 CAUSSANEL COLLEGE OF ARTS AND SCIENCE
Navigator Panel
The Navigator panel provides options for scaling your view of an image and
panning. You can access the Navigator panel in several ways:
If the Navigator panel group is already displayed, click on the Navigator tab to
display it.
If the Navigator icon is shown in the column of panel icons (shown at right), click the
icon.
Otherwise, go to Window > Navigator.
In this example, the Navigator panel was displayed by
clicking its icon in the icon dock. The Navigator panel group flies out and displays to the left
of the panel icons. The current image is displayed in the panel. You will notice a red box
surrounding the cat image. The red box shows what portion of the image is visible in the
document window. In this case, the entire image is visible.
At the bottom of the panel you can see an input box that displays the magnification level
as a percentage value. You can enter a different level here. Double-click to select the
entry and type in a new value of 75. It isn't necessary to type the percent symbol. Then
press Enter (Return) or use the Enter key on the numeric keypad to apply the new
magnification. Notice how your view in the image window has changed.
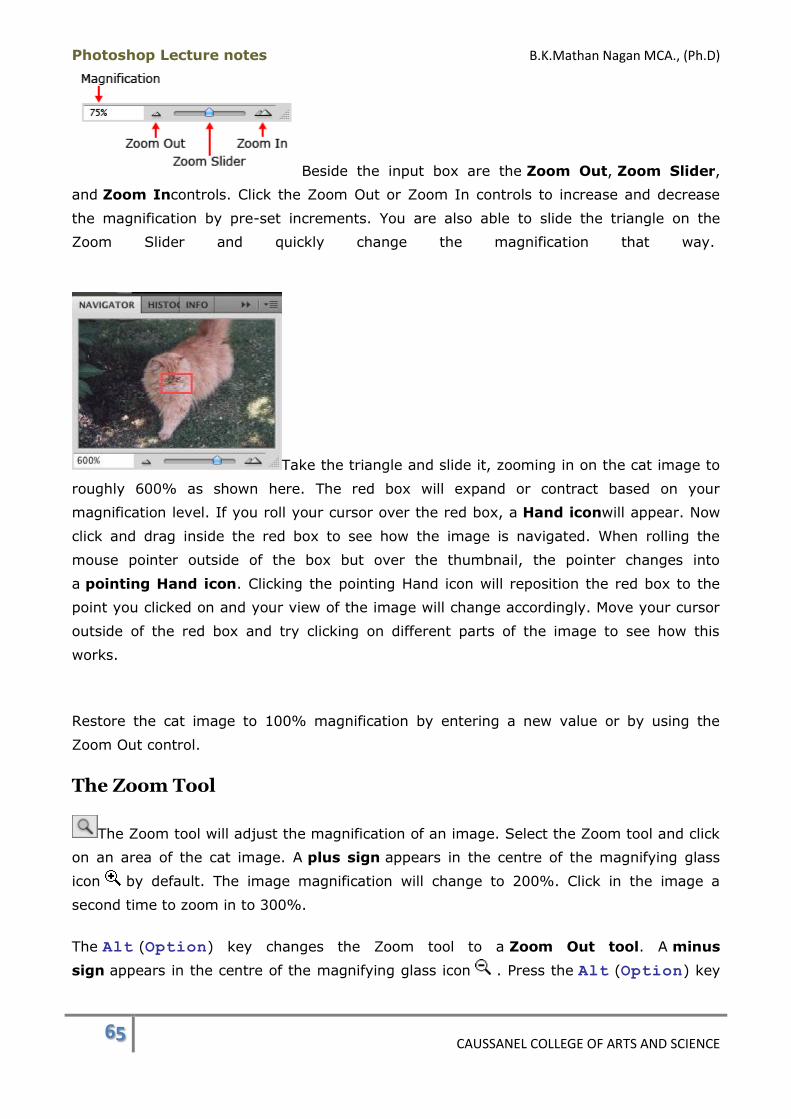
Photoshop Lecture notes B.K.Mathan Nagan MCA., (Ph.D)
65 CAUSSANEL COLLEGE OF ARTS AND SCIENCE
Beside the input box are the Zoom Out, Zoom Slider,
and Zoom Incontrols. Click the Zoom Out or Zoom In controls to increase and decrease
the magnification by pre-set increments. You are also able to slide the triangle on the
Zoom Slider and quickly change the magnification that way.
Take the triangle and slide it, zooming in on the cat image to
roughly 600% as shown here. The red box will expand or contract based on your
magnification level. If you roll your cursor over the red box, a Hand iconwill appear. Now
click and drag inside the red box to see how the image is navigated. When rolling the
mouse pointer outside of the box but over the thumbnail, the pointer changes into
a pointing Hand icon. Clicking the pointing Hand icon will reposition the red box to the
point you clicked on and your view of the image will change accordingly. Move your cursor
outside of the red box and try clicking on different parts of the image to see how this
works.
Restore the cat image to 100% magnification by entering a new value or by using the
Zoom Out control.
The Zoom Tool
The Zoom tool will adjust the magnification of an image. Select the Zoom tool and click
on an area of the cat image. A plus sign appears in the centre of the magnifying glass
icon by default. The image magnification will change to 200%. Click in the image a
second time to zoom in to 300%.
The Alt (Option) key changes the Zoom tool to a Zoom Out tool. A minus
sign appears in the centre of the magnifying glass icon . Press the Alt (Option) key
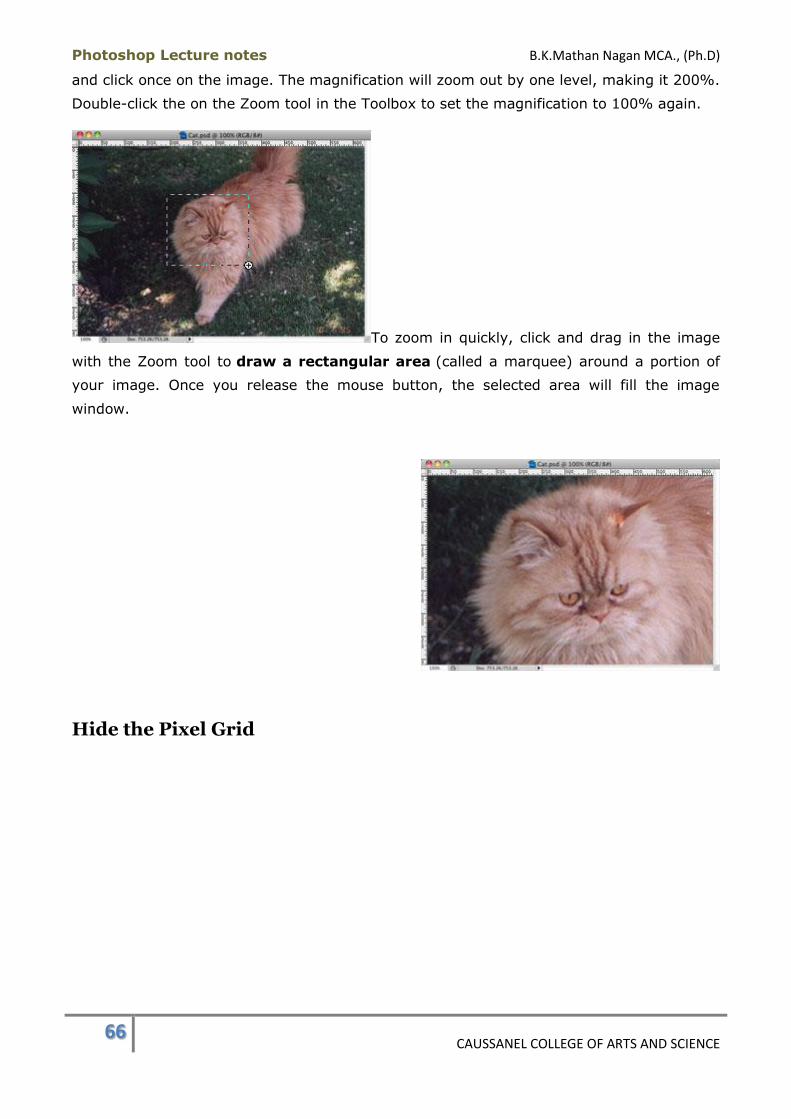
Photoshop Lecture notes B.K.Mathan Nagan MCA., (Ph.D)
66 CAUSSANEL COLLEGE OF ARTS AND SCIENCE
and click once on the image. The magnification will zoom out by one level, making it 200%.
Double-click the on the Zoom tool in the Toolbox to set the magnification to 100% again.
To zoom in quickly, click and drag in the image
with the Zoom tool to draw a rectangular area (called a marquee) around a portion of
your image. Once you release the mouse button, the selected area will fill the image
window.
Hide the Pixel Grid

Photoshop Lecture notes B.K.Mathan Nagan MCA., (Ph.D)
67 CAUSSANEL COLLEGE OF ARTS AND SCIENCE
The images at the right were magnified by 1600% to
demonstrate the difference between hiding and showing the pixel grid. The grid is displayed
by default in images zoomed to more than 500%. If you're doing some detailed editing
at the pixel level, this can help you identify where each pixel is.
To hide the pixel grid go to View > Show, and deselect Pixel Grid.
Zoom Shortcuts
Change to Zoom In tool when another tool is active: Ctrl-space bar (Cmd-
space bar)
Change to Zoom Out tool when another tool is active: Alt-space
bar (Option-space bar)
Zoom In: Ctrl + (Cmd +)
Zoom Out: Ctrl - (Cmd -)
Zoom Tool Options
The Tool Options bar for the Zoom
tool contains several settings that affect your view of the image window. Shown here is the
left half of the Tool Options bar.
Tool Preset Picker
If you have created any presets for the Zoom tool, clicking on this button will display
a fly-out menu from which you can select and apply the preset.
Zoom In and Zoom Out Buttons

Photoshop Lecture notes B.K.Mathan Nagan MCA., (Ph.D)
68 CAUSSANEL COLLEGE OF ARTS AND SCIENCE
By default, when you select the Zoom tool in the Toolbox, it will be in Zoom In
mode, with the plus sign displayed on it. You can switch back and forth between the
two modes by using these buttons.
Resize Windows to Fit
While trying out some of the options above, you may have noticed that sometimes
the image window resizes when you zoom in and out and sometimes it remains a
fixed size, depending on which methods you use. The Resize Windows to Fit option
will scale the window when the magnification changes. To maintain the window at a
fixed size regardless of magnification, disable this option.
Zoom All Windows
With this option enabled, using the Zoom tool in one image will change the
magnification in all open images. Note that this doesn't apply when the menu
command View > Zoom In/Out or the keyboard shortcuts Ctrl + (Cmd +)
and Ctrl - (Cmd -) are used to zoom. The Zoom tool icon must be displayed in
the image window either by directly selecting it from the Toolbox or using the
commands for temporarily accessing the Zoom tool mentioned earlier.
Scrubby Zoom
This option requires that your computer video card supports OpenGL and that
the Animated Zoomoption is enabled in the General preferences. With the Zoom tool
selected, if you drag the mouse up or to the right, the image zooms in. Dragging
down or to the left zooms out.
Here is the second half of the Zoom Tool Options. All of the options discussed below can
also be found in the View menu.
Actual Pixels
Clicking this button sets the magnification to 100%.
Fit Screen
Clicking this button will maximize the window size.
Fill Screen
Depending on the proportions of your image, the Fit Screen option may leave gaps
around the document window. With the Fill Screen option, the image will fill the
entire available workspace. This could result in part of your image being hidden
and only available if you scroll in the image window.
Print Size
Clicking this button will display the image at the size it will print. You won't see any
difference in an image at 72 ppi but you will at higher resolutions. The print size will
be smaller.
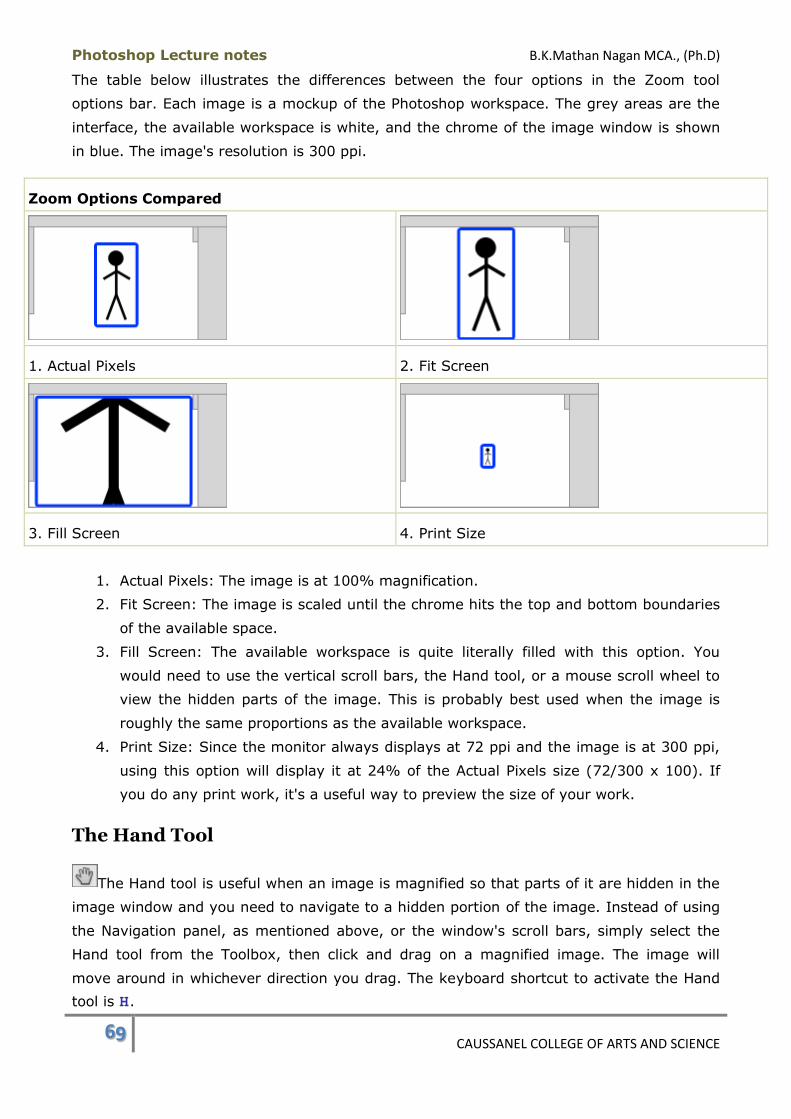
Photoshop Lecture notes B.K.Mathan Nagan MCA., (Ph.D)
69 CAUSSANEL COLLEGE OF ARTS AND SCIENCE
The table below illustrates the differences between the four options in the Zoom tool
options bar. Each image is a mockup of the Photoshop workspace. The grey areas are the
interface, the available workspace is white, and the chrome of the image window is shown
in blue. The image's resolution is 300 ppi.
Zoom Options Compared
1. Actual Pixels 2. Fit Screen
3. Fill Screen 4. Print Size
1. Actual Pixels: The image is at 100% magnification.
2. Fit Screen: The image is scaled until the chrome hits the top and bottom boundaries
of the available space.
3. Fill Screen: The available workspace is quite literally filled with this option. You
would need to use the vertical scroll bars, the Hand tool, or a mouse scroll wheel to
view the hidden parts of the image. This is probably best used when the image is
roughly the same proportions as the available workspace.
4. Print Size: Since the monitor always displays at 72 ppi and the image is at 300 ppi,
using this option will display it at 24% of the Actual Pixels size (72/300 x 100). If
you do any print work, it's a useful way to preview the size of your work.
The Hand Tool
The Hand tool is useful when an image is magnified so that parts of it are hidden in the
image window and you need to navigate to a hidden portion of the image. Instead of using
the Navigation panel, as mentioned above, or the window's scroll bars, simply select the
Hand tool from the Toolbox, then click and drag on a magnified image. The image will
move around in whichever direction you drag. The keyboard shortcut to activate the Hand
tool is H.
Photoshop Lecture notes B.K.Mathan Nagan MCA., (Ph.D)
70 CAUSSANEL COLLEGE OF ARTS AND SCIENCE
In addition, if you hold the space bar down at any time, the Hand tool will appear for
use. Once you release the space bar, the tool will revert back to the original one you
were using. This is one of the most useful shortcuts you can learn. Magnify the image using
one of the above methods, then select the Hand tool and click and drag the Hand tool to
navigate around the image. Return the image to 100% using one of the above-mentioned
methods. Note that you won't be able to drag the image with the Hand tool if the entire
image is visible in the image window.
Double-clicking the Hand tool will have the same effect as using the Fit Screen option.
Magnification/Navigation Controls Summary
There are three viewing modes that affect how the document window will be
displayed: Standard, Full-Screen With Menu Bar, and Full-Screen.
The Navigator panel, Zoom tool, Hand tool, and Zoom Levels menu are used to
change the magnification and/or navigate within images.
Clicking on the Zoom In and Zoom Out controls in the Navigator panel lets you
change the magnification by pre-set increments.
You can use the Zoom slider control in the Navigator panel to quickly change
between magnifications and you are not confined to pre-set magnification levels.
The Navigator panel can also be used to move around within a magnified image by
dragging the red box around in the panel.
The Zoom tool alternates between being a Zoom In (+) and Zoom Out (-) tool.
Clicking the image with the Zoom tool changes the magnification by one pre-set
level.
Drawing a marquee with the Zoom tool around a section of the image will magnify
the selected area so it fills the image window.
The pixel grid is displayed in images magnified by over 500%. It can be hidden by
going to View > Show > Pixel Grid.
The Zoom tool options set magnifications and window size behaviour.
Double-clicking the Zoom tool will set the magnification to 100%.
Custom magnification values can be entered in the lower left corner of the document
window.
Double-clicking the Hand tool is equivalent to the Fit Screen option.
The Hand tool is used to navigate around a magnified image by clicking and
dragging.
Magnification/Navigation Controls Keyboard Shortcuts:
Zoom In: Ctrl + (Cmd +)
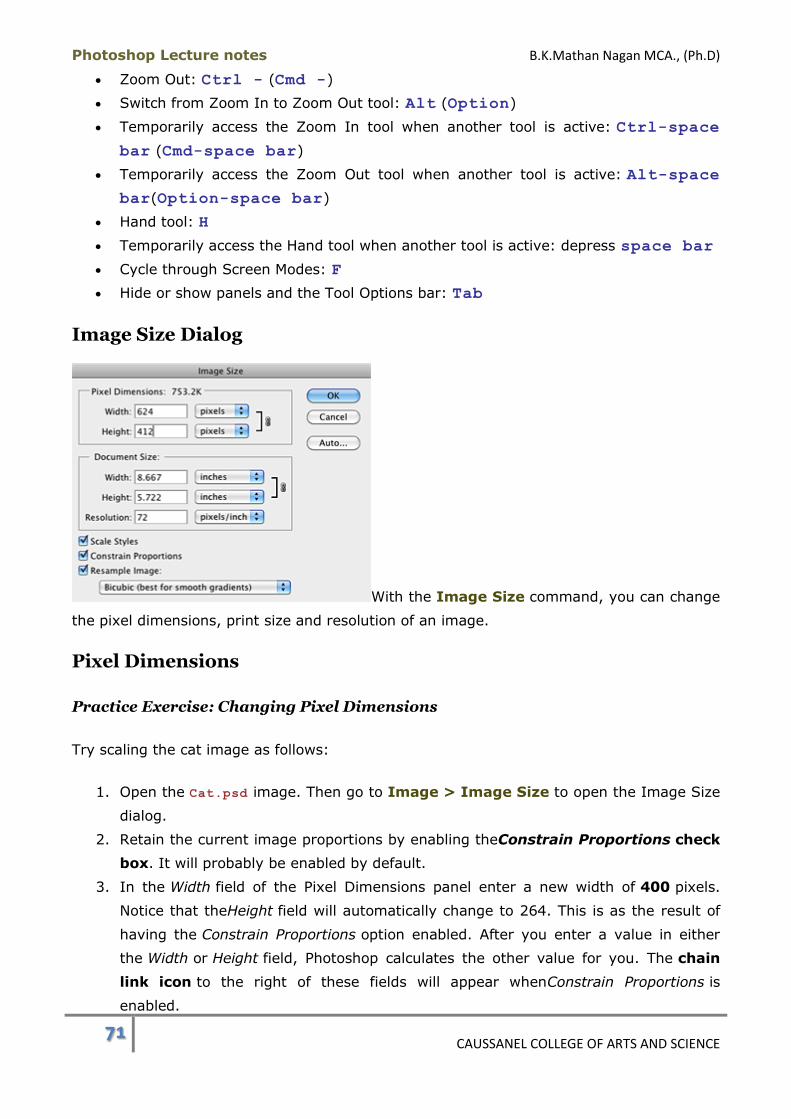
Photoshop Lecture notes B.K.Mathan Nagan MCA., (Ph.D)
71 CAUSSANEL COLLEGE OF ARTS AND SCIENCE
Zoom Out: Ctrl - (Cmd -)
Switch from Zoom In to Zoom Out tool: Alt (Option)
Temporarily access the Zoom In tool when another tool is active: Ctrl-space
bar (Cmd-space bar)
Temporarily access the Zoom Out tool when another tool is active: Alt-space
bar(Option-space bar)
Hand tool: H
Temporarily access the Hand tool when another tool is active: depress space bar
Cycle through Screen Modes: F
Hide or show panels and the Tool Options bar: Tab
Image Size Dialog
With the Image Size command, you can change
the pixel dimensions, print size and resolution of an image.
Pixel Dimensions
Practice Exercise: Changing Pixel Dimensions
Try scaling the cat image as follows:
1. Open the Cat.psd image. Then go to Image > Image Size to open the Image Size
dialog.
2. Retain the current image proportions by enabling theConstrain Proportions check
box. It will probably be enabled by default.
3. In the Width field of the Pixel Dimensions panel enter a new width of 400 pixels.
Notice that theHeight field will automatically change to 264. This is as the result of
having the Constrain Proportions option enabled. After you enter a value in either
the Width or Height field, Photoshop calculates the other value for you. The chain
link icon to the right of these fields will appear whenConstrain Proportions is
enabled.

Photoshop Lecture notes B.K.Mathan Nagan MCA., (Ph.D)
72 CAUSSANEL COLLEGE OF ARTS AND SCIENCE
The Pixel Dimensions panel should now look like
the image to the right. The new file size (in kilobytes) is displayed following the Pixel
Dimensions title and the original file size appears in parentheses beside it.
4. We'll leave the other settings as they are for now. Click the OK button to change the
size of the cat image.
Instead of entering pixel dimensions in the Width and Height fields, you can
enter percentage values.
5. Go to Image > Image Size again and click on the pop-up that says pixels beside
the Width field. Select percent.
6. Type a value of 120 in the Width field. The Pixel Dimensions panel of the dialog
should look like the image below. The Height field label will change to percent and
the value will display as 120.
7. Click OK to scale your image to 120% of its previous size. This is equivalent to
increasing it by 20%.
8. Let's try scaling the image in one direction only. In the Image Size dialog, disable
the Constrain Proportions check box. You'll notice that the chain link icon is gone.
Set the width to 350 pixelsand click OK.
9. Keep Cat.psd open with the changes you just made as we'll use it again in the next
lecture.
Resampling and Interpolation Methods
Resizing images as we've done here will result in a reduction in image quality. This is
because the colour of each original pixel must be redistributed across a different number of
pixels and the result will be less precise than the original. There will be an inevitable loss of
sharpness, regardless of whether you made the image larger or smaller.
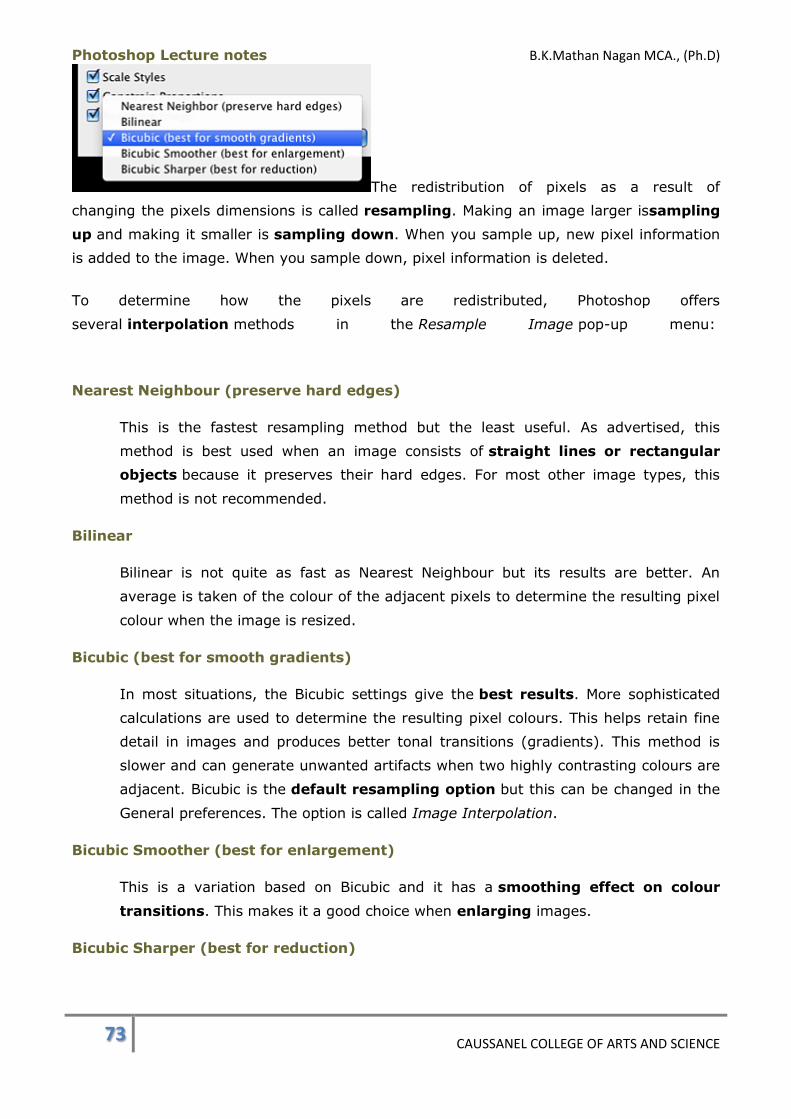
Photoshop Lecture notes B.K.Mathan Nagan MCA., (Ph.D)
73 CAUSSANEL COLLEGE OF ARTS AND SCIENCE
The redistribution of pixels as a result of
changing the pixels dimensions is called resampling. Making an image larger issampling
up and making it smaller is sampling down. When you sample up, new pixel information
is added to the image. When you sample down, pixel information is deleted.
To determine how the pixels are redistributed, Photoshop offers
several interpolation methods in the Resample Image pop-up menu:
Nearest Neighbour (preserve hard edges)
This is the fastest resampling method but the least useful. As advertised, this
method is best used when an image consists of straight lines or rectangular
objects because it preserves their hard edges. For most other image types, this
method is not recommended.
Bilinear
Bilinear is not quite as fast as Nearest Neighbour but its results are better. An
average is taken of the colour of the adjacent pixels to determine the resulting pixel
colour when the image is resized.
Bicubic (best for smooth gradients)
In most situations, the Bicubic settings give the best results. More sophisticated
calculations are used to determine the resulting pixel colours. This helps retain fine
detail in images and produces better tonal transitions (gradients). This method is
slower and can generate unwanted artifacts when two highly contrasting colours are
adjacent. Bicubic is the default resampling option but this can be changed in the
General preferences. The option is called Image Interpolation.
Bicubic Smoother (best for enlargement)
This is a variation based on Bicubic and it has a smoothing effect on colour
transitions. This makes it a good choice when enlarging images.
Bicubic Sharper (best for reduction)

Photoshop Lecture notes B.K.Mathan Nagan MCA., (Ph.D)
74 CAUSSANEL COLLEGE OF ARTS AND SCIENCE
This one is also based on Bicubic and has a sharpening filter applied to it making it
the best choice for reducing image sizes.
Resampling Method
Original
2 x 1 3 x 1 4 x 1
Nearest Neighbour
Bilinear
Bicubic
Bicubic Smoother
Bicubic Sharper
The examples above show the results of resizing a 2 pixel by 1 pixel image to 3 x 1 and 4 x
1 using the five interpolation methods. Each image has been magnified 20 times. In the
Bicubic and Bilinear examples, you can see that Photoshop has added intermediate pixel
colours between the original two pixels. The results look nearly identical but in the 4x1
example, there is a slight difference in the colours of the intermediate pixels. Bicubic
Smoother has muted all the colours to a degree. Nearest Neighbour doesn't assign new
colours to the intermediate pixels although it will in certain cases. Here it applied the colour
of a neighbouring pixel to the new pixels, hence its name. In the 3 x 1 example, it decided
to colour the middle pixel blue. In the 4 x 1 example, since there was an even number of
pixels, it gave each new pixel the colour of its neighbour.
The table below shows some simple geographic shapes and text in a raster image that was
sampled up using the main three interpolation methods. We skipped the Bicubic variations
because this type of image isn't a true test of their capabilities.
Original Size
Nearest Neighbour
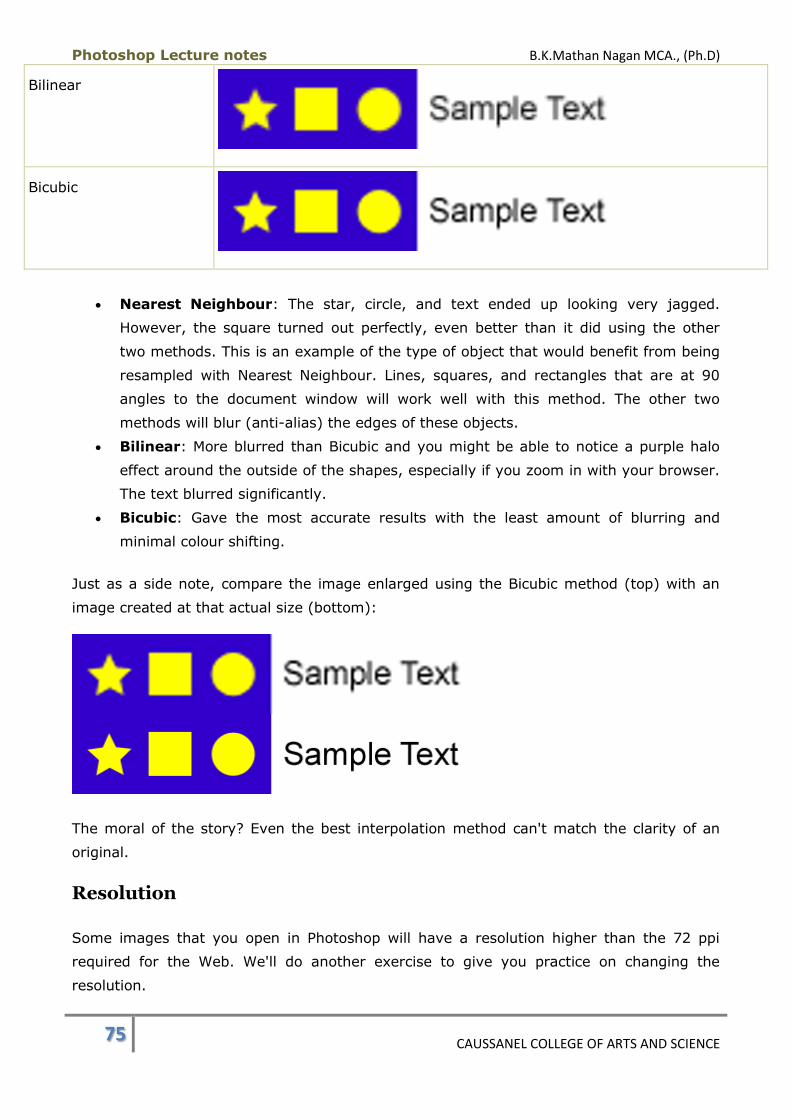
Photoshop Lecture notes B.K.Mathan Nagan MCA., (Ph.D)
75 CAUSSANEL COLLEGE OF ARTS AND SCIENCE
Bilinear
Bicubic
Nearest Neighbour: The star, circle, and text ended up looking very jagged.
However, the square turned out perfectly, even better than it did using the other
two methods. This is an example of the type of object that would benefit from being
resampled with Nearest Neighbour. Lines, squares, and rectangles that are at 90
angles to the document window will work well with this method. The other two
methods will blur (anti-alias) the edges of these objects.
Bilinear: More blurred than Bicubic and you might be able to notice a purple halo
effect around the outside of the shapes, especially if you zoom in with your browser.
The text blurred significantly.
Bicubic: Gave the most accurate results with the least amount of blurring and
minimal colour shifting.
Just as a side note, compare the image enlarged using the Bicubic method (top) with an
image created at that actual size (bottom):
The moral of the story? Even the best interpolation method can't match the clarity of an
original.
Resolution
Some images that you open in Photoshop will have a resolution higher than the 72 ppi
required for the Web. We'll do another exercise to give you practice on changing the
resolution.
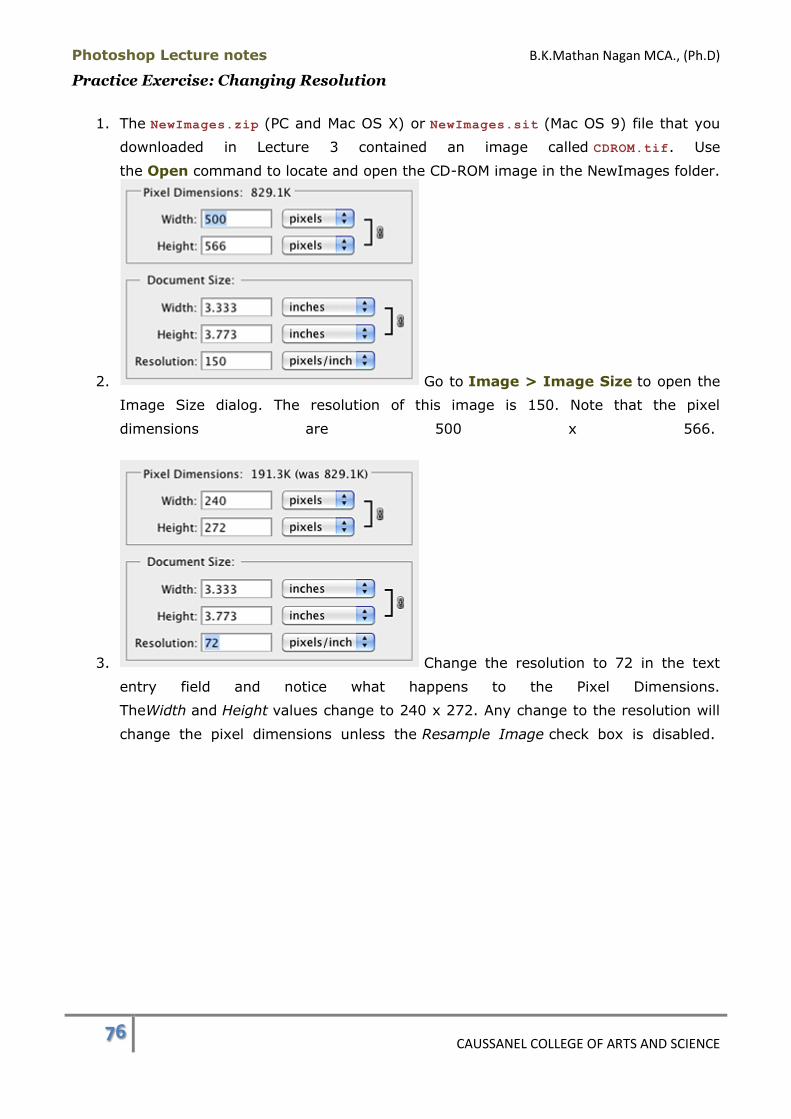
Photoshop Lecture notes B.K.Mathan Nagan MCA., (Ph.D)
76 CAUSSANEL COLLEGE OF ARTS AND SCIENCE
Practice Exercise: Changing Resolution
1. The NewImages.zip (PC and Mac OS X) or NewImages.sit (Mac OS 9) file that you
downloaded in Lecture 3 contained an image called CDROM.tif. Use
the Open command to locate and open the CD-ROM image in the NewImages folder.
2. Go to Image > Image Size to open the
Image Size dialog. The resolution of this image is 150. Note that the pixel
dimensions are 500 x 566.
3. Change the resolution to 72 in the text
entry field and notice what happens to the Pixel Dimensions.
TheWidth and Height values change to 240 x 272. Any change to the resolution will
change the pixel dimensions unless the Resample Image check box is disabled.
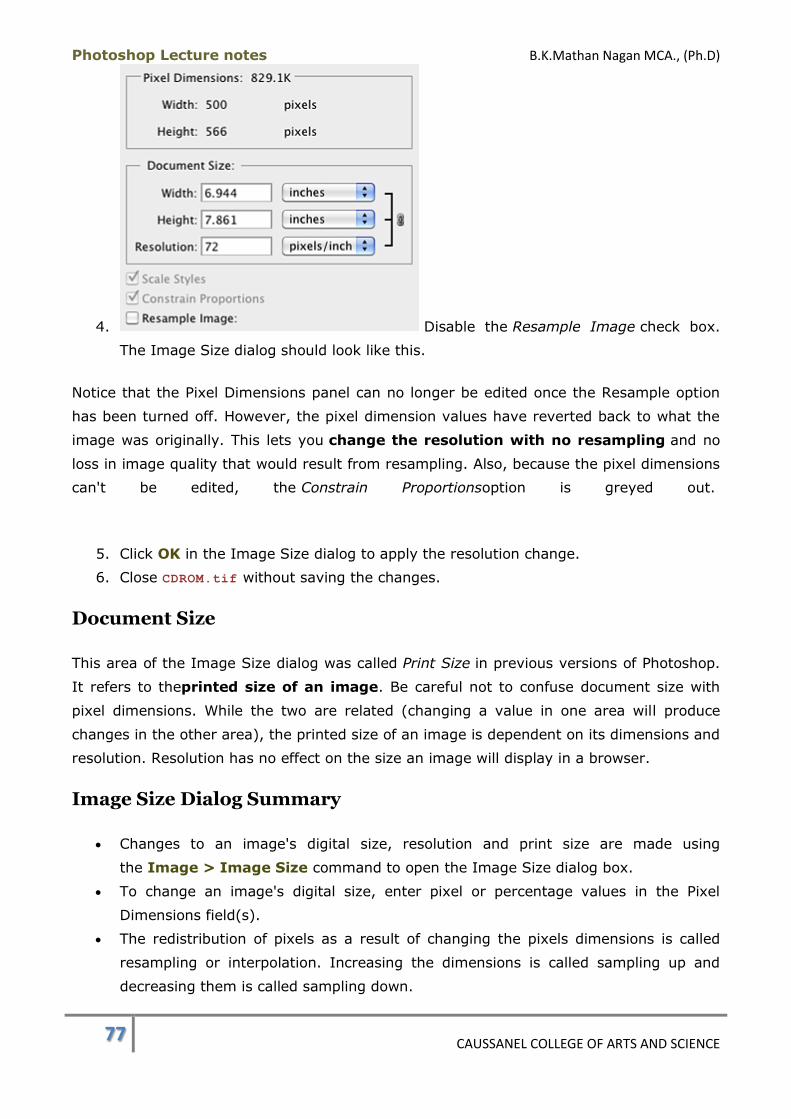
Photoshop Lecture notes B.K.Mathan Nagan MCA., (Ph.D)
77 CAUSSANEL COLLEGE OF ARTS AND SCIENCE
4. Disable the Resample Image check box.
The Image Size dialog should look like this.
Notice that the Pixel Dimensions panel can no longer be edited once the Resample option
has been turned off. However, the pixel dimension values have reverted back to what the
image was originally. This lets you change the resolution with no resampling and no
loss in image quality that would result from resampling. Also, because the pixel dimensions
can't be edited, the Constrain Proportionsoption is greyed out.
5. Click OK in the Image Size dialog to apply the resolution change.
6. Close CDROM.tif without saving the changes.
Document Size
This area of the Image Size dialog was called Print Size in previous versions of Photoshop.
It refers to theprinted size of an image. Be careful not to confuse document size with
pixel dimensions. While the two are related (changing a value in one area will produce
changes in the other area), the printed size of an image is dependent on its dimensions and
resolution. Resolution has no effect on the size an image will display in a browser.
Image Size Dialog Summary
Changes to an image's digital size, resolution and print size are made using
the Image > Image Size command to open the Image Size dialog box.
To change an image's digital size, enter pixel or percentage values in the Pixel
Dimensions field(s).
The redistribution of pixels as a result of changing the pixels dimensions is called
resampling or interpolation. Increasing the dimensions is called sampling up and
decreasing them is called sampling down.
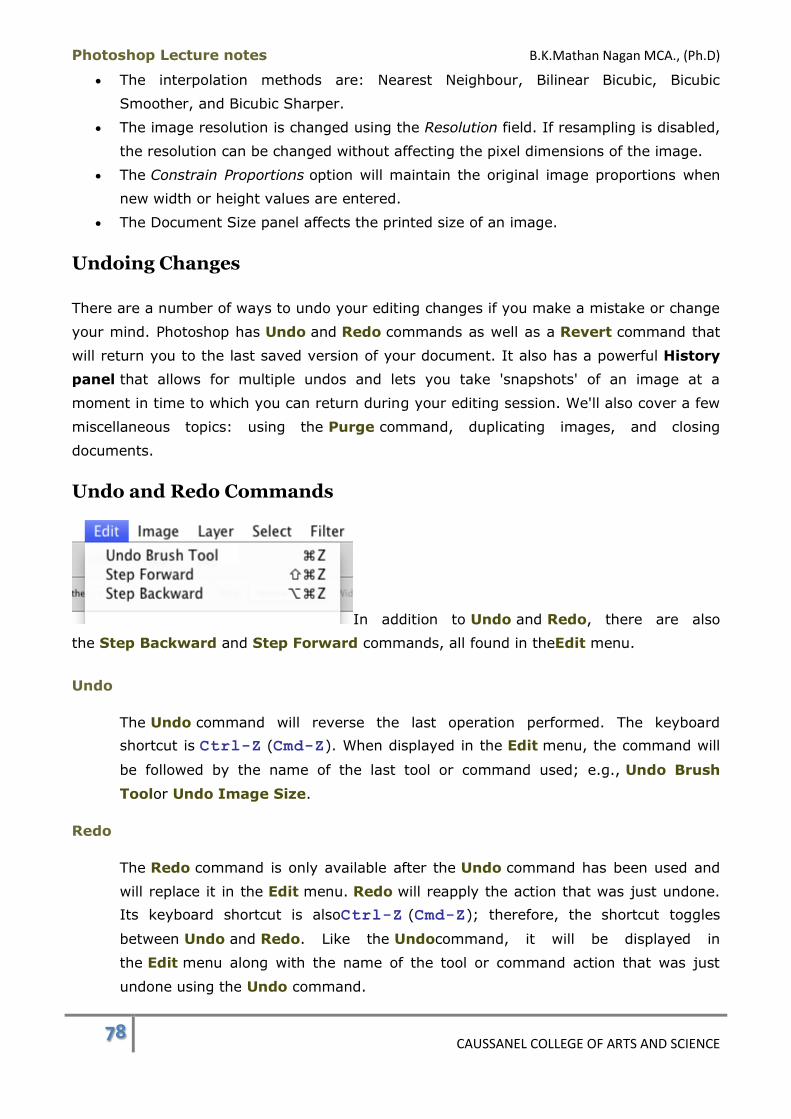
Photoshop Lecture notes B.K.Mathan Nagan MCA., (Ph.D)
78 CAUSSANEL COLLEGE OF ARTS AND SCIENCE
The interpolation methods are: Nearest Neighbour, Bilinear Bicubic, Bicubic
Smoother, and Bicubic Sharper.
The image resolution is changed using the Resolution field. If resampling is disabled,
the resolution can be changed without affecting the pixel dimensions of the image.
The Constrain Proportions option will maintain the original image proportions when
new width or height values are entered.
The Document Size panel affects the printed size of an image.
Undoing Changes
There are a number of ways to undo your editing changes if you make a mistake or change
your mind. Photoshop has Undo and Redo commands as well as a Revert command that
will return you to the last saved version of your document. It also has a powerful History
panel that allows for multiple undos and lets you take 'snapshots' of an image at a
moment in time to which you can return during your editing session. We'll also cover a few
miscellaneous topics: using the Purge command, duplicating images, and closing
documents.
Undo and Redo Commands
In addition to Undo and Redo, there are also
the Step Backward and Step Forward commands, all found in theEdit menu.
Undo
The Undo command will reverse the last operation performed. The keyboard
shortcut is Ctrl-Z (Cmd-Z). When displayed in the Edit menu, the command will
be followed by the name of the last tool or command used; e.g., Undo Brush
Toolor Undo Image Size.
Redo
The Redo command is only available after the Undo command has been used and
will replace it in the Edit menu. Redo will reapply the action that was just undone.
Its keyboard shortcut is alsoCtrl-Z (Cmd-Z); therefore, the shortcut toggles
between Undo and Redo. Like the Undocommand, it will be displayed in
the Edit menu along with the name of the tool or command action that was just
undone using the Undo command.
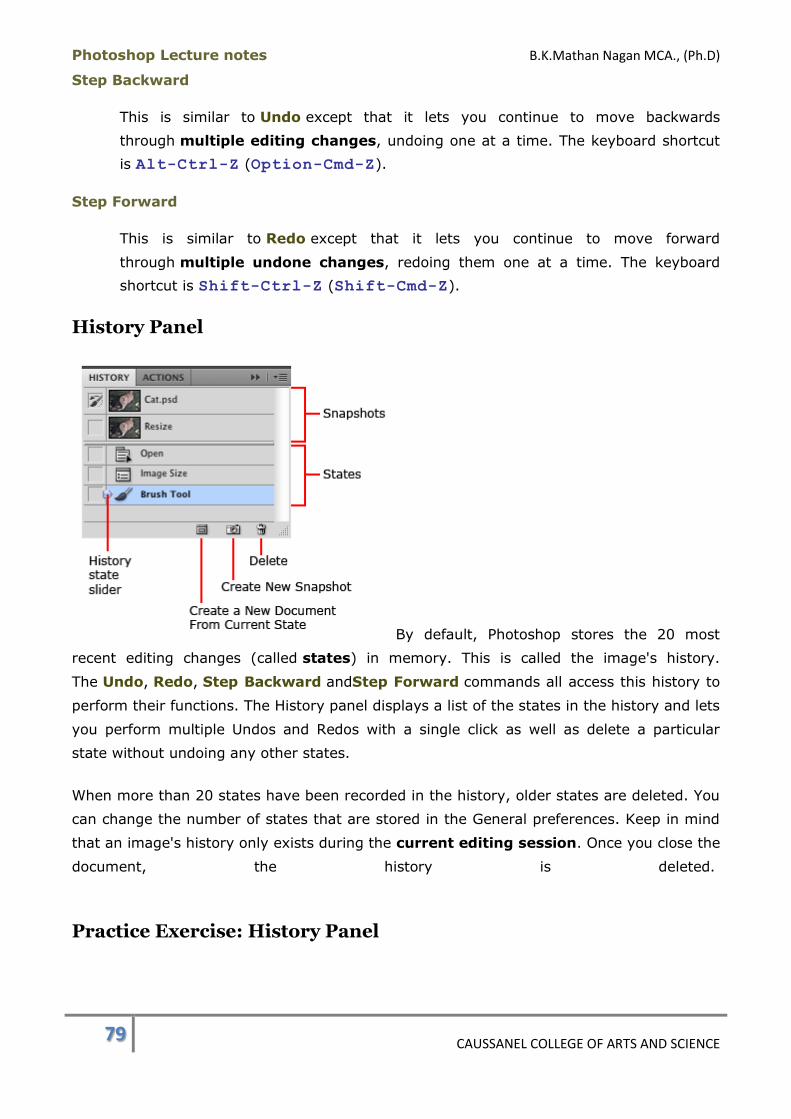
Photoshop Lecture notes B.K.Mathan Nagan MCA., (Ph.D)
79 CAUSSANEL COLLEGE OF ARTS AND SCIENCE
Step Backward
This is similar to Undo except that it lets you continue to move backwards
through multiple editing changes, undoing one at a time. The keyboard shortcut
is Alt-Ctrl-Z (Option-Cmd-Z).
Step Forward
This is similar to Redo except that it lets you continue to move forward
through multiple undone changes, redoing them one at a time. The keyboard
shortcut is Shift-Ctrl-Z (Shift-Cmd-Z).
History Panel
By default, Photoshop stores the 20 most
recent editing changes (called states) in memory. This is called the image's history.
The Undo, Redo, Step Backward andStep Forward commands all access this history to
perform their functions. The History panel displays a list of the states in the history and lets
you perform multiple Undos and Redos with a single click as well as delete a particular
state without undoing any other states.
When more than 20 states have been recorded in the history, older states are deleted. You
can change the number of states that are stored in the General preferences. Keep in mind
that an image's history only exists during the current editing session. Once you close the
document, the history is deleted.
Practice Exercise: History Panel

Photoshop Lecture notes B.K.Mathan Nagan MCA., (Ph.D)
80 CAUSSANEL COLLEGE OF ARTS AND SCIENCE
If the panel group containing the History panel is already
displayed, click on the History tab to bring it to the front; otherwise, open the panel by
going to Window > History. Assuming that you still have Cat.psd open from the previous
lecture, your History panel should look like the one shown here. In the top row, a
thumbnail of the image is displayed. This is the snapshot. To the left of it is the History
Brush tool icon. We'll cover that function in a later lecture. The image states are listed
underneath the snapshot with the earliest state at the top of the list.
The States
Our cat image has four states: the Open command and
three Image Size commands. You can revert to any state by clicking on it in the list. When
you do this, the states underneath become greyed out, taking all changes away except the
one that was selected.
1. Click once on the Open state. All of the resizing you did has been undone, leaving
you with the original image.
2. Click on the last Image Size state in the panel. All of the states have been reapplied
to the image.
The Snapshot
The thumbnail that appears in the History panel represents a snapshot of that image at a
particular moment in time. When an image is opened or first created, a snapshot is
generated automatically. You can create new snapshots for reference at any time and you
may return to any one of them at any given time. To return to a specific snapshot, simply
click once on the thumbnail. This is a powerful feature that can provide a level of security if

Photoshop Lecture notes B.K.Mathan Nagan MCA., (Ph.D)
81 CAUSSANEL COLLEGE OF ARTS AND SCIENCE
you wish to experiment with an image but need to be able to return to a pre-defined
snapshot of the image. It's also handy in case you've exceeded the 20 levels of Undo but
need to go further back in the history to a state no longer in the history list. For our cat
image we have a snapshot of the original image. Let's experiment with this a little.
3. Try clicking on the snapshot. All of the states, including the Open state, will become
greyed out and the cat image will return to its original appearance.
4. Click on the second Image Size state.
5. Click on the Create New Snapshot button at the bottom of the History panel.
Now your panel should look like the one at the right. A second snapshot has been
inserted below the first one and has been given the name "Snapshot 1".
6. Double-click on the snapshot name and it will become
editable. Type Resize as the new name and click OK.
7. Click on the last Image Size state. Even though you reverted to a previous state to
create the snapshot, you can still return to a later state.
8. There is a slider control to the left of the states. Try dragging it up and down the
list. This is an alternate way of moving back and forth between states. When the
state area of the panel is active, the slider appears there. When the snapshot area is
active, the slider appears there. Drag the slider to the first Image Size state on the
history list.
9. Select the Brush tool and paint a scribble in your image with it. If you don't see
it in the Toolbox, use the keyboard shortcut B to activate the tool.
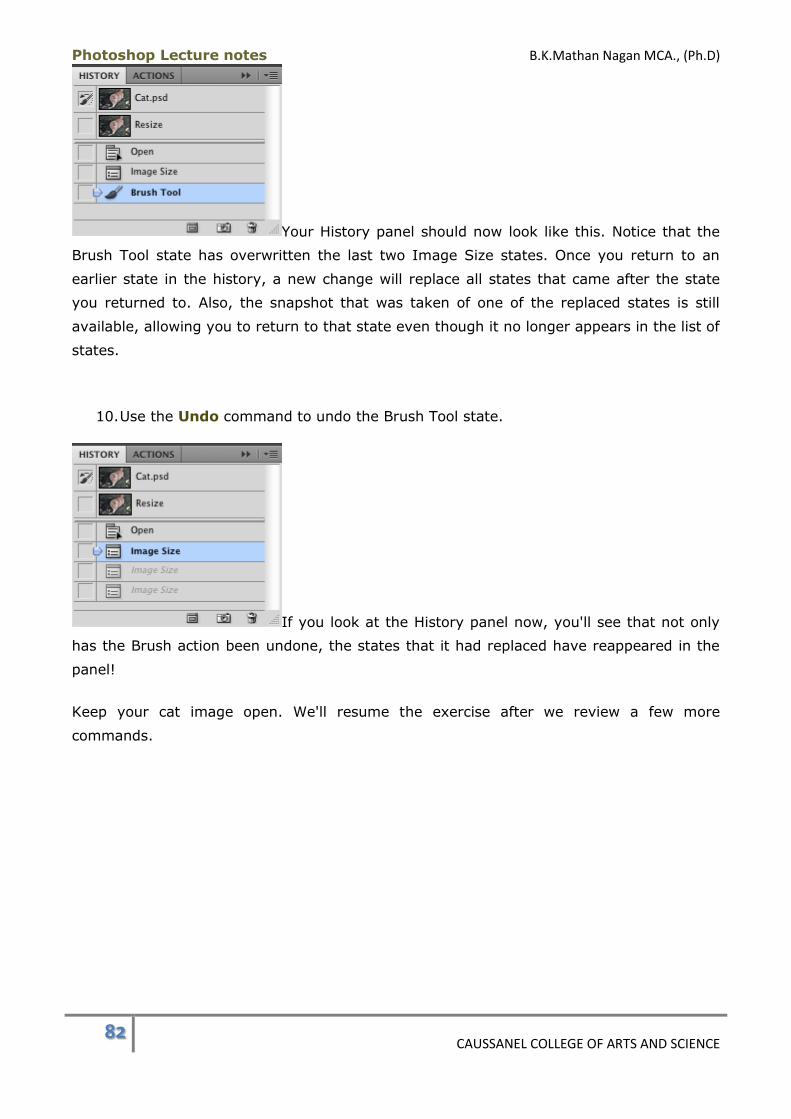
Photoshop Lecture notes B.K.Mathan Nagan MCA., (Ph.D)
82 CAUSSANEL COLLEGE OF ARTS AND SCIENCE
Your History panel should now look like this. Notice that the
Brush Tool state has overwritten the last two Image Size states. Once you return to an
earlier state in the history, a new change will replace all states that came after the state
you returned to. Also, the snapshot that was taken of one of the replaced states is still
available, allowing you to return to that state even though it no longer appears in the list of
states.
10. Use the Undo command to undo the Brush Tool state.
If you look at the History panel now, you'll see that not only
has the Brush action been undone, the states that it had replaced have reappeared in the
panel!
Keep your cat image open. We'll resume the exercise after we review a few more
commands.
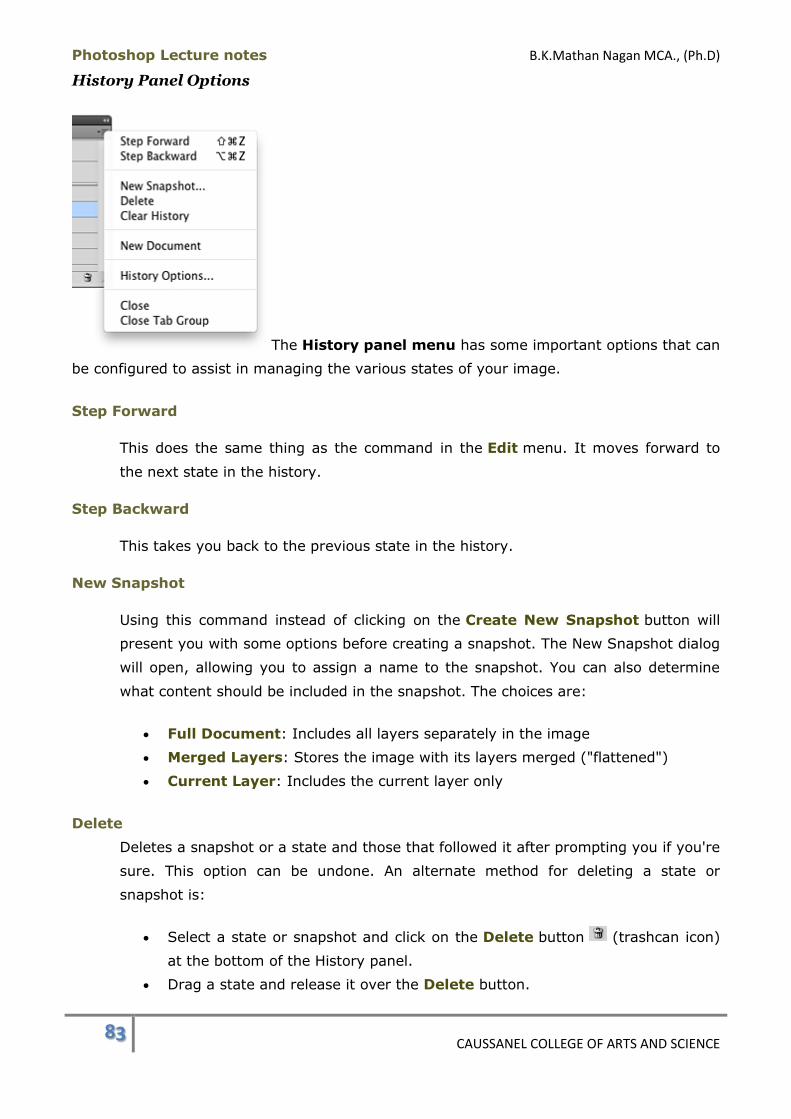
Photoshop Lecture notes B.K.Mathan Nagan MCA., (Ph.D)
83 CAUSSANEL COLLEGE OF ARTS AND SCIENCE
History Panel Options
The History panel menu has some important options that can
be configured to assist in managing the various states of your image.
Step Forward
This does the same thing as the command in the Edit menu. It moves forward to
the next state in the history.
Step Backward
This takes you back to the previous state in the history.
New Snapshot
Using this command instead of clicking on the Create New Snapshot button will
present you with some options before creating a snapshot. The New Snapshot dialog
will open, allowing you to assign a name to the snapshot. You can also determine
what content should be included in the snapshot. The choices are:
Full Document: Includes all layers separately in the image
Merged Layers: Stores the image with its layers merged ("flattened")
Current Layer: Includes the current layer only
Delete
Deletes a snapshot or a state and those that followed it after prompting you if you're
sure. This option can be undone. An alternate method for deleting a state or
snapshot is:
Select a state or snapshot and click on the Delete button (trashcan icon)
at the bottom of the History panel.
Drag a state and release it over the Delete button.
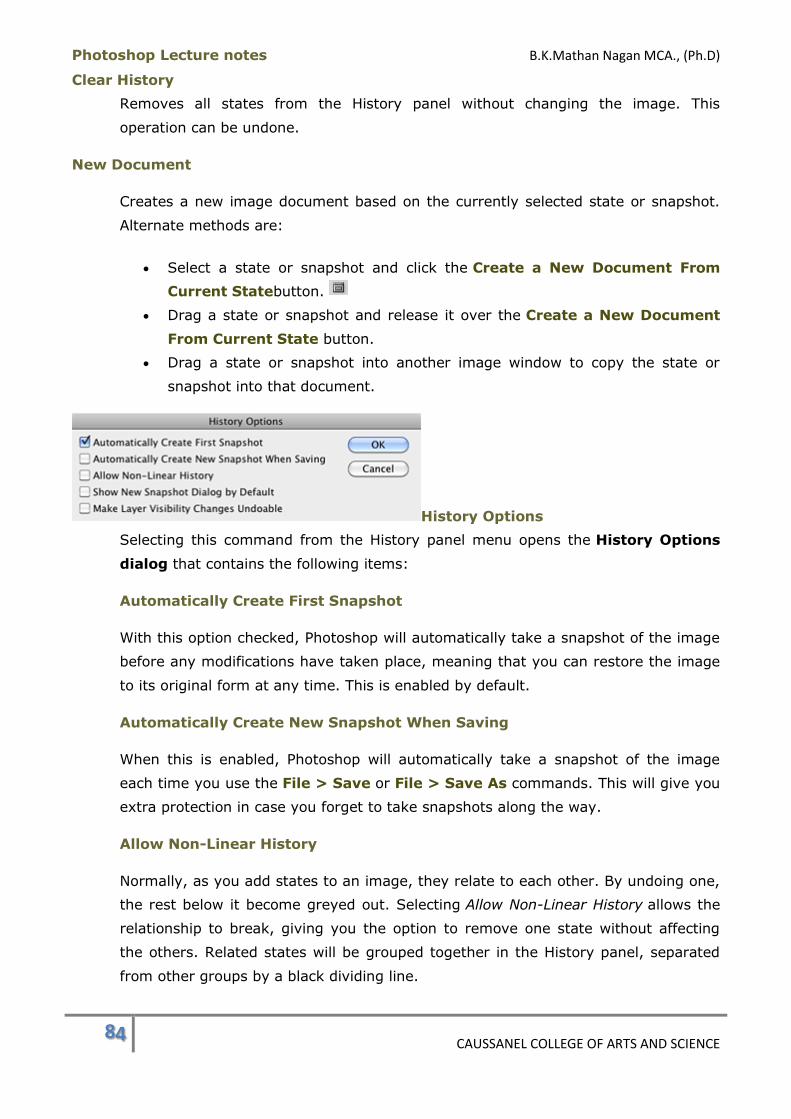
Photoshop Lecture notes B.K.Mathan Nagan MCA., (Ph.D)
84 CAUSSANEL COLLEGE OF ARTS AND SCIENCE
Clear History
Removes all states from the History panel without changing the image. This
operation can be undone.
New Document
Creates a new image document based on the currently selected state or snapshot.
Alternate methods are:
Select a state or snapshot and click the Create a New Document From
Current Statebutton.
Drag a state or snapshot and release it over the Create a New Document
From Current State button.
Drag a state or snapshot into another image window to copy the state or
snapshot into that document.
History Options
Selecting this command from the History panel menu opens the History Options
dialog that contains the following items:
Automatically Create First Snapshot
With this option checked, Photoshop will automatically take a snapshot of the image
before any modifications have taken place, meaning that you can restore the image
to its original form at any time. This is enabled by default.
Automatically Create New Snapshot When Saving
When this is enabled, Photoshop will automatically take a snapshot of the image
each time you use the File > Save or File > Save As commands. This will give you
extra protection in case you forget to take snapshots along the way.
Allow Non-Linear History
Normally, as you add states to an image, they relate to each other. By undoing one,
the rest below it become greyed out. Selecting Allow Non-Linear History allows the
relationship to break, giving you the option to remove one state without affecting
the others. Related states will be grouped together in the History panel, separated
from other groups by a black dividing line.
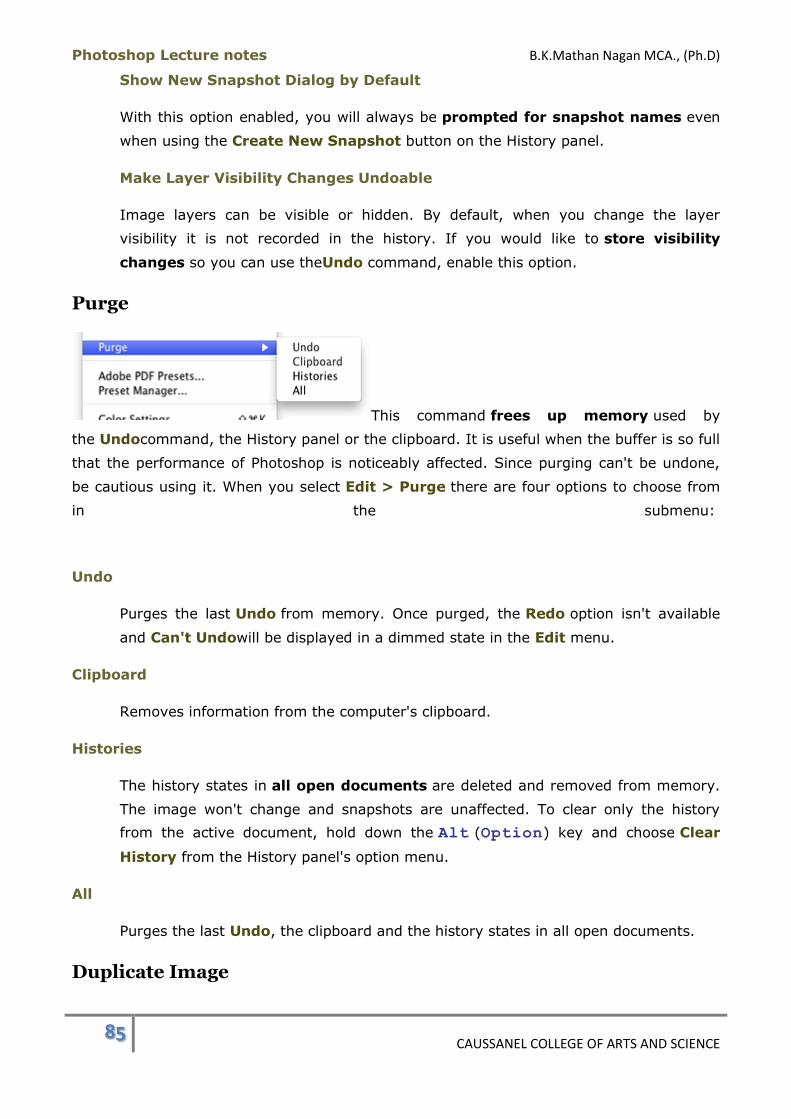
Photoshop Lecture notes B.K.Mathan Nagan MCA., (Ph.D)
85 CAUSSANEL COLLEGE OF ARTS AND SCIENCE
Show New Snapshot Dialog by Default
With this option enabled, you will always be prompted for snapshot names even
when using the Create New Snapshot button on the History panel.
Make Layer Visibility Changes Undoable
Image layers can be visible or hidden. By default, when you change the layer
visibility it is not recorded in the history. If you would like to store visibility
changes so you can use theUndo command, enable this option.
Purge
This command frees up memory used by
the Undocommand, the History panel or the clipboard. It is useful when the buffer is so full
that the performance of Photoshop is noticeably affected. Since purging can't be undone,
be cautious using it. When you select Edit > Purge there are four options to choose from
in the submenu:
Undo
Purges the last Undo from memory. Once purged, the Redo option isn't available
and Can't Undowill be displayed in a dimmed state in the Edit menu.
Clipboard
Removes information from the computer's clipboard.
Histories
The history states in all open documents are deleted and removed from memory.
The image won't change and snapshots are unaffected. To clear only the history
from the active document, hold down the Alt (Option) key and choose Clear
History from the History panel's option menu.
All
Purges the last Undo, the clipboard and the history states in all open documents.
Duplicate Image
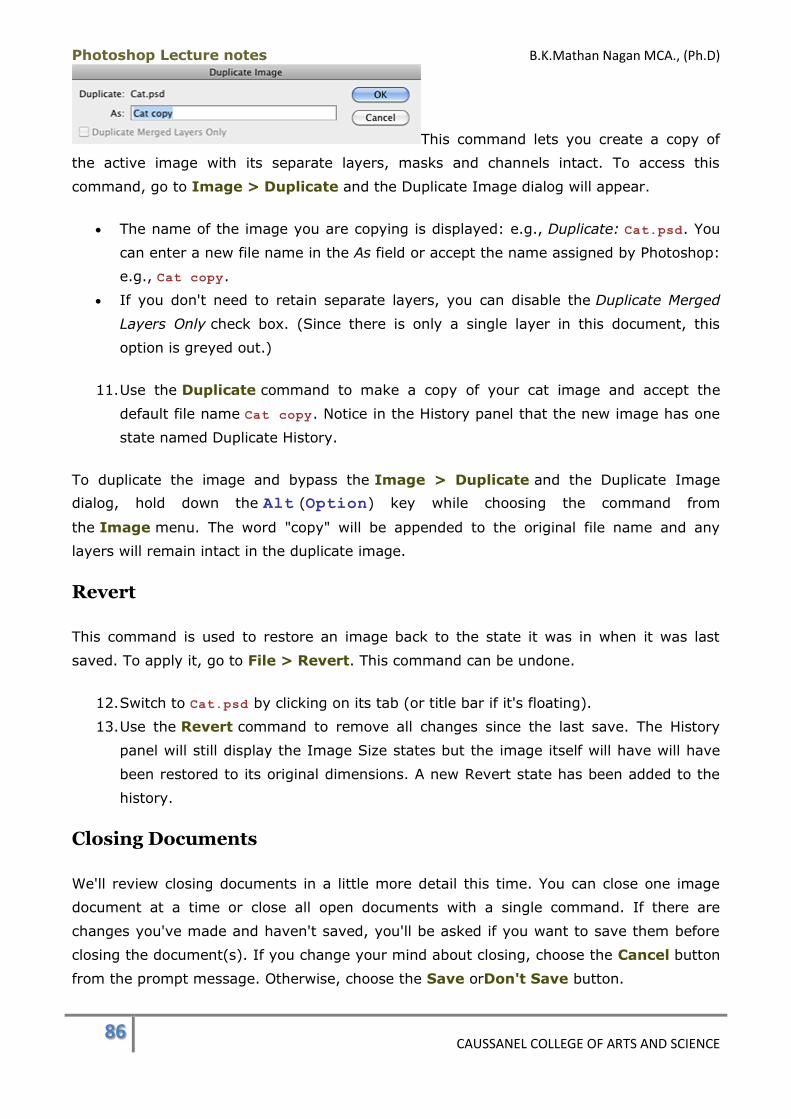
Photoshop Lecture notes B.K.Mathan Nagan MCA., (Ph.D)
86 CAUSSANEL COLLEGE OF ARTS AND SCIENCE
This command lets you create a copy of
the active image with its separate layers, masks and channels intact. To access this
command, go to Image > Duplicate and the Duplicate Image dialog will appear.
The name of the image you are copying is displayed: e.g., Duplicate: Cat.psd. You
can enter a new file name in the As field or accept the name assigned by Photoshop:
e.g., Cat copy.
If you don't need to retain separate layers, you can disable the Duplicate Merged
Layers Only check box. (Since there is only a single layer in this document, this
option is greyed out.)
11. Use the Duplicate command to make a copy of your cat image and accept the
default file name Cat copy. Notice in the History panel that the new image has one
state named Duplicate History.
To duplicate the image and bypass the Image > Duplicate and the Duplicate Image
dialog, hold down the Alt (Option) key while choosing the command from
the Image menu. The word "copy" will be appended to the original file name and any
layers will remain intact in the duplicate image.
Revert
This command is used to restore an image back to the state it was in when it was last
saved. To apply it, go to File > Revert. This command can be undone.
12. Switch to Cat.psd by clicking on its tab (or title bar if it's floating).
13. Use the Revert command to remove all changes since the last save. The History
panel will still display the Image Size states but the image itself will have will have
been restored to its original dimensions. A new Revert state has been added to the
history.
Closing Documents
We'll review closing documents in a little more detail this time. You can close one image
document at a time or close all open documents with a single command. If there are
changes you've made and haven't saved, you'll be asked if you want to save them before
closing the document(s). If you change your mind about closing, choose the Cancel button
from the prompt message. Otherwise, choose the Save orDon't Save button.

Photoshop Lecture notes B.K.Mathan Nagan MCA., (Ph.D)
87 CAUSSANEL COLLEGE OF ARTS AND SCIENCE
Close
Located in the File menu, this command
will close the active document window. The keyboard shortcut isCtrl-W (Cmd-W).
Close All
To close all open documents, go to File >
Close All or use the keyboard shortcut Shift-Ctrl-W(Option-Cmd-W).
If the Apply to All checkbox is checked, the action you choose (Save or Don't Save)
will be applied to all open images at once before closing them. If left unchecked,
Photoshop will prompt you what you want to do with each image, one at a time.
14. We'll be closing Cat.psd and Cat copy. Use the File > Close All command to
display the dialog. Enable the Apply to All checkbox to lose the changes you made
to Cat.psd and then click theDon't Save button.
Undoing Changes Summary
The Undo command reverses the last editing change in the active document.
Redo will reapply a change reversed by Undo.
Step Backward is like Undo except you can continue using this command to move
backwards through the history one step at a time.
Step Forward is similar to Redo but it lets you redo multiple editing changes that
were reversed using the History panel.
The Revert command will restore a document to the state it was in when it was last
saved. This action can be undone.
The History panel is Photoshop's Undo manager. It provides for multiple levels of
Undo.
Every change made to an image is recorded in the History panel as a state. You can
return to an earlier or later state by clicking on its entry in the panel.
Photoshop Lecture notes B.K.Mathan Nagan MCA., (Ph.D)
88 CAUSSANEL COLLEGE OF ARTS AND SCIENCE
A snapshot records the state of an image at a moment in time. It is represented by
a thumbnail image in the History panel. Clicking on a snapshot will cause your image
to revert to the state it was in when the snapshot was taken.
You can store multiple snapshots in the History panel and assign names to them.
The History panel has options that let you manage aspects of snapshots and states.
An image's history is deleted once the image file is closed.
The Purge command frees up memory used by the Undo command, the History
panel or the clipboard.
Documents can be closed individually or you can close all open documents at once.
Undoing Changes Keyboard Shortcuts:
Undo/Redo: Ctrl-Z (Cmd-Z)
Step Backward: Alt-Ctrl-Z (Option-Cmd-Z)
Step Forward: Shift-Ctrl-Z (Shift-Cmd-Z)
Selections
Overview
A key to manipulating images is the ability to isolate an area so that you can edit that part
without affecting the rest of the image. Selections are one way of accomplishing this. The
various selections tools are covered in this section along with exercises in which you can
practice making selections.
Here is a summary of the topics in this module:
(1) Marquee Tool
This tool lets you define a selection area in shapes such as rectangles, circles, or
one-pixel wide strips.
(2) Lasso Tool
This tool has several options for making freehand selections.
(3) Magic Wand Tool
The Magic Wand tool defines selections relative to the colour of the pixel(s) that you
click on with the tool.
(4) The Pen Tool
The Pen tool lets you create vector-based paths in an image.

Photoshop Lecture notes B.K.Mathan Nagan MCA., (Ph.D)
89 CAUSSANEL COLLEGE OF ARTS AND SCIENCE
(5) Converting a Path to a Selection
Once you've defined a path using the Pen tool, you can convert it to a selection.
(6) Colour Range
The Colour Range selection allows you to identify a single colour (and/or variations)
and make a selection based on that colour.
(7) Manipulating Selections
This lecture describes how to modify and move selections.
Marquee Tool
When you create a selection in an image, you will be able to modify the area that is inside
the selection border without affecting other areas. Two examples of tasks you might
perform after making a selection are cutting an area from an image or applying filter
effects to an area of an image. Photoshop has different tools that offer this ability. One of
these is the Marquee tool.
Like many of the tools in Photoshop, the Marquee tool is
actually four tools in one. There is one button for it in the Toolbox but if you keep holding
down the left mouse button while on the tool, a fly-out menu will appear with the other
variations of the tool.
Practice Exercise: Marquee Tools and Options
Rectangular Marquee Tool
1. We will use each tool on the Cat.psd image that we were working with previously. If
you do not already have that image open, please open it now.
2. If another tool is currently in use, you can switch to the Marquee tool by
pressing M on the keyboard as an alternative to
clicking on the tool itself.
3. By clicking and dragging with the Marquee tool
inside an image, you can select a rectangular area.
If you hold down the Shiftkey while dragging,
the selection shape will be constrained to a perfect
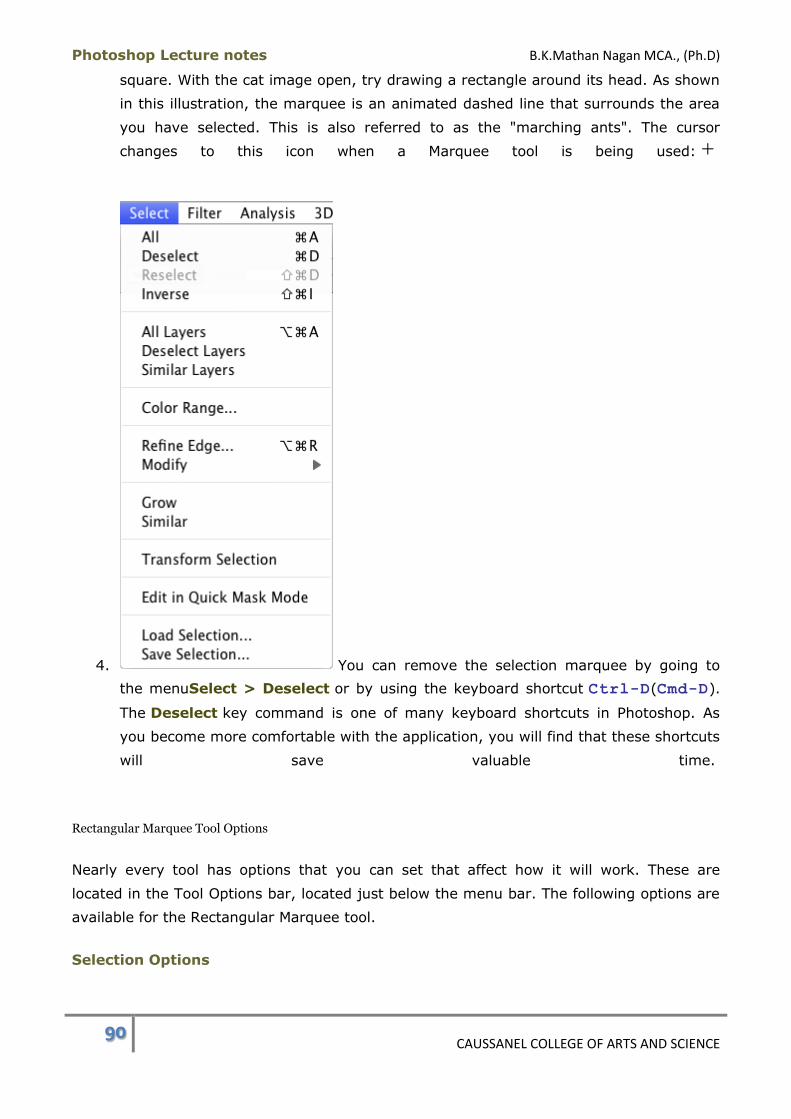
Photoshop Lecture notes B.K.Mathan Nagan MCA., (Ph.D)
90 CAUSSANEL COLLEGE OF ARTS AND SCIENCE
square. With the cat image open, try drawing a rectangle around its head. As shown
in this illustration, the marquee is an animated dashed line that surrounds the area
you have selected. This is also referred to as the "marching ants". The cursor
changes to this icon when a Marquee tool is being used:
4. You can remove the selection marquee by going to
the menuSelect > Deselect or by using the keyboard shortcut Ctrl-D(Cmd-D).
The Deselect key command is one of many keyboard shortcuts in Photoshop. As
you become more comfortable with the application, you will find that these shortcuts
will save valuable time.
Rectangular Marquee Tool Options
Nearly every tool has options that you can set that affect how it will work. These are
located in the Tool Options bar, located just below the menu bar. The following options are
available for the Rectangular Marquee tool.
Selection Options
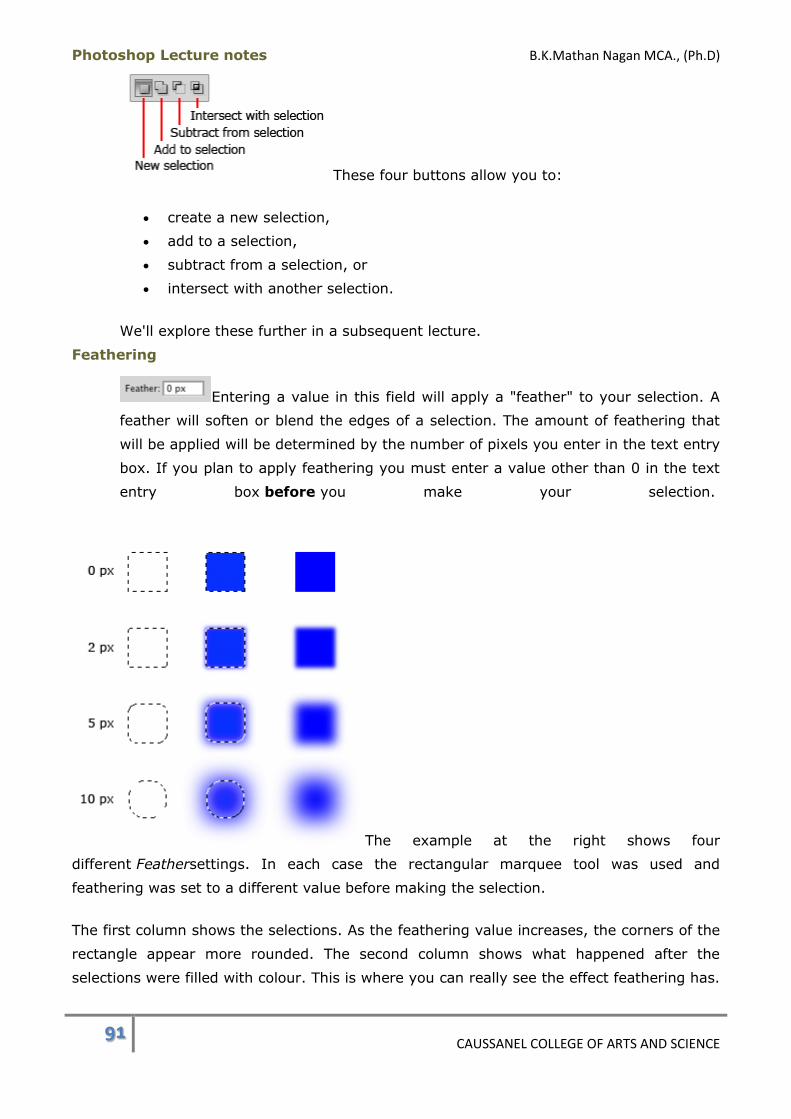
Photoshop Lecture notes B.K.Mathan Nagan MCA., (Ph.D)
91 CAUSSANEL COLLEGE OF ARTS AND SCIENCE
These four buttons allow you to:
create a new selection,
add to a selection,
subtract from a selection, or
intersect with another selection.
We'll explore these further in a subsequent lecture.
Feathering
Entering a value in this field will apply a "feather" to your selection. A
feather will soften or blend the edges of a selection. The amount of feathering that
will be applied will be determined by the number of pixels you enter in the text entry
box. If you plan to apply feathering you must enter a value other than 0 in the text
entry box before you make your selection.
The example at the right shows four
different Feathersettings. In each case the rectangular marquee tool was used and
feathering was set to a different value before making the selection.
The first column shows the selections. As the feathering value increases, the corners of the
rectangle appear more rounded. The second column shows what happened after the
selections were filled with colour. This is where you can really see the effect feathering has.
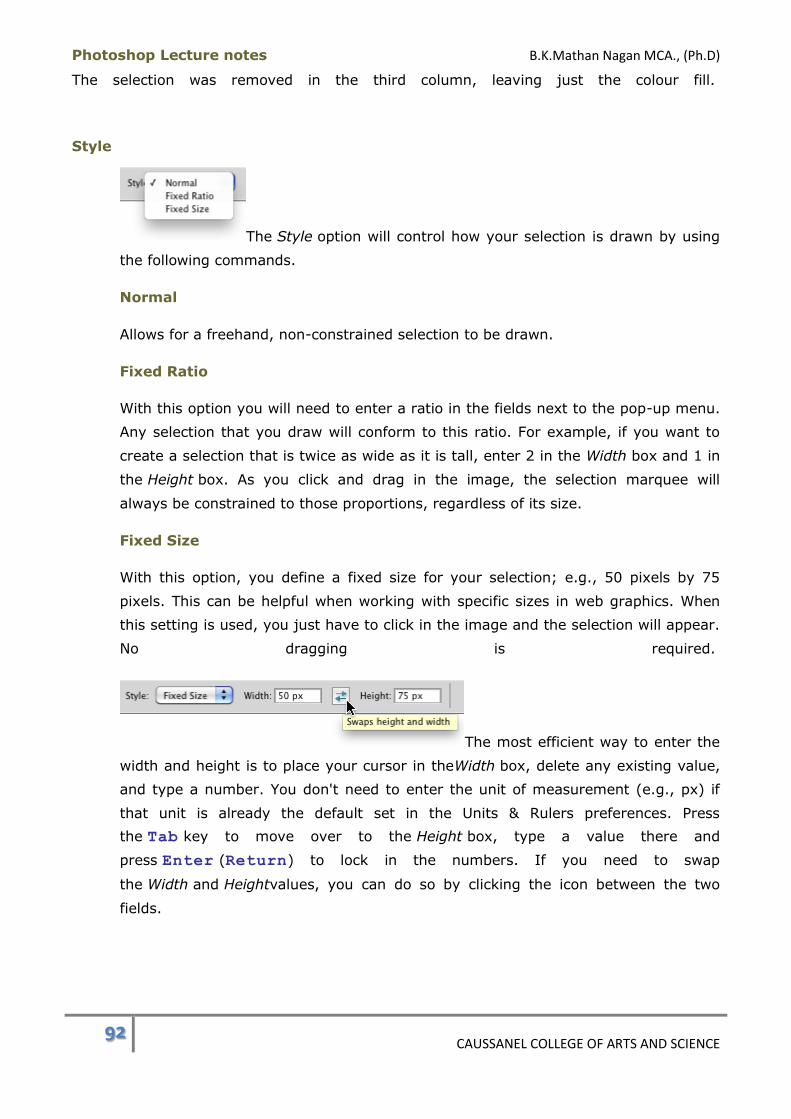
Photoshop Lecture notes B.K.Mathan Nagan MCA., (Ph.D)
92 CAUSSANEL COLLEGE OF ARTS AND SCIENCE
The selection was removed in the third column, leaving just the colour fill.
Style
The Style option will control how your selection is drawn by using
the following commands.
Normal
Allows for a freehand, non-constrained selection to be drawn.
Fixed Ratio
With this option you will need to enter a ratio in the fields next to the pop-up menu.
Any selection that you draw will conform to this ratio. For example, if you want to
create a selection that is twice as wide as it is tall, enter 2 in the Width box and 1 in
the Height box. As you click and drag in the image, the selection marquee will
always be constrained to those proportions, regardless of its size.
Fixed Size
With this option, you define a fixed size for your selection; e.g., 50 pixels by 75
pixels. This can be helpful when working with specific sizes in web graphics. When
this setting is used, you just have to click in the image and the selection will appear.
No dragging is required.
The most efficient way to enter the
width and height is to place your cursor in theWidth box, delete any existing value,
and type a number. You don't need to enter the unit of measurement (e.g., px) if
that unit is already the default set in the Units & Rulers preferences. Press
the Tab key to move over to the Height box, type a value there and
press Enter (Return) to lock in the numbers. If you need to swap
the Width and Heightvalues, you can do so by clicking the icon between the two
fields.

Photoshop Lecture notes B.K.Mathan Nagan MCA., (Ph.D)
93 CAUSSANEL COLLEGE OF ARTS AND SCIENCE
Displaying Selection Dimensions
The Info panel dynamically displays the dimensions of a
selection made both during its creation and after it's been drawn. This is a very handy
feature.
5. To display the Info panel, go to Window > Info.
In the example shown here, the selection marquee is in the process of being drawn. The W
(width) and H (height) fields continually update as the size of the marquee changes. Once
you release the mouse button, these fields will display the dimensions of the completed
marquee border. The X and Y fields display the current coordinates of the pointer in the
image. The X value displays the distance from the left edge of the image document and the
Y value shows the distance from the top of the document.
Elliptical Marquee Tool
This tool will allow you to draw an oval or circular marquee around a portion of an
image. Holding down the Shift key while dragging with this tool will constrain the shape
to a perfect circle.
6. Try drawing a circular marquee around the cat's head.
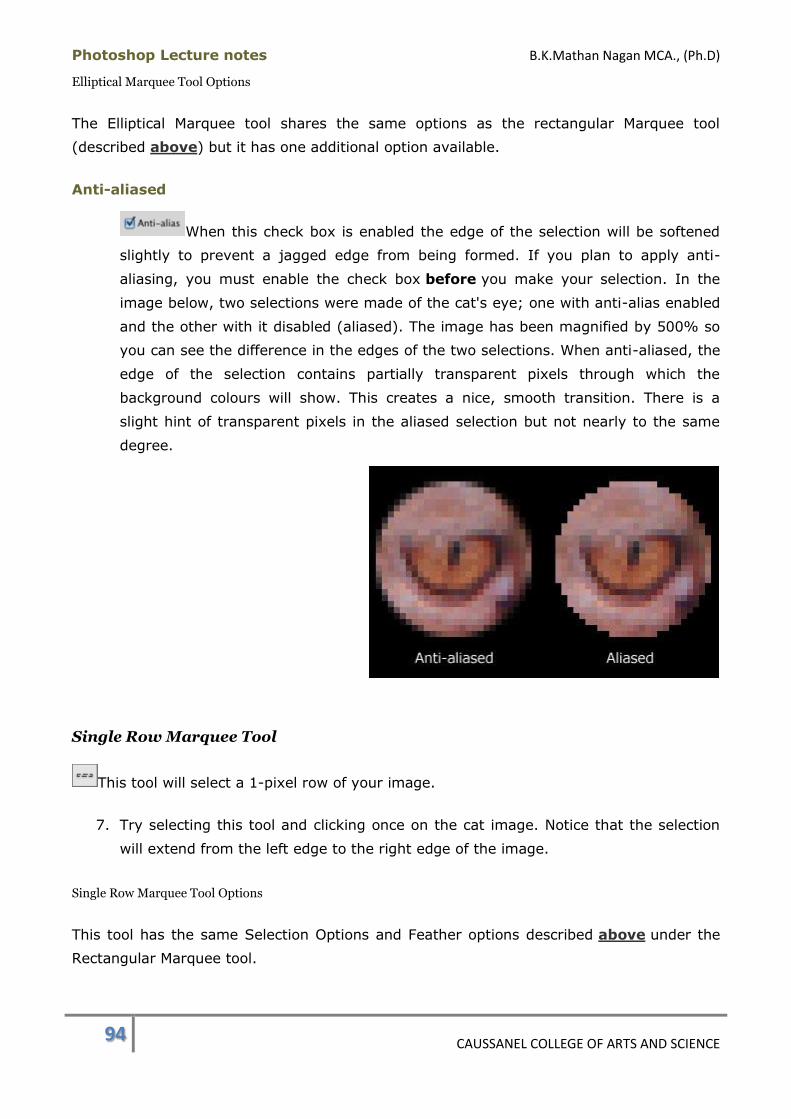
Photoshop Lecture notes B.K.Mathan Nagan MCA., (Ph.D)
94 CAUSSANEL COLLEGE OF ARTS AND SCIENCE
Elliptical Marquee Tool Options
The Elliptical Marquee tool shares the same options as the rectangular Marquee tool
(described above) but it has one additional option available.
Anti-aliased
When this check box is enabled the edge of the selection will be softened
slightly to prevent a jagged edge from being formed. If you plan to apply anti-
aliasing, you must enable the check box before you make your selection. In the
image below, two selections were made of the cat's eye; one with anti-alias enabled
and the other with it disabled (aliased). The image has been magnified by 500% so
you can see the difference in the edges of the two selections. When anti-aliased, the
edge of the selection contains partially transparent pixels through which the
background colours will show. This creates a nice, smooth transition. There is a
slight hint of transparent pixels in the aliased selection but not nearly to the same
degree.
Single Row Marquee Tool
This tool will select a 1-pixel row of your image.
7. Try selecting this tool and clicking once on the cat image. Notice that the selection
will extend from the left edge to the right edge of the image.
Single Row Marquee Tool Options
This tool has the same Selection Options and Feather options described above under the
Rectangular Marquee tool.
Photoshop Lecture notes B.K.Mathan Nagan MCA., (Ph.D)
95 CAUSSANEL COLLEGE OF ARTS AND SCIENCE
Single Column Marquee Tool
This tool will select a 1-pixel column of your image.
8. Select this tool and click once on the cat image. Notice that the selection will extend
from the top edge to the bottom edge of the image.
Single Column Marquee Tool Options
This tool has the same Selection Options and Feather options described above under the
Rectangular Marquee tool.
9. Leave your file open if you're moving onto the next lecture right away.
Marquee Tool Summary
Selections are used to isolate part of an image before manipulating it in some way.
The four Marquee selection tools are the Rectangular, Elliptical, Single Row and
Single Column Marquee tools.
When using the Rectangular or Elliptical Marquee tools, holding down
the Shift key while dragging the tool will constrain the shape of the marquee to a
perfect square or circle.
Each Marquee tool has a number of options that affect how selections are drawn or
applied to the image.
The Selection Options allow you to create a new selection, add to a selection,
subtract from a selection, or intersect with another selection.
The Feather option will soften or blend the edges of a selection by the number of
pixels you specify.
The Style option will control how your selection is drawn and can be one of the
following: Normal, Constrained Aspect Ratio, or Fixed Size.
The Anti-aliasing option will soften the edges of a selection.
The dimensions of a selection marquee created with the Marquee tool are displayed
in the W and H fields in the Info panel.
The Info panel dynamically displays the X and Y coordinates of the pointer location
in the document window.
Marquee Tool Keyboard Shortcuts:
Deselect: Ctrl-D (Cmd-D)
Marquee tool: M
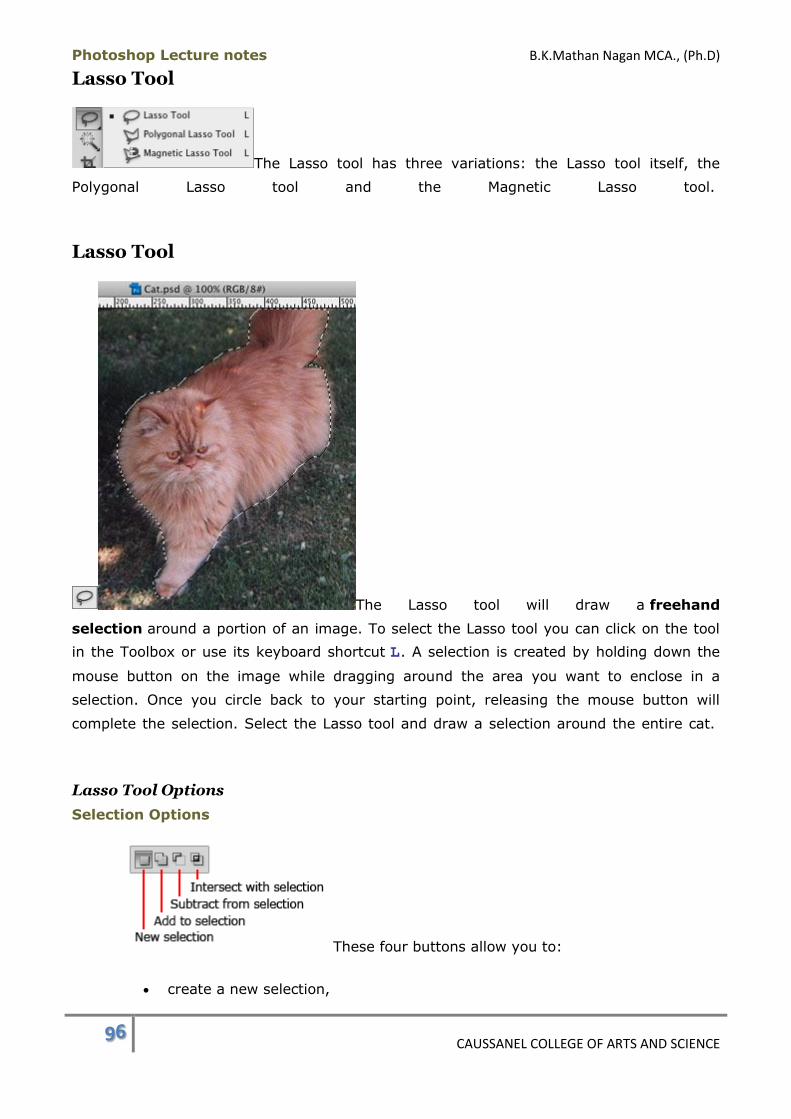
Photoshop Lecture notes B.K.Mathan Nagan MCA., (Ph.D)
96 CAUSSANEL COLLEGE OF ARTS AND SCIENCE
Lasso Tool
The Lasso tool has three variations: the Lasso tool itself, the
Polygonal Lasso tool and the Magnetic Lasso tool.
Lasso Tool
The Lasso tool will draw a freehand
selection around a portion of an image. To select the Lasso tool you can click on the tool
in the Toolbox or use its keyboard shortcut L. A selection is created by holding down the
mouse button on the image while dragging around the area you want to enclose in a
selection. Once you circle back to your starting point, releasing the mouse button will
complete the selection. Select the Lasso tool and draw a selection around the entire cat.
Lasso Tool Options
Selection Options
These four buttons allow you to:
create a new selection,

Photoshop Lecture notes B.K.Mathan Nagan MCA., (Ph.D)
97 CAUSSANEL COLLEGE OF ARTS AND SCIENCE
add to a selection,
subtract from a selection, or
intersect with another selection.
Feather
Entering a pixel value in this field will apply a feather to your selection.
Feathering will soften or blend the edges of a selection by the distance you've
entered. With a value of 0, no feathering will be applied.
Anti-Alias
This option will apply anti-aliasing to the selection that you draw. Anti-
aliasing will provide a smooth and crisp edge around the selection.
Polygonal Lasso Tool
The Polygonal Lasso tool draws its selections when you click on points around the
image. The tool will automatically draw straight lines between each pair of points. The
selection is completed when you double-click on the starting point. Try drawing a selection
around the cat with this tool.
Polygonal Lasso Tool Options
The tool options are the same as those described above for the Lasso tool.

Photoshop Lecture notes B.K.Mathan Nagan MCA., (Ph.D)
98 CAUSSANEL COLLEGE OF ARTS AND SCIENCE
Magnetic Lasso Tool
The Magnetic Lasso tool will detect the border between contrasting colours. When you
drag your cursor around objects in an image the selection will snap to this border.
Alternately, you can click once at the point where you want the selection to start and move
your cursor over the edges of the object without holding down the mouse button. To finish
your selection, click on the starting point. Select this tool and draw a selection around the
cat again and compare it with the level of patience and difficulty required with the other
tools for the same selection.
The example at the right shows a selection in
progress using the Magnetic Lasso tool. Notice
that there are small squares every so often
along the path created. These are
called anchor (or fastening) points and
they are inserted by the Magnetic Lasso tool
at strong edges of the image. The most
recently-placed anchor point has a solid
white fill while the previous points
are hollow. As you are moving around the
object, you can remove the most recently-
added path and anchor point by pressing
theBackspace (Delete) key. You can
continue removing points by pressing
the Backspace (Delete) key until you've
removed the desired segments of the
selection path. Then you can start selecting
again from that point.
Magnetic Lasso Tool Options
The Selection Options, Feather, and Anti-alias options are the same as those
described above for the Lasso tool. This tool has additional options that let you customize
its sensitivity.
Width
Photoshop Lecture notes B.K.Mathan Nagan MCA., (Ph.D)
99 CAUSSANEL COLLEGE OF ARTS AND SCIENCE
This field defines the radius around the pointer that will be examined to locate an
edge. The range is anywhere between 1-40 pixels.
Contrast
This option lets you set the amount of contrast the Magnetic Lasso should evaluate
when looking for an edge. The values can range between 1%-100%. A lesser value
detects a softer edge; a higher value detects a sharper edge.
Frequency
The Frequency setting determines how frequently anchor points will be placed in
creating the selection. The range for this setting is between 1-100. A higher value
sets the points closer together.
Stylus Pressure
When using a pressure-sensitive tablet, enabling this activates the ability to
adjust the size of the tool's tip. More pressure will create a larger tip.
Lasso Tool Summary
The Lasso tool has three variations: the Lasso tool itself, the Polygonal Lasso tool
and the Magnetic Lasso tool.
The Lasso tool lets you draw a freehand selection around a portion of an image.
The Polygonal Lasso tool draws straight-line selection paths between the points you
click on the image.
The Magnetic Lasso tool can detect the boundary where two different colours meet
to help make selections in a more automatic manner.
All three tools have the Selection Options, Feather, and Anti-alias options. In
addition to these, the Magnetic Lasso tool has Width, Contrast, Frequency and Stylus
Pressure options.
Lasso Tool Keyboard Shortcuts:
Lasso tool: L
Quick Selection Tool
The Quick Selection tool has two variations:
Quick Selection tool
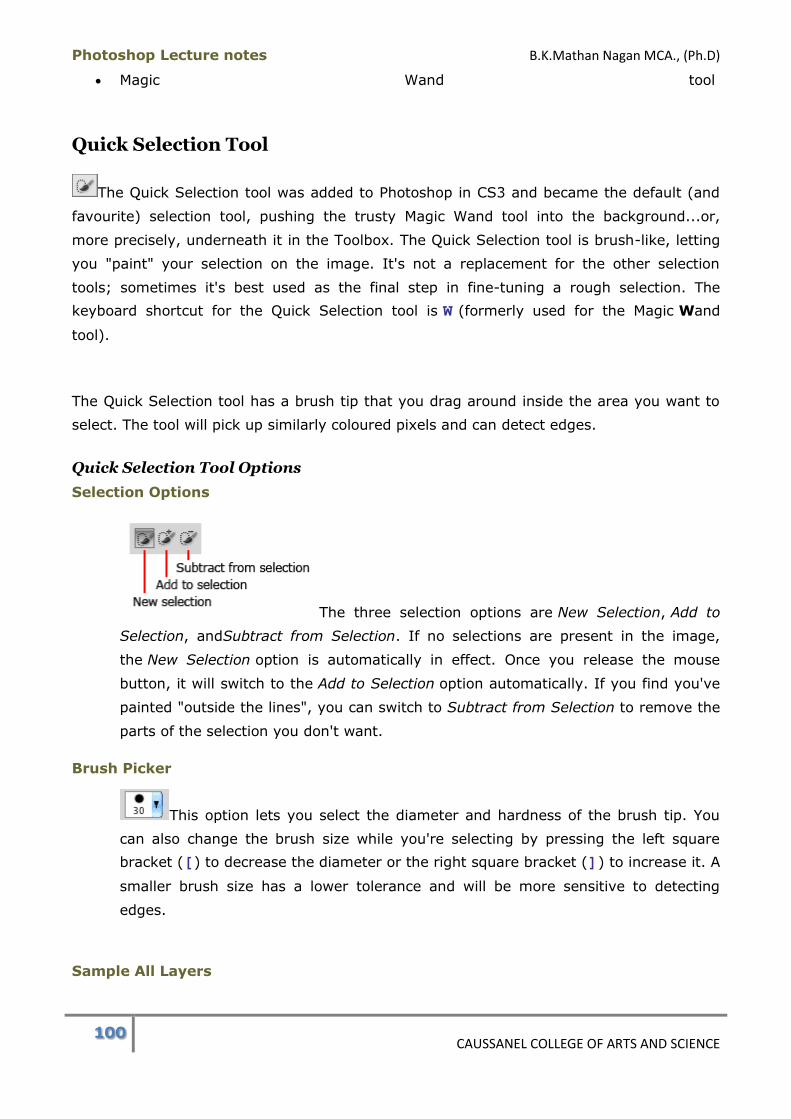
Photoshop Lecture notes B.K.Mathan Nagan MCA., (Ph.D)
100 CAUSSANEL COLLEGE OF ARTS AND SCIENCE
Magic Wand tool
Quick Selection Tool
The Quick Selection tool was added to Photoshop in CS3 and became the default (and
favourite) selection tool, pushing the trusty Magic Wand tool into the background...or,
more precisely, underneath it in the Toolbox. The Quick Selection tool is brush-like, letting
you "paint" your selection on the image. It's not a replacement for the other selection
tools; sometimes it's best used as the final step in fine-tuning a rough selection. The
keyboard shortcut for the Quick Selection tool is W (formerly used for the Magic Wand
tool).
The Quick Selection tool has a brush tip that you drag around inside the area you want to
select. The tool will pick up similarly coloured pixels and can detect edges.
Quick Selection Tool Options
Selection Options
The three selection options are New Selection, Add to
Selection, andSubtract from Selection. If no selections are present in the image,
the New Selection option is automatically in effect. Once you release the mouse
button, it will switch to the Add to Selection option automatically. If you find you've
painted "outside the lines", you can switch to Subtract from Selection to remove the
parts of the selection you don't want.
Brush Picker
This option lets you select the diameter and hardness of the brush tip. You
can also change the brush size while you're selecting by pressing the left square
bracket ([) to decrease the diameter or the right square bracket (]) to increase it. A
smaller brush size has a lower tolerance and will be more sensitive to detecting
edges.
Sample All Layers
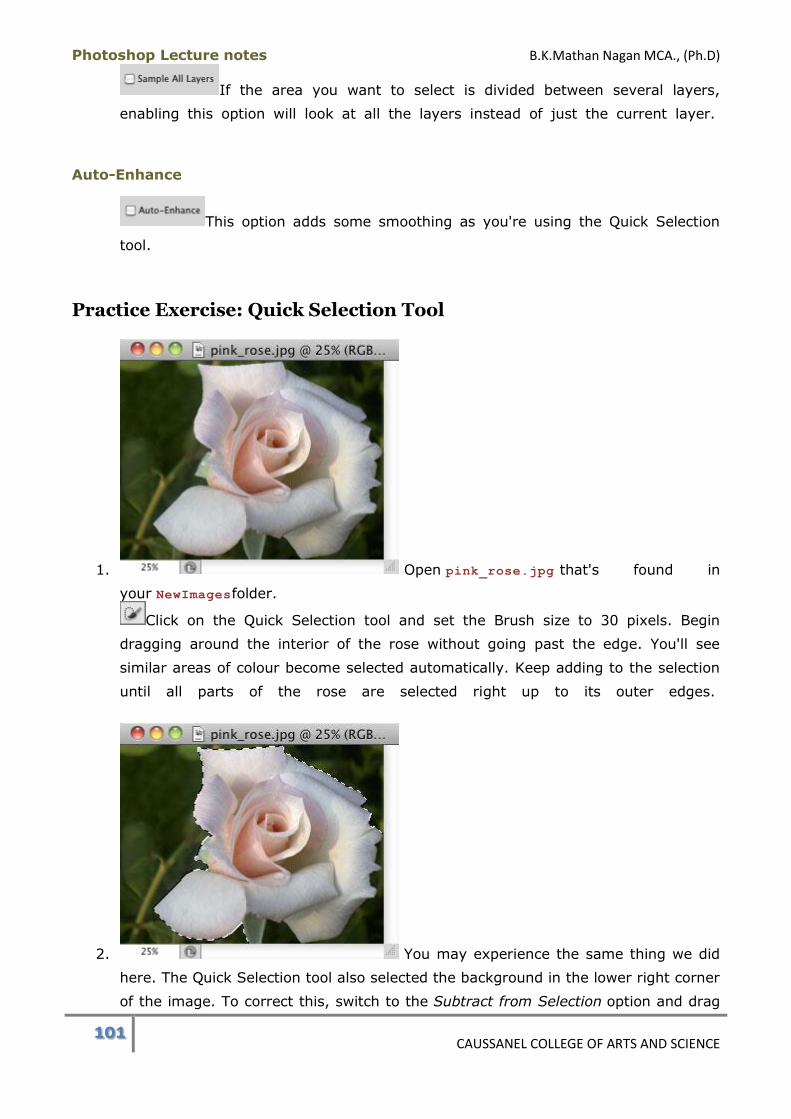
Photoshop Lecture notes B.K.Mathan Nagan MCA., (Ph.D)
101 CAUSSANEL COLLEGE OF ARTS AND SCIENCE
If the area you want to select is divided between several layers,
enabling this option will look at all the layers instead of just the current layer.
Auto-Enhance
This option adds some smoothing as you're using the Quick Selection
tool.
Practice Exercise: Quick Selection Tool
1. Open pink_rose.jpg that's found in
your NewImagesfolder.
Click on the Quick Selection tool and set the Brush size to 30 pixels. Begin
dragging around the interior of the rose without going past the edge. You'll see
similar areas of colour become selected automatically. Keep adding to the selection
until all parts of the rose are selected right up to its outer edges.
2. You may experience the same thing we did
here. The Quick Selection tool also selected the background in the lower right corner
of the image. To correct this, switch to the Subtract from Selection option and drag
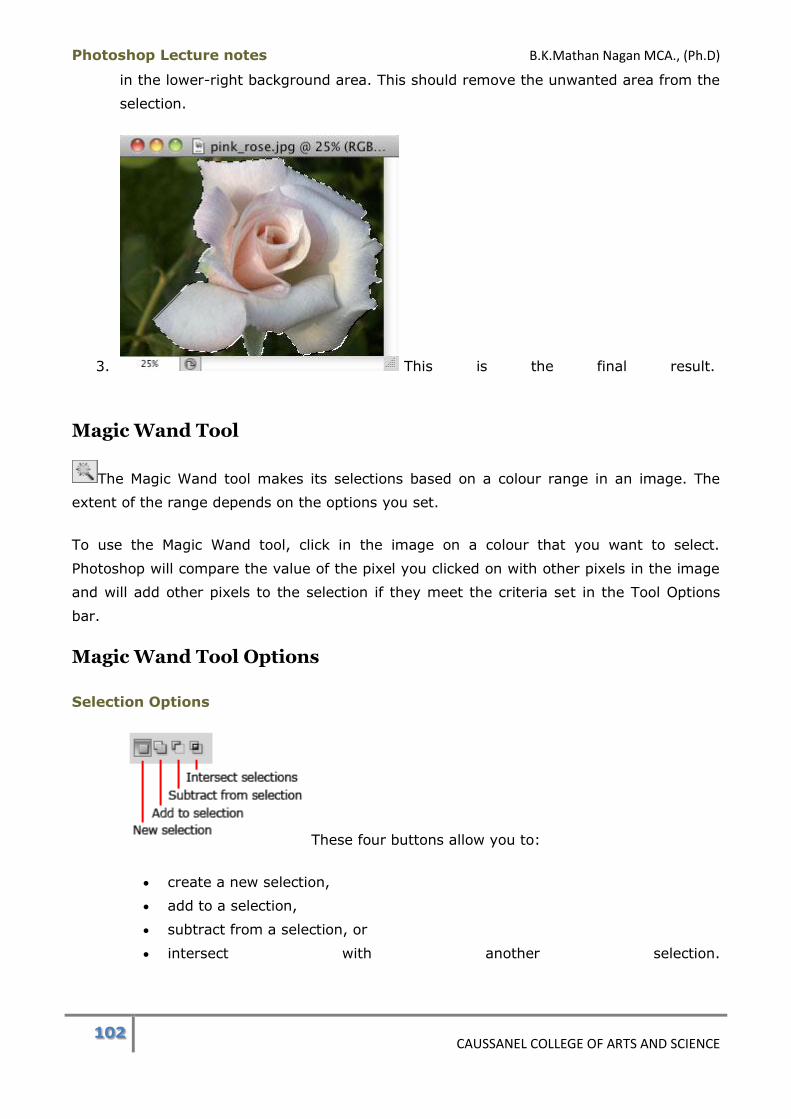
Photoshop Lecture notes B.K.Mathan Nagan MCA., (Ph.D)
102 CAUSSANEL COLLEGE OF ARTS AND SCIENCE
in the lower-right background area. This should remove the unwanted area from the
selection.
3. This is the final result.
Magic Wand Tool
The Magic Wand tool makes its selections based on a colour range in an image. The
extent of the range depends on the options you set.
To use the Magic Wand tool, click in the image on a colour that you want to select.
Photoshop will compare the value of the pixel you clicked on with other pixels in the image
and will add other pixels to the selection if they meet the criteria set in the Tool Options
bar.
Magic Wand Tool Options
Selection Options
These four buttons allow you to:
create a new selection,
add to a selection,
subtract from a selection, or
intersect with another selection.

Photoshop Lecture notes B.K.Mathan Nagan MCA., (Ph.D)
103 CAUSSANEL COLLEGE OF ARTS AND SCIENCE
Tolerance
Tolerance will increase or decrease a colour range for the selection. If
you wanted to select all the orange in the cat image, you could increase this
number. If you wanted to select a narrower colour range, you would decrease the
value.
Anti-alias
This option will apply anti-aliasing to the selection that you draw. Anti-
aliasing will provide a smooth and crisp edge around the selection.
Contiguous
When turned on, this setting will limit the selection to pixels that are next
to each other and within the designated tolerance.
Sample All Layers
This option will make a selection using all of the layers in the
Photoshop image. This is disabled by default so only pixels on the current layer will
be selected.
Practice Exercise: Magic Wand Tool
1. We'll use the rose image again. Remove the previous selection by pressing Ctrl-
D (Cmd-D).
2. Set the Tolerance to 0 and enable Anti-alias and Contiguous.
3. Click once anywhere inside the rose. You'll probably select just a single pixel. At
most, only a few adjacent pixels will be selected. Setting the tolerance to 0 means
that only adjacent pixels containing exactly the same RGB value as the pixel clicked
on will be included in the resulting selection.
4. Deselect by pressing Ctrl-D (Cmd-D).
5. Set the Tolerance to 32, a generally good setting for selection tolerance.

Photoshop Lecture notes B.K.Mathan Nagan MCA., (Ph.D)
104 CAUSSANEL COLLEGE OF ARTS AND SCIENCE
6. Click on the lower-left petal of the rose. Your
selection look something like the example shown here. You can keep increasing
the Tolerance value to include more pixels in your selection or you can use multiple
selections - a topic that will be covered later in this module.
7. Deselect by pressing Ctrl-D (Cmd-D).
8. Disable the Contiguous option and click on the
same petal as before. This time the Magic Wand selected pixels matching the
Tolerance setting throughout the image.
You could use multiple selections to successfully select the entire rose. Since the Quick
Selection tool worked so well, it was the better choice for this particular image.
9. Close your file without saving it.
Quick Selection Tool Summary
The Quick Selection tool lets you "paint" on a selection by dragging a brush over the
image.
This tool has three Selection Options as well as the Brush Picker, Sample All Layers,
and Auto-Enhance options.
The Magic Wand tool makes selections by comparing the RGB value of the pixel
clicked on with other pixels in the image and includes other pixels within the
prescribed colour range in the selection.
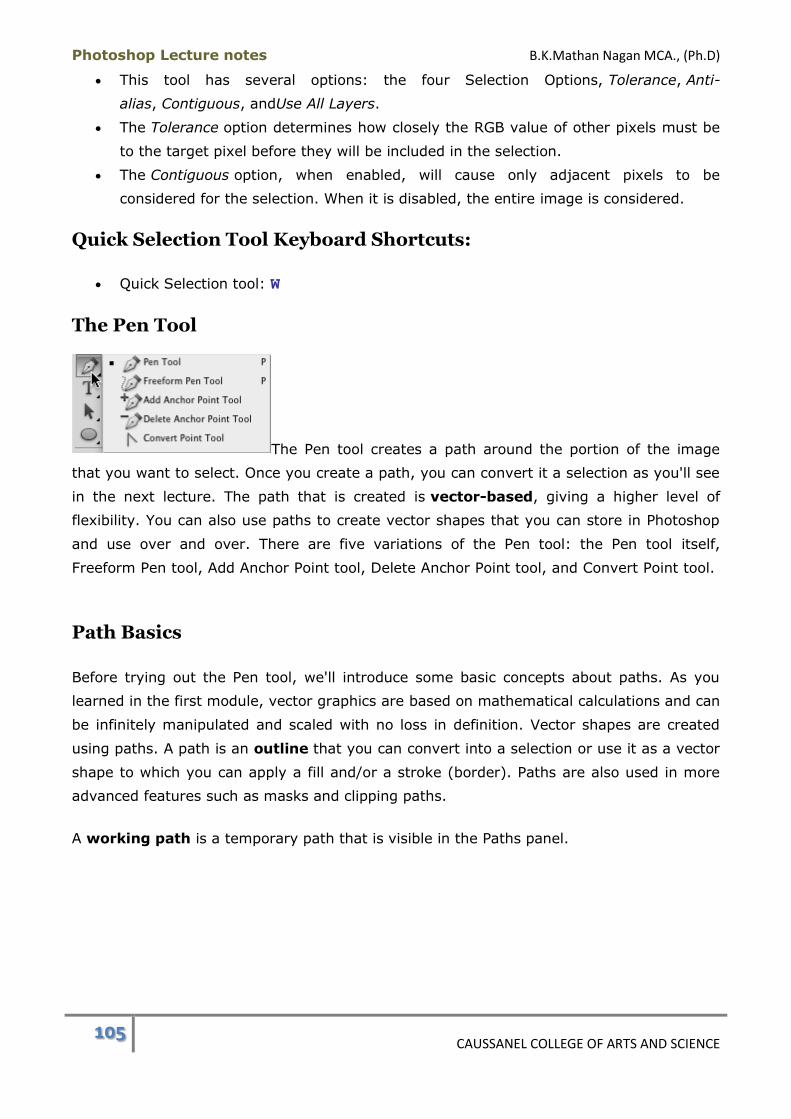
Photoshop Lecture notes B.K.Mathan Nagan MCA., (Ph.D)
105 CAUSSANEL COLLEGE OF ARTS AND SCIENCE
This tool has several options: the four Selection Options, Tolerance, Anti-
alias, Contiguous, andUse All Layers.
The Tolerance option determines how closely the RGB value of other pixels must be
to the target pixel before they will be included in the selection.
The Contiguous option, when enabled, will cause only adjacent pixels to be
considered for the selection. When it is disabled, the entire image is considered.
Quick Selection Tool Keyboard Shortcuts:
Quick Selection tool: W
The Pen Tool
The Pen tool creates a path around the portion of the image
that you want to select. Once you create a path, you can convert it a selection as you'll see
in the next lecture. The path that is created is vector-based, giving a higher level of
flexibility. You can also use paths to create vector shapes that you can store in Photoshop
and use over and over. There are five variations of the Pen tool: the Pen tool itself,
Freeform Pen tool, Add Anchor Point tool, Delete Anchor Point tool, and Convert Point tool.
Path Basics
Before trying out the Pen tool, we'll introduce some basic concepts about paths. As you
learned in the first module, vector graphics are based on mathematical calculations and can
be infinitely manipulated and scaled with no loss in definition. Vector shapes are created
using paths. A path is an outline that you can convert into a selection or use it as a vector
shape to which you can apply a fill and/or a stroke (border). Paths are also used in more
advanced features such as masks and clipping paths.
A working path is a temporary path that is visible in the Paths panel.
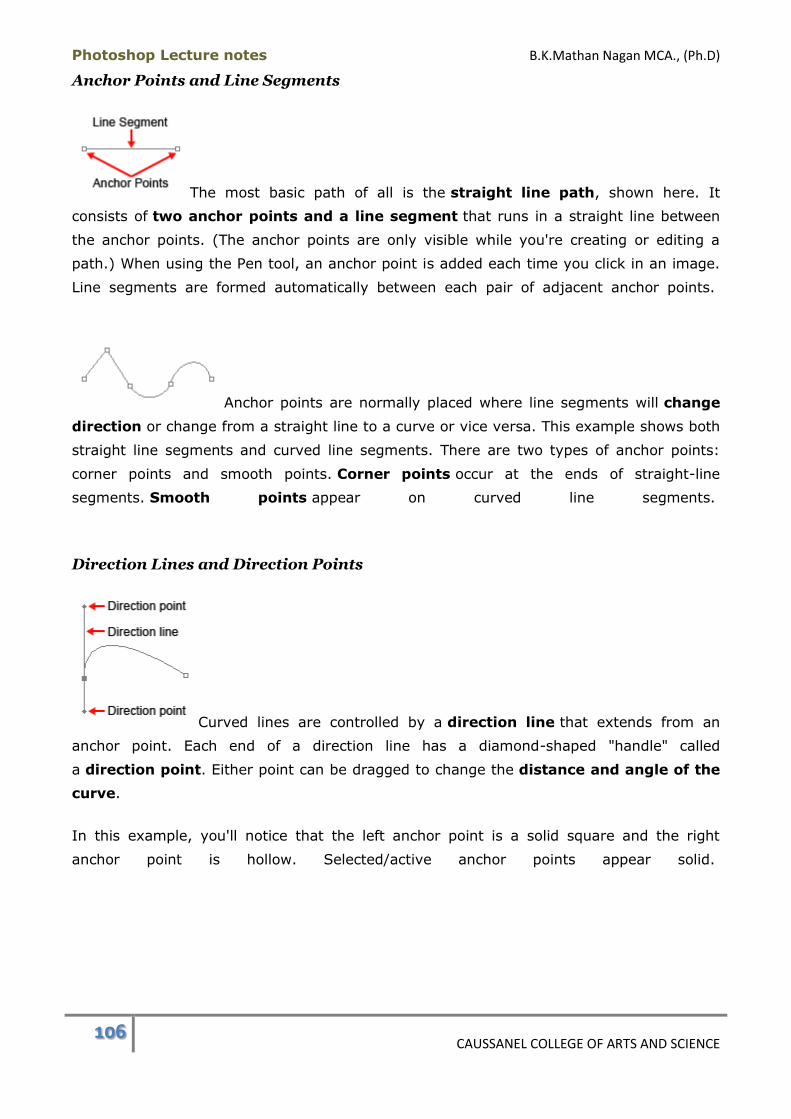
Photoshop Lecture notes B.K.Mathan Nagan MCA., (Ph.D)
106 CAUSSANEL COLLEGE OF ARTS AND SCIENCE
Anchor Points and Line Segments
The most basic path of all is the straight line path, shown here. It
consists of two anchor points and a line segment that runs in a straight line between
the anchor points. (The anchor points are only visible while you're creating or editing a
path.) When using the Pen tool, an anchor point is added each time you click in an image.
Line segments are formed automatically between each pair of adjacent anchor points.
Anchor points are normally placed where line segments will change
direction or change from a straight line to a curve or vice versa. This example shows both
straight line segments and curved line segments. There are two types of anchor points:
corner points and smooth points. Corner points occur at the ends of straight-line
segments. Smooth points appear on curved line segments.
Direction Lines and Direction Points
Curved lines are controlled by a direction line that extends from an
anchor point. Each end of a direction line has a diamond-shaped "handle" called
a direction point. Either point can be dragged to change the distance and angle of the
curve.
In this example, you'll notice that the left anchor point is a solid square and the right
anchor point is hollow. Selected/active anchor points appear solid.
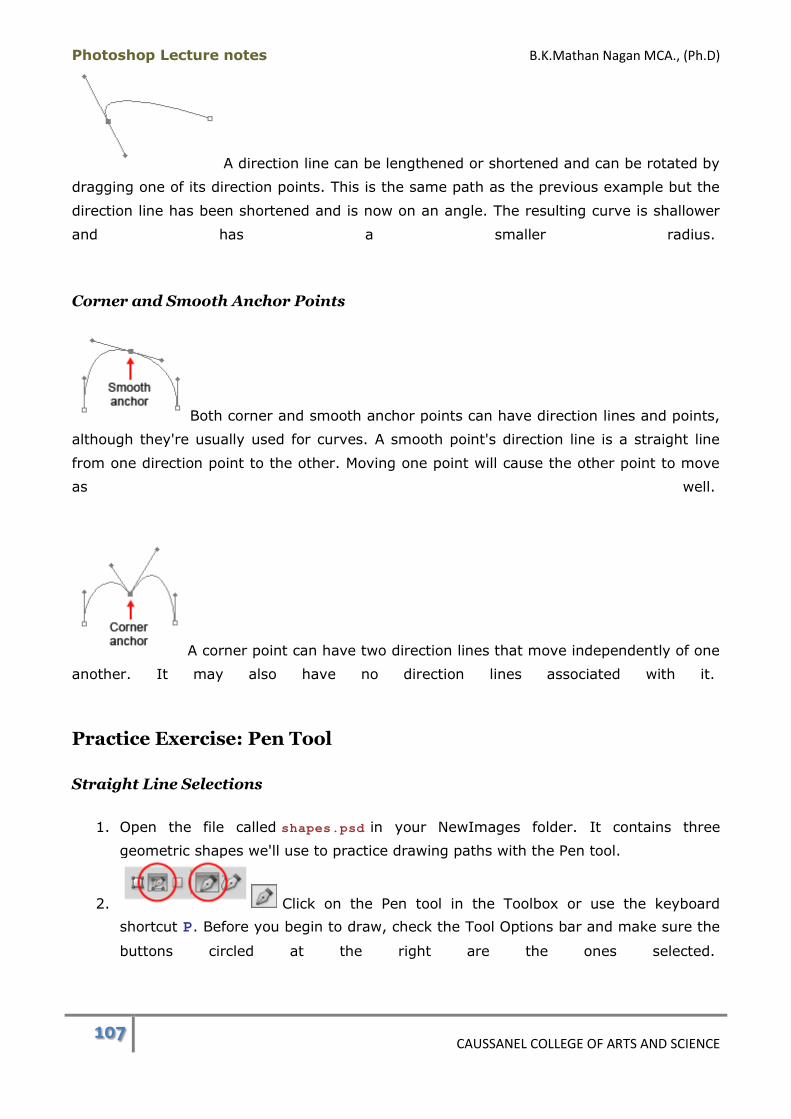
Photoshop Lecture notes B.K.Mathan Nagan MCA., (Ph.D)
107 CAUSSANEL COLLEGE OF ARTS AND SCIENCE
A direction line can be lengthened or shortened and can be rotated by
dragging one of its direction points. This is the same path as the previous example but the
direction line has been shortened and is now on an angle. The resulting curve is shallower
and has a smaller radius.
Corner and Smooth Anchor Points
Both corner and smooth anchor points can have direction lines and points,
although they're usually used for curves. A smooth point's direction line is a straight line
from one direction point to the other. Moving one point will cause the other point to move
as well.
A corner point can have two direction lines that move independently of one
another. It may also have no direction lines associated with it.
Practice Exercise: Pen Tool
Straight Line Selections
1. Open the file called shapes.psd in your NewImages folder. It contains three
geometric shapes we'll use to practice drawing paths with the Pen tool.
2. Click on the Pen tool in the Toolbox or use the keyboard
shortcut P. Before you begin to draw, check the Tool Options bar and make sure the
buttons circled at the right are the ones selected.
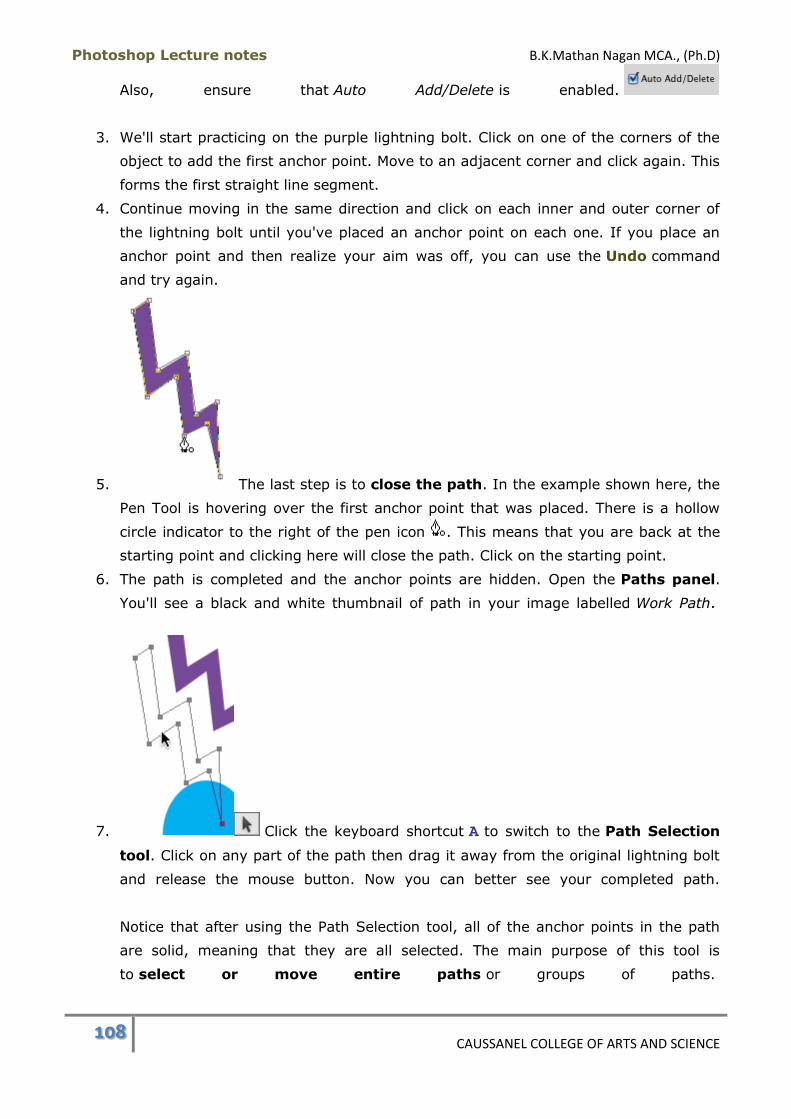
Photoshop Lecture notes B.K.Mathan Nagan MCA., (Ph.D)
108 CAUSSANEL COLLEGE OF ARTS AND SCIENCE
Also, ensure that Auto Add/Delete is enabled.
3. We'll start practicing on the purple lightning bolt. Click on one of the corners of the
object to add the first anchor point. Move to an adjacent corner and click again. This
forms the first straight line segment.
4. Continue moving in the same direction and click on each inner and outer corner of
the lightning bolt until you've placed an anchor point on each one. If you place an
anchor point and then realize your aim was off, you can use the Undo command
and try again.
5. The last step is to close the path. In the example shown here, the
Pen Tool is hovering over the first anchor point that was placed. There is a hollow
circle indicator to the right of the pen icon . This means that you are back at the
starting point and clicking here will close the path. Click on the starting point.
6. The path is completed and the anchor points are hidden. Open the Paths panel.
You'll see a black and white thumbnail of path in your image labelled Work Path.
7. Click the keyboard shortcut A to switch to the Path Selection
tool. Click on any part of the path then drag it away from the original lightning bolt
and release the mouse button. Now you can better see your completed path.
Notice that after using the Path Selection tool, all of the anchor points in the path
are solid, meaning that they are all selected. The main purpose of this tool is
to select or move entire paths or groups of paths.
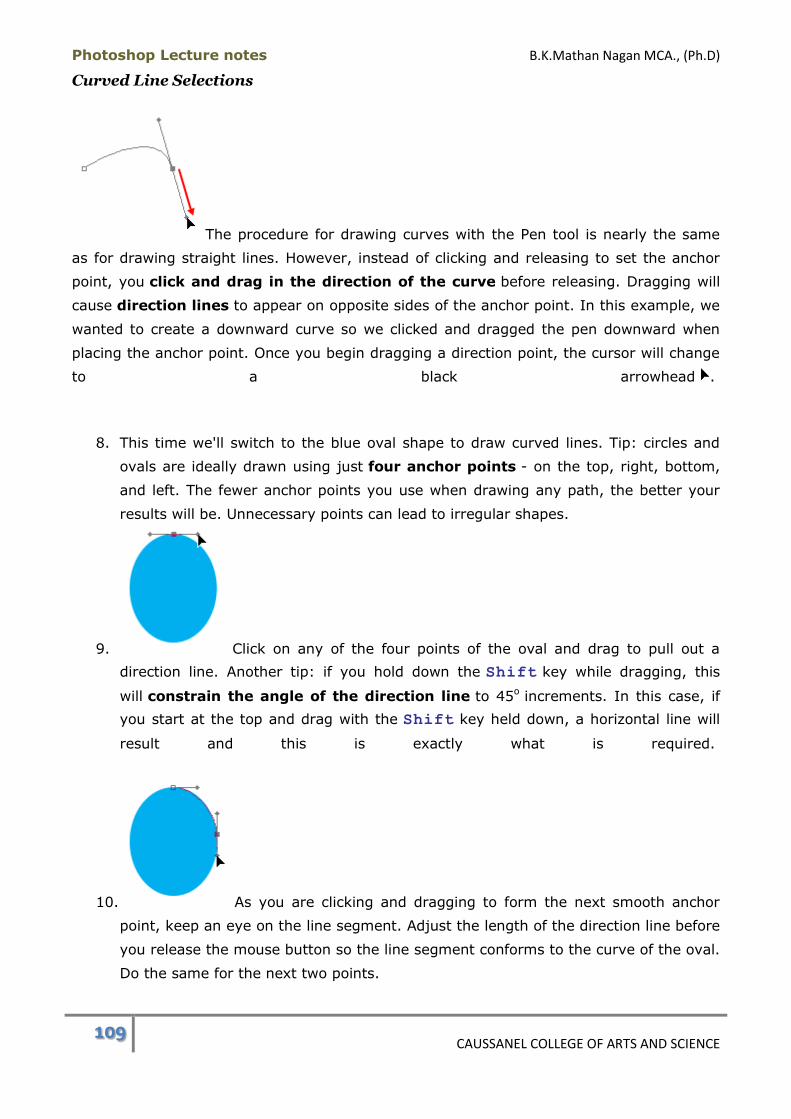
Photoshop Lecture notes B.K.Mathan Nagan MCA., (Ph.D)
109 CAUSSANEL COLLEGE OF ARTS AND SCIENCE
Curved Line Selections
The procedure for drawing curves with the Pen tool is nearly the same
as for drawing straight lines. However, instead of clicking and releasing to set the anchor
point, you click and drag in the direction of the curve before releasing. Dragging will
cause direction lines to appear on opposite sides of the anchor point. In this example, we
wanted to create a downward curve so we clicked and dragged the pen downward when
placing the anchor point. Once you begin dragging a direction point, the cursor will change
to a black arrowhead .
8. This time we'll switch to the blue oval shape to draw curved lines. Tip: circles and
ovals are ideally drawn using just four anchor points - on the top, right, bottom,
and left. The fewer anchor points you use when drawing any path, the better your
results will be. Unnecessary points can lead to irregular shapes.
9. Click on any of the four points of the oval and drag to pull out a
direction line. Another tip: if you hold down the Shift key while dragging, this
will constrain the angle of the direction line to 45o increments. In this case, if
you start at the top and drag with the Shift key held down, a horizontal line will
result and this is exactly what is required.
10. As you are clicking and dragging to form the next smooth anchor
point, keep an eye on the line segment. Adjust the length of the direction line before
you release the mouse button so the line segment conforms to the curve of the oval.
Do the same for the next two points.
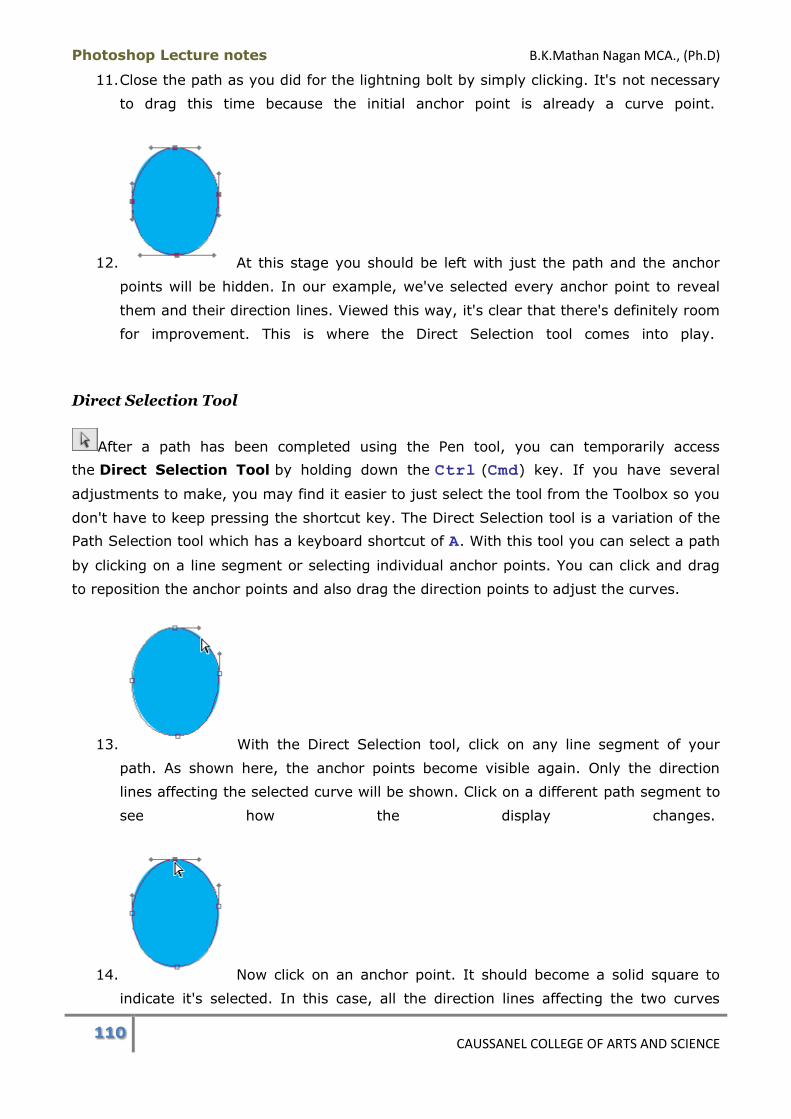
Photoshop Lecture notes B.K.Mathan Nagan MCA., (Ph.D)
110 CAUSSANEL COLLEGE OF ARTS AND SCIENCE
11. Close the path as you did for the lightning bolt by simply clicking. It's not necessary
to drag this time because the initial anchor point is already a curve point.
12. At this stage you should be left with just the path and the anchor
points will be hidden. In our example, we've selected every anchor point to reveal
them and their direction lines. Viewed this way, it's clear that there's definitely room
for improvement. This is where the Direct Selection tool comes into play.
Direct Selection Tool
After a path has been completed using the Pen tool, you can temporarily access
the Direct Selection Tool by holding down the Ctrl (Cmd) key. If you have several
adjustments to make, you may find it easier to just select the tool from the Toolbox so you
don't have to keep pressing the shortcut key. The Direct Selection tool is a variation of the
Path Selection tool which has a keyboard shortcut of A. With this tool you can select a path
by clicking on a line segment or selecting individual anchor points. You can click and drag
to reposition the anchor points and also drag the direction points to adjust the curves.
13. With the Direct Selection tool, click on any line segment of your
path. As shown here, the anchor points become visible again. Only the direction
lines affecting the selected curve will be shown. Click on a different path segment to
see how the display changes.
14. Now click on an anchor point. It should become a solid square to
indicate it's selected. In this case, all the direction lines affecting the two curves
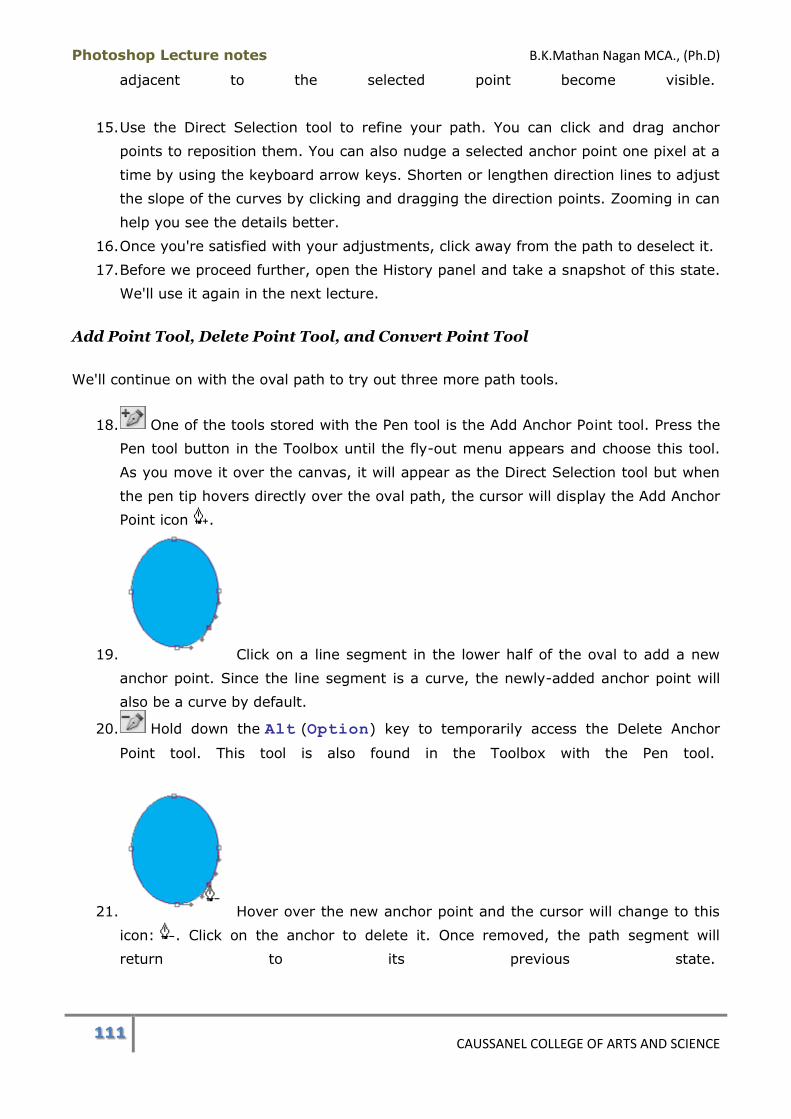
Photoshop Lecture notes B.K.Mathan Nagan MCA., (Ph.D)
111 CAUSSANEL COLLEGE OF ARTS AND SCIENCE
adjacent to the selected point become visible.
15. Use the Direct Selection tool to refine your path. You can click and drag anchor
points to reposition them. You can also nudge a selected anchor point one pixel at a
time by using the keyboard arrow keys. Shorten or lengthen direction lines to adjust
the slope of the curves by clicking and dragging the direction points. Zooming in can
help you see the details better.
16. Once you're satisfied with your adjustments, click away from the path to deselect it.
17. Before we proceed further, open the History panel and take a snapshot of this state.
We'll use it again in the next lecture.
Add Point Tool, Delete Point Tool, and Convert Point Tool
We'll continue on with the oval path to try out three more path tools.
18. One of the tools stored with the Pen tool is the Add Anchor Point tool. Press the
Pen tool button in the Toolbox until the fly-out menu appears and choose this tool.
As you move it over the canvas, it will appear as the Direct Selection tool but when
the pen tip hovers directly over the oval path, the cursor will display the Add Anchor
Point icon .
19. Click on a line segment in the lower half of the oval to add a new
anchor point. Since the line segment is a curve, the newly-added anchor point will
also be a curve by default.
20. Hold down the Alt (Option) key to temporarily access the Delete Anchor
Point tool. This tool is also found in the Toolbox with the Pen tool.
21. Hover over the new anchor point and the cursor will change to this
icon: . Click on the anchor to delete it. Once removed, the path segment will
return to its previous state.
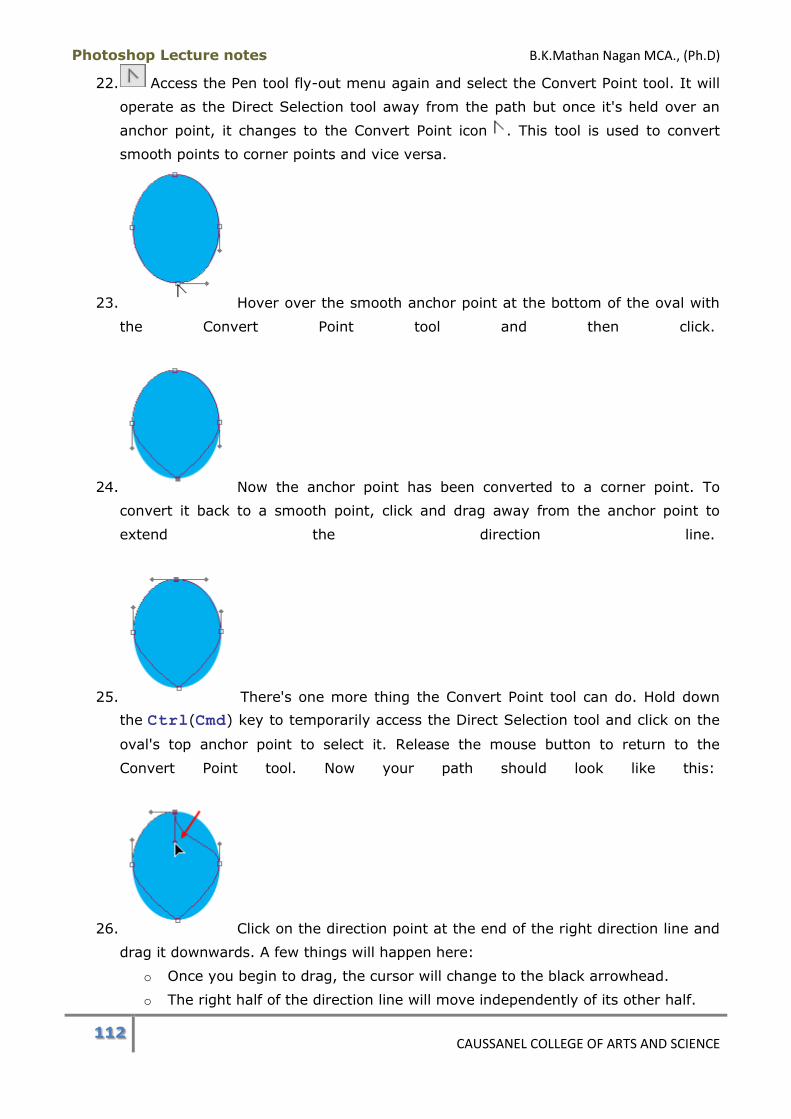
Photoshop Lecture notes B.K.Mathan Nagan MCA., (Ph.D)
112 CAUSSANEL COLLEGE OF ARTS AND SCIENCE
22. Access the Pen tool fly-out menu again and select the Convert Point tool. It will
operate as the Direct Selection tool away from the path but once it's held over an
anchor point, it changes to the Convert Point icon . This tool is used to convert
smooth points to corner points and vice versa.
23. Hover over the smooth anchor point at the bottom of the oval with
the Convert Point tool and then click.
24. Now the anchor point has been converted to a corner point. To
convert it back to a smooth point, click and drag away from the anchor point to
extend the direction line.
25. There's one more thing the Convert Point tool can do. Hold down
the Ctrl(Cmd) key to temporarily access the Direct Selection tool and click on the
oval's top anchor point to select it. Release the mouse button to return to the
Convert Point tool. Now your path should look like this:
26. Click on the direction point at the end of the right direction line and
drag it downwards. A few things will happen here:
o Once you begin to drag, the cursor will change to the black arrowhead.
o The right half of the direction line will move independently of its other half.
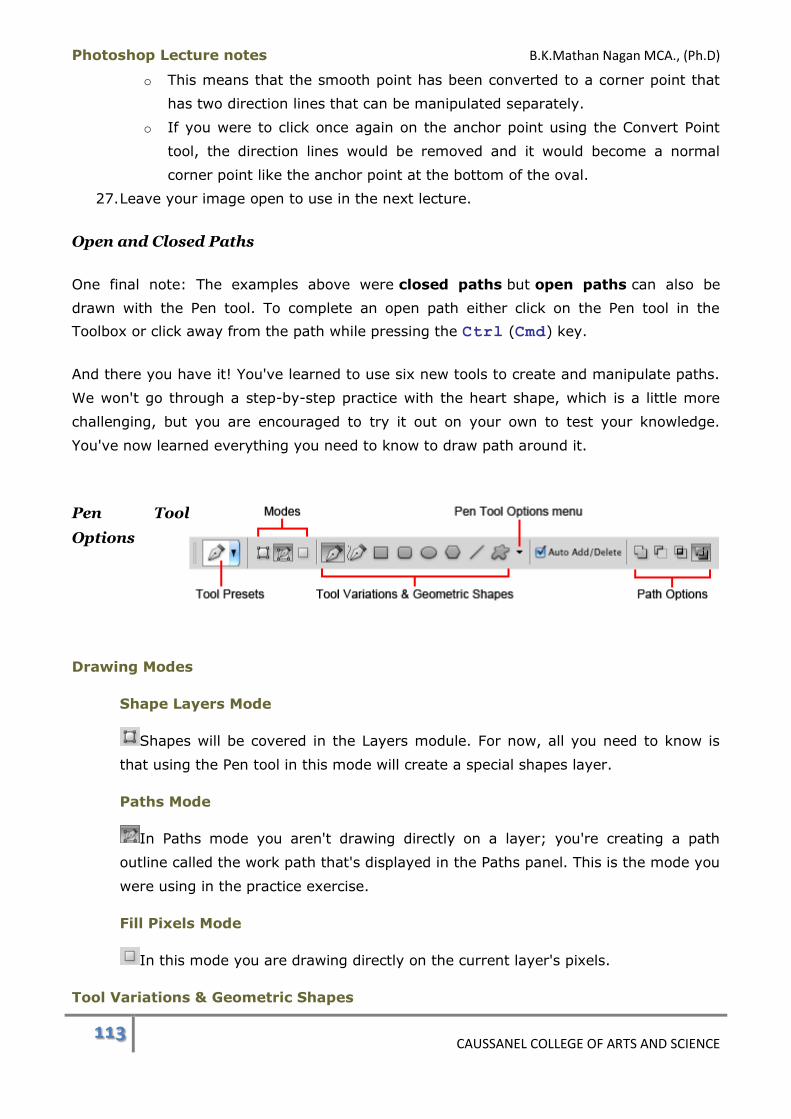
Photoshop Lecture notes B.K.Mathan Nagan MCA., (Ph.D)
113 CAUSSANEL COLLEGE OF ARTS AND SCIENCE
o This means that the smooth point has been converted to a corner point that
has two direction lines that can be manipulated separately.
o If you were to click once again on the anchor point using the Convert Point
tool, the direction lines would be removed and it would become a normal
corner point like the anchor point at the bottom of the oval.
27. Leave your image open to use in the next lecture.
Open and Closed Paths
One final note: The examples above were closed paths but open paths can also be
drawn with the Pen tool. To complete an open path either click on the Pen tool in the
Toolbox or click away from the path while pressing the Ctrl (Cmd) key.
And there you have it! You've learned to use six new tools to create and manipulate paths.
We won't go through a step-by-step practice with the heart shape, which is a little more
challenging, but you are encouraged to try it out on your own to test your knowledge.
You've now learned everything you need to know to draw path around it.
Pen Tool
Options
Drawing Modes
Shape Layers Mode
Shapes will be covered in the Layers module. For now, all you need to know is
that using the Pen tool in this mode will create a special shapes layer.
Paths Mode
In Paths mode you aren't drawing directly on a layer; you're creating a path
outline called the work path that's displayed in the Paths panel. This is the mode you
were using in the practice exercise.
Fill Pixels Mode
In this mode you are drawing directly on the current layer's pixels.
Tool Variations & Geometric Shapes

Photoshop Lecture notes B.K.Mathan Nagan MCA., (Ph.D)
114 CAUSSANEL COLLEGE OF ARTS AND SCIENCE
This option lets you toggle between the Pen Tool, the FreeForm Pen Tool, and
geometric shapes.
Pen Tool Options Menu
This menu contains one option: Rubber Band.
Rubber Band
When this option is enabled, the line segment you are working on
will be displayed before you click to create its second anchor point. This preview
won't reflect what might happen if you drag to create a smooth point. It shows what
would happen if a corner point is added.
Auto Add/Delete
Instead of having to switch between the Pen, Add Anchor Point, and
Delete Anchor Point tools to edit a path, with this enabled the Pen tool cursor
detects when it's over a line segment or an anchor point and switches automatically
to the appropriate tool.
When hovering over a line segment, the Pen tool will change to the Add
Anchor Point tool.
When hovering over an anchor point, the Pen tool will change to the Delete
Anchor Point tool.
Path Options
When you add new path components to the working path, these options determine
how the new component will interact with the existing one(s). In the examples
shown below, the triangle was the first path drawn. The path option was then set
and the circle was drawn. The images on the left show the paths still selected and

Photoshop Lecture notes B.K.Mathan Nagan MCA., (Ph.D)
115 CAUSSANEL COLLEGE OF ARTS AND SCIENCE
the images on the right show the de-selected final result. (These were actually filled
shapes so you can see the effect but the concepts are the same.)
Add to Path Area
Whether the components are overlapping or separated, the
working path will include all parts of each component. When you move one path, the
other will move in unison.
Remove From Path Area
When the second path component overlaps the first one, this
option will subtract the overlapping area.
Intersect Path Areas
When the second path component overlaps the first one, the
resulting path will consist only of the overlap.
Exclude Overlapping Path Areas
When the second path component overlaps the first one, the
overlapping area will be excluded.
Freeform Pen Tool
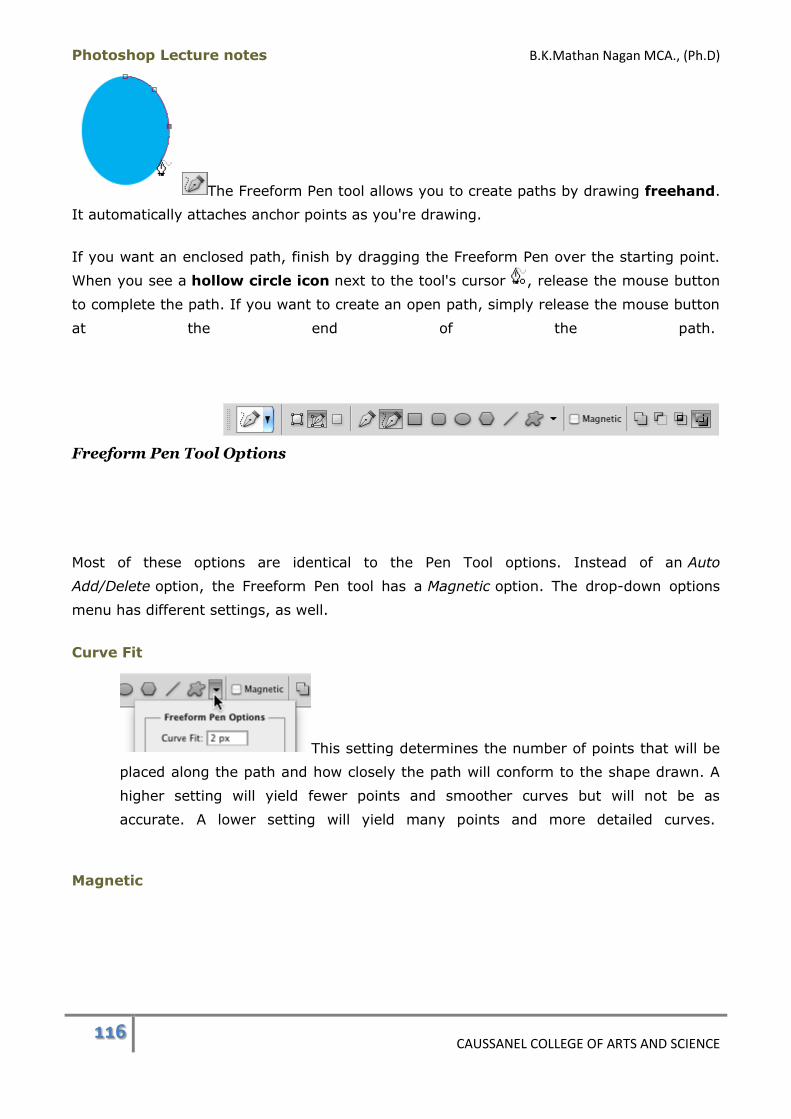
Photoshop Lecture notes B.K.Mathan Nagan MCA., (Ph.D)
116 CAUSSANEL COLLEGE OF ARTS AND SCIENCE
The Freeform Pen tool allows you to create paths by drawing freehand.
It automatically attaches anchor points as you're drawing.
If you want an enclosed path, finish by dragging the Freeform Pen over the starting point.
When you see a hollow circle icon next to the tool's cursor , release the mouse button
to complete the path. If you want to create an open path, simply release the mouse button
at the end of the path.
Freeform Pen Tool Options
Most of these options are identical to the Pen Tool options. Instead of an Auto
Add/Delete option, the Freeform Pen tool has a Magnetic option. The drop-down options
menu has different settings, as well.
Curve Fit
This setting determines the number of points that will be
placed along the path and how closely the path will conform to the shape drawn. A
higher setting will yield fewer points and smoother curves but will not be as
accurate. A lower setting will yield many points and more detailed curves.
Magnetic
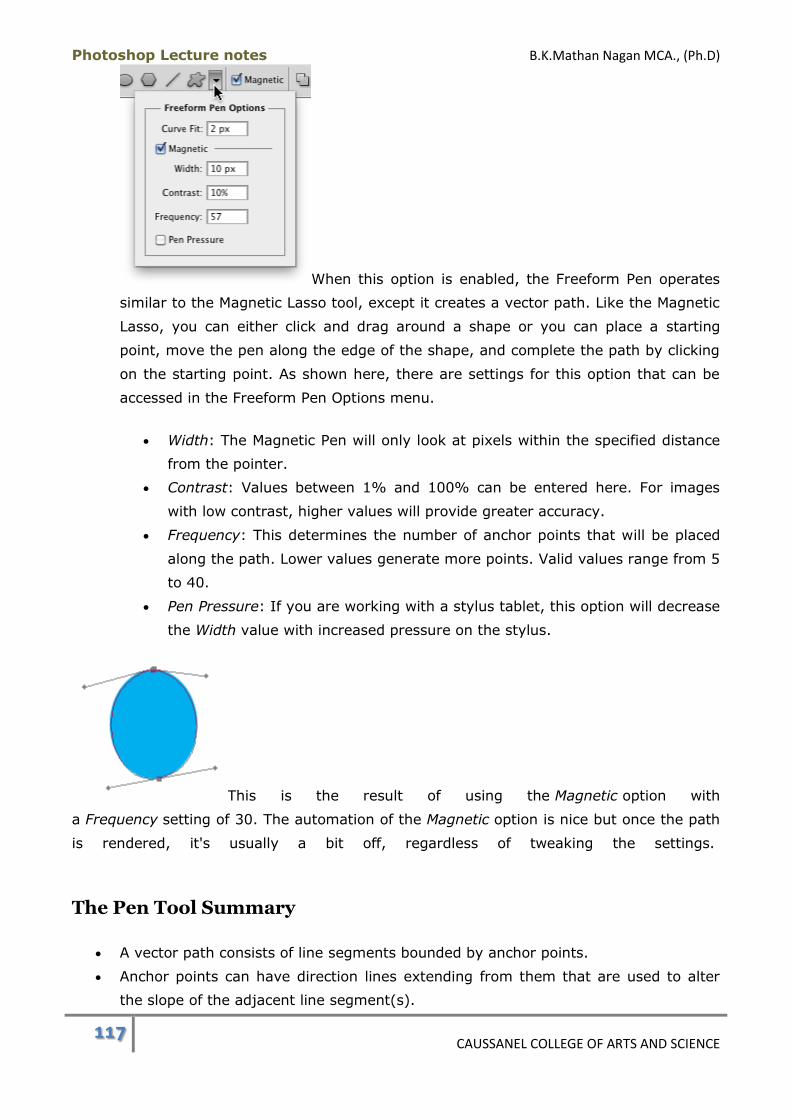
Photoshop Lecture notes B.K.Mathan Nagan MCA., (Ph.D)
117 CAUSSANEL COLLEGE OF ARTS AND SCIENCE
When this option is enabled, the Freeform Pen operates
similar to the Magnetic Lasso tool, except it creates a vector path. Like the Magnetic
Lasso, you can either click and drag around a shape or you can place a starting
point, move the pen along the edge of the shape, and complete the path by clicking
on the starting point. As shown here, there are settings for this option that can be
accessed in the Freeform Pen Options menu.
Width: The Magnetic Pen will only look at pixels within the specified distance
from the pointer.
Contrast: Values between 1% and 100% can be entered here. For images
with low contrast, higher values will provide greater accuracy.
Frequency: This determines the number of anchor points that will be placed
along the path. Lower values generate more points. Valid values range from 5
to 40.
Pen Pressure: If you are working with a stylus tablet, this option will decrease
the Width value with increased pressure on the stylus.
This is the result of using the Magnetic option with
a Frequency setting of 30. The automation of the Magnetic option is nice but once the path
is rendered, it's usually a bit off, regardless of tweaking the settings.
The Pen Tool Summary
A vector path consists of line segments bounded by anchor points.
Anchor points can have direction lines extending from them that are used to alter
the slope of the adjacent line segment(s).
Photoshop Lecture notes B.K.Mathan Nagan MCA., (Ph.D)
118 CAUSSANEL COLLEGE OF ARTS AND SCIENCE
Each direction line has a point on the end called a direction point. Dragging it will
rotate, lengthen, or shorten a direction line.
Paths are temporarily stored in the Paths panel.
The Pen tool and its variation, the Freeform Pen tool, are used to create vector-
based paths around a portion of an image.
The other tool variations - Add Anchor Point tool, Delete Anchor Point tool, and
Convert Point tool - are used to edit the anchor points along a path.
The Pen tool can draw paths with straight or curved line segments or a mixture of
both types. You click to place each point of the path when using the Pen tool.
Clicking without dragging creates a corner point while clicking and then dragging
creates a smooth point.
The Freeform Pen tool draws a path as you drag the pointer around the image.
When its Magneticoption is enabled, it detects an edge in the underlying image and
snaps the path to the edge. Instead of dragging, you can click (or click and drag) to
place the first anchor point then release the mouse button and move the cursor over
the edges of the object to form the path. Then click on the starting point to complete
the path.
The Add Anchor Point tool adds corner or curve points to an existing path.
The Delete Anchor Point tool removes corner or curve points from an existing path.
The Convert Point tool has performs three operations:
o It converts a curve point to a corner point without direction lines.
o It converts a curve point to a corner point with direction lines.
o It converts a corner point to a curve point.
The Path Selection tool is used to select or move paths or groups of paths.
The Direct Selection tool selects line segments or anchor points and is used to
manipulate direction lines.
The Pen Tool Keyboard Shortcuts:
Pen tool: P
Path Selection tool: A
Temporarily access the Direct Selection tool when the Pen tool and its variations are
selected:Ctrl (Cmd)
Temporarily access the Delete Anchor Point tool when the Add Anchor Point tool is
selected: Alt(Option)
Converting a Path to a Selection
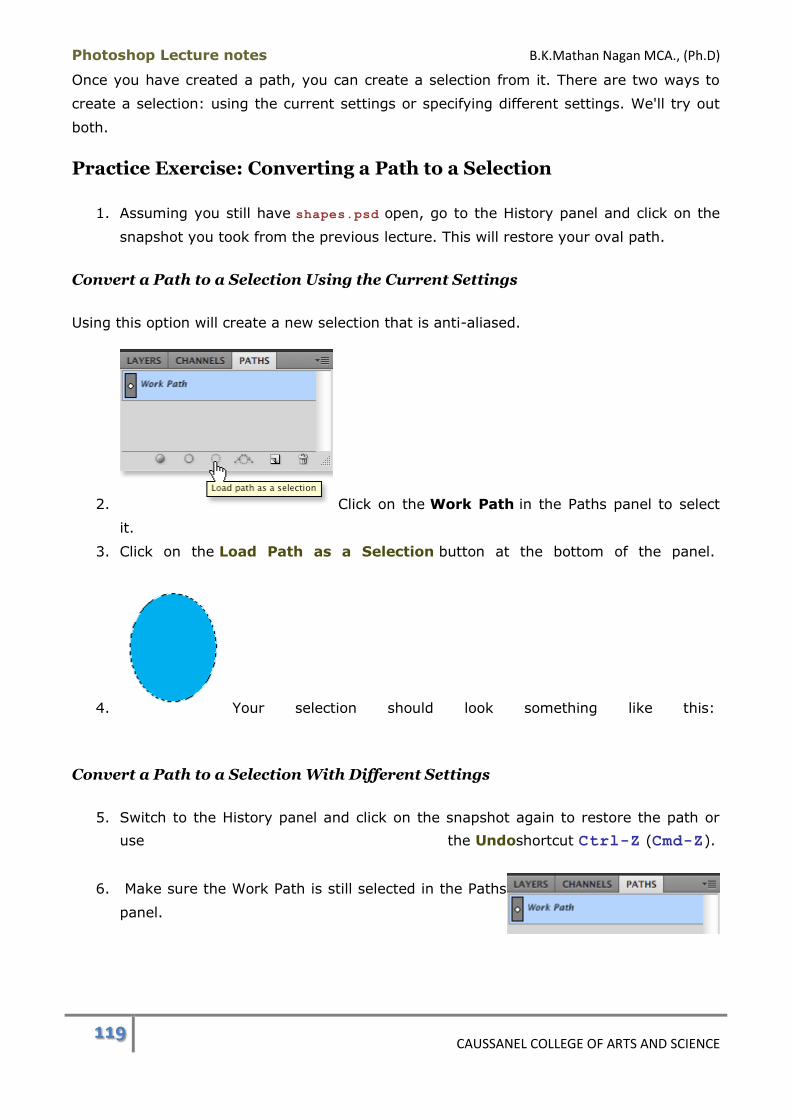
Photoshop Lecture notes B.K.Mathan Nagan MCA., (Ph.D)
119 CAUSSANEL COLLEGE OF ARTS AND SCIENCE
Once you have created a path, you can create a selection from it. There are two ways to
create a selection: using the current settings or specifying different settings. We'll try out
both.
Practice Exercise: Converting a Path to a Selection
1. Assuming you still have shapes.psd open, go to the History panel and click on the
snapshot you took from the previous lecture. This will restore your oval path.
Convert a Path to a Selection Using the Current Settings
Using this option will create a new selection that is anti-aliased.
2. Click on the Work Path in the Paths panel to select
it.
3. Click on the Load Path as a Selection button at the bottom of the panel.
4. Your selection should look something like this:
Convert a Path to a Selection With Different Settings
5. Switch to the History panel and click on the snapshot again to restore the path or
use the Undoshortcut Ctrl-Z (Cmd-Z).
6. Make sure the Work Path is still selected in the Paths
panel.
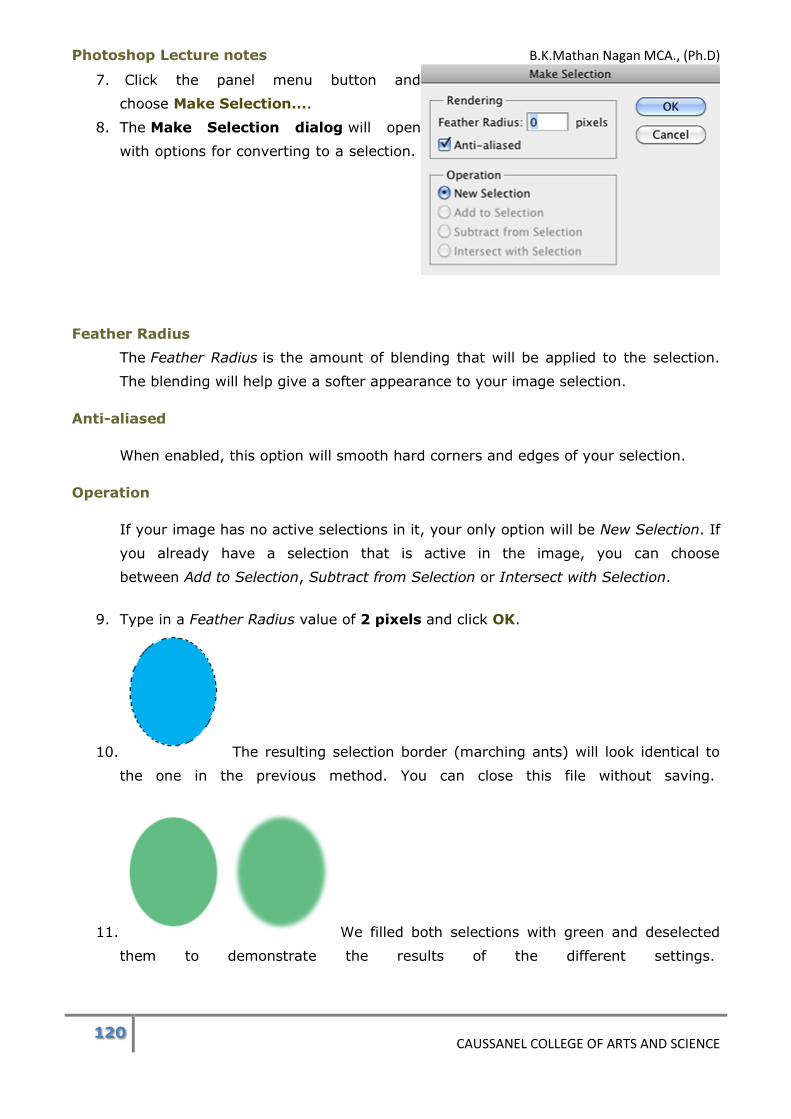
Photoshop Lecture notes B.K.Mathan Nagan MCA., (Ph.D)
120 CAUSSANEL COLLEGE OF ARTS AND SCIENCE
7. Click the panel menu button and
choose Make Selection....
8. The Make Selection dialog will open
with options for converting to a selection.
Feather Radius
The Feather Radius is the amount of blending that will be applied to the selection.
The blending will help give a softer appearance to your image selection.
Anti-aliased
When enabled, this option will smooth hard corners and edges of your selection.
Operation
If your image has no active selections in it, your only option will be New Selection. If
you already have a selection that is active in the image, you can choose
between Add to Selection, Subtract from Selection or Intersect with Selection.
9. Type in a Feather Radius value of 2 pixels and click OK.
10. The resulting selection border (marching ants) will look identical to
the one in the previous method. You can close this file without saving.
11. We filled both selections with green and deselected
them to demonstrate the results of the different settings.
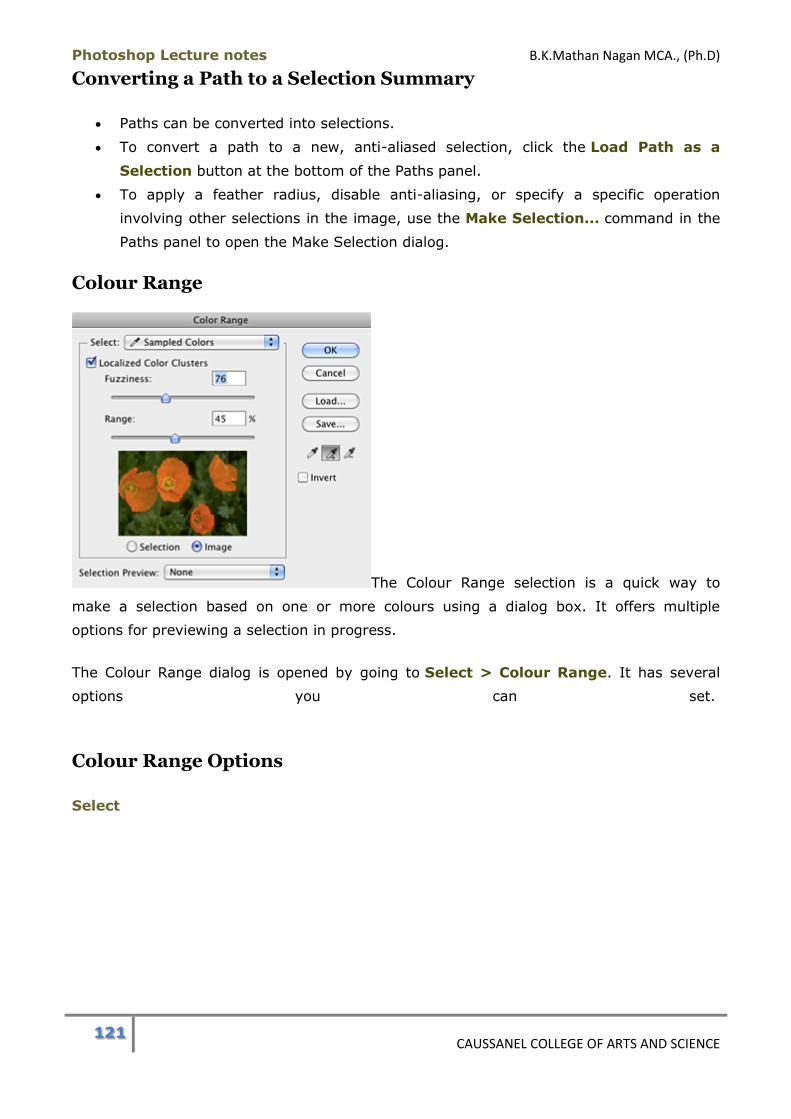
Photoshop Lecture notes B.K.Mathan Nagan MCA., (Ph.D)
121 CAUSSANEL COLLEGE OF ARTS AND SCIENCE
Converting a Path to a Selection Summary
Paths can be converted into selections.
To convert a path to a new, anti-aliased selection, click the Load Path as a
Selection button at the bottom of the Paths panel.
To apply a feather radius, disable anti-aliasing, or specify a specific operation
involving other selections in the image, use the Make Selection... command in the
Paths panel to open the Make Selection dialog.
Colour Range
The Colour Range selection is a quick way to
make a selection based on one or more colours using a dialog box. It offers multiple
options for previewing a selection in progress.
The Colour Range dialog is opened by going to Select > Colour Range. It has several
options you can set.
Colour Range Options
Select
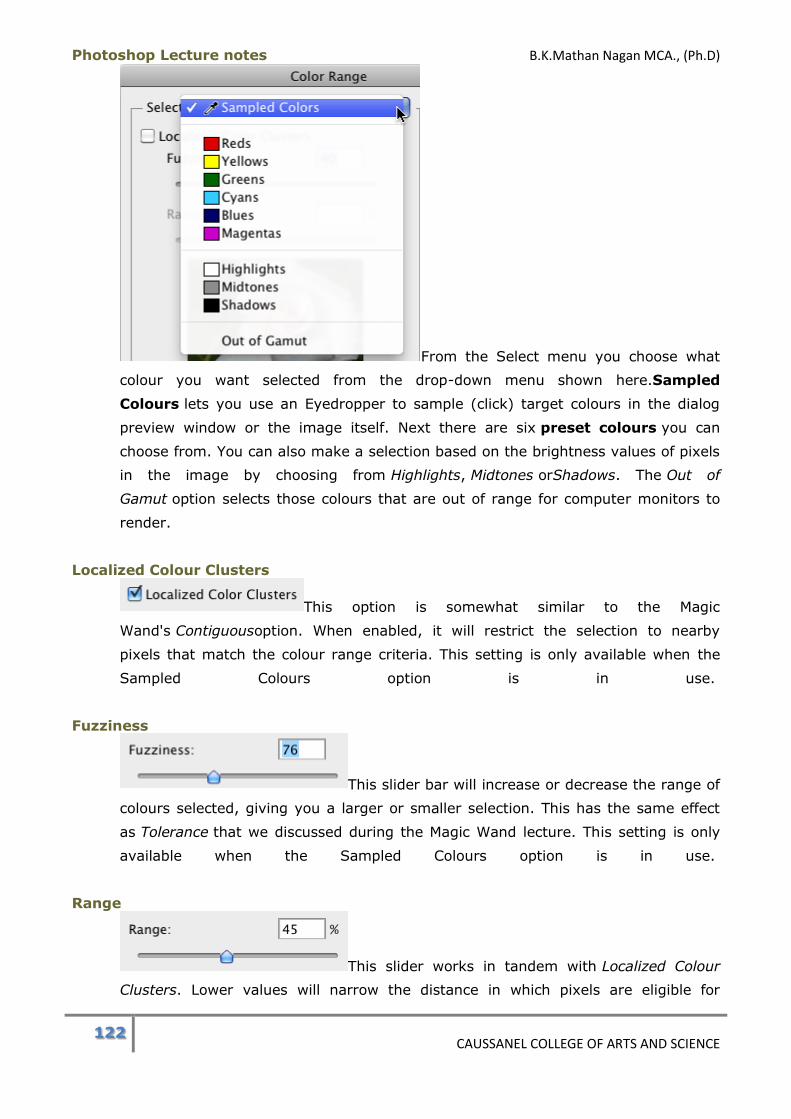
Photoshop Lecture notes B.K.Mathan Nagan MCA., (Ph.D)
122 CAUSSANEL COLLEGE OF ARTS AND SCIENCE
From the Select menu you choose what
colour you want selected from the drop-down menu shown here.Sampled
Colours lets you use an Eyedropper to sample (click) target colours in the dialog
preview window or the image itself. Next there are six preset colours you can
choose from. You can also make a selection based on the brightness values of pixels
in the image by choosing from Highlights, Midtones orShadows. The Out of
Gamut option selects those colours that are out of range for computer monitors to
render.
Localized Colour Clusters
This option is somewhat similar to the Magic
Wand's Contiguousoption. When enabled, it will restrict the selection to nearby
pixels that match the colour range criteria. This setting is only available when the
Sampled Colours option is in use.
Fuzziness
This slider bar will increase or decrease the range of
colours selected, giving you a larger or smaller selection. This has the same effect
as Tolerance that we discussed during the Magic Wand lecture. This setting is only
available when the Sampled Colours option is in use.
Range
This slider works in tandem with Localized Colour
Clusters. Lower values will narrow the distance in which pixels are eligible for

Photoshop Lecture notes B.K.Mathan Nagan MCA., (Ph.D)
123 CAUSSANEL COLLEGE OF ARTS AND SCIENCE
selection.
Selection or Image Buttons
The radio buttons below the preview window simply
toggle between a preview for the black and white selection or a thumbnail of the
image.
The preview window shown here is set to display the image.
This preview window displays the selection as a
greyscale image with the selected areas shown in white.
Selection Preview
This option is unrelated to the thumbnail
preview discussed above. The Selection Preview menu allows you to preview the
image document with the current selection applied as either a greyscale channel, a
black or white background or with a quick mask applied. (Quick masks are covered
in a later module. The red overlay appears over unselected areas of the selection
preview.) These options are helpful depending on the final output of your selection;
you can view at a glance if the selection you have is the one you want.
The examples in the table below show how each of the preview options is displayed
in the image window. The poppies are only partially selected at this point.

Photoshop Lecture notes B.K.Mathan Nagan MCA., (Ph.D)
124 CAUSSANEL COLLEGE OF ARTS AND SCIENCE
Selection Preview Options
None Greyscale
Black Matte White Matte
Quick Mask
Load and Save Buttons
The Load and Save buttons will either save the current selection and settings or
load a saved selection and settings.
Colour Sampling Eyedroppers
The Eyedroppers are used to sample colours to make or modify
selections. You can use these again and again to fine-tune your selection.
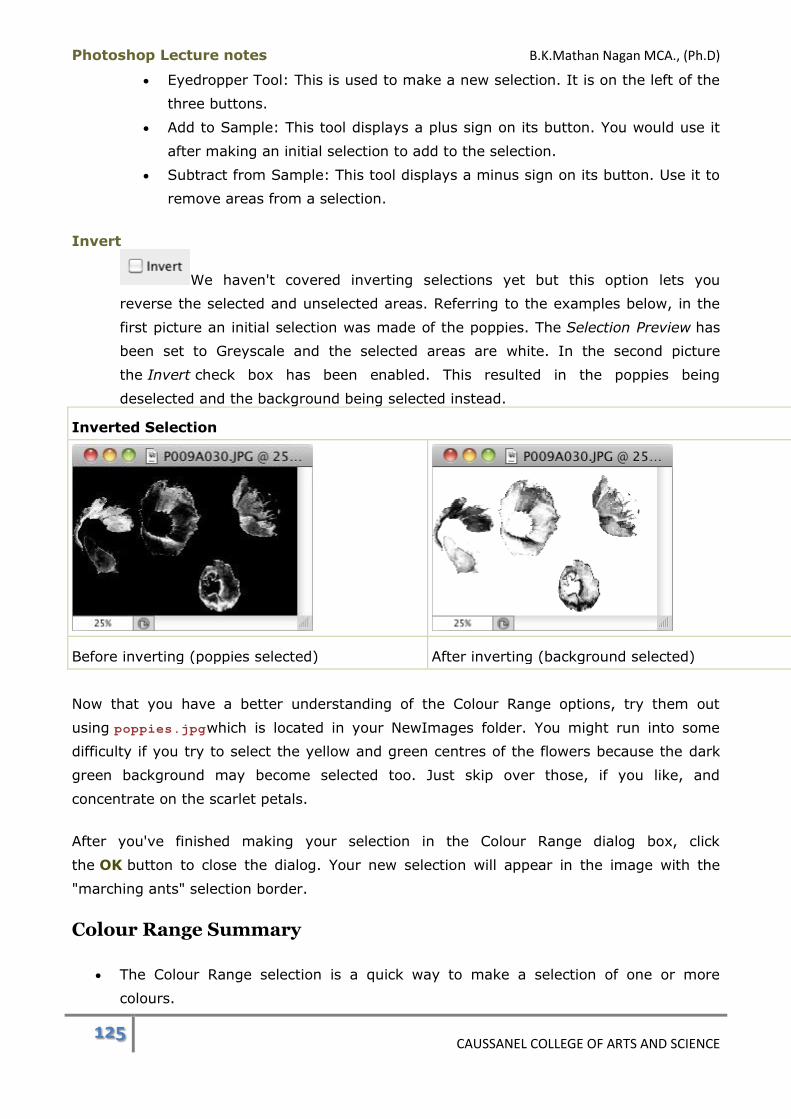
Photoshop Lecture notes B.K.Mathan Nagan MCA., (Ph.D)
125 CAUSSANEL COLLEGE OF ARTS AND SCIENCE
Eyedropper Tool: This is used to make a new selection. It is on the left of the
three buttons.
Add to Sample: This tool displays a plus sign on its button. You would use it
after making an initial selection to add to the selection.
Subtract from Sample: This tool displays a minus sign on its button. Use it to
remove areas from a selection.
Invert
We haven't covered inverting selections yet but this option lets you
reverse the selected and unselected areas. Referring to the examples below, in the
first picture an initial selection was made of the poppies. The Selection Preview has
been set to Greyscale and the selected areas are white. In the second picture
the Invert check box has been enabled. This resulted in the poppies being
deselected and the background being selected instead.
Inverted Selection
Before inverting (poppies selected) After inverting (background selected)
Now that you have a better understanding of the Colour Range options, try them out
using poppies.jpgwhich is located in your NewImages folder. You might run into some
difficulty if you try to select the yellow and green centres of the flowers because the dark
green background may become selected too. Just skip over those, if you like, and
concentrate on the scarlet petals.
After you've finished making your selection in the Colour Range dialog box, click
the OK button to close the dialog. Your new selection will appear in the image with the
"marching ants" selection border.
Colour Range Summary
The Colour Range selection is a quick way to make a selection of one or more
colours.
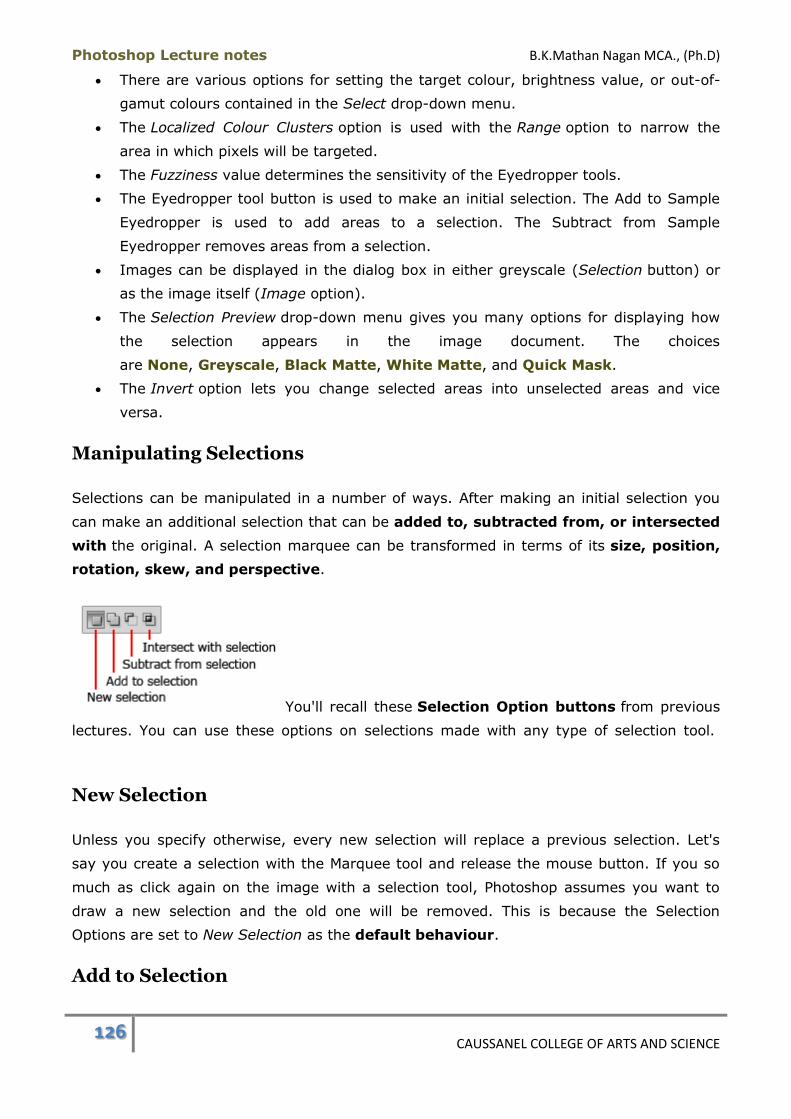
Photoshop Lecture notes B.K.Mathan Nagan MCA., (Ph.D)
126 CAUSSANEL COLLEGE OF ARTS AND SCIENCE
There are various options for setting the target colour, brightness value, or out-of-
gamut colours contained in the Select drop-down menu.
The Localized Colour Clusters option is used with the Range option to narrow the
area in which pixels will be targeted.
The Fuzziness value determines the sensitivity of the Eyedropper tools.
The Eyedropper tool button is used to make an initial selection. The Add to Sample
Eyedropper is used to add areas to a selection. The Subtract from Sample
Eyedropper removes areas from a selection.
Images can be displayed in the dialog box in either greyscale (Selection button) or
as the image itself (Image option).
The Selection Preview drop-down menu gives you many options for displaying how
the selection appears in the image document. The choices
are None, Greyscale, Black Matte, White Matte, and Quick Mask.
The Invert option lets you change selected areas into unselected areas and vice
versa.
Manipulating Selections
Selections can be manipulated in a number of ways. After making an initial selection you
can make an additional selection that can be added to, subtracted from, or intersected
with the original. A selection marquee can be transformed in terms of its size, position,
rotation, skew, and perspective.
You'll recall these Selection Option buttons from previous
lectures. You can use these options on selections made with any type of selection tool.
New Selection
Unless you specify otherwise, every new selection will replace a previous selection. Let's
say you create a selection with the Marquee tool and release the mouse button. If you so
much as click again on the image with a selection tool, Photoshop assumes you want to
draw a new selection and the old one will be removed. This is because the Selection
Options are set to New Selection as the default behaviour.
Add to Selection
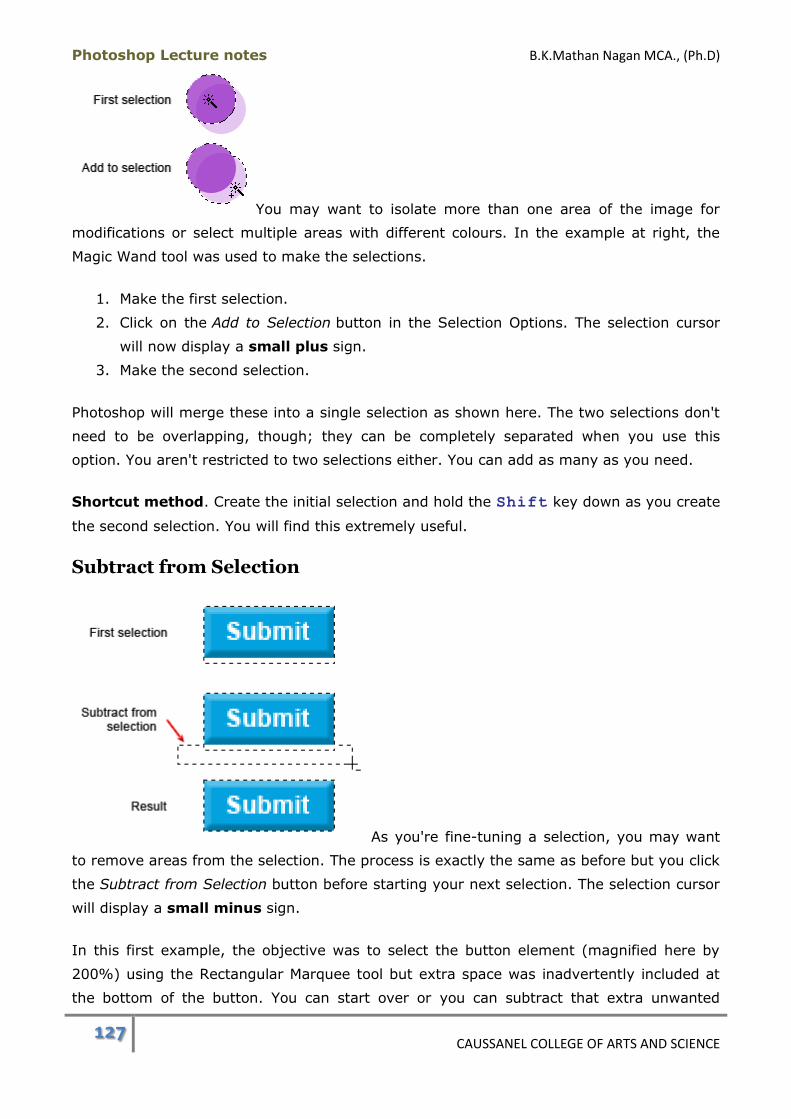
Photoshop Lecture notes B.K.Mathan Nagan MCA., (Ph.D)
127 CAUSSANEL COLLEGE OF ARTS AND SCIENCE
You may want to isolate more than one area of the image for
modifications or select multiple areas with different colours. In the example at right, the
Magic Wand tool was used to make the selections.
1. Make the first selection.
2. Click on the Add to Selection button in the Selection Options. The selection cursor
will now display a small plus sign.
3. Make the second selection.
Photoshop will merge these into a single selection as shown here. The two selections don't
need to be overlapping, though; they can be completely separated when you use this
option. You aren't restricted to two selections either. You can add as many as you need.
Shortcut method. Create the initial selection and hold the Shift key down as you create
the second selection. You will find this extremely useful.
Subtract from Selection
As you're fine-tuning a selection, you may want
to remove areas from the selection. The process is exactly the same as before but you click
the Subtract from Selection button before starting your next selection. The selection cursor
will display a small minus sign.
In this first example, the objective was to select the button element (magnified here by
200%) using the Rectangular Marquee tool but extra space was inadvertently included at
the bottom of the button. You can start over or you can subtract that extra unwanted

Photoshop Lecture notes B.K.Mathan Nagan MCA., (Ph.D)
128 CAUSSANEL COLLEGE OF ARTS AND SCIENCE
portion of the selection. In the second image, after the Subtract from Selection button was
enabled, another marquee was drawn to include the unwanted white pixels. The final image
shows the result.
Shortcut method. Create the initial selection and hold
the Alt (Option) key down as you create the second selection.
You can also use the Subtract from Selection option to "take a bite" out of another
selection. In this example we wanted to create a selection in a crescent moon shape. The
Oval Marquee tool was used with the Shift key held down to draw perfect circles. The
first selection created the circle. The second selection subtracted a portion of the of the first
selection, leaving the crescent-shaped selection as the final result.
Intersect With Selection
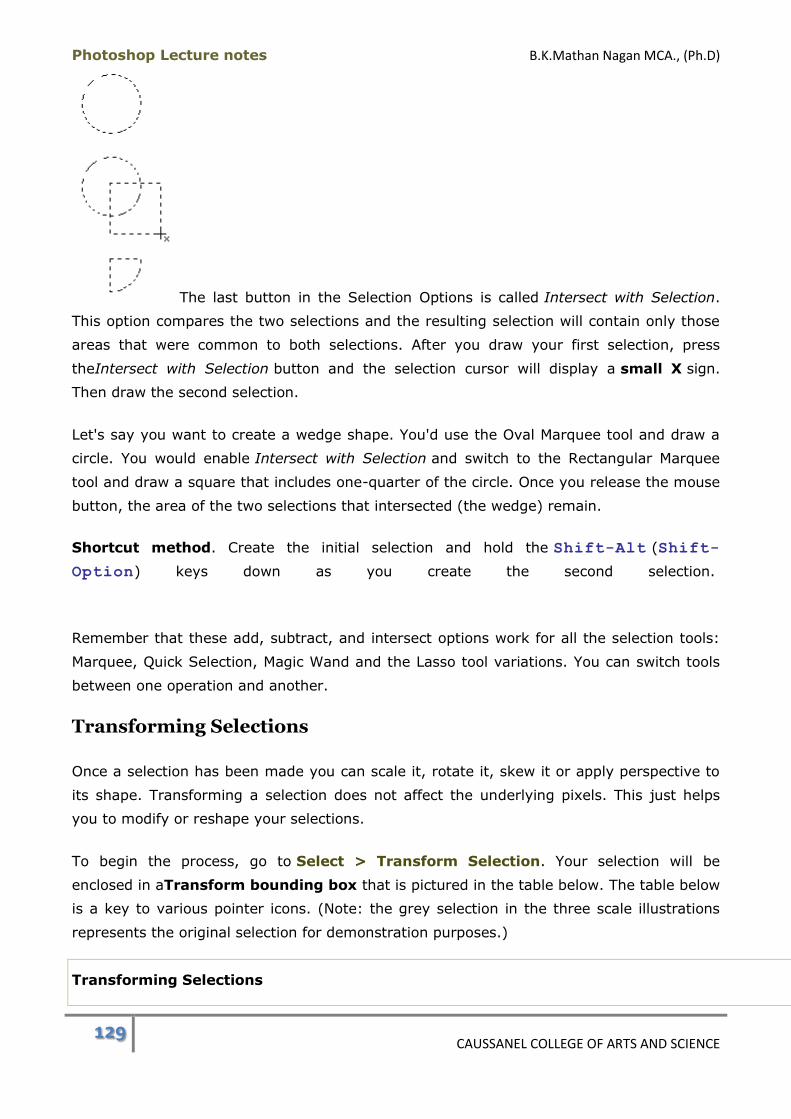
Photoshop Lecture notes B.K.Mathan Nagan MCA., (Ph.D)
129 CAUSSANEL COLLEGE OF ARTS AND SCIENCE
The last button in the Selection Options is called Intersect with Selection.
This option compares the two selections and the resulting selection will contain only those
areas that were common to both selections. After you draw your first selection, press
theIntersect with Selection button and the selection cursor will display a small X sign.
Then draw the second selection.
Let's say you want to create a wedge shape. You'd use the Oval Marquee tool and draw a
circle. You would enable Intersect with Selection and switch to the Rectangular Marquee
tool and draw a square that includes one-quarter of the circle. Once you release the mouse
button, the area of the two selections that intersected (the wedge) remain.
Shortcut method. Create the initial selection and hold the Shift-Alt (Shift-
Option) keys down as you create the second selection.
Remember that these add, subtract, and intersect options work for all the selection tools:
Marquee, Quick Selection, Magic Wand and the Lasso tool variations. You can switch tools
between one operation and another.
Transforming Selections
Once a selection has been made you can scale it, rotate it, skew it or apply perspective to
its shape. Transforming a selection does not affect the underlying pixels. This just helps
you to modify or reshape your selections.
To begin the process, go to Select > Transform Selection. Your selection will be
enclosed in aTransform bounding box that is pictured in the table below. The table below
is a key to various pointer icons. (Note: the grey selection in the three scale illustrations
represents the original selection for demonstration purposes.)
Transforming Selections
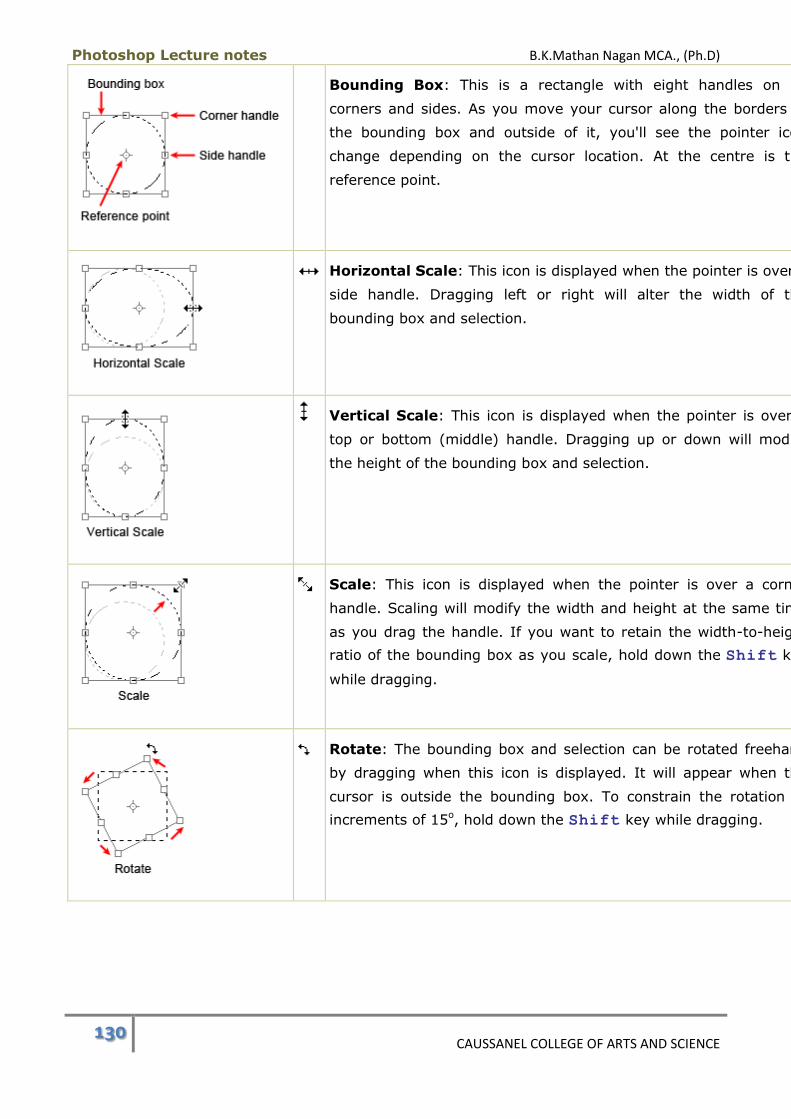
Photoshop Lecture notes B.K.Mathan Nagan MCA., (Ph.D)
130 CAUSSANEL COLLEGE OF ARTS AND SCIENCE
Bounding Box: This is a rectangle with eight handles on its
corners and sides. As you move your cursor along the borders of
the bounding box and outside of it, you'll see the pointer icon
change depending on the cursor location. At the centre is the
reference point.
Horizontal Scale: This icon is displayed when the pointer is over a
side handle. Dragging left or right will alter the width of the
bounding box and selection.
Vertical Scale: This icon is displayed when the pointer is over a
top or bottom (middle) handle. Dragging up or down will modify
the height of the bounding box and selection.
Scale: This icon is displayed when the pointer is over a corner
handle. Scaling will modify the width and height at the same time
as you drag the handle. If you want to retain the width-to-height
ratio of the bounding box as you scale, hold down the Shift key
while dragging.
Rotate: The bounding box and selection can be rotated freehand
by dragging when this icon is displayed. It will appear when the
cursor is outside the bounding box. To constrain the rotation to
increments of 15o, hold down the Shift key while dragging.
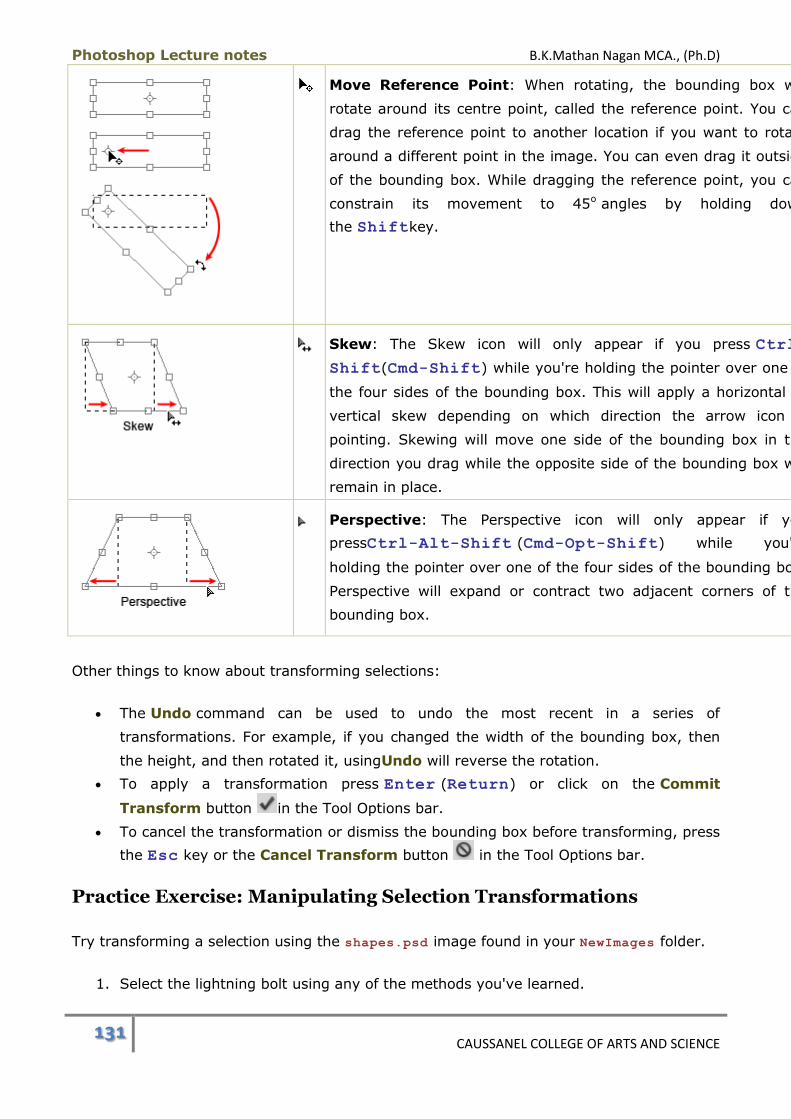
Photoshop Lecture notes B.K.Mathan Nagan MCA., (Ph.D)
131 CAUSSANEL COLLEGE OF ARTS AND SCIENCE
Move Reference Point: When rotating, the bounding box will
rotate around its centre point, called the reference point. You can
drag the reference point to another location if you want to rotate
around a different point in the image. You can even drag it outside
of the bounding box. While dragging the reference point, you can
constrain its movement to 45o angles by holding down
the Shiftkey.
Skew: The Skew icon will only appear if you press Ctrl-
Shift(Cmd-Shift) while you're holding the pointer over one of
the four sides of the bounding box. This will apply a horizontal or
vertical skew depending on which direction the arrow icon is
pointing. Skewing will move one side of the bounding box in the
direction you drag while the opposite side of the bounding box will
remain in place.
Perspective: The Perspective icon will only appear if you
pressCtrl-Alt-Shift (Cmd-Opt-Shift) while you're
holding the pointer over one of the four sides of the bounding box.
Perspective will expand or contract two adjacent corners of the
bounding box.
Other things to know about transforming selections:
The Undo command can be used to undo the most recent in a series of
transformations. For example, if you changed the width of the bounding box, then
the height, and then rotated it, usingUndo will reverse the rotation.
To apply a transformation press Enter (Return) or click on the Commit
Transform button in the Tool Options bar.
To cancel the transformation or dismiss the bounding box before transforming, press
the Esc key or the Cancel Transform button in the Tool Options bar.
Practice Exercise: Manipulating Selection Transformations
Try transforming a selection using the shapes.psd image found in your NewImages folder.
1. Select the lightning bolt using any of the methods you've learned.
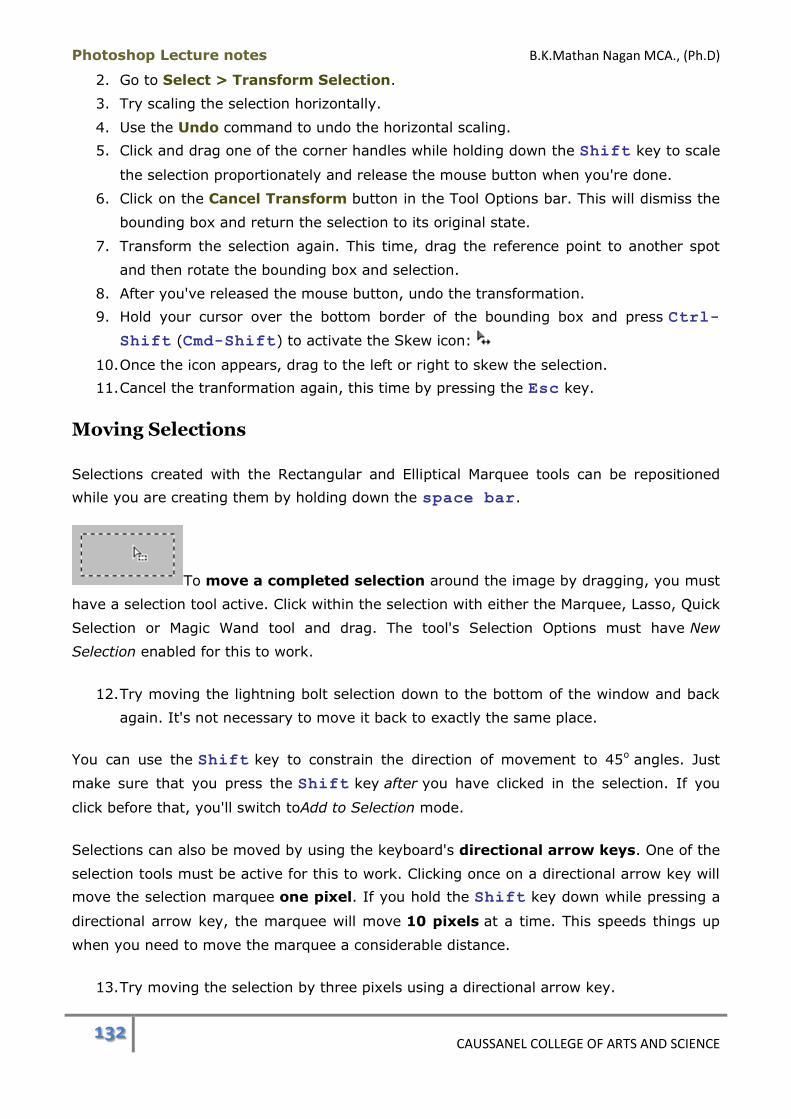
Photoshop Lecture notes B.K.Mathan Nagan MCA., (Ph.D)
132 CAUSSANEL COLLEGE OF ARTS AND SCIENCE
2. Go to Select > Transform Selection.
3. Try scaling the selection horizontally.
4. Use the Undo command to undo the horizontal scaling.
5. Click and drag one of the corner handles while holding down the Shift key to scale
the selection proportionately and release the mouse button when you're done.
6. Click on the Cancel Transform button in the Tool Options bar. This will dismiss the
bounding box and return the selection to its original state.
7. Transform the selection again. This time, drag the reference point to another spot
and then rotate the bounding box and selection.
8. After you've released the mouse button, undo the transformation.
9. Hold your cursor over the bottom border of the bounding box and press Ctrl-
Shift (Cmd-Shift) to activate the Skew icon:
10. Once the icon appears, drag to the left or right to skew the selection.
11. Cancel the tranformation again, this time by pressing the Esc key.
Moving Selections
Selections created with the Rectangular and Elliptical Marquee tools can be repositioned
while you are creating them by holding down the space bar.
To move a completed selection around the image by dragging, you must
have a selection tool active. Click within the selection with either the Marquee, Lasso, Quick
Selection or Magic Wand tool and drag. The tool's Selection Options must have New
Selection enabled for this to work.
12. Try moving the lightning bolt selection down to the bottom of the window and back
again. It's not necessary to move it back to exactly the same place.
You can use the Shift key to constrain the direction of movement to 45o angles. Just
make sure that you press the Shift key after you have clicked in the selection. If you
click before that, you'll switch toAdd to Selection mode.
Selections can also be moved by using the keyboard's directional arrow keys. One of the
selection tools must be active for this to work. Clicking once on a directional arrow key will
move the selection marquee one pixel. If you hold the Shift key down while pressing a
directional arrow key, the marquee will move 10 pixels at a time. This speeds things up
when you need to move the marquee a considerable distance.
13. Try moving the selection by three pixels using a directional arrow key.
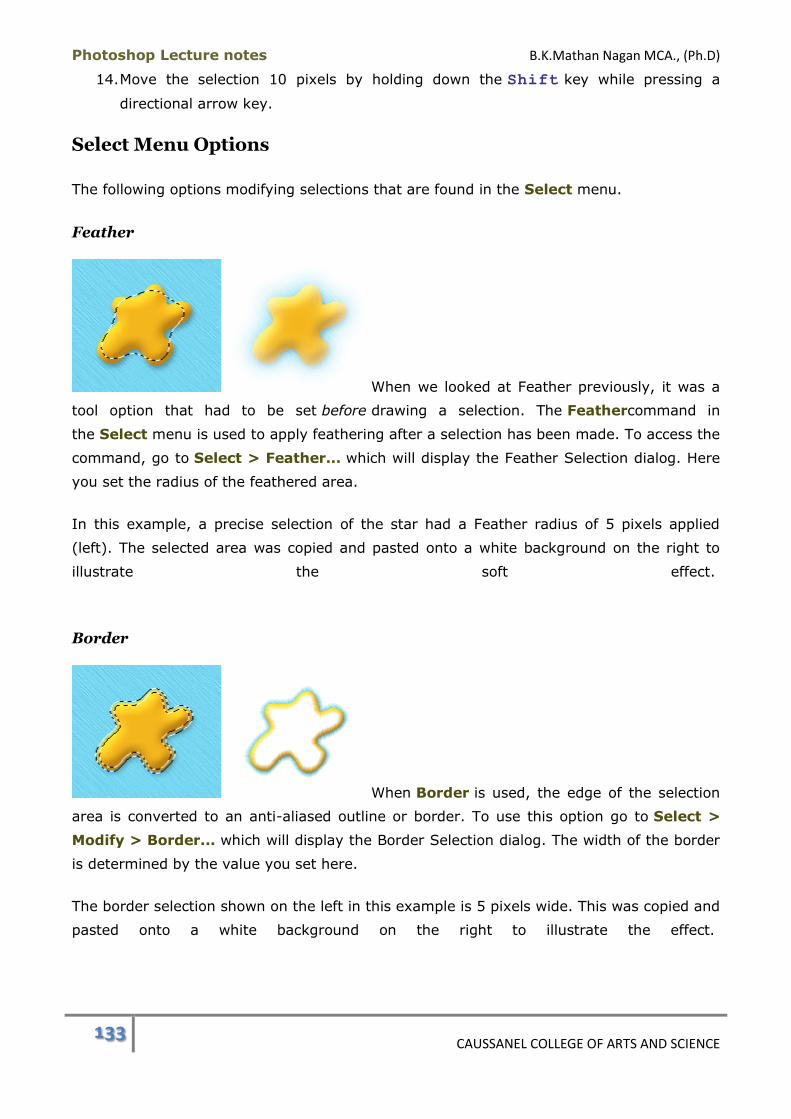
Photoshop Lecture notes B.K.Mathan Nagan MCA., (Ph.D)
133 CAUSSANEL COLLEGE OF ARTS AND SCIENCE
14. Move the selection 10 pixels by holding down the Shift key while pressing a
directional arrow key.
Select Menu Options
The following options modifying selections that are found in the Select menu.
Feather
When we looked at Feather previously, it was a
tool option that had to be set before drawing a selection. The Feathercommand in
the Select menu is used to apply feathering after a selection has been made. To access the
command, go to Select > Feather... which will display the Feather Selection dialog. Here
you set the radius of the feathered area.
In this example, a precise selection of the star had a Feather radius of 5 pixels applied
(left). The selected area was copied and pasted onto a white background on the right to
illustrate the soft effect.
Border
When Border is used, the edge of the selection
area is converted to an anti-aliased outline or border. To use this option go to Select >
Modify > Border... which will display the Border Selection dialog. The width of the border
is determined by the value you set here.
The border selection shown on the left in this example is 5 pixels wide. This was copied and
pasted onto a white background on the right to illustrate the effect.
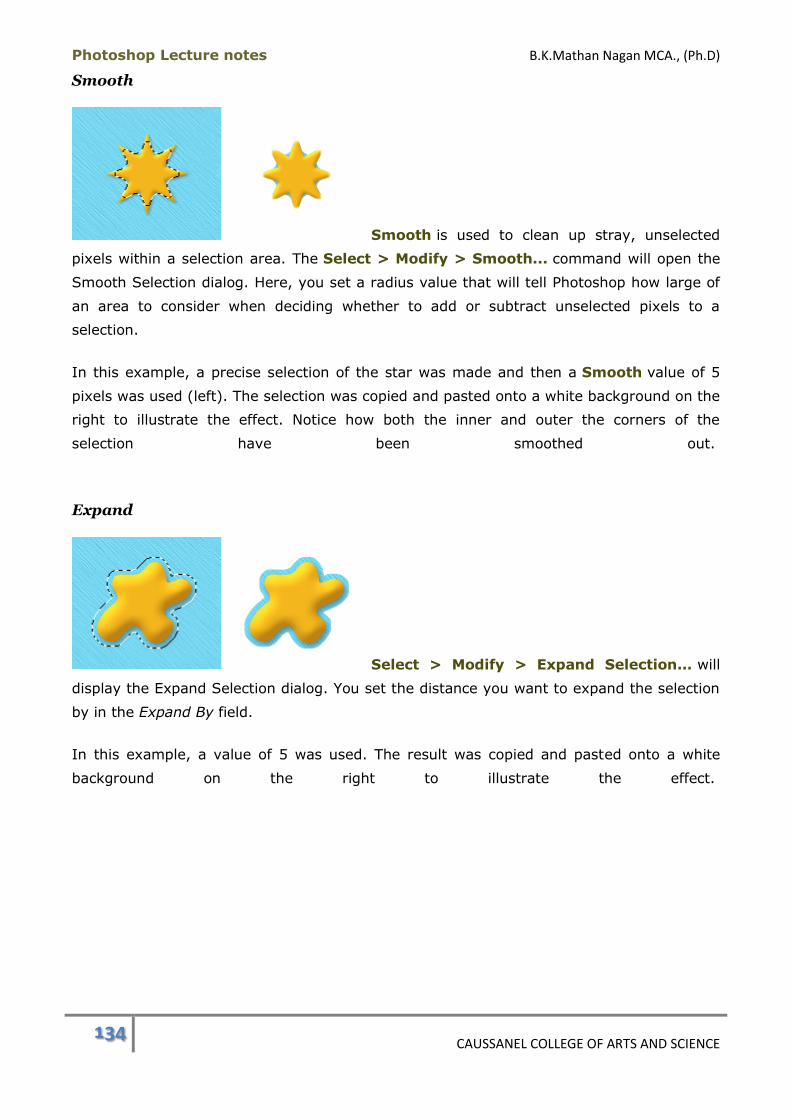
Photoshop Lecture notes B.K.Mathan Nagan MCA., (Ph.D)
134 CAUSSANEL COLLEGE OF ARTS AND SCIENCE
Smooth
Smooth is used to clean up stray, unselected
pixels within a selection area. The Select > Modify > Smooth... command will open the
Smooth Selection dialog. Here, you set a radius value that will tell Photoshop how large of
an area to consider when deciding whether to add or subtract unselected pixels to a
selection.
In this example, a precise selection of the star was made and then a Smooth value of 5
pixels was used (left). The selection was copied and pasted onto a white background on the
right to illustrate the effect. Notice how both the inner and outer the corners of the
selection have been smoothed out.
Expand
Select > Modify > Expand Selection... will
display the Expand Selection dialog. You set the distance you want to expand the selection
by in the Expand By field.
In this example, a value of 5 was used. The result was copied and pasted onto a white
background on the right to illustrate the effect.

Photoshop Lecture notes B.K.Mathan Nagan MCA., (Ph.D)
135 CAUSSANEL COLLEGE OF ARTS AND SCIENCE
Contract
Select > Modify > Contract Selection... will
display the Contract Selection dialog. You set the distance you want to contract the
selection by in the Contract By field.
In this example, a value of 5 was used. The result was copied and pasted onto a white
background on the right to illustrate the effect.
Grow
Grow has a similar effect to adding to a
selection using the Magic Wand tool. In fact, it uses the current Tolerancesetting for the
Magic Wand when it is applied. The command is accessed by going to Select > Grow.
There are no options for Grow. It will increase the selection to include adjacent
pixels that fall within the tolerance range set for the Magic Wand tool. Using the command
repeatedly will add more pixels to the selection each time.
In this example, the centre of the star was clicked on with the Magic Wand set to
a Tolerance of 32 (left) and Contiguous was enabled. The right image shows how the
selection changed after the Growcommand was used.
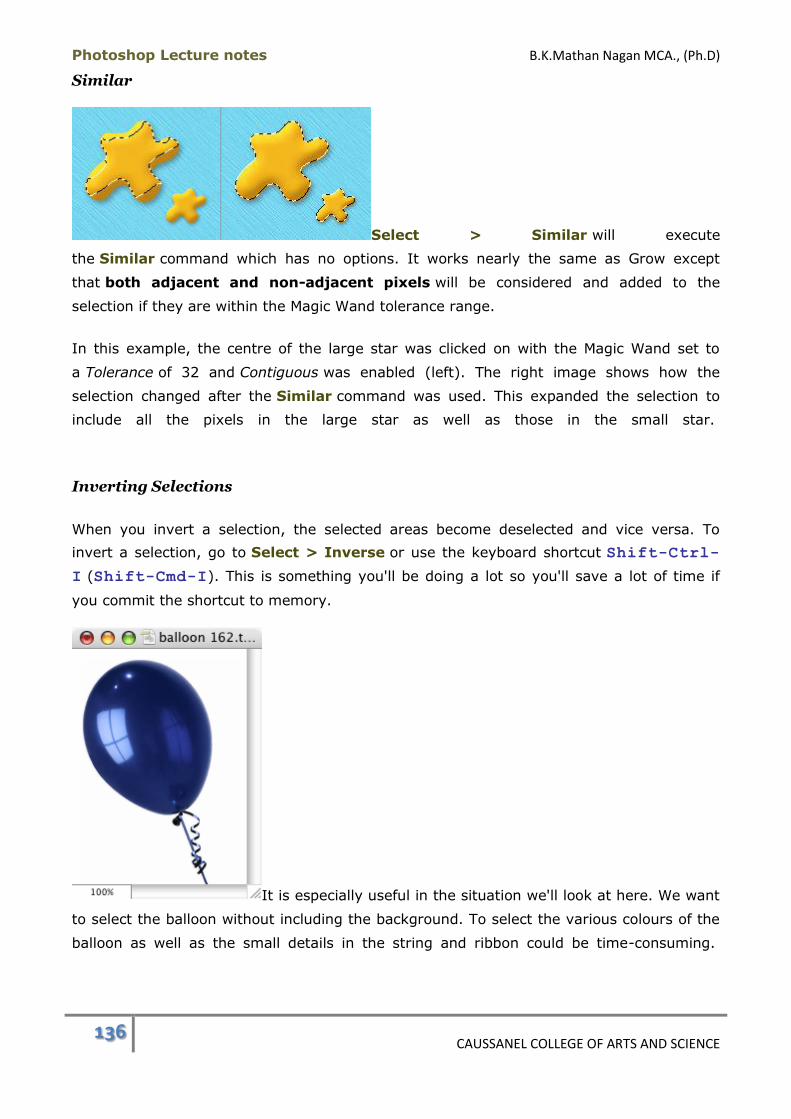
Photoshop Lecture notes B.K.Mathan Nagan MCA., (Ph.D)
136 CAUSSANEL COLLEGE OF ARTS AND SCIENCE
Similar
Select > Similar will execute
the Similar command which has no options. It works nearly the same as Grow except
that both adjacent and non-adjacent pixels will be considered and added to the
selection if they are within the Magic Wand tolerance range.
In this example, the centre of the large star was clicked on with the Magic Wand set to
a Tolerance of 32 and Contiguous was enabled (left). The right image shows how the
selection changed after the Similar command was used. This expanded the selection to
include all the pixels in the large star as well as those in the small star.
Inverting Selections
When you invert a selection, the selected areas become deselected and vice versa. To
invert a selection, go to Select > Inverse or use the keyboard shortcut Shift-Ctrl-
I (Shift-Cmd-I). This is something you'll be doing a lot so you'll save a lot of time if
you commit the shortcut to memory.
It is especially useful in the situation we'll look at here. We want
to select the balloon without including the background. To select the various colours of the
balloon as well as the small details in the string and ribbon could be time-consuming.

Photoshop Lecture notes B.K.Mathan Nagan MCA., (Ph.D)
137 CAUSSANEL COLLEGE OF ARTS AND SCIENCE
Instead, we're going to select the background and then invert
the selection so the balloon itself is selected. The Magic Wand tool was used to selectonly
the background. Diagonal lines were added to illustrate the selected pixels.
Then the Inverse command was applied. After the selection
was inverted, the selection enclosed all the pixels except for the background. This gave
us the selection we wanted in two quick steps.
15. Open the History panel and click on the state where you made your initial selection
around the lightning bolt.
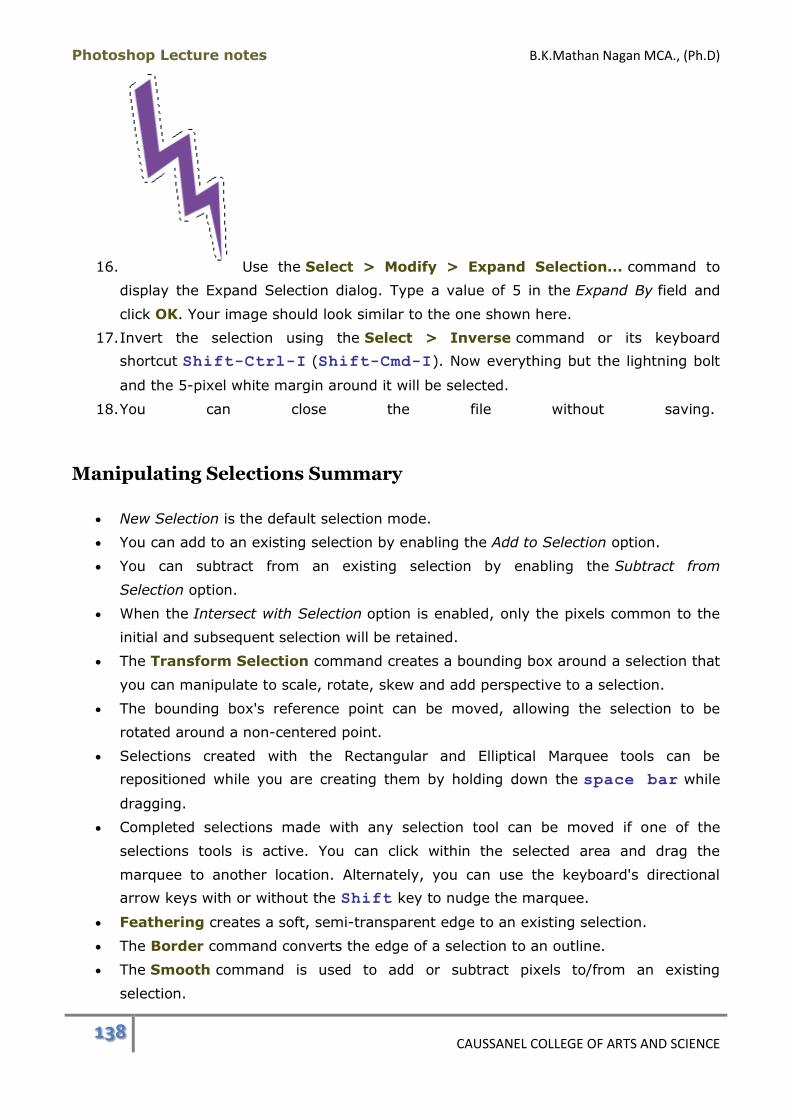
Photoshop Lecture notes B.K.Mathan Nagan MCA., (Ph.D)
138 CAUSSANEL COLLEGE OF ARTS AND SCIENCE
16. Use the Select > Modify > Expand Selection... command to
display the Expand Selection dialog. Type a value of 5 in the Expand By field and
click OK. Your image should look similar to the one shown here.
17. Invert the selection using the Select > Inverse command or its keyboard
shortcut Shift-Ctrl-I (Shift-Cmd-I). Now everything but the lightning bolt
and the 5-pixel white margin around it will be selected.
18. You can close the file without saving.
Manipulating Selections Summary
New Selection is the default selection mode.
You can add to an existing selection by enabling the Add to Selection option.
You can subtract from an existing selection by enabling the Subtract from
Selection option.
When the Intersect with Selection option is enabled, only the pixels common to the
initial and subsequent selection will be retained.
The Transform Selection command creates a bounding box around a selection that
you can manipulate to scale, rotate, skew and add perspective to a selection.
The bounding box's reference point can be moved, allowing the selection to be
rotated around a non-centered point.
Selections created with the Rectangular and Elliptical Marquee tools can be
repositioned while you are creating them by holding down the space bar while
dragging.
Completed selections made with any selection tool can be moved if one of the
selections tools is active. You can click within the selected area and drag the
marquee to another location. Alternately, you can use the keyboard's directional
arrow keys with or without the Shift key to nudge the marquee.
Feathering creates a soft, semi-transparent edge to an existing selection.
The Border command converts the edge of a selection to an outline.
The Smooth command is used to add or subtract pixels to/from an existing
selection.
Photoshop Lecture notes B.K.Mathan Nagan MCA., (Ph.D)
139 CAUSSANEL COLLEGE OF ARTS AND SCIENCE
Expand will extend the boundary of a selection by the designated amount.
Contract will shrink a selection by the designated amount.
Grow adds adjacent pixels to a selection when they fall within the Magic Wand's
current Tolerancerange.
Similar adds adjacent and non-adjacent pixels to a selection when they fall within
the Magic Wand's current Tolerance range.
Manipulating Selections Keyboard Shortcuts:
Add to Selection: Shift while making a subsequent selection
Subtract from Selection: Alt (Option) while making a subsequent selection
Intersect with Selection: Shift-Alt (Shift-Option) while making a
subsequent selection
Transform Skew: Ctrl-Shift (Cmd-Shift) while in Transform Selection mode
Transform Perspective: Ctrl-Alt-Shift (Cmd-Opt-Shift) while in
Transform Selection mode
Commit Transform: Enter (Return)
Cancel Transform: Esc
Invert selection: Shift-Ctrl-I (Shift-Cmd-I)
Nudge a selection one pixel: Press a directional arrow key
Nudge a selection 10 pixels: Press Shift plus a directional arrow key
Colour
Overview
In this module you'll learn about using colour in Photoshop. It covers colour modes, setting
colours, the Colour and Swatches panels, mixing your own colours using the colour picker,
and using the Eyedropper tool to sample colours from images.
Here is a summary of the topics in this module:
(1) Colour Modes
Colour modes are the colour spaces you can work in when using Photoshop that are
based on colour models. The different colour modes are explained and procedures
for converting from one mode to another are described.
(2) Setting the Foreground and Background Colours
The Toolbox contains a foreground and background colour swatch. This lecture
describes working with these controls.
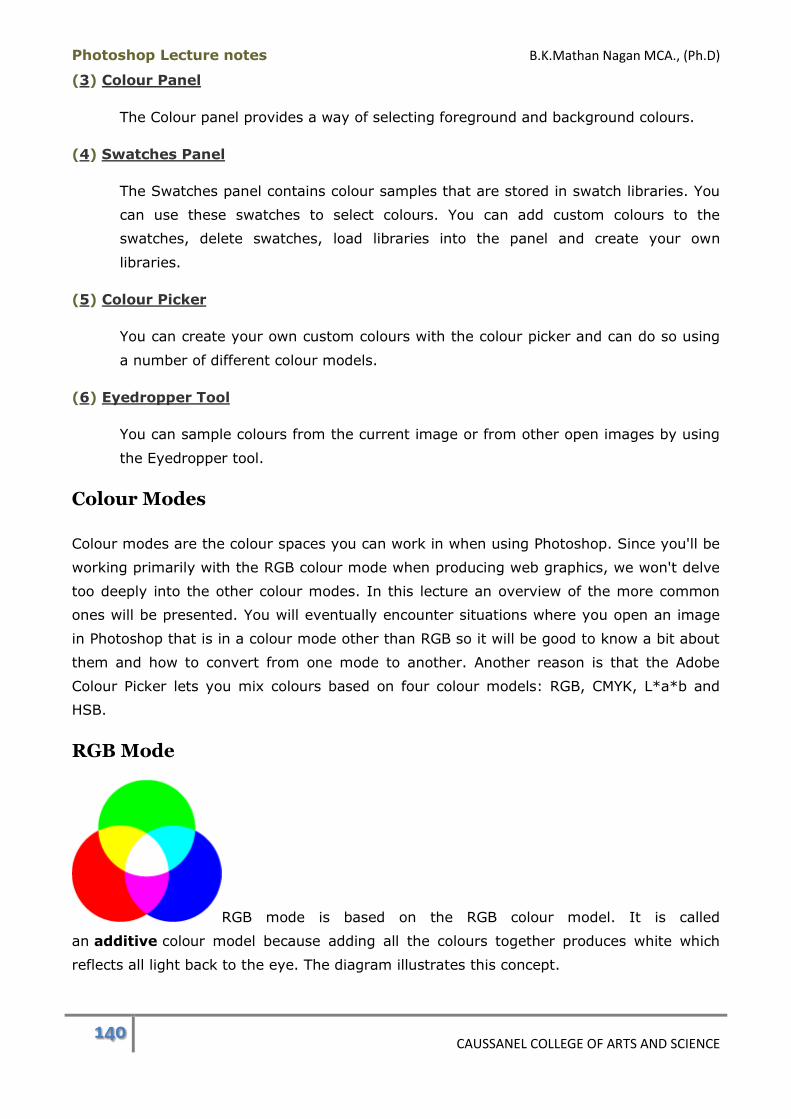
Photoshop Lecture notes B.K.Mathan Nagan MCA., (Ph.D)
140 CAUSSANEL COLLEGE OF ARTS AND SCIENCE
(3) Colour Panel
The Colour panel provides a way of selecting foreground and background colours.
(4) Swatches Panel
The Swatches panel contains colour samples that are stored in swatch libraries. You
can use these swatches to select colours. You can add custom colours to the
swatches, delete swatches, load libraries into the panel and create your own
libraries.
(5) Colour Picker
You can create your own custom colours with the colour picker and can do so using
a number of different colour models.
(6) Eyedropper Tool
You can sample colours from the current image or from other open images by using
the Eyedropper tool.
Colour Modes
Colour modes are the colour spaces you can work in when using Photoshop. Since you'll be
working primarily with the RGB colour mode when producing web graphics, we won't delve
too deeply into the other colour modes. In this lecture an overview of the more common
ones will be presented. You will eventually encounter situations where you open an image
in Photoshop that is in a colour mode other than RGB so it will be good to know a bit about
them and how to convert from one mode to another. Another reason is that the Adobe
Colour Picker lets you mix colours based on four colour models: RGB, CMYK, L*a*b and
HSB.
RGB Mode
RGB mode is based on the RGB colour model. It is called
an additive colour model because adding all the colours together produces white which
reflects all light back to the eye. The diagram illustrates this concept.
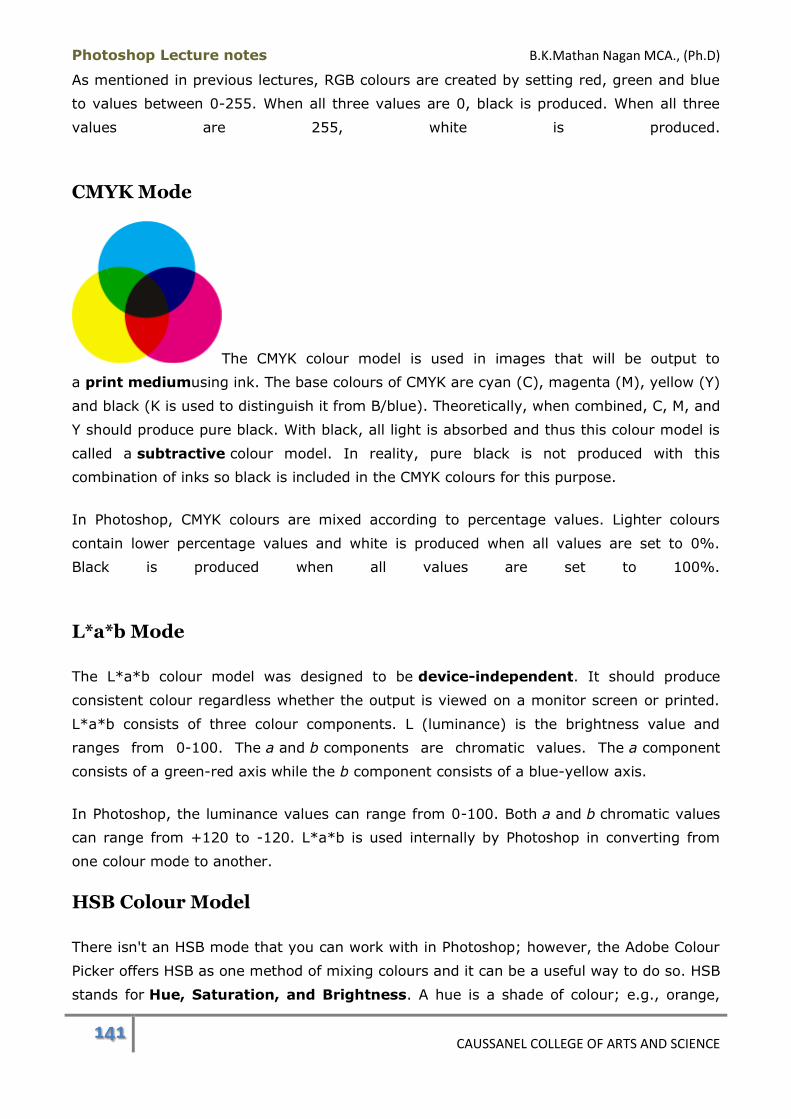
Photoshop Lecture notes B.K.Mathan Nagan MCA., (Ph.D)
141 CAUSSANEL COLLEGE OF ARTS AND SCIENCE
As mentioned in previous lectures, RGB colours are created by setting red, green and blue
to values between 0-255. When all three values are 0, black is produced. When all three
values are 255, white is produced.
CMYK Mode
The CMYK colour model is used in images that will be output to
a print mediumusing ink. The base colours of CMYK are cyan (C), magenta (M), yellow (Y)
and black (K is used to distinguish it from B/blue). Theoretically, when combined, C, M, and
Y should produce pure black. With black, all light is absorbed and thus this colour model is
called a subtractive colour model. In reality, pure black is not produced with this
combination of inks so black is included in the CMYK colours for this purpose.
In Photoshop, CMYK colours are mixed according to percentage values. Lighter colours
contain lower percentage values and white is produced when all values are set to 0%.
Black is produced when all values are set to 100%.
L*a*b Mode
The L*a*b colour model was designed to be device-independent. It should produce
consistent colour regardless whether the output is viewed on a monitor screen or printed.
L*a*b consists of three colour components. L (luminance) is the brightness value and
ranges from 0-100. The a and b components are chromatic values. The a component
consists of a green-red axis while the b component consists of a blue-yellow axis.
In Photoshop, the luminance values can range from 0-100. Both a and b chromatic values
can range from +120 to -120. L*a*b is used internally by Photoshop in converting from
one colour mode to another.
HSB Colour Model
There isn't an HSB mode that you can work with in Photoshop; however, the Adobe Colour
Picker offers HSB as one method of mixing colours and it can be a useful way to do so. HSB
stands for Hue, Saturation, and Brightness. A hue is a shade of colour; e.g., orange,

Photoshop Lecture notes B.K.Mathan Nagan MCA., (Ph.D)
142 CAUSSANEL COLLEGE OF ARTS AND SCIENCE
blue, purple. Saturation determines the strength of the hue. Brightness is the
lightness/darkness of a colour.
For example, let's say you add red food colouring to a glass of water. The red dye in the
food colouring is the hue. One drop will result in a weak colour that is equivalent to a low
saturation value. If you add six drops of food colouring, the result will be highly saturated.
If you shine a light on your tinted glass of water, the colour will appear very bright but if
you view it in a darkened room, the effect will be much darker.
Hue values range from 0-360 degrees, representing a location on a colour wheel.
Saturation and brightness values are expressed as percentages. The image below shows
two different interfaces for creating HSB colours. Both have a separate control for
brightness values. The hue and saturation areas are combined, one in a circular fashion
and one in a linear style. We added arrows to the drawings to indicate how different hue
(H) and saturation (S) values are chosen. Brightness controls are designated with a red B.
HSB colours can be tweaked in a more intuitive way than RGB. Let's say you've mixed a
colour that looks just right except that it is a little lighter or darker than you'd like it to be.
Changing the brightness value will correct it and it won't disturb the hue or saturation of
the colour. Likewise with saturation values. If you just need to fade or strengthen a colour's
saturation without altering its hue or brightness, using HSB can be very useful for that.
Greyscale Mode
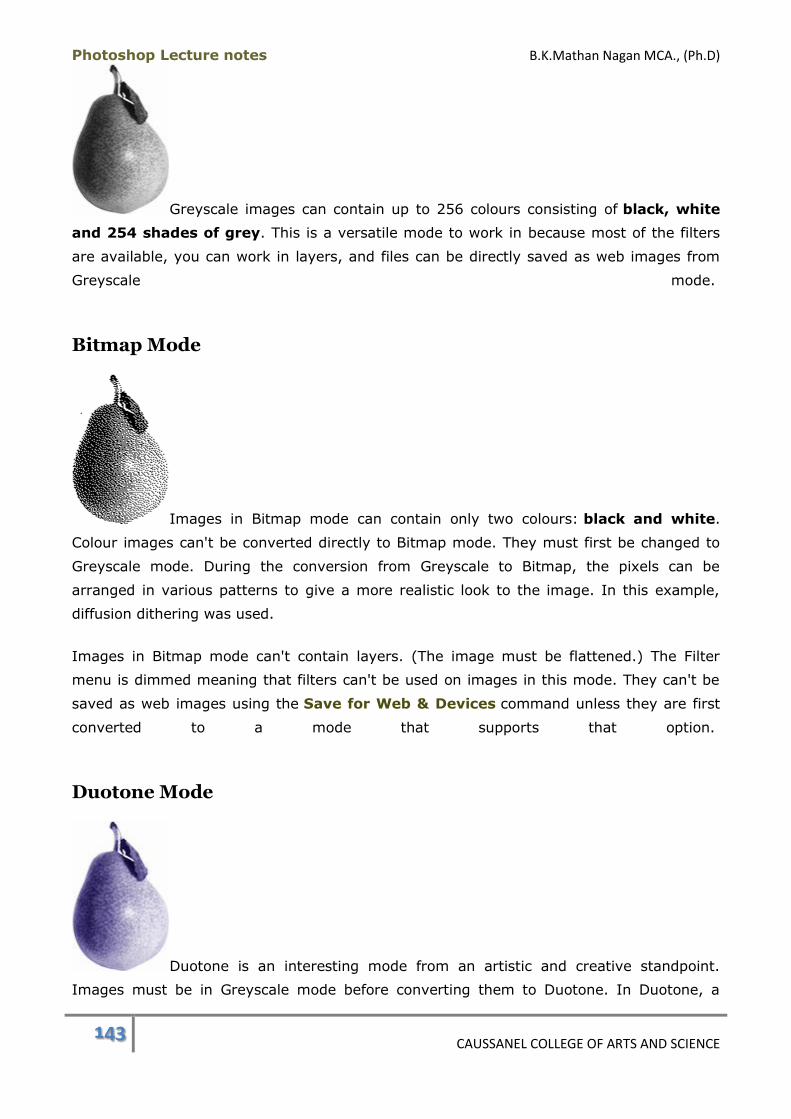
Photoshop Lecture notes B.K.Mathan Nagan MCA., (Ph.D)
143 CAUSSANEL COLLEGE OF ARTS AND SCIENCE
Greyscale images can contain up to 256 colours consisting of black, white
and 254 shades of grey. This is a versatile mode to work in because most of the filters
are available, you can work in layers, and files can be directly saved as web images from
Greyscale mode.
Bitmap Mode
Images in Bitmap mode can contain only two colours: black and white.
Colour images can't be converted directly to Bitmap mode. They must first be changed to
Greyscale mode. During the conversion from Greyscale to Bitmap, the pixels can be
arranged in various patterns to give a more realistic look to the image. In this example,
diffusion dithering was used.
Images in Bitmap mode can't contain layers. (The image must be flattened.) The Filter
menu is dimmed meaning that filters can't be used on images in this mode. They can't be
saved as web images using the Save for Web & Devices command unless they are first
converted to a mode that supports that option.
Duotone Mode
Duotone is an interesting mode from an artistic and creative standpoint.
Images must be in Greyscale mode before converting them to Duotone. In Duotone, a
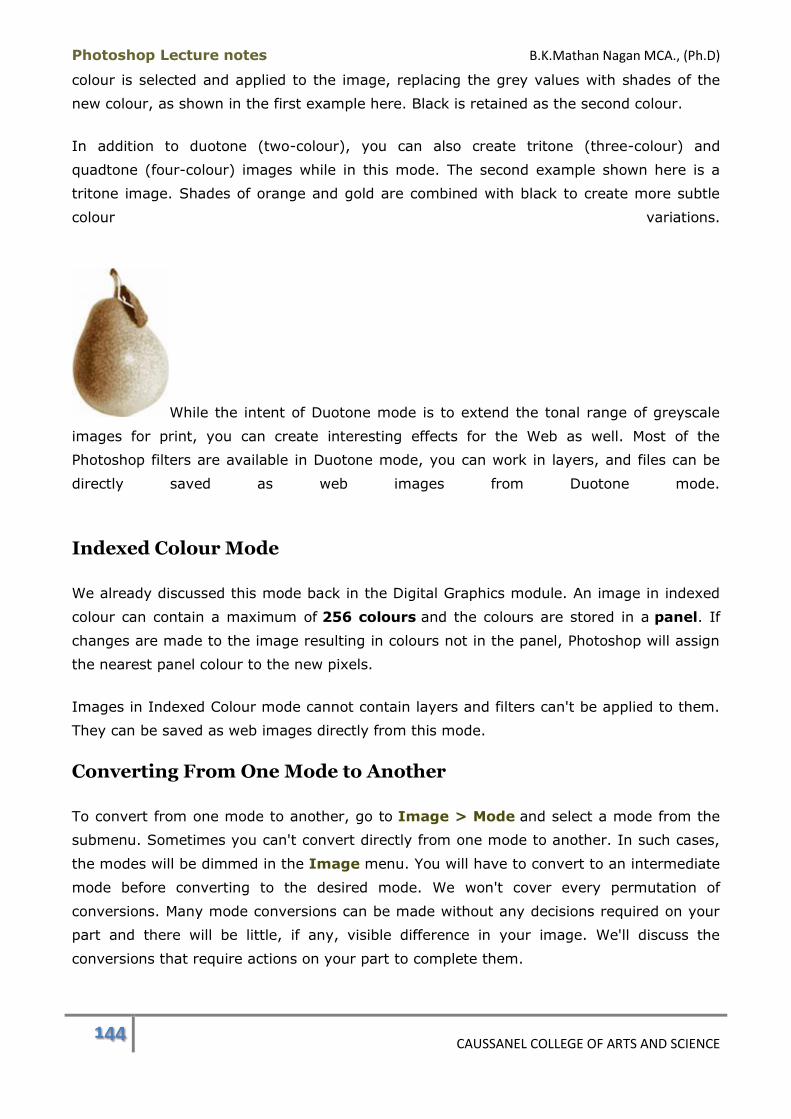
Photoshop Lecture notes B.K.Mathan Nagan MCA., (Ph.D)
144 CAUSSANEL COLLEGE OF ARTS AND SCIENCE
colour is selected and applied to the image, replacing the grey values with shades of the
new colour, as shown in the first example here. Black is retained as the second colour.
In addition to duotone (two-colour), you can also create tritone (three-colour) and
quadtone (four-colour) images while in this mode. The second example shown here is a
tritone image. Shades of orange and gold are combined with black to create more subtle
colour variations.
While the intent of Duotone mode is to extend the tonal range of greyscale
images for print, you can create interesting effects for the Web as well. Most of the
Photoshop filters are available in Duotone mode, you can work in layers, and files can be
directly saved as web images from Duotone mode.
Indexed Colour Mode
We already discussed this mode back in the Digital Graphics module. An image in indexed
colour can contain a maximum of 256 colours and the colours are stored in a panel. If
changes are made to the image resulting in colours not in the panel, Photoshop will assign
the nearest panel colour to the new pixels.
Images in Indexed Colour mode cannot contain layers and filters can't be applied to them.
They can be saved as web images directly from this mode.
Converting From One Mode to Another
To convert from one mode to another, go to Image > Mode and select a mode from the
submenu. Sometimes you can't convert directly from one mode to another. In such cases,
the modes will be dimmed in the Image menu. You will have to convert to an intermediate
mode before converting to the desired mode. We won't cover every permutation of
conversions. Many mode conversions can be made without any decisions required on your
part and there will be little, if any, visible difference in your image. We'll discuss the
conversions that require actions on your part to complete them.
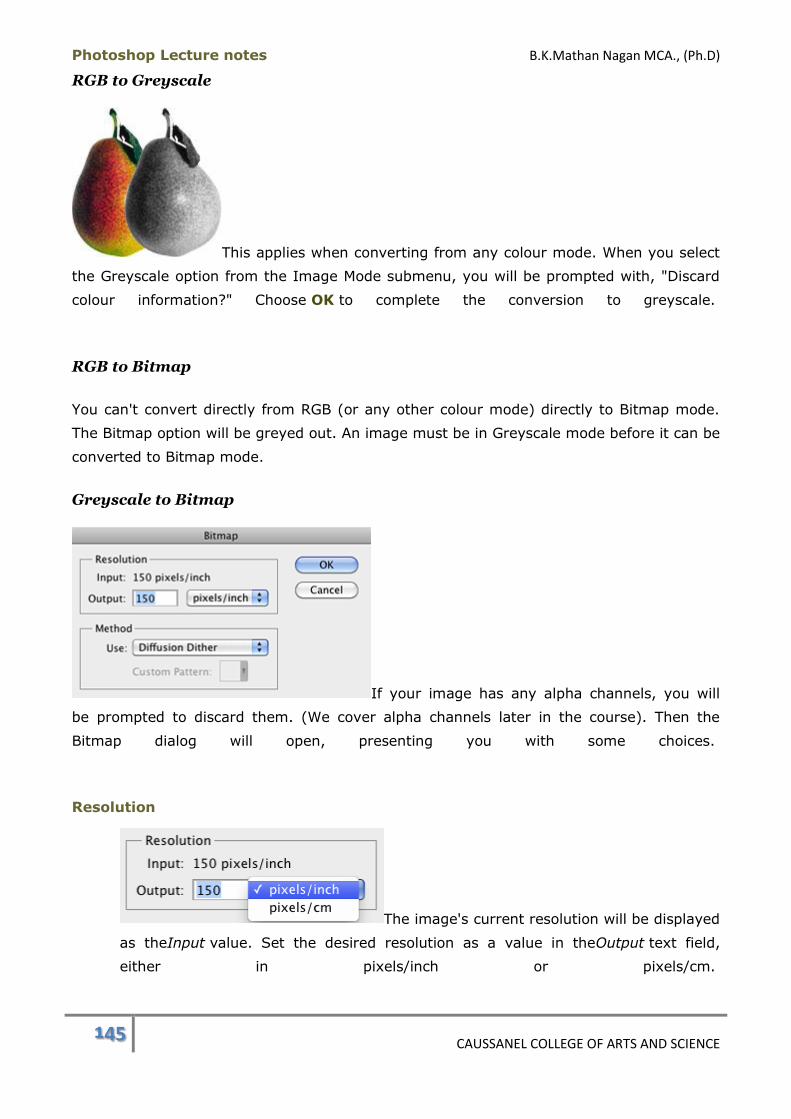
Photoshop Lecture notes B.K.Mathan Nagan MCA., (Ph.D)
145 CAUSSANEL COLLEGE OF ARTS AND SCIENCE
RGB to Greyscale
This applies when converting from any colour mode. When you select
the Greyscale option from the Image Mode submenu, you will be prompted with, "Discard
colour information?" Choose OK to complete the conversion to greyscale.
RGB to Bitmap
You can't convert directly from RGB (or any other colour mode) directly to Bitmap mode.
The Bitmap option will be greyed out. An image must be in Greyscale mode before it can be
converted to Bitmap mode.
Greyscale to Bitmap
If your image has any alpha channels, you will
be prompted to discard them. (We cover alpha channels later in the course). Then the
Bitmap dialog will open, presenting you with some choices.
Resolution
The image's current resolution will be displayed
as theInput value. Set the desired resolution as a value in theOutput text field,
either in pixels/inch or pixels/cm.
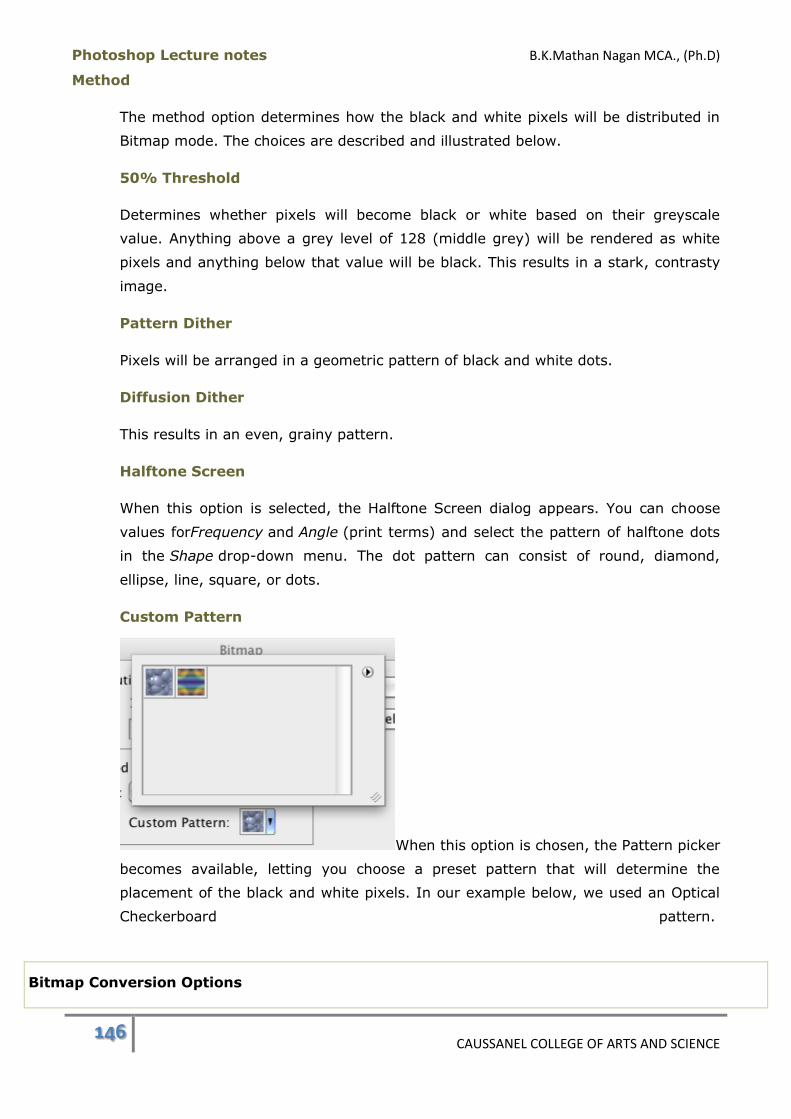
Photoshop Lecture notes B.K.Mathan Nagan MCA., (Ph.D)
146 CAUSSANEL COLLEGE OF ARTS AND SCIENCE
Method
The method option determines how the black and white pixels will be distributed in
Bitmap mode. The choices are described and illustrated below.
50% Threshold
Determines whether pixels will become black or white based on their greyscale
value. Anything above a grey level of 128 (middle grey) will be rendered as white
pixels and anything below that value will be black. This results in a stark, contrasty
image.
Pattern Dither
Pixels will be arranged in a geometric pattern of black and white dots.
Diffusion Dither
This results in an even, grainy pattern.
Halftone Screen
When this option is selected, the Halftone Screen dialog appears. You can choose
values forFrequency and Angle (print terms) and select the pattern of halftone dots
in the Shape drop-down menu. The dot pattern can consist of round, diamond,
ellipse, line, square, or dots.
Custom Pattern
When this option is chosen, the Pattern picker
becomes available, letting you choose a preset pattern that will determine the
placement of the black and white pixels. In our example below, we used an Optical
Checkerboard pattern.
Bitmap Conversion Options
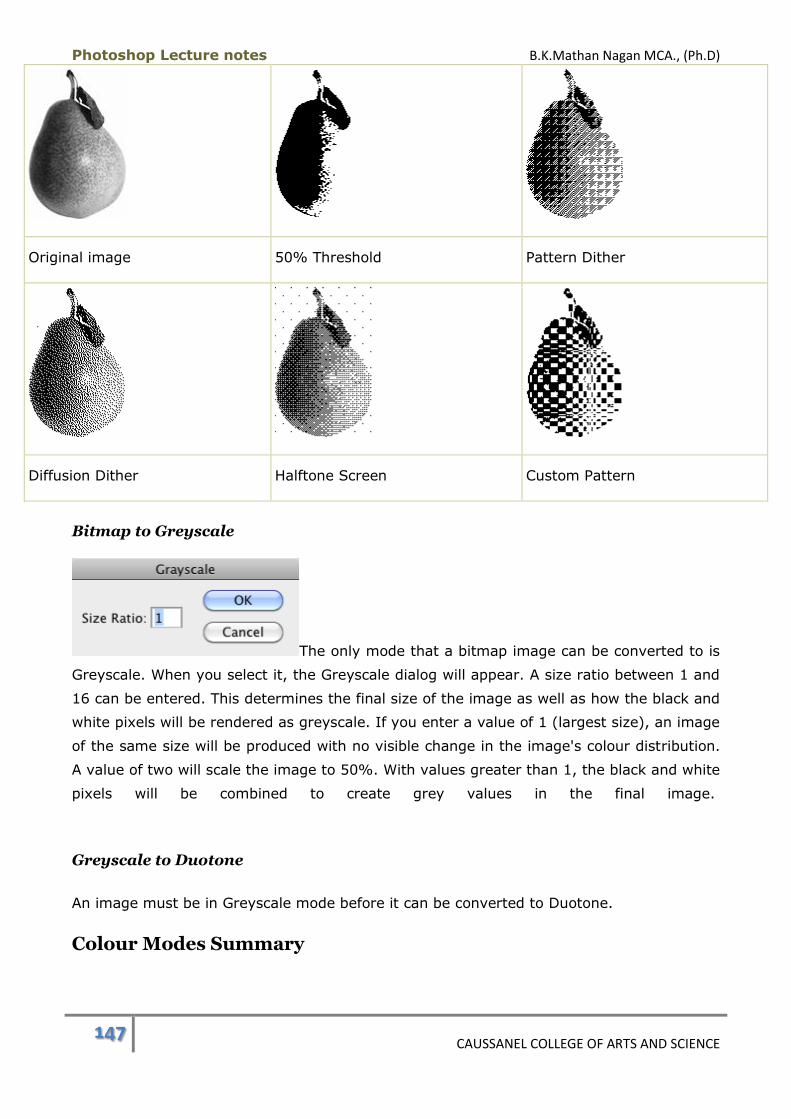
Photoshop Lecture notes B.K.Mathan Nagan MCA., (Ph.D)
147 CAUSSANEL COLLEGE OF ARTS AND SCIENCE
Original image 50% Threshold Pattern Dither
Diffusion Dither Halftone Screen Custom Pattern
Bitmap to Greyscale
The only mode that a bitmap image can be converted to is
Greyscale. When you select it, the Greyscale dialog will appear. A size ratio between 1 and
16 can be entered. This determines the final size of the image as well as how the black and
white pixels will be rendered as greyscale. If you enter a value of 1 (largest size), an image
of the same size will be produced with no visible change in the image's colour distribution.
A value of two will scale the image to 50%. With values greater than 1, the black and white
pixels will be combined to create grey values in the final image.
Greyscale to Duotone
An image must be in Greyscale mode before it can be converted to Duotone.
Colour Modes Summary
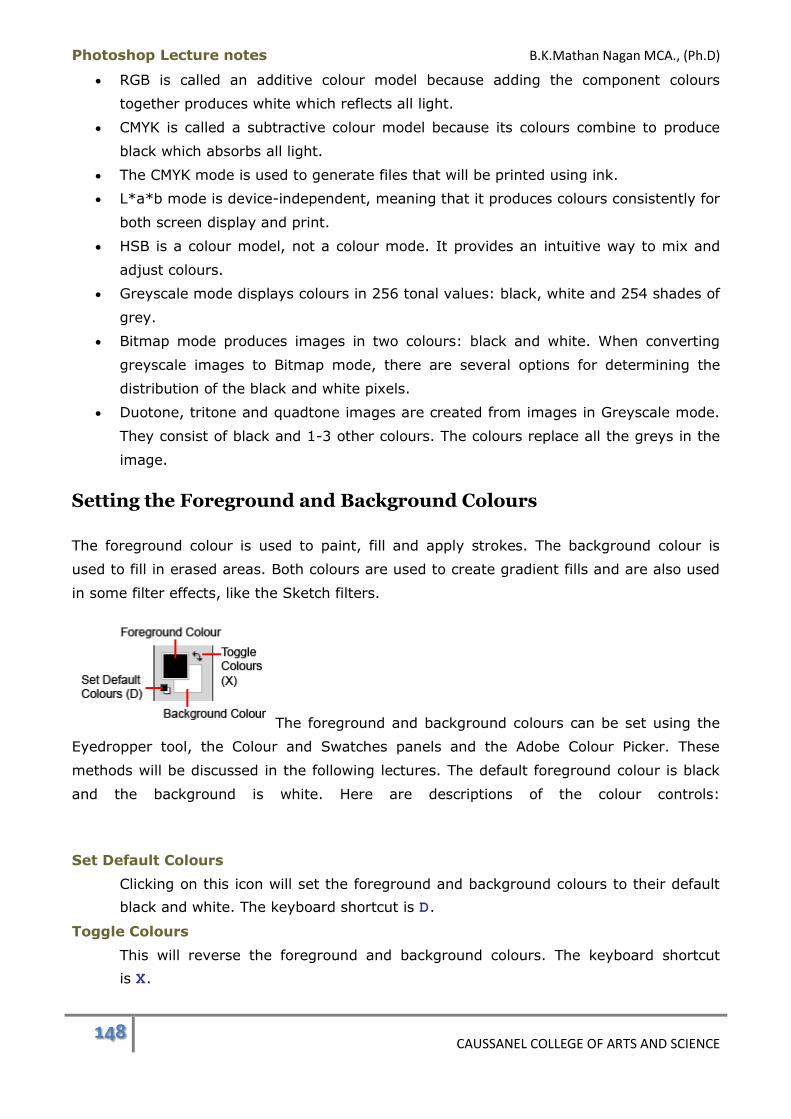
Photoshop Lecture notes B.K.Mathan Nagan MCA., (Ph.D)
148 CAUSSANEL COLLEGE OF ARTS AND SCIENCE
RGB is called an additive colour model because adding the component colours
together produces white which reflects all light.
CMYK is called a subtractive colour model because its colours combine to produce
black which absorbs all light.
The CMYK mode is used to generate files that will be printed using ink.
L*a*b mode is device-independent, meaning that it produces colours consistently for
both screen display and print.
HSB is a colour model, not a colour mode. It provides an intuitive way to mix and
adjust colours.
Greyscale mode displays colours in 256 tonal values: black, white and 254 shades of
grey.
Bitmap mode produces images in two colours: black and white. When converting
greyscale images to Bitmap mode, there are several options for determining the
distribution of the black and white pixels.
Duotone, tritone and quadtone images are created from images in Greyscale mode.
They consist of black and 1-3 other colours. The colours replace all the greys in the
image.
Setting the Foreground and Background Colours
The foreground colour is used to paint, fill and apply strokes. The background colour is
used to fill in erased areas. Both colours are used to create gradient fills and are also used
in some filter effects, like the Sketch filters.
The foreground and background colours can be set using the
Eyedropper tool, the Colour and Swatches panels and the Adobe Colour Picker. These
methods will be discussed in the following lectures. The default foreground colour is black
and the background is white. Here are descriptions of the colour controls:
Set Default Colours
Clicking on this icon will set the foreground and background colours to their default
black and white. The keyboard shortcut is D.
Toggle Colours
This will reverse the foreground and background colours. The keyboard shortcut
is X.
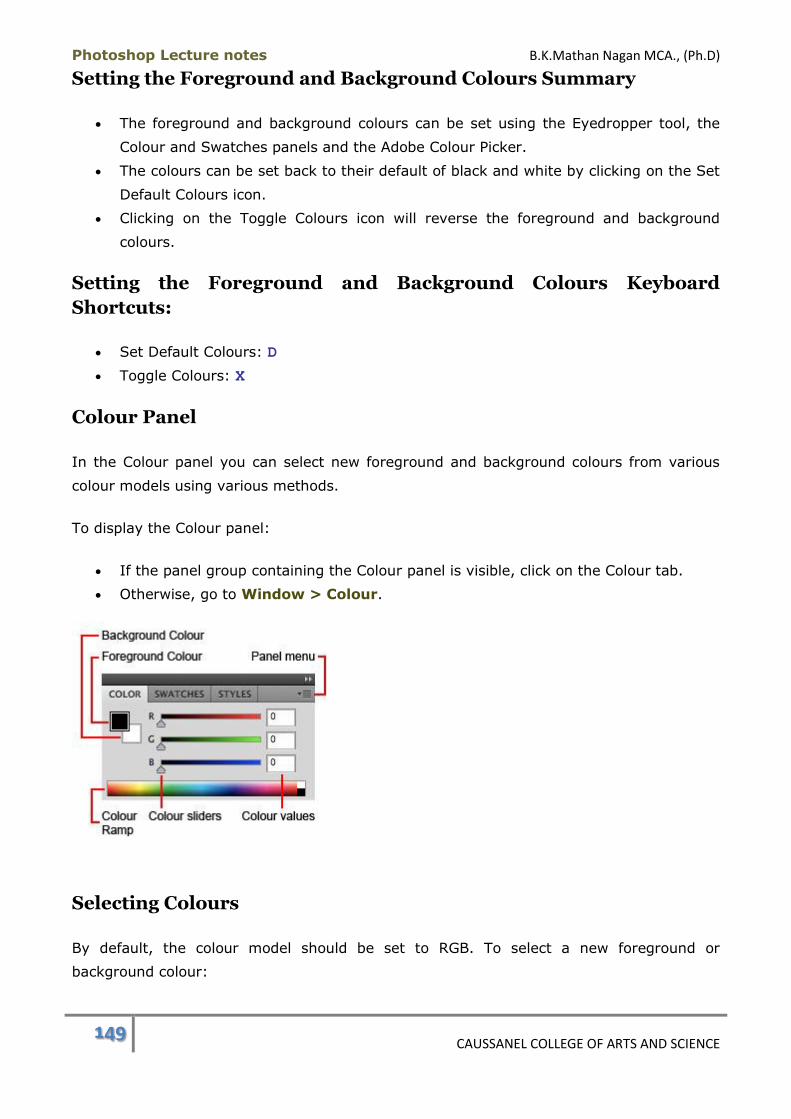
Photoshop Lecture notes B.K.Mathan Nagan MCA., (Ph.D)
149 CAUSSANEL COLLEGE OF ARTS AND SCIENCE
Setting the Foreground and Background Colours Summary
The foreground and background colours can be set using the Eyedropper tool, the
Colour and Swatches panels and the Adobe Colour Picker.
The colours can be set back to their default of black and white by clicking on the Set
Default Colours icon.
Clicking on the Toggle Colours icon will reverse the foreground and background
colours.
Setting the Foreground and Background Colours Keyboard
Shortcuts:
Set Default Colours: D
Toggle Colours: X
Colour Panel
In the Colour panel you can select new foreground and background colours from various
colour models using various methods.
To display the Colour panel:
If the panel group containing the Colour panel is visible, click on the Colour tab.
Otherwise, go to Window > Colour.
Selecting Colours
By default, the colour model should be set to RGB. To select a new foreground or
background colour:

Photoshop Lecture notes B.K.Mathan Nagan MCA., (Ph.D)
150 CAUSSANEL COLLEGE OF ARTS AND SCIENCE
1. Make sure the colour selection box of the colour you want to
change is active. The active box will be outlined like the black foreground colour box
at the right. If the one you want to change isn't active, click on it to make it active.
2. Do one of the following:
o Use the sliders to create a new colour.
o Enter colour values in the text entry boxes beside the sliders.
o Drag your cursor through the colour ramp. A new colour is selected when you
release the mouse button.
o Click on the active colour selection box to open the Colour picker, select a
new colour and click OK. (The Colour Picker will be covered in an upcoming
lecture.)
Colour Panel Menu
The first six commands listed in the top part of the menu
are used to select the colour model for the slider controls. The number of sliders will vary
according to the number of channels the colour model uses. For example, RGB will have
three sliders, CMYK - four sliders, Greyscale - one slider. The Web Colour sliders are a little
different in that they will snap to points along the bar.

Photoshop Lecture notes B.K.Mathan Nagan MCA., (Ph.D)
151 CAUSSANEL COLLEGE OF ARTS AND SCIENCE
The Copy Colour as HTML option will convert the currently active colour to an HTML
hexadecimal code (e.g. color="#996666") and will copy the code as text to the clipboard.
You can then paste it into another application or HTML document.
Copy Colour's Hex Code will copy just the hexadecimal value which you can then paste
elsewhere; e.g., 996666.
The spectrum and colour ramp options at the bottom of the menu apply to the colour ramp
which is discussed below.
Colour Ramp
Using the Colour panel menu, the colour ramp
can be set to display in various ways, as illustrated here. Each ramp has a white and black
selection box at the right end.
RGB Spectrum
The colour ramp displays the 16.8 million colours available in the RGB colour model.
CMYK Spectrum
The colours available in the CMYK spectrum are displayed.
Greyscale Ramp
A gradient ranging from black to white is displayed.
Current Colours
The current foreground and background colours are displayed as a gradient, allowing
you to choose an intermediate colour.
Make Ramp Web-Safe
Regardless of which spectrum you display in the colour ramp, you can enable this
option so that only the Web-safe colours within that spectrum will be displayed in
the colour ramp. In the examples shown above, the RGB spectrum is shown as Web-
Safe.
You can Shift-click on the colour ramp to quickly cycle through the different
spectrum options.
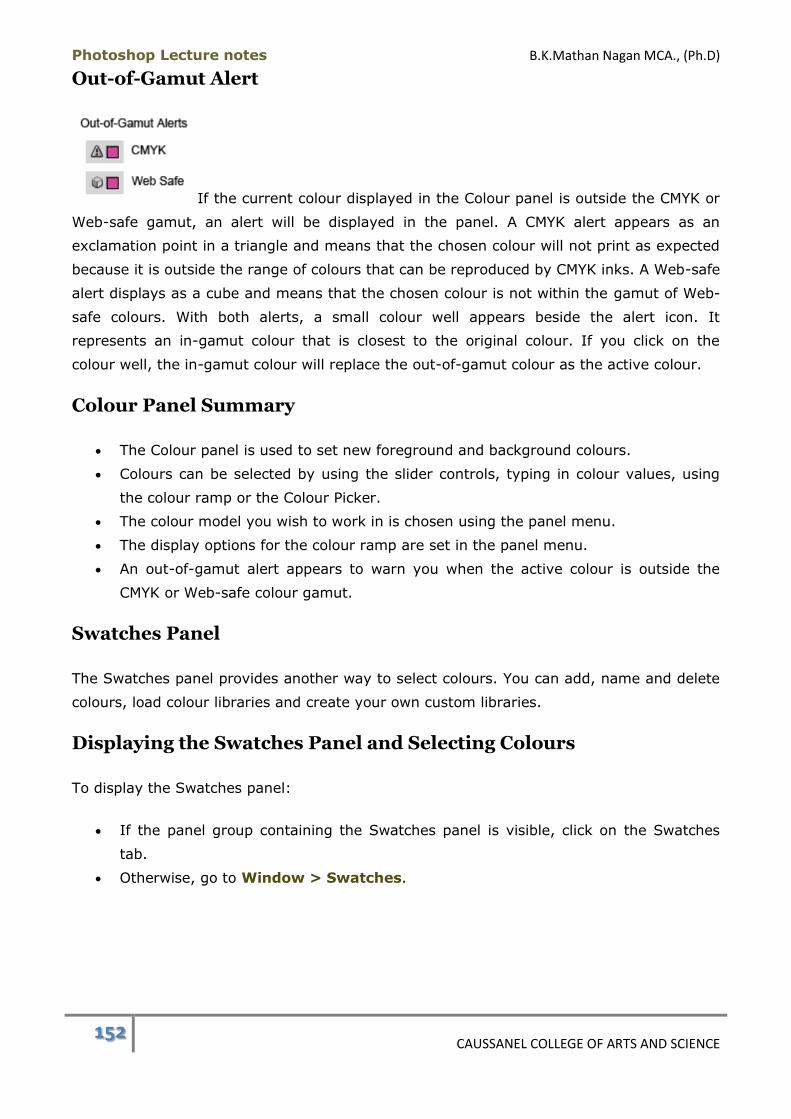
Photoshop Lecture notes B.K.Mathan Nagan MCA., (Ph.D)
152 CAUSSANEL COLLEGE OF ARTS AND SCIENCE
Out-of-Gamut Alert
If the current colour displayed in the Colour panel is outside the CMYK or
Web-safe gamut, an alert will be displayed in the panel. A CMYK alert appears as an
exclamation point in a triangle and means that the chosen colour will not print as expected
because it is outside the range of colours that can be reproduced by CMYK inks. A Web-safe
alert displays as a cube and means that the chosen colour is not within the gamut of Web-
safe colours. With both alerts, a small colour well appears beside the alert icon. It
represents an in-gamut colour that is closest to the original colour. If you click on the
colour well, the in-gamut colour will replace the out-of-gamut colour as the active colour.
Colour Panel Summary
The Colour panel is used to set new foreground and background colours.
Colours can be selected by using the slider controls, typing in colour values, using
the colour ramp or the Colour Picker.
The colour model you wish to work in is chosen using the panel menu.
The display options for the colour ramp are set in the panel menu.
An out-of-gamut alert appears to warn you when the active colour is outside the
CMYK or Web-safe colour gamut.
Swatches Panel
The Swatches panel provides another way to select colours. You can add, name and delete
colours, load colour libraries and create your own custom libraries.
Displaying the Swatches Panel and Selecting Colours
To display the Swatches panel:
If the panel group containing the Swatches panel is visible, click on the Swatches
tab.
Otherwise, go to Window > Swatches.

Photoshop Lecture notes B.K.Mathan Nagan MCA., (Ph.D)
153 CAUSSANEL COLLEGE OF ARTS AND SCIENCE
The swatches are the small squares of colour organized in
the panel. When you hold the pointer over the swatches, it turns into an eyedropper.
Clicking a swatch with the eyedropper will set a new foreground colour. It will be displayed
in the Toolbox and the Colour Panel. To set the background colour, Alt-
click (Option-click) on a swatch. When the eyedropper hovers over a colour, a tool
tip will appear showing the colour's name.
Swatches Panel Menu
The Swatches panel menu contains commands for
viewing and managing swatches as well a list of swatch libraries (not shown) that can be
loaded into the panel. Many of these libraries pertain to print output and, therefore, aren't
relevant to web graphics.
Display Options
The default swatch arrangement is called Small Thumbnail. The other options are Large
Thumbnail,Small List, and Large List. The list options display the swatch colours and
their names in a vertical list. To select a different display option, select its name from the
panel menu.
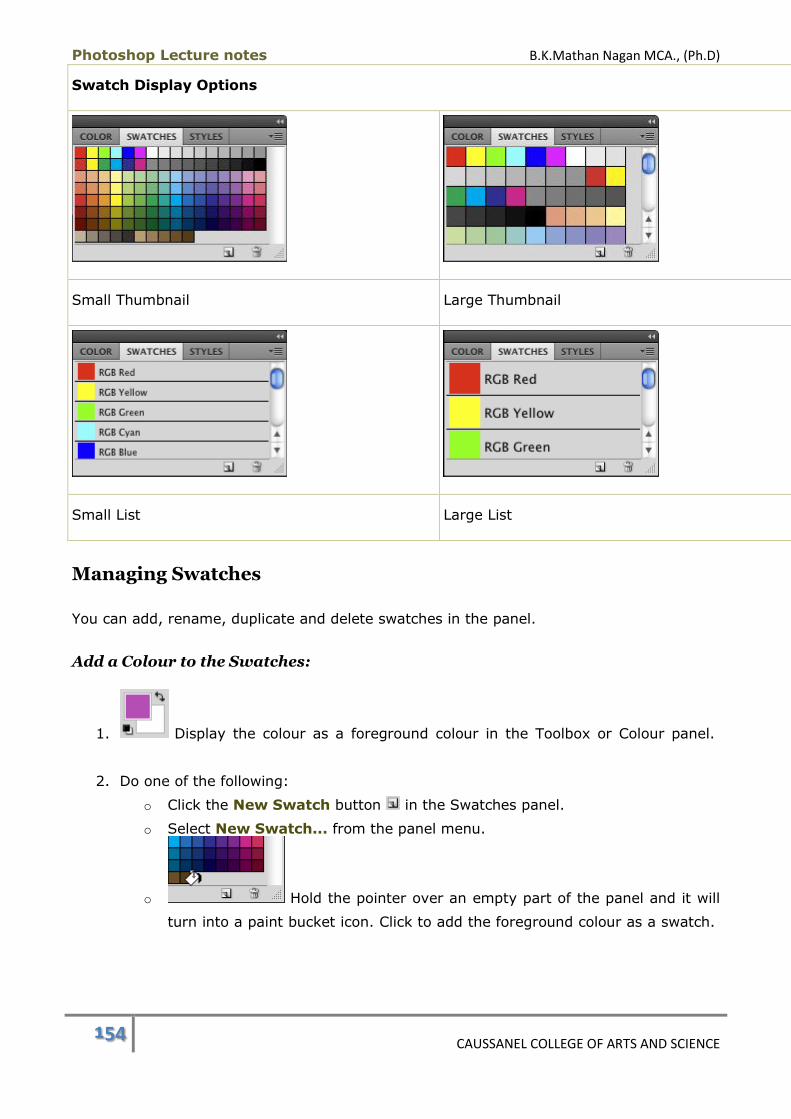
Photoshop Lecture notes B.K.Mathan Nagan MCA., (Ph.D)
154 CAUSSANEL COLLEGE OF ARTS AND SCIENCE
Swatch Display Options
Small Thumbnail Large Thumbnail
Small List Large List
Managing Swatches
You can add, rename, duplicate and delete swatches in the panel.
Add a Colour to the Swatches:
1. Display the colour as a foreground colour in the Toolbox or Colour panel.
2. Do one of the following:
o Click the New Swatch button in the Swatches panel.
o Select New Swatch... from the panel menu.
o Hold the pointer over an empty part of the panel and it will
turn into a paint bucket icon. Click to add the foreground colour as a swatch.
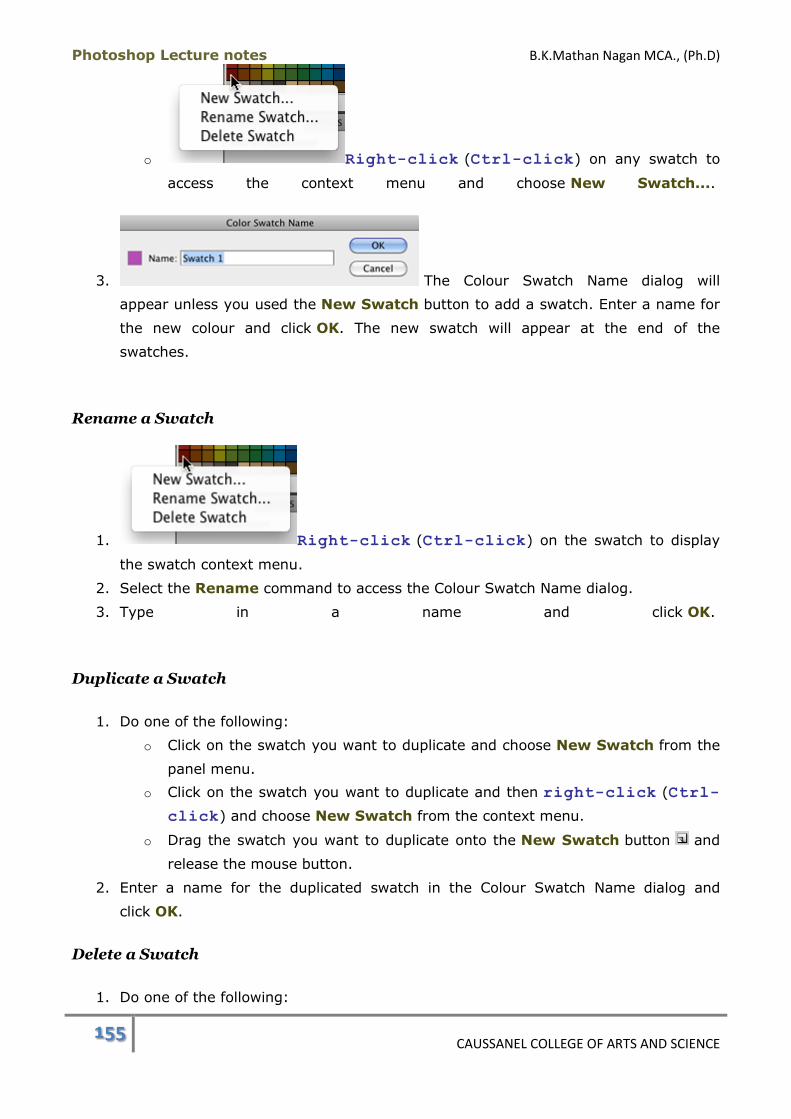
Photoshop Lecture notes B.K.Mathan Nagan MCA., (Ph.D)
155 CAUSSANEL COLLEGE OF ARTS AND SCIENCE
o Right-click (Ctrl-click) on any swatch to
access the context menu and choose New Swatch....
3. The Colour Swatch Name dialog will
appear unless you used the New Swatch button to add a swatch. Enter a name for
the new colour and click OK. The new swatch will appear at the end of the
swatches.
Rename a Swatch
1. Right-click (Ctrl-click) on the swatch to display
the swatch context menu.
2. Select the Rename command to access the Colour Swatch Name dialog.
3. Type in a name and click OK.
Duplicate a Swatch
1. Do one of the following:
o Click on the swatch you want to duplicate and choose New Swatch from the
panel menu.
o Click on the swatch you want to duplicate and then right-click (Ctrl-
click) and choose New Swatch from the context menu.
o Drag the swatch you want to duplicate onto the New Swatch button and
release the mouse button.
2. Enter a name for the duplicated swatch in the Colour Swatch Name dialog and
click OK.
Delete a Swatch
1. Do one of the following:

Photoshop Lecture notes B.K.Mathan Nagan MCA., (Ph.D)
156 CAUSSANEL COLLEGE OF ARTS AND SCIENCE
o Drag the swatch onto the Delete Swatch button and release the mouse
button.
o Right-click (Ctrl-click) on the swatch and
chooseDelete Swatch from the context menu.
o Hold down the Alt (Option) key and hold the pointer over the swatch. It
will appear as a scissors icon. Click to delete the swatch.
Working With Libraries
A swatch library is collection of colour swatches. Photoshop comes with a number of preset
libraries. Some of them are geared for web graphics and some for print work. You can load
a library into the Swatches panel, restore the default swatches and save your own custom
colours in a permanent library file.
Load or Replace a Swatch Library
You can load a library of swatches into the Swatches panel and can choose whether you
want to add (append) them to the current swatches or replace the current swatches with
the library.
1. Do one of the following:
o Select a library name from the
panel menu. A prompt message will ask you whether you want to replace the
current swatches with the new library. Click Append to add, click Cancel to
abort the operation, or click OK to replace to replace the current swatches.
o If the library you're looking for isn't listed in the menu, choose the Load
Swatchescommand. Navigate to the file on your hard drive and find the
library name. (Swatch library names have an .aco file extension.) Select it
and click the Load button. This will automatically append the library to your
current set of swatches without prompting.
o To replace the current swatch set without receiving a prompt, choose
the Replace Swatchescommand in the panel menu. Navigate to an .aco file
on your hard drive, select the file name, and click Load.
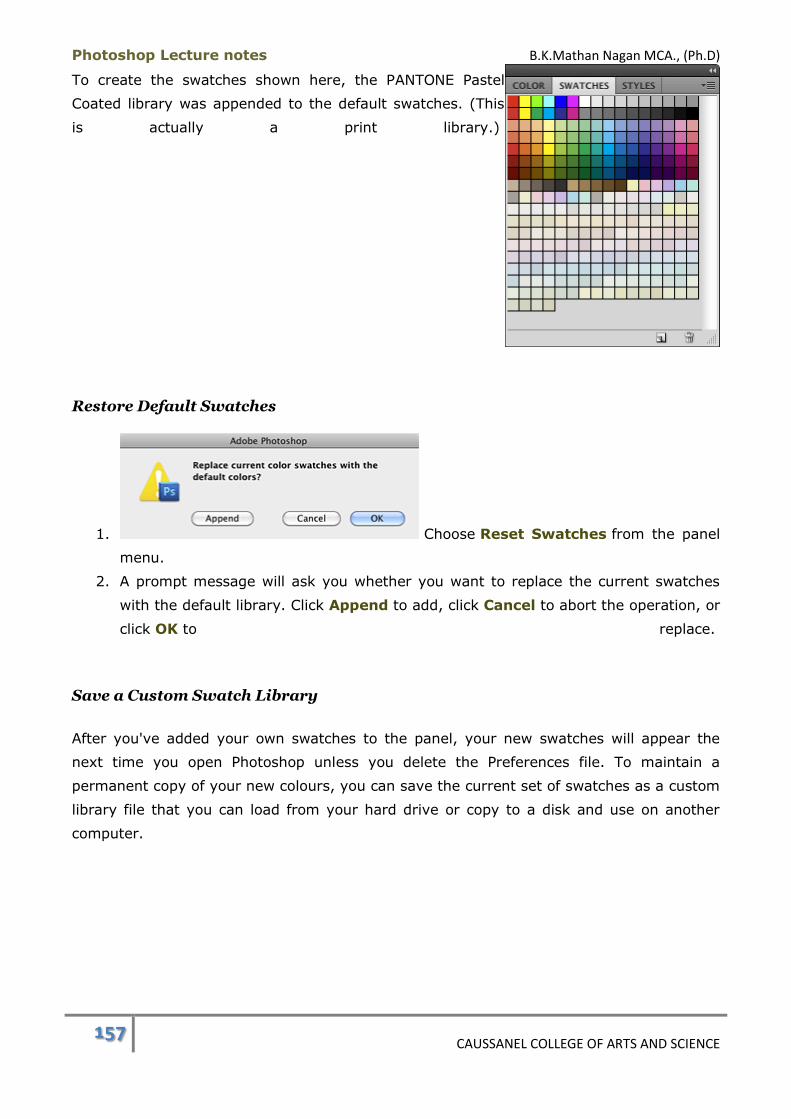
Photoshop Lecture notes B.K.Mathan Nagan MCA., (Ph.D)
157 CAUSSANEL COLLEGE OF ARTS AND SCIENCE
To create the swatches shown here, the PANTONE Pastel
Coated library was appended to the default swatches. (This
is actually a print library.)
Restore Default Swatches
1. Choose Reset Swatches from the panel
menu.
2. A prompt message will ask you whether you want to replace the current swatches
with the default library. Click Append to add, click Cancel to abort the operation, or
click OK to replace.
Save a Custom Swatch Library
After you've added your own swatches to the panel, your new swatches will appear the
next time you open Photoshop unless you delete the Preferences file. To maintain a
permanent copy of your new colours, you can save the current set of swatches as a custom
library file that you can load from your hard drive or copy to a disk and use on another
computer.

Photoshop Lecture notes B.K.Mathan Nagan MCA., (Ph.D)
158 CAUSSANEL COLLEGE OF ARTS AND SCIENCE
1. Choose Save
Swatches from the panel menu.
2. The Save dialog will appear with a default file name. Type in your own name for the
library and retain the .aco extension.
3. Click the Save button.
The .aco file can be saved anywhere on your hard drive. If you want the library to appear
in the panel menu, save it to the Presets/Color Swatches (Presets/Color Swatches)
folder in the Photoshop application folder. To prevent a library from appearing in the panel
menu, move the file out of the aforementioned folder. You will have to restart the
application to see changes in the panel menu's library list.
Save Swatches for Exchange
This option allows you to save the currently displayed swatches to a file that can be loaded
into other applications, such as Adobe Illustrator or InDesign.
Swatches Panel Summary
The Swatches panel provides a way to select and manage colours.
You can add, rename, duplicate and delete swatches.
Photoshop comes with preset swatch libraries that you can load into the panel.
You can create your own custom swatch libraries.
Swatches Panel Keyboard Shortcuts:
Set the background colour: Alt-click (Option-click) on a swatch
Colour Picker
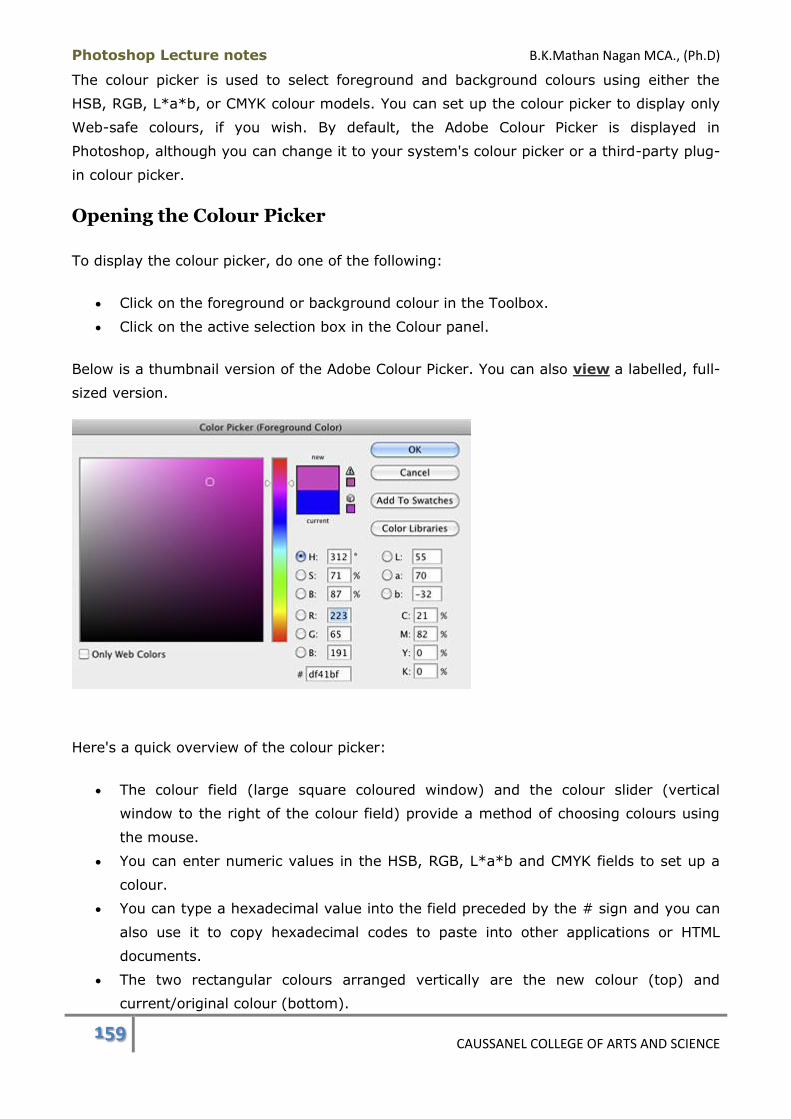
Photoshop Lecture notes B.K.Mathan Nagan MCA., (Ph.D)
159 CAUSSANEL COLLEGE OF ARTS AND SCIENCE
The colour picker is used to select foreground and background colours using either the
HSB, RGB, L*a*b, or CMYK colour models. You can set up the colour picker to display only
Web-safe colours, if you wish. By default, the Adobe Colour Picker is displayed in
Photoshop, although you can change it to your system's colour picker or a third-party plug-
in colour picker.
Opening the Colour Picker
To display the colour picker, do one of the following:
Click on the foreground or background colour in the Toolbox.
Click on the active selection box in the Colour panel.
Below is a thumbnail version of the Adobe Colour Picker. You can also view a labelled, full-
sized version.
Here's a quick overview of the colour picker:
The colour field (large square coloured window) and the colour slider (vertical
window to the right of the colour field) provide a method of choosing colours using
the mouse.
You can enter numeric values in the HSB, RGB, L*a*b and CMYK fields to set up a
colour.
You can type a hexadecimal value into the field preceded by the # sign and you can
also use it to copy hexadecimal codes to paste into other applications or HTML
documents.
The two rectangular colours arranged vertically are the new colour (top) and
current/original colour (bottom).
Photoshop Lecture notes B.K.Mathan Nagan MCA., (Ph.D)
160 CAUSSANEL COLLEGE OF ARTS AND SCIENCE
Selecting Colours
Using Colour Field and Slider
The method we present here uses the more intuitive HSB colour model as the basis for
selecting a colour.
1. Make sure that the radio button beside H(ue) is selected.
2. Drag a triangle beside the colour slider and move to a hue. Alternately, you can drag
your cursor inside the colour slider.
3. The colour field will display all variations of that hue. The most saturated colours will
be on the right and the lightest ones will be on top. You can click or drag your cursor
around inside the colour field to select a colour. The circular marker shows the
position of the current colour. As you're changing colours, you'll notice that the
values in the colour model fields are changing dynamically to always reflect values
for the current colour.
4. When you've created a colour you like, click the OK button to close the colour
picker. This colour will appear as the new foreground or background colour.
Using Numeric Values
You can enter numeric values into the colour component fields for any of the four colour
models. As you enter in values, the colour field and colour slider will update automatically.
The acceptable range of values for each colour model is as follows:
HSB
Hue is expressed as an angle between 0 and 360 degrees. Saturation and Brightness
are expressed as percentages.
RGB
Each value can range from 0-255.
L*a*b
The Luminance (lightness) value can be from 0-100. The a axis (green to magenta)
and b axis (blue to yellow) ranges from -128 to +127.
CMYK
Each value is expressed as a percentage.
New Colour/Current Colour
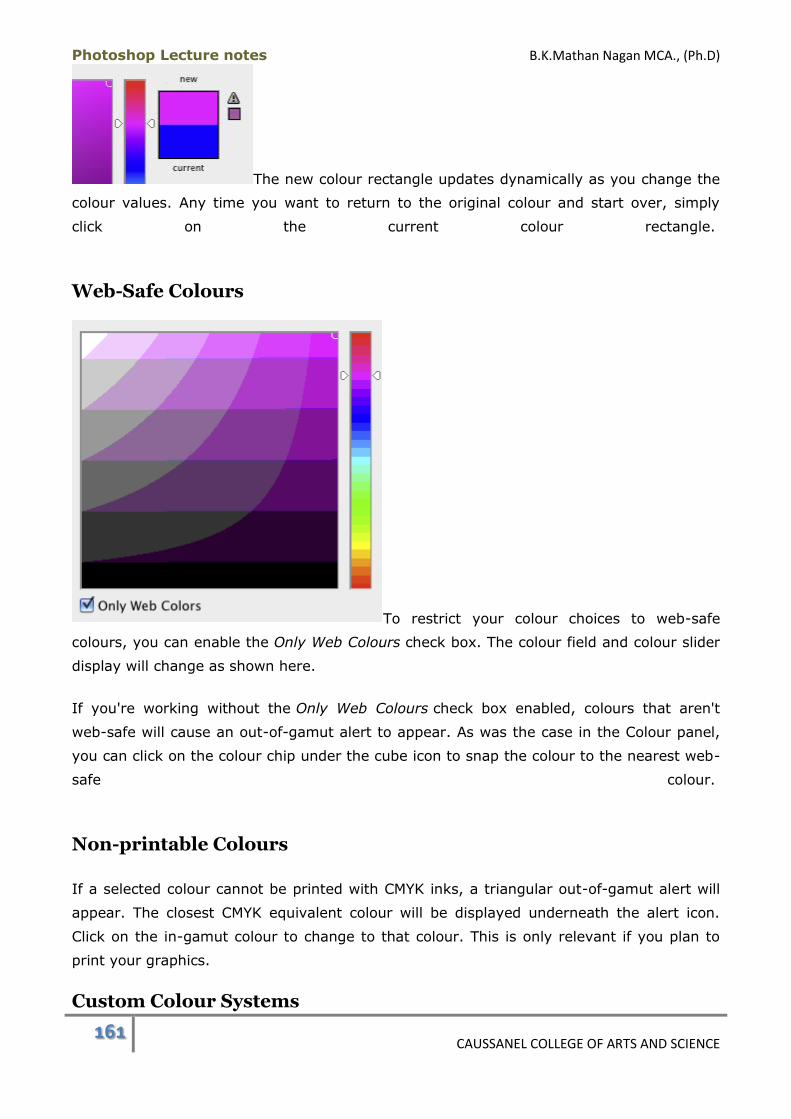
Photoshop Lecture notes B.K.Mathan Nagan MCA., (Ph.D)
161 CAUSSANEL COLLEGE OF ARTS AND SCIENCE
The new colour rectangle updates dynamically as you change the
colour values. Any time you want to return to the original colour and start over, simply
click on the current colour rectangle.
Web-Safe Colours
To restrict your colour choices to web-safe
colours, you can enable the Only Web Colours check box. The colour field and colour slider
display will change as shown here.
If you're working without the Only Web Colours check box enabled, colours that aren't
web-safe will cause an out-of-gamut alert to appear. As was the case in the Colour panel,
you can click on the colour chip under the cube icon to snap the colour to the nearest web-
safe colour.
Non-printable Colours
If a selected colour cannot be printed with CMYK inks, a triangular out-of-gamut alert will
appear. The closest CMYK equivalent colour will be displayed underneath the alert icon.
Click on the in-gamut colour to change to that colour. This is only relevant if you plan to
print your graphics.
Custom Colour Systems
Photoshop Lecture notes B.K.Mathan Nagan MCA., (Ph.D)
162 CAUSSANEL COLLEGE OF ARTS AND SCIENCE
This has no application to web graphics but here is a brief explanation as to what
the Custom button is for in the colour picker. There are a number of colour systems that
professional printers and service bureaus use for printing. The designer can select colours
from printed swatches provided by the ink manufacturer and be assured that the final
printed output will match the swatch. Examples of colour systems are Pantone Matching
System, Trumatch Swatching System and Focoltone Colour System.
The Custom button lets you choose colours from several custom colour systems.
Other Colour Pickers
Both the Windows and Macintosh operating systems have their own versions of colour
pickers. There are plug-in colour pickers available too. If you would prefer to work with
another colour picker, go to Edit > Preferences > General (Photoshop > Preferences
> General). The Colour Picker pop-up menu will list all of the installed colour pickers on
your system. Choose your preference and then click OK. Now, when you click on a
foreground or background colour in the Toolbox or Colour panel, the colour picker of your
choice will appear instead of the Adobe Colour Picker.
Colour Picker Summary
The colour picker is used to select foreground and background colours.
You can use the Adobe Colour Picker (default) or any other colour picker installed on
your system. The colour picker can be changed in Edit > Preferences >
General (Photoshop > Preferences > General).
Colours can be selected by using the mouse in the colour field and colour slider.
The colour picker provides numeric readouts for four colour models: HSB, RGB,
L*a*b and CMYK. You can enter values into these fields to create colours.
The hexadecimal field accepts hexadecimal code input and you can also copy the
codes generated here and paste them into other applications or into HTML
documents.
If you want to restrict your colour choices to web-safe colours, enable the Only Web
Colours check box in the colour picker.
Eyedropper Tool
The Eyedropper tool is used to set a foreground or background colour by sampling
colours from an image. You can sample from the active image or any other image you have
open in Photoshop.
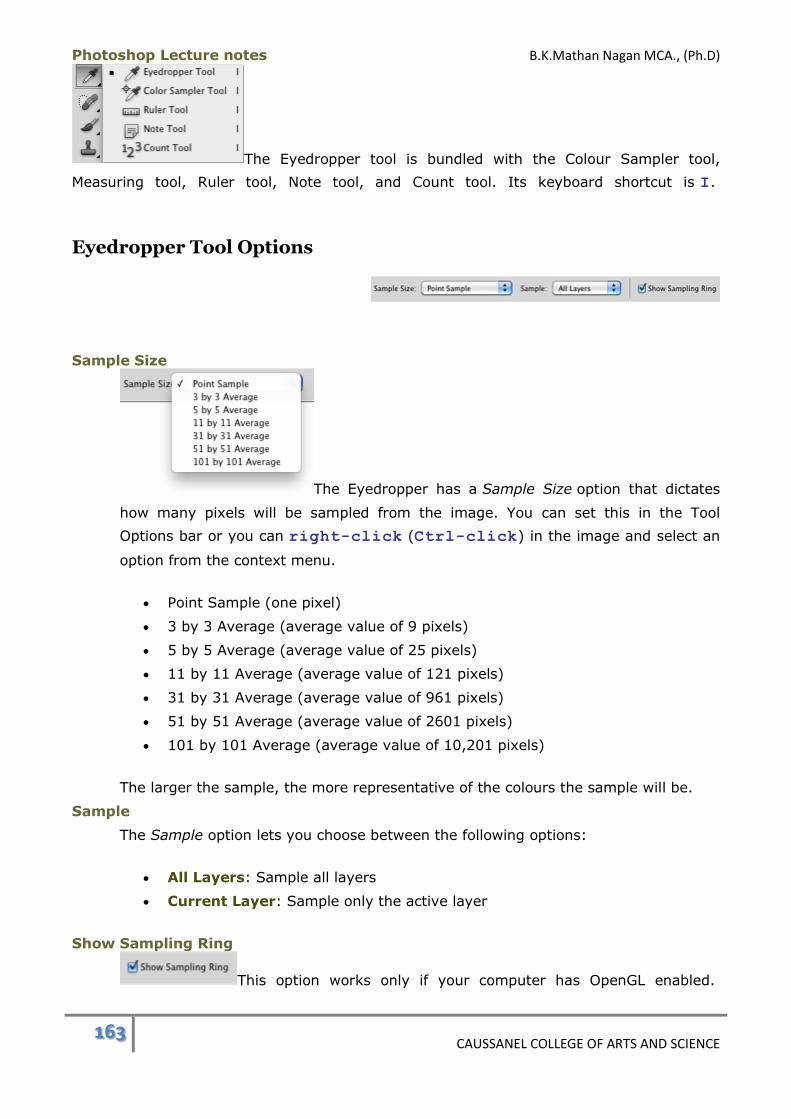
Photoshop Lecture notes B.K.Mathan Nagan MCA., (Ph.D)
163 CAUSSANEL COLLEGE OF ARTS AND SCIENCE
The Eyedropper tool is bundled with the Colour Sampler tool,
Measuring tool, Ruler tool, Note tool, and Count tool. Its keyboard shortcut is I.
Eyedropper Tool Options
Sample Size
The Eyedropper has a Sample Size option that dictates
how many pixels will be sampled from the image. You can set this in the Tool
Options bar or you can right-click (Ctrl-click) in the image and select an
option from the context menu.
Point Sample (one pixel)
3 by 3 Average (average value of 9 pixels)
5 by 5 Average (average value of 25 pixels)
11 by 11 Average (average value of 121 pixels)
31 by 31 Average (average value of 961 pixels)
51 by 51 Average (average value of 2601 pixels)
101 by 101 Average (average value of 10,201 pixels)
The larger the sample, the more representative of the colours the sample will be.
Sample
The Sample option lets you choose between the following options:
All Layers: Sample all layers
Current Layer: Sample only the active layer
Show Sampling Ring
This option works only if your computer has OpenGL enabled.
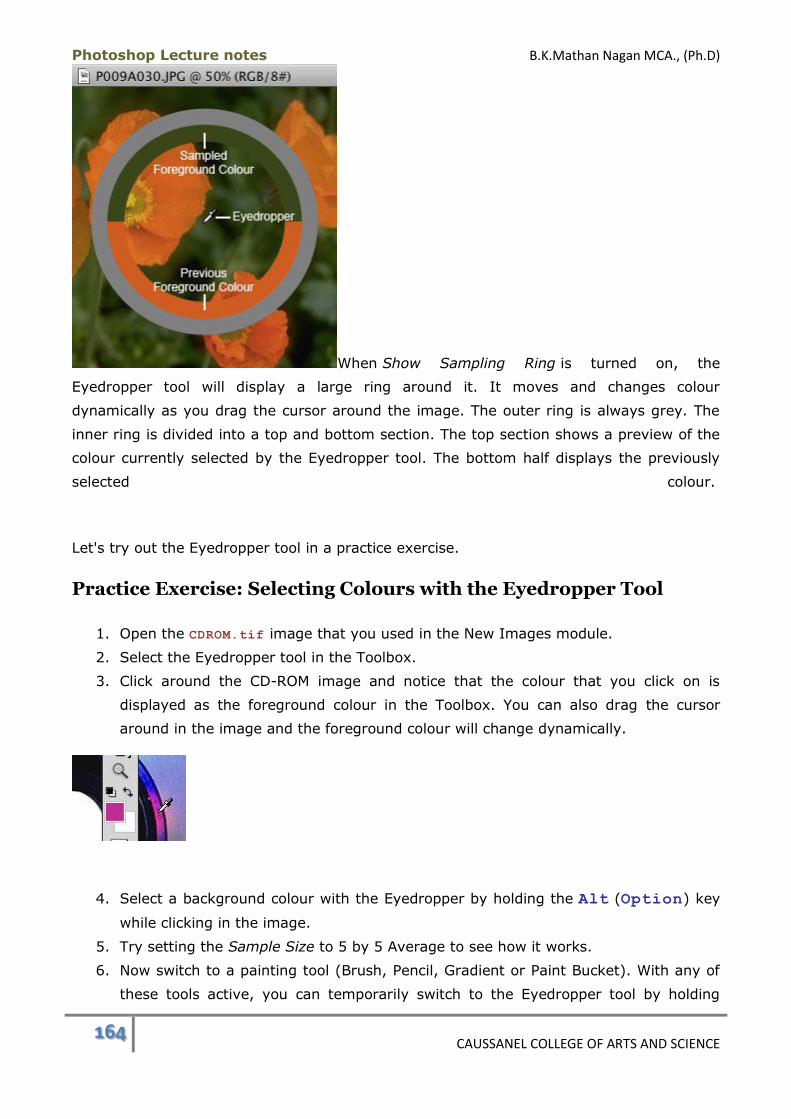
Photoshop Lecture notes B.K.Mathan Nagan MCA., (Ph.D)
164 CAUSSANEL COLLEGE OF ARTS AND SCIENCE
When Show Sampling Ring is turned on, the
Eyedropper tool will display a large ring around it. It moves and changes colour
dynamically as you drag the cursor around the image. The outer ring is always grey. The
inner ring is divided into a top and bottom section. The top section shows a preview of the
colour currently selected by the Eyedropper tool. The bottom half displays the previously
selected colour.
Let's try out the Eyedropper tool in a practice exercise.
Practice Exercise: Selecting Colours with the Eyedropper Tool
1. Open the CDROM.tif image that you used in the New Images module.
2. Select the Eyedropper tool in the Toolbox.
3. Click around the CD-ROM image and notice that the colour that you click on is
displayed as the foreground colour in the Toolbox. You can also drag the cursor
around in the image and the foreground colour will change dynamically.
4. Select a background colour with the Eyedropper by holding the Alt (Option) key
while clicking in the image.
5. Try setting the Sample Size to 5 by 5 Average to see how it works.
6. Now switch to a painting tool (Brush, Pencil, Gradient or Paint Bucket). With any of
these tools active, you can temporarily switch to the Eyedropper tool by holding
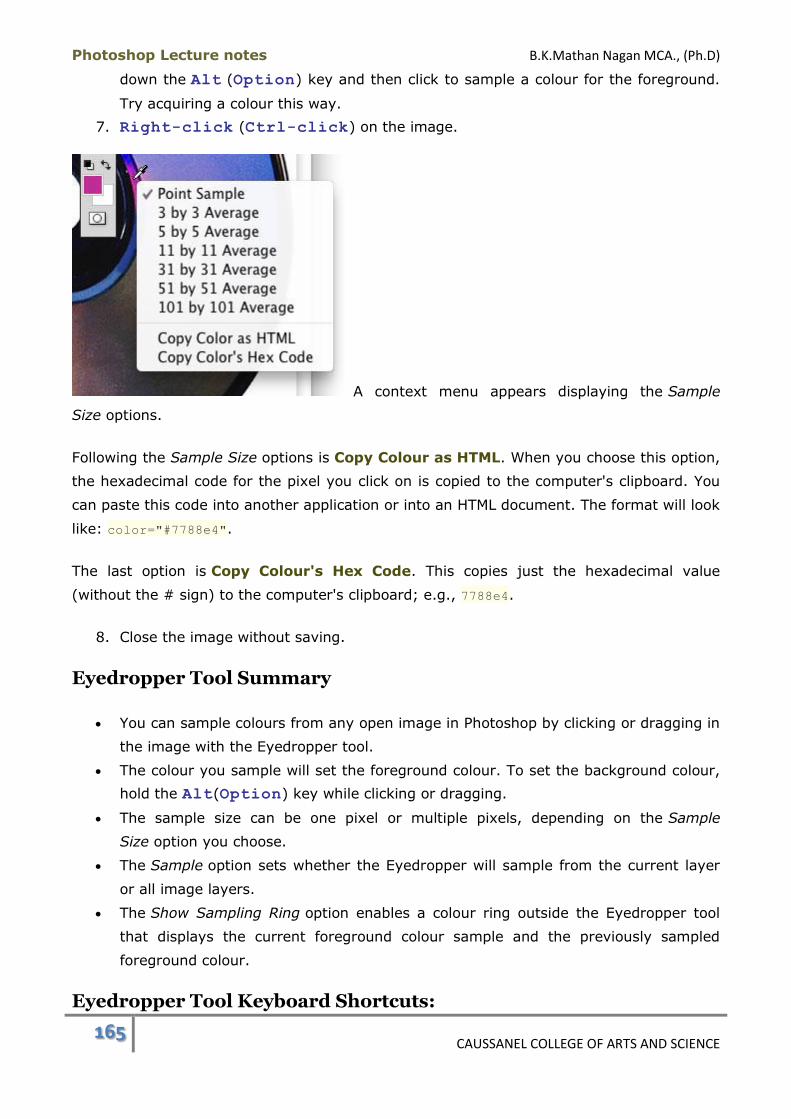
Photoshop Lecture notes B.K.Mathan Nagan MCA., (Ph.D)
165 CAUSSANEL COLLEGE OF ARTS AND SCIENCE
down the Alt (Option) key and then click to sample a colour for the foreground.
Try acquiring a colour this way.
7. Right-click (Ctrl-click) on the image.
A context menu appears displaying the Sample
Size options.
Following the Sample Size options is Copy Colour as HTML. When you choose this option,
the hexadecimal code for the pixel you click on is copied to the computer's clipboard. You
can paste this code into another application or into an HTML document. The format will look
like: color="#7788e4".
The last option is Copy Colour's Hex Code. This copies just the hexadecimal value
(without the # sign) to the computer's clipboard; e.g., 7788e4.
8. Close the image without saving.
Eyedropper Tool Summary
You can sample colours from any open image in Photoshop by clicking or dragging in
the image with the Eyedropper tool.
The colour you sample will set the foreground colour. To set the background colour,
hold the Alt(Option) key while clicking or dragging.
The sample size can be one pixel or multiple pixels, depending on the Sample
Size option you choose.
The Sample option sets whether the Eyedropper will sample from the current layer
or all image layers.
The Show Sampling Ring option enables a colour ring outside the Eyedropper tool
that displays the current foreground colour sample and the previously sampled
foreground colour.
Eyedropper Tool Keyboard Shortcuts:

Photoshop Lecture notes B.K.Mathan Nagan MCA., (Ph.D)
166 CAUSSANEL COLLEGE OF ARTS AND SCIENCE
Eyedropper tool: I
To temporarily access the Eyedropper while another painting tool is
active: Alt (Option)
Painting
Overview
This module covers the painting tools and their options, managing tool presets, and the Fill
and Stroke commands. There are quite a number of hands-on exercises during which you'll
learn the concepts and try your hand at digital imagery.
Here is a summary of the topics in this module:
(1) About Painting and Drawing
This short lecture describes the differences between painting and drawing.
(2) Brush and Pencil Tools
These are the most basic painting tools in Photoshop. They each have a number of
options that affect things like the size and shape of the tool and determine how the
paint applied with a tool will interact with the underlying paint. The Brush Preset
picker will be introduced in this lecture.
(3) Brush Panel
The Brush panel has many options for customizing brush settings. We look at
Photoshop's new bristle brushes and the associated Bristle Brush Preview option.
(4) Brush Presets Panel
This lecture identifies the similarities and differences between the Brush Presets
panel and the Brush Presets picker. It covers the panel menu commands for both
since they are identical. There is a practice exercise at the end of the lecture that
will get you comfortable with the panel menu commands used to manage presets
and preset libraries.
(5) Tool Presets
The Tool Preset picker and the Tool Presets panel are explored in this lecture.
(6) Preset Manager
Photoshop Lecture notes B.K.Mathan Nagan MCA., (Ph.D)
167 CAUSSANEL COLLEGE OF ARTS AND SCIENCE
The Preset Manager lets you manage libraries of preset brushes, swatches,
gradients, styles, patterns, contours, custom shapes, and tool presets. You can
restore the defaults of any preset library, load other libraries, save new libraries and
delete individual presets.
(7) Mixer Brush Tool
The Mixer Brush tool emulates real-life painting by allowing colours to be combined
on a brush that will also pick up paint from the image canvas.
(8) Gradient Tool
The Gradient tool and its options are covered in this lecture and you'll try it out in
two practice exercises.
(9) Gradient Editor
After learning a few basics about the Gradient Editor, you'll complete three exercises
where you'll learn how to create and apply a solid gradient, a gradient containing
transparency, and a noise gradient.
(A) Paint Bucket Tool
This is primarily a hands-on lecture where you'll learn to apply solid colours and
patterns with the Paint Bucket tool, define your own pattern and apply it, and
manage patterns. There is a bonus exercise on creating a video line effect on an
image.
(B) Fill Commands and Shortcuts
This lecture introduces the Fill dialog and shortcut commands for applying fills to
images. The Content-Aware fill and History fill are included.
(C) Stroke Command
Learn how to use the Stroke dialog to apply strokes in a practice exercise. You'll
create a graphic using selections, fills and strokes.
About Painting and Drawing
Photoshop Lecture notes B.K.Mathan Nagan MCA., (Ph.D)
168 CAUSSANEL COLLEGE OF ARTS AND SCIENCE
There are distinct differences between painting and drawing
in Photoshop. Painting involves applying colour to pixels in the image. Painted areas can
have soft edges. Drawing, on the other hand, generates hard-edged, anti-
aliased vector shapes.
With painting, the paint applied to an image is merged with any paint underneath it on the
same layer. Editing painted pixels can be very difficult. Vector drawings, however, remain
as separate objects that can easily be moved and resized at any time with no loss in
quality.
In this module, we'll be looking at the painting tools, fills, strokes, gradients and patterns.
We looked at presets when discussing the Swatches panel but in this module we'll examine
all aspects of tool presets, including the Preset Manager. This knowledge will be
applicable to many of the tools you'll be learning about in the course.
About Painting and Drawing Summary
Painting involves applying colour to the image's pixels.
Drawing involves creating vector shapes.
Painted areas can have soft or hard edges while drawn objects will have hard,
smooth edges.
Drawn shapes remain as separate objects that can be moved, edited and resized
without affecting the rest of the image.
Brush and Pencil Tools
These two tools paint the foreground colour onto the image. The key difference between
them is that paint strokes made with the Brush tool are anti-aliased while those made with
the Pencil tool are not.
The Brush tool's flyout menu in the Toolbox is pictured here.
It contains the Pencil tool and two other painting tools. The keyboard shortcut to switch to
the Brush tool is B.
Photoshop Lecture notes B.K.Mathan Nagan MCA., (Ph.D)
169 CAUSSANEL COLLEGE OF ARTS AND SCIENCE
Brush Tool
The Brush tool applies paint in strokes that range from hard to soft edges depending on
the brush options chosen. Even with hardness set to 100%, the edges of a Brush stroke
are anti-aliased, meaning that there will be some semi-transparent pixels at the edges of
the stroke to provide a smooth transition between the paint and the background area.
Brush Tool Options
The Brush tool options (below) appear in the Tool Options bar when the Brush is
selected.
Tool Preset Picker
This button opens the Tool Preset picker which is different from the Brush Preset
picker we'll be talking about next. This will be discussed in depth in a separate lecture.
Brush Preset Picker
The button shown here opens up the Brush Preset picker. You can use this not only
to choose brush presets, but to also manaully change the attributes of the brush itself.
Photoshop Lecture notes B.K.Mathan Nagan MCA., (Ph.D)
170 CAUSSANEL COLLEGE OF ARTS AND SCIENCE
A sample of the current brush and its size in pixels is
displayed on this button. When you click on it, it opens the panel pictured below. You can
use the current brush settings as a basis for creating a temporary brush and you can also
save it so it's included in the brush presets. Changing a brush's settings doesn't modify the
original brush. Your temporary setting changes will remain in effect until you select another
brush.
The different parts of the Brush Preset picker are explained below.
Size
This setting controls the diameter or size of the
brush. You can use the slider to change the displayed value or you can type in a new
value. For non-round brushes, the Use Sample Size button will appear. Clicking it
will reset the brush to its original size. When typing in a size value, you aren't
required to type "px"; Photoshop will fill that in after you change fields or press
the Enter(Return) key to close the panel.
These two examples show the strokes painted
with a small brush size compared with a larger
one.
Hardness
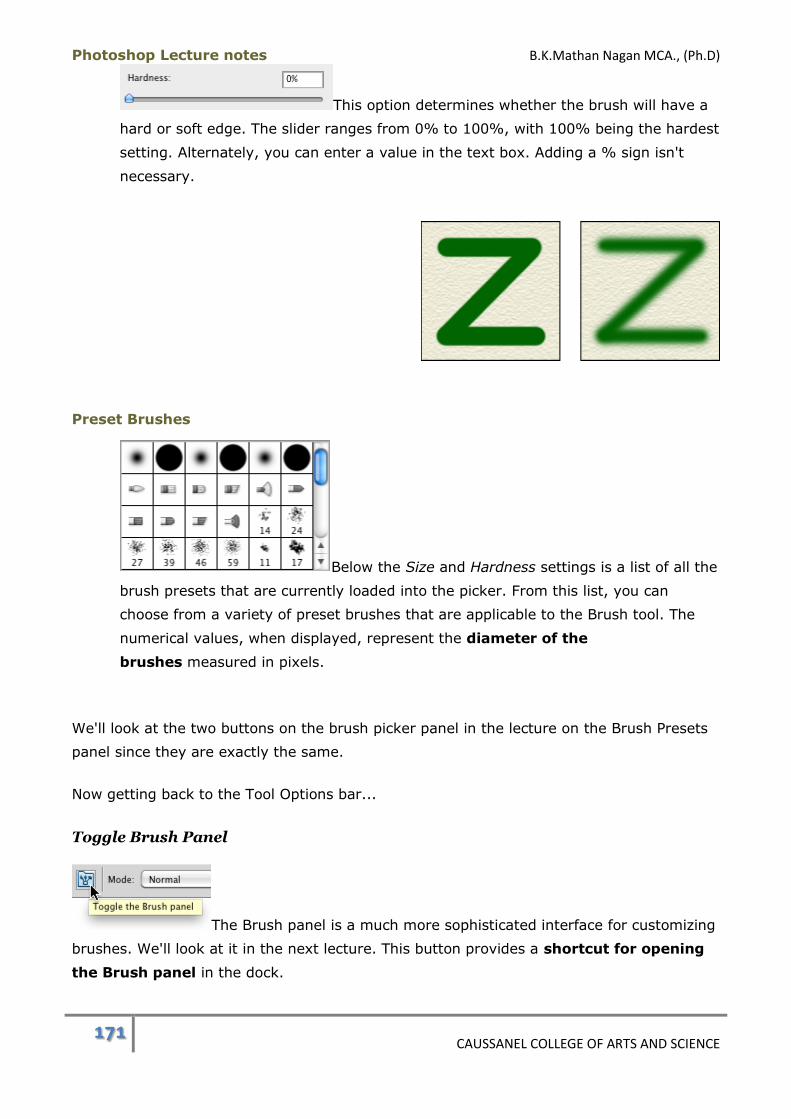
Photoshop Lecture notes B.K.Mathan Nagan MCA., (Ph.D)
171 CAUSSANEL COLLEGE OF ARTS AND SCIENCE
This option determines whether the brush will have a
hard or soft edge. The slider ranges from 0% to 100%, with 100% being the hardest
setting. Alternately, you can enter a value in the text box. Adding a % sign isn't
necessary.
Preset Brushes
Below the Size and Hardness settings is a list of all the
brush presets that are currently loaded into the picker. From this list, you can
choose from a variety of preset brushes that are applicable to the Brush tool. The
numerical values, when displayed, represent the diameter of the
brushes measured in pixels.
We'll look at the two buttons on the brush picker panel in the lecture on the Brush Presets
panel since they are exactly the same.
Now getting back to the Tool Options bar...
Toggle Brush Panel
The Brush panel is a much more sophisticated interface for customizing
brushes. We'll look at it in the next lecture. This button provides a shortcut for opening
the Brush panel in the dock.

Photoshop Lecture notes B.K.Mathan Nagan MCA., (Ph.D)
172 CAUSSANEL COLLEGE OF ARTS AND SCIENCE
Mode
The effect of each blend mode will be covered in detail in the Layers
module. Briefly, these modes affect how the paint will interact with existing
coloursyou paint over on the same layer. When set to Normal, the paint will overwrite the
underlying paint.
Opacity
Clicking on the arrow button displays the Opacity slider. You can also enter
values directly in the text box. Opacity affects whether any transparency is applied when
you're painting. When set at 100%, the colour is opaque and will replace all paint
underneath it. Values between 1% and 99% will create partial transparency. The lower the
value, the more transparent the colour will be.
Tablet Pressure Controls Opacity
If you use a pressure-sensitive tablet, this option enables you to apply variable
pressure to the stylus to control the opacity of the paint. This will override
the Opacity setting in the Brush panel.
Flow
This option sets the rate at which paint will be applied. For example, with
the Brush tool, the reducing the Flow setting will cause the brush to paint more lightly.
The Flow setting controls the amount of paint being laid down by the brush
during a stroke. It differs from Opacity because the paint will build up when the same area
is painted over again. In the example shown here, the Flow was set to 10% and you can
see the variations in paint density.
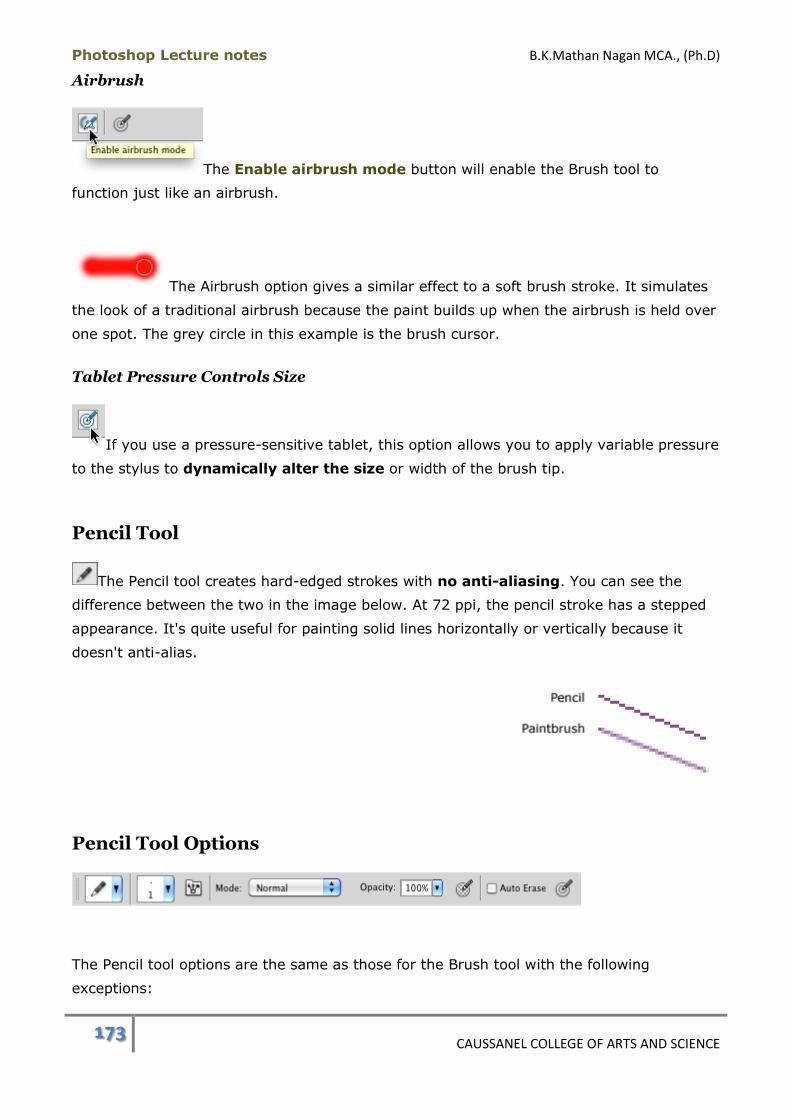
Photoshop Lecture notes B.K.Mathan Nagan MCA., (Ph.D)
173 CAUSSANEL COLLEGE OF ARTS AND SCIENCE
Airbrush
The Enable airbrush mode button will enable the Brush tool to
function just like an airbrush.
The Airbrush option gives a similar effect to a soft brush stroke. It simulates
the look of a traditional airbrush because the paint builds up when the airbrush is held over
one spot. The grey circle in this example is the brush cursor.
Tablet Pressure Controls Size
If you use a pressure-sensitive tablet, this option allows you to apply variable pressure
to the stylus to dynamically alter the size or width of the brush tip.
Pencil Tool
The Pencil tool creates hard-edged strokes with no anti-aliasing. You can see the
difference between the two in the image below. At 72 ppi, the pencil stroke has a stepped
appearance. It's quite useful for painting solid lines horizontally or vertically because it
doesn't anti-alias.
Pencil Tool Options
The Pencil tool options are the same as those for the Brush tool with the following
exceptions:
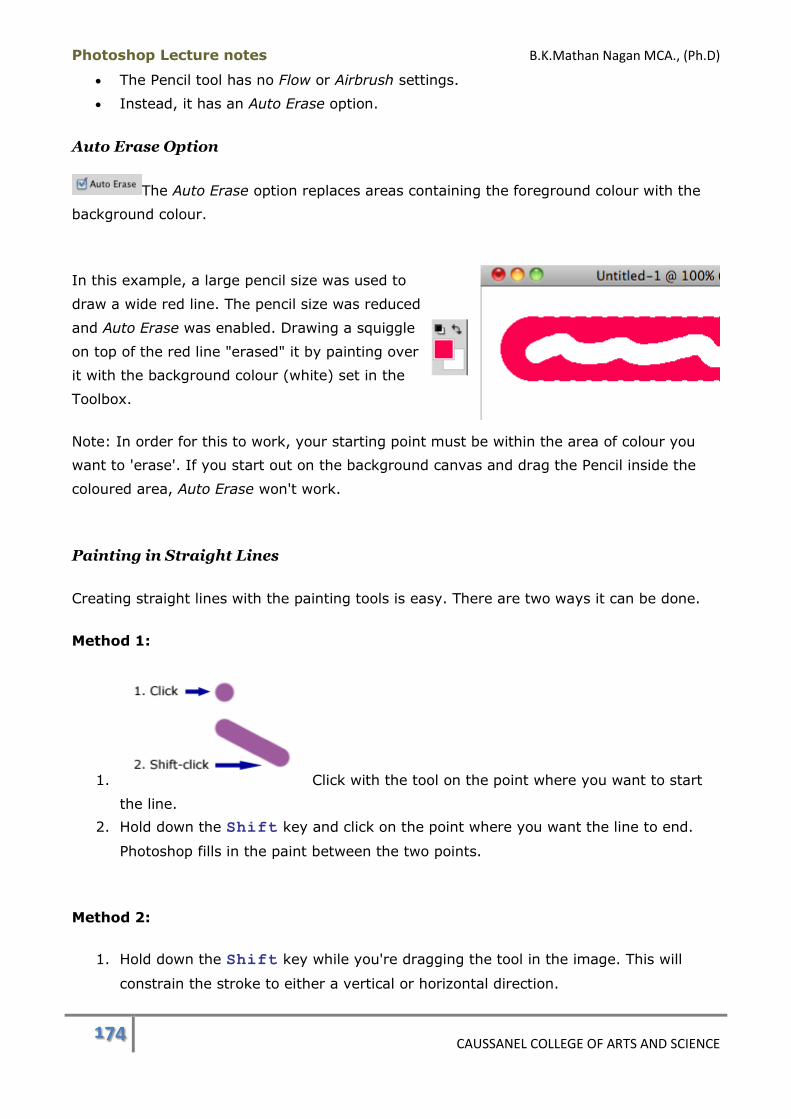
Photoshop Lecture notes B.K.Mathan Nagan MCA., (Ph.D)
174 CAUSSANEL COLLEGE OF ARTS AND SCIENCE
The Pencil tool has no Flow or Airbrush settings.
Instead, it has an Auto Erase option.
Auto Erase Option
The Auto Erase option replaces areas containing the foreground colour with the
background colour.
In this example, a large pencil size was used to
draw a wide red line. The pencil size was reduced
and Auto Erase was enabled. Drawing a squiggle
on top of the red line "erased" it by painting over
it with the background colour (white) set in the
Toolbox.
Note: In order for this to work, your starting point must be within the area of colour you
want to 'erase'. If you start out on the background canvas and drag the Pencil inside the
coloured area, Auto Erase won't work.
Painting in Straight Lines
Creating straight lines with the painting tools is easy. There are two ways it can be done.
Method 1:
1. Click with the tool on the point where you want to start
the line.
2. Hold down the Shift key and click on the point where you want the line to end.
Photoshop fills in the paint between the two points.
Method 2:
1. Hold down the Shift key while you're dragging the tool in the image. This will
constrain the stroke to either a vertical or horizontal direction.
Photoshop Lecture notes B.K.Mathan Nagan MCA., (Ph.D)
175 CAUSSANEL COLLEGE OF ARTS AND SCIENCE
This not only works for the Brush and Pencil tools, it works for all the painting and editing
tools such as the Eraser, Clone Stamp, etc.
Brush and Pencil Tools Summary
The Brush and Pencil tools apply the foreground colour to the image.
The Brush tool applies paint with anti-aliased edges that can range from crisp to
very soft.
The Pencil tool applies paint with an aliased edge.
The Brush Presets Picker panel lets you choose from a set of preset brushes.
The Toggle Brush Panel option will open the Brush panel in the dock.
A brush's Blend mode setting determines how the paint will interact with the pixels
underneath.
By lowering the Opacity setting, you can make paint strokes semi-transparent.
There are size and opacity settings available for users of pressure-sensitive tablets.
Changing the amount of pressure on the tip of the stylus pen will dynamically
change the brush tip size or the brush opacity.
The Brush's Flow setting controls the amount of paint released during a brush
stroke.
The Brush's Airbrush option causes paint to build up under the Brush when it's held
stationery.
The Pencil tool has an Auto Erase option that replaces areas containing the
foreground colour with the background colour.
Brush and Pencil Tools Keyboard Shortcuts:
Brush tool: B
Constrain stroke to horizontal or vertical: Shift while dragging
Brush Panel
The Brush panel is used to define the physical characteristics of a brush and the stroke that
it will paint on an image. It contains an extraordinary number of settings - more than you
can see at first glance. It would be impossible to describe every option in the scope of this
course but we'll cover the basics and let you experiment with other settings on your own if
you wish to explore brushes further.
The Brush panel applies to more tools than just the Brush tool. It can be used with the
Pencil, Mixer, Clone Stamp, Pattern Stamp, History, Art History, Eraser, Blur, Sharpen,
Smudge, Dodge, Burn, and Sponge tools. To simplify these instructions, we'll focus on how
the panel works using the Brush tool as an example.

Photoshop Lecture notes B.K.Mathan Nagan MCA., (Ph.D)
176 CAUSSANEL COLLEGE OF ARTS AND SCIENCE
Opening the Brush Panel
With the Brush tool selected, open the Brush panel in one of the following ways:
Click on the Toggle Brush panel button in the Tool Options bar.
Press the F5 key.
Go to Window > Brush.
If the Brush panel icon is displayed in the icon dock, click it to expand the
panel.
By default, the Brush panel is part of a panel
group that includes the Brush Presets and Clone Source panels. You can see their tabs in
the image to the right as well as their icons in the icon dock. (The top icon in the icon dock
is for the Brush Presets panel.)
View a full-sized, labeled version of the Brush Panel.
The Brush Presets button appears at the top left of the panel. This is used to
open the Brush Presets panel. In this particular case, the panel tab is right above the
button so it looks redundant. Remember, though, that you can detach panels from groups
and create custom workspaces so these two panels may not always be grouped together.
Panel Layout

Photoshop Lecture notes B.K.Mathan Nagan MCA., (Ph.D)
177 CAUSSANEL COLLEGE OF ARTS AND SCIENCE
The main body of the Brush panel can be broken
down intothree sections. (The brush stroke preview at the bottom was omitted here.)
The list of settings on the left side of the panel are divided into two categories: those that
have additional options and those that don't. When you click on a setting in the "Settings
with options" section, the right half of the panel will change to display the options
applicable to that particular setting.
The settings without options cannot be clicked on and selected. They are simple check
boxes.
Brush Stroke Preview
The window at the bottom of the panel has
a black and white preview of what a brush stroke will look like with its current settings.
As you make changes to the settings, the preview will update automatically to reflect the
changes.
Brush Tip Shape
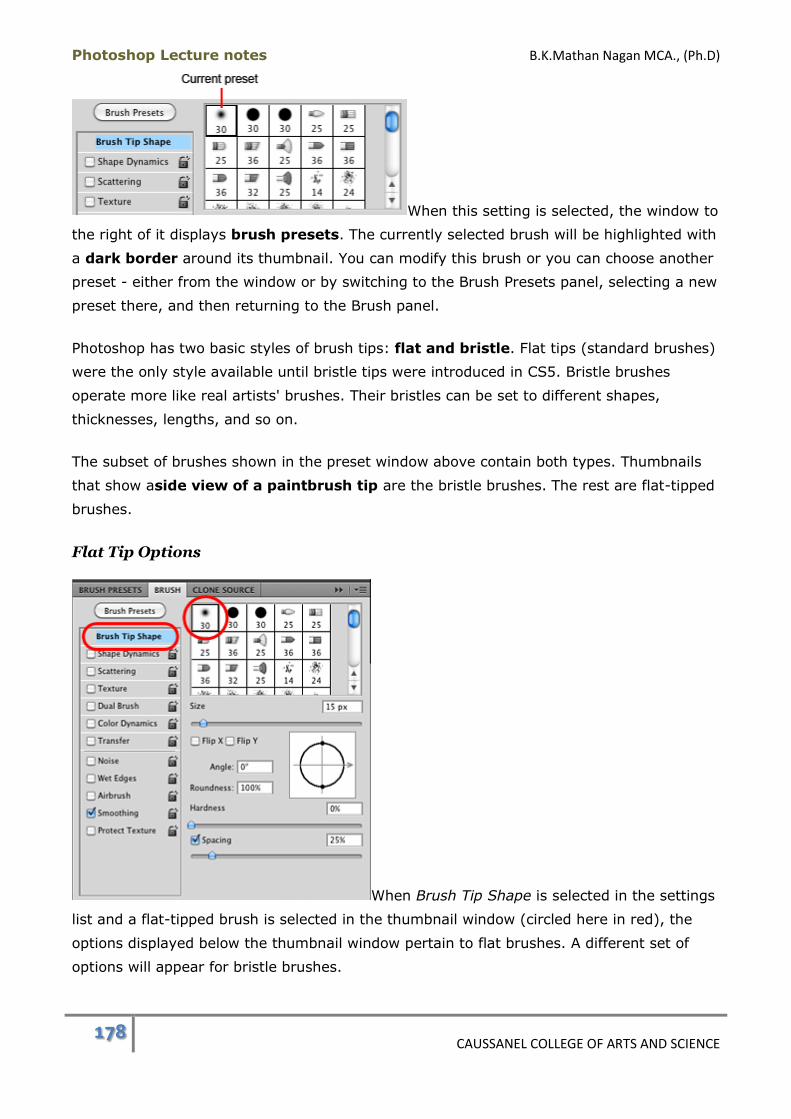
Photoshop Lecture notes B.K.Mathan Nagan MCA., (Ph.D)
178 CAUSSANEL COLLEGE OF ARTS AND SCIENCE
When this setting is selected, the window to
the right of it displays brush presets. The currently selected brush will be highlighted with
a dark border around its thumbnail. You can modify this brush or you can choose another
preset - either from the window or by switching to the Brush Presets panel, selecting a new
preset there, and then returning to the Brush panel.
Photoshop has two basic styles of brush tips: flat and bristle. Flat tips (standard brushes)
were the only style available until bristle tips were introduced in CS5. Bristle brushes
operate more like real artists' brushes. Their bristles can be set to different shapes,
thicknesses, lengths, and so on.
The subset of brushes shown in the preset window above contain both types. Thumbnails
that show aside view of a paintbrush tip are the bristle brushes. The rest are flat-tipped
brushes.
Flat Tip Options
When Brush Tip Shape is selected in the settings
list and a flat-tipped brush is selected in the thumbnail window (circled here in red), the
options displayed below the thumbnail window pertain to flat brushes. A different set of
options will appear for bristle brushes.
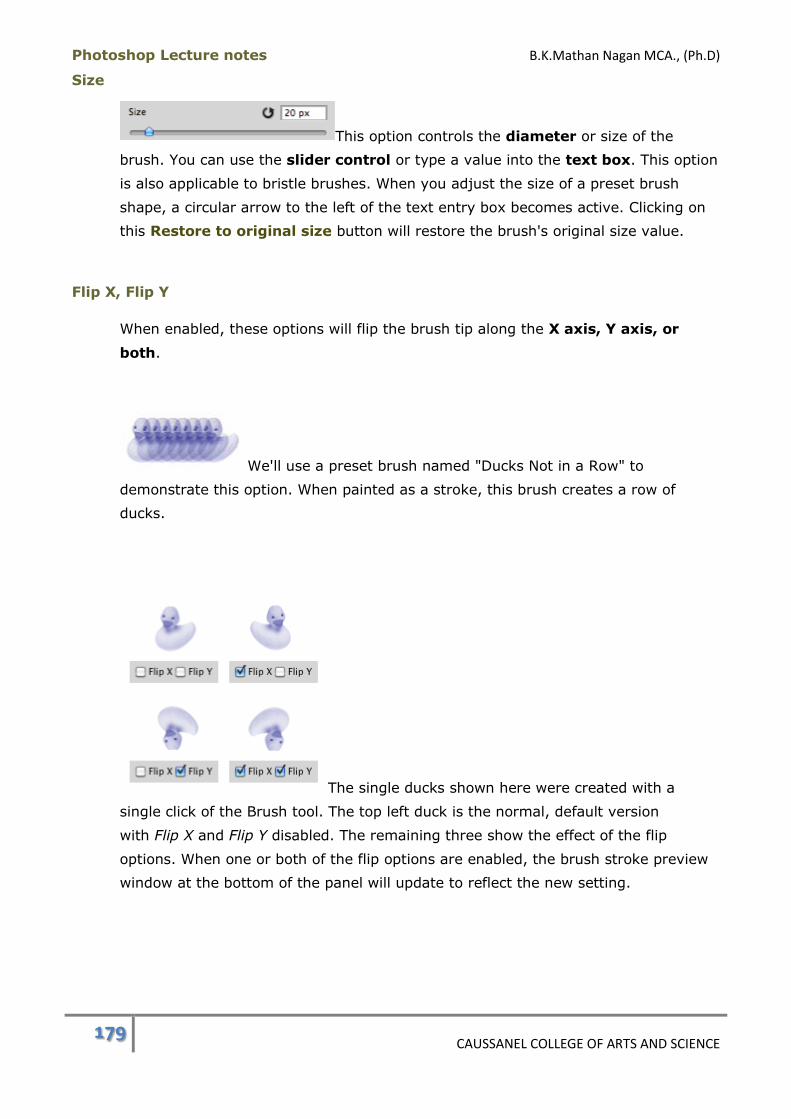
Photoshop Lecture notes B.K.Mathan Nagan MCA., (Ph.D)
179 CAUSSANEL COLLEGE OF ARTS AND SCIENCE
Size
This option controls the diameter or size of the
brush. You can use the slider control or type a value into the text box. This option
is also applicable to bristle brushes. When you adjust the size of a preset brush
shape, a circular arrow to the left of the text entry box becomes active. Clicking on
this Restore to original size button will restore the brush's original size value.
Flip X, Flip Y
When enabled, these options will flip the brush tip along the X axis, Y axis, or
both.
We'll use a preset brush named "Ducks Not in a Row" to
demonstrate this option. When painted as a stroke, this brush creates a row of
ducks.
The single ducks shown here were created with a
single click of the Brush tool. The top left duck is the normal, default version
with Flip X and Flip Y disabled. The remaining three show the effect of the flip
options. When one or both of the flip options are enabled, the brush stroke preview
window at the bottom of the panel will update to reflect the new setting.
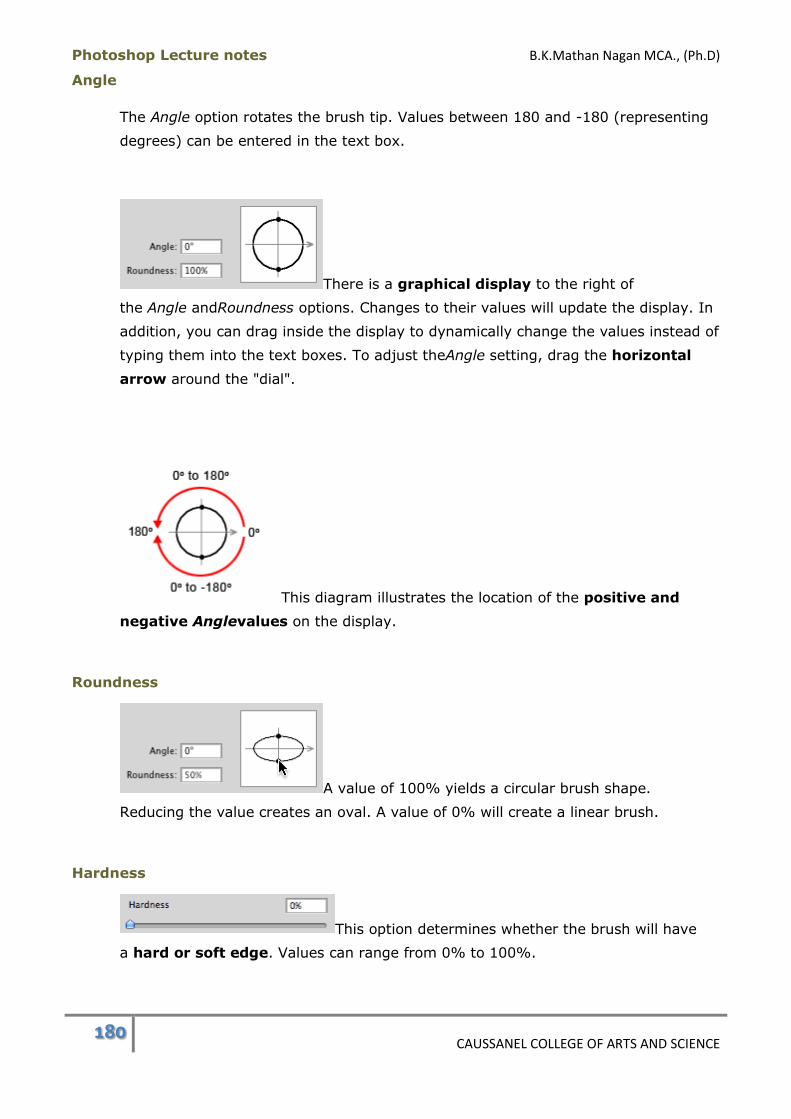
Photoshop Lecture notes B.K.Mathan Nagan MCA., (Ph.D)
180 CAUSSANEL COLLEGE OF ARTS AND SCIENCE
Angle
The Angle option rotates the brush tip. Values between 180 and -180 (representing
degrees) can be entered in the text box.
There is a graphical display to the right of
the Angle andRoundness options. Changes to their values will update the display. In
addition, you can drag inside the display to dynamically change the values instead of
typing them into the text boxes. To adjust theAngle setting, drag the horizontal
arrow around the "dial".
This diagram illustrates the location of the positive and
negative Anglevalues on the display.
Roundness
A value of 100% yields a circular brush shape.
Reducing the value creates an oval. A value of 0% will create a linear brush.
Hardness
This option determines whether the brush will have
a hard or soft edge. Values can range from 0% to 100%.
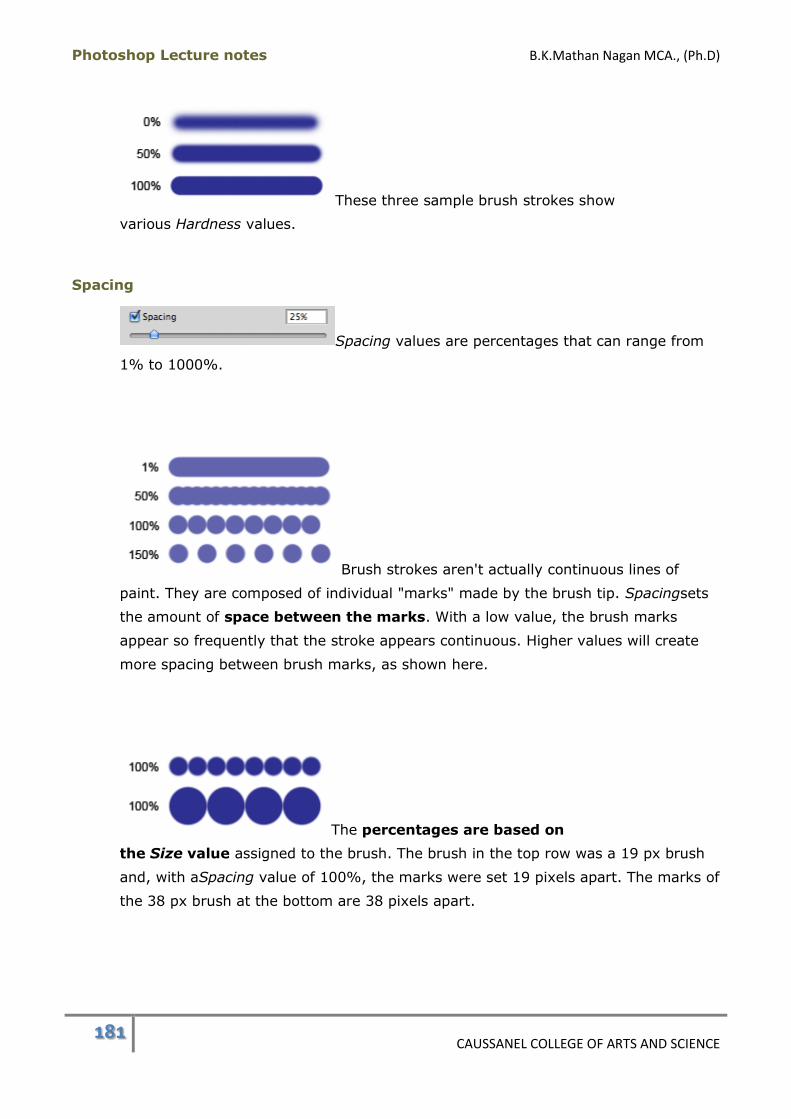
Photoshop Lecture notes B.K.Mathan Nagan MCA., (Ph.D)
181 CAUSSANEL COLLEGE OF ARTS AND SCIENCE
These three sample brush strokes show
various Hardness values.
Spacing
Spacing values are percentages that can range from
1% to 1000%.
Brush strokes aren't actually continuous lines of
paint. They are composed of individual "marks" made by the brush tip. Spacingsets
the amount of space between the marks. With a low value, the brush marks
appear so frequently that the stroke appears continuous. Higher values will create
more spacing between brush marks, as shown here.
The percentages are based on
the Size value assigned to the brush. The brush in the top row was a 19 px brush
and, with aSpacing value of 100%, the marks were set 19 pixels apart. The marks of
the 38 px brush at the bottom are 38 pixels apart.
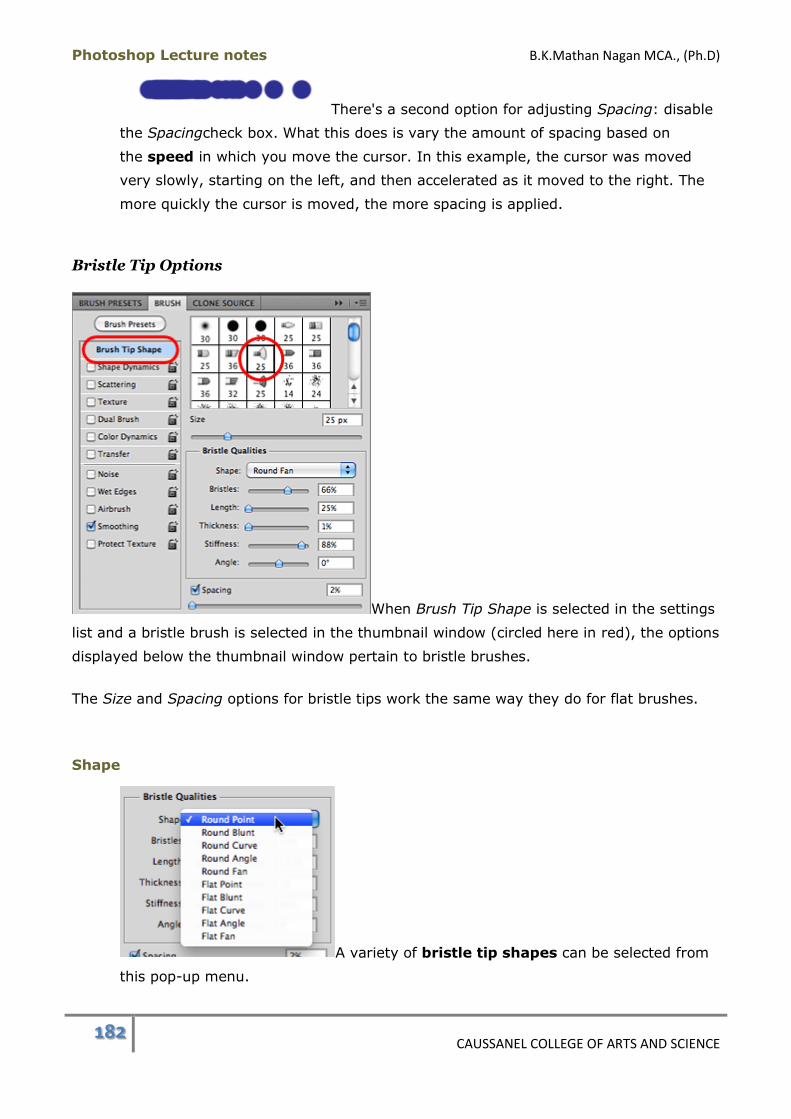
Photoshop Lecture notes B.K.Mathan Nagan MCA., (Ph.D)
182 CAUSSANEL COLLEGE OF ARTS AND SCIENCE
There's a second option for adjusting Spacing: disable
the Spacingcheck box. What this does is vary the amount of spacing based on
the speed in which you move the cursor. In this example, the cursor was moved
very slowly, starting on the left, and then accelerated as it moved to the right. The
more quickly the cursor is moved, the more spacing is applied.
Bristle Tip Options
When Brush Tip Shape is selected in the settings
list and a bristle brush is selected in the thumbnail window (circled here in red), the options
displayed below the thumbnail window pertain to bristle brushes.
The Size and Spacing options for bristle tips work the same way they do for flat brushes.
Shape
A variety of bristle tip shapes can be selected from
this pop-up menu.
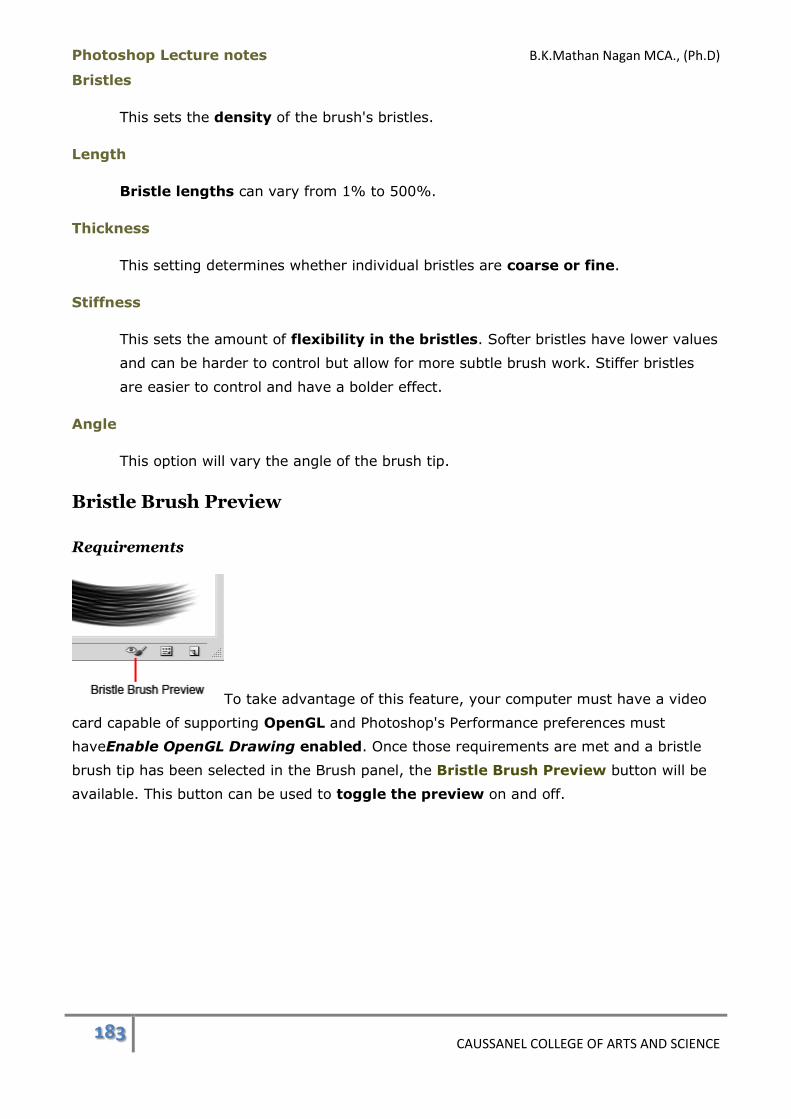
Photoshop Lecture notes B.K.Mathan Nagan MCA., (Ph.D)
183 CAUSSANEL COLLEGE OF ARTS AND SCIENCE
Bristles
This sets the density of the brush's bristles.
Length
Bristle lengths can vary from 1% to 500%.
Thickness
This setting determines whether individual bristles are coarse or fine.
Stiffness
This sets the amount of flexibility in the bristles. Softer bristles have lower values
and can be harder to control but allow for more subtle brush work. Stiffer bristles
are easier to control and have a bolder effect.
Angle
This option will vary the angle of the brush tip.
Bristle Brush Preview
Requirements
To take advantage of this feature, your computer must have a video
card capable of supporting OpenGL and Photoshop's Performance preferences must
haveEnable OpenGL Drawing enabled. Once those requirements are met and a bristle
brush tip has been selected in the Brush panel, the Bristle Brush Preview button will be
available. This button can be used to toggle the preview on and off.

Photoshop Lecture notes B.K.Mathan Nagan MCA., (Ph.D)
184 CAUSSANEL COLLEGE OF ARTS AND SCIENCE
Static and Animated Appearance
The Bristle Brush Preview appears inside the image document, as
shown here. The dashed line represents the painting surface. When you're not currently
painting on the image, the brush is raised above the surface as it appears here.
Once you begin painting, the brush inside the
preview becomes animated, showing the position of the bristles as you paint. Here is a
screen shot of a brush stroke as it was being made, along with the Bristle Brush Preview as
it appeared at the time.
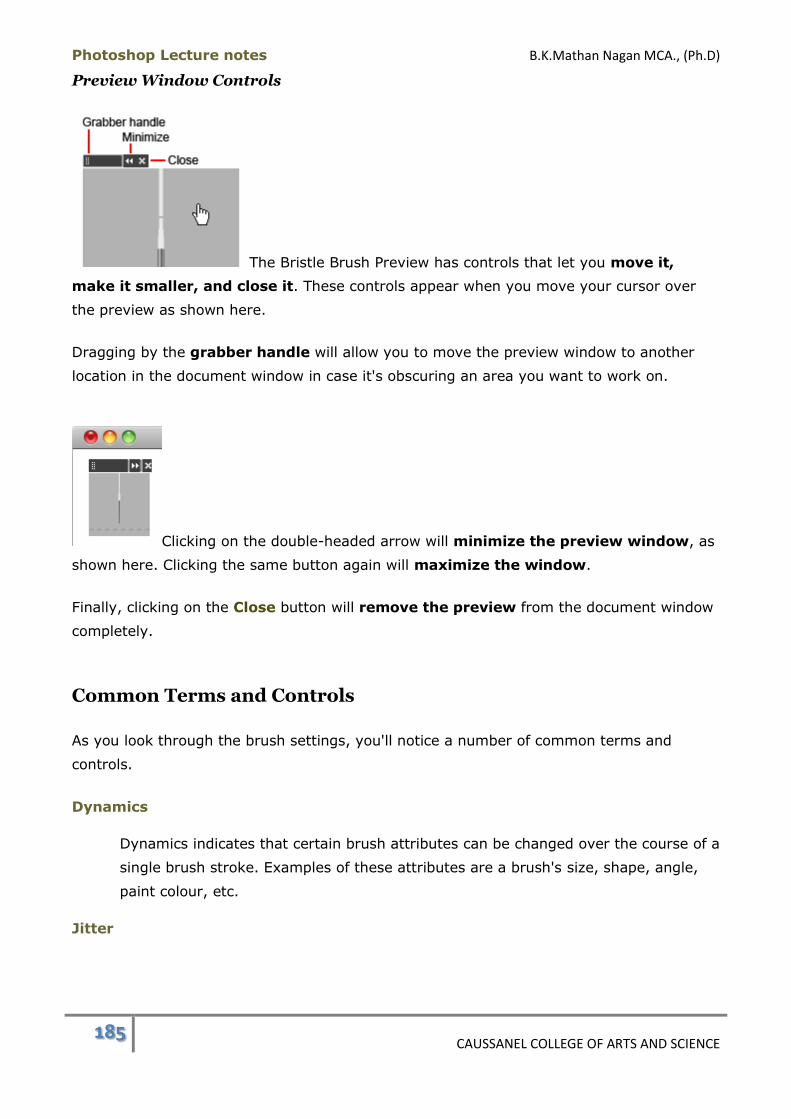
Photoshop Lecture notes B.K.Mathan Nagan MCA., (Ph.D)
185 CAUSSANEL COLLEGE OF ARTS AND SCIENCE
Preview Window Controls
The Bristle Brush Preview has controls that let you move it,
make it smaller, and close it. These controls appear when you move your cursor over
the preview as shown here.
Dragging by the grabber handle will allow you to move the preview window to another
location in the document window in case it's obscuring an area you want to work on.
Clicking on the double-headed arrow will minimize the preview window, as
shown here. Clicking the same button again will maximize the window.
Finally, clicking on the Close button will remove the preview from the document window
completely.
Common Terms and Controls
As you look through the brush settings, you'll notice a number of common terms and
controls.
Dynamics
Dynamics indicates that certain brush attributes can be changed over the course of a
single brush stroke. Examples of these attributes are a brush's size, shape, angle,
paint colour, etc.
Jitter
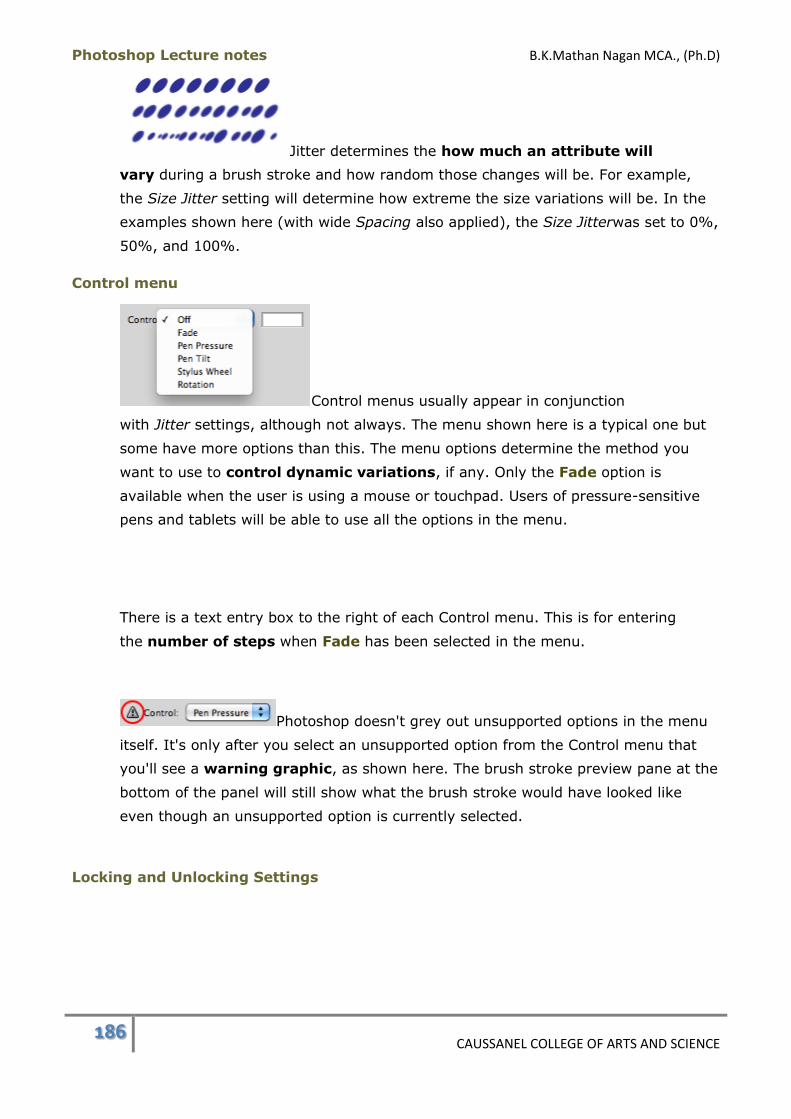
Photoshop Lecture notes B.K.Mathan Nagan MCA., (Ph.D)
186 CAUSSANEL COLLEGE OF ARTS AND SCIENCE
Jitter determines the how much an attribute will
vary during a brush stroke and how random those changes will be. For example,
the Size Jitter setting will determine how extreme the size variations will be. In the
examples shown here (with wide Spacing also applied), the Size Jitterwas set to 0%,
50%, and 100%.
Control menu
Control menus usually appear in conjunction
with Jitter settings, although not always. The menu shown here is a typical one but
some have more options than this. The menu options determine the method you
want to use to control dynamic variations, if any. Only the Fade option is
available when the user is using a mouse or touchpad. Users of pressure-sensitive
pens and tablets will be able to use all the options in the menu.
There is a text entry box to the right of each Control menu. This is for entering
the number of steps when Fade has been selected in the menu.
Photoshop doesn't grey out unsupported options in the menu
itself. It's only after you select an unsupported option from the Control menu that
you'll see a warning graphic, as shown here. The brush stroke preview pane at the
bottom of the panel will still show what the brush stroke would have looked like
even though an unsupported option is currently selected.
Locking and Unlocking Settings
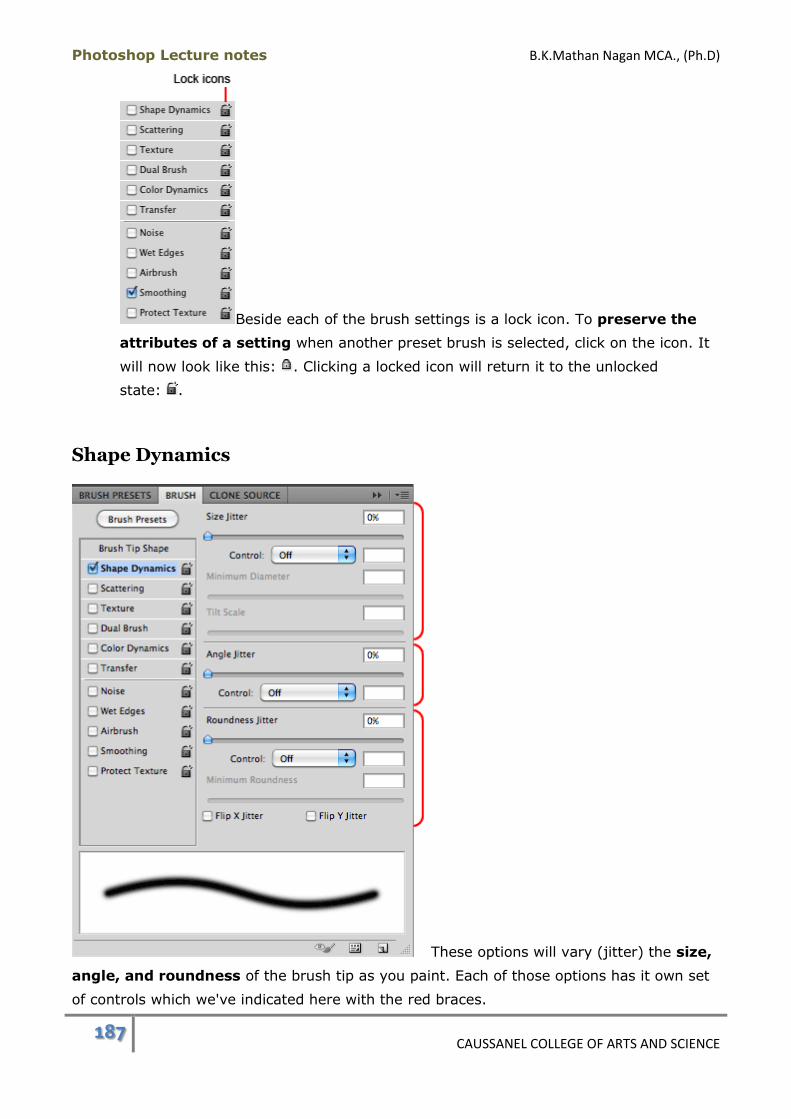
Photoshop Lecture notes B.K.Mathan Nagan MCA., (Ph.D)
187 CAUSSANEL COLLEGE OF ARTS AND SCIENCE
Beside each of the brush settings is a lock icon. To preserve the
attributes of a setting when another preset brush is selected, click on the icon. It
will now look like this: . Clicking a locked icon will return it to the unlocked
state: .
Shape Dynamics
These options will vary (jitter) the size,
angle, and roundness of the brush tip as you paint. Each of those options has it own set
of controls which we've indicated here with the red braces.
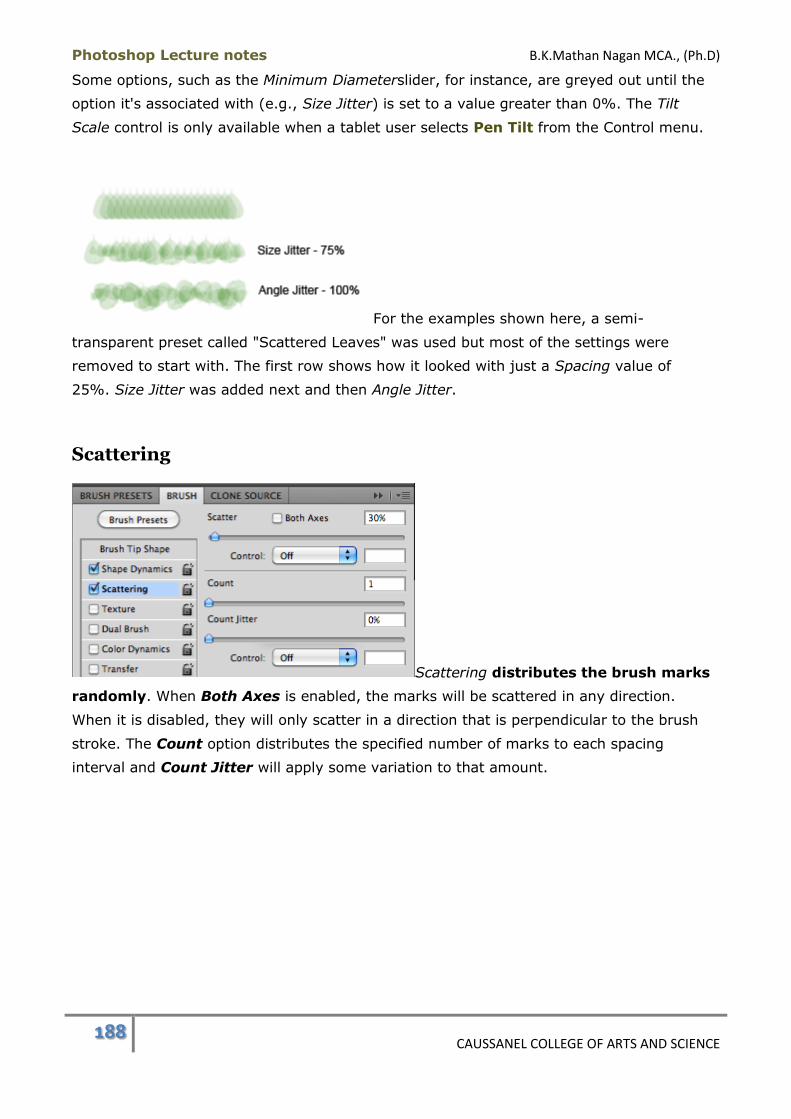
Photoshop Lecture notes B.K.Mathan Nagan MCA., (Ph.D)
188 CAUSSANEL COLLEGE OF ARTS AND SCIENCE
Some options, such as the Minimum Diameterslider, for instance, are greyed out until the
option it's associated with (e.g., Size Jitter) is set to a value greater than 0%. The Tilt
Scale control is only available when a tablet user selects Pen Tilt from the Control menu.
For the examples shown here, a semi-
transparent preset called "Scattered Leaves" was used but most of the settings were
removed to start with. The first row shows how it looked with just a Spacing value of
25%. Size Jitter was added next and then Angle Jitter.
Scattering
Scattering distributes the brush marks
randomly. When Both Axes is enabled, the marks will be scattered in any direction.
When it is disabled, they will only scatter in a direction that is perpendicular to the brush
stroke. The Count option distributes the specified number of marks to each spacing
interval and Count Jitter will apply some variation to that amount.
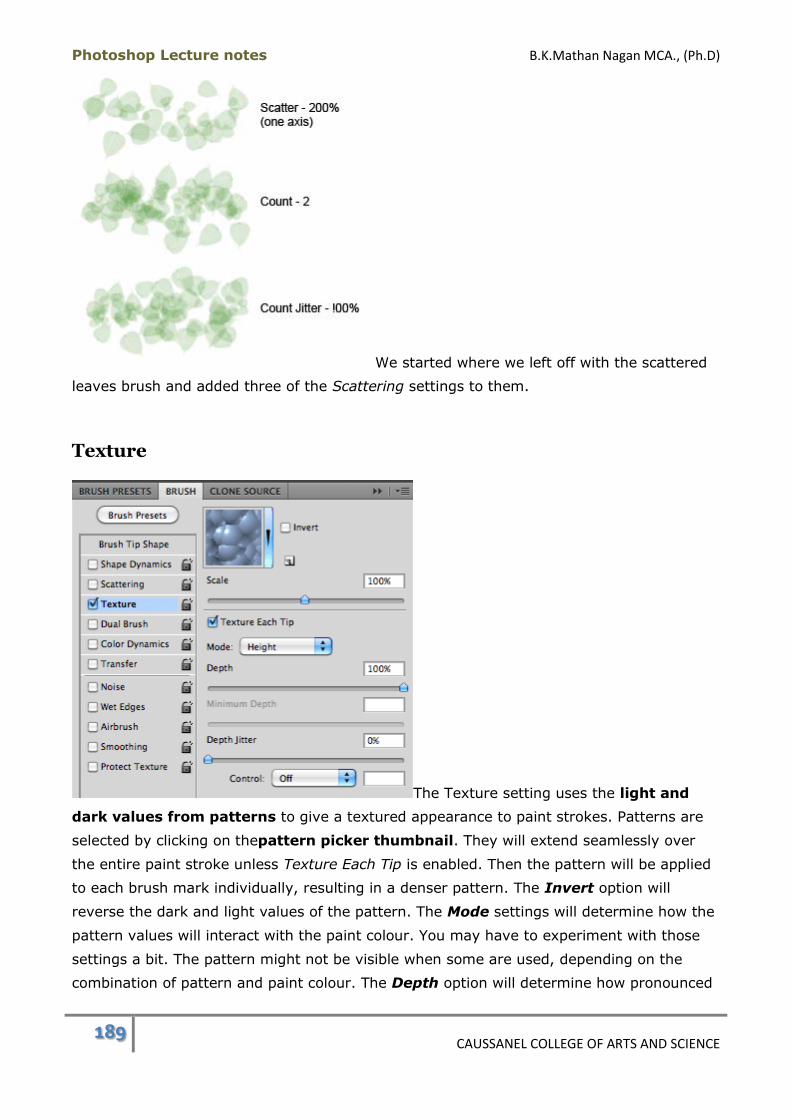
Photoshop Lecture notes B.K.Mathan Nagan MCA., (Ph.D)
189 CAUSSANEL COLLEGE OF ARTS AND SCIENCE
We started where we left off with the scattered
leaves brush and added three of the Scattering settings to them.
Texture
The Texture setting uses the light and
dark values from patterns to give a textured appearance to paint strokes. Patterns are
selected by clicking on thepattern picker thumbnail. They will extend seamlessly over
the entire paint stroke unless Texture Each Tip is enabled. Then the pattern will be applied
to each brush mark individually, resulting in a denser pattern. The Invert option will
reverse the dark and light values of the pattern. The Mode settings will determine how the
pattern values will interact with the paint colour. You may have to experiment with those
settings a bit. The pattern might not be visible when some are used, depending on the
combination of pattern and paint colour. The Depth option will determine how pronounced

Photoshop Lecture notes B.K.Mathan Nagan MCA., (Ph.D)
190 CAUSSANEL COLLEGE OF ARTS AND SCIENCE
the texture effect will be.
A large, round, flat brush was used to
create these textured paint strokes.
Dual Brush
After you have selected a brush initially,
you can use the Dual Brush settings to select a second brush andpaint with both
brushes at the same time. This is an option that definitely requires some experimentation
with brush combinations and options from the Modemenu. Spacing and Scatter will create a
more diffuse effect and Count will intensify it.
The bristle brushes are not available with this option.
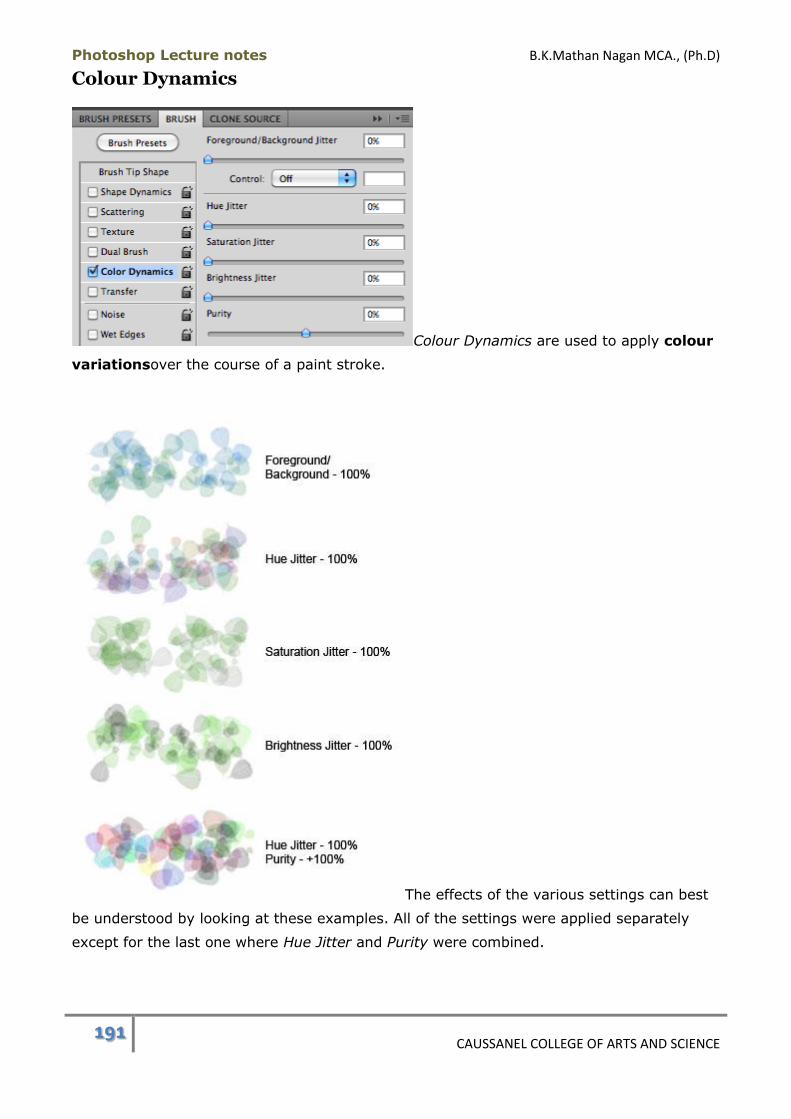
Photoshop Lecture notes B.K.Mathan Nagan MCA., (Ph.D)
191 CAUSSANEL COLLEGE OF ARTS AND SCIENCE
Colour Dynamics
Colour Dynamics are used to apply colour
variationsover the course of a paint stroke.
The effects of the various settings can best
be understood by looking at these examples. All of the settings were applied separately
except for the last one where Hue Jitter and Purity were combined.
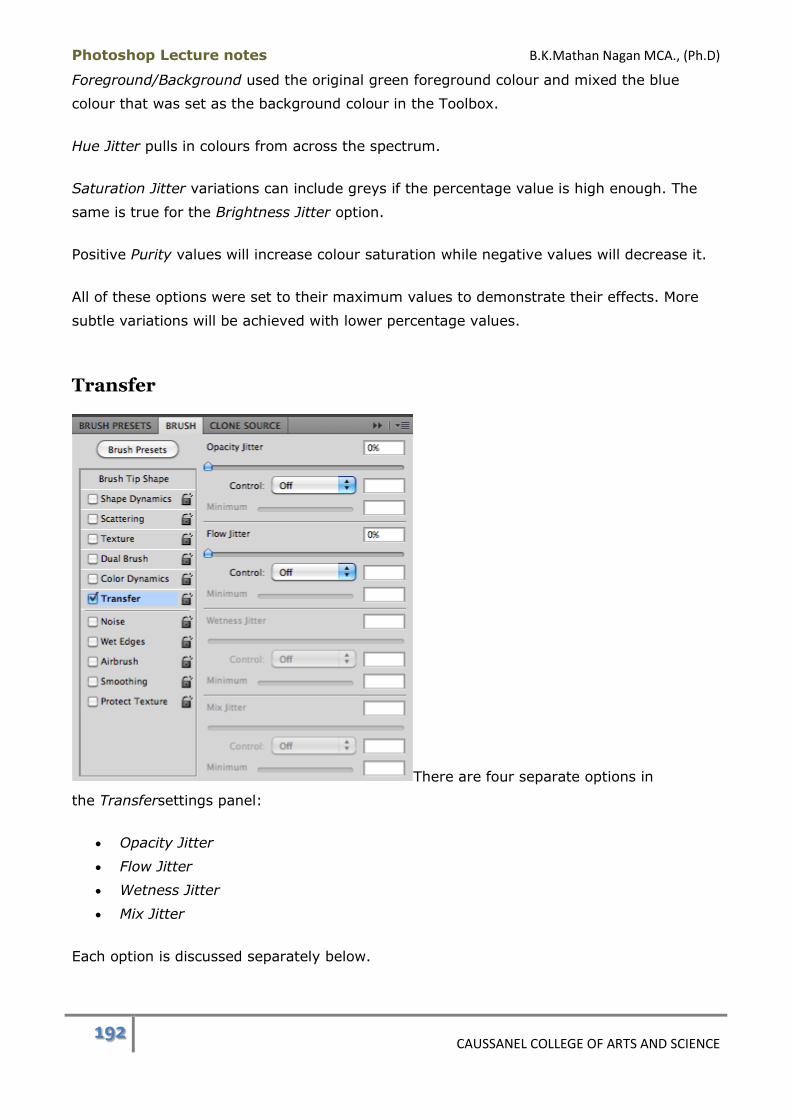
Photoshop Lecture notes B.K.Mathan Nagan MCA., (Ph.D)
192 CAUSSANEL COLLEGE OF ARTS AND SCIENCE
Foreground/Background used the original green foreground colour and mixed the blue
colour that was set as the background colour in the Toolbox.
Hue Jitter pulls in colours from across the spectrum.
Saturation Jitter variations can include greys if the percentage value is high enough. The
same is true for the Brightness Jitter option.
Positive Purity values will increase colour saturation while negative values will decrease it.
All of these options were set to their maximum values to demonstrate their effects. More
subtle variations will be achieved with lower percentage values.
Transfer
There are four separate options in
the Transfersettings panel:
Opacity Jitter
Flow Jitter
Wetness Jitter
Mix Jitter
Each option is discussed separately below.
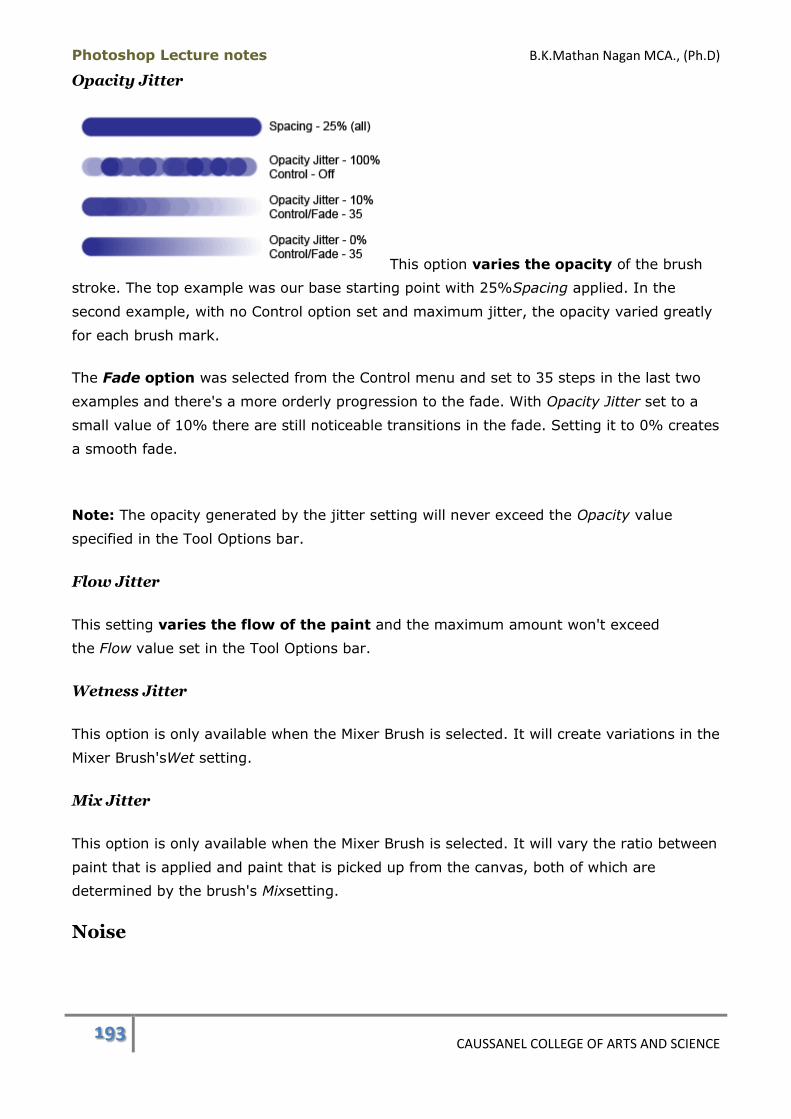
Photoshop Lecture notes B.K.Mathan Nagan MCA., (Ph.D)
193 CAUSSANEL COLLEGE OF ARTS AND SCIENCE
Opacity Jitter
This option varies the opacity of the brush
stroke. The top example was our base starting point with 25%Spacing applied. In the
second example, with no Control option set and maximum jitter, the opacity varied greatly
for each brush mark.
The Fade option was selected from the Control menu and set to 35 steps in the last two
examples and there's a more orderly progression to the fade. With Opacity Jitter set to a
small value of 10% there are still noticeable transitions in the fade. Setting it to 0% creates
a smooth fade.
Note: The opacity generated by the jitter setting will never exceed the Opacity value
specified in the Tool Options bar.
Flow Jitter
This setting varies the flow of the paint and the maximum amount won't exceed
the Flow value set in the Tool Options bar.
Wetness Jitter
This option is only available when the Mixer Brush is selected. It will create variations in the
Mixer Brush'sWet setting.
Mix Jitter
This option is only available when the Mixer Brush is selected. It will vary the ratio between
paint that is applied and paint that is picked up from the canvas, both of which are
determined by the brush's Mixsetting.
Noise

Photoshop Lecture notes B.K.Mathan Nagan MCA., (Ph.D)
194 CAUSSANEL COLLEGE OF ARTS AND SCIENCE
This applies a random scattering of pixels that are visible in
the softer areas of the paint stroke. It's more noticeable with large, soft brushes, as shown
here.
Wet Edges
When this option is enabled, the effect is like watercolour
painting. The opacity is reduced in areas where pressure from the brush bristles would be
the greatest and there is a slight build-up of paint along the borders of the stroke.
Airbrush
This duplicates the function of the button located on the Tool Options bar for the tools that
support theAirbrush capability. If this option isn't enabled in the Tool Options bar, enabling
it in the Brush panel will simultaneously enable it in the Tool Options bar and vice versa.
Smoothing
The purpose of Smoothing is to smooth the curves of brush strokes. It is most effective
when used with a stylus.
Protect Texture
This setting will apply the current texture at its current scale to all preset brushes that have
textures. When you're using multiple brushes in the same document, this will provide a
consistent texture, no matter which brush you're using.
Panel Menu
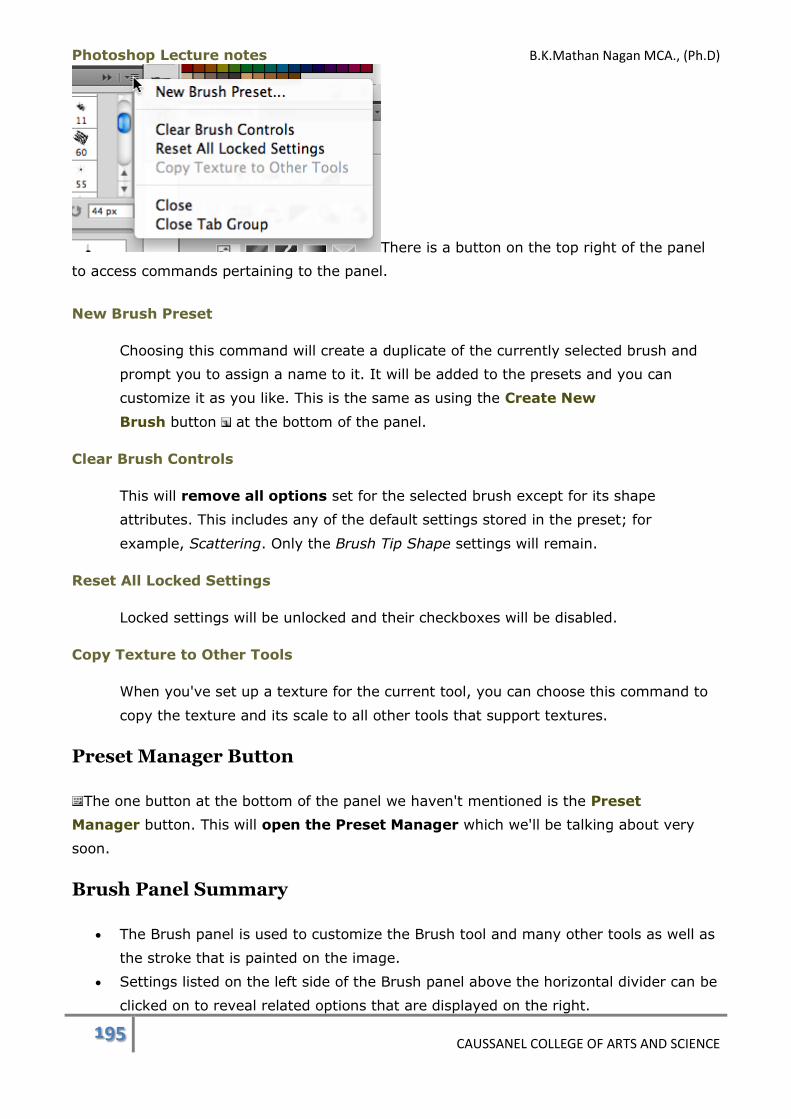
Photoshop Lecture notes B.K.Mathan Nagan MCA., (Ph.D)
195 CAUSSANEL COLLEGE OF ARTS AND SCIENCE
There is a button on the top right of the panel
to access commands pertaining to the panel.
New Brush Preset
Choosing this command will create a duplicate of the currently selected brush and
prompt you to assign a name to it. It will be added to the presets and you can
customize it as you like. This is the same as using the Create New
Brush button at the bottom of the panel.
Clear Brush Controls
This will remove all options set for the selected brush except for its shape
attributes. This includes any of the default settings stored in the preset; for
example, Scattering. Only the Brush Tip Shape settings will remain.
Reset All Locked Settings
Locked settings will be unlocked and their checkboxes will be disabled.
Copy Texture to Other Tools
When you've set up a texture for the current tool, you can choose this command to
copy the texture and its scale to all other tools that support textures.
Preset Manager Button
The one button at the bottom of the panel we haven't mentioned is the Preset
Manager button. This will open the Preset Manager which we'll be talking about very
soon.
Brush Panel Summary
The Brush panel is used to customize the Brush tool and many other tools as well as
the stroke that is painted on the image.
Settings listed on the left side of the Brush panel above the horizontal divider can be
clicked on to reveal related options that are displayed on the right.
Photoshop Lecture notes B.K.Mathan Nagan MCA., (Ph.D)
196 CAUSSANEL COLLEGE OF ARTS AND SCIENCE
The panel contains a brush stroke preview pane with a black and white view of the
stroke that will be produced with the current settings.
Brushes have either flat tips or bristle tips. Each type has its own options.
A flat-tip brush has options for setting its Size (diameter), Flip X and Flip
Y, Angle, Roundness,Hardness, and Spacing.
A bristle-tip brush has options for setting its Size
(diameter), Shape, Bristles (density), bristleLength, bristle Thickness,
bristle Stiffness, Angle, and Spacing.
Each brush stroke is formed by individual brush "marks". The Spacing option sets
the distance between each mark.
The Bristle Brush Preview can be displayed in the image to provide a dynamic,
animated view of a bristle brush as you're painting.
Brush dynamics are settings that will cause the paint stroke to change as it's being
applied.
Jitter is a random variation that can be applied to certain brush or paint attributes
such as size, shape, angle, paint colour, etc.
Settings listed on the left side of the Brush panel can be locked and unlocked.
Shape Dynamics varies the size, angle, and roundness of the brush tip while
painting.
Scattering randomizes the placement and number of brush marks.
The Texture setting uses patterns to add a textured look to a brush stroke.
The Dual Brush setting lets you paint with two flat brushes simultaneously.
Colour Dynamics varies the colour attributes of a paint stroke such as its hue,
saturation, brightness and purity.
Opacity Jitter and Flow Jitter will vary the opacity and flow of the paint stroke. The
variations that are generated will not exceed the values set for these same
attributes in the Tool Options bar.
Noise applies random speckling to soft areas of a brush stroke.
Paint strokes with Wet Edges enabled will be thin (partially transparent) where the
brush pressure is the greatest and the paint that is displaced will appear thicker
along the edges of the stroke.
The Airbrush checkbox duplicates the Airbrush button in the Tool Options bar. Both
will enable or disable the airbrush capability.
Smoothing is primarily useful for smoothing the curves of brush strokes drawn with
a pen and tablet.
Protect Texture will assign the current texture and its scale value to all other
brushes.
Photoshop Lecture notes B.K.Mathan Nagan MCA., (Ph.D)
197 CAUSSANEL COLLEGE OF ARTS AND SCIENCE
Brush presets can be created and modified by using the New Brush
Preset command in the panel menu or clicking on the Create New Brush button at
the bottom of the panel.
The panel menu's Clear Brush Controls command removes all settings for the
current brush except for its shape attributes.
The panel menu's Reset All Locked Settings option will unlock all settings and
disable them for the current brush.
A texture being used with the current brush can be copied to other tools that
support textures by selecting the Copy Texture to Other Tools command from the
panel menu.
The Preset Manager button at the bottom of the Brush panel will open the Preset
Manager.
Brush Panel Keyboard Shortcuts:
Open Brush panel: F5
Brush Presets Panel

Photoshop Lecture notes B.K.Mathan Nagan MCA., (Ph.D)
198 CAUSSANEL COLLEGE OF ARTS AND SCIENCE
The features of the Brush Presets
panel are almost identical to those in the Brush Preset picker. Unlike the brush picker, the
panel can be left open as you're trying out different brushes. Here are the functionality
differences:
The Brush Preset picker has a Hardnessslider control in addition to the Sizecontrol.
The Brush Presets panel has a button to toggle the Bristle Brush Preview.
The Brush Presets panel has buttons forDelete Brush and Preset Manager while
the picker has those options only as panel menu commands.
Their panel menus are the same so the commands we cover here apply to both.
To open the Brush Presets panel do one of the following:
Go to Window > Brush Presets.

Photoshop Lecture notes B.K.Mathan Nagan MCA., (Ph.D)
199 CAUSSANEL COLLEGE OF ARTS AND SCIENCE
If the Brush Presets panel icon is displayed in the icon dock, click it to expand
the panel.
If the Brush panel is currently open, click the Brush Presets button.
Size Setting
This control works the same way as it does in the Brush Preset
picker. Any change you make to a brush's size will only be temporary and will not alter the
preset itself. If you switch brushes and come back to the one you changed, its
original Size value will be restored.
Brush Presets Panel Buttons
Most of these were covered in the previous two lectures so this will just be a quick review.
Toggle Brush Panel button
This is equivalent to the same button in the Tool Options bar.
Bristle Brush Preview
When a bristle brush is selected and you have OpenGL enabled in the Performance
preferences, this activates the bristle brush preview window in the image document.
Preset Manager
This opens the Preset Manager that will be covered in a separate lecture. It is used to
manage all of Photoshop's presets.
Create New Brush Preset
This adds a new preset to the preset list. We'll create a new preset in a practice exercise.
Delete Preset Brush
This will delete a brush selected in the preset list. If no brush is currently selected in the
list, the trashcan icon will be dimmed.
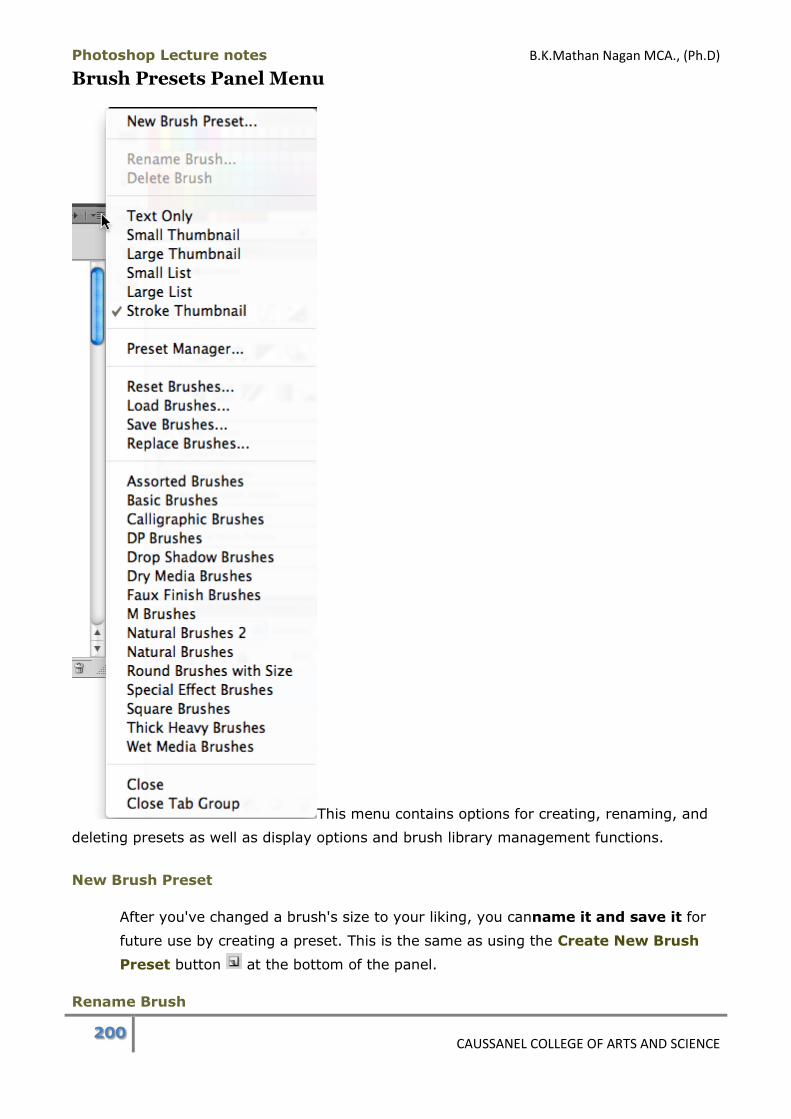
Photoshop Lecture notes B.K.Mathan Nagan MCA., (Ph.D)
200 CAUSSANEL COLLEGE OF ARTS AND SCIENCE
Brush Presets Panel Menu
This menu contains options for creating, renaming, and
deleting presets as well as display options and brush library management functions.
New Brush Preset
After you've changed a brush's size to your liking, you canname it and save it for
future use by creating a preset. This is the same as using the Create New Brush
Preset button at the bottom of the panel.
Rename Brush
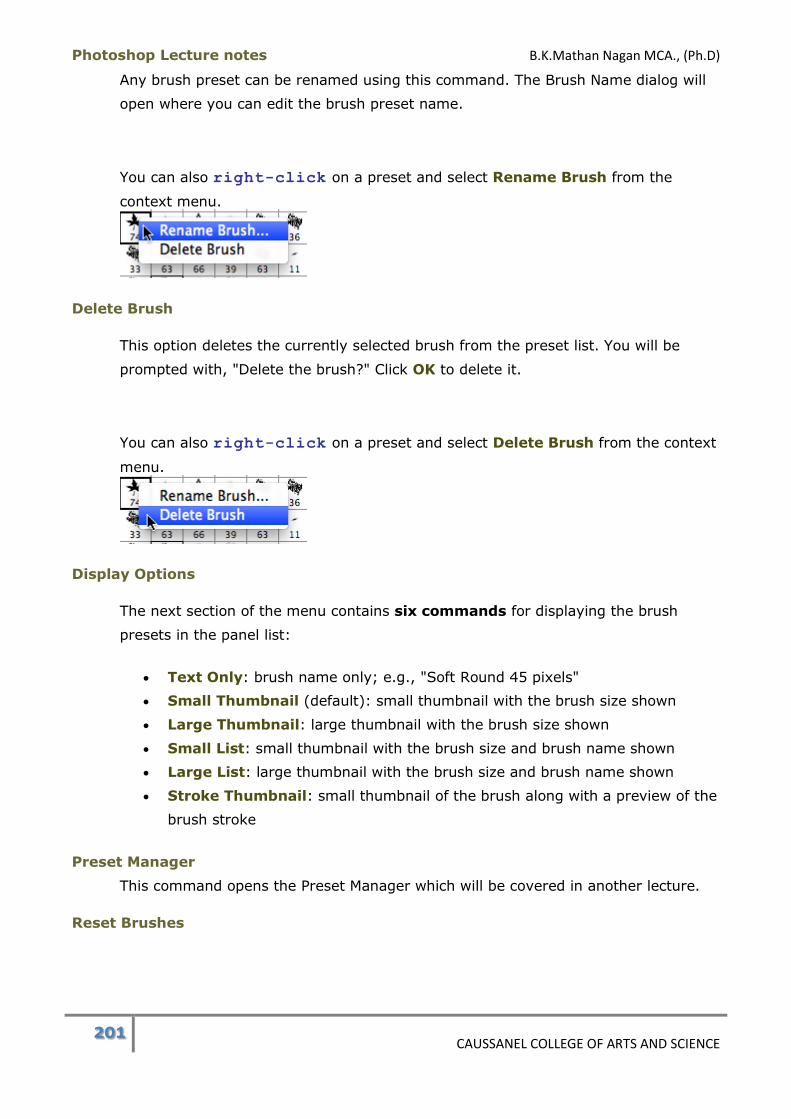
Photoshop Lecture notes B.K.Mathan Nagan MCA., (Ph.D)
201 CAUSSANEL COLLEGE OF ARTS AND SCIENCE
Any brush preset can be renamed using this command. The Brush Name dialog will
open where you can edit the brush preset name.
You can also right-click on a preset and select Rename Brush from the
context menu.
Delete Brush
This option deletes the currently selected brush from the preset list. You will be
prompted with, "Delete the brush?" Click OK to delete it.
You can also right-click on a preset and select Delete Brush from the context
menu.
Display Options
The next section of the menu contains six commands for displaying the brush
presets in the panel list:
Text Only: brush name only; e.g., "Soft Round 45 pixels"
Small Thumbnail (default): small thumbnail with the brush size shown
Large Thumbnail: large thumbnail with the brush size shown
Small List: small thumbnail with the brush size and brush name shown
Large List: large thumbnail with the brush size and brush name shown
Stroke Thumbnail: small thumbnail of the brush along with a preview of the
brush stroke
Preset Manager
This command opens the Preset Manager which will be covered in another lecture.
Reset Brushes

Photoshop Lecture notes B.K.Mathan Nagan MCA., (Ph.D)
202 CAUSSANEL COLLEGE OF ARTS AND SCIENCE
This option will convert the list of presets back to the default list. If you've created
any custom brushes without saving them in a custom library, you'll be prompted to
save the changes.
Load Brushes
This will navigate to the Presets/Brushes folder in the Photoshop application folder
on your hard drive. Select a brush library and click the Load button. The brushes in
that library will beappended to the current list of brush presets.
Save Brushes
You can save the current set of brushes as a custom library, which is particularly
handy if you've created any custom brushes. The steps are:
1. Click the Save Brushes command. The Save dialog will open.
2. If you want the library to be displayed in the Brush Presets panel menu,
navigate to thePresets/Brushes folder in the Photoshop application folder.
3. A default name of Untitled Brushes.abr will be assigned. Type in a more
appropriate name and retain the .abr file extension if it is displayed on your
system.
4. Click the Save button.
Replace Brushes
This option lets you select a brush library using the Open dialog that will replace
the set of brushes currently displayed in the list.
Brush Libraries
The brush libraries that come with Photoshop are listed at the bottom of this menu.
Clicking on one will load it into the Brush Presets panel. You will be asked to choose
between replacing the current brushes with the new library or appending it to the
current set.
Practice Exercise: Working With Brush Presets
This exercise will give you practice in working with brush presets and libraries.
1. Open the Brush Presets panel and then its panel menu.
2. Choose the option Small Thumbnail.
3. In the bottom section of the panel menu choose the Special Effect Brushes library
to load them into the panel.
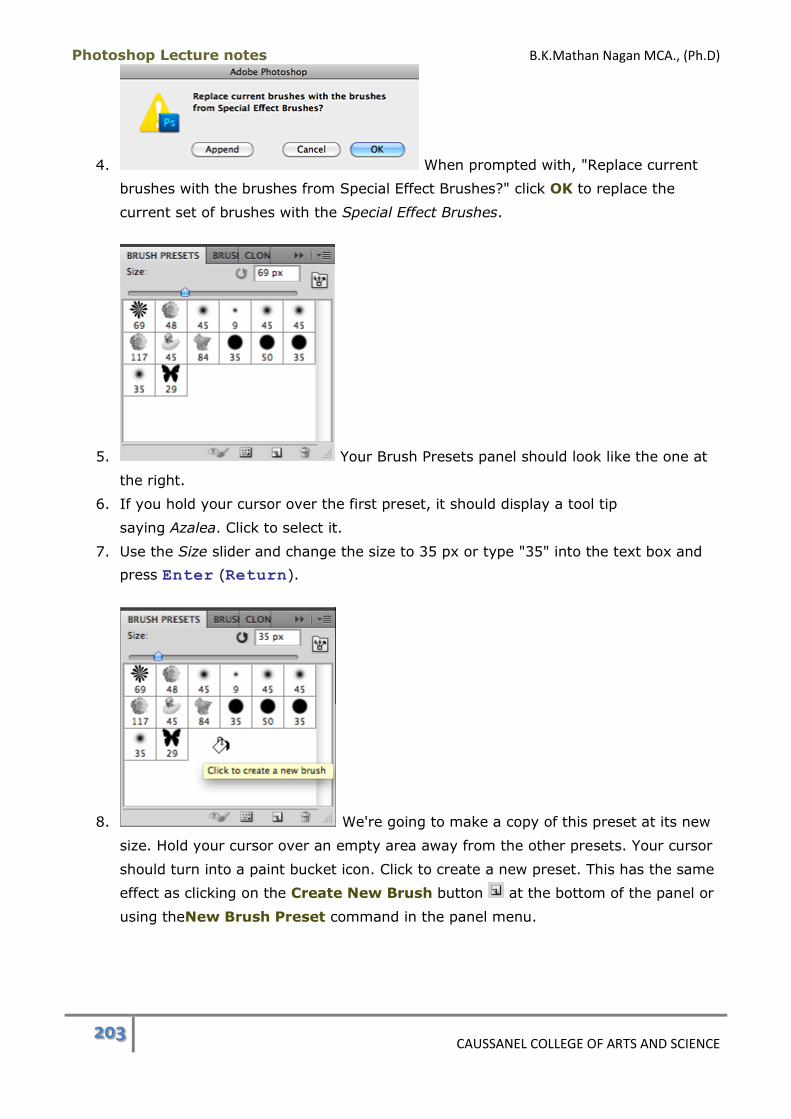
Photoshop Lecture notes B.K.Mathan Nagan MCA., (Ph.D)
203 CAUSSANEL COLLEGE OF ARTS AND SCIENCE
4. When prompted with, "Replace current
brushes with the brushes from Special Effect Brushes?" click OK to replace the
current set of brushes with the Special Effect Brushes.
5. Your Brush Presets panel should look like the one at
the right.
6. If you hold your cursor over the first preset, it should display a tool tip
saying Azalea. Click to select it.
7. Use the Size slider and change the size to 35 px or type "35" into the text box and
press Enter (Return).
8. We're going to make a copy of this preset at its new
size. Hold your cursor over an empty area away from the other presets. Your cursor
should turn into a paint bucket icon. Click to create a new preset. This has the same
effect as clicking on the Create New Brush button at the bottom of the panel or
using theNew Brush Preset command in the panel menu.
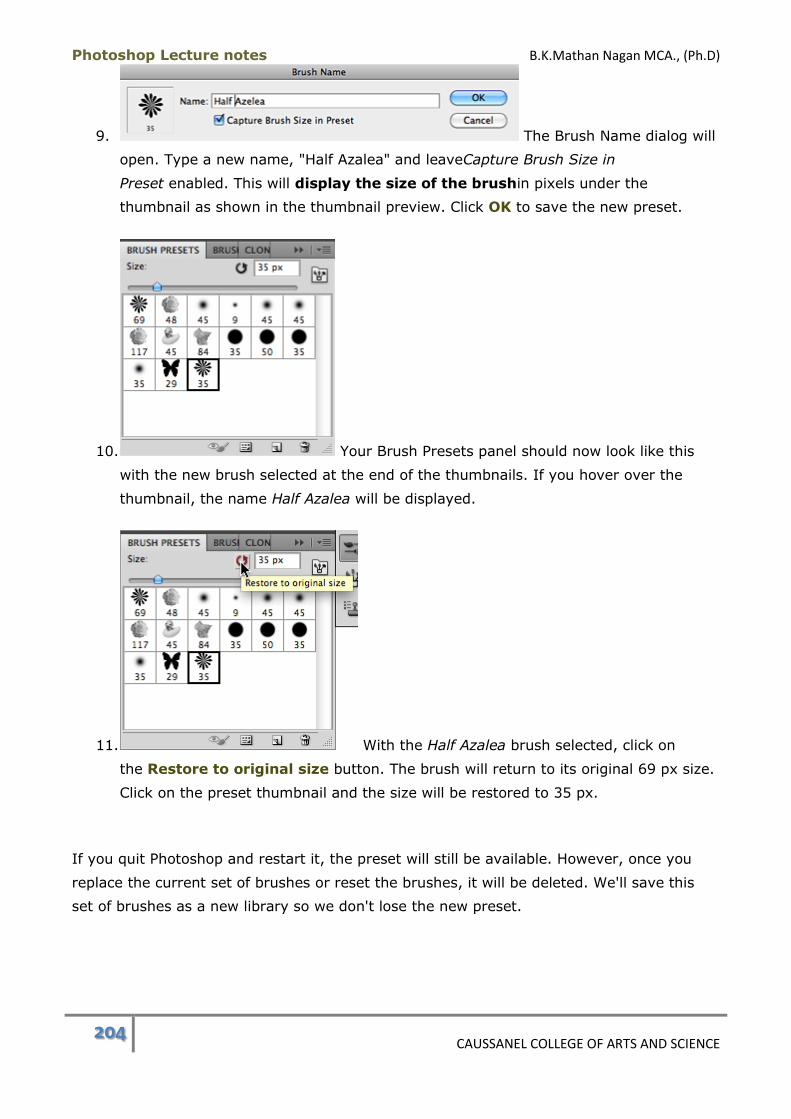
Photoshop Lecture notes B.K.Mathan Nagan MCA., (Ph.D)
204 CAUSSANEL COLLEGE OF ARTS AND SCIENCE
9. The Brush Name dialog will
open. Type a new name, "Half Azalea" and leaveCapture Brush Size in
Preset enabled. This will display the size of the brushin pixels under the
thumbnail as shown in the thumbnail preview. Click OK to save the new preset.
10. Your Brush Presets panel should now look like this
with the new brush selected at the end of the thumbnails. If you hover over the
thumbnail, the name Half Azalea will be displayed.
11. With the Half Azalea brush selected, click on
the Restore to original size button. The brush will return to its original 69 px size.
Click on the preset thumbnail and the size will be restored to 35 px.
If you quit Photoshop and restart it, the preset will still be available. However, once you
replace the current set of brushes or reset the brushes, it will be deleted. We'll save this
set of brushes as a new library so we don't lose the new preset.
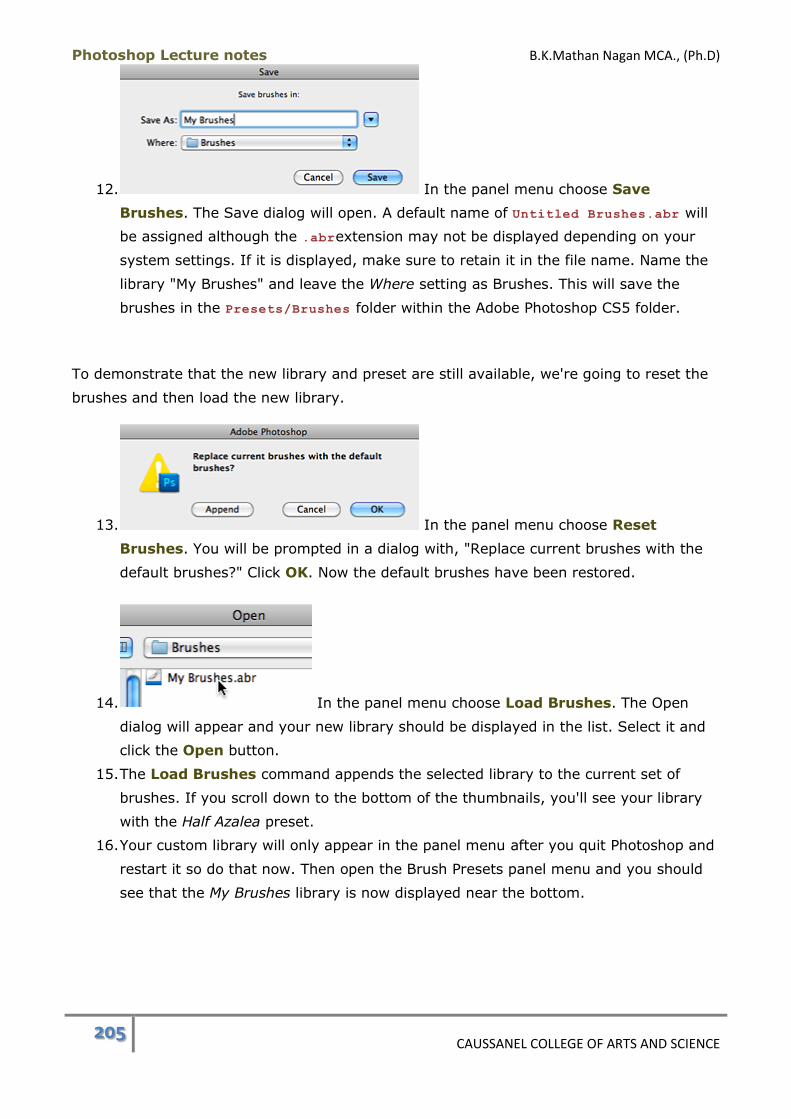
Photoshop Lecture notes B.K.Mathan Nagan MCA., (Ph.D)
205 CAUSSANEL COLLEGE OF ARTS AND SCIENCE
12. In the panel menu choose Save
Brushes. The Save dialog will open. A default name of Untitled Brushes.abr will
be assigned although the .abrextension may not be displayed depending on your
system settings. If it is displayed, make sure to retain it in the file name. Name the
library "My Brushes" and leave the Where setting as Brushes. This will save the
brushes in the Presets/Brushes folder within the Adobe Photoshop CS5 folder.
To demonstrate that the new library and preset are still available, we're going to reset the
brushes and then load the new library.
13. In the panel menu choose Reset
Brushes. You will be prompted in a dialog with, "Replace current brushes with the
default brushes?" Click OK. Now the default brushes have been restored.
14. In the panel menu choose Load Brushes. The Open
dialog will appear and your new library should be displayed in the list. Select it and
click the Open button.
15. The Load Brushes command appends the selected library to the current set of
brushes. If you scroll down to the bottom of the thumbnails, you'll see your library
with the Half Azalea preset.
16. Your custom library will only appear in the panel menu after you quit Photoshop and
restart it so do that now. Then open the Brush Presets panel menu and you should
see that the My Brushes library is now displayed near the bottom.
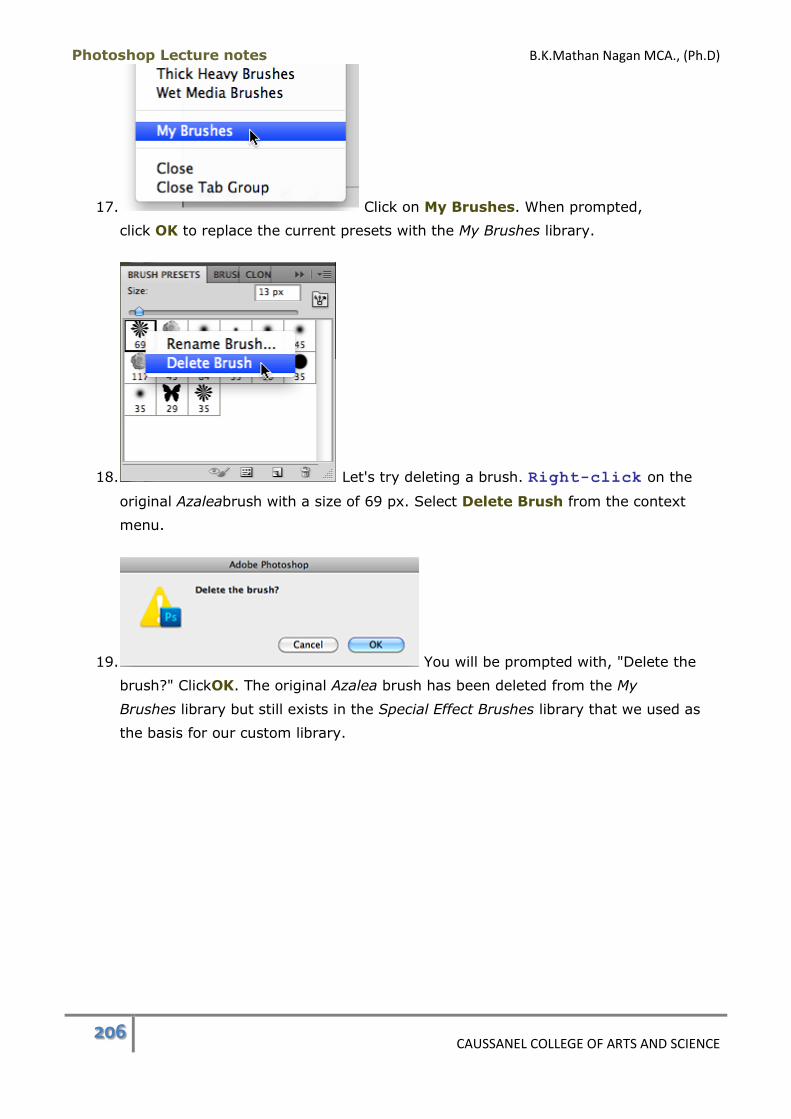
Photoshop Lecture notes B.K.Mathan Nagan MCA., (Ph.D)
206 CAUSSANEL COLLEGE OF ARTS AND SCIENCE
17. Click on My Brushes. When prompted,
click OK to replace the current presets with the My Brushes library.
18. Let's try deleting a brush. Right-click on the
original Azaleabrush with a size of 69 px. Select Delete Brush from the context
menu.
19. You will be prompted with, "Delete the
brush?" ClickOK. The original Azalea brush has been deleted from the My
Brushes library but still exists in the Special Effect Brushes library that we used as
the basis for our custom library.
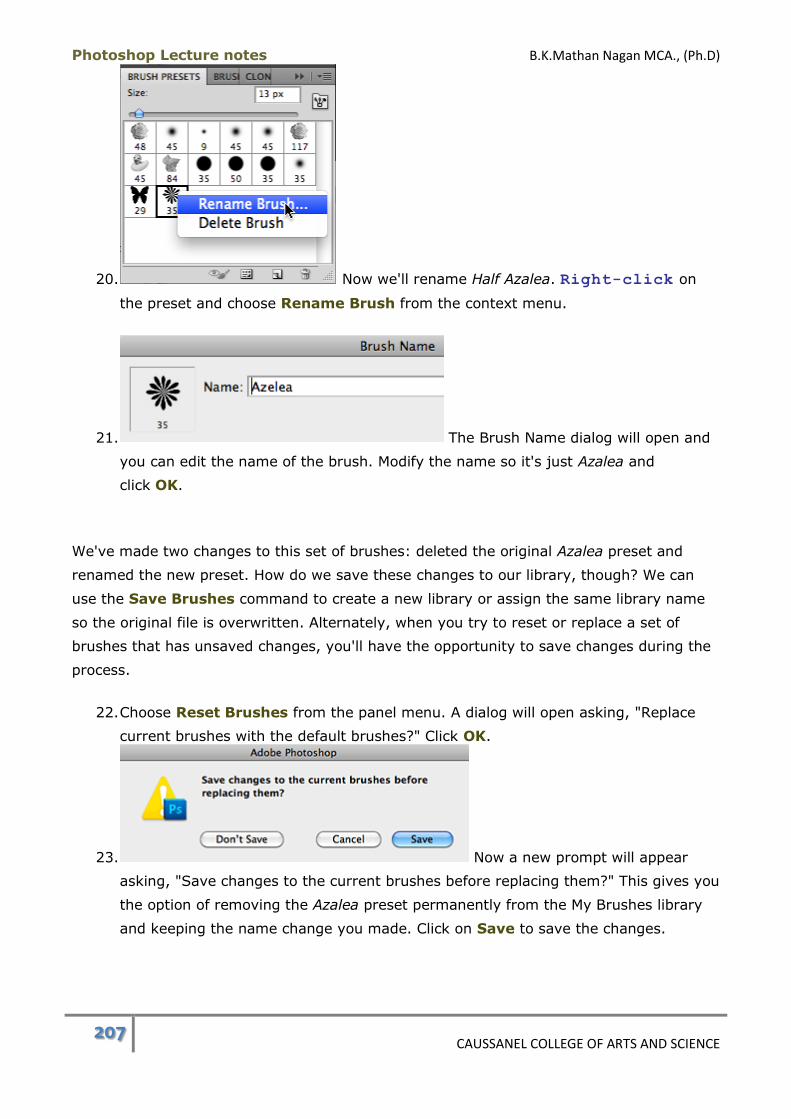
Photoshop Lecture notes B.K.Mathan Nagan MCA., (Ph.D)
207 CAUSSANEL COLLEGE OF ARTS AND SCIENCE
20. Now we'll rename Half Azalea. Right-click on
the preset and choose Rename Brush from the context menu.
21. The Brush Name dialog will open and
you can edit the name of the brush. Modify the name so it's just Azalea and
click OK.
We've made two changes to this set of brushes: deleted the original Azalea preset and
renamed the new preset. How do we save these changes to our library, though? We can
use the Save Brushes command to create a new library or assign the same library name
so the original file is overwritten. Alternately, when you try to reset or replace a set of
brushes that has unsaved changes, you'll have the opportunity to save changes during the
process.
22. Choose Reset Brushes from the panel menu. A dialog will open asking, "Replace
current brushes with the default brushes?" Click OK.
23. Now a new prompt will appear
asking, "Save changes to the current brushes before replacing them?" This gives you
the option of removing the Azalea preset permanently from the My Brushes library
and keeping the name change you made. Click on Save to save the changes.
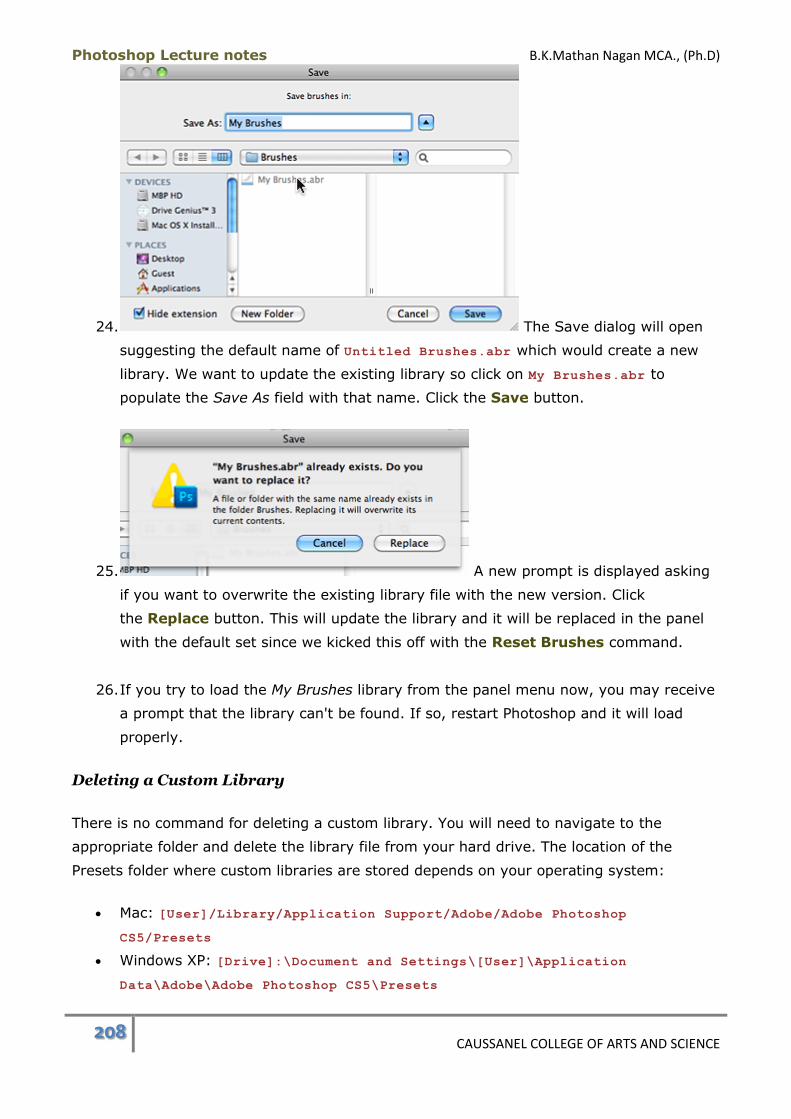
Photoshop Lecture notes B.K.Mathan Nagan MCA., (Ph.D)
208 CAUSSANEL COLLEGE OF ARTS AND SCIENCE
24. The Save dialog will open
suggesting the default name of Untitled Brushes.abr which would create a new
library. We want to update the existing library so click on My Brushes.abr to
populate the Save As field with that name. Click the Save button.
25. A new prompt is displayed asking
if you want to overwrite the existing library file with the new version. Click
the Replace button. This will update the library and it will be replaced in the panel
with the default set since we kicked this off with the Reset Brushes command.
26. If you try to load the My Brushes library from the panel menu now, you may receive
a prompt that the library can't be found. If so, restart Photoshop and it will load
properly.
Deleting a Custom Library
There is no command for deleting a custom library. You will need to navigate to the
appropriate folder and delete the library file from your hard drive. The location of the
Presets folder where custom libraries are stored depends on your operating system:
Mac: [User]/Library/Application Support/Adobe/Adobe Photoshop
CS5/Presets
Windows XP: [Drive]:\Document and Settings\[User]\Application
Data\Adobe\Adobe Photoshop CS5\Presets
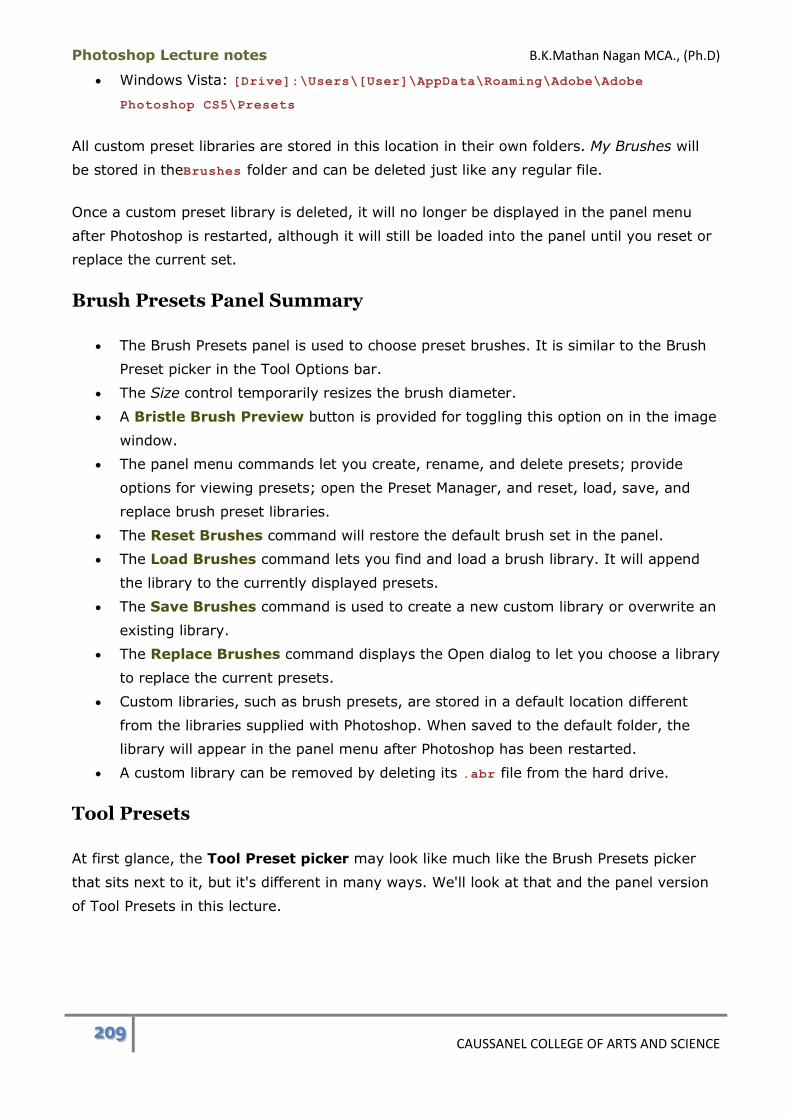
Photoshop Lecture notes B.K.Mathan Nagan MCA., (Ph.D)
209 CAUSSANEL COLLEGE OF ARTS AND SCIENCE
Windows Vista: [Drive]:\Users\[User]\AppData\Roaming\Adobe\Adobe
Photoshop CS5\Presets
All custom preset libraries are stored in this location in their own folders. My Brushes will
be stored in theBrushes folder and can be deleted just like any regular file.
Once a custom preset library is deleted, it will no longer be displayed in the panel menu
after Photoshop is restarted, although it will still be loaded into the panel until you reset or
replace the current set.
Brush Presets Panel Summary
The Brush Presets panel is used to choose preset brushes. It is similar to the Brush
Preset picker in the Tool Options bar.
The Size control temporarily resizes the brush diameter.
A Bristle Brush Preview button is provided for toggling this option on in the image
window.
The panel menu commands let you create, rename, and delete presets; provide
options for viewing presets; open the Preset Manager, and reset, load, save, and
replace brush preset libraries.
The Reset Brushes command will restore the default brush set in the panel.
The Load Brushes command lets you find and load a brush library. It will append
the library to the currently displayed presets.
The Save Brushes command is used to create a new custom library or overwrite an
existing library.
The Replace Brushes command displays the Open dialog to let you choose a library
to replace the current presets.
Custom libraries, such as brush presets, are stored in a default location different
from the libraries supplied with Photoshop. When saved to the default folder, the
library will appear in the panel menu after Photoshop has been restarted.
A custom library can be removed by deleting its .abr file from the hard drive.
Tool Presets
At first glance, the Tool Preset picker may look like much like the Brush Presets picker
that sits next to it, but it's different in many ways. We'll look at that and the panel version
of Tool Presets in this lecture.
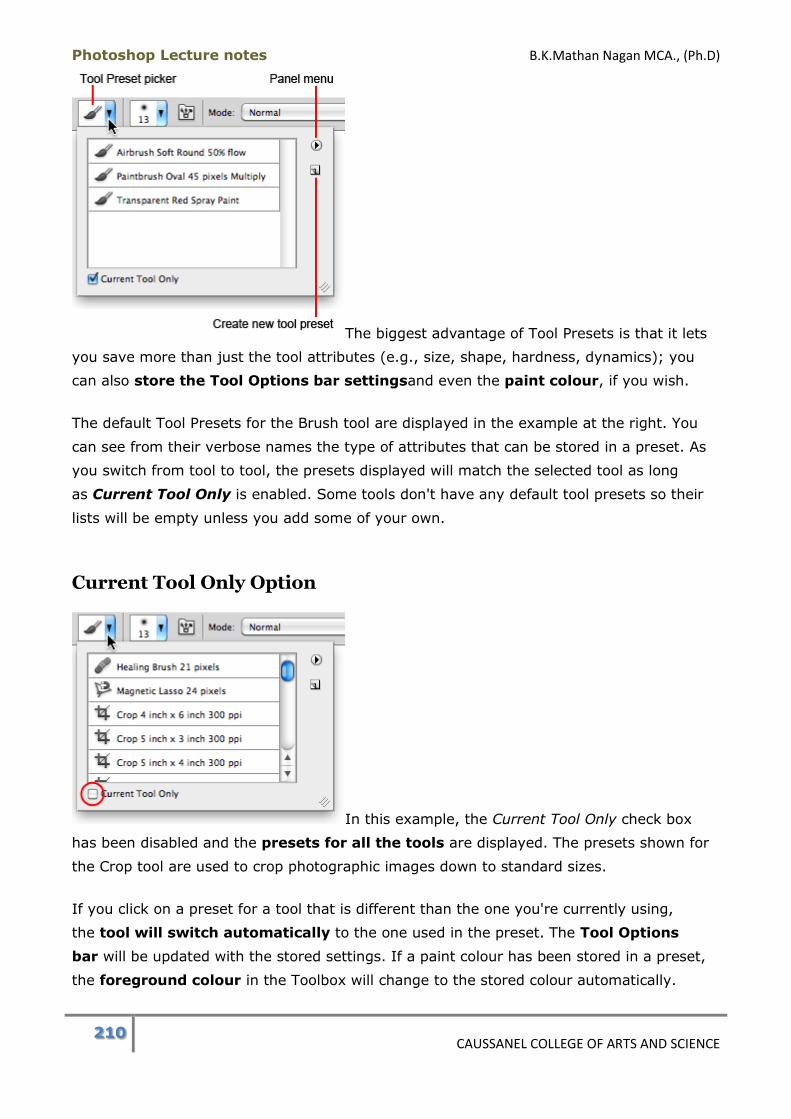
Photoshop Lecture notes B.K.Mathan Nagan MCA., (Ph.D)
210 CAUSSANEL COLLEGE OF ARTS AND SCIENCE
The biggest advantage of Tool Presets is that it lets
you save more than just the tool attributes (e.g., size, shape, hardness, dynamics); you
can also store the Tool Options bar settingsand even the paint colour, if you wish.
The default Tool Presets for the Brush tool are displayed in the example at the right. You
can see from their verbose names the type of attributes that can be stored in a preset. As
you switch from tool to tool, the presets displayed will match the selected tool as long
as Current Tool Only is enabled. Some tools don't have any default tool presets so their
lists will be empty unless you add some of your own.
Current Tool Only Option
In this example, the Current Tool Only check box
has been disabled and the presets for all the tools are displayed. The presets shown for
the Crop tool are used to crop photographic images down to standard sizes.
If you click on a preset for a tool that is different than the one you're currently using,
the tool will switch automatically to the one used in the preset. The Tool Options
bar will be updated with the stored settings. If a paint colour has been stored in a preset,
the foreground colour in the Toolbox will change to the stored colour automatically.
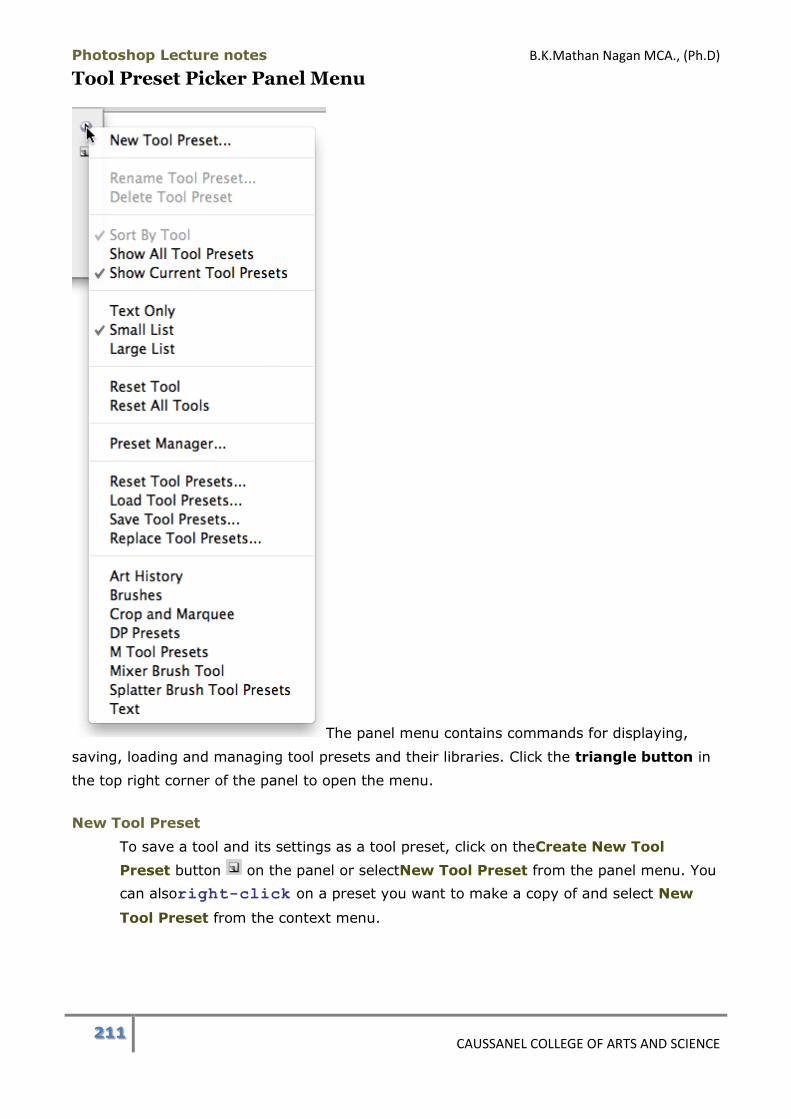
Photoshop Lecture notes B.K.Mathan Nagan MCA., (Ph.D)
211 CAUSSANEL COLLEGE OF ARTS AND SCIENCE
Tool Preset Picker Panel Menu
The panel menu contains commands for displaying,
saving, loading and managing tool presets and their libraries. Click the triangle button in
the top right corner of the panel to open the menu.
New Tool Preset
To save a tool and its settings as a tool preset, click on theCreate New Tool
Preset button on the panel or selectNew Tool Preset from the panel menu. You
can alsoright-click on a preset you want to make a copy of and select New
Tool Preset from the context menu.
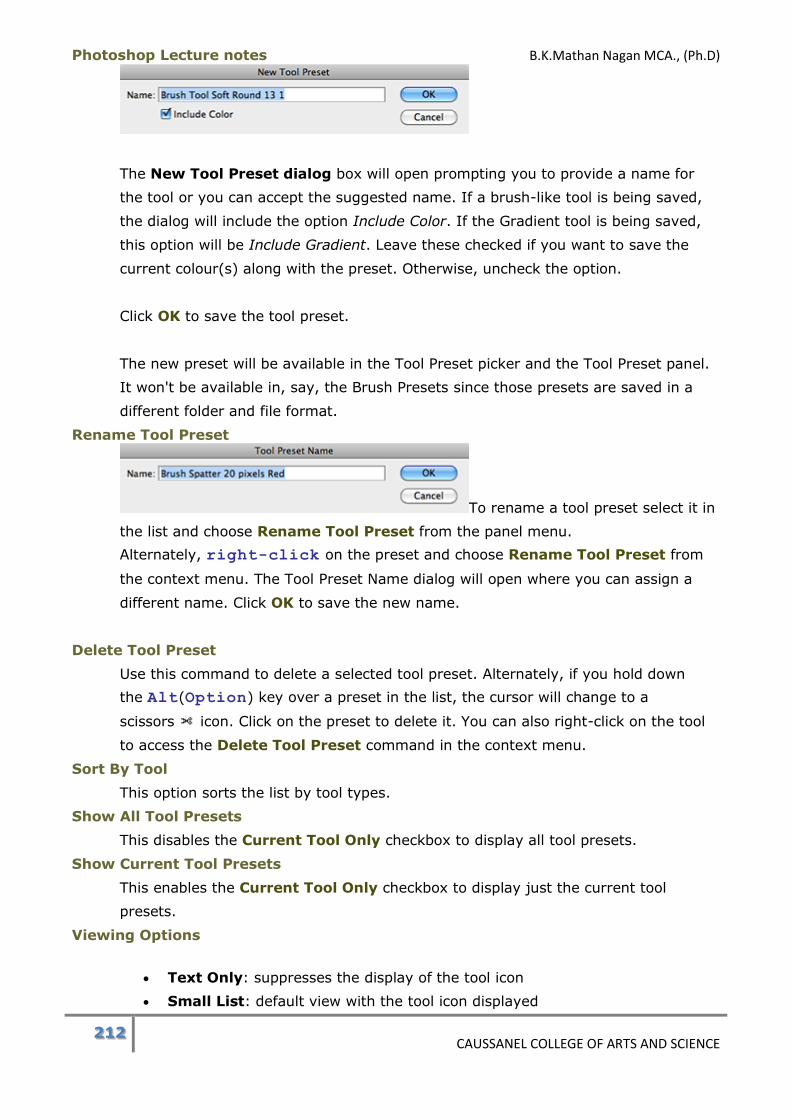
Photoshop Lecture notes B.K.Mathan Nagan MCA., (Ph.D)
212 CAUSSANEL COLLEGE OF ARTS AND SCIENCE
The New Tool Preset dialog box will open prompting you to provide a name for
the tool or you can accept the suggested name. If a brush-like tool is being saved,
the dialog will include the option Include Color. If the Gradient tool is being saved,
this option will be Include Gradient. Leave these checked if you want to save the
current colour(s) along with the preset. Otherwise, uncheck the option.
Click OK to save the tool preset.
The new preset will be available in the Tool Preset picker and the Tool Preset panel.
It won't be available in, say, the Brush Presets since those presets are saved in a
different folder and file format.
Rename Tool Preset
To rename a tool preset select it in
the list and choose Rename Tool Preset from the panel menu.
Alternately, right-click on the preset and choose Rename Tool Preset from
the context menu. The Tool Preset Name dialog will open where you can assign a
different name. Click OK to save the new name.
Delete Tool Preset
Use this command to delete a selected tool preset. Alternately, if you hold down
the Alt(Option) key over a preset in the list, the cursor will change to a
scissors icon. Click on the preset to delete it. You can also right-click on the tool
to access the Delete Tool Preset command in the context menu.
Sort By Tool
This option sorts the list by tool types.
Show All Tool Presets
This disables the Current Tool Only checkbox to display all tool presets.
Show Current Tool Presets
This enables the Current Tool Only checkbox to display just the current tool
presets.
Viewing Options
Text Only: suppresses the display of the tool icon
Small List: default view with the tool icon displayed
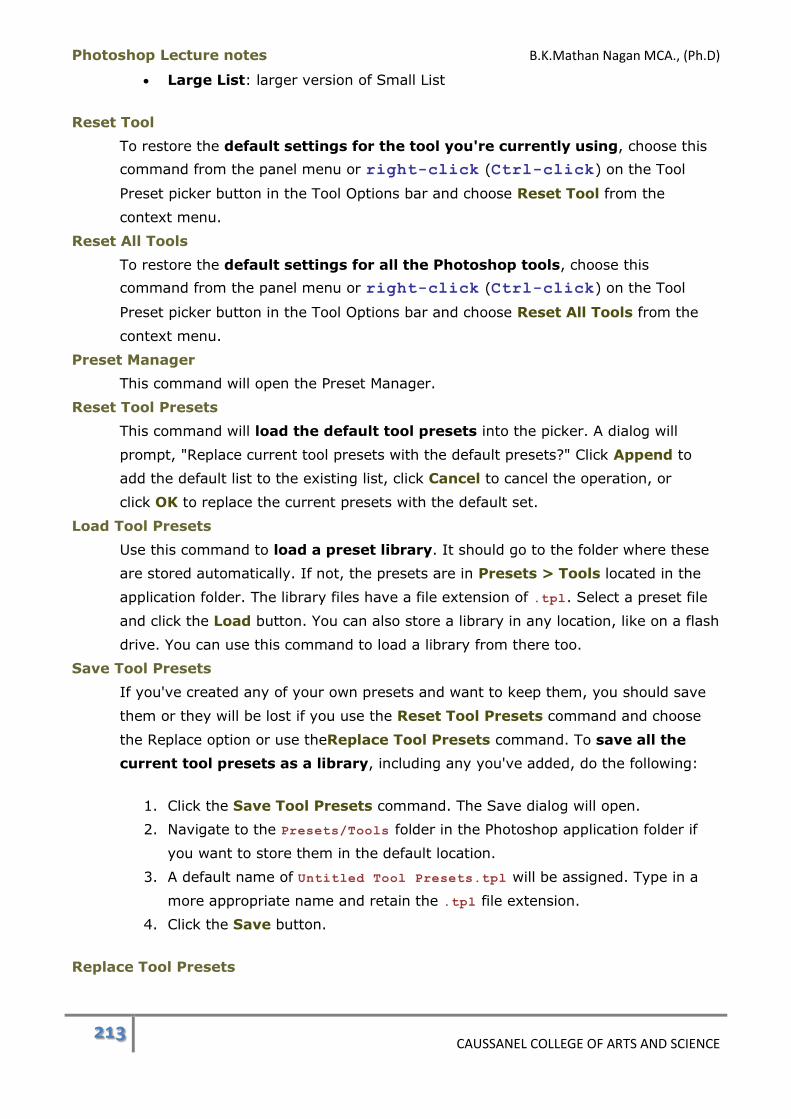
Photoshop Lecture notes B.K.Mathan Nagan MCA., (Ph.D)
213 CAUSSANEL COLLEGE OF ARTS AND SCIENCE
Large List: larger version of Small List
Reset Tool
To restore the default settings for the tool you're currently using, choose this
command from the panel menu or right-click (Ctrl-click) on the Tool
Preset picker button in the Tool Options bar and choose Reset Tool from the
context menu.
Reset All Tools
To restore the default settings for all the Photoshop tools, choose this
command from the panel menu or right-click (Ctrl-click) on the Tool
Preset picker button in the Tool Options bar and choose Reset All Tools from the
context menu.
Preset Manager
This command will open the Preset Manager.
Reset Tool Presets
This command will load the default tool presets into the picker. A dialog will
prompt, "Replace current tool presets with the default presets?" Click Append to
add the default list to the existing list, click Cancel to cancel the operation, or
click OK to replace the current presets with the default set.
Load Tool Presets
Use this command to load a preset library. It should go to the folder where these
are stored automatically. If not, the presets are in Presets > Tools located in the
application folder. The library files have a file extension of .tpl. Select a preset file
and click the Load button. You can also store a library in any location, like on a flash
drive. You can use this command to load a library from there too.
Save Tool Presets
If you've created any of your own presets and want to keep them, you should save
them or they will be lost if you use the Reset Tool Presets command and choose
the Replace option or use theReplace Tool Presets command. To save all the
current tool presets as a library, including any you've added, do the following:
1. Click the Save Tool Presets command. The Save dialog will open.
2. Navigate to the Presets/Tools folder in the Photoshop application folder if
you want to store them in the default location.
3. A default name of Untitled Tool Presets.tpl will be assigned. Type in a
more appropriate name and retain the .tpl file extension.
4. Click the Save button.
Replace Tool Presets
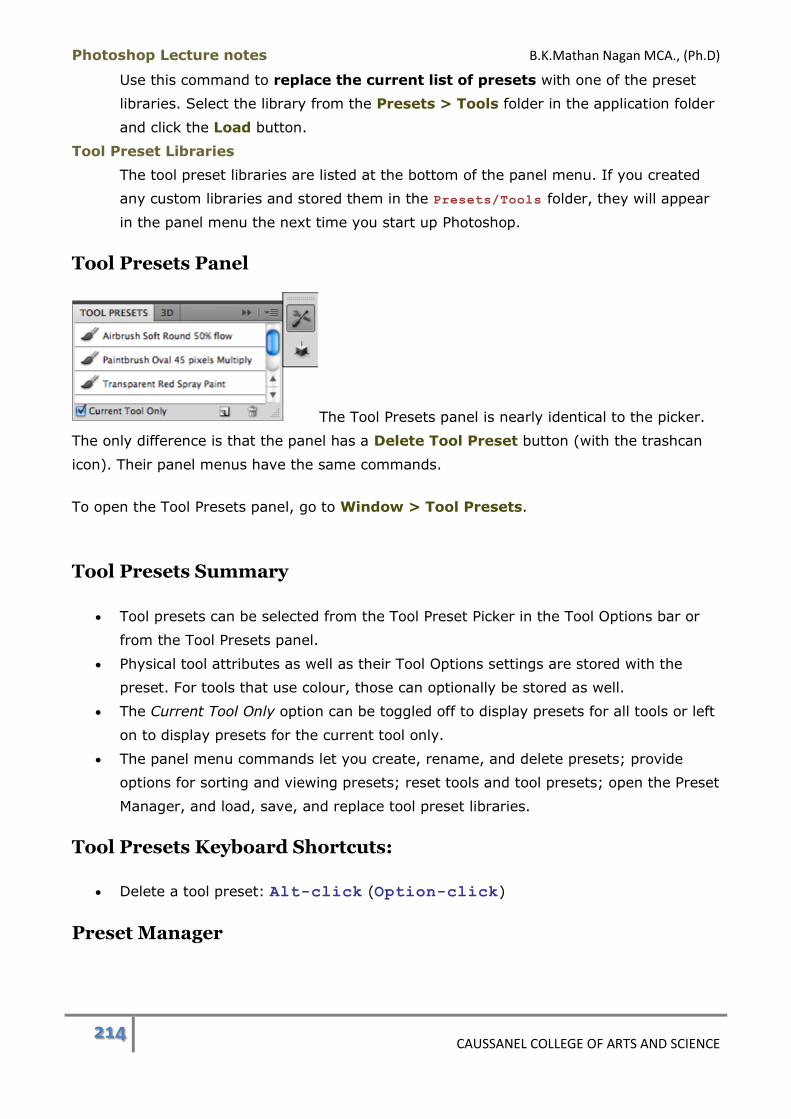
Photoshop Lecture notes B.K.Mathan Nagan MCA., (Ph.D)
214 CAUSSANEL COLLEGE OF ARTS AND SCIENCE
Use this command to replace the current list of presets with one of the preset
libraries. Select the library from the Presets > Tools folder in the application folder
and click the Load button.
Tool Preset Libraries
The tool preset libraries are listed at the bottom of the panel menu. If you created
any custom libraries and stored them in the Presets/Tools folder, they will appear
in the panel menu the next time you start up Photoshop.
Tool Presets Panel
The Tool Presets panel is nearly identical to the picker.
The only difference is that the panel has a Delete Tool Preset button (with the trashcan
icon). Their panel menus have the same commands.
To open the Tool Presets panel, go to Window > Tool Presets.
Tool Presets Summary
Tool presets can be selected from the Tool Preset Picker in the Tool Options bar or
from the Tool Presets panel.
Physical tool attributes as well as their Tool Options settings are stored with the
preset. For tools that use colour, those can optionally be stored as well.
The Current Tool Only option can be toggled off to display presets for all tools or left
on to display presets for the current tool only.
The panel menu commands let you create, rename, and delete presets; provide
options for sorting and viewing presets; reset tools and tool presets; open the Preset
Manager, and load, save, and replace tool preset libraries.
Tool Presets Keyboard Shortcuts:
Delete a tool preset: Alt-click (Option-click)
Preset Manager
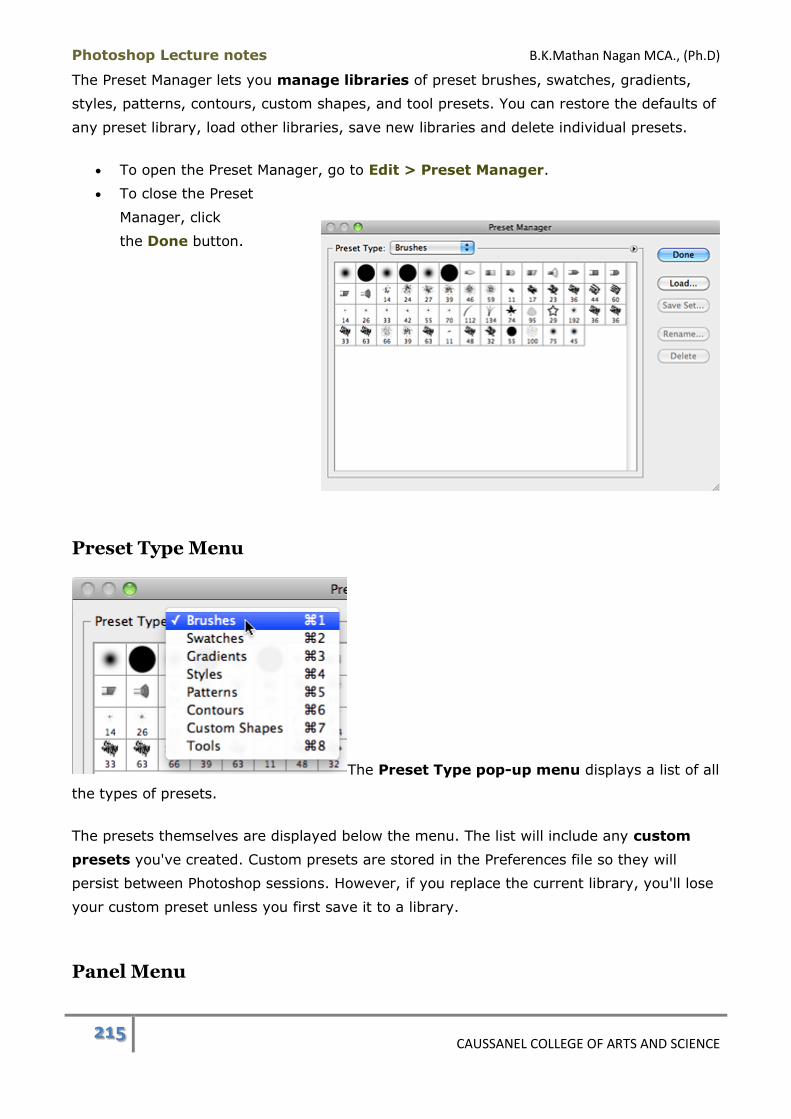
Photoshop Lecture notes B.K.Mathan Nagan MCA., (Ph.D)
215 CAUSSANEL COLLEGE OF ARTS AND SCIENCE
The Preset Manager lets you manage libraries of preset brushes, swatches, gradients,
styles, patterns, contours, custom shapes, and tool presets. You can restore the defaults of
any preset library, load other libraries, save new libraries and delete individual presets.
To open the Preset Manager, go to Edit > Preset Manager.
To close the Preset
Manager, click
the Done button.
Preset Type Menu
The Preset Type pop-up menu displays a list of all
the types of presets.
The presets themselves are displayed below the menu. The list will include any custom
presets you've created. Custom presets are stored in the Preferences file so they will
persist between Photoshop sessions. However, if you replace the current library, you'll lose
your custom preset unless you first save it to a library.
Panel Menu
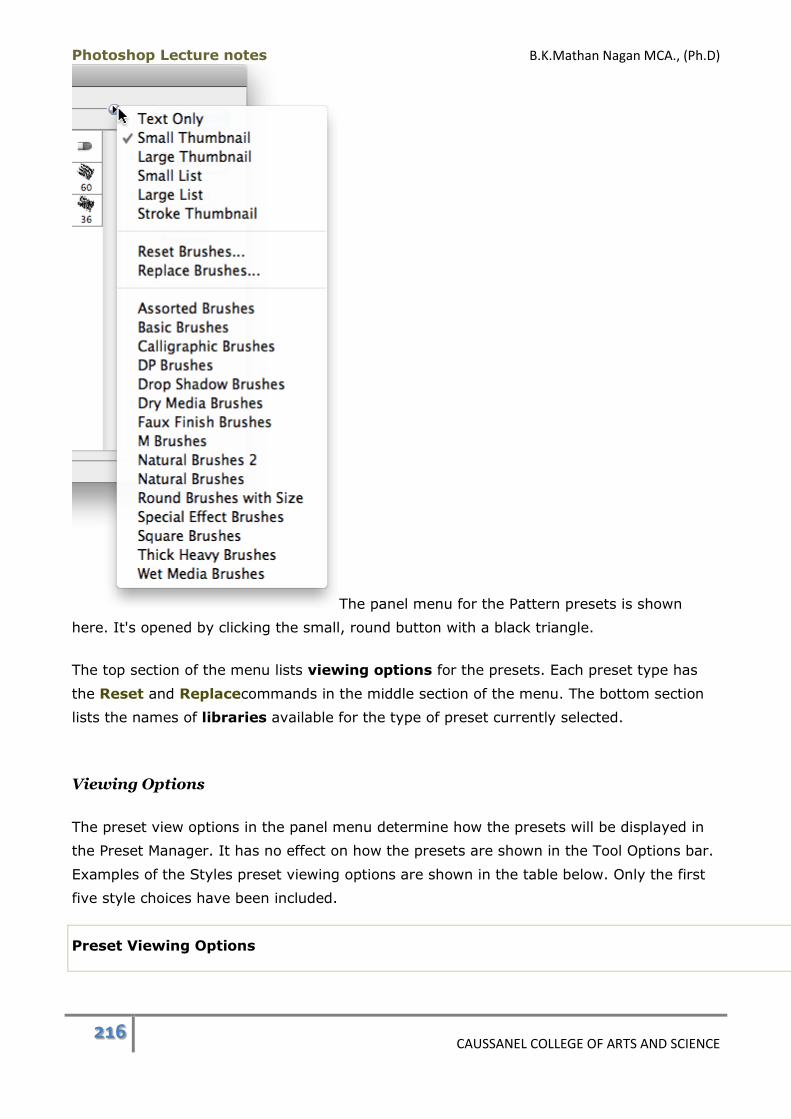
Photoshop Lecture notes B.K.Mathan Nagan MCA., (Ph.D)
216 CAUSSANEL COLLEGE OF ARTS AND SCIENCE
The panel menu for the Pattern presets is shown
here. It's opened by clicking the small, round button with a black triangle.
The top section of the menu lists viewing options for the presets. Each preset type has
the Reset and Replacecommands in the middle section of the menu. The bottom section
lists the names of libraries available for the type of preset currently selected.
Viewing Options
The preset view options in the panel menu determine how the presets will be displayed in
the Preset Manager. It has no effect on how the presets are shown in the Tool Options bar.
Examples of the Styles preset viewing options are shown in the table below. Only the first
five style choices have been included.
Preset Viewing Options
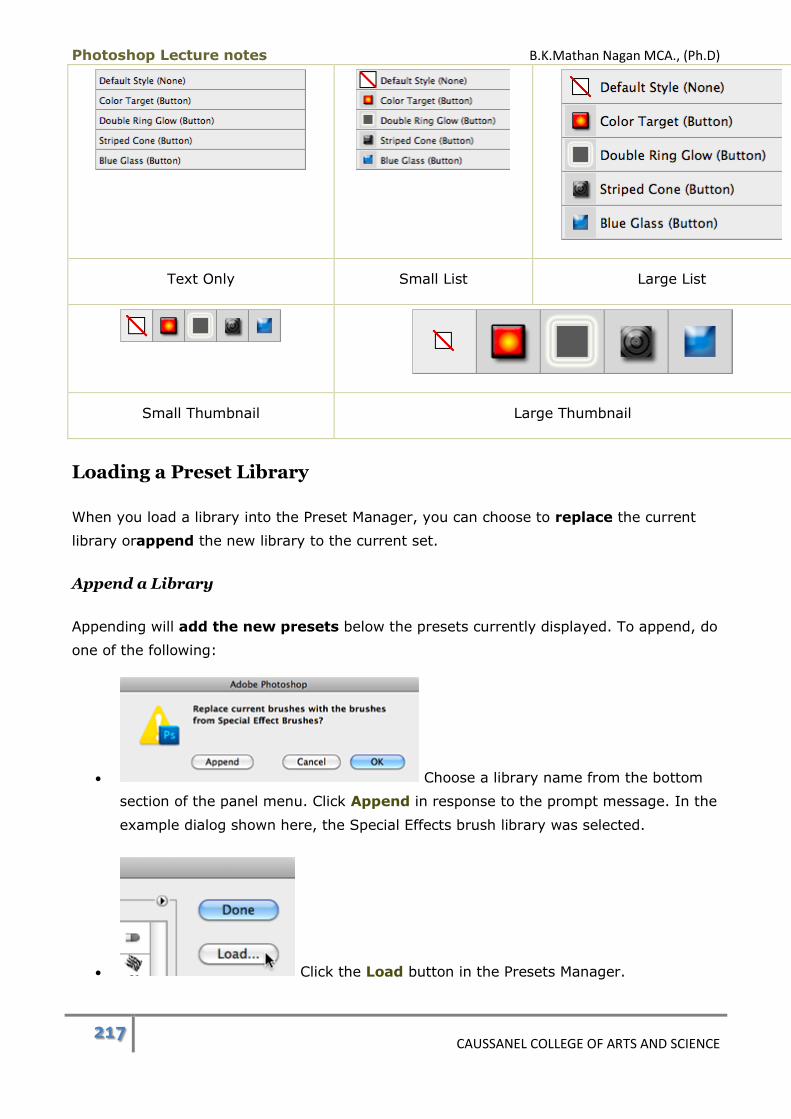
Photoshop Lecture notes B.K.Mathan Nagan MCA., (Ph.D)
217 CAUSSANEL COLLEGE OF ARTS AND SCIENCE
Text Only Small List Large List
Small Thumbnail Large Thumbnail
Loading a Preset Library
When you load a library into the Preset Manager, you can choose to replace the current
library orappend the new library to the current set.
Append a Library
Appending will add the new presets below the presets currently displayed. To append, do
one of the following:
Choose a library name from the bottom
section of the panel menu. Click Append in response to the prompt message. In the
example dialog shown here, the Special Effects brush library was selected.
Click the Load button in the Presets Manager.
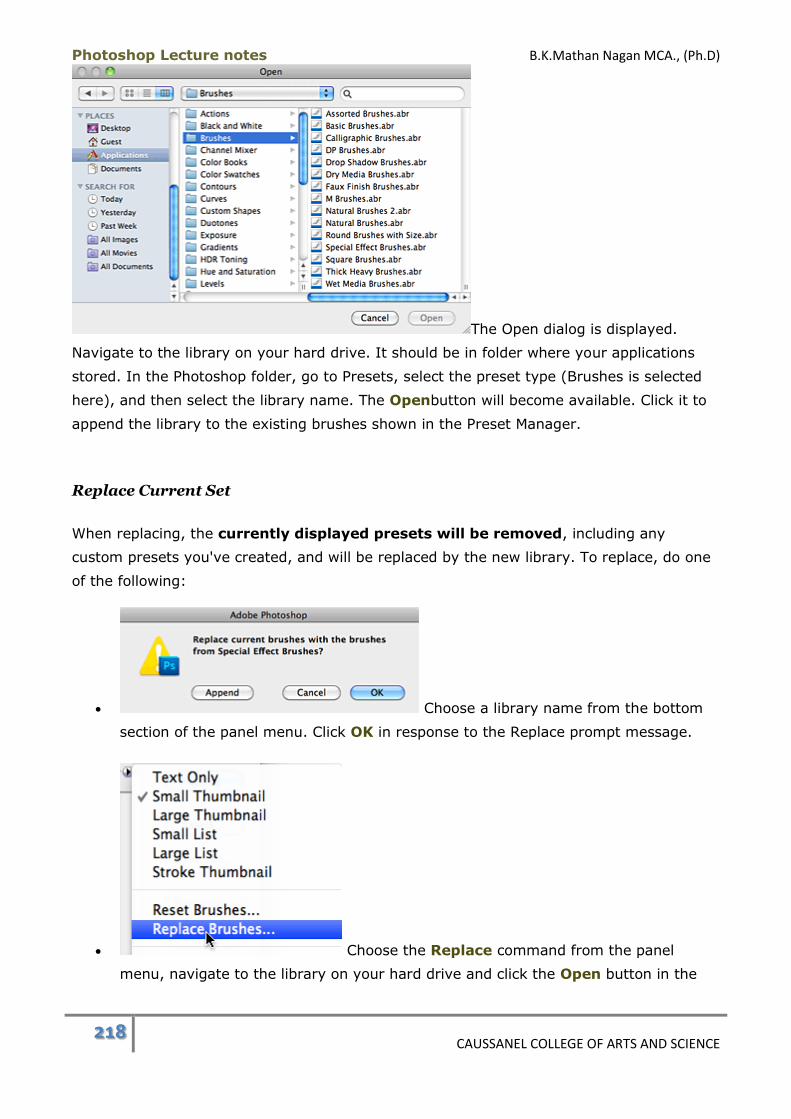
Photoshop Lecture notes B.K.Mathan Nagan MCA., (Ph.D)
218 CAUSSANEL COLLEGE OF ARTS AND SCIENCE
The Open dialog is displayed.
Navigate to the library on your hard drive. It should be in folder where your applications
stored. In the Photoshop folder, go to Presets, select the preset type (Brushes is selected
here), and then select the library name. The Openbutton will become available. Click it to
append the library to the existing brushes shown in the Preset Manager.
Replace Current Set
When replacing, the currently displayed presets will be removed, including any
custom presets you've created, and will be replaced by the new library. To replace, do one
of the following:
Choose a library name from the bottom
section of the panel menu. Click OK in response to the Replace prompt message.
Choose the Replace command from the panel
menu, navigate to the library on your hard drive and click the Open button in the
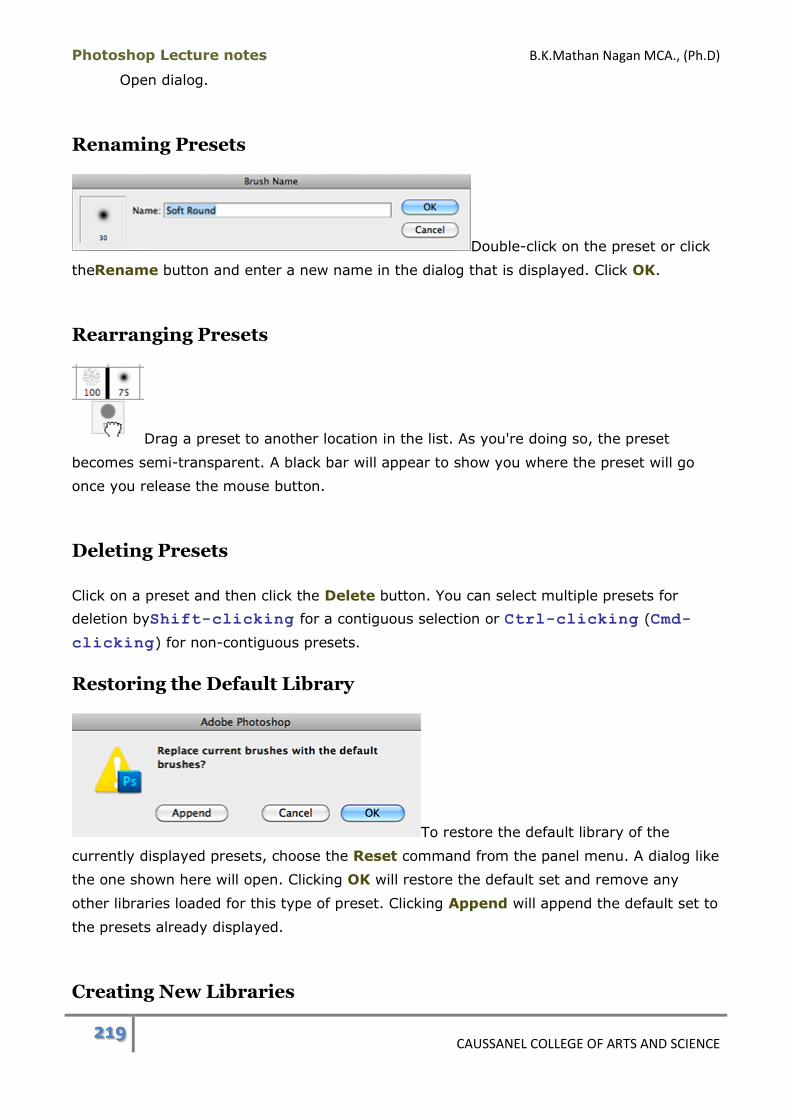
Photoshop Lecture notes B.K.Mathan Nagan MCA., (Ph.D)
219 CAUSSANEL COLLEGE OF ARTS AND SCIENCE
Open dialog.
Renaming Presets
Double-click on the preset or click
theRename button and enter a new name in the dialog that is displayed. Click OK.
Rearranging Presets
Drag a preset to another location in the list. As you're doing so, the preset
becomes semi-transparent. A black bar will appear to show you where the preset will go
once you release the mouse button.
Deleting Presets
Click on a preset and then click the Delete button. You can select multiple presets for
deletion byShift-clicking for a contiguous selection or Ctrl-clicking (Cmd-
clicking) for non-contiguous presets.
Restoring the Default Library
To restore the default library of the
currently displayed presets, choose the Reset command from the panel menu. A dialog like
the one shown here will open. Clicking OK will restore the default set and remove any
other libraries loaded for this type of preset. Clicking Append will append the default set to
the presets already displayed.
Creating New Libraries
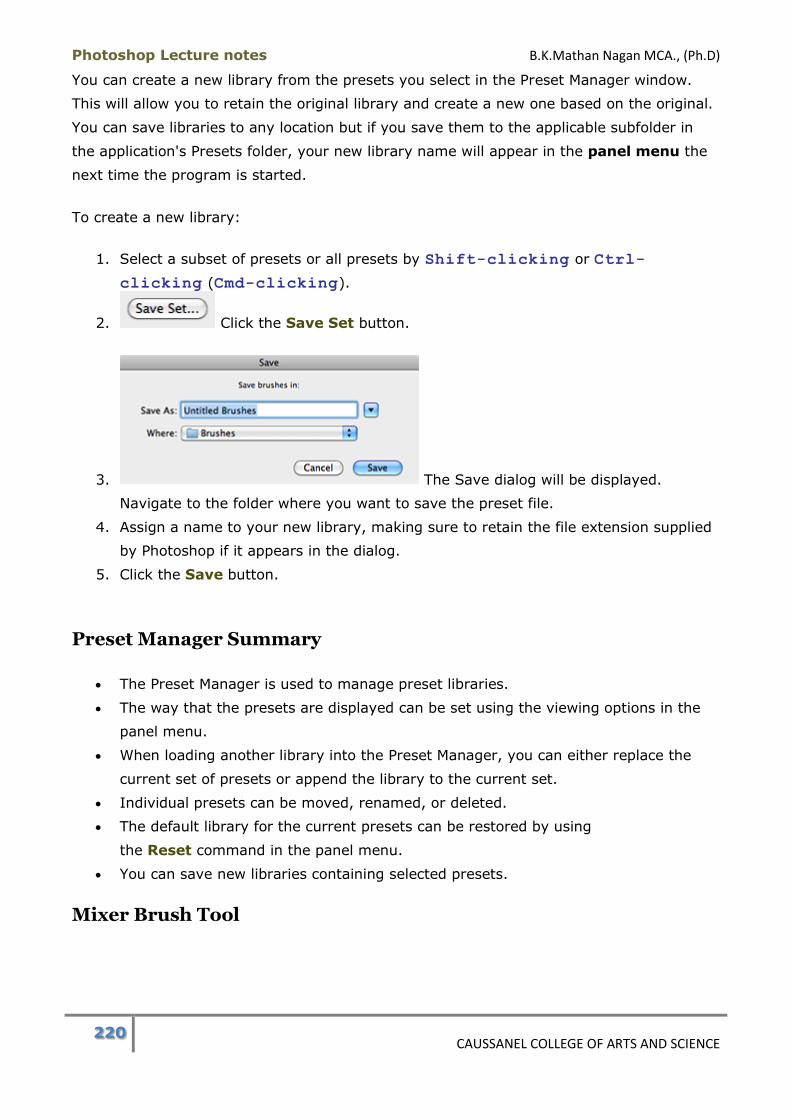
Photoshop Lecture notes B.K.Mathan Nagan MCA., (Ph.D)
220 CAUSSANEL COLLEGE OF ARTS AND SCIENCE
You can create a new library from the presets you select in the Preset Manager window.
This will allow you to retain the original library and create a new one based on the original.
You can save libraries to any location but if you save them to the applicable subfolder in
the application's Presets folder, your new library name will appear in the panel menu the
next time the program is started.
To create a new library:
1. Select a subset of presets or all presets by Shift-clicking or Ctrl-
clicking (Cmd-clicking).
2. Click the Save Set button.
3. The Save dialog will be displayed.
Navigate to the folder where you want to save the preset file.
4. Assign a name to your new library, making sure to retain the file extension supplied
by Photoshop if it appears in the dialog.
5. Click the Save button.
Preset Manager Summary
The Preset Manager is used to manage preset libraries.
The way that the presets are displayed can be set using the viewing options in the
panel menu.
When loading another library into the Preset Manager, you can either replace the
current set of presets or append the library to the current set.
Individual presets can be moved, renamed, or deleted.
The default library for the current presets can be restored by using
the Reset command in the panel menu.
You can save new libraries containing selected presets.
Mixer Brush Tool
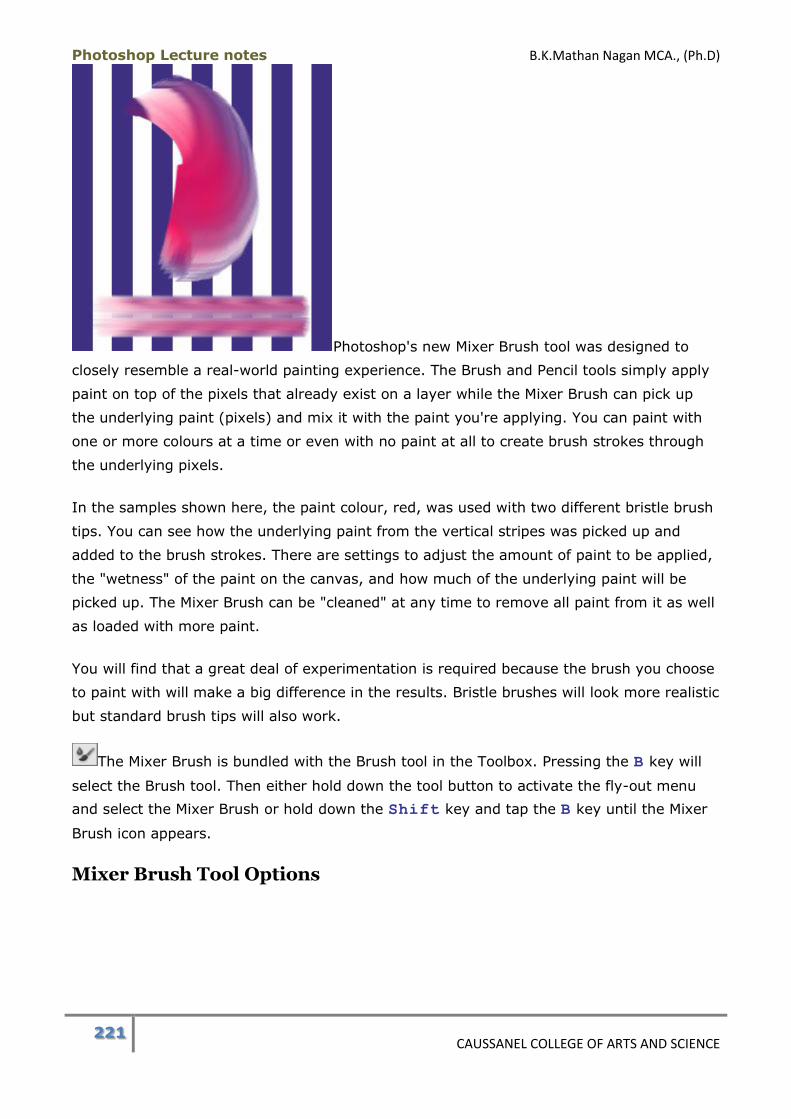
Photoshop Lecture notes B.K.Mathan Nagan MCA., (Ph.D)
221 CAUSSANEL COLLEGE OF ARTS AND SCIENCE
Photoshop's new Mixer Brush tool was designed to
closely resemble a real-world painting experience. The Brush and Pencil tools simply apply
paint on top of the pixels that already exist on a layer while the Mixer Brush can pick up
the underlying paint (pixels) and mix it with the paint you're applying. You can paint with
one or more colours at a time or even with no paint at all to create brush strokes through
the underlying pixels.
In the samples shown here, the paint colour, red, was used with two different bristle brush
tips. You can see how the underlying paint from the vertical stripes was picked up and
added to the brush strokes. There are settings to adjust the amount of paint to be applied,
the "wetness" of the paint on the canvas, and how much of the underlying paint will be
picked up. The Mixer Brush can be "cleaned" at any time to remove all paint from it as well
as loaded with more paint.
You will find that a great deal of experimentation is required because the brush you choose
to paint with will make a big difference in the results. Bristle brushes will look more realistic
but standard brush tips will also work.
The Mixer Brush is bundled with the Brush tool in the Toolbox. Pressing the B key will
select the Brush tool. Then either hold down the tool button to activate the fly-out menu
and select the Mixer Brush or hold down the Shift key and tap the B key until the Mixer
Brush icon appears.
Mixer Brush Tool Options
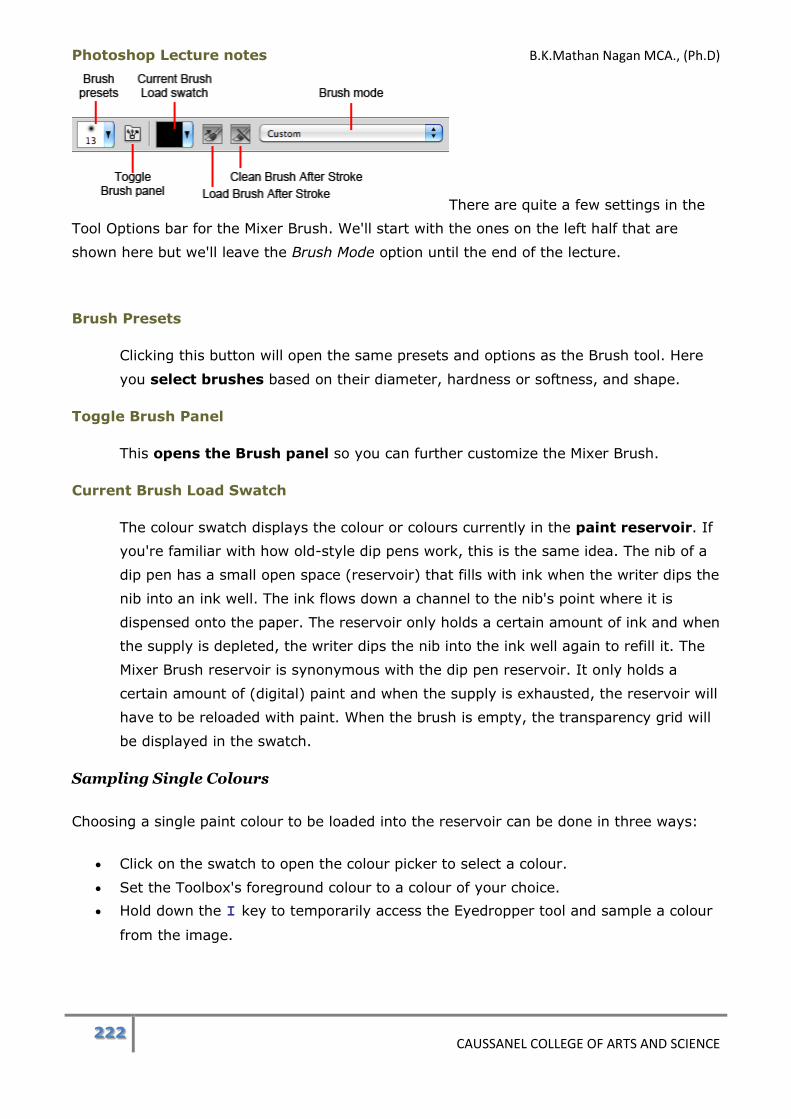
Photoshop Lecture notes B.K.Mathan Nagan MCA., (Ph.D)
222 CAUSSANEL COLLEGE OF ARTS AND SCIENCE
There are quite a few settings in the
Tool Options bar for the Mixer Brush. We'll start with the ones on the left half that are
shown here but we'll leave the Brush Mode option until the end of the lecture.
Brush Presets
Clicking this button will open the same presets and options as the Brush tool. Here
you select brushes based on their diameter, hardness or softness, and shape.
Toggle Brush Panel
This opens the Brush panel so you can further customize the Mixer Brush.
Current Brush Load Swatch
The colour swatch displays the colour or colours currently in the paint reservoir. If
you're familiar with how old-style dip pens work, this is the same idea. The nib of a
dip pen has a small open space (reservoir) that fills with ink when the writer dips the
nib into an ink well. The ink flows down a channel to the nib's point where it is
dispensed onto the paper. The reservoir only holds a certain amount of ink and when
the supply is depleted, the writer dips the nib into the ink well again to refill it. The
Mixer Brush reservoir is synonymous with the dip pen reservoir. It only holds a
certain amount of (digital) paint and when the supply is exhausted, the reservoir will
have to be reloaded with paint. When the brush is empty, the transparency grid will
be displayed in the swatch.
Sampling Single Colours
Choosing a single paint colour to be loaded into the reservoir can be done in three ways:
Click on the swatch to open the colour picker to select a colour.
Set the Toolbox's foreground colour to a colour of your choice.
Hold down the I key to temporarily access the Eyedropper tool and sample a colour
from the image.

Photoshop Lecture notes B.K.Mathan Nagan MCA., (Ph.D)
223 CAUSSANEL COLLEGE OF ARTS AND SCIENCE
Sampling Multiple Colours
Sample multiple colours by holding down the Alt (Option) key and clicking in the
image. We used Cat.psd and clicked on the cat's midsection to sample the colours.
This is a Mixer Brush stroke drawn with the colours sampled
from the cat. There was very little paint pickup from the underlying white paint.
Clicking on the vertical bar to the right of the Current Brush
Load Swatch will open the menu shown here. The three menu commands are described
below.
Load Brush
Selecting this option will load paint into the brush's reservoir.
Clean Brush
This will remove any existing paint from the brush's reservoir. If you are going to
switch paint colours, you'd probably want to clean the brush first to remove all of
the old paint colour.
Load Solid Colours Only
When this option is enabled, holding down the Alt (Option) key to sample
colours from the image will turn the cursor will turn into an Eyedropper that will
sample only one colour.
Load Brush After Stroke
When this button is enabled, paint is loaded into the brush automatically after
every brush stroke.
Clean Brush After Stroke

Photoshop Lecture notes B.K.Mathan Nagan MCA., (Ph.D)
224 CAUSSANEL COLLEGE OF ARTS AND SCIENCE
When this button is enabled, paint is cleaned from the brush automatically
after every brush stroke.
This shows the remaining
Tool Options available for the Mixer Brush. The Flow,Airbrush, and Tablet Pressure Controls
Size options are the same as those already covered for the Brush tool.
Wet
This option determines how readily the brush will pick up paint already laid
down on the layer. A higher value simulates wetter canvas paint that is more easily
drawn into the brush.
Load
This setting is used to determine how much paint will be loaded from the
reservoir onto the brush. A higher value results in more paint and a longer brush
stroke before the paint runs out.
Mix
This sets the ratio of paint coming from the brush versus from the canvas. With a
value of 100%, all paint will be picked up from the canvas. With a value of 0%, most
or all of the paint will come from the brush.
Sample All Layers
Enabling this option will cause the Mixer Brush to sample paint from all
layers instead of just the current layer. This can be useful in preserving the
integrity of an underlying layer. You can add a new transparent layer over an
original image and apply paint strokes to that and the paint from the image will be
incorporated into the strokes but the image itself will not be edited. You can use this
option to take a photograph and created a painted version of it without affecting the
original image.
Brush Mode

Photoshop Lecture notes B.K.Mathan Nagan MCA., (Ph.D)
225 CAUSSANEL COLLEGE OF ARTS AND SCIENCE
The Brush Mode popup menu has a list of presets
with various combinations of wetness, load amounts and mixing amounts.
Note that with the Dry settings, the Mix option is disabled so no paint from the
canvas is picked up by the brush. Once one of these options is chosen, the values
will be displayed in the corresponding fields to the right of this popup menu in the
Tool Options bar.
If you start with a Brush Mode preset and then tweak its settings, the Brush
Mode option will change to Custom.
One thing to keep in mind is that Dry, Moist, Wet, and Very Wetrefer to the
underlying paint and not the paint on the brush.
The table below lists the settings for each of the Brush Mode options.
Brush Mode Wet Load Mix
Dry 0% 50% -
Dry, Light Load 0% 5% -
Dry, Heavy Load 0% 100% -
Moist 10% 5% 50%
Moist, Light Mix 10% 5% 0%
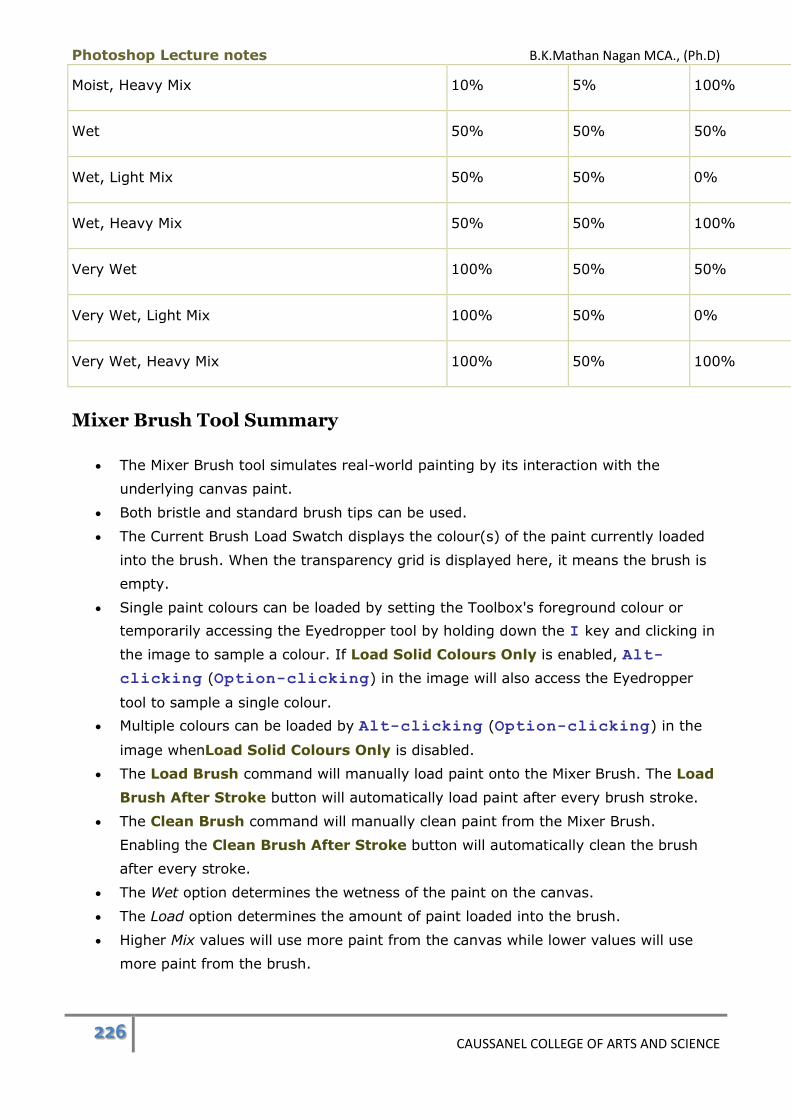
Photoshop Lecture notes B.K.Mathan Nagan MCA., (Ph.D)
226 CAUSSANEL COLLEGE OF ARTS AND SCIENCE
Moist, Heavy Mix 10% 5% 100%
Wet 50% 50% 50%
Wet, Light Mix 50% 50% 0%
Wet, Heavy Mix 50% 50% 100%
Very Wet 100% 50% 50%
Very Wet, Light Mix 100% 50% 0%
Very Wet, Heavy Mix 100% 50% 100%
Mixer Brush Tool Summary
The Mixer Brush tool simulates real-world painting by its interaction with the
underlying canvas paint.
Both bristle and standard brush tips can be used.
The Current Brush Load Swatch displays the colour(s) of the paint currently loaded
into the brush. When the transparency grid is displayed here, it means the brush is
empty.
Single paint colours can be loaded by setting the Toolbox's foreground colour or
temporarily accessing the Eyedropper tool by holding down the I key and clicking in
the image to sample a colour. If Load Solid Colours Only is enabled, Alt-
clicking (Option-clicking) in the image will also access the Eyedropper
tool to sample a single colour.
Multiple colours can be loaded by Alt-clicking (Option-clicking) in the
image whenLoad Solid Colours Only is disabled.
The Load Brush command will manually load paint onto the Mixer Brush. The Load
Brush After Stroke button will automatically load paint after every brush stroke.
The Clean Brush command will manually clean paint from the Mixer Brush.
Enabling the Clean Brush After Stroke button will automatically clean the brush
after every stroke.
The Wet option determines the wetness of the paint on the canvas.
The Load option determines the amount of paint loaded into the brush.
Higher Mix values will use more paint from the canvas while lower values will use
more paint from the brush.
Photoshop Lecture notes B.K.Mathan Nagan MCA., (Ph.D)
227 CAUSSANEL COLLEGE OF ARTS AND SCIENCE
Sample All Layers will allow for paint to be picked up from all visible layers instead
of just the current layer.
The Brush Mode pop-up menu provides a number of preset Mixer Brush settings that
vary theWet, Load, and Mix values. The Custom option will be displayed when you
choose your own settings.
Mixer Brush Tool Keyboard Shortcuts:
Toggle to Eyedropper tool: I
Sample multiple colours: Alt-click (Option-click)
Gradient Tool
A gradient is an even blend between colours or between a colour and transparency.
The Gradient tool is used to create gradients by dragging with the tool in an image. The
keyboard shortcut for the Gradient tool is G. There are several gradient tools you can
choose from. On a basic level, you can select two colours for a gradient or, with the help of
the Gradient Editor, you can create infinite varieties of gradients. The gradients you create
can be saved as presets. We'll cover basic gradients and managing gradients in this lecture.
The next lecture will deal with the Gradient Editor.
Gradient Tool Options
The Tool Options bar contains the usual array of options. We'll bypass the gradient picker
for the moment.
Gradient Tools
There are five gradient tools to choose from. We will refer to the point
where you begin dragging with the Gradient tool as the starting point and the ending point
is where you release the mouse button. In reference to the image above, from left to right
the tools are as follows:
Linear Gradient
Creates a colour transition that runs in a straight line perpendicular to the line
between the starting and ending points.
Radial Gradient
Creates a colour transition that is circular and radiates from the starting point.
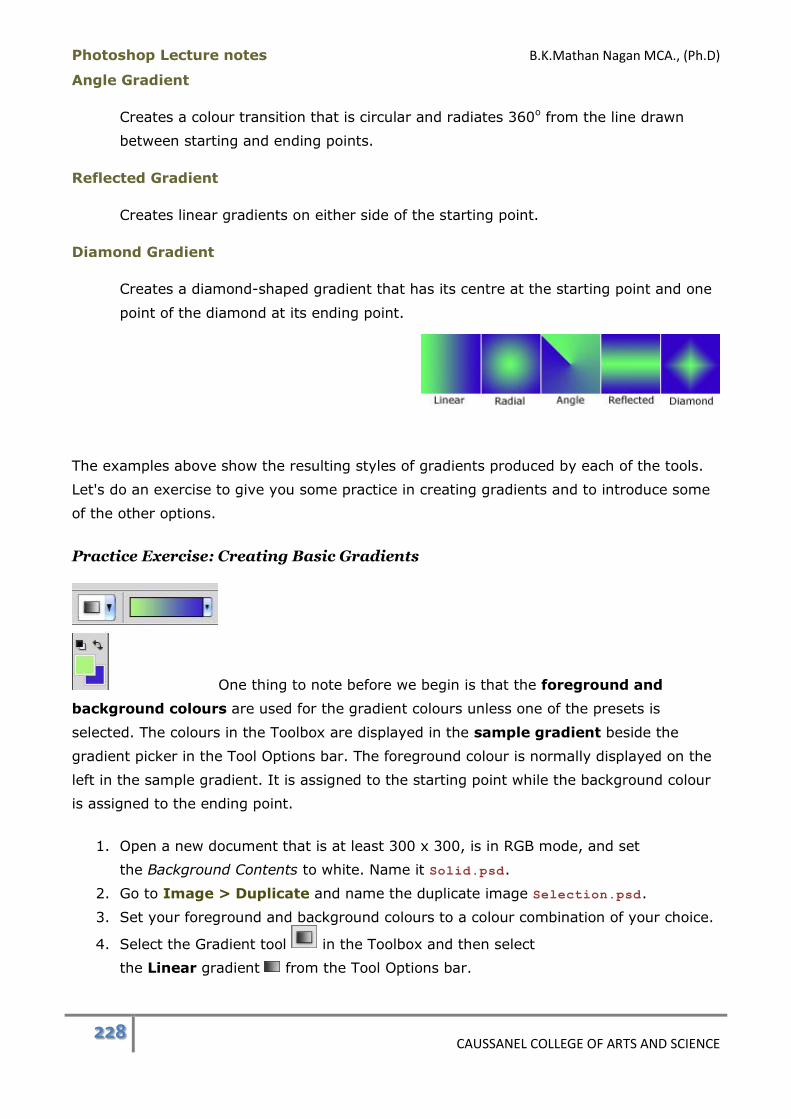
Photoshop Lecture notes B.K.Mathan Nagan MCA., (Ph.D)
228 CAUSSANEL COLLEGE OF ARTS AND SCIENCE
Angle Gradient
Creates a colour transition that is circular and radiates 360o from the line drawn
between starting and ending points.
Reflected Gradient
Creates linear gradients on either side of the starting point.
Diamond Gradient
Creates a diamond-shaped gradient that has its centre at the starting point and one
point of the diamond at its ending point.
The examples above show the resulting styles of gradients produced by each of the tools.
Let's do an exercise to give you some practice in creating gradients and to introduce some
of the other options.
Practice Exercise: Creating Basic Gradients
One thing to note before we begin is that the foreground and
background colours are used for the gradient colours unless one of the presets is
selected. The colours in the Toolbox are displayed in the sample gradient beside the
gradient picker in the Tool Options bar. The foreground colour is normally displayed on the
left in the sample gradient. It is assigned to the starting point while the background colour
is assigned to the ending point.
1. Open a new document that is at least 300 x 300, is in RGB mode, and set
the Background Contents to white. Name it Solid.psd.
2. Go to Image > Duplicate and name the duplicate image Selection.psd.
3. Set your foreground and background colours to a colour combination of your choice.
4. Select the Gradient tool in the Toolbox and then select
the Linear gradient from the Tool Options bar.
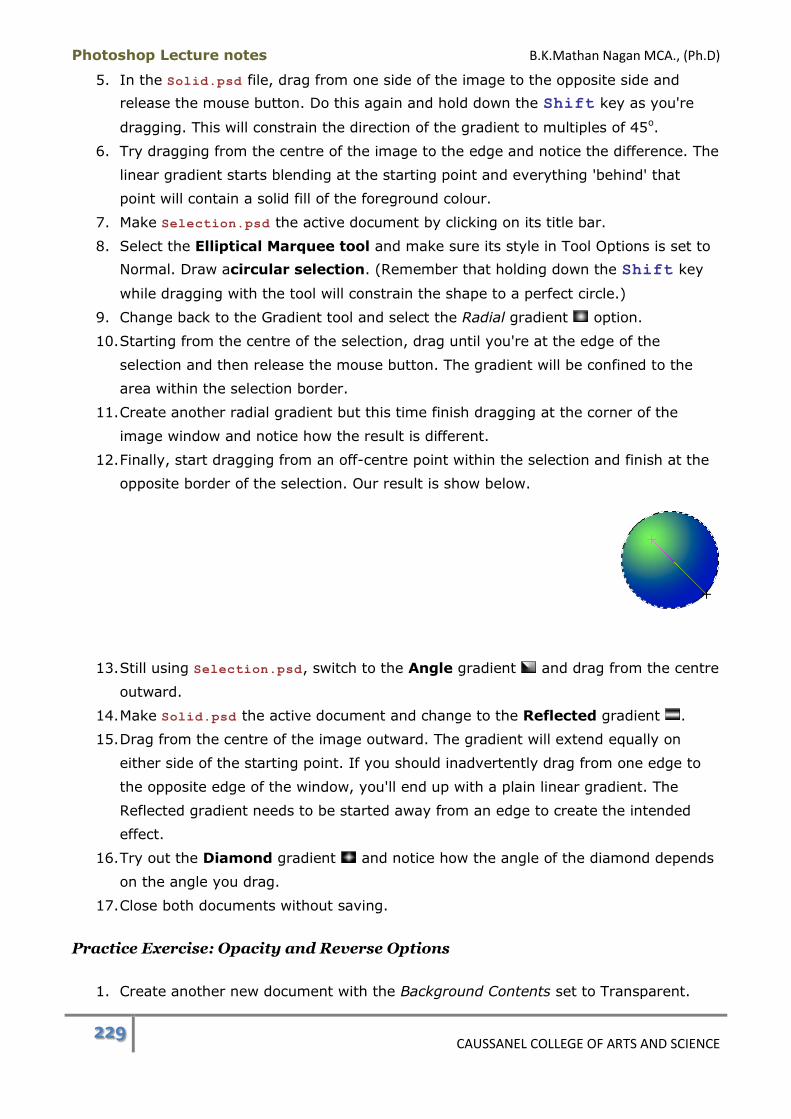
Photoshop Lecture notes B.K.Mathan Nagan MCA., (Ph.D)
229 CAUSSANEL COLLEGE OF ARTS AND SCIENCE
5. In the Solid.psd file, drag from one side of the image to the opposite side and
release the mouse button. Do this again and hold down the Shift key as you're
dragging. This will constrain the direction of the gradient to multiples of 45o.
6. Try dragging from the centre of the image to the edge and notice the difference. The
linear gradient starts blending at the starting point and everything 'behind' that
point will contain a solid fill of the foreground colour.
7. Make Selection.psd the active document by clicking on its title bar.
8. Select the Elliptical Marquee tool and make sure its style in Tool Options is set to
Normal. Draw acircular selection. (Remember that holding down the Shift key
while dragging with the tool will constrain the shape to a perfect circle.)
9. Change back to the Gradient tool and select the Radial gradient option.
10. Starting from the centre of the selection, drag until you're at the edge of the
selection and then release the mouse button. The gradient will be confined to the
area within the selection border.
11. Create another radial gradient but this time finish dragging at the corner of the
image window and notice how the result is different.
12. Finally, start dragging from an off-centre point within the selection and finish at the
opposite border of the selection. Our result is show below.
13. Still using Selection.psd, switch to the Angle gradient and drag from the centre
outward.
14. Make Solid.psd the active document and change to the Reflected gradient .
15. Drag from the centre of the image outward. The gradient will extend equally on
either side of the starting point. If you should inadvertently drag from one edge to
the opposite edge of the window, you'll end up with a plain linear gradient. The
Reflected gradient needs to be started away from an edge to create the intended
effect.
16. Try out the Diamond gradient and notice how the angle of the diamond depends
on the angle you drag.
17. Close both documents without saving.
Practice Exercise: Opacity and Reverse Options
1. Create another new document with the Background Contents set to Transparent.
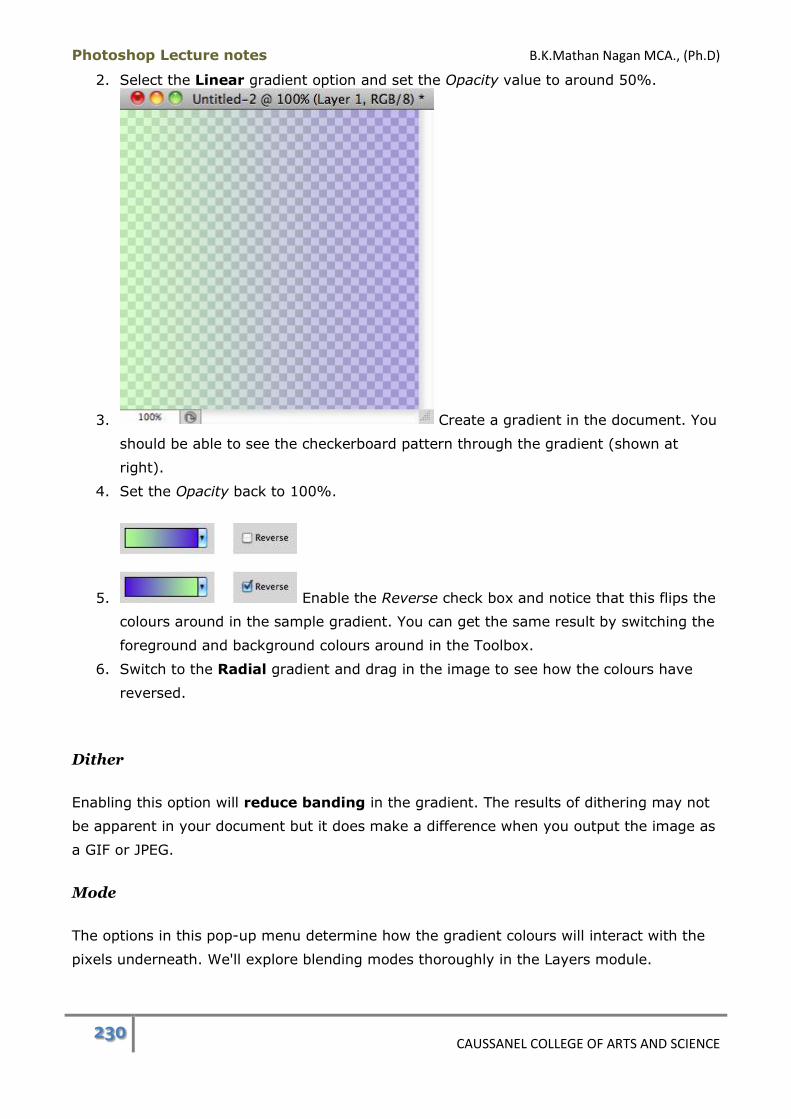
Photoshop Lecture notes B.K.Mathan Nagan MCA., (Ph.D)
230 CAUSSANEL COLLEGE OF ARTS AND SCIENCE
2. Select the Linear gradient option and set the Opacity value to around 50%.
3. Create a gradient in the document. You
should be able to see the checkerboard pattern through the gradient (shown at
right).
4. Set the Opacity back to 100%.
5. Enable the Reverse check box and notice that this flips the
colours around in the sample gradient. You can get the same result by switching the
foreground and background colours around in the Toolbox.
6. Switch to the Radial gradient and drag in the image to see how the colours have
reversed.
Dither
Enabling this option will reduce banding in the gradient. The results of dithering may not
be apparent in your document but it does make a difference when you output the image as
a GIF or JPEG.
Mode
The options in this pop-up menu determine how the gradient colours will interact with the
pixels underneath. We'll explore blending modes thoroughly in the Layers module.
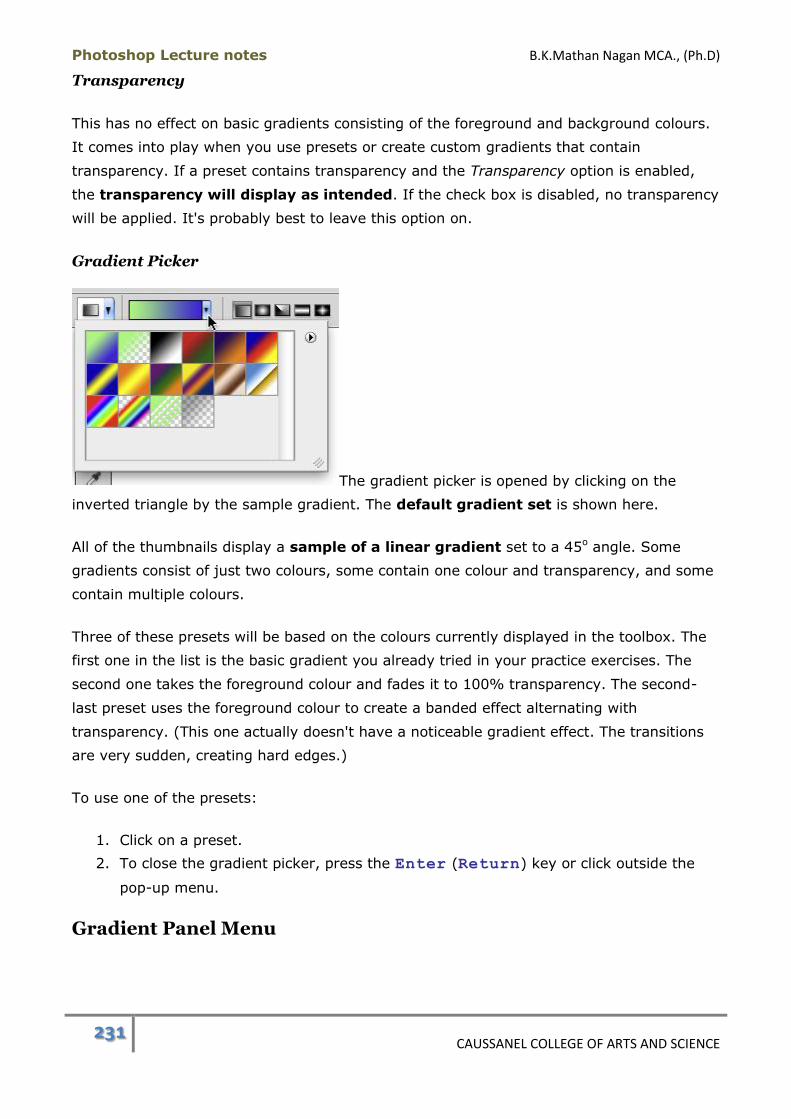
Photoshop Lecture notes B.K.Mathan Nagan MCA., (Ph.D)
231 CAUSSANEL COLLEGE OF ARTS AND SCIENCE
Transparency
This has no effect on basic gradients consisting of the foreground and background colours.
It comes into play when you use presets or create custom gradients that contain
transparency. If a preset contains transparency and the Transparency option is enabled,
the transparency will display as intended. If the check box is disabled, no transparency
will be applied. It's probably best to leave this option on.
Gradient Picker
The gradient picker is opened by clicking on the
inverted triangle by the sample gradient. The default gradient set is shown here.
All of the thumbnails display a sample of a linear gradient set to a 45o angle. Some
gradients consist of just two colours, some contain one colour and transparency, and some
contain multiple colours.
Three of these presets will be based on the colours currently displayed in the toolbox. The
first one in the list is the basic gradient you already tried in your practice exercises. The
second one takes the foreground colour and fades it to 100% transparency. The second-
last preset uses the foreground colour to create a banded effect alternating with
transparency. (This one actually doesn't have a noticeable gradient effect. The transitions
are very sudden, creating hard edges.)
To use one of the presets:
1. Click on a preset.
2. To close the gradient picker, press the Enter (Return) key or click outside the
pop-up menu.
Gradient Panel Menu
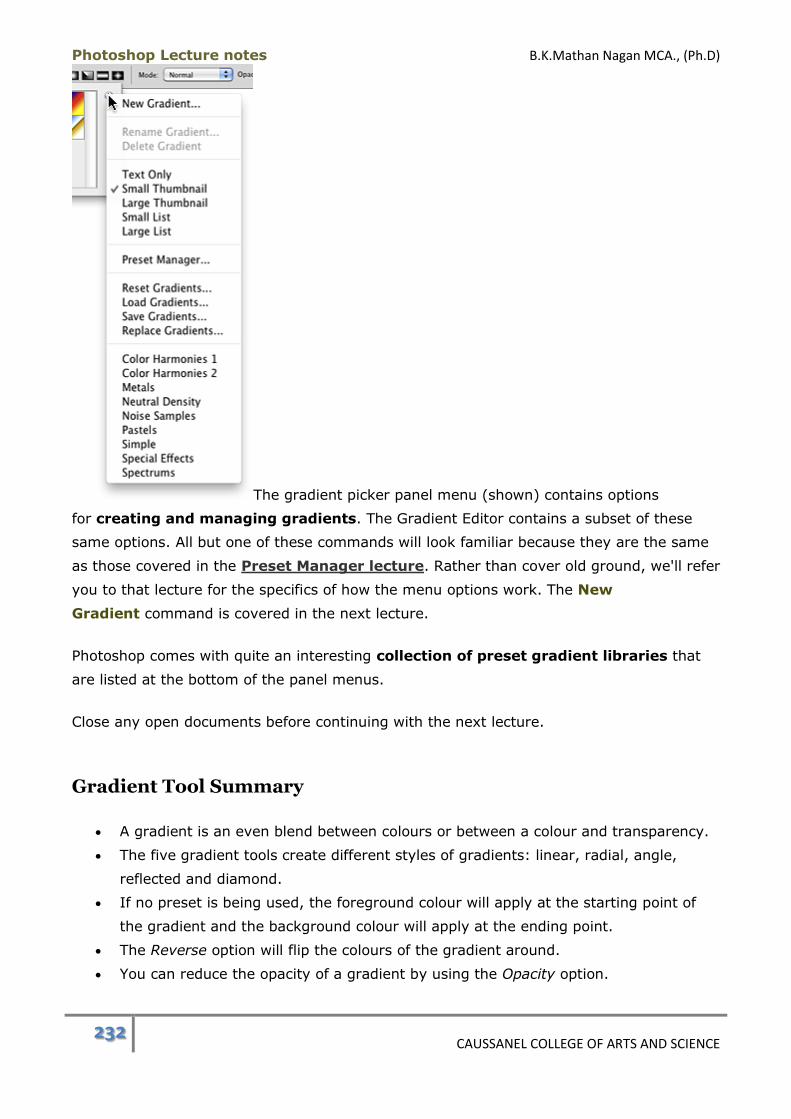
Photoshop Lecture notes B.K.Mathan Nagan MCA., (Ph.D)
232 CAUSSANEL COLLEGE OF ARTS AND SCIENCE
The gradient picker panel menu (shown) contains options
for creating and managing gradients. The Gradient Editor contains a subset of these
same options. All but one of these commands will look familiar because they are the same
as those covered in the Preset Manager lecture. Rather than cover old ground, we'll refer
you to that lecture for the specifics of how the menu options work. The New
Gradient command is covered in the next lecture.
Photoshop comes with quite an interesting collection of preset gradient libraries that
are listed at the bottom of the panel menus.
Close any open documents before continuing with the next lecture.
Gradient Tool Summary
A gradient is an even blend between colours or between a colour and transparency.
The five gradient tools create different styles of gradients: linear, radial, angle,
reflected and diamond.
If no preset is being used, the foreground colour will apply at the starting point of
the gradient and the background colour will apply at the ending point.
The Reverse option will flip the colours of the gradient around.
You can reduce the opacity of a gradient by using the Opacity option.

Photoshop Lecture notes B.K.Mathan Nagan MCA., (Ph.D)
233 CAUSSANEL COLLEGE OF ARTS AND SCIENCE
The Transparency option will enable the transparency in presets or custom
gradients.
Enabling the Dither option can reduce banding in gradients.
The gradient picker displays gradient presets you can use to create gradients.
The panel menu in the gradient picker and Gradient Editor provide ways to create
and manage gradients and gradient libraries.
Gradient Tool Keyboard Shortcuts:
Gradient tool: G
Constrain gradient direction: hold Shift key while dragging
Gradient Editor
With the Gradient Editor, you can create custom
gradients. Your gradients can contain transparent areas and you can add noise effects.
You'll learn to make solid gradients, gradients with transparency and noise gradients during
three exercises.
To open the Gradient Editor, click on the gradient samplein the Tool Options bar.
Gradient Bar
The Gradient Bar is the heart of the Gradient Editor. This is where you set and position the
colours and their midpoints, and set transparency if you are using it.
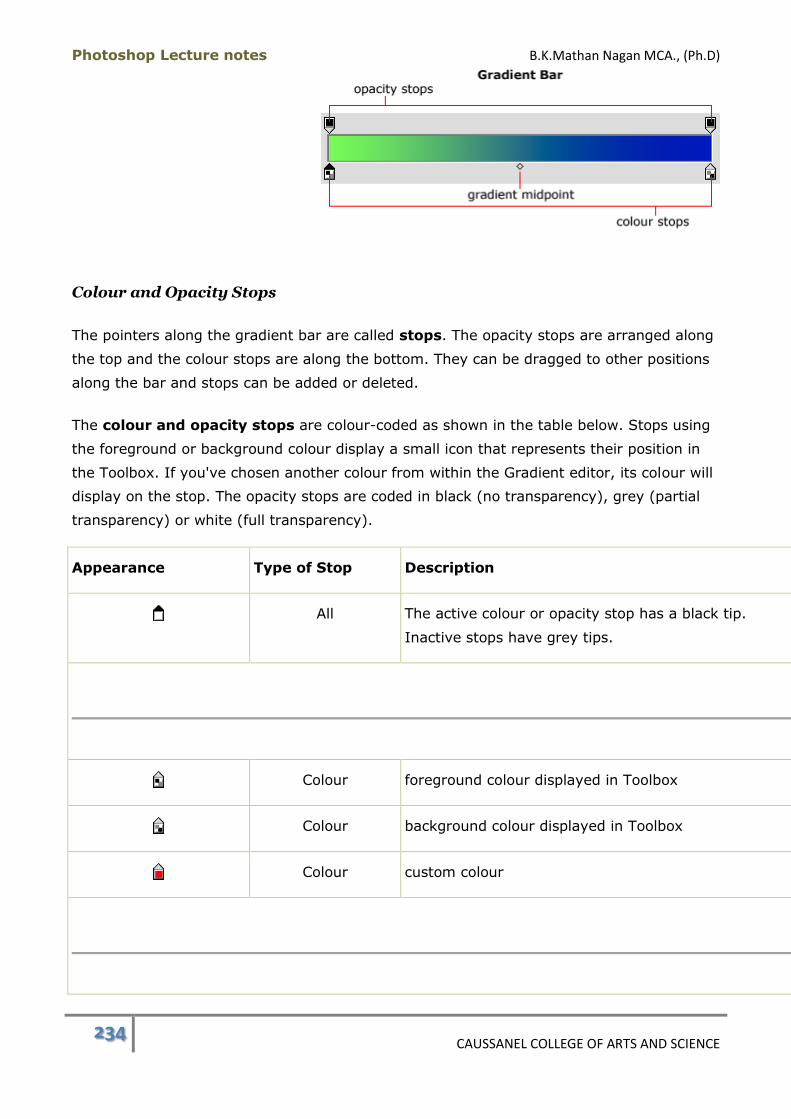
Photoshop Lecture notes B.K.Mathan Nagan MCA., (Ph.D)
234 CAUSSANEL COLLEGE OF ARTS AND SCIENCE
Colour and Opacity Stops
The pointers along the gradient bar are called stops. The opacity stops are arranged along
the top and the colour stops are along the bottom. They can be dragged to other positions
along the bar and stops can be added or deleted.
The colour and opacity stops are colour-coded as shown in the table below. Stops using
the foreground or background colour display a small icon that represents their position in
the Toolbox. If you've chosen another colour from within the Gradient editor, its colour will
display on the stop. The opacity stops are coded in black (no transparency), grey (partial
transparency) or white (full transparency).
Appearance Type of Stop Description
All The active colour or opacity stop has a black tip.
Inactive stops have grey tips.
Colour foreground colour displayed in Toolbox
Colour background colour displayed in Toolbox
Colour custom colour
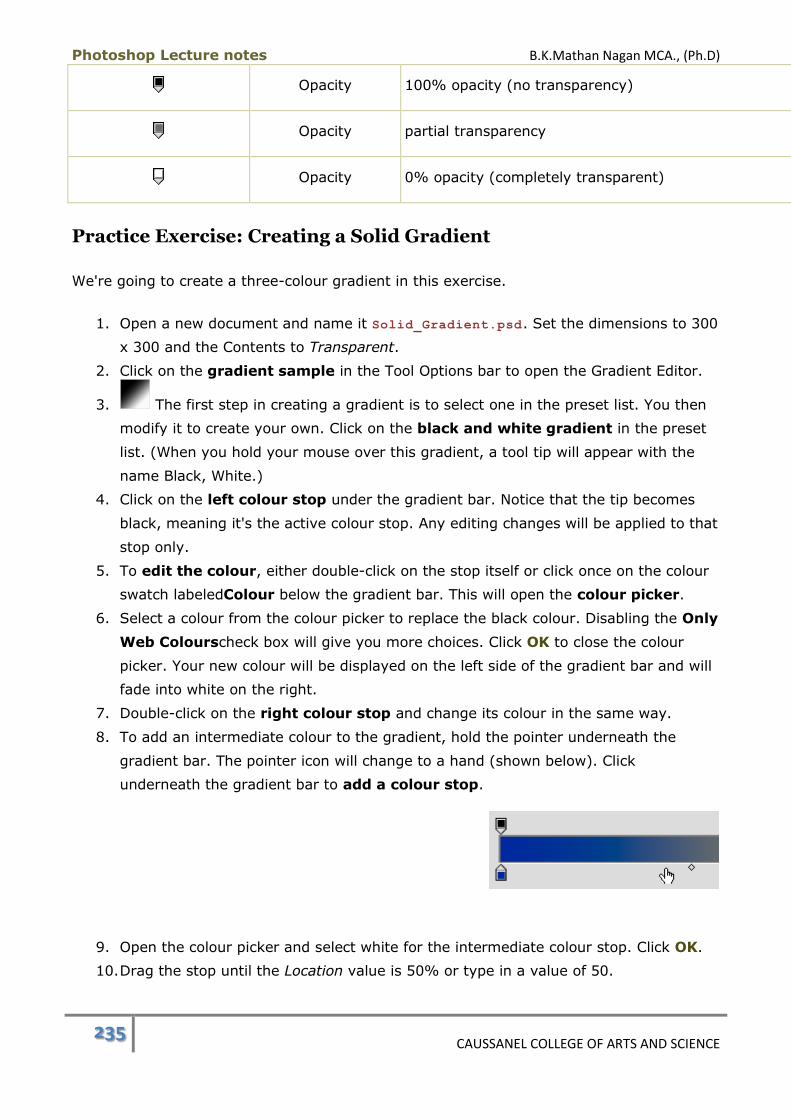
Photoshop Lecture notes B.K.Mathan Nagan MCA., (Ph.D)
235 CAUSSANEL COLLEGE OF ARTS AND SCIENCE
Opacity 100% opacity (no transparency)
Opacity partial transparency
Opacity 0% opacity (completely transparent)
Practice Exercise: Creating a Solid Gradient
We're going to create a three-colour gradient in this exercise.
1. Open a new document and name it Solid_Gradient.psd. Set the dimensions to 300
x 300 and the Contents to Transparent.
2. Click on the gradient sample in the Tool Options bar to open the Gradient Editor.
3. The first step in creating a gradient is to select one in the preset list. You then
modify it to create your own. Click on the black and white gradient in the preset
list. (When you hold your mouse over this gradient, a tool tip will appear with the
name Black, White.)
4. Click on the left colour stop under the gradient bar. Notice that the tip becomes
black, meaning it's the active colour stop. Any editing changes will be applied to that
stop only.
5. To edit the colour, either double-click on the stop itself or click once on the colour
swatch labeledColour below the gradient bar. This will open the colour picker.
6. Select a colour from the colour picker to replace the black colour. Disabling the Only
Web Colourscheck box will give you more choices. Click OK to close the colour
picker. Your new colour will be displayed on the left side of the gradient bar and will
fade into white on the right.
7. Double-click on the right colour stop and change its colour in the same way.
8. To add an intermediate colour to the gradient, hold the pointer underneath the
gradient bar. The pointer icon will change to a hand (shown below). Click
underneath the gradient bar to add a colour stop.
9. Open the colour picker and select white for the intermediate colour stop. Click OK.
10. Drag the stop until the Location value is 50% or type in a value of 50.
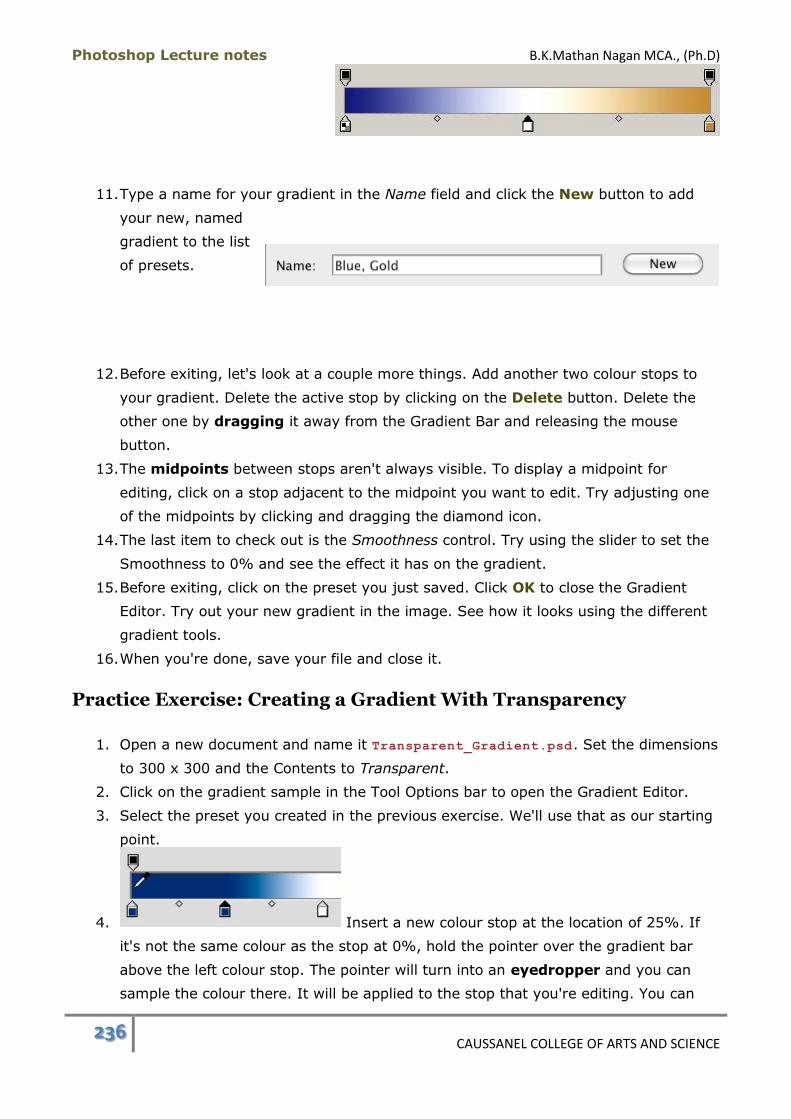
Photoshop Lecture notes B.K.Mathan Nagan MCA., (Ph.D)
236 CAUSSANEL COLLEGE OF ARTS AND SCIENCE
11. Type a name for your gradient in the Name field and click the New button to add
your new, named
gradient to the list
of presets.
12. Before exiting, let's look at a couple more things. Add another two colour stops to
your gradient. Delete the active stop by clicking on the Delete button. Delete the
other one by dragging it away from the Gradient Bar and releasing the mouse
button.
13. The midpoints between stops aren't always visible. To display a midpoint for
editing, click on a stop adjacent to the midpoint you want to edit. Try adjusting one
of the midpoints by clicking and dragging the diamond icon.
14. The last item to check out is the Smoothness control. Try using the slider to set the
Smoothness to 0% and see the effect it has on the gradient.
15. Before exiting, click on the preset you just saved. Click OK to close the Gradient
Editor. Try out your new gradient in the image. See how it looks using the different
gradient tools.
16. When you're done, save your file and close it.
Practice Exercise: Creating a Gradient With Transparency
1. Open a new document and name it Transparent_Gradient.psd. Set the dimensions
to 300 x 300 and the Contents to Transparent.
2. Click on the gradient sample in the Tool Options bar to open the Gradient Editor.
3. Select the preset you created in the previous exercise. We'll use that as our starting
point.
4. Insert a new colour stop at the location of 25%. If
it's not the same colour as the stop at 0%, hold the pointer over the gradient bar
above the left colour stop. The pointer will turn into an eyedropper and you can
sample the colour there. It will be applied to the stop that you're editing. You can
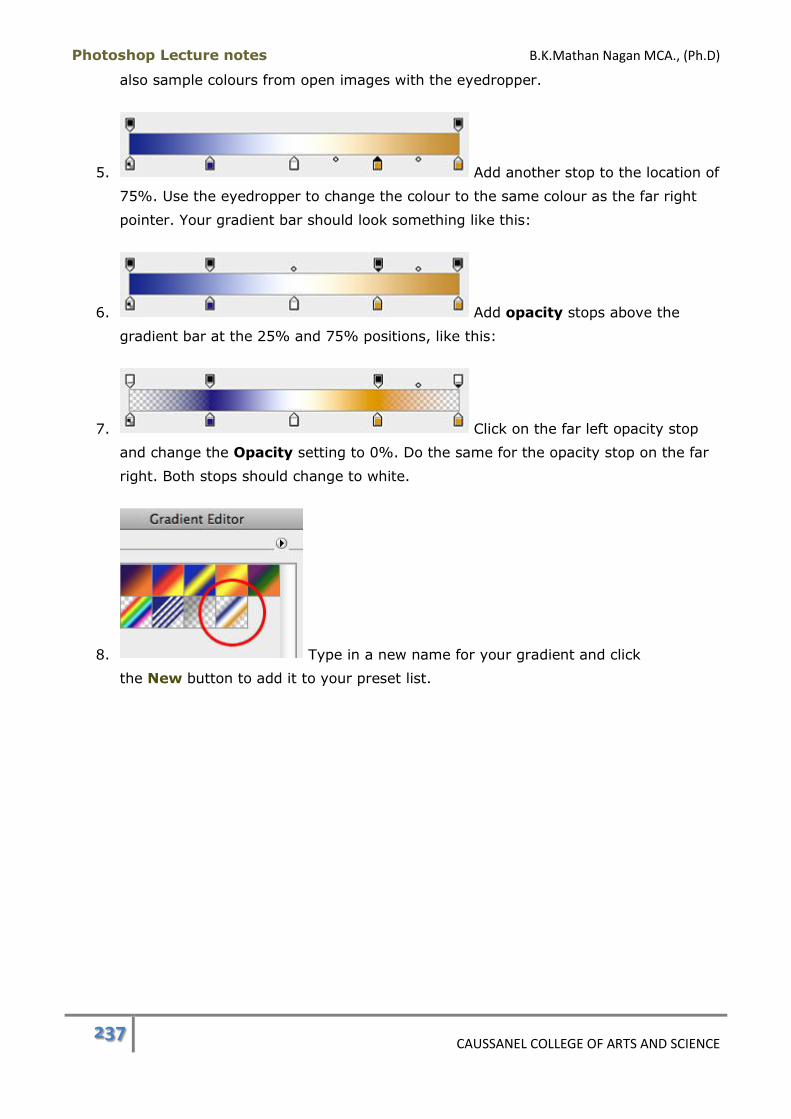
Photoshop Lecture notes B.K.Mathan Nagan MCA., (Ph.D)
237 CAUSSANEL COLLEGE OF ARTS AND SCIENCE
also sample colours from open images with the eyedropper.
5. Add another stop to the location of
75%. Use the eyedropper to change the colour to the same colour as the far right
pointer. Your gradient bar should look something like this:
6. Add opacity stops above the
gradient bar at the 25% and 75% positions, like this:
7. Click on the far left opacity stop
and change the Opacity setting to 0%. Do the same for the opacity stop on the far
right. Both stops should change to white.
8. Type in a new name for your gradient and click
the New button to add it to your preset list.
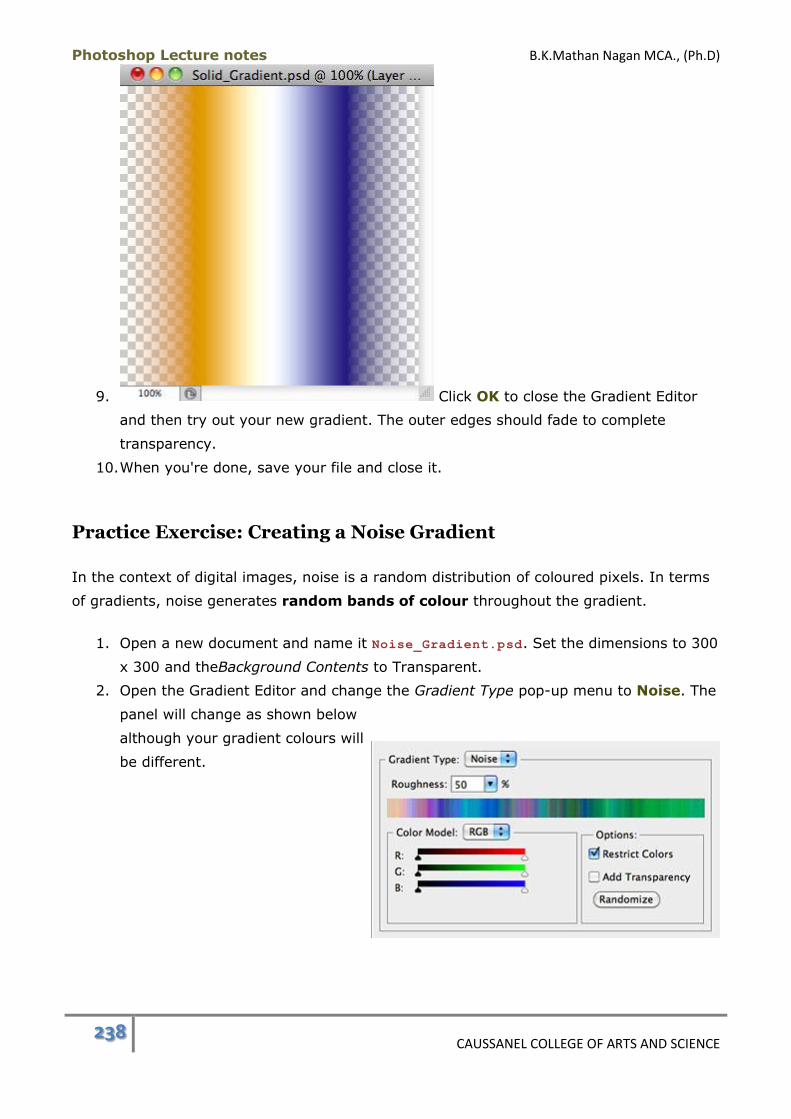
Photoshop Lecture notes B.K.Mathan Nagan MCA., (Ph.D)
238 CAUSSANEL COLLEGE OF ARTS AND SCIENCE
9. Click OK to close the Gradient Editor
and then try out your new gradient. The outer edges should fade to complete
transparency.
10. When you're done, save your file and close it.
Practice Exercise: Creating a Noise Gradient
In the context of digital images, noise is a random distribution of coloured pixels. In terms
of gradients, noise generates random bands of colour throughout the gradient.
1. Open a new document and name it Noise_Gradient.psd. Set the dimensions to 300
x 300 and theBackground Contents to Transparent.
2. Open the Gradient Editor and change the Gradient Type pop-up menu to Noise. The
panel will change as shown below
although your gradient colours will
be different.

Photoshop Lecture notes B.K.Mathan Nagan MCA., (Ph.D)
239 CAUSSANEL COLLEGE OF ARTS AND SCIENCE
The gradient preview doesn't have colour and opacity stops for noise gradients. Colours are
assigned by selecting a Colour Model (RGB, HSB or L*a*b) and manipulating the sliders.
3. Make sure the RGB colour model is selected and drag the white slider for the Red
component all the way to the left. You'll notice that this removes red from the
gradient, leaving greens and blues. Restore the Red slider to its original position and
drag the grey slider for the Green component to the left and reds and blues are left.
This is how you can narrow the colour range represented in the gradient.
4. Hold down the Alt (Option) key. The Cancel button in the Gradient Editor turns
into a Resetbutton. Click on it to restore the original values.
5. Change to the HSB colour mode. Move the grey slider for the Hue component back
and forth. The position of the slider determines the predominant colour of the
gradient. Manipulating the Saturation and Brightness sliders will reduce the range of
those values appearing in the gradient.
6. The Restrict Colours option prevents colours from becoming over-saturated. Try
disabling the check box and notice the difference. The colours become much
brighter. Enable this option again.
7. Enable the Add Transparency option. As you can see, the gradient becomes
partially transparent. Turn off this option.
8. Now try clicking on the Randomize button several times. This generates random
colour schemes.
9. Use any of the above methods to come up with a colour scheme that you like.
10. The last option is Roughness. This determines the amount of sharpness or blur
applied to the noise gradient. Here are
examples of
various Roughness settings:
11. Experiment with the Roughness option until you arrive at a setting that you like.
12. Name your noise gradient and click the New button to add it to the presets.
13. Click OK to close the Gradient Editor and then try out your noise gradient in your
image document.
14. When you're done, save your file and close it.
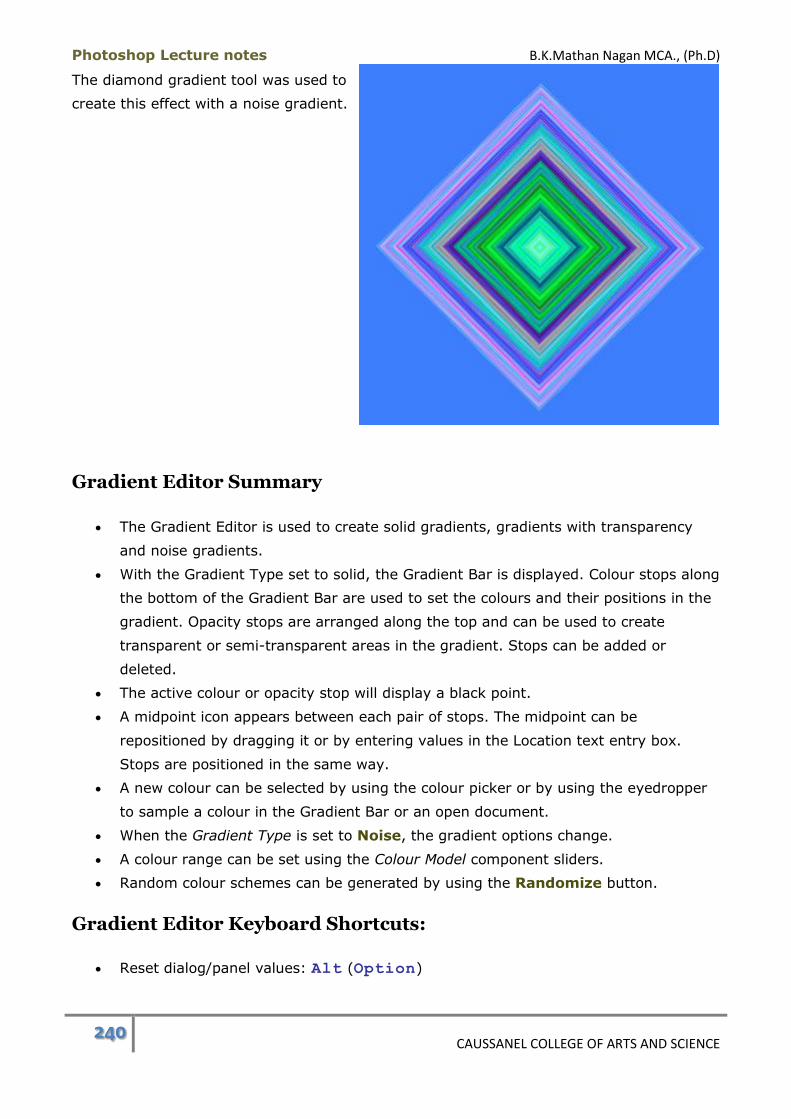
Photoshop Lecture notes B.K.Mathan Nagan MCA., (Ph.D)
240 CAUSSANEL COLLEGE OF ARTS AND SCIENCE
The diamond gradient tool was used to
create this effect with a noise gradient.
Gradient Editor Summary
The Gradient Editor is used to create solid gradients, gradients with transparency
and noise gradients.
With the Gradient Type set to solid, the Gradient Bar is displayed. Colour stops along
the bottom of the Gradient Bar are used to set the colours and their positions in the
gradient. Opacity stops are arranged along the top and can be used to create
transparent or semi-transparent areas in the gradient. Stops can be added or
deleted.
The active colour or opacity stop will display a black point.
A midpoint icon appears between each pair of stops. The midpoint can be
repositioned by dragging it or by entering values in the Location text entry box.
Stops are positioned in the same way.
A new colour can be selected by using the colour picker or by using the eyedropper
to sample a colour in the Gradient Bar or an open document.
When the Gradient Type is set to Noise, the gradient options change.
A colour range can be set using the Colour Model component sliders.
Random colour schemes can be generated by using the Randomize button.
Gradient Editor Keyboard Shortcuts:
Reset dialog/panel values: Alt (Option)

Photoshop Lecture notes B.K.Mathan Nagan MCA., (Ph.D)
241 CAUSSANEL COLLEGE OF ARTS AND SCIENCE
Paint Bucket Tool
The Paint Bucket tool is used to apply the foreground colour or a pattern to an area of
an image. The options you set determine how much paint will be applied.
The Paint Bucket tool is bundled with the Gradient tool. We'll try out the various options
in two practice exercises.
Practice Exercise: Filling With the Foreground Colour
1. Open a new document that is 300 x 75
and set the background to white.
2. Use the Linear Gradient tool to apply the
three-colour gradient you created in the
last lecture in the
imageSolid_Gradient.psd.
3. Hold the mouse button down on the Gradient tool in the
Toolbox until the tool fly-out appears and select the Paint Bucket tool.
4. Set the foreground colour to something that will stand out against the colours in
your gradient. (We used green.)
5. Make sure the Fill pop-up menu in the Tool Options bar is set to Foreground,
the Mode isNormal, Opacity is 100%, and Contiguous is enabled.
6. Type 5 in the Tolerance text entry box. Click once inside your image with the Paint
Bucket tool.
7. Set the Tolerance to 32 and click on another point in your image.
8. Set the Tolerance to 100 and click on a different area.
The coverage of the Paint Bucket tool is based on
the colour of the pixel that is clicked on in conjunction with theTolerance setting. If
the Tolerance is set to 0, only pixels of exactly the same colour as the pixel clicked on will
be filled. As you raise the Tolerance values, the tool becomes less discriminating and will fill
more pixels. The values can range from 0-255. The latter value will result in the broadest
coverage area. There are some other options that can affect the extent of coverage, too.
9. Use the History panel to return to the Gradient state of your image.

Photoshop Lecture notes B.K.Mathan Nagan MCA., (Ph.D)
242 CAUSSANEL COLLEGE OF ARTS AND SCIENCE
10. Set the Tolerance to 32 and click in the
middle of your image so you have a vertical stripe of the foreground colour.
11. Set the Tolerance to 255 and click to the
left of the stripe. As you can see, the fill stopped when it reached the stripe. That is
because the Contiguous option is turned on. Contiguous will only affect adjacent
areas containing the same or similar colours. When Contiguous is disabled, all
similar pixels in the image will be considered and filled if they fall within
the Tolerance range.
12. Undo the last change, disable Contiguous and click to the left of the stripe again.
Most or all of your image should be filled this time.
13. Revert to the Gradient state once again.
14. Set the Tolerance to 100 and reduce
the Opacityvalue to 50% either by typing in the value or using the slider control.
Click in the centre of the image to apply a semi-transparent fill.
15. Undo the semi-transparent fill, restore the Opacity to 100%, change
the Tolerance to 5 and enable Contiguous again.
16. Zoom in so your image is magnified at least 400% so you can see the effect of the
next option more clearly.
17. Click once in the image. Disable the Anti-
aliasedoption and click in another spot. The edges of the anti-aliased fill are slightly
blurred (right) while the other fill has hard edges (left).
18. You can close this image without saving it.
We'll cover the Mode setting in the Layers module. The remaining setting in the Tool
Options bar is All Layers. When All Layers is enabled, pixels that fall within the
chosen Tolerance on other layers in the image will be filled as well as those on the active
layer.

Photoshop Lecture notes B.K.Mathan Nagan MCA., (Ph.D)
243 CAUSSANEL COLLEGE OF ARTS AND SCIENCE
Practice Exercise: Filling With a Pattern
The other Fill option for the Paint Bucket tool lets you apply patterns to an area of an
image. You can use a pattern preset or you can create your own pattern to use as a fill.
When you change the Paint Bucket's Fill option
to Pattern, you can access the pattern picker to display a panel containing pattern presets
by clicking on the inverted triangle next to the pattern sample.
The two patterns shown here are the default patterns.
Using a Preset Pattern
1. Open a new image document that is 300 x 300 with a white background. Name
itPaint_Bucket.psd.
2. Select the Paint Bucket tool and change the Fill option to Pattern in the Tool
Options bar.
3. Click on the inverted triangle next to the pattern sample to open the pattern picker.
Select one of the preset patterns and then press the Enter (Return) key to close
the panel.
4. Click inside the image with the Paint Bucket tool to apply
the pattern as a fill.
The pattern preset consists only of the image contained within
the white border shown here. When applied to a larger area,
the image repeats (tiles). The presets are designed to tile
seamlessly which means that you can't tell where one tile ends
and another begins.
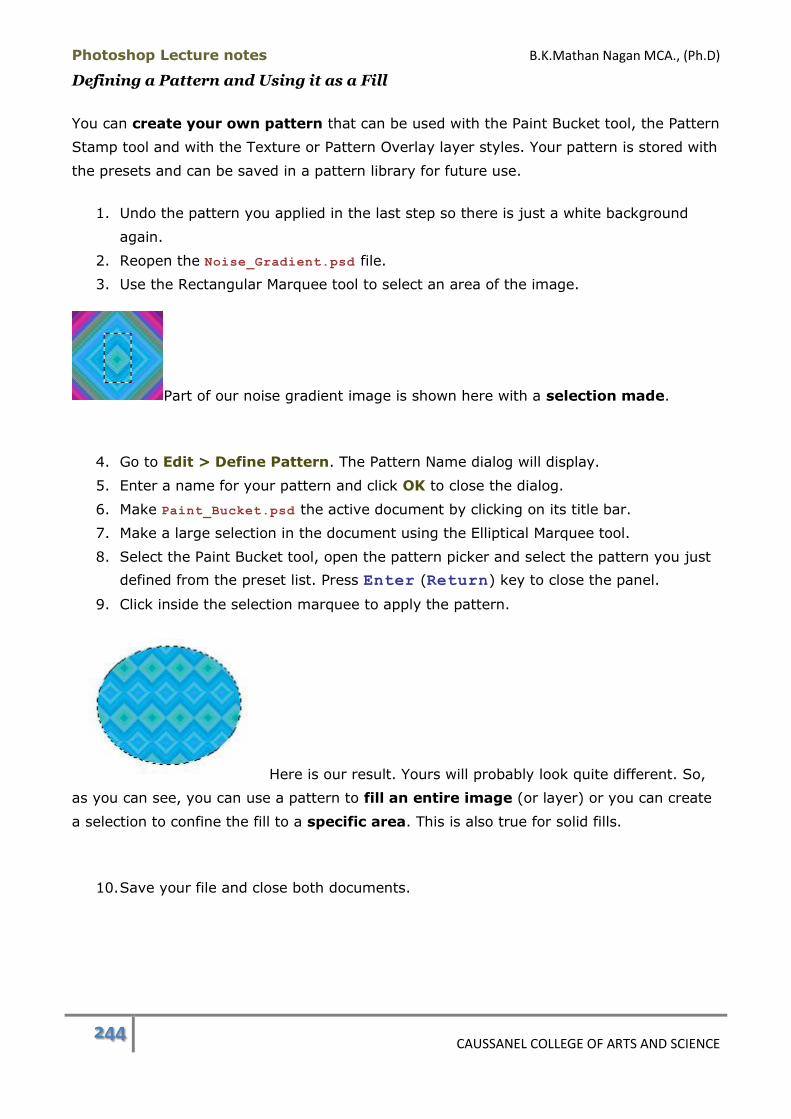
Photoshop Lecture notes B.K.Mathan Nagan MCA., (Ph.D)
244 CAUSSANEL COLLEGE OF ARTS AND SCIENCE
Defining a Pattern and Using it as a Fill
You can create your own pattern that can be used with the Paint Bucket tool, the Pattern
Stamp tool and with the Texture or Pattern Overlay layer styles. Your pattern is stored with
the presets and can be saved in a pattern library for future use.
1. Undo the pattern you applied in the last step so there is just a white background
again.
2. Reopen the Noise_Gradient.psd file.
3. Use the Rectangular Marquee tool to select an area of the image.
Part of our noise gradient image is shown here with a selection made.
4. Go to Edit > Define Pattern. The Pattern Name dialog will display.
5. Enter a name for your pattern and click OK to close the dialog.
6. Make Paint_Bucket.psd the active document by clicking on its title bar.
7. Make a large selection in the document using the Elliptical Marquee tool.
8. Select the Paint Bucket tool, open the pattern picker and select the pattern you just
defined from the preset list. Press Enter (Return) key to close the panel.
9. Click inside the selection marquee to apply the pattern.
Here is our result. Yours will probably look quite different. So,
as you can see, you can use a pattern to fill an entire image (or layer) or you can create
a selection to confine the fill to a specific area. This is also true for solid fills.
10. Save your file and close both documents.
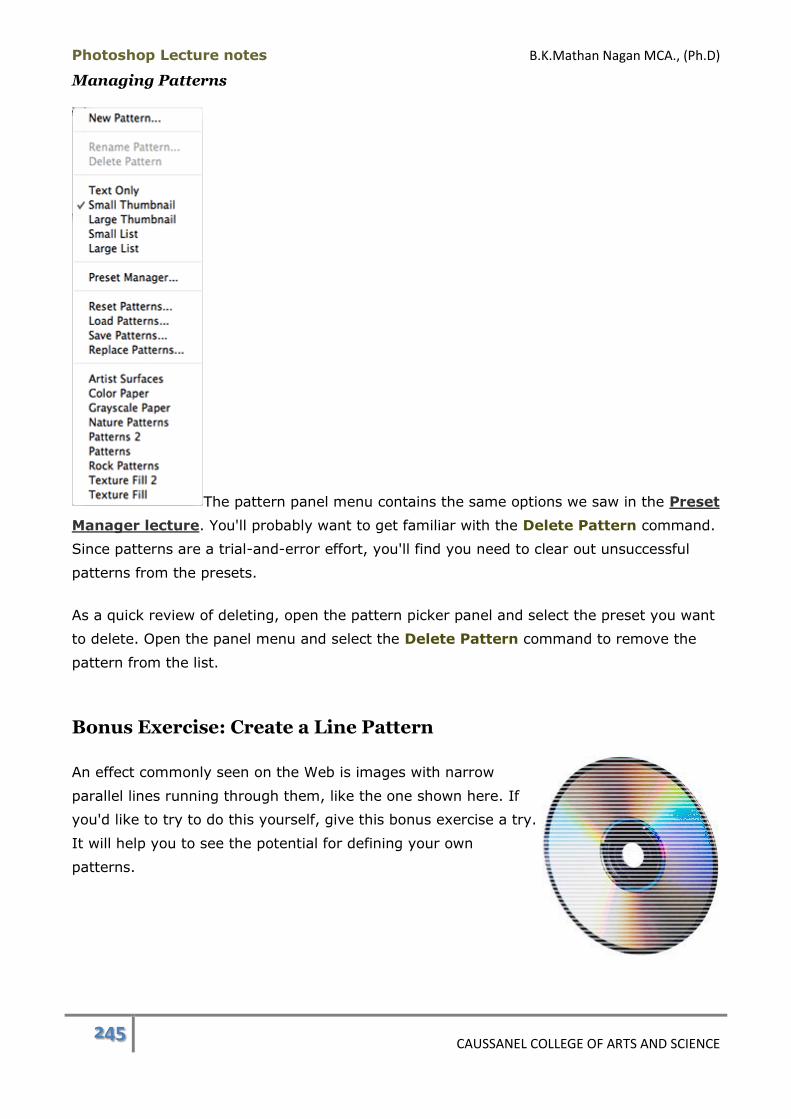
Photoshop Lecture notes B.K.Mathan Nagan MCA., (Ph.D)
245 CAUSSANEL COLLEGE OF ARTS AND SCIENCE
Managing Patterns
The pattern panel menu contains the same options we saw in the Preset
Manager lecture. You'll probably want to get familiar with the Delete Pattern command.
Since patterns are a trial-and-error effort, you'll find you need to clear out unsuccessful
patterns from the presets.
As a quick review of deleting, open the pattern picker panel and select the preset you want
to delete. Open the panel menu and select the Delete Pattern command to remove the
pattern from the list.
Bonus Exercise: Create a Line Pattern
An effect commonly seen on the Web is images with narrow
parallel lines running through them, like the one shown here. If
you'd like to try to do this yourself, give this bonus exercise a try.
It will help you to see the potential for defining your own
patterns.
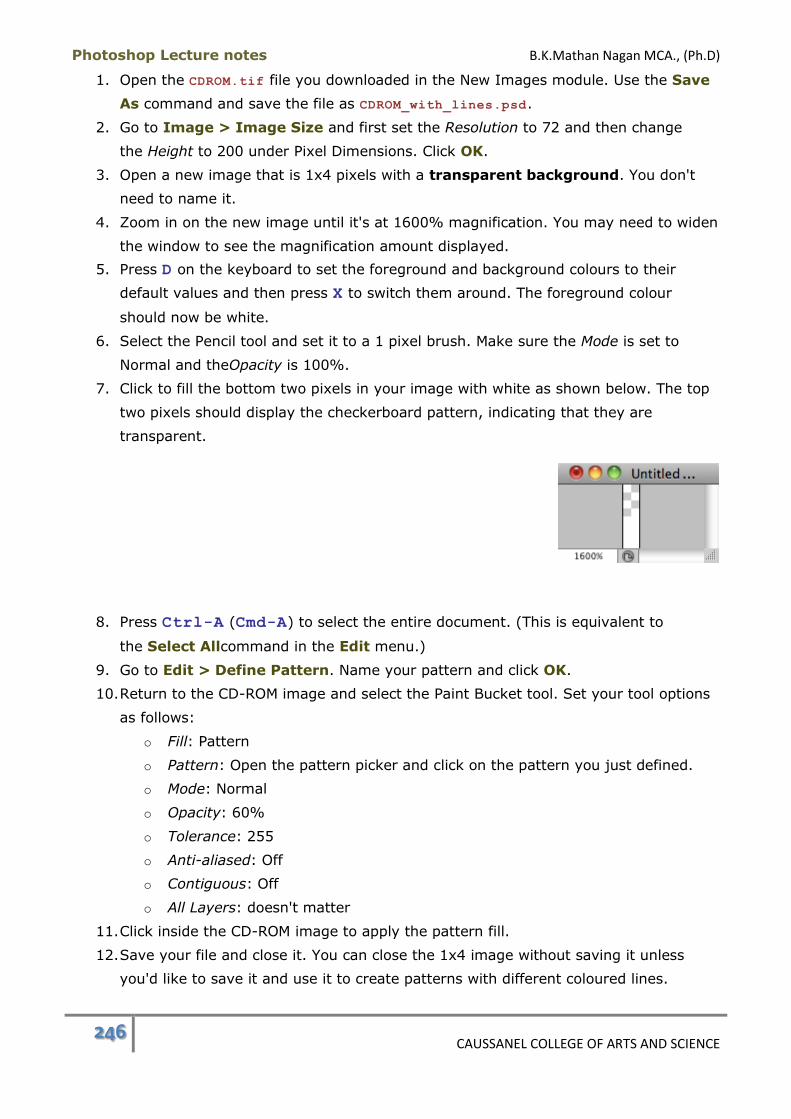
Photoshop Lecture notes B.K.Mathan Nagan MCA., (Ph.D)
246 CAUSSANEL COLLEGE OF ARTS AND SCIENCE
1. Open the CDROM.tif file you downloaded in the New Images module. Use the Save
As command and save the file as CDROM_with_lines.psd.
2. Go to Image > Image Size and first set the Resolution to 72 and then change
the Height to 200 under Pixel Dimensions. Click OK.
3. Open a new image that is 1x4 pixels with a transparent background. You don't
need to name it.
4. Zoom in on the new image until it's at 1600% magnification. You may need to widen
the window to see the magnification amount displayed.
5. Press D on the keyboard to set the foreground and background colours to their
default values and then press X to switch them around. The foreground colour
should now be white.
6. Select the Pencil tool and set it to a 1 pixel brush. Make sure the Mode is set to
Normal and theOpacity is 100%.
7. Click to fill the bottom two pixels in your image with white as shown below. The top
two pixels should display the checkerboard pattern, indicating that they are
transparent.
8. Press Ctrl-A (Cmd-A) to select the entire document. (This is equivalent to
the Select Allcommand in the Edit menu.)
9. Go to Edit > Define Pattern. Name your pattern and click OK.
10. Return to the CD-ROM image and select the Paint Bucket tool. Set your tool options
as follows:
o Fill: Pattern
o Pattern: Open the pattern picker and click on the pattern you just defined.
o Mode: Normal
o Opacity: 60%
o Tolerance: 255
o Anti-aliased: Off
o Contiguous: Off
o All Layers: doesn't matter
11. Click inside the CD-ROM image to apply the pattern fill.
12. Save your file and close it. You can close the 1x4 image without saving it unless
you'd like to save it and use it to create patterns with different coloured lines.

Photoshop Lecture notes B.K.Mathan Nagan MCA., (Ph.D)
247 CAUSSANEL COLLEGE OF ARTS AND SCIENCE
Due to Tolerance, your entire image may not have been
completely filled with the line pattern. Clicking on a mid-range
tonal value might help. Once you learn to create new layers in
your image, you can apply the pattern to a layer above an image
and won't have this problem and you won't have to paint directly
on the underlying image.
When you come up with patterns that you feel might be useful in
the future, it's a good idea to save them in a library. That way,
if you reset the pattern presets to restore the original values you won't lose the pattern you
created; you can simply load the library that contains it into the pattern picker panel.
This exercise also demonstrated that you can include transparency when defining your
patterns so that the underlying image shows through.
Paint Bucket Tool Summary
The Paint Bucket tool is bundled with the Gradient tool.
It can be used to apply the foreground colour or a pattern as a fill inside a selection
or to an entire layer.
The value set in the Tolerance option determines how selectively the tool will fill
underlying pixels. A low value is more discriminating and fills only pixels that are
quite similar to the pixel that was clicked on.
When a pattern is chosen as the fill, the pattern is selected from the pattern presets.
If the area to be filled is larger than the preset image, the pattern will tile.
You can define your own patterns and add them to the presets. They can contain
areas of transparency.
You can manage your patterns from the pattern picker's panel menu or by using the
Preset Manager's panel menu.
Paint Bucket Tool Keyboard Shortcuts:
Select All: Ctrl-A (Cmd-A)
Fill Commands and Shortcuts
In addition to using the Paint Bucket tool for applying fills to selected or unselected areas,
you can also use the Fill dialog to apply solid colours and patterns. There are keyboard
shortcuts associated with the Fill dialog that you will find invaluable. The Fill dialog has a
couple of distinct advantages over the Paint Bucket tool.
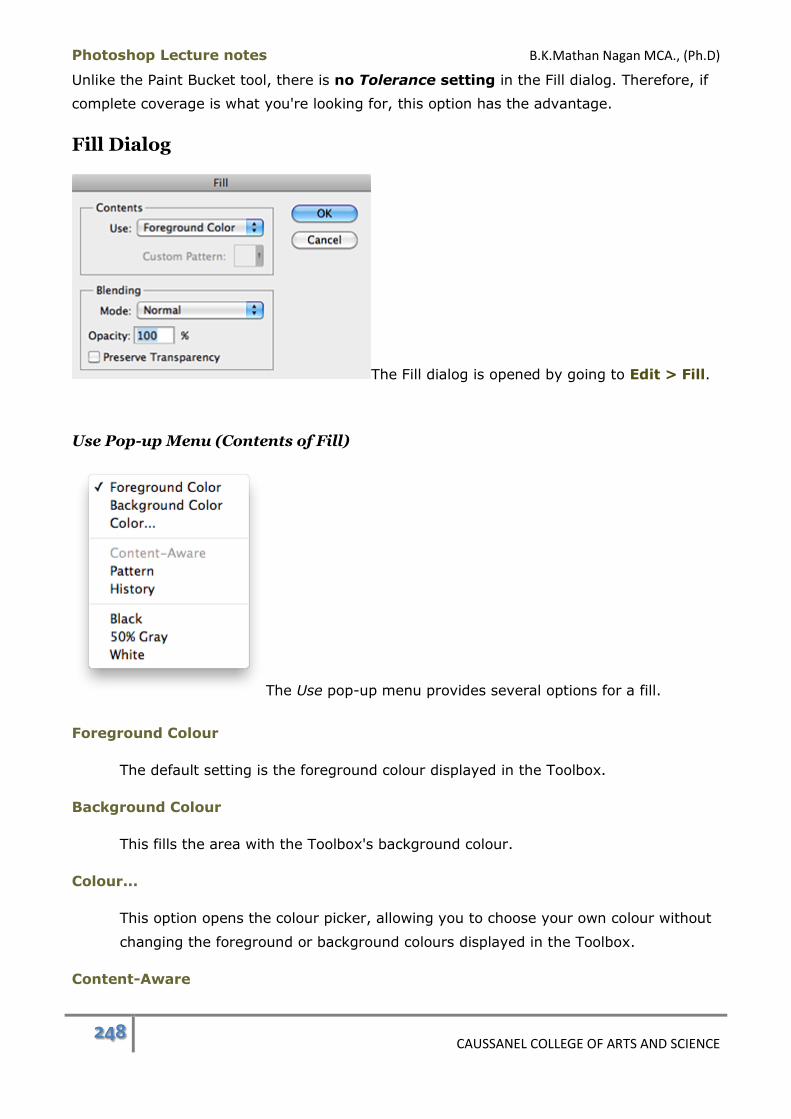
Photoshop Lecture notes B.K.Mathan Nagan MCA., (Ph.D)
248 CAUSSANEL COLLEGE OF ARTS AND SCIENCE
Unlike the Paint Bucket tool, there is no Tolerance setting in the Fill dialog. Therefore, if
complete coverage is what you're looking for, this option has the advantage.
Fill Dialog
The Fill dialog is opened by going to Edit > Fill.
Use Pop-up Menu (Contents of Fill)
The Use pop-up menu provides several options for a fill.
Foreground Colour
The default setting is the foreground colour displayed in the Toolbox.
Background Colour
This fills the area with the Toolbox's background colour.
Colour...
This option opens the colour picker, allowing you to choose your own colour without
changing the foreground or background colours displayed in the Toolbox.
Content-Aware
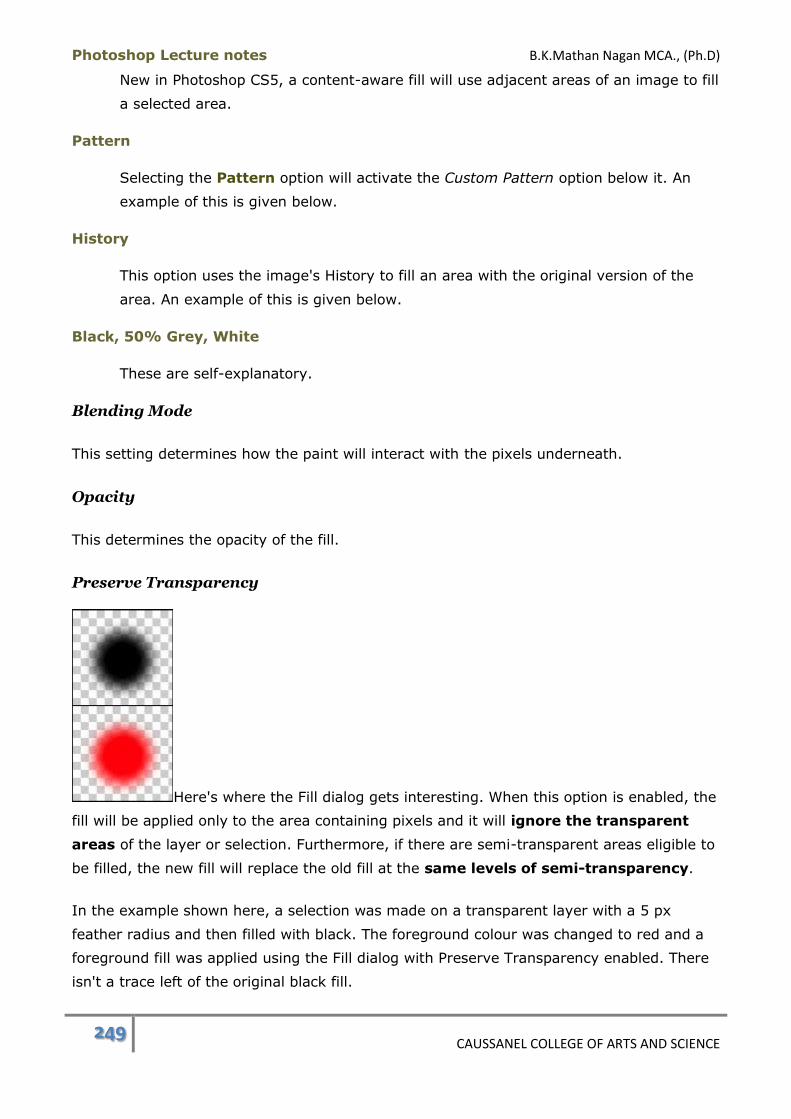
Photoshop Lecture notes B.K.Mathan Nagan MCA., (Ph.D)
249 CAUSSANEL COLLEGE OF ARTS AND SCIENCE
New in Photoshop CS5, a content-aware fill will use adjacent areas of an image to fill
a selected area.
Pattern
Selecting the Pattern option will activate the Custom Pattern option below it. An
example of this is given below.
History
This option uses the image's History to fill an area with the original version of the
area. An example of this is given below.
Black, 50% Grey, White
These are self-explanatory.
Blending Mode
This setting determines how the paint will interact with the pixels underneath.
Opacity
This determines the opacity of the fill.
Preserve Transparency
Here's where the Fill dialog gets interesting. When this option is enabled, the
fill will be applied only to the area containing pixels and it will ignore the transparent
areas of the layer or selection. Furthermore, if there are semi-transparent areas eligible to
be filled, the new fill will replace the old fill at the same levels of semi-transparency.
In the example shown here, a selection was made on a transparent layer with a 5 px
feather radius and then filled with black. The foreground colour was changed to red and a
foreground fill was applied using the Fill dialog with Preserve Transparency enabled. There
isn't a trace left of the original black fill.
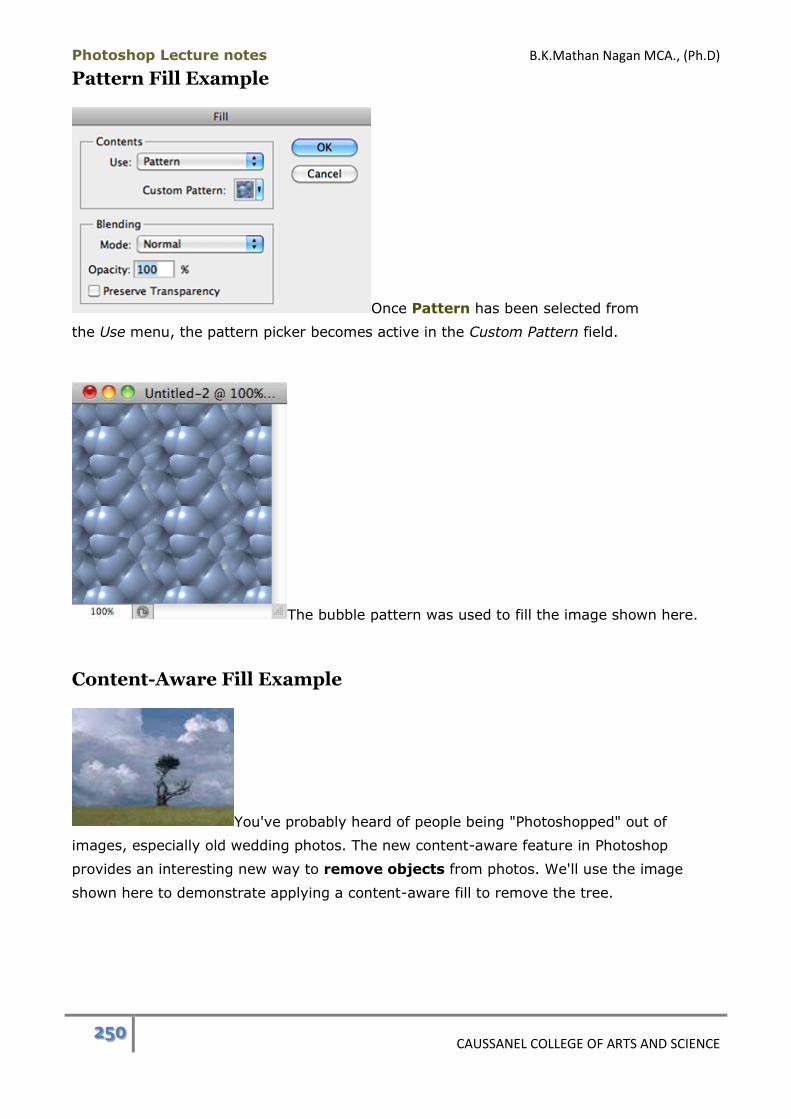
Photoshop Lecture notes B.K.Mathan Nagan MCA., (Ph.D)
250 CAUSSANEL COLLEGE OF ARTS AND SCIENCE
Pattern Fill Example
Once Pattern has been selected from
the Use menu, the pattern picker becomes active in the Custom Pattern field.
The bubble pattern was used to fill the image shown here.
Content-Aware Fill Example
You've probably heard of people being "Photoshopped" out of
images, especially old wedding photos. The new content-aware feature in Photoshop
provides an interesting new way to remove objects from photos. We'll use the image
shown here to demonstrate applying a content-aware fill to remove the tree.

Photoshop Lecture notes B.K.Mathan Nagan MCA., (Ph.D)
251 CAUSSANEL COLLEGE OF ARTS AND SCIENCE
The first step is to make a selection of the object you want to
remove. (Unless there is a selection in the image, the Content-Aware Use menu option
will be greyed out.) Adobe recommends including some of the background in the selection.
The lasso marquee tool was used to draw around the tree to make the selection.
Content-Aware was selected from the Use menu and the image
shown here is the result.
Another thing to note about content-aware fills is that they are generated randomly. This
means that if you aren't happy with the result, you can undo the fill, apply it a second time,
and get a different result.
History Fill Example
For this example, we started with the Cat.psd image and
changed its eye colour to green.
We'll change one eye back to the original colour to
demonstrate theHistory fill. First we made a selection of the right eye using the
Rectangular Marquee tool. It isn't necessary to make a precise selection for this to work; a
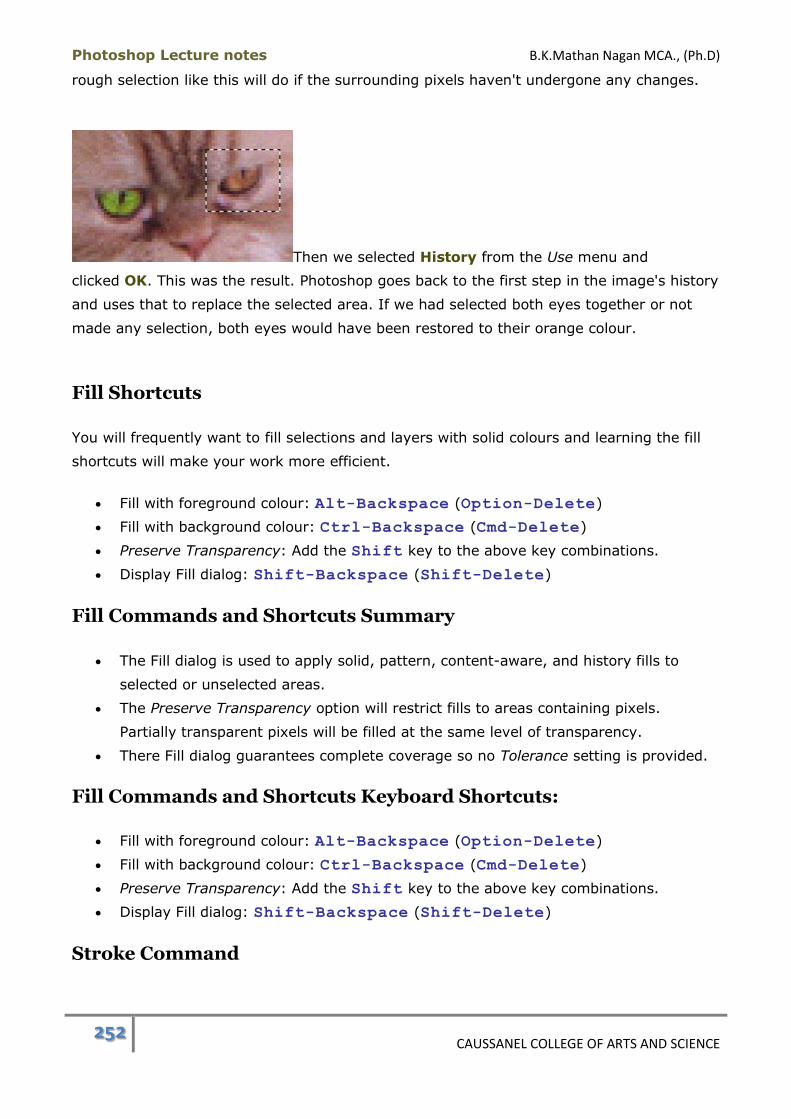
Photoshop Lecture notes B.K.Mathan Nagan MCA., (Ph.D)
252 CAUSSANEL COLLEGE OF ARTS AND SCIENCE
rough selection like this will do if the surrounding pixels haven't undergone any changes.
Then we selected History from the Use menu and
clicked OK. This was the result. Photoshop goes back to the first step in the image's history
and uses that to replace the selected area. If we had selected both eyes together or not
made any selection, both eyes would have been restored to their orange colour.
Fill Shortcuts
You will frequently want to fill selections and layers with solid colours and learning the fill
shortcuts will make your work more efficient.
Fill with foreground colour: Alt-Backspace (Option-Delete)
Fill with background colour: Ctrl-Backspace (Cmd-Delete)
Preserve Transparency: Add the Shift key to the above key combinations.
Display Fill dialog: Shift-Backspace (Shift-Delete)
Fill Commands and Shortcuts Summary
The Fill dialog is used to apply solid, pattern, content-aware, and history fills to
selected or unselected areas.
The Preserve Transparency option will restrict fills to areas containing pixels.
Partially transparent pixels will be filled at the same level of transparency.
There Fill dialog guarantees complete coverage so no Tolerance setting is provided.
Fill Commands and Shortcuts Keyboard Shortcuts:
Fill with foreground colour: Alt-Backspace (Option-Delete)
Fill with background colour: Ctrl-Backspace (Cmd-Delete)
Preserve Transparency: Add the Shift key to the above key combinations.
Display Fill dialog: Shift-Backspace (Shift-Delete)
Stroke Command
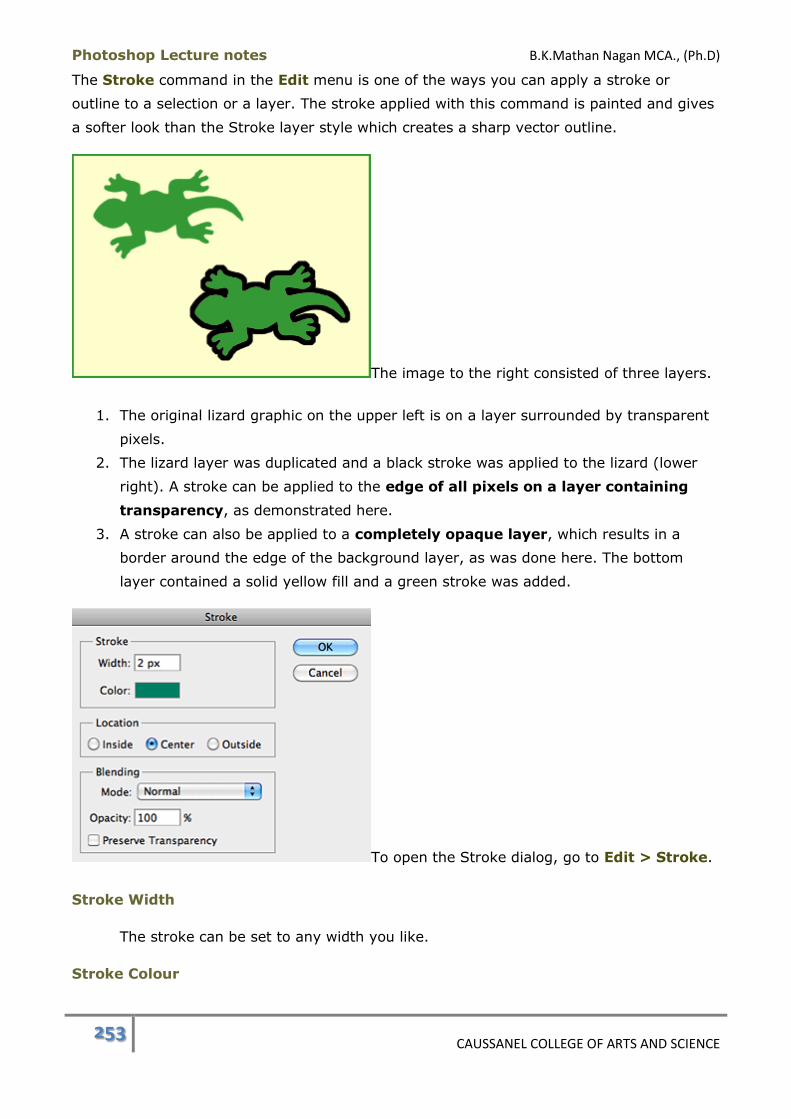
Photoshop Lecture notes B.K.Mathan Nagan MCA., (Ph.D)
253 CAUSSANEL COLLEGE OF ARTS AND SCIENCE
The Stroke command in the Edit menu is one of the ways you can apply a stroke or
outline to a selection or a layer. The stroke applied with this command is painted and gives
a softer look than the Stroke layer style which creates a sharp vector outline.
The image to the right consisted of three layers.
1. The original lizard graphic on the upper left is on a layer surrounded by transparent
pixels.
2. The lizard layer was duplicated and a black stroke was applied to the lizard (lower
right). A stroke can be applied to the edge of all pixels on a layer containing
transparency, as demonstrated here.
3. A stroke can also be applied to a completely opaque layer, which results in a
border around the edge of the background layer, as was done here. The bottom
layer contained a solid yellow fill and a green stroke was added.
To open the Stroke dialog, go to Edit > Stroke.
Stroke Width
The stroke can be set to any width you like.
Stroke Colour

Photoshop Lecture notes B.K.Mathan Nagan MCA., (Ph.D)
254 CAUSSANEL COLLEGE OF ARTS AND SCIENCE
Clicking on the colour swatch will open the colour picker. You can choose any colour
for the stroke, although it must be a solid colour, not a gradient or pattern.
Location
The image at the right demonstrates the difference between
the different stroke Location settings. The top circle with no stroke was duplicated
three times so each circle started out at the same size. Then a 10 px white stroke
was added at 60% opacity.
An inside stroke is created within the boundaries of the circle.
A centre stroke is positioned so the inner half overlaps the circle and the
outer half extends beyond it.
An outside stroke surrounds the circle without overlapping it.
You may notice some distortion on the outer edge of outside stroke. We'll address
this tendency following the practice exercise.
When applying a stroke to the outer edge of a solid background, remember to set
the Location to Inside. With a centre or outside stroke, part or all of the stroke will
fall outside the image boundaries and will be hidden.
Blending
The Blending options (Mode, Opacity, Preserve Transparency) work the same way as
they do in the Fill dialog.
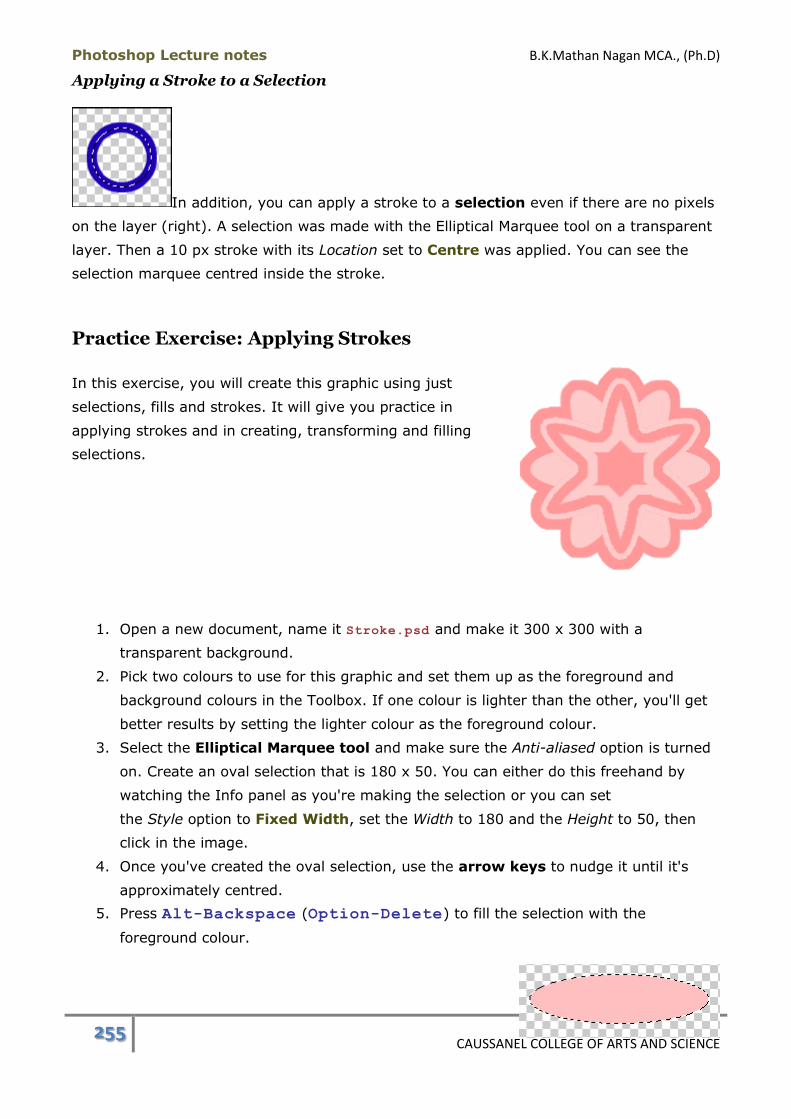
Photoshop Lecture notes B.K.Mathan Nagan MCA., (Ph.D)
255 CAUSSANEL COLLEGE OF ARTS AND SCIENCE
Applying a Stroke to a Selection
In addition, you can apply a stroke to a selection even if there are no pixels
on the layer (right). A selection was made with the Elliptical Marquee tool on a transparent
layer. Then a 10 px stroke with its Location set to Centre was applied. You can see the
selection marquee centred inside the stroke.
Practice Exercise: Applying Strokes
In this exercise, you will create this graphic using just
selections, fills and strokes. It will give you practice in
applying strokes and in creating, transforming and filling
selections.
1. Open a new document, name it Stroke.psd and make it 300 x 300 with a
transparent background.
2. Pick two colours to use for this graphic and set them up as the foreground and
background colours in the Toolbox. If one colour is lighter than the other, you'll get
better results by setting the lighter colour as the foreground colour.
3. Select the Elliptical Marquee tool and make sure the Anti-aliased option is turned
on. Create an oval selection that is 180 x 50. You can either do this freehand by
watching the Info panel as you're making the selection or you can set
the Style option to Fixed Width, set the Width to 180 and the Height to 50, then
click in the image.
4. Once you've created the oval selection, use the arrow keys to nudge it until it's
approximately centred.
5. Press Alt-Backspace (Option-Delete) to fill the selection with the
foreground colour.

Photoshop Lecture notes B.K.Mathan Nagan MCA., (Ph.D)
256 CAUSSANEL COLLEGE OF ARTS AND SCIENCE
6. Go to Selection > Transform Selection. This will place a bounding box around the
selection. Hold down the Shift key to constrain rotations to increments of 15o.
Move the pointer outside of the bounding box until the pointer icon displays a curved
arrow. Drag the bounding box in a counter-clockwise direction by 60o. You
should feel it snap to every 15o increment so 60o will be four snaps. (Tip: if you lose
track of the number of snaps, you can use the Undo command to restore the
selection to its previous position. To start the transformation all over and remove
the bounding box, use the Escape key.)
7. Press Enter (Return) to apply the transformation and remove the bounding box.
8. Fill the new selection with the foreground colour.
9. Repeat steps 6-8 once more.
10. Remove the selection by pressing Ctrl-D (Cmd-D).
11. Select the Magic Wand tool and make sure Anti-aliased and Contiguous are
enabled andTolerance is set to 32. Click on the coloured pixels to select the entire
area.
12. Go to Selection > Transform Selection. Rotate the selection by 30o or two snaps.
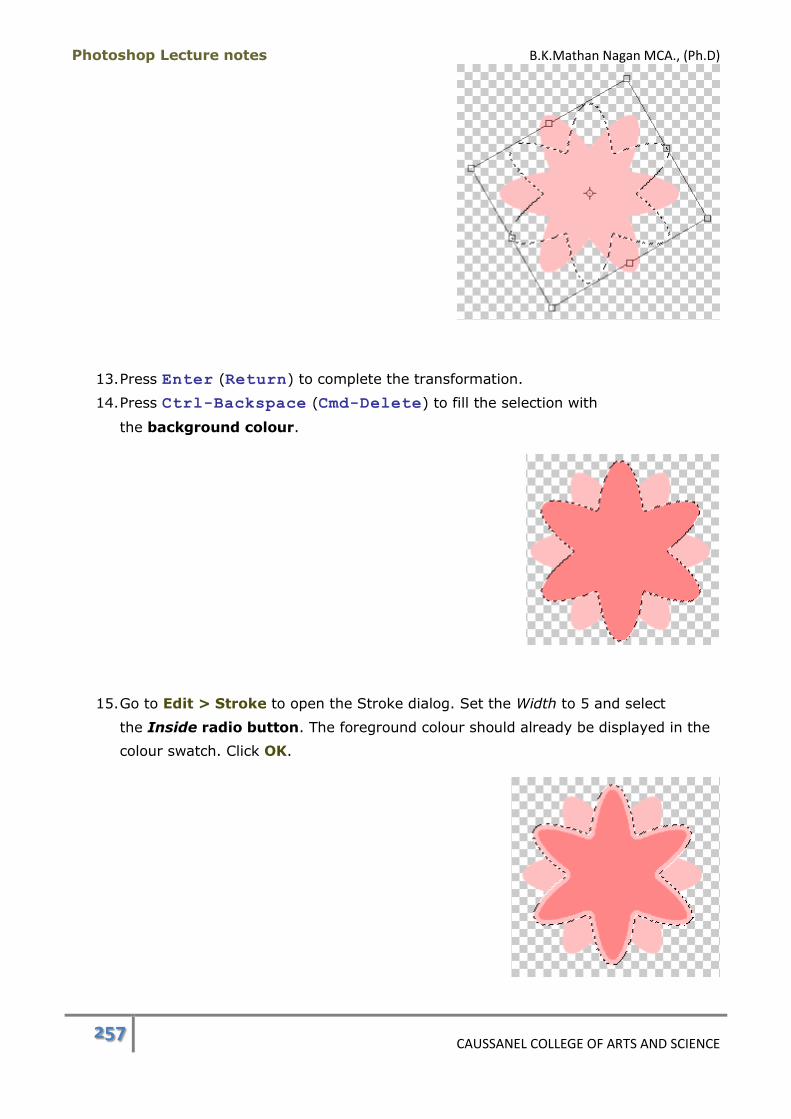
Photoshop Lecture notes B.K.Mathan Nagan MCA., (Ph.D)
257 CAUSSANEL COLLEGE OF ARTS AND SCIENCE
13. Press Enter (Return) to complete the transformation.
14. Press Ctrl-Backspace (Cmd-Delete) to fill the selection with
the background colour.
15. Go to Edit > Stroke to open the Stroke dialog. Set the Width to 5 and select
the Inside radio button. The foreground colour should already be displayed in the
colour swatch. Click OK.
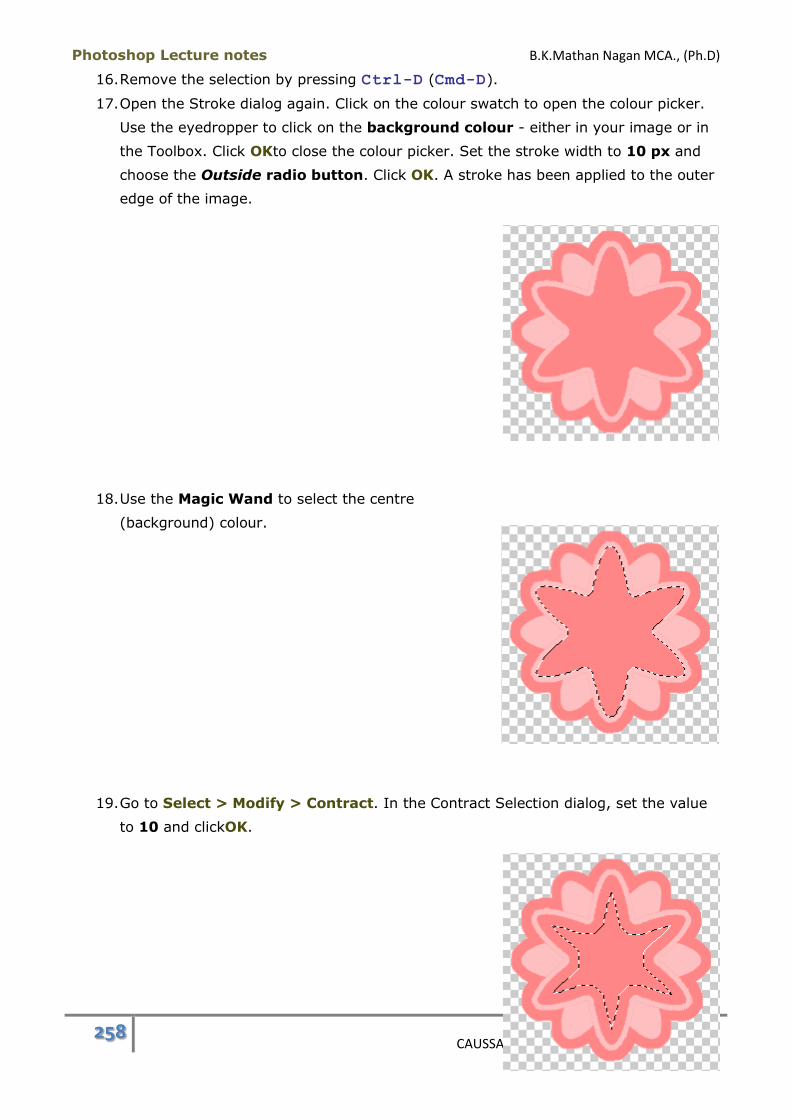
Photoshop Lecture notes B.K.Mathan Nagan MCA., (Ph.D)
258 CAUSSANEL COLLEGE OF ARTS AND SCIENCE
16. Remove the selection by pressing Ctrl-D (Cmd-D).
17. Open the Stroke dialog again. Click on the colour swatch to open the colour picker.
Use the eyedropper to click on the background colour - either in your image or in
the Toolbox. Click OKto close the colour picker. Set the stroke width to 10 px and
choose the Outside radio button. Click OK. A stroke has been applied to the outer
edge of the image.
18. Use the Magic Wand to select the centre
(background) colour.
19. Go to Select > Modify > Contract. In the Contract Selection dialog, set the value
to 10 and clickOK.

Photoshop Lecture notes B.K.Mathan Nagan MCA., (Ph.D)
259 CAUSSANEL COLLEGE OF ARTS AND SCIENCE
20. Open the Stroke dialog, set the Width to 10. You'll need to click on the colour
swatch to open the colour picker. Use the eyedropper to sample the lighter colour in
your image. (The colour is no longer displayed as the foreground colour in the
Toolbox.) Click OK.
21. Remove your selection and save the file.
Wide strokes and expanded or contracted selections have a tendency to develop straight
corners on curved edges and rounded corners on straight edges. In this exercise, this effect
is visible in a few areas. Using Inside strokes seems to eliminate this to some extent.
Keeping the stroke width minimized will also help prevent distortion.
Stroke Methods Compared
Stroke command Stroke layer style

Photoshop Lecture notes B.K.Mathan Nagan MCA., (Ph.D)
260 CAUSSANEL COLLEGE OF ARTS AND SCIENCE
Vector strokes can be added to images using layer styles, as you'll learn in the next
module. The image shown at the right, above, was made with them. Vector strokes are
rendered more accurately but they can only be applied to an entire layer, not to a
selection. Creating this graphic with layer styles involved quite a few more steps. On the
other hand, layer styles can be modified at any point after their creation and the stroke can
be a solid colour, gradient or pattern. Once a stroke is applied with the Strokecommand,
the pixels are blended with the underlying pixels. You'll have to weigh accuracy against
how your image is constructed to decide which method will work the best in any given
situation.
Stroke Command Summary
With the Stroke command, strokes can be added around:
o unselected pixels on a layer.
o selections, even if the layer is empty.
o a layer that is completely filled.
Strokes are pixel-based and the paint will be blended with the underlying pixels.
The stroke can be placed inside, in the centre, or outside of the object or selection
border.
Strokes can be any width. They cannot contain gradients or patterns.
Stroke Command Keyboard Shortcuts:
Cancel transformation: Escape
Layers
Overview
In this section you will be introduced to the most powerful feature that Photoshop has to
offer. Layers offer versatility because of their ability to interact with each other while
remaining autonomous. We will examine how to create, modify, move and manage layers
as well as how to apply special layer effects such as bevels and drop shadows. Drawing and
editing vector shapes is included in this module because they are created on special layers.
There is a project at the end of the module that reviews what you've learned.
Here is a summary of the topics in this module:
(1) Layers Panel
In this lecture, layers are defined and options for managing layers are discussed. A
practice exercise will help you to learn the basics of layers.
Photoshop Lecture notes B.K.Mathan Nagan MCA., (Ph.D)
261 CAUSSANEL COLLEGE OF ARTS AND SCIENCE
(2) Layers Panel Menu
The Layers panel menu allows you to make quick changes and modifications to the
layers used in your Photoshop image.
(3) Selecting and Moving Layer Content
The Move tool is introduced in this lecture. It can be used for a number of functions,
including repositioning layer content. We also cover creating selections based on a
layer's opacity. Both features are explored in a practice exercise.
(4) Aligning and Distributing Layer Content
To make your layouts more accurate you can align and/or distribute the position of
content on multiple layers in relation to each other or in relation to a selection
marquee.
(5) Copying and Duplicating Layers Between Images
You'll often find you need to transfer layers from one image to another. This can be
accomplished by dragging layers between images or by using
the Duplicate command to specify the destination image.
(6) Layer Blending Modes
Using Layer Blending modes allows you to create special effects through a special
interaction between layers.
(7) Layer Styles
Apply effects like drop shadows and bevels to your images using layer styles.
(8) Layer Style Settings
Each layer style has settings for customizing the effects used in the style.
(9) Clipping Masks
Clipping masks provide a way of masking portions of layers that are part of the
mask. It's a great creative tool and the beauty of it is its flexibility for making
modifications later on.
(A) Vector Shapes
Up to this point, you've been working with pixel-based or raster images. Photoshop
has a set of shape tools with which you can create simple geometric vector shapes
that can be transformed with no loss in quality and that can be rasterized. Because
Photoshop Lecture notes B.K.Mathan Nagan MCA., (Ph.D)
262 CAUSSANEL COLLEGE OF ARTS AND SCIENCE
shapes occupy a special type of layer, they are included in this module. A practice
exercise will let you get your feet wet with creating and manipulating shapes.
(B) Smart Objects
Smart objects are a relatively new, but extremely useful Photoshop feature. You can
put a layer or number of layers into a smart object, and work with it as one single
layer, while still having the ability to edit the original layers. Smart objects can also
be used to place vector objects into Photoshop without rasterizing, and function as
"master copies" of duplicate layers.
(C) Layer Comps
The Layer Comps panel creates snapshots of design compositions to help you view
and manage multiple design versions within a single Photoshop file.
(D) Layers Project
This lecture contains a step-by-step tutorial for creating a fictional advertisement.
Many of the layer functions covered in this module will be used in the project so
you'll get practice applying what you learned.
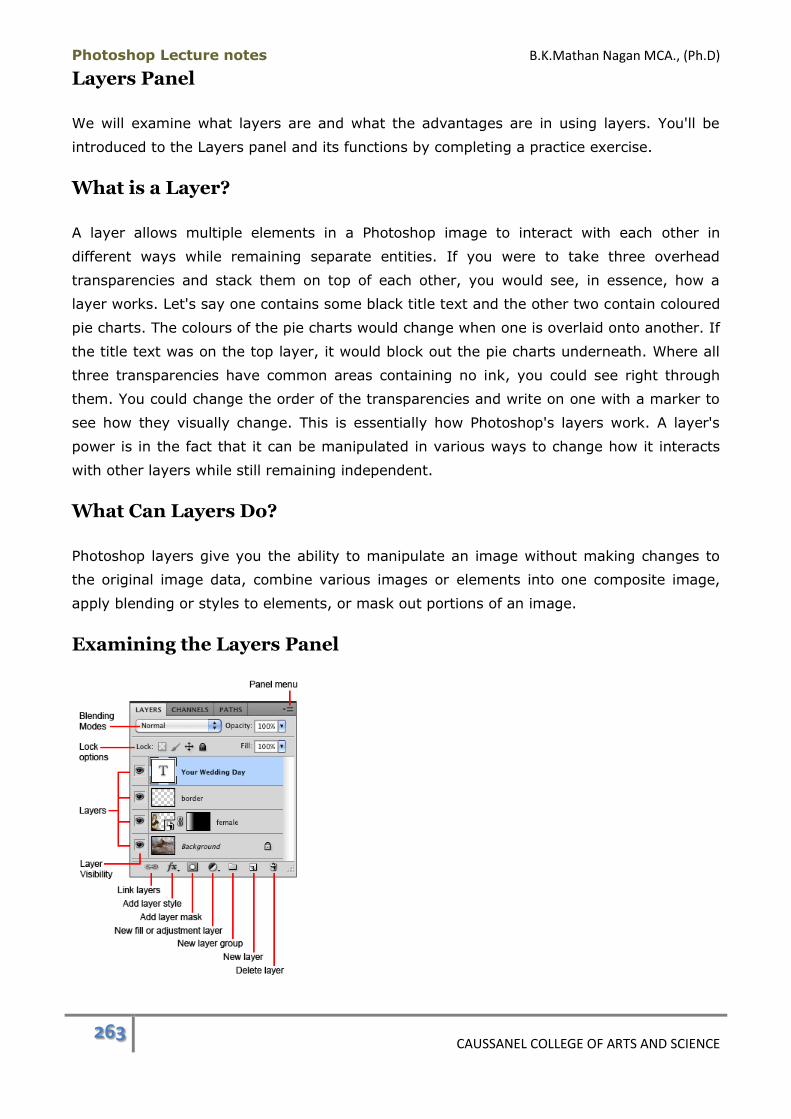
Photoshop Lecture notes B.K.Mathan Nagan MCA., (Ph.D)
263 CAUSSANEL COLLEGE OF ARTS AND SCIENCE
Layers Panel
We will examine what layers are and what the advantages are in using layers. You'll be
introduced to the Layers panel and its functions by completing a practice exercise.
What is a Layer?
A layer allows multiple elements in a Photoshop image to interact with each other in
different ways while remaining separate entities. If you were to take three overhead
transparencies and stack them on top of each other, you would see, in essence, how a
layer works. Let's say one contains some black title text and the other two contain coloured
pie charts. The colours of the pie charts would change when one is overlaid onto another. If
the title text was on the top layer, it would block out the pie charts underneath. Where all
three transparencies have common areas containing no ink, you could see right through
them. You could change the order of the transparencies and write on one with a marker to
see how they visually change. This is essentially how Photoshop's layers work. A layer's
power is in the fact that it can be manipulated in various ways to change how it interacts
with other layers while still remaining independent.
What Can Layers Do?
Photoshop layers give you the ability to manipulate an image without making changes to
the original image data, combine various images or elements into one composite image,
apply blending or styles to elements, or mask out portions of an image.
Examining the Layers Panel
Photoshop Lecture notes B.K.Mathan Nagan MCA., (Ph.D)
264 CAUSSANEL COLLEGE OF ARTS AND SCIENCE
The Layers panel is where the majority of your work with layers will take place. Let's
examine it in detail. If it's not already open in your workspace, go to Window > Layers.
Creating a New Layer
To create a new layer, click on the New Layer button at the bottom of the Layers panel.
The icon looks like a small pad of paper with the top sheet folded up.
A new layer will be displayed in the panel with a default name, such as Layer 2.
Duplicating a Layer
Layers can be duplicated by dragging them to the New Layer button at the bottom of
the Layers panel and releasing the mouse button.
Creating a Layer Group
Photoshop allows you to create a folder in which a number of layers can be stored. This
is called alayer group. Certain image manipulations, when applied to the group, will affect
all layers in the group. However, these layers will still interact with the other layers outside
the group. To create a layer group, click once on the New Layer Group button at the
bottom of the Layers panel. A new layer group will appear in your layer list with a name
like Group 1. You can then drag and drop the layers you want into that group. Make sure
that you drag the layer over the layer group name and it is highlighted before releasing the
mouse button.
Once a layer group is created and you have added layers to the group, you
can collapse the folder in the Layers panel to hide all the layers in the group to keep
things compact and tidy. Image manipulations that can be applied to an entire layer group
include:
masks
blending modes, and
repositioning the group within the image.
Nested Groups
Additionally, you can create layer groups within other layer groups if you need to. Keep in
mind that some older versions of Photoshop that don't support nested groups, or even any
groups for that matter, will still display the grouped layers, but not the groups themselves.
The layers will be taken out of the groups. Photoshop 6 and 7 support groups (called "sets"
Photoshop Lecture notes B.K.Mathan Nagan MCA., (Ph.D)
265 CAUSSANEL COLLEGE OF ARTS AND SCIENCE
prior to CS2), but not nested groups. Photoshop versions prior to 6 do not support any kind
of grouped layers.
Changing Layer Stacking Order
A layer's position in the stacking order can be changed, moving it up or down in the layer
list. To do this, simply click and drag the layer to the position you wish. The Layer >
Arrange submenu contains the commands: Bring to Front, Bring Forward, Send
Backward, Send to Back. These can also be used for moving layers within the stacking
order.
Deleting a Layer
You can delete a layer by clicking and dragging the layer to the bottom of the panel and
releasing the mouse button on top of the Delete Layer button. It has an icon that looks
like a trash can.
Showing or Hiding Layers
Layers can be shown or hidden by clicking once on the icon to the left of the Layers
panel that looks like an eye. This can be useful for viewing the image without certain
elements, especially those that might be obscuring your view of something on underlying
layers. When the eye icon is displayed, the layer is visible, When the eye icon is not
displayed beside a layer, that layer is hidden. If there are multiple, contiguous layers you
want to show or hide, you can drag the pointer through the Show/Hide column instead
of clicking on each layer individually.
Linking Layers
A link can be created between multiple layers so that the positions of the elements do not
change in relation to each other. This means that you can still move the linked layers
around, but each element in the multiple layers will act and move as though they were on
one layer.
To establish a link between multiple layers, Shift-click to select contiguous layers,
or Ctrl-click (Cmd-click) to select non-contiguous layers. Each selected layer will
be highlighted in blue. The layers can be temporarily manipulated in this way, but if you
select any other layer (without Shiftor Ctrl) they will become deselected. To establish
a more persistent link between the layers, click theLink Layers button at the bottom
left of the Layers panel. Each linked layer will display the link icon to show that it is linked.
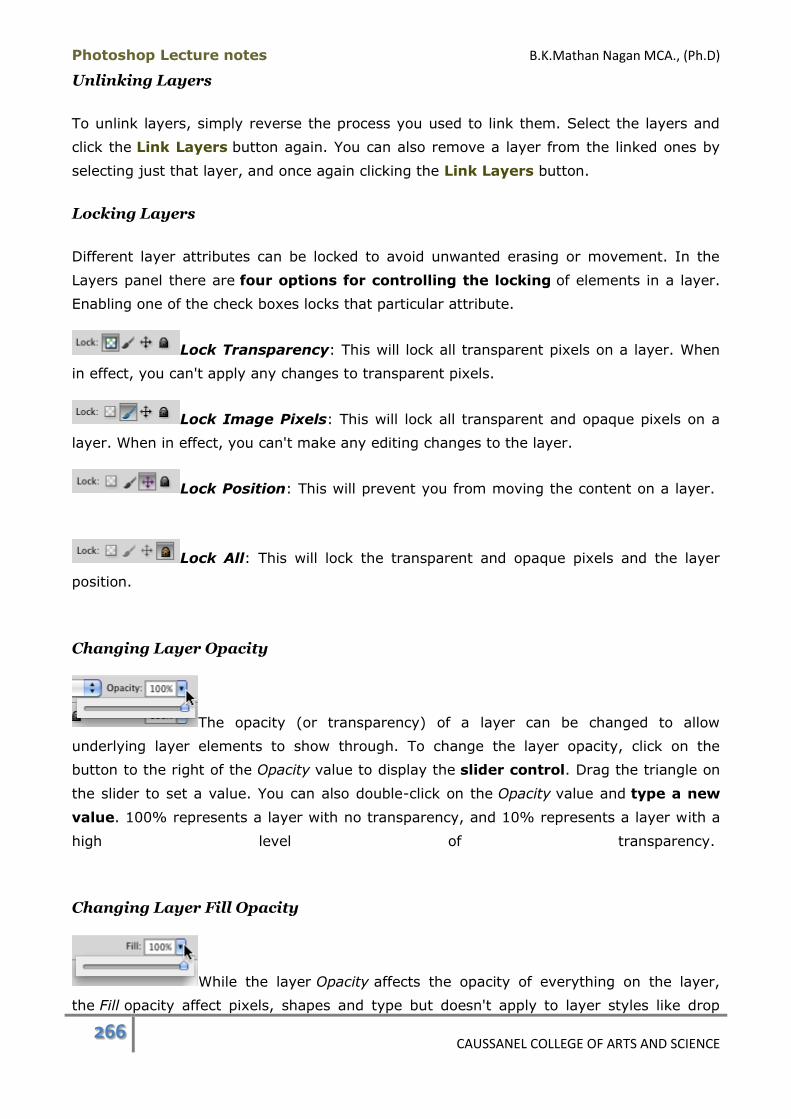
Photoshop Lecture notes B.K.Mathan Nagan MCA., (Ph.D)
266 CAUSSANEL COLLEGE OF ARTS AND SCIENCE
Unlinking Layers
To unlink layers, simply reverse the process you used to link them. Select the layers and
click the Link Layers button again. You can also remove a layer from the linked ones by
selecting just that layer, and once again clicking the Link Layers button.
Locking Layers
Different layer attributes can be locked to avoid unwanted erasing or movement. In the
Layers panel there are four options for controlling the locking of elements in a layer.
Enabling one of the check boxes locks that particular attribute.
Lock Transparency: This will lock all transparent pixels on a layer. When
in effect, you can't apply any changes to transparent pixels.
Lock Image Pixels: This will lock all transparent and opaque pixels on a
layer. When in effect, you can't make any editing changes to the layer.
Lock Position: This will prevent you from moving the content on a layer.
Lock All: This will lock the transparent and opaque pixels and the layer
position.
Changing Layer Opacity
The opacity (or transparency) of a layer can be changed to allow
underlying layer elements to show through. To change the layer opacity, click on the
button to the right of the Opacity value to display the slider control. Drag the triangle on
the slider to set a value. You can also double-click on the Opacity value and type a new
value. 100% represents a layer with no transparency, and 10% represents a layer with a
high level of transparency.
Changing Layer Fill Opacity
While the layer Opacity affects the opacity of everything on the layer,
the Fill opacity affect pixels, shapes and type but doesn't apply to layer styles like drop
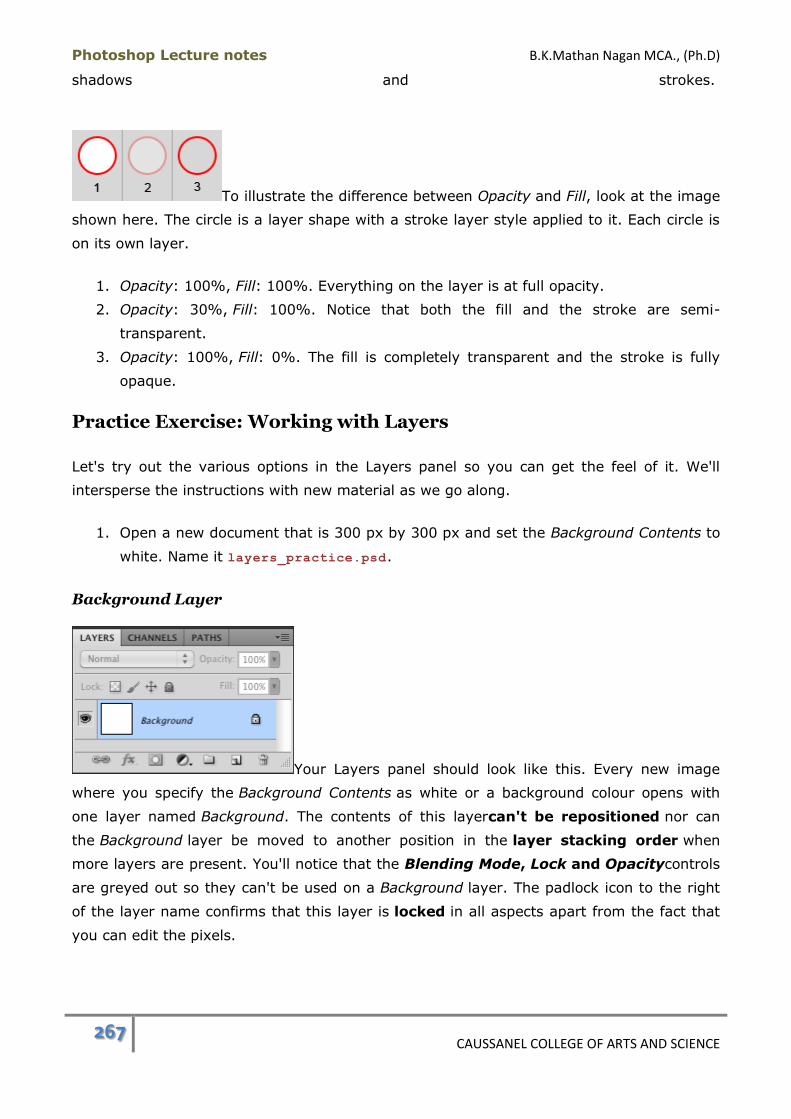
Photoshop Lecture notes B.K.Mathan Nagan MCA., (Ph.D)
267 CAUSSANEL COLLEGE OF ARTS AND SCIENCE
shadows and strokes.
To illustrate the difference between Opacity and Fill, look at the image
shown here. The circle is a layer shape with a stroke layer style applied to it. Each circle is
on its own layer.
1. Opacity: 100%, Fill: 100%. Everything on the layer is at full opacity.
2. Opacity: 30%, Fill: 100%. Notice that both the fill and the stroke are semi-
transparent.
3. Opacity: 100%, Fill: 0%. The fill is completely transparent and the stroke is fully
opaque.
Practice Exercise: Working with Layers
Let's try out the various options in the Layers panel so you can get the feel of it. We'll
intersperse the instructions with new material as we go along.
1. Open a new document that is 300 px by 300 px and set the Background Contents to
white. Name it layers_practice.psd.
Background Layer
Your Layers panel should look like this. Every new image
where you specify the Background Contents as white or a background colour opens with
one layer named Background. The contents of this layercan't be repositioned nor can
the Background layer be moved to another position in the layer stacking order when
more layers are present. You'll notice that the Blending Mode, Lock and Opacitycontrols
are greyed out so they can't be used on a Background layer. The padlock icon to the right
of the layer name confirms that this layer is locked in all aspects apart from the fact that
you can edit the pixels.
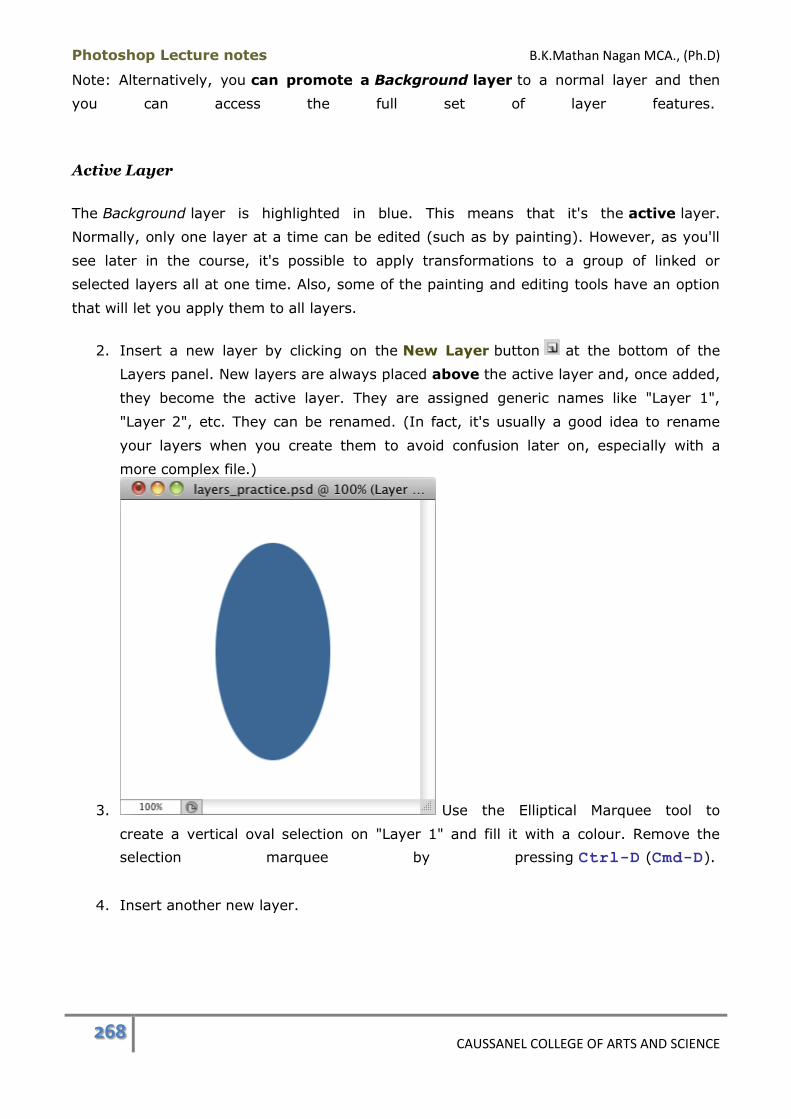
Photoshop Lecture notes B.K.Mathan Nagan MCA., (Ph.D)
268 CAUSSANEL COLLEGE OF ARTS AND SCIENCE
Note: Alternatively, you can promote a Background layer to a normal layer and then
you can access the full set of layer features.
Active Layer
The Background layer is highlighted in blue. This means that it's the active layer.
Normally, only one layer at a time can be edited (such as by painting). However, as you'll
see later in the course, it's possible to apply transformations to a group of linked or
selected layers all at one time. Also, some of the painting and editing tools have an option
that will let you apply them to all layers.
2. Insert a new layer by clicking on the New Layer button at the bottom of the
Layers panel. New layers are always placed above the active layer and, once added,
they become the active layer. They are assigned generic names like "Layer 1",
"Layer 2", etc. They can be renamed. (In fact, it's usually a good idea to rename
your layers when you create them to avoid confusion later on, especially with a
more complex file.)
3. Use the Elliptical Marquee tool to
create a vertical oval selection on "Layer 1" and fill it with a colour. Remove the
selection marquee by pressing Ctrl-D (Cmd-D).
4. Insert another new layer.
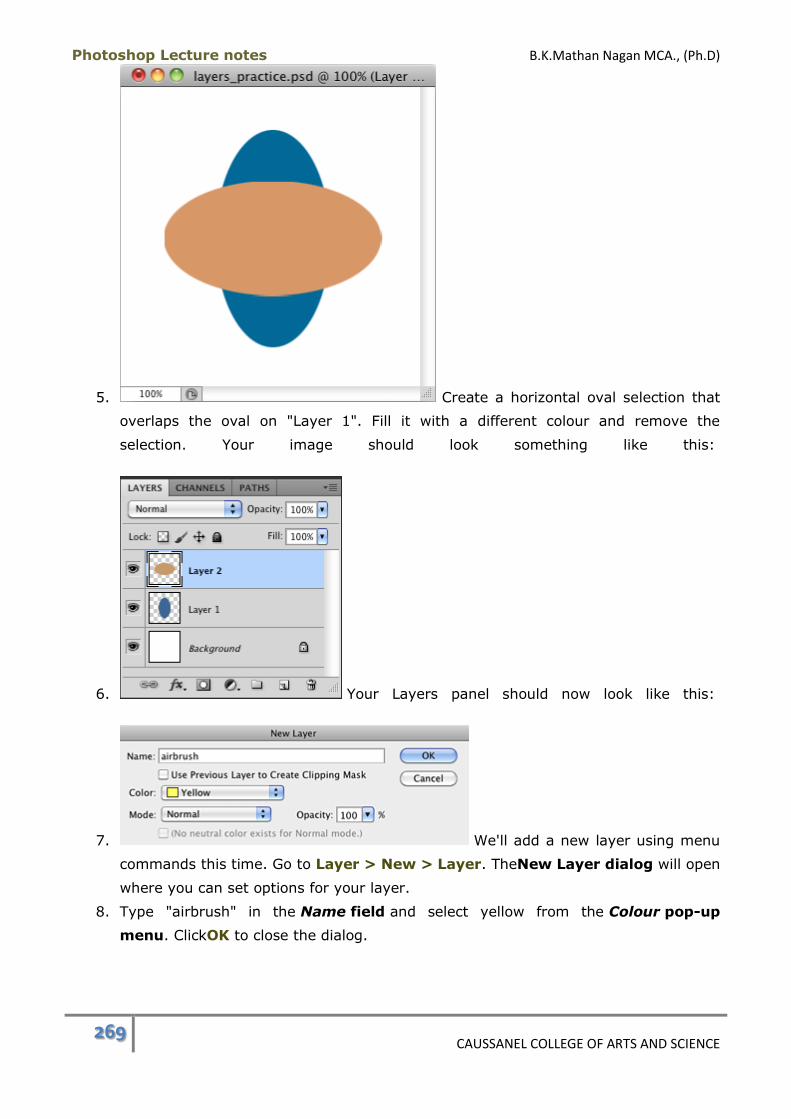
Photoshop Lecture notes B.K.Mathan Nagan MCA., (Ph.D)
269 CAUSSANEL COLLEGE OF ARTS AND SCIENCE
5. Create a horizontal oval selection that
overlaps the oval on "Layer 1". Fill it with a different colour and remove the
selection. Your image should look something like this:
6. Your Layers panel should now look like this:
7. We'll add a new layer using menu
commands this time. Go to Layer > New > Layer. TheNew Layer dialog will open
where you can set options for your layer.
8. Type "airbrush" in the Name field and select yellow from the Colour pop-up
menu. ClickOK to close the dialog.

Photoshop Lecture notes B.K.Mathan Nagan MCA., (Ph.D)
270 CAUSSANEL COLLEGE OF ARTS AND SCIENCE
9. A new layer has been added to your Layers panel
named "airbrush" and the layer visibility column has been colour-coded in yellow.
10. Select the Brush tool and enable
its Airbrushoption . Set a new foreground colour and paint random strokes on the
"airbrush" layer.
11. Click on "Layer 2" to make it the active layer. Click
on the eye icon to hide the layer. The horizontal oval should disappear from your
image document.
12. Try holding your pointer over the image document. You should see an
icon displayed that means you can't edit the layer. This is because hidden
layers are unavailable for editing. This prevents you from accidentally editing a layer
you can't see.

Photoshop Lecture notes B.K.Mathan Nagan MCA., (Ph.D)
271 CAUSSANEL COLLEGE OF ARTS AND SCIENCE
13. Make "Layer 2" visible again by clicking in the layer visibility column for the layer.
The eye icon should reappear.
14. Drag the airbrush layer down and drop it over
the New Layerbutton. This will create a duplicate layer named "airbrush copy".
The layer colour-coding was also duplicated.
15. Go to Layer > Duplicate
Layer which will open the Duplicate Layer dialog.
16. Accept the default settings and click OK. The new
layer was assigned the name "airbrush copy 2". Your layers list should look like
this:
17. Hold down the Alt (Option) key and click on
the New Groupbutton in the Layers panel. The New Layer Group dialog will
open. Accept the defaults and click OK. A new layer called "Group 1" is inserted at
the top of the layers list.
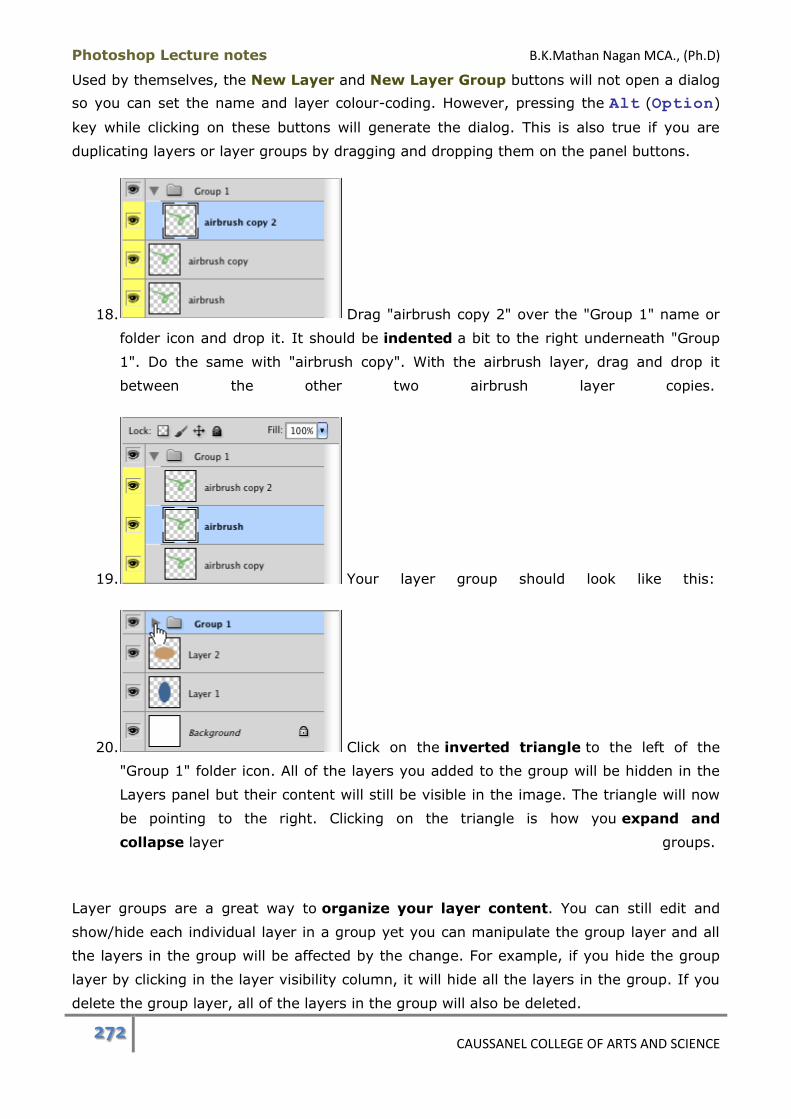
Photoshop Lecture notes B.K.Mathan Nagan MCA., (Ph.D)
272 CAUSSANEL COLLEGE OF ARTS AND SCIENCE
Used by themselves, the New Layer and New Layer Group buttons will not open a dialog
so you can set the name and layer colour-coding. However, pressing the Alt (Option)
key while clicking on these buttons will generate the dialog. This is also true if you are
duplicating layers or layer groups by dragging and dropping them on the panel buttons.
18. Drag "airbrush copy 2" over the "Group 1" name or
folder icon and drop it. It should be indented a bit to the right underneath "Group
1". Do the same with "airbrush copy". With the airbrush layer, drag and drop it
between the other two airbrush layer copies.
19. Your layer group should look like this:
20. Click on the inverted triangle to the left of the
"Group 1" folder icon. All of the layers you added to the group will be hidden in the
Layers panel but their content will still be visible in the image. The triangle will now
be pointing to the right. Clicking on the triangle is how you expand and
collapse layer groups.
Layer groups are a great way to organize your layer content. You can still edit and
show/hide each individual layer in a group yet you can manipulate the group layer and all
the layers in the group will be affected by the change. For example, if you hide the group
layer by clicking in the layer visibility column, it will hide all the layers in the group. If you
delete the group layer, all of the layers in the group will also be deleted.

Photoshop Lecture notes B.K.Mathan Nagan MCA., (Ph.D)
273 CAUSSANEL COLLEGE OF ARTS AND SCIENCE
21. Expand "Group 1" and remove one of the airbrush
layers from the group by dragging it above the "Group 1" layer. Do the same with
the other two airbrush layers. We're going to create a layer group a different way.
22. With one of the airbrush layers as the active
layer, Ctrl-click (Cmd-click) on each of the other airbrush layers to select
all three, then click the Link Layers button . A chain link icon should appear in
all three layers. Now the layers are linked together.
23. Go to Layer > New > Group
from Layers. The New Group from Layers dialog will open. Type "airbrush" in
the Name field and click OK. All of the linked airbrush layers will be automatically
added to the layer group.
24. Delete the now-empty "Group 1" layer by dragging it on top of the trashcan icon and
releasing it. Layers can be deleted the same way. Using this method, you bypass the
prompt dialog asking if you want to delete the layer or group. The alternate methods
that will display the prompt are:
o Use the menu command: Layer > Delete Layer or Layer > Delete Group.
o Select Delete Layer or Delete Group from the Layers panel menu.
o Click on the Delete button in the Layers panel.
25. Hide the "airbrush" layer group in your image by clicking in the layer visibility
column.
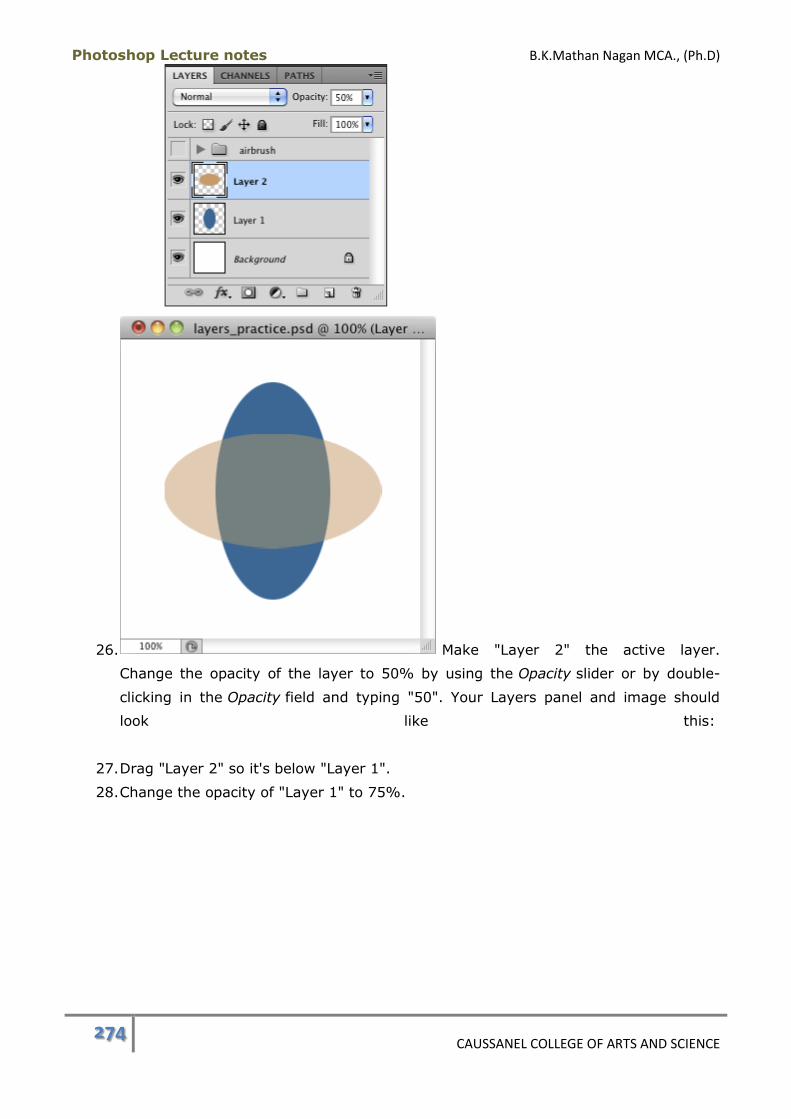
Photoshop Lecture notes B.K.Mathan Nagan MCA., (Ph.D)
274 CAUSSANEL COLLEGE OF ARTS AND SCIENCE
26. Make "Layer 2" the active layer.
Change the opacity of the layer to 50% by using the Opacity slider or by double-
clicking in the Opacity field and typing "50". Your Layers panel and image should
look like this:
27. Drag "Layer 2" so it's below "Layer 1".
28. Change the opacity of "Layer 1" to 75%.
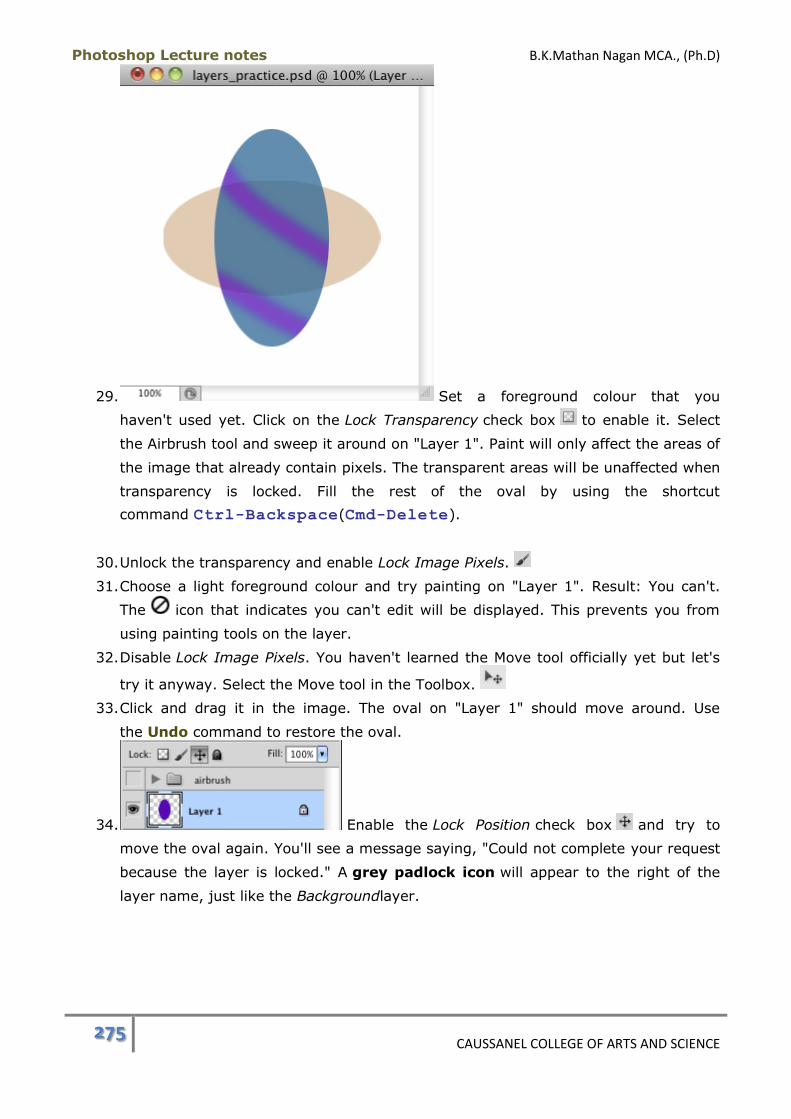
Photoshop Lecture notes B.K.Mathan Nagan MCA., (Ph.D)
275 CAUSSANEL COLLEGE OF ARTS AND SCIENCE
29. Set a foreground colour that you
haven't used yet. Click on the Lock Transparency check box to enable it. Select
the Airbrush tool and sweep it around on "Layer 1". Paint will only affect the areas of
the image that already contain pixels. The transparent areas will be unaffected when
transparency is locked. Fill the rest of the oval by using the shortcut
command Ctrl-Backspace(Cmd-Delete).
30. Unlock the transparency and enable Lock Image Pixels.
31. Choose a light foreground colour and try painting on "Layer 1". Result: You can't.
The icon that indicates you can't edit will be displayed. This prevents you from
using painting tools on the layer.
32. Disable Lock Image Pixels. You haven't learned the Move tool officially yet but let's
try it anyway. Select the Move tool in the Toolbox.
33. Click and drag it in the image. The oval on "Layer 1" should move around. Use
the Undo command to restore the oval.
34. Enable the Lock Position check box and try to
move the oval again. You'll see a message saying, "Could not complete your request
because the layer is locked." A grey padlock icon will appear to the right of the
layer name, just like the Backgroundlayer.

Photoshop Lecture notes B.K.Mathan Nagan MCA., (Ph.D)
276 CAUSSANEL COLLEGE OF ARTS AND SCIENCE
35. Disable Lock Position and try the last lock
option: Lock All. Ablack padlock icon will appear on the layer and the Blending
Mode menu, Opacity, Fill, and the other Lock options will be greyed out. This is
called a fully locked layer. The only change that can be made to it is a change in
stacking order. You won't even be able to delete it when it's fully locked.
36. Click on the "airbrush" layer group. Enable its visibility.
37. Enable Lock All and expand the group so you can
see the layers in the group. All of those are locked as well but their locks are
dimmed. None of their properties can be edited.
38. Disable the locking on the layer group and "Layer 1".
39. Double-click on the Background layer.
The New Layer dialog will appear. Click OK. The layer is now called "Layer 0". You've
just promoted the Background layer into a regular layer and it can be edited like any
other layer. The menu command is Layer > New > Layer From Background.
40. Your layer will look like this:
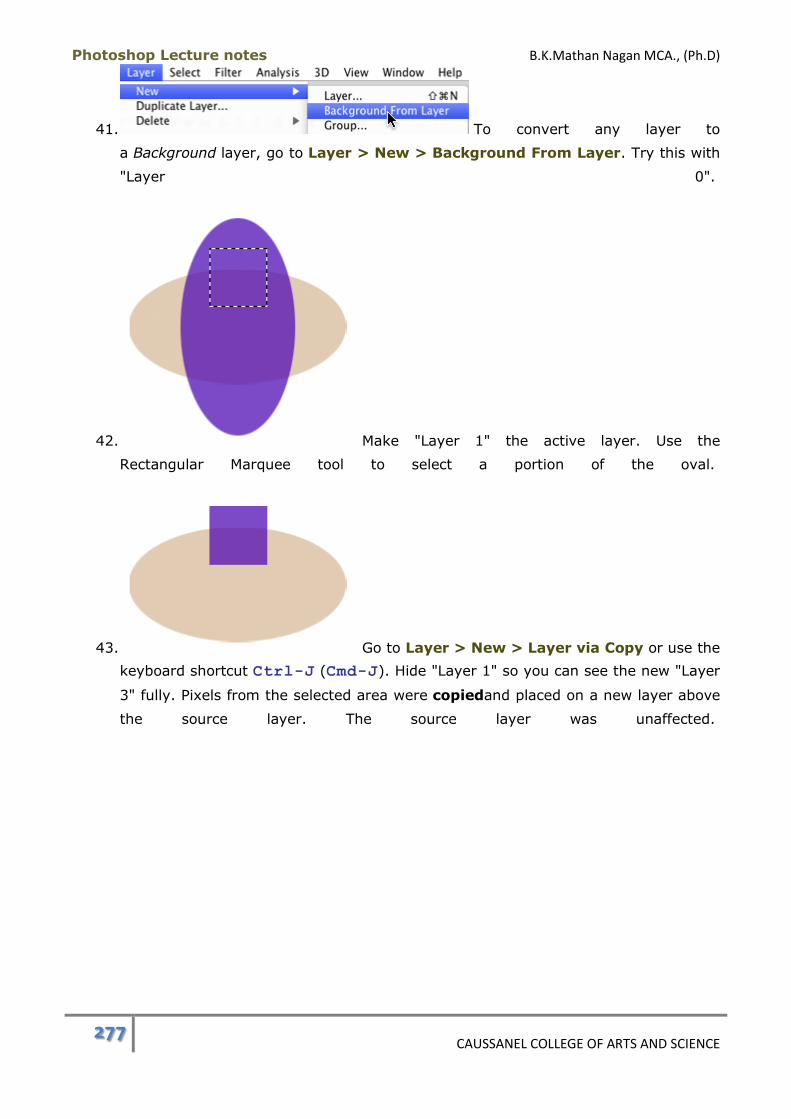
Photoshop Lecture notes B.K.Mathan Nagan MCA., (Ph.D)
277 CAUSSANEL COLLEGE OF ARTS AND SCIENCE
41. To convert any layer to
a Background layer, go to Layer > New > Background From Layer. Try this with
"Layer 0".
42. Make "Layer 1" the active layer. Use the
Rectangular Marquee tool to select a portion of the oval.
43. Go to Layer > New > Layer via Copy or use the
keyboard shortcut Ctrl-J (Cmd-J). Hide "Layer 1" so you can see the new "Layer
3" fully. Pixels from the selected area were copiedand placed on a new layer above
the source layer. The source layer was unaffected.
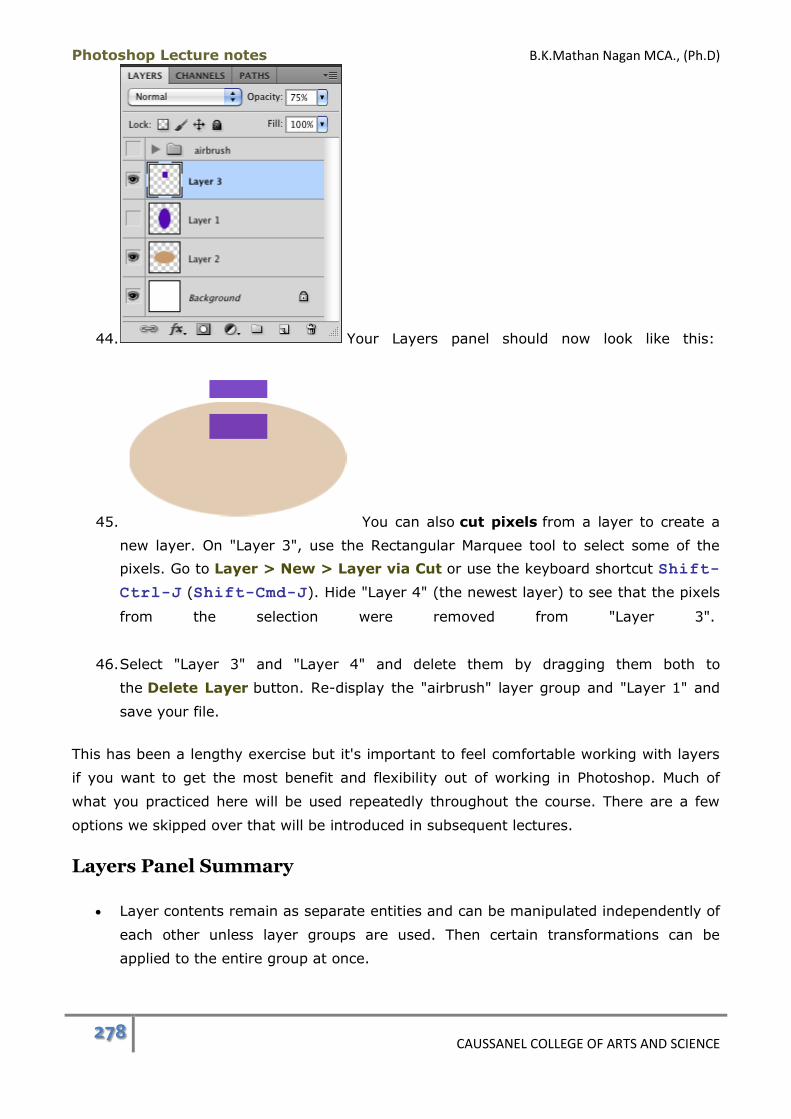
Photoshop Lecture notes B.K.Mathan Nagan MCA., (Ph.D)
278 CAUSSANEL COLLEGE OF ARTS AND SCIENCE
44. Your Layers panel should now look like this:
45. You can also cut pixels from a layer to create a
new layer. On "Layer 3", use the Rectangular Marquee tool to select some of the
pixels. Go to Layer > New > Layer via Cut or use the keyboard shortcut Shift-
Ctrl-J (Shift-Cmd-J). Hide "Layer 4" (the newest layer) to see that the pixels
from the selection were removed from "Layer 3".
46. Select "Layer 3" and "Layer 4" and delete them by dragging them both to
the Delete Layer button. Re-display the "airbrush" layer group and "Layer 1" and
save your file.
This has been a lengthy exercise but it's important to feel comfortable working with layers
if you want to get the most benefit and flexibility out of working in Photoshop. Much of
what you practiced here will be used repeatedly throughout the course. There are a few
options we skipped over that will be introduced in subsequent lectures.
Layers Panel Summary
Layer contents remain as separate entities and can be manipulated independently of
each other unless layer groups are used. Then certain transformations can be
applied to the entire group at once.
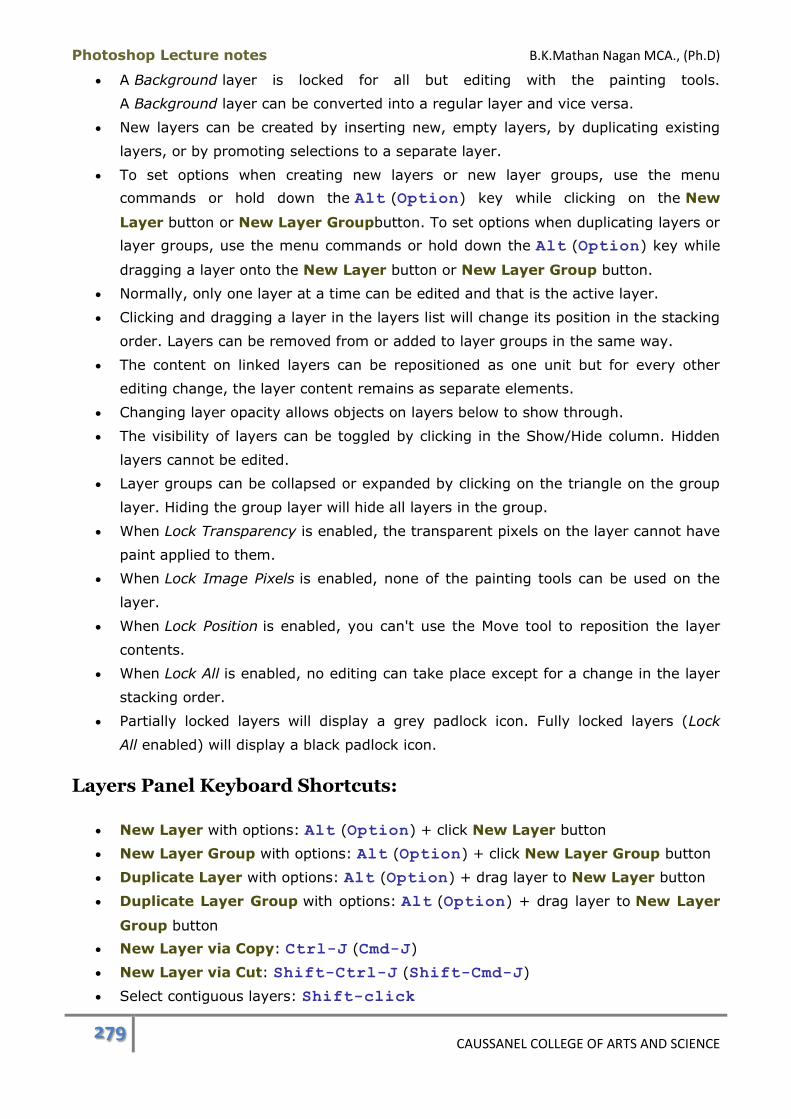
Photoshop Lecture notes B.K.Mathan Nagan MCA., (Ph.D)
279 CAUSSANEL COLLEGE OF ARTS AND SCIENCE
A Background layer is locked for all but editing with the painting tools.
A Background layer can be converted into a regular layer and vice versa.
New layers can be created by inserting new, empty layers, by duplicating existing
layers, or by promoting selections to a separate layer.
To set options when creating new layers or new layer groups, use the menu
commands or hold down the Alt (Option) key while clicking on the New
Layer button or New Layer Groupbutton. To set options when duplicating layers or
layer groups, use the menu commands or hold down the Alt (Option) key while
dragging a layer onto the New Layer button or New Layer Group button.
Normally, only one layer at a time can be edited and that is the active layer.
Clicking and dragging a layer in the layers list will change its position in the stacking
order. Layers can be removed from or added to layer groups in the same way.
The content on linked layers can be repositioned as one unit but for every other
editing change, the layer content remains as separate elements.
Changing layer opacity allows objects on layers below to show through.
The visibility of layers can be toggled by clicking in the Show/Hide column. Hidden
layers cannot be edited.
Layer groups can be collapsed or expanded by clicking on the triangle on the group
layer. Hiding the group layer will hide all layers in the group.
When Lock Transparency is enabled, the transparent pixels on the layer cannot have
paint applied to them.
When Lock Image Pixels is enabled, none of the painting tools can be used on the
layer.
When Lock Position is enabled, you can't use the Move tool to reposition the layer
contents.
When Lock All is enabled, no editing can take place except for a change in the layer
stacking order.
Partially locked layers will display a grey padlock icon. Fully locked layers (Lock
All enabled) will display a black padlock icon.
Layers Panel Keyboard Shortcuts:
New Layer with options: Alt (Option) + click New Layer button
New Layer Group with options: Alt (Option) + click New Layer Group button
Duplicate Layer with options: Alt (Option) + drag layer to New Layer button
Duplicate Layer Group with options: Alt (Option) + drag layer to New Layer
Group button
New Layer via Copy: Ctrl-J (Cmd-J)
New Layer via Cut: Shift-Ctrl-J (Shift-Cmd-J)
Select contiguous layers: Shift-click
Photoshop Lecture notes B.K.Mathan Nagan MCA., (Ph.D)
280 CAUSSANEL COLLEGE OF ARTS AND SCIENCE
Select non-contiguous layers: Ctrl-click (Cmd-click)
Layers Panel Menu
The Layers panel menu contains additional commands for working
with layers and groups.
As with every panel, there is a button with a small sideways pointing arrow in the top right-
hand corner. This opens the panel menu. The menu contains important options when
working with your layers. Many of these commands duplicate the ones you learned in the
last lecture.
The panel shown here is what appears when a layer is selected. When a group is selected,
some of the commands change to reflect that; for example,Duplicate Layer will
become Duplicate Group, Delete Layer changes toDelete Group, and so on.
New Layer
This is another method for creating new layers. The New Layer dialog will open,
giving you the option to name the layer, group it with other layers, apply a colour to
the layer in the panel, or assign a blend mode and opacity value.
Duplicate Layer or Group
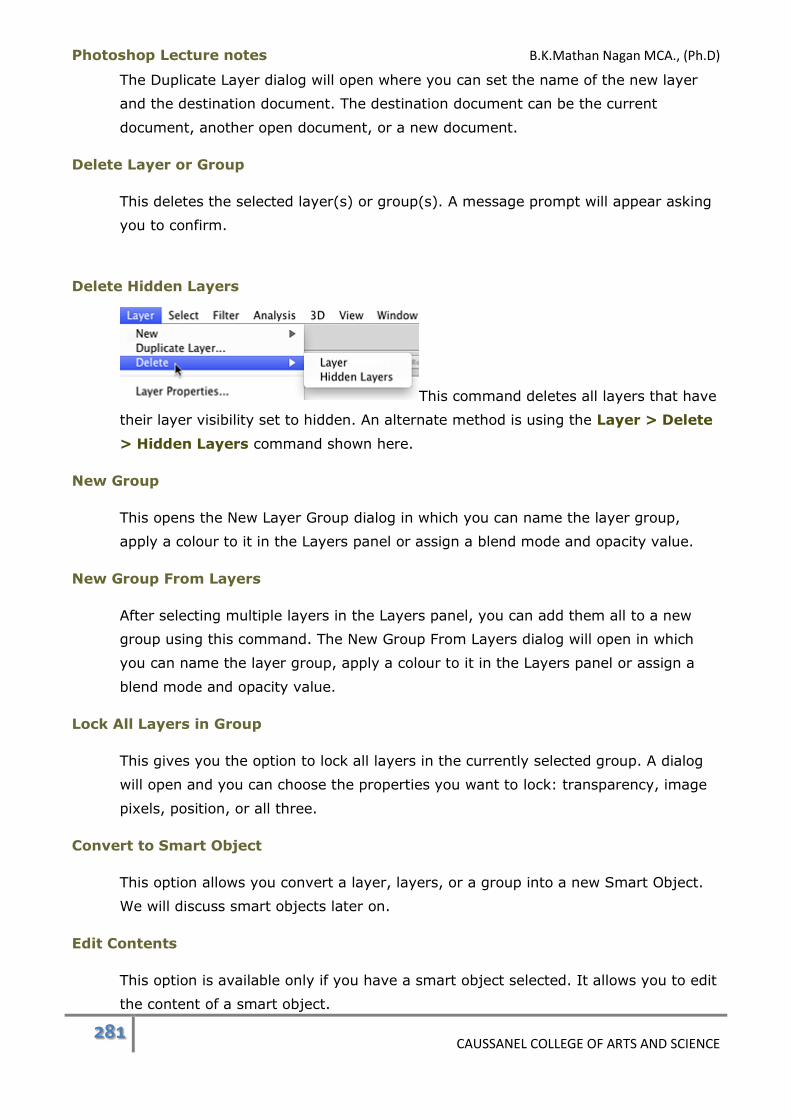
Photoshop Lecture notes B.K.Mathan Nagan MCA., (Ph.D)
281 CAUSSANEL COLLEGE OF ARTS AND SCIENCE
The Duplicate Layer dialog will open where you can set the name of the new layer
and the destination document. The destination document can be the current
document, another open document, or a new document.
Delete Layer or Group
This deletes the selected layer(s) or group(s). A message prompt will appear asking
you to confirm.
Delete Hidden Layers
This command deletes all layers that have
their layer visibility set to hidden. An alternate method is using the Layer > Delete
> Hidden Layers command shown here.
New Group
This opens the New Layer Group dialog in which you can name the layer group,
apply a colour to it in the Layers panel or assign a blend mode and opacity value.
New Group From Layers
After selecting multiple layers in the Layers panel, you can add them all to a new
group using this command. The New Group From Layers dialog will open in which
you can name the layer group, apply a colour to it in the Layers panel or assign a
blend mode and opacity value.
Lock All Layers in Group
This gives you the option to lock all layers in the currently selected group. A dialog
will open and you can choose the properties you want to lock: transparency, image
pixels, position, or all three.
Convert to Smart Object
This option allows you convert a layer, layers, or a group into a new Smart Object.
We will discuss smart objects later on.
Edit Contents
This option is available only if you have a smart object selected. It allows you to edit
the content of a smart object.

Photoshop Lecture notes B.K.Mathan Nagan MCA., (Ph.D)
282 CAUSSANEL COLLEGE OF ARTS AND SCIENCE
Layer Properties or Group Properties
This option allows you to name (or rename) a layer or group and apply a colour to it
in the Layers panel.
Blending Options
This opens the Blending Options in the Layer Styles dialog box, which will be
discussed in another lecture.
Edit Adjustment
This option will display the Adjustments panel to allow edits to be made to an
adjustment layer.
Create Clipping Mask
This option will create a clipping mask from the current layer. These will be covered
later in the module.
Link Layers
This option will link any selected layers together, just like clicking the Link
Layers button would. This option is not available unless you have more than one
layer selected.
Select Linked Layers
If a layer that is part of a linked group of layers is currently active, this option will
select the rest of the linked layers. It is not available if the current layer is not linked
to any other layers. When an image document has dozens of layers, this makes it
easy to locate all that are linked to the current layer because they all will be
highlighted.
Merge Down
This will merge the content of the current layer with that of the layer directly below
it and create a single layer. There used to be a Merge Linked command in older
Photoshop versions but this has been removed. A more detailed description of this
command appears near the end of the lecture.
Merge Visible
This command will merge all layers that are visible; in other words, those with the
eye icon displayed in the layer visibility column. This includes the Background layer,
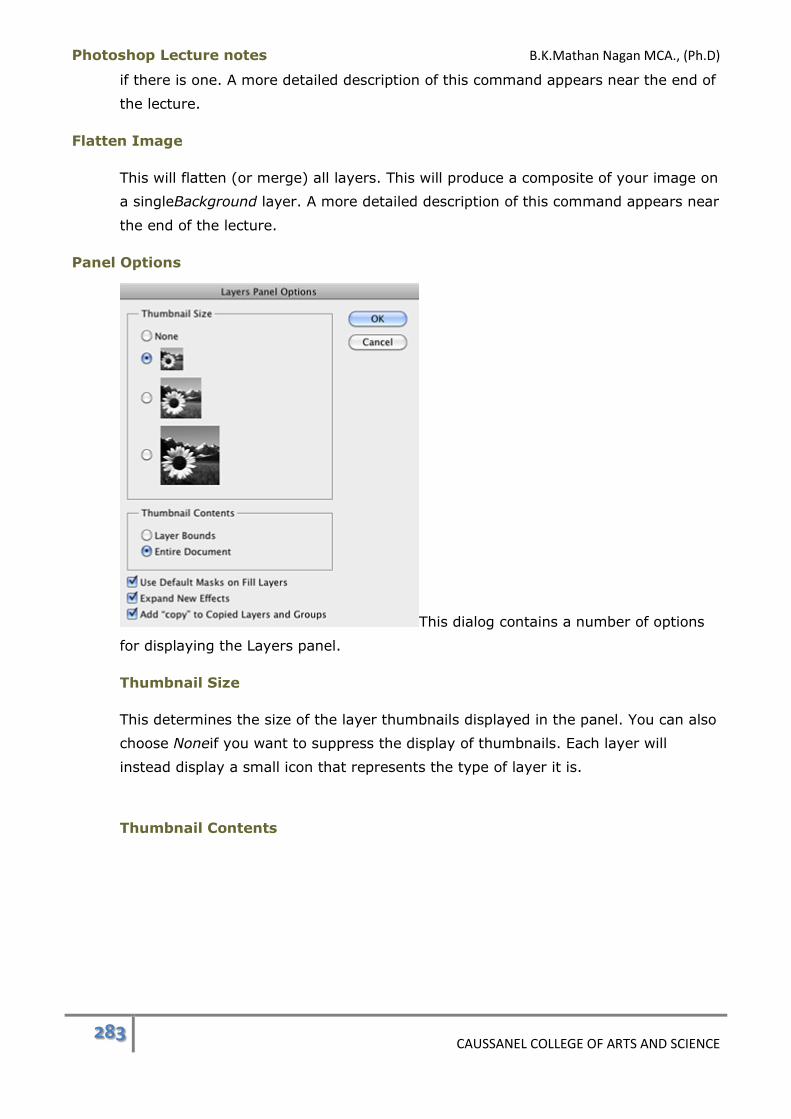
Photoshop Lecture notes B.K.Mathan Nagan MCA., (Ph.D)
283 CAUSSANEL COLLEGE OF ARTS AND SCIENCE
if there is one. A more detailed description of this command appears near the end of
the lecture.
Flatten Image
This will flatten (or merge) all layers. This will produce a composite of your image on
a singleBackground layer. A more detailed description of this command appears near
the end of the lecture.
Panel Options
This dialog contains a number of options
for displaying the Layers panel.
Thumbnail Size
This determines the size of the layer thumbnails displayed in the panel. You can also
choose Noneif you want to suppress the display of thumbnails. Each layer will
instead display a small icon that represents the type of layer it is.
Thumbnail Contents

Photoshop Lecture notes B.K.Mathan Nagan MCA., (Ph.D)
284 CAUSSANEL COLLEGE OF ARTS AND SCIENCE
Here you have a choice between Layer Bounds and Entire
Document. The example shown here shows the difference between the two types of
thumbnails.
Layer Bounds: This option will display the actual pixel content of the layer so
it fills the thumbnail.
Entire Document: This is the default setting. Each thumbnail of layer content
is displayed in the context of its size and location within the image window.
Use Default Masks on Fill Layers
When you add a fill layer (solid colour, gradient or pattern), by default a mask is
added to the layer. Disabling this option will prevent the mask from being added.
Expand New Effects
When you add layer effects (e.g., drop shadow, bevel) to a layer, the default
behaviour is to expand and display the effects indented below the layer in the Layers
panel. You have to manually collapse the effects layers afterwards if you want to
keep things compact. With this option disabled, the layer effects will be
automatically collapsed after you add them.
Add "copy" to Copied Layers and Groups
When you create a copy of a layer or group, Photoshop duplicates the name and
appends the word "copy" to the layer name so you can distinguish between the
original and the copy. You can turn that off by disabling this check box.
Merge Layers
There are two commands for merging layers into a single, composite layer: Merge
Down and Merge Visible.
Merge Down
This command merges the current layer with the one immediately
below it. To illustrate, we'll start with the two layers shown at the right.
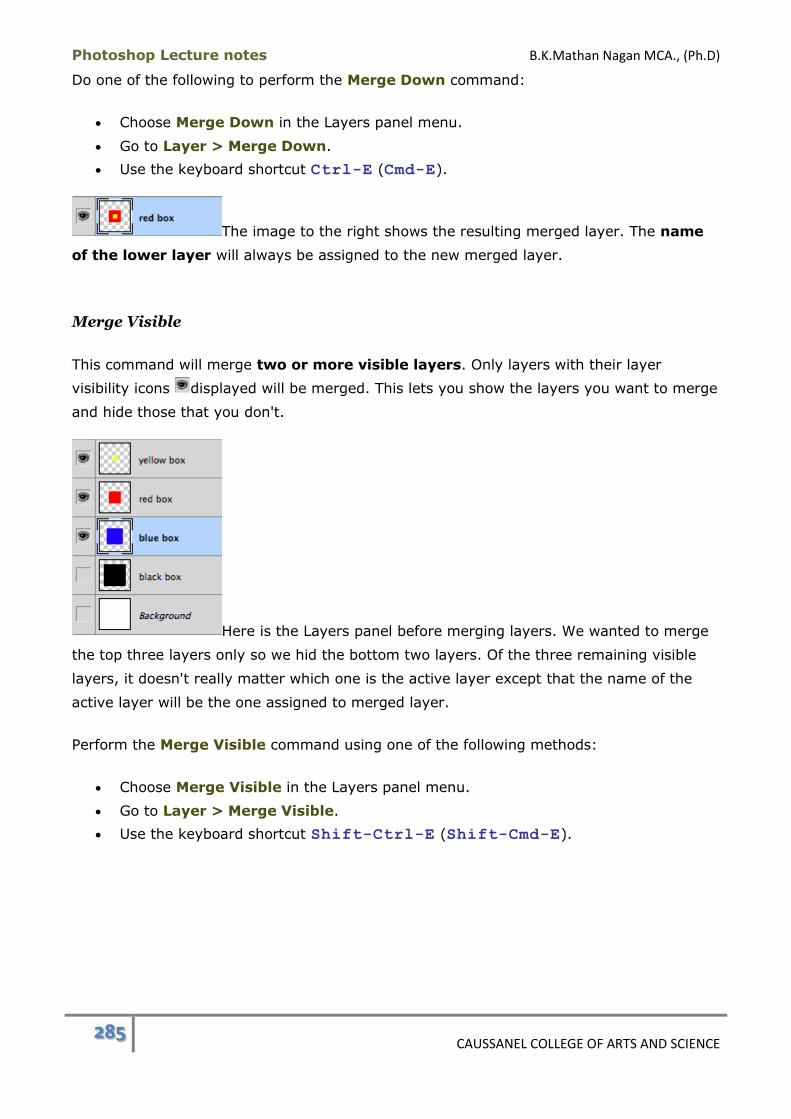
Photoshop Lecture notes B.K.Mathan Nagan MCA., (Ph.D)
285 CAUSSANEL COLLEGE OF ARTS AND SCIENCE
Do one of the following to perform the Merge Down command:
Choose Merge Down in the Layers panel menu.
Go to Layer > Merge Down.
Use the keyboard shortcut Ctrl-E (Cmd-E).
The image to the right shows the resulting merged layer. The name
of the lower layer will always be assigned to the new merged layer.
Merge Visible
This command will merge two or more visible layers. Only layers with their layer
visibility icons displayed will be merged. This lets you show the layers you want to merge
and hide those that you don't.
Here is the Layers panel before merging layers. We wanted to merge
the top three layers only so we hid the bottom two layers. Of the three remaining visible
layers, it doesn't really matter which one is the active layer except that the name of the
active layer will be the one assigned to merged layer.
Perform the Merge Visible command using one of the following methods:
Choose Merge Visible in the Layers panel menu.
Go to Layer > Merge Visible.
Use the keyboard shortcut Shift-Ctrl-E (Shift-Cmd-E).
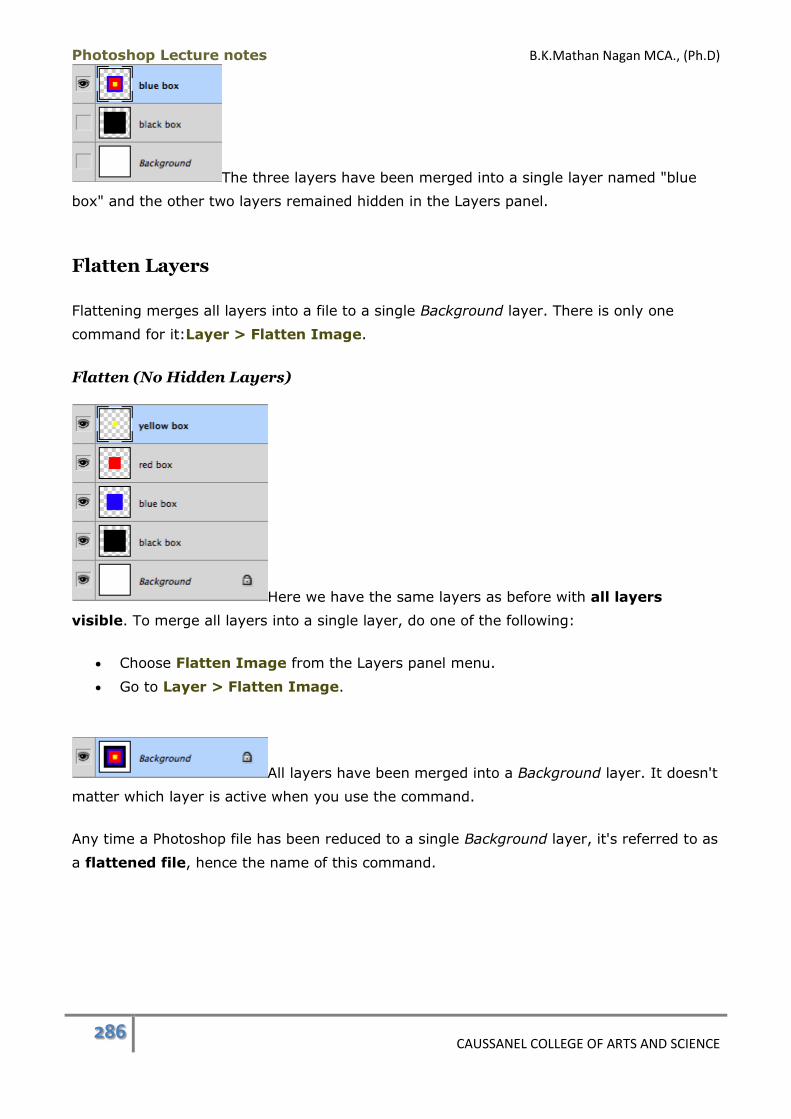
Photoshop Lecture notes B.K.Mathan Nagan MCA., (Ph.D)
286 CAUSSANEL COLLEGE OF ARTS AND SCIENCE
The three layers have been merged into a single layer named "blue
box" and the other two layers remained hidden in the Layers panel.
Flatten Layers
Flattening merges all layers into a file to a single Background layer. There is only one
command for it:Layer > Flatten Image.
Flatten (No Hidden Layers)
Here we have the same layers as before with all layers
visible. To merge all layers into a single layer, do one of the following:
Choose Flatten Image from the Layers panel menu.
Go to Layer > Flatten Image.
All layers have been merged into a Background layer. It doesn't
matter which layer is active when you use the command.
Any time a Photoshop file has been reduced to a single Background layer, it's referred to as
a flattened file, hence the name of this command.

Photoshop Lecture notes B.K.Mathan Nagan MCA., (Ph.D)
287 CAUSSANEL COLLEGE OF ARTS AND SCIENCE
Flatten (With Hidden Layers)
In this example, two of the layers were hidden before
the Flatten Image command was used.
When there are hidden layers in the file,
Photoshop will display a prompt asking if you want to discard the hidden layers and
merge only the visible layers.
If you don't want the hidden layers included in the flattened file, click the OK button
to discard them.
If you want one or more of the hidden layers to be included, click the Cancel button
and make the layers you want to include visible before using the Flatten
Image command again.
In this case, we clicked OK to discard the hidden layers. You
can see that the "black box" layer was discarded but it looks as though the original
white Background layer was included.
This raises a key point about flattening. A flattened image cannot have any
transparency. Any partially transparent or fully transparent pixels will be filled with white.
To retain transparency, you'd have to use one of the Merge commands.
Stamp Layers
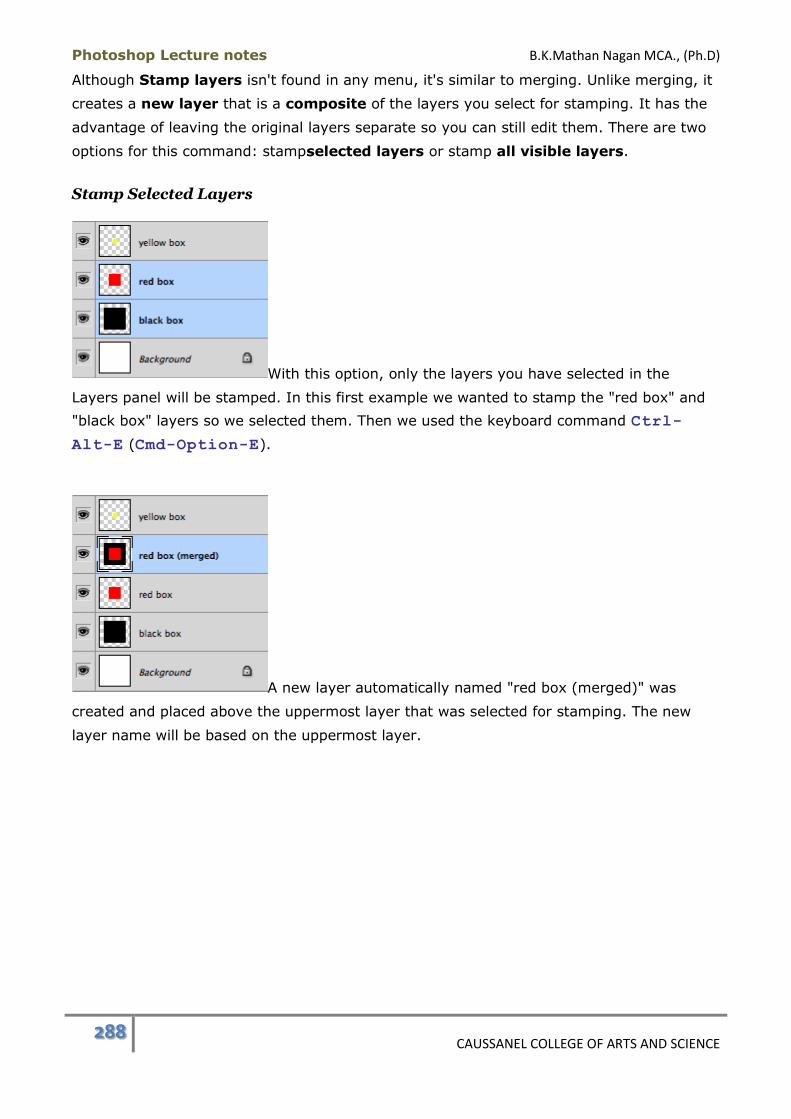
Photoshop Lecture notes B.K.Mathan Nagan MCA., (Ph.D)
288 CAUSSANEL COLLEGE OF ARTS AND SCIENCE
Although Stamp layers isn't found in any menu, it's similar to merging. Unlike merging, it
creates a new layer that is a composite of the layers you select for stamping. It has the
advantage of leaving the original layers separate so you can still edit them. There are two
options for this command: stampselected layers or stamp all visible layers.
Stamp Selected Layers
With this option, only the layers you have selected in the
Layers panel will be stamped. In this first example we wanted to stamp the "red box" and
"black box" layers so we selected them. Then we used the keyboard command Ctrl-
Alt-E (Cmd-Option-E).
A new layer automatically named "red box (merged)" was
created and placed above the uppermost layer that was selected for stamping. The new
layer name will be based on the uppermost layer.

Photoshop Lecture notes B.K.Mathan Nagan MCA., (Ph.D)
289 CAUSSANEL COLLEGE OF ARTS AND SCIENCE
Stamp Visible Layers
Rather than selecting individual layers for stamping, this option
lets you set the layer visibility to determine which layers will be stamped. Only visible
layers will the stamped; the rest will be ignored.
In the Layers panel shown here, three non-contiguous layers are visible and the remainder
were set to hidden.
To stamp the visible layers, press Shift-Ctrl-Alt-E (Shift-Cmd-Option-E).
The resulting stamped layer was named "Layer 1". (This is
inconsistent with the name assigned using the previous stamp command. Perhaps it's a
bug in this particular version.)
The new layer was inserted over the layer that was current ("black box") when the
command was used. If the "yellow box" layer had been the current layer, the new "Layer
1" would have appeared at the top of the layer list.
Layers Panel Menu Summary
The Layers panel contains commands for working with layers and groups.
Photoshop Lecture notes B.K.Mathan Nagan MCA., (Ph.D)
290 CAUSSANEL COLLEGE OF ARTS AND SCIENCE
The New Layer and New Group commands provide you with options in a dialog
when creating a new layer or group.
The Delete Layer and Delete Group commands will delete a layer or group and
present a confirmation dialog.
Delete Hidden Layers will delete all layers with their visibility set to hidden.
The New Group command creates a new, empty group and you can set its name
and other options in a dialog.
New Group from Layers will create a new group and add the currently selected
layers to it.
Lock All Layers in Group lets you lock all the layers in one step instead of
individually locking each layer.
Convert to Smart Object converts a layer, layers or group into a smart object.
Smart Objects will be covered near the end of this module.
Edit Contents allows you to edit a smart object.
Layers can be renamed using the Layer Properties command and Groups can be
renamed using the Layer Properties command. You can also apply or remove the
colour-coding of a layer or group in the dialog.
Edit Adjustment toggles the Adjustments panel.
Create Clipping Mask converts layer content into a mask.
Link Layers creates a link between two or more selected layers.
Used when a linked layer is selected, Select Linked Layers will highlight all other
layers linked to the current layer.
Merge Down will merge the current layer with the layer directly beneath it.
Merge Visible merges all visible layers including the Background layer.
Flatten Image will combine all image layers into a single Background layer.
Panel Options opens a dialog in which you can set the layer thumbnail size, how
the layer content is displayed in the thumbnail, and turn off certain default
application behaviours.
Stamping selected layers will create a new composite layer with the content of the
selected layers.
Stamping visible layers will create a new composite layer with the content of the
visible layers.
Layers Panel Menu Keyboard Shortcuts:
Merge Down: Ctrl-E (Cmd-E)
Merge Visible: Shift-Ctrl-E (Shift-Cmd-E)
Stamp selected layers: Ctrl-Alt-E (Cmd-Option-E)
Stamp visible layers: Shift-Ctrl-Alt-E (Shift-Cmd-Option-E)
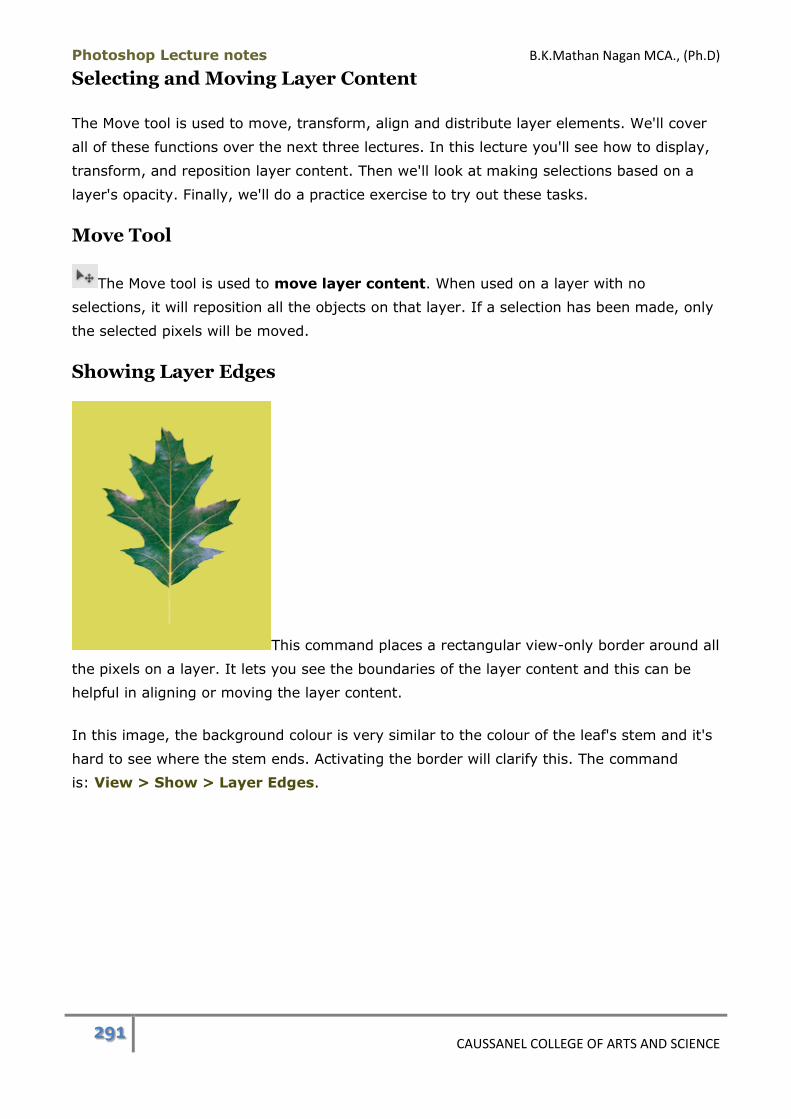
Photoshop Lecture notes B.K.Mathan Nagan MCA., (Ph.D)
291 CAUSSANEL COLLEGE OF ARTS AND SCIENCE
Selecting and Moving Layer Content
The Move tool is used to move, transform, align and distribute layer elements. We'll cover
all of these functions over the next three lectures. In this lecture you'll see how to display,
transform, and reposition layer content. Then we'll look at making selections based on a
layer's opacity. Finally, we'll do a practice exercise to try out these tasks.
Move Tool
The Move tool is used to move layer content. When used on a layer with no
selections, it will reposition all the objects on that layer. If a selection has been made, only
the selected pixels will be moved.
Showing Layer Edges
This command places a rectangular view-only border around all
the pixels on a layer. It lets you see the boundaries of the layer content and this can be
helpful in aligning or moving the layer content.
In this image, the background colour is very similar to the colour of the leaf's stem and it's
hard to see where the stem ends. Activating the border will clarify this. The command
is: View > Show > Layer Edges.

Photoshop Lecture notes B.K.Mathan Nagan MCA., (Ph.D)
292 CAUSSANEL COLLEGE OF ARTS AND SCIENCE
Now a border appears around the leaf to define its outer
edges.
To hide the border, repeat the command View > Show > Layer Edges.
The layer edges border can be used to apply transformations to the layer content. We'll be
looking at layer transformations in the next module.
Selecting Layer Opacity
Making selections based on a layer's opacity is a very useful function. Once selected, pixels
can be copied, moved, or the selection marquee can be used with another layer's contents.
We covered various selection methods in the Selections module but will add a new method
here that relies on a layer's opacity values.
To select all opaque and semi-transparent pixels on a layer, hold down
the Ctrl (Cmd) key and click on the layer thumbnail in the Layers panel.
You needn't do this on the active layer. You can be on one layer and make a
selection based on another layer's opacity.
In the example shown here, the two elements were on
the same transparent layer. It's clear that the star image is selected but it looks like only
the centre part of the gradient has been selected. Actually, Photoshop will only display a
selection border around pixels that are more than 50% opaque; however, the pixels
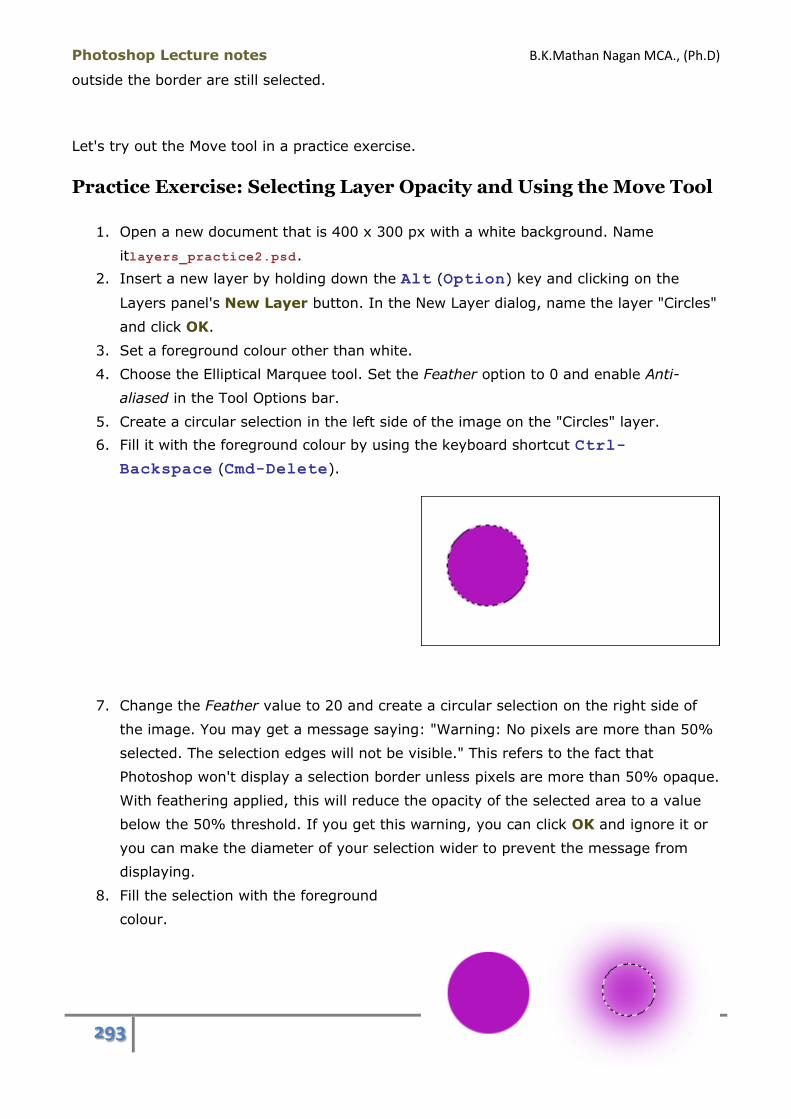
Photoshop Lecture notes B.K.Mathan Nagan MCA., (Ph.D)
293 CAUSSANEL COLLEGE OF ARTS AND SCIENCE
outside the border are still selected.
Let's try out the Move tool in a practice exercise.
Practice Exercise: Selecting Layer Opacity and Using the Move Tool
1. Open a new document that is 400 x 300 px with a white background. Name
itlayers_practice2.psd.
2. Insert a new layer by holding down the Alt (Option) key and clicking on the
Layers panel's New Layer button. In the New Layer dialog, name the layer "Circles"
and click OK.
3. Set a foreground colour other than white.
4. Choose the Elliptical Marquee tool. Set the Feather option to 0 and enable Anti-
aliased in the Tool Options bar.
5. Create a circular selection in the left side of the image on the "Circles" layer.
6. Fill it with the foreground colour by using the keyboard shortcut Ctrl-
Backspace (Cmd-Delete).
7. Change the Feather value to 20 and create a circular selection on the right side of
the image. You may get a message saying: "Warning: No pixels are more than 50%
selected. The selection edges will not be visible." This refers to the fact that
Photoshop won't display a selection border unless pixels are more than 50% opaque.
With feathering applied, this will reduce the opacity of the selected area to a value
below the 50% threshold. If you get this warning, you can click OK and ignore it or
you can make the diameter of your selection wider to prevent the message from
displaying.
8. Fill the selection with the foreground
colour.

Photoshop Lecture notes B.K.Mathan Nagan MCA., (Ph.D)
294 CAUSSANEL COLLEGE OF ARTS AND SCIENCE
9. Remove the selection by pressing Ctrl-D (Cmd-D) and reset the Feather value
back to 0.
10. Select the Move tool, click anywhere on the "Circles" layer and drag. Both circles
should move as one unit.
11. Hold down the Ctrl (Cmd) key and click on the "Circles" layer in the Layers panel.
There should be a selection border around both circles unless you chose to the
warning message mentioned above. If your gradient circle doesn't have a border,
don't worry about it.
12. Using the Move tool again, click inside a selection border and drag to shift the layer
content around. This confirms that even the partially transparent pixels not included
within the selection border are indeed selected.
13. Switch back to the Marquee tool and remove the selection by using the keyboard
shortcut or simply by clicking in the image.
14. Make a selection around the left circle
using the Elliptical Marquee tool.
15. Switch back to the Move tool. Click and drag the selected circle. Notice how it moves
independently of the right circle. You'll also notice that the selection border snaps to
the edges of the object. This is normal.
16. With the left object still selected, press one of the keyboard's directional arrow keys
a few times. This will nudge the selected pixels one pixel at a time. You can nudge
the entire contents of a layer even if no selection is made, providing the Move tool is
the active tool.
17. Enable the Move tool's Auto Select Layer option. What this does is sets the tool so it
doesn't just act on the active layer. It will apply to the topmost layer that has pixels
at the point where you click. This can be a time-saver when you're working with files
with a great many layers. It's faster to use this option than to search through layers
and groups to try and find a specific layer. When you click on the pixels with Auto
Select Layer turned on, the layer will become active in the Layers panel. Now try
clicking and dragging away from the circles. You'll get a message saying that

Photoshop Lecture notes B.K.Mathan Nagan MCA., (Ph.D)
295 CAUSSANEL COLLEGE OF ARTS AND SCIENCE
theBackground layer is locked and can't be moved. Disable the Auto Select
Layer option.
18. Enable the Show Transform Controls option. You image should display a bounding
box with handles around the selection. The handles can be used to scale, rotate and
apply other transformations to the selected areas. You can still move the selection
too. The Show Transform Controls option will apply to the entire layer's content if no
selection is present.
19. Transformations are applied by clicking on the Commit button in the Tool
Options bar. To cancel a transformation, click the Cancel button . Since you
haven't begun transforming the circle, those buttons aren't displayed. Simply
clicking on another tool will remove the bounding box.
20. Save your file.
Selecting and Moving Layer Content Summary
Photoshop will only display a selection border around pixels that are more than 50%
opaque.
The Move tool is used to reposition pixels on a layer.
If no selections are present, the Move tool will reposition all pixels on the active
layer. You can move portions of the layer content by selecting and then using the
Move tool.
You can also use the directional arrow keys to nudge layer content as long as the
Move tool is the active tool.
The Move tool's Show Transform Controls option lets you apply transformations to
layer content.
Selecting and Moving Layer Content Keyboard Shortcuts:
Select layer opacity: Ctrl-click (Cmd-click) on the layer thumbnail in Layers
panel
Nudge layer content: Press directional arrow keys while Move tool is active
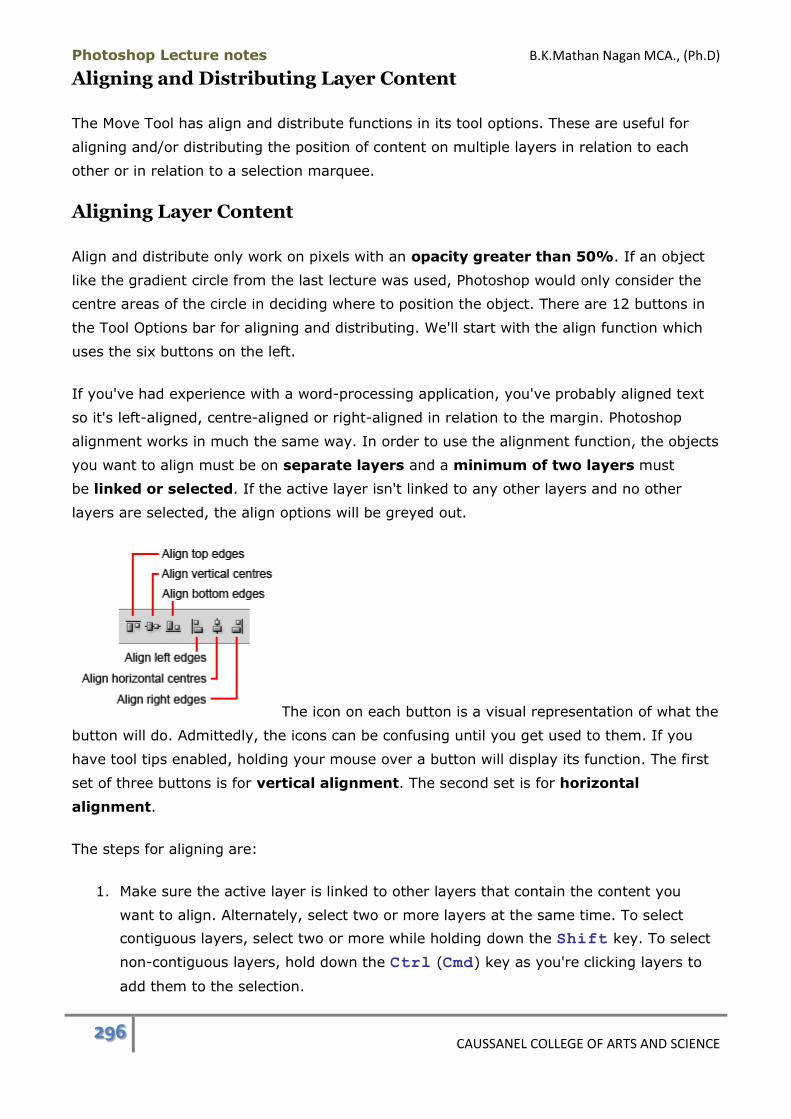
Photoshop Lecture notes B.K.Mathan Nagan MCA., (Ph.D)
296 CAUSSANEL COLLEGE OF ARTS AND SCIENCE
Aligning and Distributing Layer Content
The Move Tool has align and distribute functions in its tool options. These are useful for
aligning and/or distributing the position of content on multiple layers in relation to each
other or in relation to a selection marquee.
Aligning Layer Content
Align and distribute only work on pixels with an opacity greater than 50%. If an object
like the gradient circle from the last lecture was used, Photoshop would only consider the
centre areas of the circle in deciding where to position the object. There are 12 buttons in
the Tool Options bar for aligning and distributing. We'll start with the align function which
uses the six buttons on the left.
If you've had experience with a word-processing application, you've probably aligned text
so it's left-aligned, centre-aligned or right-aligned in relation to the margin. Photoshop
alignment works in much the same way. In order to use the alignment function, the objects
you want to align must be on separate layers and a minimum of two layers must
be linked or selected. If the active layer isn't linked to any other layers and no other
layers are selected, the align options will be greyed out.
The icon on each button is a visual representation of what the
button will do. Admittedly, the icons can be confusing until you get used to them. If you
have tool tips enabled, holding your mouse over a button will display its function. The first
set of three buttons is for vertical alignment. The second set is for horizontal
alignment.
The steps for aligning are:
1. Make sure the active layer is linked to other layers that contain the content you
want to align. Alternately, select two or more layers at the same time. To select
contiguous layers, select two or more while holding down the Shift key. To select
non-contiguous layers, hold down the Ctrl (Cmd) key as you're clicking layers to
add them to the selection.
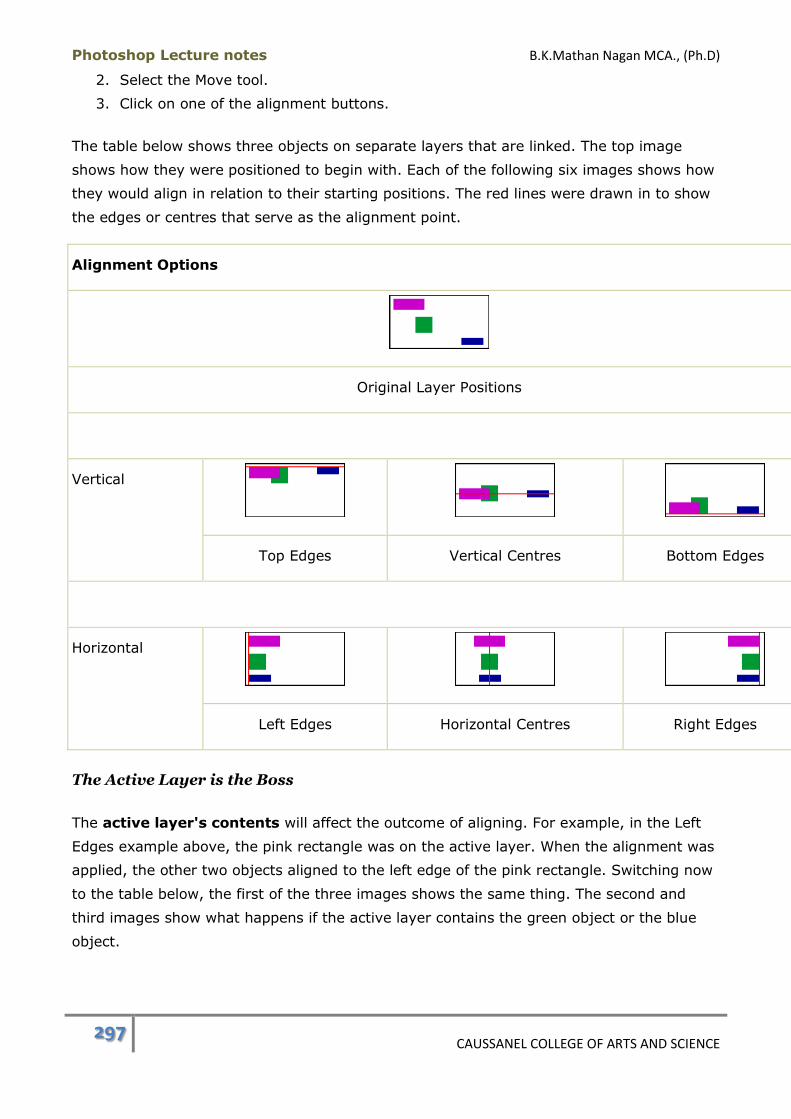
Photoshop Lecture notes B.K.Mathan Nagan MCA., (Ph.D)
297 CAUSSANEL COLLEGE OF ARTS AND SCIENCE
2. Select the Move tool.
3. Click on one of the alignment buttons.
The table below shows three objects on separate layers that are linked. The top image
shows how they were positioned to begin with. Each of the following six images shows how
they would align in relation to their starting positions. The red lines were drawn in to show
the edges or centres that serve as the alignment point.
Alignment Options
Original Layer Positions
Vertical
Top Edges Vertical Centres Bottom Edges
Horizontal
Left Edges Horizontal Centres Right Edges
The Active Layer is the Boss
The active layer's contents will affect the outcome of aligning. For example, in the Left
Edges example above, the pink rectangle was on the active layer. When the alignment was
applied, the other two objects aligned to the left edge of the pink rectangle. Switching now
to the table below, the first of the three images shows the same thing. The second and
third images show what happens if the active layer contains the green object or the blue
object.

Photoshop Lecture notes B.K.Mathan Nagan MCA., (Ph.D)
298 CAUSSANEL COLLEGE OF ARTS AND SCIENCE
Aligning to the Active Layer
Original Layer Positions
Left Alignment
(The red arrow points to the active layer.)
Aligning to a Selection
The other option for aligning is aligning to a selection border. If a
selection has been made in the image, clicking on an alignment
button will align the objects to the selection, rather than to the object on the active layer.
In this example, Align Left Edges was used. The result was that the left edge of each
coloured object was aligned to the left edge of the selection. When aligning to a selection,
you can align a single layer.
Menu Commands for Aligning
All of the Alignment options are available
in the Layer > Align submenu. The Move tool doesn't have to be selected when using the
menu commands.
Distributing Layer Content
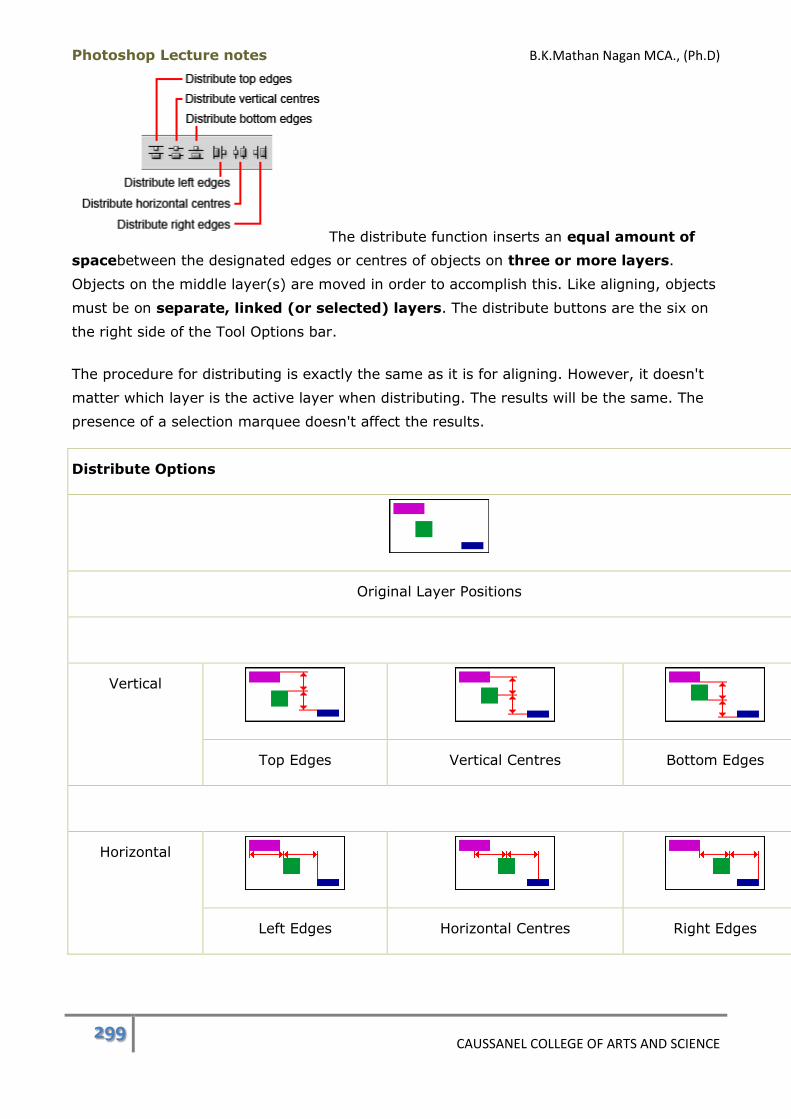
Photoshop Lecture notes B.K.Mathan Nagan MCA., (Ph.D)
299 CAUSSANEL COLLEGE OF ARTS AND SCIENCE
The distribute function inserts an equal amount of
spacebetween the designated edges or centres of objects on three or more layers.
Objects on the middle layer(s) are moved in order to accomplish this. Like aligning, objects
must be on separate, linked (or selected) layers. The distribute buttons are the six on
the right side of the Tool Options bar.
The procedure for distributing is exactly the same as it is for aligning. However, it doesn't
matter which layer is the active layer when distributing. The results will be the same. The
presence of a selection marquee doesn't affect the results.
Distribute Options
Original Layer Positions
Vertical
Top Edges Vertical Centres Bottom Edges
Horizontal
Left Edges Horizontal Centres Right Edges

Photoshop Lecture notes B.K.Mathan Nagan MCA., (Ph.D)
300 CAUSSANEL COLLEGE OF ARTS AND SCIENCE
In the examples above, the red, two-headed arrows show how the amount of spacing is
equal between the alignment points of each pair of objects. The pink and blue objects
remain in their fixed positions. The green object in the middle is shifted around to create
the proper alignment.
A useful example of the distribute function is
when setting up text on separate layers to create a graphical menu for a web page. Once
you create the text layers, you'll want to align them. You'll also want to have an equal
amount of vertical spacing between each menu item. The example to the right shows a
vertical menu that has been left-aligned (1) and then distributed (2).
If you were to measure the distance between the vertical centres of each pair of text items,
they would be identical. Keep in mind that only the middle item(s) will be shiftedto
assign equal spacing between all items. In the text example, the top and bottom text didn't
move during distribution. If you want less overall space between items, you'll have to move
the top and bottom text closer together before applying the distribute function.
Menu Commands for Distributing
All of the distribute options are available
in the Layer > Distribute submenu. The Move tool doesn't have to be selected when
using the menu commands.
Aligning and Distributing Layer Content Summary
The Move tool has align and distribute functions that are accessed through 12
buttons in the Tool Options bar.
Photoshop Lecture notes B.K.Mathan Nagan MCA., (Ph.D)
301 CAUSSANEL COLLEGE OF ARTS AND SCIENCE
Objects can be aligned in relation to each other or in relation to a selection marquee.
Objects are only distributed in relation to each other.
Only pixels with an opacity value greater than 50% will be considered for the
purposes of aligning and distributing.
Objects must be on separate layers that are either linked or selected in order to use
these functions.
There must be at least two linked or selected layers to use the align function. When
aligning to a selection border, a single layer can be used.
There must be at least three linked or selected layers to allow distributing.
When aligning, objects will be aligned to the object on the active layer unless you're
aligning to a selection. It makes no difference which layer is active when distributing
as long as it's one of the linked or selected layers.
If you use menu commands to align or distribute, the Move tool doesn't need to be
active.
Copying and Duplicating Layers Between Images
Layers can be transferred from one image document to another either by moving
(dragging) with the mouse or by using the Duplicate command.
Moving Layers Between Images
Individual layers, layer styles and layer groups can be copied from one image to another.
There are two methods for doing this.
Dragging From the Layers Panel to Another Document Window
1. Have both the source and destination documents open.

Photoshop Lecture notes B.K.Mathan Nagan MCA., (Ph.D)
302 CAUSSANEL COLLEGE OF ARTS AND SCIENCE
2. Drag the layer or layer group
from thesource document's Layers panel and drop it into the destination image
window.
In this example, the image on a yellow background is the source document and its
Layers panel is displayed. The two paw print layers were selected in the Layers
panel and are being dragged to the destination document. Layers display as semi-
transparent while you're still dragging them.
3. The layer will be inserted above the active layer in the destination image. The layer
content will be positioned in the destination document in one of the following ways:
o The layer will be positioned where you release the mouse button.
o If the two documents have the same pixel dimensions, holding
the Shift key while dragging will place the layer content in the same
position in the destination document that it occupied in the source image.
o If the two documents have different dimensions, holding the Shift key
while dragging will centre the layer content in the destination image window.
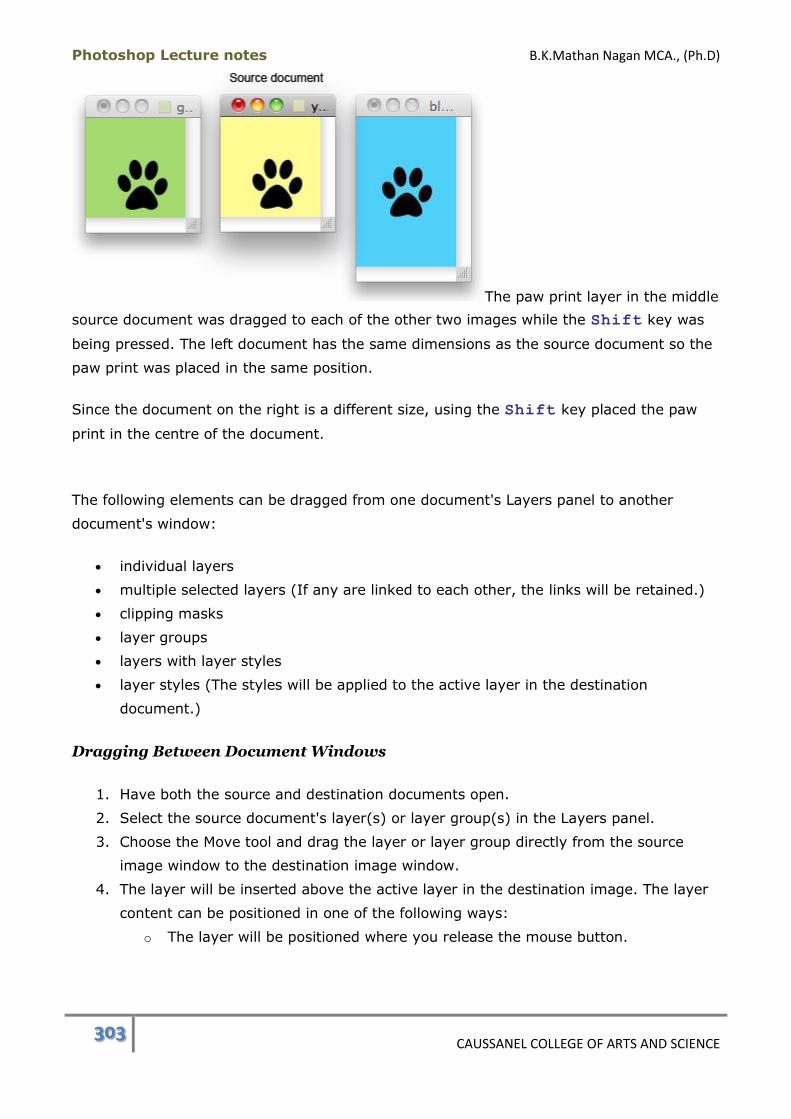
Photoshop Lecture notes B.K.Mathan Nagan MCA., (Ph.D)
303 CAUSSANEL COLLEGE OF ARTS AND SCIENCE
The paw print layer in the middle
source document was dragged to each of the other two images while the Shift key was
being pressed. The left document has the same dimensions as the source document so the
paw print was placed in the same position.
Since the document on the right is a different size, using the Shift key placed the paw
print in the centre of the document.
The following elements can be dragged from one document's Layers panel to another
document's window:
individual layers
multiple selected layers (If any are linked to each other, the links will be retained.)
clipping masks
layer groups
layers with layer styles
layer styles (The styles will be applied to the active layer in the destination
document.)
Dragging Between Document Windows
1. Have both the source and destination documents open.
2. Select the source document's layer(s) or layer group(s) in the Layers panel.
3. Choose the Move tool and drag the layer or layer group directly from the source
image window to the destination image window.
4. The layer will be inserted above the active layer in the destination image. The layer
content can be positioned in one of the following ways:
o The layer will be positioned where you release the mouse button.
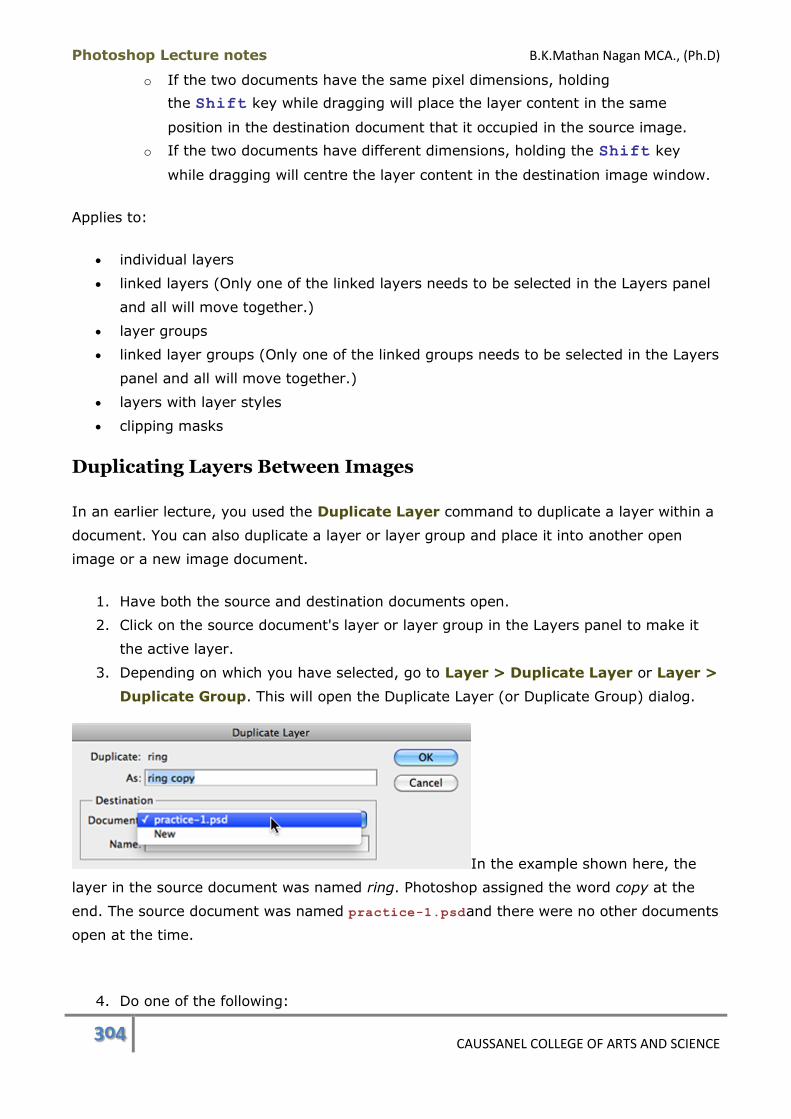
Photoshop Lecture notes B.K.Mathan Nagan MCA., (Ph.D)
304 CAUSSANEL COLLEGE OF ARTS AND SCIENCE
o If the two documents have the same pixel dimensions, holding
the Shift key while dragging will place the layer content in the same
position in the destination document that it occupied in the source image.
o If the two documents have different dimensions, holding the Shift key
while dragging will centre the layer content in the destination image window.
Applies to:
individual layers
linked layers (Only one of the linked layers needs to be selected in the Layers panel
and all will move together.)
layer groups
linked layer groups (Only one of the linked groups needs to be selected in the Layers
panel and all will move together.)
layers with layer styles
clipping masks
Duplicating Layers Between Images
In an earlier lecture, you used the Duplicate Layer command to duplicate a layer within a
document. You can also duplicate a layer or layer group and place it into another open
image or a new image document.
1. Have both the source and destination documents open.
2. Click on the source document's layer or layer group in the Layers panel to make it
the active layer.
3. Depending on which you have selected, go to Layer > Duplicate Layer or Layer >
Duplicate Group. This will open the Duplicate Layer (or Duplicate Group) dialog.
In the example shown here, the
layer in the source document was named ring. Photoshop assigned the word copy at the
end. The source document was named practice-1.psdand there were no other documents
open at the time.
4. Do one of the following:
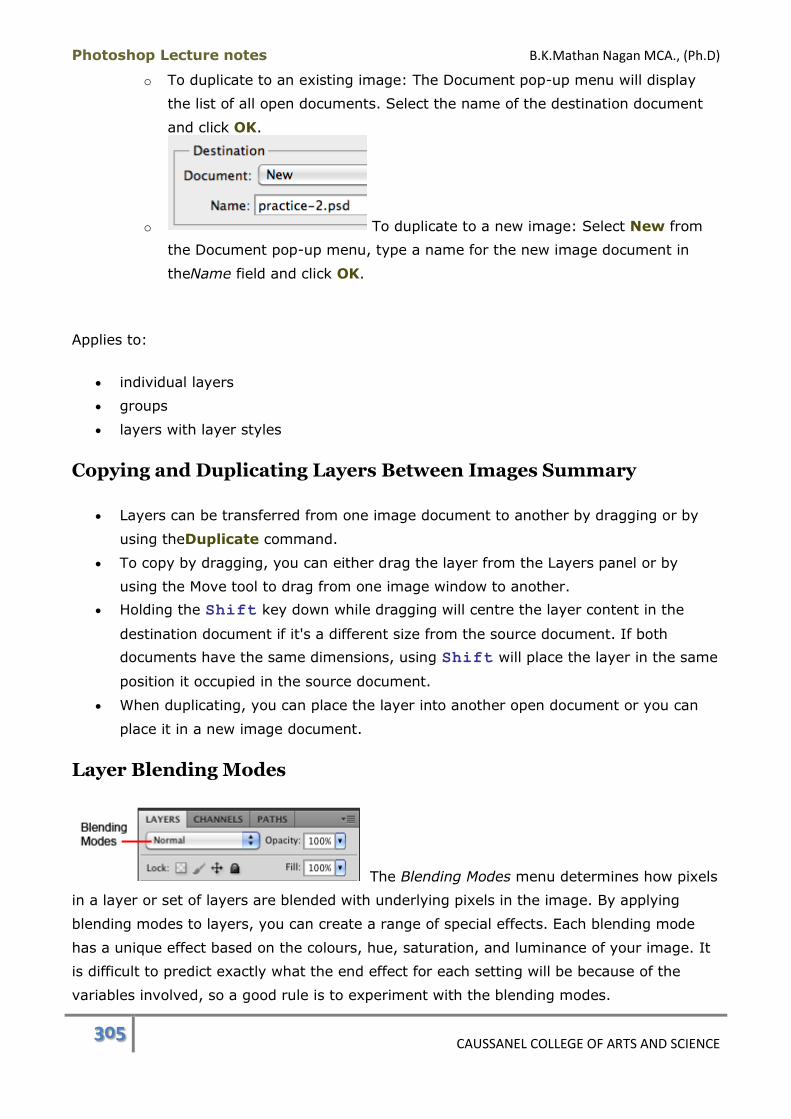
Photoshop Lecture notes B.K.Mathan Nagan MCA., (Ph.D)
305 CAUSSANEL COLLEGE OF ARTS AND SCIENCE
o To duplicate to an existing image: The Document pop-up menu will display
the list of all open documents. Select the name of the destination document
and click OK.
o To duplicate to a new image: Select New from
the Document pop-up menu, type a name for the new image document in
theName field and click OK.
Applies to:
individual layers
groups
layers with layer styles
Copying and Duplicating Layers Between Images Summary
Layers can be transferred from one image document to another by dragging or by
using theDuplicate command.
To copy by dragging, you can either drag the layer from the Layers panel or by
using the Move tool to drag from one image window to another.
Holding the Shift key down while dragging will centre the layer content in the
destination document if it's a different size from the source document. If both
documents have the same dimensions, using Shift will place the layer in the same
position it occupied in the source document.
When duplicating, you can place the layer into another open document or you can
place it in a new image document.
Layer Blending Modes
The Blending Modes menu determines how pixels
in a layer or set of layers are blended with underlying pixels in the image. By applying
blending modes to layers, you can create a range of special effects. Each blending mode
has a unique effect based on the colours, hue, saturation, and luminance of your image. It
is difficult to predict exactly what the end effect for each setting will be because of the
variables involved, so a good rule is to experiment with the blending modes.
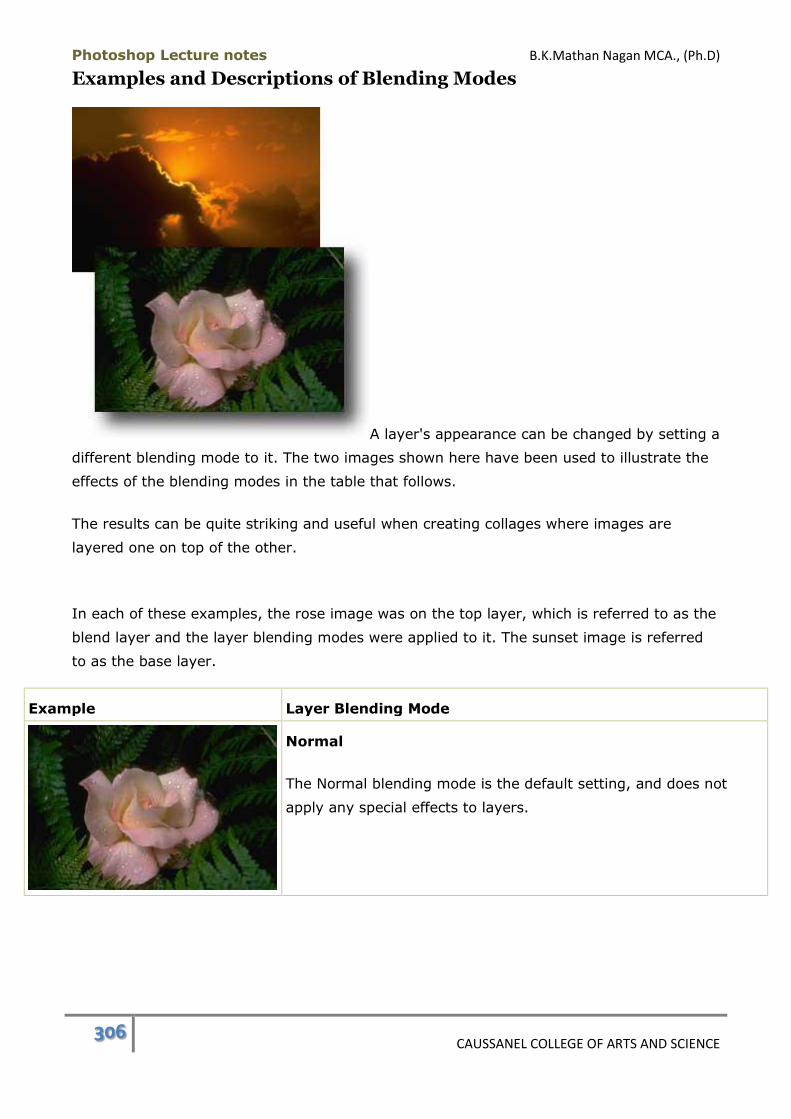
Photoshop Lecture notes B.K.Mathan Nagan MCA., (Ph.D)
306 CAUSSANEL COLLEGE OF ARTS AND SCIENCE
Examples and Descriptions of Blending Modes
A layer's appearance can be changed by setting a
different blending mode to it. The two images shown here have been used to illustrate the
effects of the blending modes in the table that follows.
The results can be quite striking and useful when creating collages where images are
layered one on top of the other.
In each of these examples, the rose image was on the top layer, which is referred to as the
blend layer and the layer blending modes were applied to it. The sunset image is referred
to as the base layer.
Example Layer Blending Mode
Normal
The Normal blending mode is the default setting, and does not
apply any special effects to layers.

Photoshop Lecture notes B.K.Mathan Nagan MCA., (Ph.D)
307 CAUSSANEL COLLEGE OF ARTS AND SCIENCE
Dissolve
This blending mode replaces random pixels on the blend layer with
those in the base layer, based upon the opacity of the blend layer.
The end result is the image on the blend layer appears as though it
is dissolving. This has no effect if the opacity of the blend layer is
100%.
Darken
Looks for lighter colour areas in the underlying layer and replaces
them with the darker colour in the blend layer.
Multiply
The colour values in the two layers are multiplied. The end result is
always darker than either of the original layers.
Colour Burn
Colour Burn darkens and increases the contrast.
Linear Burn
Colours in the underlying image are darkened by the subtracting
the brightness value of the blend layer pixels.
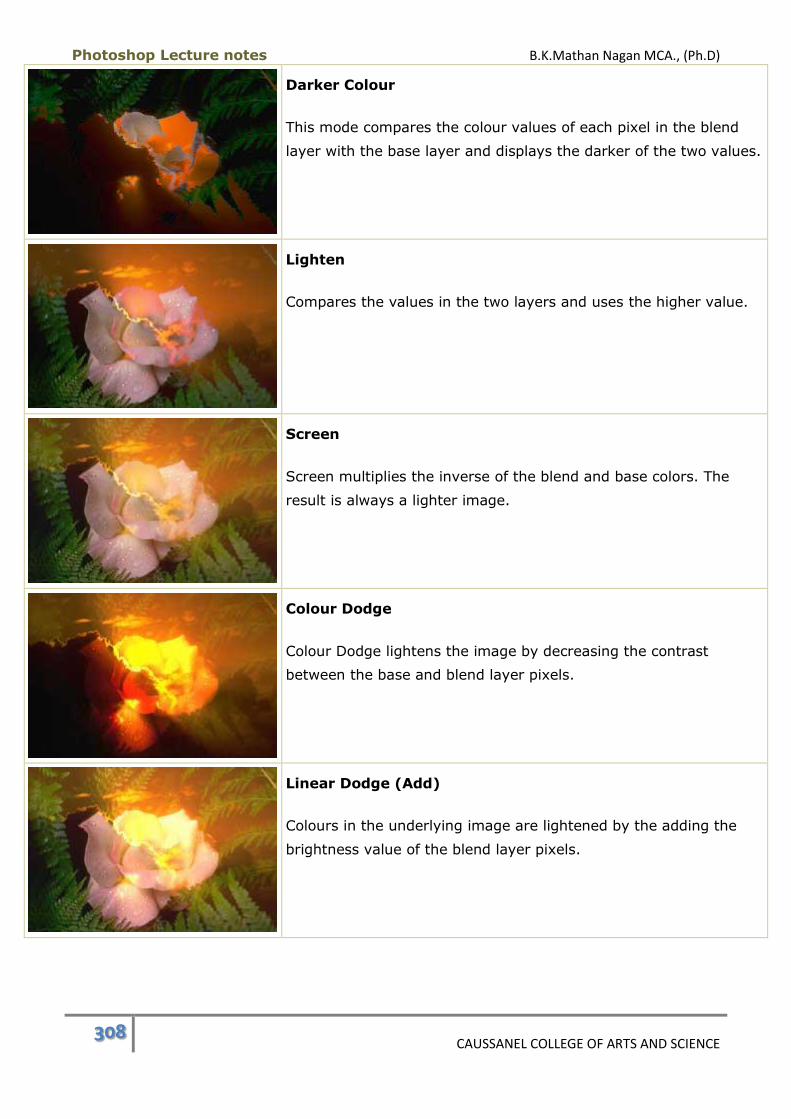
Photoshop Lecture notes B.K.Mathan Nagan MCA., (Ph.D)
308 CAUSSANEL COLLEGE OF ARTS AND SCIENCE
Darker Colour
This mode compares the colour values of each pixel in the blend
layer with the base layer and displays the darker of the two values.
Lighten
Compares the values in the two layers and uses the higher value.
Screen
Screen multiplies the inverse of the blend and base colors. The
result is always a lighter image.
Colour Dodge
Colour Dodge lightens the image by decreasing the contrast
between the base and blend layer pixels.
Linear Dodge (Add)
Colours in the underlying image are lightened by the adding the
brightness value of the blend layer pixels.
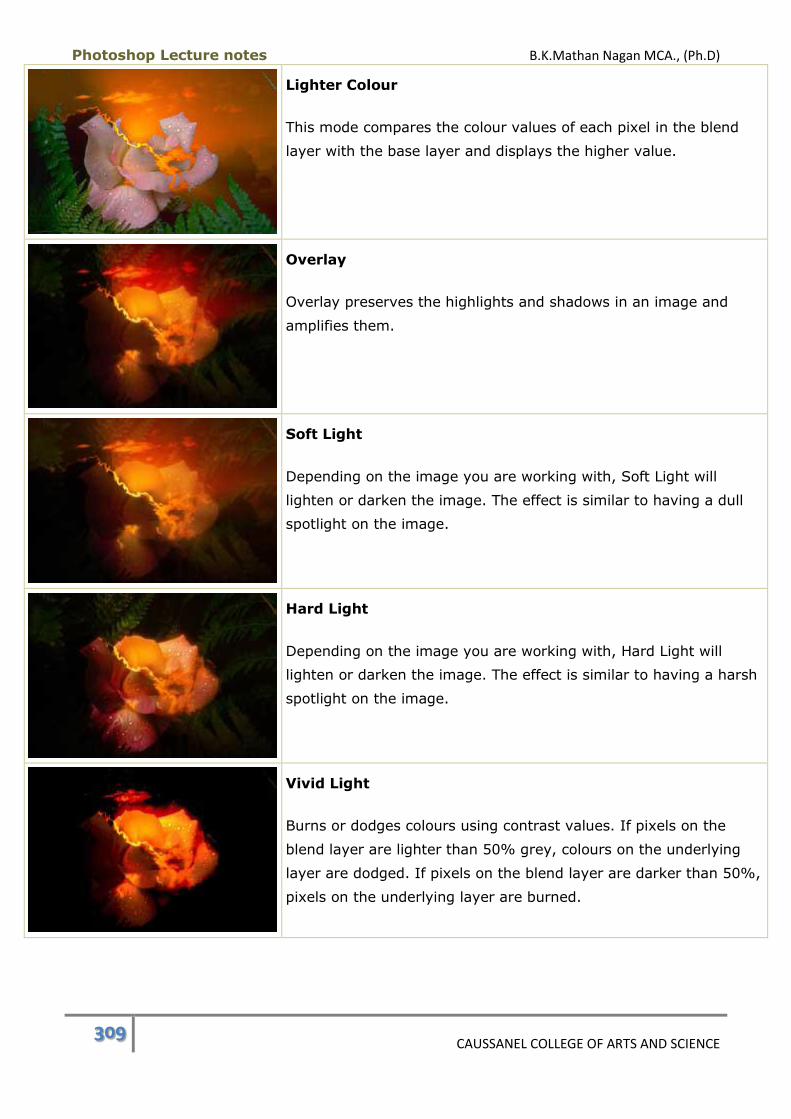
Photoshop Lecture notes B.K.Mathan Nagan MCA., (Ph.D)
309 CAUSSANEL COLLEGE OF ARTS AND SCIENCE
Lighter Colour
This mode compares the colour values of each pixel in the blend
layer with the base layer and displays the higher value.
Overlay
Overlay preserves the highlights and shadows in an image and
amplifies them.
Soft Light
Depending on the image you are working with, Soft Light will
lighten or darken the image. The effect is similar to having a dull
spotlight on the image.
Hard Light
Depending on the image you are working with, Hard Light will
lighten or darken the image. The effect is similar to having a harsh
spotlight on the image.
Vivid Light
Burns or dodges colours using contrast values. If pixels on the
blend layer are lighter than 50% grey, colours on the underlying
layer are dodged. If pixels on the blend layer are darker than 50%,
pixels on the underlying layer are burned.

Photoshop Lecture notes B.K.Mathan Nagan MCA., (Ph.D)
310 CAUSSANEL COLLEGE OF ARTS AND SCIENCE
Linear Light
Burns or dodges colours using brightness values. If pixels on the
blend layer are lighter than 50% grey, colours on the underlying
layer are dodged. If pixels on the blend layer are darker than 50%,
pixels on the underlying layer are burned.
Pin Light
Colours on both layers are compared and those on the lower layer
will be replaced by those on the blend layer, depending on the
comparison results. Pixels on the blend layer that are lighter than
50% grey will replace darker pixels below. Pixels on the blend layer
that are darker than 50% will replace lighter pixels below.
Hard Mix
Adds the RGB values of the blend layer to those on the base layer.
If the resulting value is 255 or greater, it receives a value of 255; if
it's less than 255, a value of 0 is assigned. As a result, all colours
will be either red, green, blue, or black.
Difference
Difference will apply very saturated colours to your image based on
a subtraction of colour information.
Exclusion
Exclusion has the same effect as Difference, with less contrast in
your image.

Photoshop Lecture notes B.K.Mathan Nagan MCA., (Ph.D)
311 CAUSSANEL COLLEGE OF ARTS AND SCIENCE
Subtract
The blend colour in each channel is subtracted from the base
colour. Any values that compute to less than zero are set to zero.
Divide
Unfortunately, a clear explanation is elusive so we'll just quote
from Photoshop CS5 Help: "Looks at the color information in each
channel and divides the blend color from the base color."
Hue
Hue creates an effect based on the hue of the blend layer
combined with the luminance and saturation of the underlying
layer.
Saturation
Saturation creates an effect based on the saturation of the blend
layer combined with the luminance and hue of the underlying layer.
Colour
The hue and saturation of the blend layer's colours are combined
with the luminosity of the underlying colours. This is a particularly
useful option for colourizing black and white photos.
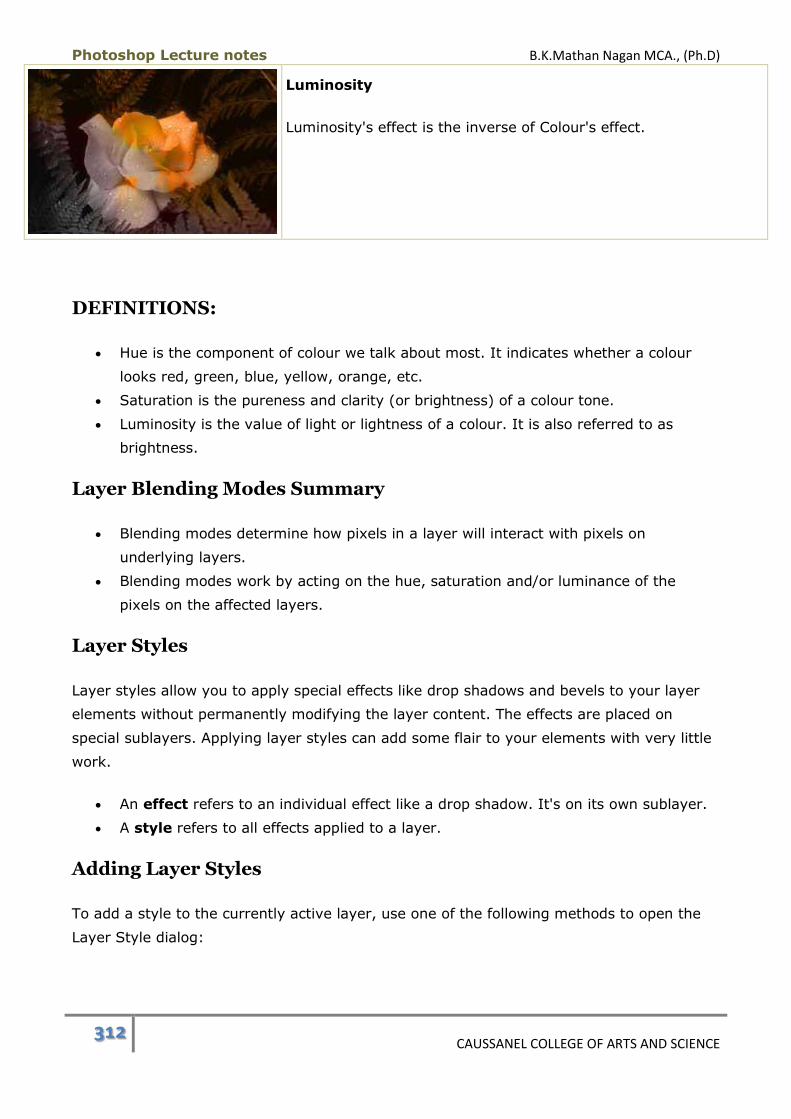
Photoshop Lecture notes B.K.Mathan Nagan MCA., (Ph.D)
312 CAUSSANEL COLLEGE OF ARTS AND SCIENCE
Luminosity
Luminosity's effect is the inverse of Colour's effect.
DEFINITIONS:
Hue is the component of colour we talk about most. It indicates whether a colour
looks red, green, blue, yellow, orange, etc.
Saturation is the pureness and clarity (or brightness) of a colour tone.
Luminosity is the value of light or lightness of a colour. It is also referred to as
brightness.
Layer Blending Modes Summary
Blending modes determine how pixels in a layer will interact with pixels on
underlying layers.
Blending modes work by acting on the hue, saturation and/or luminance of the
pixels on the affected layers.
Layer Styles
Layer styles allow you to apply special effects like drop shadows and bevels to your layer
elements without permanently modifying the layer content. The effects are placed on
special sublayers. Applying layer styles can add some flair to your elements with very little
work.
An effect refers to an individual effect like a drop shadow. It's on its own sublayer.
A style refers to all effects applied to a layer.
Adding Layer Styles
To add a style to the currently active layer, use one of the following methods to open the
Layer Style dialog:
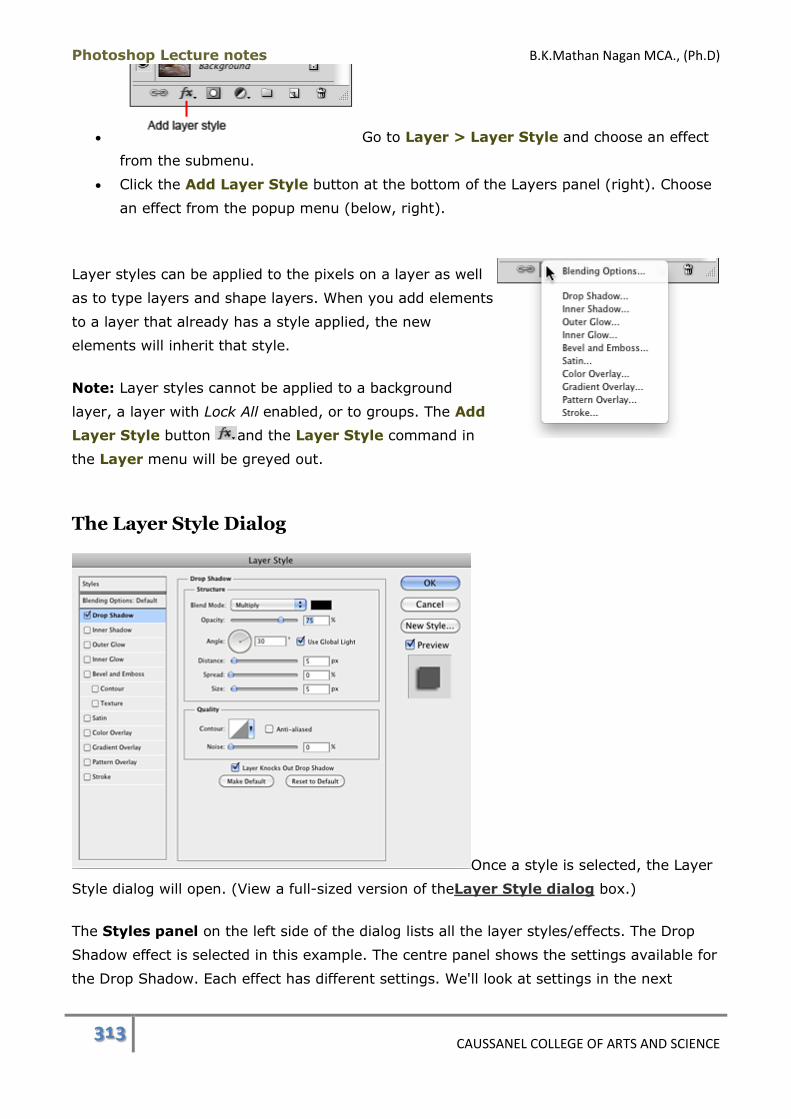
Photoshop Lecture notes B.K.Mathan Nagan MCA., (Ph.D)
313 CAUSSANEL COLLEGE OF ARTS AND SCIENCE
Go to Layer > Layer Style and choose an effect
from the submenu.
Click the Add Layer Style button at the bottom of the Layers panel (right). Choose
an effect from the popup menu (below, right).
Layer styles can be applied to the pixels on a layer as well
as to type layers and shape layers. When you add elements
to a layer that already has a style applied, the new
elements will inherit that style.
Note: Layer styles cannot be applied to a background
layer, a layer with Lock All enabled, or to groups. The Add
Layer Style button and the Layer Style command in
the Layer menu will be greyed out.
The Layer Style Dialog
Once a style is selected, the Layer
Style dialog will open. (View a full-sized version of theLayer Style dialog box.)
The Styles panel on the left side of the dialog lists all the layer styles/effects. The Drop
Shadow effect is selected in this example. The centre panel shows the settings available for
the Drop Shadow. Each effect has different settings. We'll look at settings in the next
Photoshop Lecture notes B.K.Mathan Nagan MCA., (Ph.D)
314 CAUSSANEL COLLEGE OF ARTS AND SCIENCE
lecture.
On the right side of the dialog there are the following options:
OK button
Clicking the OK button will apply the style to the active layer.
Cancel button
This button will close the Layer Style dialog without applying a new or modified
style. The button has an interesting and useful variation. When you hold down
the Alt (Option) key, the button will change to a Reset button. Clicking on it will
restore the settings to the way they were when you first opened the Layer Style
dialog.
New Style button
Clicking this button will allow you to save the style with its current settings as
a style preset.
Preview check box
This option is enabled by default and your image will automatically update so you
can preview the effects of your setting choices. Disabling the check box will let
you see the original image without the style applied. This can be handy for
comparing the 'before' and 'after' versions.
Preview thumbnail
This is just a generic example showing you what the style would look like when
applied to a black square.
Description of Effects
The table below shows a simple circle element placed on a separate layer from the
background with the various effects applied to it.
Layer Styles
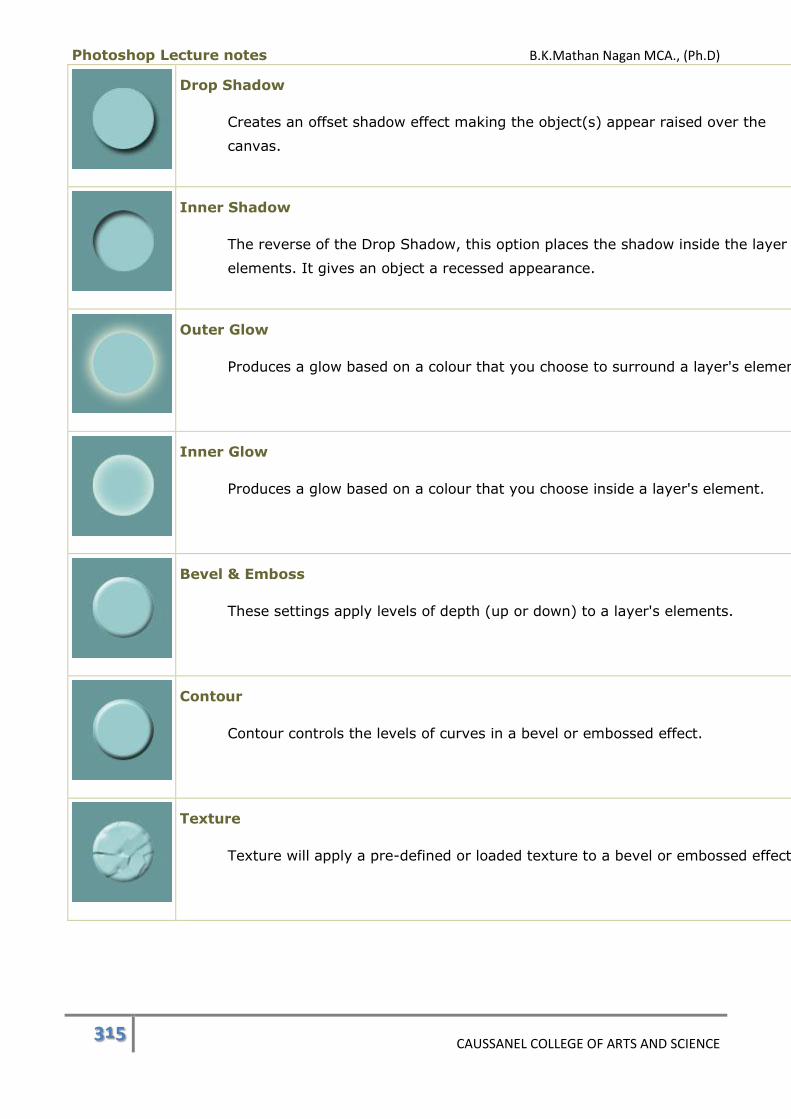
Photoshop Lecture notes B.K.Mathan Nagan MCA., (Ph.D)
315 CAUSSANEL COLLEGE OF ARTS AND SCIENCE
Drop Shadow
Creates an offset shadow effect making the object(s) appear raised over the
canvas.
Inner Shadow
The reverse of the Drop Shadow, this option places the shadow inside the layer
elements. It gives an object a recessed appearance.
Outer Glow
Produces a glow based on a colour that you choose to surround a layer's element.
Inner Glow
Produces a glow based on a colour that you choose inside a layer's element.
Bevel & Emboss
These settings apply levels of depth (up or down) to a layer's elements.
Contour
Contour controls the levels of curves in a bevel or embossed effect.
Texture
Texture will apply a pre-defined or loaded texture to a bevel or embossed effect.
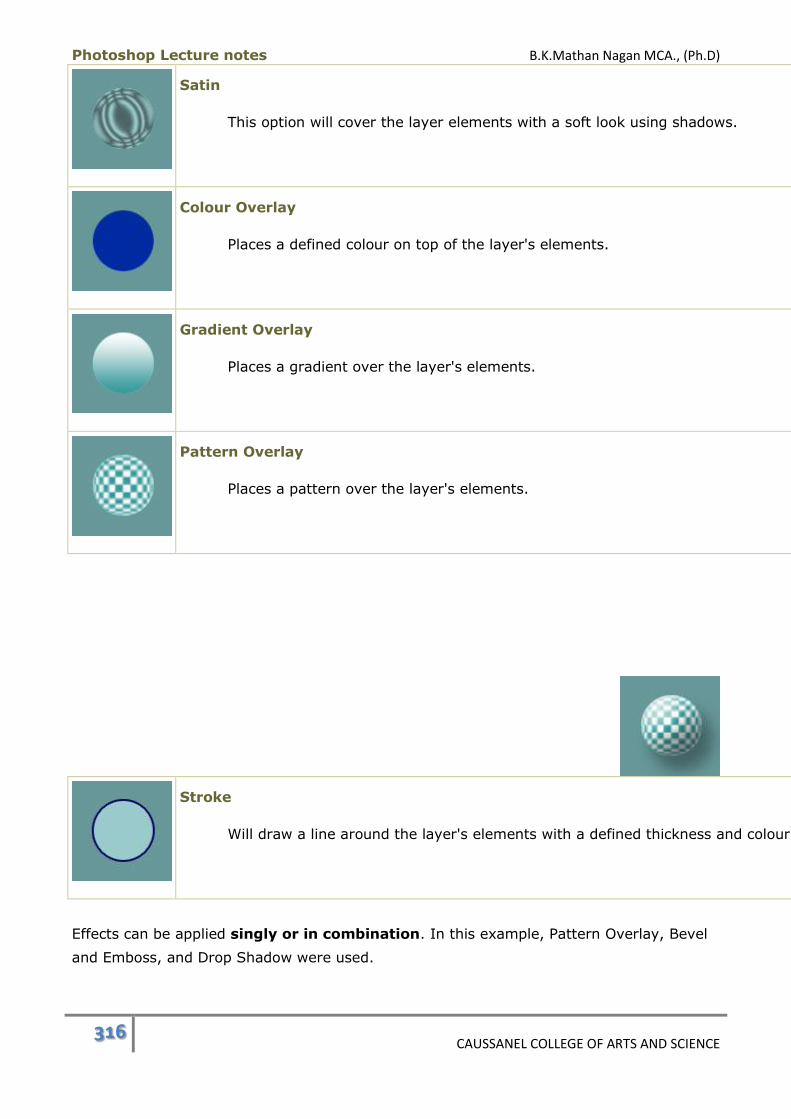
Photoshop Lecture notes B.K.Mathan Nagan MCA., (Ph.D)
316 CAUSSANEL COLLEGE OF ARTS AND SCIENCE
Satin
This option will cover the layer elements with a soft look using shadows.
Colour Overlay
Places a defined colour on top of the layer's elements.
Gradient Overlay
Places a gradient over the layer's elements.
Pattern Overlay
Places a pattern over the layer's elements.
Stroke
Will draw a line around the layer's elements with a defined thickness and colour.
Effects can be applied singly or in combination. In this example, Pattern Overlay, Bevel
and Emboss, and Drop Shadow were used.
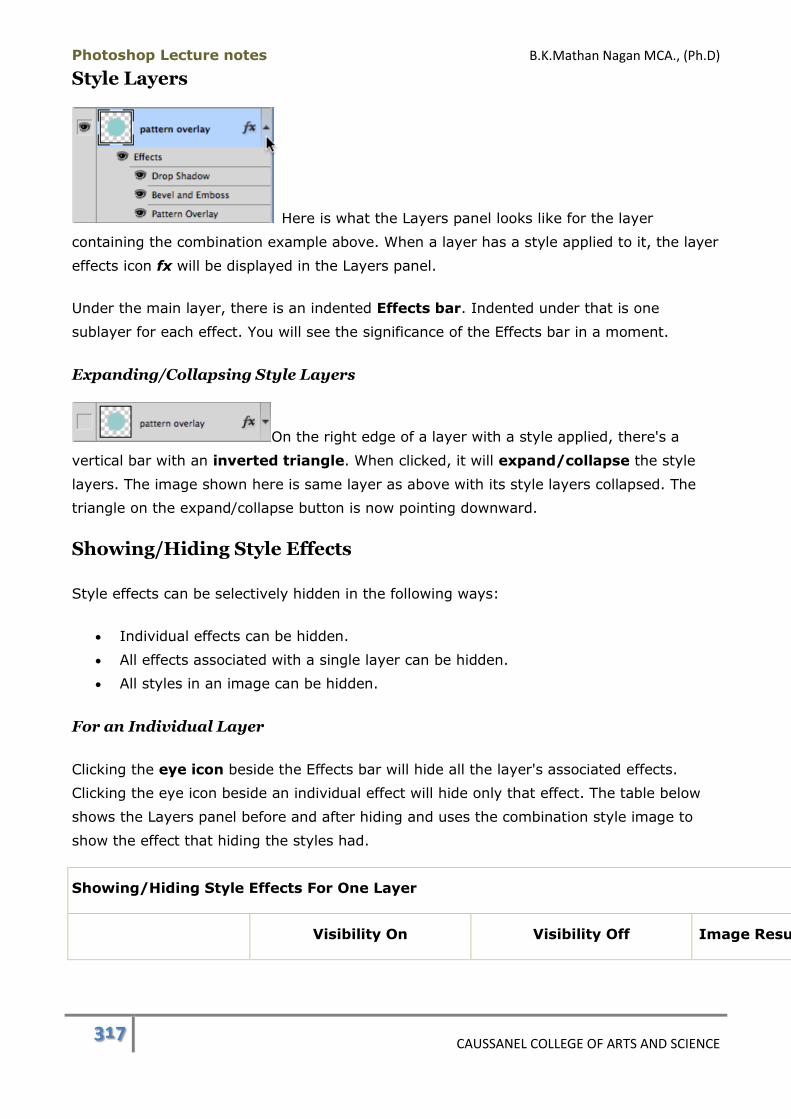
Photoshop Lecture notes B.K.Mathan Nagan MCA., (Ph.D)
317 CAUSSANEL COLLEGE OF ARTS AND SCIENCE
Style Layers
Here is what the Layers panel looks like for the layer
containing the combination example above. When a layer has a style applied to it, the layer
effects icon fx will be displayed in the Layers panel.
Under the main layer, there is an indented Effects bar. Indented under that is one
sublayer for each effect. You will see the significance of the Effects bar in a moment.
Expanding/Collapsing Style Layers
On the right edge of a layer with a style applied, there's a
vertical bar with an inverted triangle. When clicked, it will expand/collapse the style
layers. The image shown here is same layer as above with its style layers collapsed. The
triangle on the expand/collapse button is now pointing downward.
Showing/Hiding Style Effects
Style effects can be selectively hidden in the following ways:
Individual effects can be hidden.
All effects associated with a single layer can be hidden.
All styles in an image can be hidden.
For an Individual Layer
Clicking the eye icon beside the Effects bar will hide all the layer's associated effects.
Clicking the eye icon beside an individual effect will hide only that effect. The table below
shows the Layers panel before and after hiding and uses the combination style image to
show the effect that hiding the styles had.
Showing/Hiding Style Effects For One Layer
Visibility On Visibility Off Image Result
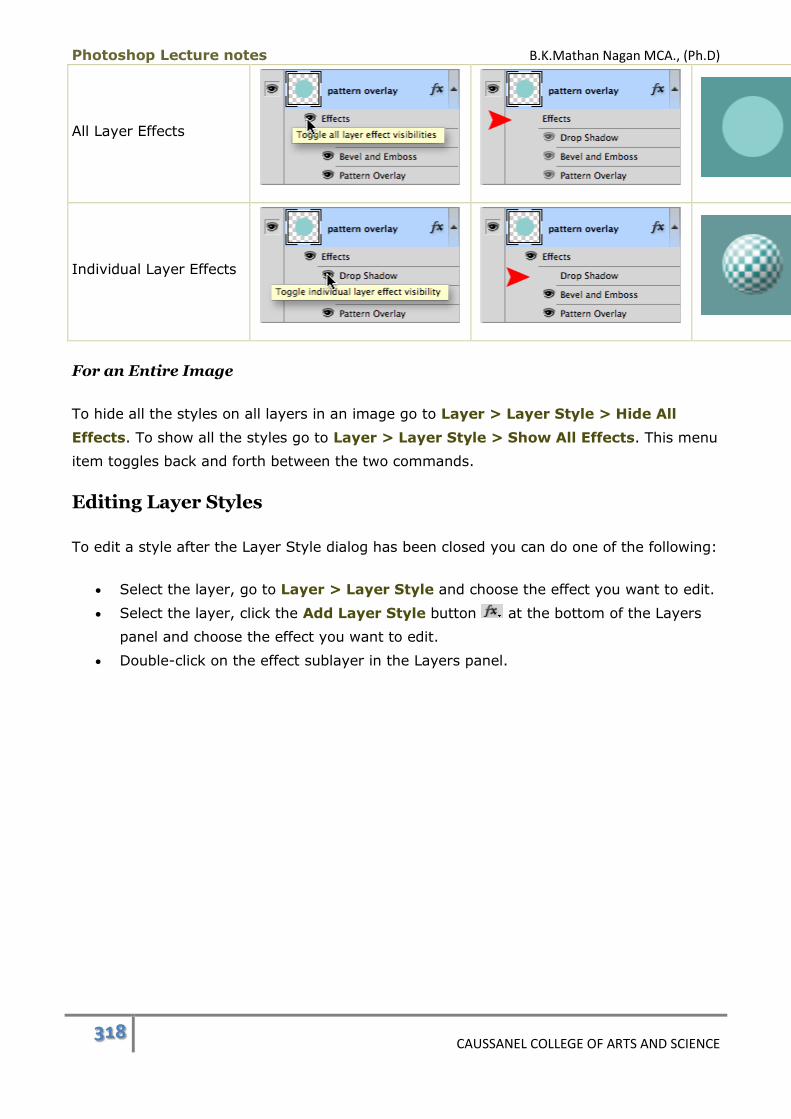
Photoshop Lecture notes B.K.Mathan Nagan MCA., (Ph.D)
318 CAUSSANEL COLLEGE OF ARTS AND SCIENCE
All Layer Effects
Individual Layer Effects
For an Entire Image
To hide all the styles on all layers in an image go to Layer > Layer Style > Hide All
Effects. To show all the styles go to Layer > Layer Style > Show All Effects. This menu
item toggles back and forth between the two commands.
Editing Layer Styles
To edit a style after the Layer Style dialog has been closed you can do one of the following:
Select the layer, go to Layer > Layer Style and choose the effect you want to edit.
Select the layer, click the Add Layer Style button at the bottom of the Layers
panel and choose the effect you want to edit.
Double-click on the effect sublayer in the Layers panel.
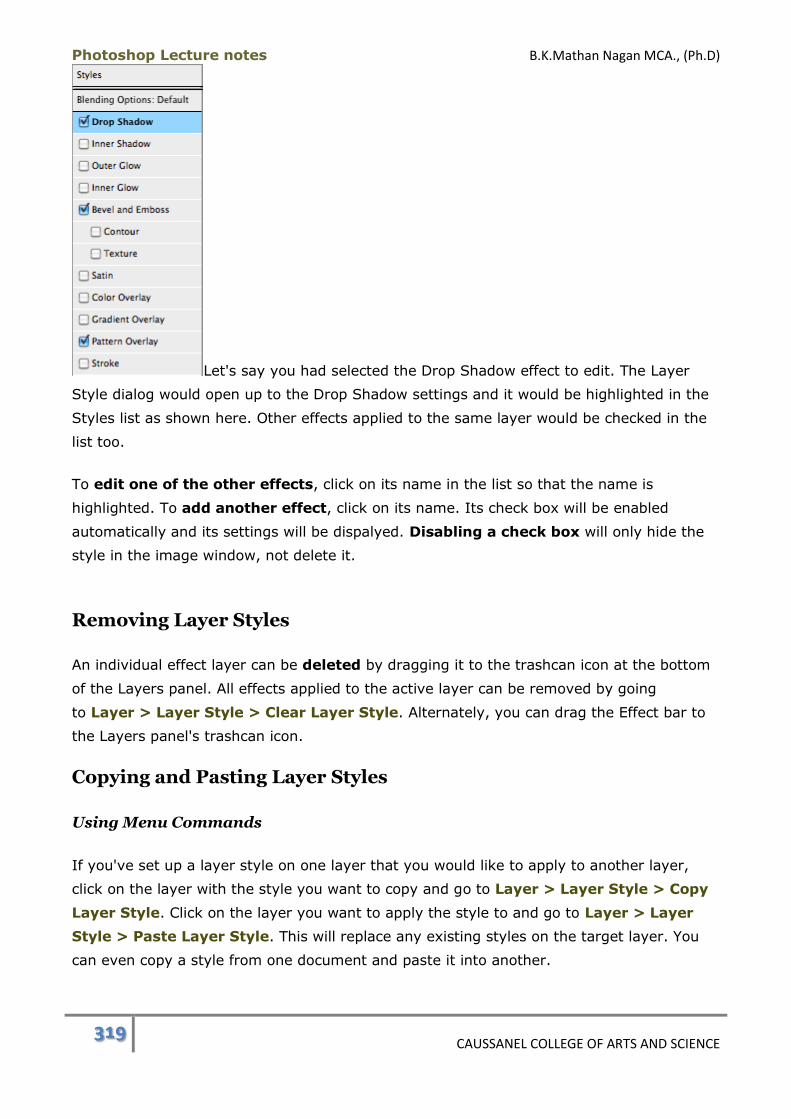
Photoshop Lecture notes B.K.Mathan Nagan MCA., (Ph.D)
319 CAUSSANEL COLLEGE OF ARTS AND SCIENCE
Let's say you had selected the Drop Shadow effect to edit. The Layer
Style dialog would open up to the Drop Shadow settings and it would be highlighted in the
Styles list as shown here. Other effects applied to the same layer would be checked in the
list too.
To edit one of the other effects, click on its name in the list so that the name is
highlighted. To add another effect, click on its name. Its check box will be enabled
automatically and its settings will be dispalyed. Disabling a check box will only hide the
style in the image window, not delete it.
Removing Layer Styles
An individual effect layer can be deleted by dragging it to the trashcan icon at the bottom
of the Layers panel. All effects applied to the active layer can be removed by going
to Layer > Layer Style > Clear Layer Style. Alternately, you can drag the Effect bar to
the Layers panel's trashcan icon.
Copying and Pasting Layer Styles
Using Menu Commands
If you've set up a layer style on one layer that you would like to apply to another layer,
click on the layer with the style you want to copy and go to Layer > Layer Style > Copy
Layer Style. Click on the layer you want to apply the style to and go to Layer > Layer
Style > Paste Layer Style. This will replace any existing styles on the target layer. You
can even copy a style from one document and paste it into another.
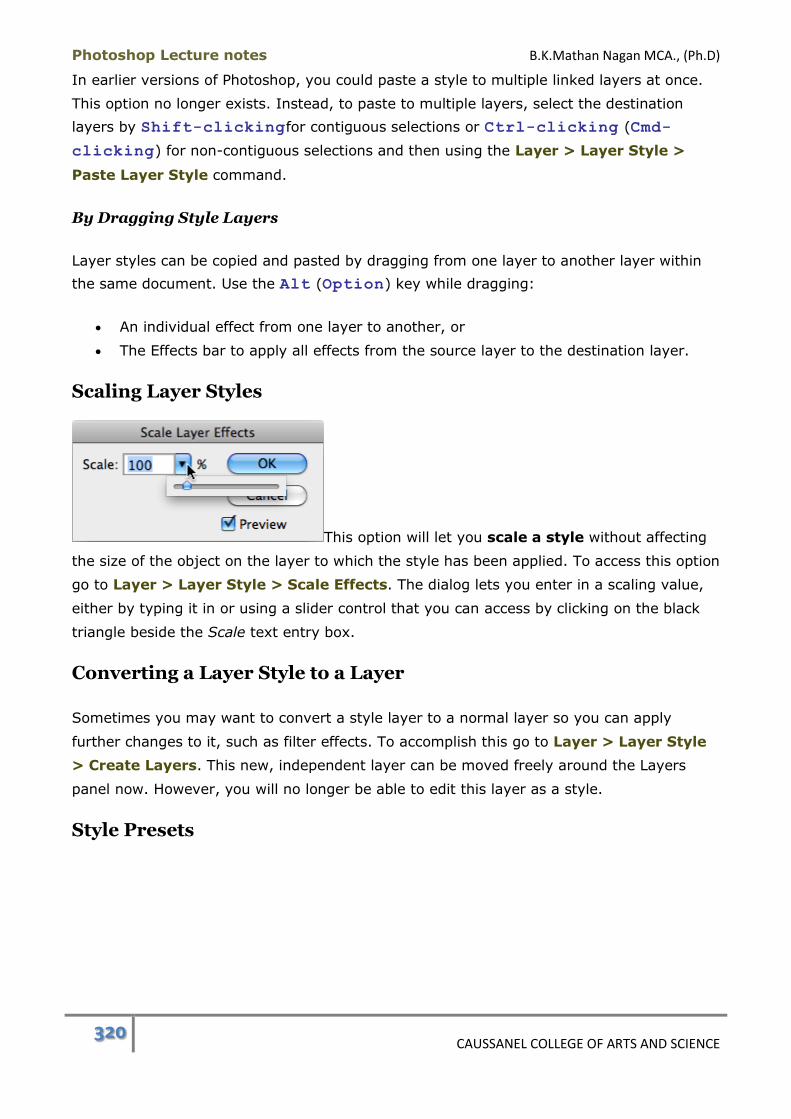
Photoshop Lecture notes B.K.Mathan Nagan MCA., (Ph.D)
320 CAUSSANEL COLLEGE OF ARTS AND SCIENCE
In earlier versions of Photoshop, you could paste a style to multiple linked layers at once.
This option no longer exists. Instead, to paste to multiple layers, select the destination
layers by Shift-clickingfor contiguous selections or Ctrl-clicking (Cmd-
clicking) for non-contiguous selections and then using the Layer > Layer Style >
Paste Layer Style command.
By Dragging Style Layers
Layer styles can be copied and pasted by dragging from one layer to another layer within
the same document. Use the Alt (Option) key while dragging:
An individual effect from one layer to another, or
The Effects bar to apply all effects from the source layer to the destination layer.
Scaling Layer Styles
This option will let you scale a style without affecting
the size of the object on the layer to which the style has been applied. To access this option
go to Layer > Layer Style > Scale Effects. The dialog lets you enter in a scaling value,
either by typing it in or using a slider control that you can access by clicking on the black
triangle beside the Scale text entry box.
Converting a Layer Style to a Layer
Sometimes you may want to convert a style layer to a normal layer so you can apply
further changes to it, such as filter effects. To accomplish this go to Layer > Layer Style
> Create Layers. This new, independent layer can be moved freely around the Layers
panel now. However, you will no longer be able to edit this layer as a style.
Style Presets
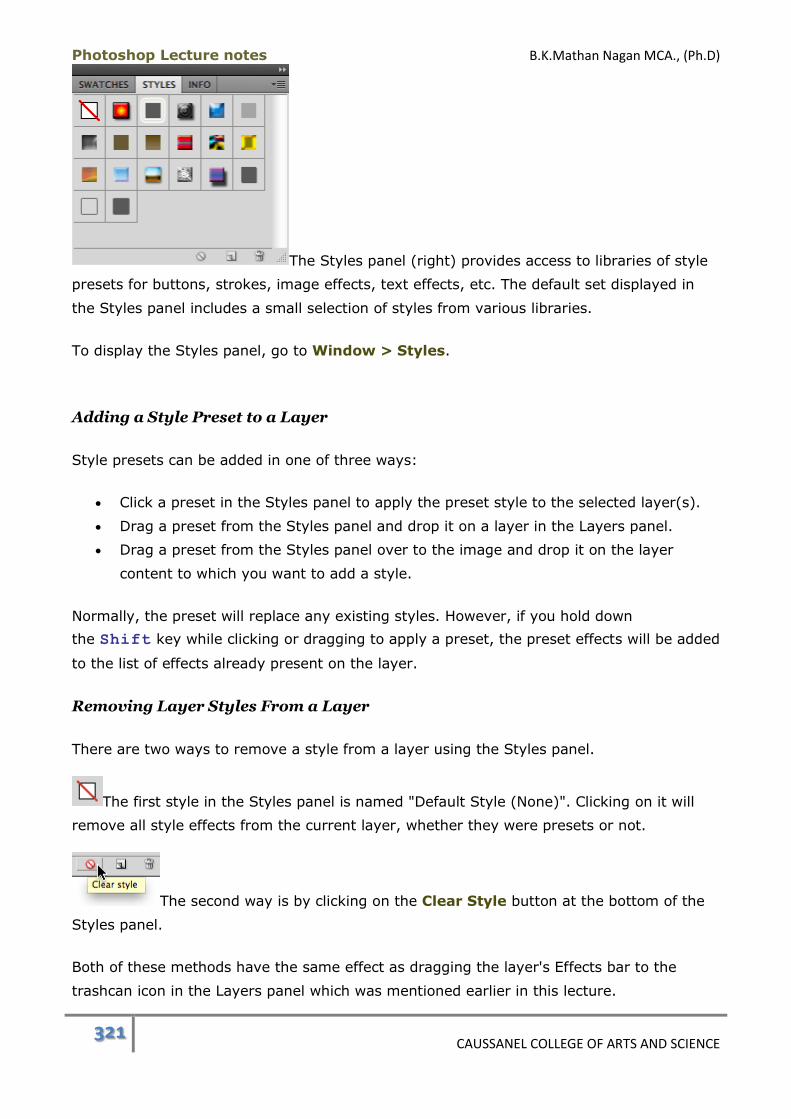
Photoshop Lecture notes B.K.Mathan Nagan MCA., (Ph.D)
321 CAUSSANEL COLLEGE OF ARTS AND SCIENCE
The Styles panel (right) provides access to libraries of style
presets for buttons, strokes, image effects, text effects, etc. The default set displayed in
the Styles panel includes a small selection of styles from various libraries.
To display the Styles panel, go to Window > Styles.
Adding a Style Preset to a Layer
Style presets can be added in one of three ways:
Click a preset in the Styles panel to apply the preset style to the selected layer(s).
Drag a preset from the Styles panel and drop it on a layer in the Layers panel.
Drag a preset from the Styles panel over to the image and drop it on the layer
content to which you want to add a style.
Normally, the preset will replace any existing styles. However, if you hold down
the Shift key while clicking or dragging to apply a preset, the preset effects will be added
to the list of effects already present on the layer.
Removing Layer Styles From a Layer
There are two ways to remove a style from a layer using the Styles panel.
The first style in the Styles panel is named "Default Style (None)". Clicking on it will
remove all style effects from the current layer, whether they were presets or not.
The second way is by clicking on the Clear Style button at the bottom of the
Styles panel.
Both of these methods have the same effect as dragging the layer's Effects bar to the
trashcan icon in the Layers panel which was mentioned earlier in this lecture.
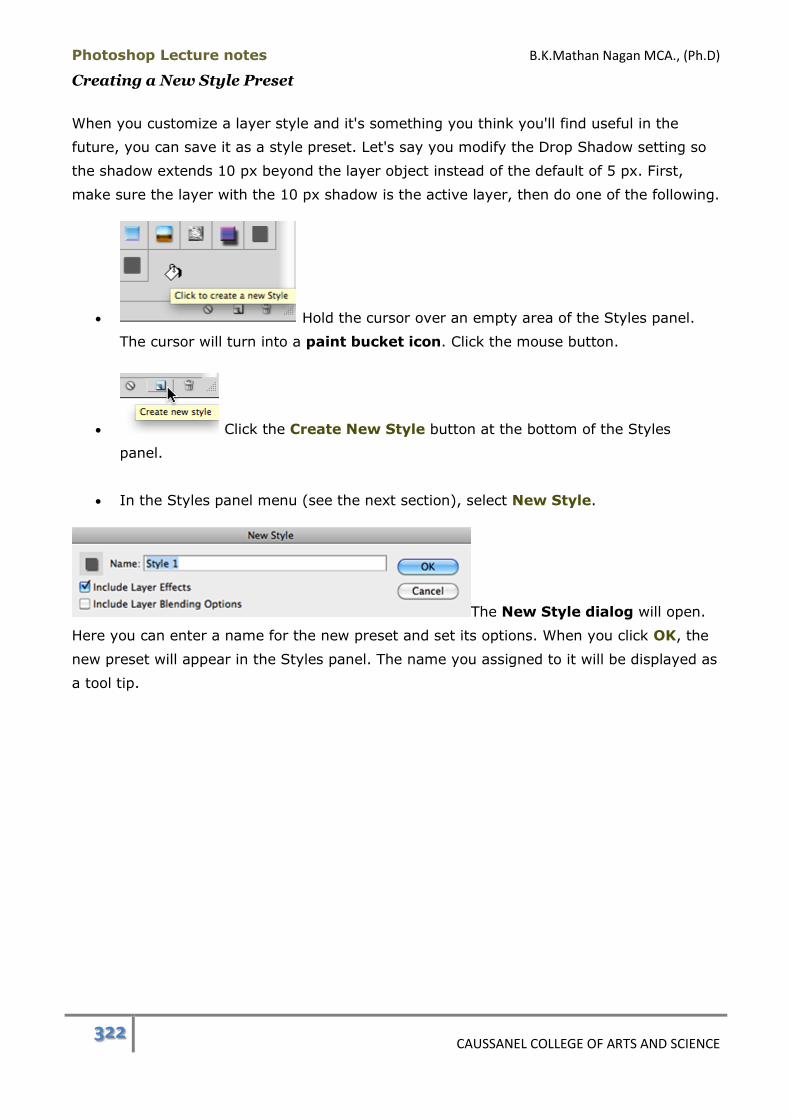
Photoshop Lecture notes B.K.Mathan Nagan MCA., (Ph.D)
322 CAUSSANEL COLLEGE OF ARTS AND SCIENCE
Creating a New Style Preset
When you customize a layer style and it's something you think you'll find useful in the
future, you can save it as a style preset. Let's say you modify the Drop Shadow setting so
the shadow extends 10 px beyond the layer object instead of the default of 5 px. First,
make sure the layer with the 10 px shadow is the active layer, then do one of the following.
Hold the cursor over an empty area of the Styles panel.
The cursor will turn into a paint bucket icon. Click the mouse button.
Click the Create New Style button at the bottom of the Styles
panel.
In the Styles panel menu (see the next section), select New Style.
The New Style dialog will open.
Here you can enter a name for the new preset and set its options. When you click OK, the
new preset will appear in the Styles panel. The name you assigned to it will be displayed as
a tool tip.
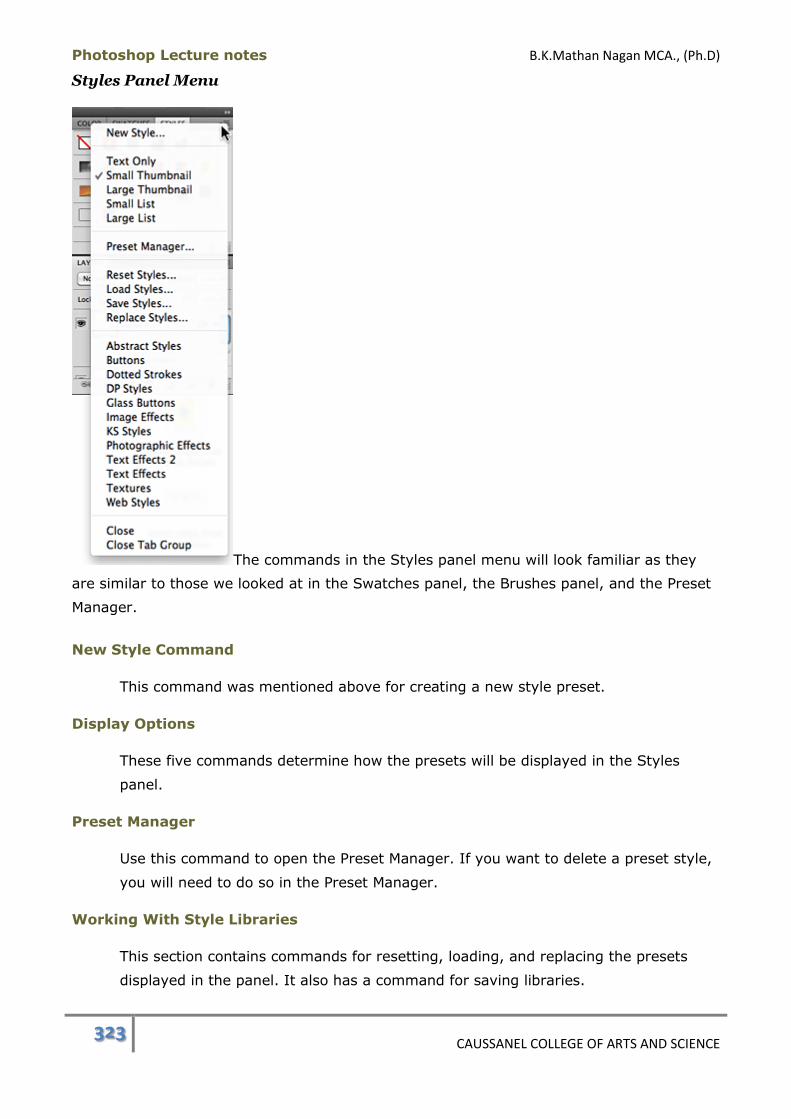
Photoshop Lecture notes B.K.Mathan Nagan MCA., (Ph.D)
323 CAUSSANEL COLLEGE OF ARTS AND SCIENCE
Styles Panel Menu
The commands in the Styles panel menu will look familiar as they
are similar to those we looked at in the Swatches panel, the Brushes panel, and the Preset
Manager.
New Style Command
This command was mentioned above for creating a new style preset.
Display Options
These five commands determine how the presets will be displayed in the Styles
panel.
Preset Manager
Use this command to open the Preset Manager. If you want to delete a preset style,
you will need to do so in the Preset Manager.
Working With Style Libraries
This section contains commands for resetting, loading, and replacing the presets
displayed in the panel. It also has a command for saving libraries.
Photoshop Lecture notes B.K.Mathan Nagan MCA., (Ph.D)
324 CAUSSANEL COLLEGE OF ARTS AND SCIENCE
Style Libraries
This section lists all the style preset libraries that come with Photoshop. One of
these, in particular, is interesting: Dotted Strokes. Strokes applied with the Edit >
Stroke command and the Stroke layer style have no options for dashed or dotted
lines. This library has presets using patterns designed to simulate dashed and dotted
strokes.
Layer Styles Summary
Special effects can be applied to elements on a layer by using layer styles.
Each layer effect is placed on a subsidiary layer and is grouped with the content
layer. One or more effects can be applied to a layer.
Style layers can be expanded or collapsed and their visibility toggled on and off.
Layer styles cannot be applied to a background layer, a layer with Lock All enabled
or a group.
Each style/effect has settings which can be customized.
Styles can be copied and pasted into other layers in the same document or in a
different document.
Styles can be scaled without scaling the object on the regular layer.
Style layers can be converted to regular layers.
Layer Styles Keyboard Shortcuts:
Change Cancel button into Reset button: Alt (Option)
Drag an effect or a style between layers: Alt-drag (Option-drag)
Layer Style Settings
Each layer style has number of settings available that let you customize the effects. Some
of the settings are common to more than one style. They are listed below in alphabetical
order after the Global Light discussion. Then there are descriptions of the gradient and
pattern presets that are used to create overlay effects.
Global Light

Photoshop Lecture notes B.K.Mathan Nagan MCA., (Ph.D)
325 CAUSSANEL COLLEGE OF ARTS AND SCIENCE
What is the Global Light?
Traditionally, in graphic and web design, lighting and shadow effects usually
appear as though a light source is shining from the upper left corner of the page. The angle
and height of this imaginary light source is called Global Light in Photoshop. It determines
theplacement of highlights and shadows in relation to the object to which the effects
have been applied. The image shown here was created using the default Global Light
settings. Bevel and Emboss and Drop Shadow Layer Styles were applied to a solid red
circle. The light appears to be shining from the upper left, casting a shadow to the lower
right of the object.
Modifying the Global Light Settings
This image shows the default Global Light settings.
If you would like to change them, go to Layer > Layer Style > Global Light. The Global
Light dialog will open.
You can set both the Angle of the light and its Altitude. Both values can be entered in
the text entry fields. Alternately, you can click and drag the tiny crosshair in the circular
dial to dynamically adjust Angle and Altitude simultaneously. As you drag the crosshair, the
values in the text entry boxes will update accordingly.
The Angle can be any value between 0 and 359 degrees. The position of 0 is where the
hour hand on a clock would appear at 3 o'clock. Moving counter-clockwise will increase the
value.
Think of the Altitude as the height of the imaginary light source. It can be compared to
the sun. The range can be between 0 and 90. At 0, the light would be like the sun at the
edge of the horizon while at 90 the light would be directly overhead. The Altitude value is 0
when the crosshair is along the outer border of the circle and is at 90 when the crosshair is
in the exact centre.

Photoshop Lecture notes B.K.Mathan Nagan MCA., (Ph.D)
326 CAUSSANEL COLLEGE OF ARTS AND SCIENCE
In this example, we used the same image as before and only changed the
Global Light settings. The Angle was set to -34 degrees and the Altitude was set to 67.
It is important to understand that modifying the Global Light setting will apply to all
effects/styles in the document that rely on it, such as Bevel and Emboss and Drop Shadow.
You can change the Angle and sometimes the Altitude for individual layer styles but you
must disable the Global Light setting in the Layer Style dialog first. Otherwise, you'll alter
the Global Light setting.
Angle
This has a similar effect as Global Light but lacks
an Altitude setting. It determines the angle of an imaginary light source for styles that
have highlights or shadows.
The Angle value can be changed by dragging the "hand" around the dial or by entering a
value in the text box. If the Use Global Light check box is enabled and you change the
value, the Global Light Angle you enter will be assigned to every layer style in the whole
document. If you want to change the Angle for only a single layer's style, disable the check
box before changing the Angle value.
Available with: Bevel and Emboss (combined with Altitude), Drop Shadow, Gradient
Overlay, Inner Shadow, Satin
Blend Mode
Effects are created by adding colour to style layers.
The Blend Modepop-up lets you set the layer blend mode for the style layer to
determine how the colour will interact with other pixels. In some cases an effect only
affects the colour of an object on the active layer (e.g., Inner Shadow) and sometimes it
only affects the appearance of objects on layers below the active layer (e.g., Drop
Shadow).

Photoshop Lecture notes B.K.Mathan Nagan MCA., (Ph.D)
327 CAUSSANEL COLLEGE OF ARTS AND SCIENCE
Sometimes this setting is called Highlight Mode or Shadow Mode, as is the case with
the Bevel and Emboss effect, but it works the same way.
Clicking on the colour swatch to the right of the pop-up will open the colour picker,
allowing you to set the colour of the effect.
Available with: All effects except Contour and Texture
Choke
This setting narrows the width of an area to which a blur is
being applied.
Available with: Inner Glow, Inner Shadow
Colour
This lets you select a colour for shadows, highlights and glows. Clicking on the colour
swatch will open the colour picker.
Available with: Bevel and Emboss's Highlight and Shadow Modes, Colour Overlay, Drop
Shadow, Inner Glow, Inner Shadow, Outer Glow, Satin, Stroke
Contour
Contour is used to apply effects to highlights and
shadows. Normally, highlights and shadows drop off in a progressively linear
fashion. Contour can create ripples, rings and other variations on these effects.
The Anti-aliased setting appears with the Contour and Gloss Contour settings. When
enabled, it's not really noticeable on larger highlights and shadows but is quite effective on
smaller, more detailed areas.
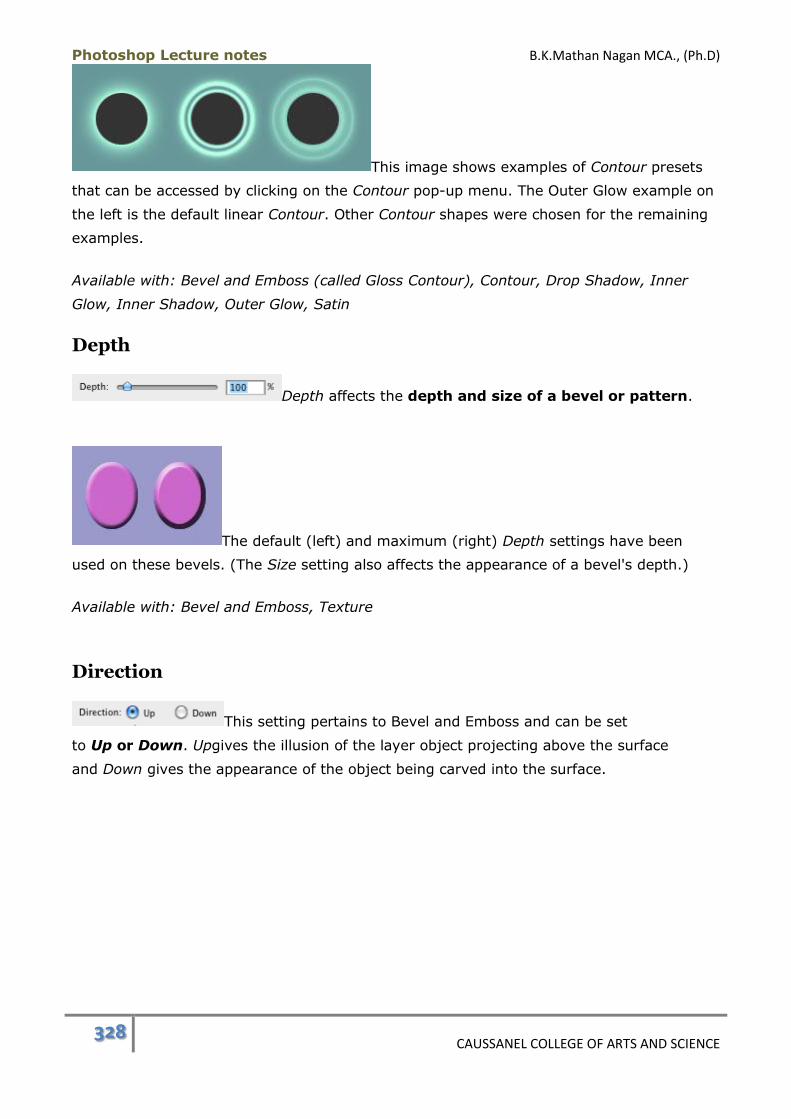
Photoshop Lecture notes B.K.Mathan Nagan MCA., (Ph.D)
328 CAUSSANEL COLLEGE OF ARTS AND SCIENCE
This image shows examples of Contour presets
that can be accessed by clicking on the Contour pop-up menu. The Outer Glow example on
the left is the default linear Contour. Other Contour shapes were chosen for the remaining
examples.
Available with: Bevel and Emboss (called Gloss Contour), Contour, Drop Shadow, Inner
Glow, Inner Shadow, Outer Glow, Satin
Depth
Depth affects the depth and size of a bevel or pattern.
The default (left) and maximum (right) Depth settings have been
used on these bevels. (The Size setting also affects the appearance of a bevel's depth.)
Available with: Bevel and Emboss, Texture
Direction
This setting pertains to Bevel and Emboss and can be set
to Up or Down. Upgives the illusion of the layer object projecting above the surface
and Down gives the appearance of the object being carved into the surface.
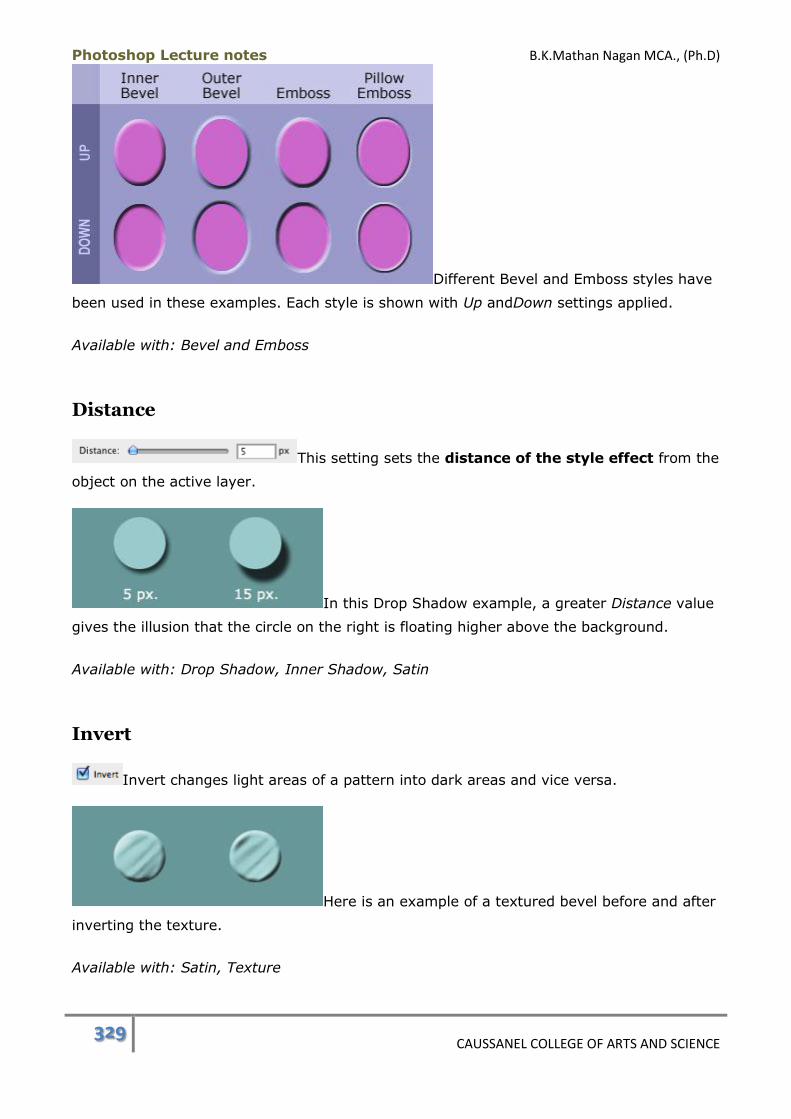
Photoshop Lecture notes B.K.Mathan Nagan MCA., (Ph.D)
329 CAUSSANEL COLLEGE OF ARTS AND SCIENCE
Different Bevel and Emboss styles have
been used in these examples. Each style is shown with Up andDown settings applied.
Available with: Bevel and Emboss
Distance
This setting sets the distance of the style effect from the
object on the active layer.
In this Drop Shadow example, a greater Distance value
gives the illusion that the circle on the right is floating higher above the background.
Available with: Drop Shadow, Inner Shadow, Satin
Invert
Invert changes light areas of a pattern into dark areas and vice versa.
Here is an example of a textured bevel before and after
inverting the texture.
Available with: Satin, Texture

Photoshop Lecture notes B.K.Mathan Nagan MCA., (Ph.D)
330 CAUSSANEL COLLEGE OF ARTS AND SCIENCE
Jitter
Jitter varies the colour and opacity of a gradient.
Available with: Inner Glow, Outer Glow
Layer Knocks Out Drop Shadow
If the active layer contains an object with reduced opacity, this
setting will prevent the drop shadow from showing through the semi-transparent pixels.
In the image at the right, the shape on the left is
the same drop shadow that appears under the two beveled puzzle pieces. The two puzzle
pieces have had their Fill settings reduced to 50% opacity. The only difference between the
two is that Layer Knocks Out Drop Shadow has been enabled on the piece at the far right.
Its drop shadow is only visible beyond the edges of the puzzle piece because the pixels of
the piece itself have "knocked out" (hidden) the shadow under it.
Available with: Drop Shadow
Link with Layer
When a pattern is used to create an effect, this setting determines whether
the pattern moves when the layer is repositioned or whether the layer can move
independently of the pattern.
Available with: Pattern, Texture
Noise
Noise is a random speckle effect that can be applied to
certain effects. The Outer Glow example below is shown without and with Noise. This
setting is useful in print work. Gradients can produce unwanted banding effects in printed
material. Adding a slight amount of noise to a gradient can prevent that from happening.
(This example used a very high setting to make the effect obvious.)
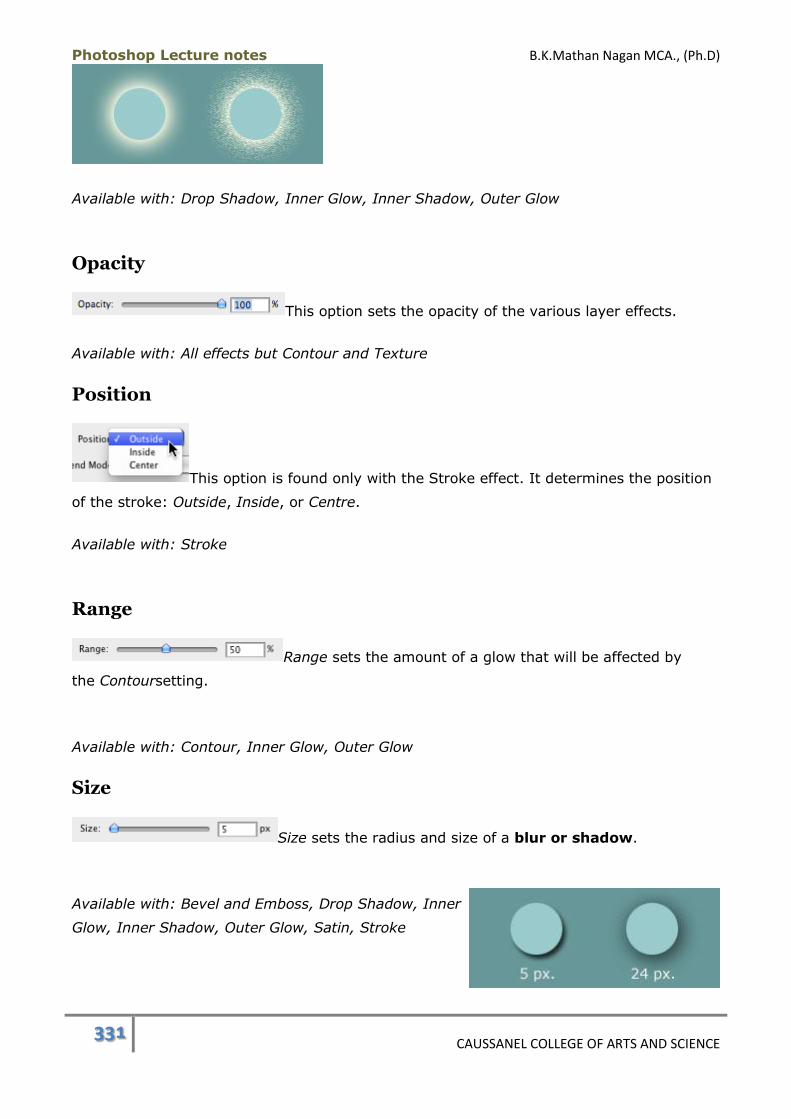
Photoshop Lecture notes B.K.Mathan Nagan MCA., (Ph.D)
331 CAUSSANEL COLLEGE OF ARTS AND SCIENCE
Available with: Drop Shadow, Inner Glow, Inner Shadow, Outer Glow
Opacity
This option sets the opacity of the various layer effects.
Available with: All effects but Contour and Texture
Position
This option is found only with the Stroke effect. It determines the position
of the stroke: Outside, Inside, or Centre.
Available with: Stroke
Range
Range sets the amount of a glow that will be affected by
the Contoursetting.
Available with: Contour, Inner Glow, Outer Glow
Size
Size sets the radius and size of a blur or shadow.
Available with: Bevel and Emboss, Drop Shadow, Inner
Glow, Inner Shadow, Outer Glow, Satin, Stroke
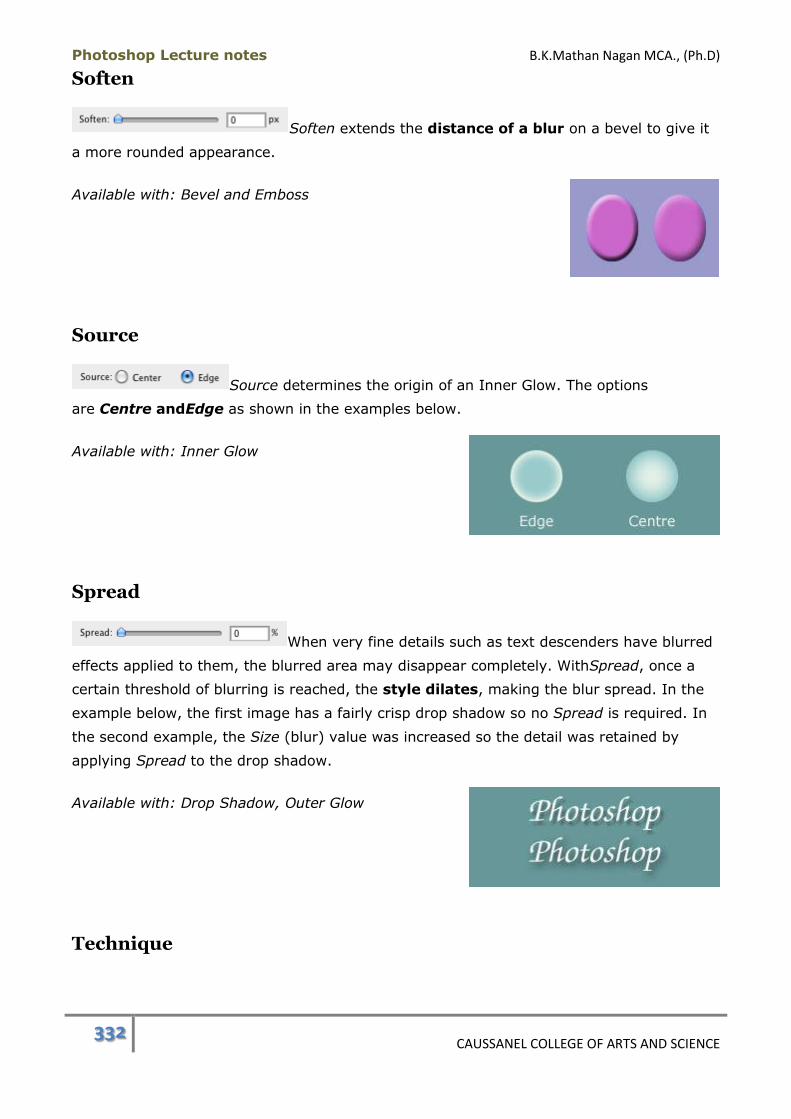
Photoshop Lecture notes B.K.Mathan Nagan MCA., (Ph.D)
332 CAUSSANEL COLLEGE OF ARTS AND SCIENCE
Soften
Soften extends the distance of a blur on a bevel to give it
a more rounded appearance.
Available with: Bevel and Emboss
Source
Source determines the origin of an Inner Glow. The options
are Centre andEdge as shown in the examples below.
Available with: Inner Glow
Spread
When very fine details such as text descenders have blurred
effects applied to them, the blurred area may disappear completely. WithSpread, once a
certain threshold of blurring is reached, the style dilates, making the blur spread. In the
example below, the first image has a fairly crisp drop shadow so no Spread is required. In
the second example, the Size (blur) value was increased so the detail was retained by
applying Spread to the drop shadow.
Available with: Drop Shadow, Outer Glow
Technique
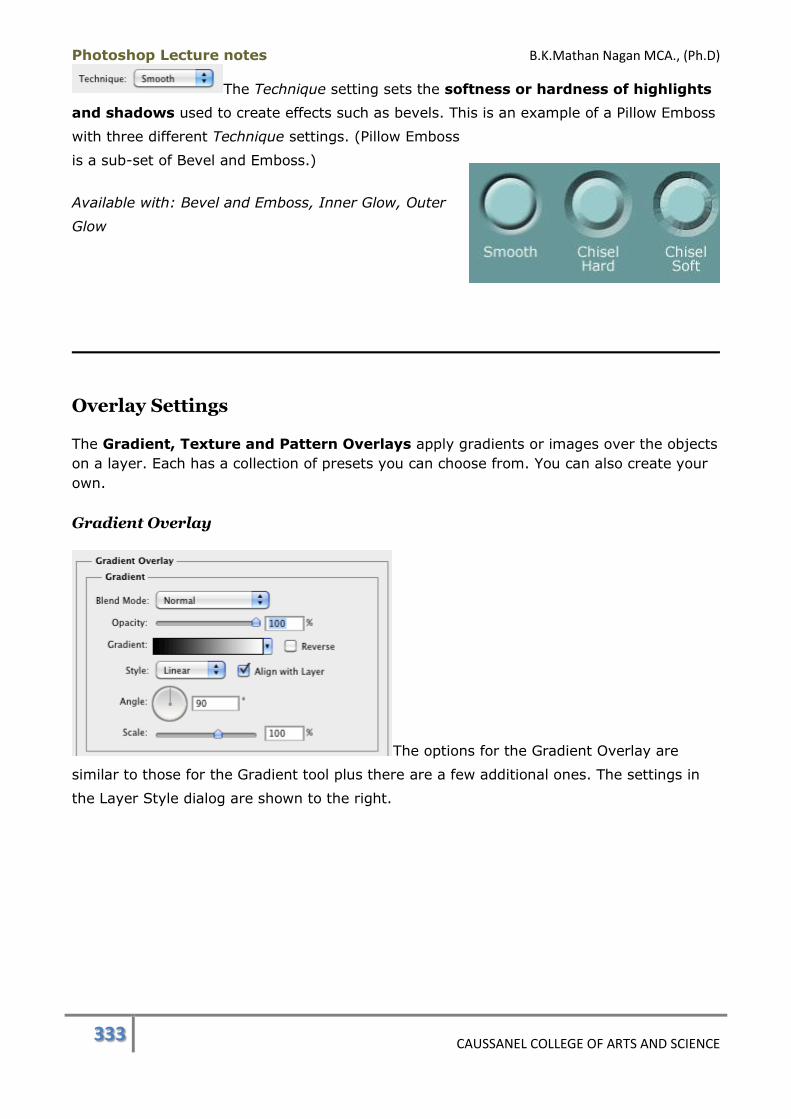
Photoshop Lecture notes B.K.Mathan Nagan MCA., (Ph.D)
333 CAUSSANEL COLLEGE OF ARTS AND SCIENCE
The Technique setting sets the softness or hardness of highlights
and shadows used to create effects such as bevels. This is an example of a Pillow Emboss
with three different Technique settings. (Pillow Emboss
is a sub-set of Bevel and Emboss.)
Available with: Bevel and Emboss, Inner Glow, Outer
Glow
Overlay Settings
The Gradient, Texture and Pattern Overlays apply gradients or images over the objects
on a layer. Each has a collection of presets you can choose from. You can also create your
own.
Gradient Overlay
The options for the Gradient Overlay are
similar to those for the Gradient tool plus there are a few additional ones. The settings in
the Layer Style dialog are shown to the right.
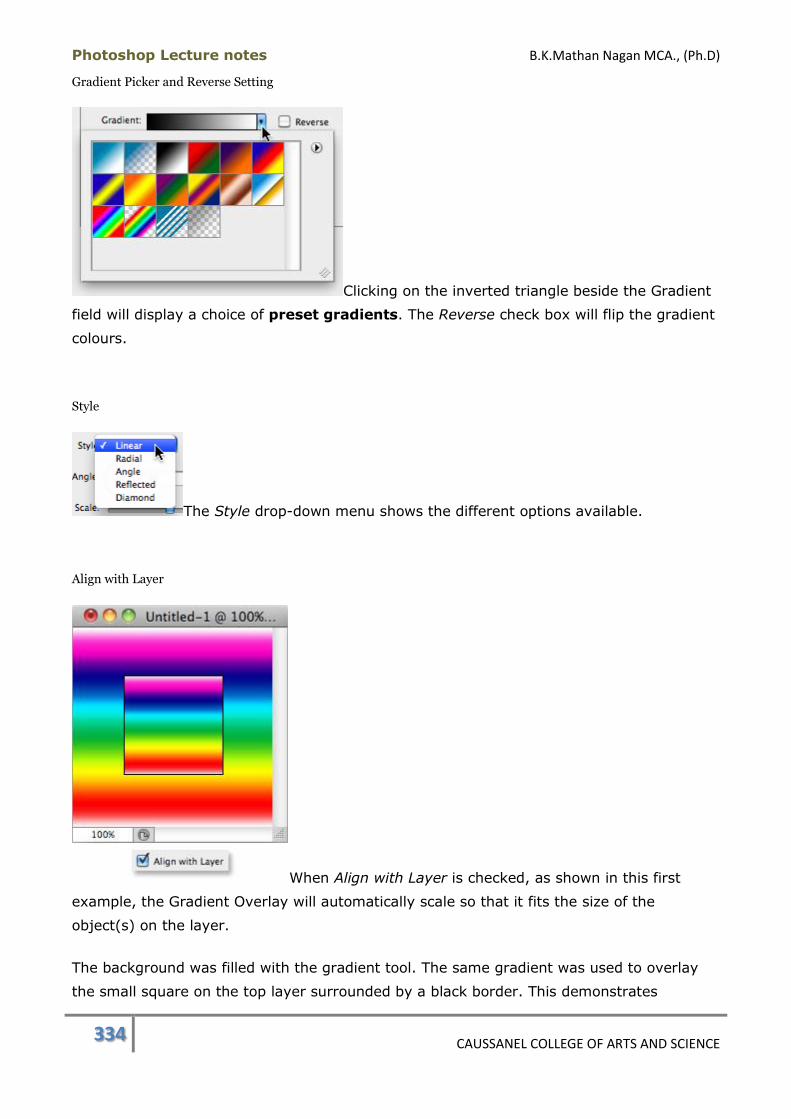
Photoshop Lecture notes B.K.Mathan Nagan MCA., (Ph.D)
334 CAUSSANEL COLLEGE OF ARTS AND SCIENCE
Gradient Picker and Reverse Setting
Clicking on the inverted triangle beside the Gradient
field will display a choice of preset gradients. The Reverse check box will flip the gradient
colours.
Style
The Style drop-down menu shows the different options available.
Align with Layer
When Align with Layer is checked, as shown in this first
example, the Gradient Overlay will automatically scale so that it fits the size of the
object(s) on the layer.
The background was filled with the gradient tool. The same gradient was used to overlay
the small square on the top layer surrounded by a black border. This demonstrates
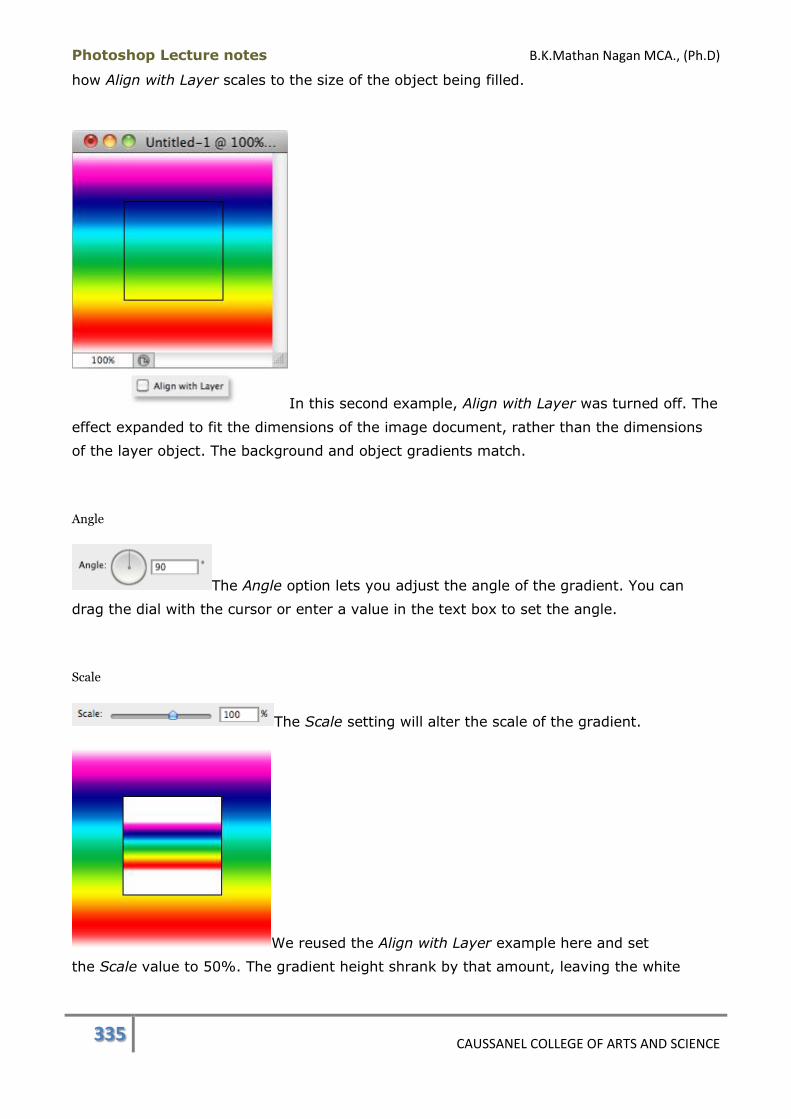
Photoshop Lecture notes B.K.Mathan Nagan MCA., (Ph.D)
335 CAUSSANEL COLLEGE OF ARTS AND SCIENCE
how Align with Layer scales to the size of the object being filled.
In this second example, Align with Layer was turned off. The
effect expanded to fit the dimensions of the image document, rather than the dimensions
of the layer object. The background and object gradients match.
Angle
The Angle option lets you adjust the angle of the gradient. You can
drag the dial with the cursor or enter a value in the text box to set the angle.
Scale
The Scale setting will alter the scale of the gradient.
We reused the Align with Layer example here and set
the Scale value to 50%. The gradient height shrank by that amount, leaving the white
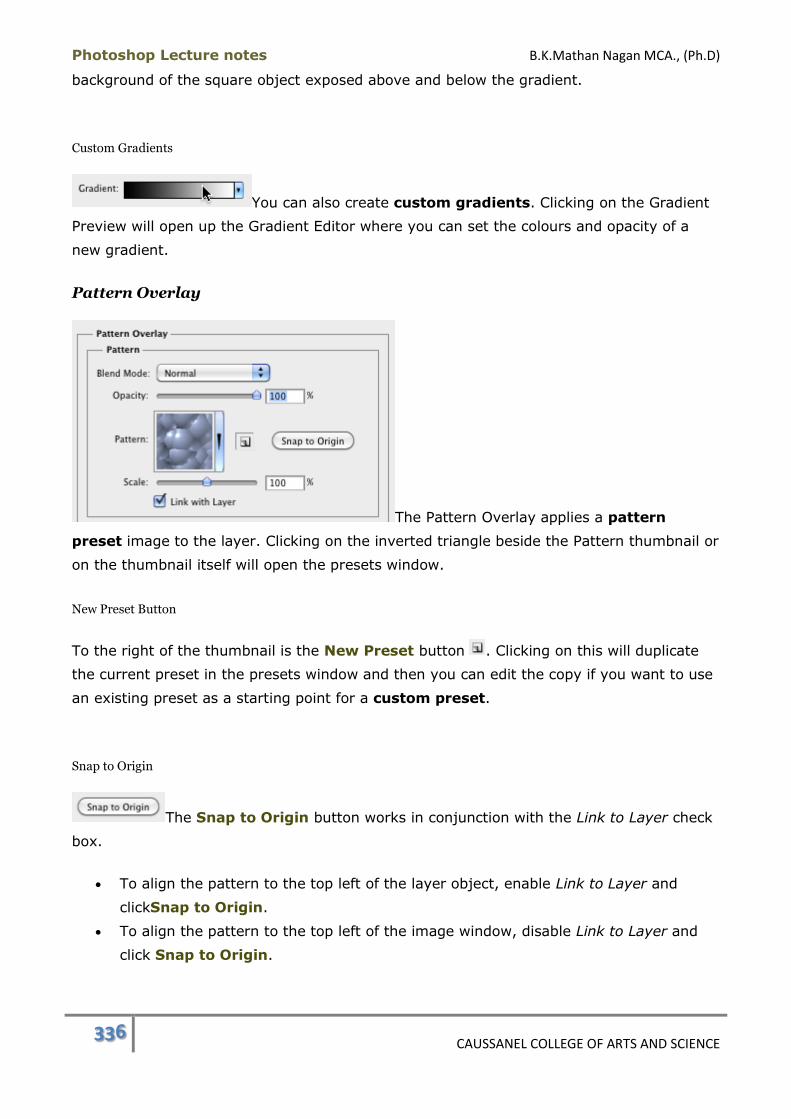
Photoshop Lecture notes B.K.Mathan Nagan MCA., (Ph.D)
336 CAUSSANEL COLLEGE OF ARTS AND SCIENCE
background of the square object exposed above and below the gradient.
Custom Gradients
You can also create custom gradients. Clicking on the Gradient
Preview will open up the Gradient Editor where you can set the colours and opacity of a
new gradient.
Pattern Overlay
The Pattern Overlay applies a pattern
preset image to the layer. Clicking on the inverted triangle beside the Pattern thumbnail or
on the thumbnail itself will open the presets window.
New Preset Button
To the right of the thumbnail is the New Preset button . Clicking on this will duplicate
the current preset in the presets window and then you can edit the copy if you want to use
an existing preset as a starting point for a custom preset.
Snap to Origin
The Snap to Origin button works in conjunction with the Link to Layer check
box.
To align the pattern to the top left of the layer object, enable Link to Layer and
clickSnap to Origin.
To align the pattern to the top left of the image window, disable Link to Layer and
click Snap to Origin.
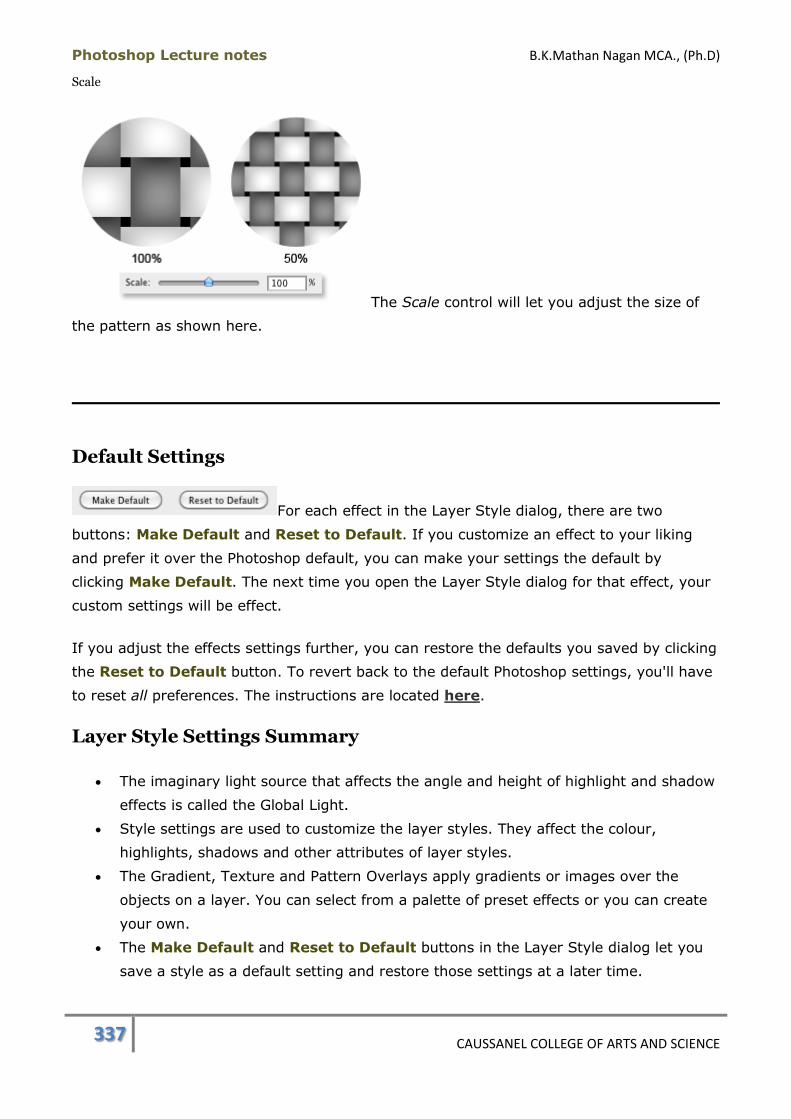
Photoshop Lecture notes B.K.Mathan Nagan MCA., (Ph.D)
337 CAUSSANEL COLLEGE OF ARTS AND SCIENCE
Scale
The Scale control will let you adjust the size of
the pattern as shown here.
Default Settings
For each effect in the Layer Style dialog, there are two
buttons: Make Default and Reset to Default. If you customize an effect to your liking
and prefer it over the Photoshop default, you can make your settings the default by
clicking Make Default. The next time you open the Layer Style dialog for that effect, your
custom settings will be effect.
If you adjust the effects settings further, you can restore the defaults you saved by clicking
the Reset to Default button. To revert back to the default Photoshop settings, you'll have
to reset all preferences. The instructions are located here.
Layer Style Settings Summary
The imaginary light source that affects the angle and height of highlight and shadow
effects is called the Global Light.
Style settings are used to customize the layer styles. They affect the colour,
highlights, shadows and other attributes of layer styles.
The Gradient, Texture and Pattern Overlays apply gradients or images over the
objects on a layer. You can select from a palette of preset effects or you can create
your own.
The Make Default and Reset to Default buttons in the Layer Style dialog let you
save a style as a default setting and restore those settings at a later time.
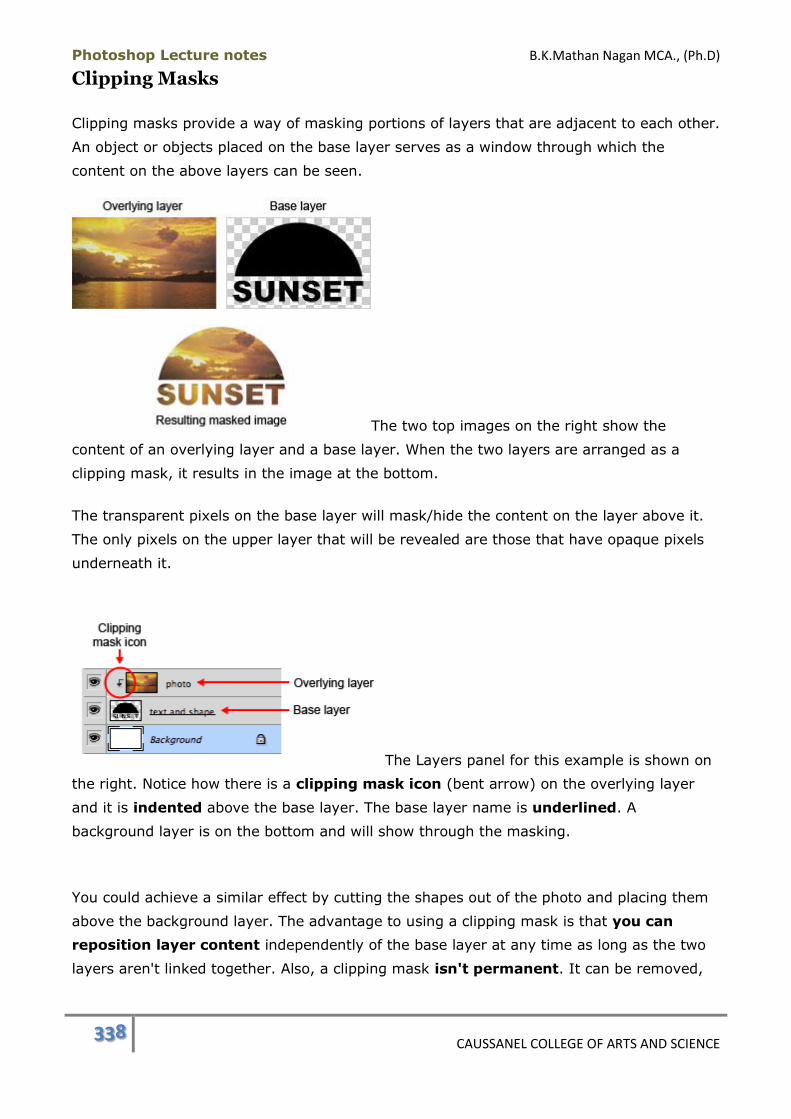
Photoshop Lecture notes B.K.Mathan Nagan MCA., (Ph.D)
338 CAUSSANEL COLLEGE OF ARTS AND SCIENCE
Clipping Masks
Clipping masks provide a way of masking portions of layers that are adjacent to each other.
An object or objects placed on the base layer serves as a window through which the
content on the above layers can be seen.
The two top images on the right show the
content of an overlying layer and a base layer. When the two layers are arranged as a
clipping mask, it results in the image at the bottom.
The transparent pixels on the base layer will mask/hide the content on the layer above it.
The only pixels on the upper layer that will be revealed are those that have opaque pixels
underneath it.
The Layers panel for this example is shown on
the right. Notice how there is a clipping mask icon (bent arrow) on the overlying layer
and it is indented above the base layer. The base layer name is underlined. A
background layer is on the bottom and will show through the masking.
You could achieve a similar effect by cutting the shapes out of the photo and placing them
above the background layer. The advantage to using a clipping mask is that you can
reposition layer content independently of the base layer at any time as long as the two
layers aren't linked together. Also, a clipping mask isn't permanent. It can be removed,
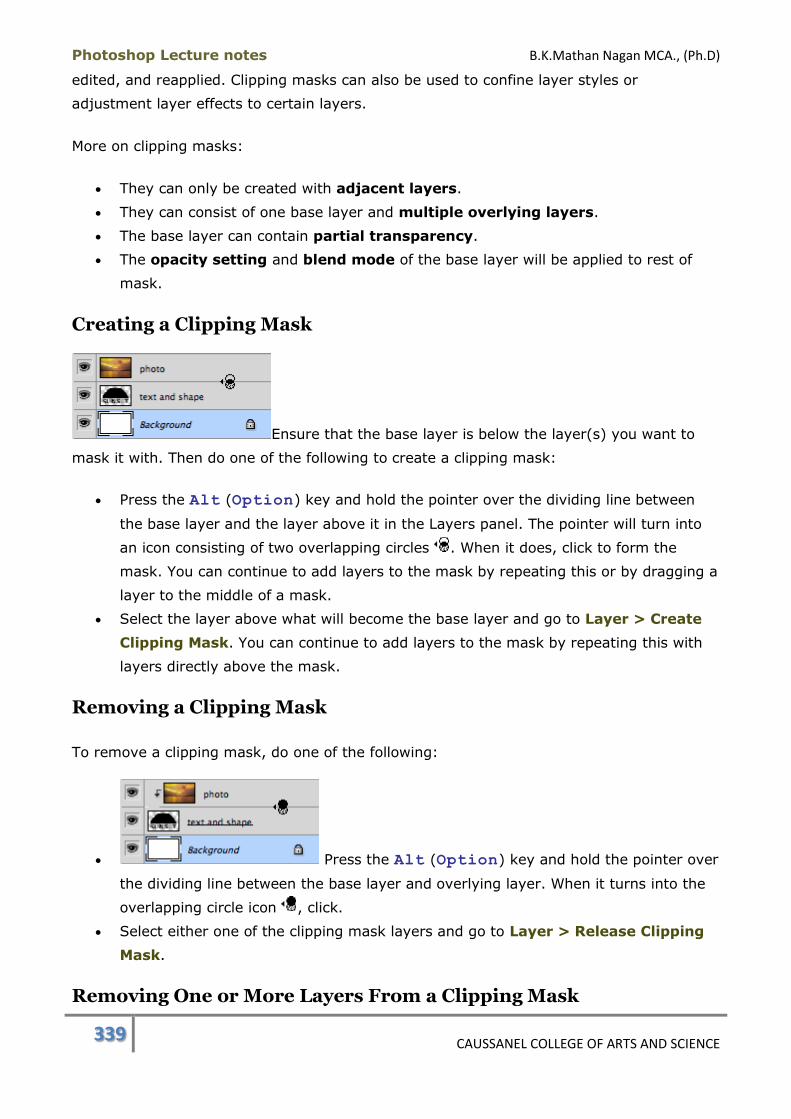
Photoshop Lecture notes B.K.Mathan Nagan MCA., (Ph.D)
339 CAUSSANEL COLLEGE OF ARTS AND SCIENCE
edited, and reapplied. Clipping masks can also be used to confine layer styles or
adjustment layer effects to certain layers.
More on clipping masks:
They can only be created with adjacent layers.
They can consist of one base layer and multiple overlying layers.
The base layer can contain partial transparency.
The opacity setting and blend mode of the base layer will be applied to rest of
mask.
Creating a Clipping Mask
Ensure that the base layer is below the layer(s) you want to
mask it with. Then do one of the following to create a clipping mask:
Press the Alt (Option) key and hold the pointer over the dividing line between
the base layer and the layer above it in the Layers panel. The pointer will turn into
an icon consisting of two overlapping circles . When it does, click to form the
mask. You can continue to add layers to the mask by repeating this or by dragging a
layer to the middle of a mask.
Select the layer above what will become the base layer and go to Layer > Create
Clipping Mask. You can continue to add layers to the mask by repeating this with
layers directly above the mask.
Removing a Clipping Mask
To remove a clipping mask, do one of the following:
Press the Alt (Option) key and hold the pointer over
the dividing line between the base layer and overlying layer. When it turns into the
overlapping circle icon , click.
Select either one of the clipping mask layers and go to Layer > Release Clipping
Mask.
Removing One or More Layers From a Clipping Mask
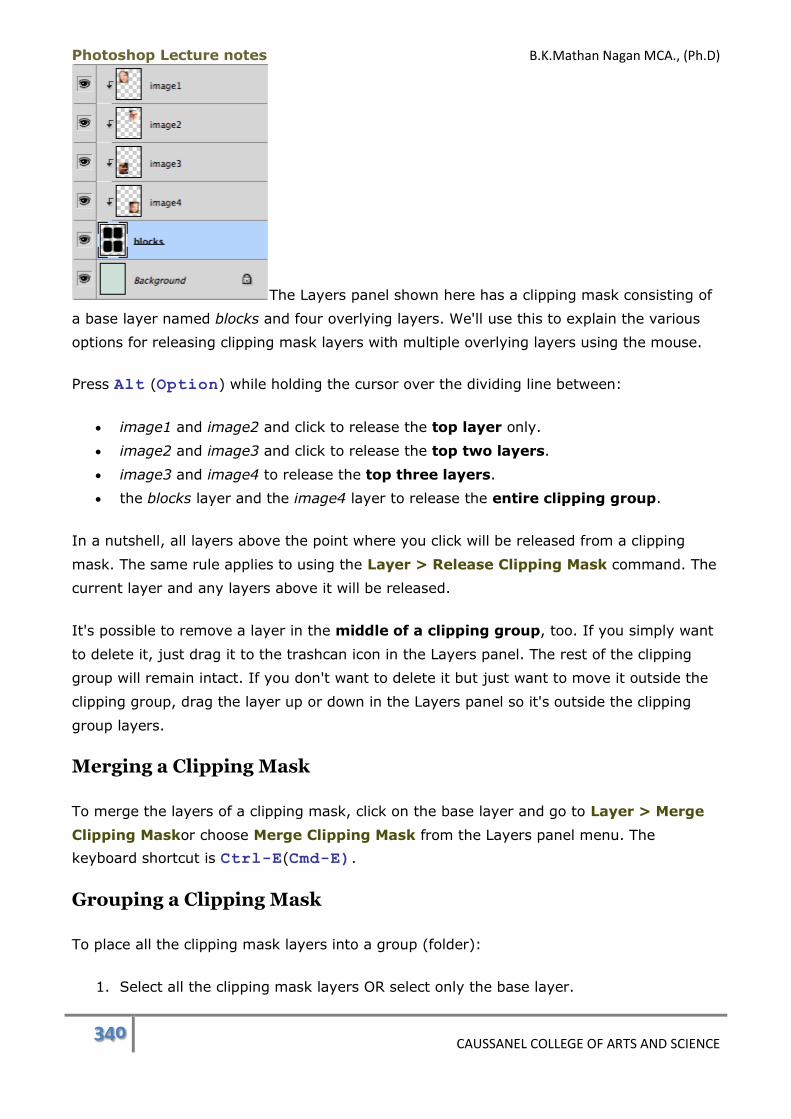
Photoshop Lecture notes B.K.Mathan Nagan MCA., (Ph.D)
340 CAUSSANEL COLLEGE OF ARTS AND SCIENCE
The Layers panel shown here has a clipping mask consisting of
a base layer named blocks and four overlying layers. We'll use this to explain the various
options for releasing clipping mask layers with multiple overlying layers using the mouse.
Press Alt (Option) while holding the cursor over the dividing line between:
image1 and image2 and click to release the top layer only.
image2 and image3 and click to release the top two layers.
image3 and image4 to release the top three layers.
the blocks layer and the image4 layer to release the entire clipping group.
In a nutshell, all layers above the point where you click will be released from a clipping
mask. The same rule applies to using the Layer > Release Clipping Mask command. The
current layer and any layers above it will be released.
It's possible to remove a layer in the middle of a clipping group, too. If you simply want
to delete it, just drag it to the trashcan icon in the Layers panel. The rest of the clipping
group will remain intact. If you don't want to delete it but just want to move it outside the
clipping group, drag the layer up or down in the Layers panel so it's outside the clipping
group layers.
Merging a Clipping Mask
To merge the layers of a clipping mask, click on the base layer and go to Layer > Merge
Clipping Maskor choose Merge Clipping Mask from the Layers panel menu. The
keyboard shortcut is Ctrl-E(Cmd-E).
Grouping a Clipping Mask
To place all the clipping mask layers into a group (folder):
1. Select all the clipping mask layers OR select only the base layer.
Photoshop Lecture notes B.K.Mathan Nagan MCA., (Ph.D)
341 CAUSSANEL COLLEGE OF ARTS AND SCIENCE
2. Go to Layer > Group Layers or, in the panel menu, select New Group from
Layers. The keyboard shortcut is Ctrl-G (Cmd-G).
Clipping Masks Summary
A clipping mask consists of a base layer and at least one other layer.
The base layer is always on the bottom layer of the mask and its name in the Layers
panel is underlined.
The masked layers above the base layer are indented and display a clipping mask
icon besides their names.
The opaque pixels on the base layer act as a window through which overlying
masked layers can be seen. The fully transparent areas of the base layer hide or
mask the content on the masked layers.
All the layers to be masked must be contiguous in the Layers panel.
The opacity and blend mode of the base layer will be applied to rest of masked
layers.
One or more overlying layers can be removed from the clipping mask group.
Clipping mask layers can be merged into a single layer.
Clipping mask layers can be placed in a layer group.
Clipping Masks Keyboard Shortcuts:
Activate the clipping mask cursor: Hold down the Alt (Option) key and place the
pointer over the border between two layers.
Merge Clipping Mask: Ctrl-E (Cmd-E)
Group Clipping Mask: Ctrl-G (Cmd-G)
Vector Shapes
Photoshop has added a tool set for creating vector shapes. By default, shapes are placed
on specialshape layers. They can be moved and transformed freely without the same
constraints as pixel-based graphics and can be rasterized (converted to bitmap pixels).
Shapes are filled with solid colours and can have layer style effects applied to them.
In the Selections module, we talked about paths in the lectures about the Pen tool set, Path
Selection tool and the Direct Selection tool. Shapes created with the shape tools are also
paths. They're referred to as vector masks. They can be edited with the tools just
mentioned.
Shape Layers
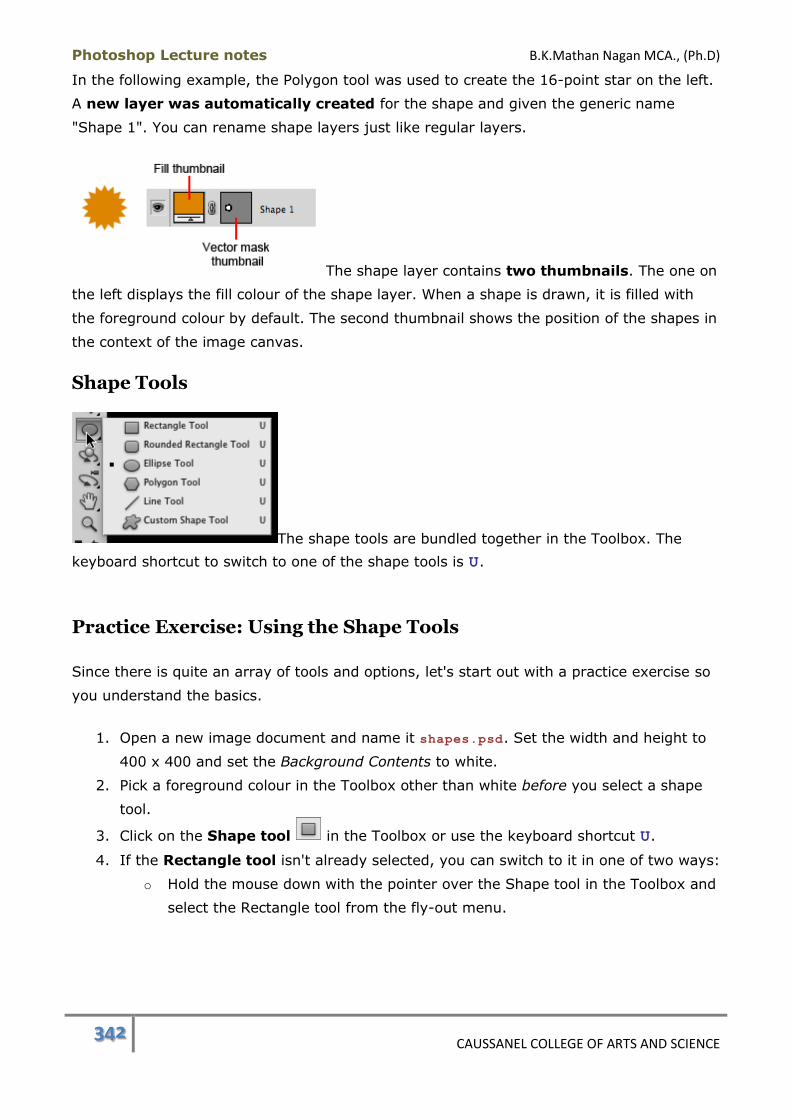
Photoshop Lecture notes B.K.Mathan Nagan MCA., (Ph.D)
342 CAUSSANEL COLLEGE OF ARTS AND SCIENCE
In the following example, the Polygon tool was used to create the 16-point star on the left.
A new layer was automatically created for the shape and given the generic name
"Shape 1". You can rename shape layers just like regular layers.
The shape layer contains two thumbnails. The one on
the left displays the fill colour of the shape layer. When a shape is drawn, it is filled with
the foreground colour by default. The second thumbnail shows the position of the shapes in
the context of the image canvas.
Shape Tools
The shape tools are bundled together in the Toolbox. The
keyboard shortcut to switch to one of the shape tools is U.
Practice Exercise: Using the Shape Tools
Since there is quite an array of tools and options, let's start out with a practice exercise so
you understand the basics.
1. Open a new image document and name it shapes.psd. Set the width and height to
400 x 400 and set the Background Contents to white.
2. Pick a foreground colour in the Toolbox other than white before you select a shape
tool.
3. Click on the Shape tool in the Toolbox or use the keyboard shortcut U.
4. If the Rectangle tool isn't already selected, you can switch to it in one of two ways:
o Hold the mouse down with the pointer over the Shape tool in the Toolbox and
select the Rectangle tool from the fly-out menu.
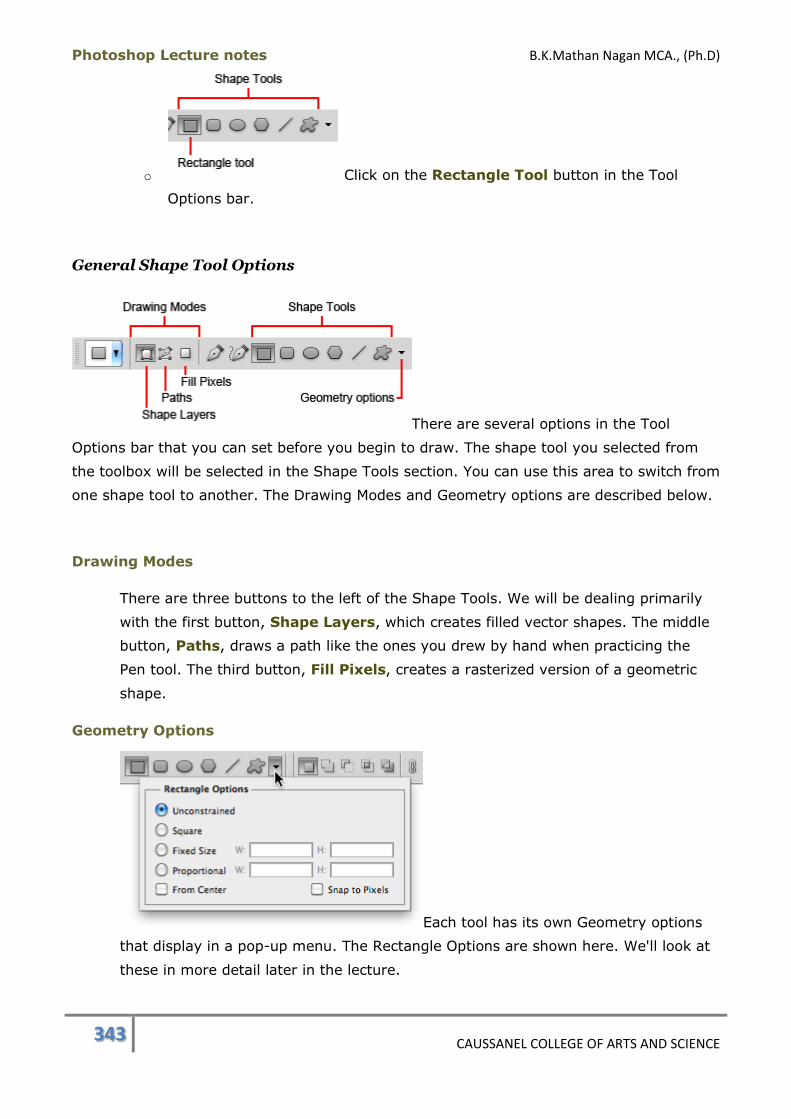
Photoshop Lecture notes B.K.Mathan Nagan MCA., (Ph.D)
343 CAUSSANEL COLLEGE OF ARTS AND SCIENCE
o Click on the Rectangle Tool button in the Tool
Options bar.
General Shape Tool Options
There are several options in the Tool
Options bar that you can set before you begin to draw. The shape tool you selected from
the toolbox will be selected in the Shape Tools section. You can use this area to switch from
one shape tool to another. The Drawing Modes and Geometry options are described below.
Drawing Modes
There are three buttons to the left of the Shape Tools. We will be dealing primarily
with the first button, Shape Layers, which creates filled vector shapes. The middle
button, Paths, draws a path like the ones you drew by hand when practicing the
Pen tool. The third button, Fill Pixels, creates a rasterized version of a geometric
shape.
Geometry Options
Each tool has its own Geometry options
that display in a pop-up menu. The Rectangle Options are shown here. We'll look at
these in more detail later in the lecture.
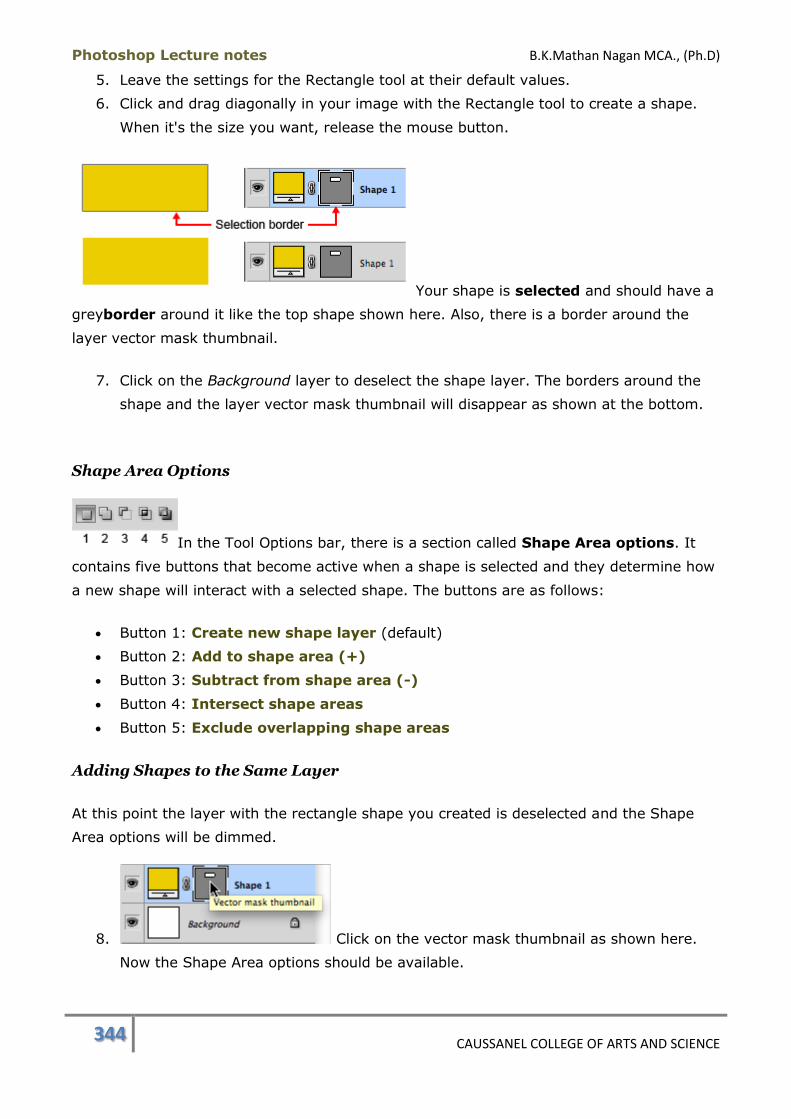
Photoshop Lecture notes B.K.Mathan Nagan MCA., (Ph.D)
344 CAUSSANEL COLLEGE OF ARTS AND SCIENCE
5. Leave the settings for the Rectangle tool at their default values.
6. Click and drag diagonally in your image with the Rectangle tool to create a shape.
When it's the size you want, release the mouse button.
Your shape is selected and should have a
greyborder around it like the top shape shown here. Also, there is a border around the
layer vector mask thumbnail.
7. Click on the Background layer to deselect the shape layer. The borders around the
shape and the layer vector mask thumbnail will disappear as shown at the bottom.
Shape Area Options
In the Tool Options bar, there is a section called Shape Area options. It
contains five buttons that become active when a shape is selected and they determine how
a new shape will interact with a selected shape. The buttons are as follows:
Button 1: Create new shape layer (default)
Button 2: Add to shape area (+)
Button 3: Subtract from shape area (-)
Button 4: Intersect shape areas
Button 5: Exclude overlapping shape areas
Adding Shapes to the Same Layer
At this point the layer with the rectangle shape you created is deselected and the Shape
Area options will be dimmed.
8. Click on the vector mask thumbnail as shown here.
Now the Shape Area options should be available.
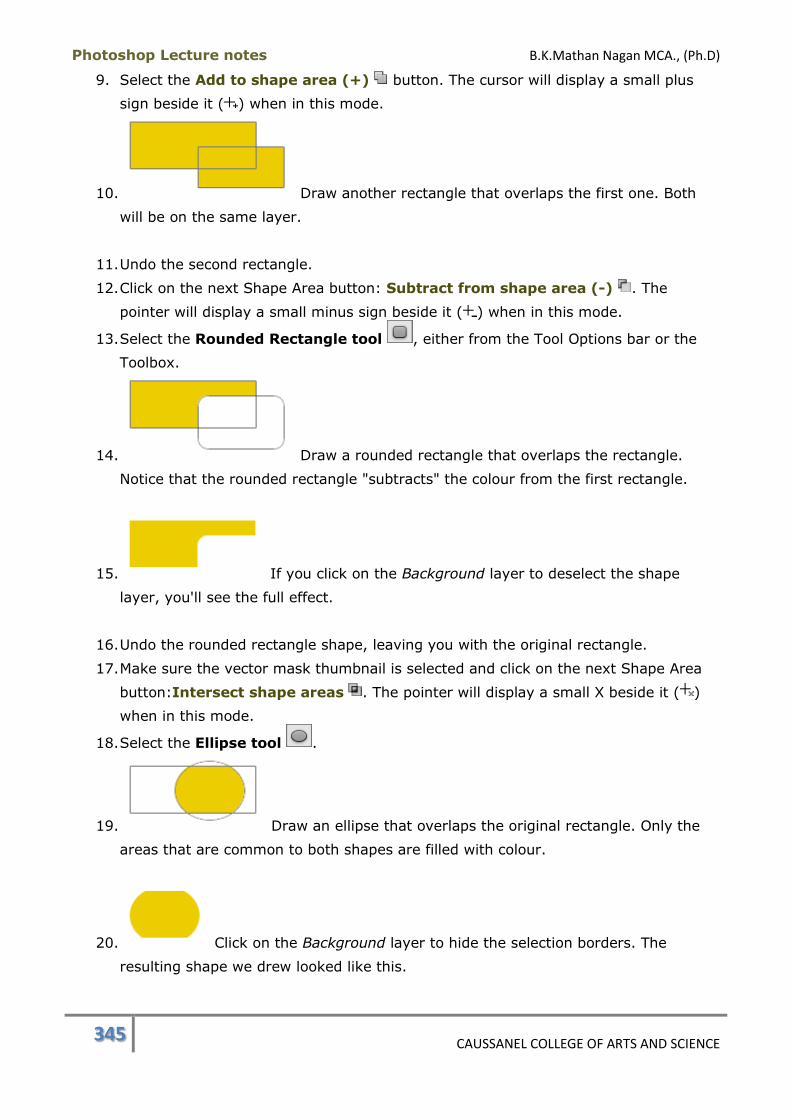
Photoshop Lecture notes B.K.Mathan Nagan MCA., (Ph.D)
345 CAUSSANEL COLLEGE OF ARTS AND SCIENCE
9. Select the Add to shape area (+) button. The cursor will display a small plus
sign beside it ( ) when in this mode.
10. Draw another rectangle that overlaps the first one. Both
will be on the same layer.
11. Undo the second rectangle.
12. Click on the next Shape Area button: Subtract from shape area (-) . The
pointer will display a small minus sign beside it ( ) when in this mode.
13. Select the Rounded Rectangle tool , either from the Tool Options bar or the
Toolbox.
14. Draw a rounded rectangle that overlaps the rectangle.
Notice that the rounded rectangle "subtracts" the colour from the first rectangle.
15. If you click on the Background layer to deselect the shape
layer, you'll see the full effect.
16. Undo the rounded rectangle shape, leaving you with the original rectangle.
17. Make sure the vector mask thumbnail is selected and click on the next Shape Area
button:Intersect shape areas . The pointer will display a small X beside it ( )
when in this mode.
18. Select the Ellipse tool .
19. Draw an ellipse that overlaps the original rectangle. Only the
areas that are common to both shapes are filled with colour.
20. Click on the Background layer to hide the selection borders. The
resulting shape we drew looked like this.
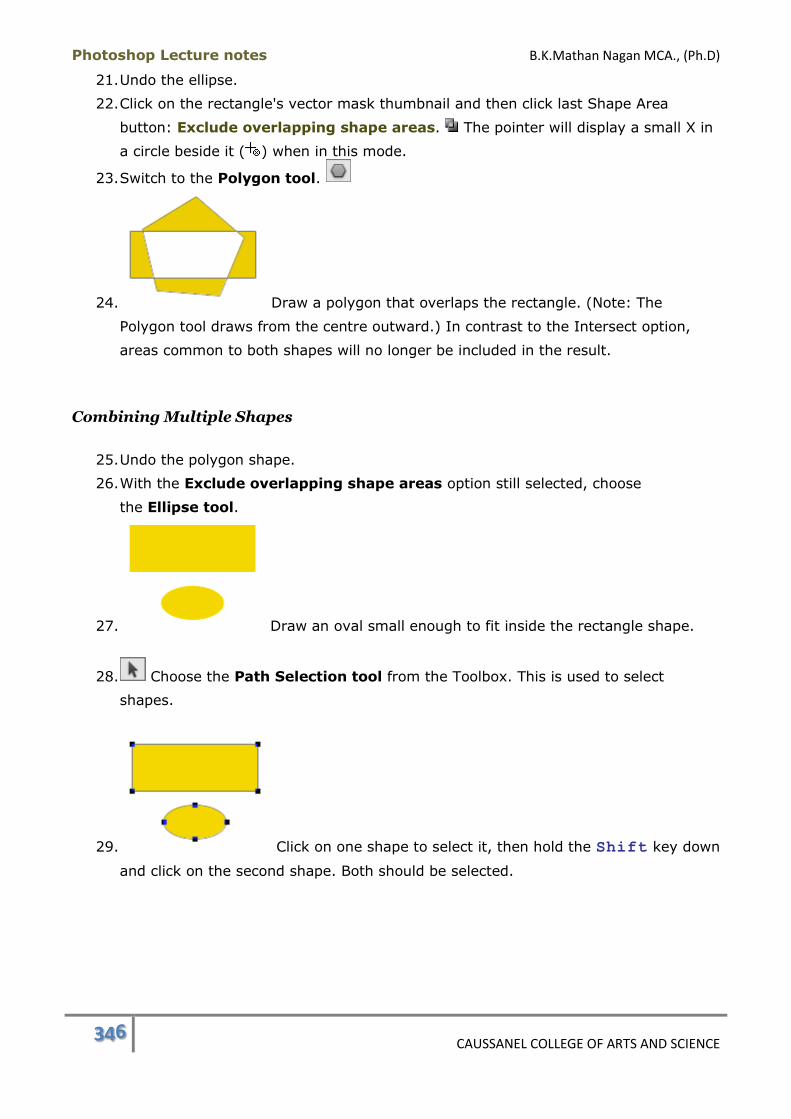
Photoshop Lecture notes B.K.Mathan Nagan MCA., (Ph.D)
346 CAUSSANEL COLLEGE OF ARTS AND SCIENCE
21. Undo the ellipse.
22. Click on the rectangle's vector mask thumbnail and then click last Shape Area
button: Exclude overlapping shape areas. The pointer will display a small X in
a circle beside it ( ) when in this mode.
23. Switch to the Polygon tool.
24. Draw a polygon that overlaps the rectangle. (Note: The
Polygon tool draws from the centre outward.) In contrast to the Intersect option,
areas common to both shapes will no longer be included in the result.
Combining Multiple Shapes
25. Undo the polygon shape.
26. With the Exclude overlapping shape areas option still selected, choose
the Ellipse tool.
27. Draw an oval small enough to fit inside the rectangle shape.
28. Choose the Path Selection tool from the Toolbox. This is used to select
shapes.
29. Click on one shape to select it, then hold the Shift key down
and click on the second shape. Both should be selected.
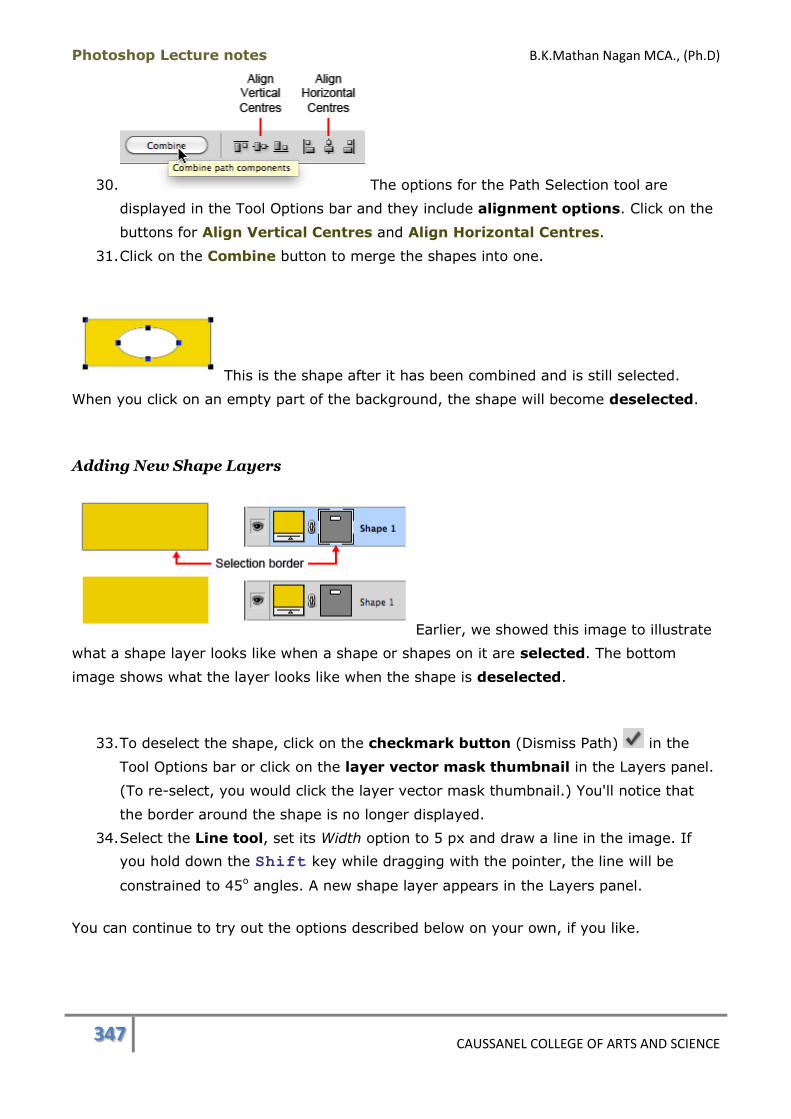
Photoshop Lecture notes B.K.Mathan Nagan MCA., (Ph.D)
347 CAUSSANEL COLLEGE OF ARTS AND SCIENCE
30. The options for the Path Selection tool are
displayed in the Tool Options bar and they include alignment options. Click on the
buttons for Align Vertical Centres and Align Horizontal Centres.
31. Click on the Combine button to merge the shapes into one.
This is the shape after it has been combined and is still selected.
When you click on an empty part of the background, the shape will become deselected.
Adding New Shape Layers
Earlier, we showed this image to illustrate
what a shape layer looks like when a shape or shapes on it are selected. The bottom
image shows what the layer looks like when the shape is deselected.
33. To deselect the shape, click on the checkmark button (Dismiss Path) in the
Tool Options bar or click on the layer vector mask thumbnail in the Layers panel.
(To re-select, you would click the layer vector mask thumbnail.) You'll notice that
the border around the shape is no longer displayed.
34. Select the Line tool, set its Width option to 5 px and draw a line in the image. If
you hold down the Shift key while dragging with the pointer, the line will be
constrained to 45o angles. A new shape layer appears in the Layers panel.
You can continue to try out the options described below on your own, if you like.

Photoshop Lecture notes B.K.Mathan Nagan MCA., (Ph.D)
348 CAUSSANEL COLLEGE OF ARTS AND SCIENCE
If you hold down Shift before drawing a new shape with the Create New Shape
Layer button still selected, it will switch to the Add to Shape Area button instead, and
your new shape will be drawn on the same shape layer.
Editing the Fill Colour
Shapes on the same layer must all have the same fill. You can't just modify the fill of one
object. This is one good reason why you might need multiple layers for shapes.
To change the fill colour of a shape, do one of the following:
Click on the Colour swatch in the Tool Options bar. Select a new colour
from the colour picker and click OK to apply it.
Double-click on the Fill thumbnail in the Layers panel to open the
colour picker. Select a new colour and click OK to apply it.
Use the Fill keyboard shortcuts Alt-Backspace (Option-Delete) to apply the
foreground colour or Ctrl-Backspace (Cmd-Delete) to apply the background
colour.
Applying Layer Styles
Styles open up great creative potential for creating objects like interface elements. Since
the objects are vector based, you can edit them freely with no loss in quality.
The Gradient and Paint Bucket tools are unavailable for filling shapes. To apply
gradients and patterns, you'll need to use layer styles. You can also apply style presets by
clicking on theStyle drop-down menu in the Tool Options bar, shown here. The icon
showing a diagonal red line means that there is currently no style applied.
The pill button shown here was drawn with the Rounded Rectangle
tool. Bevel and Emboss and Drop Shadow layer styles were used.
Layer styles work the same way on shape layers as they do on regular
layers. You can use the Stroke layer style to add strokes to your objects.
Editing the Paths of Shapes
You can edit the points and paths of a shape by selecting it with the Path Selection tool
and then using the Pen tool and/or Direct Selection tool to modify it.

Photoshop Lecture notes B.K.Mathan Nagan MCA., (Ph.D)
349 CAUSSANEL COLLEGE OF ARTS AND SCIENCE
Rasterizing Shape Layers
Shape layers can be rasterized, meaning that
they are converted from vector to bitmap format. To convert a shape layer, go to Layer >
Rasterize > Shape.
You can also use the drawing tools to create raster shapes on regular layers by
selecting the Fill Pixels button in the Tool Options bar before starting to draw.
Shape Tool Options
Once you select a shape tool, you can click on the inverted triangle in the Tool Options
bar to access a pop-up with additional tool options.
The Rectangle, Rounded Rectangle and Ellipse tools have some settings in common. The
first four listed below are mutually exclusive; i.e., only one at a time can be active.
The From Centre option can be used in combination with any of the first four options.

Photoshop Lecture notes B.K.Mathan Nagan MCA., (Ph.D)
350 CAUSSANEL COLLEGE OF ARTS AND SCIENCE
Unconstrained
Lets you draw freely with no constraints on the width or height.
Square/Circle
Constrains the shape to a perfect square or circle
Fixed Size
Sets a specific size for the shape. Just click in the image to create the shape at that
size once the dimensions are set.
Proportional
Draws the shape to the proportions you specify. 2:1 would draw the shape twice as
wide as its height.
From Centre
The centre of the shape will be at the point where you initially click with the pointer
to draw. With this option off, the initial click point will mark the upper left corner of
the shape.
The examples to the right show the path along which you'd
drag the cursor while drawing a circle. (These are drawn in a "south-east" direction but can
be drawn in any diagonal direction.)
For the left circle, the cursor's path starts at a coordinate marking where the top and left
edges of the circle will meet and ends at a coordinate marking where the right and bottom
edges will meet. The starting point when From Centre is turned on marks the centre of
the circle rather than the upper left coordinate.
There are other options that are specific to the individual tools. Some are displayed on the
Tool Options bar and others are in the pop-up list.
Rectangle Tool
Snap to Pixels (also applicable to the Rounded Rectangle tool)

Photoshop Lecture notes B.K.Mathan Nagan MCA., (Ph.D)
351 CAUSSANEL COLLEGE OF ARTS AND SCIENCE
This option snaps the shape to the pixel grid so
the boundaries of the shape line up with the edges of pixels. The image at the right
has been zoomed in to 600%. The shapes were both created using the Rounded
Rectangle tool and both are the same pixel dimensions. You can see how irregular
the boundaries of the shape are with Snap to Pixels turned off. When turned on, the
straight lines are crisp and the rounded corners all match. This kind of precision is
especially important when you're using shapes to create a web page interface and
are slicing up a large image into smaller ones. There are no fuzzy edges to contend
with and that makes your work more efficient and accurate.
Rounded Rectangle Tool
Radius
This option is located in the Tool Options bar. You can
set a Radiusvalue that will determine the roundness of the corners.
Here's a tip for creating a pill shape where the rounded ends are perfect half circles. First
determine the desired height of the rectangle. Then set the Radius to half that amount. In
this example, half of 80 px is 40 px.
Ellipse Tool
There are no additional options in the drop-down menu or Tool Options bar.
Polygon Tool
Sides

Photoshop Lecture notes B.K.Mathan Nagan MCA., (Ph.D)
352 CAUSSANEL COLLEGE OF ARTS AND SCIENCE
Located in the Tool Options bar, this sets the number of sides the
polygon will have. Three will create a triangle and five, a star, for example.
The options covered below are located in the Geometry options
drop-down menu.
Radius
Sets a predetermined distance between the centre point of the shape and its outer
points.
Smooth Corners
This option rounds the outer corners of polygons.
Star
When the Star option is checked, each side of the polygon
will be indented. Once this option is enabled, the Indent Sides by and Smooth
Indents options become available.
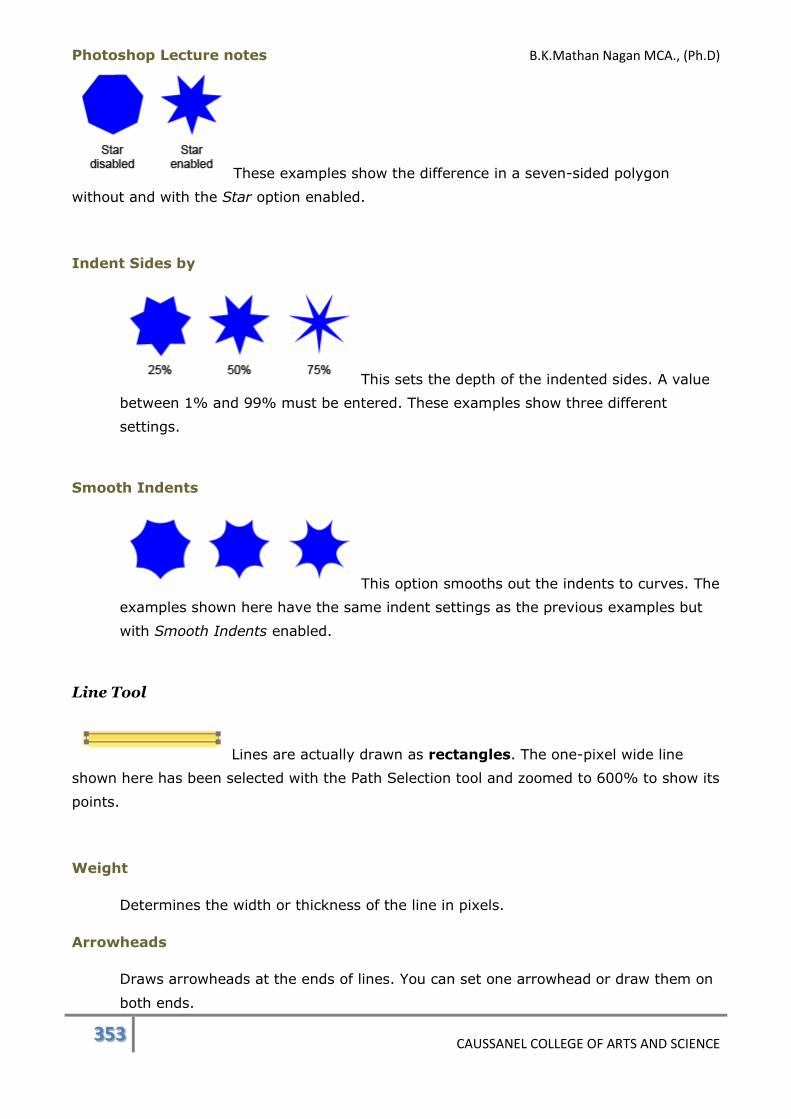
Photoshop Lecture notes B.K.Mathan Nagan MCA., (Ph.D)
353 CAUSSANEL COLLEGE OF ARTS AND SCIENCE
These examples show the difference in a seven-sided polygon
without and with the Star option enabled.
Indent Sides by
This sets the depth of the indented sides. A value
between 1% and 99% must be entered. These examples show three different
settings.
Smooth Indents
This option smooths out the indents to curves. The
examples shown here have the same indent settings as the previous examples but
with Smooth Indents enabled.
Line Tool
Lines are actually drawn as rectangles. The one-pixel wide line
shown here has been selected with the Path Selection tool and zoomed to 600% to show its
points.
Weight
Determines the width or thickness of the line in pixels.
Arrowheads
Draws arrowheads at the ends of lines. You can set one arrowhead or draw them on
both ends.
Photoshop Lecture notes B.K.Mathan Nagan MCA., (Ph.D)
354 CAUSSANEL COLLEGE OF ARTS AND SCIENCE
Start
Inserts an arrowhead at the beginning of the line as you begin drawing the line.
End
Inserts an arrowhead at the end of the line.
Width
A percentage value that sets the width of the arrowhead in relation to the line width
(weight).
Length
A percentage value that sets the length of the arrowhead in relation to the line width
(weight).
Concavity
Sets the curvature on the widest part of the
arrowhead.
Custom Shape Tool
The Custom Shape tool has a number
of presets available in theShape pop-up menu. The panel menu has additional preset
libraries with a variety of shapes you can load into this window.
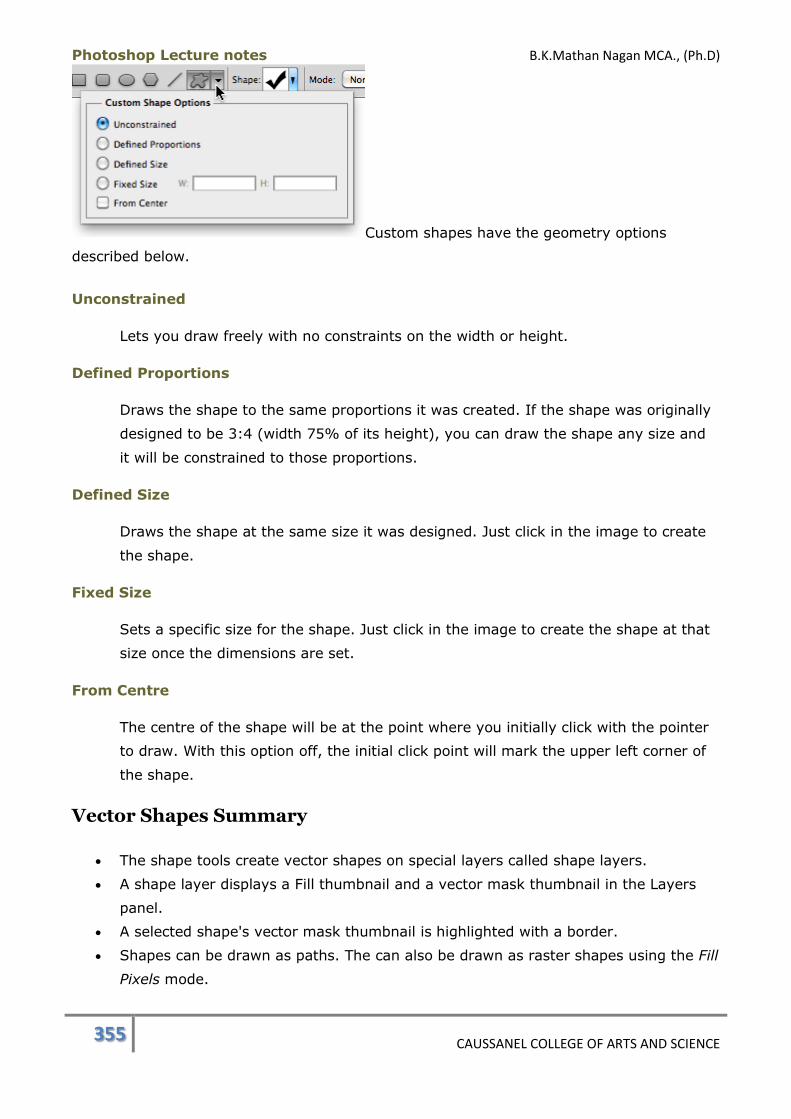
Photoshop Lecture notes B.K.Mathan Nagan MCA., (Ph.D)
355 CAUSSANEL COLLEGE OF ARTS AND SCIENCE
Custom shapes have the geometry options
described below.
Unconstrained
Lets you draw freely with no constraints on the width or height.
Defined Proportions
Draws the shape to the same proportions it was created. If the shape was originally
designed to be 3:4 (width 75% of its height), you can draw the shape any size and
it will be constrained to those proportions.
Defined Size
Draws the shape at the same size it was designed. Just click in the image to create
the shape.
Fixed Size
Sets a specific size for the shape. Just click in the image to create the shape at that
size once the dimensions are set.
From Centre
The centre of the shape will be at the point where you initially click with the pointer
to draw. With this option off, the initial click point will mark the upper left corner of
the shape.
Vector Shapes Summary
The shape tools create vector shapes on special layers called shape layers.
A shape layer displays a Fill thumbnail and a vector mask thumbnail in the Layers
panel.
A selected shape's vector mask thumbnail is highlighted with a border.
Shapes can be drawn as paths. The can also be drawn as raster shapes using the Fill
Pixels mode.

Photoshop Lecture notes B.K.Mathan Nagan MCA., (Ph.D)
356 CAUSSANEL COLLEGE OF ARTS AND SCIENCE
Once drawn, the points and paths of shapes can be selected with the Path Selection
tool and edited with the Pen tool set and Direct Selection tool.
A shape tool can be selected from the Toolbox or from the Tool Options bar once any
shape tool is active.
Multiple shapes can be drawn on a single layer and you can set the Shape Area
options to determine how the shapes will interact with each other.
Multiple shapes on the same layer can be selected using the Path Selection tool and
its options. This tool also has align and distribute options to assist in laying out the
shapes.
Multiple shapes on the same layer can be combined into a single shape using
the Combine button in the Tool Options bar.
Shapes can be drawn on separate shape layers. To do so, make sure the Create
New Shape Layer button is selected.
Change the solid fill of a shape by double-clicking on the layer's Fill thumbnail or the
colour swatch in the Tool Options bar to open the Colour Picker. You can also use
the Fill keyboard shortcuts to apply the current foreground or background colour. All
shapes on a layer must have the same fill colour and layer styles.
Layer styles can be used to apply gradients, patterns, textures, etc. to shapes.
Vector Shapes Keyboard Shortcuts:
Shape tool: U
Smart Objects
Smart Objects are relatively new to Photoshop, but they give Photoshop (CS2 and up) a
whole new added dimension.
What is a Smart Object?

Photoshop Lecture notes B.K.Mathan Nagan MCA., (Ph.D)
357 CAUSSANEL COLLEGE OF ARTS AND SCIENCE
A Smart Object is basically
a layer, but it can be thought of as a whole other layers panel contained in one layer. You
can move this layer around, rotate it, apply effects to it, pretty much everything but paint
on it or add/remove pixels. However, you can still edit the smart object. Photoshop can
open it up in a separate window for editing, just as if it was a different document. Once you
save any changes within this new window, the original document gets updated.
With vector objects, smart objects can make things much easier. Once your shape layer or
layers are converted into a smart object, things like filters can then be applied to it. Filters
can normally only be applied to raster layers.
You can use a smart object to prevent accidental editing of the contents of a layer or
layers. When converted to a smart object, the layer(s) can't be edited unless you
choose Layer > Smart Objects > Edit Contents.
Smart objects can also streamline your workflow by allowing you to make a master copy of
a layer or multiple layers. You can duplicate the smart object, then apply different effects,
position, rotation, etc. to that copy. If you need to make a change to the original object,
it's simply a matter of editing the smart object. Any duplicate layers containing that object
are automatically updated.
Compatibility
Keep in mind that smart objects are only available in Photoshop CS2 and later. Therefore, if
you try to open a PSD with smart objects in Photoshop CS or earlier, they will not be
present in the file.
Creating a Smart Object
To create a smart object, select the layer(s), or group(s) that you want to convert and do
any of the following:
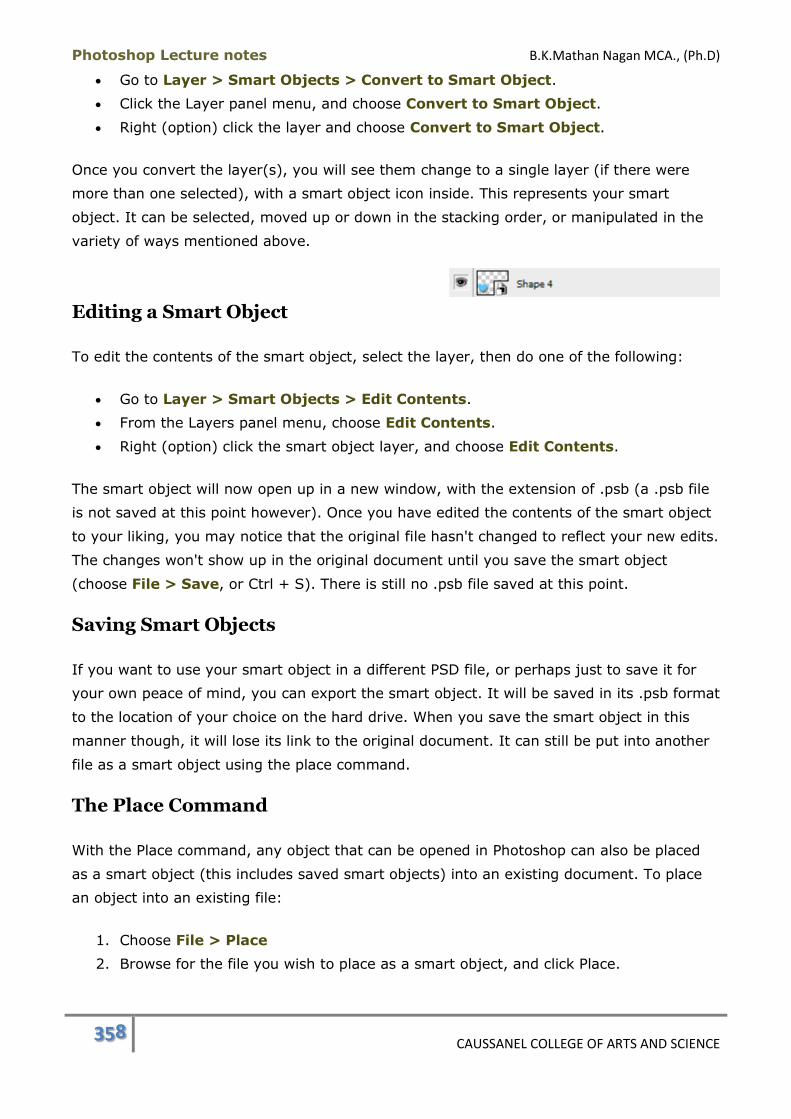
Photoshop Lecture notes B.K.Mathan Nagan MCA., (Ph.D)
358 CAUSSANEL COLLEGE OF ARTS AND SCIENCE
Go to Layer > Smart Objects > Convert to Smart Object.
Click the Layer panel menu, and choose Convert to Smart Object.
Right (option) click the layer and choose Convert to Smart Object.
Once you convert the layer(s), you will see them change to a single layer (if there were
more than one selected), with a smart object icon inside. This represents your smart
object. It can be selected, moved up or down in the stacking order, or manipulated in the
variety of ways mentioned above.
Editing a Smart Object
To edit the contents of the smart object, select the layer, then do one of the following:
Go to Layer > Smart Objects > Edit Contents.
From the Layers panel menu, choose Edit Contents.
Right (option) click the smart object layer, and choose Edit Contents.
The smart object will now open up in a new window, with the extension of .psb (a .psb file
is not saved at this point however). Once you have edited the contents of the smart object
to your liking, you may notice that the original file hasn't changed to reflect your new edits.
The changes won't show up in the original document until you save the smart object
(choose File > Save, or Ctrl + S). There is still no .psb file saved at this point.
Saving Smart Objects
If you want to use your smart object in a different PSD file, or perhaps just to save it for
your own peace of mind, you can export the smart object. It will be saved in its .psb format
to the location of your choice on the hard drive. When you save the smart object in this
manner though, it will lose its link to the original document. It can still be put into another
file as a smart object using the place command.
The Place Command
With the Place command, any object that can be opened in Photoshop can also be placed
as a smart object (this includes saved smart objects) into an existing document. To place
an object into an existing file:
1. Choose File > Place
2. Browse for the file you wish to place as a smart object, and click Place.
Photoshop Lecture notes B.K.Mathan Nagan MCA., (Ph.D)
359 CAUSSANEL COLLEGE OF ARTS AND SCIENCE
3. A new layer will show up in your document, above the current layer. The object you
opened will have resize handles to move it around and size it to your liking.
4. Press the Commit Transform (check) button in the toolbar, or the dismiss button
next to it to cancel. If you press Commit Transform, your new layer shows the smart
object icon. You can also double click the object commit transform.
Other Uses for Smart Objects
Besides all the benefits of using smart objects listed above, you can also import vector
graphics from a program such as Adobe Illustrator as a smart object. As you've already
seen, vector graphics normally need to be rasterized before they can be brought into
Photoshop. If a file is imported as a smart object, it remains a vector object that can still
be edited as such. However, since Photoshop must rasterize vector files such as the
pencil.eps file you saw earlier, clicking Edit Contents in this case won't open the smart
object in Photoshop. In the case of an .eps file, it would be opened in Adobe Illustrator. In
Illustrator, you could then edit the file and re-save it. The smart object in Photoshop will
reflect whatever changes you made.
Smart Objects Summary
Smart objects are basically a layer.
Almost any other type of layer can be incorporated into a smart object.
Smart objects can function as "master copies" that you can control duplicate layers
with.
Older versions of Photoshop, prior to CS2, don't support smart objects, and will
flatten any smart object layers when they open them.
Smart objects are created by selecting a layer or layers (or groups) and going
to Layer > Smart Objects > Convert to Smart Object.
Smart object can be edited after they are created by using the Edit
Contents command.
Smart objects can be saved as a file, so they can then be used in other Photoshop
documents.
Any file that can be opened in Photoshop, can be placed directly into a document as
a smart object by using File > Place.
Vector artwork, such as Adobe Illustrator files can be placed in Photoshop as a smart
object. Editing the contents of such a smart object will open the proper program (ie:
Illustrator) to edit the file. Saving the file out of that program will update the smart
object in Photoshop.
Smart Objects Keyboard Shortcuts:

Photoshop Lecture notes B.K.Mathan Nagan MCA., (Ph.D)
360 CAUSSANEL COLLEGE OF ARTS AND SCIENCE
Shape tool: U
Layer Comps
In the latter stages of a design project, a graphic designer or web designer will create
what's known as adesign comp. Depending on who you ask, 'comp' stands for
composition, composite, or comprehensive. At any rate, it's an advanced mockup of the
final product. In the case of web design, multiple versions of a proposed design are often
prepared to show to a client. They can vary in colours, layout, fonts, imagery, etc.
If multiple comps are stored in a single PSD file, the layers list can get very long and it
takes time to hide and show layers so you can see the different versions you've designed.
Photoshop's Layer Comps panel can help make the process more efficient. It records the
status of all the layers in the Layers panel for each composition. With a click of a button,
you can switch from one comp to another. You can also edit and update comps and
save each comp as a separate Photoshop file.
The Layer Comps panel is somewhat similar in function and appearance to the History
panel. It takessnapshots of states that can be returned to later. The ability to choose the
information that is recorded in a comp and the elimination of in-between editing steps is
what sets it apart.
Layer Comps Panel
To open the Layer Comps panel, go to Window > Layer Comps.
The panel is quite simple. Shown here is the panel
before any layer comps have been created. The Last Document State is the current
version of the file.
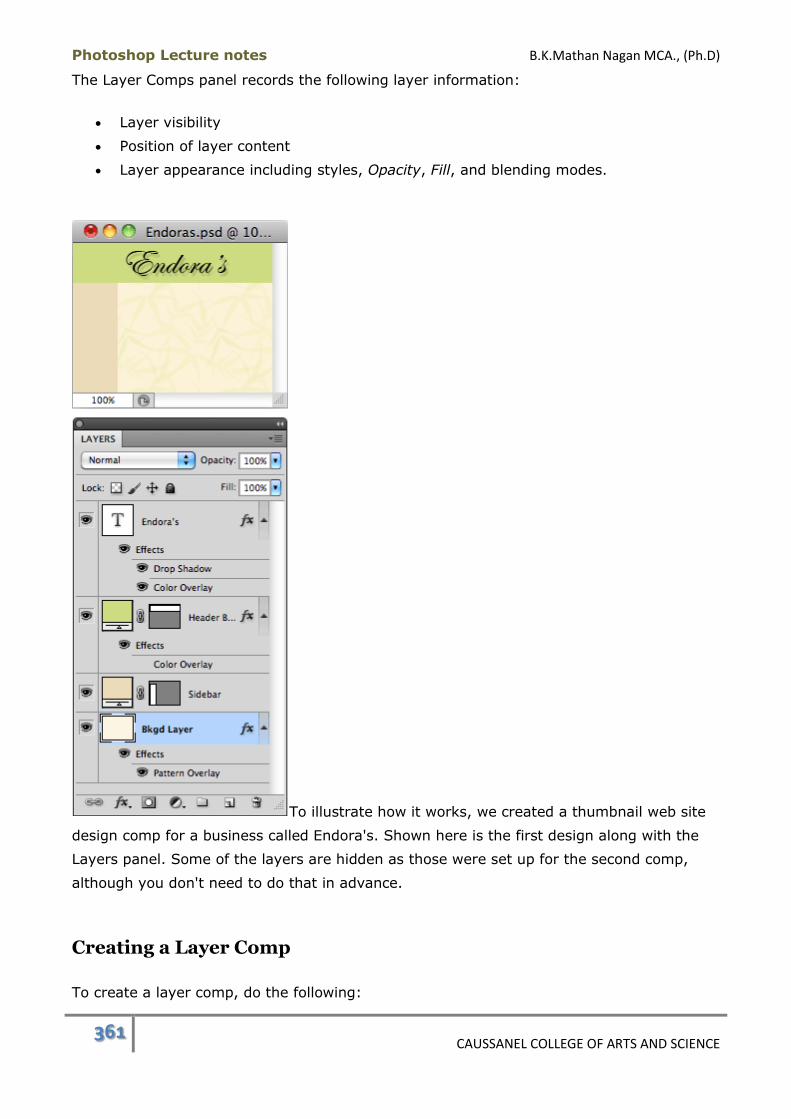
Photoshop Lecture notes B.K.Mathan Nagan MCA., (Ph.D)
361 CAUSSANEL COLLEGE OF ARTS AND SCIENCE
The Layer Comps panel records the following layer information:
Layer visibility
Position of layer content
Layer appearance including styles, Opacity, Fill, and blending modes.
To illustrate how it works, we created a thumbnail web site
design comp for a business called Endora's. Shown here is the first design along with the
Layers panel. Some of the layers are hidden as those were set up for the second comp,
although you don't need to do that in advance.
Creating a Layer Comp
To create a layer comp, do the following:
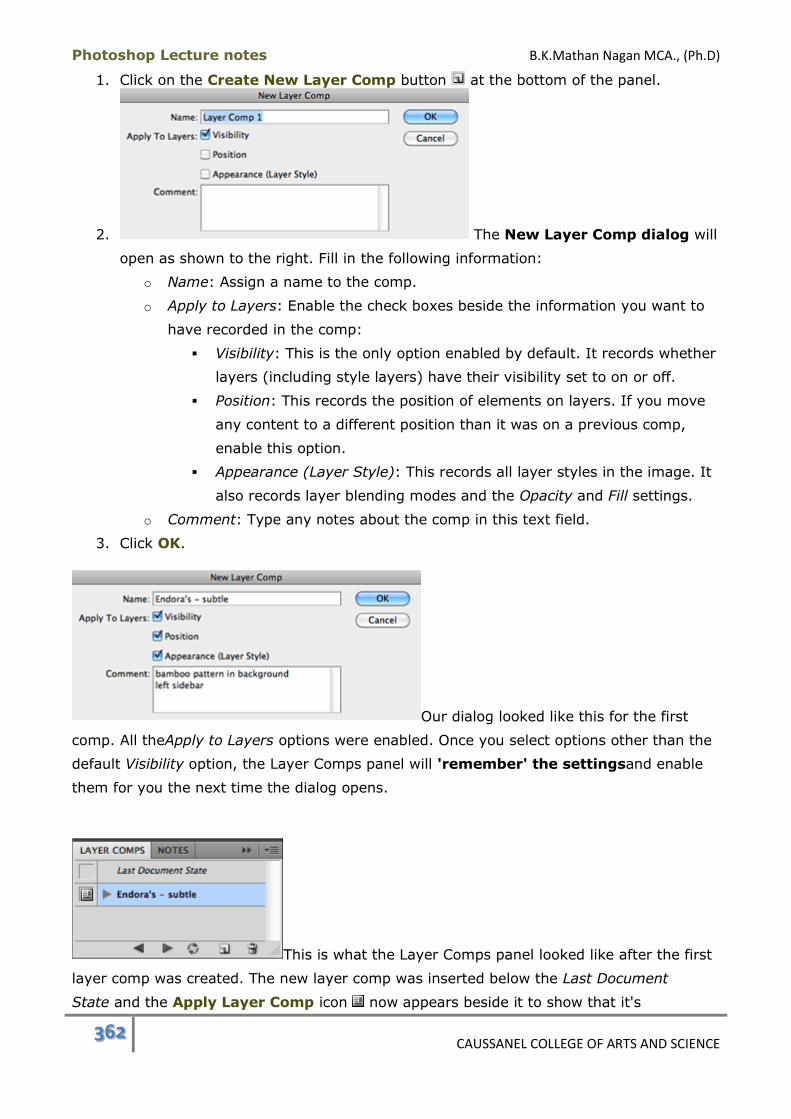
Photoshop Lecture notes B.K.Mathan Nagan MCA., (Ph.D)
362 CAUSSANEL COLLEGE OF ARTS AND SCIENCE
1. Click on the Create New Layer Comp button at the bottom of the panel.
2. The New Layer Comp dialog will
open as shown to the right. Fill in the following information:
o Name: Assign a name to the comp.
o Apply to Layers: Enable the check boxes beside the information you want to
have recorded in the comp:
Visibility: This is the only option enabled by default. It records whether
layers (including style layers) have their visibility set to on or off.
Position: This records the position of elements on layers. If you move
any content to a different position than it was on a previous comp,
enable this option.
Appearance (Layer Style): This records all layer styles in the image. It
also records layer blending modes and the Opacity and Fill settings.
o Comment: Type any notes about the comp in this text field.
3. Click OK.
Our dialog looked like this for the first
comp. All theApply to Layers options were enabled. Once you select options other than the
default Visibility option, the Layer Comps panel will 'remember' the settingsand enable
them for you the next time the dialog opens.
This is what the Layer Comps panel looked like after the first
layer comp was created. The new layer comp was inserted below the Last Document
State and the Apply Layer Comp icon now appears beside it to show that it's
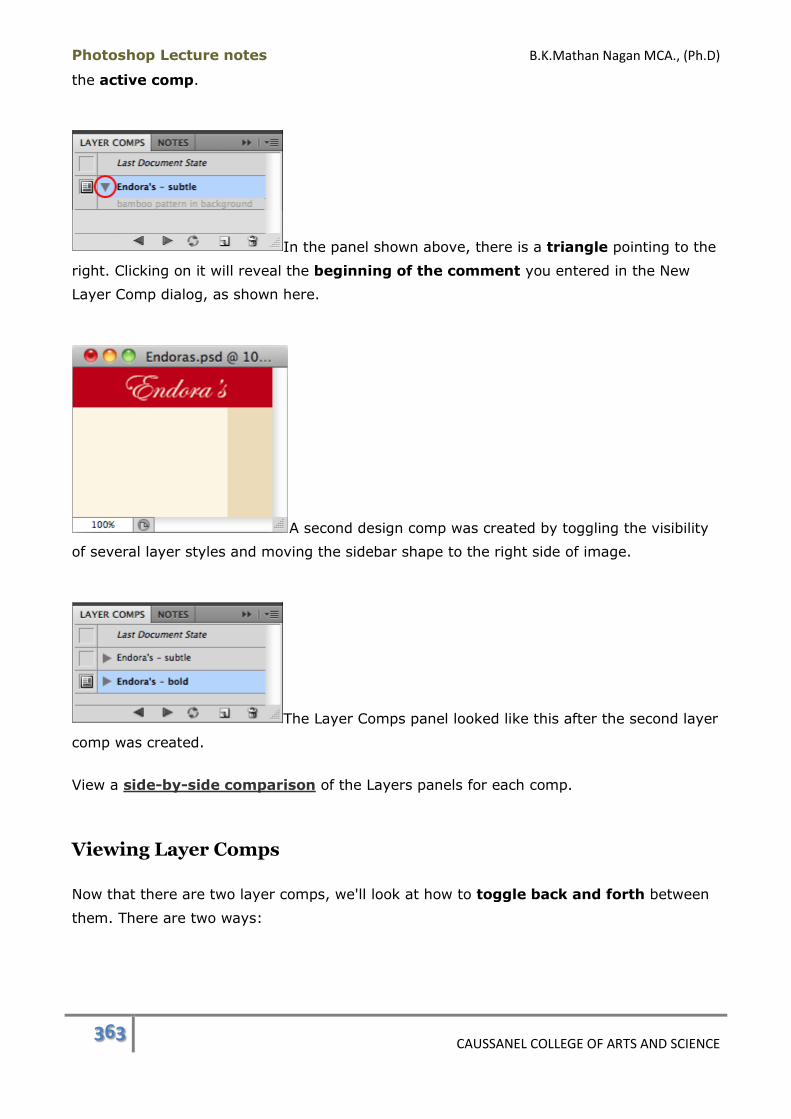
Photoshop Lecture notes B.K.Mathan Nagan MCA., (Ph.D)
363 CAUSSANEL COLLEGE OF ARTS AND SCIENCE
the active comp.
In the panel shown above, there is a triangle pointing to the
right. Clicking on it will reveal the beginning of the comment you entered in the New
Layer Comp dialog, as shown here.
A second design comp was created by toggling the visibility
of several layer styles and moving the sidebar shape to the right side of image.
The Layer Comps panel looked like this after the second layer
comp was created.
View a side-by-side comparison of the Layers panels for each comp.
Viewing Layer Comps
Now that there are two layer comps, we'll look at how to toggle back and forth between
them. There are two ways:
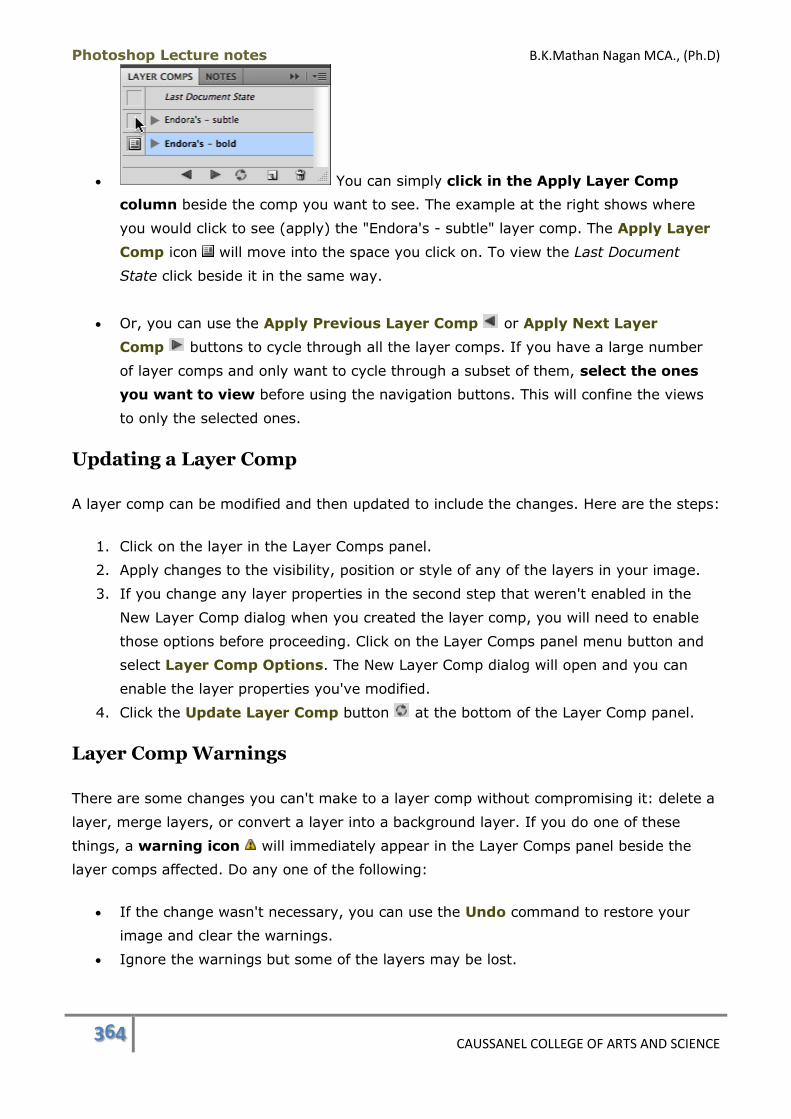
Photoshop Lecture notes B.K.Mathan Nagan MCA., (Ph.D)
364 CAUSSANEL COLLEGE OF ARTS AND SCIENCE
You can simply click in the Apply Layer Comp
column beside the comp you want to see. The example at the right shows where
you would click to see (apply) the "Endora's - subtle" layer comp. The Apply Layer
Comp icon will move into the space you click on. To view the Last Document
State click beside it in the same way.
Or, you can use the Apply Previous Layer Comp or Apply Next Layer
Comp buttons to cycle through all the layer comps. If you have a large number
of layer comps and only want to cycle through a subset of them, select the ones
you want to view before using the navigation buttons. This will confine the views
to only the selected ones.
Updating a Layer Comp
A layer comp can be modified and then updated to include the changes. Here are the steps:
1. Click on the layer in the Layer Comps panel.
2. Apply changes to the visibility, position or style of any of the layers in your image.
3. If you change any layer properties in the second step that weren't enabled in the
New Layer Comp dialog when you created the layer comp, you will need to enable
those options before proceeding. Click on the Layer Comps panel menu button and
select Layer Comp Options. The New Layer Comp dialog will open and you can
enable the layer properties you've modified.
4. Click the Update Layer Comp button at the bottom of the Layer Comp panel.
Layer Comp Warnings
There are some changes you can't make to a layer comp without compromising it: delete a
layer, merge layers, or convert a layer into a background layer. If you do one of these
things, a warning icon will immediately appear in the Layer Comps panel beside the
layer comps affected. Do any one of the following:
If the change wasn't necessary, you can use the Undo command to restore your
image and clear the warnings.
Ignore the warnings but some of the layers may be lost.
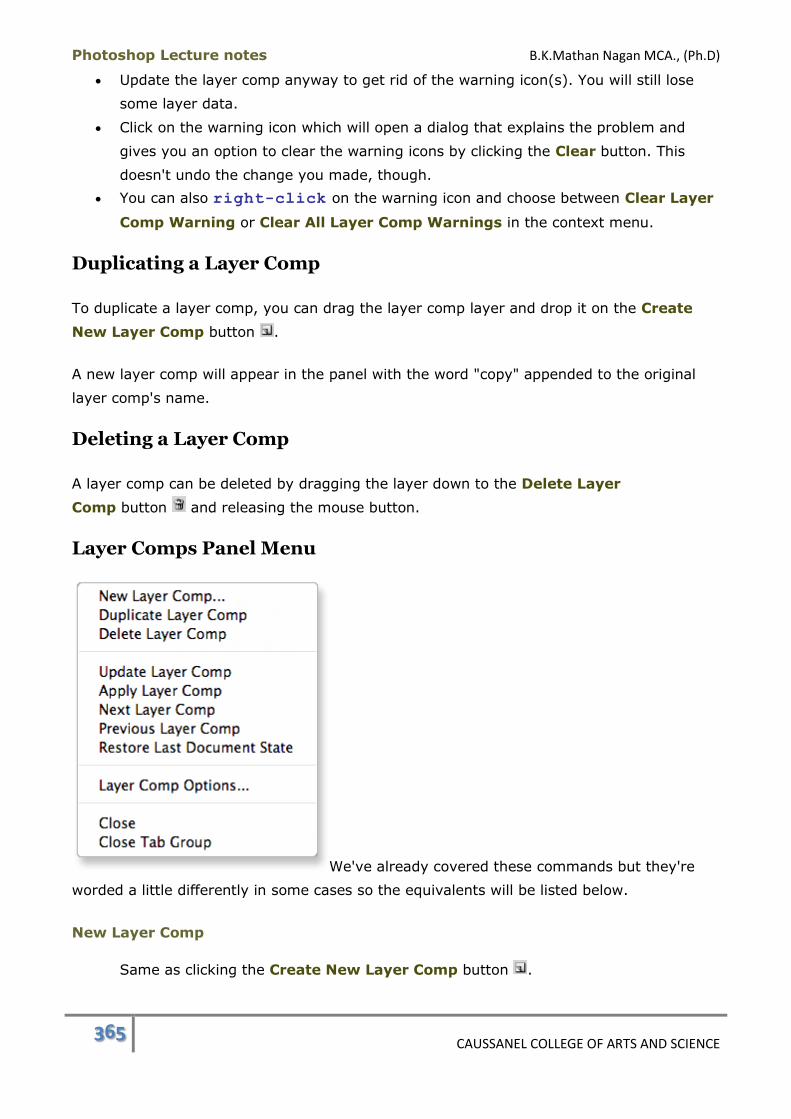
Photoshop Lecture notes B.K.Mathan Nagan MCA., (Ph.D)
365 CAUSSANEL COLLEGE OF ARTS AND SCIENCE
Update the layer comp anyway to get rid of the warning icon(s). You will still lose
some layer data.
Click on the warning icon which will open a dialog that explains the problem and
gives you an option to clear the warning icons by clicking the Clear button. This
doesn't undo the change you made, though.
You can also right-click on the warning icon and choose between Clear Layer
Comp Warning or Clear All Layer Comp Warnings in the context menu.
Duplicating a Layer Comp
To duplicate a layer comp, you can drag the layer comp layer and drop it on the Create
New Layer Comp button .
A new layer comp will appear in the panel with the word "copy" appended to the original
layer comp's name.
Deleting a Layer Comp
A layer comp can be deleted by dragging the layer down to the Delete Layer
Comp button and releasing the mouse button.
Layer Comps Panel Menu
We've already covered these commands but they're
worded a little differently in some cases so the equivalents will be listed below.
New Layer Comp
Same as clicking the Create New Layer Comp button .

Photoshop Lecture notes B.K.Mathan Nagan MCA., (Ph.D)
366 CAUSSANEL COLLEGE OF ARTS AND SCIENCE
Duplicate Layer Comp
Same as dragging and dropping a layer onto the Create New Layer
Comp button .
Delete Layer Comp
Same as dragging and dropping a layer onto the Delete Layer Comp button .
Update Layer Comp
Same as clicking the Update Layer Comp button .
Apply Layer Comp
Same as clicking in the Apply Layer Comp column to activate the Apply Layer
Comp icon . This works on the layer comp that is currently selected.
Next Layer Comp
Same as clicking the Apply Next Layer Comp button .
Previous Layer Comp
Same as clicking the Apply Previous Layer Comp button. .
Restore Last Document State
Same as clicking in the Apply Layer Comp column beside the Last Document State.
Layer Comp Options
Opens the New Layer Comp dialog so you can rename the selected comp,
change the Apply to Layers options, or modify the Comment section. A shortcut is to
double-click on the layer comp layer to the right of the name.
Layer Comps to Files
A file containing layer comps can be saved so that each comp is in its own file. They can
be saved in a number of image formats as well as PDFs. The PDF option is a great way to
provide design comps to a client.

Photoshop Lecture notes B.K.Mathan Nagan MCA., (Ph.D)
367 CAUSSANEL COLLEGE OF ARTS AND SCIENCE
To begin, go to File > Scripts. The
command we're interested in is Layer Comps to Files. There is another command Layer
Comps to WPG. WPG stands for Web Photo Gallery which has been replaced by the Adobe
Output Module in Bridge. At the time of this writing, the module was only available by
downloading it so we won't cover it here.
After choosing the command Layer Comps to
Files, theLayer Comps to Files dialog will open. Here's a rundown of its options.
Destination
This sets the location of the files that will be generated. By default, the files will be
saved in the same folder as the original PSD file. Click the Browsebutton to select a
different folder.
File Name Prefix
This will display the current file name without its .psdfile extension. You can
change the prefix if you like. The appropriate extension will be assigned based on
the File Type selected.
Selected Layer Comps Only
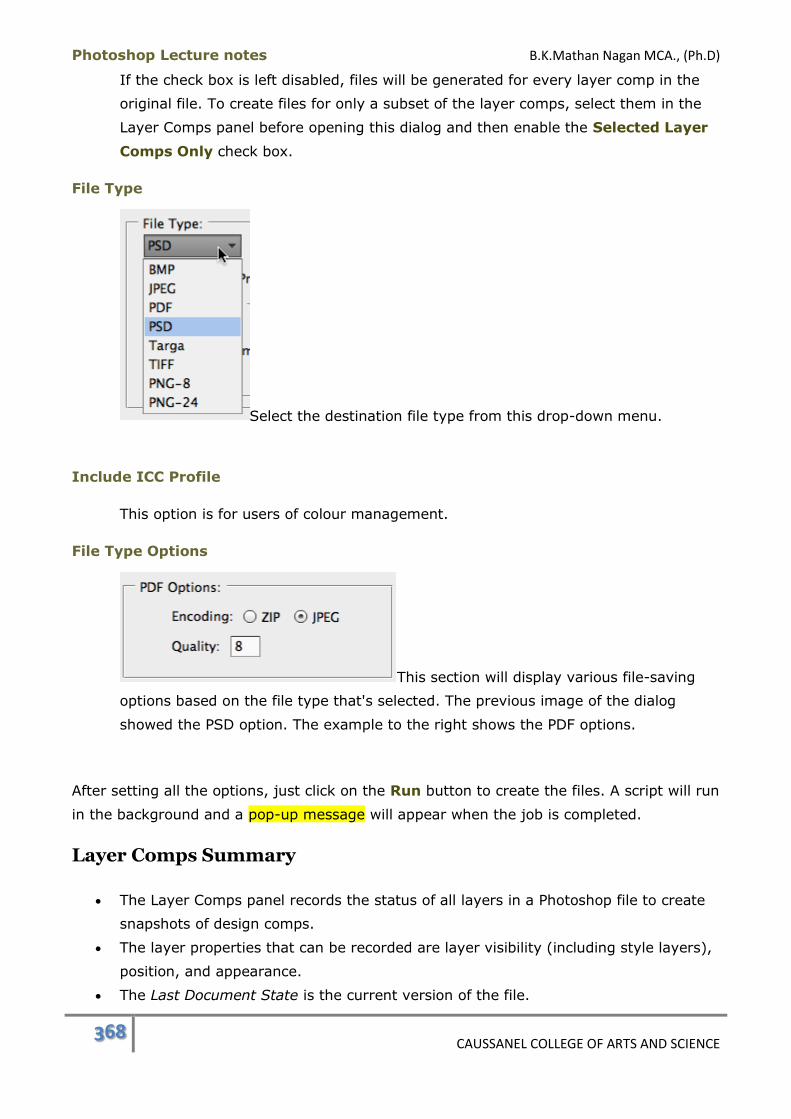
Photoshop Lecture notes B.K.Mathan Nagan MCA., (Ph.D)
368 CAUSSANEL COLLEGE OF ARTS AND SCIENCE
If the check box is left disabled, files will be generated for every layer comp in the
original file. To create files for only a subset of the layer comps, select them in the
Layer Comps panel before opening this dialog and then enable the Selected Layer
Comps Only check box.
File Type
Select the destination file type from this drop-down menu.
Include ICC Profile
This option is for users of colour management.
File Type Options
This section will display various file-saving
options based on the file type that's selected. The previous image of the dialog
showed the PSD option. The example to the right shows the PDF options.
After setting all the options, just click on the Run button to create the files. A script will run
in the background and a pop-up message will appear when the job is completed.
Layer Comps Summary
The Layer Comps panel records the status of all layers in a Photoshop file to create
snapshots of design comps.
The layer properties that can be recorded are layer visibility (including style layers),
position, and appearance.
The Last Document State is the current version of the file.

Photoshop Lecture notes B.K.Mathan Nagan MCA., (Ph.D)
369 CAUSSANEL COLLEGE OF ARTS AND SCIENCE
The New Layer Comp dialog is used to name the layer comp, set the layer properties
you want recorded, and includes a space for typing in comments.
To view/apply a layer comp, click in the Apply Layer Comp column beside the comp
you want to see. To scroll through all layer comps or a selected subset of them, use
the Apply Previous Layer Comp or Apply Next Layer Comp buttons.
An existing layer comp can be modified and then updated.
There are various ways to handle layer comp warnings. Some of these may result in
the loss of layer information.
The Layer Comps to Files command can be used to generate individual files for all
layer comps or a selected number of them. The resulting files can be in PDF or PSD
format as well as in several common image formats.
Layers Project
This exercise will serve as a review of layers. To complete it you will:
create clipping masks
apply layer styles
drag layers between images
rename layers
delete a layer
convert a layer to a Background layer
use a number of selection techniques
convert a selection to a layer
link layers
reposition layer content
duplicate layers
To create this project, you'll need to download a .zip file for the PC or .sit file for the
Macintosh (1 MB) containing the component images. Once the file has finished downloading
to your computer, extract the files from the .zip or .sit file using a decompression utility
program like WinZip (PC) or Stuffit Expander (Macintosh) (Windows XP and later do not
need a program to open .zip files). You should now have a folder called layers_project
containing five files named city.psd, glasses.psd, greenspace_text.psd,park.psd,
and project_text.psd.
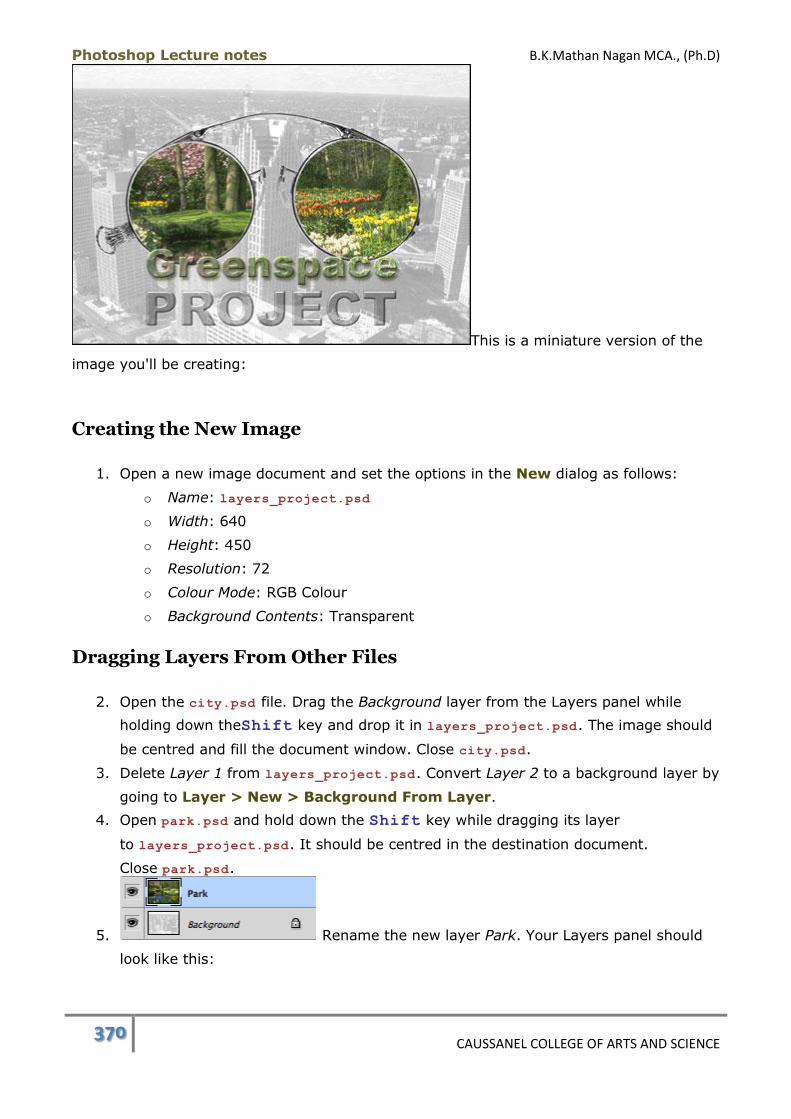
Photoshop Lecture notes B.K.Mathan Nagan MCA., (Ph.D)
370 CAUSSANEL COLLEGE OF ARTS AND SCIENCE
This is a miniature version of the
image you'll be creating:
Creating the New Image
1. Open a new image document and set the options in the New dialog as follows:
o Name: layers_project.psd
o Width: 640
o Height: 450
o Resolution: 72
o Colour Mode: RGB Colour
o Background Contents: Transparent
Dragging Layers From Other Files
2. Open the city.psd file. Drag the Background layer from the Layers panel while
holding down theShift key and drop it in layers_project.psd. The image should
be centred and fill the document window. Close city.psd.
3. Delete Layer 1 from layers_project.psd. Convert Layer 2 to a background layer by
going to Layer > New > Background From Layer.
4. Open park.psd and hold down the Shift key while dragging its layer
to layers_project.psd. It should be centred in the destination document.
Close park.psd.
5. Rename the new layer Park. Your Layers panel should
look like this:

Photoshop Lecture notes B.K.Mathan Nagan MCA., (Ph.D)
371 CAUSSANEL COLLEGE OF ARTS AND SCIENCE
Separating an Image Into Two Layers
6. Open glasses.psd. It contains an image that's on a transparent layer. The lenses
are filled with partially transparent pixels that you'll need to select and convert to a
separate layer. Drag the glasses layer into layers_project.psd and close
the glasses.psd file. Since the layer was already named in the source file, the
name was transferred into the new file.
7. Save your file.
Creating Initial Selection With the Magic Wand Tool
8. Select the Magic Wand tool and set its options as follows:
o Tolerance: 0
o Anti-aliased: enabled
o Contiguous: enabled
o Use All Layers: disabled
9. Click inside one lens; then hold down the Shift key
while clicking inside the other lens. You should now have a selection marquee
around both lenses, like this:
Refining the Selection
10. The selection is pretty jagged and doesn't include all of the lens area so you'll refine
it.
11. Go to Select > Grow. This will select a few more adjacent pixels.
12. Go to Select > Modify > Expand and enter a value of 2 pixels.
13. Go to Select > Feather and enter a Feather Radius value of 2 pixels.
New Layer From Selection
14. Cut the selection and place it on its own layer by pressing Shift-Ctrl-
J (Shift-Cmd-J).
15. Hide the new layer to see how well your selection effort turned out. If you're
unhappy with your results and you've run out of Undos, you can always use the File
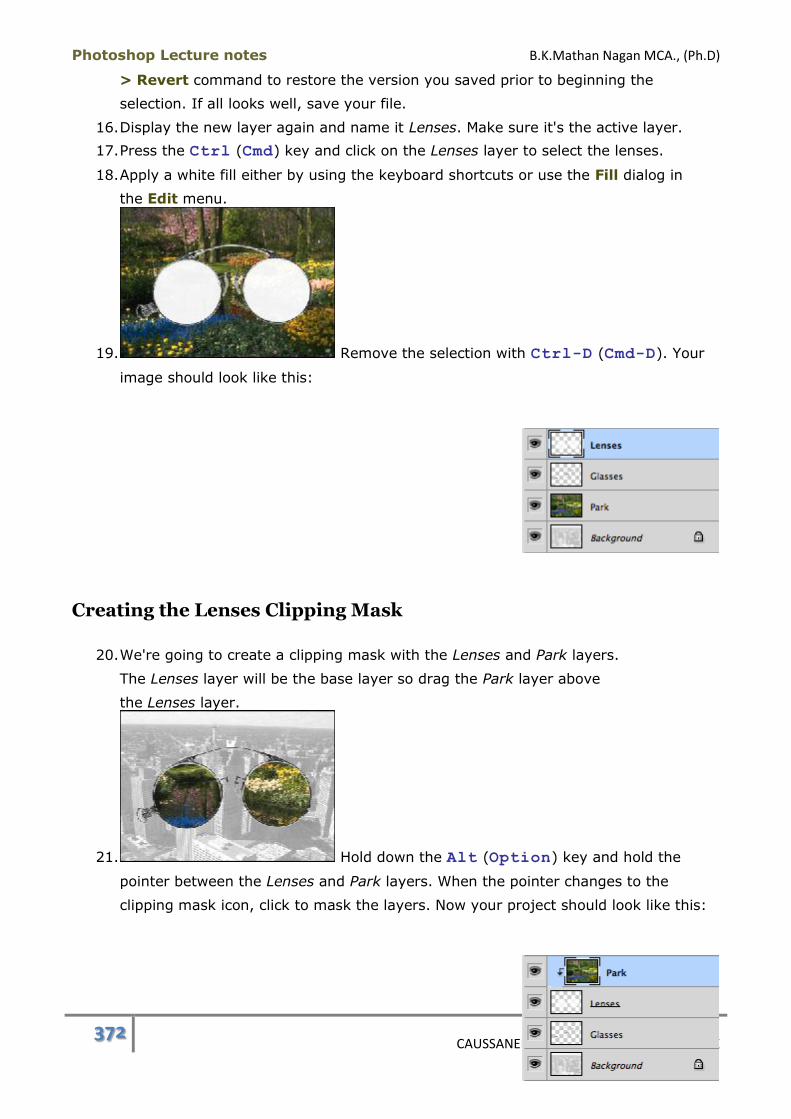
Photoshop Lecture notes B.K.Mathan Nagan MCA., (Ph.D)
372 CAUSSANEL COLLEGE OF ARTS AND SCIENCE
> Revert command to restore the version you saved prior to beginning the
selection. If all looks well, save your file.
16. Display the new layer again and name it Lenses. Make sure it's the active layer.
17. Press the Ctrl (Cmd) key and click on the Lenses layer to select the lenses.
18. Apply a white fill either by using the keyboard shortcuts or use the Fill dialog in
the Edit menu.
19. Remove the selection with Ctrl-D (Cmd-D). Your
image should look like this:
Creating the Lenses Clipping Mask
20. We're going to create a clipping mask with the Lenses and Park layers.
The Lenses layer will be the base layer so drag the Park layer above
the Lenses layer.
21. Hold down the Alt (Option) key and hold the
pointer between the Lenses and Park layers. When the pointer changes to the
clipping mask icon, click to mask the layers. Now your project should look like this:

Photoshop Lecture notes B.K.Mathan Nagan MCA., (Ph.D)
373 CAUSSANEL COLLEGE OF ARTS AND SCIENCE
22. Save your file.
23. Make the Park layer the active layer. Use the Move tool to shift the park image
around until it is framed the way you like it within the glasses.
24. Link the Park, Lenses, and Glasses layers together.
25. Use the Move tool and position the top of the glasses so they're at the top of the
building in the centre of the city image.
Creating the Greenspace Text Clipping Mask
26. Open greenspace_text.psd, hold down the Shift key and drag
the Greenspace layer into the project file. Close greenspace_text.psd. Holding
the Shift key will cause the text to be centred in the window.
27. The new layer will be added to the clipping mask group.
Remove the Greenspace layer from the clipping mask.
28. Use the Shift key along with the Move tool to drag
the Greenspace text down in the image until it just overlaps the bottom of the
glasses.
29. Duplicate the Park layer by dragging it from the layer list onto the New
Layer button in the Layers panel. It will automatically become part of

Photoshop Lecture notes B.K.Mathan Nagan MCA., (Ph.D)
374 CAUSSANEL COLLEGE OF ARTS AND SCIENCE
the Lenses clipping mask but we're going to use it for a new clipping mask. Drag
the Park copy layer in the layer list so it's above the Greenspace layer.
30. Create a clipping mask with Greenspace as the base
layer along with the Park copy layer. The park image should be displayed in the text.
31. Save your file.
Adding Layer Styles to the Greenspace Text
32. Link the Park copy layer to the Park layer. We want the park images to stay together
so there is continuity between the view through the glasses and the Greenspace
text.
33. Click on the Greenspace layer. We're going to add layer styles to the text to make it
stand apart from the glasses.
34. At the bottom of the Layers panel, click on the Add Layer Style button .
Select Colour Overlay from the pop-up menu.
35. In the Layer Style dialog, click on the colour swatch and enter the hexadecimal code
CCFF99 in the Colour Picker and click OK. Leave the Blend Mode at Normal and
reduce the Opacity to 35%.
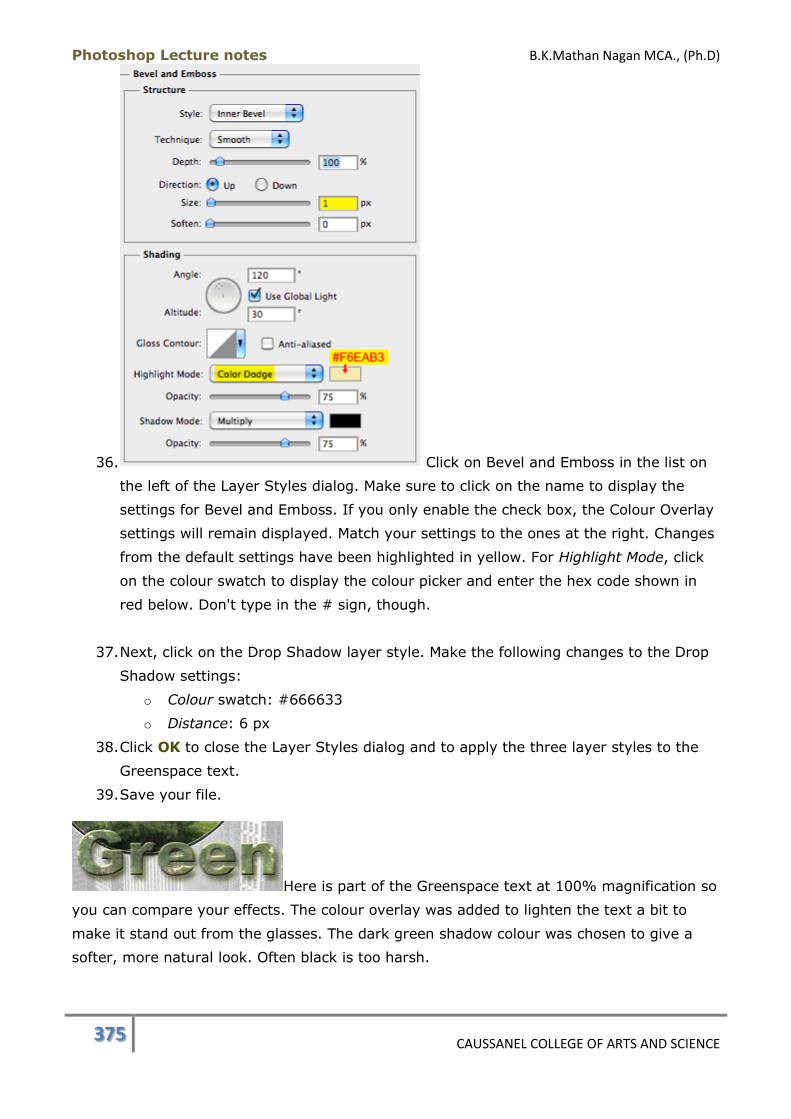
Photoshop Lecture notes B.K.Mathan Nagan MCA., (Ph.D)
375 CAUSSANEL COLLEGE OF ARTS AND SCIENCE
36. Click on Bevel and Emboss in the list on
the left of the Layer Styles dialog. Make sure to click on the name to display the
settings for Bevel and Emboss. If you only enable the check box, the Colour Overlay
settings will remain displayed. Match your settings to the ones at the right. Changes
from the default settings have been highlighted in yellow. For Highlight Mode, click
on the colour swatch to display the colour picker and enter the hex code shown in
red below. Don't type in the # sign, though.
37. Next, click on the Drop Shadow layer style. Make the following changes to the Drop
Shadow settings:
o Colour swatch: #666633
o Distance: 6 px
38. Click OK to close the Layer Styles dialog and to apply the three layer styles to the
Greenspace text.
39. Save your file.
Here is part of the Greenspace text at 100% magnification so
you can compare your effects. The colour overlay was added to lighten the text a bit to
make it stand out from the glasses. The dark green shadow colour was chosen to give a
softer, more natural look. Often black is too harsh.

Photoshop Lecture notes B.K.Mathan Nagan MCA., (Ph.D)
376 CAUSSANEL COLLEGE OF ARTS AND SCIENCE
If you like, you can collapse the style layers by clicking on
the triangle on the Greenspace layer.
Creating the Project Text Clipping mask
40. Make the Background layer the active layer.
41. Open project_text.psd. This contains text with which you'll create one more
clipping mask.
42. Hold down the Shift key and drag the Project layer into layers_project.psd.
Closeproject_text.psd.
43. Use the Move tool with the Shift key and drag the text down below the
Greenspace text.
44. Duplicate the Background layer.
45. Drag the Project layer below the Background copy layer in the layer list.
46. Convert the two layers into a clipping mask.
47. Save your file.
At this point, the text will seem to have disappeared. That's
because the image showing through the Project text is a copy of the Background layer and
it blends into the background. Once we add some layer styles, the text will stand out. The
image to the right is what the Layers panel looks like. The layer styles on
the Greenspace layer have been collapsed.
Adding Layer Styles to the Project Text

Photoshop Lecture notes B.K.Mathan Nagan MCA., (Ph.D)
377 CAUSSANEL COLLEGE OF ARTS AND SCIENCE
48. Click on the Project base layer. Click the Add Layer Style button in the Layers
panel and choose Colour Overlay in the pop-up menu.
49. In the Layer Styles dialog for Colour Overlay, set Colour to black and set
the Opacity to 25%.
50. Click on Bevel and Emboss and match
your settings to the ones below.
51. Click on the Contour style and choose the contour
shape shown here from the pop-up menu that appears when you click on the black
triangle.
52. Click OK to exit from the Layer Styles dialog.
53. Save your file. The final Layers panel should look
something like this:

Photoshop Lecture notes B.K.Mathan Nagan MCA., (Ph.D)
378 CAUSSANEL COLLEGE OF ARTS AND SCIENCE
Retouching and Editing
Overview
Now that you're familiar with the fundamentals of Photoshop, you'll be able to learn
retouching and editing functions by working through a variety of practice exercises, which
include retouching photographs.
If you'd like to download all eight of the images used in this module at once, you can
download a .zip filefor the PC (471 K) or .sit file for the Macintosh (465 K). You may also
download them individually on the lecture pages, if you prefer. Once the file has finished
downloading to your computer, extract the files from the .zip or .sit file using a
decompression utility program like WinZip (PC) or Stuffit Expander (Macintosh). You should
now have a folder called RetouchingAndEditing containing files
namedapple_tree.gif, art_history.jpg, bird.jpg, man.jpg, old_image.jpg, shell.ps
d, vase.jpg, andwoman.jpg.
Here is a summary of the topics in this module:
(1) Rulers, Grids and Guides
Before we get into the retouching tools and editing commands, we'll go over using
rulers, grids, and guides. These are extremely valuable options to assist you in
laying out your image content with accuracy.
(2) Ruler Tool
The Ruler tool measures distances and angles in an image. It can also be used to
straighten photographs and other images.
(3) Blur Tool Set
The Blur tool set is ideal for retouching selective areas of an image. The tool set
consists of the Blur, Smudge, and Sharpen tools. You'll get a chance to try out all
three of them on portrait images.
(4) Clone Stamp Tool Set
The Clone Stamp tool is used to copy a sample from one area of an image and paint
it onto another area. It's very useful in retouching images, especially photographs.
You will retouch an old photo in a practice exercise using the Clone Stamp tool. This

Photoshop Lecture notes B.K.Mathan Nagan MCA., (Ph.D)
379 CAUSSANEL COLLEGE OF ARTS AND SCIENCE
lecture also covers the Pattern Stamp tool which applies pattern presets using paint
strokes.
(5) History Brush Tool Set
This tool set consists of the History Brush and Art History Brush tools. Both let you
paint on an image using a snapshot or state from the History panel as the paint
source. The Art History Brush lets you paint with stylized brush strokes and textures.
This lecture contains a practice exercise for each tool.
(6) Eraser Tool Set
The Eraser tools can be used to touch up images and extract foreground objects
from their backgrounds by removing the background pixels. This tool set includes
the Eraser, Background Eraser and Magic Eraser tools. Three practice exercises will
acquaint you with these tools.
(7) Dodge Tool Set
This tool set is helpful for retouching photographic images. In a series of three short
exercises, you'll learn to use the Dodge, Burn and Sponge tools on a portrait.
(8) Healing Brush Tool Set
The Healing Brush and Patch tools are used to fix flaws in an image by applying
pixels copied from another area of the image. You'll fix up a flawed image with the
tools in two practice exercises.
(9) Edit Menu Commands
This lecture covers the Copy, Copy Merged, Paste, Paste
Into and Clear commands as they pertain to pixel selections.
(A) Matting
The Layer menu contains a submenu of three Matting
commands: Defringe, Remove White Matte, and Remove Black Matte. Each
option provides a different method of removing fringe pixels from the anti-aliased
edges of shapes on a transparent layer. In this lecture, you'll set up a multi-layered
image to try out the three Matting commands and it will give you practice in
copying, pasting and inverting selections.
(B) Transformations

Photoshop Lecture notes B.K.Mathan Nagan MCA., (Ph.D)
380 CAUSSANEL COLLEGE OF ARTS AND SCIENCE
Transformations such as scaling, rotating and skewing can be applied to selected
pixels, an entire layer, linked layers, and vector shapes. All of the transformations
will be covered in a practice exercise.
(C) Changing the Canvas Size
The Canvas Size command adds to, or subtracts from, the width and height of the
document window. A practice exercise will show you the ropes.
(D) Cropping and Trimming Images
Images can be cropped with the Crop tool, Crop command or Trim command. Each
works in a different way, as you'll see as you work through practice exercises.
Rulers, Grids and Guides
Before we get into the retouching tools and editing commands, we'll go over using rulers,
grids, and guides. These are extremely valuable options to assist you in laying out your
image content with accuracy.
Rulers
Rulers are displayed along the top and left
edges of the image. When your pointer is over the image window,dynamic
markers appear on both rulers to show you the cursor location coordinates.
Displaying and Hiding Rulers
To view rulers in an image document, go to View > Show Rulers. The menu command
will switch toHide Rulers which you can use to hide the rulers again.
The keyboard shortcut is Ctrl-R (Cmd-R) to toggle rulers on and off.

Photoshop Lecture notes B.K.Mathan Nagan MCA., (Ph.D)
381 CAUSSANEL COLLEGE OF ARTS AND SCIENCE
Changing Unit of Measurement
The rulers are displayed in pixel units but you can change the unit of measurement by
going to Edit > Preferences > Units & Rulers (Photoshop > Preferences > Units &
Rulers). Double-clicking on one of the rulers will also open the Units & Rulers
preferences.
This will affect the units displayed on the Tool Options bar
and in theInfo panel (partially shown here). The X and Y cursor coordinates and
the W and H (Width and Height) fields use this preference also and will change accordingly.
Other dialogs that display dimensions will change to these units as well.
Point of Origin
The point of origin is located at the coordinates
0,0 which normally is at the top left corner of an image document. If you want to measure
from another part of the image, you can change the point of origin to another point.
There is a square in the upper left corner of the image
document where the two rulers meet. If you click and drag on the corner square, you can
drop it in a new location to set a new point of origin as shown here. The cursor will change
to a crosshair and dotted lines will extend from the cursor to each ruler and move along
with the cursor.

Photoshop Lecture notes B.K.Mathan Nagan MCA., (Ph.D)
382 CAUSSANEL COLLEGE OF ARTS AND SCIENCE
This image shows how the rulers changed after setting
a new point of origin. The 0,0 coordinates intersect at another point in the image. Values
to the left or above the 0 points are negative values.
To reset the point of origin back to the default, double-
click on the corner square.
Guides
Guides are non-printing lines that you can set in an image to help you in aligning your
content. They can be horizontal or vertical. You can add, remove, reposition and lock
guides to prevent you from accidentally moving them. Guides can be toggled between
being displayed and hidden.
Adding Guides
Guides can be added in two ways: by dragging them from the rulers or by setting exact
positions for them.
Adding Guides by Dragging
1. Rulers must be displayed. If they aren't visible,
press Ctrl-R(Cmd-R).
2. Do one of the following:
o Click and drag to the right from the vertical ruler to create a vertical guide.
(shown at the right)
o Click and drag downwards from the horizontal ruler to create a horizontal
guide.
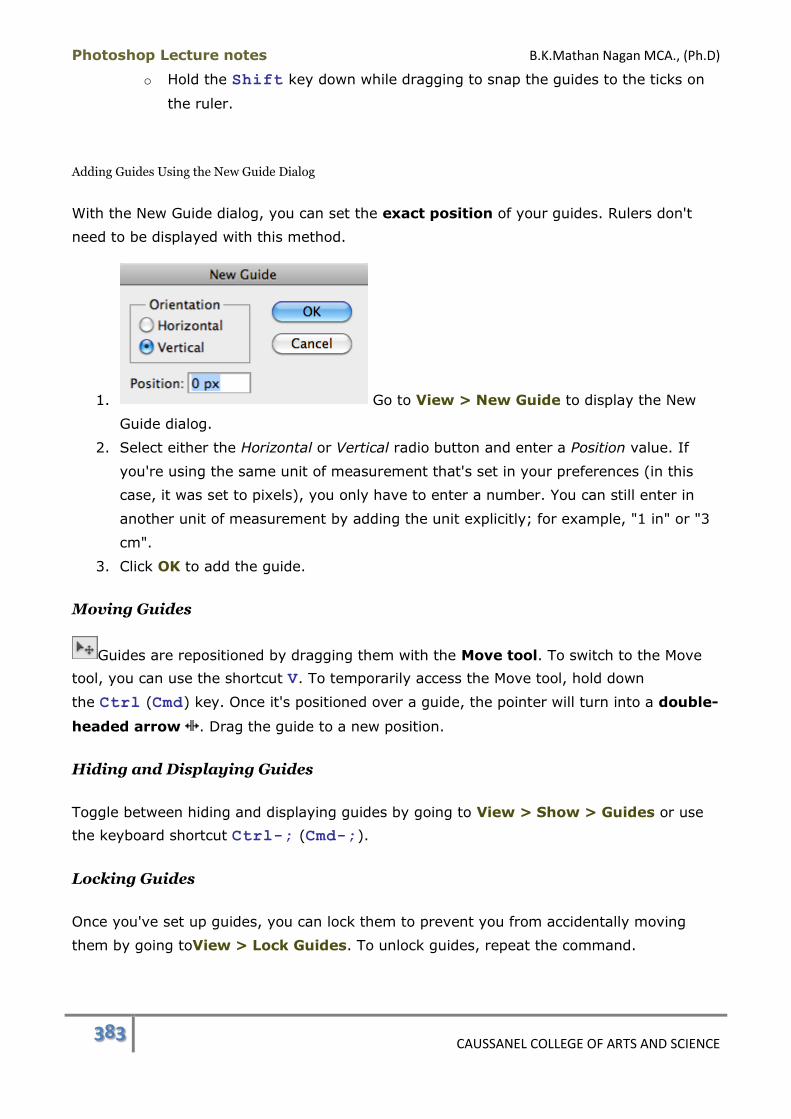
Photoshop Lecture notes B.K.Mathan Nagan MCA., (Ph.D)
383 CAUSSANEL COLLEGE OF ARTS AND SCIENCE
o Hold the Shift key down while dragging to snap the guides to the ticks on
the ruler.
Adding Guides Using the New Guide Dialog
With the New Guide dialog, you can set the exact position of your guides. Rulers don't
need to be displayed with this method.
1. Go to View > New Guide to display the New
Guide dialog.
2. Select either the Horizontal or Vertical radio button and enter a Position value. If
you're using the same unit of measurement that's set in your preferences (in this
case, it was set to pixels), you only have to enter a number. You can still enter in
another unit of measurement by adding the unit explicitly; for example, "1 in" or "3
cm".
3. Click OK to add the guide.
Moving Guides
Guides are repositioned by dragging them with the Move tool. To switch to the Move
tool, you can use the shortcut V. To temporarily access the Move tool, hold down
the Ctrl (Cmd) key. Once it's positioned over a guide, the pointer will turn into a double-
headed arrow . Drag the guide to a new position.
Hiding and Displaying Guides
Toggle between hiding and displaying guides by going to View > Show > Guides or use
the keyboard shortcut Ctrl-; (Cmd-;).
Locking Guides
Once you've set up guides, you can lock them to prevent you from accidentally moving
them by going toView > Lock Guides. To unlock guides, repeat the command.

Photoshop Lecture notes B.K.Mathan Nagan MCA., (Ph.D)
384 CAUSSANEL COLLEGE OF ARTS AND SCIENCE
Removing Guides
Guides can be removed from an image in one of the following ways:
To remove a single guide, use the Move tool to drag it and drop it onto the ruler or
outside the image window.
To remove all guides in an image, go to View > Clear Guides. This will clear
locked guides, too.
Guide Preferences
The appearance of guides can be
modified in Edit > Preferences > Grid, Guides & Slices (Photoshop > Preferences >
Grid, Guides & Slices). Alternately, double-click a guide with the Move tool to open up
the Grid, Guides & Slices preferences.
The following guide preferences will apply to all images containing guides.
Colour
You can select from one of the nine colours displayed in the pop-up menu or
choose Custom to open the colour picker and select your own colour.
Style
Choose between (solid) Lines or Dashed Lines.
Smart Guides
Smart guides help you to align objects and selections. They appear temporarily while
you're drawing or moving objects and selections. To turn the visibility of smart guides on or
off, go to View > Show > Smart Guides.
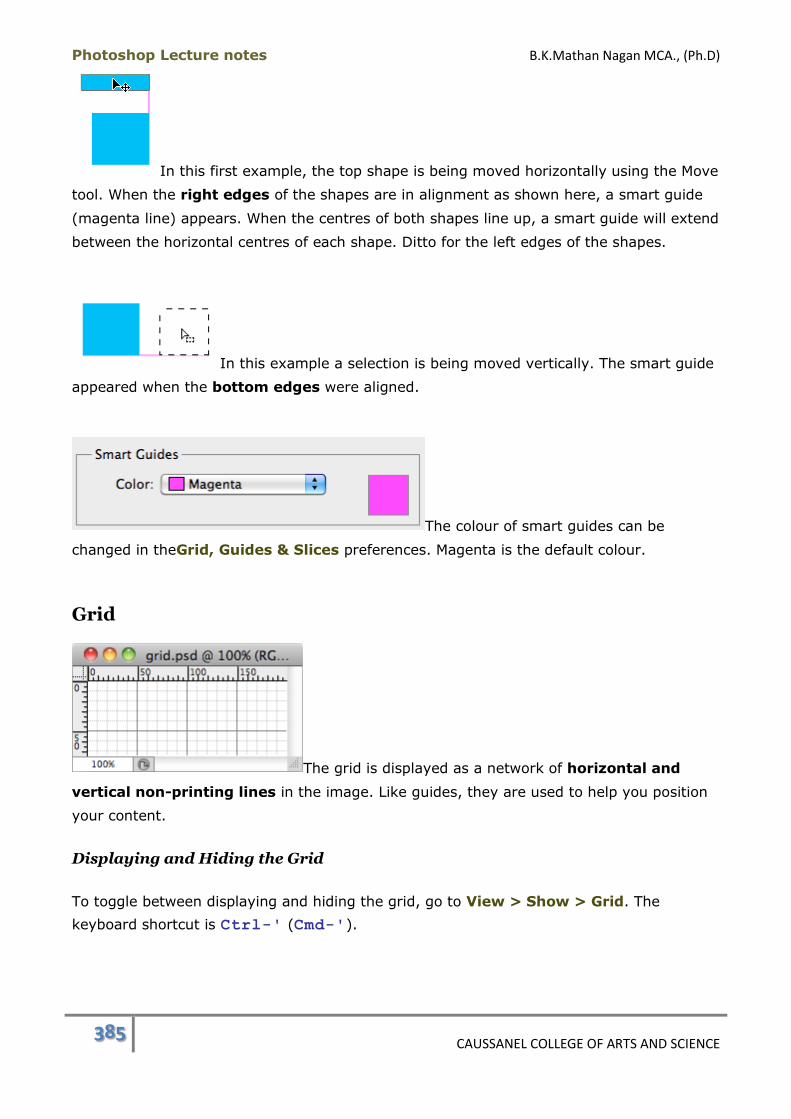
Photoshop Lecture notes B.K.Mathan Nagan MCA., (Ph.D)
385 CAUSSANEL COLLEGE OF ARTS AND SCIENCE
In this first example, the top shape is being moved horizontally using the Move
tool. When the right edges of the shapes are in alignment as shown here, a smart guide
(magenta line) appears. When the centres of both shapes line up, a smart guide will extend
between the horizontal centres of each shape. Ditto for the left edges of the shapes.
In this example a selection is being moved vertically. The smart guide
appeared when the bottom edges were aligned.
The colour of smart guides can be
changed in theGrid, Guides & Slices preferences. Magenta is the default colour.
Grid
The grid is displayed as a network of horizontal and
vertical non-printing lines in the image. Like guides, they are used to help you position
your content.
Displaying and Hiding the Grid
To toggle between displaying and hiding the grid, go to View > Show > Grid. The
keyboard shortcut is Ctrl-' (Cmd-').
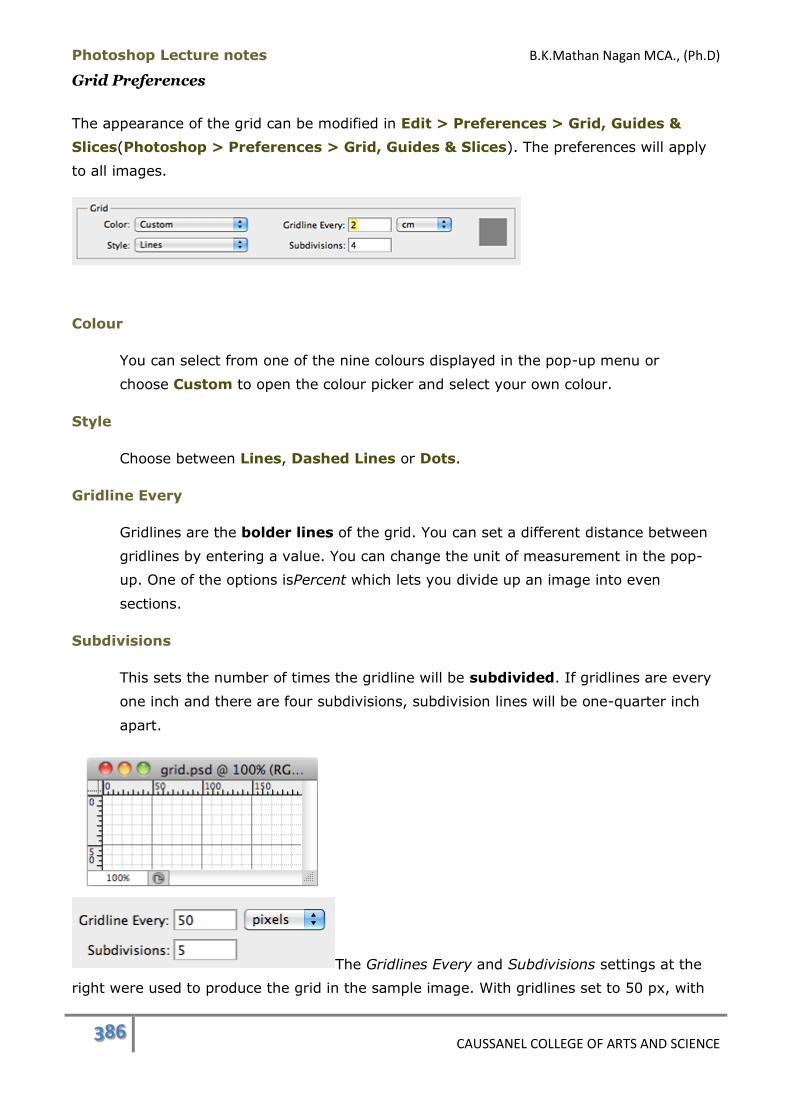
Photoshop Lecture notes B.K.Mathan Nagan MCA., (Ph.D)
386 CAUSSANEL COLLEGE OF ARTS AND SCIENCE
Grid Preferences
The appearance of the grid can be modified in Edit > Preferences > Grid, Guides &
Slices(Photoshop > Preferences > Grid, Guides & Slices). The preferences will apply
to all images.
Colour
You can select from one of the nine colours displayed in the pop-up menu or
choose Custom to open the colour picker and select your own colour.
Style
Choose between Lines, Dashed Lines or Dots.
Gridline Every
Gridlines are the bolder lines of the grid. You can set a different distance between
gridlines by entering a value. You can change the unit of measurement in the pop-
up. One of the options isPercent which lets you divide up an image into even
sections.
Subdivisions
This sets the number of times the gridline will be subdivided. If gridlines are every
one inch and there are four subdivisions, subdivision lines will be one-quarter inch
apart.
The Gridlines Every and Subdivisions settings at the
right were used to produce the grid in the sample image. With gridlines set to 50 px, with
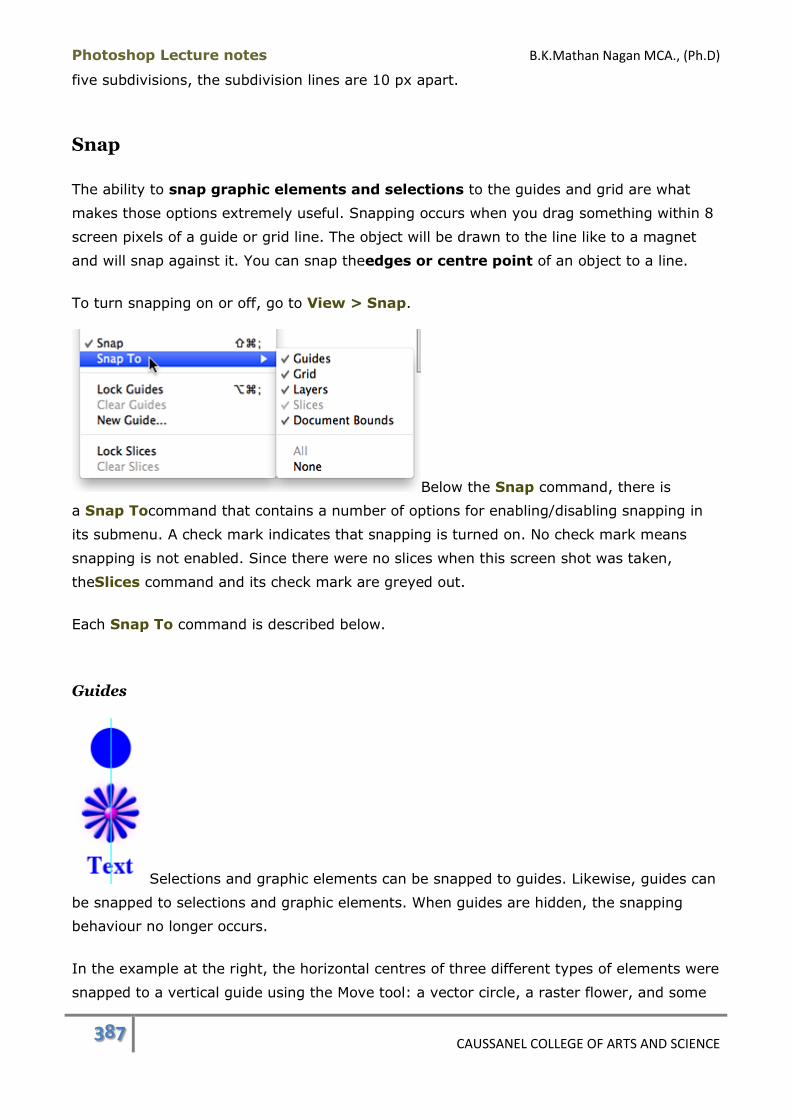
Photoshop Lecture notes B.K.Mathan Nagan MCA., (Ph.D)
387 CAUSSANEL COLLEGE OF ARTS AND SCIENCE
five subdivisions, the subdivision lines are 10 px apart.
Snap
The ability to snap graphic elements and selections to the guides and grid are what
makes those options extremely useful. Snapping occurs when you drag something within 8
screen pixels of a guide or grid line. The object will be drawn to the line like to a magnet
and will snap against it. You can snap theedges or centre point of an object to a line.
To turn snapping on or off, go to View > Snap.
Below the Snap command, there is
a Snap Tocommand that contains a number of options for enabling/disabling snapping in
its submenu. A check mark indicates that snapping is turned on. No check mark means
snapping is not enabled. Since there were no slices when this screen shot was taken,
theSlices command and its check mark are greyed out.
Each Snap To command is described below.
Guides
Selections and graphic elements can be snapped to guides. Likewise, guides can
be snapped to selections and graphic elements. When guides are hidden, the snapping
behaviour no longer occurs.
In the example at the right, the horizontal centres of three different types of elements were
snapped to a vertical guide using the Move tool: a vector circle, a raster flower, and some

Photoshop Lecture notes B.K.Mathan Nagan MCA., (Ph.D)
388 CAUSSANEL COLLEGE OF ARTS AND SCIENCE
text.
This example shows how to use guide snapping with a selection marquee to
measure out exact distances for placing objects. Our objective was to have two blue circles
arranged vertically with exactly 15 px of space between them.
1. With the circle layer active, the Move tool was used to snap a guide to the bottom of
the circle.
2. A rectangular selection marquee measuring 15 px by 15 px was drawn, starting at
the guide. You can set the exact dimensions in the Tool Options bar by
selectingFixed Size in the Style drop-down menu. If you draw the marquee away
from the guide, you can drag it with the rectangular marquee tool and snap it to the
guide.
3. Snap another guide to the bottom of the square selection.
4. Finally, create a copy of the circle layer and drag it down while holding down
theShift key using the Move tool until it snaps to the lower guide.
When using the Move tool to snap elements to guides, the normal black arrow cursor
becomes white when a snapping point is reached. This cursor is shown in step 4.
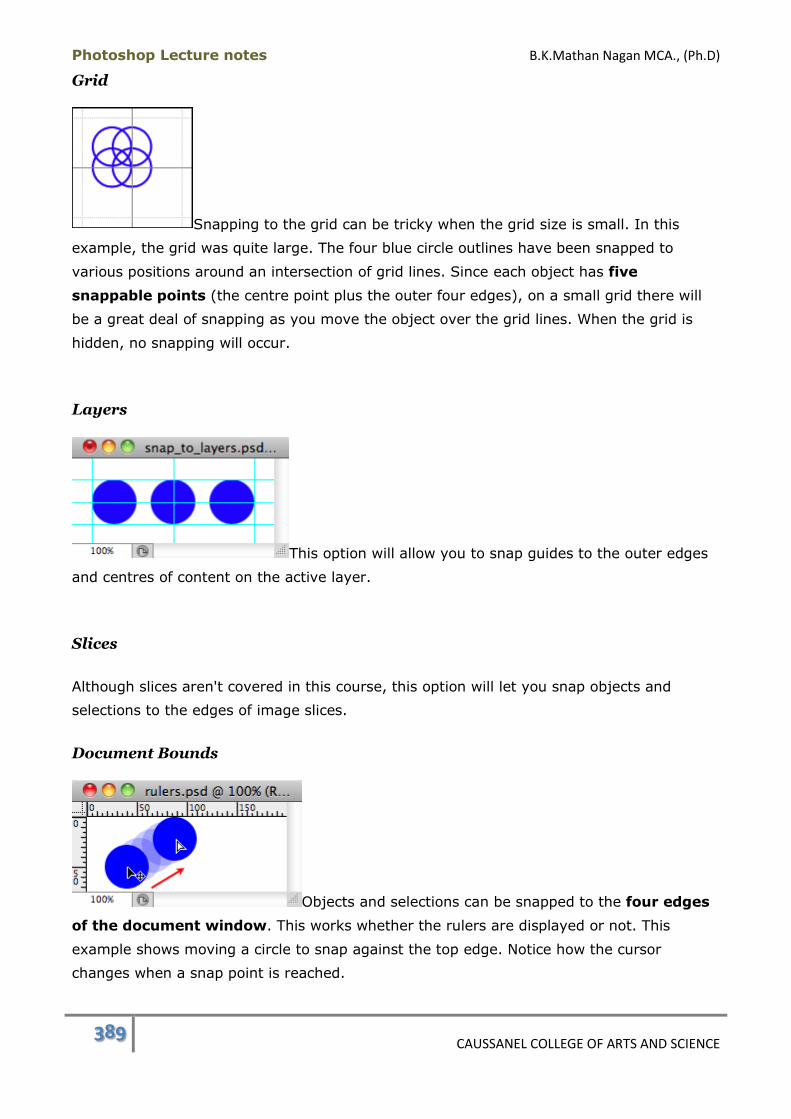
Photoshop Lecture notes B.K.Mathan Nagan MCA., (Ph.D)
389 CAUSSANEL COLLEGE OF ARTS AND SCIENCE
Grid
Snapping to the grid can be tricky when the grid size is small. In this
example, the grid was quite large. The four blue circle outlines have been snapped to
various positions around an intersection of grid lines. Since each object has five
snappable points (the centre point plus the outer four edges), on a small grid there will
be a great deal of snapping as you move the object over the grid lines. When the grid is
hidden, no snapping will occur.
Layers
This option will allow you to snap guides to the outer edges
and centres of content on the active layer.
Slices
Although slices aren't covered in this course, this option will let you snap objects and
selections to the edges of image slices.
Document Bounds
Objects and selections can be snapped to the four edges
of the document window. This works whether the rulers are displayed or not. This
example shows moving a circle to snap against the top edge. Notice how the cursor
changes when a snap point is reached.
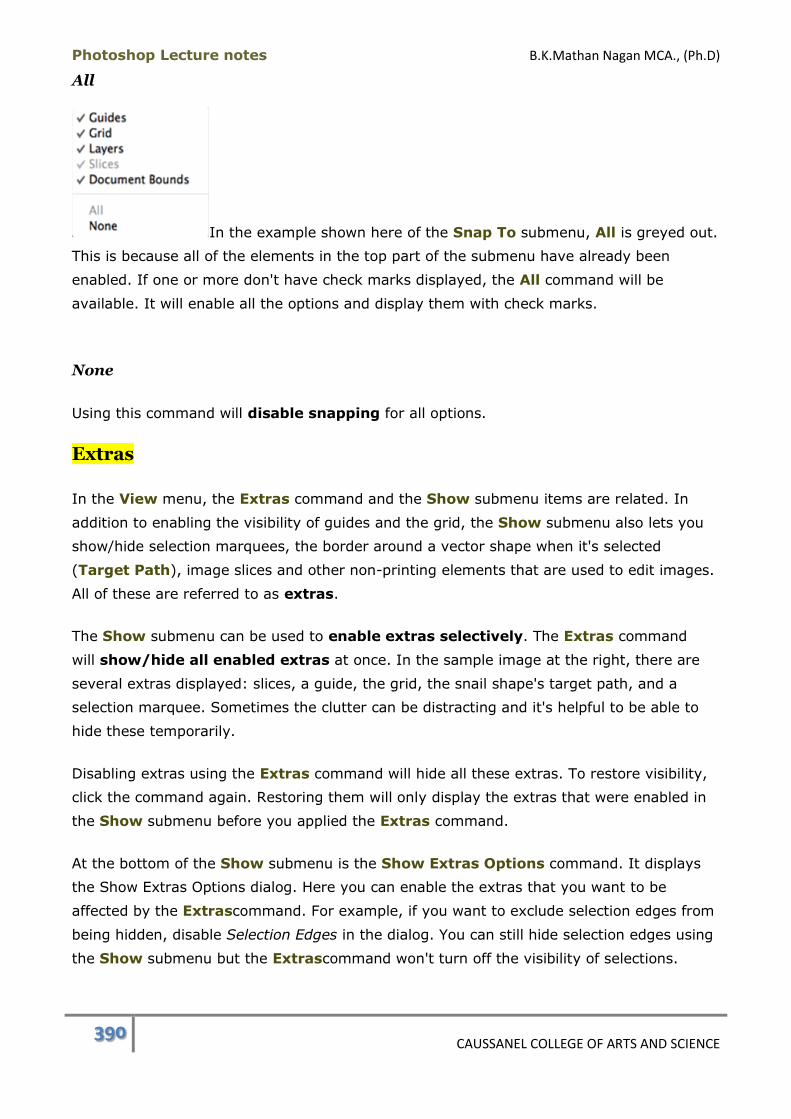
Photoshop Lecture notes B.K.Mathan Nagan MCA., (Ph.D)
390 CAUSSANEL COLLEGE OF ARTS AND SCIENCE
All
In the example shown here of the Snap To submenu, All is greyed out.
This is because all of the elements in the top part of the submenu have already been
enabled. If one or more don't have check marks displayed, the All command will be
available. It will enable all the options and display them with check marks.
None
Using this command will disable snapping for all options.
Extras
In the View menu, the Extras command and the Show submenu items are related. In
addition to enabling the visibility of guides and the grid, the Show submenu also lets you
show/hide selection marquees, the border around a vector shape when it's selected
(Target Path), image slices and other non-printing elements that are used to edit images.
All of these are referred to as extras.
The Show submenu can be used to enable extras selectively. The Extras command
will show/hide all enabled extras at once. In the sample image at the right, there are
several extras displayed: slices, a guide, the grid, the snail shape's target path, and a
selection marquee. Sometimes the clutter can be distracting and it's helpful to be able to
hide these temporarily.
Disabling extras using the Extras command will hide all these extras. To restore visibility,
click the command again. Restoring them will only display the extras that were enabled in
the Show submenu before you applied the Extras command.
At the bottom of the Show submenu is the Show Extras Options command. It displays
the Show Extras Options dialog. Here you can enable the extras that you want to be
affected by the Extrascommand. For example, if you want to exclude selection edges from
being hidden, disable Selection Edges in the dialog. You can still hide selection edges using
the Show submenu but the Extrascommand won't turn off the visibility of selections.
Photoshop Lecture notes B.K.Mathan Nagan MCA., (Ph.D)
391 CAUSSANEL COLLEGE OF ARTS AND SCIENCE
Although they don't appear in the Show submenu or the Show Extras Options dialog,
the visibility ofmeasuring lines created with the Ruler tool and colour samplers created
with the Colour Sampler tool will be toggled with the Extras command.
Rulers, Grids and Guides Summary
Rulers are displayed along the top and left edges of an image.
The unit of measurement displayed on the rulers is determined by the Rulers setting
in the Units & Rulers Preferences. This setting will also apply to the values displayed
in the Tool Options bar, the Info panel and in dialogs that use distance values.
The point of origin can be moved from its default position. The rulers will display its
0,0 values at the new point of origin.
To restore the point of origin to its default value, double-click on the top-left corner
square when rulers are displayed.
Guides and the grid are non-printing lines that you can position in your image to
assist you in laying out your content.
Rulers must be displayed to create guides by dragging.
Horizontal guides are dragged from the top (horizontal) ruler and vertical guides are
dragged from the left (vertical) ruler.
Guides can be positioned precisely using the New Guide dialog.
Guides are moved by dragging them with the Move tool.
Use the View > Lock Guides command to lock guides so they can't be
inadventently moved.
To delete a guide, drag it back to the ruler or drag it outside the image window.
To delete all guides in an image, use the View > Clear Guides command.
Smart guides, when enabled, are lines that appear temporarily in the image to help
align the centres and edges of objects with existing elements in the image.
The grid is a collection of evenly spaced horizontal and vertical lines that cover an
image.
When Snap is enabled, you can snap objects or selections to guides, the grid,
layers, slices and document bounds. Likewise, you can snap guides to objects or
selections.
The edges and centre points of objects and selections can be snapped.
The Show submenu is used to hide/show non-printing extras in an image.
The Extras command will toggle the visibility of all extras enabled in
the Show submenu unless they have been disabled in the Show Extras Options
dialog.
Rulers, Grids and Guides Keyboard Shortcuts:
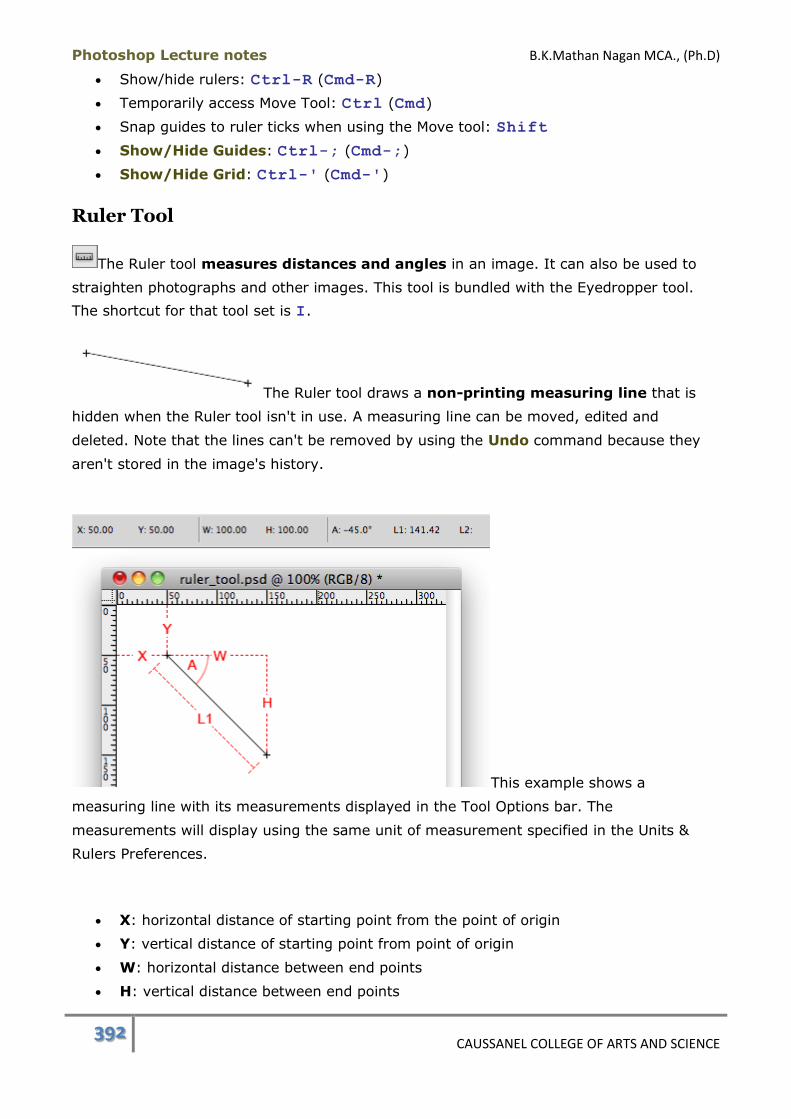
Photoshop Lecture notes B.K.Mathan Nagan MCA., (Ph.D)
392 CAUSSANEL COLLEGE OF ARTS AND SCIENCE
Show/hide rulers: Ctrl-R (Cmd-R)
Temporarily access Move Tool: Ctrl (Cmd)
Snap guides to ruler ticks when using the Move tool: Shift
Show/Hide Guides: Ctrl-; (Cmd-;)
Show/Hide Grid: Ctrl-' (Cmd-')
Ruler Tool
The Ruler tool measures distances and angles in an image. It can also be used to
straighten photographs and other images. This tool is bundled with the Eyedropper tool.
The shortcut for that tool set is I.
The Ruler tool draws a non-printing measuring line that is
hidden when the Ruler tool isn't in use. A measuring line can be moved, edited and
deleted. Note that the lines can't be removed by using the Undo command because they
aren't stored in the image's history.
This example shows a
measuring line with its measurements displayed in the Tool Options bar. The
measurements will display using the same unit of measurement specified in the Units &
Rulers Preferences.
X: horizontal distance of starting point from the point of origin
Y: vertical distance of starting point from point of origin
W: horizontal distance between end points
H: vertical distance between end points

Photoshop Lecture notes B.K.Mathan Nagan MCA., (Ph.D)
393 CAUSSANEL COLLEGE OF ARTS AND SCIENCE
A: angle of axis as measured between the starting point and
end point. This diagram shows how the angle is measured if the outer point is
rotated around the centre starting point. The current position gives a reading of 0o.
When rotated counter-clockwise, the top half will give positive angle values up to
180o. When rotated around the bottom half, negative values will result.
L1: When just a primary line is drawn, as is the case here, this displays the length
of the line between its two end points.
L2: When a secondary line is drawn to form an angle, this displays its length.
The Info panel displays the same information. If only a single
measuring line is drawn, it displays L for the length. When a secondary line is drawn to
measure an angle, the display will show L1 and L2.
Measuring Between Two Points
1. Select the Ruler tool.
2. Click on the starting point and drag. Release the mouse button when you reach the
end point. Hold the Shift key while dragging to constrain the angle to
increments of 45o.
Editing a Measuring Line
To resize or rotate a measuring line, drag an end point with the Ruler tool.
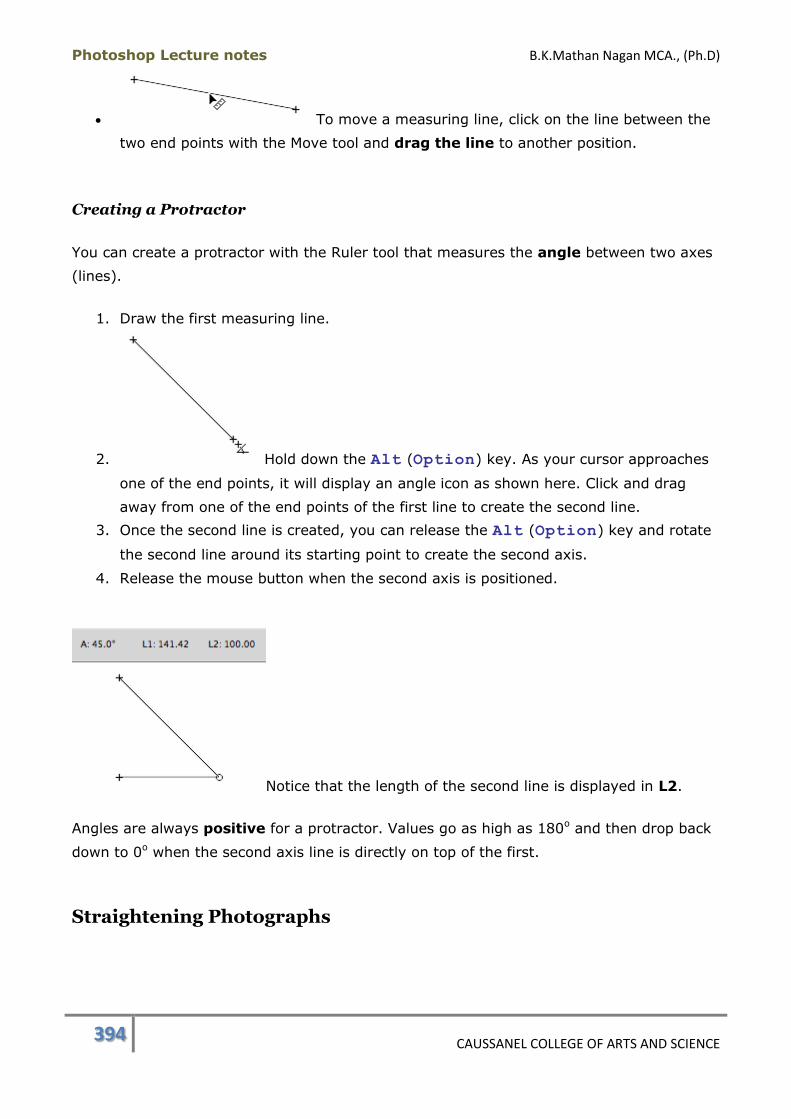
Photoshop Lecture notes B.K.Mathan Nagan MCA., (Ph.D)
394 CAUSSANEL COLLEGE OF ARTS AND SCIENCE
To move a measuring line, click on the line between the
two end points with the Move tool and drag the line to another position.
Creating a Protractor
You can create a protractor with the Ruler tool that measures the angle between two axes
(lines).
1. Draw the first measuring line.
2. Hold down the Alt (Option) key. As your cursor approaches
one of the end points, it will display an angle icon as shown here. Click and drag
away from one of the end points of the first line to create the second line.
3. Once the second line is created, you can release the Alt (Option) key and rotate
the second line around its starting point to create the second axis.
4. Release the mouse button when the second axis is positioned.
Notice that the length of the second line is displayed in L2.
Angles are always positive for a protractor. Values go as high as 180o and then drop back
down to 0o when the second axis line is directly on top of the first.
Straightening Photographs
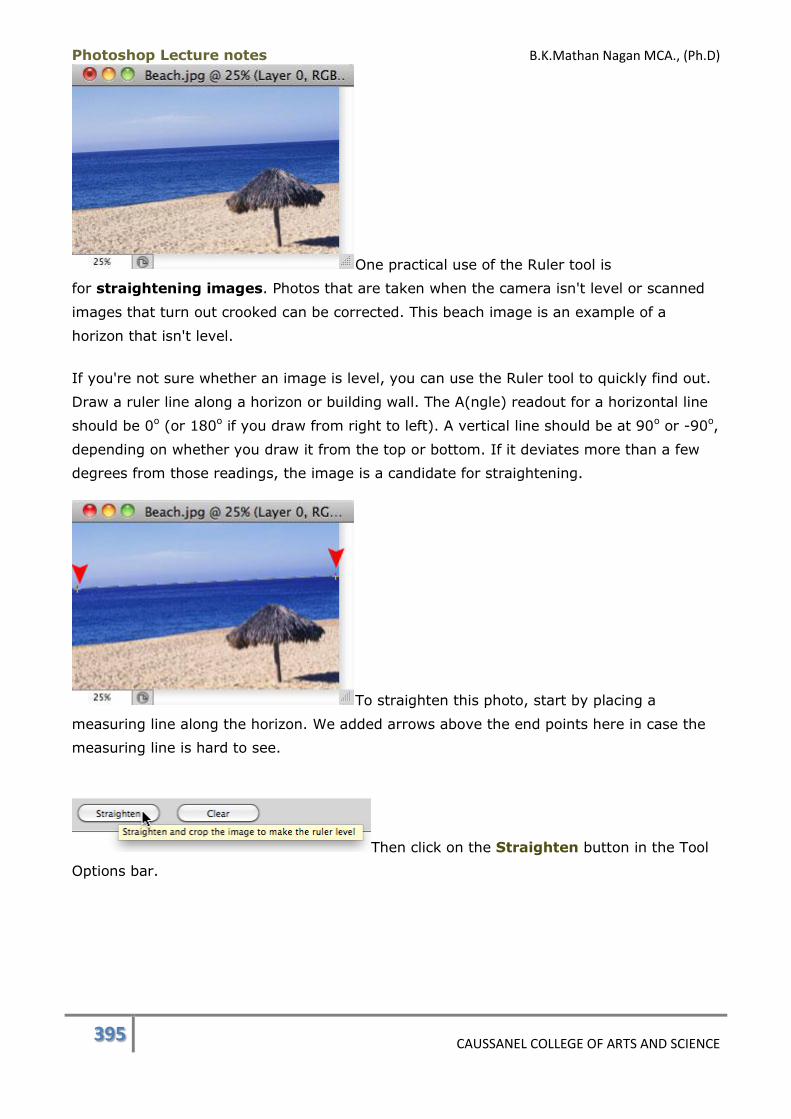
Photoshop Lecture notes B.K.Mathan Nagan MCA., (Ph.D)
395 CAUSSANEL COLLEGE OF ARTS AND SCIENCE
One practical use of the Ruler tool is
for straightening images. Photos that are taken when the camera isn't level or scanned
images that turn out crooked can be corrected. This beach image is an example of a
horizon that isn't level.
If you're not sure whether an image is level, you can use the Ruler tool to quickly find out.
Draw a ruler line along a horizon or building wall. The A(ngle) readout for a horizontal line
should be 0o (or 180o if you draw from right to left). A vertical line should be at 90o or -90o,
depending on whether you draw it from the top or bottom. If it deviates more than a few
degrees from those readings, the image is a candidate for straightening.
To straighten this photo, start by placing a
measuring line along the horizon. We added arrows above the end points here in case the
measuring line is hard to see.
Then click on the Straighten button in the Tool
Options bar.

Photoshop Lecture notes B.K.Mathan Nagan MCA., (Ph.D)
396 CAUSSANEL COLLEGE OF ARTS AND SCIENCE
Voila. Not only did that straighten the photo, it
also cropped out the extra space that resulted from the rotation.
To straighten an image without cropping, hold
down the Alt(Option) key while clicking the Straighten button. The horizon is now
level since the image was rotated. Since it wasn't cropped, the transparency grid is visible.
If it had been on a Background layer, the extra space would have been filled in with white.
Deleting a Measuring Line or Protractor
To remove a measuring line or protractor, do one of the following.
Click on the Clear button in the Tool Options bar.
Click on the line between two end points and drag it outside the image.
Drawing a second measuring line when there is already one in the image will remove the
first line.
Use Measurement Scale
This button in the Tool Options bar is only available in the Photoshop Extended version. It
is enabled by default.
Ruler Tool Summary

Photoshop Lecture notes B.K.Mathan Nagan MCA., (Ph.D)
397 CAUSSANEL COLLEGE OF ARTS AND SCIENCE
The Ruler tool is used to measure distances and angles in an image.
To use the Ruler tool, drag to create non-printing measuring lines in an image. The
measuring line's length, distance, and angle values are displayed in the Tool Options
bar.
The Ruler tool can be used as a protractor to measure the angle between two lines
or axes.
Measuring lines can edited, moved and deleted.
The Ruler tool can be used to straighten images by drawing a measuring line on an
edge that should be horizontal or vertical and then clicking the Straighten button.
This will both straighten and crop the image. Pressing Alt (Option) while clicking
the button will rotate/straighten the image but won't crop out the extra space
created by the rotation.
Ruler Tool Keyboard Shortcuts:
Ruler tool: I
Blur Tool Set
When we think of retouching, the first thing that usually comes to mind is making subtle
corrections to portraits. The Blur tool set is ideal for this purpose. Although there are filters
that blur and sharpen images, using tools lets you edit small areas selectively.
The tool set consists of the Blur, Sharpen, and Smudge tools. The
keyboard shortcut for the tool set is R. You'll get a chance to try out all three of the tools
on portrait images.
Blur Tool
The Blur tool applies fairly subtle blurring to the areas you drag the pointer over. The
image below shows the Blur tool options but all of these apply to the Sharpen and Smudge
tools, too.
Brush Preset Picker
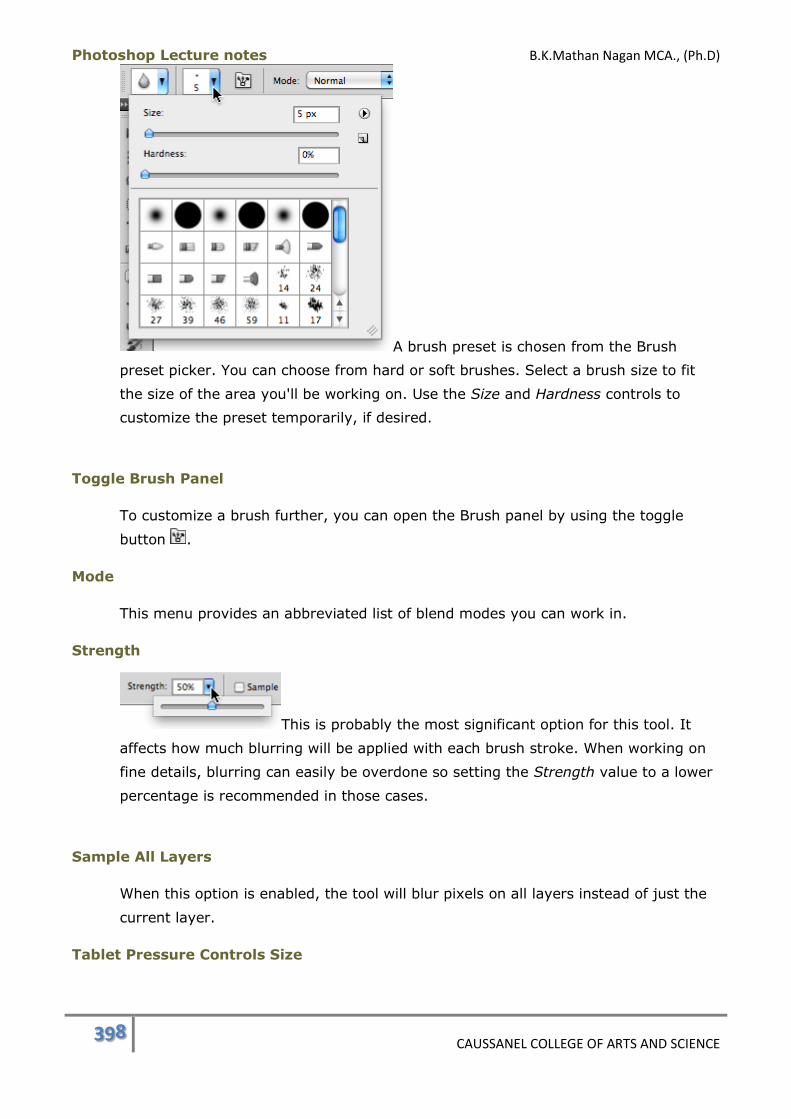
Photoshop Lecture notes B.K.Mathan Nagan MCA., (Ph.D)
398 CAUSSANEL COLLEGE OF ARTS AND SCIENCE
A brush preset is chosen from the Brush
preset picker. You can choose from hard or soft brushes. Select a brush size to fit
the size of the area you'll be working on. Use the Size and Hardness controls to
customize the preset temporarily, if desired.
Toggle Brush Panel
To customize a brush further, you can open the Brush panel by using the toggle
button .
Mode
This menu provides an abbreviated list of blend modes you can work in.
Strength
This is probably the most significant option for this tool. It
affects how much blurring will be applied with each brush stroke. When working on
fine details, blurring can easily be overdone so setting the Strength value to a lower
percentage is recommended in those cases.
Sample All Layers
When this option is enabled, the tool will blur pixels on all layers instead of just the
current layer.
Tablet Pressure Controls Size
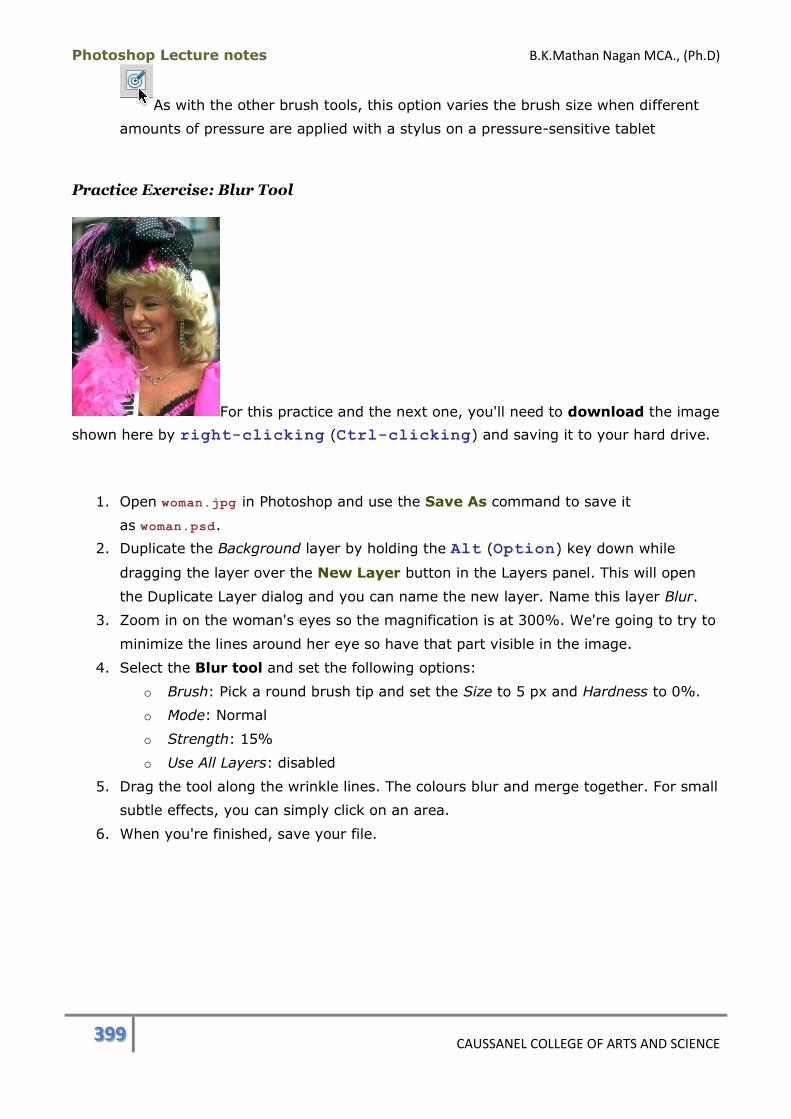
Photoshop Lecture notes B.K.Mathan Nagan MCA., (Ph.D)
399 CAUSSANEL COLLEGE OF ARTS AND SCIENCE
As with the other brush tools, this option varies the brush size when different
amounts of pressure are applied with a stylus on a pressure-sensitive tablet
Practice Exercise: Blur Tool
For this practice and the next one, you'll need to download the image
shown here by right-clicking (Ctrl-clicking) and saving it to your hard drive.
1. Open woman.jpg in Photoshop and use the Save As command to save it
as woman.psd.
2. Duplicate the Background layer by holding the Alt (Option) key down while
dragging the layer over the New Layer button in the Layers panel. This will open
the Duplicate Layer dialog and you can name the new layer. Name this layer Blur.
3. Zoom in on the woman's eyes so the magnification is at 300%. We're going to try to
minimize the lines around her eye so have that part visible in the image.
4. Select the Blur tool and set the following options:
o Brush: Pick a round brush tip and set the Size to 5 px and Hardness to 0%.
o Mode: Normal
o Strength: 15%
o Use All Layers: disabled
5. Drag the tool along the wrinkle lines. The colours blur and merge together. For small
subtle effects, you can simply click on an area.
6. When you're finished, save your file.

Photoshop Lecture notes B.K.Mathan Nagan MCA., (Ph.D)
400 CAUSSANEL COLLEGE OF ARTS AND SCIENCE
Here are our results. To view your own before-and-after results,
toggle the visibility of the Blur layer off to compare it to the original image underneath.
You have to be really careful if you're working with an image that shows obvious signs
of JPEG compression. The compression causes pixels to 'clump' together to create a very
blocky, patterned look. Blurred areas on an image like that will look unnatural unless you
use a light touch. In fact, you can get an idea of this if you try to blur the lines in the
woman's neck. That area is somewhat textured and any blurring stands out like a sore
thumb.
Here's another piece of advice that applies to all retouching jobs. If your image is really
large in terms of dimensions or is at a high resolution and you plan to reduce either of
those, do your retouching before you lower the resolution or scale down your image.
The interpolation will help blend the retouched and unretouched areas.
Smudge Tool
Like the tool icon suggests, the Smudge tool creates an effect that is like dragging
your finger through paint. This isn't particularly useful for retouching but it can be used
to create special effects. We're going to do just that using the same image as before.
Practice Exercise: Smudge Tool
Caution: This exercise is processor-intensive. It may take awhile to process the effect of
the Smudge tool at the large size we'll be using. If your computer is modest, you might
consider duplicating the original image to another document and resizing it to smaller
dimensions so you can use a smaller brush size to achieve the same effect. You can cancel
the Smudge stroke by pressing the Esc key if you find it's taking too long.
1. In woman.psd duplicate the Background layer again and name the layer Smudge.

Photoshop Lecture notes B.K.Mathan Nagan MCA., (Ph.D)
401 CAUSSANEL COLLEGE OF ARTS AND SCIENCE
2. Hide the Blur layer.
3. Set the magnification of the image so you're able to see the whole image plus a
generous amount of the grey area surrounding it.
4. Select the Smudge tool and set its options to the following:
o Brush: Pick a round brush tip and set the Size to 200 px and Hardness to 0%.
o Mode: Normal (or Luminosity gives an interesting effect)
o Strength: 50
o Sample All Layers: disabled
o Finger Painting: disabled
5. Drag the tool around the perimeter of the image. The objective is to drag the paint
around in an oval shape to create a swirling effect around the woman's face.
6. Save your file and close it when you're finished.
Here's what we came up with.
The Finger Painting option paints some of the foreground colour at the
beginning of the brush stroke and then fades. When this is disabled, the Smudge tool uses
the colours in the image at the beginning of the brush stroke.
Sharpen Tool
Unfortunately, many photos are not as sharp as they could be. Generally, sharpen
filters are used to sharpen the entire image at once. However, the Sharpen tool may come
in useful for jobs where only specific areas need sharpening.
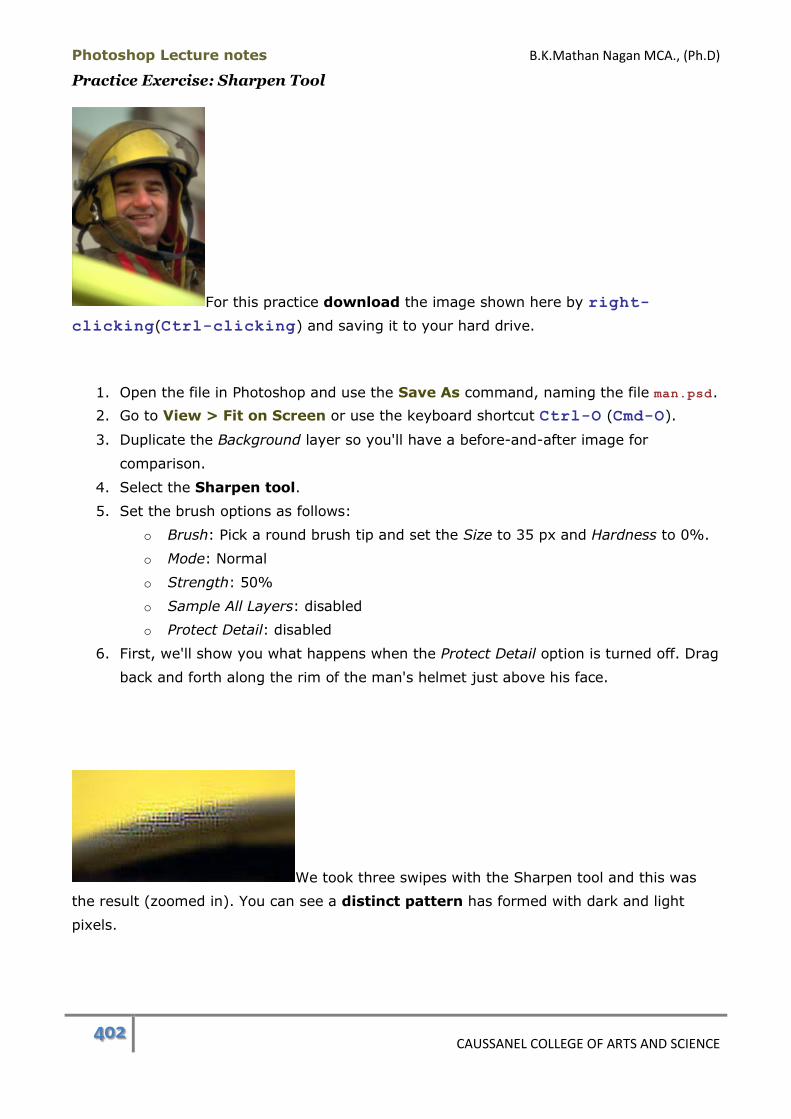
Photoshop Lecture notes B.K.Mathan Nagan MCA., (Ph.D)
402 CAUSSANEL COLLEGE OF ARTS AND SCIENCE
Practice Exercise: Sharpen Tool
For this practice download the image shown here by right-
clicking(Ctrl-clicking) and saving it to your hard drive.
1. Open the file in Photoshop and use the Save As command, naming the file man.psd.
2. Go to View > Fit on Screen or use the keyboard shortcut Ctrl-O (Cmd-O).
3. Duplicate the Background layer so you'll have a before-and-after image for
comparison.
4. Select the Sharpen tool.
5. Set the brush options as follows:
o Brush: Pick a round brush tip and set the Size to 35 px and Hardness to 0%.
o Mode: Normal
o Strength: 50%
o Sample All Layers: disabled
o Protect Detail: disabled
6. First, we'll show you what happens when the Protect Detail option is turned off. Drag
back and forth along the rim of the man's helmet just above his face.
We took three swipes with the Sharpen tool and this was
the result (zoomed in). You can see a distinct pattern has formed with dark and light
pixels.

Photoshop Lecture notes B.K.Mathan Nagan MCA., (Ph.D)
403 CAUSSANEL COLLEGE OF ARTS AND SCIENCE
7. Undo your changes and enable the Protect Detail check box.
8. Apply brush strokes to the same area again and see the different effect.
This was our result at 100%. What sharpening does is increase the
contrastbetween adjacent areas with different colour values. The Protect Detail option
prevented an unwanted pattern from forming, in this case. The yellow area above the rim
became much lighter as a result of sharpening. A smaller brush size might have helped
with that. Really, though, this image is so blurred overall that it's a prime candidate for a
sharpening filter.
9. Try working around the eye area and continue to work on different areas, especially
those that contain sharp divisions between light and dark colours. Test different
strengths.
10. Toggle the visibility of the new layer to compare your results with the original.
11. When you feel comfortable with how this tool works, save your file and close it.
Blur Tool Set Summary
The Blur tool set is useful for making corrections to selective areas of an image.
The Blur tool is quite subtle, even with the Strength value set at 100%.
The Smudge tool creates an effect like dragging your finger through paint.
The Smudge tool's Finger Painting option applies the foreground colour at the
beginning of the brush stroke.
The Sharpen tool sharpens selected areas of an image by increasing the contrast
between different areas of colour.
The Sharpen tool's Protect Detail option helps prevent unwanted patterns from
forming.
Blur Tool Set Keyboard Shortcuts:
Blur tool set: R
Clone Stamp Tool Set
The Clone Stamp tool and Pattern Stamp tool are bundled together in the Toolbox.
Both are a form of painting tool. The keyboard shortcut for this tool set is S.
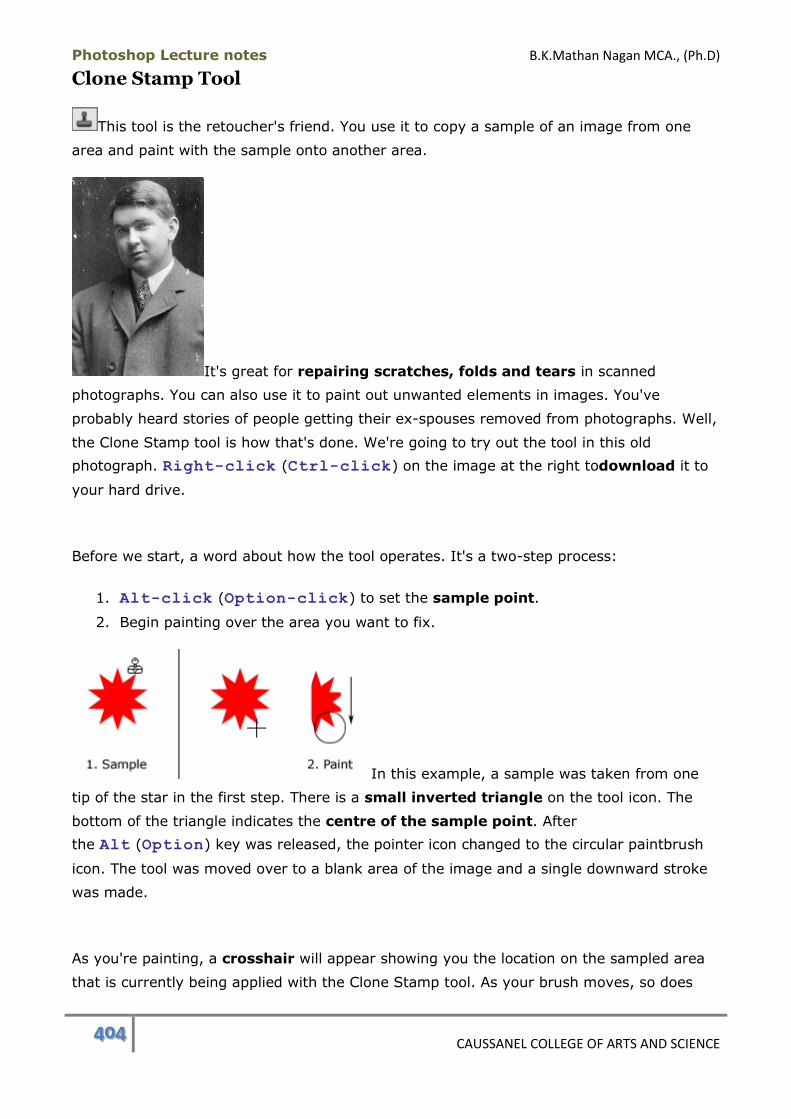
Photoshop Lecture notes B.K.Mathan Nagan MCA., (Ph.D)
404 CAUSSANEL COLLEGE OF ARTS AND SCIENCE
Clone Stamp Tool
This tool is the retoucher's friend. You use it to copy a sample of an image from one
area and paint with the sample onto another area.
It's great for repairing scratches, folds and tears in scanned
photographs. You can also use it to paint out unwanted elements in images. You've
probably heard stories of people getting their ex-spouses removed from photographs. Well,
the Clone Stamp tool is how that's done. We're going to try out the tool in this old
photograph. Right-click (Ctrl-click) on the image at the right todownload it to
your hard drive.
Before we start, a word about how the tool operates. It's a two-step process:
1. Alt-click (Option-click) to set the sample point.
2. Begin painting over the area you want to fix.
In this example, a sample was taken from one
tip of the star in the first step. There is a small inverted triangle on the tool icon. The
bottom of the triangle indicates the centre of the sample point. After
the Alt (Option) key was released, the pointer icon changed to the circular paintbrush
icon. The tool was moved over to a blank area of the image and a single downward stroke
was made.
As you're painting, a crosshair will appear showing you the location on the sampled area
that is currently being applied with the Clone Stamp tool. As your brush moves, so does

Photoshop Lecture notes B.K.Mathan Nagan MCA., (Ph.D)
405 CAUSSANEL COLLEGE OF ARTS AND SCIENCE
the crosshair. Not only is the area you clicked on initially painted on with the brush, as the
brush continues moving, the corresponding areas indicated by the crosshair are applied.
Practice Exercise: Retouching an Old Photo With the Clone Stamp Tool
1. Open old_image.jpg in Photoshop and use the Save As command to save the file
asold_image.psd.
2. Duplicate the Background layer. You'll work on the new layer.
3. Select the Clone Stamp tool in the Toolbox and set the options as follows:
o Brush: Hard Round 13 pixels
o Mode: Normal
o Opacity: 100%
o Aligned: disabled
o Use All Layers: disabled
4. Let's start in the upper-right corner of the image in the background area. Zoom in to
a magnification of 200%.
5. Pick one of the white spots in the background to work on. Alt-
click(Option-click) on an adjacent area that contains the same shade of
black as the area you want to cover.
6. Release the Alt (Option) key and paint over the white spot.
7. Continue in the upper-right corner of the image until all the white spots are fixed.
8. Shift over to the left part of the background. Let's focus on the long scratch to the
left of the man's cheek. There is a slight vertical pattern of lighter and darker areas
in the background. You'll want to choose a sample point that is directly above or
below the place where you intend to start to paint so the pattern aligns properly.
The image below illustrates a suggested sample point (indicated by the crosshair)
and starting point. The sample point will be taken directly below the left end of the
scratch. The paint will be applied in the direction of the arrow.
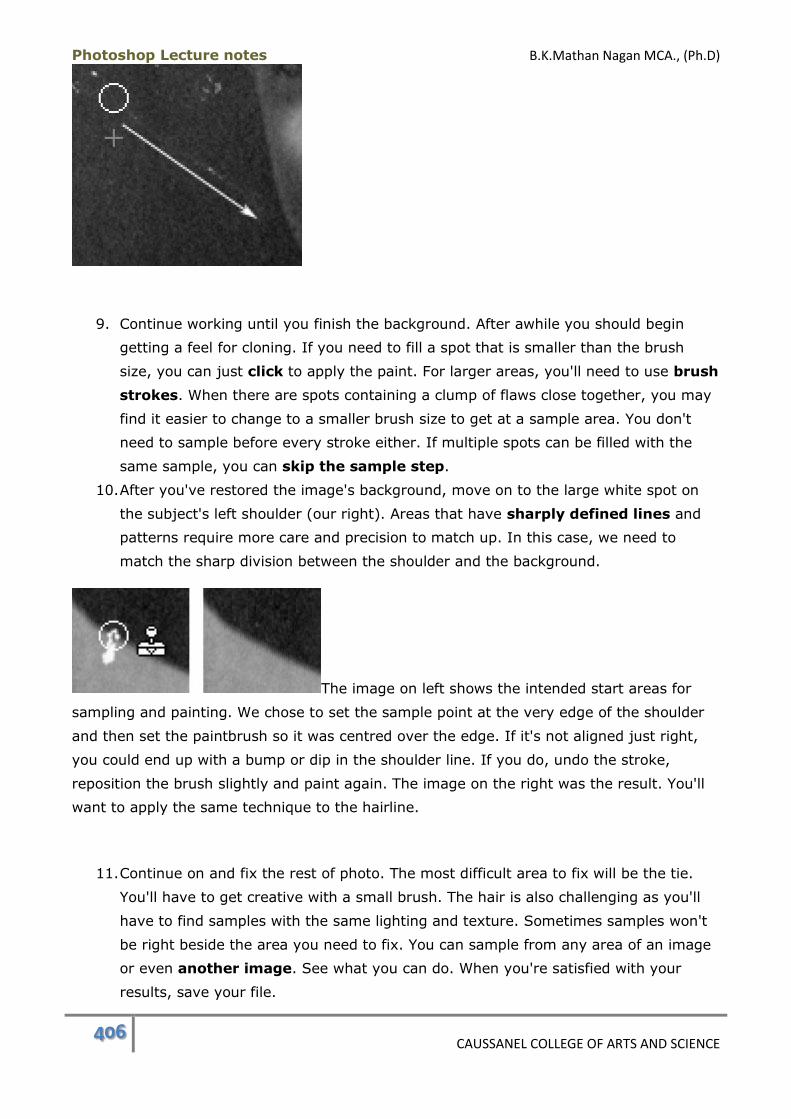
Photoshop Lecture notes B.K.Mathan Nagan MCA., (Ph.D)
406 CAUSSANEL COLLEGE OF ARTS AND SCIENCE
9. Continue working until you finish the background. After awhile you should begin
getting a feel for cloning. If you need to fill a spot that is smaller than the brush
size, you can just click to apply the paint. For larger areas, you'll need to use brush
strokes. When there are spots containing a clump of flaws close together, you may
find it easier to change to a smaller brush size to get at a sample area. You don't
need to sample before every stroke either. If multiple spots can be filled with the
same sample, you can skip the sample step.
10. After you've restored the image's background, move on to the large white spot on
the subject's left shoulder (our right). Areas that have sharply defined lines and
patterns require more care and precision to match up. In this case, we need to
match the sharp division between the shoulder and the background.
The image on left shows the intended start areas for
sampling and painting. We chose to set the sample point at the very edge of the shoulder
and then set the paintbrush so it was centred over the edge. If it's not aligned just right,
you could end up with a bump or dip in the shoulder line. If you do, undo the stroke,
reposition the brush slightly and paint again. The image on the right was the result. You'll
want to apply the same technique to the hairline.
11. Continue on and fix the rest of photo. The most difficult area to fix will be the tie.
You'll have to get creative with a small brush. The hair is also challenging as you'll
have to find samples with the same lighting and texture. Sometimes samples won't
be right beside the area you need to fix. You can sample from any area of an image
or even another image. See what you can do. When you're satisfied with your
results, save your file.

Photoshop Lecture notes B.K.Mathan Nagan MCA., (Ph.D)
407 CAUSSANEL COLLEGE OF ARTS AND SCIENCE
Tool Alignment Options
In the retouching exercise, the Clone Stamp tool had the Aligned option disabled. What
this does is that every new brush stroke begins by painting the initial sample point.
When Aligned is enabled, the position of the brush in relation to the sample point is what
determines the paint that be applied at the beginning of the brush stroke.
The examples shown here illustrate this concept. The
same sample point was used for both brush strokes. The aligned stroke began with the
green colour in line with the starting point of the brush. The unaligned stroke began with
the red colour that was sampled.
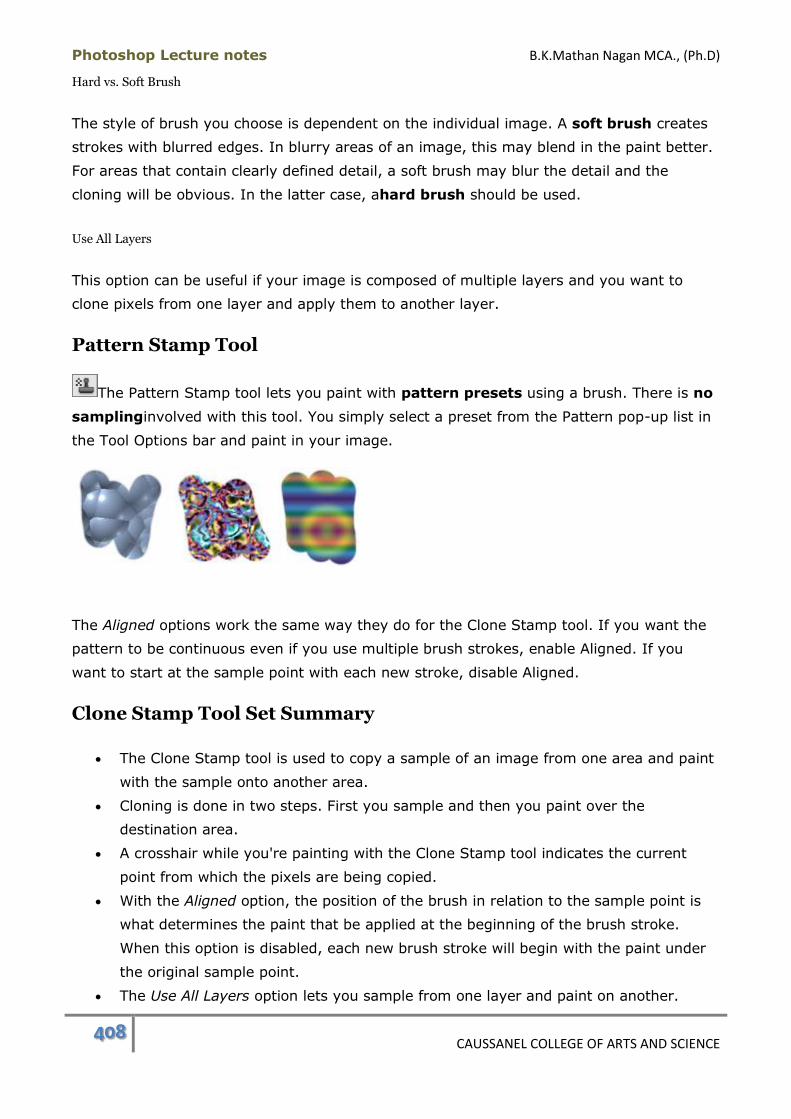
Photoshop Lecture notes B.K.Mathan Nagan MCA., (Ph.D)
408 CAUSSANEL COLLEGE OF ARTS AND SCIENCE
Hard vs. Soft Brush
The style of brush you choose is dependent on the individual image. A soft brush creates
strokes with blurred edges. In blurry areas of an image, this may blend in the paint better.
For areas that contain clearly defined detail, a soft brush may blur the detail and the
cloning will be obvious. In the latter case, ahard brush should be used.
Use All Layers
This option can be useful if your image is composed of multiple layers and you want to
clone pixels from one layer and apply them to another layer.
Pattern Stamp Tool
The Pattern Stamp tool lets you paint with pattern presets using a brush. There is no
samplinginvolved with this tool. You simply select a preset from the Pattern pop-up list in
the Tool Options bar and paint in your image.
The Aligned options work the same way they do for the Clone Stamp tool. If you want the
pattern to be continuous even if you use multiple brush strokes, enable Aligned. If you
want to start at the sample point with each new stroke, disable Aligned.
Clone Stamp Tool Set Summary
The Clone Stamp tool is used to copy a sample of an image from one area and paint
with the sample onto another area.
Cloning is done in two steps. First you sample and then you paint over the
destination area.
A crosshair while you're painting with the Clone Stamp tool indicates the current
point from which the pixels are being copied.
With the Aligned option, the position of the brush in relation to the sample point is
what determines the paint that be applied at the beginning of the brush stroke.
When this option is disabled, each new brush stroke will begin with the paint under
the original sample point.
The Use All Layers option lets you sample from one layer and paint on another.
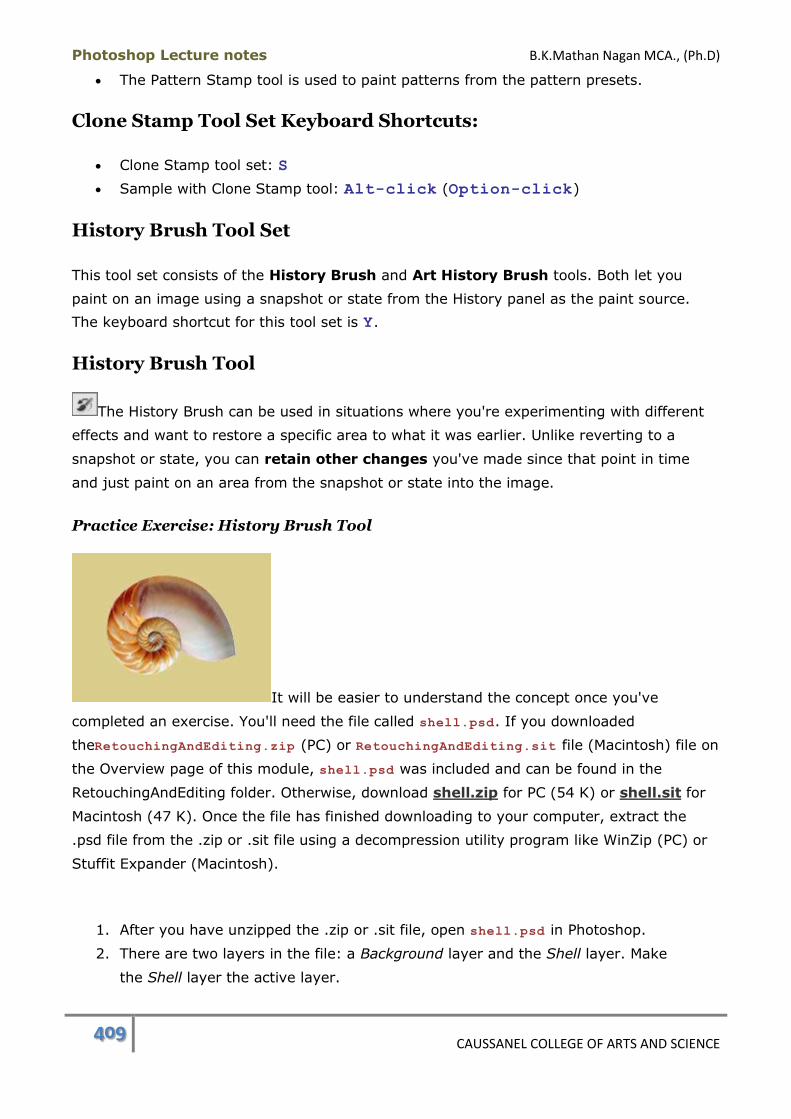
Photoshop Lecture notes B.K.Mathan Nagan MCA., (Ph.D)
409 CAUSSANEL COLLEGE OF ARTS AND SCIENCE
The Pattern Stamp tool is used to paint patterns from the pattern presets.
Clone Stamp Tool Set Keyboard Shortcuts:
Clone Stamp tool set: S
Sample with Clone Stamp tool: Alt-click (Option-click)
History Brush Tool Set
This tool set consists of the History Brush and Art History Brush tools. Both let you
paint on an image using a snapshot or state from the History panel as the paint source.
The keyboard shortcut for this tool set is Y.
History Brush Tool
The History Brush can be used in situations where you're experimenting with different
effects and want to restore a specific area to what it was earlier. Unlike reverting to a
snapshot or state, you can retain other changes you've made since that point in time
and just paint on an area from the snapshot or state into the image.
Practice Exercise: History Brush Tool
It will be easier to understand the concept once you've
completed an exercise. You'll need the file called shell.psd. If you downloaded
theRetouchingAndEditing.zip (PC) or RetouchingAndEditing.sit file (Macintosh) file on
the Overview page of this module, shell.psd was included and can be found in the
RetouchingAndEditing folder. Otherwise, download shell.zip for PC (54 K) or shell.sit for
Macintosh (47 K). Once the file has finished downloading to your computer, extract the
.psd file from the .zip or .sit file using a decompression utility program like WinZip (PC) or
Stuffit Expander (Macintosh).
1. After you have unzipped the .zip or .sit file, open shell.psd in Photoshop.
2. There are two layers in the file: a Background layer and the Shell layer. Make
the Shell layer the active layer.

Photoshop Lecture notes B.K.Mathan Nagan MCA., (Ph.D)
410 CAUSSANEL COLLEGE OF ARTS AND SCIENCE
3. Insert a new layer by holding the Alt (Option) key while clicking on the New
Layer button in the Layers panel. In the New Layer dialog name the new layer Hue,
set the Mode to Hue and set the Opacity to 75%. Click OK.
4. Create a selection of the Shell layer's opacity by holding down the Ctrl (Cmd) key
while clicking on the Shell layer.
5. Pick a foreground colour different from the tan colours in the image. We used
#00CCFF.
6. Making sure that the Hue layer is the active layer, fill the selection with the
foreground colour by pressing Alt-Backspace (Option-Delete). Your layers
and image should look like the examples below.
7. Display the History panel if it's not open by going to Window > History.
8. In the panel menu, choose New Snapshot.
9. In the New Snapshot dialog, select Merged Layers in the From pop-up menu.
Click OK to create the new snapshot. You'll use this snapshot later with the History
Brush.
10. Delete the Hue layer. You should still have a selection intact.
11. Insert a new layer over the Shell layer.
12. Pick a different foreground colour and fill the selection.
13. Try out various layer blend modes to see how your fill colour interacts with the shell
underneath.
14. When you're done experimenting, we're going to try out the History Brush.
15. Select the History Brush in the Toolbox. Set the following options:

Photoshop Lecture notes B.K.Mathan Nagan MCA., (Ph.D)
411 CAUSSANEL COLLEGE OF ARTS AND SCIENCE
o Brush: Hard Round 19 pixels
o Mode: Normal
o Opacity: 100%
16. Scroll up in the History panel until Snapshot 1 is displayed.
17. Click in the column to the left of the Snapshot
1 thumbnail. TheHistory Brush icon should move to this position. It should look
like this example.
18. Delete the layer you were experimenting with.
19. Insert another layer that is in Normal mode.
20. Paint inside the selection to apply the snapshot with the History brush.
21. Remove the selection by using the shortcut Ctrl-D (Cmd-D).
22. Save your file.
You could use the History Brush tool in the following situation, as well. Say you undid an
editing change, did something else, and then decided you wanted the change back. It
would no longer be available in the History panel as a state but if you'd taken a snapshot of
it before undoing, you could use the snapshot with the History Brush to restore the edit.
You can also paint from a state instead of a snapshot. You'd click in the column to the left
of the state in the History panel to set the History Brush icon then begin painting.
Art History Brush
The Art History Brush is just plain creative fun. It takes its source pixels from a state or
snapshot but you can paint with stylized brush strokes and many different options.
Practice Exercise: Art History Brush
We'll get you started on a practice using this tool and then let
you loose to try all the variations it offers. Right-click (Ctrl-click) on the image
at the right and download it to your computer.
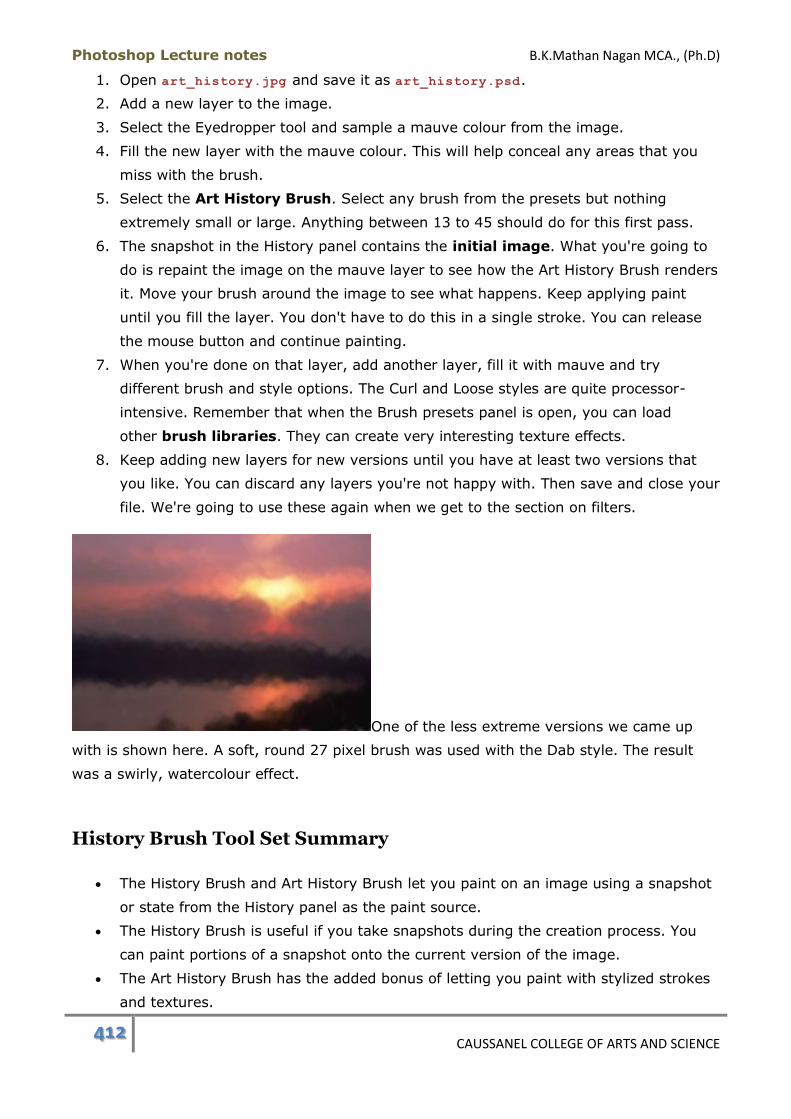
Photoshop Lecture notes B.K.Mathan Nagan MCA., (Ph.D)
412 CAUSSANEL COLLEGE OF ARTS AND SCIENCE
1. Open art_history.jpg and save it as art_history.psd.
2. Add a new layer to the image.
3. Select the Eyedropper tool and sample a mauve colour from the image.
4. Fill the new layer with the mauve colour. This will help conceal any areas that you
miss with the brush.
5. Select the Art History Brush. Select any brush from the presets but nothing
extremely small or large. Anything between 13 to 45 should do for this first pass.
6. The snapshot in the History panel contains the initial image. What you're going to
do is repaint the image on the mauve layer to see how the Art History Brush renders
it. Move your brush around the image to see what happens. Keep applying paint
until you fill the layer. You don't have to do this in a single stroke. You can release
the mouse button and continue painting.
7. When you're done on that layer, add another layer, fill it with mauve and try
different brush and style options. The Curl and Loose styles are quite processor-
intensive. Remember that when the Brush presets panel is open, you can load
other brush libraries. They can create very interesting texture effects.
8. Keep adding new layers for new versions until you have at least two versions that
you like. You can discard any layers you're not happy with. Then save and close your
file. We're going to use these again when we get to the section on filters.
One of the less extreme versions we came up
with is shown here. A soft, round 27 pixel brush was used with the Dab style. The result
was a swirly, watercolour effect.
History Brush Tool Set Summary
The History Brush and Art History Brush let you paint on an image using a snapshot
or state from the History panel as the paint source.
The History Brush is useful if you take snapshots during the creation process. You
can paint portions of a snapshot onto the current version of the image.
The Art History Brush has the added bonus of letting you paint with stylized strokes
and textures.

Photoshop Lecture notes B.K.Mathan Nagan MCA., (Ph.D)
413 CAUSSANEL COLLEGE OF ARTS AND SCIENCE
History Brush Tool Set Keyboard Shortcuts:
History Brush tool set: Y
Eraser Tool Set
The Eraser tool set consists of the Eraser, Background Eraser and Magic Eraser tools.
The keyboard shortcut for the tool set is E. These tools are used to erase pixels to
transparency or to the background colour. Each works in a different way.
Eraser Tool
The Eraser tool erases pixels to transparency or partial transparency when used on
regular layers. When used on a Background layer or a layer with locked transparency, it
changes the pixels to the current background colour displayed in the Toolbox.
We're going to use this GIF image of an apple tree for the
first exercise.Right-click (Ctrl-click) on the image and download it to your
computer.
Practice Exercise: Eraser Tool
In this practice exercise, you'll use the Eraser tool to erase to the background colour using
various erasing modes.
1. Open apple_tree.gif in Photoshop.
2. Use the Save As command to save the file as apple_tree.psd.
3. Press Ctrl-0 (Cmd-0) to have the image fill the screen.
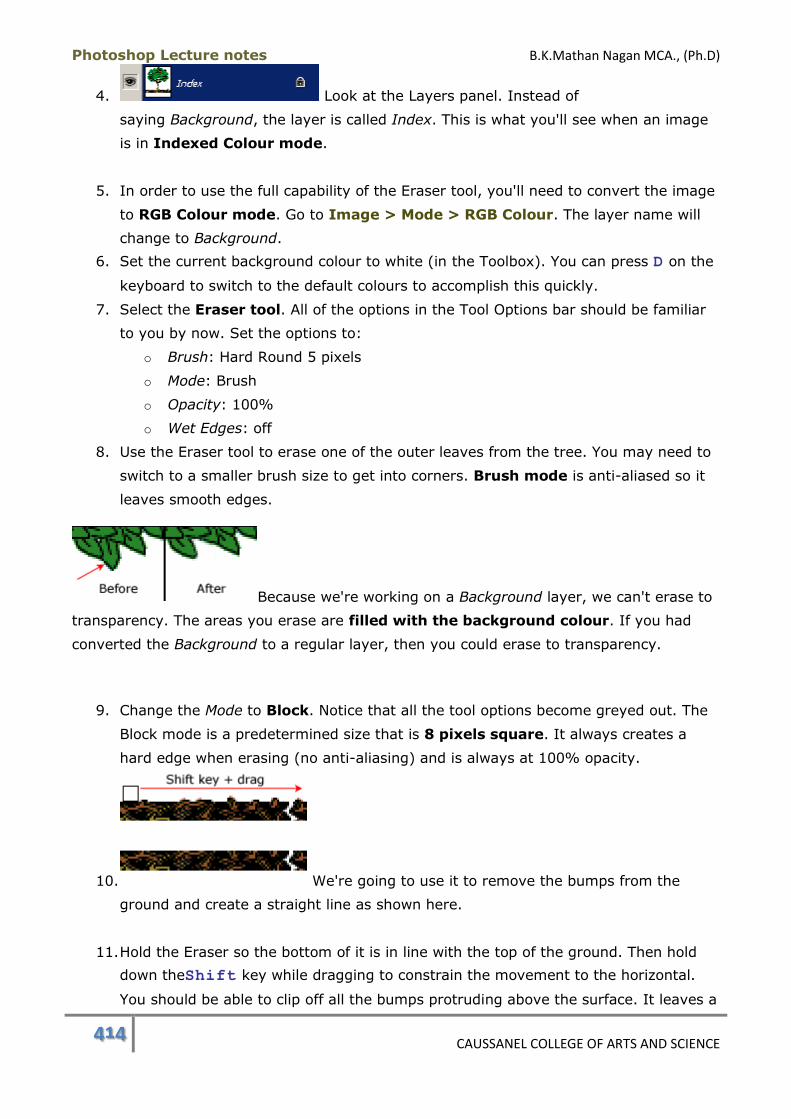
Photoshop Lecture notes B.K.Mathan Nagan MCA., (Ph.D)
414 CAUSSANEL COLLEGE OF ARTS AND SCIENCE
4. Look at the Layers panel. Instead of
saying Background, the layer is called Index. This is what you'll see when an image
is in Indexed Colour mode.
5. In order to use the full capability of the Eraser tool, you'll need to convert the image
to RGB Colour mode. Go to Image > Mode > RGB Colour. The layer name will
change to Background.
6. Set the current background colour to white (in the Toolbox). You can press D on the
keyboard to switch to the default colours to accomplish this quickly.
7. Select the Eraser tool. All of the options in the Tool Options bar should be familiar
to you by now. Set the options to:
o Brush: Hard Round 5 pixels
o Mode: Brush
o Opacity: 100%
o Wet Edges: off
8. Use the Eraser tool to erase one of the outer leaves from the tree. You may need to
switch to a smaller brush size to get into corners. Brush mode is anti-aliased so it
leaves smooth edges.
Because we're working on a Background layer, we can't erase to
transparency. The areas you erase are filled with the background colour. If you had
converted the Background to a regular layer, then you could erase to transparency.
9. Change the Mode to Block. Notice that all the tool options become greyed out. The
Block mode is a predetermined size that is 8 pixels square. It always creates a
hard edge when erasing (no anti-aliasing) and is always at 100% opacity.
10. We're going to use it to remove the bumps from the
ground and create a straight line as shown here.
11. Hold the Eraser so the bottom of it is in line with the top of the ground. Then hold
down theShift key while dragging to constrain the movement to the horizontal.
You should be able to clip off all the bumps protruding above the surface. It leaves a
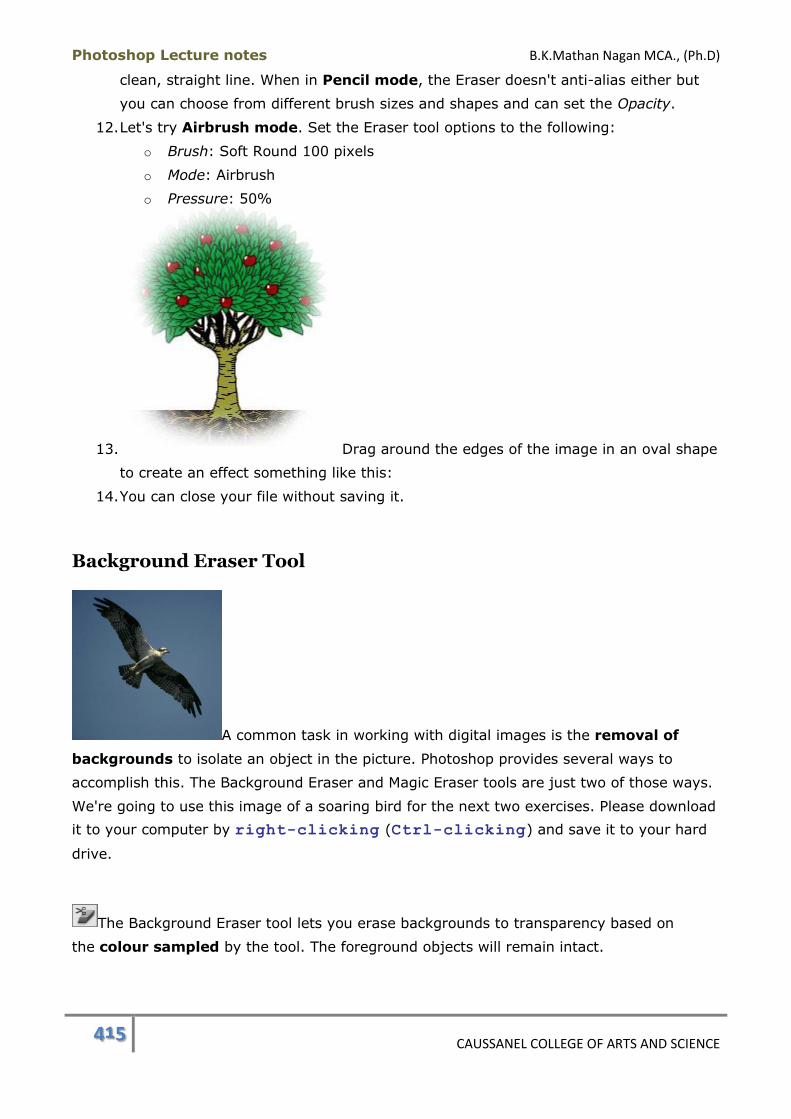
Photoshop Lecture notes B.K.Mathan Nagan MCA., (Ph.D)
415 CAUSSANEL COLLEGE OF ARTS AND SCIENCE
clean, straight line. When in Pencil mode, the Eraser doesn't anti-alias either but
you can choose from different brush sizes and shapes and can set the Opacity.
12. Let's try Airbrush mode. Set the Eraser tool options to the following:
o Brush: Soft Round 100 pixels
o Mode: Airbrush
o Pressure: 50%
13. Drag around the edges of the image in an oval shape
to create an effect something like this:
14. You can close your file without saving it.
Background Eraser Tool
A common task in working with digital images is the removal of
backgrounds to isolate an object in the picture. Photoshop provides several ways to
accomplish this. The Background Eraser and Magic Eraser tools are just two of those ways.
We're going to use this image of a soaring bird for the next two exercises. Please download
it to your computer by right-clicking (Ctrl-clicking) and save it to your hard
drive.
The Background Eraser tool lets you erase backgrounds to transparency based on
the colour sampled by the tool. The foreground objects will remain intact.
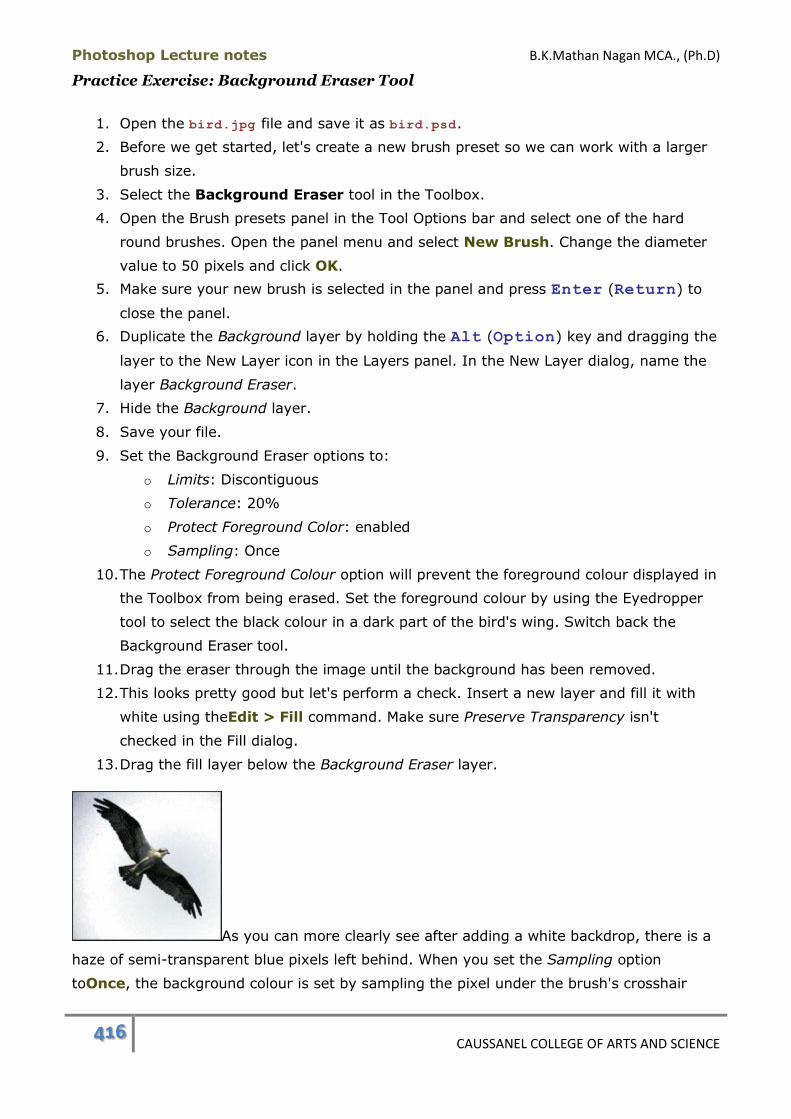
Photoshop Lecture notes B.K.Mathan Nagan MCA., (Ph.D)
416 CAUSSANEL COLLEGE OF ARTS AND SCIENCE
Practice Exercise: Background Eraser Tool
1. Open the bird.jpg file and save it as bird.psd.
2. Before we get started, let's create a new brush preset so we can work with a larger
brush size.
3. Select the Background Eraser tool in the Toolbox.
4. Open the Brush presets panel in the Tool Options bar and select one of the hard
round brushes. Open the panel menu and select New Brush. Change the diameter
value to 50 pixels and click OK.
5. Make sure your new brush is selected in the panel and press Enter (Return) to
close the panel.
6. Duplicate the Background layer by holding the Alt (Option) key and dragging the
layer to the New Layer icon in the Layers panel. In the New Layer dialog, name the
layer Background Eraser.
7. Hide the Background layer.
8. Save your file.
9. Set the Background Eraser options to:
o Limits: Discontiguous
o Tolerance: 20%
o Protect Foreground Color: enabled
o Sampling: Once
10. The Protect Foreground Colour option will prevent the foreground colour displayed in
the Toolbox from being erased. Set the foreground colour by using the Eyedropper
tool to select the black colour in a dark part of the bird's wing. Switch back the
Background Eraser tool.
11. Drag the eraser through the image until the background has been removed.
12. This looks pretty good but let's perform a check. Insert a new layer and fill it with
white using theEdit > Fill command. Make sure Preserve Transparency isn't
checked in the Fill dialog.
13. Drag the fill layer below the Background Eraser layer.
As you can more clearly see after adding a white backdrop, there is a
haze of semi-transparent blue pixels left behind. When you set the Sampling option
toOnce, the background colour is set by sampling the pixel under the brush's crosshair

Photoshop Lecture notes B.K.Mathan Nagan MCA., (Ph.D)
417 CAUSSANEL COLLEGE OF ARTS AND SCIENCE
when you first click in the image to begin erasing. If there are variations of colour that fall
outside the tolerance range, those areas won't be completely erased. We could raise
the Tolerance value but then run the risk of erasing the bird, which is actually what will
happen. Another option is to change the Samplingoption to Continuous so that the brush
samples values under the crosshair continuously. This will accommodate the variations in
the background colour.
14. In the History panel, choose the Duplicate Layer state to revert to that version of the
document. If that state is no longer available, go to File > Revert. You'll need to
duplicate the layer again before continuing.
15. Insert a new layer and fill it with white as you did before and drag it below
the Background Eraserlayer.
16. Make the Background Eraser layer the active layer.
17. Set the Sampling option to Continuous.
18. Try erasing the background again. This works great on the colour variations in the
sky but has the unfortunate effect of erasing the bird if the tool's crosshair goes over
the bird while you're erasing. The trick, it would seem, is to make sure to maintain
the crosshair over the sky at all times. That takes much more caution and is even
trickier on the narrow channel formed between the feathers of the wing tips.
Switching the Sampling option to Once will help in those areas.
19. After you've erased the background, save your file.
The end result looks much better than the first attempt but there are
still fragments of the sky left behind. A Limits option we didn't try is Find Edges. This
produces a cleaner edge around the bird but doesn't resolve the problem with the sky.
Without further ado, let's proceed on to the Magic Eraser and see how that does the job.
Magic Eraser Tool
The Magic Eraser tool erases with a single click. You can erase to transparency or
erase to the background colour on a Background layer or a layer on which the transparency
has been locked.
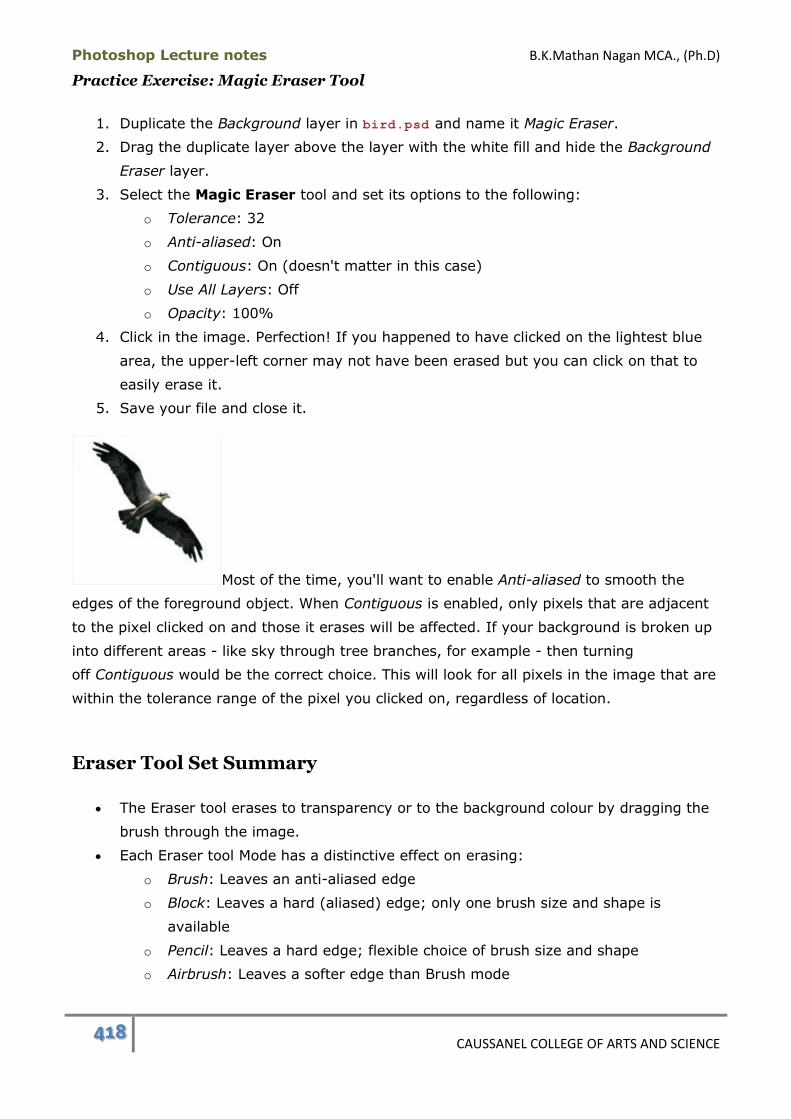
Photoshop Lecture notes B.K.Mathan Nagan MCA., (Ph.D)
418 CAUSSANEL COLLEGE OF ARTS AND SCIENCE
Practice Exercise: Magic Eraser Tool
1. Duplicate the Background layer in bird.psd and name it Magic Eraser.
2. Drag the duplicate layer above the layer with the white fill and hide the Background
Eraser layer.
3. Select the Magic Eraser tool and set its options to the following:
o Tolerance: 32
o Anti-aliased: On
o Contiguous: On (doesn't matter in this case)
o Use All Layers: Off
o Opacity: 100%
4. Click in the image. Perfection! If you happened to have clicked on the lightest blue
area, the upper-left corner may not have been erased but you can click on that to
easily erase it.
5. Save your file and close it.
Most of the time, you'll want to enable Anti-aliased to smooth the
edges of the foreground object. When Contiguous is enabled, only pixels that are adjacent
to the pixel clicked on and those it erases will be affected. If your background is broken up
into different areas - like sky through tree branches, for example - then turning
off Contiguous would be the correct choice. This will look for all pixels in the image that are
within the tolerance range of the pixel you clicked on, regardless of location.
Eraser Tool Set Summary
The Eraser tool erases to transparency or to the background colour by dragging the
brush through the image.
Each Eraser tool Mode has a distinctive effect on erasing:
o Brush: Leaves an anti-aliased edge
o Block: Leaves a hard (aliased) edge; only one brush size and shape is
available
o Pencil: Leaves a hard edge; flexible choice of brush size and shape
o Airbrush: Leaves a softer edge than Brush mode
Photoshop Lecture notes B.K.Mathan Nagan MCA., (Ph.D)
419 CAUSSANEL COLLEGE OF ARTS AND SCIENCE
Holding down the Shift key while dragging with the Eraser tool constrains the
direction of movement to horizontal or vertical.
The Background Eraser tool works by dragging it through the image to remove the
colour sampled by the tool. It erases to transparency.
Enabling the Protect Foreground Colour option for the Background Eraser tool will
help prevent you from erasing the object you want to isolate. Select a colour from
the object with the Eyedropper tool to set the colour you want to protect.
Setting Sampling to Once for the Background Eraser tool will set the colour to be
erased upon the first mouse click. The pixel under the tool's crosshair is used as the
sample. Setting Sampling toContinuous results in the tool sampling every pixel it
crosses over and the target pixels are adjusted accordingly. With this option, you
have to be careful not to cross over the foreground object.
The Magic Eraser tool erases with a single click to transparency or to the background
colour.
If the background colour you want to erase is broken up into multiple areas, disable
the Magic Eraser's Contiguous option.
Eraser Tool Set Keyboard Shortcuts:
Eraser tool set: E
Dodge Tool Set
This is another set of tools helpful for retouching photos. The Dodge tool lightens areas,
the Burn tooldarkens areas, and the Sponge tool reduces or increases the saturation of
an area, depending on which mode you choose. The keyboard shortcut for the tool set is O.
Dodge Tool
Both the Dodge and Burn tools are named after photographic printing terms. To
make a print in the darkroom, the light of an enlarger is shone through a negative onto
light-sensitive photo paper. The length of time the enlarger light is on is called exposure.
The longer the exposure time, the darker the photo will be. If one area is overexposed on
the print because of the way the photo was taken, the developer can reprint the image and
"dodge" to reduce the amount of light that falls on a particular area. Dodging is usually
done using a wand that looks like the icon on the Dodge tool button. The round end of the
wand is moved around over the problem area while the enlarger light is on, thus blocking
some of the light and yielding a lighter area in the print.
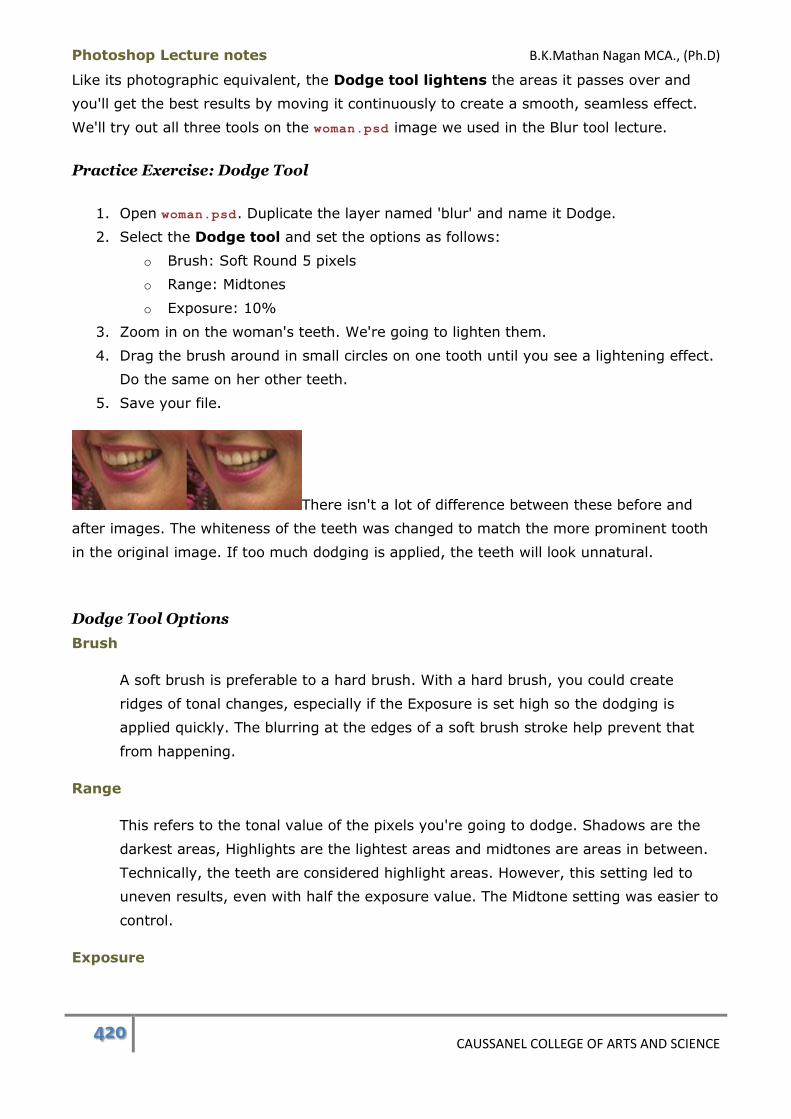
Photoshop Lecture notes B.K.Mathan Nagan MCA., (Ph.D)
420 CAUSSANEL COLLEGE OF ARTS AND SCIENCE
Like its photographic equivalent, the Dodge tool lightens the areas it passes over and
you'll get the best results by moving it continuously to create a smooth, seamless effect.
We'll try out all three tools on the woman.psd image we used in the Blur tool lecture.
Practice Exercise: Dodge Tool
1. Open woman.psd. Duplicate the layer named 'blur' and name it Dodge.
2. Select the Dodge tool and set the options as follows:
o Brush: Soft Round 5 pixels
o Range: Midtones
o Exposure: 10%
3. Zoom in on the woman's teeth. We're going to lighten them.
4. Drag the brush around in small circles on one tooth until you see a lightening effect.
Do the same on her other teeth.
5. Save your file.
There isn't a lot of difference between these before and
after images. The whiteness of the teeth was changed to match the more prominent tooth
in the original image. If too much dodging is applied, the teeth will look unnatural.
Dodge Tool Options
Brush
A soft brush is preferable to a hard brush. With a hard brush, you could create
ridges of tonal changes, especially if the Exposure is set high so the dodging is
applied quickly. The blurring at the edges of a soft brush stroke help prevent that
from happening.
Range
This refers to the tonal value of the pixels you're going to dodge. Shadows are the
darkest areas, Highlights are the lightest areas and midtones are areas in between.
Technically, the teeth are considered highlight areas. However, this setting led to
uneven results, even with half the exposure value. The Midtone setting was easier to
control.
Exposure

Photoshop Lecture notes B.K.Mathan Nagan MCA., (Ph.D)
421 CAUSSANEL COLLEGE OF ARTS AND SCIENCE
Exposure is the strength of the Dodge tool's lightening effect. Higher values will
lighten very quickly and you may be unable to maintain control to lighten an area
evenly. Lower values, while they take longer to apply, will give you greater control
and smoother-looking results.
Burn Tool
The Burn tool does the opposite of what the Dodge tool does. It will darken areas of an
image. In print developing, the developer will darken an overly-light area in a photo by
exposing it to light longer than the rest of the photo. This is accomplished by moving an
opaque card with a hole in it between the enlarger and the print. The hole is positioned
over the print area that needs to be darkened. Presumably, the tool icon represents
someone using their hand for this purpose.
Practice Exercise: Burn Tool
1. Switch to the Burn tool and set the following options:
o Brush: Soft Round 27 pixels
o Range: Midtones
o Exposure: 60%
2. You'll be darkening the background area to the left of the woman until it's black.
Drag the brush around through one of the target areas to darken the pixels. You
may find that the effect seems to stop working. If so, release the mouse button and
begin dragging again. Take care not to darken the pink feathers. You can switch to a
smaller brush size to get into small areas.
3. When you're finished, save your file.
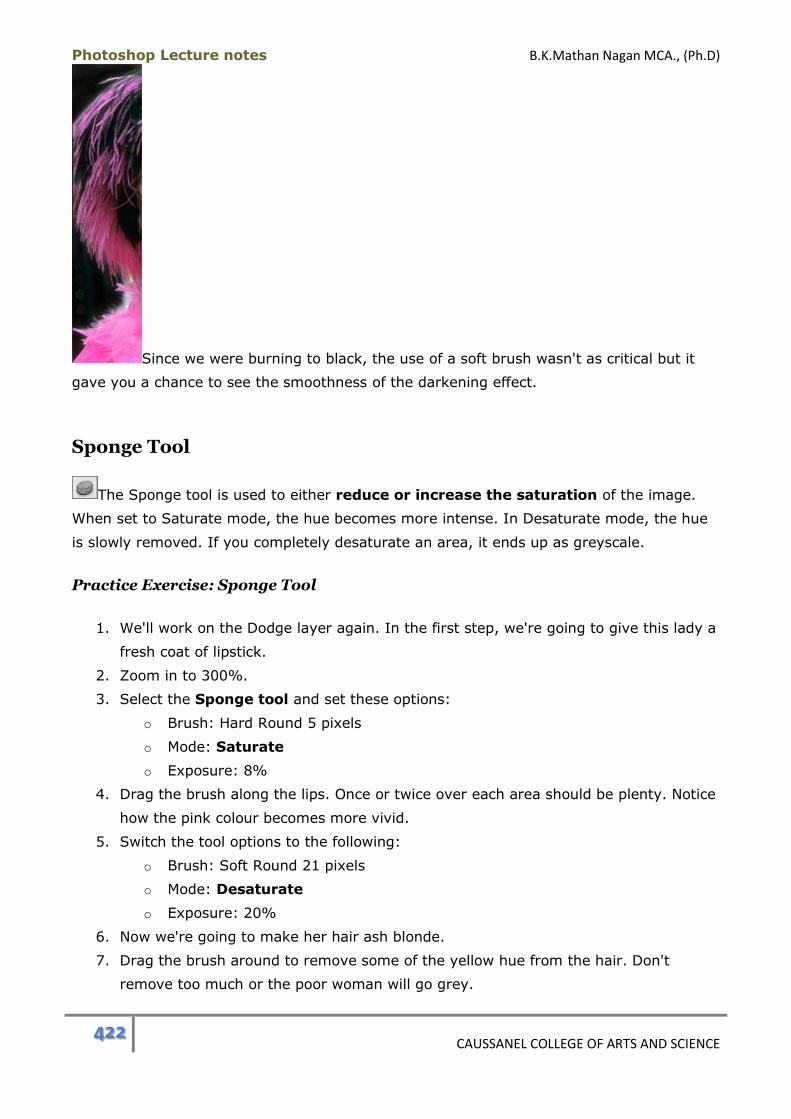
Photoshop Lecture notes B.K.Mathan Nagan MCA., (Ph.D)
422 CAUSSANEL COLLEGE OF ARTS AND SCIENCE
Since we were burning to black, the use of a soft brush wasn't as critical but it
gave you a chance to see the smoothness of the darkening effect.
Sponge Tool
The Sponge tool is used to either reduce or increase the saturation of the image.
When set to Saturate mode, the hue becomes more intense. In Desaturate mode, the hue
is slowly removed. If you completely desaturate an area, it ends up as greyscale.
Practice Exercise: Sponge Tool
1. We'll work on the Dodge layer again. In the first step, we're going to give this lady a
fresh coat of lipstick.
2. Zoom in to 300%.
3. Select the Sponge tool and set these options:
o Brush: Hard Round 5 pixels
o Mode: Saturate
o Exposure: 8%
4. Drag the brush along the lips. Once or twice over each area should be plenty. Notice
how the pink colour becomes more vivid.
5. Switch the tool options to the following:
o Brush: Soft Round 21 pixels
o Mode: Desaturate
o Exposure: 20%
6. Now we're going to make her hair ash blonde.
7. Drag the brush around to remove some of the yellow hue from the hair. Don't
remove too much or the poor woman will go grey.
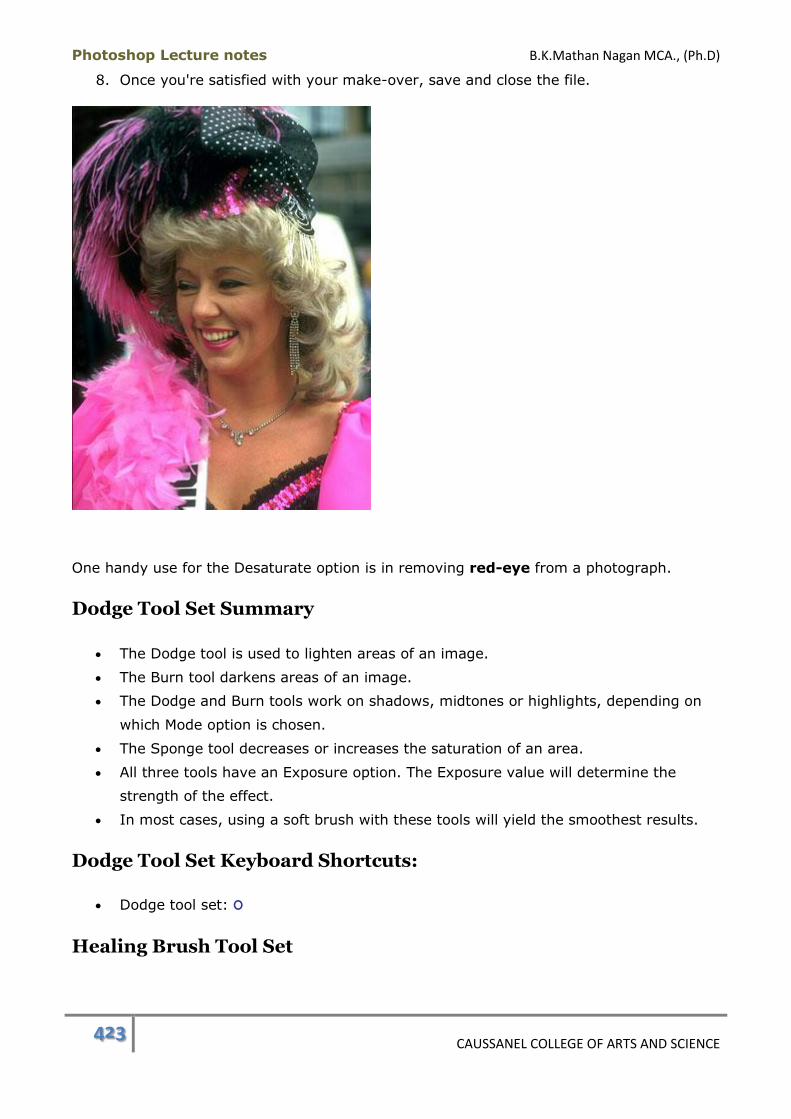
Photoshop Lecture notes B.K.Mathan Nagan MCA., (Ph.D)
423 CAUSSANEL COLLEGE OF ARTS AND SCIENCE
8. Once you're satisfied with your make-over, save and close the file.
One handy use for the Desaturate option is in removing red-eye from a photograph.
Dodge Tool Set Summary
The Dodge tool is used to lighten areas of an image.
The Burn tool darkens areas of an image.
The Dodge and Burn tools work on shadows, midtones or highlights, depending on
which Mode option is chosen.
The Sponge tool decreases or increases the saturation of an area.
All three tools have an Exposure option. The Exposure value will determine the
strength of the effect.
In most cases, using a soft brush with these tools will yield the smoothest results.
Dodge Tool Set Keyboard Shortcuts:
Dodge tool set: O
Healing Brush Tool Set
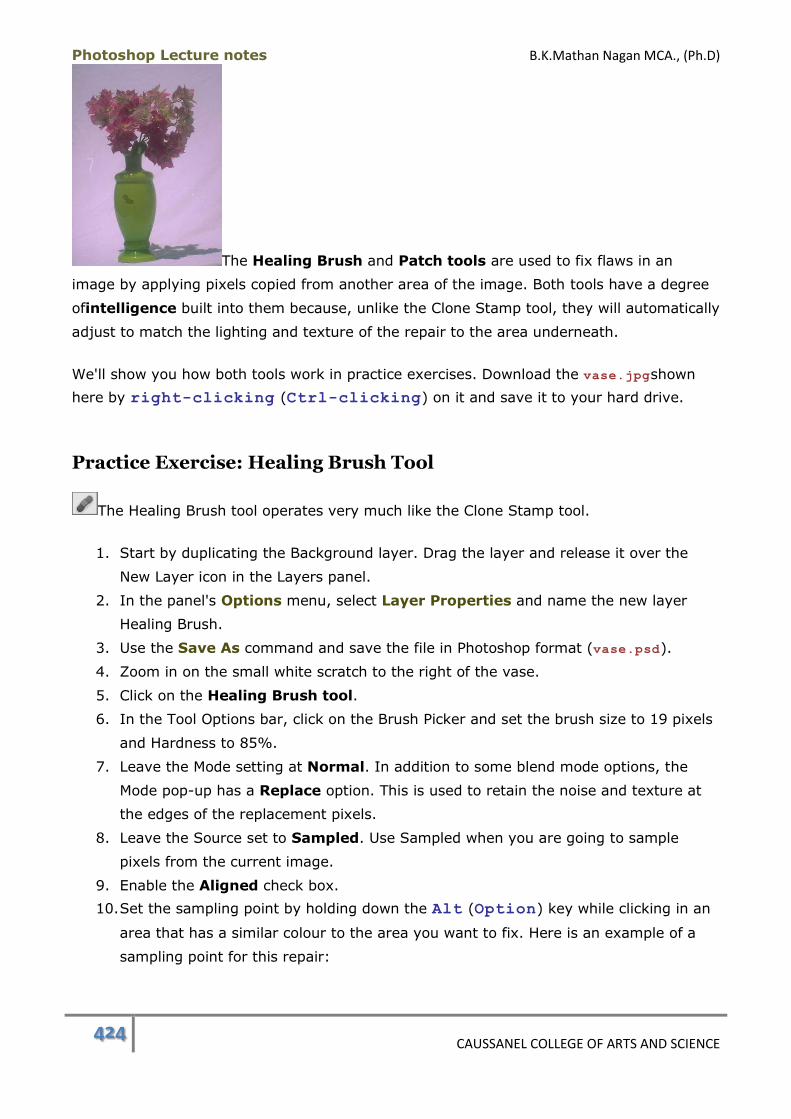
Photoshop Lecture notes B.K.Mathan Nagan MCA., (Ph.D)
424 CAUSSANEL COLLEGE OF ARTS AND SCIENCE
The Healing Brush and Patch tools are used to fix flaws in an
image by applying pixels copied from another area of the image. Both tools have a degree
ofintelligence built into them because, unlike the Clone Stamp tool, they will automatically
adjust to match the lighting and texture of the repair to the area underneath.
We'll show you how both tools work in practice exercises. Download the vase.jpgshown
here by right-clicking (Ctrl-clicking) on it and save it to your hard drive.
Practice Exercise: Healing Brush Tool
The Healing Brush tool operates very much like the Clone Stamp tool.
1. Start by duplicating the Background layer. Drag the layer and release it over the
New Layer icon in the Layers panel.
2. In the panel's Options menu, select Layer Properties and name the new layer
Healing Brush.
3. Use the Save As command and save the file in Photoshop format (vase.psd).
4. Zoom in on the small white scratch to the right of the vase.
5. Click on the Healing Brush tool.
6. In the Tool Options bar, click on the Brush Picker and set the brush size to 19 pixels
and Hardness to 85%.
7. Leave the Mode setting at Normal. In addition to some blend mode options, the
Mode pop-up has a Replace option. This is used to retain the noise and texture at
the edges of the replacement pixels.
8. Leave the Source set to Sampled. Use Sampled when you are going to sample
pixels from the current image.
9. Enable the Aligned check box.
10. Set the sampling point by holding down the Alt (Option) key while clicking in an
area that has a similar colour to the area you want to fix. Here is an example of a
sampling point for this repair:
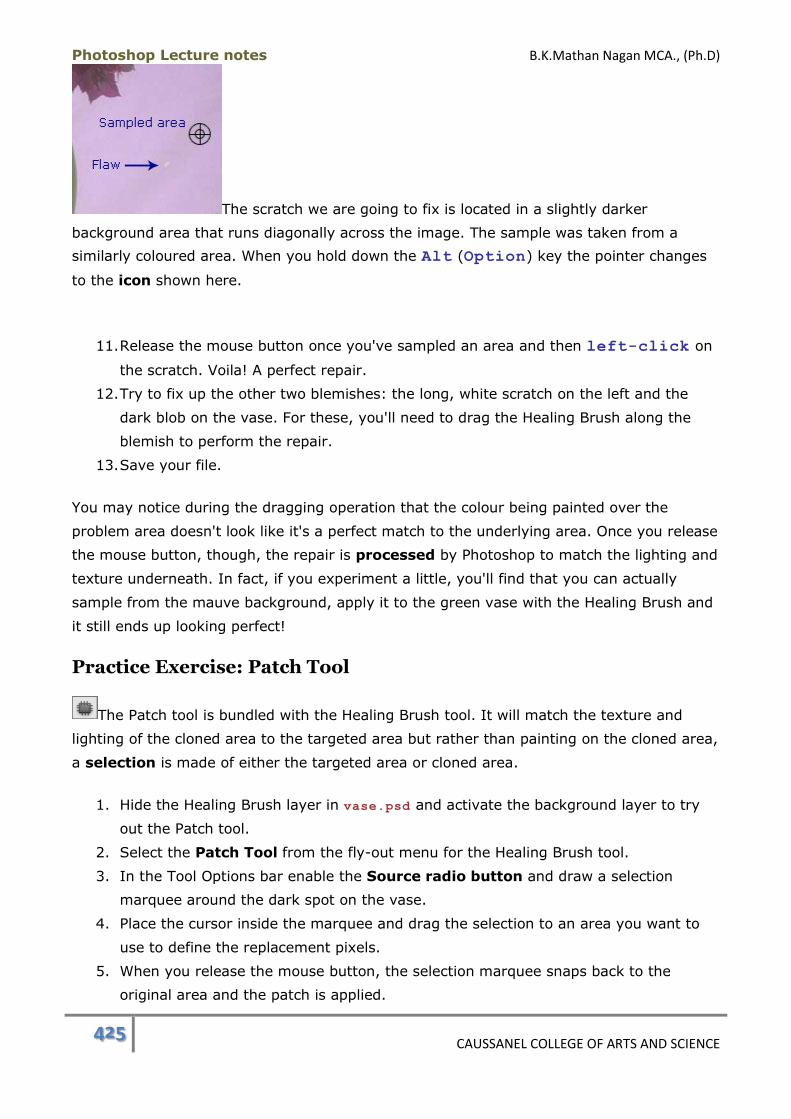
Photoshop Lecture notes B.K.Mathan Nagan MCA., (Ph.D)
425 CAUSSANEL COLLEGE OF ARTS AND SCIENCE
The scratch we are going to fix is located in a slightly darker
background area that runs diagonally across the image. The sample was taken from a
similarly coloured area. When you hold down the Alt (Option) key the pointer changes
to the icon shown here.
11. Release the mouse button once you've sampled an area and then left-click on
the scratch. Voila! A perfect repair.
12. Try to fix up the other two blemishes: the long, white scratch on the left and the
dark blob on the vase. For these, you'll need to drag the Healing Brush along the
blemish to perform the repair.
13. Save your file.
You may notice during the dragging operation that the colour being painted over the
problem area doesn't look like it's a perfect match to the underlying area. Once you release
the mouse button, though, the repair is processed by Photoshop to match the lighting and
texture underneath. In fact, if you experiment a little, you'll find that you can actually
sample from the mauve background, apply it to the green vase with the Healing Brush and
it still ends up looking perfect!
Practice Exercise: Patch Tool
The Patch tool is bundled with the Healing Brush tool. It will match the texture and
lighting of the cloned area to the targeted area but rather than painting on the cloned area,
a selection is made of either the targeted area or cloned area.
1. Hide the Healing Brush layer in vase.psd and activate the background layer to try
out the Patch tool.
2. Select the Patch Tool from the fly-out menu for the Healing Brush tool.
3. In the Tool Options bar enable the Source radio button and draw a selection
marquee around the dark spot on the vase.
4. Place the cursor inside the marquee and drag the selection to an area you want to
use to define the replacement pixels.
5. When you release the mouse button, the selection marquee snaps back to the
original area and the patch is applied.
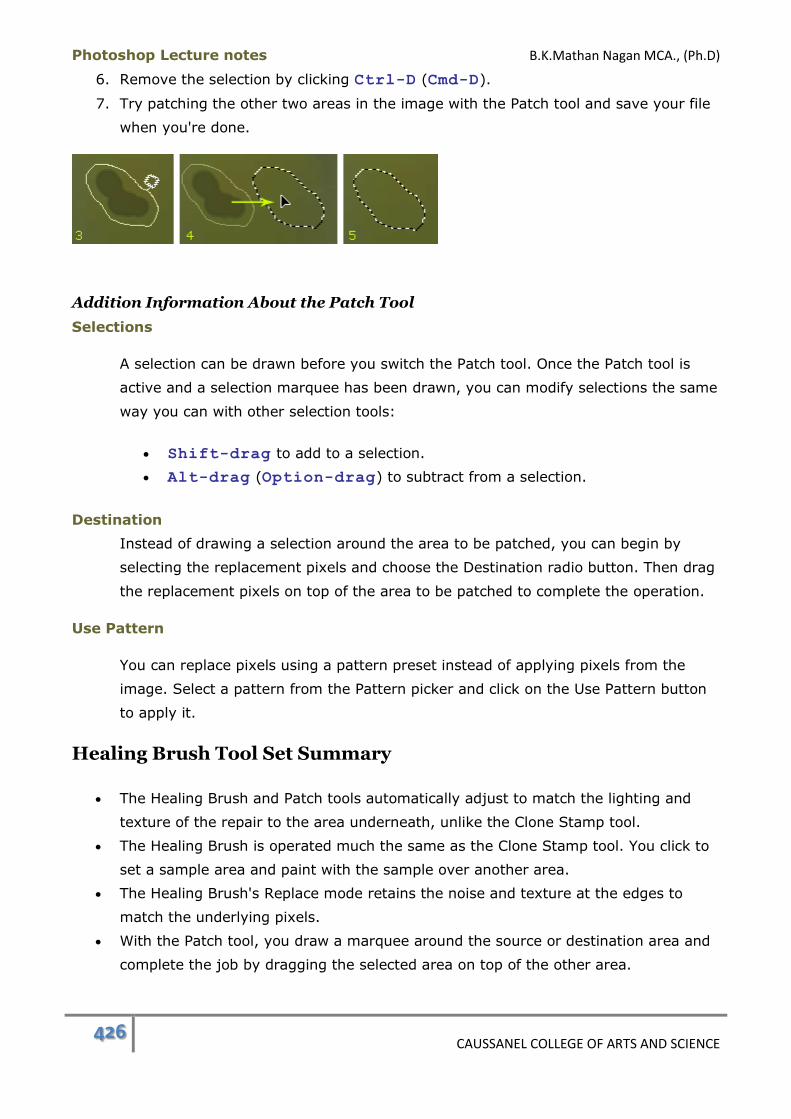
Photoshop Lecture notes B.K.Mathan Nagan MCA., (Ph.D)
426 CAUSSANEL COLLEGE OF ARTS AND SCIENCE
6. Remove the selection by clicking Ctrl-D (Cmd-D).
7. Try patching the other two areas in the image with the Patch tool and save your file
when you're done.
Addition Information About the Patch Tool
Selections
A selection can be drawn before you switch the Patch tool. Once the Patch tool is
active and a selection marquee has been drawn, you can modify selections the same
way you can with other selection tools:
Shift-drag to add to a selection.
Alt-drag (Option-drag) to subtract from a selection.
Destination
Instead of drawing a selection around the area to be patched, you can begin by
selecting the replacement pixels and choose the Destination radio button. Then drag
the replacement pixels on top of the area to be patched to complete the operation.
Use Pattern
You can replace pixels using a pattern preset instead of applying pixels from the
image. Select a pattern from the Pattern picker and click on the Use Pattern button
to apply it.
Healing Brush Tool Set Summary
The Healing Brush and Patch tools automatically adjust to match the lighting and
texture of the repair to the area underneath, unlike the Clone Stamp tool.
The Healing Brush is operated much the same as the Clone Stamp tool. You click to
set a sample area and paint with the sample over another area.
The Healing Brush's Replace mode retains the noise and texture at the edges to
match the underlying pixels.
With the Patch tool, you draw a marquee around the source or destination area and
complete the job by dragging the selected area on top of the other area.
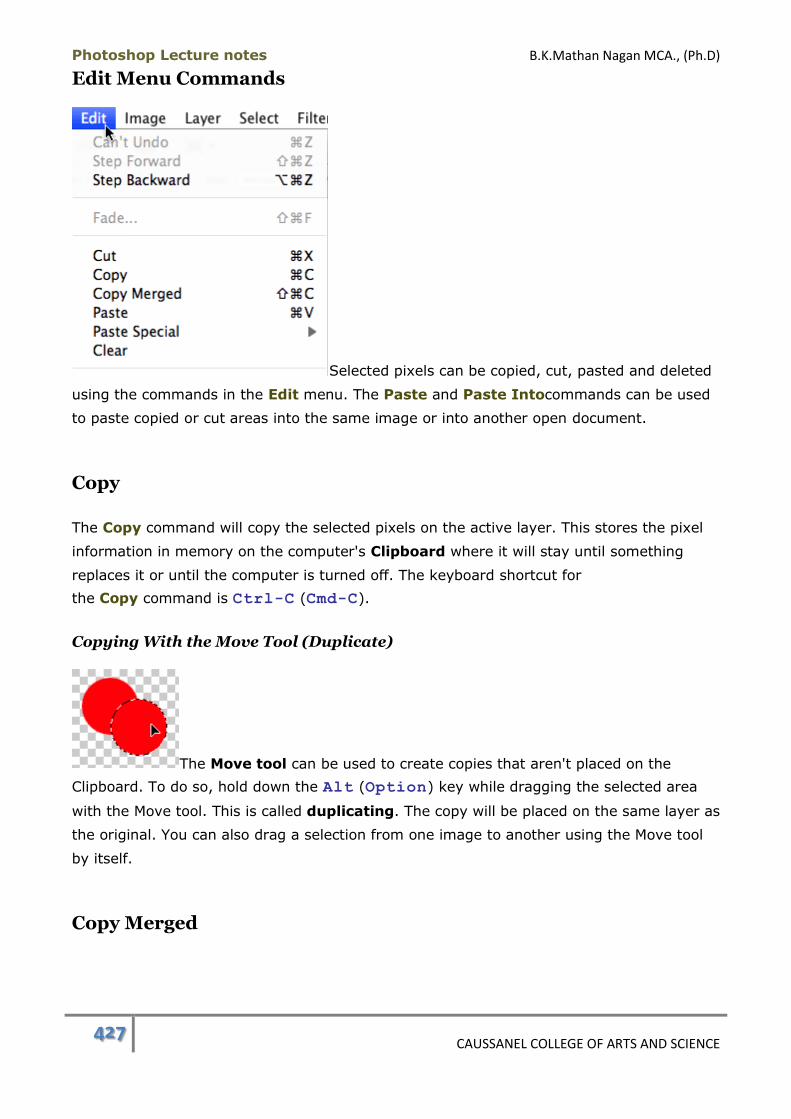
Photoshop Lecture notes B.K.Mathan Nagan MCA., (Ph.D)
427 CAUSSANEL COLLEGE OF ARTS AND SCIENCE
Edit Menu Commands
Selected pixels can be copied, cut, pasted and deleted
using the commands in the Edit menu. The Paste and Paste Intocommands can be used
to paste copied or cut areas into the same image or into another open document.
Copy
The Copy command will copy the selected pixels on the active layer. This stores the pixel
information in memory on the computer's Clipboard where it will stay until something
replaces it or until the computer is turned off. The keyboard shortcut for
the Copy command is Ctrl-C (Cmd-C).
Copying With the Move Tool (Duplicate)
The Move tool can be used to create copies that aren't placed on the
Clipboard. To do so, hold down the Alt (Option) key while dragging the selected area
with the Move tool. This is called duplicating. The copy will be placed on the same layer as
the original. You can also drag a selection from one image to another using the Move tool
by itself.
Copy Merged

Photoshop Lecture notes B.K.Mathan Nagan MCA., (Ph.D)
428 CAUSSANEL COLLEGE OF ARTS AND SCIENCE
This is similar to the Copy command but it will copy the pixel information from all visible
layers that have pixels within the selection marquee. The merged copy will be stored on
the Clipboard. The keyboard shortcut is Shift-Ctrl-C (Shift-Cmd-C).
Cut
The Cut command will remove the selected pixels from the active layer and will store the
data on the Clipboard. The keyboard shortcut is Ctrl-X (Cmd-X).
Cutting With the Move Tool
The Move tool can be used to cut and move selected
pixels without placing any data on the Clipboard. As shown here, when the pixels are on a
regular layer, moving a selection leaves transparency where the pixels were removed. On a
background layer, the gap will be filled with the current background colour displayed in the
Toolbox.
Paste
When a selection has been copied or cut and the pixel information is still stored in the
Clipboard, using the Paste command will place the selected area onto a new layer in the
current image. The new layer will be inserted above the active layer. The keyboard shortcut
is Ctrl-V (Cmd-V).
If there is a selection active in the image into which you are pasting, the pixels will
be centred in relation to the selection. If there is no selection, the pixels will be centred in
relation to the document bounds.
If the source and destination documents are at different resolutions, pasting from one to
the other will cause the pasted content to be larger or smaller than expected. It's advisable
to make the resolution of both documents the same before copying and pasting if size will
be an issue.
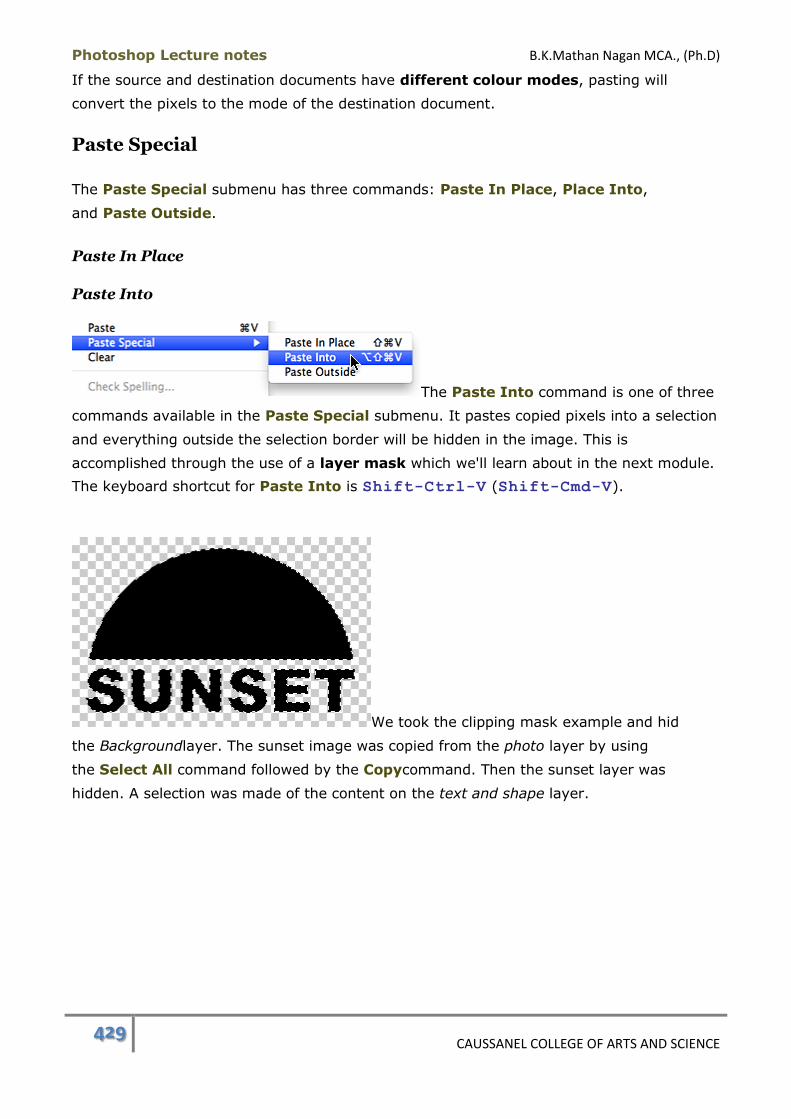
Photoshop Lecture notes B.K.Mathan Nagan MCA., (Ph.D)
429 CAUSSANEL COLLEGE OF ARTS AND SCIENCE
If the source and destination documents have different colour modes, pasting will
convert the pixels to the mode of the destination document.
Paste Special
The Paste Special submenu has three commands: Paste In Place, Place Into,
and Paste Outside.
Paste In Place
Paste Into
The Paste Into command is one of three
commands available in the Paste Special submenu. It pastes copied pixels into a selection
and everything outside the selection border will be hidden in the image. This is
accomplished through the use of a layer mask which we'll learn about in the next module.
The keyboard shortcut for Paste Into is Shift-Ctrl-V (Shift-Cmd-V).
We took the clipping mask example and hid
the Backgroundlayer. The sunset image was copied from the photo layer by using
the Select All command followed by the Copycommand. Then the sunset layer was
hidden. A selection was made of the content on the text and shape layer.
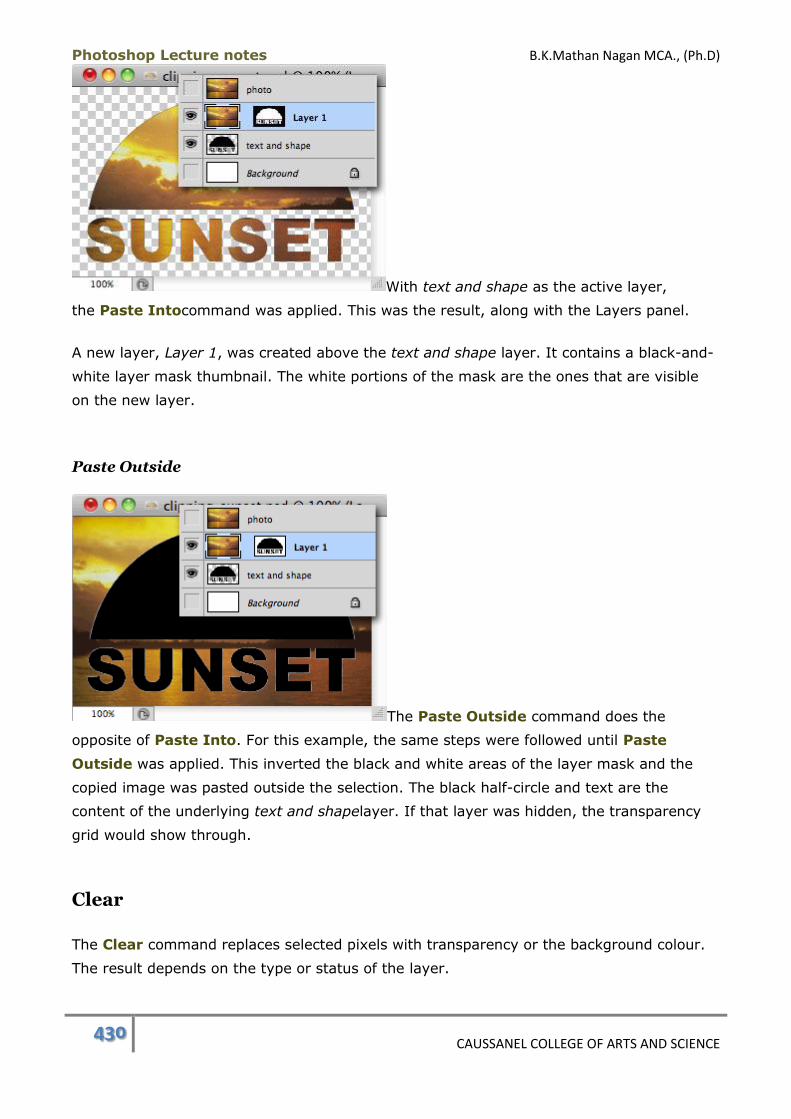
Photoshop Lecture notes B.K.Mathan Nagan MCA., (Ph.D)
430 CAUSSANEL COLLEGE OF ARTS AND SCIENCE
With text and shape as the active layer,
the Paste Intocommand was applied. This was the result, along with the Layers panel.
A new layer, Layer 1, was created above the text and shape layer. It contains a black-and-
white layer mask thumbnail. The white portions of the mask are the ones that are visible
on the new layer.
Paste Outside
The Paste Outside command does the
opposite of Paste Into. For this example, the same steps were followed until Paste
Outside was applied. This inverted the black and white areas of the layer mask and the
copied image was pasted outside the selection. The black half-circle and text are the
content of the underlying text and shapelayer. If that layer was hidden, the transparency
grid would show through.
Clear
The Clear command replaces selected pixels with transparency or the background colour.
The result depends on the type or status of the layer.

Photoshop Lecture notes B.K.Mathan Nagan MCA., (Ph.D)
431 CAUSSANEL COLLEGE OF ARTS AND SCIENCE
On a regular layer with image pixels unlocked in the Layers panel, the pixels will
be replaced by transparency.
On a Background layer or a layer with Lock image pixels enabled,
the pixels will be replaced by the current background colour.
The keyboard shortcut for the Clear command is Backspace (Delete) This command
does not copy the pixels to the clipboard like the Cut command does.
Edit Menu Commands Summary
The Copy command will copy the selected pixels on the active layer and store them
on the Clipboard.
To duplicate, hold down the Alt (Option) key while dragging the selected area
with the Move tool.
Copy Merged will copy the pixel information from all visible layers that have pixels
within the selection marquee. The merged copy will be stored on the Clipboard.
The Cut command will remove the selected pixels from the active layer and will
store the data on the Clipboard.
The Paste command will place a copied or cut area onto a new layer in the current
image.
The Paste Into command pastes copied or cut pixels into a selection and everything
outside the selection border will be hidden by a layer mask.
The Clear command replaces selected pixels with transparency or the background
colour. If transparency is unlocked on the active layer, the pixels will be deleted. If
transparency is locked, the pixels will be replaced by the current background colour.
Edit Menu Commands Keyboard Shortcuts:
Copy: Ctrl-C (Cmd-C)
Duplicate: Alt (Option) while dragging with Move tool
Copy Merged: Shift-Ctrl-C (Shift-Cmd-C)
Cut: Ctrl-X (Cmd-X)
Paste: Ctrl-V (Cmd-V)
Photoshop Lecture notes B.K.Mathan Nagan MCA., (Ph.D)
432 CAUSSANEL COLLEGE OF ARTS AND SCIENCE
Paste Into: Shift-Ctrl-V (Shift-Cmd-V)
Clear: Backspace (Delete)
Matting
You've probably seen really bad graphics on the Web, like the one below. The person who
created it obviously tried to remove the white background but didn't do a good job of it so
there is a halo of pixels from the former background around the text. This is called a fringe.
Each of the three Matting commands uses a different method to remove fringe
pixels from the anti-aliased edges of shapes on a transparent layer.
Practice Exercise: Defringing and Matting
We'll do an exercise that will test out the results of all three of these commands. It will also
give you practice in copying, pasting, and inverting selections. First, let's set up the file.
1. Open a new image document, name it matte.psd, set the dimensions to 200x200
and make the background white.
2. Double-click the Background layer and name it White in the New Layer dialog.
3. Set the foreground and background colours to the default black and white colours.
4. Insert a new layer and name it Black. Use the keyboard shortcut Alt-
Backspace (Option-Delete) to fill the layer with the black foreground colour.
5. Duplicate the Black layer and name it White Circle. (Remember that you can hold
the Alt(Option) key while dragging a layer to the New Layer button to set the
naming options right away.)
6. Select the Elliptical Marquee tool and set the following options:
o Feather: 0 px
o Anti-aliased: on
o Style: Normal
7. Create a circular selection by holding down the Shift key while dragging.
8. Fill the circle with white by pressing Ctrl-Backspace (Cmd-Delete). Don't
remove the selection yet.
Photoshop Lecture notes B.K.Mathan Nagan MCA., (Ph.D)
433 CAUSSANEL COLLEGE OF ARTS AND SCIENCE
9. Hide the White Circle and Black layer.
10. Duplicate the White layer and name it Black Circle.
11. Fill the selection with black by pressing Alt-Backspace (Option-Delete).
12. Remove the selection with Ctrl-D (Cmd-D). Your Layers panel should look like
this:
13. Drag the Black layer so it's above the White layer.
14. Select the Magic Wand tool and set these options:
o Four Box Buttons: Add to Selection
o Tolerance: 0
o Anti-aliased: on
o Contiguous: on (although it doesn't matter in this case)
o Use All Layers: off
15. Select the white background on the Black Circle layer.
16. Invert the selection by pressing Shift-Ctrl-I (Shift-Cmd-I). Now the black
circle should be selected.
17. Press Ctrl-C (Cmd-C) to copy the selected pixels.
18. Press Ctrl-V (Cmd-C) to paste them onto a new layer.
19. Rename this new layer Defringe.
20. Duplicate the Defringe layer and name it White Matte.
Photoshop Lecture notes B.K.Mathan Nagan MCA., (Ph.D)
434 CAUSSANEL COLLEGE OF ARTS AND SCIENCE
21. Click on the White Circle layer to make it the active layer. This will also turn the
visibility back on.
22. Select the black background on the White Circle layer with the Magic Wand tool.
23. Invert the selection by pressing Shift-Ctrl-I (Shift-Cmd-I). Now the white
circle should be selected.
24. Press Ctrl-C (Cmd-C) to copy the selected pixels.
25. Press Ctrl-V (Cmd-C) to paste them onto a new layer.
26. Rename this new layer Black Matte.
27. To make things less confusing, you can delete the Black Circle and White Circle
layers. You won't need them again.
28. Hide all layers except Defringe and White.
29. Save your file. Your Layers panel should look like this:
Defringe
The Defringe command removes anti-aliased fringe pixels from a shape on a transparent
layer. Pixels ofany colour can be defringed. When you choose this command,
the Defringe dialog box will open and you can set the amount of pixels that you want
removed. Use larger values if the fringe area is quite wide. Let's try it out.
30. Click on the Defringe layer to make it the active layer.
31. Make the Black layer visible. Recall that you copied this black circle from a white
background. The white fringe is very faint and you may need to zoom in to see it.
32. Go to Layer > Matting > Defringe and the Defringe dialog will open. Set
the Width to 1 and clickOK.
Photoshop Lecture notes B.K.Mathan Nagan MCA., (Ph.D)
435 CAUSSANEL COLLEGE OF ARTS AND SCIENCE
33. The fringe should have been removed from the black circle. Toggle the visibility of
the Black layer off so you can see the resulting circle. Then hide the Defringe layer.
Remove White Matte
The Remove White Matte command only works on pixels that contain a degree of white.
In this case, the black circle's fringe pixels are grey, a result of the anti-aliasing around the
circle and the mixing of black and white.
34. Click on the White Matte layer to make it the active layer.
35. Go to Layer > Matting > Remove White Matte.
36. Once again, the white halo has been removed.
37. Hide the Black layer to see the circle against the white background.
38. Save your file.
Remove Black Matte
This command removes black fringe pixels that have been blended in with the
foreground colour.
39. Hide the White Matte layer and click on the Black Matte layer. You can really see the
black fringe on this one.
40. Go to Layer > Matting > Remove Black Matte. It worked like a charm! Save your
file and close it.
Note: You may have wondered why, in creating the selection of the circles, the background
was selected and then the selection was inverted. In this case, we could have ended up
with similar results either way but we wanted to introduce the concept to you. There are
two scenarios where you'd want to select the solid background colour and invert:
If the edge between foreground and background is softer, selecting the foreground
colour will probably result in not including all of the edge pixels unless you play
around with the Tolerance. Setting the Magic Wand tolerance to 0 and selecting the
background and then inverting assures you that all of the foreground will be
included.

Photoshop Lecture notes B.K.Mathan Nagan MCA., (Ph.D)
436 CAUSSANEL COLLEGE OF ARTS AND SCIENCE
Quite often the foreground is a multi-coloured object that you want to extract from a
solid background. It's far easier and more accurate to select the background and
invert than to make compound selections of the interior.
Matting Summary
The Defringe command removes fringe pixels from an anti-aliased shape on a
transparent layer. Pixels of any colour can be defringed.
The width of the area to be defringed is set in the Defringe dialog box.
The Remove White Matte command removes white fringe pixels that have been
blended in with the foreground colour.
The Remove Black Matte command removes black fringe pixels that have been
blended in with the foreground colour.
Transformations
Transformations such as scaling, rotating and skewing can be applied to selected pixels, an
entire layer (unless locked), linked layers, and vector shapes. In the Selections module,
you learned how to transform a selection border by manipulating the handles of
a bounding box. Many of the object transformations work the same way. The difference
between transforming only the selection border versus the border and the pixels inside it is
the menu command used to apply the Transform bounding box. The ones we'll be looking
at in this lecture are in the Edit > Transform submenu. There are also rotate and flip
commands in the Image > Rotate Canvas submenu that will apply to the entire image.
When a transformation is applied, the pixels will be remapped using the interpolation
method specified in the General Preferences. Bicubic will yield the best results.
Practice Exercise: Transformations
Let's try out these commands so you feel comfortable using them.
1. Open a new image document that is 500x500 and has a white background. We're
not going to save this at the end of the exercise so you don't need to name it.
2. Open pencil.eps. In the Rasterize Generic EPS Format dialog, make sure Constrain
Proportions is checked and set the Width to 400. Mode should be RGB Colour and
Anti-aliased should be checked. Click OK.
3. Drag the layer containing the pencil into the new document.
4. Close pencil.eps without saving it.
Photoshop Lecture notes B.K.Mathan Nagan MCA., (Ph.D)
437 CAUSSANEL COLLEGE OF ARTS AND SCIENCE
5. Duplicate the layer with the pencil and hide the layer containing the original. You can
use the original during the exercise if you want to start over with an unmodified
version of the pencil.
Commit and Cancel Buttons
The Commit Transform button applies the transformation and is equivalent to
pressing Enter(Return). The Cancel Transform button discards any transformation
you may have made and removes the bounding box. It is equivalent to pressing
the Esc key.
Scale
An object's width and/or height can be modified using the Scale command.
6. Go to Edit > Transform > Scale.
A bounding box with eight handles appears
around the pencil. (Only five are shown here.) A handle can be dragged to alter the
dimensions of the pencil. The image above shows part of the bounding box and illustrates
what dimension(s) each handle controls. A double-headed arrow icon will be displayed
when you hold the pointer over a handle. The direction of the icon indicates which
dimension will be affected by the transformation.
7. Click and drag on one of the height handles to resize the bounding box. Once you
release the mouse button, the pencil resizes to fill the box.
8. Drag on one of the width handles.
9. Press Ctrl-Z (Cmd-Z) to Undo. This will reverse the previous width change but
leaves the height change intact.
10. Drag any corner handle and notice that you can change the proportions of the
pencil freely.
11. To apply these transformations, press the Enter (Return) key or click on
the Commit button in the Tool Options bar.
12. Undo the entire transformation with Ctrl-Z (Cmd-Z).
13. Go to Edit > Transform > Scale again.
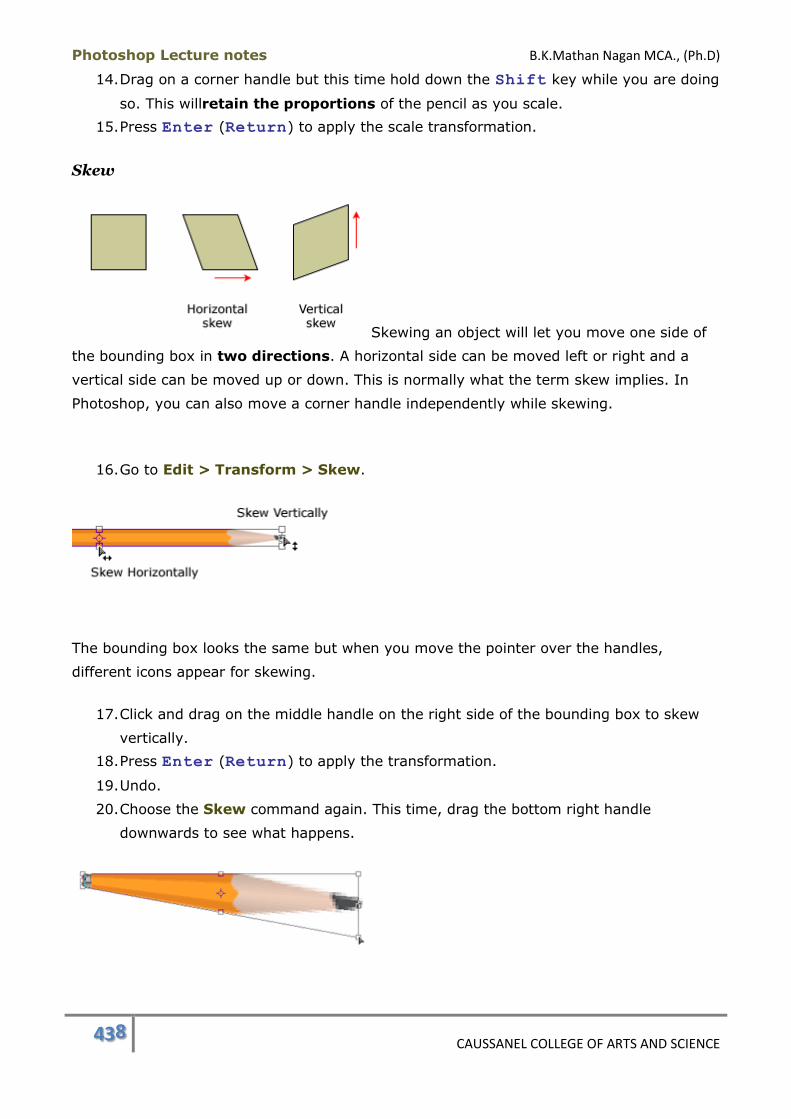
Photoshop Lecture notes B.K.Mathan Nagan MCA., (Ph.D)
438 CAUSSANEL COLLEGE OF ARTS AND SCIENCE
14. Drag on a corner handle but this time hold down the Shift key while you are doing
so. This willretain the proportions of the pencil as you scale.
15. Press Enter (Return) to apply the scale transformation.
Skew
Skewing an object will let you move one side of
the bounding box in two directions. A horizontal side can be moved left or right and a
vertical side can be moved up or down. This is normally what the term skew implies. In
Photoshop, you can also move a corner handle independently while skewing.
16. Go to Edit > Transform > Skew.
The bounding box looks the same but when you move the pointer over the handles,
different icons appear for skewing.
17. Click and drag on the middle handle on the right side of the bounding box to skew
vertically.
18. Press Enter (Return) to apply the transformation.
19. Undo.
20. Choose the Skew command again. This time, drag the bottom right handle
downwards to see what happens.
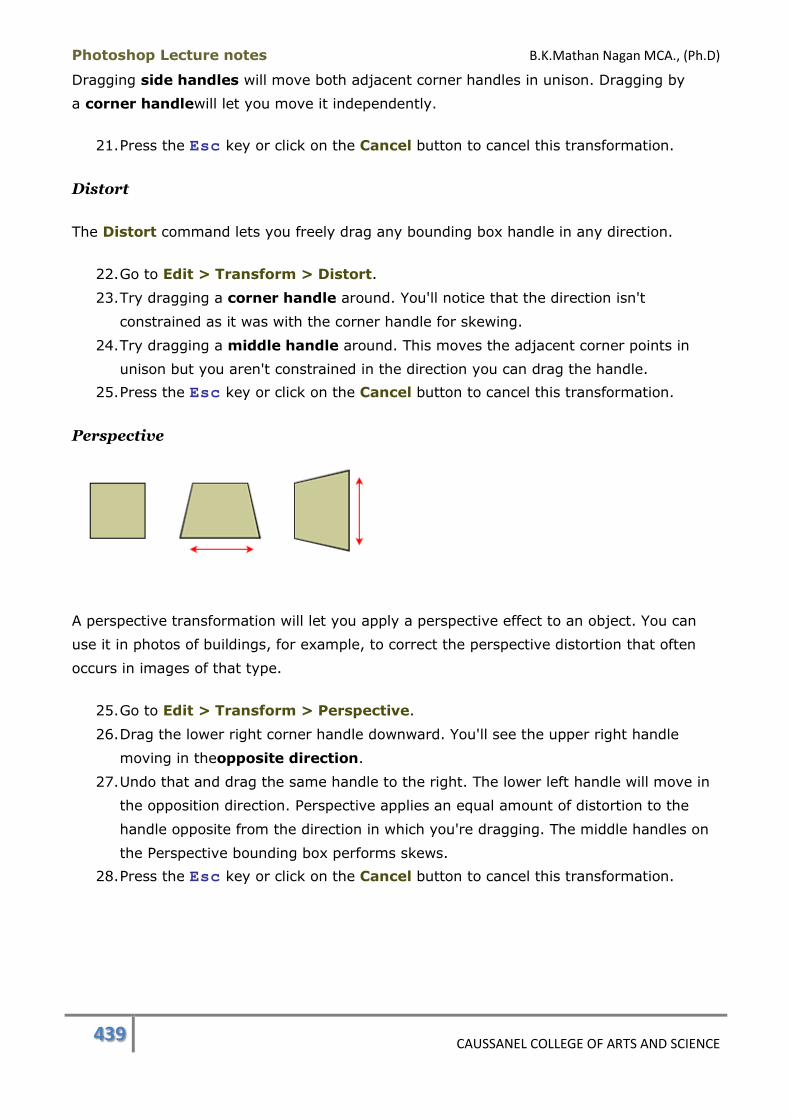
Photoshop Lecture notes B.K.Mathan Nagan MCA., (Ph.D)
439 CAUSSANEL COLLEGE OF ARTS AND SCIENCE
Dragging side handles will move both adjacent corner handles in unison. Dragging by
a corner handlewill let you move it independently.
21. Press the Esc key or click on the Cancel button to cancel this transformation.
Distort
The Distort command lets you freely drag any bounding box handle in any direction.
22. Go to Edit > Transform > Distort.
23. Try dragging a corner handle around. You'll notice that the direction isn't
constrained as it was with the corner handle for skewing.
24. Try dragging a middle handle around. This moves the adjacent corner points in
unison but you aren't constrained in the direction you can drag the handle.
25. Press the Esc key or click on the Cancel button to cancel this transformation.
Perspective
A perspective transformation will let you apply a perspective effect to an object. You can
use it in photos of buildings, for example, to correct the perspective distortion that often
occurs in images of that type.
25. Go to Edit > Transform > Perspective.
26. Drag the lower right corner handle downward. You'll see the upper right handle
moving in theopposite direction.
27. Undo that and drag the same handle to the right. The lower left handle will move in
the opposition direction. Perspective applies an equal amount of distortion to the
handle opposite from the direction in which you're dragging. The middle handles on
the Perspective bounding box performs skews.
28. Press the Esc key or click on the Cancel button to cancel this transformation.
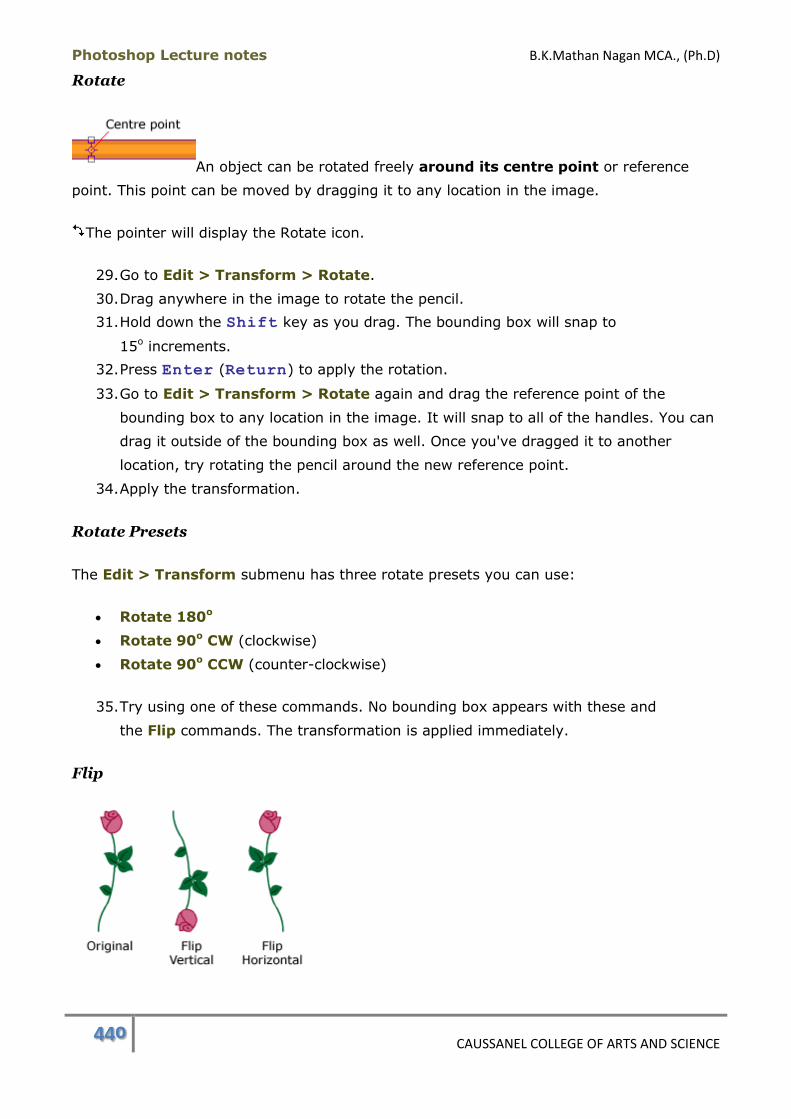
Photoshop Lecture notes B.K.Mathan Nagan MCA., (Ph.D)
440 CAUSSANEL COLLEGE OF ARTS AND SCIENCE
Rotate
An object can be rotated freely around its centre point or reference
point. This point can be moved by dragging it to any location in the image.
The pointer will display the Rotate icon.
29. Go to Edit > Transform > Rotate.
30. Drag anywhere in the image to rotate the pencil.
31. Hold down the Shift key as you drag. The bounding box will snap to
15o increments.
32. Press Enter (Return) to apply the rotation.
33. Go to Edit > Transform > Rotate again and drag the reference point of the
bounding box to any location in the image. It will snap to all of the handles. You can
drag it outside of the bounding box as well. Once you've dragged it to another
location, try rotating the pencil around the new reference point.
34. Apply the transformation.
Rotate Presets
The Edit > Transform submenu has three rotate presets you can use:
Rotate 180o
Rotate 90o CW (clockwise)
Rotate 90o CCW (counter-clockwise)
35. Try using one of these commands. No bounding box appears with these and
the Flip commands. The transformation is applied immediately.
Flip
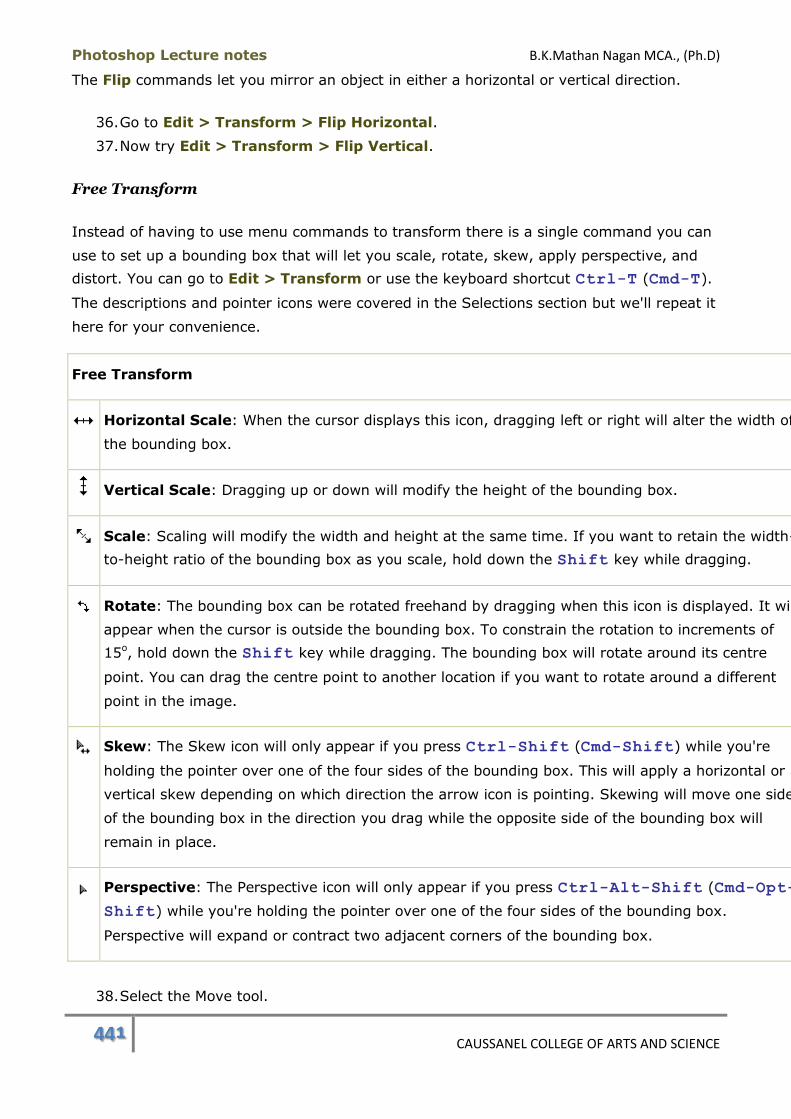
Photoshop Lecture notes B.K.Mathan Nagan MCA., (Ph.D)
441 CAUSSANEL COLLEGE OF ARTS AND SCIENCE
The Flip commands let you mirror an object in either a horizontal or vertical direction.
36. Go to Edit > Transform > Flip Horizontal.
37. Now try Edit > Transform > Flip Vertical.
Free Transform
Instead of having to use menu commands to transform there is a single command you can
use to set up a bounding box that will let you scale, rotate, skew, apply perspective, and
distort. You can go to Edit > Transform or use the keyboard shortcut Ctrl-T (Cmd-T).
The descriptions and pointer icons were covered in the Selections section but we'll repeat it
here for your convenience.
Free Transform
Horizontal Scale: When the cursor displays this icon, dragging left or right will alter the width of
the bounding box.
Vertical Scale: Dragging up or down will modify the height of the bounding box.
Scale: Scaling will modify the width and height at the same time. If you want to retain the width-
to-height ratio of the bounding box as you scale, hold down the Shift key while dragging.
Rotate: The bounding box can be rotated freehand by dragging when this icon is displayed. It will
appear when the cursor is outside the bounding box. To constrain the rotation to increments of
15o, hold down the Shift key while dragging. The bounding box will rotate around its centre
point. You can drag the centre point to another location if you want to rotate around a different
point in the image.
Skew: The Skew icon will only appear if you press Ctrl-Shift (Cmd-Shift) while you're
holding the pointer over one of the four sides of the bounding box. This will apply a horizontal or
vertical skew depending on which direction the arrow icon is pointing. Skewing will move one side
of the bounding box in the direction you drag while the opposite side of the bounding box will
remain in place.
Perspective: The Perspective icon will only appear if you press Ctrl-Alt-Shift (Cmd-Opt-
Shift) while you're holding the pointer over one of the four sides of the bounding box.
Perspective will expand or contract two adjacent corners of the bounding box.
38. Select the Move tool.
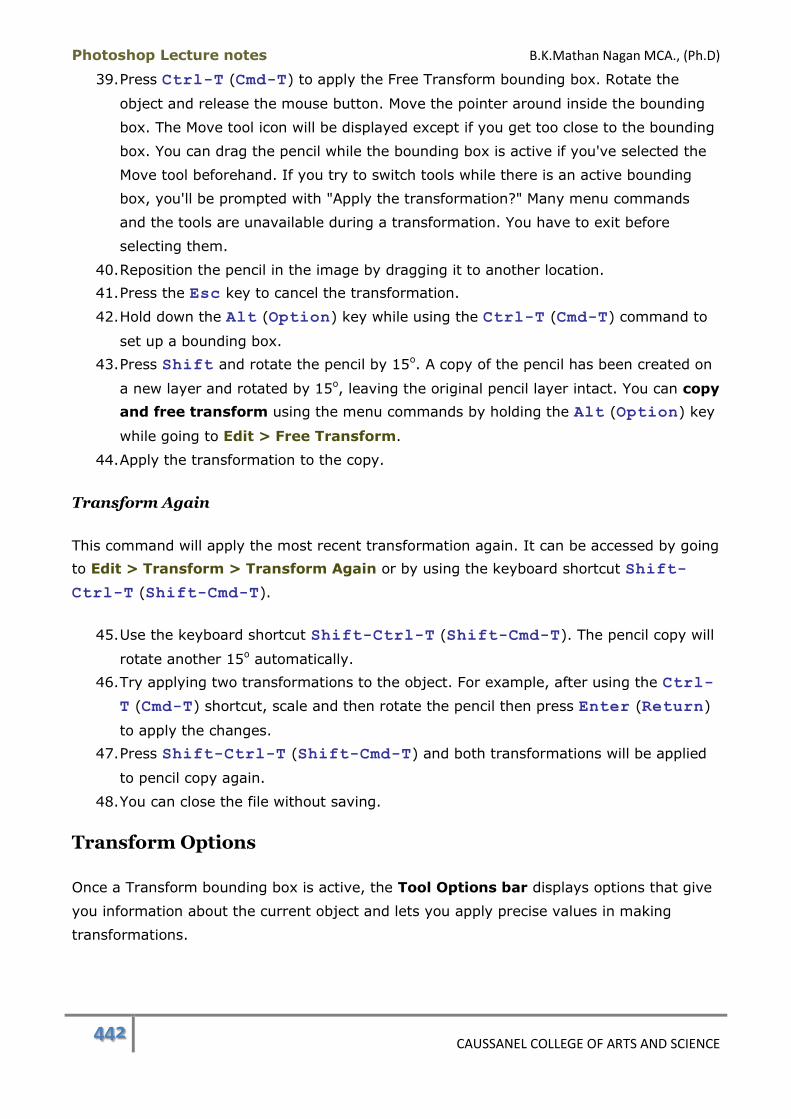
Photoshop Lecture notes B.K.Mathan Nagan MCA., (Ph.D)
442 CAUSSANEL COLLEGE OF ARTS AND SCIENCE
39. Press Ctrl-T (Cmd-T) to apply the Free Transform bounding box. Rotate the
object and release the mouse button. Move the pointer around inside the bounding
box. The Move tool icon will be displayed except if you get too close to the bounding
box. You can drag the pencil while the bounding box is active if you've selected the
Move tool beforehand. If you try to switch tools while there is an active bounding
box, you'll be prompted with "Apply the transformation?" Many menu commands
and the tools are unavailable during a transformation. You have to exit before
selecting them.
40. Reposition the pencil in the image by dragging it to another location.
41. Press the Esc key to cancel the transformation.
42. Hold down the Alt (Option) key while using the Ctrl-T (Cmd-T) command to
set up a bounding box.
43. Press Shift and rotate the pencil by 15o. A copy of the pencil has been created on
a new layer and rotated by 15o, leaving the original pencil layer intact. You can copy
and free transform using the menu commands by holding the Alt (Option) key
while going to Edit > Free Transform.
44. Apply the transformation to the copy.
Transform Again
This command will apply the most recent transformation again. It can be accessed by going
to Edit > Transform > Transform Again or by using the keyboard shortcut Shift-
Ctrl-T (Shift-Cmd-T).
45. Use the keyboard shortcut Shift-Ctrl-T (Shift-Cmd-T). The pencil copy will
rotate another 15o automatically.
46. Try applying two transformations to the object. For example, after using the Ctrl-
T (Cmd-T) shortcut, scale and then rotate the pencil then press Enter (Return)
to apply the changes.
47. Press Shift-Ctrl-T (Shift-Cmd-T) and both transformations will be applied
to pencil copy again.
48. You can close the file without saving.
Transform Options
Once a Transform bounding box is active, the Tool Options bar displays options that give
you information about the current object and lets you apply precise values in making
transformations.
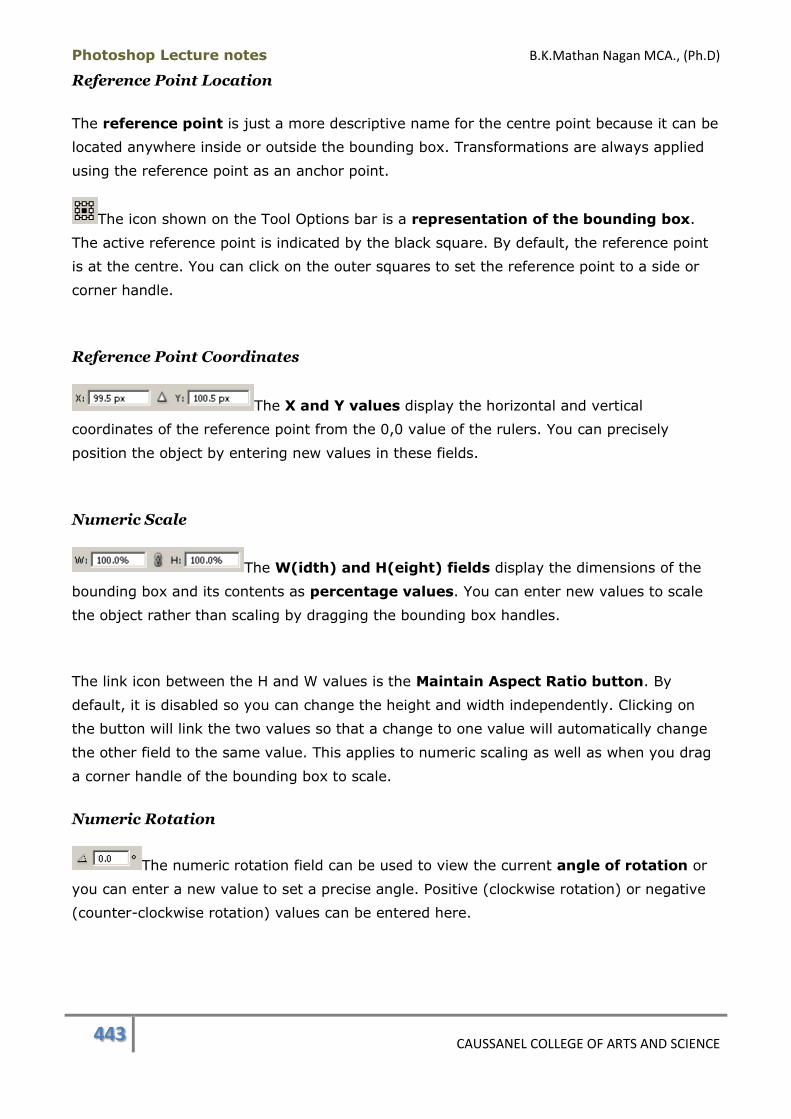
Photoshop Lecture notes B.K.Mathan Nagan MCA., (Ph.D)
443 CAUSSANEL COLLEGE OF ARTS AND SCIENCE
Reference Point Location
The reference point is just a more descriptive name for the centre point because it can be
located anywhere inside or outside the bounding box. Transformations are always applied
using the reference point as an anchor point.
The icon shown on the Tool Options bar is a representation of the bounding box.
The active reference point is indicated by the black square. By default, the reference point
is at the centre. You can click on the outer squares to set the reference point to a side or
corner handle.
Reference Point Coordinates
The X and Y values display the horizontal and vertical
coordinates of the reference point from the 0,0 value of the rulers. You can precisely
position the object by entering new values in these fields.
Numeric Scale
The W(idth) and H(eight) fields display the dimensions of the
bounding box and its contents as percentage values. You can enter new values to scale
the object rather than scaling by dragging the bounding box handles.
The link icon between the H and W values is the Maintain Aspect Ratio button. By
default, it is disabled so you can change the height and width independently. Clicking on
the button will link the two values so that a change to one value will automatically change
the other field to the same value. This applies to numeric scaling as well as when you drag
a corner handle of the bounding box to scale.
Numeric Rotation
The numeric rotation field can be used to view the current angle of rotation or
you can enter a new value to set a precise angle. Positive (clockwise rotation) or negative
(counter-clockwise rotation) values can be entered here.
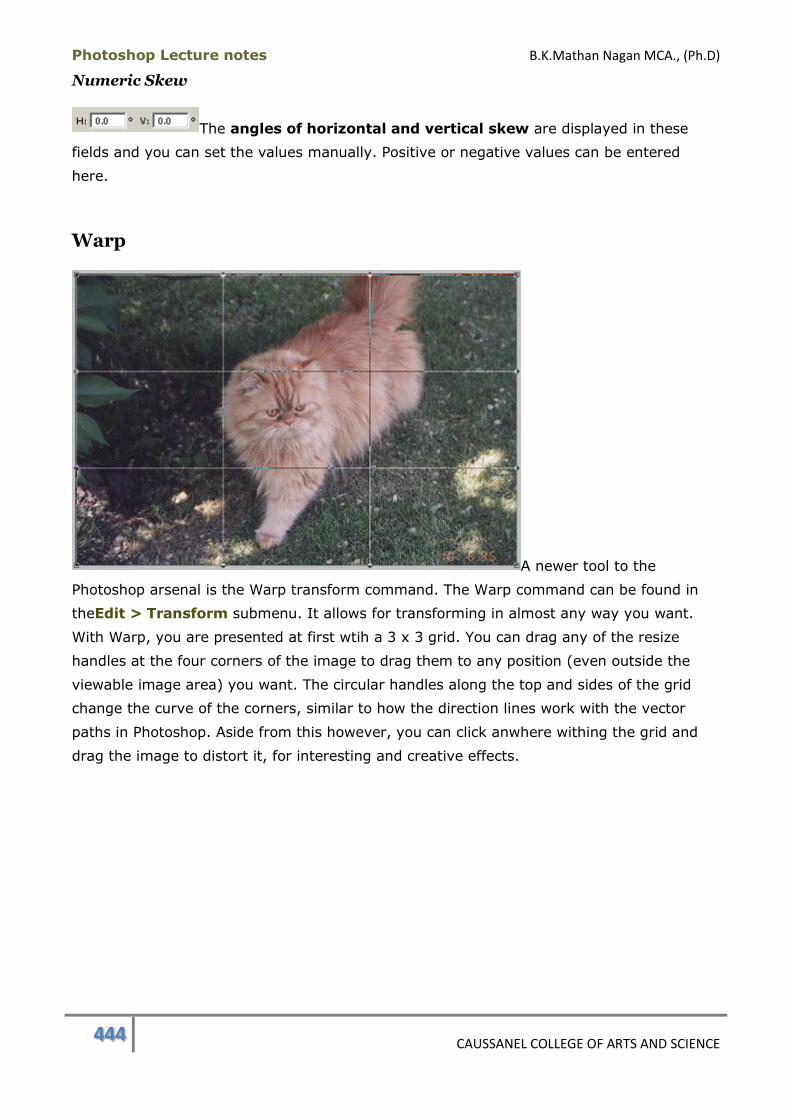
Photoshop Lecture notes B.K.Mathan Nagan MCA., (Ph.D)
444 CAUSSANEL COLLEGE OF ARTS AND SCIENCE
Numeric Skew
The angles of horizontal and vertical skew are displayed in these
fields and you can set the values manually. Positive or negative values can be entered
here.
Warp
A newer tool to the
Photoshop arsenal is the Warp transform command. The Warp command can be found in
theEdit > Transform submenu. It allows for transforming in almost any way you want.
With Warp, you are presented at first wtih a 3 x 3 grid. You can drag any of the resize
handles at the four corners of the image to drag them to any position (even outside the
viewable image area) you want. The circular handles along the top and sides of the grid
change the curve of the corners, similar to how the direction lines work with the vector
paths in Photoshop. Aside from this however, you can click anwhere withing the grid and
drag the image to distort it, for interesting and creative effects.
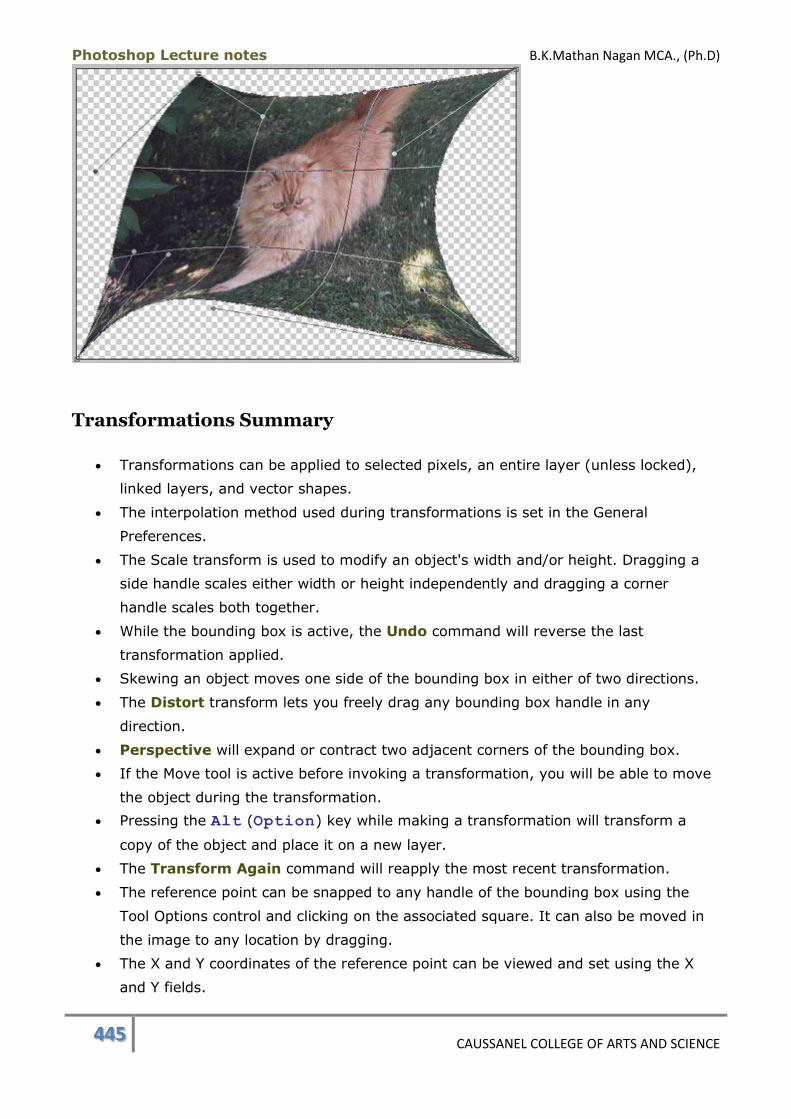
Photoshop Lecture notes B.K.Mathan Nagan MCA., (Ph.D)
445 CAUSSANEL COLLEGE OF ARTS AND SCIENCE
Transformations Summary
Transformations can be applied to selected pixels, an entire layer (unless locked),
linked layers, and vector shapes.
The interpolation method used during transformations is set in the General
Preferences.
The Scale transform is used to modify an object's width and/or height. Dragging a
side handle scales either width or height independently and dragging a corner
handle scales both together.
While the bounding box is active, the Undo command will reverse the last
transformation applied.
Skewing an object moves one side of the bounding box in either of two directions.
The Distort transform lets you freely drag any bounding box handle in any
direction.
Perspective will expand or contract two adjacent corners of the bounding box.
If the Move tool is active before invoking a transformation, you will be able to move
the object during the transformation.
Pressing the Alt (Option) key while making a transformation will transform a
copy of the object and place it on a new layer.
The Transform Again command will reapply the most recent transformation.
The reference point can be snapped to any handle of the bounding box using the
Tool Options control and clicking on the associated square. It can also be moved in
the image to any location by dragging.
The X and Y coordinates of the reference point can be viewed and set using the X
and Y fields.
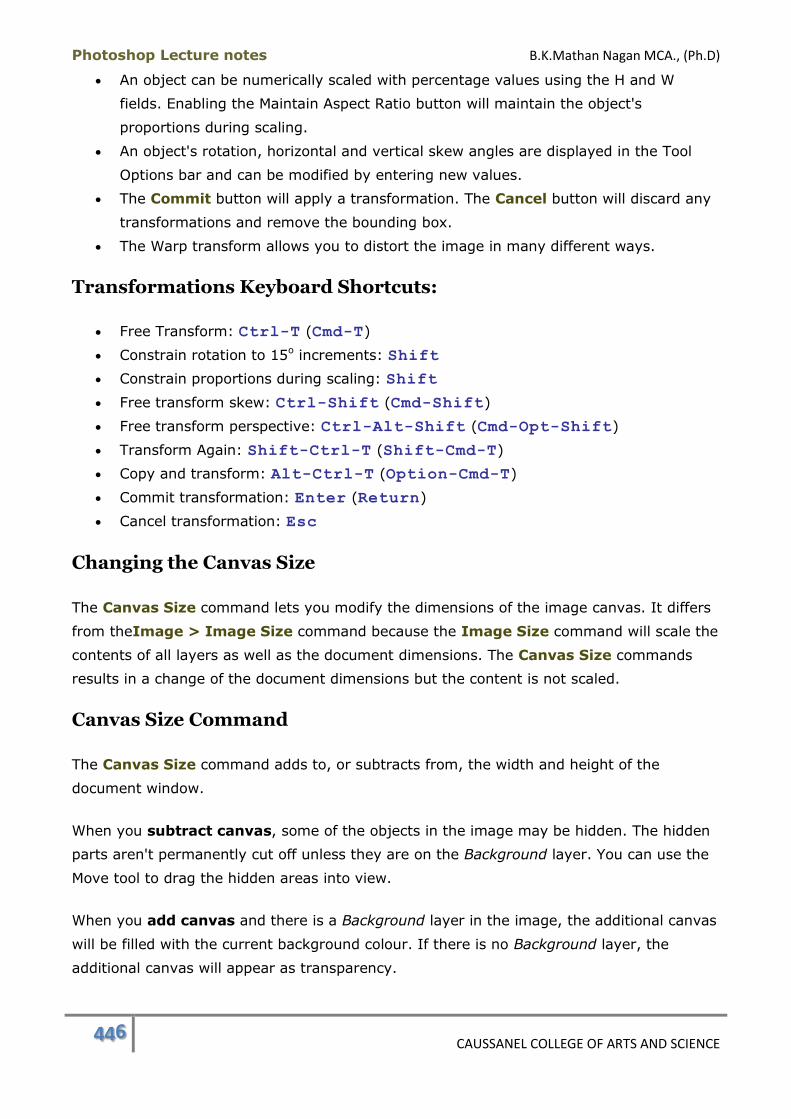
Photoshop Lecture notes B.K.Mathan Nagan MCA., (Ph.D)
446 CAUSSANEL COLLEGE OF ARTS AND SCIENCE
An object can be numerically scaled with percentage values using the H and W
fields. Enabling the Maintain Aspect Ratio button will maintain the object's
proportions during scaling.
An object's rotation, horizontal and vertical skew angles are displayed in the Tool
Options bar and can be modified by entering new values.
The Commit button will apply a transformation. The Cancel button will discard any
transformations and remove the bounding box.
The Warp transform allows you to distort the image in many different ways.
Transformations Keyboard Shortcuts:
Free Transform: Ctrl-T (Cmd-T)
Constrain rotation to 15o increments: Shift
Constrain proportions during scaling: Shift
Free transform skew: Ctrl-Shift (Cmd-Shift)
Free transform perspective: Ctrl-Alt-Shift (Cmd-Opt-Shift)
Transform Again: Shift-Ctrl-T (Shift-Cmd-T)
Copy and transform: Alt-Ctrl-T (Option-Cmd-T)
Commit transformation: Enter (Return)
Cancel transformation: Esc
Changing the Canvas Size
The Canvas Size command lets you modify the dimensions of the image canvas. It differs
from theImage > Image Size command because the Image Size command will scale the
contents of all layers as well as the document dimensions. The Canvas Size commands
results in a change of the document dimensions but the content is not scaled.
Canvas Size Command
The Canvas Size command adds to, or subtracts from, the width and height of the
document window.
When you subtract canvas, some of the objects in the image may be hidden. The hidden
parts aren't permanently cut off unless they are on the Background layer. You can use the
Move tool to drag the hidden areas into view.
When you add canvas and there is a Background layer in the image, the additional canvas
will be filled with the current background colour. If there is no Background layer, the
additional canvas will appear as transparency.
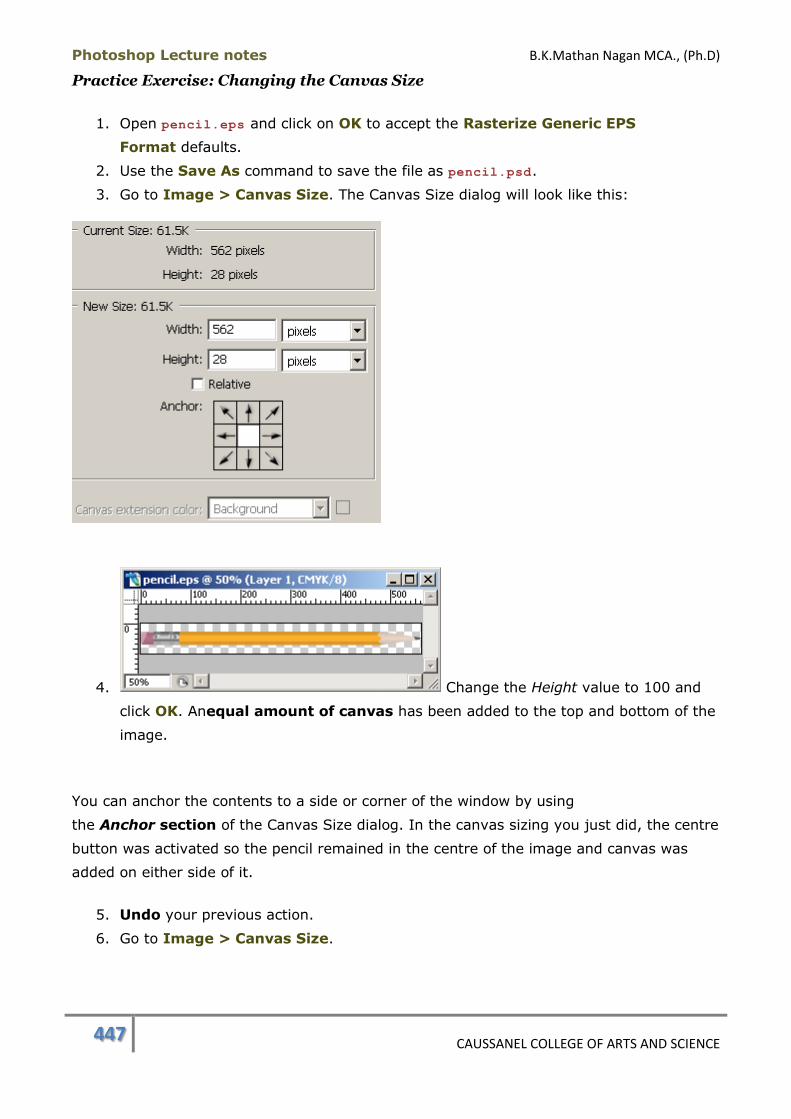
Photoshop Lecture notes B.K.Mathan Nagan MCA., (Ph.D)
447 CAUSSANEL COLLEGE OF ARTS AND SCIENCE
Practice Exercise: Changing the Canvas Size
1. Open pencil.eps and click on OK to accept the Rasterize Generic EPS
Format defaults.
2. Use the Save As command to save the file as pencil.psd.
3. Go to Image > Canvas Size. The Canvas Size dialog will look like this:
4. Change the Height value to 100 and
click OK. Anequal amount of canvas has been added to the top and bottom of the
image.
You can anchor the contents to a side or corner of the window by using
the Anchor section of the Canvas Size dialog. In the canvas sizing you just did, the centre
button was activated so the pencil remained in the centre of the image and canvas was
added on either side of it.
5. Undo your previous action.
6. Go to Image > Canvas Size.
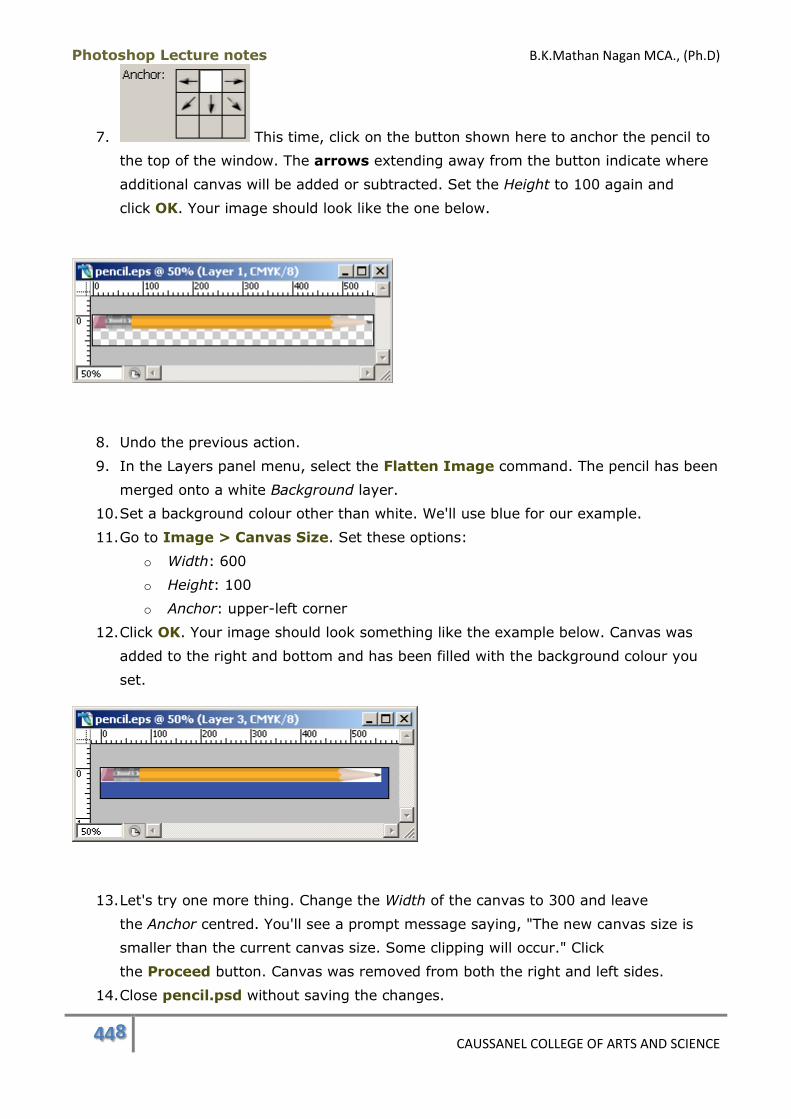
Photoshop Lecture notes B.K.Mathan Nagan MCA., (Ph.D)
448 CAUSSANEL COLLEGE OF ARTS AND SCIENCE
7. This time, click on the button shown here to anchor the pencil to
the top of the window. The arrows extending away from the button indicate where
additional canvas will be added or subtracted. Set the Height to 100 again and
click OK. Your image should look like the one below.
8. Undo the previous action.
9. In the Layers panel menu, select the Flatten Image command. The pencil has been
merged onto a white Background layer.
10. Set a background colour other than white. We'll use blue for our example.
11. Go to Image > Canvas Size. Set these options:
o Width: 600
o Height: 100
o Anchor: upper-left corner
12. Click OK. Your image should look something like the example below. Canvas was
added to the right and bottom and has been filled with the background colour you
set.
13. Let's try one more thing. Change the Width of the canvas to 300 and leave
the Anchor centred. You'll see a prompt message saying, "The new canvas size is
smaller than the current canvas size. Some clipping will occur." Click
the Proceed button. Canvas was removed from both the right and left sides.
14. Close pencil.psd without saving the changes.
Photoshop Lecture notes B.K.Mathan Nagan MCA., (Ph.D)
449 CAUSSANEL COLLEGE OF ARTS AND SCIENCE
Changing the Canvas Size Summary
The Canvas Size command adds to, or subtracts from, the width and height of the
document window without scaling the content.
If a new canvas size is smaller than the contents, the contents on regular layers will
be hidden but can still be moved into view.
When you add canvas and there is a Background layer in the image, the additional
canvas will be filled with the current background colour. If there is
no Background layer, the additional canvas will appear as transparency.
You can anchor the contents to a side or corner of the window by using
the Anchor section of the Canvas Size dialog. The arrows extending away from the
active button indicate where additional canvas will be added or subtracted.
Cropping and Trimming Images
With cropping and trimming, an area of an image is defined and then the rest of the image
is deleted or hidden, resulting in new image dimensions. This lecture covers the Crop
tool, Crop command and Trimcommand.
Cropping With the Crop Tool
The Crop tool offers the most options for cropping an image. Before you crop, you can
set the resolution and dimensions of the resulting cropped image. After you define the area
you want to crop to, you can adjust its size, move or rotate it, apply perspective, and set
whether to hide or delete the remainder of the image.
Practice Exercise: Using the Crop Tool
1. Open Cat.psd.
2. Select the Crop tool. Drag to create a marquee around the cat as shown below.
Notice that once you release the mouse button, a crop marquee appears around
the selection and the area outside the marquee is darkened by what is called
the crop shield. This helps you visualize what the cropped image will look like.
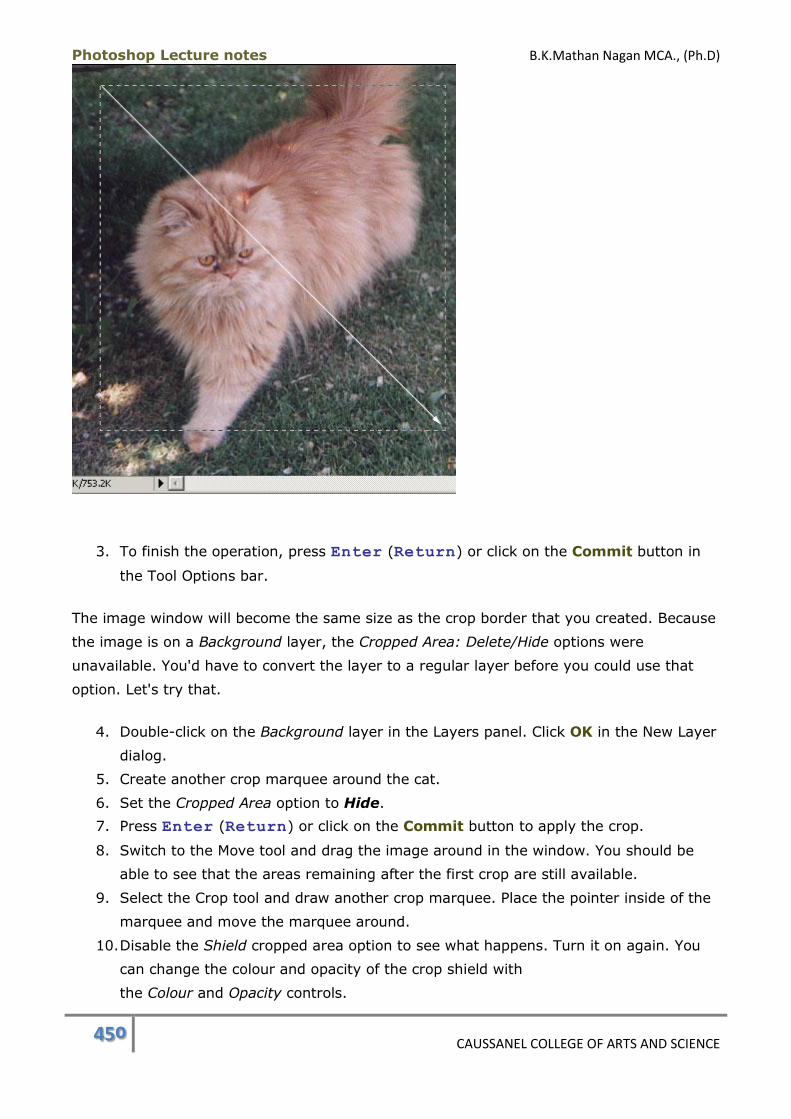
Photoshop Lecture notes B.K.Mathan Nagan MCA., (Ph.D)
450 CAUSSANEL COLLEGE OF ARTS AND SCIENCE
3. To finish the operation, press Enter (Return) or click on the Commit button in
the Tool Options bar.
The image window will become the same size as the crop border that you created. Because
the image is on a Background layer, the Cropped Area: Delete/Hide options were
unavailable. You'd have to convert the layer to a regular layer before you could use that
option. Let's try that.
4. Double-click on the Background layer in the Layers panel. Click OK in the New Layer
dialog.
5. Create another crop marquee around the cat.
6. Set the Cropped Area option to Hide.
7. Press Enter (Return) or click on the Commit button to apply the crop.
8. Switch to the Move tool and drag the image around in the window. You should be
able to see that the areas remaining after the first crop are still available.
9. Select the Crop tool and draw another crop marquee. Place the pointer inside of the
marquee and move the marquee around.
10. Disable the Shield cropped area option to see what happens. Turn it on again. You
can change the colour and opacity of the crop shield with
the Colour and Opacity controls.
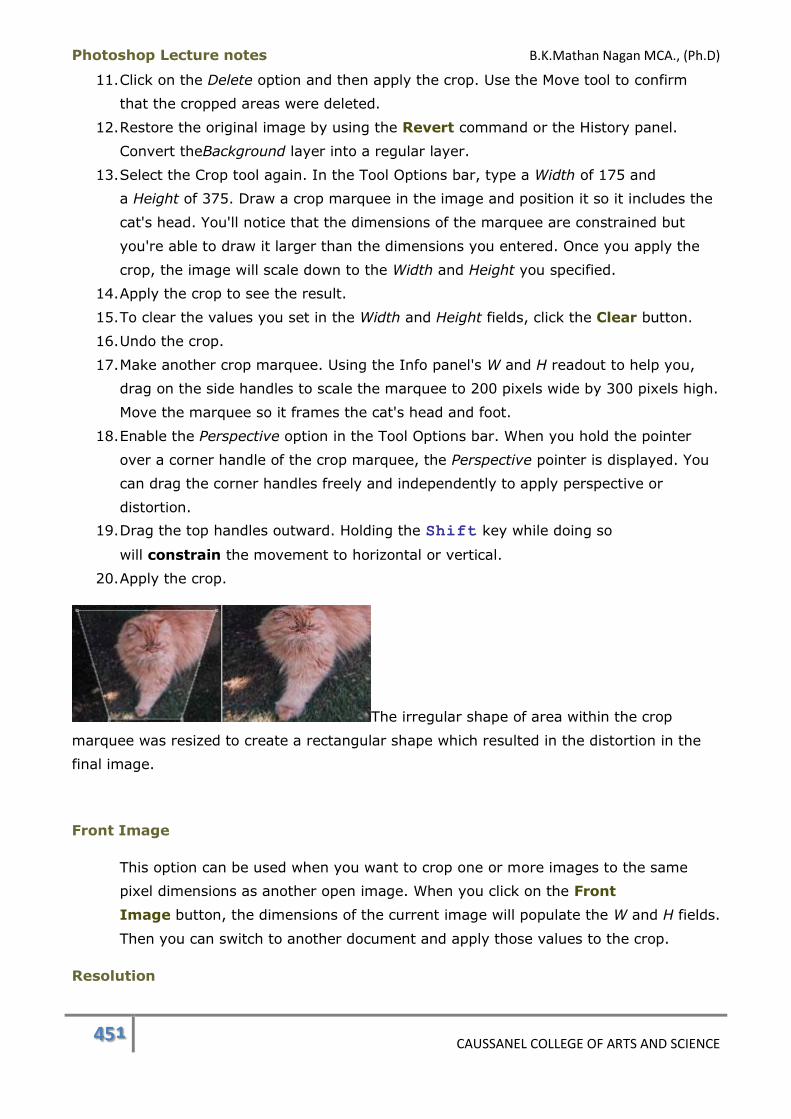
Photoshop Lecture notes B.K.Mathan Nagan MCA., (Ph.D)
451 CAUSSANEL COLLEGE OF ARTS AND SCIENCE
11. Click on the Delete option and then apply the crop. Use the Move tool to confirm
that the cropped areas were deleted.
12. Restore the original image by using the Revert command or the History panel.
Convert theBackground layer into a regular layer.
13. Select the Crop tool again. In the Tool Options bar, type a Width of 175 and
a Height of 375. Draw a crop marquee in the image and position it so it includes the
cat's head. You'll notice that the dimensions of the marquee are constrained but
you're able to draw it larger than the dimensions you entered. Once you apply the
crop, the image will scale down to the Width and Height you specified.
14. Apply the crop to see the result.
15. To clear the values you set in the Width and Height fields, click the Clear button.
16. Undo the crop.
17. Make another crop marquee. Using the Info panel's W and H readout to help you,
drag on the side handles to scale the marquee to 200 pixels wide by 300 pixels high.
Move the marquee so it frames the cat's head and foot.
18. Enable the Perspective option in the Tool Options bar. When you hold the pointer
over a corner handle of the crop marquee, the Perspective pointer is displayed. You
can drag the corner handles freely and independently to apply perspective or
distortion.
19. Drag the top handles outward. Holding the Shift key while doing so
will constrain the movement to horizontal or vertical.
20. Apply the crop.
The irregular shape of area within the crop
marquee was resized to create a rectangular shape which resulted in the distortion in the
final image.
Front Image
This option can be used when you want to crop one or more images to the same
pixel dimensions as another open image. When you click on the Front
Image button, the dimensions of the current image will populate the W and H fields.
Then you can switch to another document and apply those values to the crop.
Resolution
Photoshop Lecture notes B.K.Mathan Nagan MCA., (Ph.D)
452 CAUSSANEL COLLEGE OF ARTS AND SCIENCE
This option is handy if the image you're starting with is at a higher resolution than
72 ppi. You can both crop and resample in one step.
Cropping With the Crop Command
To use the Crop command, an area of an image must first be defined by a selection
marquee created with one of the marquee tools. The logical choice would be to apply a
rectangular marquee but the command will work with oval or irregular selections too.
Practice Exercise: Using the Crop Command
1. Undo the Perspective crop you made in the last exercise.
2. Use the Rectangular Marquee tool to make a selection of the cat.
3. Go to Image > Crop.
4. Undo this action.
5. Use the Elliptical Marquee tool to make a selection.
6. Go to Image > Crop. The image was cropped to the selection border of the oval
shape. If you shift the image with the Move tool, you'll see that the excess parts of
the image were deleted. There is no Hide option with the Crop command.
7. Close your file without saving it.
Using the Trim Command
The Trim command will trim off excess transparent areas from an image. It can also
trim based on apixel colour.
Practice Exercise: Using the Trim Command
1. Open Cat_extract.psd. This image has excess transparency that we can use to
practice the Trimcommand.
2. Go to Image > Trim and the Trim dialog will open.
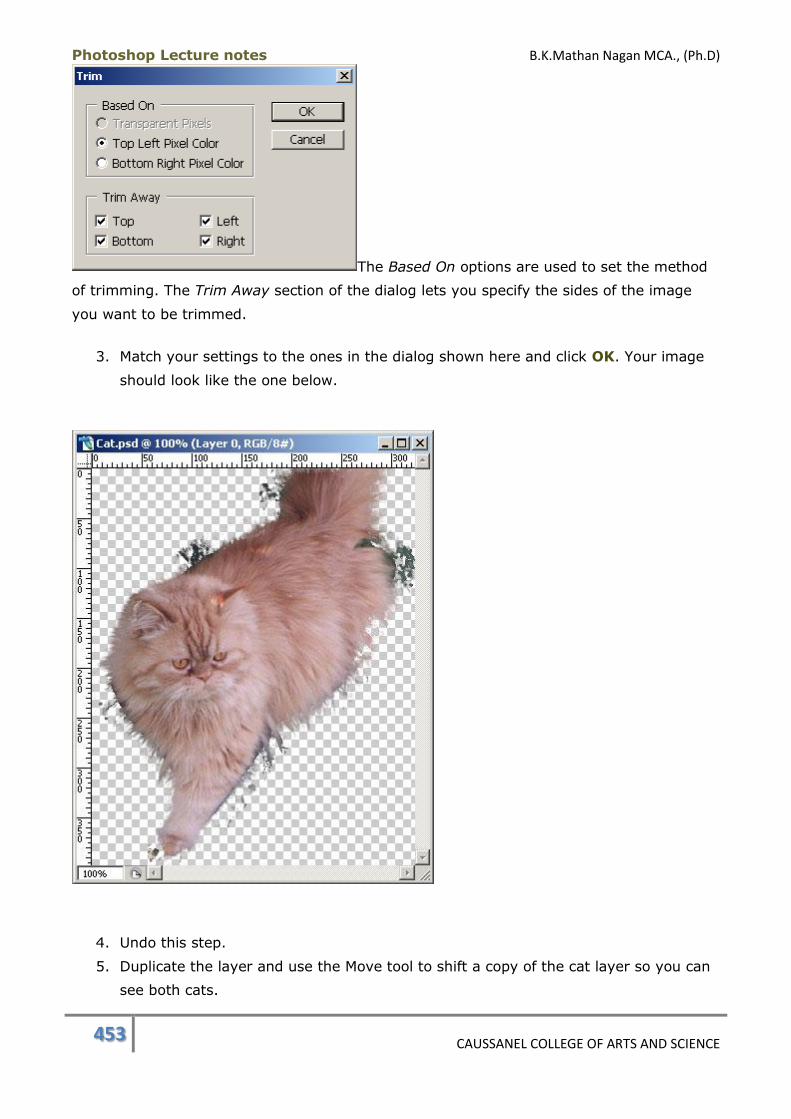
Photoshop Lecture notes B.K.Mathan Nagan MCA., (Ph.D)
453 CAUSSANEL COLLEGE OF ARTS AND SCIENCE
The Based On options are used to set the method
of trimming. The Trim Away section of the dialog lets you specify the sides of the image
you want to be trimmed.
3. Match your settings to the ones in the dialog shown here and click OK. Your image
should look like the one below.
4. Undo this step.
5. Duplicate the layer and use the Move tool to shift a copy of the cat layer so you can
see both cats.

Photoshop Lecture notes B.K.Mathan Nagan MCA., (Ph.D)
454 CAUSSANEL COLLEGE OF ARTS AND SCIENCE
6. Repeat the Trim command. This will use the opacity of both layers to set the
amount of trimming.
7. Hide one of the cat layers and trim again.
The trim was made based on the transparency of the visible pixels. The transparency of
hidden layers is ignored.
8. Close your file without saving it.
Trim Based on Pixel Colour
This option could be useful for trimming off strips of colour that appear around an
image, such as on scanned images.
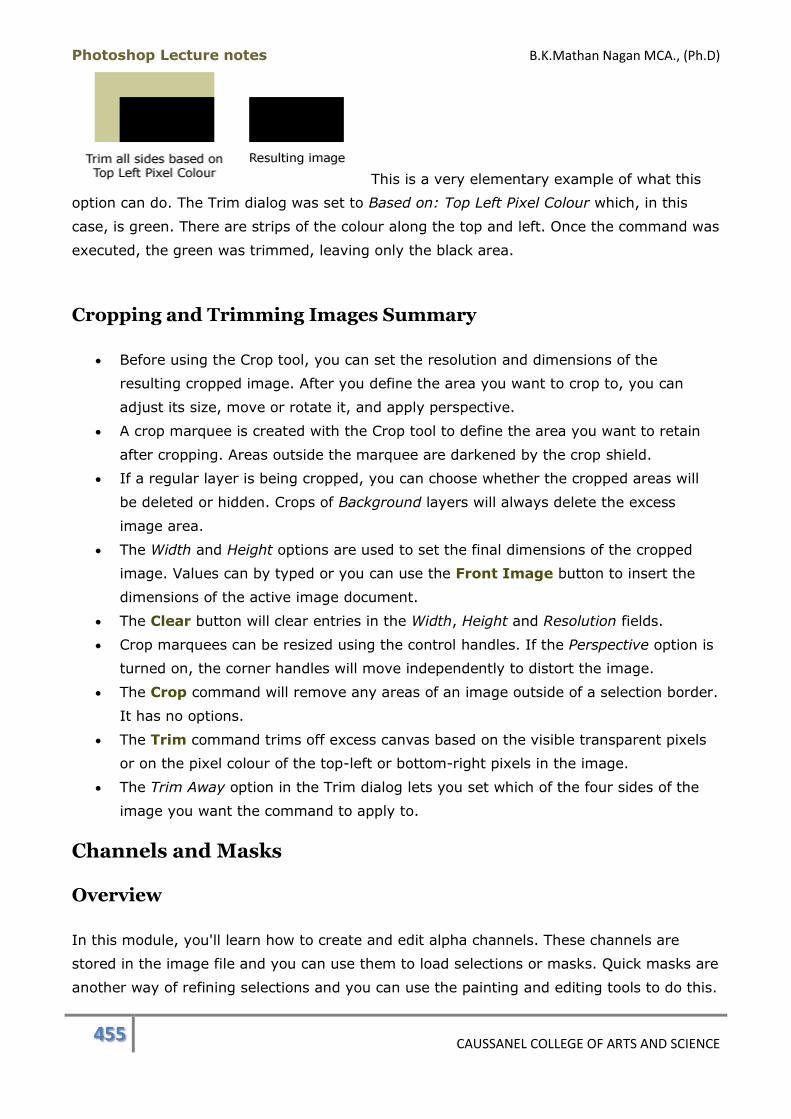
Photoshop Lecture notes B.K.Mathan Nagan MCA., (Ph.D)
455 CAUSSANEL COLLEGE OF ARTS AND SCIENCE
This is a very elementary example of what this
option can do. The Trim dialog was set to Based on: Top Left Pixel Colour which, in this
case, is green. There are strips of the colour along the top and left. Once the command was
executed, the green was trimmed, leaving only the black area.
Cropping and Trimming Images Summary
Before using the Crop tool, you can set the resolution and dimensions of the
resulting cropped image. After you define the area you want to crop to, you can
adjust its size, move or rotate it, and apply perspective.
A crop marquee is created with the Crop tool to define the area you want to retain
after cropping. Areas outside the marquee are darkened by the crop shield.
If a regular layer is being cropped, you can choose whether the cropped areas will
be deleted or hidden. Crops of Background layers will always delete the excess
image area.
The Width and Height options are used to set the final dimensions of the cropped
image. Values can by typed or you can use the Front Image button to insert the
dimensions of the active image document.
The Clear button will clear entries in the Width, Height and Resolution fields.
Crop marquees can be resized using the control handles. If the Perspective option is
turned on, the corner handles will move independently to distort the image.
The Crop command will remove any areas of an image outside of a selection border.
It has no options.
The Trim command trims off excess canvas based on the visible transparent pixels
or on the pixel colour of the top-left or bottom-right pixels in the image.
The Trim Away option in the Trim dialog lets you set which of the four sides of the
image you want the command to apply to.
Channels and Masks
Overview
In this module, you'll learn how to create and edit alpha channels. These channels are
stored in the image file and you can use them to load selections or masks. Quick masks are
another way of refining selections and you can use the painting and editing tools to do this.
Photoshop Lecture notes B.K.Mathan Nagan MCA., (Ph.D)
456 CAUSSANEL COLLEGE OF ARTS AND SCIENCE
A permanent form of mask is a layer mask that lets you protect part of a layer while
modifying another part. You can also use them to create graduated areas of transparency
on a layer.
Here is a summary of the topics in this module:
(1) Channels
Learn about colour and alpha channels in this lecture and how they affect the file
size.
(2) Channels Panel
The Channels panel is used to view colour and alpha channels. You can duplicate or
delete alpha channels using the options in this panel.
(3) Saving Selections
If you've created a selection that you may need to use again, you can save it for
later use. An exercise will guide you through the procedures for saving a selection as
an alpha channel using both the menu command and the Channels panel.
(4) Loading Selections from Channels
The Load Selection dialog lets you load selections into an image and has options for
combining a new selection with an existing one.
(5) Editing Channels
Once you've created an alpha channel, you can edit it directly. In a practice
exercise, you'll edit a channel to create a glow effect coming from a shell.
(6) Quick Mask Mode
Creating a selection in Quick Mask mode lets you use the painting tools, such as the
paintbrush, to define a selection area. This provides the greatest number of options
for refining a selection and you can view the quick mask against the image. A
practice exercise will acquaint you with quick masks.
(7) Layer Masks
A layer mask can be used for two purposes. You can use it to paint out unwanted
portions of a layer with the option of painting them back in at any given time. You
can also use a mask to protect an area of a layer while editing an unprotected area.
This lecture includes an exercise in which you'll create a composite image using a
mask.
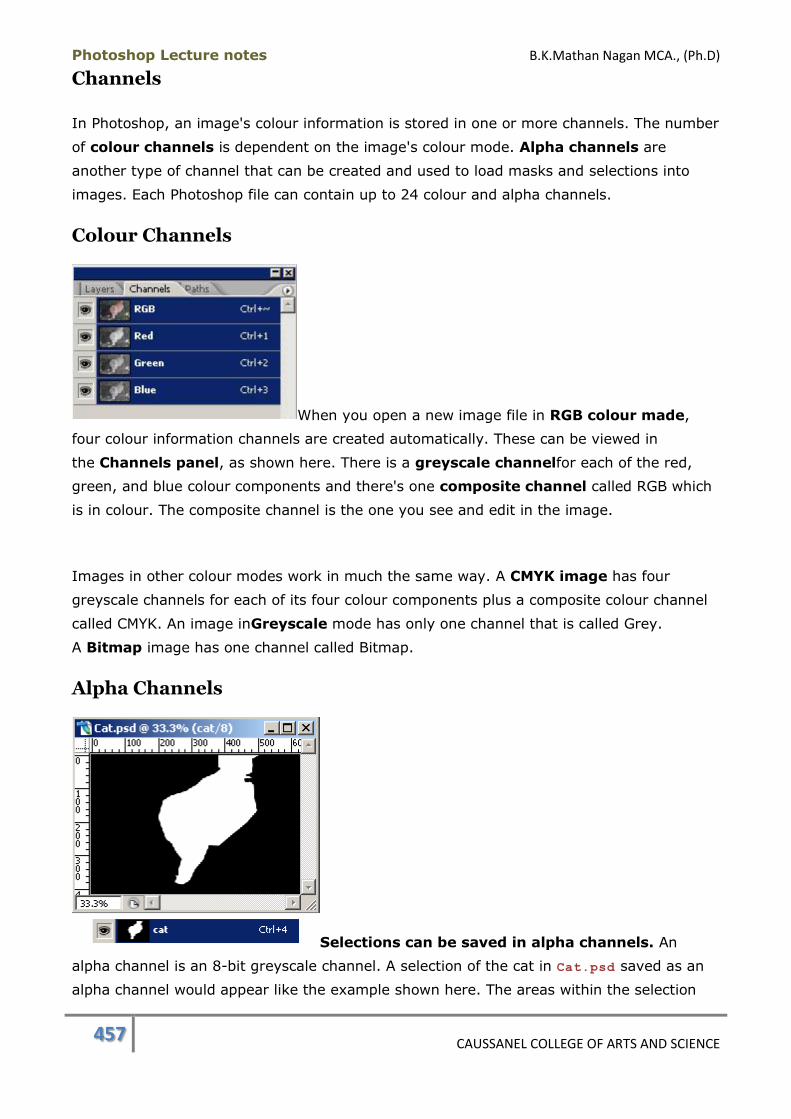
Photoshop Lecture notes B.K.Mathan Nagan MCA., (Ph.D)
457 CAUSSANEL COLLEGE OF ARTS AND SCIENCE
Channels
In Photoshop, an image's colour information is stored in one or more channels. The number
of colour channels is dependent on the image's colour mode. Alpha channels are
another type of channel that can be created and used to load masks and selections into
images. Each Photoshop file can contain up to 24 colour and alpha channels.
Colour Channels
When you open a new image file in RGB colour made,
four colour information channels are created automatically. These can be viewed in
the Channels panel, as shown here. There is a greyscale channelfor each of the red,
green, and blue colour components and there's one composite channel called RGB which
is in colour. The composite channel is the one you see and edit in the image.
Images in other colour modes work in much the same way. A CMYK image has four
greyscale channels for each of its four colour components plus a composite colour channel
called CMYK. An image inGreyscale mode has only one channel that is called Grey.
A Bitmap image has one channel called Bitmap.
Alpha Channels
Selections can be saved in alpha channels. An
alpha channel is an 8-bit greyscale channel. A selection of the cat in Cat.psd saved as an
alpha channel would appear like the example shown here. The areas within the selection
Photoshop Lecture notes B.K.Mathan Nagan MCA., (Ph.D)
458 CAUSSANEL COLLEGE OF ARTS AND SCIENCE
border are stored as white values in the channel. The unselected areas are black. Partially
selected (semi-transparent) pixels will appear as grey values.
A selection or mask can be loaded into an image based on the information stored in an
alpha channel. Alpha channels can be edited, duplicated or deleted.
Channels and File Size
Each alpha channel in an image adds to its file size. This
example shows the bottom of a document window that contains one layer and one alpha
channel. The layer information alone is 754K. With the alpha channel added in, the file size
became 960K. If the alpha channel is duplicated, the file size becomes 1.14M. Additional
layers with pixel information will also add to the file size. So the number on the left
indicates what the file size would be if the image was flattened into a single layer with no
alpha channels.
Channels Summary
Photoshop stores colour and selection information in greyscale channels.
When working in RGB mode, there will be a Red channel, Green channel, Blue
Channel and a composite channel called RGB in which image editing is usually done.
Selections can be saved to alpha channels.
An alpha channel is an 8-bit greyscale channel.
In an alpha channel white areas represent fully selected areas, black represents
unselected areas and grey represents a degree of partial selection or transparency.
Alpha channels will add to the file size of a .psd file.
Channels Panel
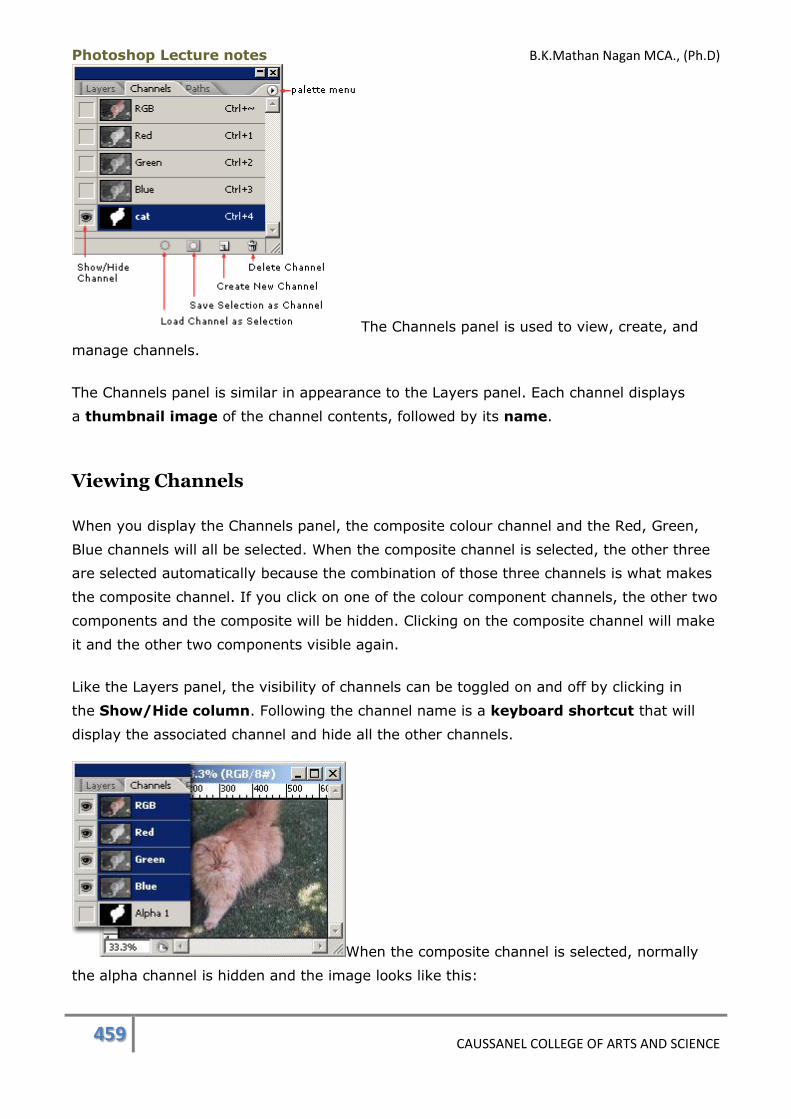
Photoshop Lecture notes B.K.Mathan Nagan MCA., (Ph.D)
459 CAUSSANEL COLLEGE OF ARTS AND SCIENCE
The Channels panel is used to view, create, and
manage channels.
The Channels panel is similar in appearance to the Layers panel. Each channel displays
a thumbnail image of the channel contents, followed by its name.
Viewing Channels
When you display the Channels panel, the composite colour channel and the Red, Green,
Blue channels will all be selected. When the composite channel is selected, the other three
are selected automatically because the combination of those three channels is what makes
the composite channel. If you click on one of the colour component channels, the other two
components and the composite will be hidden. Clicking on the composite channel will make
it and the other two components visible again.
Like the Layers panel, the visibility of channels can be toggled on and off by clicking in
the Show/Hide column. Following the channel name is a keyboard shortcut that will
display the associated channel and hide all the other channels.
When the composite channel is selected, normally
the alpha channel is hidden and the image looks like this:
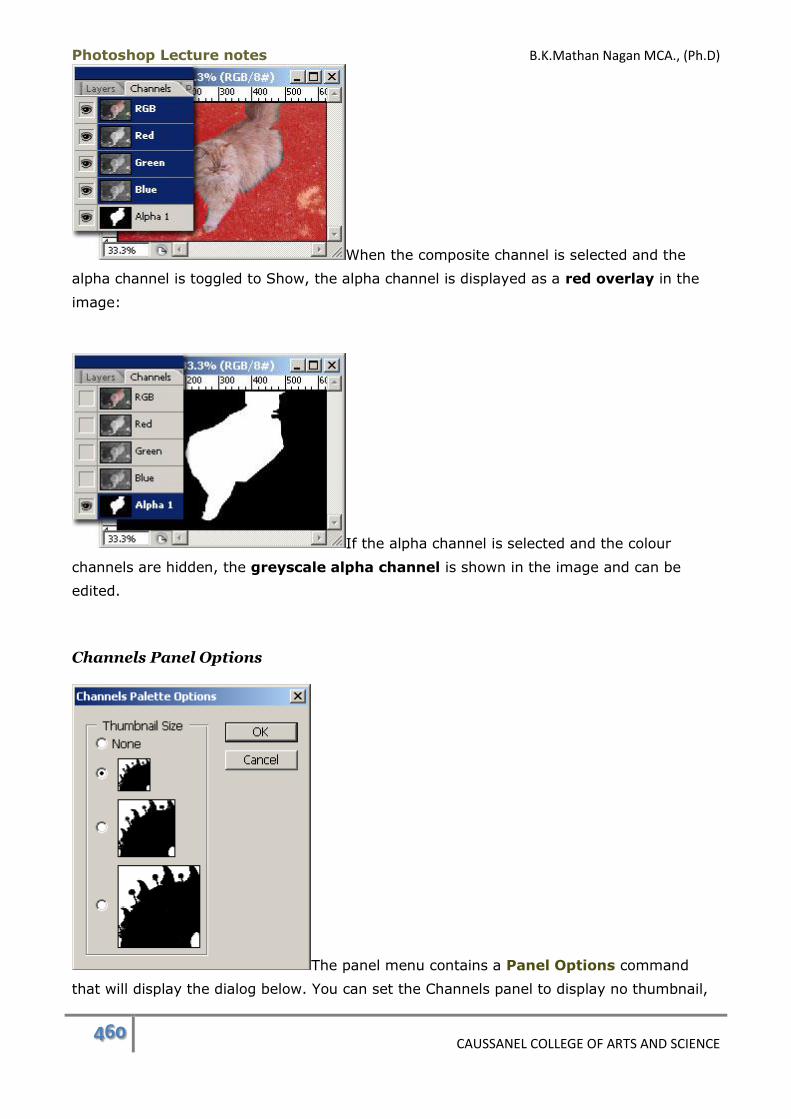
Photoshop Lecture notes B.K.Mathan Nagan MCA., (Ph.D)
460 CAUSSANEL COLLEGE OF ARTS AND SCIENCE
When the composite channel is selected and the
alpha channel is toggled to Show, the alpha channel is displayed as a red overlay in the
image:
If the alpha channel is selected and the colour
channels are hidden, the greyscale alpha channel is shown in the image and can be
edited.
Channels Panel Options
The panel menu contains a Panel Options command
that will display the dialog below. You can set the Channels panel to display no thumbnail,
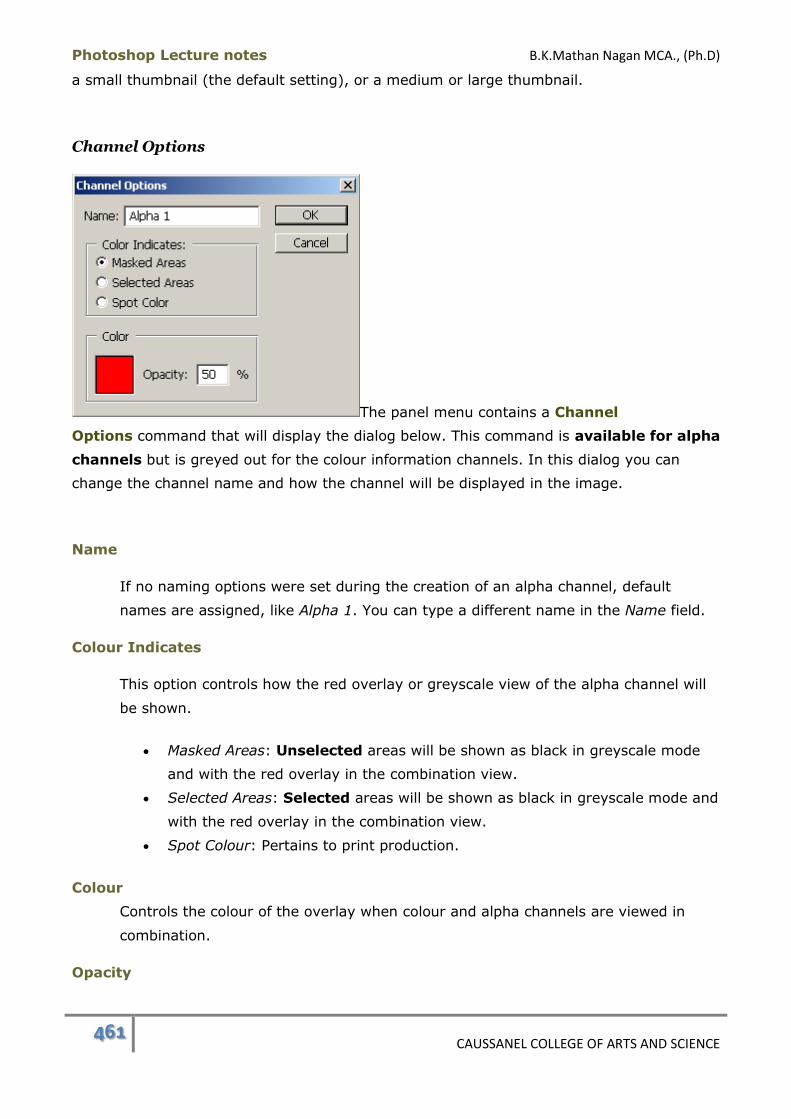
Photoshop Lecture notes B.K.Mathan Nagan MCA., (Ph.D)
461 CAUSSANEL COLLEGE OF ARTS AND SCIENCE
a small thumbnail (the default setting), or a medium or large thumbnail.
Channel Options
The panel menu contains a Channel
Options command that will display the dialog below. This command is available for alpha
channels but is greyed out for the colour information channels. In this dialog you can
change the channel name and how the channel will be displayed in the image.
Name
If no naming options were set during the creation of an alpha channel, default
names are assigned, like Alpha 1. You can type a different name in the Name field.
Colour Indicates
This option controls how the red overlay or greyscale view of the alpha channel will
be shown.
Masked Areas: Unselected areas will be shown as black in greyscale mode
and with the red overlay in the combination view.
Selected Areas: Selected areas will be shown as black in greyscale mode and
with the red overlay in the combination view.
Spot Colour: Pertains to print production.
Colour
Controls the colour of the overlay when colour and alpha channels are viewed in
combination.
Opacity
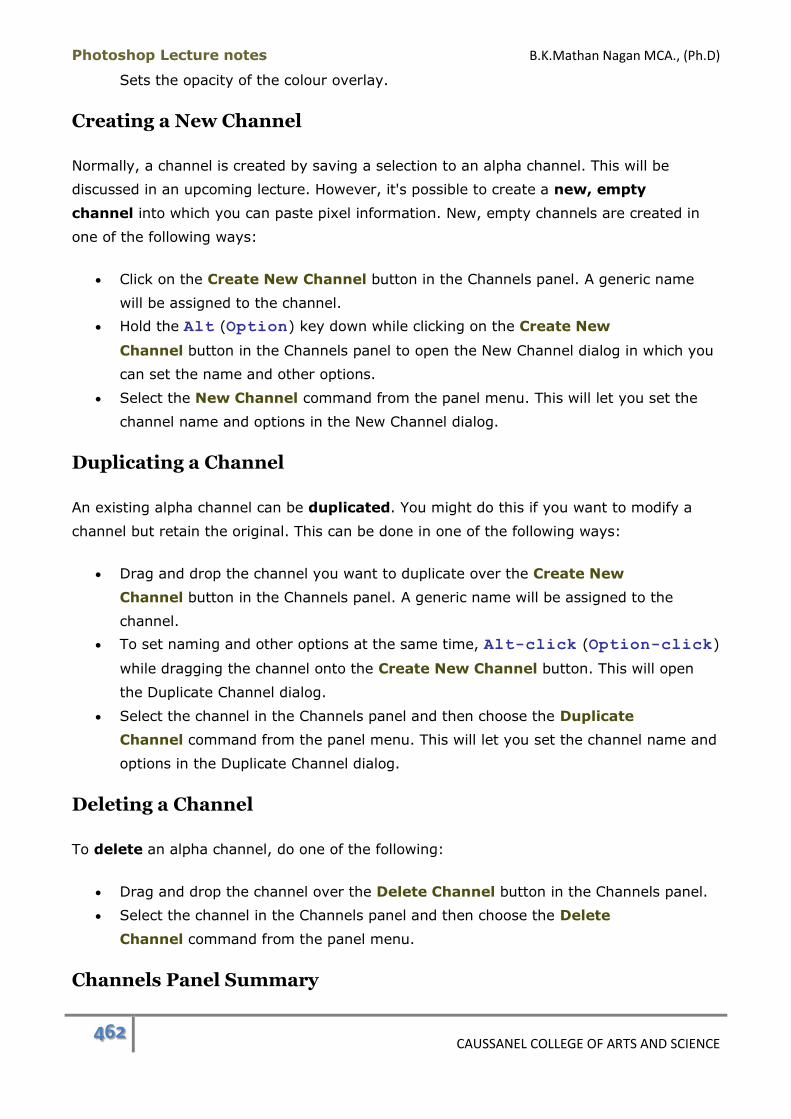
Photoshop Lecture notes B.K.Mathan Nagan MCA., (Ph.D)
462 CAUSSANEL COLLEGE OF ARTS AND SCIENCE
Sets the opacity of the colour overlay.
Creating a New Channel
Normally, a channel is created by saving a selection to an alpha channel. This will be
discussed in an upcoming lecture. However, it's possible to create a new, empty
channel into which you can paste pixel information. New, empty channels are created in
one of the following ways:
Click on the Create New Channel button in the Channels panel. A generic name
will be assigned to the channel.
Hold the Alt (Option) key down while clicking on the Create New
Channel button in the Channels panel to open the New Channel dialog in which you
can set the name and other options.
Select the New Channel command from the panel menu. This will let you set the
channel name and options in the New Channel dialog.
Duplicating a Channel
An existing alpha channel can be duplicated. You might do this if you want to modify a
channel but retain the original. This can be done in one of the following ways:
Drag and drop the channel you want to duplicate over the Create New
Channel button in the Channels panel. A generic name will be assigned to the
channel.
To set naming and other options at the same time, Alt-click (Option-click)
while dragging the channel onto the Create New Channel button. This will open
the Duplicate Channel dialog.
Select the channel in the Channels panel and then choose the Duplicate
Channel command from the panel menu. This will let you set the channel name and
options in the Duplicate Channel dialog.
Deleting a Channel
To delete an alpha channel, do one of the following:
Drag and drop the channel over the Delete Channel button in the Channels panel.
Select the channel in the Channels panel and then choose the Delete
Channel command from the panel menu.
Channels Panel Summary
Photoshop Lecture notes B.K.Mathan Nagan MCA., (Ph.D)
463 CAUSSANEL COLLEGE OF ARTS AND SCIENCE
The Channels panel is used to view, create, and manage channels.
When the composite channel is selected, the three colour component channels are
displayed automatically.
When the composite channel is selected, normally the alpha channels are not
displayed in the image window.
When the composite channel and alpha channels are displayed at the same time, the
alpha channel appears as a red overlay in the image.
When the alpha channel is selected and the colour channels are hidden, the
greyscale channel information is displayed in the image and can be edited.
Alpha channels can be renamed in the Channel Options dialog which is displayed by
choosing theChannel Options command in the panel menu.
New, empty alpha channels can be created using the Channels panel. Existing alpha
channels can be duplicated or deleted.
Channels Panel Keyboard Shortcuts:
Create new channel with options: Alt-click (Option-click) the Create New
Channelbutton
Duplicate channel with options: Alt-click (Option-click) while dragging the
channel onto the Create New Channel button
Saving Selections
In many instances you may want to use the same selection more than once. To avoid the
time needed to create the same selection repeatedly, you can save it to an alpha channel
and load it as a selection at a later time. Selections can be saved in two ways. Using
the Save Selection command lets you create an alpha channel and set saving options, like
naming. You can also use the Save Selection as Channelbutton in the Channels panel.
Practice Exercise: Saving Selections
Let's try out both options for saving selections to alpha channels. We'll also review some of
the procedures covered in the previous lectures about channels.
Saving a Selection Using the Channels Panel
1. Open Cat_extract.psd and display the Layers panel.
2. Load a selection based on the layer's opacity by holding down the Ctrl (Cmd) key
while clicking on the layer thumbnail.
3. Display the Channels panel. Click on the Save Selection as Channel button.

Photoshop Lecture notes B.K.Mathan Nagan MCA., (Ph.D)
464 CAUSSANEL COLLEGE OF ARTS AND SCIENCE
4. Save your file. Your Channels panel should look like
this:
5. A default name of Alpha 1 has been assigned to the new channel.
6. Remove the selection by pressing Ctrl-
D (Cmd-D) and click on the Alpha 1 channel in the panel. Your image window should
change to display the greyscale alpha channel.
7. Click on the RGB channel. The colour image should be displayed in the image
window and the Alpha channel will toggle to hidden in the Channels panel.
8. Click in the Show/Hide column for Alpha 1 to
turn on its visibility. Your image window should display the masked (unselected)
areas of the image as a red overlay.
9. Delete the alpha channel by dragging it to the Delete Current Channel button with
the trashcan icon in the Channels panel. Let's try another option for saving the
selection.
10. Reload the selection using the Layers panel.
Photoshop Lecture notes B.K.Mathan Nagan MCA., (Ph.D)
465 CAUSSANEL COLLEGE OF ARTS AND SCIENCE
11. Switch to the Channels panel and hold down the Alt (Option) key while clicking
on the Save Selection as Channel button.
12. The New Channel dialog will be displayed. Type Cat1 in the Name field and
click OK.
13. Remove the selection and save your file.
Saving a Selection Using the Save Selection Command
14. Duplicate Layer 0 and use the Move tool to drag a copy of the cat on Layer 0 copy to
one side.
15. Select the layer opacity of the new cat layer.
16. Go to Select > Save
Selection to open the Save Selection dialog.
Save Selection Dialog Options
Destination - Document
This determines whether you save your selection as an alpha channel in the current
document or a new document.
Channel
The Channel pop-up menu lets you choose between creating a new alpha channel,
interacting with an existing alpha channel (Cat1, in this case) or saving the selection
as a mask.
Name
You can enter the desired name for a new channel. If you leave it blank, Photoshop
will give it a generic name, like Alpha 2.

Photoshop Lecture notes B.K.Mathan Nagan MCA., (Ph.D)
466 CAUSSANEL COLLEGE OF ARTS AND SCIENCE
17. Leave the Document set to the current file name and leave the Name field blank.
Rather than create a new channel, you'll be combining the new channel with the
existing Cat1 channel. SelectCat1 from the Channel pop-up menu. The Name field
will dim.
Operation
This option will remain on New Channel if the Channel option is set to New. If the
Channel option is set to an existing channel or Quick Mask, the following options will
appear.
Replace Channel
Replaces the current selection in the channel selected in the Channel menu.
Add to Channel
Adds the current selection to the channel selected in the Channel menu.
Subtract from Channel
Subtracts the current selection from the channel selected in the Channel menu.
Intersect with Channel
Keeps the areas of the new selection that intersect with the channel selected in the
Channel menu.
18. Click on the Add to Channel option and then click OK.
19. When you view the thumbnail in the Channels panel, the Cat1 channel has been
changed to include the selections of both cats.
20. Since we've overridden our original channel with this combined channel, let's re-
create it. In the Layers panel, load a selection based on Layer 0's opacity.
21. Go to Select > Save Selection.
22. Type Cat in the Name field and leave the other settings as they are. Click OK.
23. Delete the Cat1 channel by dragging it to the Delete Current Channel button in
the Channels panel.
24. Delete Layer 0 copy.
25. Save your file.
Saving Selections Summary
Selections that you may want to use again can be saved using the Save
Selection command or the Save Selection as Channel button in the Channels
panel.
Photoshop Lecture notes B.K.Mathan Nagan MCA., (Ph.D)
467 CAUSSANEL COLLEGE OF ARTS AND SCIENCE
Selections can be saved in the current document or in a new .psd file.
With the Save Selection command you can create a new alpha channel, combine
the selection with an existing alpha channel or save the selection as a mask.
When you choose to combine the selection with an existing channel, you can add it
to the channel, replace it, subtract it, or save the parts of the two that intersect.
Saving Selections Keyboard Shortcuts:
Save alpha channel with options: Alt-click (Option-click) the Save
Selection as Channel button
Loading Selections from Channels
Once an alpha channel has been saved with the file, you can load the channel as a
selection in one of three ways. The Load Selection command lets you choose options prior
to loading the selection. There are two methods available using the Channels panel.
Load Selection Command
The Load Selection dialog is
opened by using the Selection > Load Selectioncommand. It shares much in common
with the Save Selection dialog.
Load Selection Options
Source Document
This pop-up menu will list the names of the open documents from which a selection
can be loaded. In order to appear in the Document list the document must meet the
following criteria:
Current document:
Photoshop Lecture notes B.K.Mathan Nagan MCA., (Ph.D)
468 CAUSSANEL COLLEGE OF ARTS AND SCIENCE
Must have at least one alpha channel or the active layer in the document
must contain transparency.
Other eligible documents:
Must have the same dimensions as the current document.
Must have at least one alpha channel or the active layer in the document
must contain transparency.
Channel
This pop-up menu contains the list of channels or layer transparency that can be
loaded from the selected document.
Invert
When checked, the loaded selection will be inverted, meaning that the selected area
will be unselected and the unselected area will become selected.
Operation
This option will default to New Selection unless you have a selection active. If you do
have another selection that is active, the following options are presented.
Replace Selection
Replaces the current selection.
Add to Selection
Adds to the current selection.
Subtract from Selection
Discards the areas of the new selection that intersect with the existing selection.
Intersect with Selection
Keeps the areas of the new selection that intersect with the current selection.
Loading Selections Using Channels Panel
There are two ways that you can load a selection from an alpha channel. The first of the
following two methods is the quickest.
Method 1
Photoshop Lecture notes B.K.Mathan Nagan MCA., (Ph.D)
469 CAUSSANEL COLLEGE OF ARTS AND SCIENCE
In the Channels panel you can Ctrl-click (Cmd-click) the alpha channel to
load it as a selection.
Method 2
In the Channels panel, select the alpha channel.
Click on the Load Channel as Selection button in the panel.
Click on the composite channel to restore the colour information in the
image.
Combining Selections Using Keyboard Shortcuts
With either of the methods above, you can control how the channel selection will combine
with an existing selection. Use the following keyboard shortcuts in conjunction with
clicking on the channel or the Load Channel as Selection button.
Add to selection: Ctrl-Shift-click (Cmd-Shift-click)
Subtract from selection: Ctrl-Alt-click (Cmd-Option-click)
Intersect with selection: Ctrl-Alt-Shift-click (Cmd-Option-Shift-
click)
Loading Selections from Channels Summary
Saved alpha channels can be loaded as selections.
The current document's own alpha channels can be loaded as selections or if another
document with the same dimensions is open, an alpha channel can be loaded from
it.
When using the Load Selection command, you can load the channel as an inverted
selection by enabling the Invert check box.
With any of the methods for loading selections you can optionally add to, subtract
from, or intersect with an existing selection.
Loading Selections from Channels Keyboard Shortcuts:
Load Selection: Ctrl-click (Cmd-click) on the channel
The following shortcuts work by clicking on the channel or the Load Channel as
Selection button:
o Add to selection: Ctrl-Shift-click (Cmd-Shift-click)
o Subtract from selection: Ctrl-Alt-click (Cmd-Option-click)
o Intersect with selection: Ctrl-Alt-Shift-click (Cmd-Option-
Shift-click)
Photoshop Lecture notes B.K.Mathan Nagan MCA., (Ph.D)
470 CAUSSANEL COLLEGE OF ARTS AND SCIENCE
Editing Channels
Once an alpha channel has been created, you can use the
painting and retouching tools to modify the channel directly. For this lecture, we'll do a
practice exercise to review loading selections from channels and editing an alpha channel.
You'll be creating the image shown here.
Practice Exercise: Editing an Alpha Channel
For this exercise you'll need the file called shell.psd that you downloaded in the
Retouching and Editing module. If you didn't download it earlier, you can
download shell.zip for PC (54 K) or shell.sit for Macintosh (47 K). Once the file has
finished downloading to your computer, extract the .psd file from the .zip or .sit file using a
decompression utility program like WinZip (PC) or Stuffit Expander (Macintosh).
1. Open shell.psd and use the Save As command to save the file as shell1.psd.
2. Delete the layer you created during the History Brush exercise. You should have two
layers left:Shell and Background.
3. Go to Image > Canvas Size and set the Height to 200. Anchor the image to the
bottom before clicking OK.
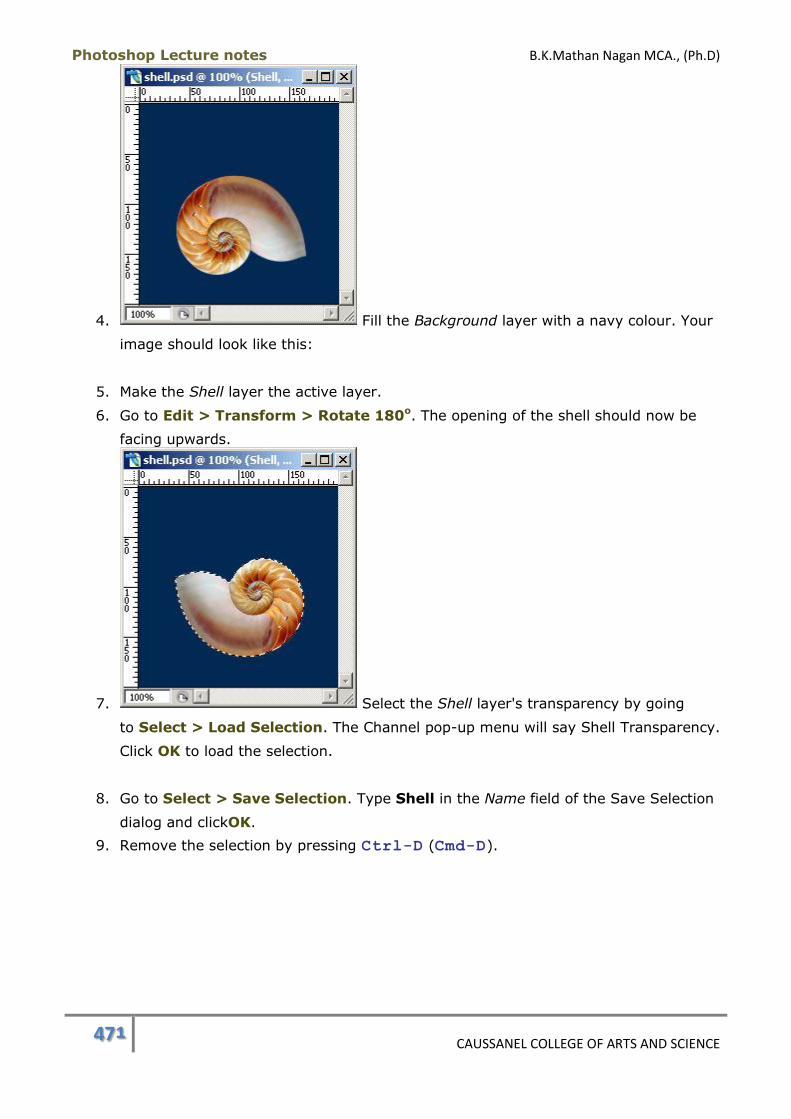
Photoshop Lecture notes B.K.Mathan Nagan MCA., (Ph.D)
471 CAUSSANEL COLLEGE OF ARTS AND SCIENCE
4. Fill the Background layer with a navy colour. Your
image should look like this:
5. Make the Shell layer the active layer.
6. Go to Edit > Transform > Rotate 180o. The opening of the shell should now be
facing upwards.
7. Select the Shell layer's transparency by going
to Select > Load Selection. The Channel pop-up menu will say Shell Transparency.
Click OK to load the selection.
8. Go to Select > Save Selection. Type Shell in the Name field of the Save Selection
dialog and clickOK.
9. Remove the selection by pressing Ctrl-D (Cmd-D).

Photoshop Lecture notes B.K.Mathan Nagan MCA., (Ph.D)
472 CAUSSANEL COLLEGE OF ARTS AND SCIENCE
10. Display the Channels panel. You should have an
alpha channel called Shell. Click on it to display the greyscale channel in the
image window.
11. Set the foreground colour to white.
12. Select the Smudge tool and set the following tool options:
o Brush: Soft Round 13 pixels
o Mode: Normal
o Opacity: 90%
13. Use the Smudge tool along with the Shift key to
drag vertical streaks of white upwards, away from the shell opening like we've done
below:
14. Click on the Load Channel as Selection button at the bottom of the Channels
panel.
15. Click on the RGB composite channel to restore the colour image.
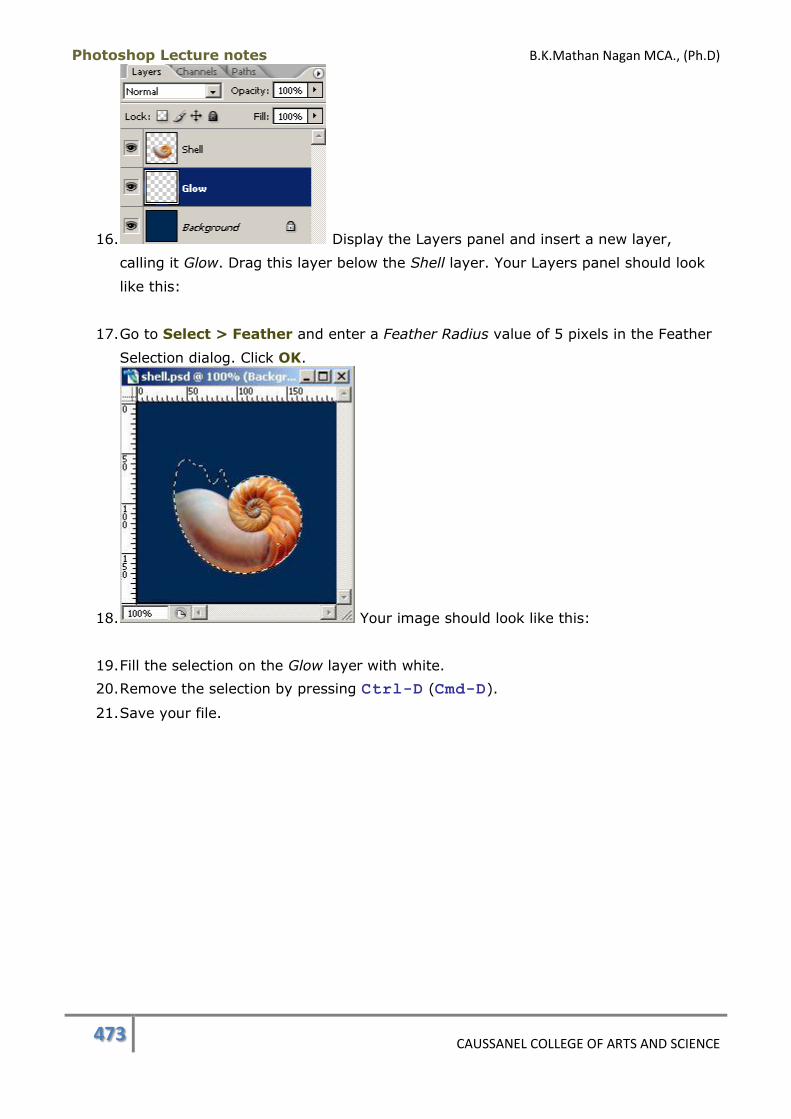
Photoshop Lecture notes B.K.Mathan Nagan MCA., (Ph.D)
473 CAUSSANEL COLLEGE OF ARTS AND SCIENCE
16. Display the Layers panel and insert a new layer,
calling it Glow. Drag this layer below the Shell layer. Your Layers panel should look
like this:
17. Go to Select > Feather and enter a Feather Radius value of 5 pixels in the Feather
Selection dialog. Click OK.
18. Your image should look like this:
19. Fill the selection on the Glow layer with white.
20. Remove the selection by pressing Ctrl-D (Cmd-D).
21. Save your file.
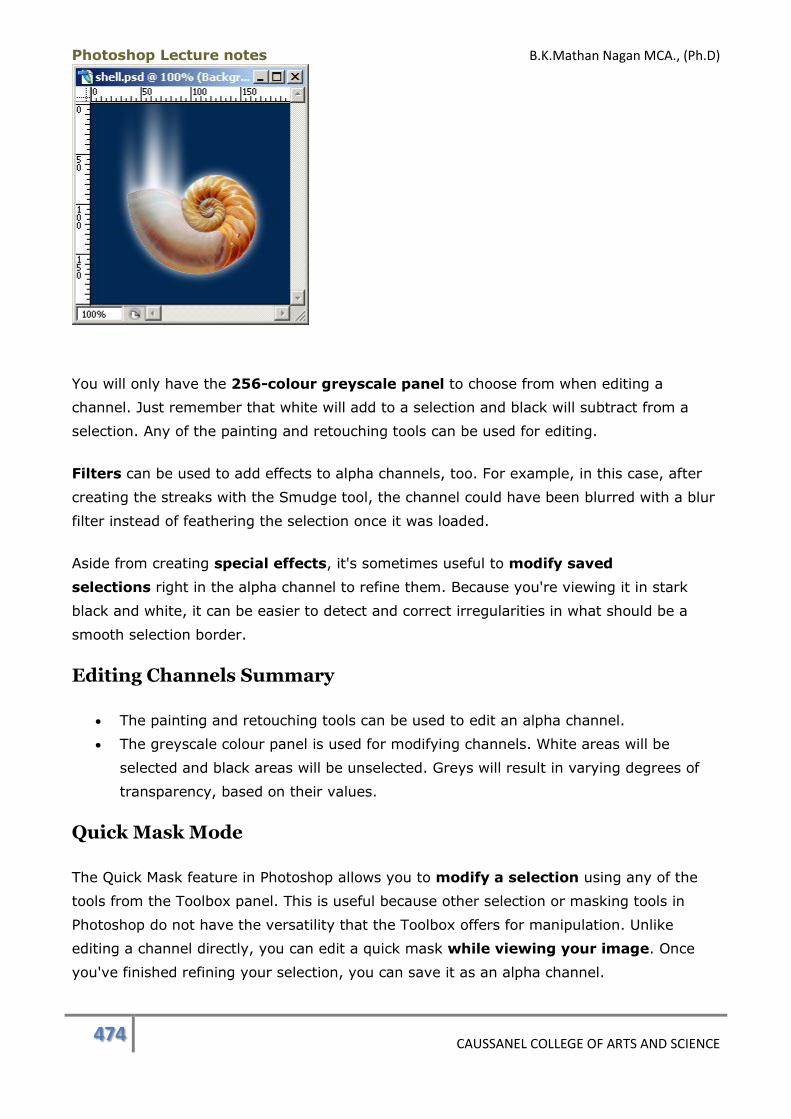
Photoshop Lecture notes B.K.Mathan Nagan MCA., (Ph.D)
474 CAUSSANEL COLLEGE OF ARTS AND SCIENCE
You will only have the 256-colour greyscale panel to choose from when editing a
channel. Just remember that white will add to a selection and black will subtract from a
selection. Any of the painting and retouching tools can be used for editing.
Filters can be used to add effects to alpha channels, too. For example, in this case, after
creating the streaks with the Smudge tool, the channel could have been blurred with a blur
filter instead of feathering the selection once it was loaded.
Aside from creating special effects, it's sometimes useful to modify saved
selections right in the alpha channel to refine them. Because you're viewing it in stark
black and white, it can be easier to detect and correct irregularities in what should be a
smooth selection border.
Editing Channels Summary
The painting and retouching tools can be used to edit an alpha channel.
The greyscale colour panel is used for modifying channels. White areas will be
selected and black areas will be unselected. Greys will result in varying degrees of
transparency, based on their values.
Quick Mask Mode
The Quick Mask feature in Photoshop allows you to modify a selection using any of the
tools from the Toolbox panel. This is useful because other selection or masking tools in
Photoshop do not have the versatility that the Toolbox offers for manipulation. Unlike
editing a channel directly, you can edit a quick mask while viewing your image. Once
you've finished refining your selection, you can save it as an alpha channel.
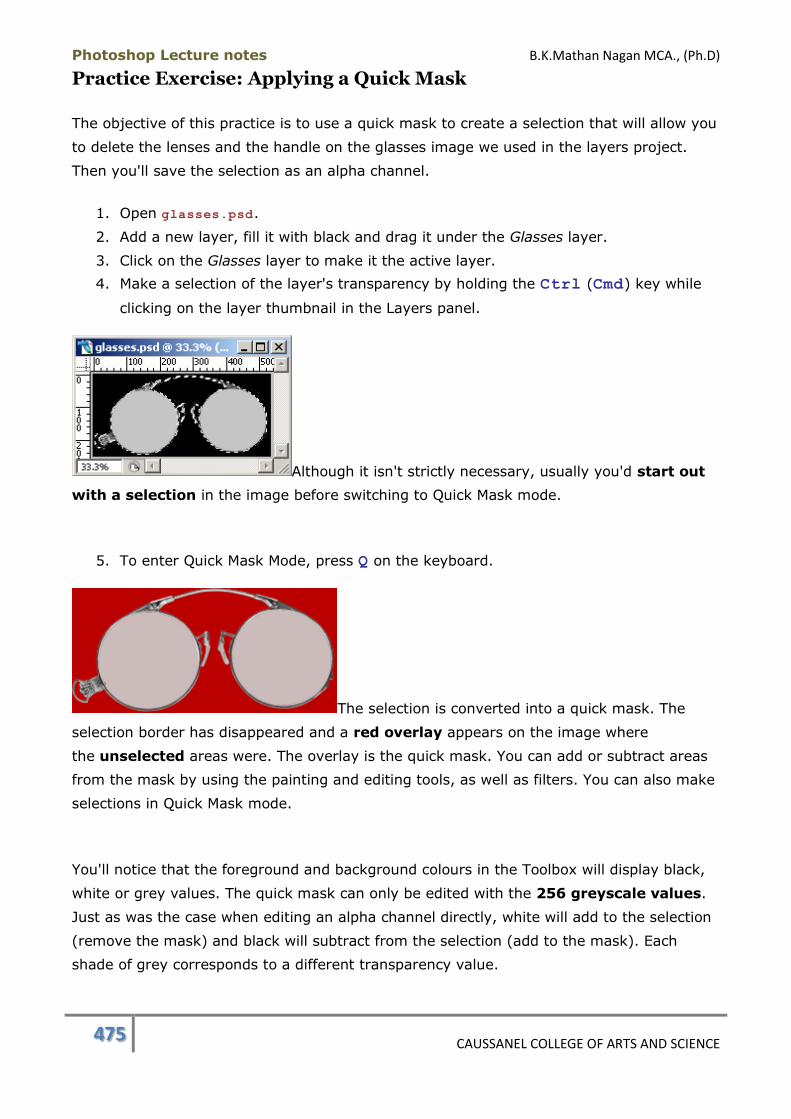
Photoshop Lecture notes B.K.Mathan Nagan MCA., (Ph.D)
475 CAUSSANEL COLLEGE OF ARTS AND SCIENCE
Practice Exercise: Applying a Quick Mask
The objective of this practice is to use a quick mask to create a selection that will allow you
to delete the lenses and the handle on the glasses image we used in the layers project.
Then you'll save the selection as an alpha channel.
1. Open glasses.psd.
2. Add a new layer, fill it with black and drag it under the Glasses layer.
3. Click on the Glasses layer to make it the active layer.
4. Make a selection of the layer's transparency by holding the Ctrl (Cmd) key while
clicking on the layer thumbnail in the Layers panel.
Although it isn't strictly necessary, usually you'd start out
with a selection in the image before switching to Quick Mask mode.
5. To enter Quick Mask Mode, press Q on the keyboard.
The selection is converted into a quick mask. The
selection border has disappeared and a red overlay appears on the image where
the unselected areas were. The overlay is the quick mask. You can add or subtract areas
from the mask by using the painting and editing tools, as well as filters. You can also make
selections in Quick Mask mode.
You'll notice that the foreground and background colours in the Toolbox will display black,
white or grey values. The quick mask can only be edited with the 256 greyscale values.
Just as was the case when editing an alpha channel directly, white will add to the selection
(remove the mask) and black will subtract from the selection (add to the mask). Each
shade of grey corresponds to a different transparency value.

Photoshop Lecture notes B.K.Mathan Nagan MCA., (Ph.D)
476 CAUSSANEL COLLEGE OF ARTS AND SCIENCE
6. Select the Magic Wand tool and set the following options:
o Tolerance: 0
o Anti-aliased: On
o Contiguous: On
o Use All Layers: Off
7. Click on one lens with the Magic Wand, then hold down the Shift key and click on
the other lens to add to the selection.
8. Fill the selected areas with black and remove the selection.
The red overlay now covers the lenses as well as the
background. The overlay is at 50% opacity and the underlying colours shows through.
That's why the quick mask appears lighter over the white lens area as opposed to the black
background. However, both are fully masked in spite of their different appearance.
9. Zoom in on the lower left corner of your image. If black isn't the current foreground
colour, make it so.
10. Select a hard, round Brush and paint over areas shown below to mask them.
11. Check the edges of the mask on the lenses to see if you need to make any
refinements. Remember that black will add to the mask and white will
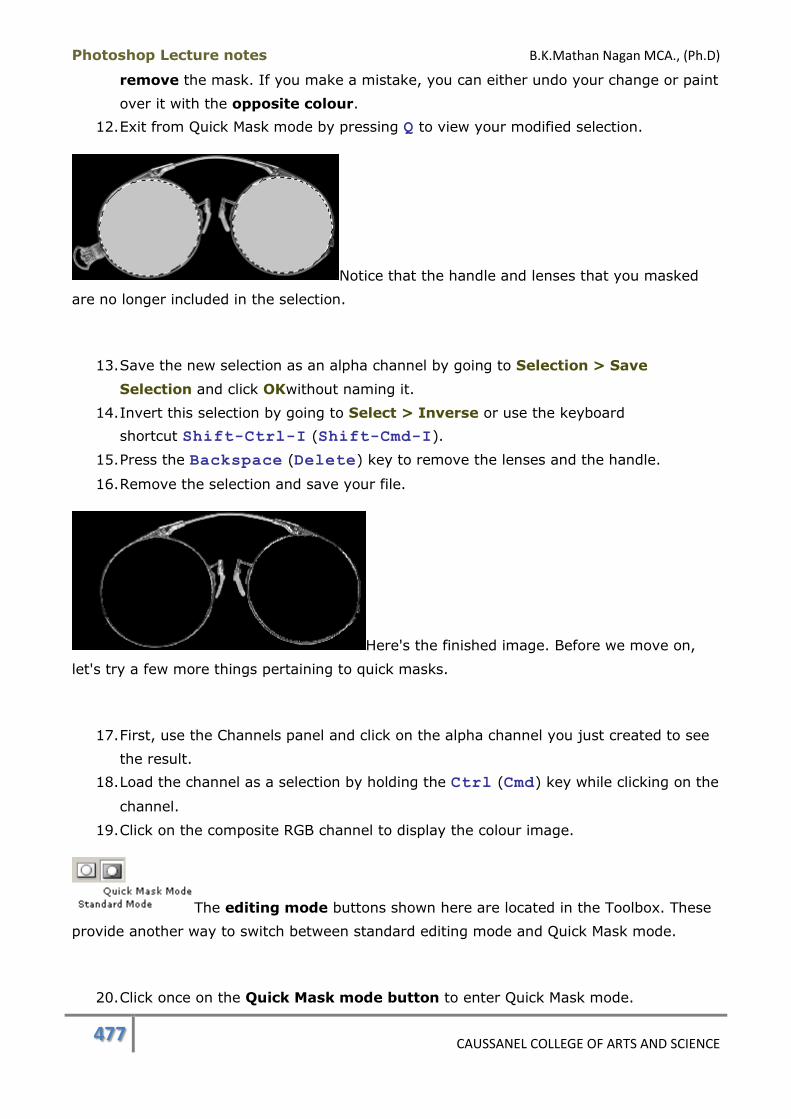
Photoshop Lecture notes B.K.Mathan Nagan MCA., (Ph.D)
477 CAUSSANEL COLLEGE OF ARTS AND SCIENCE
remove the mask. If you make a mistake, you can either undo your change or paint
over it with the opposite colour.
12. Exit from Quick Mask mode by pressing Q to view your modified selection.
Notice that the handle and lenses that you masked
are no longer included in the selection.
13. Save the new selection as an alpha channel by going to Selection > Save
Selection and click OKwithout naming it.
14. Invert this selection by going to Select > Inverse or use the keyboard
shortcut Shift-Ctrl-I (Shift-Cmd-I).
15. Press the Backspace (Delete) key to remove the lenses and the handle.
16. Remove the selection and save your file.
Here's the finished image. Before we move on,
let's try a few more things pertaining to quick masks.
17. First, use the Channels panel and click on the alpha channel you just created to see
the result.
18. Load the channel as a selection by holding the Ctrl (Cmd) key while clicking on the
channel.
19. Click on the composite RGB channel to display the colour image.
The editing mode buttons shown here are located in the Toolbox. These
provide another way to switch between standard editing mode and Quick Mask mode.
20. Click once on the Quick Mask mode button to enter Quick Mask mode.
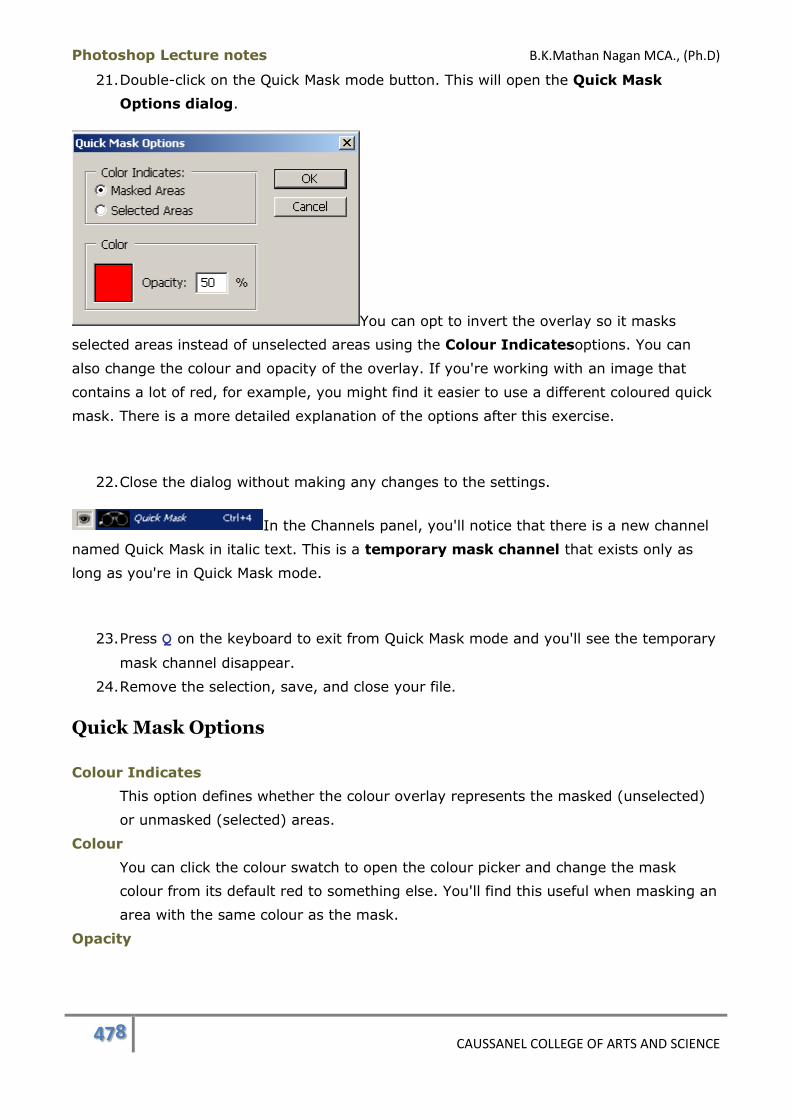
Photoshop Lecture notes B.K.Mathan Nagan MCA., (Ph.D)
478 CAUSSANEL COLLEGE OF ARTS AND SCIENCE
21. Double-click on the Quick Mask mode button. This will open the Quick Mask
Options dialog.
You can opt to invert the overlay so it masks
selected areas instead of unselected areas using the Colour Indicatesoptions. You can
also change the colour and opacity of the overlay. If you're working with an image that
contains a lot of red, for example, you might find it easier to use a different coloured quick
mask. There is a more detailed explanation of the options after this exercise.
22. Close the dialog without making any changes to the settings.
In the Channels panel, you'll notice that there is a new channel
named Quick Mask in italic text. This is a temporary mask channel that exists only as
long as you're in Quick Mask mode.
23. Press Q on the keyboard to exit from Quick Mask mode and you'll see the temporary
mask channel disappear.
24. Remove the selection, save, and close your file.
Quick Mask Options
Colour Indicates
This option defines whether the colour overlay represents the masked (unselected)
or unmasked (selected) areas.
Colour
You can click the colour swatch to open the colour picker and change the mask
colour from its default red to something else. You'll find this useful when masking an
area with the same colour as the mask.
Opacity
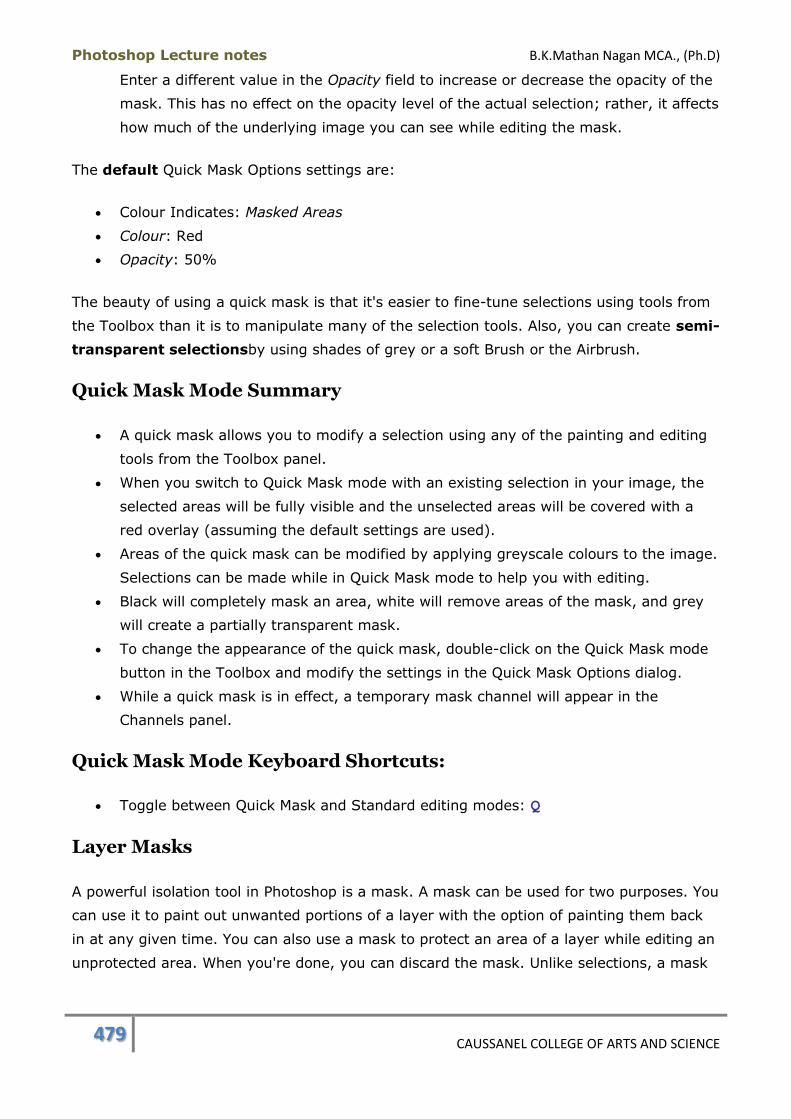
Photoshop Lecture notes B.K.Mathan Nagan MCA., (Ph.D)
479 CAUSSANEL COLLEGE OF ARTS AND SCIENCE
Enter a different value in the Opacity field to increase or decrease the opacity of the
mask. This has no effect on the opacity level of the actual selection; rather, it affects
how much of the underlying image you can see while editing the mask.
The default Quick Mask Options settings are:
Colour Indicates: Masked Areas
Colour: Red
Opacity: 50%
The beauty of using a quick mask is that it's easier to fine-tune selections using tools from
the Toolbox than it is to manipulate many of the selection tools. Also, you can create semi-
transparent selectionsby using shades of grey or a soft Brush or the Airbrush.
Quick Mask Mode Summary
A quick mask allows you to modify a selection using any of the painting and editing
tools from the Toolbox panel.
When you switch to Quick Mask mode with an existing selection in your image, the
selected areas will be fully visible and the unselected areas will be covered with a
red overlay (assuming the default settings are used).
Areas of the quick mask can be modified by applying greyscale colours to the image.
Selections can be made while in Quick Mask mode to help you with editing.
Black will completely mask an area, white will remove areas of the mask, and grey
will create a partially transparent mask.
To change the appearance of the quick mask, double-click on the Quick Mask mode
button in the Toolbox and modify the settings in the Quick Mask Options dialog.
While a quick mask is in effect, a temporary mask channel will appear in the
Channels panel.
Quick Mask Mode Keyboard Shortcuts:
Toggle between Quick Mask and Standard editing modes: Q
Layer Masks
A powerful isolation tool in Photoshop is a mask. A mask can be used for two purposes. You
can use it to paint out unwanted portions of a layer with the option of painting them back
in at any given time. You can also use a mask to protect an area of a layer while editing an
unprotected area. When you're done, you can discard the mask. Unlike selections, a mask

Photoshop Lecture notes B.K.Mathan Nagan MCA., (Ph.D)
480 CAUSSANEL COLLEGE OF ARTS AND SCIENCE
can be saved with the file. You can close a file part of the way through an editing job and
when you come back to it, you can pick up right where you left off.
Probably the best way to learn about masks is to do an exercise as we
explain them. You'll need cloud.jpg that you used in the Airbrush exercise in the Painting
module as well as this tiger image.
Practice Exercise: Using a Mask to Create a Composite Image
In this exercise we're going to use a mask to blend the cloud and tiger images to come up
with the surreal composite below.
1. Open cloud.jpg that you downloaded in a previous exercise. Use the Save
As command to save it as masked_tiger.psd.
2. Right-click (Ctrl-click) on the tiger image (tiger.jpg) at the top of this
page and save it to your hard drive. Open that image also.
3. Drag the tiger layer into the cloud image document. Close tiger.jpg.
4. Rename the tiger layer Tiger.
5. Go to Edit > Transform > Flip Horizontal to flip the tiger.
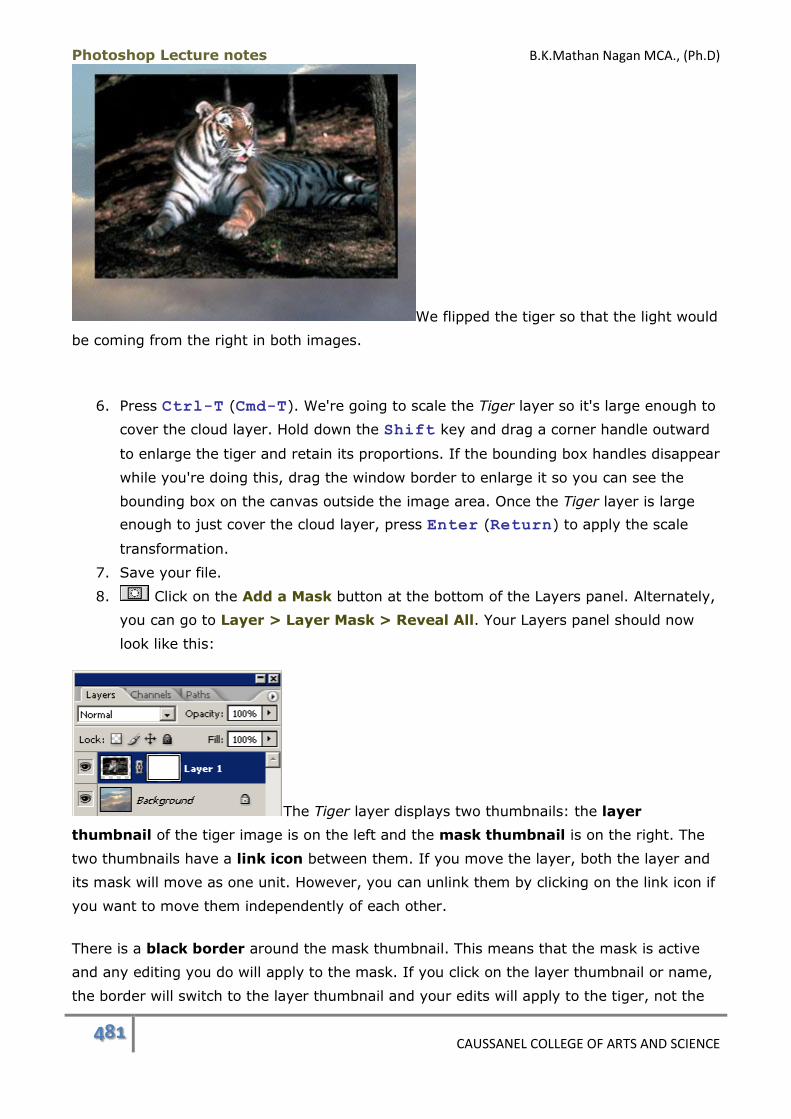
Photoshop Lecture notes B.K.Mathan Nagan MCA., (Ph.D)
481 CAUSSANEL COLLEGE OF ARTS AND SCIENCE
We flipped the tiger so that the light would
be coming from the right in both images.
6. Press Ctrl-T (Cmd-T). We're going to scale the Tiger layer so it's large enough to
cover the cloud layer. Hold down the Shift key and drag a corner handle outward
to enlarge the tiger and retain its proportions. If the bounding box handles disappear
while you're doing this, drag the window border to enlarge it so you can see the
bounding box on the canvas outside the image area. Once the Tiger layer is large
enough to just cover the cloud layer, press Enter (Return) to apply the scale
transformation.
7. Save your file.
8. Click on the Add a Mask button at the bottom of the Layers panel. Alternately,
you can go to Layer > Layer Mask > Reveal All. Your Layers panel should now
look like this:
The Tiger layer displays two thumbnails: the layer
thumbnail of the tiger image is on the left and the mask thumbnail is on the right. The
two thumbnails have a link icon between them. If you move the layer, both the layer and
its mask will move as one unit. However, you can unlink them by clicking on the link icon if
you want to move them independently of each other.
There is a black border around the mask thumbnail. This means that the mask is active
and any editing you do will apply to the mask. If you click on the layer thumbnail or name,
the border will switch to the layer thumbnail and your edits will apply to the tiger, not the

Photoshop Lecture notes B.K.Mathan Nagan MCA., (Ph.D)
482 CAUSSANEL COLLEGE OF ARTS AND SCIENCE
mask. To switch back to editing the mask, click on the mask thumbnail.
9. Make sure the mask thumbnail is active. Just like Quick Mask mode, the foreground
and background colours will be confined to the greyscale palette when you're
editing a mask.
10. In order to see what we're about to do, change the Opacity of the Tiger layer to
50%. You should be able to see the outline of the clouds now.
11. Select the Brush tool and set the following options:
o Brush: Soft Round 65 pixels
o Mode: Normal
o Opacity: 100%
o Wet Edges: Off
12. Set the foreground colour to black and drag the Brush over the cloud area as
pictured below. Don't worry about being too precise at this point. The idea here is to
reveal the clouds. We'll fine-tune it later.
What you've done is mask the top layer by
painting on it with black to reveal the underlying cloud layer. The beauty of masks is that
you can add back areas you've 'erased' by painting with white. Greys will produce semi-
transparent areas, which is what's happening with the soft edges of the brush.
13. Now that you've roughly defined the clouds, increase the Opacity of the Tiger layer
to 100%.

Photoshop Lecture notes B.K.Mathan Nagan MCA., (Ph.D)
483 CAUSSANEL COLLEGE OF ARTS AND SCIENCE
14. Choose a smaller brush size and refine
your mask around the tiger and the edges of the clouds. Useblack to remove from
the Tiger layer and white to add it back in. Remember that you can use the
keyboard shortcut X to quickly switch the foreground and background colours. If you
want to create a misty effect in areas, choose a large brush and reduce the opacity.
Smaller brushes and higher opacity will create more clearly defined edges.
15. Save your file again.
16. Set your Brush options as follows:
o Brush: Soft Round 65 pixels
o Mode: Normal
o Opacity: 100%
o Wet Edges: Off
17. Select a medium grey as the foreground colour. We used #999999.
18. Paint over the sky area behind the tiger.
Grey will partially remove the mask, leaving a midnight blue sky. Leave the ground
area and trees behind the tiger intact.
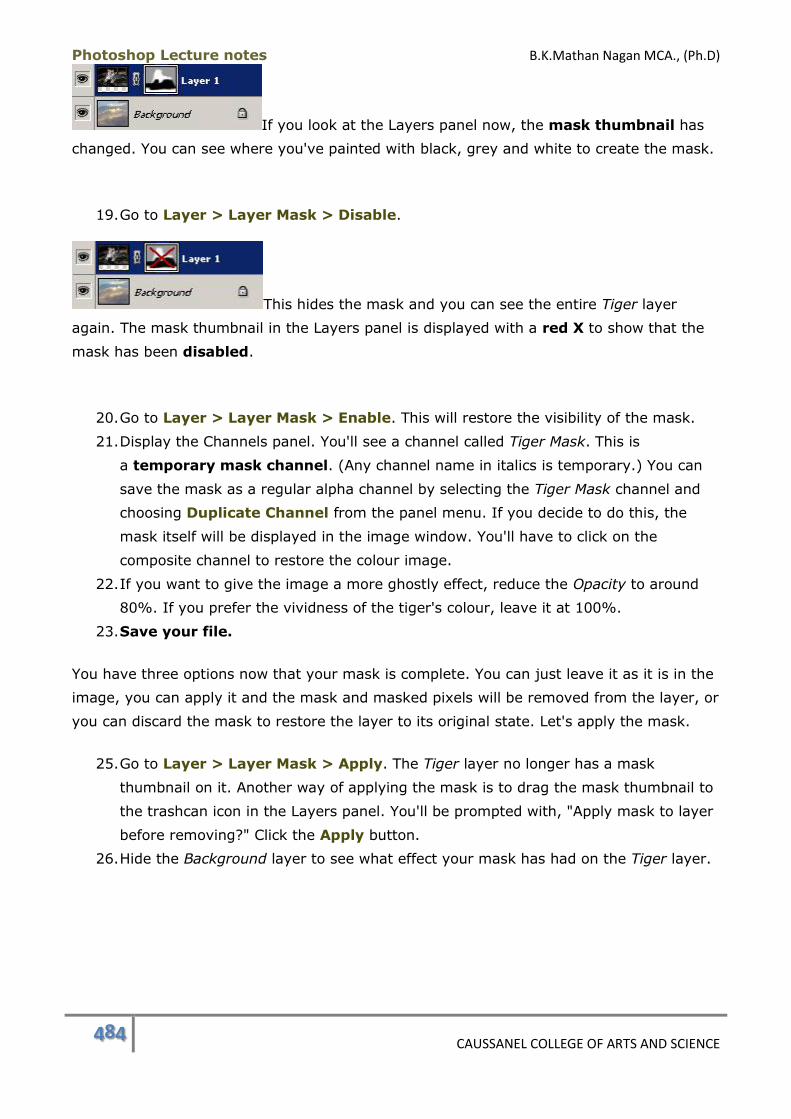
Photoshop Lecture notes B.K.Mathan Nagan MCA., (Ph.D)
484 CAUSSANEL COLLEGE OF ARTS AND SCIENCE
If you look at the Layers panel now, the mask thumbnail has
changed. You can see where you've painted with black, grey and white to create the mask.
19. Go to Layer > Layer Mask > Disable.
This hides the mask and you can see the entire Tiger layer
again. The mask thumbnail in the Layers panel is displayed with a red X to show that the
mask has been disabled.
20. Go to Layer > Layer Mask > Enable. This will restore the visibility of the mask.
21. Display the Channels panel. You'll see a channel called Tiger Mask. This is
a temporary mask channel. (Any channel name in italics is temporary.) You can
save the mask as a regular alpha channel by selecting the Tiger Mask channel and
choosing Duplicate Channel from the panel menu. If you decide to do this, the
mask itself will be displayed in the image window. You'll have to click on the
composite channel to restore the colour image.
22. If you want to give the image a more ghostly effect, reduce the Opacity to around
80%. If you prefer the vividness of the tiger's colour, leave it at 100%.
23. Save your file.
You have three options now that your mask is complete. You can just leave it as it is in the
image, you can apply it and the mask and masked pixels will be removed from the layer, or
you can discard the mask to restore the layer to its original state. Let's apply the mask.
25. Go to Layer > Layer Mask > Apply. The Tiger layer no longer has a mask
thumbnail on it. Another way of applying the mask is to drag the mask thumbnail to
the trashcan icon in the Layers panel. You'll be prompted with, "Apply mask to layer
before removing?" Click the Apply button.
26. Hide the Background layer to see what effect your mask has had on the Tiger layer.
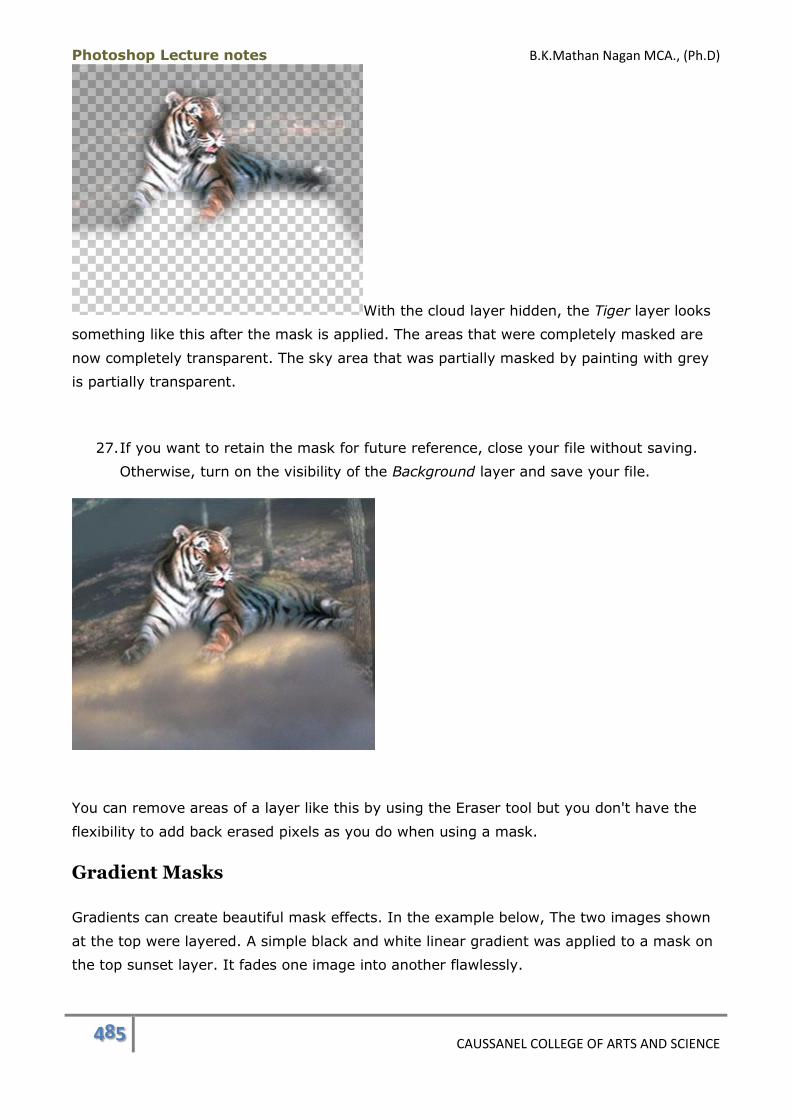
Photoshop Lecture notes B.K.Mathan Nagan MCA., (Ph.D)
485 CAUSSANEL COLLEGE OF ARTS AND SCIENCE
With the cloud layer hidden, the Tiger layer looks
something like this after the mask is applied. The areas that were completely masked are
now completely transparent. The sky area that was partially masked by painting with grey
is partially transparent.
27. If you want to retain the mask for future reference, close your file without saving.
Otherwise, turn on the visibility of the Background layer and save your file.
You can remove areas of a layer like this by using the Eraser tool but you don't have the
flexibility to add back erased pixels as you do when using a mask.
Gradient Masks
Gradients can create beautiful mask effects. In the example below, The two images shown
at the top were layered. A simple black and white linear gradient was applied to a mask on
the top sunset layer. It fades one image into another flawlessly.

Photoshop Lecture notes B.K.Mathan Nagan MCA., (Ph.D)
486 CAUSSANEL COLLEGE OF ARTS AND SCIENCE
Here's another example where a feathered oval selection was used on the mask layer to
create a soft vignette around the image.
Here are the specifics for masking:
Adding a Layer Mask

Photoshop Lecture notes B.K.Mathan Nagan MCA., (Ph.D)
487 CAUSSANEL COLLEGE OF ARTS AND SCIENCE
A mask can be applied to a layer or layer group. Background layers cannot be
masked. When adding a mask, you can start with the layer completely masked or
unmasked. If a selection is in effect, you can choose to have the selected area masked or
unmasked. These options are described below.
To Reveal All of the Mask Layer
1. Remove any selections.
2. Select the layer or layer group you want to mask.
3. Do one of the following:
o Click on the Add a Mask button at the bottom of the Layers panel.
o Go to Layer > Layer Mask > Reveal All.
4. The entire layer will be visible and the mask thumbnail will be white.
To Hide All of the Mask Layer
1. Remove any selections.
2. Select the layer or layer group you want to mask.
3. Do one of the following:
o Alt-click (Option-click) the Add a Mask button at the bottom of
the Layers panel.
o Go to Layer > Layer Mask > Hide All.
4. The entire layer will be hidden and the mask thumbnail will be black.
To Hide or Reveal a Selection
1. Create a selection of the area you want to mask.
2. Select the layer you want to mask.
3. Go to Layer > Layer Mask and select either Reveal Selection or Hide
Selection from the submenu. Clicking the Add a Mask button in the Layers panel
will reveal the selection.
Editing a Layer Mask
1. Make sure the mask thumbnail is selected so you don't inadvertently paint on the
image. A black border will outline the active thumbnail.
2. Use any of the painting, editing or selection tools.
o To add to the mask and hide the masked layer, paint with black.
o To subtract from the mask and reveal the masked layer, paint with white.
o To create partial transparency on the mask layer, paint with grey.

Photoshop Lecture notes B.K.Mathan Nagan MCA., (Ph.D)
488 CAUSSANEL COLLEGE OF ARTS AND SCIENCE
Showing/Hiding a Layer Mask
Hide a Mask
Do one of the following:
Go to Layer > Layer Mask > Disable.
Shift-click on the mask thumbnail.
Show a Mask
Do one of the following:
Go to Layer > Layer Mask > Enable.
Shift-click on the mask thumbnail.
Applying and Discarding Masks
1. Click the mask thumbnail.
2. Do one of the following:
o Click on the trashcan icon in the Layers panel.
o Drag the mask thumbnail to the trashcan icon.
o Go to Layer > Layer Mask > Apply.
3. Click the Apply button to combine the mask with the layer, leaving areas of
transparency or partial transparency. Click the Delete button to remove the mask
and restore the layer along with any changes you made to the layer pixels while it
was masked.
Layer Masks Summary
A masked layer displays a layer thumbnail and a mask thumbnail.
The thumbnails are linked when the link icon is displayed between them. You can
click the link icon to break the link and move the layer and its mask separately.
The active thumbnail will display a black border around it. When the mask is active,
only greyscale colours will be available for painting.
Black paint hides the masked layer, white reveals it and grey will make it partially
transparent.
The mask can be edited using any of the painting, editing or selection tools.
When a mask is applied, it will be combined with the layer pixels, leaving areas of
transparency or partial transparency.
Photoshop Lecture notes B.K.Mathan Nagan MCA., (Ph.D)
489 CAUSSANEL COLLEGE OF ARTS AND SCIENCE
When a mask is discarded, it will be removed from the layer and the areas it masked
will reappear.
Type
Overview
This module covers various options for creating, formatting and editing type (text).
Here is a summary of the topics in this module:
(1) About Type
This is a brief lecture about what type is and how type layers can be rasterized.
(2) Type Options
There four variations of the Type tool that create type vectors or type selections and
set them up in a horizontal or vertical orientation. These options are displayed in the
Tool Options bar along with other options.
(3) Creating Type
This lecture teaches the basics of creating type and defines point type and
paragraph type.
(4) Formatting Characters
The Character panel is used to apply formatting to characters. These options include
font family, font style, font size, leading, kerning, and tracking.
(5) Formatting Paragraphs
Paragraphs can be formatted using the Paragraph panel. Formatting options include
alignment, justification, hyphenation rules, indentation and spacing between
paragraphs.
(6) Editing Type
This lecture covers checking spelling and using the Find and Replace command.
Type
About Type
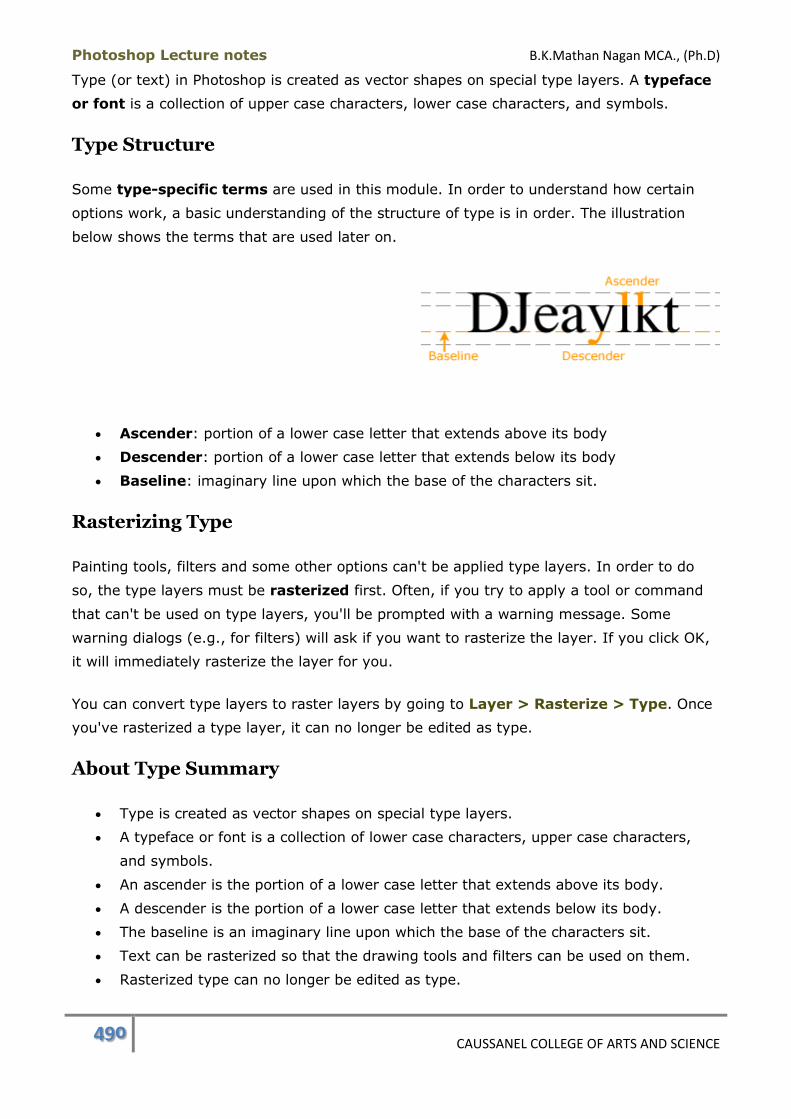
Photoshop Lecture notes B.K.Mathan Nagan MCA., (Ph.D)
490 CAUSSANEL COLLEGE OF ARTS AND SCIENCE
Type (or text) in Photoshop is created as vector shapes on special type layers. A typeface
or font is a collection of upper case characters, lower case characters, and symbols.
Type Structure
Some type-specific terms are used in this module. In order to understand how certain
options work, a basic understanding of the structure of type is in order. The illustration
below shows the terms that are used later on.
Ascender: portion of a lower case letter that extends above its body
Descender: portion of a lower case letter that extends below its body
Baseline: imaginary line upon which the base of the characters sit.
Rasterizing Type
Painting tools, filters and some other options can't be applied type layers. In order to do
so, the type layers must be rasterized first. Often, if you try to apply a tool or command
that can't be used on type layers, you'll be prompted with a warning message. Some
warning dialogs (e.g., for filters) will ask if you want to rasterize the layer. If you click OK,
it will immediately rasterize the layer for you.
You can convert type layers to raster layers by going to Layer > Rasterize > Type. Once
you've rasterized a type layer, it can no longer be edited as type.
About Type Summary
Type is created as vector shapes on special type layers.
A typeface or font is a collection of lower case characters, upper case characters,
and symbols.
An ascender is the portion of a lower case letter that extends above its body.
A descender is the portion of a lower case letter that extends below its body.
The baseline is an imaginary line upon which the base of the characters sit.
Text can be rasterized so that the drawing tools and filters can be used on them.
Rasterized type can no longer be edited as type.

Photoshop Lecture notes B.K.Mathan Nagan MCA., (Ph.D)
491 CAUSSANEL COLLEGE OF ARTS AND SCIENCE
Type Options
There are numerous options for setting up and formatting type. In this lecture, we'll look at
the basic options contained in the Tool Options bar when the Type tool is selected.
Type Tool Variations
The Type tool has a keyboard shortcut of T. There are four variations of the Type tool:
Horizontal Type
Vertical Type
Horizontal Type Mask
Vertical Type Mask
The first two variations create vector type on separate type layers. (However, if the image
is in Multichannel, Bitmap or Index Colour mode, the type will be added to the background
because layers aren't supported in those colour spaces.) The mask variations
create selections of the shape of the text on the current layer. These selections can be
moved, filled, stroked, and saved as channels.
The variations appear in a fly-out menu that is displayed
when you hold the mouse button down on the Type tool.
Font Family
The Font Family pop-up menu is located in the Tool Options bar.
Font Style

Photoshop Lecture notes B.K.Mathan Nagan MCA., (Ph.D)
492 CAUSSANEL COLLEGE OF ARTS AND SCIENCE
This pop-up lets you select from the styles available for the chosen font family.
Examples of styles are: bold, italic, demi, book, oblique. If the pop-up control button is
greyed out and Regular is displayed, there are no styles built into the font you've chosen.
Font Size
The font size can be selected from the list of preset sizes or you can type a
value into the text entry field.
Anti-aliasing
This setting determines how anti-aliasing will be applied to the type.
This image has been magnified by 200% to show the different effects of the anti-aliasing
options. Most fonts display poorly if no anti-aliasing is applied (None option) but Verdana
Regular is one that can be used successfully. Crisp can tend to apply a blocky look, as
shown here. While not apparent in this example, Strong usually creates more bold
colouring. It's quite useful when using small, light text against a dark background.
Otherwise, the other anti-aliasing options tends to blur light text too much for it to be
readable.
The effects of anti-aliasing will vary depending on the font family, style and size you use.
Alignment
Photoshop Lecture notes B.K.Mathan Nagan MCA., (Ph.D)
493 CAUSSANEL COLLEGE OF ARTS AND SCIENCE
This setting determines if text will be aligned against the right margin, centred,
or left margin.
Colour
This colour well is linked to the foreground colour displayed in the Toolbox. You can
set the text colour using either of these controls. Changing the colour in one control
will automatically change it in the other.
Warped Text
Clicking on this button opens the Warp Text dialog. It contains 15 styles plus settings
that let you customize each style. The Warped Text effect is applied after text has
been created. View examplesof the different Warped Text effects.
Type Options Summary
There are four variations of the Type tool: Horizontal Type, Vertical Type, Horizontal
Type Mask, and Vertical Type Mask.
The Horizontal and Vertical Type tools create vector shapes on special type layers.
The Type Mask tools let you create type in a quick mask which is then converted to
selections.
Commonly used options such as font family, font style, font size, colour and
alignment are located in the Tool Options bar.
There are several settings you can choose from for anti-aliasing type including None
which removes anti-aliasing.
The Warp Text option lets you create special effects with type.
Type Options Keyboard Shortcuts:
Type tool: T
Creating Type
Type is added to an image by using the Type tool. Type can be set up as point or
paragraph type. First we'll go over the basic steps for creating type and then we'll cover the
differences between point and paragraph type.
The keyboard shortcut for the Type tool is T.
Basic Steps for Creating Type
Photoshop Lecture notes B.K.Mathan Nagan MCA., (Ph.D)
494 CAUSSANEL COLLEGE OF ARTS AND SCIENCE
1. Click on the Type tool.
2. Select horizontal or vertical orientation for the type. In Photoshop 6.0 these options
are on the Tool Options bar. In 7.0 they are located in the fly-out menu for the tool.
3. Click in the image to begin. The cursor will change to an I-beam. The small
horizontal line through the I-beam indicates where the baseline of the type will be
placed. The baseline is where the bottom of the characters rest (not counting
descenders).
4. Set type options such as font family and colour now, if desired.
5. Begin typing. To start a new line press the Enter (Return) key.
6. When you're finished, click the Commit button.
Commit and Cancel
As soon as you click inside an image with the Type tool, you are in text editing mode and
can't access many of the menu commands until you either click
the Commit or Cancel button to exit from text editing. The images shown here represent
the Commit and Cancel buttons. These buttons are only displayed in the Tool Options bar
when you're in text editing mode. If you try to close a document or quit the program while
in text editing mode, a dialog will prompt you with "Commit the type layer edits before
closing?" The choices are Commit, Cancel, and Discard. Alternate ways to Commit are:
Press the Enter key on the numeric keypad.
Click on another tool in the Toolbox or in the Layers, Channels, Paths, Actions,
History, or Styles panels.
Type Layers
Once you click in an image with the Type tool a type layer is created in the Layers panel.
The thumbnail of the letter T signifies a type layer. The text that you type will appear as
the layer name.
Point Type

Photoshop Lecture notes B.K.Mathan Nagan MCA., (Ph.D)
495 CAUSSANEL COLLEGE OF ARTS AND SCIENCE
Point type doesn't have a bounding box and, therefore, doesn't wrap automatically. The
line length will continue until you stop typing or press the Enter (Return) key to force a
line break.
Point type is created when you begin by clicking with the Type tool in the image.
Paragraph Type
Paragraph type is confined within a bounding box and text
willautomatically wrap when the type reaches the right
edge of the bounding box. To create paragraph type, drag in
the image with the Type tool to define a rectangular area for
the type block, as shown here. When you release the mouse
button, handles will appear on the corners and each side of
the bounding box.
Dragging the handles will scale the box and the text will reflow inside to fit the new
dimensions. If you hold the cursor outside the perimeter of the box, the cursor will become
a curved arrow icon. You canrotate the bounding box along with the type inside it by
dragging. It will rotate around the centre point which is also represented by an icon. You
can drag the centre point to another location, even one outside the bounding box.
If too much text is entered in the bounding box, it will
overflow. This means that it will disappear from view at
the bottom of the box. This diagram shows how the
bottom right scaling handle will change to theOverflow
icon when type has exceeded the limits of the bounding
box. To correct this, either delete some type, use a
smaller font size, or enlarge the bounding box.
Creating Type Selections/Masks
1. Select or create a layer on which you want to place your text selection.
2. Select the Horizontal Type Mask Tool or the Vertical Type Mask Tool.
3. Set the font family, font style, font size and any other type options.
4. Click in the image and begin typing. As soon as you do, the image will
switch to thered mask overlay and the characters you type will
remove areas from the mask. This is the same behaviour you saw
when working with quick masks. While you are in this mode, you can
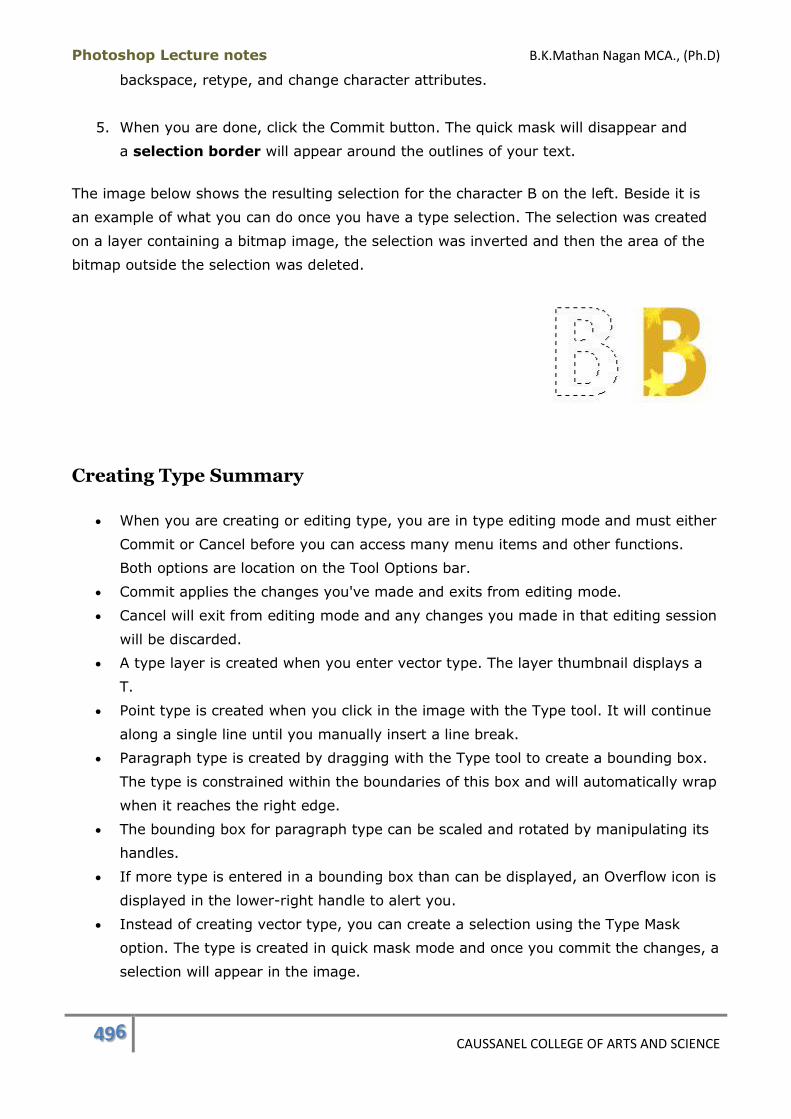
Photoshop Lecture notes B.K.Mathan Nagan MCA., (Ph.D)
496 CAUSSANEL COLLEGE OF ARTS AND SCIENCE
backspace, retype, and change character attributes.
5. When you are done, click the Commit button. The quick mask will disappear and
a selection border will appear around the outlines of your text.
The image below shows the resulting selection for the character B on the left. Beside it is
an example of what you can do once you have a type selection. The selection was created
on a layer containing a bitmap image, the selection was inverted and then the area of the
bitmap outside the selection was deleted.
Creating Type Summary
When you are creating or editing type, you are in type editing mode and must either
Commit or Cancel before you can access many menu items and other functions.
Both options are location on the Tool Options bar.
Commit applies the changes you've made and exits from editing mode.
Cancel will exit from editing mode and any changes you made in that editing session
will be discarded.
A type layer is created when you enter vector type. The layer thumbnail displays a
T.
Point type is created when you click in the image with the Type tool. It will continue
along a single line until you manually insert a line break.
Paragraph type is created by dragging with the Type tool to create a bounding box.
The type is constrained within the boundaries of this box and will automatically wrap
when it reaches the right edge.
The bounding box for paragraph type can be scaled and rotated by manipulating its
handles.
If more type is entered in a bounding box than can be displayed, an Overflow icon is
displayed in the lower-right handle to alert you.
Instead of creating vector type, you can create a selection using the Type Mask
option. The type is created in quick mask mode and once you commit the changes, a
selection will appear in the image.
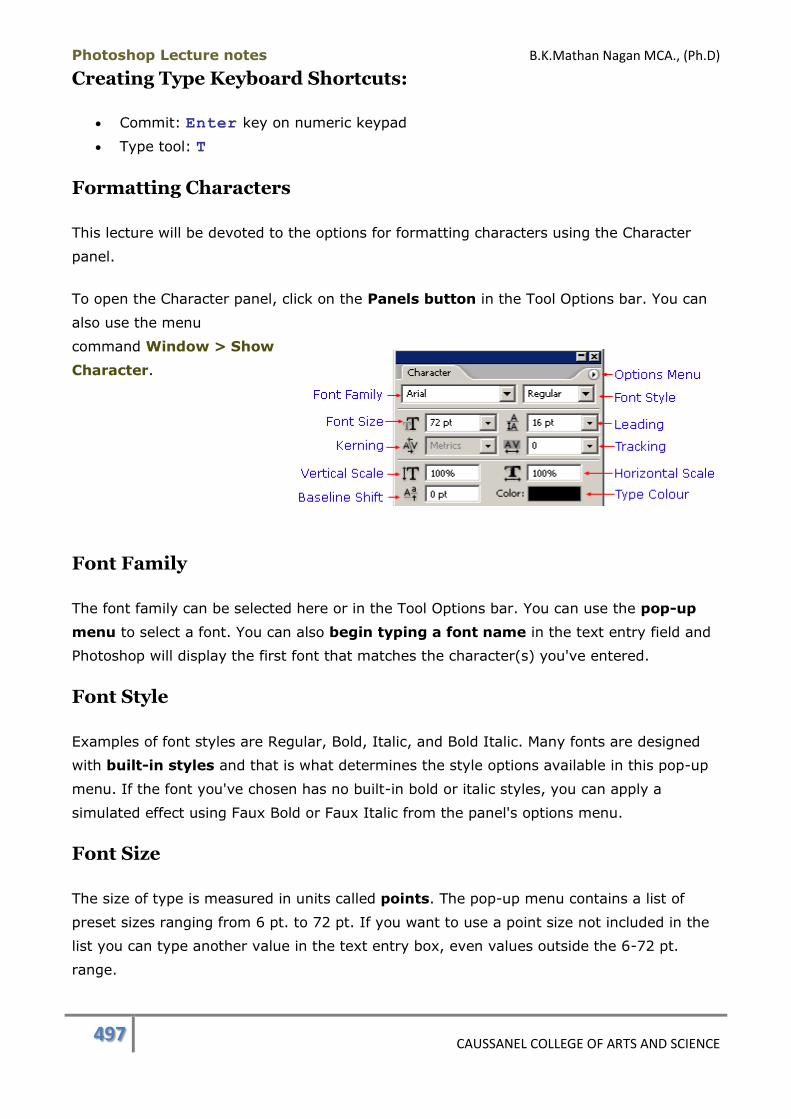
Photoshop Lecture notes B.K.Mathan Nagan MCA., (Ph.D)
497 CAUSSANEL COLLEGE OF ARTS AND SCIENCE
Creating Type Keyboard Shortcuts:
Commit: Enter key on numeric keypad
Type tool: T
Formatting Characters
This lecture will be devoted to the options for formatting characters using the Character
panel.
To open the Character panel, click on the Panels button in the Tool Options bar. You can
also use the menu
command Window > Show
Character.
Font Family
The font family can be selected here or in the Tool Options bar. You can use the pop-up
menu to select a font. You can also begin typing a font name in the text entry field and
Photoshop will display the first font that matches the character(s) you've entered.
Font Style
Examples of font styles are Regular, Bold, Italic, and Bold Italic. Many fonts are designed
with built-in styles and that is what determines the style options available in this pop-up
menu. If the font you've chosen has no built-in bold or italic styles, you can apply a
simulated effect using Faux Bold or Faux Italic from the panel's options menu.
Font Size
The size of type is measured in units called points. The pop-up menu contains a list of
preset sizes ranging from 6 pt. to 72 pt. If you want to use a point size not included in the
list you can type another value in the text entry box, even values outside the 6-72 pt.
range.
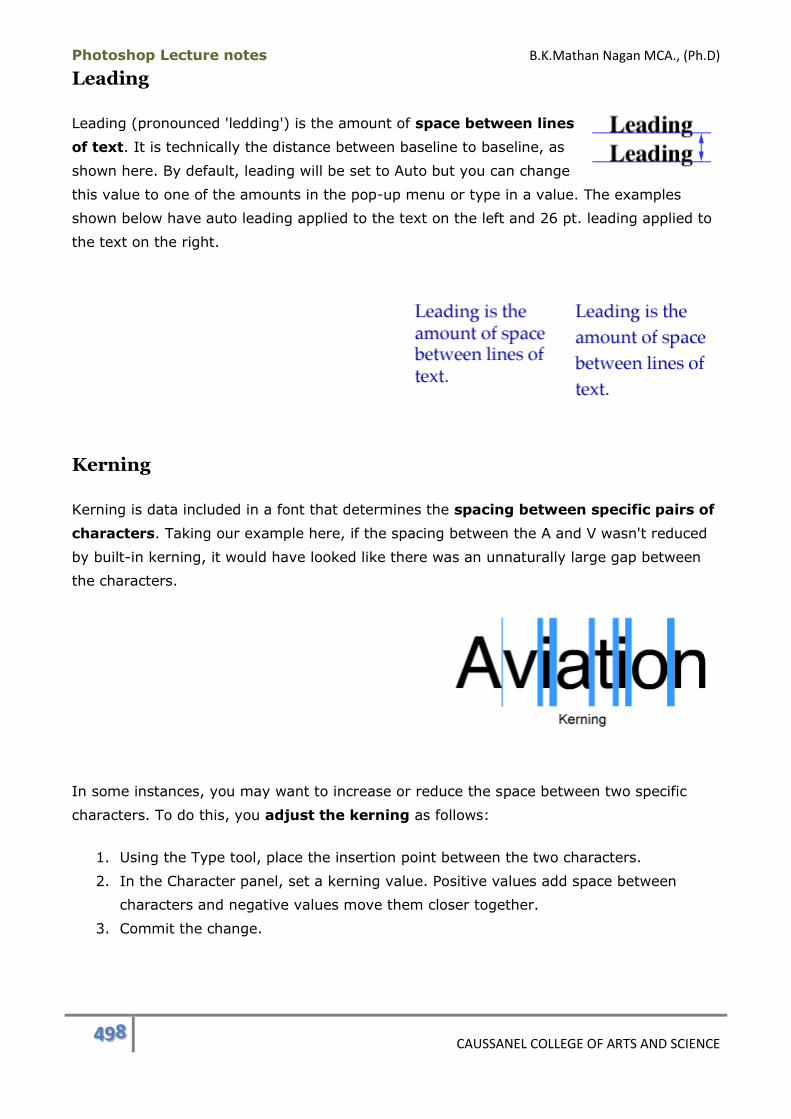
Photoshop Lecture notes B.K.Mathan Nagan MCA., (Ph.D)
498 CAUSSANEL COLLEGE OF ARTS AND SCIENCE
Leading
Leading (pronounced 'ledding') is the amount of space between lines
of text. It is technically the distance between baseline to baseline, as
shown here. By default, leading will be set to Auto but you can change
this value to one of the amounts in the pop-up menu or type in a value. The examples
shown below have auto leading applied to the text on the left and 26 pt. leading applied to
the text on the right.
Kerning
Kerning is data included in a font that determines the spacing between specific pairs of
characters. Taking our example here, if the spacing between the A and V wasn't reduced
by built-in kerning, it would have looked like there was an unnaturally large gap between
the characters.
In some instances, you may want to increase or reduce the space between two specific
characters. To do this, you adjust the kerning as follows:
1. Using the Type tool, place the insertion point between the two characters.
2. In the Character panel, set a kerning value. Positive values add space between
characters and negative values move them closer together.
3. Commit the change.
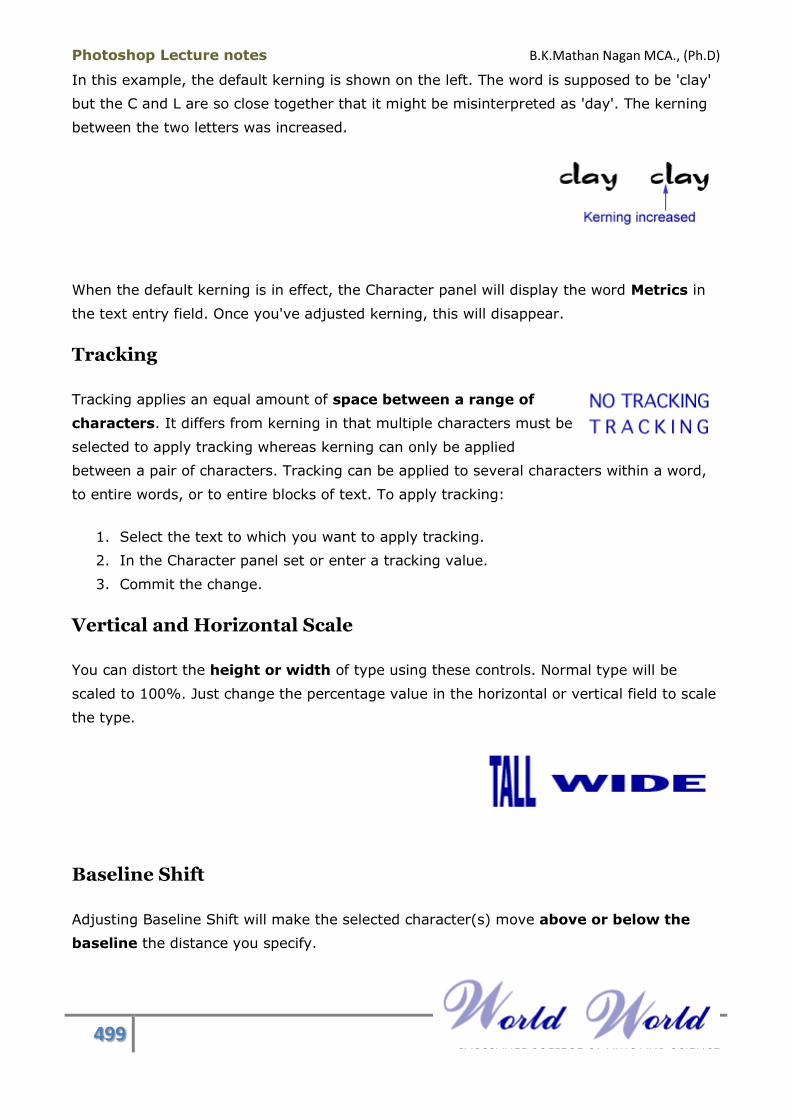
Photoshop Lecture notes B.K.Mathan Nagan MCA., (Ph.D)
499 CAUSSANEL COLLEGE OF ARTS AND SCIENCE
In this example, the default kerning is shown on the left. The word is supposed to be 'clay'
but the C and L are so close together that it might be misinterpreted as 'day'. The kerning
between the two letters was increased.
When the default kerning is in effect, the Character panel will display the word Metrics in
the text entry field. Once you've adjusted kerning, this will disappear.
Tracking
Tracking applies an equal amount of space between a range of
characters. It differs from kerning in that multiple characters must be
selected to apply tracking whereas kerning can only be applied
between a pair of characters. Tracking can be applied to several characters within a word,
to entire words, or to entire blocks of text. To apply tracking:
1. Select the text to which you want to apply tracking.
2. In the Character panel set or enter a tracking value.
3. Commit the change.
Vertical and Horizontal Scale
You can distort the height or width of type using these controls. Normal type will be
scaled to 100%. Just change the percentage value in the horizontal or vertical field to scale
the type.
Baseline Shift
Adjusting Baseline Shift will make the selected character(s) move above or below the
baseline the distance you specify.
Photoshop Lecture notes B.K.Mathan Nagan MCA., (Ph.D)
500 CAUSSANEL COLLEGE OF ARTS AND SCIENCE
Type Colour
This duplicates the colour control located in the Tool Options bar. In case you were
wondering, you can assign different colours to individual characters. In previous versions
of Photoshop, all the type in a block of text had to be the same colour.
Character Panel Options Menu
This menu has additional character formatting options.
Dock to Palette Well (Not available in Photoshop CS3)
Self-explanatory
Change Text Orientation
This option in lets you change the orientation after creating the type.
Faux Bold
If the font you're using doesn't have a bold style, you can simulate it by using Faux
Bold.
Faux Italic
If the font you're using doesn't have an italic style, you can simulate it by using
Faux Italic. Technically, it would be more accurate to call it an oblique style, which is
simply slanting the letters. True italics are a distinctly separate design from the
regular version of a font.
All Caps
Text typed in lowercase or mixed case will be converted to uppercase with this
option. You can revert back to the way you originally typed it by removing the All
Caps formatting.
Small Caps
Photoshop Lecture notes B.K.Mathan Nagan MCA., (Ph.D)
501 CAUSSANEL COLLEGE OF ARTS AND SCIENCE
This changes lowercase text to small capitals, as shown below. If a font doesn't have
small caps built into it, Photoshop will generate simulated small
caps instead.
Superscript
Characters formatted as superscript will be scaled down and raised above the
baseline.
Subscript
Characters formatted as subscript will be scaled down and moved below the
baseline.
Underline
An underline is drawn underneath horizontal type. For vertical type, the options
change to Underline Left and Underline Right. The underline will be the same colour
as the type.
Strikethrough
A line is drawn through the text and will be the same colour
as the text.
Fractional Widths
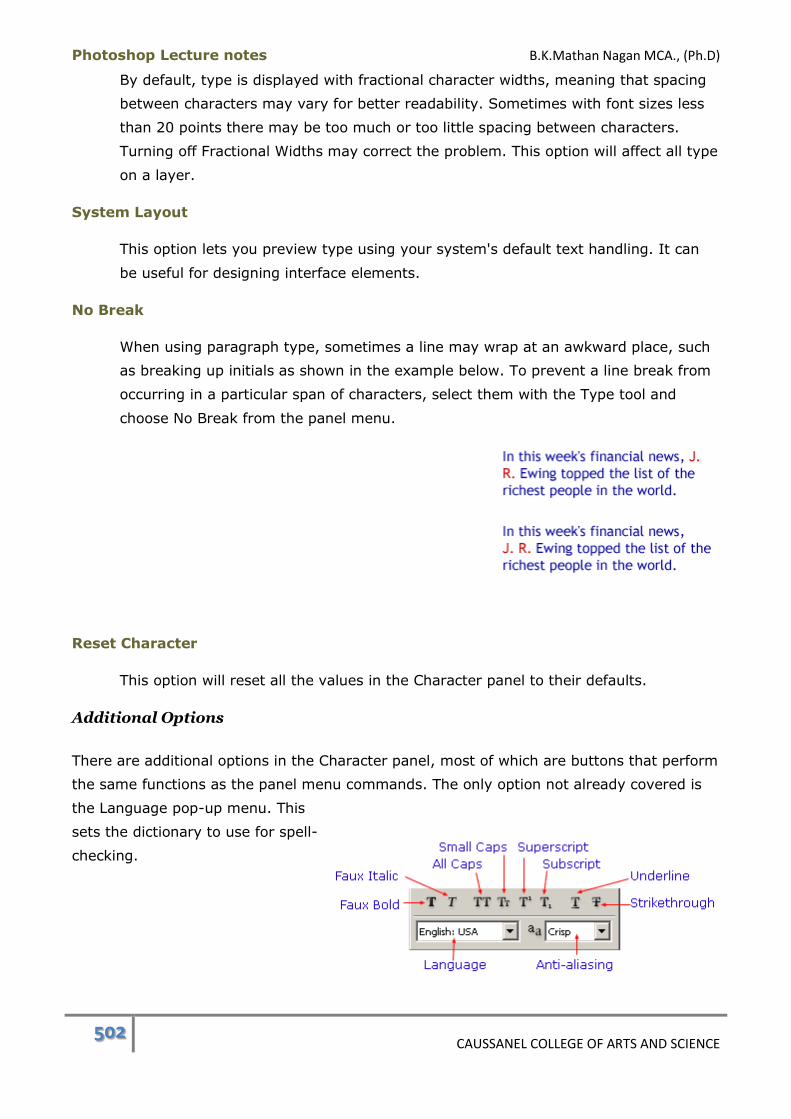
Photoshop Lecture notes B.K.Mathan Nagan MCA., (Ph.D)
502 CAUSSANEL COLLEGE OF ARTS AND SCIENCE
By default, type is displayed with fractional character widths, meaning that spacing
between characters may vary for better readability. Sometimes with font sizes less
than 20 points there may be too much or too little spacing between characters.
Turning off Fractional Widths may correct the problem. This option will affect all type
on a layer.
System Layout
This option lets you preview type using your system's default text handling. It can
be useful for designing interface elements.
No Break
When using paragraph type, sometimes a line may wrap at an awkward place, such
as breaking up initials as shown in the example below. To prevent a line break from
occurring in a particular span of characters, select them with the Type tool and
choose No Break from the panel menu.
Reset Character
This option will reset all the values in the Character panel to their defaults.
Additional Options
There are additional options in the Character panel, most of which are buttons that perform
the same functions as the panel menu commands. The only option not already covered is
the Language pop-up menu. This
sets the dictionary to use for spell-
checking.
Photoshop Lecture notes B.K.Mathan Nagan MCA., (Ph.D)
503 CAUSSANEL COLLEGE OF ARTS AND SCIENCE
Formatting Characters Summary
The Character panel is used to format type.
Leading is the amount of space between lines of text.
Kerning is a feature built into a font that determines the spacing between specific
pairs of characters.
Tracking adjusts the spacing between a range of characters.
Baseline Shift moves type above or below the baseline.
Subscript shifts type below the baseline a predetermined distance and makes the
selected character(s) smaller.
Superscript shifts type above the baseline a predetermined distance and makes the
selected character(s) smaller.
Faux Bold and Faux Italic options can be applied to fonts that don't have a built-in
bold or italic style.
Type can be converted to All Caps of Small Caps to save you from having to retype
text to achieve those effects.
The Underline option draws a line underneath the selected type while Strikethrough
draws a line through the type.
Use the No Break command to prevent a line break from occurring in a particular
span of characters.
Formatting Paragraphs
A paragraph is a range of type with a carriage return at the end. (Carriage returns are
created by pressing the Enter (Return) key.) This is not to be confused with 'paragraph
type', a term used to describe one method for creating type in Photoshop.
Paragraph type can consist of multiple paragraphs. All the point type on a layer is
considered a single paragraph even if carriage returns have been inserted.
Selecting Paragraphs
Do one of the following to select paragraphs for formatting:
Single Paragraph
Click in the paragraph with the Type tool.
Range of Paragraphs
Select all of the paragraphs to be formatted by dragging with the Type tool. The
selected type will be highlighted.

Photoshop Lecture notes B.K.Mathan Nagan MCA., (Ph.D)
504 CAUSSANEL COLLEGE OF ARTS AND SCIENCE
All Paragraphs on a Layer
With the Type tool selected, click on the type layer in the Layers panel.
Paragraph Panel
The Paragraph panel is used to apply paragraph formatting. To open it, click on the Panels
button in the Tool Options bar and click on the Paragraph tab to bring it to the front. You
can also use the menu
command Window >
Show Paragraph.
Alignment
Both point and paragraph type can be aligned. Alignment determines whether type will be
aligned to theleft edge, right edge or centre of a paragraph. Alignment can be set in the
Paragraph panel or directly from the Tool Options bar. The options for horizontal type are
shown below.
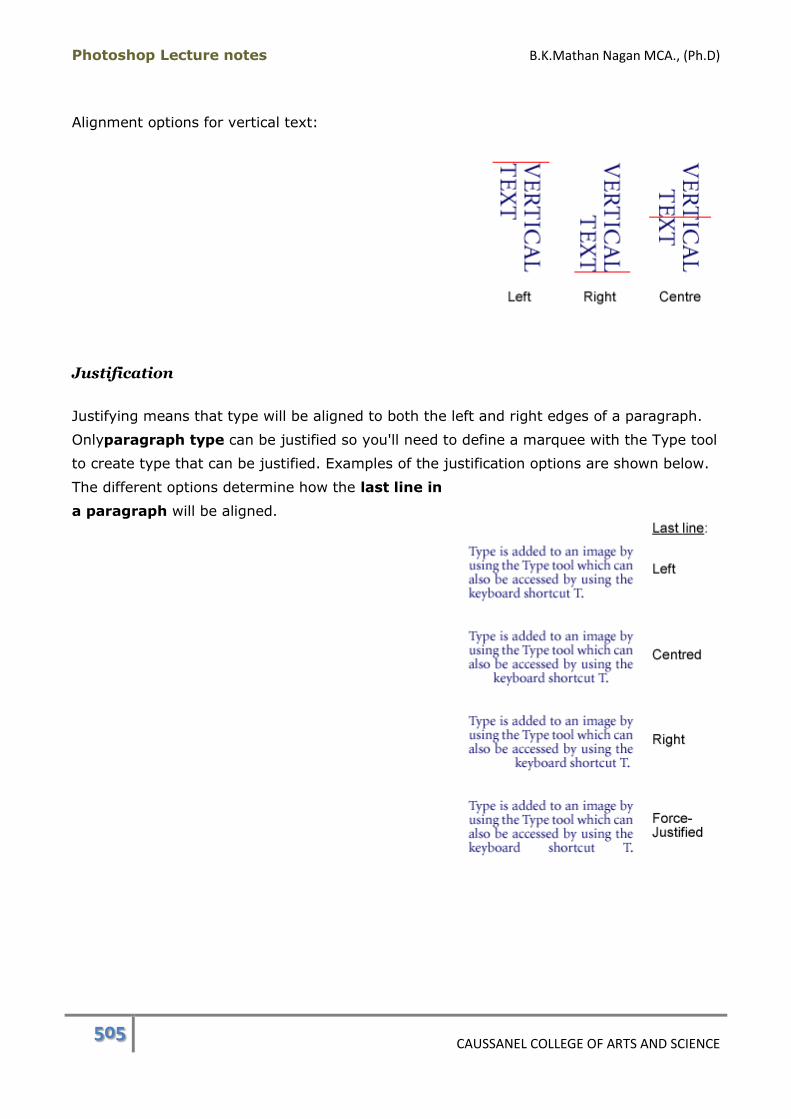
Photoshop Lecture notes B.K.Mathan Nagan MCA., (Ph.D)
505 CAUSSANEL COLLEGE OF ARTS AND SCIENCE
Alignment options for vertical text:
Justification
Justifying means that type will be aligned to both the left and right edges of a paragraph.
Onlyparagraph type can be justified so you'll need to define a marquee with the Type tool
to create type that can be justified. Examples of the justification options are shown below.
The different options determine how the last line in
a paragraph will be aligned.
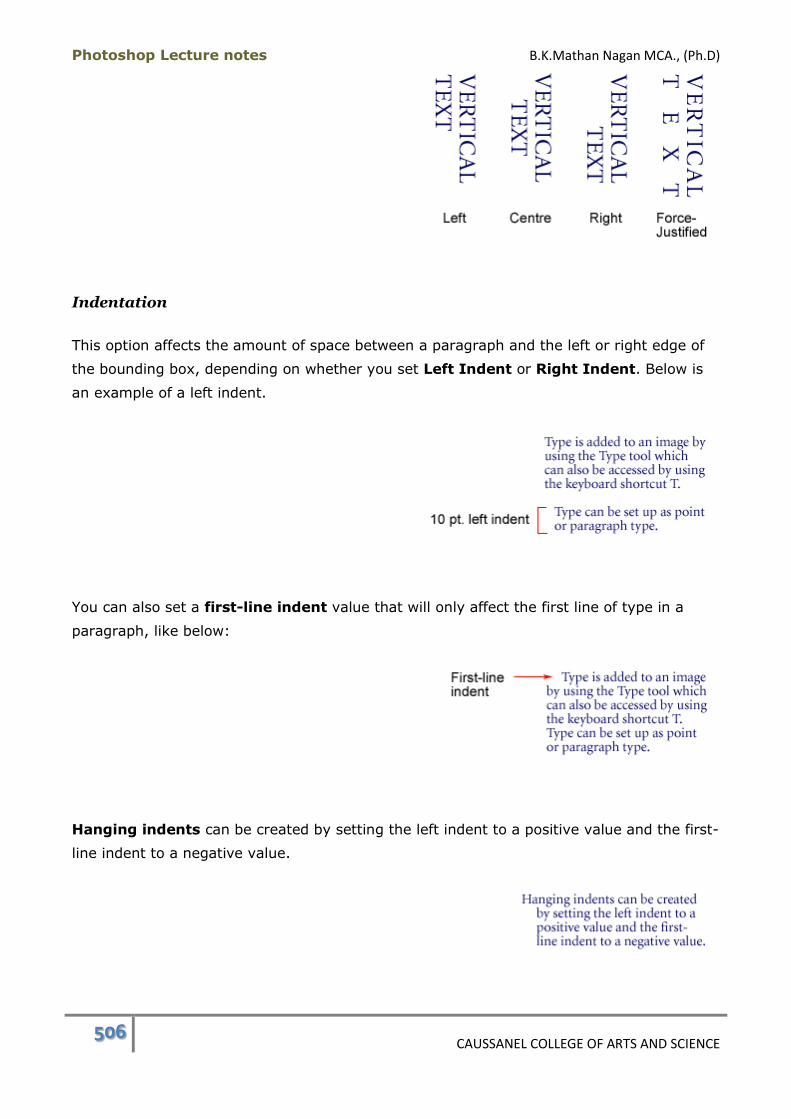
Photoshop Lecture notes B.K.Mathan Nagan MCA., (Ph.D)
506 CAUSSANEL COLLEGE OF ARTS AND SCIENCE
Indentation
This option affects the amount of space between a paragraph and the left or right edge of
the bounding box, depending on whether you set Left Indent or Right Indent. Below is
an example of a left indent.
You can also set a first-line indent value that will only affect the first line of type in a
paragraph, like below:
Hanging indents can be created by setting the left indent to a positive value and the first-
line indent to a negative value.

Photoshop Lecture notes B.K.Mathan Nagan MCA., (Ph.D)
507 CAUSSANEL COLLEGE OF ARTS AND SCIENCE
Paragraph Spacing
The two options at the bottom of the Paragraph panel are Space Before and Space After.
Space Before inserts the amount of space you specify before a paragraph. Space After does
likewise following the paragraph. You can apply either one or both of these to a single
paragraph by placing your insertion point in that paragraph or by selecting a portion or all
of the paragraph. You can also apply them to multiple paragraphs by selecting them or to
the entire active layer.
Paragraph Panel Options
The panel menu contains additional paragraph options.
Dock to Palette Well (not available in Photoshop CS3)
Docks the Paragraph panel to the palette well.
Roman Hanging Punctuation
For selected paragraphs, this forces punctuation at the right margin to extend past
the margin so all the text is flush to the margin. (Roman fonts exclude those that
use double-byte punctuation marks available in Chinese, Japanese, and Korean
fonts.)
Justification
This dialog provides options for controlling
how justification will be applied.
Hyphenation
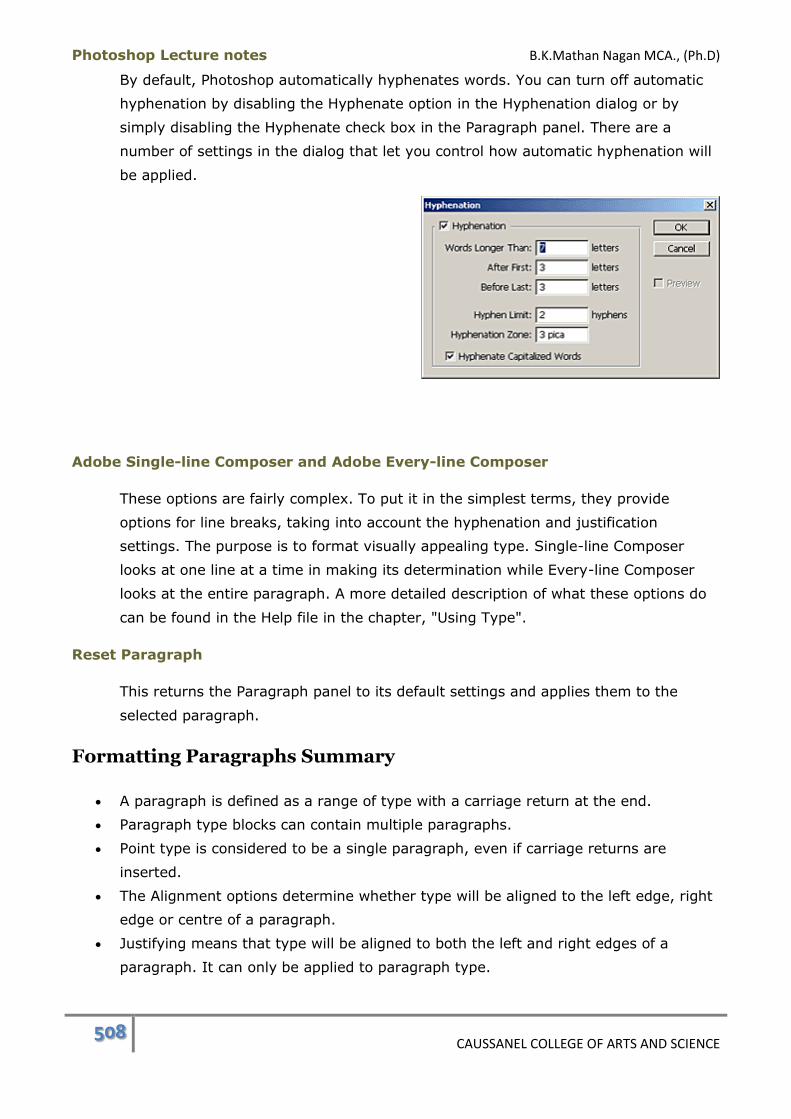
Photoshop Lecture notes B.K.Mathan Nagan MCA., (Ph.D)
508 CAUSSANEL COLLEGE OF ARTS AND SCIENCE
By default, Photoshop automatically hyphenates words. You can turn off automatic
hyphenation by disabling the Hyphenate option in the Hyphenation dialog or by
simply disabling the Hyphenate check box in the Paragraph panel. There are a
number of settings in the dialog that let you control how automatic hyphenation will
be applied.
Adobe Single-line Composer and Adobe Every-line Composer
These options are fairly complex. To put it in the simplest terms, they provide
options for line breaks, taking into account the hyphenation and justification
settings. The purpose is to format visually appealing type. Single-line Composer
looks at one line at a time in making its determination while Every-line Composer
looks at the entire paragraph. A more detailed description of what these options do
can be found in the Help file in the chapter, "Using Type".
Reset Paragraph
This returns the Paragraph panel to its default settings and applies them to the
selected paragraph.
Formatting Paragraphs Summary
A paragraph is defined as a range of type with a carriage return at the end.
Paragraph type blocks can contain multiple paragraphs.
Point type is considered to be a single paragraph, even if carriage returns are
inserted.
The Alignment options determine whether type will be aligned to the left edge, right
edge or centre of a paragraph.
Justifying means that type will be aligned to both the left and right edges of a
paragraph. It can only be applied to paragraph type.

Photoshop Lecture notes B.K.Mathan Nagan MCA., (Ph.D)
509 CAUSSANEL COLLEGE OF ARTS AND SCIENCE
The different justification options set the alignment of the last line of a justified
paragraph.
The Indent options insert spacing between the left and/or right edges of the
paragraph and the edge of the bounding box.
Additional vertical spacing between paragraphs can be inserted by using the Space
Before and Space After options.
Roman Hanging Punctuation forces punctuation at the right margin to extend past
the margin so all the text is flush to the margin.
The handling of hyphenation and justification can be controlled with the settings in
their respective dialogs, accessible from the panel menu.
Automatic hyphenation can be turned off.
Using the Reset Paragraph option will restore the default paragraph settings in the
Paragraph panel and the defaults will be applied to any selected paragraphs.
Formatting Paragraphs Keyboard Shortcuts:
Carriage return: Enter (Return)
Editing Type
Photoshop provides two features to help you with the accuracy of your text: the Check
Spellingcommand and Find and Replace command.
Checking Spelling
You can check the spelling of individual words, selected blocks of text, all text on a layer or
text on every layer.
1. Select your language of choice from the pop-up menu in the Character panel. This
determines the dictionary that Photoshop will use when performing the spelling
check.
2. To specify the text you want to spell check:
o One word: place insertion point in the word.
o Block of text: select the text.
o One layer: click on the text layer.
o All layers: no selection required.
3. Go to Edit > Check Spelling. The Check Spelling dialog will open if any errors are
encountered.
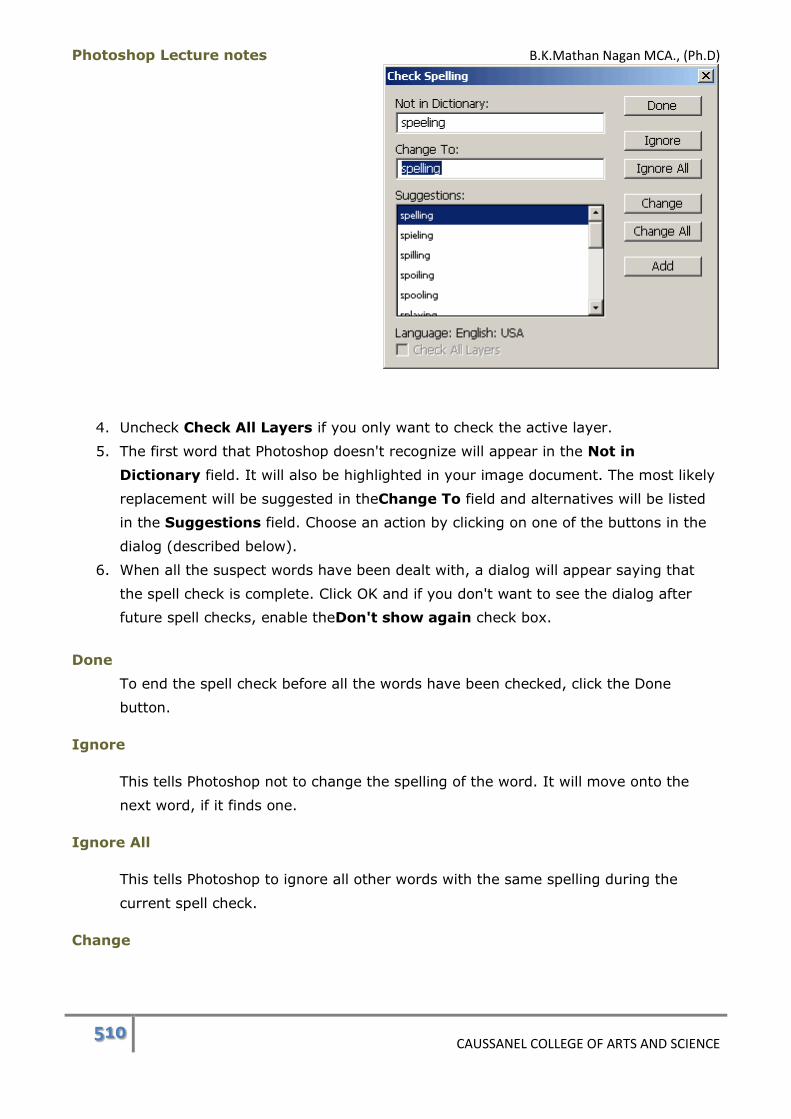
Photoshop Lecture notes B.K.Mathan Nagan MCA., (Ph.D)
510 CAUSSANEL COLLEGE OF ARTS AND SCIENCE
4. Uncheck Check All Layers if you only want to check the active layer.
5. The first word that Photoshop doesn't recognize will appear in the Not in
Dictionary field. It will also be highlighted in your image document. The most likely
replacement will be suggested in theChange To field and alternatives will be listed
in the Suggestions field. Choose an action by clicking on one of the buttons in the
dialog (described below).
6. When all the suspect words have been dealt with, a dialog will appear saying that
the spell check is complete. Click OK and if you don't want to see the dialog after
future spell checks, enable theDon't show again check box.
Done
To end the spell check before all the words have been checked, click the Done
button.
Ignore
This tells Photoshop not to change the spelling of the word. It will move onto the
next word, if it finds one.
Ignore All
This tells Photoshop to ignore all other words with the same spelling during the
current spell check.
Change
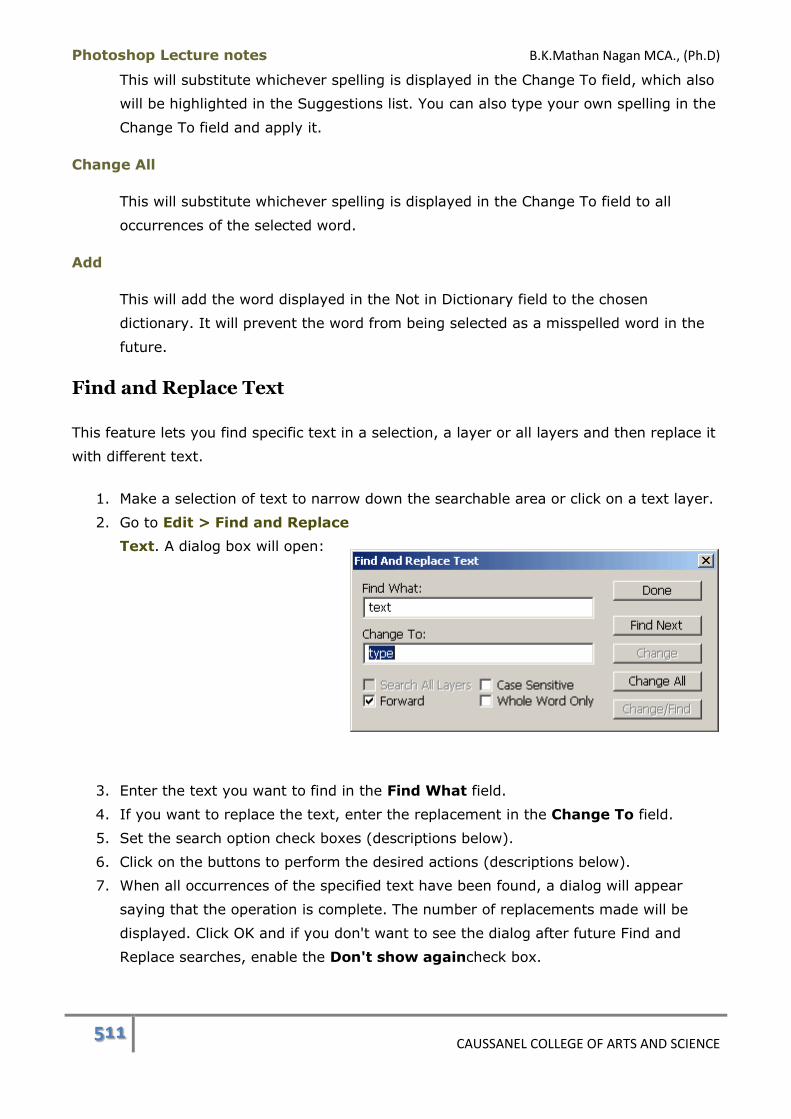
Photoshop Lecture notes B.K.Mathan Nagan MCA., (Ph.D)
511 CAUSSANEL COLLEGE OF ARTS AND SCIENCE
This will substitute whichever spelling is displayed in the Change To field, which also
will be highlighted in the Suggestions list. You can also type your own spelling in the
Change To field and apply it.
Change All
This will substitute whichever spelling is displayed in the Change To field to all
occurrences of the selected word.
Add
This will add the word displayed in the Not in Dictionary field to the chosen
dictionary. It will prevent the word from being selected as a misspelled word in the
future.
Find and Replace Text
This feature lets you find specific text in a selection, a layer or all layers and then replace it
with different text.
1. Make a selection of text to narrow down the searchable area or click on a text layer.
2. Go to Edit > Find and Replace
Text. A dialog box will open:
3. Enter the text you want to find in the Find What field.
4. If you want to replace the text, enter the replacement in the Change To field.
5. Set the search option check boxes (descriptions below).
6. Click on the buttons to perform the desired actions (descriptions below).
7. When all occurrences of the specified text have been found, a dialog will appear
saying that the operation is complete. The number of replacements made will be
displayed. Click OK and if you don't want to see the dialog after future Find and
Replace searches, enable the Don't show againcheck box.
Photoshop Lecture notes B.K.Mathan Nagan MCA., (Ph.D)
512 CAUSSANEL COLLEGE OF ARTS AND SCIENCE
Find and Replace Check Boxes
Search All Layers
When enabled, all layers will be searched for the Find What text. When disabled,
only the active layer will be searched. This option will be greyed out if some text has
been selected in the document.
Forward
When enabled, the search will be performed from top to bottom of the document. To
go backwards/up, disable the check box.
Case Sensitive
When enabled, only text that matches the case of the Find What text will be found.
For example, if you were searching for "Earth" with Case Sensitive enabled, "earth"
would be skipped over.
Whole Word Only
When enabled, the search text must not be part of another word for it to be found.
For example, if you were searching for "body" using Whole Word Only, the text
"anybody" would be skipped.
Find and Replace Buttons
Done
Click Done to terminate the operation before it is completed. If you only want to find
text and not replace it, use the Done button after you've found the text.
Find Next
This will search for the first occurrence of the search text or the next occurrence if
text has already been found.
Change
Once an occurrence of the search text has been found, you can replace it with the
Change To text by clicking this button.
Change All
Instead of finding and changing instances of text one by one, you can click the
Change All button to replace all occurrences of the search text.
Change/Find

Photoshop Lecture notes B.K.Mathan Nagan MCA., (Ph.D)
513 CAUSSANEL COLLEGE OF ARTS AND SCIENCE
Once the search text has been found, clicking Change/Find will replace the text and
go to the next occurrence of the search text.
Editing Type Summary
The Check Spelling command will compare the text you've created with a dictionary
in the language of your choice.
As Photoshop is performing a spell check it will alert you to words that aren't in the
dictionary. You can accept alternate spellings that are suggested, skip over the
questionable word, or add the word to the dictionary so you won't be prompted in
the future when that word in encountered.
The Find and Replace command can be used to find specific text and will replace it
with the text you specify.
Colour and Tonal Adjustments
Overview
An important skill when working with photographic images is the ability to adjust the colour
or brightness within an image. In this section we will take a look at the available
adjustment tools in Photoshop. Some of these can be used to create special effects.
Here is a summary of the topics in this module:
(1) Adjustment Layers
Adjustment layers give you the flexibility to try out colour and tonal adjustments on
an image without changing the image itself.
(2) The Histogram
Before you correct the colour and tonal values in an image, you need to analyze the
image's tonal range. We'll discuss what that means and introduce you to the
Histogram: a tool that will help you evaluate your images.
(3) Levels
The Levels adjustment lets you expand and improve the tonal range of an image
with great accuracy.
(4) Curves
A Curves adjustment allows even greater control over an image's tonal values than
Levels.

Photoshop Lecture notes B.K.Mathan Nagan MCA., (Ph.D)
514 CAUSSANEL COLLEGE OF ARTS AND SCIENCE
(5) Other Tonal Adjustments
The remaining commands for adjusting an image's tonal range are Auto
Contrast, Equalize, andBrightness/Contrast.
(6) Colour Wheel
An understanding of the colour wheel will be valuable when it comes to making
colour corrections so we'll present a little colour theory in this lecture.
(7) Colour Sampler Tool
In this lecture we introduce you to the last tool in the Toolbox: the Colour Sampler.
This can be used to sample colours in an image, like the Eyedropper tool, but its
values can be stored in the Info panel for future reference. It's quite helpful when
adjusting an image's colours.
(8) Colour Balance
The Colour Balance dialog is relatively straightforward to use and is effective in
correcting colour imbalances. We'll work through a practice exercise to correct a
waterfall image. We'll also resurrect our cat image one more time to fix up the tint
problem with the tips of its fur, as promised. You'll get some insight into doing spot
touch-ups with the painting tools.
(9) Other Colour Adjustment Options
There are a number of other colour adjustment options available. Some are more
selective than Colour Balance (and more complex to use), some have limited
effectiveness, and others are geared more towards special effects. An overview of
the Desaturate, Hue/Saturation, Selective Colour,Replace
Colour, Variations, Channel Mixer, and Auto Colour commands will be
presented in this lecture.
(A) Creative Image Adjustments
This lecture covers the remaining adjustment
commands: Invert, Threshold, Posterize, andGradient Map. These are used to
create special effects rather than as tonal or colour correction tools because the
resulting effects are extreme.
Adjustment Layers
Adjustment layers give you the flexibility to try out colour and tonal adjustments on an
image without changing the image itself. The colour corrections are confined to the
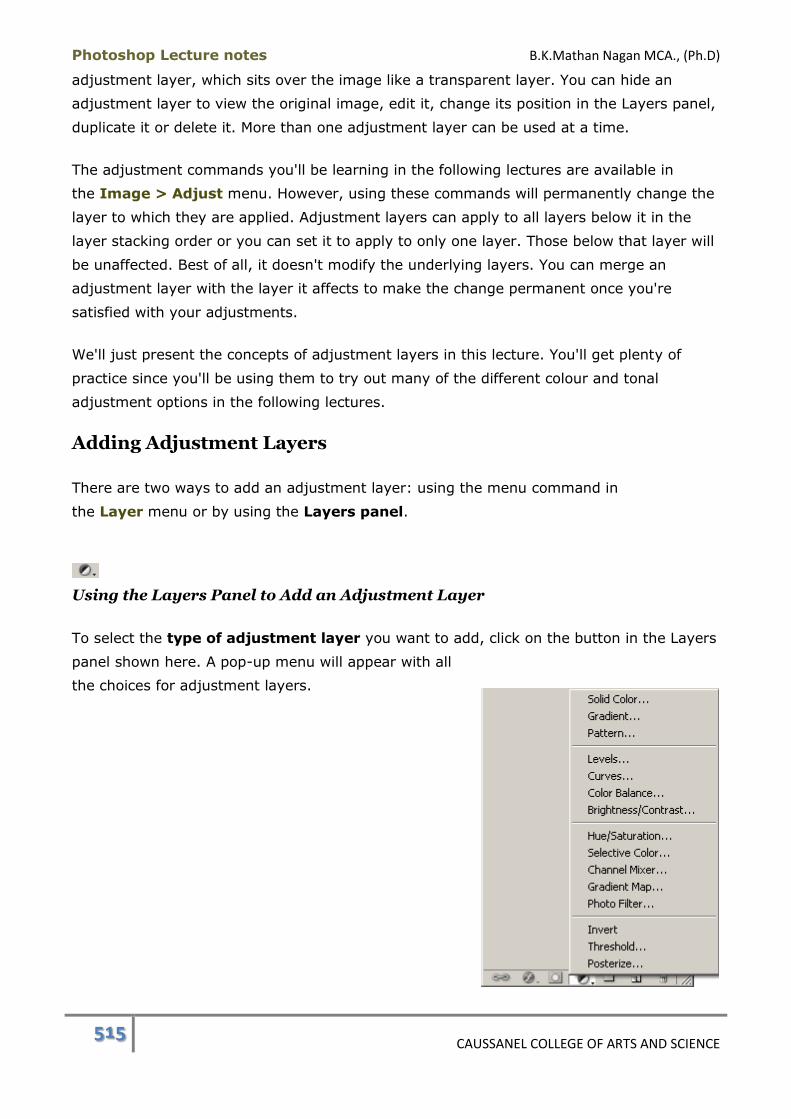
Photoshop Lecture notes B.K.Mathan Nagan MCA., (Ph.D)
515 CAUSSANEL COLLEGE OF ARTS AND SCIENCE
adjustment layer, which sits over the image like a transparent layer. You can hide an
adjustment layer to view the original image, edit it, change its position in the Layers panel,
duplicate it or delete it. More than one adjustment layer can be used at a time.
The adjustment commands you'll be learning in the following lectures are available in
the Image > Adjust menu. However, using these commands will permanently change the
layer to which they are applied. Adjustment layers can apply to all layers below it in the
layer stacking order or you can set it to apply to only one layer. Those below that layer will
be unaffected. Best of all, it doesn't modify the underlying layers. You can merge an
adjustment layer with the layer it affects to make the change permanent once you're
satisfied with your adjustments.
We'll just present the concepts of adjustment layers in this lecture. You'll get plenty of
practice since you'll be using them to try out many of the different colour and tonal
adjustment options in the following lectures.
Adding Adjustment Layers
There are two ways to add an adjustment layer: using the menu command in
the Layer menu or by using the Layers panel.
Using the Layers Panel to Add an Adjustment Layer
To select the type of adjustment layer you want to add, click on the button in the Layers
panel shown here. A pop-up menu will appear with all
the choices for adjustment layers.
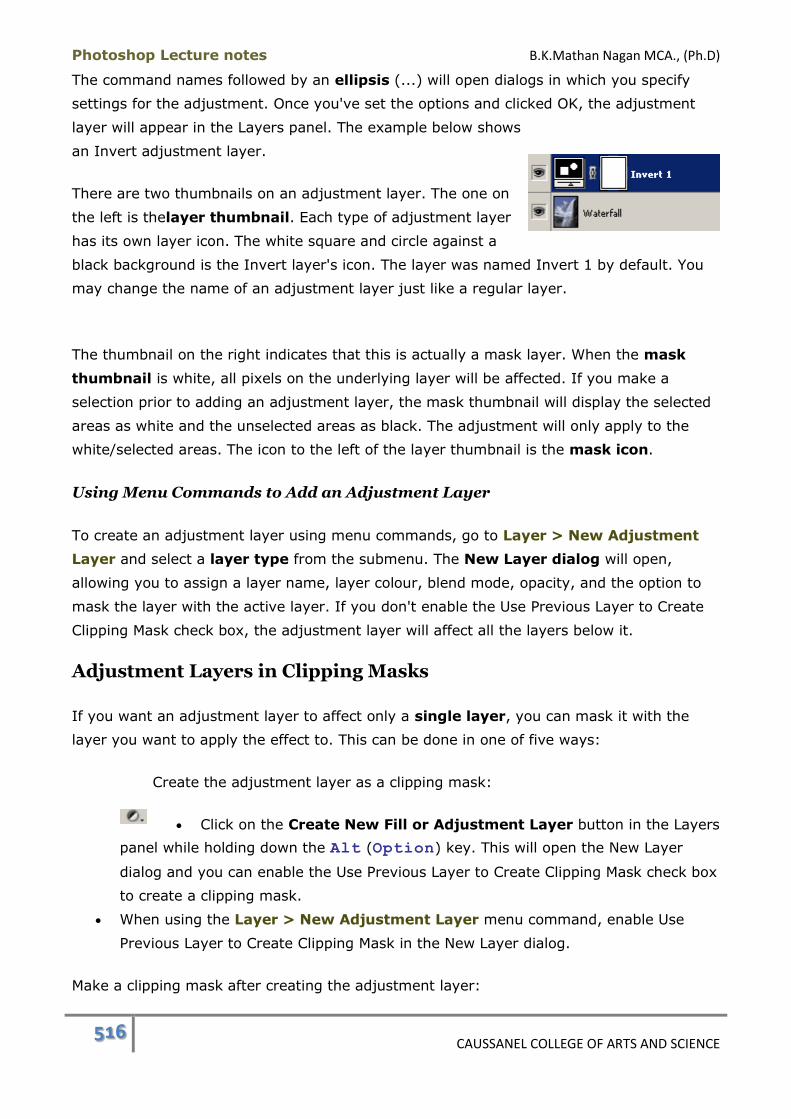
Photoshop Lecture notes B.K.Mathan Nagan MCA., (Ph.D)
516 CAUSSANEL COLLEGE OF ARTS AND SCIENCE
The command names followed by an ellipsis (...) will open dialogs in which you specify
settings for the adjustment. Once you've set the options and clicked OK, the adjustment
layer will appear in the Layers panel. The example below shows
an Invert adjustment layer.
There are two thumbnails on an adjustment layer. The one on
the left is thelayer thumbnail. Each type of adjustment layer
has its own layer icon. The white square and circle against a
black background is the Invert layer's icon. The layer was named Invert 1 by default. You
may change the name of an adjustment layer just like a regular layer.
The thumbnail on the right indicates that this is actually a mask layer. When the mask
thumbnail is white, all pixels on the underlying layer will be affected. If you make a
selection prior to adding an adjustment layer, the mask thumbnail will display the selected
areas as white and the unselected areas as black. The adjustment will only apply to the
white/selected areas. The icon to the left of the layer thumbnail is the mask icon.
Using Menu Commands to Add an Adjustment Layer
To create an adjustment layer using menu commands, go to Layer > New Adjustment
Layer and select a layer type from the submenu. The New Layer dialog will open,
allowing you to assign a layer name, layer colour, blend mode, opacity, and the option to
mask the layer with the active layer. If you don't enable the Use Previous Layer to Create
Clipping Mask check box, the adjustment layer will affect all the layers below it.
Adjustment Layers in Clipping Masks
If you want an adjustment layer to affect only a single layer, you can mask it with the
layer you want to apply the effect to. This can be done in one of five ways:
Create the adjustment layer as a clipping mask:
Click on the Create New Fill or Adjustment Layer button in the Layers
panel while holding down the Alt (Option) key. This will open the New Layer
dialog and you can enable the Use Previous Layer to Create Clipping Mask check box
to create a clipping mask.
When using the Layer > New Adjustment Layer menu command, enable Use
Previous Layer to Create Clipping Mask in the New Layer dialog.
Make a clipping mask after creating the adjustment layer:
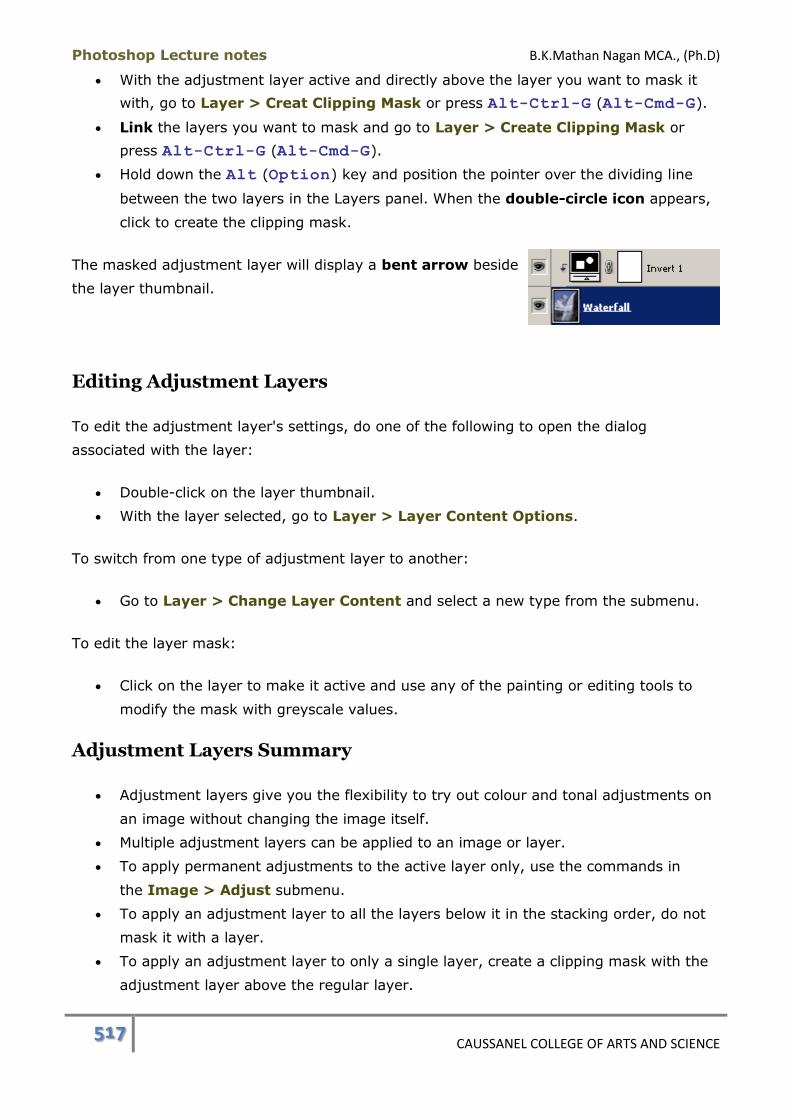
Photoshop Lecture notes B.K.Mathan Nagan MCA., (Ph.D)
517 CAUSSANEL COLLEGE OF ARTS AND SCIENCE
With the adjustment layer active and directly above the layer you want to mask it
with, go to Layer > Creat Clipping Mask or press Alt-Ctrl-G (Alt-Cmd-G).
Link the layers you want to mask and go to Layer > Create Clipping Mask or
press Alt-Ctrl-G (Alt-Cmd-G).
Hold down the Alt (Option) key and position the pointer over the dividing line
between the two layers in the Layers panel. When the double-circle icon appears,
click to create the clipping mask.
The masked adjustment layer will display a bent arrow beside
the layer thumbnail.
Editing Adjustment Layers
To edit the adjustment layer's settings, do one of the following to open the dialog
associated with the layer:
Double-click on the layer thumbnail.
With the layer selected, go to Layer > Layer Content Options.
To switch from one type of adjustment layer to another:
Go to Layer > Change Layer Content and select a new type from the submenu.
To edit the layer mask:
Click on the layer to make it active and use any of the painting or editing tools to
modify the mask with greyscale values.
Adjustment Layers Summary
Adjustment layers give you the flexibility to try out colour and tonal adjustments on
an image without changing the image itself.
Multiple adjustment layers can be applied to an image or layer.
To apply permanent adjustments to the active layer only, use the commands in
the Image > Adjust submenu.
To apply an adjustment layer to all the layers below it in the stacking order, do not
mask it with a layer.
To apply an adjustment layer to only a single layer, create a clipping mask with the
adjustment layer above the regular layer.
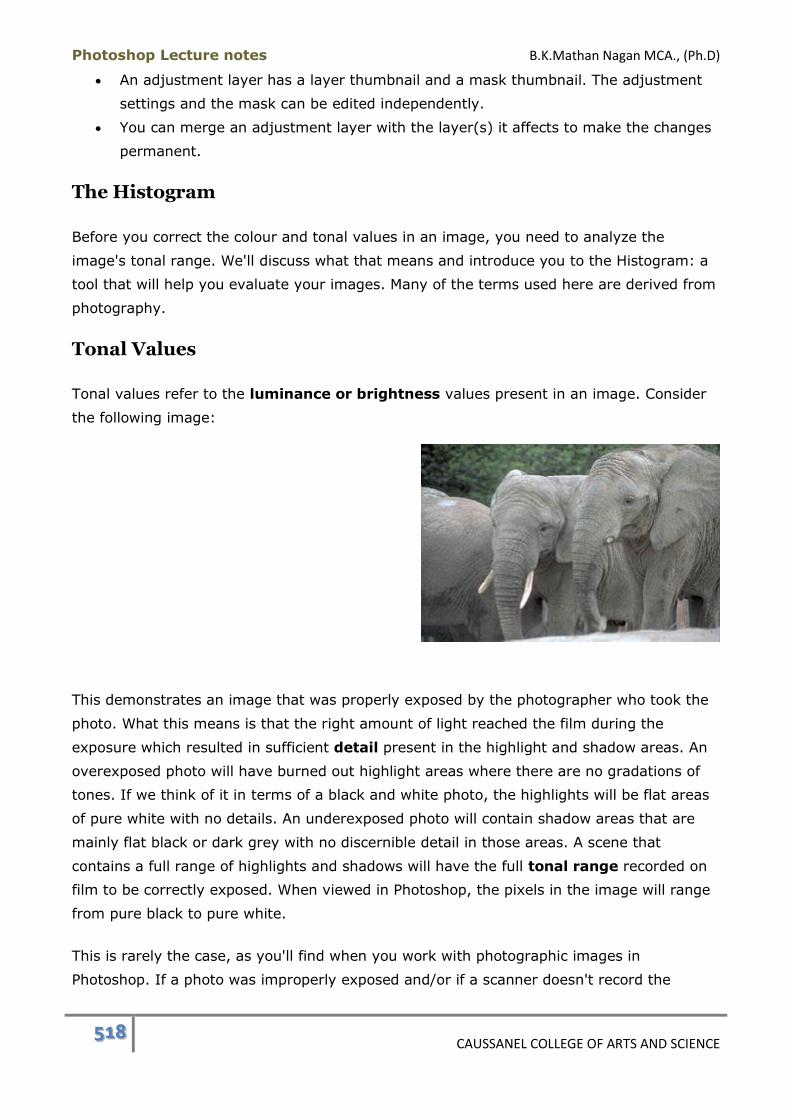
Photoshop Lecture notes B.K.Mathan Nagan MCA., (Ph.D)
518 CAUSSANEL COLLEGE OF ARTS AND SCIENCE
An adjustment layer has a layer thumbnail and a mask thumbnail. The adjustment
settings and the mask can be edited independently.
You can merge an adjustment layer with the layer(s) it affects to make the changes
permanent.
The Histogram
Before you correct the colour and tonal values in an image, you need to analyze the
image's tonal range. We'll discuss what that means and introduce you to the Histogram: a
tool that will help you evaluate your images. Many of the terms used here are derived from
photography.
Tonal Values
Tonal values refer to the luminance or brightness values present in an image. Consider
the following image:
This demonstrates an image that was properly exposed by the photographer who took the
photo. What this means is that the right amount of light reached the film during the
exposure which resulted in sufficient detail present in the highlight and shadow areas. An
overexposed photo will have burned out highlight areas where there are no gradations of
tones. If we think of it in terms of a black and white photo, the highlights will be flat areas
of pure white with no details. An underexposed photo will contain shadow areas that are
mainly flat black or dark grey with no discernible detail in those areas. A scene that
contains a full range of highlights and shadows will have the full tonal range recorded on
film to be correctly exposed. When viewed in Photoshop, the pixels in the image will range
from pure black to pure white.
This is rarely the case, as you'll find when you work with photographic images in
Photoshop. If a photo was improperly exposed and/or if a scanner doesn't record the
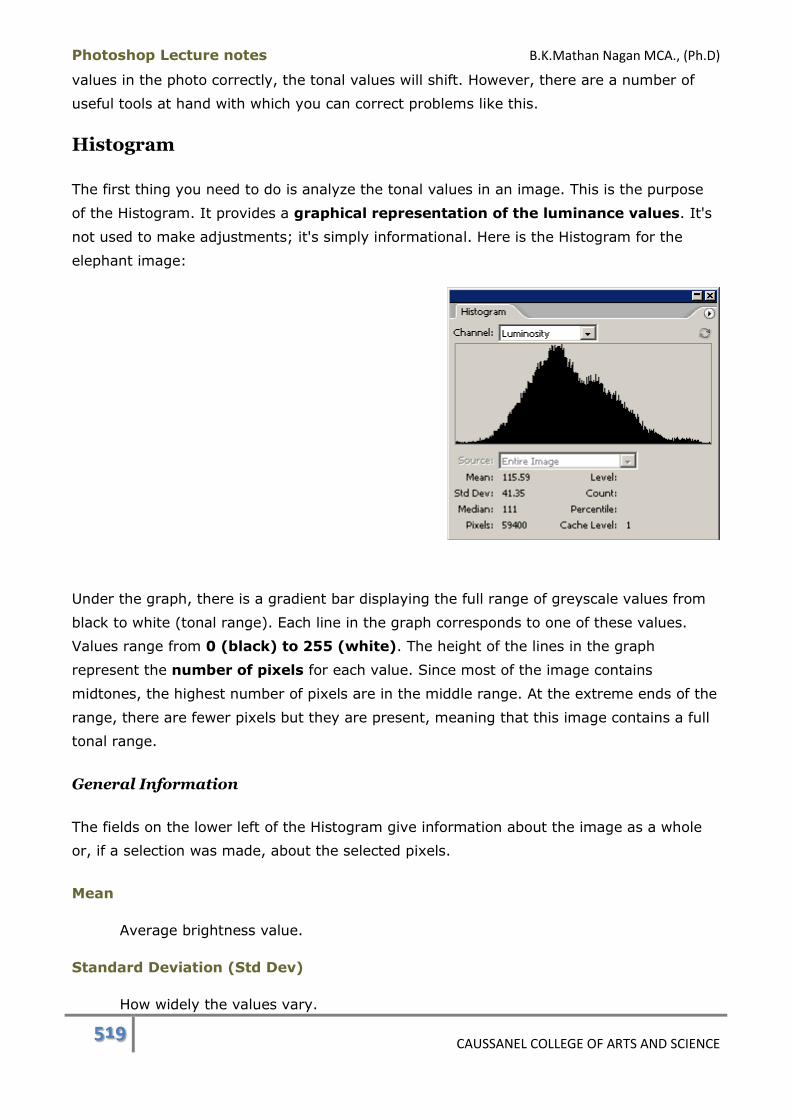
Photoshop Lecture notes B.K.Mathan Nagan MCA., (Ph.D)
519 CAUSSANEL COLLEGE OF ARTS AND SCIENCE
values in the photo correctly, the tonal values will shift. However, there are a number of
useful tools at hand with which you can correct problems like this.
Histogram
The first thing you need to do is analyze the tonal values in an image. This is the purpose
of the Histogram. It provides a graphical representation of the luminance values. It's
not used to make adjustments; it's simply informational. Here is the Histogram for the
elephant image:
Under the graph, there is a gradient bar displaying the full range of greyscale values from
black to white (tonal range). Each line in the graph corresponds to one of these values.
Values range from 0 (black) to 255 (white). The height of the lines in the graph
represent the number of pixels for each value. Since most of the image contains
midtones, the highest number of pixels are in the middle range. At the extreme ends of the
range, there are fewer pixels but they are present, meaning that this image contains a full
tonal range.
General Information
The fields on the lower left of the Histogram give information about the image as a whole
or, if a selection was made, about the selected pixels.
Mean
Average brightness value.
Standard Deviation (Std Dev)
How widely the values vary.
Photoshop Lecture notes B.K.Mathan Nagan MCA., (Ph.D)
520 CAUSSANEL COLLEGE OF ARTS AND SCIENCE
Median
Middle value in the tonal range of the image.
Pixels
Number of pixels evaluated in the image. If a selection has been made before
displaying the Histogram, only the pixels within the selection will be evaluated. In
this case, the entire image was evaluated so the number of pixels evaluated was the
product of the pixel dimensions: 300 pixels X 198 pixels = 594,000 pixels.
Value-Specific Information
The fields on the lower right of the Histogram pertain to a specific
tonal value. If you place your pointer in the graph area, the display
will change to give information about the value that your pointer is
above. In this example, the crosshair is over the highest value
(pure white or 255). This value is displayed in the Level field. The Count field shows the
number of pixels having a tonal value of 255. Percentile indicates the number of pixels
having the same or a lower value which, in this case, would be 100%.
A Cache level of 1 means that all pixels in the image were analyzed. If the Use Cache for
Histograms option has been enabled in the Image Cache preferences, only a sampling of
the pixels in an image will be analyzed. This will result in a faster calculation of the
Histogram.
To generate a Histogram for an image, go to Image > Histogram.
High-Key, Low-Key
Not all correctly exposed photos will contain a full tonal range. Images can have light or
dark pixels predominating and still be a correctly exposed photograph. An image that
contains primarily high tonal values is referred to as a high-key image. A low-key image
contains mainly dark or low values.
High-Key
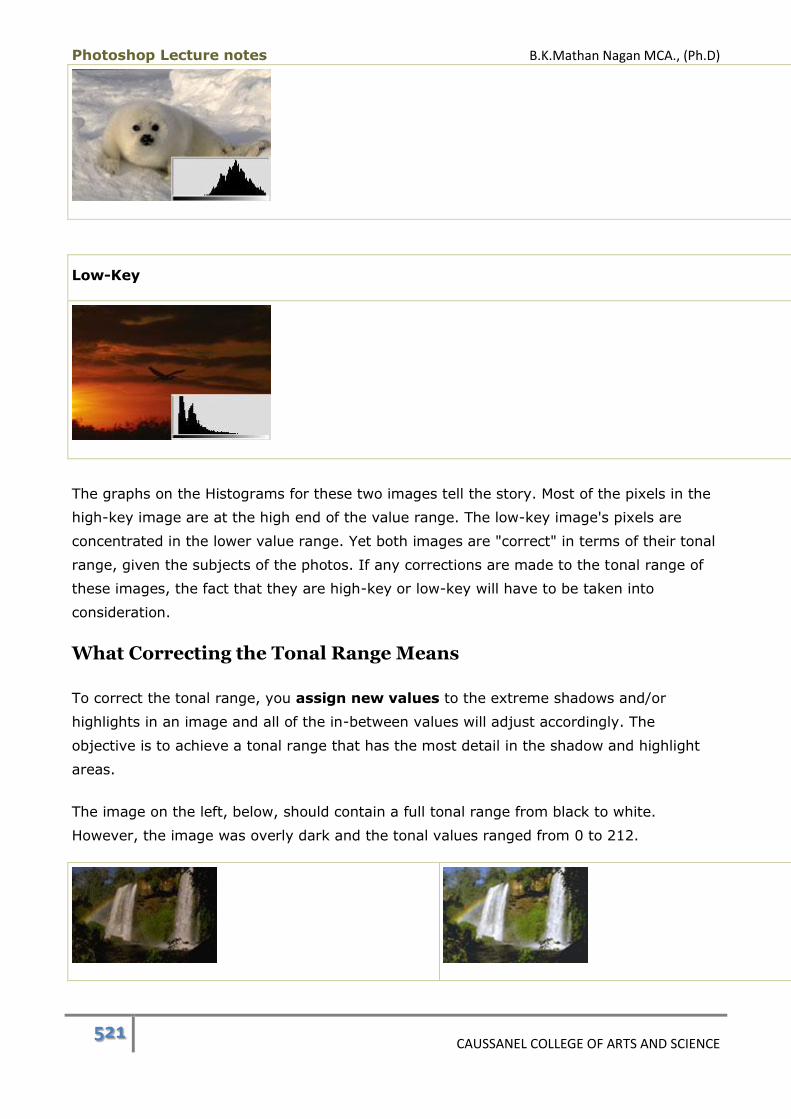
Photoshop Lecture notes B.K.Mathan Nagan MCA., (Ph.D)
521 CAUSSANEL COLLEGE OF ARTS AND SCIENCE
Low-Key
The graphs on the Histograms for these two images tell the story. Most of the pixels in the
high-key image are at the high end of the value range. The low-key image's pixels are
concentrated in the lower value range. Yet both images are "correct" in terms of their tonal
range, given the subjects of the photos. If any corrections are made to the tonal range of
these images, the fact that they are high-key or low-key will have to be taken into
consideration.
What Correcting the Tonal Range Means
To correct the tonal range, you assign new values to the extreme shadows and/or
highlights in an image and all of the in-between values will adjust accordingly. The
objective is to achieve a tonal range that has the most detail in the shadow and highlight
areas.
The image on the left, below, should contain a full tonal range from black to white.
However, the image was overly dark and the tonal values ranged from 0 to 212.
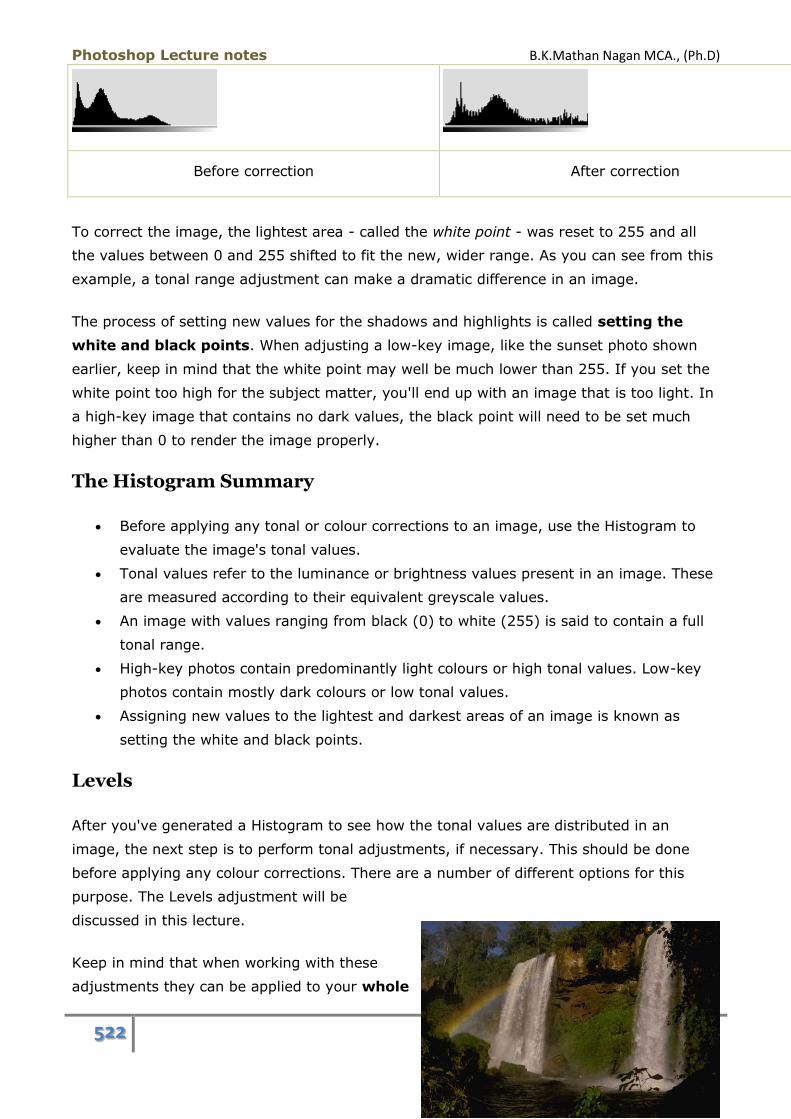
Photoshop Lecture notes B.K.Mathan Nagan MCA., (Ph.D)
522 CAUSSANEL COLLEGE OF ARTS AND SCIENCE
Before correction After correction
To correct the image, the lightest area - called the white point - was reset to 255 and all
the values between 0 and 255 shifted to fit the new, wider range. As you can see from this
example, a tonal range adjustment can make a dramatic difference in an image.
The process of setting new values for the shadows and highlights is called setting the
white and black points. When adjusting a low-key image, like the sunset photo shown
earlier, keep in mind that the white point may well be much lower than 255. If you set the
white point too high for the subject matter, you'll end up with an image that is too light. In
a high-key image that contains no dark values, the black point will need to be set much
higher than 0 to render the image properly.
The Histogram Summary
Before applying any tonal or colour corrections to an image, use the Histogram to
evaluate the image's tonal values.
Tonal values refer to the luminance or brightness values present in an image. These
are measured according to their equivalent greyscale values.
An image with values ranging from black (0) to white (255) is said to contain a full
tonal range.
High-key photos contain predominantly light colours or high tonal values. Low-key
photos contain mostly dark colours or low tonal values.
Assigning new values to the lightest and darkest areas of an image is known as
setting the white and black points.
Levels
After you've generated a Histogram to see how the tonal values are distributed in an
image, the next step is to perform tonal adjustments, if necessary. This should be done
before applying any colour corrections. There are a number of different options for this
purpose. The Levels adjustment will be
discussed in this lecture.
Keep in mind that when working with these
adjustments they can be applied to your whole

Photoshop Lecture notes B.K.Mathan Nagan MCA., (Ph.D)
523 CAUSSANEL COLLEGE OF ARTS AND SCIENCE
image or a selection that you have defined. You can apply immediate, permanent
changes to the active layer by using the commands in the Image >
Adjustments submenu. For the options available as adjustment layers, we'll use those
instead. Levels falls into this category.
Levels is used for setting the white and black points in an image. After those have been
set, you can also adjust themidpoint of the grey values, if necessary. There are several
ways that the Levels dialog can be used to adjust the tonal range. We'll look at some of
them in a practice exercise.
Practice Exercise: Levels
1. Download the waterfall image above by right-clicking (Ctrl-clicking)
on the image and save it to your hard drive.
2. Open the image and use the Save As command to save it
as levels.psd.
3. Add an adjustment layer by clicking on the button in the Layers panel and selecting
Levels from the pop-up menu or go to Layer > New Adjustment Layer > Levels.
The Levels dialog will
open.
Using the Input Levels Sliders
Let's look more closely at the Input Levels area of the dialog.
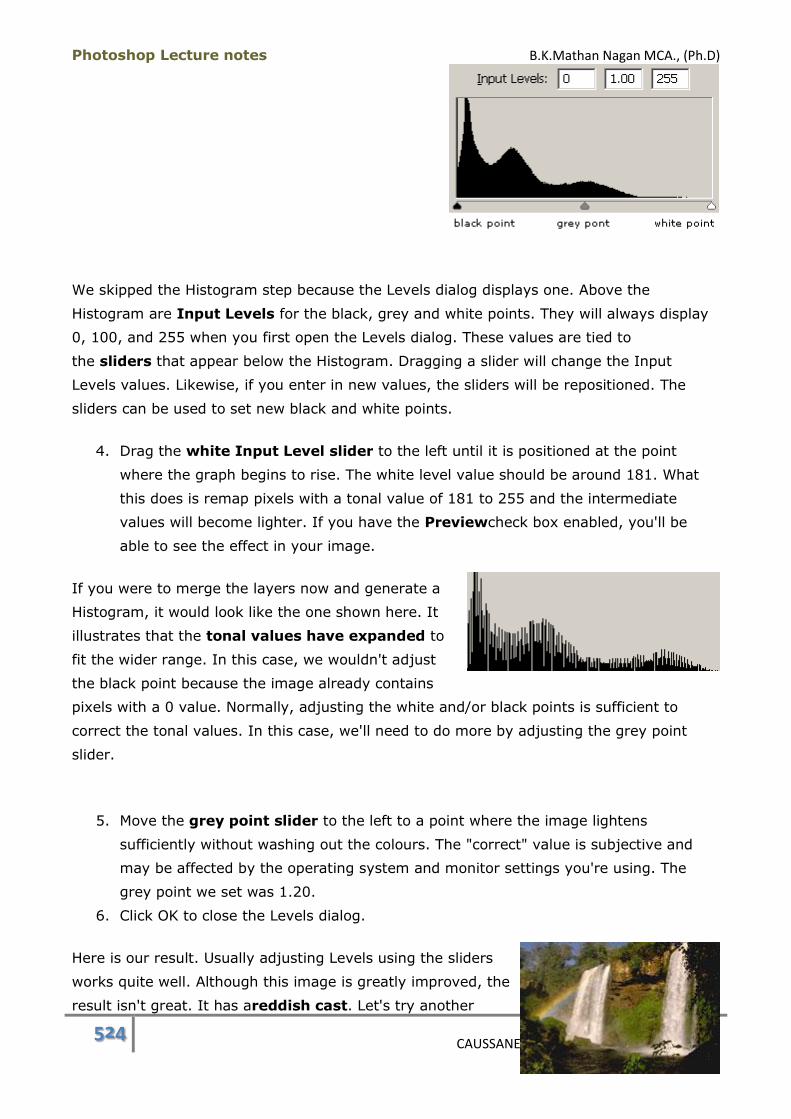
Photoshop Lecture notes B.K.Mathan Nagan MCA., (Ph.D)
524 CAUSSANEL COLLEGE OF ARTS AND SCIENCE
We skipped the Histogram step because the Levels dialog displays one. Above the
Histogram are Input Levels for the black, grey and white points. They will always display
0, 100, and 255 when you first open the Levels dialog. These values are tied to
the sliders that appear below the Histogram. Dragging a slider will change the Input
Levels values. Likewise, if you enter in new values, the sliders will be repositioned. The
sliders can be used to set new black and white points.
4. Drag the white Input Level slider to the left until it is positioned at the point
where the graph begins to rise. The white level value should be around 181. What
this does is remap pixels with a tonal value of 181 to 255 and the intermediate
values will become lighter. If you have the Previewcheck box enabled, you'll be
able to see the effect in your image.
If you were to merge the layers now and generate a
Histogram, it would look like the one shown here. It
illustrates that the tonal values have expanded to
fit the wider range. In this case, we wouldn't adjust
the black point because the image already contains
pixels with a 0 value. Normally, adjusting the white and/or black points is sufficient to
correct the tonal values. In this case, we'll need to do more by adjusting the grey point
slider.
5. Move the grey point slider to the left to a point where the image lightens
sufficiently without washing out the colours. The "correct" value is subjective and
may be affected by the operating system and monitor settings you're using. The
grey point we set was 1.20.
6. Click OK to close the Levels dialog.
Here is our result. Usually adjusting Levels using the sliders
works quite well. Although this image is greatly improved, the
result isn't great. It has areddish cast. Let's try another

Photoshop Lecture notes B.K.Mathan Nagan MCA., (Ph.D)
525 CAUSSANEL COLLEGE OF ARTS AND SCIENCE
method available in the Levels dialog. In order to compare the results of your different
settings, let's create another adjustment layer.
Using Auto Levels
6. Right-click (Ctrl-click) on the adjustment layer, select Layer Properties
from the context menu, name this layer Levels Sliders and click OK. Hide the layer.
7. Click on the Background layer and create a new Levels adjustment layer.
8. When the Levels dialog opens, click on the Auto
button and then click OK.
The Auto button automatically sets the white and black
points to the lightest and darkest areas of the image. This
has given a much better result. The red colour cast has been
removed by using the Auto option. A word of caution, though.
Auto is usually not the best choice, although it worked quite
well on this particular image. Auto Levels may result in colour shifts. It worked to our
benefit in this case but if an image's colour balance is already good, Auto Levels may cause
an unwanted colour shift. Adjusting the Input sliders will never affect the colour balance.
The Auto Levels command is also available in the Image > Adjust menu.
Using the Levels Eyedroppers
Black and white points can be set by sampling neutral-coloured areas of the image with the
eyedroppers. The key word here is neutral because if the pixel sampled isn't neutral, a
colour shift will result.
9. Right-click (Ctrl-click) on the second adjustment layer, select Layer
Properties from the context menu, name this layer Auto Levels and click OK. Hide
the layer.
10. Click on the Background layer. Hold down the Alt (Option) key while clicking on
the adjustment layer button in the Layers panel. In the New Layer dialog, name this
layer Levels Eyedroppers and click OK.
11. In the Levels dialog, click on the eyedropper for the white
point.
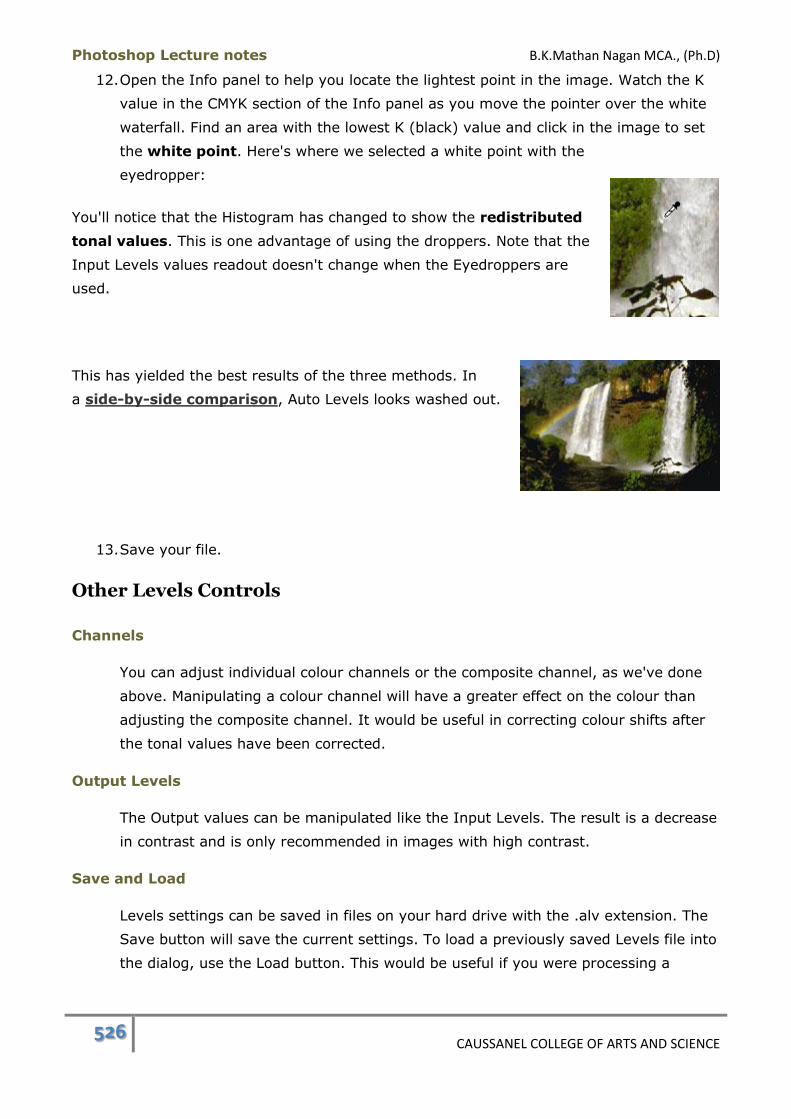
Photoshop Lecture notes B.K.Mathan Nagan MCA., (Ph.D)
526 CAUSSANEL COLLEGE OF ARTS AND SCIENCE
12. Open the Info panel to help you locate the lightest point in the image. Watch the K
value in the CMYK section of the Info panel as you move the pointer over the white
waterfall. Find an area with the lowest K (black) value and click in the image to set
the white point. Here's where we selected a white point with the
eyedropper:
You'll notice that the Histogram has changed to show the redistributed
tonal values. This is one advantage of using the droppers. Note that the
Input Levels values readout doesn't change when the Eyedroppers are
used.
This has yielded the best results of the three methods. In
a side-by-side comparison, Auto Levels looks washed out.
13. Save your file.
Other Levels Controls
Channels
You can adjust individual colour channels or the composite channel, as we've done
above. Manipulating a colour channel will have a greater effect on the colour than
adjusting the composite channel. It would be useful in correcting colour shifts after
the tonal values have been corrected.
Output Levels
The Output values can be manipulated like the Input Levels. The result is a decrease
in contrast and is only recommended in images with high contrast.
Save and Load
Levels settings can be saved in files on your hard drive with the .alv extension. The
Save button will save the current settings. To load a previously saved Levels file into
the dialog, use the Load button. This would be useful if you were processing a
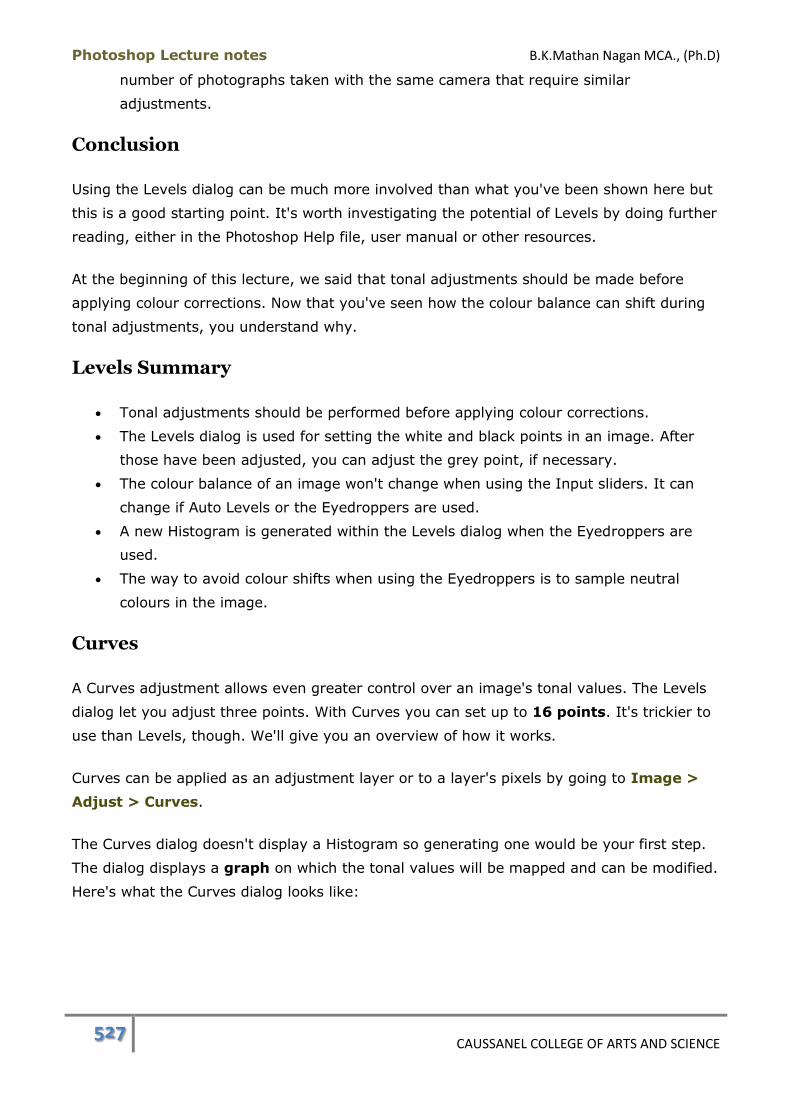
Photoshop Lecture notes B.K.Mathan Nagan MCA., (Ph.D)
527 CAUSSANEL COLLEGE OF ARTS AND SCIENCE
number of photographs taken with the same camera that require similar
adjustments.
Conclusion
Using the Levels dialog can be much more involved than what you've been shown here but
this is a good starting point. It's worth investigating the potential of Levels by doing further
reading, either in the Photoshop Help file, user manual or other resources.
At the beginning of this lecture, we said that tonal adjustments should be made before
applying colour corrections. Now that you've seen how the colour balance can shift during
tonal adjustments, you understand why.
Levels Summary
Tonal adjustments should be performed before applying colour corrections.
The Levels dialog is used for setting the white and black points in an image. After
those have been adjusted, you can adjust the grey point, if necessary.
The colour balance of an image won't change when using the Input sliders. It can
change if Auto Levels or the Eyedroppers are used.
A new Histogram is generated within the Levels dialog when the Eyedroppers are
used.
The way to avoid colour shifts when using the Eyedroppers is to sample neutral
colours in the image.
Curves
A Curves adjustment allows even greater control over an image's tonal values. The Levels
dialog let you adjust three points. With Curves you can set up to 16 points. It's trickier to
use than Levels, though. We'll give you an overview of how it works.
Curves can be applied as an adjustment layer or to a layer's pixels by going to Image >
Adjust > Curves.
The Curves dialog doesn't display a Histogram so generating one would be your first step.
The dialog displays a graph on which the tonal values will be mapped and can be modified.
Here's what the Curves dialog looks like:
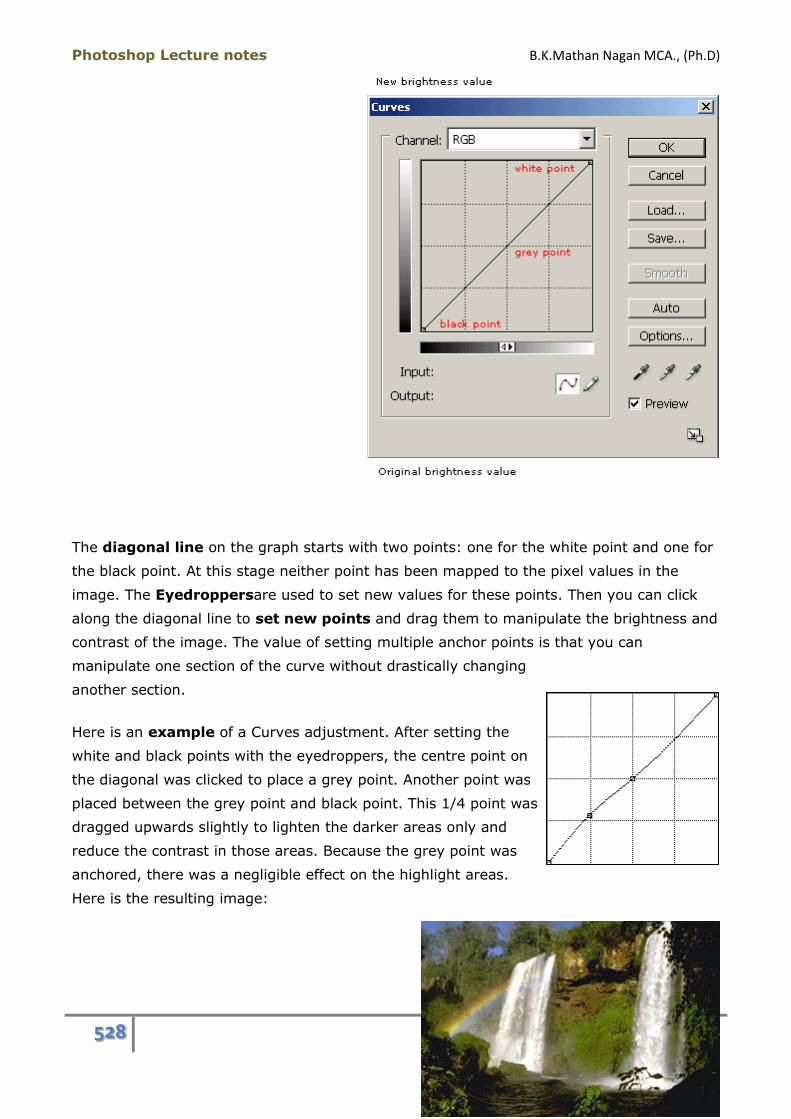
Photoshop Lecture notes B.K.Mathan Nagan MCA., (Ph.D)
528 CAUSSANEL COLLEGE OF ARTS AND SCIENCE
The diagonal line on the graph starts with two points: one for the white point and one for
the black point. At this stage neither point has been mapped to the pixel values in the
image. The Eyedroppersare used to set new values for these points. Then you can click
along the diagonal line to set new points and drag them to manipulate the brightness and
contrast of the image. The value of setting multiple anchor points is that you can
manipulate one section of the curve without drastically changing
another section.
Here is an example of a Curves adjustment. After setting the
white and black points with the eyedroppers, the centre point on
the diagonal was clicked to place a grey point. Another point was
placed between the grey point and black point. This 1/4 point was
dragged upwards slightly to lighten the darker areas only and
reduce the contrast in those areas. Because the grey point was
anchored, there was a negligible effect on the highlight areas.
Here is the resulting image:
Photoshop Lecture notes B.K.Mathan Nagan MCA., (Ph.D)
529 CAUSSANEL COLLEGE OF ARTS AND SCIENCE
Channels
You can adjust individual colour channels or the composite channel, as we've done
above. Manipulating a colour channel will have a greater effect on the colour than
adjusting the composite channel.
Input and Output
When your pointer is inside the graph area, these fields will display location of the
cursor in relation to the horizontal and vertical axes. The horizontal axis represents
the Input levels (original values) and the vertical axis is for Output levels (adjusted
values).
Arbitrary Map
The pencil button in the dialog can be used to draw a curve freehand in the graph
area.
Smooth
When you've drawn a freehand curve with the Arbitrary Map option, you can click on
the Smooth button to automatically smooth out the curve.
Auto
Automatically sets the white and black points to the lightest and darkest values
present in the image. This may work fine for an average-scale image with a full tonal
range.
Save and Load
Curves you create can be saved in files on your hard drive with the .acv extension.
The Save button will save the current curve. To load a previously saved curve file
into the dialog, use the Load button.
Cancel and Reset
The Cancel button will become a Reset button if you hold down the Alt (Option)
key. When you click on the Reset button, the original dialog values will be restored.
Curves Summary
The Curves dialog is used to adjust the tonal value of an image when set to the
composite channel. Individual colour channels can be adjusted by selecting them in
the Channels pop-up menu.
The white and black points can be set using the Eyedroppers or the Auto button.
Greater control over the tonal value is achieved because you can add 14 fixed points
to the brightness curve in addition to the white and black points you start with.
These points can be repositioned to confine the adjustments to portions of the
curve.

Photoshop Lecture notes B.K.Mathan Nagan MCA., (Ph.D)
530 CAUSSANEL COLLEGE OF ARTS AND SCIENCE
Other Tonal Adjustments
There are three other commands that will adjust the tonal values but their effectiveness is
limited, at best. Auto Contrast and Equalize have no settings you can adjust and are
applied immediately and permanently to the active layer. Brightness/Contrast allows for
adjustment and is available as a menu command or adjustment layer. However, its value is
questionable.
Auto Contrast
Auto Contrast is used to stretch the tonal range of an image and improve the contrast. It
automatically sets the white and black points in an image and clips them by 0.5%. What
this means is that extreme shadow and highlight values are ignored and a more
representative sample is used. Auto Contrast hasno effect on colours, therefore no
unwanted colour shifts will occur, nor can colour corrections be made with it.
Auto Contrast has no settings you can adjust. This command is not available as an
adjustment layer option. It is located in the Image > Adjust submenu. When used on the
waterfall image, it left a noticeable red cast.
Equalize
The Equalize command maps the lightest and darkest pixels in an image to white and
black with no clipping. Then it redistributes the values of the other pixels across the range
from black to white. In the case of the waterfall image, it became overly bright. This
command is located in the Image >
Adjustsubmenu.
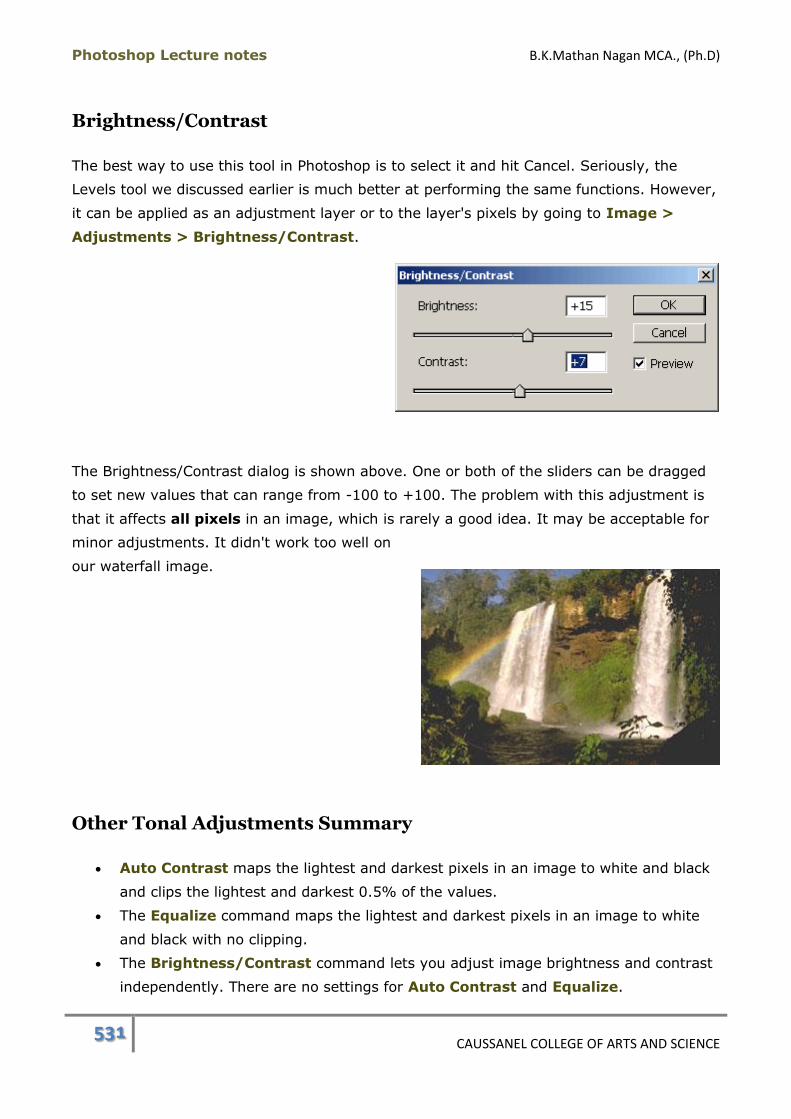
Photoshop Lecture notes B.K.Mathan Nagan MCA., (Ph.D)
531 CAUSSANEL COLLEGE OF ARTS AND SCIENCE
Brightness/Contrast
The best way to use this tool in Photoshop is to select it and hit Cancel. Seriously, the
Levels tool we discussed earlier is much better at performing the same functions. However,
it can be applied as an adjustment layer or to the layer's pixels by going to Image >
Adjustments > Brightness/Contrast.
The Brightness/Contrast dialog is shown above. One or both of the sliders can be dragged
to set new values that can range from -100 to +100. The problem with this adjustment is
that it affects all pixels in an image, which is rarely a good idea. It may be acceptable for
minor adjustments. It didn't work too well on
our waterfall image.
Other Tonal Adjustments Summary
Auto Contrast maps the lightest and darkest pixels in an image to white and black
and clips the lightest and darkest 0.5% of the values.
The Equalize command maps the lightest and darkest pixels in an image to white
and black with no clipping.
The Brightness/Contrast command lets you adjust image brightness and contrast
independently. There are no settings for Auto Contrast and Equalize.
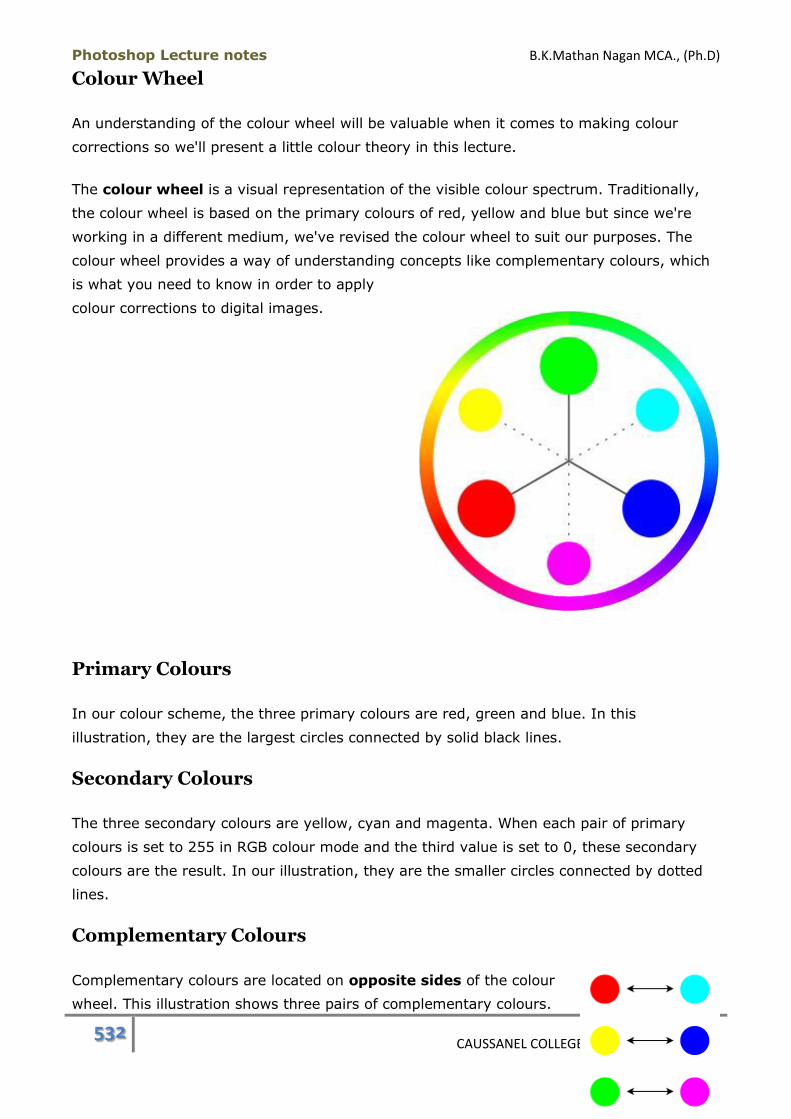
Photoshop Lecture notes B.K.Mathan Nagan MCA., (Ph.D)
532 CAUSSANEL COLLEGE OF ARTS AND SCIENCE
Colour Wheel
An understanding of the colour wheel will be valuable when it comes to making colour
corrections so we'll present a little colour theory in this lecture.
The colour wheel is a visual representation of the visible colour spectrum. Traditionally,
the colour wheel is based on the primary colours of red, yellow and blue but since we're
working in a different medium, we've revised the colour wheel to suit our purposes. The
colour wheel provides a way of understanding concepts like complementary colours, which
is what you need to know in order to apply
colour corrections to digital images.
Primary Colours
In our colour scheme, the three primary colours are red, green and blue. In this
illustration, they are the largest circles connected by solid black lines.
Secondary Colours
The three secondary colours are yellow, cyan and magenta. When each pair of primary
colours is set to 255 in RGB colour mode and the third value is set to 0, these secondary
colours are the result. In our illustration, they are the smaller circles connected by dotted
lines.
Complementary Colours
Complementary colours are located on opposite sides of the colour
wheel. This illustration shows three pairs of complementary colours.
Photoshop Lecture notes B.K.Mathan Nagan MCA., (Ph.D)
533 CAUSSANEL COLLEGE OF ARTS AND SCIENCE
They are:
Red - Cyan
Yellow - Blue
Green - Magenta
Any pair of colours on opposite sides of the colour wheel is considered complementary.
However, the controls you'll see in the colour corrections dialogs are based on the primary
and secondary RGB colours.
Colour Corrections Based on Complementary Colours
If you need to increase the amount of blue in an image, for example, you can accomplish
this by decreasing yellow, its complementary colour. Conversely, you can decrease blue by
increasing yellow. This is the strategy you'll use in the Colour Balance dialog. Other colour
correction tools let you increase or decrease colours directly and in others you may need to
increase adjacent colours to increase a particular colour.
Colour Wheel Summary
Complementary colours appear on opposite sides of the colour wheel.
A colour can be used to offset its complementary colour when making colour
adjustments. An increase in one colour will decrease its complement and vice versa.
Colour Sampler Tool
In this lecture we introduce you to the last tool in the Toolbox: the Colour Sampler. This
can be used to sample colours in an image, like the Eyedropper tool, but its values can be
stored in the Info panel for future reference. It's quite helpful when adjusting an image's
colours.
Sampling Colours
The Colour Sampler tool is bundled with the Eyedropper tool in the Toolbox. The
keyboard shortcut for this tool set is I. It works differently from the Eyedropper tool in that
you use it to click and placesample points in an image. The colour values at a sample
point are stored in the Info panel for as long as the sample point remains in the image. You
can place up to four sample points per image.
Sample Size

Photoshop Lecture notes B.K.Mathan Nagan MCA., (Ph.D)
534 CAUSSANEL COLLEGE OF ARTS AND SCIENCE
Like the Eyedropper tool, there is a Sample Size tool option with the following choices:
Point Sample (one pixel)
3 x 3 Average (average value of 9 pixels)
5 x 5 Average (average value of 25 pixels)
The larger the sample, the more representative of the colours the sample will be. If the
area you need to sample is very small, you may need to use a smaller sample size to avoid
including other colours in the sample.
Placing Sample Points
To place a sample point, simply click in the image with the Colour Sampler tool.
This image shows two sample points. Each point is numbered. The sample
points will only be visible in the image when the Colour Sampler tool and certain
other painting and editing tools are selected.
Colour Sampler Values
For the two samples that were taken above, the Info panel
displays theRGB values for each point. Note that
the sample numbers display in the panel. They correspond
with the numbered sample points in the image.
When you have samples in effect and are working in a colour
adjustment dialog, you'll see two sets of values separated
by a slash in the Info panel. The original value of the colour
component is on the left. The values on the right dynamically reflect the changes in the
sample points as you're making colour adjustments.
Photoshop Lecture notes B.K.Mathan Nagan MCA., (Ph.D)
535 CAUSSANEL COLLEGE OF ARTS AND SCIENCE
In this example, the waterfall image began with a red cast. Two colour samples were
placed in the waterfall. Both values showed that the red component of RGB was higher
than the blue and green components. We needed to adjust the colour so that the resulting
samples were neutral; i.e. the R, G and B values are the same or very close to it. The
Colour Balance adjustment was applied and as you can see by the second set of values for
each sample, we succeeded in neutralizing the red colour cast. (You'll get your chance to
try this in the next lecture.)
Sometimes it's hard to determine how the colours are weighted just by looking at the
image. Taking a sample of an area that you know should be white, grey or black will help
you assess the colour balance.
Hiding/Showing the Colour Values
To hide the Colour Sampler readouts in the Info panel, choose Hide Colour
Samplers from the panel menu. To display them again, choose Show Colour Samplers.
Removing Sample Points
To remove a single sample point, select the Colour Sampler tool and hold the pointer
over a sample point. When the tool changes to an arrowhead, drag the sample
outside of the image window.
To remove all sample points, select the Colour Sampler tool and press the Clear
button in the Tool Options bar.
Colour Sampler Tool Summary
The Colour Sampler tool is used to set up to four sample points in an image.
The RGB colour values of each sample point are displayed in the bottom of the Info
panel. The original sample values are stored in the panel until the sample points are
removed from the image.
When you're working in a colour adjustment dialog, a second set of values are
displayed in the Info panel that reflect the changes brought about by the colour
adjustments.
Colour Sampler Tool Keyboard Shortcuts:
Colour Sampler tool: I
Colour Balance
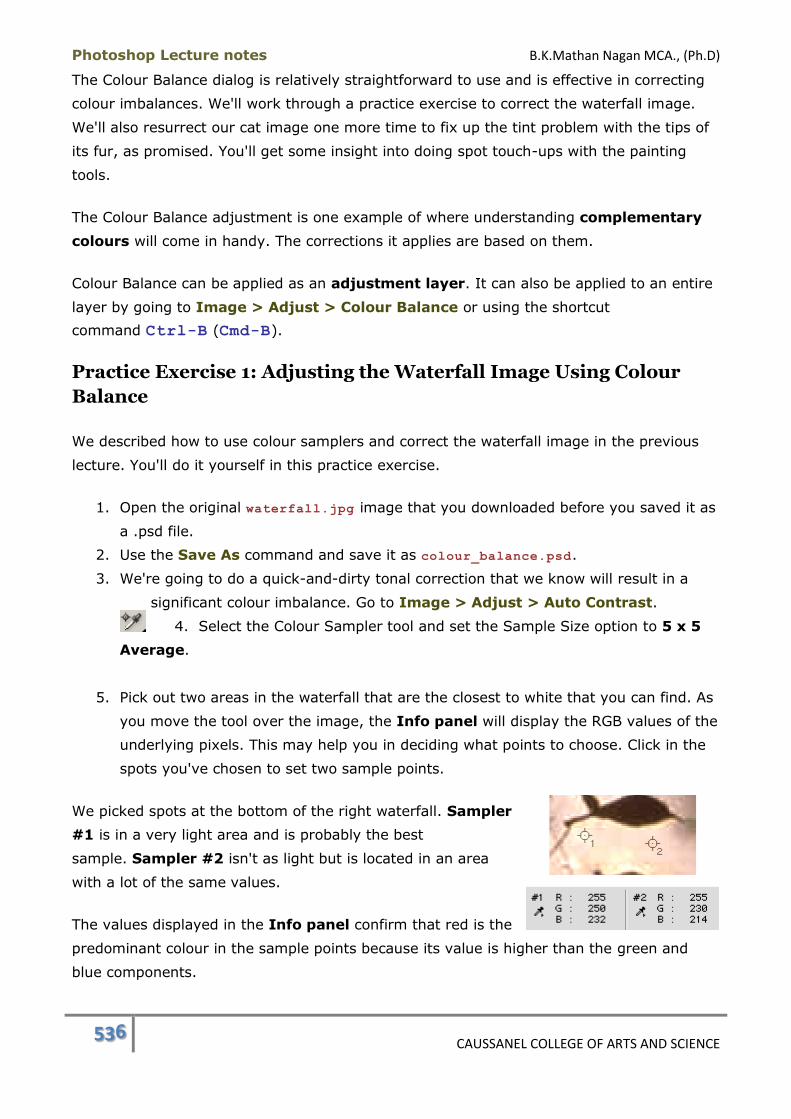
Photoshop Lecture notes B.K.Mathan Nagan MCA., (Ph.D)
536 CAUSSANEL COLLEGE OF ARTS AND SCIENCE
The Colour Balance dialog is relatively straightforward to use and is effective in correcting
colour imbalances. We'll work through a practice exercise to correct the waterfall image.
We'll also resurrect our cat image one more time to fix up the tint problem with the tips of
its fur, as promised. You'll get some insight into doing spot touch-ups with the painting
tools.
The Colour Balance adjustment is one example of where understanding complementary
colours will come in handy. The corrections it applies are based on them.
Colour Balance can be applied as an adjustment layer. It can also be applied to an entire
layer by going to Image > Adjust > Colour Balance or using the shortcut
command Ctrl-B (Cmd-B).
Practice Exercise 1: Adjusting the Waterfall Image Using Colour
Balance
We described how to use colour samplers and correct the waterfall image in the previous
lecture. You'll do it yourself in this practice exercise.
1. Open the original waterfall.jpg image that you downloaded before you saved it as
a .psd file.
2. Use the Save As command and save it as colour_balance.psd.
3. We're going to do a quick-and-dirty tonal correction that we know will result in a
significant colour imbalance. Go to Image > Adjust > Auto Contrast.
4. Select the Colour Sampler tool and set the Sample Size option to 5 x 5
Average.
5. Pick out two areas in the waterfall that are the closest to white that you can find. As
you move the tool over the image, the Info panel will display the RGB values of the
underlying pixels. This may help you in deciding what points to choose. Click in the
spots you've chosen to set two sample points.
We picked spots at the bottom of the right waterfall. Sampler
#1 is in a very light area and is probably the best
sample. Sampler #2 isn't as light but is located in an area
with a lot of the same values.
The values displayed in the Info panel confirm that red is the
predominant colour in the sample points because its value is higher than the green and
blue components.
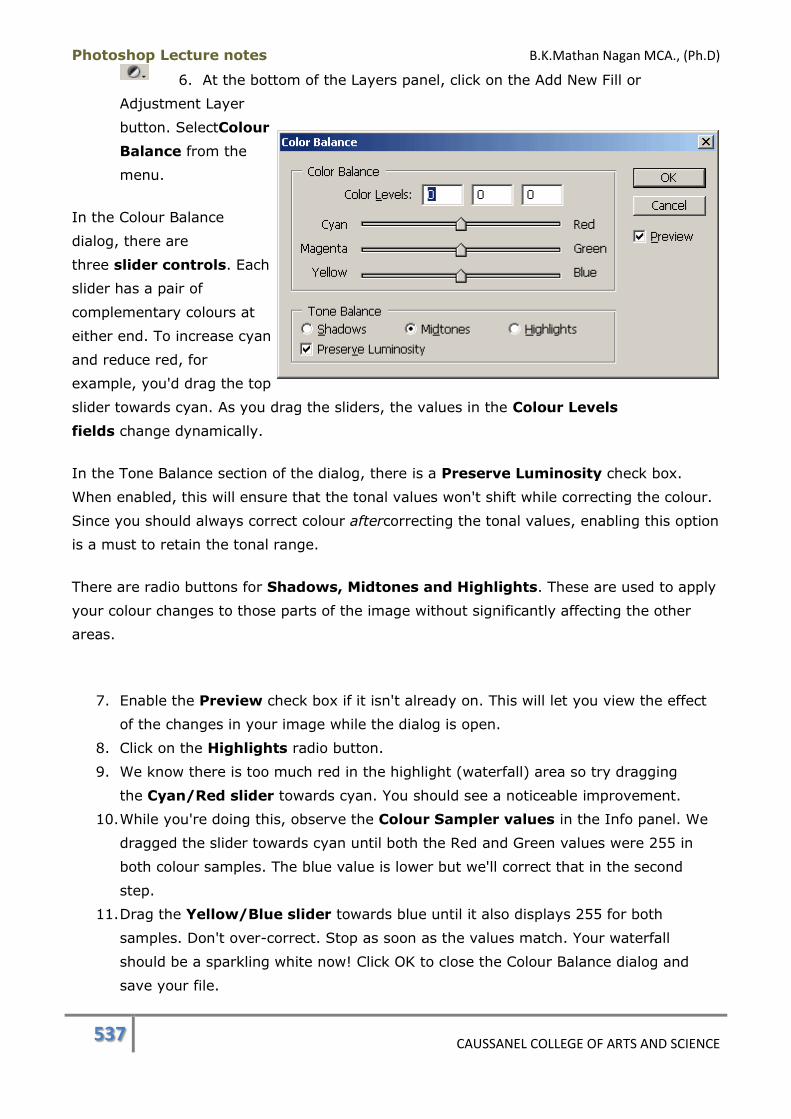
Photoshop Lecture notes B.K.Mathan Nagan MCA., (Ph.D)
537 CAUSSANEL COLLEGE OF ARTS AND SCIENCE
6. At the bottom of the Layers panel, click on the Add New Fill or
Adjustment Layer
button. SelectColour
Balance from the
menu.
In the Colour Balance
dialog, there are
three slider controls. Each
slider has a pair of
complementary colours at
either end. To increase cyan
and reduce red, for
example, you'd drag the top
slider towards cyan. As you drag the sliders, the values in the Colour Levels
fields change dynamically.
In the Tone Balance section of the dialog, there is a Preserve Luminosity check box.
When enabled, this will ensure that the tonal values won't shift while correcting the colour.
Since you should always correct colour aftercorrecting the tonal values, enabling this option
is a must to retain the tonal range.
There are radio buttons for Shadows, Midtones and Highlights. These are used to apply
your colour changes to those parts of the image without significantly affecting the other
areas.
7. Enable the Preview check box if it isn't already on. This will let you view the effect
of the changes in your image while the dialog is open.
8. Click on the Highlights radio button.
9. We know there is too much red in the highlight (waterfall) area so try dragging
the Cyan/Red slider towards cyan. You should see a noticeable improvement.
10. While you're doing this, observe the Colour Sampler values in the Info panel. We
dragged the slider towards cyan until both the Red and Green values were 255 in
both colour samples. The blue value is lower but we'll correct that in the second
step.
11. Drag the Yellow/Blue slider towards blue until it also displays 255 for both
samples. Don't over-correct. Stop as soon as the values match. Your waterfall
should be a sparkling white now! Click OK to close the Colour Balance dialog and
save your file.

Photoshop Lecture notes B.K.Mathan Nagan MCA., (Ph.D)
538 CAUSSANEL COLLEGE OF ARTS AND SCIENCE
12. Hide and display the Colour Balance adjustment layer and marvel at the difference
that it made. You can view
our before and after images.
These are the settings that we used. Yours may vary slightly; it all depends on the sample
points used. In comparing the before-and-after colours, you'll notice that the change
affected the entire image, not just the highlights. However, the majority of the adjustment
was applied to the highlights. If you were to remove or hide the adjustment layer, set a
new Colour Balance layer and try to improve the waterfall area using midtones or shadows,
you'd find it impossible to do.
The great thing about using this method is that you don't need a trained eye in colour. You
can use the colour samplers and the Info panel as your guide. The key is in selecting what
should be a neutral-coloured area in your image to base your decisions on.
Practice Exercise 2: Adjusting the Cat Image
Using Colour Balance
This poor kitty looks like he's been walking through mud
puddles. We're going to use a mask and a Colour Balance
adjustment to clean him up.
We're going to break the rules here and forego the tonal
correction step. We really don't have enough colour
information to go on. We'll skip the Colour Sampler step as
well since we certainly don't have a neutral area in the image
to sample.

Photoshop Lecture notes B.K.Mathan Nagan MCA., (Ph.D)
539 CAUSSANEL COLLEGE OF ARTS AND SCIENCE
1. Open your copy of Cat_extract.psd. This is the image in which we practiced using
the Extractcommand to remove the background.
2. Add a new layer and fill it with white. Drag this layer beneath the cat layer. We're
only doing this so we can see the cat more clearly against a solid background.
3. Click on the cat layer (Layer 0) to make it the active layer.
4. Make a selection of the cat in one of two ways:
o Ctrl-click (Cmd-click) on Layer 0 to load the layer's opacity as a
selection.
o Switch to the Channels panel and Ctrl-click (Cmd-click) on the alpha
channel you saved previously to load it as a selection.
5. Invert the selection by pressing Shift-Ctrl-I (Shift-Cmd-I) or use the
menu commandSelect > Inverse.
6. Go to Select > Feather and set the feather radius to 20 px in the Feather Selection
dialog. Feathering the inverted selection will push the selection back into the area of
the cat to include the outer edges. Using Feather rather than expanding the
selection will ensure that the colour change will fade out at the outer border of the
selection and not create a sharp transition. Because the selection border only
surrounds areas of more than 50% opacity, we can't see the part of it that feathers
over the cat's fur.
7. Hold down the Alt (Option) key while clicking on the Add New Fill or Adjustment
Layer button and selecting Colour Balance from the menu. In the New Layer
dialog, enable Use Previous Layer to Create Clipping Mask and click OK. Your Layers
panel should look like the one below:
The selection was automatically converted to a mask when the
adjustment layer was added. The white and grey (feathered)
areas of the mask (shown in the mask thumbnail) will allow the
colour adjustment to affect the underlying pixels. The colour
adjustment won't affect the black masked area at the centre of the cat. Masking this layer
with the previous layer prevents the adjustment layer from affecting the colour of any
underlying layer.
8. In the Colour Balance dialog, leave the Tone Balance set to midtones. Try adjusting
the slider controls to see if you can make the colour correction. You may find it
helpful to zoom in on the stomach area of the cat, which is the most affected by
discolouration. If you need to close the Colour Balance dialog to reposition and/or
zoom in on your image, click on the OK button, not the Cancel button. Arrange your
image the way you want and then double-click on the adjustment layer thumbnail to

Photoshop Lecture notes B.K.Mathan Nagan MCA., (Ph.D)
540 CAUSSANEL COLLEGE OF ARTS AND SCIENCE
open the dialog again. Note: the Zoom and Hand tool keyboard shortcuts will work
when the dialog is open.
9. When you've improved the colour balance as best as you can, click OK to close the
Colour Balance dialog.
10. Save your file and compare your before and after images by toggling the visibility of
the adjustment layer.
Here's what we ended up with using Colour Levels values of
+73, -22, -64 in the Colour Balance dialog. It's not perfect but
it's definitely a vast improvement.
We took it one step further and used the painting tools to fix up the stomach area, paying
close attention to the area just behind the leg. First, we merged the adjustment layer with
Layer 0 and locked the layer's transparency. The Eyedropper was used to sample a
foreground colour from a normal area of the cat's fur. A soft, round 17 pixel Brush was set
to Colour mode at 50% opacity and then the colour was applied to the greyish/purplish
areas. This fixed the colour problem.
Photoshop Lecture notes B.K.Mathan Nagan MCA., (Ph.D)
541 CAUSSANEL COLLEGE OF ARTS AND SCIENCE
The tips of the fur still looked bedraggled from the background extraction. The layer
transparency was unlocked and a small, soft Eraser brush was used to clear off some stray
pixels between strands of fur. A large, soft Eraser brush was chosen and just the edges of
it were pressed a few times against the tips of the fur to reduce the transparency a bit and
give them a softer appearance.
So there you have it. A very difficult subject has been removed from its background and
you've corrected the colour problem. The cat can be placed against any colour of
background canvas and look like it belongs.
Colour Balance Summary
The slider controls in the Colour Balance dialog are based on complementary colour
pairs. Increasing one value of a pair will decrease the corresponding complementary
value.
The key to sampling colours to use for colour corrections is to pick areas that should
be neutral; i.e. white, grey or black. Then you can remove the colour cast with
Colour Balance.
You can focus your colour corrections on an image's highlights, midtones or
shadows.
The Preserve Luminosity option will ensure that the image's tonal range is protected
during colour corrections.
If there is a selection in an image when an adjustment layer is added, the selection
will be converted to a mask.
Colour Balance Keyboard Shortcuts:
Image > Adjust > Colour Balance: Ctrl-B (Cmd-B)
Other Colour Adjustment Options
There are a number of other colour adjustment options available. Some are more selective
than Colour Balance (and more complex to use), some have limited effectiveness, and
others are geared more towards special effects. An overview of
the Desaturate, Hue/Saturation, Selective Colour, Replace
Colour, Variations, Channel Mixer, and Auto Colour commands will be presented in
this lecture.
Desaturate

Photoshop Lecture notes B.K.Mathan Nagan MCA., (Ph.D)
542 CAUSSANEL COLLEGE OF ARTS AND SCIENCE
Desaturate will remove all colour from a layer or selection, leaving a greyscale image
that is still in RGB colour mode. The command is Image > Adjustments >
Desaturate and it has no options.
Hue/Saturation
The Hue/Saturation function allows you to designate a target colour in an image and adjust
its hue, saturation or lightness. It can be applied as an adjustment layer or to a layer by
going to Image >
Adjustments >
Hue/Saturation.
Edit Pop-up Menu
If Master is selected, changes will apply to all colours in the image. The other
choices are: Reds, Yellows, Greens, Cyans, Blues, Magentas. When a specific colour
is chosen, changes will affect only pixels containing those colours.
Hue
The Hue slider will shift the colours as though moving around the colour wheel. It is
tied to the two colour bars at the bottom of the dialog. The top bar shows the
original placement of the colour wheel spectrum. The bottom bar shows the colour
shift set with the Hue slider. Values can range from -180 to +180, each of which
represents a half rotation around the colour wheel.
Saturation
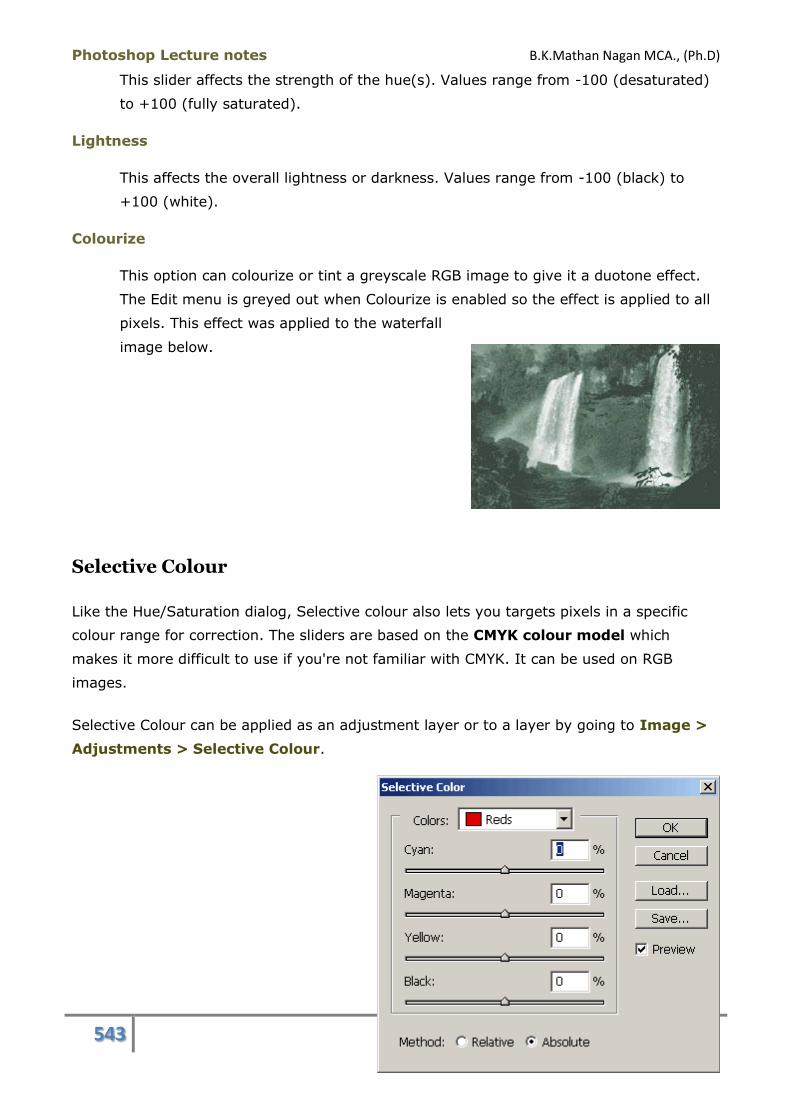
Photoshop Lecture notes B.K.Mathan Nagan MCA., (Ph.D)
543 CAUSSANEL COLLEGE OF ARTS AND SCIENCE
This slider affects the strength of the hue(s). Values range from -100 (desaturated)
to +100 (fully saturated).
Lightness
This affects the overall lightness or darkness. Values range from -100 (black) to
+100 (white).
Colourize
This option can colourize or tint a greyscale RGB image to give it a duotone effect.
The Edit menu is greyed out when Colourize is enabled so the effect is applied to all
pixels. This effect was applied to the waterfall
image below.
Selective Colour
Like the Hue/Saturation dialog, Selective colour also lets you targets pixels in a specific
colour range for correction. The sliders are based on the CMYK colour model which
makes it more difficult to use if you're not familiar with CMYK. It can be used on RGB
images.
Selective Colour can be applied as an adjustment layer or to a layer by going to Image >
Adjustments > Selective Colour.
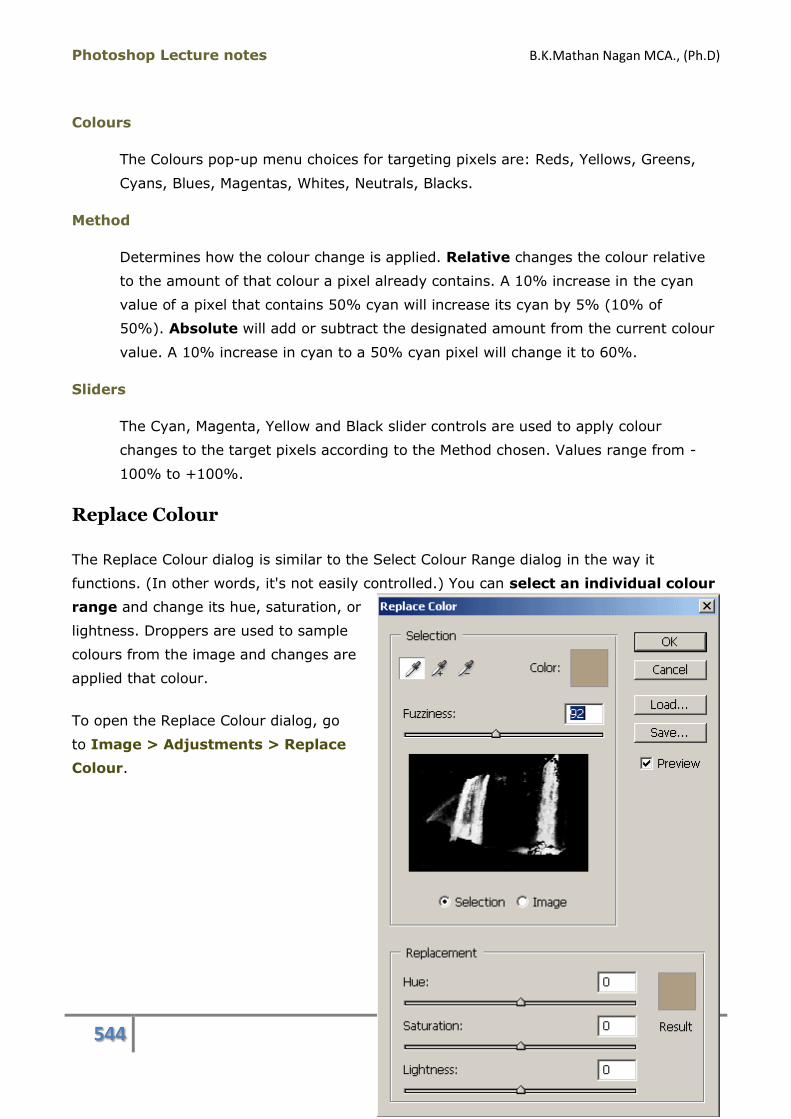
Photoshop Lecture notes B.K.Mathan Nagan MCA., (Ph.D)
544 CAUSSANEL COLLEGE OF ARTS AND SCIENCE
Colours
The Colours pop-up menu choices for targeting pixels are: Reds, Yellows, Greens,
Cyans, Blues, Magentas, Whites, Neutrals, Blacks.
Method
Determines how the colour change is applied. Relative changes the colour relative
to the amount of that colour a pixel already contains. A 10% increase in the cyan
value of a pixel that contains 50% cyan will increase its cyan by 5% (10% of
50%). Absolute will add or subtract the designated amount from the current colour
value. A 10% increase in cyan to a 50% cyan pixel will change it to 60%.
Sliders
The Cyan, Magenta, Yellow and Black slider controls are used to apply colour
changes to the target pixels according to the Method chosen. Values range from -
100% to +100%.
Replace Colour
The Replace Colour dialog is similar to the Select Colour Range dialog in the way it
functions. (In other words, it's not easily controlled.) You can select an individual colour
range and change its hue, saturation, or
lightness. Droppers are used to sample
colours from the image and changes are
applied that colour.
To open the Replace Colour dialog, go
to Image > Adjustments > Replace
Colour.

Photoshop Lecture notes B.K.Mathan Nagan MCA., (Ph.D)
545 CAUSSANEL COLLEGE OF ARTS AND SCIENCE
Fuzziness
This is a misnomer that refers to the selection tolerance. The higher the value, the
more pixels will be included in the selection. This can be used before or after a
selection has been made.
Selection/Image
The preview window will display a black and white mask for Selection or the colour
image whenImage is enabled. The Selection option is useful for confirming the
extent of your selection.
Dropper Tools
The left dropper is used to make an initial selection from the image or from the
preview window if it's set to Image. To add to the selection, use the dropper with
the plus sign. To subtract from the selection, use the dropper with the minus sign.
The Sample colour well shows the average colour you've selected with the droppers.
The Hue, Saturation, and Lightness sliders are used to change the colour in the areas
you've selected. The Sample colour will change to reflect your settings and, if
the Preview check box has been enabled, your image will also display the changes.
Variations
The Variations function will allow you to preview your image in a dialog with a number of
different options applied to it in thumbnail versions. Presumably, it was designed to be
usable even by those not comfortable with the other colour correction methods. It's very
difficult to see the details in the small thumbnails displayed in the Variations dialog.
To open the Variations dialog, go to Image > Adjustments > Variations.
You can target highlights, midtones, shadows or saturation. To change the image,
you click on thumbnails inside the dialog that look the closest to the effect you want.
There is a section for changing the hue and one for tonal values. Each section shows the
current version of the image as a basis for comparison. The Fine/Course settings
determine how much each click will affect the image. For example, if the image needs cyan
to offset too much red, clicking on the More Cyan thumbnail may apply too much cyan.
Reducing the setting towards the Fine value will apply less cyan per mouse click.
Channel Mixer

Photoshop Lecture notes B.K.Mathan Nagan MCA., (Ph.D)
546 CAUSSANEL COLLEGE OF ARTS AND SCIENCE
The Channel Mixer is a sophisticated correction and creative tool that allows you to:
Make colour corrections to individual channels.
Create high quality greyscale images by choosing the strength of each colour
channel's contribution.
Work in a greyscale version of the image and apply tinting.
The Channel Mixer can be applied as an adjustment layer or to an entire layer by going
to Image > Adjustments > Channel
Mixer.
Once you become comfortable with colour corrections using other tools, explore the
potential of the Channel Mixer.
Auto Colour
Auto Colour automatically adjusts an image's contrast and colour by looking at the values
in the image itself rather than at the image's histogram.
To apply Auto Colour, go to Image > Adjustments > Auto Colour. There are no options
for this command.
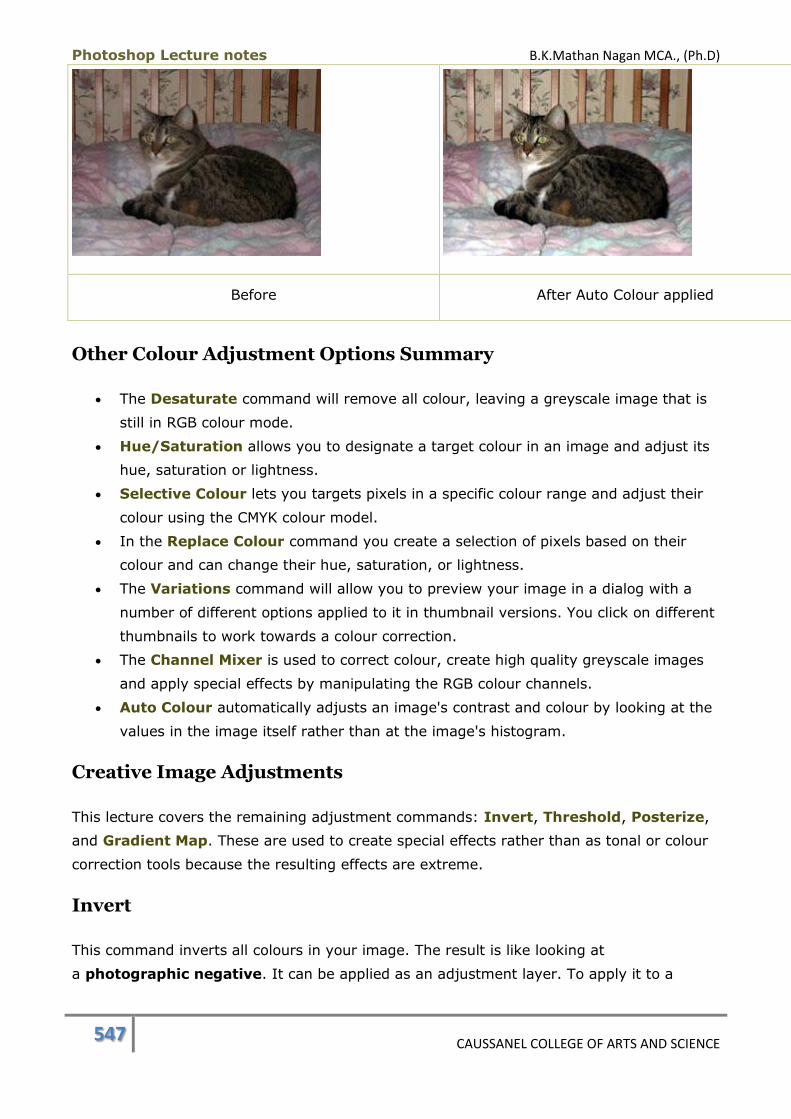
Photoshop Lecture notes B.K.Mathan Nagan MCA., (Ph.D)
547 CAUSSANEL COLLEGE OF ARTS AND SCIENCE
Before After Auto Colour applied
Other Colour Adjustment Options Summary
The Desaturate command will remove all colour, leaving a greyscale image that is
still in RGB colour mode.
Hue/Saturation allows you to designate a target colour in an image and adjust its
hue, saturation or lightness.
Selective Colour lets you targets pixels in a specific colour range and adjust their
colour using the CMYK colour model.
In the Replace Colour command you create a selection of pixels based on their
colour and can change their hue, saturation, or lightness.
The Variations command will allow you to preview your image in a dialog with a
number of different options applied to it in thumbnail versions. You click on different
thumbnails to work towards a colour correction.
The Channel Mixer is used to correct colour, create high quality greyscale images
and apply special effects by manipulating the RGB colour channels.
Auto Colour automatically adjusts an image's contrast and colour by looking at the
values in the image itself rather than at the image's histogram.
Creative Image Adjustments
This lecture covers the remaining adjustment commands: Invert, Threshold, Posterize,
and Gradient Map. These are used to create special effects rather than as tonal or colour
correction tools because the resulting effects are extreme.
Invert
This command inverts all colours in your image. The result is like looking at
a photographic negative. It can be applied as an adjustment layer. To apply it to a
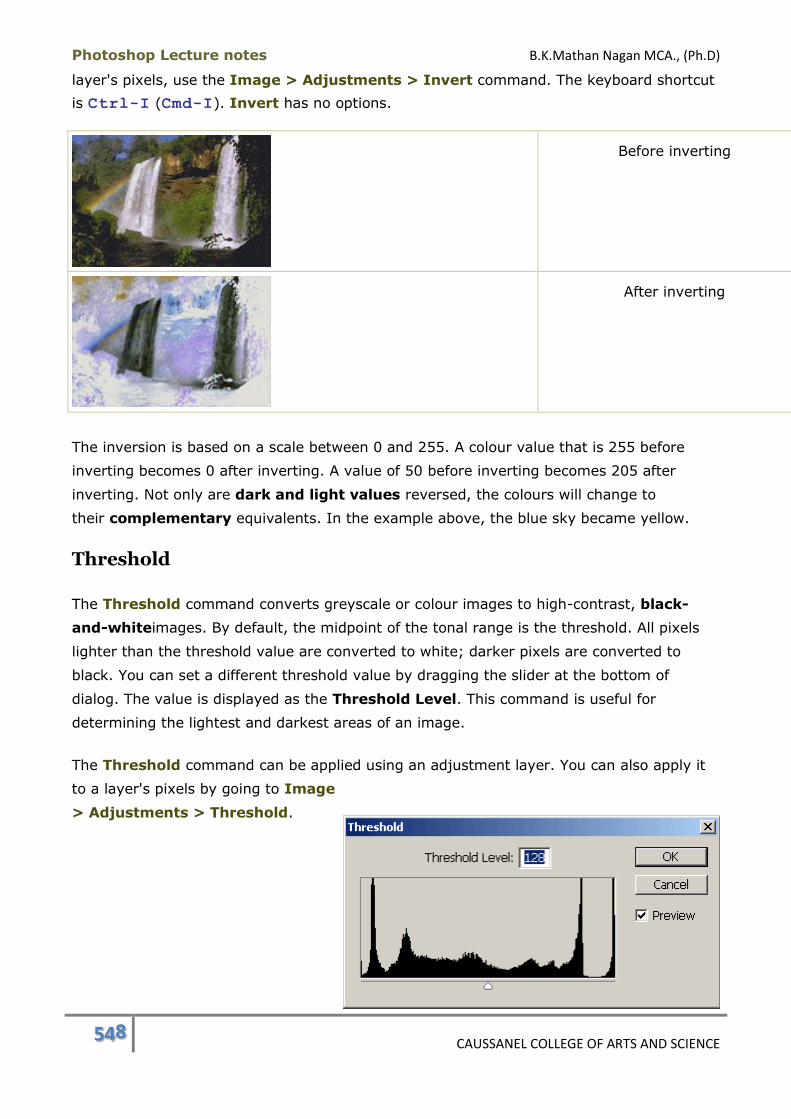
Photoshop Lecture notes B.K.Mathan Nagan MCA., (Ph.D)
548 CAUSSANEL COLLEGE OF ARTS AND SCIENCE
layer's pixels, use the Image > Adjustments > Invert command. The keyboard shortcut
is Ctrl-I (Cmd-I). Invert has no options.
Before inverting
After inverting
The inversion is based on a scale between 0 and 255. A colour value that is 255 before
inverting becomes 0 after inverting. A value of 50 before inverting becomes 205 after
inverting. Not only are dark and light values reversed, the colours will change to
their complementary equivalents. In the example above, the blue sky became yellow.
Threshold
The Threshold command converts greyscale or colour images to high-contrast, black-
and-whiteimages. By default, the midpoint of the tonal range is the threshold. All pixels
lighter than the threshold value are converted to white; darker pixels are converted to
black. You can set a different threshold value by dragging the slider at the bottom of
dialog. The value is displayed as the Threshold Level. This command is useful for
determining the lightest and darkest areas of an image.
The Threshold command can be applied using an adjustment layer. You can also apply it
to a layer's pixels by going to Image
> Adjustments > Threshold.
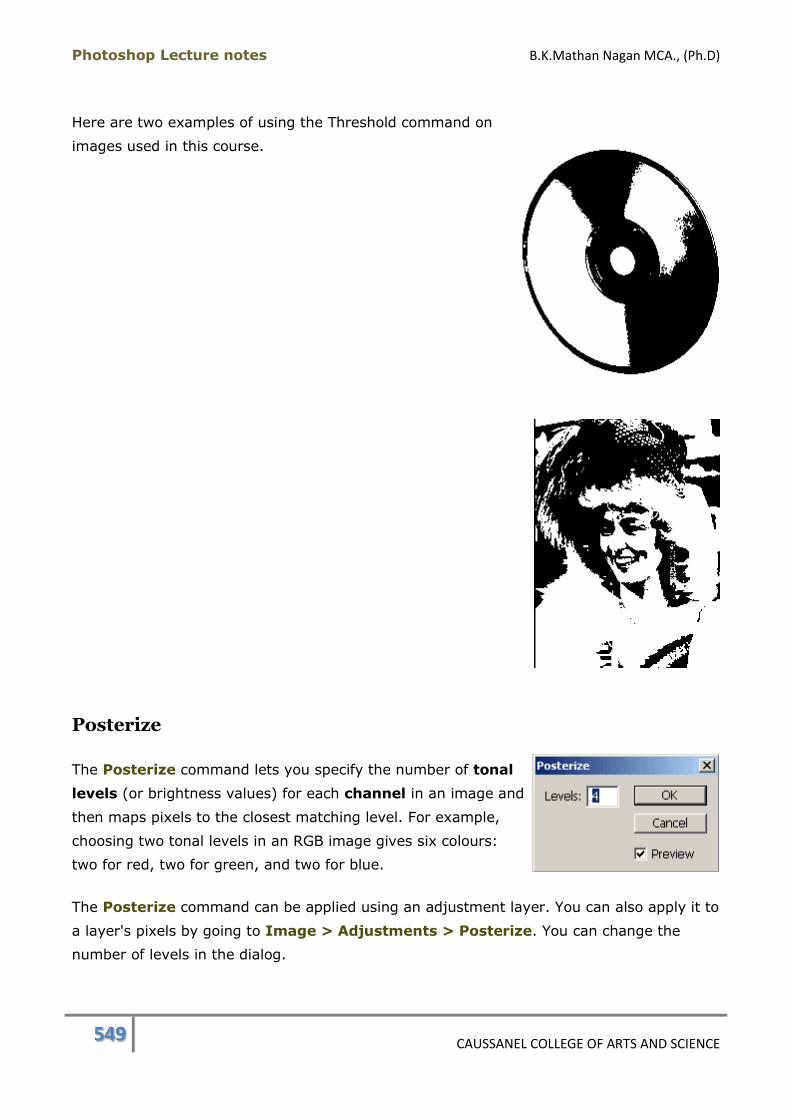
Photoshop Lecture notes B.K.Mathan Nagan MCA., (Ph.D)
549 CAUSSANEL COLLEGE OF ARTS AND SCIENCE
Here are two examples of using the Threshold command on
images used in this course.
Posterize
The Posterize command lets you specify the number of tonal
levels (or brightness values) for each channel in an image and
then maps pixels to the closest matching level. For example,
choosing two tonal levels in an RGB image gives six colours:
two for red, two for green, and two for blue.
The Posterize command can be applied using an adjustment layer. You can also apply it to
a layer's pixels by going to Image > Adjustments > Posterize. You can change the
number of levels in the dialog.
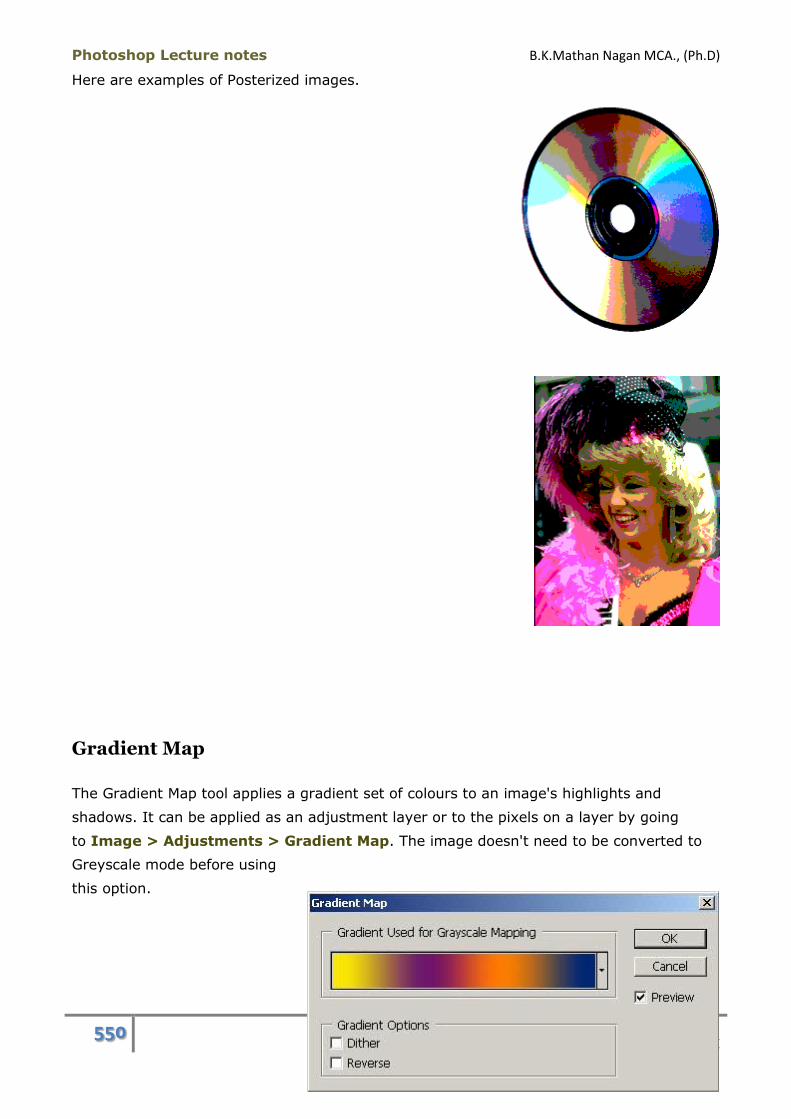
Photoshop Lecture notes B.K.Mathan Nagan MCA., (Ph.D)
550 CAUSSANEL COLLEGE OF ARTS AND SCIENCE
Here are examples of Posterized images.
Gradient Map
The Gradient Map tool applies a gradient set of colours to an image's highlights and
shadows. It can be applied as an adjustment layer or to the pixels on a layer by going
to Image > Adjustments > Gradient Map. The image doesn't need to be converted to
Greyscale mode before using
this option.
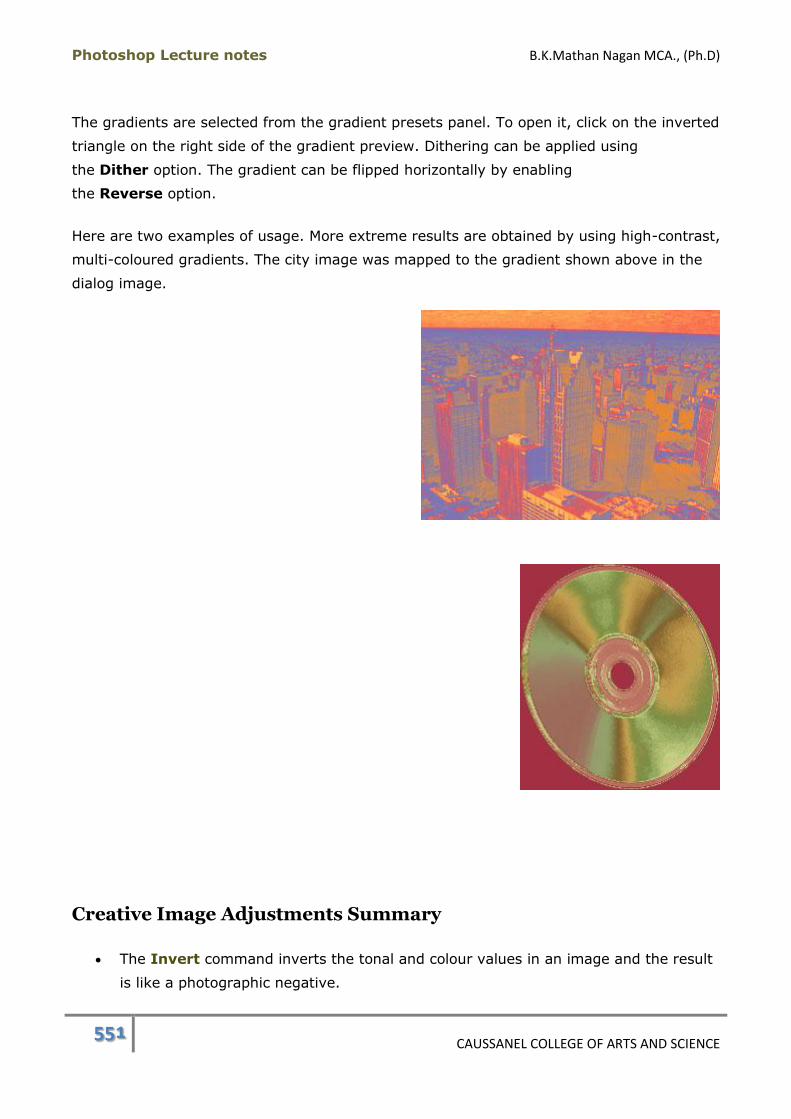
Photoshop Lecture notes B.K.Mathan Nagan MCA., (Ph.D)
551 CAUSSANEL COLLEGE OF ARTS AND SCIENCE
The gradients are selected from the gradient presets panel. To open it, click on the inverted
triangle on the right side of the gradient preview. Dithering can be applied using
the Dither option. The gradient can be flipped horizontally by enabling
the Reverse option.
Here are two examples of usage. More extreme results are obtained by using high-contrast,
multi-coloured gradients. The city image was mapped to the gradient shown above in the
dialog image.
Creative Image Adjustments Summary
The Invert command inverts the tonal and colour values in an image and the result
is like a photographic negative.
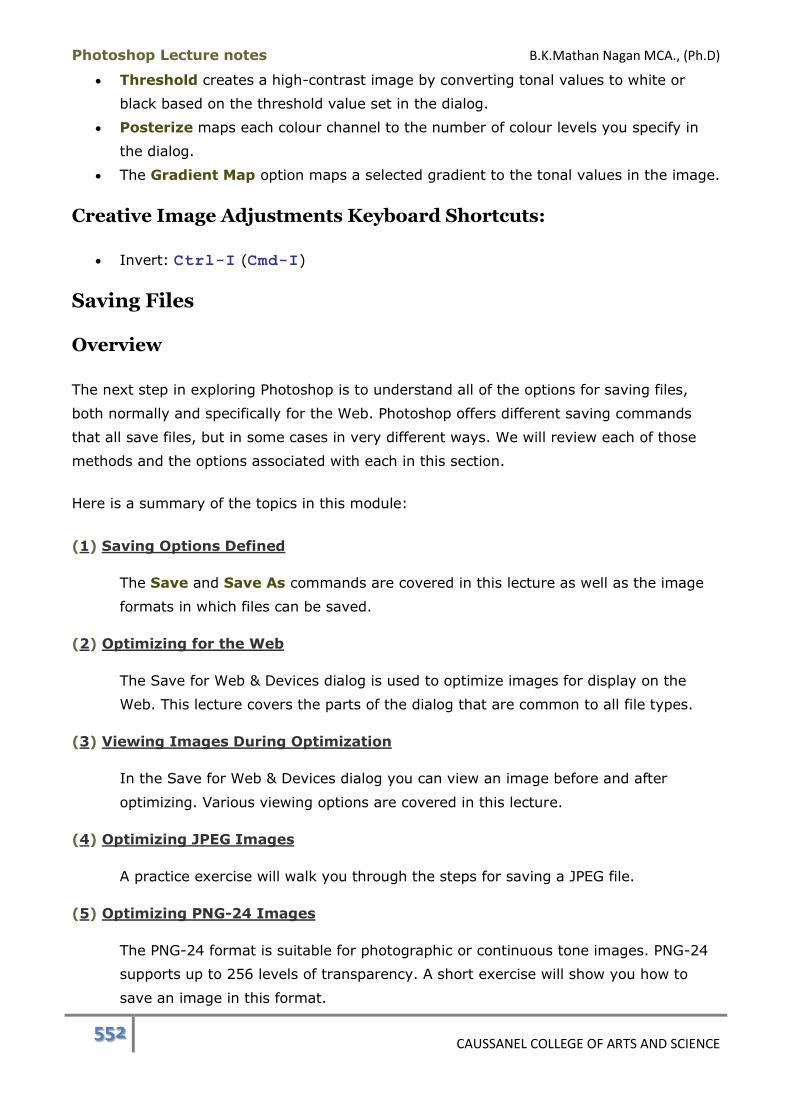
Photoshop Lecture notes B.K.Mathan Nagan MCA., (Ph.D)
552 CAUSSANEL COLLEGE OF ARTS AND SCIENCE
Threshold creates a high-contrast image by converting tonal values to white or
black based on the threshold value set in the dialog.
Posterize maps each colour channel to the number of colour levels you specify in
the dialog.
The Gradient Map option maps a selected gradient to the tonal values in the image.
Creative Image Adjustments Keyboard Shortcuts:
Invert: Ctrl-I (Cmd-I)
Saving Files
Overview
The next step in exploring Photoshop is to understand all of the options for saving files,
both normally and specifically for the Web. Photoshop offers different saving commands
that all save files, but in some cases in very different ways. We will review each of those
methods and the options associated with each in this section.
Here is a summary of the topics in this module:
(1) Saving Options Defined
The Save and Save As commands are covered in this lecture as well as the image
formats in which files can be saved.
(2) Optimizing for the Web
The Save for Web & Devices dialog is used to optimize images for display on the
Web. This lecture covers the parts of the dialog that are common to all file types.
(3) Viewing Images During Optimization
In the Save for Web & Devices dialog you can view an image before and after
optimizing. Various viewing options are covered in this lecture.
(4) Optimizing JPEG Images
A practice exercise will walk you through the steps for saving a JPEG file.
(5) Optimizing PNG-24 Images
The PNG-24 format is suitable for photographic or continuous tone images. PNG-24
supports up to 256 levels of transparency. A short exercise will show you how to
save an image in this format.

Photoshop Lecture notes B.K.Mathan Nagan MCA., (Ph.D)
553 CAUSSANEL COLLEGE OF ARTS AND SCIENCE
(6) Optimizing GIF and PNG-8 Images
Both of these image formats support 256 colours and transparency. In an exercise
you'll learn about the preset GIF and PNG-8 settings, setting transparency and
mattes, dithering and more.
(7) Colour Tables
When GIF and PNG-8 images are optimized, a colour table (or palette) is generated
for the image. There are colour reduction algorithms you can choose from that
determine the type of colour table that will be generated. The different options are
discussed.
Saving Options Defined
There are three options in Photoshop for saving files. Each of these options is found under
the Filemenu. They operate in slightly different ways; be sure you know which one to use
and when. We'll look at Save and Save As in this lecture and then cover Save for Web &
Devices in the following lectures.
Save
The first save command is simply titled Save and it performs a very simple function. It
assumes that you have previously saved the image and it will apply all changes made to
that image since the last save. For example, take an image has already been saved. Since
that save, Levels adjustments were applied to the image. This command will save the
Levels adjustments.
This command is best used as a 'save once, save often' control. There are no options
associated with the Save command. If you haven't previously saved your image and use
the Save command, the Save As dialog will open for you to set options before saving.
The keyboard shortcut for the Save command is Ctrl-S (Cmd-S).
Save As
The Save As command is used when you want to save the file:
for the first time.
with a different name.
to a different location.
in a different image format.
with different save options (e.g. alpha channels).
Photoshop Lecture notes B.K.Mathan Nagan MCA., (Ph.D)
554 CAUSSANEL COLLEGE OF ARTS AND SCIENCE
The keyboard shortcut for the Save As command is Shift-Ctrl-S (Shift-Cmd-S).
When you select Save As, a dialog box will appear asking you for some information
before the save is performed.
File Name, Location and Save Options
Name
You can type a new name for the file in this field.
New
Use this option to create a new folder in which to save your file.
As a Copy
This saves a copy to your hard drive while leaving the current file open. When this
option is disabled, the current file will be closed and any changes you made since
the last save will be lost. The new file will remain open in the application.
Alpha Channels
This will preserve alpha channels you've created in your image. If you don't wish to
save them in the new file, disable this check box. If this option is unavailable, either
there are no alpha channels in your file or the file format you've chosen doesn't
support them.
Layers
This preserves the layers in your file. To flatten the file, disable this check box. If
this option is unavailable, either the file is already flattened or the format you've
chosen doesn't support layers.
Annotations
This saves your notes or audio annotations with the image. If this option is
unavailable, either no annotations have been made or the format you've chosen
doesn't support them. (Only the Photoshop format supports annotations.)
Spot Colours
Spot colours are used in print production. If spot channels have been created, this
option will retain them in the file.
Color
Photoshop Lecture notes B.K.Mathan Nagan MCA., (Ph.D)
555 CAUSSANEL COLLEGE OF ARTS AND SCIENCE
These options are for advanced users who are familiar with colour management.
Thumbnail (Image Previews)
In the Saving Files Preferences, there are options for saving thumbnails with files.
These will be displayed in the dialogs that support thumbnails when the file name is
selected. If your thumbnail preferences have been set to Ask When Saving, these
options will appear in the Save As dialog. It will be called Thumbnail on Windows
systems and Image Previews on Macintosh systems. Thumbnails will increase the file
size so refrain from saving files with thumbnails when you're saving JPEGs and GIFs
that will be used on the Web.
Use Lower Case Extensions (File Extension options)
These options for the file extensions will only be displayed when the Append File
Extension option in the Saving Files Preferences is set to Ask When Saving.
File Format Options
Once you have selected a location, name and save options for your new image, you can
select a different file format from the Format pop-up menu. The choices (with definitions)
are as follows:
Photoshop
The first option is the native file format for Photoshop. This appends a .psd
extension to the image name. This option is the only option that allows you to save
layers, editable text, vector shapes, and styles that you may need to use after the
file is saved. Saving in some other formats will flatten the image and remove those
features from the file. It is generally a good rule to keep one version of your image
in a Photoshop file format in case you need to edit the image.
Photoshop 2.0
Photoshop 2.0 will save an image as a Photoshop file, but with compatibility for older
versions of Photoshop. Version 2.0 will not save layer information and should only
be used if you're giving it to someone using Photoshop versions 1 or 2. This option is
strictly available for compatibility reasons. There is more information on
compatibility at the end of this lecture.
BMP
Photoshop Lecture notes B.K.Mathan Nagan MCA., (Ph.D)
556 CAUSSANEL COLLEGE OF ARTS AND SCIENCE
BMP is a standard Windows image format on DOS and Windows-compatible
computers. You can specify either Microsoft Windows or OS/2 format and a bit depth
for the image.
CompuServe GIF
The CompuServe GIF (Graphic Interchange Format) is a GIF file with predetermined
compression settings.
Photoshop EPS
EPS stands for Encapsulated PostScript and is the standard for almost all illustration,
page layout and graphic applications. An EPS file can be either vector-based or a
bitmap image.
JPEG
Joint Photographic Experts Group (JPEG) format is commonly used to display
photographs over the Web. A JPEG is compressed when saved and decompressed
when opened.
PCX
The PCX file format is used for IBM-compatible PCs. The PCX format associates a
VGA colour palette along with your image.
Photoshop PDF
Using this option, Photoshop will save your image to a one-page PDF (Portable
Document Format) file. A PDF file can be used under multiple operating systems and
platforms without ever changing its appearance.
PICT File
The PICT file format is widely used throughout Mac OS applications for graphics. It
can save one alpha channel with multilevel transparency and has a high compression
rate when solid colours are predominant in an image.
PICT Resource
A PICT Resource file is the same as a PICT file with one difference. Using PICT
Resource you can select the Macintosh Resource Fork Identification, which is used in
some Mac-specific applications.
Pixar

Photoshop Lecture notes B.K.Mathan Nagan MCA., (Ph.D)
557 CAUSSANEL COLLEGE OF ARTS AND SCIENCE
PIXAR files are specifically for PIXAR computers that specialize in high-resolution
graphics for animation. Examples of PIXAR graphics are movies like Toy Story and
Monsters, Inc.
PNG
Portable Network Graphics format is used for lossless compression and for display of
images on the Web. Unlike GIF, PNG-24 supports 24-bit images and one alpha
channel with multilevel transparency. However, most Web browsers do not support
PNG images and in some cases the PNG will be displayed but the multilevel alpha
channel will be rendered incorrectly.
Raw
The Raw file format basically strips out all file associations in an image file and very
generically describes the image's colour information. The Raw format is used for
transferring images between platforms and operating systems. Some digital cameras
have an option for saving pictures in this format. Using the Raw format will allow
other computers to guess at your image's true format and can provide
misrepresentation in a lot of cases.
Scitex CT
Scitex Continuous Tone (CT) format is used for high-end image processing on Scitex
computers, typically for publishing.
Targa
Targa (TGA) is an older type of image file, but it is still used extensively throughout
the video and animation industries. Popular 3D programs such as 3D Studio Max
make use of targa files. Targa files can contain an alpha channel.
TIFF
Tagged-Image File Format (TIFF) is used to exchange files between applications,
operating systems and computer platforms. TIFF is a flexible format supported by
almost all image editing and page layout applications. An alpha channel can be
saved in a TIFF file.
Photoshop DCS 1.0
Desktop Colour Separations (DCS) format is a version of the standard EPS format
that lets you save colour separations of CMYK images. It is typically used in
publishing environments.

Photoshop Lecture notes B.K.Mathan Nagan MCA., (Ph.D)
558 CAUSSANEL COLLEGE OF ARTS AND SCIENCE
Photoshop DSC 2.0
This version of Desktop Colour Separations will save CMYK images with spot colours.
It is typically used in publishing environments.
A warning message may be displayed in the Save As dialog if there are
any incompatibilities between the current file and the options you've selected. For
example, if your file has two alpha channels and you've selected the PNG, PICT or TIFF
format, this warning will appear because these formats only support a single alpha channel.
Photoshop Format Version Compatibility
When you are saving files that will be opened in earlier versions of Photoshop, there are
certain features that aren't backwards compatible. You can maximize version
compatibility by going to the File Saving Preferences and enabling "Maximize backwards
compatibility in Photoshop format".
Here are some of the features introduced in various versions of Photoshop that aren't
supported in earlier versions. If you are using an old version of Photoshop, you may
experience a lot of difficulty sharing files with other Photoshop users. The best way to avoid
this is to always have the latest version.
Type: If you open a Photoshop document containing non-rasterized type layers in
Photoshop 5.5 or earlier, the type will be rasterized.
Layer Styles: Some of the layer styles introduced in Photoshop 6 weren't available
in earlier versions. These won't be present in Photoshop 5.5. or earlier.
Nested groups: Although layer groups (called "sets" in earlier versions) were
supported since Photoshop 6.0, nested groups were not introduced until Photoshop
CS. Therefore, if you are using nested groups (groups within groups), these will be
split up if opened in a version older than CS.
Smart Objects: Smart objects were introduced with Photoshop CS2. If you open a
file containing smart objects in Photoshop CS or earlier, the layers, effects, or
anything else within the smart object will be flattened and/or rasterized.
Smart Filters: Although we haven't discussed these yet, smart filters allow for non-
destructive use of Photoshop's filters. However, these were introduced with
Photoshop CS3, so opening a file that contains smart filters will result in those layers
being flattened.
If you want to use features that need to be transferable to an earlier version, you can
merge or rasterize your layers to retain the effect, if not the editability.
Photoshop Lecture notes B.K.Mathan Nagan MCA., (Ph.D)
559 CAUSSANEL COLLEGE OF ARTS AND SCIENCE
Saving Options Defined Summary
The Save command is used when a file has already been saved with the desired
options and needs to be saved again. There are no options with this command.
The Save As command is used when you want to save the file for the first time,
save it with a different name or options, save it to a different location, or in a
different image format.
Thumbnails or image previews should not be saved with a file when it is being saved
to a format that will be used on the Web because it will increase the file size and,
therefore, the download time.
The Photoshop format is the only option for saving a file to retain layers, editable
text, vector shapes, styles, and annotations.
A single alpha channel can be saved with files in the PNG, PICT and TIFF formats.
If the Save As dialog displays a warning message, it signals that something in your
file is not compatible with the options you've set and you may lose some
information.
Features that were introduced in later versions of Photoshop will not be supported
by earlier versions.
Saving Options Defined Keyboard Shortcuts:
Save: Ctrl-S (Cmd-S)
Save As: Shift-Ctrl-S (Shift-Cmd-S)
Optimizing for the Web
Because Photoshop is a powerful tool for creating images for the Web, Adobe recently
included the ability to save specifically to a compressed Web format within Photoshop. This
is accomplished by using theSave for Web & Devices (Save for Web in Photoshop CS2)
dialog. We'll look at the more general aspects of the dialog in this lecture and then get into
the specifics in subsequent lectures.
Optimizing Images
Your first step is to decide on the Web format for your image. The choices are GIF, JPEG,
or PNG. The format must suit the type of image; e.g., number of colours, transparency
requirements, etc. We discussed the various Web image formats in the first module of this
course. As a reminder, as we address how each format is optimized in the following
lectures, we'll review the types of images suitable for the format being discussed.
Photoshop Lecture notes B.K.Mathan Nagan MCA., (Ph.D)
560 CAUSSANEL COLLEGE OF ARTS AND SCIENCE
An optimized image is one that has been saved using a combination of settings that result
in the best visual quality and the smallest possible file size. While there are optimization
options available when using the Save As command, The Save for Web & Devices dialog
provides a dedicated interface for previewing the appearance and estimated file size of
your images as well as other saving options.
Save for Web & Devices Dialog
To open the Save for Web & Devices dialog, go to File > Save for Web & Devices or
use the keyboard shortcut Shift-Alt-Ctrl-S (Shift-Option-Cmd-S). The most
prominent feature when you open the dialog is the image display area. We'll deal with that
in the next lecture when we talk about the options for viewing your images. We'll begin by
looking at some of the other controls that are relevant regardless of which file type you'll
be generating.
Tools
There is a tool set in the top left corner of the dialog. Many of the tools are the same as
their Toolbox equivalents and have the same keyboard shortcuts. The Hand and Zoom tools
are used to navigate around the image displayed in the dialog. The Slice Select and Toggle
Slices Visibility tools are used when you create slices in your image file (not covered in this
course). The Eyedropper tool and colour swatch are used for assigning a background colour
or matte to images that have transparent areas.
Browser Preview
The Preview In button lets you preview your image in a browser window. Along with the
image, the browser will display the image's file format, dimensions, file size, and
optimization settings.

Photoshop Lecture notes B.K.Mathan Nagan MCA., (Ph.D)
561 CAUSSANEL COLLEGE OF ARTS AND SCIENCE
The Preview In button on the left will display the icon of your system's default browser.
Clicking on this button will open that browser and display your image. If you want to use a
different browser, you can choose another from the Select Browser Menu, which is
shown in the example above. All the browsers on your system are added to this menu
when Photoshop is installed. If you've installed another browser after the Photoshop
installation, you can use the Other option to navigate to the browser and preview your
image in it.
Adding a Browser to the Preview In Menu
1. Create a shortcut (Windows) or alias (Macintosh) for your browser application.
2. Drag it to the Helpers > Preview In folder in the Photoshop application folder.
3. Restart Photoshop.
Output Settings (HTML)
This button opens a dialog that lets you customize an HTML document that can be
published with the image information embedded into it.
Optimizing for the Web Summary
The Save for Web & Devices dialog is used to optimize GIF, JPEG and PNG images
for the Web.
Optimizing an image means selecting settings for saving that will produce the best
quality image at the smallest possible file size.
The Preview In button lets you preview your image in any browser installed on your
system. The browser will also display the image's file format, dimensions, file size,
and optimization settings.
Optimizing for the Web Keyboard Shortcuts:
Save for Web & Devices: Shift-Alt-Ctrl-S (Shift-Option-Cmd-S)
Viewing Images During Optimization
The image viewing area of the Save for Web & Devices dialog lets you see the image before
and after optimizing. You can view them alone or you can use the 2-Up and 4-Up options to
compare an image before and after optimization settings have been applied. The file sizes
of the images are also displayed, information that is very helpful in optimizing.

Photoshop Lecture notes B.K.Mathan Nagan MCA., (Ph.D)
562 CAUSSANEL COLLEGE OF ARTS AND SCIENCE
Choosing a View
There are four tabs at the top of the viewing area in the Save for Web & Devices dialog.
They are:
Original: displays original image only
Optimized: displays image after optimization settings have been applied
2-Up: displays original and optimized image
4-Up: displays original image and three optimized versions
Original
When the Original tab is selected, an uncompressed version of the image appears in the
viewing area with the file name and file size shown.
Optimized
When the Optimized view is chosen, the file format, file size, browser download time and
optimization settings are displayed in the window.
2-Up
In the 2-Up configuration, the original and optimized images are visible. The images may
be arranged horizontally or vertically, depending on the width/height ratio of the image.
The example below shows a horizontal
arrangement.
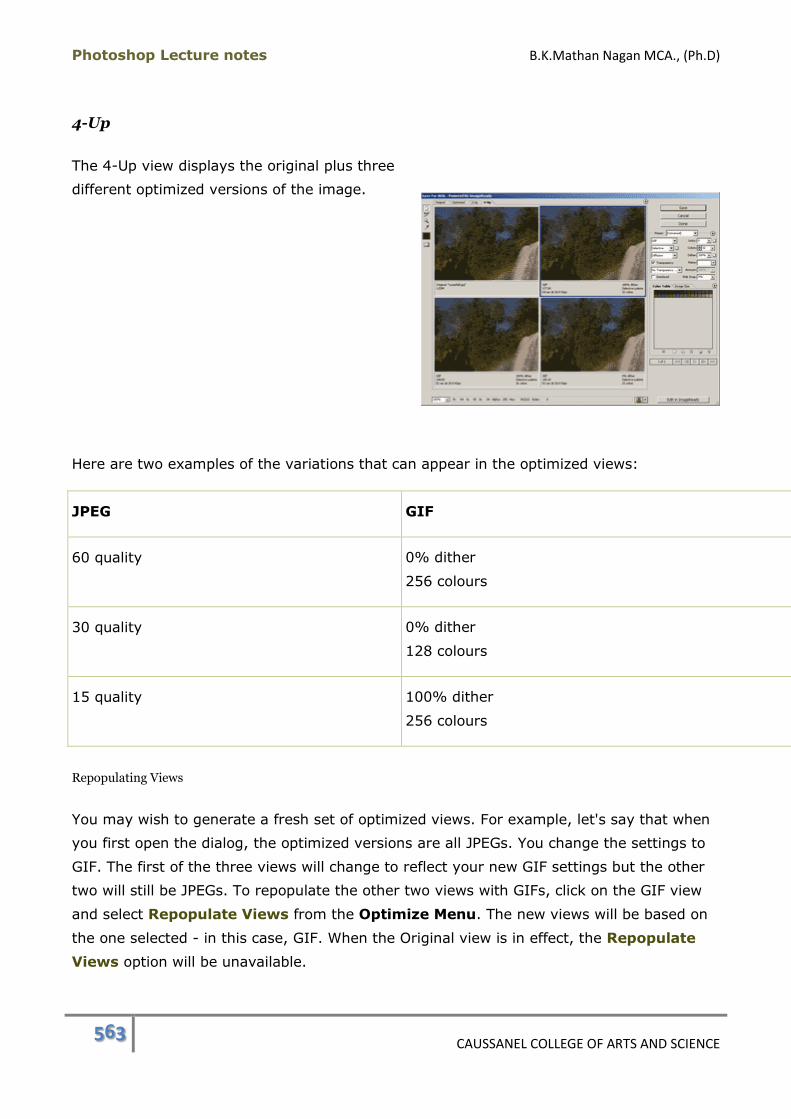
Photoshop Lecture notes B.K.Mathan Nagan MCA., (Ph.D)
563 CAUSSANEL COLLEGE OF ARTS AND SCIENCE
4-Up
The 4-Up view displays the original plus three
different optimized versions of the image.
Here are two examples of the variations that can appear in the optimized views:
JPEG GIF
60 quality 0% dither
256 colours
30 quality 0% dither
128 colours
15 quality 100% dither
256 colours
Repopulating Views
You may wish to generate a fresh set of optimized views. For example, let's say that when
you first open the dialog, the optimized versions are all JPEGs. You change the settings to
GIF. The first of the three views will change to reflect your new GIF settings but the other
two will still be JPEGs. To repopulate the other two views with GIFs, click on the GIF view
and select Repopulate Views from the Optimize Menu. The new views will be based on
the one selected - in this case, GIF. When the Original view is in effect, the Repopulate
Views option will be unavailable.

Photoshop Lecture notes B.K.Mathan Nagan MCA., (Ph.D)
564 CAUSSANEL COLLEGE OF ARTS AND SCIENCE
A selected view will display a black border around it. In addition to selecting a view to
repopulate, you can also select any view and change the optimization settings to see an
alternate version according to your own specifications.
Navigating Views
Panning
You can pan around a selected view by dragging in it with the Hand tool. All views will be
simultaneously repositioned. When held over an unselected view, the pointer becomes
a black arrow that can be used to select another view. If another tool is selected, you can
temporarily toggle to the Hand tool by holding down the space bar.
Changing the Magnification
The Zoom tool is used to change the magnification of all views simultaneously. To zoom
in, hold the Zoom tool over the selected view and click. To zoom out, hold down
the Alt (Option) key while clicking. If another tool is selected, you can temporarily
switch to the Zoom In tool by pressing the Ctrl(Cmd) key or the Zoom Out tool by
pressing the Alt (Option) key. Double-clicking on the Zoom tool is a shortcut for
returning the view to 100%.
The Zoom Level menu is another way to change the magnification of the
views. You can select a preset value from the menu or type in a value followed
by pressing the Enter key on the numeric keypad. The menu also has a Fit
on Screen option that will scale the image so that all of it fits within the
window area. Double-clicking on the Hand tool is a shortcut forFit on Screen.
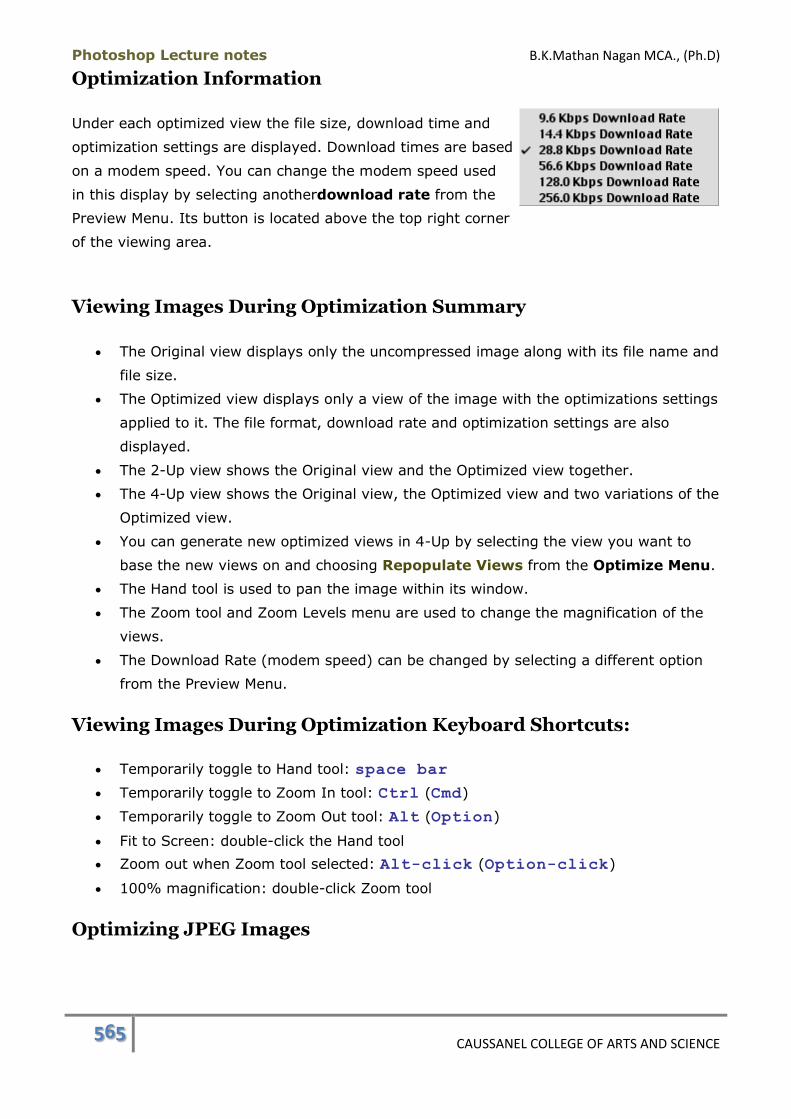
Photoshop Lecture notes B.K.Mathan Nagan MCA., (Ph.D)
565 CAUSSANEL COLLEGE OF ARTS AND SCIENCE
Optimization Information
Under each optimized view the file size, download time and
optimization settings are displayed. Download times are based
on a modem speed. You can change the modem speed used
in this display by selecting anotherdownload rate from the
Preview Menu. Its button is located above the top right corner
of the viewing area.
Viewing Images During Optimization Summary
The Original view displays only the uncompressed image along with its file name and
file size.
The Optimized view displays only a view of the image with the optimizations settings
applied to it. The file format, download rate and optimization settings are also
displayed.
The 2-Up view shows the Original view and the Optimized view together.
The 4-Up view shows the Original view, the Optimized view and two variations of the
Optimized view.
You can generate new optimized views in 4-Up by selecting the view you want to
base the new views on and choosing Repopulate Views from the Optimize Menu.
The Hand tool is used to pan the image within its window.
The Zoom tool and Zoom Levels menu are used to change the magnification of the
views.
The Download Rate (modem speed) can be changed by selecting a different option
from the Preview Menu.
Viewing Images During Optimization Keyboard Shortcuts:
Temporarily toggle to Hand tool: space bar
Temporarily toggle to Zoom In tool: Ctrl (Cmd)
Temporarily toggle to Zoom Out tool: Alt (Option)
Fit to Screen: double-click the Hand tool
Zoom out when Zoom tool selected: Alt-click (Option-click)
100% magnification: double-click Zoom tool
Optimizing JPEG Images
Photoshop Lecture notes B.K.Mathan Nagan MCA., (Ph.D)
566 CAUSSANEL COLLEGE OF ARTS AND SCIENCE
In this lecture, you'll try out the Save for Web & Devices dialog to save an image as a
JPEG. In the process, you'll learn about the different optimization settings and about
selecting a background colour for an image containing transparent areas.
About the JPEG Format
The 24-bit JPEG format supports 16.8 million colours and is ideal for photographs and
continuous tone images. It doesn't support transparency so if transparency is required,
consider a different format. However, if the Web page you plan to place the image on
contains a solid-coloured background, you can fill the background of the JPEG with a
matching matte colour to simulate the effect of transparency.
JPEG compression discards image data to make the file size smaller; thus, it is called
a lossy compression scheme. Overly compressed images can deteriorate quite badly,
resulting in banding, a blocky look or bleeding of colours. The ability to preview different
compression settings in the Save for Web & Devices dialog is very helpful in deciding on a
compression setting.
Practice Exercise: Saving a JPEG
1. Open CDROM.tif. Heaven forbid you'd actually save something this large for use on
the Web but we're going to leave it at its full size so you can better evaluate the
effects of compression.
2. This image has an alpha channel. Display the Channels panel and load the alpha
channel as a selection by Ctrl-clicking (Cmd-clicking) on the Alpha 1
channel.
3. Create a new layer containing the selected pixels by pressing Ctrl-J (Cmd-J).
4. Display the Layers panel and delete the Background layer by dragging it to the
Delete Layer button at the bottom of the panel. You should be left with the CD on an
otherwise transparent layer. This extra step was done so you can try out filling the
background with different colours while optimizing.
5. Go to File > Save for Web & Devices or use the keyboard shortcut Shift-Alt-
Ctrl-S(Shift-Option-Cmd-S).
6. Click on the 4-Up tab near the top of the Save for Web & Devices dialog.
Before we continue, let's look at why GIF isn't a suitable format for this image. The image
below contains what is called banding. Because the GIF format limits you to 256 colours,
similar colours are reassigned to a single common colour which results in the banding
effect.
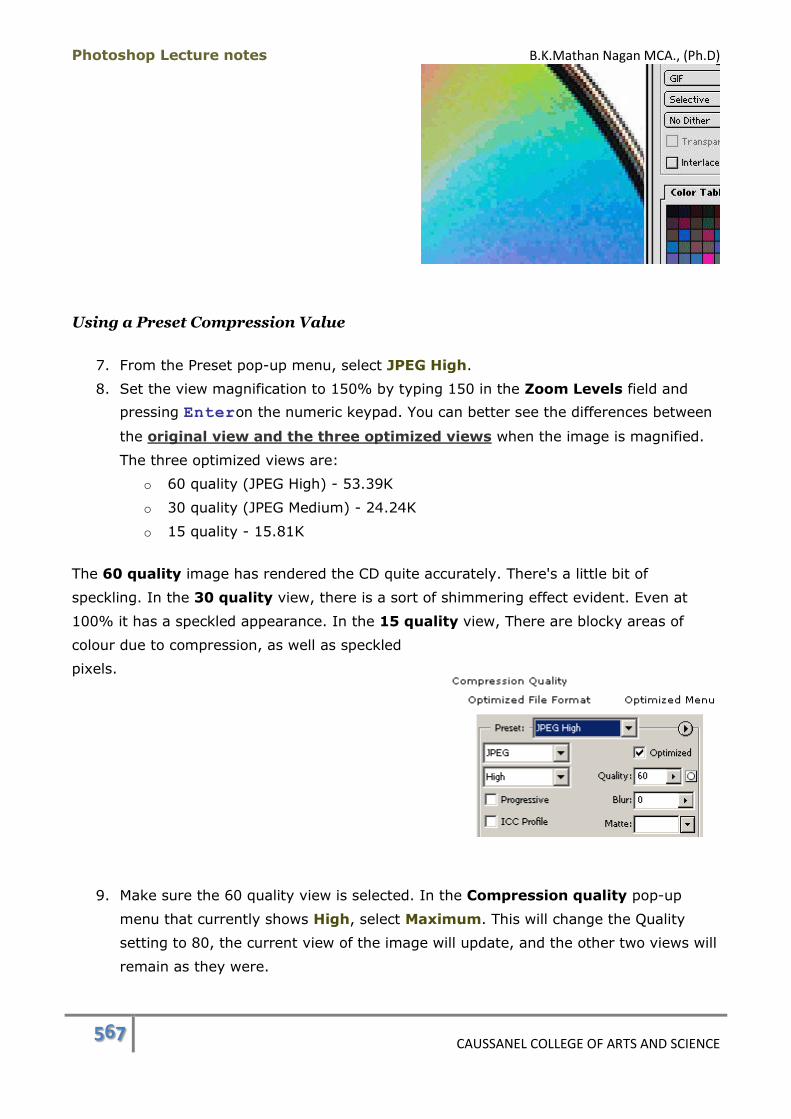
Photoshop Lecture notes B.K.Mathan Nagan MCA., (Ph.D)
567 CAUSSANEL COLLEGE OF ARTS AND SCIENCE
Using a Preset Compression Value
7. From the Preset pop-up menu, select JPEG High.
8. Set the view magnification to 150% by typing 150 in the Zoom Levels field and
pressing Enteron the numeric keypad. You can better see the differences between
the original view and the three optimized views when the image is magnified.
The three optimized views are:
o 60 quality (JPEG High) - 53.39K
o 30 quality (JPEG Medium) - 24.24K
o 15 quality - 15.81K
The 60 quality image has rendered the CD quite accurately. There's a little bit of
speckling. In the 30 quality view, there is a sort of shimmering effect evident. Even at
100% it has a speckled appearance. In the 15 quality view, There are blocky areas of
colour due to compression, as well as speckled
pixels.
9. Make sure the 60 quality view is selected. In the Compression quality pop-up
menu that currently shows High, select Maximum. This will change the Quality
setting to 80, the current view of the image will update, and the other two views will
remain as they were.

Photoshop Lecture notes B.K.Mathan Nagan MCA., (Ph.D)
568 CAUSSANEL COLLEGE OF ARTS AND SCIENCE
10. From the Optimize palette menu, choose the Repopulate Views command. The
other two views will change to 40 and 20 quality. As Photoshop is generating
previews, you may see a progress bar.
Notice that the Preset pop-up menu now
displays [Unnamed]. The Preset pop-up contains preset
compressions for various file types. Whenever you choose
a preset not listed in that menu, it will
display[Unnamed].
If you want to use a Quality setting other than 80, 60, 30 or 10 (Maximum, High, Medium
or Low), you can use the Quality slider control to set a new value in the Quality field or
you can type in a value and then press the Enter key on the numeric keypad.
Setting a Custom Compression Value
11. Let's say you decide that you want to compromise between High (60) and Medium
(30) quality for this image and want to try a Quality setting of 45. Use the slider
control to set this value in the Quality field or type in the number as described in the
previous paragraph.
Blur
12. Double-click on the Zoom tool to reset the magnification to 100%.
13. Click on the button in the Blur field and use the slider to try out various settings
while watching the effects in the view window. This applies a Gaussian blur to the
image to help smooth out rough areas of pixels - especially artifacts (illustrated
below) around the edges of objects. In this image, the danger lies in blurring the
edges of the CD too much. This control is better suited to images that don't have
clearly defined, contrasting areas of colour. Adobe recommends blur values between
0.1 and 0.5.
14. Set the Blur back to 0.
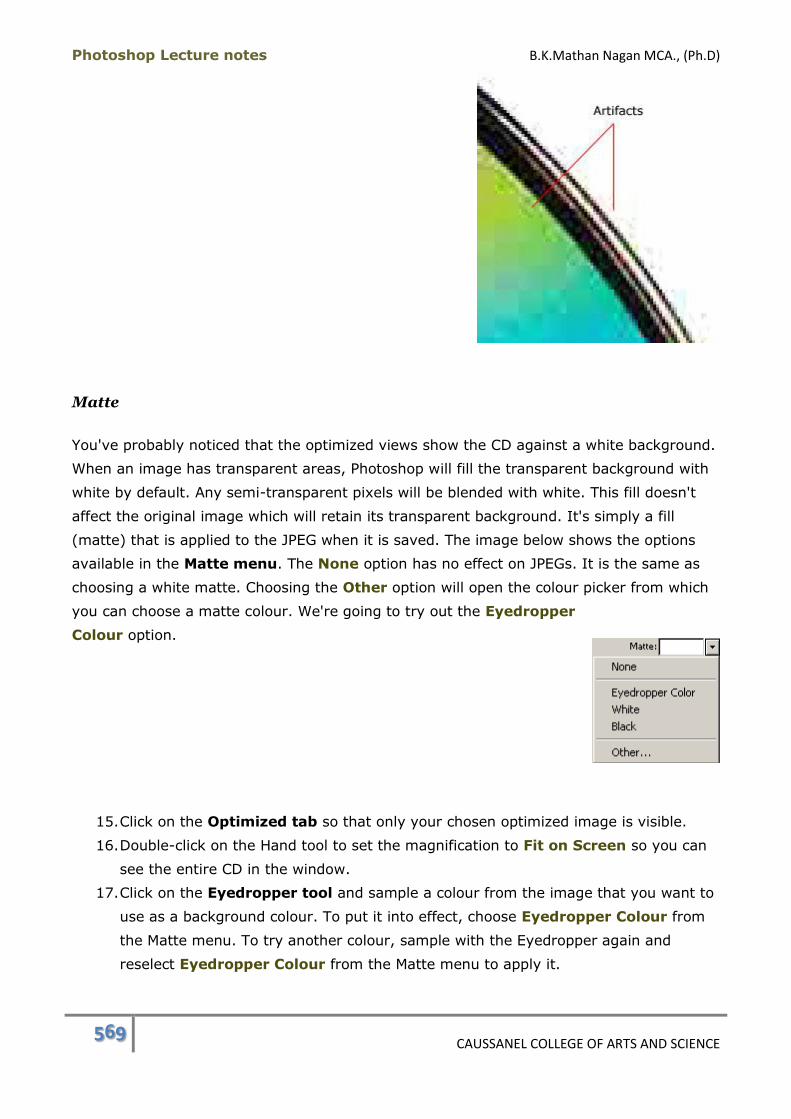
Photoshop Lecture notes B.K.Mathan Nagan MCA., (Ph.D)
569 CAUSSANEL COLLEGE OF ARTS AND SCIENCE
Matte
You've probably noticed that the optimized views show the CD against a white background.
When an image has transparent areas, Photoshop will fill the transparent background with
white by default. Any semi-transparent pixels will be blended with white. This fill doesn't
affect the original image which will retain its transparent background. It's simply a fill
(matte) that is applied to the JPEG when it is saved. The image below shows the options
available in the Matte menu. The None option has no effect on JPEGs. It is the same as
choosing a white matte. Choosing the Other option will open the colour picker from which
you can choose a matte colour. We're going to try out the Eyedropper
Colour option.
15. Click on the Optimized tab so that only your chosen optimized image is visible.
16. Double-click on the Hand tool to set the magnification to Fit on Screen so you can
see the entire CD in the window.
17. Click on the Eyedropper tool and sample a colour from the image that you want to
use as a background colour. To put it into effect, choose Eyedropper Colour from
the Matte menu. To try another colour, sample with the Eyedropper again and
reselect Eyedropper Colour from the Matte menu to apply it.
Photoshop Lecture notes B.K.Mathan Nagan MCA., (Ph.D)
570 CAUSSANEL COLLEGE OF ARTS AND SCIENCE
Previewing in a Browser and Saving
18. Once you have a colour you like, click on the Preview In button to preview your
JPEG in a browser. The matte colour you chose fills the background of the browser
window.
19. Switch back to Photoshop and click on the OK button to save your image as a JPEG.
20. Accept the default settings shown in the Save Optimized As dialog box, although
you may need to navigate to the folder of your choice for saving the new image.
Other JPEG Optimization Settings
Optimized
In addition to the JPEG compression you applied, you can further optimize an image
by checking this box. It will reduce the file size slightly in browsers that support this
feature.
Progressive
Selecting this check box will download your JPEG image in more than one pass in
Web browsers that support this feature. It requires more RAM for the browser to
render a progressive JPEG. It is best used for images with a large file size so the
viewer can get an idea of what the image will be while it's downloading.
Optimized must be enabled in order to use Progressive. Enabling Progressive will
automatically enable the Optimized check box if it was turned off.
ICC Profile
Checking the ICC Profile box will apply a colour profile to your image to try and
ensure a level of colour correction on other computers. For more advanced users.
Optimizing JPEG Images Summary
The JPEG format is ideal for images that contain many colours, like photographs and
continuous tone images.
The JPEG format doesn't support transparency but if your image contains
transparent areas, you can apply a background matte to match a solid Web page
background.
High quality JPEG settings produce better results but a larger file size. Low quality
will reduce the file size but can create areas of speckled or blocky pixels.
The Blur option smoothes out artifacts that appear as a result of compression that is
particularly noticeable around the border between contrasting colours.
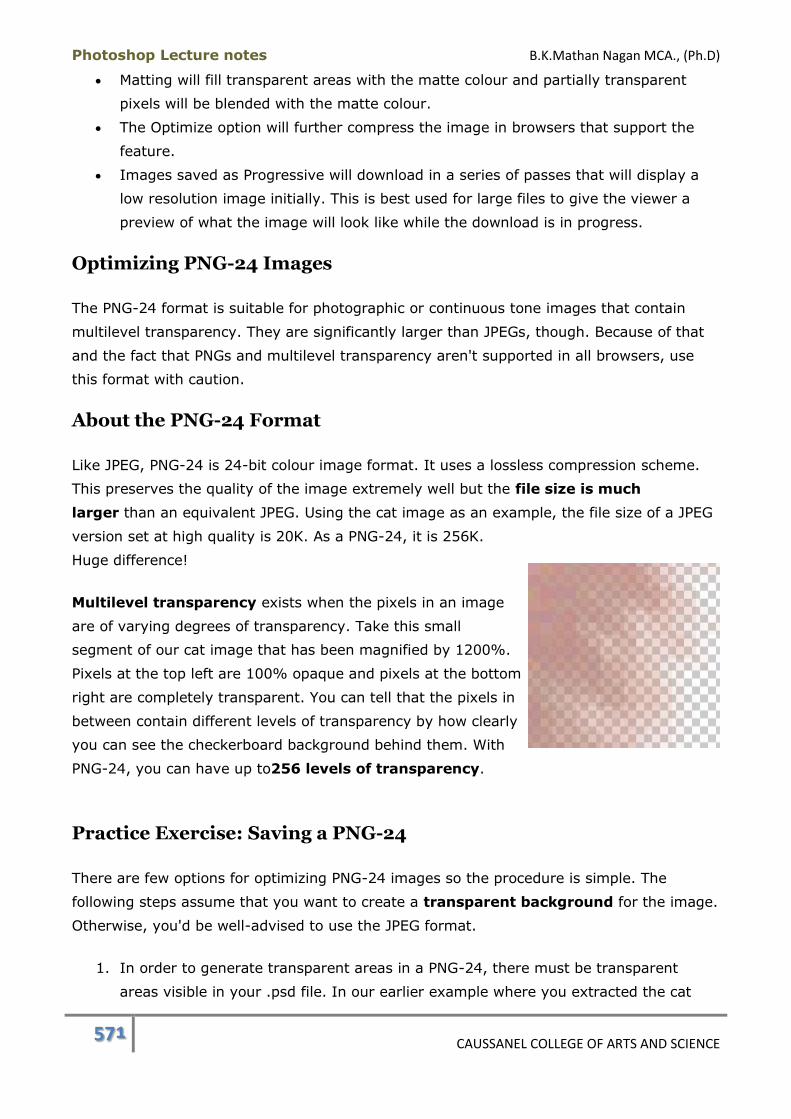
Photoshop Lecture notes B.K.Mathan Nagan MCA., (Ph.D)
571 CAUSSANEL COLLEGE OF ARTS AND SCIENCE
Matting will fill transparent areas with the matte colour and partially transparent
pixels will be blended with the matte colour.
The Optimize option will further compress the image in browsers that support the
feature.
Images saved as Progressive will download in a series of passes that will display a
low resolution image initially. This is best used for large files to give the viewer a
preview of what the image will look like while the download is in progress.
Optimizing PNG-24 Images
The PNG-24 format is suitable for photographic or continuous tone images that contain
multilevel transparency. They are significantly larger than JPEGs, though. Because of that
and the fact that PNGs and multilevel transparency aren't supported in all browsers, use
this format with caution.
About the PNG-24 Format
Like JPEG, PNG-24 is 24-bit colour image format. It uses a lossless compression scheme.
This preserves the quality of the image extremely well but the file size is much
larger than an equivalent JPEG. Using the cat image as an example, the file size of a JPEG
version set at high quality is 20K. As a PNG-24, it is 256K.
Huge difference!
Multilevel transparency exists when the pixels in an image
are of varying degrees of transparency. Take this small
segment of our cat image that has been magnified by 1200%.
Pixels at the top left are 100% opaque and pixels at the bottom
right are completely transparent. You can tell that the pixels in
between contain different levels of transparency by how clearly
you can see the checkerboard background behind them. With
PNG-24, you can have up to256 levels of transparency.
Practice Exercise: Saving a PNG-24
There are few options for optimizing PNG-24 images so the procedure is simple. The
following steps assume that you want to create a transparent background for the image.
Otherwise, you'd be well-advised to use the JPEG format.
1. In order to generate transparent areas in a PNG-24, there must be transparent
areas visible in your .psd file. In our earlier example where you extracted the cat

Photoshop Lecture notes B.K.Mathan Nagan MCA., (Ph.D)
572 CAUSSANEL COLLEGE OF ARTS AND SCIENCE
from its background and then adjusted the colour balance, you set up a white
background layer just to view the colours more easily. If you were to use this same
image to generate a PNG-24, you would hide the background layer before opening
the Save for Web & Devices dialog.
2. Open the Save for Web & Devices dialog by going to File > Save for Web &
Devices (Save for Web in Photoshop CS2 and earlier) or use the keyboard
shortcut Shift-Alt-Ctrl-S(Shift-Option-Cmd-S).
3. Select PNG-24 from the Preset pop-up menu. These are the optimization settings
available:
4. The Transparency check box should be automatically enabled by default. This will
retain multilevel transparency.
5. The Matte option is irrelevant unless you want to fill the background with colour like
you did in the JPEG exercise.
6. The Interlaced option is like the JPEG Progressive option. When enabled, a low
resolution version of the image will download into the browser initially and the
quality will continue to improve until the file is completely downloaded.
7. Click OK to save the image as PNG-24.
This is what the cat image looks like saved as a PNG-24 and placed against a patterned
background on the HTML page:

Photoshop Lecture notes B.K.Mathan Nagan MCA., (Ph.D)
573 CAUSSANEL COLLEGE OF ARTS AND SCIENCE
Optimizing PNG-24 Images Summary
PNG-24 is a 24-bit colour image format that uses a lossless compression scheme.
PNG-24 supports up to 256 levels of transparency.
Because the file size is much larger than any of the other Web image formats and
because PNG-24 is not supported by all browsers, only use this format when
necessary.
The Interlaced option is like the Progressive option for JPEG images. It downloads
the image into the browser, beginning with a low resolution version of the image,
and the quality continues to improve until the image is completely downloaded.
Optimizing GIF and PNG-8 Images
Both GIF and PNG-8 formats support a maximum of 256 colours and one level of
transparency. They are ideal for images containing very few colours such as logos, type,
line art or cartoon drawings. The optimization options for these formats are similar so we'll
look at them together in this lecture.
About the GIF Format
GIF is an 8-bit colour format that supports up to 256 colours. It supports one level of
transparency. What this means is that a pixel is either completely transparent or
completely opaque. Partial transparency isn't supported.
GIF uses LZW compression which is a lossless compression scheme, meaning that no
colour information is discarded. However, if the original image contains more colours than
the number of colours you specify when saving, colour information will be lost. Also, there
is an option to apply lossy compression to a GIF to discard some colour information and
reduce the file size.
About the PNG-8 Format
PNG-8 is very much like the GIF format. It supports up to 256 colours and one level of
transparency. PNG-8 isn't supported by all browsers, though, so GIF will be a better
choice in terms of compatibility.
PNG-8 uses a more sophisticated compression scheme and can yield smaller files in
some cases. In images containing very few colours, GIF files will be smaller so it pays to
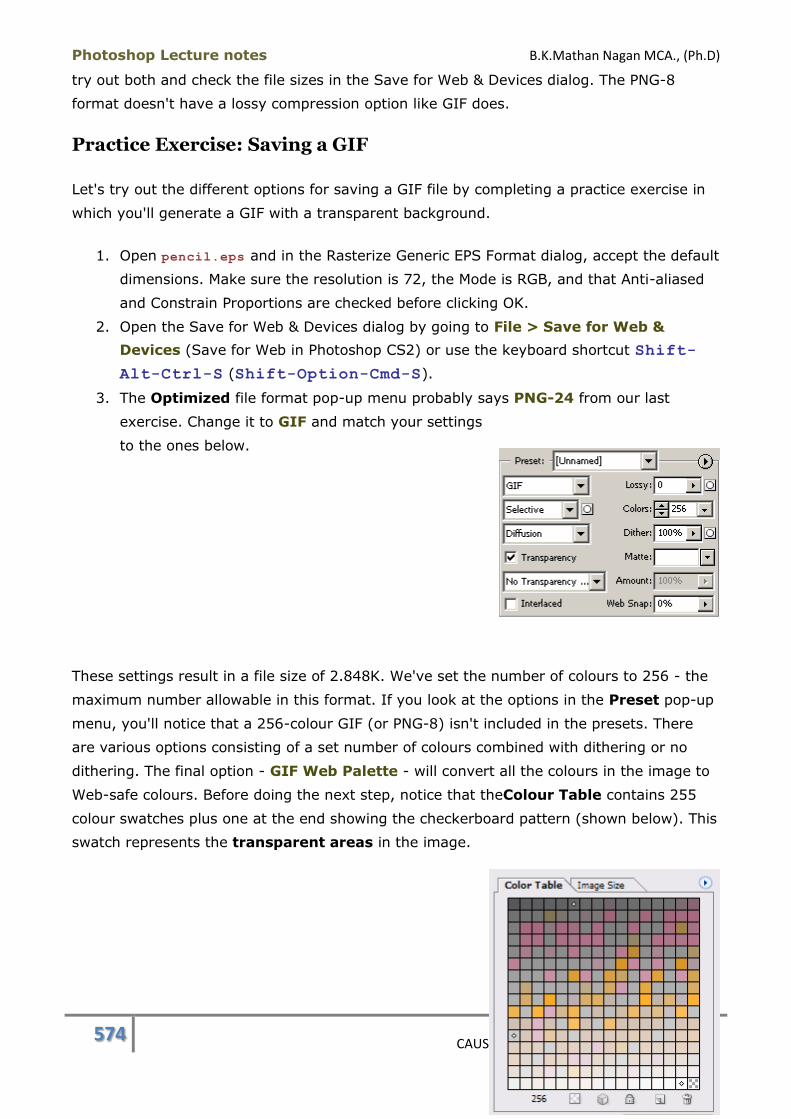
Photoshop Lecture notes B.K.Mathan Nagan MCA., (Ph.D)
574 CAUSSANEL COLLEGE OF ARTS AND SCIENCE
try out both and check the file sizes in the Save for Web & Devices dialog. The PNG-8
format doesn't have a lossy compression option like GIF does.
Practice Exercise: Saving a GIF
Let's try out the different options for saving a GIF file by completing a practice exercise in
which you'll generate a GIF with a transparent background.
1. Open pencil.eps and in the Rasterize Generic EPS Format dialog, accept the default
dimensions. Make sure the resolution is 72, the Mode is RGB, and that Anti-aliased
and Constrain Proportions are checked before clicking OK.
2. Open the Save for Web & Devices dialog by going to File > Save for Web &
Devices (Save for Web in Photoshop CS2) or use the keyboard shortcut Shift-
Alt-Ctrl-S (Shift-Option-Cmd-S).
3. The Optimized file format pop-up menu probably says PNG-24 from our last
exercise. Change it to GIF and match your settings
to the ones below.
These settings result in a file size of 2.848K. We've set the number of colours to 256 - the
maximum number allowable in this format. If you look at the options in the Preset pop-up
menu, you'll notice that a 256-colour GIF (or PNG-8) isn't included in the presets. There
are various options consisting of a set number of colours combined with dithering or no
dithering. The final option - GIF Web Palette - will convert all the colours in the image to
Web-safe colours. Before doing the next step, notice that theColour Table contains 255
colour swatches plus one at the end showing the checkerboard pattern (shown below). This
swatch represents the transparent areas in the image.
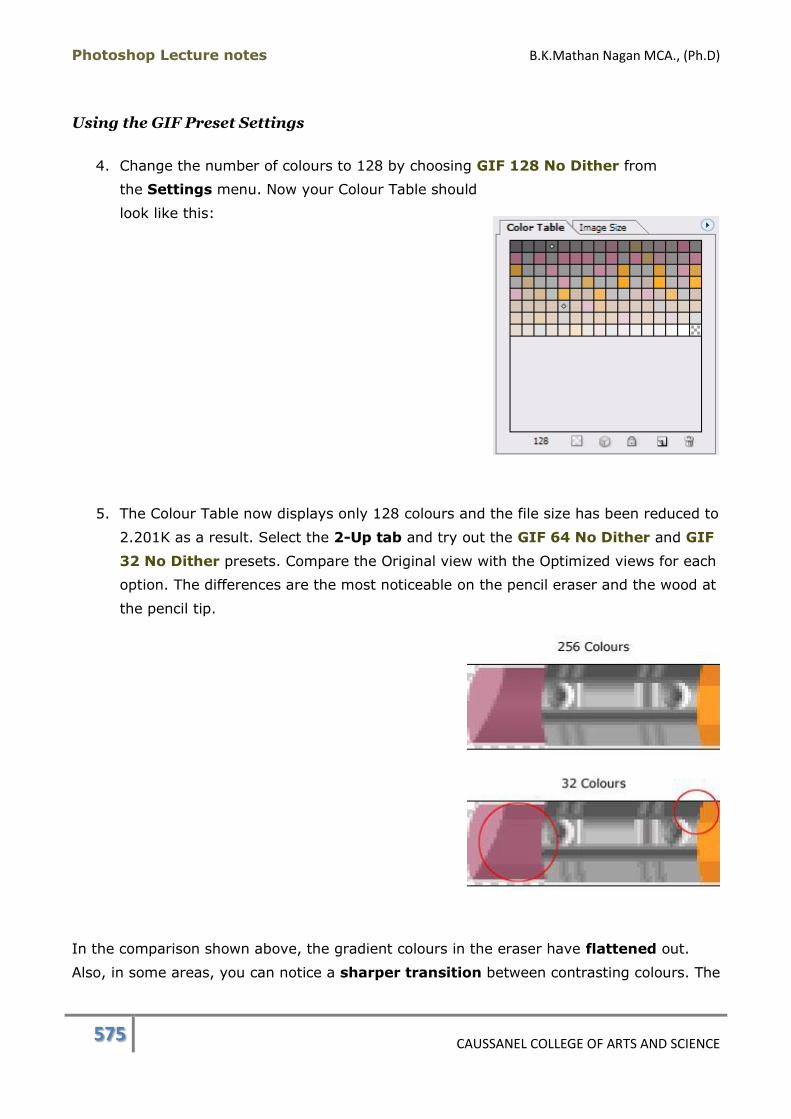
Photoshop Lecture notes B.K.Mathan Nagan MCA., (Ph.D)
575 CAUSSANEL COLLEGE OF ARTS AND SCIENCE
Using the GIF Preset Settings
4. Change the number of colours to 128 by choosing GIF 128 No Dither from
the Settings menu. Now your Colour Table should
look like this:
5. The Colour Table now displays only 128 colours and the file size has been reduced to
2.201K as a result. Select the 2-Up tab and try out the GIF 64 No Dither and GIF
32 No Dither presets. Compare the Original view with the Optimized views for each
option. The differences are the most noticeable on the pencil eraser and the wood at
the pencil tip.
In the comparison shown above, the gradient colours in the eraser have flattened out.
Also, in some areas, you can notice a sharper transition between contrasting colours. The

Photoshop Lecture notes B.K.Mathan Nagan MCA., (Ph.D)
576 CAUSSANEL COLLEGE OF ARTS AND SCIENCE
differences are barely noticeable when displayed at 100% magnification. Our examples are
shown at 300% magnification.
6. Select GIF Web Palette from the Settings menu and watch what happens in the
optimized view. Big difference! This setting snaps all the image's colours to colours
in the Web-safe palette. In this image, it results in
noticeable colour shifts.
When you've taken care to use Web-safe colours in your image, snapping colours to the
Web colour palette is a good idea. It will prevents unwanted dithering in a browser and will
display properly on monitors that only can display 256 colours. Web-safe colours are
marked with a white diamond in the Colour Table.
Transparency and Matte
7. Select the GIF 64 No Dither preset again.
8. Disable the Transparency check box. This is what you will do if you want to create
a solid background for your image instead of transparency. The colour set in
the Matte field will determine the background colour.
9. Change the Matte colour to Black and then enable Transparency again. When a
matte colour is selected and the Transparency option is in effect, the matte colour
will blend in with the partially transparent pixels to make
them 100% opaque.
This is what the pencil with a black matte will look like in the
Optimized view. It demonstrates how the semi-transparent pixels
are blended with black.
In these examples, the top pencil in each pair was matted with white
and the bottom one matted with black and set to transparent. We placed
them on white and black backgrounds in a Web page to illustrate how
smoothly they blend in when the matte colour matches the background
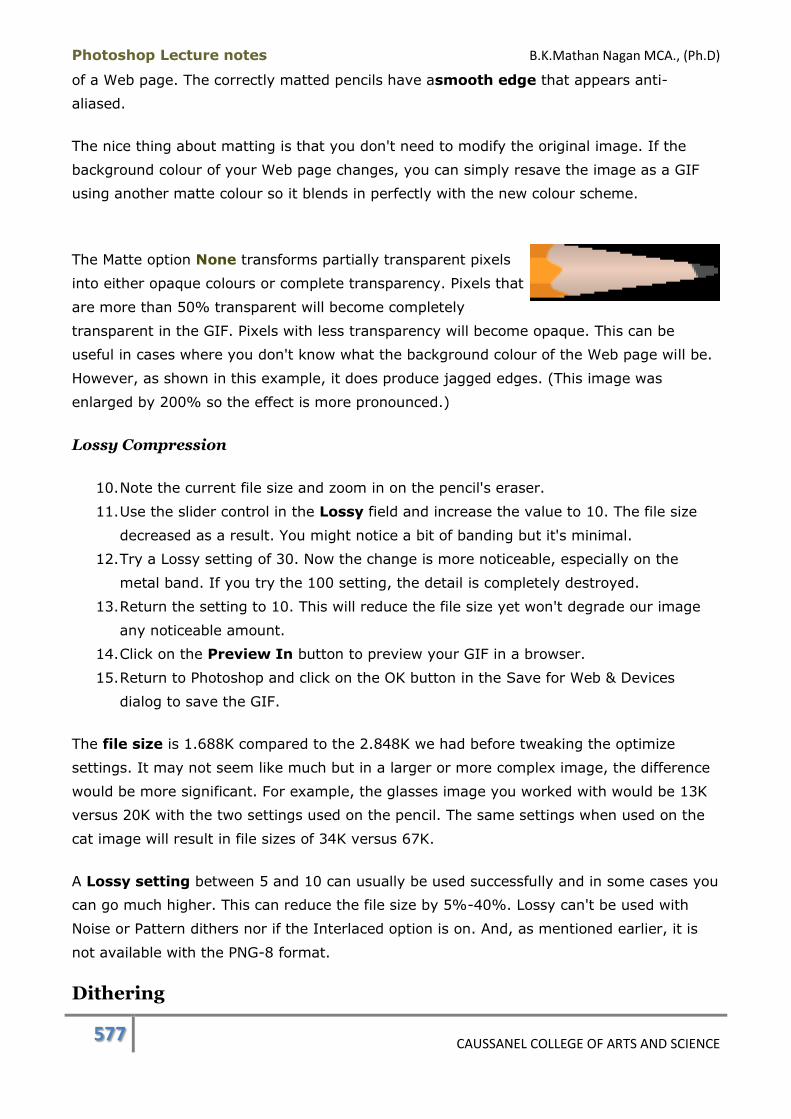
Photoshop Lecture notes B.K.Mathan Nagan MCA., (Ph.D)
577 CAUSSANEL COLLEGE OF ARTS AND SCIENCE
of a Web page. The correctly matted pencils have asmooth edge that appears anti-
aliased.
The nice thing about matting is that you don't need to modify the original image. If the
background colour of your Web page changes, you can simply resave the image as a GIF
using another matte colour so it blends in perfectly with the new colour scheme.
The Matte option None transforms partially transparent pixels
into either opaque colours or complete transparency. Pixels that
are more than 50% transparent will become completely
transparent in the GIF. Pixels with less transparency will become opaque. This can be
useful in cases where you don't know what the background colour of the Web page will be.
However, as shown in this example, it does produce jagged edges. (This image was
enlarged by 200% so the effect is more pronounced.)
Lossy Compression
10. Note the current file size and zoom in on the pencil's eraser.
11. Use the slider control in the Lossy field and increase the value to 10. The file size
decreased as a result. You might notice a bit of banding but it's minimal.
12. Try a Lossy setting of 30. Now the change is more noticeable, especially on the
metal band. If you try the 100 setting, the detail is completely destroyed.
13. Return the setting to 10. This will reduce the file size yet won't degrade our image
any noticeable amount.
14. Click on the Preview In button to preview your GIF in a browser.
15. Return to Photoshop and click on the OK button in the Save for Web & Devices
dialog to save the GIF.
The file size is 1.688K compared to the 2.848K we had before tweaking the optimize
settings. It may not seem like much but in a larger or more complex image, the difference
would be more significant. For example, the glasses image you worked with would be 13K
versus 20K with the two settings used on the pencil. The same settings when used on the
cat image will result in file sizes of 34K versus 67K.
A Lossy setting between 5 and 10 can usually be used successfully and in some cases you
can go much higher. This can reduce the file size by 5%-40%. Lossy can't be used with
Noise or Pattern dithers nor if the Interlaced option is on. And, as mentioned earlier, it is
not available with the PNG-8 format.
Dithering
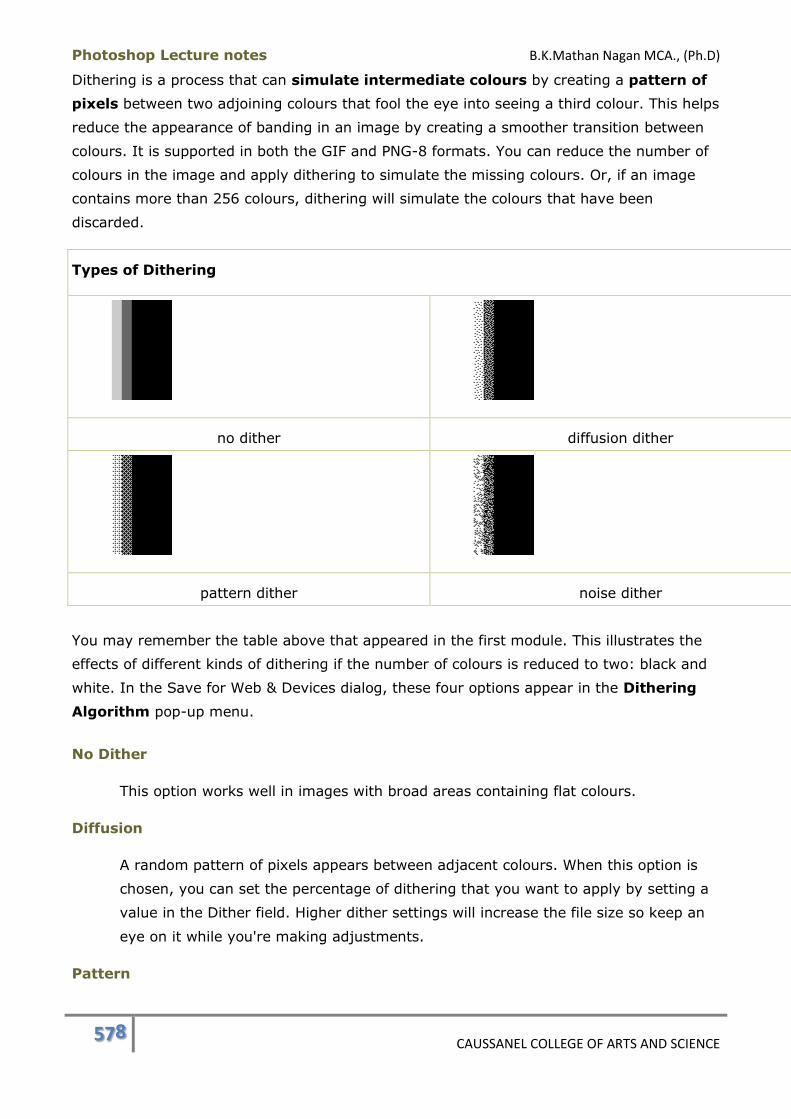
Photoshop Lecture notes B.K.Mathan Nagan MCA., (Ph.D)
578 CAUSSANEL COLLEGE OF ARTS AND SCIENCE
Dithering is a process that can simulate intermediate colours by creating a pattern of
pixels between two adjoining colours that fool the eye into seeing a third colour. This helps
reduce the appearance of banding in an image by creating a smoother transition between
colours. It is supported in both the GIF and PNG-8 formats. You can reduce the number of
colours in the image and apply dithering to simulate the missing colours. Or, if an image
contains more than 256 colours, dithering will simulate the colours that have been
discarded.
Types of Dithering
no dither diffusion dither
pattern dither noise dither
You may remember the table above that appeared in the first module. This illustrates the
effects of different kinds of dithering if the number of colours is reduced to two: black and
white. In the Save for Web & Devices dialog, these four options appear in the Dithering
Algorithm pop-up menu.
No Dither
This option works well in images with broad areas containing flat colours.
Diffusion
A random pattern of pixels appears between adjacent colours. When this option is
chosen, you can set the percentage of dithering that you want to apply by setting a
value in the Dither field. Higher dither settings will increase the file size so keep an
eye on it while you're making adjustments.
Pattern

Photoshop Lecture notes B.K.Mathan Nagan MCA., (Ph.D)
579 CAUSSANEL COLLEGE OF ARTS AND SCIENCE
A fixed pattern is used to simulate intermediate colours. The effect is more
pronounced than Diffusion dither.
Noise
A random pattern of pixels is generated but they aren't as evenly distributed as
Diffusion dithering.
Interlaced
Enabling the Interlaced option will create a GIF that initially downloads as a low resolution
version into the browser and then the quality improves gradually until the image has
finished downloading.
Web Snap
This option is used to help prevent dithering in a browser. It is done by snapping some of
the colours to Web-safe colours. The more Web-safe colours present in a GIF, the less
browser dithering will result. A value of 0% won't change any colours while a value of
100% will change all the colours in the image to Web-safe.
Optimizing GIF and PNG-8 Images Summary
GIF and PNG-8 formats support a maximum of 256 colours and one level of
transparency.
GIF's LZW compression is a lossless compression format. Colours will only be
discarded if the number of colours in the Colour Table are less than the number of
colours in the image.
PNG-8 also uses a lossless compression scheme that, in many cases, can compress
images better than LZW compression can.
PNG-8 isn't supported in all browsers so GIF would be a better choice.
The GIF Web Palette preset will snap all the colours in an image to the closest
Web-safe equivalent colour.
When the Transparency option is enabled, transparent pixels in the image will be
rendered transparent in the GIF and PNG-8 formats. When disabled, the transparent
pixels in the image will be filled with the Matte colour. Semi-transparent pixels will
be blended with the Matte colour.
If the Matte option is set to None, all semi-transparent pixels will be converted to
either opaque or completely transparent.
The Lossy Compression option can reduce the file size by 5%-40%. It applies further
compression to a GIF, in addition to the LZW compression.
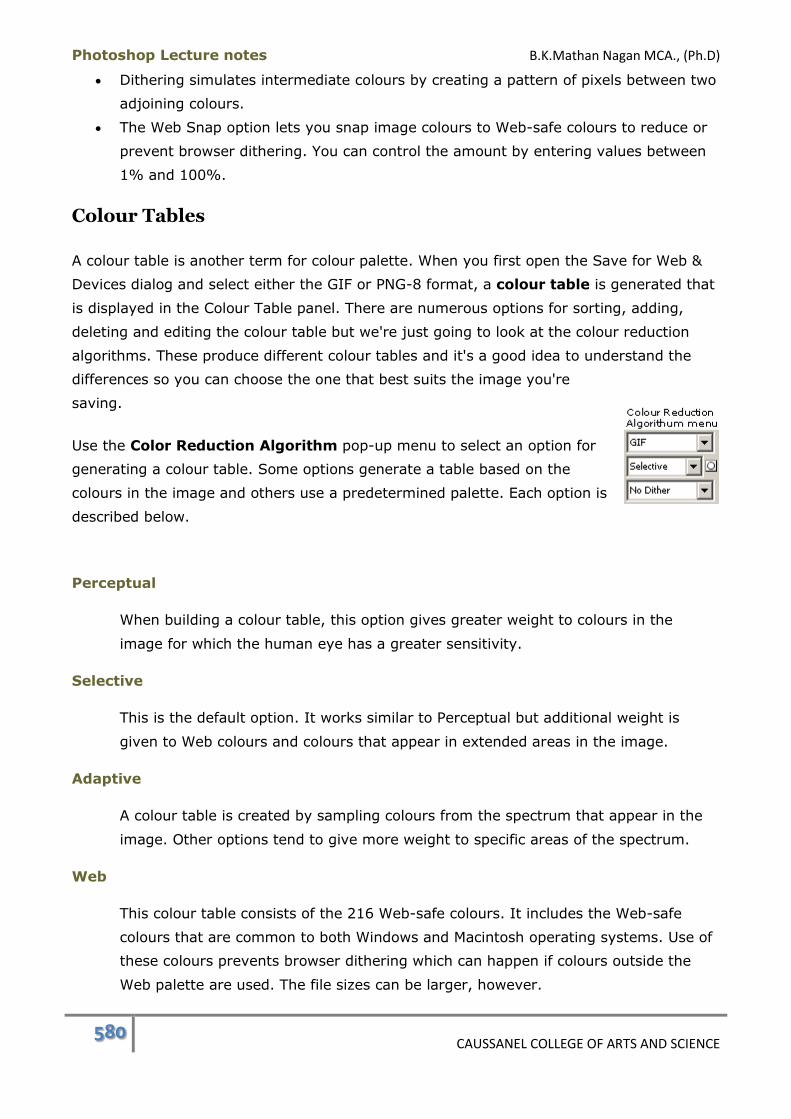
Photoshop Lecture notes B.K.Mathan Nagan MCA., (Ph.D)
580 CAUSSANEL COLLEGE OF ARTS AND SCIENCE
Dithering simulates intermediate colours by creating a pattern of pixels between two
adjoining colours.
The Web Snap option lets you snap image colours to Web-safe colours to reduce or
prevent browser dithering. You can control the amount by entering values between
1% and 100%.
Colour Tables
A colour table is another term for colour palette. When you first open the Save for Web &
Devices dialog and select either the GIF or PNG-8 format, a colour table is generated that
is displayed in the Colour Table panel. There are numerous options for sorting, adding,
deleting and editing the colour table but we're just going to look at the colour reduction
algorithms. These produce different colour tables and it's a good idea to understand the
differences so you can choose the one that best suits the image you're
saving.
Use the Color Reduction Algorithm pop-up menu to select an option for
generating a colour table. Some options generate a table based on the
colours in the image and others use a predetermined palette. Each option is
described below.
Perceptual
When building a colour table, this option gives greater weight to colours in the
image for which the human eye has a greater sensitivity.
Selective
This is the default option. It works similar to Perceptual but additional weight is
given to Web colours and colours that appear in extended areas in the image.
Adaptive
A colour table is created by sampling colours from the spectrum that appear in the
image. Other options tend to give more weight to specific areas of the spectrum.
Web
This colour table consists of the 216 Web-safe colours. It includes the Web-safe
colours that are common to both Windows and Macintosh operating systems. Use of
these colours prevents browser dithering which can happen if colours outside the
Web palette are used. The file sizes can be larger, however.
Photoshop Lecture notes B.K.Mathan Nagan MCA., (Ph.D)
581 CAUSSANEL COLLEGE OF ARTS AND SCIENCE
Custom
Retains the current palette so that any subsequent changes to the image will not
change the palette.
Black & White
This colour table consists only of black and white.
Greyscale
Uses the 256-colour greyscale palette.
Mac OS
Uses the Macintosh operating system's default 256 colour palette.
Windows
Uses the Windows operating system's default 256 colour palette.
We've put together examples of images and the colour tables used to generate them
as GIFs so you can compare the differences.
Colour Tables Summary
A colour table is another name for a colour palette. A colour table is generated for
images being optimized in GIF and PNG-8 format.
A colour table can contain up to 256 colours, including one colour for transparency.
The Perceptual, Selective and Adaptive colour tables are based on colours found in
the image.
The Custom option lets you lock in a colour table so that changes to the image won't
modify the table.
The Web, Black & White, Greyscale, Mac OS and Windows colour tables are based on
a fixed set of colours.
Filters and Special Effects
Overview
You've worked through colour theory, bitmap and vector images, and even levels and
curves. Now we can finally get to the fun part: filters and special effects in Photoshop.
Here is a summary of the topics in this module:

Photoshop Lecture notes B.K.Mathan Nagan MCA., (Ph.D)
582 CAUSSANEL COLLEGE OF ARTS AND SCIENCE
(1) The Filter Menu
The filters in the Filter menu are easy to use and provide a wide number of effects
for any image. We will go through the filter categories and discuss the kinds of
effects each set will produce.
(2) Sharpen Filters
Sharpening is simply bringing a blurry image into focus. In addition to the rather
limited Sharpen tool, Photoshop has four filters that do the job. Only one of these,
the Unsharp Mask, has options for setting the strength and range of sharpening. In
this lecture, you'll try out all four filters with particular emphasis on the Unsharp
Mask.
(3) Blur Filters
There are several blur filters that can create an overall softening effect or blur
directionally. You'll try out each one in a practice exercise.
(4) Pattern Maker
Pattern Maker is a new feature that lets you design seamless tiles from areas of
existing images. Tiles can be used to fill background areas in an image and they can
also be used as a background image on a Web page. You can save these tiles and
use them in any of the layer styles where patterns are used. You'll generate patterns
in a practice exercise. There is a bonus exercise in which you'll create a dramatic
bevel using the pattern you created in the first exercise.
(5) Duotones
Duotones can be used to colourize multiple images to create a visual theme for a
Web site. Old black and white photos can be tinted using a sepia duotone. We'll lead
you through the basic steps of applying duotones in this lecture.
(6) Liquify Command
With the Liquify command you can distort images using tools that can push, pull,
expand, contract, rotate and reflect pixels. It can be used for silly fun like making
caricatures of people's faces or for creating special effects. In this lecture there will
be two exercises. In one, you'll create a caricature and in the other, you'll be
'melting' the CD-ROM image to create abstract art.
(7) Special Effects in Photoshop
Photoshop Lecture notes B.K.Mathan Nagan MCA., (Ph.D)
583 CAUSSANEL COLLEGE OF ARTS AND SCIENCE
By combining all of the things you've learned in the course, you can create some
very stunning visual effects. In this lecture you'll create a brushed metal texture and
lightning, both from scratch.
The Filter Menu
The filters in the Filter menu are easy to use and provide a wide number of effects for any
image. We will go through the filter categories and discuss the kinds of effects each set
will produce. We'll also cover two commands that can be used after a filter is applied: Last
Filter and Fade.
Before Applying a Filter
Your first consideration is to make sure that your image is in RGB colour mode. Working
in a greyscale, CMYK or another colour mode will limit and sometime take away the filters
altogether. This is because to work properly, (most) filters need to be in a high colour bit,
typically between 24-bit and 32-bit.
Filters affect only the active layer and any layer styles applied to it. If there is a selection
on the layer, the filter effect will be confined to the selected portion of the layer. You can
apply filters to adjustment layers too.
Filters can be applied to an alpha channel to create a modified version of the channel that
can be loaded as a selection. They can also be used on masks and quick masks.
Filter Dialogs
Not all filters have dialogs but most do. They contains settings you can adjust to customize
the effect. The dialogs all have a preview window in which you can view the effect. Some
dialogs have a Preview option that allows you to preview the effect in the image itself.
For those that don't, the preview window is
your only guide.
Photoshop Lecture notes B.K.Mathan Nagan MCA., (Ph.D)
584 CAUSSANEL COLLEGE OF ARTS AND SCIENCE
You can drag inside the preview window to shift the image preview to areas you want to
inspect. There are zoom buttons under the window to include more or less of the image in
the preview.
Filter Menu Categories
When you access the Filter menu, filter categories are listed. Individual filters are selected
from the category submenus.
The filters categories are described below:
Artistic
These filters provide a wide variety of effects that make an image look as though it
was painted or hand-drawn.
Blur
The Blur filters apply effects from an out-of-focus look to a motion effect. An
upcoming lecture will describe all of the blur filters.
Brush Strokes

Photoshop Lecture notes B.K.Mathan Nagan MCA., (Ph.D)
585 CAUSSANEL COLLEGE OF ARTS AND SCIENCE
The filters in this menu will change an image to simulate wet-brushed or other
painting styles.
Distort
These filters will distort your image into swirls, waves and zigzags.
Noise
The Noise filters will apply a series of speckled pixels to your image, or remove dust
and scratches from an image.
Pixelate
The Pixelate filters separate colours into distinctive patterns of pixels.
Render
The Render filters will apply specialized Photoshop effects, like changing an image
into clouds, converting objects into 3D, and creating lighting effects.
Sharpen
Sharpen filters are using for - you guessed it - sharpening images. It is more of a
utility filter than a special effects filter. Because this is something you may need to
do frequently, the next lecture addresses the four Sharpen filters to get you on the
right track.
Sketch
Sketch is similar to the Brush Strokes category except it applies a pen, pencil or
charcoal stroke to the image. With the exception of the Chrome and Water Paper
filters, the rest of the Sketch filters will use the foreground and background colours.
If you'd rather apply effects using colours from your image, sample colours with the
Eyedropper tool to set the foreground and background colours.
Stylize
These filters create an embossed or diffused look, apply 3D textures, and
manipulate colour in the image with negative and positive effects.
Texture
The Texture filters apply a series of different textures to an image.
Video

Photoshop Lecture notes B.K.Mathan Nagan MCA., (Ph.D)
586 CAUSSANEL COLLEGE OF ARTS AND SCIENCE
These filters change colours and manipulate images that will end up in a video
production environment.
Other
Here you can create a custom filter, custom dithering for a specific colour (or
colours), move selections and modify masks.
Plug-in Filters
In addition to the filters that come with Photoshop, there are third-party companies that
produce specialty filters for Photoshop. Specialty filters include things like fire on text,
water, glass, and smoke effects.
Third-party filters are called plug-in filters. When installed, these filters will appear at the
bottom of theFilter menu.
There are many companies that sell plug-in filters supported by Photoshop. Here are two
common ones:
Eye Candy
KPT effects
Smart Filters (Photoshop CS3 only)
Smart filters were introduced with Photoshop CS3. They allow for something previously
unheard of in Photoshop: non-destructive filters. Normally filters can only be applied to
rasterized layers, and they permanently alter the pixels of the layer. With Smart Filters, the
editability of the original layer remains intact. Vector based objects such as text and vector
shapes no longer need to be rasterized before applying a filter. To accomplish this magic,
the layer must first be converted to a smart object. Once this is done, the filter can be
applied to the smart object in the form of a smart filter. To use a smart filter:
1. Select the layer you wish to apply the smart filter to.
2. Go to Filter > Convert for Smart Filters.
The smart filter is then added as layer indented
below the original layer and is named,
appropriately enough, Smart Filters. Your actual
filter is indented further below this, and can be
hidden to temporarily disable it, or double-clicked
to change the filter itself. Any other filters you add
Photoshop Lecture notes B.K.Mathan Nagan MCA., (Ph.D)
587 CAUSSANEL COLLEGE OF ARTS AND SCIENCE
to the layer will be added underneath the Smart Filters layer. You can even change the
order of the filters on the fly; something that was not possible with normal filters.
Filter-Related Commands
There are two commands that can be used after you've applied a filter effect. They work
with built-in or plug-in filters.
Last Filter
Look under the Filter menu and notice the first option down: Last Filter or Ctrl-
F (Cmd-F). It will be greyed out. After a filter has been applied, this option will change to
the name of the last filter used; for example, Add Noise. Photoshop's filters have dramatic
effects when applied once to an image and sometimes even more dramatic when applied
multiple times. Last Filter allows you to re-apply the last filter that was run again and
again. Another use is in applying the same filter to additional layers or other images. This
can be helpful when performing repetitive tasks in Photoshop.
Fade
Once you've applied a filter, you can use the Edit > Fade command to modify the effect
that the filter has had. The keyboard shortcut is Shift-Ctrl-F (Shift-Cmd-F) to
open the Fade dialog. You must use this option before doing any more editing in your
image.
You can select a blending mode from the Mode menu and adjust the Opacity either by
using the slider control or entering a value into the text entry field. As you reduce the
Opacity value, you will see the pre-filtered version of your image being restored. With
the Preview check box enabled, you can see the changes being applied to your image.
Practice Exercise: Experimenting with Filters
Photoshop Lecture notes B.K.Mathan Nagan MCA., (Ph.D)
588 CAUSSANEL COLLEGE OF ARTS AND SCIENCE
The best way to familiarize yourself with Photoshop's built-in filters is to select an image
and run a number of filters on it, noting what changes each filter applies. You may want to
use different images when playing with the filters in Photoshop, as different filters can have
very different effects on different types of images (e.g., photos of people, logos).
Spend a little time now with the art_history.psd image open (or your favourite image).
Try out different filters. After you've applied one, undo the filter before applying the next.
This will give you a good idea of what the filters can do. You may also want to try
the Fade command in the Edit menu to see how that works.
The Filter Menu Summary
All filters will be available when working in RGB colour mode. In other modes, some
or all of the filters may be greyed out.
A filter effect is applied to the active layer or to a selection on that layer.
Filters can be applied to alpha channels and quick masks.
Plug-in filters are third-party filters that work in Photoshop.
The Last Filter and Fade commands are used after a filter has been applied.
Last Filter will apply the most recently used filter to the same layer, another layer
or another image.
The Fade command will let you reduce the opacity of the effect and/or assign a
blending mode to it.
The Filter Menu Keyboard Shortcuts:
Last Filter: Ctrl-F (Cmd-F)
Fade <Filter>: Shift-Ctrl-F (Shift-Cmd-F)
Sharpen Filters
Sharpening is simply bringing a blurry image into focus. In addition to the rather limited
Sharpen tool, Photoshop has four filters that do the job. Only one of these, the Unsharp
Mask, has options for setting the strength and range of sharpening. In this lecture, we'll
discuss and try out all four filters with particular emphasis on the Unsharp Mask.
An image can be blurred for a number of reasons: an improperly focused photo or one
taken with a low-quality camera, problems during scanning, or as a result of resizing an
image in Photoshop. Resizing is often unavoidable and even if you use the highest quality
interpolation method, image quality can still suffer.
Practice Exercise: Using the Sharpen Filters
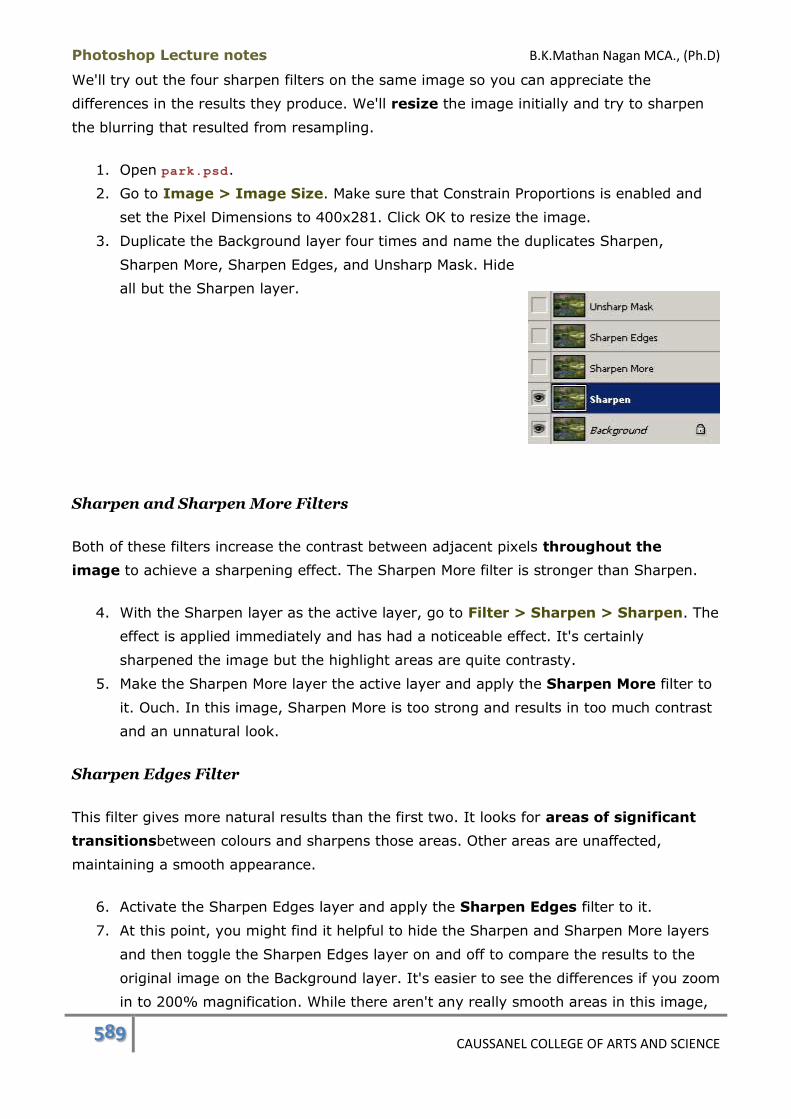
Photoshop Lecture notes B.K.Mathan Nagan MCA., (Ph.D)
589 CAUSSANEL COLLEGE OF ARTS AND SCIENCE
We'll try out the four sharpen filters on the same image so you can appreciate the
differences in the results they produce. We'll resize the image initially and try to sharpen
the blurring that resulted from resampling.
1. Open park.psd.
2. Go to Image > Image Size. Make sure that Constrain Proportions is enabled and
set the Pixel Dimensions to 400x281. Click OK to resize the image.
3. Duplicate the Background layer four times and name the duplicates Sharpen,
Sharpen More, Sharpen Edges, and Unsharp Mask. Hide
all but the Sharpen layer.
Sharpen and Sharpen More Filters
Both of these filters increase the contrast between adjacent pixels throughout the
image to achieve a sharpening effect. The Sharpen More filter is stronger than Sharpen.
4. With the Sharpen layer as the active layer, go to Filter > Sharpen > Sharpen. The
effect is applied immediately and has had a noticeable effect. It's certainly
sharpened the image but the highlight areas are quite contrasty.
5. Make the Sharpen More layer the active layer and apply the Sharpen More filter to
it. Ouch. In this image, Sharpen More is too strong and results in too much contrast
and an unnatural look.
Sharpen Edges Filter
This filter gives more natural results than the first two. It looks for areas of significant
transitionsbetween colours and sharpens those areas. Other areas are unaffected,
maintaining a smooth appearance.
6. Activate the Sharpen Edges layer and apply the Sharpen Edges filter to it.
7. At this point, you might find it helpful to hide the Sharpen and Sharpen More layers
and then toggle the Sharpen Edges layer on and off to compare the results to the
original image on the Background layer. It's easier to see the differences if you zoom
in to 200% magnification. While there aren't any really smooth areas in this image,
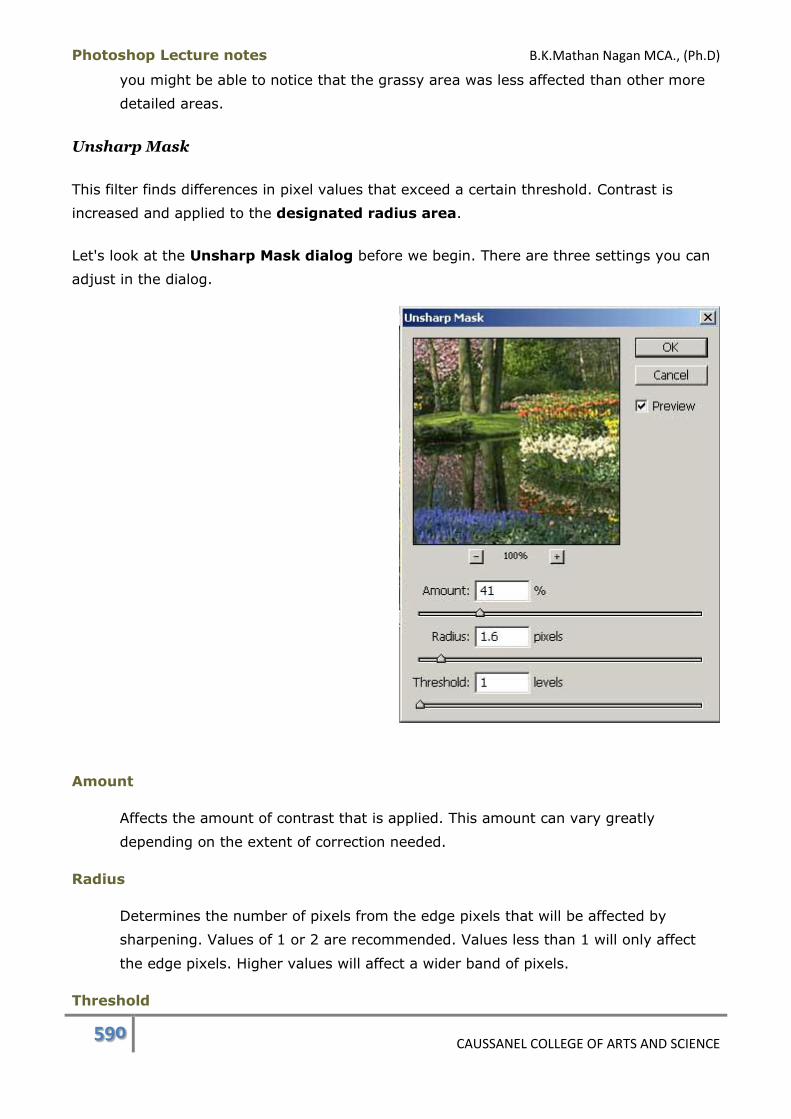
Photoshop Lecture notes B.K.Mathan Nagan MCA., (Ph.D)
590 CAUSSANEL COLLEGE OF ARTS AND SCIENCE
you might be able to notice that the grassy area was less affected than other more
detailed areas.
Unsharp Mask
This filter finds differences in pixel values that exceed a certain threshold. Contrast is
increased and applied to the designated radius area.
Let's look at the Unsharp Mask dialog before we begin. There are three settings you can
adjust in the dialog.
Amount
Affects the amount of contrast that is applied. This amount can vary greatly
depending on the extent of correction needed.
Radius
Determines the number of pixels from the edge pixels that will be affected by
sharpening. Values of 1 or 2 are recommended. Values less than 1 will only affect
the edge pixels. Higher values will affect a wider band of pixels.
Threshold
Photoshop Lecture notes B.K.Mathan Nagan MCA., (Ph.D)
591 CAUSSANEL COLLEGE OF ARTS AND SCIENCE
The Threshold value determines how much difference there must be in the colour
values of adjacent pixels before they will be considered as edge pixels. Values
between 2 and 20 are reasonable starting points. A value of 0 will eliminate the
threshold and all pixels in the image will be sharpened.
8. Make the Unsharp Mask layer the active layer and go to Filter > Sharpen >
Unsharp Mask to open the Unsharp Mask dialog.
9. Enable the Preview check box so you can view the effect in your image.
10. Try playing with the three settings until you come up with a result that you're
satisfied with. Click the OK button to apply the effect.
11. If you want to save your file, save it with another name. Otherwise, you can close it.
You can view our results on a separate page. For the Unsharp Mask version, we used the
settings in the dialog example shown above. The Unsharp Mask is far superior to the
other three Sharpen filters in that you can set the range and strength of its effect.
Sharpen Filters Summary
The Sharpen filter increases the contrast between adjacent pixels throughout the
image.
The Sharpen More filter operates the same way as the Sharpen filter but it applies
greater contrast.
The Sharpen Edges filter looks at areas containing pixels of sufficient contrast to be
considered edges. The contrast of the edge pixels is increased without affecting
other areas in the image.
The Unsharp Mask filter has three settings you can adjust to customize the
sharpening effect: Amount, Radius and Threshold. Because it's adjustable to suit the
individual requirements of each image, this method of sharpening is the preferred
method.
Blur Filters
There are several blur filters that can create an overall softening effect or blur directionally.
You'll try out each one in a practice exercise.
Practice Exercise: Blur Filters
We'll start by trying out Blur, Blur More and Smart Blur to show you what they do. You'll
undo each of them after applying them. For the Gaussian Blur, Motion Blur and Radial Blur,
you'll combine them all in an image that you'll save.

Photoshop Lecture notes B.K.Mathan Nagan MCA., (Ph.D)
592 CAUSSANEL COLLEGE OF ARTS AND SCIENCE
1. Open woman.psd and make the Dodge layer the active layer. (This is the layer on
which you tried out the Blur, Dodge, Burn and Sponge tools.)
2. Use the Layer > Duplicate Layer command to copy the Dodge layer to a new
image. In the Duplicate Layer dialog, name the layer Original in the As: field,
choose New from the Document pop-up menu and enter blur.psd in the Name
field. Click OK.
3. Use the Save command to save the file to your hard drive.
4. Close woman.psd.
5. Duplicate the Original layer by holding down the Alt (Option) key while dragging
the layer over the New Layer button. Name the layer Blur in the Duplicate Layer
dialog.
Blur
6. Use the keyboard shortcut Ctrl-0 (Cmd-0) to expand the image to fit the work
space.
7. Go to Filter > Blur > Blur to apply the Blur filter which will take effect immediately
with no options. The difference is barely perceptible. This filter creates a very subtle
softening effect by averaging the values of adjacent pixels. It can help to smooth
out small irregularities in an image.
Blur More
8. Undo the Blur filter.
9. Apply the Blur More filter. This filter works the same way as the Blur filter but is 3-
4 times stronger.
Smart Blur
Allegedly, this applies a precise,
more intelligent blur. In practice, there is a
very small threshold between minimal blurring
and the beginnings of flattening colours. Carried
much beyond this threshold, the image begins to
look like a cartoon character. The Smart Blur
dialog is pictured below.
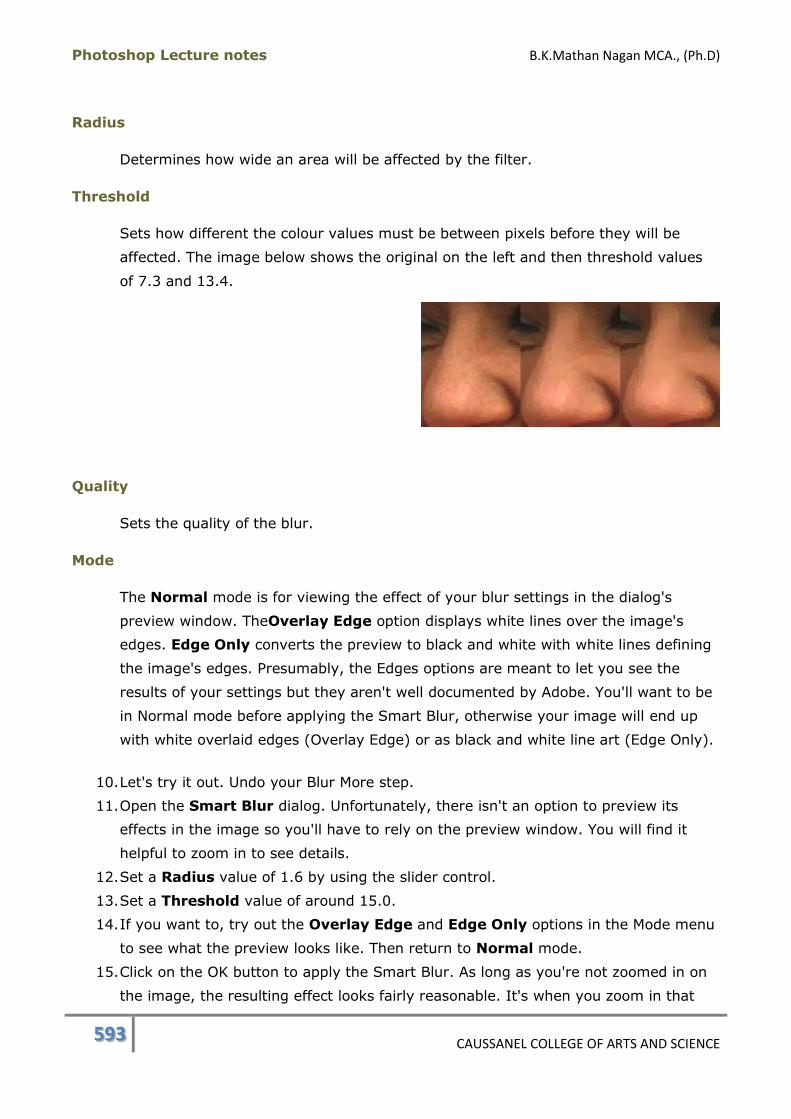
Photoshop Lecture notes B.K.Mathan Nagan MCA., (Ph.D)
593 CAUSSANEL COLLEGE OF ARTS AND SCIENCE
Radius
Determines how wide an area will be affected by the filter.
Threshold
Sets how different the colour values must be between pixels before they will be
affected. The image below shows the original on the left and then threshold values
of 7.3 and 13.4.
Quality
Sets the quality of the blur.
Mode
The Normal mode is for viewing the effect of your blur settings in the dialog's
preview window. TheOverlay Edge option displays white lines over the image's
edges. Edge Only converts the preview to black and white with white lines defining
the image's edges. Presumably, the Edges options are meant to let you see the
results of your settings but they aren't well documented by Adobe. You'll want to be
in Normal mode before applying the Smart Blur, otherwise your image will end up
with white overlaid edges (Overlay Edge) or as black and white line art (Edge Only).
10. Let's try it out. Undo your Blur More step.
11. Open the Smart Blur dialog. Unfortunately, there isn't an option to preview its
effects in the image so you'll have to rely on the preview window. You will find it
helpful to zoom in to see details.
12. Set a Radius value of 1.6 by using the slider control.
13. Set a Threshold value of around 15.0.
14. If you want to, try out the Overlay Edge and Edge Only options in the Mode menu
to see what the preview looks like. Then return to Normal mode.
15. Click on the OK button to apply the Smart Blur. As long as you're not zoomed in on
the image, the resulting effect looks fairly reasonable. It's when you zoom in that
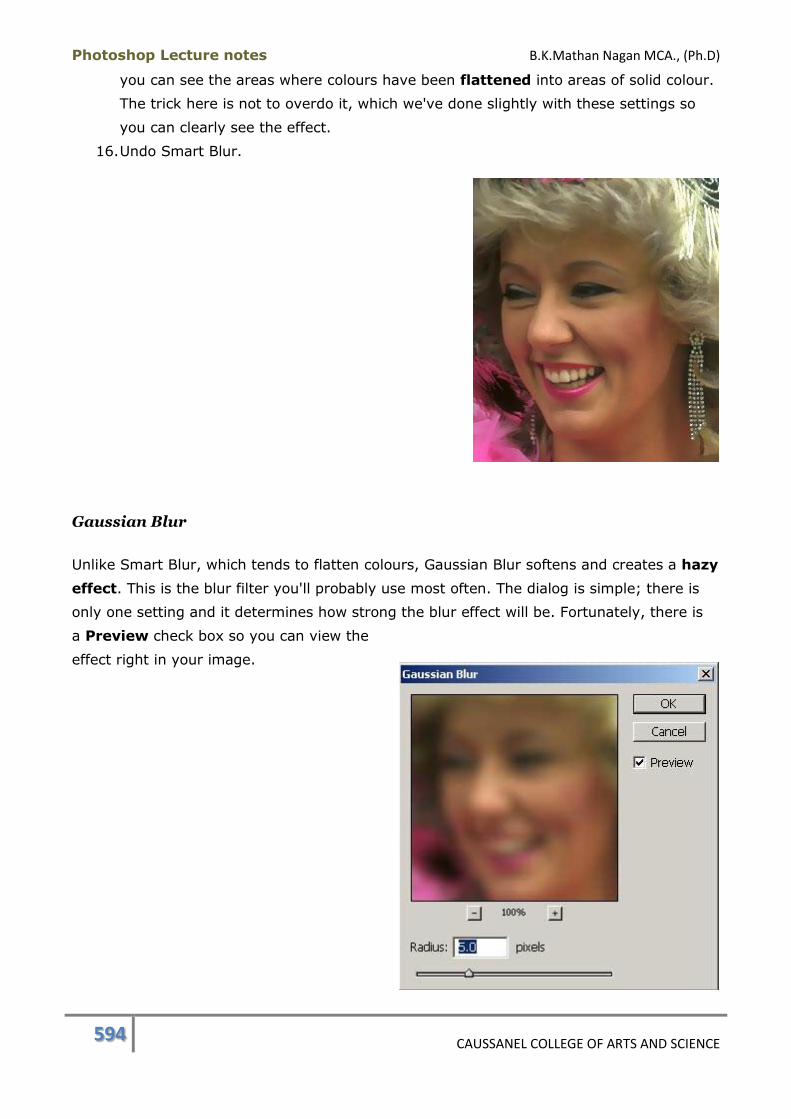
Photoshop Lecture notes B.K.Mathan Nagan MCA., (Ph.D)
594 CAUSSANEL COLLEGE OF ARTS AND SCIENCE
you can see the areas where colours have been flattened into areas of solid colour.
The trick here is not to overdo it, which we've done slightly with these settings so
you can clearly see the effect.
16. Undo Smart Blur.
Gaussian Blur
Unlike Smart Blur, which tends to flatten colours, Gaussian Blur softens and creates a hazy
effect. This is the blur filter you'll probably use most often. The dialog is simple; there is
only one setting and it determines how strong the blur effect will be. Fortunately, there is
a Preview check box so you can view the
effect right in your image.
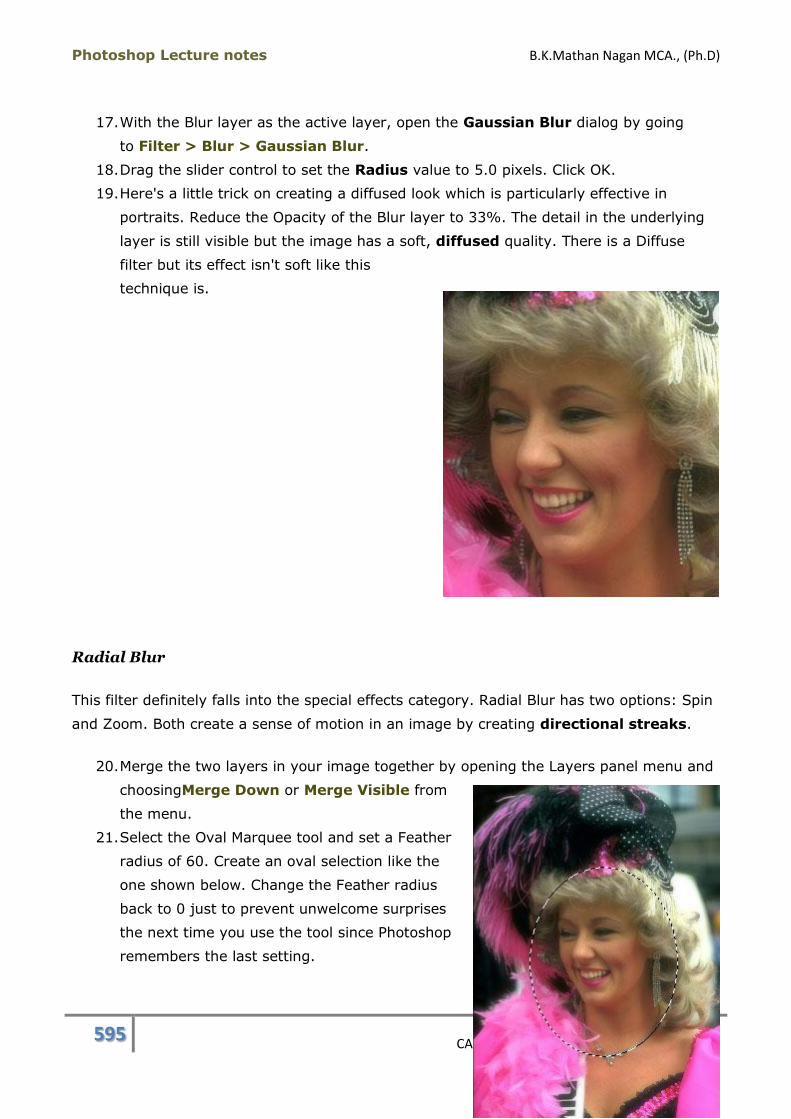
Photoshop Lecture notes B.K.Mathan Nagan MCA., (Ph.D)
595 CAUSSANEL COLLEGE OF ARTS AND SCIENCE
17. With the Blur layer as the active layer, open the Gaussian Blur dialog by going
to Filter > Blur > Gaussian Blur.
18. Drag the slider control to set the Radius value to 5.0 pixels. Click OK.
19. Here's a little trick on creating a diffused look which is particularly effective in
portraits. Reduce the Opacity of the Blur layer to 33%. The detail in the underlying
layer is still visible but the image has a soft, diffused quality. There is a Diffuse
filter but its effect isn't soft like this
technique is.
Radial Blur
This filter definitely falls into the special effects category. Radial Blur has two options: Spin
and Zoom. Both create a sense of motion in an image by creating directional streaks.
20. Merge the two layers in your image together by opening the Layers panel menu and
choosingMerge Down or Merge Visible from
the menu.
21. Select the Oval Marquee tool and set a Feather
radius of 60. Create an oval selection like the
one shown below. Change the Feather radius
back to 0 just to prevent unwelcome surprises
the next time you use the tool since Photoshop
remembers the last setting.
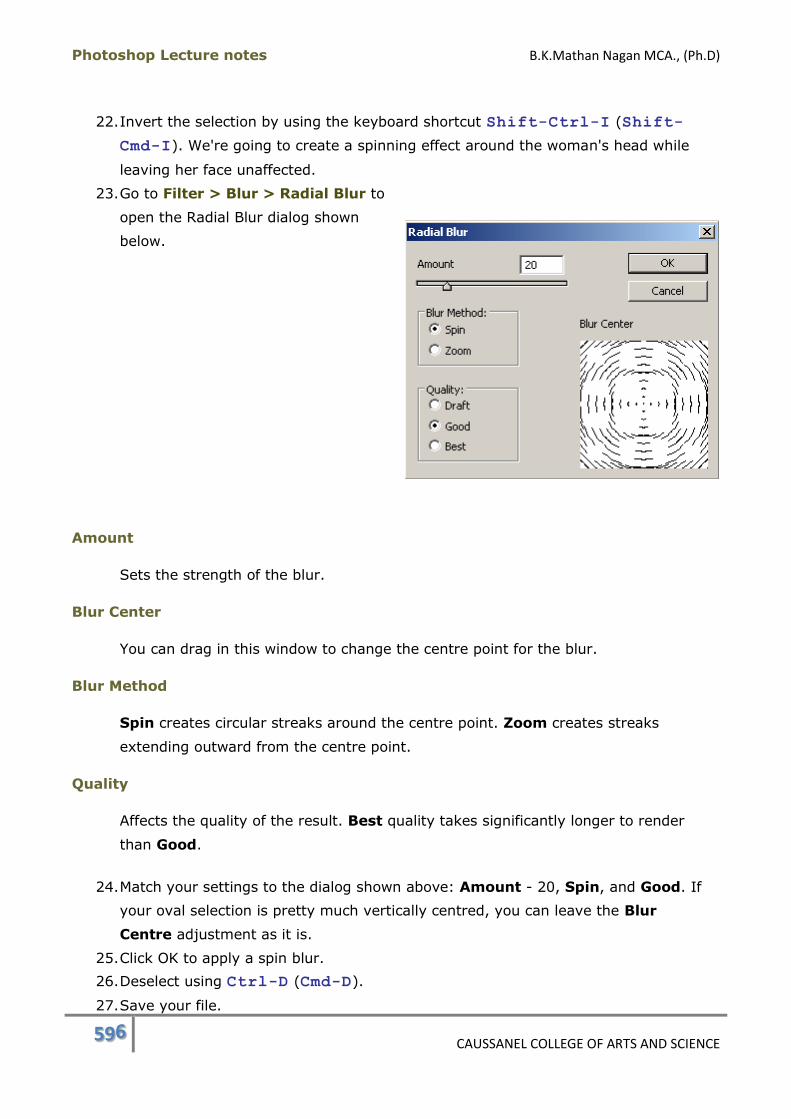
Photoshop Lecture notes B.K.Mathan Nagan MCA., (Ph.D)
596 CAUSSANEL COLLEGE OF ARTS AND SCIENCE
22. Invert the selection by using the keyboard shortcut Shift-Ctrl-I (Shift-
Cmd-I). We're going to create a spinning effect around the woman's head while
leaving her face unaffected.
23. Go to Filter > Blur > Radial Blur to
open the Radial Blur dialog shown
below.
Amount
Sets the strength of the blur.
Blur Center
You can drag in this window to change the centre point for the blur.
Blur Method
Spin creates circular streaks around the centre point. Zoom creates streaks
extending outward from the centre point.
Quality
Affects the quality of the result. Best quality takes significantly longer to render
than Good.
24. Match your settings to the dialog shown above: Amount - 20, Spin, and Good. If
your oval selection is pretty much vertically centred, you can leave the Blur
Centre adjustment as it is.
25. Click OK to apply a spin blur.
26. Deselect using Ctrl-D (Cmd-D).
27. Save your file.
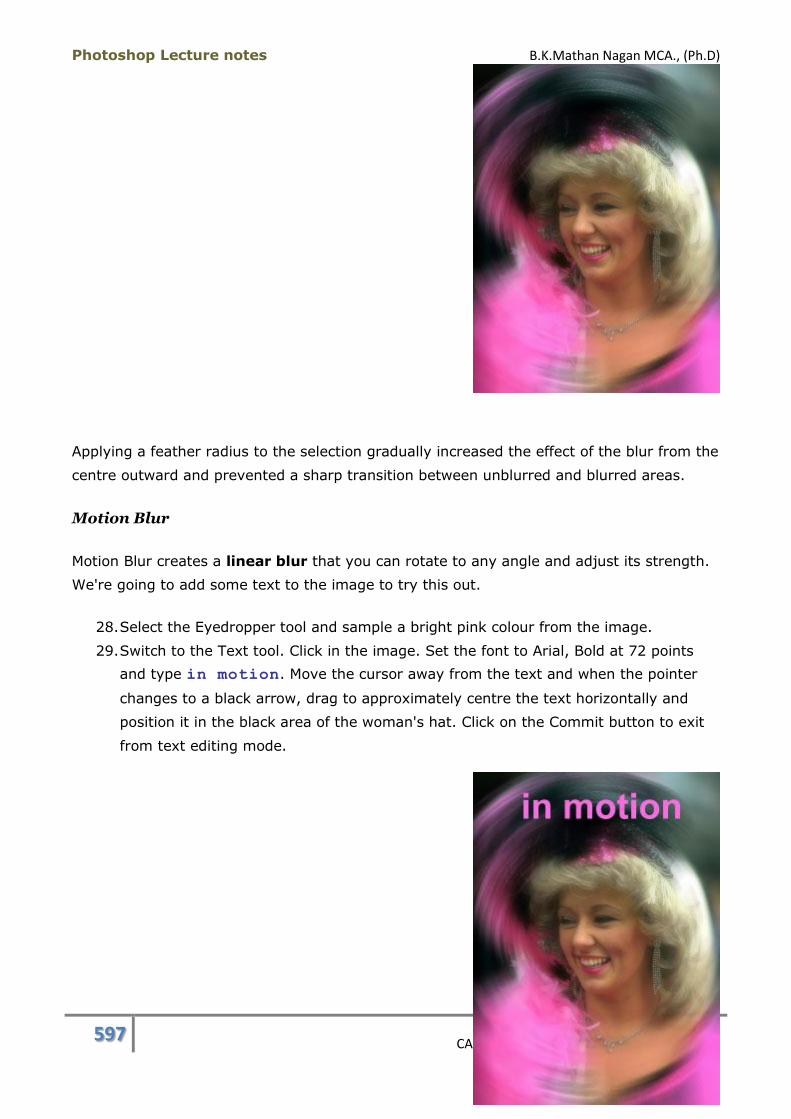
Photoshop Lecture notes B.K.Mathan Nagan MCA., (Ph.D)
597 CAUSSANEL COLLEGE OF ARTS AND SCIENCE
Applying a feather radius to the selection gradually increased the effect of the blur from the
centre outward and prevented a sharp transition between unblurred and blurred areas.
Motion Blur
Motion Blur creates a linear blur that you can rotate to any angle and adjust its strength.
We're going to add some text to the image to try this out.
28. Select the Eyedropper tool and sample a bright pink colour from the image.
29. Switch to the Text tool. Click in the image. Set the font to Arial, Bold at 72 points
and type in motion. Move the cursor away from the text and when the pointer
changes to a black arrow, drag to approximately centre the text horizontally and
position it in the black area of the woman's hat. Click on the Commit button to exit
from text editing mode.
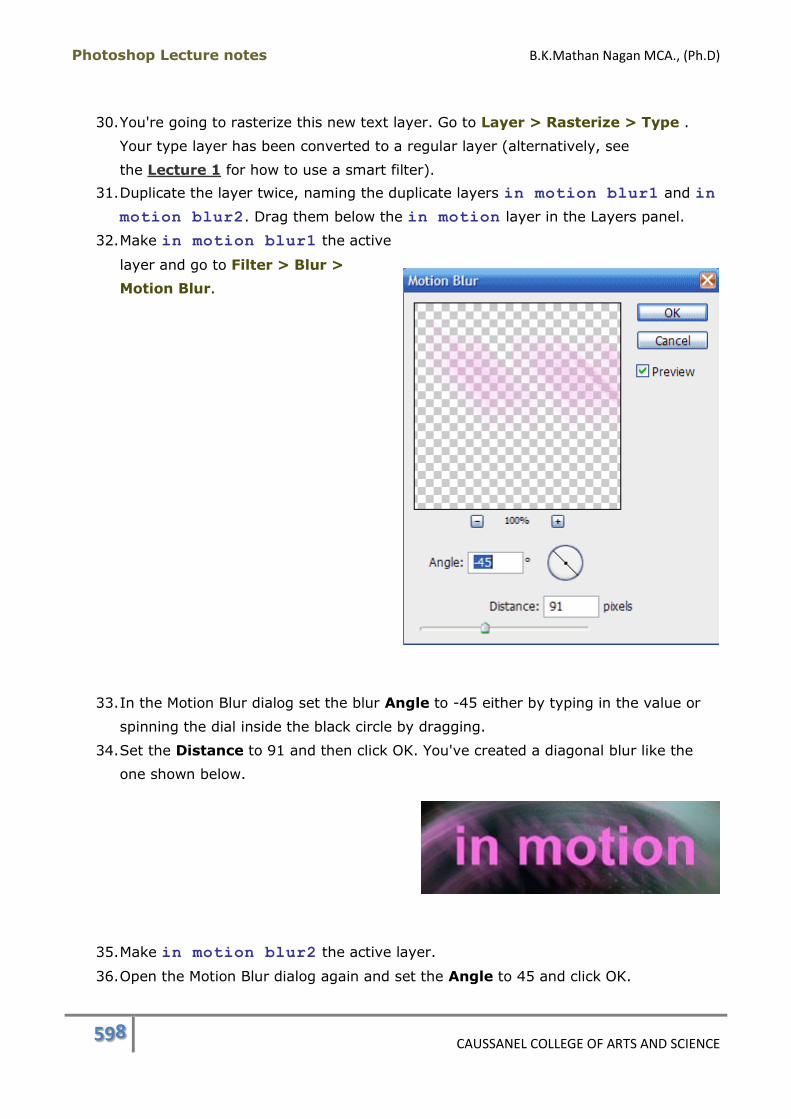
Photoshop Lecture notes B.K.Mathan Nagan MCA., (Ph.D)
598 CAUSSANEL COLLEGE OF ARTS AND SCIENCE
30. You're going to rasterize this new text layer. Go to Layer > Rasterize > Type .
Your type layer has been converted to a regular layer (alternatively, see
the Lecture 1 for how to use a smart filter).
31. Duplicate the layer twice, naming the duplicate layers in motion blur1 and in
motion blur2. Drag them below the in motion layer in the Layers panel.
32. Make in motion blur1 the active
layer and go to Filter > Blur >
Motion Blur.
33. In the Motion Blur dialog set the blur Angle to -45 either by typing in the value or
spinning the dial inside the black circle by dragging.
34. Set the Distance to 91 and then click OK. You've created a diagonal blur like the
one shown below.
35. Make in motion blur2 the active layer.
36. Open the Motion Blur dialog again and set the Angle to 45 and click OK.
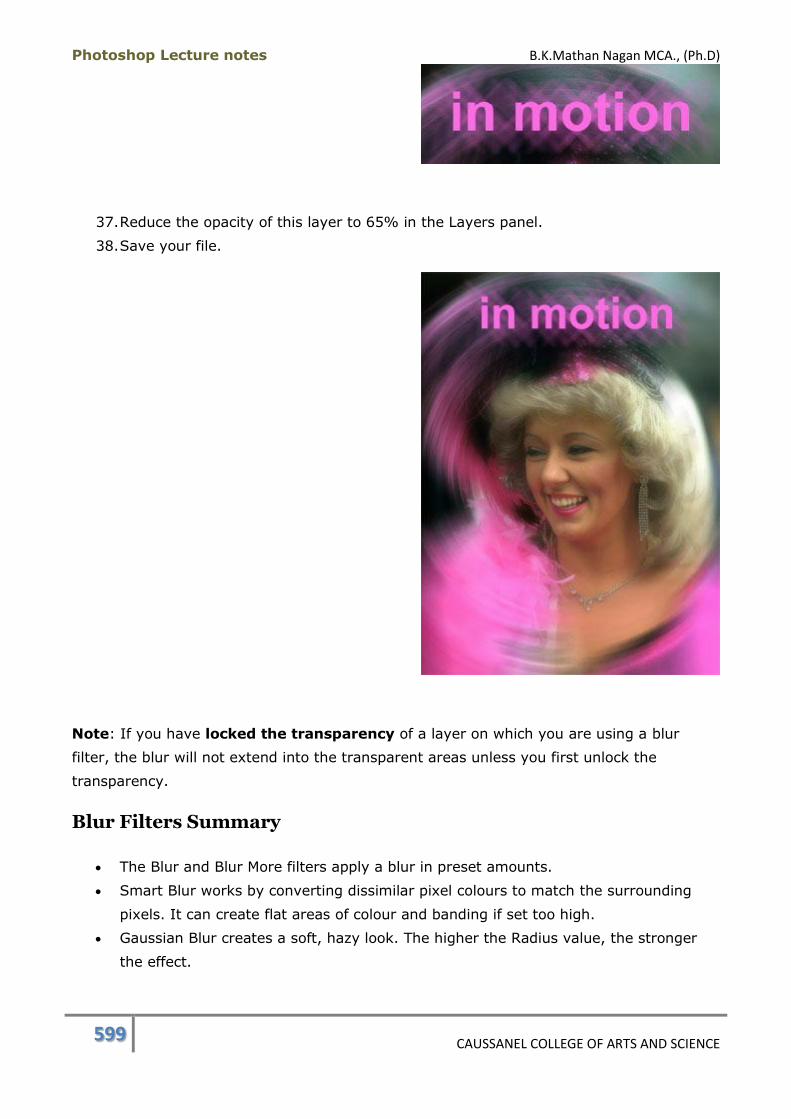
Photoshop Lecture notes B.K.Mathan Nagan MCA., (Ph.D)
599 CAUSSANEL COLLEGE OF ARTS AND SCIENCE
37. Reduce the opacity of this layer to 65% in the Layers panel.
38. Save your file.
Note: If you have locked the transparency of a layer on which you are using a blur
filter, the blur will not extend into the transparent areas unless you first unlock the
transparency.
Blur Filters Summary
The Blur and Blur More filters apply a blur in preset amounts.
Smart Blur works by converting dissimilar pixel colours to match the surrounding
pixels. It can create flat areas of colour and banding if set too high.
Gaussian Blur creates a soft, hazy look. The higher the Radius value, the stronger
the effect.
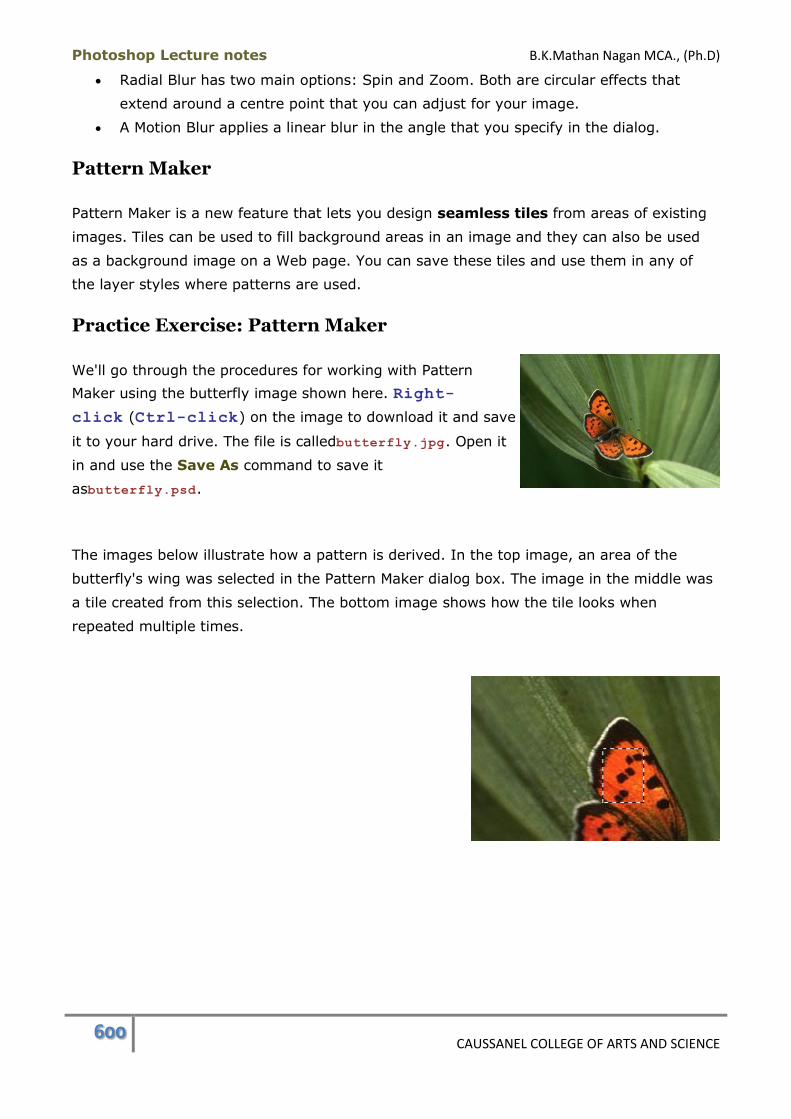
Photoshop Lecture notes B.K.Mathan Nagan MCA., (Ph.D)
600 CAUSSANEL COLLEGE OF ARTS AND SCIENCE
Radial Blur has two main options: Spin and Zoom. Both are circular effects that
extend around a centre point that you can adjust for your image.
A Motion Blur applies a linear blur in the angle that you specify in the dialog.
Pattern Maker
Pattern Maker is a new feature that lets you design seamless tiles from areas of existing
images. Tiles can be used to fill background areas in an image and they can also be used
as a background image on a Web page. You can save these tiles and use them in any of
the layer styles where patterns are used.
Practice Exercise: Pattern Maker
We'll go through the procedures for working with Pattern
Maker using the butterfly image shown here. Right-
click (Ctrl-click) on the image to download it and save
it to your hard drive. The file is calledbutterfly.jpg. Open it
in and use the Save As command to save it
asbutterfly.psd.
The images below illustrate how a pattern is derived. In the top image, an area of the
butterfly's wing was selected in the Pattern Maker dialog box. The image in the middle was
a tile created from this selection. The bottom image shows how the tile looks when
repeated multiple times.

Photoshop Lecture notes B.K.Mathan Nagan MCA., (Ph.D)
601 CAUSSANEL COLLEGE OF ARTS AND SCIENCE
About Patterns
Tiles can be as small as 1 pixel by 1 pixel and as large as the source image.
The pattern from the tile you design in Pattern Maker will be applied to one of the
following:
o The currently active layer in your document. With this option, it's a good idea
to duplicate the layer of your source image so you won't overwrite it.
o To a blank layer or to another document.
Generating a Pattern on the Current Layer
1. Duplicate the layer in butterfly.psd by dragging the Background layer onto the
New Layer icon in the Layers panel.
2. Go to Filter > Pattern Maker to open the dialog where you'll create your pattern.

Photoshop Lecture notes B.K.Mathan Nagan MCA., (Ph.D)
602 CAUSSANEL COLLEGE OF ARTS AND SCIENCE
3. The Rectangular Marquee tool, Zoom tool and Hand tool are located in the top left
corner of the dialog and work in the same way they do in image documents. If
the Rectangular Marquee toolisn't already selected, click on its button.
4. Draw a selection marquee around an area in the image that you want to generate a
pattern from. You can reposition the marquee after you've drawn it by placing the
cursor inside of it and dragging.
5. Click on the Generate button. A tile created from your selection will appear in
the Tile Historyarea. The preview area will display the tile as a repeating pattern.
6. The Generate button will have changed to say Generate Again. Click on this a few
more times to see additional tile variations.
7. Enable the Tile Boundaries check box. This will display grid lines in the preview
area that show you where the tile boundaries are. Turn Tile
Boundaries off.
8. The Tile History panel (shown above) contains buttons that let
you navigate through the tiles you've generated. Try using them to navigate
through your tiles. You can also type in a tile number into the text entry field and
press Enter (Return) to go directly to a particular tile.
9. Disable the Update Pattern Preview check box and navigate through your tiles
again. Notice that the preview area doesn't change to reflect the active tile when
this option is turned off. Some of the options we'll test later are processor-intensive
so this feature would be useful when scrolling through tiles that use more complex
options.

Photoshop Lecture notes B.K.Mathan Nagan MCA., (Ph.D)
603 CAUSSANEL COLLEGE OF ARTS AND SCIENCE
10. In the Preview panel, click on the Show pop-up menu and change it
from Generated to Original. This will restore your original source image and
selection and will delete the generated tiles from the history.
11. Generate new tiles and when you have one you like, click OK to exit from the dialog
and apply the pattern to the current layer in your image.
Generating a Pattern From the Clipboard Contents
This procedure lets you copy an image area to the computer's clipboard and then apply
the pattern to another layer or another document.
1. In butterfly.psd hide the Background copy layer (the one with your pattern) and
on the Background layer select an area with the Rectangular Marquee tool.
2. Copy the pixels to the clipboard by pressing Ctrl-C (Cmd-C) or go to Edit >
Copy.
3. Create a new document that is 400 px. by 400 px. with a transparent background.
4. Open Pattern Maker by going to Filter > Pattern Maker.
5. Enable the Use Clipboard as Sample check box.
6. Click on the Generate button. This will generate a tile from the clipboard and
display the pattern in the preview area. Using the Original option in the Show pop-
up menu will revert the display to the original clipboard contents.
7. Click OK to apply the pattern to the new image document.
8. Close the document without saving your changes.
Adjusting Tile Size
There are controls for setting the size of a tile in the Tile Generation
panel. The default tile size is set to 128 px. by 128 px. Let's try changing
the tile size.
1. Duplicate the Background layer in butterfly.psd and make sure the first pattern
layer is hidden.
2. Go to Filter > Pattern Maker to open Pattern Maker.
3. Make a rectangular selection like the one shown below to only include the two black
spots in the butterfly's wing.
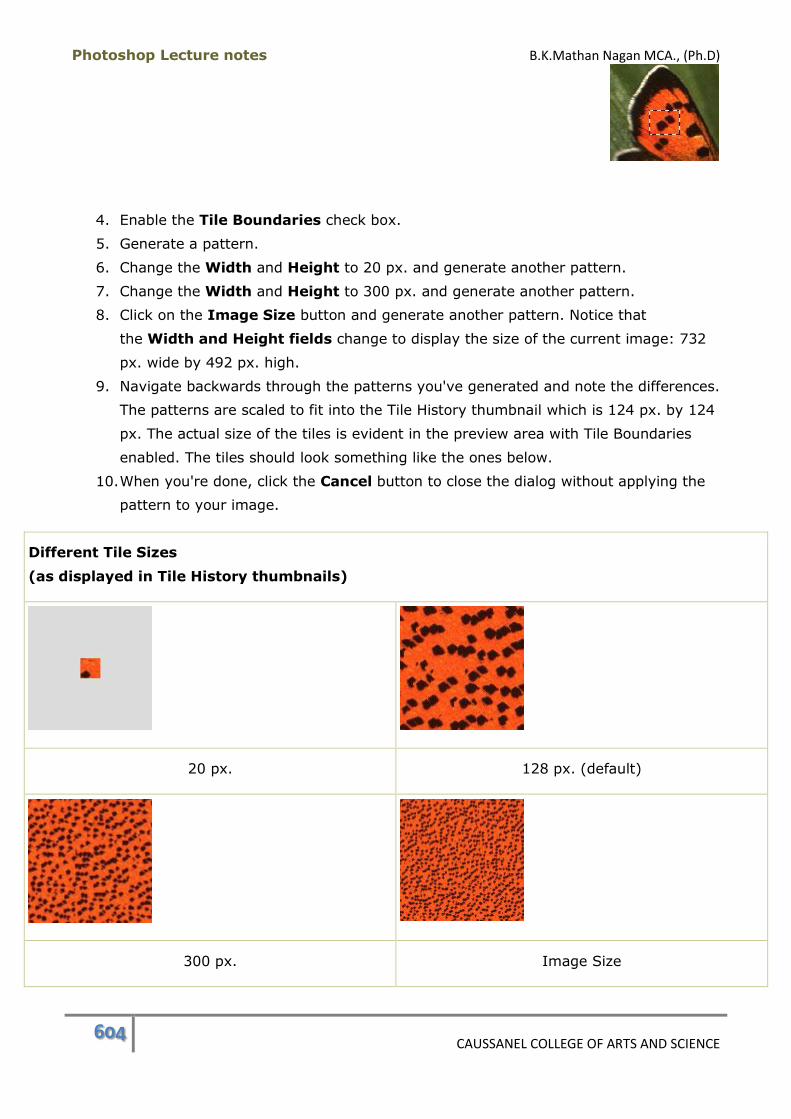
Photoshop Lecture notes B.K.Mathan Nagan MCA., (Ph.D)
604 CAUSSANEL COLLEGE OF ARTS AND SCIENCE
4. Enable the Tile Boundaries check box.
5. Generate a pattern.
6. Change the Width and Height to 20 px. and generate another pattern.
7. Change the Width and Height to 300 px. and generate another pattern.
8. Click on the Image Size button and generate another pattern. Notice that
the Width and Height fields change to display the size of the current image: 732
px. wide by 492 px. high.
9. Navigate backwards through the patterns you've generated and note the differences.
The patterns are scaled to fit into the Tile History thumbnail which is 124 px. by 124
px. The actual size of the tiles is evident in the preview area with Tile Boundaries
enabled. The tiles should look something like the ones below.
10. When you're done, click the Cancel button to close the dialog without applying the
pattern to your image.
Different Tile Sizes
(as displayed in Tile History thumbnails)
20 px. 128 px. (default)
300 px. Image Size
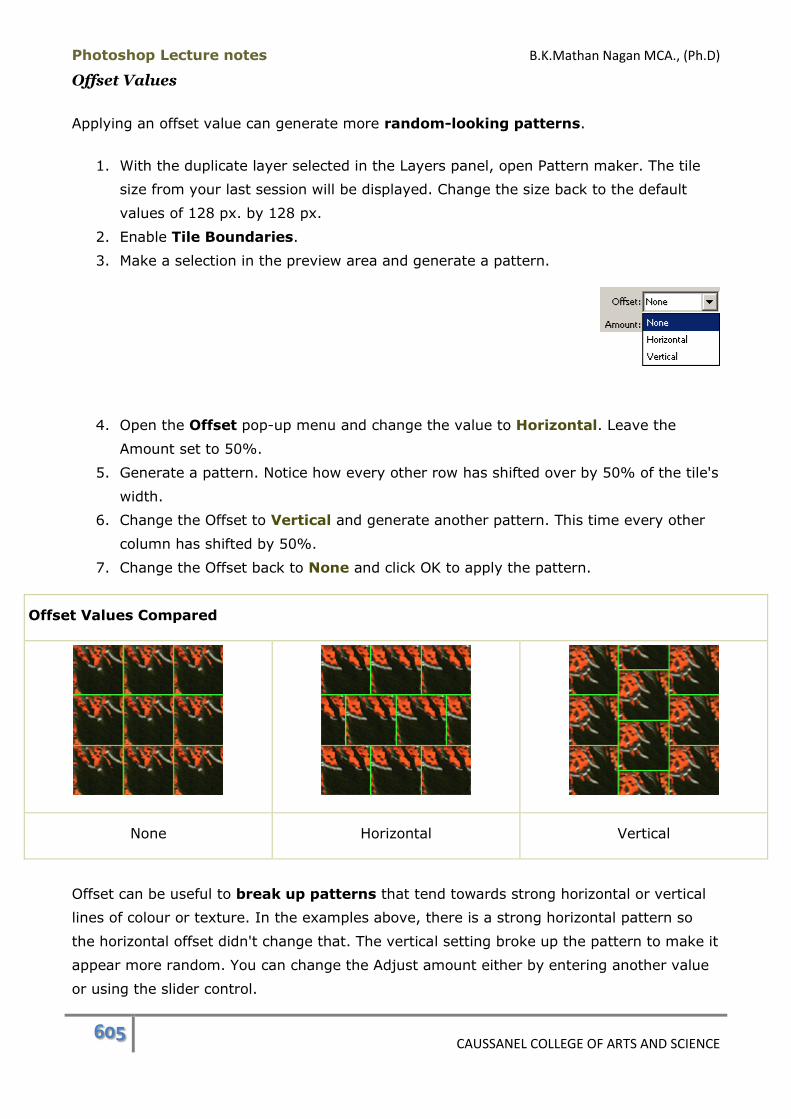
Photoshop Lecture notes B.K.Mathan Nagan MCA., (Ph.D)
605 CAUSSANEL COLLEGE OF ARTS AND SCIENCE
Offset Values
Applying an offset value can generate more random-looking patterns.
1. With the duplicate layer selected in the Layers panel, open Pattern maker. The tile
size from your last session will be displayed. Change the size back to the default
values of 128 px. by 128 px.
2. Enable Tile Boundaries.
3. Make a selection in the preview area and generate a pattern.
4. Open the Offset pop-up menu and change the value to Horizontal. Leave the
Amount set to 50%.
5. Generate a pattern. Notice how every other row has shifted over by 50% of the tile's
width.
6. Change the Offset to Vertical and generate another pattern. This time every other
column has shifted by 50%.
7. Change the Offset back to None and click OK to apply the pattern.
Offset Values Compared
None Horizontal Vertical
Offset can be useful to break up patterns that tend towards strong horizontal or vertical
lines of colour or texture. In the examples above, there is a strong horizontal pattern so
the horizontal offset didn't change that. The vertical setting broke up the pattern to make it
appear more random. You can change the Adjust amount either by entering another value
or using the slider control.
Photoshop Lecture notes B.K.Mathan Nagan MCA., (Ph.D)
606 CAUSSANEL COLLEGE OF ARTS AND SCIENCE
Smoothing
The purpose of this option is to help decrease the prominence of unwanted edges in a
pattern. After much trial and error, we were unable to see any difference in the results of
different settings. The setting choices are 1 (default), 2 and 3. Increasing the value is
supposed to reduce the edges. It takes a bit longer for Pattern Maker to render a pattern
with higher Smoothing values.
Sample Detail
Once again, we didn't have any success duplicating the promised results of this option. The
theory is that if parts of your pattern are being cut up, raising the Sample Detail value will
include more of yoursampled area into the pattern. It seemed as though the opposite was
true in practice.
High Sample Detail values can take quite a long time to render. This is where disabling
Update Pattern Preview would come in handy after you've generated some patterns. As
you're navigating through your tiles, they are re-rendered in the preview area. If you don't
need to see the previews, this will speed up navigation.
Deleting Tiles From the History
The Tile History only retains the first 20 tiles generated. If you generate a 21st tile, you'll
be prompted as to whether you want to replace the first tile with the new tile. For this and
other reasons, you may want to delete one or more tiles.
To delete a tile, navigate to the tile in the Tile History panel and click
on the Delete Tile button.
Save Preset Pattern
You can save a tile as a pattern preset. Click on the Save Preset Pattern button to save
the current tile. The tile will appear in the pattern presets. Examples of usage are shown
below. Both were created from the same pattern preset made from the butterfly's wing.
Examples of a Preset Pattern Used in Layer Styles
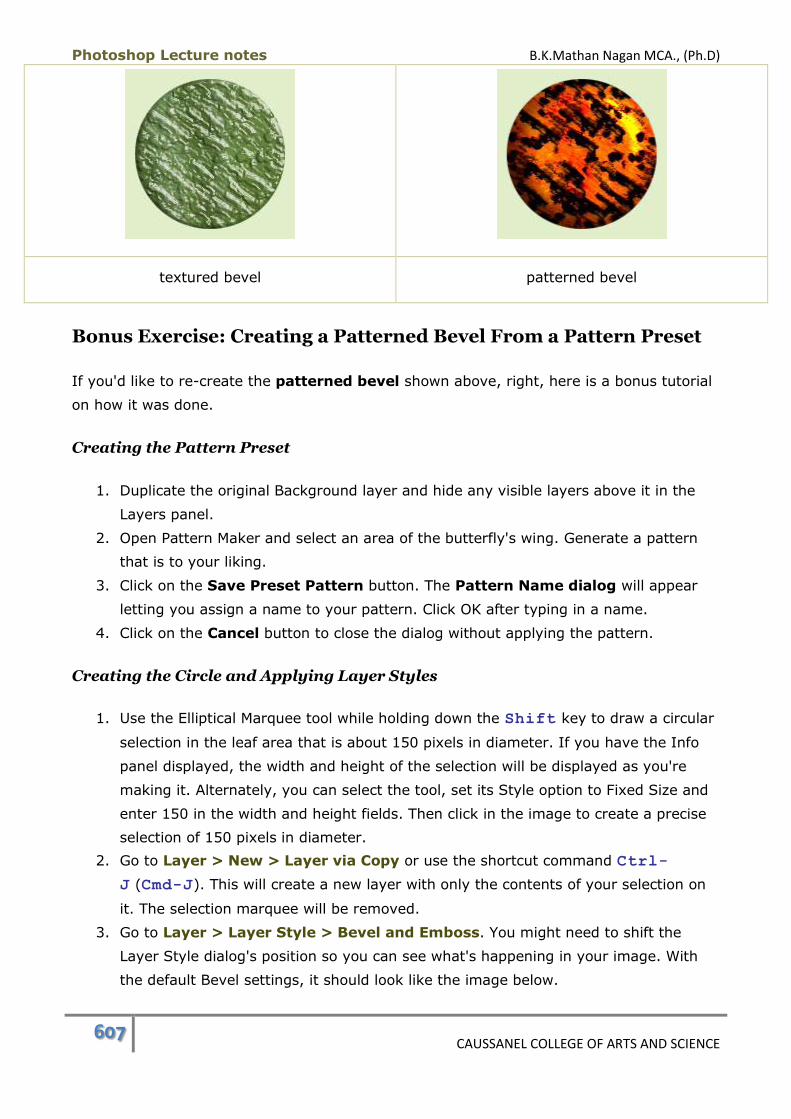
Photoshop Lecture notes B.K.Mathan Nagan MCA., (Ph.D)
607 CAUSSANEL COLLEGE OF ARTS AND SCIENCE
textured bevel patterned bevel
Bonus Exercise: Creating a Patterned Bevel From a Pattern Preset
If you'd like to re-create the patterned bevel shown above, right, here is a bonus tutorial
on how it was done.
Creating the Pattern Preset
1. Duplicate the original Background layer and hide any visible layers above it in the
Layers panel.
2. Open Pattern Maker and select an area of the butterfly's wing. Generate a pattern
that is to your liking.
3. Click on the Save Preset Pattern button. The Pattern Name dialog will appear
letting you assign a name to your pattern. Click OK after typing in a name.
4. Click on the Cancel button to close the dialog without applying the pattern.
Creating the Circle and Applying Layer Styles
1. Use the Elliptical Marquee tool while holding down the Shift key to draw a circular
selection in the leaf area that is about 150 pixels in diameter. If you have the Info
panel displayed, the width and height of the selection will be displayed as you're
making it. Alternately, you can select the tool, set its Style option to Fixed Size and
enter 150 in the width and height fields. Then click in the image to create a precise
selection of 150 pixels in diameter.
2. Go to Layer > New > Layer via Copy or use the shortcut command Ctrl-
J (Cmd-J). This will create a new layer with only the contents of your selection on
it. The selection marquee will be removed.
3. Go to Layer > Layer Style > Bevel and Emboss. You might need to shift the
Layer Style dialog's position so you can see what's happening in your image. With
the default Bevel settings, it should look like the image below.

Photoshop Lecture notes B.K.Mathan Nagan MCA., (Ph.D)
608 CAUSSANEL COLLEGE OF ARTS AND SCIENCE
4. Change the Bevel and Emboss settings to match those shown here. The settings
that were changed have been highlighted in
yellow.

Photoshop Lecture notes B.K.Mathan Nagan MCA., (Ph.D)
609 CAUSSANEL COLLEGE OF ARTS AND SCIENCE
Now your image should look something like this one.
5. Click on Pattern Overlay in the Styles list.
6. Click on the inverted arrow to the right of the Pattern thumbnail image. This will
open a list of preset patterns. Your butterfly wing pattern should appear as the last
item in the list.
7. Click on your preset and press Enter (Return) or click elsewhere in the Layer
Styles dialog to close the list.
8. Change the Blend Mode of the style to Vivid Light.
9. Click OK to close the Layer Styles dialog and save your file.
10. Admire your new effect!
For added realism, a drop
shadow layer style was added to
the image on the right, below.
Pattern Maker Summary
The Pattern Maker creates seamless tiles that can be used as fills or in layer styles.
A pattern created by selecting pixels in the Pattern Maker dialog will be applied to
the current layer, overwriting the original layer's pixels.
A pattern created from the contents of the clipboard can be applied to any
document.
Tiles can be as small as 1x1 pixel or as large as the document from which the
pattern is obtained. The default pattern size is 128x128 pixels.
Photoshop Lecture notes B.K.Mathan Nagan MCA., (Ph.D)
610 CAUSSANEL COLLEGE OF ARTS AND SCIENCE
Applying an offset can make the tiled patterns appear more random. It can break up
a strong horizontal or vertical line in a pattern.
Individual tiles can be deleted from the history by using the Delete Tile button in the
Tile History panel. All tiles that have been generated can be removed from the
history by selecting Originalfrom the Show pop-up menu.
Tile boundaries can be displayed to help you see the individual tiles in a pattern.
Tiles can be saved as a pattern preset by clicking on the Save Preset Pattern button
in the Pattern Maker dialog. Then it will be available in any panel or dialog that uses
patterns.
Duotones
The actual purpose of duotones is to extend the tonal range of a greyscale image for the
printing press. You've probably seen ads or brochures where photos are in a single colour;
for example, in shades of blue. This is another use for duotones. Duotones can be part of
your design arsenal in Web imagery as well. You can use the same duotone colour on
multiple images to create a visual theme for a site. Old black and white photos can be
tinted using a sepia duotone. We'll lead you through the basic steps of applying duotones in
this lecture.
To use this process, an image must be in Duotone colour mode. Between one and four
colours can be used. Since images using duotones are usually intended for printing
presses, the colours in the Duotone Options dialog are referred to as inks. Photoshop has
four variations for images in Duotone colour mode: monotones, duotones, tritones and
quadtones.
A duotone (two-colour) effect is created with black and another colour which combine to
tint the tonal range of a greyscale image. Duotones are the most dramatic in that they can
be quite saturated with colour, depending on which colour you're working with. When a
third or fourth colour is added to the mix (tritones and quadtones) it tends to mute the
saturation yet can lead to some subtle but interesting colour effects. Monotones aren't
particularly useful since they lack the black ink to add the needed colour depth to a photo.
Monotone and duotone effects have been applied to the same image so you can see the
difference between them.
Two Rules for Duotone Colour Mode
Rule #1
Your image must be in Greyscale colour mode before you can convert it to Duotone
mode. If it's not, the Duotone option will be greyed out.

Photoshop Lecture notes B.K.Mathan Nagan MCA., (Ph.D)
611 CAUSSANEL COLLEGE OF ARTS AND SCIENCE
Rule #2
Duotone colour mode will affect every layer in your image the same way.
Therefore, if you want to try out different duotones (or tritones or quadtones) and
compare the results side by side, create duplicate documents of your greyscale
image before proceeding.
Practice Exercise: Experimenting with Duotones
1. Pick an image for this exercise - either one from this course or one of your own.
Select something that has a good tonal range. If you're selecting images from the
course, avoid the bird and apple tree images because of their limited tonal range.
We're going to use the art_history.jpg in our examples.
2. Go to Image > Duplicate and in the Duplicate Image dialog, name this new
image duotone.psd. Close the original image.
3. Go to Image > Mode > Greyscale. Depending on whether your image has one or
more layers, do one of the following:
o Single layer: A message will appear saying, "Discard colour information?"
Click the OK button to convert your image to Greyscale mode.
o Multiple layers: A message will appear saying, "Changing modes will affect
layer compositing. Merge layers before mode change?" Click the Merge button
to merge layers and convert to Greyscale mode.
4. Switch to Duotone mode by going to Image > Mode > Duotone. This will open
the Duotone
Options dialog.
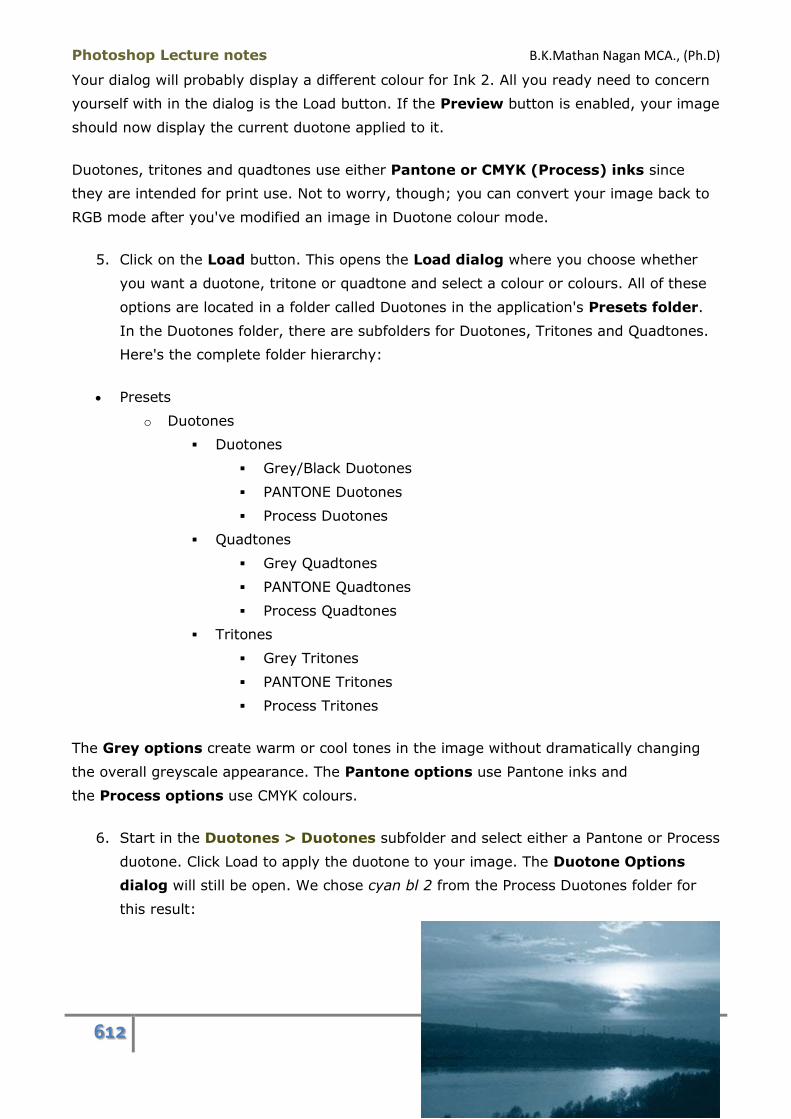
Photoshop Lecture notes B.K.Mathan Nagan MCA., (Ph.D)
612 CAUSSANEL COLLEGE OF ARTS AND SCIENCE
Your dialog will probably display a different colour for Ink 2. All you ready need to concern
yourself with in the dialog is the Load button. If the Preview button is enabled, your image
should now display the current duotone applied to it.
Duotones, tritones and quadtones use either Pantone or CMYK (Process) inks since
they are intended for print use. Not to worry, though; you can convert your image back to
RGB mode after you've modified an image in Duotone colour mode.
5. Click on the Load button. This opens the Load dialog where you choose whether
you want a duotone, tritone or quadtone and select a colour or colours. All of these
options are located in a folder called Duotones in the application's Presets folder.
In the Duotones folder, there are subfolders for Duotones, Tritones and Quadtones.
Here's the complete folder hierarchy:
Presets
o Duotones
Duotones
Grey/Black Duotones
PANTONE Duotones
Process Duotones
Quadtones
Grey Quadtones
PANTONE Quadtones
Process Quadtones
Tritones
Grey Tritones
PANTONE Tritones
Process Tritones
The Grey options create warm or cool tones in the image without dramatically changing
the overall greyscale appearance. The Pantone options use Pantone inks and
the Process options use CMYK colours.
6. Start in the Duotones > Duotones subfolder and select either a Pantone or Process
duotone. Click Load to apply the duotone to your image. The Duotone Options
dialog will still be open. We chose cyan bl 2 from the Process Duotones folder for
this result:
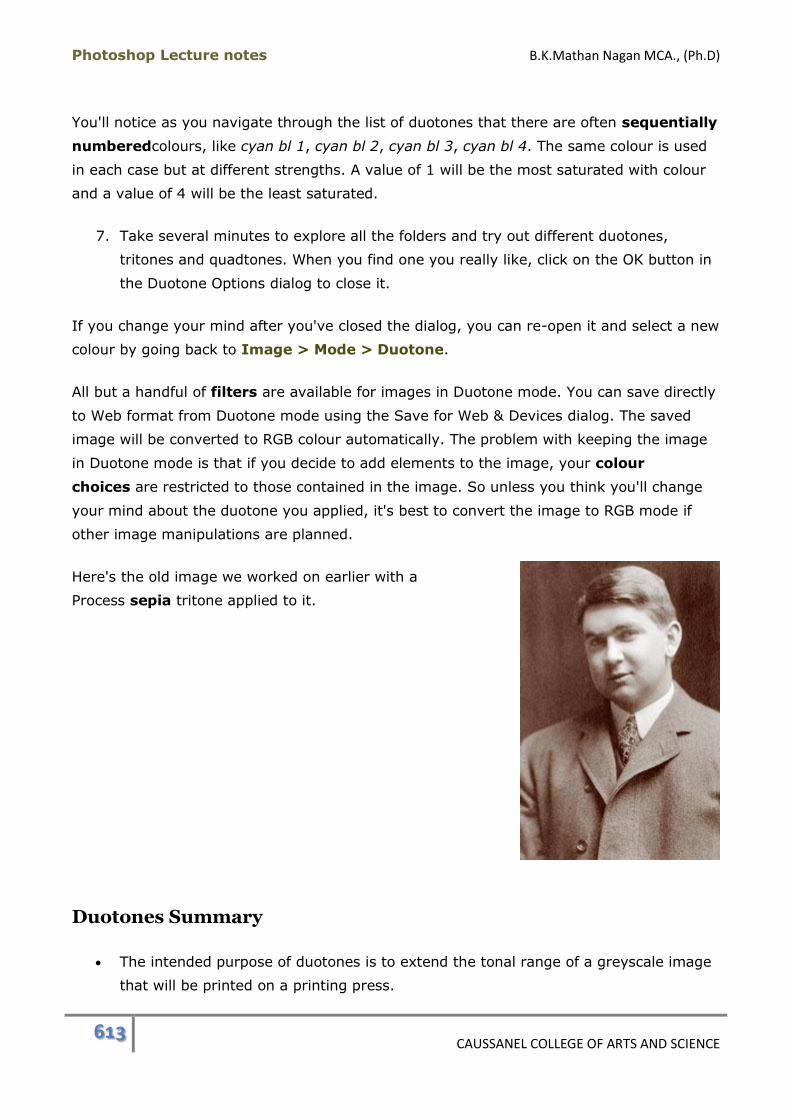
Photoshop Lecture notes B.K.Mathan Nagan MCA., (Ph.D)
613 CAUSSANEL COLLEGE OF ARTS AND SCIENCE
You'll notice as you navigate through the list of duotones that there are often sequentially
numberedcolours, like cyan bl 1, cyan bl 2, cyan bl 3, cyan bl 4. The same colour is used
in each case but at different strengths. A value of 1 will be the most saturated with colour
and a value of 4 will be the least saturated.
7. Take several minutes to explore all the folders and try out different duotones,
tritones and quadtones. When you find one you really like, click on the OK button in
the Duotone Options dialog to close it.
If you change your mind after you've closed the dialog, you can re-open it and select a new
colour by going back to Image > Mode > Duotone.
All but a handful of filters are available for images in Duotone mode. You can save directly
to Web format from Duotone mode using the Save for Web & Devices dialog. The saved
image will be converted to RGB colour automatically. The problem with keeping the image
in Duotone mode is that if you decide to add elements to the image, your colour
choices are restricted to those contained in the image. So unless you think you'll change
your mind about the duotone you applied, it's best to convert the image to RGB mode if
other image manipulations are planned.
Here's the old image we worked on earlier with a
Process sepia tritone applied to it.
Duotones Summary
The intended purpose of duotones is to extend the tonal range of a greyscale image
that will be printed on a printing press.

Photoshop Lecture notes B.K.Mathan Nagan MCA., (Ph.D)
614 CAUSSANEL COLLEGE OF ARTS AND SCIENCE
Duotones are created with black and one other colour. Tritones use black and two
other colours. Quadtones use black and three other colours. Monotones only use one
colour.
An image must be in Greyscale colour mode before it can be converted to Duotone
mode.
The duotone process uses Pantone or CMYK (Process) inks for the colour component.
Liquify Command
The Liquify command was introduced in Photoshop 6.0. You can distort images using tools
that can push, pull, expand, contract, rotate and reflect pixels. It can be used for silly fun
like making caricatures of people's faces or for creating special effects. The process is
called Liquify because it looks like the image is melted when you manipulate it with the
Liquify tools. In this lecture there will be two exercises. In one, you'll create a caricature
and in the other, you'll be 'melting' the CD-ROM image to create abstract art.
Liquify Dialog
All of the Liquify effects are applied within the Liquify dialog which is opened by using
the Filter > Liquify command or using the keyboard shortcut Shift-Ctrl-X (Shift-
Cmd-X).
Liquify Tool Set
Your main focus will be the Liquify tools that appear on the
left side of the dialog:
Warp
Pulls pixels in the direction of the brush stroke. It works like the Smudge tool but
with much more power.

Photoshop Lecture notes B.K.Mathan Nagan MCA., (Ph.D)
615 CAUSSANEL COLLEGE OF ARTS AND SCIENCE
Twirl Clockwise
Rotates pixels in a clockwise direction as you hold down the mouse button.
Twirl Counterclockwise
Rotates pixels in a counter-clockwise direction as you hold down the mouse button.
Pucker
Causes pixels to contract and move towards the centre of the brush area as you hold
down the mouse button.
Bloat
Causes pixels to expand and move away from the centre of the brush area as you
hold down the mouse button.
Shift Pixels
Moves pixels in a direction perpendicular to the brush stroke.
Left stroke: shifts pixels down.
Right stroke: shifts pixels up.
Upward stroke: shifts pixels left.
Downward stroke: shifts pixels right.
Reflection
Not a very intuitive tool. Dragging will copy pixels perpendicular to the direction of
the brush stroke. holding down the Alt (Option) copies pixels in the opposite
direction. With some practice, you can create a reflection of an area, like a scene
reflected in water, by using multiple, overlapping strokes.
Reconstruct
After you've warped, twirled and otherwise mangled an image, if you want to restore
areas to their original appearance, either partially or completely, this tool will do the
job. There are options for reconstructing that determine how it will be applied to the
image.
Freeze
You can freeze an area by painting a red mask overlay with this brush. This prevents
any distortions from affecting the frozen area.
Thaw

Photoshop Lecture notes B.K.Mathan Nagan MCA., (Ph.D)
616 CAUSSANEL COLLEGE OF ARTS AND SCIENCE
This tool removes Freezing, letting you edit the area again. It works like an eraser to
remove the red mask overlay.
You can adjust the width and pressure of each of
the tools using the controls on the right side of the
panel. Brush Size is self-explanatory. Brush
Pressure determines how easily you can move
pixels. To maintain more precise control, use lower
pressure settings. If you're using a pressure-
sensitive stylus, enable theStylus Pressure option.
Practice Exercise 1: Creating a Caricature
If you're tired of looking at Our Lady of the Feathers, here's your chance to exact some
revenge.
1. Open up woman.psd.
2. Make the Background layer the active layer. Go to Layer > Duplicate Layer. In the
Duplicate Layer dialog select New from the Document menu and name the new
image liquify1.psd.
3. For some unknown reason, this image displays at quite a small size in the Liquify
dialog at these dimensions and there is no zoom control in the dialog. To get
around this, draw a rectangular marquee around the top part of the image, leaving
part of the bottom unselected. Our marquee was 496x580 pixels. We cropped it to
that size in the final result shown below.
4. Open the Liquify dialog by using the Filter > Liquify command or the keyboard
shortcut Shift-Ctrl-X (Shift-Cmd-X).
5. We're not going to give you specific instructions here. This is your opportunity to
have some fun while getting acquainted with the Liquify tools. Here are some
general tips to get you started:
o Press down with the Bloat tool to make a feature appear larger, like the nose.
o Press down with the Pucker tool to shrink a feature, like an eye or the mouth.
o Drag with the Warp tool to stretch areas as though they are made of putty.
o Press down with a Twirl tool to twirl the paint.
o Remember that you can make the brushes smaller or larger and change their
pressure in the Tool Options panel.
o You can use the Undo keyboard shortcut to undo the last action.

Photoshop Lecture notes B.K.Mathan Nagan MCA., (Ph.D)
617 CAUSSANEL COLLEGE OF ARTS AND SCIENCE
o To undo all actions you've taken in the dialog, hold down the Alt (Option)
key. The Cancel button will change to a Reset button. Clicking on it will
restore the original image.
6. When you've finished mangling this lady,
save your file and close it.
This is what we what we came up with. The curls were made with the Twirl tools. The nose
and teeth were enlarged with the Bloat tool and sometimes frozen with the Freeze tool to
protect them while working on nearby areas. Other than that, everything else was done
with the Warp tool and sometimes the Bloat tool.
Practice Exercise 2: Creating Abstract Art
In this exercise you'll use the Liquify tools again to melt and warp the CD-ROM image.
You'll also do some work with layers to enhance your result. Every attempt at this exercise
will turn out differently. Here is one of our
results:
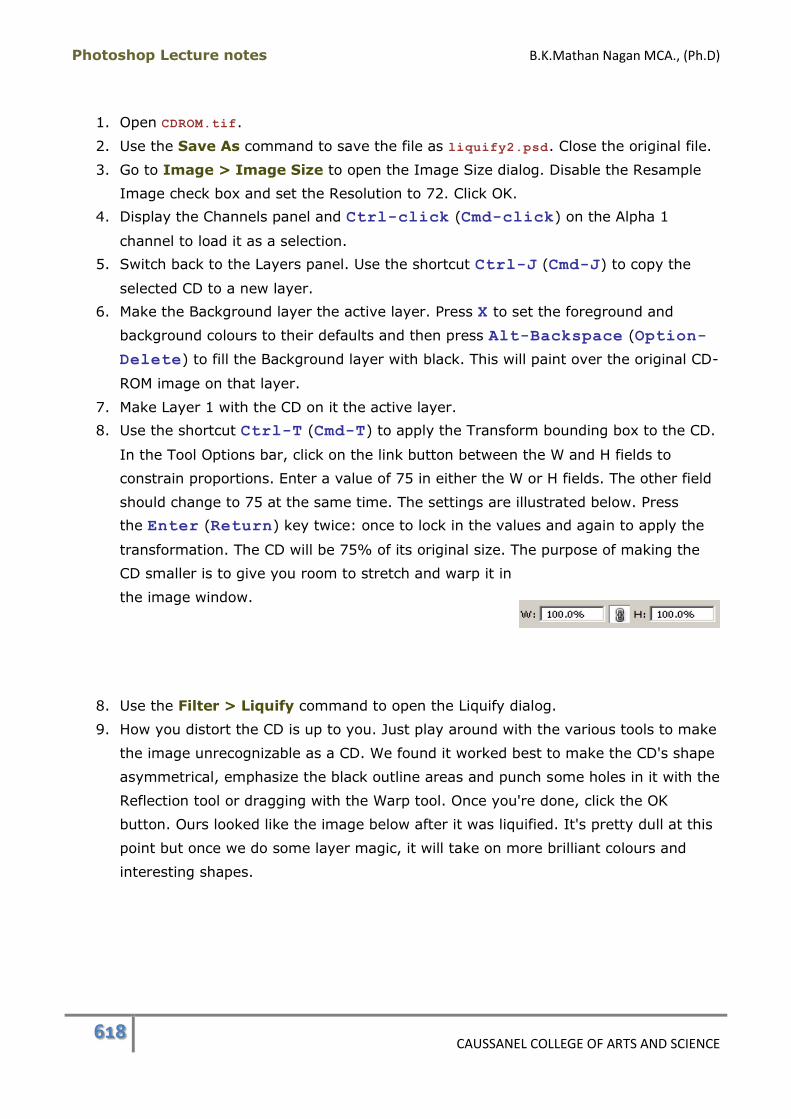
Photoshop Lecture notes B.K.Mathan Nagan MCA., (Ph.D)
618 CAUSSANEL COLLEGE OF ARTS AND SCIENCE
1. Open CDROM.tif.
2. Use the Save As command to save the file as liquify2.psd. Close the original file.
3. Go to Image > Image Size to open the Image Size dialog. Disable the Resample
Image check box and set the Resolution to 72. Click OK.
4. Display the Channels panel and Ctrl-click (Cmd-click) on the Alpha 1
channel to load it as a selection.
5. Switch back to the Layers panel. Use the shortcut Ctrl-J (Cmd-J) to copy the
selected CD to a new layer.
6. Make the Background layer the active layer. Press X to set the foreground and
background colours to their defaults and then press Alt-Backspace (Option-
Delete) to fill the Background layer with black. This will paint over the original CD-
ROM image on that layer.
7. Make Layer 1 with the CD on it the active layer.
8. Use the shortcut Ctrl-T (Cmd-T) to apply the Transform bounding box to the CD.
In the Tool Options bar, click on the link button between the W and H fields to
constrain proportions. Enter a value of 75 in either the W or H fields. The other field
should change to 75 at the same time. The settings are illustrated below. Press
the Enter (Return) key twice: once to lock in the values and again to apply the
transformation. The CD will be 75% of its original size. The purpose of making the
CD smaller is to give you room to stretch and warp it in
the image window.
8. Use the Filter > Liquify command to open the Liquify dialog.
9. How you distort the CD is up to you. Just play around with the various tools to make
the image unrecognizable as a CD. We found it worked best to make the CD's shape
asymmetrical, emphasize the black outline areas and punch some holes in it with the
Reflection tool or dragging with the Warp tool. Once you're done, click the OK
button. Ours looked like the image below after it was liquified. It's pretty dull at this
point but once we do some layer magic, it will take on more brilliant colours and
interesting shapes.

Photoshop Lecture notes B.K.Mathan Nagan MCA., (Ph.D)
619 CAUSSANEL COLLEGE OF ARTS AND SCIENCE
10. Save your file.
11. Duplicate Layer 1 with the warped CD.
12. On the Layer 1 copy go to Edit > Transform > Rotate 180o.
13. Change the layer's blend mode to Overlay and watch the colours come to life.
14. To make the colours even more brilliant, duplicate the Overlay layer. You can
experiment with different layer modes for one or both of the duplicated layers to see
how they work with your image.
15. Save your file and close it.
Here is another version we came up with:
Photoshop Lecture notes B.K.Mathan Nagan MCA., (Ph.D)
620 CAUSSANEL COLLEGE OF ARTS AND SCIENCE
If you have Photoshop 7.0, there is an image called Postcard.psd in the Samples folder.
You can open it up to see how it was constructed. Part of the effect was done with the
Liquify command. If you don't have it, you can view this stunning image on a separate
page.
Liquify Command Summary
The Liquify tools are used to distort pixels in an image.
The width and pressure of the tools can be adjusted in the Liquify dialog's Tool
Options panel.
If you create a selection before opening the Liquify dialog, only that portion of the
image will display in the dialog.
The Undo keyboard shortcut will undo the last change in the Liquify dialog.
To restore the image to its original state while in the dialog, hold down
the Alt (Option) key to change the Cancel button to a Reset button. Click on the
Reset button.
Liquify Command Keyboard Shortcuts:
Liquify: Shift-Ctrl-X (Shift-Cmd-X)
Reset Liquify dialog: Alt (Option) to display Reset button.
Warp tool: W
Twirl Clockwise tool: R
Pucker tool: P
Bloat tool: B
Shift Pixels tool: S
Reflection tool: M
Reconstruct tool: E
Freeze tool: F
Thaw tool: T
Special Effects in Photoshop
By now you know that Photoshop can manipulate an image in a variety of ways with the
help of selections, channels, layers, masks, and filters, to name only a few. If you were to
take what you've learned about these functions on an individual level and incorporate them
together in different ways, you can create some very stunning visual effects. These give
you a license to raise your Web site above the rest on a visual level. In this lecture you'll
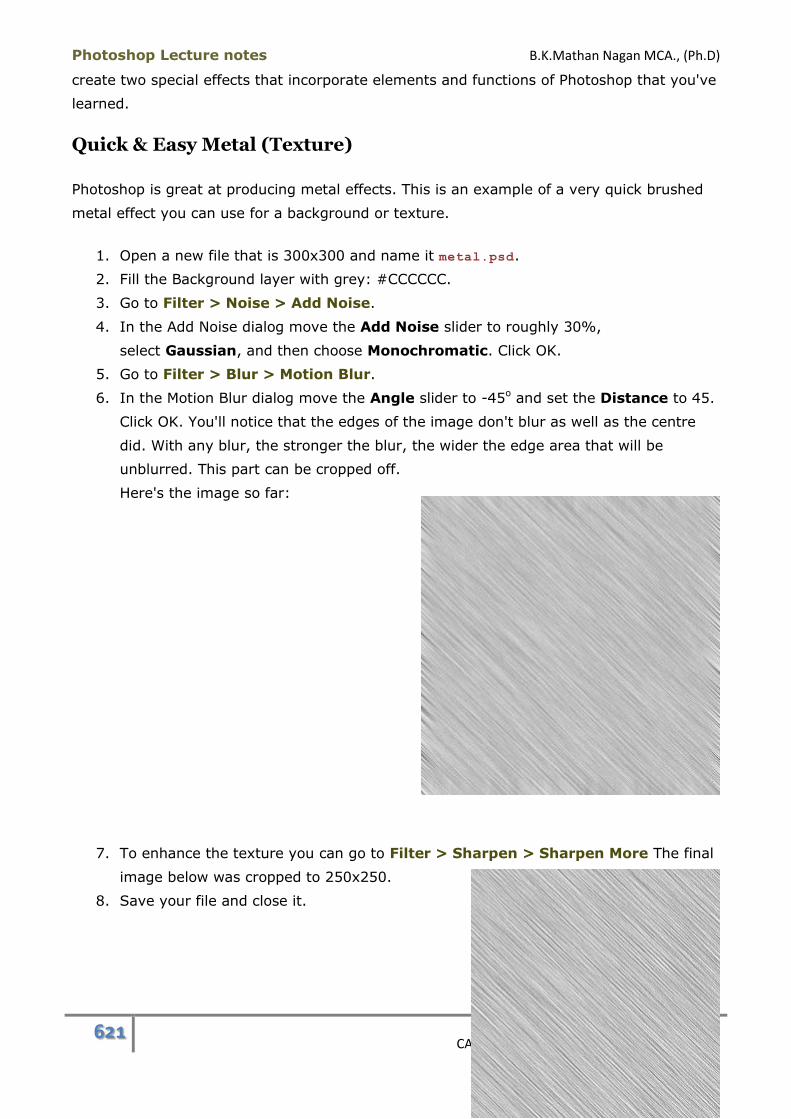
Photoshop Lecture notes B.K.Mathan Nagan MCA., (Ph.D)
621 CAUSSANEL COLLEGE OF ARTS AND SCIENCE
create two special effects that incorporate elements and functions of Photoshop that you've
learned.
Quick & Easy Metal (Texture)
Photoshop is great at producing metal effects. This is an example of a very quick brushed
metal effect you can use for a background or texture.
1. Open a new file that is 300x300 and name it metal.psd.
2. Fill the Background layer with grey: #CCCCCC.
3. Go to Filter > Noise > Add Noise.
4. In the Add Noise dialog move the Add Noise slider to roughly 30%,
select Gaussian, and then choose Monochromatic. Click OK.
5. Go to Filter > Blur > Motion Blur.
6. In the Motion Blur dialog move the Angle slider to -45o and set the Distance to 45.
Click OK. You'll notice that the edges of the image don't blur as well as the centre
did. With any blur, the stronger the blur, the wider the edge area that will be
unblurred. This part can be cropped off.
Here's the image so far:
7. To enhance the texture you can go to Filter > Sharpen > Sharpen More The final
image below was cropped to 250x250.
8. Save your file and close it.
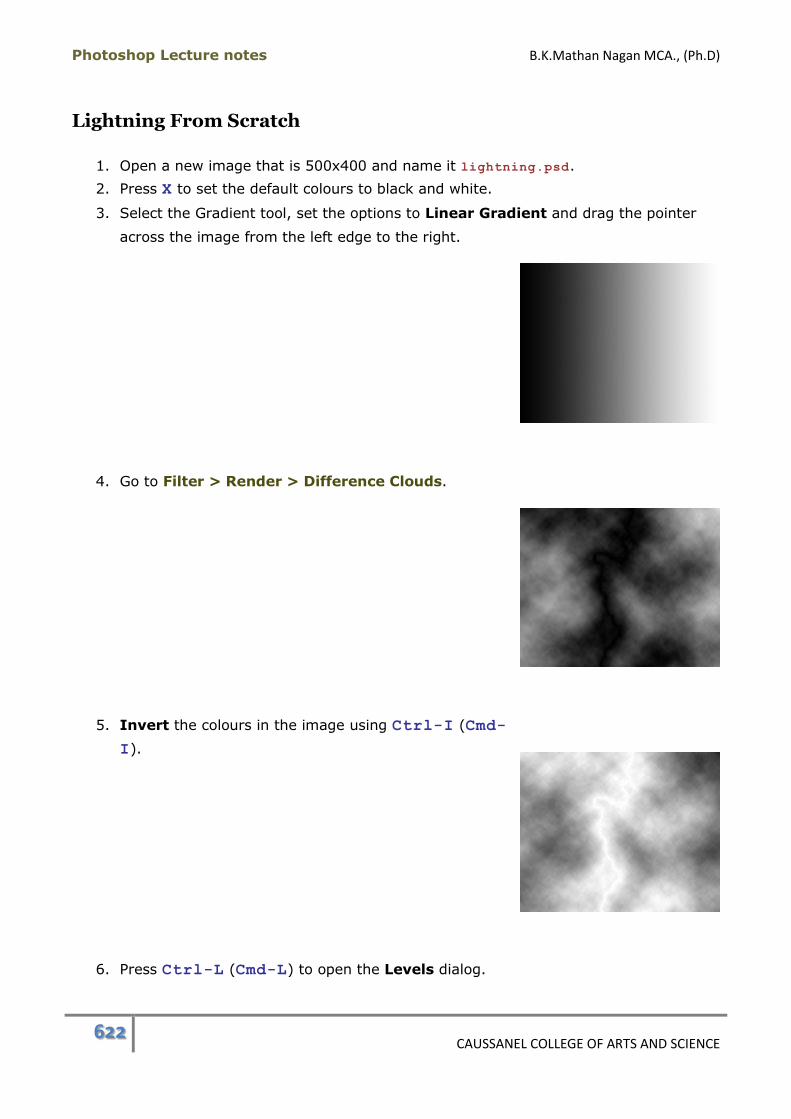
Photoshop Lecture notes B.K.Mathan Nagan MCA., (Ph.D)
622 CAUSSANEL COLLEGE OF ARTS AND SCIENCE
Lightning From Scratch
1. Open a new image that is 500x400 and name it lightning.psd.
2. Press X to set the default colours to black and white.
3. Select the Gradient tool, set the options to Linear Gradient and drag the pointer
across the image from the left edge to the right.
4. Go to Filter > Render > Difference Clouds.
5. Invert the colours in the image using Ctrl-I (Cmd-
I).
6. Press Ctrl-L (Cmd-L) to open the Levels dialog.
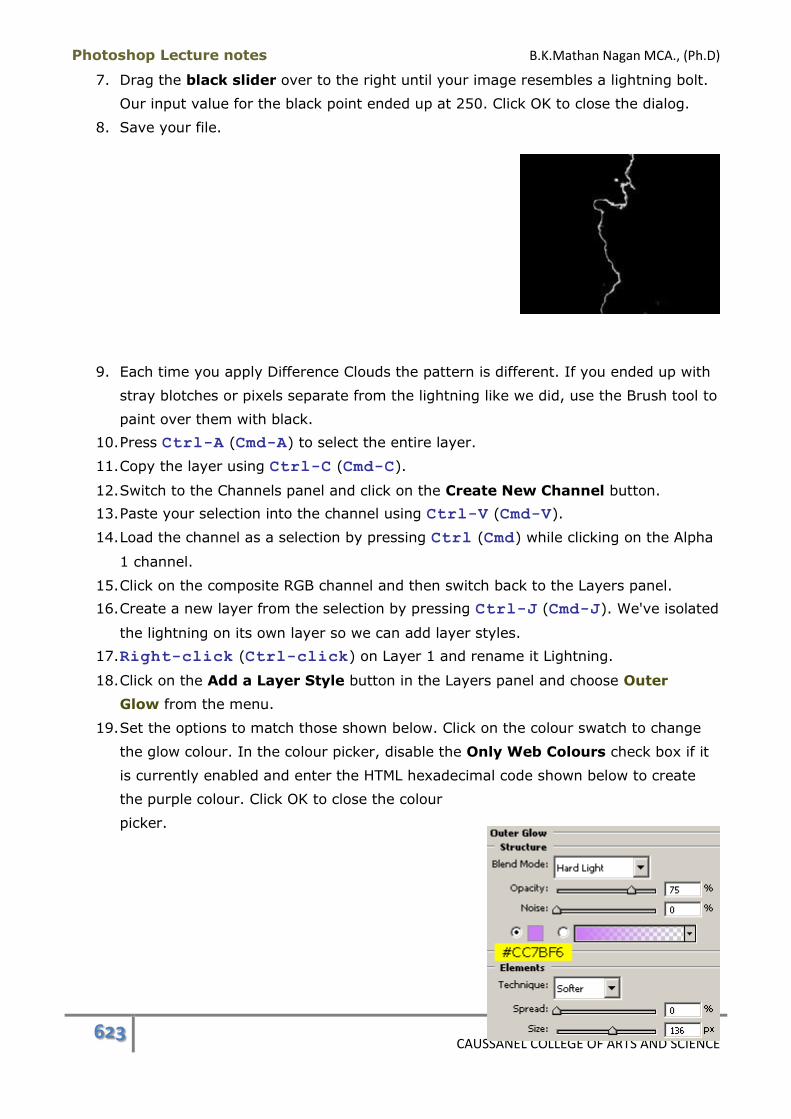
Photoshop Lecture notes B.K.Mathan Nagan MCA., (Ph.D)
623 CAUSSANEL COLLEGE OF ARTS AND SCIENCE
7. Drag the black slider over to the right until your image resembles a lightning bolt.
Our input value for the black point ended up at 250. Click OK to close the dialog.
8. Save your file.
9. Each time you apply Difference Clouds the pattern is different. If you ended up with
stray blotches or pixels separate from the lightning like we did, use the Brush tool to
paint over them with black.
10. Press Ctrl-A (Cmd-A) to select the entire layer.
11. Copy the layer using Ctrl-C (Cmd-C).
12. Switch to the Channels panel and click on the Create New Channel button.
13. Paste your selection into the channel using Ctrl-V (Cmd-V).
14. Load the channel as a selection by pressing Ctrl (Cmd) while clicking on the Alpha
1 channel.
15. Click on the composite RGB channel and then switch back to the Layers panel.
16. Create a new layer from the selection by pressing Ctrl-J (Cmd-J). We've isolated
the lightning on its own layer so we can add layer styles.
17. Right-click (Ctrl-click) on Layer 1 and rename it Lightning.
18. Click on the Add a Layer Style button in the Layers panel and choose Outer
Glow from the menu.
19. Set the options to match those shown below. Click on the colour swatch to change
the glow colour. In the colour picker, disable the Only Web Colours check box if it
is currently enabled and enter the HTML hexadecimal code shown below to create
the purple colour. Click OK to close the colour
picker.

Photoshop Lecture notes B.K.Mathan Nagan MCA., (Ph.D)
624 CAUSSANEL COLLEGE OF ARTS AND SCIENCE
20. Click on Colour Overlay in the Layer Style dialog list and match your settings to
those below. This will tint the lightning in a pink
colour.
Now your image should look something like this:
21. Select the opacity of the Lightning layer by Ctrl-clicking (Cmd-clicking)
on it in the Layers panel.
22. Click on the Create a New Layer button in the Layers panel.
23. Go to Select > Modify > Expand and set the value to 5 pixels.
24. Go to Select > Feather and enter a value of 5 pixels.
25. Set the foreground colour to #FFD3FF and fill the selection with that colour.
26. Set the layer's blending mode to Screen and reduce the Opacity to 75%.
27. Save your file.
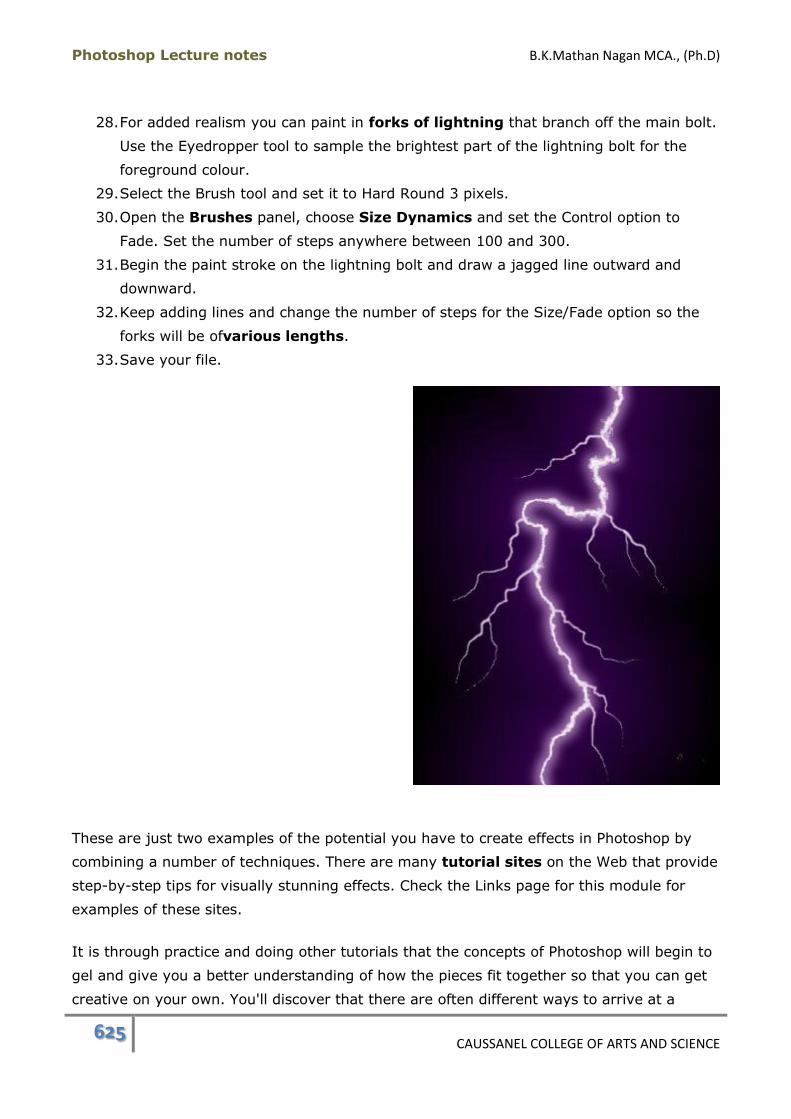
Photoshop Lecture notes B.K.Mathan Nagan MCA., (Ph.D)
625 CAUSSANEL COLLEGE OF ARTS AND SCIENCE
28. For added realism you can paint in forks of lightning that branch off the main bolt.
Use the Eyedropper tool to sample the brightest part of the lightning bolt for the
foreground colour.
29. Select the Brush tool and set it to Hard Round 3 pixels.
30. Open the Brushes panel, choose Size Dynamics and set the Control option to
Fade. Set the number of steps anywhere between 100 and 300.
31. Begin the paint stroke on the lightning bolt and draw a jagged line outward and
downward.
32. Keep adding lines and change the number of steps for the Size/Fade option so the
forks will be ofvarious lengths.
33. Save your file.
These are just two examples of the potential you have to create effects in Photoshop by
combining a number of techniques. There are many tutorial sites on the Web that provide
step-by-step tips for visually stunning effects. Check the Links page for this module for
examples of these sites.
It is through practice and doing other tutorials that the concepts of Photoshop will begin to
gel and give you a better understanding of how the pieces fit together so that you can get
creative on your own. You'll discover that there are often different ways to arrive at a

Photoshop Lecture notes B.K.Mathan Nagan MCA., (Ph.D)
626 CAUSSANEL COLLEGE OF ARTS AND SCIENCE
common solution. For example, there are probably dozens of lightning tutorials on the Web
(if not hundreds) and each of them will be somewhat different.
Special Effects in Photoshop Summary
Photoshop's ability to create visual effects comes from the independent components of the
program. When you bring these individual components together you will start to achieve
these easy yet stunning effects.
Hopefully, by now, you're feeling quite comfortable with the program. While you may not
remember every detail about how a function operates, the important thing is knowing that
there is a solution for what you're trying to achieve. You can always refer to Photoshop's
Help file to refresh your memory on the details and options. Best of luck with your creative
efforts!