Embed Size (px)
Citation preview
1
Phase 2 Beta Testers' Manual
2
TABLE OF CONTENTS
GETTING STARTED
P3: Purpose of the Beta Test
P4: Installing the Software
P8: Uninstalling the Software
P9: Launching the Game
P9: Starting the Launcher Application
P11: Character Creation and World Selection
BASIC CONTROLS
P14: Mouse and Keyboard
P16: Gamepad
NAVIGATING THE GAME SCREEN
P17: Heads up Display (HUD)
P23: Micro Menu
GAME PROGRESSION
P25: Battle
P26: Cross Hotbar
P37: Interacting with Other Players
P39: Communication
P41: Grand Companies
P43: Personal Chocobos
P44: Upon Reaching Level 10
P44: Gear Sets
P49: Crafting and Gathering
P54: Exiting the Game
P54: Getting Unstuck from Geometry
REFERENCE
P54: Test Feedback
P54: Bug Reporting
P55: Glossary of Mouse Controls
P56: Glossary of Keyboard Controls
P60: Glossary of Gamepad Controls
P62: Glossary of Text Commands
3
GETTING STARTED
■Purpose of the Beta Test
Thank you for participating in the second phase of the beta test for FINAL FANTASY XIV: A Realm
Reborn (hereafter referred to as "FFXIV: ARR).
FFXIV: ARR has undergone a number of significant adjustments, including, but not limited to, the
servers, core systems, client system, user interface, battle system, and maps. During this testing
period, we will evaluate game balance and investigate any bugs discovered in order to ensure a more
enjoyable gaming experience. Please note that as the game is still under development, you may
encounter unresolved technical and game-related issues.
Read on for further details.
* Phase 2 of the beta test will be limited to the Windows PC platform.

4
■Installing the Software
1. Launching the Installer
To launch the installer, double click ffxivsetup.exe. The file can be downloaded from the FINAL
FANTASY XIV: A Realm Reborn Tester Forums.
* Please launch the installer using an account with administrative privileges. Windows Vista® and
Windows® 7 users may be required to enter a password.
* In the event a windows security prompt is displayed, select OK to proceed with the installation.
Storage Space Requirements
・The drive selected for installation must have at least 20 GB of free space available.
・The drive containing My Documents must have at least 2 GB of free space available.
・The drive in which Windows is installed must have at least 1 GB of free space available.
Installation Precautions
・A User Account Control prompt may be displayed for Windows Vista® and Windows® 7 users.
Select Yes to proceed with the installation.
・Selecting a language different from the one set for your OS may cause the installer to display
corrupted text.
2. Region and Language Selection
After launching the installer, the region/language selection screen will be displayed. Select your
preferred language for the installer and the game. This option will be set to your Windows
region/language by default.
3. Installation Setup
After selecting your preferred region/language, the InstallShield Wizard will launch. Click Next to
begin installation.

5
* If your computer is not running a compatible version of Direct X, a message will appear prompting
you to install an up-to-date version.
4. Note on Background Applications
Please read and follow the on-screen instructions regarding background applications and anti-virus
software. Click Next when you are ready to continue.

6
5. License Agreement
The FINAL FANTASY XIV: A Realm Reborn Tester Agreement will now be displayed. Read the
agreement carefully. If you wish to proceed with the installation, check the box for "I accept the
terms of the license agreement" then click Next.
6. Choose Destination
This screen shows the destination folder to which the game data will be installed. To install to a
different folder, click Browse and designate a new destination folder.

7
7. Start Copying Files
You now have the chance to review your settings. If you are satisfied with the settings, click Next
to begin copying files.
8. InstallShield Wizard Complete
Check the box if you wish to create a shortcut on your desktop, then click Finish to complete the
installation.
Windows® 7 Users
If an error requesting that you install Windows Vista Service Pack 2 occurs during installation,
please follow these steps.
1. Right-click ffxivsetup.exe and open Properties
2. In the Compatibility tab, click Change settings for all users.
3. Uncheck the box for "Run this program in compatibility mode for:" and click Apply.
8
■Uninstalling the Software
Click Start and then Control Panel from the Windows® menu. Next, select Add or Remove
Programs for Windows® XP users, or click Uninstall a program under Programs for Windows
Vista® or Windows® 7 users. Lastly, select FINAL FANTASY XIV: A Realm Reborn (Beta
Version) from the list of programs and click either Change/Remove or Uninstall.
* If your control panel is set to category or classic view, click Programs and Features to view the
list of installed programs.
* Uninstalling the software will not remove the FINAL FANTASY XIV: A Realm Reborn (Beta Version)
data located in the My Documents folder. This data must be deleted manually.
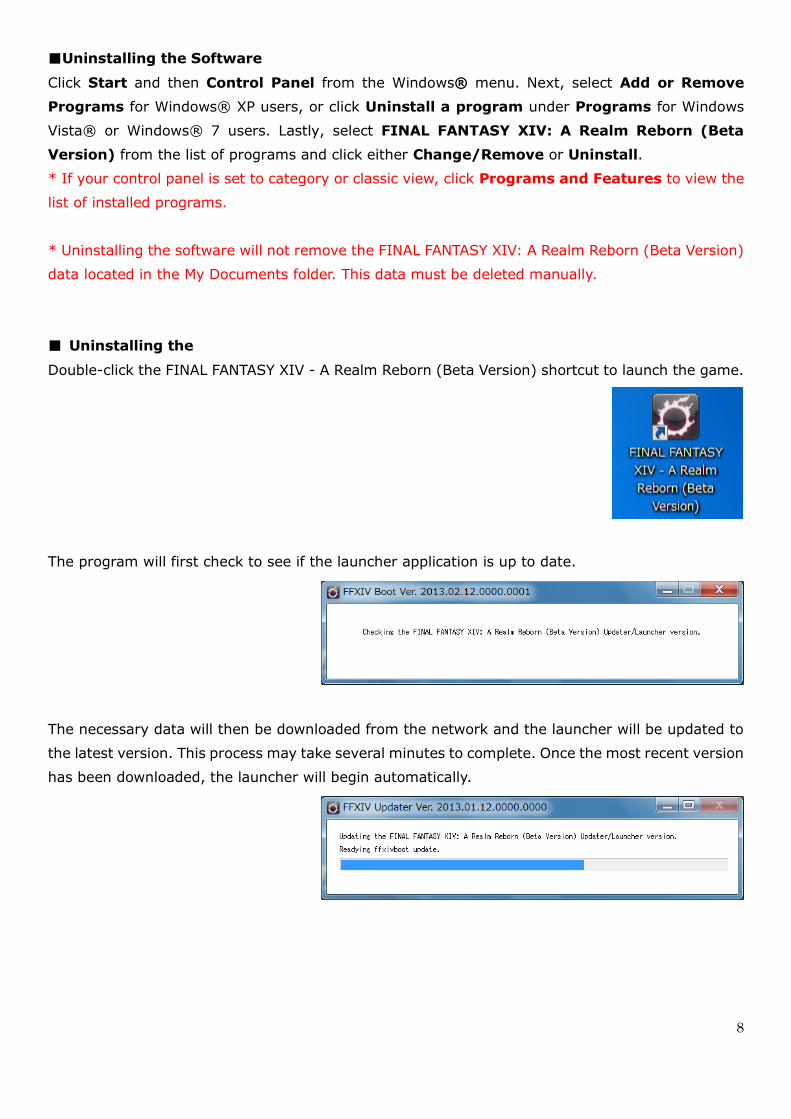
■ Uninstalling the
Double-click the FINAL FANTASY XIV - A Realm Reborn (Beta Version) shortcut to launch the game.
The program will first check to see if the launcher application is up to date.
The necessary data will then be downloaded from the network and the launcher will be updated to
the latest version. This process may take several minutes to complete. Once the most recent version
has been downloaded, the launcher will begin automatically.

9
■he necessary data will then be do
The launcher is an application that allows players to log in to the game by entering their Square Enix
account ID and password. It also provides access to account and game information, as well as certain
game settings.
For the beta test, we have provided links to the Beta Tester Forums, the official site for FINAL
FANTASY XIV: A Realm Reborn, our official Facebook and Twitter pages, the FINAL FANTASY XIV®
XIV CHANNEL on Youtube, and the Square Enix Account Manager site.
1. Log in to the Game
Log in using your registered Square Enix ID and password. If you have registered a security token,
enter your one-time password and click Log In.
10
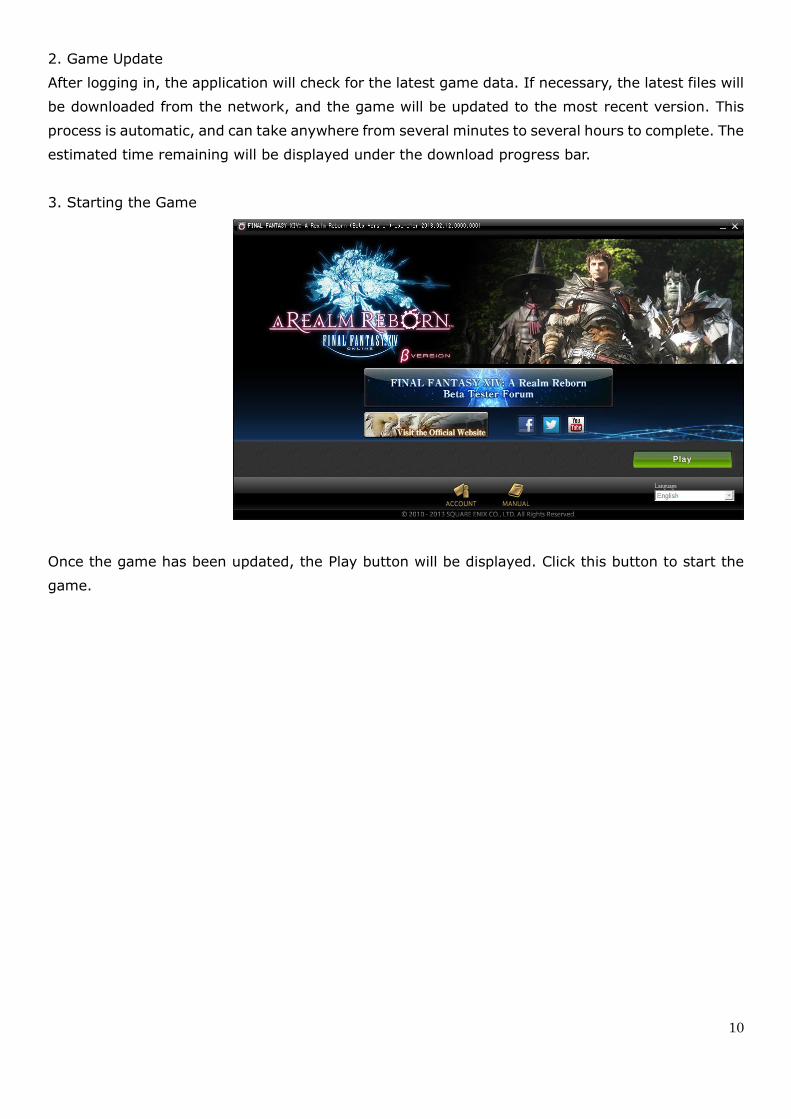
2. Game Update
After logging in, the application will check for the latest game data. If necessary, the latest files will
be downloaded from the network, and the game will be updated to the most recent version. This
process is automatic, and can take anywhere from several minutes to several hours to complete. The
estimated time remaining will be displayed under the download progress bar.
3. Starting the Game
Once the game has been updated, the Play button will be displayed. Click this button to start the
game.

11
■nce the game has been updated, the Pla
As a phase 2 beta tester, you may have your own character in Version 1.0. For this phase of testing,
however, we require that you create a new character by following the steps below. Furthermore,
please be aware that all characters will be deleted upon completion of phase 2.
Mouse and Keyboard
Gamepad
1 2 3
4
4 3 2 1

12
Manipulating the Character Creation Screen
Dragging the mouse while holding down either the left or right mouse button will rotate the camera.
You can also zoom in and out with the camera by scrolling the mouse wheel up and down.
Starting from phase 2, players will be able to control their characters using a gamepad. However, a
mouse is still required to complete the character creation process.
Character Creation Screen Controls
1. Change background image.
2. Change character gear.
Race: Displays default race gear.
Job: Displays job-specific gear for phase 2. (Available only after selecting a class)
Smallclothes: Displays undergarments. (i.e., no gear equipped)
3. Toggle between standing and unique character poses.
4. Return to the character selection screen. Current character progress will be lost.

13
Creating a Character
1. After logging in to the game, click START.
2. Click on New Character on the Character Selection screen.
3. Select a race, clan, and gender.
* Starting STR, DEX, VIT, INT, MND, and PIE attributes will differ depending on your race and clan.
However, gender has no effect on starting attributes.
4. Customize your character's appearance.
* Phase 2: Limited range of categories and sub-categories available.
5. Select your character's birthday and patron deity.
* Starting elemental resistances will differ slightly depending on your patron deity.
6. Select your character's starting class and city-state.
* Phase 2: Class selections limited to lancer, archer, and conjurer. City-state selection limited to
Gridania only.
7. Select a World server
* Phase 2: Selection restricted to beta-exclusive Worlds only.
8. Enter a forename and surname for your character, and click Confirm.
・In FFXIV: A Realm Reborn, names are restricted to 20 characters or less.
* Characters made in Version 1.0 can be transferred to FFXIV: A Realm Reborn regardless of name
length.
9. If you are satisfied with the character you have created, click OK to begin adventuring in the
game.

14
BASIC CONTROLS
As you progress through the early stages of the game, tutorial screens known as "active help
windows" will provide a gradual introduction to the various controls. Please take a moment to look
over these instructions as some changes have been made to the control scheme present in Version
1.0. Please note also that this manual only contains information pertinent to phase 2, and does not
include explanations of every feature available in the full game.
* After the game's opening cutscene, players will be able to choose between two control schemes:
mouse and keyboard, or gamepad. Once a control scheme has been selected, settings can be
adjusted further in the configuration menu.
* Only the e-frontier FF-GP1, ELECOM JC-U3312BK-FF, and XInput-compatible gamepads are
recommended for use during phase 2. All gamepad models will be supported from phase 3. Gamepad
configuration will also be possible in phase 3.
* If multiple gamepads are connected to your computer, only the first device will be detected by the
game.
■Mouse and Keyboard
Character Movement
Move your character forward by pressing the left and right mouse buttons at the same time. To
change direction while moving, keep both buttons pressed and drag the mouse button left or right.
To jump, press the spacebar on the keyboard. This can be used to leap over obstacles like small rocks
or low fences. For details on other keys assigned to character movement, please refer to the Mouse
Controls and Keyboard Controls sections found in the final chapter of this manual.
* When using the WASD keys to move your character, you can select Standard Type for a
character-based view, or Legacy Type for a camera-based view.
Configuration Options
To change the camera and movement control settings, press the Esc key, or click System in the
micro menu, and then access the Controls tab under Configuration in the System menu.

15
Camera Controls
To control the camera, drag the mouse while pressing either the left or right button.
Left Button Only the camera view will rotate, and not your character.
Right
Button
Your character faces the direction in which you rotate the
camera.
* The direction of camera rotation can be changed in the configuration menu.
Target Selection
You can target a character, or an object such as a gate or aetheryte, by moving the mouse cursor
over the intended target and click the left mouse button. With a right-click, you can begin
auto-attacking an enemy target, start a conversation with an NPC, or open a command submenu
when the target is another player.
Ctrl
By holding down the Ctrl key, you can hide all player character names, as well as make them
untargetable. This can assist with target selection when other players are present.

16
■Gamepad
Starting in phase 2, players will be able to control their characters using a gamepad by selecting
Gamepad under Control Presets in the Configuration menu. For details on button assignments for the
gamepad, please refer to the Glossary of Gamepad Controls.
* All button mapping within this manual is based on XInput-compatible gamepads. Please note that
button mapping may vary depending on the controller.
Character Movement
Move your character by using the left analog stick, and jump by pressing the Y button. In the
Configuration menu, you can select Standard Type for a character-based view, or Legacy Type for a
camera-based view.
Camera Controls
Use the right analog stick to control the camera. Analog stick camera axis can be reversed in the
Configuration menu.
Target Selection
To target a character or object, first face your target and press A. When a target circle appears, press
A again to confirm your target. To select a target amongst several, use the D-pad to cycle through
multiple targets.
Target Circle Selected Target
Menu Navigation
When using gamepad controls, players can navigate menus using the D-pad. Use A to confirm, B to
cancel, and X to open submenus. To cycle between HUD components (P17) including the log window,
minimap, and duty list, press BACK. To select the Micro Menu (P23), press START.

17
NAVIGATING THE GAME SCREEN
The following is a comprehensive listing of the main user interface components found on your screen.
■Heads up Display (HUD)
1. Party List
The list displays the vital stats of all current party members, your character's information always
coming at the top. Individual party members can be targeted by clicking on their names. Information
on forming a party can be found on page 37.
2. Log Window
Quest dialogue, systel messages, conversations with other players, and more are displayed in the log
window. You begin the game with two fully customizable main logs—General and Battle—but can
create more as you see fit. Information on using the chat function can be found on page 39.
1
2
3
5
6
4
7
8
If you wish to hide the party list when you are not in a party, access the HUD tab under
Configuration in the System menu and select "Hide Party member list when solo."

18
General Includes the chat log, and most non-battle player actions. FINAL FANTASY XIV can be
played using this tab alone.
Battle
Includes all battle-related messages. On screen cues known as "fly text" remove the
need to rely on the Battle log while in combat. However, this log is helpful when
conducting post-battle analysis of your party's strategies.
Event Includes all NPC dialogue, including quest cutscenes.
3. Action Bars
Player actions, emotes, items, macros, and target markers can be set to these slots so that they can
be accessed by simply clicking on the icon. The number indicated in the bottom left corner of the icon
is the amount of TP (Tactical Points), MP (Magical Points), or GP (Gathering Points) required to
execute the command.
Lock Bar
New commands can be added to an Action Bar at any time by dragging and dropping
them into the desired slot. Clicking on the padlock locks the actions to the bar,
preventing the accidental movement or discarding of an icon. Action Bar icon
position is saved for each class, regardless of whether or not the Lock Bar feature is
activated.
4. Parameter Bar
In addition to displaying current HP, MP/CP/GP, TP, and level progress, it also displays any status
effects that your character may be experiencing. The duration of a status effect is displayed
underneath its icon. Furthermore, any enhancing effect can be instantly removed by right clicking its
icon.
1. ナビマップ
Rested Bonus
Upon entering a "sanctuary," such as an inn room or aetheryte camp, this icon will
appear to the right of your experience bar, indicating that you are currently accruing
a rested bonus.
Experience Bar Color
Yellow: Normal
Blue: Rested bonus accrued
Red: Rested bonus accrued beyond current level
CP is used by Disciples of the Hand during synthesis.
GP is used by Disciples of the Land during gathering.

19
5. Minimap
Displays the current location of your character, as well as the location of nearby landmarks such as
shops, aetherytes, and quest destinations. It also displays the location of enemies (red dots) and
allies (blue dots). Additionally, the sun icon bordering the minimap moves to represent the time of
day.
* To view the map when using a mouse and keyboard, click the minimap at the top right of the screen.
When using a gamepad, press X.
6. Duty List
Displays active quest titles and objectives. Clicking on the quest title opens the journal, while clicking
on the objectives displays the location of those objectives on your map.
7. Gear and Inventory Grid
The set of dots on the left represent your character's gear slots. The set of dots on the right, your
inventory. Clicking on the sets opens the respective menus.
8. Micro Menu
The game's main commands can all be accessed via these icons. For more information on the micro
menu, turn to page 22.
Dot Color
Black: Empty
Green: Gear
Red: Damaged Gear
Blue: Perishable Item
Orange: Perishable Item (Full Stack)
White: 100% Spiritbonded Gear
Grey: Minion Whistle

20
9. Notices
All pending friend requests, party invites, etc., are displayed here. Clicking on the notice will bring up
the confirmation prompt.
10. Target Bar
Displays information on the object, character, or enemy currently targeted. The bar directly to the
left of the target bar indicates the character with which the target is interacting. In the case of the
screenshot above, the Level 2 ground squirrel is attacking the character, Beta Test.
11. Enmity List
Indicates the enmity levels of the target with which you are currently engaged.
12. Progress Bar
Indicates the progress of any actions (spell casting, item usage, etc.) that are not instant.
13. Focus Target Bar
Indicates the progress of any actions (spell casting, item usage, etc.) that are not instant.
10
0
0
0
0
9
14
0
0
0
0
13
0
0
0
0
12
0
0
0
0
11
0
0
0
0
In addition to your current target, you can also keep an eye on other enemies or allies by
making them focus targets. This is a good way to keep track of one target’s HP while dealing
with another. A focus target can be designated by clicking on the target and pressing Shift+F.
You can switch your main target to the focus target by clicking on the focus target bar.

21
14. Flying Text
Real-time messages and information indicating your character's actions (scrolls up), as well as
actions conducted on your character (scrolls down).
Text Description
Damage dealt
Critical damage dealt
Damage received
Critical damage received
TP damage dealt
TP damage received
HP recovered
Critical Heal
MP recovered
TP recovered
Attack partially or fully evaded
Attack missed
Target is impervious to that type of attack

22
Experience earned
The number in parenthesis indicates what
percentage of the experience point total was a bonus
added to the base reward.
Item found
The name, quantity, and quality of the item is
displayed in your General log.
Enhancing effect applied
All enhancing effect icons point upwards.
Detrimental effect applied
All detrimental effect icons point downwards.
Effect removed or expired.
Synthesis progress increased
Synthesis quality increased
Flying text indicating party and enemy actions are distinguished by color.
Party member actions
Enemy actions
Enhancing effects and restorative
actions

23
■Micro Menu
* Some features cannot be accessed until they are unlocked, and therefore may not be available at
the game‘s onset.
(Upper Row, from Left to Right)
Character
Displays detailed information on your character, including attributes, gear, class
levels, background data, and more. Once you have unlocked the Armoury
System, gear sets will become available, allowing you to save multiple gear
combinations. (See page 43)
* Gladiator is available only provisionally during phase 2; unlocking the gladiator
class will not allow you to use gear sets.
* In response to alpha tester feedback, gear set functionality will undergo
significant change following phase 2.
Journal
Upon accepting them, all quests (including levequests) are added to your journal,
where progress and objectives can be confirmed at any time. Completed quests
are also listed under a separate tab.
Personal Logs Opens the Crafting, Gathering, and Hunting Logs (if unlocked).
Social Lists Contains the party member list, Friend List, Blacklist, and Player Search feature.
Map Displays your collection of maps.
Return Return to your current home point.
* This command can only be used once every 15 minutes.
Signs Select and register signs to targets.
24
(Lower Row, from Left to Right)
Stance Change your battle stance from Active (weapon drawn) to Passive (weapon
sheathed).
Actions & Traits Opens the Actions & Traits interface.
Timers
Displays time remaining until various content becomes available, such as leve
allowances and instanced raids.
* The Duty Finder is not available in phase 2.
Inventory
Displays your current inventory. You begin the game with four bags, each holding
a maximum of 25 items. Items can be categorized into four different types─gear,
perishable items, crystals, and key items. The first two are stored in your regular
inventory, whereas key items and crystals do not take up slots in your bags. These
auxiliary items can be seen by clicking on the crystal and bag icons respectively.
Key items cannot be traded, sold, or discarded.
Left-clicking an item allows you to drag and drop it into another slot, a trade
window, or your Action Bar. Right-clicking an icon brings up a submenu which
displays options such as use, split, or discard.
Linkshells * Not available in phase 2.
Teleport Teleport to previously visited locations in exchange for gil.
* Anima has been abolished as of beta phase 1, and is no longer used to Teleport.
Emotes Displays a list of emotes which can be executed directly from the list or dragged
onto the Action Bar.
System
Various system-related tools can be accessed via this interface, including
Configuration, Keybind, Macros, and HUD Layout. Logging out is also carried out
from the System menu. Refer to page 53 for details on logging out.
* The Active Help option is not available in phase 2.
25
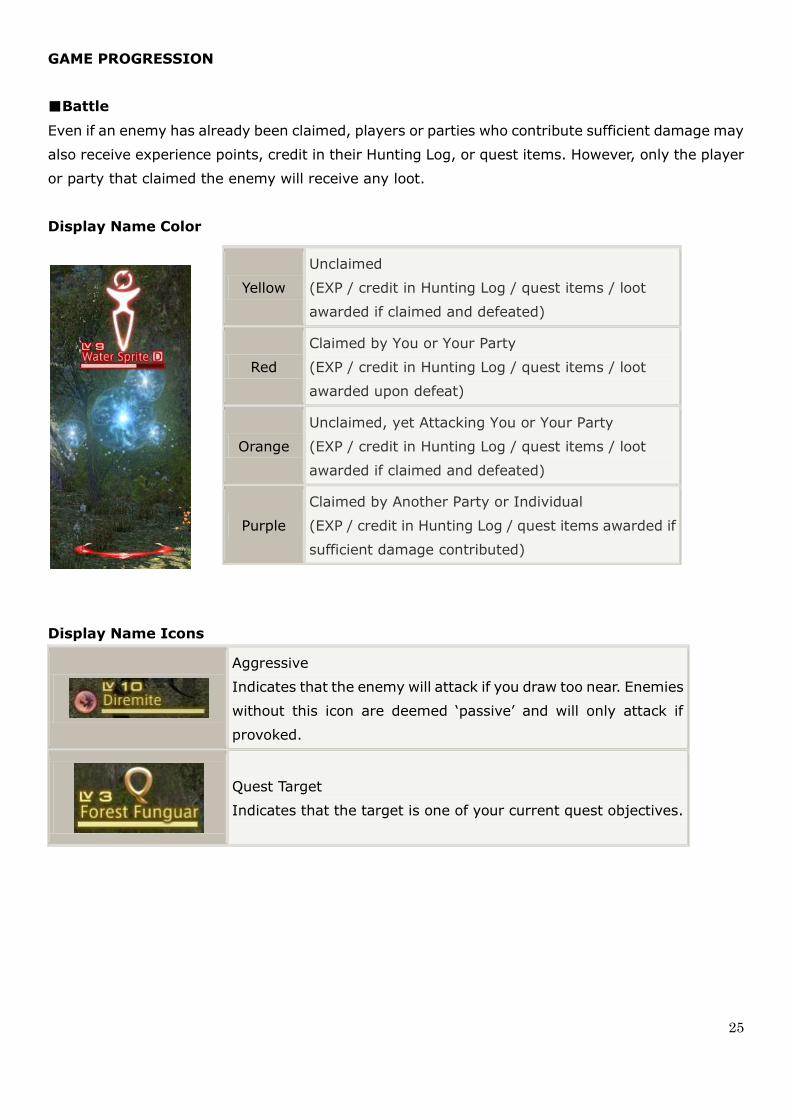
GAME PROGRESSION
■Battle
Even if an enemy has already been claimed, players or parties who contribute sufficient damage may
also receive experience points, credit in their Hunting Log, or quest items. However, only the player
or party that claimed the enemy will receive any loot.
Display Name Color
Display Name Icons
Aggressive
Indicates that the enemy will attack if you draw too near. Enemies
without this icon are deemed ‗passive‘ and will only attack if
provoked.
Quest Target
Indicates that the target is one of your current quest objectives.
Yellow
Unclaimed
(EXP / credit in Hunting Log / quest items / loot
awarded if claimed and defeated)
Red
Claimed by You or Your Party
(EXP / credit in Hunting Log / quest items / loot
awarded upon defeat)
Orange
Unclaimed, yet Attacking You or Your Party
(EXP / credit in Hunting Log / quest items / loot
awarded if claimed and defeated)
Purple
Claimed by Another Party or Individual
(EXP / credit in Hunting Log / quest items awarded if
sufficient damage contributed)

26
Action Bar (Mouse/Keyboard)
As you progress in level, you will acquire new actions. These will automatically be set to the next
available slot in your Action Bar. Additional actions can be set to an Action Bar via drag and drop in
the Action & Traits menu. Actions can be dragged to a new slot, or removed by right clicking the icon
and selecting Remove.
The amount of MP (red), CP (purple), GP (blue), or TP (yellow) required to execute an action is
indicated by the number in the lower-left corner of the icon. For example, in the screenshot above,
the conjurer spell Stone set to Action Bar 1, slot 2, requires 10 MP to cast.
■Cross Hotbar (Gamepad)
The Cross Hotbar has been introduced in phase 2 for gamepad users. To switch to the Cross Hotbar,
access the Configuration menu, then select Gamepad under Control Presets.
Like the Action Bar, actions can be set to the Cross Hotbar in the Actions & Traits menu. By holding
down RB and pressing the D-Pad or one of the four main buttons, you can cycle through the available
eight hotbar sets. Holding down either LT or RT will highlight the left or right side of the Cross Hotbar
respectively, and the actions set to the Cross Hotbar will become available for use. Actions can then
be activated by then pressing the D-Pad or one of the four main buttons. In the example below,
holding down LT and pressing B will activate Sprint.

27
Setting Actions to the Cross Hotbar
Open the Action & Traits menu, then select an action you would like to set.
Hold LT or RT, then press the button corresponding to the desired slot.

28
Setting Macros to the Cross Hotbar
In User Macros under the System menu, select the macro you wish to set, then press X.
Select Set to Hotbar in the submenu, then assign the macro to a slot in the same manner that
you assign an action.
Setting Emotes to the Cross Hotbar
In the Emotes menu, select the emote you would like to set, then press X.
Hold LT or RT, then press the button corresponding to the desired slot.
* During phase 2, signs cannot be set to the Cross Hotbar using the gamepad. A mouse must be used
to drag and drop signs to the Cross Hotbar.
29
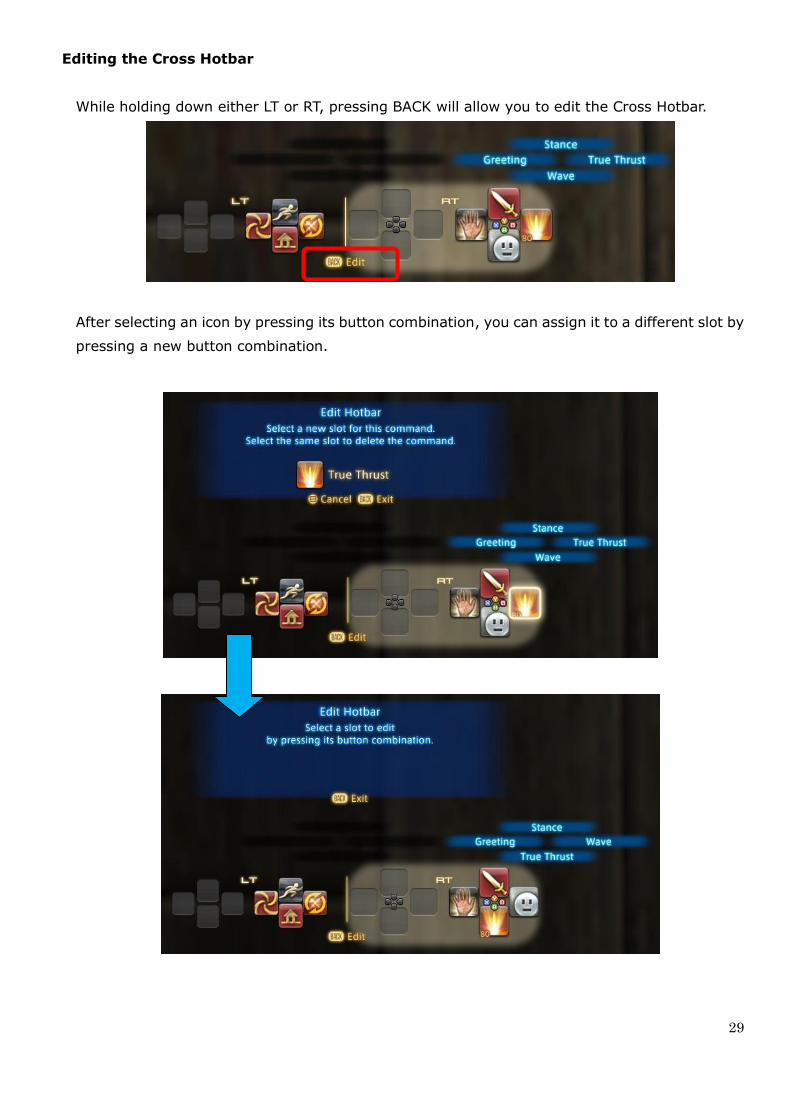
Editing the Cross Hotbar
While holding down either LT or RT, pressing BACK will allow you to edit the Cross Hotbar.
After selecting an icon by pressing its button combination, you can assign it to a different slot by
pressing a new button combination.

30
If you wish to remove that icon from the Cross Hotbar, simply press its button combination again.
31
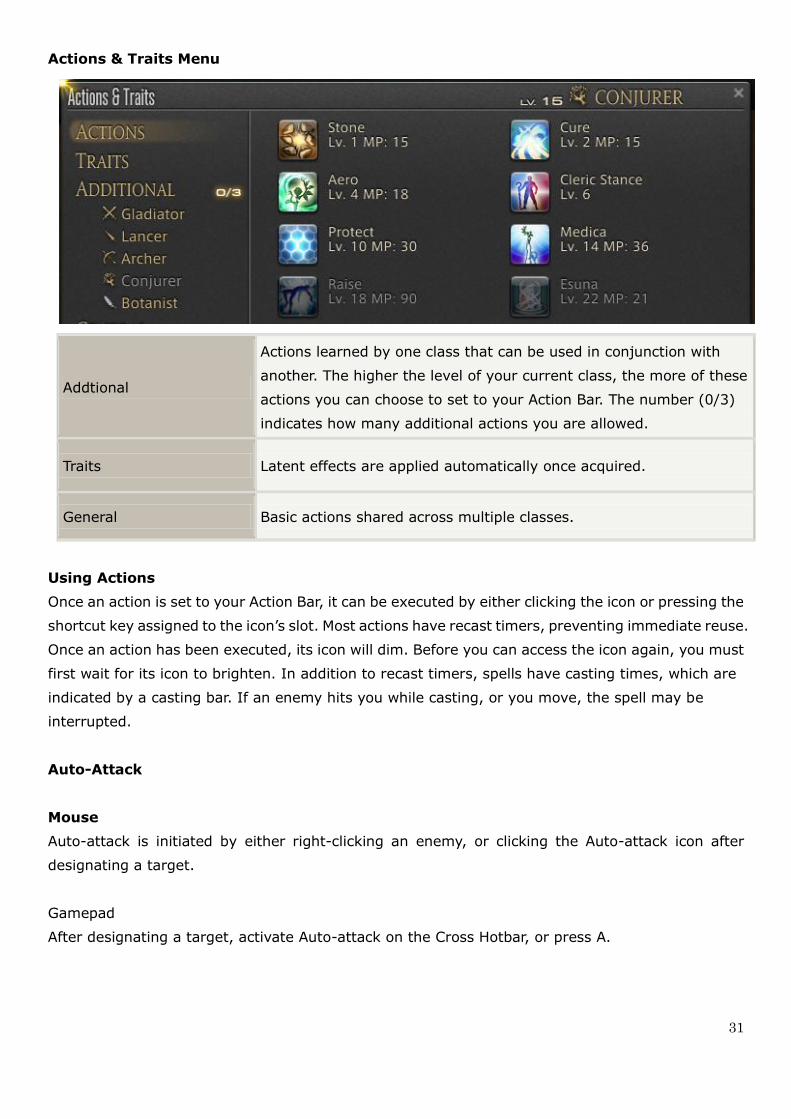
Actions & Traits Menu
Addtional
Actions learned by one class that can be used in conjunction with
another. The higher the level of your current class, the more of these
actions you can choose to set to your Action Bar. The number (0/3)
indicates how many additional actions you are allowed.
Traits Latent effects are applied automatically once acquired.
General Basic actions shared across multiple classes.
Using Actions
Once an action is set to your Action Bar, it can be executed by either clicking the icon or pressing the
shortcut key assigned to the icon‘s slot. Most actions have recast timers, preventing immediate reuse.
Once an action has been executed, its icon will dim. Before you can access the icon again, you must
first wait for its icon to brighten. In addition to recast timers, spells have casting times, which are
indicated by a casting bar. If an enemy hits you while casting, or you move, the spell may be
interrupted.
Auto-Attack
Mouse
Auto-attack is initiated by either right-clicking an enemy, or clicking the Auto-attack icon after
designating a target.
Gamepad
After designating a target, activate Auto-attack on the Cross Hotbar, or press A.

32
Combos
Some actions can be linked to deal extra damage or additional status effects. A yellow glow around
an action‘s icon indicates that it is the next step in a combo.
Recovering HP/MP/TP
HP, MP (CP/GP), and TP are all gradually restored over time. The speed of recovery,
however, is significantly faster when you are not engaged in battle.
* The Limit Break system is not accessible in phase 1.
Hunting Log
Upon completion of your level 1 starting class quest, you will unlock the Hunting Log, which can be
accessed from the micro menu or by pressing the H key.
By slaying certain creatures, you can complete entries to earn rewards. An additional bonus is also
awarded for completing all the entries in a single difficulty rank.

33
Creatures marked with this icon are listed in the hunting log.
New pages will be added to the log every ten levels; however, lower ranks must be completed before
you can attempt higher ranks.
New pages will be added to the log every ten levels; however, lower ranks must be completed before
you can attempt higher ranks.
The log can be expanded by completing the level 1 class quest for another discipline of war or magic.
However, entries for a given class can only be completed by slaying creatures as that class.
* After completing the level 10 class quest for any Disciple of War or Magic, players can speak with
the Wandering Minstrel to unlock the gladiator class and hunting log.
* Hunting Logs for gladiator, lancer, archer, and conjurer have been implemented up to rank 3 in
phase 2.
Character Attributes
Your character's attributes, resistances, and properties can be found under the Attributes tab in the
Character interface.
34
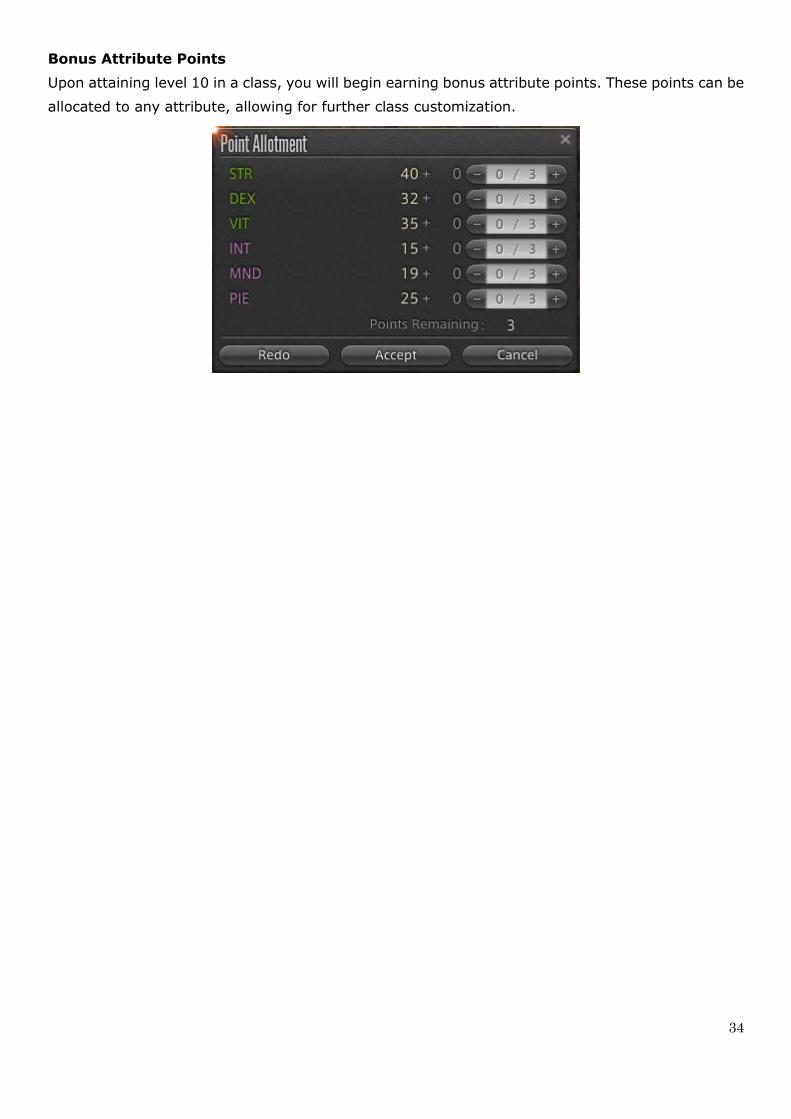
Bonus Attribute Points
Upon attaining level 10 in a class, you will begin earning bonus attribute points. These points can be
allocated to any attribute, allowing for further class customization.

35
Attributes, Properties, and Resistances
Strength Increases melee attack power and the percentage of damage mitigated by
block and parry.
Dexterity Increases ranged attack power and the chance of blocking or parrying an
attack.
Vitality Increases maximum HP.
Intelligence Increases attack magic potency for thaumaturgy.
* The thaumaturge class is not available in phase 2.
Mind Increases attack and healing magic potency for conjury.
Piety Increases maximum MP.
Fire Reduces the amount of damage received from fire-aspected attacks.
Ice Reduces the amount of damage received from ice-aspected attacks.
Wind Reduces the amount of damage received from wind-aspected attacks.
Earth Reduces the amount of damage received from earth-aspected attacks.
Lightning Reduces the amount of damage received from lightning-aspected attacks.
Water Reduces the amount of damage received from water-aspected attacks.
Accuracy Increases the accuracy of physical and magical attacks.
Critical Hit Rate Increases the probability that an attack will deal critical damage.
Determination Increases the amount of damage dealt by all attacks and the amount of HP
recovered by spells.
Attack Power Increases the amount of damage dealt by physical attacks.
Skill Speed Reduces the recast time of weaponskills.
Attack Magic
Potency Increases the amount of damage dealt by spells.

36
Healing Magic
Potentcy Increases the amount of HP recovered by spells.
Spell Speed Reduces the cast and recast times of spells.
Defense Reduces the amount of damage received from physical attacks.
Parry Increases the probability that an attack will be blocked or parried.
Magic Defense Reduces the amount of damage received from magical attacks.
Slashing Reduces the amount of damage received from slashing attacks.
Piercing Reduces the amount of damage received from piercing attacks.
Blunt Reduces the amount of damage received from blunt attacks.
Morale Reduces the amount of damage received from other players‘ attacks.
* PvP is not available in phase 2.
* The battle system and damage algorithms will undergo significant change in subsequent
phases. As a result, the above attributes, properties and resistances will change.
Acquiring Items
Items obtained are automatically sorted in your inventory according to the following rules:
・Gear is placed in your first bag.
・Potions, food and other consumables are placed in your third bag.
・Crafting materials and other items are placed in your fourth bag.
* Gear unequipped by right-clicking the icon and selecting unequip will be placed in your first bag.

37
■Interacting with Other Players
Right-clicking another player will bring up the following submenu:
v
Send Tell
Open a personal chat with the player.
Trade
Hand over an item to, or trade an item with the player.
To offer an item, either right-click it in your inventory and select Trade from the submenu, or simply
drag it onto the Trade interface. After specifying the quantity of each item you wish trade, click on the
Trade button to agree with the terms of the transaction. Once the other player has done the same, a
final prompt will be displayed, and once both parties have selected OK, the trade will be complete.

38
Invite
Invite a player to your party.
Accepting an Invite
When a player invites you to a party, a message will appear in your Notices. Click on the notice before
the timer runs down to bring up a prompt asking if you wish to accept the invite.
Leaving a Party
To leave a party, first open your Social Lists from the micro menu. Then, click the Leave button found
at the bottom of the Party Members tab.
Send Friend Request
Send a request to add a player to your Friend List.
Accepting a Friend Request
When a player sends you a friend request, a message will appear in your Notices. Click on the notice
to open the Friend List tab within your Social Lists. The name of the player who sent you the request
will be displayed in yellow. Click on the name and select Accept Friend Request from the submenu to
complete the action.
Examine
View a player‘s name, level, class, and currently equipped gear.
Follow
Lock on to a player and physically trail behind them until either you move in a different direction, or
the player leaves the immediate area.

39
Player Search
World-wide searches for other players can be conducted using the Player Search function found
within Social Lists. You can specify the conditions of your search to produce more accurate results.
To update your own search info (comment, spoken languages, etc.), click on your character‘s name
on the Party Members tab and select Edit Search Info from the submenu.

40
■Communication
You can switch between chat modes by clicking on the speech bubble to the right of the input box.
Chat Modes
Tell
Sends a message that can only be seen by the specified
recipient.
(Press Alt+R to reply to the last tell received)
Say Sends a message that can be seen by all nearby players.
(Press Alt+S to temporarily change your chat mode to [Say])
Party
Sends a message that can only be seen by current party
members.
(Press Alt+P to temporarily change your chat mode to [Party])
Shout
Sends a message that can be seen by all players in the same
area.
(Press Alt+H to temporarily change your chat mode to [Shout])
* The [Yell] chat mode will be implemented in phase 3. [Yell] will send messages to all players in an
area larger than [Say], but not as large as [Shout].
Retainers
After completing a special quest, speak with the Wandering Minstrel NPC outside the Adder‘s Nest in
New Gridania to gain permission to hire a retainer. Retainers can then be hired by speaking with
Parnell inside the Shaded Bower in Old Gridania.
41
■Grand Companies
The Grand Companies are organizations founded and governed by the city-states of Eorzea. By
enlisting in a Grand Company, players can undertake a variety of tasks.
Enlisting in a Grand Company
After completing the sidequest Sylph-Awareness, players can speak with the Wandering Minstrel
outside the Adder's Nest to obtain permission to join the Order of the Twin Adder. Next, players must
speak with Serpent Captain Fulke in the Adders' Nest.
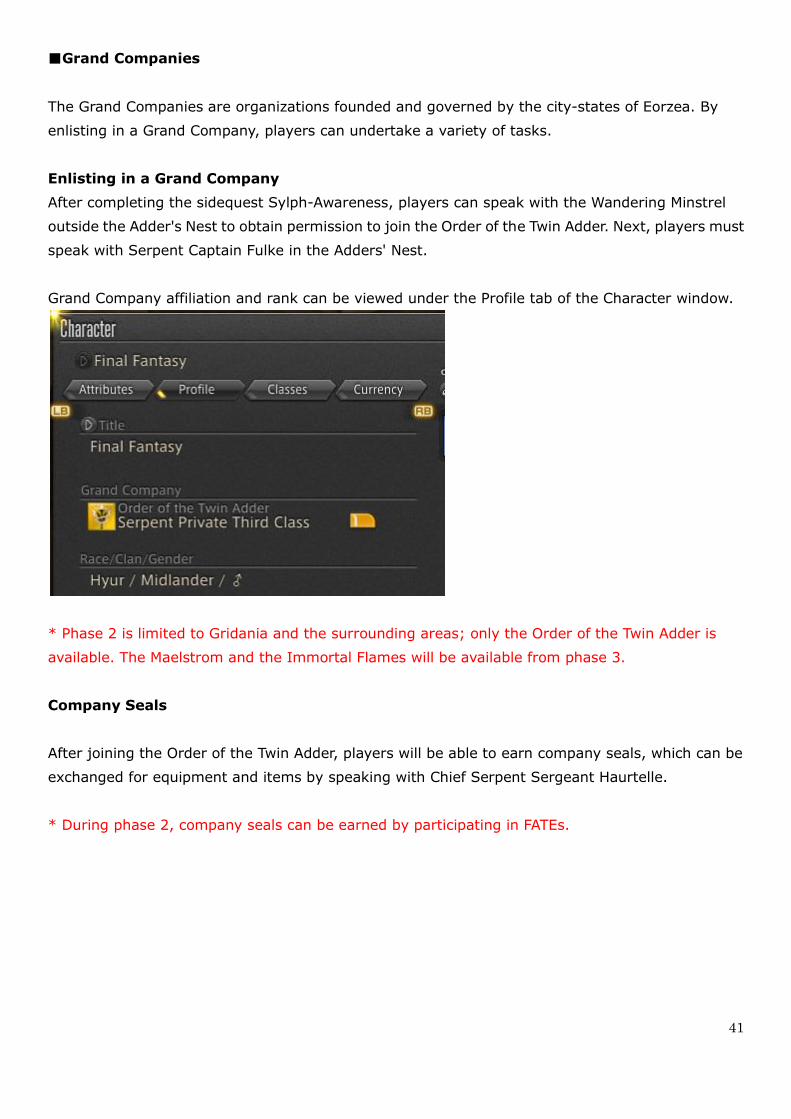
Grand Company affiliation and rank can be viewed under the Profile tab of the Character window.
* Phase 2 is limited to Gridania and the surrounding areas; only the Order of the Twin Adder is
available. The Maelstrom and the Immortal Flames will be available from phase 3.
Company Seals
After joining the Order of the Twin Adder, players will be able to earn company seals, which can be
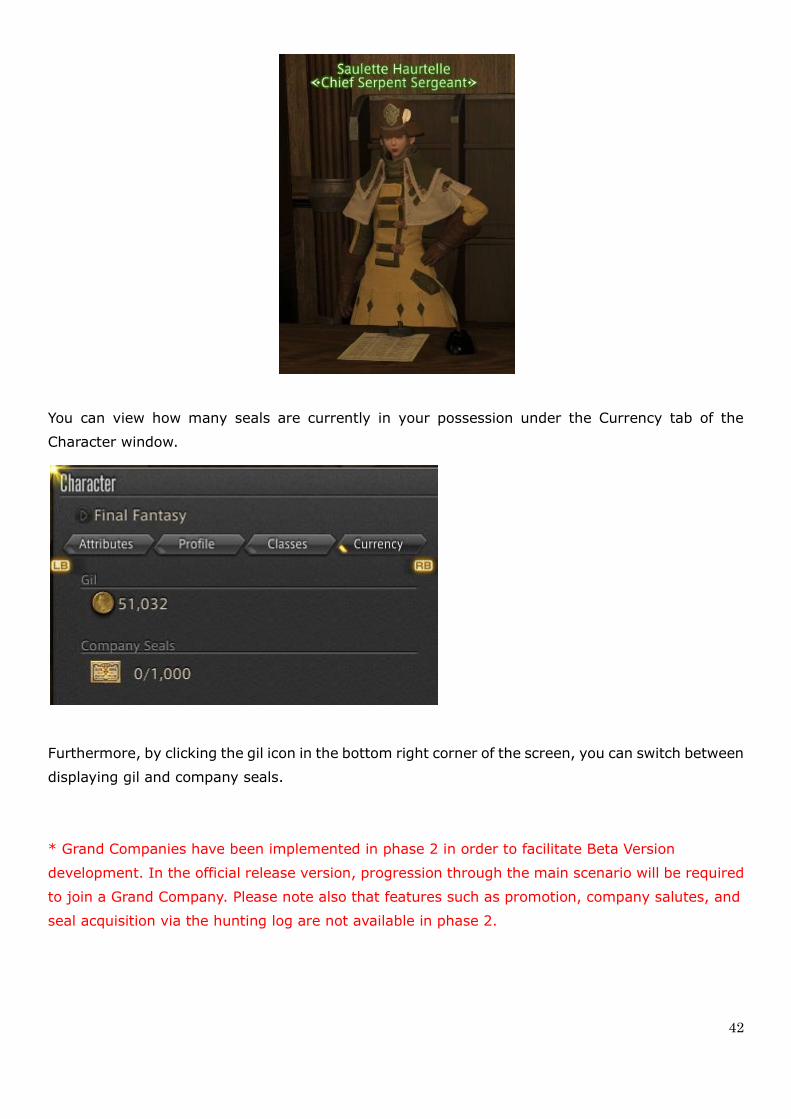
exchanged for equipment and items by speaking with Chief Serpent Sergeant Haurtelle.
* During phase 2, company seals can be earned by participating in FATEs.
42
You can view how many seals are currently in your possession under the Currency tab of the
Character window.
Furthermore, by clicking the gil icon in the bottom right corner of the screen, you can switch between
displaying gil and company seals.
* Grand Companies have been implemented in phase 2 in order to facilitate Beta Version
development. In the official release version, progression through the main scenario will be required
to join a Grand Company. Please note also that features such as promotion, company salutes, and
seal acquisition via the hunting log are not available in phase 2.

43
■Personal Chocobos
Players can summon personal chocobos by using a chocobo whistle, which can be obtained by trading
company seals to a Grand Company quartermaster. While on chocoback, you will have complete
control over the chocobo until you either dismount or are attacked. Furthermore, there is no time
limit on how long you may remain on chocoback. Once obtained, the chocobo whistle will be placed
under the fourth tab of your inventory.
* Features such as naming, outfitting, and summoning chocobos to battle are not available in phase
2.

44
■Upon Reaching Level 10
Completing the level 10 class quest for any Disciple of War or Magic will unlock the Armoury system,
allowing you to undertake the initiation quests for guilds of other disciplines. Once you have spoken
to a guild receptionist and completed the initiation quest, you will be able to change to the
corresponding class by equipping the proper weapon or tool.
■Gear Sets
Unlocking the Armoury system also grants you access to gear sets. Gear sets allow you to instantly
switch between multiple pieces of gear, saving time, effort, and space, as equipment saved to gear
sets does not take up slots in your inventory. The name of gear sets can be customized by clicking on
the pencil icon.
* Gladiator is available only provisionally during phase 2; unlocking the gladiator class will not allow
you to use gear sets.
* In response to alpha tester feedback, gear set functionality will undergo significant change
following phase 2.
* The current paper doll silhouette is scheduled to be replaced with a 3-D model of your character in
subsequent phases of the beta test.

45
Guildleves
Guildleves only become available after completing a special quest, in turn available upon attaining
level 10. Guildleves are distributed by NPCs known as ―levemetes.‖ Levemetes can be found in cities
and at outposts across Eorzea and deal in all varieties of levequests, including battlecraft (Disciples
of War or Magic), fieldcraft (Disciples of the Land), and tradecraft (Disciples of the Hand) leves.
Levemete Levequest Objective
Leve Allowances
Leve allowances are required to accept levequests. These allowances can be used to obtain new leves,
or rechallenge those failed or abandoned. You will be granted three leve allowances every 12 hours
(Earth time), up to a maximum of 100. You may accept as many as 16 levequests at any given time.

46
Quest Icons
NPCs, creatures, objects, and locations involved in quests are marked with icons.
These icons indicate quests that can be accepted, advanced, or
completed.
These icons indicate quests that cannot be accepted, advanced, or
completed due to unfulfilled requirements.
Important quests used to tell the story of Eorzea and her people are
called main quests. These tasks are easily distinguishable from others
by their unique icon.
47
Full Active Time Event (FATE)
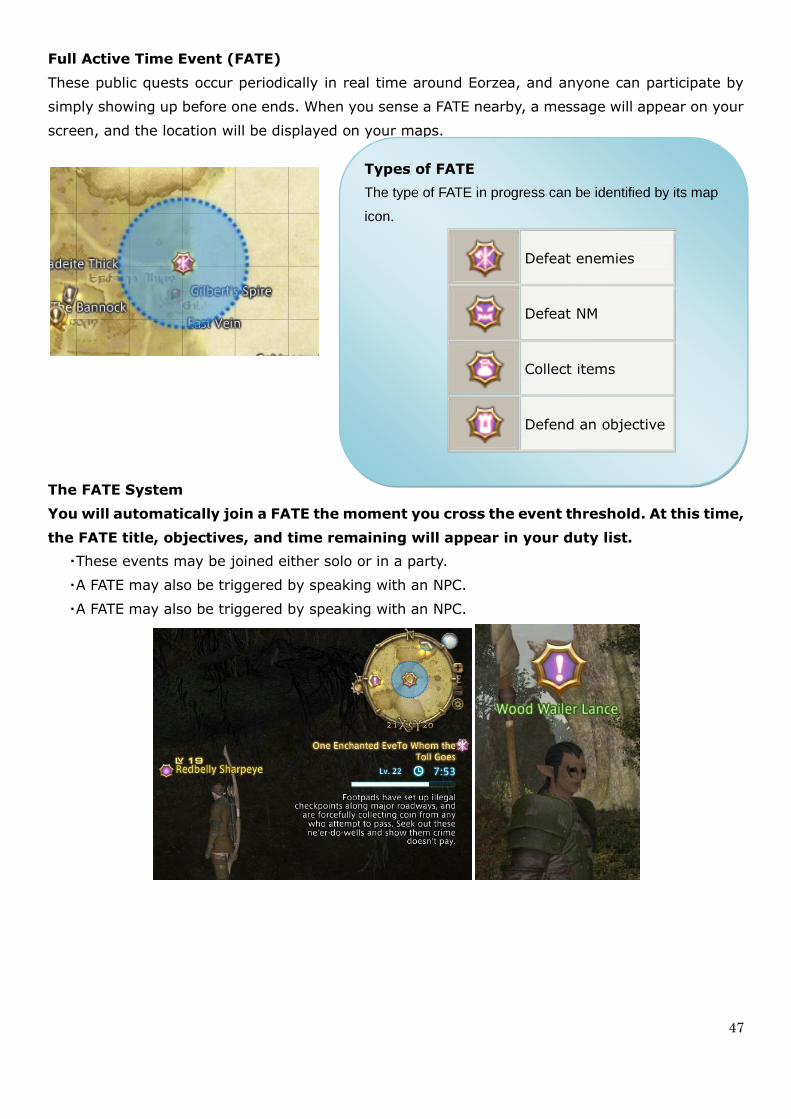
These public quests occur periodically in real time around Eorzea, and anyone can participate by
simply showing up before one ends. When you sense a FATE nearby, a message will appear on your
screen, and the location will be displayed on your maps.
The FATE System
You will automatically join a FATE the moment you cross the event threshold. At this time,
the FATE title, objectives, and time remaining will appear in your duty list.
・These events may be joined either solo or in a party.
・A FATE may also be triggered by speaking with an NPC.
・A FATE may also be triggered by speaking with an NPC.
Types of FATE
The type of FATE in progress can be identified by its map
icon.
Defeat enemies
Defeat NM
Collect items
Defend an objective

48
FATE Rewards
Once a FATE is complete, an interface detailing your reward will be displayed. Rewards are
distributed to all event participants and are based not only on success, but on individual contributions,
such as damage dealt and items delivered.
Depending on your contribution, this interface will display a gold, silver, or bronze medal.
Players who join a FATE in progress can still receive a reward for contributing.
FATE Restrictions
・Disciples of the Land and Disciples of the Hand cannot receive rewards from a FATE.
・If you are below the recommended level for a FATE, your contribution will not be weighed as heavily.
・If you are more than ten levels above the recommended level for a FATE, your contribution will be
ignored.
* In subsequent phases of the beta test, a level sync system will be implemented to allow players to
join a FATE even if they are far above the recommended level.
49
■Crafting and Gathering
After reaching level 10 with either a Disciple of War or Magic, classes under the Disciplines of the
Land (gathering) and the Hand (crafting) can be accessed upon completing their respective guilds‘
initiation quests and equipping the proper tools.
Crafting
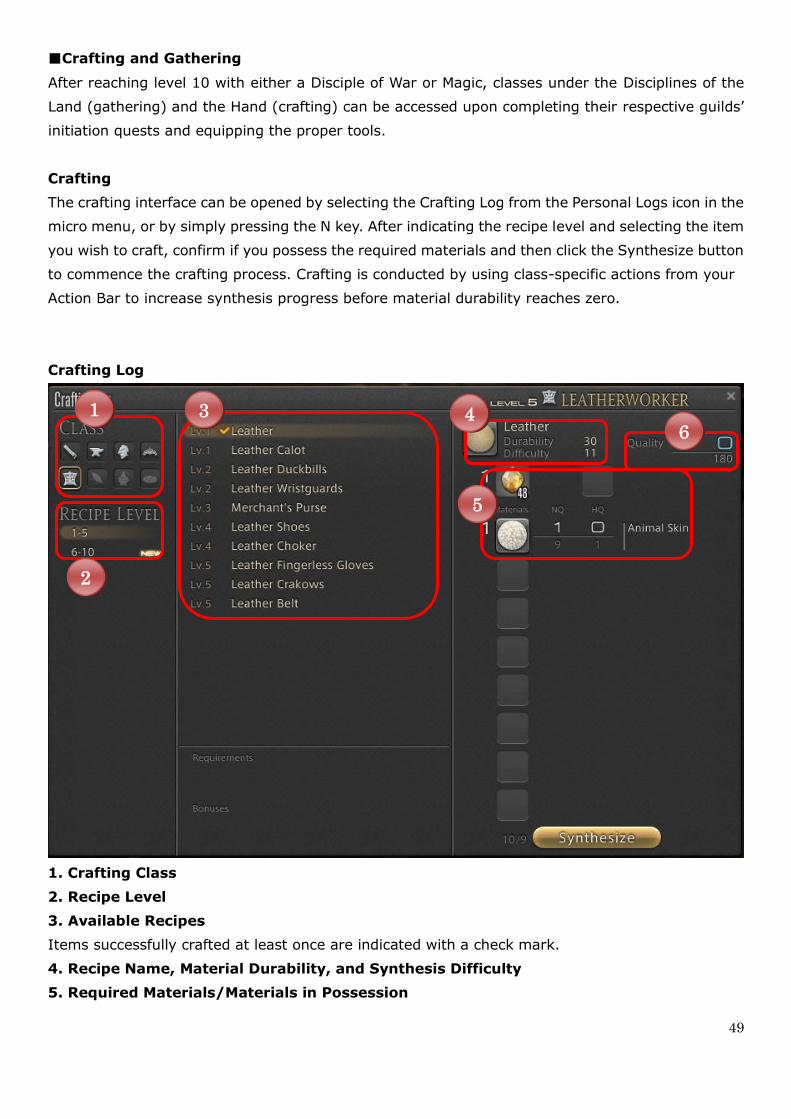
The crafting interface can be opened by selecting the Crafting Log from the Personal Logs icon in the
micro menu, or by simply pressing the N key. After indicating the recipe level and selecting the item
you wish to craft, confirm if you possess the required materials and then click the Synthesize button
to commence the crafting process. Crafting is conducted by using class-specific actions from your
Action Bar to increase synthesis progress before material durability reaches zero.
Crafting Log
1. Crafting Class
2. Recipe Level
3. Available Recipes
Items successfully crafted at least once are indicated with a check mark.
4. Recipe Name, Material Durability, and Synthesis Difficulty
5. Required Materials/Materials in Possession
1
2
3 4
5
6

50
The number to the left of the icon represents the quantity required for the recipe.
(1 earth shard, 1 animal skin)
The number to the right of the icon represents the quantity in your possession.
(48 earth shards, 9 animal skins)
If you have HQ (high quality) versions of the materials required, they can be used by hovering the
cursor over the number and clicking on the triangle icon that appears.
6. Starting Quality
Using HQ materials will increase this number. The closer the item quality is to the maximum value (in
this case 180) when the synthesis is completed, the higher chance the resulting item will be HQ itself.

51
Crafting Interface
52
Gathering
In the case of botanists, before you can begin gathering, you must first equip the proper tool (a
hatchet) and then activate the action Triangulate. Triangulate allows you to discern gathering points
(mature trees) from regular foliage, and display those locations on your minimap. To begin logging,
approach a mature tree and right click the display name, or press B on the gamepad to bring up the
gathering interface. Next, select the item you wish to attempt to gather. The chances to successfully
gather an item will vary depending on its difficulty and your current level. After a set amount of
attempts, the point will become exhausted and will yield no more items.
53
■Battle System Changes from Alpha
Experience Point Values
Experience point awards and leveling requirements have changed. These values will continue to be
adjusted until release.
Global Cooldown (GCD)
Weaponskill CD has been changed to 2.5 seconds, and spell CD has been changed to 3.5 seconds.
Weaponskill CD and spell CD can be reduced by increasing the Skill Speed and Spell Speed
attributes respectively.
Action Buffering
Weaponskills and spells can now be input 0.5 seconds before CD is complete. Actions inputted in
this fashion will be executed immediately thereafter.
Updated Action Help
Actions that change following the acquisition of certain traits will now display updated action help
information.
Falling Damage
Players will now take damage if falling from higher than a certain distance. However, players not
engaged in battle will not have their HP reduced below 1, regardless of fall distance. This is to avoid
placing undue stress on players interested in peaceful exploration.
Auto-Targeting
Players without a selected target will now automatically target the source of any damage received.
Auto-sheathe Weapon
Players can now specify the length of time before they automatically sheathe their weapon when
using this option.
Loot Distribution
All party members will be notified when another member opens a chest, and all
members—including KO‘d players—will have the opportunity to receive loot.
54
■Exiting the Game
To exit the game, press the Esc key, or click System in the micro menu, and then select Log Out to
return to the title screen, or select Exit Game to close the application. Both options will take 20
seconds to complete. You can log out immediately from within an inn room.
■Getting Unstuck from Geometry
Use the following command if your character gets stuck in world geometry and cannot move:
Command Description
/stuck Return to home point.
* This command is only available during the beta test.
Fixing the Log Window
Use the following command if the log window does not display text correctly.
Command Description
/cls Clear the log window.
* This command is only available during the beta test.
REFERENCE
■Test Feedback
Please post all comments and suggestions on the Feedback sub-forum of the official ARR
Test Forums.
■Bug Reporting
If you encounter any bugs, please post a detailed description on the Bug Reports sub-forum of the
official ARR Beta Tester Forum.
All bug reports will be reviewed by the development and operations teams. Please note that, in order
to determine the cause of a bug, we may request additional information regarding your computer‘s
specifications. Use the following command to retrieve this information if necessary:
Command Description
/systeminfo (/si)
Generates a log file containing system information.
*Save Path: My Documents/My Games/FINAL FANTASY XIV
– A Realm Reborn (Beta Version)/GameInfo
If the game client is not running, click SQUARE ENIX, FINAL FANTASY XIV - A Realm Reborn (Beta
Version) in the Windows Start Menu, then FINAL FANTASY XIV - System Information. A screen will
appear displaying your system information, which can be copied to your clipboard and pasted into a
bug report.
55
■Glossary of Mouse Controls
Command Default
Click: Select target
Left Button Drag: Rotate camera
Click: Perform action based on target.
Enemy = Auto-attack
NPC = Talk
Other Player = Open command as
submenu
Right Button
Drag: Rotate both character and camera
Move character forward Left + Right Button
Zoom in/out with camera
Zoom in/out on map (with map displayed) Scroll Mouse Wheel
Turn on/off Auto-run Mouse Wheel Button
Menu Navigation
Command Default
Select/Confirm Left Button
Display submenu Right Button
Drag area map (when displayed) Drag Left/Right Button
Zoom map in/out (when displayed) Scroll Mouse Wheel

56
■Glossary of Keyboard Controls
To change key bindings, press NUM-, or click System in the micro menu, and then select the
category of commands you wish to reassign in the Keybind menu.
UI
Command Default Key
Cancel/Close Interface NUM.
Close all UI components Esc
Movement
Command Default Key
Move Forward W
Move Back S
Turn Left A
Turn Right D
Strafe Left Q
Strafe Right E
Toggle Between Run/Walk NUM/
Turn On/Off Auto-Run R, Mouse Wheel Button
Jump Spacebar
57
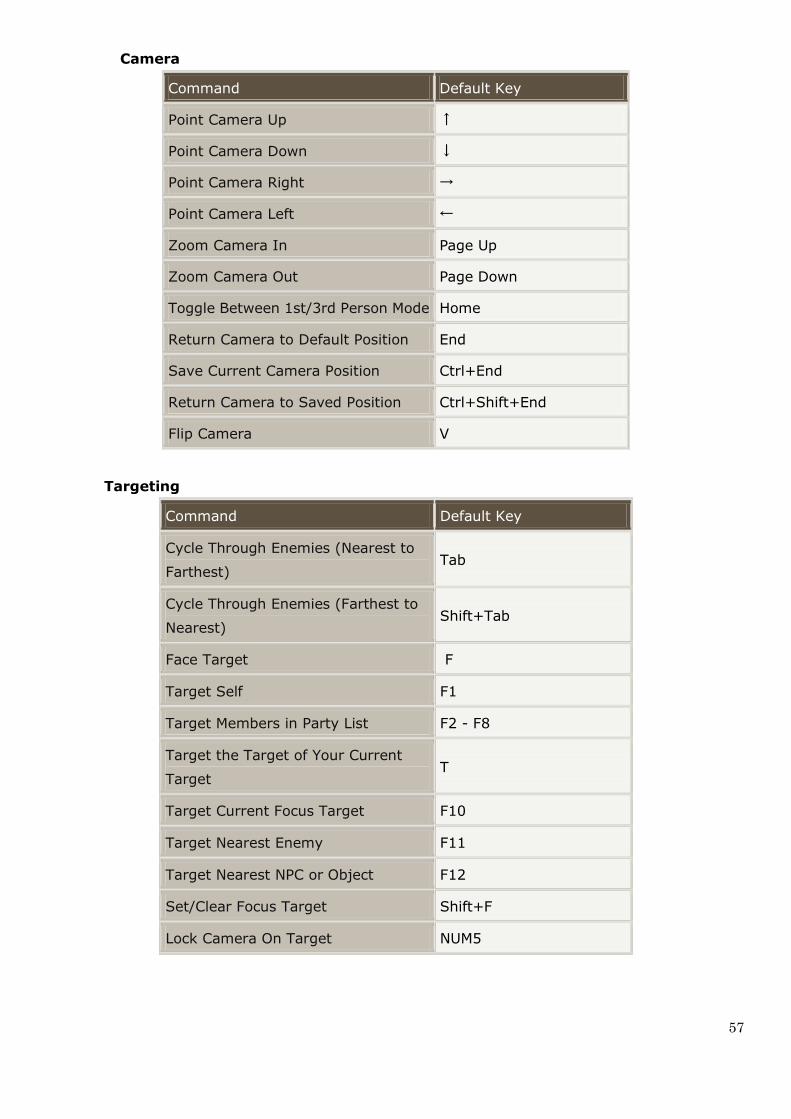
Camera
Command Default Key
Point Camera Up ↑
Point Camera Down ↓
Point Camera Right →
Point Camera Left ←
Zoom Camera In Page Up
Zoom Camera Out Page Down
Toggle Between 1st/3rd Person Mode Home
Return Camera to Default Position End
Save Current Camera Position Ctrl+End
Return Camera to Saved Position Ctrl+Shift+End
Flip Camera V
Targeting
Command Default Key
Cycle Through Enemies (Nearest to
Farthest) Tab
Cycle Through Enemies (Farthest to
Nearest) Shift+Tab
Face Target F
Target Self F1
Target Members in Party List F2 - F8
Target the Target of Your Current
Target T
Target Current Focus Target F10
Target Nearest Enemy F11
Target Nearest NPC or Object F12
Set/Clear Focus Target Shift+F
Lock Camera On Target NUM5

58
Chat
Command Default Key
Ready Chat Prompt Enter
Temporarily Switch Chat Mode to Say Alt+S
Temporarily Switch Chat Mode to Shout Alt+H
Temporarily Switch Chat Mode to Party Alt+P
Reply (Repeat to Cycle Through PCs) Alt+R
Action Bar & Micro Menu
Command Default Key
Confirm NUM0
Cancel NUM.
Subcommand NUM*
Move Cursor Up/Cycle Through Party
List NUM8
Move Cursor Down/Cycle Down Through
Party List NUM2
Move Cursor/Target Cursor Left NUM4
Move Cursor/Target Cursor Right NUM6
Cycle Through HUD Components NUM1
Select the Micro Menu NUM+
Cycle Through Action Bars (Up) Shift+↑
Cycle Through Action Bars (Down) Shift+↓
Switch to Action Bar 1 Shift+1
Switch to Action Bar 2 Shift+2
Switch to Action Bar 3 Shift+3
Draw/Sheathe Weapon Z
Character C
Inventory I
Map M
Actions and Traits P

59
Social Lists O
Timers U
Journal J
Configuration K
Crafting Log N
Gathering Log B
Hunting Log H
Emote List (No default
assignment)
System Menu NUM-
Cycle Through UI Component Tabs
(Forward/Back) NUM9/NUM7

60
■Glossary of Gamepad Controls
Movement
Command Default
Move Character Left Analog Stick
Move Camera Right Analog Stick
Toggle Between 1st/3rd Person Mode R3
Cycle Through Targets D-Pad
Cancel B
Confirm A
Sit / Lock Camera On Target L3
Map X
Jump Y
Turn On/Off Auto-Run LB+Left Analog Stick
Cycle Through Hotbars RB+D-Pad/Main Button
Activate Cross Hotbar Action LT/RT+D-Pad/Main Button
Edit Cross Hotbar LT/RT+BACK
* The button assignments for Confirm and Cancel can be switched from the game's configuration
menu.

61
Menu Navigation
Command Default
Move Cursor D-Pad
Cancel B
Confirm A
Submenu X
Confirm Checkbox A (When using Journal, X)
Cycle UI Tab (Back)/Lower Denomination LB
Cycle UI Tab (Forward)/Increase
Denomination RB
Cycle HUD Components BACK
Micro Menu START
* The button assignments for Confirm and Cancel can be switched from the game's configuration
menu.
Virtual Mouse
This allows players to use the gamepad as if it were a mouse.
Command Default
Toggle On/Off Virtual Mouse LB+R3
Move Cursor Right Analog Stick
Virtual Mouse Left Button LT
Virtual Mouse Right Button RT
62
■Glossary of Text Commands
The following list includes all text commands available in beta phase 2. New text commands will be
added in later phases and after official release.
* PC names and actions must be capitalized and in quotation marks.
* Brackets are not needed when using subcommands.
Command Description
/say (/s)
[message]
Sends a message to all PCs within a small radius.
Typing /say or /s without a message switches the default chat mode to
[Say].
/shout (/sh)
[message]
Sends a message to all PCs in the same area.
The message will not be displayed if a PC has deselected [Shout] in the chat
filter.
* The [Yell] chat mode will be implemented in phase 3. [Yell] will send
messages to all players in an area larger than [Say], but not as large as
[Shout].
/party (/p)
[message]
Sends a message to all members of your current party, regardless of their
location.
Typing /party or /p without a message switches the default chat mode to
[Party].
/echo (/e)
[message] Displays a message that only you can see.
/partycmd (/pcmd)
Executes various party commands. Opens your party members display
when no subcommand is specified.
>>Subcommands:
add ―PC name‖ – Invite a PC to your party.
leave – Leave your current party.
leader ―PC name‖ – Pass leadership to a PC in your party.
kick ―PC name‖ – Remove a PC from your party.
breakup – Dissolve your current party.
/join Accepts a party invite.
/decline Declines a party invite.
/friendlist (/flist) Executes various Friend List commands. Opens your friend list when no

63
[subcommand] subcommand is specified.
>>Subcommands:
add ―PC name‖ – Send a PC a friend request.
accept ―PC name‖ – Accept a friend request from a PC.
deny ―PC name‖ – Deny a friend request from a PC.
remove ―PC name‖ – Remove a PC from your friend list.
/blacklist (/blist)
[subcommand]
Executes various blacklist commands. Opens your blacklist when no
subcommand is specified.
>>Subcommands:
add ―PC name‖ – Add a PC to your blacklist.
remove ―PC name‖ – Remove a PC from your blacklist.
/?
[command_name]
Gives a detailed explanation of specified command. Abbreviations can be
used.
* All command names must be one word or in quotation marks.
/wait [wait time]
A macro command for adjusting the pause between commands.
A wait time amount of 1 equals one second.
The maximum wait time allowed is 60.
If the wait time amount is over 60, it will be counted as 0.
/logout Log out and return to the title screen.
/shutdown Log out and close the game.
/map Opens the current area map.
/check (/c) ―PC
name‖ (placeholder) Examines the specified target. Examines current target when not specified.
/huntinglog(/hlog) View the Hunting Log
/craftinglog(/clog) View the Crafting Log
/gatheringlog(/glog) View the Gathering Log
/trade Initiates a trade with your current target.
/return Return to your current home point.
/action (/ac) ―action
name‖ ―PC name‖
Uses an action on specified target. Uses current target when not specified.
This cannot be used with actions you have not yet learned, or when
restricted by other factors.
/battlemode (/bm)
[subcommand]
Toggle between active and passive mode. Switches to opposite mode when
no subcommand is specified.

64
>>Subcommands:
On – Draw weapon.
Off – Sheathe weapon.
/enemysign
/marking (/mk)
[target type] ―PC
name‖
(placeholder)
Set a sign on the specified target. Uses current target when not specified.
>>Target types:
attack1–5
bind1–3
ignore1–2
circle
cross
square
triangle
off (Turns off enemy sign.)
>>Example:
/marking attack1 (Sets sign ―Target to Attack 1‖ on current target.)
/target (/ta) ―PC
name‖ (placeholder)
Targets the specified target.
Target must be within range for this command to function.
/targetnpc (/tnpc) Targets the closest NPC within a certain radius.
/targetenemy
(/tenemy) Targets the closest enemy within a certain radius.
/battletarget (/bt) Targets the closest enemy within a certain radius that is attacking you.
/assist (/as) ―PC
name‖ (placeholder)
Targets the target of another PC or NPC. (A target must be specified.)
Assists current target when not specified.
/facetarget (/ft) Immediately turns your PC in the direction of your current target.
/automove Turn on/off auto-run.
/recast ―action
name‖ Displays time remaining until the specified action can be used again.
/loot Opens the loot list.
/sit (/lounge) Assume a sitting position or rise from it. Certain emotes have special sitting
equivalents. Also sits your character in a chair if one is nearby.
/follow Follow targeted player.

65
■Placeholders
Command Description
<t> Displays current target name.
<tt> Displays target of current target‘s name.
<me> Displays your character‘s name.
<0> Displays your character‘s name.
<1>~<8> Display Party Member 1-8's name.
<attack1>~
<attack5> Displays Target to Attack 1–5‘s name.
<bind1>~<bind3> Displays Target to Bind 1–3‘s name.
<stop1>~<stop2> Displays Target to Stop 1-2's name.
<square> Displays target marked with a square‘s name.
<circle> Displays target marked with a circle‘s name.
<cross> Displays target marked with a cross‘s name.
<triangle> Displays target marked with a triangle‘s name.
<mo>,<mouse> Displays mouseover target‘s name
<hp> Displays current HP and maximum HP.
<hpp> Displays current HP as a percentage.
<mp> Displays current MP and maximum MP.
<mpp> Displays current MP as a percentage.
<tp> Displays current TP.
<class>,<job> Displays current class and level.
<pos> Displays coordinates of current location.

66
■User Macros
User-defined macros are automated commands that allow you to record multiple actions and trigger
them with a single button or key stroke.
Creating Macros
Open the System menu and select User Macros.
Select a macro slot, then click on the fields to the right to input a title and body. By clicking the icon
to the left of the title, you can also select a macro icon. Up to 100 unique macros can be saved.
A macro can contain up to 20 text commands or chat messages. When you create a new macro, its
icon will appear in the selected slot. To edit a macro, simply select the icon and revise the displayed
information.
Right-clicking a macro icon or empty slot will open a submenu that allows you to copy, cut, paste,

67
delete, or execute a macro, as well as undo or redo any previous revision.
Triggering Macros
A macro, like an action, can be added to the Action Bar or Cross Hotbar by dragging and dropping it
into the desired slot. It can then be executed by either clicking the icon or pressing the shortcut key
assigned to the icon‘s slot.
Macro Examples
1. When this macro is triggered, the player will use the "/wave" emote while saying "goodbye":

68
2. When this macro is triggered, the player will open the Crafting Log:
/craftinglog
3. When this macro is triggered, the player will assign the ignore1 sign on the current target:
/marking ignore1
3. When this macro is triggered, a conjurer in a party with the above player will cast Repose on the
target marked with the ignore1 sign:
/action Repose <stop1>