Embed Size (px)
Citation preview

INE-PHSJ-5pH Meter
Instruction Manual
3, Hagavish st. Israel 58817 Tel: 972 3 5595252, Fax: 972 3 5594529
MRC. 12.18

INE-PHSJ-5 pH Meter
1
ADVICE:
Read this instruction in detail before operating the meter.
The meter should be re-tested by metrological department when it is
used over one year. And the meter can't be used until it is up to
standard.
INE-PHSJ-5 pH Meter
2
CONTENT
1. GENERAL
2. SPECIFICATIONS
3. CONSTRUCTION
4. OPERATION
5. MAINTENANCE AND SERVICE
6. THE COMPLETE SETS OF THE METER
7. APPENDIX
INE-PHSJ-5 pH Meter
3
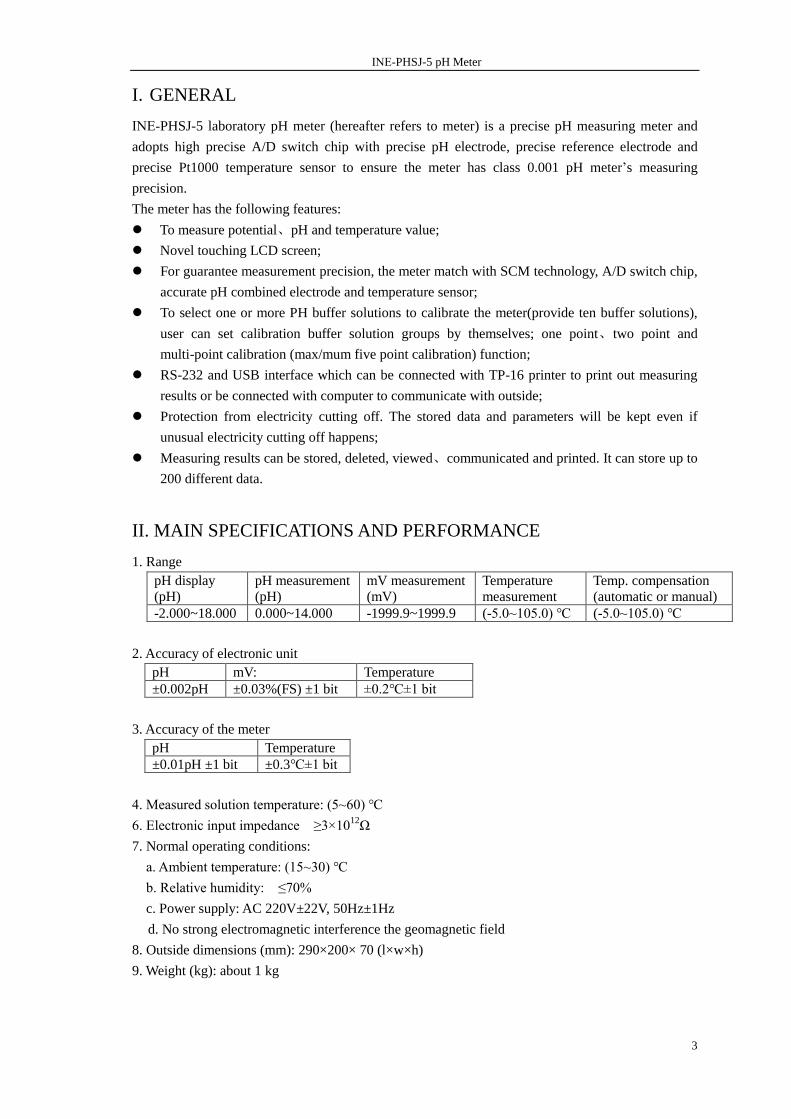
I. GENERAL
INE-PHSJ-5 laboratory pH meter (hereafter refers to meter) is a precise pH measuring meter and
adopts high precise A/D switch chip with precise pH electrode, precise reference electrode and
precise Pt1000 temperature sensor to ensure the meter has class 0.001 pH meter‟s measuring
precision.
The meter has the following features:
To measure potential、pH and temperature value;
Novel touching LCD screen;
For guarantee measurement precision, the meter match with SCM technology, A/D switch chip,
accurate pH combined electrode and temperature sensor;
To select one or more PH buffer solutions to calibrate the meter(provide ten buffer solutions),
user can set calibration buffer solution groups by themselves; one point、two point and
multi-point calibration (max/mum five point calibration) function;
RS-232 and USB interface which can be connected with TP-16 printer to print out measuring
results or be connected with computer to communicate with outside;
Protection from electricity cutting off. The stored data and parameters will be kept even if
unusual electricity cutting off happens;
Measuring results can be stored, deleted, viewed、communicated and printed. It can store up to
200 different data.
II. MAIN SPECIFICATIONS AND PERFORMANCE
1. Range
pH display
(pH)
pH measurement
(pH)
mV measurement
(mV)
Temperature
measurement
Temp. compensation
(automatic or manual)
-2.000~18.000 0.000~14.000 -1999.9~1999.9 (-5.0~105.0) ℃ (-5.0~105.0) ℃
2. Accuracy of electronic unit
pH mV: Temperature
±0.002pH ±0.03%(FS) ±1 bit ±0.2℃±1 bit
3. Accuracy of the meter
pH Temperature
±0.01pH ±1 bit ±0.3℃±1 bit
4. Measured solution temperature: (5~60) ℃
6. Electronic input impedance ≥3×10¹²
Ω
7. Normal operating conditions:
a. Ambient temperature: (15~30) ℃
b. Relative humidity: ≤70%
c. Power supply: AC 220V±22V, 50Hz±1Hz
d. No strong electromagnetic interference the geomagnetic field
8. Outside dimensions (mm): 290×200× 70 (l×w×h)
9. Weight (kg): about 1 kg
INE-PHSJ-5 pH Meter
4
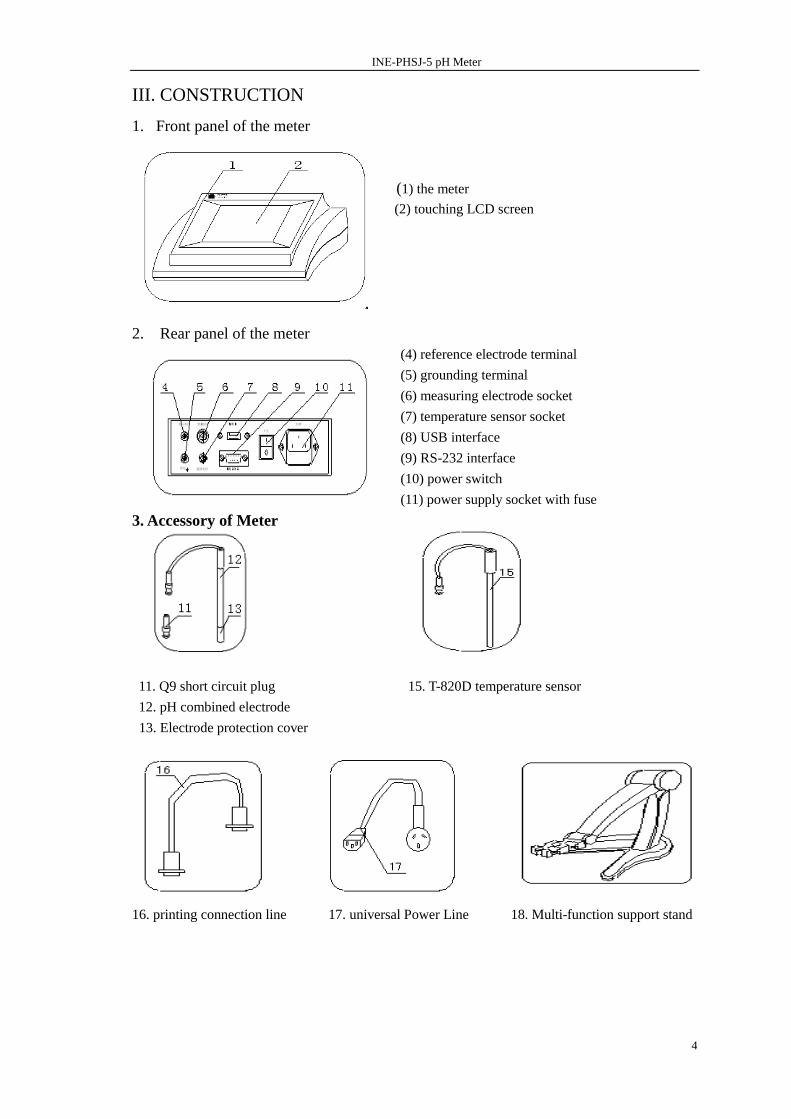
III. CONSTRUCTION
1. Front panel of the meter
(1) the meter
(2) touching LCD screen
2. Rear panel of the meter
(4) reference electrode terminal
(5) grounding terminal
(6) measuring electrode socket
(7) temperature sensor socket
(8) USB interface
(9) RS-232 interface
(10) power switch
(11) power supply socket with fuse
3. Accessory of Meter
11. Q9 short circuit plug 15. T-820D temperature sensor
12. pH combined electrode
13. Electrode protection cover
16. printing connection line 17. universal Power Line 18. Multi-function support stand
INE-PHSJ-5 pH Meter
5
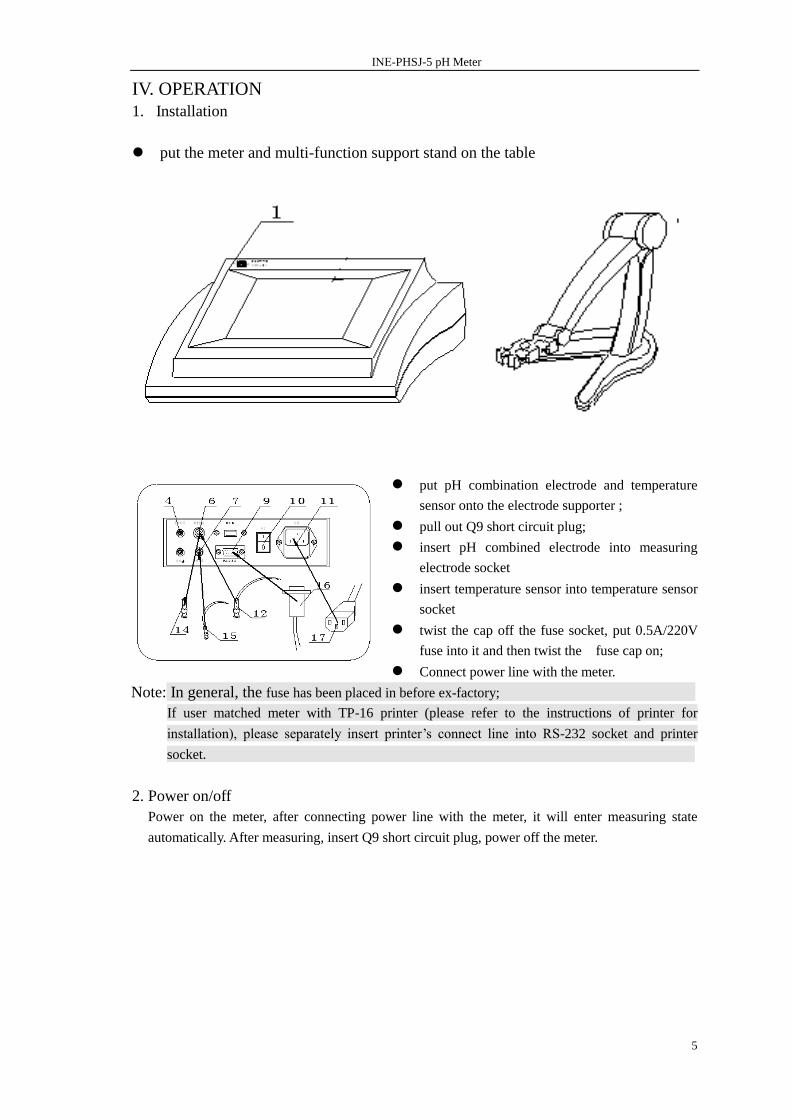
IV. OPERATION
1. Installation
put the meter and multi-function support stand on the table
put pH combination electrode and temperature
sensor onto the electrode supporter ;
pull out Q9 short circuit plug;
insert pH combined electrode into measuring
electrode socket
insert temperature sensor into temperature sensor
socket
twist the cap off the fuse socket, put 0.5A/220V
fuse into it and then twist the fuse cap on;
Connect power line with the meter.
Note: In general, the fuse has been placed in before ex-factory;
If user matched meter with TP-16 printer (please refer to the instructions of printer for
installation), please separately insert printer‟s connect line into RS-232 socket and printer
socket.
2. Power on/off
Power on the meter, after connecting power line with the meter, it will enter measuring state
automatically. After measuring, insert Q9 short circuit plug, power off the meter.
INE-PHSJ-5 pH Meter
6
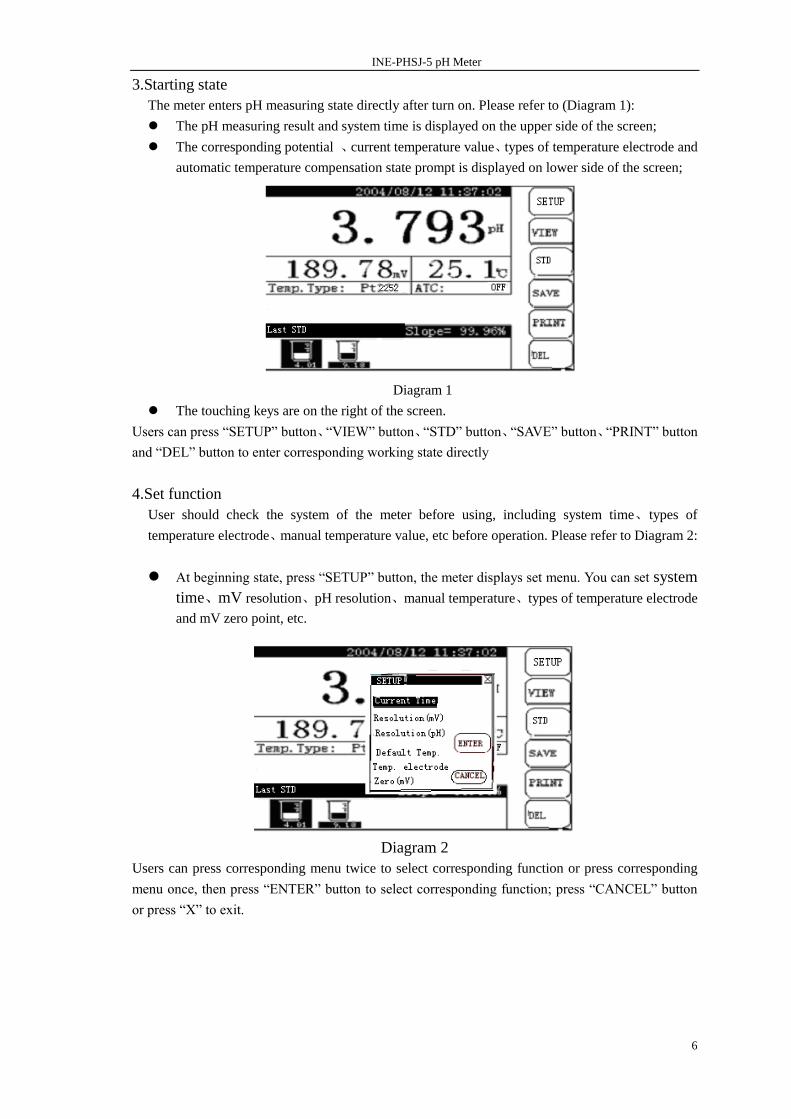
3.Starting state
The meter enters pH measuring state directly after turn on. Please refer to (Diagram 1):
The pH measuring result and system time is displayed on the upper side of the screen;
The corresponding potential 、current temperature value、types of temperature electrode and
automatic temperature compensation state prompt is displayed on lower side of the screen;
Diagram 1
The touching keys are on the right of the screen.
Users can press “SETUP” button、“VIEW” button、“STD” button、“SAVE” button、“PRINT” button
and “DEL” button to enter corresponding working state directly
4.Set function
User should check the system of the meter before using, including system time、types of
temperature electrode、manual temperature value, etc before operation. Please refer to Diagram 2:
At beginning state, press “SETUP” button, the meter displays set menu. You can set system
time、mV resolution、pH resolution、manual temperature、types of temperature electrode
and mV zero point, etc.
Diagram 2
Users can press corresponding menu twice to select corresponding function or press corresponding
menu once, then press “ENTER” button to select corresponding function; press “CANCEL” button
or press “X” to exit.

INE-PHSJ-5 pH Meter
7
4.1Set system time:
Press “SETUP” button, then press “ENTER” button to enter setting system time mode.
The current system time is shown on the top of the screen;
The corresponding time keys are at the bottom of the screen, including “YEAR”、
“MONTH”、 “DAY”、 “HOUR” “MINUTE”、 “SECOND” button.
Press corresponding time button to set time. For example: set current month: press “MONTH”
button once to add one month on top of current month, at this time screen shows another two
buttons, it is “SETUP” button and “….” button. Please refer to dia4 (Diagram 4):
Diagram 4
Press “MONTH” button repeatedly to select month you need, press “SETUP” button to enter.
(or use entering method: press “…” button, spring out a entering window, enter your needed
month directly and press “ENTER” button to exit entering window, press “SETUP” button
again to finish the setting)
Set other time is the same as above procedure.
After setting, press “X” button to exit system time setting mode, and be back to starting working
state.
4.2Set mV solution
This meter can be set mV solution, 0.1mV or 0.01mV.
Press “SETUP” button to select “mV solution” and press “ENTER” button, you can
set mV displaying solution. The meter will show “Setup solution…….”.
After setting, the meter returns to starting working state.
INE-PHSJ-5 pH Meter
8
4.3 Set pH solution
This meter can be set pH solution, 0.01mV or 0.001mV.
Press “SETUP” button to select “pH solution” and press “ENTER” button, you can
set pH displaying solution. The meter will show “Setup solution…….”.
After setting, the meter returns to starting working state.
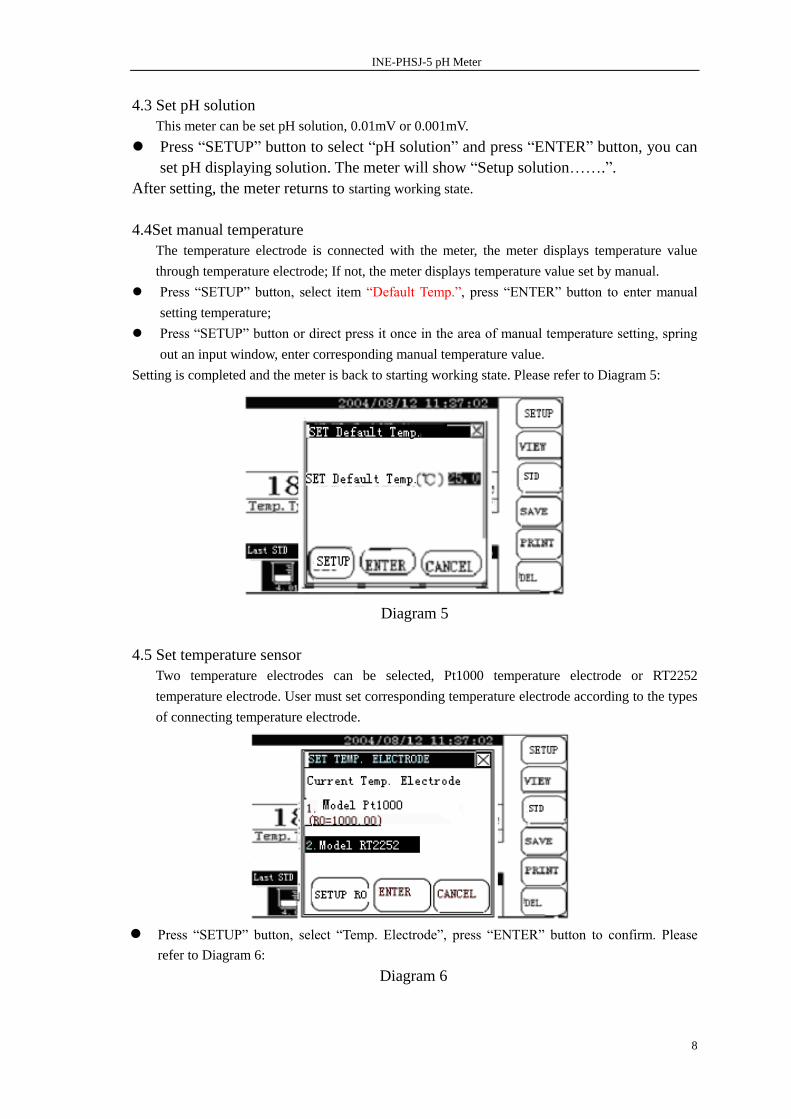
4.4Set manual temperature
The temperature electrode is connected with the meter, the meter displays temperature value
through temperature electrode; If not, the meter displays temperature value set by manual.
Press “SETUP” button, select item “Default Temp.”, press “ENTER” button to enter manual
setting temperature;
Press “SETUP” button or direct press it once in the area of manual temperature setting, spring
out an input window, enter corresponding manual temperature value.
Setting is completed and the meter is back to starting working state. Please refer to Diagram 5:
Diagram 5
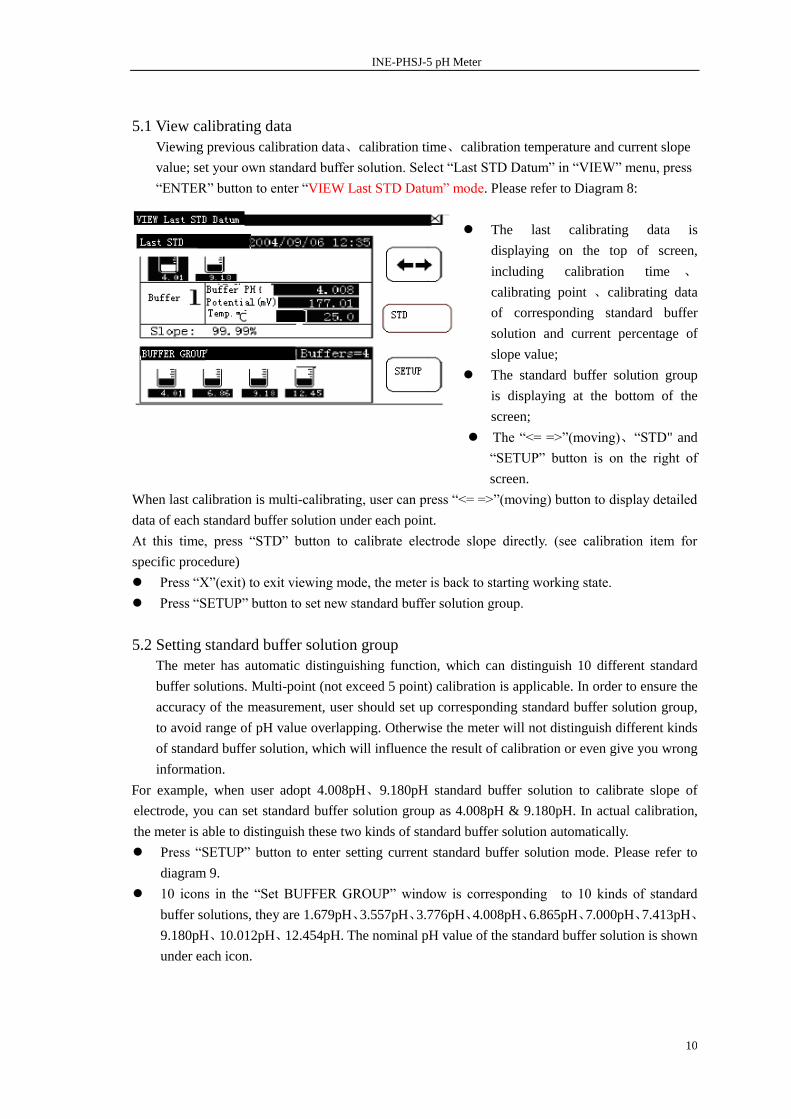
4.5 Set temperature sensor
Two temperature electrodes can be selected, Pt1000 temperature electrode or RT2252
temperature electrode. User must set corresponding temperature electrode according to the types
of connecting temperature electrode.
Press “SETUP” button, select “Temp. Electrode”, press “ENTER” button to confirm. Please
refer to Diagram 6:
Diagram 6

INE-PHSJ-5 pH Meter
9
If the meter is connected with Pt1000 temperature electrode, user should set temperature electrode to
be Pt1000, otherwise, set temperature electrode to be RT2252.
Direct press “Model Pt1000” or “Model RT2252” on screen, and press “ENTER” button to
confirm.
The meter sets temperature electrode and to be back to starting working state. Press “CANCEL”
button or “X” to exit temperature electrode setting menu, the meter is back to starting working state.
If selected temperature electrode is “Pt1000”, the meter displays “SETUP RO” button in menu, press
this button to set resistance of Pt1000 temperature electrode at 0℃. Generally, the resistance value of
Pt1000 temperature electrode under 0℃ is 1000Ω, considering the technics and material used, the
resistance value of Pt1000 temperature electrode at 0℃ is not exactly 1000Ω. At this time, in order
to ensure measuring precision, it is neccessary to reset R0 value according to nominal resistance
value. Press „SETUP R0‟ key and input R0 value of actual nominal resistance.
The measuring result will be different everytime when the data is amended. If you are not able to get
R0 resistance value in using Pt1000 electrode at 0℃, please do not amend the data at will.
4.6 Calibrating mV zero point
To ensure high precision, please calibrate mV zero point only after you switch on the meter in
half an hour
Press “SETUP” button, select “Zero(mV)”, press “ENTER” button to enter mV calibration
mode. The meter displays “Adjust zero(mV), Enter?”. Press “ENTER” button to confirm,
otherwise, press “CANCEL” button to be back to starting working state.
5. View function
Viewing previous calibration data、standard buffer solution group and saved measuring result.
Press “VIEW” button at starting working state to enter viewing mode. Please refer to Diagram 7:
Diagram 7
INE-PHSJ-5 pH Meter
10
5.1 View calibrating data
Viewing previous calibration data、calibration time、calibration temperature and current slope
value; set your own standard buffer solution. Select “Last STD Datum” in “VIEW” menu, press
“ENTER” button to enter “VIEW Last STD Datum” mode. Please refer to Diagram 8:
The last calibrating data is
displaying on the top of screen,
including calibration time 、
calibrating point 、calibrating data
of corresponding standard buffer
solution and current percentage of
slope value;
The standard buffer solution group
is displaying at the bottom of the
screen;
The “<= =>”(moving)、“STD" and
“SETUP” button is on the right of
screen.
When last calibration is multi-calibrating, user can press “<= =>”(moving) button to display detailed
data of each standard buffer solution under each point.
At this time, press “STD” button to calibrate electrode slope directly. (see calibration item for
specific procedure)
Press “X”(exit) to exit viewing mode, the meter is back to starting working state.
Press “SETUP” button to set new standard buffer solution group.
5.2 Setting standard buffer solution group
The meter has automatic distinguishing function, which can distinguish 10 different standard
buffer solutions. Multi-point (not exceed 5 point) calibration is applicable. In order to ensure the
accuracy of the measurement, user should set up corresponding standard buffer solution group,
to avoid range of pH value overlapping. Otherwise the meter will not distinguish different kinds
of standard buffer solution, which will influence the result of calibration or even give you wrong
information.
For example, when user adopt 4.008pH、9.180pH standard buffer solution to calibrate slope of
electrode, you can set standard buffer solution group as 4.008pH & 9.180pH. In actual calibration,
the meter is able to distinguish these two kinds of standard buffer solution automatically.
Press “SETUP” button to enter setting current standard buffer solution mode. Please refer to
diagram 9.
10 icons in the “Set BUFFER GROUP” window is corresponding to 10 kinds of standard
buffer solutions, they are 1.679pH、3.557pH、3.776pH、4.008pH、6.865pH、7.000pH、7.413pH、
9.180pH、10.012pH、12.454pH. The nominal pH value of the standard buffer solution is shown
under each icon.

INE-PHSJ-5 pH Meter
11
Diagram9
For example the icon of 3.68 corresponds to 3.557 pH standard buffer solution; the icon with
tick means the standard buffer solution is selected, vis-à-vis, the icon with contrastive colour
means the solution is operational. At this time, press “SELECT” or “Clear” button to select or
cancel current standard buffer solution; the quantity of standard buffer solution selected in the
standard buffer solution group to be shown on window.
Press the icon in correspond to a certain solution to make the solution operational, in case the
solution is not selected (without tick), press “SELECT” button to select current solution.
Vis-à-vis, select “Clear” to cancel
For example, if user select 3.557 pH solution, then press the icon in correspond to 3.68pH to make
the icon showing contrastive colour, press “SELECT” button, to tick off the icon which means
selected. At the same time, the meter turns the “SELECT” to “Clear” automatically. Press “Clear”
button to cancel the selection or press “Select” to select it.
In order to avoid overlapping of pH value, user should select corresponding standard buffer solution
to calibrate. User should delete all the other selection of solution which are not used.
When selection finished, press “ENTER” button or “X”(exit) button to exit, and return to view
calibration data mode.
(Please find attached 10 kinds of standard buffer solution to be distinguished by the meter.)
5.3. View calibration
In this mode of view calibration data, user can calibrate current slope of the electrode. Please refer
to chapter 6 for operation procedure
5.4. View stored data
If user need to consult the stored measuring data, press “VIEW” button in start working state and
select “STORED Datum”. Please refer to diagram10.
User can select relevant saving data according to the data shown in the diagram 10. Press “PgUp”,
“PgDn” button to review the data in the other pages.
At this time, if user need to print or delete the data, just press “PRINT” or “DEL” button.
Right side of the screen is the press button, they are “PRINT”, “DEL”, “PgUp”, “PgDn” button.
The screen displays the current saving number as well as total No. of saving; max 4 saving data
can be shown on each page, including time of saving, temperature value, slope value, electrode
potential and pH value.

INE-PHSJ-5 pH Meter
12
Diagram10
6. Calibration function
It is suggested to re-calibrated the electrode before each measurement. When you start to calibrate,
the previous calibrating data will be replaced.
Press “STD” button in the start working state, or press “STD” button to calibrate the slope of
electrode in “Stored Datum” mode.
The meter point out “Standardize now?”, press “ENTER” button, the meter enters calibration
mode.(Please refer to diagram 11)
Diagram11
The upper half of the screen shows the current measuring data: PH value (slope set as 100%)、
potential value and temperature value;
In the middle of the screen, it shows the current standard buffer solution group set by user;
At the bottom of the screen, it shows the result of the calibration.;
Right side is “AUTO.” (or “Manual”) button、“ENTER” button、 “CANCEL” button、
“SETUP” button.
Automatic (or manual) distinguish means the meter is in the state of automatic or manual
distinguish.
Press “AUTO.” or “Manual” button to switch between automatic and manual distinguish
function;
Press “SETUP” button to set current standard buffer solution group; when the value is stable
after electrode inserted into solution;
Press “ENTER” button to calibrate current standard buffer solution;
Press “Cancel” button to exit from calibration.

INE-PHSJ-5 pH Meter
13
1 .When user calibrate electrode with his own standard buffer solution
( Non-standard buffer solution), he must know the pH nominal value of this
non-standard buffer solution under the range of calibrating temperature.
2. In each measurement, suggest to re-calibrating the electrode before hand. As
soon as you start to calibrate, the previous calibration data will be replaced.
Before calibration, please prepare 1~5 different kinds of standard buffer solution ( it can be normal
standard buffer solution, and can also be user‟s own standard buffer solution), leave them under
normal temperature for a while, then set the standard buffer solution according to the
CALIBRATION FUNCTION(8). Electrode calibrating will be effective after setting.
Clean the pH measuring electrode, reference electrode, temperature sensor and put them into the
measured standard buffer solution altogether. When the reading is stable, press “ENTER” key. The
meter shows “STD Result”. After a while, the meter will ask you “End Standardization?”(refer to
diagram 12); if user need to calibrate some other standard buffer solution, please press
“CONTINUE” button, then repeat above procedure till calibration finished.
Diagram 12
During the calibration, user can finished the calibration at any time by pressing “End STD” button.
After calibrating the fifth standard buffer solution, the meter will finish the calibrating automatically.
For the standard buffer solution with the range of pH value overlapped, such as the buffer solution of
6.865 pH & 7.000pH, suggest to calibrate as follows:
When user calibrates 6.865pH standard buffer solution, set standard buffer solution group to
6.865pH only, then arrange calibration. When finished, reset standard buffer solution group to
7.000pH only, then calibrate.
Adopt manual distinguishing mode to calibrate. Every time, when user calibrate standard buffer
solution, input nominal pH value under present temperature in correspond to present standard
buffer solution by manual.
As to normal standard buffer solution, user can use automatic distinguishing function with the
standard buffer solution group set before hand. No need to change distinguishing mode (if not
able to distinguish, the meter will point out: calibration wrong to ask you to exchange electrode

INE-PHSJ-5 pH Meter
14
or to reset standard buffer solution group, or to change automatic distinguishing mode to manual
distinguishing mode. User can select according to actual situation);
If user adopt their own standard buffer solution (non-standard buffer solution) to calibrate the
electrode, manual calibration mode must be used.
For example: user has one standard buffer solution, pH standard value under 25℃ is 2.704pH,
pH standard value under 25.1℃ is 2.710pH, pH standard value under 25.2℃ is 2.720pH, they
would be better to set the calibrating temperature at 25℃.
When user start to calibrate, set the distinguishing mode to “MANUAL”, after the displaying is
stable, press “ENTER button. Input the nominal pH value at current temperature. If the current
temperature is 25.2℃, input 2.720pH and press “ENTER” button. The current calibrating data is
saved.
If user has both normal standard buffer solution and his own standard buffer solution, he can
operate under automatic & manual distinguishing mode separately.
7. Saving function
After calibration, if user want to store the present measuring data, press “SAVE” at the starting
working state. The meter springs out a window and ask “Save current result”.
Press “ENTER” button to store;
Press “CANCEL” button to cancel.
The meter returns to starting working state.
8. Print/communication function
Only one socket or one mode can be selected when user is going to print or communicate with
RS-232 or USB socket. User can not use two sockets together (RS-232 and USB) at the same time.
8.1 Immediate Print
Print present measurement data. Connect TP-16 printer with the meter in starting working state.
Press “PRINT” button to print. If user has stored measuring data, please select “PRINT current
result?” to press “Enter” button.
8.2 Immediate communication
If user want to communicate with outside through computer, please connect RS-232 interface
with computer and use << DATA connecting system >> software which is free of charge, and
will be delivered to user together with the meter.
8.3 Print stored data
Print stored measured data.
Connect TP-16 printer with the meter, and set properly. At starting working state, press “PRINT”
button to select “Print all”, then press “ENTER” button to print out all information including
“meter name, printing data, stored number, potential value, pH value, temperature value, slope
value, stored time. etc.
8.4 Sending all data
Connect the meter with computer properly, operate << DATA connecting system >> on the
computer, press “Print all” to send out.

INE-PHSJ-5 pH Meter
15
8.5 Print individual stored data
At “Stored Datum” state, select your needed data, press “PRINT” button, select “Print selected”
and press “ENTER” to print out.
8.6 Send individual stored data
If the meter is connected with computer with << DATA connecting system 1.0>> software, user
can find the saved data in his computer.
9. Delete function
9.1Delete all stored data
If user want to delete all data, he can press “DEL” button at starting working state or in “VIEW
Stored Datum” mode, press “DEL” button, the meter springs out a window and ask “Delete
stored all”, the meter presents user real want to delete all data. Press “ENTER” button to delete.
After all, the meter returns to starting mode or to “VIEW Stored Datum” mode; Press
“CANCEL” button to cancel the operation.
9.2Delete individual stored data
User can delete a certain stored data. At “VIEW Stored Datum” mode, press “DEL” button to
select “Delete current one”, press “ENTER” button to delete. Press “CANCEL” button to exit
the operation.
Note: You should be very careful to delete the data, because no data can be regain after deleting.
V. MAINTENANCE AND SERVICE
The input terminal (socket of measuring electrode) must be kept clean and dry. When the meter
doesn't work, insert Q9 short circuit plug in the socket to prevent from dirt and water drop. If
the ambient humidity is higher, the electrode plug should be dried with clean gauze.
Avoid the electrode from immerging for a long time in distilled water, protein solution and
acidity fluoride solution; avoid it from organic silicon oil; if the user finds the slope is
somewhat reduced after the electrode works for long, put lower part of the electrode into 4%
HF solution for 3-5 seconds, clean it with distilled water, then immerge it in 0.1mol/L
hydrochloric acid solution to make it renew.
The meter must has a good grounding.

INE-PHSJ-5 pH Meter
16
VI. APPENDIX
List of 10 kinds of pH standard buffer solutions
CLASS 2th
CLASS 1th
CLASS 1th
CLASS 1th
CLASS 1th
CLASS
0℃ 1.666 3.860 4.003 6.984
5℃ 1.668 3.840 3.999 6.951
10℃ 1.670 3.820 3.998 6.923
15℃ 1.672 3.802 3.999 6.900
20℃ 1.675 3.788 4.002 6.881
25℃ 1.679 3.557 3.776 4.008 6.865
30℃ 1.683 3.552 3.766 4.015 6.853
35℃ 1.688 3.549 3.759 4.024 6.844
38℃ 1.691 3.548 4.030 6.840
40℃ 1.694 3.547 3.753 4.035 6.838
45℃ 1.700 3.547 4.047 6.834
50℃ 1.707 3.549 3.749 4.060 6.833
55℃ 1.715 3.554 4.075 6.834
60℃ 1.723 3.560 4.091 6.836
70℃ 1.743 3.580 4.126 6.845
80℃ 1.766 3.609 4.164 6.859
90℃ 1.792 3.650 4.205 6.877
95℃ 1.806 3.674 4.227 6.886
CLASS (DENANARE) 1th
GRADE 1th
GRADE 1th
GRADE 2th
GRADE
0℃ 7.12 7.534 9.464 10.317 13.423
5℃ 7.500 9.395 10.245 13.207
10℃ 7.06 7.472 9.332 10.179 13.003
15℃ 7.448 9.276 10.118 12.810
20℃ 7.02 7.429 9.225 10.062 12.627
25℃ 7.00 7.413 9.180 10.012 12.454
30℃ 6.99 7.400 9.139 9.966 12.289
35℃ 7.389 9.102 9.925 12.133
38℃ 6.97 7.384 9.081 12.043
40℃ 6.97 7.380 9.068 8.889 11.984
45℃ 7.373 9.038 11.841
50℃ 6.97 7.367 9.011 9.828 11.705
55℃ 8.985 11.574
60℃ 6.97 8.962 11.449
70℃ 6.98 8.921
80℃ 7.00 8.885
90℃ 7.03 8.850

INE-PHSJ-5 pH Meter
17
95℃ 8.833
STANDARD BUFFER SOLUTION WEIGHING :
pH VALUE(25℃) CHEMICAL
NAME
CONCENTRATION
(mol/L)
WEIGHING FOR EACH
LITER (g)
1.679(2 GRADE) KH3(C2O4)2·2H2O 0.05 12.61
3.557(1 GRADE) KHC4H4O6 25℃(SATURATION) >7
3.776(1 GRADE) KH2C6H5O7 0.05 11.41
4.008(1 GRADE) KHC8H4O4 0.05 10.12
6.865(1 GRADE) KH2PO4 0.025 3.387
Na2HPO4 0.025 3.533
7.00(DENANARE) KH2PO4 0.02 2.780
Na2HPO4 0.0275 3.886
7.413(1 GRADE) KH2PO4 0.008695 1.179
Na2HPO4 0.03043 4.303
9.180(1 GRADE) Na2BO4O7·10H2O 0.01 3.80
10.012(1 GRADE) NaHCO3 0.025 2.092
Na2CO3 0.025 2.640
12.454(2 GRADE) Ca(OH)2 25℃(SATURATION) >2

INE-PHSJ-5 pH Meter
18
Packing List
INE-PHSJ-5 pH Meter
NO. Descriptions and Specifications Quantity
1 INE-PHSJ-5 pH Meter 1 set
2 E-201D PH Combination Electrode 1
3 T-820D Temperature Sensor 1
4 Buffer Solution 4.7.10 5 bags for each
5 Multifunction Electrode Support Stand 1
6 Fuse 0.5A 5
7 AF30 Stylus 1
8 TP-16 Print Connecting Line 1
9 RS-232 Communication Line 1
10 Data collection software
11 DC universal power supply
12 Operating Instruction 1