Embed Size (px)
DESCRIPTION
PetFishNet Guide Aquarium,
Citation preview

PetFish.Net Guide - Aquarium Do It Yourself

Catch Your Fish The Easy Way
By: Jubs
Well I have seen a lot people talking about catching their fish in planted and heavily decorated tanks and how much of a pain it is. Here is a easy and simple way to catch your fish without tearing up your tank.
What you need to make it:
Plastic bottle
Razor blade or scissors
The Procedure:
Cut the neck a bit below the taper from the top...

Take the cap off (no brainer but you never know
Flip the top part and put it into the bottle inverted, like so...
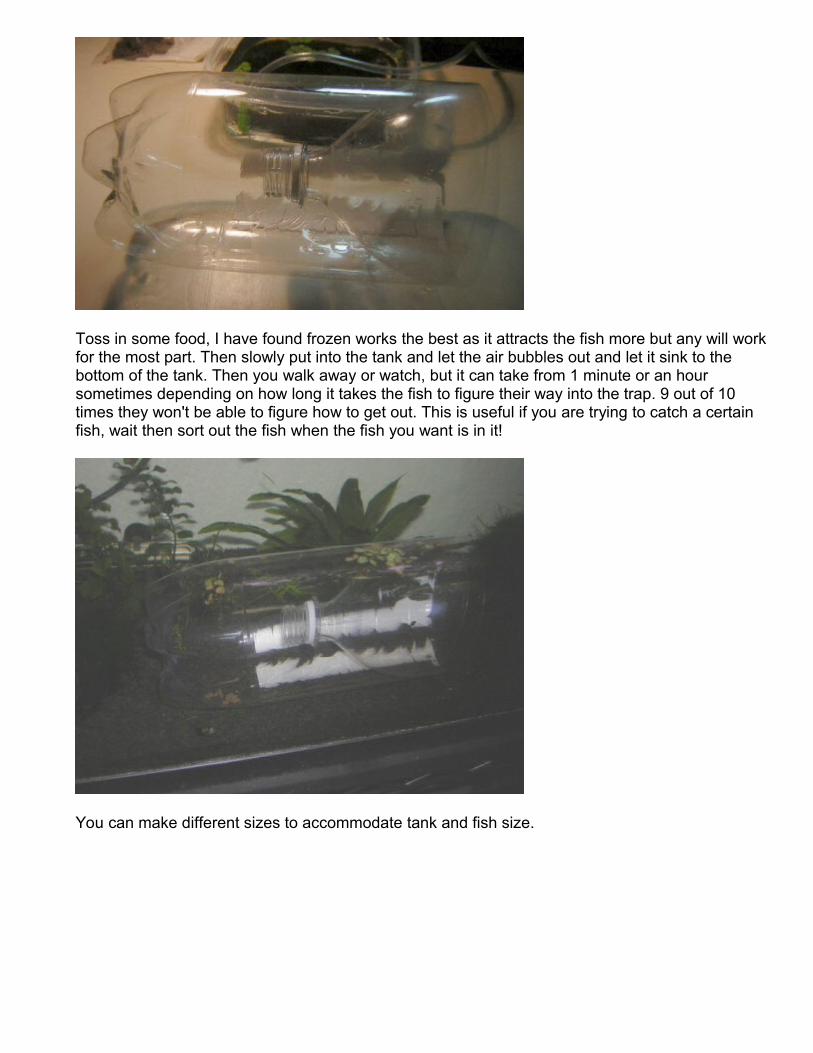
Toss in some food, I have found frozen works the best as it attracts the fish more but any will work for the most part. Then slowly put into the tank and let the air bubbles out and let it sink to the bottom of the tank. Then you walk away or watch, but it can take from 1 minute or an hour sometimes depending on how long it takes the fish to figure their way into the trap. 9 out of 10 times they won't be able to figure how to get out. This is useful if you are trying to catch a certain fish, wait then sort out the fish when the fish you want is in it!
You can make different sizes to accommodate tank and fish size.
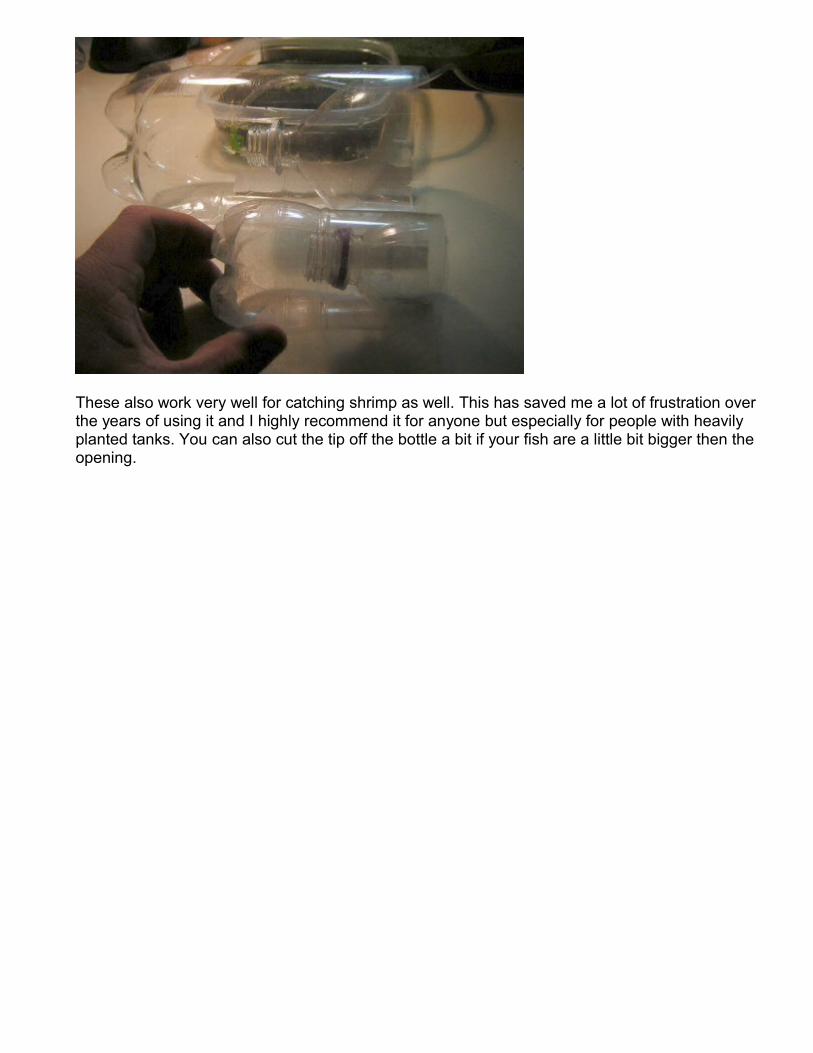
These also work very well for catching shrimp as well. This has saved me a lot of frustration over the years of using it and I highly recommend it for anyone but especially for people with heavily planted tanks. You can also cut the tip off the bottle a bit if your fish are a little bit bigger then the opening.

DIY "Tiny Tank" Gravel Vaccuum
By: Jubs Well I wanted something to get a good cleaning on my smaller tanks without just using the usual airline to suck out water I wanted a way to get gunk out of the substrate as well. If you have ever tried doing that with just a piece of hose you know things just get sucked up there is no swirling around and actual cleaning just straight down the hose! So I came up with this idea...
What you need:
4-5 feet section of standard airline hose
1 plastic 3 ml pipette/eyedropper (whatever size you can get would work but I wouldn't go any smaller)
A pair of scissors
And finally about 45 seconds
Here's the supplies...
Make a cut on each end like so... (note I would cut less off the big end next time)
Put the airline on the small end of the hose and you're ready to go !
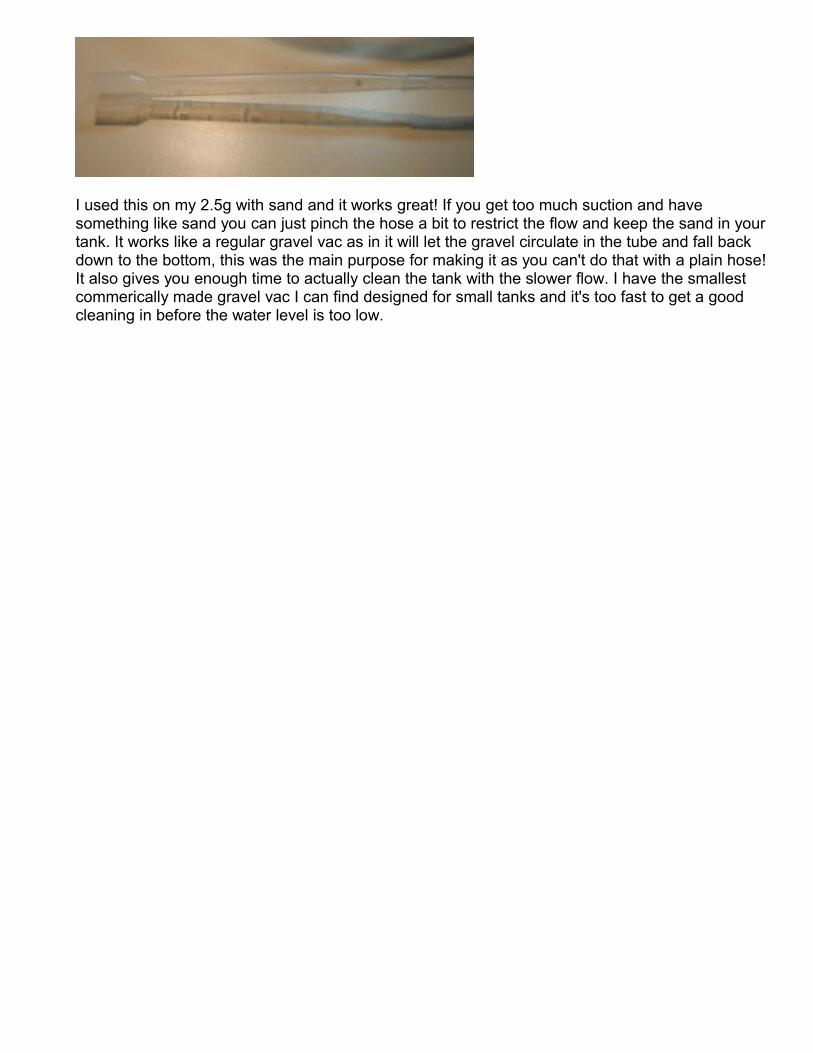
I used this on my 2.5g with sand and it works great! If you get too much suction and have something like sand you can just pinch the hose a bit to restrict the flow and keep the sand in your tank. It works like a regular gravel vac as in it will let the gravel circulate in the tube and fall back down to the bottom, this was the main purpose for making it as you can't do that with a plain hose! It also gives you enough time to actually clean the tank with the slower flow. I have the smallest commerically made gravel vac I can find designed for small tanks and it's too fast to get a good cleaning in before the water level is too low.
DIY In Tank Cannister Filter
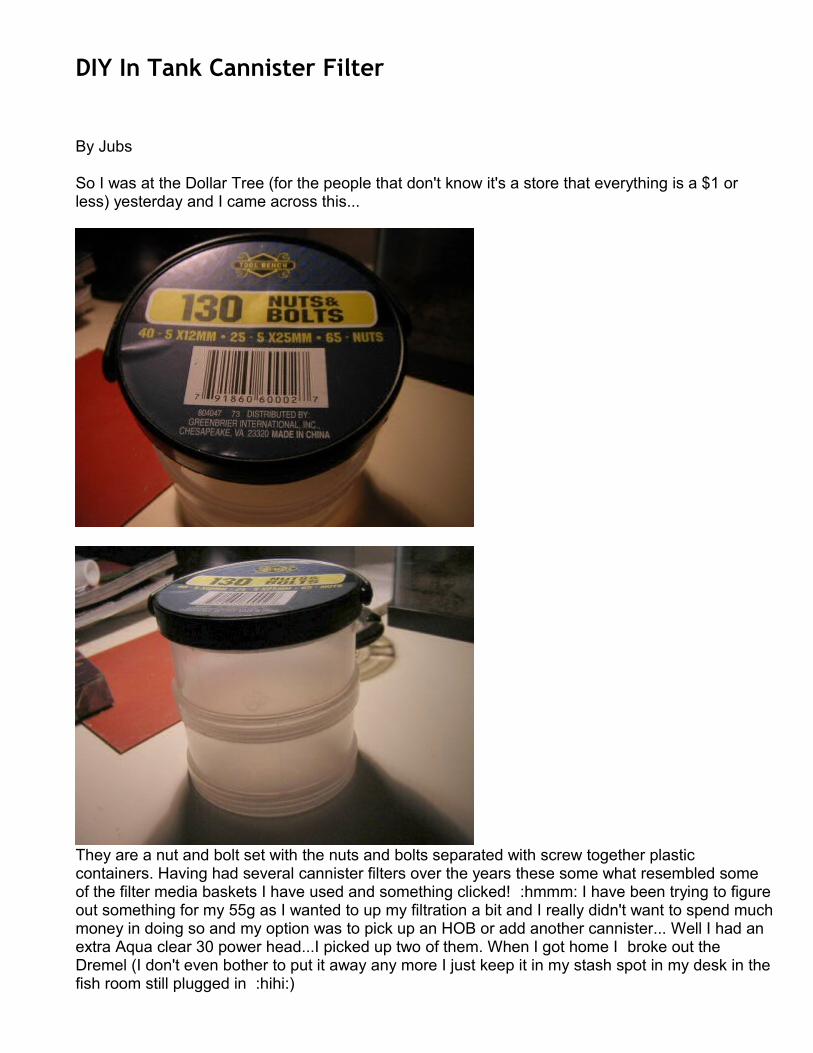
By Jubs So I was at the Dollar Tree (for the people that don't know it's a store that everything is a $1 or less) yesterday and I came across this...
They are a nut and bolt set with the nuts and bolts separated with screw together plastic containers. Having had several cannister filters over the years these some what resembled some of the filter media baskets I have used and something clicked! :hmmm: I have been trying to figure out something for my 55g as I wanted to up my filtration a bit and I really didn't want to spend much money in doing so and my option was to pick up an HOB or add another cannister... Well I had an extra Aqua clear 30 power head...I picked up two of them. When I got home I broke out the Dremel (I don't even bother to put it away any more I just keep it in my stash spot in my desk in the fish room still plugged in :hihi:)

So to begin I removed the sticker from the lid, this proved to be a major PITA and I ended up using a wire brush bit in my Dremel to get all the adhesive off it...
Then I swiss cheesed all the baskets with the Dremel like this...
I added some PTFE/ Plumbers tape to the threads just for extra sealing of the threads. Here is how I attached the power head to the lid. The hole was snug but for good measure I added a small piece of rubber hosing to use as like a retaining clip. I did have to trim the flow adjustment arm down to get it to sit as flush as possible to the lid.
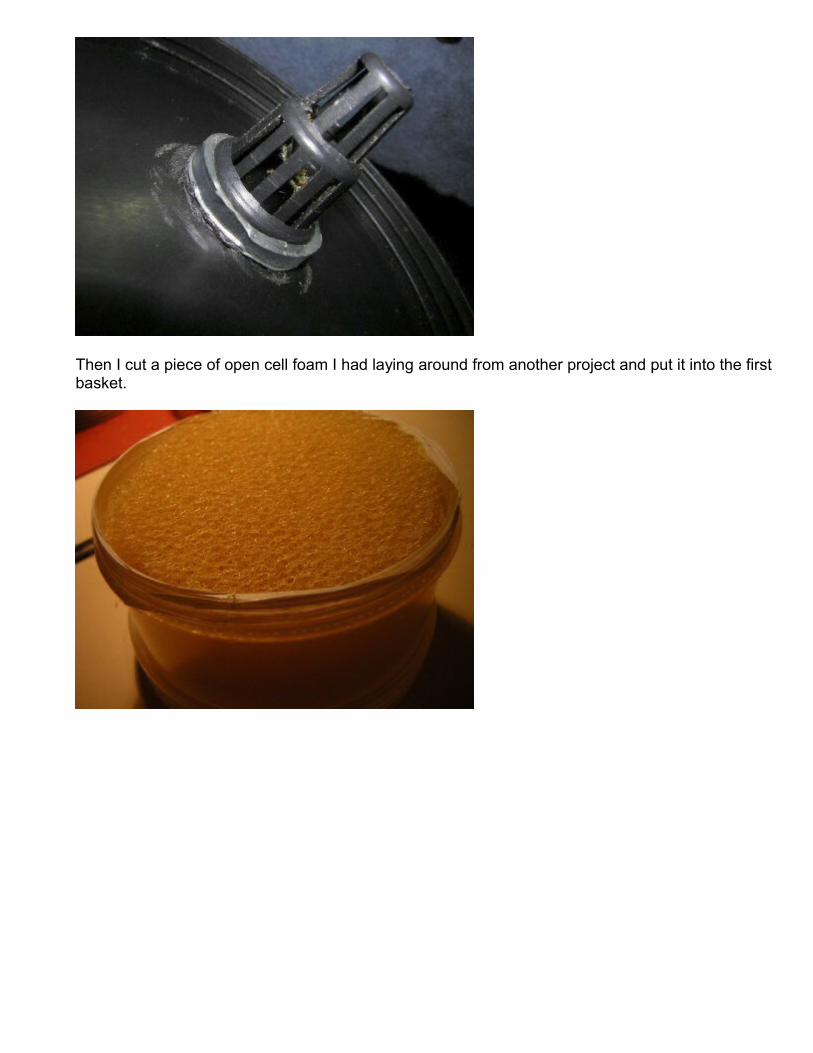
Then I cut a piece of open cell foam I had laying around from another project and put it into the first basket.
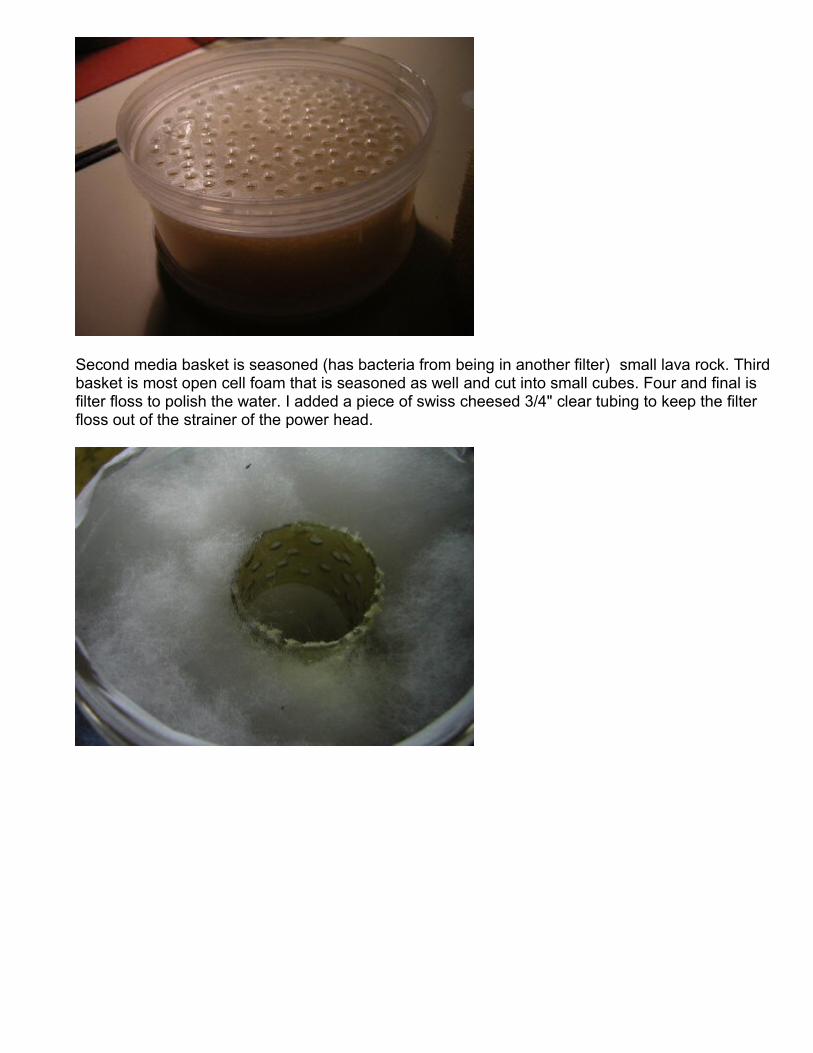
Second media basket is seasoned (has bacteria from being in another filter) small lava rock. Third basket is most open cell foam that is seasoned as well and cut into small cubes. Four and final is filter floss to polish the water. I added a piece of swiss cheesed 3/4" clear tubing to keep the filter floss out of the strainer of the power head.
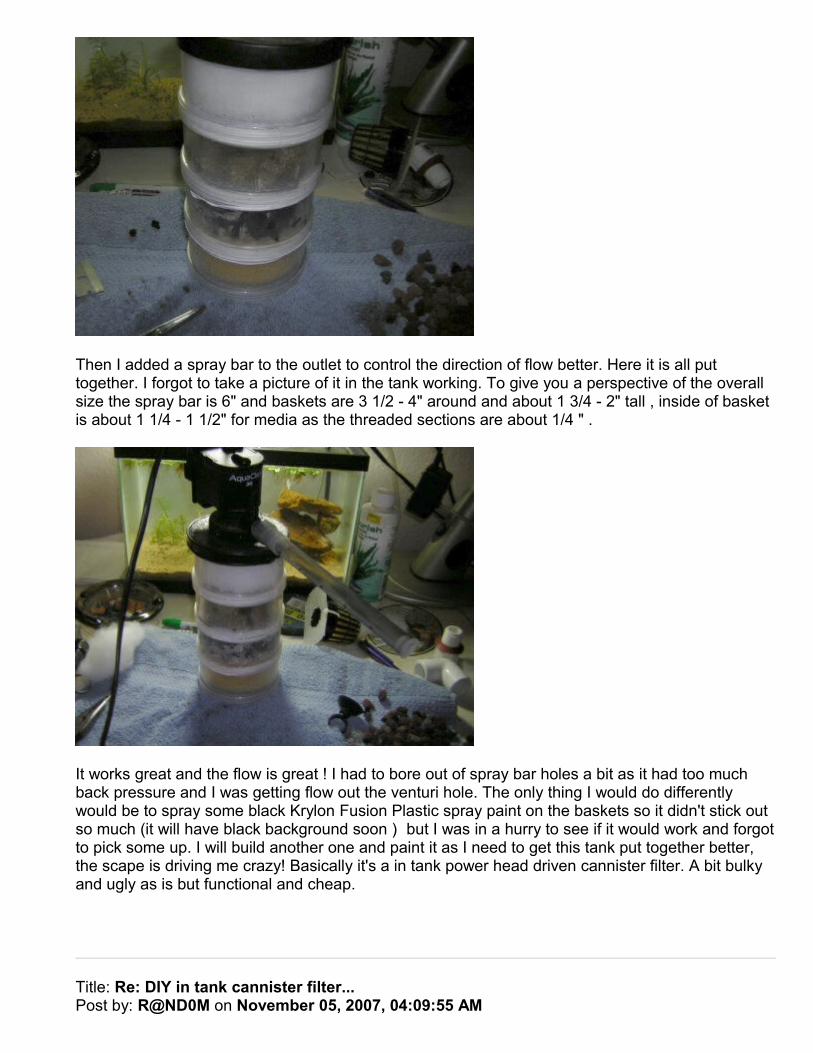
Then I added a spray bar to the outlet to control the direction of flow better. Here it is all put together. I forgot to take a picture of it in the tank working. To give you a perspective of the overall size the spray bar is 6" and baskets are 3 1/2 - 4" around and about 1 3/4 - 2" tall , inside of basket is about 1 1/4 - 1 1/2" for media as the threaded sections are about 1/4 " .
It works great and the flow is great ! I had to bore out of spray bar holes a bit as it had too much back pressure and I was getting flow out the venturi hole. The only thing I would do differently would be to spray some black Krylon Fusion Plastic spray paint on the baskets so it didn't stick out so much (it will have black background soon ) but I was in a hurry to see if it would work and forgot to pick some up. I will build another one and paint it as I need to get this tank put together better, the scape is driving me crazy! Basically it's a in tank power head driven cannister filter. A bit bulky and ugly as is but functional and cheap.
Title: Re: DIY in tank cannister filter...Post by: R@ND0M on November 05, 2007, 04:09:55 AM
That looks awesome Jubs and it's great that it works too. ;D
Title: Re: DIY in tank cannister filter...Post by: Jubs on November 05, 2007, 04:13:45 AM
Quote from: R@ND0M on Today at 04:09:55 AM That looks awesome Jubs and it's great that it works too. ;DThanks R@ndom :) I'm brain storming how to hide it now :hihi:
Title: Re: DIY in tank cannister filter...Post by: mikedmatthews on November 05, 2007, 04:57:29 AM
did you do anything on the threads to prevent leaking?
Title: Re: DIY in tank cannister filter...Post by: Jubs on November 05, 2007, 05:00:53 AM
Quote from: mikedmatthews on Today at 04:57:29 AM did you do anything on the threads to prevent leaking?Yeah I added some plumber's tape to them.
Title: Re: DIY in tank cannister filter...Post by: dalto on November 05, 2007, 09:45:29 AM
How did you get flow through the media. The power head is providing suction at the top, but is there a hole at the bottom somewhere to support forcing the water through the media?
Title: Re: DIY in tank cannister filter...Post by: Jubs on November 05, 2007, 12:44:24 PM
Quote from: dalto on Today at 09:45:29 AM How did you get flow through the media. The power head is providing suction at the top, but is there a hole at the bottom somewhere to support forcing the water through the media?:13: all the trays are drilled at the bottom.
Title: Re: DIY in tank cannister filter...Post by: Jubs on November 05, 2007, 05:06:50 PM
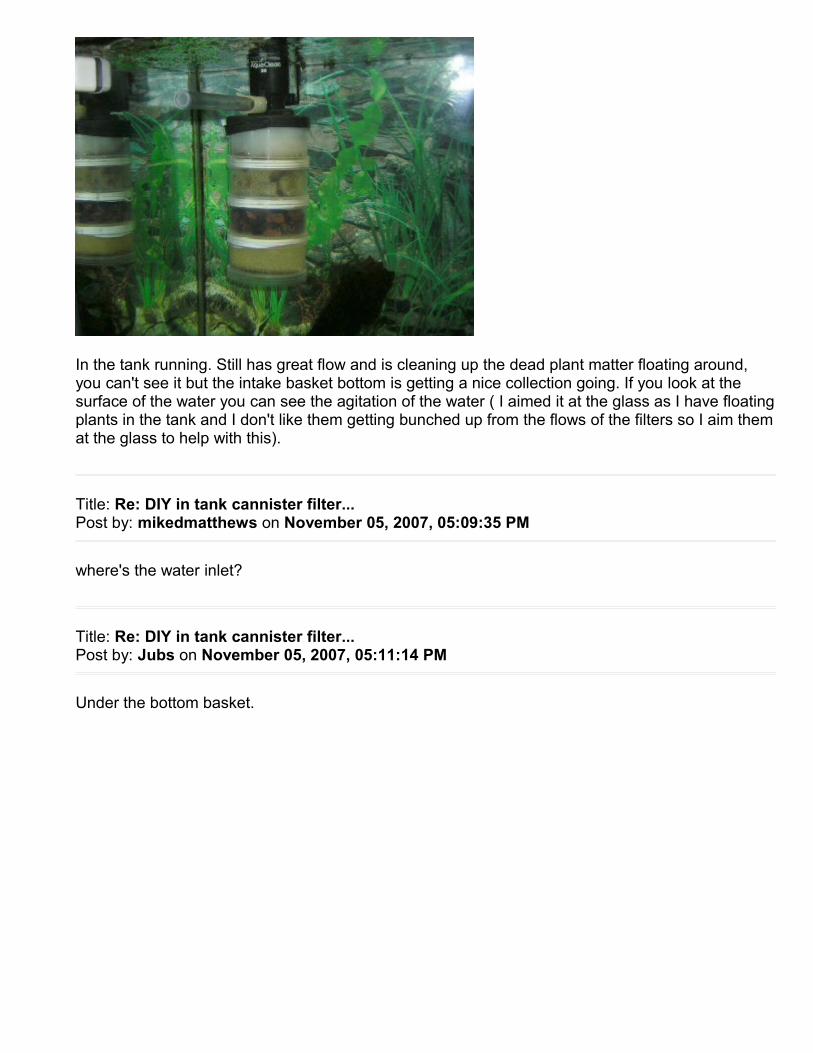
In the tank running. Still has great flow and is cleaning up the dead plant matter floating around, you can't see it but the intake basket bottom is getting a nice collection going. If you look at the surface of the water you can see the agitation of the water ( I aimed it at the glass as I have floating plants in the tank and I don't like them getting bunched up from the flows of the filters so I aim them at the glass to help with this).
Title: Re: DIY in tank cannister filter...Post by: mikedmatthews on November 05, 2007, 05:09:35 PM
where's the water inlet?
Title: Re: DIY in tank cannister filter...Post by: Jubs on November 05, 2007, 05:11:14 PM
Under the bottom basket.
DIY Python Automatic Water Changer
Title: DIY python?Post by: Carissa on November 04, 2007, 07:20:57 PM
Has anyone successfully built a python out of a waterbed draining kit? I tried it but the draining was so slow I gave it up. At first I thought I had too small a hose so I got a different hose but it was still painfully slow. I wouldn't be able to suck anything out of the gravel with it. Any other ideas? I'm just trying to save myself $50 and be lazy too. :)
Title: Re: DIY python?Post by: Jubs on November 04, 2007, 11:02:05 PM
I have one I made. I will get some pics for you tomorrow if you like. I first bought the "pump" from a LFS I just bought one of the Lee's replacement one as I couldn't find an actual water bed one. Then I bought an potable aka RV/Marine water hose ( drink safe garden hose ) from Walmart 25 ft for $10. Then I added an adapter for the garden hose adapter threads to 1/2" plumbing threads ( irrigation section of Home Depot ). Which is threaded into a 1/2" ball valve ( on off with a turn of the valve and regulate suction and flow as well ) on the other end of the ball valve I have a barbed fitting that connects it to a gravel vac. So to break it down in a parts list:
Water bed fill and drain pump
RV/Marine potable water hose ( usually white with blue stripe )
Garden hose thread to 1/2" adapter ( thread into next part )
1/2" ball valve
1/2" thread to barb on other side of the ball valve
Gravel vacuum that fits or can be made to fit the barbed end.
Mine works great I can do a 50-60% water change on my 55 g 20 long 10g and fill 2 5 gallon water holding containers in less than 45 mins with some tinkering around time.
Title: Re: DIY python?Post by: Carissa on November 05, 2007, 06:53:25 AM
Maybe I'll give the waterbed thing another go. It was just so slow, I don't know if the problem was my hose or what. Has anyone else used waterbed drain kits? It does look the same as the pictures of the python thingy online, but I'm wondering if there is some kind of modification to the python one that makes it drain faster. With my shorter siphon hose I was able to drain ok with it, but I tried two different longer hoses and they were both slow as molasses.

Title: Re: DIY python?Post by: Jubs on November 05, 2007, 12:42:20 PM
How high did you turn up the water ? That is what controls how much suction you get.
Title: Re: DIY python?Post by: dalto on November 05, 2007, 12:48:03 PM
Quote from: Jubs on Today at 12:42:20 PM How high did you turn up the water ? That is what controls how much suction you get.
And how much water pressure do you have? I need to turn the hot and cold water on all the way to get good suction.
Title: Re: DIY python?Post by: Jubs on November 05, 2007, 01:02:45 PM
Quote from: dalto on Today at 12:48:03 PM And how much water pressure do you have? I need to turn the hot and cold water on all the way to get good suction.Good point ! I don't have that problem so I didn't even think about it.
Title: Re: DIY python?Post by: Jubs on November 05, 2007, 05:02:16 PM
Here are the pictures as promised...
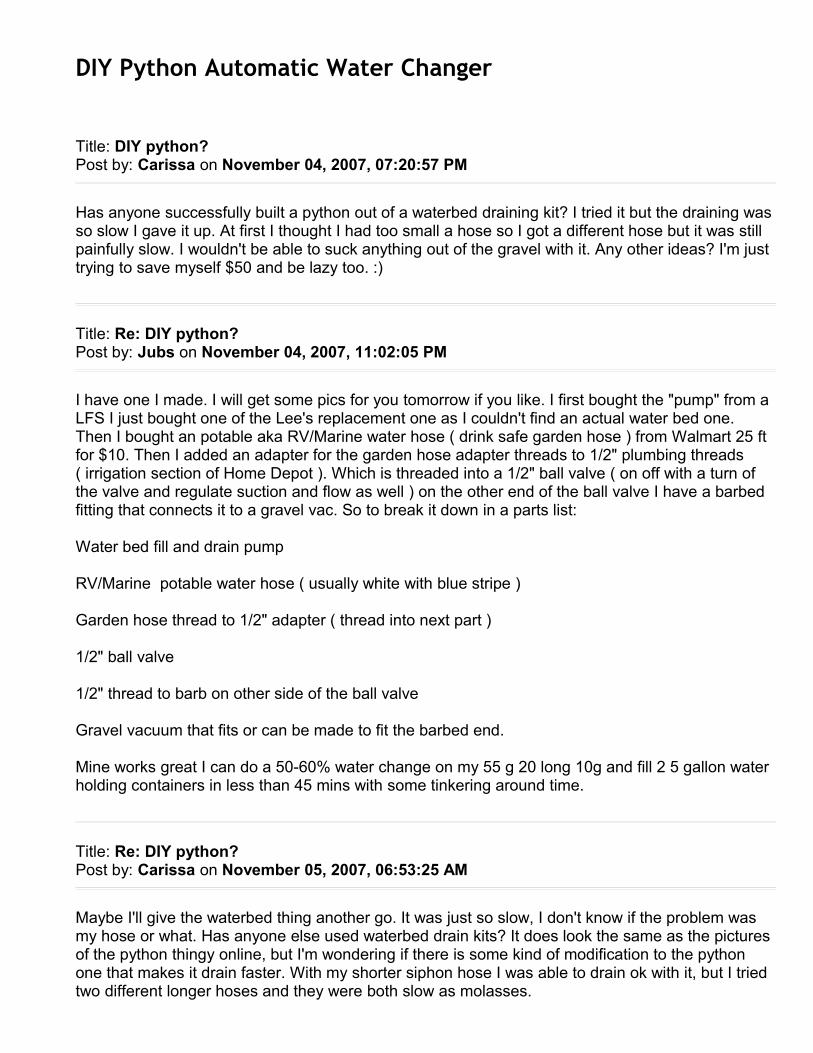
Pump and hose connected
End of hose connected to the garden hose to plumbing thread adapter ( right side ) then middle is ball valve and left side is the gravel vacuum hose connected to the threaded barb adapter to the ball valve.
Title: Re: DIY python?Post by: mikedmatthews on November 05, 2007, 05:23:18 PM
isn't it cheaper to just buy the python?
Title: Re: DIY python?Post by: wendyjo on November 05, 2007, 05:28:06 PM
Hahaha that what I was thinking Mike. And a heck of alot easier.
Title: Re: DIY python?Post by: Jubs on November 05, 2007, 05:29:45 PM
Not in Colorado dry goods are expensive here. The cheapest I have seen is $35 ish for a 25 ft. one at Walmart. The 25ft ones at the LFS's here start around $45- $50 for the cheaper Lee's ones.
Title: Re: DIY python?Post by: mikedmatthews on November 05, 2007, 05:35:51 PM
perhaps its punishment for makin them drive up those mountains!

Title: Re: DIY python?Post by: Clint on November 05, 2007, 05:37:22 PM
And the water bed fill kits turn up a lot at garage sales and flea markets.
Title: Re: DIY python?Post by: Jubs on November 05, 2007, 05:42:26 PM
Quote from: mikedmatthews on Today at 05:35:51 PM perhaps its punishment for makin them drive up those mountains!I don't know what it is but it's getting old :hihi: I lived in PA for about 3 years and my LFS was That Fish Place and the instore prices are the same or lower than the mail order or online prices so I got spoiled. I started off in the hobby in Washington state and they are high compared to east coast prices but not as bad as here. I'll put it this way one of the LFS's manager buys at retail from That Fish Place on filters and marks them up from there cause the wholesale distributors here are so over priced.

A Twist on the DIY Coconut Cave
By Jubs
Post by: Jubs on November 02, 2007, 12:01:08 AM
I bought a coconut the other day with plans to make a cave as I made some a fews ago and the fish loved them but I had since sold all the tanks and moved across country and didn't have any... Well I started thinking about and I really don't like the looks of a plain coconut cave. I have seen people that kind of Jimmy rig java moss on them and they look like crap with moss only covering the inch or so then floating all over the place :hmmm: So I came up with this idea and figured I would share it in the DIY and do a how to write up with pictures...
I am going to skip the cleaning out steps of the coconuts as you can find articles all over the net on that...
After cleaning out the coconut I had these ( the small cave is because the coconut was scored really low so instead of tossing it I decided it would work good for my shrimp to hide in ) ...
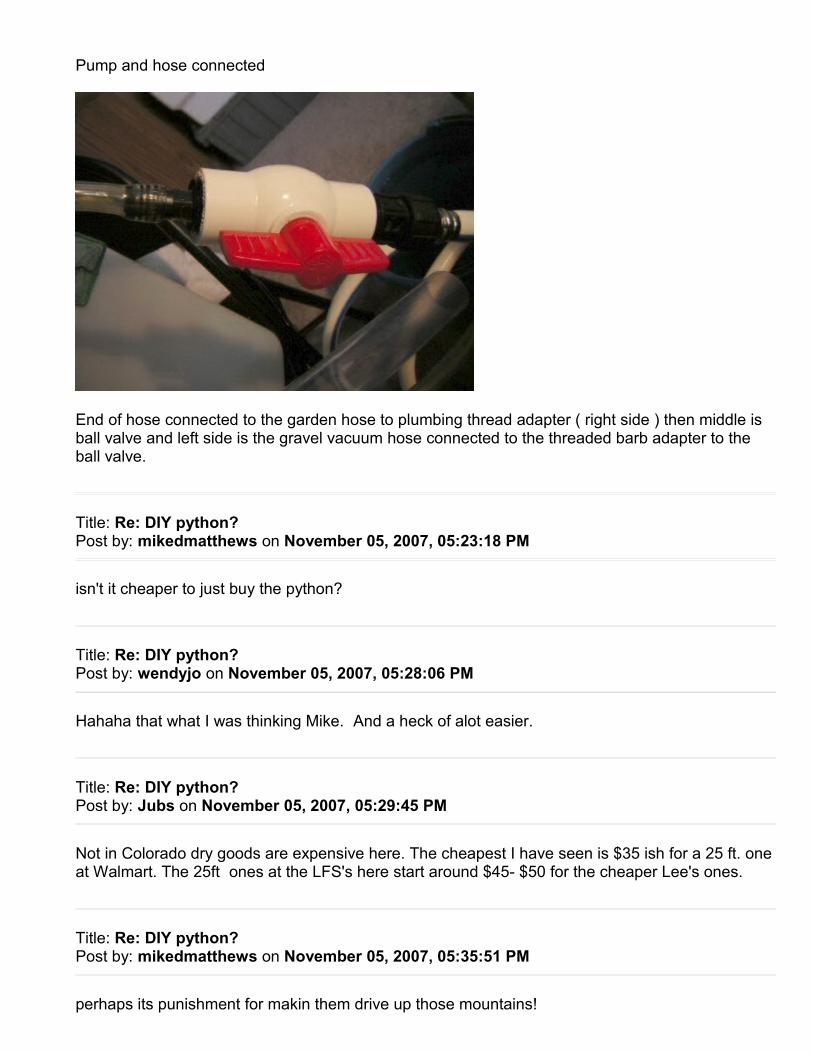
Then I decided I would drill them with a small bit on my Dremel just big enough to get a needle through. Here you can see the difference between the standard Dremel bit and the smaller ( it will require a smaller collar )
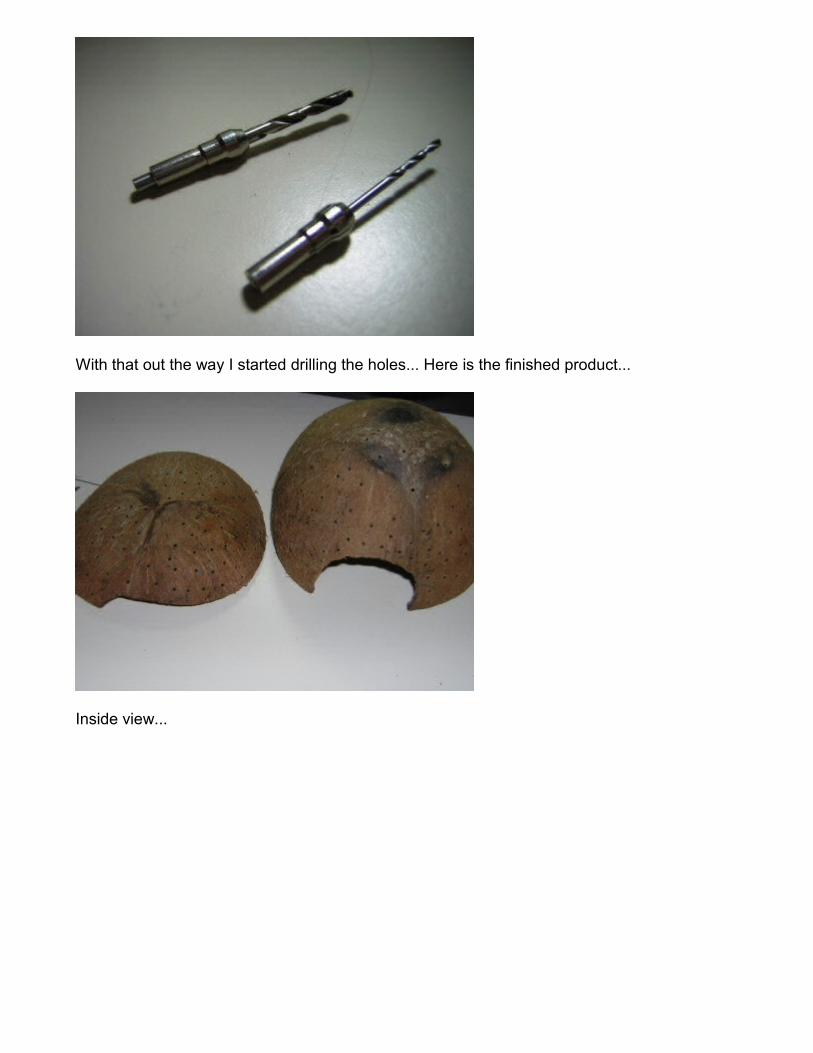
With that out the way I started drilling the holes... Here is the finished product...
Inside view...

Then you will need to get a spool of thread and a sewing needle. I used green thread but you can use any color or even fishing line (I like it to match as close as possible personally).
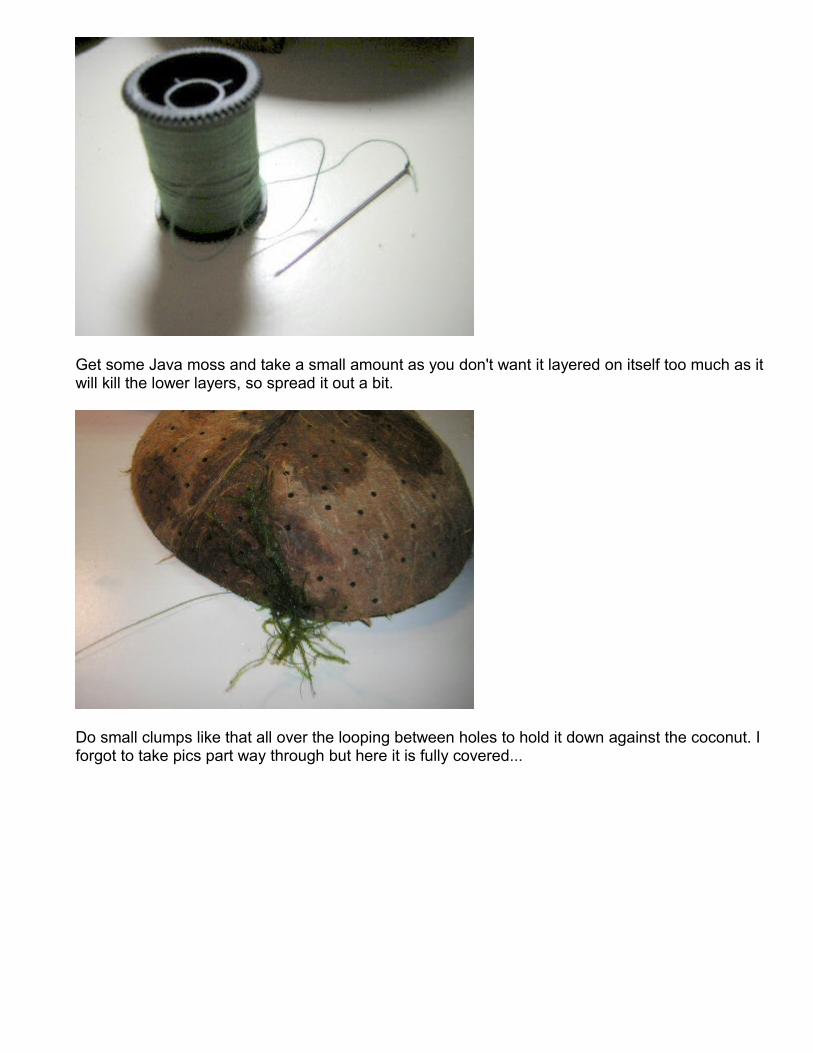
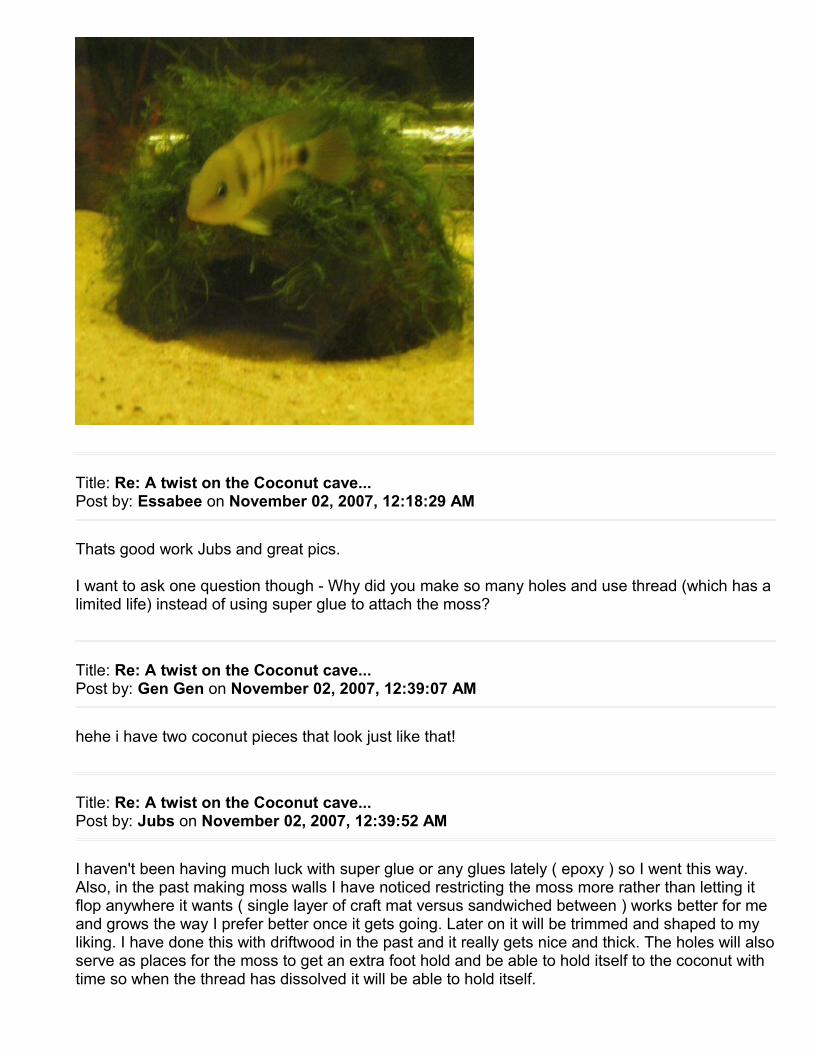
Get some Java moss and take a small amount as you don't want it layered on itself too much as it will kill the lower layers, so spread it out a bit.
Do small clumps like that all over the looping between holes to hold it down against the coconut. I forgot to take pics part way through but here it is fully covered...

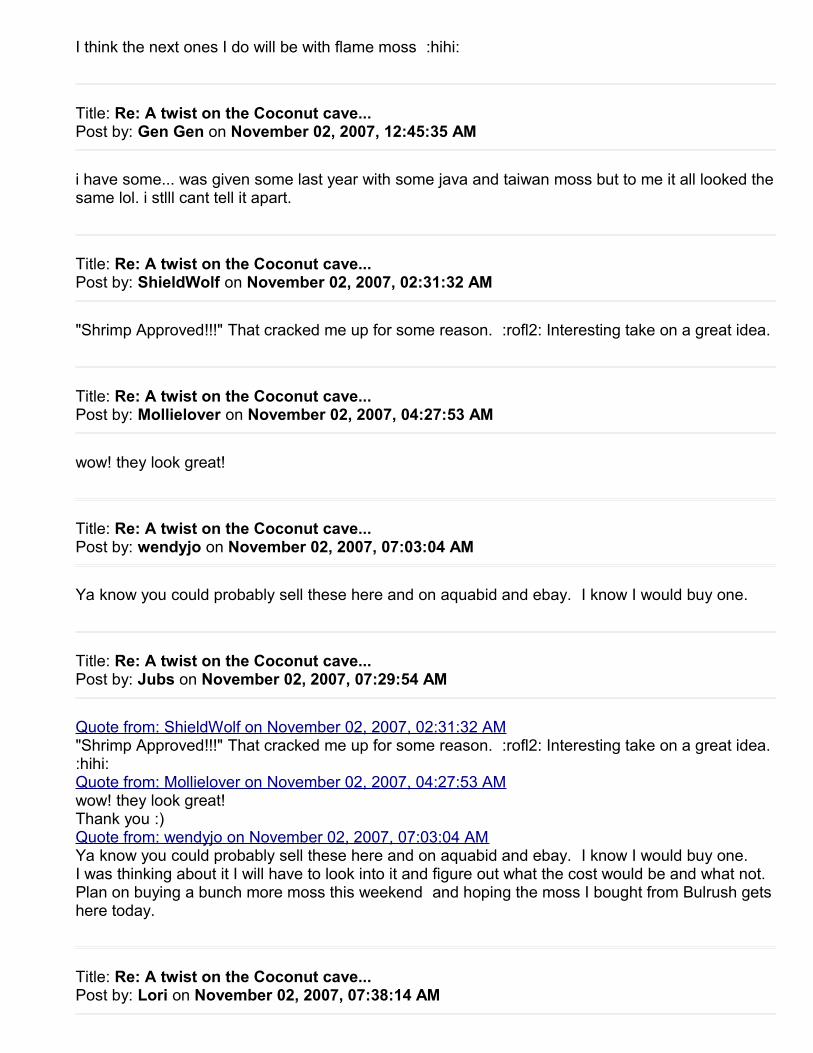
The in tank pics are crappy as my batteries were dead and the camera wasn't wanting to meter the light correctly...
Shrimp Approved!!!
... and the other in a different tank.
Title: Re: A twist on the Coconut cave...Post by: Essabee on November 02, 2007, 12:18:29 AM
Thats good work Jubs and great pics.
I want to ask one question though - Why did you make so many holes and use thread (which has a limited life) instead of using super glue to attach the moss?
Title: Re: A twist on the Coconut cave...Post by: Gen Gen on November 02, 2007, 12:39:07 AM
hehe i have two coconut pieces that look just like that!
Title: Re: A twist on the Coconut cave...Post by: Jubs on November 02, 2007, 12:39:52 AM
I haven't been having much luck with super glue or any glues lately ( epoxy ) so I went this way. Also, in the past making moss walls I have noticed restricting the moss more rather than letting it flop anywhere it wants ( single layer of craft mat versus sandwiched between ) works better for me and grows the way I prefer better once it gets going. Later on it will be trimmed and shaped to my liking. I have done this with driftwood in the past and it really gets nice and thick. The holes will also serve as places for the moss to get an extra foot hold and be able to hold itself to the coconut with time so when the thread has dissolved it will be able to hold itself.
I think the next ones I do will be with flame moss :hihi:
Title: Re: A twist on the Coconut cave...Post by: Gen Gen on November 02, 2007, 12:45:35 AM
i have some... was given some last year with some java and taiwan moss but to me it all looked the same lol. i stlll cant tell it apart.
Title: Re: A twist on the Coconut cave...Post by: ShieldWolf on November 02, 2007, 02:31:32 AM
"Shrimp Approved!!!" That cracked me up for some reason. :rofl2: Interesting take on a great idea.
Title: Re: A twist on the Coconut cave...Post by: Mollielover on November 02, 2007, 04:27:53 AM
wow! they look great!
Title: Re: A twist on the Coconut cave...Post by: wendyjo on November 02, 2007, 07:03:04 AM
Ya know you could probably sell these here and on aquabid and ebay. I know I would buy one.
Title: Re: A twist on the Coconut cave...Post by: Jubs on November 02, 2007, 07:29:54 AM
Quote from: ShieldWolf on November 02, 2007, 02:31:32 AM"Shrimp Approved!!!" That cracked me up for some reason. :rofl2: Interesting take on a great idea. :hihi: Quote from: Mollielover on November 02, 2007, 04:27:53 AMwow! they look great!Thank you :) Quote from: wendyjo on November 02, 2007, 07:03:04 AMYa know you could probably sell these here and on aquabid and ebay. I know I would buy one.I was thinking about it I will have to look into it and figure out what the cost would be and what not. Plan on buying a bunch more moss this weekend and hoping the moss I bought from Bulrush gets here today.
Title: Re: A twist on the Coconut cave...Post by: Lori on November 02, 2007, 07:38:14 AM

I love it! Great job, Jubs...and I think flame moss would look amazing. I just wish it grew faster. It would take quite a bit to cover the shell.
Thanks for sharing!!
Title: Re: A twist on the Coconut cave...Post by: Jubs on November 02, 2007, 07:56:52 AM
Quote from: Lori on November 02, 2007, 07:38:14 AMI love it! Great job, Jubs...and I think flame moss would look amazing. I just wish it grew faster. It would take quite a bit to cover the shell.
Thanks for sharing!!
Thank you ! I think it would look good as well. Yeah didn't take that into consideration though... :hmmm: You're welcome, thank you for the compliment and insight on the flame moss !
Title: Re: A twist on the Coconut cave...Post by: mikedmatthews on November 02, 2007, 08:36:24 AM
you know lori, if you want something that grows faster you could always attach hair algea instead.
Title: Re: A twist on the Coconut cave...Post by: Lori on November 02, 2007, 11:20:08 AM
LOL! Mike, you're the only person I know who actually LIKES the clumps of hair algae in their tanks.
Title: Re: A twist on the Coconut cave...Post by: wendyjo on November 02, 2007, 12:03:52 PM
Well if you decide to sell one send me a pm :)
Title: Re: A twist on the Coconut cave...Post by: Lori on November 02, 2007, 12:05:20 PM
Jubs, if you don't want to wait for flame moss to grow out, you could also do that will taiwan, fissidins or peacock moss. All would look nice on those caves. Just a thought. ;)
Title: Re: A twist on the Coconut cave...
Post by: Jubs on November 02, 2007, 01:57:34 PM
Quote from: wendyjo on November 02, 2007, 12:03:52 PMWell if you decide to sell one send me a pm :)Will do :)
Quote from: Lori on November 02, 2007, 12:05:20 PMJubs, if you don't want to wait for flame moss to grow out, you could also do that will taiwan, fissidins or peacock moss. All would look nice on those caves. Just a thought. ;)Yeah I am looking at want possible mosses I think would look nice. I have a small bit of weeping moss but I don't think I have enough to cover much yet :duh: < throwing so much of it out...
Title: Re: A twist on the Coconut cave...Post by: Tropical Dude on November 02, 2007, 02:31:00 PM
I think that is awesome. ;D
I bet I could do this with a PVC cave too :hmmm:. It would be a whole lot easier than gluing rocks ot it and would look better and be more natural looking. Great Idea. ;D
Title: Re: A twist on the Coconut cave...Post by: Jubs on November 02, 2007, 02:40:33 PM
More than likely you could. I would suggest at least sanding it a bit to get some roughness on the outside so the moss has something to grip to. I tried putting moss on egg crate and it just grew wild and egg crate was very exposed and looked horrible. Maybe even use some Krylon Fusion plastic spray paint to get a green or other darker base to work with.
Title: Re: A twist on the Coconut cave...Post by: Tropical Dude on November 02, 2007, 05:13:55 PM
Black PVC isn't very visible anyway so I don't care. I will try it and let you know how I do.
Title: Re: A twist on the Coconut cave...Post by: Steve Hampton on November 02, 2007, 07:42:55 PM
Soooo, how many Pina Colada's can one get from one coconut cave? LOL! Very cool idea Jubs.
Title: Re: A twist on the Coconut cave...Post by: Jubs on November 02, 2007, 10:22:42 PM

Quote from: Steve Hampton on November 02, 2007, 07:42:55 PMSoooo, how many Pina Colada's can one get from one coconut cave? LOL! Very cool idea Jubs. :hihi: Actually I tried the "milk" and the meat and both were umm... not so good! Thanks Steve!
Title: Re: A twist on the Coconut cave...Post by: EowynJane on November 03, 2007, 10:27:43 AM
Great idea Jubs! Thanks for sharing! I will try that out if I end up making the coconut cave for my BN (I probably will).
Title: Re: A twist on the Coconut cave...Post by: Clint on November 03, 2007, 12:14:09 PM
hey Jubs, can I make this into an article?
Title: Re: A twist on the Coconut cave...Post by: Jubs on November 03, 2007, 01:54:55 PM
Quote from: EowynJane on Yesterday at 10:27:43 AM Great idea Jubs! Thanks for sharing! I will try that out if I end up making the coconut cave for my BN (I probably will).Thank you and good luck with it let me know if you need anymore tips!

How To Make Tile Caves For Your Bristle Nose Plecos
By MPP
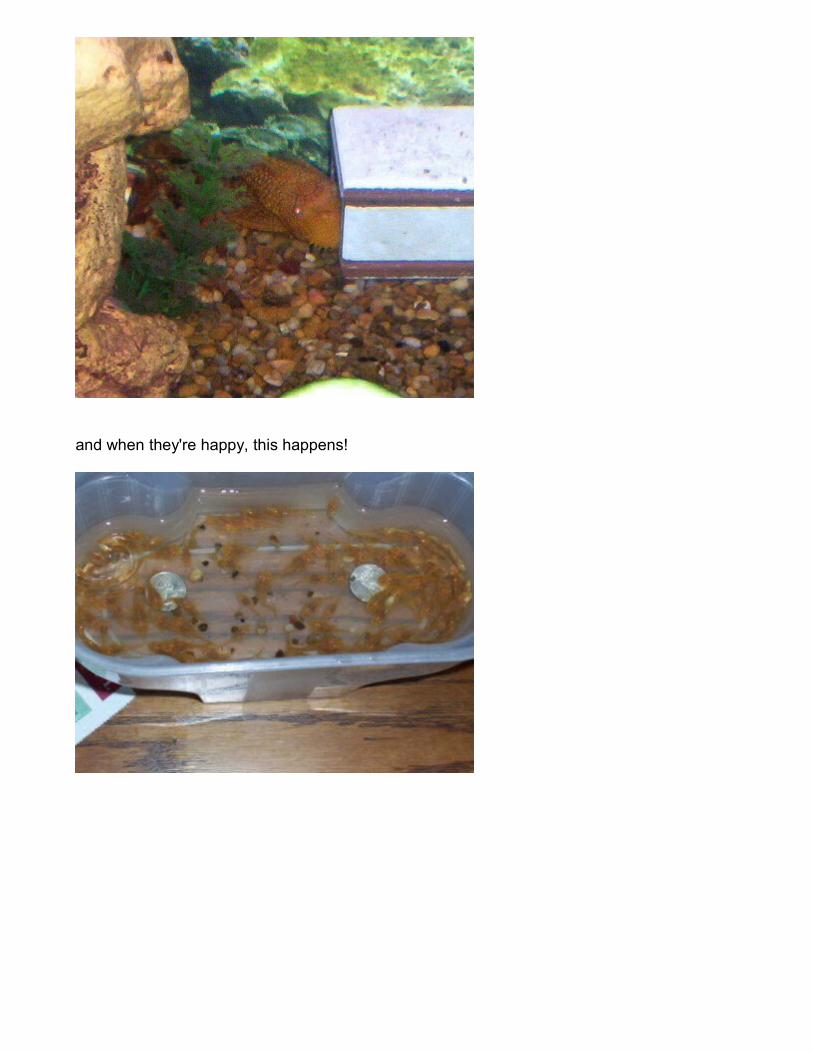
I don't remember where I got the first one but once I did, they're so easy to make. A cheap piece of floor tile might run you 50 cents at the hardware store and you can get a couple caves out of it (even with breakage) See if one of your friends has a tile snapper, measure out an inch and a half and snap off a piece. Split that piece equally into two 6 inch pieces and you've got the floor and ceiling. Snap off another 1 or so strip and split that one equally. Now you've got the two walls. Take some silicone (without any mildewcide or added "protective" chems) and glue them together, sides placed on top of the floor and roof placed on top of the sides. Once you break a piece as you're splitting out the walls or floor and roof, just trim it down to 1 inch or so (depends on your wall size) by 1 and a half. Glue that to one end. Cave done, let it cure for a couple of days and trim it up if necessary and it's ready for the tank. The Cave doesn't need to be 6 inches long. It's just easier and offers less cutting. The cave has got to be wide enough and tall enough (just barely) for mom & dad to squeeze in and do their thing. You'll need to size your caves to your adult fish sizes so some of the measurements may have to be adjusted a little. Avoid the tiles that have the embedded patterns, they're tougher to get to snap cleanly. The cheaper the tile is, the more likely it's exactly what you need to make a tile cave. You could also probably use wall time, and again, cheaper is better for our purposes. There's less decoration and they're less thick in the cheaper tiles. All we care about is making the cave and that the cave sinks like it's supposed to right? As far as sexing the BN's, for my younger "sex-still to be determined" ones, caves help decide that a little bit. Females rarely enter the caves and males will just hang out forever in the caves.
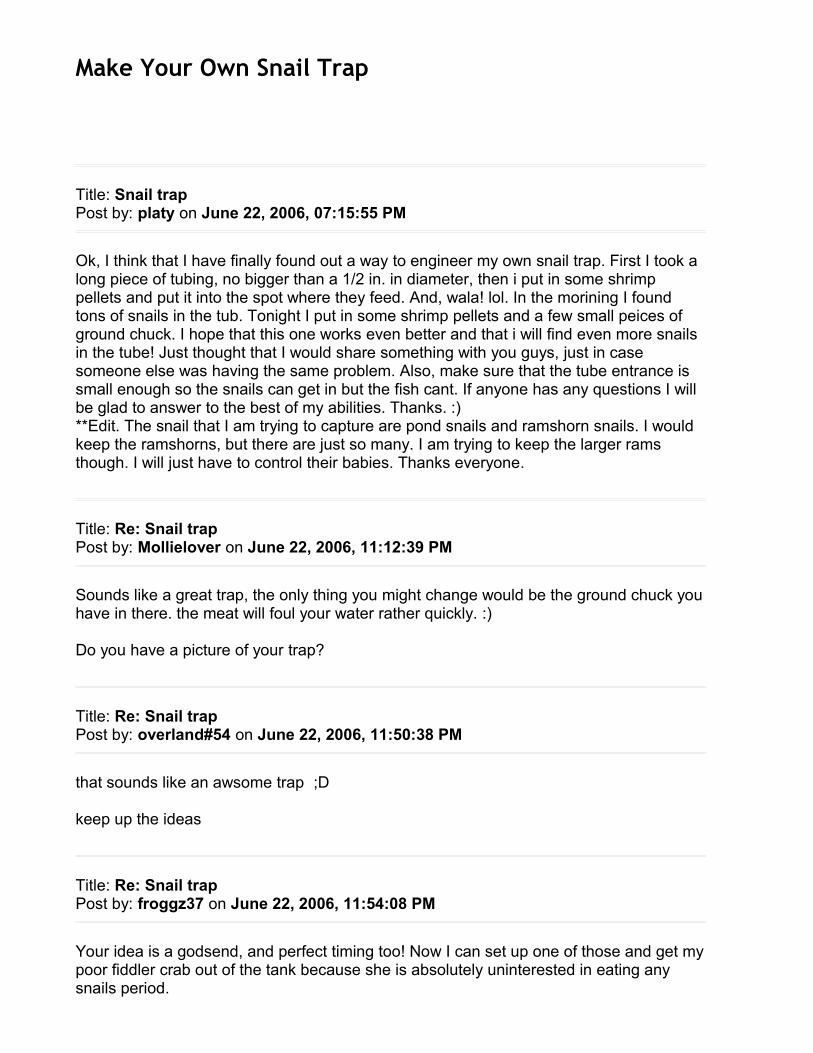
and when they're happy, this happens!
Make Your Own Snail Trap
Title: Snail trapPost by: platy on June 22, 2006, 07:15:55 PM
Ok, I think that I have finally found out a way to engineer my own snail trap. First I took a long piece of tubing, no bigger than a 1/2 in. in diameter, then i put in some shrimp pellets and put it into the spot where they feed. And, wala! lol. In the morining I found tons of snails in the tub. Tonight I put in some shrimp pellets and a few small peices of ground chuck. I hope that this one works even better and that i will find even more snails in the tube! Just thought that I would share something with you guys, just in case someone else was having the same problem. Also, make sure that the tube entrance is small enough so the snails can get in but the fish cant. If anyone has any questions I will be glad to answer to the best of my abilities. Thanks. :) **Edit. The snail that I am trying to capture are pond snails and ramshorn snails. I would keep the ramshorns, but there are just so many. I am trying to keep the larger rams though. I will just have to control their babies. Thanks everyone.
Title: Re: Snail trapPost by: Mollielover on June 22, 2006, 11:12:39 PM
Sounds like a great trap, the only thing you might change would be the ground chuck you have in there. the meat will foul your water rather quickly. :)
Do you have a picture of your trap?
Title: Re: Snail trapPost by: overland#54 on June 22, 2006, 11:50:38 PM
that sounds like an awsome trap ;D
keep up the ideas
Title: Re: Snail trapPost by: froggz37 on June 22, 2006, 11:54:08 PM
Your idea is a godsend, and perfect timing too! Now I can set up one of those and get my poor fiddler crab out of the tank because she is absolutely uninterested in eating any snails period.

Title: Re: Snail trapPost by: EowynJane on June 23, 2006, 12:01:13 AM
Thanks for sharing Platy! I just bought some shrimp pellets yesterday, I'm going to try that!
Title: Re: Snail trapPost by: platy on June 23, 2006, 01:40:33 PM
No problem guys. And yes, about the ground chuck, I did take it out. They didnt seem as interested in it as they did the shrimp pellets. Sorry guys, I dont have a picture. I will try to draw one on the computer and post it later on.
Title: Re: Snail trapPost by: platy on June 23, 2006, 02:05:20 PM
I hope that this diagram helps. If you have any more questions or you dont understand the diagram just ask. I am actually thinking of puting more of these all around my aquarium.
Title: Re: Snail trapPost by: Mollielover on June 23, 2006, 03:43:11 PM
Wow now that I got a visual I understand much better. This is an awesome idea I'm going to give it a try. Do you just use regular airline tubing?

Title: Re: Snail trapPost by: platy on June 23, 2006, 04:02:44 PM
No actually. I had a old hand vacuum for the aquarium which was supposed to take out the dirt but not the water, well it didnt work so I took it apart and made the one piece into the trap. To be exact it is a 1/2 in. in diameter. I will draw another diagram to show the size of the end. Here it is. Actually it is like a 16 of an inch bigger. It shrunk when i loaded it. But you get the size that i am talking about right?
Title: Re: Snail trapPost by: Barcode711 on April 22, 2007, 05:39:40 PM
Hm....this is just an extension of the cup-with-food-in-it, but still.How about a long tube (perhaps going out of the aquarium) with one end closed; fill with tank water,put sinking food in the entrance end, wait for it to go to the bottom and then stick the entrance end into the tank?-=-Now that I think of it, that's propbably not a great idea - snails might not smell it, and it'll be even harder to get fish out of a tube like that. But just an alternative for those that don't want to chop up their substrate vacs. :P
Title: Re: Snail trapPost by: Tropical Dude on August 03, 2007, 10:50:23 PM
My LFS sales different size thin walled clear tubing along with the rigid airline tubing although the rigid airline has a thick wall. BTW what you had was probably a battery powered sludge extractor.

Tips And Tricks
Feeder Fish Tip
People often don't think about or realize that feeder fish bought from a store can carry many diseases into your tank when you feed them to your fish. You can easily start your own tank of guppies, mollies or other live bearing fish and use their fry as feeder fish. These fish would come from your own tank so you would know that they are healthy and in the long run you would probably save a lot of money.
Quarantine Tank Tip
You can use a large Rubbermaid tub as a quarantine tank. The fish should only be in there for a maximum of two weeks so you shouldn't have any ammonia problems. Be sure to keep an eye on the ammonia just to be safe. An aerator can be useful in ensuring there is enough oxygen in your water. If you have a nocturnal fish you may want to place a decoration in there for them to hide under. If you plan to keep the lid on it, be sure to poke plenty of holes in it to let air in.
Green Water Tip
If your wake up and your tank water is green, you can rest assured it is harmless tiny algae floating around. It looks gross so you want to get rid of it right? Just cover your tank with a sleeping bag or several layers of newspaper for 3 days. The algae will not get enough light to live and will die. Just feed your fish at night when the lights are dim. Your regular aquarium plants will be ok. The water should be clear afterwards. Vacuum well afterwards to suck up the dead algae.
Flake Food Tip
When you buy a new can of flake food, it usually contains flakes too large to be consumed by the fish. You can take the flakes from the can and place them in a zip lock type bag. Get all the air out and crush them in the bag, then return them to the can and it will be much easier
to feed to your fish. Tip by petfish member.
New Plant Tip
Many new plants may carry unwanted diseases, snails and algae. You can disinfect your plant to help reduce the risk of carrying these things on your new plants. It is possible to damage your plants when disinfecting. Try one of these methods: -Potassium permanganate, this can be found in dilute form from jungle products called "clear water" give a 10 minute soak. Good for killing bacteria. -1tablesppon per gallon of alum will provide a good way to get rid of snails. Give a 2 day soak.
Quieten That Noisy Air Pump
There's 2 ways to make air pumps quieter. 1. Place the pump on a pad of foam rubber. 2. Put the whole air pump into the sock portion of a piece of pantyhose and susupend it from a nail or screw in the back of the aquarium stand.
Really Cheap Plastic Plants
Though I prefer live plants; I once saw a tank "planted" with pieces of green trash bags cut to resemble plants. It might sound goofy, but the result was immpressive. The plastic naturally floats so you have to glue or attach the plastic to a rock or some other heavy object. But the wieghtlessness of the "plant" makes it move with the flow of the water and gives a nice upright stance and surprisingly lifelike appearance. Try it, you've nothing to lose but a trash bag.
Plastic Plant Anchors
Soft drink bottle caps, rocks or pebbles, silicone. Super easy. Submitted by Rich
Baby Fish Saver
I have a tip for tanks with baby fish or very small fish/inverts.
Put a piece of nylon sock over the intake tube and keep it held in place by a rubberband. This keeps these kinds of fish from getting stuck in your filter. Also helps if you have a tank with sand in the bottom while using a power filter with a magnet impeller assembly. And it keeps the sand from getting intoyour filter. It also serves as a good prefilter. It keeps plants and other residue out of your filter. You also don't have to change the mechanical media as often. Submitted by Daniel
Quick Tips
• Use a timer for your aquarium lights, and you won't have to worry about them. • Mix several different types of flakes and freeze dried foods into one large container, it wil
give your fish a good mix of food at every feeding. • If your aquarium water sometimes has that thin film on the surface you can get it out by
laying a paper towel on the surface, wait a few seconds and lift it out. • Join a local Aquarium Society, or if there's not one near you join a national organization that
covers the fish that interest you the most. • Swap aquarium books with a local Aquarist friend. • Look for slightly damaged merchandise at your LFS (local fish store) ask for a discount and
you can probably get a deal on it. • Most fish will jump out of uncovered aquariums, always use a cover. • Acidic water loving fish will love a few dried oak leaves in their tank, it will slightly tint the
water and release tanins that make these fish feel at home. • Clay flower pots and/or boiled coconut shells make good caves for shy fish or spawning
some cichlids. • Try to let the fish adapt to your water instead of changing your water with chemicals. Fish
are very adaptable to most water as long as it's unpolluted and the parameters are consistant.
Make Your Under Gravel Filter Work Better
To make your under gravel filter work a lot more efficiently, get some filter floss and completely cover the filter grates with it, about an inch thick, then add the normal layer of gravel over that. This will increase the available area for the 'good" bacteria to grow.
This really works well. And while you're at it, take a look in the crafts section of any local department store, they should have some large bags of "quilt batting" which is exactly the same thing as filter floss, but at only about a tenth of the cost.
Stop Gravel Digging Fish
To save your under gravel filter, or to just keep large fish from digging up the gravel. Get a plastic webbing type material from the crafts section of just about any department store. This stuff is inert so it will not affect water quality. To use the webbing , cut it (with scissors) to the appropriate size and shape. Then place it on top of the gravel and add some more gravel to hide to hide it. No more fishy aquascaping now! This material also makes a great spawning grate for fish such as zebra danios and tetras.
Cheap Substitute For Charcoal
Pick up a 10 pound bag of "Lava Rocks" from your local Home Depot or Lowes. Crush it up to use as a substitute for charcoal or use it like "Live Rock" for a freshwater aquarium. This rock has an abundance of surface area for colonization by the "Good Guy" bacteria. Doesn't look too bad either.
Cheap Airline Connecters
Sometimes you might need to make an airline longer. To make quick and easy airline connecters, just get a length of rigid airline tubing and cut it into pieces about an inch long, or use the little plastic handles that come with the ice cream treat called "Fred Flintstone's Push Ups". Yabba Dabba Doooo!
The Best Fish Food
The best fish food available is the common earthworm. Although they are supposedly the most nutritious when fed live, I prefer to freeze them first and then chop them up for feeding to the fish. You might be able to dig some up in your yard but its much easier to just buy them from a bait store. The method I use with earthworms is to separate them from the dirt etc, which usually involves rinsing a few times in a large mesh net, I then put the live worms into a sandwich/freezer bag ( I think this is a humane or painless way to kill them). Then I break off a piece of frozen worms add a little water with the worms in a disposable cup and use scissors to snip , snip , snip until I have mostly bite size chunks. I then use a turkey baster to feed them to the individual tanks. This is the absolute best spawning conditioning food available for any aquarium fish!

Aluminum Foil
Aluminum foil has a couple of uses for the aquarist. Crinkle it up and then staighten it up again to make a textured background for the tank. Just tape it to the back of the aquarium. Another use, line the inside of the reflector to make your lights brighter. Another idea submitted by kevinAluminum foil is also useful for covering parts of the hood that are left empty (for filter, heater, etc.)
The Ultimate Catfish Breeder Cave
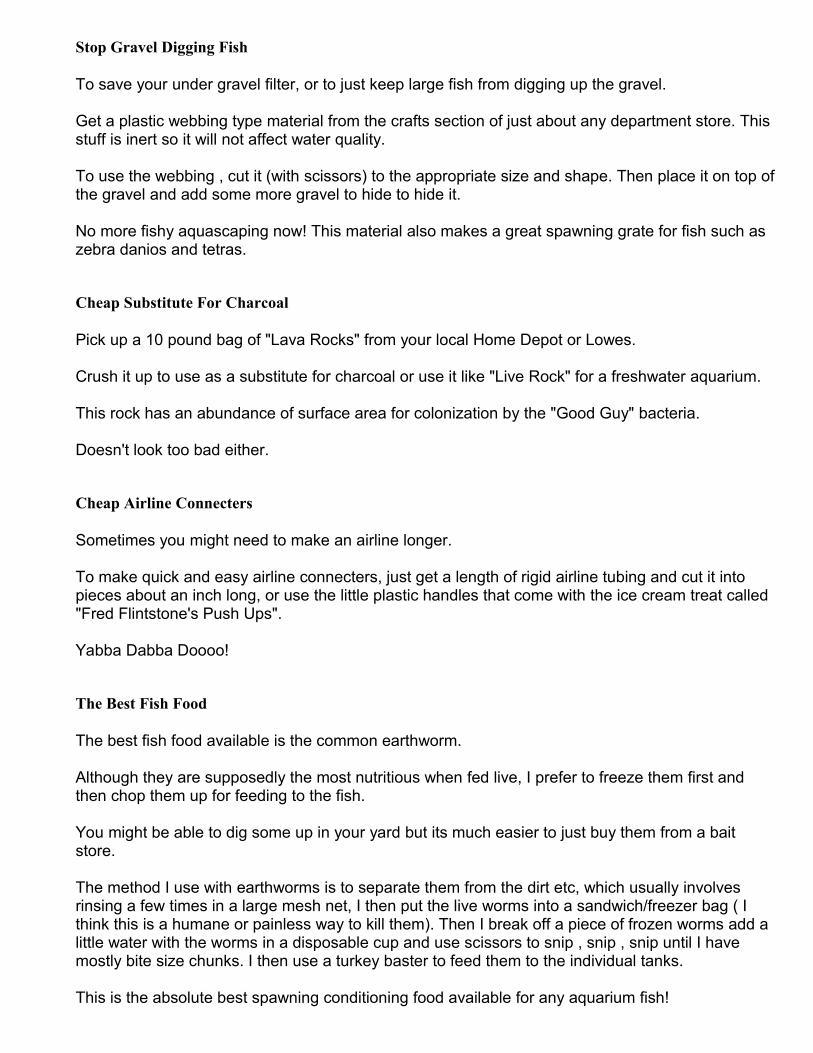
By : bassman This is article was created to help anyone looking for an inexpensive and highly effective diy catfish breeding cave.
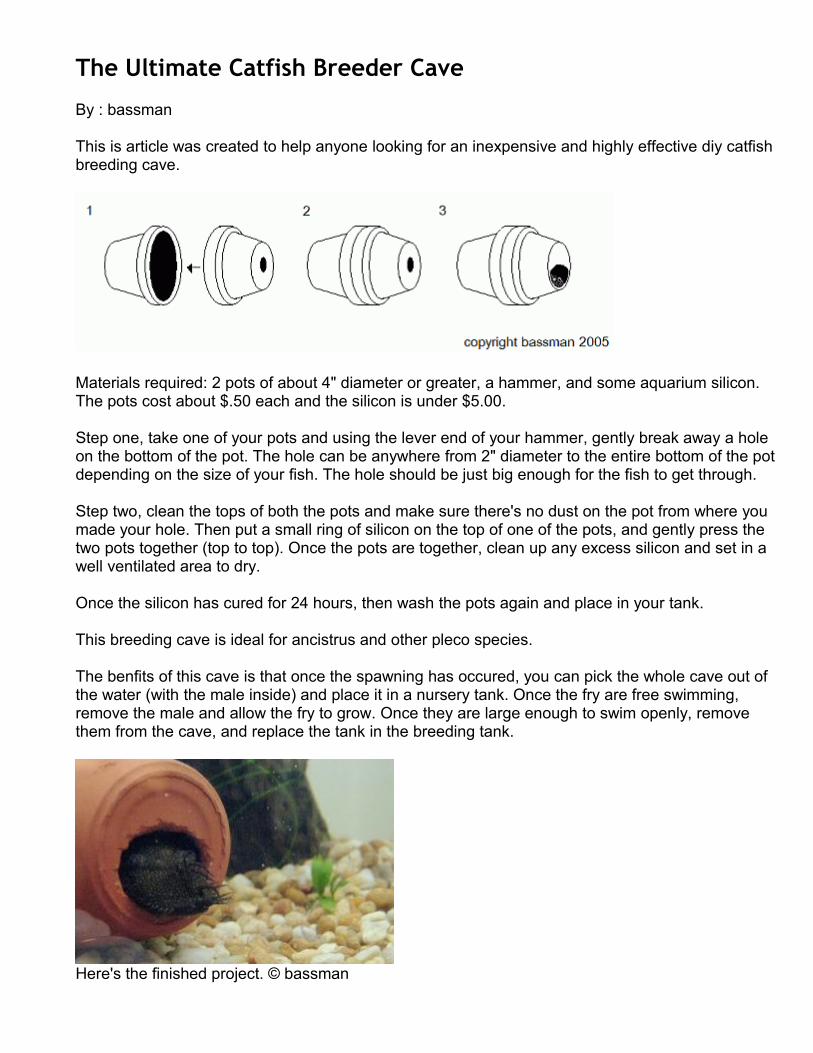
Materials required: 2 pots of about 4" diameter or greater, a hammer, and some aquarium silicon. The pots cost about $.50 each and the silicon is under $5.00. Step one, take one of your pots and using the lever end of your hammer, gently break away a hole on the bottom of the pot. The hole can be anywhere from 2" diameter to the entire bottom of the pot depending on the size of your fish. The hole should be just big enough for the fish to get through. Step two, clean the tops of both the pots and make sure there's no dust on the pot from where you made your hole. Then put a small ring of silicon on the top of one of the pots, and gently press the two pots together (top to top). Once the pots are together, clean up any excess silicon and set in a well ventilated area to dry. Once the silicon has cured for 24 hours, then wash the pots again and place in your tank. This breeding cave is ideal for ancistrus and other pleco species. The benfits of this cave is that once the spawning has occured, you can pick the whole cave out of the water (with the male inside) and place it in a nursery tank. Once the fry are free swimming, remove the male and allow the fry to grow. Once they are large enough to swim openly, remove them from the cave, and replace the tank in the breeding tank.
Here's the finished project. © bassman
DIY Tank Dividers
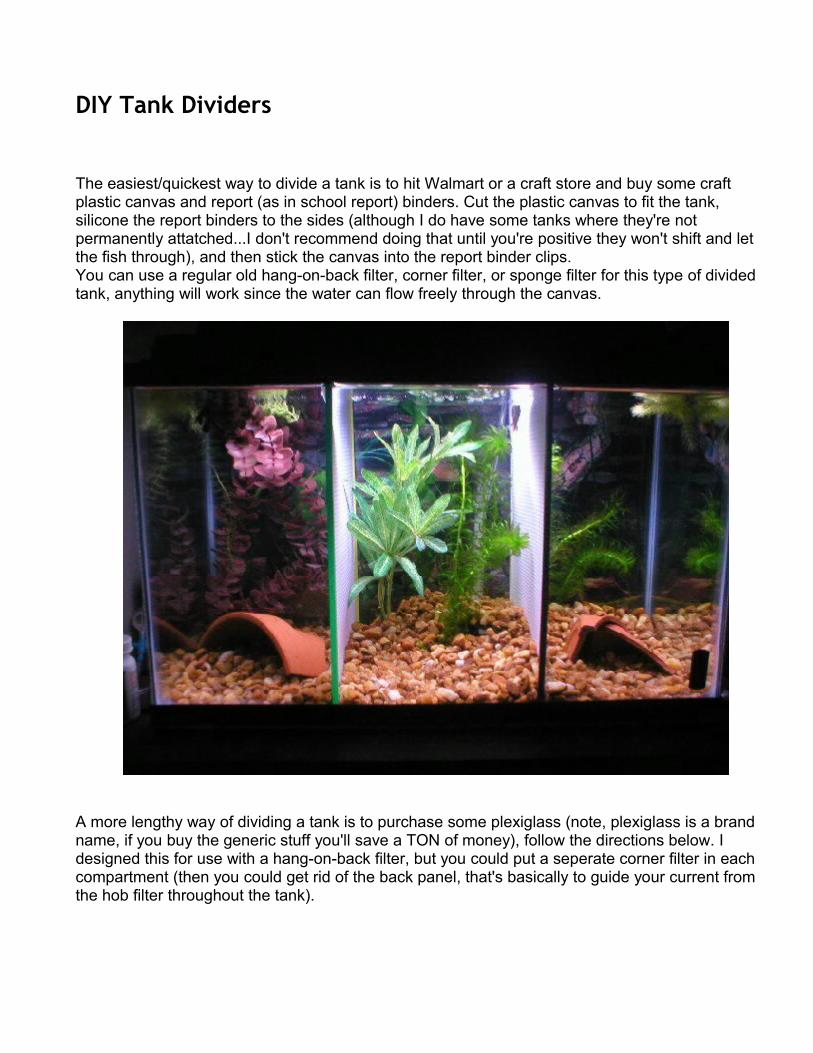
The easiest/quickest way to divide a tank is to hit Walmart or a craft store and buy some craft plastic canvas and report (as in school report) binders. Cut the plastic canvas to fit the tank, silicone the report binders to the sides (although I do have some tanks where they're not permanently attatched...I don't recommend doing that until you're positive they won't shift and let the fish through), and then stick the canvas into the report binder clips. You can use a regular old hang-on-back filter, corner filter, or sponge filter for this type of divided tank, anything will work since the water can flow freely through the canvas.
A more lengthy way of dividing a tank is to purchase some plexiglass (note, plexiglass is a brand name, if you buy the generic stuff you'll save a TON of money), follow the directions below. I designed this for use with a hang-on-back filter, but you could put a seperate corner filter in each compartment (then you could get rid of the back panel, that's basically to guide your current from the hob filter throughout the tank).
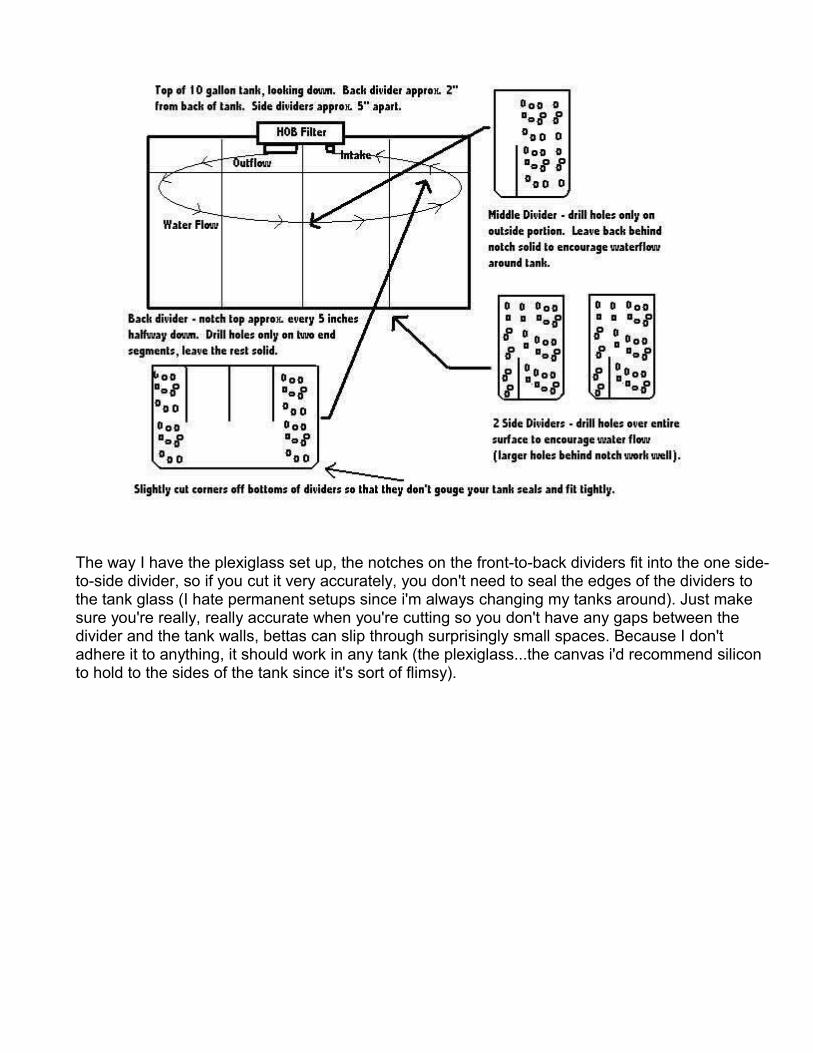
The way I have the plexiglass set up, the notches on the front-to-back dividers fit into the one side-to-side divider, so if you cut it very accurately, you don't need to seal the edges of the dividers to the tank glass (I hate permanent setups since i'm always changing my tanks around). Just make sure you're really, really accurate when you're cutting so you don't have any gaps between the divider and the tank walls, bettas can slip through surprisingly small spaces. Because I don't adhere it to anything, it should work in any tank (the plexiglass...the canvas i'd recommend silicon to hold to the sides of the tank since it's sort of flimsy).

One final note on the plexi construction - it really helps to have two people when drilling the holes - one person drills and the other should hold the plexiglass really, really well - if you let it pop up or down when drilling it can crack. i put both hands right next to the hole he was drilling and put almost all my body weight on the plexi so that it didn't crack. Pictures and text (and great idea) © R. Hunt, AKA "mushi"
Homemade Sponge Filters
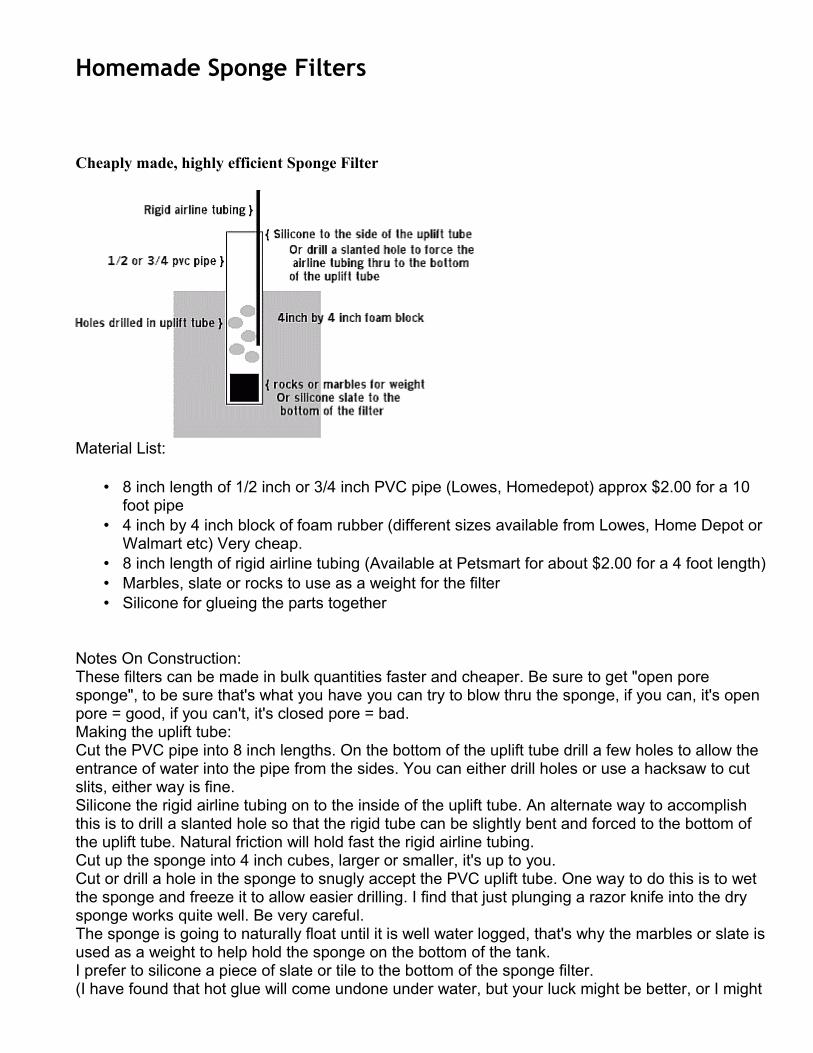
Cheaply made, highly efficient Sponge Filter
Material List:
• 8 inch length of 1/2 inch or 3/4 inch PVC pipe (Lowes, Homedepot) approx $2.00 for a 10 foot pipe
• 4 inch by 4 inch block of foam rubber (different sizes available from Lowes, Home Depot or Walmart etc) Very cheap.
• 8 inch length of rigid airline tubing (Available at Petsmart for about $2.00 for a 4 foot length) • Marbles, slate or rocks to use as a weight for the filter • Silicone for glueing the parts together
Notes On Construction:These filters can be made in bulk quantities faster and cheaper. Be sure to get "open pore sponge", to be sure that's what you have you can try to blow thru the sponge, if you can, it's open pore = good, if you can't, it's closed pore = bad.Making the uplift tube:Cut the PVC pipe into 8 inch lengths. On the bottom of the uplift tube drill a few holes to allow the entrance of water into the pipe from the sides. You can either drill holes or use a hacksaw to cut slits, either way is fine.Silicone the rigid airline tubing on to the inside of the uplift tube. An alternate way to accomplish this is to drill a slanted hole so that the rigid tube can be slightly bent and forced to the bottom of the uplift tube. Natural friction will hold fast the rigid airline tubing.Cut up the sponge into 4 inch cubes, larger or smaller, it's up to you.Cut or drill a hole in the sponge to snugly accept the PVC uplift tube. One way to do this is to wet the sponge and freeze it to allow easier drilling. I find that just plunging a razor knife into the dry sponge works quite well. Be very careful.The sponge is going to naturally float until it is well water logged, that's why the marbles or slate is used as a weight to help hold the sponge on the bottom of the tank.I prefer to silicone a piece of slate or tile to the bottom of the sponge filter.(I have found that hot glue will come undone under water, but your luck might be better, or I might

have the wrong kind of hot glue) Now hook your filter up to an airpump and it's ready to start filtering.A quick way to populate the sponge filter with "good guy" bacteria is to run it a week or 2 in a tank with an established sponge filter. Or squeaze an established sponge filter in the water of the new tank so that the new filter will suck up the bacteria released from the established filter.These filters are very efficient. One of these in a 10 gallon tank will supply all the filtration required to keep it clean and balanced. The costs of these filters if made in quantities of about 10 at a time will be under $2.00 each. Pretty good deal huh?
Questions And Comments
The material list for the diy sponge filter calls for a 4" block of foam rubber, but the instructions call for a sponge of the "open pore variety".....can u tell me exactly what i am looking for at Home Depot, Lowes, or Walmart..
Look for foam that has large pores. Also it is critical that it be open pore, to determine this you'll have to hold it to your mouth and try to breathe thru it. If you can breathe thru it then it is goodTry to do this without looking too weird. To keep the sponge from floating, are the marbles or weighted material just dropped down the center of the sponge?
You can do that, or you can silicone them to the bottom and make some "legs" for it. That would be beneficial for fry as it would keep the sponge filter off the bottom where it might trap fry. Larger rocks or slate would work also. Lastly......."rigid" airline tubing is just the normal air tubing...(clear or blue) that’s sold at petsmart, walmart, etc??
Most petshops will carry rigid airline tubing. This is hard plastic tubing not the soft flexible tubing. It is usually sold in 3 or 4 foot lengths. You can use a knife to score it and then break it off in the right length to fit the sponge filters
Sponge Filter For Shallow Tanks
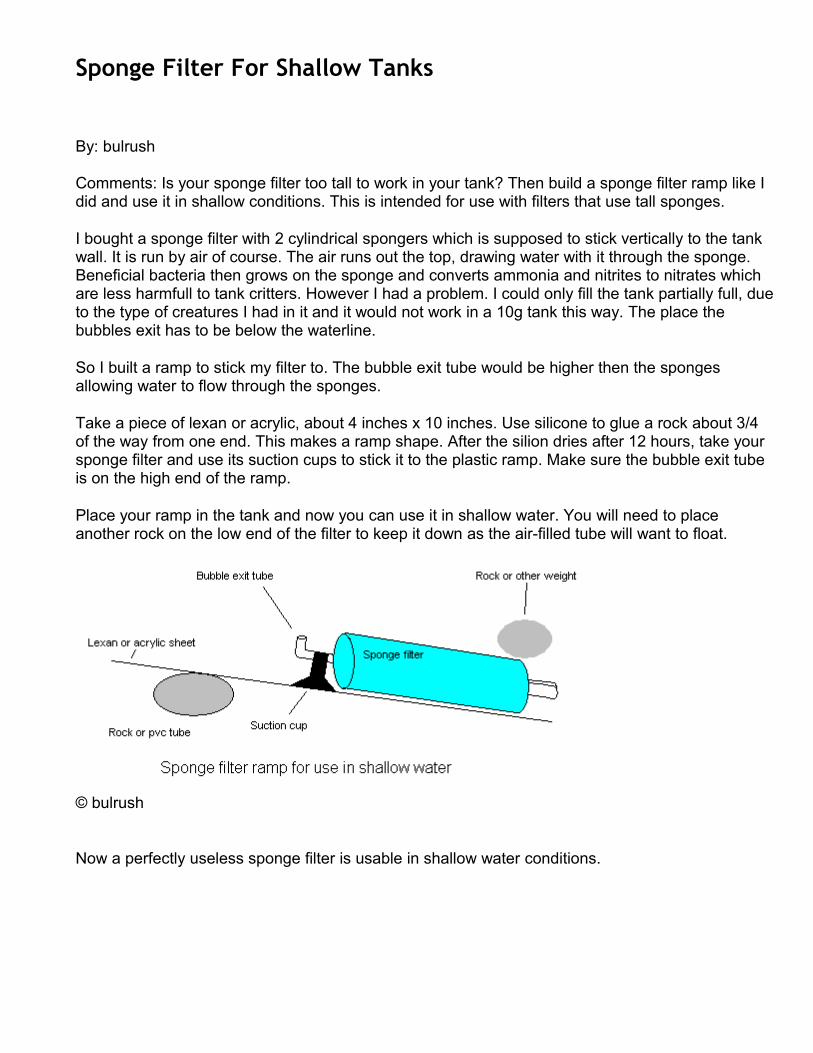
By: bulrush Comments: Is your sponge filter too tall to work in your tank? Then build a sponge filter ramp like I did and use it in shallow conditions. This is intended for use with filters that use tall sponges.
I bought a sponge filter with 2 cylindrical spongers which is supposed to stick vertically to the tank wall. It is run by air of course. The air runs out the top, drawing water with it through the sponge. Beneficial bacteria then grows on the sponge and converts ammonia and nitrites to nitrates which are less harmfull to tank critters. However I had a problem. I could only fill the tank partially full, due to the type of creatures I had in it and it would not work in a 10g tank this way. The place the bubbles exit has to be below the waterline.
So I built a ramp to stick my filter to. The bubble exit tube would be higher then the sponges allowing water to flow through the sponges.
Take a piece of lexan or acrylic, about 4 inches x 10 inches. Use silicone to glue a rock about 3/4 of the way from one end. This makes a ramp shape. After the silion dries after 12 hours, take your sponge filter and use its suction cups to stick it to the plastic ramp. Make sure the bubble exit tube is on the high end of the ramp.
Place your ramp in the tank and now you can use it in shallow water. You will need to place another rock on the low end of the filter to keep it down as the air-filled tube will want to float.
© bulrush
Now a perfectly useless sponge filter is usable in shallow water conditions.

DIY Rainmaker
By Becki
The Rainmaker in action. © Becki
The adapter and set-up © BeckiI cobbled up a homemade 'rain' machine for my breeding tank. I didn't want to lug around a watering can to simulate rain, so I headed off to Home Despot and a LPS to see what they had to offer. Originally I was thinking of a home-made rain bar system to cover most of the tank, but I didn't look forward to all that cutting, drilling, glueing.... wandering around the store, I found a quick-n-dirty alternative.... Here's what I bought:

2' length of ½" diameter aquarium hose (fits output of powerhead) $1.00 ½" hose to ¾" male threaded adapter $.40 plastic ring lawn sprinkler $3.00 pack of heavy duty suction cups (from dollar store) $1.00 Nylon string- had some at home. Setup is pretty self-explanatory. Hook up 1 end of hose to the output of the powerhead, attach the adapter at the other end, and screw on the lawn sprinkler. I attached 3 suction cups to the outside of the aquarium, and strung up the sprinkler (upside down) to hang above the water (20 tall, about 1/2 full for my cories). Now, I just need a big storm to come thru to get 'em in the mood....
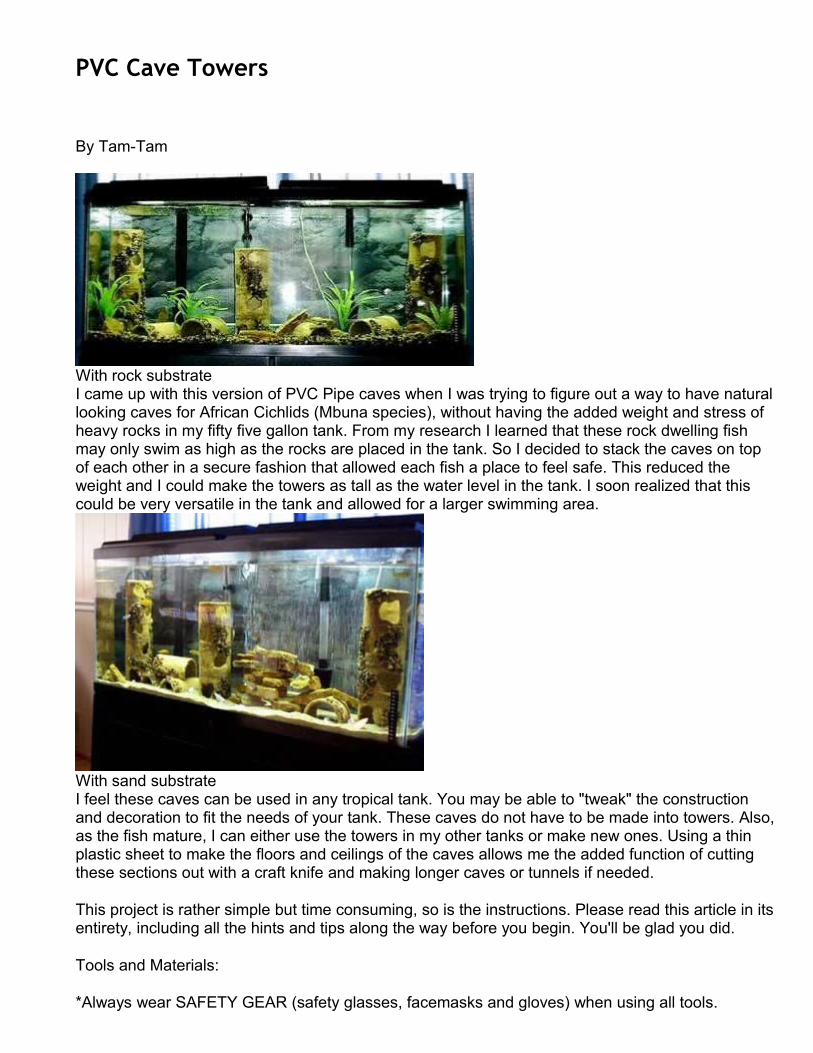
PVC Cave Towers
By Tam-Tam
With rock substrate I came up with this version of PVC Pipe caves when I was trying to figure out a way to have natural looking caves for African Cichlids (Mbuna species), without having the added weight and stress of heavy rocks in my fifty five gallon tank. From my research I learned that these rock dwelling fish may only swim as high as the rocks are placed in the tank. So I decided to stack the caves on top of each other in a secure fashion that allowed each fish a place to feel safe. This reduced the weight and I could make the towers as tall as the water level in the tank. I soon realized that this could be very versatile in the tank and allowed for a larger swimming area.
With sand substrate I feel these caves can be used in any tropical tank. You may be able to "tweak" the construction and decoration to fit the needs of your tank. These caves do not have to be made into towers. Also, as the fish mature, I can either use the towers in my other tanks or make new ones. Using a thin plastic sheet to make the floors and ceilings of the caves allows me the added function of cutting these sections out with a craft knife and making longer caves or tunnels if needed.
This project is rather simple but time consuming, so is the instructions. Please read this article in its entirety, including all the hints and tips along the way before you begin. You'll be glad you did.
Tools and Materials:
*Always wear SAFETY GEAR (safety glasses, facemasks and gloves) when using all tools.
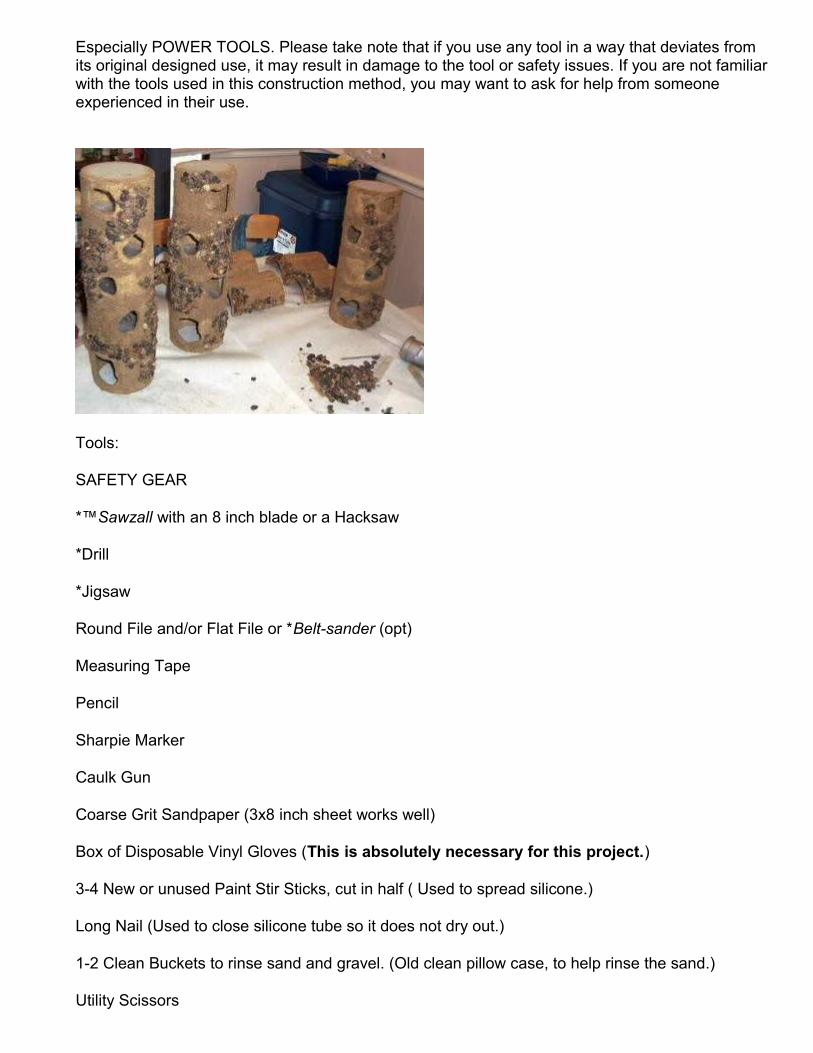
Especially POWER TOOLS. Please take note that if you use any tool in a way that deviates from its original designed use, it may result in damage to the tool or safety issues. If you are not familiar with the tools used in this construction method, you may want to ask for help from someone experienced in their use.
Tools:
SAFETY GEAR
*™Sawzall with an 8 inch blade or a Hacksaw
*Drill
*Jigsaw
Round File and/or Flat File or *Belt-sander (opt)
Measuring Tape
Pencil
Sharpie Marker
Caulk Gun
Coarse Grit Sandpaper (3x8 inch sheet works well)
Box of Disposable Vinyl Gloves (This is absolutely necessary for this project.)
3-4 New or unused Paint Stir Sticks, cut in half ( Used to spread silicone.)
Long Nail (Used to close silicone tube so it does not dry out.)
1-2 Clean Buckets to rinse sand and gravel. (Old clean pillow case, to help rinse the sand.)
Utility Scissors

Hole Punch (The kind you use on notebook paper.)
Old Newspapers (The ink on older paper is less messy than newer paper.)
Freezer Paper (Get this at the grocery store.)
Small Soft Brush ( Throw away type. This is to gently brush away excess sand after drying and curing.)
Large Rectangle Container with a 3 inch depth to hold sand . (I used a ™Yaffa Store-Tote lid.)
Materials: (Try to decide the number of caves you will be making and the number of towers you plan to build.)
White PVC Pipe 4-inch diameter (See note under Marking and Cutting pipe sections.)
Approximately 10-15Lbs.(You may need more or less.) screened Play-sand or your choice of Aquarium Sand. (This sand should not be used in the tank when finished because it may have bits of silicone in it. Rinsing the sand will be discussed later.)
Approximately 5Lbs. of Aquarium Gravel (Same as in your tank.)
Aquarium Water Conditioner of your choice. (To treat the water you will be rinsing the gravel and sand in.)
Small mesh Plastic Canvas sheets (This is in the craft section of any department store. This is for the “roof” of each tower. I usually get about 3 circles per sheet.)
Stencil Making sheets. (This is in the craft section as well. Use clear or opaque sheets. If you cannot find this, try the office supply store for clear or opaque file folders. You will be cutting circles from these sheets to make “ceilings” for the caves. Each ceiling will be the next cave’s flooring. If you cannot find the plastic sheets. You can use the small mesh plastic canvas. There will be a note on how to do this. The number of sheets you need is determined by the number of caves you make. If a tower is to have four caves, you will need one plastic canvas ceiling circle and three plastic sheet circles, with the floor of the bottom cave being left open to the tank, thus four complete caves in your tower.) In caulk tube form. The amount varies for the amount of caves and runners you make. I used about 3½ tubes for 3 three towers and four runners. I have a total of 17 caves in my tank. It is important that you use safe products in your aquarium. After a great deal of research I went with the ™GE brand in the blue and silver tube (100% Clear silicone rubber for windows and doors.) I CANNOT GUARANTEE THE SAFETY OF THIS PRODUCT!! However, I can tell you how I decided on this brand. I researched several forums and websites that had several discussions about what brand is safe to use. I read several posts from people that had been using this product for years for building tanks. According to these people, at one time this product’s instructions stated that it was safe to use on aquariums. The statement was omitted after a number of lawsuits were placed by people that were using this brand to make two hundred gallon and above tanks. The tanks sprung leaks and the lawsuits went to court. Because of other info I have encountered, I suspect but have no proof, that GE probably makes some of the silicone we use from pet-store sources.
Aquarium Safe Silicone
IMPORTANT INFO ON SILICONE:
Please read this:
So far I have not encountered any problems but this is the first time I have used this product. This, however, does not mean that it will be safe for use. If you use this product you do so at your Own Risk! Because this project relies heavily on silicone, you may want to price the product you plan to use. It is very important that you follow the drying and curing times that are provided by the manufacture and here within these instructions. Also make sure you work in a well ventilated area!
Cleaning and Rinsing the sand and gravel:
You may want to do this before you do any other part of this project so the sand and gravel will be dry. The sand can be slightly damp during application but not dripping wet.
Using your clean bucket(s), rinse your gravel well and spread it out in a single layer somewhere to dry. I would use a final rinse of treated water just to make sure there is no residue from chlorine and the like. You can also spread it out on some freezer paper, shiny side up to let it dry. I have heard about putting gravel in a low temp oven, but I have never done this. I really don’t see the need in this. The gravel does have to be completely dry to the touch.
Start with screened play-sand or the aquarium sand you prefer. Use treated water for the rinsing if you feel it is necessary. I used a clean, well rinsed, old pillowcase. You could go buy a cheap one and rinse it well in hot water to remove the sizing. (A product used in bed linens to keep it from shrinking too much.) The pillowcase goes into the bucket, then you add the sand into the pillow case. Rinse the sand in water and drain off. Do this several times. When the sand is clean pull the pillowcase out of the bucket with sand intact. Start twisting the pillowcase around. As it twists, the water will be pressed out. When you have a sufficient amount of the water out of the sand, dump the sand into the rectangle container. Smooth it out and let it dry.
Marking & Cutting the PVC Pipe Sections:
In my area you can only buy the PVC pipe in ten foot sections. I ended up using about seven feet. Also, I used the white PVC pipe because a plumber told me that the black pipe was not rated for drinking water in our area. I assumed that it might leach some chemicals into the water. Just to be safe you might want to check into this for your area. I choose the 4 inch pipe because it was easier to get the silicone and sand on the inside of the pipe sections.
*Always wear SAFETY GEAR when using all tools. Especially POWER TOOLS. Please take note that if you use any tool in a way that deviates from its original designed use, it may result in damage to the tool or safety issues. If you are not familiar with the tools used in this construction method, you may want to ask for help from someone experienced in their use.
With your pencil and measuring tape, mark off sections on the pipe. Choose sizes that fit with your fish. I made about six- three inch sections and about seven- four inch sections and two or three six inch sections. Cut sections with a *Sawzall tool with an eight inch blade or use a hacksaw. Cut sections as evenly as possible. Once the sections are cut, stack the sections on top of each other to see if each section is level. If not, use a *Belt sander or a file to smooth off the edges to make sections set level when stacked.
Cutting the six-inch runner caves:
You will need to make a paper pattern. Set the end of a pipe section on the paper and trace around the pipe. Cut out the circle pattern and check to see if it fits the same size of the pipe. Adjust the pattern if needed. Fold the pattern in half. Make sure the edges meet and the fold is even. Unfold the pattern and place on one end of the pipe section. Mark the fold line onto the pipe section on both sides of the crease. with a pencil and straight edge of the measuring tape mark lines down the both sides of the pipe section. check the other end of the pipe section and adjust your lines if needed. Cut the pipe sections on these lines with a *Sawzall with an eight inch blade or with a hacksaw. Make cuts as straight as possible. Clean and level the cut edges with a *Belt sander or file. Check to see if the runner caves will set level and adjust as needed. You can also make these sections bigger (to adjust paper pattern, mark off 1 inch from the edge and fold). Instead of a 2x6 inch runner cave, you can cut off a one inch section and the runner could be a 3x6 inch cave, or whatever size you need. After the sand applications these can be stacked and silicone together to make a solid runner cave piece (stacked in pyramid fashion) in the tank.
Cutting the entrance holes for the caves:
With a Sharpie marker draw an irregular circle in middle of cave section. Draw it slightly off to one side or the other. I alternated the sides. One opening to the left and the next cave’s opening to the right side so the fish will not be right on top of each other when entering the caves. Make the cave openings large enough to fit the size of your fish. Don’t forget to allow for the fish’s growth. *Drill a hole near the marked line big enough for the *Jigsaw blade. Use a Jigsaw to cut the opening following the outline, taking off the marked outline. Use a round file to smooth out the edges or to open up the entrance a little more if needed. The irregular shape looks more natural than just a round opening.
Rinse and dry the cave sections. Take coarse sandpaper and run it over the inside and outside of the sections. You just want to break up the slick surface of the pipe. Once again, rinse and dry the cave sections. Now is the time to double check your cuts and adjust them.
Setting up your work area:
While this project is rather simple it is time consuming because of the drying and curing times. You will want to set up your area somewhere where you can allow the cave sections to sit and dry between applications and to cure when completed. Make sure the area is protected from bad weather and is well ventilated, (silicone stinks!) You may want to use the disposable face masks. This work area is where you will be applying your silicone and sand layers and building the cave towers.
You will want to spread a few layers of old newspapers over your work surface. Next cover the newspaper layer with an overlapping layer of freezer paper, shiny side up. The silicone, when dry does not stick to the thin plastic coating of the freezer paper. You will want to keep your sand container to one side. Pick out one section to use as a palate for the silicone. I found it easier to squeeze out a 3-inch wide section of silicone onto the freezer paper and then, using a paint stir stick as a spatula, spread an even layer on the sections. Keep your silicone palate free of debris.
A note about drying and curing times:
Before we begin applying layers of silicone and sand, I want to point out how important drying and curing is to this project. Silicone tends to shrink some as it is drying. It is very important that each application of silicone-sand layer be allowed to dry for at least 24 hours. If any shrinkage occurs you can add a little more silicone to the exposed area and some more sand. Unless there are large areas of shrinkage, which need to be retouched before proceeding, you can wait until the decorating phase of the construction to add more sand and some rocks to exposed areas. It is
important that there is complete coverage of all areas of the cave section.
The recommended time frame for curing with the brand of silicone I used is 72 hours dry and 24 hours soaking in treated (use your water conditioner for your aquarium) water with some water changes. This not only allows the silicone to dry and cure, but for the smell to dissipate and any chemical residue to be removed before it is put in the tank.
Applying silicone and sand:
Put on a pair of disposable vinyl gloves, (change often).
Follow the instructions on the silicone tube for using the caulk gun. Squeeze out about a three-inch section of silicone on your palate (repeat as necessary). Using your paint stick as a spatula spread about a 1/8th to 1/4th inch layer of silicone onto the inside of the pipe section. The layer needs to be thick enough to support a good layer of sand without being bulky. Spread the silicone over the entire inside section before adding sand. Make sure to get the silicone right up to the edges both top and bottom. Hold the pipe section up in the light so you can check for spots that are not covered with silicone. Also, add silicone around the inside and outside edges of the entrance opening.
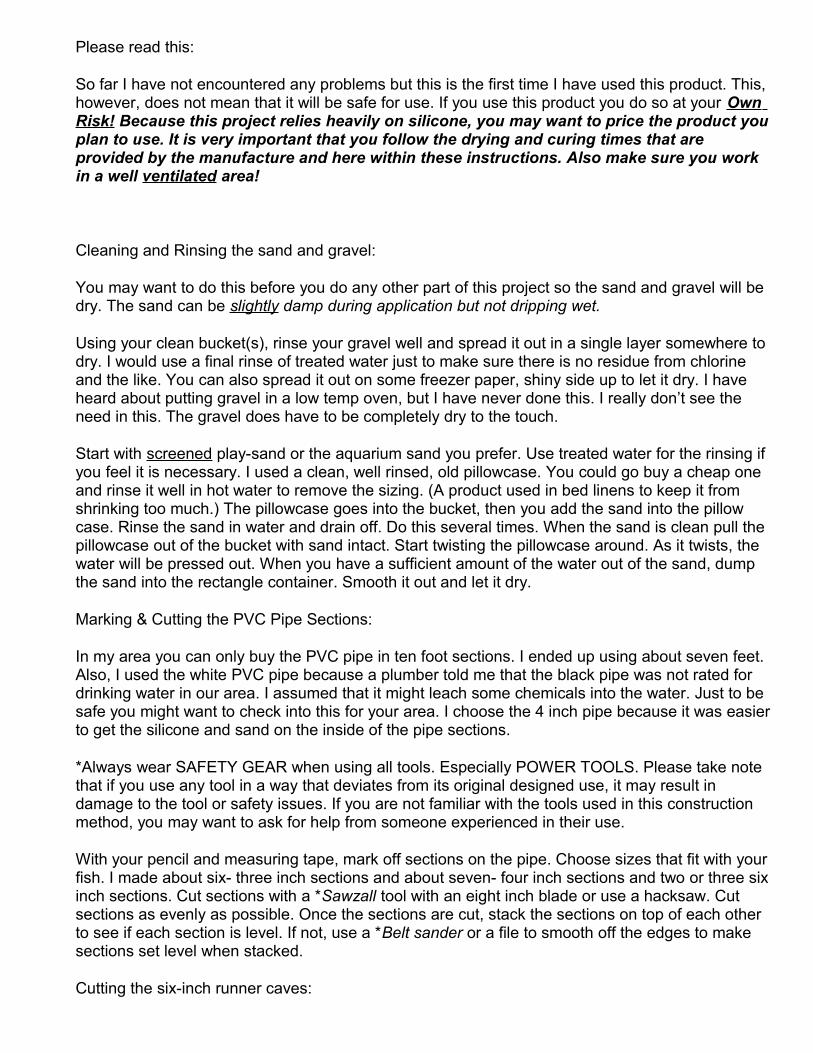
Once you have a complete layer of silicone on the inside of the pipe section sit it (wall side down) in the sand container. Start packing sand on top of silicone, gently but firmly. Turn the pipe section a little and pack more sand on section. Continue this process until the whole inside of section is covered in sand. Gently tap the cave section to remove some excess sand. Holding the pipe section by the edges, repeat the process on the outside area of the section. Place the section somewhere to dry for 24 hours. Repeat the process until you have all the sections ready with the sand layers.
For the runner caves it is just a matter of spreading the silicone on both sides and covering the layer with sand. Sit the runners to the side somewhere to dry for 24 hours. After the cave sections have dried for 24 hours, check for large exposed areas, and touch up. Dry 24 hours for all touch ups. When sand layers are complete gently brush off extra sand. Do not be alarmed at the amount of sand that comes off the cave sections.
Sand layers completed.

Runner caves, see how these could be stacked?
Attaching the ceilings to the cave sections:
The towers consist of a plastic mesh canvas ceiling on the top cave so some type of plant like Java Moss can be tied to it with fishing line. This would give the towers a Spanish moss affect as the moss grows. You could also silicone sand or rocks to the ceiling if you prefer. The bottom side of the bottom cave is left open so it can be surrounded by the substrate making it more secure. The gravel will be the floor of this cave. The ceiling of the middle caves will be the floor to the cave above it. The bottom cave receives a ceiling as well.
First stack your cave sections in towers to see how many ceiling sections you will need to cut from the mesh plastic canvas and solid plastic sheets. Take a cave section and sit it on the plastic sheet. Trace an outline around the cave on the sheet. Be careful not to mark on the cave section. Cut out the circle and use as a pattern or just use the cave section to trace the other plastic sections. Once you have the ceiling sections cut you are ready to fit them to the individual caves and glue it down with the silicone.
Plastic mesh canvas
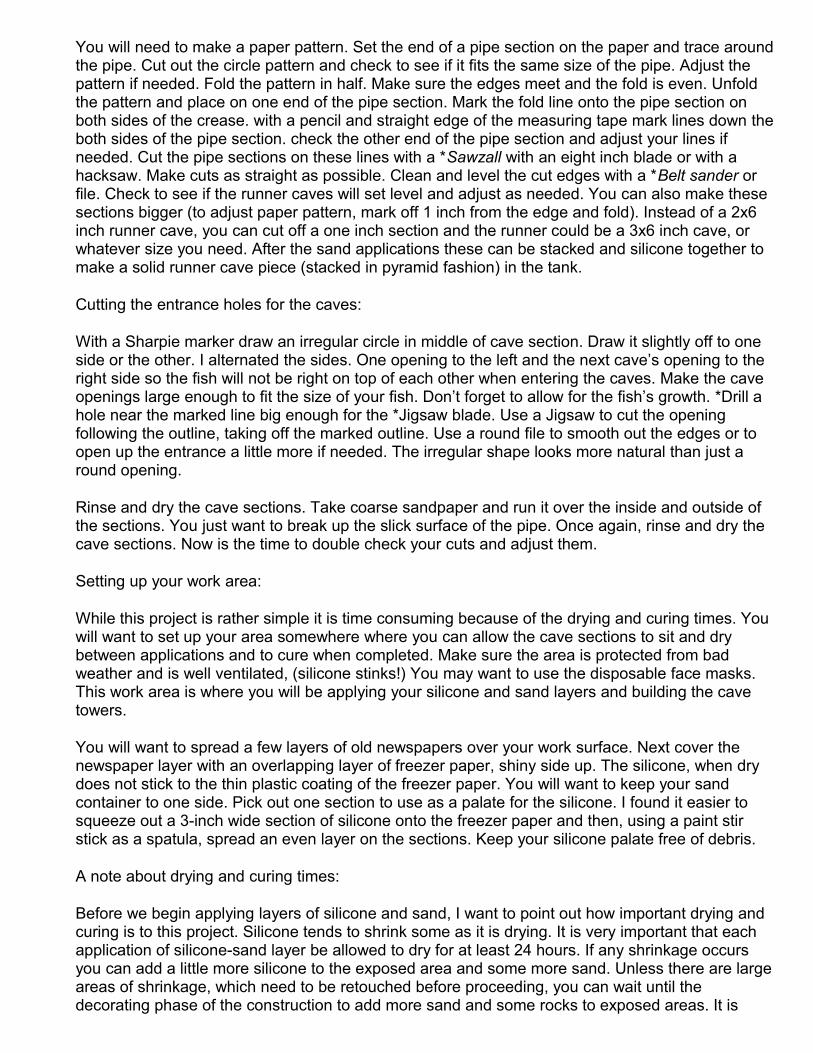
Following the diagram below, trim the plastic ceiling sections to fit midway inside the rim.
Once the ceiling sections have been trimmed, take the sand paper and sand both sides of the solid plastic sections and wipe off residue. This helps with the adhesion of the silicone and blocks the view of the fish in the caves below or above. Using the hole punch, punch a hole in each solid ceiling section. Place the hole about ¼-½inch past where the inside edge of pipe section will meet the plastic sheet. This hole is to help the water flow through the caves. If you are using the mesh plastic canvas, you will need to build a layer of silicone and sand on the top part of the sheet. Sit trimmed piece on freezer paper. Spread an even layer of silicone over the mesh. Sprinkle sand over the silicone pat down gently. Let this layer dry completely then gently peel the whole ceiling section off the paper. Use the nail to poke a few holes in the ceiling.
(TIP: Always make sure to touch the tip of the tube nozzle to the object receiving the silicone to get good contact between the object and the bead of silicone.)
Run a medium size bead of silicone around the rim of the pipe(cave) section
approximately where the plastic sheet will meet the rim. This way silicone will be on the inside and outside edge of the plastic sheet. Line up the plastic ceiling section, with the punched hole on the opposite side of the cave entrance. Then gently place ceiling section in place and tap gently all around the section to get good contact. Smooth out the extra silicone that is on the outside by spreading it evenly over the plastic ceiling section and the rim of the pipe section. This way there is no lumps of silicone that can make the caves fit unevenly when building the towers. The middle cave ceilings are done.
For the top cave of the tower that is receiving the plastic mesh ceiling sections, do the same as above, except do not add the silicone and sand layer to make a solid section, this is for middle caves only. When you are tapping the ceiling section down, make sure the silicone seeps through the holes of the mesh plastic so good contact is made. Then very gently spread out the silicone, just to smooth it out. Take a small amount of sand and gently pour it over the silicone and just gently pat it down. Do this for the ceiling cave of the towers only. If you plan to do sand and rocks on top instead of the moss, skip this step.
Now the caves are ready to sit and dry for at least 24 hours. Longer depending on the humidity in the air.
Individual caves

As you can see in the picture above, I did not worry to much about the extra sand layer that ended up on the edges. Make sure you get a good size bead of silicone around the rim and there is good contact or this will become a problem.
Building the towers:
After the ceilings are completely dry it is time to build the towers. You’ll have to choose the number of caves to use for each tower. You can build the tower as tall as your water level in the tank or use the caves as single floor caves. Tall towers may need to be anchored with counter weights depending on how stable they are. I would not go over 18-inches just to be sure. Make sure you end up with the cave with the mesh plastic ceiling on top of the tower.
Select the bottom cave. Run a ½ inch thick bead of silicone around the rim of the cave section covering to the outside edge of the rim as well as some of the ceiling’s edge, take care around the punched hole. Line up the bottom (open end) of the next cave over the bead of silicone adjusting the entrance opening to be offset from the bottom caves entrance. Evenly sit the cave down on the bottom cave. The silicone will ooze to the outside edge and the inside edge as you gently but firmly press down. Just gently spread the outside silicone across the seam, with a paint stick to smooth it out. leave the inside seam alone. Repeat this process for each additional cave until the tower is complete, with the top cave having the mesh ceiling. Gently slide the tower over to one side of your work area and leave it to dry for at least 24 hours, 48 hours would be better if you can wait that long. Now that the towers and runners are done you can decorate them. First you will cover the seams where the caves were joined. Simply spread just enough silicone over the seam to hold sand. Sprinkle sand over the silicone and pat down gently for good contact. Do each complete seam on the tower and let dry for about two hours or to the touch. Very gently brush off some excess sand. Once the seams are covered on the towers you are ready for the decorative rocks.
Decorating the cave towers and runners:
First check areas for shrinkage. These areas will help determine where to add the rocks. Lay the tower down on its side and prop it up next to some crumple newspapers or aluminum foil. You will need to apply a really thick bead of silicone to the tower covering the shrinkage area. Apply the rocks, making sure to make good contact with the silicone by packing them down into the silicone. Some rocks may fall off. After you have applied the rocks, sprinkle sand over the silicone and rocks and with a patting motion embed the sand into the silicone. You may need to stand the tower up and hold it by the top and tilt it so you can apply more rocks and sand in different areas on the
tower. You can come back about 15-30 minutes later and gently brush off some excess sand off the rocks. The rocks will look like they are encrusted and some of the silicone will be camouflaged. If you are not sure where to place the rocks, just imagine the tower being under water and all but a few layers of rocks have been washed off over time. Make sure to balance out the rock layers, so that one side will not be heavier than the other, it might tilt over to one side in the water if one side is heavier.
If you are not going with the moss look on the top of the tower and have decided to go with sand and rocks, just spread some silicone over the ceiling and add some rocks and sand. Have the rocks tumbling down over one side. Make sure to leave some of the mesh open for water flow, or if you used a solid ceiling section, do not cover the punched hole. To decorate the runner caves, just follow the same procedure making sure to leave an area on the top so it can be stacked if you decide to do so.
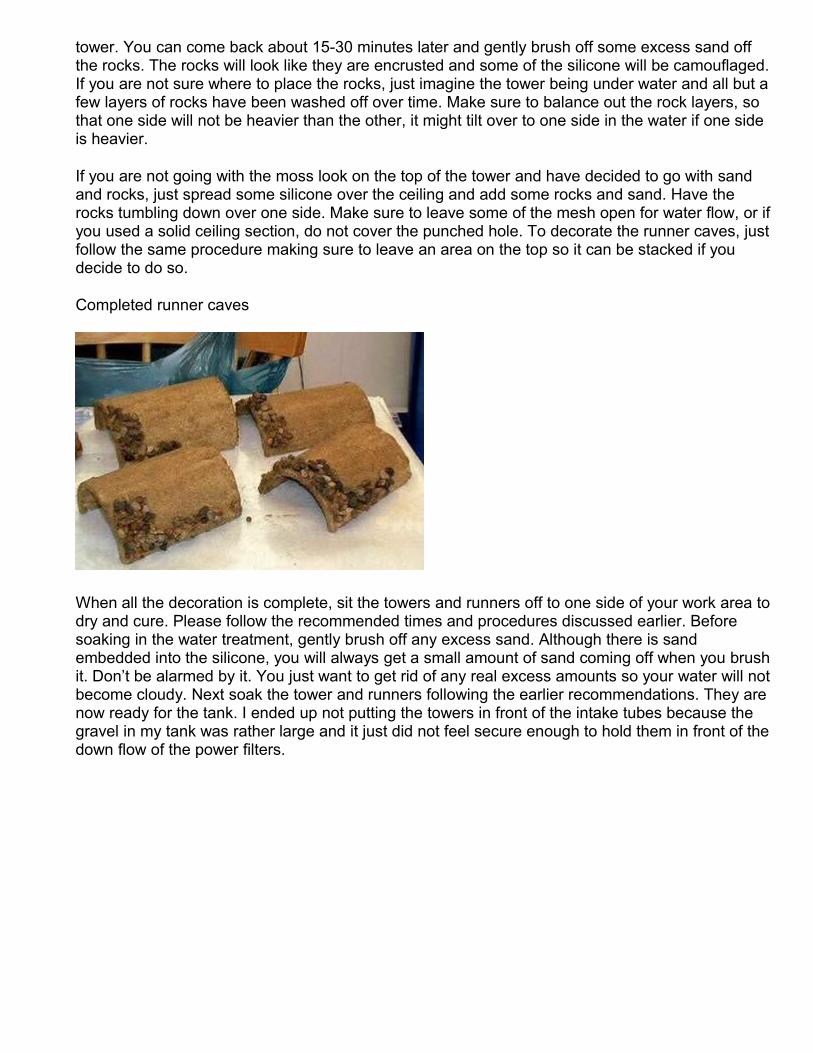
Completed runner caves
When all the decoration is complete, sit the towers and runners off to one side of your work area to dry and cure. Please follow the recommended times and procedures discussed earlier. Before soaking in the water treatment, gently brush off any excess sand. Although there is sand embedded into the silicone, you will always get a small amount of sand coming off when you brush it. Don’t be alarmed by it. You just want to get rid of any real excess amounts so your water will not become cloudy. Next soak the tower and runners following the earlier recommendations. They are now ready for the tank. I ended up not putting the towers in front of the intake tubes because the gravel in my tank was rather large and it just did not feel secure enough to hold them in front of the down flow of the power filters.

Home Sweet Home
All images and text on this page are © Tam-Tam.
PVC Towers - Revisited
By: Adam Nicholson Comments: As an addition to the PVC Towers article, After reading the article and knowing I had some spare 2" PVC pipe somewhere I decided to build a few towers for one of my tanks, but after not being albe to find the pipe (which I found after I built something else - typical) I instead used a plastic drinks bottle (gatorade in this case). Cut the top of the bottle off just below where it narrows, then cut out a rough entrance in the side, drill a small air escape hole in the top so it won't start to float if it is placed near an air stone, and cover using the same technique as for the PVC towers. Tip: Squeeze the silicone onto some cardboard, then use and old paintbrush to apply to the plastic, it you apply a large "blob" then it will mask the shape of the bottle (especially around the neck of the top) and make it look more natural (in my opinion anyways). Using the bottom section of the bottle, i cut at a slight angle from about 1/2" from the base to the top, resulting in a taper so when the bottle is on it's side, it rests at an angle, and won't roll in turbulance. Drill a small air escape hole in the highest point, and if required cut a hole in either the side or base, then cover as before. As with Tam-Tam, I settled for GE window & glass sealant (Silicone I) as from reading various posts dotted around the internet, I found it to be used most the time, and Silicone I seemed to be preferred to Silicone II, which costs more anyways, I have had the caves in the aquarium for over a week and my fish have shown no signs of trouble, This doesn't mean it's safe, just that it seems to have worked for me. Unfortunatly I don't have access to a digital camera at present, but as soon as I can, I will get a couple of frames to show my results.
In-Tank Fry Compartment
Post by: CompletePondCare on November 19, 2005, 03:07:47 PM
My killie breeder tanks aren't very large, and I don't have so many of them that I can just keep moving each new batch of fry to a separate species grow-out tank. I've tried the net-type fry compartments that hang inside the tank by hooks or suction cups, but they take up too much space in my small tanks. I'd resigned myself to keeping the fry in separate, small containers and doing daily partial water changes---man, what a hassle that's been! Then, during last night's round of water changes, inspiration struck: I could use my kids' Legos and some knee-high stockings to make my own, custom-sized, in-tank fry compartments.
You just build a square or rectangular frame in the size you want it out of Legos, then stretch the knee-high over the frame, secure the knee-high to the frame with one more layer of Legos, trim off the excess knee-high material, float that baby in the tank and add your fry! The Legos are bouyant enough that the top layer of bricks will float above the water line, effectively walling your fry off from escape or intruders while still keeping the top of the compartment open for easy feeding access.
If you need very small compartments like I did, you'll find that using pre-fab Lego window & door frames snapped onto a flat base panel makes a compartment sturdy enough to withstand having a knee-high stretched over it without collapsing. Otherwise, a frame built out of the standard, two-dot-wide Lego bricks and beams will do just fine. I'm such a geek, I even decorated my compartments with little Lego furniture, Lego houseplants and other accessories. Not that the fry really need a chair... :P
Post by: AnimeBunny on November 19, 2005, 07:15:39 PM
That's so awesome! I would have never thought of that! However, I did put a little lego fort in my tank, and it's so cool! It's very bouyant, but the lid holds it down. I will have to try the lego fry home, though. It's like a little daycare!
Easy Spawning Material That Works!
Post by: CompletePondCare on May 21, 2006, 10:56:26 PM
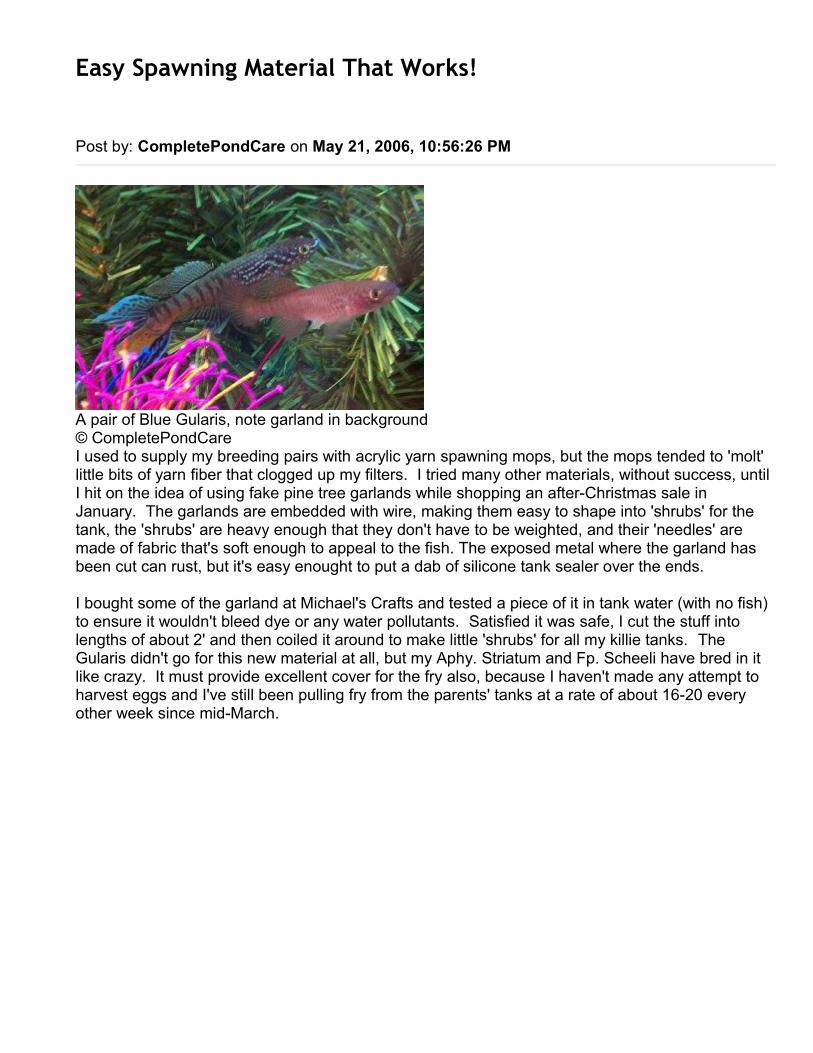
A pair of Blue Gularis, note garland in background© CompletePondCareI used to supply my breeding pairs with acrylic yarn spawning mops, but the mops tended to 'molt' little bits of yarn fiber that clogged up my filters. I tried many other materials, without success, until I hit on the idea of using fake pine tree garlands while shopping an after-Christmas sale in January. The garlands are embedded with wire, making them easy to shape into 'shrubs' for the tank, the 'shrubs' are heavy enough that they don't have to be weighted, and their 'needles' are made of fabric that's soft enough to appeal to the fish. The exposed metal where the garland has been cut can rust, but it's easy enought to put a dab of silicone tank sealer over the ends.
I bought some of the garland at Michael's Crafts and tested a piece of it in tank water (with no fish) to ensure it wouldn't bleed dye or any water pollutants. Satisfied it was safe, I cut the stuff into lengths of about 2' and then coiled it around to make little 'shrubs' for all my killie tanks. The Gularis didn't go for this new material at all, but my Aphy. Striatum and Fp. Scheeli have bred in it like crazy. It must provide excellent cover for the fry also, because I haven't made any attempt to harvest eggs and I've still been pulling fry from the parents' tanks at a rate of about 16-20 every other week since mid-March.

Easy Sand Washing Method
By Lori
Easy Sand Washing Equipment © LoriEveryone seems to like the look of a tank with a nice sandy substrate. Unfortunately, sand is much harder to clean than the typical gravel that can be thrown into a colander. Here's an easy method to clean that sand with minimal effort. If you have several tanks, this will really be helpful. First, you need a drill. Any type, electric or battery operated, will do. Now you need to run to your nearest hardware store and buy a $5 paint mixer. Use whatever clean container or bucket you would normally use for cleaning your sand. Attach the paint mixer attachment to the drill, pour your sand into a 5 gal bucket or larger and add dechlorinated water. I personally prefer to use several 5 gal. buckets, then I add about 10 lbs. of sand per bucket. Pour the water into each bucket, and then use the paint mixer to mix the sand with the water. I line my buckets up in a row and mix each one down the line. By the time I get to the last one, the first has already settled and is ready for you to pour off the water. I go back down the line pouring off the old water and adding the next rinse. Repeat the procedure down the line. It only takes 2-3 washings, and with the paint mixer it takes about 2 minutes of effortless mixing to do the job. I then pour the water into my outdoor plants to help add to the existing soil as the sand helps with drainage that you want around the roots. The result, clean, dust free sand, cleaned with minimal effort. It's so much easier than diving in up to your elbows and trying to mix the sand by hand. So many of our prized bottom dwellers prefer a sandy substrate. Don't let the initial cleaning effort sway you into going with gravel. Sand looks and feels better to your precious catfish and substrate diggers. Personally, I think this is much easier than dumping in and mixing gravel in a collander, but if that's your preferred substrate, I'm sure this method could work just as easily with gravel as with sand. Happy cleaning, Petfishers!

Making Your Own Tank Covers
By Clint Norwood I needed several tank covers for my aquariums that house Killifish. Killies are especially prone to jumping out of the tank, but they are also fond of cooler water than other tropical fish. So a glass cover wouldn't do, it traps heat. I needed to come up with something better. Reptile screen covers are available but they are quite expensive and they are somewhat cumbersome to lift off for feeding. So after thinking about it a while I came up with a pretty good solution. I gathered up the materials and tools and here is what I did. Tools and Materials:
• Plastic Channeling - Called PVC "Slimline" End Cap at Lowes, comes in 8 foot length $2.00 ea
• Plastic "Hook Rug" mat material from the crafts section at Wally World .76 ea for large size • A marble or nice rock that will be the handle or knob • Hot glue gun and glue • Heavy duty scissors or cutters.
Putting It Together First measure the inside length and width of your tank, this needs to be exact because there is little tolerance for error here. You want it to rest on the small lip of the black rim of the tank. In my case I deducted a quarter inch off the front to back measurment to leave just enough room for an airline in the back. Next cut 2 pieces the length back to front and 2 pieces the length side to side. These ends will nest together really well when the corners are pushed together so the measurments need not compensate for the width of the channeling. Now cut the plastic mesh "mat" to the exact measurment of the inside of the tank.
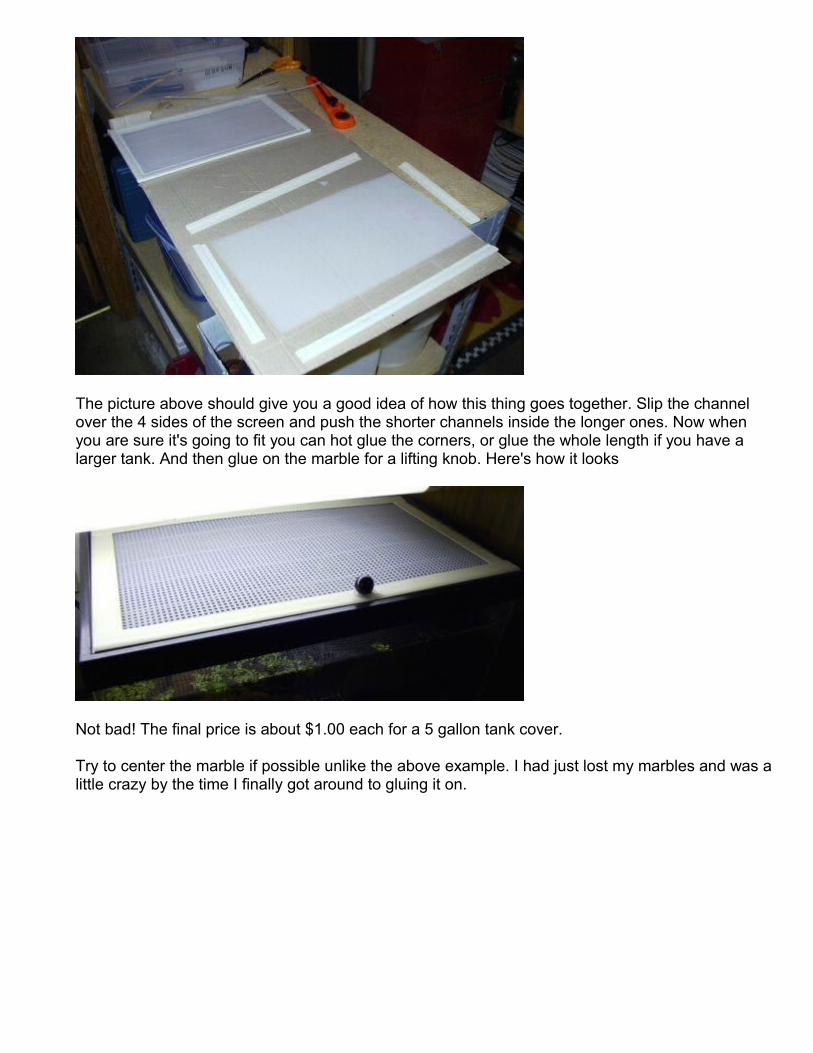
The picture above should give you a good idea of how this thing goes together. Slip the channel over the 4 sides of the screen and push the shorter channels inside the longer ones. Now when you are sure it's going to fit you can hot glue the corners, or glue the whole length if you have a larger tank. And then glue on the marble for a lifting knob. Here's how it looks
Not bad! The final price is about $1.00 each for a 5 gallon tank cover. Try to center the marble if possible unlike the above example. I had just lost my marbles and was a little crazy by the time I finally got around to gluing it on.
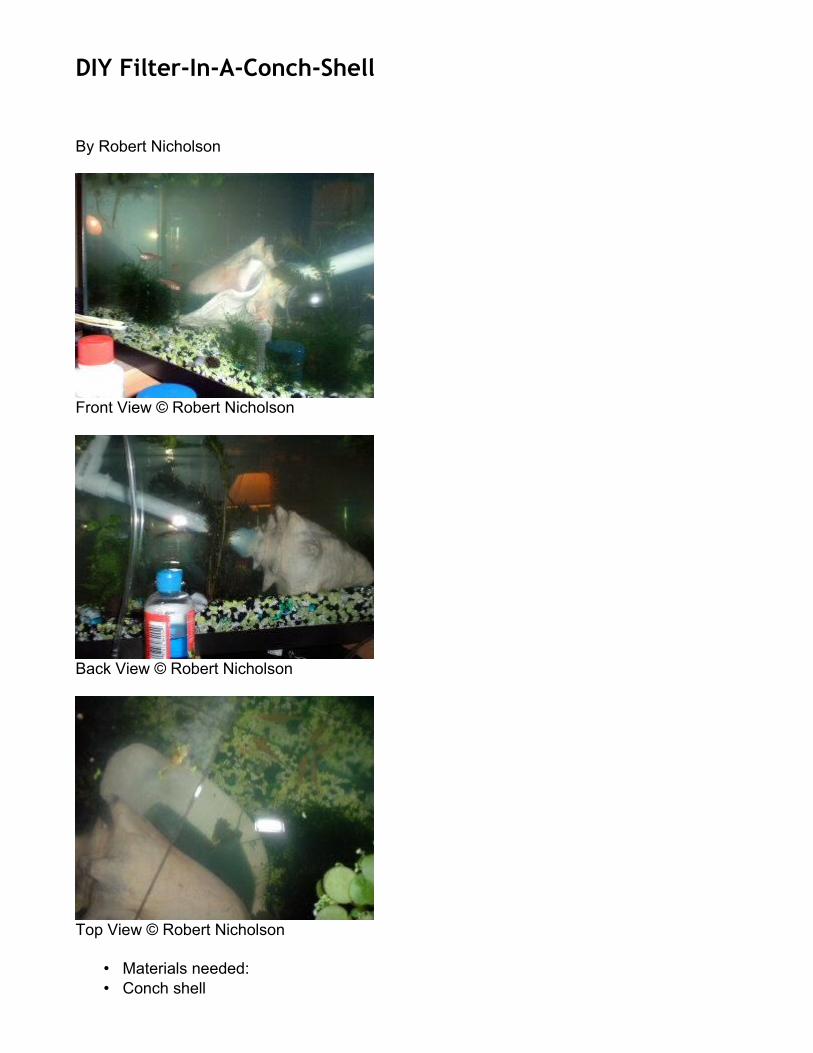
DIY Filter-In-A-Conch-Shell
By Robert Nicholson
Front View © Robert Nicholson
Back View © Robert Nicholson
Top View © Robert Nicholson
• Materials needed: • Conch shell
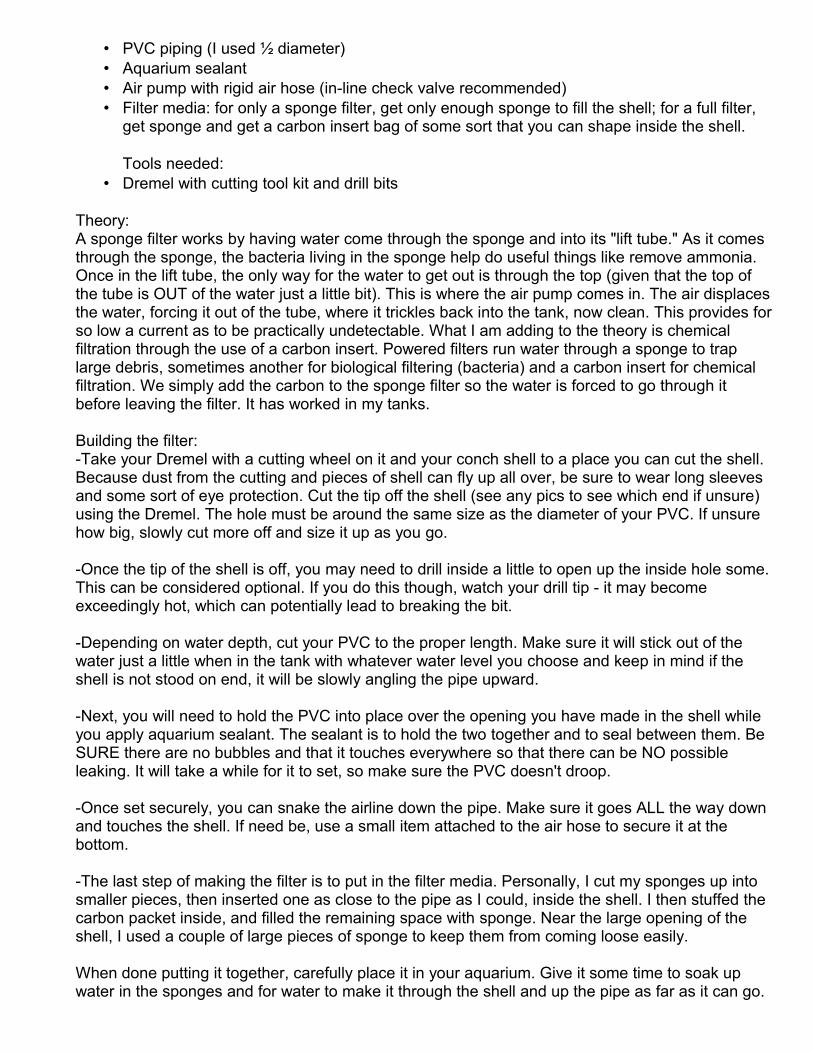
• PVC piping (I used ½ diameter) • Aquarium sealant • Air pump with rigid air hose (in-line check valve recommended) • Filter media: for only a sponge filter, get only enough sponge to fill the shell; for a full filter,
get sponge and get a carbon insert bag of some sort that you can shape inside the shell.
Tools needed: • Dremel with cutting tool kit and drill bits
Theory: A sponge filter works by having water come through the sponge and into its "lift tube." As it comes through the sponge, the bacteria living in the sponge help do useful things like remove ammonia. Once in the lift tube, the only way for the water to get out is through the top (given that the top of the tube is OUT of the water just a little bit). This is where the air pump comes in. The air displaces the water, forcing it out of the tube, where it trickles back into the tank, now clean. This provides for so low a current as to be practically undetectable. What I am adding to the theory is chemical filtration through the use of a carbon insert. Powered filters run water through a sponge to trap large debris, sometimes another for biological filtering (bacteria) and a carbon insert for chemical filtration. We simply add the carbon to the sponge filter so the water is forced to go through it before leaving the filter. It has worked in my tanks. Building the filter:-Take your Dremel with a cutting wheel on it and your conch shell to a place you can cut the shell. Because dust from the cutting and pieces of shell can fly up all over, be sure to wear long sleeves and some sort of eye protection. Cut the tip off the shell (see any pics to see which end if unsure) using the Dremel. The hole must be around the same size as the diameter of your PVC. If unsure how big, slowly cut more off and size it up as you go. -Once the tip of the shell is off, you may need to drill inside a little to open up the inside hole some. This can be considered optional. If you do this though, watch your drill tip - it may become exceedingly hot, which can potentially lead to breaking the bit. -Depending on water depth, cut your PVC to the proper length. Make sure it will stick out of the water just a little when in the tank with whatever water level you choose and keep in mind if the shell is not stood on end, it will be slowly angling the pipe upward. -Next, you will need to hold the PVC into place over the opening you have made in the shell while you apply aquarium sealant. The sealant is to hold the two together and to seal between them. Be SURE there are no bubbles and that it touches everywhere so that there can be NO possible leaking. It will take a while for it to set, so make sure the PVC doesn't droop. -Once set securely, you can snake the airline down the pipe. Make sure it goes ALL the way down and touches the shell. If need be, use a small item attached to the air hose to secure it at the bottom. -The last step of making the filter is to put in the filter media. Personally, I cut my sponges up into smaller pieces, then inserted one as close to the pipe as I could, inside the shell. I then stuffed the carbon packet inside, and filled the remaining space with sponge. Near the large opening of the shell, I used a couple of large pieces of sponge to keep them from coming loose easily. When done putting it together, carefully place it in your aquarium. Give it some time to soak up water in the sponges and for water to make it through the shell and up the pipe as far as it can go.

Once that is done, plug in the air pump. If done properly, water should come out of the tip of the PVC. Given time, it will develop bacteria in the sponges and begin to really filter your water. I found out my carbon was working when I treated some guppies with medication that turned the water blue. It said carbon inserts would remove the color and lo and behold, a day later I had clear water again. My pictures should show the completed product from two sides and also the sponge sticking out of the shell just a little.
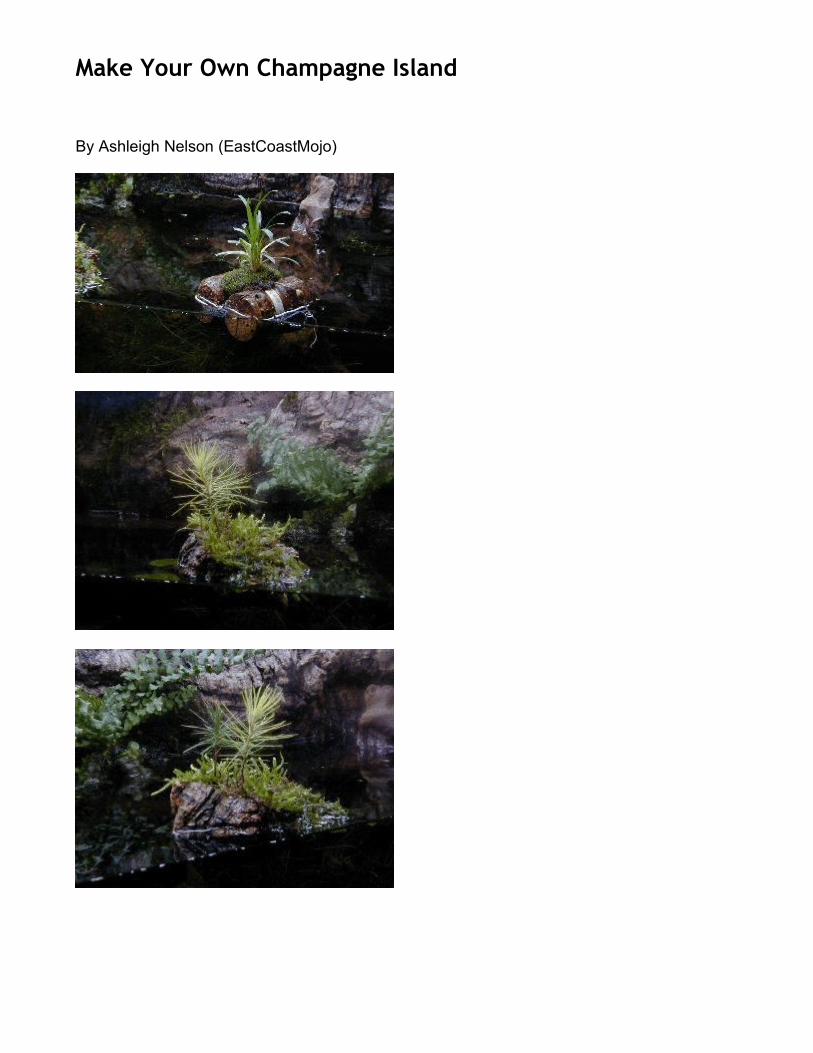
Make Your Own Champagne Island
By Ashleigh Nelson (EastCoastMojo)
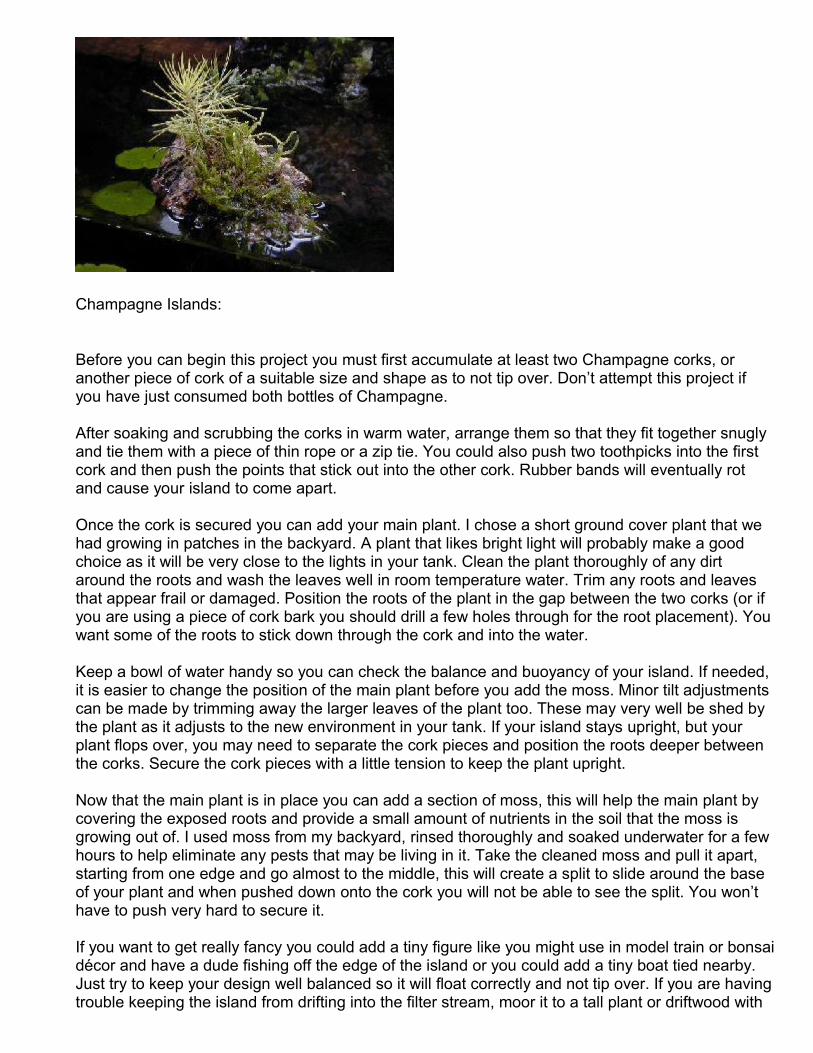
Champagne Islands:
Before you can begin this project you must first accumulate at least two Champagne corks, or another piece of cork of a suitable size and shape as to not tip over. Don’t attempt this project if you have just consumed both bottles of Champagne. After soaking and scrubbing the corks in warm water, arrange them so that they fit together snugly and tie them with a piece of thin rope or a zip tie. You could also push two toothpicks into the first cork and then push the points that stick out into the other cork. Rubber bands will eventually rot and cause your island to come apart. Once the cork is secured you can add your main plant. I chose a short ground cover plant that we had growing in patches in the backyard. A plant that likes bright light will probably make a good choice as it will be very close to the lights in your tank. Clean the plant thoroughly of any dirt around the roots and wash the leaves well in room temperature water. Trim any roots and leaves that appear frail or damaged. Position the roots of the plant in the gap between the two corks (or if you are using a piece of cork bark you should drill a few holes through for the root placement). You want some of the roots to stick down through the cork and into the water. Keep a bowl of water handy so you can check the balance and buoyancy of your island. If needed, it is easier to change the position of the main plant before you add the moss. Minor tilt adjustments can be made by trimming away the larger leaves of the plant too. These may very well be shed by the plant as it adjusts to the new environment in your tank. If your island stays upright, but your plant flops over, you may need to separate the cork pieces and position the roots deeper between the corks. Secure the cork pieces with a little tension to keep the plant upright. Now that the main plant is in place you can add a section of moss, this will help the main plant by covering the exposed roots and provide a small amount of nutrients in the soil that the moss is growing out of. I used moss from my backyard, rinsed thoroughly and soaked underwater for a few hours to help eliminate any pests that may be living in it. Take the cleaned moss and pull it apart, starting from one edge and go almost to the middle, this will create a split to slide around the base of your plant and when pushed down onto the cork you will not be able to see the split. You won’t have to push very hard to secure it. If you want to get really fancy you could add a tiny figure like you might use in model train or bonsai décor and have a dude fishing off the edge of the island or you could add a tiny boat tied nearby. Just try to keep your design well balanced so it will float correctly and not tip over. If you are having trouble keeping the island from drifting into the filter stream, moor it to a tall plant or driftwood with

black thread or fine fishing line. Enjoy!
Diy Sump
By SerVo Theory behind the sump:Sumps add more water and surface the the biological system. A 55 gallon aquarium with a 10 gallon sump has the water stability of a 60-65 gallon aquarium. Sumps can also be "bio-active" meaning they house benifical plants. In a saltwater system, red mangroves or macro remove nitrates and other nucience chemicals. Sumps also provide housing for unsightly equipment you may not want hanging on the back of your tank.
The benefit for building your own can easily be seen. A typical sump system runs easily $200. You can make one just as good if not better for $50. If you still wanted to spend the $200, then you could make yourself a really really good sump system. Materials: Cost:
Pvc pipe, 1/2" or 3/4" works nicely, about 3 feet Under $2
Pvc 90* elbows, size matching your pipe, about 10 About $0.20 apiece
Flexable tubing, size to fit into or onto the pvc pipe, 8-10' About $0.30 a foot
2 specimen containers (picture below), lee brand Around $6
Pump or powerhead, 200gph+ Around $20 for (200gph)
Tank, 10gallon plus reccommended $10 for a 10 gal. tank
Suction cups, like from wally-world $1.50
Glue like calk or super glue $1 (super glue)
Total About $50
Tools:Soldiering iron or plastic cutting device (blowtorch works too)Utility knifeHack saw
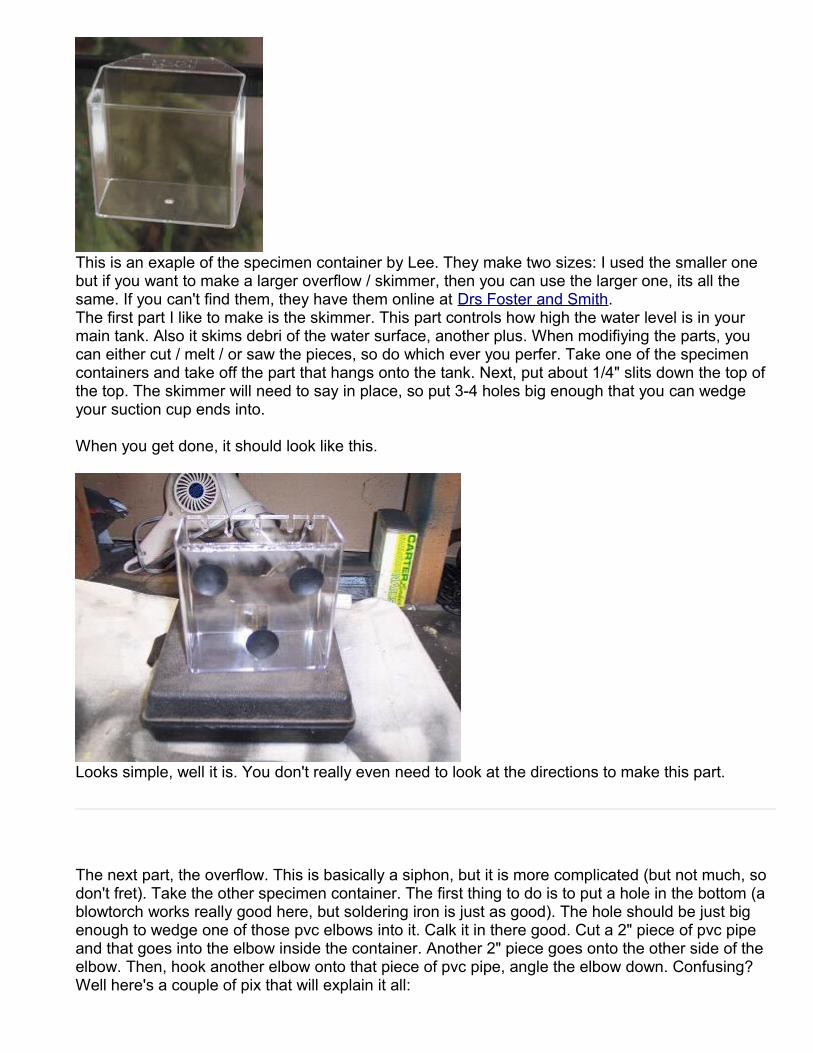
This is an exaple of the specimen container by Lee. They make two sizes: I used the smaller one but if you want to make a larger overflow / skimmer, then you can use the larger one, its all the same. If you can't find them, they have them online at Drs Foster and Smith. The first part I like to make is the skimmer. This part controls how high the water level is in your main tank. Also it skims debri of the water surface, another plus. When modifiying the parts, you can either cut / melt / or saw the pieces, so do which ever you perfer. Take one of the specimen containers and take off the part that hangs onto the tank. Next, put about 1/4" slits down the top of the top. The skimmer will need to say in place, so put 3-4 holes big enough that you can wedge your suction cup ends into. When you get done, it should look like this.
Looks simple, well it is. You don't really even need to look at the directions to make this part.
The next part, the overflow. This is basically a siphon, but it is more complicated (but not much, so don't fret). Take the other specimen container. The first thing to do is to put a hole in the bottom (a blowtorch works really good here, but soldering iron is just as good). The hole should be just big enough to wedge one of those pvc elbows into it. Calk it in there good. Cut a 2" piece of pvc pipe and that goes into the elbow inside the container. Another 2" piece goes onto the other side of the elbow. Then, hook another elbow onto that piece of pvc pipe, angle the elbow down. Confusing? Well here's a couple of pix that will explain it all:

If you want to make a more powerful skimmer, you can make another one or two of these.
Trust me, the hard part of making the sump is over, but still only half done. The part that actually siphons needs to be built. This part takes water form the skimmer and puts it into the overflow. To start, cut out 2 pieces of 4" pvc pipe and a piece of 2" pvc pipe. Put an elbow on each piece of 4" pvc pipe and connect the two by the 2" pvc pipe. Need a pic, why not:
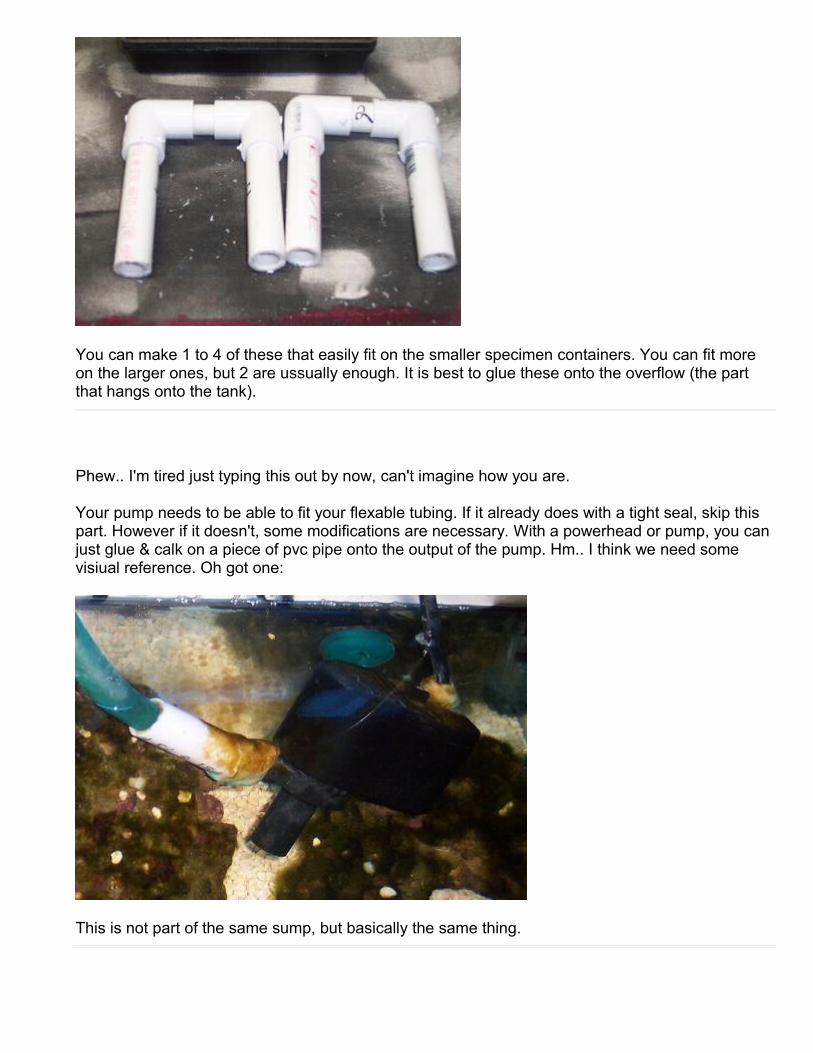
You can make 1 to 4 of these that easily fit on the smaller specimen containers. You can fit more on the larger ones, but 2 are ussually enough. It is best to glue these onto the overflow (the part that hangs onto the tank).
Phew.. I'm tired just typing this out by now, can't imagine how you are. Your pump needs to be able to fit your flexable tubing. If it already does with a tight seal, skip this part. However if it doesn't, some modifications are necessary. With a powerhead or pump, you can just glue & calk on a piece of pvc pipe onto the output of the pump. Hm.. I think we need some visiual reference. Oh got one:
This is not part of the same sump, but basically the same thing.
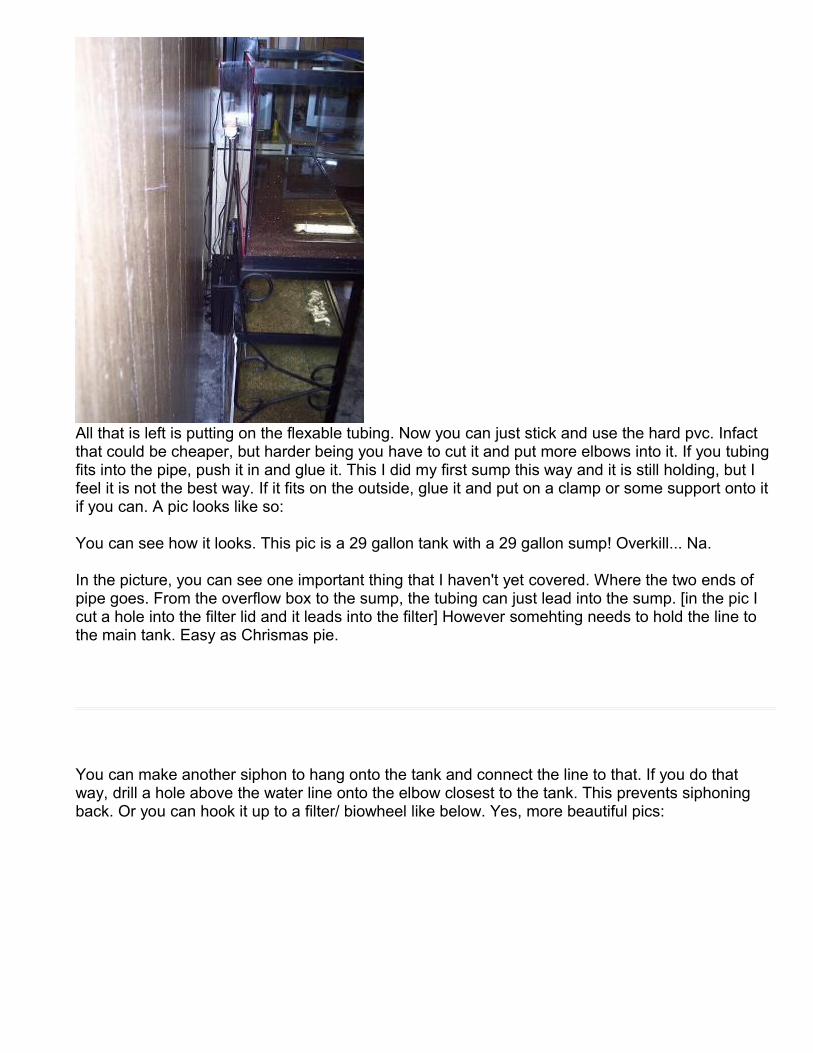
All that is left is putting on the flexable tubing. Now you can just stick and use the hard pvc. Infact that could be cheaper, but harder being you have to cut it and put more elbows into it. If you tubing fits into the pipe, push it in and glue it. This I did my first sump this way and it is still holding, but I feel it is not the best way. If it fits on the outside, glue it and put on a clamp or some support onto it if you can. A pic looks like so: You can see how it looks. This pic is a 29 gallon tank with a 29 gallon sump! Overkill... Na. In the picture, you can see one important thing that I haven't yet covered. Where the two ends of pipe goes. From the overflow box to the sump, the tubing can just lead into the sump. [in the pic I cut a hole into the filter lid and it leads into the filter] However somehting needs to hold the line to the main tank. Easy as Chrismas pie.
You can make another siphon to hang onto the tank and connect the line to that. If you do that way, drill a hole above the water line onto the elbow closest to the tank. This prevents siphoning back. Or you can hook it up to a filter/ biowheel like below. Yes, more beautiful pics:
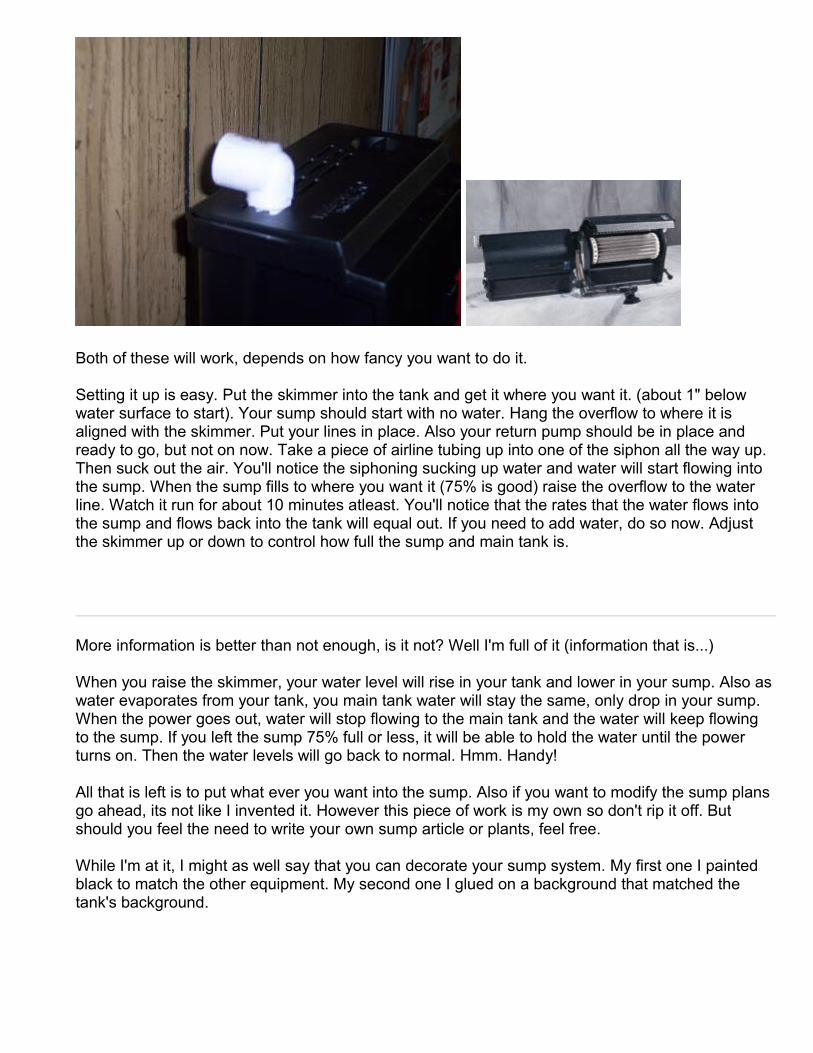
Both of these will work, depends on how fancy you want to do it. Setting it up is easy. Put the skimmer into the tank and get it where you want it. (about 1" below water surface to start). Your sump should start with no water. Hang the overflow to where it is aligned with the skimmer. Put your lines in place. Also your return pump should be in place and ready to go, but not on now. Take a piece of airline tubing up into one of the siphon all the way up. Then suck out the air. You'll notice the siphoning sucking up water and water will start flowing into the sump. When the sump fills to where you want it (75% is good) raise the overflow to the water line. Watch it run for about 10 minutes atleast. You'll notice that the rates that the water flows into the sump and flows back into the tank will equal out. If you need to add water, do so now. Adjust the skimmer up or down to control how full the sump and main tank is.
More information is better than not enough, is it not? Well I'm full of it (information that is...) When you raise the skimmer, your water level will rise in your tank and lower in your sump. Also as water evaporates from your tank, you main tank water will stay the same, only drop in your sump.When the power goes out, water will stop flowing to the main tank and the water will keep flowing to the sump. If you left the sump 75% full or less, it will be able to hold the water until the power turns on. Then the water levels will go back to normal. Hmm. Handy!
All that is left is to put what ever you want into the sump. Also if you want to modify the sump plans go ahead, its not like I invented it. However this piece of work is my own so don't rip it off. But should you feel the need to write your own sump article or plants, feel free. While I'm at it, I might as well say that you can decorate your sump system. My first one I painted black to match the other equipment. My second one I glued on a background that matched the tank's background.

Article created by SerVoHere is my Email Link! Email me if you feel like it. I would especially like pics of your completed sump system.The bio wheel 660 and Lee Specimen Container pix are from www.drsfostersmith.com's web site, but also belong to the company and are not my own works. All other pictures are my own and free to all [Ha, now they can't sue me for piracy of copyrighted pics.]
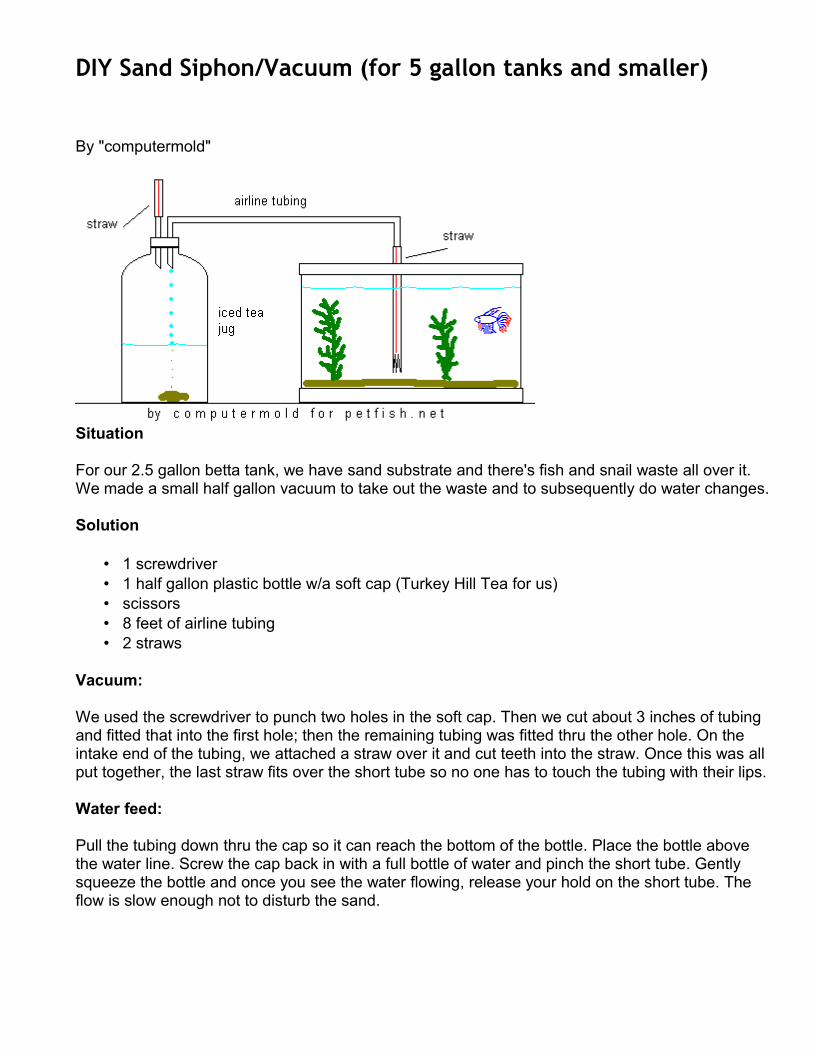
DIY Sand Siphon/Vacuum (for 5 gallon tanks and smaller)
By "computermold"
Situation For our 2.5 gallon betta tank, we have sand substrate and there's fish and snail waste all over it. We made a small half gallon vacuum to take out the waste and to subsequently do water changes. Solution
• 1 screwdriver • 1 half gallon plastic bottle w/a soft cap (Turkey Hill Tea for us) • scissors • 8 feet of airline tubing • 2 straws
Vacuum: We used the screwdriver to punch two holes in the soft cap. Then we cut about 3 inches of tubing and fitted that into the first hole; then the remaining tubing was fitted thru the other hole. On the intake end of the tubing, we attached a straw over it and cut teeth into the straw. Once this was all put together, the last straw fits over the short tube so no one has to touch the tubing with their lips. Water feed: Pull the tubing down thru the cap so it can reach the bottom of the bottle. Place the bottle above the water line. Screw the cap back in with a full bottle of water and pinch the short tube. Gently squeeze the bottle and once you see the water flowing, release your hold on the short tube. The flow is slow enough not to disturb the sand.

A Homemade Filter For Tiny Tanks
Written By: Matt Lichter This is a small zeolite filter I've used in tiny, temporary tanks. Right now I'm using it in a 2 gallon tadpole tank, stocked with a few tiny tads. I wanted some type of filtration, but didn't have the time or energy to go through the cycling process before introducing the tads. I figured I would just use zeolite, since for the short term that seemed easiest to me. Since it was such a tiny tank, I was also looking for something cheap -i.e. DIY. 1. Find a small plastic container such as a film canister, prescription container, empty fish-food container, or any other small plastic container that isn't contaminated with detergents or other harmful substances (i.e. no shampoo bottles). Rinse well with tap water. (Film canisters may contain trace heavy metals, so add some tap water conditioner in the rinse, one that says "detoxifies heavy metals".) 2. Find about 3 to 6 inches of 1/2-inch tubing. This could be from the pet store or polyethylene tubing from the hardware store. Cut a notch the bottom end (see figure), or cut it at an angle. This ensures good water flow. 3. Cut a hole slightly smaller than 1/2 inch in the lid so that the 1/2-inch tubing makes a snug fit. Put the lid on the container and push the 1/2-inch tube all the way down to the bottom of the container. With a heated nail or a drill, make a bunch of small holes in the remaining area of the lid. 4. With a heated screwdriver or a drill, make a hole in the side of the 1/2-inch tubing for the airline tubing to fit. Again, the hole should be slightly undersized for a tight fit. It would probably help to make the hole at an angle, since the airline will be coming in at an angle. Also, when making the hole, it is good to leave yourself some room (1/2 inch) between the top of the lid and the bottom of the hole. This will make the canister easier to fill with media later on. 5. Press the airline tubing into the new hole, and push it about halfway down into the canister. You don't want air bubbles to find themselves going back through the media the wrong way.

6. Now, unsnap the lid and swivel it out of the way, as you keep the 1/2-inch tubing all the way down to the bottom. Fill the rest of the container with zeolite or the media of your choice. You should be able to get a few tablespoons of media into a film canister. Carefully snap the lid back on and hook the airline tubing to a small air pump. The whole thing costs practically nothing beyond the media and the air pump. If you have a few tanks you probably already have all the materials laying around. This article including the picture are © Matt Lichter

DIY Diffusion Bell
By cROwNtaiL
Here is a step by step pictorial guide on how to make your own CO2 Diffusion Bell
Getting your materials together. You'll need a small bottle, air hose, suction cup and a check valve.
Cut a piece of the bottom of the bottle off. This will be your "bell."

Next, cut an X in the side towards the top of the bell. Make sure to keep the cuts small enough so that the hose will fit snug. Fold back the cut areas and slide in your hose.
Do the same for your suction cup but in a lower area of the bell and in whichever side is most convenient to hang in your tank. FYI (for your information) most fish/pet retailers sell bags of suction cups that you can buy. If you can't find them there try a craft store like Michaels or A.C. Moore.
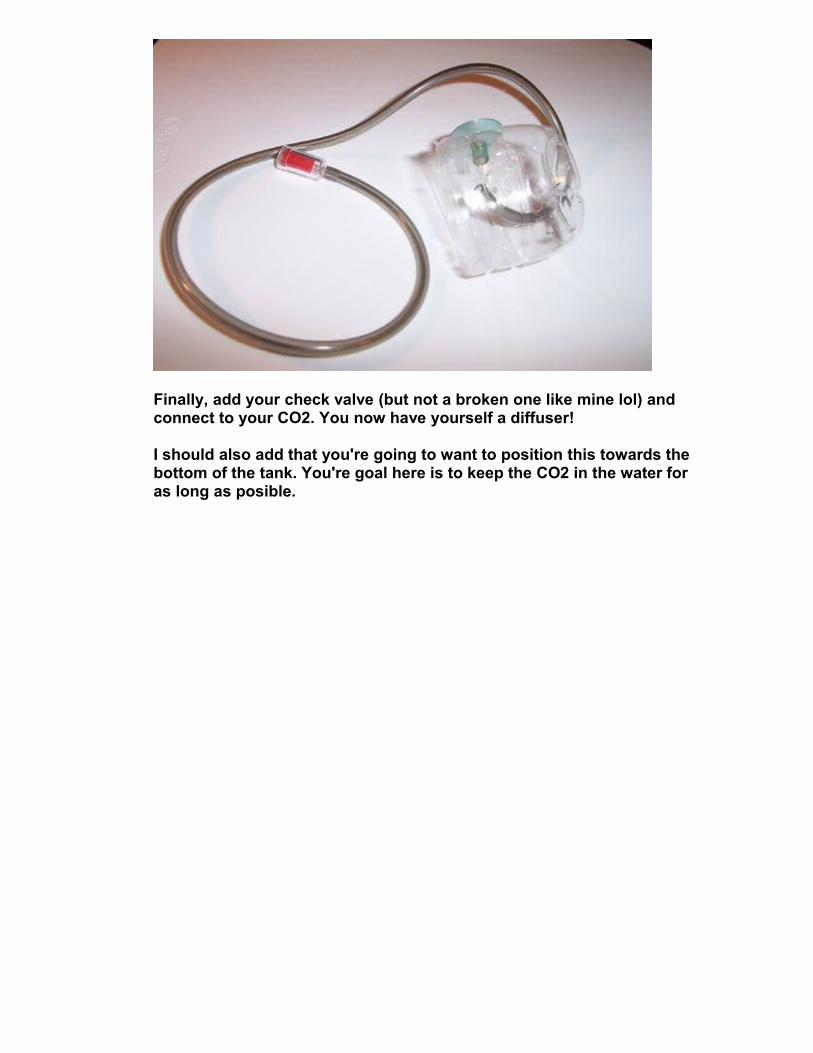
Finally, add your check valve (but not a broken one like mine lol) and connect to your CO2. You now have yourself a diffuser! I should also add that you're going to want to position this towards the bottom of the tank. You're goal here is to keep the CO2 in the water for as long as posible.

DIY Coconut Caves
Close Up of the Coconut Cave © schfiftyfive12345
By schfiftyfive12345 I have been told that coconut caves are the greatest, and I was in desperate need for some cheap caves for my kribs. So I went to the grocery store, and bought 1 coconut for 1.50$.With this coconut I was able to make 2 caves out of it. First I poked a hole in the top using a hammer and nail then drained out the coconut milk (into the sink or a glass if you want to drink it) then I cut it in half. My store sells the coconuts scored (cut almost in half) so I got a hammer and carfully tapped/hit the coconut until the score cracked then I pulled it apart, hammering as needed. Once I got the coconut in 2 pieces I then took out the meat. You can do this with a spoon and keep it if you want to eat it. I then used a hammer and a wrench to "bash" out a cave entrance. It was very challenging not to make the cave entrance way huge. So I did it very slowly. Once I did this I boiled the coconuts for 15 minutes then changed the water, because it was brown. Then I boiled it for 30 minutes and changed the water. Then another 30 minutes changed the water then I boiled it for an hour then changed the water. Then I put them in the tank. I boiled them so much because they can leach tannin into your water and turn your water brown. This tannin may not come out for a while so dont be scared if your water turns brown a little bit after you put the cave in (my water did not turn brown because of the time I boiled it.) I'm very impressed at how natural they look. It is okay to leave all the little "hairs" on the coconut on or off in your tank. I took the hairs of one and left them on another. I like the caves better with the hairs, it looks so natural. Also if you have snails, plecos, cories. they love to suck on the inside shell of the coconut.
Coconut Caves in the Aquarium © schfiftyfive12345

DIY CO2 Generator - Easy Setup
By: Manic Bang
Illustration © Manic Bang
Illustration © Manic BangI used the soda bottle method, and in 1 week, it used to stop producing CO2. I suspected lack of airtight seal was causing this. I have found a better method - with 2 cups sugar and 2 liter water and 1/2 tsp yeast, it consistently makes CO2 for 3-4 weeks. What I use is a Heinz Ketchup bottle (64 oz). It already comes with a hole in the top (ketchup nozzle). I found that the front part of a BIC ball pen fits very snugly in the ketchup top (see

pictures), and as the front of ball pen is conical, you can get a very tight fit using airline tubing. This method has really worked great for me, and has been the best DIY CO2 generator I have been able to come up with (believe me, I have tried a lot of methods, soda bottle, Apple juice bottles, glass bottles). Also, please clean your bottles thoroughly before adding the next charge of sugar solution and yeast (yeast and lactobacillI bacteria are found in air, and presence of bacteria undermines the ability of the yeast).

Filter Currents: A Betta's Worst Nightmare
By Eric Smith
Many people need some way to slow down the current of a filter, whether because their fish are being thrown around in it or because their betta, a species notorious for their hatred of water currents, despised it. I have had the same problem, and designed a system to help alleviate it. Stopping the Spectre
The vast majority of filters sold in the US are of the Hang-on-Back type. These typically have a 'waterfall-outlet,' where the water falls down out of the filter into the tank. The obvious problem is that as the water falls from the outlet, it accelerates under the force of gravity until it reaches the waterline, then creating a strong current.
The secret to stopping the current is to simply obstruct it. The most efficient way to do this is to use the body of a half-liter soda bottle. I will now describe how to construct the device.
Step 1: Start the incision...
You must first cut the soda bottle appropriately to prepare it for mounting. On the right, you will see a diagram for the first cuts, labelled "Cut 1." You must remove the two ends of the bottle, leaving only a smooth cylinder from the center of the bottle. Next, you need to tear off the label and cut the cylinder along its length, right next to the strip of glue, as shown in diagram "Cut2." You should now have a simple sheet of curled-up plastic.
Step 2: Duct Tape and BubbleGum

This step is very simple: simply tape one end of your plastic sheet - the end with the glue on it - to the top of the filter, and bring the other end around under the outflow, as pictured at left. (I outlined the edge of the sheet so you can tell where it goes) Then you're done, go play in traffic or something.
On my ten gallon tank and it works perfectly. I set it up so the water streams are deflected out the sides of the plastic. Amazingly simple, yet it works.

DIY Sponge Filter in a Coconut
By: David Hynds
Detail © David Hynds
Tired of that ugly sponge filter in your otherwise gorgeous aquarium? Here is an easy DIY project that will conceal the filter and enhance the aesthetics of your tank. Sponge filters are popular for small tanks like hospitals or breeding tanks. They also work great for fish which prefer the surface of the water to be calm. Beneficial bacteria grow on the sponge and clean the water. The problem is that sponge filters are almost always bulky and ugly. A coconut shell is perfect for adding to the atmosphere of your tank while hiding that awkward, unsightly sponge in the corner. For this project you will need: 1 coconut, a hammer, a drill, an ice-cream scoop or sturdy knife, a deep pot to boil water in, 6” length of 3/4” plastic tubing, a cap for one end of the 3/4” tubing, 4-6’ air line tubing and an air pump, a nail, aquarium-safe silicone, and an open-pore sponge. First, buy a coconut. The ones available at the grocery story are often scored, so they crack open easily. Find one of these, if possible. On the top of the coconut, you will find three indentations where the coconut was attached to the tree. Poke or drill through the largest of the three holes, and drain the milk. Using a hammer, crack the coconut in half. Don’t be too zealous in your hammering. You just want to crack it in half along the score marks, not obliterate the shell. It usually works best if you just tap it gently until it cracks enough that you can pull it apart with your hands. Scoop out the meat. An ice-cream scoop usually works best. A knife with a thick, short blade also works well. You want to get between the meat and the shell, and pop the meat out. Boil the top half of the coconut to kill anything potentially harmful and to keep it from leaching much tannin. Boil it for 15 minutes, empty the water and refill it. Do this again twice for 30 minutes and then again for an hour. The coconut may turn your water a little brown when first introduced to the tank. The tannins it leaches are mildly acidic and may affect the pH slightly.

While your coconut dries, heat the nail, and use it to poke holes in the bottom inch 3/4" outlet tube. Next, glue the air line tubing to the inside of the outlet tube. You want the end of the air line tubing to be just slightly above the holes you poked with the nail. Next, cap off bottom end of the outlet tube. Take your sponge and cut a 1" deep hole down into it. It needs to be deep enough to cover all of the holes in the outlet tube. Insert the bottom of the outlet tube into the sponge. Use a drill to enlarge the hole you made to drain the milk. Make the hole big enough for your outlet tube to fit snugly inside. Put the air line and outlet tube through the hole, so that they are sticking up out of the top of the coconut. Put the coconut into your tank, hook up the other end of the air line to the pump, and turn it on. The coconut should be heavy enough to make the whole apparatus sink. If not, simply glue a few rocks or marbles to the inside of the coconut until it sinks. This project is easy and inexpensive. The coconut will really enhance the appearance of any tank. You can even use the other half of the coconut to make a cave. Your fish will love it, and so will you.

Colanders As Fry Hatcheries
By: Stephen Kotowych I just wanted to suggest an entry for Tips and Tricks that I recently found out about and that I can't believe I didn't think of first (always being on the hunt for cheap alternatives in fish keeping): Using plastic spaghetti/pasta strainers (colanders) as fry hatcheries! I was blown away by the simplicity of this idea, and amazed at how well it works! When you think about it, that's what most fry hatcheries are really - glorified buckets (or boxes) with tiny holes in the bottom ;) As long as you don't mind not being able to see through the sides of the hatchery very well, and don't mind the fry dropping right into the tank, this is an ingenious idea! Available at any dollar store, strainers come in all shapes and sizes. I recommend a bowl-shaped strainer, scaled to the size of your tank, with a not-too-steep angle for the sides (more bowl shaped and less cone shaped, providing more room for the mother). Also, I think round-holed strainers are preferable - less sharp edges to scrape against for the fry. Just be sure to get a strainer with holes large enough for fry to fall/swim through, and be sure that you get one that has somewhere on the upper ring that can trap and contain air like a buoy or float so that the strainer won't sink. It works great for guppy fry, and I'm sure it will do well for mollies/other livebearers too!Now just don't confuse it with the one from last night's pasta... By: Stephen Kotowych

Cichlid Condo Tower
By Aiptasia "I had difficulty trying to find the right kind of cave structure for my 175 gallon African cichlid tank. I wanted some caves for them to hide in without adding any appreciable weight to the tank, and I had a length/width limitation due to the tank being box framed at the top (it only has three 17"Lx13"w openings at the top). This meant whatever I got would have to fit through those lid holes and still be large enough to accommodate a home for Africans. I didn't relish the idea of building a structure out of rocks or slate inside the tank because of the weight and space issues, so I decided to go with fired clay strawberry pots! Fired unglazed clay pots are chemically inert and wont affect the water quality of any tank. Strawberry pots have multiple openings for fish to swim inside and out of. They're lightweight and come in various sizes. I managed to track down two different sized ones in just under ten minutes at a nursery near me. The first thing I did was soak each strawberry pot in a bleach water solution (15 parts water, 1 part bleach) in 10 gallon plastic buckets overnight. Each strawberry pot had been exposed to the elements and had some dirt and gunge on them, and I didn't want any of that to hurt anything in the tank. I used a toilet brush to scrub each pot down inside and out after an hour of soaking, then let them sit overnight in the bleach water. Each came pretty clean. Then I rinsed them off with fresh tap water and allowed each one to thoroughly dry out for two days. This is important, as clay is semi-porous and you want all of the bleach neutralized. Best way to do that is to rinse it in clean water and dry them out. Next, I went around the house and found any object I had lying around doing nothing that would fit over the 3" holes in the sides of the strawberry pot, and be small enough to fit inside the large mouth at the top. I found some old leftover PVC pipe, PVC elbows, an old chipped coffee mug and an old plastic margarine container. Each one of these items was deep enough to create a "cave" in each hole from 4" to 12" deep inside the pot. I capped off the PVC with threaded screw caps glued into place with cyanoacrylate (crazy glue) and let them dry. Then, I got a couple of tubes of reef tank safe underwater epoxy. It's a two part putty which you knead like clay, and it cures and hardens in under an hour. Each cave item was fairly lightweight (except the coffeecup) and the epoxy starts to harden in under five minutes, so I had all of the caves securely created inside the pot in under 20 minutes. I let the epoxy harden completely overnight just to be sure. Now, I left some of the holes alongside the front of the pot open so that there would still be a central chamber the fish could swim through along the front. At visual level inside of the tank, you can clearly see the "caves" inside the pot (ex: White PVC) from the empty holes along the front, and I decided I didn't like that look. So, I took a few small artificial plants and jammed them into the empty holes along the front, but just in the holes where the plastic and ceramic "caves" were showing through. I think the final result looks great, and my cichlids have a great new condo tower to call home.


Pictures © John Harris

An Easy To Build Aquarium Rack System
By Clint Norwood
Material List:
• 10 - 8 inch by 16 inch cement blocks costs = $15.00 • 7 2x4 wood studs top grade = $28.00 • 1 - sheet of plywood or particle board $25.00 • 1 package of 1/2 inch styrofoam panels (Lowes) $5.00 • Nails and/or screws $4.00 • Total = $73.00
You can eliminate the plywood, thus saving $25.00. This won't weaken the structure too much. But I feel safer with the wood platform. If you modify this plan for tanks larger than 10 gallons I strongly advise using the plywood.
Putting It Together
First you have to figure out where you are going to put your rack. Although this rack is quickly put together and is modular in construction and easy to assemble / dissassemble, you don't want to have to move it after you have the tanks installed.OK so you have that problem solved, you've convinced the rest of the family how easy and cheaply you can build this aquarium rack. And how much simpler it's gonna be since you'll have all your tanks in one small area. Now you can begin the easy constuction.First put together 2 shelf frames as follows:
Notice that the frames dimensions are 15 inches by 93 inches. Although the blocks are sold as 8x16 inches they are actually 7 1/2 by 15 inches. This is done to compensate for the 1/2 inch of mortar that would normally be used on both sides of the blocks.You may notice that the width of this rack will leave an overhang of 5 inches. I usually split the difference with 2.5 inches on the front and 2.5 inches on the back. The use of the styrofoam greatly helps to distribute the weight of the tanks. The overhang isn't a problem at all.The 2x4 frames need to be put together very strong, I advise using screws. The plywood (or particle board) tops can be just laid on top, the weight of the tanks will hold it on quite nicely and it will be easier to remove in case you need to dissasemble the rack later.Now you are almost there, this thing goes together very quickly after you have the frames made. Next step is to place 2 stacks of 2 blocks 93 inches apart in the exact place where your rack is going to stand. I advise not placing it too close to the wall to allow for a little room behind the rack for running airline tubing etc.Next step, place your first frame on top of the blocks, then place the first plywood top on the frame. Stack 3 more blocks on top of each side of the frames, place the other frame on top of those blocks.Almost there!Now break open the styrofoam and cut it to fit the tops of the 2 frames. I strongly advise using the styrofoam panels as they will cushion the tanks and protect the plywood underneath. An added benefit is that the styrofoam will insulte the top rack from any heat generated by the lower level lights.And there you have it. A cheap and efficient rack for 14 or even 15 10 gallon tanks. I prefer to use part of the top rack as a work space. Now that was so cheap to build you can save enough to complete the system.Here's a breakdown of the additional costs of the tanks, lights and filtration.
• 14 - 10 gallon tanks @ 8.50 each = $119.00 • 14 - homemade sponge filters @ approximately $2.00 each = 28.00 • 2 - 6 foot shop lights @ $8.00 each = $16.00 • For total of $163.00 • Plus the cost of the rack @ $73.00 = $236.00
Here's an example of a real rack made this way. This rack is modified from the diagram by being only 60 inches wide and holding only 8 tanks. The covers are made from drop ceiling light panels available from Lowes or Home Depot type stores. As you can see I have modified my rack a bit and added an extra shelf on top for small killifish and live food cultures. Yep, I am pretty cheap. It bugs me to no end that I can't use that hollow space in the lower stacked blocks. Name: kathryn zealandComments: hello,I really like it,just a thought, you could turn the lower stacked blocks on their side, and access the holes from the side of the rack, think of how much space you would gain!

T H E E N D
This ebook and all it's content is copyright PetFish.Net or the respective authors listed.No part of this ebook may be copied without permission from PetFish.Net or the author credited.
However this ebook can be copied in whole and freely distributed as long as it is unaltered in any way. This ebook brought to you by PetFish.Net Visit our Forum to meet the people of Petfish Look for More Free Guides at PetFish.Net


![[Mary Bailey, Gina Sanford] the New Guide to Aquarium Fish](https://img.dokumen.tips/doc/110x75/55cf988c550346d033984594/mary-bailey-gina-sanford-the-new-guide-to-aquarium-fish.jpg)
![Aquarium Plants [A Fishkeepers Guide to] - B. James (1986) WW](https://img.dokumen.tips/doc/110x75/613caaf09cc893456e1e98ad/aquarium-plants-a-fishkeepers-guide-to-b-james-1986-ww.jpg)


