Embed Size (px)
Citation preview

Copyright © 2014, Oracle and/or its affiliates. All rights reserved. 1
Copyright © 2014 Oracle and/or its affiliates. All rights reserved. |
Performing Initial Configuration of OTBI Enterprise for HCM Cloud Service

Copyright © 2014, Oracle and/or its affiliates. All rights reserved.
The goal of this training is to enable implementers to configure and deploy Oracle® Transactional Business Intelligence Enterprise for Human Capital Management Cloud Service. An implementer is responsible for performing the initial setup and configuration of Oracle® Transactional Business Intelligence Enterprise for Human Capital Management Cloud Service. This may be done by the customer or by an implementation partner.
2
Copyright © 2014 Oracle and/or its affiliates. All rights reserved. |
Objectives• After completing this lesson, you should be able to:
– Use Configuration Manager to configure OTBI Enterprise for HCM Cloud Service – Use Functional Setup Manager to perform functional configuration for OTBI
Enterprise for HCM Cloud Service– Describe when to use Configuration Manager versus when to use Functional Setup
Manager
Please note that although the customer has purchased a product named OTBI Enterprise for HCM Cloud Service, for release 11.1.1.8.1, the offering (product) you need to select for implementation and configuration is Oracle Human Resources Analytics.
Copyright © 2014, Oracle and/or its affiliates. All rights reserved. 3
Copyright © 2014 Oracle and/or its affiliates. All rights reserved. |
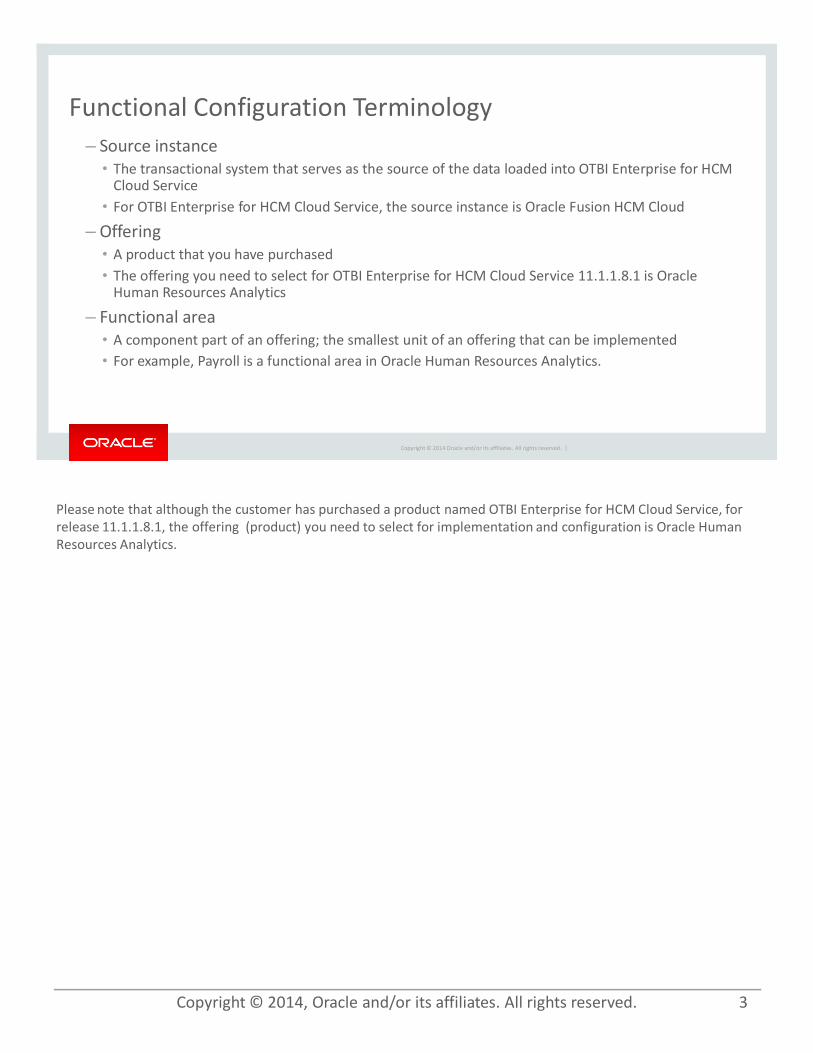
Functional Configuration Terminology– Source instance
• The transactional system that serves as the source of the data loaded into OTBI Enterprise for HCM Cloud Service
• For OTBI Enterprise for HCM Cloud Service, the source instance is Oracle Fusion HCM Cloud
– Offering• A product that you have purchased• The offering you need to select for OTBI Enterprise for HCM Cloud Service 11.1.1.8.1 is Oracle
Human Resources Analytics
– Functional area• A component part of an offering; the smallest unit of an offering that can be implemented• For example, Payroll is a functional area in Oracle Human Resources Analytics.

Copyright © 2014, Oracle and/or its affiliates. All rights reserved. 4
Copyright © 2014 Oracle and/or its affiliates. All rights reserved. |
Functional Configuration• Functional setup of offerings must be performed to ensure the accurate
and successful movement of data from a source database to the target OTBI Enterprise for HCM Cloud Service. – These functional setups, based on either business requirements or on transactional
source system settings or configurations, direct the manner in which relevant data is moved and transformed from the source to the target.
– Additionally, some functional setups control the manner in which data is displayed. – Functional setups are also called functional configurations.

Each of these tools is discussed in detail in the slides that follow. You can learn more detail about load plans in the topic titled "Managing Load Plans."
Copyright © 2014, Oracle and/or its affiliates. All rights reserved. 5
Copyright © 2014 Oracle and/or its affiliates. All rights reserved. |
Functional Configuration Tools– Functional configuration is performed using the following tools:
• Configuration Manager (CM)• Functional Setup Manager (FSM)
– Please note that you cannot perform functional configuration using either tool until you have run a domain-only load plan, which is discussed in detail later in this presentation.

Configuration Manager contains the setup objects for OTBI Enterprise for HCM Cloud Service. It provides administrative graphical user interfaces for setup and configuration. It also provides a quick review of setup values, and is the tool for monitoring and troubleshooting load plan executions. Configuration Manager works in conjunction with Functional Setup Manager to provide guided tasks to configure offerings and functional areas.
Copyright © 2014, Oracle and/or its affiliates. All rights reserved. 6
Copyright © 2014 Oracle and/or its affiliates. All rights reserved. |
Configuration Manager– Configuration Manager is a web application for setting up and maintaining an OTBI
Enterprise for HCM Cloud Service environment. – You use Configuration Manager to:
• Launch FSM to configure offerings and functional areas• Monitor and manage setup data• Monitor and manage load plans• Migrate configuration data across environments, using the import and export options

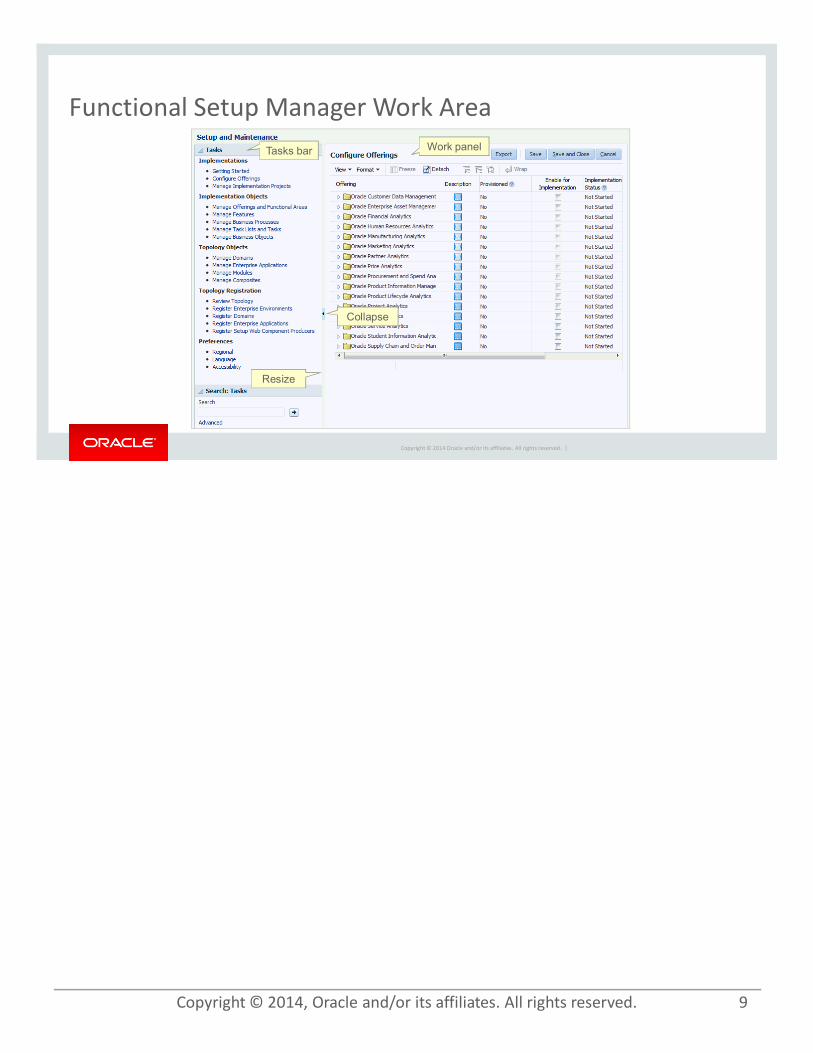
The Configuration Manager work area includes:
• Tasks bar, which provides links to Configuration Manager options
• Work panel, which displays the currently selected option
• Perform Functional Configurations option, for starting FSM
• Collapse Tasks bar arrow. Use the Collapse Tasks bar arrow to hide the Tasks bar and maximize the screen area for displaying the setup pages.
• Resize bar for the Tasks bar
• Expand/Collapse Contextual Pane arrow (for Data Load Parameters and Reporting Parameters only). Please note: Some pages (for example, the Manage Data Load Parameters page) have an additional Contextual pane on the right side that can be expanded (and resized) or collapsed.
The screenshot shows the main Tasks bar for Configuration Manager and the functional configuration work area for Manage Data Load Parameters.
Copyright © 2014, Oracle and/or its affiliates. All rights reserved. 7
Copyright © 2014 Oracle and/or its affiliates. All rights reserved. |
Configuration Manager Work AreaTasks bar
Work panel
To open FSM
Collapse
Resize
Expand/Collapse

FSM is installed and deployed as part of OTBI Enterprise for HCM Cloud Service. In FSM, you select the offering and functional areas that you wish to deploy. FSM generates a list of configuration tasks specific to the offering and functional areas that were selected. These tasks can be assigned to different functional developers and the status of the implementation project can be monitored in FSM. FSM user interfaces guide functional developers through the performance of each task. The key point here is you should use the guidance presented in Functional Setup Manager's list of tasks to perform your initial implementation configurations.
Copyright © 2014, Oracle and/or its affiliates. All rights reserved. 8
Copyright © 2014 Oracle and/or its affiliates. All rights reserved. |
Functional Setup Manager• Functional Setup Manager is a web application that enables you to manage
and perform functional configuration tasks for offerings. – Provides a guided set of sequenced tasks and dependency management for task-
based implementation– Is launched from Configuration Manager to perform functional configurations– Invokes Configuration Manager user interface for setup tasks
Copyright © 2014, Oracle and/or its affiliates. All rights reserved. 9
Copyright © 2014 Oracle and/or its affiliates. All rights reserved. |
Functional Setup Manager Work AreaTasks bar Work panel
Collapse
Resize

This slide and the next list some of the important configuration tasks you perform using Configuration Manager and Functional Setup Manager. Each task is discussed in detail in the slides that follow.
Copyright © 2014, Oracle and/or its affiliates. All rights reserved. 10
Copyright © 2014 Oracle and/or its affiliates. All rights reserved. |
Implementation Tasks1. Submit an SR to provision the Fusion Apps Cloud Adapter 2. Submit an SR to register the source system and grant user access to CM/FSM3. Work with your customer to complete the OTBI Enterprise Customer Configuration
Workbook4. View source system settings5. Enable offerings for deployment6. Edit preferred currency display names7. Set languages for data load8. Run the domain-only load plan9. Enable offerings and functional areas10. Create an implementation project
Continued on next slide.

**Please note that when migrating from stage to production you must redo all of the implementation tasks listed on these two slides, with the exception of “perform functional tasks”. The data configured during these functional tasks can be exported and imported using Configuration Manager. Refer to the task “Export/import configuration data” for more information.
Copyright © 2014, Oracle and/or its affiliates. All rights reserved. 11
Copyright © 2014 Oracle and/or its affiliates. All rights reserved. |
Implementation Tasks (Continued)10. Perform functional tasks11. Change task status12. Assign tasks to developers13. Run initial load plan14. Submit an SR to Troubleshoot a Failed Load Plan Execution15. Submit an SR to provision users16. Monitor setup data17. Export/import configuration data18. Migrate from stage to production**

• This step is necessary in order to enable the HCM Cloud Service to work with OTBI Enterprise for HCM Cloud Service.
• Once SR is submitted, Fusion Apps SaaS Ops will perform the following:
– Deploy and configure the Cloud Adaptor in the Fusion HCM POD
– Create a user with permission to download data files from the Universal Content Management (UCM) container that will be used to run load plans
– Schedule extraction of data from Fusion Apps into UCM for once a day
Copyright © 2014, Oracle and/or its affiliates. All rights reserved. 12
Copyright © 2014 Oracle and/or its affiliates. All rights reserved. |
Submit an SR to Provision the Fusion Apps Cloud Adapter• Select the following Service Type, Problem Type, and Sub Problem Type:
– Service Type = Oracle Transactional Business Intelligence Enterprise for HCM Cloud Service
– Problem Type = Hosting Services – Application– Sub Problem Type = Fusion Cloud Adaptor
• Provide the following details:– The User ID of the user that should be granted the “OBIAExport” role. This user is
typically the same user that manages HCM import/export.– Provide the HCM POD details (the Customer Admin should have this)– Indicate if the HCM POD is Stage or Production

• This step is necessary in order to create a connection from OTBI Enterprise POD to Fusion Apps HCM POD. At this point, the pod has been provisioned and the Customer (i.e., the initial Service Administrator) has been sent the OTBI Enterprise URL. As part of the process, the Service Administrator shares this information with you, the implementer. You should provide this OTBI Enterprise URL in this SR (along with the Fusion Apps host port and Fusion Apps UCM user ID).
• Once the SR is submitted, Oracle Cloud Ops will perform the following:
– Register the Fusion Apps HCM source in Configuration Manager
– Grant the Implementer and the Customer Admin access to Configuration Manager and Functional Setup Manager
• Please note the following:
– Oracle Cloud Ops will contact you to schedule a web conference to collect the Fusion Apps UCM Password.
– Instructions for filling out the add_users.csv file are provided in the next slide.
• If additional implementers or customer administrators need to be added later on in the process, enter a new SR and attach a new add_users.csv file. Also, do not combine the request to add implementers and customers administrators with the request to add regular users. Submit a separate SR to provision regular users. For more information, refer to the slide titled “Submit an SR to Provision Users” later in this presentation.
Copyright © 2014, Oracle and/or its affiliates. All rights reserved. 13
Copyright © 2014 Oracle and/or its affiliates. All rights reserved. |
Submit an SR to Register the Source System and Grant User Access to CM/FSM• Select the following Service Type, Problem Type, and Sub Problem Type:
– Service Type = Oracle Transactional Business Intelligence Enterprise for HCM Cloud Service
– Problem Type = Hosting Services - Application– Sub Problem Type = Set up an FA Connection
• Provide the following details:– Fusion Apps UCM URL, Fusion Apps UCM User ID, and URL to OTBI Enterprise POD– Attach the add_users.csv file with details for the Implementer users and Customer
Admin users (see instructions on the next slide).– Once this SR is complete, the Implementer(s) and the Customer Admin(s) will receive
an email with their User ID and PW. Users must change their PW upon sign-in.

Copyright © 2014, Oracle and/or its affiliates. All rights reserved.
• Please note: The “role” column is not in the sample.csv. You need to manually add it, but only when performing this step (i.e., not when performing the steps defined in “Setting Up Security” for regular users or additional implementers or additional customer administrators.
• Also, please note that this step is not for adding regular users who access dashboards and reports. This step is only for adding implementers and customer administrators. If a new implementer or customer administrator needs to be added after the initial ones have been added, then this step needs to be repeated and a new SR must be filed. Implementers and customer administrators should not be handled as part of adding regular users. It must be done using the process documented here. For complete instructions on provisioning users who access dashboards and reports, refer to the topic “Setting Up Security”.
14
Copyright © 2014 Oracle and/or its affiliates. All rights reserved. |
Instructions for Filling Out the add_users.csv File• This file contains the list of users and their attributes such as e-mail
address, first name, last name, display name, etc.– In the 11.1.1.8.1 release, the e-mail attribute is automatically used as the unique login
id (uid) for the user.– Important: Explicitly state in the add_users.csv which users are Implementers and
which users are Customer Administrators; without this information, the proper roles cannot be assigned.
– If you do not know where to locate this add_users.csv file, please contact the person in Oracle BI Product Management who has been assigned to assist you with your implementation. You must manually add a “role”
column to the sample.csv file.

Copyright © 2014, Oracle and/or its affiliates. All rights reserved. 15
Copyright © 2014 Oracle and/or its affiliates. All rights reserved. |
OTBI Enterprise Customer Configuration Workbook• Work with your customer to complete the OTBI Enterprise Customer
Configuration Workbook– This workbook contains the information you will need to collect from your customer
in order to define environment details, set-up options, and configuration options specific to your customer’s business requirements.
– During implementation, please follow any notes in the Notes column on the System Setup and Functional Setup tabs. These notes override any help provided from within Configuration Manager.
– If you do not know where to locate the OTBI Enterprise Customer Configuration Workbook, please contact the person in Oracle BI Product Management who has been assigned to assist you with your implementation.
Oracle Confidential – Internal/Restricted/Highly Restricted 15

Copyright © 2014, Oracle and/or its affiliates. All rights reserved. 16
Copyright © 2014 Oracle and/or its affiliates. All rights reserved. |
View the Source System Settings in Configuration Manager– Enter the following URL to access Configuration Manager: https://<host name>/biacm– Once Oracle Cloud Operations has registered the source system, you can view the
settings in Configuration Manager.– Please note: Implementers should not perform this “register source system” task or
change any of the settings configured by Oracle Cloud Operations.Select the Define Business Intelligence Applications Instance link.
View the source system properties.
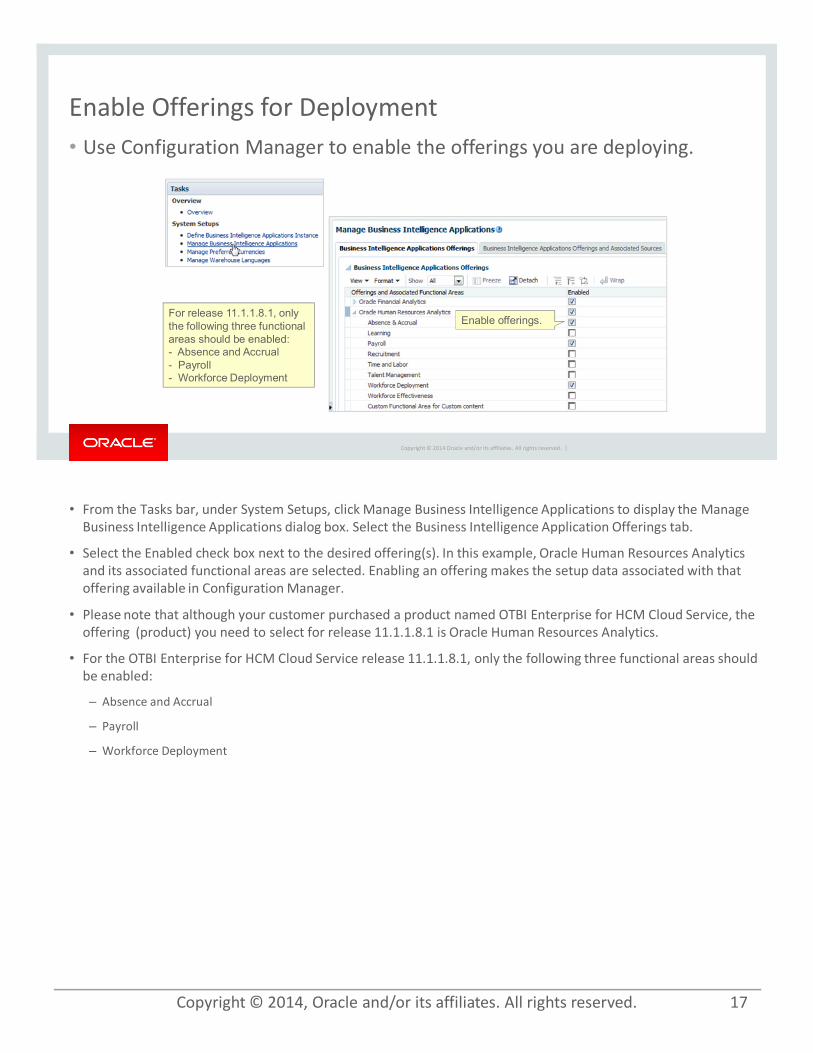
• From the Tasks bar, under System Setups, click Manage Business Intelligence Applications to display the Manage Business Intelligence Applications dialog box. Select the Business Intelligence Application Offerings tab.
• Select the Enabled check box next to the desired offering(s). In this example, Oracle Human Resources Analytics and its associated functional areas are selected. Enabling an offering makes the setup data associated with that offering available in Configuration Manager.
• Please note that although your customer purchased a product named OTBI Enterprise for HCM Cloud Service, the offering (product) you need to select for release 11.1.1.8.1 is Oracle Human Resources Analytics.
• For the OTBI Enterprise for HCM Cloud Service release 11.1.1.8.1, only the following three functional areas should be enabled:
– Absence and Accrual
– Payroll
– Workforce Deployment
Copyright © 2014, Oracle and/or its affiliates. All rights reserved. 17
Copyright © 2014 Oracle and/or its affiliates. All rights reserved. |
• Use Configuration Manager to enable the offerings you are deploying.
Enable Offerings for Deployment
Enable offerings.For release 11.1.1.8.1, only the following three functional areas should be enabled:- Absence and Accrual- Payroll - Workforce Deployment
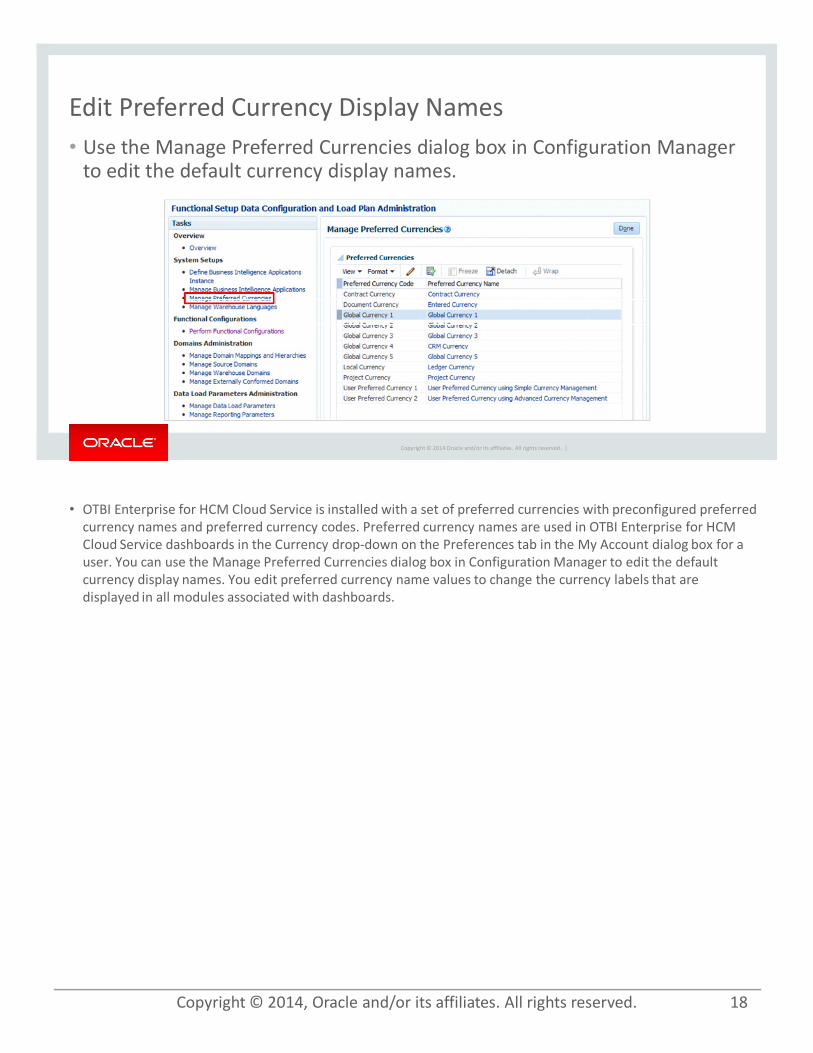
• OTBI Enterprise for HCM Cloud Service is installed with a set of preferred currencies with preconfigured preferred currency names and preferred currency codes. Preferred currency names are used in OTBI Enterprise for HCM Cloud Service dashboards in the Currency drop-down on the Preferences tab in the My Account dialog box for a user. You can use the Manage Preferred Currencies dialog box in Configuration Manager to edit the default currency display names. You edit preferred currency name values to change the currency labels that are displayed in all modules associated with dashboards.
Copyright © 2014, Oracle and/or its affiliates. All rights reserved. 18
Copyright © 2014 Oracle and/or its affiliates. All rights reserved. |
Edit Preferred Currency Display Names• Use the Manage Preferred Currencies dialog box in Configuration Manager
to edit the default currency display names.
• Please note: English is the only language supported in OTBI Enterprise for HCM Cloud Service release 11.1.1.8.1.
Copyright © 2014, Oracle and/or its affiliates. All rights reserved. 19
Copyright © 2014 Oracle and/or its affiliates. All rights reserved. |
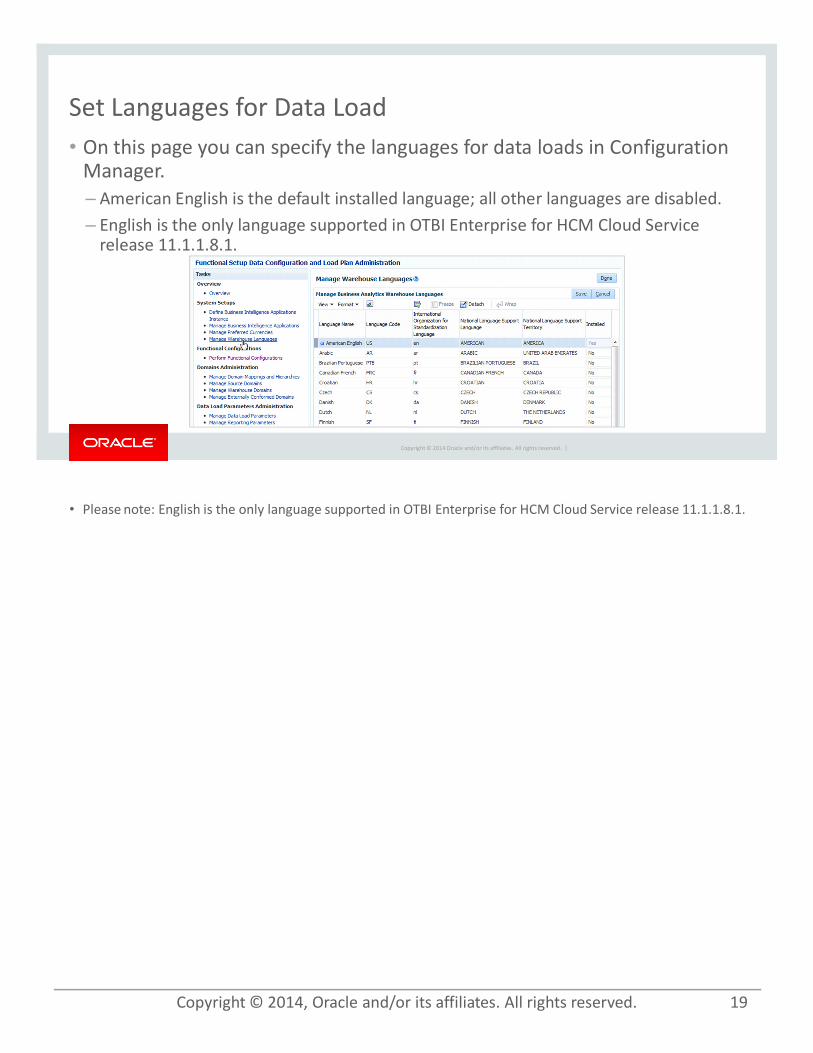
Set Languages for Data Load• On this page you can specify the languages for data loads in Configuration
Manager. – American English is the default installed language; all other languages are disabled.– English is the only language supported in OTBI Enterprise for HCM Cloud Service
release 11.1.1.8.1.
• The steps for running a load plan are covered in more detail in the topic “Managing Load Plans.” If a load plan fails and you receive an error message, work with Oracle Support to monitor, troubleshoot, diagnose, and fix load plan issues. For more detailed information about submitting an SR to troubleshoot a load plan, refer to the slide “Submit an SR to Troubleshoot a Failed Load Plan Execution” later in this presentation. For more detailed information about monitoring and troubleshooting a load plan, refer to the topic “Managing Load Plans”.
Copyright © 2014, Oracle and/or its affiliates. All rights reserved. 20
Copyright © 2014 Oracle and/or its affiliates. All rights reserved. |
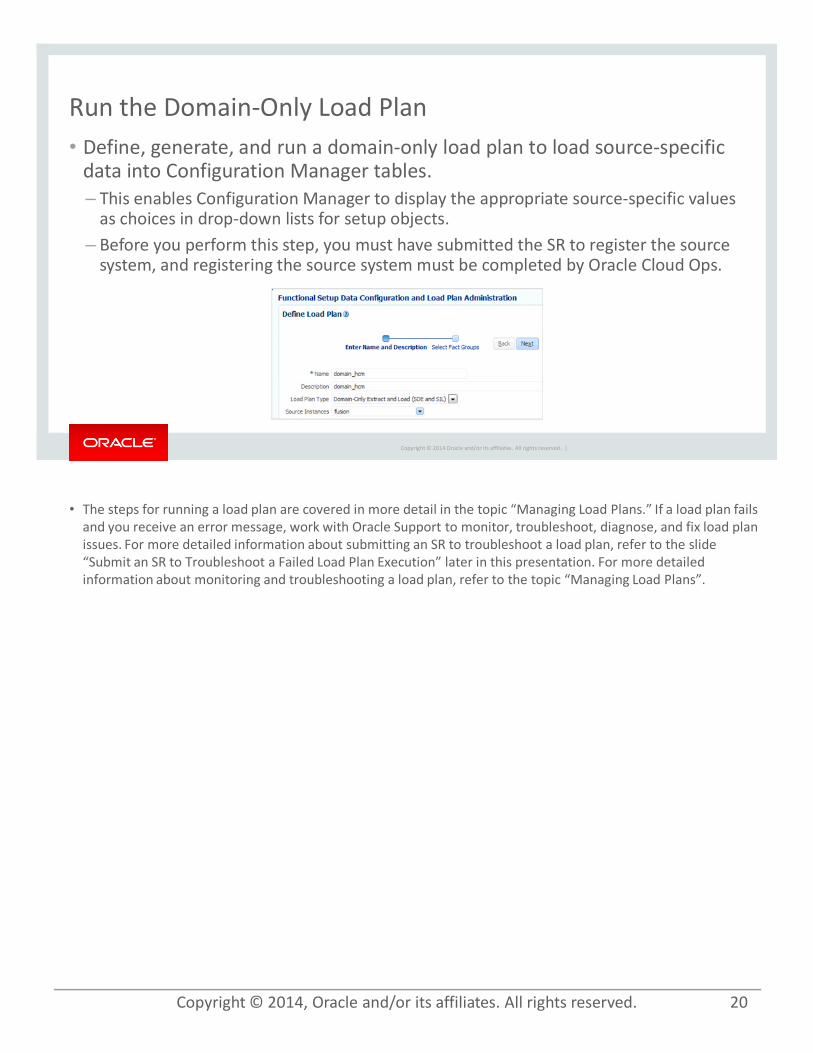
Run the Domain-Only Load Plan• Define, generate, and run a domain-only load plan to load source-specific
data into Configuration Manager tables. – This enables Configuration Manager to display the appropriate source-specific values
as choices in drop-down lists for setup objects.– Before you perform this step, you must have submitted the SR to register the source
system, and registering the source system must be completed by Oracle Cloud Ops.
• The next step is to access Functional Setup Manager to perform functional configuration.
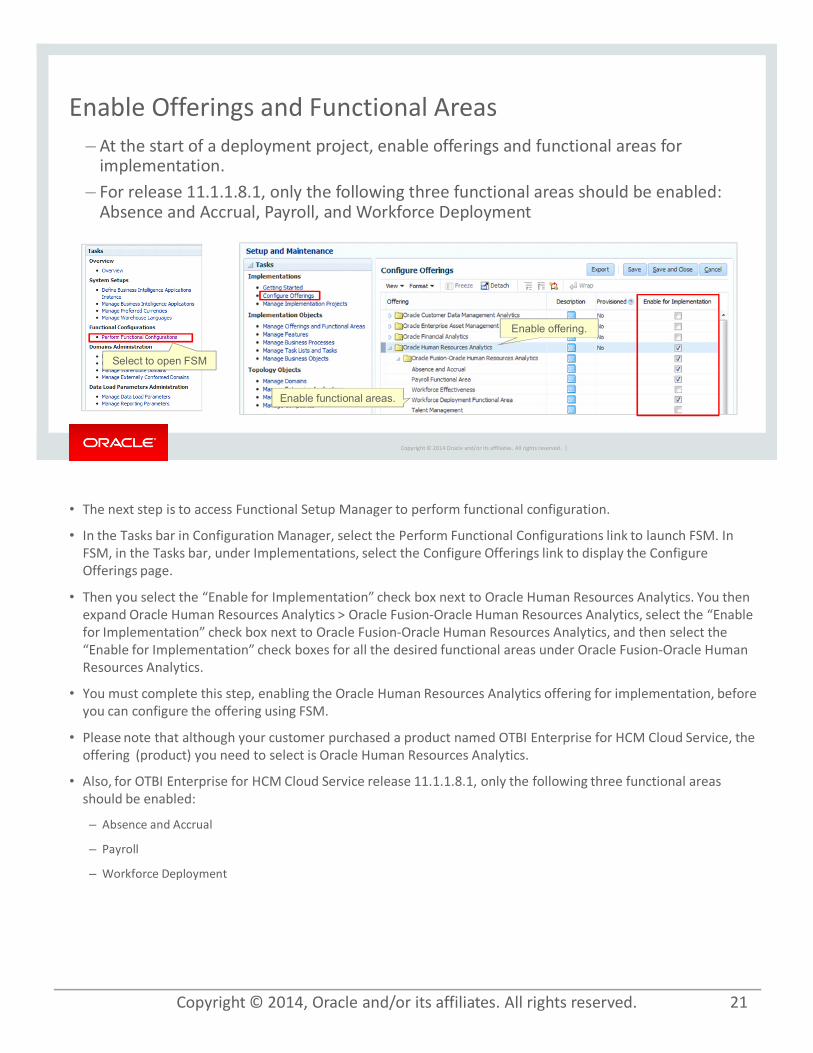
• In the Tasks bar in Configuration Manager, select the Perform Functional Configurations link to launch FSM. In FSM, in the Tasks bar, under Implementations, select the Configure Offerings link to display the Configure Offerings page.
• Then you select the “Enable for Implementation” check box next to Oracle Human Resources Analytics. You then expand Oracle Human Resources Analytics > Oracle Fusion-Oracle Human Resources Analytics, select the “Enable for Implementation” check box next to Oracle Fusion-Oracle Human Resources Analytics, and then select the “Enable for Implementation” check boxes for all the desired functional areas under Oracle Fusion-Oracle Human Resources Analytics.
• You must complete this step, enabling the Oracle Human Resources Analytics offering for implementation, before you can configure the offering using FSM.
• Please note that although your customer purchased a product named OTBI Enterprise for HCM Cloud Service, the offering (product) you need to select is Oracle Human Resources Analytics.
• Also, for OTBI Enterprise for HCM Cloud Service release 11.1.1.8.1, only the following three functional areas should be enabled:
– Absence and Accrual
– Payroll
– Workforce Deployment
Copyright © 2014, Oracle and/or its affiliates. All rights reserved. 21
Copyright © 2014 Oracle and/or its affiliates. All rights reserved. |
Enable Offerings and Functional Areas– At the start of a deployment project, enable offerings and functional areas for
implementation.– For release 11.1.1.8.1, only the following three functional areas should be enabled:
Absence and Accrual, Payroll, and Workforce Deployment
Enable offering.
Enable functional areas.
Select to open FSM
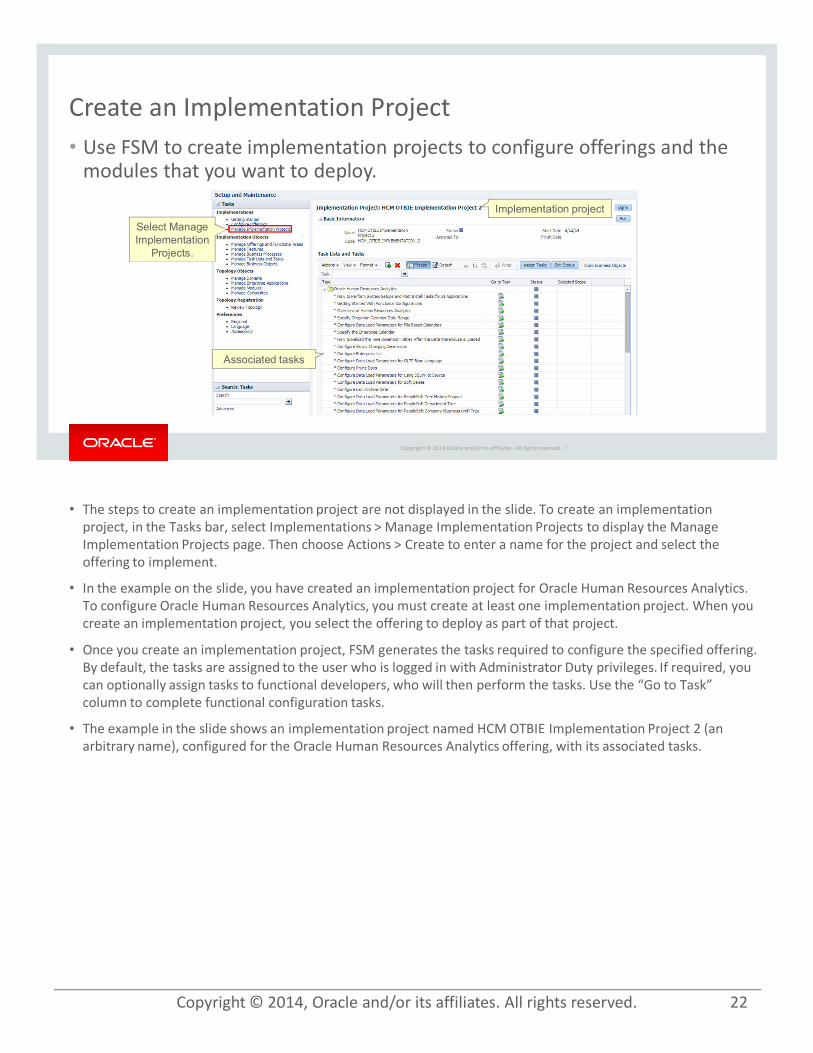
• The steps to create an implementation project are not displayed in the slide. To create an implementation project, in the Tasks bar, select Implementations > Manage Implementation Projects to display the Manage Implementation Projects page. Then choose Actions > Create to enter a name for the project and select the offering to implement.
• In the example on the slide, you have created an implementation project for Oracle Human Resources Analytics. To configure Oracle Human Resources Analytics, you must create at least one implementation project. When you create an implementation project, you select the offering to deploy as part of that project.
• Once you create an implementation project, FSM generates the tasks required to configure the specified offering. By default, the tasks are assigned to the user who is logged in with Administrator Duty privileges. If required, you can optionally assign tasks to functional developers, who will then perform the tasks. Use the “Go to Task” column to complete functional configuration tasks.
• The example in the slide shows an implementation project named HCM OTBIE Implementation Project 2 (an arbitrary name), configured for the Oracle Human Resources Analytics offering, with its associated tasks.
Copyright © 2014, Oracle and/or its affiliates. All rights reserved. 22
Copyright © 2014 Oracle and/or its affiliates. All rights reserved. |
Create an Implementation Project• Use FSM to create implementation projects to configure offerings and the
modules that you want to deploy.
Select Manage Implementation
Projects.
Implementation project
Associated tasks

• Once you have generated a list of tasks you can click the “Go to Task” link to perform the tasks.
• In the example in the slide, you select the Configure Slowly Changing Dimensions task, and then click the “Go to Task” icon to display the Task: Configure Slowly Changing Dimensions configuration page, which enables you to complete the task.
• To edit the parameter, select the parameter and click the edit icon, or click the parameter value, to open an Edit dialog box.
• Edit the parameter in the Edit Dialog and click Save and Close.
• In some cases, when you click “Go to Task” for an informational task, a list of steps is displayed that you must perform externally to FSM. For example, for a security-related task, you might be directed to documentation that describes how to complete the task.
• Please note: Work with your Oracle BI Product Management contact, who can provide a spreadsheet of seeded configuration values that need to be reviewed. You will only need to perform a configuration if you are changing the seeded value.
• For more information about performing functional tasks, please see the topic “Performing Functional Configuration of OTBI Enterprise for HCM Cloud Service.”
Copyright © 2014, Oracle and/or its affiliates. All rights reserved. 23
Copyright © 2014 Oracle and/or its affiliates. All rights reserved. |
Perform Functional Tasks• When you click “Go to Task,” you display a configuration page that enables
you complete the task.
1. Click “Go to Task”
2. Page to complete the task is displayed.
3. Click Edit or the parameter value.
4. Edit parameter value in Edit Dialog.
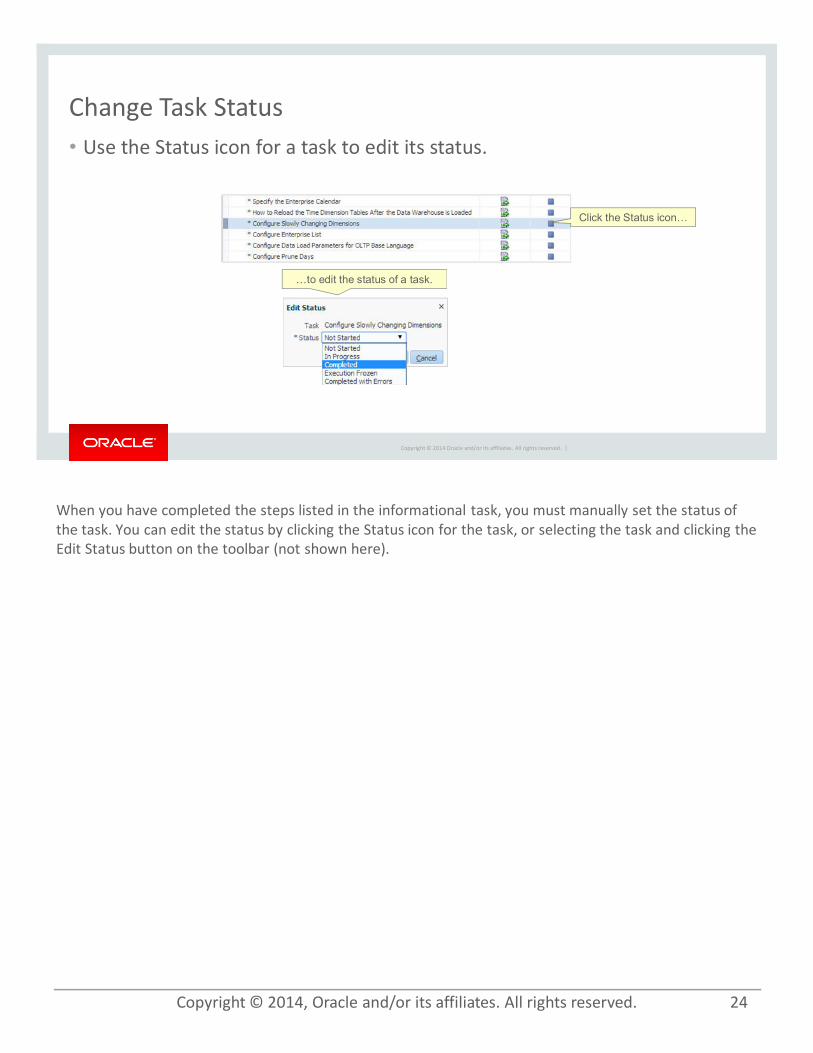
When you have completed the steps listed in the informational task, you must manually set the status of the task. You can edit the status by clicking the Status icon for the task, or selecting the task and clicking the Edit Status button on the toolbar (not shown here).
Copyright © 2014, Oracle and/or its affiliates. All rights reserved. 24
Copyright © 2014 Oracle and/or its affiliates. All rights reserved. |
Change Task Status• Use the Status icon for a task to edit its status.
Click the Status icon…
…to edit the status of a task.

• By default, the tasks are assigned to the user who is logged in with Administrator Duty privileges. You can assign tasks to functional developers so that functional developers can configure offerings. When functional developers log in and display the Assigned Implementation Tasks tab, they would only see the tasks that have been assigned to them. When Administrators log in and display the Implementation Projects tab, they see all tasks. In a small deployment project, a single person with Administrator privileges might perform all of the setup and functional configuration tasks. Notice that you could also add notes and assign a due date for a task.
• To assign a task:
1. Select the task and click Assign Tasks to open the Assign Tasks dialog.
2. Click the Add Users button to open the Select and Add Users dialog.
3. Search for and select the desired user to assign to the task.
4. The user is then assigned to the task (and notified by email).
Copyright © 2014, Oracle and/or its affiliates. All rights reserved. 25
Copyright © 2014 Oracle and/or its affiliates. All rights reserved. |
Assign Tasks1. Select task and click Assign Tasks.
2. Click to add users.
3. Search for and select users.
4. User is assigned to task.
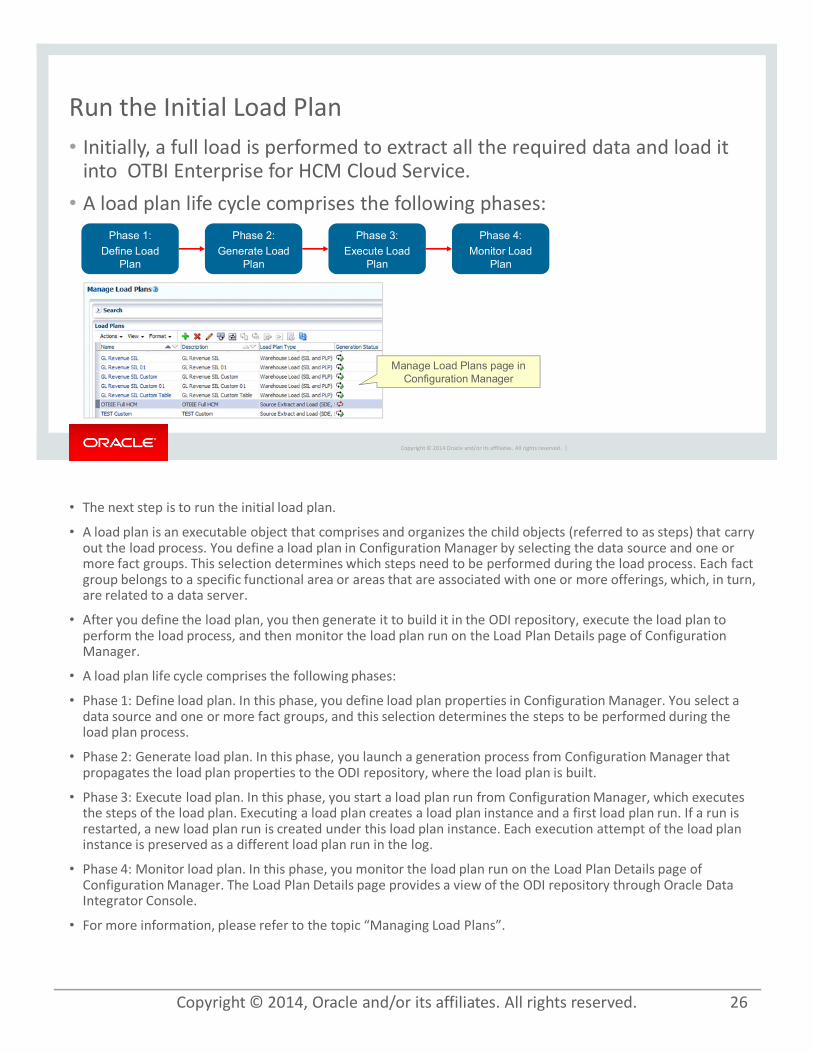
• The next step is to run the initial load plan.
• A load plan is an executable object that comprises and organizes the child objects (referred to as steps) that carry out the load process. You define a load plan in Configuration Manager by selecting the data source and one or more fact groups. This selection determines which steps need to be performed during the load process. Each fact group belongs to a specific functional area or areas that are associated with one or more offerings, which, in turn, are related to a data server.
• After you define the load plan, you then generate it to build it in the ODI repository, execute the load plan to perform the load process, and then monitor the load plan run on the Load Plan Details page of Configuration Manager.
• A load plan life cycle comprises the following phases:
• Phase 1: Define load plan. In this phase, you define load plan properties in Configuration Manager. You select a data source and one or more fact groups, and this selection determines the steps to be performed during the load plan process.
• Phase 2: Generate load plan. In this phase, you launch a generation process from Configuration Manager that propagates the load plan properties to the ODI repository, where the load plan is built.
• Phase 3: Execute load plan. In this phase, you start a load plan run from Configuration Manager, which executes the steps of the load plan. Executing a load plan creates a load plan instance and a first load plan run. If a run is restarted, a new load plan run is created under this load plan instance. Each execution attempt of the load plan instance is preserved as a different load plan run in the log.
• Phase 4: Monitor load plan. In this phase, you monitor the load plan run on the Load Plan Details page of Configuration Manager. The Load Plan Details page provides a view of the ODI repository through Oracle Data Integrator Console.
• For more information, please refer to the topic “Managing Load Plans”.
Copyright © 2014, Oracle and/or its affiliates. All rights reserved. 26
Copyright © 2014 Oracle and/or its affiliates. All rights reserved. |
Run the Initial Load Plan• Initially, a full load is performed to extract all the required data and load it
into OTBI Enterprise for HCM Cloud Service.• A load plan life cycle comprises the following phases:
Phase 1:
Define Load Plan
Phase 2:
Generate Load Plan
Phase 3:
Execute Load Plan
Phase 4:
Monitor Load Plan
Manage Load Plans page in Configuration Manager

If a load plan fails and you receive an error message, work with Oracle Support to monitor, troubleshoot, diagnose, and fix load plan issues. For more detailed information about monitoring and troubleshooting a load plan, refer to the topic “Managing Load Plans”.
Copyright © 2014, Oracle and/or its affiliates. All rights reserved. 27
Copyright © 2014 Oracle and/or its affiliates. All rights reserved. |
Submit an SR to Troubleshoot a Failed Load Plan Execution• Select the following Service Type, Problem Type, and Sub Problem Type:
– Service Type = Oracle Transactional Business Intelligence Enterprise for HCM Cloud Service
– Problem Type = Hosting Services - Application– Sub Problem Type = Load Plan Failure
• Provide the following details:– Load plan name and instance ID– Load plan status– Error message details from log in ODI Console
Oracle Confidential – Internal/Restricted/Highly Restricted 27

• After you run the initial load plan, you need to provision the users who will be accessing OTBI Enterprise for HCM Cloud Service dashboards and reports.
• OTBI Enterprise for HCM Cloud Service is provisioned with fixed set of pre-populated enterprise roles, to which authorization is granted to various bits of functionality within OTBI Enterprise for HCM Cloud Service.
• To create users, log an SR and upload the add_user.csv and add_users_to_groups.csv files containing the list of users and their membership to the fixed set of enterprise roles. See the next slide for instructions to complete the add_user.csv and add_users_to_groups.csv files.
• Once SR is complete, the user(s) will receive an email with their User ID and PW, and will be asked to change PW upon sign-on to OTBI Enterprise.
Copyright © 2014, Oracle and/or its affiliates. All rights reserved. 28
Copyright © 2014 Oracle and/or its affiliates. All rights reserved. |
Submit an SR to Provision Users• Select the following Service Type, Problem Type, and Sub Problem Type:
– Service Type = Oracle Transactional Business Intelligence Enterprise for HCM Cloud Service
– Problem Type = Hosting Services - Server Issue– Sub Problem Type = Add users in OTBI Enterprise
• Attach the add_user.csv and add_users_to_groups.csv files containing the list of users and their membership to the fixed set of enterprise roles (see instructions on the next slide).
• Once this SR is complete, the Implementer(s) and the Customer Admin(s) will receive an email with their User ID and PW. Users must change their PW upon sign-in.
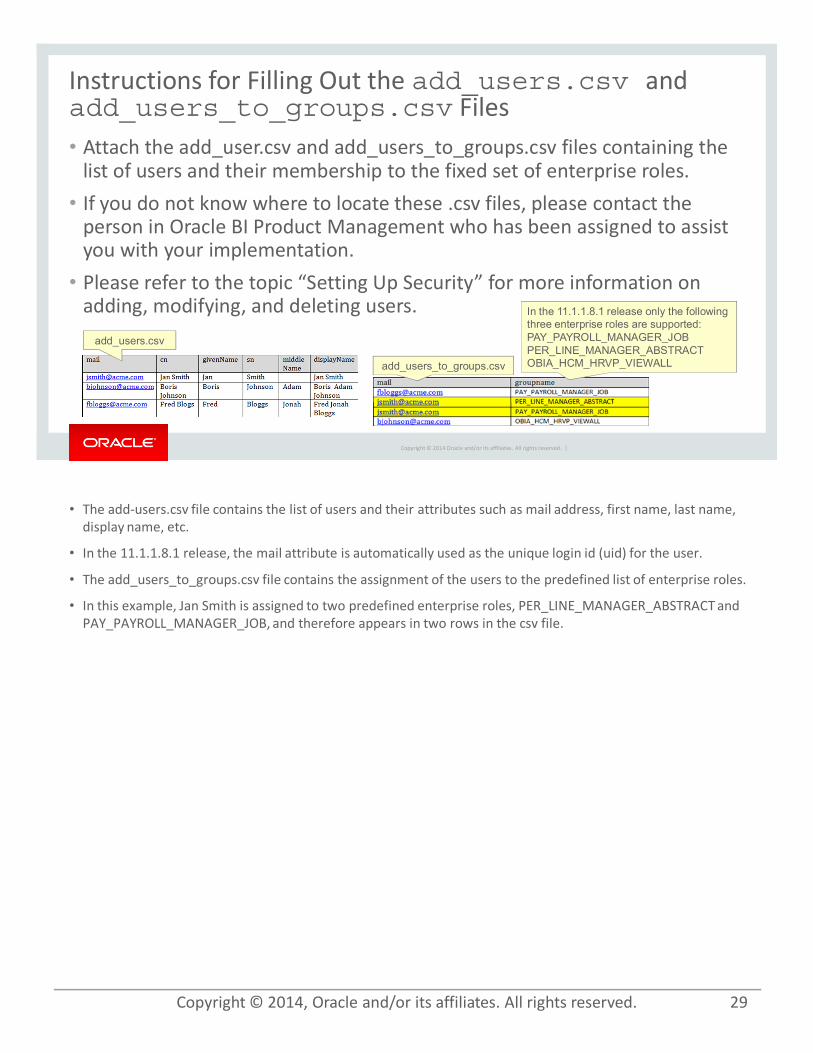
• The add-users.csv file contains the list of users and their attributes such as mail address, first name, last name, display name, etc.
• In the 11.1.1.8.1 release, the mail attribute is automatically used as the unique login id (uid) for the user.
• The add_users_to_groups.csv file contains the assignment of the users to the predefined list of enterprise roles.
• In this example, Jan Smith is assigned to two predefined enterprise roles, PER_LINE_MANAGER_ABSTRACT and PAY_PAYROLL_MANAGER_JOB, and therefore appears in two rows in the csv file.
Copyright © 2014, Oracle and/or its affiliates. All rights reserved. 29
Copyright © 2014 Oracle and/or its affiliates. All rights reserved. |
Instructions for Filling Out the add_users.csv andadd_users_to_groups.csv Files• Attach the add_user.csv and add_users_to_groups.csv files containing the
list of users and their membership to the fixed set of enterprise roles.• If you do not know where to locate these .csv files, please contact the
person in Oracle BI Product Management who has been assigned to assist you with your implementation.
• Please refer to the topic “Setting Up Security” for more information on adding, modifying, and deleting users.
add_users.csv
add_users_to_groups.csv
In the 11.1.1.8.1 release only the following three enterprise roles are supported:PAY_PAYROLL_MANAGER_JOBPER_LINE_MANAGER_ABSTRACTOBIA_HCM_HRVP_VIEWALL

• In Configuration Manager you can use the Reports panes on the Overview page to monitor setup data. For example:
– Use the System Setups list to monitor which Offerings have been enabled for deployment.
– Use the Parameters By Offerings report to monitor visually the number of parameters that have been configured.
– Use the Load Plan Executions report to monitor load plans.
– Use the “Domain Mappings by Offerings” report to monitor domain mappings.
• You can drill into each report for more detailed information. For example, drilling on the Parameters bar graph in the Parameters By Offerings report will take you to a list of parameters by offering. Drilling on the “Parameters with no values” bar in the graph will open a page where you can view and edit parameters with unassigned values.
Copyright © 2014, Oracle and/or its affiliates. All rights reserved. 30
Copyright © 2014 Oracle and/or its affiliates. All rights reserved. |
Monitor Setup Data• Use the Overview page to monitor setup data to ensure that your offerings
are correctly configured.
Drill into reports for more detail.

• You can export and import setup data for Configuration Manager to:
– Make a backup of your configuration settings for security purposes. For example, you might keep a record of the configuration changes that you have made.
– Migrate the Setup Data for Configuration Manager from one environment to another environment. For example, you might move the configuration changes that you have made from a Test environment to a Production environment.
• In the Tasks bar, select Export Setup Data and then click the Export icon to display the Export dialog box. Name the export file and use the Export dialog box to specify the setup objects that you want to export. When you export setup data, you can export only the changes that you have made to the values of the following objects: data load parameters, domains and mappings, reporting parameters, and system setups. Unchanged configuration values are not exported. For example, if you only change the value of DEFAULT_CURRENCY from USD to Euro and then you export your data, then the export zip file that is produced will contain only columns for “DEFAULT_ CURRENCY=Euro.” The Export Details pane (in the Export Setup Data pane) displays the details of the selected export file.
• To import setup data, select Tasks > Import Setup Data and follow a process similar to importing an exported file. When you import setup data from a zip file, you import whatever configuration changes were exported to that zip file.
Copyright © 2014, Oracle and/or its affiliates. All rights reserved. 31
Copyright © 2014 Oracle and/or its affiliates. All rights reserved. |
Exporting and Importing Setup Data• You can export and import setup data for Configuration Manager.
Select Export Setup Data.
Click the Export icon.
Provide an export file name.
Select the objects to export.
Export file details

Copyright © 2014, Oracle and/or its affiliates. All rights reserved. 32
Copyright © 2014 Oracle and/or its affiliates. All rights reserved. |
Migrating from Stage to Production• Please note that when migrating from stage to production you must redo
all of the implementation tasks discussed in this presentation, with the exception of “perform functional tasks”.
• The information configured during “perform functional tasks” can be exported and imported using Configuration Manager as discussed on the previous slide.

Copyright © 2014, Oracle and/or its affiliates. All rights reserved. 33
Copyright © 2014 Oracle and/or its affiliates. All rights reserved. |
Summary• In this lesson, you should have learned how to:
– Use Configuration Manager to configure OTBI Enterprise for HCM Cloud Service – Use Functional Setup Manager to perform functional configuration for OTBI
Enterprise for HCM Cloud Service– Describe when to use Configuration Manager versus when to use Functional Setup
Manager

Copyright © 2014, Oracle and/or its affiliates. All rights reserved. 34
Copyright © 2014 Oracle and/or its affiliates. All rights reserved. |
Practice• Performing Initial Configuration of OTBI Enterprise for HCM Cloud Service
Offerings
Copyright © 2014, Oracle and/or its affiliates. All rights reserved.
Page 1 of 17
Performing Initial Configuration for OTBI Enterprise for HCM Cloud Service Offerings
Overview In this practice, you learn how to perform initial configuration for an OTBI Enterprise for HCM Cloud Service offering. You sign in to Configuration Manager, enable an offering for deployment, edit preferred currencies, set languages for data load, run a domain-only load plan, enable offerings and functional areas for implementation, create an implementation project, and set up, assign, and set the status for, functional configuration tasks.
Assumptions 1. You have submitted an SR to provision the Fusion Apps Cloud Adapter, and subsequently
the Cloud Adapter has been enabled on the Fusion HCM Cloud POD 2. You have submitted an SR to register the source system and grant user access to
Configuration Manager and Functional Setup Manager, and subsequently the Fusion HCM Cloud source has been registered in OTBI Enterprise
3. Oracle Cloud Ops has provided the URL to access Configuration Manager and Functional Setup Manager in an OTBI Enterprise for HCM Cloud Service environment along with the proper credentials to sign in.
Time 30 minutes
Tasks 1. Explore Configuration Manager. Configuration Manager is a web application for setting up
and maintaining an OTBI Enterprise environment. This set of steps provides a quick overview of the application. You learn more about using Configuration Manager as you progress through this procedural exercise. a. Open a browser and enter the URL to open Configuration Manager. For example,
https://<host name>/biacm. b. Sign in with the credentials provided by Oracle Cloud Ops to open Configuration
Manager. c. Notice the Tasks bar on the left. The Tasks bar provides links to Configuration
Manager options. d. The Work Panel on the right displays the currently selected option. The default is
Overview, which is the main page in Configuration Manager. You can use the Overview link in the Tasks bar to display or return to the Overview page.
e. Notice the System Setups task area in the Tasks bar. You use this area to define the instance, and manage applications, preferred currencies, and warehouse languages.
f. Notice the Functional Configuration task area. You use the Perform Functional Configurations link to open Oracle Functional Setup Manager, which you use to perform functional configuration.
g. Notice the Domains Administration task area. You use this area to manage domain mappings and hierarchies, source domains, warehouse domains, and externally conformed domains.
h. Notice the Data Load Parameters Administration task area. You use this area to manage data load and reporting parameters.

Copyright © 2014, Oracle and/or its affiliates. All rights reserved.
Page 2 of 17
i. Notice the Load Plans Administration task area. You use this area to manage load plans.
j. Notice the “Setup Data Export and Import” task area. You use this area to backup your setup data and migrate your setup data to a separate environment, for example, from stage to production.
k. Notice the Preferences task area. You use this area to set regional, language, and accessibility preferences.
2. Using help in the Getting Started section. a. Notice the Getting Started task area. You can use this area to get help with system
setup tasks, functional configuration steps, and maintaining and administering setup data.
b. Click Performing System Setups to open a new tab or window, depending on your browser settings.
c. Expand Contents and notice there is help information for the tasks you need to perform
in Configuration Manager and Functional Setup Manager.

Copyright © 2014, Oracle and/or its affiliates. All rights reserved.
Page 3 of 17
d. Expand Performing Functional Configuration > Roadmap for Functional Configuration to display the roadmap in the right pane.
e. Return to the tab or window with the Overview page. f. Select Getting Started > Perform Functional Configurations to view another method for
navigating to the Roadmap for Functional Configuration page. g. In the left pane, expand Contents > Overview of Functional Configuration in Oracle BI
Applications > Getting Started with Oracle BI Applications Configuration Manager > About Getting Help to learn how to access the User Assistance, Help, Documentation, and other resources that are available.
h. Expand Contents > Functional Configuration Task Reference > Informational Task Reference – Miscellaneous to view a list of help topics for configuration tasks.
i. During your implementation you will use the Getting Started section for help with completing configuration tasks. This training shows you how to perform some of the key configuration tasks listed and described in this Getting Started section.
3. Explore the OTBI Enterprise Customer Configuration Workbook. You work with your customer to complete this workbook It contains the information you need to collect from your customer in order to define environment details, set-up options, and configuration options specific to your customer’s business requirements. If you do not know where to locate the OTBI Enterprise Customer Configuration Workbook, please contact the person in Oracle BI Product Management who has been assigned to assist you with your implementation.

Copyright © 2014, Oracle and/or its affiliates. All rights reserved.
Page 4 of 17
a. Notice that the workbook has four tabs: Customer, Environments, System Setup, and Functional Setup
b. Use the Customer tab to document relevant customer information, such as customer
name and contact information. c. Use the Environments tab to document relevant environment information and
connection details.
d. Use the System Setup tab to define the settings for configuration tasks to be completed
before running the domain-only load plan.
e. Use the Functional Setup tab to document and complete specific functional
configuration tasks. During implementation, please note that this tab overrides any help provided from the Getting Started section within Configuration Manager. For example, this tab in the worksheet identifies and describes the process for completing the functional configuration tasks that are specific to OTBI Enterprise for HCM Cloud
Copyright © 2014, Oracle and/or its affiliates. All rights reserved.
Page 5 of 17
Service.
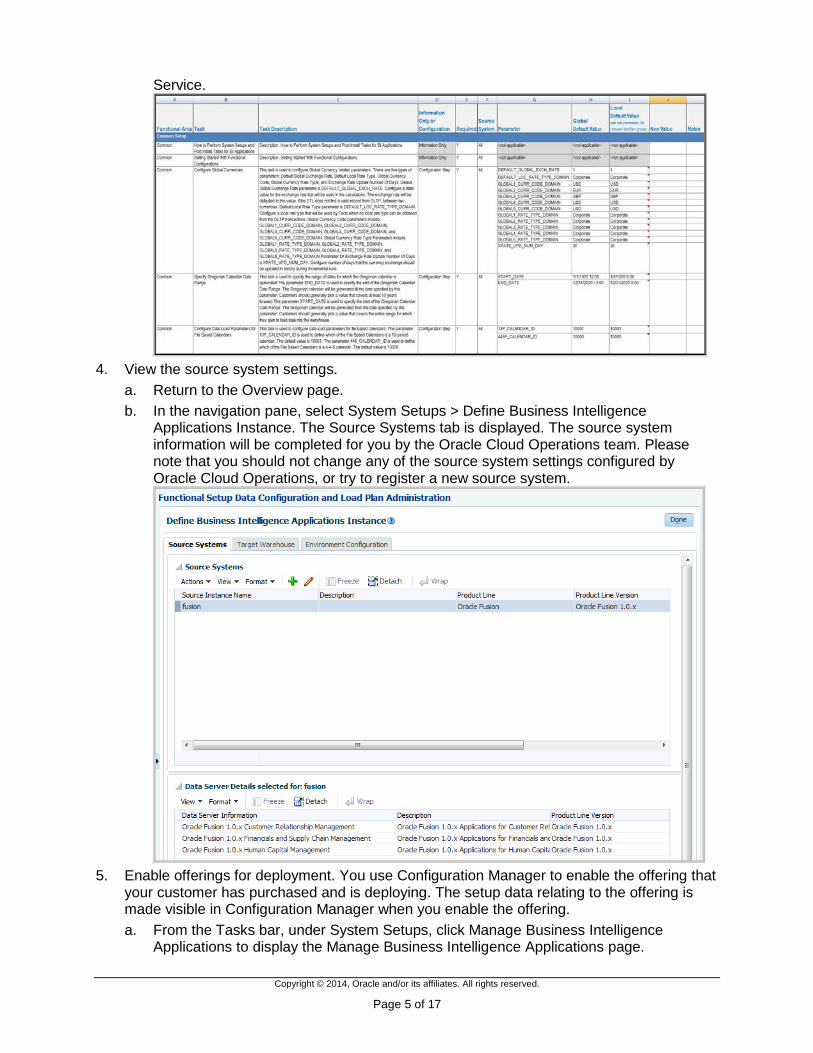
4. View the source system settings.
a. Return to the Overview page. b. In the navigation pane, select System Setups > Define Business Intelligence
Applications Instance. The Source Systems tab is displayed. The source system information will be completed for you by the Oracle Cloud Operations team. Please note that you should not change any of the source system settings configured by Oracle Cloud Operations, or try to register a new source system.
5. Enable offerings for deployment. You use Configuration Manager to enable the offering that
your customer has purchased and is deploying. The setup data relating to the offering is made visible in Configuration Manager when you enable the offering. a. From the Tasks bar, under System Setups, click Manage Business Intelligence
Applications to display the Manage Business Intelligence Applications page.

Copyright © 2014, Oracle and/or its affiliates. All rights reserved.
Page 6 of 17
b. Select the Enabled check box next to the Oracle Human Resources Analytics offering. Enabling an offering makes the setup data associated with that offering available in Configuration Manager. Please note that although your customer purchased a product named OTBI Enterprise for HCM Cloud Service, the offering (product) you need to select for release 11.1.1.8.1 is Oracle Human Resources Analytics.
c. An Information window displays with the following message: “The selected offering, Oracle Human Resources Analytics, has a functional area shared with other offerings. The shared functional area has been enabled in respective offerings too.”
d. Click OK to close the Information window. e. Expand Oracle Human Resources Analytics Offering. f. Select your functional areas. For OTBI Enterprise for HCM Cloud Service release
11.1.1.8.1, only the following three functional areas should be enabled: Absence and Accrual, Payroll, and Workforce Deployment. Deselect all other functional areas. Click OK if an information window appears with the following message “The functional area, Custom Functional Area for Custom content, will also be disabled for other offerings that it is shared by.”

Copyright © 2014, Oracle and/or its affiliates. All rights reserved.
Page 7 of 17
g. Verify your work.
h. Click Save to save your changes. i. Click Done.

Copyright © 2014, Oracle and/or its affiliates. All rights reserved.
Page 8 of 17
j. Now on the Overview page, under System Setups, you should see Oracle Human Resources Analytics.
6. Manage preferred currencies.
a. From the Tasks bar, under System Setups, click Manage Preferred Currencies to display the Manage Preferred Currencies page.
Copyright © 2014, Oracle and/or its affiliates. All rights reserved.
Page 9 of 17
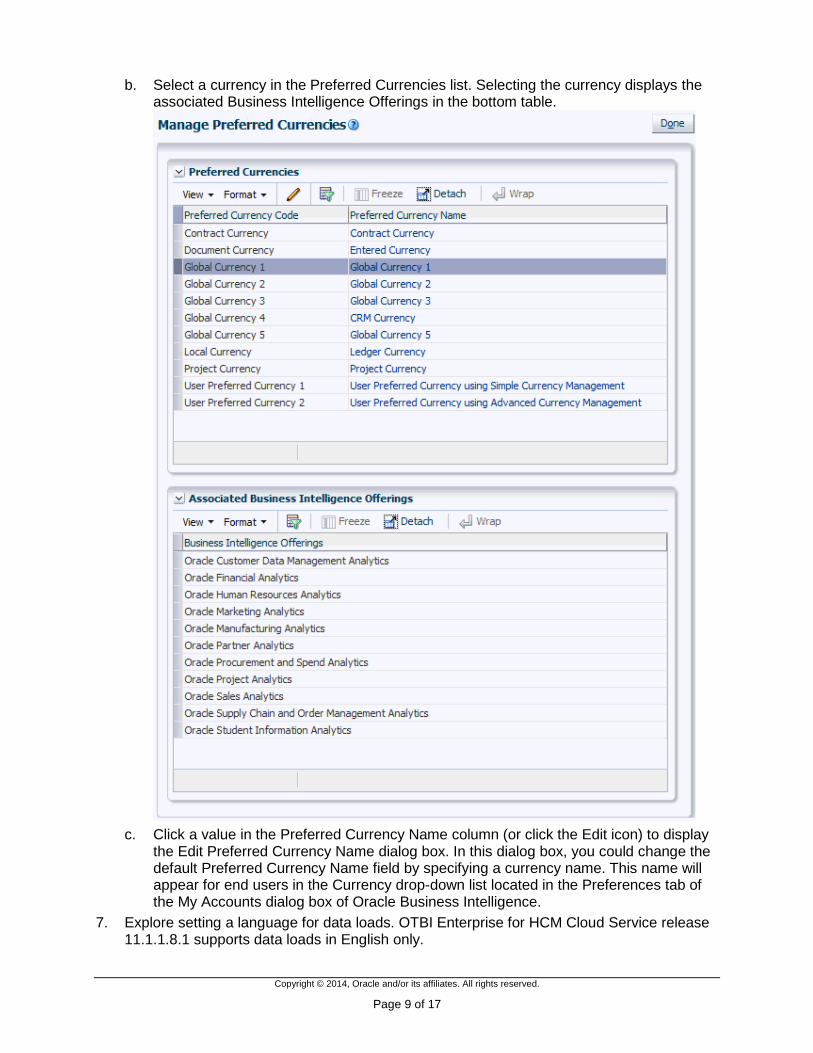
b. Select a currency in the Preferred Currencies list. Selecting the currency displays the associated Business Intelligence Offerings in the bottom table.
c. Click a value in the Preferred Currency Name column (or click the Edit icon) to display
the Edit Preferred Currency Name dialog box. In this dialog box, you could change the default Preferred Currency Name field by specifying a currency name. This name will appear for end users in the Currency drop-down list located in the Preferences tab of the My Accounts dialog box of Oracle Business Intelligence.
7. Explore setting a language for data loads. OTBI Enterprise for HCM Cloud Service release 11.1.1.8.1 supports data loads in English only.

Copyright © 2014, Oracle and/or its affiliates. All rights reserved.
Page 10 of 17
a. Click the Manage Warehouse Languages link. b. Here you can specify the languages from which data is to be extracted from the list of
languages displayed in the table by selecting Installed from the Installed drop down. American English is the default installed language. All other languages are set to No.
c. By default, American English is the base language. English is the only language supported in OTBI Enterprise for HCM Cloud Service release 11.1.1.8.1. Do not make any changes. Leave the language settings as they are.
8. Define a domain-only load plan.
a. In the Tasks pane of Configuration Manager, under Load Plans Administration, select Manage Load Plans. The Manage Load Plans page is displayed.
b. On the Load Plans toolbar, click the Add icon. The Define Load Plan page is displayed. c. On the first page of the Define Load Plan series, specify the load plan name and
description. Always start the load plan name with 'OTBIE' so that it can be monitored in EMCC by Oracle Cloud Ops.
d. Select “Domain-Only Extract and Load (SDE and SIL)” as the load plan type. e. Click Next. The second page of the Define Load Plan series is displayed. f. In the Available Selections tab, expand Oracle Human Resource Analytics, select the
fact groups to include it in the domains load plan definition. Note that fact groups may belong to a hierarchy of fact groups. You can select only the top-level parent fact group and not a child fact group. A load plan must contain at least one fact group. For OTBI Enterprise for HCM Cloud Service release 11.1.1.8.1, only the Absence and Accrual,

Copyright © 2014, Oracle and/or its affiliates. All rights reserved.
Page 11 of 17
Payroll, and Workforce Deployment fact groups should be selected.
g. Click the Selected Fact Groups tab and notice that the selected fact groups are visible
in the Fact Group field.

Copyright © 2014, Oracle and/or its affiliates. All rights reserved.
Page 12 of 17
h. Click the Save button and then select Save to save the load plan. Do not click Save and Generate. After a load plan is saved, it is displayed in the Load Plans master list.
9. Generate the domain-only load plan.
a. In the Load Plans master list, select the domain-only load plan that you defined in the previous set of steps.
b. On the Load Plans toolbar, click the Generate icon . c. Use the Generation Status column to monitor the progress of the generation process.
The process must complete and display the Succeeded icon before you can move on to the next step. Click the Refresh icon to refresh the display until the process completes.
10. Run the domain-only load plan. a. Run the domain-only load plan by selecting it in the master list and clicking the Execute
icon on the toolbar. b. Enter the following in the Execute Load Plan dialog box using the examples as a guide:
Context Global
Logical Agent OracleDIAgent
ODI Work Repository BIAPPS_WORKREP
Log Level <Accept Default>
c. Click OK. Allow a moment for the Execute Load Plan Dialog to close and the execution process to begin.
d. Use the Execution Status column to monitor the progress of the execution process. Initially the execution status icon should show as Running . Hover over the execution status icons to monitor the execution status. The process must complete and display the Done icon before you can move on to the next step. Click the Refresh icon to refresh the display.
11. Review the domain-only load plan execution status details. a. Click the Show Execution Status Details icon to open the login screen for the Work
Repository. Please note; If a login screen does not appear, try logging into ODI Console directly by using: https://<host name>/odiconsole
b. Sign in to open ODI Console using the same credentials you used to sign in to Configuration Manager.
c. The load plan execution details for the domain-only load plan are displayed in the right pane of ODI Console.
d. In the left pane of ODI Console, expand Runtime > Sessions/Load Plan Executions > Load Plan Executions.
Copyright © 2014, Oracle and/or its affiliates. All rights reserved.
Page 13 of 17
e. Select the domain-only load plan execution. f. Click the View icon to open the Load Plan Execution tab. This is another way to
access and view the executed load plan. g. In the right pane, in the Execution section, review the load plan details. Execution
Status should display the Done icon . h. If the load plan fails and you receive an error message, work with Oracle Support to
monitor, troubleshoot, diagnose, and fix load plan issues. You will need to submit an SR. Please refer to the instructions for submitting an SR in the slide deck portion of this topic.
12. Open Functional Setup Manager and explore the Getting Started options. a. From the Tasks bar in Configuration Manager, select the Perform Functional
Configurations link to launch Functional Setup Manager in a new tab. b. Sign in with the credentials provided by Oracle Cloud Ops. These are the same
credentials you used to sign in to Configuration Manager. c. The Getting Started page should be displayed by default in the right pane. If not, in the
Tasks bar, under Implementations, select Getting Started to display the recommended process flow and the prebuilt offerings.
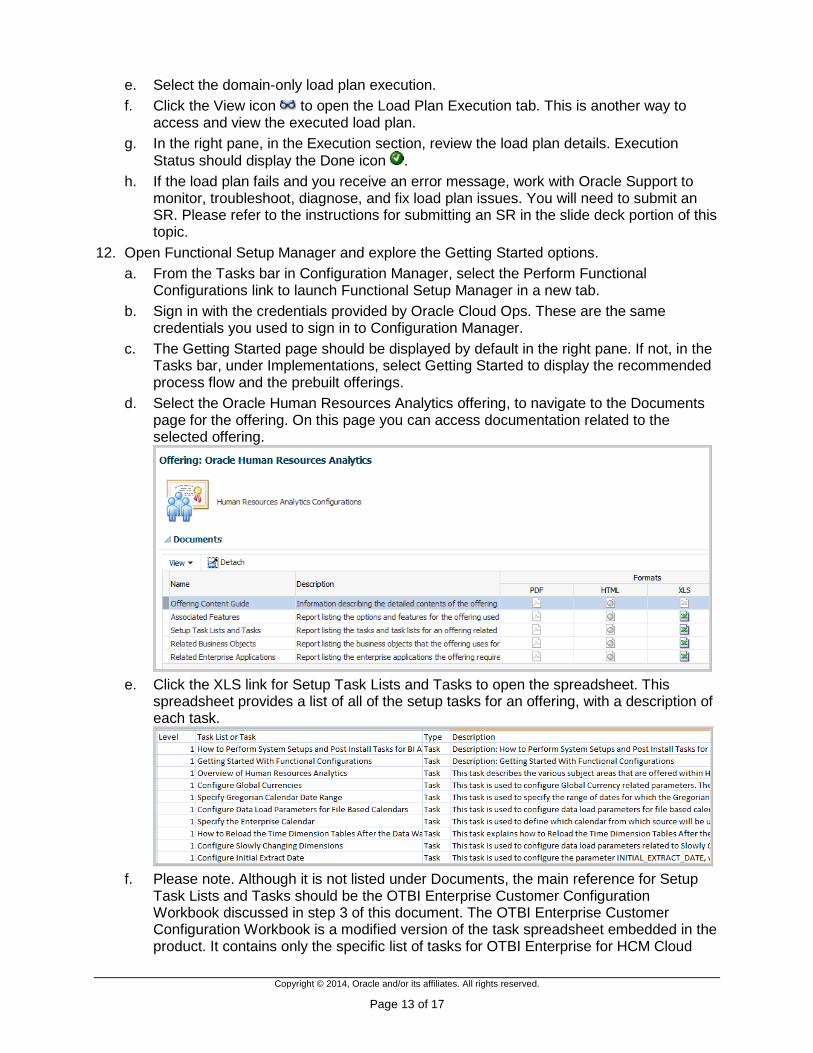
d. Select the Oracle Human Resources Analytics offering, to navigate to the Documents page for the offering. On this page you can access documentation related to the selected offering.
e. Click the XLS link for Setup Task Lists and Tasks to open the spreadsheet. This
spreadsheet provides a list of all of the setup tasks for an offering, with a description of each task.
f. Please note. Although it is not listed under Documents, the main reference for Setup
Task Lists and Tasks should be the OTBI Enterprise Customer Configuration Workbook discussed in step 3 of this document. The OTBI Enterprise Customer Configuration Workbook is a modified version of the task spreadsheet embedded in the product. It contains only the specific list of tasks for OTBI Enterprise for HCM Cloud
Copyright © 2014, Oracle and/or its affiliates. All rights reserved.
Page 14 of 17
Service and should be your only reference to complete these tasks. If you do not know where to locate the OTBI Enterprise Customer Configuration Workbook, please contact the person in Oracle BI Product Management who has been assigned to assist you with your implementation
g. Open and explore the other getting started documents. h. Click Done to return to the Getting Started page.
13. Enable offerings and functional areas for implementation. At the start of a deployment project, you must enable your Offerings and Functional Areas for implementation. a. In the Tasks bar, under Implementations, select the Configure Offerings link to display
the Configure Offerings page. b. Select the “Enable for Implementation” check box next to Oracle Human Resources
Analytics. c. Because the value in the Provisioned column for the selected Offering is set to “No,”
you will see the following warning: Warning: This offering is not provisioned. Offering implementations cannot be completed until the offering is provisioned. Do you want to continue? Click Yes.
d. The Oracle Human Resources Analytics offering should be expanded. If not, expand Oracle Human Resources Analytics and select the “Enable for Implementation” check box next to Oracle Fusion-Oracle Human Resources Analytics.
e. Select the “Enable for Implementation” check box for the functional areas under Oracle Fusion-Oracle Human Resources Analytics. Again, for OTBI Enterprise for HCM Cloud Service release 11.1.1.8.1, only the following three functional areas should be enabled: Absence and Accrual, Payroll, and Workforce Deployment.
f. Save your changes. 14. Create an implementation project. You use Functional Setup Manager to create an
Implementation Project to configure an offering and the modules that you want to deploy. In this example, you create an implementation project to configure Oracle Human Resources Analytics. a. In the Tasks pane, select Implementations > Manage Implementation Projects to
display the Manage Implementation Projects page b. Select Actions > Create to display the Enter Basic Information page. c. Enter a name in the Name field. The name is arbitrary, but should be something
meaningful.

Copyright © 2014, Oracle and/or its affiliates. All rights reserved.
Page 15 of 17
d. Click Enter or step off the Name field. A code and description are generated automatically.
e. Accept the defaults for Assigned To and Start Date and click Next to display the “Select
Offerings to Implement” page. Do not click “Save and Open Project.” Selecting “Save and Open Project” will create an incomplete implementation project.
f. Click Next. g. On the “Select Offerings to Implement” page select Include for Oracle Human
Resources Analytics h. On the “Select Offerings to Implement” page, expand Oracle Human Resources
Analytics and Oracle Fusion-Oracle Human Resources Analytics and select Include for Oracle Fusion-Oracle Human Resources Analytics
i. On the “Select Offerings to Implement” page, expand Oracle Human Resources Analytics and Oracle Fusion-Oracle Human Resources Analytics, and then select Include next to the Accrual, Payroll, and Workforce Deployment functional areas to include them in the project.
j. Click “Save and Open Project.” When you save the project, Functional Setup Manager generates the list of configuration tasks for the offering and functional areas that you included in the implementation project.

Copyright © 2014, Oracle and/or its affiliates. All rights reserved.
Page 16 of 17
k. In the “Task Lists and Tasks” section, expand Oracle Human Resources Analytics to view the list of tasks required to configure the selected Offering and Functional Areas.
15. Set up, assign, and set status for functional configuration tasks.
a. In the “Task Lists and Tasks” pane, select the “Configure Slowly Changing Dimensions” task.
b. Click the “Go to Task” icon to display the “Task: Configure Slowly Changing Dimensions” configuration screen that enables you to complete the task. Leave the parameter value set as-is for now. You will change the parameter value later.
c. Click Done to return to the “Task Lists and Tasks” pane. d. Notice that the task is now assigned to the user you are logged in as. In a small
deployment project, a single person with Administrator Duty privileges might perform all of the setup and functional configuration tasks. When you log into FSM with Administrator Duty privileges, you see all Tasks that are included in an Implementation Project.
e. With Configure Slowly Changing Dimensions still selected, click Assign Tasks to display the Assign Tasks page.
f. Notice that the user you are logged in as, is the assigned user. g. Notice also that you could add notes and assign a due date for this task. h. Click the “Select and Add” button to open the “Select and Add: Users” page. In this
dialog box, you could search for and select appropriate functional developers. You could then assign tasks to functional developers so that functional developers can configure BI Application offerings. When functional developers log in and display the Assigned Implementation Tasks tab, they would only see the tasks that have been assigned to them.
i. Click Cancel to close the “Select and Add: Users” page without making any changes. j. Click Cancel to close the Assign Tasks page without making any changes.
Copyright © 2014, Oracle and/or its affiliates. All rights reserved.
Page 17 of 17
k. With Configure Slowly Changing Dimensions still selected, click Edit Status to display the Edit Status page. Here you can change task status and add notes for the task.
l. Click Cancel to close the Edit Status page without making any changes. 16. Manage offerings and functional areas.
a. In the Tasks pane, select Implementation Objects > “Manage Offerings and Functional Areas.”
b. Select Functional Areas in the Search field and click Search to display all of the prebuilt functional areas.
c. Select Offerings in the Search field and click Search to display all of the prebuilt offerings.
d. Search for the Oracle Fusion-Oracle Human Resources Analytics offering and then drill into the object.
e. The first page displays basic information about the offering, such as its name, code, and description.
f. Click Next or click Associate Setup Tasks on the process flow chart to navigate to the Setup Tasks page. This page display setup tasks associated with the Oracle Fusion-Oracle Human Resources Analytics offering.
g. Drill on a task to see information about the task. h. Click Done to return to the process flow. i. Click Next or Related Functional Areas to view the child functional areas for this
offering. j. Click Next to display the default features associated with this offering. k. Continue to display the documents and related offerings associated with this offering. l. Click Done.