Embed Size (px)
Citation preview

Performance Management Console
System Administrator’s Guide
Version 3.0

Information in this book is subject to change without notice. Names used in examples are fictitious unless otherwise noted. No part of this document may be reproduced or transmitted in any form or by any means, for any purpose, without the express written permission of RTO Software. The product described in this book is a licensed product of RTO Software. RTO Software, Performance Management Console, and TScale are trademarks of RTO Software. All other trademarks are the property of their respective owners.
Address correspondence to: RTO Software 5400 Laurel Springs Parkway Suite 108 Suwanee, GA 30024 Phone Number: +1-678-455-5506 Web Site: http://www.rtosoft.com Email: [email protected] Copyright, © 2002-2003 By RTO Software Suwanee, GA All Rights Reserved.

Table of Contents
1. Welcome to the PMC.......................................................................................... 5
1.1. What to do if you have questions........................................................................... 5
2. What is the PMC?................................................................................................. 5
2.1. How the PMC Communicates with TScale Agents............................................... 6
2.2. Optimization Types and Levels ............................................................................. 6
3. PMC Requirements.............................................................................................. 9
4. Quick Start for Experienced Administrators ................................. 9
5. Pre-installation Planning................................................................................11
6. Installing the PMC...............................................................................................12
7. PMC Role Based Administration ............................................................20
8. Using the Performance Management Console ..............................21
8.1. Applying your TScale License Key in the PMC...................................................22
8.2. Setting up a Farm with in the PMC .....................................................................23
8.3. Adding Groups to your Farm...............................................................................24
8.4. Adding Agents to Groups (or to your Farm) .......................................................24
8.5. Installing the TScale Performance Agent on One or More Servers....................28
8.6. Managing Your Terminal Servers via Policies ....................................................30 8.6.1. Defining System Optimizations ..................................................................32 8.6.2. Defining Application Optimizations ...........................................................33 8.6.3. Defining Component Optimizations ...........................................................34 8.6.4. Applying Policies on a Scheduled Basis .....................................................35
Performance Management Console System Administrator’s Guide v3.0 3

8.7. Enforcing Policies..................................................................................................36 8.7.1. Allow Individual Agents to Override Policy Settings..................................36 8.7.2. Allow Per Agent Configuration Changes Outside of Policies......................37 8.7.3. Apply Policy Changes Automatically .........................................................37
8.8. Optimization Exclusions .......................................................................................38
8.9. Changing Schedules in Policies.............................................................................39
8.10. Implementing Multiple Policies............................................................................42
1.1. Executing a Manual Optimization .......................................................................43
8.12. Using Application Shaping ................................................................................44 8.12.1. Setting Up Application Shaping ............................................................45 8.12.2. Setting Up Application Shaping Schedules and Exceptions ......................49
8.13. Viewing the Results of Optimization Sessions .....................................................52 8.13.1. The Sessions Optimizations Graph ...........................................................53 8.13.2. The Sessions Detail View .........................................................................53 8.13.3. The Sessions Archive Node ......................................................................54 8.13.4. The Applications Optimization Graph ......................................................55 8.13.5. The Applications Detail View...................................................................56
8.14. Using the Export Function to Analyze TScale Results ........................................57
9. What to do if an Application Stops Working.................................59
10. Upgrading Evaluation Licenses to Production Licenses.......62
11. Setting Up the PMC and TScale in a Distributed Multi-Farm Environment ......................................................................................................64
Performance Management Console System Administrator’s Guide v3.0 4

1. Welcome to the PMC
Thank you for purchasing the RTO Software Performance Management Console (PMC). This document guides you through the installation, setup, and use of the PMC. RTO Software is dedicated to providing the best in scalability and performance enhancement products for Windows servers. We hope that you will get great value from the addition of the PMC to your environment. 1.1. What to do if you have questions RTO Software provides support for TScale through our online support forum. To access this forum go to www.RTOSoft.com/cgi-bin/ultimatebb.cgi. To access the support forums you will need to have your user ID and password. These should have been issued to you when RTO Software delivered your software to you. If you do not have your user ID and password, then please send email to [email protected]. If you have questions about purchasing TScale please send email to [email protected].
2. What is the PMC? The PMC is a multi-server management console designed to allow administrators of multiple Microsoft or Citrix Terminal Servers to administer the TScale 3.0 Agent on multiple terminal servers from one instance of the PMC. The PMC provides the following functions to the administrator:
1. Installation of TScale on any number of servers, upon command by the administrator, or at a scheduled point in time.
2. Role based usage of the PMC. PMC users must be members of a groups (PMC Admins, PMC Deployers, PMC Viewers) to use the PMC.
3. Policy based management of an arbitrary number of servers collected into an arbitrary number of groups.
4. Management of Application Optimizations as a part of policies applied to groups of servers
5. Management of Application Shaping as a part of policies applied to groups of servers
6. Management of Optimization Schedules as a part of policies applies to servers.
7. Administration of policies and schedules based on defined User Roles. In addition, as RTO Software develops and releases optimization products (agents) for servers other than Terminal Servers, the PMC will be able to install and manage these optimization agents in the same manner that it manages TScale Optimization Agents. Therefore, over time, the PMC will evolve into a performance management console for TScale as well as for future performance agents targeted at other types of computers running Microsoft operating systems.
Performance Management Console System Administrator’s Guide v3.0 5

2.1. How the PMC Communicates with TScale Agents In order for the PMC to be able to install TScale upon a target terminal server the following conditions must be in place:
1. Shares must exist on the terminal server to the folders where the TScale Programs will be installed (Program Files\RTO Software\TScale by default). You do not need to have an explicit share to this location if you have an admin share (X$) active on the server. The share can be named anything you want.
2. Shares must exist on the terminal server to the folders where the TScale Data will be installed (Documents and Settings\All Users\Application Data\RTO Software\Tscale by default). You do not need to have an explicit share to this location if you have an admin share (X$) active on the server. The share can be named anything you want.
3. The account under which the PMC Administration Service is running (you specified this account when you installed the PMC) needs to have full control access to the above two shares.
4. The account under which the PMC Administration Service is running (you specified this account when you installed the PMC) needs to be able to use the Connect Network Registry feature of Regedit to make a change to the registry on the target terminal server from the computer that the PMC is installed upon.
Once TScale is installed upon a terminal server, the PMC uses DCOM to communicate between the server that has the PMC and the servers that contain the TScale agents. Therefore DCOM must be enabled on all of these computers, as must all of its supporting infrastructure (RPC Services, etc.) 2.2. Optimization Types and Levels The TScale Agent implements man different optimizations, all of which are controlled in Policies that can be applied to groups of servers. The optimization types and the levels at which they can be controlled are listed the table below:
Optimization Type System Applications Components MT Performance X System Registry Optimization X User Registry Optimization X System File Protected Components X Application Shaping X Services X VM Capacity X X VM Performance X X
System Optimizations are applied globally at a server level. Application optimizations are controllable for individual applications. Component optimizations are controlled at the level of individual components (DLL’s, etc.), which make up applications.
Performance Management Console System Administrator’s Guide v3.0 6

The TScale agent implements Application Shaping, which allows you to automatically control rogue processes that consume more than the desired amount of CPU. Application Shaping is comprised of two features:
1. Application Priority allows you to designate a CPU threshold and time window for a process. If the process exceeds the CPU threshold for the time window, the TScale agent will automatically reduce its priority so that the rogue process will only get the CPU resources left over after all of the well-behaved processes have taken what they need.
2. Application Affinity allows you to nail all instances of a process to one CPU. So, if you have an application that is not the most heavily used application on the server and it tends to go rogue, you can nail all instances of that application to one CPU so that when it does go rogue it only impacts one of N CPU’s on your server.
You can use Application Priority and Application Affinity together, or separately from each other. The TScale Agent implements four different optimizations:
1. VM Capacity, which is an optimization that reduces the degree to which application components got swapped out the page file and then caused page faults when the OS discovered it needed them again. This optimization reduces VM utilization on the part of components and allows terminal servers to support a third more users per server. The VM capacity optimization can be turned on or off globally, or for individual applications and components. You can turn this optimization on or off for system file protected components at the System level. You can turn this optimization on or off for Services at the application level.
2. VM Performance, which improves the load time for applications and all of the components
that are used by each application. By reducing the number of CPU cycles required for a chain of components to call each other, this optimization improves the overall performance and responsiveness of the applications on the server. The VM Performance optimization can be turned on or off globally, or for individual applications and components.
3. MT Performance, which helps multi-threaded applications execute more efficiently. This
optimization effects both applications and the components that comprise these applications by reducing the degree to which these applications cause context switches while they are executing. MT Performance optimizations are turned on and off globally for all terminal servers in a group, in the options tab of the policy that has been defined for that group of terminal servers.
4. Registry Optimizations, which automatically defragment the system and user registries.
This mitigates the impact of the registry size limit upon scalability in Windows NT and Windows 2000, and free up virtual memory in Windows 2003. Servers which are at or near the registry size limit in Windows NT/2000, or which are VM constrained in Windows 2003 will be able to support more concurrent users as a result of this optimization.
Performance Management Console System Administrator’s Guide v3.0 7

Performance Management Console System Administrator’s Guide v3.0 8

3. PMC Requirements To run the PMC, be sure that:
• The computer is running Windows NT SP6 or above, Windows XP or Windows 2000 Server SP3 or above, or Windows 2003 Server.
• The computer is on a network that is either in the same domain as the target Terminal Servers, or in a domain that has trusted access to the Terminal Server domain.
• The Login Account for the PMC has administrative privileges to the Terminal Servers. • The Login Account for the PMC, and the account that you are logged in under are members
of the PMC Admin group.
4. Quick Start for Experienced Administrators If you are an experienced Citrix/Microsoft Administrator, this is what you need to know to install and use the PMC:
1. Identify a workstation or server that will be the computer from which you run the PMC and administer the TScale performance agents on your terminal servers. This computer should be on a LAN in the same domain as your servers, as it will need Admin privileges for all of the Terminal Servers. This computer should also be one that is left running continuously, and one that will be able to communicate to the terminal servers continuously; this computer will contain an administration service that will be responsible for carrying out scheduled and deferred activities on behalf of the PMC.
2. Identify a file server or a share on a file server that the Admin Workstation can access, and that all the Terminal Servers can access. Copy the TScale.exe file to a shared folder on this file server.
3. Install the PMC on the admin computer. You will need a license key from RTO Software in order to install the PMC. When you install the PMC you will be asked for an Admin Account. Make sure that this account satisfies the criteria in section 2.1 above (it is an admin account on the target terminal servers, has access to the admin shares on that terminal server, and can connect to the registry on the terminal servers over the network).
4. Make sure that the account that you are using to log into the computer that is running the PMC is a member of the PMC Admins Group.
5. Launch the PMC and create at least one Farm under the Enterprise Group. When you create a Farm you will be prompted for the name of the computer that will host the Admin Service. If you only have one Farm, you should use the same computer that hosts the PMC as the host of the Admin Service. If you have multiple distributed Farms, please see Section 11, “Managing large and complex Multi-Farm Installations of TScale.”
6. Create one or more groups under your Farm in the PMC. In general, you should create a Group for each Silo of hosted applications that you have in your Farm.
Performance Management Console System Administrator’s Guide v3.0 9

7. Add terminal servers to your groups in a manner appropriate to how you manage and identify your servers. If all of your servers are the same, you can put them all in one Farm directly beneath the Enterprise Group. If all of your servers are in a domain, you can simply add the domain in the Add Agent dialog, and this will add all of the computers in that domain to a Farm or Group.
8. To install TScale on a set of servers you will need an evaluation or production license key that covers the number of servers you want to install. Evaluation keys are not limited as to the number of servers that you can use the key to install. Production keys are limited, and you must purchase production keys in sufficient quantities to cover your server population. Add your TScale license key to the License Node in the PMC before you try to use the PMC to install TScale on any of your Terminal Servers.
9. Right-click on a group or a server in a group to install TScale on that server or on all of the servers in that group. In the installation dialog, specify the location of the TScale.exe file, and specify where on the servers you want the TScale program and data directories installed. Be sure to put the TScale data directory in a location where the System account and the Local System account on the server both have Full Control permissions.
10. Right-click on Default Policy and select Copy Policy. Create a Policy for every group of servers that you have defined. If you only have one Group of servers and they are all under one Farm, create a Policy for that Farm. Use the “+” key in the upper right corner of the Policy Window to associate each Policy with its Group of Servers. When you are finished, your main PMC Window should look something like the image below:
Performance Management Console System Administrator’s Guide v3.0 10

5. Pre-installation Planning The PMC is an installation and management console for TScale performance agents that run on production terminal servers. In order for the PMC to work you must identify the following computers in your network.
1. F
foMth
2. TMbsa
AcTe
M TS 1
Pan
F
Perfo
File Server cessible by the rminal Servers
and the anagement
Workstation
TScale.exe located here
3. C4. C
WadPm
5. InM
6. WAwfrco
7. Yin
TS 2
TS 3
Management Workstation or
Server
MC is installed d run from here
PMC Admin
Service for the first managed arm is installed
here
se8. Yo
9. Oth
10. Tou
11. Cth
12. Smcr
TS 4
TS N
rmance Management Console System Administrator’s G
Installation Planning Tips
ile Server should have a shared lder that is accessible to the anagement Workstation and all of e Terminal Servers. he File Server and the anagement Workstation should a
e on the same subnet and in thme dom
ll e
ain. opy TScale.exe to the File Server. opy PMC.EXE to the Managementorkstation. If multiple ministrators need access to the
MC, install one copy on a shared achine, and terminal service to it. stall PMC.EXE on the anagement Workstation. hen you install the TScale gent on a Terminal server from ithin the PMC it runs the install om the File Server where you pied TScale.exe. ou can install TScale on any dividual server or any group of rvers from the PMC. ou can also schedule installs to ccur at night if you want. nce TScale is installed on a server, e default policy is applied. he default policy will run ptimization sessions at 3 AM and pon reboot. hange the optimization schedule in e default policy if desired. ee the Policies section of this anual for information on how to eate and use custom policies.
uide v3.0 11

6. Installing the PMC
The PMC is delivered in a self-extracting compressed file. Double-click on PMC.EXE file in order to launch the setup program. The following dialog box will appear. Follow the steps outlined below to install the PMC. 1. Click “Next” to start the installation process
Performance Management Console System Administrator’s Guide v3.0 12

2. Accept the PMC End User License Agreement
Performance Management Console System Administrator’s Guide v3.0 13

3. Decide if you are installing the PMC for one Farm or for several distributed Farms. If you are
installing the PMC for one Farm, install the PMC components on the one computer that you are going to use to manage the servers in your farm. If you have multiple distributed farms, please read Chapter 11 of this manual before you start the process of installing the PMC and TScale on your farms. If you have multiple Farms distributed Farms you will want to install just the Admin Services on a server in each of those Farms.
Performance Management Console System Administrator’s Guide v3.0 14

4. The copy of the PMC that you have received can be run in two different modes:
1. If you install the PMC with an evaluation license key, the PMC will allow you to install and manage TScale Performance Agents for a 30-day period from the time that you first install the PMC. Note that you will need a separate evaluation key for the TScale agents that you install on the terminal servers.
2. If you install the PMC with a production key you have a permanent license to run the PMC, and can use it to install and manage TScale agents. However, you will have to purchase a key, which reflects the number of TScale agents that you wish to manage with the PMC and register that key with the PMC. Enter your name, your company or organization name and the license key in the boxes provided in the dialog box below.
Performance Management Console System Administrator’s Guide v3.0 15

5. Choose a location on your hard disk for the PMC software to reside.
Performance Management Console System Administrator’s Guide v3.0 16

6. Enter the domain and user name for the Administration Service. The account name you enter here must have the following permissions:
• The account must have Admin rights on the computer that the PMC is installed upon, and the servers that TScale will be installed upon.
• The account must be able to create and start services on the remote terminal server that TScale will be installed upon
• The account must be able to connect to the registry on the remote server and make changes to the remote registry (connect network registry)
• The account must have full control access to the file system on the remote server either through the admin share (X$), or an explicit share
• The account must have full access to DCOM
Performance Management Console System Administrator’s Guide v3.0 17

7. Press the “Next” button to start the installation of the PMC.
8. Press the “Next” button to view the PMC ReadMe.
Performance Management Console System Administrator’s Guide v3.0 18

9. Press the “Finish” button to complete the installation of TScale. Leave the “Launch the Performance Management Console” box checked to start the PMC automatically once the installation is complete.
Performance Management Console System Administrator’s Guide v3.0 19

7. PMC Role Based Administration The PMC uses role based administration to control who can change polices in the PMC, who can use existing policies to deploy TScale agents, and who can view optimization results in the PMC. There are three roles defined for the PMC:
1. PMC Admins. PMC Admins have full control of the PMC. They can create policies, change the contents of policies, assign policies to agents, install TScale on servers, and use all other PMC functions.
2. PMC Deployers. PMC Deployers can only install TScale agents on servers and apply existing predefined policies to these agents.
3. PMC Viewers. PMC Viewers can launch the PMC and view optimization reports, but can take no other action in the PMC.
Users and administrators who are not members of one of these three groups will get an error message “You Do Not Have Permission to Use the PMC” when they launch the PMC. To add users to these three groups go to Local Users and Groups on the server on which the PMC is installed.
Right-click on the group that you want to add users to and add the appropriate users to each group.
Performance Management Console System Administrator’s Guide v3.0 20

8. Using the Performance Management Console After installing the PMC, launch the "Performance Management Console" shortcut in the RTO Performance Management Console Start menu group.
.
Performance Management Console System Administrator’s Guide v3.0 21

8.1. Applying your TScale License Key in the PMC 8.1. Applying your TScale License Key in the PMC As a part of your purchase or evaluation of TScale 3.0 and the PMC you should have received two license keys. The key for the PMC should have been entered into the PMC installation program during the installation of the PMC. Your license key for the number of terminal servers that you purchased TScale for needs to be entered into the PMC so that the PMC can install TScale on those servers for you and manage them. Right click on the License node in the PMC and select Add License. Then paste your TScale license key into the field.
As a part of your purchase or evaluation of TScale 3.0 and the PMC you should have received two license keys. The key for the PMC should have been entered into the PMC installation program during the installation of the PMC. Your license key for the number of terminal servers that you purchased TScale for needs to be entered into the PMC so that the PMC can install TScale on those servers for you and manage them. Right click on the License node in the PMC and select Add License. Then paste your TScale license key into the field. If you are evaluating the PMC and TScale you will have been provided with 30 evaluation license keys. Once you purchase the PMC and TScale you can simply apply the production keys that will be shipped to you and convert your existing evaluation installations of the PMC and TScale into fully licensed installations (no re-installation or reconfiguration is required to convert evaluation product into fully licensed product).
If you are evaluating the PMC and TScale you will have been provided with 30 evaluation license keys. Once you purchase the PMC and TScale you can simply apply the production keys that will be shipped to you and convert your existing evaluation installations of the PMC and TScale into fully licensed installations (no re-installation or reconfiguration is required to convert evaluation product into fully licensed product).
Performance Management Console System Administrator’s Guide v3.0 22 Performance Management Console System Administrator’s Guide v3.0 22

8.2. Setting up a Farm with in the PMC The PMC supports three levels of managed entities:
• A Farm refers to a group of servers that can contain many servers hosting many different applications, in many different silos. A Farm is typically in one physical location. You must define at least one Farm in the PMC underneath the Enterprise Node.
• A Group is an arbitrary set of servers within a Farm. If you have multiple silos that each host a set of applications you should set up a Group for each silo. You do not need to use Groups if you do not want to.
• An Agent refers to a Server that runs TScale. You need to define an Agent for each server on which you want the PMC to install and subsequently manage TScale. You can add Agents directly to a Farm, or to a Group.
If you have only one Terminal Server farm in your enterprise (or you are only setting up TScale for one farm), you should define only one Farm in the PMC. Right-click on Enterprise, and select “Add Farm.” You will be prompted for the Farm Name (name it anything you want) and for the name of the server that will host the PMC Admin Service for that farm. If you are only setting up one Farm in the PMC then you should install the PMC on the machine that will manage the servers in your farm, and put the Admin Service on that machine as well. If you have multiple Farms within your Enterprise, please see the section, “Setting Up the PMC and TScale in a Distributed Multi-Farm Environment .”
Performance Management Console System Administrator’s Guide v3.0 23

8.3. Adding Groups to your Farm You can create as many Groups under your Farm as you wish. In general, you should create a Group for each Silo of servers that you have, since this will allow you to create a Policy for each Silo to control Application Optimization and Application Shaping settings for that silo.
8.4. Adding Agents to Groups (or to your Farm) To add an agent to a Group or a Farm, right click on the Group or Farm name in the PMC and select Add Agent.
When you select Add Agent, the browse network box depicted below will appear. You can add all of the servers in a domain to the Group by double clicking the domain, or by highlighting the domain and clicking Add. In the example below, TerminalServer1 has been selected for addition to the group.
Performance Management Console System Administrator’s Guide v3.0 24

After you have added servers to your group the PMC will look like the screen below. There are some important things to note about the operation of the PMC at this point:
1. The PMC is designed so as to minimize the network traffic between the PMC and the servers it manages. So, the PMC does not attempt to connect to a server when you add it to the PMC to be managed by the PMC. The PMC will only connect to the server once you initiate an action that requires that the PMC connect to the server(s) in order to complete the action.
2. The PMC is designed to minimize the impact upon the CPU resources of the server(s) being managed by the PMC. So, it will only consume CPU resources on your production servers when you initiate actions in the PMC that require the server to do work in order to complete those actions.
Performance Management Console System Administrator’s Guide v3.0 25

For the reasons stated above, when you first add servers to the PMC to be managed, and you highlight the group that the servers are in, the servers show a status of “Disconnected.” This simply means that the PMC has not yet established a logical connection to the servers and has no idea what state those servers are in.
Performance Management Console System Administrator’s Guide v3.0 26

Once you highlight an individual server, the right pane in the PMC will show you the status of the TScale Performance Agent on that server. Before you install TScale on that server the screen will look like the following screen.
Performance Management Console System Administrator’s Guide v3.0 27

8.5. Installing the TScale Performance Agent on One or More Servers You can install the TScale Agent on all servers (right click on the Farm name), on a group (right click on the group), or on an individual server (right click on the server). After you right click, select Install or Upgrade on the pop up menu. Initiating an installation (for a single server or for a group of servers brings up the screen below:
There are several very important fields in this dialog box. These fields and the information that you need to fill them out properly are:
1. You must have a license key that is for the right kinds of servers (dual CPU, quad CPU, 8 CPU) and have sufficient license capacity. If you have a license key and you have not applied it, right click on License, select Add License, and then paste your key into the field.
2. Select the directory where you want the TScale program to be installed on the target server. The selected directory should be one where both the System Account and the Local System Account have Full Control Permissions. If a previous version of TScale is installed in a different program directory for one of the servers in the group, then TScale will be updated in that directory. TScale will be installed where you specify for all terminal servers that do not already have TScale installed.
3. Select a directory where TScale will store its optimization logs and backup data. This directory must be one where both the System Account and the Local System Account have Full Control Permissions. The directory must also have at least 300MB of free file space. If a previous version of TScale uses a different data directory for one of the servers in the group, then TScale will continue to use that data directory. TScale will use the specified data directory for all terminal servers that do not already have TScale installed.
4. Use the “…” button on the “Use the following setup” to browse to the file server where you put the TScale.exe file (the 3.0 TScale.exe file, and not a previous version).
5. Decide if you want this install to run now or at a later time.
Performance Management Console System Administrator’s Guide v3.0 28

6. If deploying to a large farm (hundreds of servers), decide how many servers should attempt to hit the file server at once to run the installation program. 50 is a good maximum.
Once you have installed TScale on a Terminal Server, the PMC screen will indicate the installed status of TScale on the server.
Performance Management Console System Administrator’s Guide v3.0 29

8.6. Managing Your Terminal Servers via Policies The PMC includes a powerful policy based management system that is designed to allow you to manage large numbers of servers divided into arbitrary numbers of groups easily. The PMC ships with a default policy that is automatically applied to all terminal servers managed by the PMC. You should create a policy for each group of terminal servers that you want to install TScale on. Use the following steps to create and use policies on the groups of servers that you install TScale on:
1. Expand the Policies node, right click on the Default Policy and select “Copy Policy.” Make a copy of the default policy for each group of terminal servers that you have defined (you should have a group defined for each set of applications that a group of terminal servers host).
2. If you have Groups named Farm1, Farm2, etc., then you should have policies named Farm1 Policy, Farm2 Policy, etc.
3. Once you have created a policy, give it a name that corresponds to the group of terminal servers that you want that policy to apply to. Then click the Members tab at the bottom of the policy pane, and expand out the tree until you can put a check box in the group that you want this policy to apply to.
Performance Management Console System Administrator’s Guide v3.0 30
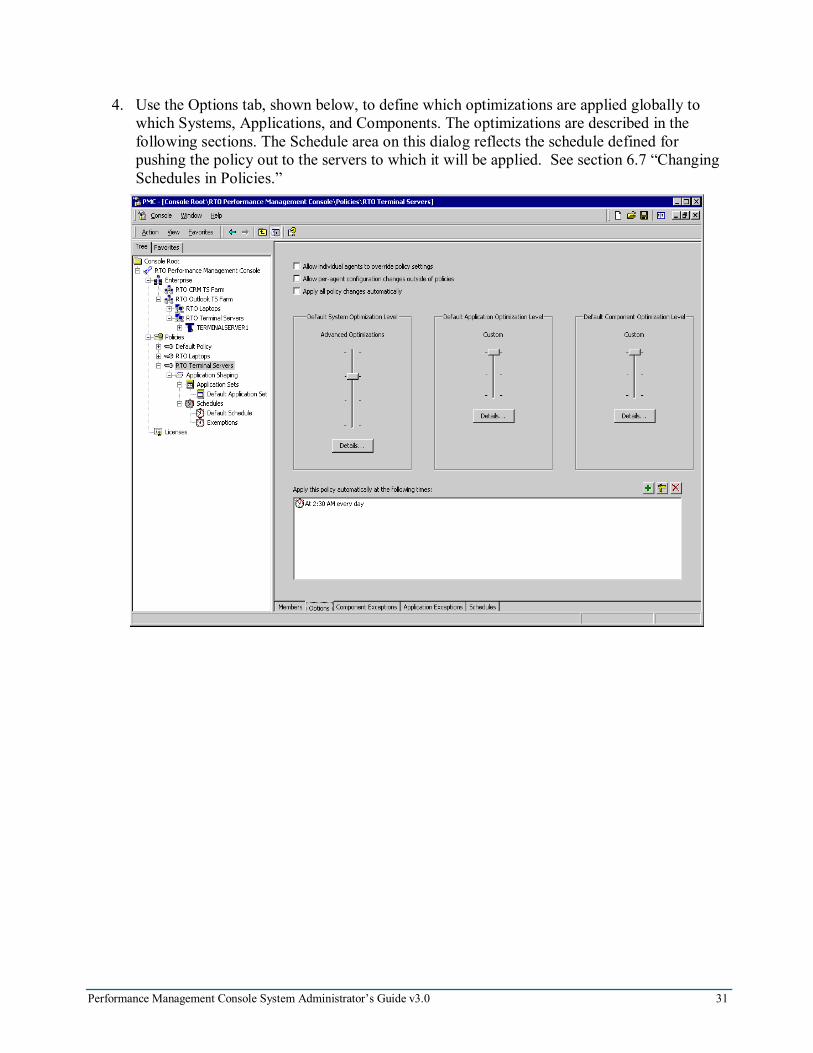
4. Use the Options tab, shown below, to define which optimizations are applied globally to which Systems, Applications, and Components. The optimizations are described in the following sections. The Schedule area on this dialog reflects the schedule defined for pushing the policy out to the servers to which it will be applied. See section 6.7 “Changing Schedules in Policies.”
Performance Management Console System Administrator’s Guide v3.0 31

8.6.1. Defining System Optimizations
Click the Details button under System Optimizations to enable and disable five different optimizations. Checking and un-checking optimizations here turns them on and off system-wide on all servers to which the selected policy applies.
User Registry Optimizations automatically compress the user registry to free up virtual memory, which can be used to support incremental users. These optimizations mitigate the impact of the W2K registry size limit upon scalability. System File Protected Components refers to giving TScale permission to optimize these components as it implements its VM Capacity and VM Performance optimizations. You should try these optimizations on a test server before you try them on a production server. System Registry Optimizations automatically compress the system registry to free up virtual memory, which can be used to support incremental users. These optimizations mitigate the impact of the W2K registry size limit upon scalability. MT Optimizations improve the execution efficiency of multi-threaded applications.
Application Shaping keeps rogue instances of an application from harming more than one CPU on the server and other applications/users. It improves utilization of server resources by eliminating headroom previously reserved for runaway applications.
Performance Management Console System Administrator’s Guide v3.0 32

8.6.2. Defining Application Optimizations Click the Details button under Applications Optimizations to enable and disable three different optimizations. Checking and unchecking optimizations here turns them on and off for all applications which are running on all servers to which the selected policy applies.
VM Capacity optimizations reduce the amount of virtual memory and page file that each application uses, allowing more concurrent copies of each application to run on each server. VM Performance optimizations reduce the time required for applications to load the components that comprise each application. This improves the load times and overall execution efficiencies of applications running on the terminal server. Not all applications are compatible with this optimization so you should not turn it on unless you have given the VM Capacity optimizations a chance to complete, and you are willing to do compatibility regression testing. Services defines whether or not the VM Capacity and VM Performance optimizations will be applied to processes that run as system services. A conservative optimization policy would be to leave this unchecked. If you wish to be aggressive and are prepared to regression test compatibility issues that may arise, you can check the Services box.
Performance Management Console System Administrator’s Guide v3.0 33

8.6.3. Defining Component Optimizations Click the Details box under Component Optimizations, to enable and disable two different optimizations. Checking and un-checking the VM Capacity and VM Performance boxes here turns these optimizations on and off for all components that run on all servers to which the selected policy applies.
VM Performance improves the speed with which one component loads when it is called by another component. Not all applications are compatible with this optimization so you should not turn it on unless you have given the VM Capacity optimizations a chance to complete, and you are willing to do compatibility regression testing. VM Capacity reduces the Virtual Memory and Page File utilization of each component allowing more concurrent copies of these components and the applications that use them to be run concurrently on the server.
Performance Management Console System Administrator’s Guide v3.0 34

8.6.4. Applying Policies on a Scheduled Basis
The PMC includes a feature that allows you to schedule the application of your policies on a regular basis. This feature exists so that you can ensure that all of your servers are always up to date with the most recent policy. You should use this feature to push down the policies before optimization sessions are run. So, if you have optimization schedules set to run at 3 AM in the morning, you might want to schedule a policy apply at 2 AM in the morning. This will ensure that an accidental or unauthorized changes to agent configuration are overwritten before an optimization session is run. To set a scheduled apply of a policy, hit the green “+” above the window at the bottom of the policy, and then select the time that you wish that policy to be pushed down to all of the agents to which this policy applies.
Performance Management Console System Administrator’s Guide v3.0 35

8.7. Enforcing Policies The PMC features options that enable you to decide the degree to which you use policies alone to manage your terminal servers. You can use these options to be sure that all of your terminal servers are configured identically, and are being configured only by the policies that you have applied to them. The third option allows you to decide whether to apply policy changes every time you make a policy change or if you want then to be “batched up” and applied when you want them to be applied.
8.7.1. Allow Individual Agents to Override Policy Settings If this option is enabled (checked), then someone can launch the console on an individual agent (terminal server) and make changes to the options and schedule tab on that server. In other words, if this box is not checked (the default), then the ONLY way to modify the options and schedule for a terminal server is through the PMC. The Options and Schedule tabs in the Agent consoles launched on an individual terminal server will be grayed out.
Performance Management Console System Administrator’s Guide v3.0 36

8.7.2. Allow Per Agent Configuration Changes Outside of Policies When enabled (checked), you (the systems administrator) can make individual configuration changes to agents within the PMC on individual terminals servers without creating a policy and applying that policy to that terminal server. If this box is not checked (the default), then you cannot edit the individual optimization levels, exclusion lists, and schedules for an agent from within the PMC. This feature is designed to give you the flexibility to make changes to an individual agent without having to create a whole new policy and the control to make sure that all servers are covered by a policy if this is how you wish to manage the farm. 8.7.3. Apply Policy Changes Automatically This option allows you to decide if you want every change that you make to a policy to be applied to all servers to which that policy is in force, or if you would like to be able to make several changes to a policy and then apply them all in one batch operation. To have all of your policy edits applied to all of the servers impacted by that policy instantly upon each change, then check the “Apply policy changes automatically” box. If you have a large number of servers in the group to which this policy applies, you should not burden your network and your server farm by making them react to each policy change as you make it. Therefore, if you have a large number of servers in each group to which you are applying a policy, please leave this box unchecked (the default) so that you can make multiple changes to a policy and then apply them all in a batch job to the servers affected by that policy.
Performance Management Console System Administrator’s Guide v3.0 37
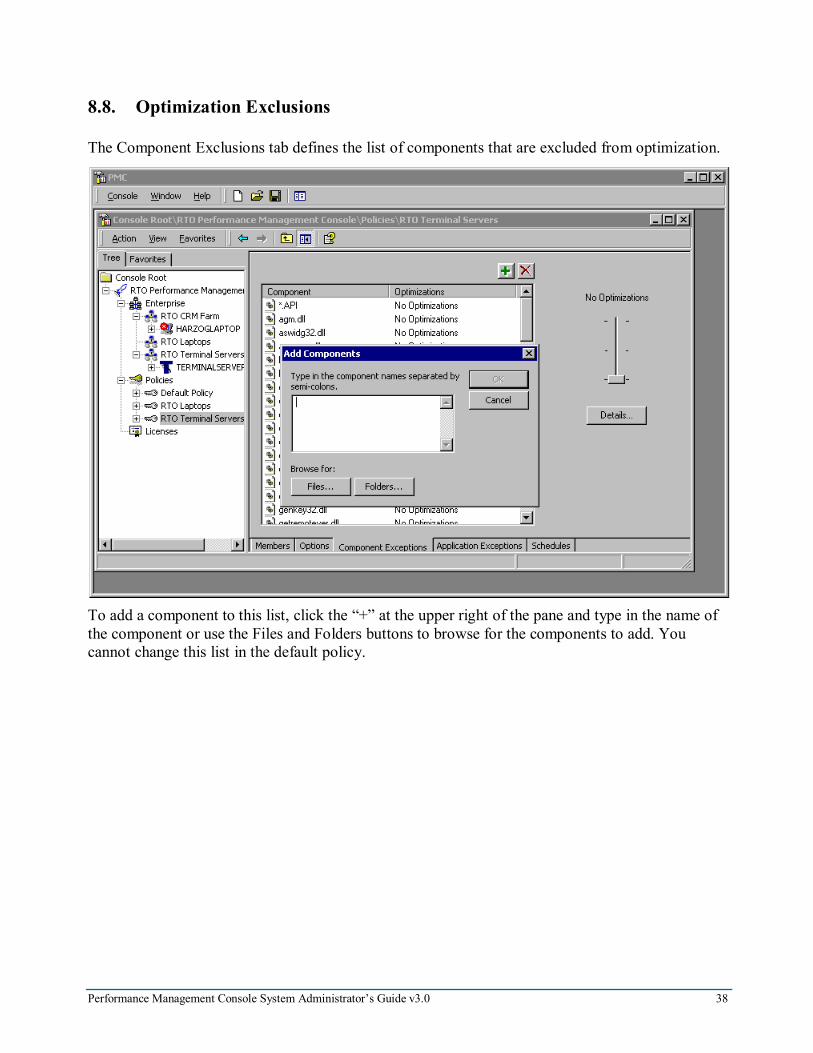
8.8. Optimization Exclusions The Component Exclusions tab defines the list of components that are excluded from optimization.
To add a component to this list, click the “+” at the upper right of the pane and type in the name of the component or use the Files and Folders buttons to browse for the components to add. You cannot change this list in the default policy.
Performance Management Console System Administrator’s Guide v3.0 38

The Applications Exclusions tab defines the list of applications that are excluded from optimization.
To add an application to this list, click the “+” at the upper left of the pane and type in the name of the application or use the Files and Folders buttons to browse for the components to add. You cannot change this list in the default policy. 8.9. Changing Schedules in Policies Once you have installed the PMC and have installed TScale via the PMC on your servers, the only change that you should have to make is to modify the optimization schedules so that they reflect how you manage your terminal servers. The Schedule tab defines the optimization schedules that are in place for all of the servers by default. The suggested changes to the schedules are:
1. Change the 3 AM scheduled optimization task to a time that the servers are not very busy if they are busy at 3 AM.
2. If you reboot your servers every night, delete the 3 AM scheduled task, since if your reboot your servers every night, the task the runs upon reboot will perform a nightly optimization for you.
3. If you do not reboot your servers every night, leave both tasks in place. This will ensure that a nightly optimization session catches most of the things that need optimization, and that applications or components that are in use, will get optimized upon reboot.
4. The Schedule tab contains a check box named “Enable Scheduled Optimizations.” If you ever want to cause TScale to not perform any further optimizations of your servers, simply
Performance Management Console System Administrator’s Guide v3.0 39

uncheck this box. This will disable Schedule Optimizations until you recheck this box. This feature exists for organizations that need to freeze the state of their servers during a certain period of the year (for example a retail organization that locks down their servers during the holiday season.)
Performance Management Console System Administrator’s Guide v3.0 40

5. If you double click on either one of the default schedules in the policy the follow dialog will come up. You can then set the schedule for the optimization session on all servers to which this policy applies.
Performance Management Console System Administrator’s Guide v3.0 41

8.10. Implementing Multiple Policies
To have different policies in effect for different groups of servers (for example, if you want a different optimization schedule for one group than for another group), you need to create a new policy. Right-click on Policies and select Add Policy. You will then get a New Policy Node in the tree underneath Policies. To apply a policy to a server or group of servers (or to your whole Farm) highlight the policy and click the Members tab. Click the “+” at the upper right of the Members tab. In the dialog, shown below, check the box next to each terminal server or group to which you want this policy to apply.
Performance Management Console System Administrator’s Guide v3.0 42

8.11. Executing a Manual Optimization After you use the PMC to install TScale on a terminal server, you might want to perform a manual optimization on that server. To run manual optimizations for all of your groups, right-click right on the Enterprise Group and select Optimize Now. To run an optimization session on the servers in a single group, right-click on that group and select Optimize Now. To run an optimization session on an individual server, right-click on the name of that server and select Optimize Now.
Performance Management Console System Administrator’s Guide v3.0 43

8.12. Using Application Shaping Application Shaping consists of two component features that together allow you to prevent a runaway (or rogue) application from damaging the performance of your servers and the experience of your users. The features that comprise Application Shaping are:
1. Application Affinity. Application Affinity allows you to specify on which of the n CPUs in your server all instances of a process will run. So, if you have a dual processor, and you frequently have cases of an application running away with your servers, you can use Application Affinity to nail all instances of the application to a CPU so that when rogue instances of the application occur, only one CPU is impacted.
2. Application Priority. Application Priority allows you to reduce the CPU priority of an application after it has used x% of the CPU for n minutes. So, if an instance of an application runs away with the CPU, you can have TScale reduce its priority after 1 minute. All other applications (including other instances of the application) will be able to get the CPU resource that they need before the rogue instance of the application takes the rest.
You set up Application Shaping for each policy. Under each policy node there is an Application Shaping node, which has two nodes underneath it, Application Sets and Schedules.
Under Application Sets you define Application Sets, which are collections of applications to which you want common Application Shaping policies applied. Under Schedules, you define a Schedule for each Application Set that determines when (what times of the day), and to whom (which users) Application Shaping is applied. You can populate the Default Application Set that is provided with the first set of applications to which you want to apply Application Shaping.
Performance Management Console System Administrator’s Guide v3.0 44

8.12.1. Setting Up Application Shaping To set up Application Shaping in a Policy in the PMC, you simply need to add the applications that you want Shaped to the Default Application Set. Expand out the Application Shaping Node and then the Application Sets Node, and highlight the Default Application Set. By default you will see that a rule exists to reduce the Priority of any application (*.*) that uses more than 80% of total CPU on your servers for more than 2 Minutes. To add specific rogue applications to be managed by Application Shaping, delete the *.* rule before you add these specific applications.
To add an application to the Default the green “+” at the top of the list of dialog is displayed.
Performance Management Console System Admi
IEXPLORE.EXE has been added to the Default Application Set for Shaping
IEXPLORE.EXE is set to have an Affinity of 1 (runs on CPU 1)
Application Set, click the Default Application Set name. Click applications that Application Shaping will be applied to. A
nistrator’s Guide v3.0 45

If you click the Files button you will be able to navigate to where the application resides in the Program Files Folder on your server. Select the application and click the Open button.
If you click Running applications and then select a server from which to import the list of running applications, you will be presented a list like the one below:
Performance Management Console System Administrator’s Guide v3.0 46

Once you have added the application to the Application Set, it will be listed in the set of applications shaped by the Application Set. Your next decision is whether or not to use Application Affinity in conjunction with Application Priority, or whether you want to use Application Priority alone to manage rogue applications. The considerations that impact this decision are:
• If you only host one application on your servers and certain instances of this application have a tendency to go rogue, you probably do not want to use Application Affinity, since Application Affinity will nail all instances of your one application to one of your n CPUs.
• On the other hand if you have many different applications on your terminal server and a few of them tend to go rogue, then it may make sense to use Application Affinity to nail those applications to a specific CPU so that when they do go rogue only one CPU is impacted.
• If you have servers with more than two CPUs you can select multiple CPUs for an application. So, if you have a quad processor server, and both IE and Word have a tendency to go rogue, you can nail IE to CPUs 0 and 1 and Word to CPUs 2 and 3.
• It is important to note that if you select Application Affinity for an application, all instances of that process (good ones and bad ones) will be nailed to the CPUs that you select for that process.
When you decide to use Application Priority for a process, the most important decision is the CPU threshold at which Application Priority will kick in and the time window for the threshold. The considerations that impact this decision are:
Performance Management Console System Administrator’s Guide v3.0 47

• TScale uses the CPU utilization numbers reported by Task Manager for a process. • In general, even multi-threaded applications will not consume more than 100% of ONE CPU
on the server. On a dual processor machine, it is extremely rare for a process to consume more than 50% of the CPU on a server (100% of one of the two CPUs). On a quad processor machine, it is extremely rare for a process to consume more than 25% of the CPU on the server (100% of one of the four CPUs). Therefore, in general, if you set the threshold value to be higher than 50% or 25% (depending upon whether you have duals or quads), Application Priority will never kick in. In most cases, you should use thresholds lower than 50% or 25%.
• The actual threshold you use should be a function of how many concurrent users there typically are for that application, and whether or not you are using Application Affinity in conjunction with Application Priority, or Application Priority alone.
• If you typically have 20 users of IE on a dual processor and you are not using Application Affinity, then you will have 10 users on each CPU. If no other work is going on, each IE user will be using 5% of the CPU. So, you should define a rogue process of IE as one that is using more than the 5% that would be normal for some period of time (like 20 or 30 seconds). You should apply some judgment as to how much more than 5% you are willing to let one process consume since CPU utilization normally varies quite a bit from moment to moment.
• If you have the same 20 users of IE on a dual processor and you are using Application Affinity to nail all of the instance of IE to one CPU, those same 20 users will be sharing 50% of the total CPU resource on the server, meaning that the average utilization for one user will be 2.5%. You should then set the threshold level at which Application Priority kicks in at some level above 2.5 % again allowing for some normal variation in how much CPU a process uses.
• If you set the time window to be very long (over a minute or two) you risk a rogue process doing damage to your servers and the experience of users before priority kicks in.
• If you set the time window to be very short (less than 10 seconds), you risk priority kicking in while an application is launching, which will cause it to take longer to launch.
In the example below, both Application Priority and Application Affinity have been set for IEXPLORE.EXE. The Application Priority rule is to reduce the priority of IEXPLORE.EXE if it uses more than 30% of CPU for more than 10 seconds. The Application Affinity rule is to run all instances of IEXPLORE on Processor 1 (the second CPU in a dual CPU server).
Performance Management Console System Administrator’s Guide v3.0 48

You can add as many applications as you wish to one Application Set. Each application in an applications set can have its own unique priority and affinity rules associated with it. Each Application Set will be associated with a Schedule, and if you desire, an Exceptions Schedule.
You can add as many applications as you wish to one Application Set. Each application in an applications set can have its own unique priority and affinity rules associated with it. Each Application Set will be associated with a Schedule, and if you desire, an Exceptions Schedule. You can set up more than one Applications Set. In general this is only necessary if you have Applications that you want to have shaped in different schedules and for different sets of users. You can set up more than one Applications Set. In general this is only necessary if you have Applications that you want to have shaped in different schedules and for different sets of users. 8.12.2. Setting Up Application Shaping Schedules and Exceptions 8.12.2. Setting Up Application Shaping Schedules and Exceptions You can control the times at which Application Shaping occurs as well as the users to which it is applied. This is set in a schedule that applies to each Application Set. The Default Application Set has a Default Schedule associated with it.
You can control the times at which Application Shaping occurs as well as the users to which it is applied. This is set in a schedule that applies to each Application Set. The Default Application Set has a Default Schedule associated with it. To set the schedule and the users, click on a schedule listed under the Schedules node. You can use the Default Schedule as the starting point to control timing and users for the Default Application Set. You will see that the Default Schedule applies to Everyone, and you will see by the width of the blue bar, the time period during the day that the Default Schedule is in effect.
To set the schedule and the users, click on a schedule listed under the Schedules node. You can use the Default Schedule as the starting point to control timing and users for the Default Application Set. You will see that the Default Schedule applies to Everyone, and you will see by the width of the blue bar, the time period during the day that the Default Schedule is in effect.
Performance Management Console System Administrator’s Guide v3.0 49 Performance Management Console System Administrator’s Guide v3.0 49

You can add or delete users to the list of people that this schedule impacts by hitting the “+” key and using the resulting dialog box to add or remove users and groups. You can modify the time window during which this schedule is in effect by dragging the ends of the blue bar to the left or the right as dictated by your needs. To add an application set to the schedule, right click the time line. Select the application set to add. The selected application set will fill the open area of the timeline.
Click and drag to set the time window for that application set to be applied. To exempt a user from Application Shaping, simply add a user to the Exemptions Schedule. The Exemptions Schedule has no application sets defined for it, and users added to it will be exempt from Application Shaping in all other schedules. You can add users individually to a Schedule and then delete those that are exempt, but using the Shaping Exemptions schedule is much easier. To add users to the Shaping Exemptions schedule, click Shaping Exemptions under the Schedules node.
Performance Management Console System Administrator’s Guide v3.0 50

Click the sign. The Add Users and Groups dialog is displayed. Highlight users or groups in the list then click Add. This will allow you to exempt individual users and groups from a particular Application Shaping schedule.
Performance Management Console
System Administrator’s Guide v3.0 51
8.13. Viewing the Results of Optimization Sessions Once you have run an optimization session, you will see another node under the Sessions node in the tree of the TScale Console. In fact, you will see a node appear for each optimization session that you run. It is recommended that you run an optimization session once a day (actually once a night, if your production usage is during the day). After you have run several optimization sessions, the tree control in the PMC will appear similar to the picture below.
In the picture above, you can see that optimization information is presented on an optimization session basis. Over time as the optimization sessions “catch” all of the components on the system, the system will become fully optimized. At that point the Optimizations Summary Graph will start to “flatten out,” indicating that the system has been fully optimized. You will notice that the PMC contains two high level nodes for each terminal server that has been optimized, the Sessions Node, and the Applications Node. The Sessions Node contains a node for each optimization session that you run. The Applications Node contains the cumulative Virtual Memory savings for each application that TScale optimizes.
Performance Management Console System Administrator’s Guide v3.0 52

8.13.1. The Sessions Optimizations Graph If you click on and highlight the node associated with a particular optimization session, then you will get a bar chart in the right pane that shows you the savings for each process that was optimized in that particular optimization session. The chart will typically look something like the one in the screen below:
8.13.2. The Sessions Detail View If you drill down into an individual optimization session, you can see which optimizations have been implemented for each application and each component of that application. In the screen shot below, you can see that both VM and MT optimizations are implemented for the BUSOBJ.EXE and that both VM performance and VM capacity optimizations have been implemented for MSO97RT.DLL.
Performance Management Console System Administrator’s Guide v3.0 53

8.13.3. The Sessions Archive Node In the list of Sessions under the Sessions node, you will notice that there is a session named “Archived Sessions.” By default, Sessions that were run more than 30 days ago are placed in this Archived Sessions Node. This prevents you from having to scroll through a large number of Sessions when expanding the Sessions Node. To modify the threshold for the number of days that will be allowed to lapse before a Session is archived, right-click on the Archived Sessions node and select a number of your choice.
Performance Management Console System Administrator’s Guide v3.0 54

8.13.4. The Applications Optimization Graph The Applications tree in the TScale Console shows you the total optimizations that have occurred to each optimized application across all optimization sessions. The applications view shows the optimizations performed over time rolled up on a per applications basis. The purpose of this view is to prevent the need for going through all of the different optimization sessions to find out how much a particular application has benefited from TScale. So the benefits on a per applications basis are simply listed in the applications tree.
To use the information in the applications tree, simply pick the applications that are run by every user on your terminal server system. Then multiply the savings depicted in the bar chart for these applications by the number of users that run each application. Add up the per-application savings and you get the total impact of TScale upon the virtual memory of your terminal server. One way to partially automate this analysis is to right-click on the Applications Node and select Export. This will allow you to export all of the detailed data behind this graph to a CSV file, which can be readily imported into Microsoft Excel. Once the data is in Excel it is very easy to create a table, which shows the summary benefit of TScale across all of the frequently used applications. This process is documented in section 7.14.
Performance Management Console System Administrator’s Guide v3.0 55

8.13.5. The Applications Detail View If you drill down onto one particular application, in this case FATAPP, you will be able to see all of the optimizations that have been implemented for that application and its components. In the screen shot below you can see that VM Capacity optimizations have been implemented for all of the components that comprise FATAPP.
Performance Management Console System Administrator’s Guide v3.0 56

8.14. Using the Export Function to Analyze TScale Results If you right click on the Applications Node (as depicted on the left below), and then select Export, you will bring up a dialogue box similar to the one depicted on the right below. Select Text (Comma Delimited) (*.csv) as the file type, and TScale will build an Excel compatible file which will allow for easy analysis of the VM savings that TScale delivers across all of your applications.
If you open the file produced by the exporlike the one below for each of the heavily
Performance Management Console System Administrat
t feature of the PMC, you will be able to build a section used applications in your Terminal Server environment.
or’s Guide v3.0 57

Application ComponentVM Size
Before (KB)VM Size
After (KB)VM Saved
(KB)NLNOTES.EXE D:\PROGRA~1\NOTES\NLSXBE.DLL 672 88 584NLNOTES.EXE D:\PROGRA~1\NOTES\NSEN31EN.DLL 24 12 12NLNOTES.EXE D:\PROGRA~1\NOTES\NSKN31EN.DLL 24 12 12NLNOTES.EXE D:\PROGRA~1\NOTES\NNTCP.DLL 92 20 72NLNOTES.EXE D:\PROGRA~1\NOTES\NTCP.DLL 44 16 28NLNOTES.EXE D:\PROGRA~1\NOTES\NAMHOOK.DLL 28 16 12NLNOTES.EXE D:\PROGRA~1\NOTES\NICNV.DLL 24 12 12NLNOTES.EXE D:\PROGRA~1\NOTES\NPLUGINS.DLL 88 24 64NLNOTES.EXE D:\PROGRA~1\NOTES\NNOTES.DLL 7400 660 6740NLNOTES.EXE D:\PROGRA~1\NOTES\LTSSB01.DLL 72 16 56NLNOTES.EXE D:\PROGRA~1\NOTES\NDBNOTES.DLL 36 16 20
8504 892 7612
Per Instance VM Savings For Notes 7612Typcial Number of Concurrent User 50Total Virtual Memory Saved for Notes 380,600
In the spreadsheet above, you can see that the TScale Agent is saving 7.6 MB of VM for each user who loads Notes. If there are 50 concurrent Notes users, the total savings is a little over 380 MB for this one application. For more details on how to use this information, and on how to correlate it with information about your Terminal Server that you can gather via other means, please see the “How to Evaluate TScale 3.0” manual.
Performance Management Console System Administrator’s Guide v3.0 58

9. What to do if an Application Stops Working If you suspect that TScale optimizations have impacted the operation of any application running on the Terminal Server, please take the following steps:
1. Contact RTO Technical Support BEFORE you try to resolve the issue yourself. Please send email to [email protected], or call RTO Technical Support at 678-455-5506 Option 4.
2. Before you take any of the actions below, please do a support request from within the PMC for the server that is experiencing the problem. Right click on any item in the tree, select Send Support Request, then put your email id in the field at the top and click Send. This will package up TScale’s optimization log files into a file named TScale.zip and email that file to [email protected]. This file will contain the information that RTO Technical Support staff will need to help you troubleshoot your issue.
3. If you are unable to contact RTO Technical Support, and everything was working well on the previous day, select the most recent optimization session in the Sessions tree of the for the problem server in the PMC, right click and select “Set Optimizations.” In the dialog, drag both sliders down to the bottom (No Optimizations). This will restore that server to the state it was in yesterday. You will need to unload and reload the applications for which optimizations were turned off in order for this action to become effective. You should then allow the PMC to apply the fact that you want to turn off optimizations for that component to the policies that you have in effect for all of your servers.
4. If you can identify the component of an application that is having trouble, find that component in the Applications tree (find the application and then the component). Right click on the component and then select “Set Optimizations.” In the dialog, drag both sliders down to the bottom (No Optimizations). You will need to unload and reload the application that uses that component in order for this action to become effective. You should then allow the PMC to apply the fact that you want to turn off optimizations for that component to the policies that you have in effect for all of your servers.
5. If you cannot identify the individual component that is causing the applications compatibility issue, then you can turn off optimizations for an application by selecting it in the Applications tree of the TScale Console right-clicking and then selecting “Set Optimizations.” In the dialog, drag both sliders down to the bottom (No Optimizations). Again, you will need to unload and reload the application for this action to take effect. You should then allow the PMC to apply the fact that you want to turn off optimizations for that component to the policies that you have in effect for all of your servers.
The screen sequence below depicts the process of turning off optimizations for a randomly chosen DLL (XPBLOCK.DLL) and then applying the fact that you do not want that DLL to be optimized any more to policies which will then ensure that this decision is enforced across all of your servers.
Performance Management Console System Administrator’s Guide v3.0 59

Find the DLL that is causing the applications incompatibility. You should be able to find it in the most recently run Session in the Sessions Node of the PMC, or listed under the name of the applications that is causing the problem under the Applications tree. For the sake of this example we are assuming that XPBLOCK.DLL is the problem. Right-click on the component, and then select “Set Optimizations”
Drag both sliders to the bottom for No Optimizations. Click OK. The following dialog box is displayed.
Performance Management Console System Administrator’s Guide v3.0 60

This dialog allows you to apply the turning off of optimizations to every server that is managed by a policy. By default, all of your servers are managed by the default policy. If you have not changed this, simply select the default policy and this will cause the selected component(s) to be placed in the list of components for which optimizations are turned off on all of your servers. Applying the decision to turn off optimizations will have the following effects upon your servers:
1. If the components for which you have turned off optimizations have been optimized on any server to which the selected policy is applied, the optimizations for that component will be reversed on all servers to which the selected policies apply. You will see a new entry in the Sessions log which has a leftward pointing arrow and which contains the processes and components for which you have turned off optimizations.
2. The selected components will not be optimized in the future on all servers to which the selected polices apply.
Therefore in the extremely rare case the TScale causes an applications incompatibility, the combination of the ability to turn off optimizations, and then to via policies propagate that change out to all of the servers in your farm gives you an very fast and effective mechanism to recover from this incompatibility.
Performance Management Console System Administrator’s Guide v3.0 61

10. Upgrading Evaluation Licenses to Production Licenses If when you first install the PMC it is with an evaluation license key, you will be able to use the PMC for 30 days to install and manage TScale agents on your terminal servers. At the end of the 30-day period you will no longer be able to manage the TScale agents from the PMC. If you are installing TScale agents with an evaluation key, these agents will be fully functional for 30 days, after which time they optimizations performed by these agents will be turned off automatically. When you purchase the PMC and the associated TScale licenses, your production PMC and TScale keys will be sent to you electronically. When you get your production PMC and TScale keys from RTO, launch the PMC and right click on the “RTO Performance Optimizations” node at the top of the tree in the PMC. Then select About, and the dialog box below will appear:
Select Activate and the key entry field below will appear.
Paste your production key into the PMC and you will convert your evaluation mode PMC into a fully licensed version able to manage all of your servers with no time limit.
Performance Management Console System Administrator’s Guide v3.0 62

The next step is to upgrade the evaluation key for the TScale agents to the production key that you have purchased. Right click on the Licenses Node in the PMC and select “Add License” as depicted below. Then paste your production TScale license key into the Add License field.
Once you paste your production key into this field, the license status information in the PMC will highlight the number and type of licenses that your have purchased as depicted below:
Performance Management Console System Administrator’s Guide v3.0 63

11. Setting Up the PMC and TScale in a Distributed Multi-Farm Environment
The PMC contains a unique set of features that allow it to effectively manage many distributed farms while conserving on the WAN bandwidth required to manage all of the servers in all of the farms, and ensuring configuration integrity across the farms. The key to using the PMC to manage multiple distributed farms is to take advantage of a feature of the PMC that allows one PMC to use multiple PMC Administration Services to manage multiple Farms. You can use these features to implement a scenario similar to the one depicted below.
WAN
WAN
WAN
LAN
Headquarters Admin Server
(Admin Service for Local Farm)
(PMC with access to local farm and all three remote Admin Services)
LAN
LAN
LAN
Singapore Admin Server
(Admin Service)
New York Admin Server
(Admin Service)
Singapore Farm
New York Farm
London Admin Server
(Admin Service) London Farm
Headquarters Farm
Performance Management Console System Administrator’s Guide v3.0 64

To implement the PMC and TScale in a distributed multi-farm environment similar to the one depicted above, please take the following steps:
1. Copy the PMC.EXE file to each of the remote Admin Servers (Admin Servers in London, Singapore, and New York in the above example).
2. Install the PMC on these Admin Servers. During the installation, select the option to install the Administration Service only, and not the entire Performance Management Console (PMC) with user interface. When prompted for an Account Name and Password during the install, make sure you use an account that meets these conditions: • The account is a Local Admin to
the target terminal servers. • The account has full control
rights to the folders and drives via either a network share or the admin share (X$)
• The account has the rights to use “Connect Network Registry” to remotely make changes to the registries on the target terminal servers.
• The account has full access to DCOM, and that DCOM is fully enabled across the Admin Servers and the target terminal servers.
Be sure to use the NETBIOS names for the accounts user name and domain name when you enter this information.
3. When you have completed the installation of the PMC Administration Components, go to Services on the Admin Servers and verify that the PMC Administration Service is running, and that the account under which the service is running has the permissions described in step 2.
4. Install a PMC (selecting to install the full Performance Management Console) on a headquarters Admin Server. When promoted for the Account Name and Password, make sure you select an Account that is a Local Admin account to the various Admin Servers.
5. When you use the PMC make sure you are logged in with an account that has Admin rights to all servers that have Admin Services, and that your account is part of the PMC Admins Group.
Performance Management Console System Administrator’s Guide v3.0 65

6. Create a Farm within the PMC for each of the remote Farms. When promoted for the name of the server that manages that Farm, put in the NETBIOS name of the Admin Server upon which you installed the PMC Admin Components for that Farm.
7. Create a Farm for the local servers. The default location for the Admin Service for this farm will be the machine upon which you have installed the PMC.
8. Go into each Farm and create Groups that correspond to the application silos (if you have them) in the farm. You can skip this step if all of the servers in the Farm are hosting the same set of applications (no silos). If you have the same silos in each of four farms, your PMC should end up looking something like the picture on the right.
9. Add Agents to your Groups or Farms that represent the servers in those groups and Farms.
10. Go to Policies and create a policy for each SILO if you have multiple silos in each farm. If you have the same silos in each of three different farms (an Office silo in each of the New York, London, and Singapore farms), you can create ONE Office policy that contains the Application Optimization and Application Shaping rules for all three (or N) of the Office silos in all of your Farms.
11. Put the focus on one of the policies and use the “+” button in the upper right of the policy pane to apply the policy to the appropriate Farms, and Groups or Silos (in the picture at the right the ERP policy is being applied to the ERP silos in three different farms)
12. If each Farm is a silo (with different applications), then create a policy for each Farm. If all of the Farms are really one big distributed Silo, then create one policy for them all.
Performance Management Console System Administrator’s Guide v3.0 66

13. Install TScale to the various Farms and Groups. You can tell the PMC to these installs immediately, or to schedule the installs to occur during the night. If you tell the PMC to schedule the install of TScale on 50 servers in New York during the night, the command set to do those installs will be sent to the Admin Service in New York, which will do all of the work. If any server is unavailable for either an immediate or scheduled install, the Admin Service for that server will remember to do the install when that server becomes available again.
The use of Admin Services to perform work on behalf of the PMC is done for the following reasons:
1. The PMC does not need to be up and running in order for actions that have been initiated to be completed. You can fire off installs, policy updates, optimization sessions, etc. from the PMC and the Admin Service for the farm will take care of processing those requests even if you exit the PMC.
2. It allows a “master” Admin Service to send commands to Admin Services that run on the various Farms. This persists the list of work to be done in each Farm, which leads to more efficient use of WAN bandwidth (the PMC is not directly interacting with individual servers over a WAN). This includes actions that you want performed immediately (changes to a policy) and scheduled actions like deferred installs, and scheduled applications of policies.
3. The Admin Services “remember” what they have been asked to do, and the list of servers for which the work is requested. This means that if you fire of an install or a policy update to 50 servers in Singapore from the PMC in New York, the Admin Service in Singapore will notice that one of the servers in Singapore has been taken out of the Farm, and will then do the install or apply the policy when that server comes back into the Farm.
The table below summarizes actions that you can take from within the Headquarters PMC and how those actions are handled by the distributed Admin Services on behalf of the PMC.
Action PMC U/I Required to be Active
Performed by Admin Service
Automatic Retries if Server Unavailable
PMC Support Request Yes Yes No Get Properties on an Optimized File Yes Yes No
Get list of running processes on a server Yes Yes No
Update Pending No Yes No Optimize Now No Yes No Installation of TScale No Yes Yes Scheduled Install of TScale No Yes Yes Uninstall of TScale No Yes Yes Create/Change Policy No Yes Yes Scheduled Policy Apply No Yes Yes License Activation No Yes Yes
Performance Management Console System Administrator’s Guide v3.0 67