Embed Size (px)
Citation preview

PERFORMANCE
CONDITIONINGVOLLEYBALL
Celebrating Over 20 Years Our Free Gift to You!
Here is Your
T“Fit-to-a-T”
7-T System of ProgramDesign Starter Library
PCONDITIONING
V O L L E Y B A L LERFORMANCE

Performance Conditioning Volleyball is Celebrating our 20th year as being the "Official Licensed Publication" of the Amer-ican Volleyball Coaches Association. We are truly grateful for this long standing relationship in providing the very best in Volley-ball-specific educational information on the conditioning of the Volleyball athlete. To celebrate this event we are providing eachAVCA member coach this starter library to help you in developing your conditioning program. We hope you enjoy. - Ken Kontor,Publisher, Performance Conditioning Volleyball
How the Library WorksWe have selected and organized past Performance Conditioning Volleyball articles to help you design your own Volleyball-
specific strength and conditioning program using the "Fit to a T" 7-T System of Program De-sign. This library spans our 20 years of bringing volleyball coaches reliable how-to articlesfrom the worlds leading Volleyball conditioning experts.
What is "Fit to a T"? No two conditioning programs are alike. If something "fits toa T" then it's perfect for your purpose and no one else. We have come up with a 7-T systemto fit you to your T to get your athletes fit to perform at their best.
Introducing the 7- 's and what they mean to you!
Section Training ageEstablish the maturity and experience level of your players. This effects the exercises you choose, how hard you do them
and for how long.
Important considerations:• Start with body weight exercises for young/beginning level athletes. Gaining control of your own bodyweight does not require
using weight or resistance to start. • Introduce good speed/footwork/quickness/agility/mobility (SFQA) skills as soon as possible. This goes hand-in-hand with vol-
leyball skill development. • In endurance training the young athlete, make it Volleyball-specific. Because volleyball is an power sport avoid long slow-dis-
tance runs. Playing volleyball is a great way to build volleyball specific endurance.• Are there injuries that may limit what your athletes can do?
Here are your articles to learn more!
-1
-1
Age Level Considerations When Adding Varietyto a Conditioning Program to Avoid Overtraining
Daryl KapisDaryl has been with San Jose City College since 2003 and since 1999 he has
served with USA Volleyball in various capacities including Apprentice Coach of theYouth National Team, Developmental Camp Director, A2 Youth National Team and Jr.National Team Assistant Coach, and High Performance Camp Coach. Before his dutiesat San Jose City College he served as volleyball coach in the high school and club ranks.Daryl is a Certified Strength and Conditioning Specialist and United States Weight Lift-ing Federation, Level I certified.
In addition to his volleyball coaching duties, Daryl is head strength coach atArchbishop Mitty High School in San Jose and has served as interim conditioning andstrength coach at Stanford University. He has a Master of Arts degree in Health, PhysicalEducation, and Recreation from St. Mary’s College of Moraga and a Bachelor of Sciencedegree in kinesiology from San Francisco State University. His blend of volleyball coach-ing and conditioning, and strength training expertise provides him with a unique per-spective on the training of volleyball athletes. [Ed.]
dding variety is one of the most important training principles to conditioning volleyball players or any athlete for thatmatter. But it is often an overlooked. One of the biggest things when training junior and adult level athletes (I learnedthis early in my career when I was fitness director at a Gold’s Gym) is that one of the main reasons young athletes feltfrustrated with lifting or quit their memberships is because they didn’t have enough knowledge of the exercises to do
and they became bored. If adults become bored with a limited amount of knowledge, so will kids. From this experience, I’ve estab-
Daryl Kapis
A
FIT TO A T QUICK STARTER LIBRARY - T1 - TRAINING AGE
PA G E 1

lished my goal, which is to make sure I give athletes a continuous amount of different types of exercises so they continue to enjoylifting and conditioning, and in addition, promote a healthy lifestyle for themselves.
Variety: A Good Hedge Against Over TrainingLet’s talk about understanding what athletes can do without over training. In terms of young athletes, it is important to know
how much and what your athletes are doing. I coach club and collegiate volleyball and knowing how many jumping repetitions myplayers are doing on a particular day in their own practices, makes me think about how much jumping or leg activities they aregoing to do in the weight room. When junior athletes are in their club season and practicing 2-3 times a week, for conditioning I willapply a plyometric activity and I will limit it to 50-60 jumps of various heights. In terms of overall strength training, they are doingthat same type of 2-3 practices per week. I think it is important to have 1-2 days of weight training per week within the season. Asa result, I see at the end of the club season that their fundamentals are much better and I can see the ability to jump high has not de-teriorated. However, at junior nationals it starts to drop really quickly. The high point of their season is in April when the kids aredoing the Junior Olympic qualifiers. When they get to June, their bodies are beat-up and worn down. A good time to start a regimentedstrength program for club players is in the beginning of May when their club schedule is not so hectic. This allows the body to adaptto the shock of weight training without being overly sore prior to junior nationals. Most of these players are not doing any type ofside strength training to keep the level up that they had when they started the season. It is important to change things up so theathletes peak in volleyball and athletic skills at the same time. Variety is not only changing exercises, but also workloads and inten-sities.
In terms of volume of approach jumps and hitting, I know how much we are doing in practice. I know when I need to backoff. Measuring vertical jumps solidifies what I am doing. It is something as simple as having your assistant coach pick a couple ofyour big hitters (they will be the ones most affected) and count how many approach jumps or full-attack jumps they make in apractice. Then you can see the volume of jumping that you are doing.
Measuring Vertical Jumps: A Good Hedge Against OvertrainingAnother principle of conditioning is individualization because every athlete responds differently to exercise. A program
may challenge some athletes while to others, the same program may not be stimulating enough to promote athletic growth.A technique I use is to continuously measure vertical jumps to see if the kids are starting to make significant drops. Conse-
quently, to know how athletes are responding, every 5-7 weeks I measure their vertical jump. Fundamental training on how to makean approach jump is continually reinforced. However, if they are continuously going down or dropping a little every time we test, Ineed to decrease the volume and intensity their jumping and change things around. If the players are increasing in their ability, I in-crease the jumping intensity. It depends on the age group I am working with.
Continuous vertical jump measuring is not difficult to do. A simple jump mat and something to measure height of a jumpon a wall will do nicely. Vertecs or computerized jump mats are the Cadillacs of measurement systems. We use the Vertec, which Iam lucky to have.
Age Level Variety GuidelinesI do a lot of work with kids 13-16 years old. I have two different roles as strength coach. I’m the head strength coach at
Archbishop Mitty High School in San Jose. On the side, I do strength training for club volleyball kids who range in age from 12 to16. Because I want them to come back, I try to vary things almost every single time I see them, which is usually twice a week. Theyare still hitting the same muscle parts, but it is completely different to them, which shocks the system. You do the muscles to helpthem learn how to regroup for the next time they come out. It gets them to enjoy things, because you will quickly lose kids if youdon’t keep changing it up and making it fun for them. You must be doing it with fun in mind and tricking them into enjoying it. Thatis the whole thing with kids—you must have passion and fire to get the kids excited about it. I make sure they are hitting everysingle body part when we do the program. I have these kids for 75 minutes. Here’s an overview of what we do.
• Warm-up - dynamic range of motion warm-up. We avoid jogging around the gym because kids just hate standard running. Theywon’t do it and they don’t enjoy it.
• Upper body exercises including medicine ball pushups, chest passes, military presses and various rotator cuff exercises with 3-5 pound dumbbells.
• Lower body exercises including front squats, rear squats and lunges in various directions.• Low-volume, low-intensity jumping over hurdles or an elastic cord. Little things so that not only are we working on jumping,
but also mechanics of approach jumps.• Speed work using speed ladders, reaction balls and T-tests. Anything that teaches the athletes to stay low, keep their core low
and change directions.• I always like to finish out with 10-12 minutes of medicine ball ab type activities and ankle stabilizations exercises on uneven
surfaces.
An important relationship of strength training and jump training needs to be noted at this time. We carefully monitor howmuch leg strength training we do and how much jump training we do. With the younger athletes, we limit the amount of plyometricswe do. If I do more strength training in a day, then we do much less jump training that day, maybe only spend 5 minutes on it. Other
FIT TO A T QUICK STARTER LIBRARY - T1 - TRAINING AGE
PA G E 2 .
days we do less strength training and increase the volume of jump training. Whenever we do jump training, we don’t want the athletesto be fatigued and end up getting hurt.
The approach for older athletes is different. My goal is to try to prepare them for college. I do this with the athletes at Mitty.I get them introduced to the Olympic-style lifts. I want to get them to the point they are very comfortable doing power cleans or splitjerks or any kind of push jerk, even to the point of getting them to do a snatch. Many of the high school/club athletes I work with goon to Division I programs. I take a lot of time with them to make sure they know how to do all the individual parts of the clean. Sincewe have been doing this at Mitty, one of the things that has come back to us is that kids who come back right after their freshmanyear of college, felt they were so far ahead of all the other incoming freshmen. It helped them not only in terms of recovery, but alsounderstanding what is expected from them in the weight room at the Division I level.
During this time we really emphasize this type of strength training. We do very little jump training with them because Iknow what type of jump volume intensity they are getting at practice. The people responsible for strength training and conditioningmust have close communications with the volleyball coach. They need to ask the coach how much the players jumped that day. Wasit a big passing day? Did they work on their arm swings? What did they do that day? It’s important to talk to the coach and see whatthe intensity level of that day was. This communication is missing with many strength and sport coaches. Strength coaches havetheir own agenda; they don’t know what happened in practice and that is where overtraining occurs. Being a volleyball coach andstrength coach has provided me an important insight into this series of circumstances.
In terms of variety at the collegiate level, it is based on how much work and volume we will do in a certain day. Because wedon’t have a strength coach at the school, I am my own strength coach. I must decide where we will invest our time. It can go fromtaking care of business in terms of keeping our bodies safe by concentrating on strength to doing a bare minimum. If my team mustfocus on a lot of fundamental volleyball training, every two days we will do 30 minutes of basic strength training exercises. To keepthe shoulders in shape, we use therabands as general warm-up exercises. Use medicine balls for pushups and weight resistance forlunges and basic split jumps. If that is all in order, than I can definitely invest more time into making sure the athletes are trained onhow to do all the Olympic-style lifts.
There is a challenge of working in a junior college. I don’t have a lot of time with these kids. I have two years and most ofthe things we do in the off-season is focus on how to do the Olympic-style lifts. During the season, if we can only lift once, we focuson the Olympic lifts and our cores and shoulders. That’s all we need to do—35 minutes and it’s taken care of. When I worked atStanford, if the players were really working hard in the weight room they only had to lift once a week. They were ultra-intense inwhat they did in that one time and it was only for 45 minutes, but it was very intense. It was either doing the Olympic lifts with othercore exercises or it was a circuit training atmosphere.
Olympic-style lifts help you be explosive, have a strong core, and they help coordination. It’s the best type of lifting to do.I preach that to my athletes and if they are doing those lifts, they are taking care of all the strength-training facets they need. Thistakes care of the variety of exercises of concern at this level.
Variety of exercise and its approach to developing volleyball players is age-specific as well as competition level (club, highschool and junior college) specific. O
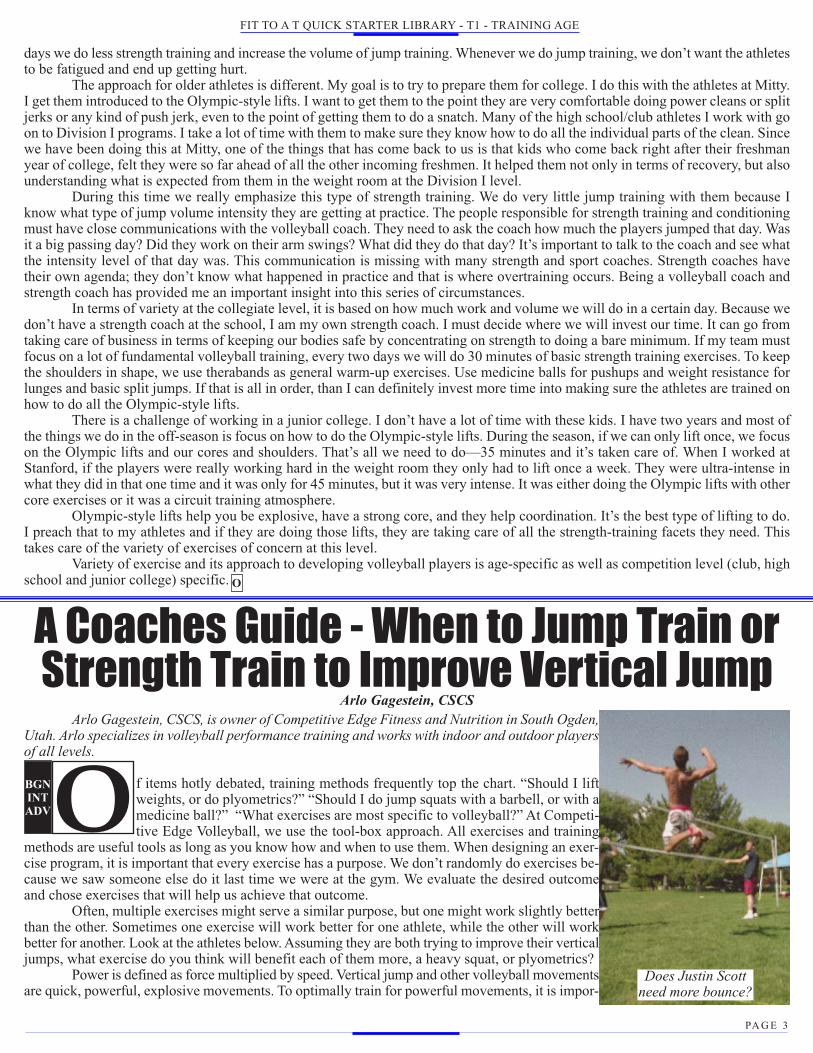
A Coaches Guide - When to Jump Train orStrength Train to Improve Vertical Jump
Arlo Gagestein, CSCSArlo Gagestein, CSCS, is owner of Competitive Edge Fitness and Nutrition in South Ogden,
Utah. Arlo specializes in volleyball performance training and works with indoor and outdoor playersof all levels.
f items hotly debated, training methods frequently top the chart. “Should I liftweights, or do plyometrics?” “Should I do jump squats with a barbell, or with amedicine ball?” “What exercises are most specific to volleyball?” At Competi-tive Edge Volleyball, we use the tool-box approach. All exercises and training
methods are useful tools as long as you know how and when to use them. When designing an exer-cise program, it is important that every exercise has a purpose. We don’t randomly do exercises be-cause we saw someone else do it last time we were at the gym. We evaluate the desired outcomeand chose exercises that will help us achieve that outcome.
Often, multiple exercises might serve a similar purpose, but one might work slightly betterthan the other. Sometimes one exercise will work better for one athlete, while the other will workbetter for another. Look at the athletes below. Assuming they are both trying to improve their verticaljumps, what exercise do you think will benefit each of them more, a heavy squat, or plyometrics?
Power is defined as force multiplied by speed. Vertical jump and other volleyball movementsare quick, powerful, explosive movements. To optimally train for powerful movements, it is impor-
OBGNINTADV
Does Justin Scottneed more bounce?
FIT TO A T QUICK STARTER LIBRARY - T1 - TRAINING AGE
PA G E 3

tant to train both strength and stretch reflex (fast rubber-band-like contraction of the musclescaused by eccentric pre-loading of the muscles and tendons during a countermovement). De-termining what area the athlete has developed most and focusing on the other is a great wayto speed results. As you probably guessed, Brandon can exert tremendous force, while Justinhas great speed. Force x Speed = Power. So, by focusing on the part of the equation each in-dividual is lacking, we can make them both more powerful, higher jumping athletes.
It is not always easy to determine which factor an athlete needs help with. Many ath-letes are exceptionally strong, super quick, and already jump out of the gym. So which dowe focus on, strength training, or plyometric type exercises? Maybe with this athlete, it wouldbe more important to try to maintain power and spend more time on perfecting movementmechanics, and honing sports skills – but, for those set on improving their jump at all costs,we will use a very simple guideline. Test your vertical without an approach (no step at all,just squat and jump), then test it again with a full approach. If the results are nearly identical,the athlete should work more on plyometric movements. If the approach jump is significantlymore than the standing jump, the athlete should work more on increasing strength. Most vol-leyball players - because they are constantly jumping during practice and competition - havegreat stretch reflex and could benefit from more strength. Some athletes are also weak andslow. In this case, a training program would address both factors. For more in-depth and spe-cific testing procedures, refer to The Vertical Jump Development Bible, by Kelly Baggett.
Once it is determined what the athlete should focus on, it is time to choose the actualexercises. If an athlete is very strong but slow, we wouldn’t leave heavy strength training out all together necessarily, we would justfocus more on fast, explosive movements.
Two important variables play into optimal exercise selection: specificity and transferability. Specificity is defined by theNational Strength and Conditioning Association in Essentials of Strength Training and Conditioning as “…the distinct adaptationsto the physiological systems that arise from the training program. A training effect is limited to the physiological systems overloadedduring training.” Basically, you need to train the muscle groups, movements, and intensities involved in participation in the sportyou are training for. Jump squats for example would be a very specific exercise for volleyball.
What kind of jump squat? Should a volleyball athlete use a barbell, a medicine ball, add lateral movement? Again, we likethe tool-box analogy. Any of these exercises might be appropriate for the volleyball player. A barbell squat jump would be even morespecific for a football player who is frequently exploding against resistance from opposing players while a volleyball player alwaysjumps without external resistance. Does this mean I wouldn’t use a barbell jump squat for volleyball? Absolutely not! If I’m workingto improve an athlete’s raw power, the barbell jump squat is a great exercise. As I enter the pre-season, I would probably trade in thebarbell for a lighter medicine ball and move to the court where the athlete could practice jumping in front of the net while movingthe ball from the chest overhead to simulate blocking. As the season gets even closer, I would progress to medicine ball jumps com-bined with quick lateral movements and agility drills because these movement patterns are similar to what will actually happenduring competition. Unfortunately, some coaches and trainers will take specificity too far and wouldn’t think of doing any exercisethat doesn’t specifically resemble a volleyball movement. This often leads to muscle imbalances, misalignment, and joint problemsas non-volleyball movements are neglected and weakened while volleyball movements are substantially over-trained.
Transferability on the other hand says that certain exercises though they might not mimic the sport exactly, have enoughcarry over to be beneficial. For example, while a bench press might not simulate any movement in volleyball (except maybe pickingyourself up off the floor after a dive!), it is still a great complex, multi-joint exercise that strengthens the pectorals, serratus, shoulders,and triceps and is therefore is a good exercise for volleyball athletes. Volleyball players need shoulder stability, strong internal rotatorsfor attacking, and strong triceps for elbow extension, therefore it has good transferability. World-renowned strength coach Joe De-Franco says, “99% of the athletes I train, regardless of sport, can benefit from squatting, pressing, rowing, jumping, etc. Basically,my ‘base’ program is a compilation of what I feel are the most productive exercises, organized in a specific manner and performedon specific days. The art of playing your sport is what ‘synchronizes’ the strength you gain and makes it ‘sport specific’.” That istransferability! Both specificity and transferability are important and should be considered when selecting exercises for a trainingprogram.
When selecting exercises for a training program, it is essential to start with a base of complex, multi-joint exercises thattrain the entire body through different movements in various planes. Then focus on weaknesses. If an athlete is strong as an ox, butslow, incorporate more explosive movements. If the athlete is quick, but can’t squat anything, improve their strength. As the seasongets closer, make the demands of the workout more similar to the demands of actual competition. Decent results can occur randomly,but a well-planned program will put your athletes head and shoulders above the competition. Train with a purpose!
Does Brandon Johnsonneed more strength?
O
2 Ways to Subscribe Today!1. Sign up when you renew your AVCA Membership HERE
2. Don’t need to renew right now? Click HERE and sign up for the library online!
FIT TO A T QUICK STARTER LIBRARY - T1 - TRAINING AGE
PA G E 4 .

Section TimeRealize that time is your master in planning a conditioning program. How much time should you spend on each Pillar in
conditioning:1. Strength, 2. Jump/Hitting Power, 3. SFQA (speed/footwork/quickness/agility/mobility)4. Volleyball-Specific Recovery/ Endurance.
More importantly, how does it all fit in with your practice and competition becomes critical. The only way to accomplishthis is to establish conditioning priorities. You cannot do everything all at once. A priority in conditioning is developing one or twoPillars of conditioning, such as strength, at a time. Incorporate the other Pillars as you set your priority, but only from the standpointmaintaining their performance levels. This "maintenance" is specific to the "season" you are in. This evolves traditional periodizationinto priority periodization. Now let's see how this fits in.
Realize that time is your master in planning a conditioning program. How much time should you spend on each Pillar inconditioning and, more importantly, how does it fit in with practice and competition becomes critical. The only way to accomplishthis is to establish conditioning priorities. You cannot do everything all at once. A priority in conditioning is developing one or twoPillars of conditioning, such as strength, at a time. Incorporate the other Pillars as you set your priority, but only from the standpointmaintaining their performance levels. This "maintenance" is specific to the "season" you are in. This evolves traditional periodizationinto priority periodization. Now let's see how this fits in.
A. Units of TimeCalendar year→ season→ weekly schedule → single practice/competition
B. Calendar Year Lay out your units of time: competitions, practice/training sessions, recovery days and divide into off-season, pre-season
and in-season. Realize that the seasons are no longer the traditional 6-8 week training blocks, but may be as little as two weeks.
C. Integrate Conditioning• Within your calendar, assign conditioning time (this includes on-court during practice).• Add the Pillars of Conditioning-Strength, Jump/Hitting Power, SFQA and Volleyball-Specific Recovery/ Endurance. • Select which Pillar(s) is your priority. • Select which exercises to do.
Seasonal Considerations and Conditioning Goals How much time can you devote to conditioning on a weekly basis? Again, priorities are based on the time of year you are
in. Determine the specific team needs at the time of year and their training age and focus more time to that Pillar. Address the otherconditioning Pillars - just enough to maintain minimum levels.
Off-season is a time to develop the conditioning Pillar of strength and put on muscle as priority. As a volleyball coach, youmust know if your athlete will continue to play volleyball, play another sport or focus more on strength training. There are a lot ofpossibilities. Weighing the Pillars of Conditioning for the off-season:Jump/Hitting Power Strength SFQA VB Recovery/Endurance
Pre-season is a time to transfer strength to jump/hitting power and SFQA. However, this window will conflict many timeswith the off-season because of time constraints. Endurance needs are specific to the energy system of volleyball which can be man-aged as part of practice. Weighing the Pillars of Conditioning for the pre-season:Jump/Hitting Power Strength VB Recovery/Endurance SFQA
In-season is for maintaining the Pillars of conditioning. Just do enough strength training to maintain. This can be done aslittle as twice a week with reduced volume and load and a few exercises. SFQA, jump/hitting power and endurance can be integratedinto practice.
-2
FIT TO A T QUICK STARTER LIBRARY - T2 - TIME
PA G E 5
Weighing the Pillars of Conditioning for the in-season:Jump/Hitting Power Strength VB Recovery/Endurance SFQA
Here are some tips: • Combine practice and conditioning - end of warm-up can be a great opportunity when athletes are fresh.• Realize you may only be able to devote one or two exercises to a Pillar. • Be sure to measure each pillar of conditioning to determine improvement.• Have communications with all people who can effect the workload of your athlete such as parents, personal trainers and other
coaches. This is critical in adapting your periodization plan and establish priorities.• Don't forget recovery.
Here are your articles to learn more! -2
Seamless Series: Integration of Strength and Conditioningwith Volleyball Practice/Competition in Designing a
Winning Year-Round Volleyball ProgramJohn Cook-Head Volleyball Coach and Laura Buttermore (Pilakowski)
his seamless integration is achieved through the planning and communicationbetween the volleyball skills coach(es), the volleyball strength and conditioningcoach and by the inter-education of each coach. The ultimate goal is a betterperforming, injury-free volleyball athlete and to win championships. Before the
interview, each participant received the following definitions in order to be on the same page: Strength/resistance training is defined as activity normally carried out in the weight room
using external resistance including barbells/dumbbells/weight machines with the goal of increasingoverall body strength and explosive power and prevents injury on a general basis. This trainingis dictated by the principles of periodization based on the competitive schedule of the team.
Conditioning training is defined as training activities usually performed on-court thatincludes warm-up, volleyball-specific movements (SAQ-Speed Agility Quickness) with or withoutthe ball and jumping activities. These activities are done with body weight and/or portable resist-ance devises that do not confine volleyball specific movement. The goal of these activities is the "refining" of overall body strengthachieved in the weight room by improving volleyball skills and/or volleyball-specific endurance based on the demands of the gameand reducing the chance of injury. This training is dictated by the principles of periodization based on the competitive schedule ofthe team.
Program design is defined as the integration of strength/resistance training, conditioning training to the volleyballpractice/competition schedule to develop volleyball athletes, improve performance, reduce injury and win championships.
John Cook-Head Volleyball Coach University of Nebraska-LincolnSince he was named the Nebraska head coach on Dec. 15, 1999, Cook has led the Huskers to the
2000 and 2006 national championships , three NCAA semifinal appearances and five Big 12 Conferencetitles. Cook has guided NU to a 187-13 overall record and a 116-4 league mark. With Cook at the helm,Nebraska has produced one Olympian, two AVCA Division I National Players of the Year, one NCAA TopEight Award winner, one AVCA Division I National Freshman of the Year, one Honda Award winner, 18AVCA All-Americans, one CoSIDA Academic All-American of the Year, nine CoSIDA Academic All-Amer-icans, three Big 12 Players of the Year and three Big 12 Co-Players of the Year. The Huskers have alsocombined for 20 All-Big 12 Conference awards and 33 academic All-Big 12 certificates. He is a two-timeAVCA National Coach of the Year, earning the prestigious honor in 2000 and 2005, and a two-time Big12 Coach of the Year.
Laura Buttermore- Head Volleyball Strength and Conditioning Coach University of Nebraska-Lin-coln
A Certified Strength and Conditioning Specialist, Laura Buttermore began working as an assistant strength and conditioningcoach for the Nebraska Volleyball Program in 2004.
John Cook
TBEGINTADV
FIT TO A T QUICK STARTER LIBRARY - T2 - TIME
PA G E 6 .

Before obtaining certification for her current position, Buttermore was a two-time AVCA All-American volleyball player at Nebraska and three-time CoSIDA Academic All-American. As a formerstudent-athlete, she excelled in the weight room, where she was a two-time Husker Power Volleyball Lifterof the Year and the 2001 Husker Power Female Athlete of the Year. Buttermore was also the 2002-03 Big12 Female Sportsperson of the Year and NCAA postgraduate scholarship winner.
PC: Let's talk about communication and how the two of you work together. Laura, you are the con-ditioner and John, as head coach you are responsible for the technical and tactical development ofyour players leading to and during competition. How often do you talk to one another?
JC: Daily!
LB: Our daily discussions include our trainer Jolene text messaging, e-mail and in person meetings. Thisis especially true if there is something going on with one of the athletes as far as injury is concerned.
PC: John, you have an extensive conditioning background and you have contributed to Performance Conditioning Volleyballon numerous occasions dating back to your days at Wisconsin. We have even published a booklet on the topic with you andLaura. How do you allow Laura to do her job without too much intervention?
JC: As I said we communicate daily. It's Laura's job to figure out what to do. I give her full authority to run the program. My job isto give her feedback on how the players perform, how they move and how healthy they are. We test a couple times a year, which alsogives us information. As a volleyball coach one must have an eye for the athletes on how they look and perform. As a volleyballcoach one must be constantly monitoring their team's physical development to make sure they are in the position to achieve thehighest level. We have worked together for seven years and from this experience we feel we both are on the same page with regardto the program and the needs of our athletes. We are constantly adjusting based on the monitoring and communication process tomeet the needs of our student-athlete to meet their potential. That's why it's important to get feedback from her on how they aredoing in conditioning.
In addition, another thing to our advantage is that we have accumulated a lot of testing data, which tells if we are making adifference with our conditioning program.
PC: Same question to you Laura but with a different slant. Unlike many strength coaches, as an All-American volleyballplayer you have a huge background in the technical and tactical side of the sport. How do you handle the fact that you arewell-versed in the technical/tactical area of the sport in your relationship with John?
LB: Things have really changed since I played so my challenge is to create new conditioning drills and exercises that fit the needsof the team. Every team is different and each individual is different. On the court, coach Cook and I might not see the same thingsas far as a player's movement abilities are concerned and that's why it's so important to communicate on a daily basis. I see thingsfrom a conditioning aspect whereas he sees things from a stats and on-court performance aspect. For example, a middle back is notgoing to her left very well-he may see that, communicate it to me and I incorporate that movement into agility drills.
I would like to go to all the practices but I'm responsible for the conditioning in four sports so my observation opportunitiesare limited. I think the best thing to do is go to games and rather than watching like a general spectator in terms of each point, Iwatch individual players and the way they move in the game setting.
PC: One of the things that is important in the seamless process is total loading and its management by you, the head coach.Total load is the summation of play, practice and conditioning. How do you plan and monitor total load to insure peak per-formance and avoid over training and injury?
JC: In term of the in-season, the approach I use is a "gut feel". But this feel comes from knowing each player's academic schedule,stress load, mental fatigue state based on how much we have been playing and traveling, and how they look to me on the court inpractice and games. As a result it's easier for me to adjust workloads on the fly then it is for Laura. She has her program that isdesigned to get the athletes to peak condition at the times that are most important to us. So her adjustments are more of a challenge.
PC: How does your relationship change during the year based on the collegiate season and calendar year?
JC: Our communication does not change-we make sure it happens daily. This is why I tell Tom Osborne, our athletic director, andon down the line that Laura is one of our most important staff members because she spends more time with our athletes than anyother staff member because of NCAA rules. So the times when I don't have the opportunity to be with them, I can still check in withher to see how they are progressing.
I do this even when I'm on the road. The only thing that really changes is my anxiety levels when I'm not around the playersas much. This is especially true during the summer when we can't be around them period. I can't even go watch workouts.
Laura Buttermore
FIT TO A T QUICK STARTER LIBRARY - T2 - TIME
PA G E 7

PC: Laura, let's talk about testing. When do you do it, what do you do and how is the information used?
LB: We test in March after our eight-week winter program and then again in August after our eight-week summer program. We startwith the vertical jump, approach jump test, pro agility, and the 10-yard dash electronically timed. We have a Performance Index, thegoal of which is to get each athlete over 2,000 points total for all four tests combined. This is done based on a modification of thescoring of the decathlon where a world record is basically 1,000 points and other results work down from there. Usually coach Cookis there for the testing and we'll discuss the results right after.
We then turn over the scores to our support staff who covert the result to points and we plot each athlete's point total in a filethat stays with them throughout their career here at Nebraska. From the results we can look at how they did in power training by thevertical jump results and analyze agility work through the pro agility test results. This collectively gives us feedback on the effec-tiveness of our program and what we might want to work on. An athlete may test out poorly on a particular day so we look at averagesas a better indicator as to if we are headed in the right direction with our conditioning program. We have the players meet with meand coach Cook to set goals.
PC: How do you use testing from a head coaching standpoint coach Cook?
JC: Outside of our locker room we have a wall chart that indicates the top five performances for each test and a chart for the topfive overall performances calculated by adding the five point totals together. These results are very visible. As Laura mentioned, weset goals after the winter conditioning session tests as well as the summer session. To me, it's very black and white-you either hityour number or you don't. It's simple. It tells the players if they worked hard because numbers don't lie.
What is interesting is that the records for football, which uses the same system of scoring that we use, are, for the most part,old. If you take a look at our volleyball records, many of the records are broken each time we test. Laura's results are still up therefrom her playing days, but that is an exception rather than the rule. This indicates to me that our strength and conditioning programis working. Not only are we breaking individual records but our team records continue to go up.
PC: Why do you think these records are being broken so frequently?
JC: I think that we are getting better athletes and we are improving our training methods. The kind of athlete that comes here isreally into all of this type of testing and training. We have kids who really train hard. Right now, we have seven former players thatplay pro. I'm sure we have the most number of pro players playing now than any from any other program in the country. I ask ourpro athletes who come back here for the summer to train with Laura if they see anything out there that's better than our program thatmaybe we can improve upon. I've yet to hear of any recommendations. They all say this is the best. These players are all over theworld including Brazil, Italy, Germany and Russia. They are exposed to everything.
PC: How do you individualize a program for a team sport? To me this is one of the great oxymorons in sport. Can it be done?
LB: When we look at conditioning, we try to condition as a team. We individualize somewhat by position. The setters and liberosdo things somewhat differently usually in relation to volume of training. For example, the liberos won't do as many block jumps butdo more shuffling and footwork. I like to train the team together. My thinking is that they will compete together on the court so con-ditioning should also be together. Individual training occurs more with our trainer who might work on a specific area based on issuesa player might have in order to stay injury free.
PC: How do you handle the individualization issue coach Cook? For example, do you do individualized conditioning exerciseson the court as part of practice?
JC: We do a little but mainly by position. For example, outside hitters will do lateral movements as a group and our setters will bedoing balancing exercises. I will give Laura feedback to let her know if I don't think someone is moving correctly. Then it's betweenher and our trainer to work on the issue.
PC: Laura, this brings up another seamless connection-you and the trainer. How does that work?
LB: Usually a movement issue is injury related. But if it is injury related I'll know before the athlete's conditioning session. Thisway it's always the trainer telling me of the issue and not the athlete. When this occurs, then I'll individualize the strength program.For example, we had an elbow issue with one of our players. We modified the program by replacing hang cleans with clean jumpsin order to not involve the elbow but still get in explosive work with that athlete. If it was a shoulder issue we'll only do pushingmovements and not any pulling movements.
PC: With such a great tradition established here at Nebraska, how do the two of you work together to carry on this tradition?How do you work together to make the athletes accountable?
FIT TO A T QUICK STARTER LIBRARY - T2 - TIME
PA G E 8 .

JC: It's about the culture we have established in the past and the goal setting that goes with it. The players know that goal setting isimportant for us and for them and their team to see. They all see this and that is a tremendous motivator.
LB: I think that the seniors are a big part of it as well. The younger athletes see their leadership and how they give 100 percent. Thatmakes my job 10 times easier. I also think that with support of the head coach it makes it even more effective. We do some things atthe end of conditioning that add to the tradition and culture. We emphasize how important the last two points are in rally scoring.Last summer we did a mental toughness drill to work on our fifth game mindset. This is done usually in the summer to keep theathletes motivated at 6:30 in the morning.
JC: A final thing as far as tradition and culture are concerned is that we give a lifter of the year award to a player who the team voteson. This is presented at our annual January banquet. This is something we have always done.
Off- Season Leg Strength and StabilityFor Volleyball Without Barbells
Vern Gambetta
This program is based on the basic principle of: body weight before external resistance. By training with bodyweight andgravity the tendons and ligaments will be prepared for the external resistance work which follows later in the training year, as wellas later in the career. This does not mean that the player never uses external resistance in the form of weights. Rather, this is a steptoward more complex means of training. The emphasis is on volume of work. It is, in essence, training to train.
This is high speed, high force type of work. The desired work rate is one rep per second. Therefore, it is demanding physicallyand psychologically. It is much more demanding than it might appear because there is no external resistance. Gravitational forcesare maximized to teach the athlete to control and use their own bodies. Expect a lot of soreness everytime you increase volume oradd a sandbag or weight vest. The high speed eccentric work is what causes this soreness. This should not be of concern if thesoreness is in the muscles. If there is any joint soreness then, modify or discontinue the routine.
There are two programs that work the legs. Each has a slightly different emphasis with the same objective. The Legs I routineis more up and down. The exercises are less complex, therefore the volume is higher. The Legs II routine is more multi-plane. Theexercises are more complex therefore the volume is lower.
Progression:Beginner: Do weeks 1-3, repeat Intermediate: Do weeks 1-6 Advanced: Do weeks 1-10Legs I* - Circuit Legs II* - CircuitA Body Weight Squat 20 Reps A2 Body Weight Squat 30 RepsB Lunge 20 (10 Reps Each Leg) B2 Diagonal Lunge 20 (10 Reps Each Leg)C Step Up 20 (10 Reps Each Leg) C2 High Step Up 20 (10 Reps Each Leg)D Jump Squat 10 Reps D2 Ice Skater 10 Reps
* Be sure to spend two or three training sessions mastering the correct rhythm and execution of the exercises before starting theactual program. This will insure the best results.
Legs I Circuit Progression - Once a weekExercise order: A-B-C-D
• The eventual goal is to go through the circuit continuously without a rest. This is a six week progression. The total volume inreps for each workout is in parenthesis.
Wk #1 - 3 X Cir - 1 Min Between Exercises - 3 Min Between Cir (210)Wk #2 - 4 X Cir - 45 Sec Between Exercises - 2 Min Between Cir (280)Wk #3 - 5 X Cir - 45 Sec Between Exercises - 90 Sec Between Cir (350)Wk #4 - 5 X Cir - 30 Sec Between Exercises - 60 Sec Between Cir (350)Wk #5 - 5 X Cir - 30 Sec Between Exercises - No Rest Between Cir (350)Wk #6 - 6 X Cir - No Rest Between Exercises - No Rest Between Cir (420)
Legs II
FIT TO A T QUICK STARTER LIBRARY - T2 - TIME
PA G E 9

Circuit Progression - Once a weekExercise order: A2-B2-C2-D2
• The eventual goal is to go through the circuit continuously without a rest. This is a six week progression. The total volume inreps for each workout is in parenthesis. This is a much more demanding circuit, therefore the total volume is less than for theLegs I circuit.
Wk #1 - 2 X Circuit - 1 Min Between Exercises - 3 Min Between Cir (160)Wk #2 - 2 X Circuit - 45 Sec Between Exercises - 2 Min Between Cir (160)Wk #3 - 3 X Circuit - 45 Sec Between Exercises - 90 Sec Between Cir (240)Wk #4 - 3 X Circuit - 30 Sec Between Exercises - 60 Sec Between Cir (240)Wk #5 - 3 X Circuit - 30 Sec Between Exercises - No Rest Between Cir (240)Wk #6 - 3 X Circuit - No Rest Between Exercises - No Rest Between Cir (240)
After Six Weeks Evaluate Progress. If You Decide To Continue Use This Progression
Legs IStage Training Progression - Once a week
• Stage training is formatted like traditional weight training in that the exercises are done for a certain number of sets and reps.The goal is to raise the intensity of training and make the transition to regular weight training.
Exercise order:A(REST) A(REST) A(REST)B(REST) B(REST) B(REST)C(REST) C(REST) C(REST)D(REST) D(REST) D(REST)
Rest between sets of the same exercise and between exercises. Use stage training to raise the intensity of the work. Add asandbag or a weight vest for resistance to get your strength levels up.
WK #7 - 3 Sets Ea Exercise - 45 Sec Rest Between Exercises Wk #8 - 4 Sets Ea Exercise - 45 Sec Rest Between Exercises Wk #9 - 5 Sets Ea Exercise - 1 Min Rest Between Exercises Wk #10 - 6 Sets Ea Exercise - 1 Min Rest Between Exercises
Legs II Stage Training Progression- Once a weekExercise order:A2(REST) A2(REST) A2(REST)B2(REST) B2(REST) B2(REST)C2(REST) C2(REST) C2(REST)D2(REST) D2(REST) D2(REST)
WK #7 - 2 Sets Ea Exercise - 1 Min Rest Between Exercises Wk #8 - 3 Sets Ea Exercise - 1 Min Rest Between Exercises Wk #9 - 4 Sets Ea Exercise - 90 Sec Rest Between Exercises Wk #10 - 4 Sets Ea Exercise - 90 Sec Rest Between Exercises
How-to Strength ExercisesSquat Start:
• Feet parallel and slightly wider than shoulder-width and toes pointed out slightly with back flat and tight.• Claps hand behind head, eyes straight ahead, chest up.
Going Down: • Under control but quickly bend hips backwards, bend knees and ankles. • Inhaling descending until tops of thighs are parallel to floor.• Keep back straight and chest up.
Coming Up: • Exhale as you straighten hips and knees to return upright position. Entire movement should take one second. • Eyes focused straight ahead.• Back flat as possible.
Tips: • Do not bounce at bottom position.
FIT TO A T QUICK STARTER LIBRARY - T2 - TIME
PA G E 1 0 .

• Do not bring knees together coming up.
Step-ups: Start:
• Stand 12 to 18 inches from a box that is high enough to create a 90° angle at the knee when the foot is placed on top of the box.• Keep body erect.
Coming up: • Inhale stepping with lead leg onto top of box placing it in the center, toes straight ahead.• Keeping body straight shift weight to lead leg (on the box).• Pull body with lead leg to a standing, balanced position on the box.• Body should be fully erect at the top position.
Coming down: • Shift body weight to same lead leg. • Exhaling step off box using unweighted leg.• Body stays erect while placing foot onto the floor followed by foot of lead leg.• Balance feet and repeat using other leg as lead leg.
Tips: • Be sure lead leg does all the work to step up onto box.
High Step Up: Follow the instructions for the step up only use a higher box (approximately 6-8" higher) and do repeatly for one legthen alternate. Movement should be explosive but controlled.
Lunge: Start:
• Use same starting procedures as the squat exercise.Coming down:
• Take one step foreword. Step as long as you are tall with lead leg keeping knee and toe in straight aline-ment.
• Plant foot on floor and bend at the knee in a controlled manner.• Lower trail leg until the knee almost touches the floor, pause.
Coming up: • Push off of lead leg maintain straight leg and body alinement.• Bring lead foot to trail foot use short steps to upright position.• Repeat with other leg.
Tips:• Lead leg should form a 90° angle at the knee. This should indicate your lead leg stride is the right length. • Trail knee should not hit the floor.
Diagonal Lunge: Follow the instructions for the lunge only step out to a 45° angle rather than straight ahead.
Jump Squat:Start:
• Use same starting procedures as the squat exercise.Going Down:
• Under control bend hips backwards, bend knees and ankles.• Inhaling descend slowly until tops of thighs are parallel to floor, pause.• Keep back straight and chest up.
Coming Up:• Exhale as you straighten hips and knees to return upright in an explosive manner raising feet off the
ground landing flat footed. • Eyes focused straight ahead.• Back flat as possible.• Knees over ankles.
Tips: • Do not bounce at bottom position.• Do not bring knees together coming up.
Ice SkaterStart:
• Assume a standing position, with your feet shoulder-width aprart.
FIT TO A T QUICK STARTER LIBRARY - T2 - TIME
PA G E 11

Movement: • Jump laterally to the right, landing on the right foot. Immediately jump laterally to the left, landing
on the left foot side to side pushing off one leg onto the other and repeat.Tips:
• Laterial jump is not for distance but quick forcefull landing and take offs.
Making the Most of the Zero Period in Conditioning High School Volleyball Players
Art Garcia
Art has been coaching male and female volleyball players for over 25years on the junior high, high school, club, community college and collegiate lev-els in Southern California.
Currently, he is at Foothill High School (Boy’s Varsity Head Coach/Girl’sFreshmen Head Coach), in Santa Ana, California. His girl’s team was 2010 Cen-tury League Champions. He is also an assistant women’s coach at Fullerton Col-lege and he is head coach of junior girl’s team and assistant to the 18-Asics teamat Golden West VBC.
He founded the Ichiban Girl’s VBC where his team won seven USA Vol-leyball Junior National titles, of which over 90 players have received collegescholarships and 6 players played with the USA Men and Women’s teams. In ad-dition, he is the USA Men’s and Women’s National & Olympic Teams volunteerCoaches’ Aide. His unique perspective on all levels of volleyball offers insight intothe conditioning of players.
he focus of this article is to discuss my years of experience atmultiple levels of volleyball play in Southern California. The firstissue is how many club level coaches also coach at the highschool level. This would be an interesting survey because the cir-
cumstances at these two levels are somewhat different. My guess is that on theclub/high school level, many coaches are former players from the college level. Because of this their experiences and expertise inconditioning volleyball players is widely diversified. The best way for them to learn more is to ask questions and gain knowledgefrom those with experience. This is what I hope to accomplish with this article.
Dual RolesThe first thing to realize is that most high school players are also club players. What this means is that they have experience
playing a lot of volleyball but not much in the way of conditioning. I don’t know of too many clubs that have a separate conditioningprogram. This is due to limited time and that time is devoted to technique and tactics. I know of some programs that hire an outsideconditioning coach but these programs have the time and financial recourses to do this. However, these programs are few and far be-tween.
From what I know and my experience is that all too many coaches at the club/high school level have their players run lapsin order to condition. It’s a case of “you have to run a mile in a certain time or you won’t be an effective player.” This makes nosense to me. Any running done should be progressive and in short distances. This short running has to have change of direction lat-erally and diagonally, etc., because these are the movements that will be made on the court. However, because of the severe timelimitations the players must be touching the ball. Some coaches do intervals and running lines. This is more specific to the energysystems in volleyball but again lacks ball touches. Therefore, if one wants players to be at a high level of conditioning during thefinal match of a game, they have to be conditioned game-specific. If time permits one can do the short, change of direction runningwithout a ball that simulates game conditioning without having the limiter of ball skills. Conditioning with a ball has its challengesbut it’s the reality most club players face.
High School—the Zero Period and Challenges Facing Volleyball PlayersIn Southern California, when club ends high school volleyball starts. Most schools have what is called a zero period. For
TBGNINT
Art Garcia
FIT TO A T QUICK STARTER LIBRARY - T2 - TIME
PA G E 1 2 .

boys’ high school volleyball, fall is an off-season and the beginning of the club season. This is when the athletes can come into theweight room at school and condition for their sport. (Note: conditioning here means all aspects of physical performance developmentincluding strength and power, not just the energy system aerobic/anaerobic demands of the sport.) On the surface this sounds like agreat opportunity for volleyball players to come in and develop their athletic skills in order to improve their volleyball skills. Unfor-tunately, most high schools have only one weight room, so during this zero period there might be football players and athletes fromother sports using the facility. Consequently, there is competition for space and equipment.
Other obstacles one might encounter are sophomores coming in who have no experience in strength training so their needsare different from the seniors. If a coach has players in the weight room with a strength coach who’s working the football team, thevolleyball players could be doing football exercises such as the bench press. Not only is this exercise non functional in contributingto athletic volleyball development, it might even put the players at risk for injury.
Coming Up with a Zero Period PlanSo, what is a volleyball coach to do? The first thing is to gain knowledge on volleyball-specific conditioning. The Performance
Conditioning Volleyball Newsletter is a great resource. Another is to ask questions if you have access to someone with volleyballconditioning experience. If this person also has volleyball experience, that’s even better. Coaches should also be aware of what is inthe facility with regard to equipment and what access they have to it during the zero period. One could have access to certain piecesof equipment at certain times. Body weight exercises can also be done if access to equipment is not available so one must learn toadjust.
The coach also has to be aware of which players are doing club. Some club players may already be spending two to threehours in the gym during the week. The zero period can be an over-do with some of these players. So, if access is limited during thezero period, one might want to consider focusing on the development of high school players and cutting the club players a little slackthus giving them some needed rest while opening up opportunities for the others—it’s a balancing act. This is not to excuse the clubplayers but rather give them different roles during zero period such as spotting, helping set up, recording workouts or maybe evenworking on a particular physical weakness that they might have.
The zero period is usually less than an hour, so there’s not a lot of time to get things done, thus the coach has to be well or-ganized and versatile. The possibilities are endless. One scenario might be to do strength training for 30 minutes and the next 30,touching the ball working on skills in the gym rather than the weight room. The coach has to realize that these classes aren’t mandatoryand that the athletes have elected to participate in them.
There also should be an element of fun involved. One can do activities that are challenging as well as fun. Games can bethings like bombardier, which is similar to dodge ball. The players are working their shoulders by throwing the ball and working onagility when trying to avoid being hit. In addition, there is nothing wrong with cross training such as playing other sports. Anotherfun thing is short distance relay races where the athletes have a baton a hands it off. This works on teamwork as well as acceleration/de-celeration skills. See Table one for an example of a zero period program for volleyball.
To get started the first thing to do is test the athletes. Start with the vertical jump and add tests for conditioning and strengthas time allows. This should be done at regular intervals to see if the program is working to develop the athletes. If there’s an athletewho has gone through an injury, testing can indicate if the athlete is finally ready to go full speed without reservation. Finally, agreat motivator is the fact that a coach can show the players that they are gaining in the vertical jump.
Making it Work within the School SettingThere are many different situations that come up; therefore, the volleyball coach has to work with school administration and
other coaches to get the job done. The way this usually works is that all spring sport athletes are in a fall zero period whereas the fallathletes are in a spring zero period as part of their off-season. The zero periods are usually the last hour of the day before dismissal.For us, fall is the best time for the zero period because the football team is in their season and don’t train the last period of schoolbefore practice. So this is more of a window of opportunity for us.
In the spring it’s a different story. Not only do we have football but we also have basketball, soccer, tennis and lacrosse plusboys and girls water polo. In the spring we have to ask favors and work in close communication with these other coaches. In ourcase, the associate athlete director is in charge of scheduling the gym and the weight room. We may have to adjust and get into theweight room at 6:30 in the morning or 6 PM after school, which creates great problem on our end because we can’t always get theathletes back to school in the evening to use the weight room.
So, with one weight room and one gym we may have to go outside to do our conditioning. Alternatively, we can go to thefootball coach and ask if we can use a small portion of the weight room for 20 minutes as part of what we do in that entire hour. Ifthis is the case, one must come into the room well organized and with a heightened sense of work ethic. This shows the other coachesand athlete that the volleyball players are just as dedicated and hard working.
It comes down to building relationships. If I want to use the weight room, how can I do it and make it easy for the footballcoach? Do I have something to offer them? Our team has a Vertec. We encourage football players to use and test with it. They loveit. We show them how to jump and make the most of the tool. The football players and coaches realize that at the NFL Combine, thevertical jump is one of the tests so we don’t have to sell it. Another thing we do is share equipment cost with things like jump ropes,which is something we all use. Why not get the ropes so everyone can use them and save each program some equipment dollars.Buying in volume collectively also saves money.
Another advantage is that once the volleyball athletes are in the weight room the volleyball coach is responsible for teaching
FIT TO A T QUICK STARTER LIBRARY - T2 - TIME
PA G E 1 3
techniques and supervising his/her own athletes. This way the football coach or the school strength coach doesn’t have to divert theirtime. Because of this, the volleyball coach has to be educated in the area of strength and conditioning. That is why this publication(Performance Conditioning Volleyball) is so important and a great tool from which to learn. Once a volleyball coach steps into theweight room, s/he has to be organized so that there is a flow for their players to move around efficiently when using various piecesof equipment.
Finally, when designing a program it’s important to make sure it fits the level of one’s athletes. In other words, don’t bedoing the USC volleyball program but rather design a program that fits your athlete’s needs and level of play. O
Table 1Foothill Girl’s VB Off-Season Class (March-June)
Meet Mondays-Fridays from 2pm-3pm. (If the boys’ teams are away, I'm hoping to send the Fr. /So. coach on the 1st buswith his team and the JV coach on the 2nd bus with the JV and Varsity. Then after the girls help me put stuff away in the gym, Iwould drive to the school).
We would use a 3 phase program of conditioning with playing games:
Phase 1: Speed, Quickness and Agility (1st 30 min. of class):The use of jump ropes, agility ladders, dot drill mats, etc. The 2nd half of the class would be playing competitive games.
Net Link: Seven jump rope exercises Click HERE.
Phase 2: Power/Jump Training (1st 30 min. of class):The use of jump boxes, the Vertec (I own one of these devices so the programs would not have to purchase one). But if we had 2 of these devices, the training would then be more efficiently run and not too many players would have to wait to perform this drill. I also have some other simple equipment that could be used as part of a circuit for jump training. In the power phase, the players could use their own body weight to strengthen their upper body. I also recommend other inexpensive devices to strengthen the small muscles of the shoulder (spiking).The 2nd half of the class would be playing competitive games.
Net Link: Six strength box exercises from Tom Justice Click HERE.
Phase 3: Core Strength Training (1st 30 min. of class):The use of yoga mats (which would ease the players' backs when on the floor), stability balls to strengthen the abdominals (lower, upper, oblique portions) and lower back when performing these drills would help in their exercises.The 2nd half of the class would be playing competitive games.
Net Link: A great physio ball core exercise from Robert Smith Click HERE.
e.g.; Week 1 thru Week 6Mon. Phase 1/Play VBTues. Phase 2/Play VBWed. Phase 3/Play VBThurs. Phase 1/Play VBFri. Phase 2/Play VBSat. (On their own) Phase 3Sun. Rest
Seven Station Pre-Season Conditioning Circuit for Volleyball
Ed Ellis
The seven-station conditioning circuit is a non-stop, high intensity, volleyball specific workout. It increases overall speedand quickness, explosive power, upper and lower body strength, vertical jump and, most of all, the athlete's conditioning. It is sportspecific in the movements of volleyball, important because athletes often get in shape only by running. But in volleyball, as in othersports, all the "angles" must be trained and conditioned. This workout is great whenever it is used, with the athlete benefiting eachand every time it is performed.
FIT TO A T QUICK STARTER LIBRARY - T2 - TIME
PA G E 1 4 .

Putting it into PracticeThe seven-station circuit is a 45-minute workout. It should be done two to three times per week. This program can be done
five to eight weeks before the season or with only two or three stations during the off-season and in-season. The workout shouldideally be done on days off from weight training. If this is not possible, it can be done several hours after weight training.
Seven Station Categories Choose one exercise from each of the following seven station categories. although there are many possibilities, remember
to base the choice on facility, equipment availability, training age of the athlete and specific areas that need work. 1. Plyometrics - steps/boxes/cones/hurdles2. Rope and bag agilities3. Plyometrics - bounding and hopping4. Agilities with cones/Direction Drill5. Bikes and Jump Ropes/Dot Drill6. Pro agility and shuttle run7. Sprints/bungie cord resistance
OrganizationWarm-up - Jog two lapsStretching - eight minutes
Seven-station - 45 minutes total6 minutes each station30 seconds between stations to switch
Post stretch - 5 minutes
Test the athletes before the first session. You will then have the information to determine the success of the program andpinpoint those areas which need additional stress during the workout.
SEVEN STATIONS1. Plyometrics - steps/boxes/cones/hurdles. This station works on lower body (power) explosion by concentrating on vertical jump.Cones, boxes, and hurdles are used. Running up a six or seven inch step, changing the lead foot, helps develop power and speed.Changing work times and the height of the jumps varies intensity levels. This station should, if possible, be done on a mat or softsurface.
SAMPLE EXERCISESBEGINNING cone jumps - six inch cone. Jump side to side over the cone with feet together for 20 seconds; rest five seconds;repeat three times. Be quick off the floor and keep the eyes focused straight ahead.INTERMEDIATE cone jumps - two, eight inch cones, two feet apart. Jump side to side over one cone; land and jump over the sec-ond cone; continue for 30 seconds; rest five seconds; repeat three times.ADVANCED cone jumps - four, eight inch cones, each two feet apart. Jump side to side over the cones, bringing the knees to thechest; continue for 30 seconds; rest five seconds; repeat three times. The advanced athlete should explode off the ground and bequick off the floor.
2. Rope and Bag Agilities. This station works on foot quickness and coordination. Ropes or tires can be used in this station. Threeor four bags or other obstacles are set up at the end of the rope around which the athlete must maneuver. The athlete must run all outand use good technique, lifting the knees and moving the feet quickly. As many different drills as possible are completed during thesix minute period, repeating each drill one, two or three times.
SAMPLE EXERCISESBEGINNING - Sprint through the ropes putting one foot in each box, lifting knees high; repeat three times. Work on good runningtechnique.INTERMEDIATE - Sprint through ropes, putting both feet in each box, lifting knees (must be quick with feet); repeat three times.ADVANCED - Run sideways through ropes putting both feet in each box. Go around to the beginning; repeat three times. Concen-trate on being explosive and fast.
3. Plyometrics - bounding and hopping. This station develops leg explosion and leg stability. Most jumps will be out in contrast tothe upward jumps of the first station. This combination builds a powerful athlete. This station should, if possible, be done on apadded surface to minimize leg shock. These jumps should first be performed using both legs; then, progress to more demandingone leg jumps. Complete as many different jumps and hops as possible during the six minute period, repeating each jump one, two
FIT TO A T QUICK STARTER LIBRARY - T2 - TIME
PA G E 1 5

or three times.
SAMPLE EXERCISEBEGINNING standing broad jump - Stand with feet at shoulder width. Jump out as far as possible; repeat three times. Concentrateon good form and outward explosion.INTERMEDIATE - Put jumps together, three or four in a row without stopping. Go for maximum distance. Be explosive off theground; repeat three times.ADVANCED - Begin with single leg jumps, four or five jumps for distance twice on each leg. Go directly to the two-legged hop,five or six jumps in a row for distance; repeat two or three times. Be explosive off the ground, with as little ground contact as pos-sible.
4. Agilities with cones/Direction Drill - This station develops footquickness and increases speed when changing direction. A series ofcones are set (six or more) 15 feet apart. (See figure one.) This providesa setting for a variety of drills. The key is going as fast as possiblethrough each drill with good technique. Do as many different drills aspossible during the six minute period; repeat each run twice.
The Direction Drill is also used at this station. The athletes as-sume good volleyball position facing the coach with knees bent andhead forward. Start the athletes with a fast foot chop. On command,they shuffle left or right, sprint forward or backpeddle. This is donenon-stop as long as they keep good position and move fast. Add timeeach session.
SAMPLE EXERCISESBEGINNING cone agility - cones 15 feet apart. Shuffle between two cones as fast as possible for 20 seconds; repeat two times.Keep head and chest up and knees bent.INTERMEDIATE cone agility - Shuffle between two cones; jump over cone and back and continue shuffling as fast as possible for30 seconds; repeat twice. Be quick with the feet and explosive on the jump.ADVANCED cone agility - six cones 15 feet apart. Shuffle to each cone, jump over the cone and continue for 45 seconds. Repeattwice, facing in and then facing out. Concentrate on being quick and explosive.
5. Bikes and Jump Ropes/Dot Drill - This station develops anaerobic conditioning, the key to volleyball. This also works on footspeed and coordination. The athlete is given different intervals on the bike; for example, 45 seconds fast, 30 seconds slow, 45 secondsfast. While several athletes are riding the bikes others are jumping rope. If a bike is unavailable, running in place is a good alternative.The athletes jumping rope will do the same intervals as those on the bike. Push-ups and sit-ups can be used to break the intervals.
SAMPLE EXERCISESBEGINNING - ride fast for 30 seconds, then slow for 30 seconds; repeat twice.INTERMEDIATE - ride fast for 30 seconds, then slow for 15 seconds; repeat three times.ADVANCED - ride fast for 20 seconds, then slow for five seconds; repeat five times. This interval should beall out.
Dot Drills may be substituted for the jump rope to "charge up" the workout. A series of jumps are per-formed using both the right and left legs. (See figure two.)
6. Pro agility and Shuttle Run - This station increases speed and quickness. The athlete runs the required course as fast as possible,as many times as possible, during the six minutes.
SAMPLE EXERCISESPro agility - The athlete sprints right or left, touching the line with the outside hand, then sprinting to theother side touching the line with the other hand, then finishing back across the starting line. (See figurethree.)Shuttle - The athlete sprints to the first line, picks up block, sprintsback, places it on starting line, sprints to far line, picks up block andsprints past the start line. (See figure four.)
During this station half the athletes can work on their block-ing technique against a wall, going to the right and to the left. Ankleweights can be added to the biceps for added resistance. Halfway
15 feet
15 feet
Figure 1
2 feet
3 feet
Figure 2
Start
30 feet
Figure 3
30 feet
Figure 4
FIT TO A T QUICK STARTER LIBRARY - T2 - TIME
PA G E 1 6 .

through the period switch and finish with the sprints. This reduces the time the athletes spend standing around.
BEGINNING - Run each drill two or three times, concentrating on good running technique.INTERMEDIATE - Run each drill four to six times; also add 10 to 20 block jumps. Run each drill all out.ADVANCED - Run each drill six to eight times; add 15 to 25 block jumps. Use ankle weights on biceps (three or four pounds) foradded resistance.
7. Sprints/Bungie Cord Resistance. This station is to increase speed and lateral quickness. The athlete runs all out for the requireddistance of five to forty yards. Bungie cords add resistance to the run. Use proper running technique when using the cords, whichalso can be used with shuffle drills. Stay low and really work the legs. Another effective drill involves taking one side step withresistance, then block jump with no resistance. Continue this down the floor. The sprints should continue for the entire six minuteperiod. When using the bungie cords, the athlete should run the required distance and back; then switch.
SAMPLE EXERCISESBEGINNING - Start with good running technique and sprint all-out five to twenty yards.INTERMEDIATE bungie cords - Sprint five to twenty yards with good form; then sprint five to forty yards. Work hard at runningfast.ADVANCED Bungie cords - Sprint five to thirty yards; shuffle ten to fifteen yards; stop and block jump ten to twenty yards; finishwith ten to forty-yard sprints. All these drills are very sport specific and help develop volleyball skills. Work hard.
EQUIPMENT CONSIDERATIONSEveryone has facilities of different size with different equipment. This program is so effective because it can be done in a
small area with minimal equipment. If equipment is a problem, here are some helpful suggestions.
Station 1. Use a regular building step; for box jumps, jump on a strong bench.Station 2. Use tires instead of the ropes or mark boxes on the ground.Station 5. Run in place or run with high knee, then chop your feet instead of riding a stationary bike.Station 7. Use a strong innertube in place of the bungie cords.
Use your imagination to create workouts beyond these suggestions. Your athletes will benefit from the variety. This workout is sport specific and effective if performed with intensity each training session.The seven-station circuit has been increased our conditioning and overall athletic ability. Properly done, the seven-station
circuit can be the most intense workout your athletes will ever complete. Start slowly and use good technique, because it is notwhere the athletes start but where they finish that counts.
Volleyball Club/High School Conditioning- The 30-Minute Magic Bullet
Lauren Hinojos
Lauren Hinojos began playing organized sports such as volleyball, basketball, and track at Goddard Jr. High as a seventhgrader and then specialized in volleyball at the high school level at Midland High. She was Academic All-District and AcademicAll-State her senior year. As a colligate athlete she played a defensive specialist at Midland College for two years. During her soph-omore year she received the Lady Chap award. Lauren player her final two years at Texas Wesleyan University in Fort Worth whereas a senior she received the Daktronics All-American Scholar Athlete award. Currently, she is employed by Robert Brown SportsPerformance as a conditioning trainer for volleyball. Throughout her athletic career her offseason activities consisted of plyometrictraining, weight training, conditioning, agility drills and private lessons.
he first consideration in establishing a club program is the level of athletes and the advisability to start a program. Re-search has shown that an untrained athlete can show improved performance after two weeks of training three days aweek of 60 to 90 minutes. Club teams are in a situation that doesn't allow them the luxury of this volume of trainingduring a typical training week. The norm is 30 minutes two days a week or one hour total as opposed to three to four
and a half hours, which is necessary for improved performance in a two week period. Because of this time limitation, improvementin performance in a club setting would take up to six weeks for any significant gains. This is equivalent to about 10 sessions.
The next consideration is that each athlete adapts differently to training. Another factor is that some club teams will conditionprior to practice (fresh) while others condition after practice (fatigued). This makes a big difference as to what can be done and atwhat level of athlete we are dealing with.
TBEGINTADV
O
FIT TO A T QUICK STARTER LIBRARY - T2 - TIME
PA G E 1 7

With regard to age of the volleyball athletes, again training response is individual.However, as a rule of thumb, starting female club players at about 12 years of age will startto equate to improved performance. It is also a good time to teach these exercises so theathletes can start to appreciate their benefits. Also of note is the type of program you initiateat this early stage. The difference is in the intensity of training, the exercises can be doneat all levels. A final note is that these exercises will aid in the prevention of injury.
Time Limitation the Critical IssueThe reason we have settled on 30 minutes of conditioning training in the club en-
vironment as magic is that most coaches can live with it. Most practices last two hours, twodays a week and giving up one hour to conditioning is asking too much. Therefore, 30 min-utes is the norm. Usually practices are done in the late hours of the evening in school gymsand it's normal to have school custodians ready to walk out as soon as practice is over. We'vehad the lights go out so that we had to shag balls in the dark. With these limitations, theconditioning coach has to select exercises that utilize the entire body to achieve maximumresults in the 30-minute timeframe. Another consideration for club players is that these ath-letes participate in conditioning activities at their school and they play additional sports.We have to design the program so they are doing exercises that are different then what theyare doing at school.
Pre- and Post-Practice Workout ChallengesGenerally speaking, the athletes who play club ball are hard workers. The pre-prac-
tice conditioning workout athletes are usually fresh and ready to go. This gets them throughtheir warm-up and conditioning drills. The results with these athletes are quick and evident. During post-practice conditioning work-outs we spend less time on the warm-ups such as the ladders. But when we do warm-ups this tells us the fatigue level of the athletescoming into the workout. As a result we may have to change the workout. We also do this observation in the pre-practice workoutas well because the athletes may have had a difficult workout session at school.
Individualization ConsiderationsWe try to individualize the workout as much as possible. This is touch to do in a team sport with only 30 minutes available.
We start by letting the players know what we are going to do for a particular session. We encourage 100 percent effort as much aspossible. In the case of an injured athlete, we have that athlete do a similar workout but with less stress on his/her joints. Thus theworkouts are very similar unless there is a specific condition that requires intervention. This is done to help in the rehab process andprovides these special needs athletes something they won't get at their school or with other sports.
Program ConsiderationsThe following is a sample of the Tuesday/Thursday conditioning routines that the club volleyball girls participate in two
days a week. Each team is given 30 minutes to train and within those 30 minutes it is our job to ensure that all the training essentialsare incorporated, such as footwork, agility, jump training, cardiovascular endurance, and strength. The coaches have important inputas to which exercises we'll do. If the coach is planning a heavy jumping day we adjust and lighten up on the jumping exercise andfocus more on close chained exercises like squats and lunges.
Circuit SystemA sample of a circuit day (which is a majority of training days) would include:
• Warm-up with ladders (working footwork- see samples below)-5 different exercises performed 3 times each• Followed by hurdles jumping with either both legs (6x) or single leg (3 each leg) (jump and hold, double bounce, etc.).• Circuits, which are performed at least twice with 30 seconds to 1 minute at each exercise station. The exercises are alternated
between high intensity and less intensity to allow for some recovery. Athletes go through each exercise in the circuit one rightafter then next for four to five minutes and then rest for half the time of the circuit (two to two and a half minutes) and then re-peat:
P jump squatsP mountain climbersP alternating lungesP lunge jumpsP push ups
• Abs are always at the end of every workout. Abs might include anything from planks, toe touches, v-ups, to any variety of dif-ferent crunches.
Spilt SystemOn other days we will split up the teams and have them run through agilities and strength training exercises. One team will
Lauren Hinojos
FIT TO A T QUICK STARTER LIBRARY - T2 - TIME
PA G E 1 8 .

be doing agilities for 15 minutes and the other team will be strength training for 15 minutes. We then switch so that the strengthgroup does agilities and the agility group does strength work. This system also allows for a change up to add variety but the majorityof the time we do circuits. A sample of this type of workout includes:
• Warm-up with ladders.• Agility drills, such as different types of cone drills (Star drill, M drill, shuffle drills) 6x each.
P M Drill is done with four cones in a squared circle one in the middle.w start in the middle, backpedal to far right conew sprint to top right conew sprint diagonally to the bottom left conew sprint to the top left cone
P Shuffle Drill is done with four cones in a squared circle one in the middle.w shuffle to the middle conew shuffle to an outside conew sprint to the next conew repeat shuffle/sprint sequence around the cones
We do a lot of shuffle/sprint contrast training with our volleyball players.
P Star Drill is done one cone in the middle and eight around from the middlew do a variety of shuffles, sprints and back pedals around it
The team with the strength exercises will do each exercise for 1 minute and then rotate.• Bleacher blasts
P Bench four to six inches off the ground standing one foot on the ground the other on the bench.P Jump explosively and switch legs
• Sit-up ball throws against the wall• Single leg good mornings standing on blue pads or exercise mat
In the 30 minutes it is important to try to train every system in the body used during sport play. To achieve the best resultsfrom each athlete, everything we do must be fast and efficient with little or no break time allowed.
Sample ladder Exercises:1. Quick Skips: Skip forward on balls of feet with one foot in each hole; hands move quickly by the pockets.
2. Side Skips: Skip sideways with quick feet. Hands move by the pockets rhythmically and quickly.
3. Variation of the same pattern- do hops with quick feet.
4. Hop Scotch: Straddle ladder and jump with both feet into next square, then jump out. Continue process down the ladder.
5. Hops Forward: Hop continuously on one foot to midpoint of ladder; switch feet for the rest of the way to end of the ladder.
O
FIT TO A T QUICK STARTER LIBRARY - T2 - TIME
PA G E 1 9

2 Ways to Subscribe Today!1. Sign up when you renew your AVCA Membership HERE
2. Don’t need to renew right now? Click HERE and sign up for the library online!
Section ToolsDetermine which tools you and your athletes have access to in developing each conditioning element.
Important Consideration:
• Is all my conditioning done on the volleyball court, or will I have access to a weight room?
Here are your articles to learn more!
-3
-3
Box Drills for Improved Strength - General and Volleyball-Specific Jumping
Tom Justice
oxes are a simple flexible tool for adding greater neuro-muscular stimulus to your work-outs. They are easily made(or purchased at a reasonable cost) and offer unlimited training variety for the creative mind. Used properly, this meansof exercise allows the coach to target several important areas:
1. Jump Mechanics- how to jump and land properly.2. Concentric Strength (muscle shortening)- needed for upward thrust.3. Eccentric Strength (muscle lengthening)- essential for landings and shock absorption.4. Acceleration Strength- the rate at which muscles build up force.5. Speed Strength- the development of maximum power against resistance (bodyweight).6. Stretch-Shortening Cycle- quickly going from muscle lengthening to shortening for greater force production.7. Complete Jump Cycle- all the variations, timing, and rhythms of different types of jumping motions preceded or succeeded by se-lected movements.8. Volleyball Specific Movements- by preceding, following, or alternating with volleyball skills, boxes can add to the accretionaleffect while maintaining a highly specific environment, both from a biomechanical and ergogenic standpoint.
For purposes of organization the author has classified exercises/drills involving boxes into (a) Strength Exercise (eccentric,concentric, or both), which can be either general or specific, (b) General Jump Training, and (c) Volleyball Specific Training. Thenatural flow of training over time should be from general to specific.
It is very important in the training process to manipulate the variables of volume, intensity and density. In training, volumeis defined as the total amount of work done, and in jump training this is typically expressed as the number of foot contacts or repe-titions. Intensity refers to the percent of maximum force production and is usually expressed in terms of relative difficulty and/orneuromuscular stress/stimulations that the exercise provides. This is regulated by the height of the box, use of single or double footcontacts, or by the complexity of the movement. Use of additional apparatus/implements, resistance, increases intensity. Density isused to describe the work-rest ratio. This may refer to the amount of rest between exercise bouts within a workout, to the number ofworkouts a day and the time allotted between them, or to the number of workouts in a weekly, monthly, or yearly training plan—oreven quadrennial plan.
A well thought out progression in the difficulty (intensity) of exercise, as well as volume, is important. At Lock Haven Uni-versity the following order of progression is used. Untrained athletes begin with exercises involving no boxes. After adaptation hasoccurred, then low boxes may be employed with those exercises. It is typical to employ sixinch boxes at this intermediate stage.Then, as further adaptation occurs the height of the box may be increased. It is useful to use a weightlifting analogy here. Increasingthe height of a box by one inch may be likened to adding 20 lbs. to the weight of a barbell. (The reader should understand that thisis strictly guesswork and for comparative, conceptual purposes only. The author knows of no study which has reported the percentof intensity increase in pounds with each one inch increase in box height.) Next, a weight vest may be employed, and the weight ofthe vest may be gradually increased. Then dumbbells may be used. Finally, an empty barbell may be put to work, and the weight ofthe bar may be increased. In addition, intensity may be augmented by shifting from double foot contacts to single foot contacts.Weight vests may be used on single foot contacts, but neither dumbbells nor barbells should be used because of the obvious problemwith balance.
BBEGINTADV
FIT TO A T QUICK STARTER LIBRARY - T3 - TOOLS
PA G E 2 0 .

The coach may skip forward or backward along the scale of progression wherever it is appropriate. For example, an athletewho enters the program with a great deal of prior jump training may be put on boxes immediately with a relatively high volume ofjumps. Another athlete who is just coming off an injury may be taken off box drills altogether and restarted at the beginning level.
It is not any one exercise or series of exercises that is important. Of primary importance, rather, is the overall training planand where the specific exercise falls within that plan. The creative manipulation and continued assessment of the variables of volume,intensity and density is everything. With that understood, here are some of the ways boxes may be used in training.
Strength ExercisesSingle-Leg Squat on Box (Figure 1)
This is an exercise that requires a great deal of leg strength. It may bedone after a high volume of parallel squats have already been completed intraining. The athlete should grasp an upright object, such as a pole or powerrack for balance and stability, and descend into a full squat while keeping thefoot of the squatting leg flat on the box surface at all times and the back straight.A weight vest may be used for added resistance. Later on a dumbbell may beheld in the free hand.
Single-Leg Squat in Front of Box (Figure 2) The rear foot is placed on the box while the squatting leg, placed well forward, extends, driving
the bodyweight upward. The progression in this exercise is from bodyweight, typically, to dumbbells, toan empty bar and finally to increasing loads on the bar. It is critical that the back remain straight in avertical alignment throughout the performance of this movement, particularly after weight has been added.
Step-ups (Figure 3)It is important that the thigh of the leg on the box be parallel when the free leg, on the floor, is up
on its toes. Upon extension, the free leg is pulled up waist-high. A vigorous arm motion is used. This ex-ercise may be used in a very specific manner to simulate a backslide. Progression is from bodyweight, toweight vest, then to a barbell. With bodyweight or weight vest a jumping action may be employed at thetop, such that the foot comes off the box. This action is not done with a barbell. An athlete experiencingback trouble with extremely heavy squats may use the step-up to continue strength gains and reduce thestress on the spinal column by roughly half. Usually all prescribed repetitions are done for one leg and thenlegs are switched but it may be done in alternating fashion.
Front Lunges on Boxes (Figure 4)Like step-ups, front lunges are usually done one leg at a time but
may be done alternating. The athlete takes a deep step forward onto thebox, descends into a position of deep knee flexion, and then pushes backto the starting position.
Split Squats on Boxes (Figure 5)Split squats are designed for use with a barbell. One box is placed
in front of the barbell and one behind. The athlete straddles the bar withone foot on the forward box and one on the rear box. The back stays per-fectly straight, and the feet do not move as the athlete lifts the weight upand down. This is a difficult exercise, and only light to moderate weightsmay be used.
Lateral Step-ups (Figure 6)The athlete stands with legs
well bent (passing or defensivestance) between two boxes and alter-nates stepping upon the box to theright and then the box on the left. Thisexercise should begin with six-inchboxes, then 12-inch and 18-inchboxes. Weight vests can then beadded, then dumbbells, and finally a barbell. The weight should remain lightto moderate. This same set-up may also be used for side lunges on a box.To do a side lunge, the hips merely descend more deeply as shown in Figure6-b, until the buttocks are close to the heel of the foot. The athlete then
FIT TO A T QUICK STARTER LIBRARY - T3 - TOOLS
PA G E 2 1

pushes back to the starting position.
Crossover Step-ups (Figure 7)Step-ups can also be done with a crossover step to simulate blocking footwork and to place greater
emphasis on the muscles of leg adduction. It is important to reverse the cross-over to return to the startingposition, i.e. in stepping up the left leg crosses over in front of the right leg (7-b), and in stepping down theright leg crosses behind the left.
Jump Ups (Figure 8)This is an excellent introductory jumping exercise in both teaching jump mechanics and in devel-
oping concentric strength. The athlete should be coached to use a vigorous arm swing in synchronizationwith leg, hip and torso extension and to land softly on top of the box (no sound). In advanced stages oftraining this exercise may be done against the resistance of rubber cables, or with a weighted vest and/oronto a very high box. Relatively easy on the knees, progress can be judged by ever-increasing box heights.
Jump Downs (Figure 9)This is a primary developer of eccentric strength. The athlete begins on
top of a box and jumps down to the floor, landing as softly and as noiselessly aspossible. Again, height of the box is the major determiner of progression. Thiscan also be done with a weight vest.
General Jump Training Exercises Depth Jump or Drop Jump (Figure 10)
Depth jumps are very stressful on the musculoskeletal system and shouldnot be undertaken until an athlete has reached physical maturity and has devel-oped a solid foundation of strength. The benchmark for strength is the demon-strated ability to do a full parallel squat with 1.5 to 2 times bodyweight. Theemphasis in the depth jump is placed on stepping horizontally off the box tomaintain the proper drop height. Athletes often will bend their support leg too much and step down and forward instead of steppinghorizontally. The result is that a 12-inch depth jump for all practical purposes becomes a 6-inch depth jump. The other thing that iscritical on a depth jump is that the amortization (contact with the ground) phase of the jump be as short as possible. The athlete mustfocus on as quick a switch- over as possible from eccentric to concentric con-tractions via the stretchshortening cycle. Like jumping onto a hot stove, theathlete wants to bounce off the surface as quickly as possible. The height ofthe box may be adjusted progressively upward.
Single-Leg Depth or Drop Jump (Figure 11)This is the most strenuous of the jump training exercises and should
be undertaken only by elite athletes at the most advanced stages of physicalpreparation. As with regular depth or drop jumps, foot contact time must be asbrief as possible.
Single-leg Push-off (Figure 12)In this exercise the athlete begins with one foot on the box and then, pushing off that one foot, attempts to drive the body as
high into the air as possible on each of the required number of repetitions. This is an outstanding low-impact exercise.
Alternate Single-leg Push-off (Figure 13)The athlete begins to one side of the box with one foot in position on it,
and then executes a powerful, single-leg push-off up, over the box to land on theother side with the opposite foot on the box. Then, a single-leg push-off is donewith that leg and the cycle of alternating legs is ready to repeat itself. Progresson single-leg push-offs is judged by how high an athlete can jump above the box.For added resistance a weight vest can be used.
Box Runs (Figure 14)With very light, quick feet the athlete rapidly alternates between con-
tacting the box with the right foot and the left foot while maintaining the rearleg as the primary support leg. Box runs are excellent for increasing foot speed,and a given number of leg cycles may be timed to measure improvement.
FIT TO A T QUICK STARTER LIBRARY - T3 - TOOLS
PA G E 2 2 .

Double-leg Box Hops (Figure 15)The athlete faces a line of boxes and hops up on the first one, then drops quickly to
the floor and up on the next one, continuing through the last box. The difficulty of the exercisemay be increased several ways. The hands may be placed on the hips, eliminating the use ofthe arms. The athlete may be required to start in a deep squat position and to return to a deepsquat on each foot contact. The height of the boxes may be increased, imparting a more ver-tical requirement on the athlete, or the boxes may be placed farther apart, demanding greaterhorizontal effort. Additional resistance may be added by wearing a weight vest or by holdinga medicine ball behind the head or in front.
The coach must have clear objectives in mind when making any adjustments withbox hops. For example, moving boxes farther apart does, indeed, increase the jumping de-mands on the athlete but it does so in a horizontal dimension. Most of the time volleyballcoaches are far more interested in increasing jumping in the vertical dimension. Ill-consideredexercise adjustments can have unintended consequences.
Single-leg Box Hop (Figure 16) A much more stressful form of box hops is to go from the floor to the box and to the
floor again using only one leg for the required number of repetitions. The athlete should begin with low boxes (6 inches) and increasethe height gradually as strength improves. A weight vest may be added forgreater resistance.
Side-to-side Box Hop (Figure 17)In this box hop the athlete begins to one side of a box and hops up
on it and then down to the other side. Reversing directions, the athlete thenhops back to the starting position. The emphasis may be on the height ofthe jump and subsequently on increasing the box height, or it may be onthe speed of the movement and on increasing the number of jumps per unitof time (10, 15, 30, 60, or even 90 seconds).
Side-to-side Over Box Hop (Figure 18)In this exercise the box is used as a barrier. The athlete begins on
one side of the box and hops over it to the other side and then quickly backagain. The emphasis is on a very short ground contact time.
Lateral Box Jumps (Figure 19)A series of boxes may be used to increase
lateral jumping/ movement ability.
Over Box Jumps (Figure 20) Using the boxes as barriers, the athlete
jumps quickly and lightly over a series of boxes in aline. This is more stressful than box hops but typi-cally has fewer foot contacts, because foot contactson top of the boxes have been eliminated.
Lateral Jumps Over Boxes (Figure 21)Again, the boxes are used as barriers with
the emphasis on quick, lateral jumping ability andlateral mobility.
Single-leg Over Box Hop (Figure 22)In this more stressful form of box hops the athlete attempts to clear a series of boxes
with a single-foot contact motion. All the hops may be done on one foot or they may be donealternating from one foot to the next.
Lateral Single-leg Hop Over Boxes (Figure 23)This is a very demanding exercise and should be attempted only by the most highly
qualified athletes at the elite level.
FIT TO A T QUICK STARTER LIBRARY - T3 - TOOLS
PA G E 2 3
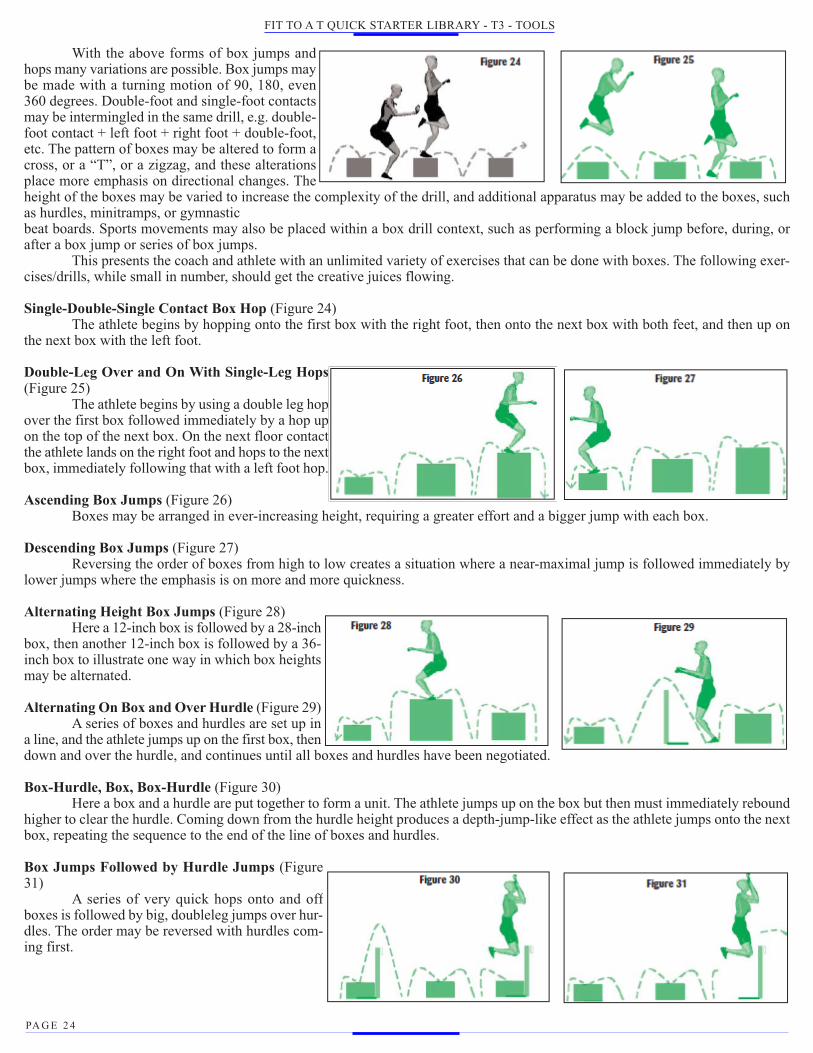
With the above forms of box jumps andhops many variations are possible. Box jumps maybe made with a turning motion of 90, 180, even360 degrees. Double-foot and single-foot contactsmay be intermingled in the same drill, e.g. double-foot contact + left foot + right foot + double-foot,etc. The pattern of boxes may be altered to form across, or a “T”, or a zigzag, and these alterationsplace more emphasis on directional changes. Theheight of the boxes may be varied to increase the complexity of the drill, and additional apparatus may be added to the boxes, suchas hurdles, minitramps, or gymnasticbeat boards. Sports movements may also be placed within a box drill context, such as performing a block jump before, during, orafter a box jump or series of box jumps.
This presents the coach and athlete with an unlimited variety of exercises that can be done with boxes. The following exer-cises/drills, while small in number, should get the creative juices flowing.
Single-Double-Single Contact Box Hop (Figure 24)The athlete begins by hopping onto the first box with the right foot, then onto the next box with both feet, and then up on
the next box with the left foot.
Double-Leg Over and On With Single-Leg Hops(Figure 25)
The athlete begins by using a double leg hopover the first box followed immediately by a hop upon the top of the next box. On the next floor contactthe athlete lands on the right foot and hops to the nextbox, immediately following that with a left foot hop.
Ascending Box Jumps (Figure 26)Boxes may be arranged in ever-increasing height, requiring a greater effort and a bigger jump with each box.
Descending Box Jumps (Figure 27)Reversing the order of boxes from high to low creates a situation where a near-maximal jump is followed immediately by
lower jumps where the emphasis is on more and more quickness.
Alternating Height Box Jumps (Figure 28) Here a 12-inch box is followed by a 28-inch
box, then another 12-inch box is followed by a 36-inch box to illustrate one way in which box heightsmay be alternated.
Alternating On Box and Over Hurdle (Figure 29)A series of boxes and hurdles are set up in
a line, and the athlete jumps up on the first box, thendown and over the hurdle, and continues until all boxes and hurdles have been negotiated.
Box-Hurdle, Box, Box-Hurdle (Figure 30)Here a box and a hurdle are put together to form a unit. The athlete jumps up on the box but then must immediately rebound
higher to clear the hurdle. Coming down from the hurdle height produces a depth-jump-like effect as the athlete jumps onto the nextbox, repeating the sequence to the end of the line of boxes and hurdles.
Box Jumps Followed by Hurdle Jumps (Figure31)
A series of very quick hops onto and offboxes is followed by big, doubleleg jumps over hur-dles. The order may be reversed with hurdles com-ing first.
FIT TO A T QUICK STARTER LIBRARY - T3 - TOOLS
PA G E 2 4 .

Volleyball Specific ExercisesVolleyball skills may be integrated with boxes during the late specific preparation period and during the pre-competition
and competition phases of a yearly training cycle. Utilizing boxes in this way increases the carry-over value of the box drill to on-court performance, and it may also increase the understanding and motivational level of the athlete. The few examples describedbelow should get the idea across:
Double and Alternating Single-Leg Hops with Slide Attack (Figure 32)The athlete begins by jumping onto the first box with a double-leg
hop. In coming off that box the athlete lands on the right foot and executesa single-leg hop onto the next box. Coming off that box the athlete performsa singleleg hop onto the last box with the left foot and then immediatelydrives off that box into the final right-left sequence of a backslide approach.Boxes could actually be set up on a court at or inside the 3-meter line. Acoach can toss balls for the athlete to hit after coming off the boxes. A settercould even be introduced with the boxes ending just before target position.In this scenario the coach would toss a ball to the setter just as the hitter wasmaking foot contact with the last box.
Box Jumps and Back row Attack (Figure 33)For this drill a series of boxes may be lined up behind the endline
and in the back row. Make certain that the last box is far enough behind the3-meter line to permit a full back row approach. A coach with a basket ofballs stands at the net. The athlete executes a series of jumps onto and offthe boxes, and then goes immediately into a back row attack as the coachtosses the ball.
Lateral Box Hops with Block Jump (Figure 34)A series of boxes may be set up along the net, beginning at
one pin. A coach with a basket of balls stands on the opposite side ofthe net near the far pin. The athlete completes a series of double-leghops with the arms in a blockingready position. After coming off thelast box the athlete must execute a full block jump and stuff block aball hit by the coach. This drill may also be done in combination witha box and minitramp or a beat board.
Alternate Box Hop and Block Jump (Figure 35)The volume of jumps can be significantly increased by having
the athlete start with a lateral box hop, but after coming off the boxexecute a full block jump in place before going to the next box. In ef-fect, then, each block jump is preceded by a depth jump stimulus. It iscritical to emphasize that the foot contact time be as brief as possible and the jumps maximal.Technique work can be added if the boxes are placed along a net and coaches or players arestationed with a ball at every jump blocking point. With such a scheme players can increasetheir jumping ability and work on a point of technique at the same time, such as penetration.
Lateral Step-ups with Acceleration (Figure 36)A defensive player is stationed between two boxes with a coach and a basket of balls
well to the front. The athlete executes a lateral step-up onto one box, returns to the center, andthen executes a step-up onto the other box. After the athlete completes a pre-set number of rep-etitions and returns to the center, the coach tosses a ball well in front of the athlete, and the ath-lete must quickly accelerate forward to run under it.
In consideration of all the previously described box exercises the coach or athlete shouldbegin with some means of evaluation to determine the present training state of the athlete.Clearly defined training objectives should next be detailed. Then a small number of exercisesshould be selected and their sequential order established. Exercises may be done sequentiallyin a circuit, or may be done one at a time for the prescribed number of sets and repetitions, e.g.three sets of six single-leg box hops. Box drills may also be done in a complex with weighttraining exercises, such as a set of power cleans followed immediately by a set of depth jumps.These steps set the broad training parameters of volume and intensity. The density of training—
FIT TO A T QUICK STARTER LIBRARY - T3 - TOOLS
PA G E 2 5

the ratio of work to rest and the number of training sessions per week—can then be determined. The training plan can then be im-plemented and should be followed by some objective means of evaluation. Following that assessment, further adjustments are madein the plan. The next stage of training is designed and executed, and the process of athletic enhancement continues.
It is beyond the scope of this article to go into any detail regarding the complexities of training plans, but the coach andathlete should at least be aware of the great number of possibilities opened up by the use of boxes. O
Cone Drills Making Them Specific for Sand and Court
Julie Kaiser
Julie is a USA Volleyball CAP level III coach for San Diego Volleyball Club in California.She is also a coaching instructor for LA ’84, and a Double-Goal coach/member of the Positive Coach-ing Alliance. Julie is also a member of the American Volleyball Coaches Association, and is a USAIMPACT and VCAP instructor for USA Volleyball.
one drills are set up in patterns to help develop volleyball players’ coordination, abil-ity to start and stop quickly, foot quickness, agility, change of direction and dynamicbalance. For a player to derive optimum benefits from the cones, he or she shouldwork for 5 to10 seconds with at least 60 seconds rest when first starting out. Coneactivities should be done for 5 to 10 minutes, one or two times per week. The be-
ginning of practice or as part of warm up are excellent times to use cones. Start with activities thatmost athletes can learn and perform correctly while moving slowly and under total control. As profi-ciency of movement improves, so can speed. Start with simple movement patterns.
The following cone drills show various from 6 member team to sand doubles. As a generalrule, when training an athlete who plays primarily on a six member team indoors, the amount of spacecovered in this drill should be significantly reduced, keeping the athlete within a reasonable area ofcoverage.
IndoorCone 1: Athlete begins forward spike approach when coachtosses the ball. Cone 2: Athlete attacks ball then opens hips and transitionsinward to attack line. Cone 3: Athlete digs angle ball initiated by the coach, theopen hips toward the sideline to begin the circuit once more.
Beach/DoublesCone 1: Athlete digs angle ball initiated by the coach, then runsforward as in attack approach. Cone 2: Athlete attacks ball tossed by coach, then opens hips andtransitions inward to middle of court.Cone 3: Athlete bump sets ball tossed by coach back toward thecoach, then drop steps back to cone 1 to repeat circuit.
Offense to Defense Three ConeDrill
Julie Kaiser
CBEGINTADV
FIT TO A T QUICK STARTER LIBRARY - T3 - TOOLS
PA G E 2 6 .
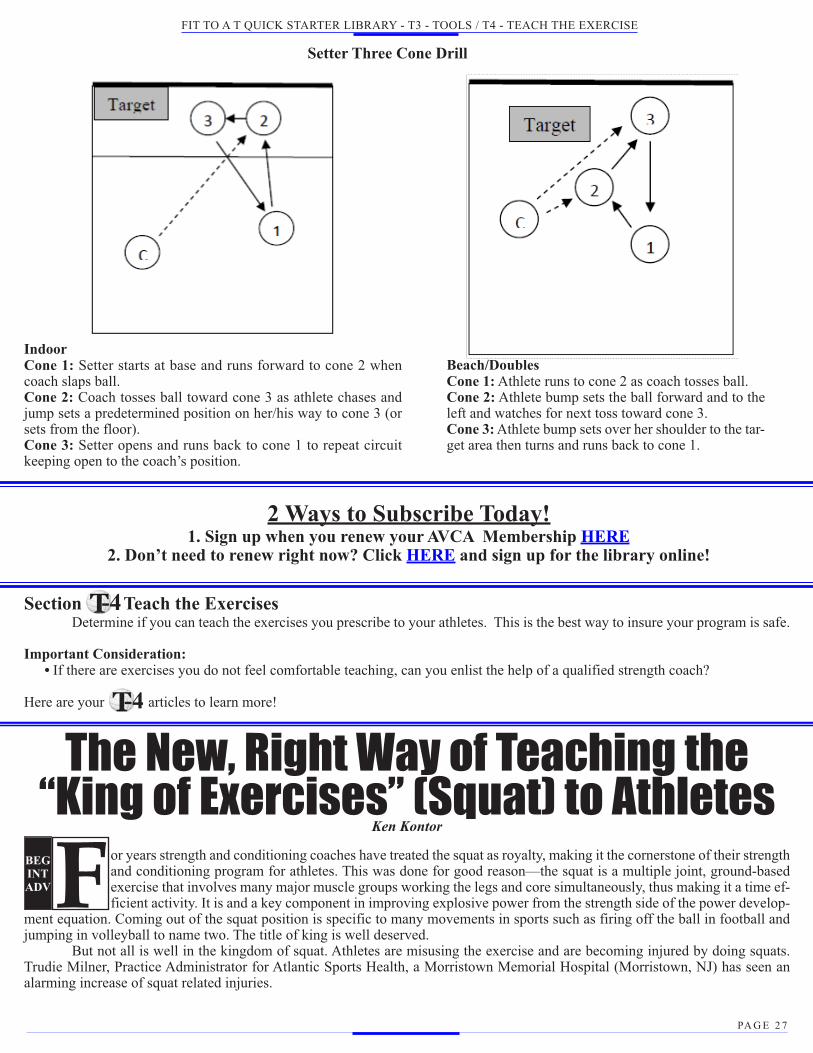
IndoorCone 1: Setter starts at base and runs forward to cone 2 whencoach slaps ball. Cone 2: Coach tosses ball toward cone 3 as athlete chases andjump sets a predetermined position on her/his way to cone 3 (orsets from the floor). Cone 3: Setter opens and runs back to cone 1 to repeat circuitkeeping open to the coach’s position.
Beach/DoublesCone 1: Athlete runs to cone 2 as coach tosses ball. Cone 2: Athlete bump sets the ball forward and to theleft and watches for next toss toward cone 3. Cone 3: Athlete bump sets over her shoulder to the tar-get area then turns and runs back to cone 1.
Setter Three Cone Drill
2 Ways to Subscribe Today!1. Sign up when you renew your AVCA Membership HERE
2. Don’t need to renew right now? Click HERE and sign up for the library online!
-4Section Teach the ExercisesDetermine if you can teach the exercises you prescribe to your athletes. This is the best way to insure your program is safe.
Important Consideration:• If there are exercises you do not feel comfortable teaching, can you enlist the help of a qualified strength coach?
Here are your articles to learn more! -4
The New, Right Way of Teaching the“King of Exercises” (Squat) to Athletes
Ken Kontor
or years strength and conditioning coaches have treated the squat as royalty, making it the cornerstone of their strengthand conditioning program for athletes. This was done for good reason—the squat is a multiple joint, ground-basedexercise that involves many major muscle groups working the legs and core simultaneously, thus making it a time ef-ficient activity. It is and a key component in improving explosive power from the strength side of the power develop-
ment equation. Coming out of the squat position is specific to many movements in sports such as firing off the ball in football andjumping in volleyball to name two. The title of king is well deserved.
But not all is well in the kingdom of squat. Athletes are misusing the exercise and are becoming injured by doing squats.Trudie Milner, Practice Administrator for Atlantic Sports Health, a Morristown Memorial Hospital (Morristown, NJ) has seen analarming increase of squat related injuries.
FBEGINTADV
FIT TO A T QUICK STARTER LIBRARY - T3 - TOOLS / T4 - TEACH THE EXERCISE
PA G E 2 7

“Because we are a sports program we see a variety of different sport athletes. In the academic yearstarting last September I was amazed at the number of kids coming to us for rehab who suffered significantback injuries (from squatting) as a result of unsupervised weight training in high schools and clubs. Theseinjuries are severe enough to jeopardize the playing careers of these young athletes.
It was so alarming that we assembled a team of different doctors to see these athletes including apediatrician, internal medicine specialist and orthopedic doctor. We find this a terrifying situation and onethat parents and coaches need to be aware of. The age of kids getting involved in competitive sports is gettingyounger and the intensity in which kids are competing is much higher. As professionals, this is somethingwe are now addressing.”
The reason for this problem is two-fold. Certainly, improper loading is a culprit but is easily correctedif there’s proper supervision. If technique breaks down, reduce the load. The other problem, poor technique,is more complex. The root of the problem is not only are the athletes doing the squat wrong but also condi-tioning professionals are teaching it wrong!
For years the squat has been taught using the classic coaching rules based on the sport of powerlifting. In working with these athletes whose only goal was to lift maximum poundage, the technique wasacceptable because the squat was the primary focus. However, applying these techniques to the general ath-letic population has its drawbacks. Athletes generally aren’t built like power lifters who are short levered.Squats are not a primary focus for most athletes whereas gaining functional strength to prevent injury is aprimary goal with performance enhancement secondary. It’s not how much but how applied. With all thecomplexity involved with athletic development, the squat has to be carefully integrated into total athlete de-velopment in order to prevent injury, not cause it. A collegiate strength and conditioning coach and former power lifter and worldrecord holder has evolved teaching the squat to make it safe for athletes. The following is his rationale.
“One of the most basic of exercises, the squat, is often the cause of many back problems. This is because proper mechanicsare not used when performing the squat. Most coaches tell athletes to keep their backs tight and chest up. The intention is good—toprevent back injuries—but it is the very cause of back problems. When an athlete hears the words “keepyour back tight or chest up,” what muscle group do you suppose he contracts? In picture (1) the hipflexors are turned on in an attempt to keep the back straight. Notice how the lower back arches. It isimpossible to squat into a deep position with the back arched. The hip and spinal joints lock up anddoesn’t allow mobility.”
“In picture (2), the lifter is able to keep an upright position and get deep. Notice how the backis in a flat position. This is an example of greater hip and spinal mobility when the pelvis is in thecorrect position. In the second picture, the athlete was told to keep his abs in a static position (distancebetween ribs and pelvis maintained), especially as he gets deeper. Now the hamstrings can keep thepelvis level as the squat is performed. The abs stabilize the spine and allow maximum mobility at thehip joints. The back muscles react by lengthening to control the forward lean, keeping the center ofgravity over the feet, similar to cables on the shaft of a crane.”
Compare the two pictures. Note the gap between the bar held against the lifter’s back and hisback in picture (1). In picture (2) the gap is gone and the back is in a neutral position. Which is more“athletic” and functional to sport movement? What position do you want your athletes’ in? Let’s lookat the wrong and right way of teaching the squat using the correct coaching cues to your athletes.
Carefully compare the two methods and adapt the right way that’s best for your athletes.
Teaching the Squat to Athletes the Wrong WayNote: The wrong coaching cues are stricken out.
Start• Use rack, with supports at mid-chest level.• Be sure spotters are in position.• Grasp the barbell palms down, slightly wider than shoulder width.• Step under bar, feet parallel and shoulder-width apart.• Place the center of the bar on the upper back so it is balanced, resting securely across back of shoulders.• Elbows pointed back, eyes straight ahead, chest up, squeeze shoulder blades together.• Straighten legs to lift the barbell off rack and step backward, feet slightly wider than shoulder-width and toes pointed out slightly
with slight arch in lower back and tight.
Movement• Under control bend hips backwards, bend knees and ankles.• Keep bar over middle of foot to heels, feet flat on the floor.• Inhaling, descend slowly until tops of thighs are parallel to floor; pause.• Do not let knees come together on descent.• Keep back straight and chest up.
Notice how the lowerback is arched (a gapbetween the lower backand straight edge) whena straight edge is placedon the back.
(1)
Notice the straight edge is flatagainst the back leaving nogap.
(2)
FIT TO A T QUICK STARTER LIBRARY - T4 - TEACH THE EXERCISE
PA G E 2 8 .

• Exhale as you straighten hips and knees to return upright under control.• Keep hips under bar, eyes focused straight ahead.• Back as flat as possible.• Knees over ankles.
Tips• Do not bounce at bottom position.• Do not bring knees together coming up.• Do not speed bar up at the top.• Stay tight throughout movement.
Teaching the Squat to Athletes the Right WayNote the new, right coaching cues are underlined.
Start• Use rack, with supports at mid-chest level.• Be sure spotters are in position.• Grasp the barbell palms down, slightly wider than shoulder-width.• Step under bar, feet parallel and shoulder-width apart.• Place center of the bar on the upper back so it is balanced, resting securely across back of shoulders.• Elbows pointed down, eyes straight ahead.• Straighten legs to lift barbell off the rack and step backward, feet slightly wider than shoulder-width and toes pointed out slightly.• Fill lungs with air (the creation of intra thoracic pressure) and hold.• Attempt to exhale forcefully but close nose and mouth air passages so that air is not allowed to escape (the creation of intra ab-
dominal pressure, Valsalva maneuver).
Movement• Under control, squat down as if sitting down on a chair.• Descend under control until tops of thighs are parallel to floor.• Keep feet flat on the floor and knees in alignment with feet.• Important: maintain the intra thoracic/intra abdominal pressure created at the start. Try to keep back relaxed the back will take
care of itself.• Upon start of the ascent, exhale forcefully using the abdominal muscles to return to the upright position.• Keep eyes focused straight ahead.
Tips• Control, do not bounce at bottom position.• Knees together coming up. The thigh adductors are hip extensors in the low position and help get you through the sticking point.• Do not speed bar up at the top.• Keep abs tight Stay tight on the descent and ascent using abdominal pressure and not the tightening of the lower back.• Avoid the shifting of weight predominately to one leg. This indicates a muscle imbalance.
Final Look- The King is Dead Long Live the KingWith all the misinformation on teaching the squat which potentially can lead to injury of the athlete the question becomes,
is keeping the squat as a viable part of your conditioning program for athletes worth it? Learning the new technique prescribed inthis article is a major undertaking and will challenge many conditioning programs. Current thinking and conditioning practices inthe collegiate and professional levels is that single leg exercises such as the lunge and step up are more functional to the athlete inmany instances. Certainly the loading for these exercises is less than a barbell squat. The king, the squat, may be dead but it’s im-portant to find a alternative to work these major muscles groups in a ground based environment- long live the king!
Acknowledgement: Ron Hruska, Postural Restoration Institute™ www.posturalrestoration.com
O
Profiling Volleyball Jumping One v. Two Legs Strength v. Elastic Jumper
Shawn Myszka, CSCS*D
Shawn Myszka is the Founder and Athletic Performance Director of Explosive Edge Athletics in Eden Prairie, Minnesota,which currently trains many of the top athletes in the state of MN on all levels and serves as a consultant to coaches at many athleticprograms. Shawn conducts jump clinics and has extensively studied the jumping and plyometric process to share his knowledge in
FIT TO A T QUICK STARTER LIBRARY - T4 - TEACH THE EXERCISE
PA G E 2 9
this important volleyball performance topic. He is a frequent presenter at strength coach and sports-specific conferences nationwide.Shawn, who is the Founder of the Plyometrics/Jump Training Special Interest Group, has also recently developed the first-ever JumpTraining Certification designed for coaches looking to specialize in training to increase jump performance. In addition, Shawn wasvoted the 2008 Minnesota NSCA Trainer of the Year.
bviously, vertical jumping is at forefront of many coaches' minds when it comes to the training of volleyball play-ers. Not only can the testing of different types of vertical jump help distinguish the best athletes on one's team;but the acquisition of phenomenal vertical jumping can allow coaches the opportunity to tactically adjust theirstrategy based on the jumping ability of the team's athletes and wreak havoc on their opposition. In the sport of
volleyball, it is common to see vertical jump double-leg takeoffs to be used frequently and they are often the rule (as opposed to asport like basketball in which single-leg takeoffs are more common). The main glaring difference would be found in an offensiveslide attack where the middle attacker will adopt a more one-legged style of plant and jump. The purpose of this article is to educatecoaches on what science tells us about each jump style and it will attempt to give direction towards proper training for the attainmentof greater overall jumping capabilities.
Components of Jumping Obviously, vertical jumping is one of the most complex displays of athletic power known to man and it is a key component
of arguably the most exciting skill witnessed in a volleyball match; the approach and spike. These movements rely on the interplayof many physical and physiological properties that combine and contribute to how it affects different jump types. This section ismeant to serve as a brief overview of some of the individual factors that combine to affect jumping and the training of it.
On its basic level, during vertical jumping, the muscles of the hips, knees, and ankles act in a rapid fashion and with greatforce to allow the body to achieve the greatest vertical velocity as it leaves the ground. The components that come into play that con-tribute to the overall height of a jump are, but not limited to; absolute/limit strength, rate of force development, relative strength, ec-centric strength, stretch-shortening cycle ability, physical maturity, body composition, and technique/coordination. However, somekey concerns of importance, such as specific exercise execution and program design variables are beyond the scope of this article.The reader is encouraged to contact a USA Volleyball accredited Volleyball Conditioning Instructor or Master Instructor for moreinformation on these topics.
What Research SaysMuch research has been conducted on the activity of vertical jumping. However, at this point, there have been very few de-
finitive studies of whether athletes are more efficient during single-leg takeoffs or double-leg takeoffs. The majority of the researchup to this point on bilateral versus unilateral strength has only been done on individuals using isometric or isokinetic experiments ofless dynamic movements not in accordance with vertical jumping. However, a few have been completed that could give us great in-sight as to the intricacies of the topic we are speaking on. Van Soest, et al. displayed a comparison of one-legged and two-leggedcountermovement jumps in 1985. The results of the study, which used well-trained male volleyball players, indicate that jumpingheight (and thus, power output) in one-legged jumps was approximately 58% of that reached in two-legged jumps and the center ofgravity was greater and push-off phase was longer than in the two-legged jump. These results would also imply that by adding theheight/power of both legs together when executed in separate movements, it would result in greater heights than if the athlete jumpedusing two-legs.
In addition, a study done by Sale in 1992 would explain the previously mentioned concept above as bilateral deficit. Bliateraldeficit can essentially be explained by the difference in force output when the right and left legs act together versus the sum of theforces that are produced when they act alone. However, in this study, it is interesting to note that it was proven that specific trainingcan either greatly increase or decrease this bilateral deficit. For example, those athletes who typically alternate leg actions in theirsport displayed a greater summed strength than their bilateral strength and vice versa with athletes who typically perform bilateralmovements. Therefore, it's important to understand that if the majority of one's sport skill movements exhibit one takeoff over another,then the athlete should train with that style of strength and dynamic movements in the majority of training time.
Research on the study of human movement, especially in regards to jump performance, can be a terrific way to offer us alook into what is occurring during movements, and how we may need to change the teaching of given sport-specific tasks. Eventhough research can sometimes not account for certain elements such as previous training or pre-existing physiological factors, it issuggested that readers continue to acknowledge this relationship of exercise and sports sciences, and how they impact the waycoaches instruct sport skills and movements.
Jump StylesBased on the above research and from simply watching athletes move out on the court, it is clear that we can suggest that
two individual athletes can often get to the same place (and this includes vertical jump height) by using a very different mixture ofthe components that go into determining jump performance. Granted, no matter what the style, it is important to be aware that theability to jump high will be determined by the combination of the factors that were previously mentioned.
However, as a guideline, we can actually identify two different types of jumping styles that the majority of athletes will beable to fit into. The first type is a strength jumper who relies mostly on absolute or limit strength qualities and they are just as likelyto attain a spectacular jump but it usually involves greater force development. These individuals are usually less graceful and rarely
OBEGINTADV
FIT TO A T QUICK STARTER LIBRARY - T4 - TEACH THE EXERCISE
PA G E 3 0 .

impress others with their pure athleticism. They may also be built with shorter limbs and thicker joints or may have a heavier andmore muscular build. Nonetheless, they use their structure and their strength to their advantage and usually will jump greater heightsoff of two legs and may even look clumsy (and at the very least; inefficient) off of one leg. These individuals will often spend muchgreater time on the ground (>250ms) after they plant before they start the overcoming/push-off phase of their jump. This longerground contact time will often help enhance the jump height for a strength jumper because it will become more mechanical and relymostly on concentric power via voluntary force production. A strength jumper will typically require greater contribution from thequadriceps musculature region for its power due to a deeper knee bend that is usually found in this style. The downward and upwardmovements will usually also be completed more slowly and deliberately.
The second type of jumper is the elastic or reactive jumper and is named this way because they rely on more plyometric ca-pabilities of movement. This person will usually have greater speed in their approach or in their countermovement (in a block).They also usually have very short transition/coupling times between downward and upward movements as they are more efficienttaking advantage of stretch-shortening cycle actions (elastic energy utilization or stretch reflex contribution). Thus, their approachwill often be performed with greater speed and will possess greater eccentric strength (lengthening tension developed in the muscleoften referred to as force absorption). Thus, their ground contact times (<250ms) will often be much less than their strength jumpingcounterparts. The elastic jumper will often possess longer limbs, longer tendons (especially the Achilles Tendon) and small joints.And because of this structure, the elastic jumper will often rely more on the muscles of the posterior chain including the glutes, ham-strings, lower back, and calves. These athletes will usually bend much less at their knee but may bend more at the waist (by "hinging"at the hip joint) with the center of gravity out in front. In addition, these types of jumpers will often make jumping look effortlessand will appear to be bouncy or springy when they land and take-off.
Which Came FirstWhen it comes to these different styles of jumpers, it is important to raise a number of questions that have often been proposed
among coaching circles everywhere: how did the athlete adopt their jumping style? Did the technique come from biomechanicalconsiderations that then led to strengths and weaknesses or imbalances? Does the individual's level of strength or activation in cor-responding muscle groups determine the jumping technique and corresponding efficiency (or lack thereof)? Is there a degree of "self-optimization" (a theory proposed by Dr. Peter Vint)?
The answers to all these questions would be mere speculation but they are good things to think about. Research has attemptedto answer some of these questions but have only partially found the answers that are sought after. It is important to continue toanalyze these concepts and continue to develop research that could provide more clear insight and allow us all better direction forthe development of our training and teaching.
Implications to TrainingFurther research into multiple factors involved in the development of vertical jump, would show that various training methods
have been proven to be effective in improving overall jumping capabilities. This is because each method may be able to overload adifferent component of the jump performance. Beyond that, it would make logical sense that the most effective type of training anathlete should undergo would be dependent on the component of jumping ability that the individual is lacking. For some athletes,these deficient components may be very apparent and visible. While for others, testing of specific components can help acknowledgewhere the weakness is for that athlete. From this starting point, the coach can help target a weakness which will then produce thequickest and greatest overall gains.
For example, a strength jumper is in need of greater speed, quicker change of direction/force application (often termedreactive strength), and increased force absorption. Thus, this athlete would need to gravitate towards more plyometric-based move-ments such as altitude shocks and drop/depth jumps. This would increase the ability to absorb and exert force in a quicker fashion.In contrast, the elastic jumper is in need of more pure concentric power production capabilities. Thus, this athlete would need to per-form movements with heavier loads such as various styles of squats, deadlifts, and high-velocity/high-force movements such asOlympic lifts. One can even simply work on practicing the type of jump style that they are not used to in order to make themselvesmore efficient with the technique involved in that specific take-off style. In a nutshell, the more an athlete can learn to adapt moreof the qualities of the style of jumper that they are not, the more likelihood that this will result in the greater performance.
Implications for the CourtAs an Athletic Performance Trainer, I often discuss these topics and issues with volleyball coaches. The one thing that is
often brought up time and time again is how the previously mentioned theories could actually impact performance out on the court.First, I will be the first to admit that there is a definitive line between that which is biomechanically correct, and that which is tacticallyoptimal. However, I would implore all coaches reading this to start to take more of a pro-active role with the analysis of the athleticqualities of the personnel they have on the court. During this analysis, one should acknowledge what physical characteristics andjump styles exist in their athletes and then determine how they can exploit those strengths to the greatest degree out on the court.
SummaryThis article attempted to offer greater insight into the key differences between one and two-legged jump styles and the ex-
pected performances of each. It also strived to highlight the multi-faceted nature of jumping and enable coaches how to more effec-tively train their athletes to increase their jump performance. O
FIT TO A T QUICK STARTER LIBRARY - T4 - TEACH THE EXERCISE
PA G E 3 1

ReferencesSale, D.G., 1992. Neural adaptation to strength training. In: P.V. Komi (ed). Strength and Power in Sport. Boston: Blackwell ScientificPub., pp 249-265.
Van Soest, A.J., Roebroeck, M.E., Bobbert, M.F., Huijing, P.A., and Van Ingen Schenau, G.J., 1985. A comparison of one-leggedand two-legged countermovement jumps. Med. Sci. Sports. Exe. 17:6: 635-639.
Jump Training Nevillizms #3 - Specific Jumping Exercises
Bill Neville
Welcome to Nevillizms. The following are a series of volleyball-specific testing and jumping exercises developed by BillNeville. They are to be used as part of a comprehensive jump training improvement strategy. Here’s Bill’s points to remember whendeveloping a jumping program.
• With a sound jump training and related conditioning program any athlete can improve his or her jump.• Always give your best effort when training. A great attitude doesn’t just show up at game time. Train your attitude—especially
when things seem tough!
he following exercises focus on technique, power, endurance, andbody control in the air.
Two Feet Spike Jump Primary focus is on approach and jumping technique. In advanced training,
when technique is ingrained, focus is on power and endurance. In intermediate andadvanced training, resistance can be added with either bicycle inner tubes or weightvests.
One foot Spike Jump (Figure 1)Basic basketball “lay-in” approach. Intermediate focus is on technique. Advanced continues with technique focus but also
concentrates on explosive power. Only resistance should be a weight vest.
Standing Block JumpAt net. No step, straight up jump and repeat without any hitch. Focus is on balanced landing and jump in repetitive sequence.
Resistance in intermediate and advanced training can either be weight vest or inner tube.
Two-Step, Side-Step Block Jump (Figure 2)At net. Balance and control in the steps and jump are the focus in the beginning and intermediate stages. Resistance can
TBEGINTADV
FIT TO A T QUICK STARTER LIBRARY - T4 - TEACH THE EXERCISE
PA G E 3 2 .

either be inner tubes or weight vests.
Two-Step, Cross-Step Block Jump (Figure 3)At net. Same focus as above.
Three-Step Block JumpAt net. Primarily for middle blockers. Combination of
twostep, side-step followed by the cross-step.
Squat Jump Free jump in open space. Back straight, squat to (at
least) 90 degrees and jump straight up. Focus on explosivepower.Variation
Instead of going straight up, do long jumps. Resistancecan be inner tube, weight vest, or dead seal.
Tuck Jump (Figure 4)In open space. Jump and bring knees to chest. Focus on
explosive power. Resistance is weight vest only. O
2 Ways to Subscribe Today!1. Sign up when you renew your AVCA Membership HERE
2. Don’t need to renew right now? Click HERE and sign up for the library online!
Section TestingDetermine a way to measure the development of your athletes and your program’s effectiveness through field testing. This
goes back to the definition of conditioning - planned, measured progressive overload.
Important Considerations:• Select field test that you can administer quickly and easily.• Test at the start/end of a season to see where you are and what you must work on. • Be sure your testing program is reliable. • Testing can also be a good way to determine if your players have movement compromises and compensation that can lead to
overuse injury.
Here are your articles to learn more!
-5
-5
Seven Habits of a Highly Effective VolleyballConditioning Program: Proper Testing Protocol
Robert L. Brown
Robert Brown is the founder and CEO of the well-regarded Robert Brown Sports Per-formance, which is one of the country’s only facilities specializing in volleyball performancetraining. A well-known, respected and outspoken leader in the volleyball sports performanceindustry, Robert has written feature articles for sport training magazines throughout NorthAmerica including Protraineronline, Performance Conditioning (Soccer, Softball, Cycling,and Volleyball) and Volleyball Magazine.[Ed.]
abits, and for our discussion good habits, are things that are repeated timeand time again to the benefit of the individual. Most players in volleyballhave not formed good habits. They go from program to program, pieceby piece, trying different things that never really settle into good habits. Robert L. BrownHBEG
INTADV
FIT TO A T QUICK STARTER LIBRARY - T4 - TEACH THE EXERCISE / T5 - TESTING
PA G E 3 3

Players and coaches must set some good guidelines or habits to establish principles that say, “My program consists of this.” Somecoaches think that they have a speed/agility program, but they do not know how it all fits together. Nothing is said about injury pre-vention and other aspects of a comprehensive program. It is just out there floating in air and not really part of anything.
Good habits allow for a systematic approach to conditioning volleyball players. They are consistent, organized and produceresults—a program with a purpose.
The Habit of Proper Testing Protocol There is a lot of testing being done at various gyms and programs to collect data on athletes. What should be done with the
testing protocol results? It is like going down the highway and not knowing where you are going. Establishing a proper programneeds proper testing protocol. You do not need 1,001 tests to start a program. A good volleyball program can be established onthree to five tests.
Selecting the Right TestsTests should be quantifiable (done over and over again in a reliable fashion) because the results have meaning from testing
session to testing session. The end result is to see if the program is working. The tests must be simple so that the athletes can easilysee what the tests are for and what the results mean. This way they “buy into” the program, which is an important part of testing.The simple tests for athletic ability are the vertical jump test, a standing long jump for horizontal power and a medicine ball toss (seeHow-to Three Simple Tests).
The coach may choose to do strength testing such as squats, cleans, etc. This takes more time and may not really be necessary.We do not do strength testing and I do not recommend maximum strength testing in things such as the Olympic-style lifts. Thereare simply too many problems maintaining good techniques My bottom line: results over time.
Results and Their UseWe are in a team concept. We can take the data in this environment and establish team norms based on age, position, etc.
Another way to use results over time is to examine the testing mean scores—a team average vertical jump of 22 inches, for example.Those above the average may not need a special plyometic program and those below may need extra programming. The results areexplained to the athlete on an individual basis. The coach cannot come down on an athlete who is not at team average, but theaverage is something the athlete should work at until they can achieve it.
This task of averaging becomes more relative if you collect and keep yearly data. This information should mainly be for thecoach to compare every year. What have you been doing, and why are the results better from one year to the next? Kids, especiallyfemale athletes (from my experience) do not like to be compared to past results. We live in the present when we discuss results withthe athletes. It is critical not to lose perspective on improvement. An athlete may work hard and go from 20 to 22 inches. Thatperson may now be average, but the percent of gain is excellent and s/he should be recognized for improving 10%! It is not as easyto get these improvements as you may think. It takes time and hard work. If the coach acknowledges the hard work, the athlete willkeep working hard.
Effects of Training HistoryWhen administering a testing protocol, the coach should be aware of the athlete’s training history. There is a phenomenon
in strength training and conditioning of quick and massive gains at the start of an athlete’s strength training programming. Resultscome slower and less dramatically as the athlete’s training age increases. This has to do with reaching genetic potential. This is atough situation for the coach and his/her program. The coach may be doing everything possible to get the athlete achieve somegains. However, the athlete may be close to their potential when small gains equal huge amounts of work. This can discourage theathlete. As a coach, I delve into their history to see if something was overlooked, such as movement speed or power training. Thecoach should also look at other tests where there was improvement. This is a good reason to strength test. If they make improvements,some positive things are happening. You may not be able to go up any higher but at the net, but you will be able todemonstrate more strength in holding the block and making the play.
Test and ParentsThe parents should be part of the testing protocol process. They must know what the tests are, what they
mean and how their child is doing. They should also be educated. They pay the bills and they have a right to knowhow their money is being spent. If you cannot validate your program, the bottom line is that you won’t have the kidvery long.
How-to Three Simple Tests:Test #1 Vertical Jump
• Determine reach with the dominant hand. • The score is the difference between the reach and the height touched.• The score is the best of three jumps.
Test 1
FIT TO A T QUICK STARTER LIBRARY - T5 - TESTING
PA G E 3 4 .

Test #2 Standing Long Jump• The athlete should initiate the movement with the feet shoulder-width apart and the hips lowered
into a jumping position. • Using a big arm swing, flex the hips and jump forward as far as possible.• Record the distance best of three jumps.
Test #3 Med Ball Squat and Overhead Toss • Grasp med ball with both hands and place med ball at the chest to a squat position. • Explosively throw the ball out as far as possible.• As the med ball is released, perform a maximum vertical jump.• Record the distance best of three throws.
Test 2
Test 3
Jump Training Nevillizms #1 BlockJump Tests: Side Step Block Jump and
Three-Cross-Step Block JumpBill Neville
Welcome to Nevillizms. The following is a series of volleyball specific testing and jumping exercises developed by Bill Neville.They are designed to be used as part of a comprehensive jump training improvement strategy. Here are Bill's points to rememberwhen developing a jumping program.
• With a sound jump training and related conditioning program any athlete can improve his or her jump.• Always give your best effort to your training. A great attitude doesn't just show up at game time. Train your attitude, especially
when things seem tough!• Regular and verifiable testing provides an objective measurement of improvement as well as motivation to continue.
We are fortunate to have Bill share some of his best tried and true tests and exercises to improve volleyball jumping. BillNeville was an assistant coach and statistician for the 1968 USA men's Olympic team in Mexico City; the Canadian Olympic coachfor the men's team in 1976; and, assistant coach for the USA Gold medal winning team in 1984. Bill has served as head women'scoach at Montana State University and the University of Washington, and was the USA men's national coach from 1988-1991. Hehas written and produced several books and videos on volleyball and designed the Coaching Accreditation Program (CAP) for USAVwhen he was Technical Director for the organization from 1985 through 1988. Currently, Bill owns his own company and serves asa personal volleyball trainer, coach and clinician in the Seattle area. [Ed.]
he protocol of testing must be consistent. All the elements of the test must be the same as previous tests for the sameathletes as well as for athletes in different locations. The sequence of activities prior to any given test must be thesame. The relative energy level needs to be the same as previous tests or those held in other locations to further en-hance reliability. Therefore, any warm-up or training activities should be similar as before with previous tests. The
day of the week and time of day should be the same.Testing is only as good as its reliability and that, in turn, confirms its validity. In its presentation each test must be a clone
of the original.
TBEGINTADV
O
FIT TO A T QUICK STARTER LIBRARY - T5 - TESTING
PA G E 3 5

Integrating Testing with TrainingTesting is the evaluation of the effectiveness of your training plan. It is an objective analysis of your work ethic; that is, how
well you are sticking to the program. Testing can tell you what areas need more attention in training. There are things that can becontrolled and those that cannot. If you have reached your physical maturity your reach and height can be tested and re-tested andno training regimen can improve those factors. However, everyone can improve his or her jump, endurance, and power. Testing ispart of the detective process ferreting out specifics of emphasis in training.
Side Step Block JumpPurpose
To measure the most common block jump with footwork.
ActionAn athlete stands perpendicular to the wall or vertical jump measuring de-
vice (such as the VERTEC) in a pre-load blocking position. The hands are held infront and even with the shoulders. The athlete stands as far away from the wall orVERTEC as he or she can control with one 2-step side-step move. Using either asweep block or shoot and surround hand movement, the athlete side steps andtouches as high as possible with both hands. Each athlete gets a minimum of threetrials. If the third trial is the highest then he or she earns another trial. Likewise, ifeach succeeding trial is higher, then another trial is earned. (Figure 1).
Notes• It is important that both hands make contact at the highest point. It is difficult for a competitive athlete to resist the temptation of
stretching with one hand to gain a little elevation. The tester must watch closely.• When using a jump testing devise such as a VERTEC, a 12- inch length of tape is placed perpendicular to the base and directly
beneath the vanes. Two other pieces of tape are placed 18 inches from and parallel to the center tape, one on each side. This givesthe jumper the area of action. All too often the jumpers do not reach their maximum because they jump too far away from thevanes.
Keys to Best MarkBalance and acceleration in the steps, stability when jumping. Make sure the
athlete is jumping in proper alignment directly under the jump device.Cross-Step Block Jump(Test Protocol is the same as the Two-Step, Side-Step Block Jump except for the fol-lowing.)
ActionThe athlete stands perpendicular to the wall or VERTEC in a pre-load block-
ing position. The hands are held in front and even with the shoulders. The athletestands as far away from the wall or VERTEC as he or she can control with one 2-step, cross-step move. The athlete initiates an accelerating cross-step as fast as he orshe can control and jumps under and touches the highest possible point with bothhands. (Figure 2).
Notes• A coach can evaluate the jump in any blocking move from the left and right. Or, to simply get the highest possible jump the athlete
can choose his or her strongest side. O
2 Ways to Subscribe Today!1. Sign up when you renew your AVCA Membership HERE
2. Don’t need to renew right now? Click HERE and sign up for the library online!
Section Total workloadDetermine the Workload Placed on Each of Your Athletes
Total workload is Volleyball practice, competition with you, work done in the gym/weight room outside your Volleyball ac-tivity, work done in other sports and work done under the direction of parents. Recovery is an important often forgotten aspect oftotal workload.
-6
FIT TO A T QUICK STARTER LIBRARY - T5 - TESTING / T6 - TOTAL WORKLOAD
PA G E 3 6 .

Be Sure to Include ItTotal workload as part of Volleyball practice can be measured by using vertical jump activity monitors etc., perceived exertion
charts or simply asking the athletes how they feel. The challenge is to determine workload done by the athlete as part of outside ac-tivity. One way to do this is have other parties (parents, other coaches) help fill in your athlete's calendar; this takes great, opencommunication. You, the Volleyball coach, should take control as the leader in this area and use this planner as your guide in estab-lishing this leadership role.
Important Consideration:• Don't forget recovery!
Here are your articles to learn more!-6
Sand Volleyball Roundtable: New Conditioning Challenges
Participants: Ali Wood-Lamberson, Danalee Corso, SAnna Collier
ith the advent of the first NCAA National Sand Volleyball Championship April 27-29 in Gulf Shores, Alabama,the co-existence of court and sand would seem to be a natural fit. However, it is the surface—sand versuscourt—that creates conditioning challenges for volleyball coaches. Surface issues include:
• Sand provides a forgiving environment to raise the jumping volume. • Raising jumping volume improves jumping endurance. • Too much training in the sand may result in reduced explosive power and potential overtraining. • Sand dampens the plyometric response—not ideal for higher intensity jump training.
To learn more about the new challenges facing the proper development of the volleyball athlete beyond the surface, wetalked with three of the country’s top sand coaching experts (one club, two collegiate). We hope this conversation adds to this newcollegiate sport’s understanding and development at all levels of play. — Ken Kontor, publisher, Performance Conditioning Vol-leyball
PC: I want to ask this expert panel about the concept of transitioning from court to sand or vice versa. What are importantphysical considerations in this process?
AWL: I would like to address my comments to the athlete transitioning from court to sand or indoor to the beach. We see a lot ofthis on the club level where they play eight months out of the year indoors. Time, or lack of it, is going to be a big issue as opposedto dealing with a two-sport athlete. I will leave the collegiate transition to Anna and Danalee who have indoor players transitioningfrom court to sand.
AC: Our sport can start March 5. However, the on-courtteam has off-season conditioning up to March 1 and theyplay competitively until then. At that point, they cometo me, transition and we compete by March 17. All sandvolleyball coaches must be aware of and concerned bythis. The question revolves around the short amount ofconditioning they can do when they come from Decem-ber. They go indoors for a quite a while and come outwith only five days to transition! I have no solutionsbut point this out in order to discuss answers from a con-ditioning/preparation standpoint.
DC: Here at Florida State we have a different situationbecause we have two completely independent programswhich have more exclusive sand players than anywhereelse in the country. My indoor coach was supportive yetskeptical when we began but is now supportive—on a
WBGNINTADV
Ali Wood-Lamberson, Danalee Corso, & Anna Collier
FIT TO A T QUICK STARTER LIBRARY - T6 - TOTAL WORKLOAD
PA G E 3 7

conservative basis. Our strength and conditioning coach for both sports, Jon Jost, is concerned about potential overtraining. This issomething I am also concerned with and I extend this “overtraining” to the mental aspect. We address recovery as an important partof our overall developmental program from day one. The girls who play both indoor and sand have a completely different agendawhich emphasizes just getting used to the sand. Their skill acquisition on the sand remains a priority. We try not to overwhelm theathlete and approach it as if it was two separate sports.
PC: Let’s talk about off-season—the time when an athlete develops the basis to build upon and become a better volleyballathlete. Based on your comment, this off-season concept is jeopardized because of scheduling. Are there compromises if youcreate a time when an athlete can develop and progress through the off-season?
DC: There is a helpful new NCAA rule that allows fall sport athletes to train with their strength and conditioning coach during thesummer if they are enrolled in summer school. This is when the strength and conditioning coach can focus on the off-season. Ourcourt coach feels that the second semester is a time of skill acquisition. Our strength coaches realize that they do not have the timein the winter/spring for base strength development. This rule change is quite different than my collegiate playing days. It offersyear-round training and skill development but the downside is that it is more mentally taxing. I think our court coach considers thesand as cross training and a conditioning opportunity for the second semester. The athletes get the repetitions they want on a moreforgiving surface even though the skills are somewhat different. Our court coach sees it as a benefit to be off the hard surface andin a more enjoyable environment. Skills (“volleyball IQ”) improve by touching the ball in a more challenging situation than if theywere indoors.
AWL: If an athlete plays for their high school from August to December, have club play until June and then train USA Beach outdoorsduring the summer (May thru July), that is total volleyball year-round. Athletes in this situation tend to burn out mentally and emo-tionally. Look at Europe—our kids actually play fewer hours here in the United States. The difference is that our kids will have ahigh school coach, a potential indoor national coach, club coach and beach coach (three or four coaches!) all demanding and pullingthe athlete in different directions. In Europe it is a one-coach system where the coach can carefully monitor physical and emotionalburnout.
AC: Another point on the collegiate scene is that girls transitioning from court to outdoors have been doing a lot. I train those whocome to me from this system, then the six that I have exclusively on sand all fall. There is no way I can place the same amount ofphysical and emotional stress on the court group, so my lesson plans are different for the two groups. I must also meet with mystrength and conditioning coach because once those players come back to me, they are in a 20-hour-a-week work environment fivedays a week which includes strength and conditioning. The court group cannot do the cleans and other big lifts that my sand playersdo. I want the court transition people to feel fresh and light on their feet in the beginning, so for them we do more band and medball work but still incorporate explosive moves. I say that beach volleyball players need “guns and buns,” and you can only get thisthrough explosive, heavy work. I concentrate on three principles with indoor players—keep them healthy, have them enjoy thissport and be competitive. Doing first two well results in the third.
PC: We define the seamless process as the volleyball coach’s interaction with the conditioning coach to develop a programthat allows the strength and conditioning coach to do their job while the volleyball coach oversees all activity. Now we arebringing in a third party (the court coach) to the seamless process. How can the three work together?
DC: It is important for other colleges to know how USC and FSU are structured. We both have directors of volleyball, who in mycase is Chris Pool. Indoor is different from other sports in the fact that we could be recruiting the same athlete. Having a directorof volleyball means that someone is always there who is accountable but also allows me autonomy in recruiting. I look to Chris forguidance and incorporate his athletes into the program. My first job was to educate him on the sand game because it was new tohim. He let me work with some of his players and we are now in the experimental stage. The relationship has been amazing for me;I have learned so much. It all comes down to the right personnel to make a marriage like this work.
AC: The third part of this triangle is Bret, my strength and conditioning coach. He comes to my practices and observes what I needmy athletes to do. He adjusts some of the workouts because he does not have a sand volleyball background. Now he understandswhat it takes to make players better by identifying the things that are different than the indoor game. We work closely with Mick(head indoor coach) to identify which players he has who want to come out for sand. This process makes me, Mick and Brent de-termine what we must do to coordinate our strength and conditioning program. Since athletes come to USC on an indoor scholarship,Mick has the final say as to the individual needs of each player. The off-season is his business, but my true sand players also makeit my business. We work independently because we have a separate relationship with Bret but we do work in tandem toward thesame goal.
AWL: Out of the 16 schools that are adding sand volleyball as an NCAA sport, 15 have this hierarchy in place. The head coach isthe same coach for both indoor and outdoor or they are over the sand coach. Florida International hired Rita Buck-Crockett as head
FIT TO A T QUICK STARTER LIBRARY - T6 - TOTAL WORKLOAD
PA G E 3 8 .

sand coach and director of volleyball. That will be unique because she supervises the indoor coach.
PC: How can physical and mental overtraining be avoided? When do you know when to back off?
AC: I’m old school; I’m not backing off. However, I think that overtraining in volleyball comes more from an emotional rather thana physical state. I train hard, teach lessons but make it fun. Indoor has become so much “pass the target, pass the target, eye, handsclose the block.” It is work. I can say three dolphins just swam by when I am on the beach. I have coached both indoor and beachand they understand that their experience with me will be the most fun they will have in sports. I take care of the emotional and spir-itual and I think the physical comes out from that.
AWL: When Anna talks about the fun factor, one indicator that your players are already over trained is if they do not want to be atpractice or don’t show up. We are starting to incorporate recovery methods to avoid over training early on with our clubs and juniornational kids. Methods include cold and hot plunges, massage and physical therapy in a pre-hab setting.
DC: I was physically over trained several times during my professional career. I learned that the fitness component of sand volleyballis huge. I worked closely with strength and conditioning to look for fatigue cues. The better the athlete’s condition, the less fatiguewill affect them. Going five days a week new to some of our beach players. John Jost and I devised a strategy to check the posteriorchain and we came up with a few tests to ensure they can physically handle what happens. We must make sure these things are ad-dressed, especially with our indoor players coming into the program—we only have one shot with them. We also require ice plungingthree times a week and massage for athletes playing both indoor and sand since their needs ought to be separately addressed. Finally,we incorporate a FlexMob, a flexibility and mobility hour getting the body back to balance. I feel that sand is more taxing on thebody than indoor; the athlete has to touch the ball so much more because of the number of players on each side. It’s more work. O
Volleyball Conditioning Program forthe Beach: The 12-Second Rule
Robert L. Brown
Robert Brown is a Volleyball Master Instructor through the USA Volleyball Con-ditioning Accreditation Program and owner of Robert Brown Sports Performance in Ar-lington, Texas, which specializes in volleyball-specific conditioning. He works with highschool and collegiate volleyball conditioning programs in the Dallas area and beyond.
PC: Beach volleyball has a 12-second rule that mandates a team engage in a rallywithin 12 seconds. How does this affect the conditioning process in preparation toplay the game?
RB: The beach game mandates 12 seconds between rallies and this creates issues in ad-justing the strength and conditioning program. The rallies in the indoor game are about11-15 seconds. This complicates program design because as we know volleyball is a 1:3work-to-rest ratio sport. It is important to realize that volleyball does not need to followthis scenario. Everything in beach conditioning is based on that 12-second rest period. Asthe body adapts over time to this rest period, what happens if the rest is shortened to five seconds? The body would be ready toadjust to the imposed demand. An opponent’s strategy might be that after the previous play is over, run back and serve immediately.The bottom line is that we are too hung up on the 12-second rule in conditioning the beach volleyball player.
PC: Based on your experience, what do you see occurring in conditioning the beach volleyball player?
RB: There is currently no structure or consensus. The first consideration is that the beach game is played on sand—an unevensurface which creates its own demand on the body. The natural tendency for players is to think, “I must push hard to move andjump; it carries over to improve my speed, agility, quickness and vertical.” This is simply not true. The problem is that if you areon a forgiving surface, that surface takes away what you should do to develop speed and power or the stretch/shortening reflex. Intechnical terms, the reason that it is hard to jump and move in sand is because of the coefficient of restitution (COF). This is howmuch the surface changes its shape and how fast it returns to the original shape or bounces back when pushed by an opposing surface(the athlete's foot). The harder a surface is and the less it flexes against force, the higher the COF. A gym floor has a high COF.Shape change is minimal and even assists a little as the court springs back to shape. Sand has a very low COF and this has majorimplications in beach training and conditioning. I do not advocate not jumping in the sand because the athlete must be comfortable
Robert Brown
FIT TO A T QUICK STARTER LIBRARY - T6 - TOTAL WORKLOAD
PA G E 3 9
with the surface they play on. However, the difference is not performance related (improving movement and jumping ability), butit is related to adapting to the surface you play on. We jump on the sand because of our adaptability. We combine both in training.We do agility, conditioning and jump training two days on the sand and two days on a hard surface. This gives us the best of bothworlds. Plyometrics are done only on hard surface—it just does not work in the sand. I cannot understand why people in the sanduse training modalities such as kettle bells in order to build strength. If I want to build strength, I will use the weight room. Researchsays that in order to get stronger there are certain intensities the athlete must work on. You can do this on sand. If I am not gettingstronger I adapt to doing kettle bells in the sand at a lower intensity. We are guilty of sand training looked at more as a fad ratherthan as proper training for the sport.
PC: Volleyball conditioning experts Arlo Gagestein and Brian Scott advocate one method of beach training. They say to dostrength training exercises such as the squat in the gym using “traditional” protocol and then do the same exercise withoutpausing at the bottom and then explode out of this low position. The first method is to “perform sets quickly but undercontrol, with no pause between eccentric (lowering) and concentric (lifting) contractions and no pause between repetitions.This will help to train the stretch reflex of the muscle, making muscles more explosive.” The second method is to “pause 2-3 seconds at the bottom portion of each movement, between the eccentric (lowering) and concentric (lifting) contractions.This will eliminate momentum, helping prepare the body for movements in the sand where stretch reflex of the muscle isminimized.” This is all done in the gym every other day. Net link: For Arlo’s entire article on sand training click HERE.
RB: That is right on target. I want to reiterate that all of the resistance training is done in a weight room. Then the proper principleof strength and power development can be applied.
PC: There seems to be an aura surrounding the beach came. If the players advocate the outside environment, why not goout to the concrete parking lot and do strength training on that hard surface?
RB: That would be a solution. The beach player must realize the importance of strength to withstand the demands of the game. Weare really trying to get the best of both worlds in the sand and on land.
PC: How does all this follow the concept of periodization? You combine the sand and hard surface. How does this changefrom pre- to in- to off-seasons? How do the conditioning demands of sand come into play in this periodization model?
RB: I will specifically address jump training. During the season I do not see any reason for jump training on hard surface other thanplaying the game. Playing and some type of strength maintenance is really all that can be realistically accomplished. Off-season iswhere the hard surface and contact jump training can take place and be combined with sand-jumping activity. We can do both forpre-season. Here we bring this all together as a program. On the hard surface you can work up to a certain level and the very samething can be done in the sand. The only difference is that the surface changes. For example, we can do four sets of a box drill with36 seconds rest for three weeks. Then for the next three weeks 24 seconds rest working in a 12-week period to a 1:1 work-to-restratio. This will elevate the conditioning level to a certain point going into the season. When the get to the season, they will knowthat there will be a decline in the work demand because of the 12-second rule. The important thing is that we do not start at a 1:1ratio. Like many people in the beach game, we work progressively down to it and give the athlete the opportunity to properly adapt.
PC: This jump training that works down to the 1:1 is specific to the beach and sand training and conditioning for the gameitself. The strength training is more in line with the basic rest periods specific to strength development which are more thanthe 1:1 ratio.
RB: Absolutely! If you are doing strength training and allow only 10 seconds recovery for that set, you are really not doing strengthtraining. When you focus on strength I want all that you havet. If the athlete is at 90% of maximum, s/he does not have the capabilityto do it again in 12 seconds.
PC: Let’s talk about the energy systems of the game.
RB: Conditioning to play the game is best done by combining the game play and metabolic-specific conditioning rather than runninglaps, etc. This is best done by linking game play with conditioning to support each other. If we do a 45-minute conditioning session,I cannot prepare the athlete to play five or six games just with intervals and other metabolic activity. We must link the conditioningsession to playing afterward to get ready to play.
PC: How does playing indoors affect beach play from a conditioning standpoint? What should I do if I play both?
RB: Doing outdoor metabolic conditioning prepares you to play the indoor game from a conditioning standpoint. However, the in-door/outdoor relationship can be very confusing when it comes to conditioning. I can take an indoor player, do conditioning in the
FIT TO A T QUICK STARTER LIBRARY - T6 - TOTAL WORKLOAD
PA G E 4 0 .

sand and withstand the physical metabolic demands on the court quite nicely. The reverse is not true. If I take an indoor player andput them in the sand, it will wear them out. There are differences when it comes to developing speed/agility/quickness, jumping/hittingpower, strength/balance/stability and metabolic conditioning specific to the game. There is carryover and there are differences—this is where the art of conditioning really comes into play. You cannot “cookie cutter” this. Each one has its own individual com-ponents specific to the demands of the indoor and outdoor game. In strength and jump training the obvious choice is hard surfacetraining. On the speed/quickness/agility, I am torn. Doing this type on activity (running cone to cone) on the sand can help in adapt-ability but this is where strength in the weight room is also important. On the metabolic conditioning side, getting over the harsh en-vironment that the beach game presents conditioning and playing in the sand is necessary. It is good for both if you do this. Youshould understand how each of these components works and how they work interactively to provide the best athletic developmenton the beach and indoors for your players.
PC: In working speed/quickness/agility, I like your concept of strength development done in the weight room being important.Would you say this can provide training efficiency?
RB: The distance traveled indoors is an average of three to five feet. Should I be doing a ten-yard box drill? I would prefer a shortdistance star drill with different movements done in the game. I want to see that outside leg loaded for efficient change of direction.On the beach, the ten-yard box drill makes more sense because there are only two people covering the court; they cover more ground.The more the beach game evolves, the more we must communicate regarding both surfaces. Many players play indoors and thentransition to the outdoor game. We have the obligation to provide information that helps them succeed in both.
PC: You identified the four components of volleyball athletic development. Each has its own developmental characteristicsspecific to the each surface of play, but are also linked by the nature of the game. Should these components be individuallytrained with a primary focus or collective within a training week? Are there differences in this based on level of play or ath-lete’s maturity?
RB: You have identified a series of future discussion that we can address to break these components down into basic programming. O
Volleyball Specific Circuit Training Sean Madden
Today's volleyball coaches and athletes have an overwhelming choice of training exercises which promise to increase jumpheight and quickness or improve specific volleyball motions. The question is often posed as to how the different options should beincorporated into an overall training regimen. The answer which works best is plugging everything into a training circuit .
Traditional circuit training combines weightlifting or conditioning exercises in a continuous, timed program which worksthe athlete's specific muscle groups one after the other on an aerobic energy base. This type of circuit is highly beneficial for generalconditioning and establishes a solid base upon which more sport-specific physical training blocks may be built.
The circuit training presented here is different. Although the concept of combining exercises in a timed series is shared,specific work:rest ratios are structured into this circuit. These place the energy demands and consequent development on the anaerobic(ATP, CP, glycogen) stores essential in the "short-burst" sport of volleyball. The work:rest ratios used are based on research in thearea of power (strength-speed) development and upon observation of sport-specific ratios in volleyball.
This circuit training concept is essentially a means of incorporating plyometrics, speed training, specific motion and agilitywork into one workout. Any dry-land exercise that involves only the body or equipment that can quickly be accessed or donned (15seconds or less) can be included. Thus, you can build medicine ball, jump rope, heavy rope, stretch-tubing, box, slideboard andother routines into one circuit. About the only thing we don't include are special types of training shoes. Use the best methods andmaterials you know of.
In the context of your training week a 45-minute volleyball circuit should be completed two or three times. Resistancetraining days (usually three per week) should be alternated with the circuit. Though a circuit can be done year round, it is best suitedto the six months before the start of the season when athletes should focus on strength and power development. In season, the vol-leyball action itself replaces the circuit for starters and key reserves, though it remains a good next-day alternative for players whodo not play in a match.
Though our Zag squad circuit trains together when school is in session, each athlete builds her own circuit routine duringthe crucial summer months. The following guidelines and sample exercises provide everything to set up your own circuit.
CIRCUIT TRAINING GUIDELINES1) Set up 10-12 stations of speed, jump, agility and motion exercises considering specific areas where improvement is needed andthe time of season. Maintain diversity in exercise type to prevent overworking specific muscles.A sample 10 station work out to emphasize foot speed might include a the following sequence: jump, speed drill, jump, speed drill,jump, speed drill, medicine ball exercise, speed drill, medicine ball exercise, speed drill.
FIT TO A T QUICK STARTER LIBRARY - T6 - TOTAL WORKLOAD
PA G E 4 1

2) Find a timing device that you can see or hear while working out. A watch set to beep every 15 seconds is perfect. Better yet,make a special workout tape of 10-12 favorite upbeat, motivational tunes to time the training. While recording each song, add anaudible tone or cut the volume off, then on every fifteen seconds to mark intervals. Cut the song at the end of three minutes and startthe next tune. Making the tape takes awhile but it provides an ideal timing device, especially in a team workout setting.
3) Warm up and stretch properly before starting the circuit. If you make an audio tape, put a couple minutes of upbeat running musicon first, followed by five minutes of mellow stretching music before the actual circuit tunes.
4) Break each exercise into twelve 15 second intervals (three minutes total) so that three sets can be completed with proper work:restratio and a longer rest at the end that allows movement to the next station. General work:rest ratio guidelines are: for plyometrics(upper & lower body) and other jumps do a set of 8-10 then rest the remainder of that 15 second interval plus the next two intervalsfor an approximate ratio of 1:5; for speed and agility work for one interval, then rest for two or three for a ratio of 1:2 or 1:3.
5) Post a sign for each exercise at its station in the circuit. Ours have large, readable type and include these sections: Start position,procedure, exercise type (plyometric, assisted speed, agility, etc.), focus, a listing of the intervals.
6) Use the rest period at the end of each exercise to physically and mentally prepare for the next station.
7) Use rest time between sets to stretch the muscles that you are working at that station. There is no better time to work on flexibil-ity.
8) Do an abdominal workout as your last station if you want it incorporated into your circuit rather than done separately. Allow sixminutes with very little rest between exercises.
9) Following the circuit with an aerobic workout of 30 minutes or more is a great idea. Do not do the aerobic work before the circuit.
10) When the complete workout is over stretch again. Post-workout is the ideal time to work on flexibility and range of motion.These can be as essential as strength and speed to the physical formula for success.
11) Do not circuit on your lifting days if possible. If you are lifting every day on an upper body-lower body split, circuit on yourupper body days and choose exercises that are lower body jump and speed only.
12) Circuit at least twice but no more than three times per week, rest at least 48 hours between sessions.
13) Push yourself to 100%. Your speed and jump will increase only if you try to max out on every repetition. If you don't push youwon't max out and will only attain 85-95% of your single rep max. You must try to max!
14) When to do it.a) Don't do circuit year round.b) Collegiate players should do during spring volleyball, summer and pre-season. Red shirts and non-starter can do it in-season.c) High School players can do it during pre-season for fall and the spring club season.d) Combine with your lifting program when you are developing explosive power. Do the circuit on days you don't lift.
15) Include some high energy music and have fun with it.
18 METER SPRINT INTERVALS START POSITION: Volleyball endline. Sprint ready position.PROCEDURE: Accelerate smoothly and sprint to other volleyball endline, coast through to the wall. Walk back to second endline.EXERCISE TYPE: UNASSISTED SPEEDFOCUS: SPEEDWORK/INTERVAL: 1) One sprint 4) One sprint 7) One sprint 10) Recover
2) One sprint 5) One sprint 8) One sprint 11) Recover3) One sprint 6) One sprint 9) Recover 12) Recover
18 METER STRIDES PROGRESSION START POSITION: Volleyball endline. Sprint ready position.PROCEDURE: Accelerate smoothly, chopping stride length at the indicated percentage of maximum while striving for maximumturnover rate. Cross opposite endline, coast through to the wall. Walk back to second endline.EXERCISE TYPE: UNASSISTED SPEED
FIT TO A T QUICK STARTER LIBRARY - T6 - TOTAL WORKLOAD
PA G E 4 2 .

FOCUS: STRIDE (TURNOVER) RATE TEACHES BETTER 1st STEP TO BALLWORK/INTERVAL: 1) One sprint @ 33% of Stride Length
2) One sprint @ 50% "3) One sprint @ 67% "4) One sprint @ 75% "5) One sprint @ 90% "6) One sprint @ 100% "7) One sprint @ 50% "8) One sprint @ 100% "9) Recover10) Recover11) Recover12) Recover
SCISSOR JUMPS START POSITION: Lunge position with the front lower leg perpendicular to the floor, the front thigh parallel to the floor, and theback leg as straight as possible with the bottom of the shoe's toe on the floor.PROCEDURE: Jump forcefully upward and scissor legs in the air before landing. Upon landing, immediately jump and scissoragain. Keep back straight, ankles locked, using arms to drive upward.EXERCISE TYPE: PLYOMETRICFOCUS: JUMP HEIGHT & QUICKNESSWORK/INTERVAL: 1) 8 jumps 4) 8 jumps 7) 8 jumps 10) 8 jumps
2) Recover 5) Recover 8) Recover 11) Recover3) Recover 6) Recover 9) Recover 12) Recover
ANGLE BOARD EXPLODE & RUN THRU START POSITION: Medium body posture 3-5 feet from angle board anchored against wall.PROCEDURE: Bound sideways into the angle board then immediately explode laterally taking three to five steps total simulatinga run thru motion to play the ball.EXERCISE TYPE PLYOMETRICFOCUS: LATERAL EXPLOSIONWORK/INTERVAL: 1) 1 rep right 4) 1 rep left 7) 1 rep right 10) 1 rep left
2) 1 rep left 5) 1 rep right 8) 1 rep left 11) Recover3) 1 rep right 6) 1 rep left 9) 1 rep right 12) Recover
CROSSTAPE AGILITY START POSITION: Defensive ready position on the center cross of the crosstape box. PROCEDURE: Keep hips facing one direction throughout. Do not cross feet side to side at any time. Stay in a low position. Go toright and touch tape, return. Go forward and touch tape, return. Go left and touch tape, return. Go back and touch tape, return.Repeat order until time expires.EXERCISE TYPE: AGILITYFOCUS: QUICKNESSWORK/INTERVAL: 1) Continuous 4) Continuous 7) Continuous 10) Continuous
2) Recover 5) Recover 8) Recover 11) Recover3) Recover 6) Recover 9) Recover 12) Recover
PROGRESSION: BEGINNING - 6FTINTERMEDIATE - 8FTADVANCED - 10FT
WEIGHTED JUMP ROPE START POSITION Stand with appropriate ultrarope held in both hands and hanging behind feet.PROCEDURE: Jump rope striving for maximum height on each jump. Keep elbows in at sides with hands at about waist level.Jump once per revolution with no bounces between. Land on the balls of the feet and rebound quickly.EXERCISE TYPE: PLYOMETRICFOCUS: JUMP HEIGHT & QUICKNESSWORK/INTERVAL: 1) Continuous 4) Continuous 7) Continuous 10) Continuous
2) Recover 5) Recover 8) Recover 11) Recover3) Recover 6) Recover 9) Recover 12) Recover
FIT TO A T QUICK STARTER LIBRARY - T6 - TOTAL WORKLOAD
PA G E 4 3

FORWARD 1ST STEP TUBING ASSISTSTART POSITION: Anchor StrechCord to an immovable object near floor level. Attach ankle strap and assume a low defensiveready position facing toward the anchor.PROCEDURE: Let tubing pull leg forward as fast as possible then return to starting position slowly and smoothly.EXERCISE TYPE: ASSISTED SPEEDFOCUS: FIRST-STEP SPEEDWORK/INTERVAL: 1) Continuous right leg 5) Continuous right leg 9) Continuous right leg
2) Recover 6) Recover 10) Recover3) Continuous left leg 7) Continuous left leg 11) Continuous left leg4) Recover 8) Recover 12) Recover
LATERAL 1ST STEP TUBING ASSISTSTART POSITION: Anchor StrechCord to an immovable object near floor level. Attach ankle strap and assume a low defensiveready position sideways to the anchor with feet wider than shoulders.PROCEDURE: Let tubing pull leg into a quick jab step to the side, then return to starting position slowly and smoothly.EXERCISE TYPE: ASSISTED SPEEDFOCUS: FIRST-STEP SPEEDWORK/INTERVAL: 1) Continuous right leg 5) Continuous right leg 9) Continuous right leg
2) Recover 6) Recover 10) Recover3) Continuous left leg 7) Continuous left leg 11) Continuous left leg4) Recover 8) Recover 12) Recover
SPEED ROPE JUMPING START POSITION: Stand with regular jump rope held in both hands and hanging behind feet.PROCEDURE: Jump rope striving for maximum speed of rotation and quickness of feet. Keep elbows in at sides with hands atabout waist level. Jump once per revolution with no bounces in between. Land on the balls of the feet and rebound quickly. Jumpin the pattern taped on the floor changing directions each time through.EXERCISE TYPE: UNASSISTED SPEEDFOCUS: HAND AND FOOT QUICKNESS & COORDINATIONWORK/INTERVAL: 1) Continuous 4) Recover 7) Recover 10) Continuous
2) Continuous 5) Continuous 8) Recover 11) Recover3) Recover 6) Continuous 9) Continuous 12) Recover
KNEELING MEDBALL THROWS START POSITION: Kneeling on floor or mat with arms bent 90 degrees at elbow and medicine ball held directly over head.PROCEDURE: Let medicine ball drop behind head as far as possible and quickly change directions to propel it up and forward.Release the ball in an attack contact position by snapping wrists. Follow through with both arms to sides. Recover ball.EXERCISE TYPE: PLYOMETRICFOCUS: ARM SPEEDWORK/INTERVAL: 1-4) 10 throws 5-6) Recover 7-10) 10 throws 11-12) RecoverPROGRESSION: BEGINNING - 1-2 KILO BALLINTERMEDIATE - 2-3 KILO BALLADVANCED - 3-5 KILO BALL
OVERHAND MEDBALL THROWS START POSITION: Standing 15-20 feet from a solid high wall holding a one-kilo soft ball size medicine ball in hitting hand.PROCEDURE: Execute a full arm swing: Hip drive, shoulder drive, elbow transfer, forearm extension, and wrist snap. Releasethe ball at the top of the swing so that it rebounds high off the wall in front of you. Catch the ball on the rebound.EXERCISE TYPE: PLYOMETRICFOCUS: ARM SPEED AND MECHANICSWORK/INTERVAL: 1-4) 10 throws 5-6) Recover 7-10) 10 throws 11-12) Recover
ASSISTED BLOCKING FOOTWORK START POSITION: Anchor 8 foot length of tubing to a volleyball standard or wall at waist level. Attach belt at waist and connecttubing to its side. Slowly pull tubing to stand in blocking ready position at the center of the court.PROCEDURE: Let tubing pull you into a quick three or four step blocking move to a position about one meter from the sideline.A block jump may also be included. Be sure to execute steps exactly as you would without tubing in a game, only faster. Maintainproper hand and body position throughout.EXERCISE TYPE: ASSISTED SPEED
FIT TO A T QUICK STARTER LIBRARY - T6 - TOTAL WORKLOAD
PA G E 4 4 .

FOCUS: FIRST-STEP AND EXECUTION SPEEDWORK/INTERVAL: 1) One rep to the left 5) One rep to the left 9) One rep to the right
2) One rep to the left 6) Recover 10) One rep to the right3) One rep to the left 7) One rep to the right 11) One rep to the right4) One rep to the left 8) One rep to the right 12) Recover
BLOCKING FOOTWORK TO VERTEC START POSITION: Place Vertec so that the vanes are directly above your normal blocking takeoff point. Assume your normalblock starting position.PROCEDURE: Using normal blocking footwork at maximum speed move from starting position to takeoff point under the Vertecand jump up to touch as high as possible on the Vertec. Strive to touch higher on each repetition.EXERCISE TYPE: PLYOMETRICFOCUS: FOOTWORK AND JUMP HEIGHTWORK/INTERVAL: 1-4) Ten reps 5-6) Recover 7-10) Ten reps 11-12) Recover
BLOCKING FOOTWORK & BOX JUMP START POSITION: Place 14" box in position under net so that it is in front of your normal blocking takeoff point. Assume yournormal block starting position.PROCEDURE: Using normal blocking footwork move at maximum speed from starting position to takeoff point in front of boxand jump up and forward onto box. Immediately drop down from box and explode back up, then drop and explode back up onemore time.EXERCISE TYPE: PLYOMETRICFOCUS: FOOTWORK AND JUMP HEIGHTWORK/INTERVAL: 1) One set to the left 4) Recover 7) One set to the right 10) Recover
2) Recover 5) One set to the left 8) Recover 11) One set to the right3) One set to the left 6) Recover 9) One set to the right 12) Recover
SINGLE LEG HOPS FOR SPEED (WOUNDED ANIMAL) START POSITION: Stand on one leg at volleyball sideline with the other leg hanging in a stationary flexed position throughoutthe exercise. PROCEDURE: Jump upward and forward as high as possible, flexing the jumping leg completely so as to bring the foot under thebutt. Then cycle by bringing the knee high to the chest and the foot forward before landing. Upon landing, jump upward again withthe same cycling action of the leg, using the arms to help achieve maximum lift.EXERCISE TYPE: PLYOMETRICFOCUS: JUMP HEIGHT, POWER, & QUICKNESSWORK/INTERVAL: 1) 8 touches right leg 4) Recover 7) 8 touches left leg 10) Recover
2) Recover 5) 8 touches right leg 8) Recover 11) 8 touches left leg3) 8 touches left leg 6) Recover 9) 8 touches right leg 12) Recover
DOUBLE LEG HOPS FOR SPEED START POSITION: Stand at volleyball sideline. PROCEDURE: Jump upward and forward as high as possible, flexing the legs completely so as to bring the feet under the butt.Then cycle by bringing the knees high to the chest and the feet forward before landing. Upon landing, jump upward again with thesame cycling action of the legs, using the arms to help achieve maximum lift.EXERCISE TYPE: PLYOMETRICFOCUS: JUMP HEIGHT, POWER, & QUICKNESSWORK/INTERVAL: 1) 8 touches 4) 8 touches 7) 8 touches 10) 8 touches
2) Recover 5) Recover 8) Recover 11) Recover3) Recover 6) Recover 9) Recover 12) Recover
PROGRESSIVE VERTICAL HOP START POSITION: Standing just to the side of the lowest end of a 15 foot length of surgical tubing attached at ground level andabout 4 feet up on a wall or pole. Face the pole.PROCEDURE: Hop back and forth over the tube, advancing up the tube (toward the wall or pole) as high as possible. Bring theknees forward and upward toward the chest while tucking the feet underneath the butt. Continue until you cannot clear the tube.This completes that set.EXERCISE TYPE: PLYOMETRICFOCUS: JUMP HEIGHT, POWER, & QUICKNESSWORK/INTERVAL: 1) One set 4) One set 7) One set 10) One set
2) Recover 5) Recover 8) Recover 11) Recover
FIT TO A T QUICK STARTER LIBRARY - T6 - TOTAL WORKLOAD
PA G E 4 5

3) Recover 6) Recover 9) Recover 12) RecoverPROGRESSION: HEIGHT OF TUBING OFF GROUNDBEGINNING - 2FTINTERMEDIATE - 3FTADVANCED - 4FT
ALTERNATE LEG BOUNDS START POSITION: Stand at volleyball endline. PROCEDURE: Bound forward with one leg, pulling the knee high and hanging in the air as long as possible before extending legto touch floor. Explode immediately off floor with opposite leg leading in same fashion.EXERCISE TYPE: PLYOMETRICFOCUS: JUMP HEIGHT, DISTANCE, AND QUICKNESSWORK/INTERVAL: 1) 8 touches 4) 8 touches 7) 8 touches 10) 8 touches
2) Recover 5) Recover 8) Recover 11) Recover3) Recover 6) Recover 9) Recover 12) Recover
APPROACH JUMPS TO BOX & DEPTH JUMP TO VERTECSTART POSITION: Appropriate distance from box to match normal approach distance from contact point with ball.PROCEDURE: Using a normal three step approach, take off 2-3 feet from the box and land squarely in the middle of the box. Keeplegs as straight as possible to clear box. Land softly on the ball of the foot. Step off box (don't jump off) and rebound upwardquickly and forcefully to touch Vertec. Try touching higher on the Vertec with each rep.EXERCISE TYPE: PLYOMETRICFOCUS: JUMP HEIGHT AND TAKEOFF FORCEWORK/INTERVAL: 1) 1 approach jump and depth jump 7) 1 approach jump and depth jump
2) 1 approach jump and depth jump 8) 1 approach jump and depth jump3) 1 approach jump and depth jump 9) 1 approach jump and depth jump4) 1 approach jump and depth jump 10) 1 approach jump and depth jump5) 1 approach jump and depth jump 11) Recover6) 1 approach jump and depth jump 12) Recover
RICOCHETS (RABBIT HOPS)START POSITION: Stand with feet close together and legs locked nearly straight at the knees.PROCEDURE: Jump as high and far as possible by driving with ankles and arms while keeping knees locked. Keep ankles lockedas much as possible upon landing on ball of foot and immediately explode into second jump. Heels should never touch floor.EXERCISE TYPE: PLYOMETRICFOCUS: LOWER LEG DRIVE FOR HEIGHTWORK/INTERVAL: 1) 12 touches 4) 12 touches 7) 12 touches 10) 12 touches
2) Recover 5) Recover 8) Recover 11) Recover3) Recover 6) Recover 9) Recover 12) Recover
STRIDE JUMP CROSSOVER START POSITION: Stand sideways to the 18" tall long box with one foot on the ground and the other on the box in a forwardstride position. Arms should be at the sides. PROCEDURE: Swing the arms rapidly upward, then continue momentum by driving off the bench with the elevated leg. Jump ashigh as possible and extend the body fully. Float over the box and land with legs in opposite position. Repeat immediately inopposite direction when foot contacts the ground.EXERCISE TYPE: PLYOMETRICFOCUS: DRIVE LEG POWERWORK/INTERVAL: 1) 8 touches 4) 8 touches 7) 8 touches 10) 8 touches
2) Recover 5) Recover 8) Recover 11) Recover3) Recover 6) Recover 9) Recover 12) Recover
PROGRESSION: BOX HEIGHTINTERMEDIATE - 14"-16"ADVANCED - 18" - 20"
SIDE DIGS TUBING ASSIST PROCEDURE: Let tubing pull arms quickly into a side digging position. Be sure to drop the outside shoulder to obtain correctplatform angle. Return to starting position slowly and smoothly.EXERCISE TYPE: ASSISTED SPEEDFOCUS: INITIATION SPEED
FIT TO A T QUICK STARTER LIBRARY - T6 - TOTAL WORKLOAD
PA G E 4 6 .
WORK/INTERVAL: 1) Continuous to right 5) Continuous to right 9) Continuous to right2) Recover 6) Recover 10) Recover3) Continuous to left 7) Continuous to left 11) Continuous to left4) Recover 8) Recover 12) Recover
MEDBALL WRIST DRIVES START POSITION: Stand 1-2 feet from wall with arms fully extended and locked at elbows. The hands are 6-8 inches in front offorehead holding a medicine ball.PROCEDURE: Keeping arms straight throughout, drop wrists backward and forcefully change direction to propel medicine ballforward. Repeat rapidly for designated number of reps.EXERCISE TYPE: PLYOMETRICFOCUS: WRIST SPEED AND REFLEX RESPONSEWORK/INTERVAL: 1) 10 reps 4) 10 reps 7) 10 reps 10) 10 reps
2) Recover 5) Recover 8) Recover 11) Recover3) Recover 6) Recover 9) Recover 12) Recover
SLIDE BOARD START POSITION: Low position at one end of the slide board with booties over shoes.PROCEDURE: Push off of end board with one foot while stepping out with the other. Set foot down and slide to other end board.Allow push foot to approach lead foot before lifting and reversing directions.EXERCISE TYPE: LATERAL SPEEDFOCUS: POWER, BALANCEWORK/INTERVAL: 1) Continuous 4) Continuous 7) Continuous 10) Continuous
2) Recover 5) Recover 8) Recover 11) Recover3) Recover 6) Recover 9) Recover 12) Recover
PROGRESSION: INCEASE LENGTH OF BOARD
MEDBALL TWISTS START POSITION: Stand in a one-quarter squat position, back to a long box standing on its end. Hold 5-kilo medball with bothhands in front of body.PROCEDURE: Twist at waist and place the medball on the box. Twist in the opposite direction to pick the ball up. Repeat. Do notmove feet.EXERCISE TYPE: PLYOMETRICFOCUS: TRUNK ROTATION SPEEDWORK/INTERVAL: 1) Continuous starting to right 5) Recover 9) Recover
2) Recover 6) Recover 10) Continuous starting to left3) Recover 7) Continuous starting to right 11) Recover4) Continuous starting to left 8) Recover 12) Recover
MEDBALL CHESTPASS START POSITION: Stand in a one-quarter squat position 1-3 meters from a wall holding medball with both hands in front of chestin a chest passing position.PROCEDURE: Drive ball forward toward the wall as quickly and powerfully as possible. Catch the ball on its rebound, immediatelypassing it back against the wall. Continue for designated number of reps.EXERCISE TYPE: PLYOMETRICFOCUS: FOREARM EXTENSION POWER AND SPEEDWORK/INTERVAL: 1) 10 reps 4) 10 reps 7) 10 reps 10) 10 reps
2) Recover 5) Recover 8) Recover 11) Recover3) Recover 6) Recover 9) Recover 12) Recover
HEXAGON CONE HOPS START POSITION: Blocking ready position in the center of the hexagon.PROCEDURE: Hips must face one direction throughout. Quickly jump directly over the top of each cone and back to the centerbeginning with the cone in front, proceeding in a circle and ending after going over the front cone the second time. Keep groundtime at a minimum. EXERCISE TYPE: PLYOMETRICFOCUS: CHANGE OF DIRECTION AND JUMP QUICKNESSWORK/INTERVAL: 1) Clockwise 5) Recover 9) Recover
2) Recover 6) Recover 10) Counterclockwise3) Recover 7) Clockwise 11) Recover
FIT TO A T QUICK STARTER LIBRARY - T6 - TOTAL WORKLOAD
PA G E 4 7

4) Counterclockwise 8) Recover 12) RecoverPROGRESSION: HEIGHT OF CONES
BEGINNING - 6"-8"INTERMEDIATE - 10"-12"ADVANCED - 14"-16"
APPROACH JUMPS TO VERTECSTART POSITION: Appropriate distance from Vertec to match normal approach distance from contact point with ball.PROCEDURE: Using a normal three step one-leg or two-leg takeoff approach, reach the Vertec vanes at the peak of your jump.Turn 90 degrees and immediately initiate another approach straight ahead from your landing position. Continue in a box and stopon the second jump touching the Vertec (fifth jump overall). Try to reach higher on the Vertec each time.EXERCISE TYPE: PLYOMETRICFOCUS: JUMP HEIGHT AND TAKEOFF FORCEWORK/INTERVAL: 1) 5 jumps 4) 5 jumps 7) 5 jumps 10) 5 Jumps
2) Recover 5) Recover 8) Recover 11) Recover3) Recover 6) Recover 9) Recover 12) Recover
ZIG-ZAG ONE-LEG HOPSSTART POSITION: Stand balanced on one foot on the edge of the blue basketball sideline.PROCEDURE: Hop continuously forward and sideways to opposite sides of the blue line (45 degrees) landing on the same foot foreight touches then switching to the other foot for eight more.EXERCISE TYPE: PLYOMETRICFOCUS: JUMP HEIGHT, LATERAL DISTANCE, AND QUICKNESSWORK/INTERVAL: 1) 8 + 8 touches 4) Recover 7) Recover 10) Recover
2) Recover 5) 8 + 8 touches 8) Recover 11) Recover3) Recover 6) Recover 9) 8 + 8 touches 12) Recover
PROGRESSION:BEGINNING - PERFORM ON TWO LEGS
SEATED MEDBALL TRUNK ROTATION START POSITION: Sit on the floor with your legs spread and the ball behind your back.PROCEDURE: Rotate to the right, pick up the ball, bring it around to your left side, and replace it behind your back (so the ballmakes a circle around your body). Repeat for eight reps then reverse directions for eight more.EXERCISE TYPE: PLYOMETRICFOCUS: TRUNK ROTATION POWERWORK/INTERVAL: 1) 8 + 8 reps 4) Recover 7) Recover 10) Recover
2) Recover 5) 8 + 8 reps 8) Recover 11) Recover3) Recover 6) Recover 9) 8 + 8 reps 12) Recover
ANGLE BOARD LATERAL EXPLOSION START POSITION: Medium body posture between two angle boards approximately 6-8 feet apart and anchored against walls.PROCEDURE: Bound sideways into one angle board then immediately explode to the opposite side. Strive for maximum forceand speed. Stay low.EXERCISE TYPE: PLYOMETRICFOCUS: LATERAL QUICKNESSWORK/INTERVAL: 1) 10 touches 4) 10 touches 7) 10 touches 10) 10 touches
2) Recover 5) Recover 8) Recover 11) Recover3) Recover 6) Recover 9) Recover 12) Recover
LATERAL HURDLE HOPS START POSITION: Blocking ready position with a 10-20" high hurdle on one side.PROCEDURE: Stand to the side facing parallel. Jump quickly sideways over the hurdle then change directions to jump back.Repeat for indicated number of touches. Keep ground time at a minimum. EXERCISE TYPE: PLYOMETRICFOCUS: CHANGE OF DIRECTION AND JUMP QUICKNESSWORK/INTERVAL: 1) 8 touches 4) 8 touches 7) 8 touches 10) 8 touches
2) Recover 5) Recover 8) Recover 11) Recover3) Recover 6) Recover 9) Recover 12) Recover
PROGRESSION: HEIGHT OF HURDLEBEGINNING - 10"
FIT TO A T QUICK STARTER LIBRARY - T6 - TOTAL WORKLOAD
PA G E 4 8 .

INTERMEDIATE - 15"ADVANCED - 20"
DEPTH JUMP & TRANSITION APPROACHSTART POSITION: Stand in blocking ready position on and at the edge of a 14-18" high long box. PROCEDURE: Drop sideways off the box at the net, immediately rebounding into a maximum block jump. Land on one footwhile stepping with the other toward a transition point marked by a piece of tape. Run to the transition point using a rocker step orhop to change direction back toward an attack takeoff point marked by a second piece of tape. Take maximum approach jump andland back on box. EXERCISE TYPE: PLYOMETRICFOCUS: MAXIMUM JUMP AND TRANSITION MOVEMENT SPEEDWORK/INTERVAL: 1) 1 rep 5) 1 rep 9) 1 rep
2) 1 rep 6) Recover and change box location 10) 1 rep3) 1 rep 7) 1 rep 11) 1 rep4) 1 rep 8) 1 rep 12) Recover
SIDEWINDERS START POSITION: Defensive ready position at the center of the volleyball baseline with rubber tubing attached to both ankles. PROCEDURE: Keep hips facing forward toward the net throughout. Do not cross feet side to side at any time. Stay in a low position.Go to right and touch sideline, return to the center of the baseline and continue to touch left sideline, then return to center baseline.EXERCISE TYPE: AGILITYFOCUS: QUICKNESSWORK/INTERVAL: 1) One rep (along baseline) 5) Recover 9) Recover
2) Recover 6) Recover 10) One rep (along baseline)3) Recover 7) One rep (angle to 3M line) 11) Recover4) One rep (angle halfway to 3M line) 8) Recover 12) Recover
PROGRESSION: ADJUST TUBING FOR LENGTH AND RESISTANCE O
Three-to-One: The VolleyballSpecific Rest-to-Work Ratio
John Speraw
A three-to-one rest-to-work ratio is reflected by the amount of rest versus the amount of work expressed in units of time.Athree-to-one ratio would require three units of rest time for one unit of work time. If an exercise is done for 20 seconds, the restperiod will be 60 seconds. This ratio closely resembles the energy system requirements in the game of volleyball. When training,coaches and athletes should keep this ratio in mind in designing conditioning and practice programs.
WARM-UPAs an assistant coach, and while doing research on my book, I learned quite a bit about the concept of how athletes should
train for a specific sport. While an assistant coach at UCLA, I was in charge of doing the warm-ups. I really became aware thatrunning around in a circle for 20 minutes to get warmed up isn’t the proper way to do a warm-up when you’re getting ready to playvolleyball. You’re not getting the right things warm. When I came to UC-Irvine, I had some extensive discussions with our strengthand conditioning coach, Eric Burkhardt. I told him what I was really interested in doing and he was very excited by the idea becausemost coaches just do what they do simply because that’s the way they have always done it. I wanted to make sure and continuemaking sure that in my coaching career I don’t just do things simply because that was what I had been doing. I want to do what isbest based on science, not tradition.
Eric has done extensive research and written some papers on the work-to-rest ratio in conditioning. We talk a lot about howwe should apply warm-ups to make them specific for what we are doing in terms of volleyball. It was really a collaborative effortbetween the two of us—a very positive thing.
The first thing we talked about was warmups and making sure that we are warming up appropriately for a fast twitch, ex-plosive sport. We do a lot of speed and agility drills as part of our warm-up. We try to do low-intensity, explosive movements. Forexample, doing light jumps that prepare us for big jumps is probably the best and most efficient way to warmup. We incorporatewhatever movements that are done while playing volleyball at a less intense movement for a warm-up. We do blocking trips, lightwarm-up jumps, jump rope, footwork drills and light sprint work. Here’s an example:* Light jog around the gym (twice)* Side stepsacross the gym lengthwise in both directions* Crossover steps across the gym lengthwise* Light sprint work* Jump rope—we do
FIT TO A T QUICK STARTER LIBRARY - T6 - TOTAL WORKLOAD
PA G E 4 9

this by partnering up two players.One jumps rope while the other does 25 push-ups and 25 sit-ups. This is done for three rounds.* Blocking trips* Run to the
net and do low amplitude approach jumps without hitting the ball* Finish by doing shoulder warmups. A variation to this is that wesubstitute foot ladder work instead of jumping rope. This works on foot speed. The warm-up is continuous with all athletes partici-pating at the same time. This gets us ready for the work to be done at practice.
How Rally Scoring Affects ConditioningVolleyball conditioning has changed because of the new rally scoring system. The three-and-a-half hour matches now last
only two hours. This puts a premium on skills and their explosive execution. It’s now more of a power game as opposed to powerendurance. An hour-and-a-half less game time is a significant change in the approach to conditioning. In addition, with the introductionof the libero, your middle blocker who is jumping all the time now goes out of the match for two rotations, which means this individualhas additional rest. These changes really focus on the demand of developing power. The three-to-one rest-to-work ratio is effectivein developing this new emphasis on power development in today’s volleyball.
Because of this we focus our three-hour practice on playing volleyball and making it part of our conditioning. You also haveto understand that the NCAA limits practice time to 20 hours a week, so we have to set our priorities based on the game. We practicethree hours a day, five days a week, which gives us 15 hours. Then we lift four days a week for one hour, which totals 19 hours andthis puts us just under the limit. This means that our conditioning is limited to the summer and the period of time between our fallpractice block and when the season starts.
Designing Practice Based on the Three-to-One Rest-to-Work Ratio ConceptIn terms of practice, what we do the majority of the time is based on a scrimmage format of 6 v 6. Just playing volleyball is
a three-to-one ratio. To overload this and increase the amount of activity on the court, you can do things to bring the ratio down to atwo-to-one situation. We do this by including wash drills. The more you throw in the ball while you play keeps the activity going fora longer period of time as opposed to the amount of rest in average volleyball play.
There is one drill we do called the UCI drill that brings this ratio down to a one-to-one ratio. The drill requires a team to putthree balls away in succession in order to get a point with two points needed to rotate. One team will receive the serve. If they put itaway, they get another ball, which they have to put away. If successful, they do it again. If at any point the other team wins the rally,then they get the opportunity to try and put three balls away. If a team successfully wins three in a row coupled with the fact that thedrill is so tiring for the front row, we rotate from one to four, then a rotation two, a rotation five, a rotation three and finally, a rotationsix. Except for one person, you are rotating two players. Working a one-to-one ratio should be done in progression. Start with three-to-one and when the team’s conditioning improves, you can move to the two-to-one and finally oneto- one for a portion of thepractice. When you go back to three-to-one it seems easy for the players because of the progressive overload you introduced.O
2 Ways to Subscribe Today!1. Sign up when you renew your AVCA Membership HERE
2. Don’t need to renew right now? Click HERE and sign up for the library online!
Section Position SpecificDetermine individual position conditioning considerations. The movement and explosive power requirements vary between middlesand the liberos, for example.
Here are your articles to learn more!
-7
-7
Volleyball Roundtable: Ask the Experts Conditioning Considerations for Specific Positions, When to Start
Welcome to Volleyball Roundtable: Ask the Experts. Conditioning concepts for the volleyball player are as diverse as thedifferent surfaces and situations on and in which we play our great sport. It is said there is more than one way to skin the “conditioningcat.” There is no single, absolute answer. For this reason, Volleyball Roundtable was created. It provides expert multiple perspectiveson one topic. It gives you different ways of looking at conditioning to help you make decisions for establishing your volleyball con-ditioning “culture.” A group of volleyball coaching experts has been assembled to help you. Enjoy! - Ken Kontor, Publisher.
Q—At what age, level of skill and/or physical abilities should a volleyball player start to specialize in a specific court position?Please give practical on-the-court indications of skills and/or physical abilities that would steer a player into a specific position.
FIT TO A T QUICK STARTER LIBRARY - T6 - TOTAL WORKLOAD / T7 - POSITION SPECIFIC
PA G E 5 0 .

Please list for each position categories you look for based on your tactical beliefs.
First off, I don’t agree with the degree to which some coaches specialize these days. Yes, you do need setters and yes, youdo need to decide what position a player will play. What I disagree with is front row players who can’t receive, serve and playdefense, back row players who can’t attack and players who are afraid to set the ball. Players should specialize once they are proficientin all the skills: serving, passing, setting, digging, hitting and blocking. It’s important to remember that young players grow andmature. Once a player has the fundamental skills, they can “specialize” according to their physical capabilities (athleticism, speed,size, strength, etc.) and the team’s personnel needs. Perhaps all beginning players should be trained first as setters (speed, vision, de-cision making) and middle blockers (lateral movement, transition, explosiveness and arm speed), then moved to other positions onthe left or right side, or as a primary passer or defensive specialist. - Patty Dowdell
I assume this question refers to indoor volleyball. As a beach player I like the fact that I get to be a defensive specialist,blocker, setter, attacker and even server, sometimes all in the same service rotation. As a coach, I like seeing kids playing doublesbecause they get more and varied opportunities to play the ball.
Regarding traditional six-person team development, I believe players should be given the opportunity to play all positionsat the early stages of their development. Using age appropriate equipment (e.g. ball, net height, court size, etc.) provides a levelplaying court for all athletes and they should have fun trying all positions. A player shouldn’t be told s/he couldn’t be a hitter becauseof size just as child shouldn’t be told s/he couldn’t play volleyball because s/he is too little. Too often I’ve talked to players whowere discouraged from playing indoor volleyball because of size, lack of skills at an early stage of development, or some otherreason. These same players found plenty of opportunities on the beach. The time to specialize is when the player develops an interestin and proclivity for certain positions.
Certain physical attributes may predispose players to certain positions (e.g. smaller players tend to be better defensive spe-cialists, taller ones better middle blockers) but this should not be the only consideration. We’ve all known good defenders who weretall and short players who played front row.
Stereotypically, I believe attributes by position should be as follows:• Setter - quick, good hands, leader, good decision making abilities, ultimately a good blocker as well.• Hitter - good jumping ability or tall, quick arm swing, good hand-eye coordination, and competent blocker.• Blocker - good jumping ability or tall, ability to read the hitter, quick lateral movement, penetrates net well.• Defensive specialist - quick, able to read the attack, moves low to the floor, good passer.• Serve receive - good lateral movement, pass well. - Dale Hoffman
Limiting the number of front and back row positions is needed so athletes do not have to learn six skills in six positions.However, specializing in that role is not encouraged. Indeed, The Nederlands won the Gold in the 1996 Olympics, largely becausethe players were able to play any and all positions, and enhancing skills from the back row. I train my players to be versatile and playpositions for a period of time, then change them.
In this regard, beach or grass doubles is a very important game for all players to play, as it expands the player’s skills froma smaller area of position to most the court. Once a teammate touches the ball, you have the entire court, and may choose all skilloptions but serving. Indoors, even our National Teams play a great deal of triples, which increases this versatility.
That said, it is also important to give players, especially better athletes, the chance to learn from the leadership role of setting.I wish everyone would use a 6-3 for 14 and 12 and unders, as it lets your athletes hit in the front row. Half the players on the courteach game are learning to set and how to move from the back row, but only in positions 1 and 6.
The only skill/position I change for younger players (and again, a version of this idea was used also by our USA Olympicteam) is to not have all players learn to block. If your digger is great, having that same player block just means your great digger getshit around. Whereas, if they dig, they can read and react with more time. At the same time, having short players learn to block anyof the front row is often a waste of time and talent. They should learn to block when they are tall enough. Note that, contrary to somecoach’s opinions, while everyone is tall enough to be a hitter (even if only from deeper off the net), not everyone is tall enough to bea blocker. - John Kessel
As for the situation in the Czech Republic, there is a great difference between current practice and the theoretical opinions.We recommend postponing specialization of players up to about 15 years of age, i.e. the age at which we play younger junior com-petitions. Practical coaches, mainly those of girl’s teams, specialize their players since the age of 12 or even younger. The reason isquite clear—the better and more efficient organization of play gives more chances to win various championships of these young cat-egories. Also, FIVB (and as a consequence the CEV “YOUTH” competitions, for girls WCH under 17, ECH yet one year earlier)means, if one wants to reach success, that the specialization must start earlier. Thus, one issue is to use specialized play and the otheris to practice more general training with youngsters in order to not limit their possible future arrangement into teams of adults. Dis-tinguishing between future (middle) blockers and (outside, receiving) hitters should not be overly stressed in practice. - MiloslavEjem
I think we often look at specialization backwards in volleyball. The traditional view is that athletes develop from “generalizedto specialized” as they get older, while systems gradually develop from “middle front sets” to a 5-1 with each athlete playing one
FIT TO A T QUICK STARTER LIBRARY - T7 - POSITION SPECIFIC
PA G E 5 1

position. The complexities of motor learning and skill acquisition suggest that it should be the opposite, with players initially spe-cializing in the skills and positions which they develop most naturally then progressively developing broader proficiency with theobjective of becoming versatile all-around players.
With this “specialized to versatile” model in mind, while I would encourage players under the age of 12 to play mini-vol-leyball with little structure and a coaching focus on the basic skills of serving and passing, I believe players should learn in specializedpositions starting in junior high school. This opens the door to players who are still developing coordination, strength and particularmotor patterns to be on the floor rather than on the bench. For example, many tall girls and boys in junior high are still learning tocoordinate their limbs in order to successfully serve or time the attack of a high set, but they can create a major presence at the netas blockers and quick hitters. Allowing them to specialize as middle or right side players who come out of the back row in favor ofsmaller players who also need their niche, opens the door to feelings of contribution and success that will keep these athletes moti-vated. Placing them in a situation where they must demonstrate broad general skills in order to get into the lineup can lead to feelingsof frustration and failure, which cause them to turn to another sport such as basketball where coaches never dream of having the bigbodies ballhandle.
Expecting general skills from young players and utilizing systems that demand broad abilities often results in medium-sizedathletes with allinclusive but average abilities playing and succeeding while the small and the tall or those who stand out in just oneskill area languor on the bench and watch or, worse yet, quit. Specialization at these early levels where practice time is very limitedalso allows a coach to elicit maximum growth in a few areas for each player that when pieced together means greater potential forteam success.
Unlike the “generalized to specialized” model that eventually fits players into molds and leaves them there for their careers,as players grow older and develop more coordination and game familiarity I believe they should be called upon to broaden theirabilities until they can successfully step in at any position and execute the skills involved limited only by unchangeable factors suchas size and natural athleticism. This allows diversification of systems and lineups at higher levels of play that will make a team muchharder to predict and prepare for, much more capable of handling broken plays successfully, and far more adaptable in the case ofthe loss of individual players to injury. This “specialized to versatile” model, which is used throughout much of the rest of the vol-leyball world, leads to star players who can do it all, while the “generalized to specialized” philosophy popular in the U.S. often pro-duces dominant middles who cannot hit a high set, All-American outsides who cannot step in to set, and setters who understand littleabout adapting to the needs of players who execute the skills preceding and following their sets. - Sean Madden
Q—If a player is unsure that the position you have selected is right for them, what methods would you use to convince theplayer and their parents?
Such a situation should be handled on a case by case basis. The following rationale, in no particular order, may be employedto encourage a player to try a new position. Having them play this position is what’s best for the team’s success at this time. Giventheir capabilities (leadership, physical, mental), this position allows them to make the most of what they got. Given the depth at acertain position, they could be better utilized somewhere else.
When a player is asked to play a new position, it’s important to encourage them to try it for a while. Point out that it will bea learning experience and they may not be as successful at first, once they’ve grown in the position, how much they can contributeto the team. - Patty Dowdell
I would stress the positive attributes instrumental in my making my decision (e.g. I certainly would have talked to the playerencouraging her to try the position because we need someone with good hands like hers to deliver balls to our hitters). I would em-phasize the importance of the position to the team and why that individual’s unique skills are necessary for the position. I would usethis approach with both the player and parent. - Dale Hoffman
As I get players to play different positions through the course of a season, this is not a problem. If not in matches/tournaments,it should be happening at practice during the scrimmage and wash scrimmaging times. In the course of a season, everyone shouldexperience playing all positions, even setter, for some brief period of time, to gain an appreciation of what one’s teammates do. -John Kessel
The question of changing position is very delicate although easier to solve in youngsters. They are not yet accustomed toplaying a certain position. They also often believe much more in their coaches. Methods: I always try to convince them by theorizingand by giving them reasons for change; also, to position them into desired positions in less important matches. Sometimes by chanceit is necessary to align them into positions because of injury, bad performance or whatever, with the usual player at that position.Stats and discussion, of course, support all of this. To make up the mind of my players is main issue, and maybe the opinion of anindependent, but well known, personality (coach, player) may help.
My personal experience: a woman player of my Czech first division team, former best junior Czech javelin thrower, wasfirst convinced by myself to go into volleyball and later I wanted to make her a setter. For her this was a kind of an offense or insult.I had to leave the team before summer break, and during this break she changed teams. To my surprise, since fall, she has played thesetter’s position in the new team and under the other coach. She later became a permanent member of the Czechoslovak selection,playing on several world and European championships. - Miloslav Ejem
FIT TO A T QUICK STARTER LIBRARY - T7 - POSITION SPECIFIC
PA G E 5 2 .
If the “specialized to adaptable” model is applied, little convincing should be done when an athlete is first allowed special-izing. As a coach I sit down with the player and parents to discuss natural abilities and why they fit the chosen position. Then, ifthere are disagreements over those natural strengths, I establish practice situations that demonstrate the athlete’s ability to succeedin the relevant skills in comparison to other players on the team. Unlike the “generalized to specialized” model where classificationis forever, the “specialized to versatile” model is less frightening to athletes and parents because the limitation of a position is viewedas temporary rather than permanent. The athlete needs only demonstrate versatile skills to be given more diverse roles. - Sean Mad-den
John Kessel has coached volleyball since 1971 and has been with USA Volleyball since1985. He has been director of the Jr. Olympic Volleyball and Beach Volleyball programs, the HighPerformance program, regional operations, national beach program and team leader for the teamin Sydney where they won a gold medal in men's play, and then in 2004 in Athens for the Women’sBronze medal winning USA Sitting team. In Volume 8, Number 4 of “Performance ConditioningVolleyball” John introduced the concept of proper reaction, anticipation and reading skills in pre-venting injury. This article addresses, in greater detail, how the occurrence of ACL injuries happenand what can be done to prevent them. [Ed.]
he concept of offside skills is not new to sport. In basketball a player dribbles witheither hand. In lacrosse the players must have the ability to shoot from either side.In soccer the players have to be able to put the ball in the net using either foot.
In volleyball, however, we develop only one-handed hitters. Our game sys-tems are designed for the right handed player, who make up over 90 percent of those playing. That’swhy our setters generally wait as targets to the right side of the court, so that the middle hitter (zone3) and outside hitter (zone 4) are hitting “on-hand” as it is called.
Nevertheless, it is important for volleyball players to be able to hit with their non-dominanthand. It’s not rocket science or hard to achieve. The thing that coaches have to do is give the kidstime at practice to learn it. This should be done at a young age, and over the net in warm up games(standing on the ground mostly), or in your form of “pepper” – just a minute or two every practice. The younger the player is whens/he gets good at using both hands the better the athlete will be in the air when it comes time to adjust once they have taken off inthe jump.
While offside hitting is important at all levels, it’s most important at the youngest age because younger athletes are the onesthat make the biggest errors in judgment. The decision making process takes place on the ground. A young athlete needs to be ableto use the opposite hand as the ball drifts to the left side of the body. The first shot we teach is the across the body motion that wouldsave the ball. The athlete will swing with the left hand and bring the ball from left to right over the net dropping the ball in zone 4because of the radical angle. Any other angle would hit the antenna.
The Occurrence of ACLThis is how an ACL injury occurs. An athlete misjudges a ball. It’s match point or the middle of practice and the coach is
screaming, “Hit every ball.” The athlete jumps and the only way to save it is by leaning way over to the left to hit the ball with theright hand. This action tilts the body to the left and creates a dangerous situation of landing, full force, off-balance over the left legand therefore potentially blowing the ACL or damaging the ankle. As the foot lands, the knee takes the torque as the player finishesthe landing process. This happens more in the front row, with the nearby antenna dictating the reality of success or failure in gettingthe ball over the net, but it also occurs in misjudged back row attacks.
Current research indicates that too many ACL injuries occur because of improper landing. The scenario just presented demon-strates how this improper landing can occur more often then we would like to think in the sport of volleyball.
The next scenario in making a save is when the athlete jumps in the middle and the ball is shot past the body during a shootor faster set. In this case a right side dominant athlete could turn and hit the ball in the court with the right hand, which again wouldput the landing in a potentially awkward position. Alternatively, the player could hit the ball back with the left hand. This isn’t anactual hit but more of a tip to an open space. Based on realities of the game and what I see happen in a lot of misjudged balls, this isan important skill to have.
A final scenario occurs when a right-handed player goes running in on the right side of the court, zone 2, and realizes that
A Very Volleyball-Specific ACL InjuryPrevention Plan: Offside Hitting
John Kessel
John Kessel
O
TBEGINT
FIT TO A T QUICK STARTER LIBRARY - T7 - POSITION SPECIFIC
PA G E 5 3

the ball is too far over to the left. Normally what the athlete does is rotate to their left and hit the ball with the right hand because onthat side, the player is still hitting into the court. As it is totally the opposite of what is seen in our zone 4 outside hit we presented inthe first scenario, the need to hit the ball with the left side is diminished greatly in this instance.
Prevention TechniquesLearning to hit offside can be a simple process. Two athletes, each right side dominant, stand at the net on opposite sides.
The first athlete turns the right shoulder to point at the athlete on the opposite side. The ball is set to the left side of the body and theathlete swings across the body, left to right, bringing the ball over to the athlete on the other side. The athlete on the other side withthe right shoulder facing his counterpart on the other side hits the ball back. The two trade off their non-dominate hands.
The bottom line is the coach needs to develop both sides. In playing pepper, over the net pepper, or in game that might beplayed one to two minutes of non-dominant hand, hitting should be done until the skill becomes automatic. Making it automatic isimportant because the players, for the most part, don’t realize that the solution is reached after take off. If athletes always knewwhere to jump they would jump in the right place.
For left handers, this non-dominant development is even more important because when they hit to zones 3 and 4, they areoften set the ball as if they were right handed and the set is delivered too far to their right. As a result, left-handers develop their non-dominant (right) hand earlier on because they are constantly getting right-handed sets. The most common result is the lefty will hitto zone 2 on the right side of the court.
I’ve experienced knee injury first hand. When I was 19 I received a set put wide to my right on the right side and couldn’tdo anything but hit the ball with my left hand (I’m left side dominant). To keep the ball in play over the net, I leaned far to the rightin air, landed one legged on my right leg and blew my right knee. So, for left-handers more time should be spent working off-handhitting techniques because the error to a right-hander is usually done by the player making an error in judgment. The error for a left-hander is usually done far more often, as setters are all used to setting right handers. If they hit zones 3 and 4 they are getting setmore often as if they were right handed by the setter who doesn’t make the slight adjustment to get the ball to the players’ left shoul-der.
Landing ConsiderationsAs I’ve stated before, recent research has indicated that ACL injuries may occur because of improper landing. The problem
occurs when an athlete is reaching out and hitting the ball over the left side of the body. How long is the athlete in the air? UnitedStates Olympic Committee research shows from a half to two thirds a second overall with .25-.32 seconds to contact and then .25-.32 seconds to landing. Therefore after the hit, the athlete will too often land before s/he has a chance to readjust the body to landwith good technique. There just isn’t enough time to adjust otherwise. So, by programming athletes to hit off-hand rather than attempta dominate hand hit, the landing issue takes care of itself because when hitting with the non-dominate hand the landing technique isnot compromised and the landing is done with good vertical form. In the end, we need to give all players the tools to solve thesejudgment errors, which happen with little time to adjust, by training the movement first one the ground, and then being able to useboth arms in the air as needed. O
2 Ways to Subscribe Today!1. Sign up when you renew your AVCA Membership HERE
2. Don’t need to renew right now? Click HERE and sign up for the library online!
FIT TO A T QUICK STARTER LIBRARY - T7 - POSITION SPECIFIC
PA G E 5 4 .

Exclusive Offer to AVCA MembersGet the Full Library
Subscribe TodayANNUAL SUBSCRIPTONHERE’S WHAT YOU GET
• Over 150 Articles- Updated Weekly• One year Unlimited Access to the Library• One year subscription to Performance Conditioning Volleyball 7 issues, a $26.00 value.• Fit to a T - Designing Your Own Conditioning Program Quick Starter Kit• 101 of our Favorite Exercises and Field Tests organized to help you build your own exercise menu library, a $11.95 value.• Library Index and User Guide to help you navigate through your library.
Regular Price - $99.95 AVCA Member Price - $89.95
3 Month SUBSCRIPTONHERE’S WHAT YOU GET
• Over 150 Articles- Updated Weekly• 3 Month Unlimited Access to the Library• Fit to a T- Designing Your Own Conditioning Program Quick Starter Kit• Library Index and User Guide to help you navigate through your library.
Regular Price - $49.95 AVCA Member Price - $44.95
Newsletter Only- One year subscription to Performance Conditioning Volleyball 7 issues $26.00
2 Ways to Subscribe Today!1. Sign up when you renew your AVCA Membership HERE
2. Don’t need to renew right now? Click HERE and sign up for the library online!
PA G E 5 5
FIT TO A T QUICK STARTER LIBRARY