Embed Size (px)
Citation preview

PeopleSoft Report Scheduling- Version 2.0 Page 1 of 30 © University of Western Australia Last Saved: Friday, November 14, 2008
PEOPLESOFT REPORT SCHEDULING

PeopleSoft Report Scheduling- Version 2.0 Page 2 of 30 © University of Western Australia Last Saved: Friday, November 14, 2008
INTRODUCTION ..................................................................................................................................3
RUNNING REPORTS ..........................................................................................................................4
SELECT THE REPORT.............................................................................................................................4 CREATE / SELECT THE RUN CONTROL..................................................................................................5
Naming Run Controls .....................................................................................................................5 Create a new Run Control ..............................................................................................................6 Select an existing Run Control........................................................................................................7
SELECT THE REPORT LAYOUT ..............................................................................................................8 MONITOR REPORT PROGRESS.............................................................................................................10
Report Parameter Page ................................................................................................................10 Process Monitor Menu..................................................................................................................11 Process Monitor Page...................................................................................................................12
V IEW / DOWNLOAD REPORT...............................................................................................................14 Report Manager Menu Item..........................................................................................................15 ‘My Reports’ on Home Page.........................................................................................................16 View / Download Reports .............................................................................................................18
SCHEDULING REPORTS .................................................................................................................20
ONCE OFF...........................................................................................................................................20 Set the Run Date............................................................................................................................20
RECURRING........................................................................................................................................22 Select Recurrence..........................................................................................................................22
EMAIL COPY OF REPORT ..............................................................................................................24
SELECT EMAIL ....................................................................................................................................24
CANCEL SCHEDULED REPORT....................................................................................................27
RUN CONTROL UPDATE.................................................................................................................29

PeopleSoft Report Scheduling- Version 2.0 Page 3 of 30 © University of Western Australia Last Saved: Friday, November 14, 2008
Introduction This document should be used as a guide to running reports in PeopleSoft. The main areas covered will be:
Running Reports Scheduling Reports Email report delivery
PeopleSoft Report Scheduling- Version 2.0 Page 4 of 30 © University of Western Australia Last Saved: Friday, November 14, 2008
Running Reports The following are the steps involved in running a report within PeopleSoft:
1. Select the report you wish to run 2. Create a run control or select an existing run control. A run control is used to
store the parameters you want to use in the report – e.g. PGs to report on etc. 3. Select the layout of the report you require. Each report within PeopleSoft has a
number of variations that can be selected to present the reports in different format / sequence. You can make multiple selections if required, typically users select one of the PDF versions (A -> F) and / or the Excel version (X)
4. Submit your report to run. This will submit your report(s) to run on the server and most reports will typically be completed within a few minutes at most.
5. Monitor progress of the reports you have submitted, you can use this to see if your reports are queued, currently running or completed.
6. View / download your completed reports While the above may seem like a complicated sequence in reality it is fairly intuitive and does not require many keystrokes / mouse clicks. Additionally not all the above must be done to run and access a report.
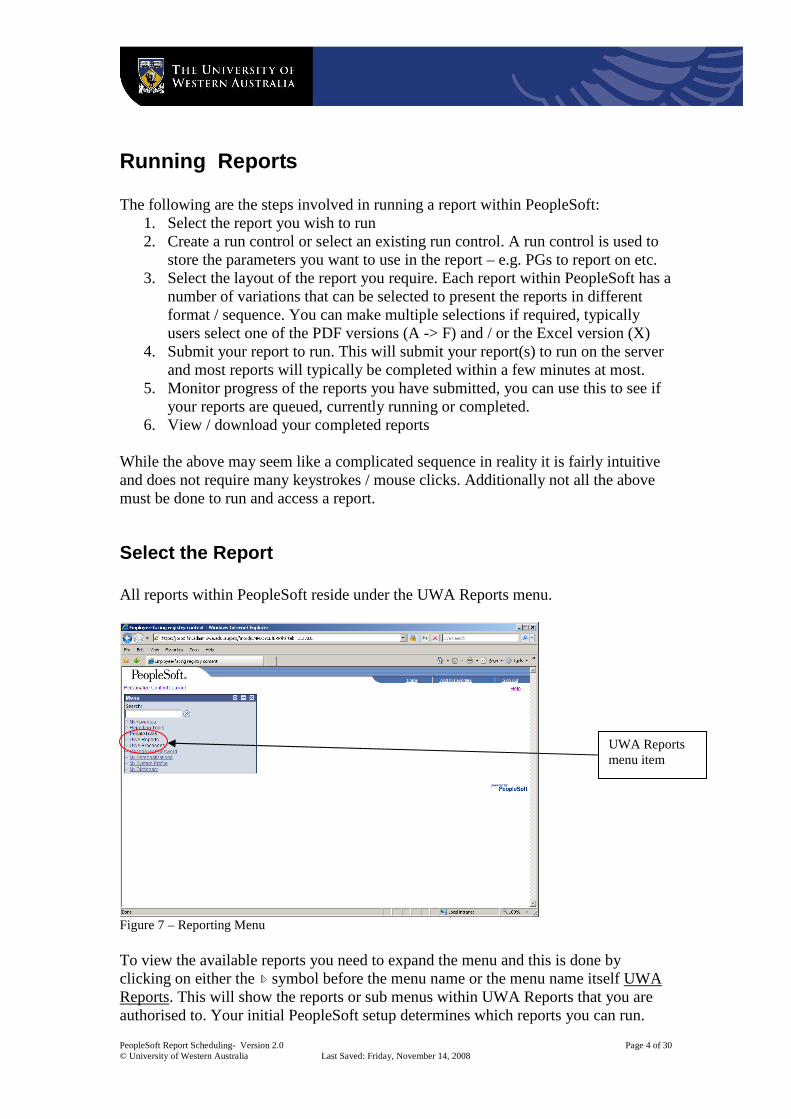
Select the Report All reports within PeopleSoft reside under the UWA Reports menu.
Figure 7 – Reporting Menu To view the available reports you need to expand the menu and this is done by clicking on either the symbol before the menu name or the menu name itself UWA Reports. This will show the reports or sub menus within UWA Reports that you are authorised to. Your initial PeopleSoft setup determines which reports you can run.
UWA Reports menu item

PeopleSoft Report Scheduling- Version 2.0 Page 5 of 30 © University of Western Australia Last Saved: Friday, November 14, 2008
For a detailed description and examples of the reports available within PeopleSoft please refer to the Reports Catalogue section on the Financial Services web site. In the following screen the UWA Reports menu and Reports submenu have been expanded to show the Transaction by PG report.
Figure 8 – Expanded reporting menu Once you have navigated to the report you wish to run, clicking on the report name will open the page where you select the run control to use when running the report.
Create / Select the Run Control Once the creation of the Run Control is done, selecting the Run Control will be a recurring process when running reports. The run control is used to store the parameters that will be used to retrieve the data to be presented on the report. Depending on the report that is selected the actual report parameters available may vary. Typically the parameters that need to be changed are:
Effective date: this should be set to the end of the month of the “To Date” that the report is being run for
Fiscal Year/Period used to select the range of data required in the report From and To
Naming Run Controls A run control should be named so as to give the user an indication of what the report is and possibly the recurrence period or the name of the person it has to be distributed to. Examples could be: M1_AWARD M3_TROHAN PMURAT_PG
Click on report name to access run control

PeopleSoft Report Scheduling- Version 2.0 Page 6 of 30 © University of Western Australia Last Saved: Friday, November 14, 2008
In the first example, the user would see that the report is to be run on a monthly basis to user AWARD, the second example, on a quarterly basis to user TROHAN etc. The advantage of naming a run control this way is that when a run control update has to occur (see Run Control Update), then the user can select all run controls starting with “M” or “M1” or “M3” etc.
Create a new Run Control To create a run control, select the report to be run.
Figure 9 – Select the Run Control Click on the “Add a New Value” tab, then enter the Run Control ID and press the “Add” button.
Figure 10 – Press the Add button to create the new Run Control This will lead to the Report Parameters page where you can select the required parameters. The new Run Control will be saved.
Click on ‘Add a New Value’ to create a new run control
Enter new Run Control ID, then press “Add”

PeopleSoft Report Scheduling- Version 2.0 Page 7 of 30 © University of Western Australia Last Saved: Friday, November 14, 2008
Select an existing Run Control Select the report to be run
Figure 11 – Press the Search button to select an existing Run Control Press on the “Search” button to select an existing Run Control. If more than one exists then a list of available Run Controls will be shown.
Figure 12 – Existing Run Controls displayed The selected Run Control will have the run control that was last used/saved. If the report you require is only for a specific period then you will need to amend the Fiscal Years and Periods to reflect the time span you require. If for a different fiscal year then the Effective Date should also be changed.

PeopleSoft Report Scheduling- Version 2.0 Page 8 of 30 © University of Western Australia Last Saved: Friday, November 14, 2008
Figure 13 – Modified run control When the necessary changes to the run parameters are completed, press the Save button and then the Run button to access the page to select the report layout you wish to run.
Figure 14 – Save run control and access report layout
Select the Report Layout Each report within PeopleSoft has a number of different layouts that you can choose from. The layouts are split over 2 categories:
1. PDF Layouts – produce a PDF copy of the report that cannot be manipulated; each layout is primarily a different report / totalling sequence
Modified to only report on 2008 period 4
Should be changed to reflect “To Date” being reported on
Select Save and Run to access the report layout selection page

PeopleSoft Report Scheduling- Version 2.0 Page 9 of 30 © University of Western Australia Last Saved: Friday, November 14, 2008
2. Excel Layout – produces an Excel version of the report which can then be used for further analysis
Figure 15 – Select required report layout(s) To select the report layout you require simply click the check box before the layout
name. Once selected the check box will have a checked symbol in it. If required you can select more than one layout to run. In the example below the B) By Manager, Project Grant and the X) MS Excel export PG have been selected.
Figure 16 – Layouts selected Once you have selected the layout(s) you require press the Ok button to submit your reports to run, each layout you select will be a separate job on the system. Under normal system load your reports should be completed in a few minutes (under 5).
Selected layouts

PeopleSoft Report Scheduling- Version 2.0 Page 10 of 30 © University of Western Australia Last Saved: Friday, November 14, 2008
Figure 17 – Submit reports to run This will return you to the report parameters page. It is important that you DO NOT amend the parameters until the report has completed as this may affect the results you get back.
Monitor Report Progress The reports you selected will have been submitted to run on the PeopleSoft server. To monitor/review the status of the reports you have submitted you need to access the PeopleSoft Process Monitor. There are two ways to access the Process Monitor:
1. From the report parameters page 2. From Process Monitor menu
Report Parameter Page On the top of the report parameter page there is a ‘hyperlink’ that allows you to access the Process Monitor page.
Click Ok to submit reports to run

PeopleSoft Report Scheduling- Version 2.0 Page 11 of 30 © University of Western Australia Last Saved: Friday, November 14, 2008
Figure 18 – Access Process Monitor from report parameters On clicking the ‘hyperlink’ the Process Monitor page will be displayed.
Figure 19 – Process Monitor via report parameters The Process Monitor retains a history for the last seven days and depending on the options selected you may see more or less jobs.
Process Monitor Menu To access the Process Monitor outside the report parameters page you need to navigate to the required menu item. The menu item resides under PeopleTools -> Process Scheduler and is titled Process Monitor.
Link to Process Monitor

PeopleSoft Report Scheduling- Version 2.0 Page 12 of 30 © University of Western Australia Last Saved: Friday, November 14, 2008
Figure 20 – Process Monitor menu navigation Select the Process Monitor menu item to open the Process Monitor page.
Figure 21 – Process Monitor via menu item
Process Monitor Page The process monitor will show the status of all reports you have submitted to run over a maximum of the last seven days. If you do not see details of reports you have submitted confirm that the selection criteria at the top of the page are correct.
Menu navigation

PeopleSoft Report Scheduling- Version 2.0 Page 13 of 30 © University of Western Australia Last Saved: Friday, November 14, 2008
Figure 22 – Process Monitor selection/filter criteria The important value to note on this page is the Run Status column as this will tell when the report is available for viewing. The common values for this are:
1. Queued report is in the queue and has not yet started processing. Maybe the result of high system usage
2. Initiated report is no longer queued and is being readied for processing 3. Processing report is being processed 4. Posting the report has been completed and is being published for
viewing 5. Success the report is available for viewing / download
Figure 23 – Process Monitor – status Queued
Selection / filter criteria

PeopleSoft Report Scheduling- Version 2.0 Page 14 of 30 © University of Western Australia Last Saved: Friday, November 14, 2008
Figure 24 – Process Monitor – status Processing
Figure 25 – Process Monitor – status Success
View / Download Report Reports are saved on the system for seven days and after this they are automatically deleted. If you run a report that you will need to refer back to, the options are to either save a local copy of the report or alternatively you can rerun the report. Once you have submitted your reports to run and they have completed processing with a Run Status of ‘Success’ they will be available to view / download. To view your reports you need to access the Report Manager which has details of all reports run for the last seven days. There are two ways of getting to the Report Manager within PeopleSoft:

PeopleSoft Report Scheduling- Version 2.0 Page 15 of 30 © University of Western Australia Last Saved: Friday, November 14, 2008
1. From the Report Manager menu item 2. Make ‘My Reports’ available from your PeopleSoft home page. This is the
recommended method as it is then always displayed when you sign in.
Report Manager Menu Item To access the Report Manager Menu you need to navigate to the appropriate menu item. The menu item resides under Reporting Tools and is titled Report Manager
Figure 26 – Report Manager menu navigation Select the Report Manager menu item to open the Report Manager page.
Figure 27 – Report Manager via menu item
Menu navigation

PeopleSoft Report Scheduling- Version 2.0 Page 16 of 30 © University of Western Australia Last Saved: Friday, November 14, 2008
‘My Reports’ on Home Page To make the ‘My Reports’ available on your PeopleSoft home page you will need to be on your home page and select Personalize Content. This will make available on your home page a list of all the reports you have run in the past seven days. The option to get to your home page is the Home hyperlink on the top of the current page you are in.
Figure 28 – Home Page navigation
Figure 29 – Home Page Select the hyperlink Content to access the page to activate ‘My Reports’ on your home page.
Click to get to Home Page
Click ‘Content’ to get to check box for ‘My Reports’

PeopleSoft Report Scheduling- Version 2.0 Page 17 of 30 © University of Western Australia Last Saved: Friday, November 14, 2008
Figure 30 – Page to activate ‘My Reports’ on home page Click the check box ‘My Reports’ to enable the list of reports on your home page.
Figure 31 – Activate ‘My Reports’ on home page On your home page there will now be a new section called ‘My Reports’ which has details of the reports you have run.
Activate ‘My Reports’
Click Save to make change permanent

PeopleSoft Report Scheduling- Version 2.0 Page 18 of 30 © University of Western Australia Last Saved: Friday, November 14, 2008
Figure 32 – ‘My Reports’ on the home page
View / Download Reports From within either Report Manger or the ‘My Reports’ list click on the report you wish to view. This will open a new internet explorer page from where you can then open the report.
Figure 33 – Click on report you wish to view This page will normally have three files that can be viewed. Two of the files are audit/log files from running the report ???.log and ????.trc files. Depending on the report layout selected when running the report the file you select to view will be either ????.PDF or ????.xls. In the example below the user requested one of the PDF layout reports and the file to open is UQY1106A_3068967.PDF.
Reports available to view / download
Click on report you want to view

PeopleSoft Report Scheduling- Version 2.0 Page 19 of 30 © University of Western Australia Last Saved: Friday, November 14, 2008
Figure 34 – List of report file and log files To view your report click on the link UQY1106A_3068967.PDF and the report will open in PDF viewer. If the report is in Excel then when selected the report will open in Microsoft Excel. You will then have the option to view the report from PeopleSoft and close it or alternatively save the report locally for future reference.

PeopleSoft Report Scheduling- Version 2.0 Page 20 of 30 © University of Western Australia Last Saved: Friday, November 14, 2008
Scheduling Reports
Once Off This is where you wish to run a report at a specific future date and time and will not require the report to be run again.
Set the Run Date The report can also be run at a future date and time.
Figure 35 – Run Date, Run Time selected Change the Run Date by manually entering the required date or click on the calendar icon to bring up a calendar to select the date
Change the Date or Time here

PeopleSoft Report Scheduling- Version 2.0 Page 21 of 30 © University of Western Australia Last Saved: Friday, November 14, 2008
Figure 36 – Run status queued Once you have selected the layout(s) you require press the Ok button to submit your reports to run, each layout you select will be a separate job on the system. Under normal system load your reports should be completed in a few minutes (under 5).
Figure 37 – Submit reports to run This will return you to the report parameters page. It is important that you DO NOT amend the parameters until the report has completed as this may affect the results you get back.
Click Ok to submit reports to run

PeopleSoft Report Scheduling- Version 2.0 Page 22 of 30 © University of Western Australia Last Saved: Friday, November 14, 2008
Recurring This is where a report can be scheduled to run at a predetermined time every week / month. Once the initial report has been setup it will then be automatically scheduled to run every week/month at the specified time.
Select Recurrence Select the report to be run using your Run Control. This will display the Parameters screen.
Figure 38 – Run the Report Your selected Run Control will default to the parameters you previously set. Press the “Run” button. This will come to the Process Scheduler request page. Click on the “Recurrence” drop down list for a list of available recurrences.
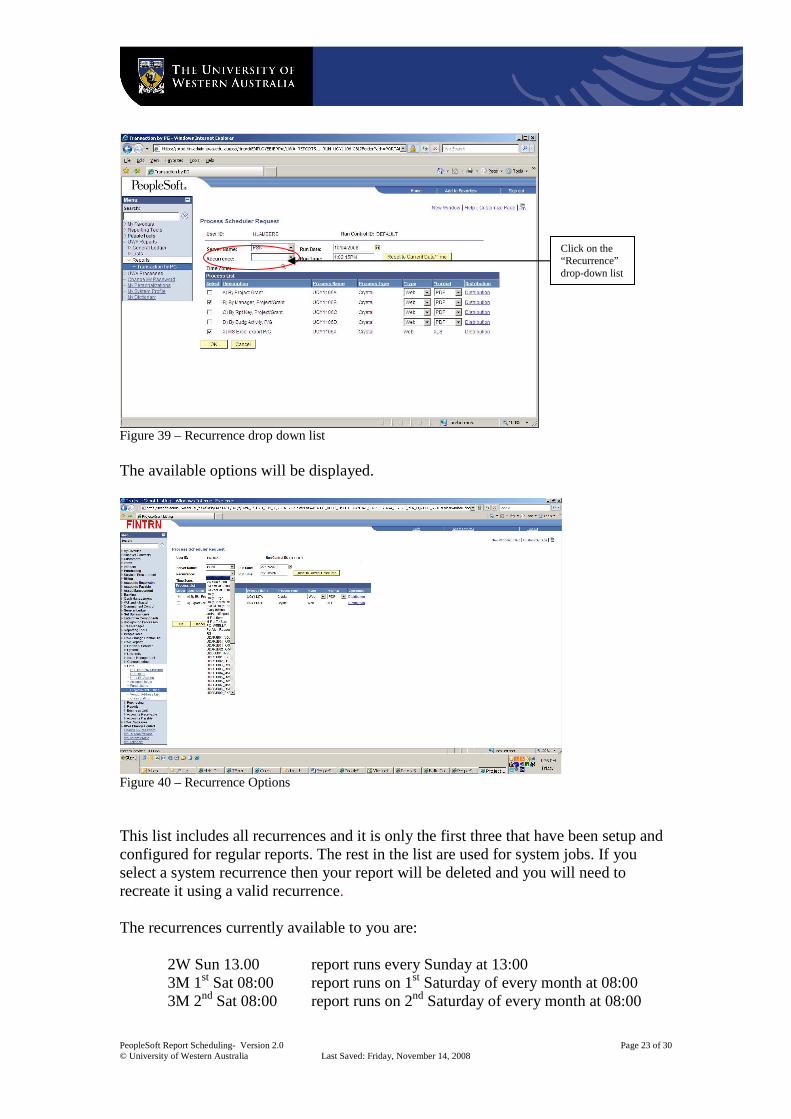
PeopleSoft Report Scheduling- Version 2.0 Page 23 of 30 © University of Western Australia Last Saved: Friday, November 14, 2008
Figure 39 – Recurrence drop down list The available options will be displayed.
Figure 40 – Recurrence Options This list includes all recurrences and it is only the first three that have been setup and configured for regular reports. The rest in the list are used for system jobs. If you select a system recurrence then your report will be deleted and you will need to recreate it using a valid recurrence. The recurrences currently available to you are:
2W Sun 13.00 report runs every Sunday at 13:00 3M 1st Sat 08:00 report runs on 1st Saturday of every month at 08:00 3M 2nd Sat 08:00 report runs on 2nd Saturday of every month at 08:00
Click on the “Recurrence” drop-down list

PeopleSoft Report Scheduling- Version 2.0 Page 24 of 30 © University of Western Australia Last Saved: Friday, November 14, 2008
When one of the 3 available options have been selected, run the report
Email copy of Report In addition to running a report and retrieving the report from within PeopleSoft it is also possible to have a copy of the report emailed to one or more users. By default a copy of the report is always sent to the person that schedules it. To email the report you will need to go through the standard steps to run a report and it is at the page where you select the required layout that the email option can be specified. When the report parameters have been selected, press the Run button. Select from the process list by ticking the required report.
Figure 41 – Report and Email selection parameters
Select Email At the “Type” drop down list, select Email. Then click on the Distribution hyperlink.
Select the required report
version
Select Email Click on the Distribution link

PeopleSoft Report Scheduling- Version 2.0 Page 25 of 30 © University of Western Australia Last Saved: Friday, November 14, 2008
The page below will appear with blank Distribution Details. These have to be populated.
Figure 42 – Blank Distribution Details Populate the Distribution Details
Figure 43 – Distribution Criteria Selection In the Distribution Details screen, enter the following: Email subject provide a meaningful subject line so the recipient will know
what the email is about/contains
Tick the Email with log box
Enter Email Subject, Text and Email Address

PeopleSoft Report Scheduling- Version 2.0 Page 26 of 30 © University of Western Australia Last Saved: Friday, November 14, 2008
Message text include details of what the report is for and also include your contact details as the report when emailed will come from a generic system email account that should not be replied to
Email Address List list the email address(s) of the people that should get a copy of
the report. Use the semicolon (;) between each email address When the details have been entered, press the Ok button
Figure 44 – Run the Report This will return you to the report parameters page It is important that you DO NOT amend the parameters until the report has completed as this may affect the results you get back. Finally, follow the steps listed under the “Monitor Report Progress” section until completion of the report.

PeopleSoft Report Scheduling- Version 2.0 Page 27 of 30 © University of Western Australia Last Saved: Friday, November 14, 2008
Cancel Scheduled Report When a scheduled report is no longer required to be run on a recurring basis, then it is necessary to cancel it. To cancel the report, find the report using the Process Monitor To access the Process Monitor outside the report parameters page you need to navigate to the required menu item. The menu item resides under PeopleTools -> Process Scheduler and is titled Process Monitor.
Figure 45 - Process Monitor menu navigation Select the Process Monitor item to open the Process List page.
Menu navigation

PeopleSoft Report Scheduling- Version 2.0 Page 28 of 30 © University of Western Australia Last Saved: Friday, November 14, 2008
Figure 46 – Process List page with recurrence report Find the report to be cancelled A report that is scheduled, will have a recurrence icon displayed next to it. Click on the Details hyperlink for the selected report This will display the Process Detail page
Figure 47 – Cancel the Scheduled Report To cancel the scheduled report, tick the “Cancel Request” button, then press OK
Tick the Cancel Request Button
Report with Recurrence Icon

PeopleSoft Report Scheduling- Version 2.0 Page 29 of 30 © University of Western Australia Last Saved: Friday, November 14, 2008
The report will now have a Run Status of Cancelled
Figure 48 – Scheduled Report has Cancelled status
Run Control Update When going through the process of creating a meaningful run control, the user will have taken into consideration, the report parameters, including the report “from” and “to” dates. These dates will normally cover a calendar year or part of it. With the approach of a new year, all these report parameters will have to be changed to reflect the new periods. To save the user the task of amending each report parameter on an individual basis, the Run Control Update function should be used. The Run Control Update will enable the user to change the report parameter period (dates) en masse instead of individually.

PeopleSoft Report Scheduling- Version 2.0 Page 30 of 30 © University of Western Australia Last Saved: Friday, November 14, 2008
Figure 49 – updating Run Controls As indicated on the screen, wildcards % and _ can be used. In the example above, all run controls beginning with M1 will be updated with the Fiscal Year From / To entered on the screen. If M% was used, then all run controls beginning with “M” would be updated etc etc. When the required run controls have been selected, press the “Update Run Control” button to make the change.
Wildcard selected to pick specific reports
Click this button when ready to update run control