Embed Size (px)
Citation preview

SILENCERCO MAXIM® 50
INSTRUCTION MANUAL
TM

Thank you for choosing to add a SilencerCo Maxim® 50 to your collection. We are proud to deliver only the best to our community and hope you will enjoy using this product as much as we enjoyed making it. Welcome to the SilencerCo family.
Sincerely and Silently,
Joshua Waldron SilencerCo Co-Founder & CEO
WE AT SIL ENCERC O ® HOP E T HAT YOU ENJOY T HE TECHNOLOGICAL ADVANCEMENTS OFFERED BY THE MA XIM 50. TO PROVIDE FOR YOUR SAFE T Y AND THE EFFECTIVE USE OF THIS PRODUCT, IT IS CRIT ICAL THAT THE OWNER AND ANY USER OF THIS PRODUCT READ THE ENTIRE MANUAL AND FOLLOW STRICTLY T HE WARNINGS AND INST RUC T IONS WI T HIN. T HIS PRODUCT IS INTENDED TO BE USED ONLY BY THOSE WHO ARE WELL-VERSED IN THE SAFE OPERATION OF MUZ ZLELOADERS.

TABLE OF CONTENTS
BASICS
1 / WARNING
2 / MODERN MUZZLELOADING
3 / SPECS
5 / FEATURES IDENTIFICATION
7 / EQUIPMENT
9 / BLACK POWDER GUIDELINE
SAFETY
13 / USER RESPONSIBILITIES
19 / SAFE STORAGE & TRANSPORTATION
21 / SAFETY & OPERATION
FUNCTION & OPERATION
25 / SAFETY FEATURES
26 / FUNCTION TEST
29 / INITIAL CLEANING
33 / TESTING THE IGNITION
35 / LOADING THE CHARGE
37 / LOADING THE PROJECTILE
41 / PRIMING
43 / FIRING
45 / MISFIRES & HANGFIRES
47 / UNLOADING & UNCHARGING
49 / OPTICS
MAINTENANCE
53 / CLEANING & MAINTENANCE
55 / FIELD STRIPPING & CLEANING
57 / DETAILED DISASSEMBLY
61 / DETAILED CLEANING
65 / BREECH PLUGS
SUPPLEMENTARY INFORMATION
69 / TROUBLESHOOTING
70 / WARRANTY

More and more sportsmen have discovered the challenge and enjoyment of muzzleloading in recent years. For both hunting and target shooting, muzzleloaders have helped a modern generation recapture and enjoy an important aspect of our nation’s sporting past.
The Maxim 50 represents the latest developments in this unique segment of shooting sports. It is manufactured to modern standards for safe and enjoyable shooting.
Failure to follow installation and maintenance instructions detailed in this manual may result in serious personal injury and damage to the Maxim 50. Do not attempt to use this product unless you have specific training and experience in the use of muzzleloaders.
Before operating the Maxim 50, be sure the muzzleloader is unloaded and the breech is open and visibly clear of a primer. If you are unsure of the proper procedures to ensure your muzzleloader is unloaded, please consult SilencerCo’s Customer Service department at 801.417.5384.
Assembly and disassembly should never be performed while the Maxim 50 is loaded.
It is of vital importance to remember that a moderated muzzleloader is just as dangerous as an unmoderated muzzleloader and that the same safe handling requirements still apply.
Moderators must be free of obstructions such as mud, dirt, etc. Do NOT attempt to shoot through an obstructed moderator.
When using the Maxim 50, use extreme caution as the moderator may be hot to the touch after firing.
Before performing maintenance, open the breech, and ensure that the muzzleloader is unloaded. Failure to do so can result in injury, death, or property damage.
This manual is intended as a basic safety guide for the proper maintenance, loading, and shooting of the Maxim 50. We recommend novice shooters obtain further instruction before use.
WARNING MODERN MUZZLELOADING
1 2

SPECS
The Maxim 50 is an inline muzzleloader with the following specs:
45” Overall Length
20” Barrel Length
9” Moderator Length
Tac2™ Trigger System — 2-Stage Competition Trigger; Set At 2 Pounds
StrikerFire™ Firing System
#209 Shotgun Ignition System
.50 Caliber
1:28” Rate-Of-Twist
3 4

FEATURES IDENTIFICATION
MUZZLEBARREL PERMANENT WELD ATTACHMENTACCELERATOR BREECH PLUGSTRIKER BUTTON
STRIKER DE-COCKING BUTTONBUTT PAD
BUTTSTOCKSLING SWIVEL STUD SLING SWIVEL STUD MODERATORTRIGGER GUARD
TRIGGER BARREL CATCH LEVER FOREND
5 6
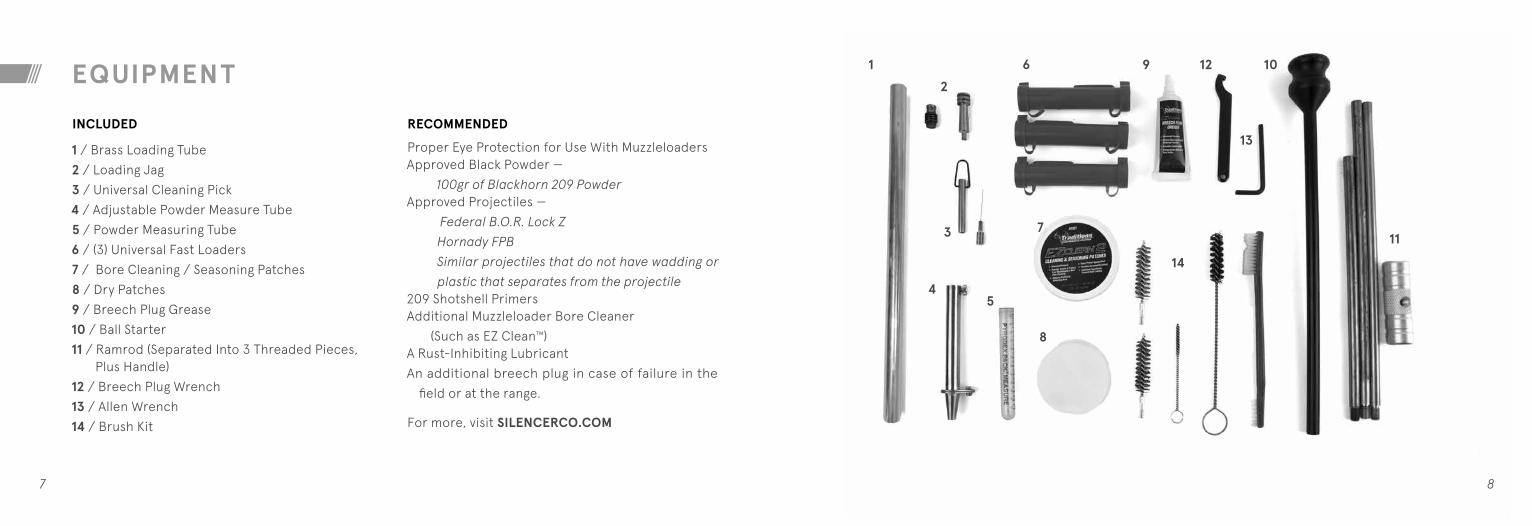
EQUIPMENT
INCLUDED
1 / Brass Loading Tube
2 / Loading Jag
3 / Universal Cleaning Pick
4 / Adjustable Powder Measure Tube
5 / Powder Measuring Tube
6 / (3) Universal Fast Loaders
7 / Bore Cleaning / Seasoning Patches
8 / Dry Patches
9 / Breech Plug Grease
10 / Ball Starter
11 / Ramrod (Separated Into 3 Threaded Pieces, Plus Handle)
12 / Breech Plug Wrench
13 / Allen Wrench
14 / Brush Kit
RECOMMENDED
Proper Eye Protection for Use With MuzzleloadersApproved Black Powder —
100gr of Blackhorn 209 PowderApproved Projectiles —
Federal B.O.R. Lock Z
Hornady FPB
Similar projectiles that do not have wadding or
plastic that separates from the projectile209 Shotshell PrimersAdditional Muzzleloader Bore Cleaner
(Such as EZ Clean™)A Rust-Inhibiting Lubricant
An additional breech plug in case of failure in the
field or at the range.
For more, visit SILENCERCO.COM
7 8
1
2
3
45
6
7
8
9 10
11
12
13
14

SilencerCo recommends the use of 100gr of Blackhorn 209 powder. Other black powders are to be used at the discretion of the muzzleloader owner. Less than 100gr of black powder is acceptable.
Follow the safe handling and storage precautions printed on the manufacturer’s container.
USE ONLY BLACK POWDER OR APPROVED BLACK POWDER SUBSTITUTE IN YOUR MUZZLELOADER. The use of any propellant other than black powder or approved black powder substitute may cause injury, death, or property damage.
NEVER USE SMOKELESS POWDER OF ANY TYPE OR IN ANY QUANTITY IN A MUZZLELOADER, AND NEVER MIX POWDERS. The use of smokeless powder could result in a serious detonation which could cause injury, death, or property damage.
BL ACK POWDER
NEVER USE POWDER YOU CANNOT POSITIVELY IDENTIFY. Using mislabeled or unknown powder could result in injury, death, or property damage.
BLACK POWDER AND BLACK POWDER SUBSTITUTES ARE CORROSIVE AND LEAVE RESIDUE THAT REQUIRE IMMEDIATE CLEANING. Always perform field cleaning after you complete firing. A thorough, in-depth cleaning is required before storage to keep the Maxim 50 functioning correctly. Failure to properly clean the muzzleloader may prevent it from functioning safely and may result in injury, death, or property damage.
BLACK POWDER IS EXTREMELY FLAMMABLE. PROPER STORAGE AND HANDLING IS ESSENTIAL. If you have any questions on black powder storage and safe handling, contact the manufacturer.
SILENCERCO RECOMMENDS NOT EXCEEDING THE RECOMMENDED BLACK POWDER OR BLACK POWDER SUBSTITUTE CHARGE LISTED IN THIS BOOK OR BY THE POWDER MANUFACTURER. Injury, death, or property damage may occur.
FOLLOW THE MANUFACTURER’S INSTRUCTIONS WHEN MEASURING ANY TYPE OF POWDER.
DO NOT USE PYRODEX® CTG. IT IS NOT SAFE FOR MUZZLELOADERS.
SILENCERCO DOES NOT RECOMMEND USING MORE THAN 100 GRAINS OF BLACK POWDER. THIS CAUSES UNBURNT POWDER AND CAN DAMAGE THE MODERATOR AND/ OR MUZZLELOADER.
BLACK POWDER IS MEASURED BY VOLUME, NOT WEIGHT.
9 10

SAFE T Y
Safety should be your top priority when operating the Maxim 50. Use the following safety information when operating any muzzleloader. If you feel uncertain, stop what you are doing and immediately contact SilencerCo’s Customer Service department at 801.417.5384 before proceeding.
If you are unfamiliar with muzzleloaders, visit SILENCERCO.COM or TRADITIONSFIREARMS.COM before operating the Maxim 50.
KEEP YOUR MUZZLELOADER POINTED IN A SAFE DIRECTION. Do not point a muzzleloader, loaded or unloaded, at anything you do not intend to shoot. Take particular care when loading, unloading, or field stripping the muzzleloader.
TREAT EVERY MUZZLELOADER AS IF IT’S LOADED. Always verify for yourself if a muzzleloader is loaded. Do not pass a muzzleloader to another person unless the breech is open and you have visually inspected that it is unloaded. Keep the muzzleloader unloaded and safely stored when not in use.
DO NOT PUT YOUR FINGER ON THE TRIGGER UNTIL YOU ARE READY TO FIRE. Take care that other objects do not enter the trigger guard or snag the trigger.
KNOW YOUR TARGET AS WELL AS WHAT IS IN FRONT OF AND BEHIND IT. Consider the path of the projectile and what it might encounter before and after its intended target.
Make sure your target has a backstop free of obstructions, water, or other surfaces that could cause ricochets. Never fire haphazardly into the sky.
IT IS YOUR RESPONSIBILITY TO ENSURE SAFE HANDLING OF THE MAXIM 50. Muzzleloaders can cause serious injury or death if improperly handled or misused. If you don’t feel comfortable, utilize muzzleloader training or visit SILENCERCO.COM for educational videos.
ONLY USE RECOMMENDED PRIMERS, BLACK POWDER, AND PROJECTILES WITH YOUR MUZZLELOADER.
USE EYE PROTECTION WHEN OPERATING ANY MUZZLELOADER. Ensure eyewear is rated for use with muzzleloaders. Utilize hearing protection with ammunition that will render the Maxim 50 non-hearing safe.
NEVER LEAN A CHARGED AND PRIMED MUZZLELOADER AGAINST A TREE, WALL, OR ANY SURFACE WHERE IT MAY FALL OVER. Once a muzzleloader has been charged and primed it is your responsibility to protect against any situation that may result in an accidental, potentially fatal, discharge.
USE YOUR MUZZLELOADER IN A WELL-VENTILATED AREA. Discharging or cleaning a muzzleloader or handling ammunition in a poorly ventilated area can result in exposure to lead and other harmful substances that are known to cause serious physical injury. Read all warnings on ammunition and cleaning supplies before using. Wash hands thoroughly after handling these items.
DO NOT ALLOW INDIVIDUALS WHO DO NOT UNDERSTAND MUZZLELOADER SAFETY OR PROPER OPERATION TO HANDLE THE MAXIM 50.
USER RESPONSIBILITIES
ALL SAFETY GUIDELINES IN THIS MANUAL MUST BE FOLLOWED TO ENSURE SAFE OPERATION. FAILURE TO FOLLOW THESE INSTRUCTIONS AND WARNINGS COULD LEAD TO SERIOUS PERSONAL INJURY OR DEATH TO YOU OR OTHERS AND/OR DAMAGE TO PROPERTY.
13 14

DO NOT FIRE THROUGH AN OBSTRUCTED BARREL. Ensure the barrel and moderator are clear of obstructions before use. Even a small obstruction can cause catastrophic failure.
APPROPRIATE USE FOR YOUR MUZZLELOADER MEANS USING IT FOR LEGAL PURPOSES. It is your responsibility to ensure that you are in compliance with all applicable federal, state, and local laws and ordinances regarding the use of your muzzleloader where you intend to use it.
NEVER USE PRODUCTS THAT CAUSE IMPAIRMENT WHILE OPERATING A MUZZLELOADER. Do not consume alcohol, drugs, medication, or anything else that causes impaired mental or physical ability while operating a muzzleloader.
NEVER SOLELY RELY ON MECHANICAL FEATURES SUCH AS A SAFETY. Mechanical features such as safeties can fail. Never exclusively rely on mechanical features with disregard to proper safe muzzleloader handling. You are responsible for always following the safe handling rules outlined in this manual.
BEFORE HANDLING ANY MUZZLELOADER, UNDERSTAND ITS OPERATION. Not all muzzleloaders are the same. Some have unique features and mechanical operations. Before using a muzzleloader, you should learn the mechanical features of the specific muzzleloader you intend to use. If you are unsure about operational aspects of the Maxim 50, please contact SilencerCo before proceeding.
USER RESPONSIBILITIES CONTINUED
DO NOT DISASSEMBLE THE MAXIM 50 BEYOND WHAT IS OUTLINED IN THIS MANUAL. Should further disassembly be required, contact SilencerCo’s Customer Service department at 801.417.5384.
DO NOT MAKE ADJUSTMENTS TO THE INTERNAL COMPONENTS OF THE MAXIM 50.
ENSURE ACCESSORIES ARE COMPATIBLE WITH YOUR MUZZLELOADER BEFORE USE. Optics and other accessories should be verified as compatible before being used with the Maxim 50.
DO NOT DRILL HOLES IN THE BARREL AS THIS COULD WEAKEN THE BARREL STRUCTURE LEADING TO A RUPTURE. A RUPTURED BARREL CAN CAUSE SERIOUS INJURY AND/OR DEATH TO THE SHOOTER OR BYSTANDERS AND DAMAGE TO PROPERTY. DRILLING HOLES IN THE BARREL VOIDS ALL WARRANTIES FROM SILENCERCO AND TRADITIONS.
15 16

UNDERSTAND MUZZLELOADER TERMINOLOGY. “Charged” refers to the presence of a propellant powder charge and projectile in the bore of the muzzleloader. “Uncharged” indicates the powder charge and projectile have been fired or removed, and the bore is completely clear.
“Primed” indicates placing a primer, cap, or priming powder in or on a muzzleloader. “Unprimed” means the primer, cap, or priming powder has been removed from the muzzleloader or is not in place.
NEVER SMOKE OR ALLOW BYSTANDERS TO SMOKE WHILE USING YOUR MUZZLELOADER. The spark from a lighted cigarette, cigar, or pipe can ignite black powder or a black powder substitute, percussion caps, or primers. Smoking around these items may cause premature firing of the muzzleloader or an explosion of the powder causing serious injury and/or death to the shooter or bystanders and damage to property.
USER RESPONSIBILITIES CONTINUED
YOU ARE RESPONSIBLE FOR THE SAFE HANDLING AND OPERATION OF THE MAXIM 50. SILENCERCO AND TRADITIONS WILL NOT BE RESPONSIBLE FOR ANY PERSONAL INJURY, DEATH, OR PROPERTY DAMAGE THAT RESULTS FROM: (1) THE CRIMINAL OR NEGLIGENT USE OF THIS MUZZLELOADER; (2) A DISREGARD FOR THESE SAFETY INSTRUCTIONS AND WARNINGS; (3) IMPROPER OR CARELESS HANDLING OF THIS MUZZLELOADER; (4) THE USE OF NON-STANDARD, DEFECTIVE, OR IMPROPER PROJECTILES; OR; (5) IMPROPER OR NEGLIGENT MODIFICATIONS OR REPAIRS TO THE MUZZLELOADER.
17 18

SECURE YOUR MUZZLELOADER TO PREVENT UNAUTHORIZED ACCESS WHENEVER YOU ARE NOT USING IT. YOUR SAFETY AND THE SAFETY OF OTHERS DEMANDS THAT YOU ALWAYS SECURE AND STORE YOUR MAXIM 50 SAFELY. NEVER LEAVE A MUZZLELOADER UNATTENDED UNLESS IT IS UNLOADED, LOCKED, AND SECURED.
NEVER TRANSPORT A CHARGED OR PRIMED MUZZLELOADER. When transporting your muzzleloader it must be uncharged, unprimed, and securely locked. Safe and secure transportation of your muzzleloader is another important aspect of your responsibility as a muzzleloader owner.
NEVER STORE A CHARGED OR PRIMED MUZZLELOADER. When storing your muzzleloader, it must be uncharged, unprimed, and securely locked. Safe and secure storage of your muzzleloader is one of your most important responsibilities as a muzzleloader owner.
YOUR MAXIM 50 IS YOUR CONSTANT RESPONSIBILITY. You must always make sure to prevent your muzzleloader from being stolen or being used by untrained or unqualified individuals. To prevent this, always keep it locked, uncharged, unprimed, and secured when not in use by you or under supervision by you.
ALWAYS FOLLOW THE LAW! In many states and local municipalities, it is illegal to keep a muzzleloader unlocked in an area accessible to children or unauthorized persons. You must be familiar with all local, state, and federal laws regarding the safe storage and transportation of your muzzleloader.
Failure to know and follow the law may result in unauthorized access or use of your muzzleloader for which you may be held accountable. Ask your local police department or gun shop for pertinent information on storing and/or transporting a muzzleloader safely and legally.
SAFE STORAGE & TRANSPORTATION
19 20

SAFE T Y & OPERATION
NEVER PRIME YOUR MUZZLELOADER UNTIL YOU ARE READY TO FIRE IT. Your muzzleloader should remain unprimed until the instant before firing. After priming, your full attention should be on the target and firing of the muzzleloader.
NEVER PASS A CHARGED MUZZLELOADER TO ANOTHER PERSON. A charged muzzleloader requires your complete attention. Never charge the muzzleloader and hand it to another shooter. Never shoot a muzzleloader charged by someone else. Only the person who loaded the muzzleloader knows whether the muzzleloader has been charged properly and should fire it.
NEVER CHARGE YOUR MUZZLELOADER DIRECTLY FROM A CAN, HORN, OR FLASK. A spark from a previous firing may ignite the stream of powder being poured and cause the container to explode. Powder explosion may cause serious injury and/or death to the shooter or bystanders and damage to property.
Use a separate pre-calibrated measuring device containing small quantities of powder to charge your muzzleloader. Keep the muzzle directed away from your face and body when loading.
WHILE SHOOTING, ALWAYS KEEP SUPPLIES OF POWDER, PRIMERS, AND CAPS WELL AWAY FROM YOUR FIRING POSITION OR SHOOTING BENCH. Follow the manufacturer’s instructions for safe handling and storage of powder, primers, or caps.
You must follow these procedures every time a muzzleloader is cleaned, handed to you or another person, transported, or stored.
WHEN LOADING, MAKE SURE THE PROJECTILE IS FIRMLY SEATED AGAINST THE POWDER CHARGE. Serious personal injury or death can result if the projectile is not seated properly.
After you have fully seated a projectile against a powder charge, mark the ramrod as a point of reference for a properly seated projectile.
DO NOT LOAD A MUZZLELOADER HOT FROM PREVIOUS FIRING. ALWAYS ALLOW THE BARREL TO COOL BEFORE YOU RELOAD YOUR MUZZLELOADER.
BEFORE LOADING, MAKE SURE YOUR MUZZLELOADER IS NOT ALREADY CHARGED. To make sure the muzzleloader is uncharged, keep the muzzle pointed in a safe direction and insert the ramrod provided with the muzzleloader into the bore.
If the ramrod stops at the reference mark you previously made to indicate proper seating of a projectile, then the muzzleloader is already charged. You can also open the breech, remove the Accelerator Breech Plug™, and visually verify there is no charge by looking down the barrel.
SILENCERCO DOES NOT RECOMMEND EXCEEDING THE MAXIMUM BLACK POWDER OR BLACK POWDER SUBSTITUTE CHARGE RECOMMENDED IN THIS MANUAL. If the recommended charge is exceeded, injury, death, or property damage can occur.
NEVER POUND ON THE RAMROD WHEN LOADING. Black powder and/or approved black powder substitutes are potentially sensitive to impact and can ignite from the impact of pounding on the ramrod. Always keep the muzzle pointed away from your face and body when loading. Place your fingers and hand around the ramrod, and not over the end of the ramrod, when seating projectile for safety.
NEVER CROSS OBSTACLES WITH A CHARGED OR PRIMED MUZZLELOADER. Always make sure your muzzleloader is unprimed and unloaded before crossing a fence, climbing a tree, jumping a ditch, or negotiating any other obstacles.
21 22

FUNCTION & OPERATION

FUNCTION TESTING THE ACTIONOpen the action by pressing on the barrel catch lever, which will then allow the action to pivot open (2A). Close the action by pivoting the opposite way from when you opened the action. You will hear a metallic click indicating that the action is locked.
SAFE T Y FEATURES
ENSURE THE MAXIM 50 IS UNLOADED AND UNCHARGED BEFORE PERFORMING ANY FUNCTION TESTS.
ALWAYS POINT THE MUZZLE IN A SAFE DIRECTION AND TREAT THE MUZZLELOADER AS IF IT IS LOADED AND CAN FIRE.
FUNCTION TEST
Your Maxim 50 break-action muzzleloader comes equipped with dual safeties.
The first safety is an internal striker block safety (1A). It prevents the striker from hitting the primer unless the trigger has been pulled. This prohibits the striker from hitting the primer in case of a drop or sudden impact.
The second safety is an ambidextrous mechanical trigger block safety that prevents trigger pull and disengages the sear (1B). The Maxim 50 can be cocked and de-cocked with the trigger block safety engaged.
When the trigger block safety disengaged, the Maxim 50 is set to “fire”, and a red ring is visible. When the trigger block safety is engaged, the Maxim 50 is set to “safe”, and no red ring is visible.
2A
1A
1B
25 26

IF THE STRIKER BUTTON DOES NOT RETURN TO ITS AT-REST, DE-COCKED POSITION ONCE THE PREVIOUS STEPS ARE COMPLETE, THEN THE MUZZLELOADER IS NOT FUNCTIONING PROPERLY AND YOU MUST ADDRESS THIS BEFORE CONTINUING WITH THE FUNCTION TEST.
FUNCTION TESTING THE MAXIM 50Push forward on the striker button until it locks forward in the cocked position. You should hear a click, and a red line should be visible in the striker button channel.
Press down on the striker de-cocking button to de-cock the striker. The striker button should return to its at-rest position and the red line in the striker button channel should not be visible.
Next, press forward on the striker button to cock the muzzleloader, and then pull on the barrel catch lever to de-cock.
This function test should also be performed any time you have disassembled the muzzleloader for cleaning or any maintenance.
FUNCTION TESTING THE TRIGGER SYSTEMPress forward on the striker button to cock the muzzleloader (2B). Press the safety button (2C) until it locks into place and you hear a metallic click. There should be no red ring visible when the safety is engaged.
Pull on the trigger. You should feel the resistance of the safety and should NOT hear the striker firing.
Press on the opposite side of the safety button until it locks into place and you hear a metallic click. There should be a visible red ring on the safety button indicating that the muzzleloader is ready to fire.
Pull on the trigger until you hear the striker fire and the trigger travels to the rear of the trigger guard.
Pull on the barrel catch lever to release the striker button and return it to its de-cocked position. You may also press on the striker de-cocking button.
FUNCTION TEST CONTINUED
2B
2C
27 28

The Maxim 50 ships with manufacturing oil and grease. These residues need to be removed for the muzzleloader to function properly.
Please review the disassembly instructions for the complete set of cleaning instructions.
After confirming the muzzleloader is unloaded with the safety in the “safe position,”open the action by pulling on the barrel catch lever, which will then allow the action to pivot open.
Unscrew and remove the Accelerator Breech Plug™ (3A) with your fingers or the breech plug wrench supplied with the muzzleloader, then close the action.
Remove forend stock screw and forend from barrel assembly using the 4mm Allen wrench provided.
Remove the barrel from the receiver by pulling the barrel catch lever. When the action starts to open, lift the barrel up and out of the receiver (3B). Clean all items with hot, soapy water or muzzleloader bore solvent such as Traditions™ Blackout 209 cleaning solvent. This will remove any manufacturing residue that may be on the inside or outside of the barrel.
Dry all of the parts completely.
INITIAL CLEANING
3A 3B
29 30

Apply a light coat of Traditions™ EZ Clean™ solvent to a dry patch (or use Traditions pre-soaked EZ Clean™ patches) and push through the bore in the direction of the muzzle (3C) using the included rod and jag. Do NOT pull patches back and forth through the barrel or moderator. Use Traditions™ Wonderlube™ pre-lubed patches to “season” the lands and grooves of the rifling before loading.
Generously lubricate the threads of the breech plug with breech plug grease (3D). Be careful to not get any grease inside the breech plug.
Reassemble your muzzleloader.
Please refer to DETAILED CLEANING section for more information. Take time to study the disassembly and assembly procedures before cleaning.
INITIAL CLEANING CONTINUED
31 32
3D
3C
3C

Before testing the ignition, follow all instructions in the SAFETY & OPERATION section to ensure that the Maxim 50 is not already charged.
TESTING & CLEARING IGNITIONPoint the muzzleloader down towards a safe area on the ground and load a primer into the 209 primer pocket of the breech plug (4A). Fire one or two primers to blow out any oil or residue from the fire channel.
After firing one or two primers, open the breech and look down the channel/barrel with the muzzle pointed at a blade of grass, leaf, or other inanimate moving object that is safe to aim at. If the object is seen moving, your channel is clear. If you cannot see movement through the breech plug, the channel is not clear and additional primers should be fired and/or the breech plug should be checked for obstructions.
TESTING THE IGNITION
WEAR PROPER EYE PROTECTION FOR THE ENTIRE LOADING PROCESS. PRIOR TO LOADING, YOU MUST ENSURE THE MUZZLELOADER IS UNCHARGED, UNLOADED, AND THE BARREL IS FREE OF ANY OBSTRUCTIONS. TO DO THIS, REMOVE THE ACCELERATOR BREECH PLUG™ AND LOOK DOWN THE BARREL (NOT FROM THE END OF THE MUZZLE) TO SEE IF THERE IS A CHARGE OR ANY OBSTRUCTION IN THE BARREL. YOU MAY ALSO USE THE FOLLOWING INSTRUCTIONS TO ENSURE THE MUZZLELOADER IS UNCHARGED AND UNLOADED.
33 34
4A

LOADING LOOSE POWDERFill your powder measure tube (5A). SilencerCo recommends 100 grains of Blackhorn 209 black powder by volume, or equivalent measures of other black powder. See manufacturer’s information.
Insert brass loading tube into the muzzle of the moderator (5B). Do not apply force.
Pour powder from the powder measure tube down the brass loading tube (5C).
Tap the side of the barrel to help settle the powder into the breech area.
LOADING PELLETIZED POWDERSilencerCo does not recommend using pellets, although they are an available option. Use at your own discretion, and follow manufacturer’s information.
When loading pelletized powder (pellets), drop the desired amount of pellets into the barrel with the igniter side down. Using a pipe cleaner to handle the pellets makes it easier to load and keeps oil from your hands off of the pellet.
LOADING THE CHARGE
MAKE SURE TO USE THE BRASS LOADING TUBE WHILE LOADING POWDER AND PROJECTILES, OTHERWISE YOU RISK IRREPARABLE DAMAGE TO THE MAXIM 50.
REMOVE THE LOADING TUBE BEFORE FIRING OR DEATH OR INJURY COULD OCCUR.
35 36
5A 5C
5B

APPROVED PROJECTILES
With the brass loading tube (6A) still seated in the moderator, drop the projectile (6B) into the barrel. Use the ball starter to begin seating the projectile. Excessive force is not necessary. (6C)
Apply pressure to the ball starter until the flare of grip meets the brass loading tube.
LOADING THE PROJECTILE
DO NOT LOAD MAXIM 50 WITH UNAPPROVED PROJECTILES. THESE INCLUDE SABOTED, POWERBAND, CONICAL, ROUND BALL, OR ANY OTHER PROJECTILE THAT REQUIRES WADDING. FAILURE TO COMPLY WITH THESE GUIDELINES WILL RESULT IN DEBRIS BECOMING LODGED WITHIN THE BAFFLES OF THE MODERATOR.
Or similar projectiles that do not have wadding or plastic that separates
from the projectile
Federal B.O.R. Lock Z Hornady FPB
37 38
6A
6C
6B
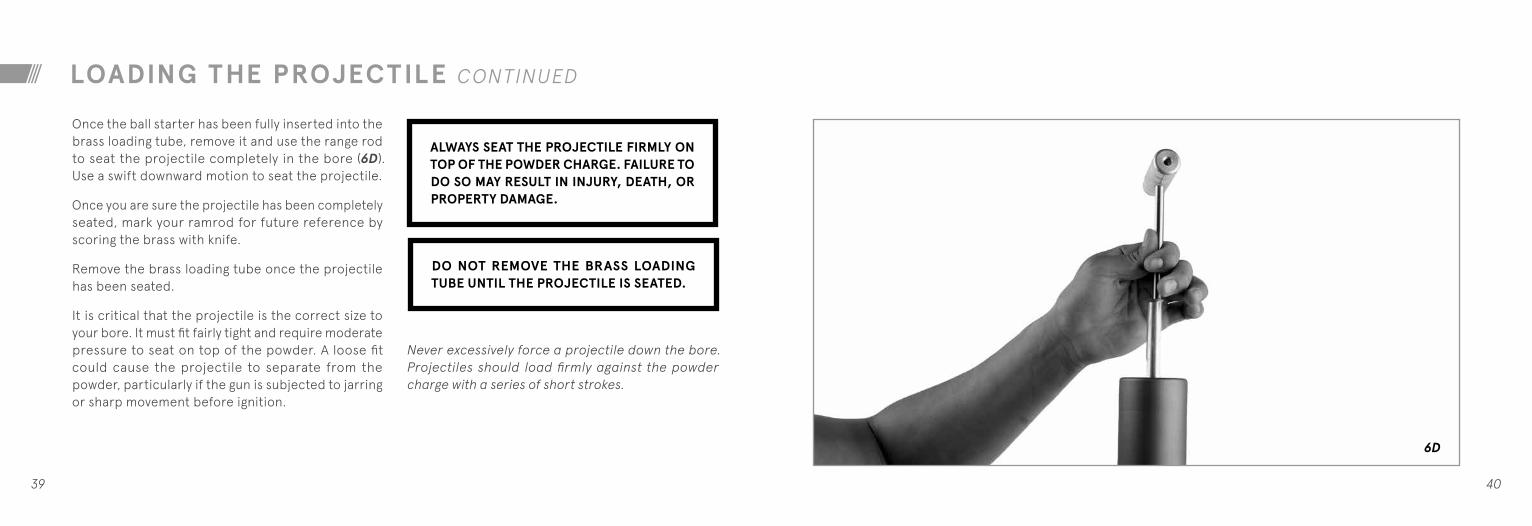
Once the ball starter has been fully inserted into the brass loading tube, remove it and use the range rod to seat the projectile completely in the bore (6D). Use a swift downward motion to seat the projectile.
Once you are sure the projectile has been completely seated, mark your ramrod for future reference by scoring the brass with knife.
Remove the brass loading tube once the projectile has been seated.
It is critical that the projectile is the correct size to your bore. It must fit fairly tight and require moderate pressure to seat on top of the powder. A loose fit could cause the projectile to separate from the powder, particularly if the gun is subjected to jarring or sharp movement before ignition.
ALWAYS SEAT THE PROJECTILE FIRMLY ON TOP OF THE POWDER CHARGE. FAILURE TO DO SO MAY RESULT IN INJURY, DEATH, OR PROPERTY DAMAGE.
LOADING THE PROJECTILE CONTINUED
DO NOT REMOVE THE BRASS LOADING TUBE UNTIL THE PROJECTILE IS SEATED.
Never excessively force a projectile down the bore. Projectiles should load firmly against the powder charge with a series of short strokes.
39 40
6D

PRIMING
DO NOT PRIME YOUR MUZZLELOADER UNTIL IMMEDIATELY BEFORE YOU ARE PREPARED TO FIRE.
The Maxim 50 uses a 209 shotshell primer. With the exception of function testing, a primer should never be placed in the Maxim 50 until the muzzleloader is loaded and you are ready to shoot.
Make sure that the manual safety on your muzzleloader is in the “safe” position.
Keeping the muzzle pointed in a safe direction, open the action to expose the breech area. Using a 209 capper (7A) or your fingers, press the primer into the opening in the breech plug (7B).
Close the action.
Your muzzleloader is now ready to fire.
41 42
7A 7B

After following the previous instructions, your muzzleloader is charged, primed, and ready to fire.
Grasp the muzzleloader firmly with both hands with your finger off the trigger and out of the trigger guard.
Raise the muzzleloader up and firmly pull the stock into your shoulder. (8A)
Acquire your target and aim using your optic. Remember to be sure of what is beyond your target as well.
Press forward on the striker button until it locks into the cocked position. You will hear an audible click and the button will stay forward exposing the red cocked indicator.
The muzzleloader is now cocked and ready to fire.
Press the safety off. Slowly squeeze the trigger until it fires. (8B)
FIRING
DEPRIMING YOUR MUZZLELOADER AFTER FIRINGPress the barrel catch lever and open the breech to expose the primer.
Remove the spent primer (8C).
43 44
8B 8C
8A

MISFIRES & HANGFIRES
If after following the previous instructions the muzzleloader did not fire, there is a misfire or hangfire. Anyone involved with muzzleloaders may experience a misfire or hangfire.
The following are a few simple procedures that will help you to effectively manage such occurrences.
MISFIREA misfire is a potentially-hazardous failure of either the primer or the main charge to ignite.
Check to make sure a primer was installed.
Verify that the action is free of debris.
Try a new primer. If the primer fires but the main charge does not:
A. Keep the muzzle pointed in a safe direction for at least one minute with the action closed. Press the safety button to engage the trigger block safety. After waiting one minute, remove the primer while still keeping the barrel pointed in a safe direction.
Using a cleaning pick, verify that the hole in the breech plug or nipple is clear of any obstruction.
B. Tap the butt pad with your hand to direct the powder into the ignition channel.
Tapping works only for granular black powder, NOT with pellets.
C. Verify the propellant was loaded under your projectile by running the ramrod down the muzzle and observing the measure marks on your ramrod. Use extreme caution to always keep the muzzle pointed in a safe direction.
D. Check for any mechanical defects in the breech area. If your gun has repeatedly failed to fire, you will need to unload the muzzleloader. If necessary, seek assistance from an experienced shooter. Never leave an unfired charge in the barrel.
E. After verifying the above directions, re-prime the muzzleloader and fire.
HANGFIREA hangfire is a delayed ignition. The primer fires when the trigger is pulled and the main charge fires a brief moment later. If you are experiencing hangfires, there are possible causes that you need to evaluate:
A. Verify that the primer is the correct size and properly fitted onto the primer pocket.
B. Ensure the ignition channel is clear of obstructions.
C. Verify the proper propellant is being used and that it is the proper granulation, free from moisture, contamination, and oils.
D. Check the condition of the primers and propellant powder. For hunting situations, use fresh primers and powder for each day of hunting.
A MISFIRE OR HANGFIRE IS A DANGEROUS SITUATION. PROCEED WITH EXTREME CAUTION. KEEP THE MUZZLELOADER POINTED IN A SAFE DIRECTION AS IT MAY FIRE AT ANY TIME.
45 46

Make sure the muzzle of the barrel is pointed in a safe direction at all times.
Open the action and carefully remove the primer from the breech plug. (9A)
Unscrew the Accelerator Breech Plug™. If necessary, use a spanner wrench to loosen the breech plug. (9B)
Insert ramrod into the muzzle and push the load out the breech end of the barrel. (9C)
Clean and wipe all surfaces to remove loose fouling and debris.
UNLOADING & UNCHARGING
47 48
9A 9B 9C

OP TICS
We recommend the user selects an optic with extended eye relief.
Start your sighting in at 25 yards with a large target. After you are able to shoot at least 3 shots in the same 2” area, adjust your sight to the center.
SilencerCo recommends cleaning the bore between every shot while sighting. Powder build-up may cause inaccuracy. Make sure to sight in using the same projectiles and powder charges first, then change if needed.
The Maxim 50 is drilled and tapped for a rail. Visit SILENCERCO.COM for more information on accessories.
49 50

MAINTENANCE

CLEANING & MAINTENANCE
Clean throughout your shooting session to avoid loading and accuracy problems. When cleaning the bore, use Traditions™ EZ Clean™ cleaning patches, NOT shooting patches.
If unusual resistance is felt while loading a projectile, place a cleaning patch on a cleaning jag affixed to the end of a ramrod and run it the full length of the barrel. Move from breech to muzzle only, never from muzzle to breech. (10A) Remove as much of the fouling build up as possible.
If a patch becomes lost in the bore, use the cleaning brush attached to the ramrod for retrieval, or if necessary, remove the breech plug and push the patch out through the breech area. NEVER load a charge over a lost patch.
If the projectile is the proper size, unusual resistance usually indicates the need to swab the bore. Use Blackout 209 cleaning solvent if barrel is heavily fouled. Occasional cleaning of the bore with a brass Traditions™ Bore Brush is advisable to remove excessive plastic and fouling build-up.
When target shooting or sighting in, wipe the bore with Traditions™ EZ Clean™ patches after each shot.
CONFIRM THERE ARE NO POWDER CHARGES, PRIMERS, OR PROJECTILES PRESENT OR AVAILABLE DURING ANY DISASSEMBLY, REASSEMBLY, OR FUNCTION TEST PROCEDURES.
A short series of shots can be fired before it’s necessary to wipe the bore with cleaning patches. If the projectile will not seat, extract the projectile from the barrel. See the UNLOADING & UNCHARGING section of this manual for further instructions.
A fouled barrel significantly affects accuracy. If the barrel is prepped and lubed at the outset, it is not necessary to clean and lube the interior of the barrel between shots when hunting.
53 54
10A

FIELD STRIPPING & CLEANING
Field disassembly must be completed after each shooting session. This procedure allows for quick cleaning, lubricating, and inspecting of all important parts and assemblies. The field disassembly procedure outlined below will keep your muzzleloader shooting safely and reliably for years to come.
DISASSEMBLYFollow all safety rules listed previously in this manual.
Press safety button to engage. Red ring is NOT visible when in safe position.
De-cock the Maxim 50 by pressing down on the striker de-cocking button or pressing barrel catch lever to de-cock gun. Open action and access breech plug.
Remove the Accelerator Breech Plug™ and inspect the barrel to be sure your muzzleloader is unprimed, unloaded, and free of obstruction.
Remove forend stock screw and forend from barrel assembly using the 4mm Allen wrench provided (11A).
Remove barrel from receiver by pressing the barrel catch lever and lifting up on the barrel assembly (11B).
Reverse steps to reassemble.
CLEANING & LUBRICATIONApply Traditions EZ Clean™ to barrel brush to clean the interior and exterior of the barrel. Run bore cleaning patches through the barrel from breech to muzzle using the ramrod and cleaning jag.
Dry the barrel interior with several dry bore patches.
Lubricate with an oil inhibitor to protect interior and exterior surfaces of both barrel and receiver from rust and to ease loading.
Lightly oil inside of receiver.
Lightly grease frame pivot pin and barrel catch surface.
Lightly oil all interior and exterior metal surfaces.
PERFORM A FUNCTION TEST AS DESCRIBED EARLIER TO CONFIRM YOUR MUZZLELOADER IS FULLY OPERATIONAL AND REASSEMBLY WAS CORRECTLY COMPLETED.
55 56
11A
11B

DE TAILED DISASSEMBLY
Detailed disassembly and cleaning should be performed after shooting is complete and before storing for an extended period of time.
Press safety button to engage. Red ring is not visible when in safe position.
De-cock gun by pressing down on the striker de-cocking button or pressing barrel catch lever to de-cock gun. Open action and access breech plug.
Remove Accelerator Breech Plug™ and inspect barrel to be sure your muzzleloader is unprimed, unloaded,and free of obstruction.
Remove forend stock screw and forend from barrel assembly using the 4mm Allen wrench provided (12A).
Remove forend and barrel from receiver (12B).
Locate safety button. Using your 4mm Allen wrench as a punch, slowly push safety button from left to right and remove it from the butt stock (12C).
The safety button can be reversed for use by left handed shooters.
57 58
12A
12B
12C

Remove butt pad using two fingers to depress the buttons (12D).
Remove stock bolt and stock bolt washer with a 6mm handle wrench (12E). Carefully slide the buttstock from the receiver.
Remove striker retention spring from striker retention pin (12F). Completely remove striker retention pin from receiver using a small punch.
Depress the barrel catch lever to remove striker assembly. Remove from rear of the receiver.
Reverse instructions to reassemble.
DE TAILED DISASSEMBLY CONTINUED
59 60
12E 12F12D

13A
DE TAILED CLEANING
IF YOU WISH TO SWITCH THE DIRECTION OF YOUR SAFETY BUTTON, ONLY DISASSEMBLE THE SAFETY BUTTON FROM THE LEFT SIDE TO THE RIGHT. REMOVING THE SAFETY BUTTON FROM THE OTHER DIRECTION CAN DAMAGE YOUR SAFETY BUTTON, SPRING, AND / OR BUTTSTOCK.
DO NOT ATTEMPT TO DISASSEMBLE RECEIVER. THIS INCLUDES ANY PINS HOLDING THE RECEIVER TOGETHER.
INSTALL THE SAFETY BUTTON FROM RIGHT TO LEFT. INSTALLING FROM THE OTHER DIRECTION CAN CAUSE DAMAGE.
CLEANING & LUBRICATIONClean inside of striker channel located in receiver with a 20ga bore mop or soft nylon brush lightly sprayed with degreaser/cleaner.
Clean striker assembly with gun degreaser/cleaner.
Spray degreaser/cleaner on trigger and sear components on bottom of receiver.
Clean inside of receiver in front of barrel catch lever.
Lightly oil striker assembly (13A).
Lightly oil inside of receiver.
Lightly oil trigger, sear, striker stop, and mechanism pins. Apply one drop of quality gun oil to each side of the referenced parts pivot points. Do not over-lubricate.
Apply Traditions EZ Clean™ to barrel brush and cleaning patches to clean both interior and exterior of barrel.
Dry barrel interior with several dry bore patches.
Lubricate with an oil inhibiting agent.
Lightly grease frame pivot pin and barrel catch surface on barrel.
Store your muzzleloader in a cool, dry, secured area. Do not store in a gun case to avoid condensation and corrosion. During long periods of storage, periodically check for signs of pitting or rusting on the surface and in the barrel bore.
61 62

DE TAILED CLEANING CONTINUED
CLEANING THE MODERATORThe moderator portion of the Maxim 50 requires limited maintenance after every 50 – 60 rounds.
Follow the field assembly steps to remove the barrel from the receiver. Then, run warm water through the barrel alternating from muzzle to breech (13A) and then from breech to muzzle (13B). Continue alternating directions until water runs clear.
Pour extremely hot water from muzzle to breech, then breech to muzzle, as a final rinse.
Dry barrel thoroughly with patches and allow moderator to air dry completely before use. Barrel should be left with the muzzle pointing up during the drying process to allow all water to run out of the baffles of the moderator.
Shoot 5 rounds to ensure the moderator is completely dry. If the moderator and barrel are not fully dry, it may cause rust inside the barrel.
Clean the barrel using the steps in FIELD CLEANING, and season the barrel thoroughly.
FAILING TO CLEAN THE MODERATOR MAY RESULT IN HANGFIRES OR INCOMPLETE POWDER BURN.
63 64
13A 13B

STUCK BREECH PLUGSAlways lubricate the breech plug threads liberally with Traditions™ breech plug grease before using your muzzleloader.
OPTION 1With the breech plug wrench fitted over the breech plug, tighten the plug and rock it back and forth to loosen the fouling.
OPTION 2Remove the barrel from the receiver. Pour hot water into the barrel and let it soak for 30 minutes. Secure the barrel in a padded vise. Position the wrench onto the breech plug and remove.
OPTION 3Spray penetrating oil down the muzzle of the barrel and let it sit for an hour. Remove the barrel from the frame and place in a padded vise. Use the spanner wrench to remove the plug.
If you still cannot remove plug, contact SilencerCo Customer Service at 801.417.5384.
The Maxim 50 ships with the Accelerator Breech Plug™ with a standard 209 shotgun primer pocket built in.
SilencerCo recommends removing, cleaning, and re-lubing the breech plug every 10-15 shots. We recommend you replace your breech plug yearly and nipples after every hunting season.
INSTALLING THE BREECH PLUGInspect the fire channel (14A) of the breech plug to ensure it is clean and free of any obstructions.
Thread the breech plug into the barrel until it makes contact with the barrel and seats firmly.
If the breech plug does not thread or seat fully, remove it and visually inspect the o-ring for wear. Inspect plug threading and inside the barrel for fouling or obstructions.
Reverse instructions for breech plug removal.
CLEANING OF THE BREECH PLUG AND NIPPLESpray the breech plug inside and out with Traditions™ Blackout 209 cleaning solvent or use the EZ Clean™ bath system to loosen the fouling. Use a stiff brush to clean the outside threads and inner area of the breech plug including the fire channel. Dry thoroughly.
Wipe with a clean cotton cloth. Repeat until all residue is removed.
Lube the threads and o-ring with Traditions™ breech plug grease or an appropriate anti-seize grease.
BREECH PLUGS
NOT USING THE RECOMMENDED LUBRICANT WILL CAUSE O-RING DAMAGE AND BREECH PLUG SEIZURE.
65 66
14A

67 68

WARRANT Y
SilencerCo and Traditions will jointly warranty any issues with the Maxim 50 or included accessories that are deemed (at the sole discretion of SilencerCo) to be related to manufacturing or materials and not caused by user error or improper use.
This manufacturer warranty is only extended to the original owner and does not extend to future possessors. The customer may be asked to present proof of purchase to verify claims of original ownership. Actions taken by the user that fall outside of recommendations in this manual void any warranty offered by either SilencerCo or Traditions.
All warranty inquiries should be directed to SilencerCo’s Customer Service department at 801.417.5384 or [email protected], at which point the customer will receive an RMA number and the warranty will be processed. Products sent back for warranty cannot be processed unless they are sent with an RMA number.
If a product issue is deemed to be the fault of the customer, SilencerCo or Traditions will either repair or replace the item in question at the expense of the customer. SilencerCo and Traditions assume no liability for unsafe or illegal use of the Maxim 50 by its purchaser or any other user who comes in contact with the product after purchase.
SilencerCo and Traditions assume no responsibility for physical injury or property damage resulting from careless or irresponsible handling or by any use contrary to the recommendations, warnings, and cautions generally listed in this manual.
TROUBLESHOOTING
Have a question that wasn’t answered in this manual? Our Customer Service team will be happy to assist.
Contact them at [email protected] or 801.417.5384
69 70

Register Your SilencerCo Product Online SIL ENCERC O.C OM/REGIST ER

Protect Your Rights | Protect Your Hearing The American Suppressor Association is fighting to protect and expand your moderator rights. Join the fight today! LEARN MORE AT AMERICANSUPPRESSORASSOCIATION.COM
JOIN NOW
FOR QUESTIONS, CONTACT OUR CUSTOMER SERVICE TEAM AT 801.417.5384 OR [email protected]
© 2017 SilencerCo, LLC. All Rights Reserved. The contents of this publication may not be reproduced in any form or by any means in whole or in part without the prior written permission of the copyright owner.

READ THE INSTRUCTIONS AND WARNINGS IN THIS MANUAL CAREFULLY BEFORE USING THIS MUZZLELOADER