Embed Size (px)
Citation preview

1
Revised 02-17-11
GROUND CONTROL-Electric Leveling Trailer Jacks WIRELESS REMOTE CONTROLLED Heavy duty construction 5,000 lb. capacity per jack Rugged precision drive system Self-braking for safe operation Large footpads for added stability Secure, safe mounting system Corrosion resistant powder coating Weatherproof sealed head LEVELING JACK INSTALLATION & OPERATION INSTRUCTIONS Rieco-Titan Products, Inc. 965 Lambrecht Road Frankfort, IL 60423 Phone: 866.403.9803 Fax: 815.469.4705 Email:[email protected] www.riecotitan.com

2
Revised 02-17-11
5000# Capacity each Jack RV Ground Control Trailer Jacks SAFETY ALERT! This symbol - !!! Is used here to alert you to potential personal safety hazards and property damage. Obey all safety messages that follow this symbol to avoid possible property damage, injury or death. READ ALL INSTRUCTIONS BEFORE STARTING TO INSTALL JACKS GROUND CONTROL REAR BRACKET & JACK INSTALLATION !!! NOTE: Please pay careful attention to the position instruction (#2) below for locating and mounting of the rear jacks. They must be within 18” of the rear wheel spring hanger. Installation cannot be any closer to the rear of the RV. Also see drawings and hardware list at back of instructions.
1. Level Trailer using Front Jacks. Disconnect Battery and unplug trailer from shore power before hooking up control panel.
!!! Block tires so trailer will not move. 2. Position the brackets on the frame as close to the rear spring hanger
as possible, but they must be within 18”. If this is not possible, notify Rieco-Titan right away. Inspect area behind rear hanger on left side and right side to find a location that will keep jacks somewhat inline on both sides. Jacks can be mounted 6 to 10 inches staggered from left side to right side. Some trimming of belly pan may be needed to fit bracket to the bottom of the frame. Mark holes on bottom of bracket to frame. Drill pilot holes first. Drill 11/32 holes in bottom of frame. Clamping bracket will make marking of holes easier.
!!! Caution drilling too deep with drill bits can damage holding tanks and
wiring behind frame. Use a drill stop or install tape around the drill bit so as not to drill too deep.
3. Install jack mounting bracket by using 4 self tapping 3/8 X 1 1/4 bolts provided in kit. Snug 4 bolts until gap between frame and bracket is tight. Drill and install 2 upper self-tapping bolts and torque all bolts to 75 foot-pounds. On
some applications, the jack will mount higher using the top holes in the bracket. When this occurs, install jack and then torque bolts.
4. When mounting to C Channel or tubing, you will be able to only put 2 bolts in the
bottom bracket.
3
Revised 02-17-11
5. Mount new Ground Control jack to mounting bracket loosely using 4, 3/8 bolts, washers and nuts. Make sure the footpad is 5-6” inches from the ground. Snug bolts and nuts aligning holes.
6. Check clearance to ground for 5 inches minimum.
7. Tighten all bolts. DO NOT OVER TIGHTEN BOLTS!!!
8. Repeat procedure for other side.
9.!!! If installing the Ground Control front jacks remember the Ground Control jacks operate 3 times faster than most front jacks. So be aware of differences in speeds of the different jacks. Do not lift one side more than the other or frame and sidewall damage may occur.
4
Revised 02-17-11
GROUND CONTROL REAR BRACKET & JACK INSTALLATION (CONTINUED) GROUND CONTROL FRONT JACK INSTALLATION
1. !!! TRAILERS ARE HEAVY AND ANY SUDDEN MOVEMENT OR WIND GUST
CAN CAUSE TRAILER TO BECOME UNSTABLE AND CAUSE INJURY OR DEATH.
Always use jacks and lifting devices that are rated to carry the load of the trailer. Block trailer tires so trailer will not move. 2. Lower front jack extenders down to raise trailer to a position to remove front jacks. 3. Install jack stands under frame as close to the front as possible. On some models, Slight modifications may be required to mount front jacks. 4. Lower front of trailer on to jack stands.
5. Check front of trailer with weight off of jacks to see if trailer is
stable. 6. Raise one (1) front jack to the full retract position. Keep the second jack close too the ground to help support trailer. 7. Disconnect battery power and shore power. 8. Mark and disconnect electrical wiring. 9. Raise extender tube up as far as it will go. This will give you the room to remove the jack thru the bottom. On some models you can remove the extender and remove the jack thru the top.
10. Remove two (2) nuts and bolts holding front jack to bracket and keep To reuse on new jacks.
11. Slide old jack outwards to remove from brackets.
!!! Use caution because brackets are sharp and jacks are heavy.
5
Revised 02-17-11
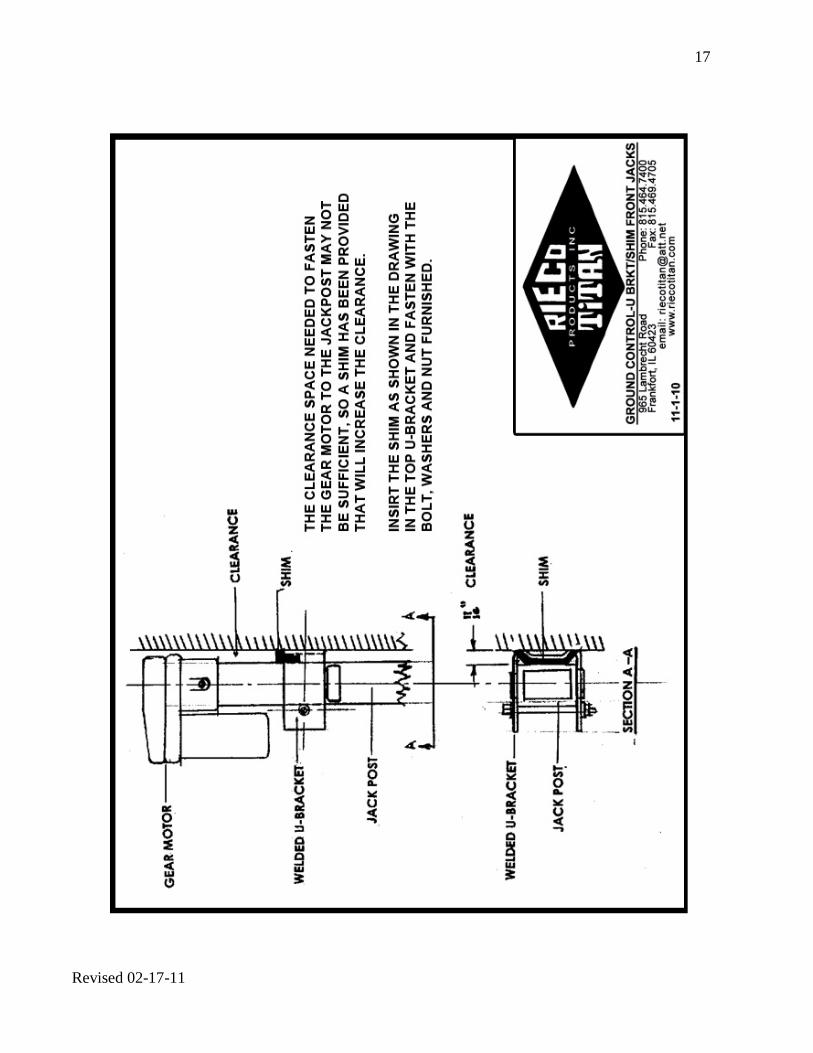
GROUND CONTROL FRONT JACK INSTALLATION (CONTINUED) 12. Install new Ground Control front jack into same mounting bracket and reinstall bolts and nuts. On some models, slight modifications may be required to mount front jacks.
13. Lower jack extenders as close to the ground as possible with the locking pin engaged. 14. Repeat process on other side. 15. After both front jacks are installed install new wiring harness that is provided in kit. ELECTRICAL INSTALLATION
1. The kit comes with a new wiring kit that has the location of the wires printed on the wire every foot. All jacks are plug and play and the Control panel wire needs to be matched to the control panel. 2. Mount the receiver control box in a water free area near a compartment
door to maximize transmitter signal. Antenna should be taped up and away from other wires to maximize signal. Remember to disconnect the battery before installing any wiring so as not to short out control box.
Find a suitable location to run the wires from the left and right jacks to a location that you have picked to mount the control box. 3. Install battery wire provided with fuse side next to battery. Reconnect
battery and test system. The negative lead from the battery must be connected to the negative terminal, and the positive lead from the battery must connect to the positive terminal in the receiver control box. !!! (See special note of caution, below)
!!! CAUTION !!! Do not connect 12VDC power from the battery to any receiver terminals except the two-12VDC battery terminals marked on the receiver case. To do so will burn out the receiver. This is not covered by the warranty.
4. Install wire hangers and or wire ties so wiring will not short out.
5. You can connect your old front jacks to the new receiver and operate by using the remote control. Just remember the new jacks will operate 3 times faster.
!!! Use caution because you can damage your frame and sidewalls.

6
Revised 02-17-11
ELECTRICAL INSTALLATION (CONTINUED)
Connect the two wires from each jack to the receiver. The left front jack should be connected to the receiver terminals marked LF. The right front to the RF terminals, and so on for the rear jacks. Each set of terminals has a (+) and a (-) side. Red wire is positive; black wire is negative.
6. The transmitter can be used in either one of these modes: (1) Wired, with a cable and plug connection to the receiver control box or remote switch panel. (2) Wireless, which is operated with a 12 volt battery, sending radio frequency signals to an antenna in the receiver control box. 7. The wireless transmitter needs no wired connection from the transmitter to the receiver control box, but instead, an antenna wire is provided to pick up the RF (radio frequency) commands. 8. A remote “on-off “switch panel is provided to control the power to the system. This needs to be mounted in a water free environment. This switch should be mounted inside the trailer, near a compartment door. The switch is equipped with an LED light, which is lit when the power is on. The power stays on for 15 minutes, and then automatically shuts off along with the LED light, stopping any possible operation of the jack system. (This safety feature eliminates the need to remember to switch the system "off") Plug the attached cable from the remote switch panel into the receiver control box. Whenever the LED light is off, it will be necessary to press the "on" switch to restore power to the system to operate the jacks. The receiver control box and the remote switch panel also have manual off controls.
9. To ensure that your operating signal of the system is secure, both the
transmitter and the receiver control box have identical 7 actuator, 21 position code switches. You may want to change the codes on the switches. The actuators must be set to match each other in both the transmitter and the receiver control box. The 21 possible positions provide you with about 2 million combinations, so the odds of having the same code as someone nearby are almost impossible, after you have changed the codes. Follow the instructions on the next page.
If Not Using Wiring Harness:
Use #8 AWG wire between receiver control box & battery. Use #10 AWG wire between receiver and jacks.

7
Revised 02-17-11
ELECTRICAL INSTALLATION (CONTINUED)
10. CODE SWITCH SETTING The codes in the code switches are set at the factory to match both the receiver and the transmitter as a set. If you wish to reset the codes to your own selection, follow this procedure: The code switches are located inside the receiver, and inside the transmitter.
a. Remove the four screws and the cover. b. Inside the enclosure, locate the code switch block. There are seven (7) switches. Each switch has three (3) positions +, 0 , —. c. As you read the numbers left to right, set the switches to one of the three positions on each switch. d. Record your setting on a slip of paper i.e. sw 1=0 or sw 1=+ or sw= —. Proceed to record all seven (7) settings in this fashion. e. Take your recorded switch settings to the next unit to be set and begin setting switches left to right as shown on your recorded slip of paper, making the settings exactly the same as the last unit set. f. Put the receiver and the transmitter side by side and carefully check to make sure that they are set identically.

8
Revised 02-17-11
ELECTRICAL INSTALLATION (CONTINUED) g. Replace the covers on both units and save the code setting record for future reference. (On units that have serial numbers, a code setting is given at the factory. This setting can be used as is or any new setting should be recorded.) NOTE : IF YOU DO NOT HAVE A SERIAL NUMBER AFFIXED TO YOUR RECEIVER OR TRANSMITTER, THE CODES ARE ALL AT "0", AND YOU SHOULD RESET THEM TO A CODE OF YOUR SELECTION. IF YOU HAVE SERIAL NUMBERS ON YOUR UNITS, YOUR FACTORY CODE SETTING IS AVAILABLE FROM RIECO-TITAN PRODUCTS, INC. Call 815.464.7400
11. Our new receiver control box is equipped with an LED light in the top for each jack circuit. When the jack is activated by the remote button control, the LED for that jack or jacks is illuminated indicating a completed circuit. Also included inside the box is an automotive blade type 40 amp fuse for each jack circuit. If a short circuit occurs, or a current overload happens, the fuse will burn protecting the electronics and the motors.
!!! It is important to find the cause of the blown fuse before replacing the fuse. The remote transmitter is the electrical control device that operates the electric jacks. The operation buttons are arranged by jack location. The left side is the driver’s side, and the right side is the passenger’s side of the trailer. The top section buttons control the front jacks, middle section, all jacks and the bottom section, the rear jacks. The “UP” arrow signifies lift the trailer, while the “DOWN” arrow means lower the trailer. The wired transmitter is plugged into the remote switch panel. * The wireless transmitter contains a 12-volt battery to power the RF (radio frequency) signal commands it sends to the antenna coming out of the receiver control box.
* For best wireless performance of the electric jack controls, it is
recommended that you install a fresh battery in the hand held remote control at the beginning of each season ( 1 per year ) This will insure that the radio control signal is strong and effective. The battery is # A-23 12 Volt Alkaline. It is available at Walgreen’s, Radio Shack, and battery stores.
* Should your battery die, use supplied wire to operate jacks.
* The transmitter cable can also be plugged directly into the receiver control box or the remote switch panel.

9
Revised 02-17-11
12. EMERGENCY REMOTE CONTROL The electronic controls include a red remote control which can be used if you lose or damage your regular remote control. This red remote is located attached to the receiver control box. It comes with a special red connecting cord with a plug on each end to connect the red remote with the remote switch plate. This red remote operates with a wire only, but lets you operate your jacks without mechanically cranking them. This red control is intended for emergency us only, so we suggest that when your replace or repair your regular remote you return the red remote to its storage location so that it will be available when you need it next time. This emergency control has the same security code as the regular remote and the receiver control box. !!! POSSIBLE INJURY AND/OR PROPERTY DAMAGE • This jack system is designed and intended for leveling your trailer. • Do not allow a person or persons in your trailer while the jacks are in use. • Never exceed the rated 5000 lbs. per jack • Never over- extend or over- retract jacks past their full travel limits. • Jacks have a clutch that prevents damage. However, when a clicking noise is
heard, release the transmitter button immediately. • Rear jacks installed further away than 18” from the rear spring hanger will
be too close to the ground, and will be torn loose. This is not covered by our warranty.
OPERATING INSTRUCTIONS
Leveling Trailer 1. Block trailer tires so trailer does not move while leveling. 2. Level front to back of trailer using front jacks only. Note leave front of trailer slightly lower. 3. Lower rear jacks one at a time until they contact the ground. 4. Lower rear jacks together until they start to raise rear of trailer. 5. Re-adjust front jacks to level trailer. 6. Level using 2 left side or right side front and rear jacks together to level side to side. !!! Caution Never raise only one jack because of damage to the frame and sidewall.

10
Revised 02-17-11
7. Turn off power on the receiver control box when leveling is complete. Raising Jacks 1. Turn on power to receiver control box.
2. Retract front and rear high side jacks until rear jack releases from ground. Retract both rear jacks until they are fully retracted. !!! Caution do not twist trailer. 3. Retract last remaining rear jack to full retract. 4. Operate two (2) front jacks together so as not to twist frame or sidewall of trailer. 5. After hooking up to truck shut off control box. Control box will automatically shut-off in 15 minutes if you forget. MANUAL OPERATION If the battery power is low, Remove the access cap on the top of the power head. The crank shaft of the gearbox will be accessible to turn with a 3/8" ratchet wrench. Rotate the wrench counter-clockwise to raise the jack and clockwise to lower the jack.
!!! Do not activate the motor with the wrench still on the crank shaft. MAINTENANCE JACKS
Lubrication: Once each year, run each jack out to its full extent, and clean the outer surface of the inner tube. Spray this surface with silicone dry spray lubricant. Clean outer surface of housing and spray the manual crank shaft with silicone lubricant. Apply a good auto wax to the outer surfaces of the jack system to maintain an attractive appearance. In coastal, rainy or humid areas, we recommend that a liquid wax such as Mother’s Polish, McGuire’s, or Turtle Wax be applied to the entire surface of the jacks. Keep the wax intact with a spray wax periodically. Repeat each year. An excellent alternate is Mercury’s Corrosion Guard

11
Revised 02-17-11
The electronic components of the jack system. Transmitter can be cleaned periodically with a soft damp cloth. Solvents or cleaners are to be avoided since they can leak inside causing electrical damage. Wipe battery contacts with a lint-free cloth. If the transmitter or receiver get wet, open their respective covers, and dry thoroughly before re-using. TROUBLE SHOOTING
For any control or electrical malfunction, check the following things to find the cause: -- Make sure that the receiver power switch is "ON".
-- Make sure all cables are firmly plugged into the receptacles. Re-plug if jack is not responding.
-- Check camper batteries for charge status. -- Check transmitter for wetness or damage.
-- Check transmitter battery and code switches to make sure they match those in control box.
After checking the above, if a jack in the system will not operate, replace it, or have it repaired. Call for assistance at Rieco-Titan Products 866-403-9803 !!! You are alerted to avoid interference with blasting operations any area where
electrical blasting caps arc stored or used, or in areas posted : TURN OFF TWO WAY RADIO. Obey all signs and instructions that you see in such areas. Be especially alert in areas with explosive atmospheres. Signs and warnings are not always clearly posted; such as in fueling, and fuel or chemical storage areas where the air contains chemicals, dust, powders or anywhere you are instructed to turn off your vehicle engine.
12
Revised 02-17-11
LIMITED WARRANTY
Warranted against manufacturing defects and workmanship for two (2) years from date of purchase. Within this period, RIECO-TITAN PRODUCTS, INC. will at its option, repair or replace the product or any part thereof without charge for parts and labor. To exercise the warranty the original consumer-owner must return the original invoice, and the product freight prepaid and insured to RIECO-TITAN PRODUCTS, INC. This warranty does not apply in the following cases; Improper installations, misuse, failure to follow installation and operating instructions, alterations, abuse, tampering, accident, or acts of God or nature. All statements, technical information and recommendations contained herein are based on tests we believe to be reliable, but the accuracy or completeness thereof is not guaranteed and the following is made in lieu of all warranties, expressed or implied. Sellers and manufacturers only obligation shall be to replace such quantity of the product proved to be defective in accordance with published Warranty Policy. Neither seller nor manufacturer shall be liable for any injury, loss or damage, service direct or consequential arising out of the use of or the inability to use the product. Before using, user shall determine the stability of the product for his intended use and user assumes all risk and liability whatsoever in connection therewith. Except as provided herein, RIECO-TITAN PRODUCTS, INC. Makes no express warranties and any implied warrant of merchantability or fitness for a particular purpose is limited to the duration of the written limited warranties set forth herein. There will be charges rendered on repairs to the product make after the expiration of the aforesaid two (2) year Warranty Period. This warranty gives you specific legal rights and you may have other rights which may vary from state to state. Electronic Controls Model #OSI – 433 N FCC ID#PM6HOM This device complies with part 1 ( 1 ) This device may not cause harmful interference and ( 2 ) This device must accept any interference received, including interference that may cause undesired operation.

13
Revised 02-17-11
GROUND CONTROL REAR BRACKET & JACK INSTALLATION (CONT’D) 2A
If you have the illustrated mounting bracket, shown here, follow steps 1 & 2 on page 2, then heed the warning on damaging holding tanks, and continue as follows.
3. Install jack mounting brackets by using 4 self tapping 3/8 x 1 ¼ bolts, provided in kit. When fastening to a closed channel frame, as shown here (twice the number of bolts shown on drawing) OR using 6 bolts when fastening to an “I” beam frame. Snug bolts until gap between frame and bracket tight. Drill and install self tapping bolts & torque all bolts to 75 foot- pounds.
4. Follow steps 4 through 9, pages 2-3 of these instructions.
GROUND CONTROL REAR BRACKET INSTALLATION- ALTERNATE BRACKET

14
Revised 02-17-11
GROUND CONTROL REAR BRACKET & JACK INSTALLATION (CONT’D) 2B
If you have the illustrated mounting bracket, shown here, follow steps 1 & 2 on page 2, then heed the warning on damaging holding tanks, and continue as follows.
3. Install jack mounting brackets by using 8 3/8 x 1¼ bolts, provided in kit. When fastening to an I-beam frame (twice the number of bolts shown on drawing) The attaching bracket to avoid a slide drive interference, can be moved as shown. When fastening to a closed channel frame, use 8 bolts provided in the kit (4 for attaching bracket and 4 for the mounting bracket to the channel). Drill and install self tapping bolts & torque all bolts to 75 foot- pounds.
4. Follow steps 4 through 9, pages 2-3 of these instructions.
GROUND CONTROL REAR BRACKET INSTALLATION- ALTERNATE BRACKET

15
Revised 02-17-11

16
Revised 02-17-11
17
Revised 02-17-11

18
Revised 02-17-11
Customer Notes: