Embed Size (px)
Citation preview
Model Exchange
Enterprise Architect
User Guide Series
Author: Sparx Systems
Date: 30/06/2017
Version: 1.0
CREATED WITH

Table of Contents
Model Exchange 3Copy Packages Between Projects 4XMI Import and Export 6
Export to XMI 8Import from XMI 10Merge Package with XMI Using Merge File 12Merge Package Directly with XMI 14Import EMX/UML2 Files 16Import a Rhapsody Model 18Import a MagicDraw MDZIP File 20Limitations of XMI 22The UML DTD 23
CSV Import and Export 24CSV Specifications 25
Using Preserve Hierarchy 28CSV Export 29CSV Import 31
Controlled Packages 33Controlled Package Menu 34Configure Packages 37Remove Package from Control 39Save a Package 40Load a Package 41Batch XMI Export 42Batch XMI Import 43Manual Version Control with XMI 44Report Deletion of Cross Package References 46
Project Data Transfer 48
User Guide - Model Exchange 30 June, 2017
Model Exchange
Using Enterprise Architect, you can transfer data between projects using one of three different mechanisms:
XMI Import and Export - Packages can be exported from and imported into your models; this greatly improves the·flexibility and robustness of the models because Analysts and Modelers can externalize model elements in XMI forversion control, distributed development, post processing and transferring Packages between models
CSV Import and Export - You can import and export information on Enterprise Architect elements in CSV format,·and then store and retrieve the information from spreadsheet tools such as Microsoft Excel
Data Transfer - You can move complete models between files, and between files and repositories, row by row, table·by table
(c) Sparx Systems 2015 - 2017 Page 3 of 50 Created with Enterprise Architect
User Guide - Model Exchange 30 June, 2017
Copy Packages Between Projects
It is possible to copy and move individual Packages between projects, exporting and importing the Packages as XMIfiles. You can also duplicate larger structures, such as complete models or projects. This gives you a high level offlexibility in building a project from re-usable parts and from elements produced in widely-dispersed geographic regions.
Access
Ribbon Publish > Model Exchange > Export XMI > Export XMI
Publish > Model Exchange > Import XMI > Import Model XMI
Context Menu Project Browser | Right-click on Package | Import/Export | Export package to XMIfile
Project Browser | Right-click on Package | Import/Export | Import package fromXMI file
Keyboard Shortcuts Ctrl+Alt+E (export to XMI)
Ctrl+Alt+I (import from XMI)
Copy a Package from one Enterprise Architect project to another
Step Action
1 Open the project to copy from.
2 In the Project Browser, right-click on the Package to copy and select the 'Export package to XMI file'option.
The 'Export Package to XMI' dialog displays.
3 Select the appropriate options and filename.
4 Click on the Export button to begin the export process.
5 When the export is complete, open the project to copy into.
6 In the Project Browser, navigate to the location to import the Package into.
7 Right-click and select the 'Import package from XMI file' option.
The 'Import Package from XMI' dialog displays.
8 Select the appropriate options and filename.
9 Click on the Import button.
The Package is copied from the source project to the destination project.
(c) Sparx Systems 2015 - 2017 Page 4 of 50 Created with Enterprise Architect

User Guide - Model Exchange 30 June, 2017
Notes
If the Package you are importing already exists in the target project (that is, it has been imported previously), you·must either import over the existing Package or select the Strip GUIDs option
In the latter case, the system creates a copy of the original Package
(c) Sparx Systems 2015 - 2017 Page 5 of 50 Created with Enterprise Architect

User Guide - Model Exchange 30 June, 2017
XMI Import and Export
XML Metadata Interchange (XMI), defined by the OMG and based on XML, is an open standard file format that enablesthe interchange of model information between models and tools.
XMI and Enterprise Architect
Enterprise Architect uses XMI as a method of importing and exporting model specifications between different UMLPackages, Enterprise Architect projects and other tools that support XMI. The system supports the XMI 1.1, 1.2, 2.1, 2.4,2.4.2 and 2.5.1 specifications. XMI 1.1 provides support for UML 1.3, whereas XMI 2.x is used for UML 2.0 - 2.5.
Enterprise Architect does not fully support the older 1.0 specification. When importing or exporting to XMI 1.0, someloss of data occurs due to the limitations of XMI 1.0.
With XMI, model details can be exchanged between different UML tools and other tools that are capable of using XMI.Limited support for export to Rational Rose is provided using the Rose version of the XMI 1.1 specification, asimplemented by Unisys for Rational products.
Packages can be exported from and imported into Enterprise Architect models, which greatly improves the flexibility androbustness of the models, helping Analysts and Modelers to externalize model elements in XMI for:
Version control·Distributed development·Post processing and·Transferring Packages between models·
When importing an XML file over an existing Package, by default all information in the current Package is deletedbefore the data is imported from the XML file. Please make sure you do not have important changes that you do not wantto lose before importing from XML. Alternatively, use a merge file to merge the information in the XMI file with thecontents of the Package.
XMI Tasks
Tasks you might perform in importing and exporting XMI include:
Setting XML Options - XMI import, export and Package control all rely on saving and loading XML files; you can·set a number of options to streamline this process
Exporting a Package to XMI in XMI 2.1 (and earlier)·Importing from XMI with support for XMI 2.1 (and earlier)·Setting up controlled Packages·Manually controlling a Package by linking it to an XMI file·Batch exporting controlled Packages·Batch importing controlled Packages·Factoring in the limitations of XMI·Applying a UML Data Type Definition (DTD)·Importing a model from IBM Rational Rhapsody·Importing a model from a MagicDraw MDZIP file·
Notes
(c) Sparx Systems 2015 - 2017 Page 6 of 50 Created with Enterprise Architect
User Guide - Model Exchange 30 June, 2017
XMI 2.1 exported by Enterprise Architect 7.0 (or later) might not be correctly imported into earlier versions of·Enterprise Architect
When performing Enterprise Architect-to-Enterprise Architect transfers, ensure that either XMI version 1.1 or XMI·version 2.1 is selected
(c) Sparx Systems 2015 - 2017 Page 7 of 50 Created with Enterprise Architect

User Guide - Model Exchange 30 June, 2017
Export to XMI
You use the 'Export Package to XMI' dialog to export a Package from your model to a file in one of several XMI(XML-based) formats. The dialog, by default, allows exporting to either XMI 1.1 or XMI 2.1. The exported XMI filecontains all the information required for completely round-tripping the Package within Enterprise Architect; that is,performing Enterprise Architect-to-Enterprise Architect transfers.
Access
Select a package in the Project Browser, then:
Ribbon Publish > Model Exchange > Export XMI > Export XMI
Context Menu Right-click on Package > Import/Export > Export Package to XMI file
Keyboard Shortcuts Ctrl+Alt+E
Export a Package to an XMI file
Option Action
Package Displays the name of the currently-selected Package.
If this is not the required Package, click on the button and select the correctPackage.
FilenameType in the file path of the XMI file to be generated, or click on the button andbrowse for the location.
Export Type 'XMI 1.1' - Select this option to export the selected Package to XMI 1.1·'XMI 2.1' - Select this option to export the selected Package to XMI 2.1·'Publish' - Click on this button to open the 'Publish Model Package' dialog for·exporting to other versions of XML
Generate Merge file usingBaseline Version
This option is enabled when:
'Export Type' is set to 'XMI 1.1' and·The selected Package has a baseline·
Click on the button to open the 'Baselines' dialog and select the baseline.
Once the export is complete, the merge file will be generated by comparing theselected Package with the selected baseline. The merge file will be generated in thesame location as the XMI file, with the same name as the XMI file but with thesuffix _Merge.xml.
This file is used to merge the contents of a Package with that of the XMI file, usingthe 'Merge Package with XMI' dialog.
View XMI Click on this button to view the exported XMI file.
(c) Sparx Systems 2015 - 2017 Page 8 of 50 Created with Enterprise Architect
User Guide - Model Exchange 30 June, 2017
Export Click on this button to initiate the XMI export.
Close Click on this button to close this dialog.
Help Click on this button to display this Help topic.
Progress Monitor the progress of the XMI Export.
Notes
In the Corporate, Business and Software Engineering, System Engineering and Ultimate editions of Enterprise·Architect, if security is enabled you must have 'Export XMI' permission to export to XMI
Alternative Images used in the Package being exported are not included in the exported XMI file, unless the 'Export·Alternate Images' option is selected in the 'XML Specifications' section of the 'Preferences' dialog
The Log file for the Package being exported is not generated unless the 'Write Log' option is selected in the 'XML·Specifications' section of the 'Preferences' dialog
XMI 2.1 exported by Enterprise Architect 7.0 (or later) might not be correctly imported into earlier versions of·Enterprise Architect
(c) Sparx Systems 2015 - 2017 Page 9 of 50 Created with Enterprise Architect
User Guide - Model Exchange 30 June, 2017
Import from XMI
You can copy Enterprise Architect model elements between models, for distributed development, manual version controland other benefits. You do so by importing the parent Package from an XMI (XML-based) file in any of these formats:
UML 1.3 (XMI 1.0)·UML 1.3 (XMI 1.1)·UML 1.4 (XMI 1.2)·UML 2.x (XMI 2.1)·MOF 1.3 (XMI 1.1)·MOF 1.4 (XMI 1.2)·
You can also import the *.emx and *.uml2 files generated by tools such as Rational Software Architect (RSA) andRational Software Modeler (RSM), as well as Canonical XMI 2.1 files, BPMN 2.0 XML files, Rhapsody andMagicDraw models, and XML files exported by ArcGIS.
Access
Select your target package in the Project Browser, then:
Ribbon Publish > Model Exchange > Import XMI > Import Model XMI
Context Menu Right-click on Package > Import/Export > Import Package From XMI
Keyboard Shortcuts Ctrl+Alt+I
Import a Package from an XMI file
Option Action
Filename Type the directory path and filename from which to import the XMI file.
Import diagrams Select the checkbox to import diagrams.
Strip GUIDs Select the checkbox to remove Universal Identifier information from the file onimport.
By removing the GUID, you can import a Package twice into the same model; thesecond import requires the checkbox to be selected, to apply new GUIDs to avoidelement collisions.
Write log file Select the checkbox to write a log of import activity (recommended).
The log file is saved in the directory from which the file is being imported, with thesame name as that of the imported file plus the suffix _ import.log.
Import using singletransaction
This option defaults to the setting of the 'Import using single transaction' checkboxin the 'XML Specifications' page of the 'Preferences' dialog. If you prefer, you canchange the option from the default setting.
If the checkbox is selected, the XMI file is imported in one transaction. This is not
(c) Sparx Systems 2015 - 2017 Page 10 of 50 Created with Enterprise Architect
User Guide - Model Exchange 30 June, 2017
recommended for large imports.
If the checkbox is not selected the data items are imported separately; you canidentify problem items without the whole import being blocked. If the import islikely to encounter locking issues, or if you are importing a large XMI file, deselectthe checkbox.
Merge XMI Click on this button to display two options for merging the content of the XMI filewith the content of the selected Package.
'Use Merge File' - Merge the contents of the XMI file with the contents of the·Package using a Merge File
'Direct Merge' - Merge the contents of the XMI file directly with the contents·of the Package, without a Merge File
Treat Imported Datatypes If you are importing from Rose XMI 1.1, click on the drop-down arrow and selectthe datatypes to add to the model.
Baseline Package afterImport
Select this checkbox to open the 'Create Baseline' dialog, through which to baselinethe imported Package once the import is complete.
Selecting this option also generates a merge file when exporting a Package to XMI1.1 using the 'Export Package to XMI' dialog.
Import Click on this button to start the import.
Close Click on this button to close the dialog.
Help Click on this button to display this Help page.
Import Progress Indicates the progress of the import.
Notes
In the Corporate, Business and Software Engineering, System Engineering and Ultimate editions of Enterprise·Architect, if security is enabled you must have 'Import XMI' permission to import Packages from XMI
If you are connected to a SQL Server repository, you require ALTER permission on the t_image table in Enterprise·Architect, to be able to import model images
When you import an XML file over an existing Package, ALL information in the current Package is deleted first,·unless you use the Use Merge File button; before you import the XML file, please make sure you do not haveimportant changes that you do not want to lose
If you are importing an XMI 1.1 file that was previously exported with a UML_EA.DTD file, the UML_EA.DTD·file must be present in the directory into which the XMI file is being written; an error occurs if the UML_EA.DTDfile is absent
(c) Sparx Systems 2015 - 2017 Page 11 of 50 Created with Enterprise Architect
User Guide - Model Exchange 30 June, 2017
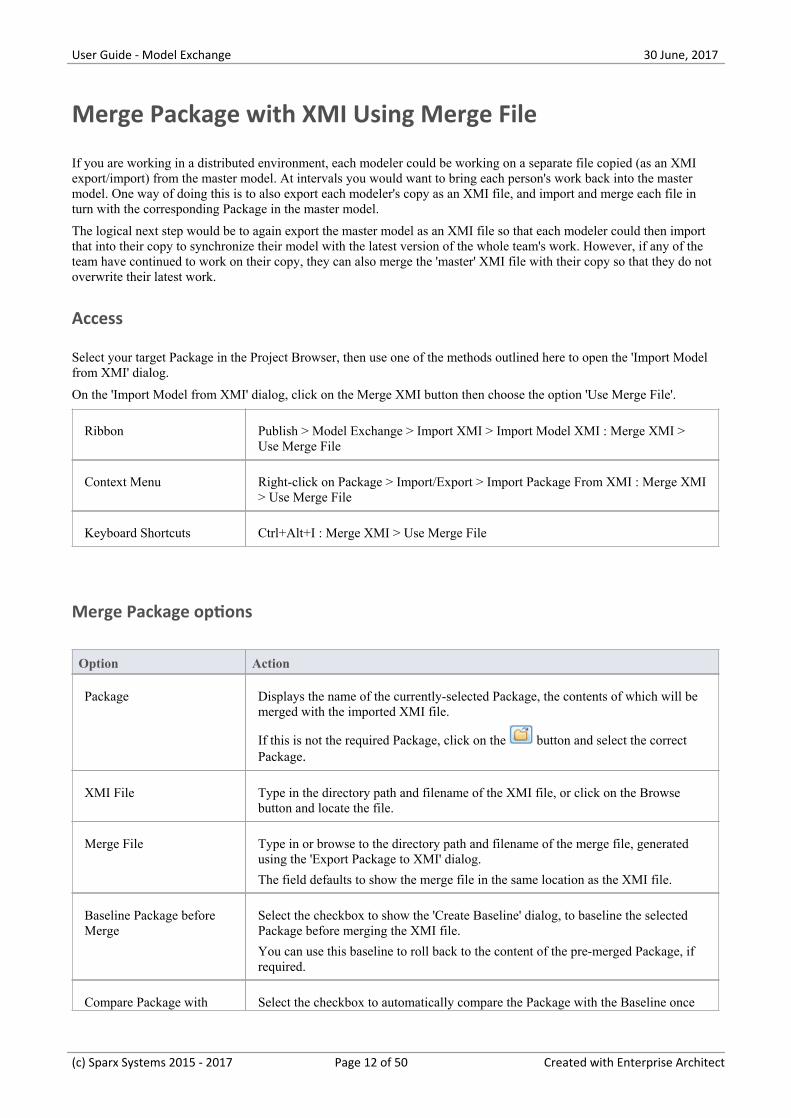
Merge Package with XMI Using Merge File
If you are working in a distributed environment, each modeler could be working on a separate file copied (as an XMIexport/import) from the master model. At intervals you would want to bring each person's work back into the mastermodel. One way of doing this is to also export each modeler's copy as an XMI file, and import and merge each file inturn with the corresponding Package in the master model.
The logical next step would be to again export the master model as an XMI file so that each modeler could then importthat into their copy to synchronize their model with the latest version of the whole team's work. However, if any of theteam have continued to work on their copy, they can also merge the 'master' XMI file with their copy so that they do notoverwrite their latest work.
Access
Select your target Package in the Project Browser, then use one of the methods outlined here to open the 'Import Modelfrom XMI' dialog.
On the 'Import Model from XMI' dialog, click on the Merge XMI button then choose the option 'Use Merge File'.
Ribbon Publish > Model Exchange > Import XMI > Import Model XMI : Merge XMI >Use Merge File
Context Menu Right-click on Package > Import/Export > Import Package From XMI : Merge XMI> Use Merge File
Keyboard Shortcuts Ctrl+Alt+I : Merge XMI > Use Merge File
Merge Package options
Option Action
Package Displays the name of the currently-selected Package, the contents of which will bemerged with the imported XMI file.
If this is not the required Package, click on the button and select the correctPackage.
XMI File Type in the directory path and filename of the XMI file, or click on the Browsebutton and locate the file.
Merge File Type in or browse to the directory path and filename of the merge file, generatedusing the 'Export Package to XMI' dialog.
The field defaults to show the merge file in the same location as the XMI file.
Baseline Package beforeMerge
Select the checkbox to show the 'Create Baseline' dialog, to baseline the selectedPackage before merging the XMI file.
You can use this baseline to roll back to the content of the pre-merged Package, ifrequired.
Compare Package with Select the checkbox to automatically compare the Package with the Baseline once
(c) Sparx Systems 2015 - 2017 Page 12 of 50 Created with Enterprise Architect
User Guide - Model Exchange 30 June, 2017
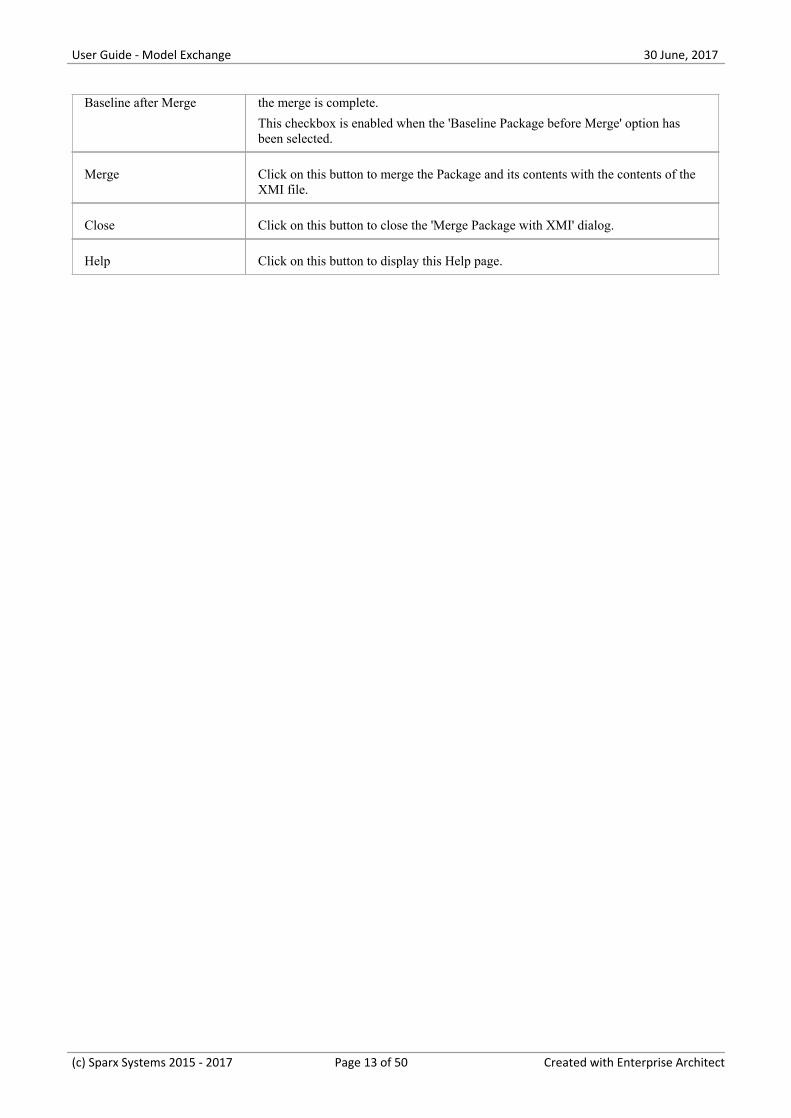
Baseline after Merge the merge is complete.
This checkbox is enabled when the 'Baseline Package before Merge' option hasbeen selected.
Merge Click on this button to merge the Package and its contents with the contents of theXMI file.
Close Click on this button to close the 'Merge Package with XMI' dialog.
Help Click on this button to display this Help page.
(c) Sparx Systems 2015 - 2017 Page 13 of 50 Created with Enterprise Architect
User Guide - Model Exchange 30 June, 2017
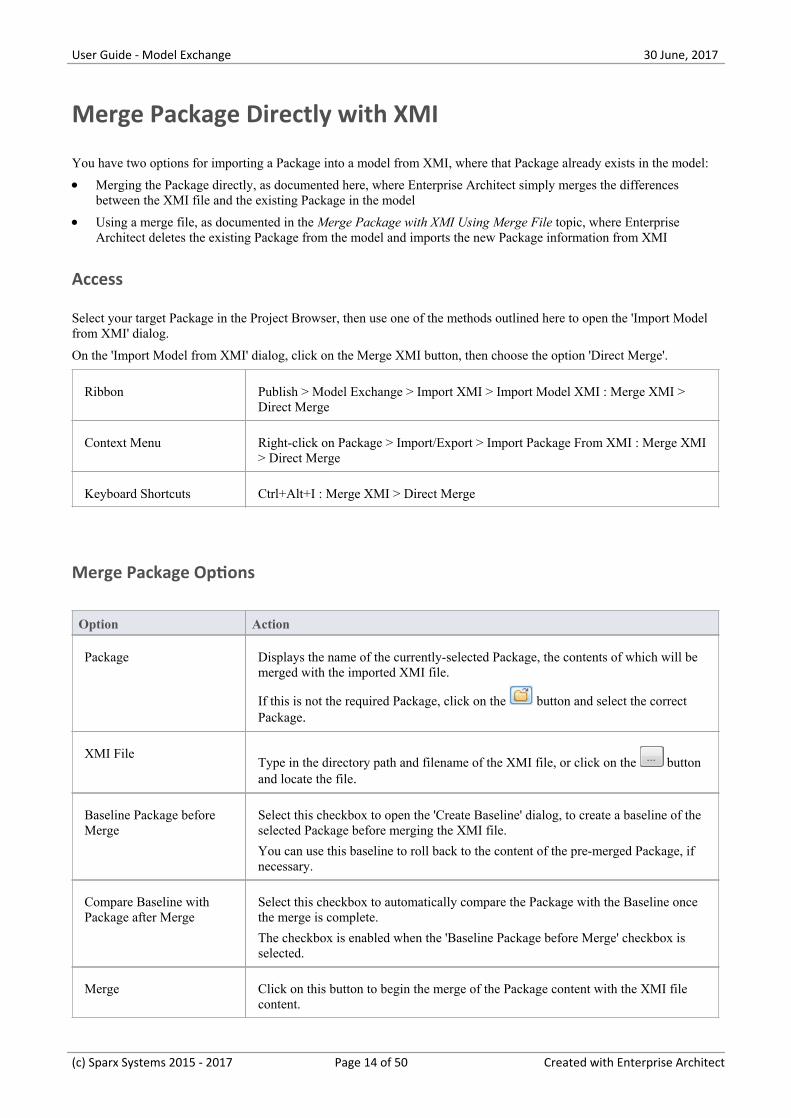
Merge Package Directly with XMI
You have two options for importing a Package into a model from XMI, where that Package already exists in the model:
Merging the Package directly, as documented here, where Enterprise Architect simply merges the differences·between the XMI file and the existing Package in the model
Using a merge file, as documented in the Merge Package with XMI Using Merge File topic, where Enterprise·Architect deletes the existing Package from the model and imports the new Package information from XMI
Access
Select your target Package in the Project Browser, then use one of the methods outlined here to open the 'Import Modelfrom XMI' dialog.
On the 'Import Model from XMI' dialog, click on the Merge XMI button, then choose the option 'Direct Merge'.
Ribbon Publish > Model Exchange > Import XMI > Import Model XMI : Merge XMI >Direct Merge
Context Menu Right-click on Package > Import/Export > Import Package From XMI : Merge XMI> Direct Merge
Keyboard Shortcuts Ctrl+Alt+I : Merge XMI > Direct Merge
Merge Package Options
Option Action
Package Displays the name of the currently-selected Package, the contents of which will bemerged with the imported XMI file.
If this is not the required Package, click on the button and select the correctPackage.
XMI FileType in the directory path and filename of the XMI file, or click on the buttonand locate the file.
Baseline Package beforeMerge
Select this checkbox to open the 'Create Baseline' dialog, to create a baseline of theselected Package before merging the XMI file.
You can use this baseline to roll back to the content of the pre-merged Package, ifnecessary.
Compare Baseline withPackage after Merge
Select this checkbox to automatically compare the Package with the Baseline oncethe merge is complete.
The checkbox is enabled when the 'Baseline Package before Merge' checkbox isselected.
Merge Click on this button to begin the merge of the Package content with the XMI filecontent.
(c) Sparx Systems 2015 - 2017 Page 14 of 50 Created with Enterprise Architect

User Guide - Model Exchange 30 June, 2017
Close Click on this button to close the 'Merge Package with XMI' dialog.
Help Click on this button to display this Help page.
(c) Sparx Systems 2015 - 2017 Page 15 of 50 Created with Enterprise Architect

User Guide - Model Exchange 30 June, 2017
Import EMX/UML2 Files
In Rational Software Architect (RSA) you can add many UML models under a single root. These models can have crossreferences between them. However, RSA cannot save the entire root as one file - it saves each UML model as a separateEMX file. This means that an EMX file with cross-references is not self-contained as it references elements in anotherEMX file.
In releases earlier than release 7.0, Enterprise Architect treats each EMX file as a separate model and hence does notallow for cross-references between them. From release 7.0, Enterprise Architect enables these cross-references.
You therefore have the options of:
Importing a single EMX/UML2 file or·Importing a group of related EMX/UML2 files together, thereby retaining the cross-references between the different·files
Access
Select your target Package in the Project Browser, then use one of the methods outlined here to open the 'Import Modelfrom XMI' dialog.
On the 'Import Model from XMI' dialog, click on the Other XML File Formats button, then choose the option'EMX/UML2'.
Ribbon Publish > Model Exchange > Import XMI > Import Model XMI : Other XML FileFormats > EMX/UML2
Context Menu Right-click on Package > Import/Export > Import Package From XMI : Other XMLFile Formats > EMX/UML2
Keyboard Shortcuts Ctrl+Alt+I : Other XML File Formats > EMX/UML2
Import Files
Option Action
Package Displays the name of the currently-selected Package.
If this is not the required Package, click on the button and select the correctPackage.
DirectoryClick on the button.
The 'Select Import EMX/UML2 File(s)' dialog displays, from which you can selectmultiple files.
Select the file or files (use Ctrl+click or Shift+click to select several files) and clickon the Open button to return to the 'Import Package from EMX/UML2' dialog.
Selected Files Lists the selected *.emx/*uml2 files.
Write Log File Select this checkbox to write a log of the import activity (recommended).
(c) Sparx Systems 2015 - 2017 Page 16 of 50 Created with Enterprise Architect
User Guide - Model Exchange 30 June, 2017
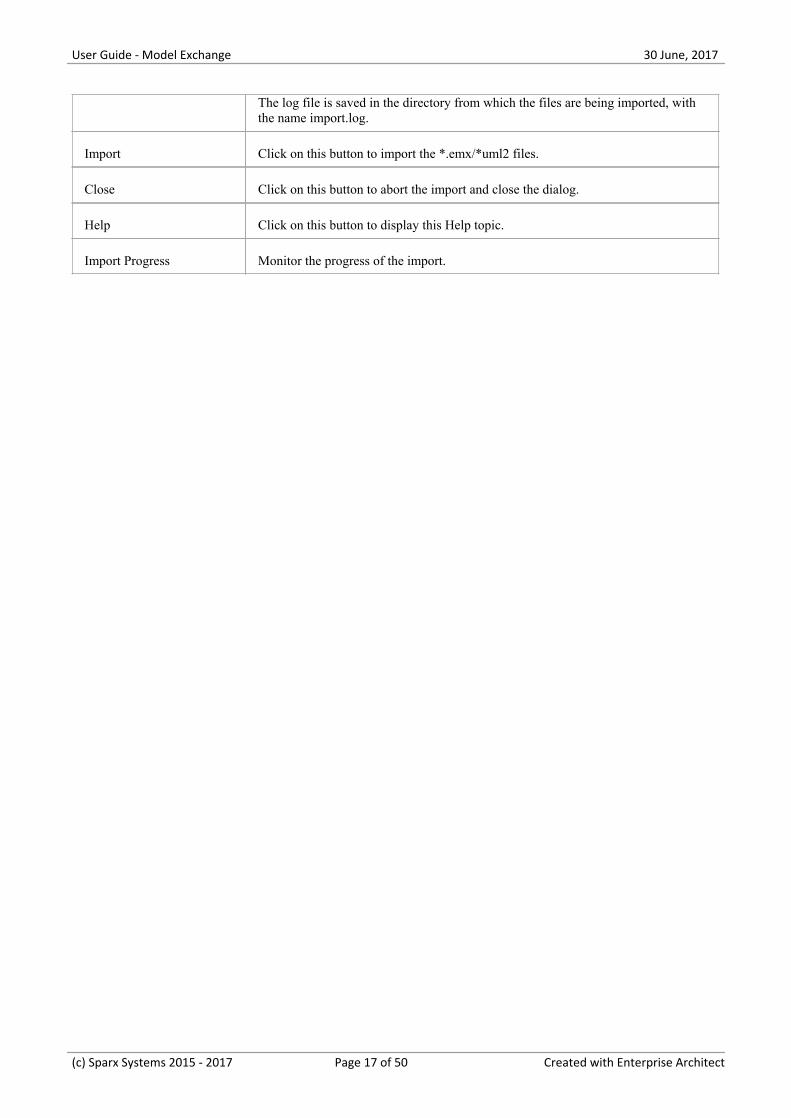
The log file is saved in the directory from which the files are being imported, withthe name import.log.
Import Click on this button to import the *.emx/*uml2 files.
Close Click on this button to abort the import and close the dialog.
Help Click on this button to display this Help topic.
Import Progress Monitor the progress of the import.
(c) Sparx Systems 2015 - 2017 Page 17 of 50 Created with Enterprise Architect

User Guide - Model Exchange 30 June, 2017
Import a Rhapsody Model
If you have developed a UML model in IBM Rational Rhapsody, you can import it into an Enterprise Architect project.
Each Rhapsody project contains one Project file (with the file extension .rpy), which is associated with a folder with thesame name, ending in _rpy. For example, if the Rhapsody project file is called CDPlayer.rpy, it is associated with afolder called CDPlayer_rpy.
The associated folder contains all the project-related files. It could also contain a file named filesTable.dat, which lists allthe files related to the Rhapsody project.
Access
Select your target Package in the Project Browser, then use one of the methods outlined here to open the 'Import Modelfrom XMI' dialog.
On the 'Import Model from XMI' dialog, click on the Other XML Formats button, then choose the option 'Rhapsody'.
Ribbon Publish > Model Exchange > Import XMI > Import Model XMI : Other XML FileFormats > Rhapsody
Context Menu Right-click on Package > Import/Export > Import Package From XMI : Other XMLFile Formats > Rhapsody
Keyboard Shortcuts Ctrl+Alt+I : Other XML File Formats > Rhapsody
Import UML Model from Rhapsody Project Files
Option Action
Package Displays the name of the currently-selected Package.
If this is not the required Package, click on the button and select the correctPackage.
Rhapsody ProjectClick on the button.
The 'Select Import Rhapsody Project' dialog displays.
Select a Rhapsody Project file, then click on the Open button to return to the'Import Model From Rhapsody' dialog.
Rhapsody Files Shows the name of the file located in the associated project folder.
Import Click on this button to import the Rhapsody model into Enterprise Architect.
Close Click on this button to abort the import and close the dialog.
Help Click on this button to display this Help topic.
Import Progress Indicates the progress of the import.
(c) Sparx Systems 2015 - 2017 Page 18 of 50 Created with Enterprise Architect

User Guide - Model Exchange 30 June, 2017
(c) Sparx Systems 2015 - 2017 Page 19 of 50 Created with Enterprise Architect

User Guide - Model Exchange 30 June, 2017
Import a MagicDraw MDZIP File
Enterprise Architect supports importing UML models from MDZIP files generated by MagicDraw 17.0.1 and above.
Access
Select your target Package in the Project Browser, then use one of the methods outlined here to open the 'Import Modelfrom XMI' dialog.
On the 'Import Model from XMI' dialog, click on the Other XML Formats button, then choose the option 'MDZIP File'.
Ribbon Publish > Model Exchange > Import XMI > Import Model XMI : Other XML FileFormats > MDZIP File
Context Menu Right-click on Package > Import/Export > Import Package From XMI : Other XMLFile Formats > MDZIP File
Keyboard Shortcuts Ctrl+Alt+I : Other XML File Formats > MDZIP File
Import UML Model from MDZIP File(s)
Option Action
Package Displays the name of the currently-selected Package.
If this is not the required Package, click on the button and select the correctPackage.
FilenameClick on the button.
The 'Select MDZIP File(s)' dialog displays, from which you can select multiplefiles.
Select the required MagicDraw MDZIP file or files (use Shift+click or Ctrl+click toselect several files), then click on the Open button to return to the 'Import FromMDZIP File(s)' dialog.
Selected File(s) Lists the *.MDZIP files you have selected for import.
Write Log File Select this checkbox to write a log of import activity.
The log file is saved in the directory from which the files are being imported, withthe name import.log.
Import Click on this button to import the MDZIP file(s) into Enterprise Architect.
Close Click on this button to close this dialog.
Help Click on this button to display this Help page.
(c) Sparx Systems 2015 - 2017 Page 20 of 50 Created with Enterprise Architect

User Guide - Model Exchange 30 June, 2017
Import Progress Indicates the progress of the import.
Notes
In the Corporate, Business and Software Engineering, System Engineering and Ultimate editions of Enterprise·Architect, if security is enabled you must have Import XMI permission to import Packages from XMI
(c) Sparx Systems 2015 - 2017 Page 21 of 50 Created with Enterprise Architect

User Guide - Model Exchange 30 June, 2017
Limitations of XMI
Whilst XMI is a valuable means of defining a UML model in a common format, it is relatively limited in the amount ofadditional information it can tolerate using the standard syntax.
Notes on Enterprise Architect
A lot of information from an Enterprise Architect model must be converted to Tagged Values, which import into othermodeling systems as additional information or are ignored completely. Enterprise Architect can both generate and read:
XMI 1.0 and 1.1 using UML 1.3 format·XMI 1.2 using UML 1.4 format, and·XMI 2.1 using UML 2.x format·
Round-tripping model elements using XMI in Enterprise Architect is possible using XMI 1.1 or XMI 2.1; XMI 1.1 usesthe additional Tagged Values to store the UML 2.x information - this ensures model completeness when round-trippingUML 2.x model elements using XMI 1.1.
Enterprise Architect exclusively uses XMI 1.1 for round-tripping models using Version Control.
Notes for Exporting to Rose and Other Tools
There are discrepancies in the Unisys/Rose implementation with regard to spelling mistakes and slightly different syntaxto the official XMI 1.1 specification, so problems might occur. The way Packages are arranged in different models canimpact successful import into other systems; experimentation is the only work around for this problem.
Some parts of the XMI import/export process do not work as expected in products like Rational Rose; for example, NoteLinks are not supported, and State Operations import but do not appear in diagrams. Rational Rose only supports importof a full project, not a single Package.
For best results, it is recommended that you keep the model elements to export to Rose simple and that they conform asclosely as possible to the UML 1.3 specification.
(c) Sparx Systems 2015 - 2017 Page 22 of 50 Created with Enterprise Architect

User Guide - Model Exchange 30 June, 2017
The UML DTD
When you import or export Packages from an Enterprise Architect model to XMI, the import or export process can bevalidated using a Data Type Definition (DTD). Several DTDs for XMI/UML exist; the OMG defines a standard UML1.3DTD for use in XMI 1.1, and Enterprise Architect uses an extension of this with some additional element extensions fornon-standard UML types, such as testing details.
The XML parser uses the DTD to validate the correctness of the model and to check that no syntactical errors haveoccurred. It is always best to use a DTD when moving Packages between Enterprise Architect models, as it ensurescorrectness of the XMI output and prevents attempted imports of incorrect XML.
Whenever you read an XML file, the XML parser looks in the current directory for the DTD - if specified - using theDOCTYPE element in the XML file. If the parser cannot find the DTD, it records an error and aborts processing; theUML_EA.DTD file must be in the current XML output path (generated by default).
(c) Sparx Systems 2015 - 2017 Page 23 of 50 Created with Enterprise Architect

User Guide - Model Exchange 30 June, 2017
CSV Import and Export
Within Enterprise Architect, you can import and export information about elements to and from comma-separated value(CSV) text files. This involves up to three possible actions.
Actions
Action Detail
Set Up Specifications To import and export element data from Enterprise Architect using CSV files, youmust first set up one or more file specifications.
You do this because the specification defines what types of value from thespreadsheet are to be imported, and how the information is translated between thespreadsheet and Enterprise Architect.
Import From CSV Once you have defined a CSV import specification, you can read in major elementcharacteristics from a CSV text file.
Export To CSV Once you have defined a CSV export specification it is possible to write out majorelement characteristics to a CSV text file.
(c) Sparx Systems 2015 - 2017 Page 24 of 50 Created with Enterprise Architect
User Guide - Model Exchange 30 June, 2017
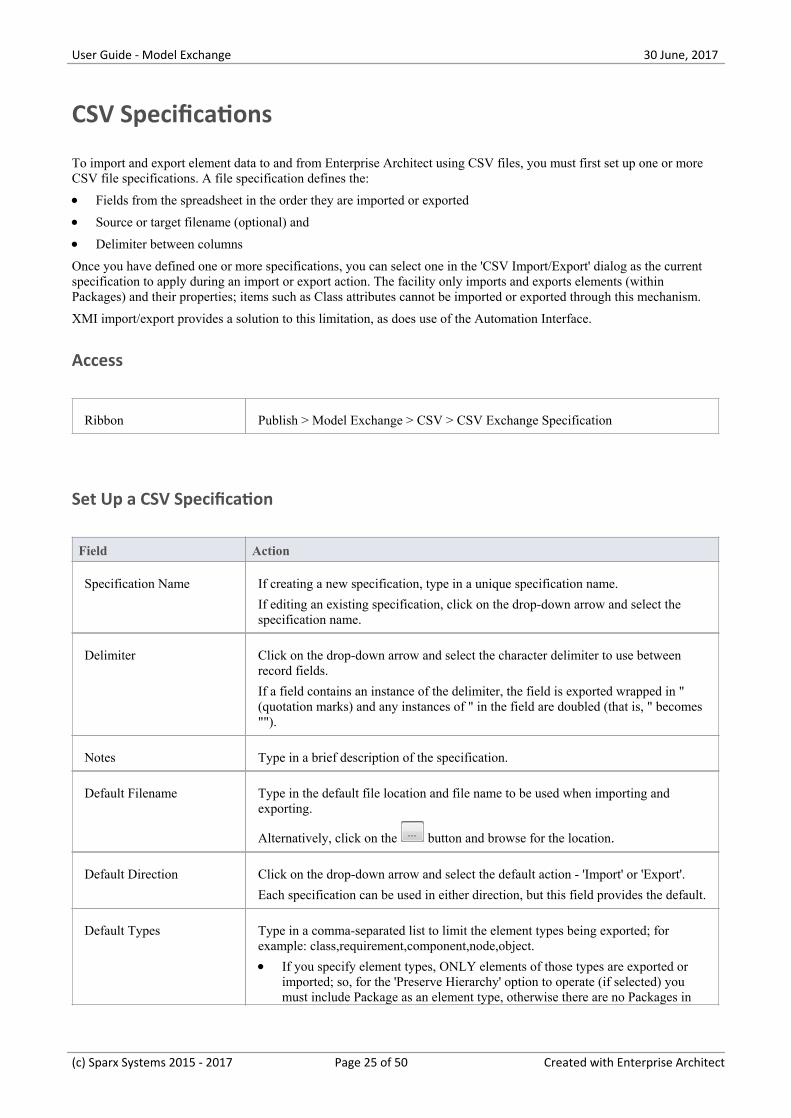
CSV Specifications
To import and export element data to and from Enterprise Architect using CSV files, you must first set up one or moreCSV file specifications. A file specification defines the:
Fields from the spreadsheet in the order they are imported or exported·Source or target filename (optional) and·Delimiter between columns·
Once you have defined one or more specifications, you can select one in the 'CSV Import/Export' dialog as the currentspecification to apply during an import or export action. The facility only imports and exports elements (withinPackages) and their properties; items such as Class attributes cannot be imported or exported through this mechanism.
XMI import/export provides a solution to this limitation, as does use of the Automation Interface.
Access
Ribbon Publish > Model Exchange > CSV > CSV Exchange Specification
Set Up a CSV Specification
Field Action
Specification Name If creating a new specification, type in a unique specification name.
If editing an existing specification, click on the drop-down arrow and select thespecification name.
Delimiter Click on the drop-down arrow and select the character delimiter to use betweenrecord fields.
If a field contains an instance of the delimiter, the field is exported wrapped in "(quotation marks) and any instances of " in the field are doubled (that is, " becomes"").
Notes Type in a brief description of the specification.
Default Filename Type in the default file location and file name to be used when importing andexporting.
Alternatively, click on the button and browse for the location.
Default Direction Click on the drop-down arrow and select the default action - 'Import' or 'Export'.
Each specification can be used in either direction, but this field provides the default.
Default Types Type in a comma-separated list to limit the element types being exported; forexample: class,requirement,component,node,object.
If you specify element types, ONLY elements of those types are exported or·imported; so, for the 'Preserve Hierarchy' option to operate (if selected) youmust include Package as an element type, otherwise there are no Packages in
(c) Sparx Systems 2015 - 2017 Page 25 of 50 Created with Enterprise Architect
User Guide - Model Exchange 30 June, 2017
which to preserve the hierarchy
If you do not specify any default element types, all elements including·Packages are exported or imported and the hierarchy can be preserved
Preserve Hierarchy Select this checkbox to include fields generated by Enterprise Architect, toembed/reconstruct the Package hierarchy.
Available Fields Click on the name of an available field, and double-click on it to add it to theSpecification (it displays at the end of the 'File Specification' list).
Press and hold Ctrl while you select several fields, but use the Add field button totransfer them all to the 'File Specification' list.
File Specification Review the record fields already assigned, listed in the order in which they areplotted across the spreadsheet.
If you want to change the sequence of fields, click on a field name and click on the
or button to move the field name up or down the list.
Add Tagged Value Field Click on this button to add a Tagged Value column to the CSV Specification, toimport or export the value that an element has for a particular tag.
A prompt displays to select one of two options:
Value - to import or export the content of the Tagged Value 'Value' field; a·column heading with the prefix 'TagValue_' is added to the Specification
Notes - to import or export the content of the Tagged Value 'Notes' field (some·Tagged Values use the 'Notes' field to accommodate long values, such as<memo> text); a column heading with the prefix 'TagNotes_' is added to theSpecification
In each case, the 'Add Tag Value Field' dialog displays. Select either the:
'Global Tagged Values' radio button, or·'Tagged Values from the selected Element' radio button, click on the Other·Element button and browse for the name of the element that contains theTagged Value
Click on the 'Tagged Value' field drop-down list and select the required TaggedValue, then click on the OK button.
Add Field Click on this button to move all selected fields from the 'Available Fields' list to the'File Specification' list.
Remove Field Click on this button to move all selected fields from the 'File Specification' list backto the 'Available Fields' list.
New Click on this button to clear all the dialog fields to create a new specification.
Save Click on this button to save all changes to the currently selected specification.
Save As Click on this button to save the current specification under a new name.
Delete Click on this button to delete the current specification.
Close Click on this button to close this dialog.
(c) Sparx Systems 2015 - 2017 Page 26 of 50 Created with Enterprise Architect

User Guide - Model Exchange 30 June, 2017
Notes
In the Corporate, Business and Software Engineering, System Engineering and Ultimate editions of Enterprise·Architect, if security is enabled you must have 'Export XMI', 'Import XMI' and 'Configure Resources' permissions touse the 'CSV Import/Export Specifications' option
In 'Available Fields' and 'File Specification', the record fields 'Created Date' and 'Modified Date' are not set when·imported from CSV
(c) Sparx Systems 2015 - 2017 Page 27 of 50 Created with Enterprise Architect

User Guide - Model Exchange 30 June, 2017
Using Preserve Hierarchy
The 'Preserve Hierarchy' option on the 'CSV Import/Export Specification' dialog includes fields generated by EnterpriseArchitect to embed/reconstruct the Package hierarchy in a CSV import or export.
When selected, the 'Preserve Hierarchy' option inserts two fields into the CSV specification that are:
automatically populated by Enterprise Architect on export and·used to reconstruct the exported Package's hierarchy upon import·
It is highly recommended that you do not change these fields if they have been automatically generated by EnterpriseArchitect's CSV exporter.
Inserted Fields
Field Action
CSV_KEY A unique identifier for the current element.
This key is unique per export; subsequent exports produce different keys for thesame set of elements.
CSV_PARENT_KEY The corresponding CSV_KEY of the current element's parent.
If the field is left blank or references a non-existent CSV_KEY, the element isadded to the top level of the Package.
External Data
If you intend to import hierarchical information from a spreadsheet that was not populated by exporting data fromEnterprise Architect, you must add these two fields to your spreadsheet as the last two columns, and populate thecolumns yourself. For example:
(c) Sparx Systems 2015 - 2017 Page 28 of 50 Created with Enterprise Architect

User Guide - Model Exchange 30 June, 2017
CSV Export
It is possible to export information about elements from your project in Enterprise Architect to a CSV text file. In thisoperation you make use of a CSV export specification.
If you intend to re-import the exported information into Enterprise Architect at some point, it is recommended that youinclude the 'GUID' field in the CSV export specification. This helps Enterprise Architect to identify and update existingelements, rather than create duplicates.
Access
Ribbon Publish > Model Exchange > CSV > CSV Import/Export
Context Menu Right-click on Package > Import/Export | CSV Import/Export
Export Data in CSV Format
Field Action
Package Confirm the name of the current selected Package.
Specification Click on the drop-down arrow and select the name of the existing exportspecification to use.
Edit/New Click on this button to edit the export specification or create a new one. The 'CSVImport/Export Specification' dialog displays.
FileType in the name and path of the file to export to, or click on the button andbrowse for the file.
Types Type in the element types to export: leave blank for all, or enter a comma-separatedlist of types.
If you specify element types, ONLY elements of those types are exported;therefore, to enable the 'Preserve Hierarchy' option in the specification to operate (ifselected) you must include 'Package' as an element type, otherwise no Packages areexported in which to preserve the hierarchy.
If you do not specify any element types, all elements including Packages areexported and the hierarchy can be preserved.
Code Page Displays the Code Page used when importing and exporting. This can be changedvia the 'Source Code Engineering' page of the 'Manage Project Options' dialog.
Action Click on the 'Export' radio button to export to file.
Export Column Names Select this checkbox to include the column names of the fields in the export file.
Include Subfolders Select this checkbox to include subfolders and their child elements in the export.
(c) Sparx Systems 2015 - 2017 Page 29 of 50 Created with Enterprise Architect
User Guide - Model Exchange 30 June, 2017
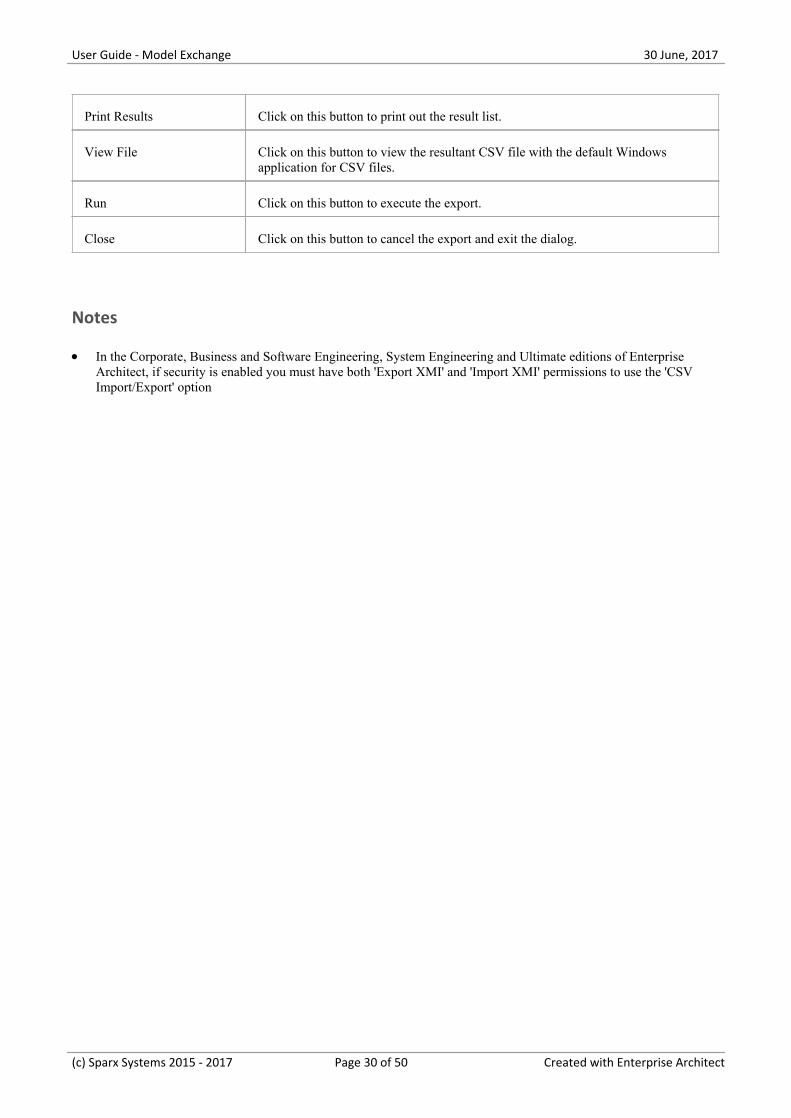
Print Results Click on this button to print out the result list.
View File Click on this button to view the resultant CSV file with the default Windowsapplication for CSV files.
Run Click on this button to execute the export.
Close Click on this button to cancel the export and exit the dialog.
Notes
In the Corporate, Business and Software Engineering, System Engineering and Ultimate editions of Enterprise·Architect, if security is enabled you must have both 'Export XMI' and 'Import XMI' permissions to use the 'CSVImport/Export' option
(c) Sparx Systems 2015 - 2017 Page 30 of 50 Created with Enterprise Architect

User Guide - Model Exchange 30 June, 2017
CSV Import
It is possible to import information about elements into your project in Enterprise Architect from a CSV text file. In thisoperation you make use of a CSV import specification. You import the CSV file into a selected Package; if this Packageor any element within the Package has a lock on it, you cannot import the CSV file into it. The 'Import' option on thedialog is grayed out.
The format and content of the CSV source data file should resemble this:
Access
Ribbon Publish > Model Exchange > CSV > CSV Import/Export
Context Menu Right-click on Package > Import/Export | CSV Import/Export
Import Data in CSV Format
Field Action
Package Confirm the name of the current selected Package.
Specification Specify the name of the import specification to use.
Edit/New Edit the import specification or create a new one.
File Specify the spreadsheet filename to import from.
Types Not used for import.
Code Page Displays the Code Page used when importing and exporting. This can be changedvia the 'Source Code Engineering' page of the 'Manage Project Options' dialog.
Action Select the 'Import' radio button to import from the file (grayed-out if the Package ora child item in the Package is locked).
(c) Sparx Systems 2015 - 2017 Page 31 of 50 Created with Enterprise Architect
User Guide - Model Exchange 30 June, 2017
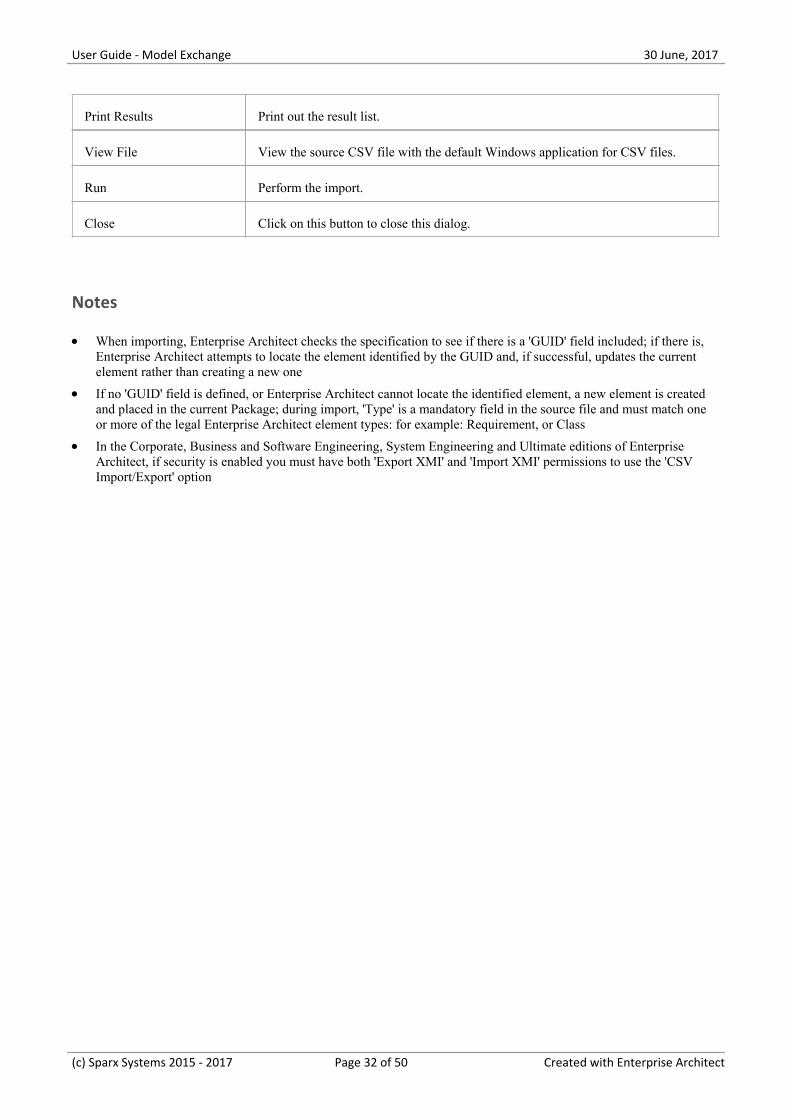
Print Results Print out the result list.
View File View the source CSV file with the default Windows application for CSV files.
Run Perform the import.
Close Click on this button to close this dialog.
Notes
When importing, Enterprise Architect checks the specification to see if there is a 'GUID' field included; if there is,·Enterprise Architect attempts to locate the element identified by the GUID and, if successful, updates the currentelement rather than creating a new one
If no 'GUID' field is defined, or Enterprise Architect cannot locate the identified element, a new element is created·and placed in the current Package; during import, 'Type' is a mandatory field in the source file and must match oneor more of the legal Enterprise Architect element types: for example: Requirement, or Class
In the Corporate, Business and Software Engineering, System Engineering and Ultimate editions of Enterprise·Architect, if security is enabled you must have both 'Export XMI' and 'Import XMI' permissions to use the 'CSVImport/Export' option
(c) Sparx Systems 2015 - 2017 Page 32 of 50 Created with Enterprise Architect

User Guide - Model Exchange 30 June, 2017
Controlled Packages
A Controlled Package is a Package configured to save and load in XML format to a named file; the XML output is UML1.3 compliant XMI, with Enterprise Architect extensions to support diagrams and additional model elements. ControlledPackages are a powerful means of 'externalizing' parts of an Enterprise Architect model.
Package XML is standard XMI-compliant output that can be loaded into any XML viewer, or used by any XML-basedtool to perform manipulations and extracts, such as document or code generators.
Controlled Packages appear in the Project Browser with a small colored rectangle to the left of the Package icon, asshown for the CIM Package:
Using Controlled Packages you can support:
Widely distributed development by having team members submit Packages in the form of XML for import into a·central Enterprise Architect repository
Version control, by writing model elements in XML text files suitable for version control using standard version·control softwareUsing XMI this way, you can manually connect to third-party version control software outside the EnterpriseArchitect environment; Enterprise Architect internally supports the configuration of version control through SCCand CVS
Import and export of model elements between different models·For example, a Class library can be re-used in many models and kept up to date in target models using ControlledPackages, reloading Packages as required when new versions of the Class model become available
Notes
If you are importing an XMI 1.1 file that was previously exported with a UML_EA.DTD (Data Type Definition)·file, the UML_EA.DTD file must be present in the directory into which the XMI file is being written; an erroroccurs if the UML_EA.DTD file is absent
When you select to apply a DTD during an XMI 1.1 export, the UML_EA.DTD file is written to the output directory·into which the XML files are written (unless the UML_EA.DTD file is already present in the directory); no error isgenerated if the UML_EA.DTD file is not present in this directory during the XMI export
(c) Sparx Systems 2015 - 2017 Page 33 of 50 Created with Enterprise Architect
User Guide - Model Exchange 30 June, 2017
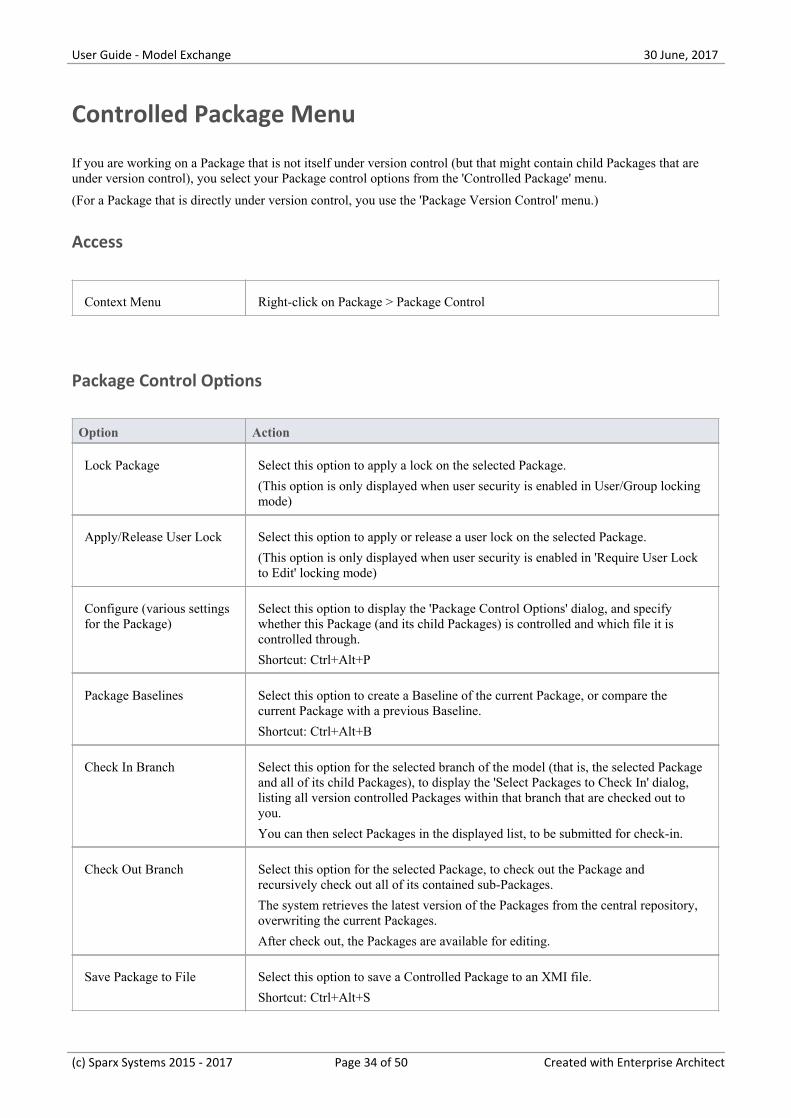
Controlled Package Menu
If you are working on a Package that is not itself under version control (but that might contain child Packages that areunder version control), you select your Package control options from the 'Controlled Package' menu.
(For a Package that is directly under version control, you use the 'Package Version Control' menu.)
Access
Context Menu Right-click on Package > Package Control
Package Control Options
Option Action
Lock Package Select this option to apply a lock on the selected Package.
(This option is only displayed when user security is enabled in User/Group lockingmode)
Apply/Release User Lock Select this option to apply or release a user lock on the selected Package.
(This option is only displayed when user security is enabled in 'Require User Lockto Edit' locking mode)
Configure (various settingsfor the Package)
Select this option to display the 'Package Control Options' dialog, and specifywhether this Package (and its child Packages) is controlled and which file it iscontrolled through.
Shortcut: Ctrl+Alt+P
Package Baselines Select this option to create a Baseline of the current Package, or compare thecurrent Package with a previous Baseline.
Shortcut: Ctrl+Alt+B
Check In Branch Select this option for the selected branch of the model (that is, the selected Packageand all of its child Packages), to display the 'Select Packages to Check In' dialog,listing all version controlled Packages within that branch that are checked out toyou.
You can then select Packages in the displayed list, to be submitted for check-in.
Check Out Branch Select this option for the selected Package, to check out the Package andrecursively check out all of its contained sub-Packages.
The system retrieves the latest version of the Packages from the central repository,overwriting the current Packages.
After check out, the Packages are available for editing.
Save Package to File Select this option to save a Controlled Package to an XMI file.
Shortcut: Ctrl+Alt+S
(c) Sparx Systems 2015 - 2017 Page 34 of 50 Created with Enterprise Architect
User Guide - Model Exchange 30 June, 2017
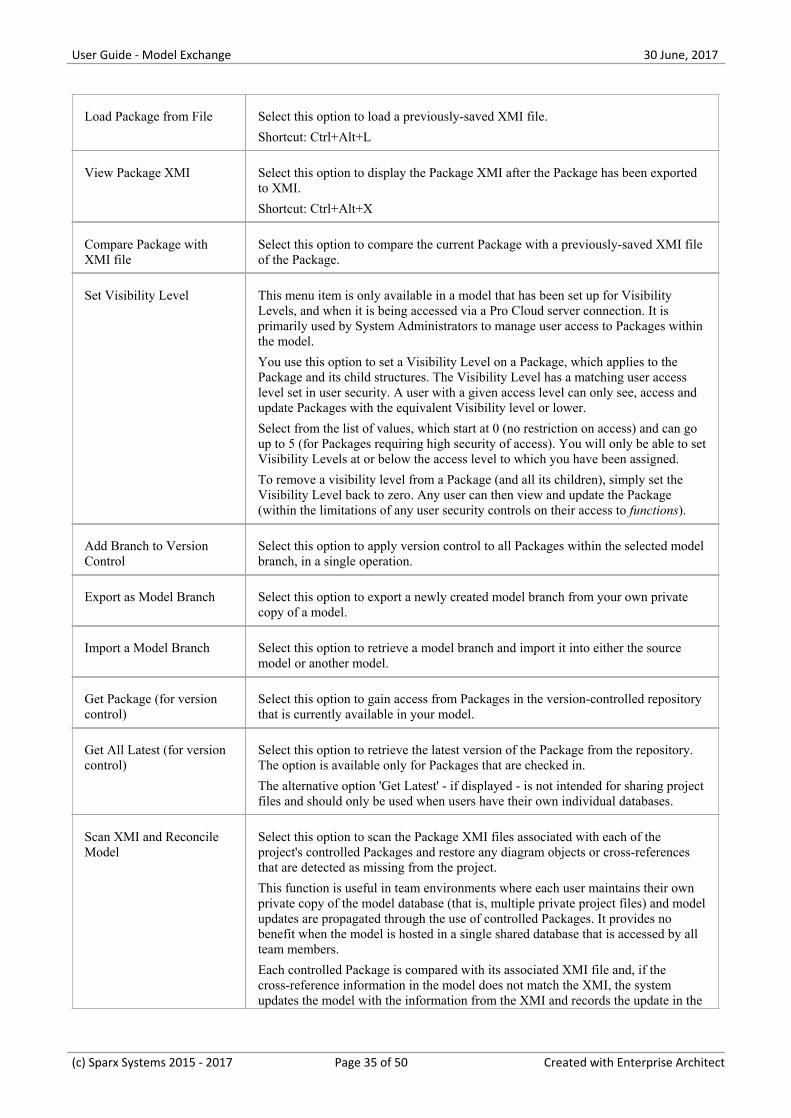
Load Package from File Select this option to load a previously-saved XMI file.
Shortcut: Ctrl+Alt+L
View Package XMI Select this option to display the Package XMI after the Package has been exportedto XMI.
Shortcut: Ctrl+Alt+X
Compare Package withXMI file
Select this option to compare the current Package with a previously-saved XMI fileof the Package.
Set Visibility Level This menu item is only available in a model that has been set up for VisibilityLevels, and when it is being accessed via a Pro Cloud server connection. It isprimarily used by System Administrators to manage user access to Packages withinthe model.
You use this option to set a Visibility Level on a Package, which applies to thePackage and its child structures. The Visibility Level has a matching user accesslevel set in user security. A user with a given access level can only see, access andupdate Packages with the equivalent Visibility level or lower.
Select from the list of values, which start at 0 (no restriction on access) and can goup to 5 (for Packages requiring high security of access). You will only be able to setVisibility Levels at or below the access level to which you have been assigned.
To remove a visibility level from a Package (and all its children), simply set theVisibility Level back to zero. Any user can then view and update the Package(within the limitations of any user security controls on their access to functions).
Add Branch to VersionControl
Select this option to apply version control to all Packages within the selected modelbranch, in a single operation.
Export as Model Branch Select this option to export a newly created model branch from your own privatecopy of a model.
Import a Model Branch Select this option to retrieve a model branch and import it into either the sourcemodel or another model.
Get Package (for versioncontrol)
Select this option to gain access from Packages in the version-controlled repositorythat is currently available in your model.
Get All Latest (for versioncontrol)
Select this option to retrieve the latest version of the Package from the repository.The option is available only for Packages that are checked in.
The alternative option 'Get Latest' - if displayed - is not intended for sharing projectfiles and should only be used when users have their own individual databases.
Scan XMI and ReconcileModel
Select this option to scan the Package XMI files associated with each of theproject's controlled Packages and restore any diagram objects or cross-referencesthat are detected as missing from the project.
This function is useful in team environments where each user maintains their ownprivate copy of the model database (that is, multiple private project files) and modelupdates are propagated through the use of controlled Packages. It provides nobenefit when the model is hosted in a single shared database that is accessed by allteam members.
Each controlled Package is compared with its associated XMI file and, if thecross-reference information in the model does not match the XMI, the systemupdates the model with the information from the XMI and records the update in the
(c) Sparx Systems 2015 - 2017 Page 35 of 50 Created with Enterprise Architect
User Guide - Model Exchange 30 June, 2017
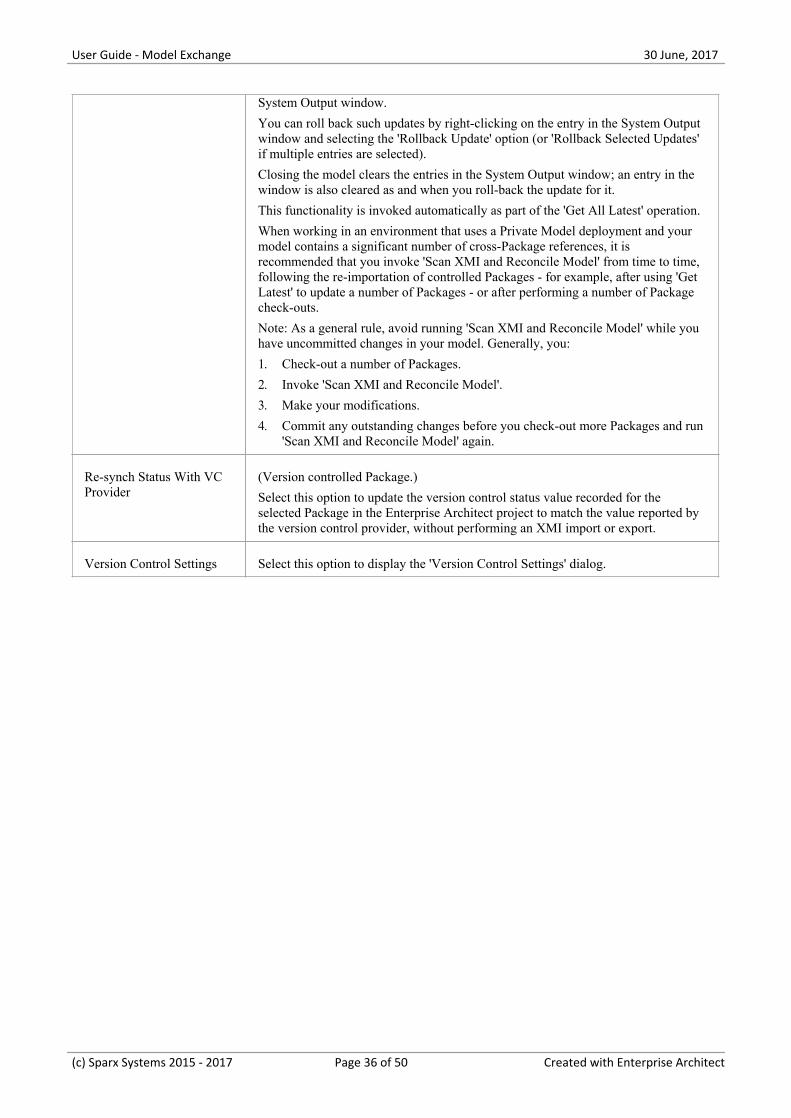
System Output window.
You can roll back such updates by right-clicking on the entry in the System Outputwindow and selecting the 'Rollback Update' option (or 'Rollback Selected Updates'if multiple entries are selected).
Closing the model clears the entries in the System Output window; an entry in thewindow is also cleared as and when you roll-back the update for it.
This functionality is invoked automatically as part of the 'Get All Latest' operation.
When working in an environment that uses a Private Model deployment and yourmodel contains a significant number of cross-Package references, it isrecommended that you invoke 'Scan XMI and Reconcile Model' from time to time,following the re-importation of controlled Packages - for example, after using 'GetLatest' to update a number of Packages - or after performing a number of Packagecheck-outs.
Note: As a general rule, avoid running 'Scan XMI and Reconcile Model' while youhave uncommitted changes in your model. Generally, you:
Check-out a number of Packages.1.
Invoke 'Scan XMI and Reconcile Model'.2.
Make your modifications.3.
Commit any outstanding changes before you check-out more Packages and run4.'Scan XMI and Reconcile Model' again.
Re-synch Status With VCProvider
(Version controlled Package.)
Select this option to update the version control status value recorded for theselected Package in the Enterprise Architect project to match the value reported bythe version control provider, without performing an XMI import or export.
Version Control Settings Select this option to display the 'Version Control Settings' dialog.
(c) Sparx Systems 2015 - 2017 Page 36 of 50 Created with Enterprise Architect

User Guide - Model Exchange 30 June, 2017
Configure Packages
In order to configure a Package to save and load in XML format to a named file, you use the 'Package Control Options'dialog to flag the Package as being controlled and set a number of options. These options include setting the XMIfilename to save to/load from, the type of XMI to import and export, and whether to export and/or import the XMI in abatch process. When the Package is configured, this is indicated by a small colored rectangle on the left of the 'Package'icon in the Project Browser, as shown for the RQ01: Formal Requirements Package.
Access
Select a package in the Project Browser, then:
Ribbon Configure > Version Control > Configure Package
Context Menu Right-click on Package > Package Control > Configure
Keyboard Shortcuts Ctrl+Alt+P
Configure a controlled Package
Option Description
Control Package Select the checkbox to indicate that this is a controlled Package.
For all packages, createplaceholders for externalreferences
Select to force all XMI 1.1 imports of this Package to exclude incomingrelationships and instead create external references.
This overrides the 'Create placeholders for missing External References duringXMI 1.1/2.1 Import' checkbox in the XML Specifications options for a user, if thatcheckbox is not selected.
Version Control Leave this field set to '(None)', to manage the Package under XMI control.
The 'Package Control Options' dialog is also used in adding a Package to VersionControl and, in this context, is described under the Version Control section.
XMI Filename Type or browse for the path and XMI file name into which to export the Packagedata and from which to import it.
You can also enter Local Path Substitution strings; for example, an XMI local pathdefinition where:
myLocalPath="C:\Documents and Settings\John\Desktop\EA Models"
So that %myLocalPath%\CIM.xml is equivalent to:
C:\Documents and Settings\John\Desktop\EA Models\CIM.xml
(c) Sparx Systems 2015 - 2017 Page 37 of 50 Created with Enterprise Architect

User Guide - Model Exchange 30 June, 2017
UML/XMI Type Click on the drop-down arrow and select the type of XMI to be generated; optionsinclude:
Enterprise Architect XMI/UML 1.3·Rational Rose/Unisys UML 1.3 and·Generic XMI 1.0/UML 1.3·Enterprise Architect XMI 2.1/UML 2.1·
For complete import/export round tripping of Packages, currently only EnterpriseArchitect XMI/UML 1.3 is supported. This format uses additional Tagged Valuesto store the model's UML 2.x information.
Version ID Type the version number you want to apply to the Package.
This field is the same as the 'Version' field on the Package 'Properties' dialog; anychange to either field updates the other.
Owner Defaults to the name of the Package owner; if necessary, type or select a differentname.
Use DTD (Optional) Select the checkbox to use a Data Type Definition (DTD) for theimports and exports.
(This option is not available for the Enterprise Architect XMI/UML 1.3 or RationalRose/Unisys UML 1.3 types.)
Log Import/Export (Optional) Select the checkbox to log import and export activity to a log file.
Batch Import (Optional) Select the checkbox to mark the Package as a Batch Import Package.
Batch Export (Optional) Select the checkbox to mark the Package as a Batch Export Package.
Include sub-packages (For an Enterprise Architect XMI/UML 1.3 export) Select the checkbox to includethe entire sub-Package hierarchy of this branch in the exported XMI (default).
Deselect the checkbox to include only the immediate contents of the Package in anXMI export (XMI stubs).
OK Click on this button to set the Package Control options and close the dialog.
Notes
In the Corporate, Business and Software Engineering, System Engineering and Ultimate editions of Enterprise·Architect, if security is enabled you must have Configure Packages permission to configure controlled Packages andPackage properties
For batch import, the file date of the XMI file is stored; you can bypass the batch import if there is no change - that·is, the file date of the last import matches that of the current file
(c) Sparx Systems 2015 - 2017 Page 38 of 50 Created with Enterprise Architect
User Guide - Model Exchange 30 June, 2017
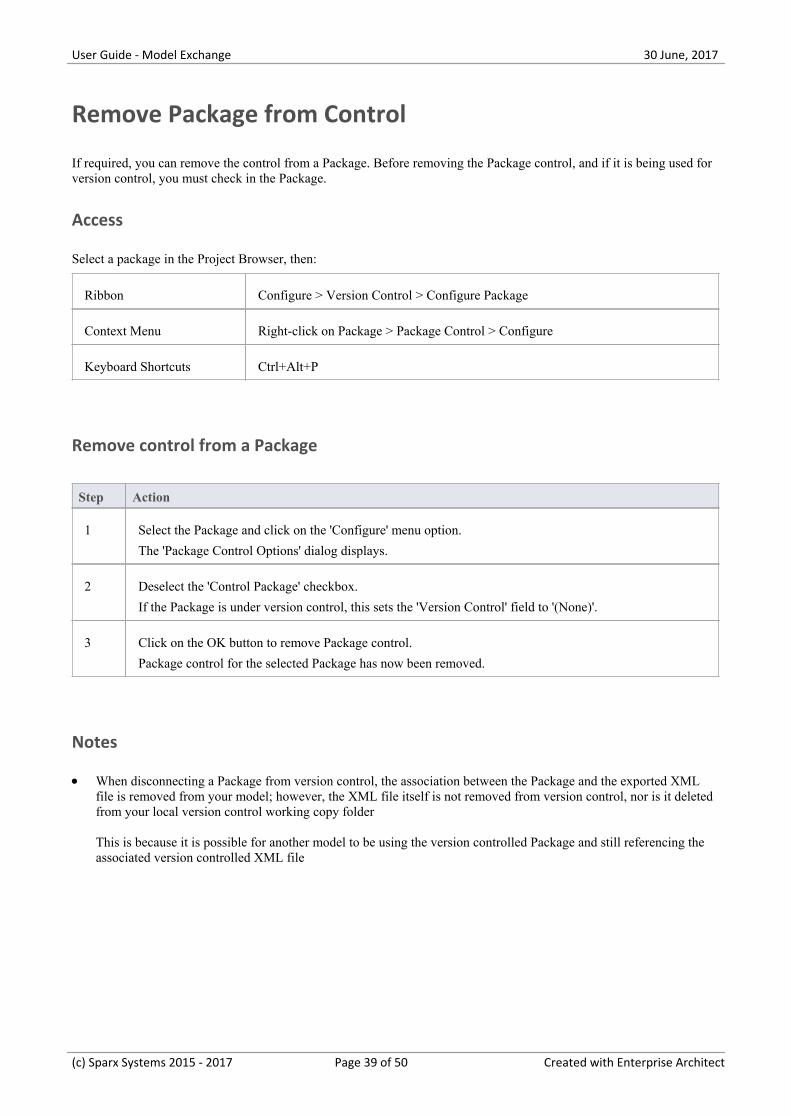
Remove Package from Control
If required, you can remove the control from a Package. Before removing the Package control, and if it is being used forversion control, you must check in the Package.
Access
Select a package in the Project Browser, then:
Ribbon Configure > Version Control > Configure Package
Context Menu Right-click on Package > Package Control > Configure
Keyboard Shortcuts Ctrl+Alt+P
Remove control from a Package
Step Action
1 Select the Package and click on the 'Configure' menu option.
The 'Package Control Options' dialog displays.
2 Deselect the 'Control Package' checkbox.
If the Package is under version control, this sets the 'Version Control' field to '(None)'.
3 Click on the OK button to remove Package control.
Package control for the selected Package has now been removed.
Notes
When disconnecting a Package from version control, the association between the Package and the exported XML·file is removed from your model; however, the XML file itself is not removed from version control, nor is it deletedfrom your local version control working copy folder
This is because it is possible for another model to be using the version controlled Package and still referencing theassociated version controlled XML file
(c) Sparx Systems 2015 - 2017 Page 39 of 50 Created with Enterprise Architect

User Guide - Model Exchange 30 June, 2017
Save a Package
Once you have correctly configured a Package, you can save the controlled Package to the designated XMI file.
Access
Select a package in the Project Browser, then:
Ribbon Publish > Model Exchange > Package Control > Save Package to File
Context Menu Right-click on Package > Package Control > Save Package to File
Keyboard Shortcuts Ctrl+Alt+S
Save a controlled Package to file
Step Action
1 Select the Package and the Save Package to File menu option.
The export process executes automatically according to your configured preferences, overwriting anyexisting file.
Notes
If you are using a version control Package in conjunction with the exported Package files, you must check out the·XMI file first to enable Enterprise Architect to overwrite the existing version
(c) Sparx Systems 2015 - 2017 Page 40 of 50 Created with Enterprise Architect

User Guide - Model Exchange 30 June, 2017
Load a Package
If a Package has been marked for control it is displayed in the Project Browser with a red rectangle to the left of thePackage icon. If you have previously saved the controlled Package, you can reload it.
Access
Select a package in the Project Browser, then:
Ribbon Publish > Model Exchange > Package Control > Load package from file
Context Menu Right-click on Package > Package Control > Load package from file
Keyboard Shortcuts Ctrl+Alt+L
Load a controlled Package from an XMI file
Step Action
1 Select the Package and the 'Load package from file' menu option.
If you have configured the Package control details, the system prompts you to confirm the import.
2 Click on the Yes button to confirm the import.
The current Package is deleted and the saved Package is imported.
Notes
Importing deletes the current Package entirely from the model, and the action cannot be undone; you must be careful·not to lose any current changes or information
(c) Sparx Systems 2015 - 2017 Page 41 of 50 Created with Enterprise Architect

User Guide - Model Exchange 30 June, 2017
Batch XMI Export
You can export a group of Controlled Packages to XMI in one step.
Access
Ribbon Publish > Model Exchange > Export XMI > Batch Export Controlled Packages
Export a group of Controlled Packages to XMI
Step Action
1 Open the 'Export Package to XMI' dialog using one of the access methods.
2 Select the checkbox against each Package to include in this export run.
Select the 'Select All' checkbox to select all Packages in the list.
3 Select the 'Restore Cross References Without Prompting' checkbox to automatically restore any missingcross-Package references without displaying a prompt.
4 To save this configuration as the default, click on the Save Settings button.
5 Click on the Run Export button.
Enterprise Architect cycles through each checked Package and exports it using the options specified in the'Package Control Options' dialog.
As long as a valid filename exists, Enterprise Architect exports the Package to XMI and proceeds to thenext Package.
Notes
The 'Restore Cross References Without Prompting' checkbox is enabled only if the option 'Report Cross Package·Reference Deletions (XMI 1.1)' is set on the 'XML Specifications' page of the 'Preferences' dialog
The option is applicable only to XMI 1.1 Controlled Packages·
(c) Sparx Systems 2015 - 2017 Page 42 of 50 Created with Enterprise Architect

User Guide - Model Exchange 30 June, 2017
Batch XMI Import
You can import a group of Controlled Packages from XMI into Enterprise Architect in one step.
As the system processes each Package, it updates the 'Status' column against each Package name on the 'Batch XMIImport' dialog.
If the import is successful, Enterprise Architect updates the Package status to 'Imported'·If the import is unsuccessful, Enterprise Architect updates the Package status to 'Not Imported'·
Common reasons for an import to fail include:
The Package not being correctly configured·The last import file date matches the import date of the file currently on disk·
Access
Ribbon Publish > Model Exchange > Import XMI > Batch Import Controlled Packages
Import a group of Controlled Packages from XMI
Step Action
1 Open the 'Batch XMI Import' dialog using one of the access methods.
2 Select the checkbox against each Package to include in the import.
Select the 'Select All' checkbox to select all Packages in the list.
3 To save this configuration as the default, click on the Save Settings button.
4 Click on the Run Import button.
Enterprise Architect cycles through each checked Package and imports it.
Notes
To avoid re-importing the same module multiple times, select the Check file date before import checkbox;·Enterprise Architect then does not import a file if the last import file date matches that of the one currently on disk
(c) Sparx Systems 2015 - 2017 Page 43 of 50 Created with Enterprise Architect

User Guide - Model Exchange 30 June, 2017
Manual Version Control with XMI
You can use XMI to support version control by writing model elements in XML text files suitable for use with standardversion control software.
Using XMI in this manner enables you to manually connect to third-party version control software outside the EnterpriseArchitect environment.
Enterprise Architect internally supports the configuration of version control through SCC and CVS configurations.
Prepare for using XMI for version control
Step Action
1 Select suitable Packages in the Project Browser, to be marked as Controlled Packages.
2 Configure these with filenames that are visible to a version control system of your choice.
3 Save the Controlled Packages to establish a model base and check these into the version control system.
Apply version control
Step Action
1 Continue working on a Package until versioning is required.
2 Check out the Package XMI file from the version control system.
3 Save the relevant Package using the Controlled Package support.
4 Check the Package back into the version control system.
Recover an earlier version
Step Action
1 Save the current version first.
This is important, because the Package is completely deleted during the import process.
If necessary, manually update the version control system.
2 Get the required Package version from the version control system.
3 Select the Package to reload.
(c) Sparx Systems 2015 - 2017 Page 44 of 50 Created with Enterprise Architect

User Guide - Model Exchange 30 June, 2017
4 Select the 'Package Control | Load package from file' menu option to import the previous version.
Enterprise Architect deletes the Controlled Package and restores the previous version.
(c) Sparx Systems 2015 - 2017 Page 45 of 50 Created with Enterprise Architect

User Guide - Model Exchange 30 June, 2017
Report Deletion of Cross Package References
Your model might contain at least one XMI 1.1 Controlled Package that is also used in other models, but not necessarilyin the same context. For example:
You have a model of Power Generation and a model of Power Consumption·Both models contain the Package called Power Storage·In the Generation model, the Power Storage Package has links to a Package called Turbine Control (which does not·exist in the Consumption model)
In the Consumption model, the Power Storage Package has links to a Package called Consumer Demand (which·does not exist in the Generation model)
All Packages are maintained in a master project, Power Control, where all the cross-Package relationships exist;·compared with Power Control, both Power Generation and Power Consumption are incomplete
Problem
Consider the process at the end of a work session on Power Storage in, say, the Power Generation model. When savingthe Package to XMI, Enterprise Architect has no information on relationships between Power Storage and the ConsumerDemand Package from the Power Consumption model, and so these are not represented in the XMI file. Consequently,when the XMI file is imported into Power Control, Enterprise Architect deletes the relationships in the master projectbecause they don't match the file.
Solution
You can easily check for and preserve the cross-Package relationships by selecting the 'Report Cross Package ReferenceDeletions (XMI 1.1)' checkbox in the 'Preferences' dialog ('Start > Workspace > Preferences > XML Specifications').When you save a controlled Package, Enterprise Architect compares the XMI for that save with the most recent XMI 1.1revision of the Package. Any items that are missing from the Package are listed on the 'Missing Cross References' dialog.
Note that if all users are connecting directly to the same repository then detection of missing cross references should notbe necessary, and you can disable the feature by deselecting the 'Report Cross Package Reference Deletions (XMI 1.1)'checkbox.
Actions
Action Detail
Decide whichcross-references to merge
In some case Enterprise Architect cannot determine whether a cross-reference ismissing or intentionally deleted by the user. When the 'Missing Cross References'dialog displays, the basic analysis process should be:
If the item was deleted intentionally, deselect the checkbox beside it·If the item was not deleted intentionally, its presence in the list suggests it is a·missing cross reference and you should leave the checkbox selected
Merge missing items Items missing from the exported Package are listed in the 'Missing CrossReferences' dialog. To regenerate them into the XMI file that is being saved:
Select the checkbox against each item type·Click on the OK button·
(c) Sparx Systems 2015 - 2017 Page 46 of 50 Created with Enterprise Architect
User Guide - Model Exchange 30 June, 2017
Items of any type that you do not select are omitted from the saved XMI file.
Abort or cancel this XMIExport
If you do not want to proceed with the export (or Check-in or Put Latest) operation:
Click on the Cancel button·
Review the details of anentry
To display the details of an entry on the 'Missing Cross References' dialog:
Double-click on the type name·The details of each item are shown on the 'Missing <item type>' dialog. For anyitems where information is missing from the XMI file, the missing details aregrayed-out.
To find the item with the missing cross-reference in the Project Browser, either:
Right-click on the entry in the list and select the 'Find in Project Browser'·option, or
Click on the item and press Alt+G·
Copy a value from acolumn on the dialog to theclipboard
To preserve a copy of an item from the dialog on the clipboard:
Click on the column value to highlight it; the selected value is shown in the·bottom left corner of the dialog
Select the text in the bottom left corner and press Ctrl+C to copy that value to·the clipboard
(c) Sparx Systems 2015 - 2017 Page 47 of 50 Created with Enterprise Architect

User Guide - Model Exchange 30 June, 2017
Project Data Transfer
In normal system maintenance, it is likely that at some point you need to relocate data between storage systems. In anyedition of Enterprise Architect, you might need to transfer all records from one project file to another (recommendedafter serious network crash or repeated database corruption). Project files can be either .eap (Access) files or .feap(Firebird) files, and you can transfer from one file type to the other.
In the Corporate, Business and Software Engineering, System Engineering and Ultimate editions of Enterprise Architect,you might need to:
Transfer an existing project file to a DBMS repository such as SQL Server or MySQL·Transfer a DBMS repository to an existing project file·Move a repository from one DBMS to another (including moving between servers using the same DBMS)·Copy all records from a JET 3.5 to JET 4 (Access 2000 or XP) repository - or back the other way·
Access
Ribbon Configure > Model > Transfer > Project Transfer
Perform a project data transfer
Step Action
1 Click on the radio button for the required transfer type:
File to File·DBMS to File·File to DBMS·DBMS to DBMS·
2 In the 'Source Project' and 'Target Project' fields, type or select the name or connection string for theSource and Target projects.
3 If you want to capture the transfer in a log file, select the 'Logfile' checkbox and browse for theappropriate log file location.
4 Click on the Transfer button.
5 It is good practice to do a Project Compare after this process to verify that all records are written.
Notes
Take a backup of the target project to ensure that you can recover any important information it already contains; in a·transfer, all records in the target repository are overwritten
You cannot move a model from a source .eap file from an Enterprise Architect version earlier than 3.5.0·
(c) Sparx Systems 2015 - 2017 Page 48 of 50 Created with Enterprise Architect

User Guide - Model Exchange 30 June, 2017
When performing a .eap file to DBMS transfer, if the .eap file has replication enabled, the replication must be·removed before performing the transfer
When transferring a model to a DBMS, you cannot transfer the data into an empty database - the tables must already·exist; if they do not, run the corresponding script supplied by Sparx Systems to create the required tables
When transferring a model into a project file, similarly, the target project file must already exist, to provide the data·structures to transfer data into
In the Corporate, Business and Software Engineering, System Engineering and Ultimate editions of Enterprise·Architect, if security is enabled you must have 'Transfer Data' permission to transfer project data betweenrepositories
(c) Sparx Systems 2015 - 2017 Page 49 of 50 Created with Enterprise Architect
User Guide - Model Exchange 30 June, 2017
(c) Sparx Systems 2015 - 2017 Page 50 of 50 Created with Enterprise Architect


![Ibrahim Assouroko Peter Denno · 2016-01-07 · XMI “XML Metadata Interchange” standard can be found on the NIST GitHub site [12]. XMI is an OMG standard for exchanging metadata](https://img.dokumen.tips/doc/110x75/5fae24388246907b9b288622/ibrahim-assouroko-peter-denno-2016-01-07-xmi-aoexml-metadata-interchangea-standard.jpg)