Embed Size (px)
Citation preview

MICHIGAN STATE UNIVERSITY Telecommunication Systems
Avaya Campus
PBX
Avaya 2410 User Guide
M I C H I G A N S T A T E U N I V E R S I T Y
Avaya 2410 Telephone User Guide
Michigan State University Telecommunication Systems
W110 Public Safety East Lansing, MI 48824-1219
Phone 517.353.5515 • Fax 517.353.6633 Email [email protected] Website www.telecom.msu.edu
April 2009
3
Table of Contents
The Home Screen ...................................................................................................................................... 6
Call Appearance and Call Identification Displays ...................................................................................... 7
Dialing Instructions ................................................................................................................................... 8
Status Icons ............................................................................................................................................... 8
Answer, Place, and End a Call ................................................................................................................... 9
Redial ........................................................................................................................................................ 9
Speakerphone ......................................................................................................................................... 10
Hold ......................................................................................................................................................... 10
Transfer ................................................................................................................................................... 11
Conference .............................................................................................................................................. 11
Speed Dial ............................................................................................................................................... 12
Working in the Speed Dial Screen ........................................................................................................... 12
Abbreviated Dialing ................................................................................................................................. 16
Options .................................................................................................................................................... 16
Call Log .................................................................................................................................................... 19
The Call Log Summary Screen ................................................................................................................. 19
Working in the Call Log Screens .............................................................................................................. 20
Message .................................................................................................................................................. 21
Send All Calls ........................................................................................................................................... 22
Call Forwarding All Calls .......................................................................................................................... 22
Call Park................................................................................................................................................... 23
Call Pickup ............................................................................................................................................... 23
‐‐ ACD Agent Instructions ‐‐ .................................................................................................................... 23
Agent Login ............................................................................................................................................. 24
Agent Logout ........................................................................................................................................... 24
Display Features .................................................................................................................................. 25
‐‐ ACD Supervisor Instructions ‐‐ ............................................................................................................. 25
Activating Service Observing ................................................................................................................... 25
4
Adding a Skill or Changing a Skill Priority ................................................................................................ 27
Removing an Agent from a Skill Assignment .......................................................................................... 28
Recording Announcements ..................................................................................................................... 28
Bridged Appearance ................................................................................................................................ 29
Directory ................................................................................................................................................. 30
Dial Intercom ........................................................................................................................................... 30
Label Action ............................................................................................................................................. 30
5
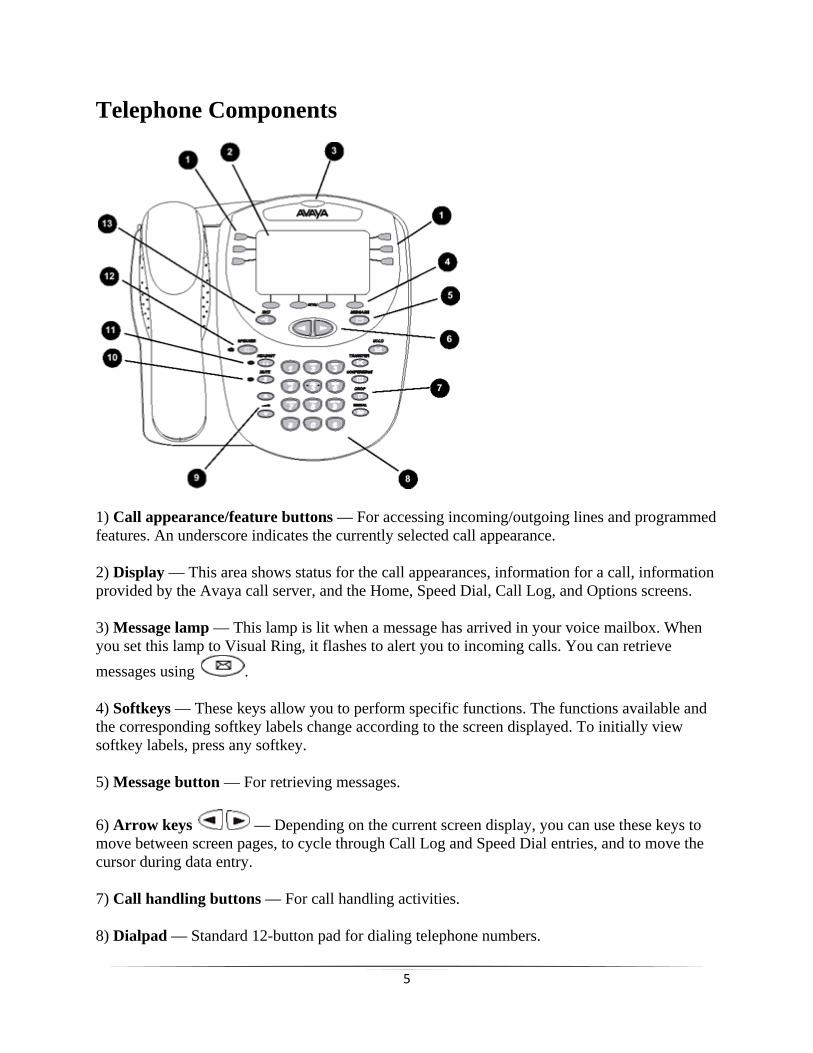
Telephone Components
1) Call appearance/feature buttons — For accessing incoming/outgoing lines and programmed features. An underscore indicates the currently selected call appearance.
2) Display — This area shows status for the call appearances, information for a call, information provided by the Avaya call server, and the Home, Speed Dial, Call Log, and Options screens.
3) Message lamp — This lamp is lit when a message has arrived in your voice mailbox. When you set this lamp to Visual Ring, it flashes to alert you to incoming calls. You can retrieve messages using .
4) Softkeys — These keys allow you to perform specific functions. The functions available and the corresponding softkey labels change according to the screen displayed. To initially view softkey labels, press any softkey.
5) Message button — For retrieving messages.
6) Arrow keys — Depending on the current screen display, you can use these keys to move between screen pages, to cycle through Call Log and Speed Dial entries, and to move the cursor during data entry.
7) Call handling buttons — For call handling activities.
8) Dialpad — Standard 12-button pad for dialing telephone numbers.

6
9) Volume control buttons — For adjusting speaker, handset, headset, or ringer volume depending on which component is in use.
10) Mute button — For turning off the microphone (handset, headset, or speaker). When the Mute feature is active, the associated light turns on and the person at the other end of the call cannot hear you.
11) Headset button — For activating a headset connected to the 2410 headset jack. The light associated with this button turns on when the headset is active.
12) Speaker button — For accessing the built-in two-way speakerphone. The light associated with this button turns on when the speakerphone is active.
13) Exit button — Pressing this button returns you to the Home screen.
The Home Screen The Home screen, which consists of two pages, displays the available call appearance/feature buttons, caller ID information, the current date and time, softkeys, and information provided by MSU Telecom Systems.
In general, you use the Home screen to perform standard call handling. Six call appearance/feature buttons are displayed on each page of the Home screen.
If you program your telephone to log unanswered, incoming calls, the counter displaying this number of new calls appears below the date and time. Every time you access the Call Log Summary screen to view the information in the call log, the counter is reset to 0.
To view the softkey labels, press any one of the softkeys. You must press one of the softkeys to access the softkey features (that is, Speed Dial, Call Log, Options, and Labels.)

7
To Press
Move to the other Home screen page
or
Return to Page 1 of the Home screen at any time
Access the Speed Dial screen The SpDial softkey
Access the Call Log Summary screen
The Log softkey
Access the Options screen The Option softkey
Access the Label Action screen The Label softkey
Call Appearance and Call Identification Displays Your telephone has six call appearance/feature buttons per screen page. Beginning with the first button in the upper left corner of the telephone and going down, the display identifies the buttons in the left column. These buttons are considered call appearance/feature buttons 1 through 3. On the display, these buttons are identified by default labels a, b, c, etc., where a represents call appearance/feature button 1. The buttons in the right column run from 4 through 6.
When you receive or make calls, the available call identification information is displayed where the date and time appear when the telephone is idle. For example, when you dial an extension, that number is shown and then replaced by the called party’s name and extension. The call identification information associated with an extension is provided by the call processing system. When a call is received from another extension, the caller’s name is shown; when a call is
8
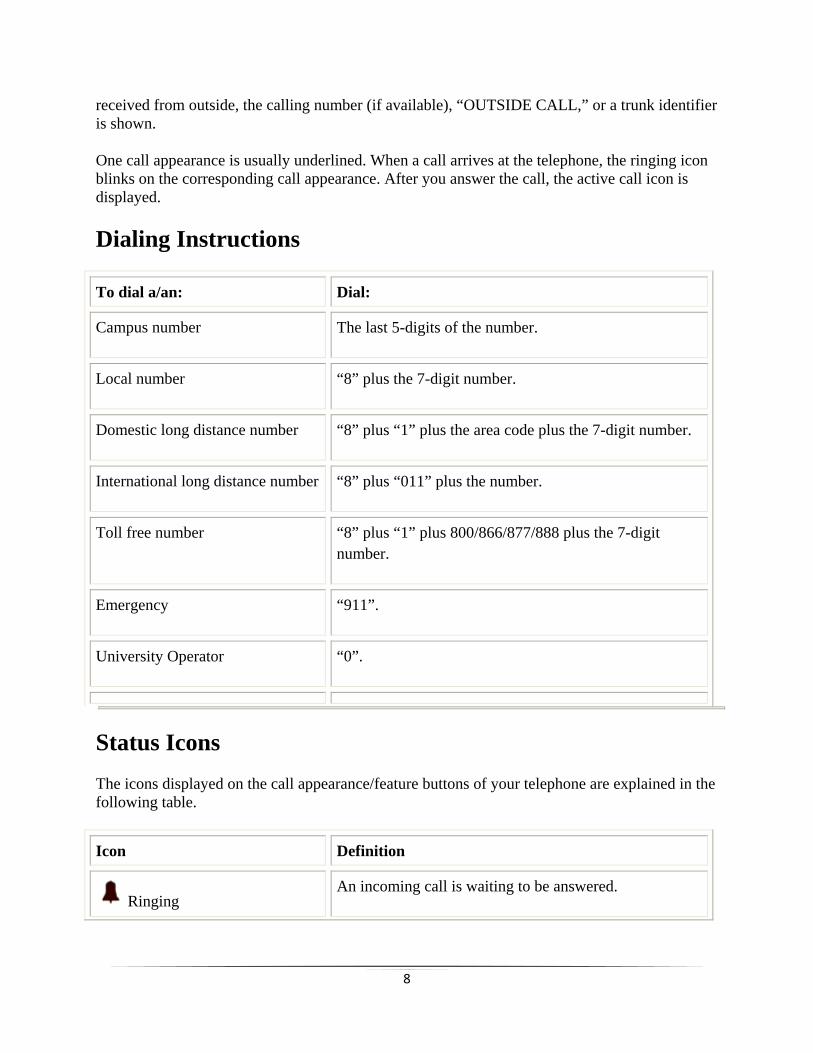
received from outside, the calling number (if available), “OUTSIDE CALL,” or a trunk identifier is shown.
One call appearance is usually underlined. When a call arrives at the telephone, the ringing icon blinks on the corresponding call appearance. After you answer the call, the active call icon is displayed.
Dialing Instructions
To dial a/an: Dial:
Campus number The last 5-digits of the number.
Local number “8” plus the 7-digit number.
Domestic long distance number “8” plus “1” plus the area code plus the 7-digit number.
International long distance number “8” plus “011” plus the number.
Toll free number “8” plus “1” plus 800/866/877/888 plus the 7-digit number.
Emergency “911”.
University Operator “0”.
Status Icons The icons displayed on the call appearance/feature buttons of your telephone are explained in the following table.
Icon Definition
Ringing An incoming call is waiting to be answered.

9
Active The call you are currently handling. If you have a bridged call appearance on your telephone, this icon will appear when that appearance is active.
On hold A call currently on hold.
On soft hold A call put on hold during a transfer or conference.
Feature active Feature on side of the display currently is active.
Answer, Place, and End a Call To answer an incoming call:
1. When a call arrives at your telephone, you hear a ringing tone and a blinking bell icon appears on the associated call appearance. In addition, call identification information is displayed. If you are not active on another call, answer the call using your handset, headset, or speakerphone.
If you are active on a call already, place the active call on hold, and then answer the incoming call. If the call appearance for the ringing call is not displayed on the current Home screen
page, use the Arrow keys to switch between the pages. Use the Exit button to return to the Home screen. When you locate the call appearance for the ringing call, press the corresponding call appearance button.
To make a call manually:
1. Go off hook using the handset, headset, or speaker. 2. When you hear dial tone, enter the extension or telephone number using the dialpad.
Note: If you are calling an off-campus number, be sure to dial “8” first to access an outside line.
Redial
10
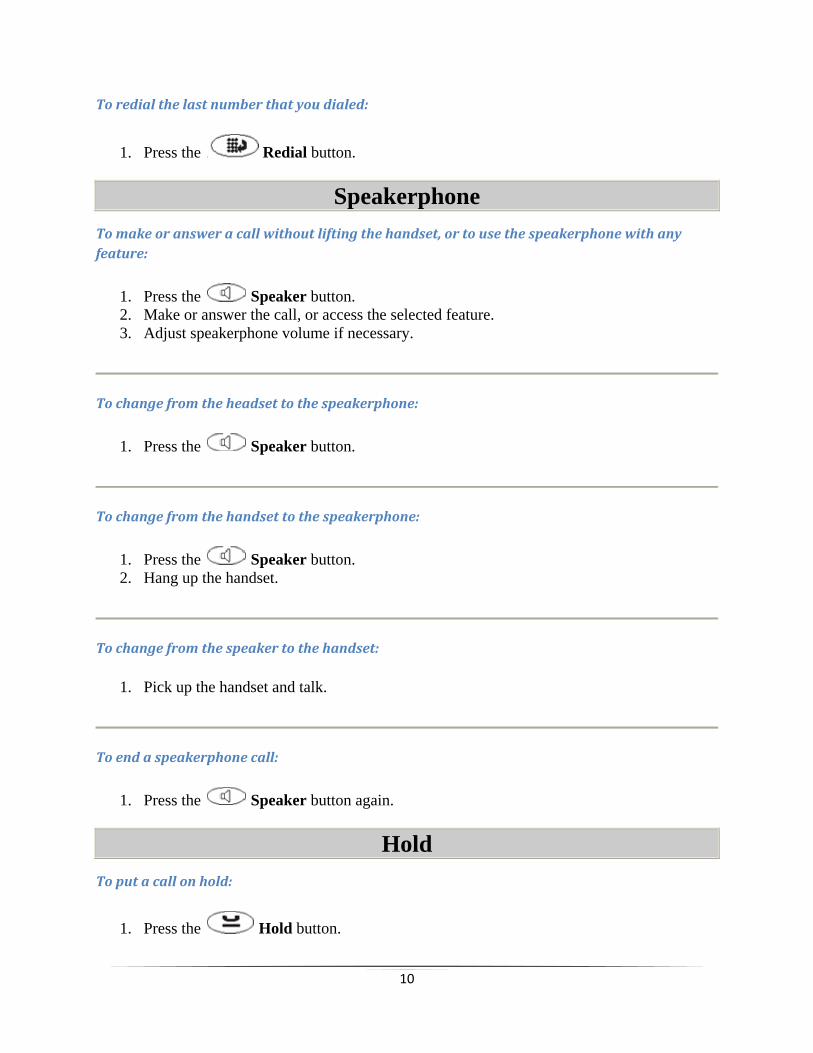
To redial the last number that you dialed:
1. Press the Redial button.
Speakerphone To make or answer a call without lifting the handset, or to use the speakerphone with any feature:
1. Press the Speaker button. 2. Make or answer the call, or access the selected feature. 3. Adjust speakerphone volume if necessary.
To change from the headset to the speakerphone:
1. Press the Speaker button.
To change from the handset to the speakerphone:
1. Press the Speaker button. 2. Hang up the handset.
To change from the speaker to the handset:
1. Pick up the handset and talk.
To end a speakerphone call:
1. Press the Speaker button again.
Hold To put a call on hold:
1. Press the Hold button.

11
To return to the held call:
1. Press the call appearance button of the held call.
Transfer To transfer the current call to another extension:
1. While on a call, press the Transfer button. The current call is placed on hold. 2. When you hear dial tone, dial the number to which the call is to be transferred.
3. When it rings on the other end, press the Transfer button again. Or, when the party answers, announce the call, explain that you are transferring a call, and then hang up.
4. If the line is busy or if there is no answer, press the Drop button. Then, you can return to the held call by pressing its call appearance button. This procedure can be used if voicemail answers the transferred call. Repeat the transfer and hang up after the first ring.
Conference To add another party to a call:
1. While on a call, Press the Conference button. The current call is placed on hold. 2. When you hear dial tone, dial the number of the person you want to add to the call. 3. Wait for an answer. Explain that you are setting up a conference call. 4. To add the person to the call, press the Conference button again. The parties in
the conference are now able to talk to each other. 5. Repeat Steps 1 through 4 for each additional conference party. 6. To be included in the conference call, press the Conference button.
To add a held call to an active call:
1. Press the Conference button. 2. When you hear dial tone, press the call appearance button corresponding to the held call. 3. Press the Conference button again.
12
To remove the last person added to the conference call:
1. Press the Drop button.
Speed Dial
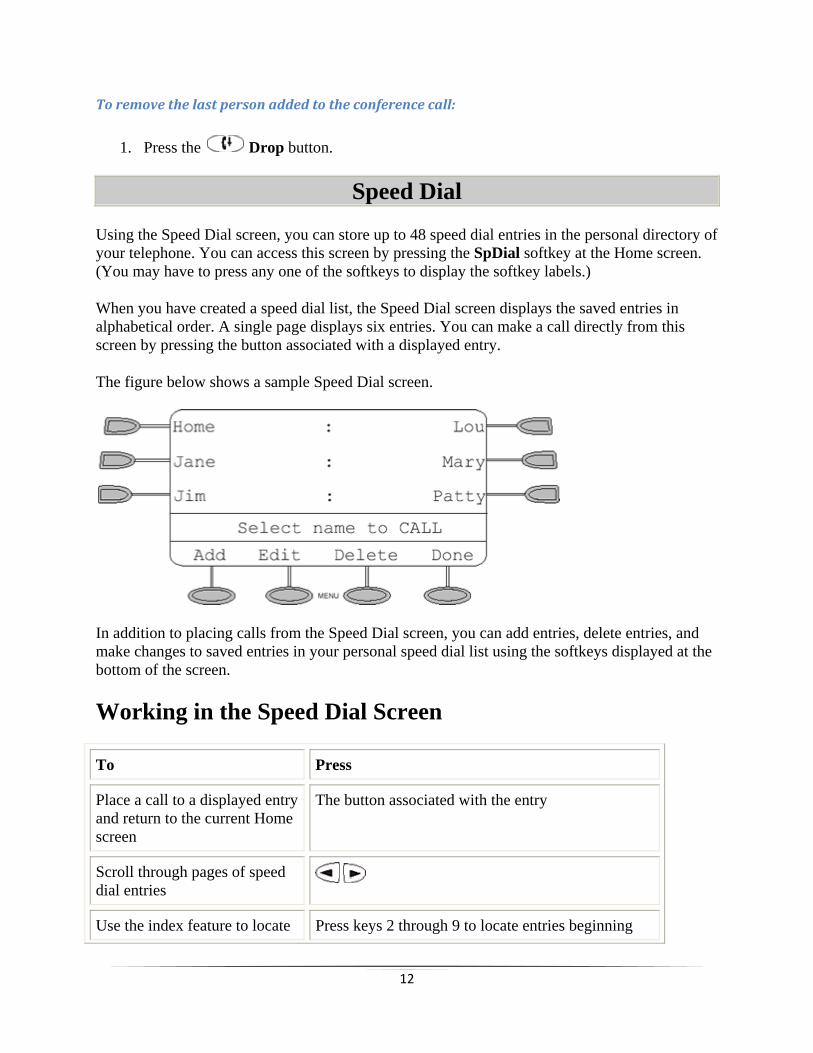
Using the Speed Dial screen, you can store up to 48 speed dial entries in the personal directory of your telephone. You can access this screen by pressing the SpDial softkey at the Home screen. (You may have to press any one of the softkeys to display the softkey labels.)
When you have created a speed dial list, the Speed Dial screen displays the saved entries in alphabetical order. A single page displays six entries. You can make a call directly from this screen by pressing the button associated with a displayed entry.
The figure below shows a sample Speed Dial screen.
In addition to placing calls from the Speed Dial screen, you can add entries, delete entries, and make changes to saved entries in your personal speed dial list using the softkeys displayed at the bottom of the screen.
Working in the Speed Dial Screen
To Press
Place a call to a displayed entry and return to the current Home screen
The button associated with the entry
Scroll through pages of speed dial entries
Use the index feature to locate Press keys 2 through 9 to locate entries beginning
13
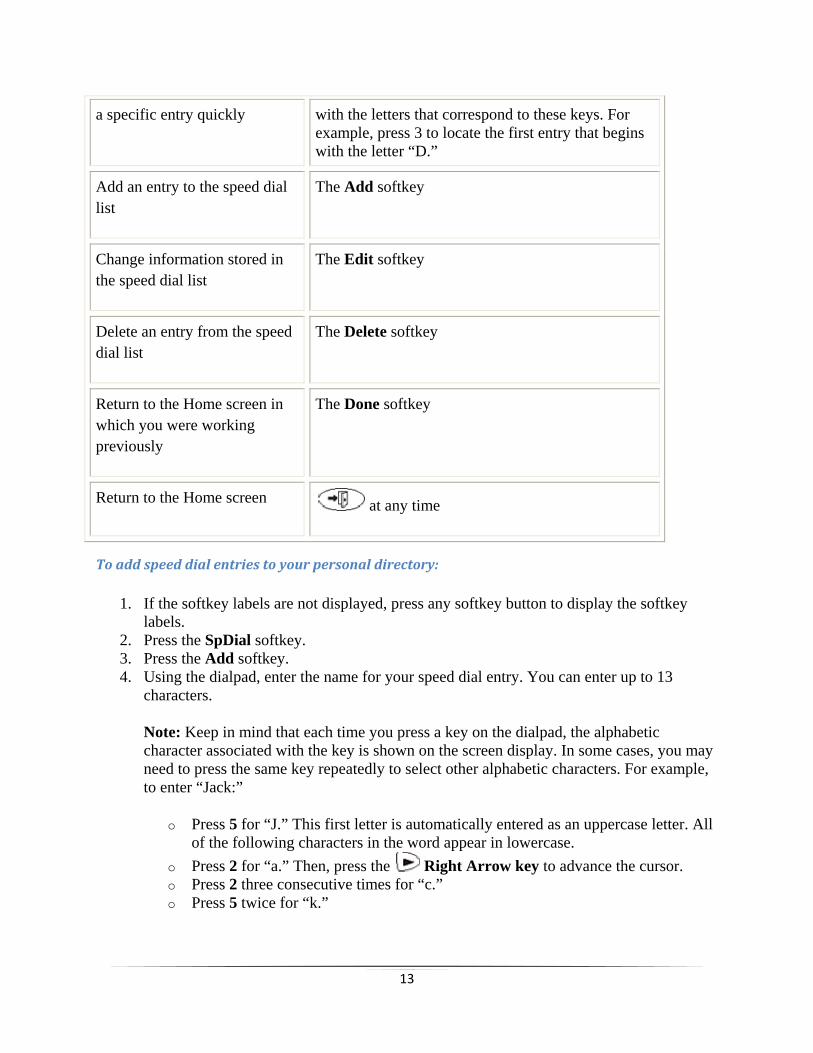
a specific entry quickly
with the letters that correspond to these keys. For example, press 3 to locate the first entry that begins with the letter “D.”
Add an entry to the speed dial list
The Add softkey
Change information stored in the speed dial list
The Edit softkey
Delete an entry from the speed dial list
The Delete softkey
Return to the Home screen in which you were working previously
The Done softkey
Return to the Home screen at any time
To add speed dial entries to your personal directory:
1. If the softkey labels are not displayed, press any softkey button to display the softkey labels.
2. Press the SpDial softkey. 3. Press the Add softkey. 4. Using the dialpad, enter the name for your speed dial entry. You can enter up to 13
characters.
Note: Keep in mind that each time you press a key on the dialpad, the alphabetic character associated with the key is shown on the screen display. In some cases, you may need to press the same key repeatedly to select other alphabetic characters. For example, to enter “Jack:”
o Press 5 for “J.” This first letter is automatically entered as an uppercase letter. All of the following characters in the word appear in lowercase.
o Press 2 for “a.” Then, press the Right Arrow key to advance the cursor. o Press 2 three consecutive times for “c.” o Press 5 twice for “k.”

14
Note that you must use the Right Arrow key if the next character you want to enter uses the same key as the character you just entered (for example, the characters “a” and “c” are both entered using the 2 key).
5. When you are finished entering a name, press the feature button to the left of the Number field to advance to that field.
6. Using the dialpad, enter the telephone number for this speed dial entry. You can enter numbers up to 20 characters long, including special characters.
Note: It is important that you observe the following conventions as you enter speed dial numbers:
o You must include the code required to access an outside line (for example, “8”) for external telephone numbers.
o You can use the Pause softkey to insert a 1.5-second pause. It is often useful to include a pause (or series of pauses) in beeper/pager numbers to allow a paging system enough time to answer.
o You can use the Hyphen softkey to insert hyphens between segments of a telephone number (for example, “9-732-555-1212”). The hyphen may make the number easier for you to read but does not affect dialing.
7. When you are finished entering the telephone number, do one of the following:
To save your entries and return to the Speed Dial screen, press the Save softkey.
To continue without saving your entries, press the Cancel softkey.
To return to the Home screen without saving your entries, press the Exit button.
8. Repeat Steps 3 through 7 to add more entries.
To make a call to a personal directory entry using the Speed Dial feature:
1. If the softkey labels are not displayed, press any softkey button to display the softkey labels.
2. Press the SpDial softkey. 3. Press the button next to the entry you want to call. (If the entry you want is not displayed
on the current page, use the Arrow keys to cycle through the entries.) o The telephone dials the number for you.
15
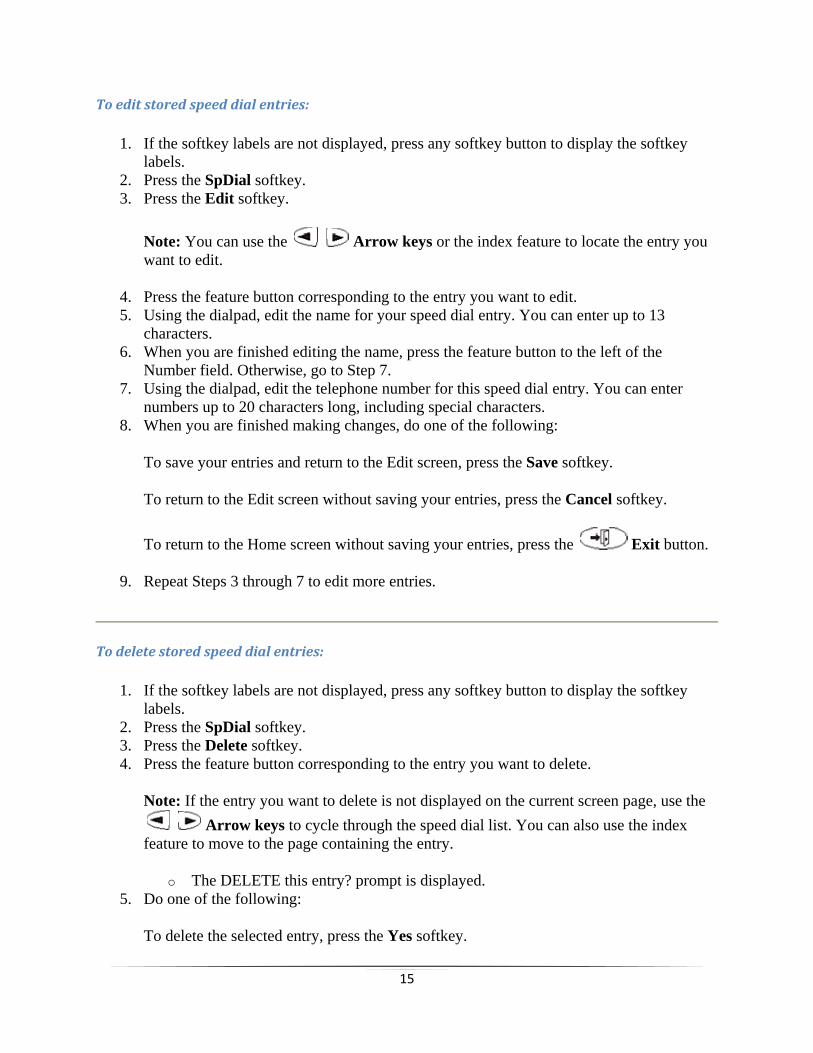
To edit stored speed dial entries:
1. If the softkey labels are not displayed, press any softkey button to display the softkey labels.
2. Press the SpDial softkey. 3. Press the Edit softkey.
Note: You can use the Arrow keys or the index feature to locate the entry you want to edit.
4. Press the feature button corresponding to the entry you want to edit. 5. Using the dialpad, edit the name for your speed dial entry. You can enter up to 13
characters. 6. When you are finished editing the name, press the feature button to the left of the
Number field. Otherwise, go to Step 7. 7. Using the dialpad, edit the telephone number for this speed dial entry. You can enter
numbers up to 20 characters long, including special characters. 8. When you are finished making changes, do one of the following:
To save your entries and return to the Edit screen, press the Save softkey.
To return to the Edit screen without saving your entries, press the Cancel softkey.
To return to the Home screen without saving your entries, press the Exit button.
9. Repeat Steps 3 through 7 to edit more entries.
To delete stored speed dial entries:
1. If the softkey labels are not displayed, press any softkey button to display the softkey labels.
2. Press the SpDial softkey. 3. Press the Delete softkey. 4. Press the feature button corresponding to the entry you want to delete.
Note: If the entry you want to delete is not displayed on the current screen page, use the Arrow keys to cycle through the speed dial list. You can also use the index
feature to move to the page containing the entry.
o The DELETE this entry? prompt is displayed. 5. Do one of the following:
To delete the selected entry, press the Yes softkey.

16
To return to the Delete screen without deleting the entry, press the Cancel softkey.
To return to the Home screen without deleting the entry, press the Exit button.
6. Repeat Steps 3 through 4 to delete more entries.
Abbreviated Dialing Allows you to store internal and external telephone numbers for quick, one button dialing.
To program or reprogram an AD button:
1. Dial the AD Program access code *0. 2. Press the call appearance button next to the button to be programmed. 3. Dial the telephone number you want to store (including 8 + 1 + area code when
necessary). 4. Press #. 5. Wait for confirmation tone. 6. If you want to program another button, repeat Steps 1 through 4. 7. To end programming, hang up.
To call a number using an AD button
1. Press the AD button to automatically dial the stored number.
Options
The Options screen allows you to personalize your options such as ring pattern, contrast control, call log setup and visual ringing.
A sample Options screen is shown in the figure below.
17
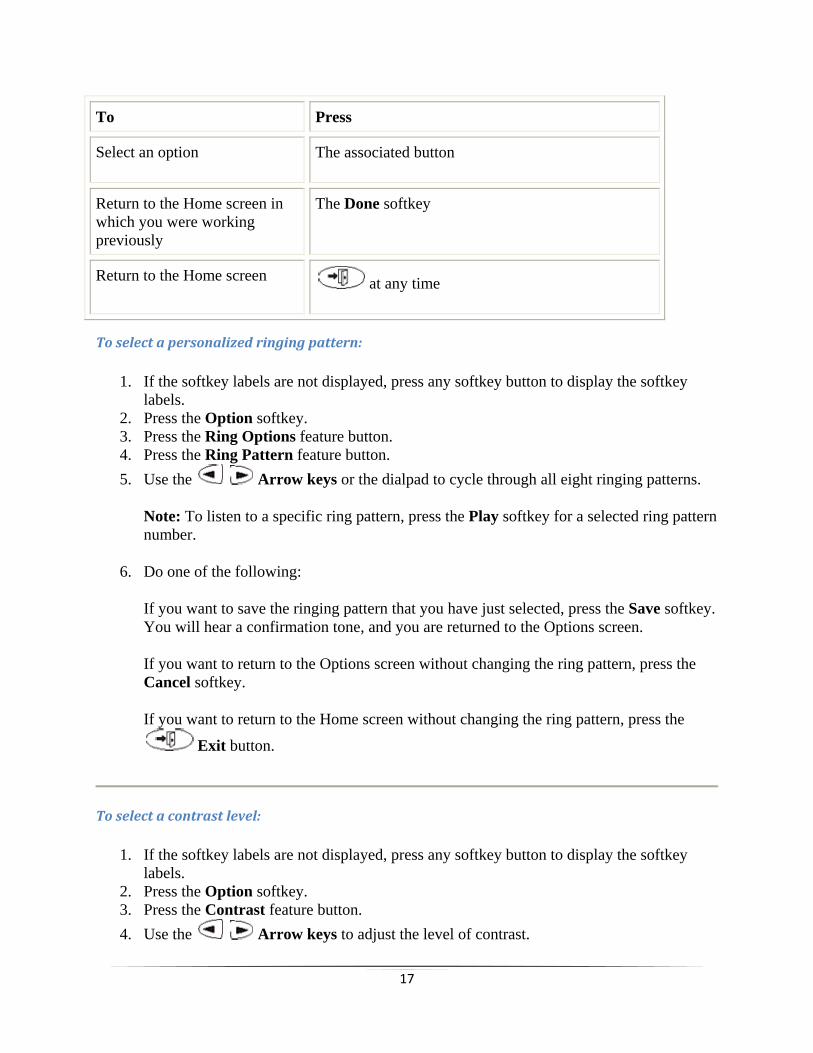
To Press
Select an option The associated button
Return to the Home screen in which you were working previously
The Done softkey
Return to the Home screen at any time
To select a personalized ringing pattern:
1. If the softkey labels are not displayed, press any softkey button to display the softkey labels.
2. Press the Option softkey. 3. Press the Ring Options feature button. 4. Press the Ring Pattern feature button. 5. Use the Arrow keys or the dialpad to cycle through all eight ringing patterns.
Note: To listen to a specific ring pattern, press the Play softkey for a selected ring pattern number.
6. Do one of the following:
If you want to save the ringing pattern that you have just selected, press the Save softkey. You will hear a confirmation tone, and you are returned to the Options screen.
If you want to return to the Options screen without changing the ring pattern, press the Cancel softkey.
If you want to return to the Home screen without changing the ring pattern, press the
Exit button.
To select a contrast level:
1. If the softkey labels are not displayed, press any softkey button to display the softkey labels.
2. Press the Option softkey. 3. Press the Contrast feature button. 4. Use the Arrow keys to adjust the level of contrast.
18
5. Do one of the following:
To return to the Options screen, press the Done softkey.
To return to the Home screen, press the Exit button.
To specify the call types that you want to appear in the Call Log:
1. If the softkey labels are not displayed, press any softkey button to display the softkey labels.
2. Press the Option softkey. 3. Press the Log Setup feature button. 4. Press Yes/No softkey to indicate which types of calls you want to appear in the Call Log. 5. Do one of the following:
If you want to save the selections that you have just made, press the Save softkey. You will hear a confirmation tone, and you are returned to the Options screen.
If you want to return to the Options screen without saving your entries, press the Cancel softkey.
If you want to return to the Home screen without saving your entries, press the Exit button.
To set the Visual Ring option:
1. If the softkey labels are not displayed, press any softkey button to display the softkey labels.
2. Press the Option softkey. 3. Press the Ring Options feature button. 4. Press the Flash Message Lamp feature button. 5. Press the Yes/No softkey to indicate whether you want Visual Ring enabled. 6. Do one of the following:
If you want to save the setting you just selected, press the Save softkey. You will hear a confirmation tone, and you are returned to the Options screen.
If you want to return to the Options screen without changing the setting, press the Cancel softkey.
19
If you want to return to the Home screen without changing the setting, press the Exit button.
Call Log
Your telephone can store up to 48 entries in the Call Log. By default, all types of calls are logged, and the number of new unanswered calls is displayed below the date and time on your telephone.
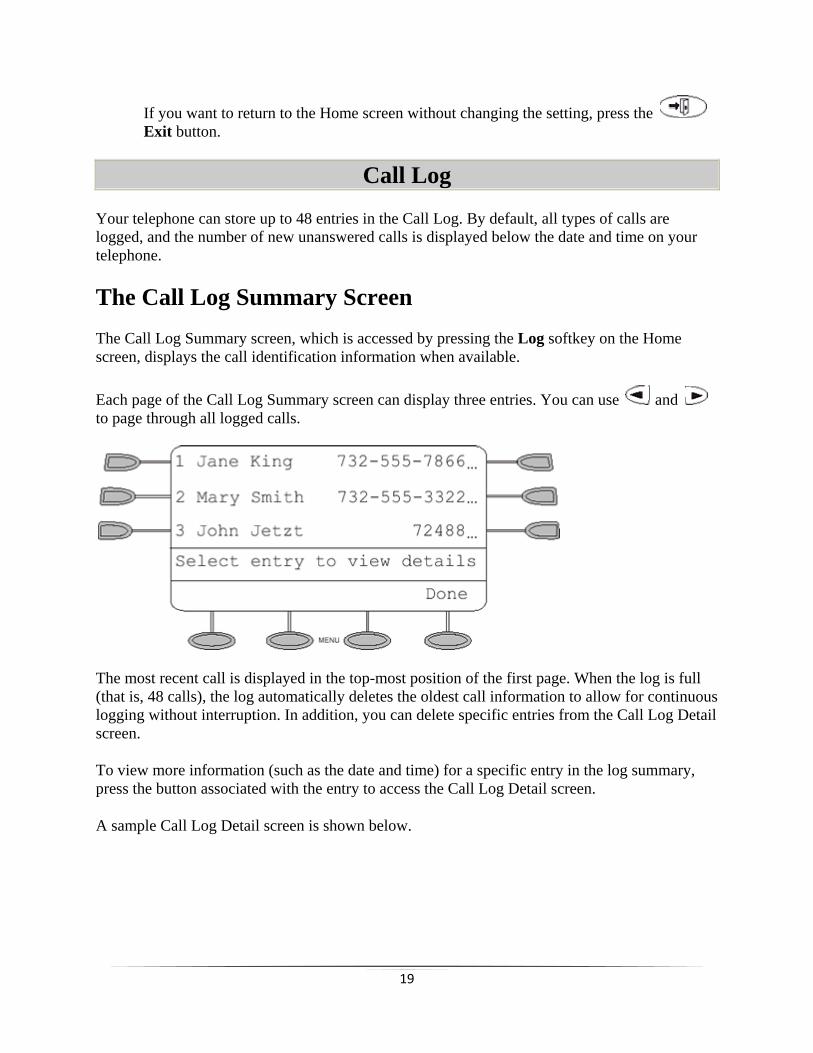
The Call Log Summary Screen The Call Log Summary screen, which is accessed by pressing the Log softkey on the Home screen, displays the call identification information when available.
Each page of the Call Log Summary screen can display three entries. You can use and to page through all logged calls.
The most recent call is displayed in the top-most position of the first page. When the log is full (that is, 48 calls), the log automatically deletes the oldest call information to allow for continuous logging without interruption. In addition, you can delete specific entries from the Call Log Detail screen.
To view more information (such as the date and time) for a specific entry in the log summary, press the button associated with the entry to access the Call Log Detail screen.
A sample Call Log Detail screen is shown below.

20
The number displayed in the upper left corner of the screen indicates the position of this call in the log summary. The call type (that is, Answered, Un-answered, or Outgoing) is displayed in the upper right corner.
Working in the Call Log Screens
To Press
View information about a specific log entry
The button associated with the entry
Scroll through the pages of call log entries
or
Make a call to the entry displayed
The Call softkey
Scroll through call log entries or
Return to the Home screen at any time
To view the list of all calls recorded in the Call Log:
1. If the softkey labels are not displayed, press any softkey button to display the softkey labels.
2. Press the Log softkey.
21
3. Use the Arrow keys to scroll through the Call Log Summary pages. 4. To view information about a specific entry, press the button corresponding to the entry.
5. Press the Exit button to return to the Home screen.
To make a call to an entry in the Call Log:
1. If the softkey labels are not displayed, press any softkey button to display the softkey labels.
2. Press the Log softkey. 3. Use the Arrow keys to scroll through the Call Log Summary pages. 4. When you locate an entry you want to call, press the button corresponding to the entry. 5. Press the Call softkey to make the call.
To save an entry in the Call Log to your Speed Dial List:
1. If the softkey labels are not displayed, press any softkey button to display the softkey labels.
2. Press the Log softkey. 3. Use the Arrow keys to scroll through the Call Log Summary pages. 4. When you locate an entry you want to save, press the button corresponding to the entry. 5. Press the Save softkey. 6. If the name appears correctly, press the Save softkey again to add the listed person to
speed dial. If not, edit the name and then press the Save softkey.
To delete an entry from the Call Log:
1. If the softkey labels are not displayed, press any softkey button to display the softkey labels.
2. Press the Log softkey. 3. Use the Arrow keys to scroll through the Call Log Summary pages. 4. When you locate an entry you want to delete, press the button corresponding to the entry. 5. Press the Delete softkey.
Message To retrieve messages from your own phone:
1. Press the Messages button.
22
2. Enter your passcode when prompted.3. Follow the directions to playback and delete messages in your mailbox.
To retrieve messages from a campus phone other than your own:
1. Dial 2-0000.2. When it asks for your passcode, press *.3. Enter your 5-digit campus phone number.4. Press *.5. Enter your mailbox passcode when prompted.6. Follow the directions to playback and delete messages in your mailbox.
To retrieve messages from offcampus:
1. Dial 517-432-0000.2. Enter your 5-digit campus phone number.3. Press *.4. Enter your mailbox passcode when prompted.5. Follow the directions to playback and delete messages in your mailbox.
Send All Calls To send all calls:
1. Press the Send Calls button (while on-hook).
To cancel Send All Calls:
1. Press the Send Calls button again (while on-hook).
Call Forwarding All Calls To temporarily redirect all calls:
1. Press the Call Fwd button.
or, Dial the Call Forward code *2.
2. Dial the extension or phone number where calls are to be sent. 3. Hang up.
23
To cancel Call Forwarding:
1. Press the Call Fwd button again (while on-hook).
or, Dial the Call Forward Cancel code #2 (while off-hook).
Call Park Allows you to put a call on hold at your telephone, for retrieval at any extension. The call parking feature must be administered by MSU Telecom Systems.
To park a call for retrieval from any extension:
1. While on the call, press the Transfer button. 2. Dial the Call Park code *6. 3. Press the Transfer button again. Wait for the confirmation tone. 4. Hang up.
To retrieve a parked call:
1. Pick up the handset or press the Speaker button. 2. Dial the Answer Back code: #6. 3. When you hear a dial tone, dial the extension at which you parked the call. If you receive
intercept tone, the parked call has been disconnected or retrieved by someone else.
Call Pickup Lets you answer a call at your telephone for another extension in your pickup group. Use when you wish to handle a call for a group member who is absent or otherwise unable to answer.
To answer a call placed to your pickup group:
Note: You can only use this feature if you and the called party have been assigned to the same pickup group by MSU Telecom Systems. Extensions in a pickup group need to be within hearing distance of each other.
1. Press the designated Call Pickup button.
or, Dial the Call Pickup code *7.
-- ACD Agent Instructions --
24
Agent Login To log in as an ACD agent:
1. Press Login if you have an Abbreviated Dialing (AD) button with the login access code stored on it.
{dial tone}
2. Dial your login-ID number. (If you hear a confirmation tone, skip the next step.)
{confirmation tone}
o Your answering position is now staffed. o You are automatically placed in Unavailable Mode. o The Unavailable light goes on steadily.
3. Press Available to be available to answer ACD calls.
Agent Logout To log out as an ACD agent:
1. Press Logout if you have an Abbreviated Dialing (AD) button with the logout access code stored on it.
{confirmation tone}
2. Hang up the handset or turn off the headset. o Your answering position is now unstaffed.
To answer ACD calls in Available Mode:
1. Log in. o Your answering position is now staffed. o You are automatically placed in Unavailable Mode. o The Unavailable light goes on.
2. Press Available. o The Unavailable light goes off. o The Available light goes on.
25
3. Listen for an audible ring, then press the ringing call appearance button or lift the handset. If you are using a headset, press the headset button and then press the line button of the incoming call. If you are using a wireless headset, press the button on the headset.
4. Converse with the caller.
If your ACD is not programmed for After Call Work Mode (ACW), you are automatically connected to your next ACD call when the caller hangs up. Go on to Step 7.
5. If you enter After Call Work Mode, the following occurs: o Your call is disconnected when the caller hangs up, or when you go on-hook and
press Release. o The Available light goes off. o The Unavailable light goes on steadily at the end of the call. o You are in After Call Work Mode.
6. When you are ready to receive another ACD call, while you are in After Call Work Mode, press Available.
7. To process another ACD call, repeat Steps 3 through 5.
To unstaff your position:
1. Log out to unstaff your position.
Display Features
If the CIQ button is lit, there are calls in queue.
To display queue status:
1. Press the CIQ button. 2. The display will show the number of calls in queue and the time the oldest caller in queue
has been waiting.
-- ACD Supervisor Instructions --
Activating Service Observing The Service Observing feature can be used to monitor an agent's performance for extended periods of time. If you are observing a particular agent or agent station, you are connected immediately to that agent's call or the call at that station, and you can hear both the agent and the caller. Service Observing can be used for training purposes to help new agents handle successive ACD calls or to evaluate service.

26
You can also use this feature to monitor a VDN. When you observe a VDN, you are connected to the next available call at that VDN. (Since multiple observers can monitor a VDN, but only one person can monitor each call, you may be placed in a queue to observe the next available call.) When connected, you will hear everything the caller hears: for example, wait treatment, music-on-hold, and the agent talking. In addition, you will hear VDN-of-Origin announcements.
Agents can be monitored only if the "Can Be Service Observed" option on the COR administration form is set to Yes.
Important: The use of the Service Observing feature may be subject to federal, state, or local laws, rules, or regulations and may be prohibited pursuant to the laws, rules, or regulations or require the consent of one or both of the parties to the conversation. Customers should familiarize themselves with and comply with all applicable laws, rules, and regulations before using these features.
To activate service observing:
1. Press an idle call appearance button.
{dial tone}
2. Press Service Observe.
{dial tone}
o If you have Service Observe, the light next to it goes on steadily.
Note: If you press Service Observe without first selecting an idle call appearance button, one is automatically selected for you.
3. Dial the extension of the agent, station, or VDN to be observed. o If the agent is not active on a call, your Service Observe light flashes slowly, you
are placed in a waiting state, and you are bridged on when the agent becomes active on a call.
o If you are using a Service Observe button, you are now able to hear both the caller and the agent, but are unable to talk to them.
4. When you are ready to listen and speak, press Service Observe again. Note that the agent must be connected to the call before you can speak.
o The Service Observe feature icon, if you are using a button, indicates the status. o You can hear the agent and caller and join in the conversation.
5. To return to a listen-only connection, press Service Observe again. o The Service Observe feature icon, if you are using a button, goes on steadily. o You can hear the agent and caller, but cannot talk to them.
6. When you are through observing, hang up or press Release.

27
Note: An optional warning tone is available (on a per-system basis) to alert the agent and caller that an observer is about to be added to the connection. This feature option is administered by the system manager.
If the agent has a call in progress, all parties on the connection hear an initial long burst of tone (two seconds) and a short burst of tone (0.5 seconds) every 12 seconds during the observer's presence.
If the agent is not active on a call, all parties hear the first warning tone (two seconds) after the beginning of the next call. All parties also hear a short burst of tone every 12 seconds while the call is being observed.
Adding a Skill or Changing a Skill Priority During a login session, agents may change one of their skill assignments or change the priority of a skill assignment (from primary to secondary or from secondary to primary). Both of these changes in skill assignment can be done by dialing a feature access code at the agent's station, or remotely at any station that is administered with console permission. Therefore, if you are an EAS supervisor with console permission, you can change an agent's skill assignment or skill priority on the agent's behalf.
Note: In order to change skill assignments or priorities, your ACD system must have EAS, and you must have COR permission.
To add a skill or change a priority for a skill on an agent's behalf:
Note: You will hear intercept tone if you are not logged in, the agent already has four skills and you try to add a fifth, or the skill is invalid.
1. Pick up the handset.
{dial tone}
2. Dial the ACD Add Skill code: 191.
{dial tone}
3. Enter the extension of the agent's login-ID. 4. Dial the number of the skill you want to add. 5. Press #.
{dial tone}

28
6. Dial 1 if the added or changed skill is to be a primary skill; dial 2 if the added or changed skill is to be a secondary skill.
o If the new skill is valid and your entry is accepted, you hear confirmation tone.
Removing an Agent from a Skill Assignment While logged in, you may also choose to remove an agent from a skill assignment.
Note: In order to remove an agent from a skill assignment, your ACD system must have EAS, and you must have COR permission.
To remove an agent from a skill assignment on the agent's behalf:
Note: You will hear intercept tone if you are not logged in, the agent is not presently assigned to the skill being removed, or the skill you are removing is the agent's only skill.
1. Pick up the handset.
{dial tone}
2. Dial the ACD Remove Skill code: 190.
{dial tone}
3. Enter the extension of the agent's login-ID. 4. Dial the number of the skill assignment from which the agent is to be removed. 5. Press #.
Note: If the agent is presently on a call in the skill from which he/she is being removed or if the agent has calls remaining in that skill, you will hear reorder tone.
Recording Announcements Follow these directions to use an Integrated Announcement Board to record, playback, or delete announcements for your ACD system.
Note: In order to record an announcement, you must have console permission and an extension must already be designated for integrated announcements (preadministered on the announcement form).
29
To record, playback, or delete ACD announcements:
1. Dial the Recorded Announcements feature access code: #1 followed by the extension assigned to integrated announcements.
o If an announcement session is already active or a Save or Restore is in progress, you hear reorder tone.
2. When you hear dial tone, do one of the following:
Note: If you hear recall dial tone rather than normal dial tone, more than 90% of the announcement board memory has been used.
-- Dial 1 to record an announcement.
-- If recording access is granted, you hear record tone (one low burst of tone), and you can begin recording. When you are finished, hang up or press #. (If you press #, you hear dial tone. You can then play the announcement or delete it or record again, by dialing 1, 2, or 3.
Note: If the announcement is protected, you hear intercept tone (the announcement must be unprotected until recorded). If the announcement is currently being played to users, you hear reorder tone.
-- Dial 2 to play or repeat a recorded announcement.
-- You hear your recorded announcement and then dial tone.
Note: If nothing was recorded, you hear reorder tone.
-- Dial 3 to delete an announcement.
o When the announcement is deleted, you hear confirmation tone.
Note: If the announcement is being played to users, is protected, or has not been recorded, you hear reorder tone.
Bridged Appearance
Permits you to answer, originate, or join in calls at someone else’s extension by pressing a bridged appearance button on your telephone. This button can be any call appearance button labeled with another user’s extension number, as assigned to you by MSU Telecom Systems. Use to assist in handling calls for a designated co-worker.
To answer a bridged appearance call:
1. Press the bridged appearance button next to the name or number you are answering.
30
Note: If the bridged appearance rings on your phone, this step is not necessary; you will automatically be connected to call when you answer.
2. The speakerphone will activate when the call appearance button is pressed or you can pick up the handset.
Directory To search the directory for a name:
1. Press the Directory button (if administered). 2. Key in the selected name with dial pad keys: last name, comma (use * ), first name or
initial. 3. Press the Next button for each successive directory name you wish to see. (The Next
button must be administered by your system manager.) 4. To search for a new name, press the Directory button and go through the above sequence
again.
5. When you are ready to exit the directory, press the Exit button.
To place a call to the name shown on the display:
1. Pick up the handset. 2. While the name is shown, press the Call Disp button (if administered) or, if you do not
have a Call Disp button on your set, press the Exit button and then dial the number using the dial pad.
Note: You can also leave your handset on-hook. The speakerphone will turn on automatically when you press Call Disp if this system feature is enabled.
Dial Intercom The dial intercom feature must be administered by MSU Telecom Systems.
To make a call to a member of your intercom group:
1. Press Intercom button. 2. Dial the group member's 1- or 2-digit code.
o A special intercom ring is sent.
Label Action

31
Using the Label Action screen, you can customize the labels of the call appearance/feature buttons on the telephone, view the labels of the call appearance/feature buttons on the call processing system, and restore the system labels of all the call appearance/feature buttons. You can access this screen by pressing the Label softkey at the Home screen.
The Label Action screen is shown in the figure below.
To Press
Change the label of a call appearance/feature button
The Edit softkey
Delete the customized labels of all the call appearance/feature buttons and restore all the system labels.
The Restore softkey
Return to the Home screen in which you were working previously
The Done softkey
Return to the Home screen at any time
To edit call appearance button labels:
1. If the softkey labels are not displayed, press any softkey button to display the softkey labels.
2. Press the Label softkey. 3. Press the Edit softkey.
32
Note: You can use the Arrow keys to locate the label you want to edit.
4. Press the feature button on the telephone corresponding to the label you want to edit. 5. Using the dialpad, edit the label. You can enter up to 13 characters. 6. When you are finished making changes, do one of the following:
To save your entries and return to the Label Select screen, press the Save softkey.
To return to the Label Select screen without saving your entries, press the Cancel softkey.
To return to the Home screen without saving your entries, press the Exit button.
7. Repeat Steps 3 through 5 to edit more labels.
To view the system labels:
1. If the softkey labels are not displayed, press any softkey button to display the softkey labels.
2. Press the Label softkey. 3. Press the Inspect softkey. 4. Use the Arrow keys to scroll through the Label Inspect screen pages on the
telephone. 5. Do one of the following:
To return to the Label Action screen, press the Done softkey.
To return to the Home screen, press the Exit button.
To restore the system labels:
1. If the softkey labels are not displayed, press any softkey button to display the softkey labels.
2. Press the Label softkey. 3. Press the Restore softkey. 4. Press the Erase softkey. 5. Do one of the following:
To erase the custom labels and restore the system labels, press the Erase softkey.

33
To return to the Label Action screen without erasing the custom labels, press the Cancel softkey.
To return to the Home screen without erasing the custom labels and restoring the system
labels, press the Exit button.