Embed Size (px)
Citation preview

1
MODULE FOR TRAINING OF SPECIALIST IN
PEDIATRICS ON NEWBORN CARE
Module - C
(Intensive Care of Newborn)
Developed by:
Dr. M.L. Gupta Associate Professor Deptt. of Paediatric Medicine SMS Medical College & J.K. Lon Hospital, Jaipur
2
INDEX
1. General objective of the training 1
2. Session wise plan 2
3. Session plan on Intensive Care of Newborn 3
4. Monitoring of critically sick newborn 4-5
5. Supportive care of critically sick newborn 6
6. Principles of critically care of sick newborn 7-51
• Maintaining normal body temperature 7-18
• Feeding and fluid management 18-30
• Oxygen therapy 30-37
• Phototherapy 37-39
• Infection prevention 39-48
• Care during referral and transport of sick newborn. 48-50
• References 51
7. Session plan for day 4 52
8. Session plan for day 5 53
9. Session plan for day 6 54

3
General objective of training
In modern times, improvement in knowledge and technology has
greatly influenced the health of children. However, past decade was marked
by limited progress in reducing infant mortality largely due to a failure in
reduction of neonatal mortality.
There is widely shared but mistaken idea that improvement in
newborn health requires advanced technologies and highly specialized staff.
The reality is that many conditions that result in perinatal death can be
prevented or treated without sophisticated and expensive technology. What
is required is essential care during child birth and immediate postpartum
period and a few critical interventions for the newborn during the first days of
life.
In this era of evidence based medicine the criteria of diagnosis and
management of illness changes frequently, hence, objective of this training
to specialists working at referral/ district level is to make them acquint about
the recent trends in the management of common newborn problems. The
module for training of pediatricians has been developed in three sections
"Module - A" contains care of newborn babies with common problems like
Birth asphyxia, Sepsis, Jaundice, Birth injuries and Convulsions, "Module -B"
contains Care of Low Birth Weight (LBW) babies and "Module - C" contains
Intensive Care of a Sick Newborn.
We hope that these modules will serve as a useful guide during
training and afterwards in practice for the specialist in Pediatrics working at
referral/district hospitals.
4
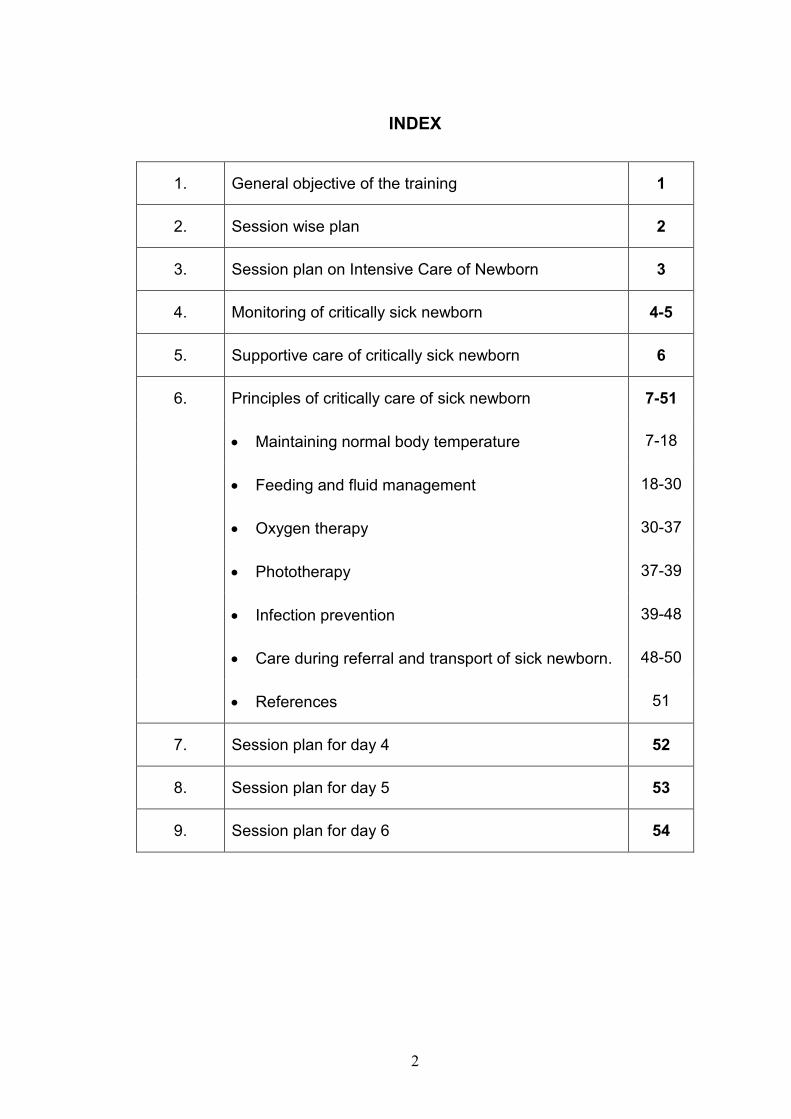
TRAINING OF SENIOR/ JUNIOR SPECIALISTS IN PEDIATRICS
SESSION WISE PLAN
Day I II III IV
1 Resuscitation of Newborn
Management of Birth Asphyxia
Preparation and Initial steps of Resuscitation
Bag & Mask ventilation
Chest Compression,
Medication and Endotrachial
Intubation
Practice of resuscitation on Baby Manikin
2. Management Convulsions
Management of Jaundice
Management of sepsis
Management of Birth injuries
3.
Management of LBW babies
Intensive Care of Newborn Including use of equipment's in
NICU- e.g. Incubators phototherapy and warmer etc.
4. Visit to labour room and OT for demonstrate of
Neonatal Resuscitation
Setting up of nursery at district
level hospital (Group work)
5. Visit to nursery for intensive care of newborn and
demonstration of equipments used in NICU
Setting up of nursery at district
level hospital (Presentation)
6. Visit to Nursery for demonstration on care of LBW,
Asphyxia, convulsions, sepsis and Jaundice.
Post test Evaluation & Discussion
No. of participants in each batch 10
Duration of Training 6 days

5
Day 3: Session III and IV (Intensive Care and Use of equipments in
Neonatal Intensive Care Unit)
Objectives
At the end of the sessions the trainee should be able to understand :
• Monitoring and Care of Sick babies
• Functioning of incubators, phototherapy, warmers and other
equipments used in nursery.
Methodology
Lecture - Discussion

6
MONITORING OF CRITICALLY SICK NEWBORN
The following parameters should be monitored by specially trained
health personnel working in Neonatal Intensive Care Unit. The frequency of
monitoring depends upon the gestational maturity and clinical status of the
baby.
Clinical monitoring
� Vital signs i.e. heart rate, respiratory rate and temperature should be
monitored frequently depending upon the condition of the baby.
� Color of the baby should be closely watched for cyanosis, greyness,
pallor (hypotension) and jaundice.
� Assess Activity and Behaviour of the baby.
� Tissue perfusion should be evaluated by capillary refilling time on
blanching which should be less than 3 seconds. When gradiant
between the core and peripheral body temperature is more than
2.5°C, it is also indicative of poor tissue perfusion.
� Abdominal girth should be monitored to identify abdominal distension
and look for occult blood and reducing substance in the stools as
early markers of necrotising enterocolitis.
� Periventricualr-intraventricular hemorrhage is best diagnosed with the
help of ultrasound examination but can be clinically suspected by
features of sudden pallor/ jaundice, fall in hematocrit, subtle seizures,
bulging anterior fontanel and marked hypotonia.
� Renal perfusion shold be monitored by recording urine output which
must be kept above 2 ml/kg/ hr.
� Weight should be recorded periodicaly to detect dihydration and
overhydration.
Electronic Monitoring
� Multichannel vital signs monitor (Non-invasive with alarms) is a
good device to monitor vital signs.

7
� Pulse oximetery is a non invasive method of measuring percent
oxygen saturation of hemoglobin. It is a fairly reliable device for
detection of hypoxia except in certain condition such as
methemoglobinemia and poor peripheral perfusion (shock,
hypothermia).
� Apnea monitoring It helps in detection of apnea which is quite
frequent in preterms.
� Non-invasive BP monitoring, continuous heart rate and ECG
monitoring is quite useful for assessment of cardiac status in
critically ill newborn.
Biochemical monitoring
� Acid base parameters and blood gases should be monitored as soon
as the infant is transferred to the NICU.
� Blood glucose and calcium should be frequently checked to indentify
hypoglycemia or hyperglycemia and hypocalcium.
� Serum electrolytes should be monitored. Hyponatremia may occur as
a consequence of inappropriate secretion of ADH while
hypernatremia may occur due to frequent administration of sodium
bicarbonate for correction of acidosis. Hyperkalemia is ominous
andcan occur due to acute renal shut down or tissue catabolism.
� Non-oliguric renal failure may occur in sick infants and is diagnosed
by elevation of BUN and creatinine.
Laboratory investigations
� Skiagram of chest should be taken in babies with respiratory distress
to exculde RDS, pneumothorax, diaphragmatic hernia, congenital
pneoumonia, air leaks etc.
� Sepsis screening and blood culture should be taken to make an early
diagnosis of bacterial infection.
� Neuroimaging (USG, CT, MRI) should be performed in criticaly sick
baby with neurological manifestations.

8
SUPPORTIVE CARE OF CRITICALLY SICK NEWBORN
� Neonate must be nursed in the thermo neutral zone of ambient
temperature. If possible, servo-controlled incubator or open care
system should be used.
� Intravenous fluids are started and enteral feeding is stopped in a sick
child for a couple of days.
� In case of documented hypoglycemia and when facilities to check
blood sugar are not readily available, it is prudent to give a mini-bolus
of 10 percent glucose (2ml /kg).
� Injection vitamin K 0.5 mg is given intravenously at admission and
twice a week till enteral feeds are re-established.
� Metabolic acidosis is corrected by using appropriately dilute sodium
bicarbonate.
� Peripheral perfusion is supported with infusion of normal saline
10ml/kg if perfusion is poor (CRT > 3 sec.) repeat the same dose 1-2
times over the next 30-45 min. if perfusion continues to be poor.
� Shock is managed by careful volume expansion (preferably with
central venous pressure monitoring), and vasopressons.
Corticosteroids are indicated in gravely sick neonates with endotoxic
shock, sclerema and adrenal insufficiency.
� Anemia is corrected with aliquots of packed cells. Fresh blood or FFP
is useful to improve defense mechanisms by providing opsonins and
polymorphonuclear leukocytes.
� Hyperbilirubinemia should be managed more aggressively with
phototherapy and exchange blood transfusion. Bilirubin
encephalophathy is likely to occur at a lower serum bilirubin level in
LBW.
� Oxygen and ventilatory therapy should be instituted in the event of
respiratory failure as per the standard indications.
� Bleeding tendency is managed by judicious administration of fresh
blood, fresh plasma, platelet concentrates and vitamin K.
� Seizures are treated with diazepam and phenobarbitone. In the
presence of manifestations of raised intracranial pressure, mannitol
can be used.

9
PRINCIPLES OF CRITICAL CARE OF SICK NEWBORN
MAINTAINING NORMAL BODY TEMPERATURE
A baby who is sick or small (less than 2.5 kg at birth or born before 37
weeks gestation) needs additional thermal protection and warmth to maintain
normal body temperature. These babies can become hypothermic very
quickly, and rewarming the baby can take a long time. The risk of
complications and mortality significantly increases if the thermal environment
is not optimal.
GENERAL PRINCIPLES
• Keep the baby clothed or covered as much as possible at all times,
including during procedures (e.g. when establishing an IV line, during
resuscitation):
- Clothe the baby and cover the head with a cap or hat;
- Wrap the baby in a soft dry cloth and cover with a blanket;
- Uncover only parts of the body that need observation or
treatment.
• Care for a sick or small baby in a warm room (not less than 25 0 C) that
is free of draughts.
• Do not place the baby near cold objects, such as a wall or window,
even if the baby is in an incubator or under a radiant warmer.
• Do not place the baby directly on a cold surface (e.g. place a cloth or
blanket under the baby before placing on a cold bed or examination
table), and ensure that hands are warm before handling the baby.
• Keep the baby warm during transfer for diagnostic or treatment
procedures. Use warming devices or transfer in skin-to-skin contact
with the mother or another person, if possible.
• Ensure warmth during procedures (e.g. use a radiant warmer).
• Change napkins whenever they are wet.
• If anything wet is applied to the skin (e.g. moistened gauze), ensure
that the baby is kept warm.

10
• Avoid bathing the baby until the baby's temperature is stable; delay
bathing a small baby until at least the seventh day of life.
MEASURING BODY TEMPERATURE
Unless directed otherwise measure the baby's temperature as often
as indicated in table below.
TABLE : Measuring body temperature
Baby with Serious Illness
Small Babya
Very Small Baby'sb
Baby Progressing
Well
Frequency of measurements
Every hour Twice daily
Four time daily
Once daily
a Small babies are less than 2.5 kg at birth or born before 37 weeks gestation.
b Very small babies are less than 1.5 kg at birth or born before 32 weeks gestation.
METHODS FOR WARMING THE BABY AND MAINTAINING BODY
TEMPERATURE
There are five methods for warning the baby and maintaining the
baby's temperature (Table). See below for specific instructin for using each
method.
Table: Methods for warming the baby and maintaining body
temperature
Method Guidelines for Selection and Use
Advantages Risks/ Disadvantages
Skin to Skin
contact
• Appropriate for all stable babies
• Appropriate for rewarning a baby with moderate hypothermia (32
0 C to
36.4 0 C),
particularly when other methods are not available
• Not appropriate for babies with life threatening problems (e.g. sepsis, severe breathing difficulty)
• Mother can closely monitor baby
• Another person can provide skin-to-skin contact if the mother is unavailable
• Babies usually maintain normal body temperature

11
Method Guidelines for Selection and Use
Advantages Risks/ Disadvantages
Kangaroo
mother care
• Appropriate for stabilized
babies weighing 1.5 to 2.5
kg, but particularly
recommended for
continuous care of babies
weighing 1.5 to 1.8 kg
• Not appropriate for babies
with life threatening
problems (e.g. sepsis,
severe breathing difficulty)
• Not appropriate if mother
has a serious illness or
complication from labour
or birth that prevents her
from caring for the baby
• Mother can
closely monitor
baby
• Babies usually
maintain normal
body
temperature
Mother may not always
be available
Radiant
warmer
• Appropriate for sick babies
and babies weighing 1.5
kg or more
• Use to keep baby warm
during initial assessment,
treatment, and procedures,
and to rewarm a cold baby
• Allows observation
of baby
• Many prodedurres
can be performed
while baby is under
warmer
• Baby can become
hyperthernic or
hypothermic if
temperature is not
monitored
• Baby can become
dehydrated
• Warmer is expensive
to buy
• Warner requires
reliable source of
electricity
Incubator
• Appropriate for continous
care of babies weighing
less than 1.5 kg who are
not eligible for kangaroo
mother care
• Appropriate for babies who
have life threatening
problems (e.g. sepsis,
• Maintains constant
temperature
• Allows observation
of baby
• Oxygen can easily
be provided
• Baby can be
naked, if necessary
• Baby can become
hyperthernic or
hypothermic if
temperature is not
monitored
• Baby can become
dehydrated
• Incubator in easily

12
Method Guidelines for Selection and Use
Advantages Risks/ Disadvantages
severe breathing difficulty) colorized by bacteria.
• Incubator is expensive
to by buy and maintain.
• Incubator requires
reliable source of
electricity.
• Personnel trained to
care for baby and
clean and maintain
incubator are required.
• Mother and baby are
separate
• Incubator in more
difficult to clean the
radiant warmer
Warm room • Appropriate for care of
babies recovering from
illness and small babies
who do not require frequent
diagnostic and treatment
procedures
• Not appropriate for babies
with life threatening
problems (e.g. sepsis,
severe breathing difficulty)
• Baby can become
hypothermic
• Room may be
uncomfortable for
adults
• Baby can become
hypothermic.
• Room may be
uncomfortable for
adults.
Other
methods (e.g.
hot water
bottles)
• Appropriate for emergency
situations when other
methods are not available
(e.g. during transport)
• Baby can become
hyperthermic
• Baby can be burned by
objects
• Baby can become
hypothermic if objects
are not replaced after
they cool
• Constant temperature
is difficult to maintain
13
SKIN-TO-SKIN CONTACT
• Clothe and secure the baby as described for Kangaroo mother care.
• Ensure that the temperature of the room where the rewarming takes
place is at least 25°C.
• Measure the baby's body temperature two hours after beginning skin-
to-skin contact unless directed otherwise. If the baby's temperature is
not 36.5 0C to 37.5 0C after the two hours of rewarming, reassess the
baby.
RADIANT HEAT WARMER/ OPEN CARE SYSTEM
• During various procedures, the infant loses body temperature, unless
he is kept warm by use of radiant heat warmer. A portable heat lamp
with two 150 watt white ordinary or bakery bulbs or infra-red bulb fixed
on the wall about 2 to 3 feet about the level of table or trolley is all that
is necessary.
• The infrared heat is preferable because it directly warms the subject
without affecting the temperature of intervening environment.
• When an overhead radiant warmer is intended to be used for a
prolonged period, it should be combined with a skin sensor and a
servo-control system.
• Open care system which is equipped with an overhead radiant
warmer and skin thermister or thermocouple with servo-control is now
the most useful and popular equipment. They are equipped with a
narrow band proportional heat controllers which can rapidly cycle up
and down the temperature.

14
• They are provided with audio and visual alarms for high and low
temperature and heater output.
• Recently, talking warmers have been introduced which provide verbal
warning to the nurses regarding low temperature, high temperature
and out of reach temperature etc.
• Unless baby is extremely small or gravely sick, open care system is
preferable over an intensive care incubator because of easy access to
the infant and less chances of noosocomial infection.
• Skin probe is applied over the liver area in the epigastrium and
shielded with a foil-covered foam adhesive pad. When a baby is
nursed prone, skin probe is applied over the flank. The probe should
not be allowed to come in contact with the bed.
• These units also have a provision for overhead light source and
phototherapy unit and are most suitable for undertaking any
prolonged procedure like assisted ventilation, exchange blood
transfusion or surgery.
• Babies nursed in the open care system have excessive evaporative
fluid losses and have significantly higher metabolic rate compared to
babies kept in the incubator.
• After stabilization of the baby kept in the open care system, it is
preferable to cover the baby with clothes or thin polythene sheet to
reduce evaporative fluid losses. Application of sterile liquid paraffin or
non-irritating oil on the skin is associated with reduced evaporative
losses from skin.

15
How to use?
• Ensure that the temperature of the room where the radiant warmer is
used is at least 22 0C.
• Clean the mattress and platform, and cover the mattress with a clean
line sheet.
• Turn on the warmer and set the temperature according to the
manufacture's instruction (usually between 36 0C and 37.5°C). When
it is known beforehand
that a baby is to arrive
in the newborn special
care unit, turn on the
warmer to pre-warm
the linen and mattress
so that the baby does
not initially lie on a cold
surface.
• Ensure that the baby's
head is covered and
the baby is clothed or
covered unless it is
necessary for the baby
to be naked or partially
undressed for
observation or a
procedure.
• Place only one baby
under each radiant
warmer.
• Turn the baby
frequently while under
the warmer, if possible.

16
• If the baby is receiving IV fluid or expressed breast milk, increase
the volume of fluid and/or milk by 10% of the total dialy volume per
day for as long as the baby is under the radiant warmer.
• Check the temperature of the warmer and of the room every hour,
and adjust the temperature setting accordingly.
• Move the baby to be with the mother as soon as the baby no longer
requires frequent
procedures and treatment.
INCUBATOR
• The incubators are
essential to provide an
ideal micro-environment
for high-risk babies. About
one-third of nursery beds
should comprise of
incubators.
• Their main functions are
isolation, maintenance of
thermoneutral ambient
temperature, desired
humidity and
administration of oxygen.
• It is desirable to nurse extremely low birth weight (< 1000 g) stable
babies in the incubator.
• The sensory stimuli like light, sound touch and pain should be kept to
the barest minimum without compromising the quality of care.
• It is essential that an incubator should not interfere with observation of
infant, should offer easy access to the baby and be readily cleanable.
• Even when sterile water is used in the humidity tank, incubators are a
potential source of infection. The water in the humidity tank should be
changed daily and 1-2 ml of glacial acetic acid or vinegar should be

17
added to prevent bacterial colonization. Most centers are now using
incubators without adding any water in the humidity chamber.
• The incubator may be of portable type for transport of sick babies or
stationed in the nursery.
• The open box type (Armstrong) incubators are incapable of
maintaining thermoneutrality due to alterations in the temperature
when lid is opened. They are equipped with an inefficient thermostat
and do not provide for entry of filtered air in the incubator.
• The intensive care or closed type (isolette) incubators are equipped
with port holes for access to the infanct. The front panel can also be
opened and bassinet can be pulled out for unhindered access to the
infant for examination and various procedures. These incubators are
equipped with an air pump for circulation of filtered air for uniform
distribution of heat throughout the incubator. They are also provided
with partitioned circuit which allows for gradual changes in heat
current as opposed to conventional on-off-thermostat.
• A double wall incubator is preferred because radiative heat loss is
reduced by 50 percent.
• A servo- control system is ideal for automatic adjustments in the
ambient temperature to keep the infant homeothermic.
• Skin sensor or thermocuple is affixed to the abdominal skin midway
between umbilicus and xiphisternum and incubator is set for
maintenance of desired skin temperature at 36.5C. The skin sensor
feeds the information regarding temperature of the baby to the
thermostat which automatically regulates the output of heat to
maintain the desired skin temperature. Infants nursed under servo
mode should be watched to ensure that skin probe is in place. If skin
probe inadvertently gets dislodged, infant may get overheated
because ambient temperature would approach 36.5C.
• They should be provided with in built audio and visual alarms for set
temperature, high body temperature, air flow, probe or sensor failure
etc.

18
• When fever develops in a baby nursed on skin servo mode, there will
be repeated activation of alarm unless he is shifted to manual mode.
• The built in heater output monitor provides information regarding the
amount of heat generated by the incubator warmer to keep the infant
homeothermic. When heater output reading is minimal or nil, it
suggests that infant is capable of generating enough metabolic heat
to keep himself warm and he can be taken out of the incubator and
nursed in an open cot.
How to use?
• Determine the appropriate temperature for the incubator based on the
baby's weight and age.
• Warm the incubator to the desired temperature before placing the
baby inside.
Table: Recommended incubator temperatures
Weight of Baby
Incubator Temperature by Age*
35 0C 34 0C 33 0C 32 0C
Less than 1.5 kg
1 to 10 day old
11 days to 3
weeks old
3 to 5 weeks old More than 5 weeks old
1.5 to 2.0 kg 1 to 10 days old
11 days to 4 weeks old
More than 4 weeks old
2.1 to 2.5 kg 1 to 2 days old
3 days to 3 weeks old
More tha 3 weeks old
More than 2.5 kg
1 to 2 days old More than 2 days old
* If the incubator is single-walled, increase the incubator temperature 1 0C
for every 7 0C difference in temperature between the room and the
incubator.
� Clean the mattress and cover it with a clean linen sheet. Ensure that
the incubator's water reservoir is empty; dangerous bacteria may

19
grow in the water and infect the baby. Leaving the reservoir dry will
not affect the function of the incubator.
� Ensure that the baby's head is covered and the baby is clothed or
covered unless it is necessary for the baby to be naked or partinally
undressed for observation or a procedure.
� Place only one baby is each incubator.
� Close the hood as quickly as possible after placing the baby inside,
and keep the portholes of the incubator closed at all times to keep the
incubator warm.
� Check the temperature of the incubator every hour for the first eight
hours, and then every three hours:
- If the temperature of the incubator does not match the set
temperature, the incubator may not be functioning properly;
adjust the temperature setting until the desired temperature is
reached inside the incubator, or use another method to warm
the baby.
� Measure the baby's temperature every hour for the first eight hours,
and then every three hours:
- If the baby's temperature is less than 36.5° C or more than
37.5°C adjust the temperature of the incubator according.
- If the baby's temperature is less than 36.5 0C or more than
37.5 0C in spite of the incubator being kept at the
recommended setting, manage for abnormal body
temperature.
� Move the baby to be with the mother as soon as the baby no longer
requires special care and frequent procedures and treatment.
WARM ROOM
• Ensure that the baby's head is covered and the baby is adequately
clothed or covered.
• Ensure that the temperature of the room is at least 26 0C. A warm
room is often uncomfortable for adult staff and caregivers; ensure that

20
the baby is not neglected and tha the staff and caregivers do not
decrease the temperature without providing another warming method.
• Place the baby in a cot in the room, away from cold walls and
windows, and away from draughts.
• Measure the temperature of the room and the baby's body
temperature four times daily.
• Provide additional warmth at night.
OTHER METHODS
• Ensure that the baby's head is covered and the baby is adequately
clothed or covered.
• Ensure that the object (e.g. hot water bottle) does not come into
contact with the baby's skin, which could cause burns.
• Ensure that the object is not too hot.
• Monitor the warmth of the object and replace it before it becomes
cold.
FEEDING AND FLUID MANAGEMENT
FEEDING
Ensure that the baby is fed as soon as possible after birth (within half
an hour if possible) unless feeding should be delayed because of a specific
problem. If possible, admit the mother when admitting the baby. Encourage
the mother to breastfeed the baby or to give expressed breast milk; support
whichever method of feeding the mother chooses.
GENERAL PRINCIPLES OF EXCLUSIVE BREASTFEEDING
• Encourage early and exclusive breastfeeding whenever possible.
• Explain to the mother and her family the benefits of early and
exclusive breastfeeding:
- Breast milk contains the exact nutrients the baby needs and
promotes the babies development:

21
- Breast milk is easily digested and efficiently used by the baby's
body;
- Breast milk protects the baby from infection;
- Breastfeeding can be used as a contracepive method
(lactational amenorrhoea method).
• Encourage the mother to breastfeed the baby on demand, both day
and night (eight or more times in 24 hours), for as long as the baby
wants.
• Have the mother offer the second breast once the baby releases the
first breast on her/his own.
• Advise the mother that she should not:
- Force the baby to feed;
- interrupt a feed before the baby is done;
- Use artificial teasts or pacifiers;
- Give the baby any other food or drink (e.g. commercial breast-
milk subsitute, animal milks, local porridges, tea, water, etc.)
other than breast milk for the first six months of life.
• Include the mother's partner, a family member, or other support
person in discussions about breastfeeding, if possible.
• Ensure that the mother east nutritious food and has enough to drink.
• Ensure that the mother can wash or shower daily, but tell her to avoid
washing or wiping her nipples before breastfeeding.
• Explain to the mother that most medication she may be given will not
harm her baby while she breastfeeds; however, if the mother is taking
cotrimoxazole or pyrimethamine with sulfadoxine, monitor the baby for
jaundice.
CORRECT POSITIONING AND ATTACHMENT FOR BREASTFEEDING
• Ask the mother to help the baby attach when the baby seems to be
ready. Signs of readiness to suckle include opening the mouth,
rooting or searching, looking around, and moving.
22
• Explain to the mother how to hold her baby during breastfeeding. She
should:
- Hold the baby in skin-to-skin contact, if possible;
- Hold the baby's head and body straight so that the baby faces
her breast, with the baby's nose near her nipple;
- Support the baby's whole body, not just the neck and
shoulders.
• Explain to the mother how to encourage her baby to attach. She
should.
- Touch the baby's lips with her nipple;
- Wait until the baby's mouth is opening wide;
- Move the baby quickly onto her breast, so that the baby's lower
lip is well below the nipple.
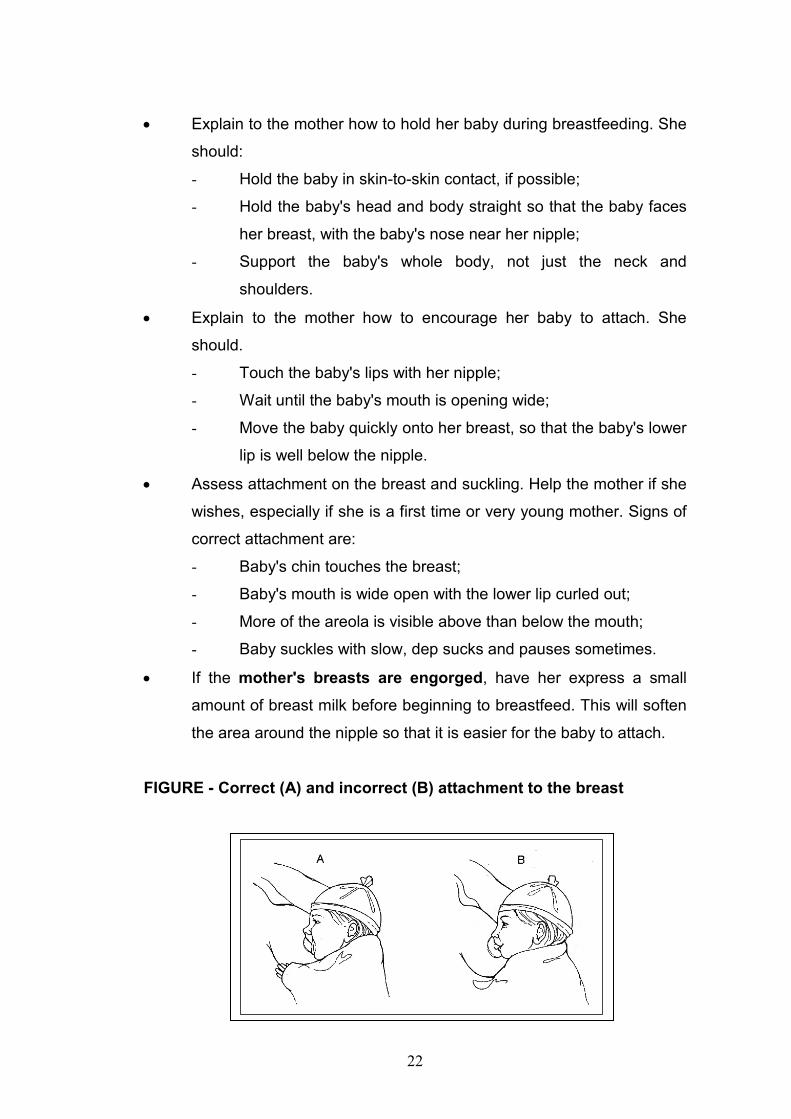
• Assess attachment on the breast and suckling. Help the mother if she
wishes, especially if she is a first time or very young mother. Signs of
correct attachment are:
- Baby's chin touches the breast;
- Baby's mouth is wide open with the lower lip curled out;
- More of the areola is visible above than below the mouth;
- Baby suckles with slow, dep sucks and pauses sometimes.
• If the mother's breasts are engorged, have her express a small
amount of breast milk before beginning to breastfeed. This will soften
the area around the nipple so that it is easier for the baby to attach.
FIGURE - Correct (A) and incorrect (B) attachment to the breast
23
BREASTFEEDING TWINS
• Reassure the mother that she has enough breast millk for both
babies.
• If the babies are small (less than 2.5 kg at birth or born before 37
weeks gestation), review the general principles of feeding a small
baby. In addition, have the mother:
- Begin feeding one baby at a time until breastfeeding is well
established in both babies;
- Ensure that the weaker twin gets enough milk;
- Rotate at every breastfeeding the breast each baby is offered;
- Give expressed breast milk using an alternative feeding
method (below) after the initial breastfeed, if necessary.
FEEDING THE BABY USING AN ALTERNATIVE FEEDING METHOD
• Teach the mother how to express breast milk, if necessary.
• Encourage the mother to express breast milk at least eight times in 24
hours.
• Assess feeding ability twice daily, and encourage and support the
mother to begin breastfeeding as soon as the baby shows signs of
readiness to suckle unless treatment of the baby's illness prevents
breastfeeding (e.g. the baby is receiving oxygen).
• Record the following each time the baby is fed:
- Time of feeding;
- Amount and kind of milk given (e.g. expressed breast milk or
breastmilk substitute );
- Any feeding difficult.
• Calculate the volume of milk required according to the baby's age.
• Ensure that the baby is receiving enough milk by assessing the
baby's growth.
• Choose the most appropriate alternative feeding method:
- Cup, cup and spoon, or other device;
- Hand-expressing breast milk into the baby's mouth;
- Gastric tube.

24
EXPRESSING BREAST MILK
• Teach the mother how to express breast milk herself. The mother
should:
- Obtain a clean (washed, boiled or rinsed with boiling water,
and air dried) cup or container to collect and store the milk;
- Wash her hands thoroughly;
- Sit or stand comfortably and hold the container underneath her
breast;
- Express the milk:
� Support the breast with four fingers and place the thumb
above the areola:
� Squeeze the areola between the thumb and fingers while
pressing backwards against the chest;
� Express each breast for at least four minutes, alternating
breast until the flow of milk stops (both breasts are
completely expressed).
• If the milk does not flow well:
- Ensure that the mother is using the correct technique:
- Have the mother apply warm compresses to her breast;
- Have someone massage the mother's back and neck.
• If the expressed breast milk is not going to be used immediately, label
the container and either refrigerate the milk and use within 24 hours
or freeze the milk (if freezing conditions can be reliably maintained) at
-20 0C for no more than six months:
- If a refrigerator or freezer is not available, keep the milk
covered at room temperature for up to eight hours;
- Ensure that the milk is at room temperature before giving it to
the baby:
• Warm frozen or refrigerated milk in a warm water bath
(approximately 40 0C), but avoid overt heating the milk;
• Use the rewarned milk promptly.

25
FEEDING BY CUP, CUP AND SPOON, OR OTHER DEVICE (PALADAI/
SOOTHI)
• Ensure that the mother can properly express breast milk.
• Feed the baby using a cup, a cup and spoon, or other suitable device
(e.g. Paladai/Soothi).
• Use clean (washed, boiled or rinsed with boiled water, and air-dried)
utensils and feeding devices for each feed.
FIGURE :Feeding by cup (A), paladai (B), or cup nd spoon (C)
• Feed the baby immediately after the milk is expressed, if possible. If
the baby does not consume all of the milk, store the remaining milk
according to the guidelines on as mentioned above for expressed
breast milk.
• Have the mother feed the baby unless she is not available. The
mother should:
- Measure the volume of breast milk in the cup, ensuring that it
meets the required volume according to the baby's age;
- Hold the baby sitting semi-upright on her lap:
- Rest the cup (or paladai or spoon) lightly on the baby's lower
lip and touch the outer part of the baby's upper lip with the
edge of the cup;
- Tip the cup (or paladia or spoon) so the milk just reaches the
baby's lips;

26
- Allow the baby to take the milk; do not pour the milk into the
baby's mouth;
- End the feeding when the baby closes her/his mouth and is no
longer interested in feeding.
• If the baby does not take the necessary volume of milk, have the
mother encourage the baby to feed for a longer time or feed more
often.
• Encourage the mother to begin breastfeeding as soon as the baby
shows signs of readiness to suckle.
• If the baby is not feeding well using a feeding device or the mother
prefers not to use it, have the mother attempt to hand-express breast
milk directly into the baby's mouth.
HAND-EXPRESSING BREAST MILK INTO BABY'S MOUTH
• Ensure that the mother can properly express breast milk.
• Have the mother:
- Hold the baby with the baby's mouth close to her nipple;
- Express the breast until some drops of milk appear on the
nipple;
- Let the baby smell the nipple and attempt to suck, and allow
some breast milk to fall into the baby's mouth;
- Express more drops of breast milk after the baby swallows;
- End the feeding when the baby closes her/his mouth and is no
longer interested in feeding.
• Ask the mother to repeat this process every one to two hours if the
baby weighs less than 1.5 kg or every two to three hours if the baby
weighs 1.5 kg or more.
FEEDING EXPRESSED BREAST MILK BY GASTRIC TUBE
• Ensure that the mother can properly express breast milk.
• Insert a gastric tube if one is not already in place.
• Confirm that the tube is properly positioned before each feeding.
• Encourage the mother to hold the baby and participate in feedings.

27
FIGURE - Feeding expressed breast milk by gastric tube
• Determine the required volume of milk for the feed according to the
baby's age.
• Remove the plunger of a high-level disinfected or sterile syringe (of a
size large enough to hold the required volume of milk) and connect
the barrel of the syringe to the end of the gastric tube:
- If a high-level disinfected or sterile syringe is not available,
use a clean (washed, boiled or rinsed with boiled water, and
air-dried) syringe;
- If a suitable syringe is not available, use any other suitable,
clean funnel that connects snugly to the gastric tube.
• Pour the required volume of milk for the feed into the syringe with the
"tip" of the syringe pointed downward.
• Have the mother hold the syringe 5 to 10 cm above the baby or
suspend the tube above the baby and allow the milk to run down the
tube by gravity. Do not force milk through the tube using the plunger
of the syringe.
• Using this method, each
feeding should take 10 to 15
minutes. If the flow of milk is
too fast, slightly pinch the tube
below the syringe to slow down
the flow.
• When the feeding is finished,
remove, wash, and high-level
disinfect or sterilize the syringe,
and cap the tube until the next
feeding.
• Progress to feeding by cup/spoon when the baby can swallow without
coughing or spitting milk. This could be in as little as one or two days,
or it may take longer than one week.

28
• Replace the gastric tube with another clean gastric tube after three
days, or earlier if it is pulled out or becomes blocked, and clean and
high-level disinfect or sterilize it.
• If breast-milk is not available, have the mother use a breast-milk
substitute that is based on animal milk and prepared at home.
FLUID MANAGEMENT
IV fluid is given to ensure that the baby receives necessary fluid, minimum
calories, and electrolytes. Give IV fluid only if indicates to do so.
Table : Intravenous Fluids for Neonates
Day of life Fluid (ml?kg/day)
Birth wt. > 1500 g
Birth > 1000-1500 g
Type
1 60 80 10% Dxtrose
2 75 95 10% Dextrose
3 90 110 N/5 saline in 10% Dextrose
4 105 125 -do-
5 120 140 -do-
6 135 155 -do-
7 onwards 150 170 -do-
If the baby is Small (less than 2.5 kg at birth or born before 37 weeks
gestation), See Module-B for special considerations for fluid and feeding
management of small babies.
CHOICE OF IV FLUID
• Give 10% glucose for the first three days of life.
• On the fourth day of life, if urine output is well established, give 10%
glucose with 3 mmol/kg body weight of sodium and 2 mmol/kg body
weight of potassium:
- It is preferable to use commercially-produced IV fluid, such as
10% Isolyte-P or 10% glucose in quarter normal saline, if
available. Using this fluid avoids the risk of introducing infection

29
by having to add electrolytes and eliminates errors in
calculations when making the solution;
- If these premixed solutions are not available, add normal saline
20 ml/kg body weight to the required volume of 10% glucose.
To calculate the necessary fluid volume, determine the volume
of fluid required for day of life and ad 20 ml/kg body weight of
normal saline, but infuse only the required daily volume. For
example:
- For a baby who is four days old, the required daily fluid volume
is 120 ml/kg body weight;
- Add 20 ml/kg body weight of normal saline to the 120 ml/kg
body weight of 10% glucose for a total fluid volume of 140
ml/kg body weight;
- Infuse 120 ml/kg body weight of this mixed solution.
• Addition of potassium to IV fluid is required when a baby cannot be
fed for a prolonged period to time. This must be done with extreme
caution because a small overdose can have serious consequences:
- Commonly available preparations are 7.5% and 15% KCl,
which contain 1 and 2 mmol of potassium per ml, respectively;
- While supplementing potassium, add 2 ml/kg body weight of
7.5% KCl or 1 ml/kg body weight of 15% KCl to the total
volume of IV fluid infused each day.
ADMINISTRATION OF IV FLUID
• Use an infusion set with a microdropper (where 1 ml = 60
microdrops). Microdroppers allow slow administration of fluid and
ensure that babies receive the volume of fluid they need. Using a
standard infusion set (where 1 ml = 20 drops) can cause dangerous
fluid overload.
• Before infusing IV fluid, check;
- The expiry date of the fluid;
- That the seal of the infusion bottle or bag is no broken;

30
- That the fluid is clear and free from visible particles.
• Calculate the rate of administration, and ensure that the microdropper
delivers the fluid at the required rate.
• Change the IV infusion sex and fluid bag every 24 hours, even if the
bag still contains IV fluid (they can be a major source of infection).
VOLUMES OF FLUID AND FEEDS DURING THE FIRST DAYS OF LIFE
• Determine the required volume of fluid according to the baby's age for
small babies [less than 2.5 kg at birth or born before 37 weeks
gestation, as described in module-B. Note that the table below
combines the volumes of IV fluid and feeds (day 1 is the day of birth).
• Subtract the volume of feeds the baby is receiving from the total daily
volume required to determine the necessary volume of IV fluid.
• Adjust the volume of feeds and/or fluid if directed to do so (e.g. if the
baby is placed under a radiant warmer or is receiving
phototherapy, increase the volume of feeds and/or fluid by 10% of
the total daily volume per day because of increased loss of water from
the skin).
• Convert the total volume into ml per hour or drops per minute.
TABLE C-4 Total daily feed and fluid volumes for babies's from birth
Day of life 1 2 3 4 5 6 7+
ml/kg body weight of
feeds and/or fluid
60 80 100 120 140 150 160
+
MONITORING BABIES RECEIVING IV FLUID
• Inspect the infusion site every hour:
- Look for redness and swelling around the insertion site of the
cannula, which indicate that the cannula is not in the vein and
fluid is leaking into the subcutaneous tissue. If redness or
swelling is seen at any time, stop the infusion, remove the
needle, and establish a new IV line in a different vein;

31
• Check the volume of fluid infused and compare to the prescribed
volume;
• Record all findings.
• Measure blood glucose every six hours:
• If the blood glucose is less than 40 mg/dl, treat for low blood glucose;
• If the blood glucose is more than 105 mg/dl (hyperglycaemia) on two
consecutive readings:
- Change to a 5% glucose solution, if possible;
- Measure blood glucose again in three hours.
• Assess hydration daily:
- If there are sings of dehydration (e.g. sunken eyes or
fontanellae, loss of skin elasticity, or dry tongue and mucous
membranes), increase the volume of fluid by 10% of the baby's
body weight on the first day that the dehydration is noted;
- If there are signs of overhydration (e.g. excessive weight gain,
puffy eyes, or increasing oedema over lower parts of the body),
reduce the volume of fluid by half for 24 hours after the
overhydration is noted;
• Document in the baby's clinical record when the baby urinates. If
there is little or no urine output in 24 hours in the absence of
asphyxia, increase the volume of fluid by 10%, as for dehydration.
• Weigh the baby daily. If the daily weight loss is more than 5%
increase the total volume of fluid by 10 ml/kg body weight for one day
to compensate for inadequate fluid administration.
Solutions containing glucose can cause tissue to die and
should not be allowed to leak into subcutaneous tissue.

32
COMBINING IV FLUID FEEDING
• Allow the baby to begin breastfeeding as soon as the baby's condition
improves unless directed otherwise. If the baby cannot be
breastfed, give expressed breast milk using an alternative feeding
method.
• If the baby tolerates the feed and there are no problems, continue
to increase the volume of feeds while decreasing the volume of IV
fluid to maintain the total daily fluid volume according to the baby's
daily requirement.
• Feed the baby every three hours, or more frequently if necessary,
adjusting the volume at each feeding accordingly.
• Add the total volume of feeds and fluid given each day. Compare this
volume with the required daily volume, and adjust the volume that the
baby receives accordingly.
• Discontinue the infusion of IV fluid when the baby is receiving more
that two-third of the daily fluid volume by mouth and has no abdominal
distension or vomiting.
• Encourage the mother to breastfeed exclusively as soon as the baby
is receiving 100% of the daily fluid volume by mouth.
OXYGEN THERAPY
ADMINISTERING OXYGEN
• Continue to perform any examinations, tests, procedures, and
treatment while the baby is receiving oxygen.
• If the baby can tolerate oral feedings, give expressed breast milk by
gastric tube. If the baby cannot be fed, establish an IV line and give IV
fluid at maintenance volume according to the baby's age.
• Ensure that the baby does not receive too little or too much oxygen:
- Giving too little oxygen may cause organ damage and eventual
death;

33
- Giving too much oxygen may damage the baby's lungs and
retinas. This damage, however, occurs after days (rather than
minutes or hours) of excess oxygen therapy and is unlikely to
occur in babies more than 35 weeks gestation.
TABLE Methods for administering oxygen
Method Flow and Concentration
Advantages Disadvantages
Nasal prongs
• Low = 0.5 L per minute
• Moderate = 0.5 to 1 L per minute
• High = more than 1 L per minute
• Low flow of oxygen required
• Constant concentration of oxygen if applied correctly
• Requires special prongs for use on newborn babies
• Requires flow control device that allows low flow
• Directs cold oxygen into baby's lungs
Nasal catheter
• Low = 0.5 L per minute
• Moderate = 0.5 to 1 L per minute
• High = more than 1 L per minute
• Low flow of oxygen required
• Constant concentration of oxygen if applied correctly
• Requires flow control device that allows low flow
• Directs cold oxygen into baby's lungs
Head box • Low = 3 L per minute
• Moderate = 3 to 5 L per minute
• High = more than 5 L minute
• Warms the oxygen
• Can give a high concentration
• High flow of oxygen required to achieve desired concentration
Face mask
• Low = 1 L per minute
• Moderate = 1 to 2 L per minute
• High = more than 2 L per minute
• Oxygen can be administered quickly
• Convenient for administering oxygen for short period of time
• Carbon dioxide can accumulate if flow rate is low or mask is small
• Difficult to feed baby while mask is in place
• Difficult to keep mask in place
Incubator • If using a head box inside the incubator, see above
• If connecting oxygen directly to the incubator, follow the manufacturer's instructions
• Warms the oxygen • High flow of oxygen required to achieve desired concentration
• Difficult to maintain oxygen concentration when incubator portholes are open for care and procedures

34
NASAL PRONGS
• Use 1-mm prongs for a small baby (less than 2.5 kg at birth or born
before 37 weeks gestation) and use 2-mm prongs for a term baby.
• Place the prongs just within the baby's nostrils.
• Secure the prongs in place using elastic or a piece of adhesive tape.
• Adjust the flow of oxygen to achieve the desired concentration.
• Change the nasal prongs twice daily. Give oxygen using a face mask
while cleaning and disinfecting the prongs, if necessary.
NASAL CATHETER
• Use an 8-F catheter. If the 8-F catheter is too large, use a 6-F
catheter.
• Determine the distance the tube should be passed measuring the
distance from the nostril to the inner margin of the eyebrow.
• Gently inset the catheter into the nostril. If a gastric tube is already in
place in one nostril, insert the catheter into the same nostril that the
gastric tube is in, if possible.
• Ensure that the catheter is correctly positioned:
- Look into the baby's mouth;
- The catheter should not be visible at the back of the mouth;
- If the catheter is visible at the back of the moth, pull the
catheter out slowly until it is no longer visible.
• Adjust the flow of oxygen to achieve the desired concentration.
• Change the nasal catheter twice daily. Give oxygen using a face
mask while cleaning and disinfecting the catheter, if necessary.
HEAD BOX FIGURE - Baby receiving oxygen via a head box

35
• Place a head box over the baby's head.
• Ensure that the baby's head stays within the head box, even when the
baby moves.
• Adjust the flow of oxygen to achieve the desired concentration.
FACE MASK
• Place that mask over the baby's mouth and nose.
• Secure the mask in place using elastic or a piece of adhesive tape.
• Adjust the flow of oxygen to achieve the desired concentration.
INCUBATOR
• Use a head box, following the instructions for a head box, or connect
the oxygen directly to the incubator according to the manufacturer's
instructions.
• Adjust the flow of oxygen to achieve the desired concentration.
SOURCES OF OXYGEN
Ensure that a source of oxygen is available at all times. Oxygen is
expensive, so expensive, so use it only in situations where it is necessary,
and discontinue as soon as possible. There are three main sources of
oxygen, which are described below. The oxygen is carried from the source to
the baby by means of non-crush, plastic oxygen delivery tubing. A face
mask, which can give a high concentration of oxygen, should always be
available in case of rapid deterioration of the baby's condition.

36
Table : Sources of oxygen
Source Special Considerations
Advantages Disadvantages
Oxygen cylinder
(cylinder filled with oxygen under high pressure)
• Ensure that a backup cylinder is available in case the first cylinder becomes empty
• Does not require electricity
• Requires a special regulator to control the flow of oxygen
Oxygen concentrator
• Ensure that a backup oxygen cylinder is available in case of electrical or mechanical failure
• May be less expensive to operate than buying oxygen cylinders (in the long term)
• Built-in-flow-control device
• Requires a reliable source of electricity
Piped oxygen from central storage area to a wall outlet
• • • Expensive
• Usually available only in lager health care facilities
• Requires a separate flow-control device at each outlet
MONITORING THE BABY'S RESPONSE TO OXYGEN
� Use an oximeter according to the manufacturer's instructions to
ensure that the baby receives an adequate concentration of oxygen.
• Pulse oximeter provides a simple, convenient and non-invasive
method for continuous monitoring of hemoglobin saturated with
oxygen and heart rate. It has virtually replaced the transcutaneous
monitors. The arterial blood oxygen saturation (SaO2) can be
determined transcutaneously be measuring the absorption of two
selected wave lengths of light. The light generated in the sensor
(probe) passes through the blood and tissue and is converted into

37
electronic signals by a photo detector located in the sensor. The
oxyhemoglobin and reduced hemoglobin allow different amounts of
light at selected wave lengths to reach the photo detector. The
monitor gives the digital display of arterial oxygen saturation, pulse
rate and audible pulse tone (Figure).
• Most instruments have a facility to set alarm limits for SaO2 (low and
high) and for pulse rate which can provide a duel function of an apnea
alarm.
• A hand held pulse oximeter which runs on batteries can be used
during transport of sick babies. The flex probe (sensor) can be affixed
on the dorsum of the foot of the baby.
• The sensor containing the photocell is extremely sensitive to light and
must be shielded from strong external light sources like observation
light and phototherapy.
• Do not apply cuff of blood pressure monitor on the same limb where
sensor is affixed. The probe site should be periodically changed to
prevent damage to skin.
� Pulse oximetery provides a simple, convenient and non-invasive
method for continuous monitoring and display of SaO2.
� It is ideal for early detection of hypoxia in critically sick newborn
babies but it has its own limitations to identify hyperoxia because
oxygen dissociation curve is displaced to the left in newborn babies.
� To safe guard against the risk of hyperoxia and retrolental
fibroplasias, it is recommended that the upper limit of alarm for
oxygen saturation should be set at 95 percent .
� Arterial oxygen saturation should be maintained between 90-95% for
acute conditions and 85-90% for chronic situations.

38
� Shock and peripheral vasoconstriction is associated with unreliable
display of SaO2
� If an Oximeter is not available, monitor the baby for signs of
oxygenation by assessing whether the baby has signs of breathing
difficulty or central cyanosis (blue tongue and lips) (note that these
observation cannot differentiate between normal and excessive
concentrations of oxygen in the blood):
- If the breathing difficulty is moderate to severe, give oxygen
at a moderate flow rate;
- When the baby's breathing begins to improve (e.g. respiratory
rate begins to move towards the normal range, grunting or
chest indrawing decreases), decrease the oxygen flow;
- When the baby's respiratory rate is within the normal range
and there are no other signs of breathing difficulty (e.g. chest
indrawing or grunting on expiration), remove oxygen and
observe the baby for 15 minutes:
- If the baby's tongue and lips remain pink, do not give any more
oxygen. Observe for central cyanosis every 15 minutes for the
next hour;
Central cyanosis is a late sign that the baby is not receiving enough oxygen. If the baby shows signs of central cyanosis, increase the concentration of oxygen immediately and continue until cyanosis is eliminated.
39
- If central cyanosis reappears at any time, give oxygen again
at the last rate given;
- Continue to observe the baby for 24 hours after oxygen is
discontinued.
PHOTOTHERAPY
Phototherapy is now generally accepted as a safe and effective
method for treatment of neonatal hyperbilirubinemia. A light source designed
to give an irradiance of 4-8 uw/ cm2 / nm between 400-500 nm wave length
range at the mattress is ideal. Blue light is more effective than the white light
but former interferes with the observation of the infant.
• Special blue lamps with a peak output at 425 to 475 nm are most
efficient for phototherapy and these do not emit harmful ultraviolet
rays.
• Photo therapy unit with combination of blue and four white fluorescent
tubes can be used with advantage. To enhance irradiance or flux, four
blue (Philips TL-52) and two white fluorescent tubes can be used but
the excessive blue color makes evaluation of the baby difficult and is
uncomfortable to the eyes.
• It is preferable to use 40 W 2 feet long tubes which are economical
with reduce recurring expenses. Cooling fan is required to reduce
radiant heat exposure to the baby.
• The nude infant may be exposed under a portable or fixed light
source kept at a distance of about 18 inches (45 cm) from the skin.
• Double-light system, where total baby is exposed from below and
above, has been used for more effective light exposure. The
conventional double surface phototherapy is uncomfortable and
unfriendly to the baby who is made to lie on a cold and hard perspex
sheet. Instead, intensive single surface phototherapy can be provided
by using tubes providing greater irradiance (40w, 2ft, TL-52) and by
reducing the distance between the tubes and the baby.

40
• The tube light should be covered
with plexiglass or plastic sheet to
screen out ultra violet rays.
• The flux density reduces with
time and average rated life of
tubes vary between 1000 to
2000 hours. The tubes should be
replaced when their ends
become black or spectral radiant
energy (‘flux’) at the level of skin
is less than 4 uw/cm2 / nm.
• Halogen bulbs are more effective
for phototherapy but are not
indigenously available. The
halogen bulb should be 150 W
and 21 V with a specially coated
reflector to absorb infra red and
ultraviolet rays. The unit is provided with a fan to keep the bulb cool.
• The halogen bulb is provided with a lens to focus the light on the baby
and they provide effective flux upto 300 hours.
• The latest phototherapy units are based on the principle of fiberoptics
in which an illuminated blanket is wrapped round the baby. It ensures
exposure of greater surface area and is ideal for providing double-
surgace light exposure. The baby is placed on the biliblanket and
additional phototherapy is provided with halogen light source from the
top.
• Newer phototherapy units are equipped with dosimeter to calculate
cumulative exposure to phototherapy.
• Recently, gallium nitride light emitting diode units have been launched
to provide intense phototherapy benefits. They produce minmal heat
and provide narrow luminous spectra in the blue-green range of

41
visible spectrum of light with massive delivery of irradiance upto 200
uw/ cm2/ nm.
INFECTION PREVENTION
Infection prevention is an important part of every component of care
of a newborn baby. Newborn babies are more susceptible to infections
because their immune system is immature; thus, the consequences of failing
to follow infection prevention principles are particularly devastating. Key
infection prevention practices are summarized below.
GENERAL PRINCIPLES OF INFECTION PREVENTION
Observing the infection prevention practices below will protect the baby,
mother, and health care provider from infections. They also will help prevent
the spread of infections.
• Provide routine care of the newborn baby.
• Consider every person (including the baby and staff) as potentially
infectious.
• Wash hands or use an alcohol-based handrub.
• Wear protective clothing and gloves.
• Use aseptic technique.
• Handle sharp instruments carefully, and clean and, if necessary,
sterilize or disinfect instruments and equipment.
• Routinely clean the newborn special care unit, and dispose of waste.
• Isolate babies with infections to prevent nosocomial infections.
INFECTION PREVENTION PRACTICES
Provide routine care of the newborn baby
• After the first six hours of life or after the baby's temperature is stable,
use cotton cloths soaked in warm water to remove blood and other
body fluids (e.g. from the birth) from the baby's skin, and then dry the
skin. Delay bathing a small baby (less than 2.5 kg at birth or born
before 37 weeks gestation) until at least the seventh day of life.

42
• Clean the buttocks and perineal area of the baby each time the baby's
napkin is changed, or as often as required, using cotton soaked in
warm, soapy water, and then carefully dry the area.
• Ensure that the mother knows correct positioning and attachment for
breastfeeding to prevent mastitis and nipple damage.
PEOPLE AS SOURCES OF INFECTION
• Locate the newborn special care unit in a low-traffic area with
restricted access.
• Do not allow personnel with skin infections or lesions to come into
direct contact with babies.
• Do not allow staff or visitors to enter the newborn special care unit if
they have an acute infection (e.g. respiratory virus).
• Limit the number of different individuals handling the baby.
HAND WASHING
• Wash hands with soap and
water.
- Before and after caring for
a baby and before any
procedure;
- After removing gloves;
- After handling soiled
instruments or other items.
• Instruct the mother and family
members to wash their hands
before and after handling the
baby.
• To wash hands:
- Thoroughly wet hands;
- Wash hands for 2 minutes with plain soap and running or
poured water;
- Allow hands to air-dry.

43
PROTECTIVE CLOTHING AND GLOVES
• It is not necessary to wear gowns or masks when providing routine
care for newborn babies.
• Wear protective clothing (e.g. aprons, gowns) when contact with
blood or body fluids is anticipated.
• Wear closed-to shoes, if possible. Do not go barefoot.
• When gloves are required for a procedure, wear a separate pair of
gloves for each baby to avoid cross-contamination, and dispose of
gloves after contact. Use different gloves for different situations:
- Wear sterile or high-level disinfected gloves for contact with
broken skin or for invasive procedures (e.g. lumbar puncture,
umbilical vein catheterization);
- Wear clean examination gloves for contact with mucous
membranes or body fluids (e.g. taking a blood sample, caring
for the umbilicus);
- Wear heavy rubber or latex utility gloves for handling
contaminated items, cleaning instruments and equipment, and
disposing of waste.
• Disposable gloves are preferred, but where resources are limited,
gloves can be reused if they are:
- Decontaminated by soaking in 0.5% chlorine solution for 10
minutes;
- Washed and rinsed;
- Sterilized by autoclaving (eliminates all microorganisms) or
high level disinfected by steaming or boiling (eliminates all
microorganisms except some bacterial endospores).
If single-use disposable surgical gloves are reused, do not
process them more than three times because invisible tears may occur.
Do not use gloves that are cracked or peeling or have visible holes or tears.

44
ASEPTIC TECHNIQUE
• Using aseptic technique eliminates or reduces to a safe level the
number of microorganisms on skin, tissue, and inanimate objects.
• Scrub hands for three to five minutes using an antiseptic soap, and
rinse with running or poured water.
• Allow hands to air dry
• Put on clean examination gloves.
• Prepare the skin for procedures by washing with a swab or cotton-
wool ball soaked in an antiseptic solution in an outward spiral motion.
Repeat two more times, using a new swab or cotton-wool ball each
time, and allow to dry. If polyvidone iodine is used, allow it to dry
after applying or wait at least two minutes before continuing with the
procedure.
• Remove examination gloves and put on high-level disinfected or
sterile gloves.
• Use sterile or high-level disinfected instruments and equipment.
• If there is any question about whether an item is sterile or not,
consider it contaminated.
MULTI-USE VIALS
• Use a new, sterile needle and syringe each time medication is
withdrawn from a multi-use vial or container.
• Store multi-use vials according to their instructions (e.g. store in a
dark, cool area or refrigerate).
• Record on the vial the date and time it was opened, and use for up to
one month or according to the expiry date.
• Do not keep opened glass ampules so that the drug can be used for
multiple babies. The drug may not be stable, and taping ampules shut
will not prevent contamination.
• Discard diluent solution (e.g. sterile water or normal saline) after 24
hours.
45
• Change the IV infusion set and fluid bag every 24 hours, even if the
bag still contains IV fluid (they can be a major source of infection).
ANTISEPTIC AND DISINFECTANT SOLUTIONS
Although the terms are sometimes used interchangeably, antiseptic
and disinfectant solutions serve different purposes. Antiseptic solutions are
used on the skin and are usually not as strong as disinfectants. Disinfectant
solutions are used to decontaminate or high-level disinfect instruments and
equipment.
Table: Acceptable antiseptic and disinfectant solutions
Acceptable Antiseptic Solutions Acceptable Disinfectant Solutions*
• 2.5% polyvidone iodine (for
skin preparation or scrub)
• 4% chlorhexidine gluconate
(for skin preparation or scrub)
• 60% to 90% ethy or isopropy
alcohol (for skin preparation for
taking a blood sample or
establishment of an IV line)
• 0.5% chlorine bleach (for
decontamination of surfaces
and high-level disinfection of
instruments)
• 2% glutaraldehyde
* Do not use disinfectants with phenolic compounds, as they may harm
newborn babies.
• To prevent contamination of antiseptic and disinfectant solutions:
- Use only boiled water for dilution, if dilution is necessary (boil
water for 20 minutes to high-level disinfect it);
- Take care not to contaminate the mouth of the container when
pouring the solution into smaller containers;
- Empty and wash containers with soap and water and allow
them to air dry at least once weekly;
- Pour the antiseptic solution onto cotton-wool balls or gauze. Do
not dip into the solution;
- Store the solutions in a cool, dark place.

46
INSTRUMENTS AND EQUIPMENT
Safe handling of sharp instruments
Immediately dispose of sharps by blacing them in a puncture-proof
container. Do not recap, bend, or break the needle or remove it from the
syringe.
INSTRUMENT PROCESSING
See Table for specific guidelines for processing instruments to ensure that
they are clean and high-level disinfected or sterile.
• Ensure that instruments that penetrate the skin (e.g. needles,
catheters) are adequately sterilized or high-level disinfected before
use and properly processed after use.
• Use a disinfectant solution to wipe off equipment that does not contact
the bloodstream (e.g. stethoscope, incubator) between each use, and
particularly between use with different babies.
Table : Guidelines for processing instruments and equipment
Instrument Processing Guidelines
(after each use)
Thermometers and stethoscopes
• Wipe with an disinfectant solution
Resuscitation bag and mask
• Wipe exposed surfaces with gauze pad soaked in disinfectant solution
• Wash with soap and water
Incubator or radiant warmer
• Wipe with a disinfectant solution daily
• Wash radiant warmer with soap and water before using for a new baby
• Wash incubator weekly, if the same baby is still in the incubator, and before using for a new baby
Suction apparatus and catheter, gastric tube, nasal prongs, nasal catheter, syringes
• Soak in disinfectant solution for 10 minutes
• Wash with soap and water
• High-level disinfect or sterilize
Oxygen head box Wash with soap and water

47
HOUSEKEEPING AND WASTE DISPOSAL
Regular and thorough cleaning will decrease microorganisms on surfaces
and help prevent infection. Remember the following about housekeeping
and waste disposal:
• Every newborn special care unit should have a housekeeping
schedule:
- Post the cleaning schedule in a visible area;
- Provide details on exactly what needs to be done and how
often;
- Educate staff regarding cleaning, and delegate responsibility.
• Follow general guidelines for housekeeping:
- Clean from the top to the bottom (e.g. of walls and window
coverings) so that the dirt that falls during cleaning is removed;
- Always wear heavy rubber or latex utility gloves;
- Ensure that a fresh bucket containing disinfectant solution is
available at all items;
- Immediately clean up spills of blood or body fluids using
disinfectant solution;
- Wrap or cover clean linens and store them in an enclosed cart
or cabinet to prevent contamination with dust;
- After each use, wipe off beds, tables, and procedure trolleys
using disinfectant solution.
• Separate contaminated waste (e.g. items soiled by blood, pus, and
other body fluids) from non-contaminated waste.
• Use a puncture-proof container for contaminated sharps, and destroy
the container when two-thirds full:
- Add a small amount of kerosene to the container, and burn the
waste in an open area downwind from the service site;
• If it is not possible to burn the disposal container, bury it in a site
at least 50 metres away from a water source.

48
Table : Sample cleaning schedule for the newborn special care unit
Frequency Cleaning Guidelines
Daily • Wet-mop floors with a disinfectant and
detergent solution. Do not sweep floors or use
cleaning methods that increase dust.
• Wipe incubators and radiant warmers with a
disinfectant solution.
Between babies • Wipe equipment, bassinets, examination
tables, etc., with a cloth dampended with
disinfectant solution.
• Clean incubators and radiant warmers
between each use, including the mattress,
with a disinfectant solution. Allow the incubator
to dry completely before placing a baby inside.
As Needed • Clean windows, walls, lamps, chairs, and
window coverings to prevent accumulation of
dust.
• Remove and destroy or clean contaminated
waste containers.
• Remove and destroy the sharps-disposal
container and replace with another suitable
container.
• Clean spills of blood or body fluids with a
disinfectant solution.
ADDITIONAL METHODS TO PREVENT INFECTION
• Have a private room specifically for newborn babies, if possible.
• Avoid overcrowding and understaffing.
• Do not place two or more babies in the same cot or incubator or under
the same radiant warmer or phototherapy unit.

49
NOSOCOMIAL INFECTIONS
Nosocomial infections are infections that are acquired in the health
care facility. A presumptive epidemic in a newborn special care unit is
defined as finding two or more babies with the same condition (e.g. skin or
eye infection, infectious diarrhoea) at the same time. If a nosocomial
infection occurs, strict control measures should be put in place and
monitored to resolve the problem.
Strategies to reduce nosocomial infections
• Hand washing and disinfection. Hand washing before and after
handling a baby is the single most important measure to prevent
nosocomial infections.
• Sterilization, disinfection and cleaning of instruments and
equipment. This should be ensured for all reusable equipment such
as laryngoscopes, resuscitation bags, masks, oxygen delivery
systems, humidifiers, ventilator tubing etc.
• Aseptic precautions should be undertaken before and during any
invasive procedure like IV cannulation, ET intubation, catheterization
etc.
• Nutrition. Enteral nutrition appears to be better than parenteral
nutrition. Enteral nutrition may have a favorable impact on
gastrointestinal immunologic function and infectious morbidity.
• Appropriate and rational prescription of antibiotics is essential to
prevent emergence of resistant strains. There should be constant
surveillance and periodic review of the antibiotic policies and
prescriptions. With careful microbiologic monitoring, cycling of
antibiotics for empiric therapy can help in reducing the emergence of
drug resistance.
• Commitment. Adequate and well-trained staff is a must. Education of
the staff about various infection control practices and procedure-
specific guidelines has an important role in the reduction of incidence
of nosocomial infections.

50
• Surveillance of nosocomial infections is an essential element of any
infection control program. This provides data useful for identifying
factors contributing to nosocomial infections. Control measures can
be evaluated objectively if the surveillance is good.
CARE DURING REFERRAL AND TRANSPORT OF SICK NEWBORN
Prepare Well Before Transport
1. Assess, Make careful assessment of the baby. Make sure that there
is a genuine indication for referral.
2. Communicate. Explain condition, the prognosis and the reasons for
referral of the baby to the family. Explain where to go and indicate
whom to contact. Inform the referral facility beforehand, if possible.
3. Correct hypothermia. If baby is in hypothermia (temperature < 36° C),
normalize the temperature of the baby, as far as possible, before
commencing the transportation. Continuing hypothermia during the
period of travel will compromise many body systems.
4. Stabilise
(a) Clear the airway of secretions or vomitus.
(b) Resuscitate, if indicated.
(c) Give a feed on breast or with spoon, if baby is sucking.
(d) Administer inj. dextrose (2mL/kg 10% dextrose) IV , if sick and
if the physician is well versed with inserting an IV line.
(e) Adminster first dose of antibiotics, if indicated ( Inj. Ampicillin
125 mg and Inj. Gentamycin 5mg.).
(f) Administer inj. vitamin K 1 mg IM, if indicated.
5. Write a note. Write a precise not for the providers at the referral
facility providing details of the baby's conditions, need for referral and
treatment given to the baby.
6. Encourage mother to accompany. Mother should accompany the
baby for breast feeding and for providing supportive care to the baby
on the way and in the hospital. In case she cannot accompany the

51
baby immediately, she should been couraged to reach the facility at
the earliest.
7. Arrange a provider to accompany. A doctor/ nurse/ health worker
should accompany the baby, if feasible to provide care to the baby en
route, and to facilitate care at thereferral facility.
Ensure Warm Transport
Use one of the following approaches to keep the baby warm during
transportation.
1. Skin to skin care (Kangaroo Mother Care). This is probably the most
effective, safe and convenient method.
• Baby is naked except for a cap and a napkin
• Baby is placed facing the mother in skin to skin contact
between breasts.
• Baby's back is the covered by tying the blouse or with a fold of
gown/ chunari.
The skin to skin contact can also be provided by another woman or a
man (father).
2. Cover the baby. Cover the baby fully with clothes (or cotton) including
the head and the limbs. Nurse the baby next to the mother or another
adult during transport.
3. Improvised containers. Different workers have suggested the use of
thermocol box, basket, padded pouch, polythene covering etc, for
ensuring temperature stability during transport. If familiar, you may
use one of these innovative methods.
4. Transport incubator. This is the ideal mode of transport, but is rarely
available.
The use of rubber hot water bottles for keeping babies warm is
fraught with danger due to accidental burns to the baby if the bottle is not
wrapped properly or remains in contact with baby's body. It is therefore best
avoided.
52
Provide Other Care during Transportation
The accompanying person should be explained to ensure the following:
1. Ensure warm feet
Whatever method of keeping the baby warm is employed, make sure
that the baby's feet are warm to touch. Warm feet means that the baby is
neither hypothermic nor in cold stress.
If the baby passes urine or stool, wipe him promptly. He should not
remain wet, otherwise he will lose heat.
2. Ensure an open airway
• Keep the neck of the baby in slight extension.
• Do not cover the baby's mouth and nose.
• Gently wipe the secretions from the nose and the mouth with a
cotton or cloth covered finger.
3. Check breathing- Watch baby's breathing. If the baby stops
breathing, provide tactile stimulation to the soles to restore it.
4. Provide feeds
• If baby is in a position to such on the breast, he should be
offered breast feeds. If he can take spoon feeding, expressed
Breastmilk can be provided carefully.
• If the distance is long, a nasogasrtic catheter may be inserted
and gavage feeding given. In that case, the amount of each
feed should be specified. However, it is not easy to train the
accompanying members in this modality, and should be
resorted to only if absolutely essential.
Intravenous fluid administration during transport is best avoided
unless a physician is accompanying the baby.
Take the baby to the nearest referral facility, by the shortest route, using the fastest possible mode of transport

53
REFERENCES
• Text book on Care of Newborn – Meharban Singh, VI Edition 2004.
• Ghai Essential Paediatrics- VI Edition, 2004.
• Manual of Neonatal care – John P. Cloherty V Edition 2004.
• Nelson Text Book of Pediatrics – 17th Edition 2004.
• Managing Newborn Problems. A guide for doctors, nurses, and
midwives: WHO Publication, 2003.

54
Day 4: Session I and III (Visit to Labour Room and OT for live
demonstration of newborn resuscitation.)
Objectives
During the sessions the trainee should :
• Observe the resuscitation of newborn in labour room and operation
theater
• “Hand on” practice on resuscitation of newborn.
Methodology
Visit to labour room and operation theater for attending delivery.
Day 4 : Session IV (Setting up of nursing at district level hospital)
Objectives:
At the end of the sessions the trainee should be able to:
• Identify the need of space and equipments.
• Plan and take appropriate action to upgrade their existing facility.
Methodology
Group work by the participants

55
Day 5 Session I-III (Visit to Nursery observing for intensive care of
newborn and demonstration of functioning of equipments)
Objectives
At the end of the sessions the trainee should be able to:
• Understand the principles of intensive care of sick newborn.
• Operate the equipments e.g. phototherapy unit, radiant warmer and
incubator properly.
• Understand use of sophisticated instruments like pulse oximeter,
infusion pumps and ventilation etc.
Methodology
Visit to Nursery and to show them the equipments in use.
Day 5 : Session IV (Setting up of nursery at district level hospital)
Objectives:
At the end of the sessions the trainee should be able to:
• Identify the need of space and equipments.
• Plan and take appropriate action to upgrade their existing facility.
Methodology
Presentation and discussion.

56
Day 6 Session I - III (Visit to Nursery for live demonstration on care of
babies having Low Birth Weight, Asphyxia, Convulsions, sepsis, Birth
Injuries and jaundice)
Objectives:
At the end of the sessions the trainee should be able to understand and
developed skill for :
• Special care of LBW.
• Clinically assess the condition of baby.
• Understand protocols and practice followed in nursery for common
neonatal problems.
Methodology
Visit to Nursery, allotment of cases followed by discussion.
Day 6: Session IV (Post Test evaluation and discussion)
Post test questionnaire distributed to participant for solving over 15 minutes
followed by group discussion and solving the same
Objective :
Objective of this session is to discuss any doubts related to the
questionnaire and any other issues related to newborn care.
Methodology : Completion of Questionnaire followed by discussion by an expert