Embed Size (px)
Citation preview

!"#!"$# %&'()(*++,,$'

!"#$% !&#&" '()*+*,+,*
-()*+./!')+&
00!'1 + 2$+34151 *6 &0.78"0$(33.8* #
$0%33 19+15*0 # ':;:2$+3 0#$'3#""<+3 0#$'3#51*#*<+3 .08*033)*
*8& # 0';*&0'$0.0(! 2$7"# +115;3 =1< $+&0 $ "$>+%0>% .078&&0(8&%033
*&828/ #& *#&<9&2#54#
91: ? 1 +14=+19@ ++ #
,A!AB ,# B# ,A B#
,! B#

– 3 –
NOTICES BEFORE REPAIRING
To make the best use of this equipment, make sure toobey the following items when repairing (or mending).
1. Do not damage or melt the tunicate of the leadingwire on the AC1 side, including the power supplycord.
2. Do not soil or stain the letters on the spec.inscription plates, notice labels, fuse labels, etc.
3. When repairing the part extracted from theconducted side of the board pattern, fix it firmlywith applying bond to the pattern and the part.
4. Restore the following items after repairing.1) Conditions of soldering of the wires (especially,
the distance on the AC1 side).2) Conditions of wiring, bundling of wires, etc.3) Types of the wries.4) Attachment conditions of all types of the insulation.
5. After repairing, always measure the insulationresistance and perform the voltage-withstand test(See Fig-1).
1) The insulation resistance must be 7 to 9.5 M Ωwhen applying 500V per second.
2) In the voltage withstand test, apply 3 kV for 1minute and check that the GO lamp lights.
* Breaking current set to 6 mA.* Connect the safety checker as shown in Fig-1, then measure the resistance and perform the test.* Do not touch the equipment during testing.* For details of the safety checker, refer to the supplied
Operation manual.
Fig-1
Safety checker (Model 7110, etc.)
Earth cable
AC cable Connect the earth cableto the outside metal partterminal.
Insulation resistance: 7 to 9.5 MΩ (500 V/s) Voltage-withstand: 3 kV for 1 minute
Safety Components Symbol
This symbol is given to important parts which serve to maintain the safety of the product, and whichare made to confirm to special Safety Specifications.Therefore, when replacing a component with this symbol make absolutely sure that you use adesignated part.
!
When servicing and checking on the TV, note the followings.board. The inside wiring is designed not to get close tothe pyrogenic parts and high voltage parts. Therefore,put these parts in the original positions.
5. Take care of the cathode-ray tube.By setting an explosion-proof cathode-ray tube in thisequipment, safety is secured against implosion.However, when removing it or servicing from theback, it gives out shock that is dangerous. Takeenough care to deal with it.
6. Avoid an X-ray.Safety is secured against an X-ray by givingconsiderations to the cathode-ray tube and the highvoltage peripheral circuit, etc. Therefore, whenrepairing the high voltage peripheral circuit, use thedesignated parts and do not change the circuit.Repairing, except indicates, causes rising of highvoltage, and the cathode-ray tube emits an X-ray.
7. Perform a safety check after servicing.Confirm that the screws, parts and wiring which wereremoved in order to service are put in the originalpositions, or whether there are deteriorated portionsaround the places serviced.
1. Keep the notices.As for the places which need special attentions, theyare indicated with labels or seals on the cabinet,chassis and parts. Make sure to keep the indicationsand notices in the operation manual.
2. Avoid an electric shock.There is a high voltage part inside. Avoid an electricshock while the electric current is flowing.
3. Use the designated parts.The parts in this equipment have the specificcharacteristics of incombustibility and withstand voltagefor safety.Therefore, use a part which has the same characteras the replaced part. Especially as to the importantparts for safety which is indicated in the circuitdiagram or the table of parts with a mark, thedesignated parts must be used.
4. Put parts and wires in the original position afterassembling or wiring.There are parts which use the insulation material suchas a tube or tape for safety, or which are assembled sothat these parts do not make contact with the printed
!

!" #$%
! " # ! # ! ! !
$ " ! ##
& ' #$(
%& ' ' ()
* #
+ $ #
,
!
%&'
Front cabinet
Rear cabinet
2
1
1
1
1
2
2
Figure 1-1
Anode cap
CRT GND
Hook CRT
CRT GND
Grip
Figure 2-1
Anode cap
CRT
Hook
Anode button
Figure 2-2

- . ! # %& '$
/ # %& ',
0 !# #
) *
1
) !" ((%
)
)' #
" ! ! ' %&$'
" ' !
) & +'" ((
* %&$' #
! !
2%'/-3)
Anode cap
Hook
Anode button
CRT
Figure 2-4
Left Right
Anode cap
Figure 3-1
Anode button
Installationsection
Figure 3-2
Figure 2-3
CRTCRT
Anode cap
HookHook
1
21

– 6 –
(3) Eliminate twisting, etc. of the high-voltage cable andarrange it so that no twisting occurs. (See Figure 3-3)Caution : If the cable is not arranged correctly, the anode
cap could turn and cause an installation defect.
(4) Turn over the rubber cap symmetrically on the left andright. (See Figure 3-4)Caution : Take great care not to damage the anode cap.
Figure 3-3
(5) Fit your forefinger over the projection at the center of thecap and hold the cap between your thumb and middlefinger. (See Figure 3-5)
Figure 3-4
Figure 3-5
High-voltage cable Anode cap

– 7 –
(6) Apply the hook on one side to the anode button as shownon the figure. (See Figure 3-6)Caution : Check that the hook is held securely.
(7) Apply the hook on the other side to the anode button asshown in Figure 3-7.
(8) Pull the anode cap slightly with the rubber cap turnedover and visually check that the hook is engaged securely.
(9) Release your hand from the rubber cap of the anode cap.Caution : Cover the anode cap so that it does not lift.
(10) Hold the skirt of the andoe cap slightly to improve theclose contact between the cap and CRT.
(11) Check that the anode cap is in close contact with the CRT.(See Figure 3-8)
Figure 3-8
Figure 3-7
Figure 3-6
Anode cap
Skirt
Hook
Anode button
Anode button
Hook
Anode button
Hook
30°

!"#!!$
%&'!(
! ! ) ! ) *'++',-. !"#!!$
%&'!( 1
2
Figure 4-1CN903
CN904
NK C.B
CN801
CN401(Speakers)
CN802(Power cord)
Front cabinet
A
Figure 5-1
/#0! # !'1#! !$#!!$-
# '/%&'!2(

!
"! "
#$%"" !
!
!! !""
!%&#!"%#'!'
!""( & )
'
%& %' ' %
'&& %'
%&&'' %
' %' ' '
% %'"
% %'
% '""
' % % %
'''
% % % %
% '&( & &)''
'' '&( & ) %'
$ $ *'' *'&( & )
*'&( & &)' % '&'
$ % % %
% % % % %
% % % '&
' %( & &) *' +, *' +,
'" %'
% % '&
!
!

!
!
' %'" % %
%'"""#' ""#' !
!!!#!!#
&!$'&!$ '&!$&( & )# "%*""
""'"""'"""'"""# """# "
"#"#!" ""'&( & &)""'&$( & )""'&$( & &)""&
""&""'*&$" *"&!&""' *&$####
&& '# &&& $# &&& *!&#!#&###!#&##
#!#&###!#&###!#"##!# ###!#&
#!#&#!#' #&&!#####!#&#!#&
#!##"&"## !!'!!!##"
&&&& *"'& *"& *"' & '&
'& *"&& '& ' & *" &!&
*"*" *"' *" *" *" *"& *"&
-# -# -# -# -#
-# ! &".!( & &)&". $ ( & )
&! %"%"&"#' $#&#'
'
$'
!!#! *" &!& *" &!&
*" &!&!#!
!
!
!
!
!
!
!
!
!
!
!
!

8 8
A
Resistor Code
Chip Resistor Part Coding
Figure
Value of resistor
Chip resistor
Wattage Type Tolerance
1/16W
1/10W
1/8W
1608
2125
3216
5%
5%
5%
CJ
CJ
CJ
Form L W t
1.6 0.8 0.45
2 1.25 0.45
3.2 1.6
108
118
128
: A : A
CHIP RESISTOR PART CODE
0.55
Resistor CodeDimensions (mm)
Symbol
1/16W 1005 5% CJ 1.0 0.5 0.35 104L
t
W


!" #
$ %"
& '() *+,
- .
/ 01 2#
3 ! . +4,
5 ! . +4,
6 ) . )+4,
" %'7* %
*'
) . )+484*9,
$ %'!! . %'!!
& 59 . 9 +59,
- . 44
/ : . :
3 : . :
5 %) . )+4*9,
6 (%)% . (44
" %9! . %9!+%9!;4,
9 . 9;
9< . 9;<
$ 2< 2
& 2 2
- 2 . =
/ 9% . 9>?
3 %) 7* *%)
5 %7' %?
6 ' . 4
$" %) . )+4*9,
$ !! . >!!=
$ 2" . %9!@=+,
$$ : 7* . :A;
$& % =#
$- %7B* 8
$/ :* :*;;4
$3 !!2 . !!=
$5 29 7* 2;
$6 959 . 9 +59,;4
&" 9(* 9(+,
& %) . )+4*9,
& 9(1 9(+8,

&$ : '% ?+ ),
&& %7 7* %
&- >?+ ),
&/ 9 89
&3 )1 8)1
&5 (7 8(7
&6 ( ! (
-" (!% 0 (#;4
- 7*
- ) 7* )
-$ ( 7* (
-& $$9% . 9 +$$9,
-- 9+), . )
-/ $$9 . 9 +$$9,
-3 B) . )+,
-5 B +"':A,
-6 B 7* +"':A,
/" * + ),
/ $$9 . 9 +$$9,
/ ! #+= ',
/$ % += ',
/& '

!
"#
$#
%
%

&"#
'#
'(
""#
)
#*
!+
)

"
##&
%
%

!"!#$%&'()"*
!+,-./01%&'2"34-" !"!#$%&
'"56)(/
'6)
'1..(712

0'006
.'/0
)'%/.
)'0/
)'11)8
/'"#.0"
/'"#.0"

)'$/)0
).'$/))


– 25 –
Color bar signal of a pattern generator
PRECAUTIONS BEFORE STARTING ADJUSTMENT
Satisfy the following setting conditions before starting adjustment.• Allow warm-up of 20 minutes or longer. (Do not turn off during
warm-up.)• Set all picture quality controls of users' setting to initial set-up,
unless otherwise specified.• Picture quality reset
1. Select "Picture" on the screen menu and press enter button.2. Select "Normal" and press enter button.3. Select "Reset" and press enter button.
• Set the pattern generator’s output level to 1.0Vp-p (across 75Ωload).
Because the video signal output from a pattern generator is used asthe adjustment signal input during adjustment, the video signaloutput from the pattern generator must conform with thespecifications. Measure the output waveform across 75 Ω load.Confirm that the synchronizing signal has an amplitude of about0.3 V, the video signal portion has an amplitude of about 0.7 V andthe burst signal has an amplitude of about 0.3 V with flat envelope.Confirm that ratio of the burst signal amplitude and the red signalamplitude is 0.30 : 0.66. If the output signal does not conform withthe specifications, calibrate the pattern generator. (Refer to patterngenerator operation manual.)Use the LEADER: LCG 404 for the pattern generator.
Fig. 1-1
Approx.0.3VApprox. 0.3V
Burst signal1 Vp-p White (Approx.
75%)
Approx. 0.7V
Yello
w
Cya
n
Gre
en
Mag
enta
Red
Blu
e
Bla
ck
75%
whi
te
TV display
1-1. Precautions
(1) Receive the white raster signal, and then perform aging for atleast 20 minutes.
(2) Demagnetize the area surronding the CRT with a degausserbefore making adjustments.
(3) Set the picture quality for each mode to the factory setting.(4) Position the front screen facing the east as much as possible.
1-2. Purpose
(1) Beam landing adjustment (purity magnet)
Set the left/right balance of beam landing. If there is adiscrepancy in this adjustment, a color irregularity will occur.After completion of the landing adjustment, it is necessary toperform convergence adjustment.
ColorirregularityColorirregularity
Before adjustment After adjustment
CRT ADJUSTMENTSET-UP FOR ADJUSTMENT 1. CRT ADJUSTMENT

– 26 –
(2) Beam convergence adjustment (4-pole magnet)
Align the R beam with the B beam. The G beam does notmove with this adjustment.
B
GRR/B
G
Align the R beam with the B beamFig. 1-2
(magenta)
(4) The composition of each magnet is as shown in Fig. 1-4.
In making adjustments, rotate the lock ring clockwise (lookingfrom the CRT’s back screen) and disengage.Be careful not to loose the lock ring too much. If the magnetassembly has become shifted during adjustments, secure it tothe position in Fig. 1-4.
(3) Beam convergence adjustment (6-pole magnet)With a 4-pole magnet align the G beam with the already alignedR/B beam.
G
R/B
RGB
(magenta)
(white)
Align the G beam with the R/B beamFig. 1-3
CRT DY
DY lock screw Purity 4-pole 6-pole Lock ring
NK C.B
Magnet assembly
Fig 1-4
Magnet assemblylock screw

– 27 –
(1) Receive the green raster signal from the pattern generator.(2) Loosen the magnet lock screw, and shift the magnet assembly
backward (toward the neck).(3) Loosen the DY lock screw, and shift the DY deflecting yoke
backward (toward the neck).(4) After opening the two purity magnets to the same angle, adjust
the color width of the bands on both sides of the screen so thatthey are equal. (refer to Fig. 1-5 (a)).
R G B
Fig 1-5 (a)
As shown in Fig. 1-5 (b), the purity magnet functions inrelation to the electron beam.
(5) Gradually shift the deflecting yoke toward the front (towardthe CRT funnel). Stop movement at the point when the screenhas become completely green.
S N N S NS SN
NN
SSS S
N N
Fig 1-5 (b)
(6) Also, verify the respective monochromatics of red and blue.(7) While looking at the screen, adjust the tilt of the deflecting
yoke and tighten the DY lock screw.(8) Shift the magnet assembly to the front (toward the CRT funnel),
stop movement before the adjustment position and then tightenthe magnet lock screw.At this time, be careful not to shift the position of the puritymagnet.
R=B
As there is occurrence of convergence distortion aftercompleting the landing adjustments, be sure to carry outconvergence adjustments.
If the color irregularities in the screen’s corner section arenot improved, correct them with the landing magnet. Afterusing the landing magnet, be sure to demagnetize the CRTwith degausser and verify that there is no occurrence of colorirregularity. (refer to Fig. 1-6)
Landing magnet: 81-JTI-710-010(two-sided adhesive tape) : 80-XVI-218-010 Cushion
Cushion
Landing magnet
Since the landing magnet is polarized,check the screen’s improvement throughrotation, not only by position.
Fig 1-6
1-3. Beam Landing Adjustment
– 28 –
Make adjustments on the convergence with 4-pole and 6-polemagnets. Operate each magnet in relation to the electron beam asshown in Figs. 1-7 and 1-8. When performing this adjustment, verifywhether there is distortion in the focus adjustment. If necessary,carry out adjustments again.
B G R
S N
N S
S
S
N NB G R
Fig 1-7
Fig 1-8
In Fig. 1-7, two 4-pole magnets are stacked together so as to be ofthe same polarity. Move the B and R beams to their respectivedirection, by rotating the two 4-pole magnets together. By adjustingthe opening of the two magnets, it is possible to adjust the amountof the beam’s movement.
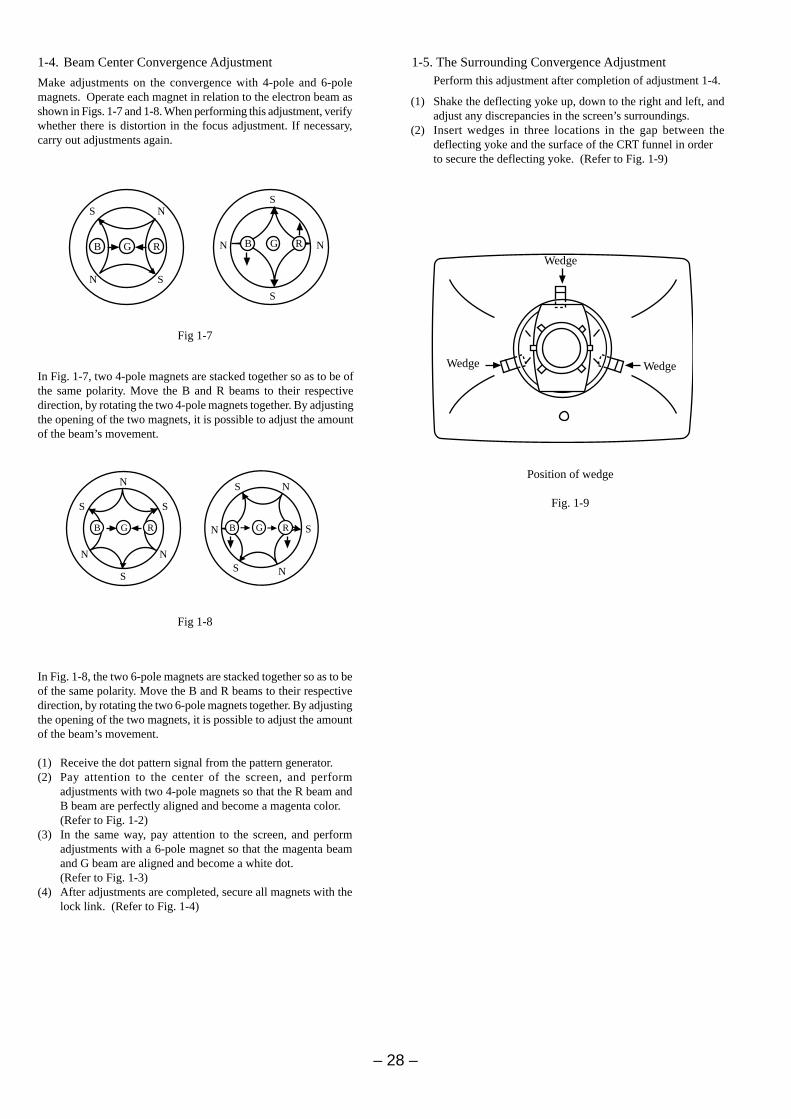
Perform this adjustment after completion of adjustment 1-4.
(1) Shake the deflecting yoke up, down to the right and left, andadjust any discrepancies in the screen’s surroundings.
(2) Insert wedges in three locations in the gap between thedeflecting yoke and the surface of the CRT funnel in orderto secure the deflecting yoke. (Refer to Fig. 1-9)
Position of wedge
Fig. 1-9
Wedge
Wedge Wedge
In Fig. 1-8, the two 6-pole magnets are stacked together so as to beof the same polarity. Move the B and R beams to their respectivedirection, by rotating the two 6-pole magnets together. By adjustingthe opening of the two magnets, it is possible to adjust the amountof the beam’s movement.
(1) Receive the dot pattern signal from the pattern generator.(2) Pay attention to the center of the screen, and perform
adjustments with two 4-pole magnets so that the R beam andB beam are perfectly aligned and become a magenta color.(Refer to Fig. 1-2)
(3) In the same way, pay attention to the screen, and performadjustments with a 6-pole magnet so that the magenta beamand G beam are aligned and become a white dot.(Refer to Fig. 1-3)
(4) After adjustments are completed, secure all magnets with thelock link. (Refer to Fig. 1-4)
G RBN
N
N
S
S
S
S
N
N
S
G RB
S
N
1-4. Beam Center Convergence Adjustment 1-5. The Surrounding Convergence Adjustment

!
" #
$ %&
' ( ) * + !,-
' . +* (,
/*#!'0
1*#!'0
" 1!&2)'0
$ 1(&3) '0
' #!/'0
4 #!1'0
' . +3!,
/*#!40
1*#!40
" 1!&2)40
$ 1(&3) 40
' #!/40
4 #!140
'"
" 5 6
'$ 7
$ !))3
$ 8&6/
$" 5#9!
$$ :/&)8 ( 3)
9#55
69#55
6 &3
66 &3
86 &3

!
" #$%&'" (#%!
(#%!
(#%!
9
* 3 -;4104
* 3 -<4(8$='00
* - 9 >4104+1$><4(8$='00,
7 %77
/%>5&3&!/
:5&3&!/% ?
@ A
*)!%
? ? A
+,
#3
B
)- "$C+B4B4B4,D+B4B4,D+"B4,D$C$440
E5555F B5555+"''"',

OK
UP
DN(DOWN)
2 : VPOS 50 20H2 : VPOS 50 19H 2 : VPOS 50 21H
2 : VPOS 50 20H
2 : VPOS 50 20H 3 : VSIZE 50 20H1 : HPOS 50 20H
MENU 1/121.H POS 502.VPOS 503.VSIZE 504.VLIN EA 505.OSDH 506.OSDV 507.V S-CORR 508.H SD SOT9.VSD SOT
20H20H20H20H03H30H16H02H20H
7 5!A + 5#9? 5(#:? 5&3? 5/&6/,
/? 7 5!A A9*?#G?3
*!())*% )39
* E H F% 7 )39 )39
" *7%+ =,
)B- E1*#!'0F? 7%?EF )39
$* 1#(9)D%
' B A ? E H F%
4*!())*% 7%
!&
##
)!& )!&*

!"# $% 7 ??
A7)39 )39+ 7,
@# 7A7 :
! "# $
%
& '(( ) %
* + +,+
- + +,+
% %
% %
% %
! "#% %$
% %
% % %
& '((% %)
* %+ %+,+
- %+ %+,+
'"( '"(.
/(0+ /(0+.
'+ '+(#+.
! ++ ++.
#( #10. 2
% '"" '33 !
& 4'# '#4)3$ %
* 4+' +'4)3$ !
- 4#" #"4)3$ !
4+( 4)3$ !
(5.
(5.
(5.
(5.
(5.
(5.
22(6 257.$8
(2#0' #0'+#1(+
#+(#" #0'#++(""
29535.
! 3.:'(+3:
3;$<3=
0 >?22@ ?A
% ' +>?@ ?BA
& #1/ #1/>?#@ ?A
('+22 (3.55
0'+22 0.55
(0# (33
! 00# 03
/0# /.3
% /1 /C9>?22@ ?A
& #'" '"("+>?22@ ?A
* 2' '"(1""(>?@ ?22A
- +'#+ +'#+(,> ?D@ ?#A
'# '<.$#"#+(,
>?+##(@ ?#"#+(,A
E#
EE .>FA
E .>.A
! E"E .>FA
+( 33
% #(# :<3
& /E .3G;F3
* <3
- <3 %

(5.
(5.
(5.
(5.
(5.
(5.
3 )39
1*#!240 40/..A 0/
1!&2)240 40/..A . 4/
" 1*#!4'0 '0/.A 4-= 0/
$ 1!&2)4'0 '0/.A . 4-= 00/
' 1*#!440 40/.A 4-= 0/
4 1!&2)440 40/.A . 4-= 00/
I 1*#!6 '0 '0/.A 6 ) 0/
< 1!&2)6 '0 '0/.A .6 ) /
= 1*#!6 40 40/.A 6 ) 0/
0 1!&2)6 40 40/.A .6 ) /
3 )39
1J4 4-=1J 0/
1J2 21J 0/
" 1J6 6 )*#!&J 0/
$ ): *40 40/.. . 0/
' )::&40 40/.+, 0/
4 ):9*40 40/.+, 0/
I ):(#:40 40/.+, 0/
< *)240 0/
= /* 40 0/
0 /8#:40 0/
3 )39
51#( 3& A+5, 0/
1#( 3& A+ , 0/
" 1#(I$ 3& A+3& , 0/
$ 3)( 3& )# )(#:) <0/
' 3)/ 3& )# )/&6/) <0/
4 1(I$ 9#1#(9)()1)(@ 00/
I 6 &3I" 6 &3 =<I"+0-)9)6 0/
&3?-3# (6 &3,
< 6 &3! !))#6 &3 0/
= 1(9# 00/
0 )51#( 1A 0/
3 )39
#*!K! ! @" 0"/
#*! A +0-3?-K, 00/
" #*88) 88)+0-3?-K, 00/
$ #*L!9 L+0-3?-K, 00/
' #*:#5 !7+0-3?-K, 00/
4 #*1#( 1 +0??, 00/
I #*J )J+0-3?-K, 00/
< #*# 00/
+0-5?- =<I"?- =<I$,
= #*# +0-3?-K, 00/
3 )39
#*1 1 +0-3?-K, 00/
#*K91 K91 +0-3?-K, 00/
" #*K ! +0-3?-K, 00/
$ #*9) 93)9)+0-3?-K, 0/
' #* !! !!+0-3?-K, 00/
4 #*#3) #3)#3#(+0-3?-K, 00/
I #*" 1 +0-3?-K, 00/
< #*4"" > A +0-3?-K, 00/
= #*( 36* ( @$ 0/
3 )39
#*31 * )*# *1 00/
#*1&6&3 )*# 00/
@&55)L 0-)"<=/.?-5 ""$/.?-58""=/.?"-"<0/.?$-'<I'/.?'-9! $'I'/.
@ 1(I$ 0- ! ?-! ?-?"-(
@"#*!K! 0-* (>!) >3!8>6?>G?&?(>(M
-* (&+(&3)&3*9-* (>3!,
-* (>!) >3!8>6?>G?&?(
"-* (>!) 8>6?>G+(&3)&3*9-* (>!) >3!,
$-* (8>6+(&3)&3*9-* (>3!,
'-* (8>6?&+(&3)&3*9-* (>3!,
@$#*( 36* 0-) ?-) *?-)?"-)?$-)
+)-)36(&!/? - 8&?*-*)!& 3?- ( K!& 3?-/ &?-/&3 ,

%&' () *-% 7 A
H & A7 N?
77% ?104+* (4'(&3),1304+3!''(&3),A1#7A
+1 ,
H A !/&8 !#G9 .B A
. +* (H3!,A7 7A
A 7
H A () )(6$0$+* (>!) ,(6$0+3!, A
.
A BCENTER
% +)(&* /*#!'0 * (.
O1>A P
7 )39
& * (
!*) . N
#) 1&)#
& (% 9 1#(9)D%
N.7 . +5,
O1>A P/*#!'0
7 )39
& * (#31)6)3)
!*) C8
#) 1&)#
& #31)6)3)
9 1#(9)D%
% #31)6)3)
N. 77B
+ C8,+5,
1*#!'0 * (A
O1>A P
7 )39
& * (
!*) C
#) 1&)#
& (%
9 1#(9)D%
%+5",
"+(+ %%(#%
"+(, #%)$-#
"+(. %%(#%

O1>A P1*#!'0
7 )39
& * (#31)6)3)
!*)
#) 1&)#
& #31)6)3)
9 1#(9)D%
%
%+5$,
" 1!&2)'0 * (A .
O1>A P
7 )39"
& * (
!*) 1 -"' $'+=0Q =$Q,
#) 1&)#
& (%
9 1#(9)D%
!*)+5',
O1>A P1!&2)'0
7 )39"
& * (#31)6)3)
!*) 77B-" "'
#) 1&)#
& #31)6)3)
9 1#(9)D% 7
7B !*)+54,
$ 1(&3) '0 * (A
O1>A P
7 )39$
& * (
!*)
#) 1&)#
& (%
9 1#(9)D% B
+5I,
3 - ?%1*#!'0+* 6),1!&2)'0+* 6)",
"+(/ #%)$-#
"+(0 %%(#%
"+(1 #%)$-#
"+(2 %%(#%
3

A B
A
B
O1>A P1(&3) '0
7 )39$
& * (#31)6)3)
!*) !N
#) 1&)#
& #31)6)3)
9 1#(9)D% 7B
N+5<,
3 - ?%1*#!'0+* 6),1!&2)'0+* 6)",
' #!/'0 * (#!.
O1>A P
7 )39'
& * (#31)6)3)
!*) C8
#) 1&)#
& #31)6)3)
N. + %,
8+ %,+5=,
4 #!1'0 * (#!A
O1>A P
7 )39'
& * (#31)6)3)
!*) C8
#) 1&)#
& #31)6)3)
N. + %,
8+ %,+50,
% +),-* /*#!40 3!.
O1>A P
7 )39
& 3!
!*) . N
#) 1&)#
& (%
9 1#(9)D% N.
7 . +5,
"+(4 #%)$-#
"+(5 #%)$-#
"+(+6 #%)$-#
",(+ # %%(#%

A B
O1>A P/*#!40
7 )39
& 3!
!*) C8
#) 1&)#
&
9 1#(9)D%
%
N. 77B
+ C8,+5,
1*#!40 3!A
O1>A P
7 )39
& 3!
!*) C
#) 1&)#
& (%
9 1#(9)D%
%+5",
O1>A P1*#!40
7 )39
& 3!
!*)
#) 1&)#
&
9 1#(9)D%
%
%+5$,
" 1!&2)40 3!A .
O1>A P
7 )39"
& 3!
!*) 1 -"' $'+=0Q =$Q,
#) 1&)#
& (%
9 1#(9)D%
!*)+5',
",(, ##$%#
",(. # %%(#%
",(/ ##$%#
",(0 # %%(#%
#$

O1>A P1!&2)40
7 )39"
& 3!
!*) 77B-4R4'
#) 1&)#
&
9 1#(9)D% 7
7B !*)+54,
$ 1(&3) 40 3!A
O1>A P
7 )39$
& 3!
!*)
#) 1&)#
& (% 9 1#(9)D% B
+5I,
3 - ?%1*#!40+* 6),1!&2)40+* 6)",
O1>A P1(&3) 40
7 )39$
& 3!
!*) !N
#) 1&)#
& #31)6)3) 9 1#(9)D% 7B
N+5<,
3 - ?%1*#!40+* 6),1!&2)40+* 6)",
' #!/40 3!#!.
O1>A P
7 )39'
& 3!
!*) C8
#) 1&)#
&
N. + %,
8+ %,+5=,
",(1 ##$%#
",(2 # %%(#%
",(4 ##$%#
",(5 ##$%#
3
3

A
B
4 #!140 3!#!A
O1>A P
7 )394
& 3!
!*) C8
#) 1&)#
& N. + %,
8+ %,+50,
% - " 5 6 5 6
O1>A P
7 )39$
& * (7+59((5&)(?:/&)I'Q,
& A-4$S0'81
-$I'/.
90*&3>5 6
!*) "$S0'1
#) 93)
A & 5 3 A$I'/." 9 1#(9)D% A
A "$S0'1
%! ."$ !))3
O1>A P
7 )39"
& * (7+59((5&)(?:/&)I'Q,
40+58!5,
!*) :8-0$/
/8-0/
#) 1&)#
! ? ! 8&6/A* 6)" "/" *!())*% 6&36$ * 7%?E0F
!))3 +5$,' 58!5 A7
!*)4 ! 8&6/A* 6)" 0/
3 - ? 8&6/ "
$ 8&6/ 7
O1>A P
7 )39"
& * (
#) 1&)#
& 9 1#(9)D% 7
+5$,
",(+6 ##$%#
"/(+
"/(,

$" 5#9!
O1>A P
&
40+58!5,
#) 1&)#
&
58!5
$$ :/&)8 ( 3) 7
00+#(# 3 (K2),
O1>A P
7 )39'>9#55
)39'>69#55
)39'">6 &3
)39'$>66 &3
)39''>86 &3
& * ( +:/&)00Q,
!*) JC0I$?KC0<4
C000TSQ
#) 1&)#
@ 0 7
00 +5$", 9#556 &3 JKA7
!*)" ?% 000TSQ
O1>A P
7 )39'>9#55
)39'>69#55
)39'">6 &3
)39'$>66 &3
)39''>86 &3
& : +:/&)00Q,
!*) :/&)
#) 1&)#
@ 0 7 @ + 4,A
"/(/
#(+66-
"/(.
9#55 +(#:(&6/,- & ! A A7 E0F9 1#(9)D% ?
A 7
6 &3 +/&6/(&6/,-" 9 1#(9)D% ? A6 &3 7 $ ? A ' 9 1#(9)D% ? A66 &3 7 4 ? A I 9 1#(9)D% ? A86 &3 77 < ? A 7= < 7 A7+5$$,
3 - ? 8&6/ "

D
D
E
E
11
14
PWB
PWB
WIRE ASSY,CRT GND 21U
12
13 19
15G
GG
G
H
F
16
17
I I
I
I
I
18
HLDR,LED
8
8
9
9
10
7
A
B
C
C
4
6
1
23
5
TV-C2121 KERJ2C,KERJ74M,KEJ2C(FileName:TVC2121.EPS)13/8/20 BJB-F

!
!
!
!
!
!
! " " # #$
# #$ % %! % %!
& & $
& &
%& &%! & &
' '( $
& & $ & #
! "! "#$ % &! "#$ % ! "'$&($)! "
#'$&! "#*$ &#%+ *+! "% #*! "
%+ *()! "% %&$ ,! "* ! "
* ! " &#&&, %$ #
,%-,%-.$$%,%- %, ,
% ,%-,%-&#% ,%-#% ,%-