Embed Size (px)
Citation preview

8/3/2019 PCLaw7 Instructions Cheats(18.10.2007)
http://slidepdf.com/reader/full/pclaw7-instructions-cheats18102007 1/15
PC Law 7
L Entering Time & Expense Recovery
L Running Month-End Bills
L Changing Finalized Bills
L Creating a New Matter
L Basic Reports
LCustomizing Reports
L Requesting a Check
L Using the Register
L Matter Manager
L Split Billing
Heckman Consulting201 792-0022

8/3/2019 PCLaw7 Instructions Cheats(18.10.2007)
http://slidepdf.com/reader/full/pclaw7-instructions-cheats18102007 2/15
© heckman consulting page 1 of 14 December 2004
When you click on the “Time Entry” button (under “Time/Fees” or “Favorites”) you seethe following screen (Note: depending on your anti-virus setting, you may get a messagesaying that an index needs to be rebuilt. Just click OK):
Most of these items are pretty self-evident:
If you click on the picture of the stop-watch under “timer” it starts a timer(Clicking again turns it off). This will automatically track the time you spenddoing a particular task. When the timer is going, the clock is
green. When the timer has been stopped, the clock is Red.
This defaults to the current date. Otherwise, click to bring up acalendar and select the desired date.
Click on the little down arrow for a list of clients. You can chooseto have this list sorted by the name of the client or the client number.
Click here to pick your name.
For most clients, this will default to “BW” (“Billable Work”). If you need anothertask, click to select (for example for contingency work or non-billable items).
The appropriate rate will be selected for the given client. You should not have tochange this.
If you use the timer, this will be filled in automatically. Otherwise, type in the timespent. The billable amount will be calculated automatically.
You can use this as a starter for filling in the Explanation field. Seeattached sheet for a list of current explanation codes. Otherwise, you can jumpdirectly to the “Explanation” field. This is description of the work done as it willappear on the bill.
hit T to proceed to the next
one.I m p o r t a n t :
hittingR
will enter your time and closethe Time Entry window. To keep your time available so that you can modify it at a later point or the end of the day, clickthe “Delay Post” button at the lower right of the screen. If you wish to keep the timer running, you must m i n i m i z e PC Law. Clicking “Delay Post”stops the timer.

8/3/2019 PCLaw7 Instructions Cheats(18.10.2007)
http://slidepdf.com/reader/full/pclaw7-instructions-cheats18102007 3/15
© heckman consulting page 2 of 14 December 2004
Fee Entry works exactly like Time Entry, except that it is for a flat fee (with no timeattached).
If you wish to edit a time entry description or change the time, click the “Register”button. You can review all your time for a specific client or all your time for a specificdate range for all clients. To review time for a specific client, select that client under“matter.” Enter the appropriate dates to select a date range. To review only your time,select “Lawyer” and enter your name. When you have made the desired selections, click“Select” and the time will appear (see “Using the Register”)..
To edit a given entry, simply double-click on it and the “Correct Time Entry” screen willappear (exactly like the original Time Entry screen). Make changes as needed.
To enter Disbursements for e . g . photocopies, courier, registration fees, click the “ExpenseRecovery” button. The following screen appears:
By default the “To”line says “ExpenseRecovery.” You do not need to change this.Click on “Explanation”for a list of possiblecharges.
Click on “Date” to get
a calendar from which you can pick the date of the charge.
Click on “Matter” to select the client. Click on “Explanation Code”to select the code. Fill in the explanation as needed (this is what will appear on the bill). For certain items such as photocopies, when you click “Amount” a screen appears with a preset charge –all you have to do is fill in the number of photocopies (or whatever). The amount will be calculated for you. If you do not want the number of copies etc. to appear on the bill, uncheck the box that says: “ShowQuantity x Rate in explanation.” Note that this is automatically assigned to the bill andgeneral ledger.
PressT to proceed to the next disbursement. You can enter multiple disbursementsfor the same client or different clients at the same time. When you pressR, thedisbursements are entered into PC Law and the screen disappears.

8/3/2019 PCLaw7 Instructions Cheats(18.10.2007)
http://slidepdf.com/reader/full/pclaw7-instructions-cheats18102007 4/15
© heckman consulting page 3 of 14 December 2004
The process of getting out bills at the end of the month involves a number of steps, each of whichis not difficult, but which must be done in the correct order in order to minimize error.
I m p o r t a n t : In PC Law, unlike some competing programs, it is possible to print either a Pre-Bill or
a Bill using any format available. Thus, you can print a Pre-Bill using a Final Bill format. You canalso have specific formats to meet the requirements of specific clients.
1. Select “Create Pre-Bills” in the Billing section oron your Favorites menu.
2. Click the black down arrow in the “Template”box and select the Pre-Bill template. Make sure“Printer” is checked so that the bills print.
3. Select the date range for billable hours to go inthis set of bills, depending on your billingcycle..
4. Click in the “Matter” box if you only want to print a single bill. Otherwise, click the “Matter”to select which matters to print.
5. To print all bills, click the “All” button. To print selected matters, click the “Selected Matters”button, then “Select.” Then select the matters you wish to print by clicking to the left of thematter. A check mark will appear. When youhave finished click the “Main” tab again and click“OK” to print.
At this point the Pre-Bills can be reviewed.
To correct pre-bills, run the register for each client to be corrected. Select the desired matter, thedate range, and click “Select.” To edit an entry, double-click on it, or click on it and click
“Change.” When you have made the changes, click OK, then Cancel to return to the register. Tosee the changes in the register, you must click on “Select” again.
At this point you should reprint the pre-bills to verify that all changes are correct. However,instead of selecting the prebill format, select the final format (you can print pre-bills in the

8/3/2019 PCLaw7 Instructions Cheats(18.10.2007)
http://slidepdf.com/reader/full/pclaw7-instructions-cheats18102007 5/15
© heckman consulting page 4 of 14 December 2004
“Final” format) to verify that all changes are correct and that the final bills will print as desired. If you still have mistakes when the final bills are printed, you must go through the “Undo Bill”process, which can be cumbersome.
To print final bills, select “Create Bill” and proceed as for pre-bills, using the final format. If youneed to re-print a bill, select “Recreate Bill,” then select and print the desired invoice.
It is possible (with some important restrictions) toskip bills that have no billable amounts due.
First, when logged in as Administrator, got to Options |System | Billing. Make sure the billing options are set asfollows:
When you run the bills or pre-bills, in the billing screen, go to the Options tab and make surethese same settings exist.
Second: You must print a l l bills in order to skip zero balance bills. If you print selected bills only the s k i p function is omitted.
Third: While this will not print zero-balance bills, it w i l l print bills for which no time is due thismonth, but still have a balance due from the client.

8/3/2019 PCLaw7 Instructions Cheats(18.10.2007)
http://slidepdf.com/reader/full/pclaw7-instructions-cheats18102007 6/15
© heckman consulting page 5 of 14 December 2004
When you run pre-bills, the PC Law does not record that the client has actually been billed.However, once you run “Create Bill,” the client is registered as having been billed in terms of
Accounts Receivable, General Ledger, Time Entries and other information. This also means that the time entries that appear on the bill can no longer be edited. In order to change a time entry that has already been billed, you have to “Undo” a bill.
Note that you can re-print an existing bill by selecting “Recreate Bill,” then selecting the client and invoice number desired.
Invoice numbers in PC Law are sequential across the program, not for a particular client.Thus a client might have invoice numbers 85, 111, and 144 in successive months (See graphic)
To change a bill, click on the “Undo Bill” button.Then select the matter. When you click on the“Invoice” box, a list of invoices for that matter
appears, as well as the amount of each invoice (not shown here). This lets you identify the bill to bechanged.
Select the Bill to be “undone.” The fees and otherinformation for that bill will appear so that you can verify that it is the correct bill. Click OK to undo thebill.
Once a bill has been “undone” you can edit time entries or make other changes. To redo the billagain, go through the bill creation process outlined above. when you do this, the new bill will receive a d i f f e r e n t invoice number from the original bill (cf. invoice numbers 46 and 50 in thegraphic above, both on the same date).

8/3/2019 PCLaw7 Instructions Cheats(18.10.2007)
http://slidepdf.com/reader/full/pclaw7-instructions-cheats18102007 7/15
© heckman consulting page 6 of 14 December 2004
Opening a new Matter is a straightforward process,although it does require attention to detail and that a numberof steps be completed accurately. If this is not done, time may be entered incorrectly, or information may be incorrect on bills.
To open a new matter, click on the left-most yellow folder on the button bar, or select File |
Matter | New Matter, or pressC-N. The followingscreen appears:
1. Assign the new client number, e . g . 0830. Notethat a matter number of 0830-001 is automatically created.
2. Select the type of law from a list of the type of
cases the firm handles.
3. The default task will be either BW (“Billable Work”) or NBW (“Non-Billable Work”)
4. Select the Default Billing rate from the pop-up list.
5. Select the Introducing and other lawyers.
6. Under description fill in what should go in the Re: line of the bill and cover letters.
7. Enter the name of the client and the Company Name in the appropriate fields. Be sure tocheck whether the client is to be displayed as a Person (i.e., Last Name) or a Corporation(Company Name). If necessary, enter an “Attention” line.
Click OK to create the client. At this point, all otherconfiguration for the client isdone from the MatterManager. Click on the MatterManager button at the bottomof the PC Law window. Thefollowing screen appears:
Enter information asappropriate.
If the bill is supposed to go toan address different from theclient’s address, enter that information on the “Billing Address” tab. There is alsoprovision for a Second Billing
8/3/2019 PCLaw7 Instructions Cheats(18.10.2007)
http://slidepdf.com/reader/full/pclaw7-instructions-cheats18102007 8/15
© heckman consulting page 7 of 14 December 2004
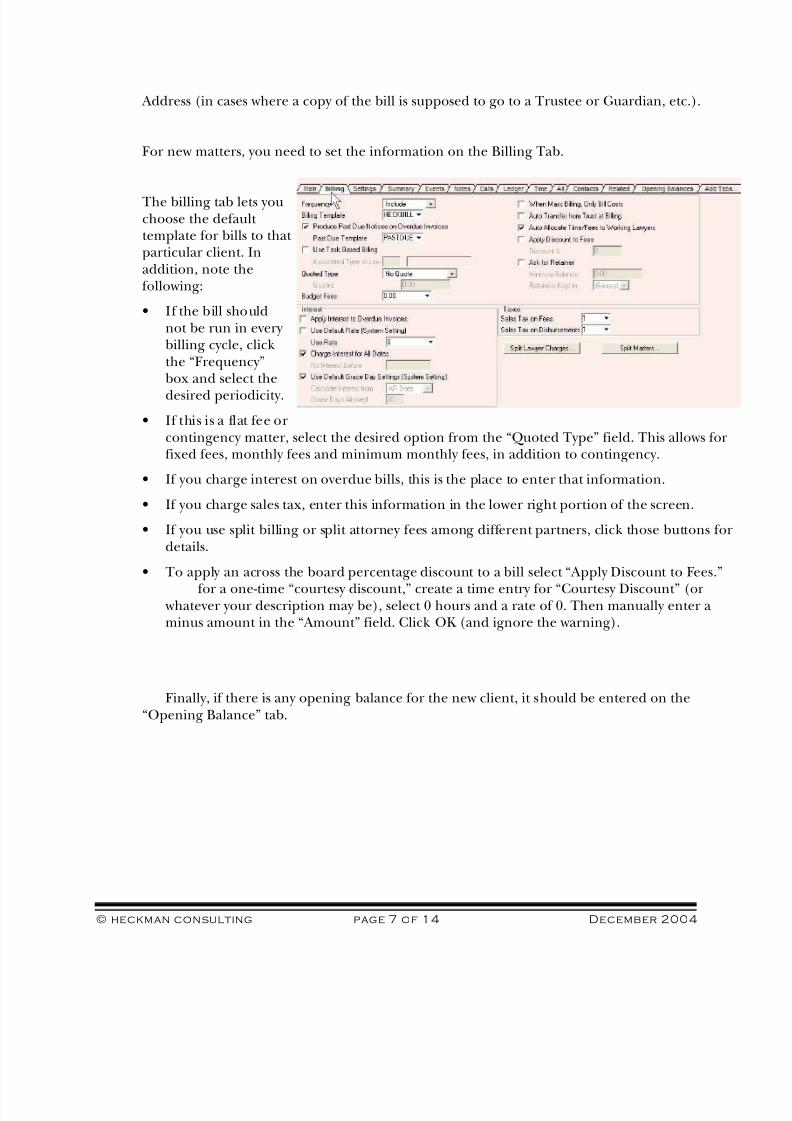
Address (in cases where a copy of the bill is supposed to go to a Trustee or Guardian, etc.).
For new matters, you need to set the information on the Billing Tab.
The billing tab lets youchoose the default template for bills to that particular client. Inaddition, note thefollowing:
• If the bill shouldnot be run in every billing cycle, clickthe “Frequency”box and select the
desired periodicity.
• If this is a flat fee orcontingency matter, select the desired option from the “Quoted Type” field. This allows forfixed fees, monthly fees and minimum monthly fees, in addition to contingency.
• If you charge interest on overdue bills, this is the place to enter that information.
• If you charge sales tax, enter this information in the lower right portion of the screen.
• If you use split billing or split attorney fees among different partners, click those buttons fordetails.
• To apply an across the board percentage discount to a bill select “Apply Discount to Fees.”
N o t e : for a one-time “courtesy discount,” create a time entry for “Courtesy Discount” (or whatever your description may be), select 0 hours and a rate of 0. Then manually enter aminus amount in the “Amount” field. Click OK (and ignore the warning).
Finally, if there is any opening balance for the new client, it should be entered on the“Opening Balance” tab.

8/3/2019 PCLaw7 Instructions Cheats(18.10.2007)
http://slidepdf.com/reader/full/pclaw7-instructions-cheats18102007 9/15
© heckman consulting page 8 of 14 December 2004
While there are many of pre-set reports available in PC Law (see below), some frequently
requested information is available instantly. This includes the following:
. The Matter Manager gives you asnapshot of the status of any given client, includingunbilled time, A/R amounts, Trust and Retaineramounts, etc. Clicking on any specific item brings upthe detail of, e . g . unbilled fees or the history of A/R payments. Simply select the matter desired and youhave an instant status of the client account. Clickingon the “Ledger” or “Time” tabs let you see the client
ledger.
. The Register lets you review time and disbursements in a number of combinations.
• By leaving the Matter selection blank, you can see the current time for any given daterange. The detail is shown above, and totals below.
• By leaving the Matter selection blank and selecting a specific attorney in the “Lawyer”box, you can see all time for that particular attorney for the selected date range.
• By selecting a Matter, you can see the time billed for that matter for a given daterange.
By clicking on the “Expense” tab of the register, you can view disbursements in a similar way.
However, there are some overall reports that you may want to run monthly (or at otherintervals) to peruse as a whole. Note that if you run any of these reports to the screen, you can “drill down” by double-clicking on any element to see the detail behind it. These
include:
Select Reports | GL Statements. To run income reports, deselect “GL” and select “IncomeStatement.” Depending on the template you select, you see different information:
8/3/2019 PCLaw7 Instructions Cheats(18.10.2007)
http://slidepdf.com/reader/full/pclaw7-instructions-cheats18102007 10/15
© heckman consulting page 9 of 14 December 2004
“Income” gives you an income & expense statement broken down by Attorney for thecurrent month and Year To Date.
“CompInc” gives you a comparison with last year’s data. Note that this will not beimmediately useful as the data does not exist.
You can also select to see detail (which may be more than you want) and to see zero-balance matters.
Accounts Receivable report. This lists Fees per attorney per client with 30, 60, 90, andover 120 day aging. To get this report, select Report | Accounts Receivable | Receivablesby Client.
Select Reports | Journal | Billing(Fees). Note that this, and other, reports arecustomizable. They can be streamlined if they appear too “busy.”
A large number of reports are available under Reports | Productivity. The most immediately obvious ones are “Billings by Lawyer,” “Daily Time Summary” and “BillableTime Summary by Working Lawyer.”
8/3/2019 PCLaw7 Instructions Cheats(18.10.2007)
http://slidepdf.com/reader/full/pclaw7-instructions-cheats18102007 11/15
© heckman consulting page 10 of 14 December 2004
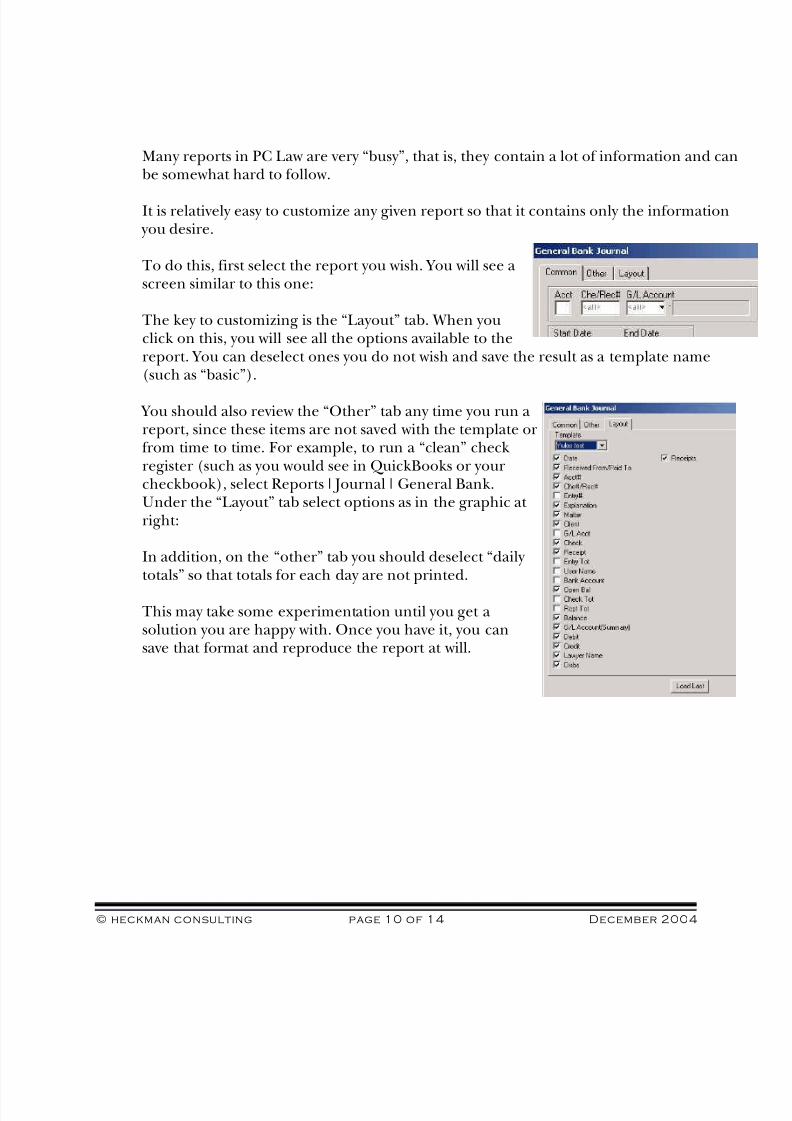
Many reports in PC Law are very “busy”, that is, they contain a lot of information and canbe somewhat hard to follow.
It is relatively easy to customize any given report so that it contains only the information you desire.
To do this, first select the report you wish. You will see ascreen similar to this one:
The key to customizing is the “Layout” tab. When youclick on this, you will see all the options available to thereport. You can deselect ones you do not wish and save the result as a template name(such as “basic”).
You should also review the “Other” tab any time you run areport, since these items are not saved with the template orfrom time to time. For example, to run a “clean” checkregister (such as you would see in QuickBooks or yourcheckbook), select Reports | Journal | General Bank.Under the “Layout” tab select options as in the graphic at right:
In addition, on the “other” tab you should deselect “daily totals” so that totals for each day are not printed.
This may take some experimentation until you get asolution you are happy with. Once you have it, you cansave that format and reproduce the report at will.

8/3/2019 PCLaw7 Instructions Cheats(18.10.2007)
http://slidepdf.com/reader/full/pclaw7-instructions-cheats18102007 12/15
© heckman consulting page 11 of 14 December 2004
PC Law Pro allows you to request a check which can processed and written at a later time.This is useful for various fees or other payments.
To request a check:
Click the “Request Checks (General)” button on your Time sheets or Favorites page. Or,select Data Entry | General Bank | Request Check.
You see a check screen:
If you have multiple bank accounts, be sure to select the appropriate one.
Fill in the check information: “To,” the date, the amount.
Click on “Explanation” and select an explanation. Type in the “explanation.” This is what will appear on the memo field on the check.
Below the check area, fill in the matter if the check is for a client-related expense (will becharged back to the client).
Fill in the explanation if needed. The amount will automatically be filled in.If you are requesting a single check for multiple client-related expenses, fill out multiple
lines and indicate the amount that is to be assigned to each matter. At the bottom of the screen click “OK.”
The check request will appear for the person responsible for writing check so that it canbe processed when required.
8/3/2019 PCLaw7 Instructions Cheats(18.10.2007)
http://slidepdf.com/reader/full/pclaw7-instructions-cheats18102007 13/15
© heckman consulting page 12 of 14 December 2004
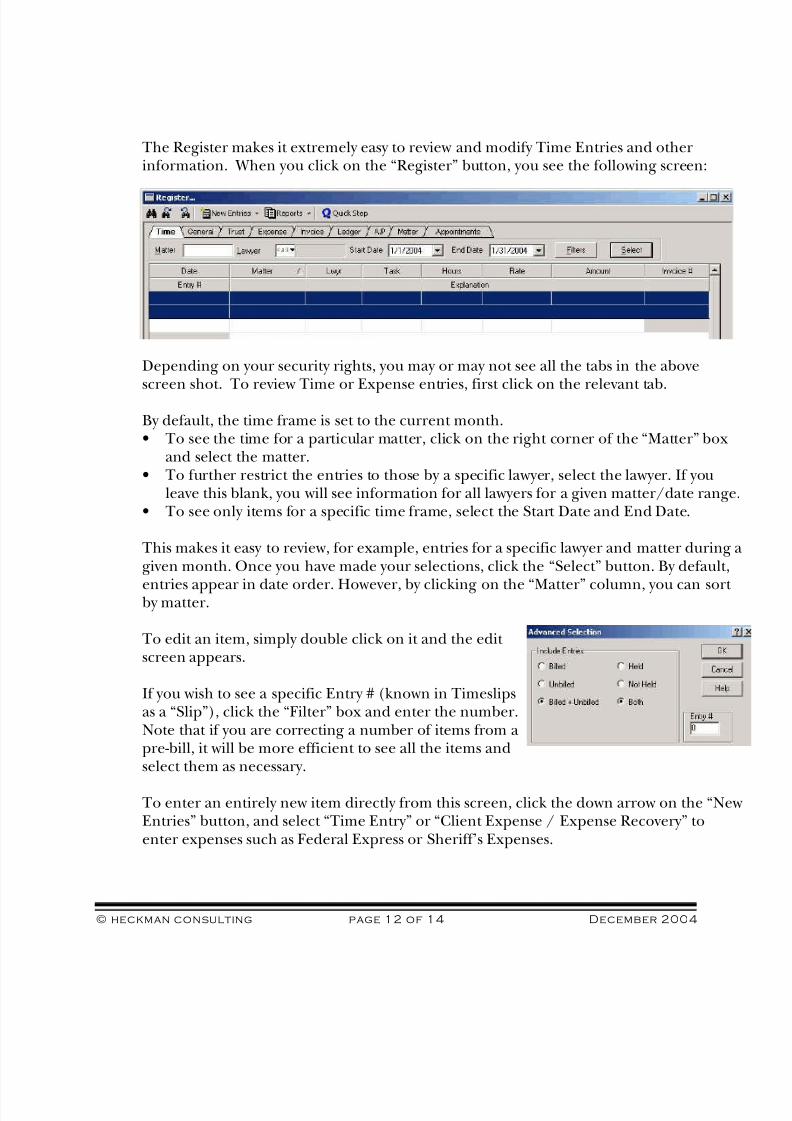
The Register makes it extremely easy to review and modify Time Entries and otherinformation. When you click on the “Register” button, you see the following screen:
Depending on your security rights, you may or may not see all the tabs in the above
screen shot. To review Time or Expense entries, first click on the relevant tab.
By default, the time frame is set to the current month.• To see the time for a particular matter, click on the right corner of the “Matter” box
and select the matter.• To further restrict the entries to those by a specific lawyer, select the lawyer. If you
leave this blank, you will see information for all lawyers for a given matter/date range.• To see only items for a specific time frame, select the Start Date and End Date.
This makes it easy to review, for example, entries for a specific lawyer and matter during agiven month. Once you have made your selections, click the “Select” button. By default,
entries appear in date order. However, by clicking on the “Matter” column, you can sort by matter.
To edit an item, simply double click on it and the edit screen appears.
If you wish to see a specific Entry # (known in Timeslipsas a “Slip”), click the “Filter” box and enter the number.Note that if you are correcting a number of items from apre-bill, it will be more efficient to see all the items andselect them as necessary.
To enter an entirely new item directly from this screen, click the down arrow on the “NewEntries” button, and select “Time Entry” or “Client Expense / Expense Recovery” toenter expenses such as Federal Express or Sheriff’s Expenses.
8/3/2019 PCLaw7 Instructions Cheats(18.10.2007)
http://slidepdf.com/reader/full/pclaw7-instructions-cheats18102007 14/15
© heckman consulting page 13 of 14 December 2004
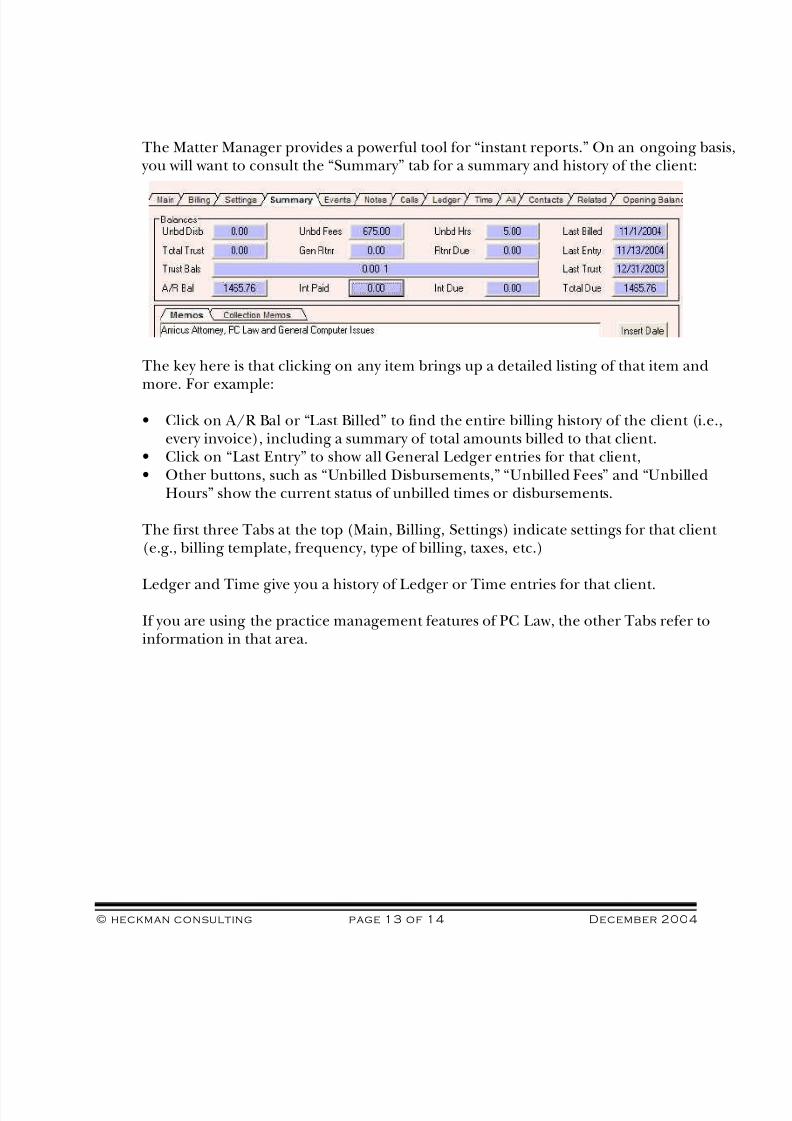
The Matter Manager provides a powerful tool for “instant reports.” On an ongoing basis, you will want to consult the “Summary” tab for a summary and history of the client:
The key here is that clicking on any item brings up a detailed listing of that item and
more. For example:
• Click on A/R Bal or “Last Billed” to find the entire billing history of the client (i.e.,every invoice), including a summary of total amounts billed to that client.
• Click on “Last Entry” to show all General Ledger entries for that client,• Other buttons, such as “Unbilled Disbursements,” “Unbilled Fees” and “Unbilled
Hours” show the current status of unbilled times or disbursements.
The first three Tabs at the top (Main, Billing, Settings) indicate settings for that client (e.g., billing template, frequency, type of billing, taxes, etc.)
Ledger and Time give you a history of Ledger or Time entries for that client.
If you are using the practice management features of PC Law, the other Tabs refer toinformation in that area.

8/3/2019 PCLaw7 Instructions Cheats(18.10.2007)
http://slidepdf.com/reader/full/pclaw7-instructions-cheats18102007 15/15
© heckman consulting page 14 of 14 December 2004
PCLaw supports split billing, but it must be set up and data entered correctly. Here is how you do it.
1. Set up the master client whose billing will be split (or use an existing one).Say Master Client, matter no: 0333-001
2. Set up the subsidiaries (or whatever). Say Subsidiary 1 0333-001aSubsidiary 2 0333-001bSubsidiary 3 0333-001c
3. Open the Master Client (in this example 0333-001)Select the “Split” tab. You will see the following screen:
Select the matters among which the master client bills are to be split and the percentagesplit (e.g., 33, 33 and 34, or 60, 20, 20). NOTE: the split MUST add up to 100% so youmay have to do a slight amount of rounding.
Save everything and exit.
When you enter time in Amicus for a client with split billing you enter it for the
master client. Any time entered for a sub client will be assigned 100% to that sub-client and NOT split. (This is because you might conceivably have time that should be assigned100% to a sub client - so you have that option).
Time entered in Amicus for the master client will be split correctly among the three sub-clients. Note that NO time is allocated to the master client per se.


![T-76.4115 Iteration Demo Tikkaajat [PP] Iteration 18.10.2007](https://img.dokumen.tips/doc/110x75/5a4d1b607f8b9ab0599ace21/t-764115-iteration-demo-tikkaajat-pp-iteration-18102007.jpg)