Embed Size (px)
Citation preview

Payroll Guide
April 11, 2018 2017.2
Copyright © 2005, 2018, Oracle and/or its affiliates. All rights reserved.
This software and related documentation are provided under a license agreement containingrestrictions on use and disclosure and are protected by intellectual property laws. Except as expresslypermitted in your license agreement or allowed by law, you may not use, copy, reproduce, translate,broadcast, modify, license, transmit, distribute, exhibit, perform, publish, or display any part, in anyform, or by any means. Reverse engineering, disassembly, or decompilation of this software, unlessrequired by law for interoperability, is prohibited.
The information contained herein is subject to change without notice and is not warranted to be error-free. If you find any errors, please report them to us in writing.
If this is software or related documentation that is delivered to the U.S. Government or anyonelicensing it on behalf of the U.S. Government, then the following notice is applicable:
U.S. GOVERNMENT END USERS: Oracle programs, including any operating system, integrated software,any programs installed on the hardware, and/or documentation, delivered to U.S. Government endusers are "commercial computer software" pursuant to the applicable Federal Acquisition Regulationand agency-specific supplemental regulations. As such, use, duplication, disclosure, modification,and adaptation of the programs, including any operating system, integrated software, any programsinstalled on the hardware, and/or documentation, shall be subject to license terms and licenserestrictions applicable to the programs. No other rights are granted to the U.S. Government.
This software or hardware is developed for general use in a variety of information managementapplications. It is not developed or intended for use in any inherently dangerous applications, includingapplications that may create a risk of personal injury. If you use this software or hardware in dangerousapplications, then you shall be responsible to take all appropriate fail-safe, backup, redundancy, andother measures to ensure its safe use. Oracle Corporation and its affiliates disclaim any liability for anydamages caused by use of this software or hardware in dangerous applications.
Oracle and Java are registered trademarks of Oracle and/or its affiliates. Other names may betrademarks of their respective owners.
Intel and Intel Xeon are trademarks or registered trademarks of Intel Corporation. All SPARCtrademarks are used under license and are trademarks or registered trademarks of SPARCInternational, Inc. AMD, Opteron, the AMD logo, and the AMD Opteron logo are trademarks orregistered trademarks of Advanced Micro Devices. UNIX is a registered trademark of The Open Group.
This software or hardware and documentation may provide access to or information about content,products, and services from third parties. Oracle Corporation and its affiliates are not responsiblefor and expressly disclaim all warranties of any kind with respect to third-party content, products,and services unless otherwise set forth in an applicable agreement between you and Oracle. OracleCorporation and its affiliates will not be responsible for any loss, costs, or damages incurred due toyour access to or use of third-party content, products, or services, except as set forth in an applicableagreement between you and Oracle.
If this document is in public or private pre-General Availability status:
This documentation is in pre-General Availability status and is intended for demonstration andpreliminary use only. It may not be specific to the hardware on which you are using the software.Oracle Corporation and its affiliates are not responsible for and expressly disclaim all warranties of anykind with respect to this documentation and will not be responsible for any loss, costs, or damagesincurred due to the use of this documentation.
If this document is in private pre-General Availability status:
The information contained in this document is for informational sharing purposes only and should beconsidered in your capacity as a customer advisory board member or pursuant to your pre-GeneralAvailability trial agreement only. It is not a commitment to deliver any material, code, or functionality,

and should not be relied upon in making purchasing decisions. The development, release, and timingof any features or functionality described in this document remains at the sole discretion of Oracle.
This document in any form, software or printed matter, contains proprietary information that is theexclusive property of Oracle. Your access to and use of this confidential material is subject to the termsand conditions of your Oracle Master Agreement, Oracle License and Services Agreement, OraclePartnerNetwork Agreement, Oracle distribution agreement, or other license agreement which hasbeen executed by you and Oracle and with which you agree to comply. This document and informationcontained herein may not be disclosed, copied, reproduced, or distributed to anyone outside Oraclewithout prior written consent of Oracle. This document is not part of your license agreement nor can itbe incorporated into any contractual agreement with Oracle or its subsidiaries or affiliates.
For information about Oracle's commitment to accessibility, visit the Oracle Accessibility Programwebsite at http://www.oracle.com/pls/topic/lookup?ctx=acc&id=docacc
Oracle customers that have purchased support have access to electronic support through My OracleSupport. For information, visit http://www.oracle.com/pls/topic/lookup?ctx=acc&id=info or visit http://www.oracle.com/pls/topic/lookup?ctx=acc&id=trs if you are hearing impaired.
Sample Code
Oracle may provide sample code in SuiteAnswers, the Help Center, User Guides, or elsewhere throughhelp links. All such sample code is provided "as is” and “as available”, for use only with an authorizedNetSuite Service account, and is made available as a SuiteCloud Technology subject to the SuiteCloudTerms of Service at www.netsuite.com/tos.
Oracle may modify or remove sample code at any time without notice.
No Excessive Use of the Service
As the Service is a multi-tenant service offering on shared databases, Customer may not use theService in excess of limits or thresholds that Oracle considers commercially reasonable for the Service.If Oracle reasonably concludes that a Customer’s use is excessive and/or will cause immediate orongoing performance issues for one or more of Oracle’s other customers, Oracle may slow down orthrottle Customer’s excess use until such time that Customer’s use stays within reasonable limits. IfCustomer’s particular usage pattern requires a higher limit or threshold, then the Customer shouldprocure a subscription to the Service that accommodates a higher limit and/or threshold that moreeffectively aligns with the Customer’s actual usage pattern.
Beta Features
Oracle may make available to Customer certain features that are labeled “beta” that are not yetgenerally available. To use such features, Customer acknowledges and agrees that such beta featuresare subject to the terms and conditions accepted by Customer upon activation of the feature, or in theabsence of such terms, subject to the limitations for the feature described in the User Guide and asfollows: The beta feature is a prototype or beta version only and is not error or bug free and Customeragrees that it will use the beta feature carefully and will not use it in any way which might result inany loss, corruption or unauthorized access of or to its or any third party’s property or information.Customer must promptly report to Oracle any defects, errors or other problems in beta featuresto [email protected] or other designated contact for the specific beta feature. Oracle cannotguarantee the continued availability of such beta features and may substantially modify or ceaseproviding such beta features without entitling Customer to any refund, credit, or other compensation.Oracle makes no representations or warranties regarding functionality or use of beta features andOracle shall have no liability for any lost data, incomplete data, re-run time, inaccurate input, workdelay, lost profits or adverse effect on the performance of the Service resulting from the use of betafeatures. Oracle’s standard service levels, warranties and related commitments regarding the Serviceshall not apply to beta features and they may not be fully supported by Oracle’s customer support.These limitations and exclusions shall apply until the date that Oracle at its sole option makes a betafeature generally available to its customers and partners as part of the Service without a “beta” label.

Table of ContentsGetting Started with NetSuite Payroll ....................................................................................... 1
Setting Up NetSuite Payroll ................................................................................................. 2Enabling NetSuite Payroll ................................................................................................ 2Entering Company Information for Payroll ........................................................................ 2Entering Workplace Records for Payroll ............................................................................ 3Setting Payroll Preferences ............................................................................................. 4Updating Employee Records for Payroll ............................................................................ 8Entering a Home Address for an Employee ....................................................................... 9Verifying the Jurisdictions for an Employee ...................................................................... 10Entering General Payroll Information for an Employee ...................................................... 10Setting Up Earnings for an Employee .............................................................................. 11Setting Up Taxes for an Employee .................................................................................. 13Using Tax Override Methods for Employee Withholding .................................................... 13Complying with Tax Requirements for Multi-State Employees ............................................. 14Setting Up Deductions for an Employee .......................................................................... 15Setting Up Negative Deductions for an Employee ............................................................. 15Setting Up Company Contributions for an Employee ......................................................... 16Setting Up Accrued Time for an Employee ....................................................................... 17Complying with State-Specific Requirements for Employee Information ............................... 19Bulk Updating Employee Records with Payroll Information ................................................ 20Setting Up Expatriates for U.S. Payroll ............................................................................ 20
Updating Payroll Information ............................................................................................ 21Receiving Warning Messages During the Setup Process ..................................................... 22
Creating Payroll Items ...................................................................................................... 23Creating Payroll Earning Items ....................................................................................... 23Creating Payroll Deduction Items ................................................................................... 27Creating Payroll Employer Contribution Items .................................................................. 28Searching for Payroll Items ........................................................................................... 29Employee Payroll Items Search ...................................................................................... 29Scheduling Payroll Item Changes ................................................................................... 30Deriving a Pay Rate from Another Payroll Item ................................................................ 30
Mapping Payroll Items ...................................................................................................... 31Using Standard Pay Codes ................................................................................................ 31
Using Earning Codes .................................................................................................... 32Using Deduction Codes ................................................................................................ 37Using Employer Contribution Codes ............................................................................... 41
Running Test Payrolls ....................................................................................................... 42Turning Off Payroll Test Mode ....................................................................................... 44Setting Up Year-To-Date Information .............................................................................. 44Entering a Payroll Start Date ......................................................................................... 45
Administering Payroll Transactions ......................................................................................... 46Generating Payroll Transactions ......................................................................................... 46
Creating a Payroll Batch ................................................................................................ 47Creating a One-Time Payroll .......................................................................................... 51Viewing Payroll Batches ................................................................................................ 52Calculating a Payroll Batch ............................................................................................ 53Using Bulk Edit ............................................................................................................ 55Editing an Individual Paycheck from a Payroll Batch .......................................................... 56Committing a Payroll Batch ........................................................................................... 59Viewing Individual Paychecks ......................................................................................... 60Running a Paycheck Search ........................................................................................... 60
Printing Payroll Checks or Vouchers ................................................................................... 61Printing Paychecks ....................................................................................................... 61

Printing Direct Deposit Vouchers ................................................................................... 61Creating Payroll Reversals or Adjustments ........................................................................... 64
Creating a Payroll Reversal ............................................................................................ 64Committing Payroll Reversals ........................................................................................ 64Creating Payroll Adjustments ......................................................................................... 65
Recording Third-Party Sick Pay Payments ............................................................................ 66Checking the Status of Payroll Transactions ......................................................................... 68
Payroll List Page .......................................................................................................... 68Payroll Status Page ...................................................................................................... 69
Making Payroll Liability Payments ...................................................................................... 69Performing Quarterly or Yearly Payroll Tasks ....................................................................... 70Allocating Paycheck Expenses to Projects ............................................................................ 72
Direct Deposit ..................................................................................................................... 74Setting Up Employees for Direct Deposit ............................................................................. 74Viewing the Status of Direct Deposit Transactions ................................................................ 75
Payroll Reports and Forms .................................................................................................... 77Employee Payroll Item History Report ................................................................................. 77Payroll Check Register ...................................................................................................... 78Payroll Liability Report ...................................................................................................... 78Payroll Journal Report ...................................................................................................... 79Payroll Summary Report ................................................................................................... 80Payroll Summary by Employee Report ................................................................................ 80Payroll Detail Report ........................................................................................................ 80Hours & Earnings Report .................................................................................................. 81State Withholding Report .................................................................................................. 81Service Fees Report .......................................................................................................... 82W-2 and 1099 Audit Information Report ............................................................................. 82Customizing Payroll Reports to Include Batch Information ..................................................... 83Modifying Payroll Report Sections ...................................................................................... 83
Using the Paycheck Journal Feature ....................................................................................... 85Getting Started with Payroll Solutions ................................................................................. 85Using Web Services for Payroll Integrations ......................................................................... 88Using SuiteScript for Payroll Solutions ................................................................................ 88Creating Custom Payroll Forms and Fields .......................................................................... 88
Creating Custom Payroll Transaction Body Fields .............................................................. 88Creating Custom Payroll Transaction Column Fields .......................................................... 89Creating Customized Paycheck Journal Forms .................................................................. 89

Getting Started with NetSuite Payroll 1
Payroll Guide
Getting Started with NetSuite PayrollNetSuite Payroll is a full-service payroll solution. All earnings, taxes, deductions, and companycontributions are automatically calculated using the latest tax data. This feature also provides federalforms W-2, 940, and 941 for printing and filing with the Internal Revenue Service (IRS).
In addition, NetSuite Payroll provides federal, state, and local tax filing, tax payments, and directdeposits to employees' bank accounts. Other features include service-printed paychecks, vouchers, andyear-end forms (W-2, W-2C, and 1099-MISC).
NetSuite Payroll includes the following features:
■ Ability to create payroll batches
■ Direct Deposit
■ All payroll filings and deposits handled for you electronically
■ W-2 forms for permanent employees and 1099-MISC forms for contract employees are processedand filed for you electronically (W-2C forms are also available, where applicable)
■ New employee registrations filed for you
■ Service printed checks and stubs
■ Service printed W-2s, 1099-MISC, and W-2Cs
■ Integrated time tracking, commissions, and expense management
NetSuite Payroll supports only U.S. federal, state, and local payroll taxes.
Important: NetSuite provides the Paycheck Journal feature for partners' use in creatinginternational payroll solutions. See Using the Paycheck Journal Feature.
NetSuite Payroll includes a “No Penalties Guarantee.” This guarantees your payroll taxes will beaccurately filed and paid on time. This guarantee is based on you providing the correct informationon time and having sufficient funds in your account. If NetSuite Payroll does not accurately file yourforms and payments on time, NetSuite Payroll pays the resulting payroll tax penalties. See details inthe Electronic Service Agreement.
If you use NetSuite OneWorld, you can run payroll for only U.S. subsidiaries that have unique EmployerIdentification Numbers (EIN). For more information, see the help topic Setting Up OneWorld.
Note: If you need tax forms for prior years, contact NetSuite Support.
Implementing the Payroll Feature
If you want to use NetSuite to process your payroll, you must enable and implement NetSuite Payroll.Contact your NetSuite account representative for details about implementing Payroll.
To read about the setup procedure for Payroll service, read Setting Up NetSuite Payroll.
After you complete payroll setup tasks, you can execute payroll transactions in NetSuite. Forinformation, see Administering Payroll Transactions.
NetSuite provides a number of reports and forms that you can use to track payroll data. Forinformation, see Payroll Reports and Forms.

Setting Up NetSuite Payroll 2
Payroll Guide
Setting Up NetSuite PayrollReview the steps below to enable and set up the NetSuite Payroll feature. You may have completedsome of these steps when you first set up your NetSuite account, but you must enter additionalinformation to process payroll.
For example, you may have previously created employee records in NetSuite, but before you canprocess payroll, you must check the Include in Payroll box on the Payroll subtab of each employeerecord.
The setup process includes the following:
1. Enabling NetSuite Payroll
2. Entering Company Information for Payroll
3. Entering Workplace Records for Payroll
4. Setting Payroll Preferences
5. Updating Employee Records for Payroll
6. Setting Up Employees for Direct Deposit
7. Updating Payroll Information
Note: You might need to repeatedly perform this step after you change payrollpreferences, workplace records, employee records, or payroll items.
8. Creating Payroll Items
9. Running Test Payrolls
10. Setting Up Year-To-Date Information
Enabling NetSuite PayrollFollow the steps below to enable the Payroll feature. You must complete this task on the first day of theimplementation process.
Important: Enable NetSuite Payroll a minimum of 30 business days before your next paydaywith the service. Payday is the date that checks are dated and direct deposits are deposited.
To enable Payroll:
1. Go to Setup > Company > Enable Features.
2. Click the Employees subtab.
3. Check the Payroll box.
4. For additional payroll related features, such as time tracking and service printed checks andstubs, select the applicable boxes.
5. Click Save.
Note: To enable Payroll, you must read and agree to the terms and conditions.
Entering Company Information for PayrollOn the Company Information page, you enter basic identifying information about your company. Forinformation about setting up subsidiaries, see the help topic Creating Subsidiary Records.
To use NetSuite Payroll, you should enter or select information in the following fields:

Setting Up NetSuite Payroll 3
Payroll Guide
■ Company Name
■ Legal Name
■ Address, City, State, and Zip
■ Employer Identification Number (EIN)
■ Phone
To enter the company information required for payroll:
1. Go to Setup > Company > Company Information.
2. Enter or select the information in the fields listed above.
3. Click Save.
For more information on entering company information, see the help topic Configuring CompanyInformation.
Any changes made to these fields must be committed on the Update Payroll Information page. Formore information, see Updating Payroll Information.
Entering Workplace Records for PayrollTo use NetSuite Payroll, you must create workplace records for each location where you have a tax IDand maintain paid employees. NetSuite uses workplace records to define the taxes the employer mustwithhold and pay. Each employee you include in a payroll must have a designated workplace.
Note: The workplace address may be used in conjunction with a home address.
To create workplace records:
1. Go to Lists > Employees > Workplaces > New.
Workplaces also are listed in the Main Office field on the Preferences tab of the Set Up Payrollpage. If you are new to NetSuite Payroll, you must create a workplace record for your mainoffice.
2. In the Name field, enter a name for the workplace.
This name appears on forms and reports that require you to choose a workplace.
For example, you might name one location Georgia Warehouse and another CaliforniaHeadquarters.
3. If this is a subworkplace of an existing workplace, select the parent workplace from the list in theSubworkplace of field.
4. To enter the address of the workplace, click the Edit link next to the Address field, and completethe fields in the address, including the following:
a. In the Attention field, enter the person at this address who should be notified of receipt ofdocuments or goods.
b. In the Addressee field, enter the company name for this workplace that should show onlabels and transactions.
This name appears under the name you enter in the Attention field.
c. Enter the phone number for this workplace the way it should appear on all forms.
d. Enter the address for this workplace.
You must include the full street address, state, and zip code for each workplace record.NetSuite Payroll uses this address to calculate taxes.
e. Click OK.

Setting Up NetSuite Payroll 4
Payroll Guide
5. Click Save.
Depending on the state where the workplace is located, you might need to set additional fields on theworkplace record. For more information, see Complying with State-Specific Requirements for EmployeeInformation.
After the Workplace record is created, you can select it in the Workplace field on the Payroll subtabof the employee record. When the Include in Payroll box is checked, you must select a value for theWorkplace field.
Note: You cannot delete a workplace if it is referenced in any employee record. If you do notwant a workplace to appear in lists, check the Workplace is Inactive box.
Setting Payroll PreferencesBefore you set up employee records for payroll, edit payroll items, or process paychecks, you must goto Setup > Payroll > Setup Tasks > Set Up Payroll to set preferences.
All of the tabs and fields described below may not be available to you. The options available on the SetUp Payroll page differ according to the features enabled in your account.
■ Setting the Subsidiary and the Date for Payroll to Begin
■ Setting General Payroll Preferences
■ Setting Default Accounts for Payroll
■ Setting Up the Integration of Payroll and Compensation Tracking
■ Setting Preferences for Jurisdictions
■ Setting Specific Tax Rates
After you finish entering information on the Set Up Payroll page, click the Save button.
Before you save changes on the Set Up Payroll page, you must set the following preferences:
■ Select a type of organization
■ Set the number of days to pay PTO and pay earnings prior to a pay period
■ Enter an email address to receive payroll alerts
■ Select a main-office workplace
If you do not set these preferences, NetSuite reminds you before permitting you to save your payrollpreferences.
Important: After updating any payroll preferences and options, you must go to the UpdatePayroll Information page and commit those changes. This ensures that all changes havebeen reviewed and committed to the tax engine. For more information, see Updating PayrollInformation.
Setting the Subsidiary and the Date for Payroll to BeginThe following fields might appear at the top of the Set Up Payroll page. Enter values or complete thetasks associated with the following fields and links:
Field Function
Payroll SubsidiaryThis field appears only inthe NetSuite OneWorldEdition and displays only
For only NetSuite OneWorld users. Identify the U.S.-based subsidiary or root-parent company for which payroll is run. The selection must have a valid U.S.address, based on its Zip Code.Each subsidiary must have:

Setting Up NetSuite Payroll 5
Payroll Guide
Field Function
US subsidiaries in thedropdown list.
■ unique Employer Identification Number (EIN) from the U.S. Internal RevenueService (IRS)
■ unique Vendor Name for each tax agency. For example, if you have twosubsidiaries located in California, you need two uniquely named Vendors forthe IRS and two uniquely named Vendors for the California Franchise TaxBoard.
Payroll Service Start DateThis date can only be setwhen this field is blank orthe date entered is in thefuture. Past dates cannotbe reset.
Enter the date that you want to start using NetSuite Payroll.You cannot process payroll using the Payroll feature prior to this date. As of thisdate, you are a payroll service user and all payrolls are processed and fundedusing service-related features.
Setting General Payroll PreferencesTo view and edit the following fields, click the Preferences subtab.
Field Name Function
General
Pay PTO prior to payperiod (days)
Enter the number of days prior to the current pay period that you want to paypersonal time off (PTO) for approved time entries not included in the last payperiod.You should enter zero unless you plan to pay employees before the last pay periodended.
Pay Earnings prior to payperiod (days)
Enter the number of days prior to the current pay period that you want to payearnings not included in the last pay period.You should enter zero unless you plan to pay employees before the last pay periodended.If your employees have been tracking their time using the Time Tracking feature,and you are now adding them to payroll and want to enter this setting, you mustenter their last paid date manually on their employee records. This ensures thatthe employee’s pay is calculated correctly. For more information, see EnteringGeneral Payroll Information for an Employee.
Payroll Issues alert emailaddresses
Enter the email addresses for users who should receive alert messages whenpayroll issues occur. Use comma separators between multiple addresses.
Main Office Select the name of the workplace that represents the main or home office foryour business. This workplace is used to calculate taxes for an employee whena workplace is not selected on the employee record. See Entering WorkplaceRecords for Payroll.
Type of Organization Select the type of organization that best describes your company: Corporation,Government Agency, LLC (limited liability corporation), Partnership, Proprietorship.The selection you make may affect the options available when setting up yourpayroll. For example, selecting Partnership enables you to set up partners with thecorrect tax exemptions.
Paychecks
Show Paychecks with ZeroAmounts
Check this box if you want to see paychecks for employees who worked zero hourson the Payroll Batch page.
Pay Expenses onPaychecks
Check this box to pay approved expense report amounts in NetSuite to employeeson their paychecks.You must create an expense payroll item to use this preference. For moreinformation, see Creating Payroll Items.

Setting Up NetSuite Payroll 6
Payroll Guide
Field Name Function
Pay EmployeeCommissions on Paychecksby Default
Check this box to pay approved commission amounts in NetSuite to employees ontheir paychecks.You must create a commission payroll item to use this preference. For moreinformation, see Creating Payroll Items.
Default “To Be Printed” onPaychecks
Check this box if you want the To Be Printed box checked by default whenprocessing individual paychecks and when you process payroll.
Note: This option is not available if you use the Service Printed Checks& Stubs feature.
Default “Do Not AccrueTime” on Paychecks
Check this box if you want the Do Not Accrue Time box on paychecks checked bydefault when processing individual paychecks and when processing payroll.If you check this box, sick and vacation accruals do not process.
Pay Sick/Vacation Time onPaychecks
Check this box if you want the Pay PTO box on paychecks checked by default whenprocessing individual paychecks and when processing payroll.If you do not check this box, sick time and vacation time are not paid.
Mask Social SecurityNumbers on Vouchers
Check this box to mask employees’ social security numbers on paycheck vouchers.When this box is checked, only the last four digits of the social security number areshown on the voucher (for example, xxx-xx-1234).For vouchers, this company setting supersedes individual permissions. Forexample, if Bob has full permission to view social security numbers but this box ischecked, social security numbers are masked when Bob views a voucher.For more information, read the help topic Working with Employee Social SecurityNumbers.
Print Single Copy Voucher Check this box to include only one copy of the paycheck voucher with thepaycheck.When this box is not checked, the list of taxes and deductions included onpaychecks may be truncated for employees with numerous tax and deduction lineitems, and two vouchers will be printed when you select vouchers at Transactions> Management > Print Checks and Forms.
Enable Multi-StateCalculation
Check this box to calculate the pertinent taxes for employees who work in differentstates during a pay period.If you check this box the pertinent taxes for the jurisdiction where work isperformed, as well as the employee’s primary office and home jurisdictions arecalculated.
Reporting
Report Payroll Liabilities By Choose to report your payroll liabilities quarterly or year-to-date (YTD).
Use Year-to-Date Values onReports(This option is applicableonly in the year that payrollis first implemented.)
Check this box if you want reports to reflect the YTD values you entered foremployees during setup. When this box is checked, the values for checks andadjustments entered prior to the YTD data will not appear on reports.If you do not check this box, the amounts for checks and adjustments that appearon reports may result in data on your reports not matching the amounts youcommitted during your payroll setup.
Setting Default Accounts for PayrollTo view and edit the following fields, click the Default Accounts subtab.
Field Function
Gross Pay Select the general ledger account to use for your gross pay.

Setting Up NetSuite Payroll 7
Payroll Guide
Field Function
PayrollExpenseAccount
Select the account to use for payroll expenses. This is used as the default expense account.
PayrollLiabilitiesAccount
Select the account to use for payroll liabilities.
PayrollFundingAccount
Select the account to use to fund payrolls. Funds are withdrawn from this account by NetSuitePayroll to satisfy payments to employees and tax agencies.
Important: The account you select here must match the payroll funding accountthat you indicate in your paperwork when you first implement NetSuite Payroll. Ifyou are updating the payroll funding account, you must follow the instructions inSuiteAnswers article 31020.
If you are using NetSuite OneWorld, not all Bank accounts are available. To display in thisdropdown list, a Bank account must be restricted to the Payroll Subsidiary defined at the top ofthe Set Up Payroll page, and should be set up with a currency of USA, meaning US dollars.
Setting Up the Integration of Payroll and CompensationTracking
Important: The Compensation Tracking feature requires SuitePeople. For more information,see the help topic SuitePeople Overview.
If the Compensation Tracking feature is enabled, the Compensation Integration subtab appearson the Set Up Payroll page. On the Compensation Integration subtab, you can allow an employee’scompensation to be synchronized automatically with NetSuite Payroll. After you save updates to anemployee’s salary or wage on the Compensation Tracking subtab of the employee record, the basewage type and amount are automatically copied to the Payroll subtab of the employee record.
To properly use Payroll with Compensation Tracking, make sure you set the following:
■ A primary payroll item for each employee who is already using NetSuite Payroll. If more than onepayroll item is associated with an employee, the Compensation Tracking feature automaticallyupdates the primary payroll item. You can set the primary payroll item in the Earnings subtab ofthe Payroll subtab on the employee record. For more information, see Setting Up Earnings for anEmployee.
■ A default salary payroll item and a default wage payroll item. These default payroll items are usedif an employee’s pay type is changed from salary to wage or from wage to salary in CompensationTracking, and if a wage or salary payroll item is not already associated with the employee. If defaultpayroll items are not set up, your employees might not be paid correctly.
To set up the integration of Payroll and Compensation Tracking:
1. On the Compensation Integration subtab, check the Copy Compensation Tracking Data toPayroll box.
2. In the Default Salary Payroll Item dropdown list, select a default salary payroll item.
3. In the Default Wage Payroll Item dropdown list, select a default wage payroll item.
For more information about the Compensation Tracking feature, see the help topic TrackingCompensation.

Setting Up NetSuite Payroll 8
Payroll Guide
Setting Preferences for Jurisdictions
The jurisdictions listed on the Jurisdictions subtab are based on the addresses of the workplacesentered in your NetSuite account. This information is also shown on each individual workplace record.If this list of jurisdictions is empty, make sure you have entered a company address or an address foreach workplace and then go to Setup > Payroll > Update Payroll Information to commit any changes.
■ On the Jurisdictions subtab, click [+] to view the Federal, State, and Local jurisdictions.
■ For each field listed, verify or enter the requested tax information for your company.
Examples of fields that may show here include Deposit Schedule and FEIN (federal EmployerIdentification Number).
Setting Specific Tax Rates
On the Taxes subtab, NetSuite Payroll automatically determines the federal, state, and local tax itemsapplicable to your company, based on your company's main office address or list of workplaces.
Note: Any tax rate fields that appear dimmed are maintained by the tax engine. If these fieldsare not updated, contact Customer Support.
Editable tax rate fields use rates specific to your company and updates are your responsibility.
■ Check the Exempt box for any taxes from which the company is exempt.
■ Enter a new rate for any tax for which the company's rate has changed.
■ Click View in the History column to view the history of any rate changes and the effective and/orexpiration date for that change.
■ Enter or select the effective date of the tax using the calendar icon.
NetSuite Payroll maintains many of the tax rates, which you cannot edit.
Setting Up Email Alerts for Payroll Issues
You can set a payroll preference that causes email alert messages to be sent automatically to selectedusers when issues occur with payroll transactions.
To receive payroll alerts:
1. Go to Setup > Payroll > Update Payroll Information.
2. On the Preferences subtab, enter one or more email addresses in the Payroll Issues alert emailaddresses field. Use commas to separate multiple addresses.
3. Click Save.
Updating Employee Records for PayrollEnter an employee record in NetSuite for all employees you want to pay using NetSuite Payroll.Employee records store all tax, earning, deduction, contribution, and time-related information thataffects payroll. They also contain employees' home addresses and workplaces.

Setting Up NetSuite Payroll 9
Payroll Guide
Before you can use NetSuite to pay an employee, you must do the following:
■ Enter a home address
■ Select a workplace
■ Enter payroll information. If the Compensation Tracking feature is enabled, and if you set up Payrollto copy Compensation Tracking information, you can enter compensation information in theCompensation Tracking tab. This information is then automatically copied to the Payroll subtab. Formore information, see Setting Up the Integration of Payroll and Compensation Tracking.
■ Verify the jurisdictions
■ Check the Include in US Payroll box
■ Enter a last paid date for the employee
Important: You must go to the Update Payroll Information page after updating informationon employee records, to commit your updates. For information, see Updating PayrollInformation.
These topics detail entering payroll information:
■ Entering a Home Address for an Employee
■ Verifying the Jurisdictions for an Employee
■ Entering General Payroll Information for an Employee
■ Setting Up Taxes for an Employee
■ Setting Up Earnings for an Employee
■ Setting Up Deductions for an Employee
■ Setting Up Company Contributions for an Employee
■ Setting Up Accrued Time for an Employee
■ Complying with State-Specific Requirements for Employee Information
Entering a Home Address for an EmployeeThe home address you enter for an employee is used to calculate state and local taxes for payroll.
Note: The home address may be used in conjunction with a workplace address.
To enter or update an employee's home address:
1. Go to Lists > Employees > Employees.
2. On the Employees list, click Edit next to the name of the employee for whom you want to enter ahome address.
3. On the Employee record, click the Address subtab.
4. Check the Home box.
5. To add or edit values for other address fields, click the pencil icon in the Edit column.
An address popup displays address fields.
a. Ensure the value for Country is correct. If it not, select a different country.

Setting Up NetSuite Payroll 10
Payroll Guide
Important: You can only use NetSuite Payroll to pay employees who live in theUnited States.
b. Enter the employee's street address.
If you enter the zip code first, city and state populate automatically.
c. Click OK.
6. On the Employee record, click Save.
Verifying the Jurisdictions for an EmployeeThe Jurisdictions subtab lists all the Federal, State, County, Local, and School District jurisdictionsapplicable based on the home address entered on the Address subtab of the employee record.
Important: You must enter and save all required information on the employee record andupdate your payroll information before verifying jurisdictions for an employee.
To verify an employee's jurisdictions:
1. Go to Lists > Employees > Employees.
2. On the Employees list, click Edit next to the name of the employee for whom you want to verifyjurisdictions.
3. Click the Payroll subtab, then click the Jurisdictions subtab.
Jurisdictions marked N/A do not apply to the selected employee.
4. Click Cancel to return to the Employees list.
Entering General Payroll Information for an EmployeeAfter you enable the NetSuite Payroll feature, the Payroll subtab is added to employee records. Youmust enter required information into this subtab so that you can use NetSuite to pay your employees.
To enter general payroll information for an employee:
1. Go to Lists > Employees > Employees.
2. Click New to create a new employee record or click Edit next to the name of the employee forwhom you are entering Payroll information.
3. Click the Payroll subtab.
4. Check the Include in Payroll box if you want to include this employee in your payroll runs.
Important: Only those employees with the Include in Payroll box checked are includedin payroll runs. You must check this box for any employee you intend to pay usingNetSuite.
If you are using NetSuite OneWorld and the Include in Payroll box is unavailable, it means thatyou must select a Subsidiary on the employee record's Info subtab to match the Subsidiarydefined at Setup > Payroll > Set Up Payroll. After you select the correct subsidiary on the Infosubtab, save the employee record. Then reopen the record in edit mode to check the Include inPayroll box.
5. In the Compensation Type field, select Wage or Salary, depending on whether your companypays this employee an hourly wage or a regular, periodic salary.

Setting Up NetSuite Payroll 11
Payroll Guide
Important: If the Compensation Tracking feature is enabled, and if you set up Payrollto copy compensation tracking information (see Setting Up the Integration of Payrolland Compensation Tracking), you should enter this information in the CompensationTracking subtab of the employee record.
6. In the Pay Frequency field, select how often this employee is paid.
7. In the Last Paid Date field, enter or verify the date of this employee's most recent paycheck.
The last paid date is defined as the last pay-period end date, which may not be the date on thecheck. For example, the date on the checks for your most recent payroll run is October 13. Thischeck included hours worked during the September 24 - October 7 pay period. Even though thedate on the checks issued is October 13, your pay period end date is October 7.
You must enter a last paid date for each employee only one time. This field is auto-updated withthe most recent pay-period end date each time you run payroll.
Note: If this employee has been tracking their time using the Time Tracking feature,and you are now adding them to payroll, it is especially important that you enter theirlast paid date. This ensures that the employee’s pay is calculated correctly accordingto the Pay Earnings Prior to Pay Periods (Days) preference in payroll setup. For moreinformation, see Setting General Payroll Preferences.
8. Select the name of the Workplace where this employee is located.
The workplace selected is used to determine the taxes that must be paid by the employer andthe employee.
Note: You cannot delete a workplace that is referenced by any employee record.
9. Select any status exemptions that apply to this employee.
The exemptions available may include the following:
■ Minor Under 18 employee by parent
■ F1/J1 Visa
■ One spouse employed by another
■ Sole Proprietor
■ Minor under 21 employed by parent
■ Partner of a Partnership
■ Parent employed by child
■ MQGE Pension Plan Participant (Social Security Exempt)
■ Exempt Corporate Officer
10. Click Save.
Setting Up Earnings for an EmployeeOn the Earnings subtab of the employee record's Payroll subtab, you can add earning items for eachemployee. These items are used to determine the employee's gross pay.
You may need to create earning items before you can select them for employees. For information, seeCreating Payroll Items.
If you want to identify an employee's primary earning item, such as a salary or wage, for search orreporting purposes, check the Primary box next to the earning item on the Earnings subtab of theemployee record's Payroll subtab.

Setting Up NetSuite Payroll 12
Payroll Guide
Important: If the Compensation Tracking feature is enabled, and if you set up Payroll to copycompensation tracking information (see Setting Up the Integration of Payroll and CompensationTracking), you should enter basic earning information in the Compensation Tracking subtab ofthe employee record. For more information about the Compensation Tracking feature, see thehelp topic Tracking Compensation.
To set up earnings information for an employee:
1. Go to Lists > Employees > Employees.
2. Click Edit next to the Employee's name.
3. Click the Payroll subtab, and then click the Earnings subtab.
4. In the Earning field, choose one of the payroll items you set up for earnings.
For example, you may have set up a payroll item called Regular Hourly Wages.
An employee should not have both wage and salary items during the same time period. If youpreviously selected a wage item for the employee, the wage item must be inactivated to add asalary payroll item.
5. In the Rate field, enter the rate that applies to that type of earning for this individual.
For example, you might enter 22.00 for an employee earning $22 per hour.
6. If this item is the employee's main pay item, check the Primary box. The Primary box has thefollowing uses:
■ You can use the Primary attribute to filter records for reporting and search purposes. Thislets you obtain lists of employee salaries and wages, without the clutter of information fromother earning items. The following related fields are available to be used as search filtersand displayed as search results: Primary Earning Type, Primary Earning Item, and PrimaryEarning Amount.
■ If the Compensation Tracking feature is enabled, and if you set up Payroll to copycompensation tracking information (see Setting Up the Integration of Payroll andCompensation Tracking), the Compensation Tracking feature uses the Primary box todetermine which payroll item to automatically update.
7. In the Default Hours field, enter the default number of hours this person is paid for this earningtype. Check the Default box if you want to create an additional pay using the rate and defaulthours.
■ If you select the Salary earning type, the system calculates the amount even if you leave theDefault Hours field blank or enter 0 (zero).
■ If you select the Hourly Wage earning type, any value you enter in the Default Hours fieldis not recognized regardless of whether the Default box is checked or not. In this case, thehours entered in time tracking are captured.
■ If you select the Additional Payroll earning type and you leave the Default Hours field blankor enter zero, this earning type is not calculated. To calculate this earning type, enter a valuegreater than zero and check the Default box.
■ If you select the Earning Additions earning type and you leave the Default Hours field blankor enter zero, this earning type is still calculated when the payroll item is marked as Defaultin the employee record, and the Allow Entry from Create Payroll box is checked in the payrollitem record.
8. To prevent the use of this item for this employee, check the Inactive box.
9. If this item is to appear on the paycheck every time you run payroll, check the Default box. Thisadditional pay is not calculated if you leave the Default Hours field blank or enter zero.
10. Enter the Effective Date and Expiration Date for the payroll item. These dates are checkedagainst the payroll period ending date to determine which payroll items are affected.

Setting Up NetSuite Payroll 13
Payroll Guide
11. Click Add.
12. Continue adding earning items as necessary.
13. Click Save.
Setting Up Taxes for an EmployeeOn the Taxes subtab of the employee record's Payroll subtab, review the list of taxes specified forthis employee. The taxes listed are based on the Home address listed on the Address subtab and theworkplace location selected in the Workplace field on the Payroll subtab.
Some taxes might require you to enter information specific to that employee. For example, for theFederal Withholding tax fields, you can define the employee's filing status, indicate whether or not theemployee is exempt, enter a number of withholding allowances, and specify a tax override method andan override amount. You should provide all tax information for each employee before using NetSuitePayroll to pay that employee.
You can set up tax override methods for special cases where employee withholding needs to varyfrom automated tax calculations. NetSuite provides three different methods: Percentage, AdjustmentAmount, and Fixed Amount. For more information, see Using Tax Override Methods for EmployeeWithholding.
To learn more about the taxes applicable for employees in each state in the U.S., you can visit the IRSWebsite.
If you want to set up taxes for an employee living in Washington, D.C. and working in a neighboringstate, you must create a workplace with the same zip code as the employee's home address, butnot assign it to the employee. After you create this workplace, if a reciprocity agreement is checked,withholding is calculated for only Washington, D.C. If a reciprocity agreement is not checked,withholding is calculated for both jurisdictions.
To set up taxes for an employee:
1. Go to Lists > Employees > Employees.
2. Click Edit next to the employee's name.
3. Click the Payroll subtab, then click the Taxes subtab.
4. In the Filing Status column, verify that the correct status for the employee is selected for eachtax item.
5. If this employee qualifies as exempt for any of the taxes listed, check the Exempt box for the taxitems.
6. Enter the number of exemptions or allowances for the employee for each tax item whereapplicable.
7. If you want to apply a tax override method to a tax item, select the method in the Tax OverrideMethod dropdown list.
For information about using tax override methods, see Using Tax Override Methods forEmployee Withholding.
8. If you chose to apply a tax override method, enter an amount in the Override Amount field.
9. Click Save.
Using Tax Override Methods for Employee WithholdingNetSuite Payroll uses tax rates to calculate the amount of taxes to withhold from employee paychecks.These tax rates are based on each employee's home address and workplace and are listed on the Taxes

Setting Up NetSuite Payroll 14
Payroll Guide
subtab of each employee record's Payroll subtab. On this same subtab, you can set up tax overridemethods for special cases where employee withholding needs to vary from automated tax calculations.
A tax override supersedes the use of allowances to determine employee withholding. For example, anemployee may request an override to increase withholding to avoid underpayment of taxes at yearend.
Note: Paychecks are sometimes used to make only non-taxable payments to employees, suchas reimbursing expenses. In these cases, because the employee’s taxable wages are zero, taxamounts are zero and tax overrides are not applied.
For information about how to set up override methods and enter tax information onto employeerecords, see Setting Up Taxes for an Employee. For information about entering other payrollinformation onto employee records, see Updating Employee Records for Payroll.
NetSuite provides three different methods for calculating tax overrides. For any tax item listed for anemployee, you can select one of these methods and specify an override amount.
■ Percentage
□ This method calculates the override withholding as a percentage of the standard withholdingamount.
□ The override amount for this method should be entered as a decimal. For example:
▬ To decrease withholding by half (50%), enter an override amount of 0.5.
▬ To increase withholding by 25%, enter an override amount of 1.25.
■ Adjustment Amount
□ This method increases or reduces the standard withholding amount by a set dollar amount.
□ The override amount for this method should be entered as a positive or negative number, thatcorresponds to a dollar amount. For example:
▬ To decrease withholding by $50 per paycheck, enter an override amount of -50.
▬ To increase withholding by $50 per paycheck, enter an override amount of 50.
■ Fixed Amount
□ This method replaces the standard withholding amount with a set dollar amount.
□ The override amount for this method should be entered as a positive number. For example,to withhold $100 per paycheck instead of the standard withholding amount, enter an overrideamount of 100.
Complying with Tax Requirements for Multi-StateEmployeesNetSuite Payroll supports tax compliance for employees who work in different states during a payperiod. NetSuite calculates the pertinent taxes for the jurisdiction where work is performed, as well asthe employee’s primary office and home jurisdictions.
NetSuite uses the system-default settings to withhold taxes for jurisdictions other than the home andprimary workplace jurisdictions. The default settings are single with no allowances.
To set up and use the multi-state taxation option:
1. Select the preference for the option:
a. Go to Setup > Other Setup > Set Up Payroll (Payroll Manager).
b. Check the Enable Multi-State Calculation box in the Paychecks group, and click Save.

Setting Up NetSuite Payroll 15
Payroll Guide
When multi-state calculation is enabled, an editable Payroll Item Workplace field is addedto the Earnings, Time, and Commissions subtabs for paychecks and bulk edit. The fieldis also added to time transactions. The Payroll Item Workplace field is not available forexpense reimbursements.
2. Go to Transactions > Employees > Create Payroll, and create a payroll batch. For moreinformation, see Creating a Payroll Batch.
3. Calculate the payroll batch. For more information, see Calculating a Payroll Batch.
4. Edit the individual paychecks, and select a Payroll Item Workplace for each payroll item in theEarnings, Time, and Commissions subtabs, as needed. The default is the workplace set on theemployee record. For more information, see Editing an Individual Paycheck from a Payroll Batch.
The dropdown list for the Payroll Item Workplace field includes all of the workplaces you haveconfigured for your company.
When you add a payroll item and leave the Payroll Item Workplace field blank, it defaults to theworkplace on the employee record when you save the change.
Setting Up Deductions for an EmployeeOn the Deductions subtab of the employee record's Payroll subtab, you can enter deductions for eachemployee to be subtracted from their gross pay.
You may need to create payroll deduction items before you can select them for employees. Forinformation, see Creating Payroll Items.
To set up deductions for an employee:
1. Go to Lists > Employees > Employees.
2. Click Edit next to the Employee's name.
3. Click the Payroll subtab, then click the Deductions subtab.
4. In the Deductions field, choose one of the payroll items you set up for deductions.
For example, you may have set up a payroll item called 401(k).
5. In the Rate field, enter the deduction per pay period for this individual as a dollar amount or as apercentage.
For example, you might enter 60 for sixty dollars or 15% for fifteen percent.
6. In the Limit field, enter a limit, if one applies.
For example, you could enter 10,500 as the annual limit for the employee's 401(k) deductions.
7. Check the Inactive box for payroll items no longer applicable for this employee.
8. Click Add.
9. Continue adding deduction items as necessary.
10. Click Save.
Setting Up Negative Deductions for an EmployeeInstead of creating a payroll adjustment to correct an incorrect deduction on a previous paycheck, youcan use a negative deduction to add it back to an employee's earnings, and if required, automaticallycalculate the taxes. The negative deduction feature complies with all federal, state, and local taxablewage rules. This feature is supported as long as it does not result in a negative paycheck. If needed, youcan enter a negative amount on the Create Payroll page, and review it before you commit the payrollbatch.

Setting Up NetSuite Payroll 16
Payroll Guide
Tip: When adjusting a pre-tax deduction from a previous quarter, NetSuite recommends youmake an adjustment instead of a negative deduction.
Negative deductions can be used for these pre-tax deductions:
■ Cafeteria Contribution — FSA: Adopt. Assist
■ Cafeteria Contribution — FSA: Dependent Care
■ Cafeteria Contribution — FSA: Health Care
■ Cafeteria Contribution — POP
■ Cafeteria Contribution — Medial Care Premiums
■ Commuter Check
■ 401(K) Contribution
■ 401(K) Catch-up
■ 403(b) Contribution
■ 403(b) Catch-up — After the Age Limit
■ 403(b) Catch-up — With 15 Years of Service
■ Government Employee Deferred — 457(b)
■ Government EE 457(b) — Catch-Up Standard
■ SEP Contribution — 408(k)(6)
■ SEP 408(k)(6) — Catch-Up
■ Simple 408(p) Contribution
■ Simple 408(p) Catch-Up
Negative deductions should not be used for the Cafeteria Contribution — HSA pretax deduction.
To set up a negative deduction for an employee:
1. Go to Lists > Employees > Employees.
2. Click Edit next to the employee’s name.
3. Click the Payroll subtab, then click the Deductions subtab.
4. In the Deductions field, choose from a list of payroll items that are set up for negative deduction.
Note: If you allocate the negative deduction as a pretax deduction the system adds theamount to the taxable wage base. If you allocate it as an after-tax deduction the systemtreats it as an additional earning item with no tax implications.
5. In the Rate field, enter the negative deduction for the pay period as a dollar amount or as apercentage.
6. Enter the effective and expiration dates for the payroll item. These dates are checked against thepayroll period ending date to determine which payroll items are affected.
7. Click Add.
8. Click Save.
When you create a payroll the negative deduction is calculated as a reimbursement.
Setting Up Company Contributions for an EmployeeOn the Contributions subtab of the employee record's Payroll subtab, you can set up companycontributions for each employee.
Setting Up NetSuite Payroll 17
Payroll Guide
You may need to create payroll contribution items before you can select them for employees. Forinformation, see Creating Payroll Items.
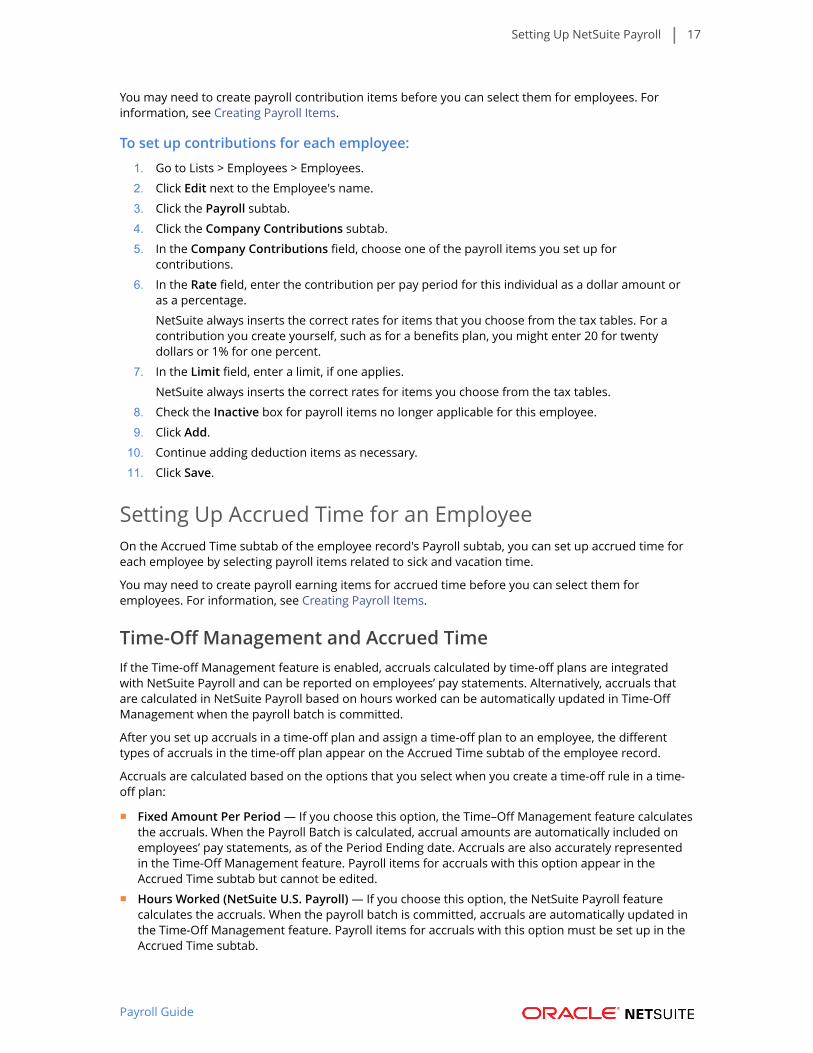
To set up contributions for each employee:
1. Go to Lists > Employees > Employees.
2. Click Edit next to the Employee's name.
3. Click the Payroll subtab.
4. Click the Company Contributions subtab.
5. In the Company Contributions field, choose one of the payroll items you set up forcontributions.
6. In the Rate field, enter the contribution per pay period for this individual as a dollar amount oras a percentage.
NetSuite always inserts the correct rates for items that you choose from the tax tables. For acontribution you create yourself, such as for a benefits plan, you might enter 20 for twentydollars or 1% for one percent.
7. In the Limit field, enter a limit, if one applies.
NetSuite always inserts the correct rates for items you choose from the tax tables.
8. Check the Inactive box for payroll items no longer applicable for this employee.
9. Click Add.
10. Continue adding deduction items as necessary.
11. Click Save.
Setting Up Accrued Time for an EmployeeOn the Accrued Time subtab of the employee record's Payroll subtab, you can set up accrued time foreach employee by selecting payroll items related to sick and vacation time.
You may need to create payroll earning items for accrued time before you can select them foremployees. For information, see Creating Payroll Items.
Time-Off Management and Accrued TimeIf the Time-off Management feature is enabled, accruals calculated by time-off plans are integratedwith NetSuite Payroll and can be reported on employees’ pay statements. Alternatively, accruals thatare calculated in NetSuite Payroll based on hours worked can be automatically updated in Time-OffManagement when the payroll batch is committed.
After you set up accruals in a time-off plan and assign a time-off plan to an employee, the differenttypes of accruals in the time-off plan appear on the Accrued Time subtab of the employee record.
Accruals are calculated based on the options that you select when you create a time-off rule in a time-off plan:
■ Fixed Amount Per Period — If you choose this option, the Time–Off Management feature calculatesthe accruals. When the Payroll Batch is calculated, accrual amounts are automatically included onemployees’ pay statements, as of the Period Ending date. Accruals are also accurately representedin the Time-Off Management feature. Payroll items for accruals with this option appear in theAccrued Time subtab but cannot be edited.
■ Hours Worked (NetSuite U.S. Payroll) — If you choose this option, the NetSuite Payroll featurecalculates the accruals. When the payroll batch is committed, accruals are automatically updated inthe Time-Off Management feature. Payroll items for accruals with this option must be set up in theAccrued Time subtab.

Setting Up NetSuite Payroll 18
Payroll Guide
If you add a new time-off rule to a time-off plan, and that rule uses a new time-off type that isassociated with a payroll item, that payroll item does not automatically appear in the Accrued Timesubtab until you edit and save the employee record. Likewise, if a time off rule includes a minimumtenure time, after the minimum tenure has passed for the employee, the associated payroll item doesnot automatically appear in the Accrued Time subtab until you edit and save the employee record.
For more information, see the help topic Creating a Time-Off Rule.
To set up accrued time for each employee:
1. Go to Lists > Employees > Employees.
2. Next to the employee's name, click Edit.
3. Click the Payroll subtab, and then click the Accrued Time subtab.
Note: If the Time-Off Management feature is enabled and a time-off plan is assignedto the employee, some accrual items automatically appear on the Accrued Time subtab.From the Accrued Time subtab, you can edit only items that accrue based on hours work.If you need to remove or add an accrual item, you must do so in the time-off rule. Formore information, see the help topic Creating a Time-Off Rule.
4. In the Accrued Time subtab, do the following:
a. In the Sick/Vacation Time field, choose one of the payroll items you set up for sick time,vacation time, or other paid time off (PTO) events.
For example, you might have set up a payroll item called PTO — Vacation.
b. In the Accrued Hours field, enter a beginning balance if you are setting up NetSuite forthe first time.
After the beginning balance is set, the system keeps track of this total.
c. In the Accrue As field, select one of the following:
■ Lump Sum: Calculate accrual based on total hours for the year. Accrual occurs with theemployee’s first payroll of the year and does not increase with subsequent payrolls.
■ Per Pay Period: Calculate accrual per pay period.
■ Per Hour Worked: Calculate accrual per hours worked. This includes overtime if thetime was recorded.
Important: If the Time-Off Management feature is enabled and a time-offplan is assigned to the employee, use Per Hour Worked if the following is true:in the associated time-off rule for the payroll item, the Accrues Based On fieldis set to Hours Worked (NetSuite U.S. Payroll). For more information, see thehelp topic Creating a Time-Off Rule.
d. In the Accrual Rate field, enter the number of hours this employee accrues for the periodof time set in the Accrue As column in the previous step.
■ If the Accrue As field is set to Lump Sum, the accrual rate should be the total numberof hours per year.
■ If the Accrue As field is set to Per Pay Period, the accrual rate should be the number ofhours the employee earns per pay period.
■ If the Accrue As field is set to Per Hour Worked, the accrual rate should be the amountof time off to accrue for each hour worked (for example, 0.1).
e. In the Monetary Rate field, enter the cost per hour of the accrued time.
If you checked the Based on Quantity box on the Payroll Item page (Lists > Employees >Payroll Items > New), the amount paid when this item is added to a paycheck is calculated

Setting Up NetSuite Payroll 19
Payroll Guide
by taking the quantity of Hours/Base and multiplying it by the Rate entered on theEarnings subtab of the paycheck. If you did not check this box, the amount paid when thisitem is added to a paycheck is based only on the Rate entered on the Earnings subtab ofthe paycheck.
f. If you want NetSuite to set the total accruals to zero and begin calculations again eachcalendar year, check the Reset at Year End box.
g. If your company sets a limit for accrued time, in the Maximum Hours field, enter themaximum number of hours that can be accrued.
h. Click Add. Continue adding payroll items as necessary.
5. The Calculated in Time-Off Plan column indicates the items that are supported by the Time-OffManagement feature. Verify that this column is correct. If you are expecting an item to accruebased on hours worked instead of a fixed amount, you can edit the item in the time-off rule. Formore information, see the help topic Creating a Time-Off Rule.
6. Click Save.
Note: If payroll items are no longer applicable for this employee, check the Inactive box on theAccrued Time subtab.
Complying with State-Specific Requirements forEmployee InformationDepending on the states where your employees work, you might need to collect and maintain specificinformation about your employees.
The U.S. Payroll Compliance SuiteApp adds fields to the employee record and workplace record sothat your company can comply with state legislation. The U.S. Payroll Compliance SuiteApp shouldbe automatically installed in your account. If it is not installed, please contact your NetSuite supportrepresentative.
The following table shows, by state, the fields that are available with the U.S. Payroll ComplianceSuiteApp:
State Required Fields RecordWherethe FieldAppears
Description
Geographic Code Workplacerecord
This field appears on the workplace record after you set theworkplace’s state to Alaska and save the record.Enter the two-digit geographic code for each workplace.For more information about geographic codes, seelive.laborstats.alaska.gov/erg/geocodes.cfm.This field also appears on the Payroll subtab of the Employeerecord, and it is automatically populated with the geographic codefrom the corresponding workplace record.
Alaska
StandardOccupationalClassification
Employeerecord(Payrollsubtab)
This field appears on the employee record after you set theemployee’s workplace to a place in Alaska.Enter the Standard Occupational Classification (SOC) code thatcorresponds with each employee's job. For more information, seehttps://www.bls.gov/soc/.
Louisiana StandardOccupationalClassification
Employeerecord(Payrollsubtab)
This field appears on the employee record after you set theemployee’s workplace to a place in Louisiana.Enter the Standard Occupational Classification (SOC) code thatcorresponds with each employee's job. For more information, seehttps://www.bls.gov/soc/.

Setting Up NetSuite Payroll 20
Payroll Guide
State Required Fields RecordWherethe FieldAppears
Description
SouthCarolina
StandardOccupationalClassification
Employeerecord(Payrollsubtab)
This field appears on the employee record after you set theemployee’s workplace to a place in South Carolina.Enter the Standard Occupational Classification (SOC) code thatcorresponds with each employee's job. For more information, seehttps://www.bls.gov/soc/.
After you update these records, you must also update payroll information. For more information, seeUpdating Payroll Information.
Bulk Updating Employee Records with PayrollInformationYou can save time by automatically updating employee records in bulk when you update a payroll item.When you update payroll item information, the new rates and limits can automatically be reflected onall employee records.
Important: Bulk updates that you make to employee records are permanent and cannot beundone.
To update employee records with new information on payroll item records:
1. Go to Lists > Employees > Payroll Items.
2. Click Edit next to the name of the item.
3. Enter the updated information in the appropriate field in the header of the payroll item record.
4. Click Save.
A warning message appears and advises that after you click Save, the previous informationis deleted from all employee records. The changes you make are permanent and cannot beundone.
5. Click OK to save the changes.
The updated payroll information is applied to all your employees.
Setting Up Expatriates for U.S. PayrollYou can include expatriate (expat) employees in your U.S. payroll. The zip code you use for theworkplace address and the employee’s home address governs the tax withholding for expatriates.
Use the zip code 00000 for expatriates. When the workplace zip code is 00000, appropriate federaltaxes are withheld. When the employee’s home zip code is 00000, no state or local taxes are withheld.
Note: Employees who live in the United States but work in another country are not consideredexpatriates and are not supported in the NetSuite Payroll system. Likewise, employees who livein another country but work in the United States are not considered expatriates and are notsupported in the NetSuite Payroll system.
To include an expat in U.S. payroll:
1. Create a new workplace. For more information, see Entering Workplace Records for Payroll.
a. Go to Lists > Employees > Workplaces > New.
Setting Up NetSuite Payroll 21
Payroll Guide
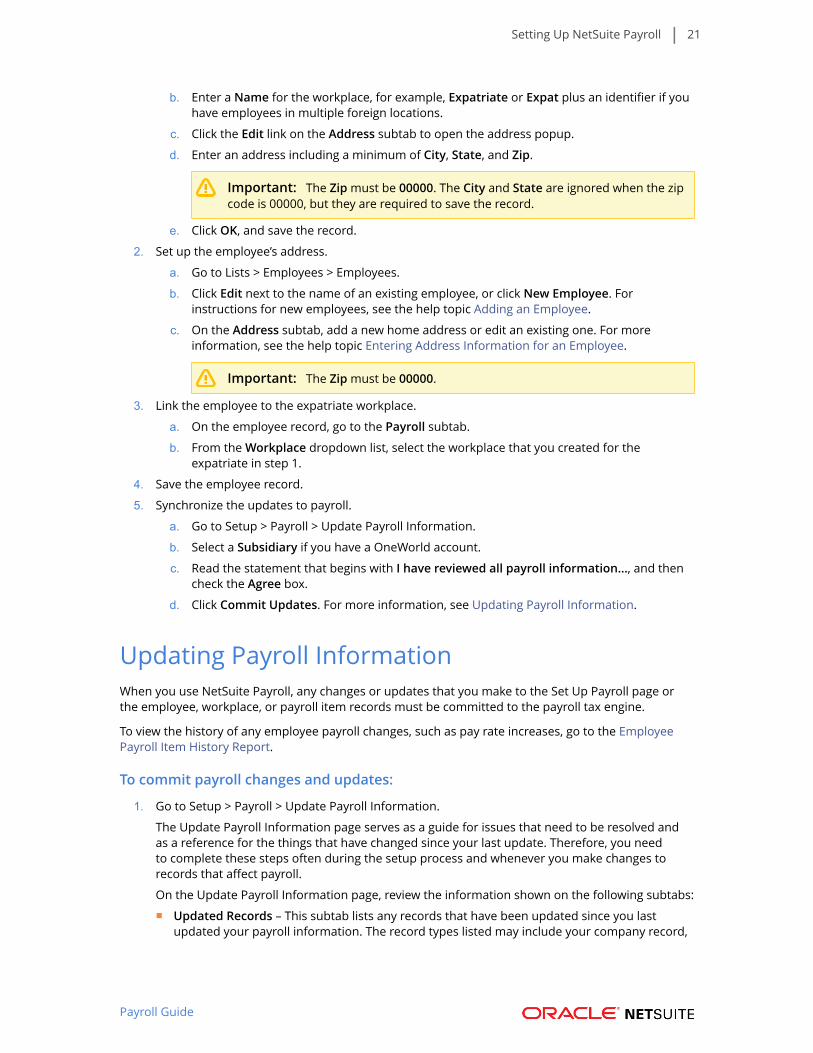
b. Enter a Name for the workplace, for example, Expatriate or Expat plus an identifier if youhave employees in multiple foreign locations.
c. Click the Edit link on the Address subtab to open the address popup.
d. Enter an address including a minimum of City, State, and Zip.
Important: The Zip must be 00000. The City and State are ignored when the zipcode is 00000, but they are required to save the record.
e. Click OK, and save the record.
2. Set up the employee’s address.
a. Go to Lists > Employees > Employees.
b. Click Edit next to the name of an existing employee, or click New Employee. Forinstructions for new employees, see the help topic Adding an Employee.
c. On the Address subtab, add a new home address or edit an existing one. For moreinformation, see the help topic Entering Address Information for an Employee.
Important: The Zip must be 00000.
3. Link the employee to the expatriate workplace.
a. On the employee record, go to the Payroll subtab.
b. From the Workplace dropdown list, select the workplace that you created for theexpatriate in step 1.
4. Save the employee record.
5. Synchronize the updates to payroll.
a. Go to Setup > Payroll > Update Payroll Information.
b. Select a Subsidiary if you have a OneWorld account.
c. Read the statement that begins with I have reviewed all payroll information..., and thencheck the Agree box.
d. Click Commit Updates. For more information, see Updating Payroll Information.
Updating Payroll InformationWhen you use NetSuite Payroll, any changes or updates that you make to the Set Up Payroll page orthe employee, workplace, or payroll item records must be committed to the payroll tax engine.
To view the history of any employee payroll changes, such as pay rate increases, go to the EmployeePayroll Item History Report.
To commit payroll changes and updates:
1. Go to Setup > Payroll > Update Payroll Information.
The Update Payroll Information page serves as a guide for issues that need to be resolved andas a reference for the things that have changed since your last update. Therefore, you needto complete these steps often during the setup process and whenever you make changes torecords that affect payroll.
On the Update Payroll Information page, review the information shown on the following subtabs:
■ Updated Records – This subtab lists any records that have been updated since you lastupdated your payroll information. The record types listed may include your company record,

Updating Payroll Information 22
Payroll Guide
payroll items, employees, and workplace records. You can click the name of a record in theName column if you want to verify any changes that you have made.
■ Employees Excluded from Payroll – This subtabs lists employees for whom the IncludeIn Payroll box is not checked on the Payroll subtab on the employee record. If you haveemployees listed here, do not assume this is an error. You should review the list of employeesand verify that you do not want to pay them using NetSuite. For example, employees whowork outside of the United States should appear on this list.
To add an employee to your payroll, click the Name of the employee and check Include inPayroll on the Payroll subtab of the employee record.
■ To Resolve – This subtab contains a list of error codes and messages for payroll-relatederrors that currently exist in your account. To resolve an issue, click the name of the record inthe Record column.
Important: All issues listed on this subtab must be resolved before you can runpayroll.
2. Read the statement that begins I have reviewed all payroll information... and then check theAgree box.
3. If you have a NetSuite OneWorld account, select a subsidiary from the dropdown list in theSubsidiary field.
For more information, see the help topic Setting Up Payroll in OneWorld.
4. Click Commit Updates.
Important: After committing your updates, you should review the To Resolve subtab again.If there are no items to resolve, you can run payroll. For more information on issues that mayneed to be resolved, see Receiving Warning Messages During the Setup Process.
Receiving Warning Messages During the Setup ProcessThe following warning messages may occur during the setup process for NetSuite Payroll. Thesemessages appear on the To Resolve subtab of the Update Payroll Information page.
Important: You cannot process payroll until all warnings are resolved.
Warning Explanation
Pending Authorizationfrom Tax Agency
NetSuite Payroll service is verifying Tax Agency Information. This process begins afterNetSuite Payroll service receives the sign-up forms. When the forms are approved,this message is automatically removed. For more information, see the help topicSubmitting Sign-Up Forms.This process takes up to 2 business days.
Company bankaccount is not active
You are required to activate your bank account. This warning remains until you enterthe required information on the Activate Bank Account page. For more information, seethe help topic Activating Your Bank Account for NetSuite Payroll.This process takes up to 2 business days to complete due to the interaction with theACH Network.
Funding Account is notactivated
You are required to activate the bank account you plan to use to fund payrolls. Thiswarning remains until you enter the required information on the Activate Bank Accountpage. For more information, see the help topic Activating Your Bank Account forNetSuite Payroll.This process takes up to 2 business days to complete due to the interaction with theACH Network.

Updating Payroll Information 23
Payroll Guide
Warning Explanation
Tax liability paymentsmust be recorded
You must enter and commit any tax deposits you made prior to starting with NetSuitePayroll.
Creating Payroll ItemsNote: This topic describes the creation of payroll items for use by NetSuite Payroll. Additionalpayroll item types are available for partners developing solutions with the Paycheck Journalfeature. See Using the Paycheck Journal Feature.
NetSuite provides a list of predefined payroll items your company can use to set up earnings,deductions, and contributions. You must create new payroll items for paying employees and fortracking payroll liabilities and expenses.
Typical new payroll items you may create include:
■ Regular Pay or Hourly Wages (Earning:Wage)
■ Overtime Pay or Hourly Wages (Earning:Wage)
■ Salary (Earning:Salary)
■ Bonus (Earning:Addition)
■ Third Party Sick Pay Taxable or Third Party Sick Pay Non Taxable (Earnings received from a thirdparty, usually for short or long-term disability) For more information, refer to Recording Third-PartySick Pay Payments.
■ Health Insurance (Company contribution for portion and deduction for employee-paid portion)
■ Union dues (Deduction)
■ Savings (Deduction)
View the complete list of payroll items by going to Lists > Employees > Payroll Items. If the list of PayrollItems shows no items, you must update your payroll information. For more information, see UpdatingPayroll Information.
To set up a new payroll item:
1. Go to Lists > Employees > Payroll Items > New.
2. On the Payroll Item page, select the type of item you want to create.
To view step-by-step instructions for a Payroll Item Type, select the type below:
■ Creating Payroll Earning Items
■ Creating Payroll Deduction Items
■ Creating Payroll Employer Contribution Items
After you finish, you must add the new payroll items to the Payroll subtab of the appropriate employeerecords to make them available in a payroll run. For more information, see Updating Employee Recordsfor Payroll.
Creating Payroll Earning ItemsTo create new Payroll Earning Items, go to Lists > Employees > Payroll Items > New.
To set an employee's primary earning item, such as a salary or wage, for search or reporting purposes,check the Primary box when you add the earning item on the employee record. For more information,see Setting Up Earnings for an Employee.

Creating Payroll Items 24
Payroll Guide
Follow the instructions below to create specific types of payroll earning items. The procedures forSalary and Commissions are the same. The procedures for Sick and Vacation are also the same. For alisting of earning item types and additional information, see Payroll Earning Item Types.
To create an Earning:Addition item:
1. Go to Lists > Employees > Payroll Items > New.
2. If you have a NetSuite OneWorld account, select a subsidiary from the dropdown list in theSubsidiary field.
3. In the Item Type field, select Earning:Addition.
4. In the Item Name field, enter a name for the earning item.
5. From the Expense Account dropdown list, select an expense account for this earning item.
6. If the item is calculated on the basis of a quantity (such as hours or miles) entered for or by theemployee, check the Based on Quantity box.
7. In the Pay Code field, select the payroll item type.
This type determines how the earnings are taxed and reported and whether or not the itemappears on the employee's W-2.
8. If there is a limit for this earning item, in the Limit field, enter a dollar amount equal to theannual limit.
9. Optionally, you can enter one of the following values:
■ Derived From – Select a payroll item from the list, and enter a number in the Rate Multiplierfield. The Rate Multiplier field is hidden until you select a Derived From value. For moreinformation, see Deriving a Pay Rate from Another Payroll Item.
■ Default Rate – Enter an amount or a percentage for this payroll item.
For example, enter 2.00 for two dollars, or 2% for two percent. The rate you enter isautomatically inserted for all new employees. If there is no typical rate, leave this field blank.You can enter individual rates on each employee's record.
10. To apply the rate entered in step 8 to all employees, check the Apply Rate to All Employees box.
11. Select a Report Section from the dropdown list to specify which section of payroll reports shoulddisplay this amount.
Your selection in this field determines where earnings or deductions associated with this payrollitem are included in payroll reports. Report section names correspond to types of payroll items.
12. Check the Inactive box to prevent the use of this earning item.
13. Check Allow Entry from Create Payroll if you want to be able to enter or edit an amount for thispayroll item from the Create Payroll page.
This option is available only for Earning:Wage and Earning:Addition earning items.
14. Click Save.
To create an Earning:Commission or Earning:Salary item:
1. Go to Lists > Employees > Payroll Items > New.
2. If you have a NetSuite OneWorld account, select a subsidiary from the dropdown list in theSubsidiary field.
3. In the Item Type field, select Earning:Salary or Earning:Commission.
4. In the Item Name field, enter a name for the earning item.
5. From the Expense Account dropdown list, select an expense account for this payroll item.
6. In the Pay Code field, select the payroll item type.
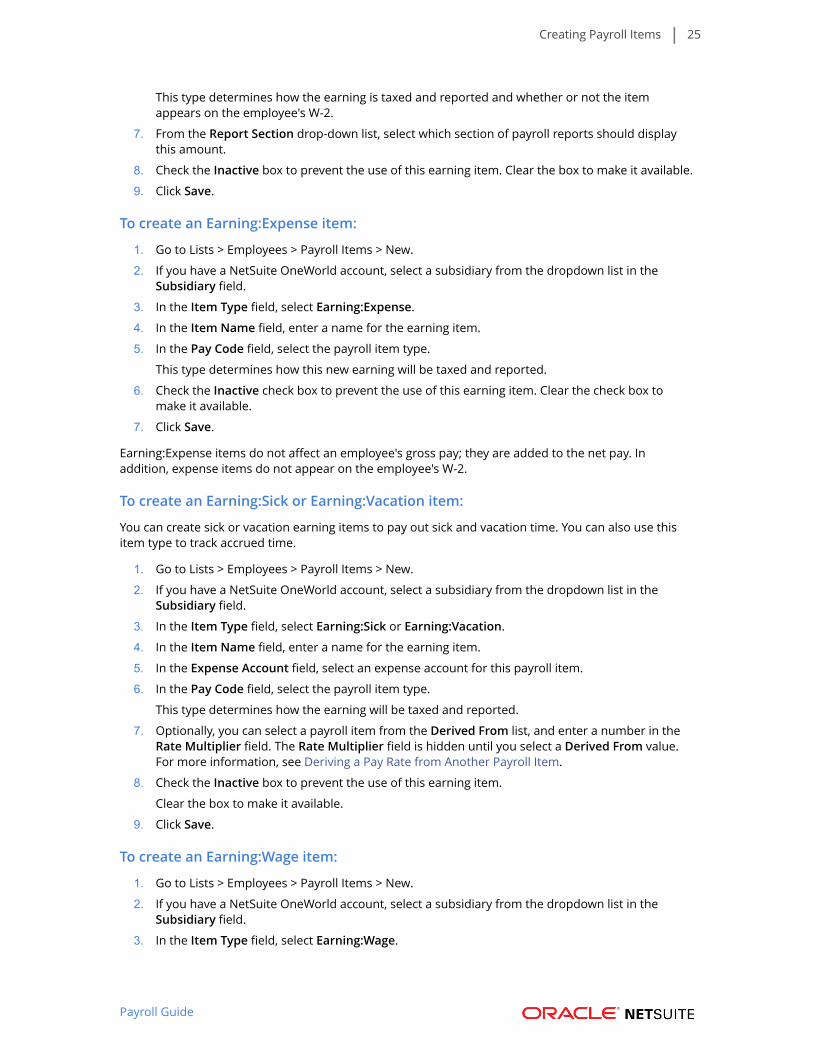
Creating Payroll Items 25
Payroll Guide
This type determines how the earning is taxed and reported and whether or not the itemappears on the employee's W-2.
7. From the Report Section drop-down list, select which section of payroll reports should displaythis amount.
8. Check the Inactive box to prevent the use of this earning item. Clear the box to make it available.
9. Click Save.
To create an Earning:Expense item:
1. Go to Lists > Employees > Payroll Items > New.
2. If you have a NetSuite OneWorld account, select a subsidiary from the dropdown list in theSubsidiary field.
3. In the Item Type field, select Earning:Expense.
4. In the Item Name field, enter a name for the earning item.
5. In the Pay Code field, select the payroll item type.
This type determines how this new earning will be taxed and reported.
6. Check the Inactive check box to prevent the use of this earning item. Clear the check box tomake it available.
7. Click Save.
Earning:Expense items do not affect an employee's gross pay; they are added to the net pay. Inaddition, expense items do not appear on the employee's W-2.
To create an Earning:Sick or Earning:Vacation item:
You can create sick or vacation earning items to pay out sick and vacation time. You can also use thisitem type to track accrued time.
1. Go to Lists > Employees > Payroll Items > New.
2. If you have a NetSuite OneWorld account, select a subsidiary from the dropdown list in theSubsidiary field.
3. In the Item Type field, select Earning:Sick or Earning:Vacation.
4. In the Item Name field, enter a name for the earning item.
5. In the Expense Account field, select an expense account for this payroll item.
6. In the Pay Code field, select the payroll item type.
This type determines how the earning will be taxed and reported.
7. Optionally, you can select a payroll item from the Derived From list, and enter a number in theRate Multiplier field. The Rate Multiplier field is hidden until you select a Derived From value.For more information, see Deriving a Pay Rate from Another Payroll Item.
8. Check the Inactive box to prevent the use of this earning item.
Clear the box to make it available.
9. Click Save.
To create an Earning:Wage item:
1. Go to Lists > Employees > Payroll Items > New.
2. If you have a NetSuite OneWorld account, select a subsidiary from the dropdown list in theSubsidiary field.
3. In the Item Type field, select Earning:Wage.

Creating Payroll Items 26
Payroll Guide
4. In the Item Name field, enter a name for the earning item.
5. From the Expense Account dropdown list, select an expense account for this payroll item.
6. In the Pay Code field, select the payroll item type.
This type determines how the earning will be taxed and reported.
7. Optionally, you can select a payroll item from the Derived From list, and enter a number in theRate Multiplier field. The Rate Multiplier field is hidden until you select a Derived From value.For more information, see Deriving a Pay Rate from Another Payroll Item.
8. Check the Inactive box to prevent the use of this earning item.
Clear the box to make it available.
9. Click the Allow Entry from Create Payroll box to enable users to enter an amount for this payrollitem directly on the Payroll Run page.
You can enter amounts for only those employees with this item added to the Payroll subtab ontheir Employee records. For more information, see Updating Employee Records for Payroll.
10. Click Save.
Payroll Earning Item TypesThe table below includes basic information about each payroll earning item type. For procedures, seeCreating Payroll Earning Items.
Earning Type Dollars vs. Hours Editableon CreatePayrollPage
Automatic/Not Automatic
Salary DollarEnter employees' annualsalary in the rate field.The salary is automaticallycalculated based on the payfrequency chosen on theemployee record.
No AutomaticThis item is automatic only if it is designated asthe default item on the employee record and theCompensation Type is Salary.
Wages HoursHourly wage code
Yes AutomaticThis item is automatic only if it is designated asthe default item on the employee record, standardhours are entered on the employee record, and theCompensation Type is Salary.Not AutomaticThis item is not automatic if the selectedCompensation Type is Wage. You must enter atime sheet to pay this item. Time entries must beapproved if Require Approvals on Time Records is setup.
Addition DollarStraight dollars pay code
Yes AutomaticThis item is automatic only if it is designated as theDefault item on the employee record and the Allowentry from Create Payroll box is checked.
Commission DollarStraight dollars pay code
No No
Expense DollarStraight dollars pay code;does not affect gross pay.
No NoExpenses can be autogenerated if they are approvedon the Expense Reports page.
Sick Hours No No

Creating Payroll Items 27
Payroll Guide
Earning Type Dollars vs. Hours Editableon CreatePayrollPage
Automatic/Not Automatic
Hourly wage payable, withhourly accrual available
Vacation HoursHourly wage payable withhourly accrual available.
No No
■ Creating Payroll Items
■ Searching for Payroll Items
■ Creating Payroll Earning Items
■ Creating Payroll Employer Contribution Items
Creating Payroll Deduction Items
To create a deduction item:
1. Go to Lists > Employees > Payroll Items > New.
2. On the Payroll Item page, if you have a NetSuite OneWorld account, select a subsidiary from thedropdown list in the Subsidiary field.
3. In the Item Type field, select Deduction.
4. In the Item Name field, enter a name for your payroll item.
5. In the Liability Account dropdown list, select a liability account for this payroll item.
6. In the Agency dropdown list, select the tax agency to which this deduction is paid.
The Agency ID for this tax vendor is pulled automatically from the vendor record. For moreinformation, see the help topics Vendor Records Overview and Associating Vendors with PayrollItems.
7. In the Pay Code dropdown list, select the appropriate pay code.
The pay code determines how the deduction is taxed and reported and whether or not the itemappears on the employee's W-2. For more information on each pay code, see Using DeductionCodes.
8. In the Limit field, enter a dollar amount equal to the annual limit for this payroll item.
If there is no limit, leave this field blank.
Note: After the deduction reaches this limit, even in the middle of a payroll run, it is nolonger included in payroll calculations.
9. Select the Limit Type that you are applying to this deduction.
■ Select Wage to apply the limit to wages. When the total amount of wages for an employee isabove the limit specified, the deduction is no longer applied.
■ Select Withholding to apply the limit to the amount withheld. When the total amountwithheld is above the limit specified, the deduction is no longer applied.
10. If you want to apply the amount entered in the Limit field to all employees, check the ApplyLimit to All Employees box.
11. Optionally, you can select a payroll item from the Derived From list, and enter a number in theRate Multiplier field. The Rate Multiplier field is hidden until you select a Derived From value.For more information, see Deriving a Pay Rate from Another Payroll Item.

Creating Payroll Items 28
Payroll Guide
When you use derived rates, the Default Rate field is hidden.
12. Enter a default amount or percentage rate for this payroll item in the Default Rate field.
For example, enter 2.00 for two dollars, or 2% for two percent. The rate you enter isautomatically inserted for all new employees. If there is no typical rate, leave this field blank. Youcan enter individual rates on each employee's record.
13. If you want to apply the Default Rate to all employees, check the Apply Rate to All Employeesbox.
14. To specify which section of payroll reports should display this amount, select a Report Sectionfrom the dropdown list.
15. Click Save.
Liability payments are made to vendors you set up as tax agencies. For more information, see the helptopic Associating Vendors with Payroll Items.
Note: If you wish to make a payroll item inactive, on the Payroll Item page, check the Inactivebox.
Creating Payroll Employer Contribution Items
To create an employer contribution payroll item:
1. Go to Lists > Employees > Payroll Items > New.
2. If you have a NetSuite OneWorld account, select a subsidiary from the dropdown list in theSubsidiary field.
3. In the Item Type field, select Employer Contribution.
4. In the Item Name field, enter a name for this payroll item.
5. In the Liability Account dropdown list, select a liability account for this payroll item.
6. In the Expense Account dropdown list, select an expense account for this payroll item.
7. In the Agency dropdown list, select the tax agency to which this deduction is paid.
The Agency ID for this tax vendor is automatically pulled from the vendor record. For moreinformation, see the help topics Vendor Records Overview and Associating Vendors with PayrollItems.
8. In the Pay Code dropdown list, select the pay code.
The pay code determines how the company contribution is taxed and reported. For moreinformation on each pay code, see Using Deduction Codes.
9. In the Limit field, enter a dollar amount equal to the annual limit for this payroll item.
If there is no limit, leave this field blank.
Note: After the amount associated with this item reaches this limit, even in the middleof a payroll run, it is no longer included in payroll calculations.
10. Select the Limit Type you are applying to this item:
■ Select Wage to apply the limit to wages. When the total amount of wages for an employee isabove the limit specified, this item is no longer applied.
■ Select Withholding to apply the limit to the amount withheld. When the total amountwithheld is above the limit specified, this item is no longer applied.
11. If you want to apply the limit entered in the Limit field all employees, check the Apply Limit toAll Employees box.

Creating Payroll Items 29
Payroll Guide
12. If the item is calculated on the basis of a quantity (such as hours or miles) entered for or by theemployee, check the Based on Quantity box.
13. Optionally, you can select a payroll item from the Derived From list, and enter a number in theRate Multiplier field. The Rate Multiplier field is hidden until you select a Derived From value.For more information, see Deriving a Pay Rate from Another Payroll Item.
When you use derived rates, the Default Rate field is hidden.
14. Enter a default amount or percentage rate for this payroll item in the Default Rate field.
For example, enter 2.00 for two dollars, or 2% for two percent. The rate you enter isautomatically inserted for all new employees. If there is no typical rate, leave this field blank. Youcan enter individual rates on each employee's record.
15. If you want to apply the Default Rate to all employees, check the Apply Rate to All Employeesbox.
16. To let employees view the amounts for this company contribution item when they view theirpaycheck history in the Employee Center, check View in Employee Center.
17. To specify which section of payroll reports should display this amount, select a Report Sectionfrom the dropdown list.
18. Click Save.
Note: If you wish to make a payroll item inactive, on the Payroll Item page, check the Inactivebox.
Searching for Payroll ItemsTo use the employee payroll item search, go to Lists > Employees > Payroll Items > Search.
Note: You must have the Payroll Manager role to use this search.
From the Name dropdown list, select the name filter on which to search payroll items and then enterspecifics in the adjacent field. Click Submit.
Click Edit or View to access a specific payroll item record.
The standard search displays the following columns:
■ Payroll item name
■ Item type
■ Master pay code
■ Associated expense account, if any
Employee Payroll Items SearchUse the Employee Payroll Items Search to find which payroll items are assigned to which employees. Itlists payroll items assigned to employees with corresponding pay, deduction, contribution, or accrualrates. This search shows the type of payroll item that is mapped for taxability and payroll-specific codesthat are attached to the specific item. It also lists what account is mapped to a payroll item. This searchprovides employee and payroll item assignment with rate such as salary or hourly rate, any hoursaccrued on time off codes and their accrual rates. This search also displays PTO information suchas Sick Time including the rate. Accrual information is also displayed such as the total accrual limit,current amount accrued, and the accrual rate for each item. This information can be used to find anypayroll liability associated with the time off.

Creating Payroll Items 30
Payroll Guide
To use the employee payroll item search, go to Reports > Search > New, and then click Employee PayrollItems. You can also go to Reports > New Search, and then click Employee Payroll Items.
Note: You must have the Payroll Manager role to use this search.
Scheduling Payroll Item ChangesYour Human Resources department or Payroll Administrator can schedule changes for payroll itemssuch as wage and deduction changes for employees. You can enter an effective date and expirationdate to determine when a payroll item starts or stops for an employee.
The option for an effective date and expiration date enables scheduling items such as a salary increase,bonus, increase in 401(k) contribution, and more.
To display an employee record, go to Lists > Employees > Employees. Click Edit next to an employeename. Click the Payroll subtab. On the Earnings, Deductions, Company Contributions, and AccruedTime subtabs, enter an effective and expiration date for payroll item changes.
To display a payroll item record, go to Lists > Employees > Payroll Items. Click Edit next to a payroll item.The Edit Payroll Item page displays the Effective Date and Expiration Date fields in the employees list.
Deriving a Pay Rate from Another Payroll ItemYou can derive pay rates using a multiplier of a linked payroll item. The derived rate is dependenton the rate for the payroll item to which it is linked. When the linked rate changes, the derived ratechanges automatically. You can derive pay rates for earning, deduction, and employer contributionpayroll item types. Expense and commission earning types are not supported.
The Derived From and Rate Multiplier fields on the payroll item record are used to calculate derivedrates.
The derived rate for the new payroll item is the rate multiplier times the pay rate of the payroll itemselected in the Derived From field.
To set up and use a derived pay rate:
1. Create the payroll item using the Derived From and Rate Multiplier fields.
■ Derived From – Select the payroll item on which the new rate is based. This is the linkedpayroll item.
Earnings can be derived from earnings. Deductions can be derived from earnings ordeductions. Contributions can be derived from earnings, deductions, or contributions.
■ Rate Multiplier – Enter the multiplier as a number, not a percentage. This number can bea decimal fraction. Negative numbers are also supported. This field is visible only when apayroll item is selected in the Derived From field.

Creating Payroll Items 31
Payroll Guide
For more information, see Creating Payroll Items.
2. Add the derived payroll item on the Payroll subtab of the employee record. The linked item mustalso be included on the employee record.
Be sure to add the payroll item on the appropriate subtab. For example, add overtime wages onthe Earnings subtab, and add 401(k) matching on the Contributions subtab.
3. Go to Payroll and HR > Payroll > Create Payroll (Payroll Manager), and create a payroll batch.When you calculate the payroll, the payroll items with derived pay rates appear in the Net Paysubtab of the Complete subtab. For more information, see Creating a Payroll Batch.
Mapping Payroll ItemsMapping payroll items is a two-part process:
■ First, NetSuite automatically maps its payroll items to the pay codes such as Federal Withholdingitems.
■ Second, you can change the automatic mapping to different codes as appropriate for your business.To view a list of codes and definitions, see Using Standard Pay Codes.
To map payroll items:
1. Go to Setup > Payroll > Map Payroll Items.
2. On the Map Payroll Items page, if you have a NetSuite OneWorld account, select a subsidiaryfrom the dropdown list in the Subsidiary field.
3. Review the selection in the New Code column for each item on the Earnings, Deductions, orCompany Contributions subtabs.
4. Select a different code from the dropdown lists in the New Code column as appropriate for thepayroll item.
5. Check the Inactive box to make a payroll item inactive.
6. Click Save.
7. On the Update Payroll Information page, check the Agree box, and then click Commit Updates.
Using Standard Pay CodesThe links below go to tables that outline the standard pay codes for earnings and deductions. Thesesame pay codes are listed in the Pay Code field on payroll item records. The code that you select in theType field affects the way the payroll item is represented on the employee's Form W-2.
■ Using Earning Codes
□ Taxable Earnings
□ Other Earning Codes
□ Fringe Benefit Earning Codes
■ Using Deduction Codes
□ Misc. Pre-Tax Employee Deductions
□ Pension Plans Contributions
□ Education Plans Contributions
□ Cafeteria Plans Contributions

Using Standard Pay Codes 32
Payroll Guide
□ After-Tax Deductions
□ Using Employer Contribution Codes
Using Earning CodesThese earning codes identify a range of compensation and other payments received by employees,both taxable and non-taxable. For example, earning codes are available for regular pay, bonuses, andovertime as well as expense reimbursements and non-taxable sick pay.
■ Taxable Earnings
■ Other Earning Codes
■ Fringe Benefit Earning Codes
Taxable Earnings
Important: In most cases, these codes are treated as regular earnings for W-2 purposes.
Code Name Description Additional Information FITTaxable
FICATaxable
W-2box
Bonus - Taxed as RegularIncome
Bonus payments made toemployees
These bonus paymentsshould be made as part ofthe regular payroll check.
Y Y box1,3, 5
Bonus - Taxed asSupplemental
Bonus payments made toemployees
Typically bonus paymentsidentified separately andtaxed as supplementalearnings.
Y Y box1,3, 5
Health Care Premiums -Domestic Partner(Employer)
Federal law requires thatpremiums for healthinsurance for domesticpartners is taxable. Thiscode adds the employercontribution to the earningsfor taxation. An automaticdeduction ensures that theemployee is not paid for thisamount.
Holiday Code to track paymentsmade for holiday pay
These payments are reportedas regular earnings.
Y Y box1,3, 5
ISO - Ordinary Income W-2 income resulting froma disqualifying dispositionof EE stock originated froma company's stock optionplan. See IRS pub 525.
An offsetting deduction canbe used if you would liketo record the ISO throughpayroll rather than directlypaying it to the employee.
N N box1,16
Overtime Premium Overtime Premium earnings Overtime Premium is usedto pay overtime hours at 0.5x standard pay rate. In caseof Double time, the OvertimePremium Code should beused to pay overtime hoursat 1 x standard pay rate.
Y Y box1,3, 5
Overtime Straight Overtime earnings paid atstraight time
This code pays overtimeat the regular hourly rate.Hours entered here are
Y Y box1,3, 5

Using Standard Pay Codes 33
Payroll Guide
Code Name Description Additional Information FITTaxable
FICATaxable
W-2box
also reflected in overtimepremium.
Paid Time Off - Taxable Code to track paymentsmade for any paid time off
These payments can includevacation and sick paid timeoff in accordance withcompany policy and arereported as regular earnings.
Y Y box1,3, 5
Personal Code to track paymentsmade for any personal timeoff
This tracks personal timeoff in accordance withcompany policy. Paymentsare reported as regularearnings.
Y Y box1,3, 5
Regular Code for regular timeworked
These payments are reportedas regular earnings.
Y Y box1,3, 5
Retroactive Pay Code for back pay owed toan employee
These payments are reportedas regular earnings andtaxed at supplemental rates.If combined with regularearnings, these payments willbe taxed at regular rates.
Y Y box1,3, 5
Severance Code for pay owed to anemployee at termination
This tracks terminationpay in accordance withcompany policy. In mostcases, termination is non-voluntary. Payments,when not combined withregular pay, are reported assupplemental earnings forwithholding purposes.
Y Y box1,3, 5
Sick Pay Code to track paymentsmade for any sick time paidby employer
This tracks regular sicktime in accordance withcompany policy. Paymentsare reported as regularearnings.
Y Y box1,3, 5
Supplemental Pay Pay for other than regularhours worked
These payments are reportedas regular earnings and taxedat supplemental rates.
Y Y box1,3, 5
Unpaid Hours This is a memo field Use this field to track anyhours not yet paid.
Y Y box1,3, 5
Other Earning CodesIn most cases, these pay codes are used for special reporting.
Code Name Description Additional Information FITTaxable
FICATaxable
W-2 box
1099 Earnings for independentcontractorsThis item is for NetSuitePayroll only.
All pay for independentcontractors should gointo this code. Earningswill be reported on Form1099 MISC box 7.
Form 1099-MISC, box 7
Advances - Loans Code for any advance whererepayment is expected
These amounts are notincluded as income for
N/A N/A N/A
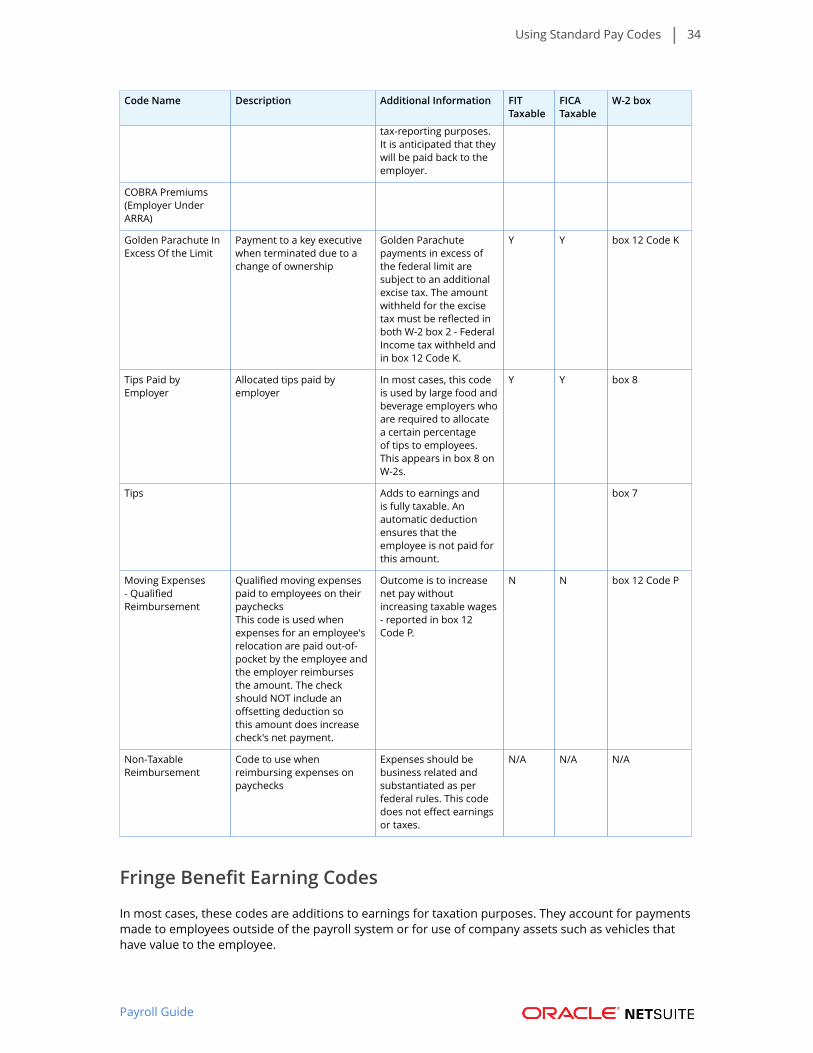
Using Standard Pay Codes 34
Payroll Guide
Code Name Description Additional Information FITTaxable
FICATaxable
W-2 box
tax-reporting purposes.It is anticipated that theywill be paid back to theemployer.
COBRA Premiums(Employer UnderARRA)
Golden Parachute InExcess Of the Limit
Payment to a key executivewhen terminated due to achange of ownership
Golden Parachutepayments in excess ofthe federal limit aresubject to an additionalexcise tax. The amountwithheld for the excisetax must be reflected inboth W-2 box 2 - FederalIncome tax withheld andin box 12 Code K.
Y Y box 12 Code K
Tips Paid byEmployer
Allocated tips paid byemployer
In most cases, this codeis used by large food andbeverage employers whoare required to allocatea certain percentageof tips to employees.This appears in box 8 onW-2s.
Y Y box 8
Tips Adds to earnings andis fully taxable. Anautomatic deductionensures that theemployee is not paid forthis amount.
box 7
Moving Expenses- QualifiedReimbursement
Qualified moving expensespaid to employees on theirpaychecksThis code is used whenexpenses for an employee'srelocation are paid out-of-pocket by the employee andthe employer reimbursesthe amount. The checkshould NOT include anoffsetting deduction sothis amount does increasecheck's net payment.
Outcome is to increasenet pay withoutincreasing taxable wages- reported in box 12Code P.
N N box 12 Code P
Non-TaxableReimbursement
Code to use whenreimbursing expenses onpaychecks
Expenses should bebusiness related andsubstantiated as perfederal rules. This codedoes not effect earningsor taxes.
N/A N/A N/A
Fringe Benefit Earning Codes
In most cases, these codes are additions to earnings for taxation purposes. They account for paymentsmade to employees outside of the payroll system or for use of company assets such as vehicles thathave value to the employee.

Using Standard Pay Codes 35
Payroll Guide
Note: Any fringe earning on a paycheck must be offset by a deduction with the same amount.You must create a matching deduction to ensure the employee receives no additional cash onthe paycheck. For details on creating deductions, read Creating Payroll Deduction Items.
Note: To offset any fringe earning code, use a deduction code based only on the FringeBenefits Offset type.
Code Name Description Additional Information FITTaxable
FICATaxable
W-2box
Advances - Non-Loans Code for any advancewhere repayment is notexpected
These are non-loan paymentsthat were made to theemployee and need to bereported as taxable income.
Y Y box1, 3,5
Cost of Employer-Sponsored Health Coverage
Code for health carecontributions made byemployerUse the Fringe BenefitsOffset deduction code toremove the net pay effectof these contributions
N N box12CodeDD
Cost of Employer-Sponsored Health Coverage(Offset)
Employee FICA Paid ByEmployer
Code for when theemployer chooses topay the employee'sFICA (Federal InsuranceContributions Act tax)
This code is used to offset theFICA paid by the employer.
Y Y box1, 3,5
Health Care Premiums:Domestic Partner/CivilUnion/Same-Sex Marriage(Employer)
For employercontribution for healthinsurance
Federal law requires thatpremiums for health insurancefor domestic partners is taxable.This code adds the employercontribution to the earningsfor taxation. An automaticdeduction ensures that theemployee is not paid for thisamount.
Y Y box1,3, 5,and14
HSA (EmployerContribution)
Employer contributionto the Employees HealthSpending Account
Paid into a qualified plan. Somestates tax these contributions.Set up a matching deduction toensure the employee is not paidfor this amount.
Note: This amountis not considered forcalculation of basewages for 401(k)contributions.
N N box12CodeW
Moving Expenses - Qualified This code recordsqualified movingexpenses.Used when expenses foran employee's relocationare paid by the employerdirectly to serviceproviders. Because themoney is already paid
These are expenses that werepaid to the employee, but notthrough payroll. These qualifiedexpenses do not affect net payand are reported in W-2 box 12Code P.
N N box12CodeP

Using Standard Pay Codes 36
Payroll Guide
Code Name Description Additional Information FITTaxable
FICATaxable
W-2box
to the third party, thecheck should includean offsetting deductionso this amount doesNOT increase check's netpayment.
Non-Cash Compensation This records taxable non-cash compensation
This code tracks non-cashcompensation, received bythe employee, for whichvalue needs to be added tothe employee's earnings fortaxation purposes. Code is fullytaxable.
Y Y box1, 3,5
Non-Qualified Stock Option This records non-qualified stock optionsand is W-2 reportable andtaxable.
This code tracks non-qualifiedstock options, exercised bythe employee, for whichvalue needs to be added tothe employee's earnings fortaxation purposes. Code is fullytaxable.
Y Y box1,3, 5,andbox12CodeV
Pension Plan Contribution(Employer)
Third Party Sick Pay -Taxable
For a sick pay plan, that theemployee contributed to, that ispaid by a third party. This codedoes not affect earnings or netpay. An automatic deductionensures that the employee isnot paid for this amount.
box1, 3,5
Third Party Sick Pay -Nontaxable
This code recordsnontaxable sick pay
This code tracks sick pay plansthat employees contribute toand is paid by a third party. Thiscode does not effect earnings ornet pay. It enables the amountto be recorded in W-2 box 12Code J.
N N box12CodeJ
Group-Term Life Insuranceover $50,000
This records the value ofgroup term life.The IRS determines thestandard amount andprovides a table forcomputing the value ofthe insurance that is inexcess of the standard.This code records thevalue of the excess inregular earnings (box 1, 3,and 5 of W-2) and reportsthe value in W-2 box 12Code C.
You must manually createa matching deduction toensure the employee receivesno additional cash on thepaycheck. Set up a matchingdeduction to ensure theemployee is not paid for thisamount.For details on creatingdeductions, read CreatingPayroll Deduction Items.
Y Y box1,3, 5,andbox12CodeC
Tips This records tips paiddirectly by customers tothe employee.
These payments are added toearnings and are fully taxable.
Y Y box1, 3,5
UnsubstantiatedReimbursements
Reimbursements forexpenses that do not
These are reimbursementsthat were previously paidand now determined to beunsubstantiated. They are
Y Y box1,3, 5,

Using Standard Pay Codes 37
Payroll Guide
Code Name Description Additional Information FITTaxable
FICATaxable
W-2box
meet the federal rules forexclusion from taxation
added to earnings and are fullytaxable.
and14
Health Ins Employer Pd--2%Shrhldrs
This code is used to setthe amount paid by anemployer to cover healthinsurance premiumsof an employee of ans-corporation who is a2%+ shareholder of thecompany.
These employer payments aretaxed at supplemental ratesand if combined with regularearnings, taxed at regular rates.
Y box1, 14
Non Taxable Fringe Benefit This code is to be usedvery carefully andonly when the payrolladministrator cannotmatch a benefit on handwith any of fringe codetypes available in thesystem.
Because it cannot be matched,it cannot be taxed properly andthis code is never taxed. It isup to an employee to reportit correctly on personal taxreturns. If the amount is largeand the benefit actually istaxable, the employee couldbe liable for an estimated taxpayment to different agenciesbefore the end of the tax year.
Pension Plan Contribution(Employer)
Records an employer'scontribution to anyemployee's pension plan.401(k) match is a typicalexample.
Using Deduction CodesThese deduction codes identify a range of deductions from employees' compensation thatan employer may have to factor into a paycheck or direct deposit. Most employee deductionsare voluntary, but some are not (for example, After-Tax Deductions such as Child Support andGarnishments). Deduction codes also include Employer Contributions paid to third parties for benefitssuch as medical insurance and pension contributions.
■ Misc. Pre-Tax Employee Deductions
■ Pension Plans Contributions
■ Education Plans Contributions
■ Cafeteria Plans Contributions
■ After-Tax Deductions
■ Using Employer Contribution Codes
Misc. Pre-Tax Employee Deductions
Code Name Description Additional Information W-2box
CommuterChecks
Employee deduction for the employee's contribution topay for commuter checksInternal Revenue Code Section 132 and theTransportation Equity Act for the 21st Century (TEA-21)enables employers to offer employees the opportunityto set aside a portion of their salary to pay for certaintransportation expenses. The employee is not taxed
Employee payment for vouchersthat the employee redeems fortransit passes, tickets or tokensand/or payment for vanpoolfares. Employers provide thesetax-free vouchers to employeesin amounts up to the federally

Using Standard Pay Codes 38
Payroll Guide
Code Name Description Additional Information W-2box
on amounts set aside and used for qualified expenses(that is, pre-tax dollars are used to pay the commutingexpenses).For IRS information specific to Transportation(Commuting) Benefits, see http://www.irs.gov/pub/irs-pdf/p15b.pdf.
mandated monthly limit.Employers may also providecommuter checks in the formof cash or cash equivalents inlieu of vouchers. Commuterchecks are a pre-tax employeededuction benefit, either as asubstitute for taxable salary or asupplemental benefit.
FringeBenefitsOffset
This code should be used as a base type for all deductioncodes used to offset the fringe earnings. Such deductioncodes should not be used for any other purposes.
Fringe earnings should notaffect a net pay of the check. Itis achieved by offsetting everyfringe earning on the checkwith a deduction of the sameamount as matching earning.
Health InsEmployerPd-2+ pctShrhldrs
This type was designed as an offset to a fringe earningtype with a matching name and should not be used!Instead, the generic offset type Fringe Benefits Offsetmust be used.
box 14withlabelHealthIns
Pension Plans Contributions
Important: In most cases, these pay codes identify pre-tax deductions used to calculatefederal and state individual income taxes.
Code Name Description Additional Information W-2box
401(k) Contribution Employee's contribution toqualified 401(k) Plan
A retirement plan funded through pre-tax payrolldeductions for eligible employees. 401(k) plans arenot taxed on any capital gains, dividends, or interestuntil they are withdrawn.
box12CodeD
401(k) AdditionalAfter-TaxContribution
Employee’s after-taxcontribution to qualified401(k) Plan
After-tax 401(k) contributions are subject to taxationagain when they are withdrawn.
box14
401(k) Catch-up box12,CodeD
401(k) LoanRepayment
Employee deduction for401(k) loan repayment
After-tax payments deducted from employee'spaycheck to repay funds obtained from a 401(k) in theform of a loan.
N/A
401(k) RothContribution
All Roth contributions areafter-tax and distributionsfrom the plan are nottaxable.
Designated Roth Contribution to 401(k) Plan In Lieu ofElective DeferralYou will find more details available at http://www.irs.gov/Retirement-Plans/Roth-IRAs.
box12CodeAA
401(k) Roth - Catch-up
box12CodeAA
403(b) RothContribution
Employee's contribution toqualified 403(b) plan.
Designated Roth Contribution to 403(b) In Lieu ofElective Deferral
box12

Using Standard Pay Codes 39
Payroll Guide
Code Name Description Additional Information W-2box
All Roth contributions areafter-tax and distributionsfrom the plan are nottaxable.
You will find more details available at http://www.irs.gov/Retirement-Plans/IRC-403(b)-Tax-Sheltered-Annuity-Plans.
CodeBB
403(b) Roth - Catch-up - With 15 Years OfService
Designated Roth Contributions to 403(b)) Plan InLieu of Elective Deferral. Use either With 15 Years OfService or After The Age Limit.
box12CodeBB
403(b) Roth - Catch-up - After The AgeLimit
Designated Roth Contributions to 403(b)) Plan InLieu of Elective Deferral. Use either With 15 Years OfService or After The Age Limit.
box12CodeBB
403(b) Contribution Employee's contribution toqualified 403(b) plan
A retirement plan for university, civil governmentand not-for-profit employees funded through pre-tax payroll deductions. 403(b) plans have the samecharacteristics and benefits of 401(k) plans.
box12CodeE
403(b) - Catch-up- With 15 Years OfService
Designated contributions to 403(b) plan. Use eitherWith 15 Years Of Service or After The Age Limit.
box12CodeE
403(b) - Catch-up -After The Age Limit
Designated contributions to 403(b) plan. Use eitherWith 15 Years Of Service or After The Age Limit.
box12CodeE
Govt. EmployeeDeferred - 457(b)
Government employeededuction for deferredcompensation plan
Non-qualified, pre-tax, deferred compensation plansestablished by state and local government and tax-exempt employers.
box12CodeG
Govt. EE 457(b) -Catch-up - Standard
box12CodeG
Govt. EE 457(b) -Catch-up, Additional- 3 Years ToRetirement
box12CodeG
MQGE PensionPlan Contribution(Employee)
Medicare QualifiedGovernment Employment(MQGE)
MQGE is a special class of government employees.There are special pension plans for this class.You will find more details are available at http://www.irs.gov/pub/irs-pdf/p963.pdf.
SEP Contribution -408(k)(6)
Simplified employeepensions
Pre-tax deduction for a Simplified Employee Pension(SEP), which is a retirement plan for employers who donot wish to sponsor or administer a qualified pensionor profit-sharing plan.
box12CodeF
SEP 408(k)(6) - Catch-up
box12CodeF
SIMPLE - 408(p)Contribution
Saving Incentive MatchPlans for employees ofsmall employers
Pre-tax deduction for a Savings Incentive Match Plan,a retirement plan for employers with no more that100 employees.
box12CodeS

Using Standard Pay Codes 40
Payroll Guide
Code Name Description Additional Information W-2box
SIMPLE - 408(p) -Catch-up
Pre-tax deduction for a Savings Incentive Match Plan,a retirement plan for employers with no more that100 employees.
box12CodeS
Education Plans Contributions
Code Name Description Additional Information W-2box
CollegeSavings Plan(529)
Employee deductionfor a qualified collegesavings plan
Employee contributions to a tax-deferred college savings plan.While the initial employee deductions are not tax deductible, tax isnot paid by the employee on the account's earnings until the fundsare disbursed to pay for college.
N/A
Cafeteria Plans Contributions
Code Name Description Additional Information W-2box
Cafeteria Contrib. - FSA: AdoptionAssist.
Employee contributionto a pre-tax adoptionassistance plan
A pre-tax payroll deduction for theemployee's contribution to his or heremployer's cafeteria plan for AdoptionAssistance savings account.
box12,Code T
Cafeteria Contrib. - FSA DependentCare
Employee contribution toa pre-tax dependent careplan
A pre-tax payroll deduction for theemployee's contribution to his or heremployer's cafeteria plan for DependentCare.
box 10
Cafeteria Contrib.-FSA: Health Care A pre-tax payroll deduction for theemployee's contribution to theiremployer's cafeteria plan for HealthCare FSA.
box 14
Cafeteria Contrib. - POP Employee contribution toa pre-tax premium-onlycafeteria plan
A pre-tax payroll deduction for theemployee's contribution to his or heremployer's cafeteria premium-only planto pay insurance premiums.
N/A
Cafeteria Contribution-MedicalCare Premiums
Employees contributionto a pre-tax medical careplan
A pre-tax payroll deduction for theemployee's contribution to his or heremployer's cafeteria plan for medicalcare.
N/A
Cafeteria Contribution - HSA Employee contribution to a HealthSavings Account (HSA) through aCafeteria Plan
box 12CodeW
After-Tax DeductionsThese deductions do not reduce taxes.
Code Name Description Additional Information W-2box
Advances -Repayment
Employee repayment ofadvance
Funds paid back to employer for a previous advance. Thisdeduction does not reduce taxes.
N/A

Using Standard Pay Codes 41
Payroll Guide
Code Name Description Additional Information W-2box
After-Tax EmployeeInsuranceContribution
Employee contributionto insurance planstreated as an after-taxdeduction
Insurance contributions made for any insurance that cannotbe pre-tax. This deduction does not reduce taxes.This code is rarely used. In most cases, employers provideat the minimum a Premium Only Plan (POP) cafeteria planthat will shift the insurance premiums to a pre-tax basis—reducing virtually all taxes, including employer taxes such asFICA, Medicare, and Unemployment.
N/A
Child Support Employee deduction forchild support payment
Money paid through payroll by the non-custodial parent tothe custodial parent for the support of children. This is anafter-tax deduction and is often, but not always, mandated bya court order. This deduction does not reduce taxes.
N/A
Employee Share SDI Employee deductionfor state disabilityinsurance
This tracks the employee deduction for state disabilityinsurance. This deduction does not reduce taxes.
box14
Garnishment Employee deduction forwage garnishment.
Wage garnishment is a legal procedure in which a person'searnings are required by court order to be withheld by anemployer for the payment of a debt. This deduction does notreduce taxes.
N/A
Health CarePremiums -Domestic Partner
Long TermDisability
Employee deductionfor long term disabilityinsurance
After-tax deduction for employee's share of the cost of longterm disability insurance. This deduction does not reducetaxes.
box14
Misc. After-taxDeduction
General employeededuction which doesnot reduce taxes
Miscellaneous after-tax deduction that can be used for adeduction not listed. This deduction does not reduce taxes.
N/A
Term Life Insurance Employee deductionfor term life insurancewhich does not reducetaxes
Employee's after-tax contribution for a term-life insurancepremium.This code should be rarely used. In most cases, this type ofinsurance is included in a pre-tax plan, such as a POP plan.This deduction does not reduce taxes.
box14
Using Employer Contribution CodesThese standard pay codes are used to record employer contributions. They do not appear onpaychecks or affect taxation or net pay in any way. The employer contributions are recorded to createchecks on the Pay Payroll Liabilities page.
Code Name Description Additional Information W-2box
Medical (EMPLOYER) Created to permit NetSuitePayroll to automatically generatethird-party checks for medicalpremiums
N/A
Pension Contributions(EMPLOYER)
Created to permit NetSuitePayroll to automatically generatethird-party checks for employermatching pension contributions
N/A
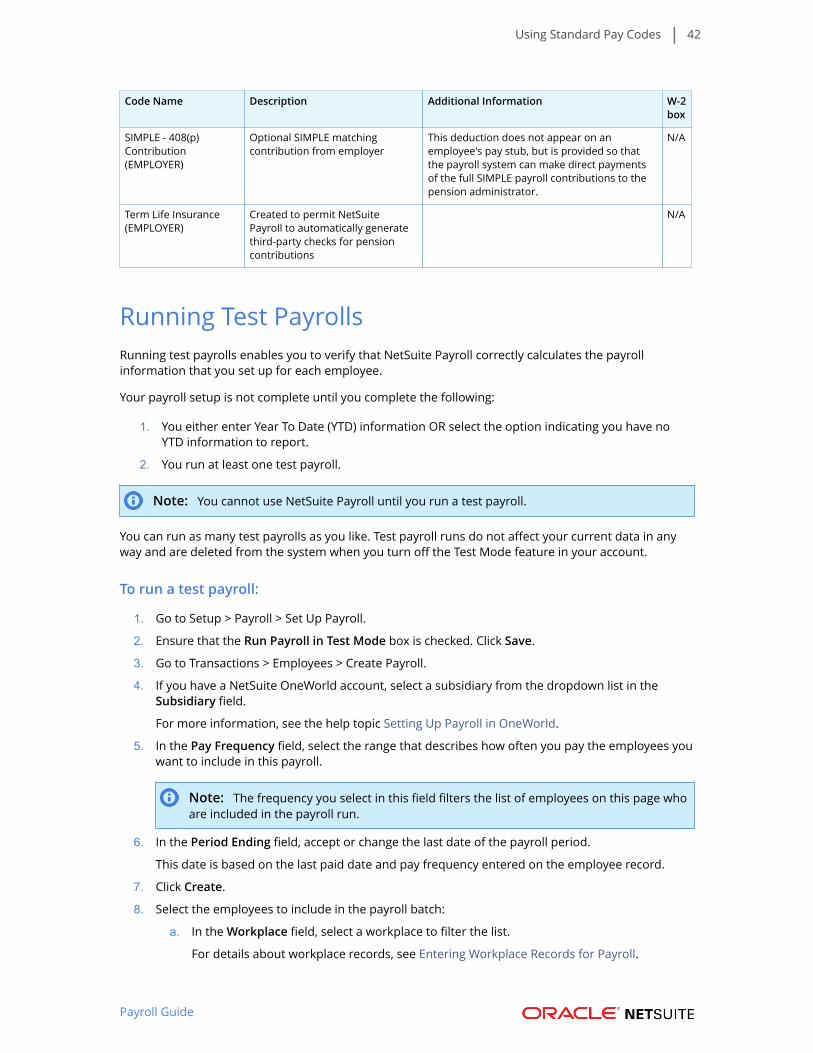
Using Standard Pay Codes 42
Payroll Guide
Code Name Description Additional Information W-2box
SIMPLE - 408(p)Contribution(EMPLOYER)
Optional SIMPLE matchingcontribution from employer
This deduction does not appear on anemployee's pay stub, but is provided so thatthe payroll system can make direct paymentsof the full SIMPLE payroll contributions to thepension administrator.
N/A
Term Life Insurance(EMPLOYER)
Created to permit NetSuitePayroll to automatically generatethird-party checks for pensioncontributions
N/A
Running Test PayrollsRunning test payrolls enables you to verify that NetSuite Payroll correctly calculates the payrollinformation that you set up for each employee.
Your payroll setup is not complete until you complete the following:
1. You either enter Year To Date (YTD) information OR select the option indicating you have noYTD information to report.
2. You run at least one test payroll.
Note: You cannot use NetSuite Payroll until you run a test payroll.
You can run as many test payrolls as you like. Test payroll runs do not affect your current data in anyway and are deleted from the system when you turn off the Test Mode feature in your account.
To run a test payroll:
1. Go to Setup > Payroll > Set Up Payroll.
2. Ensure that the Run Payroll in Test Mode box is checked. Click Save.
3. Go to Transactions > Employees > Create Payroll.
4. If you have a NetSuite OneWorld account, select a subsidiary from the dropdown list in theSubsidiary field.
For more information, see the help topic Setting Up Payroll in OneWorld.
5. In the Pay Frequency field, select the range that describes how often you pay the employees youwant to include in this payroll.
Note: The frequency you select in this field filters the list of employees on this page whoare included in the payroll run.
6. In the Period Ending field, accept or change the last date of the payroll period.
This date is based on the last paid date and pay frequency entered on the employee record.
7. Click Create.
8. Select the employees to include in the payroll batch:
a. In the Workplace field, select a workplace to filter the list.
For details about workplace records, see Entering Workplace Records for Payroll.

Running Test Payrolls 43
Payroll Guide
b. In the Department field, select a department.
For details about department records, read the help topic Departments and ClassesOverview.
c. In the Class field, select a class.
For details about class records, read the help topic Departments and Classes Overview.
d. In the Select column, next to the names of the employees you want to pay, click Mark Allor boxes.
9. Click Save.
10. In the Check Date field, accept or change the posting date of the paychecks.
Note: This date cannot be a previous date, a weekend, or a bank holiday. If you want toenter a check for today's date, you must check the To Be Printed box and locally print thecheck. NetSuite Payroll cannot process direct deposits or service-printed checks on thesame day.
11. Check or clear the following boxes:
a. To save the checks and direct deposit vouchers in a queue for printing later, check the ToBe Printed box.
Important: If you do not check this box, paychecks and direct deposit vouchersare not printed for this payroll. To print checks and vouchers later, you mustindividually access and print each transaction. If you use the Service PrintedChecks and Stubs feature, do not check this box. If you want to print the checksyourself for this payroll run only, check this box. By default, this box is not checkedfor future payrolls.
b. To pay approved commission amounts, from NetSuite Commissions, on the paychecksincluded in this run, check the Pay Commissions box.
c. To pay approved expense amounts (from NetSuite) on the paychecks included in this run,check the Pay Expenses box.
You must set up an expense payroll item to use this preference. For more information, seeCreating Payroll Earning Items.
d. If you do not want to accrue vacation or sick time on the paychecks included in this run,check the Do Not Accrue Time box.
e. To pay PTO on the paychecks included in this run, check the Pay PTO box.
12. Verify the hours and amounts shown for the earning items listed.
13. To run your test payroll and view the checks created on the Payroll Batch page, click Calculate.
14. On the Payroll Batch page, on the Complete tab, click View next to an employee's name to viewthe details on their paycheck.
If you need to make changes, click Edit to change any payroll related information on theemployee record.
15. Compare and verify employee withholding and deduction calculations with your most recentpayroll run.
If you discover errors during your test payroll runs, go to Lists > Employees > Employees to make thenecessary changes to employee records. Then, to go to Transactions > Employees > Create Payroll torerun your test payroll.
If you make changes, you may be required to update your payroll information before running anothertest payroll. To update your payroll information, go to Setup > Payroll > Update Payroll Information.

Running Test Payrolls 44
Payroll Guide
Turning Off Test ModeWhen you have completed your test runs, you need to turn off the test mode before you can run actualpayrolls. For more information, read Turning Off Payroll Test Mode.
Turning Off Payroll Test ModeWhen you have finished running test payrolls and verified your data, you can complete your setup byturning off the test mode in your account.
After the test mode is turned off, payrolls that you run do affect your account data and are postingtransactions.
To turn off Test Mode:
1. Go to Setup > Payroll > Set Up Payroll.
2. Clear the Run Payroll in Test Mode box.
If this box is not available, it is because you have not set up YTD information, that you have noYTD information to report, or you have not run at least one test payroll.
3. Click Save.
Setting Up Year-To-Date InformationSetting up Year-to-Date (YTD) information records federal and state tax liability information for theperiods prior to using NetSuite Payroll. If you have run any payrolls during the calendar year, you mustenter YTD information to ensure all calculations and reports for the remainder of the year are accurate.NetSuite requires you to enter these tax liabilities for the year up to the day before the current quarterand enter tax liabilities for the quarter to date.
When you submit your YTD information, NetSuite verifies the data you entered against its taxcalculations. If there are differences, NetSuite generates a journal entry for any unpaid liabilities.
You will be prompted to fund and pay any unpaid liabilities through NetSuite Payroll. For moreinformation, see the help topic Reporting Year-to-Date Tax Liability Payments.
To set up YTD information:
1. Go to Setup > Payroll > Year-To-Date Information.
2. If you have a NetSuite OneWorld account, then select a subsidiary.
For more information, see the help topic Setting Up Payroll in OneWorld.
3. If required, click Update Payroll Information.
On the Update Payroll Information page, complete the following steps:
a. Check the Agree box.
b. Click Commit Updates.
c. When your updates have been committed, return to Setup > Payroll > Year-To-DateInformation to continue the YTD process.
4. Select the year you will begin using NetSuite Payroll.
If you have not run any previous payrolls on another system during the current year, select I donot have YTD amounts to report to skip the YTD setup.

Running Test Payrolls 45
Payroll Guide
5. Click Next.
If you selected I have YTD amounts to report, complete the following steps:
a. Select the employees for whom you have year-to-quarter date data, and then click Next.
b. Enter Year-to-Quarter amounts for each employee, and then click Next.
You can save time by exporting and completing the template that NetSuite provides you.
c. Review the amounts, enter amounts reported to tax agencies, and review any unpaidamounts, and then click Next.
d. On the Journal page, edit the journal entry that NetSuite prepared to update your accountinformation based on the year-to-date data that you entered for your employees. ClickSave.
e. If the original or edited Journal is ready to post, on the Year To Date Setup - LiabilityPayments page, click Commit.
f. If you do not have quarter-to-date data for employees, clear the box to indicate that youdo not have quarter-to-date data to enter. Click Next.
The next step is to enter Quarter-to-Date amounts. This procedure follows the samesequence as entering Year-to-Quarter amounts. Begin by entering employee data,reviewing the amounts calculated by NetSuite, reviewing or editing the journal entryprepared by NetSuite, and committing the journal entry.
g. On the Year To Date Setup - Liability Reporting page, click the appropriate form link, andthen enter the correct amounts by day, week, month, or quarter that add up to the totalyear-to-date amounts calculated by NetSuite. Click Save.
If your company is required to report Hours-to-Quarter, you will enter this informationprior to entering your liability information.
h. Click Next.
NetSuite displays the Year To Date Setup - Finish page.
6. If you have a NetSuite OneWorld account, you can select a subsidiary from the dropdown list inthe Subsidiary field.
7. Select one of the buttons on the Year To Date Setup - Finish page:
■ Enter More Year-To-Date Data - Enables you to enter more YTD data for the company orselected subsidiary.
■ Start Over - Discards any data entered to this point, and then returns to the Year To DateSetup - Start page.
■ Return to Payroll Setup - Returns you to the Payroll Setup page.
Entering a Payroll Start DateAfter you have enabled the Payroll feature, you must enter a start date for NetSuite Payroll.
You should complete this task after you have turned off the test payroll mode. For details, read TurningOff Payroll Test Mode.
When you select a start date for NetSuite Payroll, you become a full payroll service user. After thatdate, payroll is processed and funded using NetSuite Payroll. To complete this step, go to Setup >Payroll > Set Up Payroll and enter the payroll start date.
Note: On your service start date, you must report any unpaid liabilities.

Administering Payroll Transactions 46
Payroll Guide
Administering Payroll TransactionsAfter you have completed payroll setup tasks, you can begin performing payroll transactions inNetSuite. Click the links in the following table to access task information and to see step-by-stepinstructions for payroll transactions.
Note: Prior to entering payroll transactions, if you use time tracking, you should enter andapprove time sheets for each employee. For more information, see the help topic ManagingTime Tracking.
Task See...
Generating PayrollTransactions
■ Creating a Payroll Batch
■ Creating a One-Time Payroll
■ Viewing Payroll Batches
■ Calculating a Payroll Batch
■ Viewing Individual Paychecks
■ Using Bulk Edit
■ Editing an Individual Paycheck from a Payroll Batch
■ Committing a Payroll Batch
■ Running a Paycheck Search
Creating PayrollReversals orAdjustments
■ Creating a Payroll Reversal
■ Committing Payroll Reversals
■ Creating Payroll Adjustments
Checking the Status ofPayroll Transactions
■ Payroll List Page
■ Payroll Status Page
Paying payroll liabilities ■ Making Payroll Liability Payments
Print checks andvouchers
■ Printing Payroll Checks or Vouchers
■ Printing Paychecks
■ Printing Direct Deposit Vouchers
Other ■ Allocating Paycheck Expenses to Projects
■ Performing Quarterly or Yearly Payroll Tasks
■ Recording Third-Party Sick Pay Payments
Be aware that the paycheck journal transaction is not a part of NetSuite Payroll. When the PaycheckJournal feature is enabled, this transaction is available for partners' use in creating international payrollsolutions. For more information, see Using the Paycheck Journal Feature.
Generating Payroll TransactionsNote: All direct deposits and service-printed checks must be committed at least two bankingdays before the check date by 2:00 p.m. Pacific Time. For a listing of bank holidays, see the helptopic Following the Payroll Processing Schedule.
■ Creating a Payroll Batch

Generating Payroll Transactions 47
Payroll Guide
■ Viewing Individual Paychecks
■ Creating a One-Time Payroll
■ Viewing Payroll Batches
■ Committing a Payroll Batch
■ Printing Paychecks
■ Printing Direct Deposit Vouchers
Creating a Payroll BatchTo create a payroll batch in NetSuite, you generate paychecks for hours or time periods worked duringthe specified pay period. You can also choose whether to create a regular payroll or an off-cycle payroll.For more information about off-cycle payrolls, see Creating a One-Time Payroll.
To create a payroll batch:
1. Go to Transactions > Employees > Create Payroll.
2. If you have a NetSuite OneWorld account, select a subsidiary from the list in the Subsidiary field.For more information, see the help topic Setting Up Payroll in OneWorld.
3. If this is a one-time payroll, check the Off Cycle box.
Note: Off-cycle batches do not update the Last Paid Date field on the employee record.
4. In the Pay Frequency field, select the pay frequency of the employees you want to include in thispayroll.
Pay frequency is included on the Payroll subtab of the employee record. The frequency youselect filters the list of employees who are eligible to be included in this payroll.
5. In the Period Ending field, review the last date of the payroll period, and make changes ifnecessary.
This date is based on the last paid date and pay frequency entered on the employee record.Paycheck values for new hire employees and terminated employees are based on this date.
6. Click Create. The payroll batch is saved, and the next page in the payroll batch creation processopens.
After you create the payroll batch, continue with the next steps:
■ Adding Employees to a Payroll Batch
■ Selecting Batch Payroll Payment Options
■ Calculating a Payroll Batch
■ Committing a Payroll Batch
Adding Employees to a Payroll BatchWhen you click Create on the first Payroll Batch page, a popup window opens that enables you to selectemployees to pay from those who match the Pay Frequency and Period Ending values for the batch.To open the popup window when you are editing a batch that you have previously created, click AddEmployees at the top of the page.
The number of employees visible in the list is determined by the Number of Rows in List Segments fieldon the General tab of the Set Preferences page at Home > Set Preferences. If the available employeesexceed the number set, a dropdown list appears in the upper right of the list so you can select adifferent segment in the list.

Generating Payroll Transactions 48
Payroll Guide
To add employees to the batch:
1. Click Add Employees to open the popup window.
2. If necessary, filter the available employees to determine which employees are displayed forselection. The filter criteria is additive. Only employees who meet all criteria are displayed.The total number employees available to pay is included at the top of the list. The number ofemployees that meet the filter criteria is displayed in red next to the total number. Enter thefollowing information:
■ Workplace – Select a workplace from the dropdown list.
For more information, see Entering Workplace Records for Payroll.
■ Department – Select a department from the dropdown list.
■ Class Select a class from the dropdown list.
For more information, see the help topic Departments and Classes Overview.
■ Saved Search – Select a saved search from the dropdown list.
For more information, see the help topic Saved Searches.
■ Employee Name – Type characters in the field to search for a specific employee or multipleemployees with the same character set in their names.
3. Click Mark All or check individual boxes in the Select column to select the employees you wantto pay.
4. Click Save.
The popup window closes, and the selected employees are added to the Employees to Pay list atthe bottom of the page. If the batch has been calculated before, the newly added employees arelisted in the Pending subtab.
No values appear in the Employees to Pay or Pending lists at the bottom of the Payroll Batch page untilthe batch is calculated. For information, see Creating a Payroll Batch.
Removing Paychecks from a BatchYou can remove individual paychecks from a batch before it is committed.
To remove paychecks from a batch
1. Go to Transactions > Employees > Create Payroll > List, and click Edit or View next to the batchfrom which you want to remove paychecks.
You can select paychecks to remove from the following locations on the Payroll Batch page:
■ Employees to Pay list on batches that have not been calculated
■ Pending subtab
■ Paycheck subtab of Complete subtab
■ Net Pay subtab of Complete subtab
■ Errors subtab
2. If you want to only display particular paychecks, you can filter the listed paychecks as desiredto determine which paychecks are displayed for selection. The filter criteria is additive. Onlypaychecks that meet all criteria are displayed. The total number paychecks available is includedat the top of the list. The number of paychecks that meet the filter criteria is displayed in rednext to the total number.
■ Workplace – Select a workplace from the dropdown list.
For more information, see Entering Workplace Records for Payroll.

Generating Payroll Transactions 49
Payroll Guide
■ Department – Select a department from the dropdown list.
■ Class Select a class from the dropdown list.
For more information, see the help topic Departments and Classes Overview.
■ Saved Search – Select a saved search from the dropdown list.
For more information, see the help topic Saved Searches.
■ Employee Name – Type characters in the field to search for a specific employee or multipleemployees with the same character set in their names.
3. Click Mark All or check individual boxes in the Select column to select the paychecks you want toremove from the batch.
4. Click Delete Paychecks.
Selecting Batch Payroll Payment OptionsYou can change payment options at any time before the batch is committed. If the batch status isCalculated, click Payment Options to enable editing of the options. The status changes to PaymentOptions, and you must calculate again before you commit the batch.
To select payroll payment options:
1. In the Account field, select the payroll funding account specified on the Set Up Payroll page.
For more information, see the help topic Selecting a Payroll Funding Account.
The current balance for the account appears in the Balance field.
2. In the Check Date field, review the posting date of the paychecks, and make changes ifnecessary.
If you change the date after you calculate the payroll batch, manually entered payroll items willbe retained on the individual paychecks, but you must recalculate the payroll to update the autogenerated payroll items.
Note: If you are using service-printed checks, the Check Date cannot be a date inthe past, a weekend, or a bank holiday. For a list of bank holidays, see the help topicFollowing the Payroll Processing Schedule. The payroll service cannot process directdeposits or service-printed checks on the same day as a payroll. All direct deposits andservice-printed checks must be committed by 2:00 p.m. Pacific Time at least two bankingdays before the check date. To enter a check for today's date, check the No ServicePrinted Checks box, and print the check locally.
3. Check or clear the boxes next to the following payroll options:
■ Pay Auto Earning – Check if you want to calculate automatic earnings on the paychecksincluded in this payroll batch.
■ Pay Time – Check if you want to include time tracking entries in this payroll batch.
This option appears when the Time Tracking feature is enabled. For more information, seethe help topic Managing Time Tracking.
■ Pay PTO – Check to pay Paid Time Off (PTO) on the paychecks included in this payroll batch.If this box does not appear, make sure the Pay Sick/Vacation Time on Paychecks box ischecked on the Set Up Payroll page. See Setting Payroll Preferences.
■ Pay Expenses – Check to pay approved expense amounts that have been processed fromwithin NetSuite on the paychecks included in this payroll batch.
If this box does not appear, make sure the Pay Expenses on Paychecks box is enabled on theSet Up Payroll page. See Setting Payroll Preferences.

Generating Payroll Transactions 50
Payroll Guide
You must set up an expense payroll item to use this option. For more information, seeCreating Payroll Earning Items.
■ Pay Commissions – Check to pay approved commission amounts from NetSuite Commissionon the paychecks included in this payroll batch.
This option appears when the Employee Commissions feature is enabled. For moreinformation, see the help topic Commissions. If this box does not appear, make sure the PayEmployee Commissions on Paychecks by Default box is checked on the Set Up Payroll page.For more information, see Setting Payroll Preferences.
■ Pay Auto Deduction – Check if you want to calculate automatic deductions on the paychecksincluded in this payroll batch.
■ Pay Auto Contribution – Check if you want to calculate automatic contributions on thepaychecks included in this payroll batch.
Important: The auto earning, deduction, and contribution values are those in effecton the employee record as of the Period Ending date. For example, if an employee’s401(k) contribution is $200 on 03/25/2014, the paycheck created during the periodending 03/31/2014 includes an auto deduction of $200. If the 401(k) contributionchanges to $500 as of 04/02/2014, the paycheck created during the period ending04/15/2014 will include an auto deduction of $500.
■ Do Not Accrue Time – Check if you do not want to accrue vacation or sick time on thepaychecks included in this payroll batch. This box is checked by default for off-cycle batches.
■ No Direct Deposits – Check to pay all employees by check even if an employee has the UseDirect Deposit option enabled on their employee record. This option overrides individualoptions.
If you check this box and also check the No Service Printed Checks box, all checks in thebatch are processed as employer-printed checks.
Clear this box to process paychecks using direct deposit for employees that have the UseDirect Deposit option enabled on their employee record.
■ No Service Printed Checks or To Be Printed – If the Service Printed Checks and Stubs featureis enabled, this box is called No Service Printed Checks. Otherwise, it is called To Be Printed.
Check this box to save the checks and direct deposit vouchers in a queue for printing later.For more information, see Printing Paychecks and Printing Direct Deposit Vouchers.
If the Service Printed Checks and Stubs feature is not enabled and this box is not checked,paychecks and direct deposit vouchers are not printed for this payroll batch. To print checksand vouchers later, you must access and print them individually.
The following table summarizes the combinations for No Direct Deposits and No ServicePrinted Checks/To Be Printed.
Desired Outcome Boxes to Check
No DirectDeposits
No Service PrintedChecks/To BePrinted
Employees receive service-printed checks andservice-printed direct deposit stubs.
Employees receive service-printed direct depositstubs. Employer prints checks locally.
X

Generating Payroll Transactions 51
Payroll Guide
Desired Outcome Boxes to Check
No DirectDeposits
No Service PrintedChecks/To BePrinted
All employees are paid by check regardless of theUse Direct Deposit option on their employee record.Employer prints checks locally.
X X
All employees are paid by check regardless of theUse Direct Deposit option on their employee record.Checks are printed by the service.
X
If you change payment options, you must calculate the batch again. For information, see Calculating aPayroll Batch.
Creating a One-Time PayrollYou can create a one-time payroll based on any payroll item defined in your system. For example, youcan create a one-time bonus payroll based on the Bonus (Earning:Addition) payroll item. For moreinformation about creating payroll items, see Creating Payroll Items.
To create a one-time payroll for a payroll item:
1. Go to Transactions > Employees > Create Payroll.
2. On the Payroll Batch page, do the following:
a. If you have a NetSuite OneWorld account, select a subsidiary from the Subsidary drop-down list.
b. Check the Off Cycle box.
c. In the Pay Frequency drop-down list, select the pay frequency for the employees who arereceiving the one-time payroll.
d. In the Period Ending field, enter the date that the pay period ends in the format MM/DD/YYYY.
e. Click Create.
For more information, see Creating a Payroll Batch.
3. In the popup window that appears, check the boxes beside the employees to include in the one-time payroll, and then click Save.
4. Click Bulk Edit.
Note: If you are including only one employee in the one-time payroll, you can edit theemployee on the Payroll Batch page, without clicking Bulk Edit.
a. From the Payroll Item dropdown list, select the payroll item that you want to use for thisone-time payroll.
b. In the Employee ID column, select an employee.
c. Enter a rate or an amount to pay the employee:
■ If the one-time payroll is based on hours worked, enter the number of hours in theHours/Base column, and then enter a pay rate in the Rate column.
■ If the one-time payroll is an amount, enter the total amount in the Amount column.
d. Click Add.

Generating Payroll Transactions 52
Payroll Guide
e. Repeat steps b-d for additional employees.
f. Click Save.
5. On the Payroll Batch page, in the Check Date field, change the check date to the date that theemployees will be paid.
6. Verify and make changes to individual paychecks as necessary, making sure that the one-timepayroll item is included in each paycheck.
For more information, see Viewing Payroll Batches and Editing an Individual Paycheck from aPayroll Batch.
7. After you review your payroll, click Calculate.
8. After you review your payroll calculations, click Commit. For more information, see Committing aPayroll Batch.
If you make mistakes in your payroll, but do not discover them until after the payroll iscommitted, then you must enter an adjustment or a reversal. For more information, see CreatingPayroll Adjustments and Creating a Payroll Reversal.
Note: Only those user roles that include Process Payroll with the Full option cancommit a payroll. These user roles include Full Access: Full, Payroll Manager: Full, andPayroll Setup: Full. For more information, see the help topics NetSuite Roles Overview,Showing Role Permission Differences, and Standard Roles Permissions Table.
To print checks, go to Transactions > Management > Print Checks and Forms, and clickPaychecks. For more information, see Printing Paychecks and Printing Checks and OtherTransactions.
Viewing Payroll BatchesAfter you create a payroll, you can view it on the Payroll Batch page. This page provides a summary of apayroll batch that you can review before you commit the payroll.
Note: You also can open the Payroll Batch page by going to Transactions > Employees > CreatePayroll > List. Click the Edit or View link to open that specific Payroll Batch page. For moreinformation, see Payroll List Page.
On the Payroll Batch page you can view totals for the required funding, taxes, withholdings, anddeductions for the batch. The totals for the payroll batch appear on the following subtabs:
■ Summary provides a summary of the funds needed to fund this payroll batch.
■ Paychecks lists each employee and a breakdown of the earnings, taxes, and deductions included inthe batch's paychecks.
Click View next to an employee's name to view that employee's paycheck. The paycheck includes theSummary and Disbursement subtabs that display a summary of all earnings deductions, taxes, andcompany contributions included in the transaction, and details of the disbursement of those funds.
■ Tax Withholdings and Expenses lists totals for taxes and withholdings by payroll item, for both theemployer and the employees.
■ Third Party Payments lists totals for third-party deduction items included in the batch's paychecks.
■ Net Pay lists the payroll items specific to the employees included in this payroll batch.
You can edit a payroll batch to make changes to amounts before you commit it. For more details, readEditing Calculated Payroll Batches.
If you do not need to make any changes, you can commit the batch. For information, see CommittingPayroll Reversals.

Generating Payroll Transactions 53
Payroll Guide
Note: Only those user roles that include Process Payroll with the Full option can commit apayroll. These user roles include Full Access: Full, Payroll Manager: Full, and Payroll Setup: Full.For more information, see the help topics NetSuite Roles Overview, Showing Role PermissionDifferences, and Standard Roles Permissions Table.
Calculating a Payroll BatchAfter you create a payroll batch and add employees to it, a Calculate button appears at the top of thepage. The Calculate button remains available as you change payroll options, add employees to thebatch, and remove paychecks from it. You can click Calculate after each change you make or wait untilyour changes are complete, and then calculate.
NetSuite performs the calculation one paycheck at a time. During the calculation process, a messageat the top of the page identifies the paycheck currently being calculated. A link labeled Click hererefreshes the Pending, Complete, and Error subtabs at the bottom of the page. For more information,see Payroll Batch Subtabs.
Pausing CalculationDuring calculation, a Pause button at the top of page enables you to stop calculation temporarily.When you click Pause, calculation stops after completion of the current paycheck. The Pending,Complete, and Error subtabs refresh to display the status at the point that the calculation stopped.
While calculation is stopped, the Payroll Batch status changes to Paused. You can perform the sameactions when a batch is Paused as when it is Calculated. For information, see Editing Calculated PayrollBatches.
Click Calculate again to resume calculation with the next record.
Editing Calculated Payroll BatchesWhen the calculation process finishes, the Payroll Batch status changes to Calculated. You can performseveral actions after a batch is calculated, after which you click Calculate again to recalculate thechanges. These actions are:
■ Add Employees – Click Add Employees to open the popup window and add employees to the batchas you did when you created the batch. For more information, see Adding Employees to a PayrollBatch.
■ Change payment options – Click Payment Options to edit Account, Check Date, and the paymentoption boxes. For more information, see Selecting Batch Payroll Payment Options.
Note: If you edit an individual paycheck to include a payment and then edit the payrollbatch by disabling the related payment option, NetSuite removes from the paychecks onlythose items that are generated by the system. You must manually remove any items youmanually enter. For example, you edit an employee paycheck to pay a commission, andthen you recalculate the payroll batch. You then decide against paying commission in thispayroll. You clear the Pay Commissions box and again recalculate the payroll batch. NetSuiteremoves all of the system-generated commission items from the paychecks, but leaves all ofthe manually entered commission items intact.
■ Remove paychecks from the batch – On the Pending and Errors subtabs and the Paychecksand Net Pay subtabs of the Complete subtab, select the paychecks to remove and click DeletePaychecks. For more information, see Removing Paychecks from a Batch.

Generating Payroll Transactions 54
Payroll Guide
■ Bulk edit payroll items – On the Pending and Errors subtabs and the Paychecks and Net Paysubtabs of the Complete subtab, click Bulk Edit to open a popup window, select a payroll item, andedit values for multiple employees in the batch. For more information, see Using Bulk Edit.
■ Edit an individual paycheck – On the Errors subtab and the Paychecks and Net Pay subtabs ofthe Complete subtab, click Edit to open an individual paycheck and make changes. For moreinformation, see Editing an Individual Paycheck from a Payroll Batch.
The following actions that do not require recalculation are also available:
■ Delete the entire batch – To delete the batch, select Delete from the Actions menu.
■ Access the account register – To open the register associated with the selected Account, click theopen icon.
Payroll Batch SubtabsAfter payroll batch calculation begins, the following subtabs appear at the bottom of the page:
■ Pending – This subtab lists any new or changed paychecks and is similar to the Employees to Paylist at the bottom of an uncalculated Payroll Batch page. It includes the same filters, fields, andbuttons.
■ Error – This subtab lists errors and issues with individual checks. It includes the same filters, fields,and buttons as the Pending subtab. Each entry on this subtab includes a message that is storedwith the employee paycheck record.
■ Complete – This subtab has the following subtabs:
□ Information that appears on the Summary subtab is detailed on the Paychecks, TaxWithholdings and Expenses, Third Party Payments, and Net Pay subtabs.
□ Information that appears on the Paychecks subtab includes the employee name, employee ID,and payment method. Additional information that displays includes individual earnings amount,deductions amount, employee taxes amount, net pay, company taxes amount, and the line totalof these amounts. From this subtab you can perform the following tasks:
▬ Use the Workplace, Department, Class, and Saved Search filters and the Employee field toreduce the list of employees eligible to be paid in this payroll batch.
▬ Remove one or more paychecks from this payroll batch by checking the Select boxes next tothe paychecks to be removed and then clicking Remove.
▬ View a paycheck by clicking the View link to the left of the paycheck.
▬ Modify a paycheck by clicking the Edit link to the left of the paycheck you want to modify.
For more information, see Editing an Individual Paycheck from a Payroll Batch.
▬ Access an employee record by clicking the employee’s name link in the Employee column.
For more information about employee records, see the help topic Adding an Employee.
□ Information that appears on the Tax Withholdings and Expenses subtab includes a descriptionof each tax withholding and expense item included in this payroll batch and its associateddeduction amount.
□ Information that appears on the Third Party Payments subtab includes a description of eachpayment item included in this payroll batch and its associated payment amount.
□ Information that appears on the Net Pay subtab includes detailed information about eachpaycheck including all tax withholdings, expenses, and third-party payments. From this subtabyou can perform the following tasks:
▬ Use the Workplace, Department, Class, and Saved Search filters and the Employee field toreduce the list of employees eligible to be paid in this payroll batch.

Generating Payroll Transactions 55
Payroll Guide
▬ Remove one or more paychecks from this payroll batch by checking the Select boxes next tothe paychecks to be removed and then clicking Remove.
▬ View a paycheck by clicking the View link to the left of the paycheck.
▬ Modify a paycheck by clicking the Edit link to the left of the paycheck you want to modify.
▬ Access an employee record by clicking the employee’s name link in the Employee column.
Verify the details of each paycheck to ensure its accuracy. If you make changes to paychecks orpayment options, click Calculate to update related information.
After you have thoroughly reviewed your payroll, click Commit.
Note: Only those user roles that include Process Payroll with the Full option can commit apayroll. These user roles include Full Access: Full, Payroll Manager: Full, and Payroll Setup: Full.For more information, see the help topics NetSuite Roles Overview, Showing Role PermissionDifferences, and Standard Roles Permissions Table.
For more information, see Committing a Payroll Batch.
Using Bulk EditYou can edit the values for a payroll item across multiple paychecks within a batch. The Employees toPay list at the bottom of the Payroll Batch page includes a Bulk Edit button. When the batch has beencalculated, this button is included on the Pending subtab and the Paychecks and Net Pay subtabs ofthe Complete subtab. The Bulk Edit button opens a popup window where you select a payroll item toedit.
To edit a payroll item for multiple paychecks:
1. If you do not have a payroll batch open, go to Transactions > Employees > Create Payroll > List,and click Edit for the batch you want to edit.
2. Add employees if none are listed.
3. Click Bulk Edit. This button is in the upper right of the following:
■ Employees to Pay list
■ Pending subtab
■ Paycheck subtab of Complete subtab
■ Net Pay subtab of Complete subtab
■ Errors subtab
4. Select a Payroll Item from the list in the popup window.
Employees in the batch whose employee records include the payroll item appear in an editablelist below a filter row. The list includes the option to add employee records.
Paychecks that have been calculated display values. If a paycheck has not been calculated, 0amounts are displayed.
Tax items are available only if they are calculated, included on the paycheck, and permit editing.
Note: Payroll items that are calculated automatically using some NetSuite featurescannot be edited. These features are Time Tracking, Expense Reports, and EmployeeCommissions. You can add lines for these payroll items.
■ (Optional) Use the filters to find records to edit. The filter criteria is additive. Only employeeswho meet all criteria in the filters are displayed.

Generating Payroll Transactions 56
Payroll Guide
□ Workplace – Select a workplace from the dropdown list.
For more information, see Entering Workplace Records for Payroll.
□ Department – Select a department from the dropdown list.
□ Class Select a class from the dropdown list.
For more information, see the help topic Departments and Classes Overview.
□ Saved Search – Select a saved search from the dropdown list.
For more information, see the help topic Saved Searches.
□ Employee Name – Type characters in the field to search for a specific employee ormultiple employees with the same character set in their names.
5. Edit the record rows, or add records, as needed.
The read-only Manual Entry field in the popup window is empty for all lines that have beenautomatically calculated. This does not change when you edit the line. Lines that are notautomatically calculated are populated with Yes in the Manual Entry field. The yes value is savedto the database only if you change the amount to a non-zero value. If you add a line, the value inthe Manual Entry field is always Yes. Lines with a value of 0 are not saved regardless of whetheryou added or edited them.
You cannot add lines to tax items, so these items do not include a Manual Entry field.
6. When you finish, click Save to close the popup window. Paychecks affected by your changesappear in the Pending subtab.
If you make changes, you must calculate again before you can commit the batch. When yourecalculate, manual entries are untouched, but values that were calculated automatically arecleared and recalculated. For information, see Calculating a Payroll Batch.
Editing an Individual Paycheck from a Payroll BatchYou can view or edit an individual paycheck from within a calculated payroll batch. For example,your payroll batch includes a paycheck for an employee who was recently awarded Employee of theQuarter. In your company, this award pays a $1,500 bonus. You must add the Bonus payroll item tothe paycheck. In addition to the new earnings item, the employee has requested that an additional$300 be deducted from the paycheck and contributed to their 401(k). After you save the changes to thepaycheck, NetSuite recalculates only the paycheck that has been modified.
To edit an individual paycheck:
1. Click the Complete subtab on the Payroll Batch page after you have calculated the batch.
2. Click the Paychecks or Net Pay subtab to open a list of the paychecks included in the batch.
3. Click the Edit link to the left of the paycheck to be edited.
4. Modify the relevant department, location, class, and workplace for the employee, if necessary.
5. If you checked the To Be Printed/No Service Printed Checks box when you created your payrollbatch, the Check # field displays To be printed. The system uses the next consecutive checknumber available when you print the checks.
You can enter another check number, if necessary.
6. In the Memo field, enter a memo that prints on the check.
7. Enter or edit information relevant to the paycheck on the subtabs provided.

Generating Payroll Transactions 57
Payroll Guide
Note: The PTO Hours, Summary, and Disbursements subtabs on the Paycheck recordare read-only. They do not appear when you open the record for editing.
Earnings Subtab
Existing lines in this subtab are editable. However, unless you need to reduce an amount, itis better to add new lines. New lines always have a value of Yes in the read-only Manual Entryfield. When you recalculate, manual entries are untouched, but values that were calculatedautomatically are cleared and recalculated.
1. In the Earnings field, select an earning item assigned to this employee.
For example, select Bonus for an employee receiving a bonus payroll item.
2. In the Hours/Base field, enter the number of hours worked or other number to bemultiplied by the rate shown in the Rate field, if necessary.
In this example, you can leave the value for Hours/Base at 0 for an employee receiving abonus.
3. If this earning item is related to a customer or a project, select the appropriate serviceitem in the Service Item field.
4. Click Add.
The Manual Entry field displays Yes for each new earning item you add to this paycheck.
5. Repeat these steps to select more earning items for this employee.
Time Subtab
This subtab lists approved, unpaid time transactions and appears when the Time Trackingfeature is enabled.
■ By default all unpaid time transactions are listed and checked for inclusion in the paycheckwhen the paycheck is calculated.
■ Clear the check in the Pay column to remove a transaction from the paycheck. When yourecalculate, removed transactions are no longer displayed. They will appear again as unpaidtransactions in the next payroll.
■ If you need to add hourly wages manually, use the Earnings subtab.
Expenses Subtab
This subtab lists unpaid expense reports that have been approved and appears if the ExpenseReports feature is enabled.
■ By default all unpaid expense items are listed and checked for inclusion in the paycheck whenthe paycheck is calculated.
■ Clear the check in the Pay column to remove an expense item from the paycheck. Whenyou recalculate, removed expense items are no longer displayed. They will appear again asunpaid expense items in the next payroll.
■ If you need to add expenses manually, use the Earnings subtab.
Commissions Subtab
This subtab lists unpaid commissions that have been approved and appears if the Commissionsfeature is enabled.
■ By default all unpaid commission items are listed and checked for inclusion in the paycheckwhen the paycheck is calculated.

Generating Payroll Transactions 58
Payroll Guide
■ Clear the check in the Pay column to remove a commission item from the paycheck. Whenyou recalculate, removed commission items are no longer displayed. They will appear againas unpaid commission items in the next payroll.
■ If you need to add commissions manually, use the Earnings subtab.
Deductions Subtab
Based on the payroll items selected for the employee, NetSuite applies deduction against theemployee’s pay, such as 401(k), health insurance, union dues, and credit union deposits. Existinglines in this subtab are editable. However, unless you need to reduce an amount, it is better toadd new lines. New lines always have a value of Yes in the read-only Manual Entry field. Whenyou recalculate, manual entries are untouched, but values that were calculated automatically arecleared and recalculated.
NetSuite will adjust the value of a manual entry to the limits allowed for a particular payroll item.For example, in your payroll the system generates an earning item of $40,000 for a sales rep whoclosed a very large deal. This employee would like to increase their 401(k) deduction from theusual $500 to $13,000 for this payroll. You modify the amount for the deduction item and thensave the paycheck. During batch recalculation, NetSuite reduces the $13,000 value to $10,500 toensure that the annual 401(k) allowable employee contribution limit is not exceeded.
Note: If you make a change on this subtab, you may also want to permanently changethis deduction item on the employee's record.
1. In the Deductions field, select a deduction item assigned to this employee.
For example, you may have been requested to increase the amount of the employee’s401(k) contribution.
The read-only Wage Base field displays the employee’s base pay amount.
2. In the Amount field, enter the amount of this deduction payroll item.
3. Click Add.
Note: For each new deduction item that you add to this paycheck, the value inthe Manual Entry field is Yes.
4. Repeat these steps to add more deduction items for this employee.
Contributions Subtab
Based on the payroll items selected for the employee, NetSuite applies contributions, such asthe employer’s 401(k) match.
Existing lines in this subtab are editable. However, unless you need to reduce an amount, itis better to add new lines. New lines always have a value of Yes in the read-only Manual Entryfield. When you recalculate, manual entries are untouched, but values that were calculatedautomatically are cleared and recalculated.
Note: If you make a change on this subtab, you may also want to permanently changethis contribution item on the employee's record.
1. In the Contributions field, select a contribution item assigned to this employee.
The read-only Wage Base field displays the employee’s base pay amount.
2. In the Amount field, enter the amount of this contribution item.

Generating Payroll Transactions 59
Payroll Guide
Note: The Manual Entry field displays Yes for each new contribution item youadd to this paycheck.
3. Click Add.
4. Repeat these steps to add more contribution items for this employee.
Taxes SubtabNetSuite applies tax items, such as state and federal unemployment, social security, andMedicare, when you calculate the payroll batch. Not all taxes are editable. You cannot add linesto tax items, so they do not include a Manual Entry field.
Note: If you change a tax amount on this subtab, you may also want to permanentlychange this tax item on the employee's record.
1. In the Amount field, modify the amount of this tax item.
2. Click OK.
3. Repeat these steps to modify additional tax item amounts for this employee, ifnecessary.
8. When you have finished modifying the paycheck, click Save.
The Payroll Batch page appears with a status of Edited, and edited paychecks are listed in thePending subtab.
9. Click Calculate to update the payroll batch with the modified employee paycheck.
After you review your payroll, you are ready to commit it. For instructions, see Committing a PayrollBatch.
Committing a Payroll BatchAfter you create a payroll batch, calculate it, and review and edit it, you must commit your payrollbatch. You cannot change a payroll batch or the individual paychecks in it after you commit it. All directdeposits and service-printed checks must be committed at least two banking days before the checkdate by 2:00 p.m. Pacific Time. For a listing of bank holidays, see the help topic Following the PayrollProcessing Schedule.
Note: Only those user roles that include Process Payroll with the Full option can commit apayroll. These user roles include Full Access: Full, Payroll Manager: Full, and Payroll Setup: Full.For more information, see the help topics NetSuite Roles Overview, Showing Role PermissionDifferences, and Standard Roles Permissions Table.
To commit a payroll batch:■ Click Commit at the top of the Payroll Batch page. The button appears only when the status is
Calculated.
When you click Commit, the system funds the payroll and creates a journal entry posting a debit tothe payroll funding account and a credit to the bank account. The payroll service withdraws fundselectronically to cover serve fees, tax liability payments due, and net pay.
The payroll service begins processing all committed payrolls prior to 2 p.m. Pacific Time. Payrollscommitted after 2 p.m. are not processed until the following business day.

Generating Payroll Transactions 60
Payroll Guide
If you make mistakes in your payroll but do not discover them until after the payroll is committed, youmust enter an adjustment or a reversal. For more information, see Creating Payroll Adjustments orCreating a Payroll Reversal.
To print checks, go to Transactions > Management > Print Checks and Forms, and select Paychecks. Formore information, see Printing Paychecks.
Committing a Payroll Batch with Net-Zero, Direct-DepositPaychecksNetSuite Payroll does not allow direct deposits for paychecks that have a net zero amount. Net-zeropaychecks must be printed. If you are committing a payroll batch that contains one or more net-zero,direct deposit paychecks, you will see the following error message: “Another payroll was committedsince the last time this payroll was calculated. Please calculate taxes on this payroll before committingit.”
To commit this payroll batch, you must determine which employees have net-zero, direct depositpaychecks. Then, you must set each affected employee to have their paycheck printed instead ofdelivered with direct deposit. Finally, you must recalculate and commit the payroll batch again.
To set employees with net-zero, direct-deposit paychecks to print
1. Go to Transactions > Employees > View Individual Paychecks. On the Paychecks list page, theAmount column beside each paycheck shows the net pay.
2. Sort by payroll batch number or Amount to find the relevant employees. Make note of whichemployees are affected.
3. Go to List > Employees > Employees.
4. For each of the affected employees:
a. Click Edit beside the employee.
b. On the ACH/Direct Deposit tab, clear the Use Direct Deposit box.
c. Click Save.
5. Recalculate the payroll batch. For more information, see Calculating a Payroll Batch.
6. Commit the payroll batch again. For more information, see Committing a Payroll Batch.
After you have successfully committed the payroll batch, set the affected employees back to directdeposit, if required.
Viewing Individual PaychecksYou cannot create individual paychecks using NetSuite Payroll, but you can view individual paychecks.Before you can view individual paychecks, you must create a payroll batch. For more information, seeCreating a Payroll Batch.
To view individual paychecks, go to Transactions > Employees > View Individual Paychecks.
Note: If an individual paycheck is a part of a payroll batch that has not been committed, youcan edit the paycheck. For more information, see Editing an Individual Paycheck from a PayrollBatch.
Running a Paycheck SearchA paycheck search lists all data available when a payroll is run. This data includes the employee, date,batch number, payroll item, account affected, and hours or amounts associated per line item.

Generating Payroll Transactions 61
Payroll Guide
If the check is taxed, the search also provides taxable wages. The search indicates if the amount hasany general ledger (G/L) impact. You are also able to search calculated payroll numbers.
To run a paycheck search, go to Reports > New Search. In the Search list, click Paycheck. From thePaycheck Search page you can do the following:
■ Submit to run a search
■ Export data
■ Personalize the search
■ Create a saved search
Submitting the search provides a results page.
Printing Payroll Checks or VouchersAs you are processing payroll, check the To Be Printed box if you want to print paychecks and directdeposits after you process payroll.
If you do not check this box, paychecks and direct deposit vouchers are not printed for the payroll. Toprint check and vouchers later, you must individually access and print each transaction.
If you use the Service Printed Checks and Stubs feature, this box is called No Service Printed Checks. Toprint the checks for only this pay run, check the No Service Printed Checks box. By default, this box isnot checked for future payrolls.
Printing PaychecksWhen you create a payroll or an individual paycheck and check the To Be Printed box, paychecks aresaved in a queue to be printed later. When the Service Printed Checks and Stubs feature is enabled,this box is called No Service Printed Checks. You should not check this box if you intend the PayrollService print and send checks and stubs.
After you verify that all information in a payroll batch is correct and committed, you can use NetSuite toprint some or all of the paychecks. Paychecks should be printed on check stock.
To print paychecks:
1. Go to Transactions > Management > Print Checks and Forms.
2. On the Print Checks and Forms page, click Paychecks.
3. In the Account field, select an account from which payroll is funded to display a list of itsassociated paycheck transactions.
4. Enter a check number or other information as necessary.
5. In the displayed list, mark the check or checks that you want to print.
6. Click the Print button.
Printing Direct Deposit VouchersWhen you process direct deposit payroll transactions, checking the To Be Printed box generatesvouchers that detail payment information for that pay period. You should not check this box if youhave enabled the Service Printed Checks and Stubs feature and intend the Payroll service to printchecks and stubs.
Direct deposit vouchers should be printed on plain paper or non-negotiable check stock.

Printing Payroll Checks or Vouchers 62
Payroll Guide
To print direct deposit vouchers:
1. Go to Transactions > Management > Print Checks and Forms.
2. On the Print Checks and Forms page, click Direct Deposit Voucher.
3. In the Account field, select an account to display a list of its associated direct deposittransactions.
4. In the displayed list, mark the voucher or vouchers that you want to print.
5. Click Print.
Direct Deposit Vouchers show the dollar amount of funds transferred into each prenoted employeeaccount. A prenote is a test to ensure that the bank routing information is accurate and the DirectDeposit transmission can be properly completed. Employee accounts are marked Prenoted on theDirect Deposit subtab of the Employee record.
Note: You can reprint a direct deposit voucher at any time using the preceding instructions.
Direct Deposit Payroll Transaction ExamplesExample 1: Post a direct deposit to one prenoted net account.
Result: One direct deposit voucher queues to print.
The voucher shows the net amount of the deposit ($1200.00) to the employee's account Wachovia1234567.
Example 1 voucher:
Example 2: Post direct deposits to two accounts — one prenoted savings account and one prenotednet account.
Result: One direct deposit voucher queues to print.
The voucher displays the net amount of the deposit ($1200.00) to the employee's two accounts:
■ $200.00 is deposited to savings account Wachovia 987654.
■ $1000.00 is deposited to net account Wachovia 1234567.

Printing Payroll Checks or Vouchers 63
Payroll Guide
Example 2 voucher:
Example 3: Post a direct deposit to one prenoted savings account and one non-prenoted net account.
Result: One paycheck queues to print and one prenote test posts for the net account.
As in the below example, the paycheck shows:
■ Net Pay for this period is $1200.00.
■ $200.00 is direct deposited to the prenoted savings account Wachovia 987654.
■ $1000.00 is the amount on the printed paycheck.
Example 3 paycheck:

Creating Payroll Reversals or Adjustments 64
Payroll Guide
Creating Payroll Reversals or Adjustments■ Creating a Payroll Reversal
■ Committing Payroll Reversals
■ Creating Payroll Adjustments
Creating a Payroll ReversalTo reverse disbursements associated with a previously committed paycheck, you should create payrollreversals.
When you submit a payroll reversal, NetSuite creates a journal entry that includes transaction linesdetailing the reversal of all of the funds from the original paycheck. Reversed paychecks reduce yourtax liability. Previously funded but unpaid liabilities can be refunded to you. If some or all of theliabilities incurred by the paycheck have already been paid, you can receive refunds directly from theagencies.
Note: Amounts funded to cover direct deposits and service printed-checks may be refunded ifthe reversal is made before they are completed.
Payroll reversals cannot retrieve funds from employee accounts. You must collect any overpaidamount from an employee.
To create a payroll reversal:
1. Go to Transactions > Employees >Create Payroll > List.
2. On the Payroll page, in the Status dropdown list, select Committed.
3. Click View next to the payroll batch that contains the paycheck to be reversed.
4. On the Paychecks subtab, click View next to the paycheck to be reversed.
5. Click Reverse.
In the case of a funded payroll or a payroll run in a previous quarter, reversing a paycheck incursfees. If fees apply, consider correcting this payroll with an adjustment to your next standardpayroll run. For more information, see Creating Payroll Adjustments.
6. On the Voiding Journal page, click Save.
Note: The system generates a journal entry. The Voiding Journal appears on the List ofJournal Entries after you save the transaction.
Important: You must commit all payroll reversals before your next payroll run. Forinformation, see Committing Payroll Reversals.
7. On the Payroll Batch page, click Commit.
After you reverse a paycheck, NetSuite no longer lists it in the Reconciliation Detail report or on theReconcile Bank Statement page. In addition, when you view the bank account register, the Cleared (Clr)box and the link in the Reconciled Date column no longer show for the voided paycheck.
Committing Payroll ReversalsAfter you have created payroll reversals, you must commit them before you run your next payroll.
Uncommitted reversals do not reduce your liability and may result in overpaying a tax agency. Inaddition, uncommitted reversals do not show on the Pay Payroll Liabilities page or on liability reports.

Creating Payroll Reversals or Adjustments 65
Payroll Guide
If you commit a payroll reversal after tax liabilities have been paid, unapplied payments, which areliability payments not associated with checks, may display on the Pay Payroll Liabilities page.
Note: Only those user roles that include Process Payroll with the Full option can commit apayroll. These user roles include Full Access: Full, Payroll Manager: Full, and Payroll Setup: Full.For more information, see the help topics NetSuite Roles Overview, Showing Role PermissionDifferences, and Standard Roles Permissions Table.
The following steps help you commit a payroll reversal that was not previously committed.
To commit a payroll reversal:
1. Go to Transactions > Employees > Create Payroll > List.
2. In the Payroll list, select Ready to Commit, Calculated, and Edited in the Status field.
These options filter the list to show only those payroll transactions that are ready to commit,calculated, and edited.
Note: To be able to select multiple statuses you must customize the view. On theCustomize Payroll Batch Search Results: Custom Payroll Batch View page, click theAvailable Filters subtab. If it is not visible, set the Status field as a filter, enable thefield for multiple selection, and then click Done. Click Preview. In the Status field ofthe Custom Payroll Batch View: Results page, select Ready to Commit, Calculated, andEdited. You can return to the search criteria to save the search or make modifications. Formore information, see the help topic Customizing List Views.
3. Click Edit next to an uncommitted payroll reversal.
To quickly locate your reversals, click the Type column header to sort the list by type and locateReverse payroll.
4. On the Payroll Batch page, click Commit.
5. Repeat these steps until all reversals have been committed.
After all of your reversals are committed, you can go to Transactions > Employees > Create Payroll tocreate your next payroll.
Important: Payroll reversals cannot retrieve funds from employee accounts. You must collectany overpaid amount from an employee.
Creating Payroll AdjustmentsTo make changes to previously committed paychecks, you should create payroll adjustments. Theseadjustments can be either positive or negative, depending upon the situation.
Payroll adjustments never directly affect company disbursement (bank) accounts or employeeaccounts. Instead, adjustments balance expenses recorded on your company's accounting ledgers. Youmust collect incorrect payments directly from employees.
Note: Only those user roles that include Process Payroll with the Full option can commit apayroll. These user roles include Full Access: Full, Payroll Manager: Full, and Payroll Setup: Full.For more information, see the help topics NetSuite Roles Overview, Showing Role PermissionDifferences, and Standard Roles Permissions Table.
NetSuite automatically funds any increase in liabilities from your Payroll Funding Account and filesamendments with tax agencies.

Creating Payroll Reversals or Adjustments 66
Payroll Guide
To reverse disbursements associated with a previously committed paycheck, you should create apayroll reversal. For more information, see Creating a Payroll Reversal Creating a Payroll Reversal.
To create a payroll adjustment:
1. Go to Transactions > Employees > Create Payroll Adjustment.
2. In the Payee field, select the employee for whom you are entering the adjustment.
3. If you track departments, classes, or locations, select the appropriate information for thosefields.
4. In the Pay Period Ending field, select the date for the pay period in which these funds wereoriginally disbursed.
5. In the Post Date field, enter the date of the payroll that includes the adjustment.
6. In the Posting Period field, select the fiscal period to which NetSuite must post the adjustment.
Note: You cannot post to a locked accounting period.
7. If you have a NetSuite OneWorld account, select a subsidiary from the list in the Subsidiary field.
8. Enter the amount of the adjustment. This amount can be either positive or negative.
9. Enter a memo for this adjustment.
10. Select an account to use to fund this transaction.
You must use the Payroll Funding Account you selected on the Set Up Payroll page.
11. On the Earnings, Withholdings, Deductions, and Company Contributions subtabs, enteramounts for the payroll items related to the adjustment.
Note: If you need to reduce a value, enter a negative amount.
NetSuite automatically checks the corresponding box.
In the Amount field, NetSuite calculates the total for the adjustment based on the amountsentered.
12. Click Save.
NetSuite calculates the taxes associated with this adjustment and updates the employee’spayroll history.
13. Click Commit to commit the payroll batch.
On the Payroll Adjustment page, click List to review a list of payroll adjustments. On the list, click theView or Edit links to review individual adjustment records.
Recording Third-Party Sick Pay PaymentsMany companies provide short and long-term disability benefits to their employees. Generally,companies purchase these benefit plans from third-party providers that administer the benefits, suchas insurance companies.
The third-party provider:
■ makes payments to disabled employees
■ withholds Federal taxes
□ Income

Recording Third-Party Sick Pay Payments 67
Payroll Guide
□ FICA (Federal Insurance Contribution Act)
□ Medicare
□ FUTA (Federal Unemployment Tax Act)
■ reports data to companies as required to prepare employees' annual W-2 forms
By creating Third-Party Sick Pay payroll items, companies can enter the data received from the third-party provider into NetSuite Payroll to ensure that employees receive the appropriate payments andW-2 information.
If an employee elects to receive non-taxable disability payments, NetSuite reports these payments onthe employee's W-2, but does not withhold taxes. If an employee elects to receive taxable disabilitypayments, the third-party provider withholds income tax, FICA, and Medicare contributions from theemployee's payments.
The following guidelines can help you process Third-Party Sick Pay:
■ Enter the Third-Party Sick Pay taxable gross, federal income tax (if withheld), employee socialsecurity, and Medicare.
■ Do not enter any amount in the Taxable Wage Base and Taxed Wage Base fields.
■ Do not enter any employer taxes.
■ Do not enter any state or local taxes.
■ Process each employee's benefit check as a separate adjustment. You cannot process all employees'checks at the same time.
■ Process these entries as adjustments. Process Third-Party Sick Pay adjustments separate from otherentries.
■ Do not process third-party sick pay adjustments with your regular payroll. Your payroll will notprocess with this error condition.
■ Do not pay employees third-party sick pay with a check or direct deposit, because the employee hasalready received the money from the third party payer.
■ Do not process any other types of earnings or deduction code entries with your Third-Party SickPay adjustments.
Additional notes:
■ Processing instructions for third-party sick pay must be followed to properly report the informationincluding the adjustment on Form 941 line 7b.
■ Entering any amount in the Taxable Wage Base and Taxed Wage Base fields results in a zero amountin the Social Security and Medicare tax amount fields after committing the payroll adjustment.
Note: Only those user roles that include Process Payroll with the Full option can commit apayroll. These user roles include Full Access: Full, Payroll Manager: Full, and Payroll Setup: Full.For more information, see the help topics NetSuite Roles Overview, Showing Role PermissionDifferences, and Standard Roles Permissions Table.
To record third-party sick pay payments:
1. Create two payroll earning items: Third-Party Sick Pay Taxable and Third-Party Sick Pay Non-Taxable.
You can use the most appropriate Payroll Item Type, such as Earning: Salary or Earning:Wage.Refer to Creating Payroll Earning Items.
2. Assign a third-party sick pay payroll earning item to the employee who receives the sick pay.
Recording Third-Party Sick Pay Payments 68
Payroll Guide
Refer to Updating Employee Records for Payroll.
3. On the Payroll Adjustment page, on Earnings subtab, create a payroll adjustment using a third-party sick pay payroll earning item.
On the Withholding subtab enter amounts for:
■ Employee's portion of Social Security
■ Federal tax withholding
■ Medicare employee portion
For more information, refer to Creating Payroll Adjustments.
4. Save the payroll adjustment.
NetSuite calculates the required tax amounts.
5. On the Payroll Batch page, click Commit to submit the adjustment payroll for processing.
For more information, refer to Committing a Payroll Batch.
Checking the Status of Payroll Transactions■ Payroll List Page
■ Payroll Status Page
Payroll List PageTo open the Payroll list page, go to Transactions > Employees >Create Payroll > List.
On the Payroll list, you can select an uncommitted payroll batch to review or edit, or you can select apreviously committed payroll batch to review.
You cannot edit a committed payroll batch. If you need to make changes to a committed payroll,you must create a payroll adjustment or reverse the payroll. For information, see Creating PayrollAdjustments or Creating a Payroll Reversal.
The Payroll list includes the following information for each batch:
■ Batch Number. A unique number assigned to each payroll batch.
■ Check Date. The date selected in the Check Date field when the payroll batch was created.
■ Date Created. The date the payroll batch was created.
■ Period Ending Date. The date selected in the Period Ending field when the payroll batch wascreated.
■ Status. This is the current status for the payroll batch: Hold, Initiated, Pending, Complete, or Failed.
■ Pay Frequency. The frequency selected in the Pay Frequency field when the payroll batch wascreated.
■ Type. The type of payroll batch you created. The possible types are Standard, Year to Date,Adjustment, and Reversal.
■ Subsidiary. If you use a NetSuite OneWorld account, the subsidiary for the payroll batch.
On the Payroll list page, you can:
■ Click Edit to change the check date or to edit a paycheck included in an uncommitted payroll batch.
■ Click View to view the list of checks included in the payroll batch.
Checking the Status of Payroll Transactions 69
Payroll Guide
■ Click New Payroll Batch to create a new payroll batch.
■ Click the print icon to print the list of payroll batches.
■ Click Customize View to customize the look of this list.
■ Click one of the export icons to export the list in the following formats:
□ – CSV
□ – Microsoft Excel
Payroll Status PageTo open the Payroll Status page, go to Transactions > Employees > View Payroll Status.
On the Payroll Status page, you can view the list of all disbursements associated with each payrollbatch. The list of disbursements is itemized based on the transaction type.
For each disbursement listed, NetSuite provides the transaction type, batch number, batch status,check date, description, status, transaction number, due date, settlement date, and disbursementamount.
The status of a batch may be Calculated, Committed, Created, or Edited.
Making Payroll Liability PaymentsPayroll liability is the amount you owe the government and other agencies for the taxes, deductions,and company contributions you accrue from issuing paychecks to your employees.
Liability payments are made to vendors you set up as tax agencies. For more information, see the helptopic Associating Vendors with Payroll Items.
Form 941 may show slight rounding differences between Part 1 and Part 2.
To make a payroll liabilities payment:
1. Go to Transactions > Bank > Pay Payroll Liabilities.
2. In the Account field, select the account on your balance sheet identified as the Payroll FundingAccount containing the funds to pay these expenses.
For more information, see Setting Payroll Preferences.
NetSuite displays the current balance in this bank account in the Account Balance field.
3. In the Date field, accept today's date or enter another date.
Note: The date in this field is the date that appears on the check.
4. If you use accounting periods, in the Posting Period field select the period to which you want topost this liability.
Note: If the period you select is closed, you cannot post to that period.
5. If you have a NetSuite OneWorld account, select a subsidiary from the list in the Subsidiary field.
For more information, see the help topic Setting Up Payroll in OneWorld.
6. If you want to print checks to these vendors, check the To Be Printed box.

Making Payroll Liability Payments 70
Payroll Guide
You should not check this box if you have enabled the Service Printed Checks and Stubs featureand you intend the payroll service to print checks and stubs.
7. Select the department, class, or location to associate with this payment.
8. In the Show Liabilities From field, select a beginning date for the date range of the transactionsthat you want to include in this liability payment.
9. In the Through field, select an ending date for the date range of the transactions that you wantto include in this liability payment.
10. Check Apply Existing Payments if you previously overpaid a liability and now have a credit onrecord with a tax agency.
11. Check the Pay box next to the items you want to pay.
Click Mark All to pay all of the line items.
The Amount field at the top of the page autofills with the total of the items you select.
12. Click Save.
If you checked To Be Printed, go to Transactions > Management > Print Checks and Forms > Checksto print the checks for the payments you selected to make. For more information, see the help topicPrinting Checks and Other Transactions.
Performing Quarterly or Yearly Payroll TasksUse the following checklists to complete your quarter-end and year-end payroll tasks.
Payroll Quarter-End ChecklistsComplete the following quarter-end tasks for your company and your employees.
Company Quarter-End
Task Done
Replenish check stock and envelope inventory.
Plan and coordinate benefits enrollment, if necessary.
Employee Quarter-End
Task Done
Review the data on audit reports.
Verify that employees are set up for the correct state and locality.Review employees who moved from one state to another during the tax year. Verify that theappropriate wages are set up for each state.
Review tax-exempt employees. Update their information, if necessary.
Review scheduled or repeating earnings and deductions.
Update annual limits for scheduled or repeating earnings and deductions.

Performing Quarterly or Yearly Payroll Tasks 71
Payroll Guide
Payroll Year-End ChecklistsComplete the following year-end tasks for your company and employees.
Note: For information about year-end closing in NetSuite, see the help topic Year-End Closing.
Company Year-End
Task Done
Update company-level deduction amounts and limits for the upcoming year.
Use your audit reports to do the following:
■ Verify that your company's legal name and address are correct on year-end forms.
■ Verify your Federal Employer Identification Number (FEIN).
■ Verify that earning and deduction codes print in the correct boxes.
■ Verify that earnings are mapped to box 7 of Form 1099-MISC, and the correct IRS codes are printed.
■ Verify that all of your employees and contractors appear on Form W-2 and 1099-MISC AuditInformation.
■ Review any letters in the Error column and review the Error Legend to understand the errors.
Notify NetSuite Customer Support as soon as possible if you plan to pay any large bonuses, commissions,or stock awards at the end of the year.You may be required to process early or wire funds to meet theobligations of the resulting large payroll run. Early notification of NetSuite Customer Support can avoidprocessing issues.
Update your unemployment rates as necessary . You are responsible for ensuring that these rates arecorrect. Maintaining the correct rates avoids potential penalty and interest charges relating to incorrectlypaid taxes. See the help topic How can I update the unemployment rates in NetSuite?.
Update your state tax payment frequencies as necessary . You are responsible for ensuring that taxpayment frequencies are correct in the system, to ensure that related tax deposits are made on a timelybasis. The timing of your tax deposits typically is based on the dollar amount of your liabilities from theprevious year. State tax agencies may reassess the frequency. If you receive a notice of such a change,immediately update the system. Tax deposits and filings are made based on the deposit schedule foreach jurisdiction. Deposit schedules are set on the Jurisdictions subtab of the Set Up Payroll page. SeeSetting Preferences for Jurisdictions.
Employee Year-End
Task Done
If you use the Social Security Administration's service to verify that employee names and social securitynumbers match, begin the verification process as soon as possible.
Update employee-level deduction amounts and limits.
Correct excess employee contributions to 401(k), 403(b), and SIMPLE plans.
Correct excess employee contributions to health care and dependent care spending accounts.
Notify employees to update their W-4 (Employee's Withholding Allowance Certificate) information, ifapplicable.
Notify employees to update their W-5 (Earned Income Credit Advance Payment Certificate) information,if applicable.

Performing Quarterly or Yearly Payroll Tasks 72
Payroll Guide
Forms W-2 and 1099-MISC Year-End
Task Done
Select a group of employees (totaling 5-6 individuals) to verify that items accurately print on theappropriate year-end form.
Allocating Paycheck Expenses to ProjectsThe Time Tracking feature enables you to record the hours worked by employees. If the ProjectManagement feature is also enabled, you can link employees' hours worked to specific projects. If youuse these two features with NetSuite Payroll, you can allocate payroll expenses to specific projects totrack projects' profitability.
To allocate paycheck expenses to projects, both hourly and salaried employees' time worked must belinked to a project by a selection from the Customer:Project field on the Time Tracking page.
Allocating Paycheck Expenses for Hourly EmployeesAfter the payroll run is completed, you can allocate the expenses by creating journal entries toassociate payroll amounts with specific projects. This means that only Actual Time/Hours are used forexpense allocation.
Allocating Paycheck Expenses for Salaried EmployeesFor salaried employees, earnings and company contribution expenses can be allocated to projects.Both allocated and actual hours are used to identify how much percentage of time is allocated to theproject.
For example, the following calculation is used for a salaried employee paid weekly for a 40 hour workweek, with 24 hours allocated in the project record, and an additional four hours of actual time enteredin a timesheet: (24 + 4)/40*100 = 70%
This means that 70% of the employee’s paycheck is allocated to the project.
Note: If actual hours are not tracked, paycheck allocation for salaried employees is basedentirely on allocated hours.
To allocate paycheck expenses to projects:
1. Go to Transactions > Employees > Allocate Paycheck Expenses to Projects.
This page shows unallocated payroll amounts for employees who have entered time worked andselected a project. You can select from the Date field or enter dates in the From and To fields tonarrow the list of amounts.
2. In the Journal Entry Date field at the top of the page, enter the date that you want to use for thepaycheck allocation journal entries.
3. Check the Select box for each paycheck amount that you want to allocate to a project, or clickMark All to select all payroll amounts.
4. After you have finished your selections, click Allocate to create journal entries for all of theselected payroll amounts.

Allocating Paycheck Expenses to Projects 73
Payroll Guide
For each amount:
■ The amount is credited to the Payroll Funding Account.
■ An equal amount debits the account associated with the project.
■ The names of the project and payroll item appear in the Memo field on the journal entry.
Amounts on each paycheck must be allocated using only one journal entry. A journal entryallocation can have a maximum of 200 lines.
Direct Deposit 74
Payroll Guide
Direct DepositDirect deposit is part of the NetSuite Payroll service and is automatically enabled when you enablePayroll. For details, see Enabling NetSuite Payroll.
NetSuite is integrated with a NetSuite-authorized third party to permit Electronic Funds Transfer (EFT)payment of payroll funds and to permit transfer of payroll funds. Using direct deposit for the automatictransfer of funds between financial institutions simplifies your payroll process. When you enable thePayroll feature, paychecks are sent electronically to employees you have set up for direct deposit.
When you submit payments, NetSuite transmits direct deposit payment data in batches to a NetSuitethird party, which transfers the funds to the appropriate financial institutions.
Important: For payrolls received by 3:00 p.m. Pacific Time, NetSuite sends direct depositpayment data to a NetSuite-authorized third party and they are processed as received. Directdeposits for payrolls received by 3:00 p.m. Pacific Time are processed and sent to the bank thenext business day for settlement in the employees’ accounts one business day later. You cantrack the status of all Direct Deposit transactions being processed by going to Transactions >Employees > View Payroll Status (Administrator).
Before you can use direct deposit, you must set up your bank accounts for transferring funds. For moreinformation, see Setting Up NetSuite Payroll.
Setting Up Employees for Direct DepositYou can set up employees for direct deposit payments by entering bank account information on theemployee's record. Then, you can use direct deposit to transfer funds to pay your employees.
To set up an employee record for direct deposit:
1. Go to Lists > Employees > Employees.
2. On the Employees list, click Edit next to the employee you want to set up for direct deposit.
3. On the employee record, click the ACH/Direct Deposit subtab.
4. Check the Use Direct Deposit box.
5. In the Accounts table, add bank accounts for the employee:
a. Check the Net Account box to indicate that the net paycheck balance should be depositedin this account.
For example, an employee's check amount is net pay of $1,200.00. The employee's recordlists two direct deposit accounts, one Savings account showing an amount of $200.00, andone Net account. The transaction will show a deposit of $200.00 into the savings account,and the balance, $1,000.00, is deposited into the Net account.
For more examples of Direct Deposit payroll transactions, see Printing Direct DepositVouchers.
b. If the account is a savings account, check the Savings Account box.
c. Leave the Prenoted box clear to run a prenote test transmission on the account.
Check the Prenoted box to process direct deposit transactions to this account without aprenote test. (NetSuite recommends that you run a prenote test for each account.)
d. In the Bank Name column, enter the name of the employee's bank.
You can enter up to 31 characters in this field.

Setting Up Employees for Direct Deposit 75
Payroll Guide
e. In the Routing Number column, enter the 9-digit routing number for the employee's bankaccount.
Note: International payment of employees’ direct deposit is not yet supportedby NetSuite Payroll. You may consider using Pay Card to pay the employeeswith international bank accounts. Be aware that international transit numbersmay require a specific number pattern. For example, Canadian transit numbersare regulated by the Canadian Payments Association. The number pattern forElectronic Fund Transactions (EFT) is 0YYYXXXXX. The first four digits represent thetransit number where YYY is an Institution Number. The last five digits representthe Branch Number. The last digit of the Branch Number, with few exceptions,indicates the geographical location of the branch.
f. In the Account Number column, enter the employee's bank account number.
You can enter up to 20 characters in this field.
g. In the Amount field, enter the amount of the payment to be deposited to this bankaccount.
For example, if the employee requests you to deposit $200.00 from every paycheck intotheir savings account, you enter 200 in the amount field next to the savings accountinformation.
If you checked the Net Account box mentioned in step a, you can leave this field blank.
h. Click Add to save the bank account on the employee record.
You can repeat this process to add multiple accounts for this employee.
6. Click Save.
If a direct deposit to an employee's account fails and if the error cannot be resolved with theemployee's account, NetSuite changes the paycheck from direct deposit to Employer Paid and theNetSuite Payroll service refunds the amount that initially funded the employee's direct deposit. Therefund from the NetSuite Payroll service does not trigger a correcting journal entry for the originalamount funded to the NetSuite Payroll Service. For this reason, when your company receives therefund from the NetSuite Payroll service, you must make a manual journal entry in your PayrollFunding Account. For more information, see the help topics Selecting a Payroll Funding Account,Activating Your Bank Account for NetSuite Payroll, and Making Journal Entries.
After an employee is set up for direct deposit, if you also use the ACH Vendor Payments feature, youcan pay employee expenses by transferring funds into their bank account. For more information, seethe help topic ACH Vendor Payments.
Viewing the Status of Direct Deposit TransactionsYour direct deposit transactions have a status that reflects where each transaction is in the fundstransfer process.
To view a direct deposit status:
1. Go to Transactions > Employees > View Payroll Status.
2. Use the filtering options to search for direct deposits with a status of Pending, Complete, Failed,etc.
The Payroll Status page lists the direct deposit transmissions being processed and the followinginformation is shown for each:

Viewing the Status of Direct Deposit Transactions 76
Payroll Guide
■ Type – click the direct deposit type to open the transaction. The status of the transactionappears at the top of the page. See below for more information on transmission statuses.
■ Batch Number – the batch number assigned to the transmission.
Transmissions are sorted by batch number first.
■ Batch Status – the current status of the payroll batch.
See below for more information on batch statuses:
□ Calculated – indicates that check calculation and funding has been successfullycompleted.
□ Committed – indicates that the payroll batch data was received by the payroll provider.
□ Edited – indicates that a change has been made to the payroll batch.
□ Error – indicates an error was found in the calculations.
■ Check Date – the date of the transmission approval.
■ Description – displays the name of the employee.
■ Status – the current state of the transaction as it is processed through the payment process.
See below for more information on transmission statuses:
□ Complete – the payment transaction has been successfully processed.
□ Initiated – the transaction has been sent
□ Pending – the transaction has not yet been processed.
■ Transaction Number – the transaction authentication number of the bank listed on theemployee's record.
■ Due Date – this is the date that the funds are received from the employer.
■ Settlement Date – this is the date that the funds are to be transferred into the employee’saccount.
■ Amount – the dollar amount of the transmission.
Your options for processing a direct deposit transaction depend on the transaction’stransmission status in the payment process.

Payroll Reports and Forms 77
Payroll Guide
Payroll Reports and FormsIf you have enabled NetSuite Payroll, you can print the following reports and forms:
■ Employee Payroll Item History Report
■ Payroll Check Register
■ Payroll Liability Report
■ Payroll Journal Report
■ Payroll Summary Report
■ Payroll Summary by Employee Report
■ Payroll Detail Report
■ Hours & Earnings Report
■ State Withholding Report
■ Service Fees Report
■ W-2 and 1099 Audit Information Report
Some reports can be customized to include payroll batch information. For details, see CustomizingPayroll Reports to Include Batch Information.
You can assign the Payroll Items that you define (such as Earnings, Deductions, and EmployerContributions) to Report Sections. For more information, see Modifying Payroll Report Sections andCreating Payroll Items.
Employee Payroll Item History ReportThe Employee Payroll Item History report lists payroll item changes made to existing employee recordsas well as the creation of a new employee records. The report provides the following columns:
■ Date & Time – The date and time at which changes were made to the employee record.
■ Author – The user who made the change to the employee record.
■ Payroll Item – The name of the payroll item that was changed on the employee record. Dependingupon the payroll item, the report displays information in the following additional columns:
□ Earning:
▬ Default Hours – The default number of hours the employee is paid for this earning item.
▬ Default (T/F) – Indicates whether the payroll item should appear on the paycheck each timeyou run payroll.
□ Deduction: Limit – The maximum monetary deduction.
□ Company Contribution: Limit – The maximum monetary contribution.
□ Accrued Time:
▬ Accrual Rate – The rate at which the payroll item accrues, according to the Accrue As value.
▬ Accrue As – The value on which the Accrual Rate is based.
▬ Accrued Hours – The total number of accrued hours.
▬ Limit – The maximum number of accrued hours.
▬ Reset at Year End (T/F) – Indicates whether the system should zero the total Accrued Hoursand restart calculations each calendar year.
■ Deleted (T/F) – Indicates whether the row in the employee record that was deleted.

Employee Payroll Item History Report 78
Payroll Guide
■ ID - The internal value for the row. Use this value to distinguish between multiple rows with thesame payroll item name.
■ Earning (T/F) – Indicates whether the payroll item is an earning.
■ Effective Date – The date on which this payroll item became effective.
■ Expiration Date – The date on which this payroll item is set to expire.
■ Inactive (T/F) – Indicates whether the payroll item is active.
■ Primary (T/F) – Indicates whether the payroll item is the employee’s main source of payment.
■ Rate – The rate on which this payroll item is based.
■ Rate Is Percent (T/F) – Indicates whether the rate is a percentage of the Limit.
To view the Employee Payroll Item History report:
1. Go to Reports > Payroll > Employee Payroll Item Change History.
A message appears indicating that your report is loading. The status bar indicates the progressas your report loads. You can click Cancel Report to stop the report from loading.
You can customize this report in the Report Builder by clicking Customize on the results page. For moreinformation, see the help topics Filtering Data on Reports and Adding, Removing, or Reordering ReportColumns.
Note: This report does not support reporting by period even when the Report by Periodpreference is set to All Reports. The Report by Period preference can be configured at Home >Set Preferences, the Analytics subtab.
Payroll Check RegisterThe Payroll Check Register lists all employee paychecks in chronological order within a specified daterange.
You can use the payroll check register to verify the accuracy of a pay run before printing the paychecks,approving paychecks for direct deposit, or both. The report has a column that indicates whether or notthe check has cleared your bank account.
To see the Payroll Check Register report:Go to Reports > Payroll > Payroll Check Register.
A message appears indicating that your report is loading. The status bar indicates the progress as yourreport loads. You can click Cancel Report to stop the report from loading.
Note: This report does not support reporting by period even when the Report by Periodpreference is set to All Reports. The Report by Period preference can be configured at Home >Set Preferences, the Analytics subtab.
Payroll Liability ReportThe Payroll Liability report lists the sum of your unpaid liability for each payroll item. The amountslisted on this report are the amounts you owe to tax agencies and vendors for employee taxwithholding, deductions, and company contributions.

Payroll Liability Report 79
Payroll Guide
The Payroll Liability report does not include previously paid liability. It includes only the amount owed.
To see the Payroll Liability report:
Go to Reports > Payroll > Payroll Liability.
A message appears indicating that your report is loading. The status bar indicates the progress as yourreport loads. You can click Cancel Report to stop the report from loading.
Note: This report does not support reporting by period even when the Report by Periodpreference is set to All Reports. The Report by Period preference can be configured at Home >Set Preferences, the Analytics subtab.
Payroll Liability Detail ReportThe Payroll Liability Detail report lists the details of your unpaid liabilities for each payroll item. Theamounts listed on this report are the amounts you owe tax agencies and vendors for employee taxwithholding, deductions, and company contributions.
The Payroll Liability Detail report does not include previously paid liability. It includes only the amountowed.
To see the Payroll Liability Detail report:
1. Go to Reports > Payroll > Payroll Liability to open the Payroll Liability report.
2. Click a number in the report to open the detail report for that line.
When you click the total amount, the Payroll Liability Detail includes details for all lines in thereport.
To return to the summary Payroll Liability report, click Back to Summary at the top of the report.
Note: This report does not support reporting by period even when the Report by Periodpreference is set to All Reports. The Report by Period preference can be configured at Home >Set Preferences, the Analytics subtab.
Payroll Journal ReportThe Payroll Journal report lists the journal entries made for each paycheck. Each entry shows theamount debited or credited and the account to which it was posted.
This report is presented in debit/credit format and is organized by check number.
To see the Payroll Journal report:
Go to Reports > Payroll > Payroll Journal.
A message appears indicating that your report is loading. The status bar indicates the progress as yourreport loads. You can click Cancel Report to stop the report from loading.

Payroll Journal Report 80
Payroll Guide
Note: This report does not support reporting by period even when the Report by Periodpreference is set to All Reports. The Report by Period preference can be configured at Home >Set Preferences, the Analytics subtab.
Payroll Summary ReportThe Payroll Summary report displays the sum of paycheck amounts for each payroll item within thespecified date range. The items are grouped by payroll item type.
The Payroll key performance indicator (KPI) can be added to your dashboard to provide at-a-glanceviews of totals from this report. For more information on KPIs, see the help topic Setting Up the KeyPerformance Indicators Portlet.
To see the Payroll Summary by Item report:Go to Reports > Payroll > Payroll Summary.
A message appears indicating that your report is loading. The status bar indicates the progress as yourreport loads. You can click Cancel Report to stop the report from loading.
Note: This report does not support reporting by period even when the Report by Periodpreference is set to All Reports. The Report by Period preference can be configured at Home >Set Preferences, the Analytics subtab.
Payroll Summary by Employee ReportThe Payroll Summary by Employee report presents employee pay data in a cross-tab format. The reportlists dollar amounts for earnings, employee-paid taxes, other deductions, and company contributions,and performs the gross to net calculation. The report also lists company tax liabilities related to eachpaycheck.
Report results are grouped by employee and display details for one payroll run, or for multiple payrollruns with rolled-up totals for each employee. You can customize the report to group employees bydepartment, or to roll up payroll activity for each department to a single line.
This report is available both before and after a payroll is committed.
To see a Payroll Summary by Employee report:Go to Reports > Payroll > Payroll Summary by Employee.
A message appears indicating that your report is loading. The status bar indicates the progress as yourreport loads. You can click Cancel Report to stop the report from loading.
Note: This report does not support reporting by period even when the Report by Periodpreference is set to All Reports. The Report by Period preference can be configured at Home >Set Preferences, the Analytics subtab.
Payroll Detail ReportThe Payroll Detail report lists all transactions for each payroll item within the specified date range.These items are grouped by payroll item type.

Payroll Detail Report 81
Payroll Guide
To see the Payroll Detail report:Go to Reports > Payroll > Payroll Detail.
A message appears indicating that your report is loading. The status bar indicates the progress as yourreport loads. You can click Cancel Report to stop the report from loading.
Note: This report does not support reporting by period even when the Report by Periodpreference is set to All Reports. The Report by Period preference can be configured at Home >Set Preferences, the Analytics subtab.
Hours & Earnings ReportThe Hours & Earnings report summarizes the total number of hours worked and the gross pay for eachemployee. The hours worked and the gross pay are then grouped by employee name and earning item.
You can use this information for a variety of purposes ranging from state requirements to internalaudit processes.
Most state agencies require this information on a scheduled basis, either quarterly or yearly, for thepurpose of unemployment insurance and other benefits.
To see the Hours & Earnings report:Go to Reports > Payroll > Hours & Earnings.
A message appears indicating that your report is loading. The status bar indicates the progress as yourreport loads. You can click Cancel Report to stop the report from loading.
Note: This report does not support reporting by period even when the Report by Periodpreference is set to All Reports. The Report by Period preference can be configured at Home >Set Preferences, the Analytics subtab.
State Withholding ReportThe State Withholding report shows the total amount withheld for each employee for all the paycheckswritten within the specified date range.
To see the State Withholding report:Go to Reports > Payroll > State Withholding.
A message appears indicating that your report is loading. The status bar indicates the progress as yourreport loads. You can click Cancel Report to stop the report from loading.
Note: This report does not support reporting by period even when the Report by Periodpreference is set to All Reports. The Report by Period preference can be configured at Home >Set Preferences, the Analytics subtab.
State Withholding Detail ReportThe State Withholding Detail report lists the line item amounts withheld, grouped by employee andpayroll item, for all the paychecks written within the specified date range.

State Withholding Report 82
Payroll Guide
To see the State Withholding Detail report:
1. Go to Reports > Payroll > State Withholding to open the State Withholding report.
2. Click a number in the report to open the detail report for that line.
When you click the total amount, the State Withholding Detail includes details for all lines in thereport.
To return to the summary State Withholding report, click Back to Summary at the top of the report.
Note: This report does not support reporting by period even when the Report by Periodpreference is set to All Reports. The Report by Period preference can be configured at Home >Set Preferences, the Analytics subtab.
Service Fees ReportYou can review details of the fees charged by the NetSuite Payroll service. You can run the report fora selected date range and view results listing the date and batch/check number for each billed item.You also can view the fees related to a payroll batch, or to an individual paycheck, on the Service Feessubtab of a Payroll Batch record or Paycheck record.
To see the Payroll Service Fees report:
Go to Reports > Payroll > Service Fees.
Note: This report does not support reporting by period even when the Report by Periodpreference is set to All Reports. The Report by Period preference can be configured at Home >Set Preferences, the Analytics subtab.
W-2 and 1099 Audit Information ReportWith this report you can review W-2 and 1099 tax information before year-end and before generatingthe W-2 and 1099 reports. By reviewing this information before your year-end, you can makeadjustments and corrections as necessary before year-end.
This report is a snapshot of your company- and employee-level information as of the date you runthe report. By validating this company- and employee-level information, you can ensure that accurateForms W-2 and 1099-MISC are filed with tax agencies and provided to your employees.
Information on this report appears on each employee's Form W-2 or 1099-MISC.
NetSuite Payroll service sends a reminder for you to review this report towards the end of the year.
To see the W-2 and 1099 Audit Information report:
Go to Reports > Payroll > W-2 and 1099 Audit.

Customizing Payroll Reports to Include Batch Information 83
Payroll Guide
Customizing Payroll Reports to Include BatchInformationYou can customize some payroll reports to include information for calculated but uncommitted payrollbatches. The fields that include batch information are under Payroll Transactions in the Add Fieldspane of the Report Builder. The fields are:
■ Batch: Batch Number
■ Batch: Check Date
■ Batch Status: Status
The reports that include batch information also include a multi-select filter called Batch Status: Status.By default, the filter is set to Committed.
The reports that include the batch status filter and some or all of the additional batch fields are:
■ Payroll Journal
■ Payroll Summary
■ Payroll Summary by Employee
■ Payroll Detail
■ Hours & Earnings
■ Service Fees
To include columns for payroll batch information:
1. Click Customize on any of the above reports to open the Report Builder.
2. Enter a new Name for the custom report.
3. On the Edit Columns subtab, select the batch-related fields you want to add.
4. Preview the report before you save.
Modifying Payroll Report SectionsBy default Payroll report sections are made up of subsections in the order shown in the list below.The Report Sections page enables you to reorder, remove, and add subsections for the Earnings,Deductions, and Company Contributions report sections. You cannot change the Taxes and CompanyTaxes sections.
Payroll Report Sections give you the flexibility to assign Payroll Items that you define to specific sectionsof payroll reports, some of which you can also define. You can assign each payroll item to a particularreport subsection including any new report subsections. For more information about Payroll Items, seeCreating Payroll Items.
The standard Report Sections and sub-sections are:
■ Earnings
□ Wages
□ Salary
□ Expenses
■ Taxes – You cannot add or remove this section or its sub-sections.

Modifying Payroll Report Sections 84
Payroll Guide
□ SS/Med
□ Federal
□ State
□ Local
■ Deductions
□ Retirement
□ Health
■ Company Taxes – You cannot add or remove this section or its sub-sections.
□ SS/Med
□ Federal
□ State
□ Local
■ Company Contributions
□ Retirement
□ Health
The Report Section dropdown list on the Payroll Item page includes the options that you define on theReport Sections page. For example, you can define a Payroll Item named Third Party Sick Pay - Taxableand assign that item to the Salary report sub-section of the Earnings section.
To define a payroll report section:
1. Go to Setup > Payroll > Report Sections.
2. On the Report Sections page, you can either:
■ Click the Edit link for the name of the Report Section that you want to modify.
□ You can add or remove the items in the Earnings, Deductions, or Company Contributionsreport sections. You can also reorder the items.
□ You cannot add or remove items in the Taxes or Company Taxes sections. You can reorderthe items.
■ Click the link for the Report Section name. In the Report Section popup, click Edit. Add orremove report sections and sub-sections as well as reorder sub-sections.

Using the Paycheck Journal Feature 85
Payroll Guide
Using the Paycheck Journal FeatureThe Payroll feature is the NetSuite full-service payroll solution for U.S. employees. The Paycheck Journalfeature supports different payroll capabilities including the tracking of payroll data for employees incountries other than the U.S.
The Paycheck Journal feature is completely independent from the Payroll feature although bothfeatures can be enabled in a single account. For example, in a OneWorld account the Payroll featurecan process payroll for a U.S. subsidiary, and the Paycheck Journal feature can track internationalpayroll transactions for non-U.S. subsidiaries.
■ To get started with the Paycheck Journal feature, see Getting Started with Payroll Solutions.
The Paycheck Journal feature is intended for use by NetSuite partners. It enables partners to:
■ Use web services to build integrations between NetSuite and existing external payroll solutions. SeeUsing Web Services for Payroll Integrations.
■ Use SuiteScript to build custom payroll solutions. See Using SuiteScript for Payroll Solutions.
■ Customize payroll forms and fields. See Creating Custom Payroll Forms and Fields.
After partners have created payroll scripts, custom forms, and custom fields, they can use SuiteBundlerto package these custom objects into SuiteApps that can be installed in NetSuite customer accounts.See the help topic SuiteApp Creation and Distribution.
Important: The Paycheck Journal feature is not intended for direct use by NetSuite customerswithout a partner payroll solution.
Getting Started with Payroll SolutionsYou need to understand the following before you begin work on a payroll integration or payrollSuiteApp using the Paycheck Journal feature:
■ Enabling the Paycheck Journal Feature
■ Understanding the Paycheck Journal Transaction
■ Understanding Payroll Items
Enabling the Paycheck Journal FeatureTo enable the Paycheck Journal feature, go to Setup > Company > Enable Features. Check the PaycheckJournal box. This feature is available in NetSuite accounts that have the Accounting feature enabled.
After this feature is enabled, the paycheck journal transaction and payroll item records becomeavailable to users with the appropriate permissions.
Understanding the Paycheck Journal TransactionThe paycheck journal transaction is similar to the paycheck transaction used by the Payroll feature.Unlike a paycheck, however, a paycheck journal transaction does not issue a check drawn on an

Getting Started with Payroll Solutions 86
Payroll Guide
account. Instead it creates a journal entry to record accounting impact. The purpose of this transactionis to serve as a payroll interface for web services integrations with external payroll systems and forpayroll SuiteApps built with SuiteScript.
When the Paycheck Journal feature is enabled, the paycheck journal form is available at Transactions> Employees > Paycheck Journal to users with the Paycheck Journal permission, a Transactions typepermission.
The following form is shown to illustrate the fields supported by the paycheck journal transaction.(NetSuite customers are not expected to use this form without a partner payroll solution. Partnersolutions are expected to include custom forms and custom fields that vary from this example.)
1 Body fields
2 Sublist fields
Paycheck journal body fields store basic values used by the transaction. Note the following:
■ Subsidiary is available only in OneWorld accounts.
■ Department, Class, and Location are available in only those accounts that use these classifications.
■ Currency is available in only those accounts with the Multiple Currencies feature enabled.
■ Exchange Rate is not currently in use. Its value, which is set to 1 when a currency is selected, shouldnot be changed.
■ Partners can create custom transaction body fields that display on paycheck journal forms and areaccessible to web services and SuiteScript.
Paycheck journal sublist fields store details about different types of payroll items that can be includedin the transaction. Partners can create custom transaction column fields.
Understanding Payroll ItemsSimilar to transactions related to the Payroll feature, paycheck journal transactions use the payrollitem record type to store line item values. The following table outlines some differences in how the twofeatures handle payroll items.

Getting Started with Payroll Solutions 87
Payroll Guide
Payroll Feature Paycheck Journal Feature
■ NetSuite provides predefined payroll items fordeduction, earning, and employer contributiontypes.
■ You can create additional payroll items ofthese types.
■ No predefined payroll items.
■ You must create all deduction, earning, and employercontribution type payroll items.
■ NetSuite completely manages tax line itemsfor payroll transactions.
■ You cannot create payroll items for taxes.
■ Payroll-related taxes must be implemented throughpayroll items that you create.
■ You can create two different types of payroll items fortaxes: employee paid taxes and company (employer) paidtaxes.
Payroll items must be created before any paycheck journal transactions can be entered.The following item types are supported: Deduction, Earning:Addition, Earning:Commission,Earning:Expense, Earning:Salary, Earning:Sick, Earning:Vacation, Earning:Wage, Employer:Contribution,Employer:Expense, and Tax.
The Payroll Item page is available at Lists > Accounting > Items to users with the Payroll Itemspermission, a Lists type permission. This page is shown to illustrate the fields supported by the payrollitem record.
Note the following:
■ Subsidiary is available only in OneWorld accounts.
■ Item Type: Tax is available only for non-U.S. subsidiaries.
■ Employee Paid field is available only when Item Type is set to Tax. When Employee Paid is set toFalse, item type is Company Tax. When Employee Paid is set to True, item type is Employee tax.
■ Account fields vary according to item type, as shown in the following table:
Item Type Account Fields for Payroll Items
Deduction Liability Account, Vendor (Agency)
Earning Expense Account
Employer Contribution Liability Account, Expense Account, Vendor (Agency)

Getting Started with Payroll Solutions 88
Payroll Guide
Item Type Account Fields for Payroll Items
Company Tax Liability Account, Expense Account, Vendor (Agency)
Employee Tax Liability Account, Vendor (Agency)
Using Web Services for Payroll IntegrationsThe Paycheck Journal transaction is exposed in web services so that it can act as a payroll interfacefor integrations with external payroll systems. The Payroll Item record is also exposed to supportthese integrations. Both of these record types support basic create, read, update, delete, and searchoperations.
For more information, including usage notes and sample SOAP requests and Java code, see the webservices reference topics Paycheck Journal and Payroll Item.
Using SuiteScript for Payroll SolutionsThe Paycheck Journal and Payroll Item records are exposed in SuiteScript to support the buildingof international payroll SuiteApps. These records support both client and server SuiteScript and fullscripting capabilities. For details about scripting with the Paycheck Journal transaction, includingsupported fields and many code samples, see the SuiteScript reference topic Paycheck Journal.
For details about scripting with the Payroll Item transaction, including supported fields and many codesamples, see the SuiteScript reference topic Payroll Item.
Creating Custom Payroll Forms and FieldsWhen the Paycheck Journal feature is enabled, partners can create payroll-related custom transactionbody fields and custom transaction column fields. These fields are available to web servicesintegrations and SuiteScript.
■ Creating Custom Payroll Transaction Body Fields
■ Creating Custom Payroll Transaction Column Fields
Partners can also create custom Paycheck Journal forms based on the standard form for this recordtype. See Creating Customized Paycheck Journal Forms.
Custom forms and fields can be bundled in international payroll SuiteApps along with SuiteScripts. Seethe help topic SuiteApp Creation and Distribution.
Creating Custom Payroll Transaction Body FieldsTo support partners' ability to build payroll integrations and custom solutions, the Paycheck Journalfeature supports the creation of custom payroll transaction body fields. These are fields that added topaycheck journal transaction body data.
To create a custom payroll transaction body field:
1. Go to Customization > Lists, Records, & Fields > Transaction Body Fields > New.

Creating Custom Payroll Forms and Fields 89
Payroll Guide
2. Enter a Label and optional Description for the custom payroll transaction body field.
3. On the Applies To subtab, check the Paycheck box.
4. Click Save.
The new field displays on the Custom subtab of any standard and customized Paycheck Journalrecord.
On custom forms, this field can be moved.
Creating Custom Payroll Transaction Column FieldsTo support partners' ability to build payroll integrations and custom solutions, the Paycheck Journalfeature supports the creation of custom payroll transaction column fields. These are fields that areadded to line items on one or more paycheck journal transaction sublists.
To create a custom payroll transaction column field:
1. Go to Customization > Lists, Records, & Fields > Transaction Column Fields > New.
2. Enter a Label and optional Description for the custom payroll transaction column field.
3. On the Applies To subtab, check one or more Paycheck subtabs where this field should bedisplayed.
Available subtabs include Earning, Deduction, Employee Tax, Company Tax, and CompanyContribution. You can add the same field to multiple subtabs.
4. Click Save.
These new subtabs display on the Payroll Items subtab of any standard and customizedPaycheck Journal record.
Creating Customized Paycheck Journal FormsTo support partners' ability to build international payroll SuiteApps, the Paycheck Journal featuresupports the creation of custom Paycheck Journal forms. Partners can start with the standard PaycheckJournal form and make changes to create a form that fits their solution.
To create a customized paycheck journal form:
1. Go to Customization > Forms > Transaction Forms.
2. Click the Customize link for the Standard Paycheck Journal form.
3. On the Edit Custom Transaction Form page, enter a name for the form, and then complete otherfields as needed.
4. Click Save.
Notes about Including Custom Fields on a Customized PaycheckJournal FormOn the Edit Custom Transaction Form page, note the following options when including custom bodyand column fields on your customized form.
■ To display one or more custom transaction body fields on the Custom subtab of your form, clickthe Screen Fields subtab, then click the Custom subtab. Check the Show box for each customtransaction body field.

Creating Custom Payroll Forms and Fields 90
Payroll Guide
■ To display one or more custom transaction column fields on the Earnings, Deductions, EmployeeTaxes, Company Taxes, and Company Contributions subtabs on your form, click the Tabs subtab.Check the Show box for Paycheck Lines.
Click the Screen Fields subtab. On the Earnings, Deductions, Company Taxes, Employee Taxes, andCompany Contributions subtabs, check the Show box for each custom transaction column fieldis checked. For example, you may want to display the Payroll Item, Department, Class, Location,Hours, Amount, and Printable fields on each of your subtabs.